

Page 1

■ chapter 3 battery power & power management
CHAPTER▼ THREE
BATTERY POWER & POWER
MANAGEMENT
In this chapter, you will learn the
fundamentals of power management
and how to use it to achieve longer
battery life.
3-1
Page 2

■ chapter 3 battery power & power management
In this chapter, you will learn how to operate your notebook on
battery power, how to handle and maintain the battery pack, and
learn about the system’s power saving features.
TFT display, central processor, hard disk drive are the major
hardware subsystems that consume the most power. Power
management deals how these key components should behave to
conserve power . For example, you can have the system turn off its
display after 2 minutes of inactivity to save power. Efficient power
management can help you work longer sessions before having to
recharge the battery.
The Battery Pack
Lithium-Ion Battery
Your notebook uses a six-cell Lithium-Ion battery pack
that provides power when you don’t have access to an
AC outlet.
3-2
Note:
It is necessary that you charge the battery pack for at least 6
hours before using it for the first time.
Note: In the Standby Suspend mode, a fully charged battery loses its
power in roughly 1/2 day or less. When not being used, the battery’s
power will deplete in 1-2 month.
Page 3
■ chapter 3 battery power & power management
Battery Low-Power Warning
1. Low Battery Warning
Low battery condition occurs when battery power is
reduced to 6%. The red battery status LED indicator
blinks and the system beeps once every 16 seconds or
so.
2. Very Low Battery Warning
Very Low battery condition occurs at 3 % power
remaining. The red battery status LED indicator blinks
and the system beeps at 4-second interval.
When the notebook warns you of its low battery condit ion,
you will have about 3-5 minutes to save your current
work.
Warning:
degree Celsius (32 degree F) or above 60 degree C (140F). This may
adversely affect the battery pack.
Do not expose battery packs to temperatures below 0
Note:
Press Fn+F3 to turn off the battery warning beep.
3-3
Page 4
■ chapter 3 battery power & power management
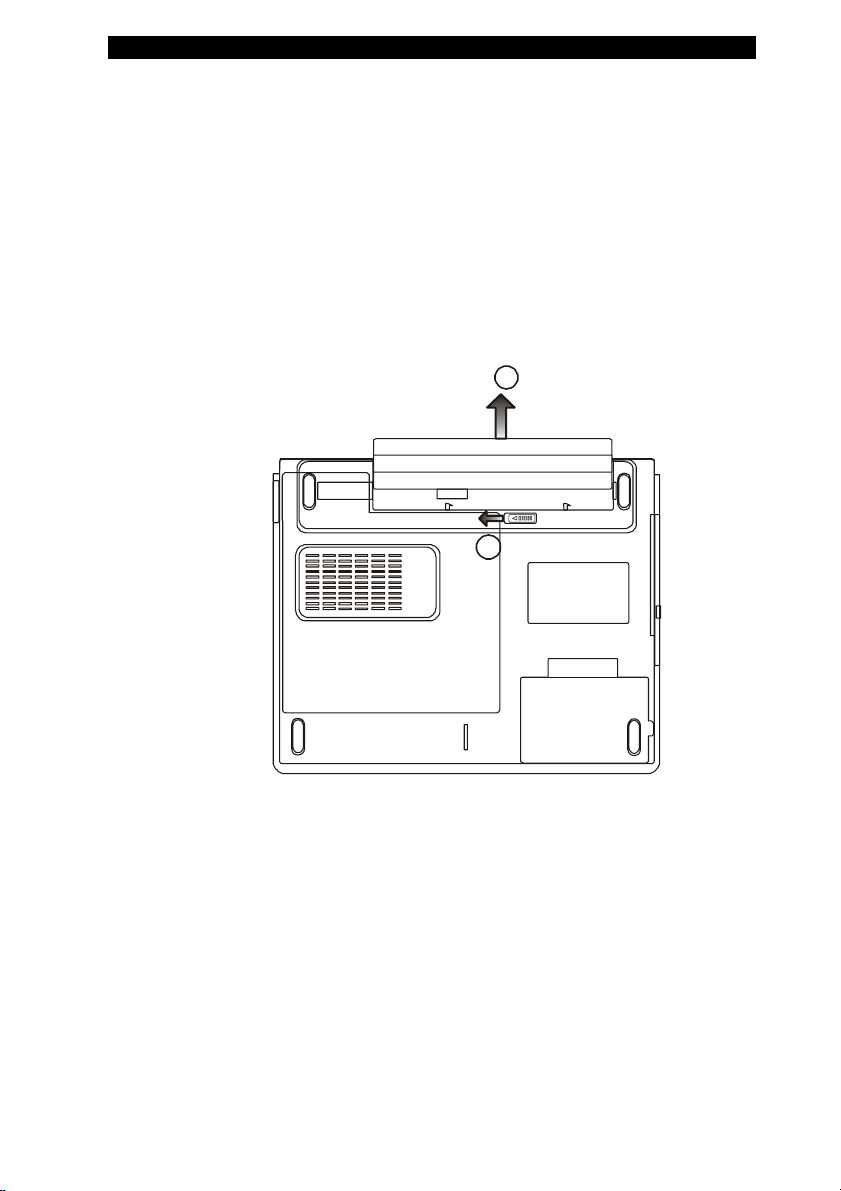
Installing and Removing the Battery Pack
To Remove the Battery Pack:
1. Place the notebook bottom-side up on a flat and
secured surface.
2. Push the latch and pull the battery’s hard case
away from the notebook.
2
1
3-4
Page 5

■ chapter 3 battery power & power management
To Install the Battery Pack:
1. Place the notebook bottom-side up on a flat and
secured surface.
2. Carefully insert the battery pack into the battery
compartment of the notebook.
Charging the Battery and Charging Time
To charge the battery, while the battery pack is in the notebook,
plug the AC adapter into the notebook and an electrical outlet.
The charging time is approximately 4-6 hours when the
notebook is turned off and approximately 8-12 hours when the
notebook is turned on.
When the battery is fully charged, the battery charge indicator
becomes dark (off).
If system runs at heavy loading or in a high temperature environment,
Note:
the battery may not be fully charged. You need to continue to charge it with the
AC adapter plugged in until the charging LED turns off.
3-5
Page 6

■ chapter 3 battery power & power management
Checking the Battery Level
You can check the remaining battery power in the Windows
battery status indicator, which is located at the lower right-hand
corner of the task bar. (If you do not see a battery or AC-in icon
on the task tray, go to Power Options Properties box and click
on the Advanced tab. Check off ``Always show icon on the task
bar``.)
Alternatively, you can access the power meter by clicking the
Power Options icon in the Windows Control Panel.
Prolonging the Battery’s Life and Usage Cycles
There are ways you can do to prolong the use of battery.
Use the AC adapter wherever AC wall outlet is available.
This will ensure uninterrupted computing.
Purchase additional battery pack.
Store the battery pa ck in room temperature. Higher
temperature tends to deplete the battery’s power faster.
Make good use of the power management function. Save
To Disk (Hibernate) saves the most energy by storing current
system contents in a hard disk space reserved for this function.
The life expectancy of the battery is approximately 300
recharges.
See the notices section in the beginning of the user
manual on how to care for the battery pack.
Note:
Read Section Protecting Your Notebook in the beginning of this manual
for tips about how to maintain the battery pack.
Note: To achieve optimal battery performance, you may need to do a battery
calibration at a 3-month interval. To do this:
1. Fully charge the battery.
2. Then discharge the battery by entering the BIOS setup screen. (Press F2
key as soon as you turn on the computer. And let it remain at the setup screen
until the battery runs out.
3. Fully charge the battery again.
3-6
Page 7

■ chapter 3 battery power & power management
Using Windows Power Options
Windows Power Management provides basic power saving
features. In the Windows Power Options Properties [Start >
Settings > Control Panel > Power Options] dialogue box, you
may enter time-out values for display and hard disk drive.
Windows power manager saves power by turning off hard drive
after 1 minute of inactivity, for example.
Windows’ Power Schemes
The power management control panel in Windows XP,
known as Power Schemes, is designed to provide the
user with an easy-to-use interface. The Power Schemes
tab can be found in the Power Options Properties panel
that is accessible via the control panel window.
Schemes are easy to understand, based on notebook
usage scenarios, and control not only processor power
usage but other system peripherals as well.
Go to [Start > Settings > Control Pan el] and double-click
the Power Options icon.
Always on mode puts the processor into maximum
performance mode, which provides no power saving.
The other schemes control processor performance
based on demand. For example, Max Battery mode
lowers the processor’s speed and voltage to conserve
power as much as possible.
3-7
Page 8

■ chapter 3 battery power & power management
In this dialog box, you can manually set the LCD and
hard drive’s time-out values in the Plugged in colu mn and
in the Running on batteries column. Lower time-out
values will save more battery power.
3-8
Note:
Also consult Windows user guide for more information on how
to use Windows power management functions.
Note: Actual dialogue box shown above may appear slightly different.
Page 9

■ chapter 3 battery power & power management
Suspend Mode
Standby Suspend
The system automatically enters this mode after a period
of inactivity, which is set in the Power Schemes dialog
box. In Standby mode, hardwa re devices, such as
display panel and hard disk, are turned off to conse rve
energy.
Hibernate Suspend
In this mode, all system data are saved in the hard disk
before powering down. When this mode is activated, all
system state and contents are saved to the hard disk
drive after a period of inactivity defined by the user. No
power or very little power is drawn from the battery
module under this mode.
However, depending on how much RAM that have been
installed on your computer, the amount of time the
system requires to restore all its previous contents can
range from 5 to 20 seconds.
For Windows 2000 / XP users, hibernation is handled by
the operating system; therefore, no special disk partition
or disk file is necessary.
If you wish to activate Hibernate mode, you need enable
Hibernate Support in the Hibernate tab of the Power
Options menu.
3-9
Page 10

■ chapter 3 battery power & power management
3-10
Note:
Do not install or remove the memory module when the system
is in the suspend mode.
Note: Actual dialogue box shown above may appear slightly different.
Page 11

■ chapter 3 battery power & power management
Power Button Action
The notebook PC’s power button can be set to turn of f
the system or activate the suspend mode.
Go to [Start > Settings > Control Panel > Power Options]
and click on the Advanced tab. In the pull-down menu,
select how you wish the power button to work as.
Note:
Actual dialogue box shown above may appear slightly different.
Warning:
pull-down menu, DO NOT select Do nothing – otherwise the system will
still run at high speed while the processor’s fan grill is fully blocked by
the closed LCD panel. The heat will damage the LCD panel.
In the When I close the lid of my portable computer
3-11
Page 12

■ chapter 3 battery power & power management
Low Battery Warning
You can define when and how the system warns you of
its battery-low condition.
Go to the Alarms tab in the Power Options Properties box.
If you wish to hear audible beeps, click on the Alarm
Action button and put a check on Sound Alarm.
3-12
Note:
Consult Windows user guide for more information on how to
use Windows power management functions.
Note: Actual dialogue box shown above may appear slightly different.
Page 13

■ chapter 3 battery power & power management
Power Manu Quick Access
Instead of making specific selections in the Power
Options Properties box, you can quickly and easily
specify which pre-set power saving function you desire
by clicking on the Battery icon at the lower right-hand
corner of the task bar. (If you do not see a battery or
AC-in icon, go to Power Options Properties box and click
on the Advanced tab. Check off ``Always show icon on
the task bar``.) Select Max Battery if you want the system
to enter suspend mode more often. Or, select Always On
if your notebook PC is plugged into an AC power source.
Actual dialogue box shown above may appear slightly different.
Note:
3-13
 Loading...