

Page 1

Elite XL Networking Guide
Contents
NEST
WebAdmin
Using the Elite XL with
Windows 95 and Windows NT 3.5
TCP/IP
Using the Elite XL with Ethernet
1
2
3
4
5
GCC
T
ECHNOLOGIES
Page 2

NEST
NEST
Contents
1
Introduction .............................................................................................1-2
Setting up the Elite XL printer .................................................................1-2
General NetWare Setup .........................................................................1-3
NetWare 3.12 instructions ......................................................................1-3
PCONSOLE .................................................................................1-3
Creating a Print Queue ..........................................................1-3
Creating a Print Server ...........................................................1-4
NetWare 4.1 instructions ........................................................................1-6
Setting up PCONSOLE ................................................................1-6
Creating a User ...........................................................................1-8
Creating a User with NWADMIN ............................................1-8
Creating a User with NETADMIN ..........................................1-10
NEST-specific Setup using WebAdmin ................................................1-11
NetWare 3.12 setup with WebAdmin .........................................1-12
NetWare 4.x setup with WebAdmin ............................................1-12
Windows computers that use your NEST printer ..................................1-14
Printing a Config page .........................................................................1-15
NEST Config page info........................................................... 1-15
Typical problems with solutions.............................................................1-15
GCC
T
ECHNOLOGIES
1-1
Page 3

NEST
Introduction
NEST (Novell Embedded Software Technology) is code written by Novell and
licensed by GCC. It provides NetWare protocols and is configured using
standard NetWare utilities. It offers these advantages:
• Your Elite XL does not require a dedicated print server, so it connects
• You can install the Elite XL anywhere you have an Ethernet connection.
• NEST works with GCC’s WebAdmin utility.
This manual shows you how to install and configure your Elite XL printer to
work with your NetWare network. You set up your Elite XL printer in two
steps – the usual NetWare setup, followed by the GCC specific NEST setup. If
any of the computers on your network are creating PostScript jobs using
Windows, you will also need to configure them.
The Elite XL NEST specific parameters are setup using GCC’s WebAdmin
utility. Instructions for accessing and using the WebAdmin utility are located
later in this section and in Section 2 of this manual.
directly to the network.
Setting up the Elite XL Printer
The instructions in this section are a condensed version of those in Chapter 1 of
the Elite XL Users Manual (on this CD-ROM), and are intended for users
experienced in setting up network laser printers. If you have questions about
any of the steps in this section, consult the Elite XL User’s Manual.
1. Unpack the printer and install the toner cartridge.
2. Insert paper into the paper tray and insert the paper tray into the printer.
3. Connect a cable from the Ethernet port to the network.
4. Plug the AC power cord into the Elite XL, then plug it into a grounded
AC outlet.
5. Switch on the printer.
1-2
Page 4

NEST
General
Netware
This section discusses the NetWare utilities you use to set up your Elite XL
printer. This process is the same as setting up any printer, but in a few cases
there are specific instructions to configure the NEST options. These are
included in the instructions where necessary.
The instructions are described first for NetWare 3.12, and then for NetWare 4.1
(beginning on page 1-6). The utilities included in this section are PCONSOLE,
NWADMIN, and NETADMIN.
Setup
NetWare 3.12 instructions
PCONSOLE
PCONSOLE has two functions: setting up and managing print queues, and
setting up and managing print servers. This manual covers the outline of how
to set up queues and servers; you must create at least one queue and one print
server. For more details consult your NetWare documentation.
Creating a Print Queue
1. Log into the file server as SUPERVISOR (or equivalent).
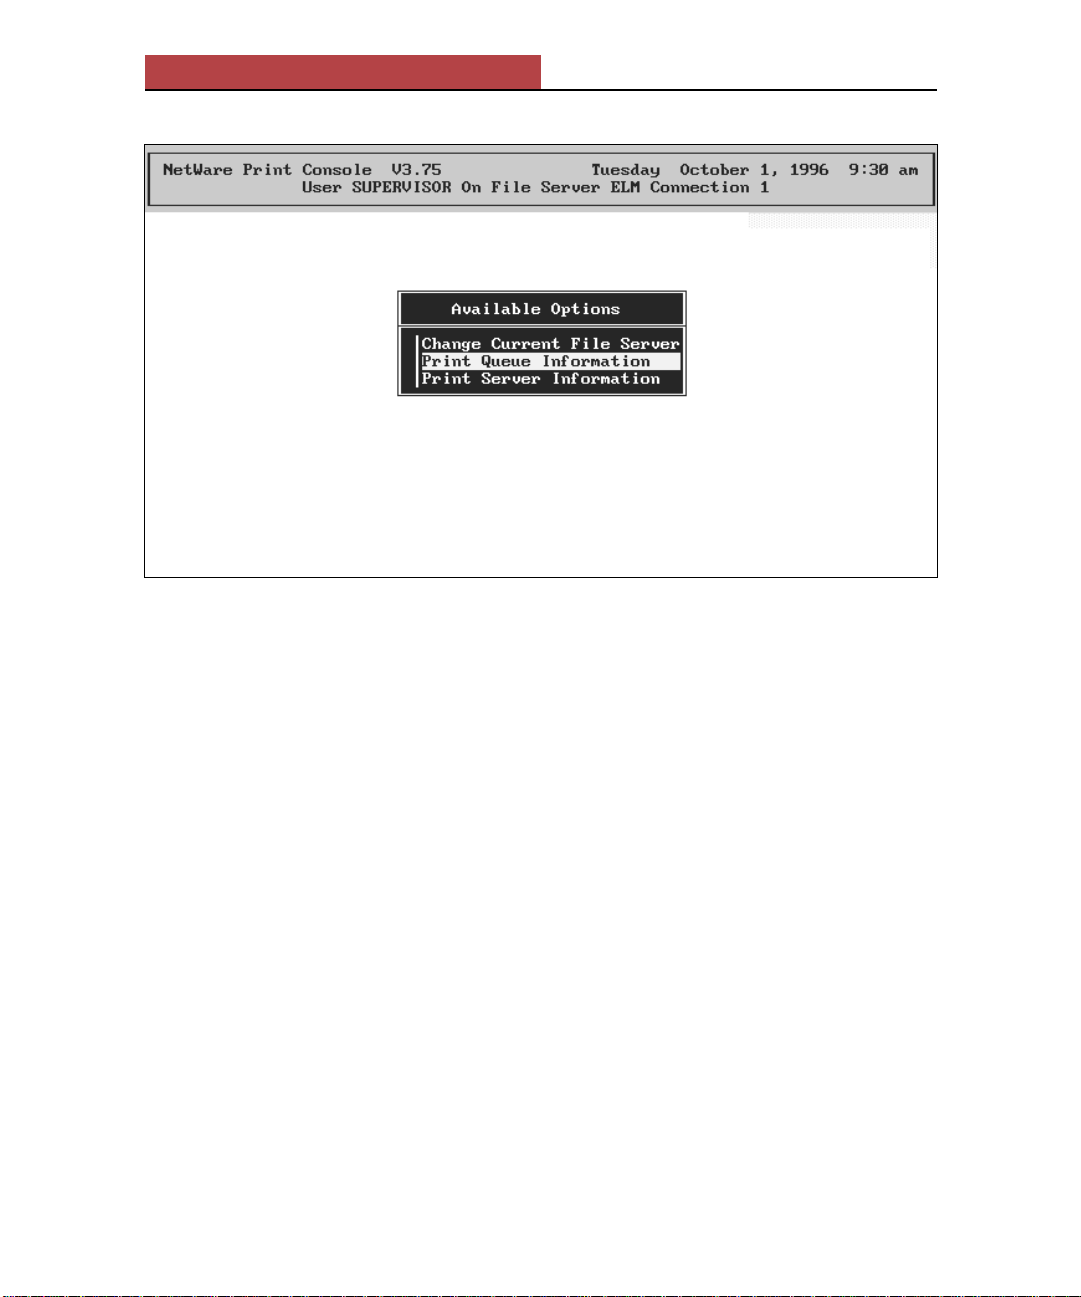
2. Start the PCONSOLE program (it is located in SYS:PUBLIC).
First you create a print queue.
3. From the menu (shown in figure 1) choose Print Queue
Information.
4. Press Ins to add a new item to the list of queues.
5. Type the name of the new queue and press Enter.
Then you add users to the queue.
6. With your new queue selected, press Enter again.
7. Choose Queue Users from the Print Queue Information menu
and press Enter.
8. Modify the list of users as necessary.
9. Press Esc to return to the Print Queue Information menu.
Choose queue operators (people or groups that can manage this queue).
10. Choose Queue Operators from this menu and press Enter.
11. Modify the list of users and groups as necessary.
12. Press Esc three times to return to the PCONSOLE main menu.
13. Repeat steps 3-12 to create further queues as needed, then proceed
to the next section.
1-3
Page 5
NEST
Figure 1. PCONSOLE’s opening menu.
Creating a Print Server
1. Choose Print Server Information.
First you create a new server.
2. Press Ins to add a new item to the list of servers.
3. Type the name of the new server and press Enter. Make a note of
the name of this server; you will need this when you use GCC’s
WebAdmin, which is described later in this section.
Then you assign users to this server.
4. With your new server selected, press Enter again.
5. Choose Print Server Users from the Print Server Information menu
and press Enter.
6. Modify the list of users as necessary.
7. Press Esc to return to the Print Server Information menu.
Then you choose users who can manage the print server.
8. Choose Print Server Operators from this menu and press Enter.
9. Modify the list of operators as necessary.
10. Press Esc to return to the Print Server Information menu.
1-4
Page 6

NEST
Figure 2. Selecting “Remote Other/Unknown” from the list of Printer types.
Now you configure the printer.
11. Choose Print Server Configuration from this menu and press
Enter.
12. Choose Printer Configuration from this menu and press
Enter.
13. You must configure the printer as printer zero (0) so choose this option
from the menu and press Enter.
14. Type a name for the printer and press Enter.
15. You will see a list of Printer Types (as in figure 2). The Elite XL
must be defined as Other Remote/Unknown. Select this option
from the list.
Finally you assign your queue to your printer.
16. When you have defined your Elite XL printer, press Esc to return
to the Print Server Configuration menu.
17. Choose Queues Serviced by Printer from this menu and press
Enter.
1-5
Page 7

NEST
18. Assign the queue you just created to the printer (see your NetWare
documentation for more details).
19. When you have finished, press Esc to return to the Print Server
Configuration menu.
You may want to implement this optional item.
22a. Choose Notify List for Printer and press Enter.
22b. Choose the Elite XL printer, and then select users that you wish to be
notified when the printer has a problem (see your Netware documentation
for more details).
22c. When you have completed your Notify List, press Esc until you return
to the Print Server Information menu.
When you have made all your changes, you exit PCONSOLE.
23. Press Esc three times to return to the PCONSOLE main menu.
24. Press Esc to save changes and exit PCONSOLE.
This ends the section of this manual devoted to Netware 3.12. Now continue
with the section “NEST-specific Setup” on page 11.
NetWare 4.1 instructions
Setting up PCONSOLE
1. Log into the network as SUPERVISOR (or equivalent).
2. Start the PCONSOLE program (it is located in SYS:PUBLIC).
3. Change to the correct context, and make a note of it. (You will need this
when you use GCC’s WebAdmin utility, discussed in a later section.)
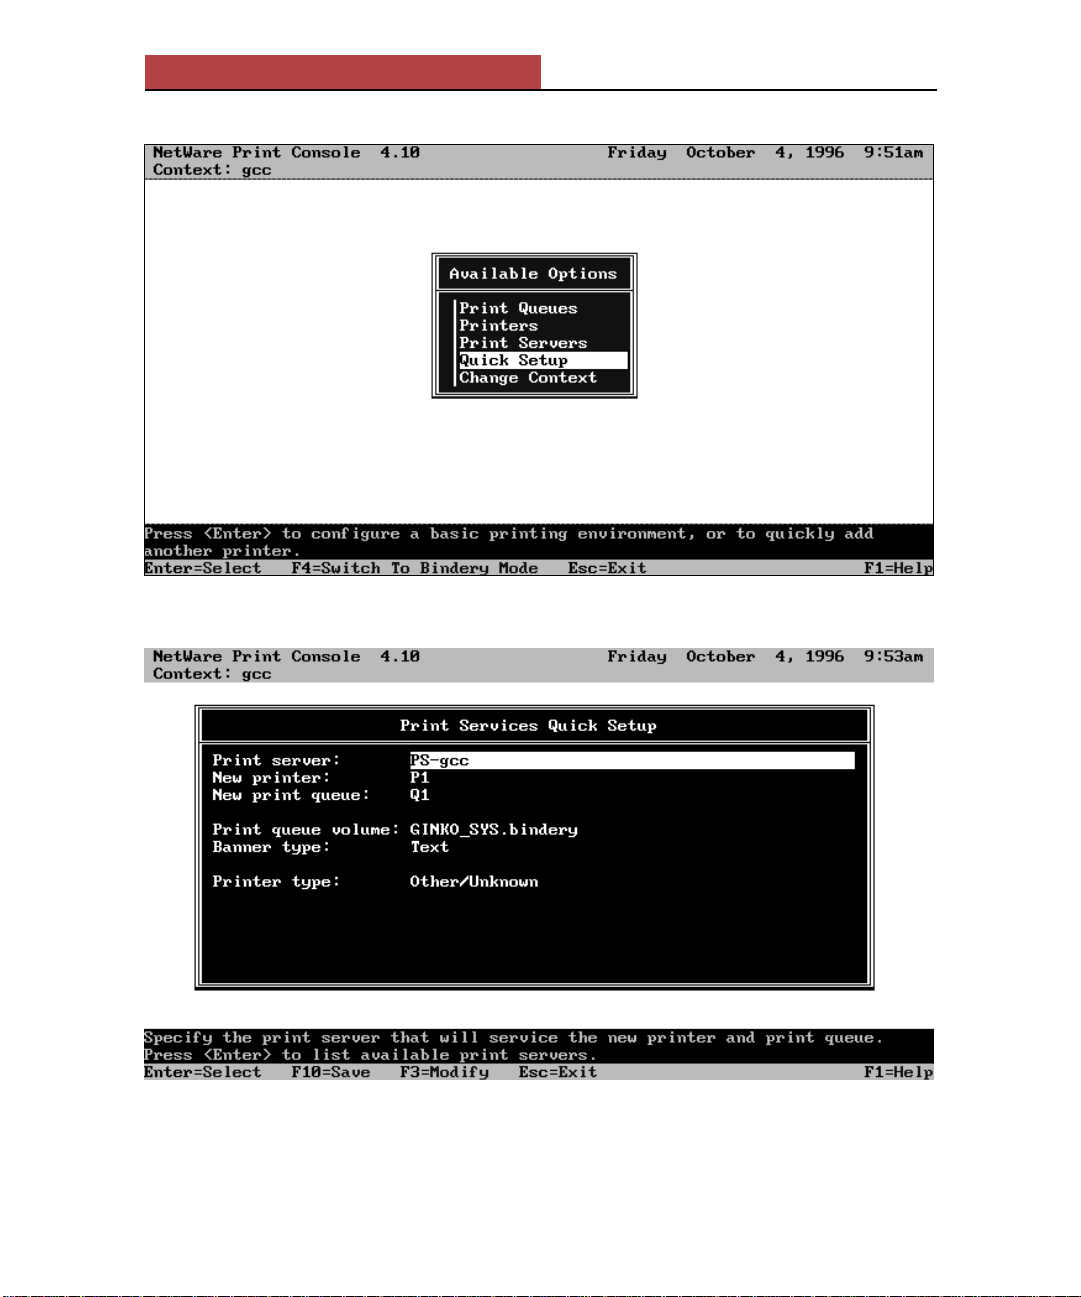
4. Choose Quick Setup and press Enter (see figure 3).
5. Enter the Print Server Name. Press Enter, then press Insert and type
the name. Make a note of this name; you will need it when use use
GCC’s WebAdmin Utility, discussed in a later section.
6. Change the New Printer and the New Print Queue entries in the same
way.
7. Choose the volume where you will store your print queues.
8. Change the Banner Type to PostScript or Text as appropriate.
9. Choose the Printer Type. For the Elite XL this must be Other/Un-
known.
10. Press Esc several times to return to the PCONSOLE main menu.
11. Press Esc to save changes and exit PCONSOLE.
1-6
Page 8
NEST
Figure 3. Choosing Quick Setup from PCONSOLE’s opening screen.
Figure 4. PCONSOLE’s Quick Setup screen.
1-7
Page 9

NEST
Figure 5. Creating a user in NWADMIN
Creating a User
NPRINTER must log in to the network, so you are required to create a user for
this purpose. You can do this either by using the NWADMIN utility (Windows) or the NETADMIN utility (DOS).
Creating a User with NWADMIN
1. Log into the network as SUPERVISOR (or equivalent).
2. Start the NWADMIN program (it is located in SYS:PUBLIC).
3. Change the context, if necessary, to the same as the printer. Choose
Change Context and press Insert to browse the list of available
contexts. Choose the correct context and press F10.
4. Highlight your required context.
5. Press Insert and choose a user object from the list, then press Enter.
6. Type the login name and press Tab.
1-8
Page 10
NEST
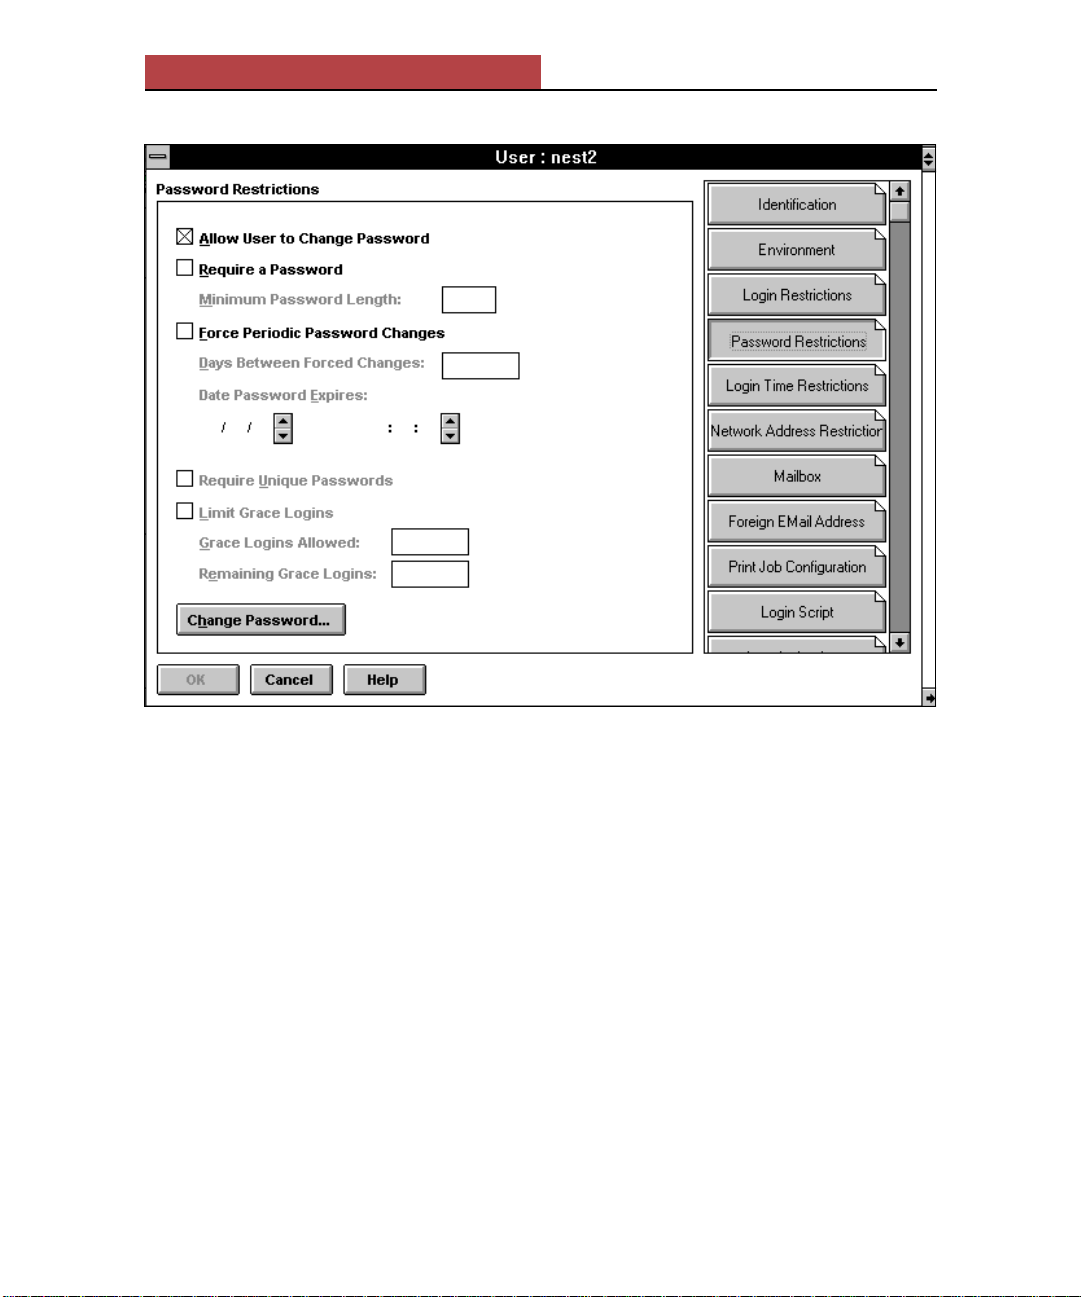
Figure 6. The Password screen in NWADMIN.
7. Type the last name and press Enter.
8. Click on the Create button.
9. Double-click on the user name to display the User dialog box.
Now you set a password.
10. Click on the Password Restriction button.
11. Click on the Change Password button.
12. Type the new password and press Enter, then type the password
again to verify it.
13. Make a note of the user name and password; you will need them for the
GCC WebAdmin setup.
14. Press the OK button to exit this dialog box. Your user is created.
1-9
Page 11
NEST
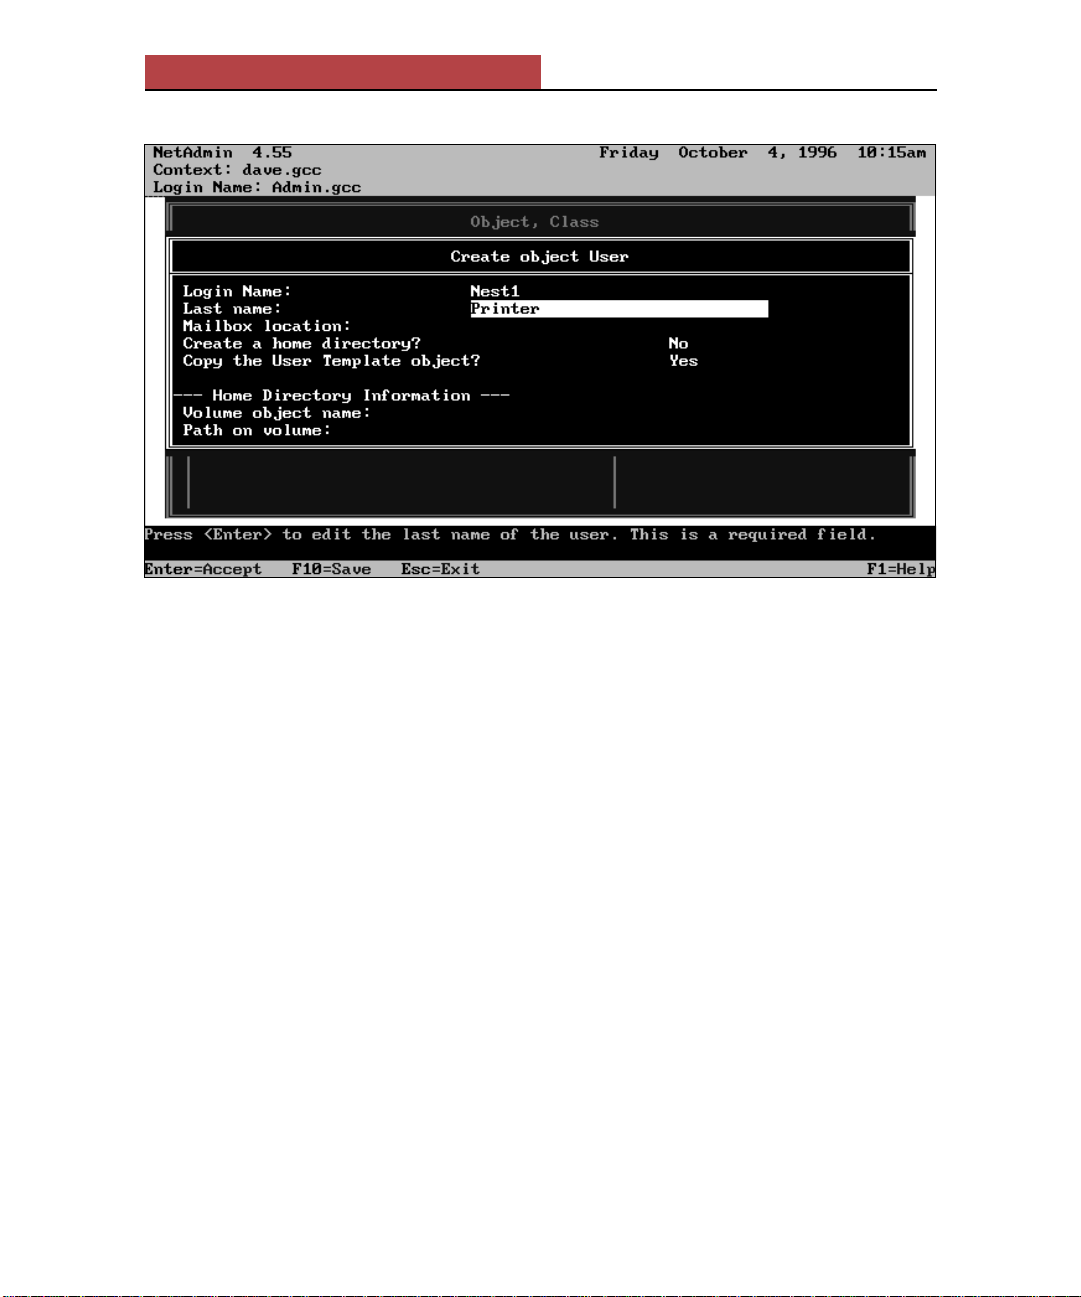
Figure 7. Creating a user in NETADMIN
Creating a User with NETADMIN
1. Log into the network as SUPERVISOR (or equivalent).
2. Start the NETADMIN program (it is located in SYS:PUBLIC).
3. Change the context, if necessary, to the same as the printer. Choose
Change Context and press Insert to browse the list of available
contexts. Choose the correct context and press F10.
4. Choose Manage Objects from the NETADMIN options list and press
Enter.
5. Press Insert to add an object.
6. Choose User and press Enter.
7. Type the login name and press the down arrow key.
8. Type the last name and press Esc.
Now you change properties or set a password, if necessary.
9. If you do not want to change properties or passwords, go to step 14.
10. Press Enter to see the Actions List.
11. View or edit properties of the User object.
12. Press Enter. If you need to change or create a password, choose
Change Password and press Enter, otherwise go to step 14.
13. Type the password and press Enter. Type the password again to
verify it and press Enter.
14. Press Esc four times to exit NETADMIN and save your changes.
1-10
Page 12

NEST
NEST-Specific Setup using WebAdmin
The following instructions for setting up NEST with an Elite XL printer apply
to both NetWare 3.12 and 4.X.
Elite XL specific NEST parameters are accessed and changed using GCC’s
WebAdmin remote printer management tool. WebAdmin allows you to view
and/or change many parameters of the Elite XL printer using a World Wide
Web browser over an Ethernet network. Please see Section 2 of this manual for
information on installation and setup of the WebAdmin utility.
All Elite XL printers on the network that you are intending to use with NEST
MUST be accessible using WebAdmin. The following instructions assume you
have followed the setup in Section 2 and are able to access the printer using
WebAdmin.
First, ensure that NEST is enabled on the printer.
1. Launch your World Wide Web browser and attached to your printer as
explained in Section 2.
2. Select (click) NETWORKS from the WebAdmin main menu.The
Networks main menu is displayed.
3. If NEST is disabled, use the pull-down menu to enable it and restart your
printer.
4. Once the printer is configured with NEST enabled, select the NEST link.
The NEST Subjects menu appears.
The NEST Subjects menu displays the available subject items (General,
Network, NPRINTER and PSERVER) that may be changed. If you select one
of the links on this page, a menu of parameters will be displayed for the subject
you have selected.
The following information pertains only to those items that are required to
change for NEST printing. If you are installing under Netware 3.12, continue
with the instructions below. If you are installing under Netware 4.x, skip
forward to the bottom of page 12.
1-11
Page 13

NEST
Netware 3.12 setup with WebAdmin
If you are installing under Netware 3.12, you will need to configure the
following items.
1. From the WebAdmin Networks menu, select the Network link. From
the Network configuration menu:
a) Change the FRAMETYPE item to a frametype that is supported by
your file server.
b) Change the MODE item to Bindery.
c) Change the PREFERRED SERVER item to the name of your file
server.
2. From the WebAdmin Networks menu, select the PSERVER link. From
the PSERVER configuration menu:
a) Change the PRINT SERVER NAME item to the print server name
that you created earlier in this chapter when you used PCONSOLE to
configure your file server.
b) Change the PASSWORD item to the password you set (if you set one)
for the print server when using PCONSOLE.
3. Click the box that is labeled Restart printer automatically and press the
submit new settings button. The Elite XL will save your changes and
reboot.
Netware 4.x setup with WebAdmin
If you are installing under Netware 4.x, you will need to configure the following items.
1. From the WebAdmin Networks menu, select the Network link. From
the Network configuration menu:
a) Change the FRAMETYPE item to a frametype that is supported by
your file server.
b) Change the MODE item to Directory Services.
c) Change the PREFERRED SERVER item to the name of your file
server.
d) Change the PREFERRED DS TREE item to the name of your
directory services tree.
1-12
Page 14

NEST
c) Change the DS Name Context item to the context that contains the
print server object, printer object and user that you created earlier in
this section.
2. From the WebAdmin Networks menu, select the NPRINTER link. From
the NPRINTER configuration menu:
a) Change the USER NAME item to the common name of the user object
that you created earlier in this section.
b) Change the USER PASSWORD item to the password you set (if you
set one) for the user.
2. From the WebAdmin Networks menu, select the PSERVER link. From
the PSERVER configuration menu:
a) Change the PRINT SERVER NAME item to the print server name
that you created earlier in this chapter when you used PCONSOLE to
configure your file server.
b) Change the PASSWORD item to the password you set (if you set one)
for the print server when using PCONSOLE.
3. Click the box that is labeled Restart printer automatically and press the
submit new settings button. The Elite XL will save your changes and
reboot.
1-13
Page 15

NEST
Windows computers that use your NEST printer
Control-d and PostScript printing
If you intend to print from computers running Windows, you may get errors
when running PostScript jobs. This is because Windows computers add a
Control-d (^d) character to the end of the job, and in some cases to the beginning as well. The following sections tell you how to configure computers
running Windows 3.1 or Windows 95 to prevent them from sending the extra
characters.
To make these changes you must first install the printer driver in each computer.
Preventing a Windows 3.1 computer from sending Control-d
1. From Program Manager, choose Run from the File Menu.
2. Type Sysedit in the dialog box and press Enter.
3. Click on the WIN.INI title bar in the Sysedit window.
4. Choose Find from the Edit menu.
5. Scroll to the section of WIN.INI headed “[GCC Elite XL,Version
1.1,LPT3]” (This line may be partially different in your computer).
6. Add the following line anywhere in this section:
CtrlD=0
7. Choose Exit from the File Menu, and save changes when prompted.
Preventing a Windows 95 computer from sending Control-d
1. From the Start menu, choose Settings and then Printers.
2. Right-click on the Elite XL icon, and choose Properties in the pop-up
menu.
3. Choose the PostScript tab in this dialog box.
4. Click on the Advanced button.
5. There are two checkboxes relating to Ctrl-d at the bottom of this dialog
box. Clear both of them.
6. Press OK twice to return to the Windows 95 desktop.
1-14
Page 16

NEST
Printing a Config page
NEST Config Page info
You can find information about the current status of your Elite XL by printing a
configuration page (unless the printer is in PCL only mode). If you are having
trouble with the Elite XL NEST setup, printing a config page may offer helpful
information.
1. Make sure the printer’s display shows “Ready.”
2. Press the On Line button to take the printer off line.
3. Press the Menu button eight times, until you see the words “Print Info
Pages: Configuration” in the display.
4. Press the Enter button. The printer will warm up, then print a configuration page.
5. When the page has printed, press the On Line button to take the printer
on line.
NEST information is at the bottom of the left column.
Typical problems with solutions
You can get information about your printer either by running the configuration
tool program, checking settings in the printer’s front panel, or by printing a
configuration page.
1. The print server didn’t log into the file server.
Make sure that the configuration page shows the same print server name
and file server name as displayed by WebAdmin. If you are using
NetWare 4, check to make sure that the name context and DS tree are
correct (with WebAdmin), and check that you have entered a typeful
name context instead of a typeless name context.
1-15
Page 17

NEST
2. The print server is running, but NPRINTER didn’t connect to it.
In NetWare 4, you must create a user on the file server for NPRINTER to
log in as; check NETADMIN or NWADMIN to make sure that you have
created a user. Use WebAdmin to make sure that the printer has the
correct name and password. Also make sure that user is in the same
context as the print server and printer objects by looking in NETADMIN
or NWADMIN.
3. I can send jobs to a queue correctly, but the printer won’t read the
jobs from the queue.
Try printing a configuration page. This will tell you if the print server
and NPRINTER have connected correctly. If they have not, the print
server will not be able to print jobs from the queue. If the print server has
connected correctly to NPRINTER, check the file server name to make
sure that you have connected to the correct file server.
If you can find no errors but the printer will still not print from the queue,
use PCONSOLE to check the queue; you may have disabled the queue.
4. The printer prints a banner page, but the rest of the job does not
print.
If your print job is sent from a Windows computer, this machine may be
sending a Control-d (^d) character at the beginning of the file which
causes a PostScript error immediately after the banner page is printed,
halting the job. See the section “Control-d and PostScript printing” in the
section “Configuring Windows computers that will print to your NEST
printer.”
5. I changed the frametype and now my printer won’t connect to the
file server.
When you change the frametype, you are also changing the network
number of the printer. Since the internal print server is now on a different
network, NetWare thinks that it is a different print server, even though it
has the same name. Since NetWare doesn’t allow more than one print
server at a time to use the same name, you must wait a few minutes until
the network realizes that the old print server is no longer running.
(You should only have this problem if the print server was already
connected to a file server and you did not change the print server name
when you changed the frametype.)
1-16
Page 18

WebAdmin
W ebAdmin
Contents
2
Introduction ............................................................................................ 2-2
Getting Started ....................................................................................... 2-2
Connecting to WebAdmin ......................................................................2-3
Navigating WebAdmin ............................................................................2-3
Linking to Pages .........................................................................2-3
Refreshing Information ...............................................................2-6
Printer Status Page ..................................................................2-7
Changing the Printer’s Configuration ...........................................2-8
Printing Informational Pages ...................................................... 2-9
WebAdmin Security ...............................................................................2-9
WebAdmin Password ................................................................ 2-10
TCP/IP Address Restriction ....................................................... 2-11
WebAdmin Index ................................................................................. 2-13
WebAdmin Messages ..........................................................................2-13
Setting up TCP/IP Protocol ..................................................................2-14
Troubleshooting Tips ............................................................................ 2-16
GCC
T
ECHNOLOGIES
2-1
Page 19

WebAdmin
Introduction
WebAdmin is an innovative solution to remote printer management. Using a
World Wide Web browser, you can view the status and configuration settings of
any Elite XL printer with WebAdmin capability on your Ethernet network.
Furthermore, you can actually change the settings from the browser. Using
WebAdmin is like standing next to the printer and physically pressing the front
panel function keys. For example, you may need to change the configuration
prior to sending a print job.
To provide this functionality, the Elite XL incorporates a built-in HTTP
(HyperText Transfer Protocol) server that provides a Web page interface for
configuration and management. The Elite XL acts as a Web server, serving
information about its configuration as Web pages to your computer. Using a
Web browser, you can view these pages and send back requests to change
certain settings on the printer.
WebAdmin is best suited for system administrators who perform a variety of
configuration tasks, and for those who are already using their printers on an
Ethernet network. WebAdmin does not send print jobs to the printer.
Getting Started
1. Install a Web browser on your computer.
2. Configure the printer for TCP/IP.
3. Configure your computer for TCP/IP.
You must use a HTML 3.0-compliant browser with forms capability.
Install a World Wide Web browser (such as Mosaic or Netscape Navigator)
on your PC or Macintosh, if you don’t already have one.
Launch your browser and open the Web page install.htm (located in the
WebAdmin Folder on the Elite XL Software and Documentation CD-
ROM provided with your printer. This page offers helpful information on
how to setup and use WebAdmin.
Refer to the TCP/IP section of this Networking guide. TCP/IP runs over an
Ethernet network; therefore, you must have an Ethernet connection from
your computer to your Elite XL to use WebAdmin.
Make sure the TCP/IP network protocol on your Macintosh or PC is set up
to enable communication between your printer and computer.
2-2
Page 20

WebAdmin
UNIX machines, Macintoshes (System 7.5 or later) and IBM PC-compatibles (Windows 95 or Windows NT) come with the TCP/IP protocol
built in.
If your computer is not configured for TCP/IP, refer to “Setting Up TCP/IP
Protocol” on page 2-14 of this Chapter.
Note:
You may want to verify the setup of TCP/IP on your printers and computers. To
verify that TCP/IP is set up properly, use some other method of connecting your
computers and printers (such as telnet or ping).
Connecting to WebAdmin
There are two ways to connect to the WebAdmin server:
1 Type the IP address of the printer in the browser’s URL (Uniform Re-
source Locator) entry area.
Example: Type http://1.0.4.23/, where 1.0.4.23 is the printer’s IP address.
2 If your network has a Domain Name Server, you can type the printer’s
assigned name in the browser’s URL entry area.
Example: Type http://myElite/, where myElite is the name of the printer.
In most cases, your system administrator will assign a hostname to your Elite
XL. This name may differ from the AppleTalk® name of the printer that
appears on the printer’s front panel display. For more information on Domain
Name Servers and local host files, contact your system administrator.
For convenience, you may want to set up an Elite XL home page on your
computer with links to all your Elite XL printers that have WebAdmin capability.
Navigating WebAdmin
Linking to Pages
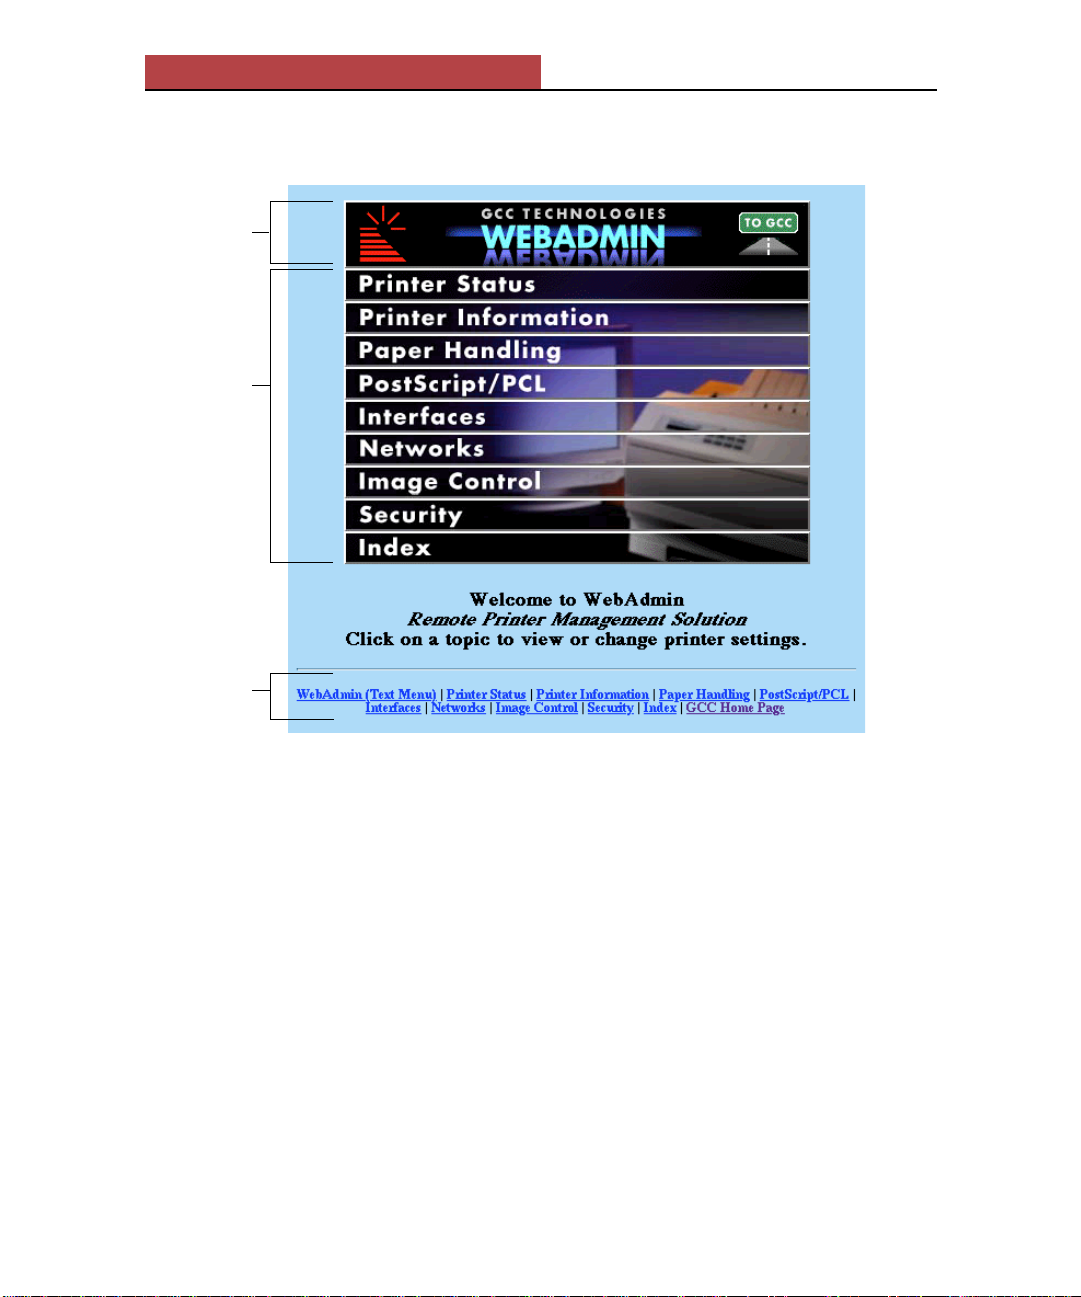
When you connect to your Elite XL, the printer’s home page automatically
appears. This page provides a list of page bars that link to the WebAdmin
pages used to view and change the printer’s configuration.
2-3
Page 21
WebAdmin
title
bar
page
bars
text
links
If you are using a browser that does not display inline images, or
you do not want to load the images on the home page, click the
WebAdmin (Text Menu) link at the bottom of the home page.
There are two ways to navigate to WebAdmin pages. To retrieve
detailed printer information, move the cursor to the Printer
Information page bar and click the mouse button. Alternatively,
you can click the Printer Information text link at the bottom of
the home page. You are linked to the Printer Information page
(shown on the next page).
2-4
Page 22
WebAdmin
Note:
Using the browser’s Back, Forward and Reload buttons will help avoid
duplicate references to the same Web page in your browser.
2-5
Page 23

WebAdmin
If your computer has Internet access, clicking the TO GCC icon (top right
corner of the WebAdmin title bar) links you to the GCC Technologies Web
home page (http://www.gcctech.com/). From the GCC home page, you can
view our online manuals, retrieve software upgrades and service information,
and find out what’s new at GCC. Clicking anywhere else on the WebAdmin
title bar displays the WebAdmin home page for your printer.
Refreshing Information
The WebAdmin page being viewed at any given time reflects the status of the
printer at the moment the page was displayed, or loaded. To insure that the
information on that page is current, you need to periodically click your Web
browser’s Reload button. That page will then be reloaded to reflect any
changes.
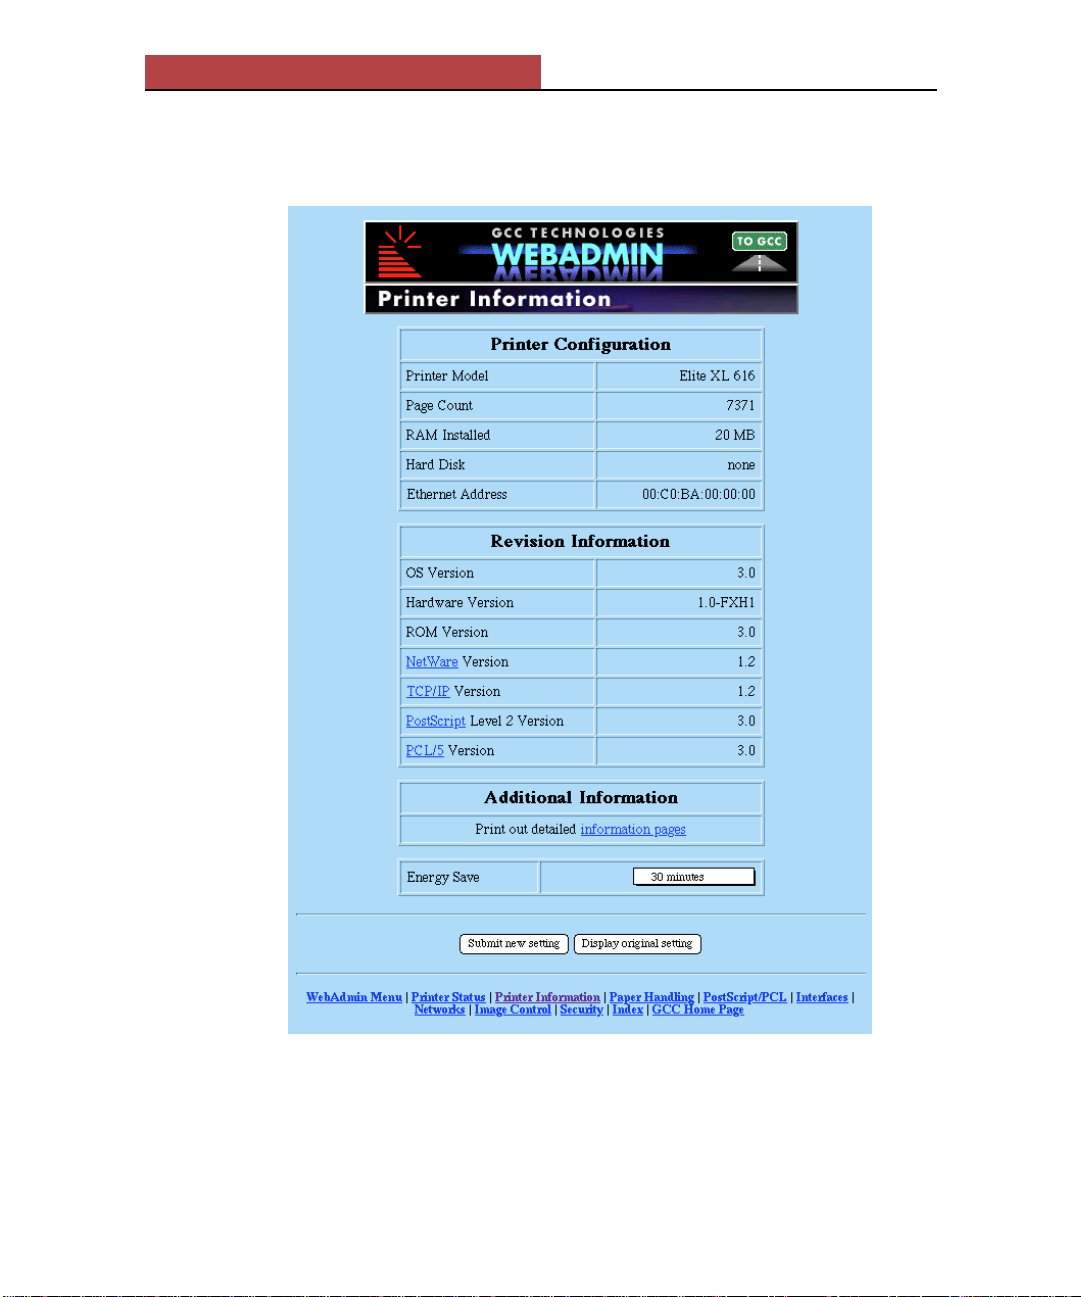
For example, the Printer Information page (shown on the previous page)
displays the printer’s page count. If another user prints a page to that printer
while you are viewing this page, the information displayed in your browser will
not be current. You need to refresh the Printer Information page to see the new
page count.
2-6
Page 24
WebAdmin
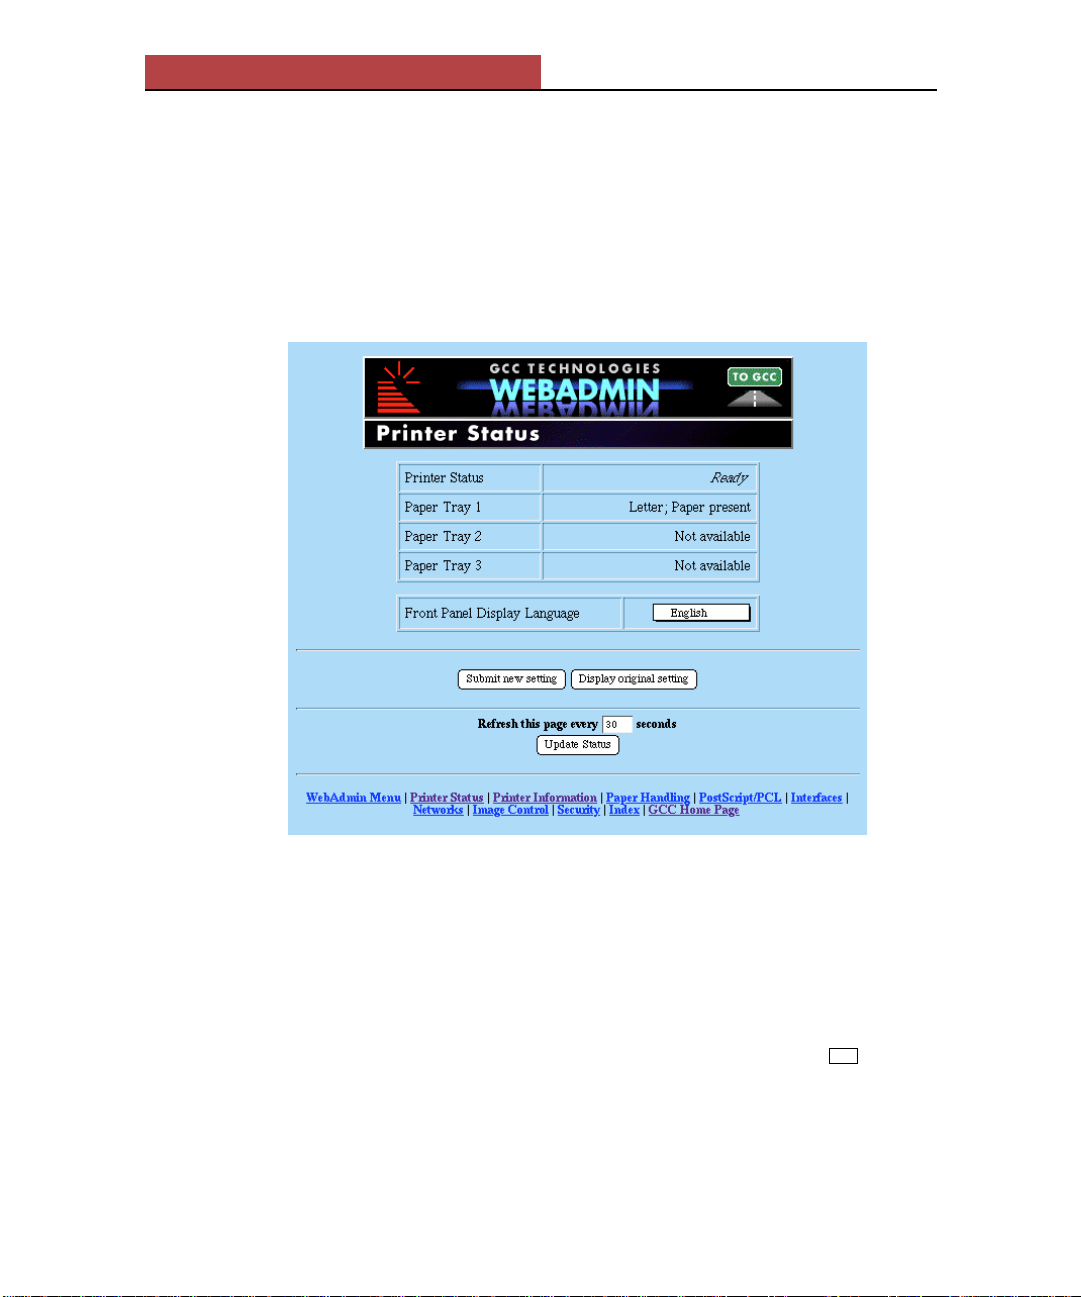
Printer Status Page
The most illustrative example of a WebAdmin page containing information that
needs to be refreshed is the Printer Status page. The Printer Status page
displays the printer’s status, the status of each paper tray, and the front panel
display language. To access this page, click the Printer Status text link at the
bottom of any WebAdmin page.
The information on this page can change frequently as multiple users send print
jobs to the printer. For example, if a user sends a print job that uses up all the
paper while you have this page loaded, the page will not reflect this current
status. You will be unaware that the paper tray is empty. The page needs to be
refreshed to display updated information.
Some Web browsers support automatic refresh. If your browser supports
automatic refresh, the Printer Status page will be automatically updated
according to the interval you enter in the Refresh this page every seconds
box. (The default is every 30 seconds.) To change the interval, type the new
value in the box and click the Update Status button.
Note:
The Printer Status page is the only WebAdmin page with the automatic refresh
option.
2-7
Page 25

WebAdmin
If your browser does not support automatic refresh, you will not see the Printer
Status page update itself. Instead, use the Update Status button or your
browser’s Reload button as frequently as you need to.
Changing the Printer’s Configuration
In addition to displaying the status of the printer, WebAdmin allows you to
make changes to the printer’s configuration. Configurable WebAdmin pages
are known as forms.
A WebAdmin form provides pop-up menus, entry boxes and buttons to make
the same changes you would make by pressing the printer’s front panel
function keys. This interface is similar to the graphical user interface of most
programs.
A description of each configuration setting can be found in Chapter 2, “The
Elite XL front panel,” of the Elite XL User’s Manual .
Note:
Web pages can be retrieved from the WebAdmin server while printing is in
progress; however, configuration settings cannot be modified until the printer is idle.
To make changes:
1. Access the page you want to make a change to via the WebAdmin
home page or the text links at the bottom of the page you are currently
on.
2. Make the necessary changes using the page’s pop-up menus, entry
boxes and buttons.
You can make more than one change on a page.
3. Click the Submit new setting button to submit the change to the
printer. Or, if you need to view the page with its original settings, click
the Display original settings button (clicking this button redisplays
settings originally received from the printer; it does not reload current
settings from the printer.)
When you submit your request, the printer is automatically taken offline,
the changes are initiated and the printer is automatically brought online.
(This process assures that your changes do not conflict with changes being
entered at the front panel by another user.)
A reply page will appear listing the changes.
IMPORTANT:
Making a change on a WebAdmin page without clicking
the Submit new setting button has no effect on the printer.
2-8
Page 26

WebAdmin
Printing Informational Pages
4. Press the browser’s Back button to go back to the page you made the
change to and press the Reload button.
Note:
Some Elite XL settings require that you restart the printer so changes can take
effect. The corresponding WebAdmin page for these settings include a Restart
printer automatically check box option to restart the printer automatically when
you click the Submit new settings button. If you choose to restart automatically,
give your printer enough time to restart before you try to reconnect to WebAdmin.
With WebAdmin, you can print the Elite XL printer informational pages that
are accessible through the printer’s front panel.
To print an informational page:
1. From the WebAdmin home page, click the Printer Information page
bar or click the Printer Information text link at the bottom of any
WebAdmin page.
The Printer Information page appears.
2. In the Additional Information section, click the information pages
link.
The Information Pages page appears.
Note:
(for PCL) will be the only informational page available to print.
3. Click the radio button to the left of the page you want to print.
4. Click the Print Selected Page button.
WebAdmin Security
WebAdmin comes with two security options to prohibit unauthorized users
from reconfiguring the printer:
1 WebAdmin password
This password prohibits unauthorized users from making changes to the
WebAdmin pages.
2 TCP/IP address restrictions
As an alternative to, or in addition to, the WebAdmin password, you may
want to restrict which TCP/IP addresses can connect to the Elite XL. These
restrictions apply to all methods of connecting via TCP/IP, including
WebAdmin, telnet and ping.
If the Elite XL’s PS/PCL Sensing option is set to PCL only, the Font List
2-9
Page 27
WebAdmin
WebAdmin Password
You define the IP addresses that are allowed to connect to your printer.
Any other addresses will not be able to view the printer’s configuration
using WebAdmin or print using TCP/IP mechanisms. For more information about IP address restrictions, refer to Chapter 4 (TCP/IP) on “Restricting Connection To Certain IP Addresses.”
The default settings for these security features allow anyone to use WebAdmin.
You can customize the settings for the level of security you require. Security is
particularly important if your printer is connected to the Internet.
IMPORTANT:
setting a password immediately after setting up your Elite XL.
Although submitting WebAdmin changes is prohibited without the password,
users can still view the printer’s configuration.
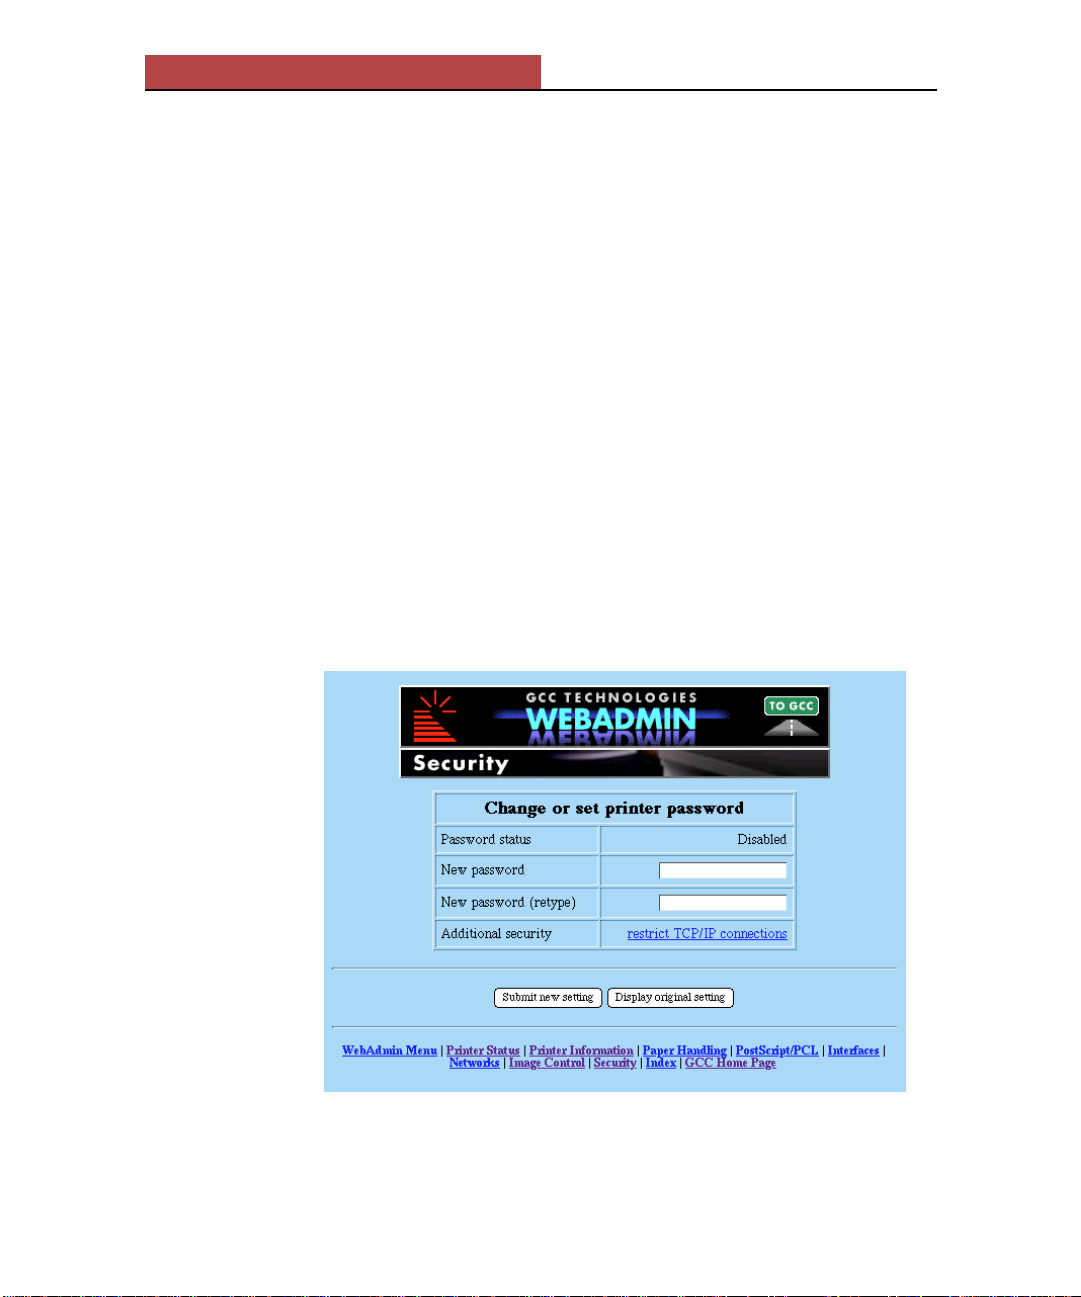
To enter a WebAdmin password:
1. Click the Security text link at the bottom of any WebAdmin page or
the Security page bar on the WebAdmin home page.
If you are concerned about unauthorized users, we recommend
2. Enter a password in the New password entry box.
The password can include up to 12 characters.
2-10
Page 28
WebAdmin
3. Enter the same password in the New password (retype) entry box.
4. Click the Submit new setting button.
All subsequently loaded WebAdmin pages will now include a Password
entry box. Each time you make a change to a page, you need to enter the
password in the Password entry box prior to clicking the Submit new
setting button.
To disable the password, leave the New password and New password (retype)
entry boxes blank, enter the current password in the Password entry box, and
click the Submit new setting button. A password cannot be reset from the front
panel.
IMPORTANT: A WebAdmin password does not prohibit users from making
changes using the front panel function keys.
If you forget your WebAdmin password, call the GCC Technical Support
Hotline at (617) 276-8620.
TCP/IP Address Restriction
IMPORTANT:
familiar with TCP/IP addressing schemes and hexadecimal masks.
To enter TCP/IP restrictions:
1. Click the Security text link at the bottom of any WebAdmin page or
the Security page bar on the WebAdmin home page.
The Security page appears.
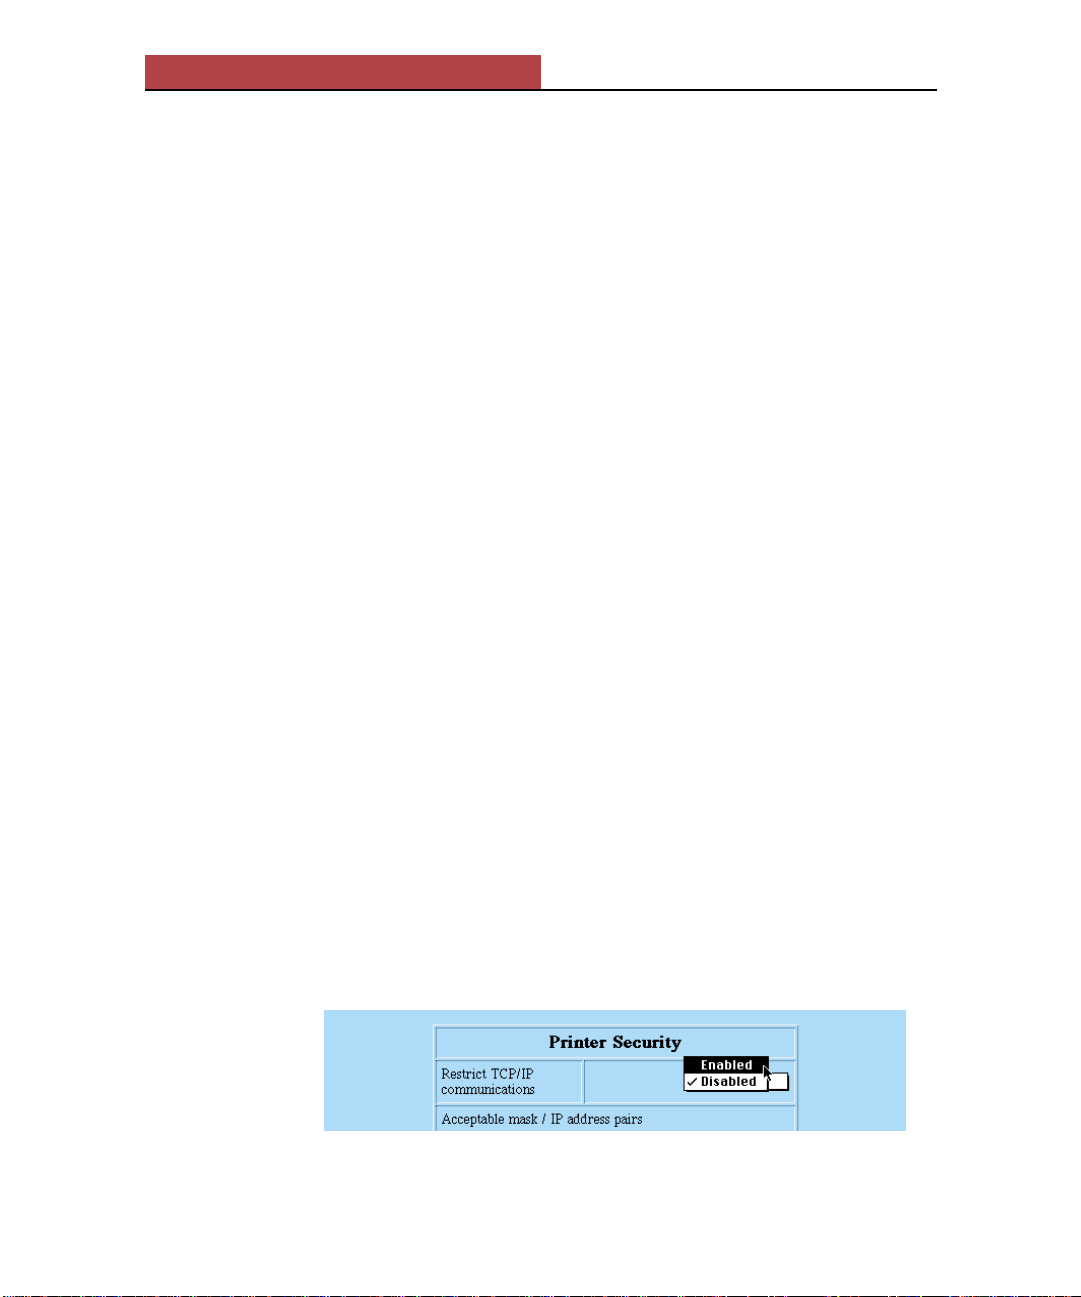
2. Click on the restrict TCP/IP connections link.
The TCP/IP Settings page appears.
3. In the Restrict TCP/IP communications pop-up menu, select Enabled.
We do not recommend setting IP restrictions unless you are
2-11
Page 29
WebAdmin
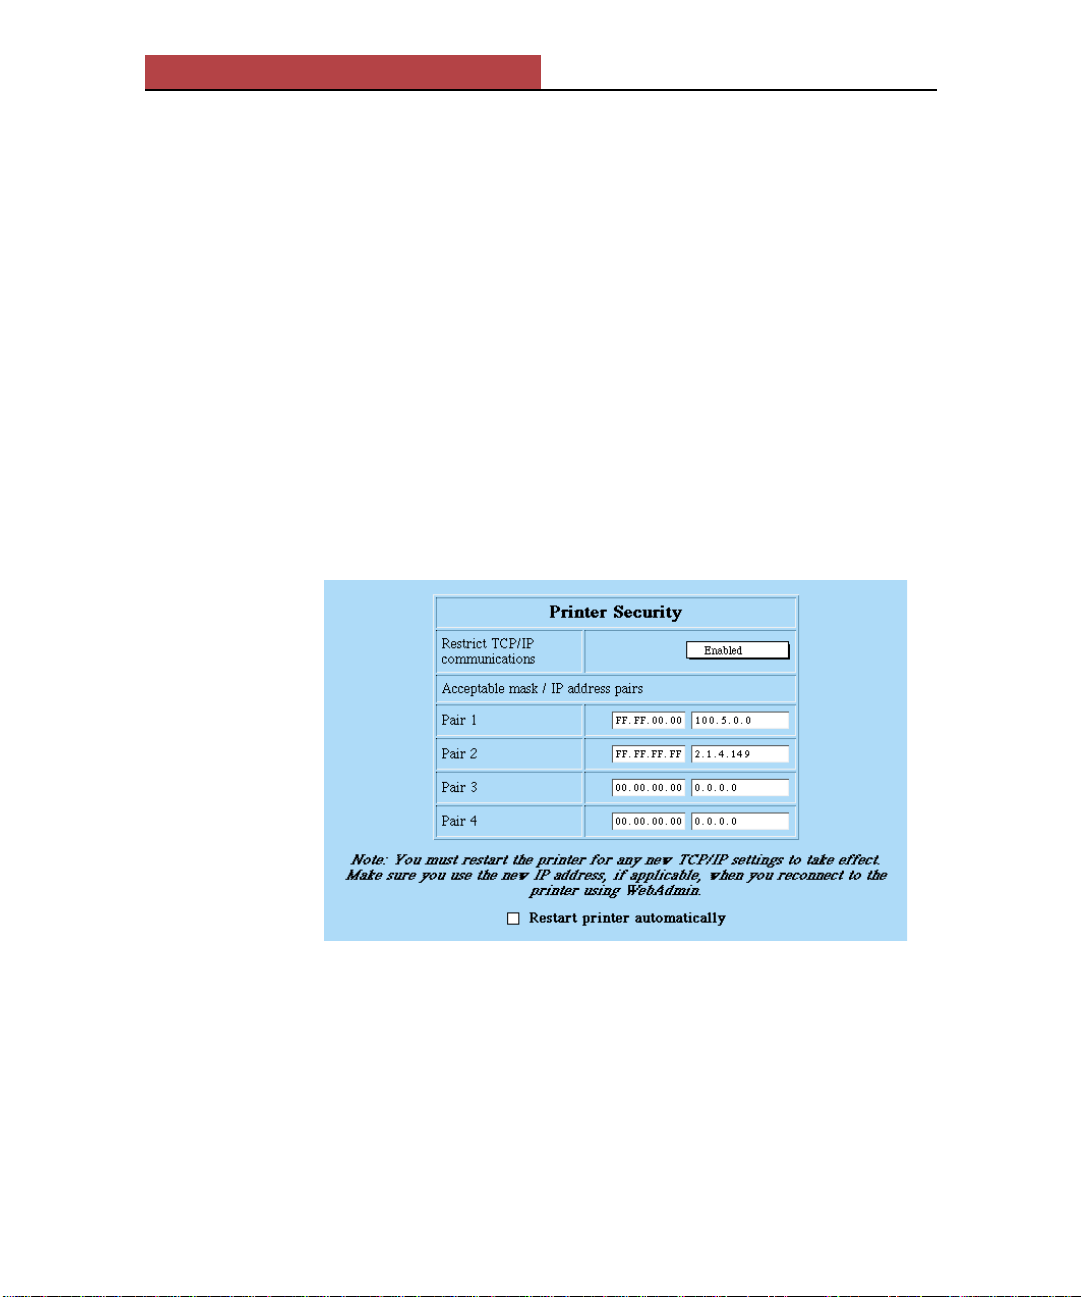
4. Enter mask/IP address pairs in the appropriate boxes.
The restrictions are defined as pairs of masks and addresses. For each
MASK/ADDRESS pair with a non-zero MASK, an IP address X.X.X.X
can connect to the printer if:
MASK & ADDRESS = MASK & X.X.X.X
(where & is a bitwise AND operator).
Note: If all the MASK values are set to zero, IP access will not be re-
stricted, even if Restrict TCP/IP communications is set to Enabled.
Example: Class A Network
If you want to allow any subnet address on the network 100.5, along with
the address 2.1.4.149, to connect to the printer, set up two mask address
pairs as follows:
IMPORTANT: When restricting the mask/address pairs, be careful not to
disable your own ability to connect to the printer. However, the IP restriction menu is accessible from the front panel of the Elite XL and can be
reset.
5. Click the Restart printer automatically check box so that the printer
will automatically restart after step 6.
6. Click the Submit new settings button.
2-12
Page 30

WebAdmin
WebAdmin Index
The WebAdmin Index provides a list of all Elite XL configuration items, each
linked to the related WebAdmin page. Note that some items specify the range
of valid settings. To access the Index page, click the Index page bar on the
WebAdmin home page or click the Index menu item at the bottom of any
WebAdmin page.
The configuration items are listed in alphabetical order. To
quickly jump to an item, click one of the links at the top of the page ( A - F | G
- L | M - R | S - Z ).
WebAdmin Messages
The following are WebAdmin messages that may appear after clicking the
Submit new setting button on a WebAdmin form.
Unable to set [parameter] to [value].
The configuration can not be changed. At least one of the changes you made on
a page will not be made because an invalid value was selected or entered.
Consult the Elite XL User’s Manual.
The printer could not be taken offline. Try again later.
The printer is busy, most likely processing a job. Check the Printer Status page
to verify that the printer’s status is Ready. (Changes were not made.)
The printer is already offline. Try again when it is back online.
A user has taken the printer offline. You can switch the printer online from the
printer’s front panel. (Changes were not made.)
Failed to bring printer back online.
Changes may have been made, but the printer could not go back online. You
need to switch the printer online from the printer’s front panel.
No configuration changes requested.
Configuration settings were not changed from originals.
No valid selection made in form.
All selections made were invalid values. (Changes were not made.) Consult the
Elite XL User’s Manual.
Password changed.
The new password submitted is in effect. If you entered a blank password, the
password requirement is disabled.
2-13
Page 31

WebAdmin
You must type the password the same way twice.
When changing a password, you are required to type the new password twice
in the same way on the Security page. Try entering the password again. Make
sure you do not add extra space or carriage return characters at the end of the
password.
You must supply the current password to change it.
To change an existing password, you need to supply the current password in
addition to the new one. Make sure you do not add extra space or carriage
return characters at the end of the password.
You must give the password to change printer configuration.
A valid password was not entered when submitting a change. If there was no
entry box for the password, reload the page.
XXX address/mask badly formed or has invalid value.
The IP address or mask for this specific field was not entered correctly. Refer
to the discussion of IP addressing in Chapter 4 of this guide.
Values of printer’s subnet mask or IP address are invalid or inconsistent.
Subnet mask or syslog host addresses are invalid. Refer to the discussion of IP
addressing in the Chapter 4 of this guide.
Broadcast address used by printer must be either all ones, or the printer’s
network number (and subnet number, if any), with a host number of all ones.
There was a problem with the broadcast address. Try using FF.FF.FF.FF or
contact your system administrator. Refer to the discussion of IP addressing in
Chapter 4 of this guide.
IP address of default router (default gateway) must have same network number
as printer (and subnet number, if any), and a host number that is not zero, all
ones, or the same as the printer’s.
There was a problem with the default router’s address. Check the network
number and subnet mask to make sure they are the same IP class. Make sure
the host’s address is not all zeros, ones or the same address as the printer.
Refer to the discussion of IP addressing in Chapter 4 of this guide.
Setting Up TCP/IP Protocol
If your Macintosh is running System 7.0 or earlier, or your PC is running
Windows 3.1 or earlier, you may need to install TCP/IP networking software if
networking software is not already present. Windows 3.1 specifically needs a
Winsock-compliant TCP/IP protocol stack, such as the shareware Trumpet
Winsock.
2-14
Page 32

WebAdmin
MacTCP is included with System 7.5 on the Macintosh. Some newer
Macintoshes use the OpenTransport TCP/IP stack. Windows 95 and Windows
NT also have TCP/IP built in.
The TCP/IP software must be configured for LAN (Local Area Network), not
for SLIP/PPP (Serial Line Internet Protocol/Point to Point Protocol), so that IP
packets will go out over your local Ethernet network to your printer, not out to
an Internet Service Provider via your modem. Note that if you use SLIP/PPP to
connect to the Internet, you will not be able to connect to WebAdmin on your
Elite XL until the TCP/IP software is configured to LAN mode.
1. Obtain IP addresses for your Macintosh or PC and Elite XL.
If your network already uses TCP/IP, ask your network administrator to
assign a unique IP address for your Elite XL and one for your Macintosh or
PC (if one is not already assigned). Follow these directions if your
Macintosh is not already configured as a TCP/IP node on Ethernet (not
LocalTalk® or SLIP/PPP).
If TCP/IP is not in use by anyone else on your network you can assign an
IP address to your Macintosh or PC and one to your Elite XL. For example,
you can assign 1.0.0.1 to your Macintosh and 1.0.0.2 to your Elite XL.
However, if you are planning to connect your network to the Internet in the
future, consult your Internet Service Provider for advice on choosing an IP
address.
2. Configure TCP/IP on your Macintosh or PC.
Open the application or control panel used for configuring TCP/IP (for
example, MacTCP or TCPMAN.exe).
Note: You should not have to change your address or any other settings in
MacTCP if your Macintosh is already set up as a TCP/IP node on the
network.
• Select the same IP class of address for your Macintosh
or PC as your printer.
• Input the computer’s IP address.
• Input any other parameters suggested by your Network
Administrator, such as a Domain Name Server.
• Exit the application and restart the computer.
Consult your computer’s TCP/IP network software documentation for
additional information.
2-15
Page 33

WebAdmin
Troubleshooting Tips
If you are unable to connect to the WebAdmin home page:
• Reboot the printer after configuring it for TCP/IP.
• Reboot the computer after configuring it for TCP/IP.
• Give the printer the same address class (A, B or C) as your Macintosh,
unless they are on different networks separated by a router.
• If a router exists between your printer and your Macintosh, enter the
printer’s IP address on the front panel. (Make sure the router handles
TCP/IP packets.)
• If your browser is set up to send all Web requests through another
computer (a Web proxy server), you need to tell the browser and
the proxy how to handle requests for the local network.
• Via the front panel, check to make sure the printer’s
OS Version is 2.9 or later.
If your browser does not connect to your printer by name, try connecting to the
printer’s IP address to verify that the network is set up correctly. For example, if
the printer’s IP address is 1.0.0.1, try the URL http://1.0.0.1/. If this works,
then the problem lies in the setup of the Domain Name Server. See your
Network Administrator.
© 1996 GCC Technologies, Inc.
2-16
Page 34

Using the Elite XL with Windows 95 and Windows NT
Windows 95/Windows NT
Contents
Introduction ...........................................................................................3-3
Using a GCC printer with Windows 95 ................................................... 3-3
Windows 95 printing software o v erview .......................................3-3
Installing a PPD for y our GCC pr inter .....................................................3-4
Before starting .............................................................................3-4
Software installation ................................................................... 3-4
Exploring the Properties dialog box ....................................................... 3-20
Printing a Windows 95 test page ................................................3-23
The Device Options panel ........................................................ 3-24
The Details panel ......................................................................3-26
The Paper panel .......................................................................3-27
The Graphics panel ..................................................................3-28
The Fonts panel ........................................................................ 3-30
The PostScript panel ............................................................... 3-31
3
Printing from Windo ws 95 applications ................................................. 3-32
Selecting print options ............................................................... 3-32
The Print Properties dialog box .................................................. 3-33
Installing the printer description files ...................................................... 3-34
Using a GCC printer with Windows NT .................................................3-35
Windows NT printing software o verview ..................................... 3-35
Before starting ...................................................................................... 3-35
Installing the Windo ws NT software ...................................................... 3-36
GCC
T
ECHNOLOGIES
3-1
Page 35

Using the Elite XL with Windows 95 and Windows NT
Windows 95/Windows NT
Contents
Selecting P age Setup and Print options ...............................................3-46
Print Setup options ....................................................................3-47
Print options .............................................................................. 3-48
Installing the printer description files .....................................................3-49
3
3-2
Page 36

Using the Elite XL with Windows 95 and Windows NT
Introduction
This chapter details the use of GCC Technologies® Elite XL laser printers with
Microsoft® Windows® 95 and Windows NT™ operating systems. For each
operating system, specific instructions are given for installing and configuring
the printer software, along with an overview of page setup and printing dialog
boxes, highlighting GCC-specific options. For further information about either
Windows 95 or Windows NT configuration and printing please refer to the user
documentation provided with these products or to the on-line help systems.
Windows 3.1 users
If you are installing the Windows 3.1 driver, please refer to Chapter 4 of your
Elite XL User’s Manual for installation instructions.
Using a GCC printer with Windows 95
Microsoft’s Windows 95 software provides a user-friendly operating environment for IBM-PC’s and compatibles. GCC printing software is designed for easy
installation, configuration, and printing under Windows 95.
Windows 95 printing software overview
The printing software is contained on the Elite XL Software and Documentation
CD-ROM. The CD-ROM contains the following:
• GCC model-specific PPD files for use with Windows 95
Each PPD file describes the characteristics and options of a specific Elite
XL printer. The PPD file is used in conjunction with the standard Windows 95 PostScript® printer driver (included with the Windows 95
software) to provide user access to page setup and printing options
available with the Elite XL printer in use and to assure optimum print
quality.
• GCC model-specific printer description files used dir ectly b y applica-
tions
Some applications do not use the Windows 95-compliant PPD’s. Because
of this, a folder containing PPD’s for these applications is included on the
Elite XL Software and Documentation CD-ROM.
3-3
Page 37

Using the Elite XL with Windows 95 and Windows NT
Installing a PPD for your GCC printer
The installation process includes the following steps:
• Installing the PPD file for your GCC printer
• Installing the Windows 95 PostScript driver
• Configuring the communication port
• Printing the Windows 95 test pa ge
Before starting
Before starting the installation procedure, you should perform the following
steps:
• Setup and connect the printer according to Chapter 1 in the Elite XL
User’s Manual.
• Switch on the printer.
And have the following items available:
• Elite XL Software and Documentation CD-ROM
• The Windows 95 CD-ROM or floppy disk set
Software installation
Software installation is accomplished using the Add Printer Wizard function of
Windows 95. Add Printer Wizard presents a simple step-by-step dialog to help
you to setup your printing software.
To install the printing software:
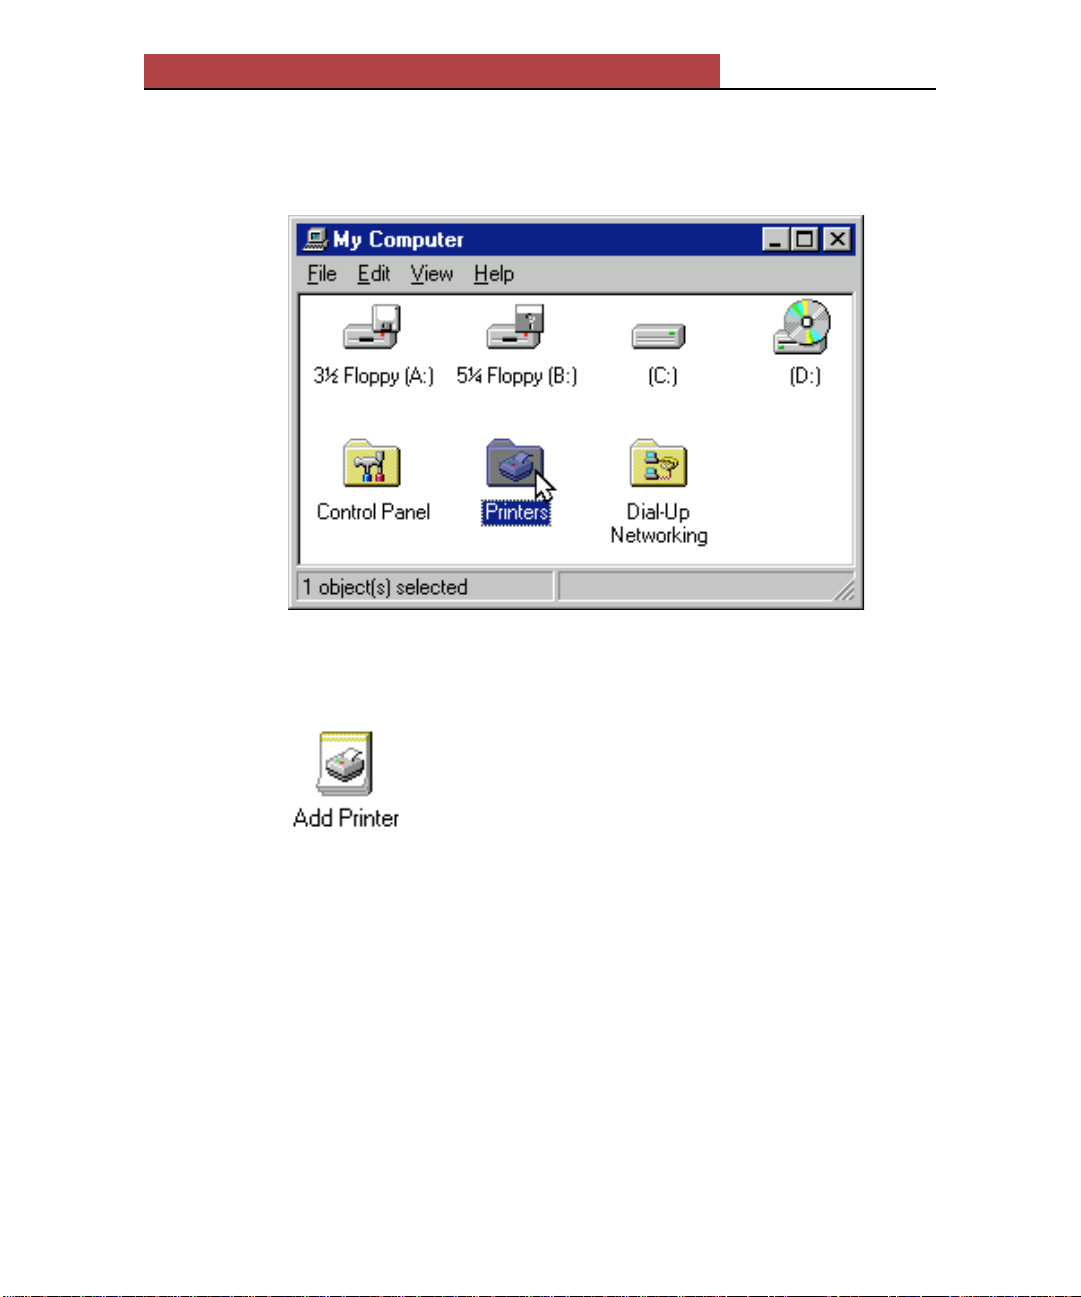
1. Double-click the My Computer icon. This is the Windows 95 icon that looks
like a computer. You may have renamed it.
The My Computer window will appear.
3-4
Page 38
Using the Elite XL with Windows 95 and Windows NT
2. Double-click the Printers folder.
The Printers folder opens.
3. Double-click the Add Printer icon.
The Add Printer Wizard dialog box appears.
3-5
Page 39

Using the Elite XL with Windows 95 and Windows NT
4. Click Next.
The local/network dialog box appears.
3-6
Page 40

Using the Elite XL with Windows 95 and Windows NT
• Select either a Local or Network connection.
• If you selected Local, go to step 7. If you selected Network, go on to
the next step.
5. Click Next. (For network connection only.)
The network path dialog appears.
• Type in the path or queue name of the printer. You can click Browse to display a
visual representation of your site’s netw ork and the printers location on it.
• Click the Yes radio button if you print from MS-DOS based programs.
If you select No for the MS-DOS printing question go to step 7. If you
selected Yes go on to the next step.
3-7
Page 41

Using the Elite XL with Windows 95 and Windows NT
6. Click Next. (For MS-DOS network printing only.)
A dialog box appears that enables you to send print jobs from MS-DOS applications to
a network printer . Click the Ca pture Printer Port button and select an appropriate
LPT port and print queue.
Click OK.
.
7. Click Next.
3-8
Page 42

Using the Elite XL with Windows 95 and Windows NT
The manufacturer/model selection dialog box appears.
This dialog box contains lists of printer manufacturers and their printer models.
8. Click Have Disk….
The Install From Disk dialog box appears.
Change A:\ to D:\ if that is the designation of your CD-ROM drive.
3-9
Page 43

Using the Elite XL with Windows 95 and Windows NT
9. Insert the Elite XL Software and Documentation CD-ROM.
10. Click OK.
A dialog box containing a list of GCC printers appears.
11. Select your GCC printer model from the disk.
As an example, the GCC Elite XL 808 is chosen in the above illustration. The
number following the printer name is the software version, and is subject to
change.
If you chose Network in step 4, go to step 15. If you chose Local, go to the next
step.
3-10
Page 44

Using the Elite XL with Windows 95 and Windows NT
12. Click Next. (For local printers)
The port selection dialog box appears.
GCC printers can accept jobs from either an LPT (Parallel) port or a COM
(Serial) port.
13. Click Configure Port…. (For local printer only.)
A configuration window, specific to the type of port chosen (LPT or COM), will
appear.
3-11
Page 45

Using the Elite XL with Windows 95 and Windows NT
LPT port configuration dialog box–
We recommend that you use the settings shown above.
3-12
Page 46

Using the Elite XL with Windows 95 and Windows NT
COM port configuration dialog box–
We recommend the above settings.
Note: The serial port settings in the printer’s front panel menus must match the settings in this
dialog box. Check the settings and change them if necessary (see Chapter 2 in your manual).
Note that the serial port’s Baud Rate submenu corresponds to the Bits per second drop-down
list box in the dialog box, while the DTR setting in the Flow Control submenu corresponds to
the Hardware setting shown above.
14. Click OK. (For local printers only.)
3-13
Page 47

Using the Elite XL with Windows 95 and Windows NT
The port selection dialog reappears.
15. Click Next.
The name printer dialog box appears.
You may enter a new name for your printer if you wish, or you may leave the
default name. Also, you should decide whether you want to make this the default
printer.
16. Click Next.
3-14
Page 48

Using the Elite XL with Windows 95 and Windows NT
The print a test page dialog appears.
We recommend that you not print the test page at this time, so change the setting
to No. We do recommend that you print a test page after the installation is
complete.
17. Click Finish.
The software installation will now commence. At one point, y ou will be asked to
insert either the Windows 95 CD-ROM or the Windows 95 floppy disk that
contains the printer driver.
3-15
Page 49
Using the Elite XL with Windows 95 and Windows NT
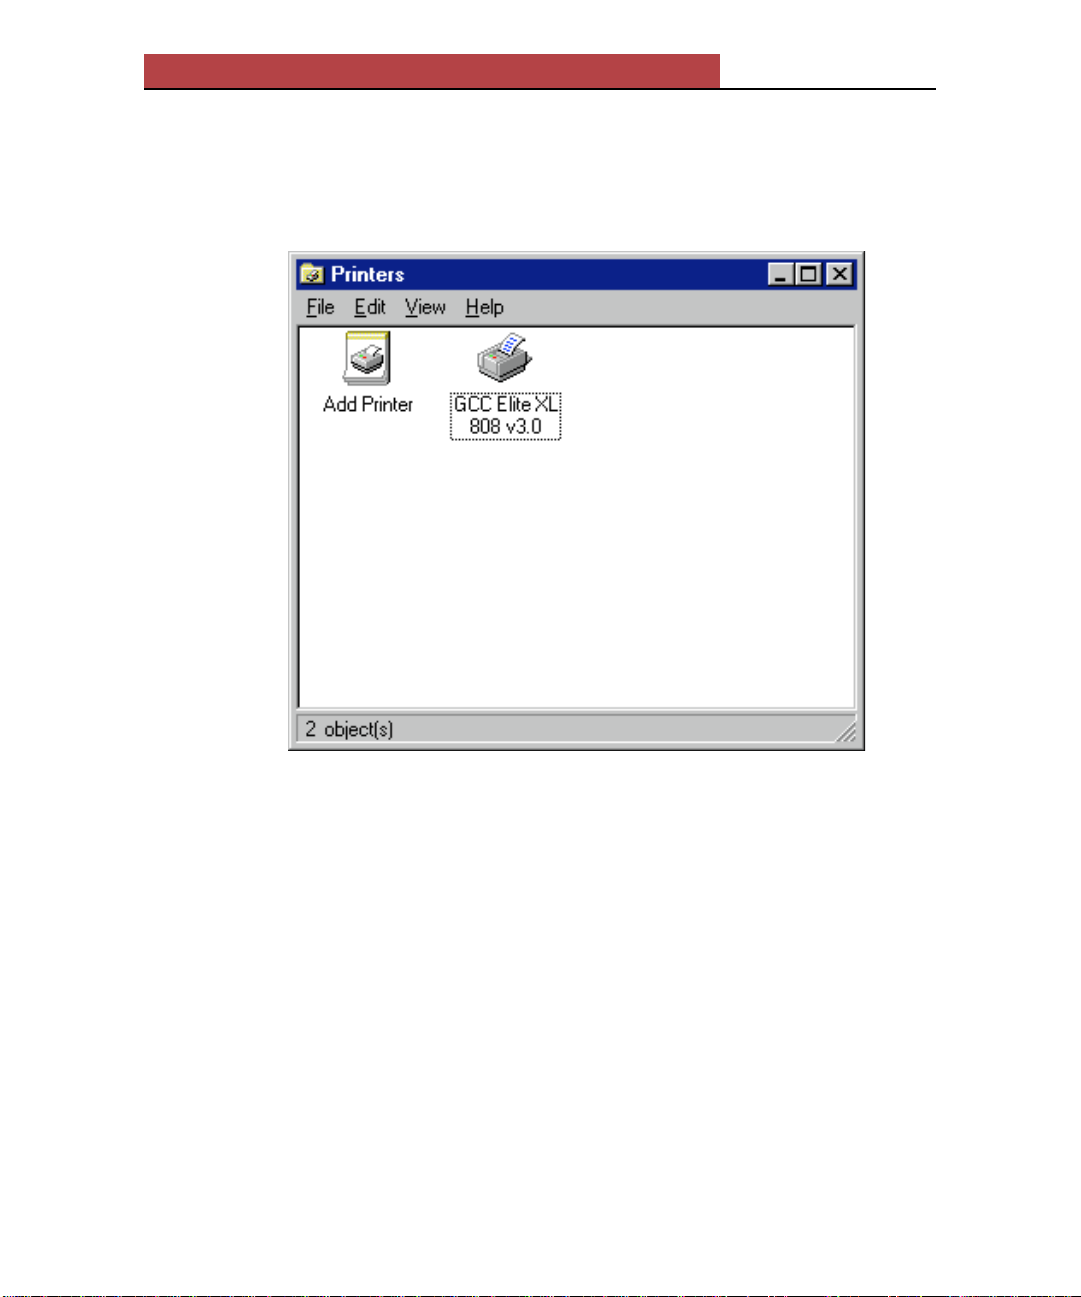
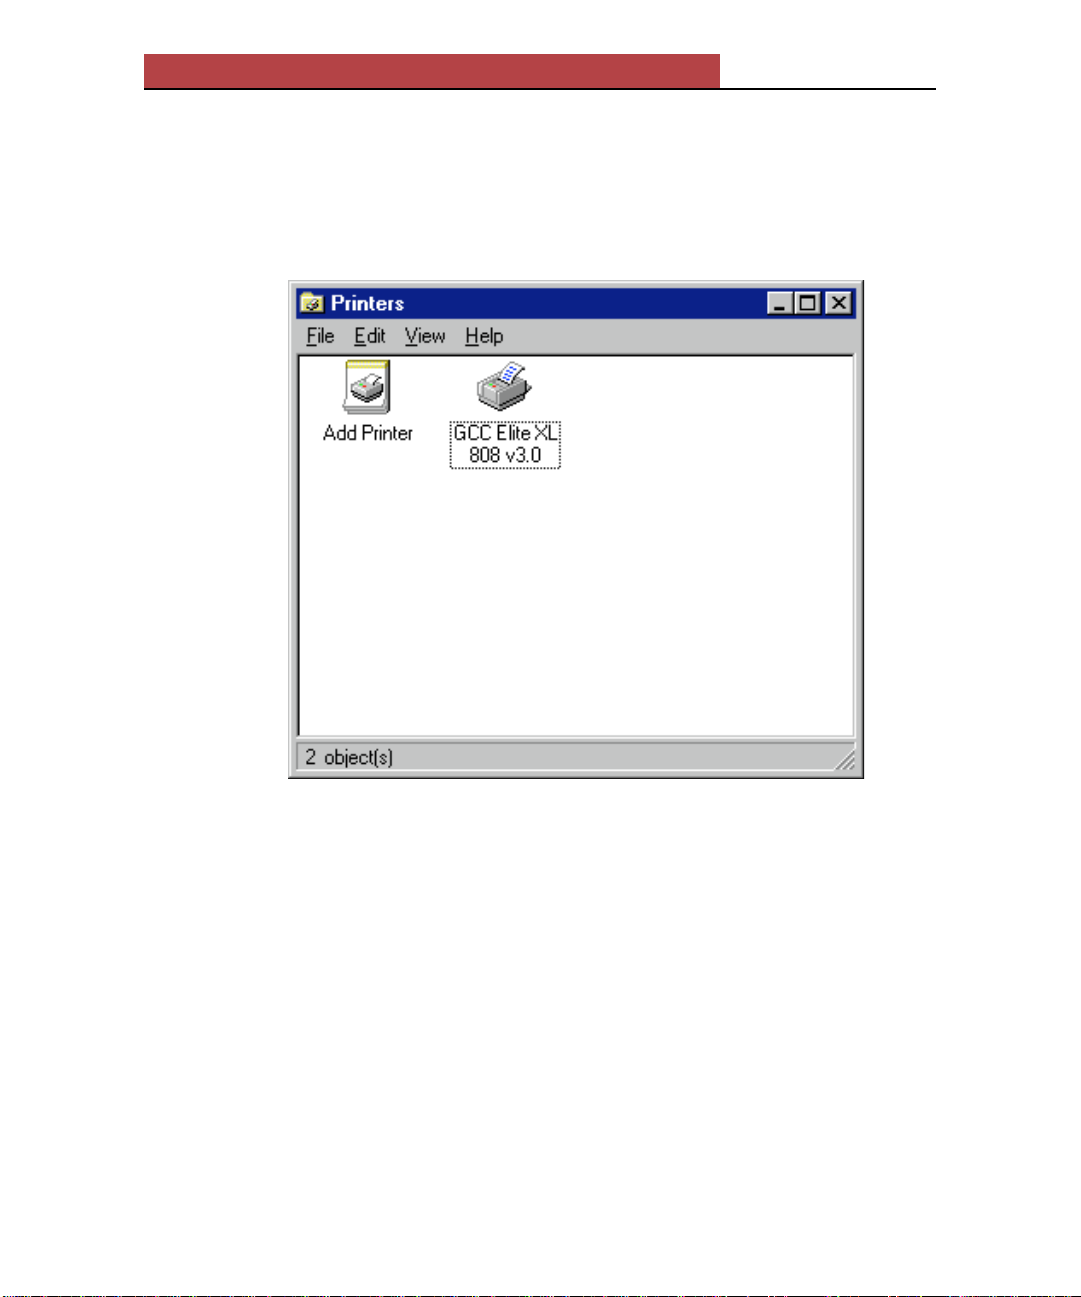
When the installation is complete, you will be returned to the Printers folder.
The folder now contains an icon for the newly installed printer, as shown below.
The remaining steps are for network printers only. If your printer is setup for
local operation go on to the next section “Exploring the Properties dialog box.”
18. Click the printer’s icon so that it is highlighted.
19. Click File in the menu bar.
20. Select Properties.
3-16
Page 50

Using the Elite XL with Windows 95 and Windows NT
The printer’s Pr operties dialog box appears displaying the General panel.
If you selected a network printer in steps 4 and 5, a Capture Settings tab will be
visible at the top of the dialog box. If not, proceed to step 22.
3-17
Page 51
Using the Elite XL with Windows 95 and Windows NT
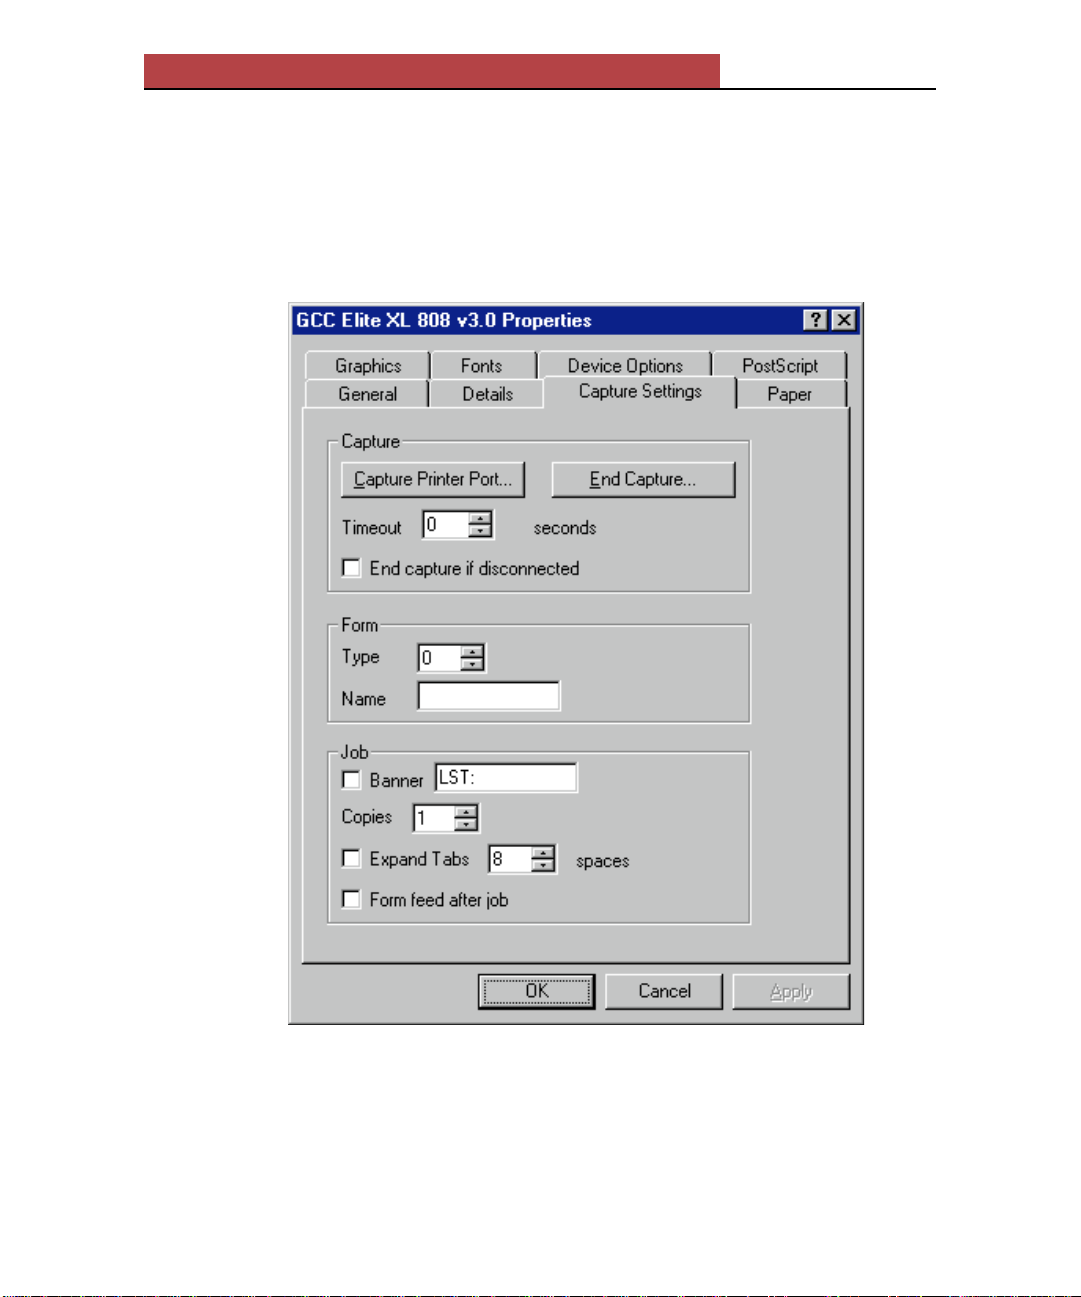
21. Click the Capture Settings tab at the top of the dialog box.
(For network connection only)
The Capture Settings panel is displayed.
Deselect all of the checkboxes, as shown above.
3-18
Page 52

Using the Elite XL with Windows 95 and Windows NT
22. Click on the Details tab at the top of the dialog box.
The Details panel is displayed.
If you did not select a parallel port (LPT1, LPT2, or LPT3), proceed to step 25.
3-19
Page 53
Using the Elite XL with Windows 95 and Windows NT
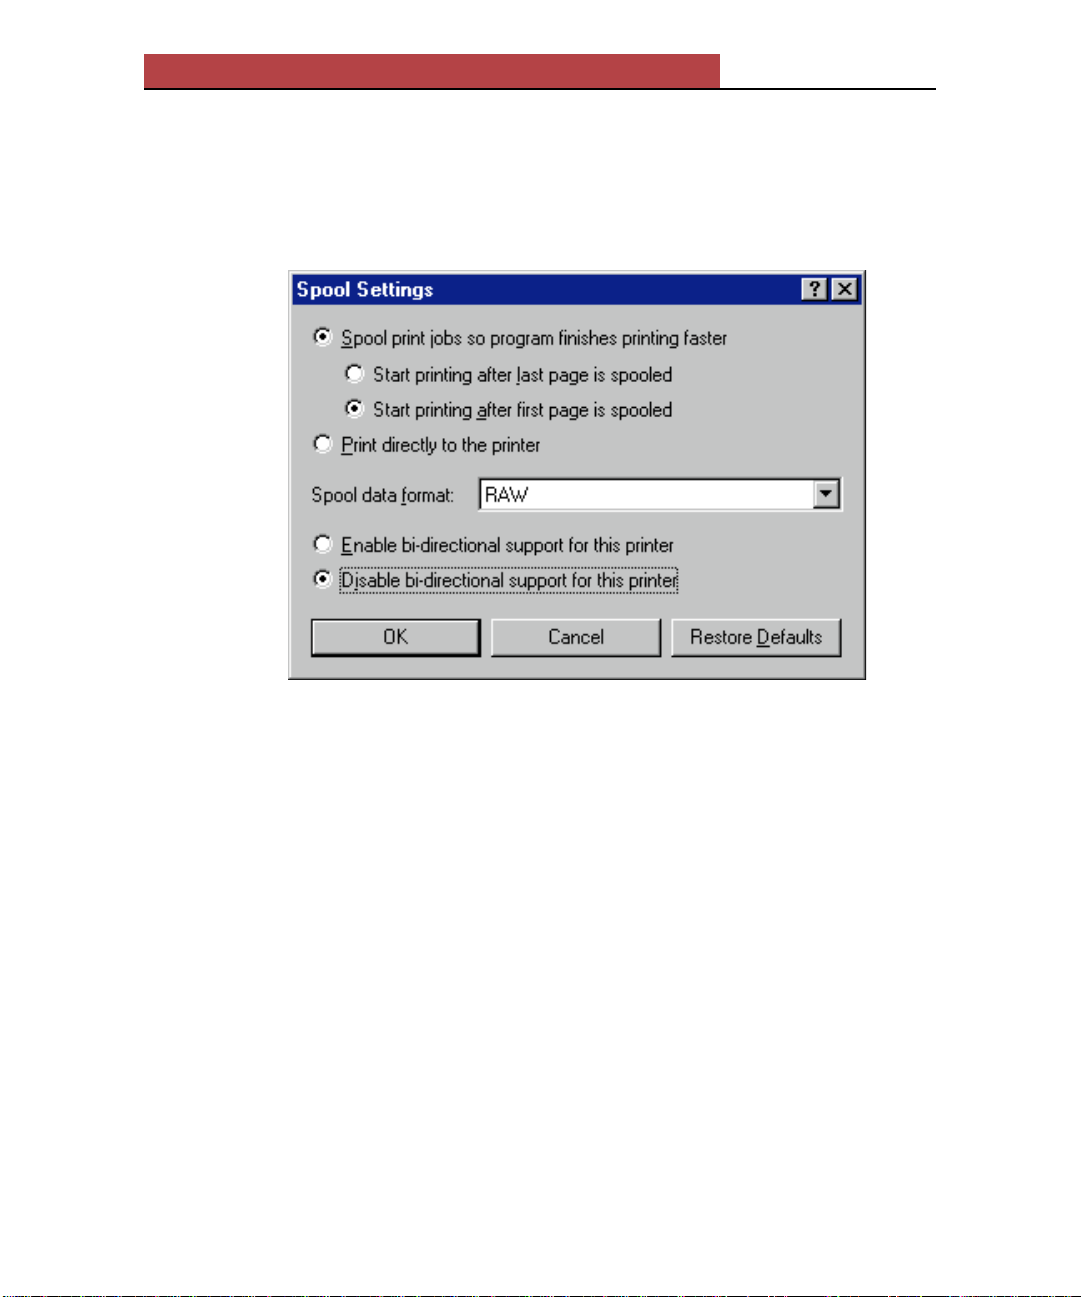
23. Click Spool Settings in the lower portion of the dialog box.
(For parallel port only)
The Spool Settings dialog box appears.
Click the Disable bi-directional support for this printer radio button.
We recommend that you also use the other settings shown above.
24. Click OK. (For parallel port only).
The Details Panel reappears.
25. Click OK.
The Printers folder reappears.
The installation procedure is now complete. Please go to the next section,
“Exploring the Properties dialog box.”
Exploring the Properties dialog box
The Windows 95 Properties dialog box is used to configure your printer’s page
setup, printing, and communications options. Most of the options found in the
Properties panels are standard to Windows 95, while some are specific to your
Elite XL printer model. This section details the GCC-specific options. For
information on other options, please refer to the Windows 95 on-line help
system, and the Windows 95 documentation.
3-20
Page 54
Using the Elite XL with Windows 95 and Windows NT
T o access the Properties dialog box f or y our GCC printer:
1. In the Printers folder, click on the printer icon of your GCC printer so that
it is highlighted.
2. Click File in the menu bar.
3. Select Properties.
3-21
Page 55

Using the Elite XL with Windows 95 and Windows NT
The printer’s Pr operties dialog box appears displaying the General panel.
3-22
Page 56

Using the Elite XL with Windows 95 and Windows NT
The Properties dialog box is a standard feature of Windows 95. The dialog box
is composed of panels that contain options for configuring your printer. Panels
are accessed by clicking on the appropriate tab along the top of the dialog box.
The Properties dialog box shown above is for a GCC Elite XL 808 printer setup
up for local communication. The only difference between the Properties boxes
for local and network printers is that network printers include a panel called
Capture Settings, which local printers do not; while local printers may include a
Sharing panel (if printer sharing is enabled in the Network control panel), which
is not shown for network printers.
The Sharing panel is not detailed in this document, and the Capture Settings
panel has already been configured with the recommended settings (see page 3-
18).
Printing a Windows 95 test page
At this point it is a good idea to print a test page to verify that your PC and
printer are communicating correctly. The General panel includes a Print Test
Page button.
Click Print T est Page now.
The test page will be formatted and a message box will appear asking you if the
test page has printed successfully. If the test page printed, click Yes; if there is a
problem, click No, and Windows 95 will display some troubleshooting steps.
3-23
Page 57
Using the Elite XL with Windows 95 and Windows NT
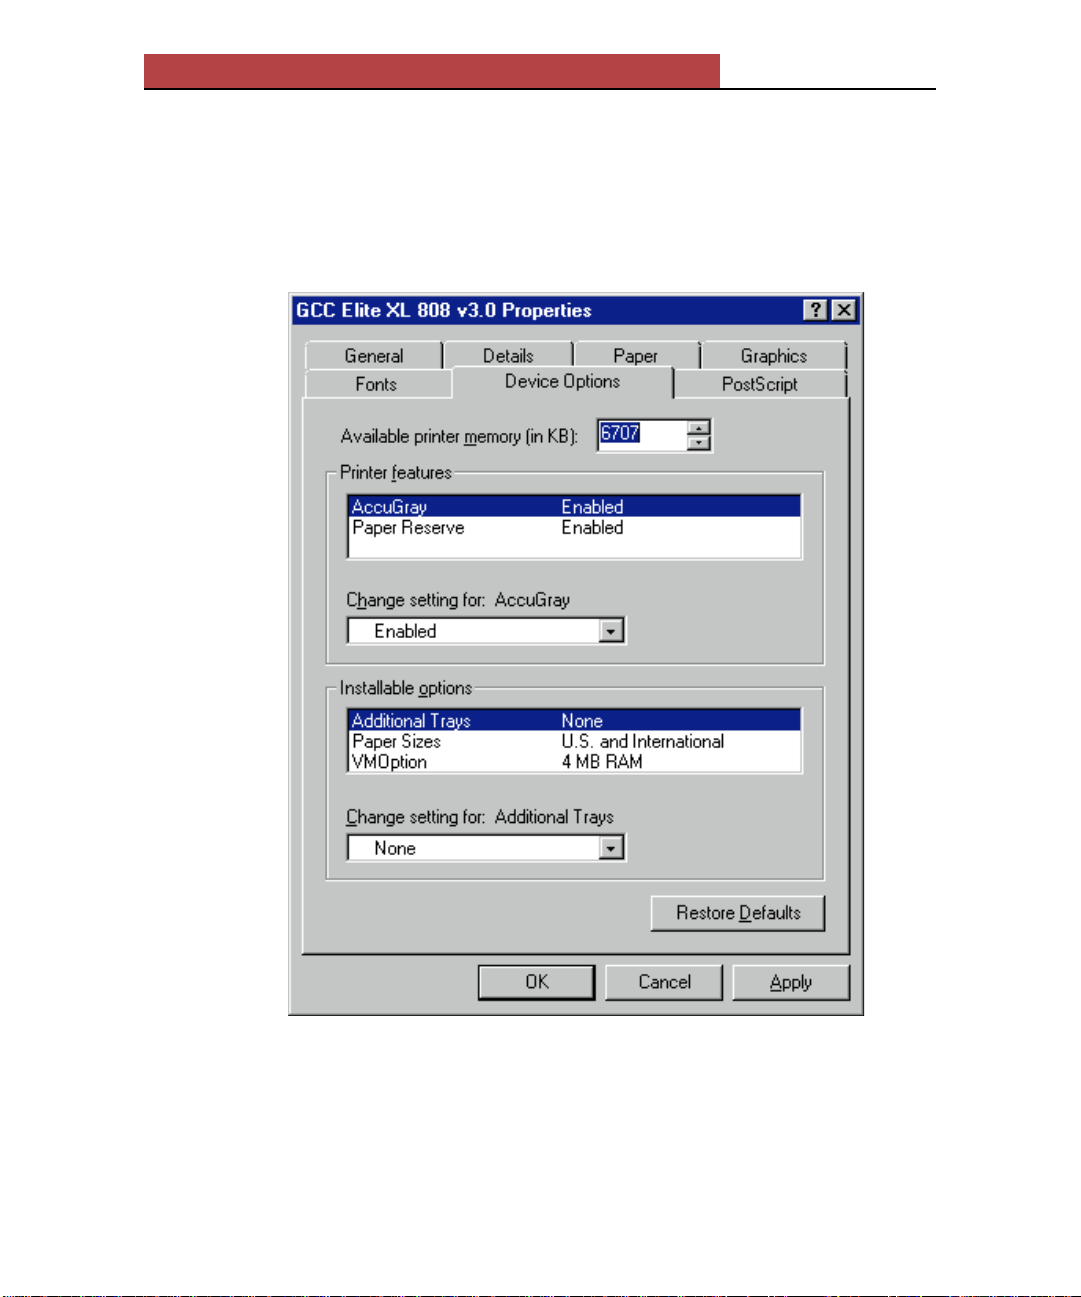
The Device Options panel
The Device Options panel contains settings specific to your GCC printer model.
3-24
Page 58

Using the Elite XL with Windows 95 and Windows NT
Printer features:
The Printer features area lists options specific to your printer in the upper scroll
box. If you want to change the current setting of any feature, highlight its name in
the upper box, and select the new setting from the drop-down list box below. Any
settings chosen here will override the corresponding setting in the printer’s front
panel.
Note: Available features will v ary between printer models. Please refer to the Elite
XL User’s Manual for information about specific fe atures.
Installable options:
The Installable options area lists items (paper trays, printer RAM) that can be
upgraded. When adding a new option, you need to update the printer driver, so
that the new option is available.
Note on VMOption: The VMOption selection corresponds to the amount of
RAM installed in the printer. In some cases, with a new printer, the number
displayed may not be correct. To display the correct memory size, highlight
VMOption and select the correct memory size from the drop-down list box.
Answer Yes to question that appears about available printer memory. Also, see
the following section on upgrading printer memory.
Updating the printer driver
After installing additional memory in your printer, it is a good idea to update the
printer driver to get maximum use out of the newly installed memory during
printing. The following procedure will enable you to adjust the Available printer
memory setting at the top of the Device Options panel. By adjusting this number,
the printer driver will be better able to process documents containing downloadable TrueType or other soft fonts.
Note: This update procedure should also be used if you routinely do wnload more than
one or two fonts to the printer’ s memory (re gardless of whether you have upgraded the
printer’s RAM). You should download your normal font set and then perform the
procedure.
To update the printer driver after installing more memory:
1. Determine the printer’s new available memory setting.
Print the file TESTPS.TXT. This file is included with Windows 95 and is
located in the System folder within the Windows folder. For e xample, if y our
printer is connected to LPT1 open a DOS window and type:
copy c:\windows\system\testps.txt lpt1
The printed file will indicate the maximum available virtual memory and
the maximum suggested virtual memory. You will use the suggested value.
3-25
Page 59

Using the Elite XL with Windows 95 and Windows NT
2. Enter the new value.
At the top of the Device Options panel, there is a box labeled Available
printer memory (in KB); enter the suggested value from step 1 into this box.
The Details panel
The Details panel enables you to change the printer driv er and port settings. Refer
to pages 3-9, 3-10, and 3-13 for information about recommended port configuration settings. Refer to pages 3-19 and 3-20 for information on the Spool Settings.
3-26
Page 60

Using the Elite XL with Windows 95 and Windows NT
The Paper panel
The Paper panel enables you to select paper sizes, layout, orientation, and paper
source.
Paper size:
The printer’s paper sizes are accessed through the Paper sizes scroll box. To
change the paper size, scroll to the desired paper icon and click on it so that it is
highlighted. Note: In some cases the name of the paper size below the paper icon
will be truncated. However, the full name of the selected paper size will appear
above the scroll box.
3-27
Page 61

Using the Elite XL with Windows 95 and Windows NT
Paper source:
The Paper source drop-down box provides options that allow you to specify how
paper will be provided to the printer. There are selections for Auto Select, any
installed paper trays, manual feed, and a multipurpose feeder (if available).
The Graphics panel
The Graphics panel enables you to adjust settings that control the look of your
documents.
3-28
Page 62

Using the Elite XL with Windows 95 and Windows NT
Resolution:
The Resolution drop-down list box enables you to choose the output resolution
(in dots per inch). The resolution selected in this menu will override the resolution selected in the printer’s front panel.
Halftoning:
The Halftoning area controls the screen frequency and screen angle for your
documents. In general, it is recommended that use the printer’s default screen
frequency by selecting Use printer’s settings. Note that you can change the
screen frequency by using the Default Screens submenu in the printer’s front
panel (see Chapter 2 of the Elite XL User’s Manual).
3-29
Page 63

Using the Elite XL with Windows 95 and Windows NT
The Fonts panel
The Fonts panel enables you to specify how fonts are sent to the printer. Use
these options in conjunction with the information provided in the “Fonts”
chapter of the Elite XL User’s Manual.
3-30
Page 64

Using the Elite XL with Windows 95 and Windows NT
The PostScript panel
The PostScript panel provides settings for controlling the way print jobs are sent
to the printer.
We recommend you use the default settings.
3-31
Page 65
Using the Elite XL with Windows 95 and Windows NT
Printing from Windows 95 applications
GCC printers are designed to work with all Windows 95 compatible applications.
The Windows 95 driver provides commonly used printing options along with
some others (e.g. paper sizes and paper trays) that are specific to GCC printers.
Printing options may be selected from within an application through the Print
dialog box, or from your printer’s Proper ties dialog bo x (see page 3-17). Options
selected through the Properties dialog box appear as the default options when you
open a new document in your applications. In general, options selected from
within an application document will override corresponding options in the
Properties dialog box, and the printer’s front panel submenus.
Selecting print options
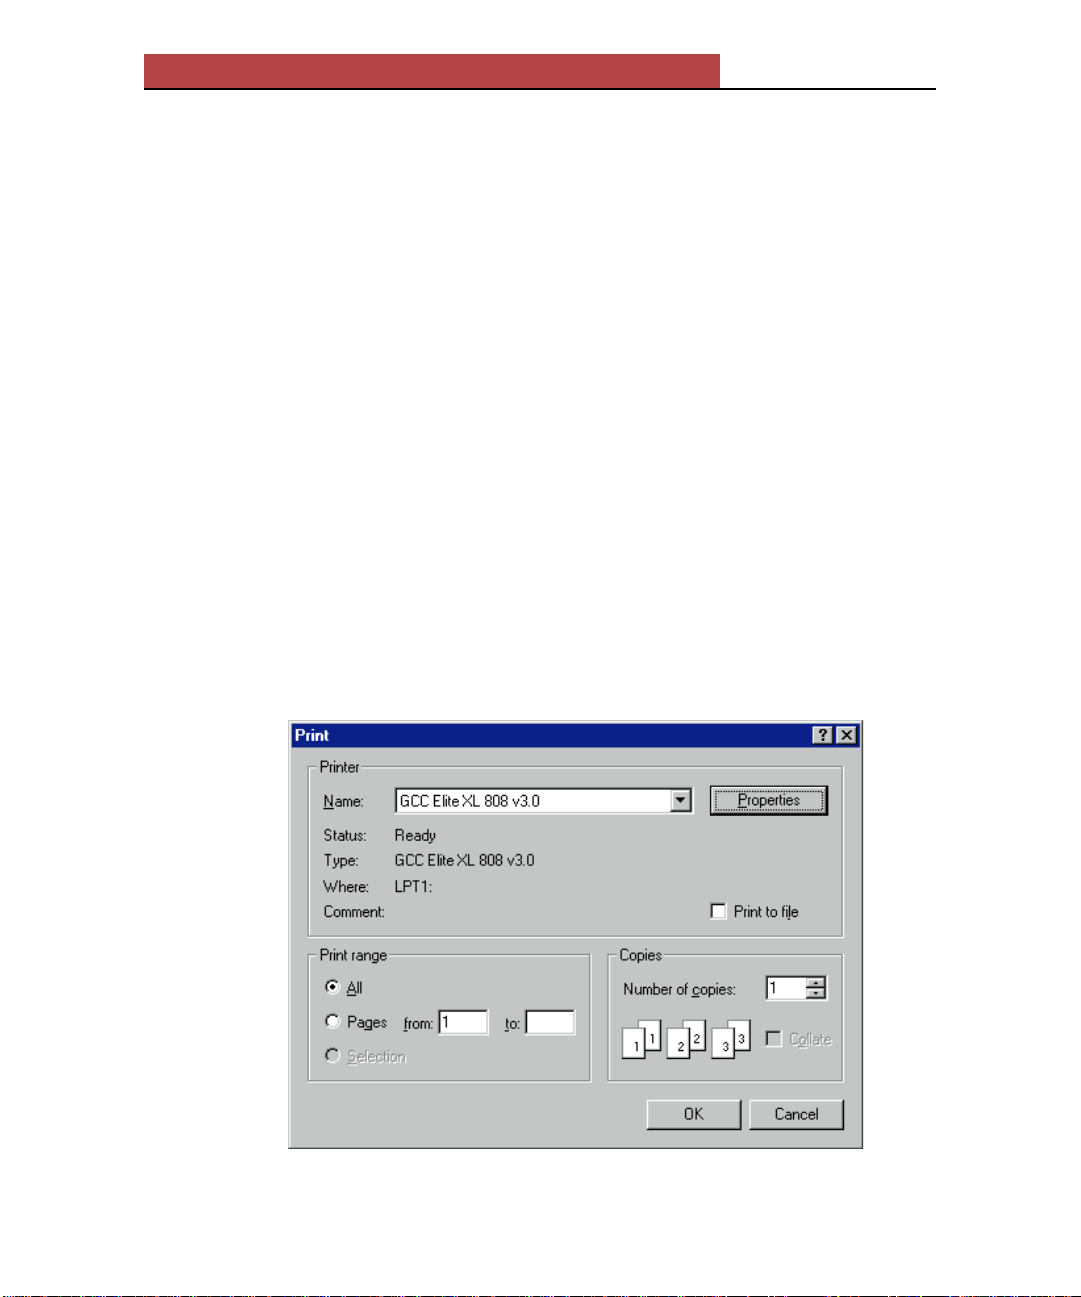
The following Print dialog box illustration is taken from WordPad, a standard
word processing application included with Windows 95. The Print option is
located under the File menu of most applications. The standard Windows 95 Print
dialog box provides settings for changing the target printer, pa ge range, and n umber
of copies. Further print settings are also available by clicking on the Properties
button. Other applications may provide additional settings.
3-32
Page 66

Using the Elite XL with Windows 95 and Windows NT
The Print Properties dialog box
The Properties dialog box available from the Print dialog box displays a subset
of the panels and options found in the printer’s Properties dialog box.
3-33
Page 67

Using the Elite XL with Windows 95 and Windows NT
Installing the printer description files
The following instructions are for installing printer description files for using
applications that do not use the Windows 95 or Windows NT PPD’s.
To install printer description files:
1. Insert the Elite XL Software and Documentation CD-ROM into your CD-
ROM drive.
2. At the root directory (C:\>), type the following command and path
name for the application you are using and press the Enter key. (Note:
Depending on where you have installed any of these applications, the
path names may be different).
• Adobe Illustrator 4.0:
Type copy d:\*.ppd c:\ai4\ppd to install the PPD file.
• Adobe PageMaker 6.0:
Type copy d:\*.ppd c:\pm6\rsrc\usenglsh\ppd4 to install the PPD
file.
• Aldus FreeHand 4.0 or PageMaker 5.0:
Type copy d:\*.ppd c:\aldus\usenglsh\ppd4 to install the PPD file.
• Aldus FreeHand 3.1 and earlier:
Type copy d:\ppd3\*.* c:\aldus\usenglsh\ppds to install the PPD and
PDX files.
• Macromedia FreeHand 5.0:
Type copy d:\*.ppd c:\fh5\usenglsh\ppd to install the PPD file.
• QuarkXPress:
Type copy d:\*.pdf c:\xpress to install the PDF file.
3-34
Page 68

Using the Elite XL with Windows 95 and Windows NT
Using a GCC printer with Windows NT
Microsoft’s Windows NT is a powerful operating system for networked environments. GCC printing software is designed for easy installation, configuration,
and printing under Windows NT.
The following instructions pertain to the installation and use of the Elite XL
printer with Windows NT v3.5. GCC does support Windows NT 4.0 and has
provided a Windows NT v4.0 driver.
Please see the README.TXT file located in the NT40 folder on the Elite XL
Software and Documentation CD-ROM for instructions on the installation and
use of Windows NT v4.0. You may also visit GCC's website at
http://www.gcctech.com for additional information.
Windows NT printing software overview
The Windows NT printing software is contained on the Elite XL Software and
Documentation CD-ROM. The Windows NT software consists of:
• Standard Windows NT P ostScript printer driver.
• GCC model-specific PPD files for use with Windo ws NT.
Each PPD file describes the characteristics and options of a specific Elite XL
printer. The PPD file is used in conjunction with the standard Windows NT
PostScript® printer driver to pro vide user access to page setup and printing options
available with the GCC printer in use and to assur e optimum print quality .
• GCC model-specific printer description files used directly by applica tions.
Some applications do not use the Windows NT-compliant PPD’s. Because of
this, a folder containing PPD’s for these applications is included on the Elite
XL Software and Documentation CD-ROM.
Before starting
Before starting the installation procedure, you should perform the following
steps:
And have the following available:
• Setup and connect the printer according to Chapter 1 in the Elite XL
User’s Manual.
• Switch on the printer.
• GCC Elite XL Software and Documentation CD-ROM.
3-35
Page 69

Using the Elite XL with Windows 95 and Windows NT
Installing the Windows NT software
Software installation is accomplished using the Printers option in the Control Panel.
The installation process includes the following steps:
• Installing the printing software (printer driver and PPD f ile).
• Selecting and configuring a communication port.
• Setting print defaults.
Step 1- Install the printing software:
1. Start Windows.
2. Double-click the Main group from the Program Manager window.
The Main group window appears.
3. Double-click the Control Panel icon.
The Control Panel window appears.
3-36
Page 70

Using the Elite XL with Windows 95 and Windows NT
4. Double-click the Printers icon.
The Print Manager window appears.
5. Select Create Printer from the File menu.
The Create Printer window appears.
3-37
Page 71

Using the Elite XL with Windows 95 and Windows NT
6. Insert the Elite XL Software and Documentation CD-ROM.
7. Select Other from the Driver drop-down list box.
The Install driver dialog box appears.
3-38
Page 72

Using the Elite XL with Windows 95 and Windows NT
Change A:\ to D:\ if that is the designation of your CD-ROM drive.
8. Click OK.
The Select Driver window appears.
9. Select a driver.
3-39
Page 73
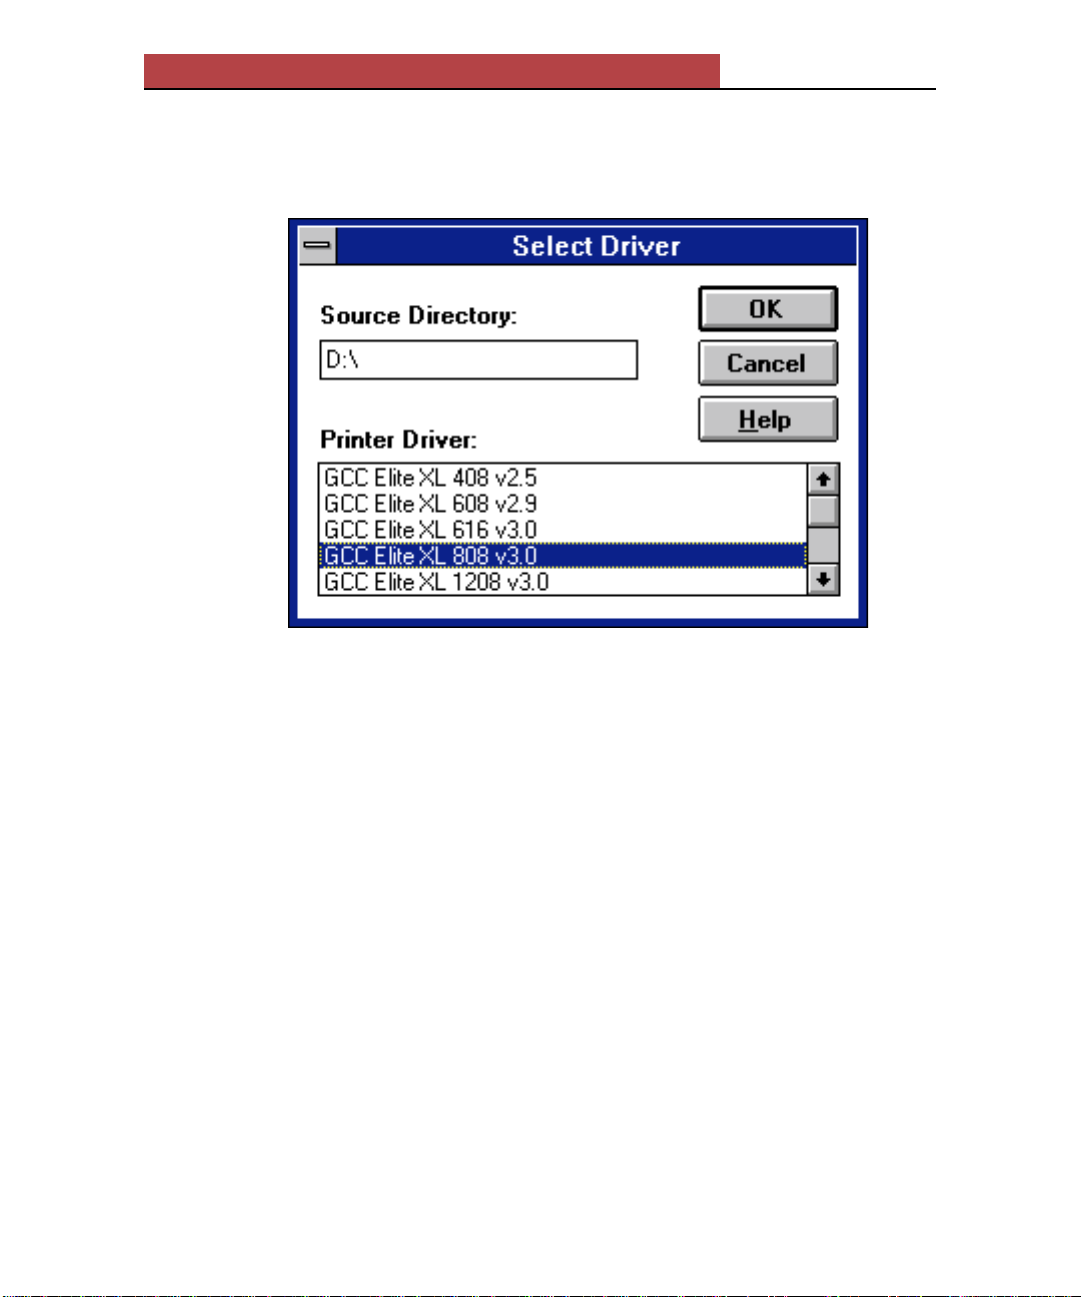
Using the Elite XL with Windows 95 and Windows NT
Select the driver for the GCC printer model you are installing.
10. Click OK.
A progress box appears. After a few seconds, the printer software is installed,
3-40
Page 74

Using the Elite XL with Windows 95 and Windows NT
and the Create Printer window reappears displaying the selected GCC driver.
At this point you must give the printer a name, and, optionally, enter a description, as shown in the example above.
11. Go on to Step 2
Step 2 - Select and configure a communications port.
In order to print you must select and configure a port. A port can be either a serial
port (also called a COM port), a parallel port (also called an LPT port), or you can
select a network queue.
3-41
Page 75

Using the Elite XL with Windows 95 and Windows NT
1. Select a port from the Print to drop-down list box.
2. Click Settings.
Depending upon the type of port selected, a different dialog box will appear.
• LPT port selected:
The Configure LPT Port dialog box appears.
We recommend the above settings.
• Click OK.
• Close the Configure LPT Port dialog box.
3-42
Page 76

Using the Elite XL with Windows 95 and Windows NT
• Network print queue selected: A network print queue resides on a print
server. Print queues are established with the network software running your
network. Any necessary settings will be specific to the network software. Refer
to the network software documentation or contact your network administrator
for information regarding correct settings.
• COM port selected:
The Ports dialog box appears, with the selected COM port highlighted.
3-43
Page 77

Using the Elite XL with Windows 95 and Windows NT
The Settings dialog box appears.
We recommend the above settings.
Note: The serial port settings in the printer’s front panel menus must match the settings in
this dialog box. Check the settings and change them if necessary (see Chapter 2 in your
manual). Note that the DTR setting in the Flow Control submenu corresponds to the
Hardware setting shown above.
• Click OK.
• Close the Settings dialog box.
At this point you should be back at the Crea te Printers dialog box.
3. Click OK.
In a few seconds the PostScript Printer Setup Window appears.
3-44
Page 78

Using the Elite XL with Windows 95 and Windows NT
• Select a default paper tray and paper size in this window. Your selections should
reflect the usual paper tray and paper size that will be used for print jobs. These
settings can always be overridden from an application’s Print window.
• Select Use Printer Halftoning. Halftoning controls the screen frequency and
screen angle for your documents. In general, it is recommended that you use the
printer’s default screen frequency by selecting Use Printer Halftoning. Note that
you can change the screen frequency by using the Default Screens submenu in
the printer’s front panel (see Chapter 2 of the Elite XL User’s Manual).
4. Click OK.
The Print Manager window reappears, now displaying a window for the newly
created printer.
You may wish to minimize the printer status window to an icon.
3-45
Page 79

Using the Elite XL with Windows 95 and Windows NT
You are now ready to print. If you wish to change any of the settings, select
Properties from the Print Manager’s File menu. For further information on
settings not detailed in this guide, refer to the extensive on-line help provided by
Windows NT.
Selecting Page Setup and Print options
The Elite XL printer is designed to work with all applications compatible with
Windo ws NT version 3.5 or later. The printing software provides commonly used
printing options along with some others (e.g. paper sizes and paper trays) that are
specific to your GCC printer model.
Printing options may be selected from within an application through the Print
Setup and Print dialog boxes, or from within the Windows NT Print Manager
or the Printers control panel. In general, options selected from within an
application document will override corresponding options in the Printers control
panel, Print Manager, and the printer’s front panel submenus.
Most of the options found in the Print Setup and Print dialog boxes are standard to
Windo ws NT, while some are specific to your GCC printer model. This section
details the GCC-specific options. For information on other options, please refer to
the W indows NT on-line help system, and the Windows NT documentation.
The location of printing options can vary among applications, and certain options
may be accessible from more than one dialog box. Refer to the application’s
documentation for further information.
3-46
Page 80
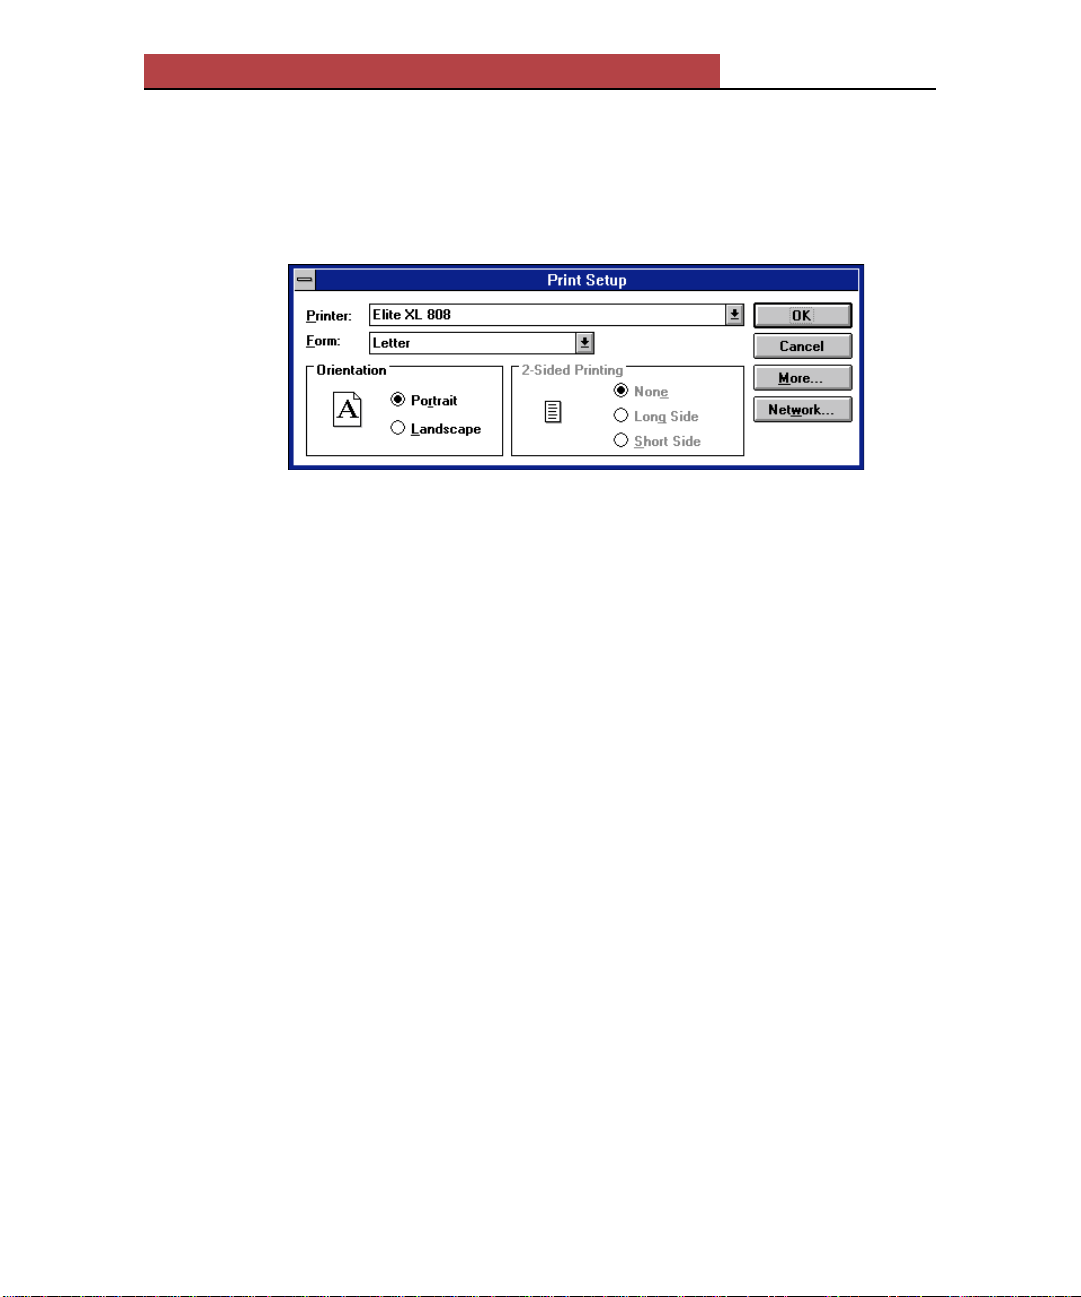
Using the Elite XL with Windows 95 and Windows NT
Print Setup options
The Print Setup option is usually located under the File menu. The following
Print Setup dialog box example is taken from Microsoft Write.
• Printer - The Printer drop-down list box enables you to select the printer that
you wish to send a job to. The printer that initially appears in the box is the
default printer. The default printer is set through the Print Manager.
• Form - The Form drop-down list box enables you to select a paper size.
Available paper sizes will differ between GCC printer models.
• Orientation - This option determines the orientation of the image on the page.
Vertical, or Portrait, orients the image upright on the page. Horizontal, or
Landscape, orients the image sideways on the page. The default is Portrait.
• 2-Sided Printing - This option is currently not supported by GCC printers.
3-47
Page 81

Using the Elite XL with Windows 95 and Windows NT
Print options
The Print option is usually located under the File menu. The following Pr int Setup
dialog box example is taken from Microsoft Write.
• Print Range - The Print Range option default is All, which prints all of the
pages in the document, from first to last. From and To allow you to specify a
range of pages to print. Click in the box labeled From, and type the first page
number of the range you want to print. Then click in the box labeled To and type
the last number of the range.
• Print Quality - This option enables you to select an output resolution for
your document. Available resolutions will differ between GCC printer models.
The resolution selected in this menu will override the resolution selected in the Print
Manager and/or the printer’s fr ont panel Default Resolution submenu.
3-48
Page 82

Using the Elite XL with Windows 95 and Windows NT
Installing the printer description files
The following instructions are for installing printer description files for using
applications that do not use the Windows 95 or Windows NT PPD’s.
To install printer description files:
1. Insert the Elite XL Software and Documentation CD-ROM into your CD-
ROM drive.
2. At the root directory (C:\>), type the following command and path
name for the application you are using and press the Enter key. (Note:
Depending on where you have installed any of these applications, the
path names may be different).
• Adobe Illustrator 4.0:
Type copy d:\*.ppd c:\ai4\ppd to install the PPD file.
• Adobe PageMaker 6.0:
Type copy d:\*.ppd c:\pm6\rsrc\usenglsh\ppd4 to install the PPD
file.
• Aldus FreeHand 4.0 or PageMaker 5.0:
Type copy d:\*.ppd c:\aldus\usenglsh\ppd4 to install the PPD file.
• Aldus FreeHand 3.1 and earlier:
Type copy d:\ppd3\*.* c:\aldus\usenglsh\ppds to install the PPD and
PDX files.
• Macromedia FreeHand 5.0:
Type copy d:\*.ppd c:\fh5\usenglsh\ppd to install the PPD file.
• QuarkXPress:
Type copy d:\*.pdf c:\xpress to install the PDF file.
3-49
Page 83

TCP/IP
TCP/IP Software Guide
Contents
Introduction ............................................................................................ 4-3
Software overview ..................................................................................4-3
Installing the optional filters .................................................................... 4-4
Setting up the printer on a TCP/IP network ...............................................4-4
Placing the printer .........................................................................4-5
Configuring the front panel TCP/IP parameters .............................. 4-5
TCP/IP submenu descr iptions........................................................4-6
Identifying the printer to the network ..............................................4-8
Confirming the network connection ................................................4-8
Introduction to printing over a TCP/IP netw ork ..........................................4-9
Printing with the internal lpd ...................................................................... 4-9
Attaching a hard disk to the pr inter .............................................4-10
Creating a spool directory ........................................................4-10
Configuring the internal spooler ................................................. 4-10
4
Sending print jobs to the internal spooler ....................................4-11
Printing with a master (Berk eley) spooler with tcpif ................................4-11
Creating a spool directory on the master spooler ........................4-12
Editing the printcap files ............................................................4-12
Printing text files with texttcpif .............................................................. 4-13
Using tcpof .................................................................................4-13
Using telnet with the Elite XL ...............................................................4-14
Appendix A: TCP/IP overview ..............................................................4-15
GCC
T
ECHNOLOGIES
4-1
Page 84

TCP/IP
TCP/IP Software Guide
Contents
4
Appendix B: TCP/IP addressing ............................................................4-17
IP address .......................................................................................4-17
IP address class ............................................................................... 4-17
IP address restrictions ......................................................................4-18
IP subnet mask ................................................................................ 4-18
Broadcast address............................................................................ 4-18
Appendix C: TCP/IP IP restrictions .......................................................4-20
4-2
Page 85

TCP/IP
Introduction
This chapter details the configuration of a GCC Elite XL (608, 616, 808, 1208,
1208S) for printing over Ethernet running the TCP/IP network protocol. All of
the software required for printing over TCP/IP to the Elite XL is contained in
the printer; additional (optional) TCP/IP software is included on the Elite XL
Software and Documentation CD-ROM that came with your Elite XL.
The requirements for TCP/IP printing with an Elite XL are:
• The Elite XL must be equipped with Ethernet (most models are).
• ROM version 2.7 or later.
• 16 MB of RAM installed in the printer.
Software overview
The TCP/IP software includes:
TCP/IP protocol stack: This is the primary TCP/IP software. It is contained
within the Elite XL.
Internal lpd - The printer contains an implementation of lpd, the Berkeley UNIX
spooler. Lpd’s on other machines can forward print jobs to the lpd in the printer, with
no additional software. For most sites, this is the preferred way to use the printer.
UNIX System V Release 4 has a different spooler, but it can be configured to
communicate with any Berkeley spooler, including the one in the printer. Note: Use
of the internal lpd requires that a hard drive be connected to the printer.
telnet server - The printer contains a telnet (remote login) server which allows
you to communicate with the printer via a telnet client running on your computer. This provides direct interaction with the printer’s PostScript interpreter.
Most computers running TCP/IP have telnet clients available.
The following TCP/IP filters are contained on the Elite XL Software and
Documentation CD-ROM in a folder named UNIX.
Three of the filters, tcpif, tcpof, and unix_pcl, are provided as C source. A
third filter, texttcpif, is provided as a Bourne shell script. Use of these filters is
optional.
tcpif - tcpif is an lpd input filter that runs on UNIX machines. It bypasses the printer’s
internal spooler and sends the final print data to the printer through a direct TCP
connection. This makes it possible for a UNIX lpd to process print data with optional
filter and formatting programs; the printer’s internal lpd does not support filters. The
tcpif filter is compatible only with the Berkeley UNIX printing system - lpr and lpd.
unix_pcl and texttcpif - These UNIX filters allow UNIX text files to be printed
properly by the Elite XL’s PCL interpreter.
4-3
Page 86

TCP/IP
tcpof - Enables you to add header pages at the beginning of print jobs.
Documentation note: Unless otherwise specified, the terms spooler, lpd,
printer’s spooler, internal spooler, and master spooler all refer to the Berkeley
UNIX print spooler named lpd.
Installing the optional filters
Copies of the optional filters are contained in a folder named UNIX on the
Elite XL Software and Documentation CD-ROM.
1. Copy the binary file “filters.tar” to the Unix machine that will be the
master spooler for the Elite XL. Please note that file transfers should
be done in binary mode.
2. Use the Unix program "tar" to unpack the file. This will create a
directory named "filters" containing several files. The following com-
mand may be used on most Unix machines:
tar xvf filters.tar
Refer to the Makefile for details on compiling and installing the filters.
Setting up the printer on a TCP/IP network
Follow these steps to set up the Elite XL on the network:
• Decide where the printer will be physically located on the
network and connect it to your Ethernet network.
• Configure the printer’s front panel with information about
your network.
• Select a hostname for the printer and enter it, along with the
printer’s IP address, into your network’s host table.
• Confirm the network connection with the UNIX program ping.
4-4
Page 87

TCP/IP
Placing the printer
The physical placement of the printer is entirely dependent on your site. The
printer should be convenient to most users.
Configuring the front panel TCP/IP parameters
You will need to configure the printer from the front panel with a number of
parameters to enable TCP/IP operation.
The front panel menu items for TCP/IP are found in the Elite XL’s Interfaces
menu under a submenu named TCP/IP:
Interfaces
TCP/IP TCP/IP
Check Addresses
IP Class
Subnet Mask
IP Address
Broadcast Address
Default Router
Syslog Host
Header Page
IP Restrictions
Two additional TCP/IP related items are located in the Elite XL’s Emulations
submenu; a new submenu named Port Emulations has been added which contains
the following settings:
LPD
TCP Direct
Configure the Elite XL front panel submenus as follows:
• Enable IP Restrictions if required and enter 1-4 mask/address pairs.
• Set TCP/IP to Enabled
• Select a Check Addresses setting.
• Enter an IP class.
• Enter a Subnet mask. If subnetting is not used leave the default settings
unchanged.
• Enter an IP address for the printer.
• Enter a Broadcast address. Leave the default setting unchanged unless
you wish to use a different Broadcast address.
• Enter the IP address for a default router if one is used.
4-5
Page 88

TCP/IP
• Enter the IP address of a computer running the Berkeley
syslog daemon (Syslog Host). The syslog daemon records error
and warning messages sent by the printer. (Optional)
• Select a Header page setting.
Important: The information necessary to configure your printer for TCP/IP
operation should be available from your network administrator. Appendixes A
and B offer an outline of TCP/IP and TCP/IP addressing, but the information is
only an overview. If you are unfamiliar with the requirements for TCP/IP
address configuration, refer to your TCP/IP network documentation or contact
the person(s) responsible for setting up your network.
TCP/IP submenu descriptions
The following table gives a brief functional description of the Elite XL’s front
panel TCP/IP submenus.
TCP/IP Submenu Functional description
TCP/IP: Determines whether print jobs will be accepted over
TCP/IP. The options are Enabled and Disabled, with
Enabled being the default. Press the + key to change the
option; press the Enter key to save your selection.
IP Class: Depending on your network configuration, the
address class will be either A, B, or C. Use the + and
– keys to change the address class; press the Enter key
to save your selection.
Check Addresses: Determines whether TCP/IP address settings must be
legal addresses or if they can be set arbitrarily. The
options are Enabled and Disabled, with Enabled being
the default.
Subnet Mask: Enter a subnet mask if subnetting is used. The subnet
mask setting depends on your network configuration. If
subnetting is not used leave the default unchanged; the
default value is, for each address class, that value that
means there is no subnetting. The subnet mask is
displayed in hexadecimal. The + key adds a 1 bit to the
right of the existing 1’s; the – key removes the
rightmost 1. In other words, the + key turns the leftmost
0 bit to a 1, and the – key turns the rightmost 1 bit
to a 0.
4-6
Page 89

TCP/IP
IP Address: The printer’s IP address is displayed in dotted decimal
notation (e.g., 129.47.6.144). Edit one byte at a time,
using the + and – keys to increase or decrease the
byte’s value. The Enter key moves you to the next
byte. You may depress and hold down the keys for
faster transitions. Only valid addresses for the class and
subnet mask, or zero, are allowed.
Broadcast Address: The IP broadcast address is displayed in dotted decimal.
The recommended broadcast address, all 1’s, is displayed as 255.255.255.255. The + and – keys step
through a list of values. Press the Enter key to save your
selection. (Depressand hold down the keys for faster
transitions.)
Default Router: If you are using a router, enter its IP address;
otherwise leave the default address (zero) unchanged. The default router is required to be on the
same net and subnet as the printer; attempts to
change the net or subnet number have no effect, if
Check Addresses is Enabled (see page 4-6).
Syslog Host: If you use a syslog host enter its IP address; other-
wise leave the default address (zero) unchanged. The
syslog host's address is displayed in dotted decimal,
and edited the same way as the printer’s IP address.
Header Page: This item determines whether a header page is
generated by the printer’s internal spooler and printed
at the front of each print job. The option may be set to
Enable or Disable. The default is Enable.
IP Restrictions: If you want to allow IP connections to the printer
only from certain hosts, Enable IP Restrictions (see
page 4-20). This option may be set to Enable or
Disable. The default is Disable, allowing anyone to
connect to the printer.
The following TCP/IP related items are found in the Port Emulations submenu of the
Emulations menu:
Lpd: This item determines whether the Elite XL’s internal
lpd port will automatically switch between PostScript
and PCL. The options are Auto switch, PostScript
only, or PCL only, with Auto switch being the
default.
4-7
Page 90

TCP/IP
TCP: This item determines whether the Elite XL’s TCP
direct port will automatically switch between
PostScript and PCL. The options are Auto switch,
PostScript only, or PCL only, with Auto switch being
the default.
Note: Port Emulations will only appear if the Emulations menu is set to Auto
switch.
Important: If the Elite XL has less than 16 Mbytes of RAM installed, you will
encounter frequent complexity errors due to insufficient memory if both PCL and
PostScript are enabled. If you encounter this problem, either add more memory or
switch the Elite XL to Post Script only or PCL only in the PS/PCL Sensing menu.
Refer to the Elite XL User’s Manual for more information.
Changes to the syslog host address and the header page setting take effect
immediately. For the changes to the printer’s own IP parameters and the default
router’s address to take effect, wait 5 seconds after you have made your
selections, then turn the printer off, wait 10 seconds, and then turn the printer
back on.
Note: The Elite XL’s configuration page reports the front panel settings. Some TCP/IP
items in the Emulations menu (TCP, ASCII, and Telnet) and in the Interface menu
(Port: 515, Queue Name: Elite XL, TCP: Port 3300, TCP ASCII: Port 3302, and Telnet:
Port 23) are not available through the front panel. These items are informational only
and cannot be changed.
Identifying the printer to the network
Select a hostname for the printer and add the name, along with the printer’s IP
address, to the host table your network uses. Common types of host table are a file on
each host, Sun’s NIS (formerly Yellow Pages), and the distributed Domain Name
Service. This will make the printer’s hostname known to other hosts on the network.
Note: Hostnames are not the same as a printer’s AppleTalk name, which is displayed
on the front panel. However, it is recommended to keep the two names the same or
similar, to reduce confusion.
Confirming the network connection
Use the UNIX program ping to confirm the printer’s availability on the network. If
this doesn’t work, recheck the Ethernet cable connection and the values you entered
through the front panel. Also, make sure you turn the printer off and back on after
setting the front panel values.
4-8
Page 91

TCP/IP
Introduction to printing over a TCP/IP network
The printer’s TCP/IP software is intended to be used with the Berkeley Unix print
spooler, lpd. However, compatible printing systems, such as the one available with
AT&T System V Release 4, may also be configured to forward print jobs to the
printer’s internal spooler. Macintoshes and IBM-PC and compatibles (DOS,
Windows, Windows 95) can also be configured (using 3rd-party software) to send
print jobs to the Elite XL’s internal spooler, and Windows NT has this capability
built-in to the operating system.
Print jobs can be sent to the printer in two ways:
(1) Print jobs are forwarded to the printer’s internal spooler (lpd).
This method offers:
• Easy set up and use.
• No requirement for custom software (i.e., tcpif).
• The ability for the printer to receive jobs (in the background
and while printing) from multiple nodes simultaneously.
• Use of a defacto printing standard, with software available
on many platforms.
This method is the easiest to use, and recommended for most sites.
However, it requires that a hard drive be attached to the printer’s
SCSI port in order to provide space for spooled files.
(2) Print jobs are spooled on a “master” Berkeley spooler located on a
UNIX machine and are then sent to the printer via the tcpif input filter.
This method offers a number of options that are not possible using the
internal spooler:
• Optional processing can be performed on print data by
the sending lpd.
• The size of print jobs is not limited to the free space of
a hard disk attached directly to the printer.
• Network access to the printer can be controlled.
Printing with the internal lpd
Sending jobs to the printer’s internal lpd is the most convenient method of printing
over TCP/IP to your printer. All that is necessary is to:
4-9
Page 92

TCP/IP
• Attach a hard disk to the Elite XL’s SCSI port.
• Create a spool directory on each machine that will use the
printer.
• Configure the internal spooler by adding the printer’s
hostname and any attributes to the file /etc/printcap on
each machine that will use the printer.
Note: The above steps apply to Berkeley Unix machines. Forwarding software for other
platforms may require additional steps.
Attaching a hard disk to the printer
In order to use the Elite XL’s internal spooler, you must attach a hard
disk to the printer’s SCSI port. The hard disk is used for temporary
storage of spooled files. A currently attached hard disk that is being used
for font storage , can also be used for spooling provided there is sufficient space for spooled files. Refer to the “Fonts” chapter of the Elite Xl
User’s Manual for more information using a hard disk with the Elite XL.
Note: Although the Elite XL supports multiple hard disks for font storage, the printer’s
lpd will not function correctly in this configuration. We recommend using a single hard
disk large enough for all fonts and spooling.
Creating a spool directory
You must create a spool directory on each computer that will use the printer. The
spool directory is used to temporarily hold print jobs until they are sent to the printer.
Typically this directory will be named /usr/spool/<printername> or /var/spool/
lpd/<printername>. This directory should be owned by user daemon and group
daemon, and should be protected 775. Because of the large size of graphics jobs, the
spool directory should be on a disk with tens of megabytes of free space.
Note: The above procedure applies to Berkeley Unix machines. Forwarding software
for other platforms may require additional steps.
Configuring the internal spooler
The UNIX lpd is configured through the system text file /etc/printcap. The printcap
file contains printer descriptions, each having a name and a number of attributes with
two-character names. You will need to add an entry to the printcap file, identifying your
printer and its attributes, on each computer that will use the printer. The file can be
edited by the superuser with any text editor. A sample printcap entry looks like this:
honolulu:\
:lp=:rm=honolulu:rp=EliteXL:\
:sd=/var/spool/lpd/honolulu:mx#0:\
:lf=/var/adm/lpd-errs:
4-10
Page 93

TCP/IP
This printcap entry uses the printer’s internal spooler. Both the hostname and the
printcap name of the printer are “honolulu.” The following capabilities are used in
the printcap entry:
lp (line printer) - The name of the local device to which the printer is
attached. This capability is not used, as the printer is
not a local device.
rm (remote machine) -The hostname of the printer.
rp (remote printer) - The name of the printer that will do the printing; in
this case, “Elite XL.”
sd (spool directory)- the pathname of the spool directory (see previous
section).
mx (maximum file size) -Set to zero (unlimited), as graphics jobs can be
very large.
lf (log file) - The pathname of the file that will record errors
encountered by the UNIX spooler and filters.
Sending print jobs to the internal spooler
After you have created a spool directory and printcap entry you are ready to
print using the lpr command. Incoming jobs are spooled and queued on the
printer’s internal hard disk, and printed in the order received. However, print
jobs received through other channels, such as the serial and parallel ports, may
be printed between lpd print jobs. Multiple jobs can be received simultaneously; jobs can be received while the printer is printing.
When printing to the Elite XL, PostScript and PCL can be mixed in multiple
files in a single lpr job (each file must be all in one language or the other).
Note: The filter unix_pcl, included with the TCP/IP software, allows UNIX text files to
be printed correctly by the PCL interpreter on the Elite XL. UNIX text files do not have
a carriage return before a line feed. unix_pcl causes line feeds in UNIX text files to be
treated as carriage return/line feed by the PCL interpreter. unix_pcl is included as C
source. The code is compatible with most versions of the UNIX system (see “Using
texttcpif” for additional information). After compilation, the filter is typically invoked
on the command line as follows:
unix_pcl <filename | lpr -Pprintername
Printing with a master (Berkeley) spooler with tcpif
Tcpif is an “input filter” that enables the printer to receive print jobs over a direct
TCP connection from a UNIX lpd acting as a “master spooler.” The master
spooler accepts print jobs forwarded to it from other lpd’s on the network. The
4-11
Page 94

TCP/IP
main advantage of bypassing the printer’s internal lpd is that optional processing
(i.e., filtering) can be performed on print data before it is sent to the printer.
In order to print using a master spooler you need to:
Note: Tcpif is
compatible
only with the
Berkeley
UNIX printing
system - lpr/
lpd.
• Choose a computer on the network whose lpd will be the master
spooler.
• Create a spool directory on the machine chosen as the master spooler
and on each machine that will use the printer.
• Edit the printcap files:
Add the printer’s hostname and attributes to the /etc/printcap file on
the master spooler.
• Add the name of the master spooler to the /etc/printcap file on each
computer that will forward print jobs to the master spooler.
Creating a spool directory on the master spooler
You must create a spool directory on the machine designated as the master
spooler and on each machine that will forward print jobs to the master spooler.
The spool directory is used to temporarily hold print jobs until they are sent to
the printer. Typically, these directories will be named /usr/spool
<printername> or /var/spool/lpd/<printername>. The spool directory
should be owned by user daemon and group daemon, and should be protected
775. Because of the large size of graphics-intensive print jobs, the spool
directory should be on a disk with tens of megabytes of free space.
Editing the
printcap
files
The lpd on the master spooler and the lpd’s on each machine that will forward
jobs to the master spooler for printing are configured through the UNIX system
text file /etc/printcap. The file can be edited by the superuser with any text
editor. The printcap file contains printer descriptions, each having a name and a
number of attributes with two-character names.
The following examples show printcap entries for an Elite XL named “proofer”
with a master spooler located on a UNIX machine named “mercury.”
The master spooler (mercury) will use the following printcap entry:
proofer:\
:lp=/dev/null:if=/usr/local/bin/tcpif_proofer:\
:sd=/var/spool/lpd/proofer:mx#0:\
:lf=/var/adm/lpd-errs:
Each computer that will forward jobs to the master spooler (mercury) will use the
following printcap entry:
4-12
Page 95

TCP/IP
proofer:\
:lp=:rm=mercury:rp=proofer:\
:sd=/var/spool/lpd/proofer:mx#0:\
:lf=/var/adm/lpd-errs:
Mercury (the master spooler) accepts print jobs over the network, does any
optional processing desired, and then, using tcpif, sends the final print data to
the printer named proofer.
After you have created the necessary spool directories and added the printer to the
printcap files, you are ready to print with the lpr command.
Printing text files with texttcpif
If you are sending UNIX text files to the Elite XL’s PCL interpreter, the printcap
file on the master spooler and each forwarding lpd need to be configured in the
printcap file so that text will print correctly. If UNIX text is sent unmodified to a
PCL printer, each line of text will appear below and to the right of the previous
line.
GCC supplies an lpd input filter named texttcpif that sends print data across the
net to the printer and tells the Elite XL’s PCL interpreter that the data is UNIXstyle text, so it will print properly. Only PCL (not PostScript) can be sent
through texttcpif. Therefore, it is recommended that you use a second printcap
entry with a different name that tells the UNIX spooler to use texttcpif.
For example, an Elite XL named “honolulu” is given a second printcap entry
with the name “honolulu_text.” The UNIX machine named “mercury” acts as a
master spooler. UNIX machines around the network forward text jobs to mercury:
honolulu_text:\
:lp=:rm=mercury:rp=honolulu_text:\
:sd=/var/spool/lpd/honolulu_text:mx#0:\
:lf=/var/adm/lpd-errs:
Mercury uses the input filter texttcpif to process the print job and then sends it
to the printer:
honolulu_text:\
:lp=/dev/null:if=/usr/local/bin/texttcpif_honolulu:\
:sd=/var/spool/lpd/honolulu_text:mx#0:\
:lf=/var/adm/lpd-errs:
Using
tcpof
The tcpof filter is an output filter that enables you to append a cover page to the
front of pcl print jobs. In the example below, the previous printcap entry has been
4-13
Page 96

TCP/IP
edited to include processing by the tcpof filter.
honolulu_text:\
:lp=/dev/null:if=/usr/local/bin/texttcpif_honolulu:\
:of=/usr/local/bin/tcpof_honolulu:\
:sd=/var/spool/lpd/honolulu_text:mx#0:\
:lf=/var/adm/lpd-errs:
For details on how to compile tcpif, tcpof, unix_pcl, and texttcpif and configure
them for your installation, refer to the Makefile located in the Filters folder on
the Elite XL Software and Documentation CD-ROM.
Using telnet with the Elite XL
The TCP/IP software includes a telnet server that enables you to use telnet
client, a standard protocol for remote login, to connect to the Elite XL. The
telnet server accepts connections from telnet clients and connects the remote
user to the printer’s PostScript interpreter. This is treated as a “print job,” so
connections must wait until the printer is idle. Once connected, other print jobs
must wait until the telnet connection is closed.
The telnet server is intended for administration and debugging, not for printing.
Telnet clients are widely available.
4-14
Page 97
TCP/IP
Appendix A: TCP/IP overview
TCP/IP is a mature and widely used set of network protocols designed by
network researchers at US universities; the research was funded by the federal
government. TCP/IP is intended primarily to connect significant numbers of
cooperating, general-purpose computers across both short and long distances.
TCP/IP is closely associated with the UNIX operating system—largely because
the University of California at Berkeley has included solid implementations in
their UNIX since 4.2BSD in 1984, and Berkeley gives away their source code.
Many other implementations of UNIX and TCP/IP are derived from
Berkeley’s. However, TCP/IP software is available on a wide variety of
computers and operating systems, including Apple Macintoshes, IBM PC’s,
most UNIX workstations, Digital Equipment Corporation VAXes running
VMS, and some mainframes.
TCP/IP actually includes a number of cooperating protocols. The core protocols
are TCP, UDP, IP, ICMP, ARP (on Ethernet and similar nets), and one or more
routing protocols (most commonly RIP.) The protocols are, like most sets of
network protocols, arranged hierarchically, where each layer supplies services
to the layer above it and uses the layer below it as a tool.
The TCP/IP protocol hierarchy, when running on Ethernet, is structured as
follows:
Applications (ftp, e-mail, telnet, lpr, etc.)
TCP
ARP IP ICMP
Ethernet
UDP
IP (Internet Protocol) supplies unreliable datagrams (messages) among hosts
running TCP/IP across multiple networks connected by routers. (Routers are
special-purpose computers connected to two or more networks, that forward IP
datagrams from one network to another.) IP is the core of the TCP/IP protocols.
An IP host is identified by a 32-bit address, unique in the world, containing a
network number and a host number within that network. IP datagrams can
travel great distances.
4-15
Page 98

TCP/IP
UDP (User Datagram Protocol) supplies messages among ports on different
hosts. The UDP protocol defines a set of virtual destinations called protocol
ports. These ports are further defined as either well-known port assignments or
dynamically bound ports. The well-known ports are numbered 1-255 and
specific ports are assigned to certain widely used TCP/IP applications (e.g.,
telnet uses port 23).
TCP (Transmission Control Protocol) supplies virtual connections, and twoway, reliable, ordered streams of bytes, with flow control, between ports on
different hosts. Data transfer is made reliable with checksums, sequence
numbers, acknowledgments, and retransmission.
ARP (Address Resolution Protocol) maps from IP addresses to Ethernet
addresses.
ICMP (Internet Control Message Protocol) is used internally by the network
protocols for control and error messages.
RIP (Routing Information Protocol) is one of several protocols used by routers
to exchange information about routes. It runs over UDP.
Applications are programs that want to talk to each other across the network.
They do so by calling TCP or UDP. The most widely used network applications
are electronic mail, remote login, file transfer, file sharing, and remote printing.
4-16
Page 99

TCP/IP
Appendix B: TCP/IP addressing
This appendix provides an overview of the various TCP/IP address types, their
structure, and their assignment in the context of different network configurations.
IP address
An IP address is a 32-bit number divided into two parts: a network number, and
a host number that identifies a specific device (computer, printer, etc.), within
that network. The network number is on the left and the host number is on the
right. The boundary between the network number and the host number can
move. The network number can use one, two, or three bytes (and correspondingly, the host number can use three, two, or one byte). The position of the
boundary is determined by the IP address class. There are three IP address
classes: Class A, Class B, and Class C. (Classes D and E exist, but are not
currently used.)
IP address class
A Class A IP address uses one byte for the network number and three bytes for the
host number. A Class B address uses two bytes for the network number and two
bytes for the host number. A Class C address uses three bytes for network number
and one byte for the host number. The first few bits of the address determine its
class, as follows:
Class first bit(s) of first byte First byte will be
A 0 0 - 127
B 10 128 - 191
C 110 192 - 223
IP addresses are represented as four separate bytes, expressed in decimal,
separated by periods. This is known as dotted decimal notation. The following
are examples of dotted decimal notation:
1.0.3.4 Class A, network 1, host 0.3.4
137.24.9.5 Class B, network 137.24, host 9.5
199.33.4.2 Class C, network 199.33.4, host 2
4-17
Page 100

TCP/IP
IP address restrictions
Each IP address consists of the class bits and two separate binary numbers (network
number and host number). There are some restrictions on the values of these numbers. Neither the network number nor the host number can be designated as zero or all
1's. Zero is reserved; all 1's is the broadcast value. Also, there is a special case IP
address, known as the software loopback address. The loopback address is the Class
A network number consisting of all ones (i.e., network number 127). Messages sent
to any address at net 127 will come back immediately, without ever going out onto
the physical network.
IP subnet masks
The original IP addressing scheme has been modified to allow a single logical
network (the IP network ) to be divided into multiple physical networks. This is
done by redefining some of the bits from the host number to constitute a subnet
number. The designation of a subnet is optional. However, where subnetting is
used, each IP address consists of three parts:
IP address = <net number><subnet number><host number>
Note: The values zero and all one’s are reserved in the subnet number, as they are in
the net number and host number fields.
The number of host bits used to designate a subnetwork can vary. The bits are
determined by a second 32-bit number associated with an IP address; this
number is called the subnet mask. The mask has 1 bits in the positions corresponding to the network and subnet numbers (including the class bits), and zero
bits corresponding to the host number.
The IP specification for designating a subnet does not require that the subnet
bits immediately follow the network number, or that they be contiguous.
However, the Elite XL does.
Since zero and all ones are reserved values, fields that can contain only those
two values are useless. In other words, all fields must be at least two bits wide
(although the subnet field need not exist).
Broadcast address
An IP broadcast address is the IP address the printer uses when it wants to send a
message to every node on the local network simultaneously. These messages are
transparent to the user. Each of the three fields of an IP broadcast address can
contain the broadcast value (all 1’s) separately. An IP broadcast address takes one
of these forms:
1’s 1’s 1’s the entire physical net
<net #> <subnet #> 1’s all hosts, one subnet
<net #> 1’s 1’s all hosts, all subnets
4-18
 Loading...