

Page 1
TM
GETTING STARTED
GUIDE
Elite Color 16 Series
Page 2

1
Getting Started Guide
What is this Guide?
This guide provides easy-to-follow instructions for unpacking, setting up and installing your
new GCC printer.
Where is the User’s Guide?
The comprehensive Elite Color 16 Series User’s Guide is located in Adobe Acrobat .pdf
format on your Elite Color 16 Series CD.
Can I access information from the GCC web site?
GCC product manuals, software installation instructions, the most current printer drivers,
FAQs, technology updates and a searchable database for technical questions are all located
in the Support Central section of GCC’s web site. Support Central can be accessed
directly at:
http://www.gccprinters.com/support
Page 3

2
Installation Checklist
For proper installation, please complete each section in order:
Step 1 Check Package Contents
Step 2 Prepare Printer Location
Step 3 Remove Tape
Step 4 Install Drum Cartridge
Step 5 Install Toner Cartridges
Step 6 Load Paper Tray
Step 7 Connect Printer Cables
Step 8 Attach Power Cord
Step 9 Install Printing Software
Step 10 Verify Printer Setup
Page 4
3
Note: No printer cables are included with the printer. For information on ordering cables, contact GCC
Direct Sales at 800 422-7777 (North America only; elsewhere consult the User’s Guide) or visit our web site
at: http://www.gccprinters.com
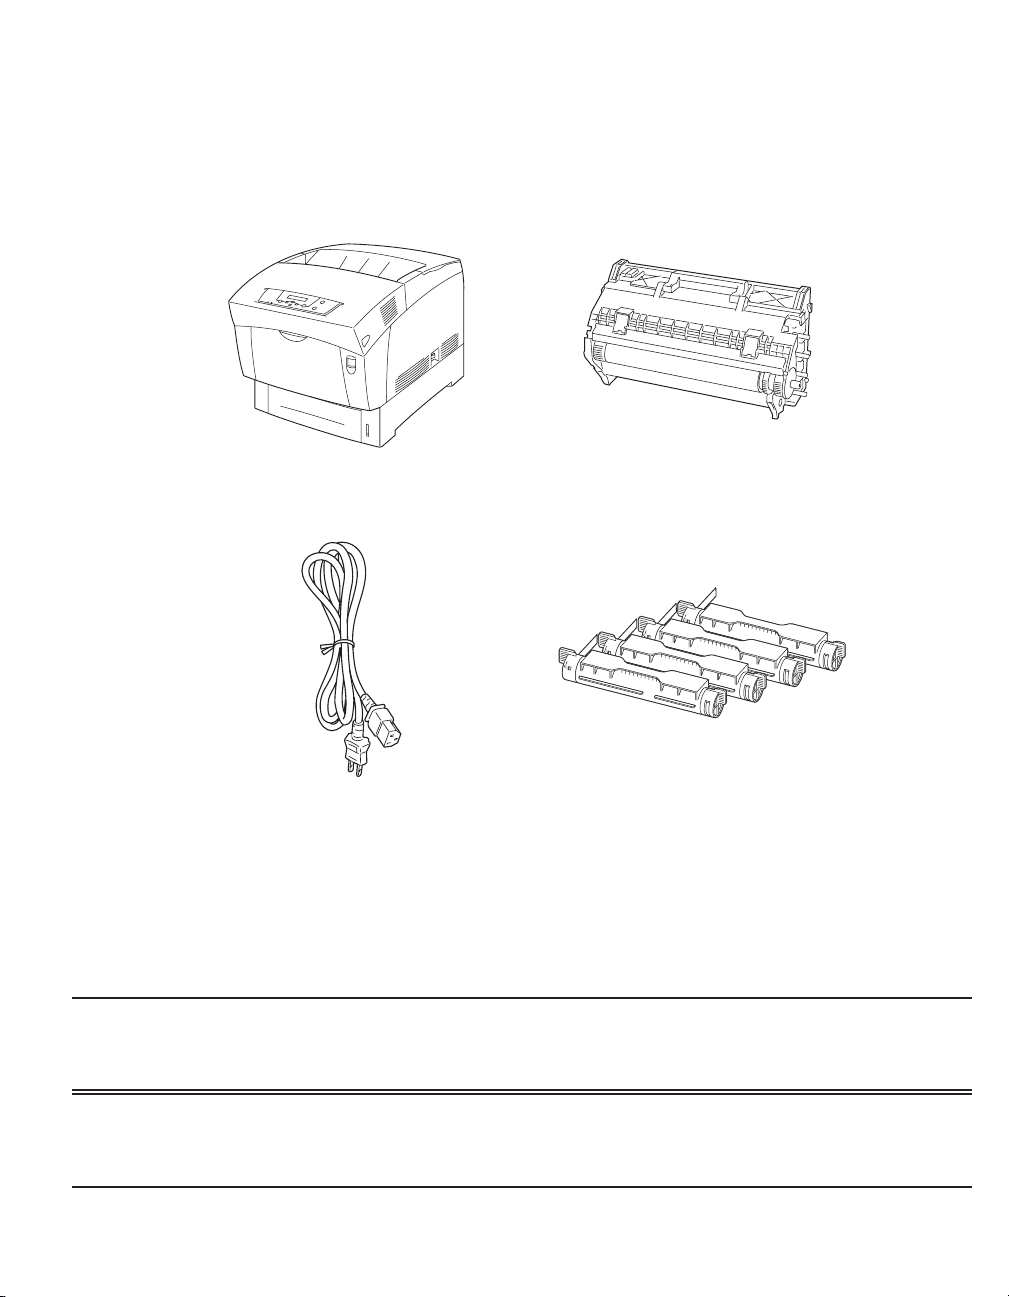
Step 1. Check Package Contents
Elite Color 16 Laser Printer
Drum Cartridge
Power Cord
Customer Kit:
Elite Color 16 Series CD-ROM
Elite Color 16 Series Getting Started Guide
Elite Color 16 Series User’s Guide
(On CD-ROM)
GCC Warranty Registration Card
Toner Cartridges
Note: Hold drum cartridge only by its sides when unpacking and handling. Use caution not to touch the
image roller within the cartridge, and avoid making contact with the protective sheet that covers the roller.
Doing so could cause scratches on the image roller and affect print quality.
Page 5
4
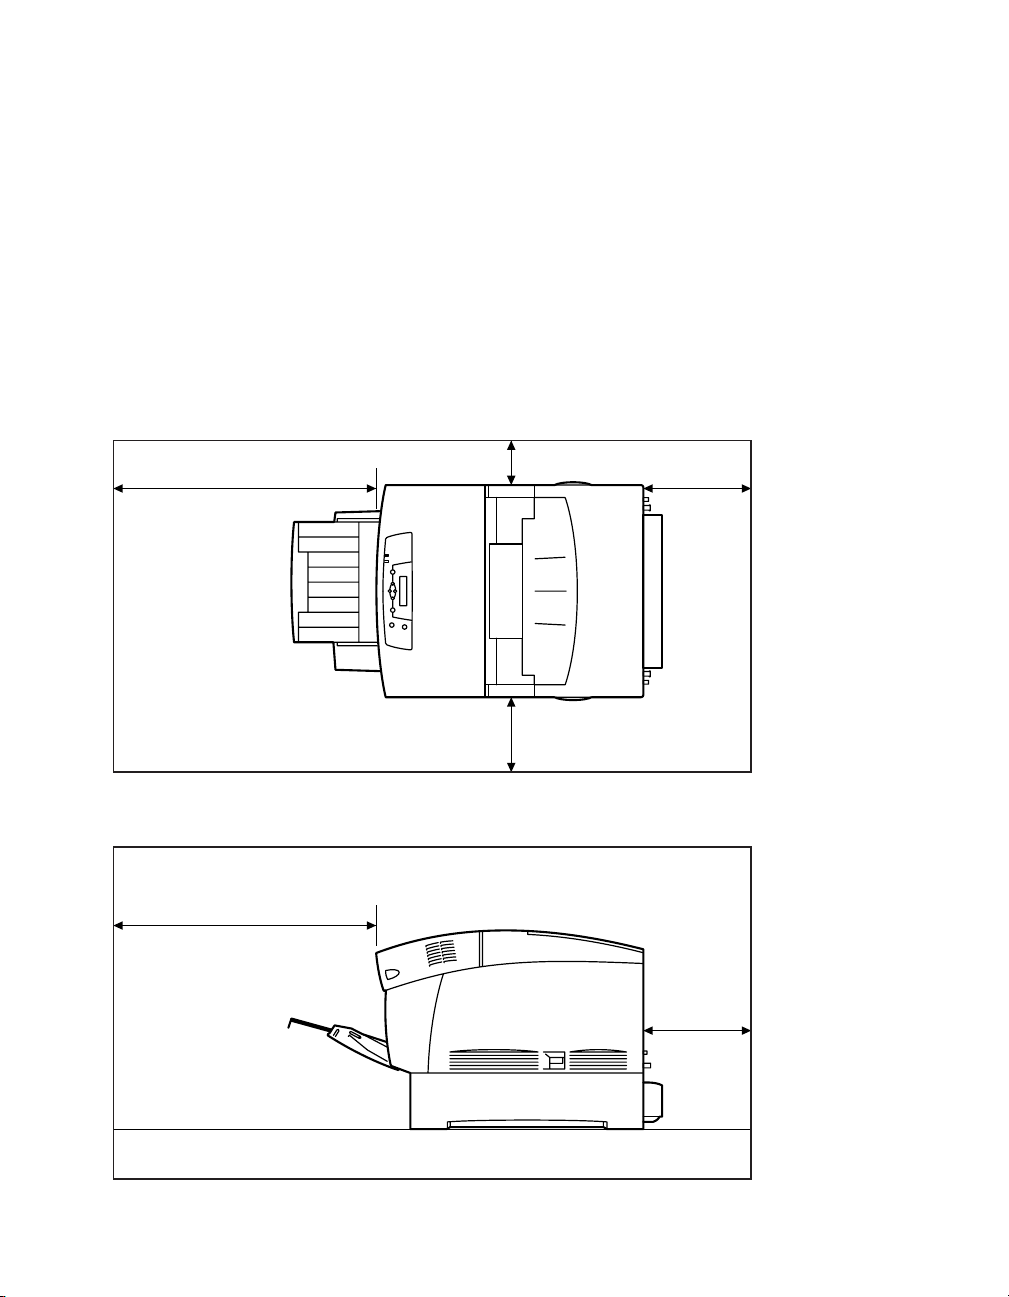
Step 2. Prepare Printer Location
Select a location for the printer on a flat, level surface in a well-ventilated area away
from direct sunlight or areas where the air temperature and humidity can vary widely.
Do not obstruct the fan vent on the right side of the printer.
4” (100mm)
8” (200mm)
Minimum Recommended Clearances:
24” (600mm)
6” (150mm)
Top View
Side View
8”
(200mm)
24” (600mm)
Page 6
5
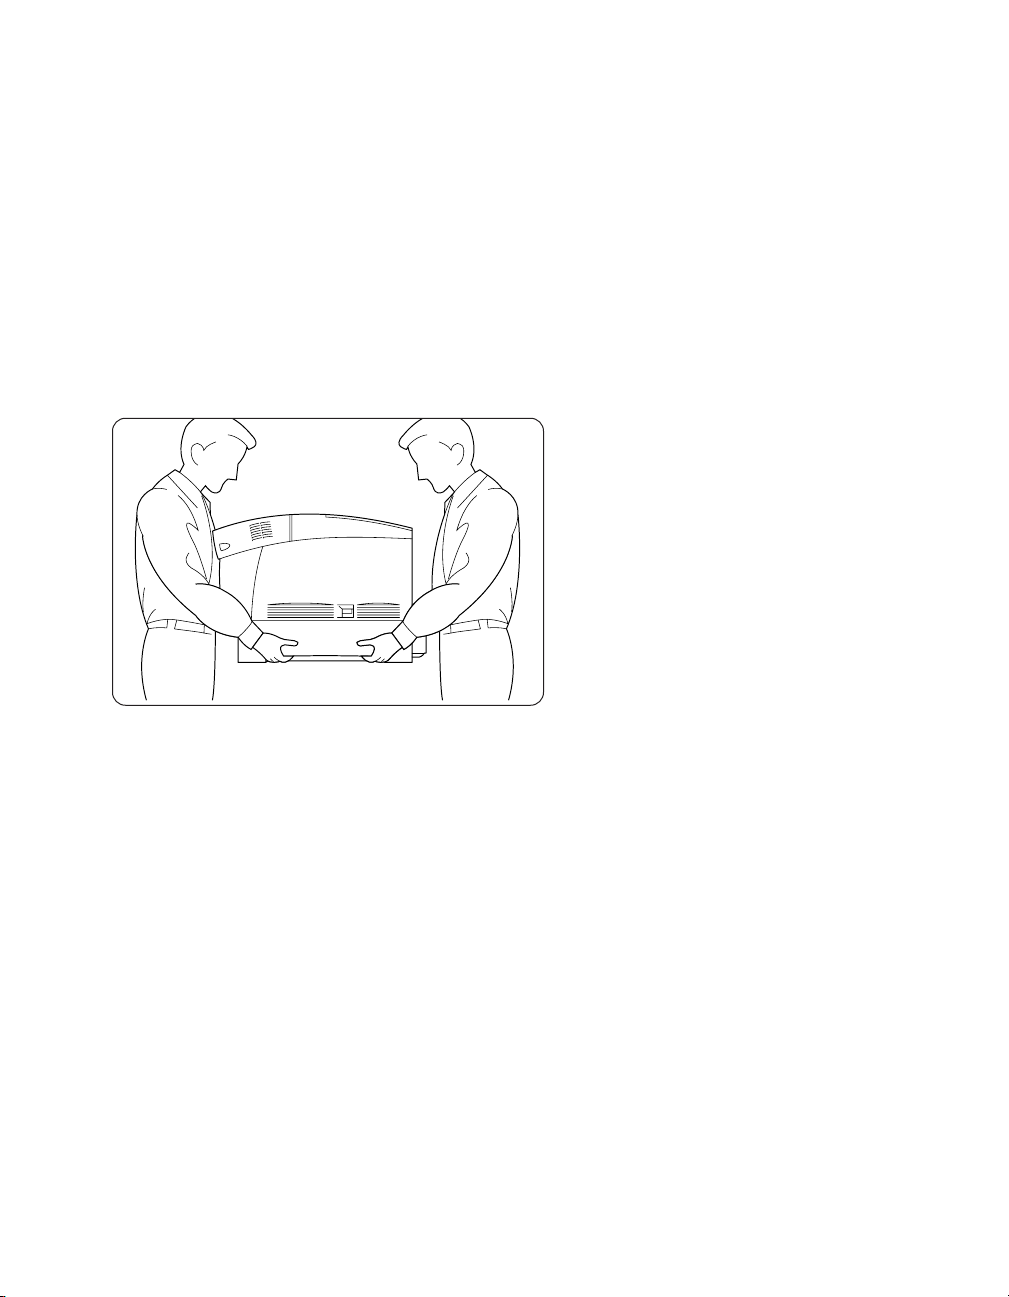
Moving the printer
To lift the printer, face the front and back
of the printer and grip the recessed areas
at the bottom left and right with both
hands, as shown.
Do not try to lift the printer by gripping
any other areas. Doing so can cause the
printer to fall and could result in injury.
The printer weighs 76 lb (34.5 kg) with the tray and consumables installed, therefore
at least two people should carry it. Lift the printer as shown in the figure below.
Bend knees when lifting to avoid back injury. Keep the printer level when moving to
prevent trays and consumables from falling out.
Note: When unpacking the printer, retain the box and all packing materials, including the
wooden pallet that the printer ships with. You will require these materials if transporting
or shipping the printer in the future.
Page 7
6
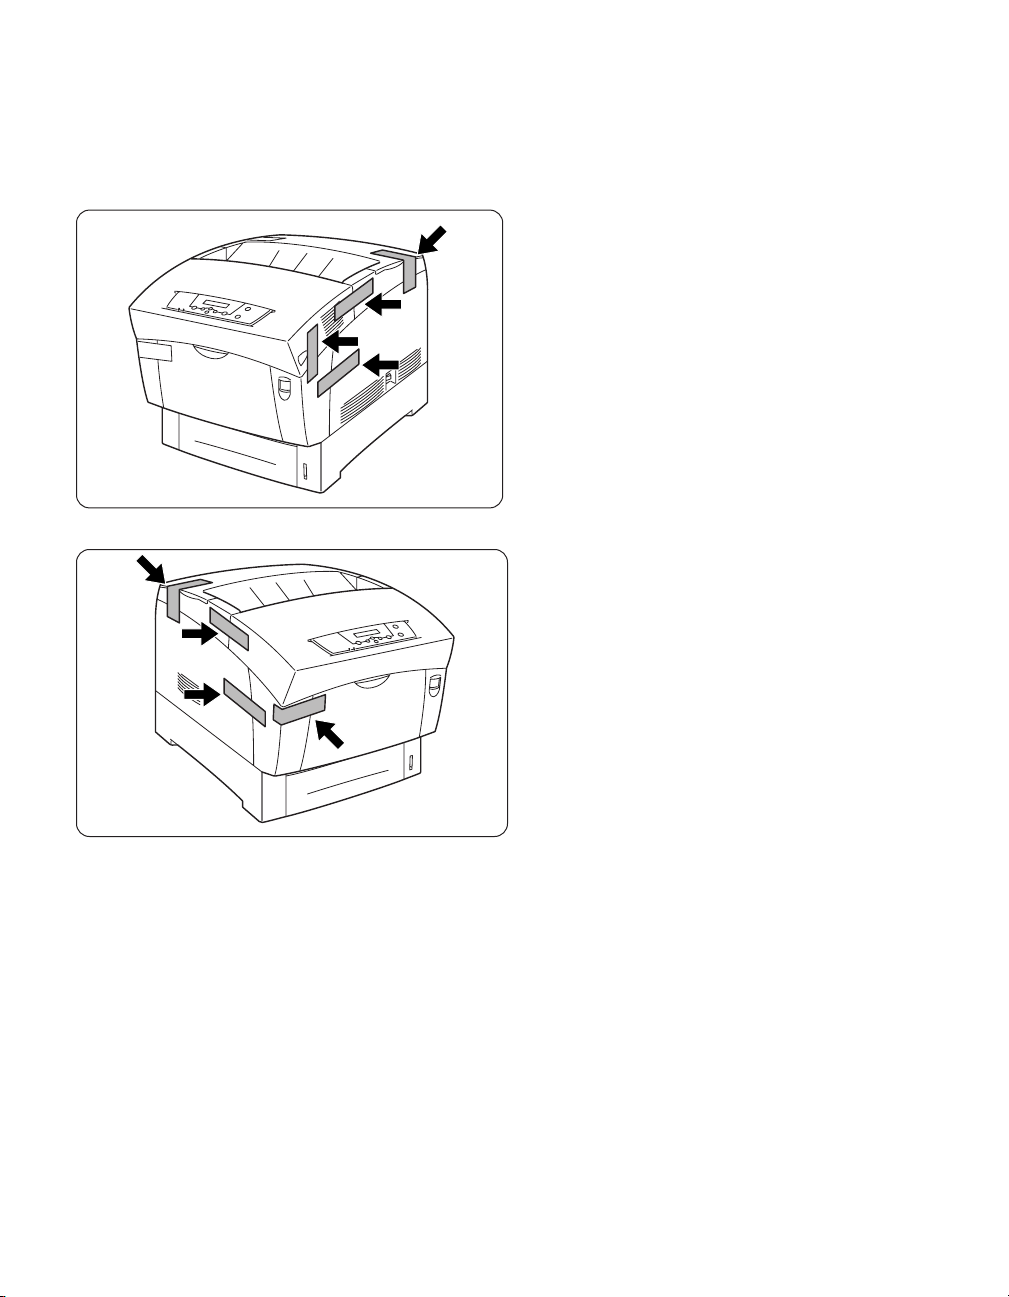
Step 3. Remove Tape
1. Remove the four pieces of tape on the
right side of the printer, as shown.
2. Remove the four pieces of tape on the
left side of the printer, as shown.
Page 8
7
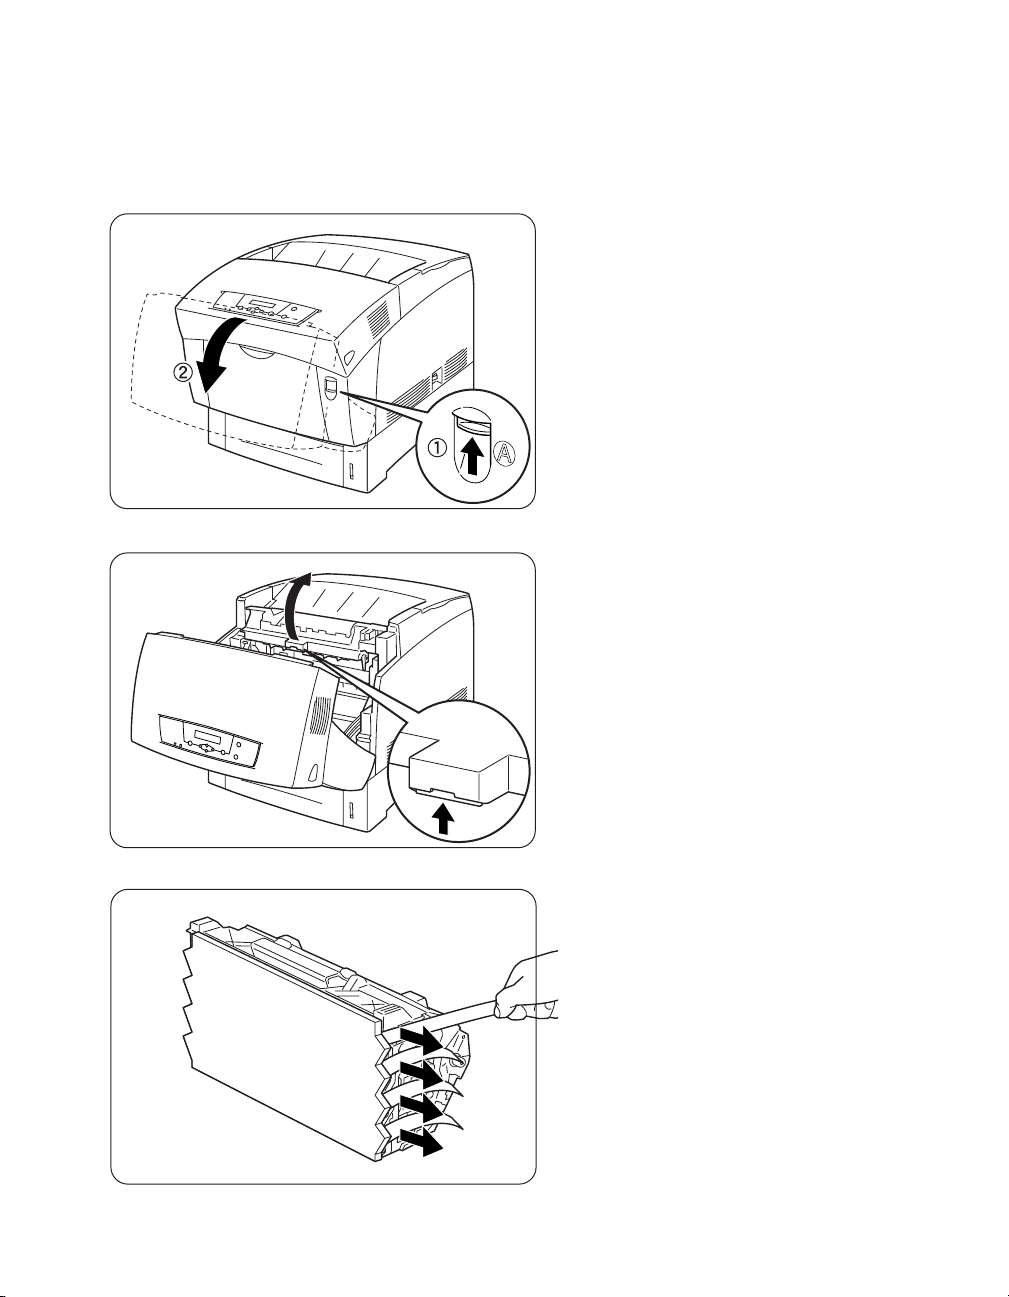
Step 4. Install Drum Cartridge
1. Press down on release button A to open
the front cover.
2. Open the Paper Outlet Cover inside the
printer, as shown.
3. Take the Drum Cartridge out of its
protective foil package and pull hard on
each of the four seals to remove them.
Pull the seals completely out.
Hold drum cartridge
only by its sides
when unpacking and handling. Use caution
not to touch the image roller within the
cartridge, and avoid making contact with
the protective sheet that covers the roller.
Doing so could cause scratches on the
image roller and affect print quality.
Page 9
8
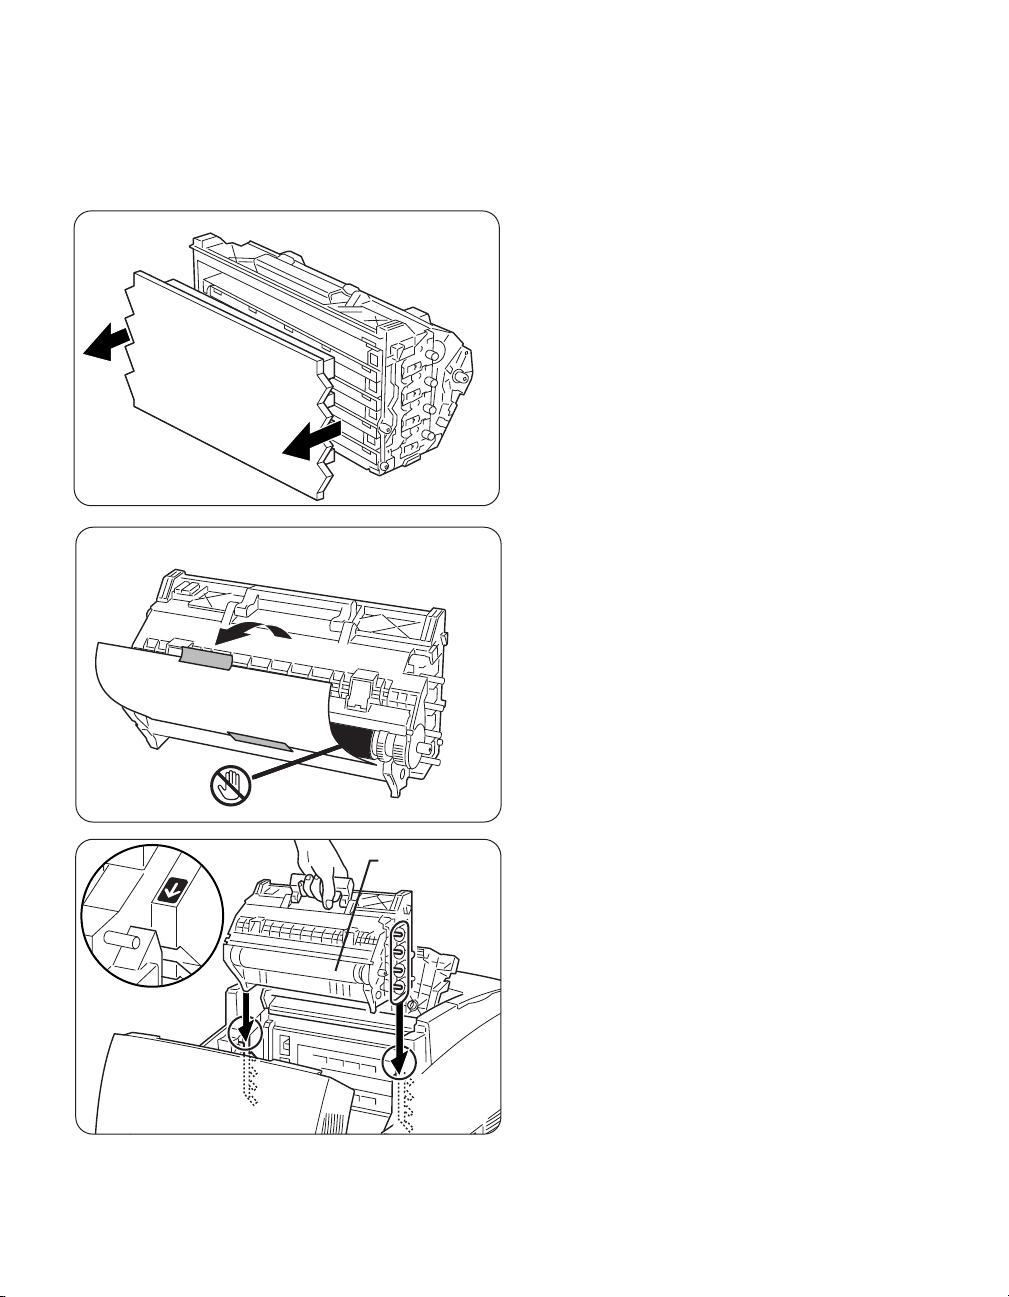
4. Hold the left and right sides of the drum
cartridge and remove the protective cover
from it, as shown.
5. Remove the protective sheet from the
drum cartridge as shown. Do not touch
the image drum surface, as this can
damage the drum and deteriorate print
quality.
6. Hold the drum cartridge by its handle,
align its four shafts with the slots
indicated by arrows in the printer, and
gently lower it into the printer.
DO NOT TOUCH
ROLL SURFACE
Page 10
9
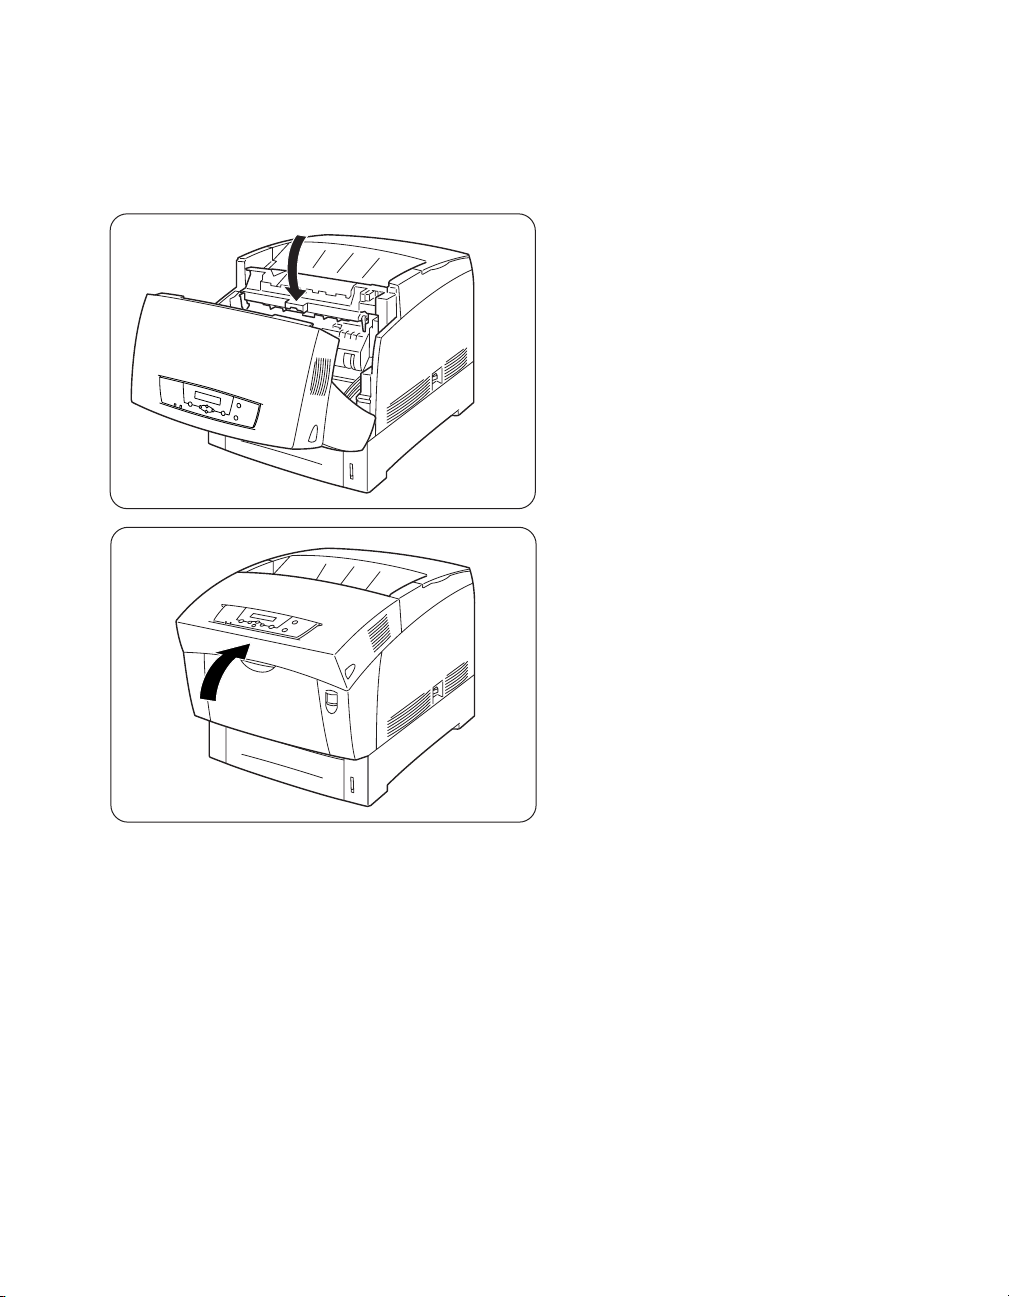
7. Close the Paper Outlet Cover inside the
printer.
8. Close the front cover. Press on the
center part of the front cover until the
cover locks securely.
Page 11
10
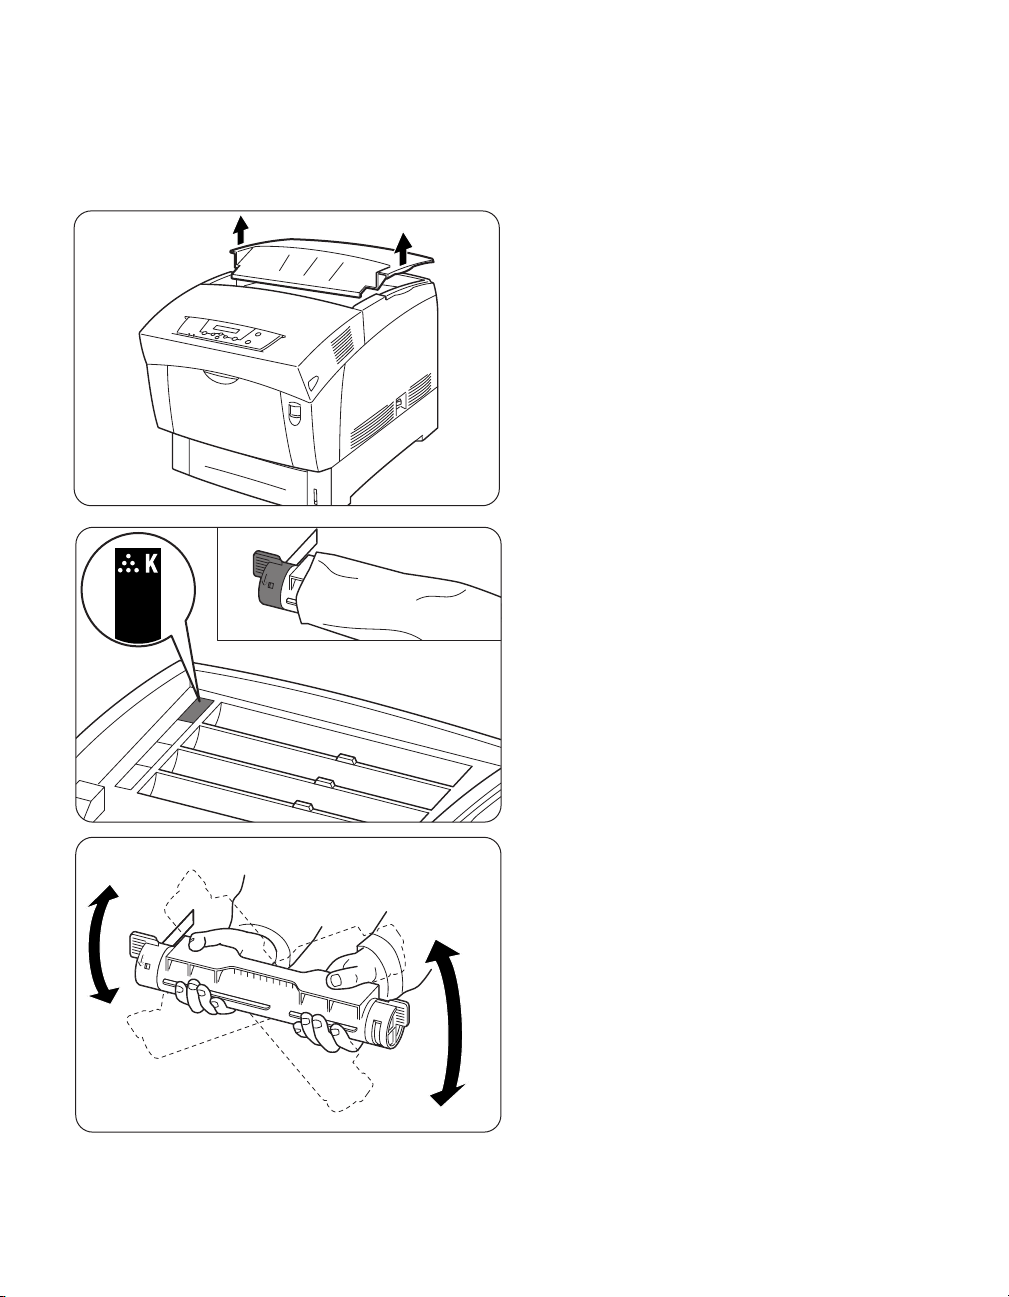
Step 5. Install Toner Cartridges
1. Remove the top cover of the printer as
shown.
2. Select the new toner cartridge whose
color matches the label on the insertion
slot in the printer and remove it from its
packaging.
The printer uses four toner cartridges:
C - Cyan
M - Magenta
Y - Yellow
K - Black
3. Shake the toner back and forth seven or
eight times as shown to distribute the
toner evenly in the cartridge.
Page 12

11
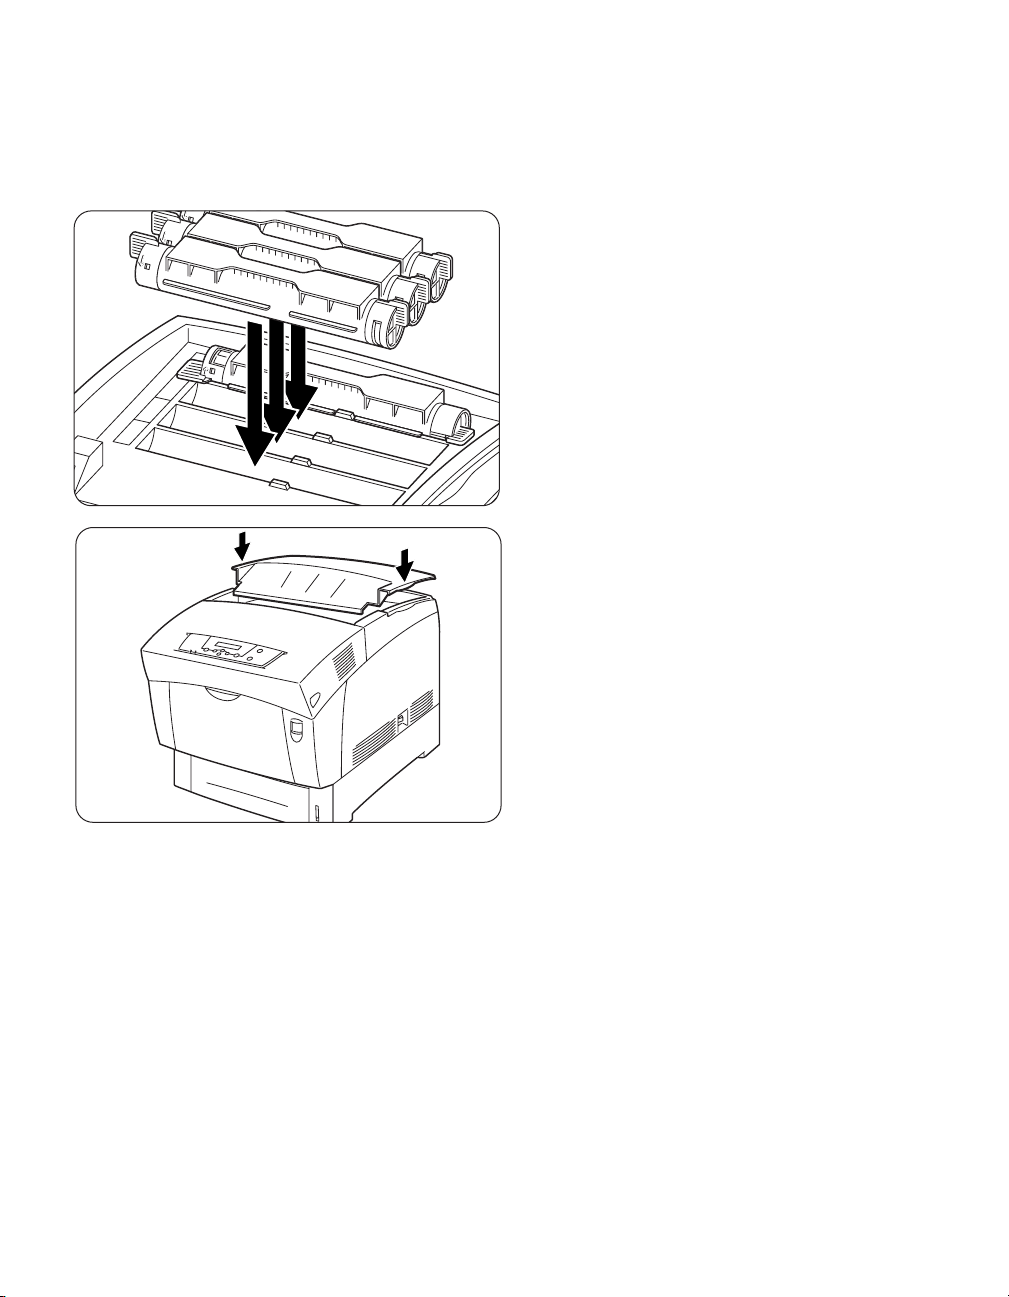
4. Align the cartridge with its corresponding
slot in the printer and gently insert it into
the slot as shown.
5. Grip the levers at each end of the toner
cartridge, then push down lightly to rotate
the levers forward and lock the cartridge
into place.
6. Grasp and pull the toner seal straight up
to remove it. Do not pull the seal
diagonally, as this may cause the seal to
tear.
Page 13
12
7. Repeat Steps 2-6 above for the remaining
toner cartridges until all four have been
installed.
8. Replace the top cover.
Page 14
13
Other sizes can be fed through the Multi-Purpose Feeder (Tray 1). The standard paper
tray will also handle up to 100 transparency or label sheets in Letter or A4 size.
The standard paper tray holds up to 500 sheets of 16-28 lb.
(60-105g/m2) plain paper. It can handle the following sizes of paper:
• US Letter • US Legal 13”• A4 • JIS B5
• US Executive • US Legal • A5
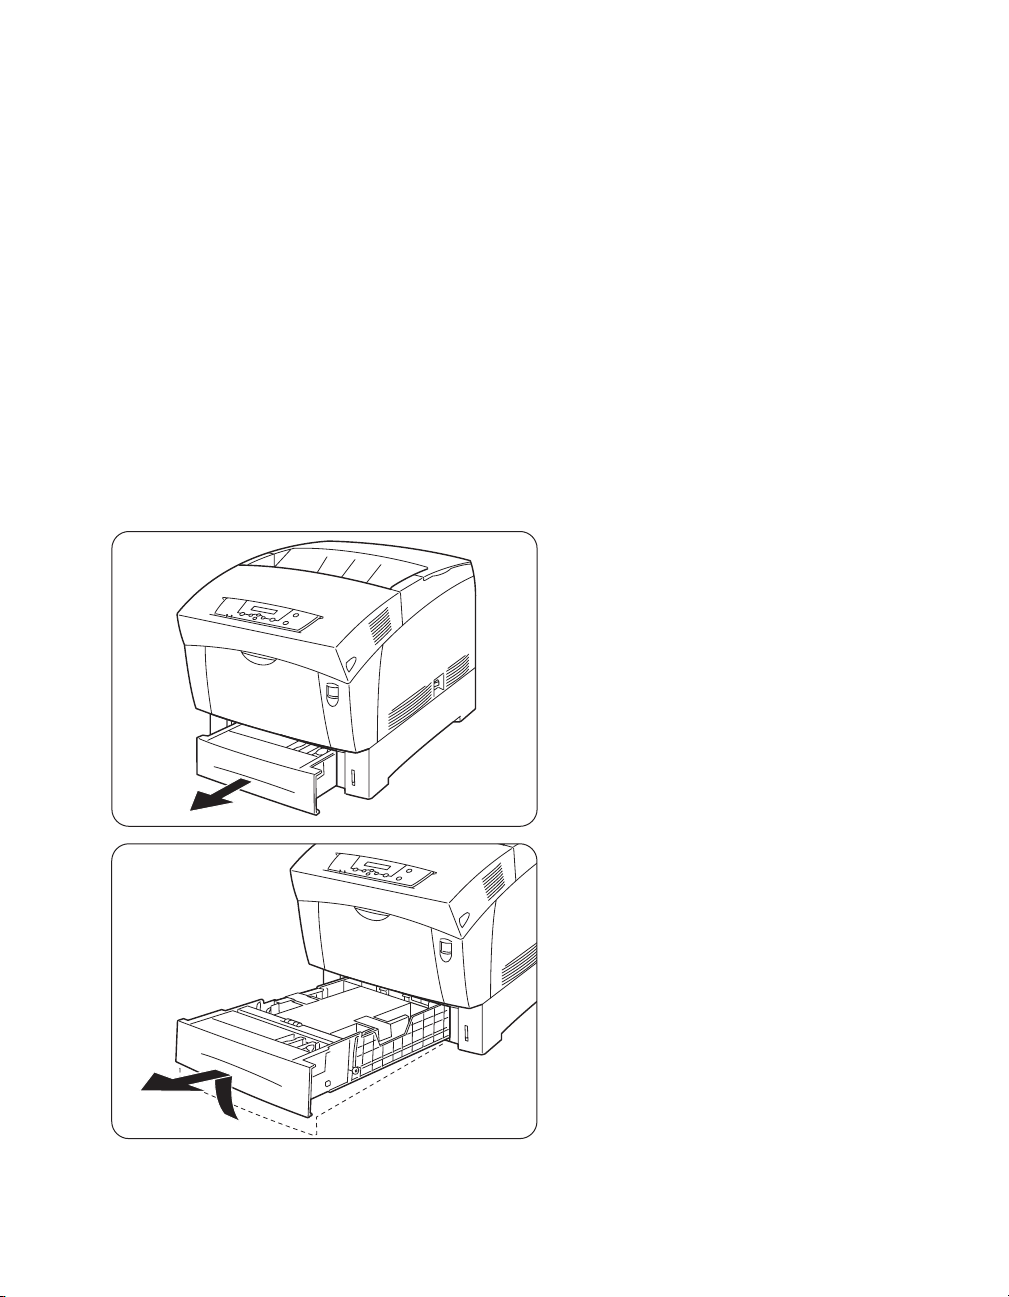
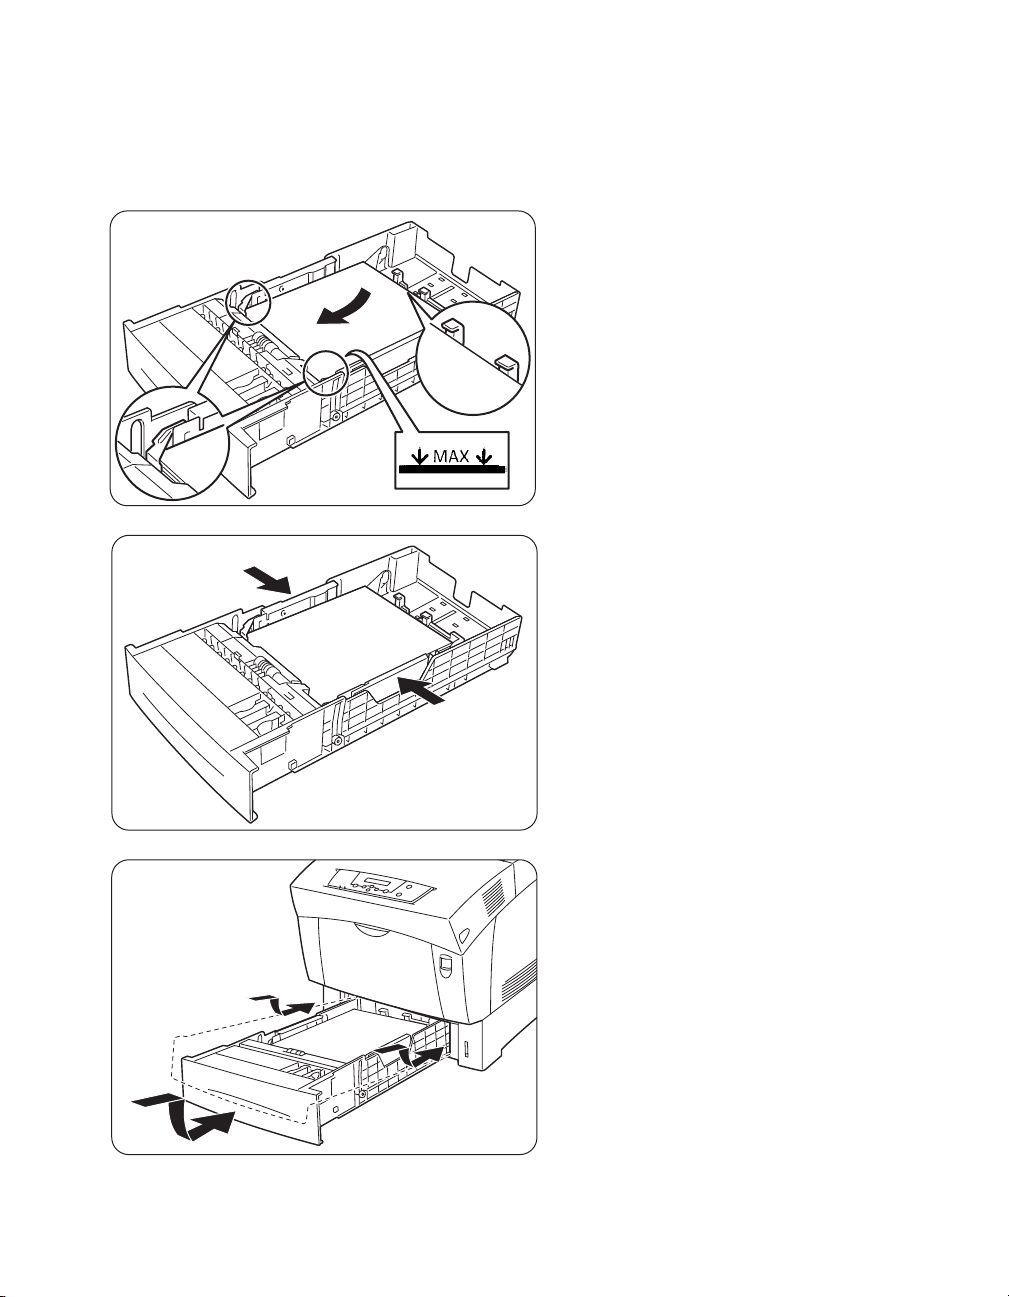
Step 6. Load Paper Tray
1. Gently pull out the paper tray until it
stops.
2. Hold the tray with both hands, lift the
front up slightly and pull it completely out
of the printer.
Page 15
14
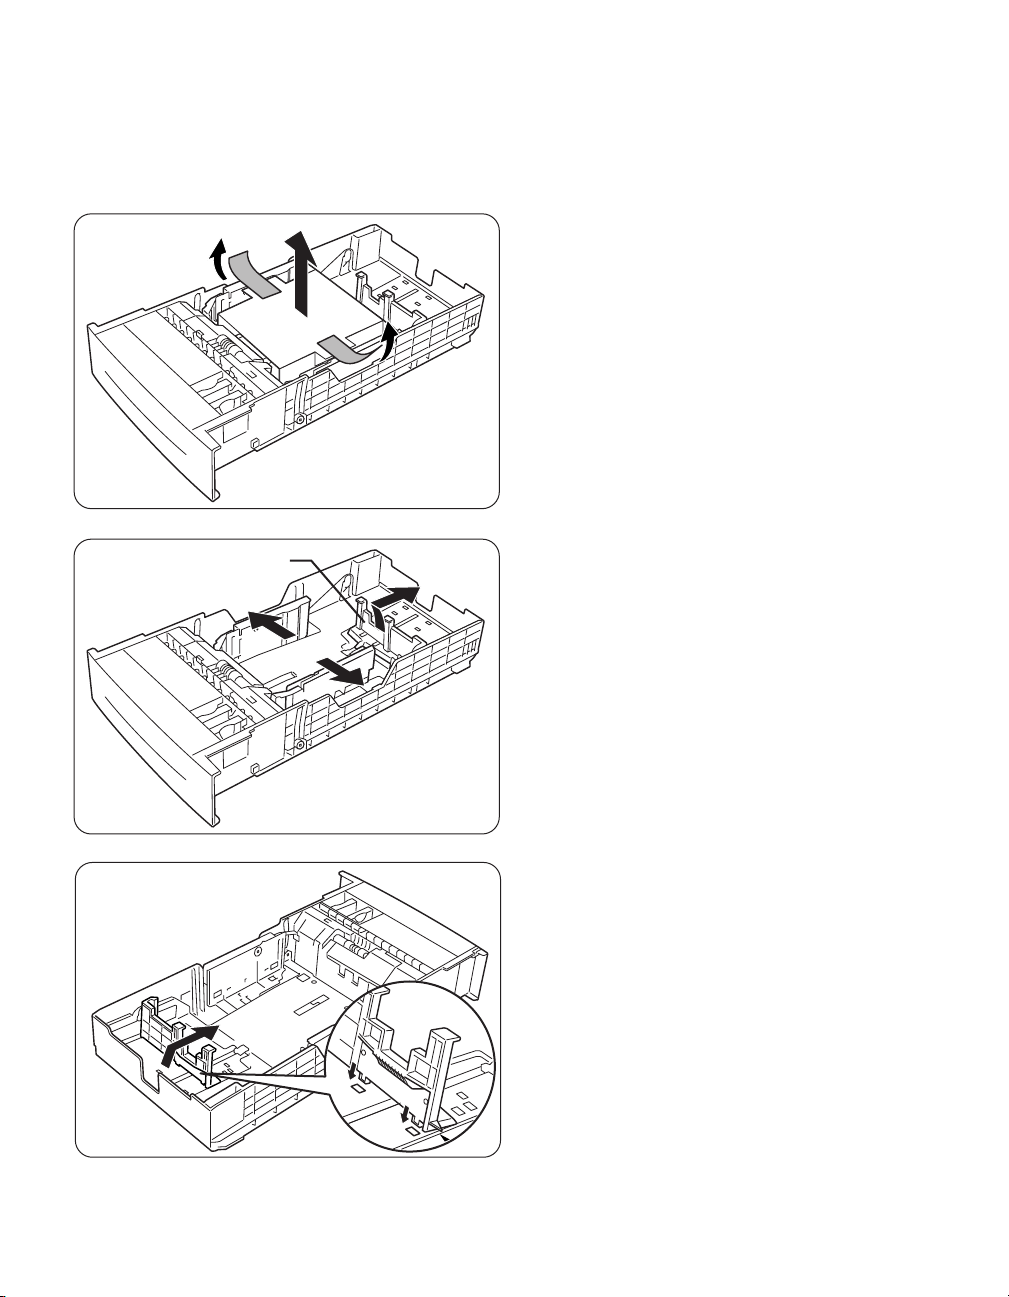
3. Remove the tape from the cardboard
spacer in the tray and remove the spacer.
Retain the spacer in case you wish to
transport or store the printer in the
future.
4. Move the side and end paper guides to
their outermost positions. Gently lift the
end paper guide to move it.
5. Grip the end paper guide and gently lift it
up. Insert the pins at the bottom of the
guide in the holes corresponding to the
paper size that you want to load.
End Paper Guide
Page 16
15
6. Align the four corners of the paper stack
and insert the paper (print side up) under
the tab at the front of the tray.
7. Align the side guides with the edges of the
paper. Do not push the guides too tightly
against the paper stack, as this can cause
paper jams.
8. Grasp the paper tray with both hands,
align it with the opening in the printer and
gently insert it, as shown.
Page 17
16
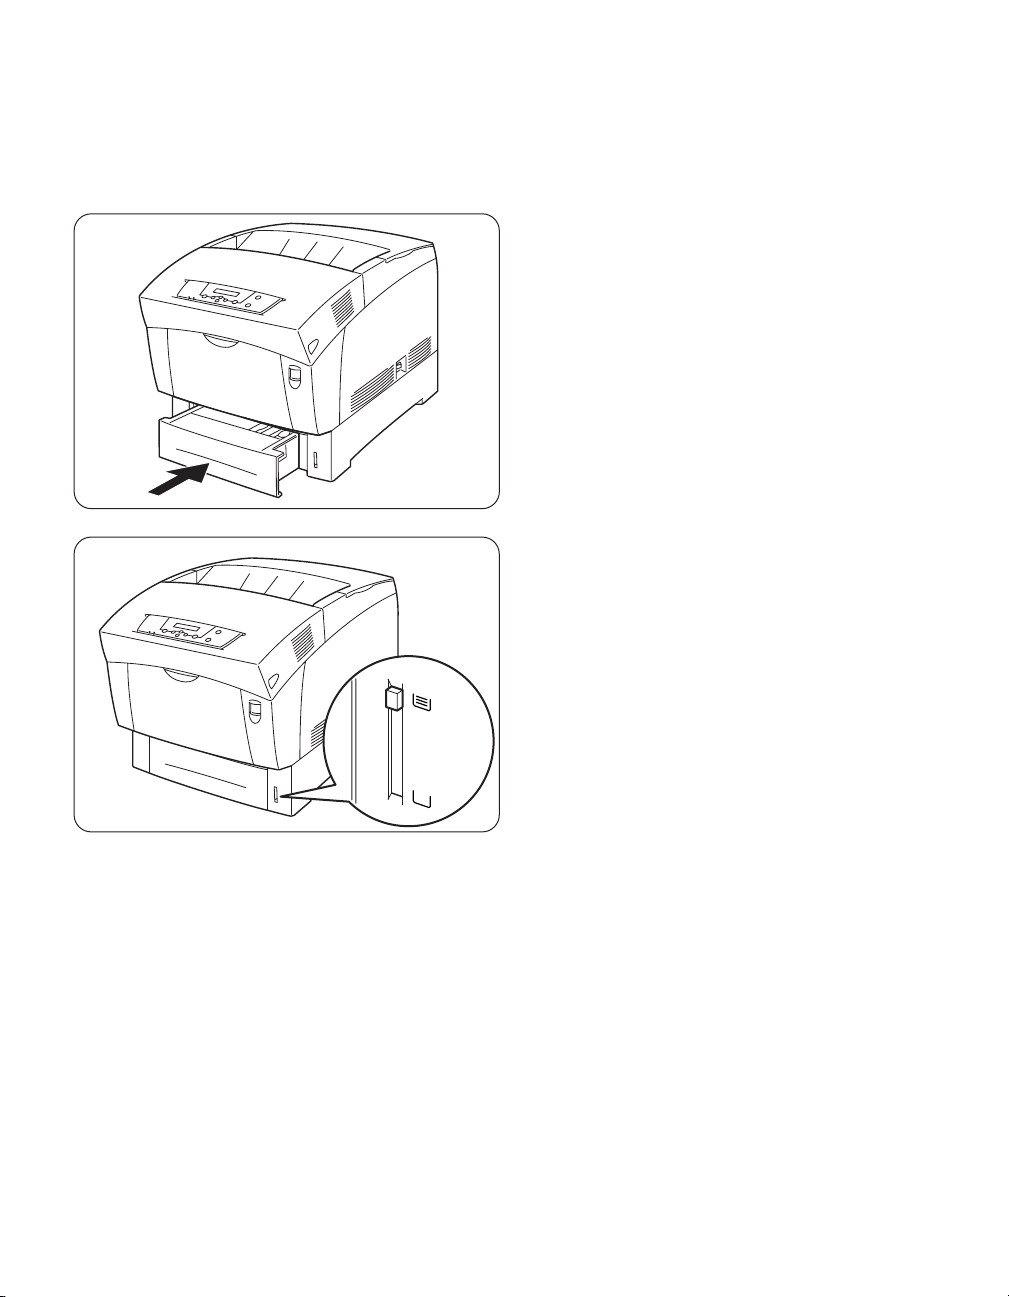
9. Gently slide the paper tray all the way
back into the printer.
10. The paper level indicator on the front of
the tray will rise to show the remaining
level of paper in the tray. Replenish paper
as necessary.
Page 18

17
Connecting Cables Correctly
Most cables come with some kind of locking device to insure that the connection is
made. Be sure to use these locking devices, otherwise you may experience intermittent errors or the printer will fail to operate altogether.
• USB cables are keyed and can only be inserted one way.
• When you have inserted a Parallel port connector, lock the connector by lifting up the wire
clips at either end of the socket so that they fit into the slots on the sides of the connector.
• Ethernet 10/100 BaseT connectors have a locking tab similar to connectors on telephone
cords. When the plug is fully inserted, the tab clicks into place.
Improperly inserted cables are the cause of many networking and printer-related
problems.
Universal Serial Bus (USB) Connection
USB connection ports can be found on nearly all new computers. USB cables have
keyed “A” and “B” connections and the cable cannot be connected incorrectly. The
interface on the printer is a “B” connection.
Note: In order to communicate using the higher-speed USB 2.0 standard, you should
obtain a USB cable specifically certified for use with USB 2.0 devices.
Bi-directional Parallel Connection
The bi-directional parallel connection between the printer and a PC requires a
standard 36-pin bi-directional cable (to IEEE 1284 standards). The length of this
cable can be up to 6.5 feet (2 meters).
Ethernet Network Connection
The Ethernet interface on your printer lets you connect to an Ethernet network via
standard 10 BaseT or 100 BaseT cabling.
Step 7. Connect Printer Cables
Page 19
18
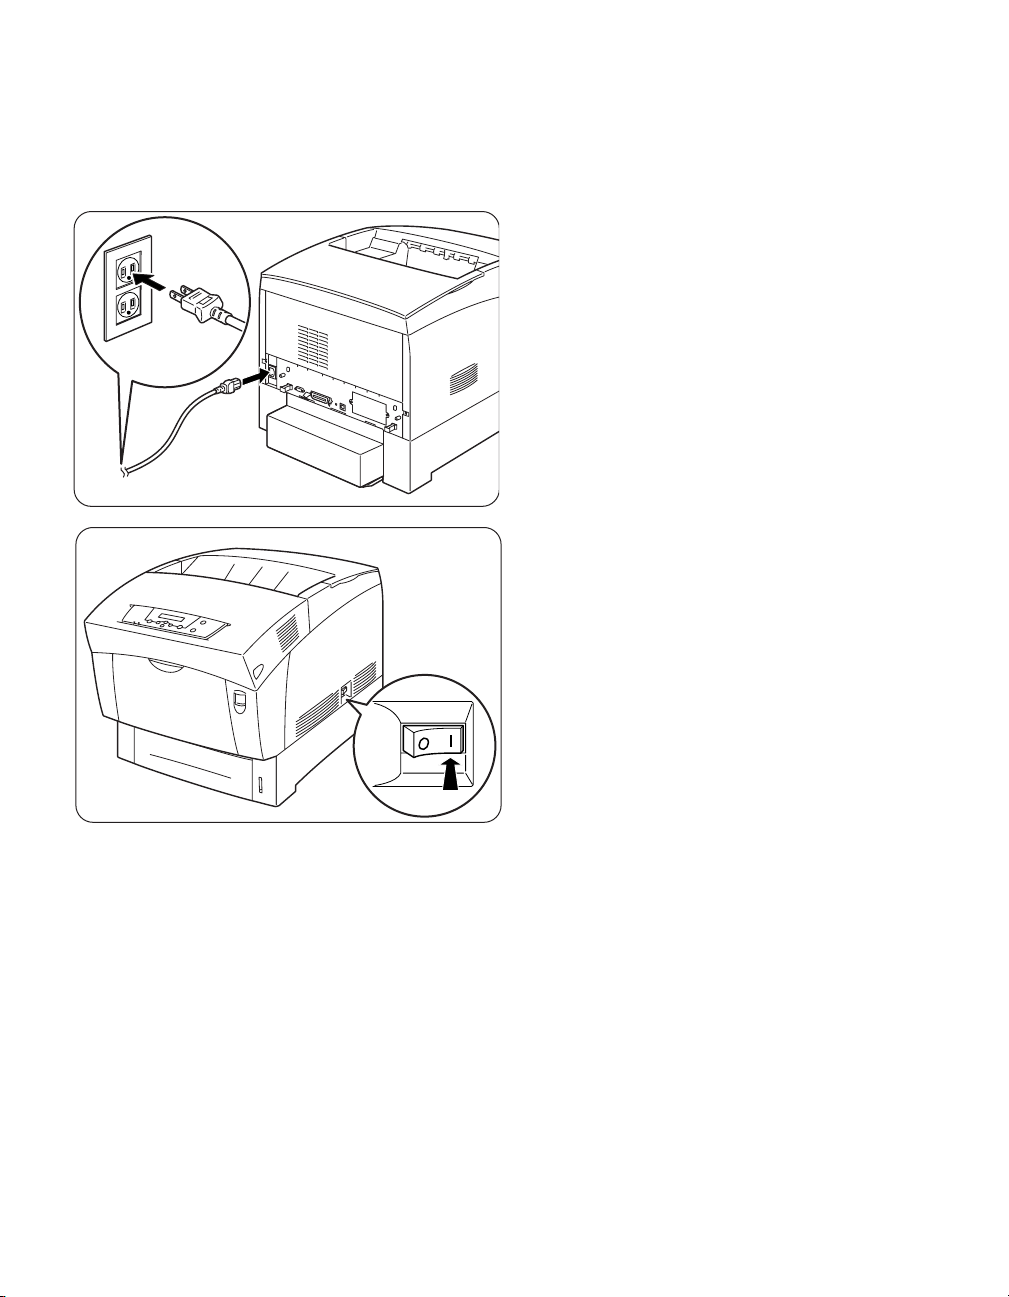
Step 8. Attach Power Cord
1. Insert the power cord into the AC power
connector on the back of the printer as
shown, then insert the other end into an
appropriate AC power outlet.
2. Switch the power switch to the On (I)
position. After the printer warms up, the
“Ready” message should be visible on the
control panel’s LCD display and the Ready
light will remain on.
Page 20

19
Step 9. Install Printing Software
Driver software for the printer must be installed on every computer that will print to
the unit. This section includes installation instructions for Macintosh,Windows
95/98/ME and Windows 2000/XP.
Page 21

20
Overview
You will need to set up your Macintosh computer to use the Elite Color 16 Series by
installing the Elite Color 16 Series software for Macintosh. This software is on the Elite
Color 16 Series CD-ROM. The CD-ROM includes customized PostScript Printer
Description (PPD) files for the Elite Color 16 Series, ColorSync ICC profile and screen
fonts for each of the resident PostScript printer fonts.
This section contains installation instructions for installing printing software for the
Macintosh. The Elite Color 16 Series supports both Mac OS versions 9.x and earlier
and Mac OS X. Pages 21-36 cover Mac OS versions 9.x and earlier, instructions for use
with Mac OS X begin on Page 37.
Step 9a. Install Macintosh Software
Page 22

21
Software Installation
This section details installation instructions for installing drivers for Mac OS versions
9.x and earlier.
Important: Read the release notes contained in the Read Me file before installing the
printer software. This file includes important last-minute feature and compatibility
information about the Elite Color 16 Series. This file is located on the Elite Color 16
Series CD-ROM.
Installing the Elite Color 16 with Mac OS 9.x and earlier
Page 23
22
1. Insert the Elite Color16 Series CD-ROM
into the computer and double-click the
CD icon to open the disk. Double-click
the “Elite Color 16 Series Installer” icon
within the disk window.
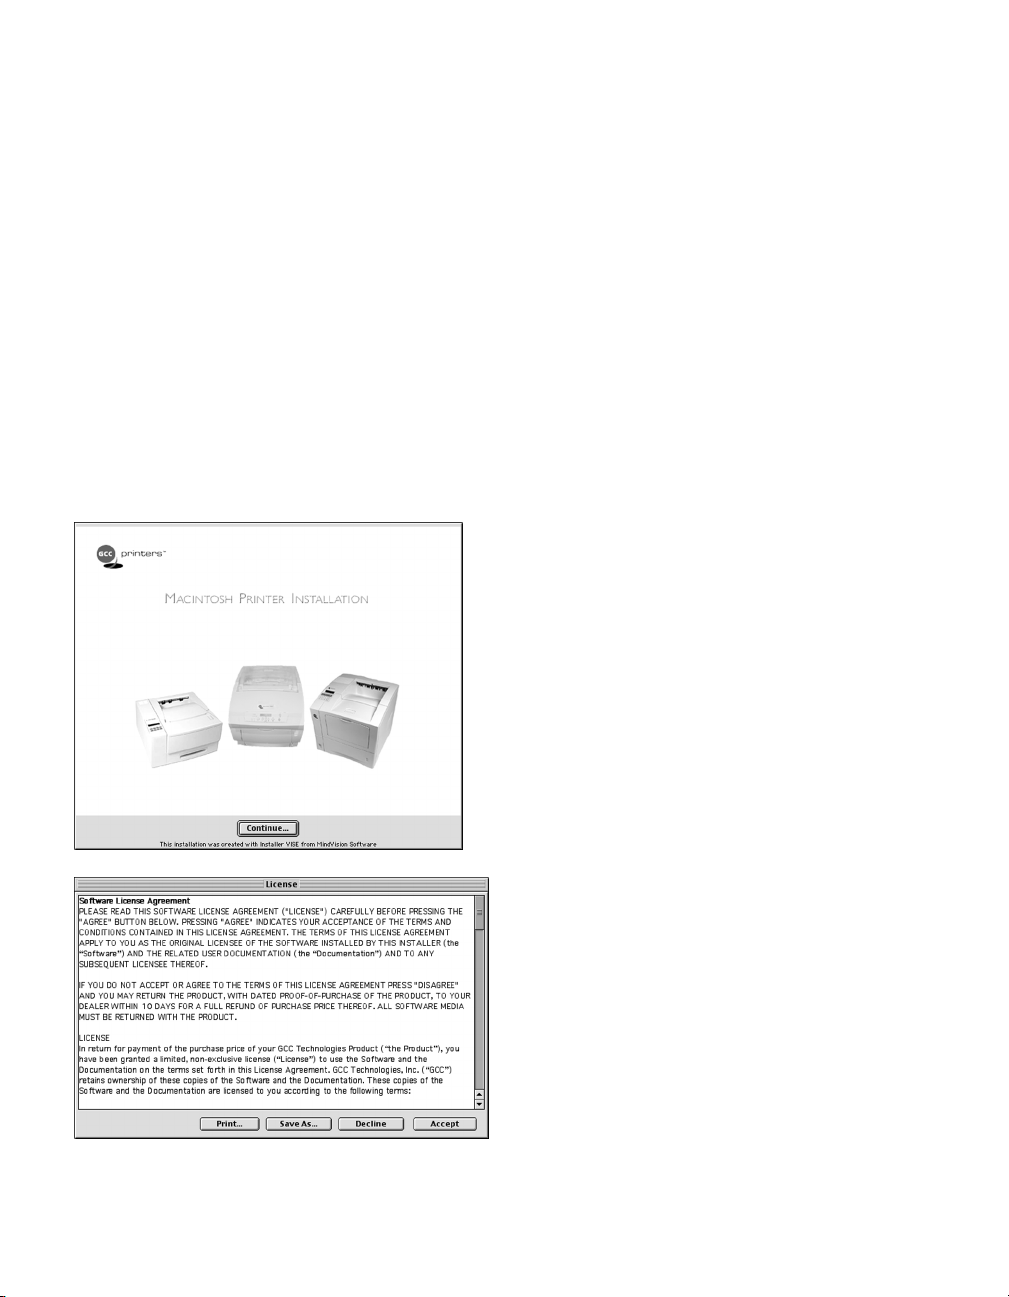
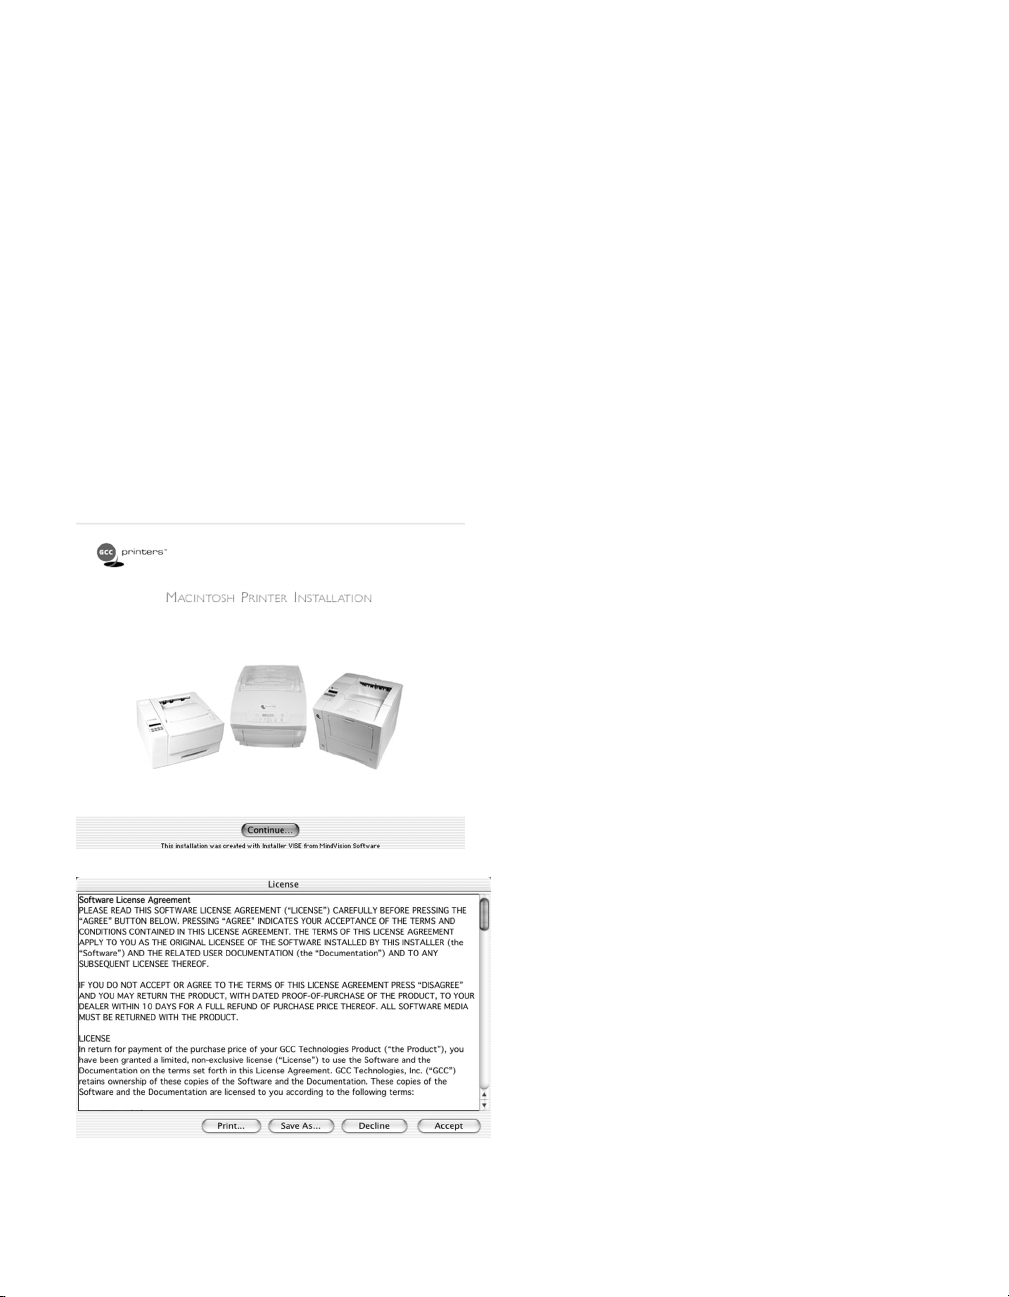
2. An introduction screen marked
“Macintosh Printer Installation” will
appear. Click “Continue.”
3. The software license agreement will
appear. Read the agreement and click
“Accept” to accept its terms.
Part 1- Installing the GCC Printing Software and Fonts
Page 24
23
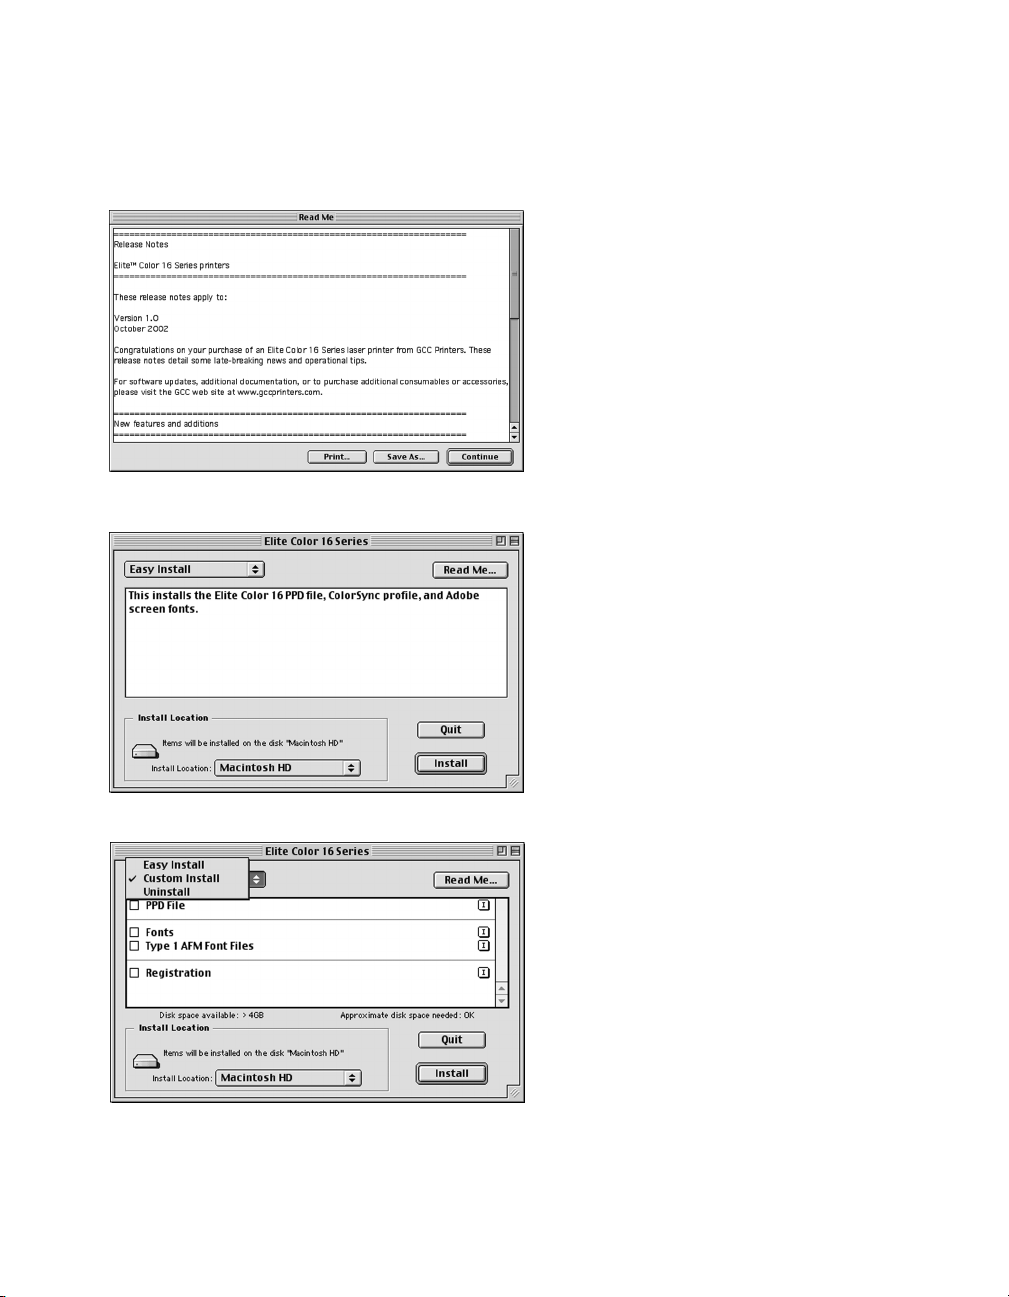
4. A window will open displaying the
ReadMe file for the software. Read the
information in this file and click
“Continue” to proceed.
5. A window will appear listing the
components that will be installed and
asking for an Install Location. Choose the
disk that you wish to install the software
onto (the startup disk of the Mac in most
cases) and click “Install.”
6. A Custom Install option is also available.
If you only wish to install certain
components of the printing software, click
on the Easy Install popup menu and select
Custom Install. Select the items you wish
to install by clicking on the check boxes
next to them, and click “Install.”
An Uninstall option is also accessible
through this menu and can be used to
remove the software as needed.
Page 25
24
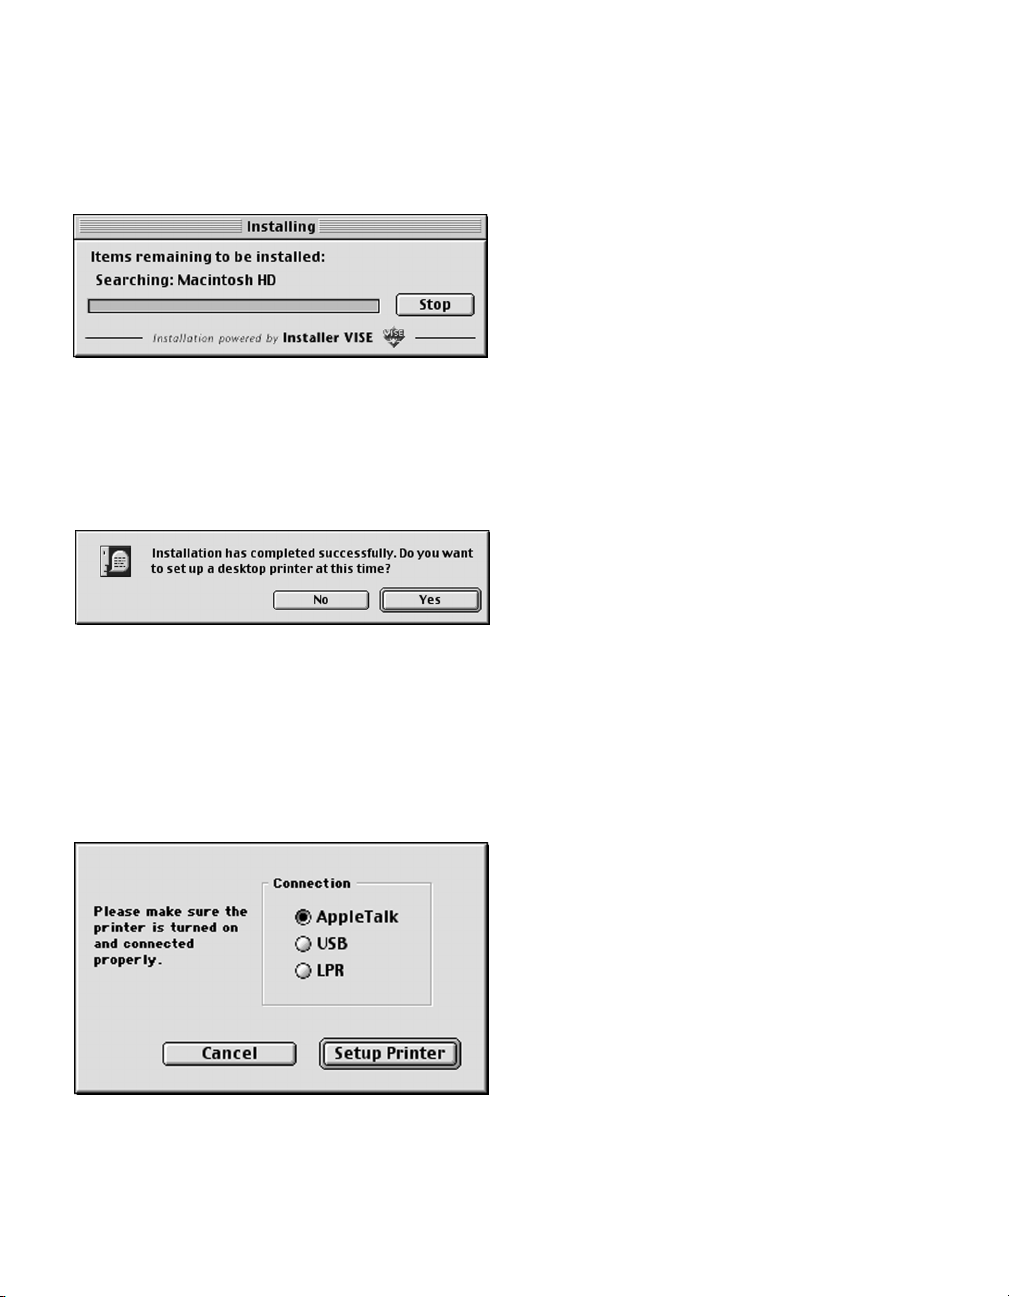
7. Installation of the files will begin. A status
window will appear showing the progress
of the installation.
8. When the installation is complete, a dialog
box will appear asking if you want to
setup a Desktop Printer. Click “Ye s ” to
setup the printer.
9. A dialog box asking how the printer is
connected will appear. Make sure the
printer is turned on and connected
properly. Select the connection method
being used for the printer (AppleTalk, USB
or LPR) and click “Setup Printer.”
Page 26
25
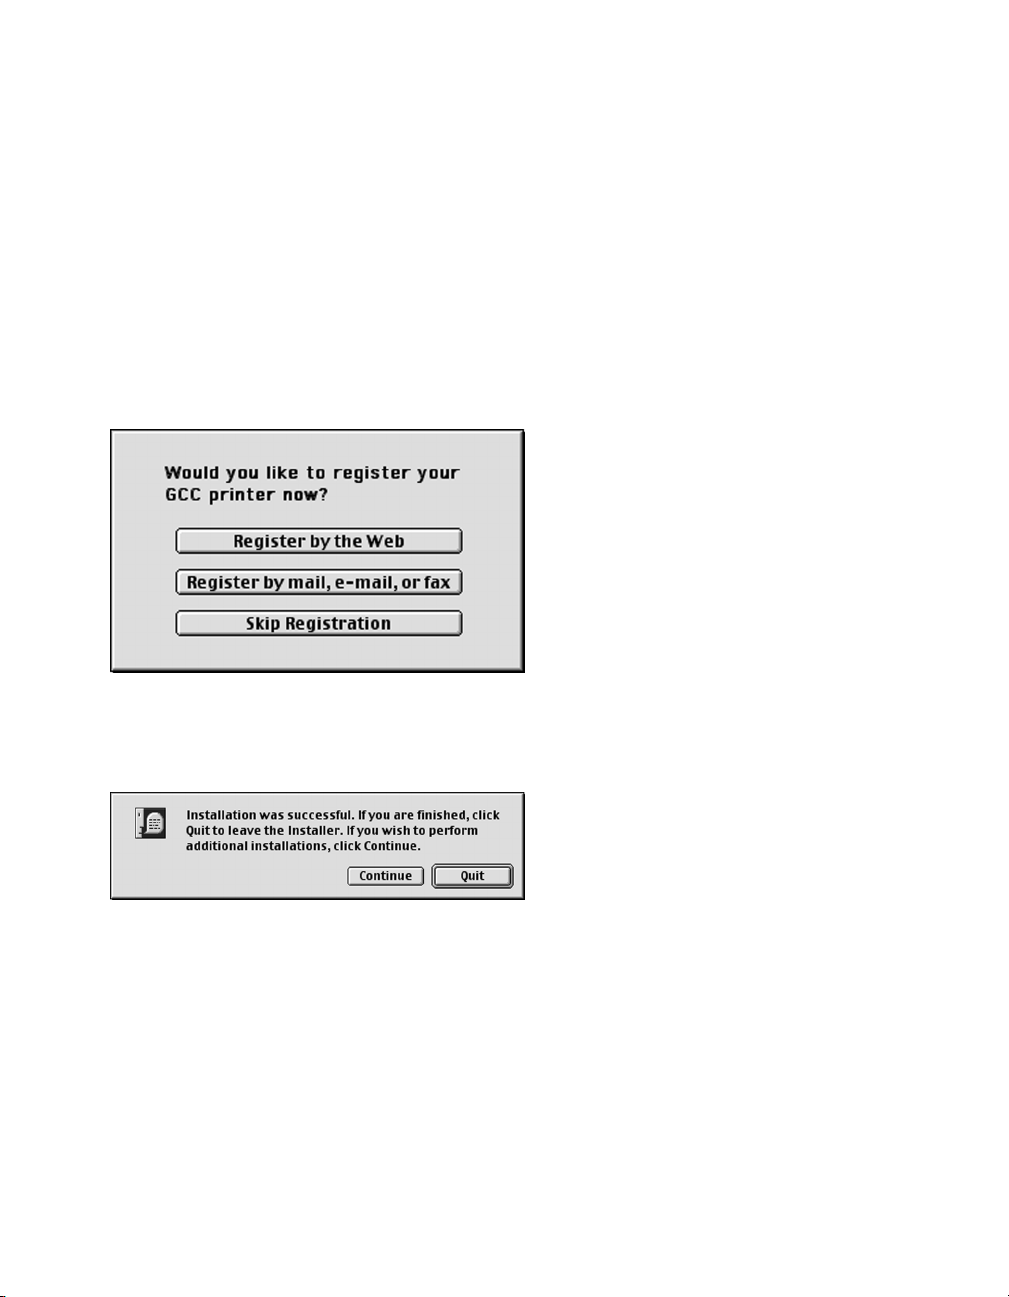
11. When the printer is setup, a Product
Registration screen will appear. You
can choose to register the printer
over the web, which will access a
registration form via your web
browser. You can also choose to
register the printer by mail, e-mail or
fax. Select the registration method
you prefer and follow the instructions
on-screen for registering the printer.
12. When the printer is setup, the
installation will finish. Click “Quit” to
exit the installer.
10. Clicking the “Setup Printer” button will open either Apple’s Desktop Printer Utility (USB or
LPR connections) or the Chooser (AppleTalk connections) in order to setup the printer. Refer
to the instructions for Creating a Desktop Printer, covered in Part 2 of the Macintosh
installation instructions in this guide as follows:
Connecting via AppleTalk: Part 2a, Page 26
Connecting via USB: Part 2b, Page 30
Connecting via LPR: Part 2c, Page 33
Page 27
26
Part 2a - Creating a Desktop Printer (via AppleTalk)
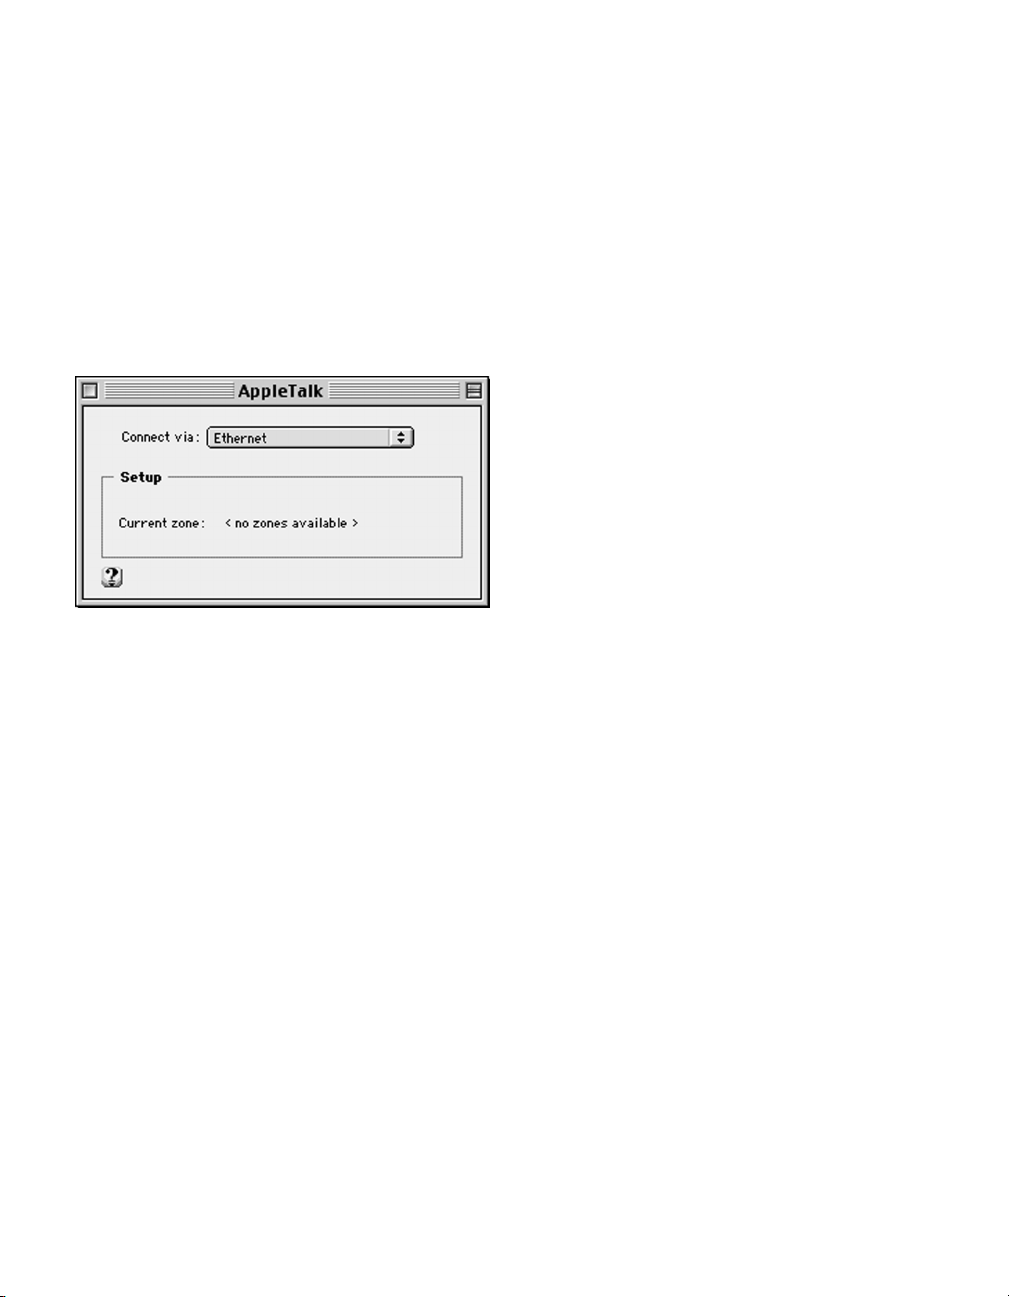
1. Confirm that the Macintosh is properly
configured to communicate over
EtherTalk. Go to the Apple menu, then to
Control Panels and to AppleTalk. In the
AppleTalk window, confirm that the
“Connect via:” selection is set to
Ethernet. Close the control panel. Click
Save if prompted to save settings.
2. Make sure that all steps in the Hardware
Setup section of this guide have been
followed. Follow the Macintosh
installation steps in Part 1 of this section.
In Step 9, select “AppleTalk” as the
connection method and click “Setup
Printer.”
Due to potential incompatibilities between Apple’s Desktop Printer Utility and certain AppleTalk
networks, GCC does not recommend using the Apple Desktop Printer Utility to set up the Elite Color
16 Series printer over AppleTalk. As a result, the Elite Color 16 Series software uses the Chooser to
set up the printer over AppleTalk rather than the Desktop Printer Utility. Follow these steps to setup
your printer over an AppleTalk connection.
Page 28
27
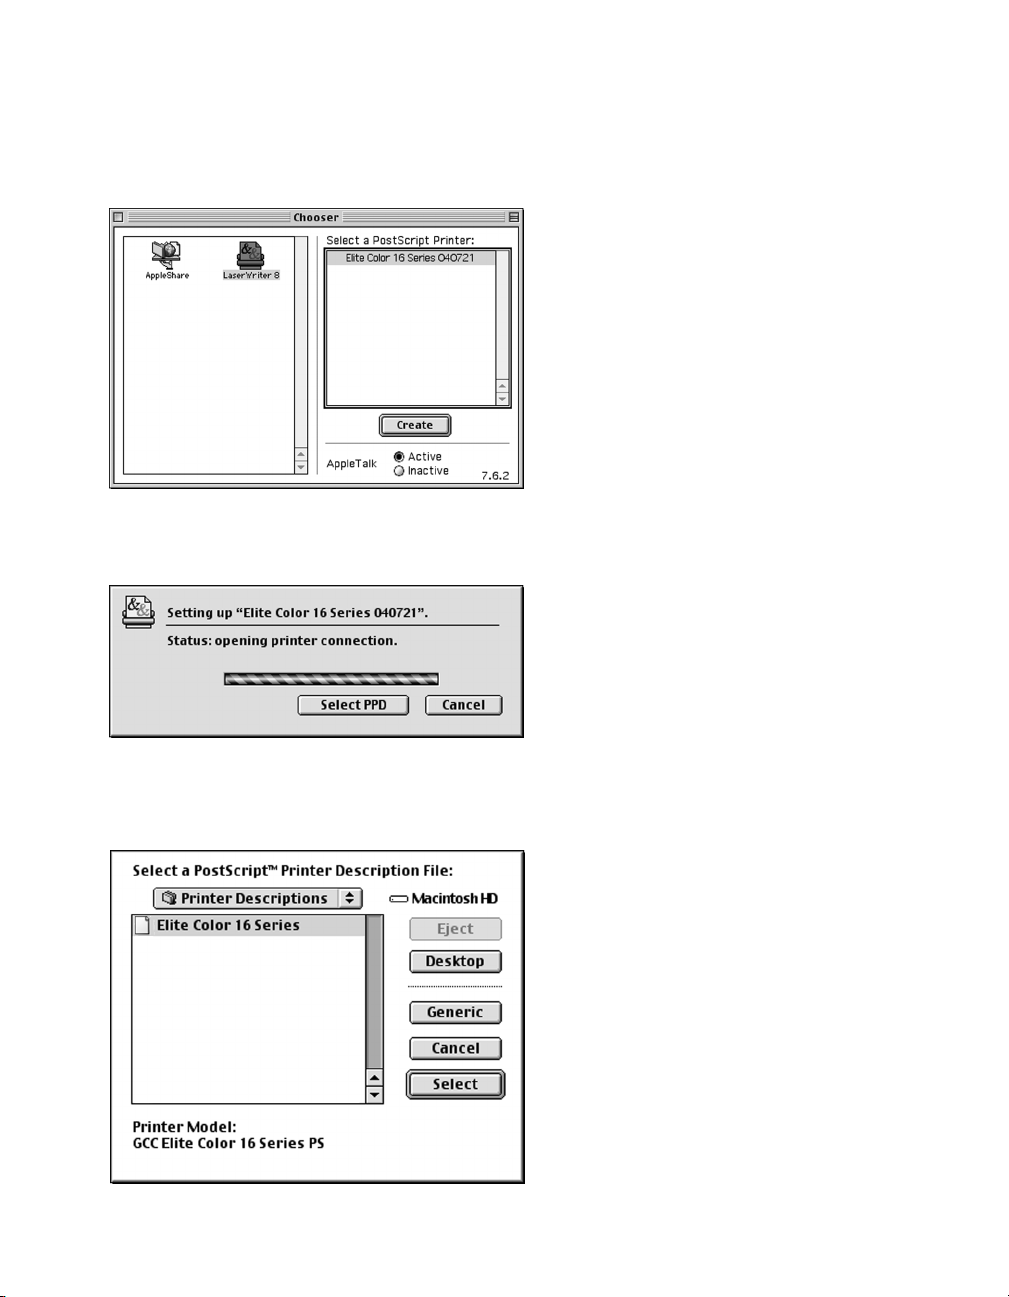
3. This will open up the Chooser window.
Click on the LaserWriter 8 icon in the
left-hand Chooser window. A list of
AppleTalk compatible printers will appear
on the right. Click on the name of your
printer from the list. The default printer
name will be “Elite Color 16 Series” with
a six-digit number appended.. Click
“Create.”
4. The Chooser will open a connection to
the printer and attempt to select the
proper PPD file for the printer.
5. A “Select a PostScript Printer Description
File” dialog may appear. Click on “Elite
Color 16 Series” from this list and click
“Select.”
Page 29

28
6. The Setup process will continue. A status
bar will show the progress of the setup.
7. A window will appear asking for any
options on the printer to be configured.
The page of options sets the Memory
Configuration and High Capacity Feeder
status. Set these items using the popup
menus and then click “OK.”
8. The setup will finish. A status window will
indicate that a Desktop Printer is being
built.
Page 30

29
9. When complete, a Desktop Printer icon
for the Elite Color 16 will appear on the
Mac’s desktop. The setup is now
complete.
If this is the only printer installed on the
Mac, it will appear with a bold outline
around it, indicating that this is the default
printer for the computer. You can set the
printer as the default by clicking once on
the Desktop Printer icon to highlight it,
then going up to the Printing menu at the
top of the screen and selecting “Set
Default Printer.”
The GCC Product Registration utility will
run after the printer is setup. Please
follow the registration instructions to
register your printer.
Page 31

30
Part 2b - Creating a Desktop Printer (via USB)
(Note: USB connection requires Mac OS 8.6 or higher)
1. Make sure that all steps in the Hardware
Setup section of this guide have been
followed. Follow the Macintosh
installation steps in Part 1 of this section.
In Step 9, select “USB” as the connection
method and click “Setup Printer.”
2. This will open up Apple’s Desktop Printer
Utility and the “New Desktop Printer”
dialog box will appear.
Highlight “Printer (USB)” from this list and
click “OK.”
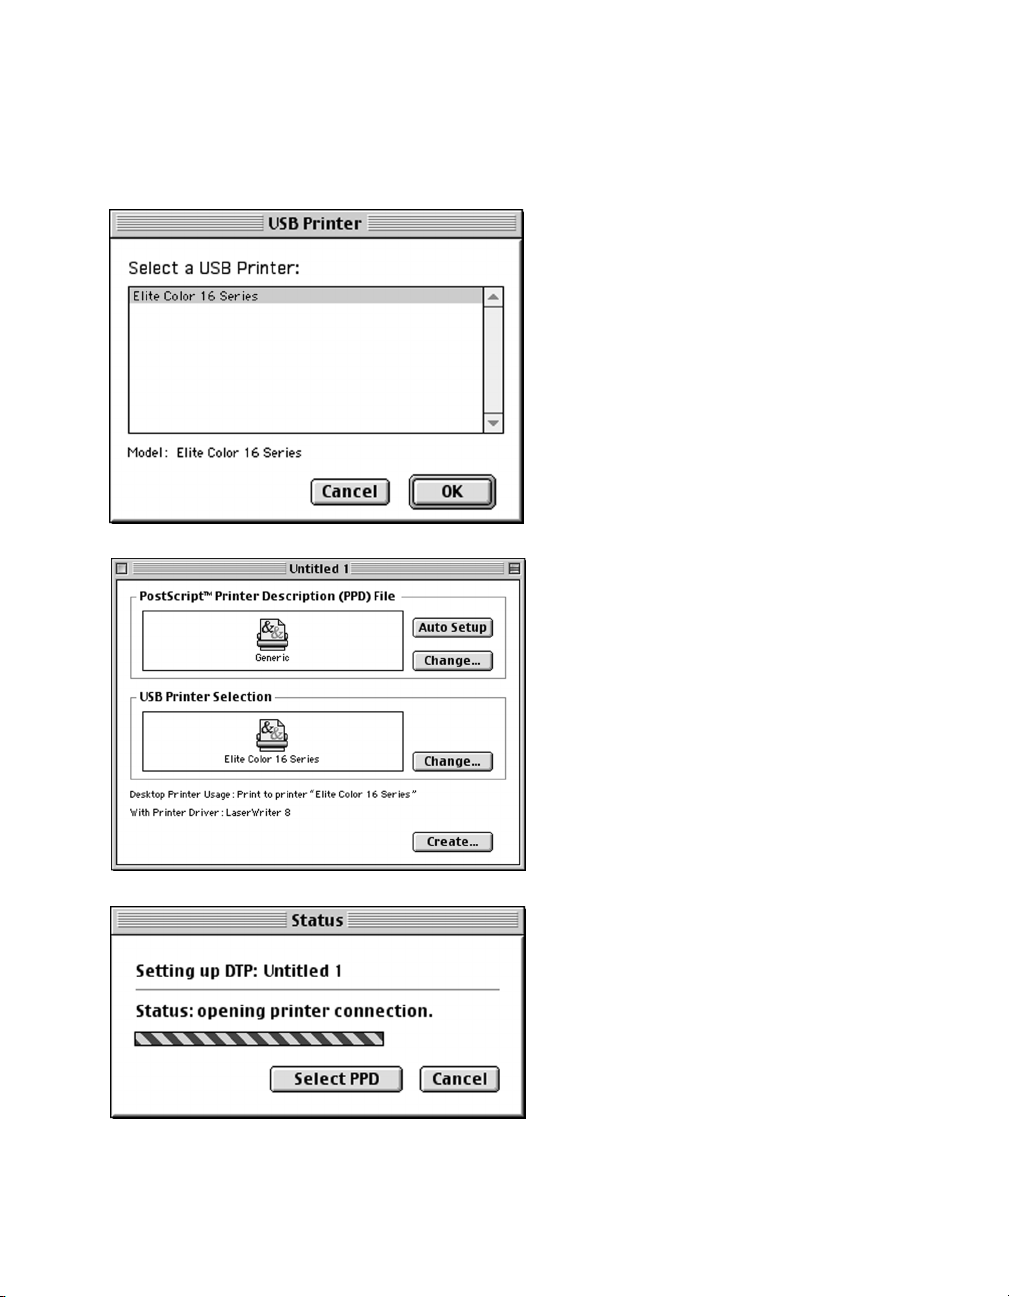
3. A dialog box called “Untitled 1” opens,
containing two printer icons. Click the
“Change” button to the right of the “USB
Printer Selection” box.
Page 32
31
4. The “USB Printer” dialog box will appear.
Click on your printer model from the list,
then click “OK.”
5. The “Untitled 1” dialog box will return.
Click on the “Auto Setup” button at the
top right of the box.
6. A status window appears, showing the
progress of the installation.
Page 33

32
7. The “Untitled 1” dialog box returns again.
The icon in the “PostScript Printer
Description (PPD) File” box now shows
your printer.
Click “Create” to create the new desktop
printer.
8. A Save dialog box opens, asking you to
save the desktop printer. Type in a name
for the desktop printer, or leave the
default name. Click “Save.”
A new Desktop Printer icon will appear
on the desktop with the name that you
assigned.
9. Go to File and Quit to exit the Desktop
Printer Utility. The printer is selected and
ready to print.
The GCC Product Registration utility will
run after the printer is setup. Please
follow the registration instructions to
register your printer.
Page 34

33
Part 2c - Creating a Desktop Printer (via LPR)
(Note: LPR connection requires a PowerPC-based Mac and LaserWriter 8.5.1 or higher)
1. Make sure that all steps in the Hardware
Setup section of this guide have been
followed. Follow the Macintosh
installation steps in Part 1 of this section.
In Step 9, select “LPR” as the connection
method and click “Setup Printer.”
2. This will open up Apple’s Desktop Printer
Utility and the “New Desktop Printer”
dialog will appear.
Highlight “Printer (LPR)” from this list and
click “OK.”
Page 35

34
3. A dialog box called “Untitled 1” opens,
containing two printer icons. Double-click
the bottom icon, in the “LPR Printer
Selection” box.
4. A dialog box called “Internet Printer”
appears. Enter the printer’s IP address in
the “Printer Address” field. The Queue
name setting is not necessary for this
printer. Consult the “Interface Menu”
section on Page 7-11 of the Elite Color 16
Series User’s Guide for information on
setting the printer’s IP address and other
network settings.
5. After entering the IP address, click “Verify.”
If the printer is configured and the IP
Address is correct, a message will appear
that the printer is located at the IP
address you specified. If not, a message
will appear that the printer cannot be
verified. In this case, check the
connection and the IP address entered
and try again. Click “OK” when the
printer is successfully verified.
Page 36

35
6. The “Untitled 1” dialog box will return.
Click on the “Change” button at the top
right of the box.
7. The “Select a PostScript Printer
Description File” box will open. Choose
your printer model from the list of
printers and click “Select.”
8. The “Untitled 1” dialog box returns again.
The icon in the “PostScript Printer
Description (PPD) File” box now shows
your printer.
Click “Create” to create the new desktop
printer.
Page 37

36
9. A Save dialog box opens, asking you to
save the desktop printer. Type in a name
for the desktop printer, or leave the
default name. Click “Save.”
A new Desktop Printer icon will appear
on the desktop with the name that you
assigned.
10. Go to File and Quit to exit the Desktop
Printer Utility. The printer is selected and
ready to print.
The GCC Product Registration utility will
run after the printer is setup. Please
follow the registration instructions to
register your printer.
Page 38

37
Software Installation
This section details installation instructions for installing software for Mac OS X.
Important: Read the release notes contained in the Read Me file before installing the
printer software. This file includes important last-minute feature and compatibility
information about the Elite Color 16 Series. This file is located on the Elite Color 16
Series CD-ROM.
Installing the Elite Color 16 with Mac OS X
Page 39
38
1. Insert the Elite Color 16 Series CD-ROM
into the computer and double-click the
CD icon to open the disk. Double-click
the “Elite Color 16 Series Installer” icon
within the disk window.
An OS X window may appear asking for
an administrator password in order to
install this software. Enter an admin user
name and password to continue. Consult
your OS X documentation for more
information on access privileges.
2. An introduction screen marked
“Macintosh Printer Installer” will appear.
Click “Continue.”
3. The software license agreement will
appear. Read the agreement and click
“Accept” to accept its terms.
Part 1 - Installing the GCC Printing Software and Fonts
Page 40

39
4. A window will open displaying the
ReadMe file for the software. Read the
information in this file and click
“Continue” to proceed.
5. A window will appear listing the
components that will be installed and
asking for an Install Location. Choose the
disk that you wish to install the software
onto (the startup disk of the Mac in most
cases) and click “Install.”
6. A Custom Install option is also available.
If you only wish to install certain
components of the printing software, click
on the Easy Install popup menu and select
Custom Install. Select the items you wish
to install by clicking on the check boxes
next to them, and click “Install.”
An Uninstall option is also accessible
through this menu and can be used to
remove the software as needed.
Page 41

40
7. Installation of the files will begin. A status
window will appear showing the progress
of the installation.
8. When all files are installed, a dialog box
will appear asking if you would like to set
up a printer queue for the printer. Click
“Yes.”
9. If this is the first printer to be installed on
the system, a dialog box will appear telling
you that no printers are installed. Click
“Add.”
Page 42

41
10. The Add Printer dialog will appear. Click
on the “Directory Services” popup menu
to see a list of connection options. Select
the appropriate connection method for
your printer (USB, IP or AppleTalk).
USB Connections: Proceed to Step 11a
IP Connections: Skip to Step 11b
AppleTalk Connections: Skip to Step 11c
11a. If USB is selected, make sure the printer is
plugged into the computer via USB and
turned on. A list of available USB printers
will appear. Click on the name of your
printer. Select “GCC” from the Printer
Model popup menu, then select your
specific GCC printer model from the
Model Name list. Click “Add.” Proceed
to Step 12.
11b.If IP Printing is selected, make sure the
printer is turned on, connected to the
network and has been assigned an IP
address. Consult the “Interface Menu”
section on Page 7-11 of the Elite Color
16 Series User’s Guide for information on
setting the printer’s IP address and other
network settings. Fill in the IP address
under the “Printer’s Address” field. Select
“GCC” from the Printer Model popup
menu, then select your specific GCC
printer model from the Model Name list.
Click “Add.” Proceed to Step 12.
Page 43

42
11c. If AppleTalk is selected, make sure the
printer is turned on and connected to the
network. A list of available AppleTalk
printers will appear. Click on the name of
your printer from the list. Click “Add.”
Note: AppleTalk is disabled by default
within OS X. Make sure that “Make
AppleTalk Active” is selected in your
Network Settings (under System
Preferences) before attempting to access
AppleTalk devices on the network.
12. Once the printer has been added, you will
be returned to the Printer List window,
where the printer will now appear as an
option.
Highlight the printer name and click the
“Configure” icon to configure printer
options.
You are now ready to print to the Elite
Color 16 printer.
13. When the installation is complete, a
Product Registration screen will appear.
You can choose to register the printer
over the internet, which will access a
registration form via your web browser.
You can also choose to register the
printer by mail, e-mail or fax. Select the
registration method you prefer and follow
the instructions on-screen for registering
the printer.
Page 44

43
14. When all files are installed, a dialog will
appear informing you that installation was
successful. Click “Quit” to exit the
installer.
Note: Using the Classic Environment within OS X
The Elite Color 16 Software Installer will locate and automatically install the necessary software for your
printer into the Classic (OS 9.x) environment within OS X. No additional software installation is necessary.
To set up your printer for use within Classic, you will need to create a Desktop Printer for the Elite Color
16 printer. Follow the steps beginning on Page 26 of this guide in order to set up a desktop printer icon for
the printer in the Classic environment.
Note: Configuring Printer Options within older versions of OS X
OS X versions previous to OS X 10.2 (Jaguar) do not allow for or require manual configuration of printer
options. When the printer is installed and selected in Print Center, the OS takes configuration information
from the PPD file and polls the printer to determine which options are present. These options (such as
additional trays, duplexing capabilities) will then automatically be available for selection within the Print dialog
box.
Page 45

44
Overview
You will need to set up your Windows computer to use the Elite Color 16 Series by
installing the Elite Color 16 software for Windows. This software is on the Elite Color
16 Series CD-ROM. The CD-ROM includes customized Windows PostScript printer
software for Windows 95/98/ME,Windows 2000/XP, and Windows NT 4.0.
This section details installation instructions for installing drivers for Windows 95/98/ME
and Windows 2000/XP. Information related to Windows NT 4.0 is available in PDF
format on the Elite Color 16 Series CD.
Important: Read the release notes contained in the ReadMe.txt file before installing the
printer software. This file includes important last-minute feature and compatibility
information about the Elite Color 16. This file is located on the Elite Color 16 Series
CD-ROM.
Step 9b. Install Windows Software
Page 46

45
Software Installation
You will need to set up your Windows computer to use the Elite Color 16 Series by
installing the Elite Color 16 Series software for Windows. This software is on the Elite
Color 16 Series CD-ROM. The CD-ROM includes customized Adobe PostScript
printer driver files for the Elite Color 16 Series and screen fonts for each of the
resident PostScript printer fonts.
This document details installation instructions for installing software for Windows
95/98 and Millennium Edition (ME).
If installing over USB or Parallel: We recommend installing your printer’s software
using Windows Plug-and-Play. Instructions for this installation are found starting on
the next page. Installation of additional software (such as Adobe Type Manager, fonts,
etc.) can be done using the GCC Menus application found on the CD. Instructions for
using the GCC Menus application are found in this guide starting on Page 52.
If installing over TCP/IP: We recommend installing your printer’s software using the
GCC Menus application found on the CD. Instructions for using the GCC Menus
application are found in this guide starting on Page 52.
Important: Read the release notes contained in the Read Me file before installing the
printer software. This file includes important last-minute feature and compatibility
information about the Elite Color 16 Series. This file is located on the Elite Color 16
Series CD-ROM.
Installing the Elite Color 16 Series with Windows 95/98/ME
Page 47

46
Windows 98/ME Software Installation - Plug and Play via USB
(Note: USB printing is not supported under Windows 95)
1. Insert the GCC Elite Color 16 Series CDROM into the Windows 98 PC. Turn on
the printer and make sure the display is
reading “Ready”. Plug the USB cable into
the printer, then into the PC.
The Add New Hardware Wizard will start
up.
Windows 98 Users: click “Next”.
2. The next window will ask what you want
Windows to do. Choose “Search for the
best driver for your device” (Win98) or
“Specify the location of the drivers”
(WinME) and click “Next.”
GCC’s Windows 98/ME USB printing software is installed through the Windows Plug
and Play process. When the printer is plugged into the PC, the PC should
automatically begin a two-step Plug and Play installation. The first step is to install USB
printing support, and the second step is to install specific software for your GCC Elite
Color 16 Series printer. The steps for these installations are as follows:
Page 48
47
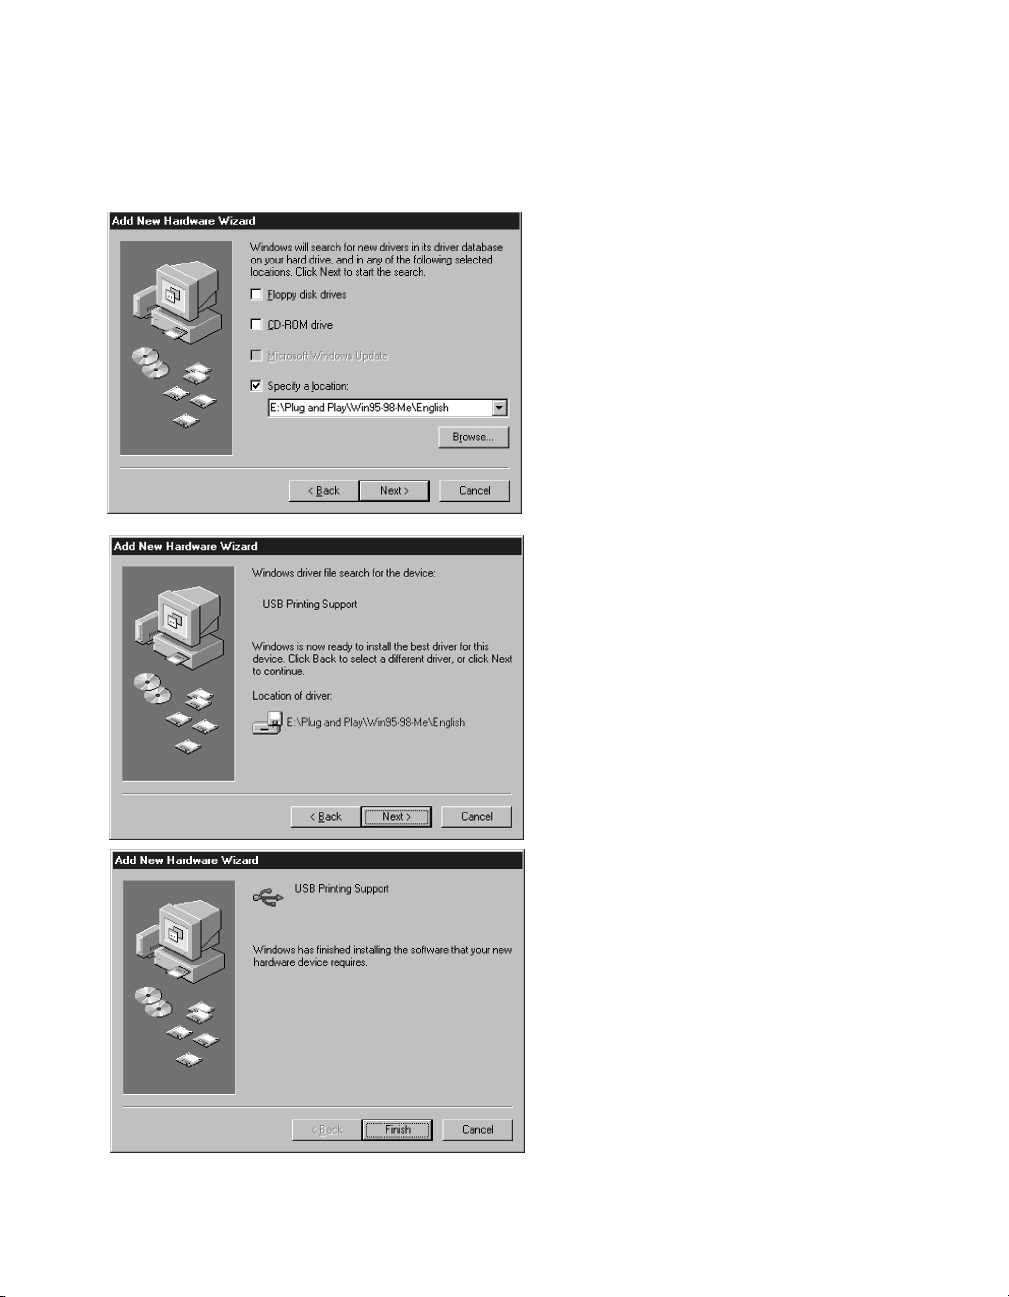
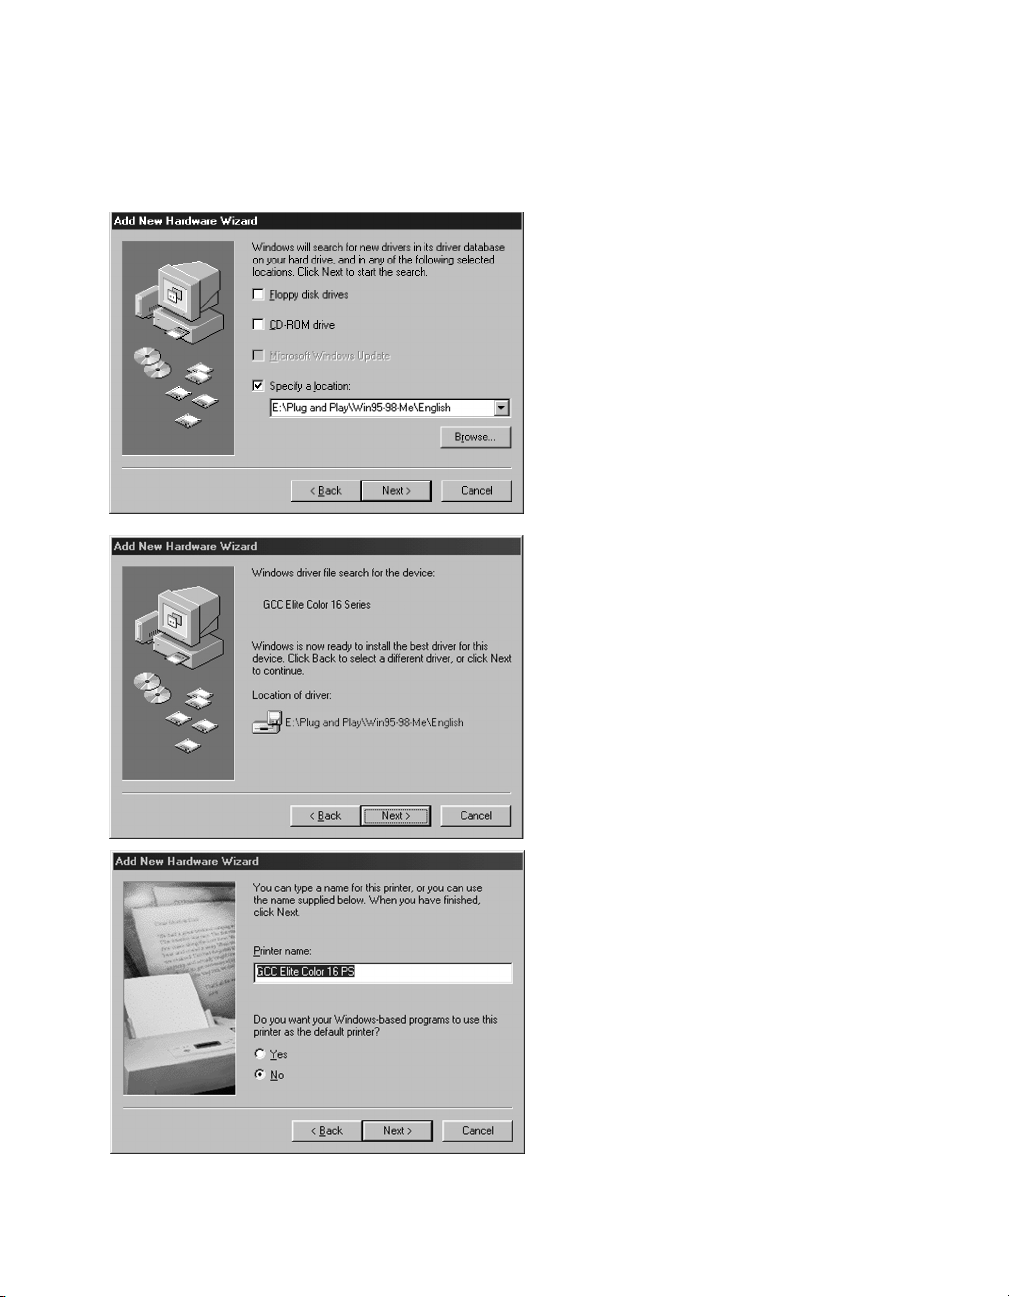
3. The system will then ask where to look
for new drivers. Make sure that the Elite
Color 16 Series CD is in the drive. Check
“Specify a Location,” and make sure that
all other check boxes are unselected. Use
the Browse button to select the “Plug and
Play” folder on the CD, then the “Win95-
98-Me” folder, then the folder that
corresponds to the language being used
(English, French, German, Italian or
Spanish.) Select the “USBPRINT.INF” item
in this folder. Click “OK.” Click “Next.”
4. The next window will inform you that a
driver has been found for USB Printing
Support. Click “Next” to install the USB
driver.
5. A window will appear showing that the
USB driver has been successfully installed.
Click “Finish.”
Once this driver is installed, the PC should
automatically sense the printer and begin
the second Plug and Play installation, for
the specific Elite Color 16 Series software.
Proceed to Step 4 on the next page for
instructions on this installation.
Page 49

48
Windows 95/98/ME Software Installation - Plug and Play via Parallel
1. If the computer is running, shut it down.
2. With the computer and printer both
powered off, attach the printer cable to
the computer and printer. Make sure that
there is paper in the printer’s tray.
3. Turn on the printer and wait for the LCD
display to read “Ready.” Turn on the
computer. A dialog box showing “Building
Printer Database” may appear.
4. The Add New Hardware Wizard will
appear automatically, telling you that
Windows has found new hardware. Insert
the Elite Color 16 CD-ROM in the PC.
Windows 95/98 Users: click “Next.”
5. The next window will ask what you want
Windows to do. Choose “Search for the
best driver for your device” (Win95/98)
or “Specify the location of the driver”
(WinME) and click “Next.”
Page 50
49
6. The system will then ask where to look
for new drivers. Make sure that the Elite
Color 16 Series CD is in the drive. Click
“Search for the best driver for your
device” (WinME only) and check “Specify a
Location.” Make sure all other check
boxes are unselected. Use the Browse
button to select the “Plug and Play” folder
on the CD, then the “Win95-98-Me”
folder, then the folder that corresponds to
the language being used (English, French,
German, Italian or Spanish.) Click “OK.”
Click “Next.”
7. The Wizard will display the driver that it
found.
Windows 95 users: click “Finish”.
Windows 98/ME users: click “Next.”
8. The next window will ask for a name for
the printer. You can type in a new name,
or keep the default name. Click “Next.”
If more than one printer is installed on
this computer, this window will also ask if
you wish to make this printer the default
printer for your Windows applications.
Click Yes or No. Click “Next.”
Page 51

50
9. A window will appear asking if you wish
to print a test page. Click Yes if you are
installing a local printer, click No if you are
installing the driver and will be setting up
the printer as a network device later.
Click “Finish.”
Windows 95/98 Users: go to Step 10
Windows ME Users: skip to Step 12
10. A dialog box may appear asking you to
insert the Windows 95 or 98 CD. Insert
the CD and click “OK.”
Otherwise, skip to Step 12.
11. A dialog box may appear telling you that
necessary files on the CD cannot be
found. Make sure the Windows CD is
inserted, then use the Browse button to
access the Windows CD. Select the folder
called ‘WIN95’ on the Windows 95 CD,
or ‘WIN98’ on the Windows 98 CD.
Click “OK.”
Page 52

51
12. A status window will appear, showing the
progress of the installation.
When finished, the test page will be
generated (if you chose to print a test
page in Step 9). If the page prints, click Yes
in the Test Page window. If not, click No
and follow the Windows troubleshooting
steps that appear.
When the installation is complete, you will
be returned to the Printers window and a
new icon for the printer will appear. You
are now ready to use your printer over
USB and/or Parallel.
If you wish to install additional software
components such as Adobe Type Manager,
fonts, etc., please proceed to the GCC
Menus instructions starting on the next
page.
Page 53

52
Windows 95/98/ME Installation via the GCC Menus Application
1. Insert the Elite Color 16 Series CD-ROM
into the computer. The “GCC Menus”
application should automatically start up.
Read the information on the Introduction
screen, then click the “Enter” button to
proceed.
2. A window will open displaying the
Software License Agreement for the
software you are about to install. Read
the agreement, then click “Agree” to agree
to its terms and continue.
3. The next window asks you to register
your printer online. Click “Register” to
open a browser window and access
GCC’s online registration page.
Please complete the registration
information on the page, then close the
browser window to proceed.
Page 54

53
1. The GCC Menus window should proceed
to the main menu window. This window
contains options for viewing release notes
and manuals, browsing the CD, accessing
GCC’s web site and installing software.
Click the top button to view the Release
Notes for the GCC software.
Click the “Printer Software” button to
proceed with the software installation.
2. The Software window will appear. This
window contains options to install TCP/IP
Printer Port software, PostScript driver,
Adobe Type Manager, and Fonts.
Each software category’s button has a
check box on it. Check the boxes for
each of the software components that you
wish to install. Recommended
components are pre-selected.
If installing over USB or Parallel, you
should have already installed the printer
driver using the Plug and Play instructions
starting on Page 46. In this case, de-select
the “TCP/IP Printer Port” and “PostScript
(PS) Driver” options on this menu.
Click the “Next” button to proceed to the
first installation.
Installing the GCC Printing Software Components
Instructions for the individual installations are found within this guide as follows:
Installation #1 (TCP/IP Printer Port) . . . . . . . . . . . . . . . . . . . . . . . . . . .Page 54
Installation #2 (PostScript Driver) . . . . . . . . . . . . . . . . . . . . . . . . . . . . .Page 57
Installation #3 (Adobe Type Manager) . . . . . . . . . . . . . . . . . . . . . . . . . .Page 63
Installation #4 (Fonts) . . . . . . . . . . . . . . . . . . . . . . . . . . . . . . . . . . . . . .Page 64
Page 55
54
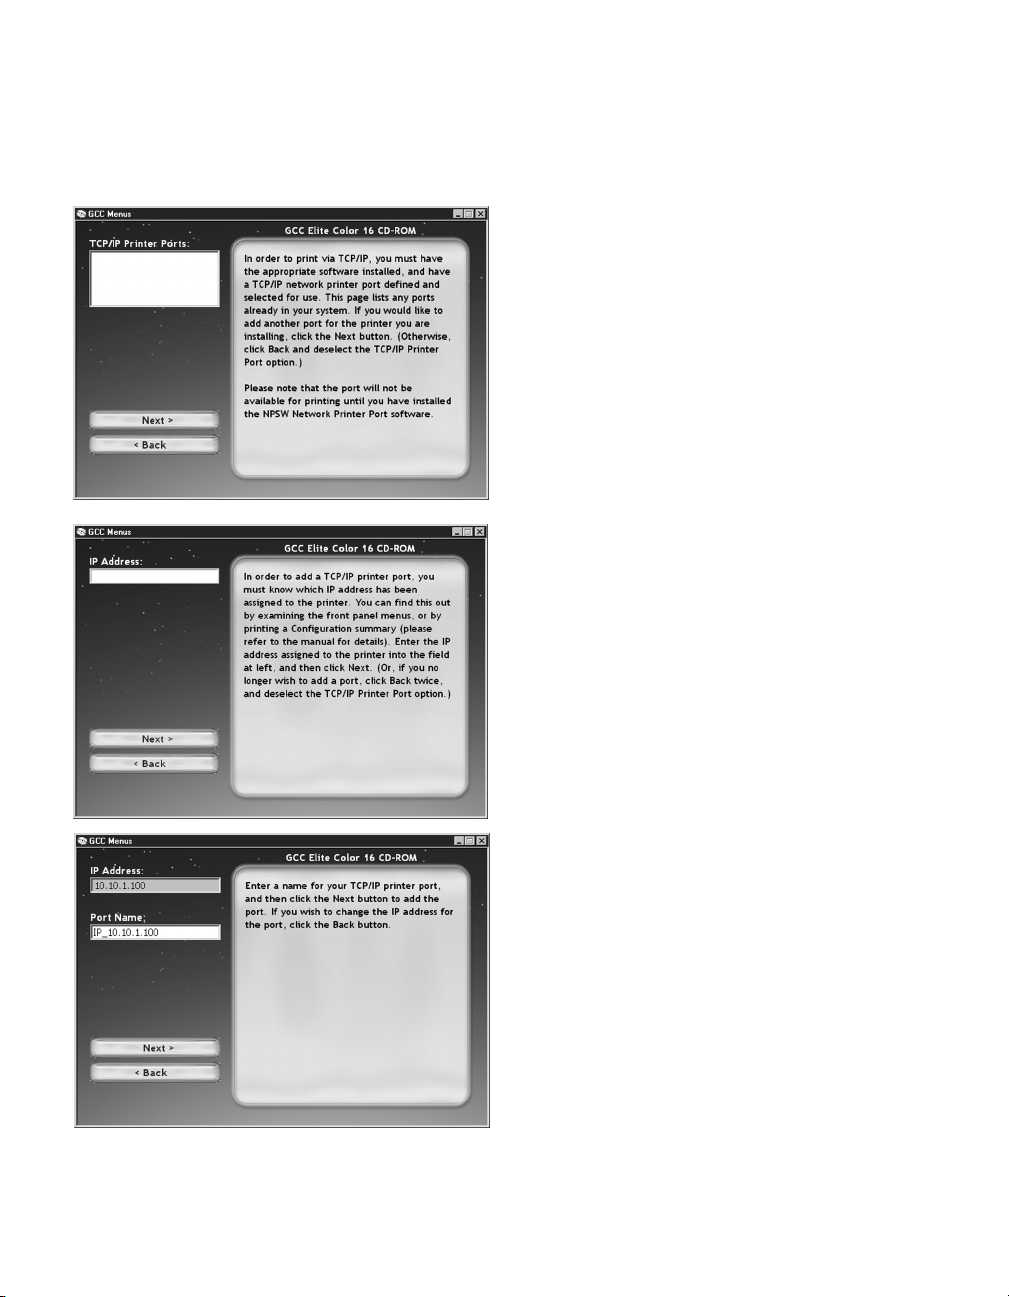
1. The first installation window to appear is
for the TCP/IP Port software.
Note: If you did not select the TCP/IP
Printer Port software check box from the
main Software menu, this window will not
appear. Skip to Installation #2 - PS Driver.
Read the information in the left-hand
window, then click the “Next” button to
begin the installation.
2. The next window will ask you to enter
the printer’s IP address. Type in the
address, then click “Next” to continue.
Consult the “Interface Menu” section on
Page 7-11 of the Elite Color 16 Series
User’s Guide for information on setting
the printer’s IP address and other network
settings.
3. The next window asks for a port name.
This will determine how the port appears
on the list of available ports on the PC.
You can leave the default name, or type in
a more distinctive name.
Installation #1 - TCP/IP Port and Network Printer Port Software
Page 56

55
4. A window will appear, informing you that
a TCP/IP port has been added to the
system. Click “OK.”
Note: This process only adds a generic
TCP/IP port to the PC. You must install
the NPSW Network Printer Port
software in the following steps in order to
access your specific printer using this
port.
5. You will be returned to the GCC Menus
application, ready to install the NPSW
Network Printer Port (NetPort) software.
Note: If you have additional TCP/IP ports
to add, you should click “Back” at this
point and repeat Steps 2-4 for each
additional port before continuing.
Click the top button to review the
ReadMe file for this software, then click
the “Next” button to begin the
installation.
6. The Network Port Installer will open.
Click “Continue.”
Page 57

56
7. Select the “Installation” radio button from
the next window, then click “Continue.”
8. A dialog box will appear informing you
that the software is installed. Click “OK.”
9. You will return to the GCC Menu
application. A dialog box will appear
asking you to click “OK” when the printer
port installation is complete. Click “OK”
to proceed to the next installation.
Page 58

57
1. The next installation window to appear is
for the PostScript (PS) Driver software.
Note: If you did not select the PostScript
Driver software check box from the main
Software menu, this window will not
appear. Skip to Installation #3 - Adobe
Type Manager.
Click the top button to review the
ReadMe file for this software, then click
the “Next” button to begin the
installation.
2. This printer uses the Adobe PostScript
Driver software. A splash screen for
Adobe’s driver installation will appear.
3. The Welcome window will appear. Quit
all applications (except for the GCC
Menus application) if you have not already
done so, then click “Next” to proceed.
Installation #2 -PostScript (PS) Driver Software
Page 59

58
4. The End User License Agreement for the
Adobe software will appear. Read the
agreement and click “Accept” to continue.
5. The next window will ask if the printer is
directly connected to your computer, or is
on the network
Click “Local Printer”
at this point, even if connecting to
the printer via TCP/IP Printer Port
.
The TCP/IP port you added earlier will
appear as a local printer port.
“Network Printer” should only be
selected at this point if the printer is
directly attached to another PC or
accessed via an NT or Win2000 server.
Click “Next.”
6. Select the port that the computer is to be
attached to. The list of available ports will
vary depending on your PC’s configuration
and the version of Windows in use. If you
installed a TCP/IP Printer Port in
Installation #1, this port should appear as
an option on this list. Click “Next.”
If installing over USB or Parallel, we
recommend using Plug and Play rather
than this installer. Click “Cancel” and
consult the instructions starting on Page
46 for more information.
Page 60
59
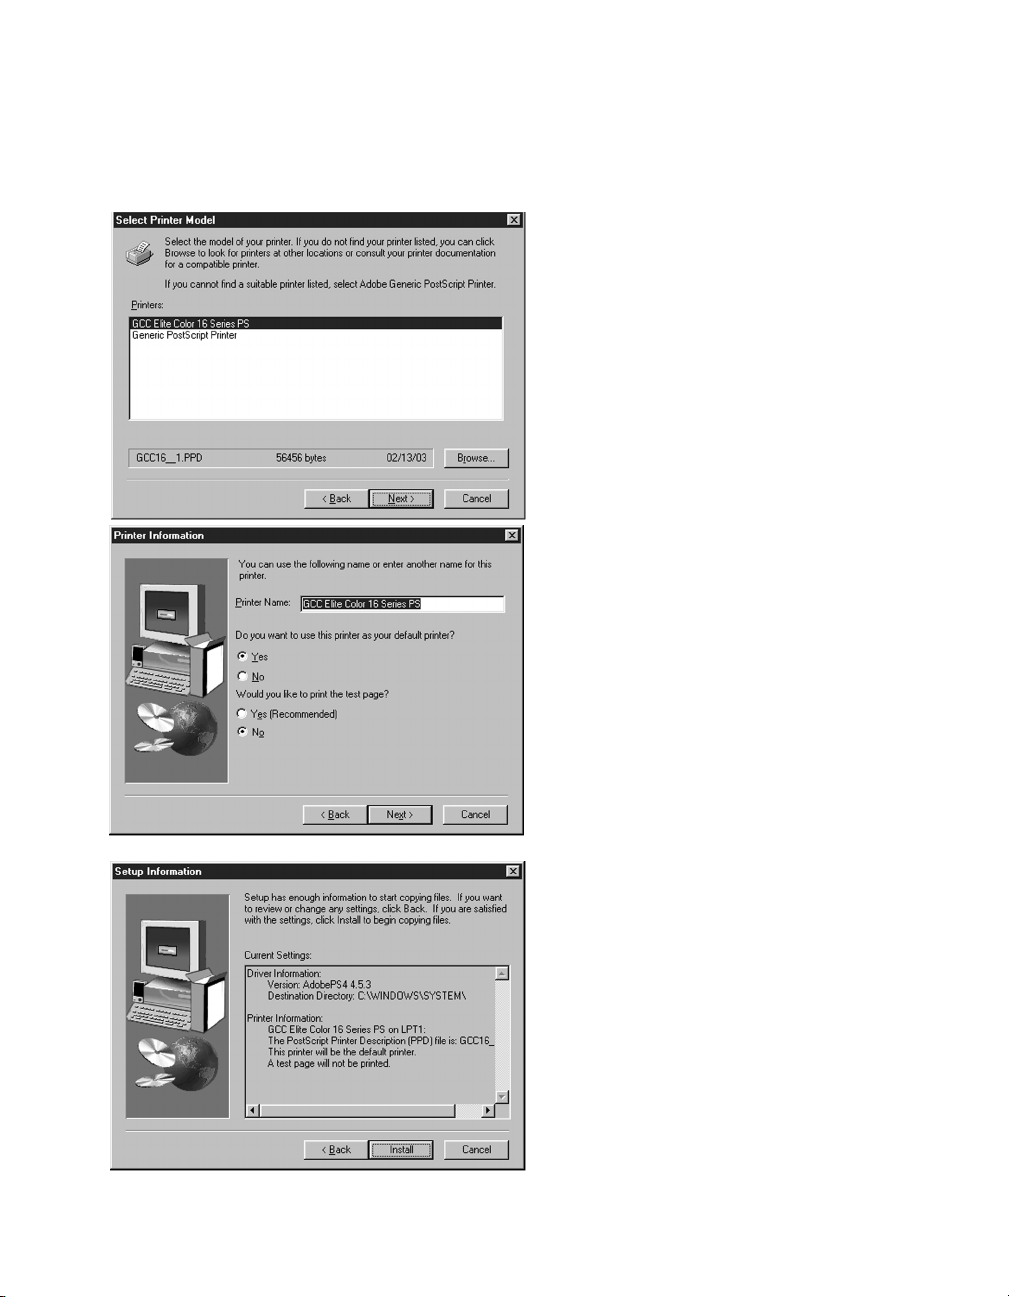
7. A window will appear asking you to select
a PPD for the printer. Select “Elite Color
16 Series PS” from the list and click
“Next.”
8. The next window will allow you to assign
a name to the printer. You can type in a
new name for the printer, or leave the
default name.
This window also allows you to choose
whether the printer will be the default for
this PC or not. Select Yes or No.
An option to print a test page also
appears. Select Yes or No. Click “Next.”
9. A summary of the selections you have
made during this installation will appear.
Look over the options to make sure they
are correct and click “Install.”
Page 61
60
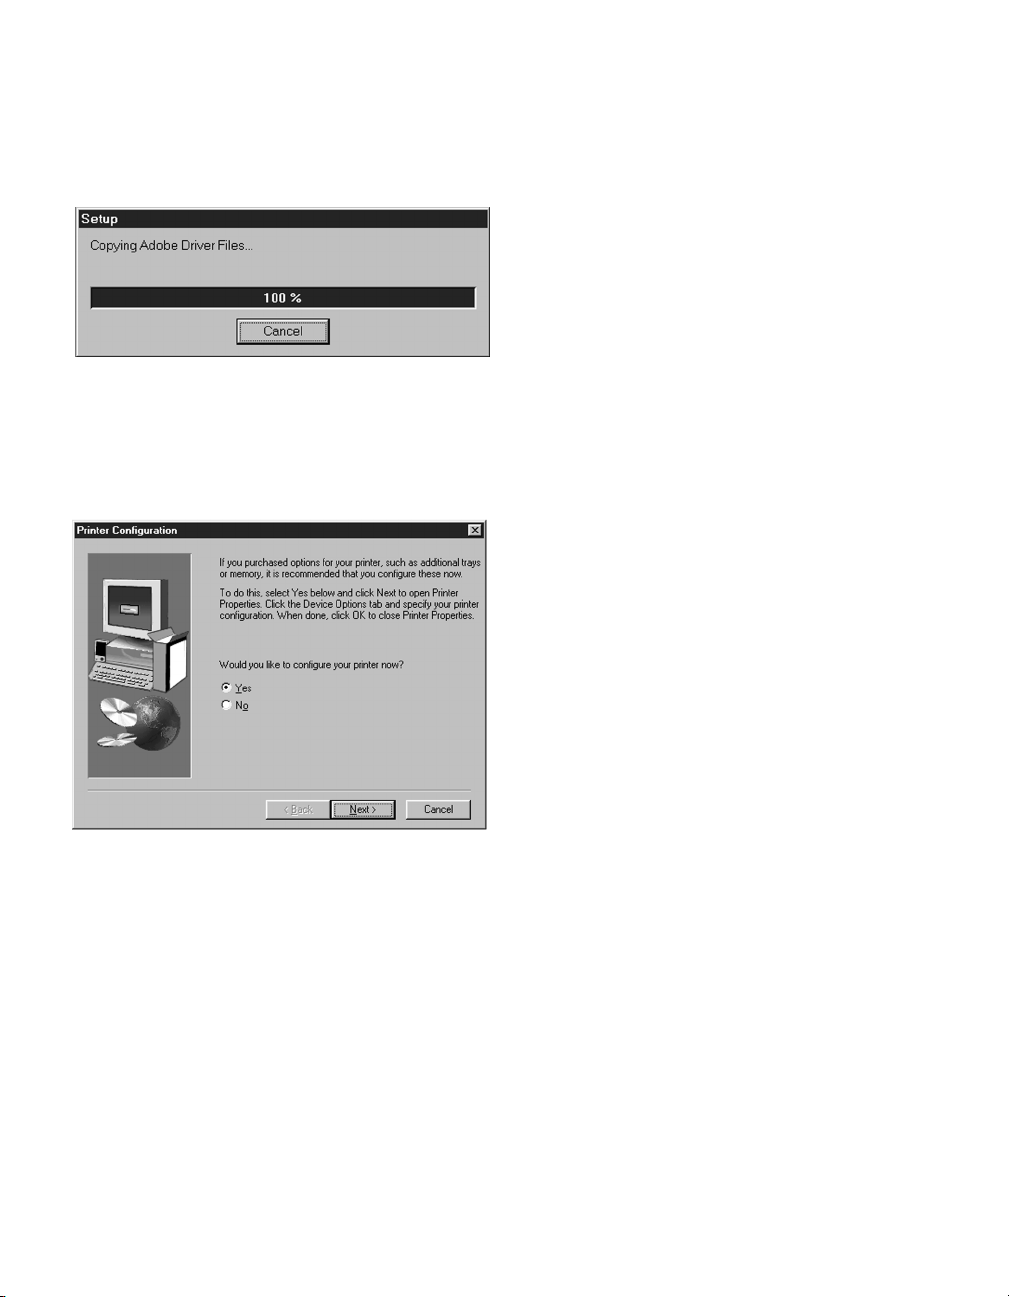
10. A status bar will appear, showing the
progress of the software installation.
11. When all files are installed, a window will
appear asking if you want to configure
your printer. This will allow you to set
the printer up to use additional options,
etc. Select “Ye s ” to configure the printer
now, and click “Next.”
Page 62

61
12. The Printer Properties window will
appear. The Paper options appear first.
Set any defaults you wish to select in this
section and click “Apply.”
Specific options for the Elite Color 16
Series can be accessed by clicking on the
“Device Options” tab.
13. Under Device Options, specific options
for the printer are found on the
“Installable Options” list.
If you have added the High Capacity
Feeder to the printer, click on “High
Capacity Feeder.” In the “Change setting
for” pull-down menu below, change the
selection to “Installed.” Click “Apply.”
If you have changed the amount of
memory in the printer, click on “Installed
Memory.” In the “Change setting for”
pull-down menu below, change the
selection to the new memory amount.
Click “Apply.”
When configuration is complete, click
“OK” to leave the Properties window and
continue the installation.
Page 63

62
14. Once you are done configuring the
printer’s options, a window will appear
informing you that the installation is
complete. An option to view the release
notes for the driver is available. Click
“Finish” to complete the installation.
15. You will return to the GCC Menu
application. A dialog box will appear
asking you to click “OK” when the Adobe
PostScript installation is complete. Click
“OK” to proceed to the next installation.
Page 64

63
1. The next installation window to appear is
for the Adobe Type Manager (ATM) Light
software.
Note: If you did not select the Adobe Type
Manager software check box from the
main Software menu, this window will not
appear. Skip to Installation #4 - Fonts.
Click the top button to review the
ReadMe file for this software, then click
the “Next” button to begin the
installation.
2. Follow the on-screen instructions to run
Adobe’s ATM Light installer.
Please consult the Windows 95/98/ME
Software Installation Guide PDF on your
Elite Color 16 Series CD for more
detailed instructions related to the ATM
installer.
Note: The final window of the installer will
ask if you would like to restart now, or
later. Click the radio button next to “No,
I will restart my computer later.” Click
“Finish” to close the installer.
3. When installation is complete, you will
return to the GCC Menu application. A
dialog box will appear asking you to click
“OK” when the ATM installation is
complete. Click “OK” to proceed to the
next installation.
Installation #3 - Adobe Type Manager
The Elite Color 16 Series software includes Adobe Type Manager (ATM) Light. ATM Light is a program
which allows you to view and manage Type 1 fonts on your PC. It is required for using Type 1 fonts
with Windows 95,Windows 98 and Windows ME systems.
If your system is running a version of ATM Deluxe, you should skip this installation. Users of ATM Light
versions prior to 4.1 should run this installer to update to this newer version.
Page 65

64
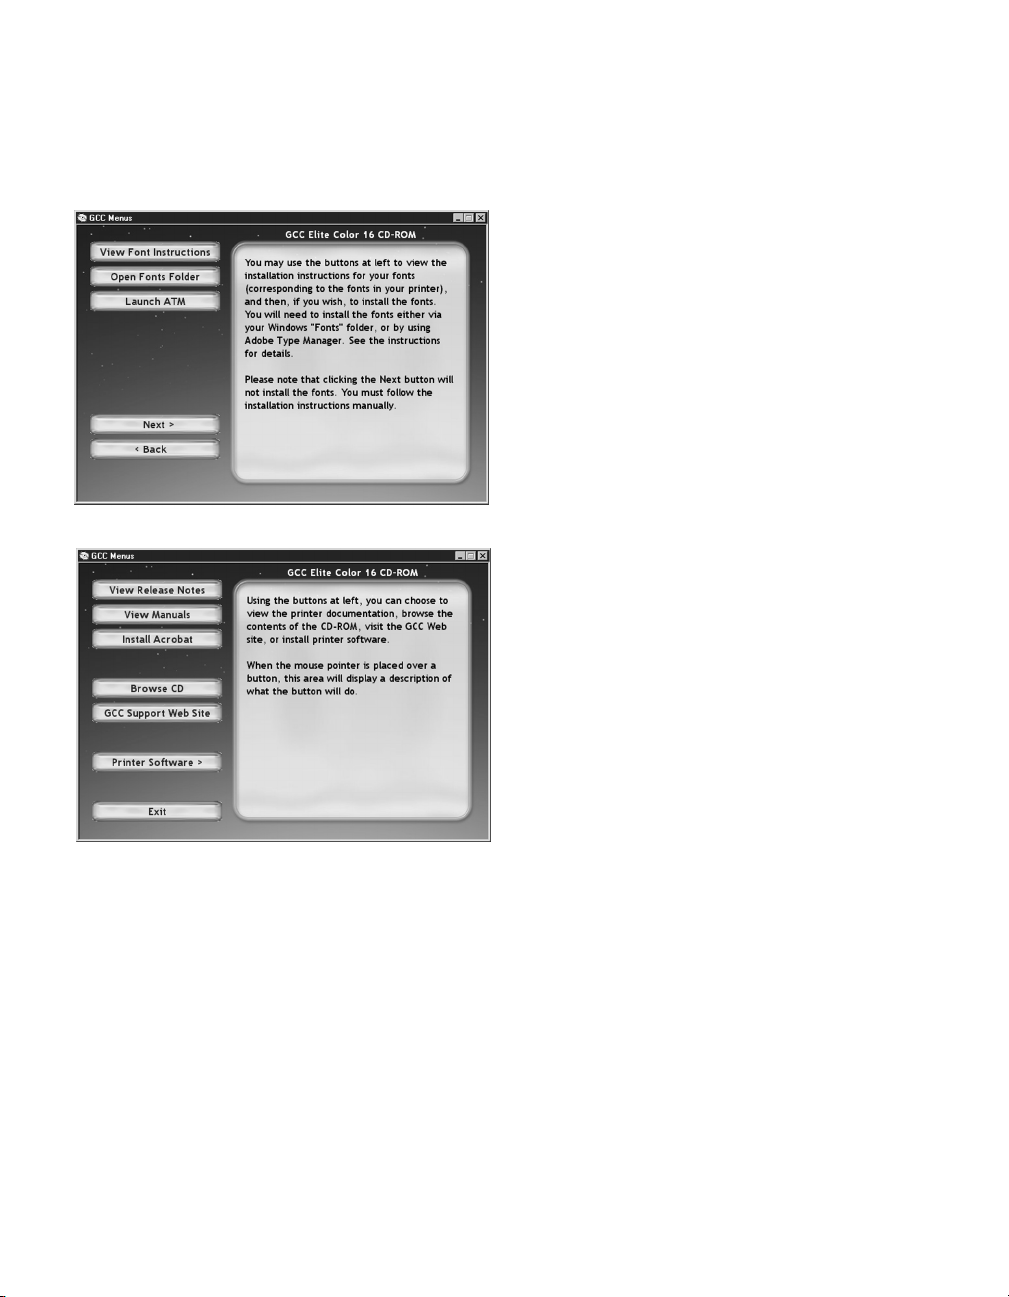
Installation #4 - Fonts
1. The next installation window to appear is
for the Fonts.
Note: If you did not select the Fonts check
box from the main Software menu, this
window will not appear.
Click the top button to review the Font
Instructions file.
To install TrueType fonts, click “Open
Fonts Folder” and proceed to Step 2.
To install Type 1 fonts, click “Launch ATM”
and skip to Step 4.
2. Clicking on the “Open Fonts Folder”
button will open the Windows Fonts
folder.
To install new TrueType fonts, go to the
File menu and select “Install New Font.”
The Elite Color 16 Series CD contains screen versions of all the resident PostScript Level 3 fonts on
the printer. Most fonts are included in Type 1 format, some are included in TrueType format. In order
to access these fonts from within your Windows applications, you must install them onto the PC first.
In Windows 95,Windows 98 and Windows ME,TrueType fonts are installed through the Windows Fonts
folder. Type 1 fonts require the use of Adobe Type Manager. If you have not installed ATM on your
system, go back and follow the steps in Installation #3 on Page 63 of this guide.
Please see the Font Instructions file for more information relating to the installation of fonts.
Page 66
65
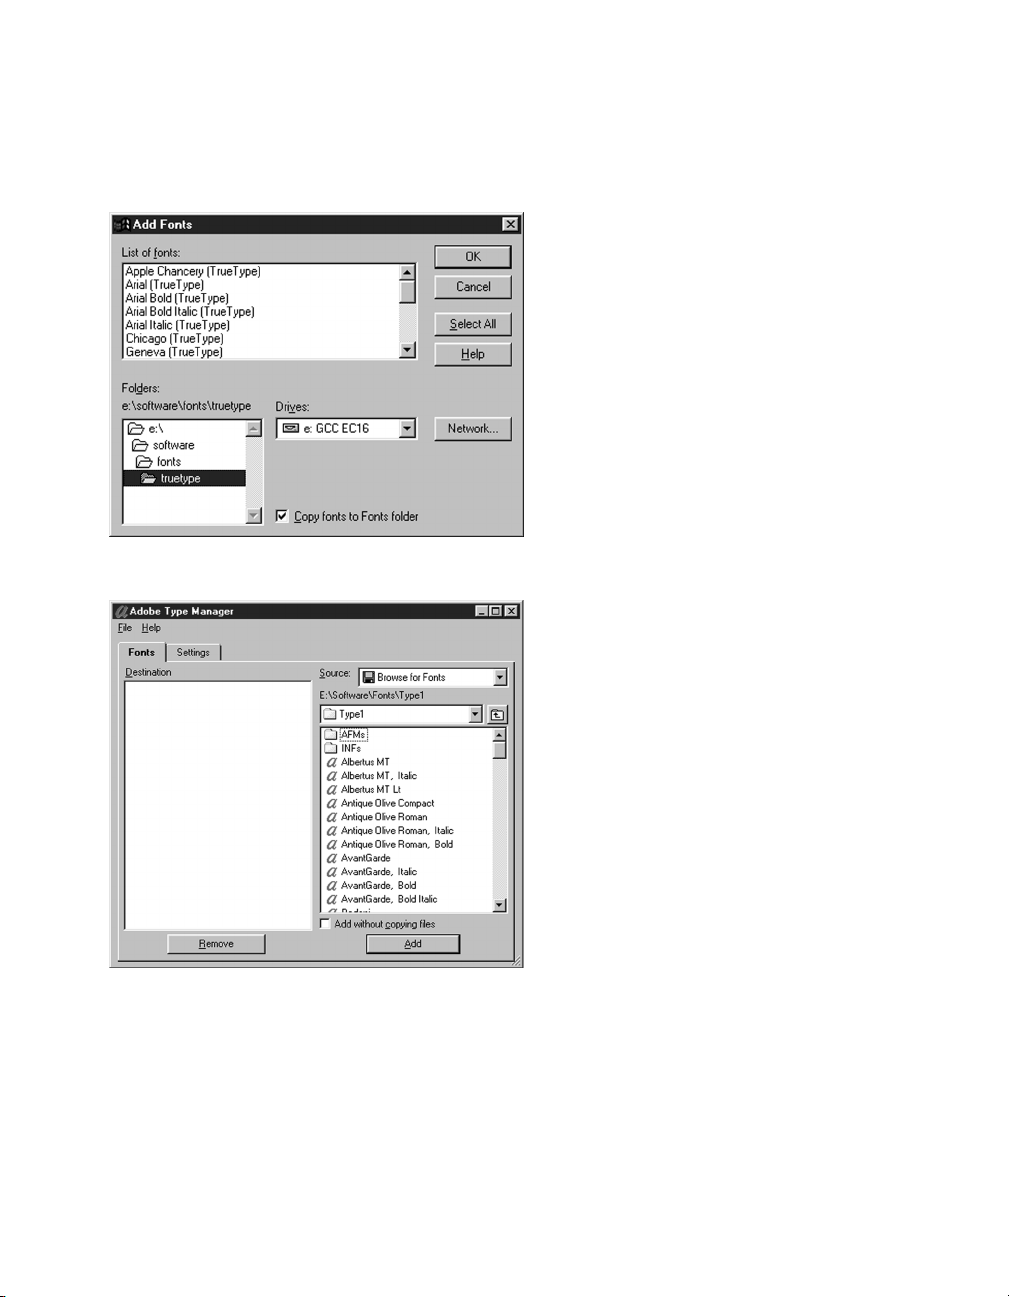
3. The Add Font window will appear. From
the “Drives” pull-down menu, select the
GCC CD-ROM. Then, under “Folders”
select the “Software” folder, then the
“Fonts” folder and finally the “TrueType”
folder. A list of TrueType fonts should
appear.
Highlight any individual fonts you wish to
install.
Note: We do not recommend selecting
fonts that are already present on your
system. Windows will not allow you to
install these fonts and an error message
will occur.
4. Clicking on the “Launch ATM” button will
open Adobe Type Manager.
To install Type I fonts, use the pull-down
menus at the top of the window to
browse to the GCC CD-ROM. Then,
under “Folders” select the “Software”
folder, then the “Fonts” folder and finally
the “Type1” folder. A list of Type1 fonts
should appear. Highlight the fonts that
you wish to install from the list, then click
the “Add” button.
This will install the Type 1 fonts on your
system and make them available to your
Windows applications. A restart may be
required.
Note: Central European-encoded variants
of the Type 1 fonts are found in the
“Software\Fonts\Type1_CE” folder on the
GCC Elite Color 16 Series CD. To install
these fonts, select this folder instead of
“Type1” under the Source section at the
top of the ATM window.
Page 67
66
5. This will install the TrueType and Type 1
fonts on your system and make them
available to your Windows applications. A
restart may be required.
When done installing fonts, close the
Fonts window or quit ATM. You will
return to the GCC Menu application.
Click “Next” to return to the Main menu
window.
6. If you are finished with all installations,
click the “Exit” button to leave the GCC
Menus application.
You should now restart your PC.
Page 68

67
Software Installation
You will need to set up your Windows computer to use the Elite Color 16 Series by
installing the Elite Color 16 Series software for Windows. This software is on the Elite
Color 16 Series CD-ROM. The CD-ROM includes customized Adobe PostScript
printer driver files for the Elite Color 16 Series and screen fonts for each of the
resident PostScript printer fonts.
This document details installation instructions for installing software for Windows
2000 and Windows XP. Screen shots for the Plug and Play instructions in this
document are from Windows 2000 and may vary slightly in Windows XP. Other
screen shots are from Windows XP and may vary in Windows 2000.
If installing over USB or Parallel: We recommend installing your printer’s software
using Windows Plug-and-Play. Instructions for this installation are found starting on
the next page. Installation of additional software (such as Adobe Type Manager, fonts,
etc.) can be done using the GCC Menus application found on the CD. Instructions for
using the GCC Menus application are found in this guide starting on Page 71.
If installing over TCP/IP: We recommend installing your printer’s software using the
GCC Menus application found on the CD. Instructions for using the GCC Menus
application are found in this guide starting on Page 71.
Important: Read the release notes contained in the Read Me file before installing the
printer software. This file includes important last-minute feature and compatibility
information about the Elite Color 16 Series. This file is located on the Elite Color 16
Series CD-ROM.
Installing the Elite Color 16 Series with Windows 2000/XP
Page 69

68
Windows 2000/XP Software Installation - Plug and Play
1. If the computer is running, shut it down.
2. With the computer and printer both powered
off, attach the parallel or USB cable to the
computer and printer. Make sure that there is
paper in the printer’s tray.
3. Turn on the printer and wait for the LCD
display to read “Ready.” Turn on the
computer.
4. The “Found New Hardware” window will
appear, indicating that the PC has recognized
the printer.
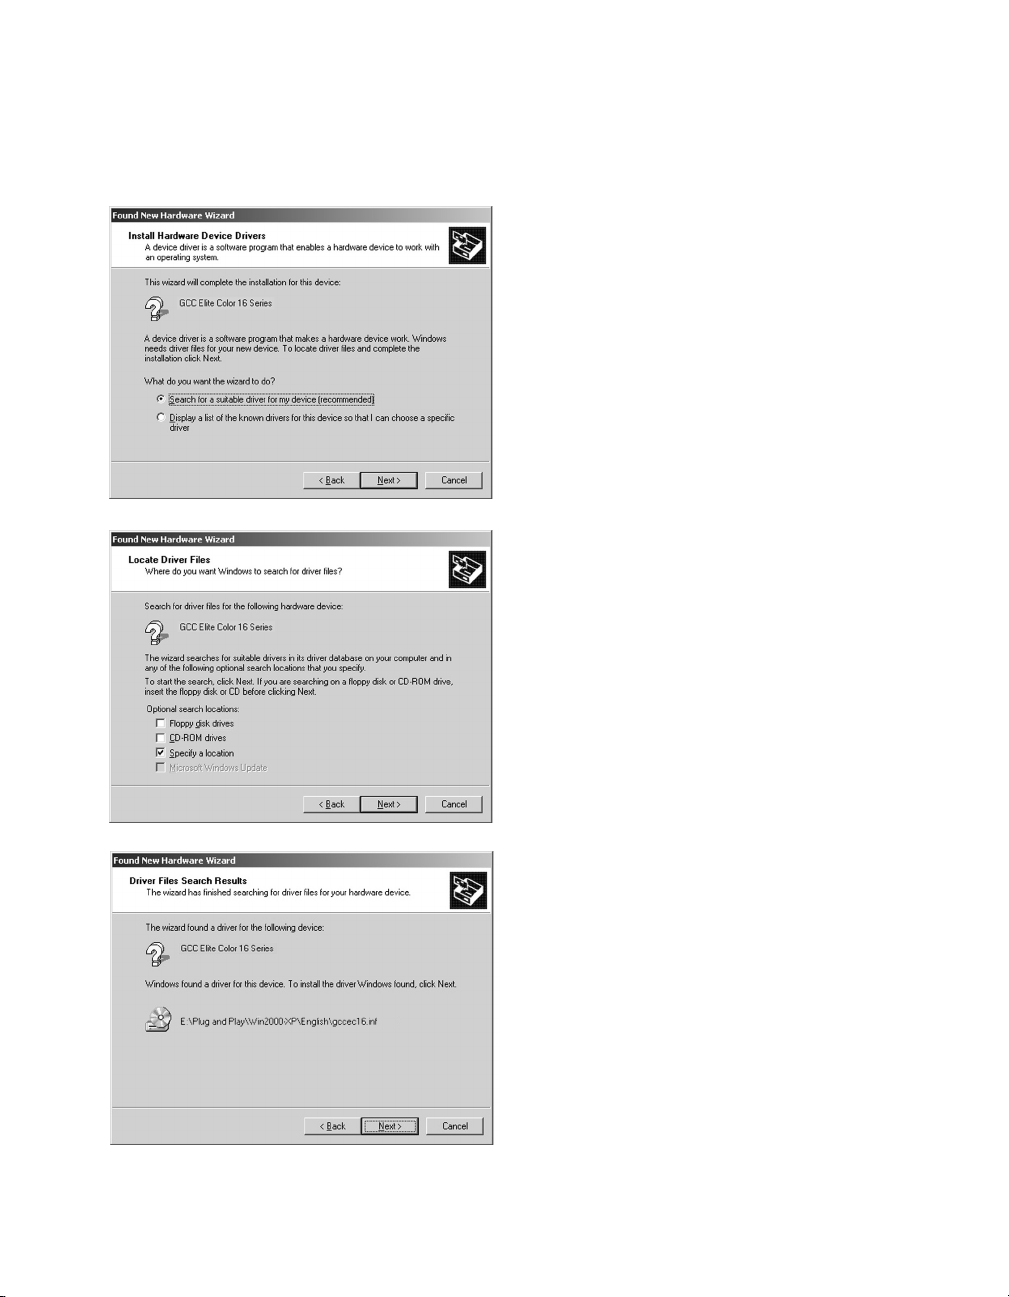
5. The Found New Hardware Wizard will start
up. Click “Next” to continue.
Page 70
69
6. The next window will ask what you want
the Wizard to do. Check “Search for a
suitable driver for my device” and click
“Next” to continue.
7. The system will then ask where to look
for new drivers. Make sure that the Elite
Color 16 Series CD is in the drive. Check
“Specify a Location.” Make sure all other
check boxes are unselected. Use the
Browse button to select the “Plug and
Play” folder on the CD, then the
“WIN2000-XP” folder, then the folder
that corresponds to the language being
used (English, French, German, Italian or
Spanish.) Select the GCCEC16.INF item
in this folder. Click “OK.” Click “Next”.
8. A window will appear showing the driver
that the Wizard found for the printer.
Click “Next” to continue the installation.
A dialog box may follow stating that a
Digital Signature was not found for the
printer. Click “Yes ” to continue the
installation.
Page 71

70
9. The Wizard will automatically copy the
driver files to their correct locations. A
status window will show the progress of
the installation.
If a “Files Needed” dialog box appears, use
the Browse button to select your Elite
Color 16 Series CD-ROM. Use the
Browse button to select the “Plug and
Play” folder on the CD, then the
“WIN2000-XP” folder, then the folder
that corresponds to the language being
used (English, French, German, Italian or
Spanish.) Select the GCCEC16.INF item
in this folder. Click “OK.”
10. The “Completing the Found New
Hardware Wizard” window will appear
when the installation is complete. Click
“Finish” to exit the Wizard.
After installation, a new icon for the
printer will appear in the Printers window
(Win2000) or the Printers and Faxes
folder (WinXP). You are now ready to
use your printer over USB and/or Parallel.
If you wish to install additional software
components such as Adobe Type Manager,
fonts, etc., please proceed to the GCC
Menus instructions starting on the next
page.
Page 72

71
Windows 2000/XP Installation via the GCC Menus Application
1. Insert the Elite Color 16 Series CD-ROM
into the computer. The “GCC Menus”
application should automatically start up.
Read the information on the Introduction
screen, then click the “Enter” button to
proceed.
2. A window will open displaying the
Software License Agreement for the
software you are about to install. Read
the agreement, then click “Agree” to agree
to its terms and continue.
3. The next window asks you to register
your printer online. Click “Register” to
open a browser window and access
GCC’s online registration page.
Please complete the registration
information on the page, then close the
browser window to proceed.
Page 73

72
1. The GCC Menus window should proceed
to the main menu window. This window
contains options for viewing release notes
and manuals, browsing the CD, accessing
GCC’s web site and installing software.
Click the “Printer Software” button to
proceed with the software installation.
2. The Software window will appear. This
window contains options to install TCP/IP
Printer Port software, PostScript drivers,
Adobe Type Manager, and Fonts.
Each software category’s button has a
check box on it. Check the boxes for
each of the software components that you
wish to install. Recommended
components are pre-selected.
If installing over USB or Parallel, you
should have already installed the printer
driver using the Plug and Play instructions
starting on Page 68. In this case, de-select
the “TCP/IP Printer Port” and “PostScript
(PS) Driver” option in this menu.
Click the “Next” button to proceed to the
first installation.
Installing the GCC Printing Software Components
Instructions for the individual installations are found within this guide as follows:
Installation #1 (TCP/IP Printer Port) . . . . . . . . . . . . . . . . . . . . . . . . . . .Page 73
Installation #2 (PostScript Driver) . . . . . . . . . . . . . . . . . . . . . . . . . . . . .Page 75
Installation #3 (Adobe Type Manager) . . . . . . . . . . . . . . . . . . . . . . . . . .Page 81
Installation #4 (Fonts) . . . . . . . . . . . . . . . . . . . . . . . . . . . . . . . . . . . . . .Page 82
Page 74

73
1. The first installation window to appear is
for the TCP/IP Printer Port.
Note: If you did not select the TCP/IP
Printer Port software check box from the
main Software menu, this window will not
appear. Skip to Installation #2 - PS Driver.
Read the information in the left-hand
window, then click the “Next” button to
begin the installation.
2. The next window will ask you to enter
the printer’s IP address. Type in the
address, then click “Next” to continue.
Consult the “Interface Menu” section on
Page 7-11 of the Elite Color 16 Series
User’s Guide for information on setting
the printer’s IP address and other network
settings.
3. The next window asks for a port name.
This will determine how the port appears
on the list of available ports on the PC.
You can leave the default name, or type in
a more distinctive name.
Installation #1 - TCP/IP Printer Port
Page 75

74
4. A window will appear, informing you that
a TCP/IP port has been added to the
system. Click “OK.”
You will be returned to the GCC Menus
application, ready for the next installation.
Page 76
75
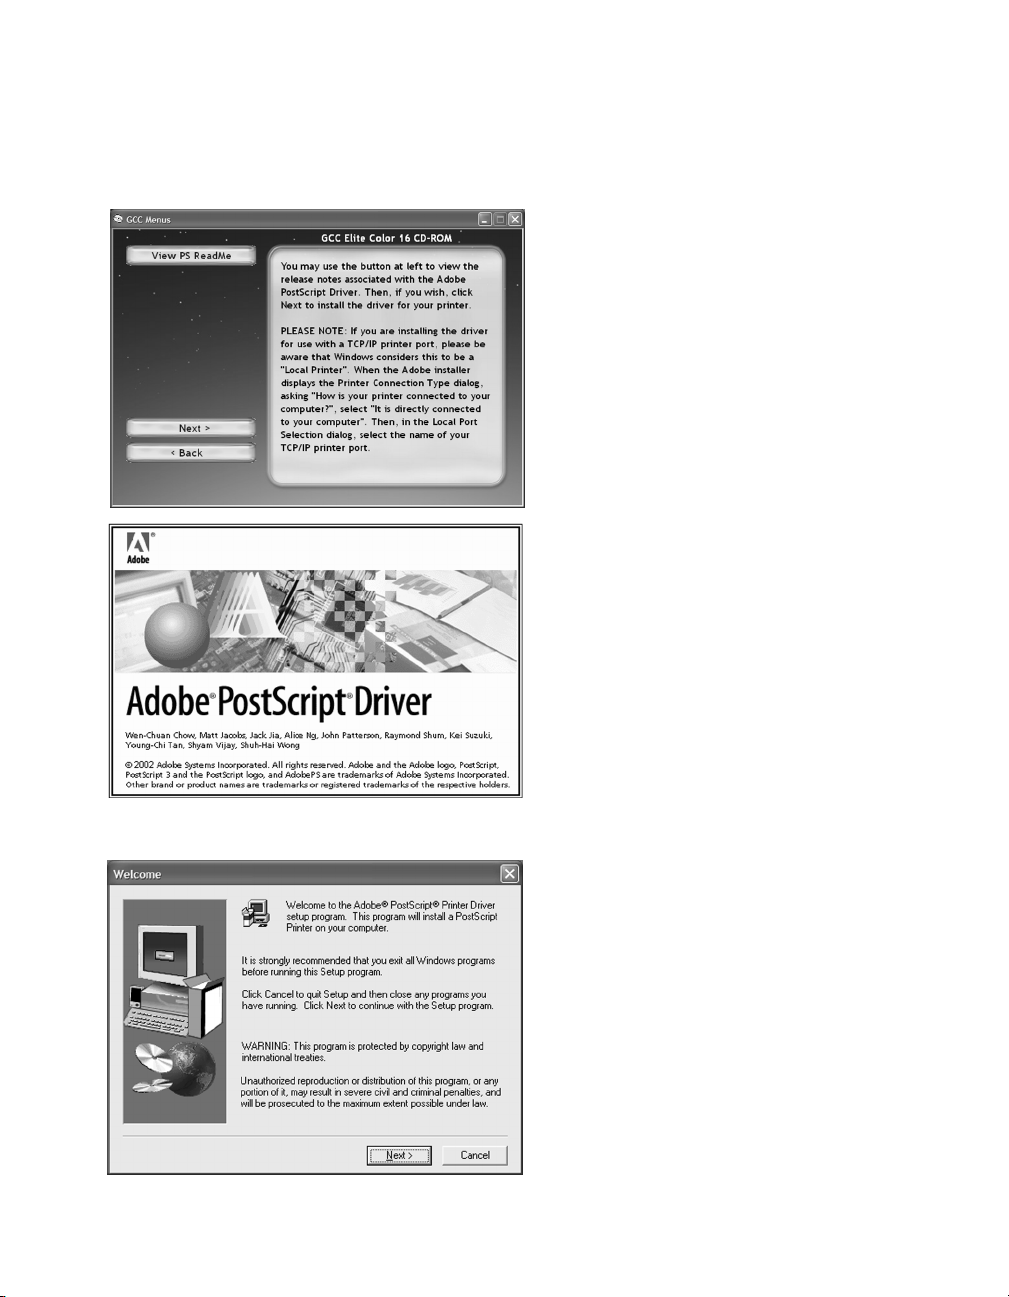
1. The next installation window to appear is
for the PostScript (PS) Driver software.
Note: If you did not select the PostScript
Driver software check box from the main
Software menu, this window will not
appear. Skip to Installation #3 - Adobe
Type Manager.
Click the top button to review the
ReadMe file for this software, then click
the “Next” button to begin the
installation.
2. This printer uses the Adobe PostScript
Driver software. A splash screen for
Adobe’s driver installation will appear.
3. The Welcome window will appear. Quit
all applications (except for the GCC
Menus application) if you have not already
done so, then click “Next” to proceed.
Installation #2 -PostScript (PS) Driver Software
Page 77

76
4. The End User License Agreement for the
Adobe software will appear. Read the
agreement and click “Accept” to continue.
5. The next window will ask if the printer is
directly connected to your computer, or is
on the network.
Click “Local Printer”
at this point, even if connecting to
the printer via TCP/IP Printer Port
.
The TCP/IP port you added earlier will
appear as a local printer port.
“Network Printer” should only be
selected at this point if the printer is
directly attached to another PC or
accessed via an NT or Win2000 server.
Click “Next.”
6. Select the port that the computer is to be
attached to. The list of available ports will
vary depending on your PC’s configuration
and the version of Windows in use. If you
installed a TCP/IP Printer Port in
Installation #1, this port should appear as
an option on this list. Click “Next.”
If installing over USB or Parallel, we
recommend using Plug and Play rather
than this installer. Click Cancel and
consult the instructions starting on Page
68 for more information.
Page 78

77
7. A window will appear asking you to select
a PPD for the printer. Select “Elite Color
16 Series PS” from the list and click
“Next.”
8. The next window will ask if the printer is
shared or not. Sharing the printer will
allow other users on your Windows
network to access your printer through
your PC’s connection. Select Shared or
Not Shared, then click “Next.”
9. The next window will allow you to assign
a name to the printer. You can type in a
new name for the printer, or leave the
default name.
This window also allows you to choose
whether the printer will be the default for
this PC or not. Select Yes or No.
An option to print a test page also
appears Select Yes or No. Click “Next.”
Page 79

78
10. A summary of the selections you have
made during this installation will appear.
Look over the options to make sure they
are correct and click “Install.”
11. A status bar will appear, showing the
progress of the software installation.
12. When all files are installed, a window will
appear asking if you want to configure
your printer. This will allow you to set
the printer up to use additional options,
etc. Select “Ye s ” to configure the printer
now, and click “Next.”
Page 80

79
13. The Printer Properties window will
appear. Scroll down to “Installable
Options” to access specific options for the
printer.
If you have added the High Capacity
Feeder to the printer, click on the “Not
Installed” link next to “High Capacity
Feeder.” Change the selection to
“Installed.”
If you have changed the amount of
memory in the printer, click on the link
next to “Installed Memory.” Change the
selection to the new memory amount.
When configuration is complete, click
“OK” to leave the Properties window and
continue the installation.
14. Once you are done configuring the
printer’s options, a window will appear
informing you that the installation is
complete. An option to view the release
notes for the driver is available. Click
“Finish” to complete the installation.
Page 81
80
15. You will return to the GCC Menu
application. A dialog box will appear
asking you to click “OK” when the Adobe
PostScript installation is complete. Click
“OK” to proceed to the next installation.
Page 82

81
1. The next installation window to appear is
for the Adobe Type Manager (ATM) Light
software.
Note: As an optional installation, ATM is
not automatically selected from the main
Software menu, so this menu may not
appear. Skip to Installation #4 - Fonts.
Click the top button to review the
ReadMe file for this software, then click
the “Next” button to begin the
installation.
2. Follow the on-screen instructions to run
Adobe’s ATM Light installer.
Please consult the Windows 2000/XP
Software Installation Guide PDF on your
Elite Color 16 Series CD for more
detailed instructions related to the ATM
installer.
3. When installation is complete, you will
return to the GCC Menu application. A
dialog box will appear asking you to click
“OK” when the ATM installation is
complete. Click “OK” to proceed to the
next installation.
Installation #3 - Adobe Type Manager
The Elite Color 16 Series software includes Adobe Type Manager (ATM) Light. ATM Light is a program
which allows you to view and manage Type 1 fonts on your PC. Windows 2000 and XP have built-in
Type 1 font support through the operating system, so installing ATM on these systems is optional.
If your system is running a version of ATM Deluxe, you should skip this installation. Users of ATM Light
versions prior to 4.1 should run this installer to update to this newer version.
Page 83

82
Installation #4 - Fonts
1. The next installation window to appear is
for the Fonts.
Note: If you did not select the Fonts check
box from the main Software menu, this
window will not appear.
Click the top button to review the Font
Instructions file, then, click “Open Fonts
Folder” to install fonts.
2. Clicking on the “Open Fonts Folder”
button will open the Windows Fonts
folder.
To install new fonts, go to the File menu
and select “Install New Font.”
The Elite Color 16 Series CD contains screen versions of all the resident PostScript Level 3 fonts on
the printer. Most fonts are included in Type 1 format, some are included in TrueType format. In order
to access these fonts from within your Windows applications, you must install them onto the PC first.
In Windows 2000 and XP, both Type 1 and TrueType fonts can be installed through the Windows Fonts
folder. Type 1 fonts can also be used with Adobe Type Manager. If you have not installed ATM on your
system and wish to, go back and follow the steps in Installation #3 on Page 81 of this guide.
Please see the Font Instructions file for more information relating to the installation of fonts.
Page 84

83
3. The Add Font window will appear. From
the “Drives” pull-down menu, select the
GCC CD-ROM. Then, under “Folders”
select the “Software” folder, then the
“Fonts” folder. Folders will appear for
Type 1,Type I CE (optional Central
European encodings) and TrueType. Select
the folder with the type of fonts you wish
to install. A list of fonts will appear.
Highlight any individual fonts you wish to
install. Note that Windows will not allow
you to install fonts already present on
your system.
5. This will install the TrueType and Type 1
fonts on your system and make them
available to your Windows applications. A
restart may be required.
When done installing fonts, close the
Fonts window or quit ATM. You will
return to the GCC Menu application.
Click “Next” to return to the Main menu
window.
6. If you are finished with all installations,
click the “Exit” button to leave the GCC
Menus application.
You should now restart your PC.
Page 85

84
Step 10. Verify Printer Setup
In order to verify that the printer has been set up properly, we recommend sending a simple print job
from the computer to the printer. To do this, make sure that the Elite Color 16 printer is selected as
the default printer on your computer, as follows:
Macintosh (OS 9.x or earlier): Single-click the printer’s icon on the Desktop. Go to the Printing
menu, then down to “Set Default Printer.”
Macintosh (OS X): Double-click the “Print Center” icon, found within the Utilities folder inside the
Applications folder. Click on the name of your printer from the list that appears. Go to the Printers
menu, then down to “Make Default.”
Windows (except XP): Go to Start, then Settings, then Printers. Right-click the icon for the printer.
Select "Set as Default" from the list.
Windows XP: Go to Start, then Printers and Faxes. Right-click the icon for the printer. Select "Set as
Default Printer" from the list.
Note:This option only appears on the list if the printer is not already the default printer.
Once the printer is selected, open an application on the computer (such as SimpleText on the Mac or
NotePad in Windows) and create a simple file. Go to File and then to Print to print the job.
If the job prints, installation is complete.
If the job fails to print, confirm that Steps 1-9 in this guide have been performed correctly. If the
printer still will not print, repeat Steps 1-9. If you still have difficulty getting a document to print,
contact GCC Technical Support by phone at (781) 276-8620 (North America only; outside North
America, refer to the User’s Guide) or http://www.gccprinters.com/support or contact your authorized
GCC dealer.
Page 86

85
TRADEMARKS
GCC Technologies is a registered trademark of GCC Technologies, Inc. GCC Printers, the GCC Printers
logo and Elite are trademarks of GCC Technologies, Inc. Apple,AppleTalk, ColorSync, LaserWriter, Mac,
Macintosh, and the Apple logo are registered trademarks of Apple Computer, Inc.Windows is a registered
trademark of Microsoft, Inc. PostScript and Adobe Type Manager are registered trademarks of Adobe
Systems Incorporated. PCL is a registered trademark of Hewlett-Packard, Inc. Ethernet is a registered
trademark of Xerox Corp.
CREDITS
© Copyright GCC Technologies, Inc., 2003. All rights reserved.
Written by David Nicholson.
Edited by Lee Doron, Laurie Freitas, Brian Harriss,Wendi LeBlanc and Phil Parsons.
Guide printed in USA. Rev A
Page 87

TM
Sales: 800.422.7777
Support: 781.276.8620
Outside North America, contact your local office.
GCC Printers
209 Burlington Road
Bedford, MA 01730
Tel: 781.275.5800
Fax: 781.275.1115
www.gccprinters.com
 Loading...