

Page 1

USER MANUAL
GEBRAUCHSANLEITUNG
MANUEL D’UTILISATION
MANUAL DE FUNCIONAMIENTO
MANUALE D’USO
GEBRUIKSAANWIJZING
РУКОВОДСТВО ПО ЭКСПЛУАТАЦИИ
ユーザーマニュアル
用户手册
EN
DE
FR
IT
ES
NL
RU
JP
CN
Page 2

EN
User Manual User Manual
EN
3
2
TABLE OF CONTENTS
DECLARATION OF CONFORMITY 5
VERSIONS 6
FEATURES 6
INSTALLING THE BATTERIES 7
BATTERIES 7
COMPATIBILITY 8
TRIGGERING 8
REMOTE CONTROL 8
FREQUENCY CHANNELS 8
TECHNICAL DATA 9
HOT-SHOE ADAPTER 10
MOUNTING ON THE CAMERA 10
DISPLAY 11
BUTTONS 12
SETUP MENU 14
MANUFACTURING RESET 16
TROUBLESHOOTING 16
FIRMWARE UPDATE 18
Tolerances and specifications conform to IEC and CE standards. Technical data subject to change without notice.
INTRODUCTION
Dear Photographer,
Thank you for choosing ELINCHROM.
All Elinchrom products are manufactured using the most advanced technology. Carefully selected components
are used to ensure the highest quality and the equipment is subjected to many tests both during and after
manufacture. We trust that it will give you many years of reliable service.
Please read this User Manual carefully before you use your new Elinchrom product. You will find information
for your safety and how to benefit from all the programmable features.
This Manual may show images of products with accessories which are not part of sets or single units.
Elinchrom set and single unit configurations may change without advice and may differ in other countries.
For further details, upgrades, news and the latest information about the Elinchrom system, please regularly
visit the Elinchrom website. The latest user guides and technical specifications can be downloaded from the
“Support” area.
Technical data, features and functions of Elinchrom flash units and accessories may change without notice.
The listed specification can differ due to tolerances in components or measuring instruments. Technical data is
subject to change. No guarantee for misprints.
Please check for the most recent manual at our website: www.elinchrom.com/support
Thanks,
Your Elinchrom-Team
Page 3
EN
User Manual User Manual
EN
5
4
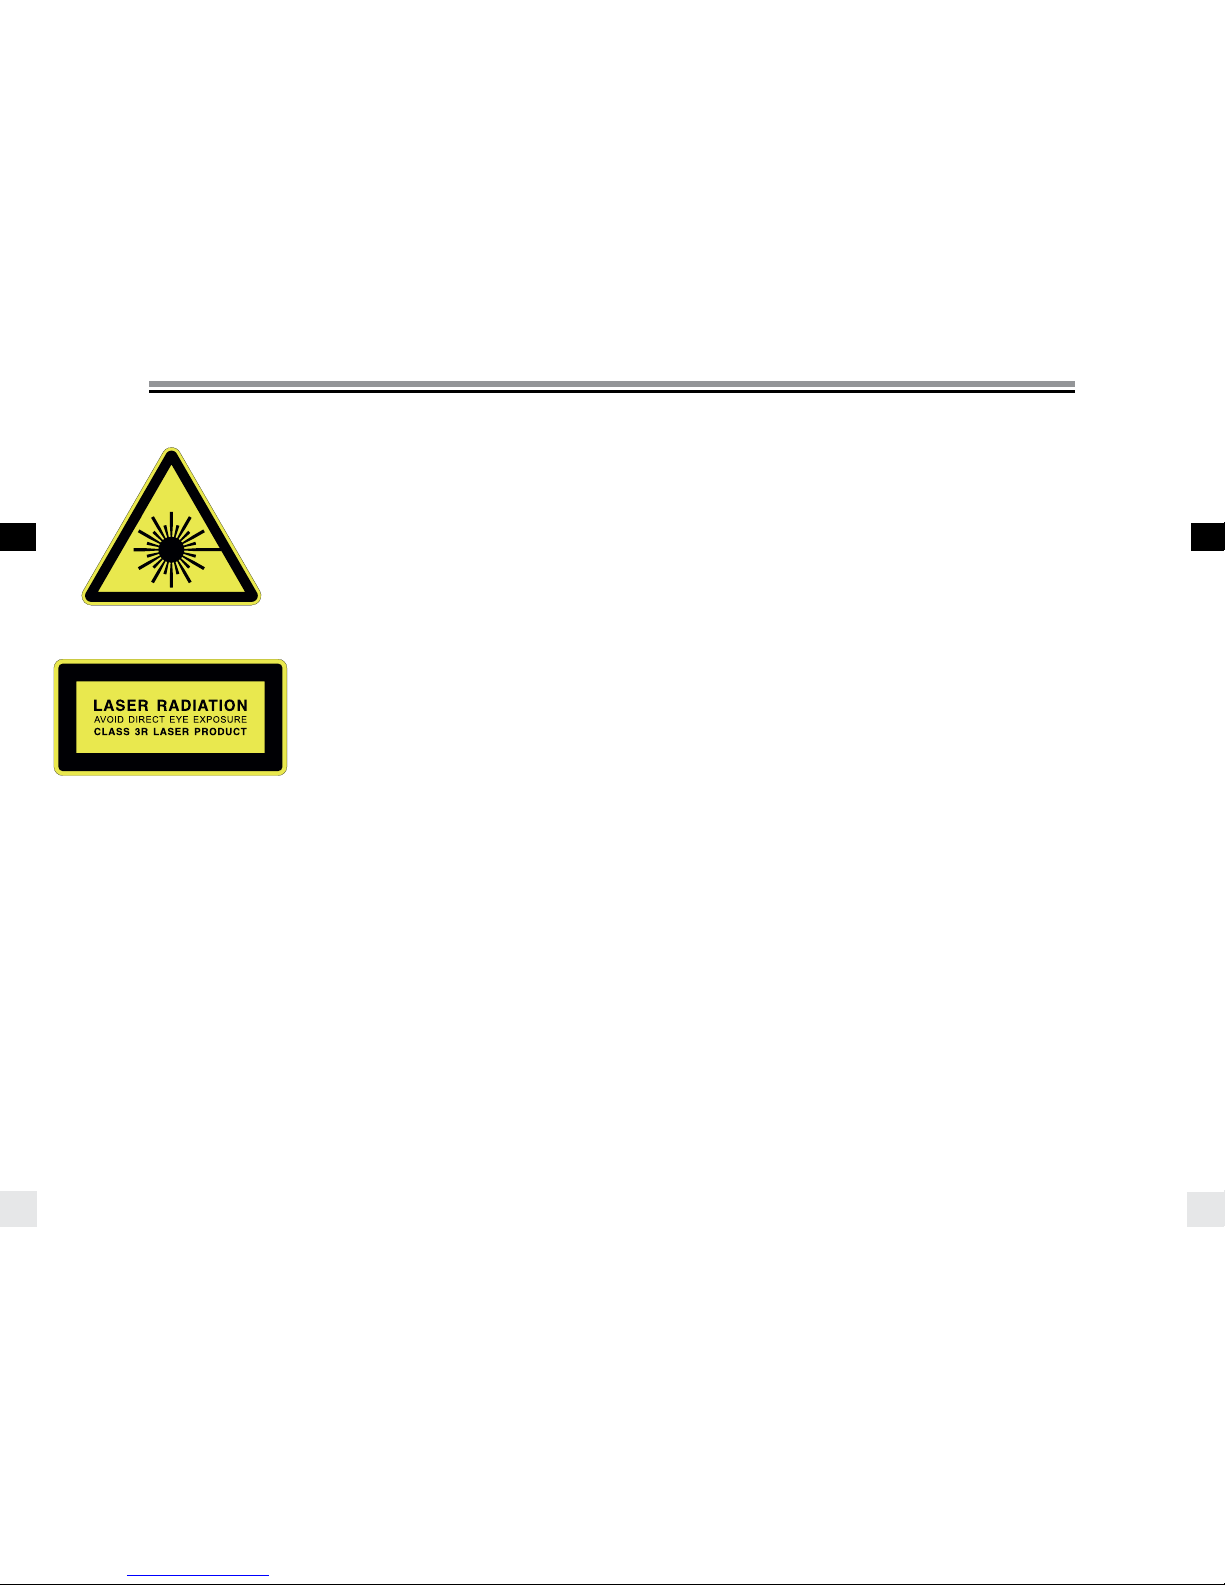
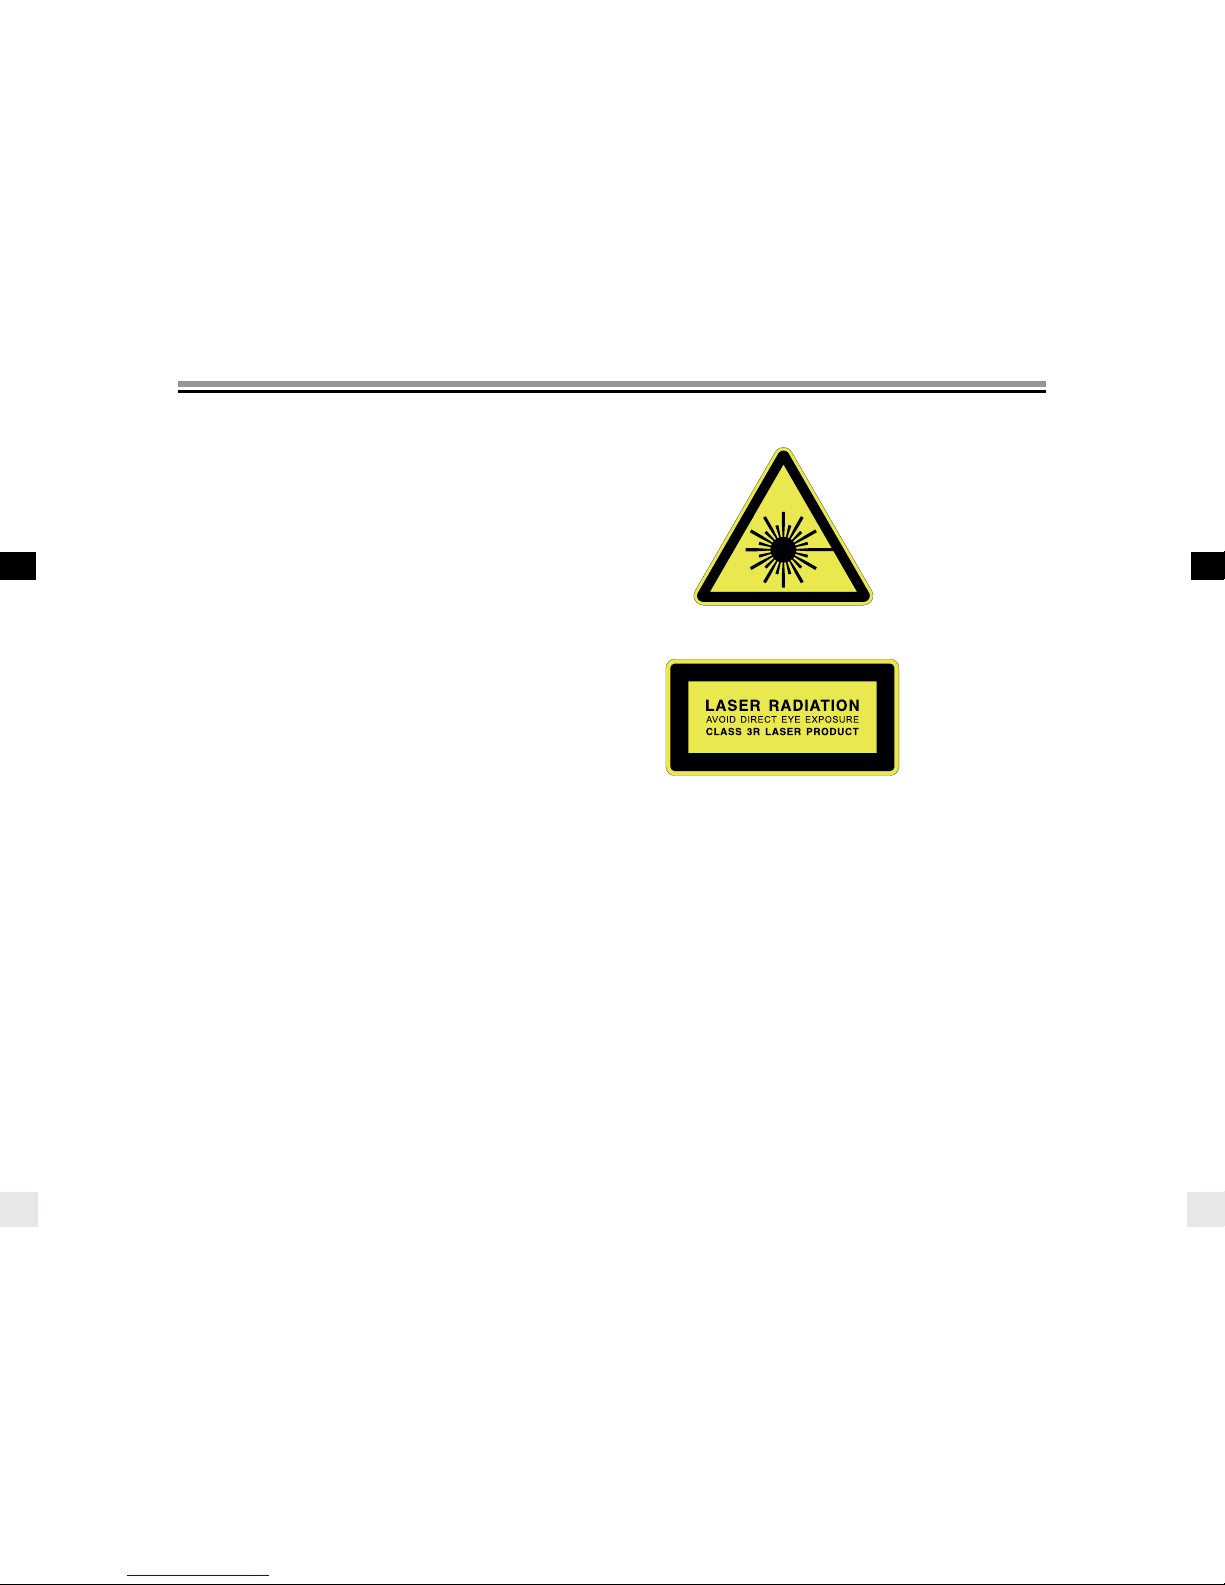
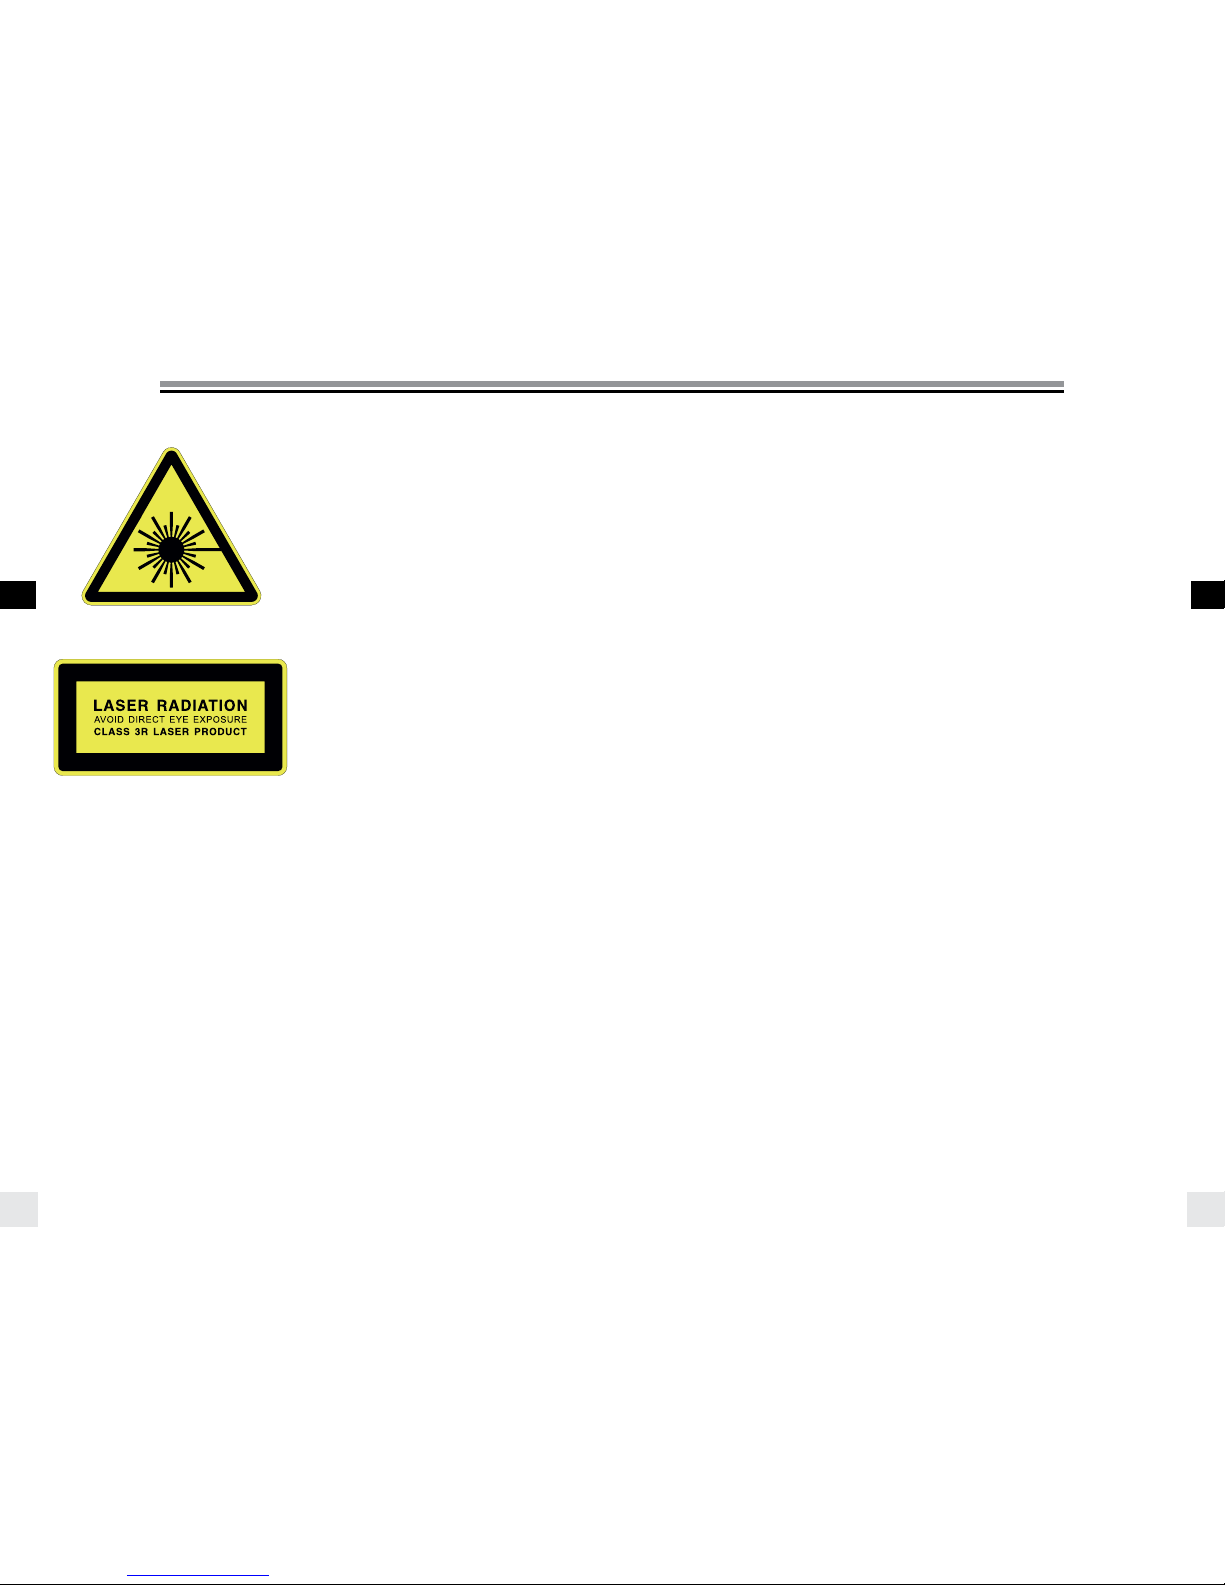
The Product is classified as a Class 3R laser
product, according to the following standards
IEC/EN 60825-1 “Radiation Safety of Laser
Products”.
Class 3R: A Class 3R Laser is considered safe if
handled carefully, with restricted beam viewing.
With a class 3R laser, the MPE can be exceeded,
but with a low risk of injury. Visible continuous
lasers in Class 3R are limited to 5mW. For other
wavelengths and for pulsed lasers, other limits
apply.
DECLARATION OF CONFORMITY USA AND CANADA
EN This device complies with Part 15 of the FCC Rules and with Industry Canada licence-exempt RSS
standard(s). Operation is subject to the following two conditions: (1) this device may not cause harmful
interference, and (2) this device must accept any interference received, including interference that may cause
undesired operation. This product complies with the Canadian ICES-003 Class B specifications.
FR Le présent appareil est conforme aux CNR d’Industrie Canada applicables aux appareils radio exempts
de licence. L’exploitation est autorisée aux deux conditions suivantes(1) ce dispositif ne doit pas produire
de brouillage préjudiciable, et (2) ce dispositif doit accepter tout brouillage radioélectrique subi, même si le
brouillage est susceptible d’en compromettre le fonctionnement. Cet appareil numérique de la classe B est
conforme à la norme NMB-003 du Canada.
Radiation Exposure Statement
EN This equipment complies with portable RF exposure limit in Canada and the USA set forth an
uncontrolled environment and is safe for intended operation as described in this manual. Further RF exposure
reduction can be achieved if the product can be kept as far as possible from the user body.
FR Le produit est conforme aux limites d’exposition pour les appareils portables RF pour les Etats- Unis et le
Canada établies pour un environnement non contrôlé. Le produit est sûr pour un fonctionnement tel que décrit
dans ce manuel. La réduction aux expositions RF peut être augmentée si l’appareil peut être utilisé aussi loin
que possible du corps de l’utilisateur.
FCC Class B Compliance note
This equipment has been tested and found to comply with the limits for a Class B digital device, pursuant
to Part 15 of the FCC Rules. These limits are designed to provide reasonable protection against harmful
interference in a residential installation. This equipment generates, uses and can radiate radio frequency energy
and, if not installed and used in accordance with the instructions, may cause harmful interference to radio
communications. However, there is no guarantee that interference will not occur in a particular installation. If
this equipment does cause harmful interference to radio or television reception, which can be determined by
turning the equipment off and on, the user is encouraged to try to correct the interference by one or more of
the following measures:
• Reorient or relocate the receiving antenna.
• Increase the separation between the equipment and receiver.
• Connect the equipment into an outlet on a circuit different from that to which the receiver is connected.
• Consult the dealer or an experienced radio/television technician for help.
Any changes or modifications not expressly approved by the party responsible for compliance could void
the user’s authority to operate this equipment. This device is limited to operation on permissible Part 15
frequencies, and it does not have the ability to be configured by end users or professional installers to operate
outside the authorized bands.
Page 4
EN
User Manual User Manual
EN
7
6
EL SKYPORT TRANSMITTER PLUS HS
VERSIONS
The ELSP Transmitter Plus HS is available for the following cameras
• Canon
• Nikon
FEATURES
• Large graphic control display.
• Display Illumination in green or red (green for Normal Sync Mode, red for Speed Sync Mode).
• Fast access buttons and rotating wheel for easy control.
• Secure Hot-Shoe connection with bayonet locking system.
• Standard 2 AA Batteries (accepts rechargeable batteries).
• 2.5mm jack trigger output.
• Firmware update with integrated Mini USB socket.
• 40 Remote channels.
• 20 frequency channels* in Normal Sync mode.
• 20 frequency channels* in Speed Sync mode.
• 4 Groups and ALL .
• EL-Skyport Sync Modes.
• Normal Sync Mode (maximum distance range).
• Speed Sync Mode (faster shutter speed particularly when HS is activated,
but reduced distance range).
• Sync Modes***.
• Standard (using the middle contact of the Hot-Shoe).
• HS **** (Sync up to 1/8000s, controlled automatically).
• ODS (manual Over-Drive-Sync) fine tune the timing of HS for maximum power and even exposure.
• Second curtain sync mode****.
• AF Light integrated***.
• Auto MOD *** to control the modelling light of Elinchrom flash units for focusing.
• Shutter Mode***** (the half pressed shutter release controls the modelling lamp).
• DOF Mode (the camera “DOF” (Depth Of Focus) button controls the modelling lamp).
• REMOTE Control** with automatic feedback from Elinchrom flash units.
• EL – flash units can be controlled “All” together, in “Groups” or “Single” units.
• Flash power up & down.
• Modelling lamp on/off or intensity up & down.
• Sleep mode and Auto OFF mode programmable.
• RESET to standard settings.
* For all the latest Elinchrom flash units with 20 frequency channels, and compatible with earlier models.
** For all Elinchrom flash units with built-in EL-Skyport Receiver and Transceiver.
*** Extended features for Canon and Nikon cameras with TTL Hot-shoe
(Limited features for Nikon, see below).
**** These features are not supported by Nikon, but can be activated in the camera menu.
***** Not supported by Nikon.
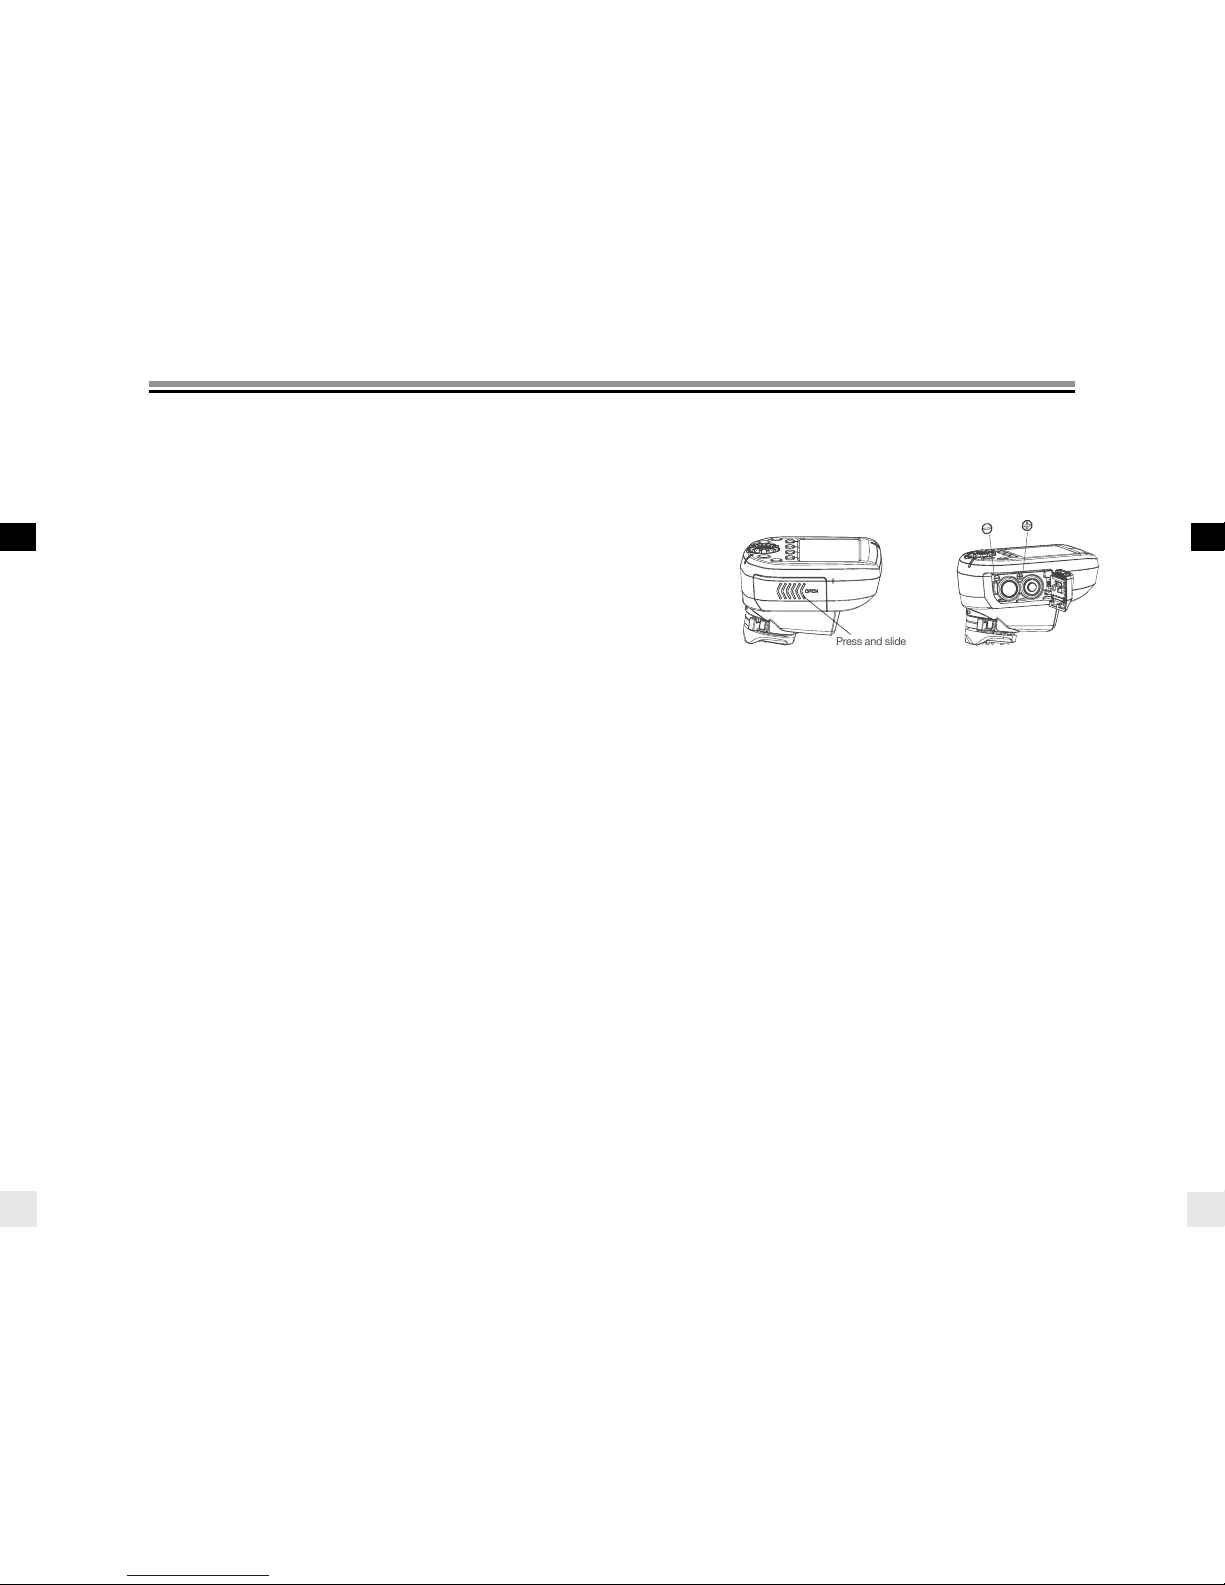
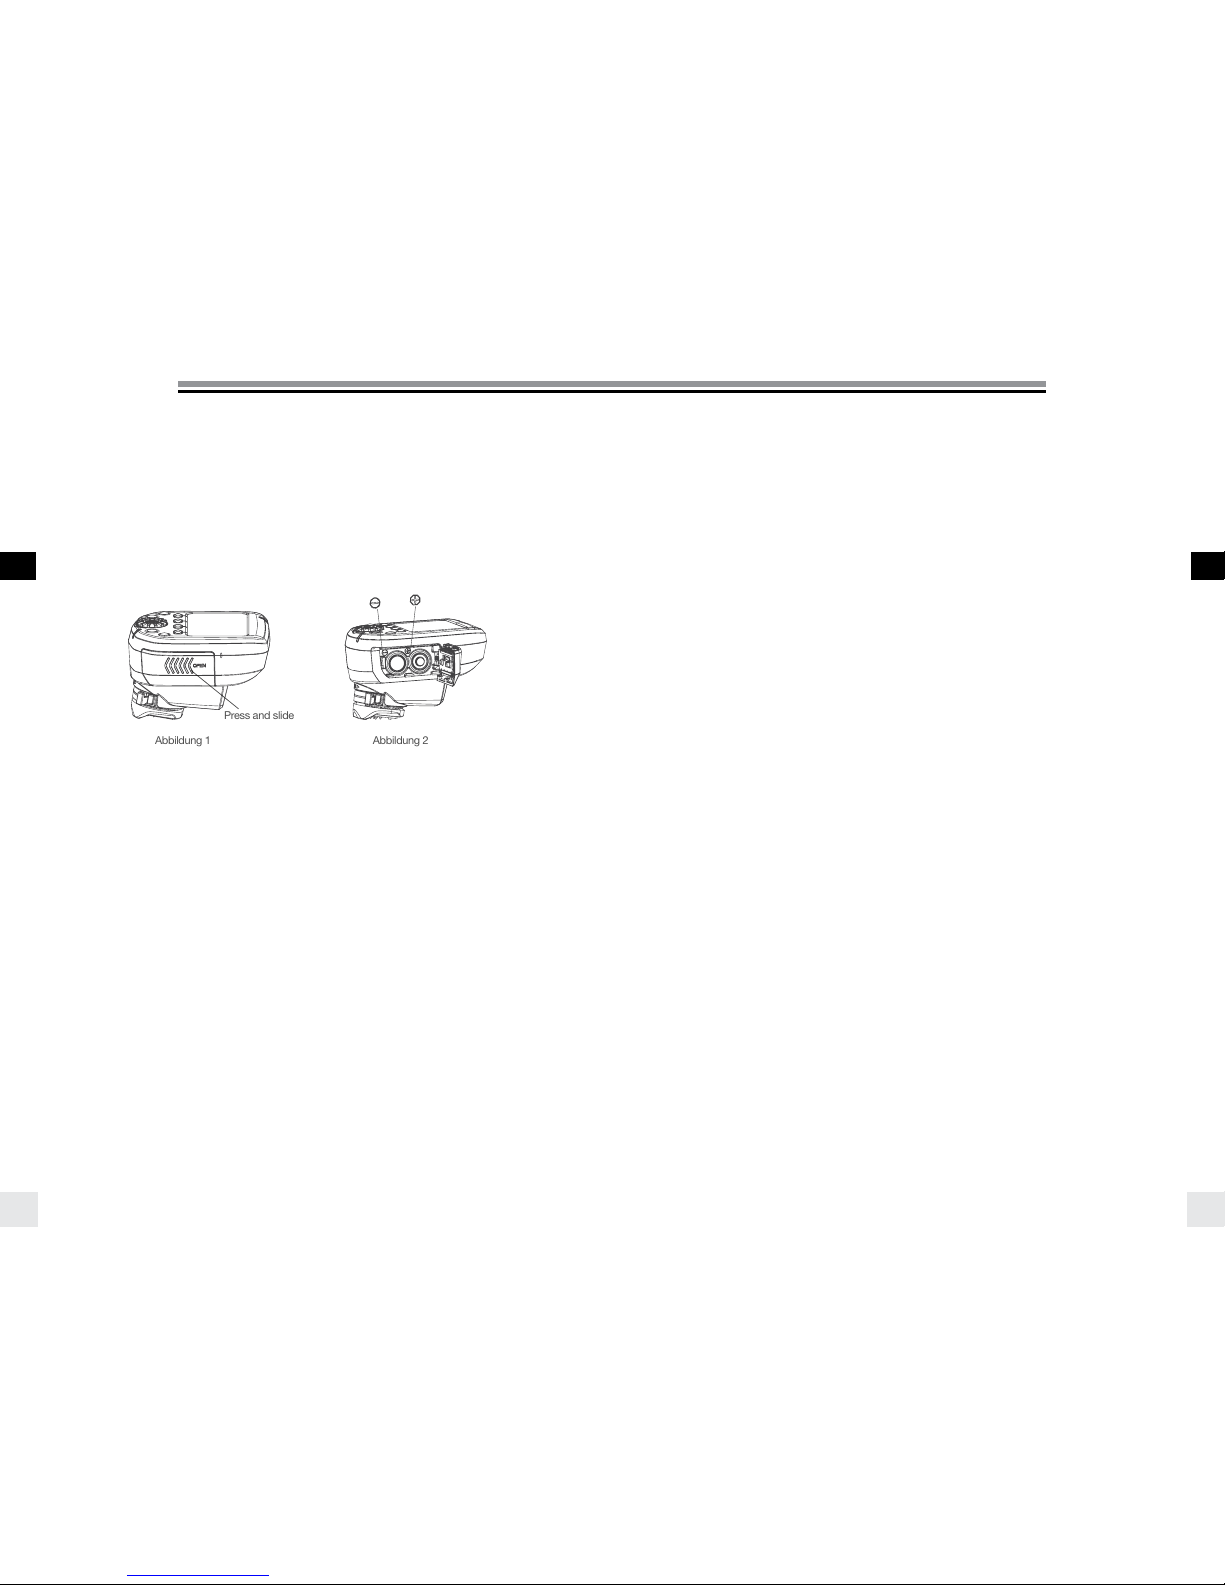
INSTALLING THE BATTERIES
Press the battery compartment cover and slide it in the direction of the arrow to open the battery cover
(See Picture 1).
Insert the batteries. Make sure the “+” and “-” battery contacts are correctly oriented (See Picture 2).
(Note: Please use 2 pieces of AA alkaline batteries or AA type NIMH batteries).
Press cover against Transmitter and slide it back into the locked position.
Picture 1 Picture 2
BATTERIES
• 2x AA batteries are used for the Transmitter.
• Installing the batteries improperly will not damage the Transmitter.
• Non-rechargeable (dry cell) AA batteries like zinc–carbon, Alkaline types or rechargeable batteries in the
AA size such as nickel-cadmium (NiCd) or nickel-metal hydride (NiMH) can be used.
• Do not mix battery types.
• Do not use Lithium AA batteries in this transmitter.
Press and slide
Page 5
EN
User Manual User Manual
EN
9
8
COMPATIBILITY
There are three different Elinchrom EL-Skyport flash unit Generations in the market:
1ST GENERATION
• EL-Skyport Transceiver RX module (Style RX, Digital RX, Ranger RX).
2ND GENERATION
• Built-in EL-Skyport module Mk1 (BRX, D-Lite RX, Quadra, Quadra Hybrid).
3RD GENERATION
• Built-in EL-Skyport module Mk2 (ELC and ELB).
This generation offers extended distance range
TRIGGERING
Triggering works with all existing Elinchrom flash units with built-in or plug-in EL-Skyport Transceivers.
REMOTE CONTROL
WHEN ALL OR GROUP 1 - 4 IS SELECTED
• All Elinchrom flash units with EL-Skyport are supported when changing “PWR±, MOD± or MOD on/off”.
When modelling lamp power settings are changed with the MOD on/off or MOD+/- button,the Elinchrom
flash in use will switch to free modelling mode. To return to proportional modelling lamp mode, settings
must be made on the EL flash unit.
• Some units do not support all modelling features, “--“ is then displayed (i.e. for Ranger, Quadra, ELB400).
WHEN A SINGLE UNIT IS SELECTED
• The selected unit is highlighted with a frame in the display and can be controlled individually.
• Only Elinchrom flash units with built-in EL-Skyport receivers of the 2nd and 3rd generation are supported.
Note:
1st Generation units are detected, but will show “--“ in the display. There is no feedback of the unit settings to
the EL-Syport Transmitter Plus HS, but they will be triggered normally.
FREQUENCY CHANNELS
Some older Elinchrom flash units with EL-Skyport built-in will support Frequency channels 1 to 4 or 1 to 8
(such as BRX, D-Lite RX, Quadra).
The latest Elinchrom flash units with EL-Skyport built-in will support up to 20 different Frequency channels 1 to
20 (ELC, ELB).
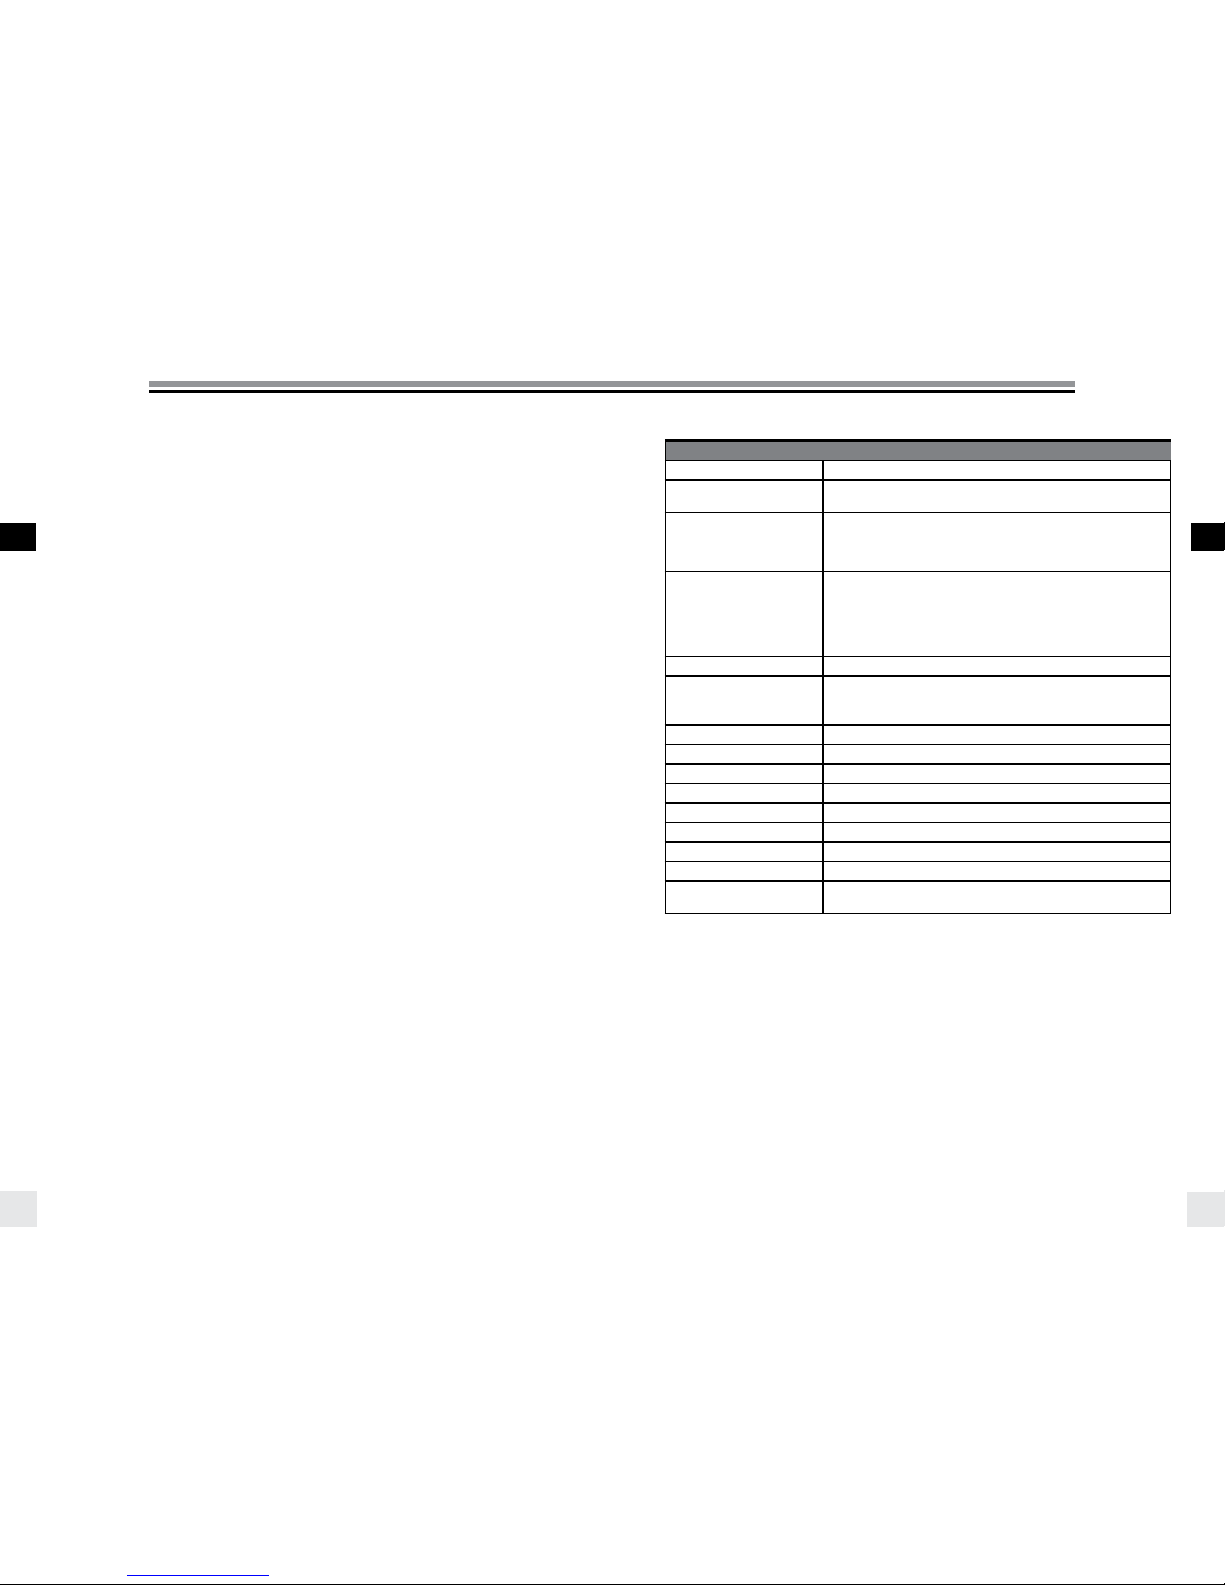
TECHNICAL DATA
PARAMETER SPECIFICATION
VERSIONS
Canon, Nikon.
TRIGGERING COMPATIBILITY
ALL Elinchrom flash units with built-in EL-Skyport Receiver or Transceiver
and the EL-Skyport RX Transceiver modules, plus EL-Skyport Universal.
REMOTE CONTROL COMPATIBILITY
ALL Elinchrom flash units with built-in EL-Skyport Transceiver: ELC Pro
HD, ELB 400, Ranger Quadra RX, Quadra Hybrid, D-Lite RX series, BRX
Series, Master RX Series and FRX series (NOTE: EL-Units used with the
plug-in Transceiver RX module have limited remote features ).
DISTANCE RANGE
Indoor > 60m.
Outdoor > 200m.
Note:
The full distance range is available with the latest Elinchrom flash units
such as ELC or ELB. Other, or older Elinchrom flash units will have a
limited distance range.
BATTERIES
2x AA batteries (standard or rechargeable).
BATTERY LIFETIME
Depends on the type of batteries and the usage.
For two standard batteries with 1000mAh each it is approx. 35 hours
working time and more than 15000 trigger releases.
REMOTE CONTROL
Max. 10 units can be detected displayed and remote controlled.
FREQUENCY CHANNELS
20 channels in Normal mode and 20 channels in Speed mode.
EL-SKYPORT MODES (ELSP)
Normal / Speed - Sync mode.
TRIGGER/CONTROL GROUPS
“All” or in “Groups” (Group 1 to 4).
SYNC MODES
Standard, HS (with or without ODS), Second Curtain.
USB SOCKET
For firmware updating.
SR SOCKET
Trigger Output 2.5mm Phone Jack mono (max. sync-voltage 3VDC).
DIMENSIONS (W x L x H)
69 x 84 x 59 mm (2.7x 3.3x 2.3 in.)
WEIGHT
Approx. 170g (6 oz) ,including 2x AA-batteries. 120g (4.2 oz) without
batteries.
Page 6
EN
User Manual User Manual
EN
11
10
HOT-SHOE ADAPTER
FEATURES
The Elinchrom Skyport Plus HS transmitter can be used for basic trigger with power control for any camera
having a “hot shoe’ type flash connection. The features described below require a Canon or Nikon camera
that is compatible with the Skyport system. To operate properly, the Skyport HS transmitter offers special
connection pins for communication with the attached camera.
There are two different Elinchrom Transmitter versions available:
• Canon for Canon EOS type A cameras compatible with ETTLII/ETTL autoflash.
• Nikon for Nikon DSLR cameras compatible with iTTL flash units.
Specilized communication terminals in the camera’s hotshoe mount enable the following Elinchrom Skyport
HS features:
• SYNC Mode
• HS and ODS Mode
• Second Curtain Sync
• Auto MOD
• AF Light
Note: Not all cameras are supported for all features.
LIST OF TESTED CAMERAS
The latest summary of camera models and supported features can be found on the Elinchrom website at:
http://www.elinchrom.com/support.php
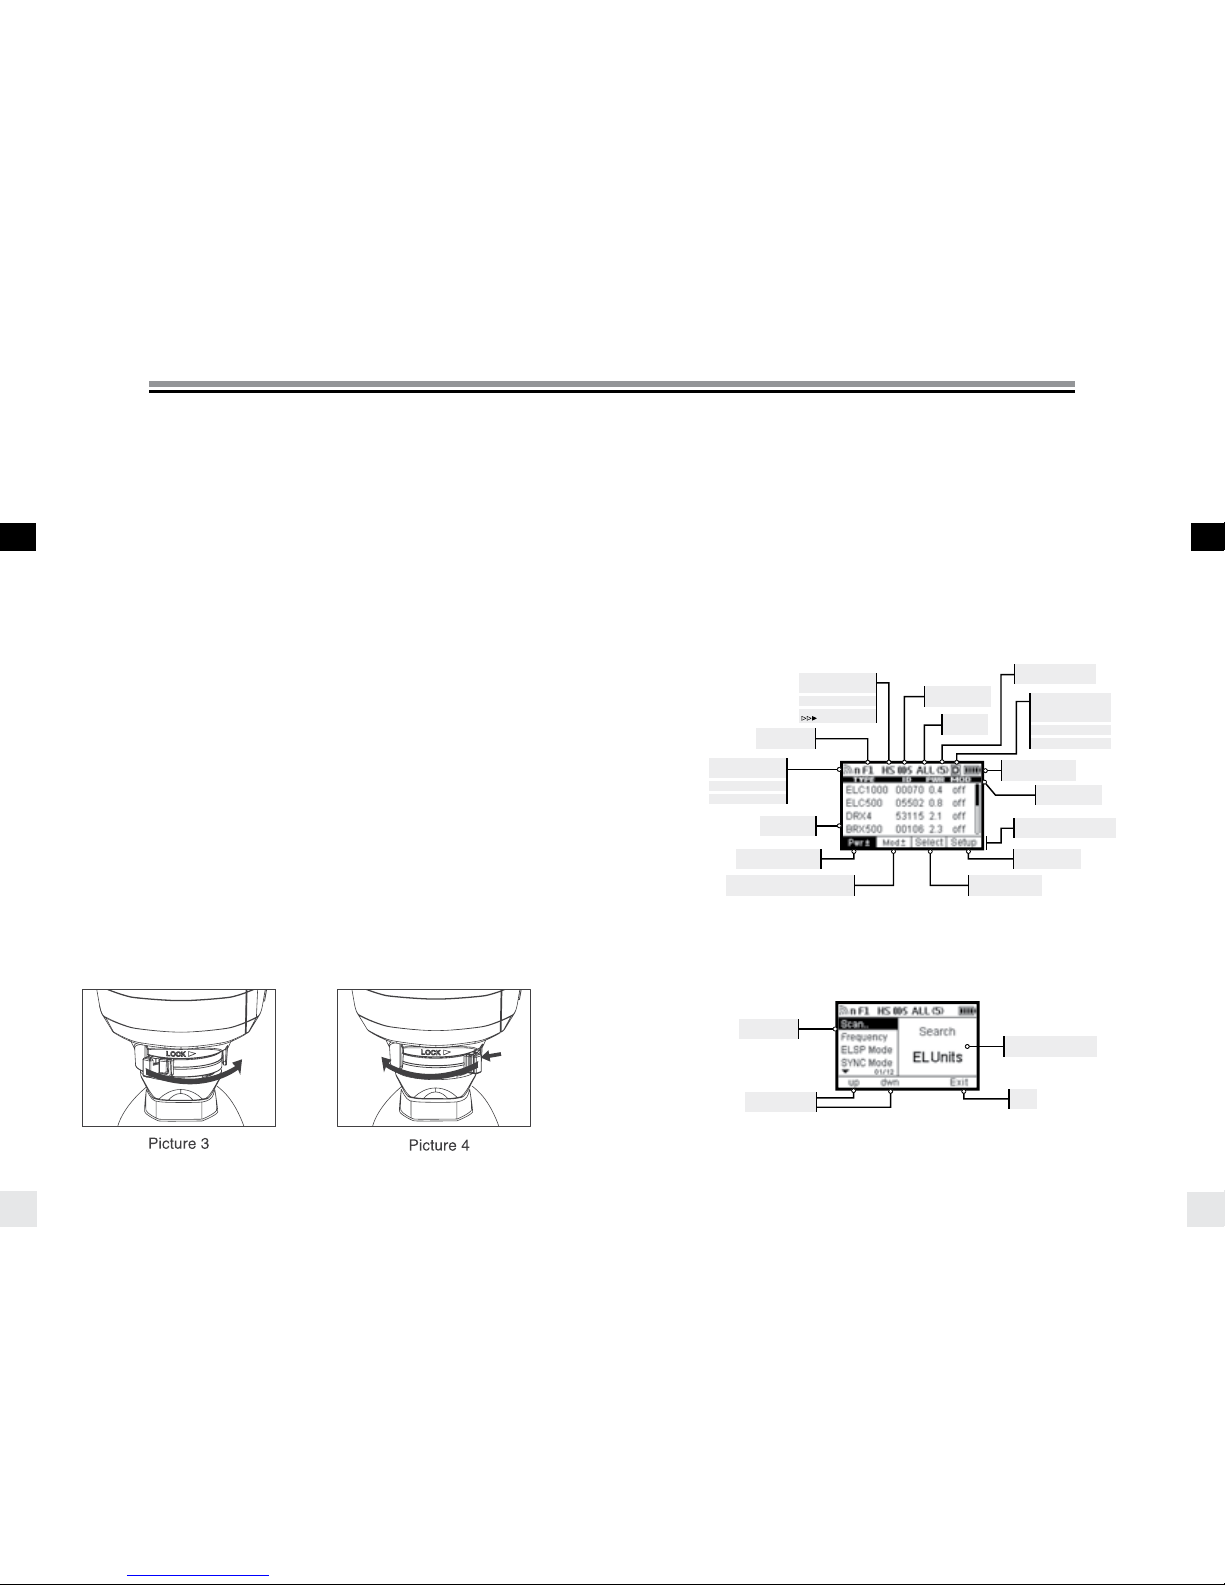
MOUNTING ON THE CAMERA
An easy locking bayonet mechanism is used to lock the Transmitter securely into the Camera’s hotshoe.
ATTACHING
1. Turn off the camera and the EL-Skyport transmitter.
2. Align the EL-Skyport transmitter hotshoe with the camera’s hotshoe mount.
3. Slide it all the way into the camera’s hotshoe mount.
4. Move the tab on the locking ring to the right until it clicks in place. (See picture 3)
DETACHING
1. Unlock: press the lock-release button and move the tab all the way to the left. (see picture 4)
2. Slide the EL-Skyport transmitter off the camera’s hotshoe mount.
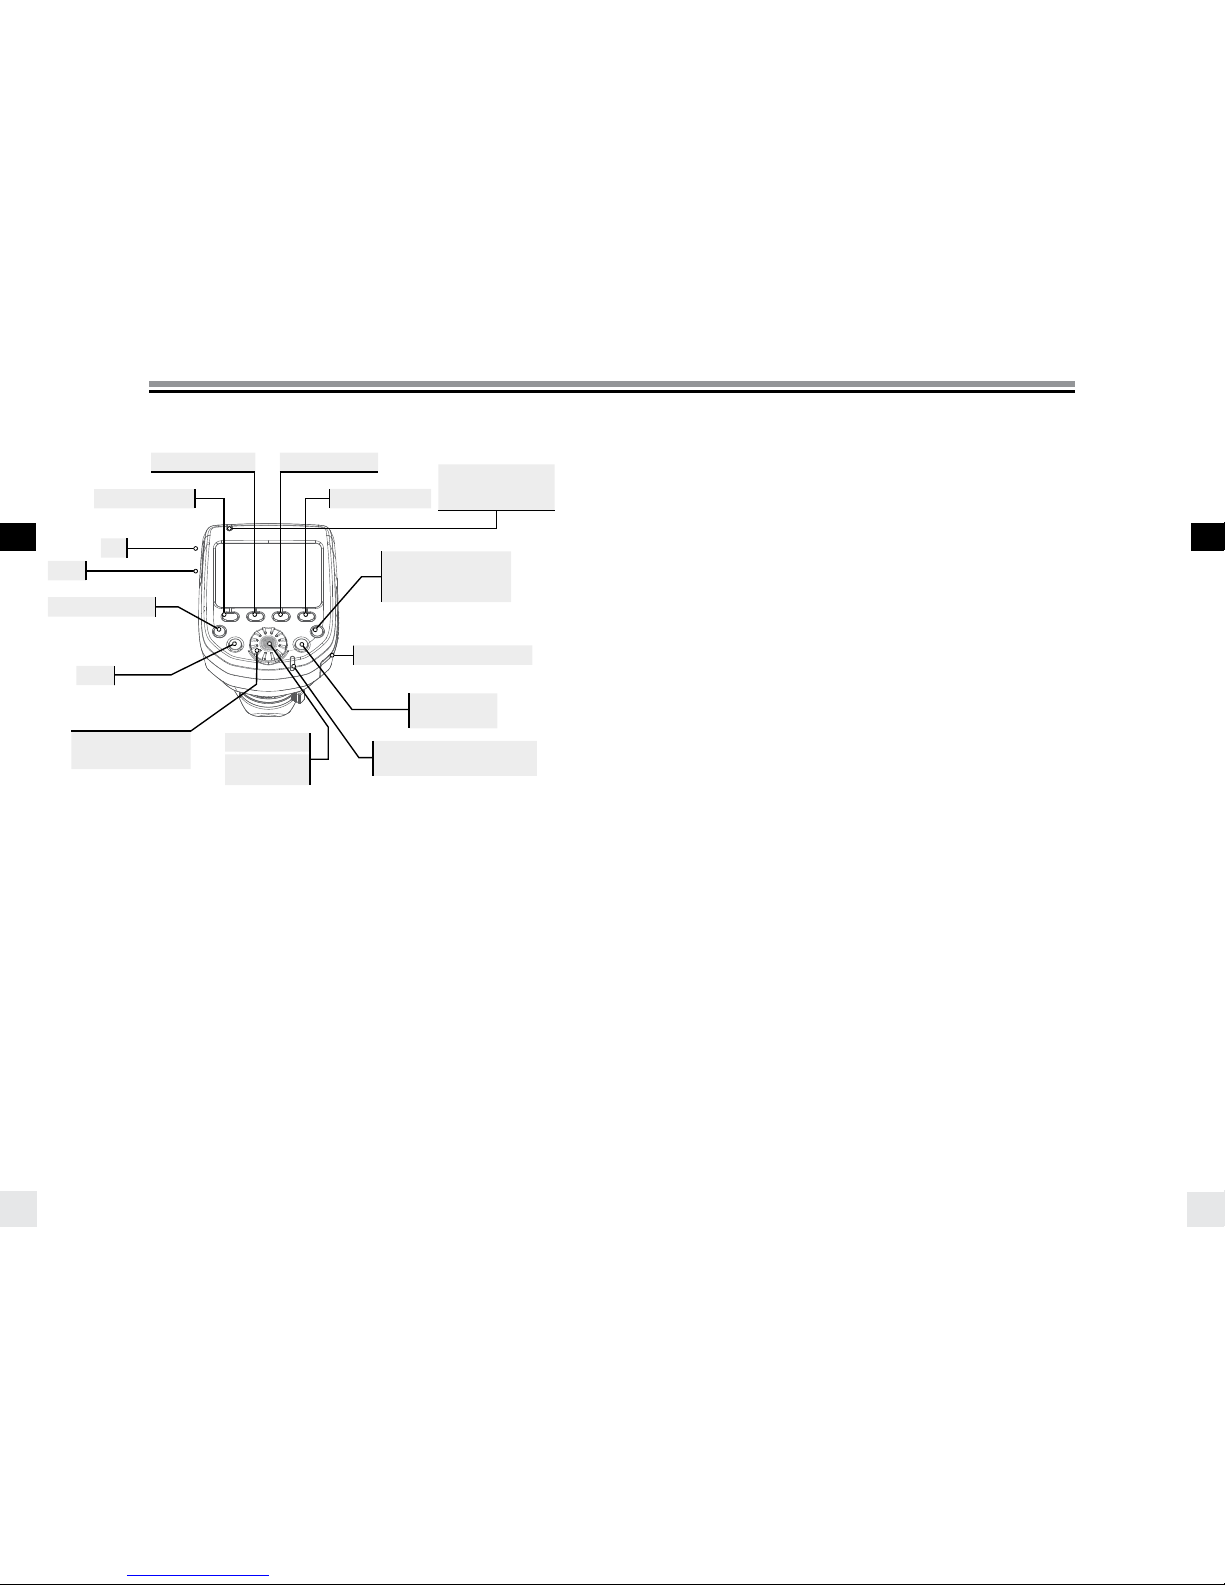
DISPLAY
The graphic display shows the status and settings of the Elinchrom unit.
The display illumination can be switched on or off.
In Normal Sync mode, the illumination is green. In Speed Sync mode, the illumination is red.
The contrast of the display can be adjusted in the setup menu.
The top bar of the display shows the status of the Elinchrom Transmitter.
The bottom bar in the display shows the functions of the 4 speed buttons.
The middle area shows a list of the Elinchrom flash units detected, It also shows setup items for the Setup
menu when selected.
DISPLAY PANEL - DASHBOARD
DISPLAY PANEL - SETUP MENU
Menu list
Up/down list
Description/mode
Exit
* These features are not supported by Nikon®, but can be activated in the camera menu.
** Not supported by Nikon®
*** Not supported by Sony®
Skyport mode
EL-unit(s)
Button function title
Column title
Battery status
Groups
ODS status
Modelling lamp
mode
Unit selection
Frequency
Sync mode
D: DOF
HS: Hi-Sync
Power settings
Setup menu
Modelling lamp settings
s: speed
n: normal
second curtain
S: Shutter
Number of unit
**
** **
***
*
Page 7
EN
User Manual User Manual
EN
13
12
SPEED BUTTONS 1-4
The Speed Buttons enable quick setting of the functions indicated below. Functions in Bold type indicate the
function of these buttons when SETUP mode is selected.
SPEED BUTTON 1 (LEFT)
Pwr± change the flash power in 1/10 f-stop up/down with the dial.
up scroll up in the setup menu when SETUP is selected.
SPEED BUTTON 2 (MIDDLE LEFT)
Press this button once or twice to toggle between the modelling lamp features.
Mod switch the modelling lamp on/off with the dial.
Mod± change the modelling lamp power in 1/10 f-stop up/down with the dial.
down scroll down in the setup menu when SETUP is selected.
SPEED BUTTON 3 (MIDDLE RIGHT)
Select toggle between the displayed (found) Elinchrom flash units.
Flash and modelling lamp settings can be individually adjusted on the selected flash unit, when highlighted
with a frame.
After approx. 5 seconds the frame will disappear and adjustments in the settings will affect all units in all
Groups, when Group “ALL” is selected. If Group 1 – 4 is selected only the flash units in that Group will be
modified.
Group selection
Test
USB
Rotation ring / Dial
Set
Battery compartment cover
On/Off
Refresh
Change value
Lock
Press for 2 seconds
To refresh manual
changes made on the flash unit
Communication Transmitter
HS / EL- flash unit.
Press for 2 seconds
Speed button 2SRSpeed button 3
Green LED
Speed button 1
Speed button 4
Blue LED
Communication camera / Transmitter HS
BUTTONS
SPEED BUTTON 4 (RIGHT)
Setup by pressing this button the functions of the speed buttons will change and the SETUP menu is
selected. In the SETUP menu features can be adjusted and activated.
Exit Exit the Setup menu and switch back to standard display mode.
ON/OFF
Press and hold for min. 2 seconds to switch the EL-SkyportTransmitter Plus HS On/Off.
GROUP BUTTON
Press to toggle between 1 through 4 groups and “ALL.”
TEST BUTTON (WITH EL LOGO)
Pressing the TEST button will fire all flashes when “ALL” is selected or any single group, 1 through 4 is
selected. Please remember to deactivate photocells for accurate
EL-Skyport triggering of your flash units.
REFRESH BUTTON
Press the Refresh button any time power setting has been done on a separate EL flash unit to update the
power setting display of the Skyport HS.
If a Group is selected, only the information for that selected Group will refresh.
When “ALL” is selected, information for all groups will be refreshed.
A flash that was not scanned and found when the Skyport HS was switched ON cannot be added with the
Refresh feature.
If a flash is added, select SETUIP and SCAN in the setup menu or switch the transmitter OFF and ON again.
The refresh can take up to 4 seconds, depending on how many flash units are found and operated by the
transmitter.
Note:
To assure the most positive operation between the Skyport HS and EL flashes, flash power information is
transmitter by the EL flash only when power level changes are made or the Refresh button is pressed.
ROTATING RING / DIAL
Turn the Dial to select various functions and change power levels of the EL flashes.
SET / CONFIRMATION BUTTON (DIAL CENTRE BUTTON)
Press to confirm a modification made in the Setup menu.
Press to switch on the display illumination.
Press to return to normal operation when Skyport HS has switched to Standby mode.
Press 2s to lock all functions and settings. Press again to unlock.
The locking feature blocks the function of the dial and other buttons to prevent mis-setting while carrying the
Skyport HS.
Page 8

EN
User Manual User Manual
EN
15
14
SETUP MENU
SCAN..
When the Skyport HS is switched ON, it will automatically search for Elinchrom flash units with built-in or plugin EL-Skyport Transceiver modules.
The Scan feature is also available in the Setup Menu. A re-scan is required, when new flash units have been
added to the lighting setup.
To find EL flash units,
• all EL flash units must be switched on,
• all flashes must have built-in or plug-in EL-Skyport Transceiver modules.
• the Transmitter Plus HS and the EL flash unit must be set for the same frequency channel settings.
FREQUENCY CHANNELS
Up to 20 EL-Skyport frequency channels can be selected.
Note:
• Only the latest Elinchrom flash units (ELC 500/1000 Pro HD, ELB 400 and future versions)
will support up to 20 frequency channels.
• All “RX” flash units will support up to 8 channels and some older Elinchrom flash units support
up to 4 channels.
ELSP MODE
The Skyport HS has two operating modes that offer different shooting functionality.
• Normal mode
Normal mode is compatible with the very first Elinchrom flash units incorporating EL-Skyport.
When selected, display illumination and status LED will light in green.
• Speed mode
The Speed mode enables faster shutter speeds of up to 1/1000s depending on the camera using normal
flash synchronisation (i.e. for leaf shutter cameras and some mirrorless).
To use shutter speeds of up to 1/8000s the HS mode must be activated when used in both Normal and
Speed mode.The display illumination and status LED are displayed in red when is in speed mode.
Note:
• The greatest working distance is available in Normal mode. Speed mode reduces working distance by
50%. Skyport transceivers in all remote flashes must have EL-Skyport mode capability to use Speed
mode.
SYNC MODE
Select the synchronization mode:
• Standard mode
In Standard mode most cameras will work with shutter speeds up to 1/200s - 1/250s.
• HS Hi-Sync mode*
In HS mode the shutter speed can be up to 1/8000s depending on the camera and the flash unit.
The HS mode requires flash units or flash heads with a long flash duration for best results.
Heads or flash units equipped with the A flash tubes (Action) are not recommended.
• Second Curtain mode*
The Second Curtain mode gives the ability to fire the flash just before the shutter closes, for moving
effects.
* With Nikon cameras, these features are activated within the camera menu.
ODS SETUP
The Over-Drive-Sync (ODS) can improve the overall exposure, when the HS Sync mode is active.
ODS relies on flash units with long flash durations, so results will depend on the flash duration of the lights
used (which also changes at different power levels), as well as the camera used. Full frame cameras with large
sensors and slow shutters are unfortunately the hardest to get good results with, but lights with long enough
flash durations can still achieve clean frames all the way to 1/8000th. In addition using ODS, they can gain up
to 2 f-stops more light, essential when sun light must be overpowered.
The ODS Setup offers adjustment from 0.1 to 5.0 ms or can be switched off.
The ODS value will vary depending on the camera and the flash unit which is used and must be adjusted
manually
Note:
• Over-Drive-Sync (ODS) can only be used when the SYNC mode is set to HS.
• When ODS is adjusted, the position of the flash cutoff (dark edge at top or bottom of picture) can be
moved within the frame. When switched OFF, the flash trigger point will be selected automatically when
in HS mode.
AUTO MOD
• Off
The modelling light of the Elinchrom flash units does not change.
• Shutter**
Pressing the camera’s shutter button for focusing will cause the modelling lamp of the EL flash unit will
switch on for a few seconds as an aid to focusing in low light. (Not supported by Nikon)
• DOF
The Elinchrom flash units will switch on their modelling lamp for as long as the DOF (Depth of field)
button on the camera is held.
AF LIGHT
Activates the Auto-Focus assist light of the Skyport HS when the shutter release is half pressed for focusing
(check also camera settings).
KEY CLICK
When activated, pressing any control button will be indicated by a beep tone.
SLEEP
When not uise for a time, the Skyport HS will switch to Sleep Mode to save battery power.
Delay Sleep mode from 1 to 60 minutes or turn OFF.
AUTO OFF
The Skyport HS will automatically turn OFF when left unattended for a time.
Delay Auto Off start from 1 to 60 minutes or turn OFF.
When Sleep mode and Auto Off are both active, the Transmitter Plus HS will switch the power OFF at the user
set Sleep Mode delay.
CONTRAST
The display contrast can be adjusted from 80 to 120%
BACKLIGHT
The display illumination of the device can be switched on/off
* With Nikon cameras, these features are activated within the camera menu.
** Not supported by Nikon.
Page 9
EN
User Manual User Manual
EN
17
16
MANUFACTURING RESET
Pressing and holding in the Left and Right Speed buttons while switching the Skyport HS ON (approximately
2 seconds) will reset the Skyport HS to manufacture settings. All user settings, except the display contrast, will
be reset.
FIRMWARE UPDATE
To update the Firmware of the Transmitter Plus HS, the Elinchrom Transmitter HS Updater is required.
Available from the Elinchrom website.
TROUBLESHOOTING
Pressing and holding in the Left and Right Speed buttons while switching the Skyport HS ON (approximately
2 seconds) will reset the Skyport HS to manufacture settings. All user settings, except the display contrast, will
be reset.
HAVING THIS PROBLEM? PLEASE CHECK THE FOLLOWING POINTS:
THE UNIT IS NOT SWITCHING ON
• Check battery polarity and replace both
discharged batteries.
FLASH UNIT CANNOT BE TRIGGERED WHEN
THE MODE “ALL” IS SELECTED
• Transmitter and receiver must have the same
frequency channel settings.
• ELSP MODE: transmitter and receiver must
have the same synchronisation mode settings:
normal or speed sync mode.
• Check that the EL-Skyport receiver in all ELunits with built-in receivers, is switched on.
• Check that the transmitter version corresponds
to your Canon or Nikon camera.
SOME UNITS ARE NOT TRIGGERING WHEN
THE GROUP MODE IS SELECTED
• Check the group settings of the EL- flash unit.
• Reduce the distance to any unresponsive unit.
• Transmitter and receiver must have the same
synchronisation mode settings: normal or speed
sync mode, and frequency channel settings.
THE TEST BUTTON WORKS, BUT THE CAMERA
WILL NOT TRIGGER FLASH UNITS
• Check the hotshoe fitting.
• Check the camera settings (turn hotshoe
communication on).
• Check that the transmitter version corresponds
to your Canon or Nikon camera.
• Check the list of compatible cameras.
SOME INFORMATION IS NOT DISPLAYED
ABOUT DIGITAL RX, RANGER RX OR STYLE
RX UNITS
• Units equipped with a plug-in Transceiver RX
are limited in remote features. These units
can however be triggered and controlled (but
with no visual feedback) by the EL-Skyport
Transmitter Plus HS.
LIMITED DISTANCE RANGE:
• Reposition the units.
• Increase the distance from walls and ceilings.
• ELSP Mode: In speed sync mode the distance
range is reduced by approximately 50 %,
switch back to normal sync mode.
• Outdoors, the distance range could be reduced
due to humidity, interference, obstacles etc.
INTERFERENCE WITH OTHER 2.4 GHZ
NETWORKS, UNRELIABLE TRIGGERING:
• Try another frequency channel for both
transmitter and the receiver of the EL-unit.
• Reduce the distance between the flash unit and
transmitter.
HS MODE; SYNC UP TO 1/8000S:
• Elinchrom Action (previously A) heads are not
optimised for the HS mode. To benefit from
better performance please use flash units with
Pro flashtubes (Standard or S previously) or
ideally use with dedicated HS heads.
• ODS fine tuning helps to optimise HS
performance.
• If there is visible banding please reduce the
shutter speed on your camera, or set ODS and
adjust to minimise or avoid banding.
• HS functionality only works with Canon or Nikon
cameras and the appropriate transmitter.
SCANNING EL-UNITS:
NO EL-UNIT FOUND, OR SOME UNITS ARE
MISSING.
• Switch on all enabled EL-units, than switch on
the EL-Skyport Transmitter Plus HS on or go to
setup and rescan.
• Frequency, group and ELSP mode settings
must match with the transmitter.
• Ensure that all EL-Skyport Transmitter Plus
HS enabled units are operating on the latest
firmware.
Page 10

19
Gebrauchsanleitung
DE
User Manual
EN
18
FREQUENCY CHANNEL FOR EL-SKYPORT SPEED RECEIVERS
This is not relevant to this product, but it may help with frequency set-up on legacy EL-Skyport units.
DOWNLOAD THE EL-SKYPORT TRANSMITTER PLUS HS
USER GUIDE
Obtain the complete user guide using this link: http://bc.gs/elspths
DOWNLOAD CONFORMITY
Find your declaration for EC and USA & Canada conformity here: http://bc.gs/ec
FIRMWARE UPDATE BY USB PORT
Please download our lastest firmware and follow the instructions: http://bc.gs/fw
INHALT
KONFORMITÄTSERKLÄRUNG 22
VERSIONEN 23
FUNKTIONEN 23
BATTERIEN EINSETZEN 24
BATTERIEN 24
KOMPATIBILITÄT 25
AUSLÖSEN 25
FERNBEDIENUNG 25
FREQUENZKANÄLE 25
TECHNISCHE DATEN 26
BLITZSCHUHADAPTER 26
MONTAGE AUF DER KAMERA 27
ANZEIGE 28
TASTEN 29
SETUP-MENÜ 31
RÜCKSETZEN AUF WERKSEINSTELLUNGEN 33
FEHLERBEHEBUNG 33
UPDATE DER FIRMWARE 35
Toleranzen und Spezifikationen entsprechen den IEC- und CE-Standards.
Änderungen der technischen Daten vorbehalten.
Page 11
21
20
Gebrauchsanleitung Gebrauchsanleitung
DEDE
EINLEITUNG
Sehr geehrter Fotograf,
Danke, dass Sie ELINCHROM gewählt haben.
Alle Produkte von Elinchrom werden unter Nutzung der neuesten Technologie hergestellt. Sorgfältig
ausgewählte Komponenten werden benutzt, um höchste Qualität zu gewährleisten, und das Gerät wird vielen
Tests unterworfen, sowohl während als auch nach der Herstellung. Wir vertrauen darauf, dass es Ihnen viele
Jahre treue Dienste leisten wird.
Bitte lesen Sie diese Gebrauchsanleitung sorgfältig durch, bevor Sie Ihr neues Elinchrom-Produkt benutzen.
Sie finden Informationen zu Ihrer Sicherheit und wie Sie aus all den programmierbaren Funktionen Nutzen
ziehen.
In dieser Anleitung können Bilder von Produkten mit Zubehör enthalten sein, die nicht Teil von Sets oder
einzelnen Einheiten sind.
Für die Konfiguration von Sets oder einzelnen Einheiten von Elinchrom werden Änderungen vorbehalten und
diese können in anderen Ländern unterschiedlich sein.
Für weitere Details, Upgrades, Neuigkeiten und die neuesten Informationen über das Enlinchrom-System
besuchen Sie bitte regelmäßig die Website von Elinchrom. Die neuesten Gebrauchsanleitungen und
technischen Spezifikationen können aus dem „Support“-Bereich heruntergeladen werden.
Für technische Daten, Eigenschaften und Funktionen von Blitzgeräten von Elinchrom und Zubehör sind
Änderungen vorbehalten. Die aufgeführten Spezifikationen können durch Toleranzen in Komponenten oder
Messinstrumenten abweichen. Für technische Daten werden Änderungen vorbehalten. Keine Garantie für
Druckfehler.
Bitte prüfen Sie auf die neueste Anleitung auf unserer Website: www.elinchrom.com/support
Danke
Ihr Team von Elinchrom
Das Produkt ist als Class 3R Laser-Produkt
klassifiziert gemäß der folgenden Standards
IEC/EN 60825-1 „Radiation Safety of Laser
Products”.
Class 3R: Ein Class 3R Laser wird als sicher
angesehen, wenn er vorsichtig genutzt wird, mit
beschränktem Hineinsehen in den Laserstrahl.
Mit einem Class
3R Laser kann die MPE überschritten werden,
aber mit einem geringen Risiko für Verletzungen.
Sichtbare permanente Laser in Class 3R sind auf
5 mW begrenzt. Für andere Wellenlängen und
für pulsierende Laser finden andere Grenzwerte
Anwendung.
Page 12

23
22
Gebrauchsanleitung Gebrauchsanleitung
DEDE
DECLARATION OF CONFORMITY USA AND CANADA
EN This device complies with Part 15 of the FCC Rules and with Industry Canada licence-exempt RSS
standard(s). Operation is subject to the following two conditions: (1) this device may not cause harmful
interference, and (2) this device must accept any interference received, including interference that may cause
undesired operation. This product complies with the Canadian ICES-003 Class B specifications.
FR Le présent appareil est conforme aux CNR d’Industrie Canada applicables aux appareils radio exempts
de licence. L’exploitation est autorisée aux deux conditions suivantes(1) ce dispositif ne doit pas produire
de brouillage préjudiciable, et (2) ce dispositif doit accepter tout brouillage radioélectrique subi, même si le
brouillage est susceptible d’en compromettre le fonctionnement. Cet appareil numérique de la classe B est
conforme à la norme NMB-003 du Canada.
Radiation Exposure Statement
EN This equipment complies with portable RF exposure limit in Canada and the USA set forth an
uncontrolled environment and is safe for intended operation as described in this manual. Further RF exposure
reduction can be achieved if the product can be kept as far as possible from the user body.
FR Le produit est conforme aux limites d’exposition pour les appareils portables RF pour les Etats- Unis et le
Canada établies pour un environnement non contrôlé. Le produit est sûr pour un fonctionnement tel que décrit
dans ce manuel. La réduction aux expositions RF peut être augmentée si l’appareil peut être utilisé aussi loin
que possible du corps de l’utilisateur.
FCC Class B Compliance note
This equipment has been tested and found to comply with the limits for a Class B digital device, pursuant
to Part 15 of the FCC Rules. These limits are designed to provide reasonable protection against harmful
interference in a residential installation. This equipment generates, uses and can radiate radio frequency energy
and, if not installed and used in accordance with the instructions, may cause harmful interference to radio
communications. However, there is no guarantee that interference will not occur in a particular installation. If
this equipment does cause harmful interference to radio or television reception, which can be determined by
turning the equipment off and on, the user is encouraged to try to correct the interference by one or more of
the following measures:
• Reorient or relocate the receiving antenna.
• Increase the separation between the equipment and receiver.
• Connect the equipment into an outlet on a circuit different from that to which the receiver is connected.
• Consult the dealer or an experienced radio/television technician for help.
Any changes or modifications not expressly approved by the party responsible for compliance could void
the user’s authority to operate this equipment. This device is limited to operation on permissible Part 15
frequencies, and it does not have the ability to be configured by end users or professional installers to operate
outside the authorized bands.
EL SKYPORT TRANSMITTER PLUS HS
VERSIONEN
Der ELSP Transmitter Plus HS ist für die folgenden Kameras verfügbar:
• Canon
• Nikon
EIGENSCHAFTEN
• Große grafische Kontrollanzeige.
• Beleuchtung der Anzeige in grün oder rot (grün für den Normal Sync-Modus, rot für den Speed SyncModus).
• Schnellzugriffstasten und Drehrad für leichte Steuerung.
• Sichere Blitzschuhverbindung mit Bajonettverschluss.
• Standardbatterien 2 AA (auch wieder aufladbare Akkus verwendbar).
• 2,5 mm Anschluss für Auslöser-Output.
• Firmware-Update über integrierten Mini-USB-Anschluss.
• 40 Remote-Kanäle.
• 20 Frequenzkanäle* im Normal Sync-Modus.
• 20 Frequenzkanäle* im Speed Sync-Modus.
• 4 Groups und ALL.
• EL-Skyport Sync-Modi.
• Normal Sync-Modus (maximaler Abstandsbereich).
• Speed Sync-Modus (schnellere Verschlussgeschwindigkeit, insbesondere wenn HS aktiviert ist, aber
verminderter Abstandsbereich).
• Sync-Modi***.
• Standard (unter Benutzung des mittleren Kontakts auf dem Blitzschuh).
• HS **** (Sync bis zu 1/8000 s, automatisch gesteuert).
• ODS (manueller Over-Drive-Sync) Feineinstellung der Zeit von HS für maximale Leistung und
gleichmäßige Belichtung.
• Sync-Modus**** für zweiten Vorhang.
• AF-Licht integriert***.
• Auto MOD *** zur Steuerung des Einstelllichts von Elinchrom-Blitzgeräten zur Fokussierung.
• Shutter Mode***** (der halb gedrückte Auslöser steuert die Einstelllampe).
• DOF Mode (die “DOF”-Taste (Tiefenschärfe, Depth Of Focus) der Kamera steuert die Einstelllampe).
• Fernbedienung** mit automatischer Rückmeldung von Elinchrom-Blitzgeräten.
• EL-Blitzgeräte können gesteuert werden “All” zusammen, als “Groups” oder “Single” Geräte.
• Blitzleistung herauf und herunter.
• Einstelllampe an / aus oder Intensität herauf und herunter.
• Sleep-Modus und Auto OFF-Modus programmierbar.
• RESET auf Standardeinstellungen.
* Für alle neuesten Elinchrom-Blitzgeräte mit 20 Frequenzkanälen und kompatibel mit früheren Modellen.
** Für alle Elinchrom-Blitzgeräte mit eingebautem EL-Skyport-Empfänger und Transceiver.
*** Erweiterte Funktionen für Kameras von Canon und Nikon mit TTL-Blitzschuh (eingeschränkte Funktionen
für Nikon, siehe unten).
**** Diese Funktionen werden nicht von Nikon unterstützt, können aber im Kameramenü aktiviert werden.
***** Nicht von Nikon unterstützt.
Page 13
25
24
Gebrauchsanleitung Gebrauchsanleitung
DEDE
EINSETZEN DER BATTERIEN
Drücken Sie auf die Abdeckung des Batteriefachs und schieben Sie sie in Pfeilrichtung, um die Abdeckung des
Batteriefachs zu öffnen (siehe Abbildung 1).
Setzen Sie die Batterien ein. Stellen Sie sicher, dass die Kontakte „+” und „-” der Batterie richtig orientiert sind
(siehe Abbildung 2). (Hinweis: Bitte verwenden Sie zwei Stück AA Alkali-Batterien oder NiMH-Akkus vom Typ
AA).
Drücken Sie die Abdeckung gegen den Transmitter und schieben Sie sie zurück in die eingerastete Position.
BATTERIEN
• 2 x AA Batterien werden für den Transmitter benutzt.
• Falsches Einsetzen der Batterien beschädigt den Transmitter nicht.
• Nicht wiederaufladbare AA (Trocken-)Batterien wie vom Typ Zink-Carbon, Alkali oder wiederaufladbare
Akkus in der Größe AA wie Nickel-Cadmium (NiCd) oder Nickel-Metallhydrid (NiMH) können benutzt
werden.
• Batterietypen nicht mischen.
• Benutzen Sie in diesem Transmitter keine Lithium-AA-Batterien.
Press and slide
Abbildung 1
Abbildung 2
KOMPATIBILITÄT
Es gibt drei verschiedene Generationen von Elinchrom EL-Skyport-Blitzgeräten im Markt:
1. GENERATION
• EL-Skyport Transceiver RX-Modul (Style RX, Digital RX, Ranger RX).
2. GENERATION
• Eingebautes EL-Skyport-Modul Mk1 (BRX, D-Lite RX, Quadra, Quadra Hybrid).
3. GENERATION
• Eingebautes EL-Skyport-Modul Mk2 (ELC und ELB). Diese Generation bietet erweiterten Abstandsbereich
AUSLÖSEN
Auslösen funktioniert mit allen existierenden Elinchrom-Blitzgeräten mit eingebauten oder zusätzlichen ELSkyport-Transceivern.
FERNBEDIENUNG
WENN ALL ODER GROUP 1 - 4 AUSGEWÄHLT IST
• Alle Elinchrom-Blitzgeräte mit EL-Skyport werden unterstützt, wenn „PWR±, MOD± oder MOD on/off”
verändert wird. Wenn die Einstellungen zur Leistung der Einstelllampe mit den Tasten MOD on/off oder
MOD+/- geändert werden, schaltet der benutzte Elinchrom-Blitz in den Modus für freies Einstelllicht. Um
zum proportionalen Modus des Einstelllichts zurückzukehren, müssen die Einstellungen am EL-Blitzgerät
vorgenommen werden.
• Einige Geräte unterstützen nicht alle Funktionen des Einstelllichts, dann wird „--“ angezeigt (z. B. für
Ranger, Quadra, ELB400).
WENN EIN EINZIGES GERÄT AUSGEWÄHLT IST
• Das ausgewählte Gerät wird mit einem Rahmen in der Anzeige hervorgehoben und kann individuell
gesteuert werden.
• Es werden nur Elinchrom-Blitzgeräte mit eingebauten EL-Skyport-Empfängern der 2. und 3. Generation
unterstützt.
Hinweis:
Geräte der 1. Generation werden erkannt, aber zeigen „--“ in der Anzeige. Es gibt keine Rückmeldung der
Einstellungen des Geräts an den EL-Skyport Transmitter Plus HS, aber es wird normal ausgelöst.
FREQUENZKANÄLE
Einige ältere Elinchrom-Blitzgeräte mit eingebautem EL-Skyport unterstützen die Frequenzkanäle 1 bis 4 oder
1 bis 8 (wie BRX, D-Lite RX, Quadra).
Die neuesten Elinchrom-Blitzgeräte mit eingebautem EL-Skyport unterstützen bis zu 20 verschiedene
Frequenzkanäle 1 bis 20 (ELC, ELB).
Page 14
27
26
Gebrauchsanleitung Gebrauchsanleitung
DEDE
TECHNISCHE DATEN
PARAMETER SPEZIFIKATION
VERSIONEN
Canon, Nikon.
AUSLÖSEKOMPATIBILITÄT
ALLE Elinchrom-Blitzgeräte mit eingebautem EL-Skyport-Empfänger
oder Transceiver und die EL-Skyport RX Transceiver-Module, plus ELSkyport Universal.
KOMPATIBILITÄT DER
FERNBEDIENUNG
ALLE Elinchrom-Blitzgeräte mit eingebautem EL-Skyport Transceiver:
ELC Pro HD, ELB 400, Ranger Quadra RX, Quadra Hybrid, D-Lite
RX-Serien, BRX-Serien, Master RX-Serien und FRX-Serien (HINWEIS:
EL-Geräte mit separatem Transceiver RX-Modul haben begrenzte
Fernbedienungsfunktionen).
ABSTANDSBEREICH
Im Haus > 60 m.
Im Freien > 200 m.
Hinweis:
Der volle Abstandsbereich ist mit den neuesten Elinchrom-Blitzgeräten
verfügbar wie ELC oder ELB. Andere oder ältere Elinchrom-Blitzgeräte
haben einen eingeschränkten Abstandsbereich.
BATTERIEN
2x AA Batterien (Standard oder wieder aufladbar).
BATTERIELEBENSDAUER
Hängt von der Art der Batterien und der Nutzung ab.
Für zwei Standardbatterien mit je 1000 mAh beträgt sie ungefähr 35
Stunden Betriebszeit und mehr als 15000 Auslösevorgänge.
FERNBEDIENUNG
Max. 10 Geräte können erkannt, angezeigt und fernbedient werden.
FREQUENZKANÄLE
20 Kanäle im Normalmodus und 20 Kanäle im Speed-Modus.
EL-SKYPORT MODI (ELSP)
Normal / Speed-Sync Modus.
AUSLÖSE- / BEDIENGRUPPEN
„All” oder in „Groups” (Gruppe 1 bis 4).
SYNC-MODI
Standard, HS (mit oder ohne ODS), zweiter Vorhang.
USB-ANSCHLUSS
Für den Update der Firmware.
SR-ANSCHLUSS
Trigger Output 2,5 mm Phone Jack mono (max. Sync-Spannung 3 V
DC).
ABMESSUNGEN (B X L X H)
69 x 84 x 59 mm (2,7 x 3,3 x 2,3 Zoll.)
GEWICHT
Ca. 170 g (6 oz) einschließlich 2 x AA-Batterien. 120 g (4,2 oz) ohne
Batterien.
BLITZSCHUHADAPTER
FUNKTIONEN
Der Elinchrom Skyport Plus HS Transmitter kann für einfache Auslösung mit Leistungsregelung für jede
Kamera genutzt werden, die einen schuhförmigen Blitzanschluss hat. Die unten beschriebenen Funktionen
erfordern eine Kamera von Canon oder Nikon, die mit dem Skyport-System kompatibel ist. Um richtig zu
funktionieren, bietet der Skyport HS Transmitter spezielle Verbindungspins für die Kommunikation mit der
verbundenen Kamera.
Es sind zwei unterschiedliche Versionen des Elinchrom-Transmitters verfügbar:
• Canon für Canon EOS-Kameras von Typ A, die mit der ETTLII / ETTL-Blitzautomatik kompatibel sind.
• Nikon für Nikon DSLR-Kameras, die mit iTTL-Blitzgeräten kompatibel sind.
Spezialisierte Kommunikationsanschlüsse im Blitzschuhanschluss der Kamera ermöglichen die folgenden
Funktionen des Elinchrom Skyport HS:
• SYNC-Modus
• HS- und ODS-Modus
• Sync für zweiten Vorhang
• Auto MOD
• AF-Licht
Hinweis: Nicht alle Kameras werden für alle Funktionen unterstützt.
LISTE DER GETESTETEN KAMERAS
Die neueste Zusammenfassung der Kameramodelle und der unterstützten Funktionen befindet sich auf der
Website von Elinchrom unter: http://www.elinchrom.com/support.php
MONTAGE AUF DER KAMERA
Ein einfacher Bojonettverschllussmechanismus wird genutzt, um den Transmitter sicher am Blitzschuh der
Kamera zu befestigen.
ANBRINGEN
1. Schalten Sie die Kamera und den EL-Skyport Transmitter aus.
2. Richten Sie den Blitzschuh des EL-Skyport Transmitters nach der Blitzschuhaufnahme der Kamera aus.
3. Vollständig in die Blitzschuhaufnahme der Kamera einschieben.
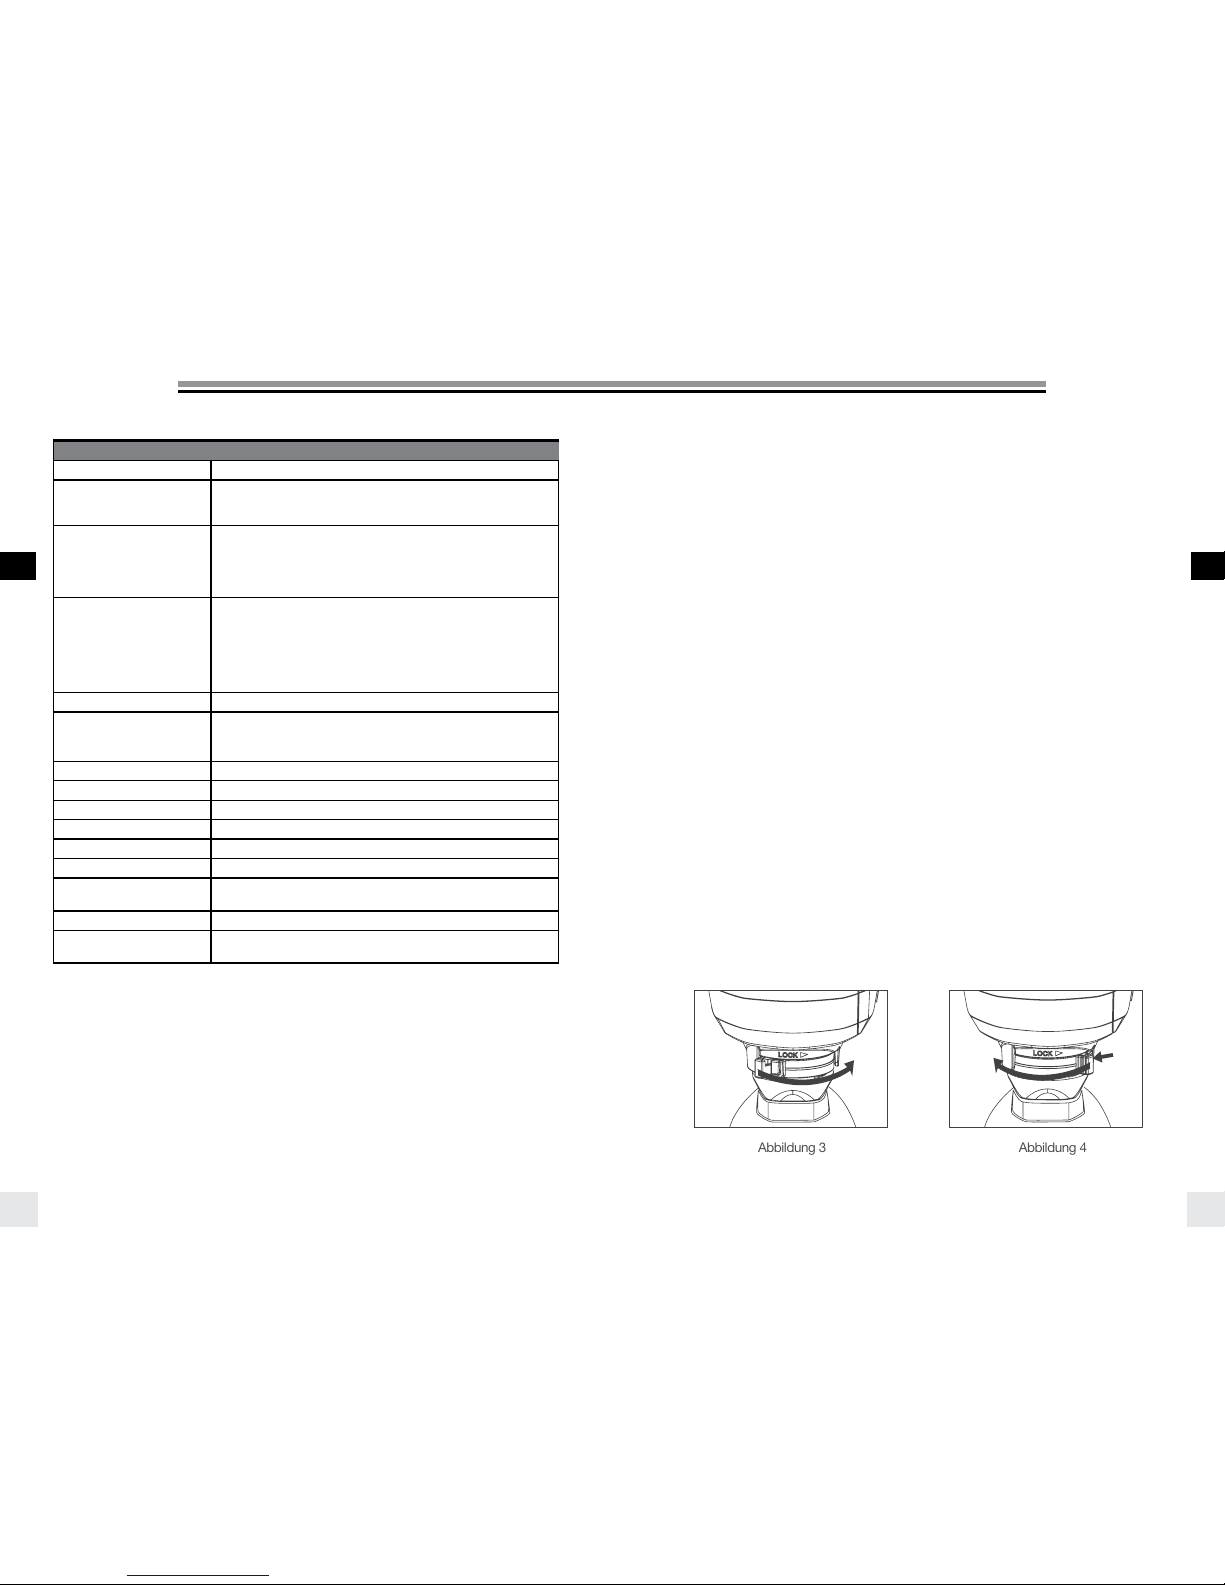
4. Die Lasche am Befestigungsring nach rechts bewegen, bis er einrastet. (Siehe Abbildung 3)
ENTFERNEN
1. Ausrasten: Den Freigabeknopf drücken und die Lasche vollständig nach links bewegen.
(Siehe Abbildung 4)
2. Den EL-Skyport Transmitter aus dem Blitzschuh der Kamera herausschieben.
Abbildung 3
Abbildung 4
Page 15
29
28
Gebrauchsanleitung Gebrauchsanleitung
DEDE
ANZEIGE
Die grafische Anzeige zeigt den Status und die Einstellungen des Elinchrom-Geräts an.
Die Beleuchtung der Anzeige kann ein- und ausgeschaltet werden.
Im Normal Sync-Modus ist die Beleuchtung grün. Im Speed Sync-Modus ist die Beleuchtung rot.
Der Kontrast der Anzeige kann im Setup-Menü angepasst werden.
Die obere Leiste der Anzeige zeigt den Status des Elinchrom-Transmitters an.
Die untere Leiste der Anzeige zeigt die Funktionen der vier Schnellwahltasten an.
Der mittlere Bereich zeigt eine Liste der erkannten Elinchrom-Blitzgeräte an. Wenn ausgewählt, werden auch
die Elemente für das Setup-Menü angezeigt.
ANZEIGEFELD – DASHBOARD
ANZEIGEFELD – SETUP-MENÜ
Menu list
Up/down list
Description/mode
Exit
* In Nikon-Kameras werden diese Funktionen im Menü der Kamera aktiviert.
** Nicht unterstützt durch das Nikon®
*** Nicht unterstützt durch das Sony®
SPEED BUTTONS 1-4
Die Schnellwahltasten ermöglichen die schnelle Einstellung der unten angeführten Funktionen. Fett gedruckte
Funktionen bezeichnen die Funktion dieser Tasten, wenn der SETUP-Modus ausgewählt ist.
SPEED BUTTON 1 (LEFT)
Pwr± Änderung der Blitzleistung in 1/10 relativen Blendenstufen auf /ab mit dem Wählrad.
up aufwärts scrollen im Setup-Menü, wenn SETUP ausgewählt ist.
SPEED BUTTON 2 (MIDDLE LEFT)
Drücken Sie diese Taste einmal oder zweimal, um zwischen den Funktonen der Einstelllampe hin- und
herzuschalten.
Mod die Einstelllampe mit dem Wählrad ein- / ausschalten.
Mod± Änderung der Leistung der Einstelllampe in 1/10 relativen Blendenstufen auf /ab mit dem Wählrad.
down abwärts scrollen im Setup-Menü, wenn SETUP ausgewählt ist.
SPEED BUTTON 3 (MIDDLE RIGHT)
Select zwischen den angezeigten (gefundenen) Elinchrom-Blitzgeräten hin- und herschalten.
Einstellungen für Blitz und Einstelllampe können auf dem ausgewählten Blitzgerät individuell angepasst
werden, wenn es mit einem Rahmen hervorgehoben ist.
Nach ungefähr 5 Sekunden verschwindet der Rahmen und Anpassungen der Einstellungen betreffen alle
Geräte in allen Gruppen, wenn Gruppe “ALL” ausgewählt ist. Wenn Gruppe 1 – 4 ausgewählt ist, werden nur
die Blitzgeräte in dieser Gruppe geändert.
Group selection
Test
USB
Rotation ring / Dial
Set
Battery compartment cover
On/Off
Refresh
Change value
Lock
Press for 2 seconds
To refresh manual
changes made on the flash unit
Communication Transmitter
HS / EL- flash unit.
Press for 2 seconds
Speed button 2SRSpeed button 3
Green LED
Speed button 1
Speed button 4
Blue LED
Communication camera / Transmitter HS
TASTEN
Skyport mode
EL-unit(s)
Button function title
Column title
Battery status
Groups
ODS status
Modelling lamp
mode
Unit selection
Frequency
Sync mode
D: DOF
HS: Hi-Sync
Power settings
Setup menu
Modelling lamp settings
s: speed
n: normal
second curtain
S: Shutter
Number of unit
**
** **
***
*
Page 16

31
30
Gebrauchsanleitung Gebrauchsanleitung
DEDE
SPEED BUTTON 4 (RIGHT)
Setup durch Drücken dieser Taste ändern sich die Funktionen der Schnellwahltasten und das SETUP-
Menü wird ausgewählt. Im SETUP-Menü können die Funktionen angepasst und aktiviert werden.
Exit das SETUP-Menü verlassen und auf den Standardanzeigemodus zurückschalten.
ON/OFF
Drücken und für mindestens 2 Sekunden halten, um den EL-Skyport Transmitter Plus HS ein- oder
auszuschalten.
GROUP BUTTON
Drücken, um zwischen Gruppen 1 bis 4 und „ALL” zu wechseln.
TEST BUTTON (MIT EL LOGO)
Durch Drücken der TEST-Taste werden alle Blitze ausgelöst, wenn “ALL” ausgewählt ist, oder eine einzelne
Gruppe, wenn 1 bis 4 ausgewählt ist. Bitte denken Sie daran, die Fotozellen für genaue EL-Skyport-Auslösung
Ihrer Blitzgeräte zu deaktivieren.
REFRESH BUTTON
Drücken Sie die Aktualisieren-Taste jedes Mal, wenn Leistungseinstellungen auf einem EL-Blitzgerät
vorgenommen wurden, um die Anzeige der Leistungseinstellung am Skyport HS zu aktualisieren.
Wenn eine Gruppe ausgewählt ist, werden nur die Informationen für diese ausgewählte Gruppe aktualisiert.
Wenn „ALL” ausgewählt ist, werden die Informationen für alle Gruppen aktualisiert.
Ein Blitz, der nicht gescannt und gefunden wurde, als das Skyport HS eingeschaltet wurde, kann nicht mit der
Aktualisieren-Funktion hinzugefügt werden.
Wenn ein Blitz hinzugefügt wird, wählen Sie SETUP und SCAN im Setup-Menü oder schalten Sie den
Transmitter aus und wieder an. Die Aktualisierung kann bis zu 4 Sekunden dauern, abhängig davon, wie viele
Blitzgeräte gefunden und über den Transmitter betrieben werden.
Hinweis:
Um den sichersten Betrieb zwischen dem Skyport HS und EL-Blitzen zu sichern, werden die Informationen
über die Blitzleistung von dem EL-Blitz nur übertragen, wenn Änderungen an der Leistung vorgenommen
wurden oder die Aktualisieren-Taste gedrückt wird.
ROTATING RING / DIAL
Drehen Sie am Wählrad, um verschiedene Funktionen auszuwählen und die Leistung der EL-Blitze zu ändern.
SET / CONFIRMATION BUTTON (TASTE IN DER MITTE DES
WÄHLRADS)
Drücken, um eine Änderung zu bestätigen, die im Setup-Menü vorgenommen wurde.
Drücken, um die Beleuchtung der Anzeige einzuschalten.
Drücken, um zum normalen Betrieb zurückzukehren, wenn sich das Skyport HS in den Standby-Modus
versetzt hat.
2 Sekunden drücken, um alle Funktionen und Einstellungen zu sperren. Nochmals drücken, um sie wieder
freizugeben.
Die Sperr-Funktion blockiert die Funktion des Wählrads und anderer Tasten, um Falscheinstellungen zu
verhindern, wenn das Skyport HS transportiert wird.
SETUP MENU
SCAN..
Wenn das Skyport HS eingeschaltet wird, sucht es automatisch nach Elinchrom-Blitzgeräten mit eingebauten
oder separaten EL-Skyport Transceiver-Modulen.
Die Scan-Funktion ist auch im Setup-Menü verfügbar. Ein erneuter Scan ist notwendig, wenn neue Blitzgeräte
zum Beleuchtungssystem hinzugefügt wurden.
Um EL-Blitzgeräte zu finden,
• müssen alle EL-Blitzgeräte eingeschaltet sein,
• alle Blitze müssen eingebaute oder separate EL-Skyport Transceiver-Module haben,
• der Transmitter Plus HS und das EL-Blitzgerät müssen auf denselben Frequenzkanal eingestellt sein.
FREQUENCY CHANNELS
Bis zu 20 EL-Skyport-Frequenzkanäle können ausgewählt werden.
Hinweis:
• Nur die neuesten Elinchrom-Blitzgeräte (ELC 500 / 1000 Pro HD, ELB 400 und spätere Versionen)
unterstützen bis zu 20 Frequenzkanäle.
• Alle „RX”-Blitzgeräte unterstützen bis zu 8 Kanäle und einige ältere Elinchrom-Blitzgeräte unterstützen bis
zu 4 Kanäle.
ELSP MODE
Das Skyport HS hat zwei Betriebsarten, die unterschiedliche Blitzfunktionen bieten.
• Normal-Modus
• Der Normal-Modus ist mit den allerersten Elinchrom-Blitzgeräten kompatibel, die EL-Skyport enthalten.
Wenn ausgewählt, sind die Anzeigenbeleuchtung und die Status-LED grün.
• Speed-Modus
Der Speed-Modus ermöglicht höhere Verschlussgeschwindigkeiten von bis zu 1/1000 s abhängig von
der Kamera, die normale Blitzsynchronisation nutzt (d. h. für Kameras mit Zentralverschluss und einige
spiegellose).
Um Verschlussgeschwindigkeiten von bis zu 1/8000 s zu nutzen, muss der HS-Modus bei Benutzung im
Normal- als auch im Speed-Modus aktiviert sein. Die Anzeigenbeleuchtung und die Status-LED sind rot,
wenn der Speed-Modus aktiv ist.
Hinweis:
• Der größte Arbeitsabstand ist im Normal-Modus verfügbar. Der Speed-Modus reduziert den
Arbeitsabstand um 50 %. Die Skyport Transceiver in allen abgesetzten Blitzen müssen die Fähigkeit des
EL-Skyport-Modus haben, den Speed-Modus zu nutzen.
SYNC MODE
Den Synchronisations-Modus auswählen:
• Standard-Modus
Im Standard-Modus arbeiten die meisten Kameras mit Verschlussgeschwindigkeiten bis zu 1/200 1/250 s.
• HS Hi-Sync-Modus*
Im HS-Modus kann die Verschlussgeschwindigkeit bis zu 1/8000 s betragen abhängig von der Kamera
und dem Blitzgerät.
Der HS-Modus erfordert für beste Ergebnisse Blitzgeräte oder Blitzköpfe mit langer Blitzdauer. Köpfe
oder Blitzgeräte, die mit A-Blitzröhren (Action) ausgerüstet sind, werden nicht empfohlen.
• Zweiter-Vorhang-Modus*
Der Zweiter-Vorhang-Modus gibt die Möglichkeit, den Blitz genau vor dem Schließen des Verschlusses
auszulösen, um Bewegungseffekte zu erzielen.
* Bei Nikon-Kameras werden diese Funktionen im Kamera-Menu aktiviert.
Page 17

33
32
Gebrauchsanleitung Gebrauchsanleitung
DEDE
ODS SETUP
Der Over-Drive-Sync (ODS) kann die Gesamtbelichtung verbessern, wenn der HS-Sync-Modus aktiv ist.
ODS beruht auf Blitzgeräten mit langer Dauer des Blitzes, daher hängen die Ergebnisse von der Dauer der
Blitze der genutzten Geräte ab (die sich auch bei unterschiedlicher Leistung ändert), sowie der benutzten
Kamera. Mit Vollbildkameras mit großen Sensoren und langsamen Verschlüssen ist es leider am schwierigsten,
gute Ergebnisse zu erzielen, aber mit Geräten mit einer Dauer des Blitzes, die lang genug ist, können immer
noch saubere Bilder mit bis zu 1/8000 s erreicht werden. Wenn ODS genutzt wird, können sie zusätzlich bis zu
2 Blenden mehr Licht gewinnen, wichtig, wenn Sonnenlicht überwunden werden muss.
Das ODS-Setup bietet Anpassungen von 0,1 bis 5,0 ms oder es kann ausgeschaltet werden.
Der ODS-Wert variiert abhängig von der Kamera und dem Blitzgerät, die verwendet werden, und muss manuell
eingestellt werden.
Hinweis:
• Over-Drive-Sync (ODS) kann nur genutzt werden, wenn der SYNC-Modus auf HS eingestellt ist.
• Wenn ODS angepasst wird, kann die Position der Blitzabschaltung (dunkler Rand oben oder unten auf
dem Bild) innerhalb des Rahmens bewegt werden. Wenn es ausgeschaltet ist, wird der Blitzauslösepunkt
automatisch ausgewählt, wenn der HS-Modus besteht.
AUTO MOD
• Off
Das Einstelllicht der Elinchrom-Blitzgeräte ändert sich nicht.
• Shutter**
Drücken der Auslösertaste der Kamera, um zu focussieren, bewirkt, dass die Einstelllampe des ELBlitzgeräts sich für einige Sekunden einschaltet als Hilfe beim Fokussieren bei schwachem Licht. (Von
Nikon nicht unterstützt)
• DOF
Die Elinchrom-Blitzgeräte schalten ihre Einstelllampen so lange an, wie die Taste DOF (Tiefenschärfe,
Depth of field) an der Kamera gedrückt gehalten wird.
AF-LICHT
Aktiviert das Auto-Focus-Unterstützungslicht des Skyport HS, wenn die Auslösetaste zur Fokussierung halb
gedrückt wird (überprüfen Sie auch die Kameraeinstellungen).
KEY CLICK
Wenn aktiviert, wird das Drücken jeder Steuerungstaste durch einen Piepton angezeigt.
SLEEP
Wenn es für eine gewisse Zeit nicht benutzt wird, schaltet das Skyport HS in den Ruhezustand, um
Batterieenergie zu sparen. Stellen Sie die Zeit bis zum Ruhezustand auf 1 bis 60 Minuten ein oder schalten Sie
dies aus.
AUTO OFF
Das Skyport HS schaltet sich automatisch aus, wenn es für eine bestimmte Zeit nicht bedient wurde.
Stellen Sie die Zeit bis zur Auto-Abschaltung von 1 bis 60 Minuten ein oder schalten Sie diese aus.
Wenn Ruhen und Auto-Abschaltung beide aktiv sind, schaltet sich der Transmitter Plus HS nach der vom
Benutzer eingestellten Zeit bis zum Ruhen aus.
CONTRAST
Der Kontrast der Anzeige kann von 80 bis 120 % eingestellt werden.
BACKLIGHT
Die Beleuchtung der Anzeige des Geräts kann ein- oder ausgeschaltet werden.
* Bei Nikon-Kameras können diese Funktionen im Kamera-Menü aktiviert werden.
** Nicht unterstützt von Nikon.
AUF WERKSEINSTELLUNGEN ZURÜCKSETZEN
Durch Drücken und Halten der linken und rechten Schnellwahltasten, während das Skyport HS eingeschaltet
ist (ungefähr 2 Sekunden), wird das Skyport HS auf die Werkseinstellungen zurückgesetzt. Alle Einstellungen
durch den Benutzer außer dem Kontrast der Anzeige werden zurückgesetzt.
FIRMWARE-UPDATE
Um einen Update der Firmware des Transmitter Plus HS vorzunehmen, wird der Elinchrom Transmitter HS
Updater benötigt. Dieser ist auf der Website von Elinchrom erhältlich.
FEHLERBESEITIGUNG
Durch Drücken und Halten der linken und rechten Schnellwahltasten, während das Skyport HS eingeschaltet
ist (ungefähr 2 Sekunden), wird das Skyport HS auf die Werkseinstellungen zurückgesetzt. Alle Einstellungen
durch den Benutzer außer dem Kontrast der Anzeige werden zurückgesetzt.
WELCHES PROBLEM HABEN SIE? BITTE PRÜFEN SIE FOLGENDE PUNKTE:
DAS GERÄT LÄSST SICH NICHT EINSCHALTEN
• Prüfen Sie die Polarität der Batterie und
ersetzen Sie beide entladenen Batterien.
BLITZGERÄT KANN NICHT AUSGELÖST
WERDEN, WENN DER MODUS „ALL”
AUSGEWÄHLT IST
• Transmitter und Empfänger müssen dieselben
Einstellungen für den Frequenzkanal haben.
• ELSP-MODUS: Transmitter und Empfänger
müssen dieselben Einstellungen für den
Synchronisationsmodus haben: Normal- oder
Speed Sync-Modus.
• Überprüfen Sie, dass der EL-SkyportEmpfänger in allen EL-Blitzen mit eingebauten
Empfängern eingeschaltet ist.
• Überprüfen Sie, dass die Version des
Transmitters Ihrer Canon- oder Nikon-Kamera
entspricht.
EINIGE BLITZE WERDEN NICHT AUSGELÖST,
WENN DER GROUP-MODUS AUSGEWÄHLT IST
• Überprüfen Sie die Group-Einstellungen des
EL-Blitzgeräts.
• Verringern Sie den Abstand zu jedem Gerät, das
nicht reagiert.
• Transmitter und Empfänger müssen dieselben
Einstellungen für den Synchronisationsmodus
haben: Normal- oder Speed Sync-Modus sowie
dieselben Einstellungen für den Frequenzkanal.
Page 18
35
34
Gebrauchsanleitung Gebrauchsanleitung
DEDE
DIE TASTE TEST FUNKTIONIERT, ABER DIE
KAMERA LÖST DIE BLITZGERÄTE NICHT AUS
• Überprüfen Sie die Montage auf dem
Blitzschuh.
• Überprüfen Sie die Kameraeinstellungen
(schalten Sie die Kommunikation mit dem
Blitzschuh ein).
• Überprüfen Sie, dass die Version des
Transmitters Ihrer Canon- oder Nikon-Kamera
entspricht.
• Überprüfen Sie die Liste der kompatiblen
Kameras.
EINIGE INFORMATIONEN WERDEN NICHT
ANGEZEIGT
BEI DIGITAL RX, RANGER RX ODER STYLE
RX-GERÄTEN
• Geräte, die mit einem separaten Transceiver
RX ausgerüstet sind, sind bei ihren
ferngesteuerten Funktionen eingeschränkt.
Diese Geräte können aber durch den
EL-Skyport Transmitter Plus HS ausgelöst
und gesteuert werden (aber ohne visuelle
Rückmeldung).
BEGRENZTER ENTFERNUNGSBEREICH:
• Stellen Sie die Geräte anders auf.
• Vergrößern Sie den Abstand zu Wänden und
Decken..
• ELSP-Modus: Im Speed Sync-Modus wird
der Abstandsbereich um ca. 50 % verringert,
schalten Sie auf den normalen Sync-Modus
zurück.
• Im Freien kann der Abstandsbereich durch
Feuchtigkeit, Störungen, Hindernisse usw.
verringert werden.
STÖRUNGEN DURCH ANDERE 2,4 GHZNETZWERKE, UNZUVERLÄSSIGE AUSLÖSUNG:
• Versuchen Sie es mit einem anderen
Frequenzkanal für Transmitter und Empfänger
der EL-Geräte.
• Verringern Sie den Abstand zwischen dem
Blitzgerät und dem Transmitter.
HS MODUS; SYNC BIS ZU 1/8000 S:
• Elinchrom Action- (früher A-) Köpfe sind nicht
für den HS-Modus optimiert. Um die bessere
Leistung zu erhalten, benutzen Sie bitte
Blitzgeräte mit Pro-Blitzröhren (früher Standard
oder S) oder benutzen Sie idealerweise
spezielle HS-Köpfe.
• ODS-Feineinstellung hilft dabei, die HSLeistung zu optimieren.
• Wenn es sichtbare Streifen gibt, verringern
Sie die Verschlussgeschwindigkeit an Ihrer
Kamera oder stellen Sie ODS ein und passen
es an, um Streifen zu minimieren oder zu
vermeiden.
• Die HS-Funktion arbeitet nur mit Canon- oder
Nikon-Kameras und dem entsprechenden
Transmitter zusammen.
FREQUENZKANÄLE FÜR EL-SKYPORT SPEED-EMPFÄNGER
Dies ist für dieses Produkt nicht relevant, könnte aber hilfreich sein bei der Frequenzeinstellung an älteren ELSkyport-Geräten.
DIE GEBRAUCHSANLEITUNG FÜR DEN EL-SKYPORT
TRANSMITTER PLUS HS HERUNTERLADEN
Erhalten Sie die vollständige Gebrauchsanleitung über diesen Link: http://bc.gs/elspths
KONFORMITÄTSERKLÄRUNG HERUNTERLADEN
Sie finden Ihre Konformitätserklärung für EU sowie USA und Kanada hier: http://bc.gs/ec
FIRMWARE-UPDATE ÜBER USB-ANSCHLUSS
Bitte laden Sie unsere neueste Firmware herunter und folgen Sie den Anweisungen:
http://bc.gs/fw
SCANNEN DER EL-GERÄTE:
KEIN EL-GERÄT GEFUNDEN ODER EINNIGE
GERÄTE FEHLEN.
• Schalten Sie alle aktivierten EL-Geräte ein, dann
schalten Sie den EL-Skyport Transmitter Plus
HS ein oder gehen Sie zu Einstellungen und
wiederholen das Scannen.
• Einstellungen für Frequenz, Group- und
ELSP-Modus müssen mit dem Transmitter
übereinstimmen.
• Stellen Sie sicher, dass alle im EL-Skyport
Transmitter Plus HS aktivierten Geräte mit der
neuesten Firmware arbeiten.
Page 19

37
36
Mode d’utilisation Mode d’utilisation
FRFR
MANUEL D’UTILISATION
TABLE DES MATIÈRES 36
DÉCLARATION DE CONFORMITÉ 39
VERSIONS 40
FONCTIONNALITÉS 40
INSTALLER LES PILES 41
PILES ET ACCUMULATEURS 41
COMPATIBILITÉ 42
DÉCLENCHEMENT 42
CONTRÔLE À DISTANCE 42
CANAUX DE FRÉQUENCE 42
DONNÉES TECHNIQUES 43
ADAPTATEUR GRIFFE 44
INSTALLATION SUR L’APPAREIL PHOTO 44
AFFICHAGES 45
BOUTONS 46
MENU DES PARAMÈTRES 47
REMISE À L’ÉTAT D’USINE 50
MISE À JOUR DU FIRMWARE 52
Les tolérances et spécifications sont établies conformément aux standards IEC et CE. Les données
techniques peuvent changer sans préavis.
INTRODUCTION
Cher Photographe,
Nous vous remercions d’avoir choisi ELINCHROM.
Tous les produits Elinchrom sont fabriqués en utilisant la technologie la plus avancée. Les composants utilisés
sont sélectionnés avec soin pour garantir la meilleure qualité, et le matériel fait l’objet de nombreux tests
pendant et après la fabrication. Nous sommes sûrs qu’il vous donnera de nombreuses années de service
fiable.
Veuillez lire attentivement ce manuel d’utilisation avant d’utiliser votre nouveau produit Elinchrom. Vous
trouverez des informations pour votre sécurité et des instructions pour bénéficier de toutes les fonctionnalités
programmables.
Ce manuel peut utiliser des images de produits équipés d’accessoires qui ne font pas partie des ensembles ou
des appareils seuls.
La configuration des ensembles et des appareils seuls vendus par Elinchrom peut changer sans préavis et
peut différer selon le pays.
Pour plus de détails, des mises à jour, l’actualité et les dernières informations concernant le système
Elinchrom, veuillez visiter régulièrement le site web d’Elinchrom. Les derniers guides d’utilisation et
spécifications techniques peuvent être téléchargés dans la section « Support ».
Les données techniques, fonctionnalités et data, caractéristiques et fonctions des unités et accessoires de
flash Elinchrom peuvent changer sans préavis. Les spécifications affichées peuvent différer du fait des marges
de tolérance des composants et des instruments de mesure. Les données techniques peuvent varier. Nous
n’apportons aucune garantie pour les erreurs d‘impression.
Veuillez vérifier s’il existe un manuel plus récent sur notre site web : www.elinchrom.com/support
Avec nos remerciements,
Votre équipe Elinchrom
Page 20
39
38
Mode d’utilisation Mode d’utilisation
FRFR
Le produit est classé comme produit laser de
catégorie 3R, selon les standards IEC/EN 608251 « Sécurité des radiations des produits laser ».
Catégorie 3R : un laser de catégorie 3R est
considéré comme sûr s’il est manipulé avec soin,
avec une observation restreinte du faisceau.
Avec un laser de catégorie 3R, l’exposition
maximale autorisée peut être dépassée, mais
avec un faible risque de dommage. Les lasers
continus visibles de catégorie 3R sont limités à 5
mW. Pour d’autres longueurs d’onde et pour les
lasers pulsés, d’autres limites s’appliquent.
DECLARATION OF CONFORMITY USA AND CANADA
EN This device complies with Part 15 of the FCC Rules and with Industry Canada licence-exempt RSS
standard(s). Operation is subject to the following two conditions: (1) this device may not cause harmful
interference, and (2) this device must accept any interference received, including interference that may cause
undesired operation. This product complies with the Canadian ICES-003 Class B specifications.
FR Le présent appareil est conforme aux CNR d’Industrie Canada applicables aux appareils radio exempts
de licence. L’exploitation est autorisée aux deux conditions suivantes(1) ce dispositif ne doit pas produire
de brouillage préjudiciable, et (2) ce dispositif doit accepter tout brouillage radioélectrique subi, même si le
brouillage est susceptible d’en compromettre le fonctionnement. Cet appareil numérique de la classe B est
conforme à la norme NMB-003 du Canada.
Radiation Exposure Statement
EN This equipment complies with portable RF exposure limit in Canada and the USA set forth an
uncontrolled environment and is safe for intended operation as described in this manual. Further RF exposure
reduction can be achieved if the product can be kept as far as possible from the user body.
FR Le produit est conforme aux limites d’exposition pour les appareils portables RF pour les Etats- Unis et le
Canada établies pour un environnement non contrôlé. Le produit est sûr pour un fonctionnement tel que décrit
dans ce manuel. La réduction aux expositions RF peut être augmentée si l’appareil peut être utilisé aussi loin
que possible du corps de l’utilisateur.
FCC Class B Compliance note
This equipment has been tested and found to comply with the limits for a Class B digital device, pursuant
to Part 15 of the FCC Rules. These limits are designed to provide reasonable protection against harmful
interference in a residential installation. This equipment generates, uses and can radiate radio frequency energy
and, if not installed and used in accordance with the instructions, may cause harmful interference to radio
communications. However, there is no guarantee that interference will not occur in a particular installation. If
this equipment does cause harmful interference to radio or television reception, which can be determined by
turning the equipment off and on, the user is encouraged to try to correct the interference by one or more of
the following measures:
• Reorient or relocate the receiving antenna.
• Increase the separation between the equipment and receiver.
• Connect the equipment into an outlet on a circuit different from that to which the receiver is connected.
• Consult the dealer or an experienced radio/television technician for help.
Any changes or modifications not expressly approved by the party responsible for compliance could void
the user’s authority to operate this equipment. This device is limited to operation on permissible Part 15
frequencies, and it does not have the ability to be configured by end users or professional installers to operate
outside the authorized bands.
Page 21

41
40
Mode d’utilisation Mode d’utilisation
FRFR
TRANSMETTEUR EL SKYPORT PLUS HS
VERSIONS
Le Transmetteur ELSP Plus HS est disponible pour les appareils photo suivants :
• Canon
• Nikon
CARACTÉRISTIQUE
• Grand affichage graphique pour le réglage.
• Éclairage de l’affichage en vert ou rouge (vert pour le Mode de Synchronisation Normal, rouge pour le
Mode de Synchronisation Rapide).
• Boutons d’accès rapide et molette pour un contrôle facilité.
• Connexion par griffe sécurisée par un système de verrouillage par baïonnette.
• Deux piles AA standard (accepte les batteries rechargeables).
• Prise de sortie 2,5 mm pour le déclenchement.
• Mise à jour du firmware avec la prise mini USB intégrée.
• 40 canaux à distance.
• 20 canaux de fréquence* en Mode de Synchronisation Normal.
• 20 canaux de fréquence* en Mode de Synchronisation Rapide.
• 4 groupes et ALL.
• Modes de synchronisation EL-Skyport.
• Mode de Synchronisation Normal (portée maximale).
• Mode de Synchronisation Rapide (vitesse d’obturation plus rapide, surtout lorsque HS est activé,
mais portée réduite).
• Modes de Synchronisation ***.
• Standard (en utilisant le contact du milieu de la griffe).
• HS - Synchronisation haute vitesse **** (Synchronisation jusqu’à 1/8000 s, gérée automatiquement).
• Synchronisation ODS (Synchronisation manuelle surmultipliée) ajustant le temps la synchronisation
haute vitesse pour une puissance maximum et une exposition régulière.
• Mode de synchronisation deuxième rideau ****.
• Lumière autofocus (AF) intégrée ***.
• AUTO - Mode automatique *** pour contrôler la lumière pilote des flashs Elinchrom pour la mise au point.
• Mode obturation***** (le déclencheur d’obturateur à moitié pressé contrôle la lampe pilote).
• Mode DOF (le bouton de profondeur de champ de la caméra contrôle la lampe pilote).
• REMOTE – Contrôle à distance** avec un retour automatique du flash Elinchrom.
• EL – Les flashs peuvent être contrôlés tous ensemble (« All »), par groupes (« Groups »), ou seul («
Single »).
• Modulation de la puissance de flash (haut & bas).
• Allumage et extinction de la lampe pilote et intensité (haut & bas).
• Mode veille et Auto OFF programmables.
• RESET pour réinitialiser les paramètres.
INSTALLATIONS DES PILES
Appuyez sur le capot du compartiment des piles et faites le glisser dans la direction de la flèche pour ouvrir le
capot des piles (voir Image 1).
Insérez les piles. Assurez-vous que les contacts « + » et « -» des piles sont correctement orientés (voir Image
2). (Note : veuillez utiliser 2 piles alcalines AA ou des accumulateurs NiMH de type AA).
Rabattez le capot sur le Transmetteur et faites-le glisser dans sa position de verrouillage.
PILES ET ACCUMULATEURS
• 2 piles AA sont utilisées pour le Transmetteur.
• Installer les piles d’une façon incorrecte n’endommagera pas le Transmetteur.
• Des piles non rechargeables (pile sèche) AA de type zinc-carbone ou alcalines, ou des accumulateurs
de taille AA telles que des accumulateurs nickel-cadmium (NiCd) ou nickel-hydrure métallique (NiMH)
peuvent être utilisés.
• Ne mélangez pas plusieurs types de piles ou accumulateurs entre eux.
• N’utilisez pas des piles AA au lithium dans ce transmetteur.
Appuyez et glissez
Image 1
Image 2
* Pour les derniers Flashs Elinchrom avec 20 canaux de fréquence, et compatibles avec les modèles plus
anciens.
** Pour tous les Flashs Elinchrom disposant du Récepteur et Émetteur-récepteur EL-Skyport.
*** Fonctionnalités étendues pour les appareils photo Canon et Nikon avec griffe TTL (fonctionnalités limitées
pour Nikon, voir ci-dessous).
**** Ces fonctionnalités ne sont pas prises en charge par Nikon, mais peuvent être activées dans le menu
de l’appareil photo.
***** Non supporté par Nikon.
Page 22
43
42
Mode d’utilisation Mode d’utilisation
FRFR
DONNÉES TECHNIQUES
PARAMÈTRE SPÉCIFICATION
VERSIONS
Canon, Nikon.
COMPATIBILITÉ DE DÉCLENCHEUR
Tous les Flashs Elinchrom avec récepteur ou les Récepteurs EL-Skyport
ou les émetteurs-récepteurs et les modules d’émetteur-récepteur
externes EL-Skyport RX, ainsi que EL-Skyport Universal.
COMPATIBILITÉ DE CONTRÔLE À
DISTANCE
ALL Flashs Elinchrom avec Émetteur-récepteur EL-Skyport intégré : ELC
Pro HD, ELB 400, Ranger Quadra RX, Quadra Hybrid, D-Lite RX séries,
BRX Series, Master RX Series et FRX séries (NOTE : Les flashs EL utilisés
avec le module externe d’Émetteur-récepteur RX ont des fonctionnalités
à distance limitée).
PORTÉE
Intérieur > 60 m.
Extérieur > 200 m.
Note :
La portée maximale est disponible avec les derniers Flashs Elinchrom
tels qu’ELC ou ELB. Les autres Flashs Elinchrom, ou les modèles plus
anciens auront une portée limitée.
PILES
Deux batteries AA (piles ou accumulateurs).
DURÉE DE VIE DES PILES
Dépends du type de batterie et de l’utilisation.
Deux piles standards de 1000 mAh chacune auront une durée de vie
d’approximativement 35 heures de fonctionnement et plus de 15 000
déclenchements.
CONTRÔLE À DISTANCE
Un maximum de 10 flashs peuvent être affichés comme détectés et
contrôlés à distance.
CANAUX DE FRÉQUENCES
Mode de synchronisation Normal ou Rapide.
MODES EL-SKYPORT (ELSP)
Normal / Speed - Sync mode.
GROUPS DE DÉCLENCHEMENT/
CONTRÔLE
Tous (« All ») ou des groupes (« Groups ») de 1 à 4.
MODES DE SYNCHRONISATION
Standard, HS (avec ou sans ODS), Deuxième Rideau.
PORT USB
Pour la mise à jour du firmware.
PORT SR
Prise de sortie mono de déclencheur de 2,5 mm (tension maximum de
synchronisation : 3 V DC).
DIMENSIONS (W x L x H)
69 x 84 x 59 mm (2.7x 3.3x 2.3 in.)
POIDS
Environ 170 g (6 oz), en comptant les deux piles AA.
120 g (4.2 oz) sans les piles.
COMPATIBILITÉ
Il existe trois générations différentes de flash Elinchrom EL-Skyport flash sur le marché :
1RE GÉNÉRATION
• Module émetteur-récepteur EL-Skyport RX (Style RX, Digital RX, Ranger RX).
2E GÉNÉRATION
• Module intégré EL-Skyport Mk1 (BRX, D-Lite RX, Quadra, Quadra Hybrid).
3E GÉNÉRATION
• Module intégré EL-Skyport Mk2 (ELC et ELB). Cette génération dispose d’une portée étendue.
DÉCLENCHEMENT
Le déclenchement fonctionne avec tous les Flashs Elinchrom avec émetteur-récepteur EL-Skyport intégré ou
en module externe existants.
CONTRÔLE À DISTANCE
QUAND TOUT (ALL) OU GROUPE 1 - 4 EST SÉLECTIONNÉ
• Tous les Flashs Elinchrom avec EL-Skyport sont pris en charge lors du changement « PWR±, MOD± ou
MOD on/off ». Lorsque les paramètres de puissance de la lampe pilote sont changés avec le bouton MOD
on/off ou MOD+/-, le flash Elinchrom utilisé passera au mode de mise au point libre. Pour revenir en mode
lampe pilote proportionnelle, les paramètres doivent être ajustés sur le flash EL.
• Certains flashs ne prennent pas en charge toutes les fonctionnalités de mise au point, « -- « est alors
affiché (par exemple pour Ranger, Quadra, ELB400).
LORSQU’UN FLASH SEUL EST SÉLECTIONNÉ
• Le flash sélectionné est indiqué avec un cadre sur l’écran d’affichage et peut être contrôlé
individuellement.
• Seuls les Flashs Elinchrom avec Récepteur EL-Skyport intégrés de deuxième ou de troisième génération
sont pris en charge.
Note :
Les flashs de première génération sont détectés, mais afficheront « -- « sur l’écran d’affichage. Il n’y a pas
de retour des paramètres du flash vers le Transmetteur EL-Syport Plus HS, mais ils seront déclenchés
normalement.
CANAUX DE FRÉQUENCE
Certains modèles anciens de Flashs Elinchrom avec EL-Skyport intégré prendront en charge les canaux de
fréquence de 1 à 4 ou de 1 à 8 (comme le BRX, D-Lite RX, Quadra).
Les derniers Flashs Elinchrom avec EL-Skyport intégré prendront en charge jusqu’à 20 canaux de fréquence
différents de 1 à 20 (ELC, ELB).
Page 23
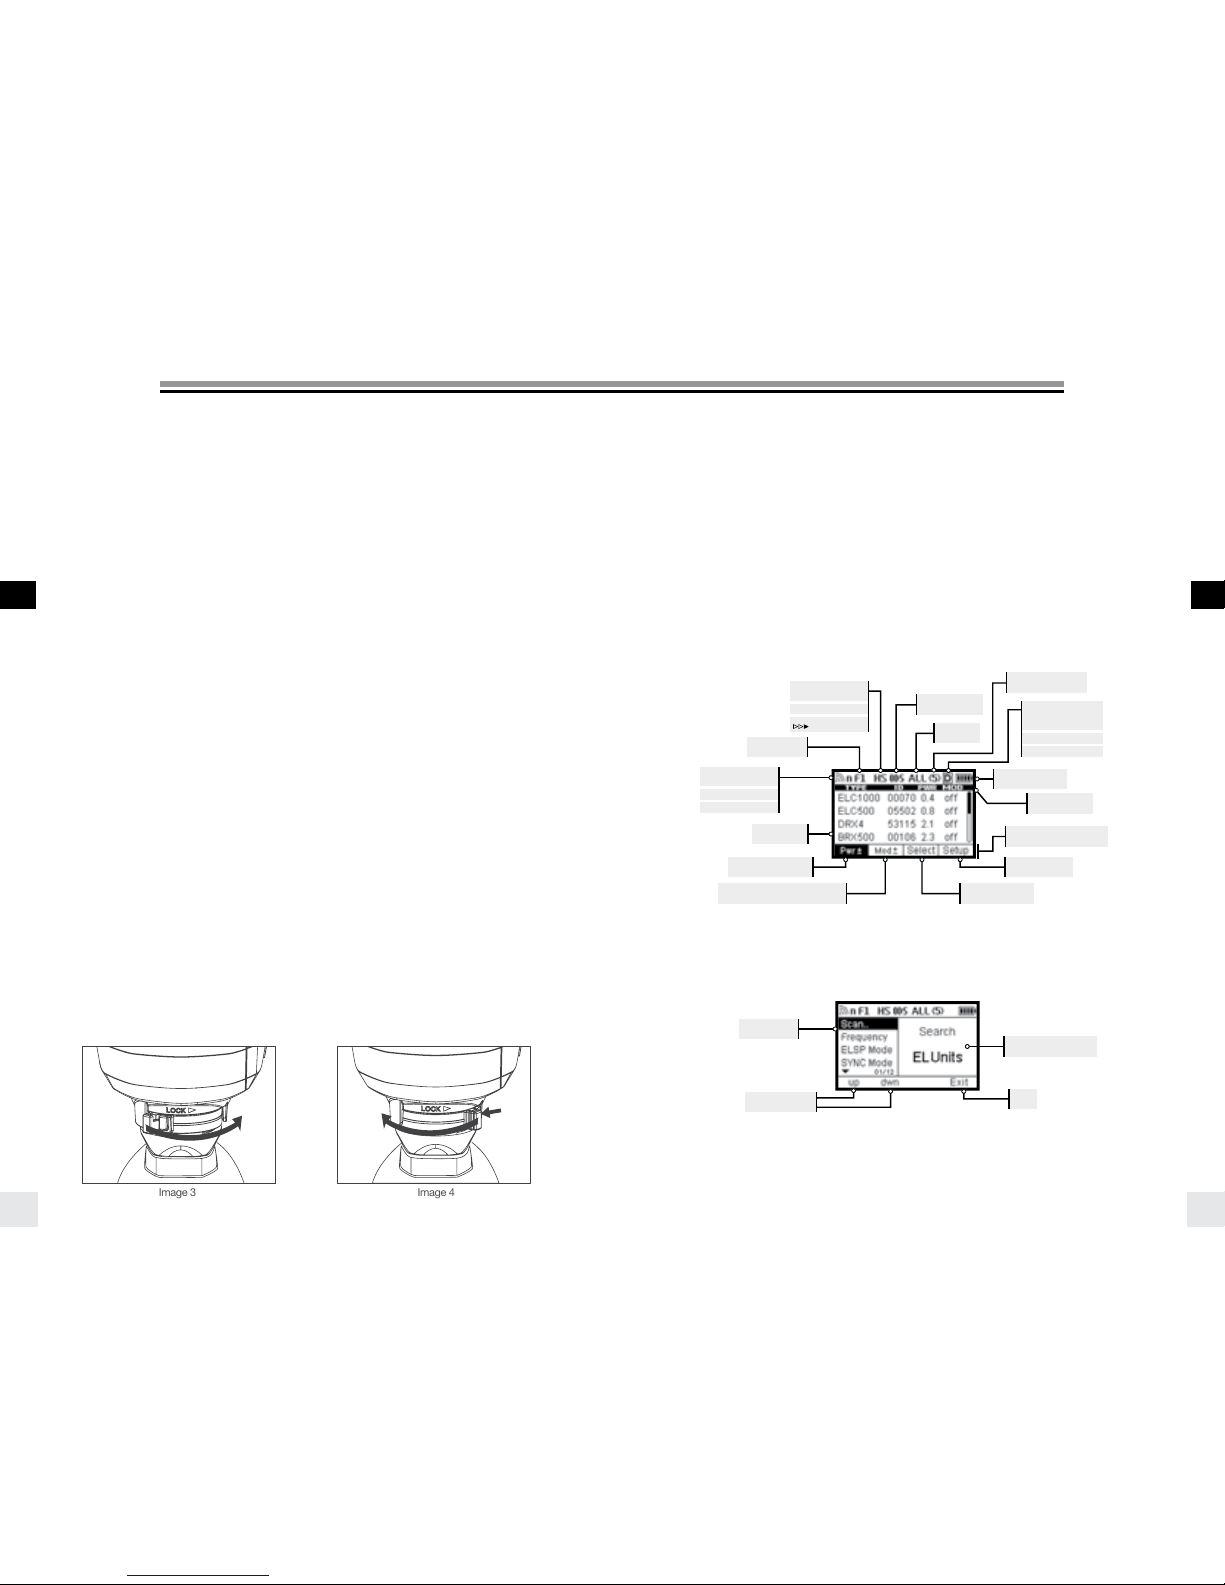
45
44
Mode d’utilisation Mode d’utilisation
FRFR
ADAPTATEUR GRIFFE
FONCTIONNALITÉS
Le transmetteur Elinchrom Skyport Plus HS peut être utilisé pour un déclenchement simple avec contrôle de
la puissance avec tout appareil photo disposant d’une griffe de connexion flash. Les fonctionnalités décrites
ci-dessous nécessitent un appareil Canon ou Nikon compatible avec le système Skyport. Pour fonctionner
correctement, le transmetteur Skyport HS dispose de connecteurs spéciaux pour communiquer avec l’appareil
photo lié.
Il y a deux versions du Transmetteur Elinchrom disponibles :
• Canon pour les appareils photo Canon EOS type A compatibles avec les flashs ETTLII/ETTL.
• Nikon pour les appareils photo Nikon DSLR compatibles avec les flashs iTTL.
Les terminaux de communication spécialisés dans la griffe de l’appareil photo permettent les fonctionnalités
suivantes d’Elinchrom Skyport HS :
• Mode synchronisation
• Mode HS et ODS
• Synchronisation de second rideau
• Mode Auto
• Lumière AF
Note : tous les appareils photo ne prennent pas en charge toutes ces fonctionnalités.
LISTE DES APPAREILS PHOTO TESTÉS
Le dernier récapitulatif des modèles d’appareil photo et des fonctionnalités prises en charge peut être consulté
sur le site web d’Elinchrom à l’adresse : http://www.elinchrom.com/support.php
INSTALLATION SUR L’APPAREIL PHOTO
Un mécanisme de verrouillage par baïonnette simple d’utilisation permet de verrouiller fermement le
Transmetteur sur la griffe de l’appareil photo.
FIXATION
1. Éteignez l’appareil photo et le Transmetteur EL-Skyport.
2. Alignez la griffe du Transmetteur EL-Skyport avec la griffe de l’appareil photo.
3. Glissez-le entièrement dans la griffe.
4. Déplacez vers la droite le curseur sur l’anneau de verrouillage jusqu’à ce qu’un déclic se fasse entendre.
(voir image 3)
RETRAIT
1. Déverrouillez : appuyez sur le bouton de relâchement du verrouillage et déplacez le curseur entièrement
vers la gauche. (voir image 4).
2. Faites glisser le Transmetteur EL-Skyport jusqu’à le faire sortir de la griffe de l’appareil photo.
AFFICHAGE
L’affiche graphique montre l’état et les paramètres du flash Elinchrom.
L’éclairage de l’affichage peut être activé ou désactivé.
En Mode de Synchronisation Normal, l’éclairage de l’affichage est vert. En mode de Synchronisation Rapide,
l’éclairage de l’affichage est rouge.
Le contraste de l’affichage peut être ajusté dans le menu des paramètres.
La barre en haut de l’affichage montre l’état du Transmetteur Elinchrom.
La barre en bas de l’affichage montre les fonctions des 4 boutons de vitesse.
La zone du milieu affiche une liste des Flashs Elinchrom détectés, et affiche également les éléments de
paramètres du menu des paramètres lorsqu’il est sélectionné.
PANNEAU D’AFFICHAGE – TABLEAU DE CONTRÔLE
PANNEAU D’AFFICHAGE – MENU DES PARAMÈTRES
Menu list
Up/down list
Description/mode
Exit
* Sur les appareils photo Nikon, ces fonctionnalités s’activent dans le menu de l’appareil photo.
** Non pris en charge par les systèmes Nikon®
** Non pris en charge par les systèmes Sony®
Image 3
Image 4
Skyport mode
EL-unit(s)
Button function title
Column title
Battery status
Groups
ODS status
Modelling lamp
mode
Unit selection
Frequency
Sync mode
D: DOF
HS: Hi-Sync
Power settings
Setup menu
Modelling lamp settings
s: speed
n: normal
second curtain
S: Shutter
Number of unit
**
** **
***
*
Page 24

47
46
Mode d’utilisation Mode d’utilisation
FRFR
SPEED BUTTONS 1-4
Les Boutons Rapides activent des paramètres rapides pour les fonctions indiquées ci-après. Les fonctions en
gras indiquent que la fonction est assignée à ces boutons lorsque le mode des paramètres (SETUP) est activé.
SPEED BUTTON 1 (LEFT)
Pwr± change la puissance de flash en 1/10 d’ouverture en tournant la molette vers le haut ou vers le bas.
up monte dans le menu de paramètres lorsque SETUP est sélectionné.
SPEED BUTTON 2 (MIDDLE LEFT)
Appuyez une ou deux fois sur ce bouton pour naviguer dans les fonctionnalités de la lampe pilote.
Mod allume ou éteint la lampe pilote avec la molette.
Mod± change la puissance de la lampe pilote en 1/10 d’ouverture en tournant la molette vers le haut ou
vers le bas.
down descend dans le menu de paramètres lorsque SETUP est sélectionné.
SPEED BUTTON 3 (MIDDLE RIGHT)
Select navigue entre les Flashs Elinchrom affichés (détectés).
Les paramètres de flash et de la lampe pilote peuvent être ajustés individuellement sur le flash sélectionné,
lorsqu’il est affiché dans un cadre.
Après environ 5 secondes, le cadre disparaît et les ajustements des paramètres affecteront tous les flashs de
tous les Groupes, lorsque le Groupe « ALL » (TOUS) est sélectionné. Si un Groupe de 1 à 4 est sélectionné,
seuls les flashs de ce Groupe seront modifiés.
Group selection
Test
USB
Rotation ring / Dial
Set
Battery compartment cover
On/Off
Refresh
Change value
Lock
Press for 2 seconds
To refresh manual
changes made on the flash unit
Communication Transmitter
HS / EL- flash unit.
Press for 2 seconds
Speed button 2SRSpeed button 3
Green LED
Speed button 1
Speed button 4
Blue LED
Communication camera / Transmitter HS
BOUTONS
SPEED BUTTON 4 (RIGHT)
Setup en appuyant sur ce bouton, les fonctionnalités des boutons rapides changeront et le menu des
paramètres (SETUP) est sélectionné. Dans le menu SETUP, les fonctionnalités peuvent être
ajustées et activées.
Exit Quitter le menu des paramètres et revenir au mode d’affichage standard.
ON/OFF
Appuyez et maintenez au moins 2 secondes pour allumer ou éteindre le Transmetteur EL-Skyport Plus HS.
GROUP BUTTON
Appuyez pour naviguer dans les groupes 1 à 4 et pour sélectionner le groupe « ALL » pour les sélectionner
tous.
TEST BUTTON (AVEC LOGO EL)
Appuyer sur le bouton TEST allumera tous les flashs lorsque « ALL » est sélectionné ou qu’un groupe de 1 à
4 est sélectionné. Veuillez vous souvenir de désactiver les cellules photoélectriques pour un déclenchement
EL-Skyport précis de vos flashs.
REFRESH BUTTON
Appuyez sur le bouton Rafraîchir (« Refresh ») à tout moment où les paramètres de puissance ont été réglés
sur un flash EL séparé pour mettre à jour l’affichage du paramètre de puissance via Skyport HS.
Si un Groupe est sélectionné, seules les informations concernant ce Groupe seront rafraîchies.
Lorsque « ALL » est sélectionné, les informations seront rafraîchies pour tous les groupes.
Un flash qui n’a pas été cherché et trouvé lorsque Skyport HS a été allumé ne pourra pas être ajouté avec la
fonction Rafraîchir.
Si un flash est ajouté, sélectionnez SETUP et SCAN dans le menu des paramètres ou éteignez le transmetteur
puis rallumez-le. Le rafraîchissement peut prendre jusqu’à 4 secondes, selon le nombre de flashs trouvés et
gérés par le transmetteur.
Note:
Pour assurer la meilleure interaction entre le Skyport HS et les flashs EL, les informations de puissances des
flashs sont transmises par le flash EL seulement lors des changements de niveau de puissance ou lorsque le
bouton de rafraîchissement est enclenché.
ROTATING RING / DIAL
Tournez la molette pour sélectionner les différentes fonctions ou changer les niveaux de puissance des flashs EL.
SET / CONFIRMATION BUTTON (BOUTON CENTRAL DE LA
MOLETTE)
Appuyez pour confirmer une modification réalisée dans le menu des paramètres.
Appuyez pour activer l’éclairage de l’écran d’affichage.
Appuyez pour revenir au mode normal lorsque Skyport HS est passé en mode veille.
Appuyez pendant 2 secondes pour verrouiller toutes les fonctions et tous les paramètres. Appuyez de nouveau
pour les déverrouiller. La fonction de verrouillage bloque le fonctionnement de la molette et des autres boutons
pour éviter les fausses manipulations pendant le transport du Skyport HS.
Page 25

49
48
Mode d’utilisation Mode d’utilisation
FRFR
SETUP MENU
SCAN..
Lorsque le Skyport HS est allumé, il se mettra automatiquement à chercher des Flashs Elinchrom dotés
d’émetteur-récepteur EL-Skyport intégré ou en module externe.
La fonctionnalité de Scan est également disponible dans le menu des paramètres. Un nouveau scan est requis
lorsque de nouveaux flashs sont ajoutés à la configuration d’éclairage.
Pour trouver des flashs EL,
• Tous les flashs EL doivent être allumés,
• Tous les flashs doivent avoir un Émetteur-récepteur EL-Skyport incorporé ou en module externe.
• Le Transmetteur Plus HS et le flash EL doivent être réglés avec les mêmes paramètres de canal de
fréquence.
FREQUENCY CHANNELS
Jusqu’à 20 canaux de fréquences EL-Skyport peuvent être sélectionnés.
Note :
• Seuls les derniers Flashs Elinchrom (ELC 500/1000 Pro HD, ELB 400 et versions ultérieures) prendront en
charge jusqu’à 20 canaux de fréquence.
• Tous les flashs « RX » supporteront jusqu’à 8 canaux et certains modèles de Flashs Elinchrom plus
anciens supportent jusqu’à 4 canaux.
ELSP MODE
Le Skyport HS a deux modes de fonctionnent qui disposent des fonctionnalités de prise de vue différentes.
• Normal mode
Le mode Normal est compatible avec les tout premiers Flashs Elinchrom qui incorporent EL-Skyport.
Lorsqu’ils sont sélectionnés, l’écran d’affichage et le voyant d’état s’éclaireront en vert.
• Speed mode
Le Speed mode permet des vitesses d’obturation plus rapides allant jusqu’à 1/1000 s si l’appareil photo
utilise une synchronisation de flash normale (c’est-à-dire l’obturateur central ou certains sans miroir).
Pour utiliser des vitesses d’obturation allant jusqu’à 1/8000 s, le mode HS doit être activé lorsque le
mode Normal ou Rapide est utilisé. Lorsqu’ils sont sélectionnés, l’écran d’affichage et le voyant d’état
s’éclaireront en rouge lorsque le mode HS est activé.
Note :
• La portée de fonctionnement est disponible en mode Normal. Le mode Rapide réduit la portée de 50
%. Les émetteurs-récepteurs Skyport dans tous les flashs à distance doivent avoir un mode de prise en
charge d’EL-Skyport pour utiliser le mode Rapide.
SYNC MODE
Sélectionnez le mode de synchronisation :
• Standard mode
En mode Standard la plupart des appareils photo fonctionneront avec des vitesses d’obturation allant
jusqu’à 1/200 s ou 1/250 s.
• HS Hi-Sync mode*
En mode HS la vitesse d’obturation peut aller jusqu’à 1/8000 s selon l’appareil photo et le flash. Le mode
HS nécessite des flashs ou des têtes de flash avec une longue durée de flash pour de meilleurs résultats.
Les têtes de flash ou les flashs équipés de tubes de flash A (Action) ne sont pas conseillés.
• Second Curtain mode*
Le mode Second rideau vous donne la possibilité d’actionner le flash juste avant que l’obturateur se
ferme, pour les effets de mouvements.
* Avec les appareils photo Nikon, ces fonctionnalités sont activées dans le menu de l’appareil.
ODS SETUP
La synchronisation ODS (Over-Drive-Sync, ou Synchronisation surmultipliée) peut améliorer l’exposition
globale, lorsque le mode de synchronisation HS est actif.
L’ODS repose sur les flashs avec des durées de flash importantes, les résultats dépendront donc de la durée
de flash des systèmes d’éclairage utilisé (qui varient également selon les niveaux de puissance), ainsi que de
l’appareil photo utilisé. Les appareils photo plein format avec grand objectif et obturateur lent sont hélas les
plus difficiles pour obtenir de bons résultats, mais les lampes avec des durées de flash suffisamment élevées
peuvent encore réaliser des captures propres jusqu’aux 1/8000. En plus d’utiliser l’ODS, ils peuvent capturer
plus de lumière avec une ouverture jusqu’à deux crans supplémentaires, lorsque la lumière du soleil doit être
maîtrisée. Les paramètres d’ODS proposent un ajustement allant de 0,1 à 5,0 ms ou désactivé.
La valeur d’ODS variera selon l’appareil photo et le flash qui est utilisé et doit être ajustée manuellement.
Note :
• L’ODS (Over-Drive-Sync) ne peut être utilisé que quand le mode de Synchronisation est réglé sur HS.
• Lorsque l’ODS est ajusté, la position de l’arrêt du flash (bord sombre en haut ou en bas de l‘image) peut
être déplacée dans le cadre. Lorsqu’il est désactivé, le point de déclenchement du flash sera basculé
automatiquement en mode HS.
AUTO MOD
• Off
La lumière pilote des Flashs Elinchrom ne change pas.
• Shutter**
Appuyer sur le bouton d’obturation de l’appareil photo pour faire la mise au point allumera la lampe pilote
du flash EL pendant quelques secondes pour assister à la mise au point en faible lumière. (Non pris en
charge par Nikon)
• DOF
Les Flashs Elinchrom allumeront leur lampe pilote tant que le bouton de profondeur de champ (DOF,
Depth of field) de l’appareil photo est maintenu appuyé.
AF LIGHT
Active la lumière d’assistance Auto-Focus du Skyport HS lorsque le déclencheur d’obturateur est à mi-course
pour faire la mise au point (reportez-vous également aux paramètres de l’appareil photo).
KEY CLICK
Lorsque l’option est activée, appuyer sur un bouton de contrôle déclenchera une tonalité.
SLEEP
Lorsqu’il n’est pas utilisé pendant un certain temps, le Skyport HS passera en mode Veille pour économiser la
batterie. Le délai de mise en veille va de 1 à 60 minutes ou peut être désactivé.
AUTO OFF
Le Skyport HS s’éteindra automatiquement lorsqu’il est utilisé pendant un certain temps.
Le délai d’Auto Off va de 1 à 60 minutes ou peut être désactivé.
Lorsque le mode Veille et Auto Off sont tous deux actifs, le Transmetteur Plus HS s’éteindra lorsque le temps
de mise en veille sera écoulé.
CONTRASTE
Le contraste de l’affichage peut être ajusté entre 80 et 120 %
BACKLIGHT
L’éclairage de l’appareil peut être allumé ou éteint.
* Sur les appareils photo Nikon, ces fonctionnalités s’activent dans le menu de l’appareil photo.
** Non pris en charge par les systèmes Nikon.
Page 26

51
50
Mode d’utilisation Mode d’utilisation
FRFR
REMISE À L’ÉTAT D’USINE
Appuyer et maintenir les boutons speed gauche et droit lorsque le Skyport HS est allumé (pendant
approximativement 2 secondes) réinitialisera le Skyport HS aux paramètres d’usine. Tous les paramètres
réglés par l’utilisateur, mis à part le contraste de l’écran, seront réinitialisés.
MISE À JOUR DU FIRMWARE
Pour mettre à jour le Firmware (microgiciel) du Transmetteur Plus HS, l’Updater du Transmetteur HS Elinchrom
est nécessaire. Ce logiciel de mise à jour est disponible sur le site web d’Elinchrom.
DÉPANNAGE
Appuyer et maintenir les boutons rapides gauche et droit tout en allumant le Skyport HS (pendant
approximativement 2 secondes) réinitialisera le Skyport HS aux paramètres d’usine. Tous les paramètres
réglés par l’utilisateur, mis à part le contraste de l’écran, seront réinitialisés.
VOUS AVEZ CE PROBLÈME ? VEUILLEZ VÉRIFIER LES ÉLÉMENTS SUIVANTS
LE FLASH NE S’ALLUME PAS
• Vérifiez la polarité des piles et remplacez les
deux piles si elles sont déchargées.
LE FLASH NE PEUT PAS ÊTRE DÉCLENCHÉ
LORSQUE LE MODE « ALL » EST SÉLECTIONNÉ
• Le transmetteur et le récepteur doivent avoir les
mêmes paramètres de canal de fréquence.
• MODE ELSP
• le transmetteur et le récepteur doivent
avoir les mêmes paramètres de mode
de synchronisation : normal ou mode de
synchronisation rapide.
• Vérifiez que les récepteurs EL-Skyport de
tous les flashs EL avec récepteur intégré sont
allumés.
• Vérifiez que la version du transmetteur
correspond à votre appareil photo Canon ou
Nikon.
CERTAINS FLASH NE SE DÉCLENCHENT
PAS LORSQUE LE MODE GROUPE EST
SÉLECTIONNÉ
• Vérifiez les paramètres de groupe du flash EL.
• Réduisez la distance d’un flash ne répondant
pas.
• MODE ELSP : le transmetteur et le récepteur
doivent avoir les mêmes paramètres de mode
de synchronisation : normal ou mode de
synchronisation rapide, ainsi que les mêmes
paramètres de canal de fréquence.
LE BOUTON DE TEST FONCTIONNE, MAIS
L’APPAREIL PHOTO NE DÉCLENCHE PAS LES
FLASHS
• Vérifiez la griffe.
• Vérifiez les paramètres de l’appareil photo
(activer la communication de la griffe).
• Vérifiez que la version du transmetteur
correspond à votre appareil photo Canon ou
Nikon.
• Vérifiez la liste des appareils photo compatibles.
CERTAINES INFORMATIONS NE SONT PAS
AFFICHÉES À PROPOS DES FLASHS DIGITAL
RX, RANGER RX OU STYLE RX
• Les flashs équippés avec un module externe
d’Émetteur-récepteur RX sont limités en ce qui
concerne les fonctions à distance. Ces flashs
peuvent cependant être déclenchés et contrôlés
(mais sans retour visuel) par le Transmetteur
EL-Skyport Plus HS.
PORTÉE LIMITÉE :
• Positionnez les flashs autrement.
• Éloignez des murs et plafonds.
• Mode ELSP : En mode de synchronisation
rapide, la portée est réduite
d’approximativement 50 %, revenez en mode
de synchronisation normal.
• En extérieur, la portée peut être réduite du fait
de l’humidité, d’interférences, d’obstacles, etc.
INTERFÉRENCE AVEC D’AUTRES RÉSEAUX
2,4 GHZ, DÉCLENCHEMENT ALÉATOIRE :
• Essayez un autre canal de fréquences pour le
transmetteur et le receveur du flash EL.
• Réduisez la distance entre le flash et le
transmetteur.
MODE HS ; SYNCHRONISATION JUSQU’À
1/8000 S :
• Les têtes Elinchrom Action (précédemment
A) ne sont pas optimisées pour le mode HS.
Pour bénéficier de meilleures performances,
veuillez utiliser les flashs avec tubes de flash Pro
(Standard ou précédemment S) ou idéalement
des têtes HS dédiées.
• Un paramétrage précis d’ODS aide à optimiser
les performances HS.
• S’il y a un problème de rendu des couleurs,
veuillez réduire la vitesse d’obturation sur votre
appareil photo, ou réglez les paramètres ODS et
ajuster pour réduire ou résoudre ce problème.
• Les fonctionnalités HS ne fonctionnent qu’avec
les appareils photo Canon ou Nikon et le
transmetteur approprié.
SCAN DES FLASHS EL :
AUCUN FLASH EL TROUVÉ, OU CERTAINS
FLASHS MANQUENT.
• Allumez tous les flashs EL, puis allumez le
Transmetteur EL-Skyport Plus HS ou allez dans
les paramètres et refaites un scan.
• Les paramètres de mode de fréquence,
groupe et ELSP doivent correspondre avec le
transmetteur.
• Assurez-vous que tous les flashs avec
Transmetteur EL-Skyport Plus HS fonctionnent
avec le dernier firmware à jour.
Page 27

53
Manuale d’uso
IT
52
Mode d’utilisation
FR
CANAUX DE FRÉQUENCES POUR RÉCEPTEURS EL-SKYPORT
Cela ne concerne pas directement ce produit, mais peut vous aider pour le paramétrage de fréquence des
flashs EL-Skyport.
TÉLÉCHARGEZ LE MANUEL D’UTILISATION DU
TRANSMETTEUR EL-SKYPORT PLUS HS
Obtenez le manuel d’utilisation complet en suivant le lien : http://bc.gs/elspths
INFORMATIONS DE CONFORMITÉ
Obtenez votre déclaration de conformité CE, États-Unis et Canada ici : http://bc.gs/ec
MISE À JOUR DU FIRMWARE PAR PORT USB
Veuillez télécharger notre dernier firmware et suivre les instructions : http://bc.gs/fw
ENINDICE
DICHIARAZIONE DI CONFORMITÀ 56
VERSIONI 57
CARATTERISTICHE 57
INSTALLAZIONE DELLE BATTERIE 58
BATTERIE 58
COMPATIBILITÀ 59
ATTIVAZIONE 59
TELECOMANDO 59
CANALI DI FREQUENZA 59
DATI TECNICI 60
ADATTATORE ATTACCO A SLITTA 60
MONTAGGIO SULLA FOTOCAMERA 61
SCHERMO 62
PULSANTI 63
MENU SETUP 65
RIPRISTINO IMPOSTAZIONI DI FABBRICA 67
RISOLUZIONE DEI PROBLEMI 67
AGGIORNAMENTO FIRMWARE 69
Specifiche e tolleranze conformi agli standard IEC e CE. Dati tecnici soggetti a modifiche senza preavviso.
Page 28

5554
Manuale d’uso Manuale d’uso
ITIT
INTRODUZIONE
Caro Fotografo,
Grazie per aver scelto ELINCHROM.
Tutti i prodotti Elinchrom sono realizzati con la tecnologia più avanzata. Per garantire la massima qualità,
vengono utilizzati dei componenti accuratamente selezionati. Inoltre, l‘apparecchiatura viene sottoposta a
molte prove, sia durante che dopo la fabbricazione.
Siamo certi che ti offrirà un servizio affidabile per molti anni.
Ti preghiamo di leggere attentamente questo manuale prima di utilizzare il tuo nuovo prodotto Elinchrom.
Troverai informazioni per la tua sicurezza e su come trarre vantaggio da tutte le funzioni programmabili.
Questo manuale può mostrare delle immagini di prodotti con accessori che non fanno parte di apparecchi o di
singole unità.
Le configurazioni dell’apparecchio e della singola unità Elinchrom possono cambiare senza preavviso e
possono differire in altri paesi.
Per ulteriori dettagli, aggiornamenti, notizie e per le informazioni più recenti relative al sistema Elinchrom, visita
regolarmente il sito di Elinchrom.
Le ultime guide utente e specifiche tecniche possono essere scaricate dall’Area di “Supporto”.
I dati tecnici, le caratteristiche e le funzioni delle unità flash Elinchrom e dei relativi accessori possono variare
senza preavviso.
Le specifiche elencate possono variare a causa di tolleranze nei componenti o negli strumenti di misura. I dati
tecnici sono soggetti a modifiche. Nessuna garanzia per gli errori di stampa.
Per il manuale più recente, visita nostro sito Web: www.elinchrom.com/support
Grazie,
Il tuo Team Elinchrom.
Il prodotto è classificato come prodotto laser di
classe 3R, secondo le seguenti normative IEC/
EN 60825-1 “Sicurezza delle radiazioni degli
apparecchi laser”.
Classe 3R: Un laser di classe 3R è considerato
sicuro se viene maneggiato con cura, con una
visualizzazione limitata del raggio. Con un laser
di classe 3R, l’errore massimo tollerato (MPE)
può essere superato, ma con un basso rischio di
lesioni. I laser visibili e ininterrotti nella classe 3R
sono limitati a 5mW. Per altre lunghezze d’onda
e per laser pulsanti, vengono applicati altri limiti.
Page 29

5756
Manuale d’uso Manuale d’uso
ITIT
DECLARATION OF CONFORMITY USA AND CANADA
EN This device complies with Part 15 of the FCC Rules and with Industry Canada licence-exempt RSS
standard(s). Operation is subject to the following two conditions: (1) this device may not cause harmful
interference, and (2) this device must accept any interference received, including interference that may cause
undesired operation. This product complies with the Canadian ICES-003 Class B specifications.
FR Le présent appareil est conforme aux CNR d’Industrie Canada applicables aux appareils radio exempts
de licence. L’exploitation est autorisée aux deux conditions suivantes(1) ce dispositif ne doit pas produire
de brouillage préjudiciable, et (2) ce dispositif doit accepter tout brouillage radioélectrique subi, même si le
brouillage est susceptible d’en compromettre le fonctionnement. Cet appareil numérique de la classe B est
conforme à la norme NMB-003 du Canada.
Radiation Exposure Statement
EN This equipment complies with portable RF exposure limit in Canada and the USA set forth an
uncontrolled environment and is safe for intended operation as described in this manual. Further RF exposure
reduction can be achieved if the product can be kept as far as possible from the user body.
FR Le produit est conforme aux limites d’exposition pour les appareils portables RF pour les Etats- Unis et le
Canada établies pour un environnement non contrôlé. Le produit est sûr pour un fonctionnement tel que décrit
dans ce manuel. La réduction aux expositions RF peut être augmentée si l’appareil peut être utilisé aussi loin
que possible du corps de l’utilisateur.
FCC Class B Compliance note
This equipment has been tested and found to comply with the limits for a Class B digital device, pursuant
to Part 15 of the FCC Rules. These limits are designed to provide reasonable protection against harmful
interference in a residential installation. This equipment generates, uses and can radiate radio frequency energy
and, if not installed and used in accordance with the instructions, may cause harmful interference to radio
communications. However, there is no guarantee that interference will not occur in a particular installation. If
this equipment does cause harmful interference to radio or television reception, which can be determined by
turning the equipment off and on, the user is encouraged to try to correct the interference by one or more of
the following measures:
• Reorient or relocate the receiving antenna.
• Increase the separation between the equipment and receiver.
• Connect the equipment into an outlet on a circuit different from that to which the receiver is connected.
• Consult the dealer or an experienced radio/television technician for help.
Any changes or modifications not expressly approved by the party responsible for compliance could void
the user’s authority to operate this equipment. This device is limited to operation on permissible Part 15
frequencies, and it does not have the ability to be configured by end users or professional installers to operate
outside the authorized bands.
TRASMETTITORE EL SKYPORT PLUS HS
VERSIONI
Il trasmettitore ELSP Plus HS è disponibile per le seguenti fotocamere:
• Canon
• Nikon
CARATTERISTICHE
• Schermo con grande controllo grafico.
• Illuminazione dello schermo in verde o rosso (verde per la modalità di sincronizzazione normale, rosso per
la modalità di sincronizzazione veloce).
• Pulsanti di accesso rapido e ruota girevole per un facile controllo.
• Connessione sicura sull’attacco a slitta con sistema di bloccaggio a baionetta.
• 2 batterie standard AA (accetta batterie ricaricabili).
• Uscita jack trigger da 2,5mm.
• Aggiornamento del firmware con presa mini USB integrata.
• Telecomando con 40 canali.
• 20 canali frequenza* in modalità di sincronizzazione normale.
• 20 canali frequenza* in modalità di sincronizzazione veloce.
• 4 gruppi e TUTTI.
• Modalità di sincronizzazione EL-Skyport.
• Modalità di sincronizzazione normale (distanza massima).
• Modalità di sincronizzazione veloce (velocità più rapida dell’otturatore, in particolare
quando HS è attivato, ma ridotta gamma di distanza).
• Modalità di sincronizzazione***.
• Standard (utilizzando il contatto centrale dell’attacco a slitta).
• HS*** (sincronizzazione fino a 1/8000s, controllata automaticamente).
• ODS (sincronizzazione manuale Over-Drive) che ottimizza i tempi HS, per la massima
potenza, e anche l‘esposizione.
• Modalità di sincronizzazione seconda tendina****.
• Luce AF integrata***.
• Auto MOD*** per controllare la luce pilota delle unità flash Elinchrom per la messa a fuoco.
• Modalità otturatore*** (il pulsante di scatto premuto a metà controlla la lampada pilota).
• Modalità DOF (il pulsante fotocamera “DOF” (profondità di messa a fuoco) controlla la lampada
pilota).
• TELECOMANDO** con feedback automatico dalle unità flash Elinchrom.
• Le unità EL-flash possono essere controllate “Tutte” insieme, in “Gruppi” o per “Singole” unità.
• Accensione e spegnimento del flash.
• Lampada pilota on/off o intensità su e giù.
• Modalità di sospensione e modalità di SPEGNIMENTO automatico programmabile.
• RIPRISTINO alle impostazioni standard.
* Per tutte le ultime unità flash Elinchrom con frequenza di 20 canali e compatibili con i modelli precedenti.
** Per tutte le unità flash Elinchrom con ricevitore EL-Skyport incorporato e ricetrasmettitore.
*** Funzionalità estese per fotocamere Canon e Nikon con TTL Hot-shoe (Funzionalità limitate per Nikon,
vedere in basso).
**** Queste funzionalità non sono supportate da Nikon, ma possono essere attivate nel menu della
fotocamera.
***** Non supportato da Nikon.
Page 30

5958
Manuale d’uso Manuale d’uso
ITIT
INSTALLAZIONE DELLE BATTERIE
Premere il coperchio del vano batterie e farlo scorrere nella direzione della freccia per aprirlo
(Vedere figura 1).
Inserire le batterie. Assicurarsi che i simboli “+” e “-” relativi ai contatti della batteria siano orientati
correttamente (Vedere figura 2).
(Nota: Si prega di utilizzare 2 pezzi di batterie alcaline AA o batterie NIMH di tipo AA).
Premere il coperchio contro il trasmettitore e farlo scorrere indietro nella posizione di blocco.
BATTERIE
• Per il trasmettitore vengono utilizzate 2 batterie AA.
• L’installazione delle batterie in modo improprio non danneggia il trasmettitore.
• Le batterie AA non ricaricabili (pile a secco) come zinco-carbone, alcaline o batterie ricaricabili nelle
dimensioni AA, come nichel-cadmio (NiCd) o nichel-metallo idruro (NiMH), possono essere utilizzate.
• Non combinare batterie di tipi diversi.
• Non utilizzare batterie al litio AA in questo trasmettitore
COMPATIBILITÀ
Sul mercato sono presenti tre diverse generazioni di unità flash Elinchrom EL-Skyport:
PRIMA GENERAZIONE
• Modulo ricetrasmittente RX EL-Skyport (Stile RX, Digital RX, Ranger RX).
SECONDA GENERAZIONE
• Modulo integrato Mk1 EL-Skyport (BRX, D-Lite RX, Quadra, Quadra Hybrid).
TERZA GENERAZIONE
• Modulo integrato Mk2 EL-Skyport (ELC e ELB).
Questa generazione offre una estesa gittata.
ATTIVAZIONE
L’avviamento funziona con tutte le unità flash Elinchrom esistenti con ricetrasmettitori EL-Skyport incorporati o
plug-in.
TELECOMANDO
QUANDO SI SELEZIONA TUTTI O UN GRUPPO DI 1-4
• Tutte le unità flash Elinchrom con EL-Skyport sono supportate quando si cambia “PWR±, MOD± o MOD
on/off”. Quando le impostazioni di potenza della lampada pilota vengono modificate con il pulsante MOD
on/off o MOD+/-, il flash Elinchrom in uso passerà alla modalità libera pilota. Per tornare alla modalità
lampada pilota proporzionale, le impostazioni devono essere effettuate sull’unità flash EL.
• Alcune unità non supportano tutte le funzioni pilota, quindi, viene visualizzato “--” (vale a dire per Ranger,
Quadra, ELB400).
QUANDO SI SELEZIONA UNA SINGOLA UNITÀ
• L’unità selezionata viene evidenziata con una cornice sullo schermo e può essere controllata
singolarmente.
• Sono supportate solo le unità flash Elinchrom con ricevitori EL-Skyport della 2a e 3a generazione.
Nota:
Le unità di 1a generazione vengono rilevate, ma verrà mostrato il segno “-” sullo schermo. Non è presente
alcun feedback delle impostazioni relative all’unità per il trasmettitore EL-Syport Plus HS, ma esse verranno
attivate normalmente.
CANALI DI FREQUENZA
Alcune vecchie unità flash Elinchrom con EL-Skyport integrato supporteranno i canali di frequenza da 1 a 4 o
da 1 a 8 (ad esempio, BRX, D-Lite RX, Quadra).
Le ultime unità di flash Elinchrom con EL-Skyport integrato supporteranno fino a 20 canali diversi di frequenza,
da 1 a 20 (ELC, ELB).
Premere e far scorrere
Figura 1
Figura 2
Page 31

6160
Manuale d’uso Manuale d’uso
ITIT
DATI TECNICI
PARAMETRI SPECIFICHE
VERSIONI
Canon, Nikon.
COMPATIBILITÀ AVVIAMENTO
TUTTE le unità flash Elinchrom con ricevitore EL-Skyport incorporato
o ricetrasmettitore e moduli ricetrasmettitori RX EL-Skyport, oltre a ELSkyport universale.
COMPATIBILITÀ TELECOMANDO
Tutte le unità flash Elinchrom con ricetrasmettitore EL-Skyport integrato:
ELC Pro HD, ELB 400, Ranger Quadra RX, Quadra Hybrid, serie
D-Lite RX, Serie BRX, Serie Master RX e serie FRX (NOTA: Le unità EL
utilizzate con il modulo ricetrasmettitore RX hanno limitate funzioni da
telecomando).
RANGE DI DISTANZA
Al coperto > 60m.
All’aperto > 200m.
Nota:
Il range di distanza completo è disponibile con le ultime unità flash
Elinchrom, ad esempio ELC o ELB. Le altre unità flash Elinchrom, o
quelle più vecchie, avranno un range di distanza limitato.
BATTERIE
2 x AA batterie (standard o ricaricabili).
DURATA DELLA BATTERIA
Dipende dal tipo di batterie e dall’utilizzo.
Per due batterie standard da 1000mAh è di circa 35 ore di lavoro e più di
15000 rilasci del grilletto.
TELECOMANDO
Possono essere rilevate, mostrate e controllate 10 unità al massimo
tramite telecomando.
CANALI DI FREQUENZA
20 canali in modalità normale e 20 canali in modalità veloce.
MODALITÀ EL-SKYPORT (ELSP)
Modalità di sincronizzazione normale / veloce.
GRUPPI DI CONTROLLO/GRILLETTO
Tutte” o in “Gruppi” (gruppo da 1 a 4).
MODALITÀ DI SINCRONIZZAZIONE
Standard, HS (con o senza ODS), seconda tendina.
PRESA USB
Per l’aggiornamento del firmware.
SOCKET SR
Uscita trigger 2,5 mm jack telefono mono (3VDC max. tensionesincronizzazione).
DIMENSIONI (W X L X H)
69 x 84 x 59 mm (2,7x 3,3x 2,3 in.)
PESO
Circa 170g (6 oz), incluse 2 batterie di AA. 120g (4,2 once) senza batterie.
ADATTATORE ATTACCO A SLITTA
CARATTERISTICHE
Il trasmettitore Elinchrom Skyport Plus HS può essere utilizzato come trigger di base con controllo di potenza
per qualsiasi fotocamera che abbia una connessione flash di tipo “attacco a slitta”.
Le caratteristiche descritte di seguito richiedono una fotocamera Canon o Nikon che sia compatibile con il
sistema Skyport.
Per un corretto funzionamento, il trasmettitore Skyport HS offre dei pin di connessione speciali per la
comunicazione con la fotocamera collegata.
Sono disponibili due diverse versioni di trasmettitori Elinchrom:
• Canon - per le fotocamere Canon EOS tipo A compatibili con autoflash ETTLII/ETTL.
• Nikon - per fotocamere Nikon DSLR compatibili con le unità flash iTTL.
I terminali di comunicazione specializzati che montano un attacco a slitta sulla fotocamera permettono le
seguenti caratteristiche Elinchrom Skyport HS:
• Modalità di SINCRONIZZAZIONE
• Modalità HS e ODS
• Sincronizzazione della seconda tendina
• Auto MOD
• Luce AF
Nota: Non tutte le fotocamere sono supportate per tutte le funzionalità.
ELENCO DELLE FOTOCAMERE TESTATE
L’ultima sintesi relativa ai modelli di fotocamera e alle funzionalità supportate può essere trovata sul sito
Elinchrom, all’indirizzo: http://www.elinchrom.com/support.php
MONTAGGIO SULLA FOTOCAMERA
Per bloccare il trasmettitore in modo sicuro sull’attacco a slitta della fotocamera, viene utilizzato un semplice
meccanismo di bloccaggio a baionetta.
ATTACCO
1. Spegnere la fotocamera e il trasmettitore EL-Skyport.
2. Allineare il trasmettitore EL-Skyport con l’attacco a slitta della fotocamera.
3. Farlo scorrere completamente nell’attacco a slitta della fotocamera.
4. Spostare la linguetta verso destra sull’anello di bloccaggio, fino a quando scatterà in posizione.
(Vedere fig. 3)
DISTACCO
1. Per sbloccare: premere il pulsante di sblocco e spostare la linguetta completamente a sinistra.
(Vedere foto 4)
2. Far scorrere il trasmettitore EL-Skyport fuori dall’attacco a slitta.
Figura 3
Figura 4
Page 32

6362
Manuale d’uso Manuale d’uso
ITIT
SCHERMO
Il display grafico mostra lo stato e le impostazioni dell’unità Elinchrom.
L’illuminazione dello schermo può essere accesa o spenta.
In Modalità di sincronizzazione normale, l’illuminazione è di colore verde. In Modalità di sincronizzazione
veloce, l’illuminazione è di colore rosso.
Il contrasto dello schermo può essere regolato nel menu delle impostazioni.
La barra superiore dello schermo mostra lo stato del trasmettitore Elinchrom.
La barra inferiore dello schermo mostra le funzioni dei pulsanti a 4 velocità.
L’area centrale mostra un elenco delle unità flash Elinchrom rilevate; esso mostra, inoltre, gli elementi di
configurazione per il menu di Setup, quando selezionati.
PANNELLO SCHERMO – DASHBOARD
PANNELLO SCHERMO - MENU SETUP
Menu list
Up/down list
Description/mode
Exit
SPEED BUTTONS 1-4
I Pulsanti veloci (Speed) attivano le impostazione veloci delle funzioni indicate di seguito. Le funzioni in
grassetto indicano la funzione di questi pulsanti quando la modalità SETUP è selezionata.
SPEED BUTTON 1 (SINISTRA)
Pwr± Cambia la potenza del flash in 1/10 f-stop, su/giù con il quadrante.
up Scorre verso l’alto nel menu setup quando il menu SETUP è selezionato.
SPEED BUTTON 2 (IN MEZZO A SINISTRA)
Premere questo pulsante una o due volte per scorrere tra le funzioni della lampada pilota.
Mod Accende la lampada pilota inserita/disinserita con il quadrante.
Mod± Modifica l’alimentazione della lampada pilota in 1/10 f-stop, su/giù con il quadrante.
down Scorre verso il basso nel menu setup quando SETUP è selezionato.
SPEED BUTTON 3 (IN MEZZO A DESTRA)
Select Alterna la visualizzazione tra le unità flash Elinchrom (trovate).
Le impostazioni del flash e della lampada pilota possono essere regolate individualmente sull’unità
flash selezionata, quando evidenziato con una cornice.
Dopo circa 5 secondi la cornice scomparirà e le regolazioni alle impostazioni influenzeranno tutte le
unità in tutti i gruppi, quando il Gruppo “TUTTI” è selezionato.
Se il gruppo 1 - 4 è selezionato, solo le unità flash in quel gruppo saranno modificate.
Group selection
Test
USB
Rotation ring / Dial
Set
Battery compartment cover
On/Off
Refresh
Change value
Lock
Press for 2 seconds
To refresh manual
changes made on the flash unit
Communication Transmitter
HS / EL- flash unit.
Press for 2 seconds
Speed button 2SRSpeed button 3
Green LED
Speed button 1
Speed button 4
Blue LED
Communication camera / Transmitter HS
PULSANTI
Skyport mode
EL-unit(s)
Button function title
Column title
Battery status
Groups
ODS status
Modelling lamp
mode
Unit selection
Frequency
Sync mode
D: DOF
HS: Hi-Sync
Power settings
Setup menu
Modelling lamp settings
s: speed
n: normal
second curtain
S: Shutter
Number of unit
**
** **
***
*
* Nelle fotocamere Nikon, queste funzioni sono attivate nel menu della fotocamera.
** Non supportato dal sistema Nikon®
*** Non supportato dal sistema Sony®
Page 33

6564
Manuale d’uso Manuale d’uso
ITIT
SPEED BUTTON 4 (DESTRA)
Setup Premendo questo pulsante, le funzioni dei pulsanti veloci cambieranno e il menu SETUP viene
selezionato.
Nel menu SETUP le caratteristiche possono essere regolate e attivate.
Exit Esce dal menu Setup e torna alla modalità di visualizzazione standard
ON/OFF
Premere e tenere premuto per almeno 2 secondi per accendere/spegnere EL-SkyportTransmitter Plus HS.
GROUP BUTTON
Premere per passare dai gruppi 1 a 4 e “Tutti”.
TEST BUTTON (CON LOGO EL)
Premendo il pulsante TEST si rilasceranno tutti i flash quando “ALL” o ogni singolo gruppo, da 1 a 4, è
selezionato.
Ricordatevi di disattivare le fotocellule per una accurata attivazione delle vostre unità flash da parte di ELSkyport.
REFRESH BUTTON
Premere il pulsante Refresh tutte le volte che viene fatta una impostazione di potenza su una singola unità flash
EL, per aggiornare le impostazioni del display di Skyport HS.
Se un gruppo è selezionato, solo le informazioni per il gruppo selezionato verranno aggiornate.
Quando viene selezionato “ALL”, verranno aggiornate le informazioni per tutti i gruppi.
Un flash di cui non sia stata fatta scansione che viene trovato quando HS Skyport viene acceso, non può
essere aggiunto con la funzione Refresh.
Se viene aggiunto un flash, selezionare SETUP e SCAN nel menu di configurazione, oppure, premere il
pulsante del trasmettitore OFF e poi di nuovo ON.
L’aggiornamento può richiedere fino a 4 secondi, a seconda di quante unità di flash vengono trovate e gestite
dal trasmettitore.
Nota: Per garantire il miglior funzionamento tra Skyport HS e i flash EL, le informazioni sull’alimentazione del
flash vengono trasmesse dal flash EL solo quando vengono apportate delle modifiche al livello di potenza o
viene premuto il pulsante Refresh.
ROTATING RING / DIAL
Ruotare il quadrante per selezionare le varie funzioni e modificare i livelli di potenza dei flash EL.
SET / CONFIRMATION BUTTON (PULSANTE QUADRANTE
CENTRALE)
Premere per confermare una modifica apportata nel menu Setup.
Premere per accendere l’illuminazione dello schermo.
Premere per tornare al funzionamento normale, quando Skyport HS è stato in modalità Standby.
Premere 2s per bloccare tutte le funzioni e le impostazioni. Premere di nuovo per sbloccare.
La funzione di bloccaggio blocca la funzione del quadrante e degli altri pulsanti per prevenire la perdita di
configurazioni mentre si trasporta Skyport HS.
SETUP (MENU DI CONFIGURAZIONE)
SCAN..
Quando HS Skyport viene acceso, esso cercherà automaticamente le unità flash Elinchrom con moduli
ricetrasmettitori EL-Skyport incorporati o plug-in.
La funzione Scan è disponibile anche nel Menu Setup. Quando delle nuove unità flash vengono aggiunte al
setup di illuminazione, sarà necessaria una nuova scansione.
Per trovare le unità flash EL,
• Tutte le unità flash EL devono essere accese,
• Tutti i flash devono avere moduli ricetrasmettitori EL-Skyport incorporati o plug-in.
• Il trasmettitore Plus HS e l’unità flash EL devono essere impostati sulle stesse impostazioni relative al
canale di frequenza.
FREQUENCY CHANNELS
Up to 20 EL-Skyport frequency channels can be selected.
Nota:
• Solo le ultime unità flash Elinchrom (ELC 500/1000 Pro HD, ELB 400 e versioni future) supportano fino a
20 canali di frequenza.
• Tutte le unità flash “RX” supporteranno fino a 8 canali e alcune vecchie unità flash Elinchrom supportano
fino a 4 canali.
ELSP MODE
Skyport HS possiede due modalità operative che offrono diverse funzionalità di scatto.
• Normal mode
La Modalità normale è compatibile con le primissime unità flash Elinchrom che incorporano EL-Skyport.
• Quando selezionata, l’illuminazione dello schermo e il LED di stato diventano di colore verde.
• Speed mode
La Modalità veloce consente tempi di posa fino a 1/1000s, a seconda della fotocamera, utilizzando la
normale sincronizzazione flash (cioè, per fotocamere con otturatore a foglia e alcune mirrorless).
• Per utilizzare le velocità dell’otturatore fino a 1/8000s deve essere attiva la modalità HS, sia che venga
utilizzata la modalità normale che quella veloce. L’illuminazione dello schermo e il LED di stato vengono
visualizzati in rosso quando si è in modalità veloce.
Nota:
• La distanza maggiore di lavoro è disponibile in Modalità normale. La modalità veloce riduce la distanza
di lavoro del 50%. Per utilizzare la modalità veloce, i ricetrasmettitori Skyport in tutti i flash a distanza
devono disporre di capacità per la modalità EL-Skyport.
SYNC MODE
Selezionare la modalità di sincronizzazione
• Standard mode
In modalità Standard, la maggior parte delle fotocamere funzionerà con velocità dell’otturatore fino a
1/200s - 1/250s.
• HS Hi-Sync mode*
In modalità HS la velocità dell’otturatore può essere fino a 1/8000s, a seconda della fotocamera e della
unità flash. Per ottenere i migliori risultati, la modalità HS richiede unità flash o monotorce con una lunga
durata di lampeggiamento. Le monotorce o le unità flash equipaggiate con i tubi flash A (azione) non
sono raccomandate.
• Second Curtain mode*
La seconda modalità tendina offre la possibilità di liberare il flash poco prima che l’otturatore si chiuda,
per gli effetti di movimento.
* Con le fotocamere Nikon, queste funzioni sono attivate all’interno del menu della fotocamera.
Page 34

6766
Manuale d’uso Manuale d’uso
ITIT
ODS SETUP
L’Over-Drive-Sync (ODS) può migliorare l’esposizione complessiva, quando è attiva la modalità di
sincronizzazione HS.
ODS si basa su unità flash con lampeggiamenti di lunga durata, quindi i risultati dipenderanno dalla durata
della luce del flash utilizzato (che cambia anche a livelli di potenza differente), così come dalla fotocamera
utilizzata.
Le fotocamere full frame con sensori di grandi dimensioni e otturatori lenti sono quelle con cui, purtroppo,
ottenere dei buoni risultati è più difficile, ma delle luci con durate di flash abbastanza lunghe possono ancora
raggiungere cornici pulite fino a 1/8000th.
Inoltre, utilizzando ODS, si possono guadagnare fino a 2 f-stop ulteriori, essenziali quando la luce del sole deve
essere superata.
Il Setup ODS offre una regolazione da 0,1 a 5,0 ms o può essere spento.
Il valore ODS varierà a seconda della fotocamera e dall’unità flash che viene utilizzata e deve essere regolato
manualmente.
Nota:
• Over-Drive-Sync (ODS) può essere utilizzato solo quando la modalità di sincronizzazione è impostata su
HS.
• Quando ODS viene regolato, la posizione del limite del flash (bordo scuro nella parte superiore o inferiore
dell’immagine) può essere spostata all’interno della cornice. Quando viene spento, il punto flash del
trigger verrà selezionato automaticamente in modalità HS.
AUTO MOD
• Off
La luce pilota delle unità flash Elinchrom non cambia.
• Shutter**
Premere il pulsante di scatto della fotocamera per mettere a fuoco, causerà l’accensione per pochi
secondi della lampada pilota relativa all’unità flash EL, come aiuto alla messa a fuoco, in condizioni di
scarsa luminosità. (Non supportato da Nikon)
• DOF
Le unità flash Elinchrom accenderanno la loro lampada pilota per tutto il tempo in cui il pulsante DOF
(profondità di campo) sulla fotocamera viene premuto.
AF LIGHT
Attiva la luce di supporto Auto-Focus di Skyport HS quando il pulsante di scatto è premuto a metà per la
messa a fuoco (controllare anche le impostazioni della fotocamera).
KEY CLICK
Quando attivato, la pressione di un qualsiasi pulsante di controllo sarà indicato da un segnale acustico.
SLEEP
Quando non in uso per un periodo di tempo, Skyport HS passerà alla modalità Sleep per risparmiare energia.
Modalità sospensione ritardata da 1 a 60 minuti o spegnimento
AUTO OFF
Skyport HS si spegne automaticamente quando lasciato incustodito per un periodo di tempo.
Spegnimento ritardato automatico da 1 a 60 minuti o spegnimento.
Quando le modalità Sleep e di spegnimento automatico sono entrambi attive, il trasmettitore Plus HS si
spegnerà impostando la modalità di sospensione ritardata.
* Con le fotocamere Nikon, queste funzioni sono attivate all’interno del menu della fotocamera.
** Non supportato da Nikon.
CONTRAST
Il contrasto del display può essere regolato da 80 a 120%
BACKLIGHT
L’illuminazione dello schermo del dispositivo può essere accesa/spenta
RIPRISTINO IMPOSTAZIONI DI FABBRICA
Premendo e tenendo premuti i pulsanti Speed di sinistra e destra (circa 2 secondi) mentre Skyport HS è
acceso, il dispositivo verrà reimpostato alle impostazioni di fabbrica.
Tutte le impostazioni utente, tranne il contrasto dello schermo, verranno reimpostate.
AGGIORNAMENTO FIRMWARE
Per aggiornare il Firmware del trasmettitore Plus HS, è richiesto l’Updater del trasmettitore Elinchrom HS.
Disponibile sul sito web di Elinchrom.
RISOLUZIONE DEI PROBLEMI
Premendo e tenendo premuti i pulsanti Speed di sinistra e destra (circa 2 secondi) mentre Skyport HS è
acceso, il dispositivo verrà reimpostato alle impostazioni di fabbrica.
Tutte le impostazioni utente, tranne il contrasto dello schermo, verranno reimpostate
SI HA QUESTO PROBLEMA? SI PREGA DI CONTROLLARE I SEGUENTI
PUNTI:
L’UNITÀ NON SI ACCENDE
• Controllare la polarità della batteria e sostituire
entrambe le batterie scariche.
L’UNITÀ FLASH NON PUÒ ESSERE ATTIVATA
QUANDO LA MODALITÀ “TUTTI” È
SELEZIONATA
• Il trasmettitore e il ricevitore devono essere
impostati sullo stesso canale di frequenza.
• MODALITÀ ELSP: trasmettitore e ricevitore
devono essere impostati con la stessa modalità
di sincronizzazione: modalità di sincronizzazione
normale o veloce.
• Verificare che il ricevitore EL-Skyport in tutte le
unità EL con ricevitori incorporati sia acceso.
• Verificare che la versione del trasmettitore
corrisponde al proprio modello di fotocamera
Canon o Nikon.
ALCUNE UNITÀ NON SONO ATTIVE QUANDO
LA MODALITÀ GRUPPO È SELEZIONATA
• Controllare le impostazioni del gruppo delle
unità flash EL.
• Ridurre la distanza di tutte le unità che non
rispondono.
• Trasmettitore e ricevitore devono essere
impostati con la stessa modalità di
sincronizzazione: modalità di sincronizzazione
normale o veloce, e impostazioni del canale di
frequenza.
Page 35

6968
Manuale d’uso Manuale d’uso
ITIT
IL PULSANTE TEST FUNZIONA, MA LA
FOTOCAMERA NON ATTIVA LE UNITÀ FLASH
• Verificare la perfetta aderenza dell’attacco a
slitta.
• Controllare le impostazioni della fotocamera
(attivare la comunicazione dell’attacco a slitta).
• Verificare che la versione del trasmettitore
corrisponda alla propria fotocamera Canon o
Nikon.
• Controllare l’elenco delle fotocamere
compatibili.
NON VENGONO VISUALIZZATE ALCUNE
INFORMAZIONI RELATIVE A DIGITAL RX,
RANGER RX O UNITÀ STILE RX
• Le unità equipaggiate con un plug-in
ricetrasmettitore RX sono limitate nelle
caratteristiche a distanza. Queste unità possono
tuttavia essere attivate e controllate (ma non
vi sarà alcun feedback visivo) dal trasmettitore
EL-Skyport Plus HS.
RANGE DI DISTANZA LIMITATO
• Riposizionare le unità.
• Aumentare la distanza dalle pareti e dai soffitti.
• Modalità ELSP: in modalità di sincronizzazione
veloce, il range di distanza è ridotto di circa il
50%, tornare alla modalità di sincronizzazione
normale.
• All’aperto, il range di distanza potrebbe essere
ridotto a causa di umidità, interferenze, ostacoli
ecc.
INTERFERENZA CON ALTRE RETI A 2,4 GHZ,
ATTIVAZIONE INATTENDIBILE:
• Provare un altro canale di frequenza per il
trasmettitore e il ricevitore dell’unità EL.
• Ridurre la distanza tra l’unità flash e il
trasmettitore.
MODALITÀ HS; SINCRONIZZAZIONE FINO A
1/8000S:
• Le monotorce azione Elinchrom
(precedentemente A) non sono ottimizzate
per la modalità HS. Per beneficiare di migliori
prestazioni, si prega di utilizzare unità flash con
lampade flash Pro (Standard o S in precedenza)
o utilizzare idealmente con monotorce HS
dedicate.
• La sintonia fine ODS aiuta ad ottimizzare le
prestazioni HS.
• Se vi è banding visibile, si prega di ridurre la
velocità dell’otturatore della fotocamera, o
impostare ODS e regolare per ridurre al minimo
o il banding.
• La funzionalità HS funziona solo con fotocamere
Canon o Nikon e il trasmettitore appropriato.
UNITÀ DI SCANSIONE EL:
NESSUNA UNITÀ EL TROVATA, O ALCUNE
UNITÀ SONO MANCANTI.
• Accendere tutte le unità EL attivate, quindi
accendere il trasmettitore EL-Skyport Plus HS o
visitare le impostazioni per ripetere la scansione.
• Frequenza, gruppo e modalità ELSP devono
corrispondere con il trasmettitore.
• Assicurarsi che tutte le unità attivate sul
trasmettitore EL-Skyport Plus HS funzionino
sull’ultimo firmware.
CANALE DI FREQUENZA PER RICEVITORI EL-SKYPORT SPEED
Esso non è rilevante per questo prodotto, ma può aiutare con la configurazione di frequenze su unità legacy
EL-Skyport.
SCARICA LA GUIDA UTENTE DEL TRASMETTITORE
EL-SKYPORT PLUS HS
Per ottenere la guida completa utilizzare questo collegamento: http://bc.gs/elspths
SCARICA LA CONFORMITÀ
Trova la dichiarazione di conformità CE e USA e Canada qui: http://bc.gs/ec
AGGIORNAMENTO FIRMWARE TRAMITE PORTA USB
Si prega di scaricare i nostri ultimi firmware e di seguire le istruzioni: http://bc.gs/fw
Page 36

Manual de Instrucciones Manual de Instrucciones
71
70
ESES
ÍNDICE
DECLARACIÓN DE CONFORMIDAD 73
VERSIONES 74
CARACTERÍSTICAS 74
INSTALACIÓN DE LAS BATERÍAS 75
BATERÍAS 75
COMPATIBILIDAD 76
DISPARADOR 76
CONTROL REMOTO 76
CANALES DE FRECUENCIA 76
DATOS TÉCNICOS 77
ADAPTADOR HOT-SHOE 78
INSTALACIÓN EN LA CÁMARA 78
PANTALLA 79
BOTONES 80
MENÚ DE CONFIGURACIÓN 82
RESTAURAR VALORES DE FÁBRICA 83
SOLUCIÓN DE PROBLEMAS 84
ACTUALIZACIÓN DEL FIRMWARE 86
Tolerancias y especificaciones de conformidad con los estándares IEC y CE. Los datos técnicos están sujetos
a posibles modificaciones sin previo aviso.
INTRODUCCIÓN
Estimado/a fotógrafo/a:
En primer lugar, gracias por confiar en ELINCHROM.
Todos los productos Elinchrom se fabrican con la tecnología más avanzada. Cada componente es seleccionado
de forma exhaustiva con el objetivo de garantizar la máxima calidad y todos los componentes son sometidos
a numerosas pruebas, tanto durante como después del proceso de producción. Consideramos que con este
sistema seremos capaces de ofrecerle un servicio fiable durante muchos años.
Por favor, lea atentamente el presente manual de usuario antes de utilizar su nuevo producto Elinchrom. En él
encontrará información útil acerca de su seguridad y las instrucciones necesarias para sacar el máximo partido a
todas las funciones del producto.
El presente manual de usuario puede mostrar productos con accesorios que no forman parte de su unidad o su
set. Las configuraciones de las unidades y los sets Elinchrom pueden ser objeto de modificaciones sin previo
aviso y pueden variar en función del país.
Para más detalles, actualizaciones, novedades y estar al tanto de las últimas noticias acerca de los sistemas
Elinchrom, por favor, visite periódicamente la página web de Elinchrom. Los últimos manuales de usuario y
especificaciones técnicas se pueden descargar en la sección “Soporte”.
Los datos técnicos, características y funciones de las unidades de flash y los accesorios de Elinchrom pueden ser
objeto de modificaciones sin previo aviso. Las especificaciones que se enumeran pueden ser diferentes en función
de las tolerancias de los componentes o los instrumentos de medida. Los datos técnicos están sujetos a posibles
modificaciones. Los errores de imprenta no se incluyen en la garantía.
Por favor, verifique en nuestra página web si este es el manual más reciente de su producto: www.elinchrom.com/
soporte
Gracias,
El equipo de Elinchrom
Page 37

Manual de Instrucciones Manual de Instrucciones
73
72
ESES
Este producto está clasificado como producto
láser Clase 3R, atendiendo a criterios de
la vigente clasificación: IEC/EN 60825-1
“Seguridad de los productos láser”.
Clase 3R: un producto láser Clase 3R se
considera seguro si se manipula con seguridad,
la visión directa del haz es siempre peligrosa.
Con un láser Clase 3R se puede exceder la
exposición máxima permisible (EMP) con un
riesgo bajo de lesión. Los láseres continuos
visibles en la Clase 3R están limitados a 5mW.
Para otras longitudes de onda y para láseres
pulsados se aplican otros límites.
DECLARATION OF CONFORMITY USA AND CANADA
EN This device complies with Part 15 of the FCC Rules and with Industry Canada licence-exempt RSS
standard(s). Operation is subject to the following two conditions: (1) this device may not cause harmful
interference, and (2) this device must accept any interference received, including interference that may cause
undesired operation. This product complies with the Canadian ICES-003 Class B specifications.
FR Le présent appareil est conforme aux CNR d’Industrie Canada applicables aux appareils radio exempts
de licence. L’exploitation est autorisée aux deux conditions suivantes(1) ce dispositif ne doit pas produire
de brouillage préjudiciable, et (2) ce dispositif doit accepter tout brouillage radioélectrique subi, même si le
brouillage est susceptible d’en compromettre le fonctionnement. Cet appareil numérique de la classe B est
conforme à la norme NMB-003 du Canada.
Radiation Exposure Statement
EN This equipment complies with portable RF exposure limit in Canada and the USA set forth an
uncontrolled environment and is safe for intended operation as described in this manual. Further RF exposure
reduction can be achieved if the product can be kept as far as possible from the user body.
FR Le produit est conforme aux limites d’exposition pour les appareils portables RF pour les Etats- Unis et le
Canada établies pour un environnement non contrôlé. Le produit est sûr pour un fonctionnement tel que décrit
dans ce manuel. La réduction aux expositions RF peut être augmentée si l’appareil peut être utilisé aussi loin
que possible du corps de l’utilisateur.
FCC Class B Compliance note
This equipment has been tested and found to comply with the limits for a Class B digital device, pursuant
to Part 15 of the FCC Rules. These limits are designed to provide reasonable protection against harmful
interference in a residential installation. This equipment generates, uses and can radiate radio frequency energy
and, if not installed and used in accordance with the instructions, may cause harmful interference to radio
communications. However, there is no guarantee that interference will not occur in a particular installation. If
this equipment does cause harmful interference to radio or television reception, which can be determined by
turning the equipment off and on, the user is encouraged to try to correct the interference by one or more of
the following measures:
• Reorient or relocate the receiving antenna.
• Increase the separation between the equipment and receiver.
• Connect the equipment into an outlet on a circuit different from that to which the receiver is connected.
• Consult the dealer or an experienced radio/television technician for help.
Any changes or modifications not expressly approved by the party responsible for compliance could void
the user’s authority to operate this equipment. This device is limited to operation on permissible Part 15
frequencies, and it does not have the ability to be configured by end users or professional installers to operate
outside the authorized bands.
Page 38

Manual de Instrucciones Manual de Instrucciones
75
74
ESES
EL SKYPORT TRANSMITTER PLUS HS
VERSIONES
El ELSP Transmitter Plus HS está disponible para las siguientes cámaras
• Canon
• Nikon
CARACTERÍSTICAS
Amplia pantalla de control gráfico.
• Iluminación de la pantalla en verde o rojo (verde para el modo Normal Sync, rojo para el modo Speed
Sync).
• Botones rápidos de acceso directo y botón giratorio para facilitar el control.
• Conexión segura Hot-Shoe con sistema de cierre en bayoneta.
• Pilas estándar 2 AA (admite pilas recargables).
• Salida del disparador para conexión jack 2,5 mm.
• Actualización de firmware con entrada mini USB integrada.
• 40 canales remotos
• 20 canales de frecuencia* en el modo Normal Sync.
• 20 canales de frecuencia* en el modo Speed Sync.
• 4 Grupos (“Groups”) y opción Todos (“ALL”) .
• Modos EL-Skyport Sync.
• Modo Normal Sync (máximo alcance).
• Modo Speed Sync (mayor velocidad de obturador, especialmente cuando está activado el modo HS,
pero alcance más reducido).
• Modos Sync***.
• Standard (utilizando el contacto medio del Hot-Shoe).
• HS **** (Sync hasta 1/8000 s, control automático).
• ODS (Over-Drive-Sync manual), configura los tiempos del HS para una máxima potencia y
exposición.
• Modo Second Curtain Sync**** (segunda cortina).
• Luz AF integrada***.
• Auto MOD *** para controlar la luz de modelado de las unidades de flash Elinchrom para enfocar.
• Modo Shutter***** (modo obturador, pulsando a la mitad el botón del disparador se controla la
lámpara de modelado).
• Modo DOF (el botón “DOF”, profundidad del campo, controla la lámpara de modelado).
• Control remoto, REMOTE**, con retroalimentación automática de las unidades de flash Elinchrom.
• Las unidades de flash EL se pueden controlar todas a la vez (All), en grupos (Groups) o de forma
individual (Single).
• Control (+/-) de potencia del flash.
• Apagado y encendido (on/off) y control de intensidad (+/-) de la lámpara de modelado.
• Modo Ahorro (Sleep) y modo Auto apagado (Auto OFF) programables.
• Opción RESET para restaurar los valores de fábrica.
* Para las últimas unidades de flash Elinchrom con 20 canales de frecuencia y compatible con los modelos más antiguos.
** Para todas las unidades de flash Elinchrom con el receptor y el transceptor EL-Skyport incorporados.
*** Funciones completas para cámaras Canon y Nikon con TTL Hot-Shoe (funciones limitadas para cámaras Nikon, ver más abajo).
**** Estas funciones no son compatibles con Nikon, pero se pueden activar desde el menú de la cámara.
***** No compatible con Nikon.
INSTALACIÓN DE LAS BATERÍAS
Abra la tapa del compartimento de la batería presionándola y deslizándola en el sentido que indica la flecha
(véase la Imagen 1).
Introduzca las pilas. Asegúrese de que los polos “+” y “-” de las pilas estén en la posición correcta (véase la
Imagen 2). (Nota: por favor, utilice 2 pilas AA alcalinas o AA tipo NiMH).
Presione la tapa contra el transmisor y deslícela de nuevo hasta que quede completamente cerrada.
BATERÍAS
• 2 pilas AA para el transmisor.
• El transmisor no se dañará en caso de que se coloquen las pilas de forma incorrecta.
• Se pueden utilizar: pilas AA no recargables (pilas secas), como las de zinc–carbono; pilas tipo alcalinas; o
pilas recargables de tamaño AA, como las de níquel-cadmio (NiCd) o níquel-metal hidruro (NiMH).
• No mezclar diferentes tipos de pilas.
• No utilizar pilas AA de litio en el transmisor.
Presione y deslice
Imagen 1
Imagen 2
Page 39

Manual de Instrucciones Manual de Instrucciones
77
76
ESES
COMPATIBILIDAD
Hay tres generaciones de unidades de flash Elinchrom EL-Skyport disponibles en el mercado:
1ª GENERACIÓN
• Módulo EL-Skyport Transceiver RX (Style RX, Digital RX, Ranger RX).
2ª GENERACIÓN
• Módulo integrado EL-Skyport Mk1 (BRX, D-Lite RX, Quadra, Quadra Hybrid).
3ª GENERACIÓN
• Módulo integrado EL-Skyport Mk2 (ELC y ELB). Esta generación ofrece un mayor alcance.
DISPARADOR
El disparador es compatible con todas las unidades de flash Elinchrom existentes con transceptores ELSkyport incorporados o acoplables.
CONTROL REMOTO
CUANDO SE SELECCIONA TODO (ALL) O UN GRUPO (GROUP) DE 1 A 4
• Todas las unidades de flash Elinchrom con EL-Skyport son compatibles cuando se modifica alguno de
los siguientes parámetros: “PWR±, MOD± o MOD on/off”. Cuando los ajustes de potencia de la lámpara
de modelado se modifican con el botón MOD on/off o MOD+/-, el flash Elinchrom que se esté utilizando
en ese momento se cambiará al modo de modelado libre. Para volver al modo de lámpara de modelado
proporcional, los ajustes se deben realizar en la unidad de flash EL.
• Algunas unidades no son compatibles con todas las funciones de modelado, en ese caso se mostrará en
la pantalla el siguiente símbolo: “--” (por ejemplo: Ranger, Quadra o ELB400).
CUANDO SE SELECCIONA UNA UNIDAD INDIVIDUAL (SINGLE)
• En la pantalla, la unidad seleccionada quedará encuadrada en un marco y de ese modo se podrá
controlar de forma individual.
• Solo son compatibles las unidades de flash Elinchrom con receptores EL-Skyport incorporados de 2ª y 3ª
generación.
Nota:
Las unidades de 1ª generación son detectadas, pero en la pantalla aparecerá el símbolo “--”. Los ajustes de
la unidad no tendrán retroalimentación con el EL-Skyport Transmitter Plus HS, pero podrá disparar con total
normalidad.
CANALES DE FRECUENCIA
Algunas unidades de flash Elinchrom antiguas con EL-Skyport incorporado admiten los canales de frecuencia
del 1 al 4 o del 1 al 8 (como BRX, D-Lite RX o Quadra).
Las últimas unidades de flash Elinchrom con EL-Skyport incorporado admiten hasta 20 canales de frecuencia
diferentes, del 1 al 20 (ELC, ELB).
DATOS TÉCNICOS
PARÁMETROS ESPECIFICACIONES
VERSIONES
Canon, Nikon.
COMPATIBILIDAD DEL DISPARADOR
TODAS las unidades flash Elinchrom con receptor o transceptor ELSkyport incorporado y los módulos EL-Skyport Transceiver RX, además
del EL-Skyport Universal.
COMPATIBILIDAD DEL CONTROL
REMOTO
TODAS las unidades flash Elinchrom con transceptor EL-Skyport
incorporado: ELC Pro HD, ELB 400, Ranger Quadra RX, Quadra Hybrid,
D-Lite RX series, BRX Series, Master RX Series y FRX series (NOTA: Las
unidades EL con módulo acoplable Transceiver RX tienen limitadas las
funciones de control remoto).
ALCANCE
Interior > 60 m.
Exterior > 200 m.
Nota: El máximo alcance es posible con las últimas unidades de flash
Elinchrom como ELC o ELB. El resto, o las unidades de flash Elinchrom
más antiguas, tienen un alcance más limitado.
BATERÍA
2x pilas AA (estándar o recargables).
VIDA DE LA BATERÍA
Depende del tipo de pilas y el uso.
Para dos pilas estándar con 1000 mAh cada una, se estiman
aproximadamente unas 35 horas de trabajo y más de 15 000 disparos.
CONTROL REMOTO
Se pueden detectar, mostrar y controlar de forma remota un máximo de
10 unidades.
CANALES DE FRECUENCIA
20 canales en el modo Normal y 20 canales en el modo Speed.
MODOS EL-SKYPORT (ELSP)
Normal/Speed – Modo Sync.
GRUPOS DE DISPARADOR/CONTROL
“All” (todo) o “Groups” (Grupos de 1 a 4).
MODOS SYNC
Standard, HS (con o sin ODS), Second Curtain (segunda cortina).
ENTRADA USB
Para actualizaciones de firmware.
ENTRADA SR
Salida del disparador: jack 2,5 mm mono (máx. sinc-voltaje 3 Vcc).
DIMENSIONES (ALTURA X ANCHO X
PROFUNDIDAD)
69 x 84 x 59 mm (2.7x 3.3x 2.3 in.)
PESO
Aprox. 170 g, incluyendo 2x pilas AA. 120 g sin pilas
Page 40

Manual de Instrucciones Manual de Instrucciones
79
78
ESES
ADAPTADOR HOT-SHOE
CARACTERÍSTICAS
El transmisor Elinchrom Skyport Plus HS se puede utilizar para disparos básicos con el control de potencia en
cualquier cámara que tenga una zapata de flash tipo “hot shoe”. Las funciones descritas más abajo requieren
una cámara Canon o Nikon que sea compatible con el sistema Skyport. Para un óptimo trabajo, el transmisor
Skyport HS cuenta con pines de conexión especiales para comunicarse con la cámara conectada.
Hay disponibles dos versiones de transmisores Elinchrom:
• Canon, para cámaras Canon EOS tipo A compatibles con unidades de autoflash ETTL/ETTLII.
• Nikon, para cámaras Nikon DSLR compatibles con unidades de flash i-TTL.
Las terminales de comunicación específicas de la zapata de la cámara permiten las siguientes funciones
Elinchrom Skyport HS:
• Modo SYNC
• Modo HS y ODS
• Sync Second Curtain
• Auto MOD
• Luz AF
Nota: no todas las cámaras son compatibles con todas las funciones.
LISTADO DE CÁMARAS COMPATIBLES TESTADAS
El último listado de modelos de cámaras y funciones compatibles se puede encontrar accediendo a la página
web de Elinchrom:
http://www.elinchrom.com/support.php
INSTALACIÓN EN LA CÁMARA
Un sencillo mecanismo de cierre de bayoneta permite acoplar de forma segura el transmisor en la zapata de
la cámara.
MONTAJE
1. Apague la cámara y el transmisor EL-Skyport.
2. Alinee la zapata del transmisor EL-Skyport con la zapata de la cámara.
3. Deslice el transmisor completamente por la zapata de la cámara.
4. Mueva la pestaña del anillo de cierre hacia la derecha hasta que oiga un “clic” (véase la Imagen 3).
DESMONTAJE
1. Para desinstalar el transmisor presione el botón de desbloqueo y mueva la pestaña completamente hacia
la izquierda (véase la Imagen 4).
2. Deslice el transmisor EL-Skyport fuera de la zapata de la cámara.
PANTALLA
Los gráficos de la pantalla muestran el estado y los ajustes de la unidad Elinchrom.
La iluminación de la pantalla se puede activar y desactivar.
En el modo Normal Sync, la iluminación es verde. En el modo Speed Sync, la iluminación es roja.
El contraste de la pantalla se puede ajustar en el menú de Configuración.
La barra superior de la pantalla muestra el estado del transmisor Elinchrom.
La barra inferior de la pantalla muestra las funciones de los botones rápidos.
El área intermedia muestra la lista de las unidades flash Elinchrom detectadas. Cuando se selecciona el menú
de Configuración muestra los parámetros ajustables.
PANTALLA – PANEL DE CONTROL
PANTALLA – MENÚ CONFIGURACIÓN
Menu list
Up/down list
Description/mode
Exit
* En las cámaras Nikon, estas funciones se activan en el menú de la cámara.
** No compatible con los sistemas Nikon®
*** No compatible con los sistemas Sony®
Imagen 3
Figura 4
Skyport mode
EL-unit(s)
Button function title
Column title
Battery status
Groups
ODS status
Modelling lamp
mode
Unit selection
Frequency
Sync mode
D: DOF
HS: Hi-Sync
Power settings
Setup menu
Modelling lamp settings
s: speed
n: normal
second curtain
S: Shutter
Number of unit
**
** **
***
*
Page 41

Manual de Instrucciones Manual de Instrucciones
81
80
ESES
SPEED BUTTONS 1-4
Los botones rápidos permiten un acceso directo a los ajustes de las funciones indicadas más abajo. Los
términos mostrados en negrita indican la función de esos botones cuando el menú de Configuración está
seleccionado.
SPEED BUTTON 1 (IZQUIERDA)
Pwr± (Potencia±) cambia la potencia del flash, números f (f-stop) del 1 al 10, subiendo/
bajando con el dial.
up (arriba) sube por el menú cuando está seleccionado el menú de Configuración.
SPEED BUTTON 2 (CENTRO IZQUIERDA)
Presione el botón una o dos veces para permutar entre las funciones de la lámpara de modelado.
Mod activa o desactiva la lámpara de modelado con el dial.
Mod± cambia la potencia de la lámpara de modelado, números f (f-stop) del 1 al 10, subiendo/bajando
con el dial.
down (abajo) baja por el menú cuando está seleccionado el menú de Configuración.
SPEED BUTTON 3 (CENTRO DERECHA)
Select (Seleccionar) permuta entre las unidades de flash Elinchrom mostradas (encontradas) en pantalla.
Los ajustes del flash y la lámpara de modelado se pueden configurar de forma individual en la unidad de flash
seleccionada cuando esta aparece encuadrada en un marco.
Después de aproximadamente 5 segundos, el marco desaparecerá y los ajustes de la configuración afectarán
a todas las unidades de todos los grupos cuando la opción de grupo “ALL” esté seleccionada. Si se
selecciona la opción “Group” 1–4, solo las unidades incluidas en ese grupo serán modificadas.
Group selection
Test
USB
Rotation ring / Dial
Set
Battery compartment cover
On/Off
Refresh
Change value
Lock
Press for 2 seconds
To refresh manual
changes made on the flash unit
Communication Transmitter
HS / EL- flash unit.
Press for 2 seconds
Speed button 2SRSpeed button 3
Green LED
Speed button 1
Speed button 4
Blue LED
Communication camera / Transmitter HS
BUTTONS
SPEED BUTTON 4 (RIGHT)
Setup (Configuración) al presionar este botón, las funciones de los botones rápidos cambiarán y se
seleccionará el menú de Configuración. En el menú de Configuración se pueden ajustar y activar
las diferentes funciones.
Exit Salir) para salir del menú de Configuración y regresar al modo de pantalla estándar.
ON/OFF
Presiónelo y manténgalo pulsado durante al menos 2 segundos para apagar y encender el EL-Skyport
Transmitter Plus HS.
GROUP BUTTON
Presiónelo para permutar entre los grupos del 1 al 4 y la opción “ALL”.
TEST BUTTON (CON EL LOGO)
Presione el botón de Actualizar cada vez que se hayan modificado los ajustes de potencia en una unidad flash
EL por separado, de este modo se actualizará la pantalla del Skyport HS con dichos ajustes.
Si se ha seleccionado la opción ”Group”, solo será actualizada la información modificada de dicho grupo
seleccionado.
REFRESH BUTTON
Cuando se seleccione la opción “ALL”, se actualizará la información de todos los grupos.
Si un flash no ha sido reconocido ni escaneado al encender el Skyport HS, no se podrá incluir en la función
Actualizar.
Si un flash ha sido añadido, seleccione Configuración y Escanear en el menú de Configuración o apague y
encienda el transmisor.
La actualización puede tardar en ejecutarse hasta 4 segundos, dependiendo de cuántas unidades de flash se
hayan conectado y cuántas hayan sido reconocidas por el transmisor.
Note:
Para garantizar la máxima eficacia entre el Skyport HS y las unidades de flash EL, la información de la
potencia del flash será transmitida por el flash EL solo cuando los niveles de potencia sean modificados o se
presione el botón Actualizar.
ROTATING RING / DIAL
Gire el Dial para seleccionar las diferentes funciones y cambiar los niveles de potencia de los flashes EL.
SET / CONFIRMATION BUTTON (DIAL CENTRE BUTTON)
Presiónelo para confirmar cualquier modificación realizada en el menú de Configuración.
Presiónelo para activar la iluminación de la pantalla.
Presiónelo para operar con normalidad cuando el Skyport HS se haya cambiado al modo Standby.
Presiónelo durante 2 segundos para bloquear todas las funciones y ajustes. Presiónelo de nuevo para
desbloquearlos.
Esta función sirve para bloquear el dial y otros botones y que de este modo no se produzca un desajuste en
los parámetros mientras se transporta el Skyport HS.
Page 42

Manual de Instrucciones Manual de Instrucciones
83
82
ESES
SETUP MENU
SCAN..
Cuando el Skyport HS se enciende, automáticamente busca unidades de flash Elinchrom incorporadas o
conectadas en los módulos EL-Skyport Transceiver.
La función Escanear también está disponible en el menú de Configuración. Cuando se añade una nueva
unidad de flash a la configuración de iluminación se requiere un re-escaneado.
Para encontrar unidades de flash EL,
• todas las unidades de flash EL deben estar encendidas
• todos los flashes deben estar incorporados o conectados a los módulos EL-Skyport Transceiver
• el Transmitter Plus HS y las unidades de flash EL deben estar configuradas para los mismos canales de
frecuencia
FREQUENCY CHANNELS
Se pueden seleccionar hasta un máximo de 20 canales de frecuencia EL-Skyport.
Nota:
• Solo las últimas unidades de flash Elinchrom (ELC 500/1000 Pro HD, ELB 400 y futuras versiones)
admiten hasta 20 canales de frecuencia.
• Todas las unidades de flash “RX” admiten hasta 8 canales de frecuencia y otras unidades de flash
Elinchrom más antiguas admiten hasta 4 canales de frecuencia.
ELSP MODE
El Skyport HS tiene dos modos de trabajo que ofrecen diferentes funcionalidades de disparo:
• Normal mode
El modo Normal es compatible con las primeras unidades de flash Elinchrom que incorporan ELSkyport. Al seleccionarlo, tanto la pantalla como el LED de estado se iluminarán en verde.
• Speed mode
El modo Speed permite velocidades de obturador de hasta 1/1000 s dependiendo de si la cámara
utiliza una sincronización de flash normal (por ejemplo, para cámaras con obturador central y algunas
mirrorless). Para velocidades de obturador de hasta 1/8000 s, el modo HS debe estar activado, tanto
si se usa el modo Normal como el modo Speed. En el modo Speed, tanto la pantalla como el LED de
estado se iluminarán en rojo.
Nota:
Las mejores distancias de trabajo se consiguen en el modo Normal. El modo Speed reduce la distancia de
trabajo un 50%. Para todos los flashes remotos, los transcriptores de Skyport deben tener un modo ELSkyport con capacidad para utilizar el modo Speed.
SYNC MODE
Permite seleccionar el modo de sincronización:
• Standard mode
En el modo Standard la mayoría de cámaras trabajan con un obturador a velocidades de entre 1/200 s y
1/250 s.
• HS Hi-Sync mode*
En el modo HS la velocidad del obturador puede llegar a los 1/8000 s dependiendo de la cámara y de la
unidad de flash. El modo HS requiere unidades de flash o cabezales de flash con una larga duración de
flash para obtener los mejores resultados. Los cabezales o las unidades de flash equipados con tubos
de flash tipo A (acción) no están recomendados.
• Second Curtain mode*
El modo Second Curtain (segunda cortina) permite activar el flash justo antes de que se cierre el
obturador, de este modo se genera un efecto de movimiento.
* Con las cámaras Nikon estas funciones se activan desde el menú de la cámara.
ODS SETUP
La ODS (Over-Drive-Sync) puede mejorar la exposición total, cuando el modo HS Sync está activado.
La ODS tiene un funcionamiento más óptimo con unidades de flash de larga duración, por lo que los
resultados dependerán de la duración del flash de las luces utilizadas (que también varía en función de los
niveles de potencia) tanto como de la cámara. Con las cámaras “full frame” con sensores de mayor tamaño
y obturadores lentos es más difícil obtener buenos resultados, pero las luces con una duración de flash
suficiente pueden conseguir encuadres limpios hasta los 1/8000. Además, utilizando la ODS, se pueden ganar
hasta 2 f-stops más de luz, algo fundamental cuando se debe superar la luz del sol.
La configuración ODS ofrece ajustes desde los 0,1 a los 5,0 ms y puede ser desactivada.
Los valores ODS varían dependiendo de la cámara y de la unidad de flash utilizada y se pueden ajustar
manualmente.
Nota:
• La ODS (Over-Drive-Sync) solo se puede utilizar cuando el modo Sync está configurado en HS.
• Cuando se ajusta la ODS, la posición del “cut-off” del flash (el borde oscuro en la parte superior e inferior
de la foto) se puede mover dentro del encuadre. Si está desactivado, el punto de disparo del flash se
puede seleccionar automáticamente en el modo HS.
AUTO MOD
• Off
La luz de modelado de las unidades de flash Elinchrom no varía.
• Shutter**
Al presionar el botón Shutter (obturador) de la cámara para enfocar, la lámpara de modelado de la
unidad de flash EL se encenderá por unos segundos para ayudar a enfocar con luces bajas. (No
compatible con Nikon)
• DOF
Las unidades de flash Elinchrom encenderán sus lámparas de modelado durante todo el tiempo en el
que se mantenga pulsado el botón DOF (Depth of Field o profundidad de campo) de la cámara.
AF LIGHT
El Auto-Focus (autofoco) ayuda en el enfoque a la luz del Skyport HS cuando el botón del obturador está
presionado a la mitad (compruebe además los ajustes de la cámara).
KEY CLICK
Cuando está activado, al presionar cualquier botón sonará un “bip”.
SLEEP
Cuando no se manipule por un tiempo, el Skyport HS pasará al modo Ahorro para ahorrar batería.
Configure el modo Ahorro (Sleep) o el apagado del dispositivo para que se active en un rango de 1 y 60
minutos.
AUTO OFF
El Skyport HS se apagará automáticamente cuando no se manipule por un tiempo.
Configure el modo Auto apagado (Auto off) para que se active en un rango de 1 y 60 minutos.
Si el modo Ahorro y el Auto apagado están activos, el Transmitter Plus HS se apagará en tiempo configurado
para el modo Ahorro.
CONTRAST
El contraste de la pantalla se puede ajustar de 80 a 120%
BACKLIGHT
La iluminación de la pantalla del dispositivo puede activarse o desactivarte
* Con las cámaras Nikon, estas funciones se activan en el menú de la cámara.
** No compatible con cámaras Nikon.
Page 43

Manual de Instrucciones Manual de Instrucciones
85
84
ESES
MANUFACTURING RESET
Pulsando y manteniendo pulsado el botón rápido izquierdo y el derecho mientras se enciende el Skyport
HS (aproximadamente 2 segundos) se restaurarán los valores de fábrica del Skyport HS. Todos los ajustes
realizados por el usuario a excepción del contraste de la pantalla, serán restaurados.
FIRMWARE UPDATE
Para actualizar el Firmware del Transmitter Plus HS es necesario el Elinchrom Transmitter HS Updater. Está
disponible en la página web de Elinchrom.
TROUBLESHOOTING
Pulsando y manteniendo pulsado el botón rápido izquierdo y el derecho mientras se enciende el Skyport
HS (aproximadamente 2 segundos) se restaurarán los valores de fábrica del Skyport HS. Todos los ajustes
realizados por el usuario, excepto el contraste de la pantalla serán restaurados.
TIENE ESTE PROBLEMA? POR FAVOR COMPRUEBE LO SIGUIENTE
LA UNIDAD NO SE ENCIENDE
• Compruebe la polaridad de las pilas y
recámbielas si están descargadas.
LA UNIDAD DE FLASH NO SE DISPARA
CUANDO ESTÁ SELECCIONADO EL MODO
“ALL”
• El transmisor y el receptor deben tener la misma
configuración de canales de frecuencia.
• MODO ELSP: el transmisor y el receptor deben
tener la misma configuración del modo Sync:
modo Sync Normal o Speed.
• Verifique que el receptor EL-Skyport esté
encendido en todas las unidades EL con
receptores incorporados.
• Verifique que la versión del transmisor es la
adecuada para su cámara Canon o Nikon.
ALGUNAS UNIDADES NO SE DISPARAN
CUANDO ESTÁ SELECCIONADO EL MODO
“GROUP”
• Verifique los ajustes de Grupo de la unidad de
flash EL.
• Reduzca la distancia con cualquier unidad que
no responda.
• El transmisor y el receptor deben tener la misma
configuración del modo Sync, modo Sync
Normal o Speed y la misma configuración de
los canales de frecuencia.
EL BOTÓN TEST FUNCIONA, PERO LA
CÁMARA NO DISPARA LAS UNIDADES DE
FLASH
• Verifique el ajuste de la zapata.
• Verifique la configuración de la cámara (active la
comunicación de la zapata).
• Verifique que la versión del transmisor es la
adecuada para su cámara Canon o Nikon.
• Verifique el listado de cámaras compatibles.
NO SE MUESTRA TODA LA INFORMACIÓN
ACERCA DE LAS UNIDADES: DIGITAL RX,
RANGER RX O STYLE RX
• Las unidades equipadas con un Transceiver RX
conectado tiene funciones de control remoto
limitadas. Sin embargo, estas unidades pueden
ser disparadas y controladas por el EL-Skyport
Transmitter Plus HS (pero sin retroalimentación
visual).
ALCANCE LIMITADO
• Pruebe a reponer las unidades.
• Aumente la distancia respecto a las paredes y
techos.
• Modo ELSP: en el modo Sync Speed el alcance
se reduce aproximadamente en un 50%,
cambie al modo Sync Normal.
• En exteriores, el alcance se puede reducir
debido a la humedad, la interferencias, los
obstáculos, etc.
SE PRODUCEN INTERFERENCIAS CON OTRAS
REDES DE 2,4 GHZ, EL DISPARO ES POCO
FIABLE:
• Pruebe otro canal de frecuencia tanto para el
transmisor como para el receptor de la unidad
EL.
• Reduzca la distancia entre la unidad de flash y
el transmisor.
EN EL MODO HS, LA SINCRONIZACIÓN LLEGA
HASTA 1/8000 S:
• Los cabezales Action de Elinchrom (de acción,
anteriormente A) no están optimizados para
el modo HS. Para beneficiarse de un mejor
rendimiento, por favor utilice unidades con
tubos de flash Pro (anteriormente Standard o S)
o use cabezales específicos para el modo HS.
• El ajuste de precisión de la ODS ayuda a
optimizar el rendimiento del modo HS.
• Si se produce un efecto banding, por favor,
reduzca la velocidad del obturador de su
cámara o configure la ODS ajustándola para
reducirlo o eliminarlo.
• La función HS solo es compatible con cámaras
Canon o Nikon y los transmisores adecuados.
UNIDADES DE ESCANER EL:
NO SE ENCUENTRAN UNIDADES EL O
ALGUNAS UNIDADES SE HAN PERDIDO.
• Conecte todas las unidades EL habilitadas,
luego encienda el EL-Skyport Transmitter Plus
HS o vaya al menú configuración y realice un
re-escaneo.
• Los ajustes de frecuencia, de grupo y del modo
ELSP, deben coincidir con los del transmisor.
• Asegúrese de que las unidades habilitadas ELSkyport Transmitter Plus HS están funcionando
con el último firmware disponible.
Page 44

Gebruiksaanwijzing
87
NL
Manual de Instrucciones
86
ES
FREQUENCY CHANNEL FOR EL-SKYPORT SPEED RECEIVERS
Esto no es relevante para este producto, pero podría ayudar con la configuración de la frecuencia en unidades
antiguas de EL-Skyport.
DESCARGA DEL MANUAL DE USUARIO DE EL-SKYPORT
TRANSMITTER PLUS HS
Consiga el manual de usuario íntegro accediendo a este enlace: http://bc.gs/elspths
DESCARGA DE LA DECLARACIÓN DE CONFORMIDAD
Encuentre su declaración de conformidad EC para EE. UU. y Canadá accediendo a este
enlace: http://bc.gs/ec
ACTUALIZACIÓN DEL FIRMWARE A TRAVÉS
DEL PUERTO USB
Por favor, descargue nuestro último firmware y siga atentamente
las instrucciones: http://bc.gs/fw
INHOUDSOPGAVE
VERKLARING VAN OVEREENSTEMMING 90
VERSIES 91
FUNCTIES 91
DE BATTERIJEN INSTALLEREN 92
BATTERIJEN 92
COMPTABILITEIT 93
TRIGGEREN 93
AFSTANDSBEDIENING 93
FREQUENTIEKANALEN 93
TECHNISCHE GEGEVENS 94
FLITSSCHOEN ADAPTER 95
MONTAGE OP DE CAMERA 95
SCHERM 96
TOETSEN 98
SETUP MENU 99
FABRIEKSINSTELLINGEN HERSTELLEN 101
PROBLEMEN OPLOSSEN 101
FIRMWARE UPDATE 103
Toleranties en specificaties voldoen aan de IEC- en CE-normen. Technische gegevens kunnen worden
gewijzigd zonder voorafgaande kennisgeving
Page 45

Gebruiksaanwijzing Gebruiksaanwijzing
89
88
NLNL
INTRODUCTIE
Beste fotograaf,
Bedankt voor het kiezen van ELINCHROM.
Alle Elinchrom producten bevatten de meest geavanceerde technologie. Alle onderdelen worden zorgvuldig
uitgekozen om de beste kwaliteit te kunnen garanderen, en onze apparaten worden zowel tijdens als na het
productieproces uitgebreid getest. We zijn er van overtuigd dat je er vele jaren op zal kunnen vertrouwen.
Lees deze handleiding alstublieft aandachtig voor je je nieuw Elinchrom product in gebruik neemt. Je vindt hier
informatie voor jouw veiligheid en hoe je het meeste uit de programmeerbare functies kan halen.
Deze handleiding kan afbeeldingen van producten bevatten met accessoires die geen onderdeel van
bepaalde sets of enkele eenheden uitmaken. Elinchrom set en enkele eenheid configuraties kunnen zonder
waarschuwing veranderen en verschillen tussen verschillende landen.
Voor verdere details, upgrades, nieuws en de laatste informatie over het Elinchrom systeem kan je terecht
op de Elinchrom website. De laatste nieuwe handleidingen en technische specificaties kunnen gedownload
worden uit de “Support” sectie.
Technische gegevens, functionaliteit en functies van Elinchrom flash units en accessoires kunnen
veranderen zonder kennisgeving. De vermelde specificaties kunnen afwijken door foutjes in onderdelen of
meetinstrumenten. Technische gegevens zijn onder voorbehoud. We bieden geen garantie voor drukfouten.
Kijk voor de meest recente handleiding op onze website: www.elinchrom.com/support
Bedankt,
Jouw Elinchrom-team
Het product is geclassificeerd als een Klasse
3R Laser volgende de volgende normen IEC/
EN 60825-1 “Stralingsbescherming van Laser
Producten”.
Klasse 3R: Een Klasse 3R Laser wordt veilig
geacht indien er zorgvuldig mee wordt
omgegaan, met een beperkt zicht op de straal.
Bij een Klasse 3R Laser kan de MPE worden
overschreden, maar met een laag risico op letsel.
Continue zichtbare lasers van Klasse 3R worden
beperkt tot 5 MW. Voor andere golflengten en
voor gepulste lasers gelden andere restricties.
Page 46

Gebruiksaanwijzing Gebruiksaanwijzing
91
90
NLNL
DECLARATION OF CONFORMITY USA AND CANADA
EN This device complies with Part 15 of the FCC Rules and with Industry Canada licence-exempt RSS
standard(s). Operation is subject to the following two conditions: (1) this device may not cause harmful
interference, and (2) this device must accept any interference received, including interference that may cause
undesired operation. This product complies with the Canadian ICES-003 Class B specifications.
FR Le présent appareil est conforme aux CNR d’Industrie Canada applicables aux appareils radio exempts
de licence. L’exploitation est autorisée aux deux conditions suivantes(1) ce dispositif ne doit pas produire
de brouillage préjudiciable, et (2) ce dispositif doit accepter tout brouillage radioélectrique subi, même si le
brouillage est susceptible d’en compromettre le fonctionnement. Cet appareil numérique de la classe B est
conforme à la norme NMB-003 du Canada.
Radiation Exposure Statement
EN This equipment complies with portable RF exposure limit in Canada and the USA set forth an
uncontrolled environment and is safe for intended operation as described in this manual. Further RF exposure
reduction can be achieved if the product can be kept as far as possible from the user body.
FR Le produit est conforme aux limites d’exposition pour les appareils portables RF pour les Etats- Unis et le
Canada établies pour un environnement non contrôlé. Le produit est sûr pour un fonctionnement tel que décrit
dans ce manuel. La réduction aux expositions RF peut être augmentée si l’appareil peut être utilisé aussi loin
que possible du corps de l’utilisateur.
FCC Class B Compliance note
This equipment has been tested and found to comply with the limits for a Class B digital device, pursuant
to Part 15 of the FCC Rules. These limits are designed to provide reasonable protection against harmful
interference in a residential installation. This equipment generates, uses and can radiate radio frequency energy
and, if not installed and used in accordance with the instructions, may cause harmful interference to radio
communications. However, there is no guarantee that interference will not occur in a particular installation. If
this equipment does cause harmful interference to radio or television reception, which can be determined by
turning the equipment off and on, the user is encouraged to try to correct the interference by one or more of
the following measures:
• Reorient or relocate the receiving antenna.
• Increase the separation between the equipment and receiver.
• Connect the equipment into an outlet on a circuit different from that to which the receiver is connected.
• Consult the dealer or an experienced radio/television technician for help.
Any changes or modifications not expressly approved by the party responsible for compliance could void
the user’s authority to operate this equipment. This device is limited to operation on permissible Part 15
frequencies, and it does not have the ability to be configured by end users or professional installers to operate
outside the authorized bands.
EL SKYPORT TRANSMITTER PLUS HS
VERSIES
De ELSP Transmitter Plus HS is verkrijgbaar voor de volgende camera’s:
• Canon
• Nikon
FUNCTIES
• Groot grafisch scherm
• Schermverlichting in groen of rood (groen voor Normale Sync Mode, rood voor Speed Sync Mode)
• Snel toegankelijke knoppen en een draaiend wiel voor eenvoudige bediening
• Veilige flitsschoen montage met bajonetsluiting
• 2 standaard AA batterijen (werkt met oplaadbare batterijen)
• 2.5 mm jack trigger-uitgang
• Update de firmware met geïntegreerde mini-USB aansluiting
• 40 kanalen:
• 20 frequentiekanalen* in Normale Sync Mode
• 20 frequentiekanalen* in Speed Sync Mode
• 4 groepen en ALL
• EL-Skyport Sync Modes
• Normale Sync Mode (maximaal afstandsbereik)
• Speed Sync Mode (snellere sluitertijd vooral als HS geactiveerd is, maar kleiner afstandsbereik)
• Sync Modes***:
• Standaard (gebruikt het middelste contact van de flitsschoen)
• HS **** (Synchroniseert tot 1/8000s, automatisch gecontroleerd)
• ODS (manuele Over-Drive-Sync) finetune de timing van HS voor maximaal vermogen en blootstelling
• Tweede gordijn sync mode****.
• Ingebouwd AF-hulplicht
• Auto MOD*** om het modelling licht van Elinchrom flitsers te controleren voor het scherpstellen
• Shutter Mode ***** (de half ingedrukte ontspanknop regelt de modelling lamp)
• DOF Mode (de “DOF” (scherptediepte) knoppen van je camera regelt de modelling lamp)
• Afstandsbediening ** met automatische feedback van Elinchrom flash units
• EL-flash units kunnen allemaal tegelijk, in groepen of apart worden gecontroleerd
• Flash vermogen verhogen of verlagen
• Modelling lamp aan/uit of intensiteit verhogen of verlagen
• Slaapstand en programmeerbaar automatisch uitzetten
• RESETTEN naar fabrieksinstellingen
* Voor alle laatste Elinchrom flash units met 20 frequentiekanalen, en compatibel met eerdere modellen.
** Voor alle Elinchrom flash units met ingebouwd EL-Skyport Receiver en Transceiver
*** Uitgebreide functionaliteit voor Canon en Nikon camera’s met TTL flitsschoen (beperkte mogelijkheden
voor Nikon, zie hieronder)
**** Deze functies worden niet ondersteund door Nikon, maar kunnen in het camera-menu worden
geactiveerd.
***** Niet ondersteund door Nikon
Page 47

Gebruiksaanwijzing Gebruiksaanwijzing
93
92
NLNL
DE BATTERIJEN INSTALLEREN
Druk op het batterij-klepje en schuif in de richting van de pijl om het batterij-gedeelte te openen (zie afbeelding
1).
Plaats de batterijen. Zorg ervoor dat de “+” en “-“ contacten op de juiste plaats zitten (zie afbeelding 2).
(Opmerking: gebruik alstublieft 2 AA alkaline batterijen of AA NIMH-type batterijen).
Druk het klepje in en schuif het terug in de vergrendelde positie.
BATTERIJEN
• 2x AA batterijen worden gebruikt voor de zender
• Het foutief installeren van de batterijen zal de zender niet beschadigen.
• Niet-oplaadbare AA batterijen zoals zink-carbon, types alkaline of herlaadbare AA batterijen zoals nikkelcadmium (NiCd) of nikkel-metaalhydride (NiMH) kunnen worden gebruikt.
• Gebruik geen verschillende types batterijen door elkaar.
• Gebruik geen Lithium AA batterijen in de zender.
COMPATIBILITEIT
Er zijn drie verschillende Elinchrom EL-Skyport flash units generaties in de markt:
EERSTE GENERATIE
• EL-Skyport Transceiver RX module (Style RX, Digital RX, Ranger RX).
TWEEDE GENERATIE
• Ingebouwde EL-Skyport module Mk1 (BRX, D-Lite RX, Quadra, Quadra Hybrid).
DERDE GENERATIE
• Ingebouwde EL-Skyport module Mk2 (ELC and ELB). Deze generatie heeft een vergroot bereik.
TRIGGEREN
Tripleren werkt met alle bestaande Elinchrom flash units met ingebouwde of plug-in EL-Skyport Transceivers.
AFSTANDSBEDIENING
ALS ALLEMAAL OF GROEP 1-4 GESELECTEERD IS
• Alle Elinchrom Flash Units met EL-Skyport worden ondersteund als je “PWR±, MOD± of MOD” aan/uit
zet. Als de instellingen van de modelling lamp veranderen met de MOD aan/uit of MOD +/- knop, zal de
Elinchrom flash omschakelen naar free modelling mode. Om terug te keren naar proportional modelling
lamp mode, moet je de instellingen op de EL flash unit aanpassen.
• Sommige units ondersteunen niet alle modelling functies, “—“ wordt dan weergegeven (voor Ranger,
Quadra, ELB400).
ALS EEN ENKELE EENHEID GESELECTEERD IS
• De geselecteerde unit wordt met een kader gemarkeerd op het scherm en kan individueel gecontroleerd
worden.
• Alleen Elinchrom flash units met ingebouwde EL-Skyport receivers van de tweede en derde generatie
worden ondersteund.
Opmerking:
Eerste generatie units worden gedetecteerd, maar op het scherm zal “—“ weergeven worden. Er is geen
terugkoppeling van de instellingen naar de EL-Skyport Transmitter Plus HS, maar ze zullen wel normaal
tripleren.
FREQUENTIEKANALEN
Sommige oudere Elinchrom flash units met ingebouwde EL-Skyport ondersteunen de frequentiekanalen 1 tot
4 of 1 tot 8 (zoals BRX, D-Lite RX, Quadra).
De laatste Elinchrom flash units met ingebouwde El-Skyport ondersteunen tot 20 verschillende
frequentiekanalen van 1 tot 20 (ELC, ELB).
Druk het klepje in
en schuif
afbeelding 1
afbeelding 2
Page 48

Gebruiksaanwijzing Gebruiksaanwijzing
95
94
NLNL
PARAMETER SPECIFICATIE
PARAMETER SPECIFICATIE
VERSIES
Canon, Nikon.
TRIGGERING COMPATIBILITEIT
Alle Elinchrom flash units met ingebouwde EL-Skyport Receiver of
Transceiver en de EL-Skyport RX Transceiver modules, plus EL-Skyport
Universal
AFSTANDSBEDIENING
COMPATIBILITEIT
Alle Elinchrom flash Units met ingebouwde EL-Skyport Transceiver: ELC
Pro HD, ELB 400, Ranger Quadra RX, Quadra Hybrid, D-Lite RX series,
BRX Series, Master RX Series en FRX series (OPMERKING: EL-Units met
de plug-in Transceiver RX module hebben beperkte functionaliteit).
AFSTANDSBEREIK
Binnen > 60m
Buiten > 200 m.
Opmerking:
Het volledige bereik kan worden gehaald met de laatste Elinchrom flash
units zoals ELC of ELB. Andere of oudere Elinchrom flash units zullen een
beperkter bereik hebben.
BATTERIJEN
2x AA Batterijen (standaard of herlaadbaar)
LEVENSDUUR BATTERIJEN
Hangt af van het type batterijen en het gebruik.
Voor twee standaard-batterijen met 1000mAh per batterij is het ongeveer
35 uur werktijd en meer dan 150000 triggers.
AFSTANDSBEDIENING
Maximaal 10 units kunnen worden ontdekt, weergegeven en
gecontroleerd.
FREQUENTIEKANALEN
20 kanalen in normale modus en 20 kanalen in speed modus
EL-SKYPORT MODES (ELSP)
Normal / Speed - Sync Mode
TRIGGER/CONTROLE GROEPEN
“Allemaal” of in “Groepen” (Groep 1 tot 4).
SYNC MODES
Standaard, HS (met of zonder ODS), Tweede Gordijn.
USB-AANSLUITING
Voor het updaten van de firmware
SR-AANSLUITING
Trigger Output 2.5 mm Phone Jack mono (max. sync-voltage 3VDC).
AFMETINGEN (B x L x H)
69 x 84 x 59 mm (2.7x 3.3x 2.3 in.)
GEWICHT
Ongeveer 170g (6 oz), inclusief 2 AA-batterijen. 120g (4.2 oz) zonder
batterijen.
FLITSSCHOEN ADAPTER
FUNCTIES
De Elinchrom Skyport Plus HS zender kan worden gebruikt als basis trigger met power control voor een
camera met een flitsschoen-verbinding. De hieronder beschreven functies vereisen een Canon of Nikon
camera die compatibel is met het Skyport systeem. Om een goede werking te garanderen biedt de Skyport
HS zender speciale aansluiting-pinnen voor communicatie met de aangesloten camera.
ER zijn twee verschillende Elinchrom Zender versies beschikbaar:
• Canon voor Canon EOS Type A camera’s compatibel met ETTLII/ETTL autoflash.
• Nikon voor Nikon DSLR camera’s compatibel met iTTL flash units.
Gespecialiseerde communicatie-terminals in de camera haar flitsschoen zorgen dat je de volgende Elinchrom
Skyport HS functies kan gebruiken:
• SYNC Mode
• HS en ODS Mode
• Tweede Gordijn Sync
• Auto MOD
• AF Licht
Opmerking:
Niet alle camera’s ondersteunen alle functies.
LIJST VAN GETESTE CAMERA’S
De laatste samenvatting van camera-modellen en ondersteunde functies kan gevonden worden op de
website: http://www.elinchrom.com/support.php
MONTAGE OP DE CAMERA
Een makkelijk te gebruiken bajonetsluiting wordt gebruikt om de zender veilig in de flitsschoen van de camera
te steken.
VASTMAKEN
1. Zet de camera en de EL-Skyport zender
2. Zet de EL-Skyport zender aansluiting op dezelfde hoogte als de flitsschoen van de camera
3. Schuif de sluiting helmaal in de flitsschoen
4. Verplaats lipje op de sluitingsring naar rechts tot het vastklikt. (zie afbeelding 3)
LOSMAKEN
1. Losmaken: druk het knopje in en schuif het lipje helemaal naar links. (zie afbeelding 4)
2. Schuif de EL-Skyport zender uit de flitsschoen aansluiting van de camera.
afbeelding 3
afbeelding 4
Page 49

Gebruiksaanwijzing Gebruiksaanwijzing
97
96
NLNL
SCHERM
Het grafische scherm geeft de status en de instellingen van het Elinchrom apparaat weer.
De displayverlichting kan worden in- of uitgeschakeld.
In Normal Sync Mode is de verlichting groen. In Speed Sync Mode is de verlichting rood.
Het contrast van het scherm aan aangepast worden in de instellingen.
De bovenste balk van het scherm geeft de status van de Elinchrom zender weer.
De onderste balk van het scherm toont de functies van de 4 snelheidsknoppen.
Het middelste deel toont een lijst van de gedetecteerde Elinchrom flash units en de setup items voor het
geselecteerde setup menu.
DISPLAY PANEL - DASHBOARD
DISPLAY PANEL - SETUP MENU
Menu list
Up/down list
Description/mode
Exit
* In Nikon camera’s worden deze functies geactiveerd in het menu van de camera.
** Niet ondersteund door het
Nikon®
** Niet ondersteund door het Sony®
SPEED BUTTONS 1-4
De snelheidsknoppen laten je snel onderstaande functies instellen. Functies in het vet geven de functies van
deze knoppen aan als setup mode geselecteerd is.
SPEED BUTTON 1 (LEFT)
Pwr± verander het flitsvermogen in 1/10 f-stop up/down met het draaiwiel.
up scroll naar boven in het setup menu als SETUP geselecteerd is
SPEED BUTTON 2 (MIDDLE LEFT)
Duw deze knop 1 of 2 keer in om te wisselen tussen modelling lamp functies
Mod zet de modelling lamp aan/uit met het wiel
Mod± verander het vermogen van de modelling kamp in 1/10 f-stop up/down met het wiel
down scroll naar beneden in het setup menu als SETUP geselecteerd is
SPEED BUTTON 3 (MIDDLE RIGHT)
Select wissel tussen de weergegeven Elinchrom flash units
Flash en modelling lamp instellingen kunnen individueel worden aangepast voor de geselecteerde unit als deze
gemarkeerd is met een kader.
Na ongeveer 5 seconden zal het kader verwijderen en zullen de aanpassingen een effect hebben op alle units
in de groep, als de groep “ALLEMAAL” geselecteerd is. Als Groep 1-4 geselecteerd is zullen enkel de flash
units van die groep worden aangepast.
Group selection
Test
USB
Rotation ring / Dial
Set
Battery compartment cover
On/Off
Refresh
Change value
Lock
Press for 2 seconds
To refresh manual
changes made on the flash unit
Communication Transmitter
HS / EL- flash unit.
Press for 2 seconds
Speed button 2SRSpeed button 3
Green LED
Speed button 1
Speed button 4
Blue LED
Communication camera / Transmitter HS
BUTTONS
Skyport mode
EL-unit(s)
Button function title
Column title
Battery status
Groups
ODS status
Modelling lamp
mode
Unit selection
Frequency
Sync mode
D: DOF
HS: Hi-Sync
Power settings
Setup menu
Modelling lamp settings
s: speed
n: normal
second curtain
S: Shutter
Number of unit
**
** **
***
*
Page 50

Gebruiksaanwijzing Gebruiksaanwijzing
99
98
NLNL
SPEED BUTTON 4 (RIGHT)
Setup door op deze knop te drukken zullen de functies van de snelheidsknoppen veranderen en het
SETUP menu geselecteerd worden. In het SETUP menu kunnen functies worden aangepast en
geactiveerd.
Exit verlaat het Setup menu en schakel terug naar de standaard display modus.
ON/OFF
Druk de knop in en houdt 2 seconden ingedrukt om de EL-Skyport Transmitter Plus HS aan- of uit te
schakelen.
GROUP BUTTON
Druk in om te wisselen tussen de groepen 1 tot 4 en “ALLEMAAL”
TEST BUTTON (MET EL LOGO)
Door de TEST knop in te drukken zullen alle flashes aangaan als “ALLEMAAL” is geselecteerd of een enkel
groep als deze geselecteerd is. Vergeet niet om de fotocellen te deactiveren om de flash units accuraat te
tripleren.
REFRESH BUTTON
Druk de Ververs-knop elke keer de instellingen op een afzonderlijke EL flash unit worden aangepast om de
instellingen op de Skyport HS te verversen.
Als een groep is geselecteerd zal alleen de informatie van die groep verversen.
Als “ALLEMAAL” is geselecteerd worden de gegevens van alle groepen ververst.
Een flash die niet gevonden werd toen de Skyport HS werd aangezet kan niet met de ververs-functie worden
toegevoegd.
Als een flash is toegevoegd, selecteer SETUP en SCAN in het setup menu of zet de zender uit en terug aan.
Het verversen kan 4 seconden duren, afhankelijk van hoeveel flash units gevonden zijn en worden aangestuurd
door de zender.
Opmerking:
Om de best mogelijke samenwerking tussen de Skyport HS en EL Flashes te garanderen, wordt informatie
over het flashvermogen enkel doorgestuurd als het flashvermogen veranderd of de ververs-knop ingedrukt
wordt.
ROTATING RING / DIAL
Draai aan het wiel om de verschillende functies te selecteren en het vermogen van EL flashes te veranderen.
SET / CONFIRMATION BUTTON (DIAL CENTRE BUTTON)
Druk in om een aanpassingen in het setup menu te bevestigen.
Druk in om de schermverlichting te wisselen.
Druk in om terug te keren naar normale functionering als de Skyport HS in standby staat.
Druk twee seconden in om alle functies en instellingen te vergrendelen. Druk nogmaals in om de vergrendeling
op te heffen.
Het vergrendelen blokkeert de werking van het wiel en da andere knoppen om te voorkomen dat je
aanpassingen doet terwijl je de Skyport HS meeneemt.
SETUP MENU
SCAN..
Als de Skyport HS wordt aangezet, zoekt hij automatisch naar Elinchrom flash units met ingebouwde of plugin EL-Skyport Transceiver modules.
De scan-functie is ook beschikbaar in het Setup menu. Opnieuw scannen is noodzakelijk als nieuwe flash units
aan de setup zijn toegevoegd.
Om EL flash units te vinden,
• all EL flash units must be switched on,
• all flashes must have built-in or plug-in EL-Skyport Transceiver modules.
• the Transmitter Plus HS and the EL flash unit must be set for the same frequency channel settings.
FREQUENCY CHANNELS
Tot 20 EL-Skyport frequentiekanalen kunnen worden geselecteerd.
Opmerking:
• Alleen de laatste Elinchrom flash units (ELC 500/1000 Pro HD, ELB 400 en toekomstige versies) zullen tot
20 frequentiekanalen ondersteunen.
• Alle “RX” flash units ondersteunen tot 8 kanalen en sommige oudere Elinchrom flash units tot 4 kanalen.
ELSP MODE
De Skyport HS heeft twee modi met verschillende opnamemogelijkheden
• Normal mode
Normal mode is compatibel met de allereerste Elinchrom flash units met EL-Skyport ondersteuning. Als
deze modus geselecteerd is zal het scherm en het LED-status lichtje groen oplichten.
• Speed mode
Speed mode laat snellere sluitertijden toe tot 1/1000s afhankelijk van de camera met normale
flitssynchronisatie (spiegelreflexcamera’s en sommige anderen).
Om sluitertijden tot 1/8000s te gebruiken moet de HS modus geactiveerd zijn in zowel Normal als Speed
mode. Als deze modus geselecteerd is zal het scherm en het LED-status lichtje rood oplichten.
Opmerking:
• Het grootste bereik is beschikbaar in Normal mode. Speed mode reduceert het bereik met 50%. Skyport
zenders in alle flashes moeten EL-Skyport mode ondersteunen om Speed mode te gebruiken.
SYNC MODE
Selecteer de synchronisatie modus:
• Standard mode
In standaard modus werken camera’s met een sluitertijd tot 1/200s - 1/250 s.
• HS Hi-Sync mode*
In HS mode kan de sluitertijd tot 1/8000s bedragen afhankelijk van de camera en de flash unit.
De HS mode vereist flash units met een lange flitsduur voor de beste resultaten.
Flitsen met een A flash tube (Actie)
• Second Curtain mode*
De tweede gordijn biedt je de mogelijkheid om de flits te laten afgaan vlak voor de sluiter sluit, voor een
bewegend effect.
* Bij Nikon camera’s moeten deze functies geactiveerd worden in het camera menu.
Page 51

Gebruiksaanwijzing Gebruiksaanwijzing
101
100
NLNL
ODS SETUP
De Over-Drive-Sync (ODS) kan de algehele belichting verbeteren wanneer de HS mode actief is.
ODS benut flitsers met lange flits looptijden, dus de resultaten zullen afhangen van de looptijd van de gebruikte
flits (wat ook verandert bij verschillende niveau’s van vermogen) en van de gebruikte camera. Full frame
camera’s met grote sensoren en trage sluiters zijn het moeilijkst om goede resultaten mee te verkrijgen, maar
met een flits tijd die lang genoeg is kan je nog nette frames bekomen. Daarnaast kan men met ODS tot 2
f-stops meer licht bekomen, essentieel als men zonlicht moet kunnen counteren.
De ODS setup biedt aanpassingen van 0.1 tot 5.0 ms of kan uitgeschakeld worden.
De ODS waarde zal variëren afhankelijk van de gebruikte camera en de flash unit en moet manueel aangepast
worden.
Opmerking:
• Over-Drive-Sync (ODS) kan alleen gebruikt worden met de SYNC mode ingesteld op HS.
• Wanneer ODS wordt aangepast kan de positie van de flitser cutoff (donkere rand aan de bovenkant of
onderkant van het beeld) in het frame worden verplaatst. Als deze wordt uitgeschakeld zal het flitser
trigger-punt automatisch geselecteerd worden in de HS-modus.
AUTO MOD
• Off
Het modelling licht van de Elinchrom flash verandert niet.
• Shutter**
Het induwen van de ontspanknop van de camera voor het scherpstellen zal de modelling lamp van
de EL flash unit enkele seconden aanzetten als hulpmiddel bij het scherpstellen bij weinig licht. (Niet
ondersteund door Nikon).
• DOF
De Elinchrom flash units zullen hun modelling lamp aanzetten zolang de DOF knop op de camera
ingeduwd wordt.
AF LIGHT
Activeert het auto-focus hulplicht van de Skyport HS als de ontspanknop half ingedrukt wordt voor het
scherpstellen (zie ook de camera instellingen).
KEY CLICK
Indien geactiveerd zal het induwen van een knop worden aangegeven door een pieptoon.
SLEEP
Als de Skyport HS een tijd niet gebruikt wordt gaat deze automatisch in slaapstand om batterij te besparen.
Je kan de tijd hoelang dit duurt instellen van 1 tot 60 minuten of automatische slaapstand volledig uitzetten.
AUTO OFF
De Skyport HS zal automatisch worden uitgezet indien deze een tijd niet wordt gebruikt.
Vertraag auto off met 1 tot 60 minuten of zet deze functie volledig uit.
Als slaapstand en auto off beiden actief zijn, zal de Transmitter Plus HS zichzelf uitzetten na de tijd die de
gebruiker bij de slaapstand instellingen ingeeft.
CONTRAST
Het schermcontrast kan worden ingesteld van 80 tot 120%.
BACKLIGHT
De schermverlichting kan worden in- of uitgeschakeld.
* Bij Nikon camera’s moeten deze functies in het camera menu worden geactiveerd.
** Niet ondersteund door Nikon.
FABRIEKSINSTELLINGEN HERSTELLEN
Door het indrukken van de linker- en rechter speed knop gedurende ongeveer 2 seconden terwijl de Skyport
HS aan is zal de Skyport HS herstellen naar de fabrieksinstellingen. Alle eigen instellingen, behalve het
schermcontrast, zullen worden gereset.
FIRMWARE UPDATE
Om de firmware van de Transmitter Plus HS te updaten is de Elinchrom Transmitter HS Update vereist. Deze
is beschikbaar op de Elinchrom website.
PROBLEMEN OPLOSSEN
Door het indrukken van de linker- en rechter snelheidsknop gedurende ongeveer 2 seconden terwijl je de
Skyport HS aanzet zal de Skyport HS herstellen naar de fabrieksinstellingen. Alle eigen instellingen, behalve het
schermcontrast, zullen worden gereset.
HEB JE DIT PROBLEEM? KIJK EENS NAAR DEZE PUNTEN
HET APPARAAT GAAT NIET AAN
• Check de batterijmoraliteit en vervang beide
batterijen.
JE KAN DE FLASH UNIT NIET TRIGGEREN ALS
DE MODUS “ALLEMAAL” GESELECTEERD IS
• Zender en ontvanger moeten dezelfde
instellingen betreffende frequentiekanaal
hebben
• ELSP MODUS: zender en ontvanger moeten
dezelfde instellingen betreffende synchronisatiemodus hebben: normal of speed sync mode
• Check dat alle EL-Skyport ontvangers in de ELunits met ingebouwde ontvangers aanstaan
• Check dat de zender compatibel is met jouw
Canon of Nikon camera
JE KAN SOMMIGE UNITS NIET TRIGGEREN
ALS GROEP MODUS GESELECTEERD IS
• Check de groepsinstellingen van de EL-flash
unit
• Verminder de afstand tot een unit die niet
reageert
• Zender en ontvanger moeten dezelfde
instellingen hebben: normal of speed sync
mode en frequentiekanaal instellingen
DE TEST KNOP WERKT, MAAR DE CAMERA
TRIGGERT GEEN FLASH UNTIS
• Check de flitsschoen sluiting
• Check de instellingen van de camera (zet
flitsschoen communicatie aan)
• Check dat de zender compatibel is met jouw
Canon of Nikon camera
• Check de lijst van compatibele camera’s
INFORMATIE OVER DIGITAL RX, RANGER
RX OF STYLE RX UNITS WORDT NIET
WEERGEVEN
• Units uitgerust met een plug-in Transceiver
RX zijn beperkt in het gebruik van
afstandsbediening functies. Deze units kunnen
echter wel getriggert en gecontroleerd (maar
zonder visuele feedback) worden door de
EL-Skyport Transmitter Plus HS.
Page 52

Gebruiksaanwijzing Gebruiksaanwijzing
103
102
NLNL
BEPERKT BEREIK:
• Verplaats de units
• Vergroot de afstand tot muren en plafond
• ELSP Mode: In speed sync mode is het bereik
gereduceerd met ongeveer 50%, schakel terug
over op normal sync mode.
• Buiten kan het bereik beïnvloed worden door
vochtigheid, obstakels,…
STORING MET ANDERE 2.4 GHZ NETWERKEN,
ONBETROUWBARE TRIGGERING:
• Probeer een ander frequentiekanaal voor zowel
de zender als de ontvanger
• Verminder de afstand tussen de flash unit en
de zender
HS MODE; SYNC TOT 1/8000S:
• Elinchrom Action (voorheen A) heads zijn
niet geoptimaliseerd voor HS-modus. Om te
profiteren van betere prestaties gebruik je best
flash units met Pro flashtubes (Standaard of S
voorheen) of speciale HS heads.
• ODS finetuning helpt om HS prestaties te
verbeteren.
• Als er zich zichtbare strepen vormen verminder
je best de sluitertijd van je camera of stel je ODS
in en pas je het aan om deze streepvorming te
minimaliseren.
• HS functionaliteit werkt enkel met Canon of
Nikon camera’s en de juiste zender.
SCANNEN VAN EL-UNITS:
GEEN EL-UNIT GEVONDEN OF ER ONTBREKEN
SOMMIGE UNITS
• Zet alle EL-units en vervolgens de EL-Skyport
Transmitter Plus HS aan of ga naar setup en
scan opnieuw.
• De frequentie, de groep en de ELSP-modus
instellingen moeten matchen met de zender.
• Zorg dat alle EL-Skyport Transmitter Plus HS
units de laatste nieuwe firmware gebruiken.
FREQUENTIEKANALEN VOOR EL-SKYPORT SPEED
ONTVANGERS
Dit is niet relevant voor dit product, maar het kan helpen met het opzetten van de frequentie voor EL-Skyport
Units.
DOWNLOAD DE EL-SKYPORT TRANSMITTER PLUS HS
HANDLEIDING
Download de volledige handleiding via deze link: http://bc.gs/elspths
DOWNLOAD CONFORMITEIT
Vind de verklaring voor EC en USA & Canada conformiteit hier: http://bc.gs/ec
FIRMWARE UPDATE VIA USB-AANSLUITING
Download de laatste firmware en volg de instructies: http://bc.gs/fw
Page 53

РУКОВОДСТВО ПОЛЬЗОВАТЕЛЯ
РУКОВОДСТВО ПОЛЬЗОВАТЕЛЯ
105
104
RURU
СОДЕРЖАНИЕ
ДЕКЛАРАЦИЯ О СООТВЕТСТВИИ 107
ВЕРСИИ 108
ХАРАКТЕРИСТИКИ 108
УСТАНОВКА ЭЛЕМЕНТОВ ПИТАНИЯ 109
ЭЛЕМЕНТЫ ПИТАНИЯ 109
СОВМЕСТИМОСТЬ 110
СИНХРОНИЗАЦИЯ 110
ДИСТАНЦИОННОЕ УПРАВЛЕНИЕ 110
ЧАСТОТНЫЕ КАНАЛЫ 110
ТЕХНИЧЕСКИЕ ХАРАКТЕРИСТИКИ 111
СОЕДИНЕНИЕ “ГОРЯЧИЙ БАШМАК” 112
УСТАНОВКА НА ФОТОКАМЕРУ 112
ДИСПЛЕЙ 113
КНОПКИ 114
МЕНЮ НАСТРОЙКИ 116
СБРОС ДО ЗАВОДСКИХ НАСТРОЕК 118
ПОИСК И УСТРАНЕНИЕ НЕИСПРАВНОСТЕЙ 118
ОБНОВЛЕНИЕ ВСТРОЕННОГО ПО 121
Технические параметры и допуски соответствуют требованиям стандартов IEC и CE. Технические
характеристики могут быть изменены без предварительного уведомления.
ВВЕДЕНИЕ
Уважаемый Фотограф,
Благодарим Вас за выбор продукции компании ELINCHROM.
РУС
При производстве своей продукции компания Elinchrom использует самые передовые
технологии. Тщательно отобранные компоненты обеспечивают высочайшее качество, а
оборудование проходит множество испытаний, как в процессе производства, так и после его
завершения. Мы уверены, что наша продукция будет надежно служить Вам долгие годы.
Внимательно ознакомьтесь с данным Руководством по эксплуатации перед первым
использованием продукции Elinchrom. Вы узнаете о мерах обеспечения безопасности
пользователя и обо всех преимуществах программируемых функций.
Данное Руководство по эксплуатации может содержать изображения продукции со
вспомогательным оборудованием, которое не является частью комплекта или отдельного
устройства. Конфигурации комплектов и отдельных устройств компании Elinchrom могут быть
изменены без уведомления и могут отличаться в зависимости от страны реализации.
Для ознакомления с дополнительной информацией, новостями и обновлениями системы
Elinchrom, рекомендуем регулярно посещать сайт компании Elinchrom. Актуальные руководства
пользователей и технические спецификации для скачивания находятся в разделе „Поддержка“.
Технические характеристики и функции вспышек и вспомогательного оборудования от
Elinchrom могут быть изменены без предварительного уведомления. Фактические параметры
могут отличаться от указанных в пределах допусков, определенных для компонентов, или
погрешностей измерительных приборов. Технические характеристики могут быть изменены.
Компания не несет ответственность за возможные опечатки.
Рекомендуем проверить наличие актуальной редакции Руководства на нашем сайте: www.
elinchrom.com/support.
С уважением,
Ваш Elinchrom
Page 54

РУКОВОДСТВО ПОЛЬЗОВАТЕЛЯ
РУКОВОДСТВО ПОЛЬЗОВАТЕЛЯ
107
106
RURU
Данное устройство классифицируется
как лазерная аппаратура класса 3R,
в соответствии со стандартом IEC/EN
60825-1 “Безопасность лазерной РУС
аппаратуры”.
Класс 3R: Лазер класса 3R считается
безопасным при соблюдении мер
предосторожности и при ограничении
времени наблюдения за лучом. При
применении лазера класса 3R возможно
превышение MPE (максимально
допустимого воздействия), но с низкой
травмоопасностью. Мощность видимого
непрерывного лазера класса 3R
ограничена 5 мВт. Для лазеров с другой
длиной волны и для импульсных лазеров
применяются другие ограничения.
DECLARATION OF CONFORMITY USA AND CANADA
EN This device complies with Part 15 of the FCC Rules and with Industry Canada licence-exempt RSS
standard(s). Operation is subject to the following two conditions: (1) this device may not cause harmful
interference, and (2) this device must accept any interference received, including interference that may cause
undesired operation. This product complies with the Canadian ICES-003 Class B specifications.
FR Le présent appareil est conforme aux CNR d’Industrie Canada applicables aux appareils radio exempts
de licence. L’exploitation est autorisée aux deux conditions suivantes(1) ce dispositif ne doit pas produire
de brouillage préjudiciable, et (2) ce dispositif doit accepter tout brouillage radioélectrique subi, même si le
brouillage est susceptible d’en compromettre le fonctionnement. Cet appareil numérique de la classe B est
conforme à la norme NMB-003 du Canada.
Radiation Exposure Statement
EN This equipment complies with portable RF exposure limit in Canada and the USA set forth an
uncontrolled environment and is safe for intended operation as described in this manual. Further RF exposure
reduction can be achieved if the product can be kept as far as possible from the user body.
FR Le produit est conforme aux limites d’exposition pour les appareils portables RF pour les Etats- Unis et le
Canada établies pour un environnement non contrôlé. Le produit est sûr pour un fonctionnement tel que décrit
dans ce manuel. La réduction aux expositions RF peut être augmentée si l’appareil peut être utilisé aussi loin
que possible du corps de l’utilisateur.
FCC Class B Compliance note
This equipment has been tested and found to comply with the limits for a Class B digital device, pursuant
to Part 15 of the FCC Rules. These limits are designed to provide reasonable protection against harmful
interference in a residential installation. This equipment generates, uses and can radiate radio frequency energy
and, if not installed and used in accordance with the instructions, may cause harmful interference to radio
communications. However, there is no guarantee that interference will not occur in a particular installation. If
this equipment does cause harmful interference to radio or television reception, which can be determined by
turning the equipment off and on, the user is encouraged to try to correct the interference by one or more of
the following measures:
• Reorient or relocate the receiving antenna.
• Increase the separation between the equipment and receiver.
• Connect the equipment into an outlet on a circuit different from that to which the receiver is connected.
• Consult the dealer or an experienced radio/television technician for help.
Any changes or modifications not expressly approved by the party responsible for compliance could void
the user’s authority to operate this equipment. This device is limited to operation on permissible Part 15
frequencies, and it does not have the ability to be configured by end users or professional installers to operate
outside the authorized bands.
Page 55

РУКОВОДСТВО ПОЛЬЗОВАТЕЛЯ
РУКОВОДСТВО ПОЛЬЗОВАТЕЛЯ
109
108
RURU
ПЕРЕДАТЧИК EL SKYPORT PLUS HS
ВЕРСИИ
Передатчик ELSP Transmitter Plus HS выпускается для фотокамер следующих производителей
• Canon
• Nikon
ХАРАКТЕРИСТИКИ
• Большой графический дисплей для управления.
• Подсветка дисплея зеленого или красного цвета (зеленая подсветка в нормальном режиме
синхронизации, красная подсветка в режиме скоростной синхронизации).
• Кнопки быстрого доступа и вращающееся колесико для удобного управления.
• Надежное соединение типа „горячий башмак“ с системой фиксации.
• 2 стандартных элемента питания типа АА (допускается использование аккумуляторных
батареек).
• разъем 2,5 мм для управления затвором.
• Обновление встроенного ПО при помощи разъема mini USB.
• 40 каналов для дистанционного управления
• 20 частотных каналов* в нормальном режиме синхронизации.
• 20 частотных каналов* в режиме скоростной синхронизации.
• Режимы управления отдельными группами (4 группы) и режим “ВСЕ”.
• Режимы синхронизации посредством EL-Skyport.
• Нормальный режим синхронизации (максимальная дальность действия).
• Скоростной режим синхронизации (увеличение скорости затвора, особенно при активации
режима HS, но при снижении дальности действия).
• Режимы синхронизации***.
• Стандартный (используется средний контакт „горячего башмака“).
• HS **** (скорость синхронизации до 1/8000 секунды, автоматическое управление).
• ODS (ручная настройка Over-Drive-Sync) точная настройка синхронизации в режиме HS для
максимальной мощности и равномерной экспозиции.
• Режим синхронизации по второй шторке****.
• Встроенная подсветка автофокуса***.
• Auto MOD *** для управления пилотным светом вспышек Elinchrom для фокусировки.
• Режим затвора***** (полунажатая кнопка спуска затвора управляет лампой пилотного света).
• Режим DOF (кнопка “DOF” (просмотра глубины резкости) фотокамеры управляет лампой
пилотного света).
• ДИСТАНЦИОННОЕ управление** с автоматической обратной связью от вспышек Elinchrom.
• Управление вспышками EL возможно в режимах “Все”, “Группа вспышек” или “Отдельная
вспышка”.
• Увеличение и уменьшение мощности вспышки.
• Включение/ выключение лампы пилотного света или изменение интенсивности света.
• Возможность программирования спящего режима и автоматического выключения.
• СБРОС до стандартных настроек.
УСТАНОВКА ЭЛЕМЕНТОВ ПИТАНИЯ
Чтобы открыть отсек элементов питания, нажмите на крышку отсека и сдвиньте ее в указанном
стрелкой направлении (Рис. 1).
Установите элементы питания. Проверьте правильность установки элементов питания с учетом
полярности: „+“ и „-“ (Рис.2).
(Примечание: Используйте 2 алкалиновые батарейки типа АА или 2 аккумулятора NiMH (никельметал-гидридные) типа АА).
Нажмите на крышку отсека для элементов питания и сдвиньте ее в закрытое положение.
ЭЛЕМЕНТЫ ПИТАНИЯ
• Передатчик использует 2 x AA элемента питания.
• Неправильная установка элементов питания не может повредить передатчик.
• Допускается применение одноразовых (сухих элементов) батареек типа АА, например,
солевых или алкалиновых, или аккумуляторных батареек типа АА, таких как никелькадмиевые (NiCd) или никель-метал-гидридные(NiMH).
• Запрещается устанавливать элементы питания разных типов.
• Запрещается использовать литиевые батарейки типа АА для данного передатчика.
* Для всех последних моделей вспышек Elinchrom с 20 частотными каналами и совместимых
с более ранними моделями.
** Для всех вспышек Elinchrom со встроенным приемником и трансивером EL-Skyport.
*** Дополнительные функции фотокамер Canon и Nikon с „горячим башмаком“ TTL
(Ограничение для Nikon см. ниже).
**** Данные функции не поддерживаются Nikon, но могут быть активированы в меню
управления фотокамеры.
***** Не поддерживаются Nikon.
Нажать и сдвинуть
Рис. 1
Рис. 2
Page 56

РУКОВОДСТВО ПОЛЬЗОВАТЕЛЯ
РУКОВОДСТВО ПОЛЬЗОВАТЕЛЯ
111
110
RURU
ТЕХНИЧЕСКИЕ ХАРАКТЕРИСТИКИ
ПАРАМЕТР ХАРАКТЕРИСТИКА
ВЕРСИИ
Canon, Nikon.
СОВМЕСТИМОСТЬ ДЛЯ
СИНХРОНИЗАЦИИ
ВСЕ вспышки Elinchrom со встроенным приемником или
трансивером EL-Skyport и трансивером EL-Skyport RX плюс ELSkyport Universal.
СОВМЕСТИМОСТЬ ДЛЯ
ДИСТАНЦИОННОГО
УПРАВЛЕНИЯ
Все вспышки Elinchrom со встроенным трансивером ELSkyport: ELC Pro HD, ELB 400, Ranger Quadra RX, Quadra Hybrid,
серия D-Lite RX, серия BRX, серия Master RX и серия FRX
(ПРИМЕЧАНИЕ: вспышки EL, используемые с подключаемым
трансивером RX обладают ограниченными функциями
дистанционного управления).
ДАЛЬНОСТЬ ДЕЙСТВИЯ
В помещении > 60 метров.
Вне помещения > 200 метров.
Примечание:
Максимальная дальность действия доступна с последними
моделями вспышек Elinchrom, например, ELC или ELB. Прочие
или более ранние модели вспышек Elinchrom обладают
ограниченной дальностью действия.
ЭЛЕМЕНТЫ
ПИТАНИЯ
2 x AA элемента питания (одноразового использования или с
возможностью подзарядки).
СРОК ЭКСПЛУАТАЦИИ
ЭЛЕМЕНТОВ ПИТАНИЯ
В зависимости от типа элементов питания и интенсивности
использования. Для двух стандартных элементов питания по 1
000 мАч приблизительно 35 часов рабочего времени и более
15 000 спусков затвора.
ДИСТАНЦИОННОЕ
УПРАВЛЕНИЕ
Данное оборудование может распознать, отобразить
и обеспечить дистанционное управление максимум 10
устройствами.
ЧАСТОТНЫЕ КАНАЛЫ
20 каналов в нормальном режиме синхронизации и 20 каналов
в режиме скоростной синхронизации.
РЕЖИМЫ EL-SKYPORT (ELSP)
Режим нормальной/ скоростной синхронизации.
ГРУППЫ ДЛЯ
СИНХРОНИЗАЦИИ ЗАТВОРА/
УПРАВЛЕНИЯ
«Все» или «Группа» (Группы от 1 до 4).
РЕЖИМЫ СИНХРОНИЗАЦИИ
Стандартный, HS (с или без ODS), по второй шторке.
РАЗЪЕМ USB
Для обновления встроенного ПО.
РАЗЪЕМ SR
Разъем для управления затвором 2.5 мм mono (макс.
напряжение синхронизации 3 В пост.тока).
ГАБАРИТЫ (Ш х Д х В)
69 x 84 x 59 мм (2.7x 3.3 x 2.3 дюйма)
ВЕС
Прибл. 170 г (6 унций), включая 2 х АА батарейки, 120 г (4,2
унции) без батареек.
СОВМЕСТИМОСТЬ
В настоящее время на рынке представлены три поколения вспышек Elinchrom EL-Skyport:
1-Е ПОКОЛЕНИЕ
• Трансивер EL-Skyport Transceiver RX (Style RX, Digital RX, Ranger RX).
2-Е ПОКОЛЕНИЕ
• Встроенный модуль EL-Skyport Mk1 (BRX, D-Lite RX, Quadra, Quadra Hybrid).
3-Е ПОКОЛЕНИЕ
• Встроенный модуль EL-Skyport module Mk2 (ELC и ELB).
Устройства этого поколения предлагают увеличенную дальность действия.
СИНХРОНИЗАЦИЯ
Функция синхронизации доступна для всех существующих вспышек Elinchrom со встроенными
или подключаемыми трансиверами EL-Skyport Transceivers.
ДИСТАНЦИОННОЕ УПРАВЛЕНИЕ
ПРИ ВЫБОРЕ РЕЖИМА “ВСЕ” ИЛИ ГРУППЫ ВСПЫШЕК 1 - 4
• Изменение параметров “PWR±, MOD± или MOD on/off” (изменение мощности вспышки,
интенсивности пилотного света, включение/ выключение лампы пилотного света)
поддерживается для всех вспышек Elinchrom с EL-Skyport. При изменении настроек лампы
пилотного света при помощи кнопок MOD on/off или MOD+/-, задействованная вспышка
Elinchrom переключается в режим свободного регулирования. Для возврата к режиму
пропорционального регулирования пилотного света, необходимо выполнить настройку на
вспышке EL.
• Некоторые модели не поддерживают все функции настройки пилотного света, при этом на
дисплее отображается «--» (например, Ranger, Quadra, ELB400).
ПРИ ВЫБОРЕ ОТДЕЛЬНОЙ ВСПЫШКИ
• Выбранная вспышка выделяется на дисплее рамкой, допуская индивидуальное управление.
• Поддерживаются только вспышки Elinchrom со встроенными приемниками EL-Skyport 2-го
и 3-го поколений.
Примечание:
Вспышки 1-го поколения распознаются, но отображаются на дисплее символом «--». На
передатчик EL-Skyport Transmitter Plus HS не поступает обратная связь о настройках вспышки,
но синхронизация выполняется в нормальном режиме.
ЧАСТОТНЫЕ КАНАЛЫ
Некоторые более ранние модели вспышек Elinchrom со встроенным EL-Skyport поддерживают
от 1 до 4 или от 1 до 8 частотных каналов (например, BRX, D-Lite RX, Quadra).
Последние модели вспышек Elinchrom со встроенным EL-Skyport поддерживают до 20
различных частотных каналов от 1 до 20 (ELC, ELB).
Page 57

РУКОВОДСТВО ПОЛЬЗОВАТЕЛЯ
РУКОВОДСТВО ПОЛЬЗОВАТЕЛЯ
113
112
RURU
СОЕДИНЕНИЕ „ГОРЯЧИЙ БАШМАК“
ФУНКЦИИ
Передатчик Elinchrom Skyport Plus HS может использоваться, как основной синхронизатор
(пускатель) с регулировкой мощности для любой фотокамеры с соединением типа „горячий
башмак“. Описанные ниже функции требуют наличия камеры Canon или Nikon, совместимой с
системой Skyport. Для обеспечения надлежащего функционирования, в передатчике Skyport HS
предусмотрены специальные соединительные штыри, обеспечивающие связь с используемой
фотокамерой.
Доступны две версии передатчика Elinchrom:
• Canon для зеркальных камер Canon EOS типа А, совместимых с режимом автовспышки
ETTLII/ETTL.
• Nikon для зеркальных фотоаппаратов Nikon DSLR, совместимых с режимом управления
вспышкой iTTL.
Специальные терминалы связи в креплении фотокамеры типа „горячий башмак“ позволяют
использовать следующие функции Elinchrom Skyport HS:
• Режим синхронизации
• Режимы HS и ODS
• Синхронизация по второй шторке
• Автоматический режим пилотного света
• Подсветка автофокуса
Примечание: Функции поддерживаются не для всех фотокамер.
ПЕРЕЧЕНЬ ФОТОКАМЕР, ПРОШЕДШИХ ИСПЫТАНИЯ
Актуальный перечень моделей фотокамер и поддерживаемых функций представлен на сайте
Elinchrom: http://www.elinchrom.com/support.php
УСТАНОВКА НА ФОТОКАМЕРУ
Для надежного крепления передатчика на „горячем башмаке“ фотокамеры используется
удобное байонетное соединение.
ЗАКРЕПЛЕНИЕ
1. Отключить фотокамеру и передатчик EL-Skyport.
2. Совместить крепление передатчика EL-Skyport с креплением фотокамеры.
3. Задвинуть крепление передатчика в „горячий башмак“ фотокамеры до упора.
4. Передвинуть выступ на фиксирующем кольце вправо до щелчка. (Рис.3)
ОТСОЕДИНЕНИЕ
1. Для разблокировки: нажать на кнопку снятия блокировки и передвинуть выступ на кольце
влево до упора. (Рис.4)
2. Выдвинуть крепление передатчика EL-Skyport из „горячего башмака“ фотокамеры.
ДИСПЛЕЙ
На графическом дисплее отображается состояние и настройки устройства Elinchrom. Подсветку
дисплея можно включить и отключить.
В нормальном режиме синхронизации дисплей подсвечивается зеленым светом. В режиме
скоростной синхронизации дисплей подсвечивается красным светом. Контрастность дисплея
можно отрегулировать в меню настройки.
В верхней строчке дисплея отображается статус передатчика Elinchrom.
В нижней строчке дисплея указаны функции четырех кнопок быстрого доступа.
В средней части дисплея отображается перечень обнаруженных вспышек Elinchrom, а также
параметры меню настройки при его выборе.
ДИСПЛЕЙ - ИНФОРМАЦИОННАЯ ПАНЕЛЬ
ДИСПЛЕЙ - МЕНЮ НАСТРОЙКИ
Menu list
Up/down list
Description/mode
Exit
* В фотокамерах Nikon эти функции активируют в меню фотокамеры.
** Не поддерживается системами Nikon
®.
*** Не поддерживается системами
Sony®.
Рис.3
Рис.3
Skyport mode
EL-unit(s)
Button function title
Column title
Battery status
Groups
ODS status
Modelling lamp
mode
Unit selection
Frequency
Sync mode
D: DOF
HS: Hi-Sync
Power settings
Setup menu
Modelling lamp settings
s: speed
n: normal
second curtain
S: Shutter
Number of unit
**
** **
***
*
Page 58

РУКОВОДСТВО ПОЛЬЗОВАТЕЛЯ
РУКОВОДСТВО ПОЛЬЗОВАТЕЛЯ
115
114
RURU
SPEED BUTTONS 1-4
Кнопки быстрого доступа обеспечивают быструю настройку нижеперечисленных функций.
Наименования функций таких кнопок в режиме НАСТРОЙКИ выделены жирным шрифтом.
SPEED BUTTON 1 (LEFT)
Pwr± изменение мощности вспышки на 1/10 f-stop вверх/вниз при помощи ручки
регулировки.
up перемещение вверх по меню настройки в режиме НАСТРОЙКИ
SPEED BUTTON 2 (MIDDLE LEFT)
Нажатие этой кнопки позволяет переключать функции лампы пилотного света.
Mod включение/ выключение лампы пилотного света при помощи ручки регулировки.
Mod± изменение мощности лампы пилотного света на 1/10 f-stop вверх/вниз при помощи
ручки регулировки.
down перемещение вниз по меню настройки в режиме НАСТРОЙКИ.
SPEED BUTTON 3 (MIDDLE RIGHT)
Select переключение между отображенными (обнаруженными) вспышками Elinchrom.
Индивидуальная настройка ламп вспышки и пилотного света выбранной вспышки, выделенной
рамкой.
Через 5 секунд выделение рамкой исчезает, и внесенные изменения настроек применяются ко
всем устройствам во всех группах, при выборе режима «ВСЕ». Если выбрана одна из групп 1 - 4
изменения настроек применяются только к устройствам данной группы.
Group selection
Test
USB
Rotation ring / Dial
Set
Battery compartment cover
On/Off
Refresh
Change value
Lock
Press for 2 seconds
To refresh manual
changes made on the flash unit
Communication Transmitter
HS / EL- flash unit.
Press for 2 seconds
Speed button 2SRSpeed button 3
Green LED
Speed button 1
Speed button 4
Blue LED
Communication camera / Transmitter HS
КНОПКИ
SPEED BUTTON 4 (RIGHT)
Setup нажатием этой кнопки можно поменять функции кнопок быстрого доступа и выбрать
меню НАСТРОЙКИ. В меню НАСТРОЙКИ можно настроить и активировать функции.
Exit Выход из меню настройки и переключение в стандартный режим работы дисплея.
ON/OFF
Нажать и удерживать в течение, как минимум, 2 секунд для включения/выключения передатчика
EL-Skyport Transmitter Plus HS.
GROUP BUTTON
Нажатие этой кнопки переключает выделение отдельных групп с 1 до 4 и режима «ВСЕ».
TEST BUTTON (С СИМВОЛОМ EL)
При нажатии этой кнопки срабатывают все вспышки, если выбран режим «ВСЕ» или одна из
групп, если выбрана 1 - 4 группа вспышек. Не забудьте отключить фотоэлементы для точной
синхронизации Ваших вспышек посредством EL-Skyport..
REFRESH BUTTON
После внесения изменений в настройках мощности отдельной вспышки EL нажмите на кнопку
Обновление для обновления дисплея с настройками мощности Skyport HS.
Если выбрана какая-либо группа вспышек обновится информация только по этой группе. При
выборе режима «ВСЕ» обновится информация всех групп.
Вспышка, которая не была обнаружена при включении Skyport HS, не может быть добавлена
при помощи функции Обновление.
При добавлении вспышки, выберите SETUIP и SCAN в меню настройки или выключите, а затем
повторно включите передатчик.
Обновление может занять до 4 секунд, в зависимости от количества обнаруженных и
контролируемых передатчиком вспышек.
Примечание: Для оптимального взаимодействия между Skyport HS и вспышками EL,
информация о мощности передается вспышками EL только после изменения уровня мощности
или нажатия кнопки Обновление.
ROTATING RING / DIAL
Поворот ручки регулировки позволяет выбрать различные функции и изменить уровень
мощности вспышек EL.
SET / CONFIRMATION BUTTON (DIAL CENTRE BUTTON)
Нажатие кнопки подтверждает изменение, внесенное в меню настройки. Нажатие кнопки
включает подсветку дисплея.
Если Skyport HS находится в режиме ожидания, нажатие кнопки возвращает его в нормальный
режим работы.
Нажмите и удерживайте в течение 2 секунд для блокировки всех функций и настроек. Для
снятия блокировки повторно нажмите кнопку.
При блокировке действие ручки регулировки и прочих кнопок блокируется, чтобы избежать
сбоя настроек при транспортировке Skyport HS.
Page 59

РУКОВОДСТВО ПОЛЬЗОВАТЕЛЯ
РУКОВОДСТВО ПОЛЬЗОВАТЕЛЯ
117
116
RURU
SETUP MENU
SCAN..
При включении Skyport HS, происходит автоматический поиск вспышек Elinchrom со
встроенными или подключенными трансиверами EL-Skyport.
Функция сканирования также доступна в меню Настройки. При добавлении новых вспышек в
схему освещения требуется провести повторное сканирование.
Для обнаружения вспышек EL,
• все вспышки EL должны быть включены,
• все вспышки должны быть оснащены встроенным или подключаемым трансивером ELSkyport,
• передатчик Plus HS и вспышки EL должны иметь одинаковые настройки частотного канала.
FREQUENCY CHANNELS
Можно выбрать до 20 частотных каналов EL-Skyport.
Примечание:
• Только последние модели вспышек Elinchrom (ELC 500/1000 Pro HD, ELB 400 и более
поздние модели) поддерживают до 20 частотных каналов.
• Все вспышки серии «RX» поддерживают до 8 каналов, а некоторые более ранние модели
вспышек Elinchrom поддерживают до 4 каналов.
ELSP MODE
Предусмотрены два режима работы Skyport HS, которые предлагают различные режимы съемки
• Нормальный режим
Нормальный режим работы совместим с первыми моделями вспышек Elinchrom,
оснащенных EL-Skyport. При работе в нормальном режиме подсветка дисплея и светодиод
состояния горят зеленым светом.
• Скоростной режим
Скоростной режим обеспечивает более высокую скорость затвора, до 1/1000 секунды
в зависимости от типа фотокамеры в нормальном режиме синхронизации вспышки
(например, для камер с лепестковым затвором и некоторых беззеркальных камер).
Для достижения скорости затвора до 1/8000 секунды необходимо активировать режим HS,
как в нормальном, так и в скоростном режимах работы. При работе в скоростном режиме
подсветка дисплея и светодиод состояния горят красным светом.
Примечание:
• Максимальная дальность действия доступна в нормальном режиме работы. Скоростной
режим работы сокращает дальность действия на 50%. Для применения скоростного
режима трансиверы Skyport во всех вспышках с дистанционным управлением должны
иметь возможность включения режима EL-Skyport.
SYNC MODE
Выбор режима синхронизации:
• Стандартный режим
В стандартном режиме скорость работы затвора большинства фотокамер составляет до
1/200 - 1/250 секунды.
• Режим высокоскоростной синхронизации HS Hi-Sync*
В режиме HS скорость затвора может достигнуть 1/8000 секунды в зависимости от
камеры и вспышки. Для достижения наилучшего результата в режиме HS необходимо
использовать вспышки или дополнительные вспышки с длительной вспышкой.
Не рекомендуется использовать вспышки или дополнительные вспышки с импульсными
лампами типа А (Action).
• Синхронизация по второй шторке*
Режим синхронизации по второй шторке позволяет запустить вспышку непосредственно
перед закрытием затвора для эффекта движения.
* В фотокамерах Nikon эти функции активируют в меню фотокамеры.
ODS SETUP
Режим Over-Drive-Sync (ODS) способен улучшить общую экспозицию, при активном режиме HS
Sync.
ODS разработан для вспышек с длительной вспышкой, поэтому результаты будут зависеть от
длительности вспышки используемых ламп (которая также изменяется в зависимости от уровня
мощности), а также от модели фотокамеры. К сожалению, сложнее всего достичь хороших
результатов при использовании камер с полнокадровым сенсором и увеличенной выдержкой,
но лампы с достаточной длительностью вспышки могут обеспечить четкость кадра при времени
выдержки до 1/8000 секунды. Дополнительно, при использовании ODS они смогут получить до
2 f-stops больше света, что имеет важное значение при необходимости подавления солнечного
света.
Настройка ODS включает в себя изменение от 0.1 до 5.0 мс или отключение.
Значение ODS варьируется в зависимости от используемой фотокамеры и вспышки и требует
настройки в ручном режиме.
Примечание:
• Режим ODS может использоваться только при выборе режима ВЫСОКОСКОРОСТНОЙ
СИНХРОНИЗАЦИИ (HS).
• При настроенном ODS положение «отсечки» вспышки (темная полоса в верхней или нижней
части снимка) можно сдвинуть в рамках кадра. При ОТКЛЮЧЕНИИ режима ODS в режиме
HS точка срабатывания вспышки определяется автоматически.
AUTO MOD
• Off
Пилотный свет вспышек Elinchrom не меняется.
• Shutter**
При нажатии на кнопку спуска затвора фотокамеры для фокусировки, лампа пилотного
света вспышки EL включается на несколько секунд для лучшей фокусировки в условиях
пониженной освещенности. (Не поддерживается Nikon).
• DOF
При нажатии и удерживании в нажатом положении кнопки DOF (глубина резкости) на
фотокамере, лампы пилотного света на вспышках Elinchrom остаются включенными.
AF LIGHT
Активирует вспомогательную подсветку автофокуса Skyport HS при полунажатии кнопки спуска
затвора для фокусировки (необходимо также проверить настройки фотокамеры).
KEY CLICK
При активации нажатие любой клавиши управления сопровождается звуковым сигналом.
SLEEP
Если передатчик Skyport HS не используется в течение определенного промежутка времени,
он переходит в спящий режим для экономии заряда. Задержка для перехода в спящий режим
варьируется от 1 до 60 минут, также переход в спящий режим можно отключить.
Page 60

РУКОВОДСТВО ПОЛЬЗОВАТЕЛЯ
РУКОВОДСТВО ПОЛЬЗОВАТЕЛЯ
119
118
RURU
AUTO OFF
В случае отсутствия каких-либо действий в течение определенного периода времени Skyport
HS автоматически отключается. Задержка для отключения варьируется от 1 до 60 минут, также
автоотключение можно отключить.
Если активированы обе функции: переход в спящий режим и автоотключение, передатчик
Plus HS отключается при достижении установленной пользователем отсрочки для перехода в
спящий режим.
CONTRAST
Контрастность дисплея можно установить от 80 до 120%.
BACKLIGHT
Подсветку дисплея можно включить/отключить.
* В фотокамерах Nikon эти функции активируют в меню фотокамеры.
** Не поддерживается Nikon.
СБРОС ДО ЗАВОДСКИХ НАСТРОЕК
Нажатие и удерживание левой и правой клавиш быстрого доступа (Speed) (приблизительно в
течение 2 секунд) при включенном Skyport HS приводит к сбросу передатчика Skyport HS до
заводских настроек. Все настройки пользователя, за исключением контрастности дисплея,
будут сброшены.
ОБНОВЛЕНИЕ ВСТРОЕННОГО ПО
Для обновления встроенного ПО передатчика Plus HS, необходимо установить Elinchrom
Transmitter HS Updater.
Данное ПО доступно на сайте Elinchrom.
ПОИСК И УСТРАНЕНИЕ НЕИСПРАВНОСТЕЙ
При включении Skyport HS нажатие и удерживание левой и правой клавиш быстрого доступа
(приблизительно в течение 2 секунд) приводит к сбросу передатчика Skyport HS до заводских
настроек. Все настройки пользователя, за исключением контрастности дисплея, будут
сброшены.
ОПИСАНИЕ НЕИСПРАВНОСТИ ВОЗМОЖНЫЕ ПРИЧИНЫ
УСТРОЙСТВО НЕ ВКЛЮЧАЕТСЯ
• проверить полярность элементов
питания и заменить обе разряженные
батарейки.
ВСПЫШКА НЕ СРАБАТЫВАЕТ ПРИ ВЫБОРЕ
РЕЖИМА «ВСЕ»
• Передатчик и приемник должны иметь
одинаковые настройки частотного
канала.
• РЕЖИМ ELSP: передатчик и приемник
должны иметь одинаковые настройки
режима синхронизации: нормальный или
ускоренный.
• Убедиться, что приемники EL-Skyport
включены во всех вспышках EL со
встроенным приемником.
• Убедиться, что версия передатчика
соответствует используемой модели
фотокамеры Canon или Nikon.
НЕКОТОРЫЕ ВСПЫШКИ НЕ СРАБАТЫВАЮТ
ПРИ ВЫБОРЕ РЕЖИМА «ГРУППА»
• Проверить настройки группы вспышки
EL.
• Сократить расстояние до вспышек,
которые не срабатывают.
• Передатчик и приемник должны
иметь одинаковые настройки режима
синхронизации: нормальный или
ускоренный, и настройки частотного
канала.
КНОПКА ТЕСТ РАБОТАЕТ, НО ФОТОКАМЕРА
НЕ ЗАПУСКАЕТ ВСПЫШКИ
• Проверить соединение “горячий башмак”.
• Проверить настройки фотокамеры
(включить связь через “горячий башмак”).
• Убедиться, что версия передатчика
соответствует используемой модели
фотокамеры Canon или Nikon.
• Проверить список совместимых
фотокамер.
НА ДИСПЛЕЕ НЕ ОТОБРАЖАЕТСЯ НЕКОТОРАЯ
ИНФОРМАЦИЯ О ВСПЫШКАХ DIGITAL RX,
RANGER RX ИЛИ STYLE RX
• Устройства, оборудованные
подключаемым трансивером RX,
обладают ограниченными функциями
дистанционного управления. Тем не
менее, такие вспышки могут управляться
и синхронизироваться (без визуальной
обратной связи) при помощи EL-Skyport
Transmitter Plus HS.
ОГРАНИЧЕННАЯ ДАЛЬНОСТЬ ДЕЙСТВИЯ:
• Изменить расположение вспышек.
• Увеличить расстояние от стен и потолков.
• Режим ELSP: В режиме скоростной
синхронизации дальность действия
уменьшается приблизительно на 50%
в сравнении с нормальным режимом
синхронизации.
• Вне помещения дальность действия
может быть снижена из-за воздействия
влажности, помех, препятствий и т.д.
Page 61

РУКОВОДСТВО ПОЛЬЗОВАТЕЛЯ
РУКОВОДСТВО ПОЛЬЗОВАТЕЛЯ
121
120
RURU
ЧАСТОТНЫЙ КАНАЛ ДЛЯ ПРИЕМНИКОВ EL-SKYPORT
Данная информация не относится к нашей продукции, но может оказаться полезной при настройке
частоты устройств с EL-Skyport прежних версий.
ЗАГРУЗКА РУКОВОДСТВА ПОЛЬЗОВАТЕЛЕЙ ДЛЯ
ПЕРЕДАТЧИКА EL-SKYPORT TRANSMITTER PLUS HS
Полная версия руководства по эксплуатации доступна на: http://bc.gs/elspths
ЗАГРУЗКА СЕРТИФИКАТОВ СООТВЕТСТВИЯ
Декларации о соответствии стандартам ЕС, США и Канады доступны на: http://bc.gs/ec
ОБНОВЛЕНИЕ ВСТРОЕННОГО ПО ЧЕРЕЗ ПОРТ USB
Загрузите актуальную версию встроенного ПО на http://bc.gs/fw и следуйте инструкциям.
ПОМЕХИ ОТ ПРОЧИХ СЕТЕЙ 2,4 ГГц,
НЕНАДЕЖНОЕ СРАБАТЫВАНИЕ:
• Изменить частотный канал как для
передатчика, так и для приемника
устройства EL.
• Сократить расстояние между
передатчиком и вспышкой
РЕЖИМ HS; СИНХРОНИЗАЦИЯ ДО 1/8000
СЕКУНДЫ:
• Дополнительные вспышки Elinchrom
Action (ранее обозначаемые буквой А) не
рассчитаны на режим HS. Для достижения
наилучшего результата рекомендуем
использовать вспышки с лампами Pro
(ранее обозначаемые Standard или
S) или наиболее предпочтительными
дополнительными вспышками HS.
• Точная настройка ODS позволяет
оптимизировать работу в режиме HS.
• При возникновении визуально заметной
“полосатости”, рекомендуем снизить
скорость затвора фотокамеры или
настроить режим ODS для уменьшения или
полного исключения “полосатости”.
• Функция HS доступна только для
фотокамер Canon или Nikon при наличии
соответствующего передатчика.
СКАНИРОВАНИЕ ВСПЫШЕК EL:
ВСЕ ИЛИ НЕКОТОРЫЕ ВСПЫШКИ EL НЕ
ОБНАРУЖЕНЫ
• Включить все вспышки EL, затем включить
передатчик EL-Skyport Transmitter Plus HS
или перейти в меню настройки и выполнить
повторное сканирование.
• Настройки частоты, выбора группы
и режима ELSP вспышки должны
соответствовать настройкам передатчика.
• Убедиться, что встроенное ПО всех
устройств, взаимодействующих с
EL-Skyport Transmitter Plus HS, обновлено
до последней версии.
Page 62

安 全 ガ イド安 全 ガ イド
123
122
JPJP
目次
適合宣言書
125
バー ジョン
126
機能
126
電池の 取り付け
127
電池
127
互換性
128
トリガ ー
128
リモ ートコント ロール
128
周波数チャネル
128
技術データ
129
ホットシューアダプター
130
カメラ へ のマ ウント
130
ディスプレイ
131
ボタン
132
セットア ップメ ニ ュ ー
133
ファクトリ ーリ セ ット
136
トラブル シュ ー ティング
136
ファームウェ ア更 新
138
公差および仕様はIECおよびCEの基準に適合しています。技術データは通知なく変わることがあります。
はじめに
写真家の皆様
この度はELINCHROMの製品をご購入いただきありがとうございます。
Elinchromの製品はすべて最先端のテクノロジーを駆使して製造されています。最高品質を確保するために
厳選されたコンポーネントが使われ、機器は製造中から製造後まで多くの試験を
受けています。このため、長年にわたって信頼できるサービスを提供することをお約束いたします。
Elinchrom製品のご購入後は、ご使用前にこのユーザーマニュアルをよくお読みください。お客様の安全に関わる
情 報 や 、
機能のプログラム方法などがすべて網羅されています。
このマニュアルには、セットやシングルユニットに含まれていないアクセサリーが 付属した 製品 のイメージが含まれて
い る 場 合 が あ り ま す 。
Elinchromのセットとシングルユニットの構成は、通知なく変わる場合や国によって異なる場合があります。
Elinchromのシステムに関する詳細、アップグレード、ニュース、最新情報については、
Elinchromのウェブサイトを定期的にご覧ください。最新のユーザーガイドと技術仕様は、「サポート」ページからダ
ウンロ ード
してい た だ けま す。
Elinchromのフラッシュユニットとアクセサリーの技術データ、機能および働きは、通知なく変わる場合があります。
記載の仕様は、コンポーネントの公差や計器によって変わる場合があります。技術データは
変更される場合があります。誤植に対する保証はありません。
当社のウェブサイト(www.elinchrom.com/support)で最新のマニュアルが発行されていないかをご確認くださ
い。
よろしくお願いいたします。
Elinchrom社員一同
Page 63

安 全 ガ イド安 全 ガ イド
125
124
JPJP
本製品は、IEC/EN 60825-1 “Radiation Safety
of Laser Products”
の基準に従って、クラス3Rの
レーザー製品に分類
されてい ます。
クラス3R:クラス3Rレーザーは、ビームの観察が
制限されており、
注意深く取り扱われた場合に安全であると考えら
れ て い ま す 。
クラス3RレーザーはMPEを超えることがありま
す が 、
怪我の危険性は低いです。クラス3Rでは、
連続する可視レーザーは5mWに制限されていま
す 。他 の
波長やパルスレーザーに関しては、他の制限が
適用されます。
DECLARATION OF CONFORMITY USA AND CANADA
EN This device complies with Part 15 of the FCC Rules and with Industry Canada licence-exempt RSS
standard(s). Operation is subject to the following two conditions: (1) this device may not cause harmful
interference, and (2) this device must accept any interference received, including interference that may cause
undesired operation. This product complies with the Canadian ICES-003 Class B specifications.
FR Le présent appareil est conforme aux CNR d’Industrie Canada applicables aux appareils radio exempts
de licence. L’exploitation est autorisée aux deux conditions suivantes(1) ce dispositif ne doit pas produire
de brouillage préjudiciable, et (2) ce dispositif doit accepter tout brouillage radioélectrique subi, même si le
brouillage est susceptible d’en compromettre le fonctionnement. Cet appareil numérique de la classe B est
conforme à la norme NMB-003 du Canada.
Radiation Exposure Statement
EN This equipment complies with portable RF exposure limit in Canada and the USA set forth an
uncontrolled environment and is safe for intended operation as described in this manual. Further RF exposure
reduction can be achieved if the product can be kept as far as possible from the user body.
FR Le produit est conforme aux limites d’exposition pour les appareils portables RF pour les Etats- Unis et le
Canada établies pour un environnement non contrôlé. Le produit est sûr pour un fonctionnement tel que décrit
dans ce manuel. La réduction aux expositions RF peut être augmentée si l’appareil peut être utilisé aussi loin
que possible du corps de l’utilisateur.
FCC Class B Compliance note
This equipment has been tested and found to comply with the limits for a Class B digital device, pursuant
to Part 15 of the FCC Rules. These limits are designed to provide reasonable protection against harmful
interference in a residential installation. This equipment generates, uses and can radiate radio frequency energy
and, if not installed and used in accordance with the instructions, may cause harmful interference to radio
communications. However, there is no guarantee that interference will not occur in a particular installation. If
this equipment does cause harmful interference to radio or television reception, which can be determined by
turning the equipment off and on, the user is encouraged to try to correct the interference by one or more of
the following measures:
• Reorient or relocate the receiving antenna.
• Increase the separation between the equipment and receiver.
• Connect the equipment into an outlet on a circuit different from that to which the receiver is connected.
• Consult the dealer or an experienced radio/television technician for help.
Any changes or modifications not expressly approved by the party responsible for compliance could void
the user’s authority to operate this equipment. This device is limited to operation on permissible Part 15
frequencies, and it does not have the ability to be configured by end users or professional installers to operate
outside the authorized bands.
Page 64

安 全 ガ イド安 全 ガ イド
127
126
JPJP
EL SKYPORT TRANSMITTER PLUS HS
バージョン
ELSP Transmitter Plus HSは、次のメーカーのカメラに対して使用できます
• Canon
• Nikon
機能
• 大画面のグラフィックコントロールディスプレイ。
• 緑または赤のディスプレイ照明色(標準シンクロモード時は緑、高速シンクロモード時は赤)
• 高 速アクセス ボタンと回 転ホイール による 簡 単コントロ ール 。
• バヨネットロックシステムによる安定したホットシュー接続。
• 標準的な単3電池2本(充電式電池使用可)。
• 2.5mmジャックトリガー出力。
• 一体型Mini USBソケットを使ったファームウェア更新。
• 4 0 のリモ ートチャネル。
• 標準シンクロモードの20の周波数チャネル*。
• 高速シンクロモードの20の周波数チャネル*。
• 4 グ ル ー プ と す べ て 。
• EL-Skyportシンクロモード。
• 標準シンクロモード(最大通達距離)。
• 高速シンクロモード(特にHSが有効なときにシャッター速度が速くなりますが、
• 通達距離が減少します)。
• • シンクロモード***。
• • 標準(ホットシューの中間コンタクトを使用)
• HS ****(最大1/8000秒でシンクロ。自動制御)。
• ODS(手動Over-Drive-Sync)、最大出力と均一な露光でHSのタイミングを微調整します。
• セカンドカーテンシンクロモード****。
• • AF補助光一体型***。
• オートMOD ***、フォーカスのためにElinchrom製フラッシュユニットのモデリングライトを制御します。
• • シャッターモード*****(シャッターを半分押すとモデリングランプを制御できます)。
• • DOFモード(カメラの「DOF」(焦点深度)ボタンでモデリングランプを制御できます)。
• • Elinchrom製フラッシュユニットからの自動フィードバックによるリモートコントロール**。
• • • ELフラッシュユニットは「すべて」一緒にか、「グループ」または「単一」ユニットで制御できます。
• フラッシュ出力の調整。
• モデリングランプのオン/オフまたは強度の調整。
• • スリープモードと自動オフモードのプログラムが可能。
• 標準設定へのリセット。
* 20の周波数チャネルを持つ最新の全Elinchrom製フラッシュユニット用。過去のモデルにも対応。
** EL-Skyportレシーバーおよびトランシーバーが内蔵されたすべてのElinchrom製フラッシュユニット用。
*** TTLホットシューを備えたCanonおよびNikon製カメラ用の拡張機能
(Nikonでは限定されている機能については、以下を参照してください)。
**** これらの機能はNikonではサポートされていませんが、カメラメニューで有効にできます。
***** Nikonではサポートされていません。
電池の取り付け
電池収納部のカバーを押して矢印の方向にスライドすると、電池カバーが開きます
(図1を参照)。
電池を挿入します。電池の「+」と「-」が正しい向きになっていることを確認します(図2を参照)。
(注:単3形のアルカリ乾電池または単3形のニッケル水素電池を2本使ってください)
カバーを本 製品に押し込み、スライドしてロックポジションに戻します。
電池
• 本製品では単3電池を2本使います。
• 電池を不適切に取り付けても本製品が破損することはありません。
• 非充電式の単3乾電池(マンガンやアルカリタイプなど)または単3形の充電式電池(ニッケル・カドミウム
(NiCd)や
• ニッケル・水素(NiMH)など)を使うことができます。
• 種類の異なる電池を混ぜて使わないでください。
• 本製品には単3形のリチウム電池を使わないでください。
押して スラ イド
図1
図2
Page 65

安 全 ガ イド安 全 ガ イド
129
128
JPJP
ユー ザ ーマニュアル
互換性
ElinchromのEL-Skyportフラッシュユニットは、現在以下の3世代が販売されています。
第1世代
• EL-Skyport Transceiver RXモジュール(Style RX、Digital RX、Ranger RX)。
第2世代
• 内蔵型EL-SkyportモジュールMk1(BRX、D-Lite RX、Quadra、Quadra Hybrid)。
第3世代
• 内蔵型EL-SkyportモジュールMk2(ELCとELB)。
この世代では通達距離が長くなります
トリガ ー
トリガーは、EL-Skyportトランシーバーが内蔵またはプラグインされた既存のすべてのElinchrom製フラッシュユ
ニットで 機 能します 。
リモ ートコントロー ル
すべてまたはグループ1〜4を選択した場合
• EL-Skyportを備えたすべてのElinchrom製フラッシュユニットは、「PWR±、MOD±またはMODオン/オフ」を
変更したときにサポートされます。
• モデリングランプの出力設定をMODオン/オフまたはMOD+/-ボタンで変更した場合、使用中のElinchrom
製
• フラッシュはフリーモデリングモードに切り替わります。プロポーショナルモデリングランプモードに戻る場合
は 、設 定
• をELフラッシュユニットで行う必要があります。
• 一部のユニットではすべてのモデリング機能がサポートされておらず、この場合「--」と表示されます
(Ranger、Quadra、ELB400)。
• 単一ユニットを選択した場合
• ディスプレイに選択したユニットが枠でハイライトされ、個々に制御できます。
• 第2世代と第3世代のEL-Skyportレシーバーが内蔵されたElinchrom製フラッシュユニットだけがサポート
されてい ます。
注:
第1世代のユニットは検出されますが、ディスプレイに「--」と表示されます。EL-Syport Transmitter Plus HSに対
する
ユニット設定のフィードバックはありませんが、正 常にトリガーされます。
周波数チャネル
EL-Skyportが内蔵された過去のElinchrom製フラッシュユニットの中には、1〜4または1〜8の周波数チャネルを
サポ ートする ものがありま す
(BRX、D-Lite RX、Quadraなど)。
EL-Skyportが内蔵された最新のElinchrom製フラッシュユニットは、1〜20の周波数チャネルを最大20サポート
します
(ELC、ELB)。
技術データ
パラメー タ ー 仕様
バー ジョン
Canon, Nikon.
トリガーの互換性
内蔵型EL-SkyportレシーバーまたはトランシーバーとEL-Skyport RXトラ
ン シ ー バ ー モ ジ ュ ー ル 、
およびEL-Skyport Universalが備わったすべてのElinchrom製フラッシュ
ユニ ット 。
リモートコントロールの互換性
EL-Skyportトランシーバーが内蔵されたすべてのElinchrom製フラッシュ
ユニット:ELC Pro
HD、ELB 400、Ranger Quadra RX、Quadra Hybrid、D-Lite RXシリー
ズ、BRX
シリーズ、Master RXシリーズ、FRXシリーズ(注:トランシーバーRXモジュ
ールがプラグインされたELユニットの場合、
リモート機能は制限されます)。
通達距離
屋内 > 60m。
屋外 > 200m。
注:
最大の通達距離は、最新のElinchrom製フラッシュユニットで利用できます
(ELCやELBなど)。他社製、または過去のElinchrom製フラッシュユニット
の場合、 通達距離は制限されます。
電池
単3電池2本(非充電式または充電式)。
電池寿命
電池の種類と使い方によります。
1000mAhの標準的な電池2本の場合、稼働時間は約35時間、
トリガーリリースは15000回以上です。
リモ ートコント ロール
最大10ユニットを検出表示およびリモートコントロールできます。
周波数チャネル
標準モードの20チャネルと高速モードの20チャネル。
EL-SKYPORTモード
(ELSP)
標準/高速 - シンクロモード。
トリガ ー /コ ントロ ー ル グル
ープ
「すべて」または「グループ」(グループ1〜4 )。
シンクロモ ード
標準、HS(ODSありまたはなし)、セカンドカーテン。
USBソケット
ファームウェア 更 新 用 。
S R ソケ ット
トリガー出力2.5mmモノラルフォンジャック(最大シンクロ電圧3VDC)。
寸法(横 x 縦 x 高さ)
69 x 84 x 59 mm(2.7 x 3.3 x 2.3インチ)
重量
約 170g(6オンス)、単3電池2本装着時。120g(4.2オンス)、
Page 66

安 全 ガ イド安 全 ガ イド
131
130
JPJP
ホットシューアダプター
機能
ElinchromのSkyport Plus HSトランスミッターを使うと、「ホットシュー」タイプのフラッシュ接続を持つあらゆる
カ メ ラ に 対 し て 、
出力を制御して基本的なトリガーを行うことができます。以下に説明する機能には、Skyportシステムに対応した
CanonまたはNikon製カメラが必要です。適切に動作するように、Skyport HSトランスミッターには取り付けられ
たカメラと
の通信用の特別な接続ピンが用意されています。
利用できるElinchrom製トランスミッターには、以下の2つのバージョンがあります:
• Canon、ETTLII/ETTLオートフラッシュに対応したCanon EOSタイプAカメラ用。
• Nikon、iTTLフラッシュユニットに対応したNikon DSLRカメラ用。
カメラのホットシューマウントに専用の通信端子がある場合、以下のElinchrom Skyport HS機能を使うことがで
き ま す:
• シンクロモ ード
• HSとODSモード
• セカンドカーテンシンクロ
• オートMOD
• AF補助光
注:すべての カメラですべての 機 能 がサポートされているわけで はありませ ん。
検査済みカメラの一覧
カメラのモデルとサポートされる機能の最新情報については、次のElinchromのウェブサイトをご覧ください:
http://www.elinchrom.com/support.php
カメラへの マウント
簡 単 なロッ クバ ヨネットメ カ ニ ズ ム を 使 ってトラ ンス ミッター をカメ ラ の ホットシュ ー に固 定します 。
取り付け
1. カメラとEL-Skyportトランスミッターの電源を切ります。
2. EL-Skyportトランスミッターのホットシューをカメラのホットシューマウントの位置に合わせます。
3. ホットシューをカメラの ホットシューマウントの奥までスライドします。
4. 所定の位置にきちんと収まるまでロックリングのタブを右に動かします。(図3を参照)
取り外し
1. ロック解除:ロックリリースボタンを押して、タブを左奥に動かします。(図4を参照)
2. EL-Skyportトランスミッターをスライドして、カメラのホットシューマウントから取り外します。
ディスプレイ
グラフィックディスプレイには、Elinchrom製ユニットのステータスと設定が表示されます。
ディスプレイ照明 はオンとオフを 切り替えることができます。
標準シンクロモードの場合、照明は緑です。高速シンクロモードの場合、照明は赤です。
ディスプレイ のコ ントラストは セットアップメニュー で 調 整 することが でき ます。
ディスプレイ上部のバーには、Elinchromトランスミッターのステータスが表示されます。
ディスプレイ下部のバーには、4つの高速ボタンの働きが表示されます。
中央部には、検出されたElinchrom製フラッシュユニットの一覧が表示されます。また、セットアップメニューを選択
し た 場 合 は 、
その セットアップ項目 が 表 示 され ます。
DISPLAY PANEL - DASHBOARD
DISPLAY PANEL - SETUP MENU
Menu list
Up/down list
Description/mode
Exit
* Nikon製カメラの場合、これらの機能はカメラのメニューで有効にします。
** Nikon
®の シ ス テ ム で は サ ポ ー ト さ れ て い ま せ ん 。
***
Sony®の シ ス テ ム で は サ ポ ー ト さ れ て い ま せ ん 。
図3 図4
Skyport mode
EL-unit(s)
Button function title
Column title
Battery status
Groups
ODS status
Modelling lamp
mode
Unit selection
Frequency
Sync mode
D: DOF
HS: Hi-Sync
Power settings
Setup menu
Modelling lamp settings
s: speed
n: normal
second curtain
S: Shutter
Number of unit
**
** **
***
*
Page 67

安 全 ガ イド安 全 ガ イド
133
132
JPJP
SPEED BUTTONS 1-4
高速ボタンを使うと、以下に説明する働きを素早く設定することができます。太字の働きは、セットアップモードを
選択したときのボタンの働きを表しています。
SPEED BUTTON 1 (LEFT)
Pwr± ダイアルを使って1/10 Fストップ単位でフラッシュの出力を増減します。
up セットアップを選 択したとき、セットアップメニュー を 上 にスク ロールし ます。
SPEED BUTTON 2 (MIDDLE LEFT)
このボタンを1回または2回押すことで、モデリングランプ機能を切り替えることができます。
Mod ダイアルでモデリング ランプのオン/ オフを切 り替え ます。
Mod± ダイアルを使って1/10 Fストップ単位でモデリングランプの出力を増減します。
down セットアップを選 択 したとき 、セットアップメニューを下 にスクロ ールします。
SPEED BUTTON 3 (MIDDLE RIGHT)
Select 表示(発見)されたElinchrom製フラッシュユニットを切り替えます。
選択(枠でハイライト)したフラッシュユニットは、個別にフラッシュとモデリングランプの設定を調整することが
できま す。
グループを「すべて」に選択した場合、約5秒後に枠が消え、設定の調整はすべてのグループのすべての
ユニットに対して有効になります。グループ1〜4を選択した場合は、そのグループのフラッシュユニットのみが
変 更 さ れ ま す 。
Group selection
Test
USB
Rotation ring / Dial
Set
Battery compartment cover
On/Off
Refresh
Change value
Lock
Press for 2 seconds
To refresh manual
changes made on the flash unit
Communication Transmitter
HS / EL- flash unit.
Press for 2 seconds
Speed button 2SRSpeed button 3
Green LED
Speed button 1
Speed button 4
Blue LED
Communication camera / Transmitter HS
ボタン
SPEED BUTTON 4 (RIGHT)
Setup このボタンを 押すと 、高 速 ボタン の 働き が 変 わり、セットアップメニューが
選択されます。セットアップメニューでは、機能の調整と有効化が可能です。
Exit セットアップメニューを 終 了し、標準ディスプレ イモ ード に戻 ります。
ON/OFF
2秒以上押し続けると、EL-Skyport Transmitter Plus HSのオン/オフを切り替えることができます。
GROUP BUTTON
押すと、1〜4のグル ープと「すべて」を切り替えることができます。
TEST BUTTON (WITH EL LOGO)
テストボタンを押すと、「すべて」を選択している場合はすべてのフラッシュが、1〜4を選択している場合は単一のグ
ル ープ が
発光します。EL-Skyportによるフラッシュユニットのトリガーが正確になるよう、
フォトセルは必ず無効にしてください。
REFRESH BUTTON
個別のELフラッシュユニットで出力設定が完了したときにリフレッシュボタンを押すと、
Skyport HSの出力設定表示が更新されます。
グループを選択している場合は、選択しているグループの情報だけが更新されます。
「すべて」を選択している場合は、全グループの情報が更新されます。
Skyport HSの電源を入れたときにスキャンおよび発見されなかったフラッシュは、更新機能の対象に追加するこ
とは
できません。
フラッシュが追加されている場合は、セットアップメニューでSETUIPとSCANを選択するか、またはトランスミッター
の電源を入れ直します。
更新には4秒程度かかることがありますが、これはトランスミッターによって発見および操作されるフラッシュユニッ
トの
台 数 によります。
注:
Skyport HSとELフラッシュ間の動作をできるだけ安定させるために、フラッシュの出力情報は、
出力レベルが変更された場合または更新ボタンが押された場合のみ、ELフラッシュによって伝送されます。
ROTATING RING / DIAL
ダイアルを回すと、様々な 働きを 選 択したり 、EL フラッシュの出力レベ ルを 変えることができます。
SET / CONFIRMATION BUTTON (DIAL CENTRE BUTTON)
セットアップメニューで 行った変 更内 容 を確 定するときに押 します。
ディス プ レイ照 明を 切 り替 えると きに 押 し ま す。
Skyport HSがスタンバイモードに切り替わっているときに押すと、通常動作に戻ります。
2秒間押すと、すべての働きと設定がロックされます。もう一度押すとロックが解除されます。
ロック機能はダイアルとその他のボタンの働きをブロックするため、Skyport HSを運んでいるときに起こる誤設定
を 防 ぐ こ と が で き ま す 。
Page 68

安 全 ガ イド安 全 ガ イド
135
134
JPJP
SETUP MENU
SCAN..
Skyport HSの電源が入っているときは、EL-Skyportトランシーバーモジュールが内蔵またはプラグインされた
Elinchrom製フラッシュユニットが
自動的に検索されます。
スキ ャン 機能 は、セ ットアップ メニューでも 使用 できま す。新しい フラッシ ュユ ニットが 照明 セットアップ に 追加 され た
と き は 、
再 ス キ ャ ン が 必 要 で す 。
ELフラッシュユニットを発見するには、
• すべてのELフラッシュユニットの電源 が 入っている必 要があります。
• すべてのフラッシュに、EL-Skyportトランシーバーモジュールが内蔵またはプラグインされている必要があり
ま す 。
• Transmitter Plus HSとELフラッシュユニットが同じ周波数チャネル設定にセットされている必要がありま
す。
FREQUENCY CHANNELS
最大で20のEL-Skyport周波数チャネルを選択できます。
注:
• 最大で20の周波数チャネルをサポートしているのは、最新のElinchrom製フラッシュユニットのみです
• (ELC 500/1000 Pro HD、ELB 400、今後のバージョン)。
• すべての「RX」フラッシュユニットは最大で8チャネルをサポートしています。一部の過去のElinchrom製フラ
ッシュユ ニット は
• 最 大 で 4 チャネル を サ ポートして います。
ELSP MODE
Skyport HSには2つの動作モードがあり、それぞれ撮影の働きが異なります
• 標準 モ ード
• 標準モードは、EL-Skyportが組み込まれた最初期のElinchrom製フラッシュユニットに対応しています。
• 選択した場合、ディスプレイ照明とステータスLEDは緑に点灯します。
• 高速 モ ード
• 高速モードでは、標準的なフラッシュシンクロを使うカメラ(リーフシャッターカメラと一部のミラーレス)次第
で は 、
• シャッター速度が最大1/1000秒とより高速になります。
• 標準モードおよび高速モード使用時、最大1/8000秒のシャッター速度を使う場合はHSモードを有効にす
る 必 要 が あ り ま す 。
• 高速モードでは、ディスプレイ照明とステータスLEDは赤に点灯します。
注:
• 標準モードの方が、作動距離が長くなります。高速モードの場合、作動距離は
• 50%短くなります。高速モードを使うには、すべてのリモートフラッシュのSkyportトランシーバーにELSkyportモードの機能が備わっている必要が あります。
SYNC MODE
以下のシンクロモードを選択できます:
• 標準 モ ード
標準モードの場合、大半のカメラは1/200秒〜1/250秒のシャッター速度で機能します。
• HS Hi-Syncモード*
HSモードの場合、カメラとフラッシュユニット次第では、シャッター速度を最大1/8000秒にすることができ
ま す 。
* Nikon製カメラの場合、これらの機能はカメラのメニューで有効にします。
HSモードで最高の結果を出すためには、フラッシュ時間の長いフラッシュユニットまたはフラッシュヘッドが
必要 です。 Aフラッシュチューブ(アクション)が備わったヘッドまたはフラッシュユニットは推 奨されません 。
• セカンドカーテン モード *
セカンドカーテンモードでは、シャッターが閉じる直前にフラッシュを発光させることで、残像効果を
生 み 出 し ま す 。
ODS SETUP
Over-Drive-Sync(ODS)は、HSシンクロモード有効時に、全体の露光を改善することができます。
ODSはフラッシュ時間の長いフラッシュユニットに依存するため、結果は使用する照明のフラッシュ時間
(これは 出力レベルでも変 わります)と、使用するカメラによります。大きなセンサーと低 速シャッターを
備えたフルフレームカメラの場合、残念ながら良い結果を得るのは非常に困難になりますが、それでもフラッシュ時
間が十分に長い照明を使えば、
1/8000秒までクリーンなフレームを得ることが可能です。また、ODSを使用すると
最大で2 Fストップ多くの照明を得ることが可能で、これは太陽光が強すぎる場合に不可欠なものになります。
ODSセットアップでは、0.1〜5.0 msの範囲で調整するか、またはオフにすることができます。
ODS値は使用するカメラとフラッシュユニット次第で異なるため、手動で調整する必要が
あります。
注:
• Over-Drive-Sync(ODS)は、シンクロモードがHSに設定されているときのみ使用できます。
• ODSを調整すると、フラッシュのカットオフ(写真の上部または底部の暗いエッジ)の位置がフレーム内で 動く
ことがあります。オフにすると、HSモード時はフラッシュトリガーポイントが自動的に 選択されます。
AUTO MOD
• Off
Elinchrom製フラッシュユニットのモデリングライトは変化しません。
• Shutter**
フォーカスのためにカメラのシャッターボタンを押 すと、ELフラッシュユニットのモデリングライトが
数秒間点灯し、暗い場所でのフォーカスに役立ちます。(Nikonではサポートされていません)
• DOF
カメラのDOF(Depth of eld)ボタンを押している間、Elinchrom製フラッシュユニットはモデリングランプ
を 点灯させます。
AF LIGHT
• フォーカスのためにシャッターを半分押したときに、Skyport HSのオートフォーカス補助光が有効になりま
す ( カ メ ラ の 設 定 も 確 認 し て く だ さ い )。
KEY CLICK
有 効にすると 、コントロー ルボタンを 押 すとビープ音 が鳴りま す。
SLEEP
しばらく使わないと、Skyport HSは電池の消費を節約するためにスリープモードに切り替わります。
スリープモードに入る時間は1〜60分の範囲で指定できます。また、オフにもできます。
AUTO OFF
SKYPORT HSは、しばらく操作しないと自動的に電源が切れます。
オートオフに入る時間は1〜60分の範囲で指定できます。また、オフにもできます。
スリープモードとオートオフがどちらも有効な場合、TRANSMITTER PLUS HSはユーザー
が設定したスリープモードの時間で 電 源 が 切 れ ま す 。
CONTRAST
ディスプレイのコントラストは80〜120%の範囲で調整できます。
* Nikon製カメラの場合、これらの機能はカメラのメニューで有効にします。
** Nikonではサポートされていません。
Page 69

安 全 ガ イド安 全 ガ イド
137
136
JPJP
BACKLIGHT
デバイスの ディスプレイ照明 は オン/ オフを切 り替えることができます。
ファクトリ ーリセット
左右の高速ボタンを押し続けながらSkyport HSの電源を入れる(約2秒)と、
Skyport HSは工場出荷時の状態にリセットされます。ディスプレイのコントラストを除くすべてのユーザー設定が
リセットされます。
ファームウェア更新
Transmitter Plus HSのファームウェアを更新するには、Elinchrom Transmitter HS Updaterが必要です。
Elinchromのウェブサイトから入手できます。
トラブルシューティング
左右の高速ボタンを押し続けながらSkyport HSの電源を入れる(約2秒)と、
Skyport HSは工場出荷時の状態にリセットされます。ディスプレイのコントラストを除くすべてのユーザー設定が
リセットされます。
症状 確認点
ユニットの電源が入らない
• 電池の向きを確認し、放電した電池は
交 換しま す。
モード「すべて」選択時、フラッシュユニットを
トリガ ーで き な い
• トランスミッターとレシーバ ーが同 じ周 波 数 チャ
ネル設定になっている必要があります。
• ELSPモード:トランスミッターとレシーバーが同
じ シンクロモード設定になっている必要があり
ます (標準または高速シンクロモード)。
• レシー バー が内蔵 され たすべ ての E L ユニットの
EL-Skyportレシーバーの電源が入っていること
を確 認します。
• トランスミッターのバージョンがお使いの
CanonまたはNikon製カメラに対応しているこ
と を 確 認 し ま す 。
グループモード選択時、一部の ユニットがトリガー
されない
• ELフラッシュユニットのグループ設定を確認
• します。
• 反応しな いユ ニットの距 離を短くします。トランス
ミッタ ーとレシ ーバー が 同 じ シン クロ モード設 定
(標準または高速 シンクロモード)と周波数チ
ャネル設定になっている必要があります。
テストボタンは機能するが、カメラから フラッシュユ
ニット をトリ ガ ー で き な い
• ホ ッ ト シ ュ ー の 取 り 付 け を 確 認 し ま す 。
• カメラ設定を確認します(ホットシューの 通信を
オンにします)。
• トランスミッターのバージョンがお使いの
CanonまたはNikon製カメラに対応しているこ
と を 確 認 し ま す 。
• 互換性のあるカメラの一覧を確認します。
DIGITAL RX、RANGER RXまたはSTYLE RX
ユニットに関する一部の情報が
表示されない
• Transceiver RXがプラグインされたユニット は
リモート機能が制限されています。しかし、 この
ユニットはEL-Skyport Transmitter Plus HS
で トリガー および 制 御することができます(しか
し視 覚的なフィードバックは ありません)。
通達距離が制限される
• ユ ニ ッ ト の 位 置 を 変 え ま す 。
• 壁や天井からの距離を長くします。
• ELSPモード:高速シンクロモードの場合、通達
距離は約50%短くなります。 標準シンクロモー
ドに戻しま す。
• 屋外の場合、湿気、干渉、障害物などによって 通
達距離が短くなることがあります。
他の2.4 GHzのネットワークを干渉する、
トリガーが不安定
• E Lユ ニットのトランスミッターとレシ ーバー の 両
方で 他の 周 波 数 チャネ ル を 試し ます。
• フラッシュユニットとトランスミッター間の 距 離
を 短くし ま す 。
HSモード。最大1/8000秒のシンクロ
• ElinchromのAction(旧称はA)ヘッドは、 HSモ
ー ド に は 最 適 で は あ り ま せ ん 。高 い パ フ ォ ー マ ン
スを 発揮させるためには、Proフラッシュチュー
ブ (Standard、旧称はS)を備えたフラッシュユ
ニットか、 理想的には専用のHSヘッドを使って
くださ い 。
• ODSを微調整すると、HSのパフォーマンスを最
適 化 する ことが で きま す。
• 目に見えるバンディングが発生する場合は、 カメ
ラのシャッター速度を遅くするか、 ODSを設定し
てバンディングを最 小化 ないし無くします。
• HSの働きは、CanonまたはNikon製カメラと適
切 な トランスミッター で の み 機 能しま す。
E L ユ ニ ッ ト の ス キ ャ ン:
ELユニットが発見されない。または一部のユニッ
トが
見つからない
• 有効なすべてのELユニットの電源を入れてから、
• EL-Skyport Transmitter Plus HSの電源を
入れます。または 、 セットアップに 移 動して 再ス
キャンします。 周波数、グループ、ELSPモードの
設定がトランスミッターと 一致している必要が
あります。
• EL-Skyport Transmitter Plus HSで有効にな
っているすべてのユニットが、 最 新 のファームウ
ェアで動作していることを 確認します。
Page 70

安 全 ガ イド
138
JP
EL-SKYPORT SPEEDレシーバーの周波数チャネル
以下の情報は本製品と関係するものではありませんが、過去のEL-Skyportユニットの周波数のセットアップに役立
つことがありま す。
EL-SKYPORT TRANSMITTER PLUS HSユー
ザー ガイドの
ダウンロ ード: http://bc.gs/elspthsから完全なユーザーガイドを取得できます。
適合宣言書のダウンロード
http://bc.gs/ecからEC、米国、カナダの適合宣言書を取得できます。
USBポートによるファームウェア更新
http://bc.gs/fwから最新のファームウェアをダウンロードし、指示に従ってください。
Page 71

使用手册
3
简介
尊敬的摄影师:
感谢您选择 Elinchrom。
Elinchrom 的所有产品都使用最先进的技术制造。我们采用精心挑选的零部件,确保为您提供质量最好的产
品,并在生产过程中和生产完成后对设备进行多次测试。我们相信,本产品稳定的性能,将会在未来很多年
一直带给您很棒的体验感受。
在使用新的 Elinchrom 产品前,请您仔细阅读用户手册。本手册包含安全使用须知和所有可编程功能的妙
处。
本手册显示产品配图中的配件并不属于套装或机身的一部分。Elinchrom 套装和机身配置可能在未经通知的
情况下有所变更,且可能与其他国家有所区别。
要了解关于 Elinchrom 系统的更多详细信息、升级、资讯和最新信息,请定期访问 Elinchrom 的网站。您
可以在网站的“支持”部分下载最新的用户指南和技术规格。
Elinchrom 闪光灯装置及配件的技术数据、特点和功能可能会在未经通知的情况下发生变更。由于部件或测
量工具的工差,所列规格可能会有不同。技术数据可能会发生变化。不保证没有印刷错误。
最新手册,请登录我们的网站: www.elinchrom.com/support 查询,谢谢,
您的 El inchrom 团队
CN
使用手册
2
容差和规格符合 IEC 和 CE 标准。技术数据可能会发生变化,恕不另行通知。
目录
符合性声明
5
版本
6
功能
6
安装电池
7
电池
7
兼容性
8
触发
8
遥控器
8
频道
8
技术数据
9
热靴适配器
10
安装到相机上
10
显示
11
按钮
12
设置菜单
14
恢复出厂设置
16
故障排除
16
固件升级
18
CN
Page 72

5
使用手册
美国和加拿大的符合性声明
英语 本设备符合美国联邦通信委员会法规(FCC)第 15 部分和加拿大工业部许可证豁免 RSS 标准的规定。
操作时须符合以下两个条件:(1)本设备不会造成有害的电信干扰,和(2)此设备必须接受任何接收到
的电信干扰,包括可能导致意外操作的干扰。本产品符合加拿大 ICES-003B 类规格。
法
语 本设备符合美国联邦通信委员会法规(FCC)第 15 部分和加拿大工业部许可证豁免 RSS 标准的规
定。操作时须符合以下两个条件:(1)本设备不会造成有害的电信干扰,
和(2)此设备必须接受任何接收到的电信干扰,包括可能导致意外操作的干扰。本产品符合加拿大 ICES-
003B 类规格。
辐射暴露声明
英语 本设备符合加拿大和美国的便携式射频辐射限值(超过该限值,环境条件将不可控制),且对本手册
所载预定操作来讲是安全的。如果将该产品放置在尽量远离用户的地方,可进一步降低射频辐射值。
法语本设备符合加拿大和美国的便携式射频辐射限值(超过该限值,环境条件将不可控制),且对本手册所
载预定操作来讲是安全的。如果将该产品放置在尽量远离用户的地方,可进一步降低射频辐射值。
FCC B 类合规声明
注意:本设备经测试证明符合《美国 FCC 技术法规》第 15 部分有关 A 类数字设备的限制规定。这些
限制用于为居民区使用提供适当保护,
使其不受有害干扰。本设备产生、使用并能够发射无线电频率。如未按使用说明书进行安装和使用,可能会
对无线电通讯造成有害干扰。然而,无法保证采用何种安装模式可以完全避免干扰。如果该设备对无线电或
电视接收造成有害干扰,导致必须开启或关闭该设备,用户可以尝试以下几种方法避免干扰:
•
调整接收天线。
•
增加设备与接收器之间的分离。
•
将该设备与其它信号接收设备分置在不同电源上。
•
与供应商取得联系,或向资深广播电视技术人员咨询。
未经合规方明示同意的对产品的任何改动将可能剥夺用户对产品的使用权。本设备须按照第 15 部分规
定的频率进行操作,
且终端用户或专业安装人员无法对其进行配置,以使其在未授权波段运行。
CN
使用手册
4
根据以下 IEC/EN 标准 60825-1——”激光产品
的辐射安全“,本产品应归类为 3R 级激光产品。
3R 级:只要操作谨慎且避免直接射入眼睛,3R
级激光就不会造成伤害。使用 3R 级激光,会超出
最大允许照射量(MPE),但是致伤风险低。3R
级可见连续激光的限值为 5 mW。其他波长和脉冲
激光,限值有别。
CN
Page 73

7
使用手册
安装电池
按压电池盒盖, 向箭头指示方向滑动,打开电池盒盖。(见图 1)。
插入电池。确保电池” +“和”-“触点方向正确。(见图 2)。(注意:请插入两节 AA 碱性电池或 AA 式
NIMH 电池)。
按压电池盒盖,滑回锁定位置。
电池
滑动
图 1 图 2
•
发射器需安装 2 节 AA 电池。
•
电池安装不当不会损害发射器。
•
非充电(干电池)AA 电池(如锌炭电池)、碱性电池或 AA 可充电电池(如镍镉电池或镍-金属氢化
物电池)均可使用。
•
切勿混合使用不同类型的电池。
•
不要在该发射器内安装锂 AA 电池。
CN
按住并
6
使用手册
EL SKYPORT TRANSMITTER PLUS HS
版本
ELSP Transmitter Plus HS可用于下列品牌的相机
•
佳能
•
尼康
功能
•
图像控制大显示屏。
•
红、绿显示灯(绿色代表正常同步模式,红色代表 Speed 同步模式)。
•
可快速触及的按钮和转盘,方便控制。
•
安全热靴连接,配有卡销锁定系统。
•
2 节标准 AA 电池(也可用充电式电池) 。
•
2.5mm 插口触发器输出。
•
固件与集成迷你 USB 插座一起升级。
•
40 个远程通道。
•
20 个正常同步模式频道*。
•
20 个 Speed 同步模式频道*。
•
4 个群组和全部。
•
EL-Skyport 同步模式。
•
正常同步模式(最大距离范围)
•
Speed 同步模式 (快门速度更快,尤其是当 HS 处于激活状态时,但是
距离范围缩小了)。
•
同步模式***。
•
标准(使用热靴的中间接触面)。
•
HS ****(同步达 1/8000 秒,自动控制)。
•
ODS (手动 Over-Drive-Sync)微调 HS 时间,获得最大功率和均匀曝光。
•
后帘同步模式****。
•
集成自动对焦灯***。
•
自动模式 * **为对焦而控制 Elinchrom 闪光灯装置的造型灯。
•
快门模式***** (半按快门,然后释放,可控制造型灯)。
•
DOF 模式(相机的”DOF“(焦深)按钮可控制造型灯)。
•
远程控制**拥有来自 El inchrom 闪光灯装置的自动反馈。
•
EL——闪光灯装置可进行”全部“一起、”分组“或”单独“控制。
•
闪光灯启动和关闭。
•
造型灯启动/关闭或亮度提升/降低。
•
睡眠模式和自动关闭模式可进行设计。
•
恢复至标准设置。
*
所有的最新
Elinchrom
闪关灯装置都配有20个频道,且与先前的型号兼容。
**针对具有内置 EL-Skyport 接收器和收发器的 Elinchrom 闪光灯装置。
*** 配有 TTL 热靴的佳能和尼康相机的扩展功能(关于尼康相机的有限功
能,请见下文)。
**** 这些特性不适用于尼康相机,但是可在相机菜单中激活。
***** 不适用于尼康品牌。
CN
Page 74

9
使用手册
技术数据
参数 规格
版本
佳能、尼康
触发器兼容性
兼容所有配有内置 EL-Skyport 接收器或收发器、EL-Skyport RX 收发器
模块以及
EL-Skyport Universal的Elinchrom
闪光灯装置。
遥控兼容性
所有配有内置 EL -Skyport 收发器的 Elinchrom 闪光灯装置: ELC Pro
HD、 ELB 400、 Ranger Quadra RX、 Quadra Hybrid、 D-Lite RX 系
列、 BRX 系列、 Master RX 系列和 FR X 系列 (注意:与插入式收发器
距离范围
室内 > 60m. 室
外 > 200m. 注
意:
最新款 Elinchrom 闪光灯装置(如 ELC 或 ELB)可达到最大距离范
围。其他或旧款 Elinc hrom 闪光灯装置则距离范围有限。
电池
2 节 AA 电池(标准型或可充电式) 。
电池寿命
取决于电池类型和使用情况。
两节标准电池,每节 1000mAh,大约可工作 35 小时,释放 15000
多次触发器信号。
遥控器
最多可探测、显示和遥控 10 台设备。
频道
正常模式中有 20 个频道,Speed 模式中有 20 个频道。
EL-SKYPORT
模式 (
ELSP
)
正常
/ Speed——
同步模式。
触发器/控制分组
“全部”或“分组”(1到4
组)。
同步模式
标准,HS (有或没有 ODS),后帘。
USB
插口
用于固件升级
SR
插口
触发器输出 2.5 mm Phone Jack 单声道(最大同步电压3 VDC)。
尺寸(宽x长x高)
69 x 84 x 59 mm (2.7x 3.3x 2.3 英寸)
重量
大约 170 克(6 盎司),包括 2 节 AA-电池。无电池是 120 克
(
4.2
盎司)
CN
8
使用手册
兼容性
市面上有三代不同的 Elinch rom EL-Skyport 闪光灯:
第1代
•
EL-Skyport 收发器 RX 模块 (Style RX、 Digital RX、Ranger RX)。
第2代
•
内置 EL -Skyport 模块 Mk1(BRX、 D-Lite RX、 Quadra、 Quadra Hybrid)。
第3代
•
内置 EL -Skyport 模块 Mk2(ELC 和 ELB)。这
一代的距离范围有所扩展。
触发
现在配有内置或插入式 EL-Skyport 收发器的 Elinchrom 闪光灯都可进行触发。
遥控器
当选择了所有分组或分组
1-4
时
•
当改变”PWR±、 MOD±或 MOD 开/关“时,配有 EL-Skyport 的所有 Elinchrom 闪光灯都能支持。当造型
灯电源设置随 M OD 开/关或 MOD+/-按钮状态改变时,相关 Elinchrom 闪光灯将转换至自由造型模式。
如需返回至均衡造型灯模式,必须设置 EL 闪光灯装置。
•
有些闪光灯并不支持所有模型功能, 那么将显示”--“(例如,Ranger、Quadra、ELB400)。
选择单一闪 光灯装置 时
•
选择的装置在显示器中框出,突出显示,并可进行单个控制。
•
只适用于配有内置 EL-Skyport 接收器的第 2 代和第 3 代 Elinch rom 闪光灯。
注意:
探测到第 1 代闪光灯装置,但是显示器将显示”--“。装置设置未向 EL-Syport Transmitter Plus HS 发送反馈,
但是它们仍可被正常触发。
频道
某些配有内置 EL-Skyport 的旧款 Elinchrom 闪光灯装置可支持的频道数量为 1 到 4 或 1 到 8(比如 BRX、
D-Lite RX、 Quadra)。
最新款配有内置 EL-Skyport 的 Elinchrom 闪光灯可支持多达 20 个频道 1-20(ELC 和 ELB)。
CN
Page 75

11
使用手册
显示
图像显示 Elinchrom 装置的状态和设置。 显示灯可以打开或关闭。
在正常同步模式中,灯光是绿色的。在 Speed 同步模式中,灯光是红色的。 可在设置菜
单中调节显示屏的对比度。
显示屏顶部一栏显示的是 Elinchrom 发射器的状态。 显示屏底部一栏显
示的是 4 个 speed 按钮的功能。
中间区域显示检测到的 Elinchrom 闪光灯装置列表。当选择设置菜单时,该区域还显示设置项目。
显示面板-控制面板
显示面板-设置菜单
说明/模式
退出
*
在尼康相机中,要在相机的菜单中激活这些功能。
** 并不是所有的尼康系统都支持。
菜单列表
同步模式
HS
:
hypersync
TM
*
装置数量
造型灯模式
D:DOF
S
:快门
**
Skyport
模式
n:
正常
s:
电池状态
栏标题
按钮功能标题
设置菜单
装置选择
ODS
状态
群组
频率
EL-
装置
电源设置
造型灯设置
CN
上/下列表
10
使用手册
热靴适配器
功能
Elinchrom Skyport Plus HS 发射器可以当作进行电源的基本控触发器,适用于拥有“热靴”类闪光连接的所
有相机。下面描述的功能需要有一台与 Skyport 系统兼容的佳能或尼康相机。 为了能正确运行,Skyport
HS 发射器提供了用于跟所连接的相机进行通信的特殊连接针。
提供两种不同的 Elinchrom 发射器版本:
•
佳能版本,用于那些可跟 ETTLII/ETTL 自动闪光兼容的佳能 EOS A 类相机。
•
尼康版本,用于可跟 iTTL 闪光灯部件兼容的尼康 NSLR 相机。
相机热靴底座中的专用通信终端能让 Elinchrom Skyport 具有以下功能:
•
同步模式
•
HS 和 ODS 模式
•
后帘同步
•
自动 MOD
•
自动对焦灯光
注意:并不是所有相机都支持所有功能
被测试相机的列表
可以在 Elinchro m 网站上找到关于相机类型和所支持功能的最新汇总,请访问:
http://www.elinchrom.com/support.php
安装到相机上
一个便捷的锁定卡口机制被用来将发射器牢固地锁到相机的热靴里。
连接
1.
关闭相机和 EL-Skyport 发射器。
2.
将 EL-Skyport 发射器的热靴对准相机的热靴底座。
3.
将其完全放入相机的热靴底座中。
4.
向右转动锁环上的袢扣,直到听见咔哒声。(见图 3)
分离
1.
解锁:点击解锁按钮,将袢扣转动到最左侧。(见图 4)
2.
将 EL-Skyport 发射器滑出相机的热靴底座。
CN
Menu list
Up/down list
Description/mode
Exit
Skyport mode
EL-unit(s)
Button function title
Column title
Battery status
Groups
ODS status
Modelling lamp
mode
Unit selection
Frequency
Sync mode
D: DOF
HS: Hi-Sync
Power settings
Setup menu
Modelling lamp settings
s: speed
n: normal
second curtain
S: Shutter
Number of unit
**
** **
***
*
Page 76

13
使用手册
Speed 按钮4
(右)
Setup 点击这个按钮,可以修改 speed 按钮的功能,并且会选中设置菜单。在设置菜单中,可以调
整或激活功能。
Exit
退出设置菜单,返回标准显示模式。
开/关
按下并持续两秒,将 EL -Skyport 发射器 Plus HS 打开/关闭。
群组按钮
按下,在群组 1 至 4 以及“全部”之间进行切换。
测试按钮(有EL图标)
当选择“所有”或群组 1 至 4 之间的任一单个群组时,按下测试按钮会打开所有闪光灯。为了让 EL-Skyport
正确触发您的闪光灯装置,请记得停用光电池。
刷新按钮
当单独的 EL 闪光灯装置完成电源设置时,请按下刷新按钮,更新 kyport HS 的电源设置显示。
如果选择了一个群组,那么只有该被选中的群组的信息会被刷新。 如果选择
“全部”,那么所有群组的信息都会刷新。
当 Skyport HS 处于打开状态时,如果闪光灯未被扫描到或被找到,那么它就不能添加刷新功能。
如果添加了一个闪光灯,那么请在设置菜单中选择设置和扫描,或者再次将发射器关闭和打开。
根据发射器找到和运行的闪光灯的数量,刷新可能会持续最多 4 秒。
请注意:
为了确保 Skyport HS 和 EL 闪光灯之间实现最良性的运行,只有当更改了功率或按下刷新按钮时,闪光灯电源
信息才会由 EL 闪光灯发射。
旋转环/盘
按下该按钮可以选择 EL 闪光灯的各种不同功能以及更改功率。
设置/确认按钮(转盘中心按钮)
按下确认设置菜单中所做的修改。 按下切换显示灯光。
当 Skyport HS 切换至待机模式时,按下返回到正常运行。
按住 2 秒,锁住所有功能和设置。再次按下即可解锁。
在带着 Sk yport HS 的过程中,锁定功能会封住转盘和其他按钮的功能,防止误设。
CN
12
使用手册
固定
锁定
按住2秒
Speed 按钮1
SR
刷新
用来刷新手动对闪光灯装置所做
更改
群组选择
电池盒盖
测试
开/关
按住2秒
旋转环
/
盘
更改值
Speed 按钮2
Speed 按钮4
USB
按钮
Speed 按钮3
Speed 按钮1 - 4
Speed 按钮可以快速设置下面所示的功能。当选择设置模式时,用粗体表示的功能显示的是这些按钮的功
能。
Speed 按钮1
(左)
Pwr±
用这个按钮将闪光灯电源上/下修改
1/10
光圈。
up
当选择设置时,向上滚动设置菜单 。
Speed 按钮2
(中左)
将该按钮按下一次或两次,在造型灯功能之间进行切换。
Mod
用这个按钮将造型灯打开/关闭 。
Mod± 用这个按钮将造型 灯电源上/下修改 1 /10 光圈。
down 当选择设置时,向下滚动设置菜单 。
Speed 按钮3
(中右)
Select 在显示的(找到的)Elinchrom 闪光灯装置之间进行切换
当所选的闪光灯装置用一个方框突出显示时,可以分别调整它们的闪光灯和造型灯设置。
当选择群组“全部”时,大约 5 秒后,方框将消失,那么设置中的调整将影响到所有群组中的所有装置。如果
选择了群组 1-4,那么只有这个群组中的闪光灯装置会被修改。
CN
Speed 按钮2
Page 77

15
使用手册
ODS
设置
当激活 HS 同步模式时,Over-Drive-Sync(ODS)可以提高总体曝光。
ODS 依靠拥有较长闪光持续时间的闪光灯装置,因此,拍摄效果要取决于所用的其他灯光的闪光持续时间
(它们在不同功率时也会变好)以及所用的相机。配备大型传感器和慢快门的全框相机很不幸地成为最难获
得不错效果的相机,但具备充分长闪光持续时间的灯光则始终能取得干净的画面。 除了使用 ODS,它们还
可以获得多大 2 个光圈的更多光线,这在阳光过强时是必需的。
ODS 设置可以进行 0.1 到 5.0 毫秒的调整,或者可以将其关闭。
根据所用和必须调整的相机和闪光灯装置的不同,ODS 值会有所不同。
注
意:
•
只有当同步模式被设置到 HS 中时才可使用 Over-Drive-Sync (ODS)。
•
当调整 ODS 时,闪光灯边缘(即照片顶部或底部的黑边)的位置会在方框中移动。在 HS 模式中,
当切换到关闭状态时,闪光灯触发点将被自动选择。
自动模式
•
关闭
Elinchrom 闪光灯装置的造型灯不会变化。
•
快门**
为了对焦而按下相机的快门按钮将启动 EL 闪光灯装置的造型灯,并且开启几秒钟,用来协助在弱光
线中对焦。(不适用于尼康品牌)
•
DOF
只要相机上的景深(DOF)按钮一直按着,那么 Elinchrom 闪光灯装置将一直开启造型灯。
自动对焦灯
当半按住快门释放按钮进行对焦时,请激活 Skyport HS 的自动对焦(AF)辅助灯(还要检查相机设置)。
按键音
当被激活时,按下任何控制键都会有提示音。
睡眠模式
当暂时不用时, Sk yport HS 将进入睡眠模式,节省电池电量。 可以将睡眠模式延迟 1-60
分钟,或者可以关闭。
自动关闭
当在一段时间内未被使用时,Skyport HS 将自动关闭。 可以将自动关闭延迟
1-60 分钟,或者可以关闭。
当同时启用睡眠模式和自动关机模式时,发射器 Plus HS 将在用户设置的睡眠模式延迟上自动关机。
对比度
显示对比度可以调整的范围是 80%至 120%。
背景灯
设备上的显示灯可以打开/关闭。
*
对于尼康相机,这些功能要在相机菜单中激活。
** 不适用于尼康品牌
CN
14
使用手册
设置菜单
扫描
..
当 Skyport HS 处于打开状态时,它会自动搜索装有内置或插入式 EL-Skyport 收发器模块的 Elinchrom 闪光
灯装置。
还可以在设置菜单中找到扫描功能。当有新闪光灯装置添加到灯光设置中时,需要进行重新扫描。
为了找到 EL 闪光灯装置:
•
所有的 EL 闪光灯装置都必须处于打开状态;
•
所有的闪光灯都必须有内置或插入式 EL-Skyport 收发器模块;
•
发射器 P lus HS 和 EL 闪光灯装置必须设有相同的频道。
频道
可选的 EL-Skyport 频道多达 20 个。
请
注意:
•
只有最新的 El inchrom 闪光灯装置(ELC 500/1000 Pro HD、ELB 400 及未来的版本)才
支持多达 20 个频道。
•
所有的“RX”闪光灯将支持最多 8 个频道,而更早的 Elinchrom 闪光灯装置则支持最多 4 个频
道。
ELSP
模式
Skyport HS 拥有两种运行模式,提供不同的拍摄功能
•
普通模式
正常模式能与使用 EL-Skyport 的第一批 Elinchrom 闪光灯装置兼容。 当选择该模式时,显示灯
和 LED 状态灯将为绿色。
•
Speed 模式
根据使用正常闪光同步的相机(即叶片式快门相机和一些无反光镜相机)的不同,Speed 模式可以让快
门速度加快,达到 1/1000 秒。
当用于正常和 Speed 模式中时,为了使用达到 1/8000 秒的快门速度,必须激活 HS 模式。当处于 speed
模式中时,显示灯和 LED 状态灯将为红色。
注
意:
•
在正常模式下可以实现最远工作距离。Speed 模式会减少 50%的工作距离。 所有远程闪光灯中的
Skyport 收发器必须拥有能使用 Speed 模式的 EL -Skyport 模式。
同步模式
选择同步模式:
•
标准模式
在标准模式中,大部分相机工作时的快门速度为 1/200 秒 - 1/250 秒以内。
•
HS Hi-Sync 模式*
在 HS 模式中,根据相机和闪光灯装置的不同,快门速度可以达到 1/8000 秒。为了取得最佳效果,
HS 模式要求闪光灯装置或闪光灯头要有较长的闪光持续时间。
不推荐使用配有 A 闪光管(Action)的灯头或闪光灯装置。
•
后帘模式 *
为了获得移动效果,后帘模式可以在快门关闭前才亮起闪光灯。
*
在尼康相机中,要在相机的菜单中激活这些功能。
CN
Page 78

17
使用手册
距离范围 有限:
•
改变装置的位置 。
•
增加墙面到天花板的距离 。
•
ELSP 模式:在 speed 同步模式中,距离范围
减少大约 50%,切换回正常同步模式。
•
在户外,由于湿度、干扰、障碍物等因素,距
离范围可能会缩短。
受到其他
2.4GHZ
网络的干扰,触发不可
靠:
•
为 EL-装置的发射器和接收器尝试其他频
道 。
•
缩短闪光灯装置和发射器之间的距离。
HS
模式;同步最高
1/8000
秒:
•
对 HS 模式来说,Elinchrom Action(以前的
A)灯头并不是最优的。。为了获得更好的表
现,请使用配有 Pro 闪光灯管(标准或以前
的 S),后者最理想的是使用专用 HS 灯头
•
ODS 微调有助于优化 HS 的表现。
•
如果存在可见光波段,请降低您相机的快门速
度,或者设置 ODS 并进行调整,从而最小化
或避免波段。
•
HS 只有与佳能或尼康相机以及合适的发射器一
起使用时才能发挥功能。
扫描
EL-
装置:
未找到
EL-
装置或有些装置丢失。
•
打开所有激活的 EL-装置,然后打开 ELSkyport 发射器 Plus HS,或者进行设置并重
新扫描。
•
频率、群组和 E LSP 模式设置必须与发射
器匹配。
•
确保 EL -Skyport 发射器 Plus HS 激活的所
有装置都使用最新固件运行。
CN
16
使用手册
恢复出厂设置
在打开 Sk yport HS 时,同时按住左右两个 Speed 按钮,这样可以将 Skyport HS 重置为出厂设置。所有的
设置(显示屏对比度除外)都将被重置。
固件更新
为了更新发射器 Plu s HS 的固件,需要 Elinchrom 发射器 HS 更新器。可以从 Elinchrom 网站上获取。
故障排除
在打开 Sk yport HS 时,同时按住左右两个 Speed 按钮,这样可以将 Skyport HS 重置为出厂设置。所有的
设置(显示屏对比度除外)都将被重置。
存在这个问题? 请检查以下几点:
装置无法打开
•
检查电池的两极并更换用完的电池。
当选择“全部”模式时,无法触发闪光灯装置。
•
发射器和接收器必须有相同的频道设置。
•
ELSP 模式:发射器和接收器必须有相同的同
步模式设置:正常或 speed 同步模式。
•
检查拥有内置接收器的 EL 装置中的 ELSkyport 接收器是否已打开。
•
检查发射器的版本与您的佳能或尼康相机是否
对应。
当选择群组模式时一些装置未触发
•
检查 EL-闪光灯装置的群组设置。
•
缩短距任何无反应装置的距离。
•
发射器和接收器必须有相同的同步模式设置
(正常或 sp eed 同步模式)和频道设置。
测试按钮可用,但相机未触发闪光灯装置。
•
检查热靴是否安装好。
•
检查相机设置(将热靴通信打开)。
•
检查发射器的版本与您的佳能或尼康相机是否
对应。
•
检查兼容相机列表。
关于
Digital RX、Ranger RX或Style RX
装
置的一些信息无法显示
•
配有插入式收发器 RX 的装置在远程功能上
会受到限制。不过,这些装置可以被 EL-
Skyport 发射器 Plus HS 触发和控制(但没
有视觉反馈)。
CN
Page 79

18
使用手册
EL-Skyport Speed
接收器的频道
这与本产品无关,但它有助于设置旧式 EL-Skyport 装置的频率。
下载
EL-Skyport
发射器
Plus HS
用户指南
请点击本链接,获取完整的用户指南:http://bc.gs/elspths
下载合格性
请在这里找到您针对欧共体、美国和加拿大的合格性声明:
http://bc.gs/ec
用
USB
端口升级固件
请下载我们的最新固件,并遵守说明:
http://bc.gs/fw
CN
 Loading...