

Page 1
is a registered trademark of ELINCHROM LTD, RENENS, SWITZERLAND
USER MANUAL
GEBRAUCHSANLEITUNG
MANUEL D’UTILISATION
MANUALE D’USO
MANUAL DE INSTRUCCIONES
Rotalux
EN
DE
FR
IT
ES
Elinchrom SA Rotalux 23.05.2011 (73320)
Page 2
1.A 1.B
1.C
1.C
1.E
1.I
1.D 1.D
1.FG
1.H
2.C
2.A
2.D
2.B
2.E
2.E
Page 3

Table of contents
EN
Introduction 4
Characteristics 4
Security Advise
1. Assembling the Rotalux Softbox: 6
2. Mounting the Rotalux Softbox on the Elinchrom flash-unit: 7
Warranty 28
DE
Einleitung 8
Charakteristik 9
Sicherheits- und Warnhinweis 9
1. Zusammenbau der Softbox 10
2. Montage auf die Blitzleuchte 11
Warranty 28
FR
Introduction 12
Caractéristiques 13
Avertissement de sécurité 13
1. Assemblage des Soft Box Rotalux 14
2. Montage d’une boîte Rotalux sur une unité flash Elinchrom 15
Warranty 28
5
IT
Introduzione 16
Caratteristiche 17
Consigli di sicurezza 18
1. Montaggio del softbox Rotalux: 19
2. Montaggio dei softbox Rotalux sui flash Elinchrom: 20
Warranty 28
ES
Introducción 21
Características 22
Recomendaciones de seguridad 23
1. Montaje de la caja de luz Rotalux 24
2. Montaje de una caja de luz Rotalux en una antorcha Elinchrom 25
Warranty 28
3
Page 4

Rotalux Softbox User Manual
Introduction
Dear Photographer
Thank you for buying the ELINCHROM Rotalux Softbox. All Elinchrom
products are manufactured using the most advanced technology.
Carefully selected components are used to ensure the highest quality
and the equipment is submitted to many tests both during and after
manufacture. We trust that it will give you many years of reliable
service.
Please read the instructions carefully, before use, for your safety
and to obtain maximum benet from many features.
Your Elinchrom-Team
The easy mounting Rotalux system is probably the most widely
copied of all Softbox systems. However, it is easier to copy a design
than a quality and they remain the best units in their class.
What continues to make the Elinchrom units unique are the optional
sets of deectors – gold, silver, frosted and translucent that enable
the softness / hardness and colour to be modied; tting centrally over
the ashtube at your chosen distance. Folding down like an umbrella,
they are easily transported or just kept clean, in their included carrying
bag.
Characteristics
• Rotalux Speedring with improved mechanics and extremely
lightweight, only 263 g.
• Improved nish of the Rotalux reector tissue with grey piping for
better light efciency.
• 360° revolving system.
• Folds down like an umbrella, without dismounting the softbox.
• The translucent Deector to modify softness is included.
• Carrying bag for a folded Rotalux is included.
• Optional Hooded Diffusers to control the light spread, are available
for all Rotalux.
4
Page 5

• Optional Rotagrids for direct lighting are available for the Rotalux
70x70 cm, 60x80 cm and the 90x110 cm.
• Lighttools™ offers a wide range of grids in different sizes and
angles for Rotalux softboxes.
• Adapter Speed Rings for other ash brands such as Profoto™,
Bowens™, Hensel™, Alien-Bees™ / Balcar™ are available soon.
Adapters for additional brands are in process.
Security Advise
• The maximum modelling lamp wattage for all Rotalux softboxes is
limited to 300 W
• Ensure that the Rotalux is correctly assembled and locked to the
ash unit.
• The unit, the ash tube and accessories may become very hot
during and after use! To avoid injuries, handle with isolating cloth or
wait until parts have cooled down.
• Even though we use re retardant materials; the fabric should
never get in contact with the hot ash tube or the modelling lamp.
• The metal Speed Ring and the locking knob for the revolving
system may heat up enormously when the ash unit is used at
maximum ash and modelling lamp power levels. Please wait until
the parts have cooled down, before packing away.
• Always switch the ash unit off before tting or exchanging
reectors and softboxes.
• Ensure that the ventilation system of ashunits is working correctly.
• Double check that the internal fabric diffuser is correctly tted and
does not make contact with the hot ash tube and modelling lamp.
• Lower the modelling lamp power and reduce the number of ashes
per minute, when small size softboxes are used, such as the
Rotalux models 26178-26180-26181-26175. The reective surface
is very close to the modelling lamp/ ashtube. The fabric, can be
damaged by excessive heat.
English
5
Page 6

Rotalux Softbox User Manual
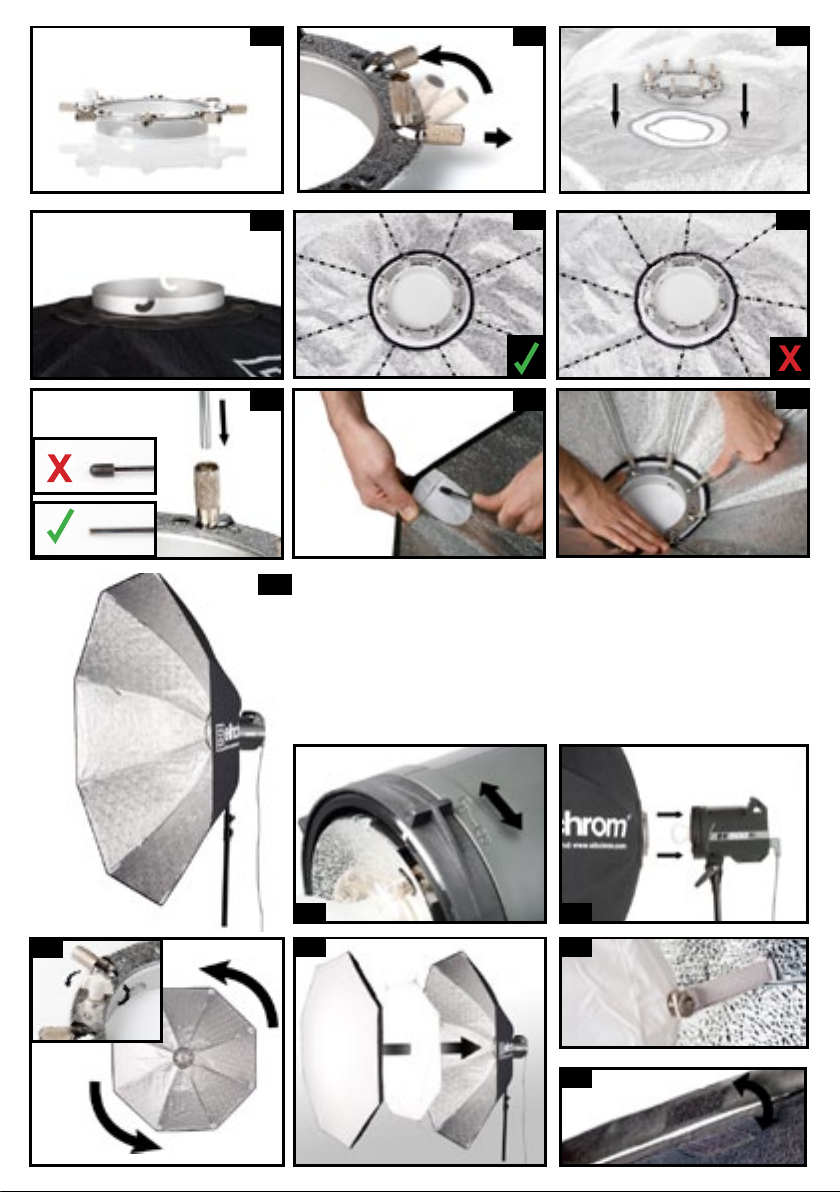
1. Assembling the Rotalux Softbox:
A) Place the speed ring with the locking knob (for the 360° revolving
system) at the top, on a rm horizontal surface.
B) Pull out each of the rod sockets and move them into the 90° vertical
position and release.
C) Place the speed ring on the centre of the reection cloth.
D) Ensure that the slots of the rod sockets coincide with the seams of
the reection cloth.
E) Insert the bare ends of the rods into the sockets of the speed ring.
F) Que at a time bend rods opposite outwards, applying gradual
pressure on the capped end to give slight curvature. Manipulate the
respective capped ends to t into the cloth pockets at the coinciding
corners of the reection cloth. If necessary, readjust shown in
picture 1 D.
G) The rods xed at both ends, have now a convex curve. Hold the rod
and twist each to make the curve concave.
H) Hold down the speed ring in a xed position. Que at a time apply
pressure on the rods near the rod socket. The rod sockets return to
the previous horizontal position and lock. The reection cloth now
acquires a concave tent-like curvature.
I) The Rotalux Softbox is now ready to be mounted on the ash unit.
6
Page 7

2. Mounting the Rotalux Softbox on the Elinchrom ash-unit:
A) Turn the locking ring of the ash unit (mounted on the tripod), anti
clockwise to unlock the bayonet. Remove the protective cap from
the ash unit anti clockwise.
B) Ensure that the locking knob on the speed ring is tightened (see
2.C). Insert the Rotalux speed ring and turn clock wise. It clicks into
place. Turn the locking ring clockwise to lock the bayonet with the
Rotalux speed ring attached.
C) The angle of the Rotalux softbox can be adjusted with the revolving
system. Unlock the locking knob of the speed ring and turn the
softbox into the desired position. Make sure that the speed ring is
locked in the bayonet of the ash unit whilst turning the softbox.
NOTE: The speed ring and the locking knob may become
hot when the Rotalux is in use. Protect your hands with heat
resistant gloves and switch off the unit and disconnect it from
the mains, when you need to adjust the softbox angle.
D) Attach the diffusing cloths of the softbox.
E) Fix the cloths with the Velcro-fastening tapes along the softbox sides
and edges.
English
7
Page 8

Rotalux Softbox Gebrauchsanleitung
Einleitung
Lieber Photograph und Fotoenthusiast
Herzlichen Dank, dass Sie sich für Elinchrom Rotalux Softboxen
entschieden haben.
Die hervorragende Lichtqualität und die technische Leistung der
Rotalux beruhen auf langjährigen Erfahrungen auf dem Gebiet der
Herstellung von Blitzanlagen und Zubehör. Elinchrom Blitzlichtprodukte
entsprechen den gültigen elektrischen Normen unter Verwendung
hochwertiger ausgesuchter Materialien, die Ihnen langfristige
Produktivität und Zuverlässigkeit gewähren sollen.
Bitte sorgfältig lesen...
Diese Anleitung enthält Fotos von Produkten die ständig
weiterentwickelt werden. Von daher sind Änderungen in Ausstattung,
Funktionen und Design jederzeit möglich. Zudem werden Blitzgeräte
mit Reektoren oder Stativen gezeigt, die nicht, oder nur in Einzelfällen
zur Grundausstattung eines Blitzgerätes oder eines Sets dazugehören.
Aktualisierte Informationen über Blitzgeräte, Zubehör und EL-Skyport
sind von der Elinchrom Webseite zu entnehmen www.elinchrom.com.
Toleranzen der technischen Daten für Bauelemente und Messwerte
entsprechen den IEC - und EC Normen. Technische Änderungen
vorbehalten. Die Werte können durch Messgeräte und Toleranzen in
den Bauelementen schwanken und sind als Richtwerte zu verstehen
und nicht im rechtlichen Sinne als zugesicherte Eigenschaften. Keine
Haftung für Druckfehler.
Ihr Elinchrom Team
8
Page 9

Charakteristik
• Der Rotalux Adapterring wurde mechanisch verbessert und wiegt
nur noch 263 g.
• Neue verbesserte Rotalux Materialien und Verarbeitung mit grauen
Nähten, um durchscheinendes Licht zu vermindern.
• Rotalux Adapterring mit 360° Drehvorrichtung.
• Rotalux kann ohne Demontage wie ein Schirm zusammengefaltet
und transportiert werden.
• Die Grundausstattung beinhaltet einen Deektor zur Modizierung
der Lichtcharakteristik.
• Enthalten ist auch eine Tragetasche für eine zusammengefaltete
Rotalux.
• Optionale Hooded Diffusoren sind verfügbar zur Verminderung des
Streulichtes.
• Optionale RotaGrid Waben sind verfügbar für Rotalux 70x70 cm,
60x80 cm und 90x110 cm.
• Lighttools™ bietet eine weite Auswahl von Waben für alle Rotalux
softboxen an.
• Bald Verfügbar... Adapterringe für Profoto™, Bowens™, Hensel™,
Alien-Bee™ / Balcar™ und weitere sind in Planung.
Deutsch
Sicherheits- und Warnhinweis
• Maximales Halogenlicht: 300 W
• Darauf achten das die Rotalux korrekt zusammengebaut und am
Blitzgerät angebracht wurde.
• Adapterring, Arretierungsschraube und Blitzgerät werden sehr heiß
während des Gebrauchs. Um Verbrennungen zu vermeiden, immer
isolierende Schutzhandschuhe tragen und abkühlen lassen, bevor
die Softbox oder die Position gewechselt wird.
• Auch wenn feuerverzögernde Materialien verwendet werden,
niemals die Softbox überhitzen und vermeiden Sie das die Blitzröhre
und die Pilotlampe mit dem Stoff in Berührung kommt.
• Immer das Blitzgerät erst abschalten bevor Diffusoren und Zubehör
angebracht werden.
9
Page 10

Rotalux Softbox Gebrauchsanleitung
• Bitte darauf achten das die Ventilation des Blitzgerätes funktioniert!
• Bei den ROTALUX Softboxen 26178-26180-26181-26175 (kleinere
Ausführungen) liegt die reektierende Innenseite sehr nahe an
der Pilotlampe und der Blitzröhre. Die Stoffbespannung und die
reektierende Innenseite kann durch die Hitzeentwicklung beschädigt
werden (vor allem mit Halogenlampen bei hoher Leistung). Bitte
reduzieren Sie in diesem Falle die Intensität des Pilotlichtes.
Bei schnellen Blitzfolgen über einen längeren Zeitraum ist es
empfehlenswert das Pilotlicht auf ein Minimum zu reduzieren oder gar
auszuschalten.
• Verschmutzte oder veraltete Diffusoren können die Lichtfarbe
verfälschen und müssen gewechselt werden.
• Achten Sie darauf das keine heißen Leuchtquellen auf die Rotalux
Softbox gerichtet sind, die eventuell die Softbox Außenbespannung
beschädigen oder gar verbrennen!
• Achten Sie immer darauf, dass die Softbox nicht überhitzt, während
sie benutzt wird. Nichtbenötigte Beleuchtung immer abschalten.
• Elinchrom übernimmt keinerlei Haftung für Beschädigungen die durch
Hitzeentwicklung entstehen! Folgeschäden sind bei sachgemäßem
Umgang auszuschließen
1. Aufbau der Softbox
A) Legen Sie den Rotalux Adapterring auf eine ebene Fläche (z.B.
Tisch). Der Blockierungsknebel für die Rotation muss nach oben
zeigen.
B) Bringen Sie die Hülsen für die Spannstäbe in eine aufrechte
Position, indem Sie diese zunächst nach außen ziehen und dann
um 90° nach oben stellen.
C) Entfalten Sie die Bespannung und legen Sie diese so auf den
Tisch, dass die reektierende Seite nach oben zeigt. Den Rotalux
Adapterring platzieren Sie zentrisch in die Aussparung.
D) Orientieren Sie die Hülsen für die Spannstäbe so, dass deren
Position identisch ist mit den Nähten der Bespannung.
10
Page 11

E) Stecken Sie die Spannstäbe in die Hülsen, möglichst paarweise und
immer gegenüberliegend.
F) Nehmen Sie den ersten Spannstab, stecken Sie die Seite (ohne
Kappe) in die federnde Hülse und (mit etwas Kraft und geringfügiger
Spannung) das entgegengesetzte Ende (mit der Schutzkappe) in
die vorgesehene Manschette der Softbox. Das gleiche machen
Sie mit dem gegenüberliegenden (nicht daneben liegenden!)
Spannstab, usw.
G) Jetzt sitzen die Spannstäbe mit einer konvexen Biegung in der
Softbox. Halten Sie die Softbox am Rotalux Adapterring. Durch
einen leichten Druck auf die Spannstäbe erreichen Sie, dass die
Biegung nach innen orientiert ist (konkav).
H) Nun den Rotalux Adapterring, mit der Handäche nach unten
drücken und gleichzeitig mit der anderen Hand eine Hülse nach
unten (90°) in die Rasterung zurückführen. Damit erreichen die
Spannstäbe eine feste Arretierung mit der erforderlichen Spannung.
Gegebenenfalls, nochmals die Positionierung der Spannstäbe
nachkorrigieren (gleiche Position wie die Nähte der Softbox).
I) Die Rotalux Softbox kann nun am Blitzgerät befestigt werden.
2. Montage der Elinchrom Blitzleuchte
Deutsch
A) Drehen Sie das Verriegelungsbajonett an der Blitzleuchte so, dass
die beiden entsprechenden Markierungen nebeneinander liegen
(Gegen den Uhrzeigersinn = Blockierung gelöst).
B) Vergewissern Sie sich, dass die Rotation der Soltbox blockiert ist.
Setzen Sie den Rotalux Adapterring in das Lampenbajonett ein
und drehen Sie ihn im Uhrzeigersinn. Ein Klick zeigt an, dass die
Softbox im Bajonett eingerastet ist. Nun den Bajonettring verriegeln.
C) Lösen Sie etwas die Arretierung der Rotation, um die Softbox
besser ausrichten zu können. Nun setzen Sie den Innendiffusor ein,
falls dieser für die Lichtcharakteristik benötigt wird.
D) Nun wird der Außendiffusor mit dem Velcro – Klettverschluss
befestigt.
E) Entfernen des Blitzgerätes: arretieren Sie die Rotation und verfahren
Sie in umgekehrter Reihenfolge.
11
Page 12

Rotalux Softbox User Manual
Introduction
Cher photographe,
Merci d’avoir choisi d’acheter cette boîte à lumière Rotalux. Tous les
produits Elinchrom sont fabriqués en utilisant la technologie la plus
avancée. Elinchrom n’utilise que des composants de haute qualité et
testés pour la fabrication de ses produits. Nous espérons que vous
serez pleinement satisfait de cet appareil.
Nous vous prions de vous conformer aux présentes instructions et aux
prescriptions de sécurité. Vous obtiendrez ainsi les résultats que vous
attendez de vote appareil et vous assurerez de son fonctionnement
pour longtemps.
Il est possible que ce manuel montre des images de produits avec
des accessoires qui ne fassent pas partie de produits, sets ou unité
individuelle. Les sets et les unités individuelles peuvent changer à tout
moment sans avis et peuvent varier selon les pays. Vous trouverez les
congurations actuelles sur www.elinchrom.com
Les données techniques et fonctions des produits sont sujettes à
modications sans avis. Les tolérances des spécications et des
composants sont conformes aux standards IEC et CE. Les valeurs
listées peuvent varier dues aux tolérances des composants ou des
instruments de mesure. Nous déclinons la responsabilité des erreurs
d’impression.
Nous vous remercions de votre conance,
Votre équipe Elinchrom.
Le système de montage Rotalux est probablement le système de boîtes
à lumière le plus copié au monde. Il est cependant plus facile de copier
un design plutôt que sa qualité et le système Rotalux reste le meilleur
dans sa catégorie.
Ce qui continue de faire les produits Elinchrom uniques sont les sets
de déecteurs – doré, argent, translucide et satiné qui permettent
de modier l’adoucissement/le durcissement ainsi que la couleur; se
xant centralement devant le tube éclair à votre distance voulue. Les
boîtes à lumières Rotalux se déplient comme un parapluie, sont faciles
à transporter et peuvent être gardés au propre dans leur housse de
transport
12
Page 13

Caractéristiques
• Monture Rotalux avec mécanique améliorée et extrêmement
légère, seulement 263 g.
• Finition grise sur le tissu réecteur Rotalux pour une efcacité
optimale de la lumière.
• Système de pivotement à 360°
• Se déplie comme un parapluie sans avoir besoin d’ôter la monture
• Un déecteur translucide est inclus an de modier ou non la
douceur de la lumière
• Une housse de transport pour le Rotalux déplié est incluse.
• Des coupes ux pour contrôler la répartition de la lumière sont
disponibles pour tous les Rotalux.
• Des grilles nid d’abeilles sont disponibles pour les Rotalux 70x70
cm, 60x80 cm et 90x110 cm.
• Lighttools™ offre un large choix de grilles nids d’abeilles de
différentes tailles et angles pour les boîtes à lumières Rotalux.
• Des montures Rotalux adaptées pour d’autres marques, tels
que Profoto™, Bowens™, Hensel™, Alien-Bee™ / Balcar™ sont
disponibles. Les adaptateurs pour d’autres marques suivront.
Français
Avertissement de sécurité
• La puissance maximale de lampe pilote est de 300 W pour toutes
les boîtes à lumières Rotalux.
• Assurez vous que la Rotalux est assemblée et xée correctement
sur l’unité ash.
• L’unité, le tube éclair ainsi que les accessoires peuvent devenir très
chaud pendant et après usage. An d’éviter des blessures, maniez
avec un tissu isolant ou attendez que les parties aient refroidies.
• Même si nous utilisons des matériaux anti inammables ; les tissus
ne devraient jamais rentrer en contact avec le tube éclair ou la
lampe pilote.
• La monture en métal et la vis de blocage du système de rotation
peuvent chauffer énormément lorsque les unités ashs sont
utilisées à puissance maximale. Veuillez attendre que les parties
aient refroidies.
13
Page 14

Rotalux Softbox Manuel d’utilisation
• Eteigniez l’unité ash avant d’insérer ou de remplacer un réecteur
ou une boîte à lumière.
• Assurez vous que le ventilateur fonctionne correctement sur l’unité.
• Assurez vous que le tissu interne soit xé correctement et qu’il ne
soit pas en contact avec le tube éclair ou la lampe pilote.
• Baissez la puissance de la lampe pilote et réduisez le nombre de
ash par minute quand des boîtes à lumière de petites tailles sont
utilisés, comme les modèles de Rotalux 26178 – 26180 – 26181 –
26175. Le tissu peut être endommagé en cas de chaleur excessive.
• Les diffuseurs peuvent être sali et la température de couleur peut
varier dans ces cas. Le nettoyage à sec peut parfois éviter ce genre
de problème.
• La garantie n’est plus valable si les produits sont utilisés
incorrectement ou s’ils sont endommagés à cause d’une chaleur
excessive.
1. Assemblage des Soft Box Rotalux :
A) Placer la monture avec le bouton de blocage dirigé contre le haut
(pour le système de rotation à 360°) sur une surface horizontale.
B) Libérer les douilles en appliquant une traction vers l’extérieur et un
pivotement de 90 degrés.
C) Déployer la toile avec la partie rééchissante dirigée contre le
haut, insérer la monture dans la toile en faisant sortir la bague à
baïonnette par l’ouverture.
D) Orienter les douilles de manière à ce qu’elles coïncident avec les
coutures du réecteur.
E) Insérer les tiges dans les douilles, de préférence deux à deux et en
opposition.
F) Saisir une tige et appliquer une pression graduelle sur l’extrémité de
façon à donner une légère courbure. Insérer l’extrémité de la tige
pourvue de sa protection noire dans le logement, faire de même
pour la tige placée en opposition et ainsi de suite.
14
Page 15

G) Inverser la courbure des tiges en exerçant une pression et rotation,
la courbure doit être concave et épouser la forme du réecteur.
H) Maintenir la monture d’une main et mettre en place les tiges
en appliquant une pression près des douilles de verrouillage
an qu’elle revienne dans leurs positions de départ. Corriger
éventuellement la position des tiges par une légère rotation de la
monture, pour que les tiges épousent parfaitement les coutures du
réecteur.
I) Serrer la vis de blocage (illustration 2.C), la boîte à lumière Rotalux
est maintenant prête à être montée sur le ash.
2. Montage d’une boîte Rotalux sur une unité ash Elinchrom :
A) Placer le ash sur un trépied et tourner la bague de verrouillage du
ash dans le sens inverse des aiguilles d’une montre, de manière à
amener les repères l’un en face de l’autre. Retirez le capuchon de
protection.
B) Aligner sur le repère et engager la baïonnette du réecteur Rotalux
par une rotation à droite ( dans le sens des aiguilles d’une montre).
Ensuite verrouiller la bague de sécurité en la faisant tourner elle
aussi dans le même sens.
Français
C) Desserrer légèrement la vis de blocage pour pouvoir ultérieurement
modier la position angulaire de la boîte à lumière.
Avertissement : La monture et la vis se blocage peuvent
devenir très chaud lorsque la Rotalux est utilisée. Protégez vos
mains avec des gants résistants à la chaleur si vous voulez
modier la position angulaire de la boîte à lumière en cours
d’utilisation.
D) Mettre en place le diffuseur frontal en engageant ce dernier sur les
extrémités du réecteur. Vous pouvez également mettre en place la
toile de diffusion interne.
E) Fixer le diffuseur en pressant les bandes «Velcro» sur chaque bord
du réecteur.
15
Page 16

Istruzioni per l’uso dei softbox Rotalux
Introduzione
Caro Fotografo,
Grazie per aver acquistato un softbox Rotalux ELINCHROM. Tutti
i prodotti Elinchrom sono fabbricati con le tecnologie più avanzate.
I componenti sono stati accuratamente selezionati per assicurare
la miglior qualità e l’apparecchiatura è stata sottoposta a numerosi
controlli sia durante che dopo la produzione. Siamo certi che questo
prodotto potrà garantirLe un servizio afdabile per molti anni.
Si prega di leggere attentamente le istruzioni prima dell’uso, per
garantire la massima sicurezza e sfruttare al meglio i numerosi
vantaggi del prodotto.
In questo manuale possono comparire immagini di prodotti completi
di accessori che non sono forniti di serie con i set o i singoli articoli
della gamma. Le congurazioni dei set e dei singoli articoli Elinchrom
possono variare senza preavviso e a seconda dei paesi. Per le
congurazioni disponibili, consultare il sito www.elinchrom.com
I dati tecnici, le caratteristiche e le funzioni dei prodotti Elinchrom
possono essere modicati senza preavviso.
Tolleranze delle speciche e dei componenti conformi agli standard
IEC e CE. I valori indicati possono variare a seconda delle diverse
tolleranze dei componenti utilizzati o degli strumenti di misura. Le
caratteristiche tecniche dei prodotti sono suscettibili di modiche senza
preavviso. Si declina qualsiasi responsabilità per eventuali errori di
stampa.
Il team Elinchrom
Il sistema Rotalux è facile da montare ed è probabilmente il più imitato
tra tutti i sistemi di softbox. Tuttavia, per quanto sia facile copiare la
concezione di un prodotto, è molto più difcile riprodurne la qualità e
quindi questi softbox rimangono tuttora i migliori della loro categoria.
16
Page 17

Ciò che rende unici i softbox Elinchrom sono i set dei deettori (dorati,
argentati e traslucidi) che consentono di modulare la morbidezza/
durezza e il tono della luce, grazie alla montatura centrale sopra il
tubo ash e alla distanza regolabile. I softbox Rotalux si possono
ripiegare come un ombrello per poter essere facilmente trasportati e
possono essere riposti nell’apposita sacca, anche semplicemente per
proteggerli dalla polvere.
Caratteristiche
• Anello adattatore Rotalux con meccanica migliorata, ultraleggero
(solo 263 g).
• Finitura migliorata del tessuto riettente Rotalux con nervature grigie
per una migliore resa della luce.
• Sistema di rotazione a 360°.
• Ripiegabili come un ombrello senza bisogno di essere smontati.
• Deettore traslucido bianco fornito in dotazione per modicare la
morbidezza della luce.
• Sacca di trasporto inclusa.
• Per tutti i softbox Rotalux sono disponibili i diffusori anteriori optional
per un miglior controllo della distribuzione della luce.
• Per i modelli Rotalux 70 x70 cm, 60 x 80 cm e 90 x110 cm sono
disponibili i diffusori Rotagrid optional per l’illuminazione diretta.
• Lighttools™ offre un’ampia gamma di griglie per i softbox Rotalux,
disponibili in varie misure e con varie inclinazioni.
• Sono disponibili anelli adattatori per altre marche, come Profoto™,
Bowens™, Hensel™, Alien-Bee™ / Balcar™. Sono inoltre in fase di
realizzazione altri tipi di adattatori per altre marche.
Italiano
17
Page 18

Istruzioni per l’uso dei softbox Rotalux
Consigli di sicurezza
• La potenza massima della lampada pilota per tutti i softbox Rotalux
è limitata a 300 W.
• Vericare che il Rotalux sia correttamente montato sulla torcia.
• La torcia, il tubo ash e gli accessori tendono a surriscaldarsi
durante e dopo l’uso! Per evitare danni sici, maneggiare con
un panno isolante o attendere no a che i componenti si siano
raffreddati.
• Anche se i nostri prodotti utilizzano materiali ignifughi, il tessuto
non deve mai entrare a contatto del tubo ash o della lampada
pilota caldi.
• L’anello adattatore in metallo e la vite di bloccaggio del sistema di
rotazione potrebbero surriscaldarsi notevolmente quando il ash
viene utilizzato alla massima potenza del lampo e della lampada
pilota. Si raccomanda di attendere che tutti i componenti di siano
raffreddati.
• Spegnere sempre il ash prima di inserire o di sostituire i riettori e
i softbox.
• Vericare che il sistema di ventilazione del ash funzioni
correttamente.
• Controllare accuratamente che il telo diffusore interno sia
correttamente montato e che non entri a contatto del tubo ash e
della lampada pilota caldi.
• Quando si utilizzano softbox di piccole dimensioni, come i modelli
Rotalux 26178, 26180, 26181 o 26175, ridurre la potenza della
lampada pilota e la quantità di lampi al minuto. La supercie
riettente si trova molto vicina alla lampada pilota e al tubo ash. Il
calore eccessivo può danneggiare il tessuto.
• I diffusori possono sporcarsi e la temperatura del colore può virare
al giallo dopo qualche tempo. In tal caso, è opportuno sostituirli.
Talvolta è sufciente lavarli a secco.
• Il prodotto non è garantito dai danni provocati da un utilizzo
improprio o dal calore eccessivo.
18
Page 19

1. Montaggio del softbox Rotalux:
A) Posizionare l’anello adattatore con la vite di bloccaggio (per la
rotazione a 360°) rivolta verso l’alto e con i cilindretti in posizione
orizzontale.
B) Tirare i cilindretti verso l’esterno e orientarli verticalmente a 90°.
C) Posizionare l’anello adattatore sul telo riettente.
D) Orientare l’anello adattatore in modo tale che i fori dei cilindretti
siano allineati con le cuciture del telo riettente.
E) Inserire le estremità scoperte delle bacchette nei cilindretti.
F) Flettere le bacchette verso l’esterno, esercitando una pressione
graduale sulle estremità provviste di gommino, in modo tale da
imprimere una leggera curvatura. Inserire le estremità con il
gommino nelle corrispondenti tasche sugli angoli del telo riettente.
Se necessario, riallineare come mostrato nella gura 1 D.
G) Le bacchette ssate a entrambe le estremità presentano ora una
curvatura convessa. Invertire la curvatura delle bacchette in modo
tale che risulti concava.
Italiano
H) Tenendo fermo l’anello con una mano, spingere le bacchette
verso il basso in prossimità dei cilindretti in modo tale da bloccare
di nuovo i cilindretti nella posizione orizzontale originaria. Il telo
riettente ora ha una curvatura concava simile a quella di una
tenda.
I) A questo punto il softbox Rotalux è pronto per essere montato sul
ash.
19
Page 20

Istruzioni per l’uso dei softbox Rotalux
2. Montaggio dei softbox Rotalux sui ash Elinchrom:
A) Ruotare l’anello di bloccaggio della torcia (montata sul treppiede)
in senso antiorario per aprire la baionetta. Togliere la calotta di
protezione dalla torcia ruotandola in senso antiorario.
B) Assicurarsi che la vite di bloccaggio sull’anello adattatore sia serrata
(vedere 2 C). Inserire l’anello adattatore del Rotalux e ruotare in
senso orario no a bloccarlo in posizione con uno scatto. Ruotare
l’anello di bloccaggio in senso orario per bloccare la baionetta con
inserito l’anello adattatore Rotalux.
C) Il softbox Rotalux può essere regolato con il sistema di rotazione.
Sbloccare la vite di bloccaggio posta sull’anello adattatore e
ruotare il softbox nella posizione desiderata. Durante la rotazione
del softbox, assicurarsi che l’anello adattatore sia perfettamente
bloccato nella baionetta della torcia.
NOTA: L’anello adattatore e la vite di bloccaggio tendono a
surriscaldarsi durante l’utilizzo del Rotalux. Proteggere le mani
con guanti resistenti al calore e spegnere il ash scollegandolo
dall’alimentazione elettrica quando si deve regolare
l’inclinazione del softbox.
D) Applicare il telo diffusore del softbox.
E) Fissare il telo con il Velcro lungo i lati e gli angoli del softbox.
20
Page 21

Manual de Instrucciones de las cajas de luz Rotalux
Introducción
Estimado fotógrafo,
Gracias por haber comprado una caja de luz Rotalux ELINCHROM.
Todos los productos Elinchrom se fabrican utilizando la tecnología
más moderna y avanzada. Sus componentes son cuidadosamente
seleccionados para asegurar la más alta calidad y los equipos se
someten a muchos controles, tanto durante como después de su
fabricación. Estamos seguros de que le ofrecerán muchos años de
servicio able.
Antes del uso le aconsejamos leer cuidadosamente las instrucciones
para su seguridad y para obtener el máximo benecio de las muchas
características del equipo.
Este manual puede contener imágenes de productos con accesorios
que no se suministran de serie con los equipos o unidades
individuales de la gama. Las conguraciones de las unidades
individuales o de los equipos completos Elinchrom pueden variar
sin aviso previo y las mismas pueden ser diferentes en otros países.
Consulte la página www.elinchrom.com para ver las conguraciones
disponibles
Español
Los datos técnicos, características y funciones de los productos
Elinchrom pueden ser modicados sin aviso previo.
Tolerancias de las especicaciones técnicas y componentes conforme
a los estándares CEI y CE. Los valores indicados pueden diferir
debido a las tolerancias de los componentes o de los instrumentos
de medición. La información técnica está sujeta a modicaciones. Se
declina toda responsabilidad por los eventuales errores de impresión.
Su Equipo Elinchrom
El sistema Rotalux de fácil montaje es probablemente el más
ampliamente imitado entre todos los sistemas de cajas de luz. Sin
embargo, por fácil que sea copiar el diseño de un producto, es mucho
más difícil reproducir su calidad y por consiguiente estas cajas de luz
permanecen hasta hoy como las mejores de su categoría.
21
Page 22

Manual de Instrucciones de las cajas de luz Rotalux
Lo que convierte en únicas a las unidades Elinchrom son los juegos de
deectores -dora¬dos, plateados y translúcidos- montados en el centro
sobre el tubo de ash y a distancia regulable, que permiten modicar
el color y la intensidad de la luz. Cerrándose como un paraguas
son fáciles de transportar y de mantener protegidas contra el polvo
guardadas en su funda incluida.
Características
• La potenza massima della lampada pilota per tutti i softbox Rotalux
Anillo adaptador Rotalux con mecánica mejorada y ultraliviano
(sólo 263 g).
• Acabado mejorado de la tela reectora Rotalux con nervadura gris
para una mejor eciencia luminosa.
• Sistema de rotación a 360°.
• Se cierra como un paraguas, sin necesidad de desmontarla.
• Deector translúcido blanco incluido para modicar la intensidad de
la luz.
• Bolsa de transporte incluida.
• Para todas las cajas de luz Rotalux hay disponibles unos difusores
opcionales con visera para controlar la distribución de la luz.
• Para los modelos Rotalux 70x70 cm, 60x80 cm y 90x110 cm se
encuentran disponibles los difusores Rotagrids opcionales para la
iluminación directa
• Lighttools™ ofrece una vasta gama de rejillas de diferentes
tamaños y ángulos para las cajas de luz Rotalux
• Se dispone también de anillos adaptadores Speed para otras
marcas de ash como Profoto™, Bowens™, Hensel™, Alien-
Bee™ / Balcar™. Se encuentran también en fase de fabricación
adaptadores para otras marcas.
22
Page 23

Recomendaciones de seguridad
• La potencia máxima de la lámpara de modelado para todas las cajas
de luz Rotalux es de 300 W
• Compruebe que la Rotalux esté correctamente montada y conectada
a la antorcha.
• ¡La unidad, el tubo de ash y los accesorios se pueden calentar
considerablemente durante y después del uso! Para evitar accidentes,
manéjelos con guantes de aislamiento o espere hasta que las piezas
se hayan enfriado.
• Aunque utilizamos materiales ignífugos para nuestros productos, las
telas jamás deben entrar en contacto con el tubo de ash o con la
lámpara de modelado.
• El anillo adaptador de metal y la perilla de bloqueo del sistema de
rotación pueden calentarse enormemente cuando la antorcha se usa
a la máxima potencia del ash y de la lámpara de modelado.
Se recomienda esperar hasta que las piezas se hayan enfriado.
• Apague siempre la antorcha antes de conectar o reemplazar los
reectores y las cajas de luz.
• Compruebe que el sistema de ventilación de la antorcha funcione
correctamente.
• Compruebe atentamente que la tela difusora interna esté
correctamente montada y que no entre en contacto con el tubo de
ash y la lámpara de modelado calientes.
• Cuando utilice cajas de luz de pequeñas dimensiones, como los
modelos Rotalux 26178 – 26180 – 26181 – 26175, reduzca la potencia
de la lámpara de modelado y la cantidad de destellos por minuto.
La supercie reectora se encuentra muy cerca de la lámpara de
modelado y del tubo de ash. El calor excesivo puede dañar la tela.
• Los difusores se pueden ensuciar y después de algún tiempo la
temperatura del color se puede poner amarillenta. Si esto sucede es
necesario sustituirlos. A veces se pueden recuperar llevándolos a una
tintorería de lavado en seco.
• El producto no se garantiza contra los daños causados por un uso
impropio o por exceso de calor.
Español
23
Page 24

Manual de Instrucciones de las cajas de luz Rotalux
1. Montaje de la caja de luz Rotalux:
A) Coloque el anillo adaptador con la perilla de bloqueo (para el sistema
de rotación a 360°) en la parte superior, en posición horizontal
quedando en el borde con las ranuras en zig-zag .
B) Libere los casquillos de las varillas tirándolos hacia fuera y oriéntelos
verticalmente a 90°.
C) Coloque el anillo adaptador sobre la tela reectora.
D) Compruebe que las ranuras de los casquillos de las varillas coincidan
con las costuras de la tela reectora.
E) Inserte los extremos descubiertos de las varillas en los casquillos del
anillo adaptador.
F) Doble hacia afuera las varillas, aplicando una presión gradual sobre el
extremo con capuchón de modo de curvarlas levemente. Introduzca
los extremos cubiertos en los casquillos de las varillas, en los ángulos
correspondientes de la tela reectora. Si es necesario, vuelva a alinear,
como ilustrado en la gura 1 D).
G) Las varillas jadas en ambos extremos tendrán ahora una curva
convexa. Invierta la curva de las varillas de modo tal que resulte
cóncava.
H) Manteniendo jo el anillo adaptador con una mano, empuje hacia
abajo las varillas cerca de los casquillos, de modo tal que los mismos
regresen y permanezcan bloqueados en la posición horizontal original.
La tela reectora ahora tendrá una curvatura cóncava, similar a la de
una tienda.
I) Ahora la caja de luz Rotalux estará lista para ser montada en la
antorcha.
24
Page 25

2. Montaje de una caja de luz Rotalux en una antorcha Elinchrom:
A) Gire el anillo de bloqueo de la antorcha (montado en el trípode),
en sentido antihorario para abrir la bayoneta. Quite el capuchón de
protección de la antorcha girándolo en sentido antihorario.
B) Compruebe que la perilla de bloqueo del anillo adaptador esté
apretada (véase 2.C). Inserte el anillo adaptador Rotalux y gírelo en
sentido horario hasta que se bloquee en posición con un chasquido.
Gire el anillo de bloqueo en sentido horario para bloquear la
bayoneta con el anillo adaptador Rotalux insertado.
C) La caja de luz Rotalux se puede ajustar con el sistema de rotación.
Aoje la perilla de bloqueo del anillo adaptador y coloque la caja de
luz en la posición deseada. Compruebe que el anillo adaptador esté
perfectamente bloqueado en la bayoneta de la antorcha durante la
rotación de la caja de luz.
NOTA: El anillo adaptador y la perilla de bloqueo tienden a
recalentarse durante el uso de la Rotalux. Proteja sus manos con
guantes resistentes al calor; apague el ash y desconéctelo de la
alimentación eléctrica cuando tenga que regular la inclinación de la
caja de luz.
D) Coloque la tela difusora de la caja de luz.
E) Fije la tela con el Velcro a lo largo de los lados y bordes de la caja
de luz.
25
Page 26

STRIP
Standard 26180 - - 26181 - - -
Hooded Diffuser - 26324 - - 26325 - -
Optional diffuser - -
Size (cm) 35 x 90 - - 130 x 50 - - -
Depth (cm) 25 - - 42 - - -
15x90cm
26268
- -
25x130cm
26270
15x130cm
26269
OCTA
Standard 26183 - 26184 - 26186 -
Hooded Diffuser - 26326 - 26327 - 26320
Size (cm) Ø 100 - Ø 135 - Ø 175 -
Depth (cm) 32 - 42 - 50 -
SQUARE
Standard 26178 - - 26179 -
Hooded Diffuser - 26322 - - 26323
Rotagrid - - 26117 - -
Size (cm) 70 x 70 - - 100 x 100 -
Depth (cm) 32 - - 42 -
Page 27

Rotalux Family
• New Rotalux rectangular 60 x 80 cm / 90 x 110 cm.
• New Rotalux octagonal 175 cm.
Rotalux Diffuser - Reflector
• Improved quality of the diffusing and reflecting fabriks.
• Hooded Diffuser – reduces the spread of light.
• RotaGrid – sharper cut off, direct light.
• Grey rip piping, professional finish.
Rotalux Speed - Ring
• Lightweight Speed-Ring, only 263 g.
• Moulded Elinchrom Logo.
• Redesigned locking with wing nut.
• Redesigned snap locks.
SYSTEM UPGRADE
DEEP
Standard 26187 - 26185 -
Hooded Diffuser - 26770 - 26328
Size (cm) Ø 70 - Ø 100 -
Depth (cm) 40 - 65 -
Every Sofboxes come with:
• Reectiv Fabric
• External Diffuser
• Internal Diffuser
• Speed Ring
• Rods
• Carrying Bag
RECTA
Standard 26175 - - 26176 - -
Hooded Diffuser - 26318 - - 26319 -
Rotagrid - - 26110 - - 26111
Size (cm) 60 x 80 - - 90 x 110 - -
Depth (cm) 30 20 - 42 - -
Page 28

Warranty
This ELINCHROM product will be repaired free of charge by the vending agent if during a period of
24 months from date of purchase its working order is impaired through a manufacturing or material
defect. The faulty product should be immediately sent to the authorized dealer or ELINCHROM agent.
This guarantee is not valid for equipment which has been misused, dismantled, modified, or repaired
by persons not belonging to the ELINCHROM distribution network. It does not cover flash tubes, lamps
and the normal ageing of capacitors. No responsibilities can be accepted for damage, resulting from
unsatisfactory operation of the equipment, such as wasted film or other expenses.
Dieses ELINCHROM Produkt wird durch den Verkäufer des Gerätes kostenlos repariert, falls sich
innerhalb von 24 Monaten ab Verkaufsdatum durch Fabrikations oder Materialfehler verursachte
Mängel auftreten. Senden Sie das Gerät sofort an den zuständigen Händler oder ELINCHROM Vertreter.
Der Garantieanspruch entfällt, wenn das Gerät unsachgemäss behandelt oder durch unberechtigte,
Personen demontiert, umgebaut oder repariert wurde. Ausgeschlossen von dieser Garantie sind
Blitzröhren, Lampen, das normale Altern von Kondensatoren sowie Schäden die durch ein defektes
Gerät entstehen könnten, z.B. Filmverlust, Reise-und andere Kosten.
Cet appareil ELINCHROM sera gratuitement remis en état par son vendeur en cas de mauvais
fonctionnement imputable à un défaut de fabrication ou de composants apparu dans un délai de 24
mois à partir de la date d’achat. L’appareil doit être envoyé dès que possible à l’adresse du vendeur
ou de l’agent ELINCHROM autorisé. Cette garantie n’est plus valable pour les appareils soumis à un
usage non approprié démontés, modifiés ou réparés par des personnes n’appartenant pas au réseau
de distribution ELINCHROM. Sont exclus de cette garantie les tubes-éclairs, les lampes pilotes et le
vieillissement des condensateurs. ELINCHROM n’est pas responsable de dommages résultant d’un
fonctionnemement défectueux de l’appareil (perte de film, manque à gagner ou autres frais).
Questo prodotto ELINCHROM sarà riparato gratuitamente da un agente della casa produttrice se
durante un periodo di 24 mesi dalla data dell’acquisto il suo funzionamento è danneggiato da un
difetto di fabbricazione o di materiale. Il prodotto difettoso dovrà essere inviato immediatamente
a un centro autorizzato o ad un rappresentante ELINCHROM. Questa garanzia non si applica ad
apparecchiature usate in modo non conforme, che sono state smontate, su cui hanno operato o che
sono state riparate da personale non appartenente alla rete di distribuzione ELINCHROM. Parimenti
essa non copre lampadine per flash, lampade e il normale ammortamento dei condensatori. Non ci
si assume la responsabilità di danni derivanti da un funzionamento insoddisfacente dell’apparecchio
come pellicole rovinate o spese similari.
Este aparato ELINCHROM será reparado gratuitamente por el vendedor en caso de mal
funcionamiento, imputable a un defecto de fabricación o de material, surgido durante los 24
meses siguientes a la fecha de compra. El aparato detectuoso deberá ser enviado rápidamente
al comerciante o al agente ELINCHROM. Esta garantía no es válida para los aparatos sometidos
a un uso anormal, desmontados, modificados a reparados por personas que no pertenecen a la
red de distribución ELINCHROM. Esta garantía no incluye los tubos de destello, los capacitores y el
envejecimiento normal de las bombillas de luz de modelado, así como también cualquier daño que
pueda resultar del funcionamiento defectuoso del aparato (pérdida de film, gastos de desplazamiento,
pérdida de ganancias, etc.).
Page 29

Please „register“ your Elinchrom product online under:
i
Bitte registrieren Sie ihr Elinchrom Produkt unter:
Veuillez enregistrer votre produit Elinchrom on line sous:
Per favore registrare il suo prodotto Elinchrom in linea sul sito:
Por favor registre su producto Elinchrom por internet:
www.elinchrom.com / SUPPORT / LOGIN
In case you cannot register your Elinchrom unit via internet, please fill in the
Guarantee card and post it to ELINCHROM.
Please return this registration card directly to
Diese Registrierkarte bitte direkt zurücksenden an
Veuillez retourner cette carte d’enregistrement directement à
Vi preghiamo di far pervenire questa cartolina di iscrizione direttamente a
Por favor envíe esta tarjeta de registro directamente a:
Elinchrom model
Elinchrom Modell
Elinchrom modèle
Modello di Elinchrom
Modelo de Elinchrom
Date of purchase
Kaufdatum
La date d’achat
La data di acquisto
La fecha de la compra
Your full name and address
Name und Adresse
Votre nom complet et adresse
Il suo nome pieno ed indirizza
Su nombre completo y dirección
:
:
:
:
:
:
:
:
:
:
:
:
:
:
:
✂
✂
Dealer
Händler
Négociant
Il distributore
El comerciante
:
ELINCHROM S.A.
:
P.O. Box 458
:
Avenue de Longemalle 11
:
CH-1020 Renens
:
Switzerland
N°
:
:
:
:
:
Page 30

Elinchrom SA Rotalux 04.02.2011 (73320)
 Loading...