

Page 1
DS1480SS
14 place settings
half-load function
Page 2
Witheach washcycle.
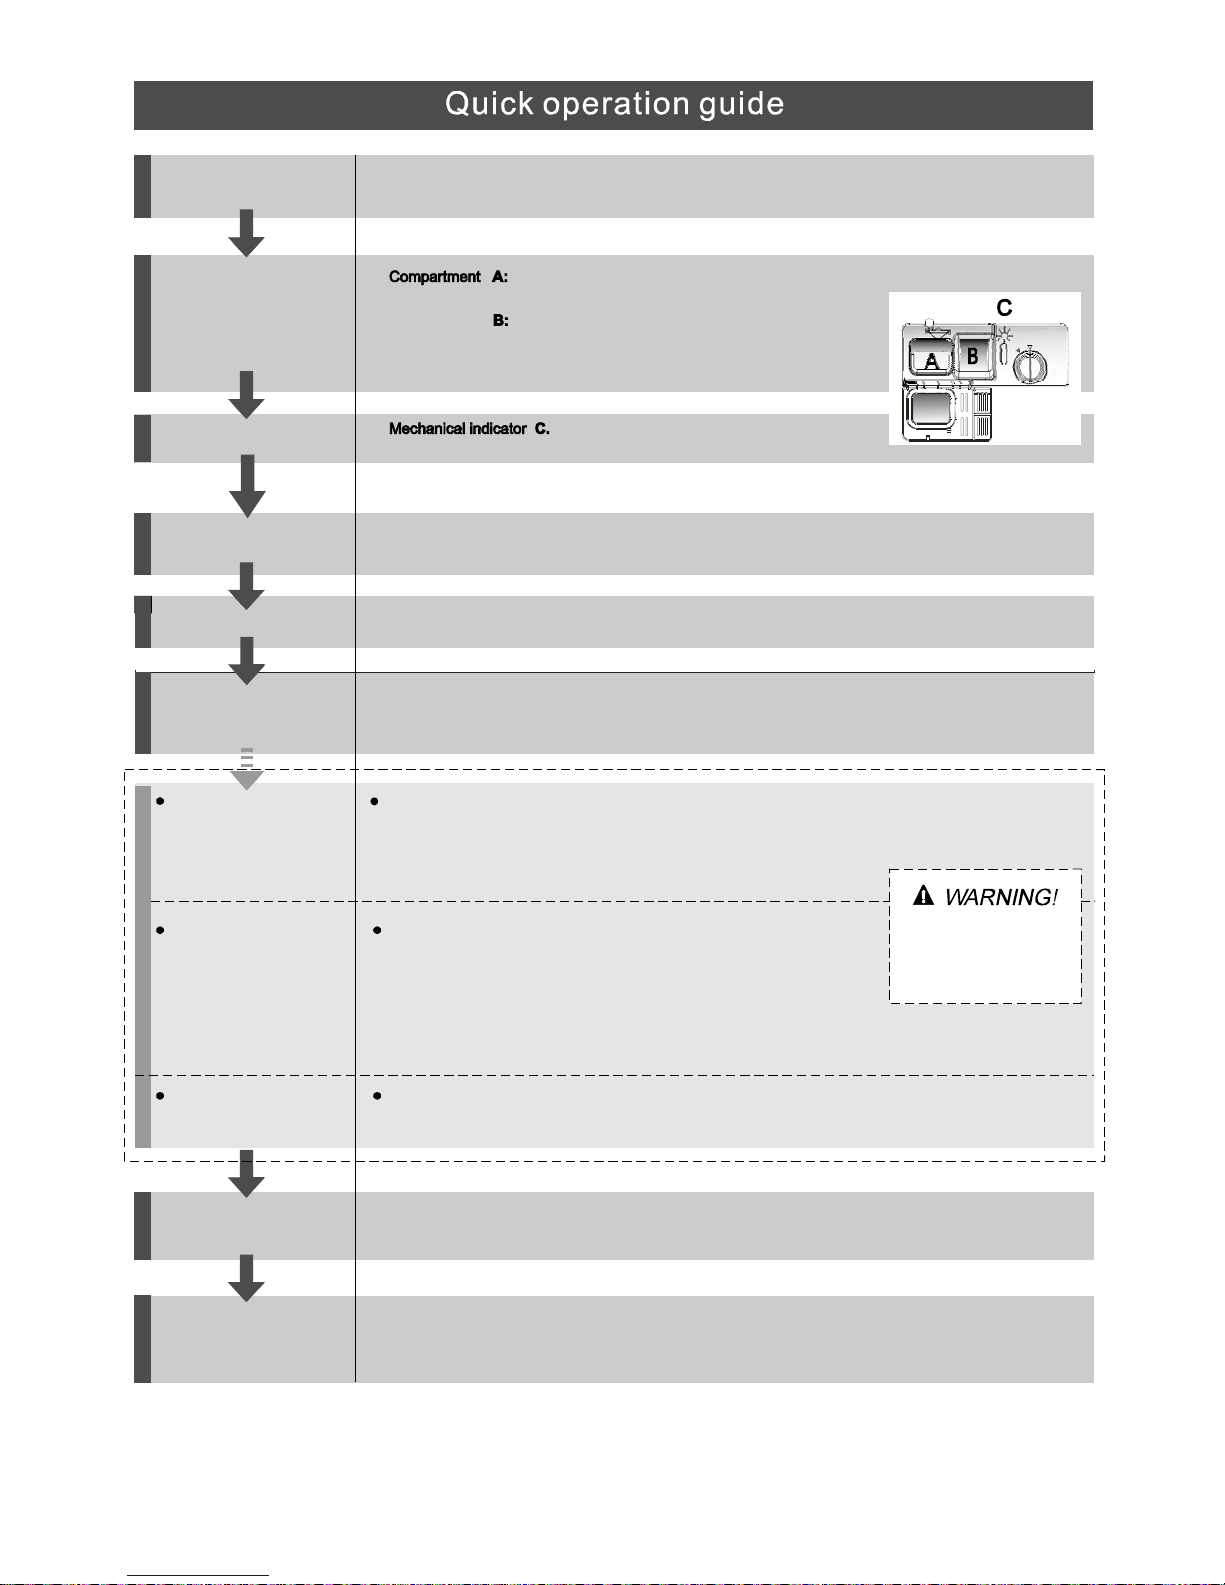
Compartment
For programmes with pre-wash only.
(Follow the user instructions!)
Electric indicatoron control panel(if provided).
Check the rinse aid level
Loadthe baskets
Switch off the appliance
Turn off the water tap,
unload the baskets
Fill the detergent dispenser
Warning: wait a few minutes (about 15 minutes) before unloading the dishwasher to avoid handling
the dishes and utensils while they are still hot and more susceptible to break.
They will also dry better.Unload the appliance, starting from the lower basket.
Scrape off any large amount of leftover food. Soften remnants of burnt food in pans,
then load the baskets. Refer to the dishwasher loading instructions.
Whenthe workingcycle hasfinished, the buzzerof the
dishwasher will sound 8 times, then stop.
Turn off the appliance using the On/Off Button.
Switch on the appliance Press the On/Off button to switch on the appliance, Open the door.
Fordetailedoperatingmethod readthe correspondingcontentonthe instruction manual.
Select a programme
Turn on the water tap and press the Start/Pause Button. The machine will start working
after about 10 seconds.
Running the dishwasher
Changing the programme
Addforgottendishes in the
dishwasher.
If the appliance is switched
off during a wash cycle.
Open the door carefully.
Hot steammay escape
when the door is opened!
If the appliance is switched off during a wash cycle, when switched
on again, please re-select the washing cycle and operate the dishwasher
according to the original Power-on state ).
Close the door,press the Programme Button to select a desired programme.
( See the section entitled Operating instruction )“”
1.PresstheStart/PauseButtontostopthewashing.
2.Openthe door a little .
3.After the spray arms stop working, you can open the door completely.
4.Add forgotten dishes.
5.Close the door
6.Press the Start/Pause Button, the dishwasher will run after 10 seconds.
1. Arunning cycle can only be modified if it has been running for a short time. Otherwise the detergent
may have already been released and the water already drained. If this is the case, the detergent
dispenser must be refilled.
2. Press the Start/Pause button thenpress the program buttonfor more than3 seconds to cancelthe
running programme.
3.Select a new programme.
4. Restart the dishwasher.
Page 3
Toreview the section on troubleshooting Tip s
will helpyoutosolve somecommon problems
byyourself .
Dear Customer ,
Pleasecarefully r eadthismanualbefore usingthe
dishwasher, it willhelpy out o useandmaintainthe
dishwasher properly.
Passit ontoanysub sequentowner of the appliance.
Thismanual contains sectionson safety Instructions,
Operating I nstructions, InstallationI nstructions an d
Troubles ho o tin g Tip s, etc.
The manufactu rer,following a policy of c onstant
development a nd updat ing of the product , may
make modificatio ns witho ut givi ng pr ior notice .
Keep it as a ref er in the later days .
Ifyou can not solve the problems b y you rself ,
please ask fo r the help of p rofessiona l te chnician s.
This appli ance isintended t o be used in h ousehold
andsimilarapplicationssuchas:
-staff kitch en a reas in s hop s, offices and other
working enviro nme nts;
-farm houses;
-by cli ents inhotels, mo tels and other res idential
ty pe e nvironm e nts;
-bed andbreakfasttypeenvironments.
DishwasherFeatures.......................................2
AttentionbeforeorafterloadingtheDishwasher
Baskets..........................................................6
FilteringSystem.............................................10
Caringf ortheDishwasher..................... .........11.
A FilltheRinseAid Dispenser............. .. ..3、 ..... ...
B Functionof Detergent .........................4、 ........
............ ..7
The Met hod Loading Nor mal D ishware
WashCycle Table...........................................8
Turning on th e Appl ian ce. ... ..... . ... ..... . .. ... .... .. ..8
Changethe Programme.............. ................9....
At theEne of the WashCycle...........................9
Positioningthe A ppliance................... ..........12..
Water Connect ion..... . .... ... ... . ..... . .. .... ... .. .. .... .1 3.
AboutPower Connection........................ .......12.
Starto f dishwasher................................ ......14..
Befo re call ing for s erv ic e..... .. .. . ... ... . ... .. .. ... . ... .1 5.
Errorcodes.................................... ..............16.
Technicalinformation.............................. .....17..
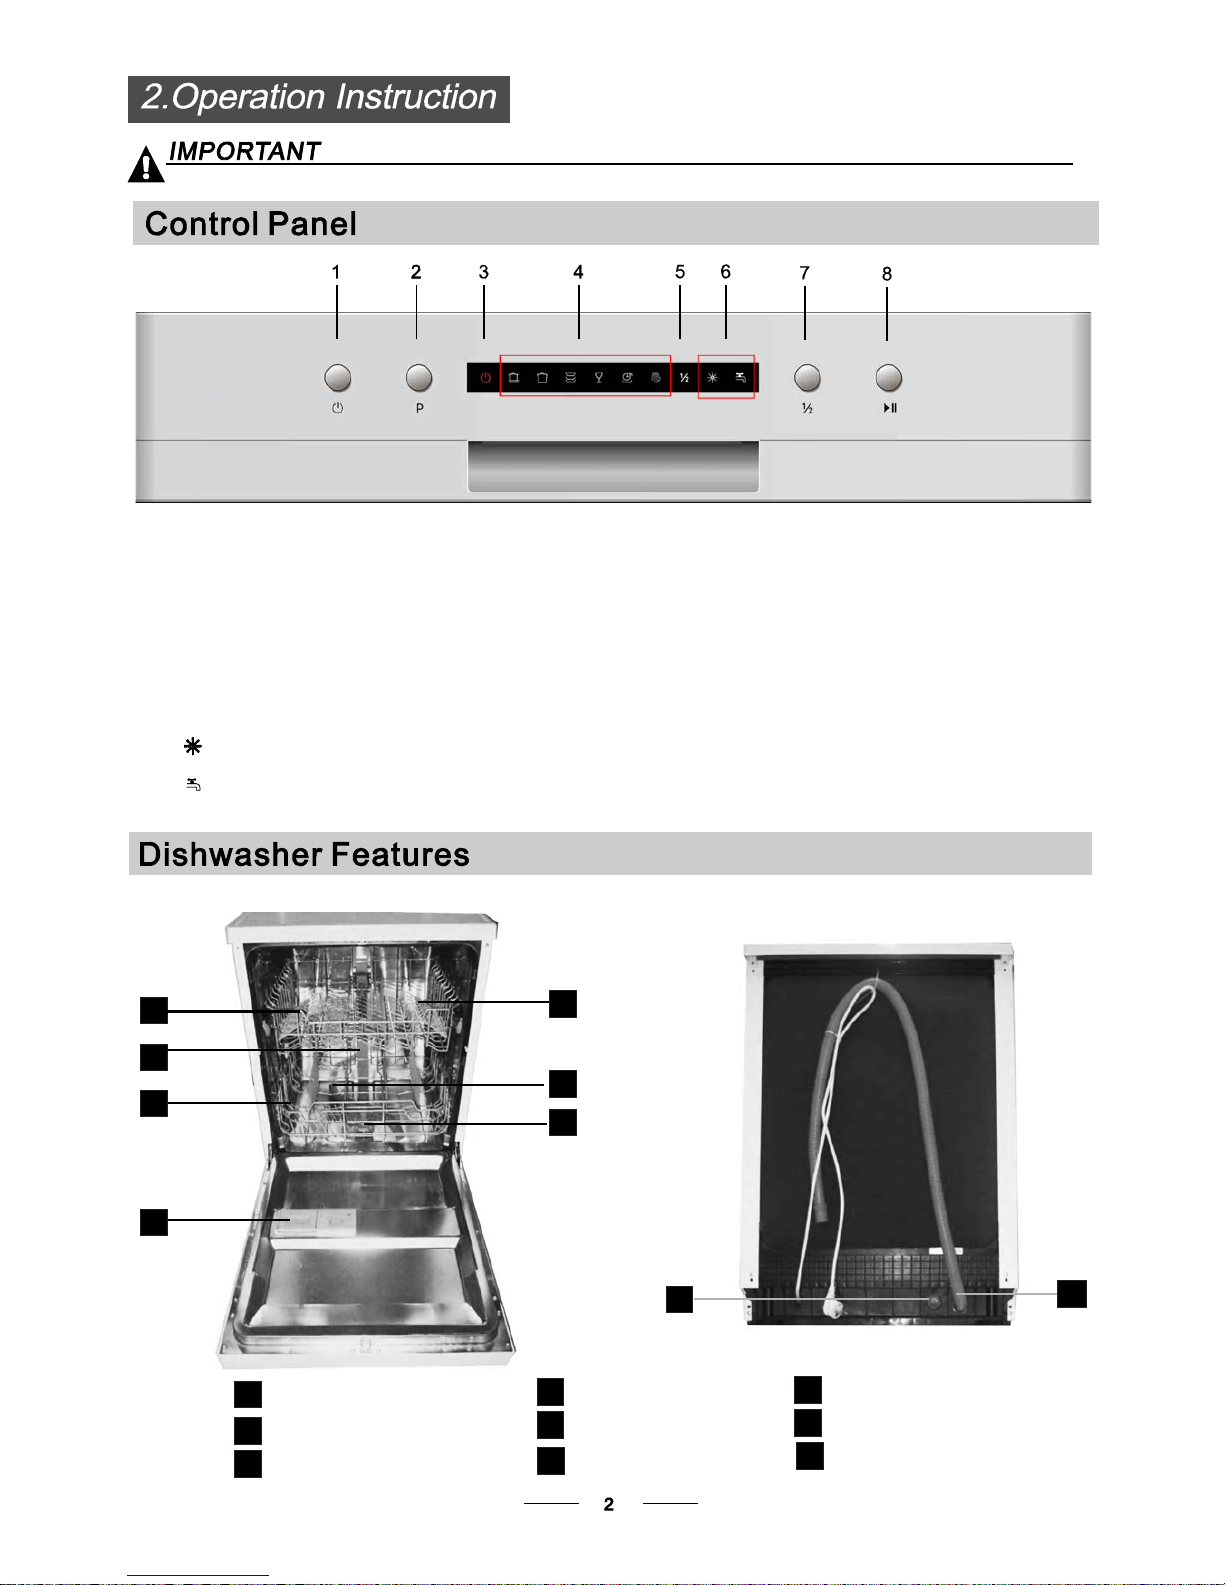
Contro l Pane l.... ... . ... ........ ... . ... ........ ....... ... .. .. ...2
Page 4
This appliance must be grounded. In the event of a
malfunction or breakdown, grounding will reduce
the risk of anelectric shock by providing a path of
least resistance of electric current. This appliance
is equipped with a cord having an equipmentgrounding conductor and a grounding plug.
The plug must be plugged into an appropriate outlet
that is installed and grounded in accordance with
all local codes and ordinances.
Keep children away from detergent and rinse aid, keep
child away from the open door of the dishwasher,
there could still be some detergent left inside.
ren
Donotabuse,siton,orstandonthedoorordish
rack of the dishwasher.
Do not touch the heating element during or
immediately after use.
(This instruction is only applicable to machines
with a visual heating element.)
Do not wash plastic items unless they are marked
dishwasher safe or the equivalent. For plastic items
n
ot so marked, check the manufacturer's
recommendations.
Use only det ergent and rinse additives
design ed for an a ut omati c dishwa sher.
Never use so ap, laun dry de tergent, or hand
washing dete rgent in your dishwasher. Keep
these prod u cts ou t of the reach of child ren.
During installat ion, the power suppl y must n ot
be exces sively or dangerously be nt or flattened.
Do not tamper with controls.
Do not place any heavy objects the
door when it is open. The appliance could tip
forward.
on or stand on
When loadin g items to be w ashed:
1) Locate sharp items sothat theyare not li kely
to damage the door seal;
2 Warni ng: Kni ves and other ute nsils with
sharp points must be l oade d in the basket
with their points down or placed i n a
horizontal position.
)
When using y our dishwasher, you shoul d
pr ev ent pl a stic ite ms f r o m c omin g in t o co ntac t
with the h eating element.(T his inst ruction is only
applicable to machines with a visual heatin g
element. )
Ifthesupply cord i sdamaged, it mustbe replaced
bythemanufactureroritsserviceagentora
similar ly q uali fi ed person i n or de r t o av oid a
hazard .
Pleasedispose ofpacking m aterials properly.
Use the dishwasher only for its intended function.
Remove the door to the washing compartment when
removing an old dishwasher from service or discarding it.
Dishwasher de tergents ar e stro ngly alkal ine, th ey
can be extr emely da ngerous if swallowed. Avoid
contact with skin and eyes and keep ch ildren away
from the dishwasher when the door is open.
Check that th e deterge nt comparm ent is e mpty
after completio n of the wash cycle .
The applianc e is to be conn ected to the water
mains us ing new hose sets and that old hose-sets
should not be reused.
The maximum number of place settings to be
washed is 14 .
The maximum permissible i nlet wa ter pressur e is
1Mpa.
The minimum permissible i nlet w ater press ure i s
0.04Mpa.
Children should be supervised to ensure that they do
not play with the appliance.
This appliance is not intended for use by persons
(including children with reduced physical, sensory or
mental capabilities, or lack of experience and
knowledge ,unless they have been given supervision
or instruction concerning use of the appliance by a
person responsible for their safety.
)
When using your dishwasher, fo l low the precaut i ons listed below:
The door sh ould n ot be left open,
since this could increase the risk of tripping.
Improper connection of the equipment-grounding
conductor can result in the risk of an electric shock.
Check with a qualified electrician or service
representative if you are in doubt whether the
appliance is properly grounded. Do not modify the
plug provided with the appliance; If it does not fit
the outlet. Have a proper outlet installed by a
qualified electrician.
Do not operate your dishwasher unless all
enclosure panels are properly in place. Open
the door very carefully if the dishwasher is
operating, there is a risk of water squirting out.
Page 5
8
Back View
1
2
3
4
5
6
7
Front view
Dispenser
CupS helf
Sprayarms
Filterassembly
Inletpipe connector
Drain pipe
Lower Basket
Innerpipe
UpperBasket
1
before using itfor the firsttime.
Toget the bestperformance fr omyourdishwasher, r ead all operating instructions
4
5
6
7
8
9
3
2
9
8. Sta rt /Pa use bu tton: Tostart the sel ected
washing p rogram or pau se the washing program
when themachine is wor king.
1. On/OffButton: to switch On/Offth eappliance.
7. Half load functionsButton:To selectHalfload
functions.(With this Halfload functionyoucan
only use it when you have o nly about or less than
6 place settingdish wave, andyouwillse e less
water and energy c onsumption , can onlybe use d with
Intensive, H eavy,Normal,Glass and 1 Hour . )
3. Power indica t or :To show wh e n the power on.
2.Program Button : To Press thebuttonto select
appropriate Program.
4. Prog ram ind icat o rs:To sh o w w hich progra m
you ha v e chose.
5. Half lo ad indicators :To show Ha lf load functions
starting up or not.
Rinse aid w ar nin g lights: To sho w
whenthe dispenserneed to be refilled
Water fa u c e t light: to s how wh e n t he wat er
faucet is forget turn on.
6.
Page 6
Before usi ng you r dishw asher f or th e first time:
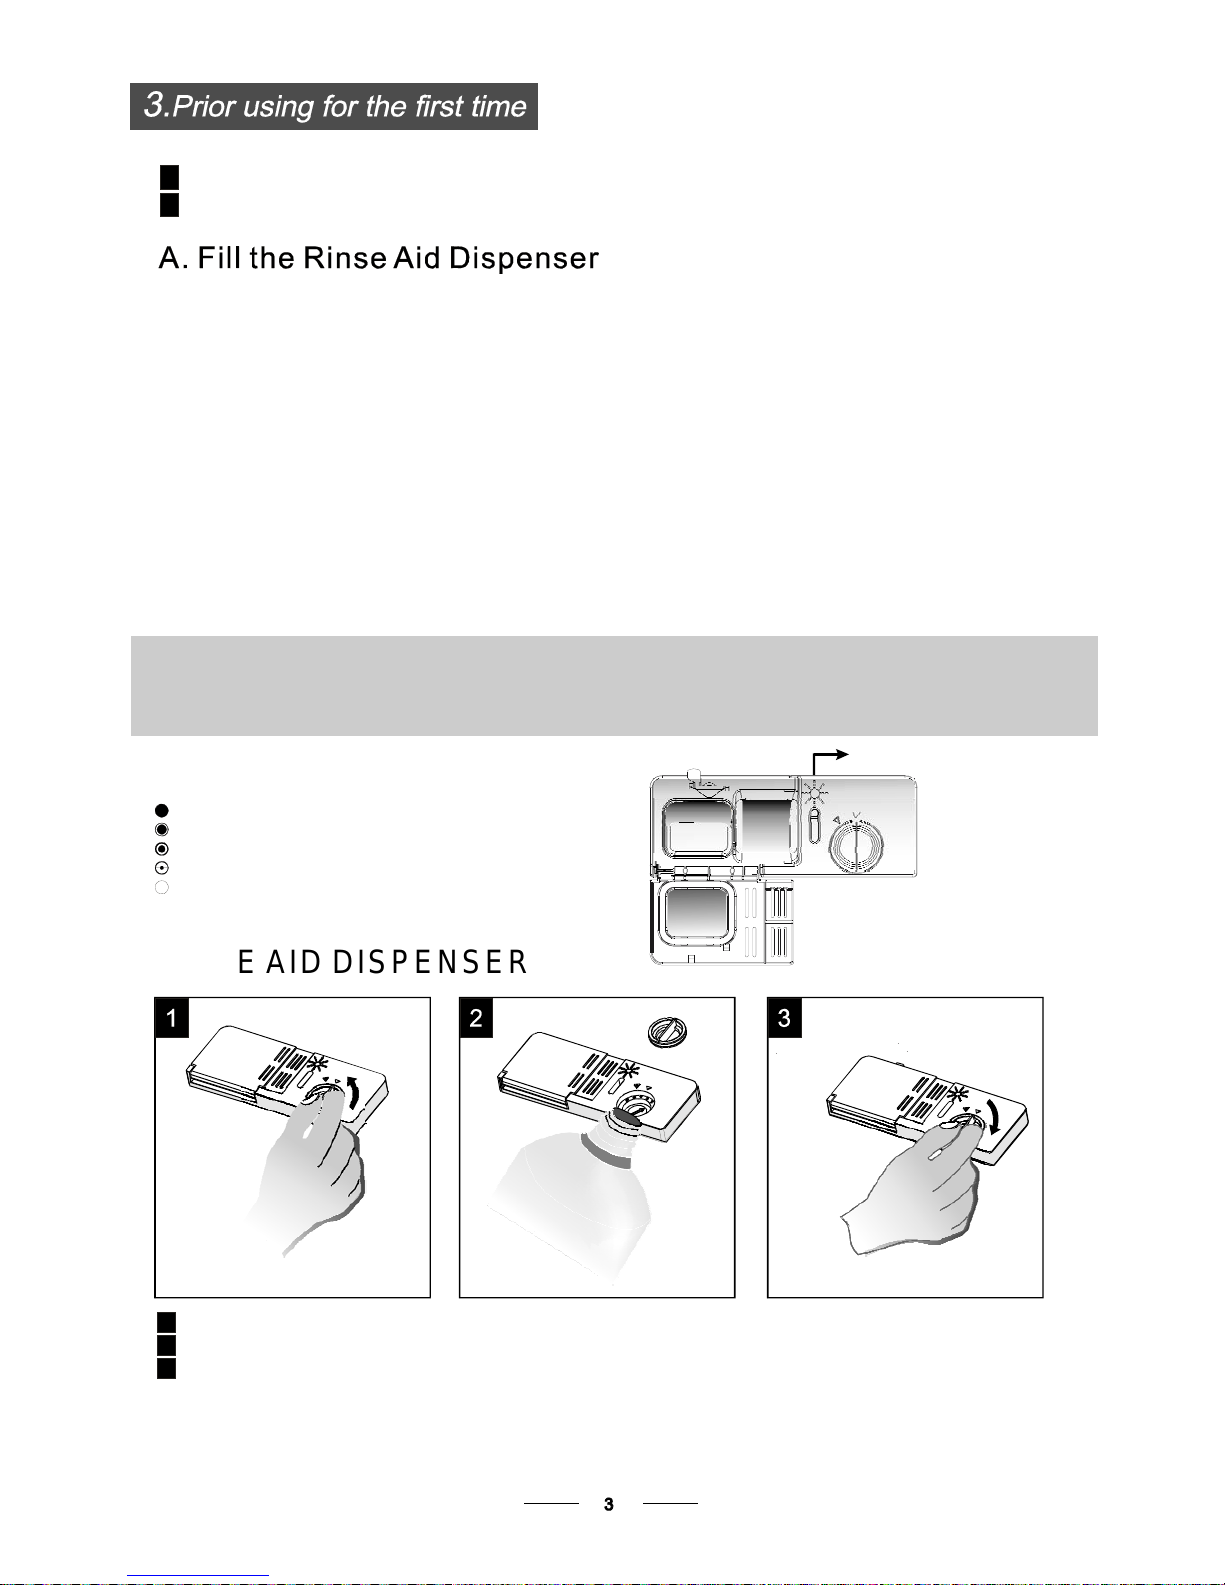
A. Fill the rinsea iddispenser
B. Fill in de te rge nt
The rinse aid isreleasedduringthefinal rinseto preventwater from forming droplets on your dishes, which c an
leave spotsand streaks.It alsoimprovesdryingby allowing water to roll off thedishes. Yourdishwasher is
designedto use liquid rinse aids.The rinseaid dispenser islocated insidethe door nextto the detergent dispenser.
Tofill the dispenser,open t he ca p and pour the rin se ai d into the dispense r unt il th e level i ndica tor turns completely
black.Thevolumeof the rinse aid containerisabout 110ml.
Rins eAid Di spen s er
Functi on of RinseAid
Rinse aid is automatical ly added du rin g th e last rinse , e nsuring thoro ugh r insi ng, an d s pot and str eak fr ee drying.
Attenti on!
Only use branded rinse aidfordishwasher. Neverfill therinsea iddispenser withanyothersubstances
(e.g. Dis hwasher clean ing a gen t, li quid detergen t). Thi s w ould damage t he appliance.
As the rinse aid diminishes, the size of the bl ack dot
on the rinse aid l ev el indica tor c hanges, as illust rated below.
Full
3/4full
1/2full
1/4full-Shouldrefilltoeliminatespotting
Empty
If there is no r inse-a id warnin g l ight in the c ontrol p ane l, you can judg e the amount o f rin se-aid by the colorofthe
opticallevel
indicator "C" located next to the cap. When th e rinse -aid co ntainer is ful l, the whole indicator will be dark .As the
rinse-aid
diminishes, the s ize of the dark dot decr eases . Youshould neve r let the ri nse aid get bel ow 1 / 4 f ull.
When to Re fill the R inseAid Dispen ser
RINSEAID DISPENSER
To open t he dispe nser,turn the cap to the "open" (left) arrow and lift it out .
Pour th e rinse aid in to the di sp ense r, being care ful not to over fill.
Replacethecap by insertingit alignedwith "open"arrow andturningitto the closed(right) arrow.
Be careful not to o verfill th e di spenser, because this could cause over sudsing. Wipe away any spill s
witha dampcloth.Don't forget to replacethec ap beforeyouclosedishwasherdoor.
Attention!
Clean up a ny ri nse ai d split during fil ling w ith an absorbent clo th toavoid e xcess fo aming
during the next wash.
1
2
3
Page 7
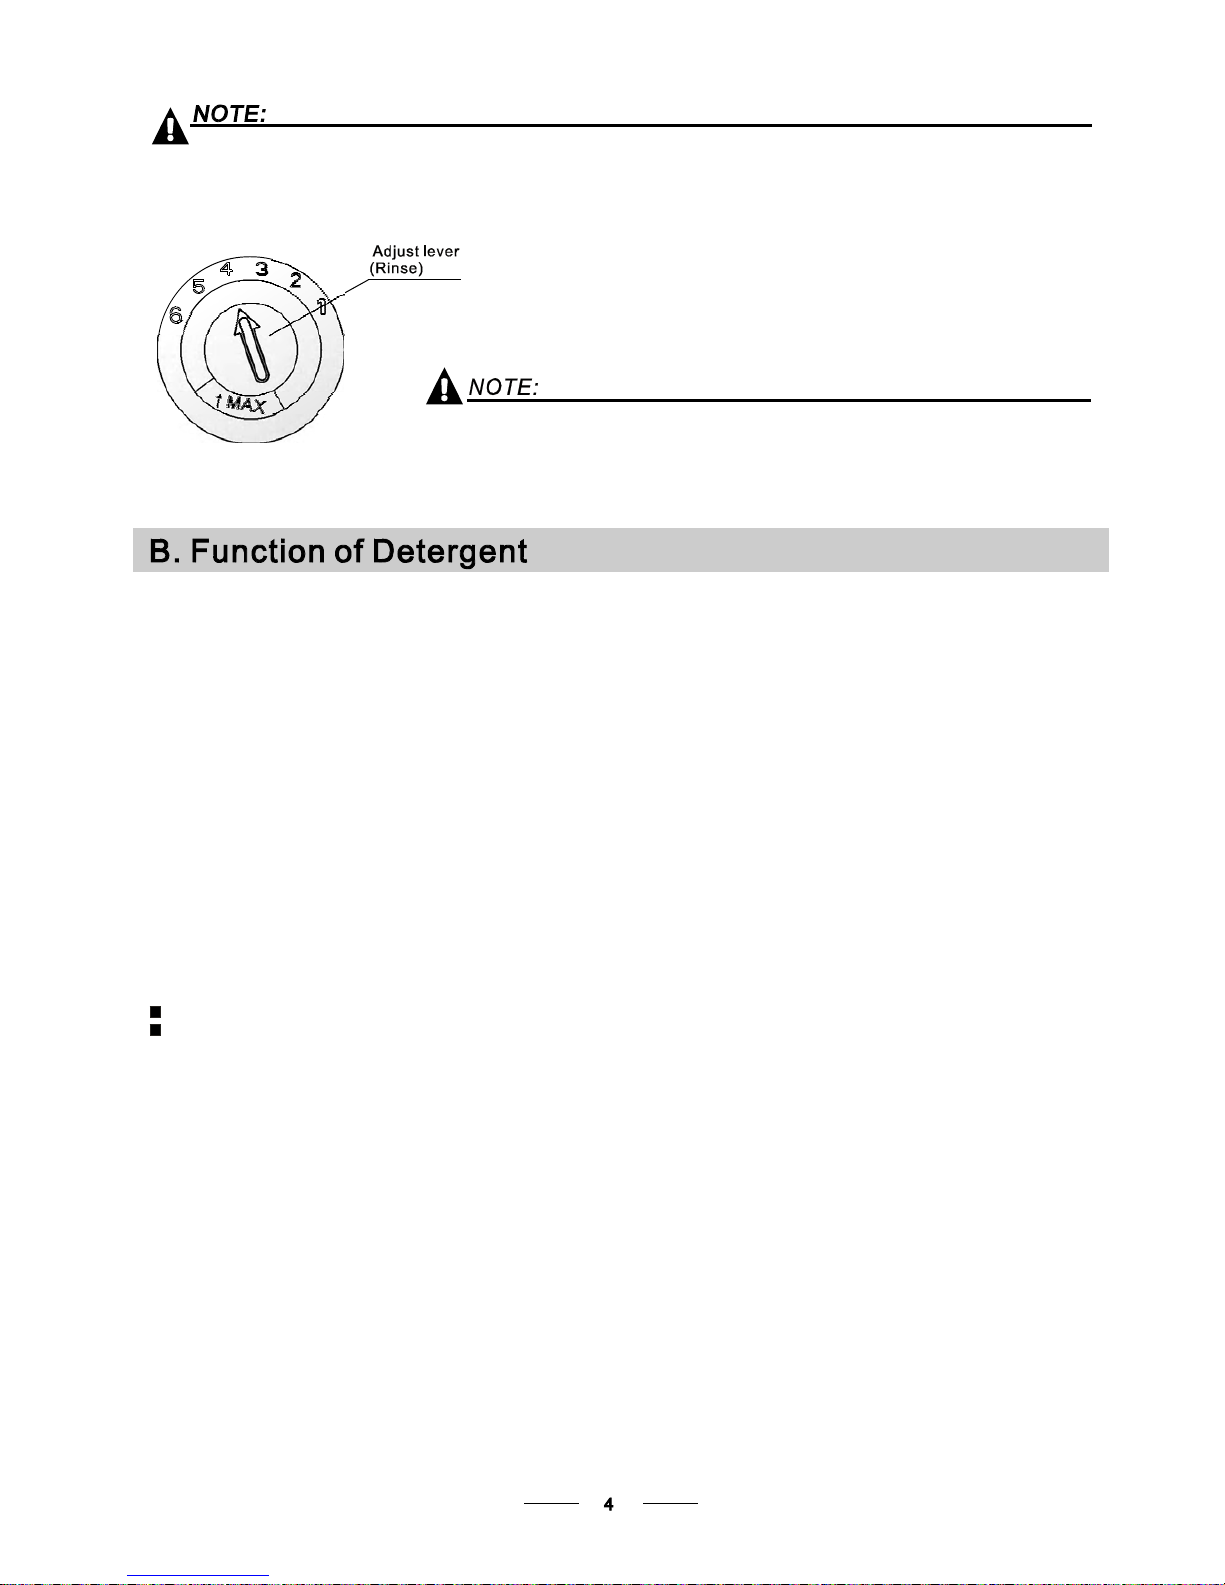
Adjust ing R inseAid Dispenser
The rin se aid di spen ser h as six or four settings. Always start withthe dispenser
set on " 4". I f s pots and poor dryi ng a re a pro blem, increa se th e am ount of rinse
aid dispensed byremoving thedispenserlid androtating thedial to "5".If the
dishes still are not drying p roperly o r are show spots, adjust the di al to th e next
higher le ver unti l you r d ishes are s pot- free. T he recommend ed setting is "4".
(Factoryvalueis"4".)
Increase th e dose if ther e are d rops of water o r lime spots on the dishes after washing.
Reduce it i f the re ar e stick y whit ish sta ins on your di shes o r a bl uish film on g lasswar e or
knifeblades.
duringthe nextwash.
Don't for get to replacethe cap before you close dishwa sher d oor.
Clean up an y ri nse aid spilled while during fi lling with an abso rbent clot h to avoid excessive foaming
Detergents w ith its chemical ingredients a re ne cessary t o r emove dirt, crush dirt and transport it out of the dishw asher.
Most of th e co mmercial quality de terge nts are suitable fo r t his p urpose.
Detergen ts
There are 3 sorts of detergents
1.Withphosphate and with chlori ne
2.Withphosphate and without chlori ne
3.Withoutphosphate and without chlorine
Based ontheir chemicalcomposition, detergents canbesplit intwo basictypes:
Detergent t ablets o f differen t brands disso lve at different spe eds. For this reason some
detergent t ablets ca nnot d issolve an d devel op th eir f ull cl eaning power during sho rt
programs. Ther efore pl ease use long progr ams when using d etergent tablets, to
ensurethecompleteremoval of detergentresiduals.
Thedispenser mus t be refilledbeforethe start of each wash cyclefollowingthe instructions
provided in the was h cycle t able . Your dishwasher u ses l ess detergent and rin se aid t han
Conventional dishwasher. Generally,only one tablespoon of detergent is needed f or
a normalwashload. Moreheavilysoileditemsneedmore detergent. Alwaysadd the
detergent j ust b efore st arting the dishwa sher, otherw ise it coul d g et damp and will not
dissolve pr operly.
ConcentratedDetergent
Detergent Ta blets
DetergentDispenser
conventional , alkaline detergents with caustic components
low alkal ine conc entrated detergents with natural enzymes
Normally new pulveris ed deter gent is without p hosphate. Thus the water softener fun ction of
phosphate is not given . In this case we recommend t ofill salt in the s alt c ontainer evenwhen
the har dness o f water is only 6 dH. Ifdeterg ents wit hout pho sphate are used inthe case of hard w ater
often white spots appe ar o n dishes and glasses . In this case ple ase add more deterg ent to reach
better resu lts. Det ergents without chlor ine do o nly bl each a little. Strong and colo ured spots will n ot
beremoved completely.In thiscase pleasechoosea program witha highertemperature.
°
Page 8

Amountof Detergent toUse
Proper Use of Detergent
Use only det ergent specifically m ade for the us e in d ishwashers . Keep your deter gent fresh and dry.
Don't put powdered det ergent into the dispe nser u ntil you'r e ready to wa sh dish es.
Dishwasherdetergentiscorrosive!Takecare tokeep it outofreachof children.
Always add the detergent j ust be fore starting each wa sh c ycle.
Only use br anded deterg ent aidfor d ishwasher.
If t he li d i s closed: press release butt on . The l id w i ll sprin g op en.
Detergent tablet
Deter gent powder
Fill the dete rgent di spenser with detergent.
The markingindicatesthe dosinglevels , as
illustrated o nthe right:
The place o f main wash cycle de tergent pl aced.
The place o f pre- wash cycle detergent pl aced.
Please observe the manufacture rs dosing an d st orage
Rec ommendat ions as s tated on the d eter gen t p ack a ging.
Closethelid andpressuntil itlocks inplace.
Ifthedishes areheavilysoiled, place an additional
detergent dose in the pr e-wash d etergen t chamber.T his deterge nt wi ll tak e effect during the pr e-wash phase.
A
B
Fill in Detergent
You find information abou t the a moun t of d etergen t for the single pr ogramm e on the las t page.
Pleaseaware, th at accor ding tothe le vel soil ing and t he sp ecific ha rdness of water differences are poss ible.
Pleaseobserve t he manu facturer 's recom mendations on the dete rgent packaging.
Page 9

Cutlerywithw ooden,horn china or
mother-of-pearl handles
Plastic ite ms that are not heat resis tant
Older cutl ery with glued parts t hat are not
temperatureresistant
Bonded cutl ery ite ms or dishes
Pewter or cooper ite ms
Crystal glass
Steel items subject t o rusti ng
Wooden platters
Itemsmade fromsyntheticfibres
Some types ofglasses c an becom e
dull after a large number of washes
Silver an d a l uminum part s ha ve a
tendency to discolourduringwashing
Glazedpatterns mayfade if machine
washed frequent ly
Are not suitable
Are of limitedsuitability
Dishes anditemsofcutlery mustnot lie insideone another, or cover each other.
To avoid d amage to glasse s, th ey mus t not t ouch.
Load larg e ite ms which are most difficult to c lean int o the lower basket.
The upper basket is de signed to hold m ore deli cate and lighter dishw are such as glasses , coffee
and t eacups
Long blad ed kni ves stored in an upright po sition are a pot ential hazard!
Long and/or sharp items of cutlery such as carvi ng knives must be p ositione d
horizon tally in the upp er b asket.
Please do not ove rload your dishw asher. Thisis important for good results a nd for
reasonab le consu mption o f en ergy.
Load hollow it ems suc h as cups, glasses, pans etc. With the opening facing downwards so that
wat er c anno t co l l ect in the container or a deep b a se.
Considerbuying utensilswhich are identified as dishwasher-proof.
Use a mild detergent thati sdescribed as 'kind todishes'. If necessary,seekfurther
informationfromthedetergentmanufacturers.
Forparticularitems, selecta program withas lowa temperatureas possible.
Toprev ent damage , d o no t take gla ss a nd cutlery out of the dishwashe r immediat el y
after t he p r ogram me h as ended .
(For best per formance of the di shwasher, follow t hese load ing gu ide lines.
Features and appearance of baskets and cutlery ba skets may vary from your model.)
Scrape off any large amo unts o f left over foo d. Soften remnants o f burnt food in pa ns.
It is no t necess ary torinse t he dishes u nder running water.
Place objects in the dishwasher in following way:
1.Itemssuch as cups, g lasses, pots/pans, etc. a re fa ced dow nwards.
2.Curveditems, or ones with reces ses, sh ould be loaded aslant so that w ater can run off.
3.Allutensils are stacked securely and can not tip ov er.
4.Allutensils are placed in t he way that the spray arms can rotate f reely during wa shing.
Very sm all it ems should n ot b e washed in the dishwasher as they could ea sily fall out of the basket.
To prevent water drippi ng fr om the uppe r ba sket i nto the lower ba sket, we recommend that you
empty the lower basket first and t he n the upp er ba sket.
Page 10

The u pper basket is designed to hol d more delicate
and lighter di shware s uch as g lasses, coffee and
teacupsand saucers, aswellasplates, smallbowls
and s hallowpans (aslong astheyarenot toodirty).
Positionthe dishes and cookwaresothattheywill
notgetmovedbythespray ofw ater.
We sugges t that yo u pl a ce l arge items and t he most
difficult to clean items are to beplaced into the lower
basket: suchas pots, pans, lids, serving dishes and
bowls, as sh own in t h e f igur e below. I t is prefer able t o
pla ce s ervi n g di shes an d lids o n the s i d e of the ra cks
in order to avoid blocki ng the rotation of the top spray
arm .
Pots,servingbowls,etc,mustalwaysbeplacedtopdown.
D eep pots s hould be sl anted to a llo w water t o f low out.
Please be remin ded tha t:
The B otto m B ask et fe atur es foldin g sp ikes so t hat l arg er or mor e po ts and p ans can be l o ade d.
Foldin g Spike s of Lower B asket
For better stacking ofpots and pans,
the spi kes can b e folded down a s
show in the p ictu re right.
Foldin g bac k the cup s helives
For better s tacking ofpots and p ans,
the spikes c an b e fo lded do w n a s
show in th e pict ure ri ght .
Cutleryshouldbe placedinthecutlery rackseparately
from each ot her in th e ap propriate positions, and do
make sure the utensils d o not nest tog ether,this may
cause badperformance.
Adjustingthe UpperBasket
The heigh t of the upper ba sket can be adjus ted i n order to
create mores pace for largeutensilsbo thforthe upper
/lower bas ket. The height of the upper basket can be
adj u sted by placing the wheel s on di f fere nt heigh t o f the
rails. Long items, serving c utlery,salad servers and knives
shouldbe placed on theshelfs othatthey do notobstruct
therotationofthesprayarms..
Page 11

Means:need to fill rinseintothe Rinse-AidDispenser.
()
* : This pr ogram is the test cycle. The information for comparabil ity test
inaccordance wi th , as follo ws:
AS/NZS 2007.1
AS/NZS 2007.1
Capacity:14 setting
Position Upper basket: upper wheels on rai ls
Rinse aid setting: 6
Open the door slightly 50mm to assi st in drying of the di shes afte r every wash
Starting a cyclewash
1 Draw out the lower and upper b asket, l oad the d ishes a nd push them back.
It is co mmended to load t he low er b asket f irst, t hen t he uppe r one (see the section entitled
Loading the Dishwa she r ).
2 Pour in t he d etergent ( see t he sect ion e ntitled Detergentand Rins eAid ).
3 Insert the plug into the socket. The power su pply is 220-240 VAC /50 HZ , the spe cificat ion
of the so cket i s 10A 250VAC. Make sure t hat t he wa ter s upply is turned on to full pressure.
4 Cl o se the do o r, pr e ss t he ON/OFF But ton, and t he O N/OF F li g ht w i l l t u rn on.
5Presstheprogrambutton
If a program i s selected, the resp onse l ight will light. Th en pres s the Start/Pause b utton, the
dishwasher be gins to start.
“”
“”
, the wash p rogram w ill be changed a s fo llows dir ection:
Intensive->Heavy-> ->Glass->1 Hour ;Normal ->Soak
Normal
Intensive
Heavy
(OrAll )in1
5/27.5 g
(OrAll )in1
5/27.5g
(OrAll )in1
5/27.5g
Pre-wash(50 )
Wash(65 )
Rinse
Rinse
Rinse(65 )
Drying
℃
℃
℃
Pre-wash(45 )
Wash(55 )
Rinse
Rinse (60 )
Drying
℃
℃
℃
Per-wash
Wash (50 )
Rinse
Rinse(50 )
Drying
℃
℃
165
160
135
1.15
0.90
1.4
18
14.5
13.9
1Hour
Pre-w ash(5 0 )
wash(6 0 )
Rinse (55 )
Dryi ng
℃
℃
℃
60
10
0.9
5/27.5g
(*AS/NZS2007.1)
For hea vi l y soiled loa ds ,
such as pots, plates, glasses
and lightly soiled pa ns.
Glass
20 g
Pre-wash
wash(40 )
Rinse
Rinse(60 )
Drying
℃
℃
115
0.8 14.5
For heaviest soiled crockery,
andnormally soiled pots
pans dishes etc with dried
onsoiling.
、
、
Forlightlysoiled crockery
andglass
Standard daily cycle for
nor mal ly soil ed load s, such
as pots plates glasses.、、
For light ly soiled loads t ha t
do not need excellent d rying
efficiency.
Torinsedishes that y ou plan
to w a sh l ate r t h a t day.
Soak
Pre-wash
80.01
3.8
Page 12

When the wo rking cycle has finished, the buzzer of the d ishwasher w ill soun d for 8 seconds, the n stop . Turn off
the appliance using the ON/OFF button, shut off the water supp ly and o pen t he do or of t he di shwasher.
Waitfor a few minutes bef ore unlo ading th e dishwash er to avoid handlin g the dishes and utensils while t hey
are still hotand more susceptible to breakage. They will al so dry better.
SwitchOff the Dishwasher
The p rogram l ight is on but i s not b linking, o nly inthis case the progr amme h as ended .
1.Switchoff the dishwasher by pressingthe ON/OFF button.
2.Turn offthe watertap!
Openthe door carefully.
Hotdishesare sensitive to knocks. Thedishes should thereforebe allowed to cool down around 15minutes
before rem oving fr om the a ppliance .
Open t he dish washer's door,le ave i t aj ar and w ait a few minutes before remo ving the dishes. In this w ay they
will be cooler and thedrying wi ll be improved.
Unloadingthedishwasher
It is n ormal thatthe dis hwashe r is wet inside.
Emptythelowerbasketfirstandthenthe upperone.This will avoidwaterdripping fromthe upperBasket onto
thedishesinthelowerone.
Ifyouopen the door , the machinewill pause. The programlightwill
stopblinkingandthe buzzer will mooing every minuteunlessyouclosethe door . After
you clos e the doo r ,t he mac hi ne wil l keep on w orki n g afte r 10 sec ond s.
duringawashcycle
Premise:
Ac ycle that is un derwa y can on ly be modified ifit ha s on ly been r unning for a short time. Other wise, the
detergent m ay ha v e alread y be en releas ed, a nd the applianc e may ha ve already dr aine d the wash water.
If thi s is the case, the detergent dispenser must be r efilled (s ee t he s ection entitled " Loading t he
Detergent " ).
Press t he St art/Pause button , the machine wi ll b e in s tandby st ate, press the prog ram butto n mo re th an
3s then you can c hange t he program to th e de sired cycl e setting (see the s ection en ti tled "Starting awash
cycle. . .").
1
2
Aforgottendish can be added any time before the detergent cup opens.
Add forgotten dishes.
Close the door
After thespray armsstop working,you can openthedoor
completely.
2
3
Open the door a little .
1
4
5
6
Press the Start/Pause Button to stop the washing.
Press the , the dishwasher will run
after 10 seconds.
Start/PauseButton
When you pressthe Start/Pausebuttontopause during washing,the will
stopblinkingandthe dishwasherwill mooing every minute unlessyou press the
St art/Pa use button to s tar t.
runni n g indic ato r
Washthe arms insoapyand warm water andusea softbrush to
clean the j ets. Repla ce them after rinsing them thor oughly.
When following this procedure from step1 to step 3, the filter system will be removed;
when following it from Step 3 to Step 1, the filter system will be installed.
Itisdangerous to open thedoor whenwashing,becausethe hotwatermay scald you.
Page 13

The filter prevents lar ger remnants of food or o ther objects from getting insi de th e pum.
Theresidues mayblockthe filter, inthiscase they must be removed.
The filter system consists of a coarse fi lter,aflat (Main filter)
And a mi crofilter(F i ne fi lte r ) .
Foodand soilparticlestrapped inthis filterarepulverizedbya
special jet on the l ower spray arm an d washe d down todrain.
Large r items, s uc h as p i e c es of bo nes or gla s s, that could blo ck
the drain are trapped in thecoarse filter.To remove the items
caught by the fil ter,gently sque eze the tap on th e top of this
filter andl ift out.
This filterholdssoilandfoodresidues in thesump area a nd
prevents i tfrombeing redeposit on the dishesduringwash cycle.
Main filter
1
Coarse filter
2
Fine filter
3
2
3
1
Filterassembly
Thefilterefficiently
For best performance and results, the filte r must b e cle aned re gular ly. this reaso n, it is a goodidea to
remove th e lar ger foo d par ticles tr apped in the filte r aft er each wash cyc le by rin sing the semicirc ular f ilter an d
cup unde r runnin g wat er.Tor emove th e fil ter de vice, p ull the c up ha ndle inthe upwar d direct ion.
removes food particles fro m the wash water, allowin g it t o be rec ycled d uring the cycle.
For
The dishwasher must ne ver be u sed with out t he fil ters.
Improper replacement of the filter may reduce the perform ance level of the appliance
anddamagedishesandutensils.
Step 1 Turnt he filter in ant i-clockwise d irection,:
Step 2 l ift the filter assy up:
When following this procedure from step1 to step 2, the filter system will be removed;
when following it from Step 2 to Step 1, the filter system will be installed.
1
2
Page 14

The control p anel can be cleaned by using a lightly dampened cloth .
After cleaning, make sure to dry it t horoug hly.
For the exter ior, us e a goo d a pp lia nc e poli s h w ax .
Neveruse sharp objects, sco uring pa ds or h arsh c leaners onany p art of the dishwasher.
Protec tAgain st Freezi ng
1.Cutoff theelectricalpowertothe dishwasher.
2.Turnof f the w ater su pply an d disco nnect the water i nlet pi pe from the water valve.
3.Drain the wat er from the inlet p ipe an d water valve. (Use a pan to gather the water)
4.Reconnect the water inlet pi pe t o the water valve.
5.Remove the filte r at the bottom o f the tub and use a spong e to soak up wate r in the sump.
please t ake fros t protect ion meas ures o nthe di shwasher in winter. Every fter washing c ycles,
please op erate as follows
timea
:
Cleaning the Filter
CleaningThe Door
To c l ean the co a rse fil ter and the fi n e f i l t e r, use a cleani n g b rush. R e as semble th e fil ter parts as show n in th e figures
on the last pa ge a nd reins ert t he entire assemb ly in the dishwa sher, po sitio ning it i n i ts s eat and pressing downwa rds .
Whenc leaning the filters, don't knock on them. O therwise,thefilterscouldbe
contortedand theperformance ofthedishwashercould bedecreased.
To clean th e edge around the d oor, you shoul d use o nly a soft warm, damp clot h.
To avoid pene tration o f wate r into the door lock and electr ical com ponents, d o not
usea spray cleaner ofany kind.
Never use a s pray c leaner to clean t he d oor panel as it m ay dam age the door loc k
andelectrical c omponents.
Abrasive agents o r somepaper towels should not b e use d b ecause of t he ris k of
scra t chi ng or leavi ng spots on th e st ainl es s steel surface.
Cleani ng the SprayArms
If your dishwasher cannot work because of the ice,
please con tact pr ofessiona l service persons.
It is necess ary to cle an th e sp r ay a r ms regular l y fo r ha r d
water chemicals willclogthe spray armjets and bearings.
- Inspect the filters for blocking a fter e very time t he di shwa sher has been used.
- By unscrew ing t he coar se fil ter,you can r emove t he filter system. Remove any foo d re mnants and
cleanthe filtersunder running water.
Remarks:
Theentire filterassemblyshould be cleanedonce a week.
Toremovethelowersprayarm, pulloutthesprayarm u pward.
Tor e mov e the up per spr a y a rm , hold the n u t, rot ate the arm
clockwisetoremove it.
Washthe arms in soapy and w arm w ater an d use a soft brus h to
clean the jets . Repl ace th em after rinsing the m thorough ly.
Page 15

It isrecommend that yourun a wash cycle with the
dishwasher empt y and the n remove the plug fr om the
socket, turn o ff the wa ter supply and l eave the door of
the app lian ce s l i ghtly open. Th i s w ill help th e d oo r
sealstolastlongerand prevent odours fromforming
withinthe appliance.
If the app liance must be move d, tr y to keep it in the
verticalposition.If absolutely necessary, it canbe
positioned on its back.
Oneofthefactorsthatcauseodourstoforminthe
dishwasher is f ood th at remain s tr apped in the seals.
Periodic cleaning with a damp sponge will p reve nt this
fro m occurr ing.
Ensure the v oltage a nd frequ ency of the powe r being correspond sto
those on the rating pl ate. Only insert the plug into an electrica l socket which is ear thed
properly.Ifthe el ectrical sock et t o which theapplianc e must b e conne cted is not
appropriatefor the plug , replacethe socket, ratherthanusing a adaptors orthe like as
theycould causeoverheatingandburns.
Please look at th e ra ting label to know the r ating v oltage and connect t he d ishwasher to the appropriate power supply.
Use the r equired fuse 10 amp, time d elay f use orcircuit bre aker r ecommended and provide separate circuit servi ng
only this appliance.
Position the appliance i n t he desired location. T he back should r est ag ainst t he w all behin d it, and the sides,
along the adjacent ca binets or walls. T he dishwash er is equipped with water supply and drai n hos es th at can
be positio ned eith er to t he r ight or the left sides to facilitate p roper in stallatio n.
Once the appliance is positioned for levelling, the height of the dishwashe r
may be altered vi a adjust ment of the screwing level of the feet. In any case,
the applia nce should notbe inclin ed more t han 2 .
For personal safety:
DO NOT USE AN EXTENSION CORD OR AN ADAPTER PLUG WITH THIS APPLIANCE.
DONOT, UNDERANYCIRCUMSTANCES, CUT OR REMOVE THE EARTHING
CONNECTION FROM THE POWER CORD.
Before cleani ng or performing maintenance, always
remove the p lug from t he socket.
To cleantheexterior and rubber partsof the dishwasher,
donot use solvents or abrasivecleaning products.
Only use a clo th with warm so apy wate r.
Torem ov e sp ots or st ains from the sur face of t he
interi or, use a clot h da mpe ned with wa ter an a little
vinegar,or a c leaning pro duct mad e sp ecifically fo r
dishwashers.
Removethe Plug
No Solv ent s or Abras ive C leani ng
Moving theA pplia nce
Seals
After ever y wash, turn off t he wa ter supp ly to the
appliance and leave th e doo r slight ly open sothat
moisture a nd odou rs a re not t rapped i nside .
AfterEvery Wash
Whennotin Use for aLongTime
This appliance must be earthed. In the event of a malfunction or breakdown, earthing will reduce the risk of
electric shock by providing a path of least resistance for the electric current. This appliance is equipped with a
cord havingan equipment-earthing conductorandan earthing plug. The plug mustbe plugged into an
appropriate outlet that is installed and earthed in accordance with all local standards and requirements.
Page 16

for personal safety:
DO NOT USE AN EXTENSION CORD OR AN ADAPTER PLUG WITH THIS APPLIANCE.
DO NOT, UNDER ANY CIRCUMSTANCES,CUT OR REMOVE THE
FROM THE POWER CORD.
EARTHING
CONNECTION
Connect the cold water supply hose to a thr eaded 3/4 (inch ) connecto r and make sure
thatitisfastened tightly in place.
If the wat er pipes are new or have no t been used for anextended period of t ime, let the
water runto makesure that thewater is clear. Thisp recaution is neededtoavoidthe
risk of the water in let to be blocked and dam age the appliance.
Improper connection of the equipment earthing conductor can result in the risk of an
electric shock.
Check with a qualified electrician or service representative if you are in doubt whether the
appliance is properly earthed.
Do not modify the plug provided with the appliance. If the plug does not fit properly to the
outlet, please have a qualified electrician to install a proper outlet.
Insert the drainhose into a dra in pipe with a m inimum diam eter of 40mm, or let it run into the sink, making sure to
avoid bending or crimping it.Thetopof the hosemust beless than1000mm.
A
Counter
Front
Drain pipe
NOTE
The top of the hose
must be less than
1000mm.
φ 40mm
B
Please clo se the hydr ant after usi ng.
Page 17

Thefollowingthings shouldbe checked beforestartingthe dishwasher.
The conten t of this manual is very he lpful t o the u sers.
After installation, please make sure tokeep this manual.
1
Thedishwasheris level andfixed properly
2
The i nle t va lve is ope n
3
Thereis a leakageat the connectionsof theconducts
4
Thewires are tightlyconnected
5
The poweris switched on
6
The i nlet and dr ain hoses a re k notte d
7
Allpacking materials andprintings shouldbe takenout from the dishwasher
ExtensionHose
Ifyou need a drainhose extension, makesure tousea similar drainhose.
It must be no longer t han 4 metres; otherw ise t he clean ing effectof the di shwasher could be reduced.
Wat e r O utle t
Connect the water d rain h ose. The dr ain h ose mustbe cor rectly fit ted t o avoid water lea ks.
Ensure that the water drain hose is no t kinked or squashed .
If the sink is 1 000 hig her fr om the floor, th e exces s wa ter in h o ses cannot be draine d dire c tly
into thesink.It willbe necessary todrainexcess w ater fromhoses into abowl or suitable
container that is held outside and low er th an the s ink.
How to Drain ExcessWaterF romHoses
Syphon Conn ection
Insert the dr ain hose into a drain pipe with a minimum diameter of 40mm, or let it run into the sin k, makin g sure t o
avoid bending o r crimpi ng it. The top of the hose mus t be less t han 100 0mm.
Page 18

Fuse blown, or the
circuit breaker acted
Replace fuse or reset circuit breaker. Remove any other
appliances sharing the same circuit with the dishwasher
Spilled rinse-aid
Always wipe up rinse-aid spills immediately .
Hard water minerals
The affected items are
notcorrosionresistant.
The lid of the softer
is loose
Aspayarmis
knocking against
an itemin a basket
r
Items of crockery
are loose in the
wash cabinet
This may be caused
by on-site installation
or the cross-section of
the piping.
A programme wasnot
run after dishwasher
salt was added.
Traces of salt have
gotten into the wash cycle.
To clean the interior, use a damp sponge with
dishwasher detergent and wear rubber gloves.
Never use any other cleaner than dishwasher
detergent for the risk of foaming or suds.
Always run the quick wash programme .
without any crockery in the dishwasher and
without selecting the Turbo function (if present),
after adding dishwasher salt.
Check the lip .Ensure the fix is fine.
Interrupt the programme, and rearrange the items
which are obstructing the sp ay arm.r
Interrupt the programme,
and rearrange the items of crockery.
This has no influence on the dishwasher function.
if in doubt, contacta suitably qualified plumber.
Detergent with
colourant was used
Make sure that the detergent is the one without
colourant.
Improper detergent
Make sure the dishwasher is turned on and the door is
closed securely.
Check that the water supply is connected properly and
the water is turned on.
Make sure to close the door properly and latch it.
Make sure the power cord is properlyplugged into the
wall socket.
Power supplyis not
turned on
Water pressure is low
Door of dishwasher
not properly closed.
Kink in drain hose
Filter clogged
Kitchen sink clogged
Check drain hose.
Check coarse the filter
(see section titled )" Cleaning The Filter "
Check the kitchen sink to make sure it is draining well.
If the problem is the kitchen sink not draining ,you may
need a plumber rather than a serviceman for dishwashers.
Use only the special dishwasher detergent to avoid suds.
If this occurs, open the dishwasher and let suds evaporate.
Add 1 gallon of cold water to the tub. Close and latch the
dishwasher, then select anycycle.Dishwasherwilldrain
outthewaterat the first step.Open the doorafter draining
is stop and check if the suds is disappeared.
Repeat if necessary.
Page 19

The dishes were not
loaded correctly.
See notes in " Loading the Dishwasher Baskets ".
Select a more intensive programme.
See" Wash Cycle Table ."
Use more detergent, or change your detergent.
Rearrange the items so that the sp ay can rotate freely.r
Clean and/or fit the filter combinationcorrectly.
Clean the sp ay arm jets. See "Cleaning the Spray
Arms".
r
Use less detergent if you have soft water and select
a shortest cycle to wash the glassware and to get
them clean.
Use a mild abrasive cleaner to eliminate those marks.
Re-loading the dishes properly.
Load the dishwasher as suggested in the directions.
Increase the amount of rinse-aid/refillthe rinse-aid
dispenser.
Do not empty your dishwasher immedia tely after
washing. Open the door slightly so that the steam can
escape. Begin unloadingthe dishwasher only once t
he dishes are barely warm to the touch. Empty the low
basket first. This prevents water form dropping off
dishes in the upper basket.
In short program the washing temperature is lower.
This also lowers cleaning performance. Choose
a program with a long washing time.
Water drainage is more difficult with these items.
Cutlery or dishes of this type are not suitable for
washing in the dishwasher.
Theprogrammewas
notpowerfulenough.
Not enough detergent
wasdispensed.
Items are blocking
the path of sp ay arms.r
The filter combination
inthebaseofwash
cabinet is not clean or
is not correctly fitted.
This may cause
the sp ay arm jets
to get blocked.
r
Combination of soft
water and too much
detergent.
Aluminum utensils
have rubbed against
dishes.
Dishes block
detergent cups.
Improper loading
Too little rinse-aid
Dishes are removed
too soon
Wrong program
has been selected
Use of cutlery with
a low-quality coating
Overflow.
When some malfunctions come on, the appliance will display error codes to warn you:
Longer inlet time.
Faucets is not opened, or water intake is
restri cted,or water pressure is too low.
Some element of dishwasher leaks .
TheSoak lightflicker fleetly
The Glass light f lic ke r fleetly
Page 20

Height: 845mm
Width : 598mm
Depth: 600mm
Water pre ssur e: 0.04- 1.0M Pa
Pow er s upp l y: see ra ti ng la b el
Capacity: 14place settings
If overflow occurs, turn off the main water supply before calling a service.
If there is water in the base pan because of an overfill or small leak,
the water should be removed before restarting the dishwasher.
Page 21

 Loading...