

Page 1
Ample,Artic,Grace
ASSEMBLY GUIDE / MONTAGEANLEITUNG /
INSTRUCTIONS DE MONTAGE / INSTRUKCJA MONTAŻU
1
Fig. 1 a
Fig. 1 b
Ø5mm
Fig. 1 c
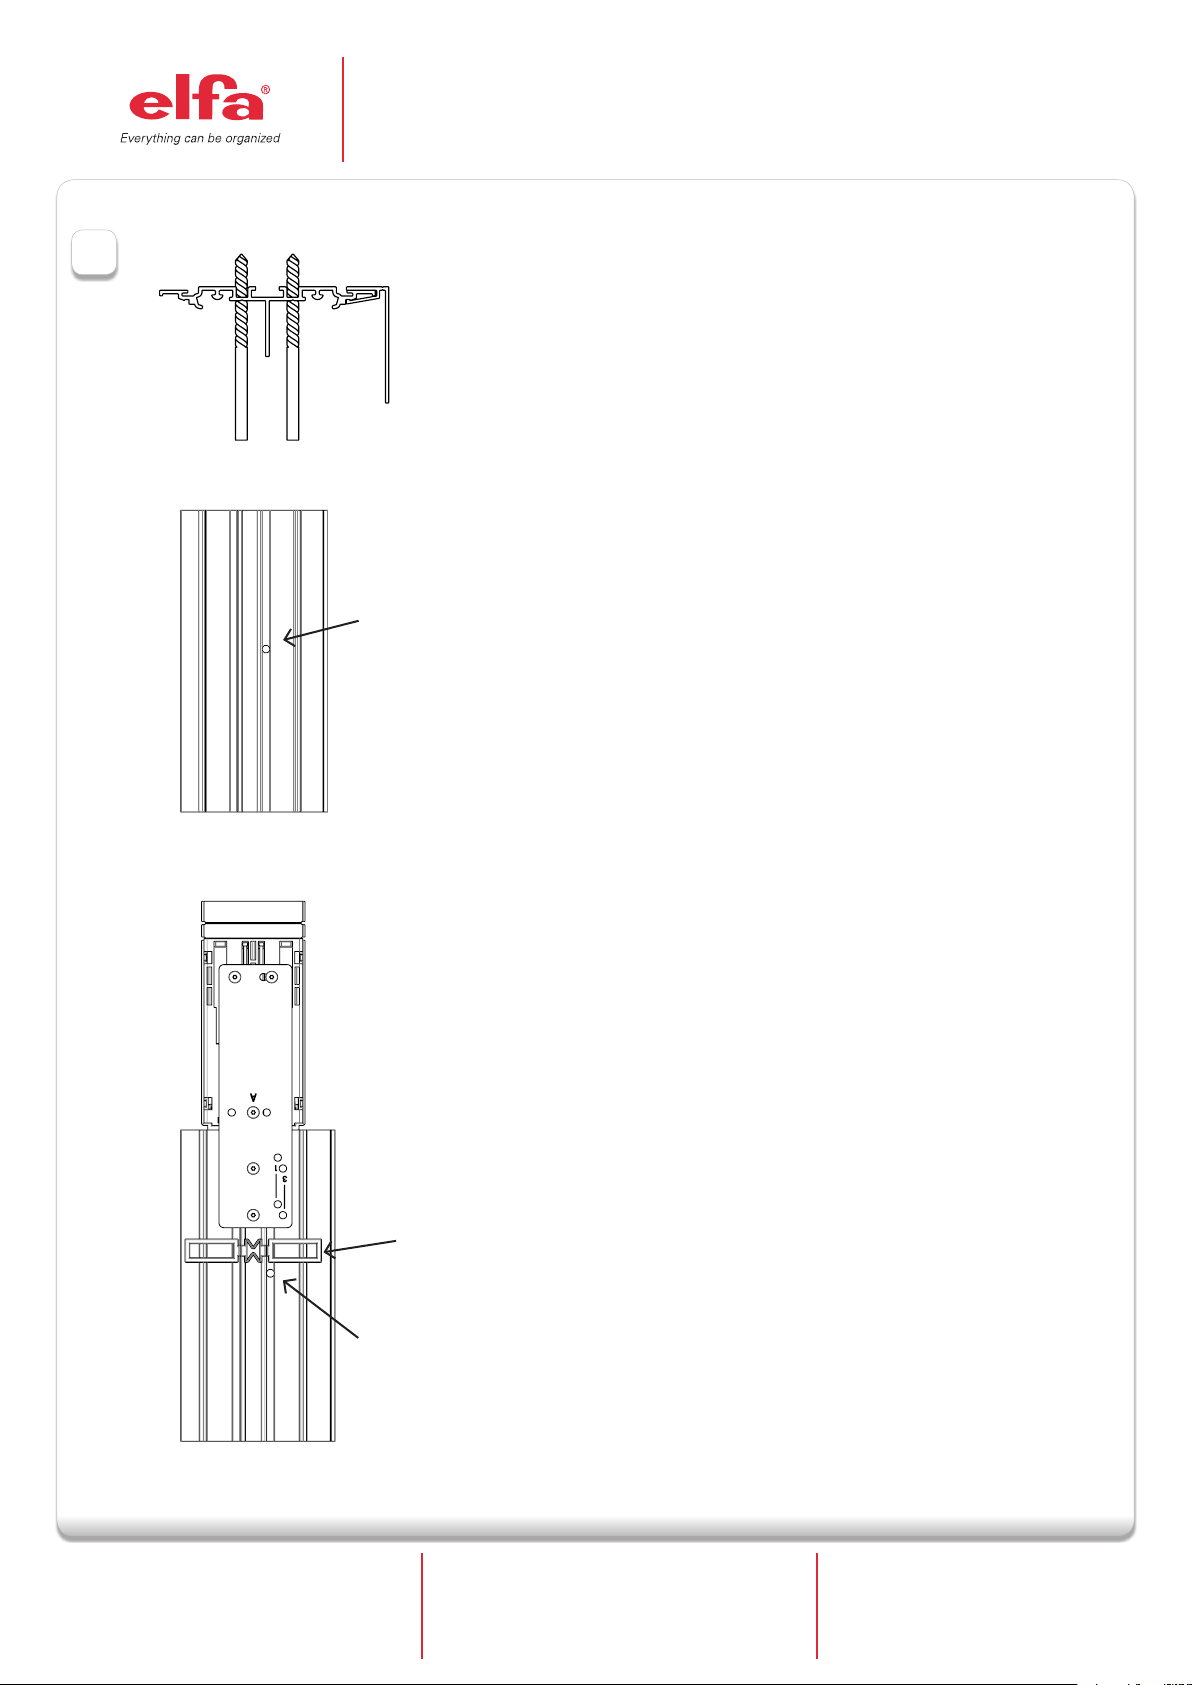
Drilling and mounting the top track
The top track is delivered without drilled holes. The top track is to be secured to the
ceiling with screws. Drill the appropriate points of attachment with a 5 mm drill and
secure the top track with screws at the front edge of the opening. See fig. 1 a and 1 b.
If the opening has a soft close mechanism, place the pre-mounted spacers, marked A in
fic. 1 c, close to the drilled 5 mm holes.
If more attachment points are choosen than there is pre-mounted spacers, place a 2 mm
thick object as an own spacer near the holes before tightening the screw.
Montage Deckenschiene (oben)
Die obere Laufschiene (Fig.1a) muss an die Decke geschraubt werden.
Bohren Sie hierfür die entsprechenden Befestigungspunkte (Fig. 1b)mit einem 5mm
Bohrer vor und schrauben danndie obere Laufschiene bündig mit der Vorderkante der
Öffnung an der Decke fest.
Die Laufschiene muss in Waage montiert werden.
Wenn die Laufschiene mit einem Softschließbeschlag (Fig. 1c) geliefert wird platzieren Sie
bitte die Abstandhalter aus Kunststoff (A) in der Nähe der Bohrungen.
Perçage et montage du rail haut.
Le rail haut doit être vissé au plafond. Il est livré non percé, afin que vous choisissiez les
emplacements les mieux appropriés pour les perforations (environ 20cm de chaque
extrémité du rail et les autres réparties sur le rail – pour 2 mètres de rail, 1 perforation à
chaque extrémité + 1 au centre suffiront).
Pour cela pré-percez avec un foret de 5mm (fig.1 bis et 1 ter), marquez ces perforations
sur votre plafond, mettez les chevilles à l’emplacement de vos marquages, puis vissez le
rail avec des vis à tête fraisée.
Si vous avez un système de fermeture amortie, placez les entretoises pré-montées
(marquées A sur la fig. 1c), près de chaque perforation de Ø 5 mm.
Customer service / Kundendienst
Deutschland
Tel. 05242 3789375 Fax. 05242 9683632.
E-post:planung@elfa.de
A
Ø5mm
Nawiercanie i montaż szyny górnej.
Szyna górna jest dostarczana bez wywierconych otworów. Powinna zostać
przykręcona do sutu za pomocą wkrętów. Wywierć otwory w szynie wiertłem 5mm
po zewnętrznej stronie szyny. Rys 1a i 1b.
Jeśli montujesz szynę z cichym zamknięciem, umieść plastikowe dystanse (A rys.
1c) blisko wywierconych otworów. Jeśli koniczne jest wywiercenie większej ilości
otworów niż ilość dystansów, umieść 2mm grubości przedmioty blisko otworów
przed dokręceniem śrub.
Page 1 of 8
Service client
France
Tél. +33 472 330 731 – Fax +33 472 345 260
e-mail: contact.france@elfa.com
Serwis
Polska
Tel. 42 611 64 01 Fax. 42 611 64 02
E-post:elfa@elfa.pl
www.elfa.com
Page 2
H
Ample,Artic,Grace
ASSEMBLY GUIDE / MONTAGEANLEITUNG /
INSTRUCTIONS DE MONTAGE / INSTRUKCJA MONTAŻU
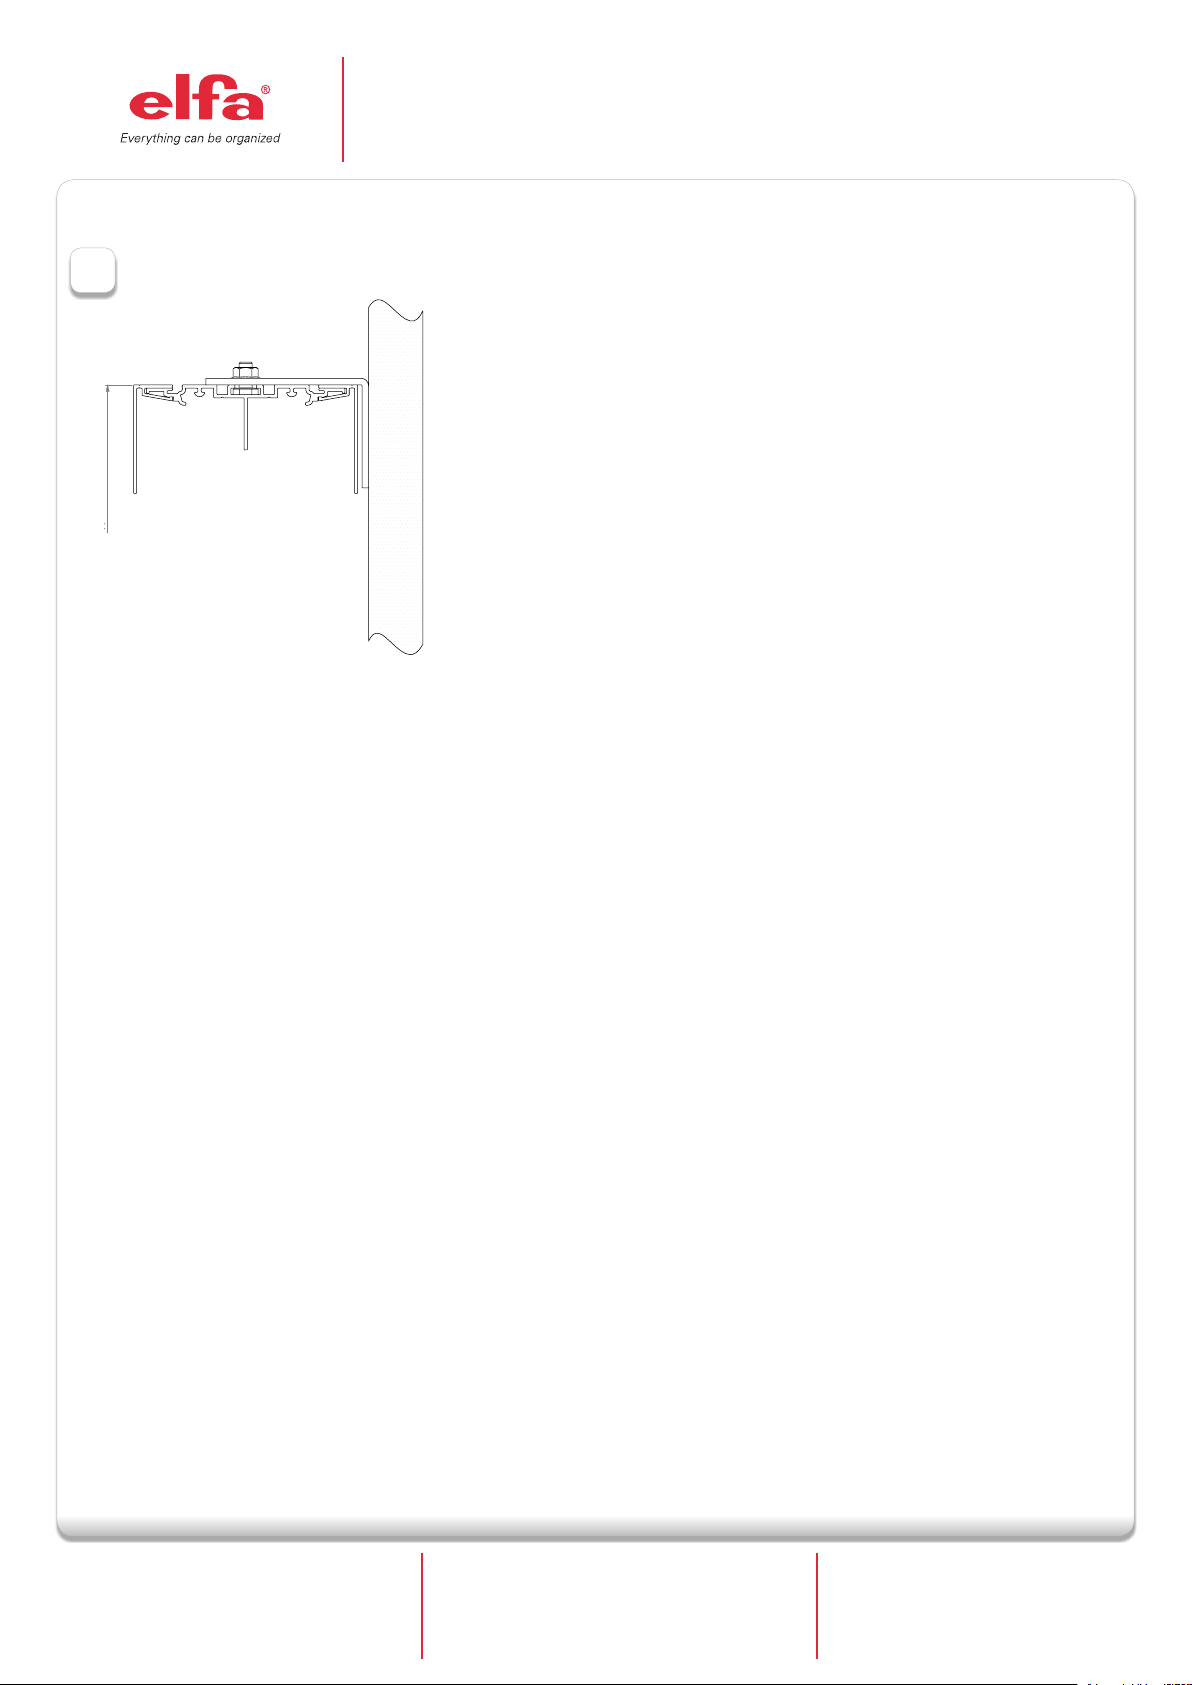
Secure the top track to a wall
2
Fig. 2
H
The top track comes with angeled wall brackets. Place the top of the track at the height
(H) ordered. See pic 2. Secure the angled brackets to the wall above the opening.
See step 3 for assembly of bottom track.
Montage der Deckenschiene (oben) bei Wandbefestigung.
Die Deckenschiene ist im oberen Abschnitt mit Befestigungswinkeln (Fig. 2) ausgestattet.
Legen Sie die Deckenschiene so an, dass sich deren Oberkante (H) auf der im
Lieferschein angegebenen ”Lichten Höhe”
befindet. Montieren Sie die Befestigungswinkel an der Wand oberhalb der Öffnung.
Zur Montage der Bodenschiene siehe Punkt 3!
Montage du rail haut avec une solution à fixation murale.
Le rail haut est livré avec des équerres de fixation placées sur le dessus.
La partie supérieure du rail doit être mis en place à la hauteur commandée (fig. 2).
Fixez les équerres sur le mur au-dessus de l’ouverture.
Pour monter le rail bas, reportez-vous à l’étape 3.
Montaż szyny górnej do ściany.
Szyna jest dostarczona z kątownikami wkręcanymi w ścianę. Zamontuj szynę tak by
jej górna końcówka znajdowała się na wysokości (H) podanej w zamówieniu (rys. 2).
Przykręć kątowniki do ściany powyżej otworu drzwiowego.
Przejdź do punktu 3 – montaż szyny dolnej.
Page 2 of 8
Customer service / Kundendienst
Deutschland
Tel. 05242 3789375 Fax. 05242 9683632.
E-post:planung@elfa.de
Service client
France
Tél. +33 472 330 731 – Fax +33 472 345 260
e-mail: contact.france@elfa.com
Serwis
Polska
Tel. 42 611 64 01 Fax. 42 611 64 02
E-post:elfa@elfa.pl
www.elfa.com
Page 3
Ample,Artic,Grace
ASSEMBLY GUIDE / MONTAGEANLEITUNG /
INSTRUCTIONS DE MONTAGE / INSTRUKCJA MONTAŻU
Fig. 3 a
3
Fig. 3 b
Fig.3 c
Fig.3 d
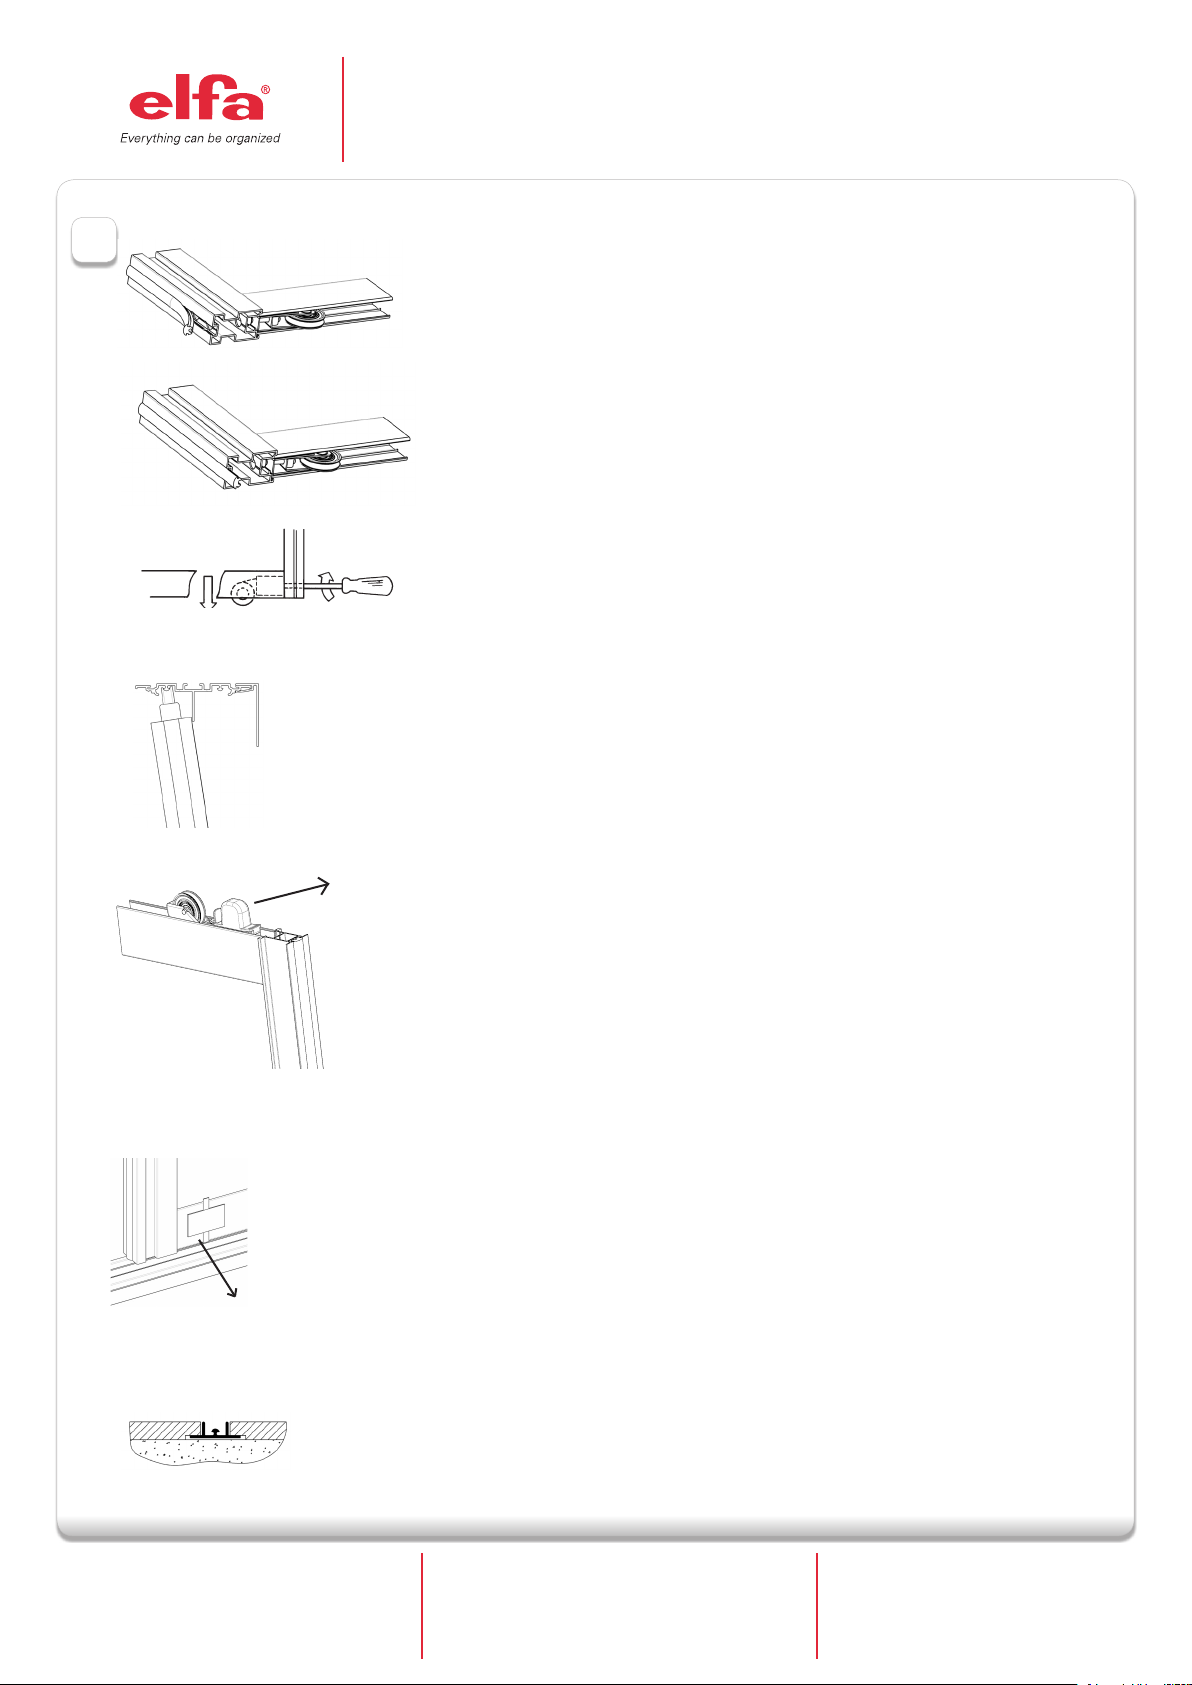
Assemble the bottom track and the doors.
The entire surface where the soft close tracks are to be mounted must be level.
Place the bottom track on the floor immediately below the top track.
If the top track is wall assembled, the bottom track should be centered below the top track
so that equally stand out on both sides.
Start by setting back the bottom wheel. Lift the rubber strip off the groove to reach the
adjustment screw. See fig. 3 a and 3 c.
Press the rubber strip back in place and cut it to the same length as the groove. See fig.3 b.
If the door solution has soft close mechanism, remove the safety device from the wheels
before installing the door. Bottom track mounted soft closing, see fig. 3 f. Top track
mounted soft closing, see fig 3 e.
If fitting a milled single bottom track to the floor, it has to be recessed so that the side walls
touch the floor. This allows for adjustment of the height of the doors. See fig. 3 g.
Fit the rear sliding door first. Slide it into the rear rail of the top track. See fig. 3 d.
Place the door with the wheels in the rear rail of the bottom track.
Use a spirit level to check that the door is straight and then make sure that the bottom track
is in the right position in relation to the top track. Move the door sideways and check with
the spirit level that the door is vertical at both ends of the bottom track.
Fig. 3 e
Fig. 3 f
Fig. 3 g
Mark the final position of the bottom track with a pen or pencil. Remove the door. Fix the
bottom track in position with double-sided tape or drill and fix it with countersunk screws.
The single trackset can only be mounted with double-sided tape.
Put all doors in place, starting with the doors that run in the rear rails.
Adjust the bottom wheels so that the doors sit flush against the side walls. Lift the door
slightly while adjusting. See fig. 3 h.
If you have a door with soft close mechanism, activate the mechanism by pulling all the
doors to both outer sides.
Montage der Bodenschiene und Schiebetüren.
Platzieren Sie die Bodenschiene lose direkt unterhalb der oberen Deckenschiene.
Entfernen Sie die Gummidichtung am seitlichen Griffprofil und drehen die untere Bodenrolle
mit einem PH2-Kreuzschraubendreher über die Stellschraube ein wenig aus dem unteren
Querprofil. (Fig. 3a und 3c)
Drücken Sie die Gummidichtung wieder fest auf das Griffprofil und scheiden den Überstand
einfach ab. (Fig. 3b)
Wenn die Schiebetür mit der Funktion ”Softschließen” ausgestattet ist entfernen Sie bitte
die Schutzkappen an den Laufrollen (Fig. 3e und 3f)
Bei der Montage einer eingelassenen einspurigen Bodenschiene ist diese so vertieft in den
Fußboden einzulassen, dass die Seiten mit dem fertigen Fußboden bündig abschließen.
Dadurch bleibt die Höhenverstellbarkeit der Türen erhalten. (Fig. 3g)
Customer service / Kundendienst
Deutschland
Tel. 05242 3789375 Fax. 05242 9683632.
E-post:planung@elfa.de
Service client
France
Tél. +33 472 330 731 – Fax +33 472 345 260
e-mail: contact.france@elfa.com
Page 3 of 8
Serwis
Polska
Tel. 42 611 64 01 Fax. 42 611 64 02
E-post:elfa@elfa.pl
www.elfa.com
Page 4

Fig.3 h
Ample,Artic,Grace
ASSEMBLY GUIDE / MONTAGEANLEITUNG /
INSTRUCTIONS DE MONTAGE / INSTRUKCJA MONTAŻU
Montieren Sie die hintere Schiebetür zuerst, indem Sie diese in die hintere Spur der
Deckenschiene einsetzen. (Fig. 3d)
Setzen Sie dann die Schiebetür mit den Laufrollen in die hintere Spur der Bodenschiene.
Mithilfe einer Wasserwaage kontrollieren Sie nun, ob die Schiebetür im Lot ist.
Stellen Sie dann sicher, dass die Bodenschiene korrekt zur Deckenschiene ausgerichtet ist.
Lassen Sie die Schiebetür zur Seite gleiten und prüfen Sie anhand der Wasserwaage, ob die
Schiebetür an beiden Enden der Bodenschiene absolut senkrecht steht.
Zeichnen Sie mit einem Bleistift oder Kugelschreiber die endgültige Position der
Bodenschiene an. Entfernen Sie die Schiebetür. Fixieren Sie die Bodenschiene in der
endgültigen Position mit doppelseitigem Klebeband oder bohren Sie Befestigungslöcher
und befestigen die Schiene mittels Senkschrauben am Fußboden.
Setzen Sie alle Türen ein, indem Sie mit den in der hinteren Spur laufenden Schiebetüren
beginnen.
Stellen Sie die unteren Laufrollen so ein, dass die Schiebetür gerade auf die Seitenwand
zuläuft. Heben Sie die Schiebetür beim Einstellen etwas an.(Fig. 3h)
Bei einer Schiebetür mit der Funktion „Soft-Schließen” wird diese aktiviert, indem alle
Schiebetüren beidseitig nach außen geschoben werden.
Montage du rail bas et des portes.
La surface sur laquelle sera monté le rail bas doit être parfaitement horizontale.
Vérifiez la propreté de chaque roulette, afin d’éviter qu’un élément extérieur ne détériore le
système de roulement.
Placez le rail bas au sol, juste en dessous du rail haut.
Pour un rail haut mural, centrez le rail bas par rapport au rail haut.
Pour un rail bas encastré dans le sol, vous devez l’encastrer de façon à ce que les parois
latérales affleurent le sol. Cela permet de préserver la capacité de réglage en hauteur des
portes (voir fig. 3g).
Pour un système de fermeture amortie, enlevez le système de protection des roulettes
avant l’installation des portes (voir fig. 3e et 3f).
Positionnez la porte arrière dans la voie arrière du rail haut (fig. 3d), puis positionnez les
roulettes basses dans la voie arrière du rail bas. Vérifiez la verticalité de la porte à l’aide d’un
niveau.
Soulevez la languette en caoutchouc située en bas du profil (voir fig. 3a et 3c), pour atteindre la vis de réglage. Réglez les roulettes, puis faites coulisser la porte pour vous assurer
qu’elle coulisse facilement – réglez les roulettes jusqu’à ce que la porte soit de niveau, aux
deux extrémités du rail bas.
Customer service / Kundendienst
Deutschland
Tel. 05242 3789375 Fax. 05242 9683632.
E-post:planung@elfa.de
Marquez l’emplacement du rail bail en traçant un trait au sol avec un crayon ; enlevez la
porte ; fixez le rail bas avec de l’adhésif double face, (ou éventuellement des vis à têtes
fraisées).
Le rail simple ne pourra être fixé qu’avec de l’adhésif double face.
Remettez la baguette en caoutchouc en place, et coupez-la à la longueur du profil (en haut
et en bas) (fig. 3b).
Page 4 of 8
Service client
France
Tél. +33 472 330 731 – Fax +33 472 345 260
e-mail: contact.france@elfa.com
Serwis
Polska
Tel. 42 611 64 01 Fax. 42 611 64 02
E-post:elfa@elfa.pl
www.elfa.com
Page 5

Ample,Artic,Grace
ASSEMBLY GUIDE / MONTAGEANLEITUNG /
INSTRUCTIONS DE MONTAGE / INSTRUKCJA MONTAŻU
Retirez les caches rouges placés sur les tétons des roulettes.
Installez toutes les portes en commençant par celle qui coulissera sur la voie arrière du rail.
Ajustez-les, de sortes qu’elles soient bien parallèles aux parois latérales à chaque extrémité
du rail – soulevez légèrement la porte lorsque vous l’ajustez (fig. 3h).
Pour activer le système de fermeture amortie, tirez chaque porte des deux côtés du rail
jusqu’à ce que le taquet du haut active le ressort du boîtier.
Montaż szyny dolnej i drzwi.
Powierzchnia, na której będzie montowana szyna dolna musi być odpowiednio
wypoziomowana.
Umieść szynę dolną bezpośrednio pod zamontowaną szyną górną.
Jeśli szyna górna została prawidłowo zamontowana, szyna dolna powinna być
wyśrodkowana dokładnie pod nią.
Zacznij od przygotowania dolnych kółek. Wyjmij uszczelkę z dołu prolu bocznego aby
dostać
się do regulacji kółka. Patrz rys. 3 a i 3 c.
Wciśnij silikonową uszczelkę z powrotem w prol i przytnij równo z końcówką prole
(rys.3 b).
Jeśli drzwi mają ciche zamknięcie, zdejmij zabezpieczenie z kółek przed montażem
drzwi.
Ciche zamknięcie montowane na szynie dolnej patrz rys. 3 f. Ciche zamknięcie montowane
na szynie górnej rys. 3 e.
W przypadku montażu szyny wpuszczanej w podłogę, szyna powinna być dopasowana
tak,
by ściany zewnętrze szyny dotykały do ścianek podłogi. Pozwoli to na regulację
wysokości
drzwi rys. 3 g.
Na początku zamontuj tylne drzwi. Wsuń drzwi w tylną szynę szyny górnej. Patrz rys.
3d.
Następnie umieść dolne kółka w odpowiedniej dolnej szynie.
Użyj poziomicy aby upewnić się, że szyna dolna jest równoległa z szyną górną. Przesuń
drzwi z jednego końca szyny na drugi I upewnij się, że drzwi dochodzą do ścian po obu
końcach szyny.
Zaznacz ostateczną pozycję szyny dolnej długopisem lub ołówkiem. Zdejmij drzwi i
zamontuj szynę w wcześniej zaznaczonym miejscu. Do montażu polecamy taśmę
dwustronną lub śruby z łbem stożkowym.
Szyna pojedyncza może być zamontowana tylko przy użyciu taśmy dwustronnej.
Umieść wszystkie drzwi w szynie zaczynając od tych, które jeżdżą po tylnej prowadnicy.
Customer service / Kundendienst
Deutschland
Tel. 05242 3789375 Fax. 05242 9683632.
E-post:planung@elfa.de
Wyreguluj dolne kółka tak aby drzwi były równoległe ze ścianą. Unieś delikatnie drzwi w
trakcie regulacji kółek. Zobacz rys. 3 h.
Jeśli posiadasz drzwi z cichym zamknięciem aktywuj mechanizm poprzez przesunięcie
wszystkich drzwi na skrajnie lewą stronę, a później na skrajnie prawą.
Page 5 of 8
Service client
France
Tél. +33 472 330 731 – Fax +33 472 345 260
e-mail: contact.france@elfa.com
Serwis
Polska
Tel. 42 611 64 01 Fax. 42 611 64 02
E-post:elfa@elfa.pl
www.elfa.com
Page 6

Ample,Artic,Grace
ASSEMBLY GUIDE / MONTAGEANLEITUNG /
INSTRUCTIONS DE MONTAGE / INSTRUKCJA MONTAŻU
4
Position stop
1. Place the doors so that there is equal overlap on both sides.
2. Mark on the top track the position of the centre of the wheel.
3. Slide the door sideways.
4. Centre the stop on the marked spot and screw into place.
Positionsstopp
1. Platzieren Sie die Schiebetüren so, dass die Überlappung auf beiden Seiten gleich groß ist.
2. Zeichnen Sie an der Deckenschiene die Mitte der Rolle an.
3. Schieben Sie die Tür zur Seite.
4. Befestigen Sie den Positionsstopp mit der Schraube mittig an der Markierung.
Butée (pour les solutions avec plus de deux portes)
1. Positionnez les portes de sorte qu’elles se chevauchent de la largeur d’un profil.
2. Marquez la position de l’axe d’une des roulettes sur le rail haut.
3. Faites glisser la porte sur le côté
4. Fixez la butée à l’aide de la vis, centrée sur le marquage.
Blokada pozycji
1. Przesuń skrzydła do pożądanej pozycji, tak aby zakładki z dwóch stron były takie
same.
2.Zaznacz na górnej szynie pozycję środka kółka.
3. Odsuń drzwi na bok.
4. Umieść blokadę pozycji w zaznaczonym miejscu.
Lighting (accessory)
5
The lighting is ready assembled in the top track and can be plugged straight into the wall
socket.
Do not change the position of the cable. The cable has been fitted correctly by the
manufacturer.
Beleuchtung (Zubehör)
Die Beleuchtung wird komplett in der Deckenschiene montiert, und der Stecker kann dort
direkt in die Wanddose eingesteckt werden.
Eclairage (accessoire)
L’éclairage à LED est entièrement monté dans le rail haut, et la prise de courant peut être
insérée directement dans une prise murale.
Ne pas modifier la position du câble (il a été monté en usine, conformément à votre
commande).
Oświetlenie (akcesoria)
Oświetlenie jest już zamontowane na szynie górnej wystarczy jedynie włożyć wtyczkę
do kontaktu.
Nie zmieniaj pozycji kabla. Jest on fabrycznie umieszczany po prawej stronie.
Page 6 of 8
Customer service / Kundendienst
Deutschland
Tel. 05242 3789375 Fax. 05242 9683632.
E-post:planung@elfa.de
Service client
France
Tél. +33 472 330 731 – Fax +33 472 345 260
e-mail: contact.france@elfa.com
Serwis
Polska
Tel. 42 611 64 01 Fax. 42 611 64 02
E-post:elfa@elfa.pl
www.elfa.com
Page 7

Ample,Artic,Grace
ASSEMBLY GUIDE / MONTAGEANLEITUNG /
INSTRUCTIONS DE MONTAGE / INSTRUKCJA MONTAŻU
Brushes (optional)
6
Ample
A brush seal can be fitted to the profile to prevent dust from entering the doors. The
brush seal is primarily intended for side profile Ample.
Bürsten (Zubehör)
Bürstendichtung im Überdeckungsbereich hinter die aufrechen Griffprofile kleben.
Stärke der Bürstendichtung ist nur für die Profile Ample ausreichend.
Brosses (accessoire)
Pour éviter l’intrusion de poussière entre les portes, il est possible de mettre en place
un joint brosse.
Il est particulièrement adapté pour les profil Ample, mais trouvera quand même sa
place (plus étroite cependant) sur les autres profils.
Szczotki (akcesoria)
Istnieje możliwość montażu szczotek zapobiegających dostawaniu sie kurzu
pomiędzy drzwi. Szczotki można zamontować na prolach Ample.
Artic
Grace
Customer service / Kundendienst
Deutschland
Tel. 05242 3789375 Fax. 05242 9683632.
E-post:planung@elfa.de
Service client
France
Tél. +33 472 330 731 – Fax +33 472 345 260
e-mail: contact.france@elfa.com
Page 7 of 8
Serwis
Polska
Tel. 42 611 64 01 Fax. 42 611 64 02
E-post:elfa@elfa.pl
www.elfa.com
Page 8

Ample,Artic,Grace
ASSEMBLY GUIDE / MONTAGEANLEITUNG /
INSTRUCTIONS DE MONTAGE / INSTRUKCJA MONTAŻU
Cleaning instructions
7
Mirrors
Use a window cleaner to remove stains from the mirror. If this does not work, use a
razor blade or steel wool.
(N.B. Only steel wool not Scotch-Brite™ or similar.) Razor blades and steel wool will not
scratch the mirror!
Any spots or glue residue left on the mirror from production, despite our quality control,
can be removed as described above.
Veneered panels
There may be some dust on the back of the veneered panels. Vacuum clean the back surface
and wipe with a damp cloth.
Pflege- und Reinigungshinweise
Spiegelflächen
Flecken auf der Spiegelfläche lassen sich am besten mit einem handelsüblichen
Glasreiniger entfernen. Reicht dies nicht aus, können Sie es mit einer Rasierklinge oder
Stahlwolle versuchen.
(Bitte beachten: Es sollte ausschließlich Stahlwolle und nicht Scotch-Brite™ oder ähnliche
Produkte verwendet werden!) Weder eine Rasierklinge noch Stahlwolle werden den
Spiegelflächen Kratzer zufügen!
Sollten sich trotz unserer strengen Qualitätskontrolle noch Klebstoffreste vom
Herstellungsprozess auf der Spiegelfläche befinden, können diese nach der oben erwähnten
Reinigungsmethode entfernt werden.
Furnierte Paneele
Sollte sich Staub auf der Rückseite der furnierten Paneele befinden, saugen Sie die
Oberfläche zuerst ab und wischen Sie sie dann mit einem feuchten Tuch ab.
Instructions de nettoyage
Miroirs
Si malgré notre contrôle qualité, le miroir présente des taches, utilisez un produit nettoyant
pour vitres. Si les taches persistent, vous pouvez utiliser une lame de rasoir ou de la paille
de fer (remarque : uniquement de la paille de fer, et non du Scotch-Brite™ ou un produit équivalent, la lame de rasoir et la paille de fer ne rayeront pas le miroir).
Panneaux en placage
Les panneaux en placage peuvent contenir de la poussière au dos. Nettoyez la surface en
question à l’aide d’un aspirateur et essuyez à l’aide d’un chiffon humide.
Instrukcje czyszczenia
Lustra
Zabrudzenia powinny się zmyć środkiem do mycia okien. Jeśli to nie zadziała można ostrożnie
użyć żyletki .
Nie powinna ona zarysować powierzchni lustra!
Jeśli na powierzchni znajdują się pozostałości kleju, których nie dostrzegliśmy w trakcie
kontroli jakości, zmyj je powyższą metodą.
Fornir
Z tyłu drzwi może się zbierać kurz. Odkurz powierzchnie drzwi i przetrzyj nawilżoną
ściereczką.
Customer service / Kundendienst
Deutschland
Tel. 05242 3789375 Fax. 05242 9683632.
E-post:planung@elfa.de
Service client
France
Tél. +33 472 330 731 – Fax +33 472 345 260
e-mail: contact.france@elfa.com
Page 8 of 8
Serwis
Polska
Tel. 42 611 64 01 Fax. 42 611 64 02
E-post:elfa@elfa.pl
www.elfa.com
 Loading...