

Page 1

Телефон стандарта DECT
CLPD-6010
Руководство пользователя
Page 2

СОДЕРЖАНИЕ
ВВЕДЕНИЕ --------------------------------------------------- 3
НАЧАЛО РАБОТЫ -------------------------------------------- 4
ОПИСАНИЕ ТЕЛЕФОНА ---------------------------------------- 5
ОСНОВНЫЕ ФУНКЦИИ ----------------------------------------- 6
АВТОМАТИЧЕСКИЙ ОПРЕДЕЛИТЕЛЬ НОМЕРА --------------------- 9
ДЕТСКИЙ РЕЖИМ -------------------------------------------- 10
УСТАНОВКИ ТРУБЫ ------------------------------------------- 11
ИСПОЛЬЗОВАНИЕ АККУМУЛЯТОРОВ ----------------------------- 12
ОТКЛЮЧЕНИЕ ПИТАНИЯ --------------------------------------- 12
УСТРАНЕНИЕ НЕПОЛАДОК ------------------------------------ 13
2
Page 3

ВВЕДЕНИЕ
Поздравляем Вас с приобретением беспроводного телефона стандарта
DECT компании Elenberg.
Данный телефон разработан и произведен в соответствии с мировыми
требованиями к средствам коммуникации. При правильном уходе и
эксплуатации он прослужит долгие годы.
Меры предосторожности
• Телефон не работает, если база отключена от электросети.
• Т.к. вокруг телефонной трубки существует магнитное поле,
не оставляйте ее рядом с металлическими предметами. Перед
использованием проверяйте, не прилипли ли к ней острые
металлические предметы.
• Телефонная труба и база должны быть отключены, если в воздухе
присутствуют огнеопасные испарения.
Отличительные особенности
Технология 1.9 ГГц
Обширный радиус действия
Использование частоты 1.9 ГГц позволяет значительно увеличить
радиус приема трубы, по сравнению с беспроводными телефонами,
работающими на частоте 43-49 МГц.
Радиопомехи
Использование ультравысокой частоты позволяет существенно
снизить уровень радиопомех во время работы.
ВАЖНАЯ ИНФОРМАЦИЯ:
Чтобы использовать услугу АОН, Вам необходимо заключить договор
с компанией предоставляющей услуги связи в Вашем регионе
подключении этой услуги.
о
3
Page 4
НАЧАЛО РАБОТЫ
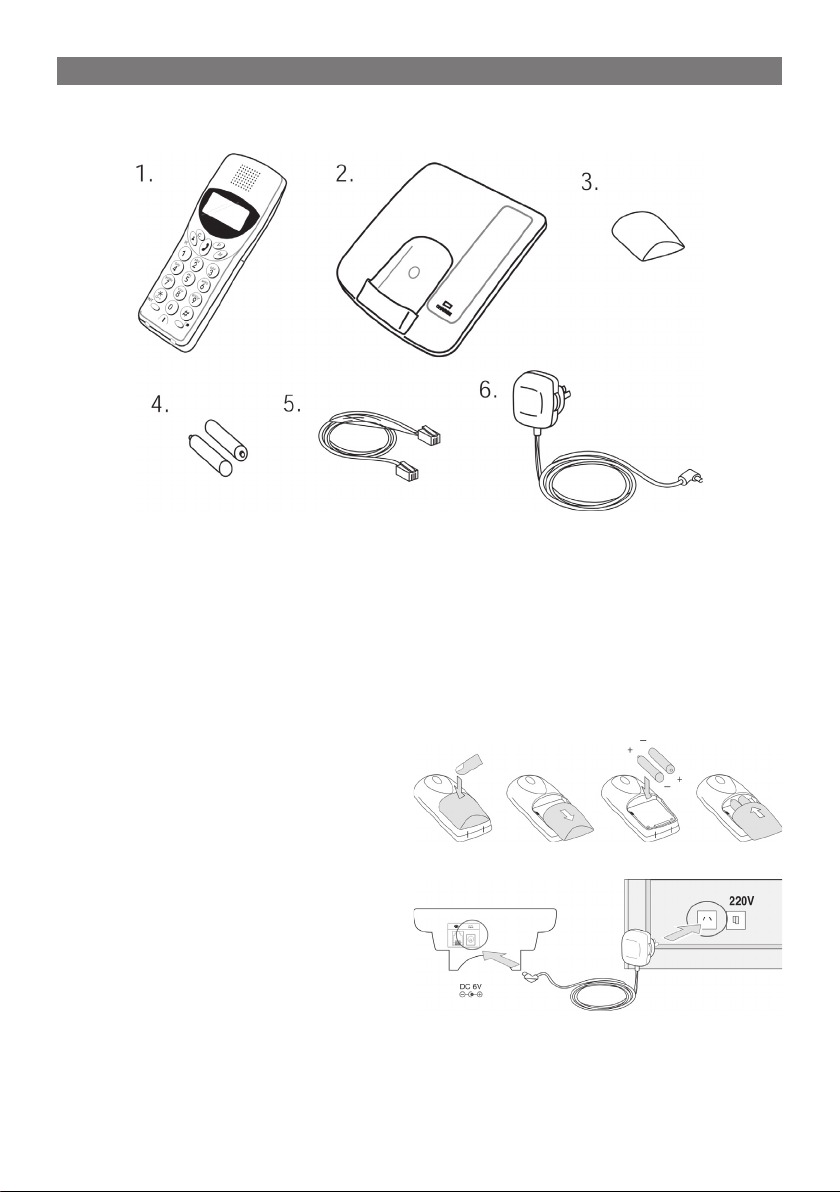
Проверка комплектации
На рисунке приведена полная комплектация данного телефона.
1. Труба
2. База
3. Крышка батарейного отсека
4. Аккумуляторы ААА, 2 шт.
5. Телефонный шнур
6. Сетевой адаптер
Советы по установке
Чтобы снизить количество радиопомех не устанавливайте базу рядом
с телевизором, микроволновой печью, видеомагнитофоном и ПК.
Подключение телефона
1. Снимите крышку аккумуляторного отсека, расположенную на
трубе. Вставьте аккумуляторы
в соответствии с маркировкой
“+/-”, нанесенной на крышку.
2. Сначала, подключите сетевой
адаптер к базе, после чего,
подключите его к электросети.
3. Поставьте трубу на базу.
Зажжется индикатор зарядки.
Для нормальной работы
телефона, в первый раз
необходимо заряжать аккумуляторы непрерывно в течение 16 часов.
Замечание: Во время зарядки труба может нагреться - это нормально.
Внимание: Используйте только фирменный адаптер, поставляемый
вместе с телефоном. Использование другого адаптера может
4
Page 5
привести к поломке прибора.
Подключение к телефонной линии
4. Вставьте один штекер телефонного шнура в разъем, расположенный
на задней части базы. Другой штекер телефонного шнура нужно
включить в телефонную розетку.
Замена аккумуляторов
В первый раз, обязательно заряжайте
аккумуляторы в течение 16 часов. На жкэкране расположен индикатор, который
отображает степень заряженности аккумуляторов.
Замечание: Во время зарядки труба может
нагреться - это нормально.
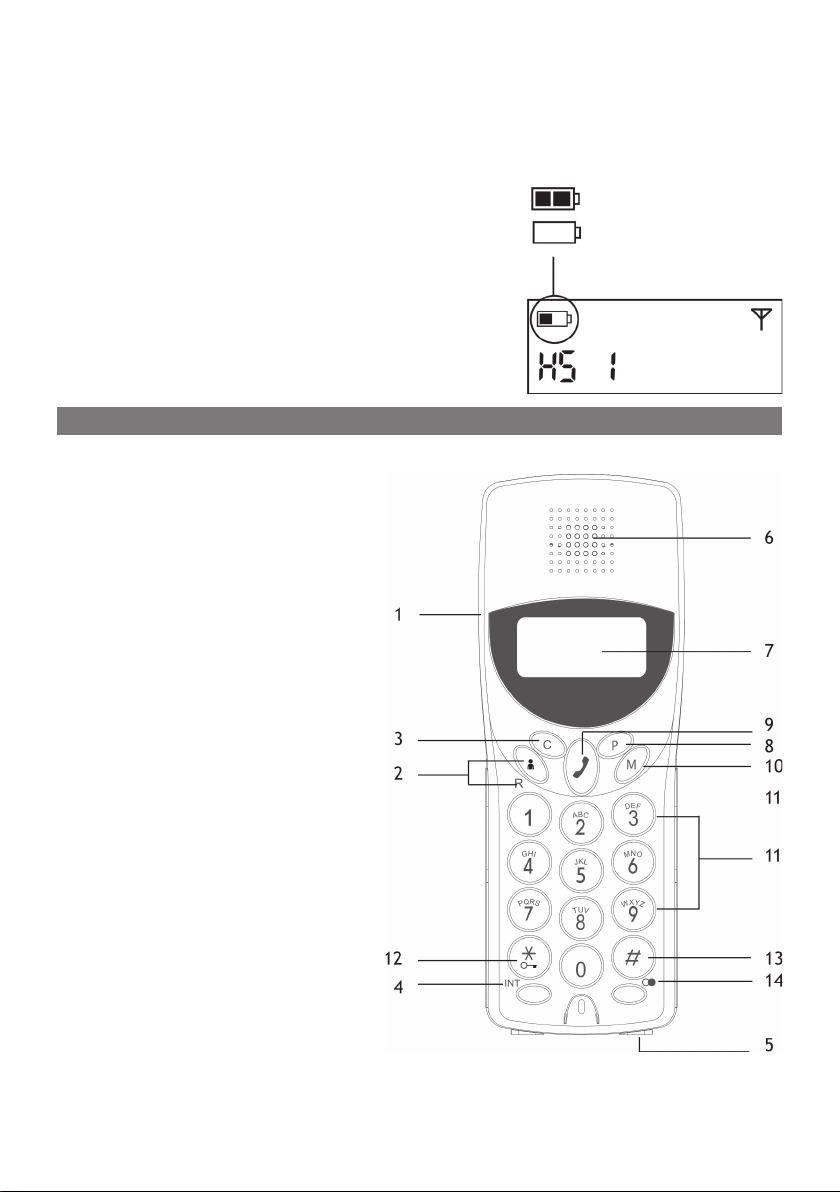
ОПИСАНИЕ ТЕЛЕФОНА
Труба
1. Зажим
2. Определение номера/
Отзыв
3. Отмена/Подавление
4. Интерком (используется
для систем с 2-я трубками)
5. Контакты для зарядки
6. Воспроизводящая
мембрана
7. ЖК-экран
8. Программа
9. Отбой
10. Память
11. Кнопки с цифрами “0-9”
12. */Замок
13. Кнопка “#”
14. Повторный звонок
5
Page 6
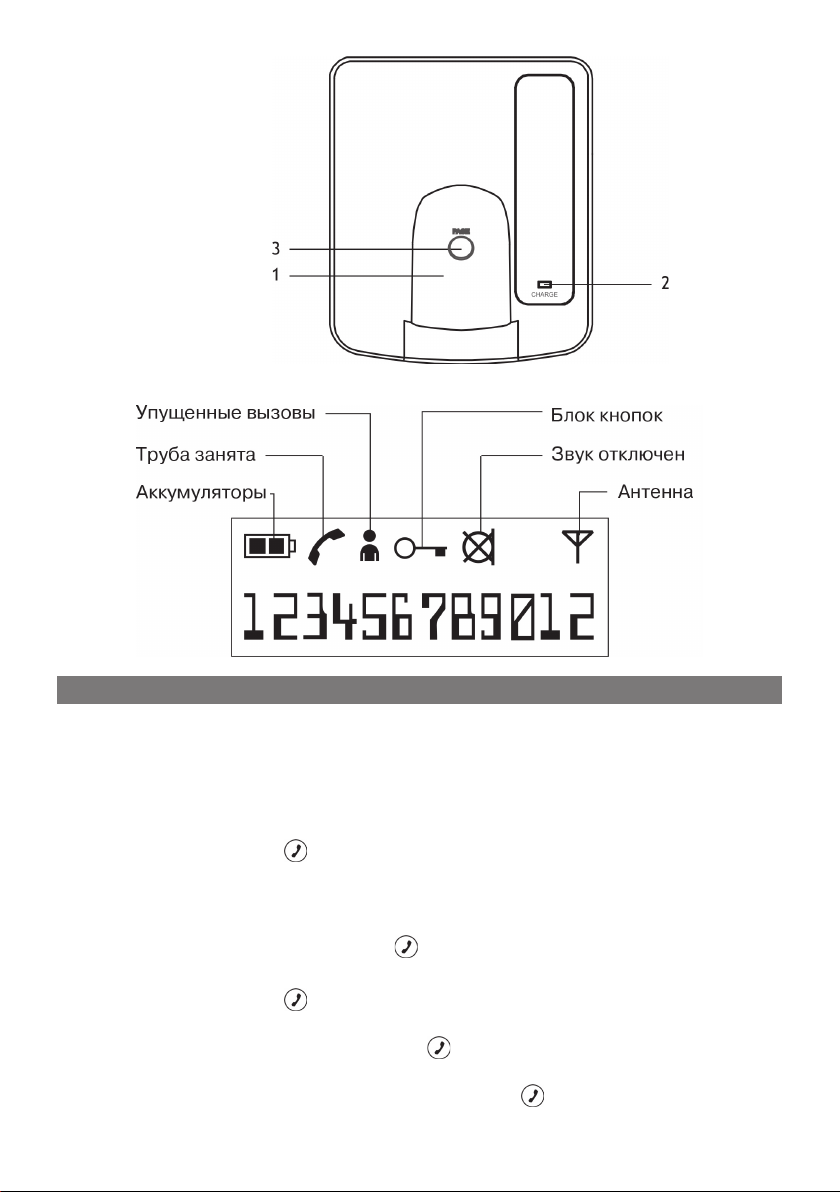
База
1. Ложе для трубы
2. Индикатор зарядки
3. Кнопка “PAGE”
ЖК-экран
ОСНОВНЫЕ ФУНКЦИИ
Прием звонков
При приеме вызова, телефон начинает звонить, а на экране
высвечивается сопутствующая информация.
Замечание: Для корректной работы функции АОН, необходимо
заключить договор с АТС о предоставлении такой услуги.
1. Нажмите кнопку , чтобы ответить на звонок.
Замечание: Если труба находится на базе, телефон автоматически
переходит в режим громкой связи до тех пор, пока с базы не будет
снята труба.
2. Повторное нажатие кнопки сбросит вызов.
Набор номеров
1. Нажмите кнопку , чтобы перейти в режим набора номера.
Замечание: Если труба находится на базе, сначала снимите ее с
базы, а потом нажмите кнопку .
2. Набранные Вами цифры будут отображаться на экране.
3. Чтобы прервать звонок нажмите кнопку или положите трубу на
базу.
6
Page 7

Время звонка
На экране автоматически отображается время входящих и исходя-
щих звонков.
Время звонка отображается в течение 5 секунд после его
завершения.
Регулировка громкости принимаемых сигналов
1. Когда труба находится на базе, нажмите
кнопку “P” и кнопку [4]. Труба перейдет в режим настройки громкости. Вы можете выбрать
один из 3-х уровней громкости: low (низкий),
medium (средний), high (высокий). Для выбора нажмите кнопку [1],
[2] или [3], соответственно.
2. После того, как Вы сделали свой выбор, нажмите кнопку “P”, чтобы
сохранить внесенные изменения. Если нажать кнопку ©, будут
восстановлены оригинальный уровень громкости.
Кнопка Отмена/Подавление
Если Вы не хотите, чтобы Ваш оппонент слышал то, что Вы собирае-
тесь сказать, нажмите кнопку ©. При этом Вы будете слышать то, что
он говорит, а он Вас слышать не будет. На экране появится значок
“ ”. Повторное нажатие этой кнопки, отключает функцию блокировки передачи голоса.
Автоматический набор номера (до 18 цифр)
1. Не нажимая кнопку , наберите нужный номер. Чтобы удалить
последнюю набранную цифру используйте кнопку ©.
2. После того, как Вы полностью набрали номер нажмите кнопку .
Телефон автоматически наберет введенный Вами номер.
Повторный звонок (до 18 цифр)
1. Убедитесь, что труба не находится в режиме набора номера.
2. Вы можете сделать повторный звонок на один из пяти последних
набранных номеров. Для этого, нажимая кнопку выберите
нужный Вам номер и нажмите кнопку .
ИЛИ
1. Нажмите кнопку .
2. Нажмите кнопку , чтобы позвонить на последний набранный
номер.
Телефонная книга
Вы можете сохранить 10 наиболее часто используемых номеров.
Запись номеров в телефонную книгу
1. Чтобы войти в режим записи номеров сначала нажмите кнопку “P”,
потом нажмите кнопку “M”.
2. Нажимайте кнопку “M”, чтобы выбрать ячейку для хранения номера
(0-9). Если в ячейку уже занесен номер, его можно заменить на
новый.
7
Page 8

3. Если ячейке уже присвоен номер, нажмите и удержите кнопку ©,
чтобы очистить ее.
4. Введите нужный номер. Чтобы удалить последнюю набранную
цифру используйте кнопку ©. Если необходимо добавить паузу,
нажмите кнопку в том месте, где она должна находиться.
5. Нажмите кнопку “P”, чтобы сохранить набранный номер в памяти.
Вызов номеров из памяти
1. Телефон не должен находиться в режиме набора номера.
2. Нажимая кнопку “M”, выберите нужный Вам номер.
ИЛИ
2. Нажмите кнопку “M”, потом ячейку (0-9), в которой хранится
нужный Вам номер.
3. Нажмите кнопку .
Замечание: Если телефонный номер состоит из более чем 10 цифр,
нажмите кнопку , чтобы увидеть оставшиеся цифры.
Удаление содержимого памяти
1. Нажмите кнопку “P”. Потом нажмите кнопку “M”, чтобы войти в
режим редактирования памяти.
2. Нажимайте кнопку “M” до тех пор, пока на экране не появится
номер, который Вы хотите удалить.
3. Нажмите и удержите кнопку ©, чтобы удалить этот номер.
4. Нажмите кнопку “P”, чтобы подтвердить удаление этого номера.
Отзыв
Эта функция позволяет получить доступ к специальным возможностям
Вашей телефонной линии. Если Вы подключены к АТС, нажмите кнопку
/R, чтобы получить доступ к дополнительным услугам, таким как
расширенная передача запроса.
Поиск трубы (Пейджинг)
Используйте эту функцию, если Вы не можете
найти трубу.
Нажмите кнопку [ PAGE ], расположенную на базе,
труба начнет подавать сигналы, по которым
ее можно найти. Сигналы будут подаваться 60
секунд или до тех пор, пока не будет сделано
следующее:
1. Нажмите на трубу кнопку .
2. Повторно нажмите кнопку [ PAGE ].
Израсходован заряд аккумуляторов
Когда заряд аккумуляторов подошел к концу, труба подает 3 корот-
ких гудка. При этом индикатор заряда аккумуляторов выглядит
следующим образом: .
8
Page 9

АВТОМАТИЧЕСКИЙ ОПРЕДЕЛИТЕЛЬ НОМЕРА (АОН)
Чтобы использовать услугу АОН, Вам необходимо заключить договор
с компанией предоставляющей услуги связи в Вашем регионе о
подключении этой услуги.
При подключенной услуге АОН, на экране будете отображаться номер
звонящего Вам абонента. Если номер абонента заблокирован, экран
будет пустым или на нем появится следующее: “____“.
Звонки, на которые Вы не ответили, сохраняются в
памяти телефона. При этом на экране появляется
соответствующий значок.
В памяти телефона хранятся номера последних 15
не отвеченных звонков. Вы можете проверить список таких номеров.
При переполнении этого списка, наиболее старые номера стираются.
Замечание: Если телефонный номер состоит из более чем 10 цифр,
нажмите кнопку , чтобы увидеть оставшиеся цифры.
Просмотр упущенных вызовов
Когда труба находится в состоянии ожидания нажмите кнопку ,
чтобы просмотреть список из последних 15 упущенных вызовов.
Номера отображаются в обратном хронологическом порядке. Для
перехода от свежих номеров к старым, используйте кнопку . При
достижении последней записи на экране появится: “____“. Если еще
раз нажать кнопку , Вы переключитесь на первый номер списка.
Чтобы выйти их этого режима, нажмите кнопку ©.
Замечание:
• Если нет упущенных вызовов, при нажатии кнопки , на экране
отобразится: ”____”.
• После просмотра всего списка, значок упущенного вызова исчез-
нет с экрана.
Набор номера из списка упущенных вызовов
1. Труба должна находится в режиме ожидания.
2. Нажимая кнопку , выберите нужный номер.
3. Нажмите кнопку , чтобы начать набор выбранного номера.
Удаление номеров из списка упущенных вызовов
1. Труба должна находится в режиме ожидания.
2. Нажимая кнопку , выберите нужный номер.
3. Нажмите и удержите кнопку ©, чтобы удалить выбранный номер.
9
Page 10

ДЕТСКИЙ РЕЖИМ
Детский режим имеет много функций. Если, при включенном детском
режиме, нажать кнопку или другую кнопку набора номера, телефон
автоматически пошлет вызов на заранее указанный Вами номер. Родители
могут указать номер своего мобильного телефона, чтобы дети могли
позвонить им при возникновении чрезвычайной ситуации.
Установка номера
Этот номер будет набираться при нажатии кнопки или другой
кнопки дозвона.
1. Нажмите кнопку “P”, а потом кнопку [3], чтобы войти в состояние
редактирования детского режима.
2. На экране отобразится: “____“.
3. Введите PIN-код (“0000”, если он не был
изменен Вами), после чего нажмите “P”.
Введите номер и нажмите кнопку “P”. Если другой
номер был установлен, нажмите и удержите
кнопку ©, чтобы удалить его. Один раз нажмите кнопку ©, чтобы
выйти из этого режима.
Включение детского режима
1. Нажмите кнопку “P”, после чего нажмите кнопку [2].
Замечание: Если установки детского режима не были определены,
он не включится, а телефон перейдет в режим ожидания.
2. На экране отобразится: “____“.
3. Введите PIN-код (“0000”, если он не был изменен Вами).
4. Нажмите кнопку “P”. Труба подаст сигнал и на экране начнет мигать
индикатор детского режима.
Выключение детского режима
1. Нажмите кнопку “P”, после чего нажмите кнопку [2]
2. На экране отобразится: “____“.
3. Введите PIN-код и нажмите кнопку “P”.
4. Индикатор детского режима пропадет с
экрана.
10
Page 11

УСТАНОВКИ ТРУБЫ
Мелодия звонка
1. Нажмите кнопку “P” и потом кнопку [5]. Вы можете установить
одну из шести мелодий, выбирая их нажатием кнопок от [1] до [6].
После нажатия кнопки будет воспроизведена соответствующая
мелодия.
2. После выбора нужной мелодии нажмите кнопку “P”.
Установка громкости звонка
1. Нажмите кнопку “P” и потом кнопку [6]. Вы можете выбрать один
из 3-х уровней громкости: low (низкий), medium (средний),
high (высокий). Для выбора нажмите кнопку [1], [2] или [3],
соответственно.
2. Нажмите кнопку “P”, чтобы сохранить сделанные изменения.
Режим блокировки
Вы можете заблокировать клавиатуру телефона, чтобы избежать
случайного нажатия на кнопки.
1. Нажмите и удержите кнопку до появления на экране индикатора
блокировки клавиатуры.
2. Чтобы снять блокировку, снова нажмите кнопку . Индикатор
блокировки исчезнет с экрана.
Замечание: Блок кнопок снимается во время входящих звонков и
восстанавливается после завершения разговора.
Система PIN-кода
Данный телефон оснащен системой PIN-кода предназначенной,
предотвращать случайное изменение критических настроек. По
умолчанию используется код “0000”. Вы можете поменять его на
другой. Если Вы забыли свой пароль, обратитесь в сервисный центр.
1. Нажмите кнопку “P” и потом кнопку [1].
2. На экране отобразится: “____“.
3. Введите текущий PIN-код и после этого
нажмите кнопку “P”.
4. На экране снова отобразится “____”.
5. Введите новый PIN-код из четырех цифр и нажмите кнопку “P”.
6. На экране снова отобразится “____”.
7. Повторите новый PIN-код из четырех цифр и нажмите кнопку “P”.
Тональный или импульсный режим набора номера
Чтобы установить режим набора номера нажмите кнопку “P”, а потом
[*]. На экране появится надпись: “P-”.
Нажмите кнопку [1], чтобы активировать импульсный режим или
кнопку [2], чтобы активировать тональный режим, затем нажмите
кнопку “P”, чтобы подтвердить Ваш выбор.
11
Page 12

Изначальные установки телефона
Метод набора Тоновой
Уровень громкости звонка 3
Мелодия звонка 2
Уровень громкости связи 2
PIN-код 0000
Перерыв между повторными
звонками
Детский режим Выключен
100 мс
ИСПОЛЬЗОВАНИЕ АККУМУЛЯТОРОВ
Если время работы трубы сокращается, значит, ресур аккумуляторов
иссяк.
При нормальных условиях эксплуатирования аккумуляторов хватает на
один год работы.
Предупреждение:
• Используйте только аккумуляторы: AAA Ni-MH 1.5V, 550mAh.
• Не разбирайте аккумуляторы и не подвергайте их воздействию
тепла.
• Берегите корпус аккумуляторов от повреждения.
Замечание: Используйте только AAA 1.5V, 550mAh аккумуляторы.
Используйте только качественные аккумуляторы.
Первый раз, заряжайте аккумуляторы в течение 16 часов
Не кладите трубу на базу постоянно. Позволяйте аккумуляторам
разряжаться один раз в неделю - это продлит срок их службы.
Если время работы аккумуляторов после зарядки сократилось,
возможно они потеряли часть своей емкости. Это можно исправть:
1. Отключите базу от телефонной линии, чтобы не занимать ее. Трубу
оставьте включенной в режиме набора номера. Подождите пока она
полность разрядится.
2. Поставьте трубу на базу и заряжайте в течение 16 часов.
3. Еще раз повторите шаги 1 и 2.
ОТКЛЮЧЕНИЕ ПИТАНИЯ
Если электропитание базы отключено, телефон не будет работать
12
.
Page 13

УСТРАНЕНИЕ НЕПОЛАДОК
АОН
НЕ ОТОБРАЖАЕТСЯ ИНФОРМАЦИЯ
• Замените аккумуляторы.
• Проверьте правильность подключения базы.
• Телефонная станция не предоставляет информации для АОН, т.к.
Вы не подписали с нею соответствующий договор.
Телефон
НЕ РАБОТАЕТ
• Проверьте установку:
- Проверьте подключение сетевого адаптера.
- Проверьте подключение телефонного кабеля.
- Проверьте работоспособность электрической розетки.
- Труба находится вне зоны действия базы
- Аккумуляторы имеют недостаточный заряд.
- Аккумуляторы установлены не верно.
ТЕЛЕФОН ПОДАЕТ СИГНАЛЫ
• Зарядите аккумуляторы.
• Замените аккумуляторы.
НЕ ЗАПУСКАЕТСЯ НАБОР НОМЕРА ИЗ ПАМЯТИ
• Память пуста.
Причины плохого приема сигнала
• Наличие препятствий из алюминия.
• Труба работает рядом с фольгой или изоляционным покрытием.
• Массивные металлические конструкции могут искажать
радиосигнал.
• Вы находитесь слишком близко к компьютеру, микроволновой
печи и т.п.
• Гроза.
• База установлена слишком низко.
• Заряд аккумуляторов подошел к концу.
• Вы находитесь вне радиуса действия базы.
13
Page 14

По истечении срока службы товара, необходимо обратиться в
сервисный центр за консультацией по дальнейшей эксплуатации
товара. В противном случае дальнейшая эксплуатация может повлечь
невозможность нормального использования товара.
Срок службы данного изделия - 3 года с момента продажи
Изготовитель “ЭЛЕНБЕРГ ЛИМИТЕД”, Великобритания
Адрес: 35 Бромптон Роад, Кнайтсбридж Лондон СВ3 ИДЕ
Сделано в Китае. ”ЭЛЕНБЕРГ ЭЛЕКТРИК КОМПАНИ ЛТД”
А08 Р2-Б4 билдинг, Кеджинан 2 Роад, С энд Т Индастри Парк,
14
Шензень, Гуандонг Провинс, Китай.
Page 15

DECT Telephone CLPD-6010
Instruction Manual
Page 16

TABLE OF CONTENT
INTRODUCTION ----------------------------------------------- 17
GETTING STARTED -------------------------------------------- 18
NAMES AND CONTROLS ---------------------------------------- 19
BASICS ------------------------------------------------------ 20
CALLER ID FEATURES ------------------------------------------ 23
BABY MODE ------------------------------------------------- 24
HANDSET SETTING ------------------------------------------- 25
CHANGING THE BATTERY -------------------------------------- 26
POWER FAILURE ---------------------------------------------- 26
TROUBLE-SHOOTING ------------------------------------------ 27
MAINTENANCE ----------------------------------------------- 28
REFRESH BATTERY -------------------------------------------- 29
16
Page 17

INTRODUCTION
Congratulations on your purchase of this Elenberg cordless telephone.
This cordless telephone is a high-quality home communications product.
It is carefully designed and produced by a world leader of consumer and
industrial electronic equipment. With proper maintenance and care, it will
provide you with years of enjoyment and convenience.
Important Safety Warnings
• This cordless phone will be inoperable when mains power fails
• Due to magnetic fields in the handset, please ensure that no sharp metal
objects such as pins or needles are attached to the handset, BEFORE
use.
• Please ensure this product is turned off near fuel depots, petrol stations,
chemical plants or any explosive atmosphere.
Main Features
1.9 GHz Technology
Superior Range
The use of 1.9 GHz frequency band for signal transmission between base
and handset means greater communication range compared to conventional 43-49MHz cordless telephones.
Ultra-Low-Noise
The high frequency communication also has significantly reduced noise
level.
IMPORTANT:
To use Caller ID feature, you must subscribe to Caller ID Service from
your telephone company, you can see the caller’s phone number on the
LCD.
17
Page 18

GETTING STARTED
Checking Package Contents
Make Sure your package includes the items show here.
1. Handset
2. Base unit
3. Battery cover
4. AAA batteries, 2 pieces.
5. Telephone Line Cord.
6. AC Adaptor
Installation tips
To minimize or prevent interference with other electrical devices, the
base of the DECT cordless should not be placed near or on top of a TV,
microwave oven, or VCR.
Battery Setup
1. Remove the battery compartment cover on the handset, insert the batteries into the battery
compartment according to the +/- markings and replace the cover.
2. Plug the AC adaptor into the
Power DC socket on the back of
the base. Plug another end into
an electrical outlet.
3. Place the handset in the base.
The CHARGE indicator comes on
verifying that the battery is charging. Charge the handset for at least 16
continuous hours prior to first use. The initial battery charge is important for best performance.
Note: It is normal for the handset and base to get warm when the hand-
set is charging in the base.
18
Page 19

Caution: Use only the Elenberg adapter that is supplied with this phone.
Using other AC adapter may damage the telephone.
Telephone line connection
4. Plug the telephone line cord into the TEL LINE socket on the back of the
base. Plug the other end into the telephone line socket.
Charging the handset batteries
You must charge the handset batteries for
16 continuous hours the first time you use
them. During charging, the battery icon is as
shown below.
Note: Batteries and handset may become
warm during charging. This is normal.
NAMES AND CONTROLS
Handset
1. Belt clip
2. CID (Caller ID retrieve key)/
Recall.
3. Cancel key/ Mute
4. Intercom Key (used on for
system with 2 handsets)
5. Charging contacts
6. Receiver
7. LCD screen
8. Program Key
9. Phone key
10. Memory key
11. Keypad 0-9
12. */ Lock key
13. #key
14. Redial key
19
Page 20

Base Unit
1. Handset cradle
2. CHARGE LED
3. Page key
LCD screen messages
BASICS
Receiving a call
When an incoming call is received, the phone will ring on the handset
and the handset will show the caller information .
Note: A subscription is required from your local phone company to re-
ceive Caller ID information on your phone. See Caller ID Features.
1. Press the key to answer the call.
Note: If the handset is in the base cradle, the phone will enter talk
mode automatically as soon as you pick the handset up from the base
cradle.
2. Press the key once again to hang up the call.
Making a call
1. Press the key to go off hook.
Note: If the handset is in the base cradle, pick the handset up before
pressing the key.
2. Dial the phone number. The screen shows the number as you enter
it.
3. To end the call, press key again or place the handset on the base
20
Page 21

cradle.
Call timer
The handset will automatically time the duration of all outgoing or in-
coming calls.
The handset display shows the call duration when the call is ended for 5
seconds.
To adjust the receiver volume
1. When the phone is on hook, press “P” and then
the [4] key. The handset enters the receiver volume adjustment mode. There are three receiver
levels of low, medium and high selections by pressing the [1], [2] and
[3] keys respectively.
2. Once the selection key is pressed, press the “P” key again to store the
new setting. If the © key is pressed instead, the original receiver level
is restored.
Mute Key
To have a private, off-line conversation, use the MUTE feature. The caller
on the other end of the line cannot hear you, but you can hear them
To mute the microphone
1. While a call is in progress, press the © key once. The Mute symbol
“ ” will appear on the LCD.
2. Press the © key again to resume your telephone conversation.
Pre-dialing (up to 18 digits)
1. When the phone is OFF (not in TALK mode), enter the telephone num-
ber. The number is displayed as you enter it. If you want to correct a
wrong entry digit, press the © key to remove the last entered digit.
2. After you have completed the entry of the telephone number, press
the key to switch to TALK mode and the entered number will be
dialed automatically.
Redialing (up to 18 digits)
1. Make sure the phone is OFF (not in TALK mode).
2. To call one of the last five numbers dialed, press repeatedly until
the number you want is displayed on the LCD, then press the key.
OR
1. Make sure the phone is ON by pressing key.
2. Press key to redial the last number
The Phone Book memories
You can store up to 10 of your most frequently used numbers.
To store a number in the phone book
1. Press P then “M” to enter the memory editing mode.
2. Press the “M” key to scroll to one of the (0-9) locations for storing
the number (if the location shown already has a number, that number
may be over-written by the new number).
21
Page 22

3. If the location selected already has a number stored and you want to
replace it, long press the © key will clear the stored number. Otherwise press “M” key repeatedly to select an empty location.
4. Enter the desired telephone number. In case a wrong digit is entered,
press the© key to delete the digit for correction. If you wish to add a
pause, press key at the desired location
5. Press the “P” key to store the new number into the memory.
To dial a number from memory
1. Make sure the phone is OFF (not in TALK mode).
2. Press “M” repeatedly to scroll to the number you want to dial.
OR
2. Press “M” key then press numeric key (0-9) to select the desired num-
ber.
3. Press the key
Remark: If the phone number contains more than 10 digits, press the
key will toggle the display to display the “remaining” digits.
To delete memory contents
1. Press “P” then “M” to enter the memory editing mode.
2. Press “M” key repeatedly until the number you wish to delete is dis-
played.
3. Long press © key to clear the stored number.
4. Press “P” key to confirm, and confirmation tone can be heard.
Recall
Recall is used to access special telephone service. Contact your local
telephone company for details. If your unit is connected to a PBX, press
the /R key allows you to access some features of your PBX such as
transferring an extension call.
Handset Locator (Paging Function)
This feature helps to locate a misplaced handset.
Press [ Page ] button on the base, the handset will
beep continuously for 60 seconds or until you do
one of the following:
1. Press key on the handset.
2. Press [ Page ] key again.
Low battery warning
There are three short beeps to alarm that the battery is empty and the
battery is needed to recharge. After the beeps, the battery icon will indicate the battery is empty as showing “ ”.
22
Page 23

CALLER ID FEATURES
To use the Caller ID you must first subscribe to your network Service Providers’ Caller ID Service. The network operator may apply a small regular
charge for this service. If you subscribe to Caller ID Service, you can see on
the display the caller’s phone number (unless the number has been withheld).
When you receive a call, the caller’s telephone number will appear the display. If the caller has withheld their number, the LCD will show “____“ or
empty.
When there is an incoming call and has not been
answered, the unanswered call will be stored in the
Caller ID List and the New Missed Call Icon will be
displayed.
When there is an unanswered incoming call, the caller’s number is stored
in the Caller ID List. The Caller ID List holds the telephone numbers of the
last 15 unanswered calls. You can check the Caller ID List and scroll through
the list and dial numbers from the list (described in Reviewing Caller ID List
section). When there is a call received and the calls list is full, then the oldest entry will be deleted automatically from the memory.
Remark: If the phone number contains more than 10 digits, press the key
will toggle the display to display the “remaining” digits.
Reviewing Caller ID List
When the handset is at standby mode, press key and the Caller ID list
of the last 15 unanswered calls will show. The most recent unanswered
call will be show as first record. The user may press the key to scroll
from the most recent to the oldest. If it has reached the oldest record,
the display will show “____“. Further press of the key will go back to the
first record and continue scrolling from there.
Press © will exit and return to standby mode.
Note:
• If there is no unanswered call, the display will show ”____” when you
press key at standby mode.
• After you review unanswered calls and return to standby mode, the
new missed call icon will disappear from LCD.
Dialing a Caller ID number
1. Make sure the phone is OFF (not in TALK mode).
2. Press key repeatedly to select the desire Caller ID entry.
3. Press key. The number dials automatically.
Deleting entries from the caller list
1. Make sure the phone is OFF (not in TALK mode).
2. Press key repeatedly until find the entry you want to delete.
3. Long press © key to delete the present number and then next entry
will be shown.
23
Page 24

BABY MODE
The Baby Mode feature is very useful and has many applications. This feature is available only when the baby mode is ON. In Baby Mode when the
key or any one of the dial keys are pressed the phone will automatically dial
any number that you have pre-programmed. Parents could pre-program
their mobile number for their children to make contact in the event of an
emergency. A mobile number can be pre-programmed for the baby-sitter,
for example.
To set a Baby Mode phone number
This is the number that will be called when the or any other dial keys
are pressed.
1. Press “P” and then [3] to enter the Baby Call number editing.
2. The screen will show “____“.
3. Enter the PIN number (the default setting is
“0000” if it has not been changed) followed by
“P” key.
Enter the phone number followed by “P” key (In case there has been a
previously programmed number, if you want to replace it, long press the
© key to clear the previous number and then enter new phone number
followed “P” key. Otherwise long press © key to clear all and then press
© key once again to exit. The previous number will be restored).
To set Baby Mode ON
1. Press the “P” and then the [2] key.
NOTE: If the Baby Mode phone number has not been programmed,
the phone will not enter the Baby Mode and will return to STANDBY
mode.
2. The screen will show “-— “as below
3. Enter the PIN number (the default setting is “0000” if it has not been
changed)
4. Press “P” key. The handset will enter the Baby Mode. A beep tone will
be emitted and the Baby Mode number will be flashing to indicate the
handset in the Baby Mode.
To set Baby Mode OFF
1. Press the “P” and then the [2] key.
2. The screen will show “-— “ to prompt for the PIN number.
3. Enter the PIN number then followed by “P” key.
4. The Baby Mode number will disappear from LCD and the handset will
return to normal mode.
24
Page 25

HANDSET SETTING
Select Ringer Tones
1. To enter the Ringer tone selection, press the “P” and then the [5] key.
There are 6 different ringer melodies selectable via the [1] to [6] keys.
The handset ringer will provide the respective ringing melody when
any of these keys is pressed.
2. Press “P” when the required melody is selected.
Select Ringer Volume
1. To enter the ringer volume selection, press the “P” and then the [6]
key. There are 3 ringer volume levels, low, medium and, high levels,
selectable via the [1], [2] and [3] keys.
2. Press “P” key to store the setting.
Key Lock Mode
You can lock the keypad to prevent keys from accidentally being pressed.
To lock the keypad:
1. Long press key and the key icon will be displayed.
2. To unlock, long press key again. When the handset is unlocked, the
key icon will disappear on the display.
Note: Key lock is disabled in the event of an incoming call, but return to
key lock when the call ends.
System PIN number
The Elenberg DECT has built-in a system PIN which is used for prevent-
ing misuse of certain features or accidental mis-programming of certain
features such as Baby Mode (described in the previous section). The factory default setting for the Pin Number is 0000. You can change it to any
other four digits you can remember easily. If you forget it, please consult
your nearest Service Centre.
To change the PIN number proceed as follows:
1. Press “P” and then [1] key.
2. The screen shows “____” to prompt you to input
the current PIN (factory default is 0000).
3. Enter the current PIN number then followed by “P” key.
4. The “____” will be shown again.
5. Enter the new 4 digit numeric PIN followed by “P” key.
6. The “____” will be shown again.
7. Enter the new 4-digit numeric PIN followed by “P” key again for re-
confirmation.
Tone or pulse dialing mode
To change the dialling mode, press “P” and [*] will enter the dial mode
selection operation.
The display will show “P-”.
Press [1] to enter the pulse mode or press [2] to stay in tone mode, then
press “P” to confirm.
25
Page 26

Handset Initial Setting
Function Initial Setting
Dialing Mode Tone
Handset Ringer Volume 3
Handset Ringer Pattern 2
Handset Receiver Volume 2
PIN Number 0000
Recall Time 100ms
Baby Mode OFF
CHANGING THE BATTERY
Battery replacement and handling
When the operating time becomes short even after a battery is recharged,
please replace the batteries.
With normal usage, your battery should last about one year.
Caution:
• Use only the specified battery type (AAA Ni-MH 1.2V, 550mAh).
• Only use rechargeable batteries.
• Never throw the battery into a fire, disassemble it or heat it.
• Do not remove or damage the battery casing.
Replace the batteries
1. Slide off the battery compartment cover.
2. Remove the batteries from the compartment.
3. Insert the new batteries according to the polarity printed.
4. Put the battery compartment cover back on.
5. Place handset on the base to charge for 16 hours.
Note: Charge the handset batteries for at least 16 hours continuously
prior to first use. The initial charge is important for best performance.
Batteries and handset may become warm during charging. This is normal.
Caution: To reduce the risk of fire or personal injury, use AAA 1.2V,
550mAh rechargeable batteries.
Under no circumstances should non-rechargeable batteries be used.
Only use the approved batteries will invalidate your warranty and may
damage the telephone.
POWER FAILURE
When power is off, you will not be able to make or receive calls with the
DECT telephone.
26
Page 27

TROUBLE-SHOOTING
Caller-ID
NO DISPLAY
• Is the battery fully charged? Try to replace the batteries.
• Make sure that the base is connected to a non-switched AC outlet.
Disconnect the base from the plug and plug it in again.
• Have you subscribed to the Caller ID service from your local tele-
phone company? The display will not work unless you do this.
Telephone
NO DIAL TONE
• Check installation:
- Is the base power cord connected to a working outlet?
- Is the telephone line cord connected to the base unit and the wall
jack?
- Disconnect the base from the wall jack and connect another to
the same jack. If there is no dial tone in the second phone, the
problem might be your wiring or local service.
- Is the handset out of range of the base?
- Make sure the batteries properly charged (at least 16 continuous
hours).
- Are the batteries installed properly?
- Did the handset beep when you press the ? Did the CHARGE
indicator come during battery charging? The batteries may need
to be charged.
PHONE BEEPS
• If it does not work, charge the batteries for 16 continuous hours.
• Replace batteries.
DIALING FROM MEMORY
• Did you program the memories correctly?
Causes of poor reception
• Aluminum siding.
• Foil backing on insulation.
• Heating ducts and other metal construction can shield radio signals.
• You are too close to appliances such as microwaves, stoves, computers etc.
• Atmospheric conditions, such as storms.
• Base is installed in the basemen or lower floor of the house.
• Handset batteries are low.
• You are out of range of the base.
27
Page 28

MAINTENANCE
The freedom that your cordless telephone can offer is fully dependent on
the performance of the rechargeable batteries in the handset. To maximize
the battery performance, follow these guidelines:
Charge it for at least 16 continuous hours.
Before initial use of your new battery, charge it for at least 16 hours con-
tinuously. The proper initial charging is very important to maximize the
battery performance.
Battery Performance
To keep your batteries in the best condition, leave the handset off the
base for a few hours at a time. Running the batteries right down at least
once a week will help them last as long as possible.
REFRESH BATTERY
If your batteries seem to need recharging more often than usual, it may
have lost part of its charging capacity because of premature recharges. To
bring back its full capacity, try “refreshing” the batteries:
1. First discharge the batteries by leaving the handset in TALK mode until
Battery Low indicator turns on (Disconnect the base from the phone line,
so that your line is not busy all the time.)
2. Then charge it for 16 continuous hours.
3. Repeat the above once more.
Address to service center for consultation, when the service life of product has expired. Otherwise the further operation can entail impossibility of
normal use of the product.
Service life of the given product - 3 years from the moment of sale
28
 Loading...