

Page 1

БЛЕНДЕР BL-2300
РУКОВОДСТВО ПОЛЬЗОВАТЕЛЯ
Page 2

МЕРЫ ПРЕДОСТОРОЖНОСТИ
При использовании электрических приборов всегда следуйте перечисленным ниже правилам:
1. Полностью прочтите инструкцию.
2. Перед использованием убедитесь, что рабочее напряжение прибора
соответствует напряжению в электросети.
3. Не используйте прибор с поврежденным шнуром питания или
штепселем. При возникновении любой поломки обращайтесь в
сервисный центр для осуществления ремонта.
4. Если шнур питания поврежден, он должен быть заменен в сервисном
центре.
5. Отключайте прибор от сети после каждого использования, перед
заменой или снятием насадок и перед чисткой.
6. Не позволяйте шнуру питания свисать с краев стола.
7. Не допускайте попадания влаги на ручку блендера.
8. Не оставляйте прибор без присмотра, если в помещении присутствуют дети или инвалиды.
9. Не подносите пальцы к подвижным частям.
10. Не используйте дополнительных приспособлений во время работы
взбивания, чтобы избежать травм и поломки прибора. Допускается
использовать лопаточку, но только в тех случаях, когда блендер не
работает.
11. Чтобы избежать травм всегда соблюдайте следующий порядок:
сначала установите миску на основание, а потом прикрепите ножи.
12. Перед началом работы убедитесь, что ножи плотно закреплены.
13. Использование приспособлений, не одобренных производителем,
может привести к травмам.
14. Используйте прибор только по прямому назначению.
15. Не используйте прибор вне помещения.
16. Сохраните эту инструкцию для дальнейшего использования.
ТОЛЬКО ДЛЯ ДОМАШНЕГО ИСПОЛЬЗОВАНИЯ
2
Page 3
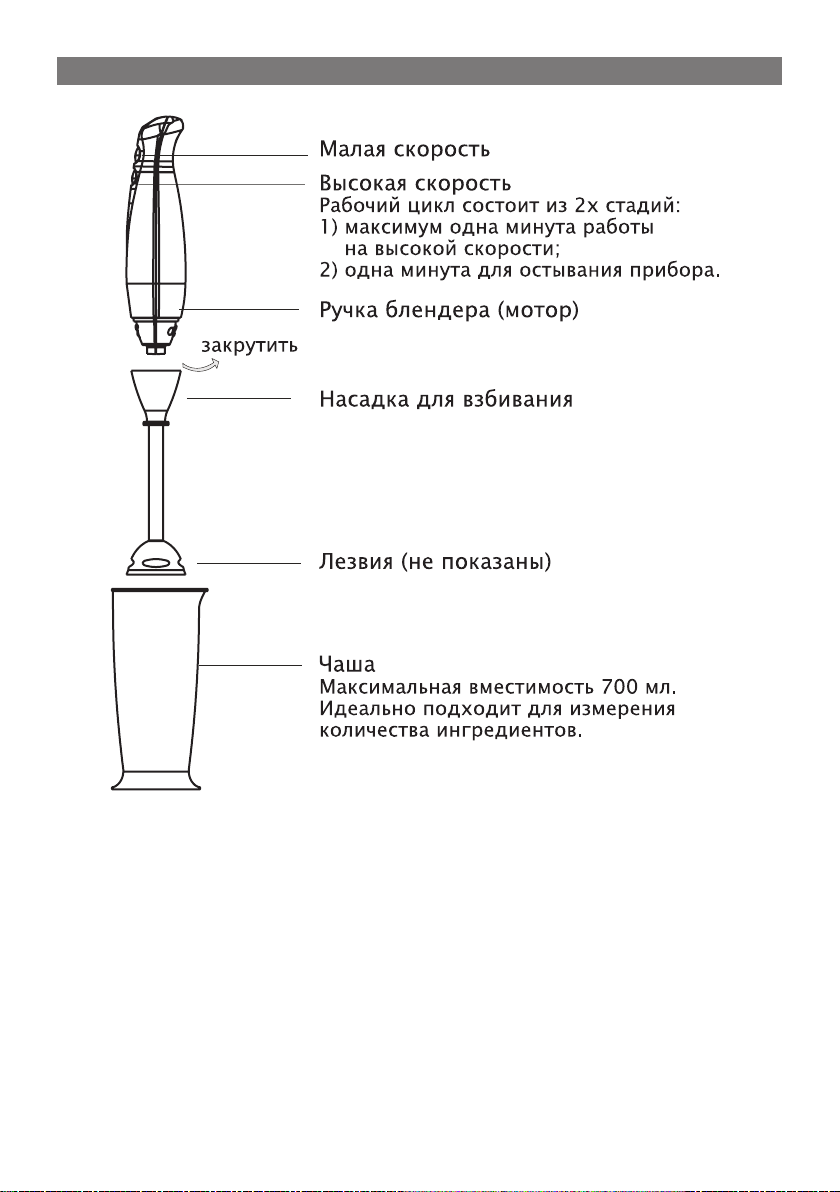
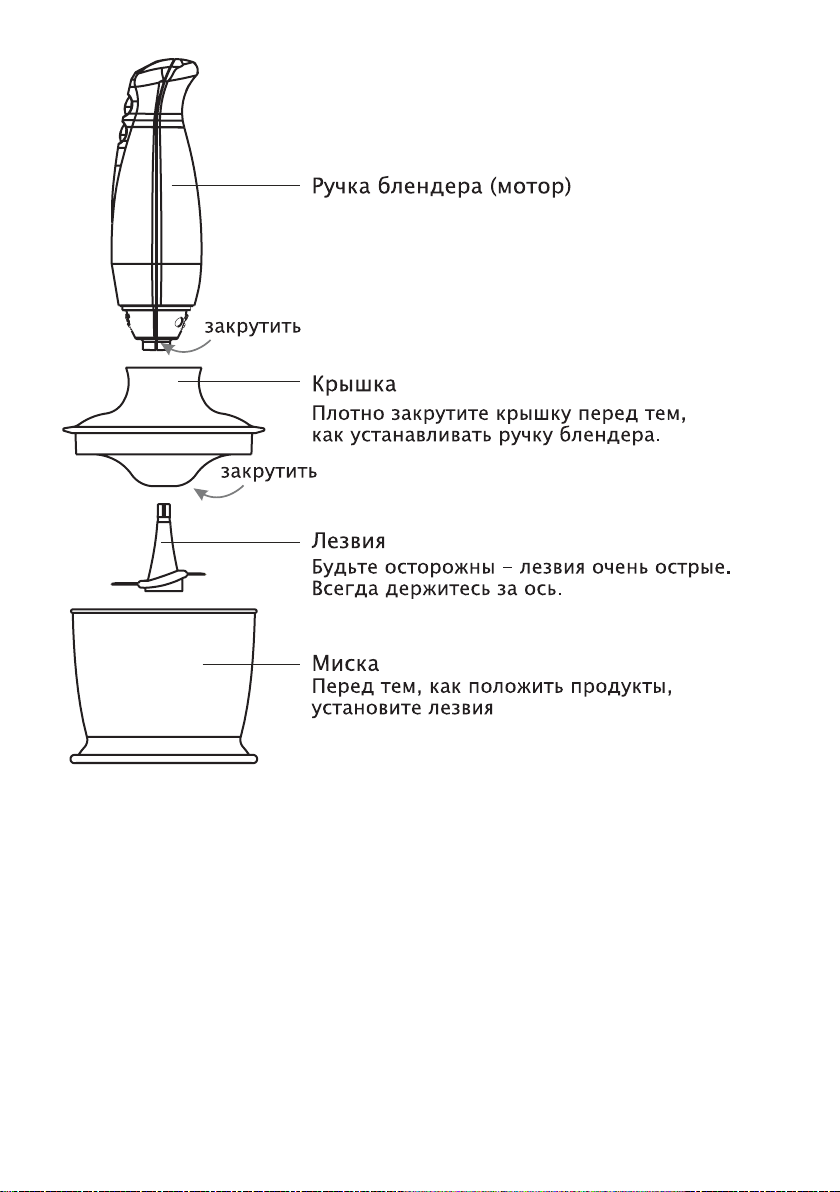
ОПИСАНИЕ ПРИБОРА
3
Page 4
4
Page 5

ИСПОЛЬЗОВАНИЕ БЛЕНДЕРА
Важно: Отключите блендер от электросети перед тем, как менять или
снимать насадки.
Взбивание
1. Чтобы прикрепить насадку для взбивания, приставьте ее к ручке
блендера и плотно заверните против часовой стрелки. Чтобы снять
эту насадку, поверните ее по часовой стрелке.
2. Подключите ручку блендера к электросети.
3. Погрузите насадку для взбивания в еду и нажмите кнопку нужной
скорости.
4. Чтобы остановить блендер, уберите палец с кнопки скорости.
Измельчение
1. Поставьте миску на чистую устойчивую поверхность.
2. Установите ножи в миску, как показано на рисунке 1.
3. Положите продукты в миску.
4. Накройте миску крышкой и заверните ее в направлении часовой
стрелки. (Рис. 2)
Чтобы снять крышку, поверните ее против часовой стрелки.
5. Вставьте ручку блендера в крышку и поверните ее по часовой стрелке,
чтобы закрепить. (Рис. 3)
6. Подключите ручку блендера к электросети и нажмите кнопку с нуж-
ной скоростью.
7. Чтобы остановить блендер, уберите палец с кнопки скорости.
Предупреждение:
• Никогда не ставьте ножи на основание, не закрепив предварительно
миску.
• Убедитесь, что крышка плотно закрыта, перед тем, как включать
блендер.
5
Page 6

ОБСЛУЖИВАНИЕ ПРИБОРА
1. Отключите блендер от электросети и снимите насадку.
Замечание:
Не мойте крышку и насадку для взбивания в воде, т.к. со временем с
них могут смыться смазочные материалы.
2. Промывайте лезвия насадки для взбивания под струей воды. Не
используйте абразивные моющие средства. После очистки поставьте
насадку для взбивания вертикально, чтобы дать воде стечь с нее.
3. Миску и ножи мойте в теплой мыльной воде. Не кладите стакан и
миску в посудомоечную машину.
4. Протрите ручку блендера мягкой сухой тряпочкой. Не допускайте
попадания воды на нее - это может привести к удару током.
5. Высушите все компоненты блендера.
Внимание: Ножи блендера очень острые, будьте предельно осторожны.
Быстрая очистка блендера
Перед очередным запуском блендера поместите его в стакан, до
половины наполненный водой и включите на некоторое время.
Утилизация
Вы можете защитить окружающую среду!
Утилизируйте пришедшие в негодность электрические приборы в
соответствии с законами Вашей страны.
По истечении срока службы товара, необходимо обратиться в
сервисный центр за консультацией по дальнейшей эксплуатации
товара. В противном случае дальнейшая эксплуатация может повлечь
невозможность нормального использования товара.
Срок службы данного изделия - 3 года с момента продажи
Изготовитель “ЭЛЕНБЕРГ ЛИМИТЕД”, Великобритания
Адрес: 35 Бромптон Роад, Кнайтсбридж Лондон СВ3 ИДЕ
Сделано в Китае. ”ЭЛЕНБЕРГ ЭЛЕКТРИК КОМПАНИ ЛТД”
А08 Р2-Б4 билдинг, Кеджинан 2 Роад, С энд Т Индастри Парк,
6
Шензень, Гуандонг Провинс, Китай.
Page 7

STICK BLENDER BL-2300
INSTRUCTION MANUAL
Page 8

IMPORTANT SAFEGUARD
Before using the electrical appliance, the following basic precautions should
always be followed including the following:
1. Read all instructions.
2. Before use checks that the voltage of wall outlet corresponds to the one
shown on the rating plate.
3. Do not operate any appliance with a damaged cord or plug or after
the appliance malfunctions, or is dropped or damaged in any manner.
Return appliance to the nearest authorized service facility for examination, repair or electrical or mechanical adjustment.
4. If the supply cord is damaged it must be replaced by the manufacturer
or a authorized service agent or a qualified technician in order to avoid
a hazard.
5. Unplug from outlet when not in use, before putting on or taking off
parts, and before cleaning.
6. Do not let cord hangover edge of table or hot surface.
7. Do not immerse upper part of blender into water as this would give rise
to electric shock.
8. Close supervision is necessary when your appliance is being used near
children or infirm persons.
9. Ensure fingers are kept well away from moving parts.
10. Keep hands and utensils out of container while blending to reduce the
risk of severe injury to persons or damage to the blender. A scraper
may be used but must be used only when the blender is not running.
11. To reduce the risk of injury, never place cutting blade on base without
first putting bowl properly in place.
12. Be sure chopper lid is securely locked in place before operating appliance.
13. The use of accessory not recommended by the manufacturer may cause
injuries to persons.
14. Do not operate the appliance for other than its intended use.
15. Do not use outdoors.
16. Save these instructions.
HOUSEHOLD USE ONLY
8
Page 9

UNIT DESCRIPTION
9
Page 10

10
Page 11

USING YOUR STICK BLENDER
Important: Ensure that the stick blender is unplugged from the power
outlet before assembling or removing attachments.
Instruction for blender
1. To assemble the detachable shaft with the motor unit, turn the shaft
anti-clockwise direction until tightened. To disassemble, just turn in the
adverse direction.
2. Simply plug the stick blender to power outlet.
3. Lower the stick blender into food and depress the switch at the top of
the motor unit.
4. To stop the stick blender takes your fingers off the switch button.
Instruction for chopper
1. Place the chopper bowl on a clean, level surface.
2. Assemble the stainless steel blade into the chopper bowl, as shown in
Fig.1
3. Place food into the chopper bowl.
4. Attach the Lid onto the chopper bowl and turn it in clockwise direction
until it locks into position. (see Fig.2)
To detach the lid, turn in adverse direction.
5. Insert the top part of the chopper into the hole of the chopper lid, and
turn in clockwise direction to lock. (See Fig.3)
6. Plug the stick blender to power outlet and depress the switch to begin
operation.
7. To stop the stick blender takes your fingers off the switch button.
Caution:
• To reduce the risk of injury, never place cutting blade on base without
first putting bowl properly in place.
• Be sure chopper lid is securely locked in place before operating appli-
ance.
11
Page 12

CLEANING AND MAINTENANCE
1. Unplug the appliance and remove the detachable shaft or chopper lid.
Note:
Do not immerse the detachable shaft of the blender and chopper lid
in water because overtime the lubrication on the bearings may wash
away.
2. Wash the detachable shaft under running water, without the use of abra-
sive cleaner or detergents. After finishing cleaning the detachable shaft,
place it upright so that any water which may have got in, can drain out.
3. Wash the cup or bowl and blade in warm soapy water. The cup and bowl
is not recommend to place in dishwashing machine as the plastic component deteriorate through prolonged use of dishwasher cleaning.
4. Wipe the motor unit with a damp cloth. Never immerse it in water for
cleaning as a electric shock may occur.
5. Dry thoroughly.
Caution: Blades are very sharp, handle with care.
For a quick wash up
Between processing tasks, hold the stick blender in the cup or bowl half
filled with water and turn on for a few seconds.
Environment friendly disposal
You can help protect the environment!
Please remember to respect the local regulations: hand in the non-
working electrical equipments to an appropriate waste disposal center.
Address to service center for consultation, when the service life of prod
uct has expired. Otherwise the further operation can entail impossibility of
normal use of the product.
Service life of the given product - 3 years from the moment of sale
-
12
 Loading...