

Page 1

QUICK START GUIDE
SMART TV
Page 2

Package Contents:
• TV
• TV STAND
•
• REMOTE CONTROL
• 2 AAA BATERIES
• USER MANUAL
• QUICK START GUIDE
QUICK START GUIDE
Page 3
QUICK START GUIDE
TABLE OF CONTENTS
IMPORTANT SAFETY INSTRUCTIONS 4
INSTALLING THE BASE 5
FIRST TIME SETUP 6
START STREAMING 10
PROGRAMMING YOUR REMOTE 11
FAQ 12
CUSTOMER SUPPORT 14
WARRANTY 16
Page 4
IMPORTANT SAFETY INSTRUCTIONS
• Read these instructions – All the safety and operating instructions should be read
before this product is operated.
• Keep these instructions – The safety and operating instructions should be retained
for future reference.
• Heed all warnings – All warnings on the appliance and in the operating instructions
should be adhered to.
• Follow all instructions – All operating and instructions should be followed.
• Do not use this apparatus near water – The appliance should not be used near water
or moisture - for example, in a wet basement or near a swimming pool and the like.
• Clean only with a dry cloth.
• DO NOT:
• block any ventilation openings. Always install in accordance with the
manufacturer’s instructions.
• Install near any hear sources such as radiators, heat registers, stoves, or other
apparatus (including amplifiers) that produce heat.
• Use a polarized plug for this television. A polarized plug has two blades with
one wider that the other. A grounding-type plug has two blades and a third
grounding prong, the wide blade (or third prong) are provided for your safety.
If the provided plug does not fit into your outlet, consult an electrician for a
replacement of the obsolete outlet.
• Protect the power cord from being walked on or pinched, particularly at plugs,
convenience receptacles, and the point where they exit from the apparatus.
• Only use attachments/accessories specified by the manufacturer.
• Use only with the cart, stand, tripod, bracket or table specified by the manufacturer,
or sold with the apparatus. When a cart is used, use caution when moving the cart.
apparatus combination to avoid injury from tip-over.
• Unplug this apparatus during lightning storms or when unused for long periods of
time.
• Refer all servicing to qualify service personnel. Servicing is required when the
apparatus has been damaged in any way, such as the power-supply cord or plug
is damaged, liquid has been spilled or objects have fallen into the apparatus, the
apparatus has been exposed to rain or moisture, does not operate normally, or has
been dropped.
4
• Keep unit in a well ventilated environment.
• WARNING:
QUICK START GUIDE
• To reduce the risk of fire or electric shock, do not expose this apparatus to rain
or moisture. The apparatus should not be exposed to dripping or splashing.
Objects filled with liquids, such as vases should not be placed on apparatus.
• The batteries shall not be exposed to excessive heat such as sunshine, fire or
the like.
• The main plug is used as disconnect device, the disconnect device shall remain
readily operable.
• To reduce the risk of electric shock, do not remove cover (or back) as there are
no user-serviceable parts inside. Refer servicing to qualified personnel.
This symbol is intended to alert the user to the presence of non-insulated “dangerous
voltage” within the product’s enclosure that may be of sufficient magnitude to
constitute a risk of electric shock.
This symbol is intended to alert the user to the presence of important operating and
maintenance instructions in the literature accompanying the appliance.
This equipment is a Class II or double insulated electrical appliance. It has been
designed in such a way that it does not require a safety connection to the electrical earth.
This product contains electrical or electronic materials. The presence of these
materials may, if not disposed of properly, have potential adverse effects on the
environment and human health. Presence of this label on the product means it
should be disposed of as unsorted waste and must be collected separately. As a
consumer, you are responsible for ensuring that this product is disposed of properly.
Page 5

QUICK START GUIDE
INSTALLING THE BASE
1. Remove any plastic wrapping from the TV and stand. Place the TV
screen-down on a clean and flat surface to prevent scratches or
damage to the screen.
*It is recommended that two people take part in the base stand installation
2. Connect the TV and the legs as pictured and using the four screws
provided. With a Phillips screw driver, screw each leg into place.
3. When finished lift TV up and place it on a stable flat surface.
Wall Mounting
The TV is provided with mounting holes for a VESA approved wall mounting bracket (not supplied). To install remove screws,
holding the base to the base bracket and lift the base away (do not remove the base mounting brackets). Mount the VESA bracket
using 4*M6*12 isometric threaded screws (not supplied).
5
Page 6
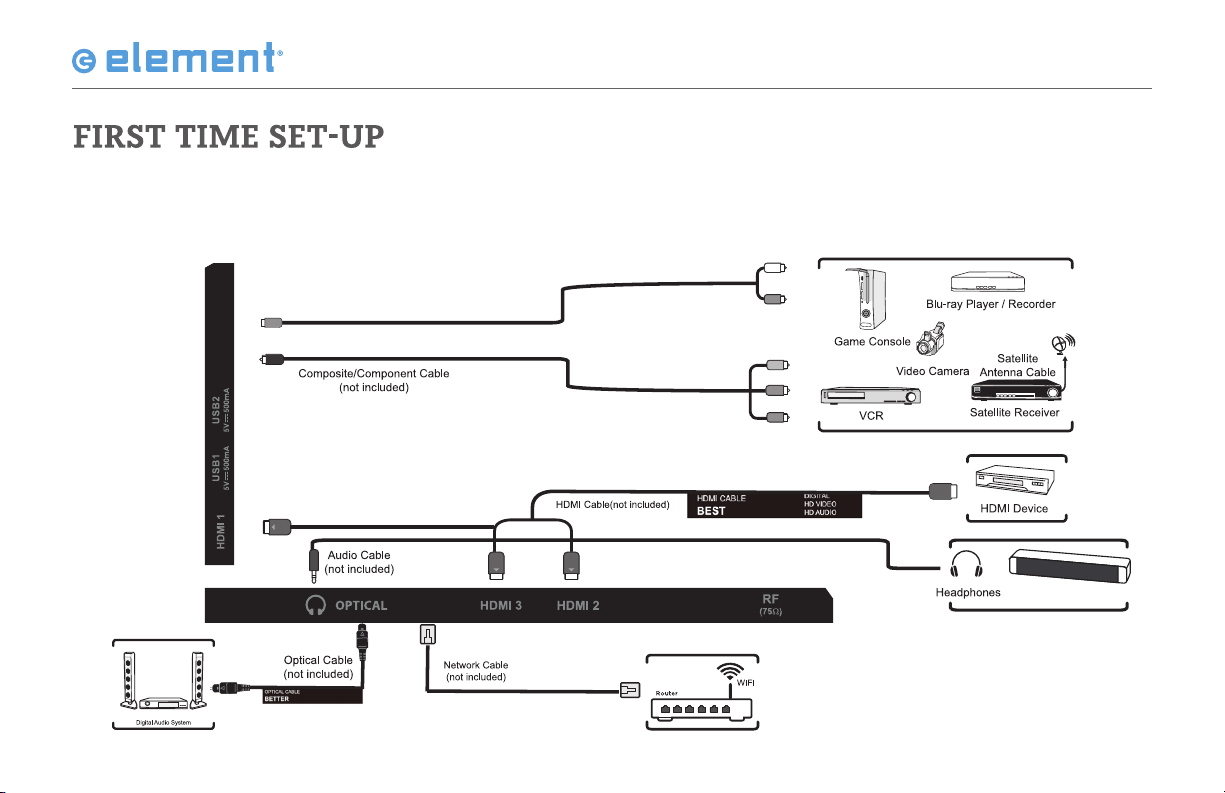
QUICK START GUIDE
1. Connect all of your devices. Choose one connection type for each device.
Note: the image shown below is for illustrative purposes only, and may be subject to change. The actual number of ports and
their locations may vary depending on the model.
L/R
AUD IO
CVBS
YPB PR
RJ-45
6
RF IN
Soundbar
Page 7

QUICK START GUIDE
1
2
3
2. Remove your remote from the accessory
box and open the battery cover. Insert 2 AAA
batteries, as shown in the image above. Close
the battery cover.
CAUTION:
Incorrect installation may cause battery leakage and corrosion
resulting in damage to the remote control.
• Do not mix old and new batteries
•
magnesium batteries)
• Do not use rechargeable batteries
• Do not burn or break batteries
3. Plug the power cord into an electrical outlet.
The fl at edge of the connector goes toward the
outside of the TV.
7
Page 8

QUICK START GUIDE
RJ-45
4. if you have a high-speed internet
connection, connect a network cable from
your modem/router to the back of the TV as
shown.
For the best smart TV experience, Element
recommends using the built in Wi-Fi.
8
Network Configuration
Do you want to set Network?
YES
Skip
BACK
WIFI
LAN
BACK
Return
Return
Select
ENTER
Network
Select network scan type.
Select
ENTER
5. The fi rst time you turn the TV on it will go
into the Setup Wizard. Press the arrow buttons
on your remote to highlight and select your
desired mode, then press OK to confi rm.
Page 9

QUICK START GUIDE
OSD language
Config Menu language.
English
Español
ENTER
Select
French
Time Zone
Select the time zone.
ENTER
Select
Pacific
Central
Eastern
BACK
Return
6. Use the arrow buttons on the remote to
highlight 'Do you want to set Network?' and
press YES. On the next menu, select 'WIFI' and
press OK.
Scan Network
7. Select ‘
to see available networks, then
select the desired one and press ‘
9
Page 10

QUICK START GUIDE
Press the button on the television or on your
remote control to display the streaming menu. Then
select the desired app or use the hot key on the
remote control the enter the app directly.
NOTE: After the TV connects to network, the status Unconnected will
change to connected.
NETFLIX
YouTube
VUDU
Pandora
Twitter
Facebook
Accu Weather
Screencast Allows you to mirror your mobile device's content to your TV screen.
10
Enjoys TV shows & movies streamed instantly over the Internet.
YouTube your way on the best screen in your house.
Discover,watch and collect the latest movies and TV show in high quality 1920×1080.Free to sign up.No subscriptions,late fees
or commitments.
one of your favorite artist, songs, genres or composers and Pandora will do the rest. It’s easy to create personalized
stations that play only music you’ll love.
Search Twitter to find the latest news and world events faster
Create an account or log into Facebook. Connect with friends, family and other people you know. Share photos and
Displays the current weather conditions and the temperature anywhere in the world in Centigrade or Fahrenheit.
videos, send messages and get updates.
Page 11

QUICK START GUIDE
FAQ
Q: My TV won’t power on. What could be wrong?
Make sure your power cord is firmly plugged into both the back of the TV and the power outlet. Some models
have a power switch on the side of the TV; make sure it is in the ON position. If you are trying to turn on your TV
using the remote control, make sure you are using new batteries and that they are inserted properly. On universal
remote controls, first press the TV button on remote control, and then press the POWER button.
Q: I only see a blue screen when I turn on the TV or my TV displays ‘No Signal’
The incorrect Source may have been selected. Press the SOURCE button to select the source you would like to
use (cable, HDMI, etc.).
Q: I have everything connected, but there is no picture or sound?
Make sure all cables are firmly connected into your television and your external AV sources. After you have made
all connections, press the INPUT or SOURCE button on either the TV or the remote and choose the correct
Q: I have sound with no picture.
Make sure all cables are firmly connected into your television and your external AV source. After you have made all
connections, make sure the sound input matches the video input. If you are trying to view a TV station, switch to
contrast settings are correct by entering the main menu and adjusting.
11
Page 12

QUICK START GUIDE
FAQ
Q: I have picture with no sound.
Make sure the television is not muted. Check all cables to ensure they are firmly connected into the TV and your
external AV source. After you have done so, check to see that the video input matches the sound input. Increase
the volume on either the remote control or TV. If you are trying to view a TV station, switch to another station
Q: My picture is not filling the screen. I have black bars around my picture.
This is due to the aspect ratio. An increasing amount of digital TV programming and movies are presented in
widescreen (16:9). Make sure your aspect ratio is set accordingly. To change the appearance of the screen press
the ASPECT button and cycle through the options, selecting the one that best fits your TV.
Q: Why am I getting a black square in the center of my television screen?
A: The Closed Caption function is set in the “text” mode. To remove it, access Closed Caption through the MENU
Q: I can’t control my television with my current remote control.
Check to see that the television is still plugged in to the outlet. If you have a television with a universal remote,
be sure to select the TV mode on the remote. If the remote still does not work, reset the remote by removing
and reinserting the batteries - assuring the batteries are installed in the correct position. Then, press the power
button down for 30 seconds. If the problem still exists, try replacing the batteries. If you have reset or changed the
batteries in a universal remote control, you will need to reprogram the remote for the TV and other units.
12
Page 13

QUICK START GUIDE
CUSTOMER SUPPORT
Still have questions? Contact our support team at:
Phone: 1-888-842-3577
Email: customerservice@elementelectronics.com
or go to elementelectronics.com where you can start a live chat and check out our how-to videos.
13
Page 14

CUSTOMER SUPPORT
Don’t forget to take a moment to register your product at:
ElementElectronics.com/product-registration
Why register?
Customized support
Get assistance quickly by pre-registering your product.
from Element.
Safety and satisfactions
Stay up to date with important product updates and
notifi cation.
QUICK START GUIDE
14
Page 15

QUICK START GUIDE
WARRANTY
ELEMENT LCD TV LIMITED WARRANTY TO ORIGINAL CONSUMER
LCD TV– 42 inches and above Screen Size Models (the “Product”)
This Product (including any accessories included in the original packaging) as supplied and distributed in new condition, is warranted by Element TV Company, LP ("Element") to the original
purchaser against defects in material and workmanship (“Warranty”) as follows:
1.WARRANTY SERVICE (Parts, Labor and/or Replacement): For a period of one (1) year from the date of the original customer purchase ("the Warranty Period"), if this Product or any of its parts
are determined by Element or an Element authorized customer service provider to be defective in material or workmanship, Element will, at its sole discretion and option: (i) supply, at no charge
to the original customer, new or rebuilt replacement parts in exchange for defective parts, (ii) repair the Product and pay the labor charges of such Element authorized service provider for same,
at no charge to the original customer, (iii) replace the Product with a new or refurbished product of similar or better quality, at no charge to the original customer, or (iv) refund the original
purchase price of the Product (excluding tax) to the original customer. After the Warranty Period, the customer must pay for all parts, labor and replacement costs associated with the Product,
regardless of any defects in the Product.
A. IN-HOME SERVICE: During the Warranty Period, this Warranty includes “in-home” service (subject to availability), which includes an Element authorized service provider repairing
the Product in the original customer’s home, or taking the Product for repairs at an Element authorized service provider and returning the Product to the original consumer’s home.
“In-home” service is NOT available in all areas. In order for a customer to receive “in-home” service, the Product must be accessible to the Element authorized service provider. If
“in-home” service is unavailable, or the repair cannot be completed through "in-home" service, Element may require that the customer transport the Product to an Element authorized
service center, for which the customer may be responsible for any transportation charges incurred to deliver the Product or part(s) to an Element authorized service provider for
diagnosis, repair or replacement. The customer shall not return the Product to Element without Element’s prior written consent. Element recommends that the customer insure the
Product for its full replacement cost when shipping.
B. TIMING AND PROCEDURE: Before Warranty service can commence, the original customer purchaser must contact Element for problem determination and service procedures. Proof
of purchase in the form of a bill of sale or receipted invoice, evidencing that the Product is within the Warranty Period, MUST be presented to an Element authorized customer service
provider in order to obtain the requested service. Please call the Toll Free Customer Service Line at (888) 842-3577 to obtain Warranty Service and Troubleshooting information.
Please have your model and serial number available, along with your date of purchase of the Product. You can also visit us online at: www.elementelectronics.com.
2. EXCLUSIONS AND LIMITATIONS TO WARRANTY SERVICE
This Warranty covers manufacturing defects in materials and workmanship encountered in the normal, non-commercial use of the Product, and does not cover (a) damage or failure caused by
or attributable to Product abuse or misuse, failure to follow instructions, improper installation or maintenance, alteration, accident, or excess voltage or current; (b) improper or incorrectly
performed repairs by non-authorized service facilities; (c) onsite customer instruction or adjustments; (d) transportation, shipping, delivery, insurance, installation or set-up costs; (e) costs of
product removal, transportation or reinstallation costs; (f) ordinary wear and tear, cosmetic damage or damage due to acts of nature, including but not limited to water, floods, wind, tornado,
earthquake or fire, or due to damage caused by automobile accidents or extraordinary impact events, such as dropping or crushing; (g) commercial use of the Product; (h) modification of the
Product or to any part of the Product. In addition, this Warranty does not cover images “burnt” into the screen.
15
Page 16

QUICK START GUIDE
WARRANTY
This Warranty applies to the original consumer only and does not cover Products sold AS IS or WITH ALL FAULTS, or consumables (e.g., fuses, batteries, bulbs etc.).The Warranty is invalid if the
factory-applied serial number has been altered or removed from the Product. This Warranty is valid only in the United States and Canada, and only applies to products purchased and serviced
in the United States and Canada. All replaced parts and Products, and Products on which a refund is made, become the property of Element. The addition of equipment or features to the
Product that are not manufactured or recommended by Element could affect the intended function of the Product, and therefore may void the Warranty. The Warranty is contingent upon the
proper use, maintenance and care of the Product. The Warranty may be void if the Product has been used in a manner contradictory to or in violation of the terms of the user's manual, warnings
or instructions accompanying the Product.
This Warranty is made in lieu of and supersedes all other warranties or conditions of merchantability or fitness for a particular purpose or general use, whether express, implied, collateral,
statutory, or provided by common law, the Uniform Commercial Code or otherwise. Element further disclaims all warranties after the end of the Warranty Period defined above. No other express
warranty or guaranty given by any other person, firm or entity with respect to the Product shall be binding on Element. Repair, replacement, or refund of the original purchase price, at
Element's sole discretion, are the exclusive remedies of the customer. Element shall not be liable for any incidental or consequential damages caused by the use, misuse or inability to use the
Product. These include but are not limited to any damages in the form of lost profits, loss of use, legal fees, economic loss, personal injuries, or any other damages caused by circumstances
beyond the control of Element. Notwithstanding the foregoing, the customer's recovery shall not exceed the purchase price of the Product. This Warranty shall not extend to anyone other than
the original customer who purchased the Product, and is not transferrable. No person is authorized to alter, extend or waive the Warranty of Element.
Some states do not allow the exclusion or limitation of incidental or consequential damages, or allow limitations on warranties, so the above limitations or exclusions may not apply to you. This
Warranty gives you specific rights, and you may have other rights, which vary from state to state. The exclusions and limitations to the Warranty apply to the maximum extent permitted by law
and unless restricted or prohibited by law. Where any term of this Warranty is prohibited by applicable law, it shall be null and void, but the remainder of this Warranty shall remain in effect.
PLEASE DIRECT ALL CORRESPONDENCE TO:
Element TV Company, LP Customer Service
customerservice@elementelectronics.com
(888) 842-3577
www.elementelectronics.com
PLEASE CONTACT CUSTOMER SERVICE TO CONFIRM ADDRESSES AND PROCEDURES FOR WARRANTY SERVICE.
16
Page 17

QUICK START GUIDE
SPECIFICATONS
Display Technology LED
Resolution 4K (2160P)
Connector Type HDMI Type A
Model E4SJ6519
Screen Size 65inch
TV System NTSC/ATSC
Smart Yes
Brand Element
Assembled Product W eight 38.58 LBS
Depth (with stand) 9.91"
Width (with stand) 57.31"
Height (with stand) 35.04"
Refresh Rate 60.00 Hz
HDMI input x 3; Component (YPbPr) input x 1; Composite(AV) input x 1;
I/O Port:
APP included Netflix; YouTube; Vudu; Pandora, AccuW eather; Twitter; Facebook.
Features
Audio Input L-R x 1; Headphone Output x 1; USB 2.0 x 2;
Optical x 1;
Display Aspect Ratio: 16:9; Viewable Angle (H/V): 176/176;
OSD Language: English/French/Spanish; Built-in W i-Fi: Yes
RJ-45x1.
17
Page 18

Element and the Element Logo are trademarks of Element Brand Holding, LLC.
©2018 Element Brand Holding, LLC, All Rights Reserved.
 Loading...