

Page 1

User Guide
10.2” Portable DVD Player
ELE 1020PD
Page 2

Table of Contents
Tabl e of Co ntents ..... ..... . ..... . ..... ... ... ...... ..... . ..... ...... ... ... ..... . ... ..... ... ... ... ... ..... ...... ... ... ..... . ..... . ..... ...... ...... ..... . ..... ...... ... ... ... ... ..... ... .1
Safe ty Informa tio n.. ... ... ..... ...... ... ... ..... . ..... . ..... ...... ...... ..... . ... ... ..... ... ... ...... ..... . ..... ...... ...... ..... . ..... ... ... ... ..... ...... ... ... ..... . ..... . ..... ..... .2
Remo te Cont r ol... ... ... ... ... ........ ... ... ..... . ..... . ..... ... ... ...... ..... . ... ... ..... ... ... ...... ..... . ..... ...... ...... ..... . ..... ... ... ... ... ........ ... ... ..... . ..... . ..... ..... .3
Descript io n..... ... ... ..... . ..... ... ... ... ... ........ ... ... ..... . ..... . ..... ... ... ...... ..... ...... ..... . ..... ...... ... ... ..... . ..... . ..... ...... ...... ..... . ..... ...... ... ... ... ..... ... ..4
Us ing the Rem ote C ont rol... ..... . ..... ...... ...... ..... . ..... ... ... ... ... ... ..... ... ... ... .. . ..... ... ... ...... ..... . ..... ...... ... ... ..... . ..... . ..... ... ... ...... ...... ..... ...... 5
Conn ecting Earpho nes (O pti onal Ac ces s ory ).. ..... ... ..... ... ... ......... ..... ...... ... ... ..... . ..... . ..... ... ... ...... ..... . ..... ...... ... ... ..... . ..... . ..... ... ... ..... .6
Conn ecting t o an Ext ernal Co m pon en t ... ..... . ..... ... ... ...... ..... . ... ... ..... ... ... ...... ..... . ..... ...... ...... ..... . ..... . ..... ... ... ...... ..... ... ... ... ... ... ..... ... ..7
Conn ecting to a TV ... ... ..... . ..... . ..... ... ... ...... ..... ... ... ... ... ... ..... ... . ... ..... ... ... ...... ..... . ..... ...... ...... ..... . ..... . ..... ... ... ...... ..... . ..... ... ... ... ..... ... ..8
Conn ecting to a Ster eo Comp one nt. ... ........ ... ... ..... . ..... . ..... . ..... ..... . ..... ...... ...... ..... . ..... ...... ... ... ...... ..... . ..... ...... ...... ..... . ..... ... ... ..... ... 9
Us ing U SB Port.... ... ... ... ... ..... . ..... ... ... ........ ... ..... . ..... ... ... ....... ..... ...... ..... . ..... ...... ... ... ..... . ..... . ..... ... ... ...... ..... ... ... ... ... ... ..... . ..... ..... . 10
Us ing t he AC Ad apt or.. . ..... ... ... ... ... ........ ... ... ... ... ..... ...... ... ... ... ... ..... ... ... ...... ..... . ..... ...... ...... ..... . ..... . ..... ... ... ...... ..... . ..... ... ... ... ... ..... 11
Us ing t he Ba tte ry Pac k ..... ..... . ..... ...... ...... ..... . ..... ...... ... ... ..... . . ..... ..... . ..... ...... ...... ..... . ..... ... ... ... ... ........ ... ... ... .. . ..... ...... ... ... ... ... ..... . 12
Caut i on s i n U sing Batt ery P ack . ..... ... ... ... ..... . ..... ... ... ...... ..... . ...... ..... ...... ... ... ..... . ..... . ..... ... ... ...... ..... . ..... ... ... ... ... ..... ... ... ... ...... ..... ..13
Play ing a Di sc.... ...... ... ... ..... . ..... ...... ... ........ ...... ..... . ..... ...... . ..... ..... . ..... . ..... ... ... ...... ..... . ..... ...... ... ... ..... . ..... ... ... ... ... ........ ...... ...14- 16
Play ing MP 3 an d Re g ul ar Au d io CD. ..... . ..... ... ... ... ..... ...... ... .... ..... ...... ..... . ..... ...... ... ... ..... . ..... . ..... ...... ...... ..... . ..... ... ... ... ... ... ..... ... ... 17
Play ing Pic tur e CD... ...... ... ... ..... . ..... ...... ... ........ ...... ..... . ..... .... ... ..... ... ... ...... ..... . ..... ...... ...... ..... . ..... . .. ... ... ... ........ ... ... ... ... ..... . ..... ... 18
Display ing and Sor tin g Fi les ... ..... ...... ... ... ..... . ..... ...... ... ... ...... . ..... ..... . ..... ...... ...... ..... . ..... ...... ... ... ...... ..... ... ... ... ..... ...... ... ... ... ... ..... . 19
Sett ing L anguage f or OSD, Menu, Aud io, S ubtitle. . ..... . ..... ... ... . ..... ..... . ..... ... ... ...... ..... ... ... ... ... ... ..... ...... ...... ..... . ..... ...... ... ... ... ... ..... . 20
Sett ing S cre en fo r Dis p lay F ormat, S cree n Sav er, TV Sy ste m. . . ..... ..... . ..... ...... ...... ..... . ..... ...... ... ... ...... ..... . ..... ... ... ...... ..... ... ... ... ... ... 21
Sett ing Au dio fo r D ow n mix .... ...... ... ... ..... . ..... . ..... ... ..... ... ..... . ... ... ..... ...... ... ... ..... . ..... ... ... ... ..... ...... ... ... ..... . ..... . ..... ... ... ...... ...... ..... ..22
Sett ing P arental C ontro l, Pas sword, C amer a Angle, D efa ult ....... ..... ...... ..... ... ... ... ... ... ..... ... ... ...... ..... . ..... ...... ... ... ..... . ..... . ..... . ..... ....23
Adju sti ng LCD Scr een ..... ... ... ...... ..... . ..... ...... . .... ... ... ...... ..... . ...... ..... ...... ... ... ..... . ..... . ..... ... ... ...... ..... ... ... ... ... ... ..... ... ... ...... ...... ..... ..24
Trou ble sho oti ng. . ..... ... ... ...... ..... . ..... ... ... ........ ... ... ... ... ..... . ..... . ..... ..... . ..... . ..... ... ... ...... ..... . ..... ...... ... ... ..... . ..... . ..... ... ... ...... ........ 25- 26
Spec ifi cat ion s.. ... ... ...... ..... ... ... ... ..... . ..... ...... ...... ..... . ..... ...... ... ... ..... ... ... ...... ..... . ..... ...... ...... ..... . ..... . ..... ... ... ...... ..... ... ... ... ... ... ..... ..2 7
~ 1 ~
Page 3
Safety Information
Plea se r e ad a ll of the saf ety and op eratin g in str u ction s bef o re oper ating t his Play er, fol l ow al l warni ngs pla ced on the P layer
and i n th e use r's manual . The s e safet y and ope rating instru c tions shou ld b e retai n ed f or f utu r e re f er ence.
Sa fety Inf ormation
Do no t ex p ose the s y ste m t o exc ess ive moi stu re, rai n, sand, or heat sour c es .
Plac e the DV D Play er o n a firm, flat surfa ce.
Keep the D VD Pl aye r aw ay f r om dom es t ic heatin g equ ipm ent an d d i rec t sunlight .
When p lac ing th e DVD P l aye r in a cab ine t, a llo w abo ut o n e i nch of s pac e a ll ar o und the DVD Pl aye r for ventilat ion.
SA F ETY WARNING
CLASS 1 LASER PRODU CT / KLA SSE 1 LA SER PRODU KT / LUO KAN 1 LASER LA ITE / KLASS 1 LASE R APP ARAT / PROD U CTO
LASE R CLASE.
IN VISIB LE L ASE R RADIATI ON W HEN O PEN AND INTE R LOCK S DEF EAT ED. AVO ID EX POSU RE TO BEAM.
WAR N ING
1.To pr eve nt f ire or el ectric al s hoc k, d o not exp ose thi s Player t o rain or moisture.
2.To avoi d electric a l sh ock , do n ot o pen the c abi net, no user-se r vic eable par ts insid e, refe r ser vic ing to qu ali fie d pe rso nnel onl y.
3.Ce rta in c o untries ma y reg ula t e t h e d isposal of t h e b att ery used to power thi s pr odu ct. P le a se co nsult w ith your loc al a uth ority.
4.Liste nin g wi th earp h one s for m any hours at m axi mum volu me ma y da mage yo ur heari ng.
5.Th e Pl ayer sho uld be c onnecte d to a p ower s u pply only of the type des c ribed in th e operatin g ins tructions or as mar ked on th e Player.
At t e nti on:
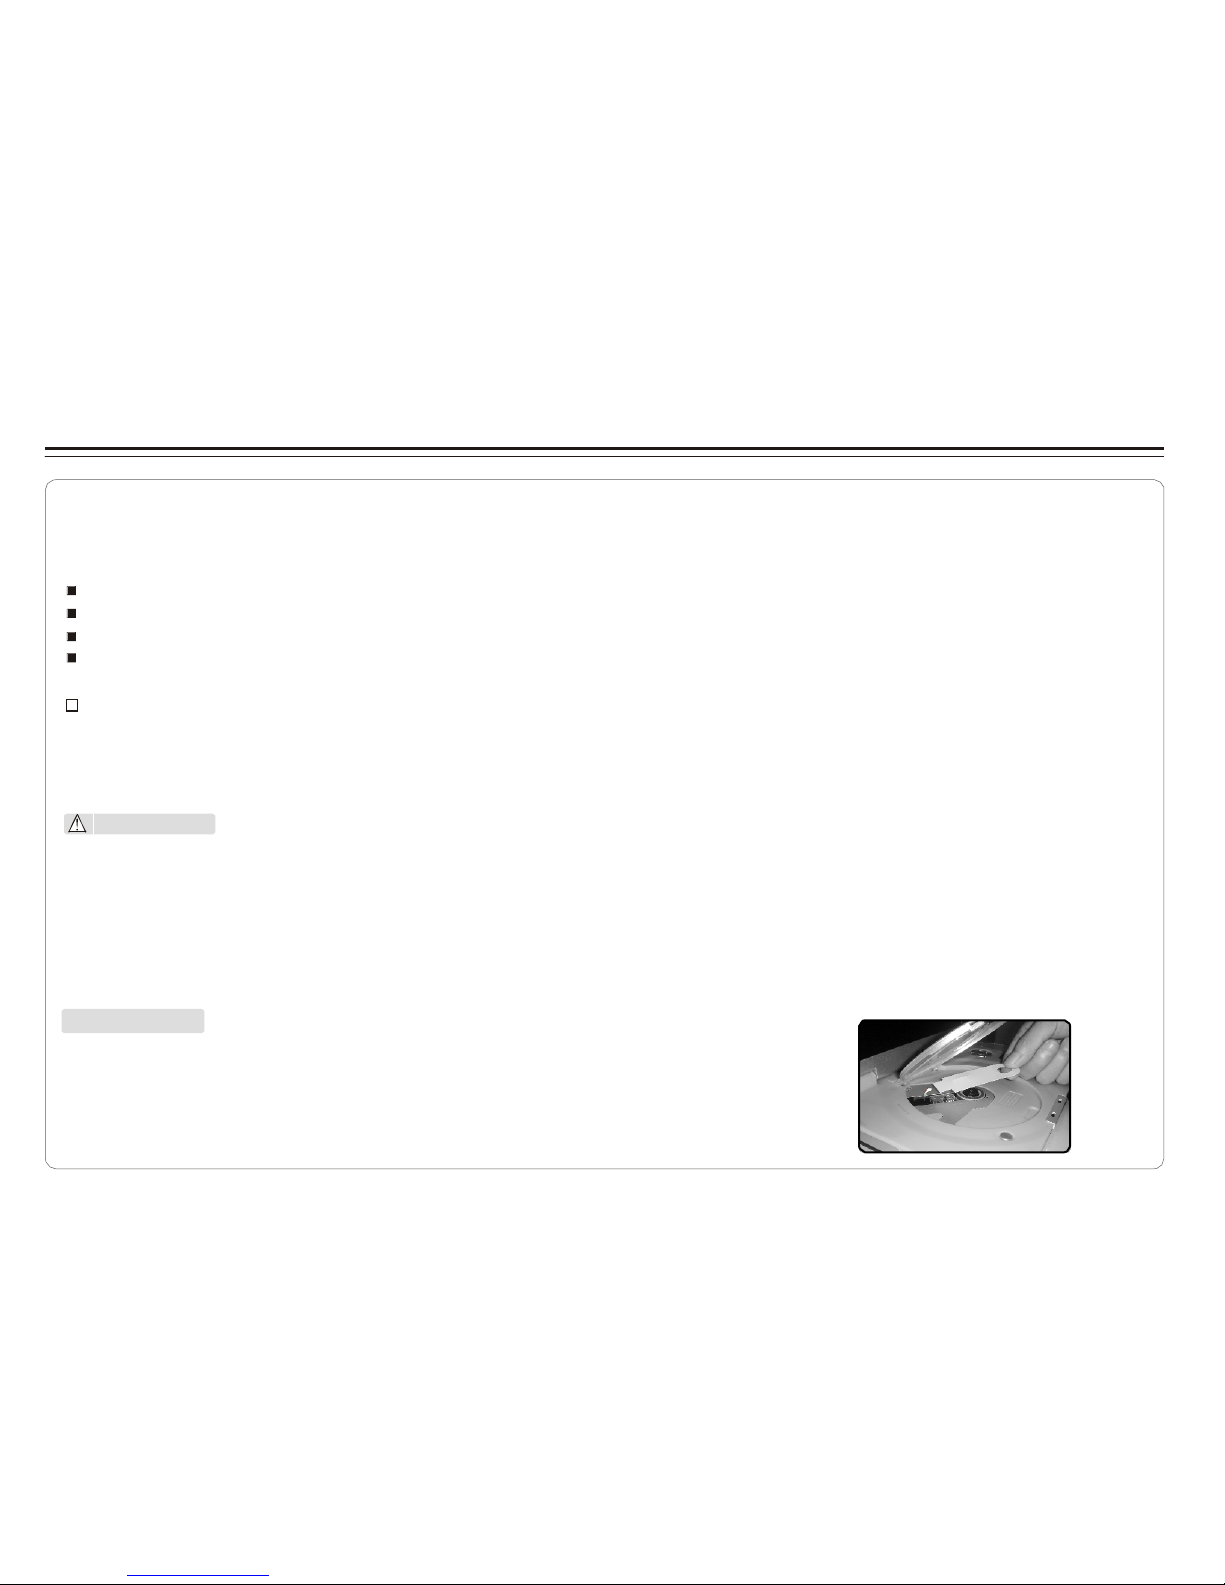
Remo v e th e pr otecti on card i nsid e t h e disc co mp artm ent bef ore using this P l ay er.
~ 2 ~
Page 4
Remote Control
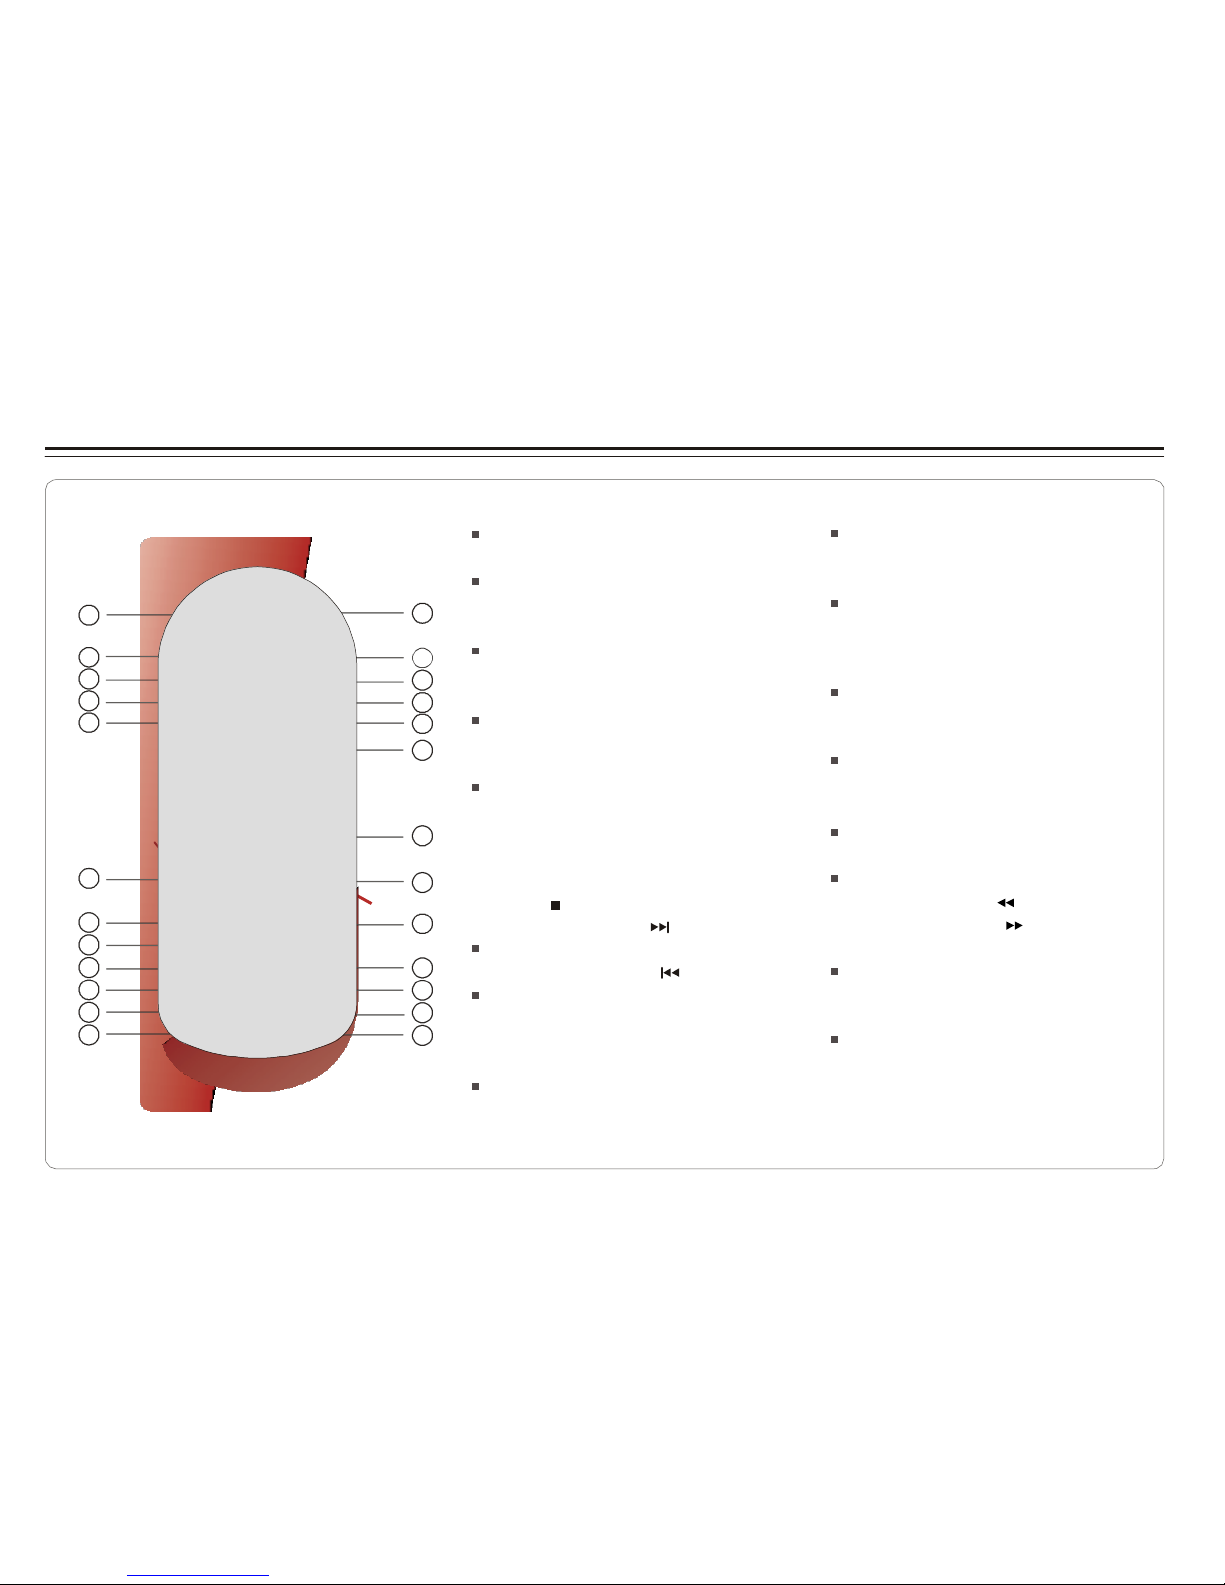
Re m ote Cont ro l
14
15
16
17
18
19
20
21
22
23
24
25
1.ME NU/ PBC B utt on
Br in gs u p the dis c men u.
2.L/ R Bu tto n
Sele cts lef t, r i gh t and s tereo
1
so und tracks .
3.P/ N Bu tto n
2
Sele cts PAL/N TSC / AUT O TV sys tem s.
3
4.TI TLE But ton
4
5.SU BTI TLE B utt on
5
Sele cts the s ub t itle's lan gua ge.
6
6.Nu mber Butto n s (0,1,... ,9)
7.SE TUP But t on
Br in gs u p the set u p ME NU
to set up th e sy s tem's
7
language, au dio , di spl ay,
passw ord et c.
8 8.(P LAY /EN TER ) /DI REC TIO N But t ons
9.ST OP ( ) B utton
9
10.S KIP FORWARD ( )B utt on
Us e to ski p to nex t title , chapter or tra ck.
10
11.S KIP BA CKW ARD ( ) B utt on
11
Us e to ski p to pre vio us titl e,
12
ch apter or t r ack .
13
12.Z OOM B utt on
13.G OTO B utton
Us e to enter th e s p ecific c ha p ter, tr ack
or ti me to pla yba ck.
14.D VD/ USB B utt on
Sw itc hes be t wee n DV D and USB
mode.
15.D ISP LAY Butto n
Display s the cu rrent dis c play b ack
informa tio n.
16.MUTE But t on
17.A NGLE Bu tton
Us e to ac c ess vari ous
ca me r a an gle s on a DVD .
18.L ANG UAGE But ton
Sele cts the v oi ce langua ge i n a DVD .
19.S LOW B utt on
20.V OL- But t on
Us e to dec rease th e vo l um e.
21.V OL+ B utton
Us e to inc rease th e vo l um e.
22.F AST R EVE RSE ( ) B utton
23.F AST FORWAR D ( ) B utton
24.R EPE A T But t on
Allo ws y ou to repeat p lay
a title, chapter, tr ack , or disc .
25.MARK B utt on
Us e to mark a point whe re th e
play bac k start s eac h tim e w h en
the MARK b utt on is pres sed
later on .
~ 3 ~
Page 5
5
Description
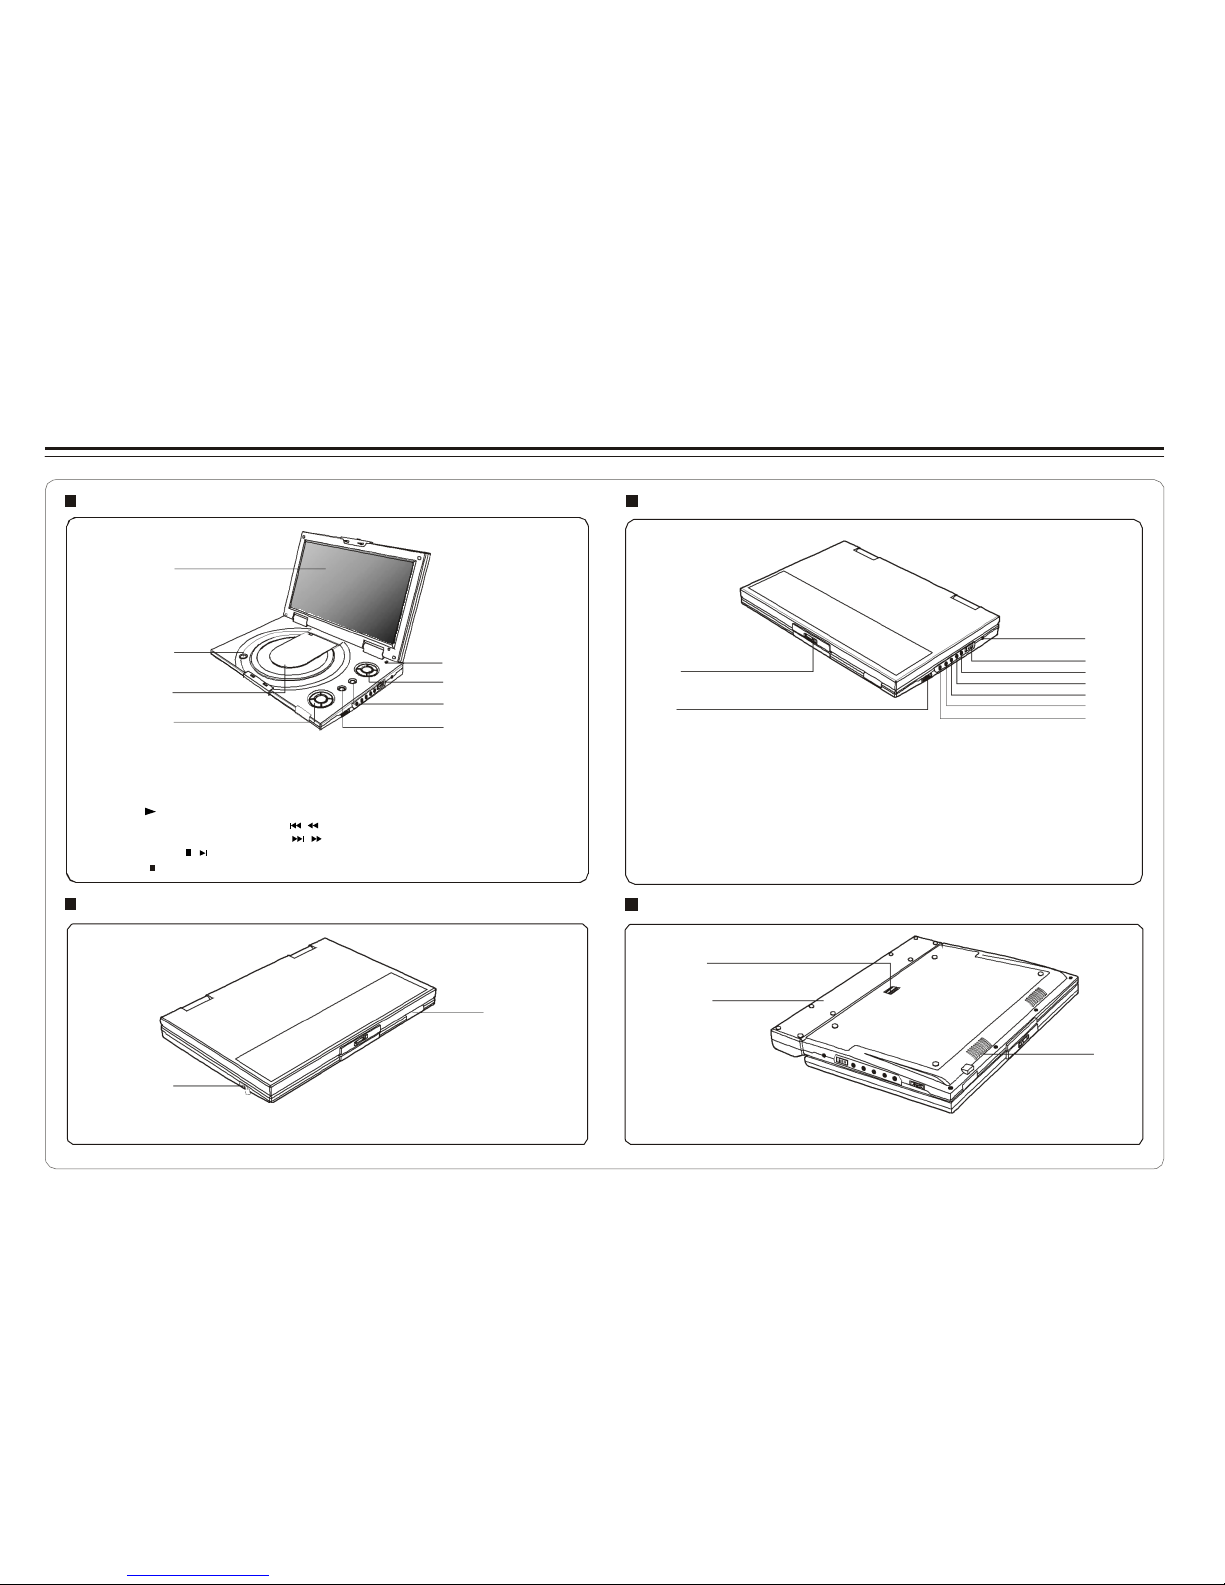
Front Vie w
Right Vie w
1
2
3
5
4
3
6
1
6
7
1.L CD
2. OP EN
7
2
8
4
8
9
5. LCD on/ off s wi tch
6. C U R SO R( UP /D O WN/ LEF T/ RI G H T ),
3
.D IS C C OVER
4.P LAYBA CK BU TT ONS
PL AY ( )
SKI P- PREV IOU S/F AST
RE VERS E( / ) S KIPFO RWA RD/ FAS T FO RWARD ( / )
PA USE /ST EP( / )
ST OP ( )
ENT E R
7. M ENU/ P B C/ L C D ad j.
8. D VD /U S B Bu tto n
1. OPE N
2.E ARPH ON E / SP EAKE R VOL UM E
3.D C I N 1 2V
4.P OWER ON/ OFF
5.V ID EO IN
6. AUD IO IN/ OUT
7.V IDE O OU T
8.S PDI F: Di gi tal au dio si gna l
ou tp ut jac k
9.
EA RP HO NE JACK
Left Vie w
Bottom Vie w
1
2
1
2
1. LED LIG HT /R EM OTE
CON TROL SE NS OR
2. U S B S lo t
3
1.R E LE ASE LAT CH (Ba tter y
pack se pa ra tio n sw it ch)
2.B ATT ER Y PA C K
3.S PEA KE R
~ 4 ~
Page 6

Using the Remote Control
Installi ng the batter y
1. Op e n t he batte ry c o mpart m ent cov er us i ng a coin.
Us ing the remot e c ontrol
Poin t th e re mot e contro l direc tly at th e re m ote sens or
on the fr ont of th e DVD Play er.
2. Inser t a 3V lit h iu m batter y into t he ba ttery co mpartm ent w ith
the polarit y ( + ) f aci ng up as ma rke d.
Ba tt er y
3. Re pla ce th e batter y compartment c ove r and tu r n c loc k wis e
unti l it stops.
Re m ot e Con t r ol Se n sor
ba tte ry c om p ar tm en t
co ve r
~ 5 ~
Page 7
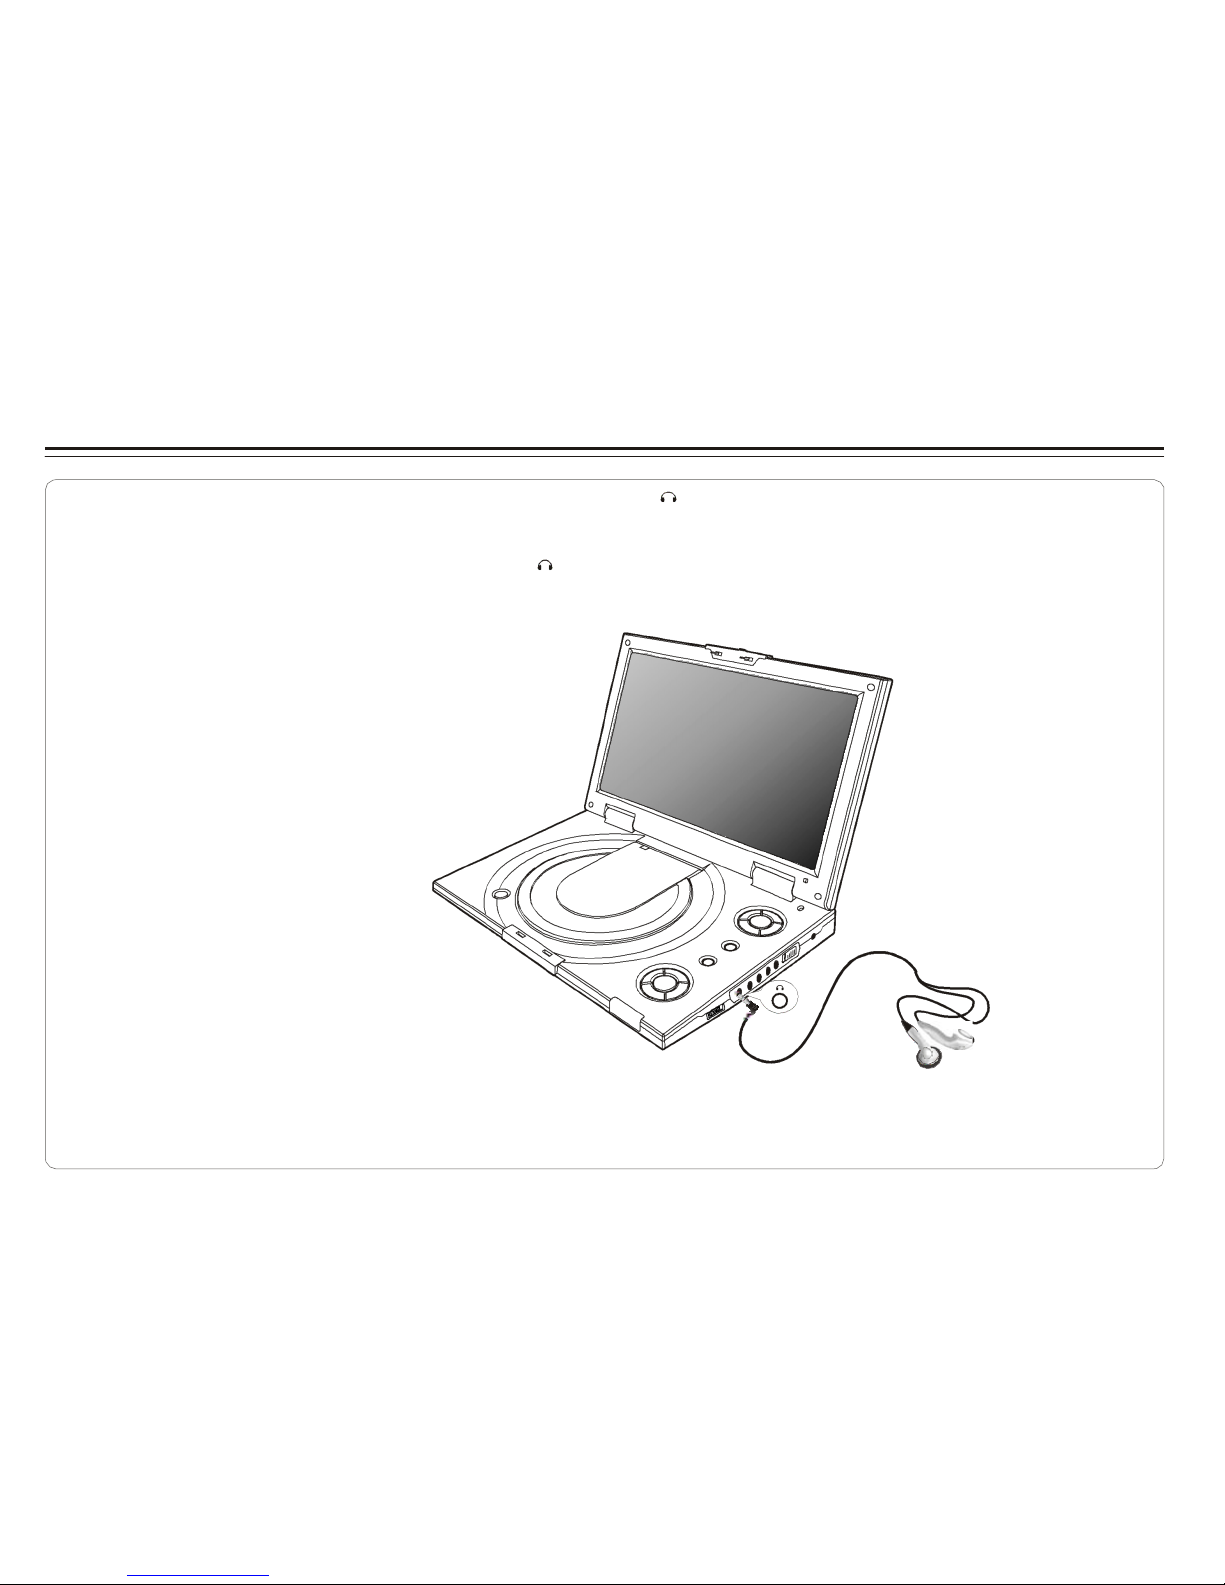
Connecting Earphones (Optional Accessory)
You can att ach a n earph one w it h a stere o mini- jac k plu g to the phone jack ( ) for pr iva t e l ist e ni ng. Th e vo lum e can be ad j us t ed
us ing VO L + and VOL - on t he re mot e contr ol.
Note : Whe n t h e earph one is co nne cte d to t he P hone Jac k ( ), the spe ake r wi ll be dis c onn ect ed.
*E arphon e is an opti onal ac c ess ory
~ 6 ~
Page 8
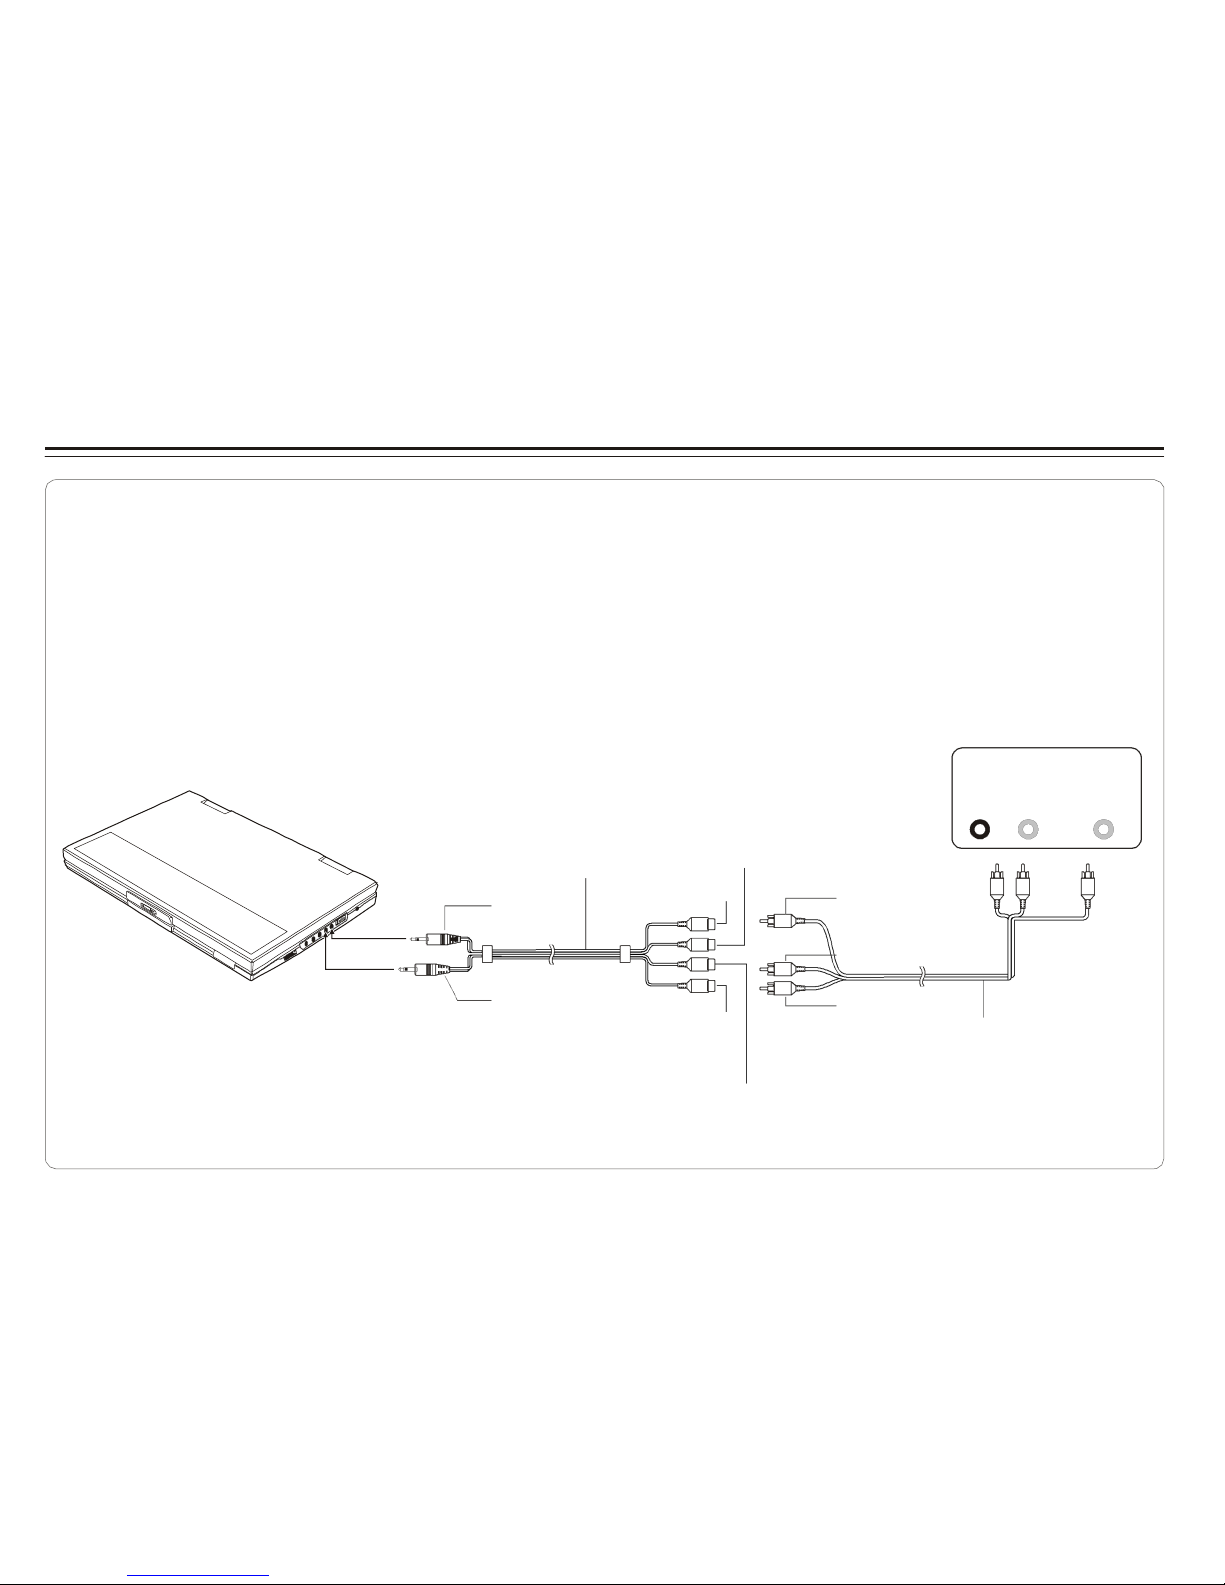
Connecting to an External Component
You can enjoy video f r o m VCR or ca m c order on your D VD play er.
1. Turn of f DV D play er, V CR an d other c omponents .
2. Co nne ct t he audio a nd v ide o cabl es as illus trate d belo w.
3.Tu r n o n power.
VC R or ot her co mpo nent equipp ed w ith exte r na l output con nec t ors
AUD IO
OUT
VID EO
OUT
AV ada pt or cabl e (p rovided)
(Mi ni -j ac k t o R CA )
R L
Video ou t: Yell ow
Video (y ello w)
Video in : Gre en
Video ou t: Yell ow
VID EO IN
Aud io (l ef t) :W hi te
AUD IO IN /OUT
Aud io (bla ck )
Aud io (rig ht ): Red
Aud io (rig ht ): Red
AV CAB LE (Not p rov id ed)
Aud io (l ef t) :W hi te
~ 7 ~
Page 9

Connecting to a TV
You can enjoy DVD quality vi deo on TV screen.
1. Turn of f DV D play er an d ot her co mpo nen ts.
2. Co nne ct t he audio a nd v ide o cabl es as illus trate d belo w.
3.Tu r n o n power.
4.Re p ea t edly pr es s TV/ V ide o butt o n on yo ur TV to s e lec t the input from the D VD pl ayer.
Conn ect to a TV equ ipp ed with ext ern al c onn ec t ion jacks
AUD IO
IN
VID EO
IN
R L
AV ada pt or cabl e (p rovided)
(Mi ni -j ac k t o R CA )
Aud io (l ef t) :W hi te
Aud io (bla ck )
Aud io (rig ht ): Red
Aud io (rig ht ): Red
AUD IO IN /OUT
Aud io (l ef t) :W hi te
VID EO OU T
Video (y ello w)
Video in : Gre en
Video in : Yel low
AV CAB LE (Not p rov id ed)
Video ou t: Yell ow
TIP S
If you wi sh to v iew vid eo on y ou r TV only, close the displ ay p ane l of your P layer .
With the dis p lay pan el s h ut, use the rem ote to contr o l t h e Pl aye r.
~ 8 ~
Page 10

Connecting to a Stereo Component
By connecting the digital output (SPDIF) on the DVD player through a coaxial cable (optional accessory)
to a Dolby Dig ital/D TS a mplifier or processor, yo u can enjoy f ull 5.1 channel s urround sound. Follow
these steps for making the connection.
1.Tu r n off both DVD p la yer a nd your s ter e o s y s tem.
2.Co n ne ct t he SPDIF to you r st ere o sys t em as il lus trated below.
3.Tu r n on p ower of DVD p l ay er.
Coax ial ter min al c o nne cti ng st ere o sys tem
COA XI AL
Coa xi al ca bl e
Coa xi al ca bl e
SPD IF (blac k) COA XI AL (b lack )
Depe ndi ng on your am pli f ie r s y ste m, y ou nee d to mak e the f ollo wing se lec tio n from ME NU:
1.Re fer to C hanging Audi o Outp u t on p age 22.
2.Se lec t SPDIF /RA W if your ampli fie r has 5.1-channe l de cod er.
3.Se lec t SPDIF /PC M if y o ur a mpl ifi er has 2 c han nels .
4.Se lec t OFF, i f t h er e is no dig ita l sig nal out p ut fro m the DVD play er.
~ 9 ~
Page 11

Using USB Port
The player accepts m ost USB de vices suc h as MP3, DSC, U SB- drive, Digit al C am corder etc. The USB in this Player support s
ver sion 1 .1/2 .0.
US B sl ot
Pl uging a USB devic e
1.Pl ug i n the USB d ev ice to the USB port o n t he player.
2.Re p ea t edly pr es s DV D/U SB to s elect USB mode.
Re m oving a USB devic e
You can remove t he US B de vic e any tim e eve n it is pl ayi ng. To remo v e th e USB d evi ce, sim ply gras p t he en d of the USB an d rem ov e it
from the s lot.
Playing a USB device
1.In ser t th e USB dev ice and re pea ted ly p r es s DV D/U SB to s ele c t U SB mod e. T he fil e ma nager appears an d the first song file of th e
firs t fo lde r pl ays .
2.Us e di r ec t io n key ( and ) to selec t the fil e yo u wan t to pla y and pres s to pl ay.
Note:
If yo u have dif f e r e n t fi le ty pes (p h o t o , mu s i c , vi d e o) in the USB, ma k e s u r e you ha v e selected to di s p l a y a l l fil e ty p e s
( see " Dis pl a y i ng an d So r ting Fil e s " ) o therw i s e , some file t y p e s ma y no t di s pl a y .
~ 10 ~
Page 12

Using the AC Adaptor
This p ortab le D V D player can b e pow er e d by AC thro ugh t he sup pli ed switchi ng p ow er AC a dap tor. It c an al so us e th e sup pli ed batt ery
pack t o p ower.
When the AC a da pto r is co nn e cted to the unit and p owered , the unit w i ll be aut oma tic all y and ele ctr ica lly dis c onn ect ed f rom the bat t er y
pack and pow e red by th e AC power.
T o DC 1 2V I N o n the DVD p l a yer
T o hom e po w e r outl et
Im p ortant !
Alway s turn off th e DVD P lay er b efo r e con nec tin g or dis c onnec t ing the AC cord.
On ly use the AC ada pto r sup pli ed w ith t hi s Pla yer. Usi ng a diff e r en t ty pe of a d ap t or m ay caus e m al f unc tio n o r dam age t o th e pro duc t.
When the AC a da pto r is us ed f or p rol ong e d perio d of tim e, th e adapt or may hea t up ,
th is i s norma l and is n ot a c aus e for con cer n .
When n ot usin g the ada ptor, un plu g it from the outlet .
~ 11 ~
Page 13

Using the Battery Pack
Installi ng the battery pack Re m oving t he bat t ery pack
<1>. A li g n a nd insert the bat ter y
pack int o th e corres pon din g
sl ots on t he ba ck of th e uni t.
<2>. S li d e t he batt e ry pa ck to th e
left un t il it c lic k s into p lac e.
<1>. S li d e d own t he la tch . <2>.Slide t he batt ery pack t o th e
righ t, a nd r e mov e.
Ch arging t he bat tery pack
1.At tac h th e batter y pa ck to the Pla yer .
2.Us e th e AC a dap t er t o cha rge the b at ter y pac k. M ake t he co nne cti on as illus trated belo w .
3.Sl ide POW ER to OFF. ( Th e Pl ayer mus t be t ur n ed o ff to c har ge th e ba tte ry) .
To DC 12 V IN on t he DV D play er
To ho me pow e r out let
LED Indic at or
Durin g c har g ing , t h e red an d gr een LE Ds bl ink al ter n atively.
When the b att ery is f u ll y charg ed, th e or ang e LE D sta ys lit .
When the Play er us es b a ttery for power, steady red LE D lig hts .
If th e batte ry power is l ow, t he red LE D blinks .
OPEN
LE D IN DIC ATO R
~ 12 ~
Page 14

Cautions in Using Battery Pack
Da nger!
Stric tly fo llo w these sa fety in for mat ion whe n usi ng t he b att ery pa ck, other wis e , a short c irc uit, ov erheating, smoke , fi re,
or da m age to th e pr oduc t ma y res ul t .
Never di sas s emb le or modify the bat tery pac k in any way. Do not to uch the termi nal of th e batte ry p a ck wi th a met al objec t.
Do no t place th e battery p ack in di r ect sun li g ht , das hboard of a vehic le, or h igh tempera t ur e pla ce. It ca n cause e xplos ion or fir e .
Do no t ex p ose the bat t er y pac k to water, fire , or heat .
Alway s us e the inc lud e d AC adaptor when chargi ng t he b att ery pa ck.
This b atter y pack is d esigned exc lus ively f or yo ur porta ble DVD pla yer. Do no t use it w ith oth er devi ces .
Wa rning!
1. Do not dr op o r su bje ct to str o ng vibr at i on.
2. Ke ep out of r eac h of chil dre n.
3. Th e batt ery pac k may leak fluid t hat is h arm ful to your ey es.
If th is f lui d gets i n your eyes, w ash eye s imm edi ate ly w ith lar g e amounts of ru nning wat er and g et medic al a ttenti on im me diat el y.
If th e fl uid gets o n yo ur ski n o r cl oth ing , was h imm edi ately w ith water.
Ca ut ion!
1. When not using t he batte ry pac k , rem ov e it and s tor e in a coo l pl ace.
2. Keep the batte ry pac k free fro m smok e, s tea m, moisture, a nd du st.
3. Using th e batt ery p ac k u nde r 0oC ( 32oF) or ov er 40oC( 104oF) c an c aus e reduced b att ery l ife .
x
~ 13 ~
Page 15

Playing a Disc
Pre parat i on for Playbac k
1.Mak e s ure th e Pl aye r has the pow er e ither fr o m t h e batte ry
pack or t h e AC a daptor.
2.Lo ad a disc, fol lowing these steps :
Op en t he top cover .
Pr es s the OPEN bu tto n to open the d isc c over.
Plac e a disc in to t he t r ay with the l abe l side facin g up .
Clos e th e dis c cov er.
3.Sl ide PO WER t o ON to tur n on th e pow er.
Play
Pr es s (on t he rem ot e contr o l) o r (on the player) to s tart
play .
Resume
Ther e ar e tw o way s to r esu me yo ur p lay bac k whe n int er rupted.
Meth od 1 : for sh ort time int err upt ion
1.Pr ess S TOP ( ) , the Pl a yer rem emb ers w he r e you sto ppe d.
2.To resu me, pres s PLAY, the Player wil l play f rom wh er e you
st opped.
Meth od 2 : for lon g er tim e in t err upt ion
1.Pr ess O PEN to ope n t h e d i sc compa rtm ent door
2.Yo u can t ur n off the power, an d ev e n rem ove the d isc from the
desk, whe n yo u tur n o n the pow e r and rep lac e the disc, the
Play er w ill p la y fro m wh ere you st opp ed.
St o p
1.Pr ess (on the re mo t e o r on th e pl aye r) to tem por ari ly s t op
the play b ack , " " appe ars on th e sc ree n.
2.Pr ess aga in t o sto p the playb a ck.
Ad j usting v olume
Pr es s V OL+ or VOL- t o ch ang e volume .
Sk ip
You can s kip cha pters on DVD -Vid eo, trac ks on CD s , and
Vide o CD s .
1.To s k ip for w ard, pr e ss du rin g play ,it s k ips t o the nex t
ch apter or t r ack . Each pres s inc rease s the n umbers o f ski ps.
2.To s k ip t o pr e vious c hap t er or tr a ck, pre ss .
Fa st F orward and Rev er se
1.Du ring playb ack, to f a st f or w ard , pre ss and h o ld (on t he
play er) to i ncreas e the fas t forwa r d spe ed 2 x, t hen re pe a ted ly
pres s t o i ncr e as e to 4x , 8 x, 16x, 3 2x. You c an also si mpl y
repe ate dly pre ss on the r emote c ontrol to in cre a se the
fast for war d spe ed.
2.Du ring playb ack, to f a st r eve rse , pre ss and h o ld (on t he
play er) to i ncreas e the fas t rev ers e spe ed 2 x ,t hen re pe a ted ly
pres s t o i ncr e as e to 4x , 8 x, 16x, 3 2x. Yo u can als o sim pl y
repe ate dly pre ss on th e re mot e co ntr ol to inc reas e th e
fast rev ers e spe ed.
3.To r esu me norma l playb a ck, pre ss .
~ 14 ~
Page 16

Playing a Disc
Sl ow Motion
1.Du ring playb ack, repe ate d ly pre ss SLOW to pla y at 1/2, 1/4 ,
1/8, 1/1 6, 1/32 sp eeds.
2.To r esu me norma l pla yba ck, pre ss .
You can o nly per for m slow moti o n pl ay in t he f orw ard dire cti on.
Re peat Playbac k
You can p l ay a cha pter, a track, a title, a fi le or the ent ire d isc
repe ate dly .
1.Du ring play bac k, re peatedly press R EPE AT t o cho ose a
Repe at option . Depe ndi ng on th e typ e of d isc , the Re pea t
opti ons m ay be different.
2.To cance l rep eat playback, r epe ate dly p res s REPEA T unti l
“ off ”appears o n the s c reen.
Ma rk (Bookmark)
The Mark f unc tio n lets y o u "book mark" po i nt s on the disc f or
play bac k at a lat er t ime. Y ou can sto r e up to 2 0 bookma rk
locatio ns.
Foll ow t h es e steps to set u p mark er pl ayback:
1.Du ring playb ack, pres s MAR K on the rem ote c ontrol .
2.Us e to sel ect a bo o kmark lo cation.
3.Wh en y o u reach t he s c ene you w ant to ma rk, press to
co nfirm .
4.Re p ea t the above proc e dur e for a new scene. You ca n ha ve
up to 2 0 bookmark s .
You can p erfor m marker play bac k at a ny ti me by pr essi ng
MARK , and usi ng to sel ec t one of the book ma rks , the n
pres s ing t o st art play in g th e bookma rked scene. The
Play bac k conti nues unt il th e en d of the disc. Rep eat the ab ove
to pl ay t h e other mar ked s c en es.
GO T O
You can g o d irec tly to a des ired cha pte r an d pl ay, o r pl ay at a
desired p oint of tim e. F o ll ow thes e ste ps :
(A )To play a s pec ific chapter
1. Pr ess GOT O, use to selec t t itle (T T) and cha pter ( CH)
and enter the des ired nu mber .
2. Pr ess ENTER to confir m and start play.
(B )To play f r o m a spec ifi c poi nt o f tim e.
1. Pr ess GOT O tw i ce t o mov e to t he t ime dis play an d it
ch ang es 00: 00: 0 0.
2. Fi ll i n the tim e ( h our : min ut e : se con d).
3. Pr ess ENTER to confir m and start play.
ZO O M
ZO OM le ts y ou enlarge the v i deo i ma ge dur ing pla yback a nd
pan thro ugh the enlar ged i mag e.
1.Pr ess ZOO M rep eat edl y during video play b ack t o e nla r ge
the i m age to x 2 or x 4 t ime s of the normal siz e.
2.Pr ess ZOO M rep eat edl y whi le dis p lay ing JP EG f ile and
Picture CD disc to z oo m in th e picture at 150 % or 2 00 % and
zo om out t he pi ctu r e a t 25 % or 50 %.
Us e dire cti on k eys ( and ) to mov e ar ound (pa n an d
sc an) the enl ar g ed vi d eo or p i cture.
~ 15 ~
Page 17

Playing a Disc
Mute
Pr es s M UTE t o si l en ce t he audio, pre ss MUT E a gai n to res tor e
it.
Me n u /PBC
Durin g D VD pl ayb ack, pres s MEN U/P BC to ret ur n to the disc' s
Star t Me n u. I f the d isc does not hav e th e Start Menu , or dis cs
that ref use MEN U func tio n, app ears.
For V CD play b ack, press MENU / PBC to tur n on/off P B C
(P la yba ck Cont r ol). If PBC is e n ab l ed, menu of s c ene 's
thumbnails a pp ear s , y o u can m ake sel ect ion for play b ack .
LA NG UAGE
Repe ate d ly pre ss LANG UAGE duri ng D VD pl ayb ack to cha nge
the l angu age of the vo ice if th e dis c ha s mul tip le l ang uag es.
This func tio n is only va lid for DV Ds.
Su bt itle
Repe ate d ly pre ss SUBT I TLE d uri ng D VD pl ay bac k to c hang e
the s u btitl e's l ang ua g e If the dis c has m ultipl e subt i tle 's
languages.
This func tio n is only va lid for DV Ds.
An g le
Repe ate d ly pre ss ANGL E d ur i ng D VD p l ay bac k to c hang e th e
ca me r a an gle if the di sc has diffe rent ca mer a an gles.
This func tio n is only va lid for DV Ds.
TITLE
Pr es s T ITLE, i t ta kes you t o the ver y be gin nin g of th e title and
play , or t o the MENU if it h as ti tle m enu .
DI SPLAY
Repe ate d ly pre ss DISP LAY durin g playback t o dis pla y vario us
play bac k in for m at i on s uch as cur rent titl e, chapte r, trac k
elaps ed t ime , l anguages etc .
L/R
This func tio n is mos tly use d for kar aok e (s ing a lon g) discs , by
repe ate dly pre ssin g L/R, yo u can se lec t STE REO , MON O
(Lef t), MON O (Right), MI X MON O etc.
P/N
This i s use d when y ou con nec t the P lay er to a TV and w atc h
vi deo o n the TV. R epe ate dly pr ess P/ N t o s elect NTSC,
PA L a nd AUTO to mat ch tha t of your TV.
The LCD sc ree n does no t ha ve NTSC or PAL, so if you watch
vi deo on t he Pl aye r's screen , it is rec omm ende d t o set to
NT SC w hic h w i ll giv e a bet ter vi deo qua lit y. The play e r wi ll
play b ot h PAL or NTSC D VD's tit les even w hen the Pl ay er i s
se t to NT SC.
~ 16 ~
Page 18

Playing Mp3 and Regular Audio CD
Va lid MP3 C D
Your MP 3 fil es shou ld be I SO 96 60 or JOL IET for ma t.
Play
In mos t c ases , whe n a MP3 or a udi o disc is pla ced i nto the
play er, the firs t so ng file of the fir st fo lde r pl ays.
In ot her cas es, th e fi le m ana ger appe ars . Use di r ec t io n key s
( and ) to s ele ct t he song file a nd pr ess to play.
~ 17 ~
Page 19

Playing Picture CD
Va lid Picture
The pl aye r ca n play bot h Ko dak Pi ctu re C D tha t you ord e r fr om
phot o p r oc essi ng store , an d h ome - ma de CD by b ur n ing JP EG
files onto a CD -R o r CD - RW di sc.
Play
Rotate
The picture c an be rot ate d and fli ppe d.
1.Du ring playb ack, use directi on k eys ( and ) to
rota t e r ight 90 de gre es, lef t 90 degr ees , f l ip v ert ica ll y and
hori zon tal ly respectively.
In mos t c ases , aft er t he d isc is placed in t o the player, th e fi rst
file wil l be show n .
In ot her cas es, th e fi le m ana ger appe ars . Use di r ec t io n key s
( and ) to select t he picture a nd pres s PLA Y on t he
Play er o r on th e re mot e contr ol to s tar t th e slide s how
( plays p h ot os automatically).
To retu r n t o fil e man ager, pr ess MEN U/P BC.
To displ ay t hum bnail, pr es s " " duri ng p lay bac k of im age s.
To st art slide show, pre ss " " during pl ayback of i mages.
Pr es s Z OOM to en lar ge t he pho to a nd us e and t o mov e
arou nd th e en l ar g ed photo. The slide s h ow f unc tio n sto ps when
yo u p res s ZO OM.
Rot ate Ri gh t 90
O
Or iginal Rota t e r ight 90 de gre es
Fli p V er tica ll y
Fli p H ori zo nta lly
Flip ver tic ally Flip hor izonta lly
Next/Pre v ious
You can m an ual ly sk ip to the n ex t picture by pr essi ng , an d
to ski p t o the pre vio us pict ure by pressi ng .
~ 18 ~
Page 20

Displaying and Sorting Files
Di splaying files
When a disc or U S B dev ice co n tai ns mu lti ple fil e type s, y o u
ca n selec t and dis play only certa i n fil e typ es .
1. Press STOP a nd s e lec t FI LE TYPE and press " " to
co nfirm .
2. Select t he fil e typ e you do n ot want to displ ay an d rep eat e dl y
pres s " " so t he c h eck mark di sap pea rs.
3. Rep eat S TEP 2 t o hide the ot her f ile type.
4. Select EXI T a n d press " " to ge t out.
Sorting files
You can lis t the fil e in the or de r acc ord in g to its t y pe, name or
date.
1. Pr ess STO P and sel ect SO R T FILE, p r es s " " t o
co nfirm .
2. Se lec t one of t h e s ort i ng cr iteri a ( by type, by nam e
and by date) .
3. Se lec t Asc end ing or D esce ndi ng or der for lis tin g the
files, pres s " " to c onf irm.
4. Se lec t EX IT an d pr ess " " to get out.
NO TE: If t he f ile is li ste d by na me, It w ill firs t lis t th e file
names wit h ca pit al letter in alph abe tic al or de r,
then fil es with lo wer cas e.
RO OT OP -0 6NW 1 1
FI LE T YP E:
OP -0 6NW 2 2
RO OT
OP -0 6NW 1 1
MP 3
MOPG
-0 6NW3 3
SO RT F ILE:
OP -0 6NW 2 2
MP 2
OVOPB-0 6NW 4 4
Me tho d: SOePq-u0e6nNcWe:3 3
JP EG
DA T
OAVPI -0 6NW5 5
OWPM-A06 NW6 6
EOxPi-t
06 NW7 7
OP -0 6NW 8 8
By type
By name
By date
OP -A0s6cNeWnd4
i ng
4
OP -D0e6NscWe5
ndi ng 5
OP -0 6NW 6 6
OP -0 6NWE7
xi t
7
Fi le Type
So rt Fi le
OP -0 6NW 8 8
Fi le Ty pe
So rt Fi le
~ 19 ~
Page 21

Setting Language for OSD, Menu, Audio, Subtitle
1. Pr ess SETUP on the remote contr ol.
2. Us e th e dir ection k ey s ( ) to sel ect L a ngu age Set up
and its s ub- m enu.
3. Pr ess to co nfi r m y our s electi on.
4. Pr ess SETUP to exit.
Ch anging v oice la n g uage
La ng ua ge Se t up
Ch anging OSD langua ge
OSD OS D
Me nu
Au di o
Su bt it le
En gli s h
C hin es e
Ja pa ne se
Fr en ch
Ge rm a n
La ngu age Set up
OSD
OS D
Me nu
Au dio
Su btit le
En glis h
Fr enc h
Ge rma n
Ita lia n
Sp ani sh
:S el ect
Ch anging s ubt itle langua g e
:S elec t
La ng ua ge Se t up
Ch anging menu lan g uage
OSD
OS D
Me nu
Au di o
Su bt it le
En gli s h
C hin es e
Ja pa ne se
Fr en ch
Ge rm a n
La ngu age Set up
OSD
OS D
Me nu
Au dio
Su btit le
En glis h
Ch ine se
Ja pan ese
Fr enc h
Ge rma n
:S el ect
:S elec t
~ 20 ~
Page 22

Setting Screen for Display Format, Screen Saver, TV System
1. Pr ess SETUP on the remote contr ol.
2. Us e th e dir ection k ey s ( ) to s elec t Scr een Set up and
its su b- m enu .
3. Pr ess to c o nfirm y our sel ect ion .
4. Pr ess SETUP to exit.
Tu r n ing on/off screen save r
Sc ree n Se tup
Ad j usting t he Asp ect Ratio
OSD
Di spla y F orma t
Sc ree n Sa ver
TV Sys tem
On
Of f
4:3 LB (L ett e r Box )
Display s the co nte n t of the D VD t i tle in 1 6:9 a spec t rati o.
The blac k bars wil l app ear at th e to p and botto m of th e scr een.
4:3 P S ( Pa n Sc a n)
The left and ri ght of the screen ar e cut off and dis plays t he
ce ntral por t io n of t h e 16:9 s c reen.
:S elec t
Se lecting T V sy stem
Sc ree n Se tup Sc ree n Se tup
OSD
Di spla y F orma t
Sc ree n Sa ver
TV Sys tem
4: 3 PS
4: 3 LB
16 :9
OSD
Di spla y F orma t
Sc ree n Sa ver
TV Sys tem
NT SC
PAL
Au to
:S elec t :S elec t
~ 21 ~
Page 23

Setting Audio for Downmix
1. Pr ess SETUP on the remote contr ol.
2. Us e th e dir ection k ey s ( ) to s elec t Au d io S etu p an d
its su b- m enu .
3. Pr ess to c o nfirm y our sel ect ion .
Ch anging D ownmix
Au dio Set up
4. Pr ess SETUP to exit.
OSD
Di gita l Ou t
Do wnm ix
Lo /Ro
Lt/ Rt
Ch anging Digital Out
Au dio Set up
:S elec t
OSD
Di gita l Ou t
Do wnm ix
SP DIF /PC M
SP DIF /RA W
Of f
:S elec t
No te:
SP DIF/O FF: s el e ct thi s whe n you do n ot wan t to h av e dig ita l
audio si g na l output .
SP DIF/R A W:s elec t th is when the di git al a udio out put is
co nnect e d t o an ex ter n al a mplifier w ith Dolby
Digi tal or D TS dec ode r whic h giv es 5. 1 cha nne l
so und.
SP DIF/P CM: select t his whe n the ext er n a l a mplifi er has no
decod er.
~ 22 ~
Page 24

Setting Parental Control, Password, Camera Angle, Default
1. Pr ess SETUP on the remote contr ol.
2. Us e th e dir ection k ey s ( ) to s elec t Cu s tom Set up and
its su b- m enu .
3. Pr ess to c o nfirm y our sel ect ion .
4. Pr ess SETUP to exit.
Se tting par e ntal control
Tu r n ing on/off camera angle
When O N is selected, the p lay er wi ll d is p lay mul t i- angl e mark
on the sc r een if t he disc has multi -an gle sho t.
Cu sto m Se tup
Cu sto m Se tup
OSD
Pa ren tal Ctrl
Pa ssw ord
…
On
Of f
OSD
Pa ren tal Ctrl
Pa ssw ord
…
An gle Mar k
De faul t
5
6
7
8
Of f
An gle Mar k
De faul t
:S elec t
:S elec t
Ch anging pa s s w ord
1. Us e direc tio n key s ( ) t o se lec t Pa ssword an d pr ess
EN TER to confirm.
2. Ke y in y o ur o ld p as s wor d ( 88 88 i f this is the fir s t u se) .
3. Ke y in new passw ord and ag ain to v erify.
Ret urning t o def ault sett ing
All s ett ing s wi ll rev ert to t he or igi nal fac tor y setti ngs w h en
Reset is s elect e d.
Cu sto m Se tup
Cu sto m Se tup
OSD
Pa ren tal Ctrl
Pa ssw ord
…
An gle Mar k
Re set
OSD
Pa ren tal Ctrl
Pa ssw ord
…
An gle Mar k
De faul t
De faul t
Ol d:
Ne w:
Ve rify :
:S elec t
:S elec t
~ 23 ~
Page 25

Adjusting LCD Screen
You can a d ju st scr een"s Br i ght nes s, Co ntr ast , Color, as w e ll a s to rev ers e the scre en imag e 18 0 degree s.
Ad j usting Bright ness, Co ntrast and Co l or
1.Pr ess an d ho ld MENU/P BC/LCD a d j. for a f ew sec onds to d isp lay the adjus tment menu.
2.Us e to selec t th e Brightnes s ( ), Cont r ast ( ), Color ( ), and us e to mak e the adjus tme nt, P res s ENTER t o confir m.
Ch o osing the as p ect ratio
1. Press an d hold MEN U/P BC/LCD ad j. for a f ew s econ ds to d isplay t h e Adjus t men t Me n u.
2. Select 1 6: 9/4:3 and pr ess ENTER to co nfi r m.
Reversing t he sc r een
1.Pr ess an d ho ld MENU/P BC/LCD a d j. for a f ew sec onds to d isp lay the adjus tment menu.
2.Se lec t R EVE RSE and pres s ENT ER to c o nfirm.
Resetting s creen setting to defa u lt va lu e
1.Pr ess an d ho ld MENU/P BC/LCD a d j. for a f ew sec onds to d isp lay the adjus tment menu.
2.Se lec t R ESE T an d pr e ss EN TER to c onfir m.
No te: I f no ke y is presse d for 3~4 s econds, t he Men u dis app ear s .
~ 24 ~
Page 26

Troubleshooting
If your D VD pl a yer dos e not see m to b e functi oni ng p rop erly, chec k th e items below before you co nta ct a s erv ice c ent er.
Sy mptom
Ch eck
Power do e s n o t tur n on
or su ddenly tur n s off
Make sur e th e A C Po w er cord is sec urely plugg ed into a n AC o utl et.
Turn the po w er off and the n ba ck on .
Battery p ac k is i n plac e b ut
the p ower doe s not tur n on
or su ddenly tur n s off
Chec k that th e battery pack is charged. I f not, recharge it.
Remo t e co ntr ol d oes n ot w ork Chec k that t h e batte ry i s inser ted i n the "+" a nd " -" d irec tio ns pr o pe rly .
The batt eri es may be d ead . Re place the m with n ew batte rie s.
Chec k that th e sig nal tra nsmiss ion is direc ted a t t h e remot e con tro l s enor o n th e DV D play er .
Di sc d oes not play Chec k that th e disc is a DVD , D VD-R W, VID EO CD , or AUD IO CD.
Do no t us e a di sc th at has sc r at che s or di rt.
Chec k that th e lab el -sid e o f the d isc is f aci ng up .
The pick- up l ens o f th e DV D play er m ay b e dirty . Contact the s erv ice c ent er f or le ns c leaning.
No pi ctu r e Chec k if the LC D on/off sw it c h i s stuck, and c ann ot m ov e f r eely wh en t he top co ver is ope n.
No s oun d Chec k the vol ume s ett ing . If set t o zer o, t ur n up v o lume le vel.
Chec k that th e hea dp h ones ar e pl ugge d into t he P HONE S and Audio ja ck. Speakers
ca nnot be us e d wit h the he adphones.
~ 25 ~
Page 27

Troubleshooting
Sy mptom
Ch eck
Whil e in th e inp ut mo de, no pictu r e is
outp ut fro m th e e xterna l co mponent
to th e DV D play er
Battery pack won't charge
Chec k that th e vid eo o r aud io ca ble is se cur ely connec t ed.
Chec k tha t the DVD play er is t urn e d on .
You c ann ot c har ge the b at ter y pac k with the p layer turned off.
A h ot batte ry pac k may t a ke lon ger t o charge.
Wait un t il t he batt ery pack is suf fic ien tly cooled dow n.
Ch ar gin g LED in d icator does n ot l igh t Che ck with anothe r ful ly c har ged p ack if t h e LE D lig hts .
Chec k that th e AC a d ap t or is sec ure ly p lugged in.
If DV D or b a tte ry p ack is overh eat e d, you w il l not be ab le to cha r ge t he ba ttery pack .
On ch arg i ng the de ple t ed b att er y,
the r ed an d green LED c har gin g
indi c at ors q uic kly light , indicatin g
batt ery is f u lly cha rged, b u t in fact
it is not
Disconnect the AC ada pto r and rec onnect t o ma ke sur e t h e c o n nec tio n is O K.
Us e another batt er y pac k , if the same sym pto m oc c ur s , the AC adapt or m ay be def ect ive .
If th e sec ond bat ter y pa ck ch ar g es witho ut any pr obl em, your fir s t b atter y pack may b e
defective.
~ 26 ~
Page 28

Specifications
General
Power Requirements
Power Consumption
Weight
Dimensions
Operating Temperature Range
Input AC 100V~240V, 50/60 Hz, Output DC 12V
12 W
1155.5g (without battery pack)
255mm ( W ) x 179mm ( D ) x 32.2mm ( H )
+10 C~ + 40 C
Readable
Di sc
Readable USB
DV D, D VD- R, D VD+ R, DVD -RW ,DV D+R W, VC D , CD, HDC D, P i c ture C D, C D-R, CD-R W,
MPEG 4, MP 3, W MA .
DS C, C amcor d er, U-d riv e , MP 3 pl ay e r, and other U SB s tor a ge dev ices
Video Output
Audio Output
Composite Video
2 Channel
1 channel : 1.0 Vp-p (75 load)
L(1/L), R(2/R)
Frequency Response
S/N Ratio
Dynamic Ran ge
20Hz - 20 kHz
>
85 dB
>
80 dB
-
+
2.5dB
Battery Specifications
Op erating e n v ironme nt
ITEM
Nomi nal Vol t ag e
Max C h arg e Cu rre nt
Us e T ime
Char ging tim e t o F ull cap acity
SP ECI FICATION
7.4V
1A
~2 .5HR
4.0H R
Char g e 0 C~ +45
C Dis cha rge -20 C ~ + 60
C Store les s tha n 1 mo nth -20 C ~ +6 0
C Store les s tha n 3 mo nths -20 C~ +4 5
C Store les s tha n 1 year -2 0 C ~ +2 5
C
The s p eci fic at i on s ar e subjec t to cha nge w i tho ut notic e. We ight and di mensio ns are
appr oxim ate.
Due to c ont inu ed produc t improv e men ts, if the r e is a ny dis c rep anc y in t h is us er man ual , the ac tual unit prevai ls.
Page 29

Call Element Electronics Toll Free Tech support # at 1 888-319-9464
LIMITED WARRANTY
The Manufacturer warrants that this product is free of
defects in both workmanship and material. This warranty lasts
for ninety days from purchase of the product. The Manufacturer will replace the
defective product with the same or a model with substantially the
same features and function. In order to be eligible for service,
you must return the defective product to the store where it was purchased.
Proof of purchase is required.
 Loading...