Eleding EE815W-SH15, EE820W-SH20, EE810W-SH10 User Manual

Installation Instruction |
eLEDing® / EE800W-SH series |
Solar Powered LED Smart Street/Parking Lot Lighting |
Thank you for choosing eLEDing!
This product is designed to provide years of trouble-free services by using environment-friendly Solar-Hybrid-Lithium based energy technologies. US, European, China and international patents granted and pending worldwide. All rights reserved. Users must read this manual before installation, comply with local laws and regulations regarding construction & electric/electronic projects, follow proper safety guidelines to prevent any possible accidents and/or injuries. Consult experienced installer and electrical technicians for assistance.
Initial Activation & quick test
The purpose of this step is to ensure the light unit, control system, and every component are all fully functional and in normal working condition. Firmly press the ON/OFF button on the side of the unit (Fig.1), the light will turn on with max brightness. Once it activated, the light is ready for installation. If installation is conducted in daytime, the light will automatically turn OFF after 10-minutes initial walk test period. During nighttime, the light will provide all-night-long illumination with default settings (continue reading if you want to know more details about how to choose different lighting profiles, otherwise, follow the installation guidelines and start installation now).
SMART lighting profile
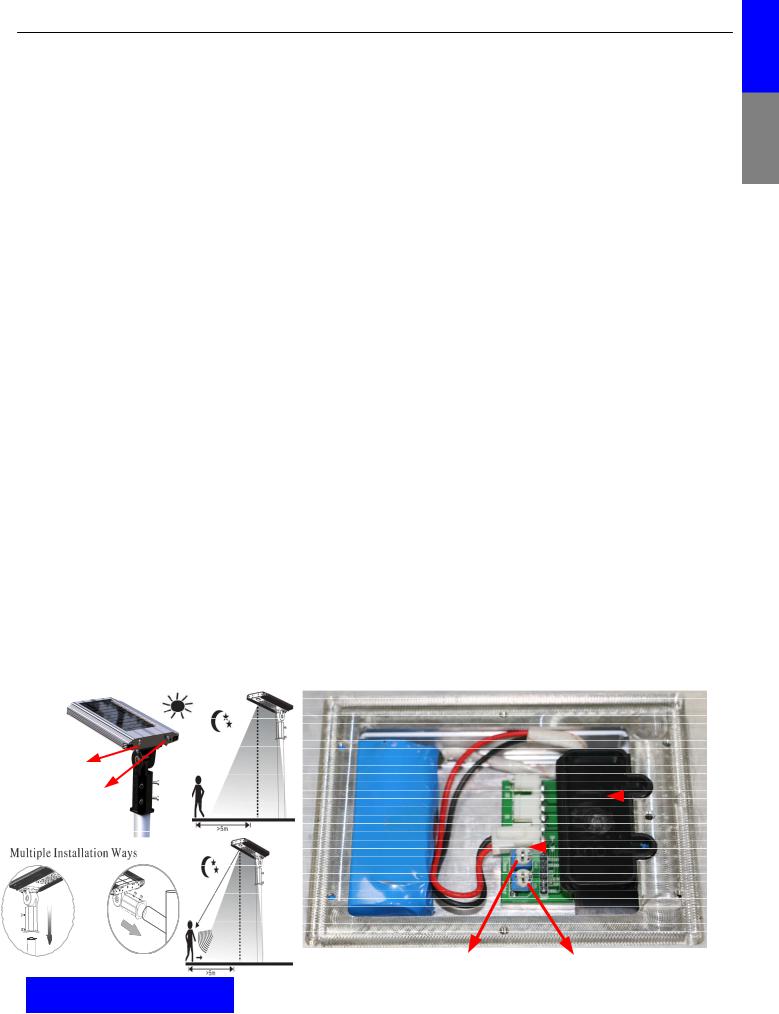
eLEDing’s software-based Intelligent Power Management (IPM) system offers auto power compensation during critical weather or at different geographic locations to optimize the light’s overall performance. This light provide two selectable innovative SMART lighting profile with Dusk-to-Dawn capability. Check Fig.2 and find the jumper on the electronic control board. Jumper 2 in open position gives SMART 1 mode; jumper 2 in close position gives SMART 2 mode. Under harsh weather, if the IPM system detects low power reserve, the control system will automatically switch the light to AUTO mode. Under Auto Mode, the light will only turn on when it detects motion. Such arrangement ensure the light can still provide security lighting under low power condition. The light will automatically switch back to SMART mode once it get fully charged.
SMART 1 (default): When nighttime comes, the light will activate and keep on maximum brightness for the first 3 hours (rush hours). After the rush hours, the light will dim down to preset level for the rest of the night, and come up to max brightness when it detects motion (Fig.3). SMART 1 mode is highly recommended for areas with sufficient sunlight all year round, such as California, Texas, Florida, and countries/areas close to the equator. In these areas, the light can easily receive sufficient solar energy and get fully charged to support full brightness, high-power illumination for longer period.
SMART 2: When nighttime comes, the light will activate and dim down to preset level as saving mode for the whole night, and come up to maximum brightness when it detects motion. SMART 2 mode is recommended for high-latitude areas where solar energy will reduce during winter time or wet/windy seasons.
Lighting Profile Setup & Battery Change: open the bottom cover (Fig. 2)
Battery change: unplug the old battery and replace it with the new battery. Noted that the battery plug only fit in one way.
Adjust the settings by using the dial VR1 and VR2:
VR1: adjust dimming brightness (can be adjusted from 5-50% of max brightness, turn clockwise to increase brightness) VR2: adjust sensor range (can be adjusted from 10 - 50 ft, turn counterclockwise to decrease sensitivity range)
Notes: increasing dimming brightness & sensitivity may reduce the length of illumination period during winter time SMART 1 is default & recommended. Close jumper 2 to switch to SMART 2 mode. Use tweezers if necessary.
Installation Guidelines
1.Follow above standard setup procedure to activate the lighting system (Fig.1 or 2)
2.Securely mount the unit on the light pole or wall, adjust the light head direction and angles based on your need (Fig.4)
3.The light will automatically shut down and charge during daytime sunshine condition (Fig.1)
4.Solar Panel: must be mounted in a non-obstructed position that allows at least 5-6 hours direct sunlight all year round. For most of the North America projects, adjust the tilt of the solar panel at 25°- 45° degrees based on your actual location. If you are close to equator’s location, a flat installation, which means the light head is parallel to the ground, will be enough.
The solar panel can be pointed to east, west and south but definitely not to north.
For northern hemisphere installations, a south-facing position is best and visa-versa for southern hemisphere installation.
Optional AUX DC power sources can be used as back-up power source or charging enhancement device, to give the light a quick charge before installation or during low power due to critical weather (Fig. 1).
5.Suggested Mounting Height (Fig. 5): EE810W-SH10 (8-12 ft); EE815W-SH15 (10-15 ft); EE820W-SH20 (13-19 ft)
6.Diameter of Mounting Adaptor: 2”-7/16 (2.3” to 2.44”) refer (Fig. 6)
7.Solar Panel Maintenance: Use soft, wet cloth to clean the solar panel periodically (at least once a one year) to avoid energy output reduction resulted from accumulated dust. Clean accumulated snow ASAP during snowing season.
eLEDing
1-2
ON/OFF |
Select lighting |
|
|
|
profile: |
AUX for: |
|
unscrew & |
|
remove the |
|
External solar panel |
|
|
|
cover, use |
|
|
||
USB Adaptor 12-24V, 2A |
|
jumper 2 |
Power Bank Fig.1 |
Fig.3 |
|
Battery |
|
|
|
|
|
|
|
Connect |
|
|
|
|
|
|
|
Plug |
|
|
Fig.2 |
||
Fig.4 |
VR2: adjust sensor range |
VR1: adjust dimming brightness |
||
|
|
|
|
|
|
EE Systems Group Inc. |
(Patented Technology) |
||
|
|
|
|
|
|
12346 Valley Blvd, El Monte, CA 91732 USA Phone Number: 1-877-579-3889 |
Fax Number: (626) 452-9194 www.eesgi.com /www.eleding.com/ |
||
|
|
Rev: 12112017 |
||
 Loading...