

Page 1
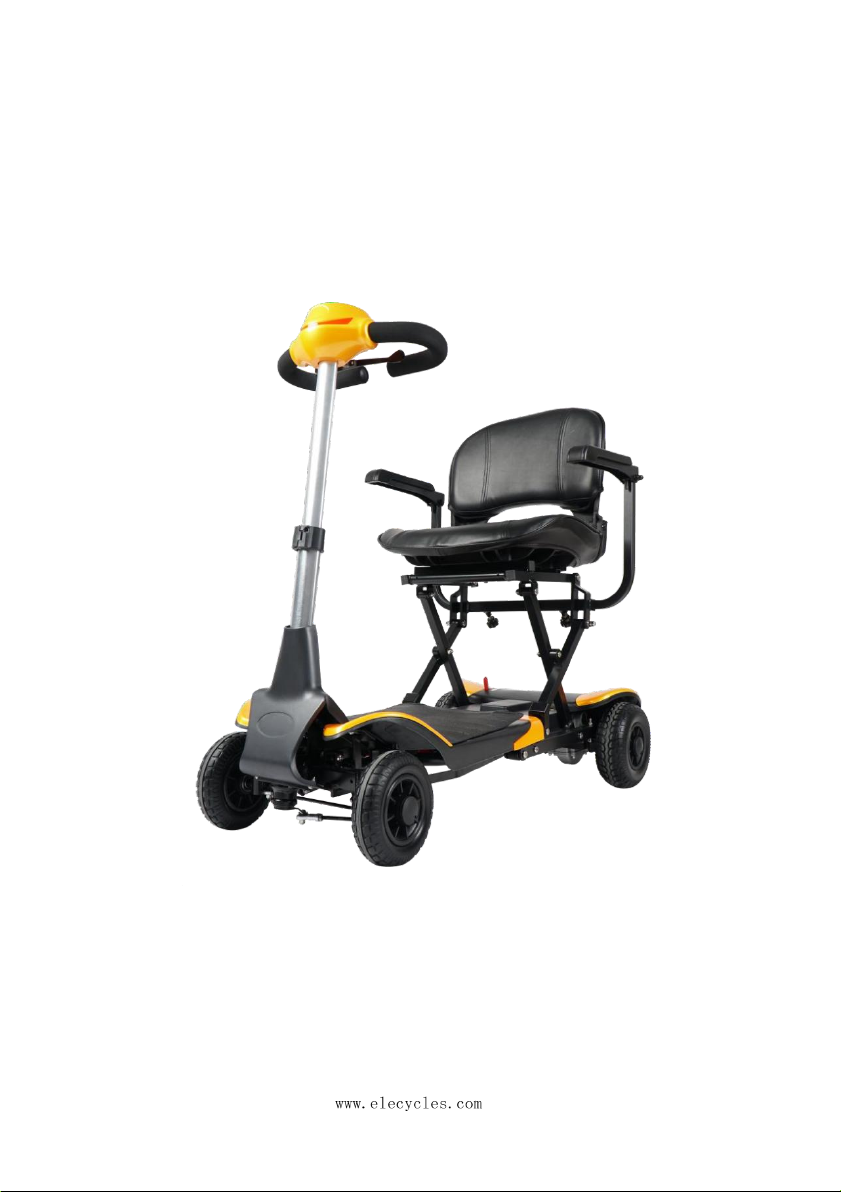
Intelligent Folding
Electric Scooter
Page 2

Introduction
Dear customer:
Thank you for choosing the Intelligent Electric Folding Scooter .
Please carefully read thorough this manual fully before operating the scooter.
Should you not understand the content well or need to help, please contact the dealer
nearby or contact with our after service department directly.
This manual has brief introduction to the operational approach on every part of the
scooter, specification and how to deal with accidental conditions.
The following mark in the manual: 「★」in the manual stands for prohibited action and
behavior.
Please pay attention to Detailed reading on the paragraph with words
“Warning,Attention and A device ”
● This manual enclosed With A Warranty Form. Please always keep it along with
scooter.
● If you transfer this scooter to another person, please do not forget to pass the
manual to the next owner.
● The factory keep the right to have design changes ,all information and pictures without
further notification.
Thank you for your understanding and support.
We hope that the electric folding scooter brings you more convenient and better life with
our permanent repair service.
Page 3

Contents
Ⅰ.Safety Requirements..................................................................................................1
II.
Description of part....................................................................................................
III.
Operating Instruction..................................................................................................6
Ⅳ.Battery and Charging Method....................................................................................9
V.
Adjustment of Folding and Unfolding......................................................................10
VI.
Inspection and Maintenance......................................................................................
VII.
Trouble Shooting....................................................................................................13
Ⅷ.Technical Parameters................................................................................................15
Ⅸ.Appendix..................................................................................................................16
12
5
Page 4

1
■
Before driving
Ⅰ
. Safety Requirement
●
Please drive on the pavement. Any case that you come across the road without
sidewalk, please drive to outer side.
●
Please pay attention to traffic of other vehicles on the road when there is no
sidewalk available.
●
Please do not cross the road.
●
Please avoid driving into heavy traffic zone.
●
No drinking and fatigue driving.
●
Avoid driving at night.
●
Please obey traffic signs , local traffic laws and regulations.
■
Driving Ground
Electric scooter enhances best stability driving on normal surface conditions (such as
dried cement, concrete or asphalt floor consist terrain ) .
●
It can be used in parks and grasslands safely.
●
Avoid driving on unconsolidated pebble stone ,covered soil and gravel surfaces.
●
If you can not judge the condition of the road, do not drive on it.
●
Electric scooters can stride across the obstacles with certain height. That needs a
lower speed, slowly passing the obstacle.
Page 5
2
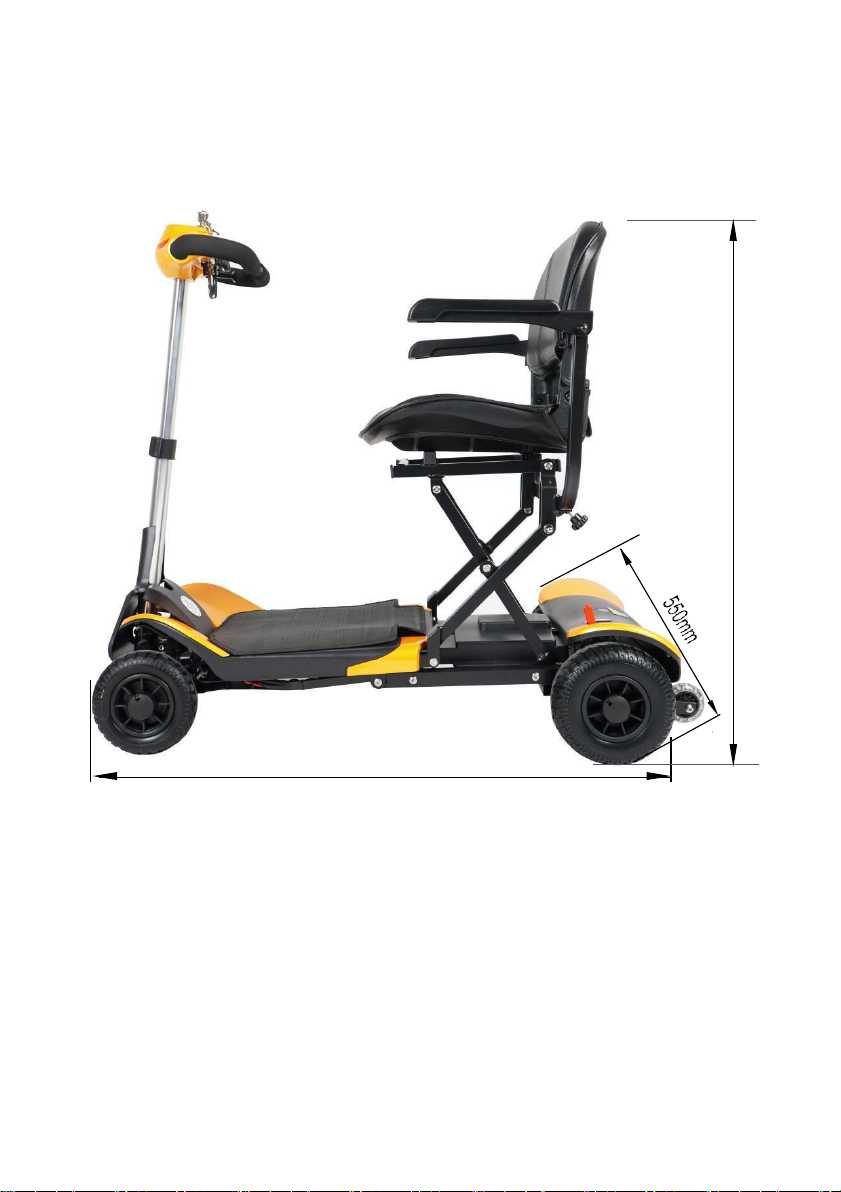
1050mm
870mm
Page 6

3
Warning: do not try to cross the slope beyond the angle listed in the
manual , please follow other requirements mentioned in this manual.
■
Safe Precaution
●
Don’t try to drive before you read and fully understand the manual.
●
This scooter is designed to only one person. No additional passenger is allowed.
●
Please switch off the power when the scooter is not in use.
●
Please drive slowly when come cross with rugged rock or soft ground.
●
Please slow down when you turn in the corner.
●
Please slow down when you turn in the corner.
●
Please don’t drive on the sharp slopes and drive continuously 300 meters on
slope above 9 degree.The control system will automatically cut off the power when
exceeds the limited angle. Under the circumstance ,please shut down the power and
restart again.
●
When drive on the bottom of slope or about to face slope , rugged ground, no
protected edge area ( the road side, door and stairs), please drive carefully.
●
Any change and modification on initial setting and modification is prohibited.
●
Please drive carefully when you are in the busy street, market and shopping center.
Drive on the unsafe and no permitted road is prohibited. Please consult with local
government or state agencies regarding the rules of electric scooter.
●
Take the electric scooter as a seat in a moving vehicle is prohibited.
●
This product is equipped with lithium-ion battery, non professional person is
not allowed to disassemble the internal parts of battery.
Page 7

4
Precautions on usage
■
●
Repair and modification
If the repair or modification is needed, please contact the store or agent.
●
Original parts
Please use the original parts of former factory when the replacement is needed.
●
Environment protection
Please don’t abandon the scrapped scooter and battery.If necessary, please contact
the dealer or agent.
Page 8
5
1
2
3
1
9
8
7
6
5
4
1
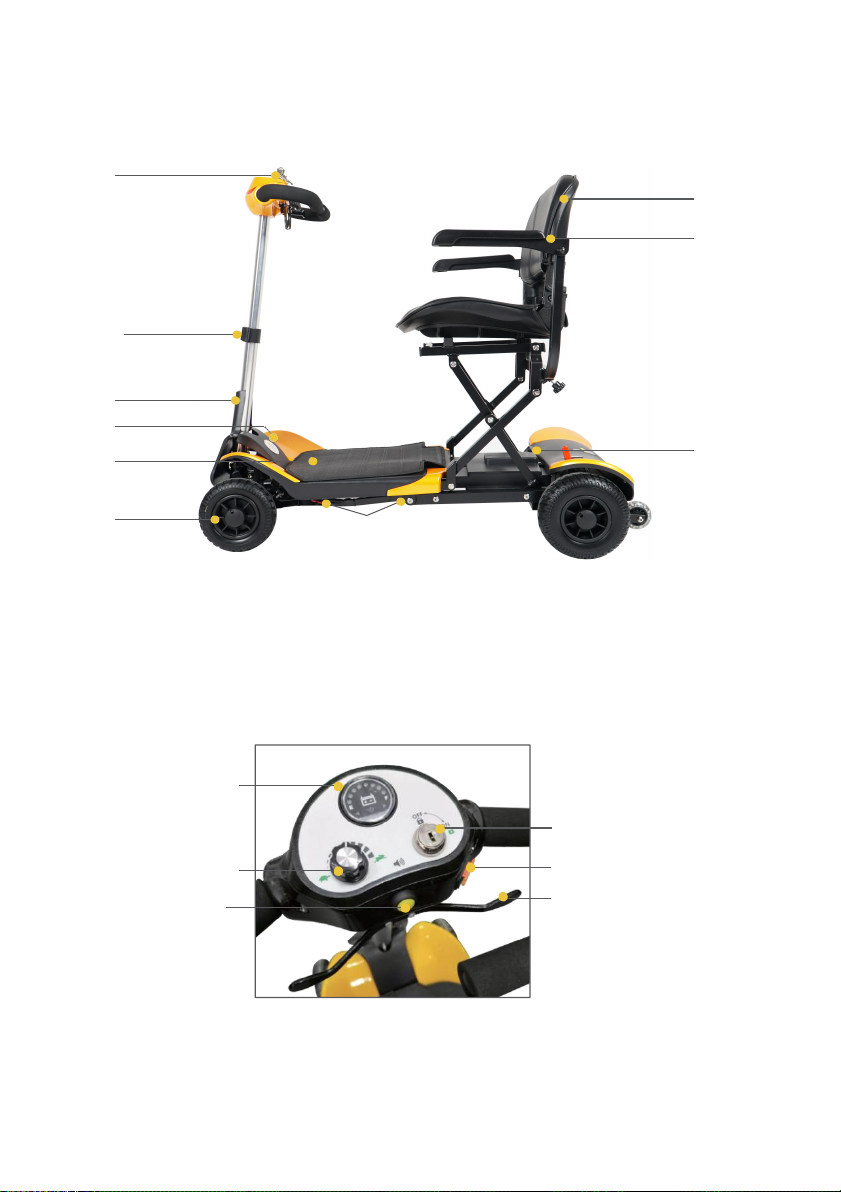
. Description of each part
Ⅱ
1.Control Panel 2. Leather seat 3. Armrest 4. Plastic cover
5.PU Solid Wheel 6. Charging Socket 7. Footrest and Battery Holder
8.Decorative pieces 9. Aluminum Steering post 10. Fastening Device
●
Detailed diagram
2
4
5
3
1.Speed Nut 2. Battery indicator 3. Horn Button
4. Key Switch 5. USB interface 6. Directional control lever
6
Page 9
6
Picture Three
. Operating Instruction
●
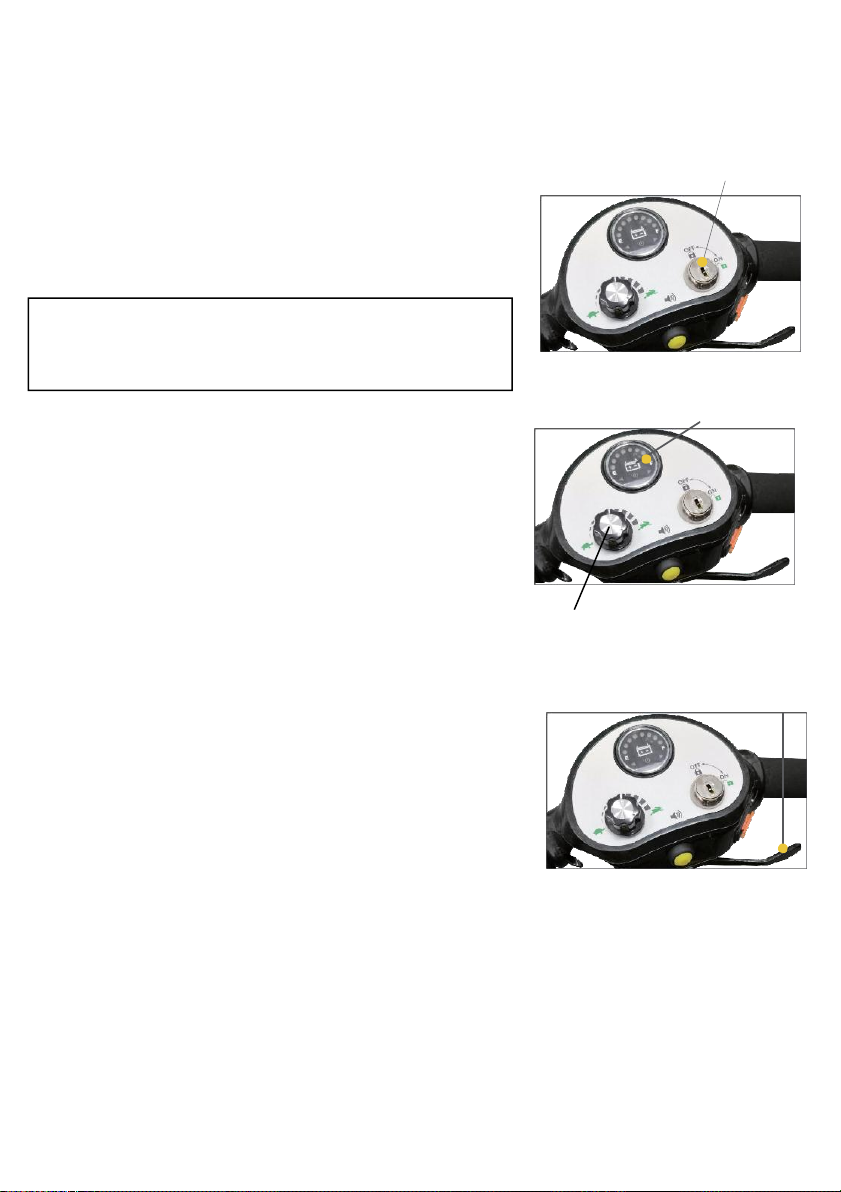
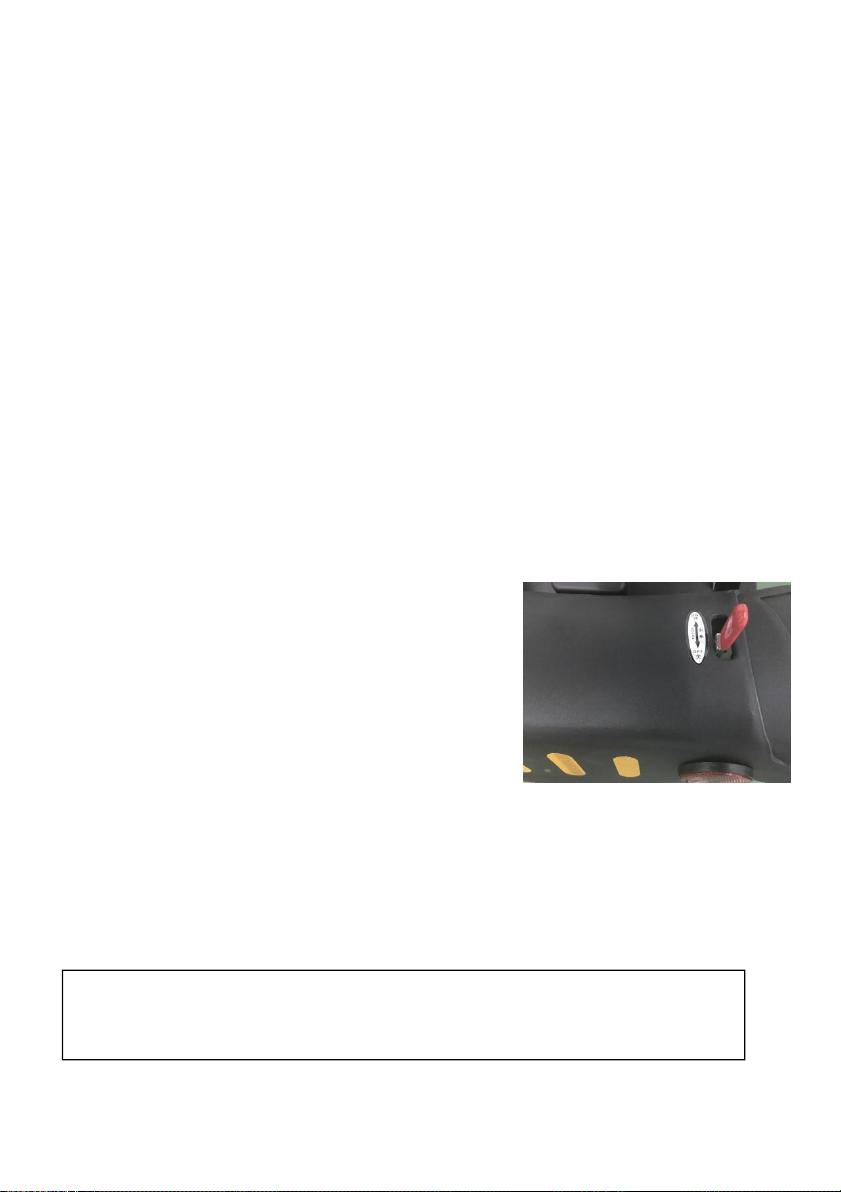
Power Switch(Picture one)
The power switch is located on the right side of the
control panel on the handle.
Turn the power switch key clockwise for power on.
Power
Warning: If the power is turned off while the electric
scooter is running, the electromagnetic braking system
will be on and the scooter will stop abruptly.
Picture One
Picture Two
Speed Adjuster
Ⅲ
●
Battery indicator(Picture Two) Battery Indicator
Turn on the power switch, battery indicating light
will be on,green bars indicates strong power, while
yellow indicates weak power and red indicates low
electric requiring for immediate charging.
●
Speed adjuster(Picture Two)
Speed adjuster is for adjusting the speed, the speed range
is 0.2km/h~6km/h. Turn the knob to the end left for lowest
speed. Turn the knob to the right for higher speed.
●
Forward and Backward(Picture Three)
Pull back the right directional control lever for going
forward.Pull back the left directional lever for moving
backward. The alarming beep sound will be the sound
will be sound while the scooter goes backward. The
electromagnetic braking system be on automatically
while the directional control lever is in neutral status.
Page 10
7
Warning:
Pull down The brake joystick during downhill is absolutely prohibited,that
will cause the scooter entering hand walking state without any brake action.
●
Horn Button
Press the button of horn for sound to prevent any accident and injury ,please use it in
time while it is necessary.
●
Battery Holder
Built-in 24V 6AH lithium-ion battery is to supply strong power for the running and
folding of the scooter.
●
Controller
Controller is set under the seat of the rear frame to receive the signal from the top control
panel on handle bar for controlling motor, brake and other systems work properly.
●
Brake Joystick
Hand Brake on and off can be done by switching the lever
for manual or electric movement.
「Electric Moving」: pull back the brake lever to
(off) for electric moving
「Manual Movement」:pull forward the brake lever
to(on) for manual movement.
Picture Four
●
Driving Parts
The motor/driving is an electrical part that convents
electric energy into the rear wheel drive power.
Page 11

8
Caution:
1.
Please keep power off when you get on or off the scooter.
2.
Do not operate directional controller lever with both hands at the same time.
3.
Do not power off while driving,falling down will be caused by an emergent brake.
4.
Please drive indoor at low speed.
5.
Be careful when driving at places with crowd people and heavy traffic.
6.
Please pay attention to crowd behind and other obstacles when reversing.
Caution: The braking distance will vary depending on the driving conditions,
want to stop,please prepare to brake in advance.
Driving Method
■
●
Start Moving
1.Make sure the hand Post is pulled out and at locked position .Turn the power
switch key clockwise, then the power indicator light is on.
2.Check the remaining power of the battery through battery power display ,charging
is required when battery is low.
3.Adjust the speed controller to the desired speed.
4.Understand forward and backward controlling function of directional control lever.
5.Make sure the surrounding environment and road conditions are safe.
6.Pull or Push the directional controlling lever with fingers for forward of
backward,and adjust the speed of scooter if necessary.
●
Stop
1.
When the directional controlling lever returns to the original「 center position 」,
the brake will automatically release ,then the scooter will stop.
2.
Turn the power switch key counterclockwise and the power indicator light will be
off.
Page 12
9
Picture Six
Picture Six
Warning:
1.
Do not disassemble the battery ,it may cause accidents and injury.
2.
Do not drive on icy,slippery floors or saline-alkali soils as this may cause
accident and injury.
. Battery and Charge Method
Ⅳ
●
Lithium ion Battery
This product uses by 24V 6AH high-performance lithium-ion battery, Fully charged the
battery is required before first time use.
●
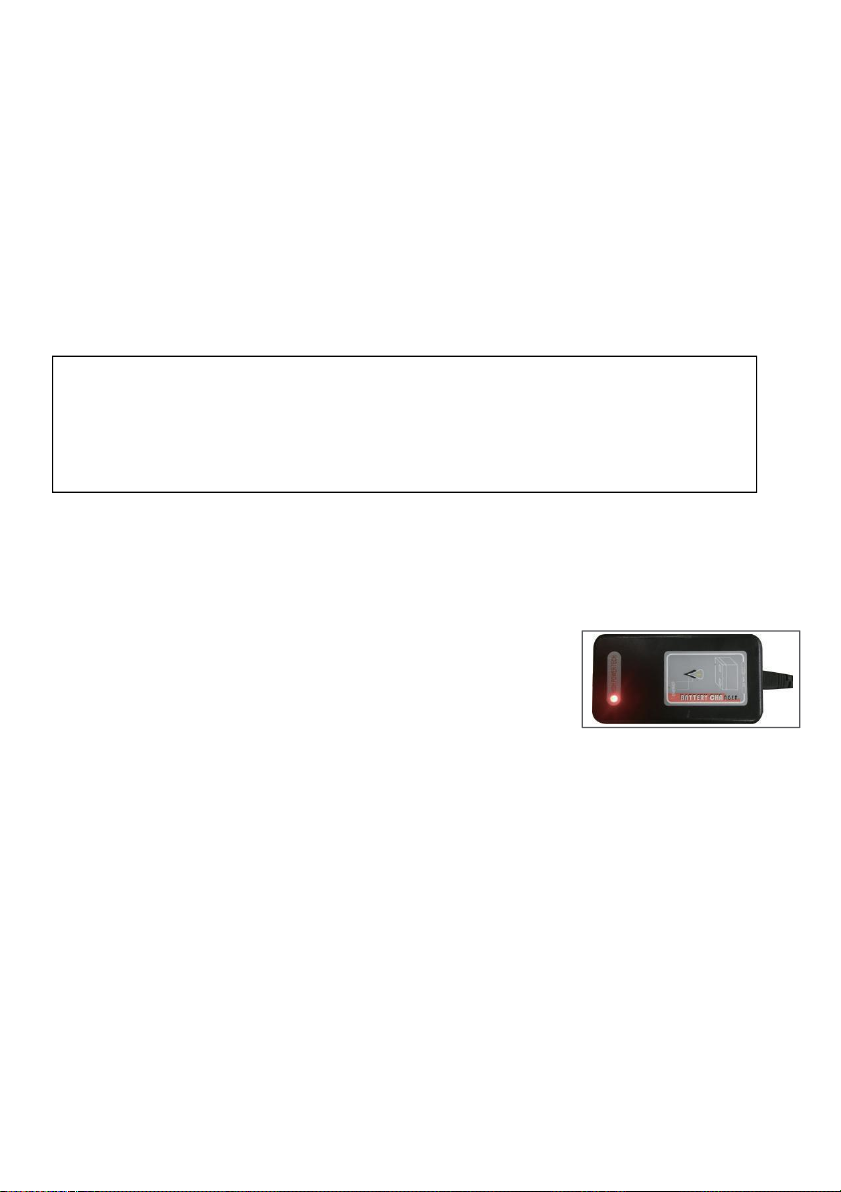
Charger (Picture Six)
This product uses efficient charger-AC 100-240V/DC24/2A. As shown
in picture six.
●
Charger (Picture Seven)
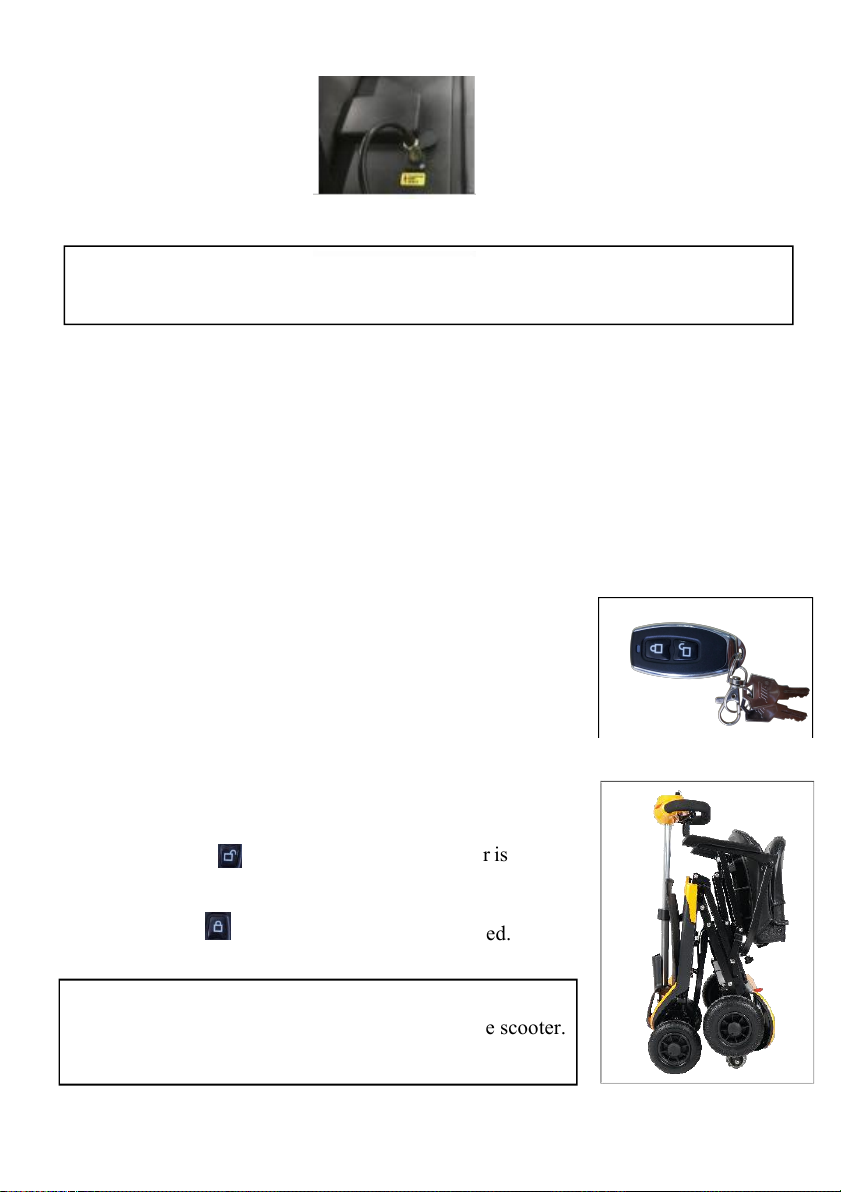
The charging mode of the scooter is direct charging.
1.
Turn the power off the scooter.
2.
Insert the microphone plug of the charger into the socket under the seat in
the scooter directly. As shown in picture seven.
3.
Insert the charger's power plug into power supply.
4.
When charging by using household power source condition , the red
indicating light goes on. The charging time will be vary according to the
battery status and temperature, generally 5-8 hours. The indicator light is
orange during charging.
5.
When the charge is complete, the charger automatically stops working and
the indicator light changes from orange to green. Pull out the charger's input
line first, and then pull the microphone plug of the charger out of the battery
interface.
Page 13
10
Caution:
Please make sure there is no object on or under the scooter.
Caution
:
Please observe the following regulations to avoid accidents caused by
abnormal charging.
★The battery shall only be charged with the charger provided by manufacturer and
Picture Seven
Picture Eight
Picture Nine
make sure it is full charged. Or it may result in battery damage or can’t be charged .
★Do not disassemble or modify the charger.
Please charge the scooter under good venting place without direct sunlight.
★
Ⅴ.Adjustment of Folding and Unfolding
●
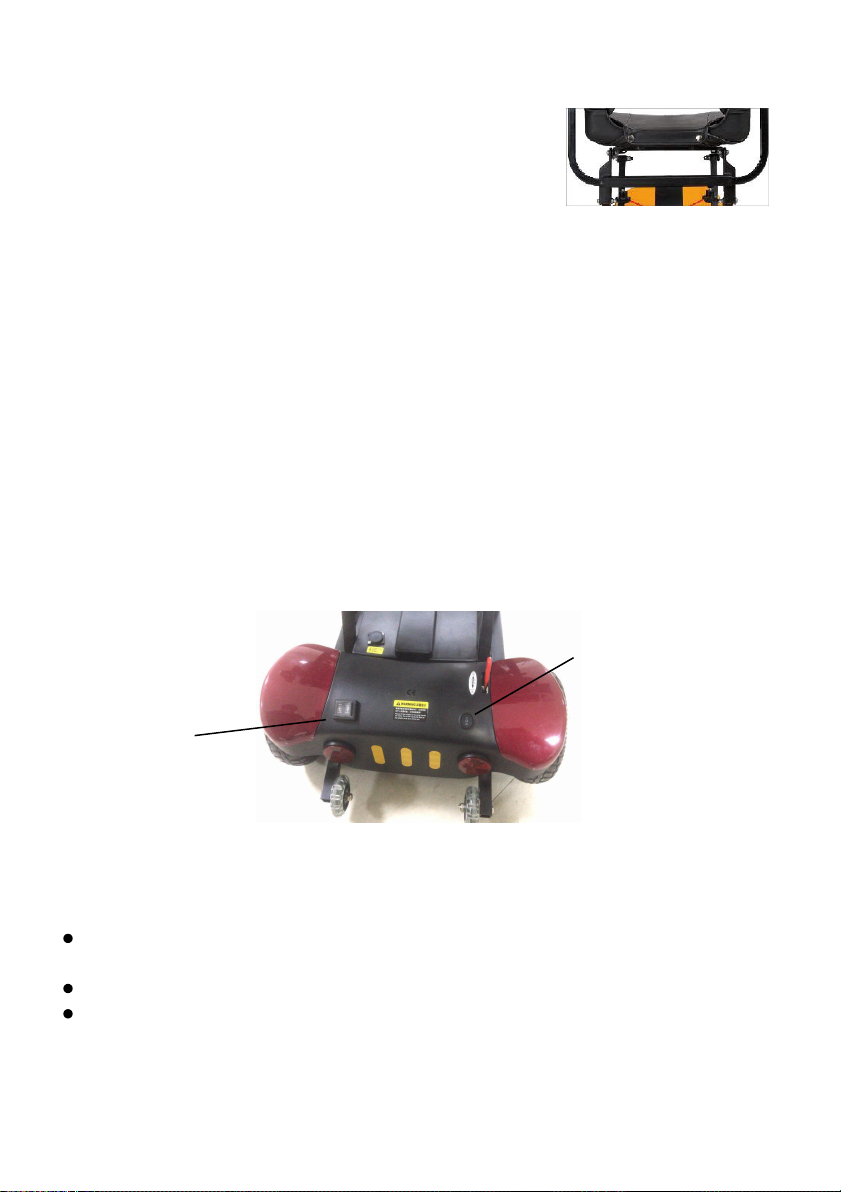
Folding and Unfolding
remote-controller (Picture Eight)
●
Folding and unfolding of scooter
Picture(Picture Nine)
1.
Take out the remote controller .
2.
Keep pressing“ ”until completing the scooter is
completely unfolded.
Keep pressing “ ”until the scooter is fully folded.
Page 14
11
●
Picture Ten
Arm Rest Adjustment (Picture Ten)
Handrail width can be adjusted inward and outward.
1.
Release loose the armrest fastening knob under the seat.
2.
Move inward pr outward to the desired position,and then fasten the knob.
3.
The armrest width adjustment ranges from 450mm-550mm.
4.
Uplift the armrest bar of armrest for the convenience of Getting on and off the
scooter.
●
Handle telescopic adjustment
Push aside the locking lever of the handle outward to the
lowest position and lock the handle.
●
Folding and unfolding action
1.
Turn power off.
2.
Push forward or backward with holding the handle.
Folding Mode Switching
Manually
fold/unfold button
The scooter can also be folded and unfolded manually by using the switch found at
the back on the shroud under the seat. The scooter can also be folded and unfolded
manually by using the switch found at the back on the shroud under the seat.
With the switch in the double bar position the scooter will fold/open manually with
the button on the right side of scooter.
With the switch in the single bar position the scooter will fold/open using the remote.
When the switch is in the “O” position the scooter will not fold or unfold.
★It is recommended the switch is left in the “O” position at all times to prevent
accidental folding and unfolding.
Page 15
12
Caution:
when you consider there is some mechanical problem, please go to the dealer or
agent for the inspection and maintenance.
VI.Inspection and Maintenance
Inspection item
Inspection content
Handle
Is there any loose situation? Is it possible to turn right
and turn left ? Can it be extended in and out ?
Speed adjuster
Does it rotate normally? Is the speed adjustment
under normal condition?
The forward and
backward of
directional control
Can it be operated forward and backward movement
well and stop at neutral position?
Brake lever
Can it be switched for manual and electric
control function ?
Battery indicator
Are the light bars for battery indication works
well ? Is the battery full charged?
RoutineInspection
■
Before driving, please make sure that the following items have being inspected, if
unusual situation happen, please have inspection carried out by yourself or inspected
by your dealer or agent.
Page 16

13
Caution:
The charging of battery in every one month is required without while the
scooter is not used for some time. It is recommended to charge and discharge
battery every three months.
●
Battery Maintenance
This product uses high performance lithium-ion battery, please charge the battery in time
each time after using the scooter.Please don’t over discharge the battery.
1.
Check all insulation on wires regularly and fastening status of the attachment connectors .
2.
Keep all electronic components away from moisture, otherwise it must be completely
before use again.
dried
3.
Please use the soft cloth to clean the dirt on the scooter body, do not clean the
scooter body with water directly.
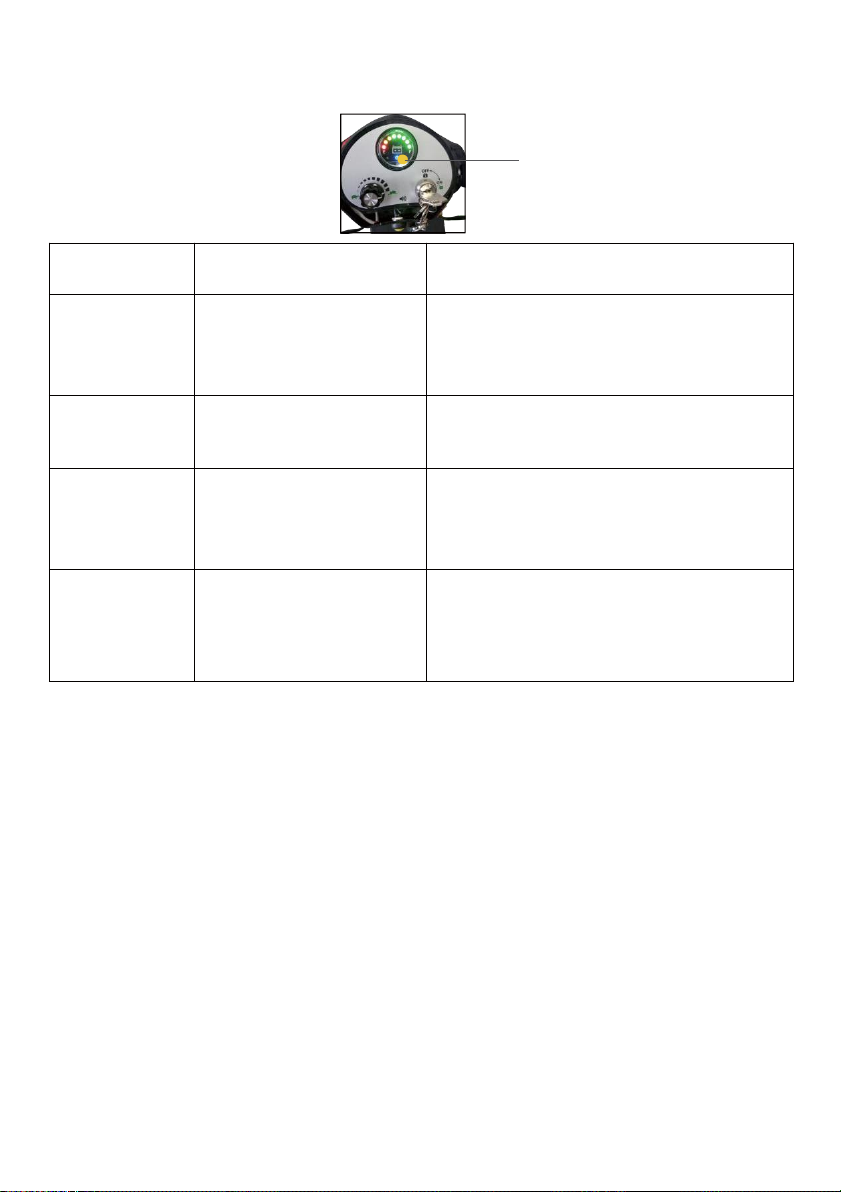
Ⅶ. Common Trouble Removal
The controller contains the procedure of trouble shooting and trouble free. Any
error and problem is detected by the diagnostic program, the LED on the control
panel will light up. LED light for indicating failure will be on until the failure is
sorted out.For example:the flashing “1-9”time with different situation,the
following showing the situation of flashing times.If the problem persists ,please
consult that with us or our agent.
Page 17
14
Fault Display LED
Flash ’s number
of times
Trouble description
Possible cause
1
Low battery voltage or
battery connection problem
Check the battery connection, if there is no
problem with the connection, try charging the
battery
2
Problems with motor
connection
Check all connections between motor and
controller
7
Forward and backward
controlling lever failure
Before turning on the power of the scooter,
make sure the controlling lever is in the
neutral position
9
Brake Lever failure
Check the connection of the brake lever and
the motor to ensure that the controller is
connected securely
Page 18

15
.Technical Parameters
Item
Parameters
Dimensions(L*W*H)
1050x550x870mm
Packing Dimensions(L*W*H)
480x550x790mm
Weight(With Batteries)
29KG
Front wheel
2*7”PU wheel
Back wheel
2*8”PU wheel
Speed
0-6km( Adjustable)
Endurance
20km
Spanning ability
40mm
Driving and braking mode
Back-wheel drive, electromagnetic brake
Load capacity
120kg
Height from the ground
50mm
Seat off-ground height
560mm
Minimum radius of gyration
1200mm
Maximum gradeability
6°±1°
Controller
PG45A
Motor
180W
Charger
DC24V/2A AC100-240V
Battery
24V 6AH lithium battery(two batteries)
Color
red,blue,yellow, silver
Ⅷ
Page 19

16
Ⅸ Intelligent Electric Scooter
User Name
:
ID card No:
Address
:
Phone Number:
Product Name
:
Scooter Number:
Purchasing date:
Warranty Period
:
Name of the agent
:
Phone Number:
Product warranty card
Page 20

17
● Scope of WarrantyDescription
The agent is responsible for repairing or replacing the component when there is quality
problem caused by manufacture under normal use.
●
No warranty for the damage caused by the following conditions
1.Failure to use and maintain in accordance with the correct operation method in the
instructions.
2.Do not use the spare parts produced by regular manufacturers.
3.Spare parts damage caused by accidents.
4.Consumables parts such as tires,bearings and etc are not covered by warranty.
5.Self modify the scooter settings.
6.Typhoons,floods,earthquake and other natural disasters.
 Loading...