

Page 1
1
EPILEPSY WARNING
Please read before using this game or allowing your children to use it.
Some people are susceptible to epileptic seizures or loss of consciousness when exposed to certain
flashing lights or light patterns in everyday life. Such people may have a seizure while watching
television images or playing certain video games. This may happen even if the person has no medical
history of epilepsy or has never had any epileptic seizures. If you or anyone in your family has ever
had symptoms related to epilepsy (seizures or loss of consciousness) when exposed to flashing lights,
consult your doctor prior to playing.
We advise that parents should monitor the use of video games by their children. If you or your child
experience any of the following symptoms: dizziness, blurred vision, eye or muscle twitches, loss of
consciousness, disorientation, any involuntary movement or convulsion, while playing a video game,
discontinue use IMMEDIATELY and consult your doctor.
PRECAUTIONS TO TAKE
DURING USE
Do not stand too close to the screen. Sit a good distance away from the screen, as far away as the >
length of the cable allows.
Preferably play the game on a small screen. >
Avoid playing if you are tired or have not had much sleep. >
Make sure that the room in which you are playing is well lit. >
Rest for at least 10 to 15 minutes per hour while playing a video game. >
INSTALLING THE GAME
NOTE: For system requirements, see the readme fi le.
To install (disc users):
Insert the disc into your disc drive and follow the on-screen instructions.
If the Autorun menu does not automatically appear, launch the installer manually in Windows
®
7,
Windows Vista
®
, or Windows® XP by opening Start > Run, typing D:\AutoRun.exe in the text box, then
clicking OK (substitute the correct letter of your CD/DVD-ROM drive if other than ‘D:’).
Once the game has installed you can launch it from the game’s AutoRun menu or by locating the game
through the START menu.
To install (EA Store users):
NOTE: If you’d like more information about purchasing direct downloads from EA, visit
www.eastore.ea.com and click MORE ABOUT DIRECT DOWNLOADS.
Once the game has been downloaded by EA Download Manager, click the install icon that appears and
follow the on-screen instructions.
NOTE: If you’ve already purchased a title and would like to install it on another PC, fi rst download
and install the EA Download Manager on the other PC, then launch the application and log in with your
EA account. Select the appropriate title from the list that appears and click the start button to download
the game.
To install (third party online users):
Please contact the digital retailer through whom you purchased this game for instructions on how to
install the game or how to download and reinstall another copy.
STARTING THE GAME
To start the game:
Games on Windows Vista or Windows 7 are located in the Start > Games menu and on earlier versions
of Windows in the Start > Programs (or All Programs) menu. (EA Store users must have the EA
Download Manager running.)
NOTE: In Windows Vista Classic Start menu style, games are located in the Start > Programs >
Games > Games Explorer menu.
This product has been rated by the Entertainment Software Rating Board. For information about the
ESRB rating please visit www.esrb.org.
AGI:948093 REV#: 2 PA:Comart Poolid:190 56 303
CONTENTS
INSTALLING THE GAME _ _ _ _ _ _ _ _ _ _ _ _ _ _ _ _ _ _ 01
STARTING THE GAME _ _ _ _ _ _ _ _ _ _ _ _ _ _ _ _ _ _ _ _ 01
COMPLETE CONTROLS _ _ _ _ _ _ _ _ _ _ _ _ _ _ _ _ _ _ _ 02
PLAYING
DEAD SPACE 2
_ _ _ _ _ _ _ _ _ _ _ _ _ _ _ _ _ _ 02
WEAPONS _ _ _ _ _ _ _ _ _ _ _ _ _ _ _ _ _ _ _ _ _ _ _ _ _ _ _ 06
SUITS _ _ _ _ _ _ _ _ _ _ _ _ _ _ _ _ _ _ _ _ _ _ _ _ _ _ _ _ _ 07
PLAYING ONLINE _ _ _ _ _ _ _ _ _ _ _ _ _ _ _ _ _ _ _ _ _ _ 08
PERFORMANCE TIPS _ _ _ _ _ _ _ _ _ _ _ _ _ _ _ _ _ _ _ _ 11
TECHNICAL SUPPORT _ _ _ _ _ _ _ _ _ _ _ _ _ _ _ _ _ _ _ _ 12
LIMITED 90-DAY WARRANTY _ _ _ _ _ _ _ _ _ _ _ _ _ _ _ 13
Page 2
2
3
COMPLETE CONTROLS
SING LE PL AYER GA MEPL AY
Move
W/A/S/D
Activate Zero-G
ALT
Look / Aim
Mouse
Locator B
Reload R
Action / Confirm E
Quick Heal Q
Telekinesis
F (while aiming)
Recharge Stasis C
Stasis
C (while aiming)
Run
Left Shift/Right Shift
Stomp
SPACE
Aim
Right Click/Caps Lock (Toggle)
Melee
Left Click
Fire Weapon
Left Click (while aiming)
Alt. Fire
SPACE/MOUSE3
Choose Weapon
1/2/3/4
Pause Menu ESC
RIG TAB
PL AYING DEAD SPACE 2
ISAAC
In Dead Space 2, you join Isaac Clarke, the Systems Engineer from Dead Space, as he wakes up three
years after the horrific events on the USG Ishimura. The Ishimura was a Planetcracker-class starship
besieged by grotesque reanimations of its dead crew, known as “Necromorphs.” After unearthing a
strange artifact known as the Marker, Isaac finds himself on the Sprawl, a giant space station in orbit
around Saturn. Unable to remember how he got here and plagued with demented visions of his dead
girlfriend Nicole, he must survive another nightmarish outbreak of Necromorphs as he fights his way
towards an answer he hopes will end all the chaos.
HUD
Dead Space 2 does not utilize a traditional heads up display to deliver vital information. Rather than
using life meters or ammo counts, all of the information you need to know is displayed on-screen via a
series of in-game indicators.
Foremost amongst the indicators is Isaac’s RIG. The RIG is a part of Isaac’s suit and provides valuable
data via several signals. When all of the lights down Isaac’s back are lit and blue, you are in good
health. As the lights change to yellow and then red, you are losing health and close to dying. Find and
use a med pack to heal yourself before it’s too late. On Isaac’s right shoulder is your current Stasis
charge. As you use Stasis, this charge decreases. Recharge it with Stasis Packs. Stasis will also
recharge slowly over time.
Your ammo is displayed on top of your currently equipped weapon when aiming. When this counter
turns orange, you are running low on ammo and should reload. When the counter turns red, your clip
is empty and you must reload. Isaac will reload automatically if he has another clip for that weapon.
When there are red bars on the top and bottom of the counter, it means you have no more clips in
your inventory.
RIG
Activate the RIG Holotech Inventory System to view an in-depth report on your progress and status. You
can access the Inventory, Mission, and Database sub-menus from the RIG.
INVENTORY
View your weapons, key items, suit status, number of nodes, and credits from the inventory. You can
use (when available) or drop items from this menu, as well. Dropped items will appear in the world and
can be picked up again if desired.
MISSION
View your current objectives and personal journal. Completed objectives are highlighted in green, while
incomplete ones remain blue. Highlight an objective to view further details, when available.
DATABASE
Listen to the audio and video transmissions you have picked up over the course of the game, sorted
by chapter.
TUTORIALS
You may view tutorials to familiarize yourself with vital game mechanics.
Page 3
4
5
ZERO-G
Occasionally, you will be required to take part in zero gravity activities. In zero gravity action, you will
float above the ground and be able to maneuver in all directions. Moving forward, backward, and
sideways works just as it does under standard gravity, but you now have the ability to essentially
“fly” upwards or down. In combat situations, take advantage of your newfound mobility by locating
new vantage points to take on the Necromorphs from relative safety. You can also use Boost to move
quickly in situations where speed is preferable to control. If you get disoriented, press Left Shift/Right
Shift to re-orient yourself so your head is up relative to the floor.
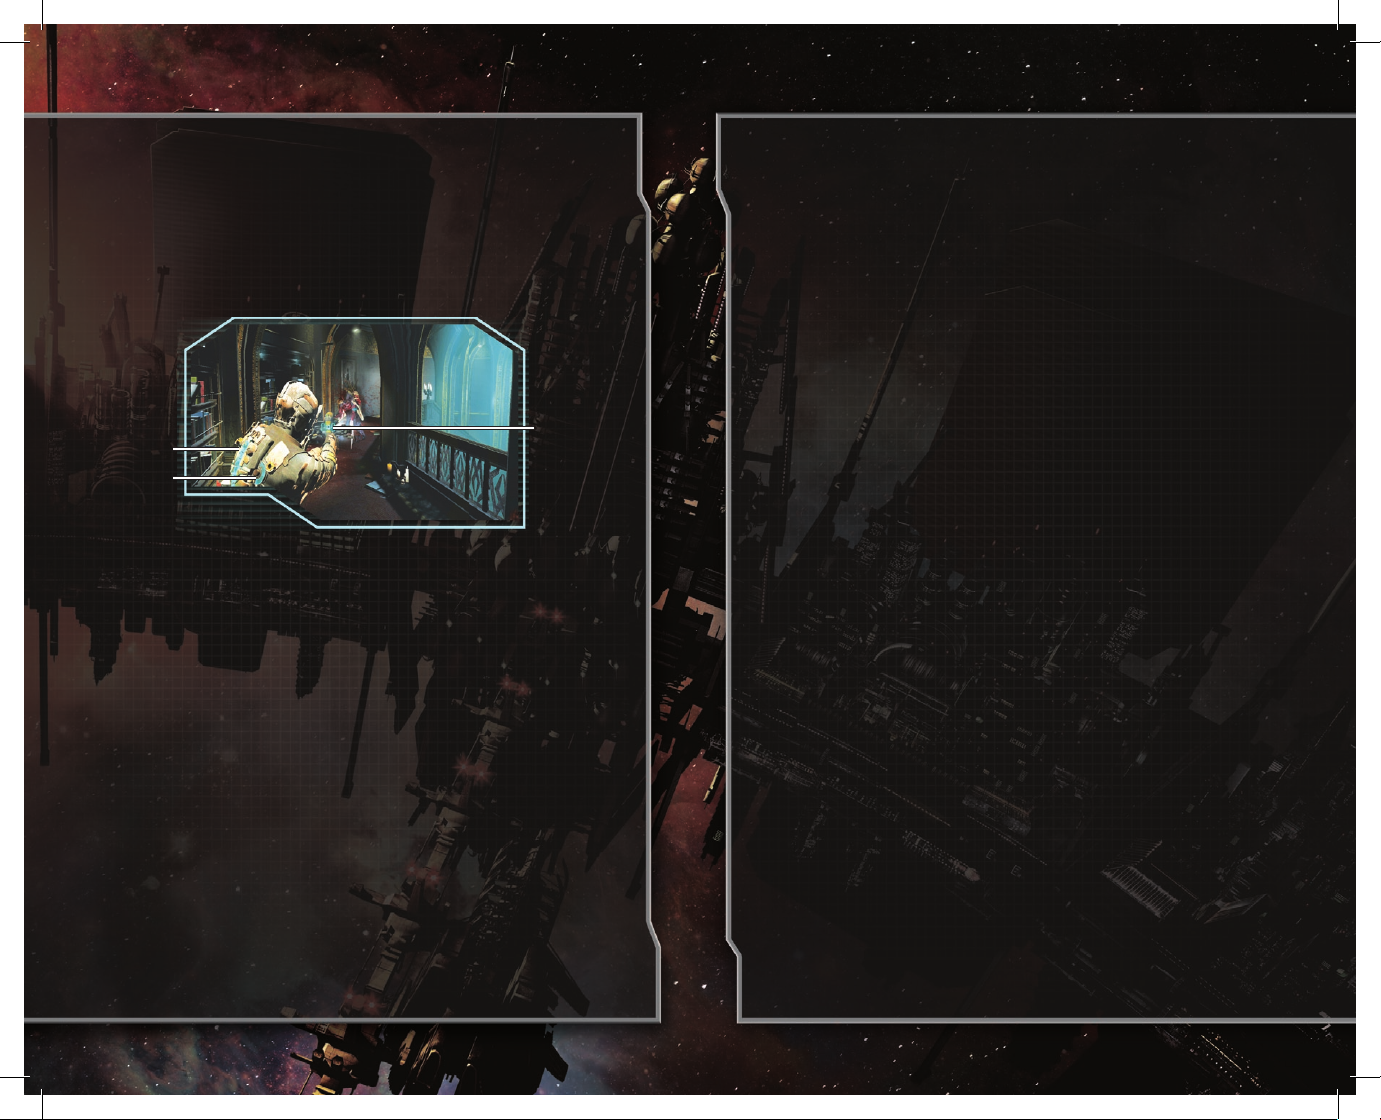
GAME SCREEN
Ammo
Health
Stasis
MAIN MENU
Single Player Continue a previously saved game, begin a new game, enter a New Game+,
or view a summary of the original Dead Space.
Multiplayer Get online and strategically dismember your friends.
Settings Adjust Audio, Visuals, Controls and Difficulty.
Extras Enter codes to redeem content or view the credits.
Exit Game Quit game and exit to computer desktop.
PAUSE MENU
Checkpoint Restart Return to last achieved checkpoint. All unsaved progress past that checkpoint
is lost.
Settings Adjust Audio, Visuals, Controls and Difficulty.
Tutorials Review gameplay tutorials.
Quit Quit and return to the main menu.
SETTINGS
Audio Change the volume of the music, voice, or sound effects. Change speaker setup
or toggle subtitles ON or OFF.
Visuals Adjust the brightness, resolution, v-sync, fullscreen and graphics
quality settings.
Controls Invert the x- or y-axis, toggle vibration ON or OFF, change sensitivity, adjust
aiming style, toggle aim assist ON or OFF, or customize controls.
Difficulty Select CASUAL, NORMAL, SURVIVALIST, ZEALOT, or HARD CORE. Hard Core is
only unlocked after completing Dead Space 2 once.
Upon loading up the game for the first time, you will be prompted to adjust your brightness settings.
After this, to adjust the brightness you will need to go to the A/V options inside the Settings menu.
STORE
View your current Credits and Nodes, shop for new weapons, ammo, and upgrades, view your
inventory, or move items to your Safe.
SHOP
Upload weapon schematics to upgrade your arsenal, med packs, ammo, and upgrades for your suit.
INVENTORY
View and sell items in your inventory.
SAFE
Move items from your inventory to the Safe to free up space. The items in your safe can be accessed
from any Store location.
BENCH
Use the bench to upgrade your suit and weapons. You can increase your hit points, boost your Stasis
capacity, increase the firing power of your weapons, or even unlock special abilities for your weapons.
Upgrading requires Nodes, so keep an eye out for Nodes hidden in boxes.
Page 4

6
7
WEAPONS
In order to survive in Dead Space 2, your most effective technique is to strategically dismember your
enemies. Use these weapons to get the job done.
PLASMA CUTTER
This high-energy mineral cutter is the first weapon you find and one of the most reliable. Activating
the alt-fire alters the angle of the energy that it fires, so it can be fired horizontally or vertically. Use
the alt-fire to efficiently sever specific limbs from your enemies.
LINE GUN
This wide-beamed slicer does a fantastic job of severing limbs. It slowly travels in a straight line after
being fired, and can pass through enemies to hit those behind the target. Activating its alt-fire sends
a timed mine into the field. After a few moments, it blinks and explodes, destroying anything in the
surrounding area.
PULSE RIFLE
This military-grade assault rifle has a high rate of fire. Use this weapon when facing several enemies
at once. With careful application of firepower, this weapon can clear a hallway in seconds. The alt-fire
is a grenade launcher.
JAVELIN GUN
The Javelin Gun uses javelins for penetrative survey work. These javelins pierce and impale enemies,
and using the alt-fire causes an electrical shock to be activated from the last javelin fired.
FLAMETHROWER
This Hydrazine industrial torch’s commercial uses have fallen by the wayside, but the flamethrower is
remarkably effective against enemies. The alt-fire launches a lit fuel canister a short distance, which
then explodes after a brief delay. New mining technology allows airless use.
SEEKER RIFLE
The Seeker Rifle is a riot control device that is meant for accuracy at long-range. It packs a punch but
is slow to reload. Use the alt-fire to zoom in with the scope for even greater damage.
DETONATOR MINES
Detonator Mines are sensor-tripped mining charges that can be placed onto any surface. Activating the
alt-fire deactivates the charges, allowing them to be safely retrieved for later use.
FORCE GUN
The Force Gun is a short-range kinetic booster device that was used originally for clearing surfaces of
dust and debris in the vacuum of space. Use the alt-fire to activate a focused force beam that can rip
the limbs off almost anything.
CONTACT BEAM
A heavy-duty energy pulse device, the Contact Beam is used for commercial destruction where a
powerful but focused explosive force is needed. The alt-fire delivers a ground-clearing blast around
the user.
RIPPER
The Ripper uses a built-in TK module to project and hold a circular titanium saw blade spinning at high
RPM in front of the user, useful for all cutting jobs, delicate or otherwise. Alt-fire ejects the blades in a
straight line for long-distance cutting.
SUITS
All the suits are intended to mitigate the dangers of working in space, and enable the wearer to survive
for varying lengths of time in raw vacuum. All of the suits are equipped with maneuvering thrusters for
use in zero gravity conditions and carry 120 seconds of breathable air, minimum. The suits vary in their
Inventory capacity, damage protection, and special properties. Certain suits even have bonuses.
CEC ENGINEERING SUIT
This basic suit covers all the needs of the space-faring engineer. Its ribbed armor offers damage
protection of 5% and has space for 10 items.
EARTHGOV SECURITY
FORCES SUIT
This suit features lightweight state-of-the art protective armor, and is resistant to concussive damage
and lacerations. It offers damage protection of 10% and can carry 15 items. As a bonus, your Pulse
Rifle receives a 5% damage increase.
Page 5

8
9
CEC VINTAGE SUIT
The Vintage suit is a beloved throwback to the days when protective materials relied on mass rather
than technology. Sturdier than even modern suits, it offers damage protection of 15% and can carry
20 items. As a bonus, you receive a discount of 10% on all items in the Store.
ADVANCED PROTOTYPE SUIT
The Advanced suit relies on classified technology and is intended for elite forces in dangerous
situations in the harshest of environments. It has damage protection of 20% and can carry 25 items.
As a bonus, your Stasis recharge time is decreased by 10%.
PLAYING ONLINE
INTERNET CONNECTION, ONLINE AUTHENTICATION AND ACCEPTANCE OF END USER
LICENSE AGREEMENT REQUIRED TO PLAY. ACCESS TO ONLINE SERVICES AND OR FEATURES
REQUIRES AN EA ACCOUNT AND GAME REGISTRATION WITH THE ENCLOSED ONE-TIME USE
SERIAL CODE. REGISTRATION IS LIMITED TO ONE EA ACCOUNT PER SERIAL CODE, WHICH IS
NON-TRANSFERABLE ONCE USED. EA ONLINE PRIVACY POLICY AND TERMS OF SERVICE CAN
BE FOUND AT WWW.EA.COM. YOU MUST BE 13+ TO REGISTER FOR AN EA ACCOUNT. GAME
USES SOLIDSHIELD CONTENT PROTECTION TECHNOLOGY. (WWW.SOLIDSHIELD.COM). GAME
CAN BE PLAYED ON UP TO FIVE COMPUTERS AT THE SAME TIME; USERS CAN MANAGE WHICH
COMPUTERS ARE AUTHORIZED OR DE-AUTHORIZED TO PLAY GAME. VISIT
HTTP://ACTIVATE.EA.COM/DEAUTHORIZE/ FOR MORE INFORMATION ON DE-AUTHORIZATION.
EA MAY PROVIDE CERTAIN INCREMENTAL CONTENT AND/OR UPDATES FOR NO ADDITIONAL
CHARGE, IF AND WHEN AVAILABLE.
EA MAY RETIRE ONLINE SERVICES AFTER 30 DAYS NOTICE POSTED ON
WWW.EA.COM/2/SERVICE-UPDATES.
PLAYING DEAD SPACE 2
ONLINE
Quick Match Jump into a multiplayer match with friends and strangers.
Character Setup Adjust your weapons and suit.
Leaderboard View the top performers in Dead Space 2.
Friends List View your Dead Space 2 friends list and invite friends to join a game.
Create Playgroup Join a posse of up to four players.
HUMA N CONT ROLS
Move
W/A/S/D
Look / Aim
Mouse
Locator B
Reload R
Action / Confirm E
Quick Heal Q
Telekinesis
F (while aiming)
Stasis
C (while aiming)
Run
Left Shift/Right Shift
Stomp
SPACE
Aim
Right Click (hold)/CAPS LOCK (Toggle)
Melee
Left Click
Fire Weapon
Left Click (while aiming)
Alt. Fire
MOUSE3/SPACE (while aiming)
Choose Weapon
1/2/3/4
Online Menu ESC
Scoreboard TAB
NECROMORPH CONTROLS
Move
W/A/S/D
Look / Aim
Mouse
Jump/Sprint
SPACE
Drop / Toggle Wall-Walk
F (Lurker only)
Run
Left Shift/Right Shift
Aim
Right Click (hold)/Caps Lock (toggle)
Melee
Left Click
Grapple E
Fire
Left Click (while aiming)
Online Menu ESC
Scoreboard TAB
Page 6

10
11
CHARACTER SETUP
AND PROGRESSION
As you play Dead Space 2 online, you earn experience points. As these points build, and you gain
experience levels, you unlock new and improved weapons or abilities. Create a load-out that best
serves your style of play and go wild.
PLAYGROUPS
A playgroup is a private group of players. Once you join a playgroup, you will be placed on teams with
your comrades when possible. Playgroups allow you to have a small party of friends and allies that
stick with you over the course of your multiplayer session.
MAPS
Every map has its own specific feel and gametype. Playing the maps reveals a story for each specific
map, whether players have to escape from destruction or prepare for an oncoming attack.
SOLAR ARRAY
The Human team has orders from Tiedemann to deliver the firing coordinates to the Solar Array. The
Solar Array will allow the humans to utterly destroy the Necromorphs.
FUEL CORE
The Human team is on a mission to eradicate the Necromorphs by detonating the fuel core.
MARKER LAB
The scientists have been conducting experiments with markers and corruption in the government
sector labs. These experiments must be shut down. The Human team must destroy the marker
experiments to keep them from falling into the wrong hands.
TITAN MINES
Trapped in the Titan Mines and surrounded by Necromorphs, Tiedemann’s security forces must
attempt to stop the outbreak by constructing a Shockmine. The Necromorphs swarming all over the
mines must hold back the security forces and destroy them.
ESCAPE
On this infested ship docked near the Sprawl are several humans who must escape via the escape
pods. Between the humans and salvation, though, are the Necromorphs, who just have murder on
their minds. The humans must evade and eliminate the Necromorphs if they expect to survive.
PERFORMANCE TIPS
PROBLEMS RUNNING
THE GAME
Make sure you meet the minimum system requirements for this game and that you have the latest >
drivers for your video card and sound card installed:
For NVIDIA video cards, visit www.nvidia.com to locate and download them.
For ATI video cards, visit www.ati.amd.com to locate and download them.
If you are running the disc version of this game, try reinstalling DirectX from the disc. This is >
typically found in the DirectX folder on the root of the disc. If you have Internet access, you can visit
www.microsoft.com to download the latest version of DirectX.
GENERAL TROUBLESHOOTING
TIPS
If you have the disc version of this game and the AutoPlay screen does not automatically appear for >
installation/playing, right-click the disc drive icon found in My Computer and select AutoPlay.
If the game is running slowly, try reducing the quality of some of the video and sound settings from >
the game’s options menu. Reducing the screen resolution can often improve performance.
For optimum performance when playing, you may like to disable other background tasks (except >
the EADM application, if applicable) running in Windows.
INTERNET PERFORMANCE
ISSUES
To avoid poor performance during Internet play, be sure that you close any file sharing, streaming
audio, or chat programs prior to entering gameplay. These applications can monopolize your
connection’s bandwidth, causing lag or other undesirable effects.
This game uses the following TCP and UDP port(s) for Internet play:
TCP ports: 80, 443, 9988
UDP Ports: 9570, 3659, 6000
Please consult your router or personal firewall documentation for information on how to allow game
related traffic on these ports. If you are attempting to play on a corporate Internet connection, contact
your network administrator.
YOU PLAYED THE GAME. NOW PLAY THE MUSIC.
EA SOUNDTRACKS AND RINGTONES
AVAILABLE AT WWW.EA.COM/EATRAX/
Page 7

12
13
TECHNICAL SUPPORT
If you have trouble with this game, EA Technical Support can help.
The EA Help file provides solutions and answers to the most common difficulties and questions about
how to properly use this product.
To access the EA Help file (with the game
already installed):
Windows Vista and Windows 7 users, go to Start > Games, right-click the game icon, and select the
appropriate support link from the drop-down menu.
For users on earlier versions of Windows, click the Technical Support link in the game’s directory
located in the Start > Programs (or All Programs) menu.
To access the EA Help file (without the game
already installed):
1. Insert the game disc into your DVD-ROM drive.
2. Double-click the My Computer icon on the Desktop. (If the My Computer icon is not visible on your
desktop, you may need to click the Start button and then click the My Computer icon).
3. Right-click the DVD-ROM drive that has the game disc and then select OPEN.
4. Open the Support > EA Help > Electronic_Arts_Technical_Support.htm file.
If you are still experiencing difficulty after utilizing the information in the EA Help file you can contact
EA Technical Support.
EA TECHNICAL SUPPORT ON
THE INTERNET
If you have Internet access, be sure to check our EA Technical Support website at:
http://support.ea.com
Here you will find a wealth of information on DirectX, game controllers, modems, and networks,
as well as information on regular system maintenance and performance. Our website contains
up-to-date information on the most common difficulties, game-specific help, and frequently asked
questions (FAQs). This is the same information our support technicians use to troubleshoot your
performance issues. We keep the support website updated on a daily basis, so please check here
first for no-wait solutions.
TECHNICAL SUPPORT CONTACT INFO
If you need to talk to someone immediately, call our Technical Support team (Monday through Friday
8 AM – 5 PM PST):
Telephone: US 1 (650) 628-1001.
NOTE: No hints or codes are available from Technical Support.
Website: http://support.ea.com
Mailing Address: EA Technical Support
9001 N I-35 Suite 110
Austin, TX 78753
© 2011 Electronic Arts Inc. EA, the EA logo and Dead Space are trademarks of Electronic Arts Inc. All other trademarks are the property of their
respective owners.
LIMITED 90-DAY
WARRANTY
NOTE: The following warranties only apply to products sold at retail. These warranties do not apply
to products sold online via EA Store or third parties.
Electronic A rts L imited Warranty
Electronic Arts warrants to the original purchaser of this product that the recording medium on which the software program(s) are recorded (the “Recording
Medium”) and the documentation that is included with this product (the “Manual”) are free from defects in materials and workmanship for a period of 90 days
from the date of purchase. If the Recording Medium or the Manual is found to be defective within 90 days from the date of purchase, Electronic Arts agrees
to replace the Recording Medium or Manual free of charge upon receipt of the Recording Medium or Manual at its service center, postage paid, with proof of
purchase. This warranty is limited to the Recording Medium containing the software program and the Manual that were originally provided by Electronic Arts.
This warranty shall not be applicable and shall be void if, in the judgment of Electronic Arts, the defect has arisen through abuse, mistreatment or neglect.
This limited warranty is in lieu of all other warranties, whether oral or written, express or implied, including any warranty of merchantability or fitness for a
particular purpose, and no other representation of any nature shall be binding on or obligate Electronic Arts. If any such warranties are incapable of exclusion,
then such warranties applicable to this product, including implied warranties of merchantability and fitness for a particular purpose, are limited to the 90-day
period described above. In no event will Electronic Arts be liable for any special, incidental, or consequential damages resulting from possession, use or
malfunction of this Electronic Arts product, including damage to property, and to the extent permitted by law, damages for personal injury, even if Electronic
Arts has been advised of the possibility of such damages. Some states do not allow limitation as to how long an implied warranty lasts and/or exclusions or
limitation of incidental or consequential damages so the above limitations and/or exclusion of liability may not apply to you. In such jurisdictions, the Electronic
Arts’ liability shall be limited to the fullest extent permitted by law. This warranty gives you specific rights. You may also have other rights that vary from state
to state.
Returns Within the 90 -Day Warranty Period
Please return the product along with (1) a copy of the original sales receipt showing the date of purchase, (2) a brief description of the difficulty you are
experiencing, and (3) your name, address and phone number to the address below and Electronic Arts will mail a replacement Recording Medium and/or Manual
to you. If the product was damaged through misuse or accident, this 90-day warranty is rendered void and you will need to follow the instructions for returns
after the 90-day warranty period. We strongly recommend that you send your products using a traceable delivery method. Electronic Arts is not responsible for
products not in its possession.
EA Warranty Information
If the defect in the Recording Medium or Manual resulted from abuse, mistreatment or neglect, or if the Recording Medium or Manual is found to be defective
after 90 days from the date of purchase, choose one of the following options to receive our replacement instructions:
Online: http://warrantyinfo.ea.com
Automated Warranty Information: You can contact our automated phone system 24 hours a day for any and all warranty questions:
US 1 (650) 628-1001
EA Warranty Mailing Address
Electronic Arts Customer Warranty
9001 N I-35 Suite 110
Austin, TX 78753
Notice
Electronic Arts reserves the right to make improvements in the product described in this manual at anytime and without notice. This manual and the product
described in this manual are copyrighted. All rights reserved.
Technical Support Contact Info
E-mail and Website: For instant access to all of our technical support knowledge, please visit http://techsupport.ea.com.
Telephone Support: Technical Support is also available from 8am to 5pm PST by calling us at (650) 628-1001. No hints or codes are available from (650)
628-1001.
Mailing Address: Electronic Arts Technical Support
9001 N I-35 Suite 110
Austin, TX 78753
1953905
 Loading...