

Electrolux ZHT 510, ZHT 620, ZHT 610, ZHT 910, ZHT 920 Installation, Use And Maintenance Handbook
Page 1

Cappa
Cooker hood
Hotte de cuisine
Dunstabzugshaube
Dampkap
Coifa
ZHT 510 ZHT 610
ZHT 620 ZHT 910
ZHT 920
MANUALE DI INSTALLAZIONE, USO E MANUTENZIONE
INSTALLATION, USE AND MAINTENANCE HANDBOOK
MANUEL D’INSTRUCTIONS POUR L’INSTALLATION, L’EMPLOI ET L’ENTRETIEN
HANDBUCH FÜR INSTALLATION, BEDIENUNG UND WARTUNG
INSTRUCTIES VOOR MONTAGE, GEBRUIK EN ONDERHOUD
MANUAL DE INSTALAÇÃO UTILIZAÇÃO MANUTENÇÃO
Page 2

Contenuti - Contenents - Sommaire
1 -GENERALITÀ ................................................................................................................................................. 4
2 - AVVERTENZE PER LA SICUREZZA ............................................................................................................ 4
4 -INSTALLAZIONE ............................................................................................................................................ 4
3.1 - Installazione al muro .............................................................................................................................. 4
3.2 - Installazione al pensile ............................................................................................................................ 6
3.3 - Connessione aspirante o filtrante ............................................................................................................ 6
3.4 - Collegamento elettrico e controllo funzionale .......................................................................................... 7
1 -AVVERTENZE PER LA SICUREZZA ............................................................................................................. 8
2 -USO ................................................................................................................................................. 8
3 -MANUTENZIONE ............................................................................................................................................ 9
3.1 - Filtro antigrasso in fibra sintetica ............................................................................................................. 9
3.2 - Filtri antigrasso metallici .......................................................................................................................... 9
3.3 - Filtri al carbone attivo .............................................................................................................................. 9
3.4 - Illuminazione .......................................................................................................................................... 10
3.5 - Pulizia .................................................................................................................................................... 10
1 - GENERAL INFORMATION .......................................................................................................................... 11
2 - SAFETY WARNINGS ................................................................................................................................... 11
3 - INSTALLATION ............................................................................................................................................ 11
3.1 - Wall installation...................................................................................................................................... 11
3.2 – Wall unit installation .............................................................................................................................. 13
3.3 - Connecting suction or filter hoods ......................................................................................................... 13
3.4 - Electrical connection and working test .................................................................................................. 14
1 - SAFETY WARNINGS ................................................................................................................................... 15
2 - USE ............................................................................................................................................... 15
3 - MAINTENANCE ........................................................................................................................................... 16
3.1 - Synthetic grease filters .......................................................................................................................... 16
3.2 - Metal grease filters ................................................................................................................................ 16
3.3 - Charcoal filters ....................................................................................................................................... 16
3.4 - Lighting .................................................................................................................................................. 17
3.5 - Cleaning ................................................................................................................................................ 17
1 - GÉNÉRALITÉS ............................................................................................................................................ 18
2 - CONSEILS CONCERNANT LA SECURITE ................................................................................................ 18
3 - INSTALLATION ............................................................................................................................................ 18
3.1 - Installation contre le mur ....................................................................................................................... 18
3.2 - Installation avec élément mural ............................................................................................................. 20
3.3 - Connexion aspirante ou filtrante ............................................................................................................ 20
3.4 - Raccordement électrique et contrôle fonctionnel .................................................................................. 21
1 - CONSEILS CONCERNANT LA SECURITE ................................................................................................ 22
2 - UTILISATION ............................................................................................................................................... 22
3 - ENTRETIEN ............................................................................................................................................... 23
3.1 - Filtre anti-graisse en fibre synthétique ................................................................................................... 23
3.2 - Filtres anti-graisse métalliques .............................................................................................................. 23
3.3 - Filtres à charbon actif ............................................................................................................................ 23
3.4 - Éclairage ................................................................................................................................................ 24
3.5 - Nettoyage .............................................................................................................................................. 24
2
Page 3

Inhalt - Inhoud - Conteúdos
1 - ALLGEMEINES ............................................................................................................................................ 25
2 - SICHERHEITSHINWEISE ............................................................................................................................ 25
3 - MONTAGE ............................................................................................................................................... 26
3.1 - Wandmontage ....................................................................................................................................... 26
3.2 - Montage an einem Oberschrank ........................................................................................................... 27
3.3 - Abluft- oder Umluftanschluß .................................................................................................................. 27
3.4- Elektrischer Anschluß und Funktionskontrolle........................................................................................ 28
1 - SICHERHEITSHINWEISE ............................................................................................................................ 29
2 - BEDIENUNG ............................................................................................................................................... 29
3 - WARTUNG ............................................................................................................................................... 30
3.1 - Fettfilter aus Synthetikfasern ................................................................................................................. 30
3.2 - Metall-Fettfilter ....................................................................................................................................... 30
3.3 - Aktivkohlefilter ....................................................................................................................................... 30
3.4 - Beleuchtung ........................................................................................................................................... 31
3.5 - Pflege .................................................................................................................................................... 31
1 - ALGEMEEN ............................................................................................................................................... 32
2 - VEILIGHEIDSMAATREGELEN ................................................................................................................... 32
3 - INSTALLATIE ............................................................................................................................................... 32
3.1 - Installatie aan de muur .......................................................................................................................... 32
3.2 - Installatie aan een bovenkastje ............................................................................................................. 34
3.3 - Afzuigende of filterende aansluiting....................................................................................................... 34
3.4 - Elektrische aansluiting en in bedrijf stelling ........................................................................................... 35
1 - VEILIGHEIDSMAATREGELEN ................................................................................................................... 36
2 - GEBRUIK ............................................................................................................................................... 36
3 - ONDERHOUD .............................................................................................................................................. 37
3.1 - Vetfilters van synthetische vezels .......................................................................................................... 37
3.2 - Metalen vetfilters ................................................................................................................................... 37
3.3 - Koolstoffilters ......................................................................................................................................... 37
3.4 - Verlichting .............................................................................................................................................. 38
3.5 - Reiniging ................................................................................................................................................ 38
1 - GENERALIDADES ....................................................................................................................................... 39
2 - PRECAUÇÕES DE SEGURANÇA .............................................................................................................. 39
3 - INSTALAÇÃO .............................................................................................................................................. 39
3.1 – Instalação na parede ............................................................................................................................ 39
3.2 - Instalação no móvel de cozinha ............................................................................................................ 41
3.3 - Conexão da versão aspirante ou filtrante .............................................................................................. 41
3.4 - Ligação eléctrica e controlo do funcionamento ..................................................................................... 42
1 - PRECAUÇÕES DE SEGURANÇA .............................................................................................................. 43
2 - UTILIZAÇÃO ............................................................................................................................................... 43
3 - MANUTENÇÃO ............................................................................................................................................ 44
3.1 - Filtro antigordura de fibra sintética ........................................................................................................ 44
3.2 - Filtros metálicos antigordura ................................................................................................................. 44
3.3 - Filtros de carvão activo.......................................................................................................................... 44
3.4 - Iluminação ............................................................................................................................................. 45
3.5 - Limpeza ................................................................................................................................................. 45
3
Page 4

Part 1 - INSTALLATION INSTRUCTIONS
1 - GENERAL INFORMATION
This hood has been designed to be wall-mounted above a cooking hob. It can be
installed under a wall unit or directly onto a wall. It can work either by ducting system
(external discharge) or filter (internal recirculation). Before starting the installation,
consideration should be given to the difficulties to be found during installation.
The installation work must be undertaken by a qualified and competent person
in conformity to the rules concerning the evacuation of contaminated air. The
manufacturer disclaims all liability for any damage or injury caused as a result
of not following the instructions for installation contained in the following text.
2 - SAFETY WARNINGS
2.1 - When used in the extraction mode, the cooker hood ducting must not be connected
to a flue which is used for exhausting fumes from appliances supplied with energy
other than electric, such as a central heating flue or water heating flue.
2.2 - Before connecting to the mains supply ensure that the mains voltage corresponds
with the voltage on the rating plate inside the hood.
2.3 - Connect the cooker hood to the mains via a bipolar switch which has 3mm
clearance between the contacts.
2.4 - The device does not require earthing, as it is double-insulated.
2.5 - When installed, the hood must be positioned at least 65 cm above the hotplate.
2.6 - Never do flambé cooking under this cooker hood.
2.7 - Never leave frying pans unattended during use as overheated fat and oil may catch
fire.
2.8 - Before carrying out any kind of maintenance or cleaning, disconnect the hood from
the mains supply.
2.9 - If the room where the cooker hood is to be used contains a fuel burning appliance
such as a central heating boiler then this must be of the room sealed or balanced
flue type. If other types of flue or appliance are fitted, ensure that there is an
adequate supply of air into the room. When the cooker hood is used in conjunction
with appliances supplied with energy other than electric, the negative pressure in
the room must not exceed 0,04 mbar to prevent fumes being drawn back into the
room by the cooker hood.
3 - INSTALLATION
3.1 - Wall installation
The hood can be supplied with two different fixing kits:
a) screws, plugs and safety square.
b) screws, plugs and metal brackets.
11
Page 5
Part 1 - INSTALLATION INSTRUCTIONS
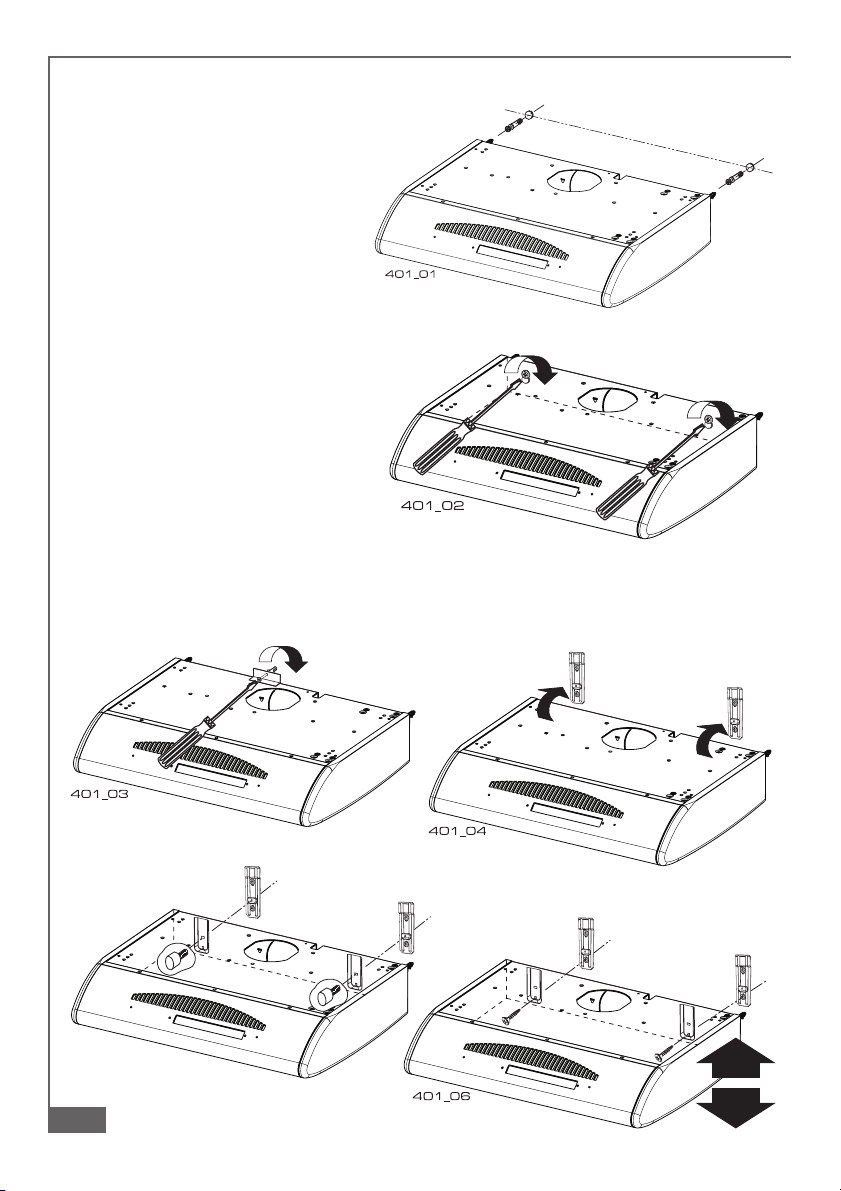
1 - Fixing with screws
Using the cardboard template,
mark and drill the holes on the
wall (2 holes Ø 8 mm see
instructions on the template),
insert the plugs in the holes,
tighten both 4,2 x 44,4 screws
(supplied) leaving about 5 mm
unscrewed, hook the hood onto
the screws (fig. 1) and secure
tightly from inside (fig. 2). Mount
the safety square (supplied) above
the hood (fig. 3).
2 - Fixing with brackets
Using the cardboard template,
mark and drill the holes on the wall
(4 holes Ø 8 mm see instructions
on the template), fix the metal
brackets with screws and plugs
(supplied), hook the hood onto the
brackets (fig. 4). Fix the hood with two knobs (supplied) (fig. 5). Make sure the hood
is level and, if necessary, adjust by acting upon the adjustment screws (fig. 6).
3 - Respect warning 2.5.
22
2
11
1
12
401_05a
55
5
33
3
44
4
66
6
Page 6
Part 1 - INSTALLATION INSTRUCTIONS
3.2 – Wall unit installation
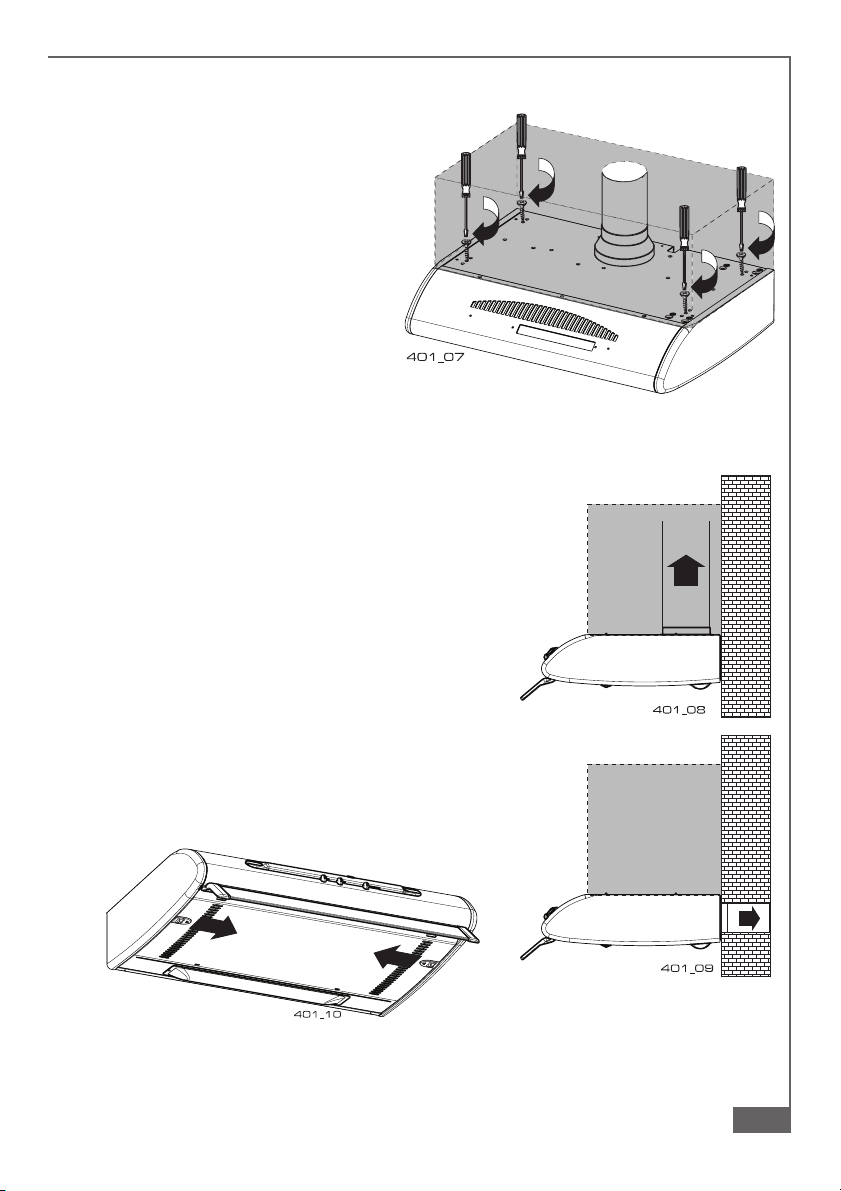
Using the cardboard template, mark
and drill the bottom of the wall unit,
(see instructions on the template).
Fasten the hood from inside the unit
using four screws 4,2 x 44,4
(supplied) (fig.7). For suction hoods,
the wall unit must be drilled to allow
for the air discharge duct. Filter hoods
do not require this type of drilling
operation since the air is recycled into
the room through vents situated on
the front of the hood.
3.3 - Connecting suction or filter hoods
1 - Connecting suction hoods (air is discharged into the atmosphere)
The hood comes with two air outlets, a plastic cover
fitted in the rear hole and a flange to be fitted
according to the solution chosen: top discharge (fig.
8), rear discharge (fig. 9). In case of installation with
rear discharge, fit the plastic cover in the top hole
and the flange in the rear hole. Using a pipe Ø 100
o 120 mm, connect the air discharge flange to the
external discharge duct. Open the grid panel by
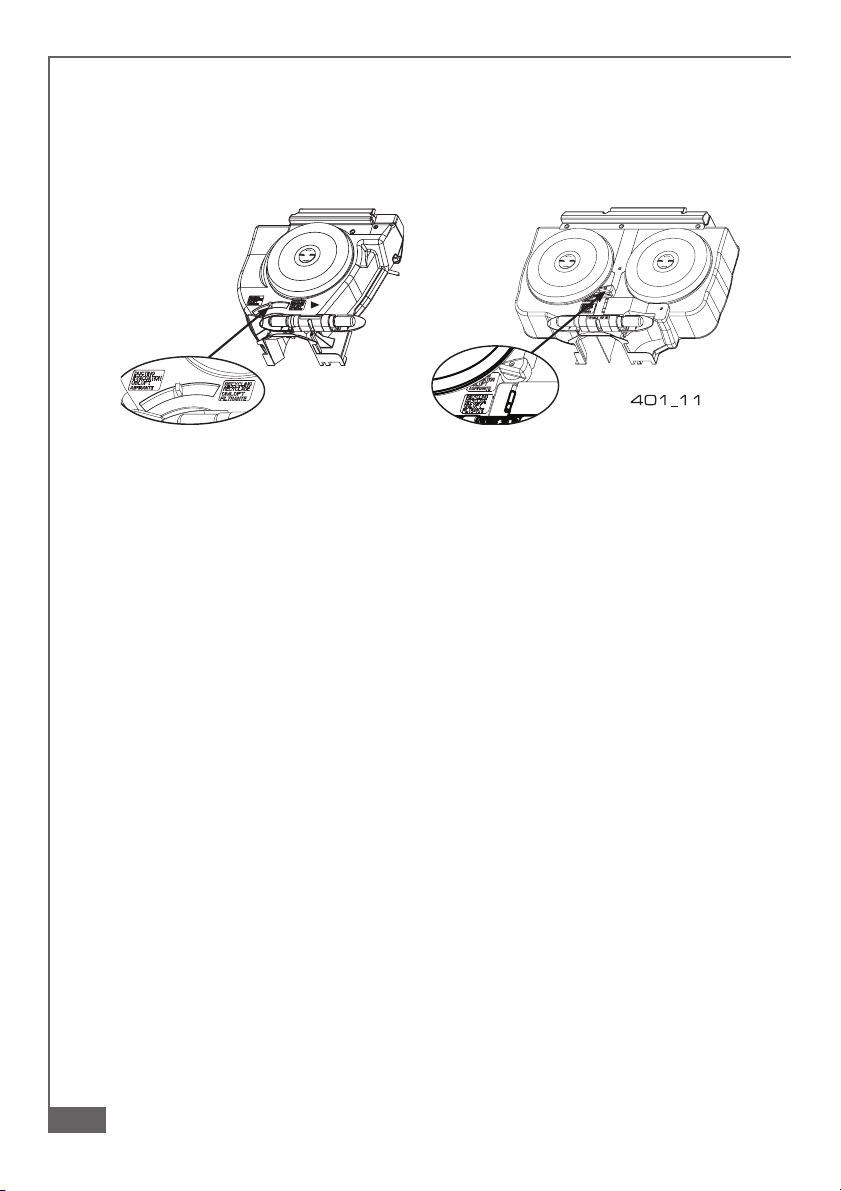
pressing inwards on the knobs (fig. 10), check that
the lever (hood with one motor) or the handle (hood
with two motors) points to the ducting mode position
(fig. 11), remove the charcoal filter, if any, by turning
the handle anti-clockwise (see par.3.3 2 part 2°).
Respect warning 2.1
88
8
77
7
1010
10
99
9
13
Page 7
Part 1 - INSTALLATION INSTRUCTIONS
2 - Connecting filter hoods (air is filtered and recirculated inside the room)
Open the grid panel, check that the lever (hood with one motor) or the handle (hood
with two motors) points to the filter mode position (fig. 11), insert the charcoal filter
(see par.3.3 2 part 2°).
1111
11
3.4 - Electrical connection and working test
1 - The safety measures 2.2, 2.3 and 2.4 of paragraph 2 are to be strictly observed.
2 - Once the electrical connection has been completed, check that the worktop
illumination, motor and speeds work properly.
14
Page 8
Part 2 - USE AND MAINTENANCE INSTRUCTIONS
1 - SAFETY WARNINGS
It is most important that all the warnings shown in paragraph 2 of the Installation
Instructions are strictly observed. Moreover, special attention must be paid to the
following warnings during the use and maintenance of the cooker hood:
1.1 - The grease filters and the charcoal filters should be cleaned or replaced as
recommended by the manufacturer or more frequently if the hood is used
consistently (more than 4 hours per day).
1.2 - When using a gas hob in connection with the cooker hood never leave the burners
of the hob uncovered while the hood is in use or when the pans have been
removed. Switch off the gas before removing the pan or for just short periods and
never leave the hob unattended.
1.3 - Always ensure that the appliance is kept at the correct intensity to prevent the
flame from licking round from the bottom of the pan; this will save energy and will
avoid a dangerous concentration of heat.
1.4 - Always ensure that the appliance is used in accordance with the manufacturer’s
instructions for the removal of contaminated odours during cooking.
2 - USE
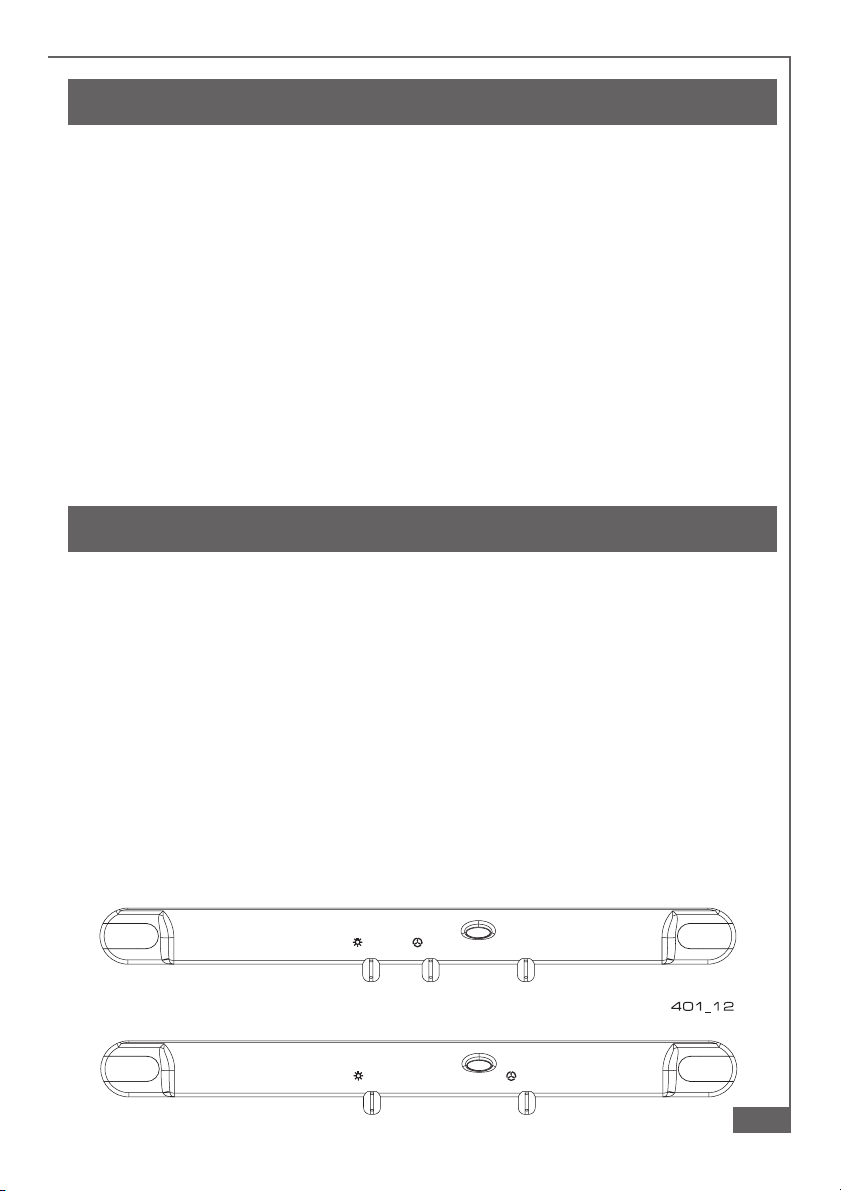
2.1 - Control panel (3 switches) (fig. 12a)
SWITCH L = controls the worktop illumination
SWITCH M = switches the motor on or off
SWITCH V = controls the fan speed
2.2 - Control panel (2 switches) (fig. 12b)
SWITCH L = controls the worktop illumination
SWITCH M = controls the power to the motor and the fan speed
Working speeds:
Position 1 = low speed, should be selected when simmering or using only one pan:
the noise level is kept to the minimum.
Position 2 = medium speed, should be selected for normal cooking. This speed offers
the best ratio between air capacity and noise level.
Position 3 = top speed, should be selected when frying or cooking food with strong
odours, even for a long period.
1212
12
bb
b
aa
a
01 12301
LL
L
LL
L
MM
M
01 0123
VV
V
MM
M
15
Page 9
Part 2 - USE AND MAINTENANCE INSTRUCTIONS
3 - MAINTENANCE
Regular maintenance will ensure good performance and extend the working life of
the hood. Special attention should be taken to the grease filters and, for the filter
hoods only, to the charcoal filters.
3.1 - Synthetic grease filters
1 - They cannot be washed and
should be replaced every two
months on average. If the filter
is equipped with chemical
indicators of saturation, replace
it when the visible red-coloured
dots show all over the surface.
2 - Replacement
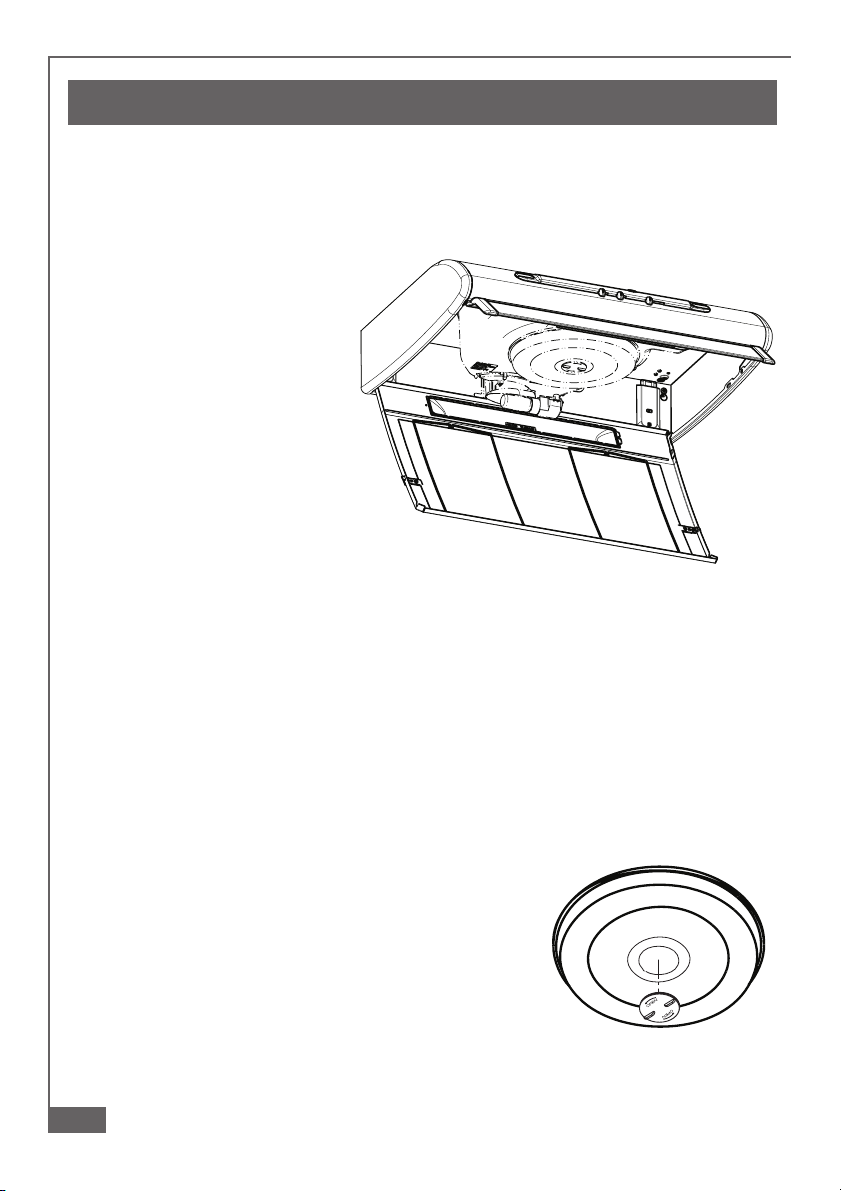
Open the grid panel, remove the
steel-wire clips and replace the
grease filter (fig. 13). Close the
grid panel.
3.2 - Metal grease filters
1 - Cleaning
These filters need to be washed with ordinary household detergent every 2 months
maximum. Thanks to their reduced dimensions, they can also be washed in the
dishwasher.
2 - Removing the filter
Open the grid panel, remove the steel wire clips and the grease filter (fig. 13). Make
sure that the filter is dry before replacing it, close the grid panel.
WARNING : Respect replacement and maintenance schedules recommended
in order to avoid fire hazards caused by over-saturated filters.
1313
13
3.3 - Charcoal filters
1 - How they work
Charcoal filters can absorb smells and odours until they
are saturated. They cannot be washed or recycled and
so they should be replaced at least every 4 months or
more frequently if the hood is heavily used.
2 - Replacement:
Open the grid panel, replace the charcoal filter by turning
the locking handle anti-clockwise for removing and
clockwise for replacing (fig. 14). Close the grid panel.
16
1414
14
Page 10
Part 2 - USE AND MAINTENANCE INSTRUCTIONS
4
0
1
_
1
3
L
2
3.4 - Lighting
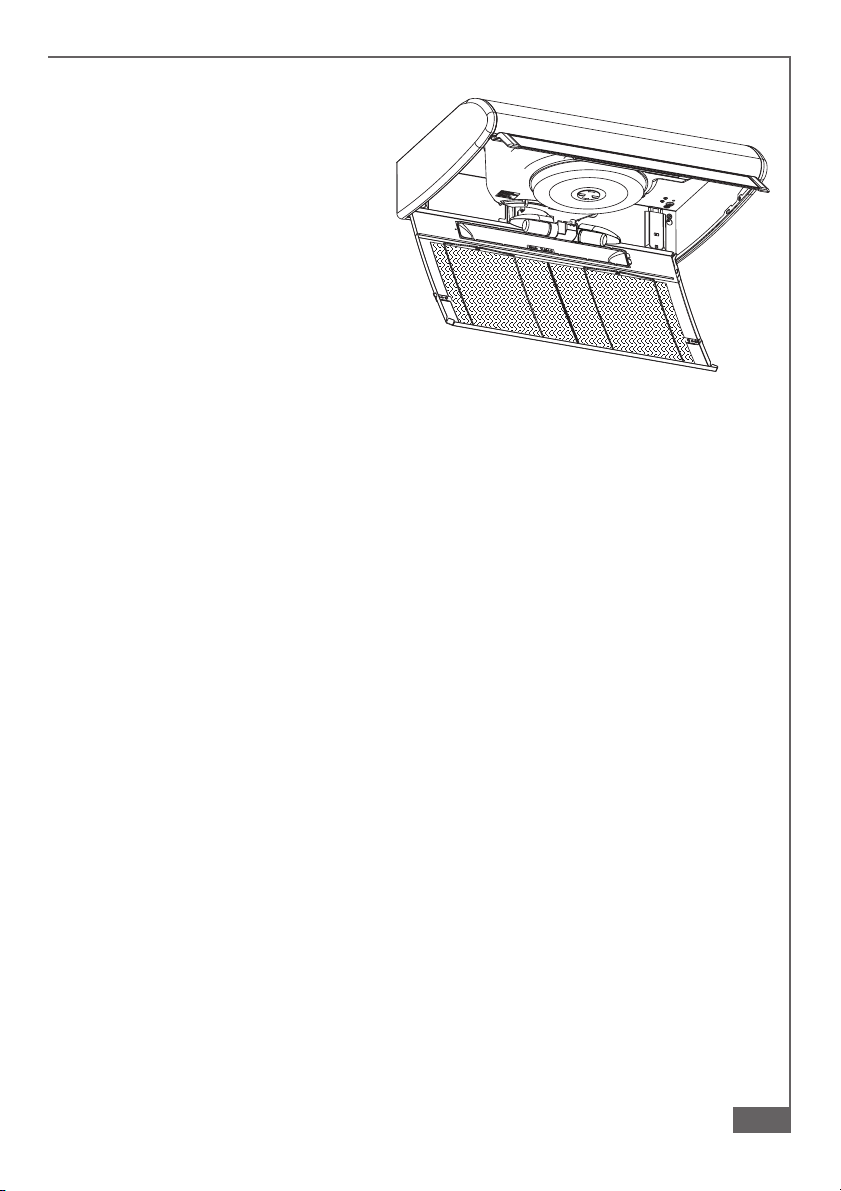
It is composed of one or two 40 W
lamps which can be reached by
removing the grid panel (Fig.15).
If the lights fail to function, check
that they are fully screwed into
place. If they have blown, they
should be replaced with similar
lamps having the same voltage and
1515
15
power.
3.5 - Cleaning
When cleaning the hood:
- Never use a wet cloth or sponge, or running water.
- Never use thinners or products containing alcohol, as they might damage the
paintwork.
- Never use abrasive cleaning materials, in particular when cleaning stainless steel
surfaces.
It is recommended to use a damp cloth and mild liquid household cleaner.
17
 Loading...