

Page 1
IK007 Integration kit
Installation manual
Refrigeration
STM3900, STM4200, SBM3800, SBM4300,
WTM2800, WTM3000, WTM3300, WTM3900,
WTM4200, WTM4400, WTM5200, WTE4200,
WTE5200, WTB2300, WTB2500, WTB2800,
WTB3400, WTB3700, WBM3700, WBM3800,
WBM4000, WBM4300, WBM5100, WBE4300,
WBE5100, WRM3700, WRM4300,WFM3000,
WFM3600, KTM2800, KTM3000, KTM3300,
KTM3600, KTM3900, KTM4200, KTM4400,
KTM5200, KBM3800, KBM4300, KBM5100.
Page 2

2
CONGRATULATIONS
Congratulations and thank you for choosing our integration
kit. Before you install the integration kit, we recommend
that you read through the entire installation manual.
To avoid the risks that are always present when you install
an electrical appliance, it is important that the integration
kit and appliance is installed correctly. Please read the
safety instructions in this installation manual as well as the
appliance’s user manual to carefully to avoid misuse
and hazards.
We recommend that you keep this instruction booklet
for future reference and pass it on to any future owners.
After unpacking the integration kit, please check it is not
damaged. If in doubt, do not use the integration kit but
contact your local Electrolux Customer Care Centre.
BEFORE YOU CALL
Please ensure you read the instruction manual fully before
you call for service, or a full service fee could be applicable.
INFORMATION ON DISPOSAL
FOR USERS
ENVIRONMENT!
• Mostofthepackagingmaterialsarerecyclable.
Please dispose of these materials through your local
recycling depot or by placing them in appropriate
collection containers.
• Ifyouwishtodiscardthisproduct,pleasecontact
your local authorities and ask for the correct method
of disposal.
CONTENTS
3 General warnings
4 Refrigerator integration kit items
5 Cupboard dimensions
8 Installation of 120˚ hinge
9 Preparation
9 Attaching top hinge bracket
10 Attaching slide-housing to refrigerator doors
12 Placing refrigerator in cupboard
12 Refrigerator alignment
13 Securing refrigerator in cupboard
14 Attaching slide-bar to cupboard door
Page 3

3
GENERAL WARNINGS
Please read the user manual carefully and store in a
handy place for later reference. Pass the user manual
on to possible new owners of the appliance.
NOTE: We strongly recommend that a professional
builder/cabinetmaker builds this unit into required
cabinetry prior to finished installation in customer’s
kitchen. Electrolux cannot take responsibility for
any installation issues when customer retrofits
this product into cabinetry. Cabinet door height
built in excess of refrigerator door height will be
unsupported and risk bowing.
NOTE: Please refer to your Appliance User Manual for
warnings relating to the appliance.
SYMBOLS
IMPORTANT!
This symbol indicates tips and information about
use of the appliance.
ENVIRONMENT!
This symbol indicates tips and information about
economical and ecological use of the appliance.
Page 4

4
Item Quantity in kit Quantity required Description
Two door model
Single door model
Top hinge bracket
PN º 1433129
1 1 1
Slide-housing
PN º 1445132
2 2 1
Slide-bar
PN º 1421620
2 2 1
Location bracket
front footing
PNº 1444993
Note: this pa rt is to be used
on all mod els other than
WTB2300, WTB2500,
WTB280 0, WTB3400 &
WTB3700.
1 1 1
Refrigerator
screws
PN º 74124 9
8 8 4
Cupboard screws
PN º 144942 2
12 12 8
120º hinge
PN º 1457832
5 5 (3+2) 3
Mounting plate
for hinge
PN º 14 58211
5 5 (3+2) 3
120° hinge
Self tapping
wood screws
PN º 1458212
20 20 12
120° hinge
mounting plate
120° hinge
mounting plate
120° hinge
mounting plate
120° hinge
mounting plate
Z bracket
IK foot location
PNº 808958001
(Used in m odels W TB2300,
WTB250 0, WTB28 00,
WTB3400 & WTB3700)
1 1 0
REFRIGERATOR INTEGRATION KIT ITEMS
Because this kit is common to a variety of models, you
need to select the items required to suit your model. The
items required for the models covered in this instruction
booklet are shown below.
Those items not required on your particular model should
be discarded.
Page 5

5
CUPBOARD DIMENSIONS
IMPORTANT!
Pages 5, 6, 7 and 8 should be given to the person
responsible for cupboard design and construction.
The cupboard dimensions required for each model are
shown on page 6, 7 & 8.
1. All sizes are internal and measured in millimetres.
2. It is important to ensure that the correct cupboard
sizes are used to ensure adequate air flow around
the refrigerator.
3. Cupboard hinges should be a 120° opening type.
(Use hinges supplied).
4. Three hinges should be used on each cupboard
door higher than 1000mm.
5. Ensure the refrigerator is not connected to a power
supply whilst installation takes place.
6. Each operation should be carried out in the sequence
specified in this instruction sheet.
Step 1
Measure and confirm Dimension ‘A’.
Step 2
To calculate Dimension ‘I’ use the equation below.
Dim ‘I’ = Dim ‘A’ - (Dim ‘D’ + 5mm) mm
NOTE: All sizes are internal and in millimetres.
Model
Dim ‘A’
(mm)
minimum
Dim ‘B’
(mm)
Dim ‘C’
(mm)
Dim ‘D’*
(mm)
Dim ‘E’
(mm)
Dim ‘G’
(mm)
Dim ‘H’
(mm)
Dim ‘I’*
(mm)
2 door top freezer models
Please
use the
calculation
below to
measure
Dimension
‘I’ for your
specific
model.
WTB2300
WTB2500
WTB2800
WTM2800, KTM2800
WTM3000, KTM3000
WTM3300, KTM3300
WTB3400
KTM3600
WTB3700
WTM3900, KTM3900, STM3900
WTM4200, WTE4200, KTM4200, STM4200
WTM4400, KTM4400
WTM5200, WTE5200, KTM5200
1485
1550
1650
1640
1710
1810
1690
1730
1800
1810
1730
1810
1810
680
680
680
680
680
680
715
680
715
680
740
740
740
645
645
645
700
700
700
700
795
700
795
795
795
895
910
975
1075
1047
1117
1217
1110
1137
1220
1217
1137
1217
1217
450
450
450
500
500
500
500
600
500
600
600
600
600
270
270
270
219
219
219
298
241
298
241
241
241
278
250
250
250
300
300
300
300
395
300
395
395
395
495
2 door bottom freezer models
WBM3700
WBM3800, KBM3800, SBM3800
WBM4000
WBM4300, WBE4300, KBM4300, SBM4300
WBM5100, WBE5100, KBM5100
1660
1810
1760
1810
1810
740
680
740
740
740
745
795
745
795
895
702
702
702
702
702
600
600
600
600
600
241
241
241
278
395
395
395
395
495
single door models
WFM3000
WFM3600
WRM3700
WRM4300
1810
1810
1810
1810
680
680
680
680
700
795
700
795
–
–
–
–
500
600
500
600
219
241
219
241
300
395
300
395
Step 3
* Add cabinetry thickness to Dimension ‘D’ and
Dimension ‘I’ for final measurement before construction.
Page 6
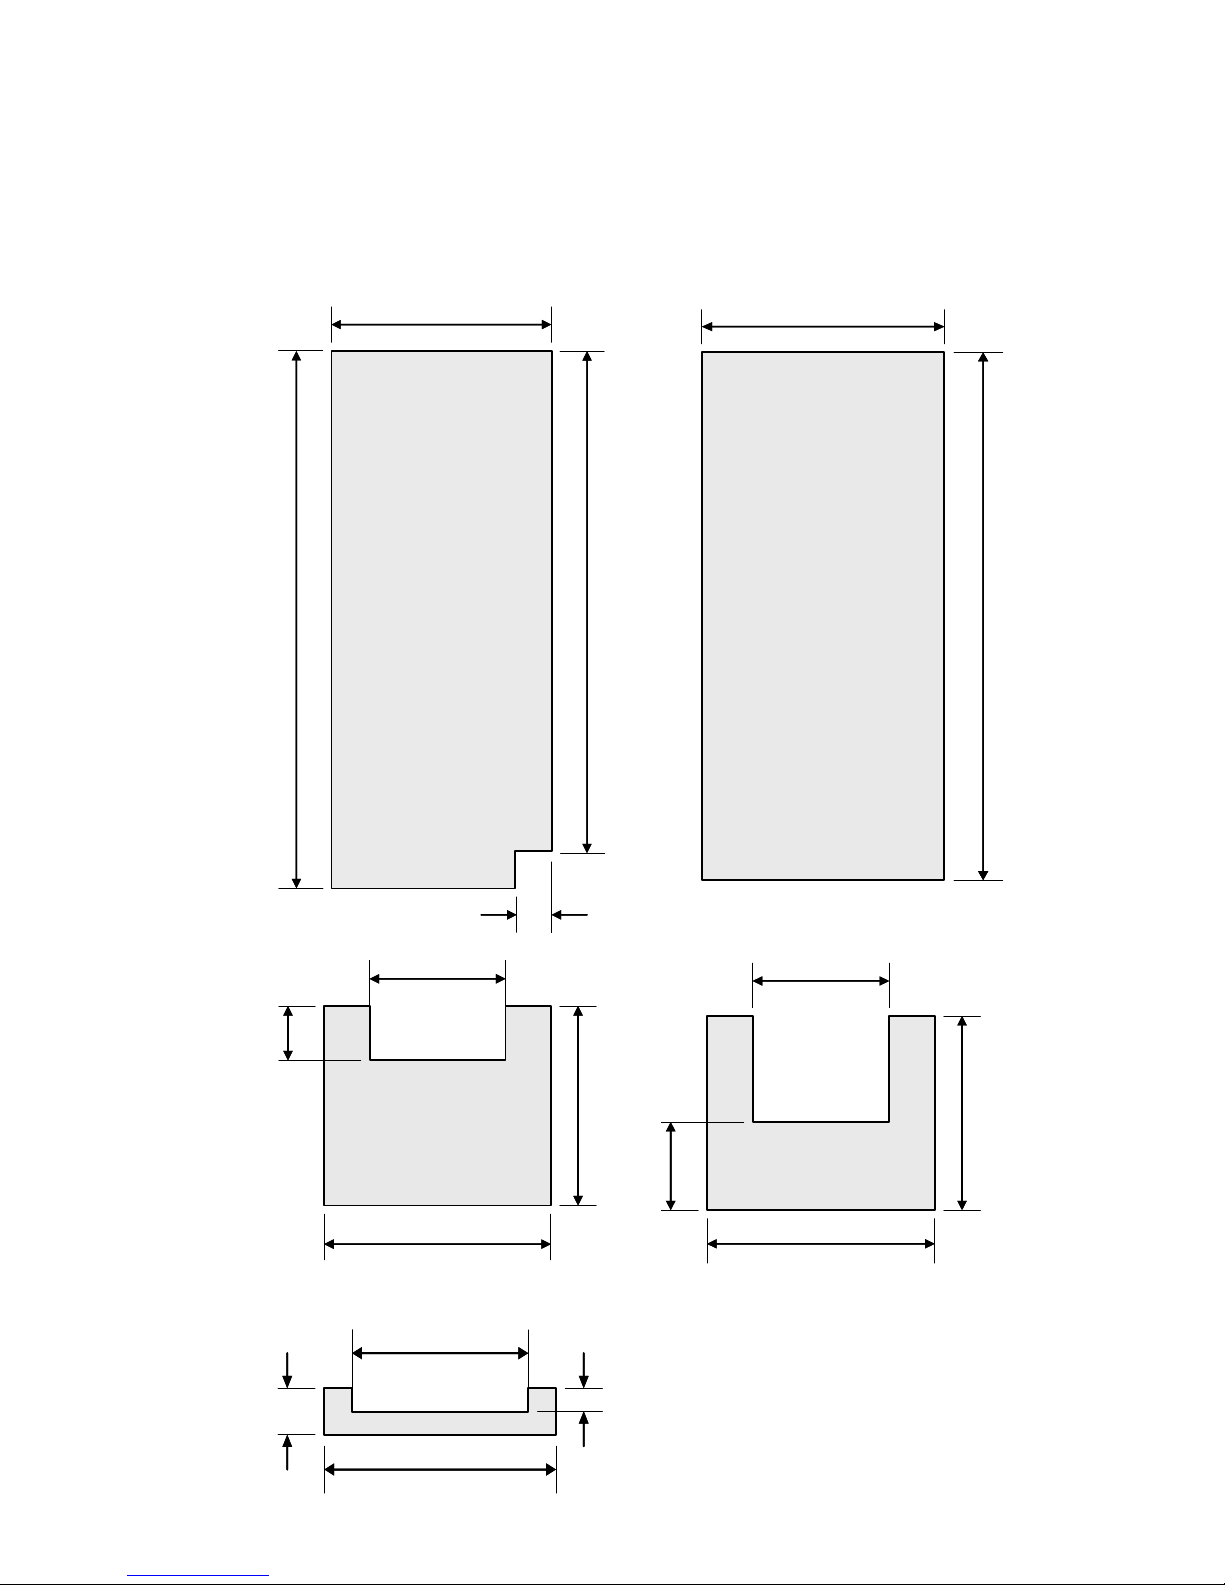
6
CUPBOARD DIMENSIONS
NOTE: All sizes are internal and measured in millimetres.
For ‘lettered’ dimensions refer to the table on page 5.
Panel A
(sides)
Dim B
100mm
Dim A
Dim A + Skirting height
Panel B
(back)
Dim A + Skirting height + board thickness
Dim C + 2x Board
thickness
Dim B
Dim C
Dim E
80mm
Panel D
(bottom)
Panel C
(top)
130mm
Dim C
Dim B
Dim H
Dim C + 2x Board
thickness
Dim E
50mm
Skirting
height
Page 7
7
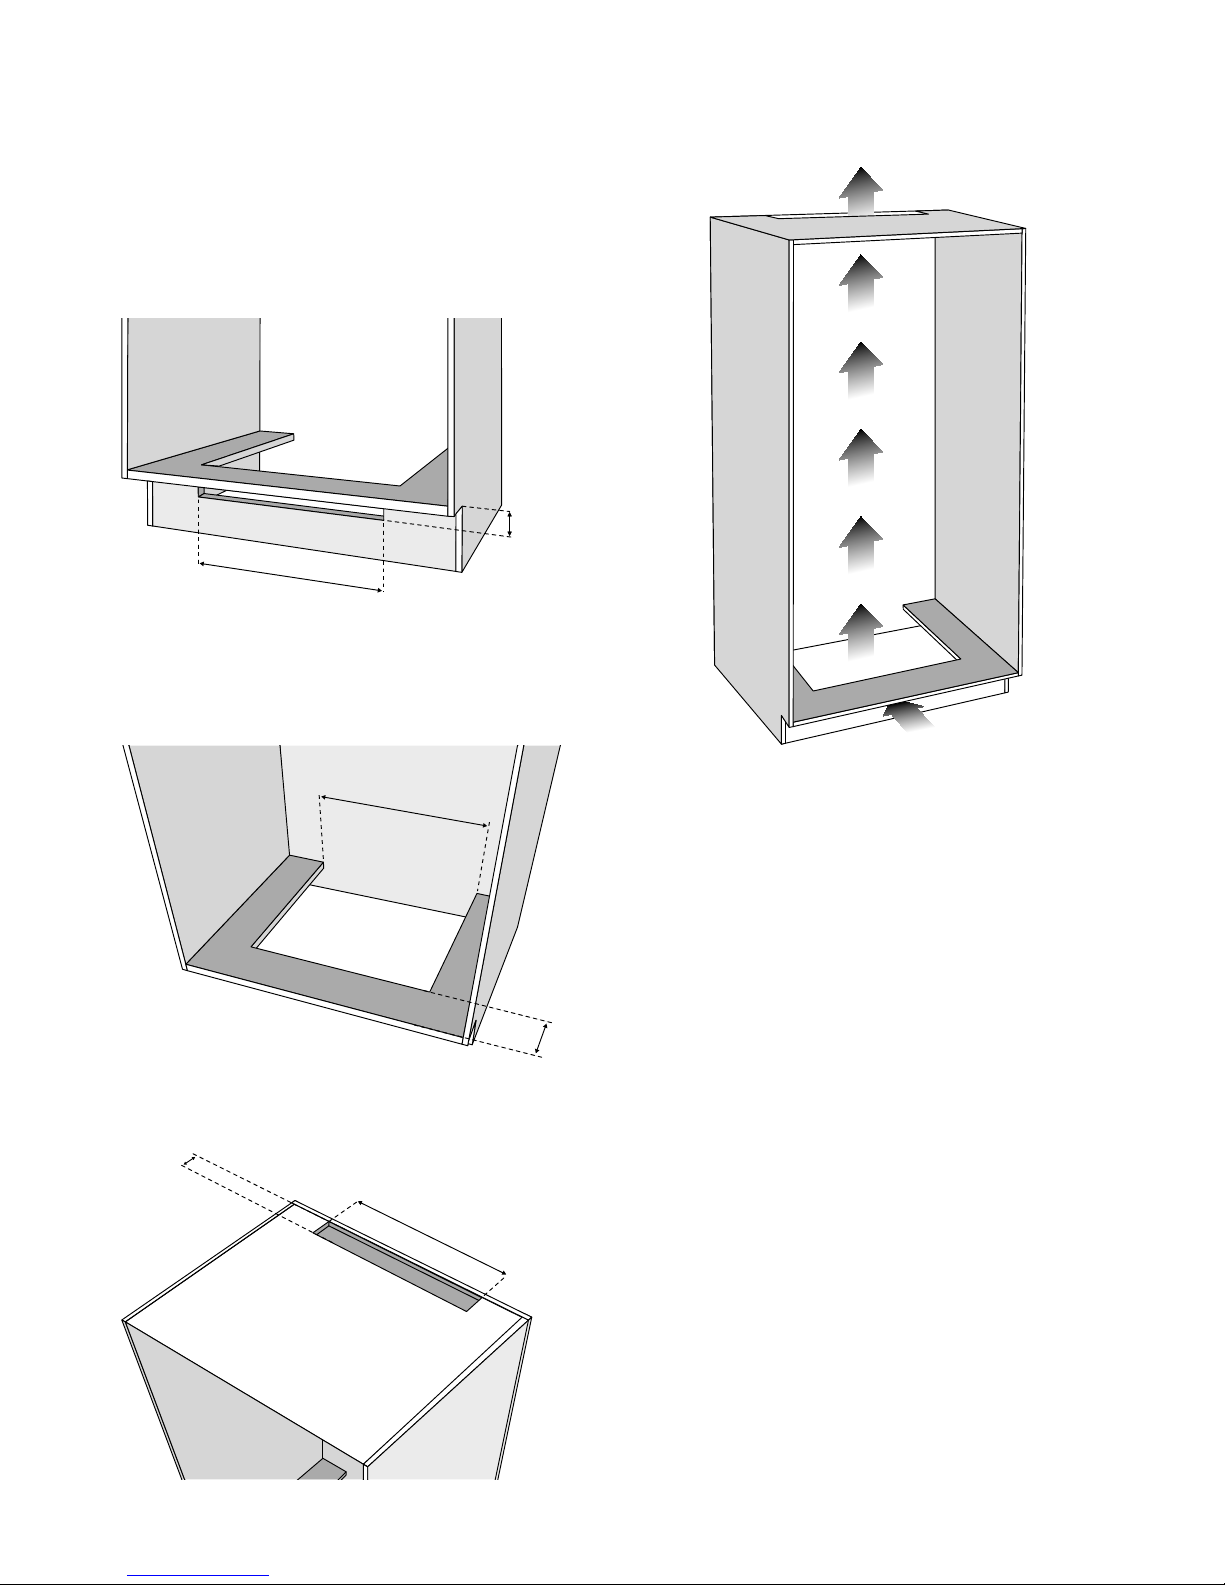
CUPBOARD DIMENSIONS
Clearances
When installed the refrigerator needs to have adequate
air ventilation. It is important to ensure there is good airflow
from the front to underneath and up the rear to the top of
the cabinet (see diagrams).
Front airflow cut-out
Dim E
50mm
NOTE: A decorative grill can be fitted so long as it does not
obstruct airflow and is removable for cleaning.
Bottom rear airflow cut-out
Dim E
130mm
Top rear airflow cut-out
Dim E
80mm
Airflow
Page 8
8
CUPBOARD DIMENSIONS
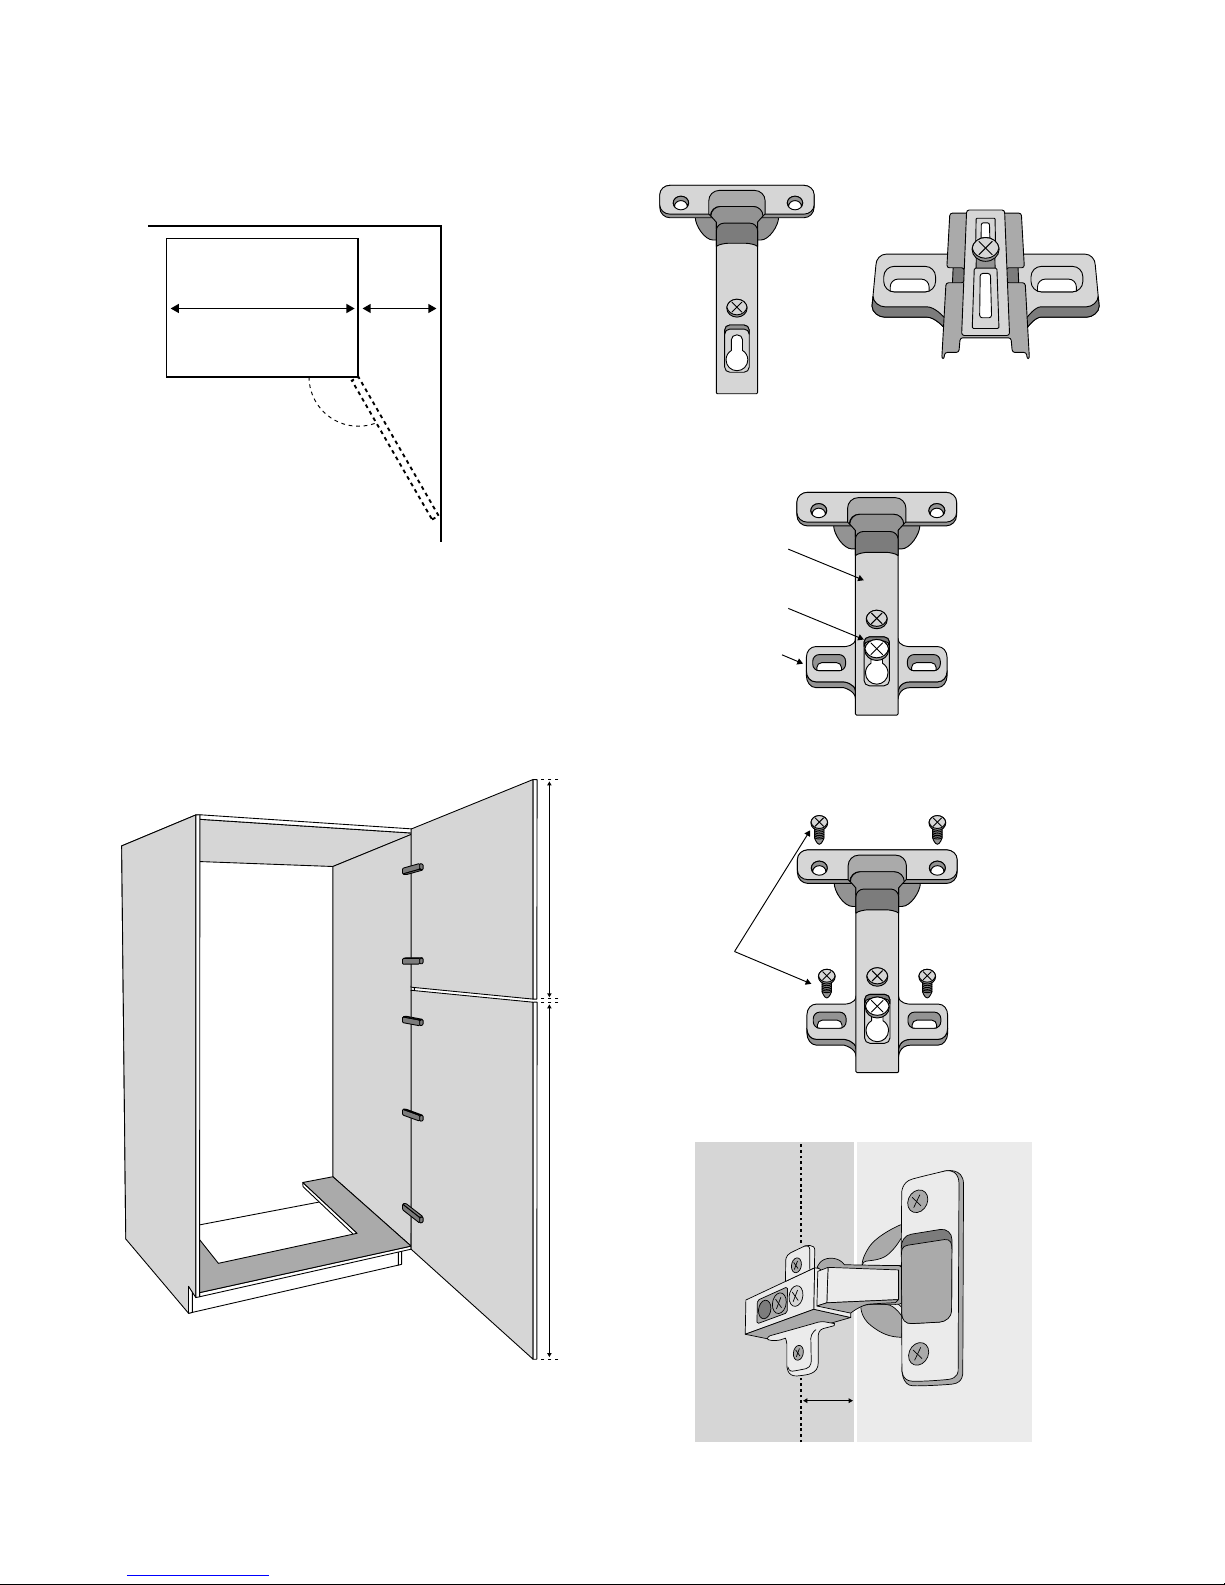
When positioned in a corner the clearance of Dim G on the
hinge side of the cabinet will allow the doors to be opened
enough to enable the removal of the crisper bins.
Dim C Dim G
120°
NOTE: Use the 120° hinges supplied with the kit to attach the
cupboard door to the cupboard.
Attach the hinge to the door to ensure that door can have
maximum opening, i.e. the door edge should not hit the
cabinet when the door is fully open.
Cabinet construction
(top mount cupbord shown below)
Dim D
Dim I
5mm gap
between doors
NOTE: If Dim D is bigger than 1000mm in height, 3 hinges
are required to attach the cupboard door to the cupboard.
If Dim D is smaller than 1000mm in height, 2 hinges are
required/sufficient.
INSTALLATION OF 120˚ HINGE
Please follow the instructions below to install the
120º hinge.
120° hinge
120° hinge
mounting plate
Attach mounting plate with 120º hinge and tighten
the sc rew.
screw
screws
120° hinge
mounting plate
37mm
cabinet cupboard door
Use screws provided with the hinge to attach the
cupboard door to the cupboard.
screws
37mm
cabinet cupboard door
Use 120º hinge to attach the cupboard door to the cabinet.
37mm
cabinet cupboard door
This dimension is typically 37mm
(from centre line of mounting plate
to the cupboard cabinet edge)
Page 9
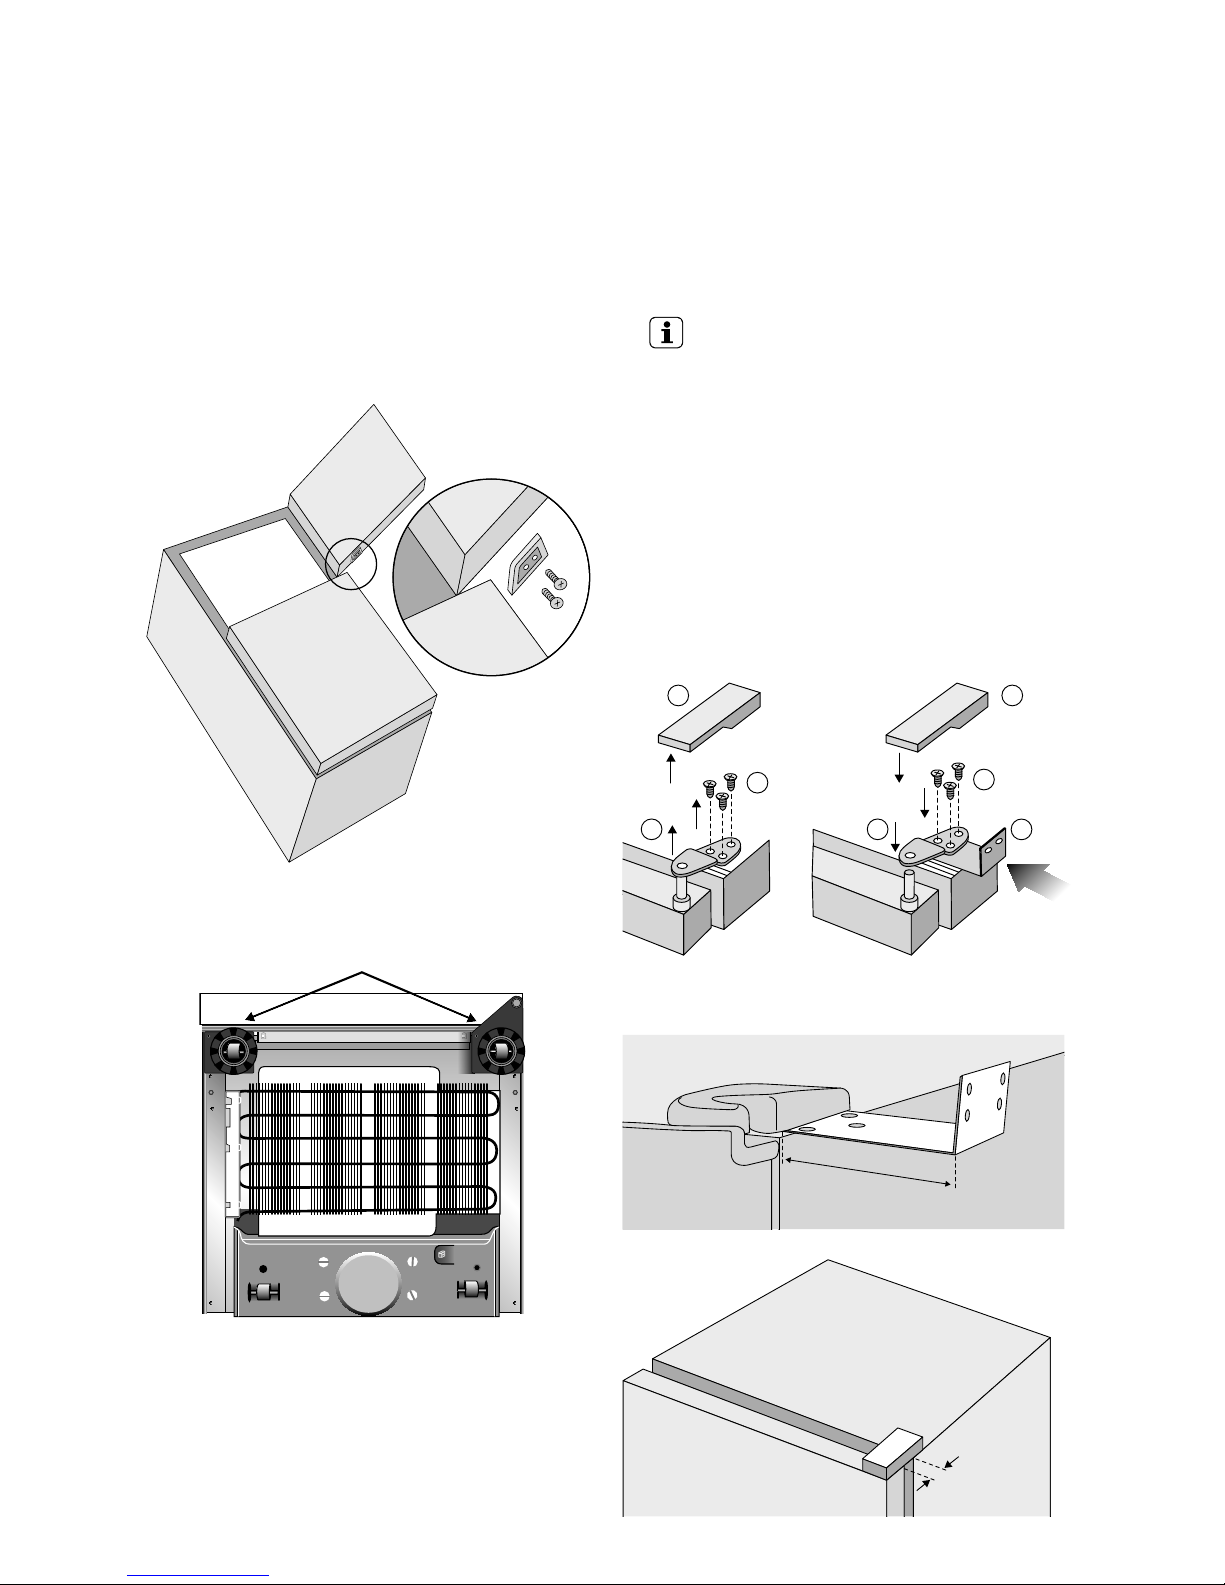
9
PREPARATION
1. Unpack refrigerator, removing foam packing.
2. Lay the refrigerator down on its back on a piece of
soft packing material. Use caution and two people
while laying the appliance down.
3. Remove top door stopper if fitted (Figure 1).
4. Place adjustable rollers in the fully retracted position
by screwing height adjusting screw fully anti-clockwise
(Figure 2). Do not remove the adjusting nut completely.
5. Stand upright.
Figure 1
Figure 2
Plastic roller nut
ATTACHING THE TOP HINGE BRACKET
1. Remove top hinge cover (Figure 3), cover clips off.
2. Remove the three (3) top hinge screws.
3. Elevate hinge.
4. Slide the top hinge bracket into position below
the hinge.
5. Re-attach hinge and screws ensuring that refrigerator
door is still correctly positioned.
IMPORTANT!
You must ensure that the refrigerator door is:
• Parallelwithsidesandtopofcabinet.
• Thegapbetweenthedoorandcabinetistypically
12mm allowing the door gasket to act correctly
(Figure 4).
Note: Ensure the gasket acts correctly, i.e. doesn’t make
a noise or leave gaps when the door is closed.
6. Recap hinge cover into position.
Figure 3
Top hinge cover
Top hinge
bracket
1
2
6
5
5
3
4
Top hinge bracket fitted
74mm
Figure 4
12mm
Page 10
10
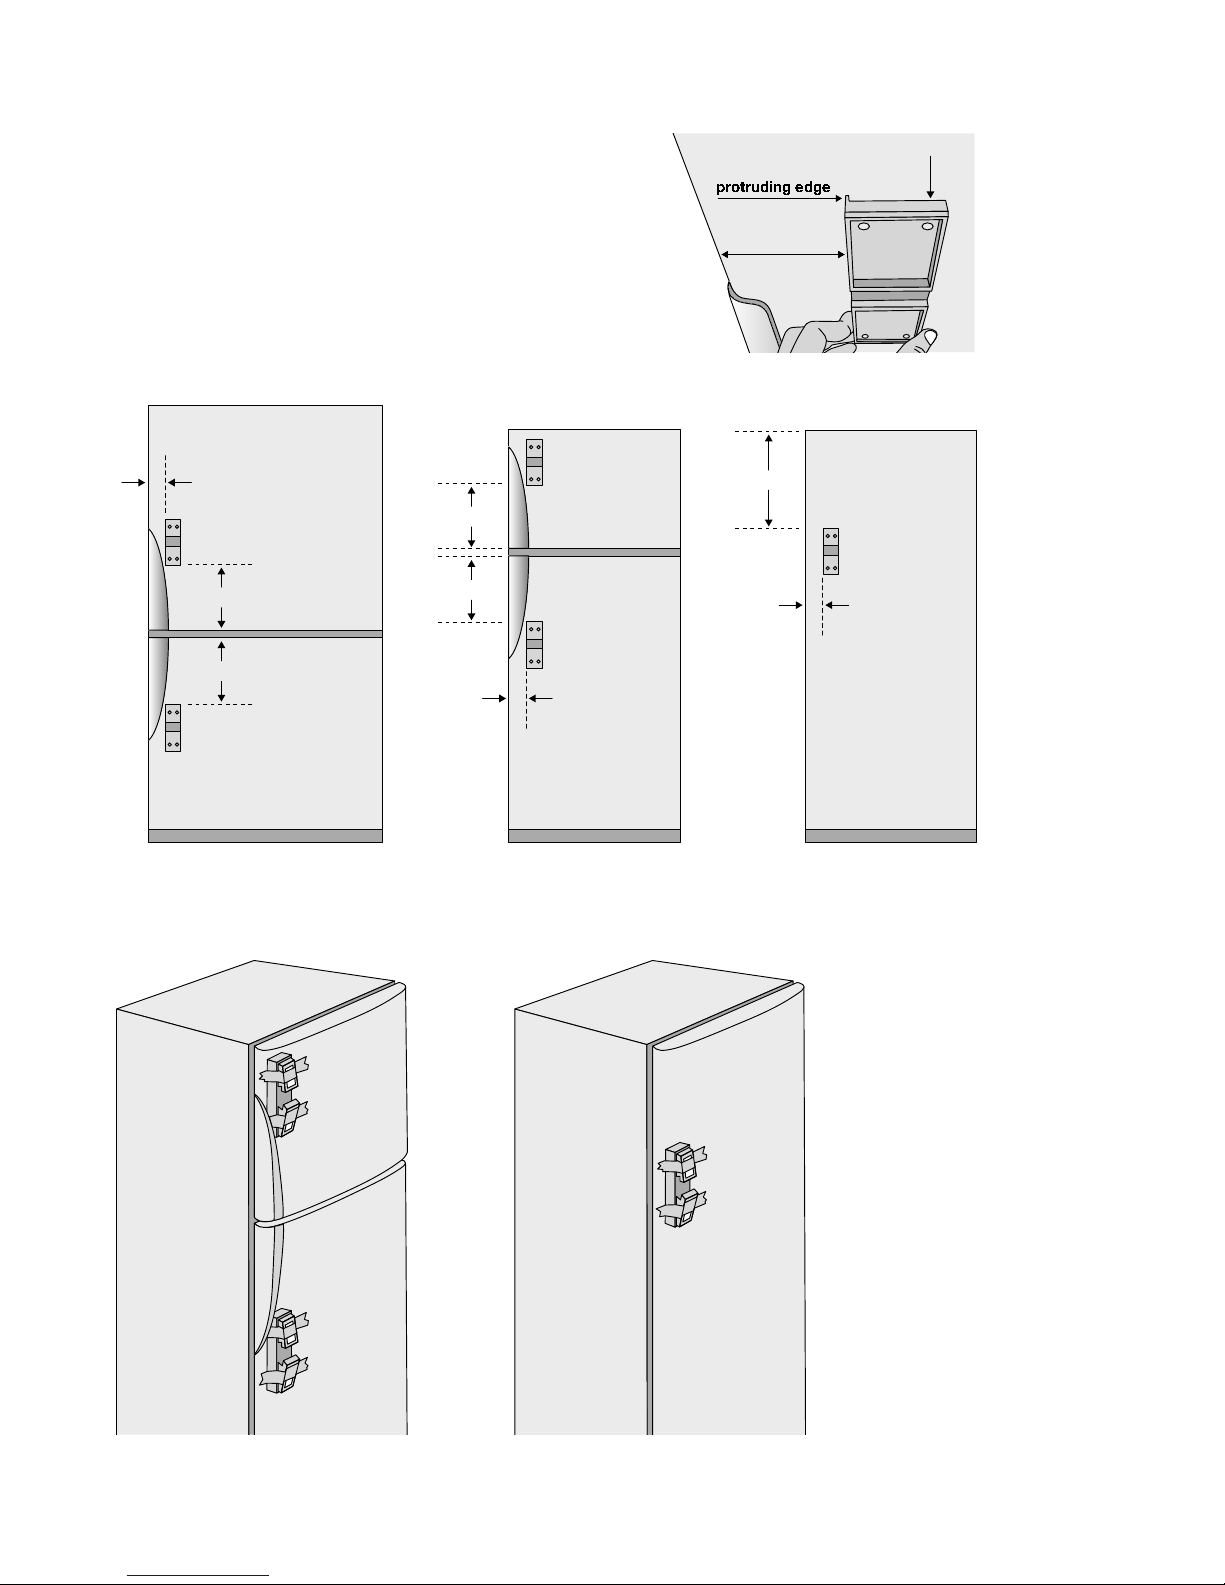
ATTACHING SLIDE-HOUSING TO REFRIGERATOR DOORS
1. Ensure slide-housing is positioned squarely as shown.
2. Ensure that the slide-housing is positioned on the door
as shown in the diagrams.
Note: The slide-housing ‘protruding edge’ side must always
be closest to the door handle side (diagram right).
...and secure with tape.
two door single door
70mm
235mm
70mm
70mm
235mm
2 door bottom freezer 2 door top freezer single door
235mm
360mm
235mm
slide housing
door handle
70mm
protruding edge
Page 11
11
NOTE: For single door models, the door handle must be
completely removed to provide clearance to the cupboard
door and the resulting handle mounting holes hidden with
a cover. Installer must use a tape or plastic cover that suits the
installation appearance (not supplied).
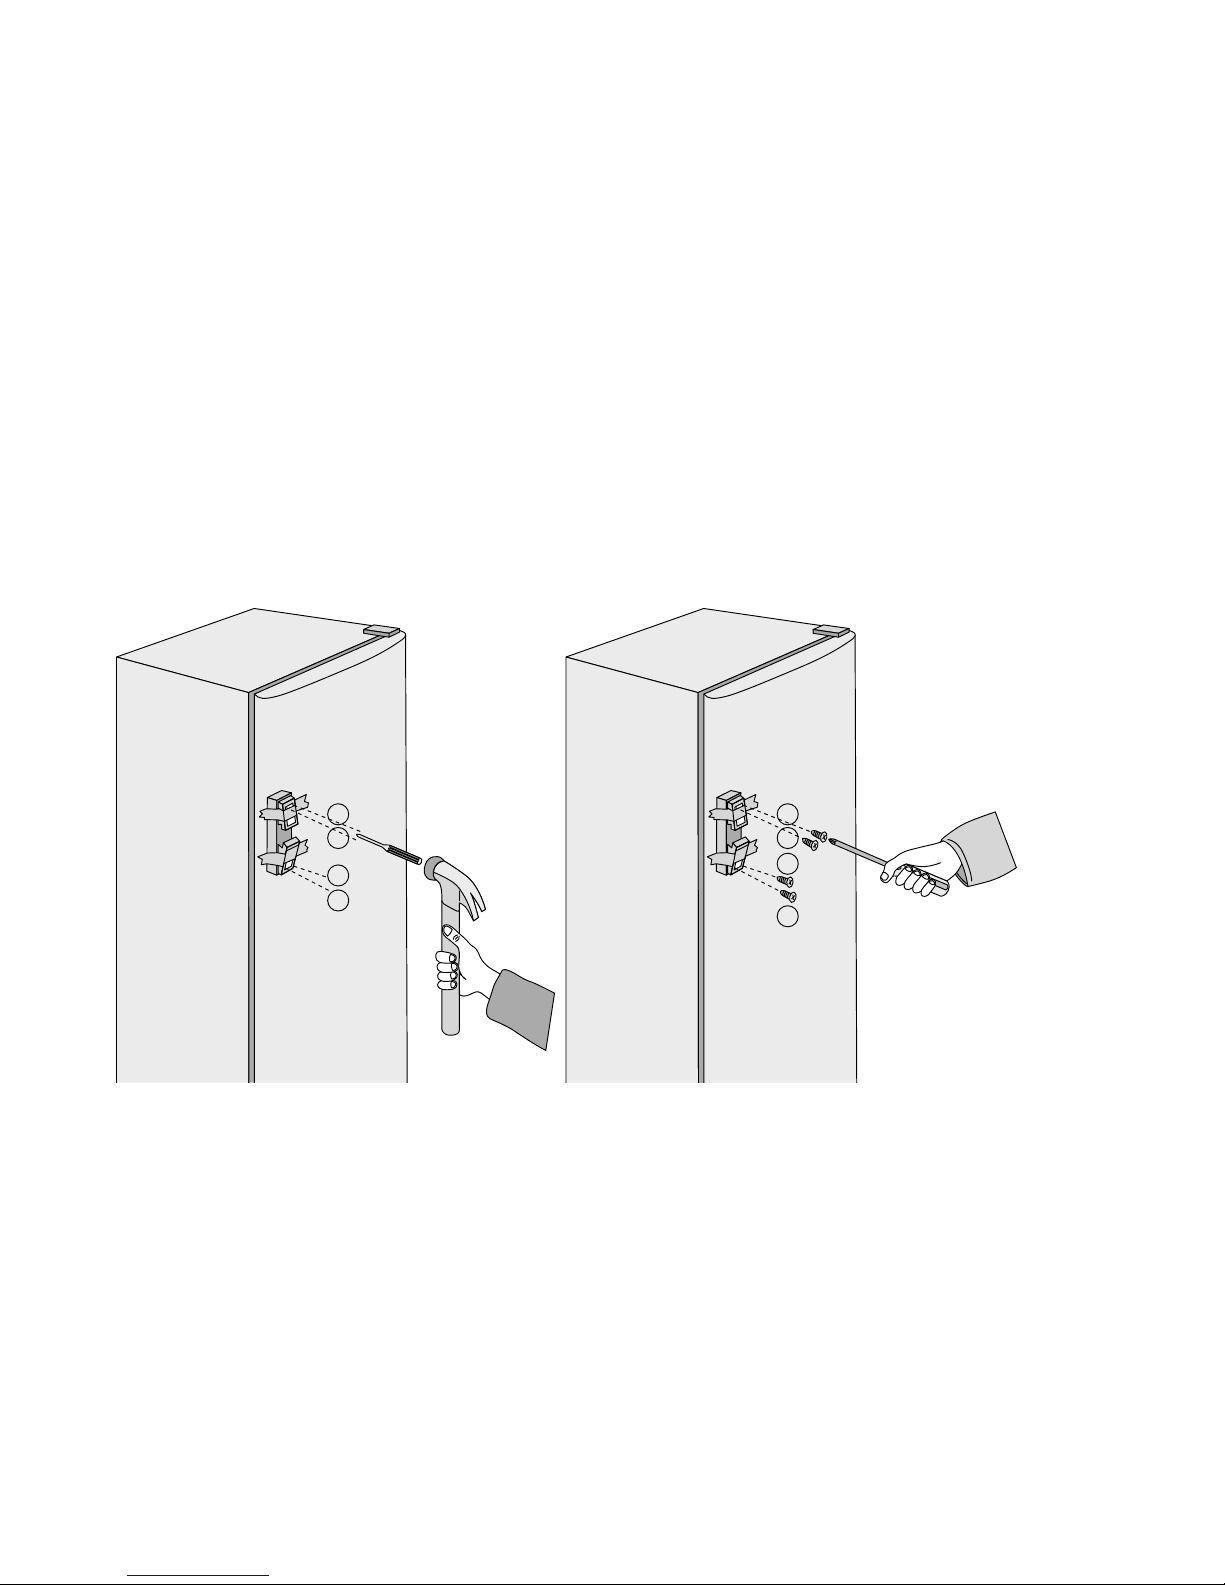
3. While the slide-housing is taped in position, punch a
small hole in the refrigerator door skin corresponding
to the four (4) holes in the housing (Figure 5).
4. The holes should be punched, not drilled, to ensure
the maximum thread can be formed in the metal.
5. Screw four (4) refrigerator screws into the holes
securing the housing in place. The refrigerator screws
are supplied in kit (Figure 6).
If you have a two door refrigerator, repeat this process for
the other door.
1
2
3
4
1
2
3
4
Figure 5 Figure 6
Page 12
12
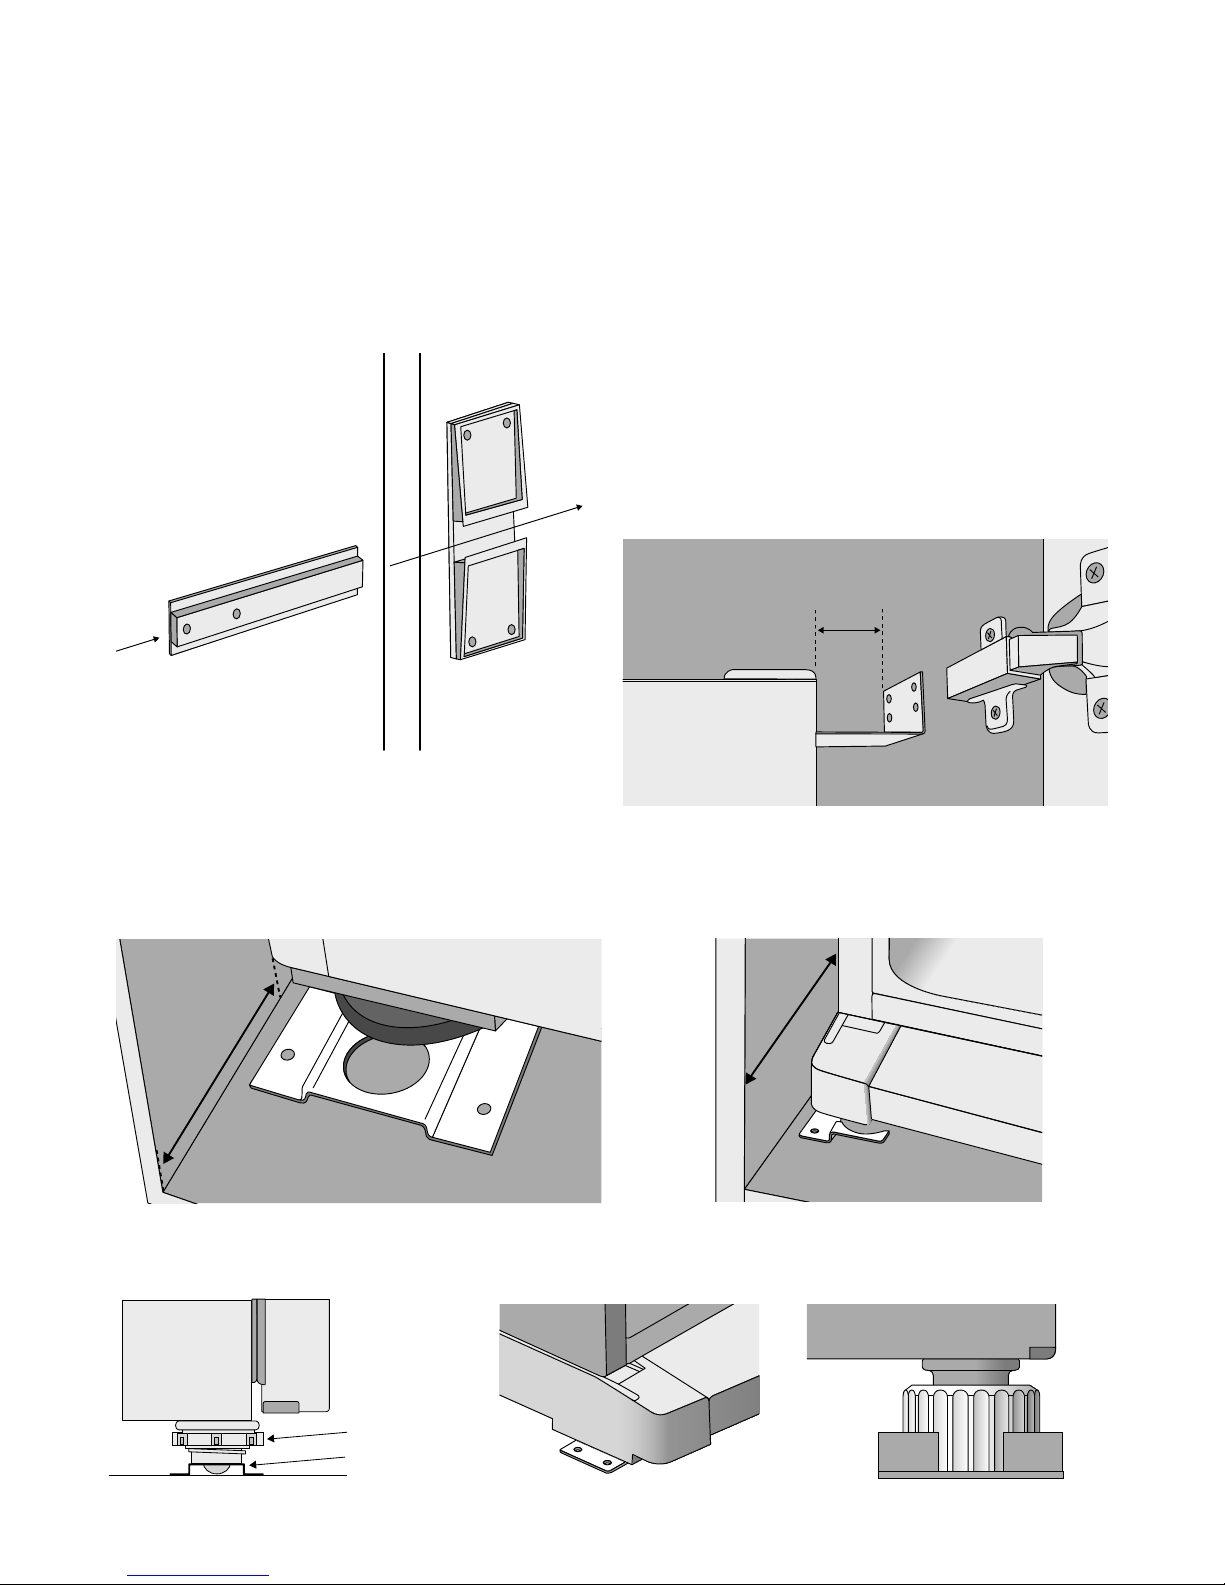
PLACING REFRIGERATOR IN CUPBOARD
1. Ensure cupboard is level and square.
2. Put refrigerator into cupboard. Use caution and
two people if necessary.
3. Insert slide bars into slide-housings (Figure 7).
NOTE: Ensure the refrigerator is level in the cupboard.
Raise the front of the refrigerator by using the height
adjusting screws.
Figure 7
REFRIGERATOR ALIGNMENT
Position the refrigerator in the cupboard so that:
1. Top hinge bracket is against cupboard wall (Figure 8).
2. Front of refrigerator cabinet (with doors open) is parallel
to and approximately 87mm from the front of the
cupboard (Figure 9. Figure 9a for selected models
only).
3. Position bottom location bracket as shown (opposite
hinge side Figure 10). Fit adjustable foot in appropriate
hole as shown and level refrigerator. (Figure 10a & 10b
for selected models only.)
NOTE: Do not screw in place yet.
NOTE: The front adjustable rollers may need raising (rotate
anti-clockwise when viewed from above) to achieve this.
74mm
Fridge
Top Hinge Bracket fitted – note the space between
the cupboard and the side of the refrigerator is to be
approximately 74mm.
Figure 8
87mm
Figure 9
Cupboard floor
Plastic roller nut
Location bracket
Figure 10
For WTB2300 & WTB2500
Figure 10a
For WTB2800, WTB3400 & WTB3700
Figure 10b
For WTB2300 & WTB2500
87mm
Figure 9a
Page 13
13
SECURING THE REFRIGERATOR IN THE
CUPBOARD
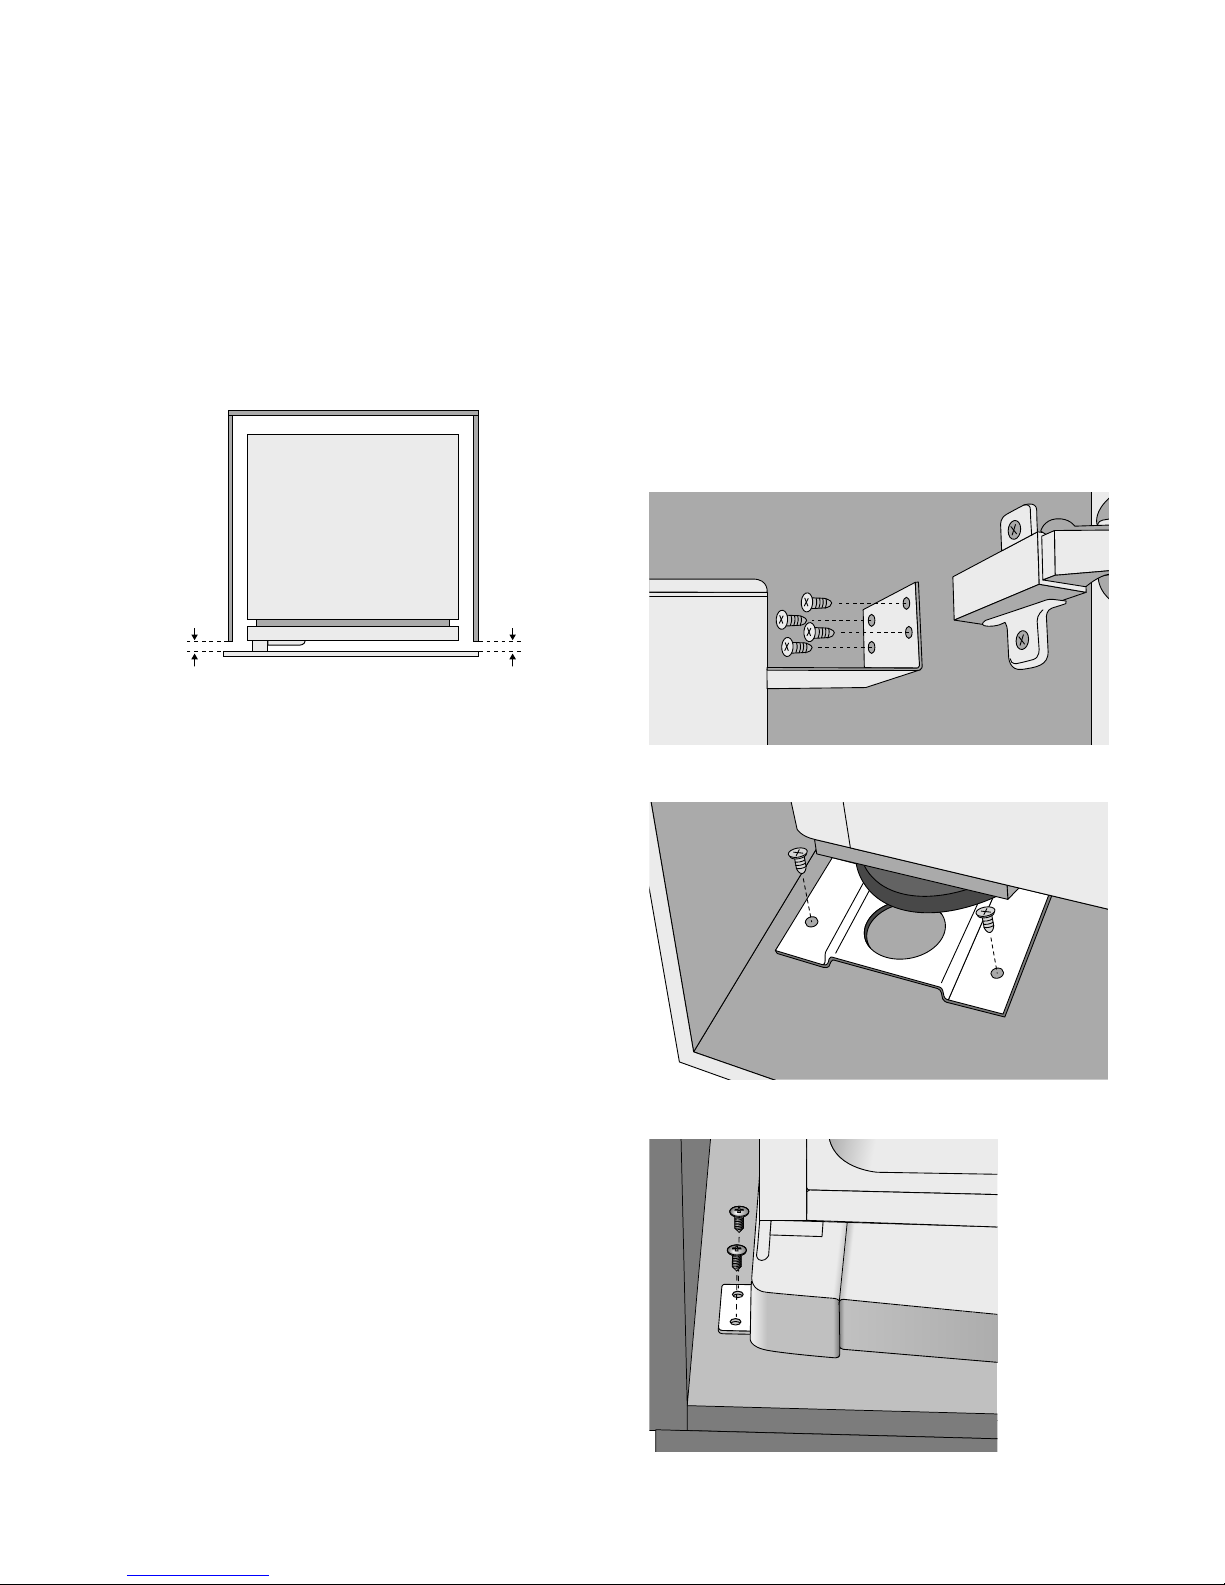
4. Slowly close the cupboard door (pushing the
refrigerator back) until it is slightly ajar, i.e. with a gap
of about 4mm (Figure 11).
You may have to reposition the refrigerator back or forward
until the 4mm gap is obtained. Ensure that the refrigerator
remains parallel as you do this. Once you have the correct
gap, proceed to the next step.
4mm hinge gap
Figure 11
NOTE: The gap is left to ensure the refrigerator door will be
allowed to close fully for a good gasket seal.
NOTE: When attaching all screws to cupboard, first drill
a 2mm pilot hole in the correct position. This will allow
easy hand insertion of self tapping screw.
Now that the refrigerator is correctly positioned:
1. Screw in top hinge bracket to the cupboard wall using
4 cupboard screws provided. This will secure the top
of the refrigerator (Figure 12).
2. Screw down foot bracket to cupboard floor with 2
cupboard screws. This will secure the bottom of the
refrigerator (Figure 13. Figure 13a for selected
models only).
Fridge
Figure 12
Figure 13
For WTB2300 & WTB2500
Figure 13a
Page 14
14
ATTACHING SLIDE-BAR TO THE CUPBOARD DOOR
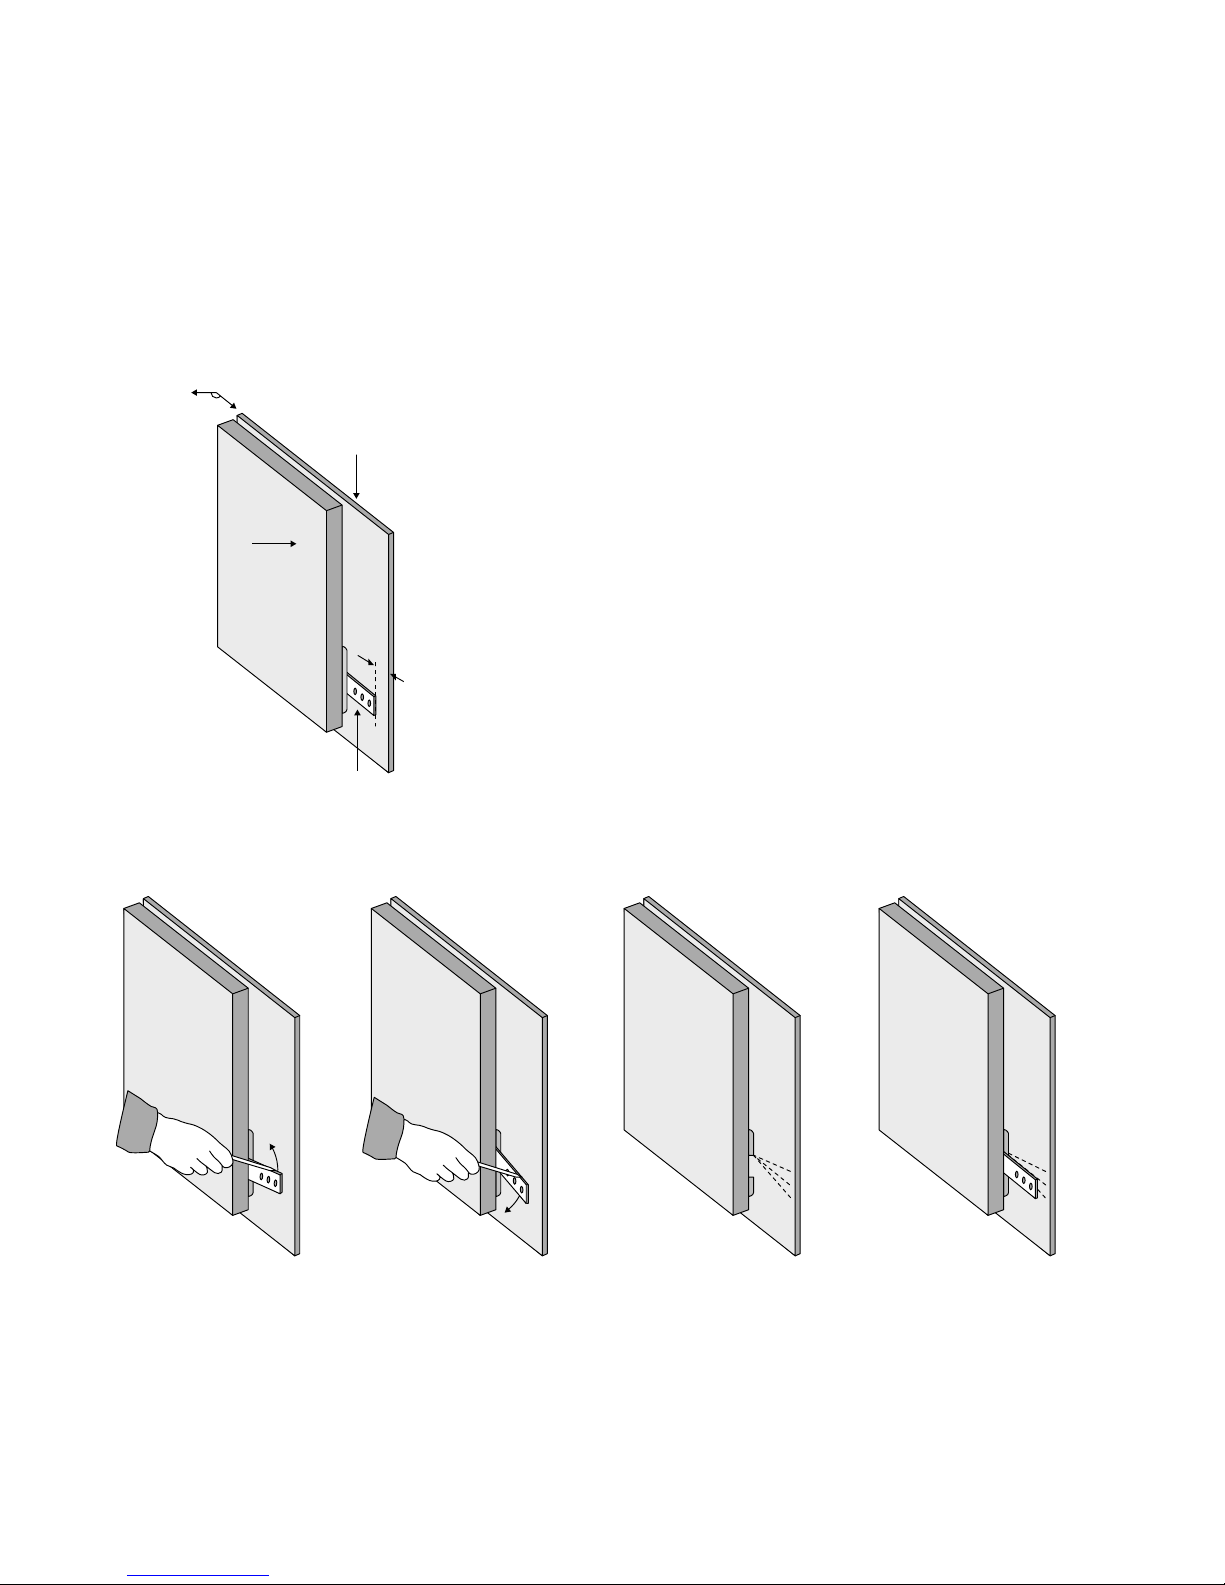
1. Fully open cupboard door (120°).
2. Open refrigerator door until it rests against the
cupboard door.
3. Position slide-bar in slide-housing so that all three
holes are visible when both doors are fully open (120°).
This position is typically 125mm from the edge of the
cupboard door (Figure 14).
Whilst slide-bar is still in housing:
4. Rotate slide-bar to uppermost alignment, mark a line
on cupboard door (Figure 15).
5. Rotate slide-bar to lower alignment, mark a line on
cupboard door (Figure 16).
6. Remove slide-bar and draw line to indicate central
alignment (Figure 17).
7. Replace slide-bar and align to centre line marked in
previous operation (Figure 18).
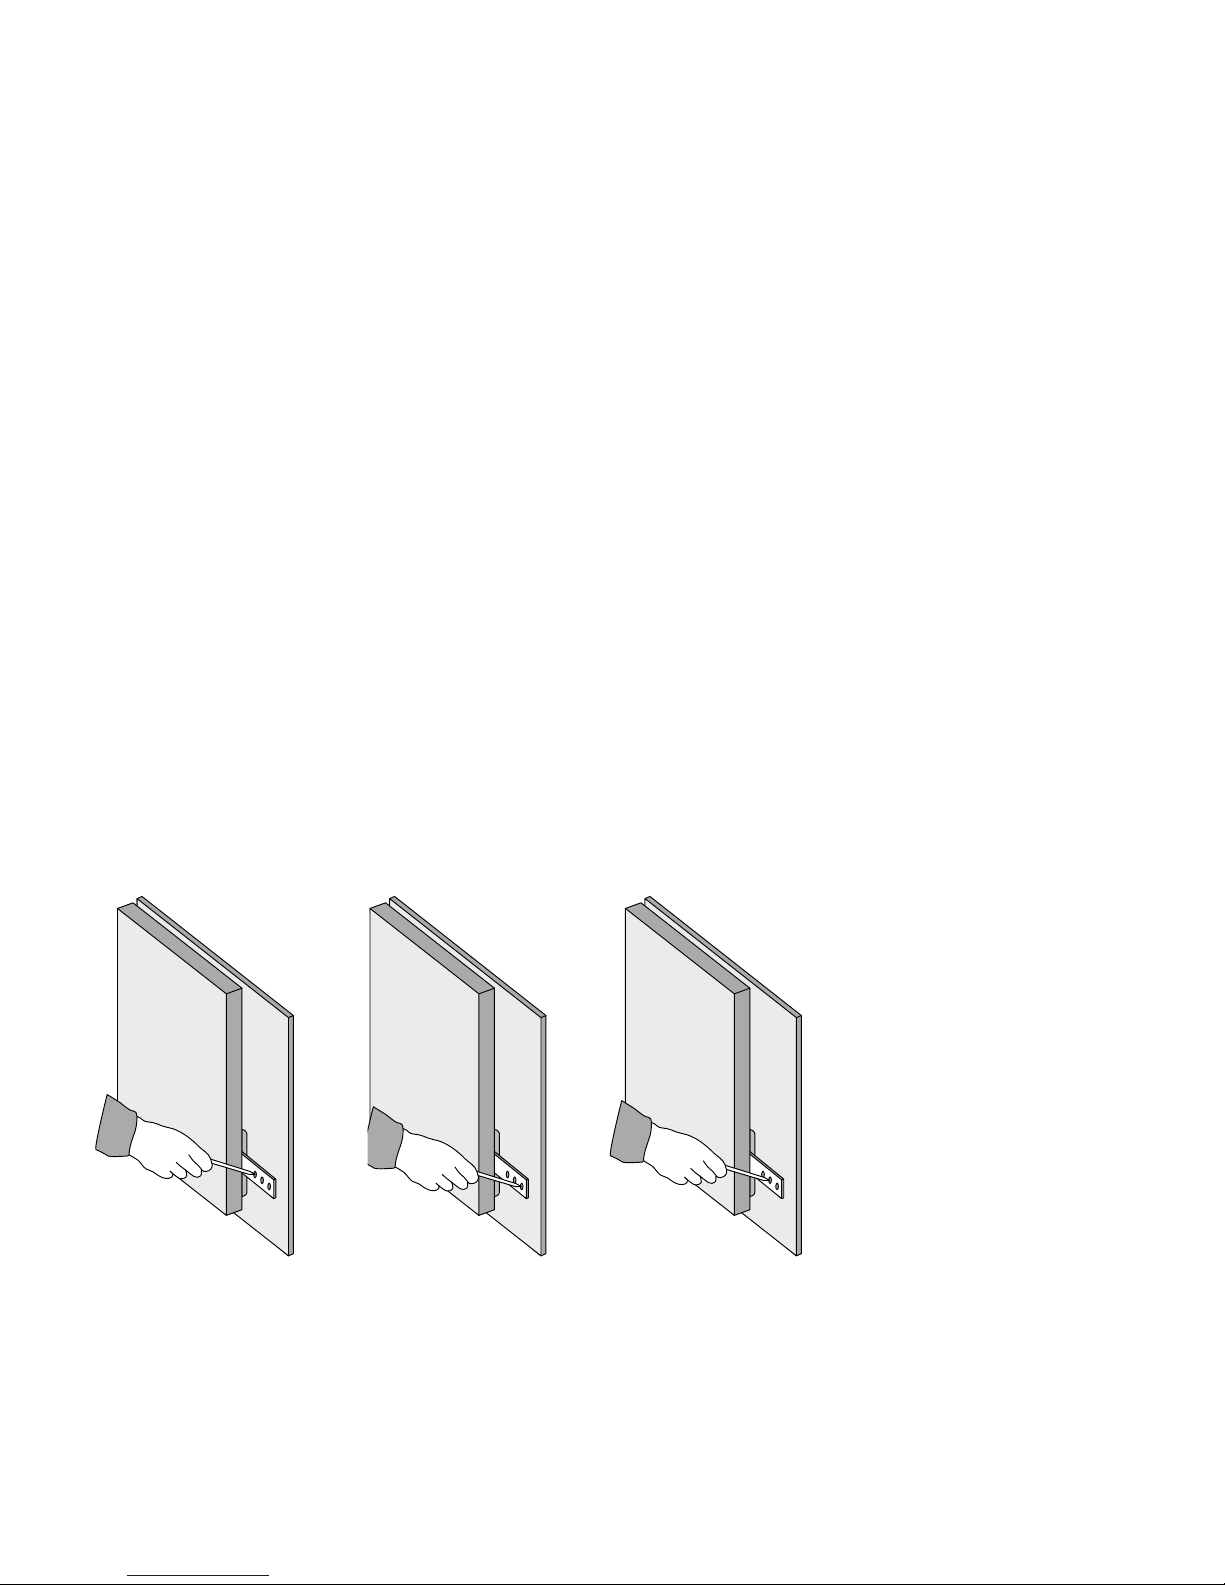
8. Secure slide-bar by driving a cupboard screw into the
centre of the inner slot (Figure 19).
Gently test closing of door.
9. If the action is smooth and the slider does not move in
relation to the cupboard door, drive another cupboard
screw into the end slot (Figure 20).
10. Open and close the door a number of times if the
action is not smooth. Loosen the screws and re-adjust
slide-bar. Once the desired smooth action is achieved
attach the central locking screws (Figure 21).
refrigerator door
125mm
slide bar
120º
cupboard door
Figure 14
Figure 15 Figure 17Figure 16 Figure 18
Page 15
15
Figure 19 Figure 21Figure 20
REPEAT THIS PROCEDURE FOR THE SECOND SLIDE BAR IF NECESSARY.
THIS COMPLETES THE INSTALLATION PROCEDURE.
CUSTOMERS PLEASE NOTE:
In the unlikely event service is required on an integrated refrigerator during the warranty period, it is the customer’s responsibility
to remove the refrigerator from the cupboard. Removal of the refrigerator from the cupboard is not covered by warranty. For full
details of the warranty terms and conditions, please refer to the information contained with your appliance.
Page 16

P/No. 1445129
© 2013 Electrolux Home Products Pty Ltd.
ABN 51 004 762 341
WKMAN_IntKit_Nov13
Electrolux Home Products Australia
telephone: 1300 363 640
fax: 1800 350 067
email: [email protected]
web: www.electrolux.com.au
Electrolux Home Products New Zealand
telephone: 0800 234 234
fax: 0800 363 600
email: [email protected]
web: www.electrolux.co.nz
The Thoughtful Design Innovator.
Do you remember the last time you opened a gift that made you say
“Oh! How did you know? That’s exactly what I wanted!” That’s the kind
of feeling that the designers at Electrolux seek to evoke in everyone who
chooses or uses one of our products. We devote time, knowledge, and
a great deal of thought to anticipating and creating the kind of appliances
that our customers really need and want.
This kind of thoughtful care means innovating with insight. Not design for design’s
sake, but design for the user’s sake. For us, thoughtful design means making
appliances easier to use and tasks more enjoyable to perform, freeing our
customers to experience that ultimate 21st century luxury, ease of mind. Our aim
is to make this ease of mind more available to more people in more parts of their
everyday lives, all over the world. So when we say we’re thinking
of you, you know we mean just that.
The “Thinking of you” promise from Electrolux goes beyond meeting the needs of
today’s consumers. It also means we’re committed to making appliances safe for
the environment - now and for future generations.
Electrolux. Thinking of you.
Share more of our thinking at www.electrolux.com.au or www.electrolux.co.nz
 Loading...