

Page 1
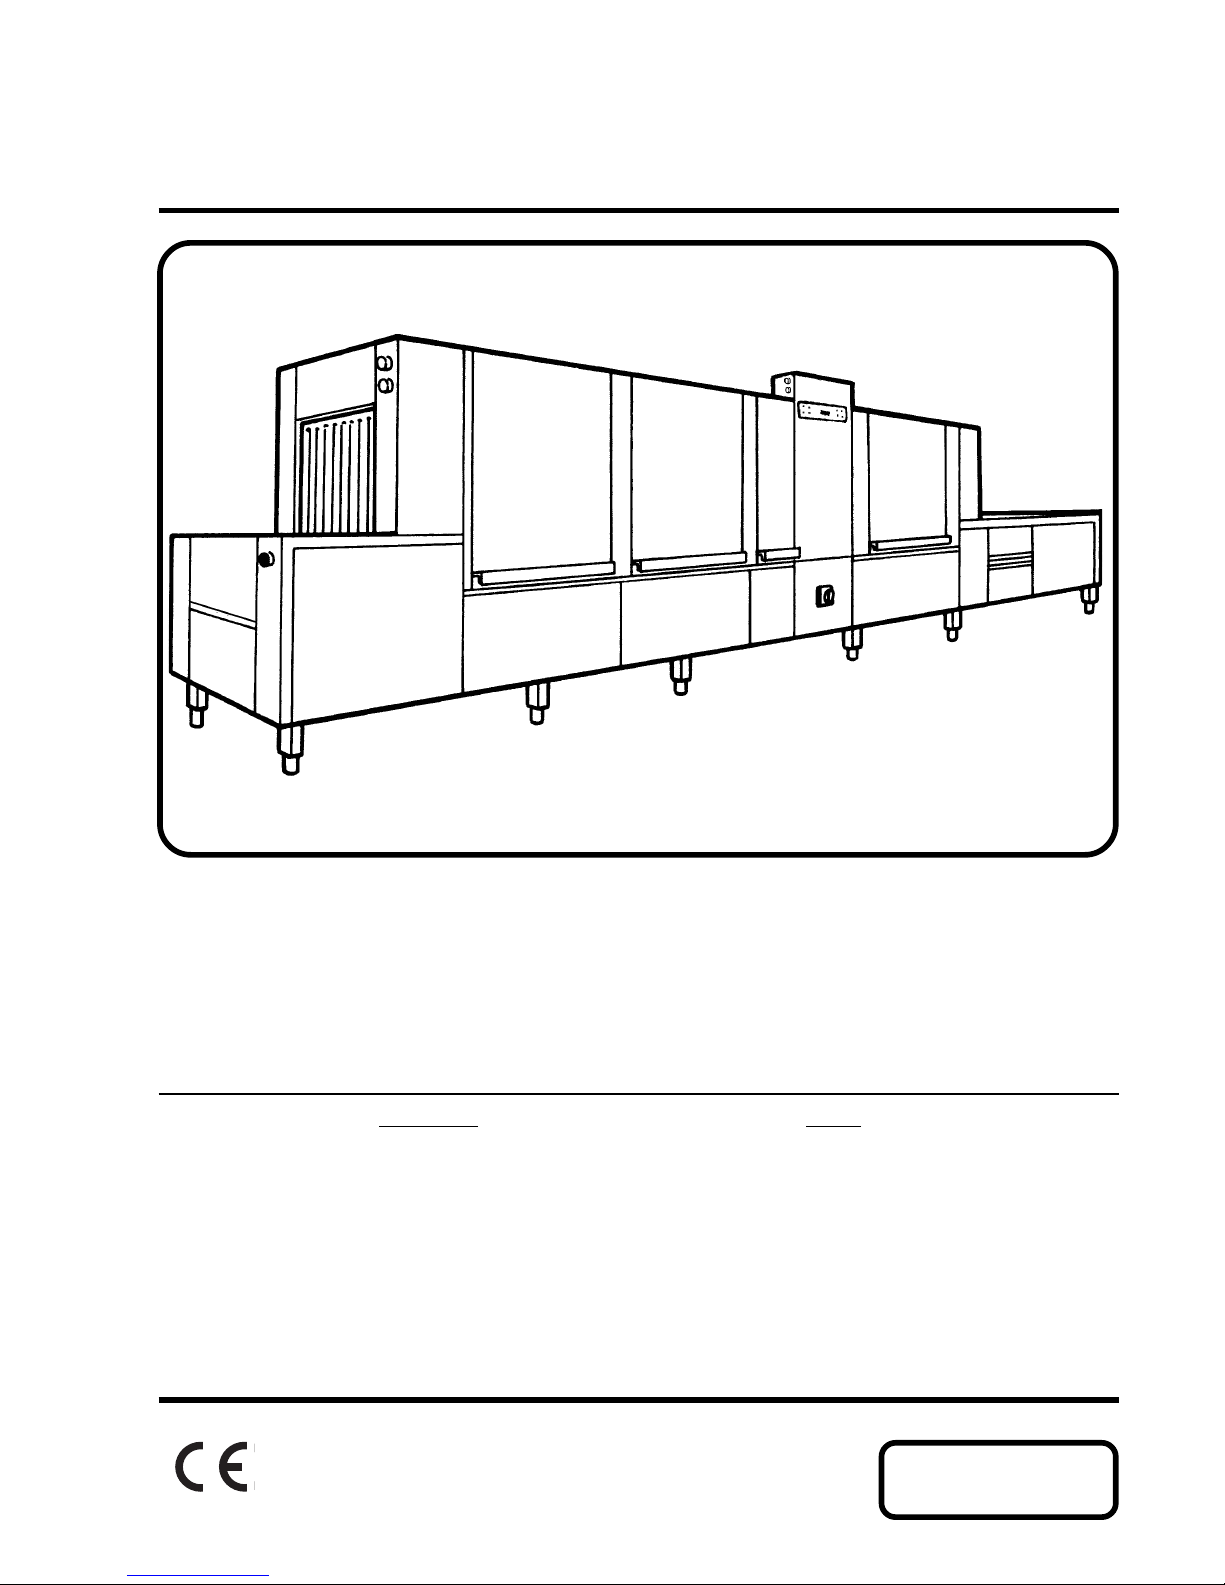
Flight Dishwasher
WT 730 WT730TS WT760 WT790
WT 730W WT730WTS WT760W WT790W
FT36 FT36TS FT50 FT72
FT36W FT36WTS FT50W FT72W
Contents Page
General product description 3-4
General instructions 4
Safety instructions 5
Technical data 5
Operator information 5-6
Warnings and alarms 6
Manual operation 6-7
‘HACCP’ function 8-9
Cleaning 10
Curtain assembly 11
DOC. NO.
ST0 12 28-02
EDITION 1 07.2001
Operating Instructions
Page 2

2
Page 3
3
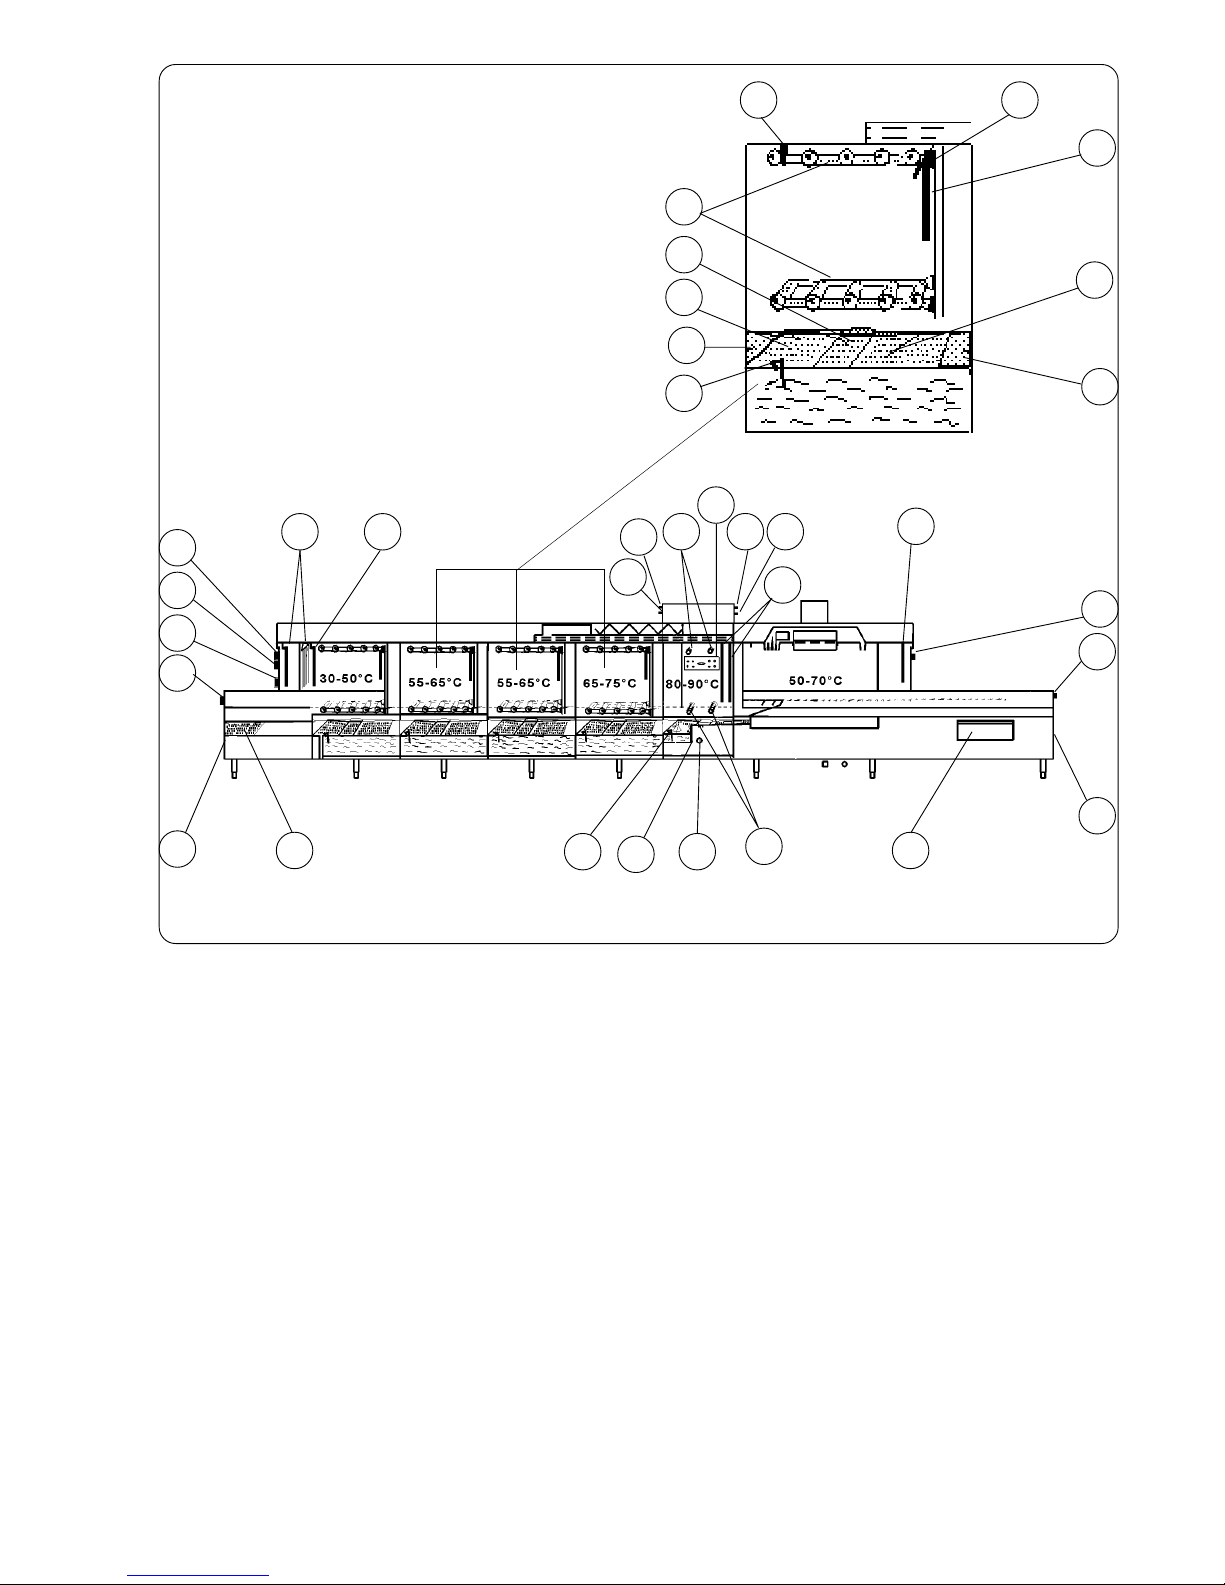
General product description
A Feed-in zone
B Pre-wash zone
C Chemical wash zone 1
D Chemical wash zone 2
E Dishwashing tank 3
F Final rinsing zone
G Drying zone
H Feed-out zone
1. ’Start & Stop’-button – feed-in/feed-out
2. Curtain 1/1 Wide
3. Signal lamp, red*
4. Signal lamp, green*
5. Emergency stop
6. Curtain, 1/1
7. Paddle, Auto start
8. Drain handle
9. Splash plate
10. Strainer plate
11. Strainer box
12. Rinse system in pre-wash, chemical wash,
dishwashing tank 3
13. Locking, rinse system
14. Curtain, 2/3
15. Rinse system, final rinse
16. Control panel
17. Inspection panel
18. Fine mesh, final rinse zone
19. Strainer plate, feed-in
20. Main switch
* For Normal (not Wide) machines, signal lamps are lo-
cated on the top of the electrical cabinet.
Fig 1.
2
3
3
16
15
7 6
4
5
1
17 19
8 18 20
15
17
5
1
17
6
ABC F G H
3
DE
4
4
1313
12
10
8
9
11
14
10
9
55-75°C
Page 4
4
General instructions
If the instructions in this and other documentation for the
equipment are not followed, it could endanger safety and
void the supplier’s guarantee and liability for the product.
• Read the instructions in this document carefully, since
they contain important safety information about installation, operating reliability, use and maintenance of the
product. Keep these instructions in a handy place so
that they are accessible to all users.
• Installation and testing must be carried out by technicians who are trained for such work, and in accordance with the manufacturer’s instructions.
• The product must be installed and connected to the
necessary services in accordance with the relevant
standards and directives.
• All servicing, maintenance and repairs must be carried out by technicians who are trained for such work.
Use only original spare parts. See the Service Instructions* and Spare Parts Catalogue*.
• This product may only be operated and maintained by
trained personnel (operators).
* Not supplied. May be ordered from the manufacturer or manufac-
turer’s representative.
General product description
Range of applications
This dishwasher is designed for washing porcelain,
glasses, cutlery, containers, trays and other kinds of
kitchen equipment. It is only to be used with the aforementioned products and must not under any circumstance be used in any other way or for any purpose
other than that stipulated in these user instructions.
This dishwasher has been designed to fulfil the highest
demands to ensure an excellent working environment and
good economy. It also operates at a low noise
level and has extremely low heat output.
The electronics provide a clear overview of the washing
process.
The control panel’s display (fig. 2A/B) warns the user if
anything is wrong, for example if the temperature or water
level is too low, if the pump or fan motor is not working or
if any of the machine’s doors are open. If an alarm has
been triggered, the red signal lamp will appear (3) (fig. 1).
The machine’s opening measurements:
Normal Wide
660x420 mm 804x570 mm
Each metre of washing belt can accommodate, for example:
Normal Wide
32 large plates, 48 large plates,
48 side plates, 72 side plates,
64 small dishes, 96 small dishes,
2 normal dishwashing racks 2 normal dishwashing racks
16 serving trays 16 serving trays
The machine has two different belt speeds. The higher speed
is designed for normal and slightly soiled tableware, while
the lower speed is designed for heavily soiled tableware
and for materials and shapes that are difficult to dry.
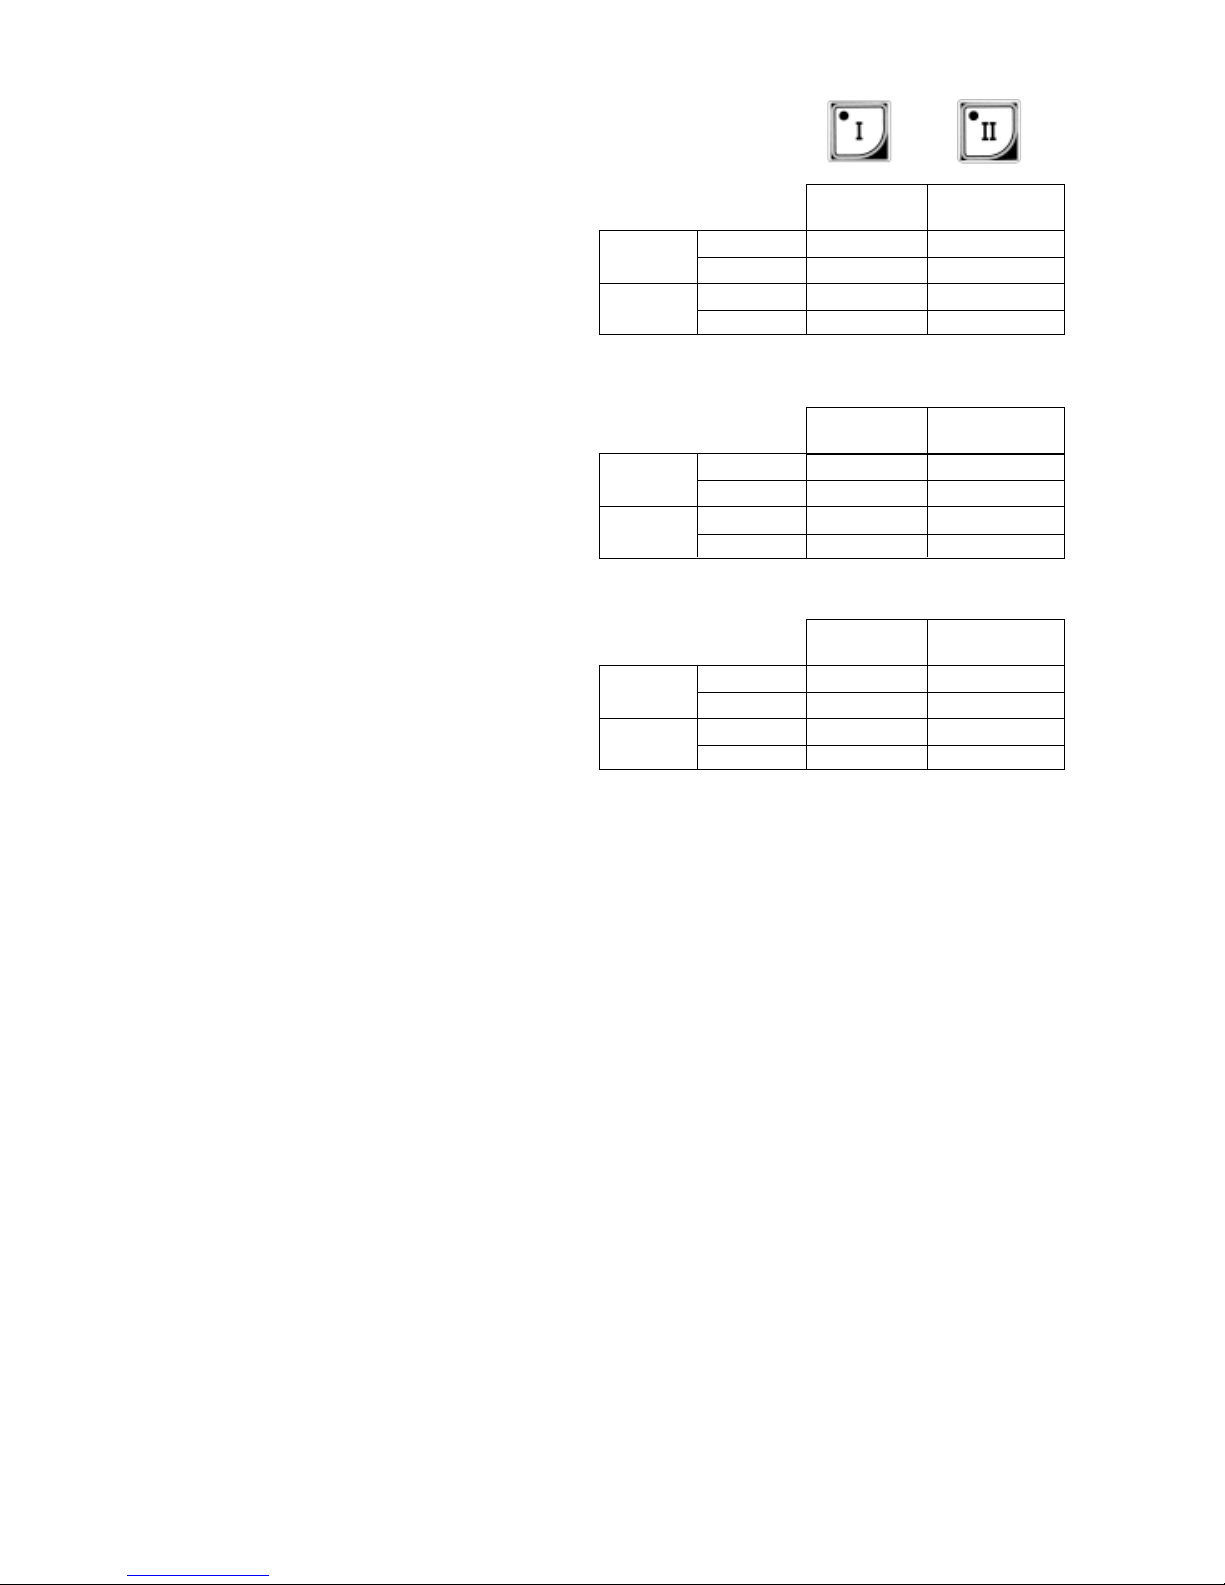
Washing capacity
WT730 Low feeding High feeding
FT36 speed speed
Normal plates/hour 1400/1800 2800/3600
racks/hour 84/108 168/216
Wide plates/hour 2100/2700 4200/5400
racks/hour 84/108 168/216
WT760 Low feeding High feeding
FT50 speed speed
Normal plates/hour 2500 5000
racks/hour 150 300
Wide plates/hour 3700 7500
racks/hour 150 300
WT790 Low feeding High feeding
FT72 speed speed
Normal plates/hour 3600 7200
racks/hour 216 432
Wide plates/hour 5400 10800
racks/hour 216 432
Energy and water consumption
If your dishwasher is equipped with the complete energy
saving device ESD, which consists of a water heat exchanger in combination with a condensing plant, surplus heat from
both the waste air and the final rinse water is used.
The dishwasher also works with a special water return
flow via the water heat exchanger. This means that the
amount of water that is replaced, and to which new detergent must be added, only amounts to 100 litres/hour.
Hot water is used when the machine is filling its tanks at
the beginning of the washing cycle.
During operation a machine equipped with ESD uses only
600 litres of cold water/hour.
A machine without ESD uses approx. 320/420* litres of
hot water in the final rinse zone.
* Wide model
Each washing zone is equipped with automatic temperature regulation. The water temperature in each dishwashing tank can be read on the panel’s display.
The dishwashing tanks are emptied using a handle. The
drain closes automatically when the door is closed to ensure that filling of the tanks with water cannot take place
when the drain is open.
The wash arms can be lifted out so that you can inspect
and clean them.
The fine mesh in the final rinse zone prevents the DUO
ramp’s nozzles from becoming clogged.
Page 5
5
DUO rinsing**
The final rinse operates using ‘DUO rinsing’. The clean, hot
water from the booster goes directly to the second of the
final rinse’s two rinsing ramps, before being pumped up and
then rinsed through the first rinsing ramp. 100 litres of the
used rinsing water passes to the dishwashing tank.
** Only in TOP machines.
Built-in safety
At the feed-in/feed-out zones there is a start & stop function(1) and an emergencystop function (5) for both the
dishwasher and the conveyor belt (fig. 1).
There is also an automatic end limit switch, which stops
the belt if clean products have not been removed before
the end of the feed-out zone.
CE Directives
This dishwasher is manufactured in accordance with EU
directives MD 89/392/EEC ANNEX IIA, EMC 89/336/EEC,
LVD 73/23/EEC, std EN-60-335-1 and 60-335-2-58, and is
checked to ensure that it complies with CE labelling requirements.
Detergent injectors
Only detergent injectors complying with the relevant directives may be connected to the machine. Detergent injectors must not be connected in such a way that they
impair the operation or the safety of the machine.
Warning! Electricity!
Place a sign on the electrical cabinet. The door of the
electrical cabinet and other cover panels may only be
opened by technicians who are trained for such work.
Safety instructions
• Switch off the power before attempting to rectify faults
or operating problems or if tableware becomes stuck
or falls into the machine.
• Press the ’From’ button (fig. 2A/B).
• Switch off the ’Main switch’ (20) on the final rinse
tank F (fig. 1).
• If the dishwasher is connected to the mains supply via
a fully isolated switch (as recommended by the supplier), the power supply can be switched off using this.
Warning!
• Do not spray water straight at the control panel or nearby.
• If water comes into contact with live components it
could be fatal. Always take care when cleaning close
to electrical components.
• Use a damp cloth for cleaning.
For more information refer to the section on Cleaning.
Warning! Crushing risk!
Do not place your hands/arms in the feed-in/feed-out opening or down in the conveyor during operation.
Technical data
The rating plate
which states the dishwasher’s serial number is located at
the bottom of the final rinse tank, on the inside of the cover
of the electrical cabinet, as well as on the Manufacturer’s
Declaration which accompanies the machine on delivery.
Noise level: < 70 dB at 50 m
2
SABIN
Operator information
• Before working with the product, the operator must
- be fully aware of how to operate and maintain the
machine.
- locate each warning sign, understand their purpose,
and note where the emergency stop buttons are.
- read the safety instructions and warning texts extremely carefully.
• Read the General Instructions.
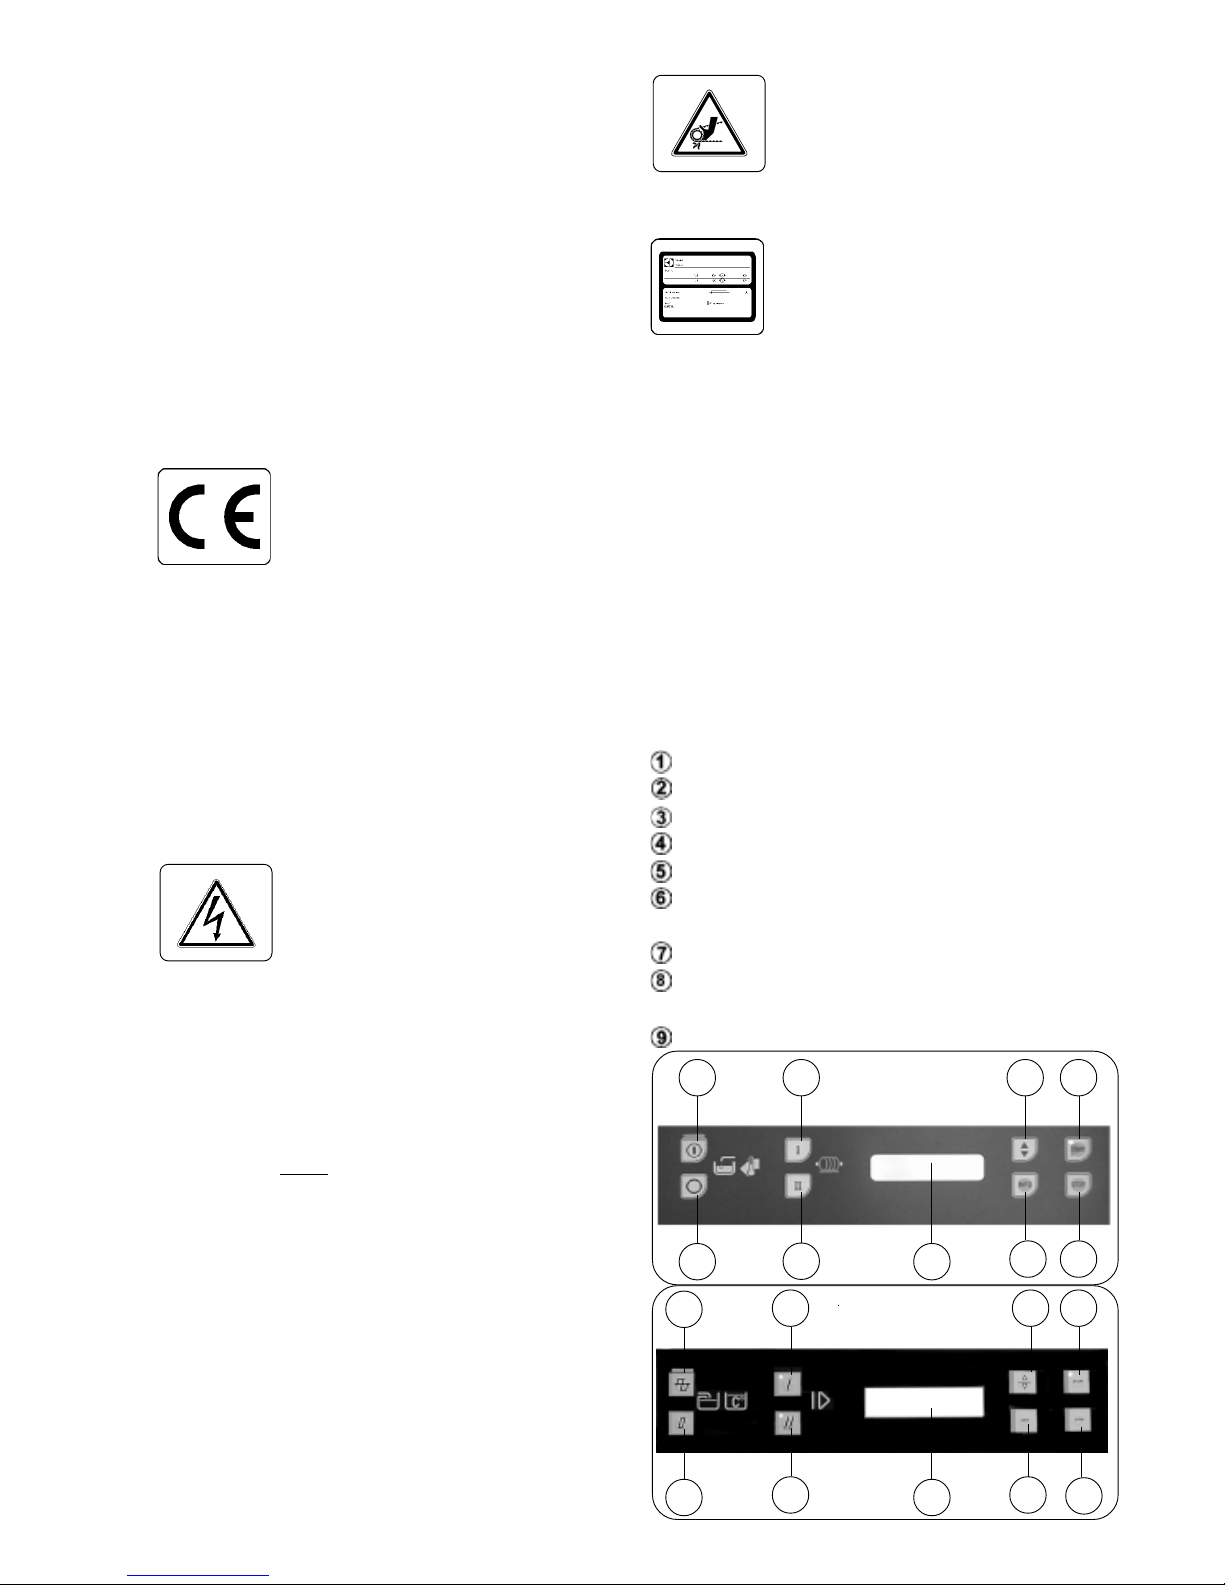
Indications, control panel (fig.2A/B)
= On button, with indicating lamp
= Off button
= Low speed button, with light-emitting diode (LED)
= High speed button, with light-emitting diode (LED)
= Display (Message/alarm)
= Variable UP/DOWN
(Look through menu/adjust value)
= INFO button (Select menu)
= START button(Wash cycle) with light-emitting
diode LED
= STOP button(Wash cycle)
fig. 2B
4
2
3 6 8
7
9
1
5
fig. 2A
4
2
3 6 8
7 9
1
5
Page 6
6
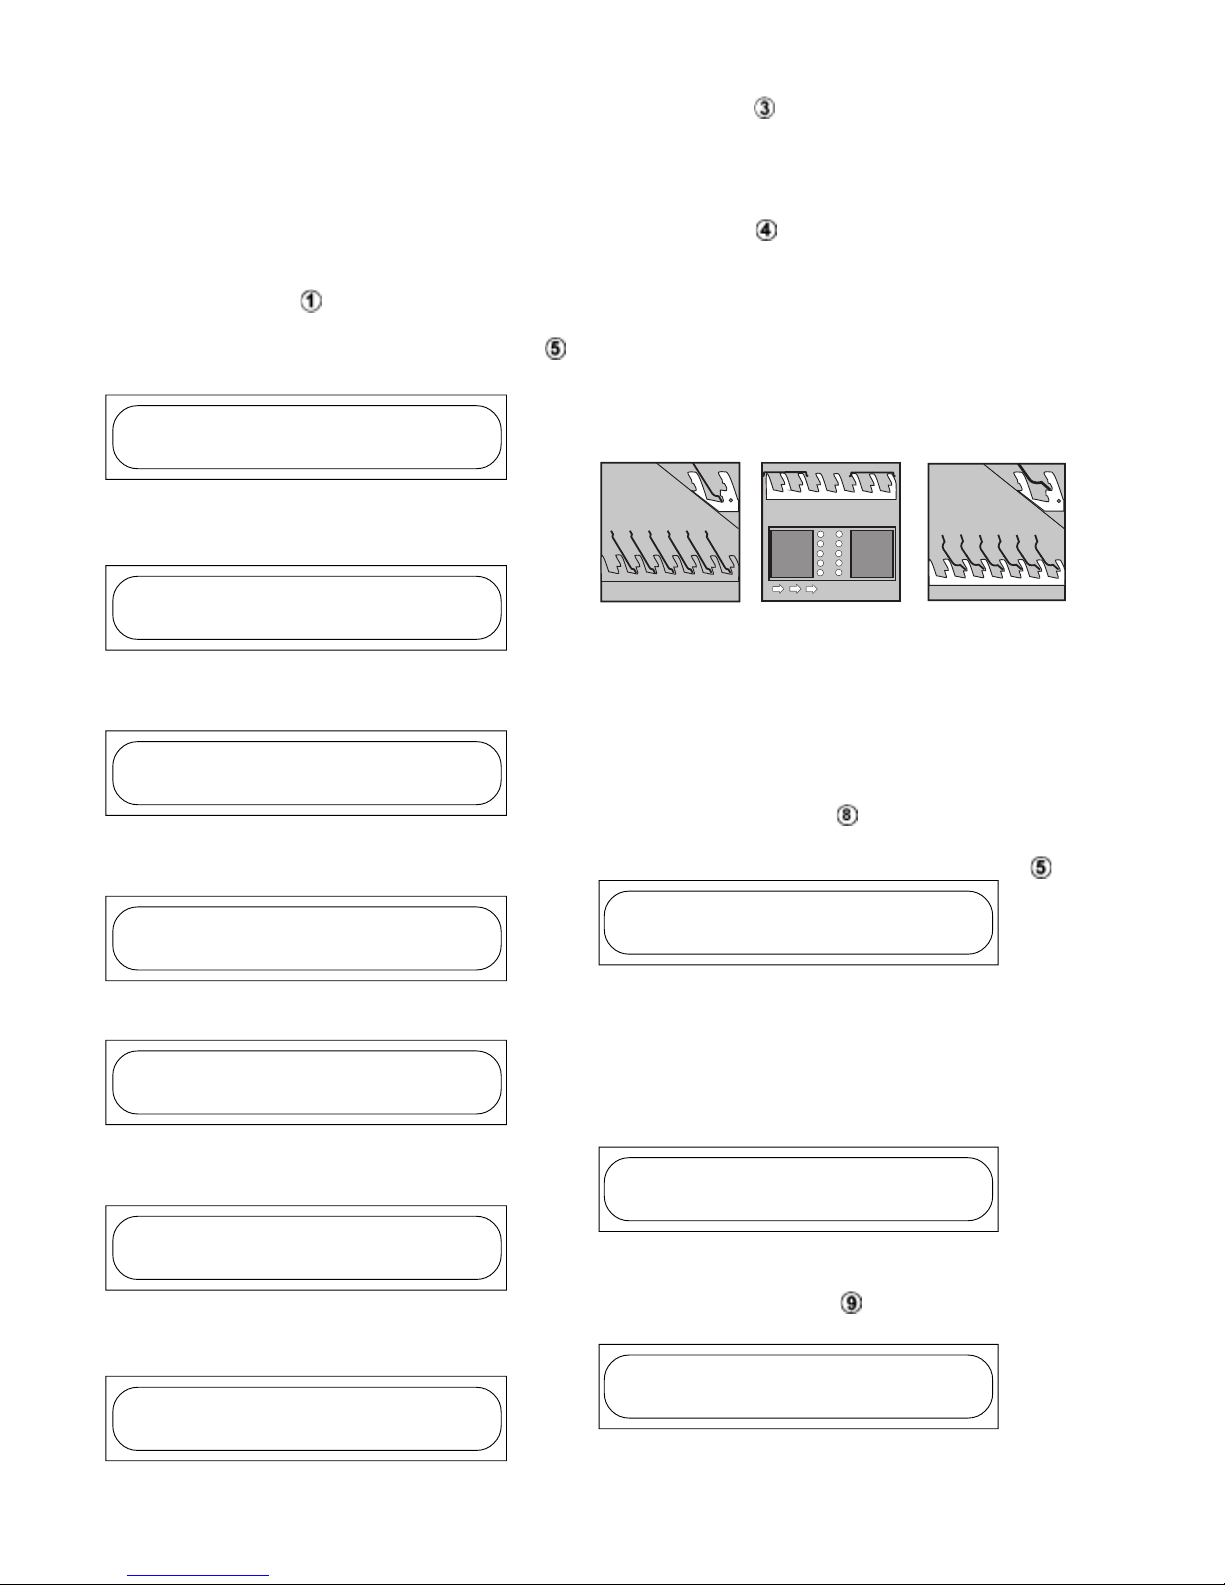
Before washing (fig.1)
• Ensure that the strainer plates, strainer boxes, rinse
system and curtains are in their respective places in
the machine.
Note that the rinse system must be locked (13).
• The fine mesh (18) must be put into place in the final
rinse tank.
• Close the doors. The drain plug seals automatically
when the door is closed.
• Switch on the’Main switch’ (20).
• Press the On button and the green indicating lamp
will come on. (fig. 2A/B)
The following message may appear on the panel’s display .
PROGRAM VERSION
XXXX-XX-XX XX.X
After around four seconds, the following messages may
appear on the panel:
WAIT....
CLOSE DOOR
Close all covers including the feed-in/feed-out and drying
zones.
WAIT....
FILLING UP
Make sure that the taps are open and wait for the
dishwashing tanks to fill.
WAIT....
HEATING UP
Wait until the temperature has reached the preset value.
WAIT....
READY TO OPERATE
The machine is ready to begin when this message
appears.
TIME TO ORDER
SERVICE
If this message appears, it is recommended that you call
the technical service department.
TIME TO ORDER
FULL SERVICE
If this message appears, it is recommended that you call
the technical service department.
During washing (fig. 2A/B)
• Press button I for ’Low feeding speed’ and the
red LED indicating lamp will come on.
This is used for heavily soiled tableware and for materials and shapes that are difficult to dry. Recommended for the ’HACCP’ function.
• Press button II for ’High feeding speed’, and the
red LED indicating lamp will come on.
Used for normal and slightly soiled tableware.
Place tableware on the belt.
• Flat plates, side-plates and serving trays are placed
on the belt’s lower position. fig. 3
• Deep plates are placed on the upper part of the belt to
maintain the correct angle during the washing process, fig. 5
• Cups, glasses, bowls and cutlery are placed in the
racks above the conveyor belt.
fig. 3 fig. 4 fig. 5
• When washing 1/1- food container (530x325), you
must place it with its wider side facing the conveyor
belt’s direction of travel. To make draining easier, 60100 mm must be left between each container. fig. 4.
• Remove any food scraps from plates and trays.
• Rinse the tableware with cold or luke-warm water us-
ing the pre-rinse spray unit.
• Press the START button , to start the feeding system, pumps and the automatic washing program.
The following message may appear on the display :
WASHING (EFF)
XXXX(XXX)
• The pumps stop when the preset time has expired.
The feeding system will still be operating. The pumps
will restart when the tableware reaches the entrance
of the machine.
If the tableware reaches the ‘End limit switch’ at the end of
the feeding system, the following message will appear:
END LIMIT
REMOVE CARRIER
• Remove the tableware or racks to resume the washing process.
• Press the ’STOP’ button , and the following mes-
sage will appear:
STANDBY...
READY TO OPERATE
• Washing will stop, but the machine will still be operating and will retain heat.
• It is more economical to use this function during short
washing pauses.
Page 7
7
Warnings and alarms
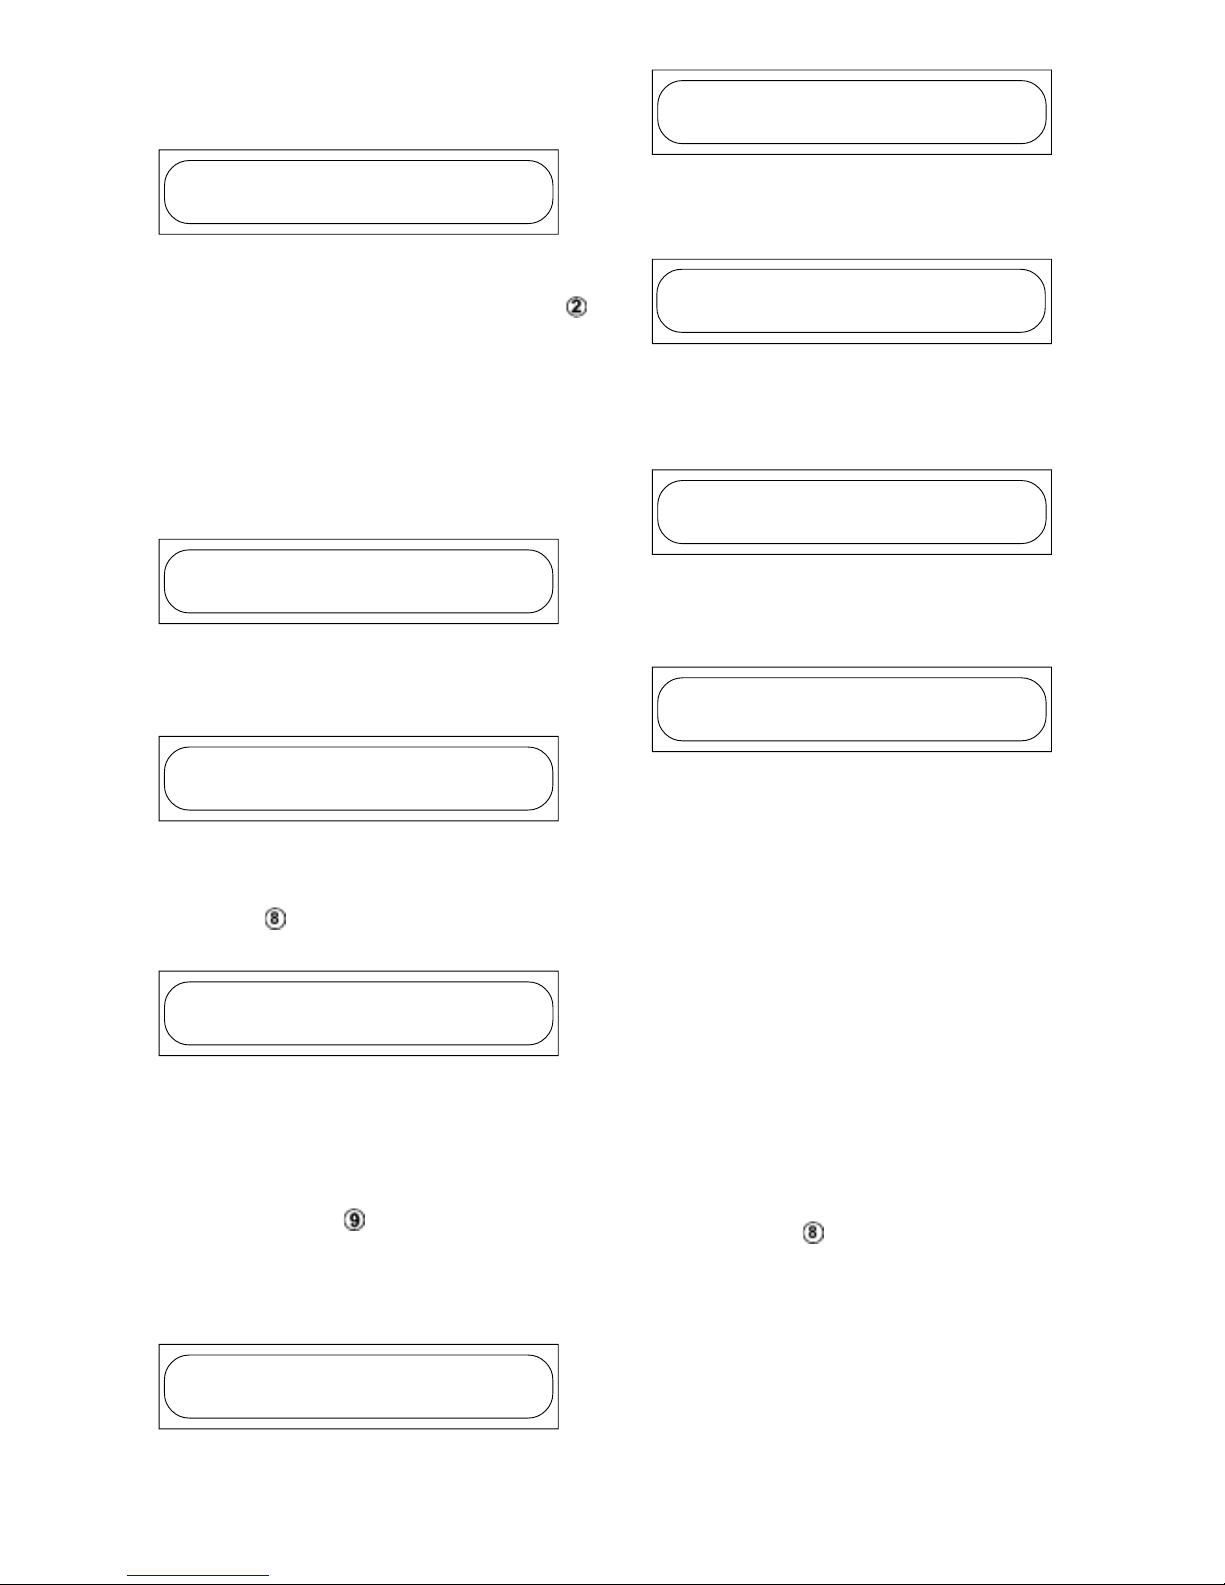
The dishwasher will give a warning or register an alarm in
the event of a function fault or operational stoppage.
FEEDING ALARM
XX:XX
FEEDING ALARM indicates that the feeding system has
stopped:
• Switch off the machine by pressing the ’OFF’ but-
ton on the control panel. (fig. 2A/B)
• Switch off the main switch (20). (fig.1)
• Open the covers.
• Check if anything has become stuck in the machine
and remove it.
• Restart the dishwasher.
In all other cases, call the technical service
department.
END LIMIT
REMOVE CARRIER
END LIMIT ALARM indicates that the feeding system
has been halted by the end limit switch:
• Remove the tableware or racks from the conveyor
belt at the feed-out section to resume washing.
WAIT....
CLOSE DOOR
WAIT....CLOSE DOOR ALARM indicates that one or
more doors are open.
• Check and close all doors and press the
’START’ or ’Start & Stop’ (1) button at the feed-in/
feed-out sections to resume washing.
DISHWASHING TANK X LOW
xx:xx-xx:xx (xx)
TEMPERATURE ALARM indicates that one or more zones
are experiencing High or Low temperatures. This registers
an alarm for the pre-wash, chemical wash 1 and 2* and
power rinse zones*, as well as final rinsing, ESD and drying.
The display shows the zone in question, as well as the
time and the temperature at which the alarm was given.
• Press the ’STOP’ or ’Start & Stop’ (1) button at
the feed-in/feed-out sections to stop the machine in
standby mode. Wait until the machine reaches the preset temperature.
* WT760, WT790, FT50, FT72
WATERLEVEL LOW
xx:xx-xx:xx (xx)
WATERLEVEL LOW ALARM indicates that one or more
zones has a LOW WATER LEVEL.
Stop the machine in standby mode and wait until the dishwashing tanks fill up.
PUMP ALARM
xx:xx-xx:xx (xx)
PUMP or FAN ALARM indicates that one or more
WASH PUMPS or VENTILATION fans are not working.
• Contact the service department.
DETERGENT ALARM
XX:XX
DETERGENT ALARM ** indicates that the DETERGENT
HAS RUN OUT.
• Fill up.
CONTACT TIME LOW
xx:xx-xx:xx (xx)
CONTACT TIME LOW ALARM ** indicates that the washing contact time is too short.
• Check feeding speed.
S.P. X LOW FLOW
xx:xx-xx:xx (xx)
LOW FLOW ALARM ** indicates that the water flow is
too low in one or more of the connections.
• Contact the service department.
** Optional
For all other alarms, it is recommended that
you the contact the service department.
Manual operation mode (fig.2A/B)
NOTE: Manual operation is not a normal washing program
and should be used ONLY during TEMPORARY interrup-
tions, operational stoppages or when filling the machine’s
booster during installation or repair.
To start the dishwasher in Manual operation mode, press
the START button on the control panel for more than 3
seconds. The LED will start to flash. The flashing LED
indicates that Manual operation is On.
In the Manual operation mode, washing and final rinsing
are always switched on.
In the Manual operation mode, it is also possible to start
the machine before the temperature reaches the preset
value (Wait for heating up). All alarm functions operate as
normal.
Page 8
8
To pause during washing
• Press the ’Stop’ (fig.2A/B) or the ’Start & Stop’(1)
button for the feed-in/feed-out (fig.1) sections.
The feeding and washing processes will stop, but the
machine will still be operating in the ’Standby’ mode
and will retain heat.
• If necessary, check and empty the strainer boxes in
the dishwashing tanks. You can replace the tank water
during a pause in washing. Open the drain, and the
tanks will empty. Close the door and the tanks will
refill with water.
After washing
Switch off the machine.
• Press the ’Off’ button . (fig.2A/B)
• Open the covers.
• Empty the water by pulling up the drain handle in each
dishwashing tank and final rinse tank.
’HACCP’ function (fig.2A/B)
The dishwasher’s electronics are designed to collect data
to ensure safer operation. It registers all deviations and
any operational stoppages and makes it possible to identify problems and take action against them.
The data collected can be printed out or transferred to a
computer (PC).
* Optional (contact to PC or printer)
Standby mode (Standby)
In the standby mode, if you press the INFO button first
and then the UP/DOWN button, the following menus and
information can be accessed:
• Program version
• Temperature (Current and preset value)
• Flow limiter, settings**
• Statistics (Today’s washing)
• Alarms (Today’s washing)
• Time to service.
•’HACCP’ protocols**
Print or transfer protocol to the computer
Delete protocol
Washing mode
By pressing the INFO button first and then the UP/DOWN
button, the following information can be accessed:
• Washing efficiency
Current Alarm
• Current and limit values for:
Temperature
Speed
• Electrical consumption**
• Statistics (Today’s washing)
• Alarms (Today’s washing)
** Optional
Set-up mode
In the set-up mode, by pressing the INFO button &
the STOP button at the same time for more than5
seconds, the following information can be updated:
• Date & Time
• Language
• Process collected data (transfer/delete protocol)
NOTE. For the ’Access code’, contact an authorised serv-
ice company.
Select language
The following languages can be selected:
English (English)
Swedish (Svenska)
German (Deutsch)
Italian (Italiano)
French (Français)
Finnish (Suomi)
Dutch (Nederlands)
Spanish (Español)
To select a language: (fig. 2A/B)
• Press the ’ON’ button to start the machine.
• Press the ’INFO’ button and the ’STOP’ button
at the same time for more than 5 seconds, and the
following message will appear:
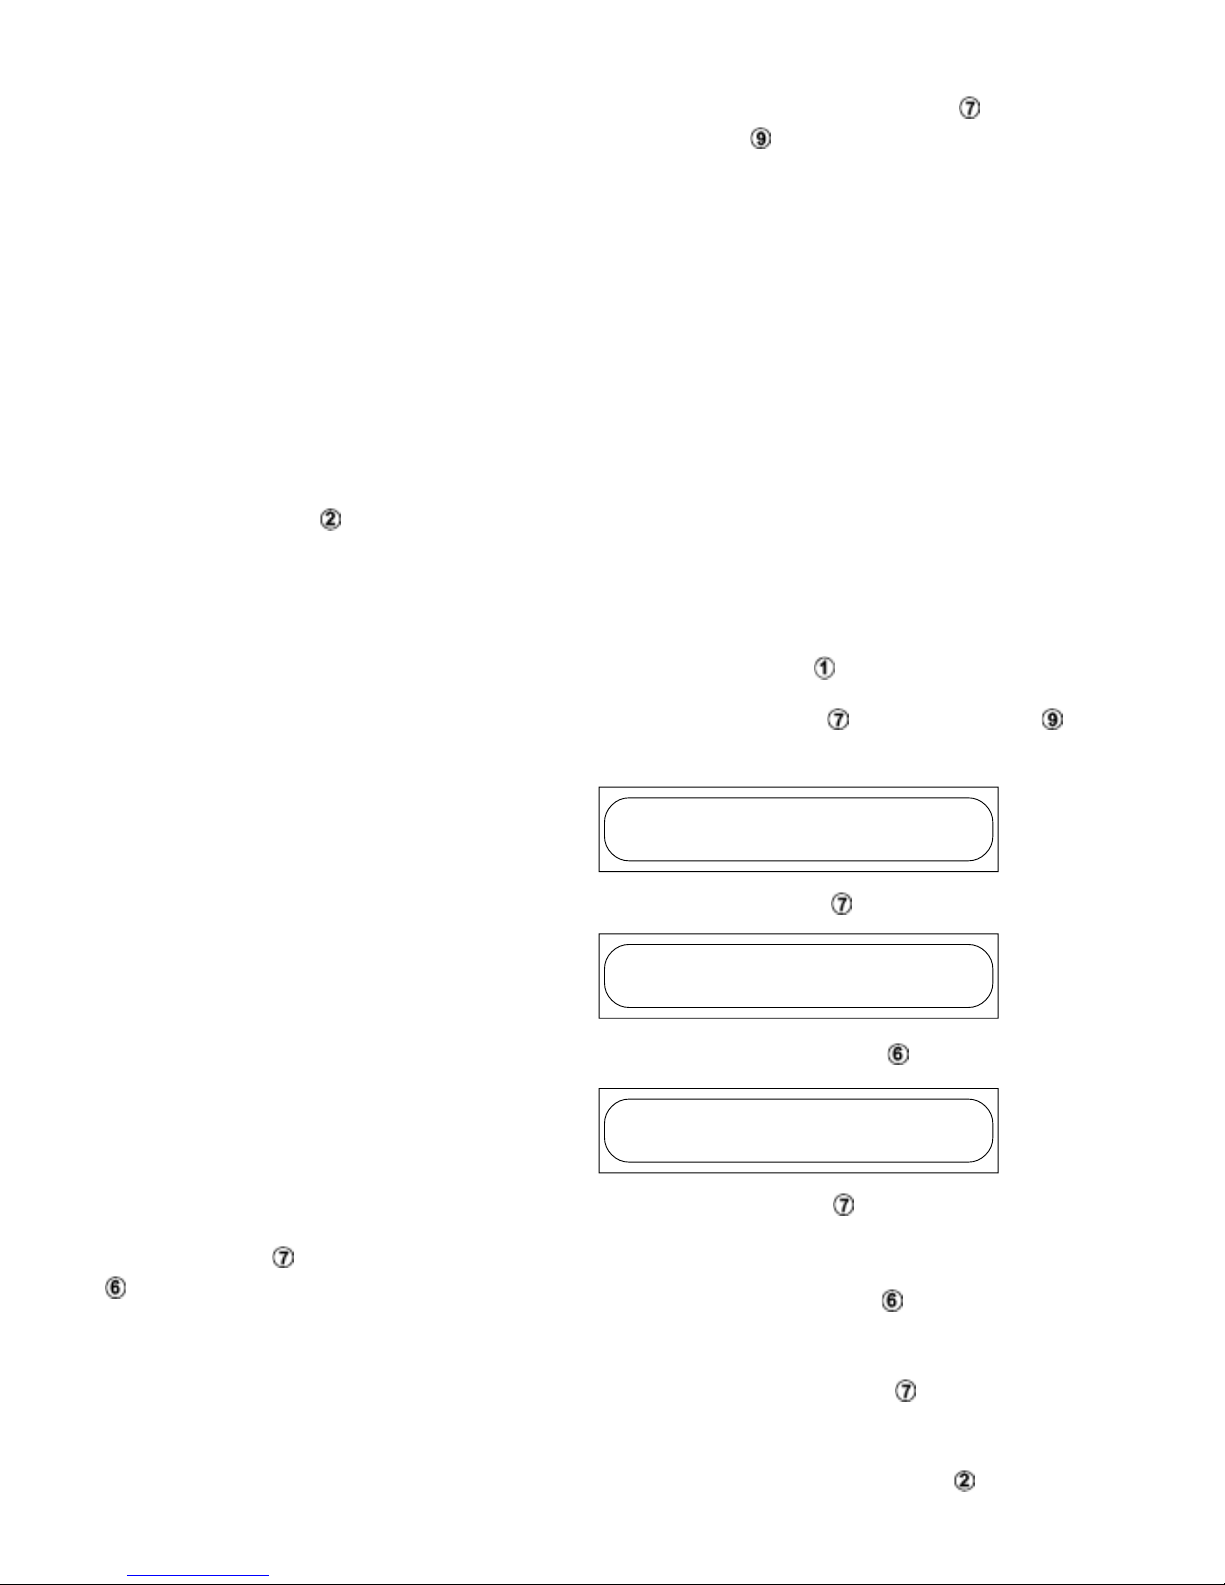
SETUP
DATE & TIME
• Press the ’INFO’ button once, and the following
message will appear:
SETUP
LANGUAGE
• Press the ’UP/DOWN’ button , and the following
message will appear:
SELECT
SWEDISH
• Press the ’INFO’ button next to the name of the
language, and the symbol will appear.
• Press the ’UP/DOWN’ button , until the desired
language appears.
• Finally, press the ’INFO’ button to save your
chosen language.
To exit the set-up mode, press the ’OFF’ button.
Page 9
9
Internal cleaning
• Switch off the machine by pressing the ’OFF’ button
. (fig.2A/B)
• Switch off the ’main switch’ (20) (fig.1).
• Open the covers.
• Empty the water and pull up the drain handle (8) in
each dishwashing tank. (fig.1)
• Remove the strainer boxes (11), strainer plates (10)
and rinse thoroughly
• Remove the rinsing system (12), rinse thoroughly and
clean any clogged nozzles. If necessary, loosen the
nuts at the end of the spraying tubes and rinse.
Screw the nuts back on and tighten securely.
• Remove curtains (2), (6), (14) for cleaning.
• Remove the fine mesh (18) in the final rinse tank (F)
and rinse thoroughly.
• The machine rinses internally to ensure that no deter-
gent or food scraps are left.
• Open the inspection panels (17), remove the strainer
plate and rinse thoroughly.
NOTE! Be particularly careful when cleaning the fine mesh
in the final rinse tank.
External cleaning
• Also clean the equipment’s external stainless steel
surfaces with hot water. If necessary you can also
use a neutral detergent, and a soft brush or sponge.
• Wipe the control panel with a damp cloth.
Weekly cleaning
• Clean the inside of the covers by rinsing them with a
hose through the feed-in/feed-out openings or through
the cover in the tank next to them.
• Clean the pump strainers.
• Remove the final rinse arms (15) and clean thorough-
ly (fig.1).
If the equipment is not in use
Follow the instructions below if the equipment is not used
for a long period of time.
• Switch off the main switch (20). (fig. 1)
• Clean the machine externally and internally, as well
as its detachable parts. See Cleaning.
• Turn off the water supply.
• Open the covers, lids and doors so that air can circu-
late. This prevents mould and odours from developing
in a closed environment.
Adjust Time & Date (fig.2A/B)
• Press the ’ON’ button to start the machine.
• Press the ’INFO’ button and the ’STOP’ button
at the same time for more than 5 seconds, and the
following message will appear:
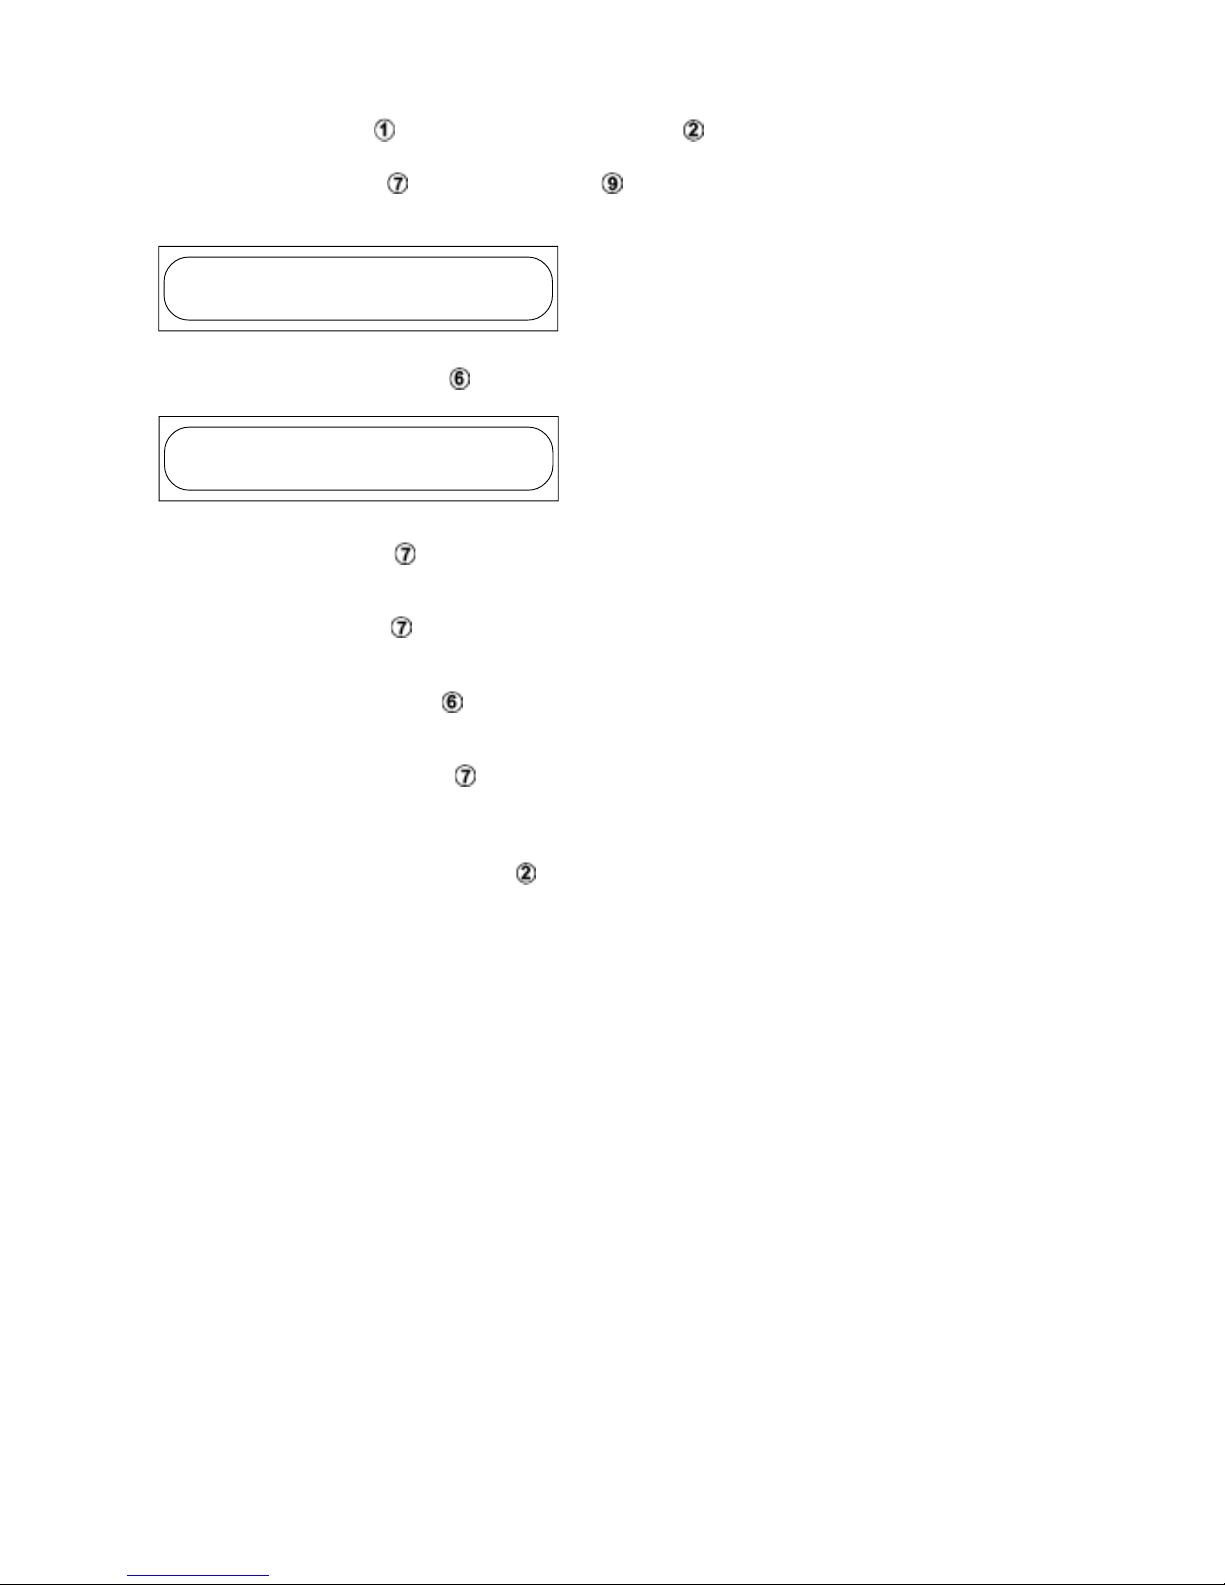
SETUP
DATE & TIME
• Press the ’UP/DOWN’ button , and the following
message will appear:
SELECT
2001 03 08
• Press the ’INFO’ button next to the chosen infor-
mation, and the symbol or will appear.
• Press the ’INFO’ button once, and the symbol will
move to the next option.
• Press the ’UP/DOWN’ button , until the desired
time/date appears on the display.
• Finally, press the ’INFO’ button to save your cho-
sen time/date.
To exit the set-up mode, press the ’OFF’ button.
Cleaning
Switch off the power before cleaning.
NOTE! This machine must not be cleaned with a highpressure cleaner.
Cleaning should be carried out after each day’s use.
Use hot water and, IF necessary, a neutral, environmentally friendly cleaning agent and a soft brush or sponge. If
other cleaning agents that are designed for various catering products are used, follow the manufacturer’s instructions carefully and observe the prescribed safety recommendations.
NOTE!
Do not use steel wool or abrasive cleaning materials when
cleaning stainless steel surfaces.
For environmental reasons, cleaning agents that contain
chlorine should not be used. If chlorine or chlorine compounds come into contact with stainless steel, they can
cause corrosion. As a result,
if this kind of detergent is used, you must be sure to rinse
the surfaces thoroughly.
Regular cleaning of the dishwasher is necessary if you want to have clean tableware
at the lowest possible cost, which is the aim of all washing.
Page 10
10
Curtains
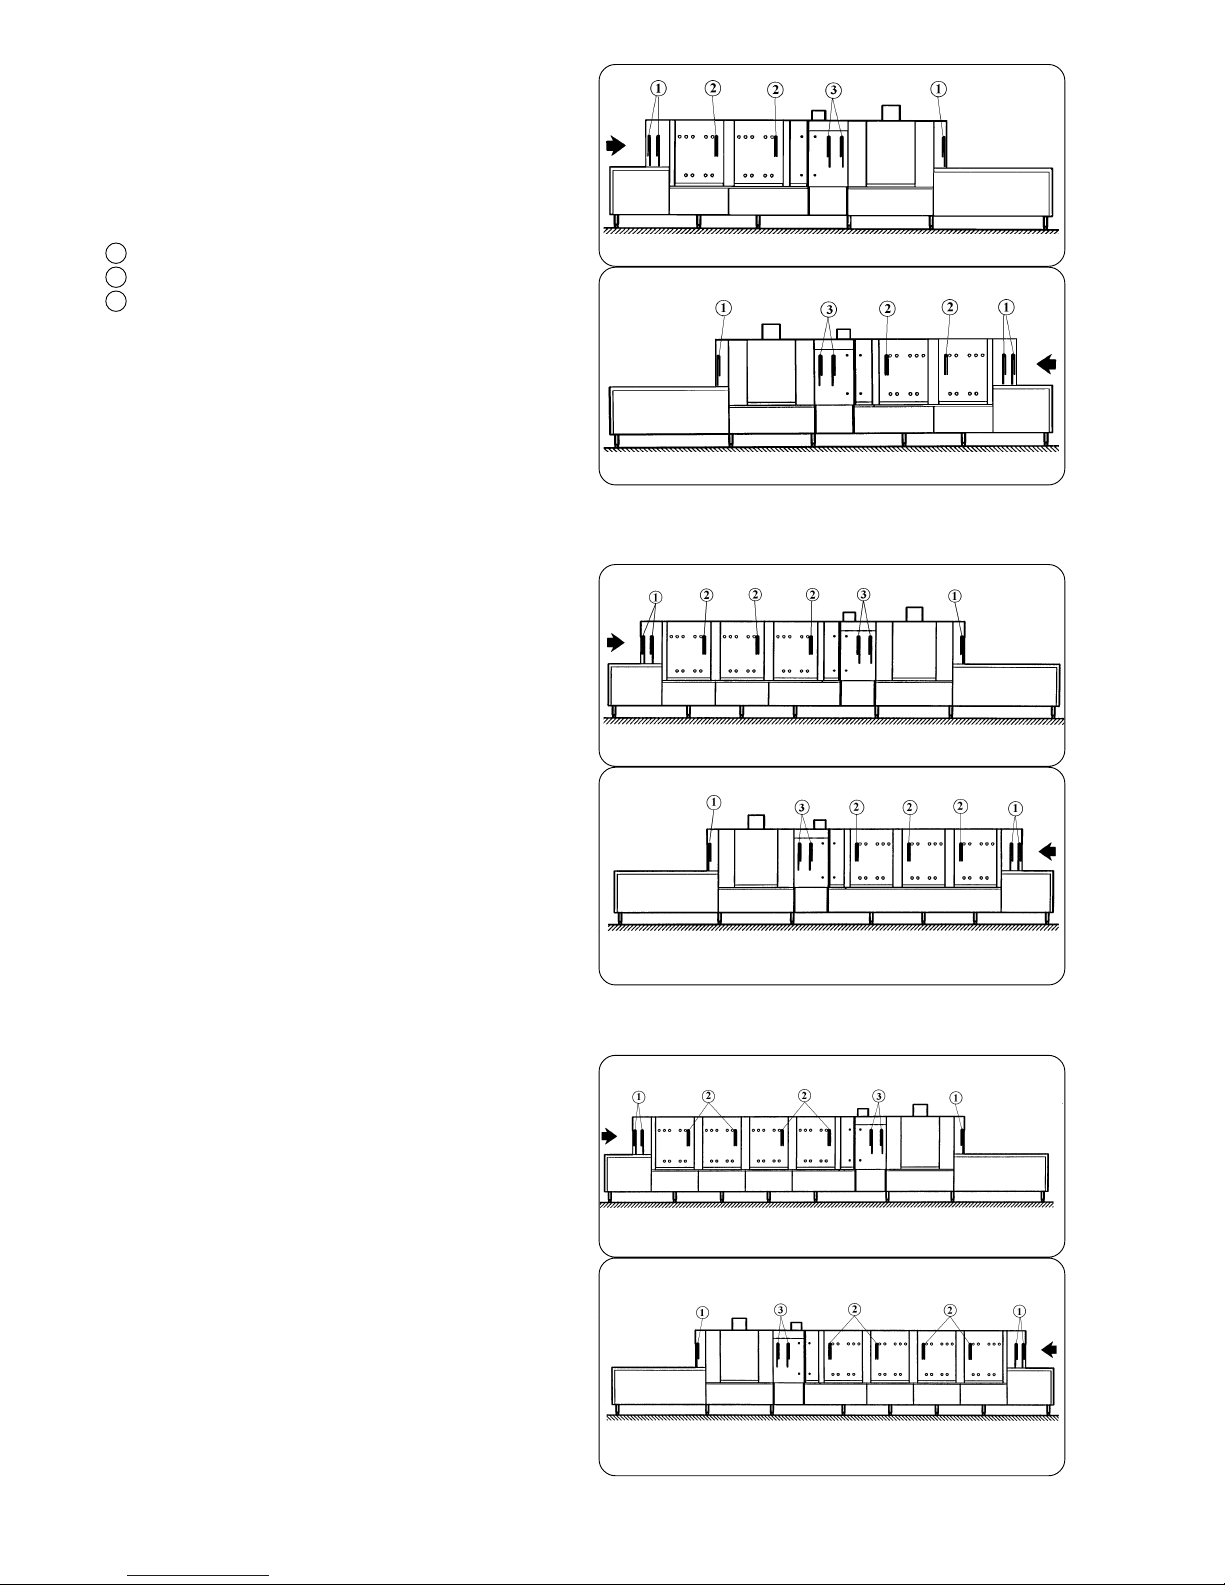
To balance the steam and the temperature in the dishwasher
and to prevent water splashing between different wash
zones, insert the curtains correctly as shown in fig. 7A-F.
The curtains can only be placed in their correct position
due to their design.
Curtain variations (fig.7A-F)
1/1
2/3
1/1 wide
Replacing curtains
Curtains must be replaced when they have become worn.
(This is not covered by our guarantee.)
Accessories
Dishwashing racks
Brown rack Cutlery
Blue rack Glasses* and cups*
Upper wash arms with side rinsing
Pins to be placed in the standard belt to help the dishwashing racks to move more easily.
* Must not be stacked on top of each other during washing.
Other documentation
Manufacturer’s Declaration
Installation Instructions
Set-up Instructions
Service Instructions*
Spare Parts Catalogue*
* Not supplied with the machine. Can be ordered from the supplier or
the supplier’s representative.
1
3
2
fig. 7B
Right-feeding machine
fig. 7A
Left-feeding machine
WT730 / FT36
fig. 7C
fig. 7D
Left-feeding machine
Right-feeding machine
WT760 / FT50
fig. 7E
fig. 7F
Left-feeding machine
Right-feeding machine
WT790 / FT72
Page 11

11
Page 12

 Loading...