

Page 1

TW SL6 E
EN TUMBLE DRYER USER MANUAL 2
DE WÄSCHETROCKNER BENUTZERINFORMATION 29
Page 2
www.electrolux.com2
CONTENTS
1. SAFETY INFORMATION...................................................................................... 3
2. SAFETY INSTRUCTIONS.....................................................................................5
3. PRODUCT DESCRIPTION................................................................................... 7
4. ACCESSORIES....................................................................................................8
5. CONTROL PANEL...............................................................................................9
6. PROGRAMME TABLE....................................................................................... 11
7. OPTIONS...........................................................................................................15
8. BEFORE FIRST USE..........................................................................................16
9. DAILY USE........................................................................................................ 17
10. HINTS AND TIPS............................................................................................. 19
11. CARE AND CLEANING....................................................................................21
12. TROUBLESHOOTING......................................................................................24
13. TECHNICAL DATA...........................................................................................25
14. INSTALLATION................................................................................................26
15. GUARANTEE ..................................................................................................27
WE’RE THINKING OF YOU
Thank you for purchasing an Electrolux appliance. You’ve chosen a product that
brings with it decades of professional experience and innovation. Ingenious and
stylish, it has been designed with you in mind. So whenever you use it, you can be
safe in the knowledge that you’ll get great results every time.
Welcome to Electrolux.
Visit our website for:
Get usage advice, brochures, trouble shooter, service information:
www.electrolux.com
Register your product for better service:
www.registerelectrolux.com
Buy Accessories, Consumables and Original spare parts for your appliance:
www.electrolux.com/shop
CUSTOMER CARE AND SERVICE
Always use original spare parts.
When contacting our Authorised Service Centre, ensure that you have the following
data available: Model, PNC, Serial Number.
The information can be found on the rating plate.
Warning / Caution-Safety information
General information and tips
Environmental information
Subject to change without notice.
Page 3

1. SAFETY INFORMATION
Before the installation and use of the appliance, carefully
read the supplied instructions. The manufacturer is not
responsible if an incorrect installation and use causes
injuries and damages. Always keep the instructions with
the appliance for future reference.
- Read the supplied instructions.
1.1 Children and vulnerable people safety
WARNING!
Risk of suffocation, injury or permanent disability.
• This appliance can be used by children aged from 8
years and above and persons with reduced physical,
sensory or mental capabilities or lack of experience and
knowledge if they have been given supervision or
instruction concerning use of the appliance in a safe
way and understand the hazards involved.
• Do not let children play with the appliance.
• Children of less than 3 years should be kept away
unless continuously supervised.
• Keep all packaging away from children.
• Keep all detergents away from children.
• Keep children and pets away from the appliance door
when it is open.
• If the appliance has a child safety device, we
recommend you activate it.
• Cleaning and user maintenance shall not be made by
children without supervision.
ENGLISH
3
1.2 General Safety
• Do not change the specification of this appliance.
• If the tumble dryer is put on top of a washing machine,
use the stacking kit. The stacking kit, available from
your authorized vendor, can be used only with the
appliance specified in the instructions, supplied with the
Page 4

www.electrolux.com4
accessory. Read it carefully before installation (Refer to
the Installation leaflet).
• The appliance can be installed as freestanding or below
the kitchen counter with correct space (Refer to the
Installation leaflet).
• Do not install the appliance behind a lockable door, a
sliding door or a door with a hinge on the opposite side,
where the appliance door can not be fully opened.
• The ventilation openings in the base (if applicable) must
not be obstructed by a carpet.
• Connect the mains plug to the mains socket only at the
end of the installation. Make sure that there is access to
the mains plug after the installation.
• Ensure you have good ventilation in the installation room
to avoid the back flow of gases into the room from
appliances burning other fuels, including open fires.
• Exhaust air must not be discharged into a flue which is
used for exhausting fumes from appliances burning gas
or other fuels. (if applicable)
• If the supply cord is damaged, it must be replaced by
the manufacturer, its Authorised Service Centre or
similarly qualified persons in order to avoid a hazard.
• Obey the maximum load volume of 8kg (refer to the
“Programme chart” chapter).
• Do not use the appliance if industrial chemicals have
been used for cleaning.
• Wipe away lint that has accumulated around the
appliance.
• Do not run the appliance without a filter. Clean the lint
filter before or after each use.
• Do not dry unwashed items in the tumble dryer.
• Items that have been soiled with substances such as
cooking oil, acetone, alcohol, petrol, kerosene, spot
removers, turpentine, waxes and wax removers should
be washed in hot water with an extra amount of
detergent before being dried in the tumble dryer.
Page 5

• Items such as foam rubber (latex foam), shower caps,
waterproof textiles, rubber backed articles and clothes
or pillows fitted with foam rubber pads should not be
dried in the tumble dryer.
• Fabric softeners, or similar products, should be used as
specified by the fabric softener instructions.
• Remove all objects from pockets such as lighters and
matches.
• Never stop a tumble dryer before the end of the drying
cycle unless all items are quickly removed and spread
out so that the heat is dissipated.
• The final part of a tumble dryer cycle occurs without
heat (cool down cycle) to ensure that the items are left
at a temperature that ensures that the items will not be
damaged.
• Before maintenance, deactivate the appliance and
disconnect the mains plug from the mains socket.
2. SAFETY INSTRUCTIONS
ENGLISH
5
2.1 Installation
• Remove all the packaging.
• Do not install or use a damaged
appliance.
• Obey the installation instruction
supplied with the appliance.
• Always be careful when you move the
appliance because it is heavy. Always
wear safety gloves.
• Do not install or use the appliance
where the temperature is less than 5°C
or higher than 35°C.
• Make sure that the floor where you
install the appliance is flat, stable, heat
resistant and clean.
• Make sure that there is air circulation
between the appliance and the floor.
• Always move the appliance vertically.
• The rear surface of the appliance must
be put against the wall.
• When the appliance is put in its
permanent position, check if it is fully
level with the aid of a spirit level. If it is
not, adjust the feet until it is.
2.2 Electrical connection
WARNING!
Risk of fire and electrical
shock.
• The appliance must be earthed.
• Make sure that the electrical
information on the rating plate agrees
with the power supply. If not, contact
an electrician.
• Always use a correctly installed
shockproof socket.
• Do not use multi-plug adapters and
extension cables.
• Do not pull the mains cable to
disconnect the appliance. Always pull
the mains plug.
• Do not touch the mains cable or the
mains plug with wet hands.
• Only for UK and Ireland. The appliance
has a 13 amp mains plug. If it is
necessary to change the fuse in the
mains plug, use a 13 amp ASTA (BS
1362) fuse.
• This appliance complies with the E.E.C.
Directives.
Page 6

www.electrolux.com6
2.3 Use
WARNING!
Risk of injury, electrical
shock, fire, burns or damage
to the appliance.
• Use this appliance in a household only.
• Do not dry the damaged items which
contain padding or fillings.
• Only dry fabrics which are applicable to
dry in the tumble dryer. Follow the
instructions on the fabric label.
• If you have washed your laundry with a
stain remover start an extra rinse cycle
before you start the dryer.
• Do not drink or prepare food with the
condensed water/distilled water. It can
cause health problems to people and
pets.
• Do not sit or stand on the open door.
• Do not dry dripping wet clothes in the
tumble dryer.
2.4 Internal light
WARNING!
Risk of injury.
• Visible LED radiation, do not look
directly into the beam.
• The type of light bulb or halogen lamp
used for this appliance is only for
household appliances. Do not use it for
house lighting.
• To replace the internal light, contact
the Authorised Service Centre.
• Do not use water spray and steam to
clean the appliance.
• Clean the appliance with a moist soft
cloth. Only use neutral detergents. Do
not use abrasive products, abrasive
cleaning pads, solvents or metal
objects.
2.6 Compressor
WARNING!
Risk of damage to the
appliance.
• The compressor and its system in the
tumble dryer is filled with the special
agent which is free from fluoro-chlorohydrocarbons. This system must stay
tight. The damage of the system can
cause a leakage.
2.7 Disposal
WARNING!
Risk of injury or suffocation.
• Disconnect the appliance from the
mains supply.
• Cut off the mains cable and discard it.
• Remove the door catch to prevent
children and pets to get closed in the
appliance.
2.5 Care and cleaning
WARNING!
Risk of injury or damage to
the appliance.
Page 7
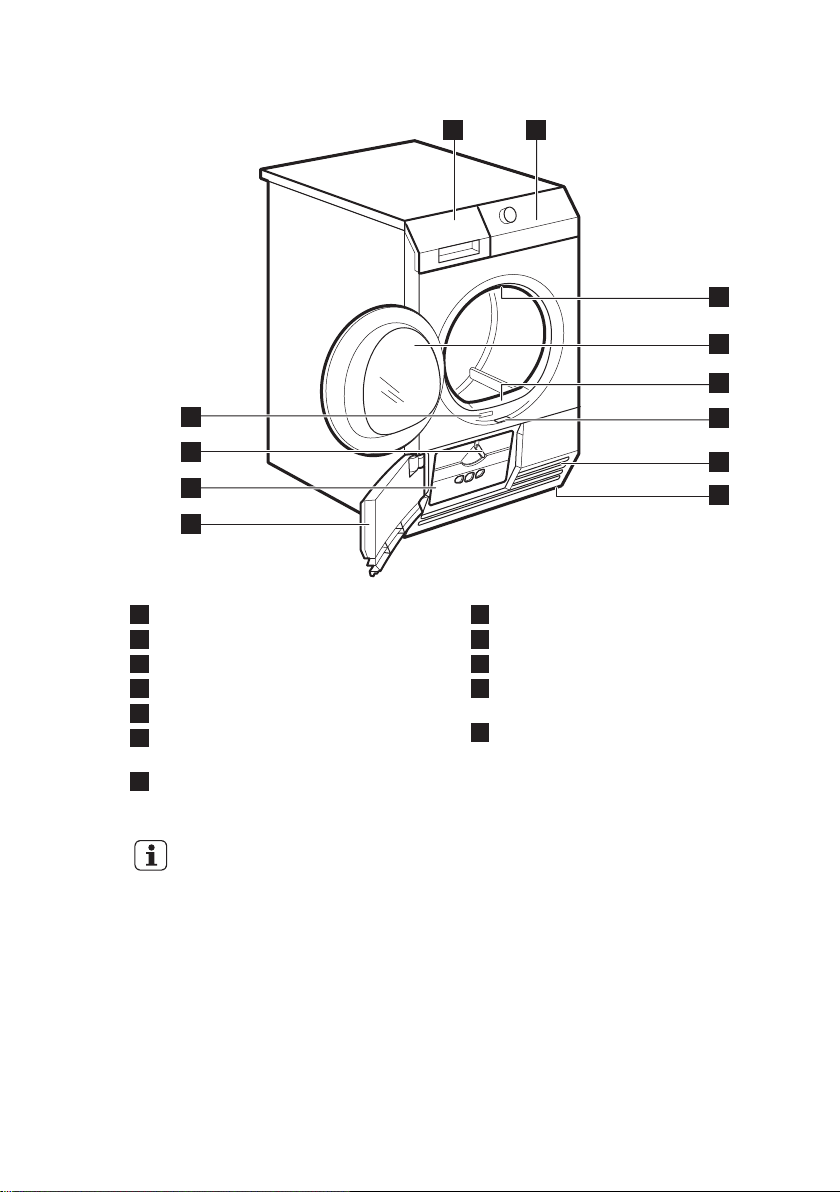
3. PRODUCT DESCRIPTION
1 2
7
3
4
5
6
9
10
11
12
8
ENGLISH
7
Water container
1
Control panel
2
Internal light
3
Appliance door
4
Filter
5
The button to open the heat
6
Adjustable feet
8
Heat exchanger door
9
Heat exchanger cover
10
The knob to lock the heat exchanger
11
cover
Rating plate
12
exchanger door
Airflow slots
7
The load door can be
installed by the user in the
opposite side. It can help to
easily put and remove the
laundry or if there is a limit to
install the appliance (see
separate leaflet).
Page 8
www.electrolux.com8
4. ACCESSORIES
4.1 Stacking kit
Accessory name: SKP11, STA8, STA9
Available from your authorized vendor.
Stacking kit can be used only with the
washing machines specified in the leaflet.
See the leaflet attached.
Read carefully the instructions supplied
with the accessory.
4.2 Draining kit
The installed hose must be on the height
from minimum of 50 cm to maximum of 1
m from floor level. The hose cannot be in
loop. Decrease the length of the hose if
necessary.
Read carefully the instructions supplied
with the accessory.
4.3 Pedestal with the drawer
Accessory name: PDSTP10.
It is available from your authorized vendor.
To put the appliance higher at the level
what helps to easy load and remove the
laundry.
The drawer can be used for laundry
storage e.g. : towels, cleaning products
and more.
Read carefully the instructions supplied
with the accessory.
Accessory name: DK11.
It is available from your authorized vendor
(can be attached to some types of the
tumble dryers)
The accessory for through draining of the
condensed water into a basin, siphon,
gully, etc. After the installation, the water
container is drained automatically. The
water container must stay in the
appliance.
4.4 Drying rack
Accessory name: RA5, RA6, RA11, RA12.
Page 9
It is available from your authorized vendor
1 2
34
Zeitvorwahl
Départ Différé
Zeitwahl
Minuterie
Signal
Alarme
Trocken+
Séchage+
U/Min.
Essorage
Knitterschutz
Anti-froissage
Start/Pause
Départ/Pause
Extra Leise
Extra Silence
8 kg
Zeit Sparen
Gain de Temps
Eco
(can be attached to some types of the
tumble dryers). Do the check with the
vendor or on the web site if the accessory
is compatible with your appliance.
Drying rack accessory let to dry safely in
the tumble dryer:
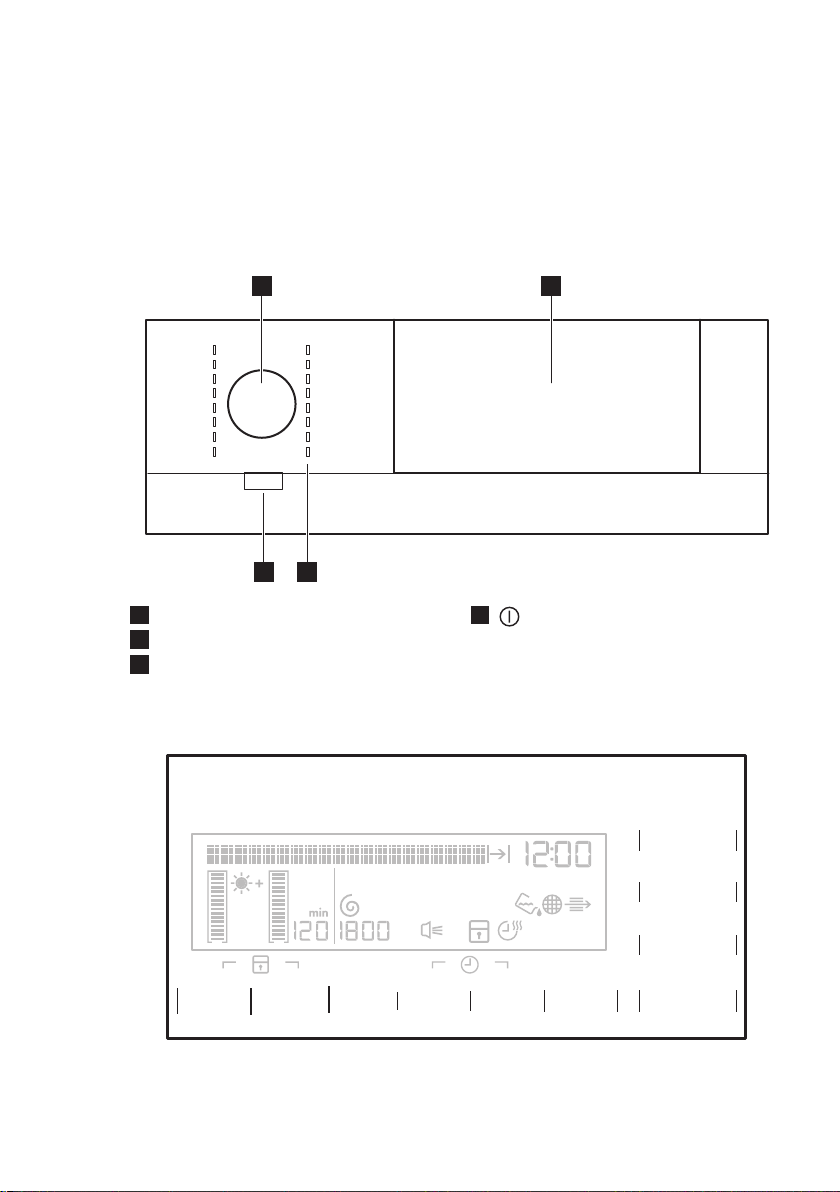
5. CONTROL PANEL
Programme dial
1
Touch panel with the display
2
Programme indicators
3
ENGLISH
• sport shoes
• wool
• soft toys
• lingerie
Read carefully the instructions supplied
with the accessory.
4
On/Off (Ein/Aus) button with the
Auto Off function
9
5.1 The touch panel
As alternative for the buttons to set the
option you must touch the area with the
option name. Each area between the
vertical marks senses the user finger.
Page 10

www.electrolux.com10
For accurate selection touch
the centre point of the area
between the vertical marks.
Do not wear gloves when you
touch the panel to set the
function. Make sure the panel
is always clean and dry.
5.2 Display
Symbol on the display Symbol description
text bar
Symbol on the display Symbol description
, ,
clock
cycle time indication
estimated hour of the programme end
estimated hour of the time programme end
time programme interval 10min. — 120min.
estimated hour of the programme end with the delayed start
delay start interval 30min. — 20h.
extra laundry dryness: default, moderate, maximum
Page 11
Symbol on the display Symbol description
, -
-
- - -
Symbol on the display Symbol description
anti-crease phase duration: default, interval (30min. 120min.)
laundry was spun at: 800 — 1800 rpm
default
buzzer on
child lock on
time dry option on
indicator: drain the water container
ENGLISH
11
6. PROGRAMME TABLE
Programmes
Extra Dry (Extratrocken)
Cupboard Dry (Schrank-
trocken)
Iron Dry (Bügeltrocken)
Jeans
2)3)
2)
indicator: clean filter
indicator: do the check of the heat exchanger
1)
Load
Cotton (Baumwolle)
8 kg
8 kg
8 kg
8 kg
Drying level: extra dry.
Drying level: cupboard dry.
Drying level: applicable for iron.
Leisure clothing such as jeans,
sweat-shirts of different material
thicknesses (e.g. at the neck,
cuffs and seams).
Properties / Fabric mark
/
/
/
/
Page 12
www.electrolux.com12
Programmes
Bed Linen (Bettwäsche)
Duvets (Daunen)
Time (Zeitprogramm)
Extra Quick Mixed (Mix
Extra Kurz)
Extra Dry (Extratrocken)
Cupboard Dry (Schrank-
2)
trocken)
Iron Dry (Bügeltrocken)
Easy Iron (Leichtbügeln)
Outdoor
Microfiber (Mikrofaser)
Silk/Lingerie (Seide)
Load
1)
Properties / Fabric mark
To dry bed linen such as: single
3 kg
and double sheet, pillowcase,
bedspread.
To dry one or two duvet and pil-
3 kg
lows (with feather, down or synthetic fillings).
With this programme you can use
8 kg
the option Time (Zeitwahl) and set
the programme duration.
3 kg
To dry cotton and synthetic fabrics, uses low temperature.
Synthetic (Mischgewebe)
3,5 kg
3,5 kg
3,5 kg
Drying level: extra dry.
Drying level: cupboard dry.
Drying level: applicable for iron.
Easy care fabrics for which a minimum of ironing is necessary. The drying results can be different from one type of fabric to the other.
1 kg (or 5
shirts)
Shake the items before you put them in the appliance. When the programme is completed,
Immediately remove the items and put them on
a hanger.
/
To dry outdoor pieces of clothing, technical,
2 kg
sports, pile fabrics, waterproof and breathable
jackets, shell jacket teamed with a removable
fleece or inner insulation.
2 kg
1 kg
Sportswear, thin and light fabrics, microfiber,
polyester, which are not ironed.
To dry silk/lingerie with warm air
and gentle movement.
/
/
/
/
/
/
/
/
Page 13
ENGLISH
13
Programmes
Load
1)
Properties / Fabric mark
To dry the cloths made of wool . The cloths become soft and cosy. We recommend to remove the cloths immediately after the programme end. To increase or to decrease the
level of the remaining moisture of the laundry
you can use the function Dry Plus (Trocken+).
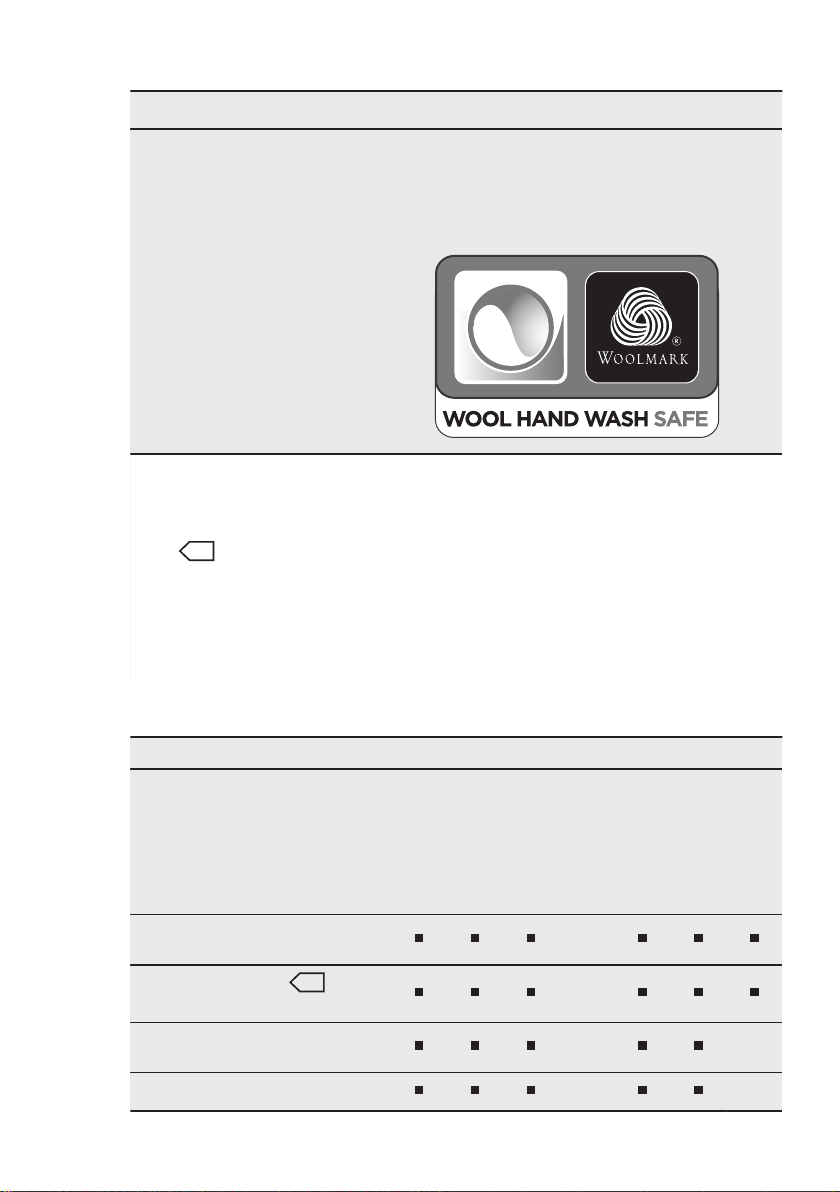
Wool (Wolle)
1)
The maximum weight refers to dry items.
2)
For test institutes only: Standard programmes for tests are specified in the EN 61121
document. If is necessary to correct the remaining moisture level of the laundry, adjust the programme with the Dry Plus (Trocken+) option Clean the filter after each cycle
3)
The
cotton programme” and it is suitable to dry normal wet cotton laundry and it is the most efficient programme in terms of energy consumption for drying wet cotton laundry.
4)
The wool drying cycle of this tumble drying machine has been tested and approved by The
Woolmark Company. The cycle is suitable to dry wool garments, which are labelled "hand
wash" provided that the garments are washed in a Woolmark endorsed hand washing cycle
and tumble dried according to the instructions issued by the manufacturer. 1780SW13W.
4)
Cotton (Baumwolle) Cupboard Dry (Schranktrocken) programme is the “Standard
1 kg
6.1 Programmes and options selection
Options
Anti-
Dry
crea
Spun
at
RPM
(U/
Min.)
Time
Dry
(Zeitwahl)
Eco
Programmes
1)
(Troc
ken
Plus
se
(Knitt
er-
+)
schu
tz)
Cotton (Baumwolle); Extra Dry
(Extratrocken)
Cotton (Baumwolle); Cupboard Dry (Schranktrocken)
Cotton (Baumwolle); Iron Dry (Bügeltrocken)
Jeans
Time
Save
2)
(Zeit
Spa-
ren)
Extra
Silent
(Ex-
tra
Le-
ise)
Page 14
www.electrolux.com14
Options
Anti-
Dry
crea
Spun
at
RPM
(U/
Min.)
Time
Dry
(Zeitwahl)
Eco
Programmes
1)
(Troc
ken
Plus
se
(Knitt
er-
+)
schu
tz)
Bed Linen (Bettwäsche)
Duvets (Daunen)
Time (Zeitprogramm)
Extra
Time
Save
2)
(Zeit
Spa-
ren)
Silent
(Ex-
tra
Le-
ise)
Extra Quick Mixed (Mix Extra
Kurz)
Synthetic (Mischgewebe); Extra
Dry (Extratrocken)
Synthetic (Mischgewebe); Cupboard Dry (Schranktrocken)
Synthetic (Mischgewebe); Iron Dry
(Bügeltrocken)
Easy Iron (Leichtbügeln)
Outdoor
Microfiber (Mikrofaser)
Silk/Lingerie (Seide)
Wool (Wolle)
1)
Together with the programme you can set 1 or more options.
2)
The option is off if the 1 of the options Time Save (Zeit Sparen) or Extra Silent (Extra Leise) is
on.
3)
Only with the drying rack — see chapter ACCESSORIES
3)
6.2 Consumption Data
Programme Spun at / residual humidity Drying time
Cotton (Baumwolle) 8 kg
Cupboard Dry
(Schranktrocken)
1400 rpm / 50% 189 min. 1,32 kWh
1000 rpm / 60% 215 min. 1,51 kWh
Energy
consump-
tion
Page 15

Start/Pause
Départ/Pause
Extra Leise
Extra Silence
Zeitvorwahl
Départ Différé
Zeitwahl
Minuterie
Signal
Alarme
Trocken+
Séchage+
U/Min.
Essorage
Knitterschutz
Anti-froissage
8 kg
Zeit Sparen
Gain de Temps
Eco
Start/Pause
Départ/Pause
Extra Leise
Extra Silence
Zeitvorwahl
Départ Différé
Zeitwahl
Minuterie
Signal
Alarme
Trocken+
Séchage+
U/Min.
Essorage
Knitterschutz
Anti-froissage
8 kg
Zeit Sparen
Gain de Temps
Eco
Start/Pause
Départ/Pause
Extra Leise
Extra Silence
Zeitvorwahl
Départ Différé
Zeitwahl
Minuterie
Signal
Alarme
Trocken+
Séchage+
U/Min.
Essorage
Knitterschutz
Anti-froissage
8 kg
Zeit Sparen
Gain de Temps
Eco
Start/Pause
Départ/Pause
Extra Leise
Extra Silence
Zeitvorwahl
Départ Différé
Zeitwahl
Minuterie
Signal
Alarme
Trocken+
Séchage+
U/Min.
Essorage
Knitterschutz
Anti-froissage
8 kg
Zeit Sparen
Gain de Temps
Eco
ENGLISH
15
Programme Spun at / residual humidity Drying time
Iron Dry (Bügeltrocken)
1000 rpm / 60% 164 min. 1,19 kWh
Cupboard Dry
(Schranktrocken)
800 rpm / 50% 86 min. 0,53 kWh
7. OPTIONS
7.1 Dry Plus (Trocken+)
This option helps to get the laundry more
dried. There are 3 possible selections:
- the default selection which is related
to the programme.
- the selection to get the laundry lightly
dried.
- the selection to get the laundry more
dried.
Energy
consump-
tion
1400 rpm / 50% 144 min. 1,04 kWh
Synthetic (Mischgewebe) 3,5 kg
1200 rpm / 40% 76 min. 0,47 kWh
can be removed during the anti-crease
phase.
7.3 Spun at RPM (U/Min.)
This option helps to set the best condition
to dry the laundry.
If you know the initial spin speed when
you washed you can use this option.
Higher spin speed causes that the laundry
contains less water.
7.4 Buzzer (Signal)
7.2 Anti-crease (Knitterschutz)
Extends of 30, 60, 90 or 120 minutes the
standard anti-crease phase (30 minutes)
at the end of the drying cycle. This option
prevents laundry from creases. Laundry
When the buzzer option is activated you
can hear the sound at the:
• cycle end
• anti-crease phase start and end
• cycle interruption
Page 16

Start/Pause
Départ/Pause
Extra Leise
Extra Silence
Zeitvorwahl
Départ Différé
Zeitwahl
Minuterie
Signal
Alarme
Trocken+
Séchage+
U/Min.
Essorage
Knitterschutz
Anti-froissage
8 kg
Zeit Sparen
Gain de Temps
Eco
Start/Pause
Départ/Pause
Extra Leise
Extra Silence
Zeitvorwahl
Départ Différé
Zeitwahl
Minuterie
Signal
Alarme
Trocken+
Séchage+
U/Min.
Essorage
Knitterschutz
Anti-froissage
8 kg
Zeit Sparen
Gain de Temps
Eco
Start/Pause
Départ/Pause
Extra Leise
Extra Silence
Zeitvorwahl
Départ Différé
Zeitwahl
Minuterie
Signal
Alarme
Trocken+
Séchage+
U/Min.
Essorage
Knitterschutz
Anti-froissage
8 kg
Zeit Sparen
Gain de Temps
Eco
Start/Pause
Départ/Pause
Extra Leise
Extra Silence
Zeitvorwahl
Départ Différé
Zeitwahl
Minuterie
Signal
Alarme
Trocken+
Séchage+
U/Min.
Essorage
Knitterschutz
Anti-froissage
8 kg
Zeit Sparen
Gain de Temps
Eco
Start/Pause
Départ/Pause
Extra Leise
Extra Silence
Zeitvorwahl
Départ Différé
Zeitwahl
Minuterie
Signal
Alarme
Trocken+
Séchage+
U/Min.
Essorage
Knitterschutz
Anti-froissage
8 kg
Zeit Sparen
Gain de Temps
Eco
www.electrolux.com16
The buzzer option is by default always on.
You can use this option to activate or
deactivate the sound.
You can activate the Buzzer
(Signal) option with all
programmes.
7.5 Time Dry (Zeitwahl)
Operates only with the Time
(Zeitprogramm) programme. Lets the user
to set special time of drying programme
from minimum 10 min. to maximum of 2
hours (in 10 min. steps).
7.6 Delay Start (Zeitvorwahl)
7.7 Eco
This option is on by default with all the
programmes. Does not include the Extra
Quick Mixed (Mix Extra Kurz) programme.
The power consumption is at the
minimum level.
The option Eco is off if 1 of the options
Time Save (Zeit Sparen) or Extra Silent
(Extra Leise) is on.
7.8 Time Save (Zeit Sparen)
Lets to delay the start of a
drying programme from
minimum of 30 minutes to
maximum of 20 hours.
1. Set the drying programme and
options.
2. Touch the Delay Start (Zeitvorwahl)
option field again and again.
The time of the delay come into the view
on the display (e.g.
programme has to start after 12 hours.)
3. To activate the Delay Start
(Zeitvorwahl) option, touch the Start/
Pause field.
Time to start decreases on the display.
8. BEFORE FIRST USE
Before you use the appliance for the first
time do these operations:
Decreases the time of the cycle without
the effect on the drying quality. The cycle
time can be shorter by 30% on the
cottons and 40% on synthetics. The
appliance operates with the higher energy
consumption.
7.9 Extra Silent (Extra Leise)
if the
The appliance operates with low noise 62
dB without the effect on the drying quality.
The appliance operates slowly with the
longer cycle time.
• Clean the tumble dryer drum with a
moist cloth.
Page 17
• Start a short programme (e.g. 30
minutes) with moist laundry.
At the beginning of drying
cycle (3-5 min.) there could
be a slightly higher sound
level. It is because of start of
the compressor that is
normal for compressor
powered appliances such:
refrigerators, freezers.
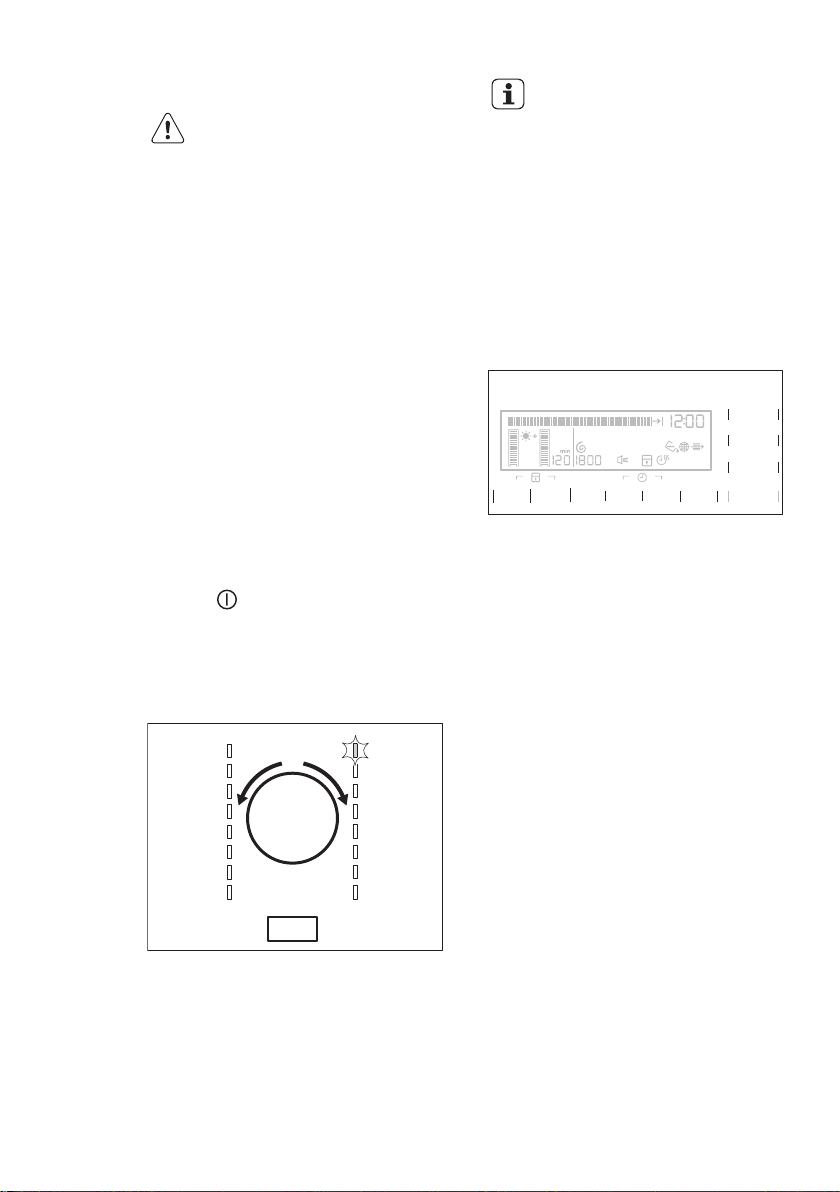
8.1 Language
The first time you turn on the dryer the
default language comes into the view on
the display. You can confirm it or change
the different language from the available
languages list.
To set the different language:
1. Turn the programme dial to set your
language.
2. Touch the Start/Pause field.
9. DAILY USE
ENGLISH
The language is memorised.
8.2 Clock
The first time you turn on the dryer the
default time comes into the view on the
display. You can confirm or change it.
To set the different time:
1. Turn the programme dial to set new
hour.
2. Touch the Start/Pause field.
The hour is memorised.
3. Turn the programme dial to set new
minutes.
4. Touch the Start/Pause field.
The minutes are memorised.
17
9.1 Preparing the laundry
• Close the zippers.
• Close the fasteners of the duvet
covers.
• Do not keep ties or ribbons loose (e.g.
apron ribbons). Tie them before you
start a programme.
• Remove all items from the pockets.
• If an item has the internal layer made of
cotton, turn it inside out. Make sure
that the cotton layer is always external
• We recommend that you set the
correct programme applicable for the
type of fabrics that are in the appliance.
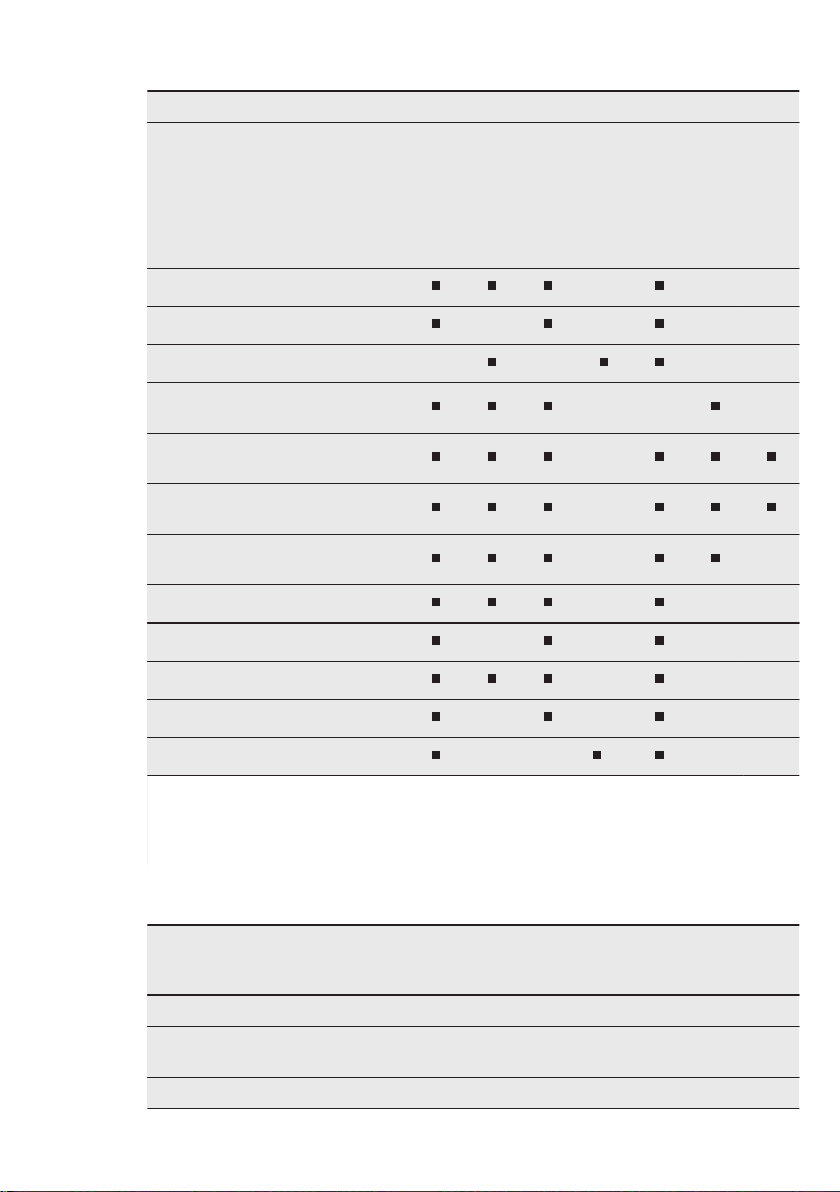
Fabric label Description
Laundry that is applicable for tumble dryer.
Laundry that is applicable for tumble dryer. Set the programme with
standard temperature.
Laundry that is applicable for tumble dryer. Set the programme with
low temperature.
Laundry that is not applicable for tumble dryer.
• Do not put fabrics with strong colours
together with fabrics with light colours.
Strong colours can bleed.
• Use an applicable programme for
cotton jersey and knitwear to prevent
the items to shrink.
• Make sure that the laundry weight is
not more than the maximum weight
that is in the programme table.
• Dry only the laundry that is applicable
for tumble dryer. Refer to the fabric
label on the items.
Page 18
Zeitvorwahl
Départ Différé
Zeitwahl
Minuterie
Signal
Alarme
Trocken+
Séchage+
U/Min.
Essorage
Knitterschutz
Anti-froissage
Start/Pause
Départ/Pause
Extra Leise
Extra Silence
8 kg
Zeit Sparen
Gain de Temps
Eco
www.electrolux.com18
9.2 Loading the laundry
CAUTION!
Do not lock the laundry in
between the appliance door
and rubber seal.
1. Pull the appliance door.
2. Load loosely the laundry.
3. Close the appliance door.
9.3 Turning on the appliance
To turn on the appliance:
Push the On/Off (Ein/Aus) button.
If the appliance is on, some indications
come in to the view on the display.
9.4 Auto Off function
To decrease the energy consumption, the
Auto Off function turns off automatically
the appliance:
• if the Start/Pause field was not touched
in the time of 5 minutes.
• after 5 minutes from the programme
end.
Push the On/Off (Ein/Aus) button to
turn on the appliance.
If the appliance is on, some indications
come in to the view on the display.
9.5 Setting a programme
The drying time you see is
related to the load of 5 kg for
cotton and jeans
programmes. For the other
programmes the drying time
is related to the
recommended loads. The
drying time of the cotton and
jeans programmes with the
load more than 5 kg is longer.
9.6 Options
Together with the programme you can set
1 or more special options.
To activate or deactivate the option touch
the applicable option field.
When the option is activated the LED
above the option field or symbol on the
display comes into the view.
9.7 Child lock option
The child lock can be set to prevent the
children to play with the appliance. The
child lock option locks all push buttons
and the programme dial (this option does
not lock On/Off (Ein/Aus) button).
You can activate the child lock option:
• before you push the Start/Pause
button - the appliance cannot start
• after you push the Start/Pause button
- programmes and option selection is
off.
Use the programme dial to set the
programme.
The possible time to complete the
programme comes into the view on the
display.
Child lock option activation:
1. Turn on the dryer.
2. Wait approximately 8 seconds.
3. Select 1 of the available programmes.
4. Touch at the same time and hold
down the Dry Plus (Trocken+) and
Anti-crease (Knitterschutz) option
fields.
Page 19

Zeitvorwahl
Départ Différé
Zeitwahl
Minuterie
Signal
Alarme
Trocken+
Séchage+
U/Min.
Essorage
Knitterschutz
Anti-froissage
Start/Pause
Départ/Pause
Extra Leise
Extra Silence
8 kg
Zeit Sparen
Gain de Temps
Eco
The symbol comes into the view on the
Zeitvorwahl
Départ Différé
Zeitwahl
Minuterie
Signal
Alarme
Trocken+
Séchage+
U/Min.
Essorage
Knitterschutz
Anti-froissage
Start/Pause
Départ/Pause
Extra Leise
Extra Silence
8 kg
Zeit Sparen
Gain de Temps
Eco
display.
5. To deactivate the child lock, touch
again the above option fields until the
symbol goes out of the view.
9.8 Starting a programme
To start the programme:
Touch the Start/Pause field.
The appliance starts and the LED above
the touch field does not flash but is stable.
ENGLISH
9.10 Programme end
Clean the filter and drain the
water container after each
drying cycle. (See chapter
CARE AND CLEANING.)
If the drying cycle is completed, the
symbol flashes on the display. If the
Buzzer (Signal) option is on, the acoustic
signal sounds intermittently for 1 minute.
If you do not turn off the
appliance, the crease guard
phase starts. Laundry can be
removed during this phase.
To remove the laundry:
1. Push the On/Off (Ein/Aus) button for 2
seconds to turn off the appliance.
2. Open the appliance door.
3. Remove the laundry.
4. Close the appliance door.
19
9.9 Programme change
To change a programme:
1. Push the On/Off (Ein/Aus) button to
turn off the appliance.
2. Push again the On/Off (Ein/Aus)
button to turn on the appliance.
3. Set a new programme.
10. HINTS AND TIPS
10.1 Ecological hints
• Spin good the laundry before drying.
• Use the load volumes which are
specified in the programme chart.
• Clean the filter after each drying cycle.
• Do not use fabric softener to wash and
then dry. In the tumble dryer laundry
becomes soft automatically.
• Use the condensate as distilled water,
e.g. for steam ironing. If it is necessary
clean the condensate before (e.g. with
a coffee filter) to remove possible small
pieces of fluff.
• Always keep the airflow slots on the
bottom of the appliance clear.
• Make sure that is good airflow in the
appliance installation position.
Page 20

Zeitvorwahl
Départ Différé
Zeitwahl
Minuterie
Signal
Alarme
Trocken+
Séchage+
U/Min.
Essorage
Knitterschutz
Anti-froissage
Start/Pause
Départ/Pause
Extra Leise
Extra Silence
8 kg
Zeit Sparen
Gain de Temps
Eco
Zeitvorwahl
Départ Différé
Zeitwahl
Minuterie
Signal
Alarme
Trocken+
Séchage+
U/Min.
Essorage
Knitterschutz
Anti-froissage
Start/Pause
Départ/Pause
Extra Leise
Extra Silence
8 kg
Zeit Sparen
Gain de Temps
Eco
Zeitvorwahl
Départ Différé
Zeitwahl
Minuterie
Signal
Alarme
Trocken+
Séchage+
U/Min.
Essorage
Knitterschutz
Anti-froissage
Start/Pause
Départ/Pause
Extra Leise
Extra Silence
8 kg
Zeit Sparen
Gain de Temps
Eco
www.electrolux.com20
10.2 Adjustment of the
remaining laundry moisture
degree
To change the default degree of the
remaining moisture of the laundry:
1. Turn on the appliance.
2. Wait approximately 8 seconds.
3. Select 1 of available programmes.
4. Touch at the same time and hold
down the Dry Plus (Trocken+) and
Spun at RPM (U/Min.) option fields.
One of the symbols goes into the view on
the display:
- the maximum dry laundry
- the more dry laundry
- the standard dry laundry
5. Touch the Start/Pause field again
and again until you set necessary
degree.
6. To memorise the setting, touch at the
same time the Dry Plus (Trocken+)
and Spun at RPM (U/Min.) option
fields for approximately 2 seconds.
10.3 Deactivating the Water
container (Behälter) indicator
1. Turn on the appliance.
2. Wait approximately 8 seconds.
3. Select 1 of available programmes.
4. Touch at the same time and hold
down the Dry Plus (Trocken+) and
Buzzer (Signal) option fields.
• the Water container (Behälter)
indicator: is on and the symbol
goes into the view - the
water container indicator is
permanently on
• the Water container (Behälter)
indicator: is off and the symbol
goes into the view - the
water container indicator is
permanently off
10.4 Language
You can change the language each time
you want.
To set the different language:
1. Turn on the dryer.
2. Wait approximately 8 seconds.
3. Touch at the same time the Anticrease (Knitterschutz) and Spun at
RPM (U/Min.) option fields and hold
down.
You see the language name on the
display.
4. Turn the programme dial to set the
new language.
5. Touch the Start/Pause field.
The language is memorised.
10.5 Clock
You can change the clock each time you
want.
To set the different time:
1. Turn on the dryer.
2. Wait approximately 8 seconds.
3. Touch at the same time the Buzzer
(Signal) and Time Dry (Zeitwahl)
option fields and hold down.
One of 2 configurations is possible:
Page 21

Zeitvorwahl
Départ Différé
Zeitwahl
Minuterie
Signal
Alarme
Trocken+
Séchage+
U/Min.
Essorage
Knitterschutz
Anti-froissage
Start/Pause
Départ/Pause
Extra Leise
Extra Silence
8 kg
Zeit Sparen
Gain de Temps
Eco
Ta ge sz ei t
Clock digits start to flash on the display.
4. Turn the programme dial to set new
hour.
5. Touch the Start/Pause field.
11. CARE AND CLEANING
11.1 Cleaning the filter
At the end of each cycle the symbol
Filter (Sieb) is on the display and you must
clean the filter.
The filter collects the fluff. The
fluff occurs while the cloths
are dried in the tumble dryer.
1. Open the door. Pull the filter.
ENGLISH
The hour is memorised.
6. Turn the programme dial to set new
minutes.
7. Touch the Start/Pause field.
The minutes are memorised.
21
2. Push the hook to open the filter.
3. Use a moist hand to clean both parts
of the filter.
4. If necessary clean the filter with the
brush under warm tap water and/or a
vacuum cleaner. Close the filter.
5. If necessary remove fluff from the filter
socket and gasket. You can use a
vacuum cleaner. Put the filter inside
the filter socket.
Page 22

www.electrolux.com22
11.2 Draining the water
container
Drain the condensed water container after
each drying cycle.
If the condensed water container is full,
the programme breaks off automatically.
The symbol
is on the display and you must drain the
water container.
To drain the water container:
1. Pull the water container and keep it in
horizontal position.
Water container (Behälter)
11.3 Cleaning the heat exchanger
If the symbol Heat exchanger
(Kondensator) flashes on the display, do
the inspection of the heat exchanger and
its compartment. If there is a dirt, clean it.
To do the inspection:
1. Open the door. Pull the filter.
2. Move the release button on the
bottom of the door to open the heat
exchanger door.
2. Move the plastic connection out and
drain the water into a basin or
equivalent receptacle.
3. Move plastic connection in and install
water container.
4. To continue the programme press the
Start/Pause button.
3. Turn the blockage to unlock the heat
exchanger cover.
Page 23

4. Lower the heat exchanger cover.
ENGLISH
11.4 Cleaning the drum
WARNING!
Disconnect the appliance
before you clean it.
Use a standard neutral soap detergent to
clean the inner surface of the drum and
drum ribs. Dry the cleaned surfaces with a
soft cloth.
CAUTION!
Do not use abrasive materials
or steel wool to clean the
drum.
11.5 Cleaning the control panel and housing
Use a standard neutral soap detergent to
clean the control panel and housing.
Use a moist cloth to clean. Dry the
cleaned surfaces with a soft cloth.
CAUTION!
Do not use furniture cleaning
agents or cleaning agents
which can cause corrosion to
clean the appliance.
23
5. If necessary, remove the fluff from the
heat exchanger and its compartment.
You can use wet cloth and/or a
vacuum cleaner with the brush.
6. Close the heat exchanger cover.
7. Lock the blockage until it snaps.
8. Put the filter back.
11.6 Cleaning the airflow slots
Use a vacuum cleaner to remove the fluff
from the airflow slots.
Page 24

www.electrolux.com24
12. TROUBLESHOOTING
Problem
The tumble dryer does not operate.
Unsatisfactory
drying result.
The loading
door does not
closed
Err (Error) on
the display.
No drum light
1)
Possible cause Remedy
The tumble dryer is not connected to mains supply.
The loading door is opened. Close the loading door.
The On/Off (Ein/Aus) button was
not pushed.
The Start/Pause button was not
pushed.
The appliance is in the standby
mode.
Incorrect programme selection. Do the selection of the applicable
The filter is clogged.
The Dry Plus (Trocken+) option
was in minimum level.
Too high volume of the load. Obey the maximum load volume.
The airflow grill is clogged. Clean the airflow grill in the bot-
Dirt on the humidity sensor in the
drum.
Incorrect remaining laundry moisture degree.
The heat exchanger is clogged.
The filter not locked in the position.
The laundry is locked between
the door and the seal.
You try to change the programme
or the option after the start of the
cycle.
The option you try to activate is
not applicable with the selected
programme.
Defective drum lamp. Contact the service centre to re-
4)
Connect in at mains socket.
Check fuse in fuse box (domestic
installation).
Push the On/Off (Ein/Aus) button.
Push the Start/Pause button.
Push the On/Off (Ein/Aus) button.
programme.
Clean the filter.
Change the Dry Plus (Trocken+)
option to the moderate or maxi-
mum level.
tom of the appliance.
Clean the front surface of the
drum.
Adjust remaining laundry moisture
degree.
Clean the heat exchanger.
Put the filter in the correct position.
Put the load correctly in the drum.
Turn the tumble dryer off and on.
Make the new selection.
Turn the tumble dryer off and on.
Make the new selection.
place the drum lamp.
2)
3)
4)
5)
3)
Page 25

ENGLISH
25
Problem
1)
Abnormally
elapsing time
on the display.
Programme inactive.
The time to end is calculated on
the basis of the volume and
dampness of the laundry.
The water container is full. Drain the water container, push
Possible cause Remedy
The automatic procedure — this
is not the appliance malfunction.
the Start/Pause button.
3)
Too small laundry volume. Do the selection of time pro-
gramme. The time value must be
related to the load. To dry 1 item
Drying cycle too
short.
or small quantities of the laundry
we recommend to use short
times.
The laundry is too dry. Do the selection of time pro-
gramme or higher drying level
(e.g. Extra Dry (Extratrocken))
The filter is clogged. Clean the filter.
Drying cycle too
6)
long
1)
If there is an error message on the display (e.g. E51): Turn the tumble dryer off and on.
Make a selection of the new programme. Push the Start/Pause button. Does not operate? contact the service centre and give the error code.
2)
Follow the programme description — see PROGRAMME TABLE
3)
See chapter CARE AND CLEANING
4)
Only dryers with the Dry Plus (Trocken+) option
5)
See HINTS AND TIPS chapter
6)
Note: After maximum 5 hours the drying cycle ends automatically.
Too high volume of the load. Obey the maximum load volume.
The laundry not spun sufficiently. Spin correctly the laundry.
Very high room temperature - this
is not the appliance malfunction.
If possible, lower the room temperature.
13. TECHNICAL DATA
Height x Width x Depth 850 x 600 x 600 mm (maximal 640 mm)
Max. depth with the appliance door open 1090 mm
Max. width with the appliance door open 950 mm
Adjustable height 850 mm (+ 15 mm - feet regulation)
Drum volume 118 l
Maximum load volume 8 kg
Voltage 230 V
Frequency 50 Hz
Page 26

15mm
www.electrolux.com26
Necessary fuse 5 A
Total power 1000 W
Energy efficiency class
Energy consumption
Annual energy consumption
Left—on mode power absorption 0,11 W
Off mode power absorption 0,11 W
Type of use Household
Permitted ambient temperature + 5°C to + 35°C
Level of protection against ingress of solid
particles and moisture ensured by the protective cover, except where the low voltage equipment has no protection against
moisture
1)
With reference to EN 61121. 8kg of cotton centrifuged at 1000 rpm.
2)
Energy consumption per year in kWh, based on 160 drying cycles of the standard cotton
programme at full and partial load, and the consumption of the low-power modes. Actual energy consumption per cycle will depend on how the appliance is used (REGULATION (EU) No
392/2012).
14. INSTALLATION
A+++
1)
2)
1,51 kWh
176,92 kWh
IPX4
14.1 Unpacking
CAUTION!
Before use all parts of the
transport packaging must be
removed.
To remove the polystyrene blockages:
1. Open the door.
2. Pull plastic hose with the polystyrene
blockages out from the drum.
14.2 Feet regulation
It is possible to adjust the height of the
tumble dryer. To do that adjust the feet.
14.3 Installation under a counter
The appliance can be installed as
freestanding or below the kitchen counter
with correct space (see picture).
Page 27

> 850 mm
600 mm
600 mm
15. CH GUARANTEE
Customer Service Centres
Industriestrasse 10
5506 Mägenwil
Morgenstrasse 131
3018 Bern
Zürcherstrasse 204E
9000 St. Gallen
Seetalstrasse 11
6020 Emmenbrücke
St. Jakob-Turm Birsstrasse 320B
4052 Basel
Comercialstrasse 19
7000 Chur
Point of Service
Le Trési 6
1028 Préverenges
ENGLISH
Via Violino 11
6928 Manno
27
Spare parts service Industriestrasse 10,
5506 Mägenwil, Tel. 0848 848 111
Specialist advice/Sale Badenerstrasse
587, 8048 Zürich, Tel. 044 405 81 11
Warranty For each product we provide a
two-year guarantee from the date of
purchase or delivery to the consumer (with
a guarantee certificate, invoice or sales
receipt serving as proof). The guarantee
16. ENVIRONMENT CONCERNS
Recycle the materials with the symbol .
Put the packaging in applicable containers
to recycle it. Help protect the environment
and human health and to recycle waste of
electrical and electronic appliances. Do
not dispose appliances marked with the
covers the costs of materials, labour and
travel. The guarantee will lapse if the
operating instructions and conditions of
use are not adhered to, if the product is
incorrectly installed, or in the event of
damage caused by external influences,
force majeure, intervention by third parties
or the use of non-genuine components.
symbol with the household waste.
Return the product to your local recycling
facility or contact your municipal office.
Page 28

www.electrolux.com28
For Switzerland:
Where should you take your
old equipment?
Anywhere that sells new
equipment or hand it in to
official SENS collection points
or official SENS recycling
firms.
The list of official SENS
collection points can be
found at www.erecycling.ch
Page 29

DEUTSCH
INHALTSVERZEICHNIS
1. SICHERHEITSHINWEISE...................................................................................30
2. SICHERHEITSANWEISUNGEN..........................................................................33
3. GERÄTEBESCHREIBUNG.................................................................................35
4. ZUBEHÖR......................................................................................................... 36
5. BEDIENFELD.....................................................................................................37
6. PROGRAMMTABELLE...................................................................................... 40
7. OPTIONEN........................................................................................................ 44
8. VOR DER ERSTEN INBETRIEBNAHME............................................................. 45
9. TÄGLICHER GEBRAUCH.................................................................................. 46
10. TIPPS UND HINWEISE.................................................................................... 49
11. REINIGUNG UND PFLEGE.............................................................................. 50
12. FEHLERSUCHE...............................................................................................53
13. TECHNISCHE DATEN..................................................................................... 55
14. MONTAGE.......................................................................................................56
15. GARANTIE.......................................................................................................57
WIR DENKEN AN SIE
Vielen Dank, dass Sie sich für ein Gerät von Electrolux entschieden haben. Sie
haben ein Produkt gewählt, hinter dem jahrzehntelange professionelle Erfahrung und
Innovation stehen. Bei der Entwicklung dieses großartigen und eleganten Geräts
haben wir an Sie gedacht. So haben Sie bei jedem Gebrauch die Gewissheit, dass
Sie stets großartige Ergebnisse erzielen werden.
Willkommen bei Electrolux.
Besuchen Sie uns auf unserer Website, um:
Anwendungshinweise, Prospekte, Fehlerbehebungs- und Service-Informationen
zu erhalten:
www.electrolux.com
Ihr erworbenes Produkt zu registrieren, um den besten Service dafür zu
gewährleisten:
www.registerelectrolux.com
Zubehör, Verbrauchsmaterial und Original-Ersatzteile für Ihr Gerät zu erwerben:
www.electrolux.com/shop
29
REPARATUR- UND KUNDENDIENST
Bitte verwenden Sie ausschließlich Original-Ersatzteile für Ihre Produkte.
Halten Sie folgende Angaben bereit, wenn Sie sich an den Kundendienst wenden
Modell, Produktnummer (PNC), Seriennummer.
Diese Informationen finden Sie auf dem Typenschild.
Warnungs-/ Sicherheitshinweise
Allgemeine Informationen und Empfehlungen
Informationen zum Umweltschutz
Änderungen vorbehalten.
Page 30

www.electrolux.com30
1. SICHERHEITSHINWEISE
Lesen Sie vor der Montage und dem Gebrauch des
Geräts zuerst die Gebrauchsanleitung. Der Hersteller
übernimmt keine Verantwortung für Verletzungen und
Beschädigungen durch unsachgemäße Montage.
Bewahren Sie die Gebrauchsanleitung griffbereit auf.
- Lesen Sie bitte die mitgelieferte Anleitung.
1.1 Sicherheit von Kindern und schutzbedürftigen Personen
WARNUNG!
Erstickungs- und Verletzungsgefahr sowie Gefahr
einer dauerhaften Behinderung.
• Das Gerät kann von Kindern ab 8 Jahren und Personen
mit eingeschränkten physischen, sensorischen oder
geistigen Fähigkeiten oder mit mangelnder Erfahrung
und/oder mangelndem Wissen nur dann verwendet
werden, wenn sie durch eine für ihre Sicherheit
zuständige Person beaufsichtigt werden oder in die
sichere Verwendung des Geräts eingewiesen wurden
und die mit dem Gerät verbundenen Gefahren
verstanden haben.
• Kinder dürfen nicht mit dem Gerät spielen.
• Halten Sie Kinder unter 3 Jahren vom Gerät fern, wenn
sie nicht ständig beaufsichtigt werden.
• Alle Verpackungsmaterialien von Kindern fernhalten.
• Alle Reinigungsmittel von Kindern fernhalten.
• Halten Sie Kinder und Haustiere vom geöffneten Gerät
fern.
• Falls Ihr Gerät mit einer Kindersicherung ausgestattet
ist, empfehlen wir, diese einzuschalten.
• Wartung oder Reinigung des Geräts dürfen nicht von
Kindern ohne Aufsicht erfolgen.
Page 31

DEUTSCH
1.2 Allgemeine Sicherheit
• Nehmen Sie keine technischen Änderungen am Gerät
vor.
• Wenn der Wäschetrockner auf einer Waschmaschine
aufgestellt wird, muss die Befestigung mithilfe des
Bausatzes Wasch-Trocken-Säule erfolgen. Der Bausatz
Wasch-Trocken Säule, der bei Ihrem autorisierten
Lieferanten erhältlich ist, kann nur für die in der
mitgelieferten Anleitung aufgeführten Geräte verwendet
werden. Lesen Sie die Anleitung aufmerksam vor der
Montage (siehe Montageanleitung).
• Das Gerät kann freistehend oder unter einer
Küchenarbeitsplatte in einer Nische mit den
entsprechenden Abmessungen montiert werden (siehe
Montageanleitung).
• Das Gerät darf nicht hinter einer verschließbaren Tür,
einer Schiebetür oder einer Tür mit einem Scharnier,
das dem des Gerätes gegenüber liegt und eine
vollständige Öffnung der Gerätetür verhindert,
aufgestellt werden.
• Die Lüftungsöffnungen im Gerätesockel (falls vorhanden)
dürfen nicht von einem Teppichboden blockiert werden.
• Stecken Sie den Netzstecker erst nach Abschluss der
Montage in die Steckdose. Stellen Sie sicher, dass der
Netzstecker nach der Montage noch zugänglich ist.
• Der Raum, in dem das Gerät aufgestellt wird, muss gut
belüftet sein, damit keine Gase in den Raum
zurückströmen, die von offenem Feuer oder von
anderen Geräten stammen, die mit Brennstoffen
arbeiten.
• Die Abluft darf nicht über denselben Abzug abgeleitet
werden, durch den der Dunstabzug von mit Gas oder
sonstigen Brennstoffen betriebenen Geräten
gewährleistet wird. (falls zutreffend)
• Wenn das Netzkabel beschädigt ist, muss es vom
Hersteller, seinem autorisierten Kundenservice oder
31
Page 32

www.electrolux.com32
einer gleichermaßen qualifizierten Person ausgetauscht
werden, um Gefahrenquellen zu vermeiden.
• Beachten Sie die maximale Beladungsmenge von 8 kg
(siehe Kapitel „Programmtabelle“).
• Verwenden Sie das Gerät nicht, wenn es mit
Industriechemikalien gereinigt wurde.
• Wischen Sie die um das Gerät ggf. angesammelten
Flusen weg.
• Benutzen Sie das Gerät niemals ohne Filter. Reinigen
Sie den Flusenfilter vor oder nach jedem Gebrauch.
• Trocknen Sie keine ungewaschenen Wäschestücke im
Trockner.
• Wäschestücke, die mit Speiseöl verschmutzt sind oder
die mit Aceton, Alkohol, Kerosin, Fleckentfernern,
Terpentin und Wachsentfernern behandelt worden sind,
müssen vor dem Trocknen in dem Wäschetrockner in
heißem Wasser und zusätzlichem Waschmittel
gewaschen werden.
• Artikel wie Schaumgummi (Latexschaumgummi),
Duschhauben, imprägnierte Textilien,
gummibeschichtete Wäschestücke und Kleider oder
Kissen mit Schaumgummipolster dürfen in dem Gerät
nicht getrocknet werden.
• Weichspüler oder ähnliche Produkte dürfen nur
entsprechend den Herstelleranweisungen benutzt
werden.
• Entfernen Sie alle Gegenstände, wie Feuerzeuge und
Streichhölzer, aus den Taschen.
• Wenn Sie die Trockentrommel vor dem Ende des
Trockengangs anhalten müssen, entnehmen Sie bitte
sofort die gesamte Wäsche und breiten Sie diese zur
Wärmeableitung aus.
• Der letzte Teil eines Trockenprogramms findet ohne
Hitze statt (Abkühlzyklus), um sicherzustellen, dass die
Wäsche auf einer Temperatur bleibt, bei der sie nicht
beschädigt wird.
Page 33

• Schalten Sie das Gerät immer aus und ziehen Sie den
Netzstecker aus der Steckdose, bevor
Reinigungsarbeiten durchgeführt werden.
2. SICHERHEITSANWEISUNGEN
DEUTSCH
33
2.1 Montage
• Entfernen Sie das
Verpackungsmaterial.
• Stellen Sie ein beschädigtes Gerät
nicht auf und benutzen Sie es nicht.
• Halten Sie sich an die mitgelieferte
Montageanleitung.
• Seien Sie beim Umsetzen des Geräts
vorsichtig, denn es ist schwer. Tragen
Sie stets Sicherheitshandschuhe.
• Das Gerät darf nicht an einem Ort
aufgestellt oder verwendet werden, an
dem die Temperatur unter 5 °C
absinken oder auf über 35°C steigen
kann.
• Stellen Sie sicher, dass der Boden, auf
dem das Gerät aufgestellt wird, eben,
hitzebeständig und sauber ist.
• Stellen Sie sicher, dass die Luft
zwischen Gerät und Boden zirkulieren
kann.
• Das Gerät darf ausschließlich stehend
transportiert oder umgesetzt werden.
• Die Geräterückseite muss gegen die
Wand zeigen.
• Überprüfen Sie den waagrechten
Stand des Geräts mit einer
Wasserwaage, wenn es an seinen
endgültigen Platz gestellt wird. Richten
Sie es gegebenenfalls mit den
Schraubfüßen waagerecht aus.
2.2 Elektrischer Anschluss
WARNUNG!
Brand- und
Stromschlaggefahr.
• Das Gerät muss geerdet sein.
• Stellen Sie sicher, dass die elektrischen
Daten auf dem Typenschild den Daten
Ihrer Stromversorgung entsprechen.
Wenden Sie sich andernfalls an eine
Elektrofachkraft.
• Schließen Sie das Gerät nur an eine
ordnungsgemäß installierte
Schutzkontaktsteckdose an.
• Verwenden Sie keine
Mehrfachsteckdosen oder
Verlängerungskabel.
• Ziehen Sie nicht am Netzkabel, wenn
Sie das Gerät von der
Stromversorgung trennen möchten.
Ziehen Sie stets am Netzstecker.
• Fassen Sie das Netzkabel oder den
Netzstecker nicht mit nassen Händen
an.
• Nur für GB und Irland. Das Gerät
besitzt einen Netzstecker mit einer 13
A Sicherung. Muss die Sicherung im
Netzstecker ausgetauscht werden,
setzen Sie eine 13 A Sicherung des
Typs ASTA (BS 1362) ein.
• Das Gerät entspricht den EWGRichtlinien.
2.3 Gebrauch
WARNUNG!
Verletzungs-, Stromschlag-,
Brand-, Verbrennungsgefahr
sowie Risiko von Schäden
am Gerät.
• Das Gerät ist ausschließlich für die
Verwendung im Haushalt vorgesehen.
• Beschädigte Wäschestücke mit
Wattierungen oder Füllungen dürfen
nicht im Gerät getrocknet werden.
• Nur Textilien trocknen, die für
Wäschetrockner geeignet sind.
Beachten Sie die Pflegehinweise auf
dem Textiletikett.
• Für Wäsche, die mit einem
Fleckenentferner behandelt wurde,
muss vor dem Trocknen ein
zusätzlicher Spülgang durchgeführt
werden.
• Das Kondenswasser/destillierte Wasser
darf nicht getrunken oder für das
Zubereiten von Speisen verwendet
werden. Dies kann bei Mensch und
Tier gesundheitliche Schäden
hervorrufen.
Page 34

www.electrolux.com34
• Setzen oder stellen Sie sich niemals auf
die geöffnete Gerätetür.
• Trocknen Sie keine tropfnassen
Wäschestücke im Trockner.
Sie ausschließlich Neutralreiniger
Benutzen Sie keine Scheuermittel,
scheuernde Reinigungsschwämmchen,
Lösungsmittel oder Metallgegenstände.
2.4 Innenbeleuchtung
WARNUNG!
Verletzungsgefahr.
• Sichtbare LED-Abstrahlung; vermeiden
Sie es, direkt in den Lichtstrahl zu
blicken.
• Die Leuchtmittel in diesem Gerät sind
nur für Haushaltsgeräte geeignet.
Benutzen Sie sie nicht für die
Raumbeleuchtung.
• Für den Austausch der
Innenbeleuchtung wenden Sie sich
bitte an den Kundendienst.
2.5 Reinigung und Pflege
WARNUNG!
Verletzungsgefahr sowie
Risiko von Schäden am
Gerät.
• Reinigen Sie das Gerät nicht mit einem
Wasser- oder Dampfstrahl.
• Reinigen Sie das Gerät mit einem
weichen, feuchten Tuch. Verwenden
2.6 Kompressor
WARNUNG!
Das Gerät könnte beschädigt
werden.
• Das Kompressorsystem des
Wäschetrockners ist mit einem
speziellem Mittel gefüllt, das keine
Fluorchlorkohlenwasserstoffe enthält.
Das System muss dicht bleiben. Eine
Beschädigung des Systems kann zu
einem Leck führen.
2.7 Entsorgung
WARNUNG!
Verletzungs- und
Erstickungsgefahr.
• Trennen Sie das Gerät von der
Stromversorgung.
• Schneiden Sie das Netzkabel ab, und
entsorgen Sie es.
• Entfernen Sie das Türschloss, um zu
verhindern, dass sich Kinder oder
Haustiere in dem Gerät einschliessen.
Page 35

3. GERÄTEBESCHREIBUNG
1 2
7
3
4
5
6
9
10
11
12
8
DEUTSCH
35
Wasserbehälter
1
Bedienfeld
2
Innenbeleuchtung
3
Gerätetür
4
Filter
5
Taste zum Öffnen der
6
Schraubfüße
8
Zugangstür zum Wärmetauscher
9
Wärmetauscherabdeckung
10
Taste zum Verriegeln der
11
Wärmetauscherabdeckung
Typenschild
12
Wärmetauschertür
Luftschlitze
7
Die Einfülltür kann vom
Benutzer an der
gegenüberliegenden Seite
angebracht werden. So kann
die Wäsche in einigen Fällen
einfacher eingelegt und
entnommen werden (siehe
separate Broschüre).
Page 36

www.electrolux.com36
4. ZUBEHÖR
4.1 Bausatz Wasch-Trocken-
Säule
Zubehörbezeichnung: SKP11, STA8,
STA9
Sie erhalten den Bausatz bei Ihrem
Vertragshändler.
Der Bausatz Wasch-Trocken-Säule kann
nur mit den in der Broschüre aufgeführten
Waschmaschinen verwendet werden.
Siehe beiliegende Broschüre.
Lesen Sie die dem Zubehör beiliegende
Anleitung sorgfältig durch.
4.2 Bausatz zur Ableitung des Kondenswassers
Zubehör für die Ableitung des
Kondenswassers in ein Waschbecken,
einen Siphon, einen Gully o. ä. Nach der
Montage wird der Wasserbehälter
automatisch geleert. Der Wasserbehälter
muss im Gerät bleiben.
Der Schlauch muss mindestens 50 cm
und höchstens 1 m über dem Boden
installiert werden. Der Schlauch darf keine
Schleife bilden. Kürzen Sie den Schlauch
bei Bedarf.
Lesen Sie die dem Zubehör beiliegende
Anleitung sorgfältig durch.
4.3 Sockel mit Schublade
Zubehörbezeichnung: PDSTP10.
Sie erhalten den Bausatz bei Ihrem
Vertragshändler.
Damit wird das Gerät auf eine höhere
Ebene gebracht und das Be- und
Entladen erleichtert.
Die Schublade kann zur Aufbewahrung
von Wäsche benutzt werden, z. B. für
Handtücher, Reinigungsprodukte usw.
Lesen Sie die dem Zubehör beiliegende
Anleitung sorgfältig durch.
Zubehörbezeichnung: DK11.
Erhältlich bei Ihrem autorisierten Händler
(kann bei einigen Modellen des
Wäschetrockners angebracht werden)
Page 37

4.4 Trockenkorb
1 2
34
Zubehörbezeichnung: RA5, RA6, RA11,
RA12.
5. BEDIENFELD
DEUTSCH
Erhältlich bei Ihrem autorisierten Händler
(kann bei einigen Modellen des
Wäschetrockners angebracht werden).
Informieren Sie sich bei Ihrem Händler
oder auf der Website, ob das Zubehör mit
Ihrem Gerät kompatibel ist.
Trockenkorb zum sicheren Trocknen im
Wäschetrockner von:
• Turnschuhen
• Wolle
• Stofftieren
• Dessous
Lesen Sie die dem Zubehör beiliegende
Anleitung sorgfältig durch.
37
Programmwahlschalter
1
Touch Panel mit Display
2
Programmanzeigen
3
4
Ein/Aus Taste mit der
entsprechenden Auto Off -Funktion
Page 38

Zeitvorwahl
Départ Différé
Zeitwahl
Minuterie
Signal
Alarme
Trocken+
Séchage+
U/Min.
Essorage
Knitterschutz
Anti-froissage
Start/Pause
Départ/Pause
Extra Leise
Extra Silence
8 kg
Zeit Sparen
Gain de Temps
Eco
www.electrolux.com38
5.1 Das Touch Panel
Statt über Tasten stellen Sie die Optionen
durch Berühren des Feldes mit dem
Namen der Option ein. Die einzelnen
Bereiche zwischen den senkrechten
Strichen erfassen die Fingerberührung.
5.2 Display
Das im Display ange-
zeigte Symbol
Textzeile
Uhrzeit
Anzeige der Programmdauer
Geschätzter Zeitpunkt, an dem das Programm endet
Am besten berühren Sie die
Fläche in der Mitte zwischen
den senkrechten Strichen.
Tragen Sie zum Einstellen der
Funktionen über das Touch
Panel keine Handschuhe.
Achten Sie darauf, dass das
Touch Panel immer sauber
und trocken ist.
Symbolbeschreibungen
Page 39

DEUTSCH
39
Das im Display ange-
zeigte Symbol
Das im Display ange-
zeigte Symbol
, ,
, -
-
- - -
Symbolbeschreibungen
Geschätzter Zeitpunkt, an dem das Zeitprogramm endet
Einstellbereich für das Zeitprogramm 10 Min. – 120 Min.
Geschätzter Zeitpunkt, an dem das Programm mit Zeitvorwahl endet
Einstellbereich für die Zeitvorwahl 30 Min. – 20 Std.
Symbolbeschreibungen
Trockengrad Extratrocken: normal, mittel, maximal
Dauer der Knitterschutzphase: Standarddauer, Einstellbereich (zwischen 30 Min. - 120 Min.)
Schleudergang mit: 800 - 1800 U/min
Standard
Das im Display ange-
zeigte Symbol
Symbolbeschreibungen
Signal eingeschaltet
Kindersicherung eingeschaltet
Trockenzeit-Option eingeschaltet
Page 40

www.electrolux.com40
Das im Display ange-
zeigte Symbol
6. PROGRAMMTABELLE
Programme
Extratrocken
Schranktrocken
Bügeltrocken
Jeans
Bettwäsche
Daunen
Zeitprogramm
Mix Extra Kurz
2)
2)3)
Symbolbeschreibungen
Kontrolllampe: Wasserbehälter leeren
Kontrolllampe: Filter reinigen
Kontrolllampe: Wärmetauscher prüfen
Bela-
dung
8 kg
8 kg
8 kg
8 kg
3 kg
3 kg
8 kg
3 kg
1)
Baumwolle
Mischgewebe
Eigenschaften/Pflegesymbol
Trockengrad: Extratrocken.
Trockengrad: Schranktrocken.
Trockengrad: Bügeltrocken.
Zum Trocknen von Freizeitkleidung wie Jeans, Sweatshirts mit
unterschiedlicher Materialstärke
(z. B. am Kragen, an den Manschetten und Nähten).
Zum Trocknen von Bettwäsche
wie: Einzel-/Doppelbettlaken, Kissenbezügen, Tagesdecken.
Zum Trocknen von 1-2 Bettdecken und Kopfkissen (mit Feder-,
Daunen- oder Synthetikfüllung).
Für dieses Programm kann die
Option Zeitprogramm verwendet
und die Programmdauer eingestellt werden.
Zum Trocknen von Textilien aus
Baumwolle und Synthetikgeweben bei niedriger Temperatur.
/
/
/
/
/
/
/
/
Extratrocken
Schranktrocken
Bügeltrocken
3,5 kg
2)
3,5 kg
3,5 kg
Trockengrad: Extratrocken.
Trockengrad: Schranktrocken.
Trockengrad: Bügeltrocken.
/
/
/
Page 41

DEUTSCH
41
Programme
Leichtbügeln
Outdoor
Mikrofaser
Seide
Bela-
1)
dung
1 kg (oder
5 Hem-
den)
2 kg
2 kg
1 kg
Eigenschaften/Pflegesymbol
Pflegeleichte Textilien, die nur leicht gebügelt
werden müssen. Das Trocknungsergebnis
kann je nach Gewebeart unterschiedlich ausfallen. Schütteln Sie jedes Wäschestück leicht
aus, bevor Sie es in das Gerät legen. Nehmen
Sie die Wäsche unmittelbar nach Abschluss
des Programms aus dem Gerät und hängen
Sie sie auf Kleiderbügel.
/
Zum Trocknen von Outdoorkleidung, Sportund Florgewebe, imprägnierten und atmungsaktiven Jacken, Jacken mit herausnehmbarem Fleeceteil oder Innenwattierung.
Dünne, leichte, bügelfreie Sportkleidung aus
Polyester oder Mikrofaser.
Zum Trocknen von Seide und
Dessous mit Warmluft und sanfter
Bewegung.
/
Page 42

www.electrolux.com42
Programme
Bela-
dung
1)
Eigenschaften/Pflegesymbol
Zum Trocknen von Textilien aus Wolle. Die Kleidungsstücke werden weich und anschmiegsam. Wir empfehlen, die Wäsche sofort nach
dem Programmende zu entnehmen. Um den
Restfeuchtegrad der Wäsche zu erhöhen oder
zu reduzieren, verwenden Sie die Funktion
Trocken+.
4)
Wolle
1)
Die Angabe des maximalen Gewichts bezieht sich auf trockene Wäsche.
2)
Nur für Prüfinstitute: Standardprogramme für Prüfungen sind im Dokument EN 61121 an-
gegeben. Ist der Restfeuchtegrad der Wäsche nicht zufriedenstellend, stellen Sie das Programm über die Option Trocken+ entsprechend ein. Reinigen Sie den Filter nach jedem Programm.
3)
Das
wolle“ und eignet sich zum Trocknen von normaler, feuchter Baumwollwäsche und ist in Bezug auf den Energieverbrauch zum Trocknen feuchter Baumwollwäsche das effizienteste Programm.
4)
Das Programm Wolle dieses Wäschetrockners wurde von der Woolmark Company geprüft
und anerkannt. Dieses Programm eignet sich zum Trocknen von Kleidungsstücken aus Wolle,
die mit dem Hinweis „Handwäsche“ versehen sind, jedoch ausschließlich dann, wenn diese
zuvor mit einem von Woolmark anerkannten Handwäsche-Programm gewaschen wurden,
und bei der Trocknung die Herstelleranleitung befolgt wird. 1780SW13W.
Baumwolle Schranktrocken-Programm ist das „Standardprogramm für Baum-
1 kg
6.1 Programm- und Optionsauswahl
Optionen
Knit-
Programme
1)
ken+
ter-
schu
U/
Min.
Zeitwahl
Eco
Troc
tz
Baumwolle; Extratrocken
Baumwolle; Schranktrocken
Baumwolle; Bügeltrocken
Jeans
Zeit
2)
Spa-
ren
Extra
Leise
Page 43

DEUTSCH
Optionen
Programme
Knit-
Troc
1)
ken+
ter-
schu
U/
Min.
Zeitwahl
Eco
tz
Zeit
Spa-
ren
Extra
Leise
2)
Bettwäsche
Daunen
Zeitprogramm
Mix Extra Kurz
Mischgewebe; Extratrocken
Mischgewebe; Schranktrocken
Mischgewebe; Bügeltrocken
Leichtbügeln
Outdoor
Mikrofaser
Seide
43
Wolle
1)
Sie können zusammen mit dem Programm eine oder mehrere Optionen wählen.
2)
Die Option ist ausgeschaltet, wenn eine der Optionen Zeit Sparen oder Extra Leise einge-
schaltet ist.
3)
Nur mit Trockenkorb – siehe Kapitel ZUBEHÖR
3)
6.2 Verbrauchswerte
Programm U/min / Restfeuchte Trockenzeit
Baumwolle 8 kg
Schranktrocken 1400 U/min / 50% 189 Min. 1,32 kWh
1000 U/min / 60% 215 Min. 1,51 kWh
Bügeltrocken 1400 U/min / 50% 144 Min. 1,04 kWh
1000 U/min / 60% 164 Min. 1,19 kWh
Mischgewebe 3,5 kg
Schranktrocken 1200 U/min / 40 % 76 Min. 0,47 kWh
800 U/min / 50% 86 Min. 0,53 kWh
Energie-
verbrauch
Page 44

Start/Pause
Départ/Pause
Extra Leise
Extra Silence
Zeitvorwahl
Départ Différé
Zeitwahl
Minuterie
Signal
Alarme
Trocken+
Séchage+
U/Min.
Essorage
Knitterschutz
Anti-froissage
8 kg
Zeit Sparen
Gain de Temps
Eco
Start/Pause
Départ/Pause
Extra Leise
Extra Silence
Zeitvorwahl
Départ Différé
Zeitwahl
Minuterie
Signal
Alarme
Trocken+
Séchage+
U/Min.
Essorage
Knitterschutz
Anti-froissage
8 kg
Zeit Sparen
Gain de Temps
Eco
Start/Pause
Départ/Pause
Extra Leise
Extra Silence
Zeitvorwahl
Départ Différé
Zeitwahl
Minuterie
Signal
Alarme
Trocken+
Séchage+
U/Min.
Essorage
Knitterschutz
Anti-froissage
8 kg
Zeit Sparen
Gain de Temps
Eco
Start/Pause
Départ/Pause
Extra Leise
Extra Silence
Zeitvorwahl
Départ Différé
Zeitwahl
Minuterie
Signal
Alarme
Trocken+
Séchage+
U/Min.
Essorage
Knitterschutz
Anti-froissage
8 kg
Zeit Sparen
Gain de Temps
Eco
Start/Pause
Départ/Pause
Extra Leise
Extra Silence
Zeitvorwahl
Départ Différé
Zeitwahl
Minuterie
Signal
Alarme
Trocken+
Séchage+
U/Min.
Essorage
Knitterschutz
Anti-froissage
8 kg
Zeit Sparen
Gain de Temps
Eco
www.electrolux.com44
7. OPTIONEN
7.1 Trocken+
Mit dieser Option kann die Wäsche stärker
getrocknet werden. Es stehen 3 Optionen
zur Verfügung:
- Die zum Programm gehörende
Standardauswahl.
– Auswahl für leicht getrocknete
Wäsche.
– Auswahl für etwas stärker
getrocknete Wäsche.
7.2 Knitterschutz
Verlängert die Knitterschutzphase (30
Minuten) am Ende des
Trockenprogramms auf 30, 60, 90 oder
120 Minuten. Diese Option beugt
Knitterfalten in den Textilien vor. Während
der Knitterschutzphase kann Wäsche
entnommen werden.
Wäsche am besten geeigneten
Trockengrad einstellen.
Sie können die Option benutzen, wenn Sie
die Schleuderdrehzahl aus dem
vorangegangenen Waschprogramm
kennen. Durch eine höhere
Schleuderdrehzahl wird der Wäsche mehr
Feuchtigkeit entzogen.
7.4 Signal
Wenn die Option Signal eingeschaltet ist,
ertönt das Signal:
• am Programmende
• zu Beginn und Ende der
Knitterschutzphase
• bei einer Unterbrechung des
Programms
Die Option Signal ist standardmäßig
eingeschaltet. Mit dieser Option können
Sie den Ton ein- oder ausschalten.
Die Option Signal kann für
alle Programme eingestellt
werden.
7.5 Zeitwahl
7.3 U/Min.
Mit dieser Option können Sie den für Ihre
Funktioniert nur mit dem Programm
Zeitprogramm. Damit kann die Dauer des
Trockenprogramms von min. 10 Minuten
bis max. 2 Stunden (in Schritten von 10
Minuten) eingestellt werden.
Page 45

7.6 Zeitvorwahl
Start/Pause
Départ/Pause
Extra Leise
Extra Silence
Zeitvorwahl
Départ Différé
Zeitwahl
Minuterie
Signal
Alarme
Trocken+
Séchage+
U/Min.
Essorage
Knitterschutz
Anti-froissage
8 kg
Zeit Sparen
Gain de Temps
Eco
Start/Pause
Départ/Pause
Extra Leise
Extra Silence
Zeitvorwahl
Départ Différé
Zeitwahl
Minuterie
Signal
Alarme
Trocken+
Séchage+
U/Min.
Essorage
Knitterschutz
Anti-froissage
8 kg
Zeit Sparen
Gain de Temps
Eco
Start/Pause
Départ/Pause
Extra Leise
Extra Silence
Zeitvorwahl
Départ Différé
Zeitwahl
Minuterie
Signal
Alarme
Trocken+
Séchage+
U/Min.
Essorage
Knitterschutz
Anti-froissage
8 kg
Zeit Sparen
Gain de Temps
Eco
Start/Pause
Départ/Pause
Extra Leise
Extra Silence
Zeitvorwahl
Départ Différé
Zeitwahl
Minuterie
Signal
Alarme
Trocken+
Séchage+
U/Min.
Essorage
Knitterschutz
Anti-froissage
8 kg
Zeit Sparen
Gain de Temps
Eco
Zur Verzögerung des
Programmstarts um
mindestens 30 Minuten bis
höchstens 20 Stunden.
1. Wählen Sie ein Trockenprogramm und
Optionen.
2. Berühren Sie wiederholt das
Optionsfeld Zeitvorwahl.
Die Zeit der Verzögerung wird auf dem
Display angezeigt (z.B. , wenn das
Programm nach 12 Stunden starten soll.)
3. Zum Einschalten der ZeitvorwahlOption berühren Sie das Feld Start/
Pause.
Auf dem Display wird angezeigt, wie viel
Zeit noch bis zum Programmstart
verbleibt.
DEUTSCH
Programmen eingeschaltet, außer bei dem
Programm Mix Extra Kurz.
Der Stromverbrauch wird minimiert.
Die Option Eco ist ausgeschaltet, wenn
eine der Optionen Zeit Sparen oder Extra
Leise eingeschaltet ist.
7.8 Zeit Sparen
Die Programmdauer wird verkürzt, ohne
die Trockenqualität zu beeinträchtigen.
Das Programm kann bei Baumwolle um
30 % und bei Mischgewebe um 40 %
verkürzt werden. Durch diese Funktion
erhöht sich der Energieverbrauch.
7.9 Extra Leise
45
7.7 Eco
Der Geräuschpegel wird auf 62 dB
reduziert, ohne die Trockenqualität zu
beeinträchtigen. Dabei verlängert sich die
Programmdauer.
Diese Option ist standardmäßig bei allen
8. VOR DER ERSTEN INBETRIEBNAHME
Führen Sie vor der erstmaligen
Inbetriebnahme des Geräts die folgenden
Schritte aus:
• Reinigen Sie die Trommel des
Wäschetrockners mit einem feuchten
Tuch.
• Beladen Sie die Trommel mit feuchter
Wäsche und starten Sie ein kurzes
Programm (z. B. 30 Minuten).
Page 46

www.electrolux.com46
Zu Beginn eines
Trockengangs (in den ersten
3-5 Min.) ist der
Geräuschpegel
möglicherweise etwas höher.
Dieser wird vom
Kompressoranlauf erzeugt,
was auch bei folgenden, mit
einem Kompressor
ausgestatteten Geräten
normal ist: Kühl- und
Gefrierschränke.
8.1 Sprache
Wenn Sie den Trockner zum ersten Mal
einschalten, wird im Display die
Standardsprache angezeigt. Sie können
sie bestätigen oder unter den verfügbaren
Sprachen eine andere auswählen.
So stellen Sie eine andere Sprache ein:
1. Drehen Sie den
Programmwahlschalter, um Ihre
Sprache einzustellen.
2. Berühren Sie das Feld Start/Pause.
9. TÄGLICHER GEBRAUCH
Die Sprache wird gespeichert.
8.2 Uhr
Wenn Sie den Trockner zum ersten Mal
einschalten, wird im Display die
Standardzeit angezeigt. Diese können Sie
bestätigen oder ändern.
So stellen Sie die neue Uhrzeit ein:
1. Drehen Sie den
Programmwahlschalter, um die
Stunden einzustellen.
2. Berühren Sie das Feld Start/Pause.
Der Stundenwert wird gespeichert.
3. Drehen Sie den
Programmwahlschalter, um die
Minuten einzustellen.
4. Berühren Sie das Feld Start/Pause.
Der Minutenwert wird gespeichert.
9.1 Vorbereiten der Wäsche
• Schließen Sie ggf. alle Reißverschlüsse.
• Wenn Sie Bettbezüge trocknen,
knöpfen Sie diese zu.
• Binden Sie sämtliche lose Gürtel oder
Bänder (z. B. von Schürzen)
zusammen, bevor Sie ein Programm
starten.
• Entfernen Sie sämtliche Gegenstände
aus den Taschen.
• Drehen Sie Wäschestücke mit
Baumwollfutter auf links. Vergewissern
Sie sich unbedingt, dass das
Baumwollfutter außen ist.
• Wir empfehlen, die zu trocknende
Gewebeart bei der
Programmeinstellung zu
berücksichtigen.
Textiletikett Beschreibung
Textilien, die für Wäschetrockner geeignet sind.
• Bunte und helle Textilien sollten nicht
zusammen getrocknet werden. Kräftige
Farben können auf hellere abfärben.
• Achten Sie auf die Auswahl von
geeigneten Programmen für
Trikotwäsche und Strickwaren, um das
Einlaufen der Wäsche zu verhindern.
• Stellen Sie sicher, dass das
Wäschegewicht den in der
Programmtabelle angegebenen
Maximalwert nicht überschreitet.
• Trocknen Sie nur Textilien, die für
Wäschetrockner geeignet sind.
Beachten Sie die Pflegehinweise auf
dem Textiletikett.
Page 47

Textiletikett Beschreibung
Textilien, die für Wäschetrockner geeignet sind. Wählen Sie ein Programm mit Standardtemperatur.
Textilien, die für Wäschetrockner geeignet sind. Wählen Sie ein Programm mit einer niedrigeren Temperatur.
Textilien, die für Wäschetrockner nicht geeignet sind.
DEUTSCH
47
9.2 Einfüllen der Wäsche
ACHTUNG!
Die Wäsche nicht zwischen
Gerätetür und
Gummidichtung einklemmen.
1. Ziehen Sie die Gerätetür auf.
2. Legen Sie die Wäsche locker ein.
3. Schließen Sie die Gerätetür.
9.3 Einschalten des Geräts
Einschalten des Geräts:
Drücken Sie die Ein/Aus-Taste.
Wenn das Gerät eingeschaltet ist,
erscheinen auf dem Display einige
Anzeigen.
9.4 Funktion Auto Off
Um den Energieverbrauch zu senken, wird
das Gerät in folgenden Fällen über die
Auto Off-Funktion automatisch
ausgeschaltet:
• Wenn das Start/Pause-Feld nicht
innerhalb von 5 Min. berührt wird.
• 5 Minuten nach Programmende.
Schalten Sie das Gerät über die Taste
Ein/Aus ein.
Wenn das Gerät eingeschaltet ist,
erscheinen auf dem Display einige
Anzeigen.
9.5 Einstellen eines Programms
Wählen Sie das gewünschte Programm
mit dem Programmwahlschalter aus.
Die mögliche Programmdauer erscheint im
Display.
Die angegebene Trockenzeit
bezieht sich auf eine
Beladung mit 5 kg für
Baumwoll- und
Jeansprogramme. Für andere
Programme bezieht sich die
Trockenzeit auf die
empfohlene
Beladungsmenge. Die
Trockenzeit für Baumwollund Jeansprogramme ist
länger, wenn die Beladung 5
kg übersteigt.
Page 48

Zeitvorwahl
Départ Différé
Zeitwahl
Minuterie
Signal
Alarme
Trocken+
Séchage+
U/Min.
Essorage
Knitterschutz
Anti-froissage
Start/Pause
Départ/Pause
Extra Leise
Extra Silence
8 kg
Zeit Sparen
Gain de Temps
Eco
Zeitvorwahl
Départ Différé
Zeitwahl
Minuterie
Signal
Alarme
Trocken+
Séchage+
U/Min.
Essorage
Knitterschutz
Anti-froissage
Start/Pause
Départ/Pause
Extra Leise
Extra Silence
8 kg
Zeit Sparen
Gain de Temps
Eco
Zeitvorwahl
Départ Différé
Zeitwahl
Minuterie
Signal
Alarme
Trocken+
Séchage+
U/Min.
Essorage
Knitterschutz
Anti-froissage
Start/Pause
Départ/Pause
Extra Leise
Extra Silence
8 kg
Zeit Sparen
Gain de Temps
Eco
www.electrolux.com48
9.6 Optionen
Sie können zusammen mit dem
Programm eine oder mehrere Optionen
wählen.
Zum Ein- oder Ausschalten der Option
das zugehörige Optionsfeld berühren.
Ist die Option eingeschaltet, leuchtet die
Kontrolllampe über dem Optionsfeld auf
oder das Symbol erscheint auf dem
Display.
9.7 Kindersicherung
Die Kindersicherung kann eingeschaltet
werden, um zu verhindern, dass Kinder
mit dem Gerät spielen. Die
Kindersicherung sperrt alle Tasten sowie
den Programmwahlschalter (diese Option
sperrt nicht die Ein/Aus-Taste).
Die Kindersicherung kann eingeschaltet
werden:
• Bevor Sie die Taste Start/Pause
drücken - das Gerät kann nicht starten
• Nachdem Sie die Taste Start/Pause
gedrückt haben - die Programme- und
Optionenauswahl ist ausgeschaltet.
Einschalten der Kindersicherung:
1. Schalten Sie den Trockner ein.
2. Warten Sie etwa 8 Sekunden.
3. Wählen Sie eines der verfügbaren
Programme.
4. Berühren Sie gleichzeitig die
Optionsfelder Trocken+ und
Knitterschutz .
Das Symbol leuchtet auf dem Display
auf.
5. Zum Ausschalten der Kindersicherung
berühren Sie erneut die obigen
Optionsfelder, bis das Symbol im
Display erlischt.
9.8 Starten eines Programms
So starten Sie das Programm:
Berühren Sie das Feld Start/Pause.
Das Gerät startet und die Kontrolllampe
über dem Sensorfeld hört auf zu blinken
und leuchtet kontinuierlich.
9.9 Programmänderung
Ändern eines Programms:
1.
Schalten Sie das Gerät über die Ein/
Aus-Taste aus.
2. Schalten Sie das Gerät über die Ein/
Aus-Taste wieder ein.
3. Wählen Sie ein neues Programm.
9.10 Programmende
Reinigen Sie den Filter und
entleeren Sie den
Wasserbehälter nach jedem
Trockengang. (Siehe Kapitel
REINIGUNG UND PFLEGE.)
Nach Abschluss des Trockenprogramms
blinkt das Symbol
Option Signal eingeschaltet, ertönt etwa
eine Minute lang eine akustische
Signalfolge.
Wenn Sie das Gerät nicht
abschalten, beginnt die
Knitterschutzphase. Während
dieser Phase kann Wäsche
entnommen werden.
im Display. Ist die
Page 49

Entnehmen der Wäsche:
Zeitvorwahl
Départ Différé
Zeitwahl
Minuterie
Signal
Alarme
Trocken+
Séchage+
U/Min.
Essorage
Knitterschutz
Anti-froissage
Start/Pause
Départ/Pause
Extra Leise
Extra Silence
8 kg
Zeit Sparen
Gain de Temps
Eco
Zeitvorwahl
Départ Différé
Zeitwahl
Minuterie
Signal
Alarme
Trocken+
Séchage+
U/Min.
Essorage
Knitterschutz
Anti-froissage
Start/Pause
Départ/Pause
Extra Leise
Extra Silence
8 kg
Zeit Sparen
Gain de Temps
Eco
1. Halten Sie die Ein/Aus-Taste 2
Sekunden lang gedrückt, um das
Gerät auszuschalten.
2. Öffnen Sie die Gerätetür.
3. Entnehmen Sie die Wäsche.
4. Schließen Sie die Gerätetür.
10. TIPPS UND HINWEISE
10.1 Umwelttipps
• Schleudern Sie die Wäsche vor dem
Trocknen gut.
• Halten Sie sich an die in der
Programmtabelle aufgeführten
Füllmengen.
• Reinigen Sie das Sieb nach jedem
Trockenprogramm.
• Benutzen Sie keinen Weichspüler für
Wäsche, die Sie anschließend in den
Trockner geben. Im Wäschetrockner
wird die Wäsche automatisch weich.
• Das Kondenswasser kann als
destilliertes Wasser verwendet werden,
z. B. zum Bügeln mit einem
Dampfbügeleisen. Reinigen Sie das
Kondensat zuvor (z. B. mit einem
Kaffeefilter), um eventuelle Rückstände
oder Flusen zu entfernen.
• Halten Sie die Lüftungsschlitze unten
am Gerät stets frei.
• Achten Sie darauf, dass am
Installationsort des Geräts eine gute
Luftzirkulation herrscht.
10.2 Einstellen des
Restfeuchtegrads der Wäsche
Ändern des werkseitig eingestellten
Restfeuchtegrads:
1. Schalten Sie das Gerät ein.
2. Warten Sie etwa 8 Sekunden.
3. Wählen Sie eines der verfügbaren
Programme.
4. Berühren Sie gleichzeitig die
Optionsfelder Trocken+ und U/Min..
DEUTSCH
Eines der Symbole leuchtet auf dem
Display auf:
- höchster Trocknungsgrad
- stärkerer Trocknungsgrad
- voreingestellter Trocknungsgrad
5. Berühren Sie das Feld Start/Pause
wiederholt, bis der gewünschte Grad
eingestellt ist.
6. Zum Speichern der Einstellung
berühren Sie gleichzeitig ca. 2
Sekunden lang die Optionsfelder
Trocken+ und U/Min..
10.3 Ausschalten der
Kontrolllampe Behälter
1. Schalten Sie das Gerät ein.
2. Warten Sie etwa 8 Sekunden.
3. Wählen Sie eines der verfügbaren
Programme.
4. Berühren Sie gleichzeitig die
Optionsfelder Trocken+ und Signal.
49
Eine von 2 Konfigurationen ist möglich:
Page 50

Zeitvorwahl
Départ Différé
Zeitwahl
Minuterie
Signal
Alarme
Trocken+
Séchage+
U/Min.
Essorage
Knitterschutz
Anti-froissage
Start/Pause
Départ/Pause
Extra Leise
Extra Silence
8 kg
Zeit Sparen
Gain de Temps
Eco
Zeitvorwahl
Départ Différé
Zeitwahl
Minuterie
Signal
Alarme
Trocken+
Séchage+
U/Min.
Essorage
Knitterschutz
Anti-froissage
Start/Pause
Départ/Pause
Extra Leise
Extra Silence
8 kg
Zeit Sparen
Gain de Temps
Eco
Ta ge sz ei t
www.electrolux.com50
• Die Kontrolllampe Behälter ist
eingeschaltet und das Symbol
leuchtet auf - die
Wasserbehälteranzeige steht
ständig auf Ein.
• Die Kontrolllampe Behälter ist
ausgeschaltet und das Symbol
leuchtet auf - die
Wasserbehälteranzeige steht
ständig auf Aus.
10.4 Sprache
Sie können die Sprache jederzeit erneut
ändern.
So stellen Sie eine andere Sprache ein:
1. Schalten Sie den Trockner ein.
2. Warten Sie etwa 8 Sekunden.
3. Berühren Sie gleichzeitig die
Optionsfelder Knitterschutz und U/
Min., und halten Sie sie gedrückt.
Daraufhin wird die Sprache im Display
angezeigt.
4. Drehen Sie den
Programmwahlschalter, um die neue
Sprache einzustellen.
5. Berühren Sie das Feld Start/Pause.
Die Sprache wird gespeichert.
10.5 Uhr
Sie können die Uhr jederzeit erneut
einstellen.
So stellen Sie die neue Uhrzeit ein:
1. Schalten Sie den Trockner ein.
2. Warten Sie etwa 8 Sekunden.
3. Berühren Sie gleichzeitig die
Optionsfelder Signal und Zeitwahl,
und halten Sie sie gedrückt.
Die Uhrzeit beginnt im Display zu blinken.
4. Drehen Sie den
Programmwahlschalter, um die
Stunden einzustellen.
5. Berühren Sie das Feld Start/Pause.
Der Stundenwert wird gespeichert.
6. Drehen Sie den
Programmwahlschalter, um die
Minuten einzustellen.
7. Berühren Sie das Feld Start/Pause.
Der Minutenwert wird gespeichert.
11. REINIGUNG UND PFLEGE
11.1 Reinigen des Siebs
Am Ende jedes Programms erscheint das
Symbol Sieb auf dem Display, und Sie
müssen das Sieb reinigen.
Das Sieb hält Flusen zurück.
Die Flusen lösen sich
während des Trockengangs
von der Wäsche.
1. Öffnen Sie die Tür. Ziehen Sie das
Sieb heraus.
2. Drücken Sie auf den Haken, um das
Sieb zu öffnen.
Page 51

3. Reinigen Sie beide Teile des Siebs mit
der feuchten Hand.
4. Bei Bedarf können Sie auch die Bürste
und warmes Leitungswasser und/oder
einen Staubsauger zum Reinigen des
Siebs verwenden. Schließen Sie das
Sieb.
DEUTSCH
das Sieb in den Sockel ein.
11.2 Leeren des Wasserbehälters
Der Kondensatbehälter muss nach jedem
Trockengang entleert werden.
Wenn der Kondensatbehälter voll ist,
bricht das Programm automatisch ab. Das
Symbol
auf, Sie müssen den Wasserbehälter
entleeren.
Entleeren des Wasserbehälters:
1. Ziehen Sie den Wasserbehälter heraus
Behälter leuchtet am Display
und halten Sie ihn waagerecht.
51
5. Entfernen Sie, falls erforderlich, Flusen
vom Sockel des Siebs und von der
Dichtung. Hierfür können Sie einen
Staubsauger verwenden. Setzen Sie
2. Ziehen Sie die Kunststoffverbindung
heraus und entleeren Sie das Wasser
in ein Waschbecken.
3. Schieben Sie die Kunststoffverbindung
ein und setzen Sie den Behälter ein.
4. Drücken Sie die Taste Start/Pause,
um das Programm fortzusetzen.
Page 52

www.electrolux.com52
11.3 Reinigen des
Wärmetauschers
Wenn das Symbol Kondensator im
Display blinkt, müssen der
Wärmetauscher und sein Fach überprüft
werden. Sind sie verschmutzt, reinigen Sie
beide.
So führen Sie die Prüfung durch:
1. Öffnen Sie die Tür. Ziehen Sie das
Sieb heraus.
2. Schieben Sie den Entriegelungsknopf
am unteren Rand der Einfüllöffnung
zur Seite, um die Wärmetauschertür
zu öffnen.
4. Klappen Sie die
Wärmetauscherabdeckung nach
unten.
3. Drehen Sie die Verriegelung, um die
Wärmetauscherabdeckung zu öffnen.
5. Entfernen Sie, falls erforderlich, die
Flusen aus dem Wärmetauscher und
seinem Fach. Hierzu können Sie einen
feuchten Lappen und/oder einen
Staubsauger mit Bürste verwenden.
Page 53

6. Schließen Sie die
Wärmetauscherabdeckung.
7. Verriegeln Sie die Abdeckung, bis sie
einrastet.
8. Setzen Sie das Sieb wieder ein.
11.4 Reinigen der Trommel
WARNUNG!
Ziehen Sie vor der Reinigung
des Geräts den Netzstecker.
Verwenden Sie einen handelsüblichen
neutralen Reiniger zur Reinigung der
Trommelinnenflächen und
Wäscheabweiser. Trocknen Sie die
gereinigten Flächen mit einem weichen
Tuch.
DEUTSCH
ACHTUNG!
Verwenden Sie keine
Scheuermittel oder
Metallschwämmchen zum
Reinigen der Trommel.
11.5 Bedienfeld und Gehäuse reinigen
Verwenden Sie einen handelsüblichen
neutralen Reiniger zur Reinigung des
Bedienfelds und Gehäuses.
Verwenden Sie zur Reinigung ein feuchtes
Tuch. Trocknen Sie die gereinigten
Flächen mit einem weichen Tuch.
ACHTUNG!
Verwenden Sie keine
Möbelreiniger oder
Reinigungsmittel, die eine
Korrosion des Geräts
verursachen können.
11.6 Reinigen der Lüftungsschlitze
Benutzen Sie einen Staubsauger, um
Flusen aus den Lüftungsschlitzen zu
entfernen.
53
12. FEHLERSUCHE
Problem
Der Wäschetrockner funktioniert nicht.
1)
Mögliche Ursache Abhilfe
Der Wäschetrockner ist nicht an
die Stromversorgung angeschlossen.
Die Einfülltür ist offen. Schließen Sie die Einfülltür.
Die Ein/Aus-Taste wurde nicht
gedrückt.
Die Start/Pause-Taste wurde
nicht gedrückt.
Das Gerät befindet sich im Standby-Modus.
Stecken Sie den Netzstecker in
die Steckdose. Kontrollieren Sie
die Sicherung der Hausinstallation.
Drücken Sie die Ein/Aus-Taste.
Drücken Sie die Start/PauseTaste.
Drücken Sie die Ein/Aus-Taste.
Page 54

www.electrolux.com54
Problem
1)
Nicht zufriedenstellendes
Trockenergebnis.
Die Einfülltür
schließt nicht.
Err (Fehler) auf
dem Display.
Keine Trommelbeleuchtung
Ungewöhnlicher
Zeitablauf im
Display.
Das Programm
läuft nicht.
Mögliche Ursache Abhilfe
Es wurde ein falsches Programm
eingestellt.
Der Filter ist verstopft.
Die Trocken+-Option war auf
minimal eingestellt.
4)
Wählen Sie ein geeignetes Pro-
2)
gramm.
Reinigen Sie den Filter.
3)
Ändern Sie die Trocken+-Option
auf mittel oder maximal.
4)
Das Gerät ist zu stark beladen. Beachten Sie die maximale Füll-
menge.
Das Lüftungsgitter ist verstopft. Reinigen Sie das Lüftungsgitter
am Boden des Geräts.
Schmutz auf dem Feuchtigkeitssensor in der Trommel.
Falscher Restfeuchtegrad der
Wäsche.
Reinigen Sie die vordere Fläche
der Trommel.
Stellen Sie den Restfeuchtegrad
der Wäsche ein.
5)
Der Wärmetauscher ist verstopft. Reinigen Sie den Wärmetausch-
3)
er.
Der Filter ist nicht eingerastet. Setzen Sie den Filter korrekt ein.
Zwischen der Tür und der Dichtung ist Wäsche eingeklemmt.
Sie haben nach dem Programmstart versucht, das Programm
oder die Option zu ändern.
Die Option, die Sie einschalten
möchten, lässt sich nicht mit dem
ausgewählten Programm kombi-
Laden Sie die Wäsche richtig in
die Trommel.
Schalten Sie den Wäschetrockner
aus und wieder ein. Wählen Sie
ein neues Programm.
Schalten Sie den Wäschetrockner
aus und wieder ein. Wählen Sie
ein neues Programm.
nieren.
Defekte Trommellampe. Kontaktieren Sie den Kunden-
dienst und lassen Sie die Trommellampe austauschen.
Die voraussichtliche Programmdauer wird unter Berücksichtigung der Menge und des Feuch-
Dieser Vorgang erfolgt automatisch; es handelt sich nicht um
eine Gerätestörung.
tegrades der Wäsche errechnet.
Der Wasserbehälter ist voll. Leeren Sie den Wasserbehälter,
drücken Sie die Start/Pause-
3)
Taste.
Page 55

DEUTSCH
55
Problem
1)
Mögliche Ursache Abhilfe
Es befindet sich nicht genügend
Wäsche in der Trommel.
Wählen Sie ein Zeitprogramm. Die
Zeitdauer ist entsprechend der
Wäschemenge einzustellen. Zum
Der Trockengang ist zu
kurz.
Trocknen eines einzelnen Teils
oder geringer Wäschemengen
sollten kurze Zeiten ausgewählt
werden.
Die Wäsche ist zu trocken. Wählen Sie ein Zeitprogramm
oder einen höheren Trocknungsgrad (z. B. Extratrocken).
Der Filter ist verstopft. Reinigen Sie den Filter.
Das Gerät ist zu stark beladen. Beachten Sie die maximale Füll-
Der Trockengang ist zu
6)
lang.
Die Wäsche wurde nicht genug
geschleudert.
Die Raumtemperatur ist zu hoch,
es handelt sich nicht um eine
menge.
Schleudern Sie die Wäsche richtig.
Falls möglich, senken Sie die
Raumtemperatur.
Gerätestörung.
1)
Das Display zeigt eine Fehlermeldung an (z. B. E51): Schalten Sie den Wäschetrockner aus
und wieder ein. Wählen Sie ein neues Programm. Drücken Sie die Start/Pause-Taste. Funktioniert das Gerät nicht? - Wenden Sie sich an den Kundendienst unter Angabe des Fehlercodes.
2)
Lesen Sie die Programmbeschreibung – siehe PROGRAMMTABELLE
3)
Siehe Kapitel REINIGUNG UND PFLEGE
4)
Nur Trockner mit Trocken+-Option
5)
Siehe Abschnitt HINWEISE UND TIPPS
6)
Hinweis: Nach maximal 5 Stunden wird der Trockengang automatisch abgebrochen.
13. TECHNISCHE DATEN
Höhe x Breite x Tiefe 850 x 600 x 600 mm (maximal 640 mm)
Max. Tiefe bei geöffneter Gerätetür 1090 mm
Max. Breite bei geöffneter Gerätetür 950 mm
Höhenverstellbar 850 mm (+ 15 mm - Fußeinstellung)
Trommelvolumen 118 Liter
Max. Fassungsvermögen 8 kg
Spannung 230 V
Frequenz 50 Hz
Notwendige Sicherung 5 A
Gesamte Leistungsaufnahme 1000 W
Page 56

15mm
www.electrolux.com56
Energie-Effizienzklasse
Energieverbrauch
Jährlicher Energieverbrauch
Leistungsaufnahme im Ein-Zustand 0,11 W
Leistungsaufnahme im Aus-Zustand 0,11 W
Verwendungsart Haushalt
Zulässige Umgebungstemperatur +5 °C bis +35 °C
Die Schutzverkleidung gewährleistet einen
Schutz gegen das Eindringen von festen
Fremdkörpern und Spritzwasser (Feuchtigkeit), außer an den Stellen, an denen das
Niederspannungsgerät keinen Schutz gegen Feuchtigkeit besitzt.
1)
Gemäß EN 61121; bei einer Beladung von 8 kg Baumwolle und einer Drehzahl von 1000 U/
min.
2)
Jährlicher Energieverbrauch in kWh, ausgehend von 160 Trockenprogrammen mit dem
Standard-Baumwollprogramm bei voller Beladung und bei Teilbeladung und vom Verbrauch
der energiesparenden Betriebsmodi. Der tatsächliche Energieverbrauch pro Trockenprogramm
hängt davon ab, wie das Gerät verwendet wird (VERORDNUNG (EU) Nr. 392/2012).
14. MONTAGE
14.1 Auspacken
ACHTUNG!
Entfernen Sie vor dem
Gebrauch das gesamte
Verpackungsmaterial.
A+++
1)
2)
1,51 kWh
176,92 kWh
IPX4
14.2 Einstellung der Gerätefüße
Die Höhe des Wäschetrockners ist
verstellbar. Justieren Sie dazu die Füße.
Entfernen der Styroporteile:
1. Öffnen Sie die Tür.
2. Ziehen Sie den Kunststoffschlauch mit
den Styroporteilen aus der Trommel
heraus.
14.3 Montage als Einbaugerät
Das Gerät kann freistehend oder unter
einer Küchenarbeitsplatte in einer Nische
mit den entsprechenden Abmessungen
montiert werden (siehe Abbildung).
Page 57

> 850 mm
600 mm
600 mm
15. CH GARANTIE
Kundendienst
Industriestrasse 10
5506 Mägenwil
Morgenstrasse 131
Zürcherstrasse 204E
9000 St. Gallen
Seetalstrasse 11
6020 Emmenbrücke
St. Jakob-Turm Birsstrasse 320B
Comercialstrasse 19
3018 Bern
4052 Basel
7000 Chur
Servicestellen
Le Trési 6
1028 Préverenges
DEUTSCH
Via Violino 11
6928 Manno
57
Ersatzteilverkauf Industriestrasse 10,
5506 Mägenwil, Tel. 0848 848 111
Fachberatung/Verkauf Badenerstrasse
587, 8048 Zürich, Tel. 044 405 81 11
Garantie Für jedes Produkt gewähren wir
ab Verkauf bzw. Lieferdatum an den
Endverbraucher eine Garantie von 2
Jahren. (Ausweis durch Garantieschein,
Faktura oder Verkaufsbeleg). Die
16. UMWELTTIPPS
Recyceln Sie Materialien mit dem Symbol
. Entsorgen Sie die Verpackung in den
entsprechenden Recyclingbehältern.
Recyceln Sie zum Umwelt- und
Gesundheitsschutz elektrische und
elektronische Geräte. Entsorgen Sie
Garantieleistung umfasst die Kosten für
Material, Arbeits- und Reisezeit. Die
Garantieleistung entfällt bei
Nichtbeachtung der Gebrauchsanweisung
und Betriebsvorschriften, unsachgerechter
Installation, sowie bei Beschädigung durch
äussere Einflüsse, höhere Gewalt, Eingriffe
Dritter und Verwendung von Nicht-Original
Teilen.
Geräte mit diesem Symbol nicht mit
dem Hausmüll. Bringen Sie das Gerät zu
Ihrer örtlichen Sammelstelle oder wenden
Sie sich an Ihr Gemeindeamt.
Page 58

www.electrolux.com58
Für die Schweiz:
Wohin mit den Altgeräten?
Überall dort wo neue Geräte
verkauft werden oder Abgabe
bei den offiziellen SENSSammelstellen oder offiziellen
SENS-Recyclern.
Die Liste der offiziellen SENSSammelstellen findet sich
unter www.erecycling.ch
*
Page 59

DEUTSCH
59
Page 60

www.electrolux.com/shop
136935020-A-322014
 Loading...