

Page 1

User manual
Notice d’utilisation
Electronic-Fridge
Réfrigérateur
SANTO 72398-6 KA
Page 2
2
Dear Customer
Thank you for choosing one of our high-quality products.
With this appliance you will experience the perfect combination of
functional design and cutting edge technology.
Convince yourself that our appliances are engineered to deliver the best
performance and control - indeed we are setting the highest standards of
excellence.
In addition to this you will find environmental and energy saving aspects as
an integral part of our products.
To ensure optimal and regular performance of your appliance please read
this instruction manual carefully . It will enable you to navigate all processes
perfectly and most efficiently.
To refer to this manual any time you need to, we recommend you to keep
it in a safe place, and please pass it to any future owner of the appliance.
We wish you much joy with your new appliance.
The following symbols are used in this manual
Important information concerning your personal safety and information on
how to avoid damaging the appliance
General information and tips
Environmental information
Page 3

3
Contents
Safety . . . . . . . . . . . . . . . . . . . . . . . . . . . . . . . . . . . . . . . . . . . . . . . . . .4
Disposal . . . . . . . . . . . . . . . . . . . . . . . . . . . . . . . . . . . . . . . . . . . . . . . .5
Appliance Packaging Information . . . . . . . . . . . . . . . . . . . . . . . . . . . . . .5
Disposal of old Appliances . . . . . . . . . . . . . . . . . . . . . . . . . . . . . . . . .5
Remove transport safeguard . . . . . . . . . . . . . . . . . . . . . . . . . . . . . . . .6
Your appliance needs air . . . . . . . . . . . . . . . . . . . . . . . . . . . . . . . . . . .6
Installation . . . . . . . . . . . . . . . . . . . . . . . . . . . . . . . . . . . . . . . . . . . . . .7
Installation Location . . . . . . . . . . . . . . . . . . . . . . . . . . . . . . . . . . . . . .7
Rear spacer . . . . . . . . . . . . . . . . . . . . . . . . . . . . . . . . . . . . . . . . . . . . . . . . . .8
Fitting the Door Handle . . . . . . . . . . . . . . . . . . . . . . . . . . . . . . . . . . .8
Rehingeing the door . . . . . . . . . . . . . . . . . . . . . . . . . . . . . . . . . . . . . . . . . .9
Electrical connection . . . . . . . . . . . . . . . . . . . . . . . . . . . . . . . . . . . . .11
Prior to Inital Start-up . . . . . . . . . . . . . . . . . . . . . . . . . . . . . . . . . . .11
Control panel . . . . . . . . . . . . . . . . . . . . . . . . . . . . . . . . . . . . . . . . . . .11
Starting up - setting the temperature . . . . . . . . . . . . . . . . . . . . . . .12
Interior Accessories . . . . . . . . . . . . . . . . . . . . . . . . . . . . . . . . . . . . . .15
Storage shelves . . . . . . . . . . . . . . . . . . . . . . . . . . . . . . . . . . . . . . . . . . . . .15
Door rack . . . . . . . . . . . . . . . . . . . . . . . . . . . . . . . . . . . . . . . . . . . . . . . . . .15
Bottle Holder . . . . . . . . . . . . . . . . . . . . . . . . . . . . . . . . . . . . . . . . . . . . . . .15
Quick chill shelf . . . . . . . . . . . . . . . . . . . . . . . . . . . . . . . . . . . . . . . . . . . . .16
Bottle-and Can Holder . . . . . . . . . . . . . . . . . . . . . . . . . . . . . . . . . . . . . . .16
Dismantling of the Bottle - and Can Holder . . . . . . . . . . . . . . . . . . . . .16
Installation of the carbon filter . . . . . . . . . . . . . . . . . . . . . . . . . . . . . . .17
Changing the carbon filter . . . . . . . . . . . . . . . . . . . . . . . . . . . . . . . . . . .17
Fresh food refrigeration . . . . . . . . . . . . . . . . . . . . . . . . . . . . . . . . . .18
Defrosting . . . . . . . . . . . . . . . . . . . . . . . . . . . . . . . . . . . . . . . . . . . . .18
Switching off the appliance . . . . . . . . . . . . . . . . . . . . . . . . . . . . . . .19
Cleaning and Care . . . . . . . . . . . . . . . . . . . . . . . . . . . . . . . . . . . . . . .19
Energy Saving Tips . . . . . . . . . . . . . . . . . . . . . . . . . . . . . . . . . . . . . . .20
What to do if . . . . . . . . . . . . . . . . . . . . . . . . . . . . . . . . . . . . . . . . . .21
Correcting Malfunctions . . . . . . . . . . . . . . . . . . . . . . . . . . . . . . . . . . . . .21
Changing the light bulb . . . . . . . . . . . . . . . . . . . . . . . . . . . . . . . . . . . . . .22
Regulations, Standards, Guidelines . . . . . . . . . . . . . . . . . . . . . . . . .23
Page 4
4
Safety
The safety aspects of our refrigerators/freezers comply with accepted
technical standards and the German Appliance Safety Law. Nevertheless, we
consider it our obligation to make you aware of the following safety
information:
Intended use
• The refrigerator is intended for use in the home. It is suitable for cooling
food. If the appliance is used for purposes other than those intended or
used incorrectly , no liability can be accepted by the manufactur er for any
damage that may be caused.
• Alterations or changes to the freezer are not permitted for reasons of safety.
• If you use the refrigerator in a commercial application or for purposes
other than the cooling of foods, please observe all valid legal regulations
for your application.
Prior to initial start–up
• Check the refrigerator for transport damage. Under no circumstance
should a damaged appliance be plugged in! In the event of damage, please
contact the retailer.
Refrigerant
The refrigerant isobutane (R600a) is contained within the refriger ant cir cuit
of the appliance, a natural gas with a high level of environmental
compatibility, which is nevertheless flammable.
• During transportation and installation of the appliance, be certain that
none of the components of the refrigerant circuit become damaged.
• If the refrigerant circuit should become damaged:
– avoid open flames and sources of ignition;
– thoroughly ventilate the room in which the appliance is situated.
Safety of children
• Packaging (e.g. wraps, polystyr ene) can be dangerous for childr en. There is
a risk of suffocation! Keep packaging material away from children!
• Please make old appliances unusable prior to disposal. Pull out the mains
plug, cut off the mains cable, break or remove spring or boltcatches, if
fitted. By doing this you ensure that children cannot lock themselves in
the fridge when playing (there is risk of suffocation!)or get themselves
into other dangerous situations.
• This appliance is not intended for use by persons (including children) with
reduced physical, sensory or mental capabilities, or lack of experience and
knowledge, unless they have been given supervision or instruction
concerning use of the appliance by a person responsible for their safety.
Page 5

5
Children should be supervised to ensure that they do not play with the
appliance. !
Daily Operation
• Do not operate any electrical appliances in the refrigerator/freezer (e.g.
electric ice cream makers, mixers etc.).
• Before cleaning the appliance, always switch it off and unplug it, or pull
the house fuse or switch off the circuit breaker.
• When unplugging always pull the plug from the mains socket, do not pull
on the cable.
In case of malfunction
• If a malfunction occurs on the appliance, please look first in the "What to
do if ..." section of these instructions. If the information given there does
not help, please do not perform any further repairs yourself.
• Refrigerators/freezers may only be repaired by qualified service engineers.
Improper repairs can give rise to significant hazar ds. If your appliance needs
repairing, please contact your local Service Force Centre.
Disposal
Appliance Packaging Information
All materials are environmentally sound! They can be dumped or burned at
an incinerating plant without danger!
About the materials: The plastics can be recycled and are identified as
follows:
>PE< for polyethylene, e.g. the outer covering and the bags in the interior.
>PS< for polystyrene foam, e.g. the pads, which are all free of
chlorofluorocarbon.
The carton parts are made from recycled paper and should be disposed of
at a waste-paper recycling collection location.
Disposal of old Appliances
For environmental reasons, refrigeration appliances must be disposed of
properly. This applies to your old appliance, and - at the end of its service
life - your new appliance as well.
Warning! Before disposing of old appliances make them inoperable. Remove
plug from mains, sever the power cable, remove or destroy any snap or latch
closures. This eliminates the danger that playing children lock themselves
into the appliance (danger of suffocation!) or place themselves into other
life-endangering situations.
Disposal:
• The appliance may not be disposed of with domestic waste or bulky refuse.
• The refrigerant circuit, especially the heat exchanger at the back of the
appliance, may not be damaged.
Page 6
6
• The symbol on the product or on its packaging indicates that
this product may not be treated as household waste. Instead it
should be handed over to the appropriate collection point for the
recycling of electrical and electronic equipment. By ensuring this
product is disposed of correctly, you will help prevent potential
negative consequences for the environment and human health,
which could otherwise be caused by inappropriate waste handling of
this product. For more detailed information about recycling of this
product, please contact your local council, your household waste
disposal service or the shop where you purchased the product.
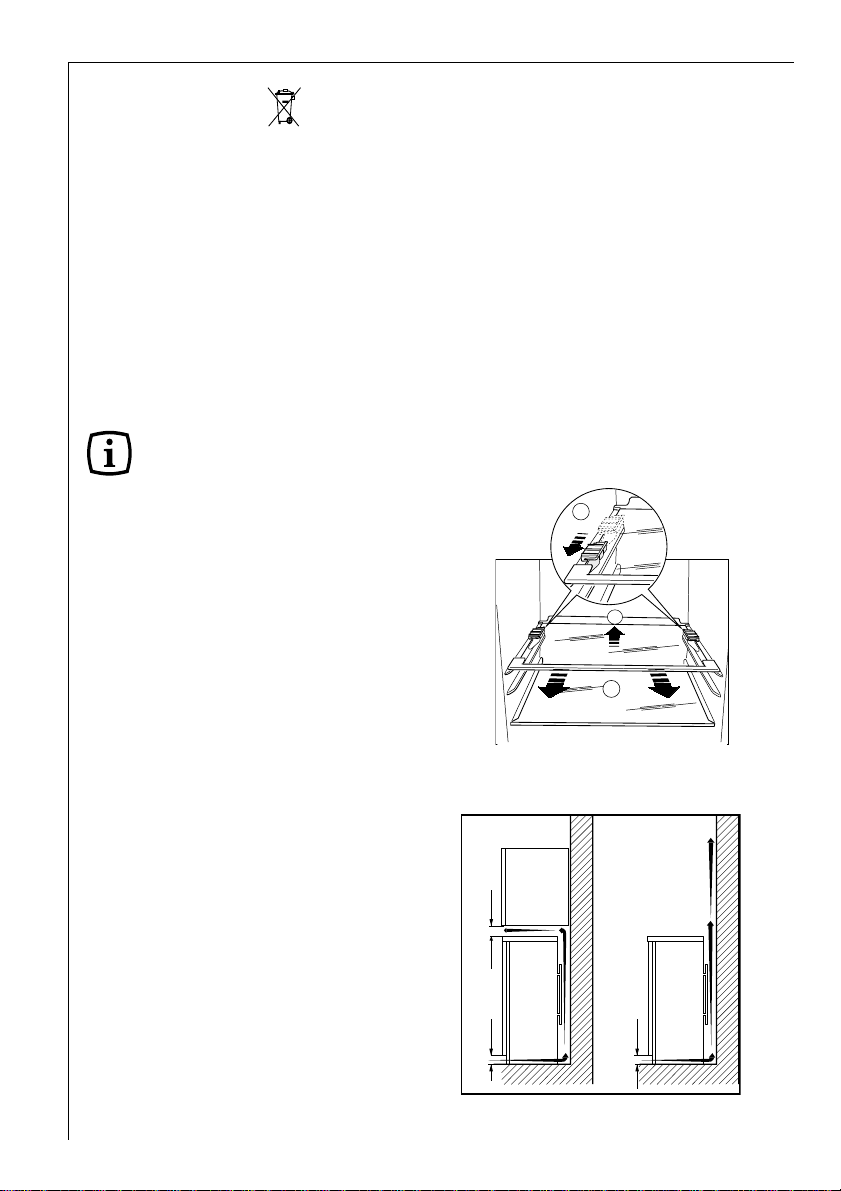
Remove transport safeguard
The appliance and the interior fittings are protected for transport.
•Remove all adhesive tape and packing pieces from the interior of the
appliance.
Your appliance is equipped with shelf
retainers that make it possible to
secure the shelves during
transportation.
To remove them proceed as follows:
Move the shelf retainers in the
direction of the arrow, raise the shelf
from the rear and push it forward
until it is freed and remove the
retainers.
A
C
B
Your appliance needs air
For safety reasons, minimum
ventilationmust be as shown Fig.
Attention: keep ventilation
openings clear of obstruction;
100 mm10 mm
10 mm
NP007
Page 7
7
If installation next to a source of heat is unavoidable, the following
minimum clearances must be maintained at the sides of the appliance:
– for electric cookers 3 cm;
– for oil and coal fired ranges 30 cm.
If these clearances cannot be maintained a heat insulating pad is required
between the cooker and the refrigeration appliance.
If the refrigeration appliance is installed next to another refrigerator or
freezer a clearance of 5 cm at the sides is required, in order to prevent the
formation of condensation on the outside of the appliance.
Installation
Installation Location
The appliance should be set up in a well ventilated, dry room.
Energy use is affected by the ambient temperature. The appliance should
therefore
– not be exposed to direct sunlight;
– not be installed next to radiators, cookers or other sources of heat;
– only be installed at a location whose ambient temperature corresponds to
the climate classification, for which the appliance is designed.
The climate classification can be found on the serial plate, which is located
at the left on the inside of the appliance.
The following table shows which ambient temperature is correct for each
climate classification: each climate classification:
Climate classification for an ambient temperature of
SN +10 bis +32 °C
N +16 bis +32 °C
ST +18 bis +38 °C
T +18 bis +43 °C
Page 8
8
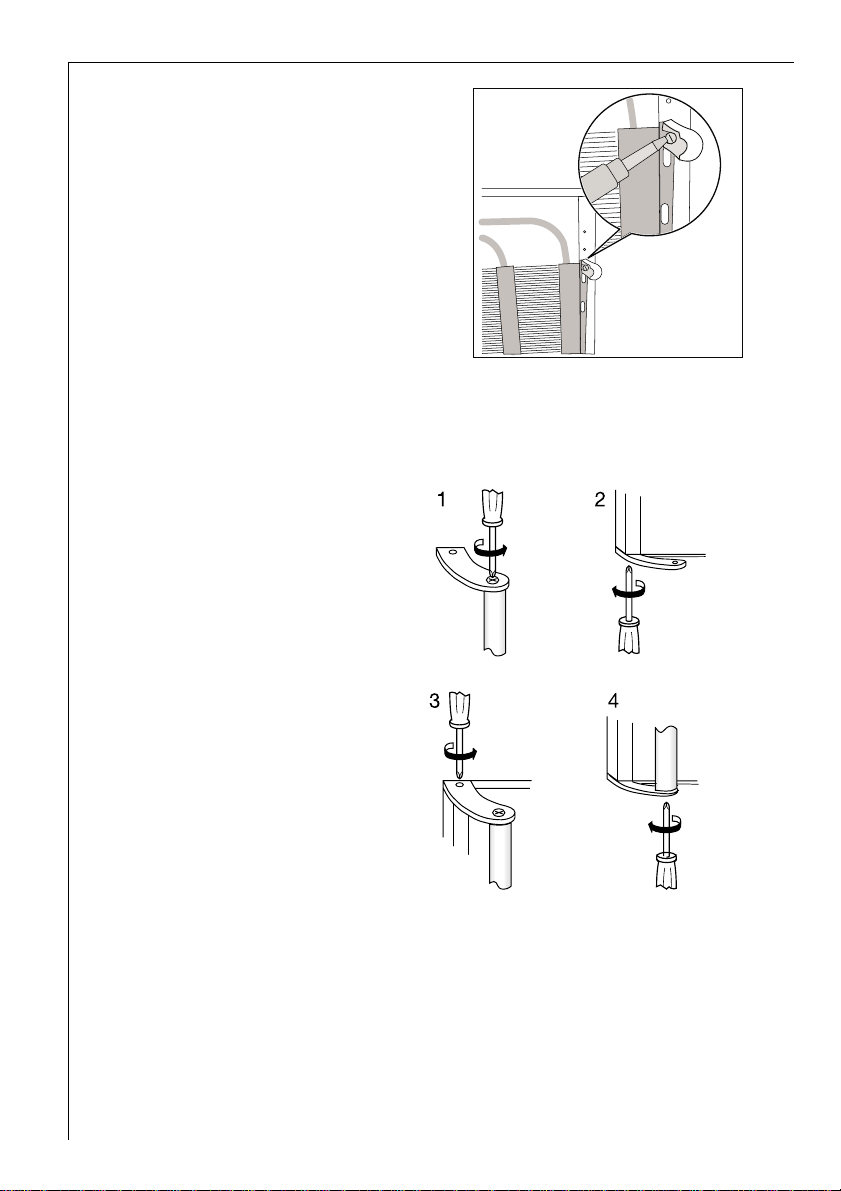
1. Screw the top handle
bracket to the handle rod
(1). Fit the bottom handle
bracket on the lower lefthand side of the door (2).
2. Fit the top handle bracket
on the top left-hand side
of the door (3) and screw
the handle rod to the
bottom handle bracket (4).
Attention!
Do not overtighten the
screws (max. 2 Nm) as you
may damage the door
handles.
Fitting the Door Handle
Rear spacers
Fit the rear spacers contained in
the appliance to ensure escape of
heat generated during operation.
Proceed in the sequence
illustrated in figures.
Page 9
9
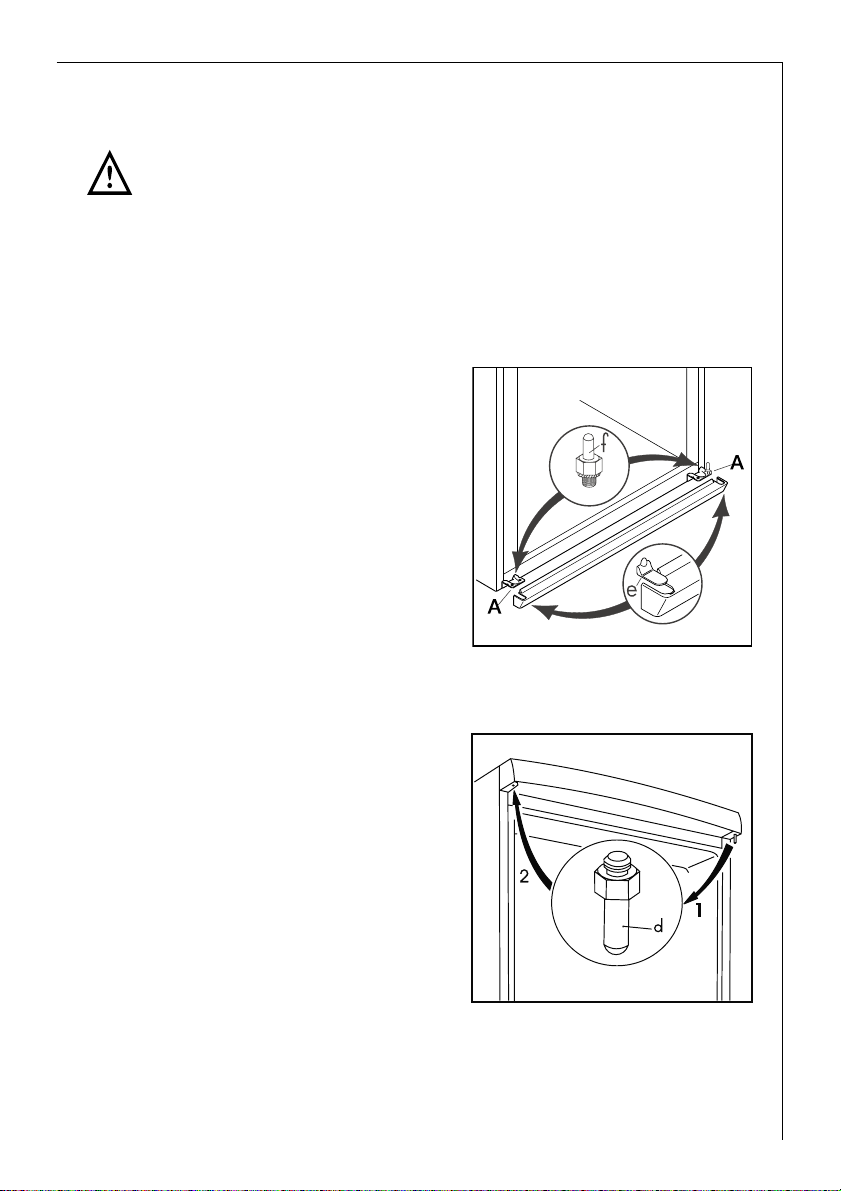
Rehingeing the door
The side at which the door opens can be changed from the right side
(factory adjustment) to the left side, if the installation site requires.
Warning! When changing the side at which the door opens, the appliance
may not be connected to the mains. Remove plug from the mains
beforehand.
Procced as follows:
To carry out the following
operations, we suggest that this be
done with another person that will
keep a firm hold on the door of the
appliance during the operations.
Gently lay the appliance on its
back.
1. Remove the ventilation grille.
2. Remove the bottom hinge (A) by
unscrewing the fixing screws.
3. Remove the door.
4. Unscrew the pin of the bottom
hinge (f) and refit it on the
opposite side.
5. Unscrew the pin of the upper hinge
(d) and refit it on the opposite side.
6. Insert the door in the upper hinge
and refit the upper hinges (A).
Pay attention that the border of the
doors are parallel to the top border,
otherwise adjust the position of
the lower hinge of the door (A).
7. Remove from the ventilation
grille the cover (e) and refit it on
the opposite side.
8. Refit ventilation grille.
Page 10
10
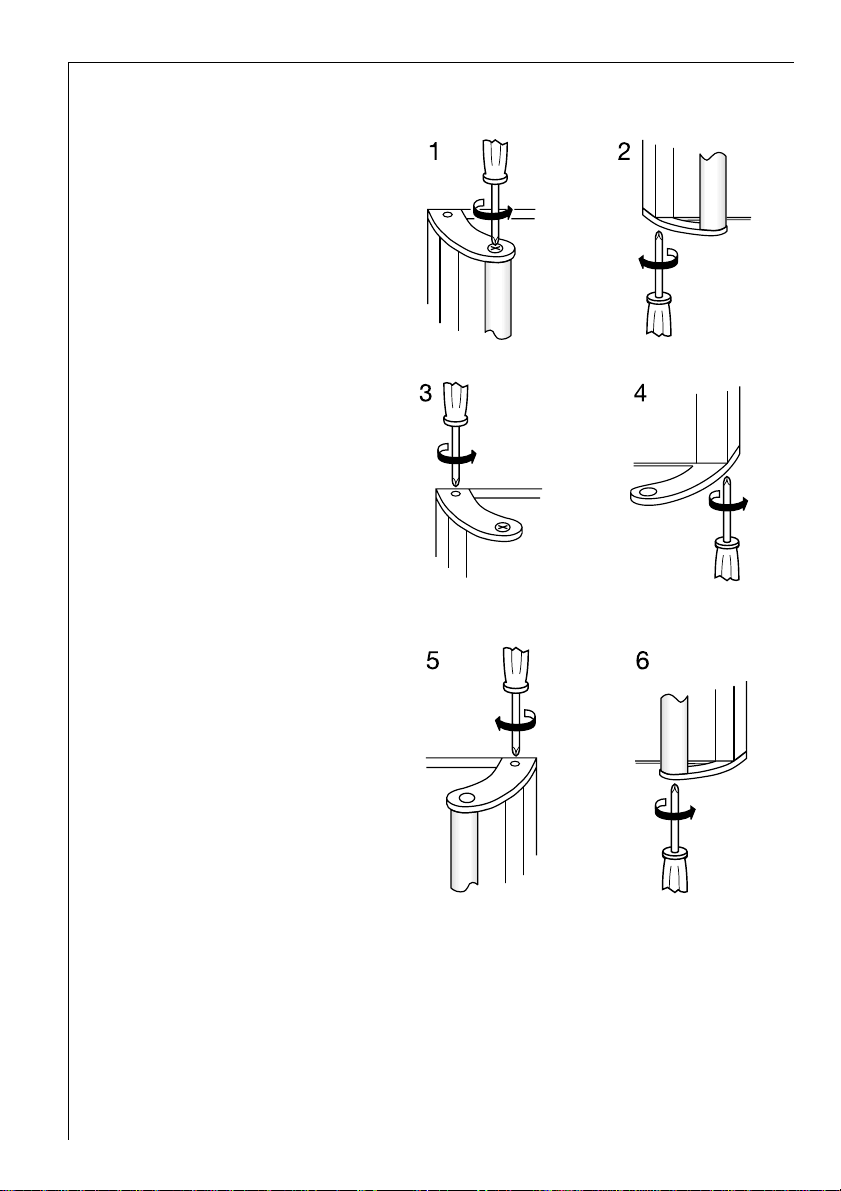
9. Unscrew the top handle bracket
from the handle rod (1). Unscrew
the bottom handle bracket from
the door (2).
Unscrew the top handle
bracket from the door (3) and
screw onto the bottom righthand side of the door (4).
Turn the handle bracket with
the handle rod 180° and screw
them to the door (5) and the
fitted handle bracket (6).
Move the small plug from right
to left..
Reposition, level the
appliance, wait for at least
one hour and then connect it
to the mains socket.
In any case you do not want to
carry out the above mentioned
operations, contact your local
Sales Service Force. The
Service engineer will carry
out the reversibility of the
doors at your cost.
Attention:
After having reversed the opening direction of the doors check that all the
screws are properly tightened and that the magnetic seal adheres to the
cabinet. If the ambient temperature is cold (i.e. in Winter), the gasket may
not fit perfectly to the cabinet. in that case, wait for the natural fitting of
the gasket or accelerate this process by heating up the part involved with a
normal hairdryer.
Page 11
11
Electrical connection
Before initial start-up, refer to the appliance rating plate to ascertain if
supply voltage and current values correspond with those of the mains at the
installation location.
e.g.: AC 230 ... 240 V 50 Hz or
230 ... 240 V~ 50 Hz
(i.e. 230 to 240 volts alternating current, 50 Hertz)
The rating plate is inside the appliance on the left.
A correctly installed, earthed socket is required for the electrical supply. The
supply must have a fuse rating of at least 10 Amps.
If the socket is not accessible once the appliance is built in, the electrical
installation must include suitable means of isolating the appliance from the
mains (e.g. fuse, cut-out, current trip or similar with a minimum contact
separation of 3 mm).
Attention: it must be possible to disconnect the appliance from the mains
power supply; the plug must therefore be easily accessible after the
installation.
Attention: If the supply cord is damaged, it must be replaced by a special
cord or assembly available from the manufacturer or its Service Agent.
Prior to Initial Start–Up
• Please clean the appliance interior and all accessories prior to initial start-
up (see section: “Cleaning and Care”).
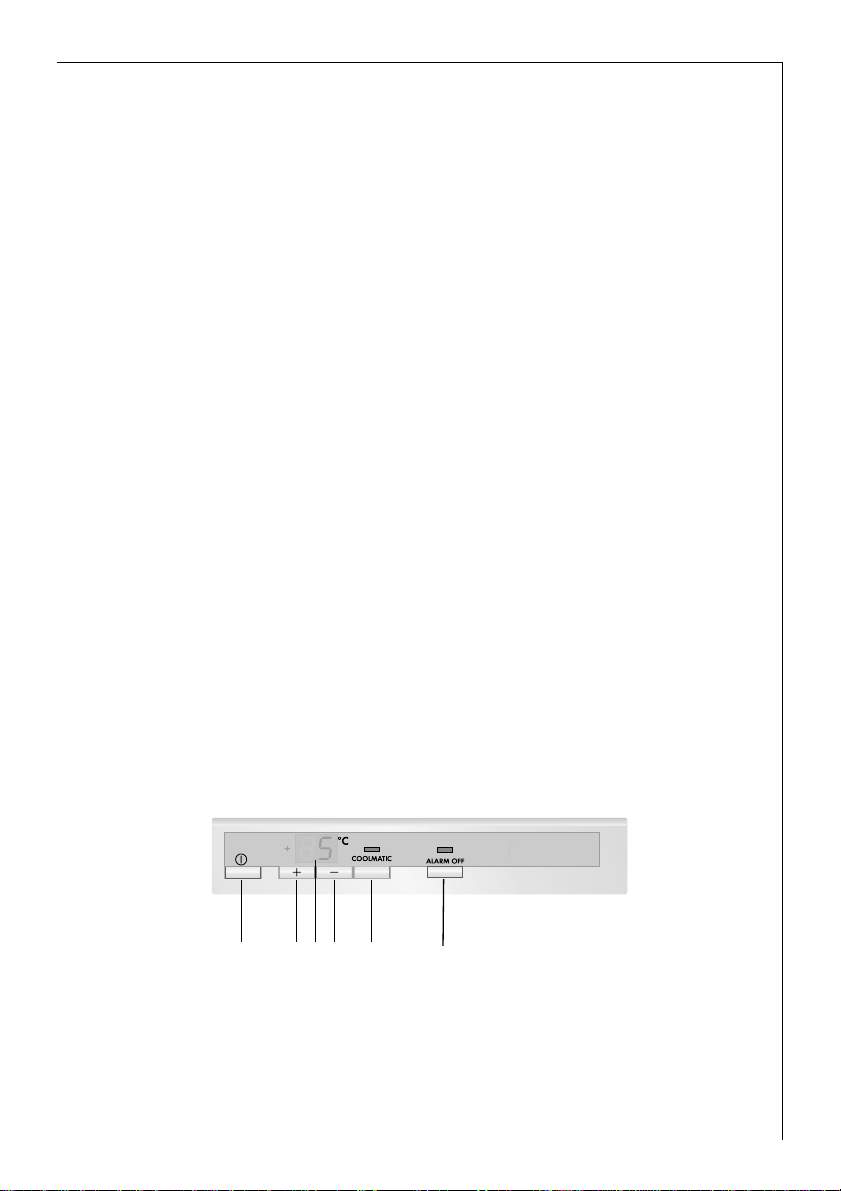
Control panel
B
C
E
D
F
A
A. Button ON/OFF
B. Temperature setting button (for warmer temperatures)
C. Temperature display
D. Temperature setting button (for colder temperatures)
E. COOLMATIC function and COOLMATIC indicator (yellow)
F ALARMOFF button and red warning light
Page 12

12
Temperature setting buttons
The temperature is adjusted using the “B“ and “D“ buttons. These buttons
are connected to the temperature display.
• The temperature display is switched over from the display of the ACTUAL
temperature (Temperature display is illuminated) to the display of the
DESIRED temperature (Temperature display flashes) by pressing one of the
two buttons, “B“ or “D“ .
• Each time one of the two buttons is pressed again the DESIRED temperature
is adjusted by 1 °C. The DESIRED temperature must be reached within 24
hours.
If neither button is pressed, the temperature display automatically switches
back after a short period (approx. 5 sec.) to the display of the ACTUAL
temperature.
DESIRED temperature means:
The temperature that has been selected for inside the fridge. The DESIRED
temperature is indicated by flashing numbers.
ACTUAL temperature means:
The temperature display indicates the current temperature inside the fridge.
The ACTUAL temperature is indicated with illuminated numbers.
Temperature display
The temperature display can indicate several pieces of information.
• During normal operation, the temperature currently present in the fridge
(ACTUAL temperature) is displayed.
• When the temperature is being adjusted a flashing display indicates the
fridge temperature currently set (DESIRED temperature).
ALARM OFF button
With the ALARM OFF button, the acoustic warning signal can be switched
off, e.g. the "Open Door" warning when loading or rearranging food to be
chilled.
Starting Up - Setting the Temperature
1. Plug the mains plug into the mains socket.
2. Press button (A). The appliance starts.
3. Press either the “B“ or “D“ button. The temperature display switches over
and the DESIRED temperature currently set flashes on the temperature
display.
4. Set the required temperature by pressing the “B“ or “D“ buttons (see section
"Temperature setting buttons"). The temperature display will immediately
show the changed setting. Each time the button is pressed the temperature
Page 13
13
is adjusted by 1 °C.
From a food safety point of view +5 °C should be considered sufficiently
cold for storing food in the fridge.
5. Once the required temperature has been set, after a short period (approx. 5
sec.) the temperature display will change and again indicate the current
ACTUAL temperature inside the fridge. The display will change from flashing
to continuous illumination.
Information! When the setting is changed, the compressor does not start
immediately if automatic defrosting is currently taking place. As the storage
temperature within the fridge is reached quickly you can store food
immediately after switching on.
COOLMATIC
The COOLMATIC function is suited for quick cooling of large quantities of
goods in the refrigerator.
1. The COOLMATIC function is switched on by pressing the COOLMATIC
button. The yellow light illuminates. The COOLMATIC function now provides
for intensive cooling. A DESIRED temperature of +2 °C is automatically
selected. The COOLMATIC function is ended automatically after a period of
6 hours.
2. The COOLMATIC function can be ended manually at any time by pressing
the COOLMATIC button again. The yellow light goes out.
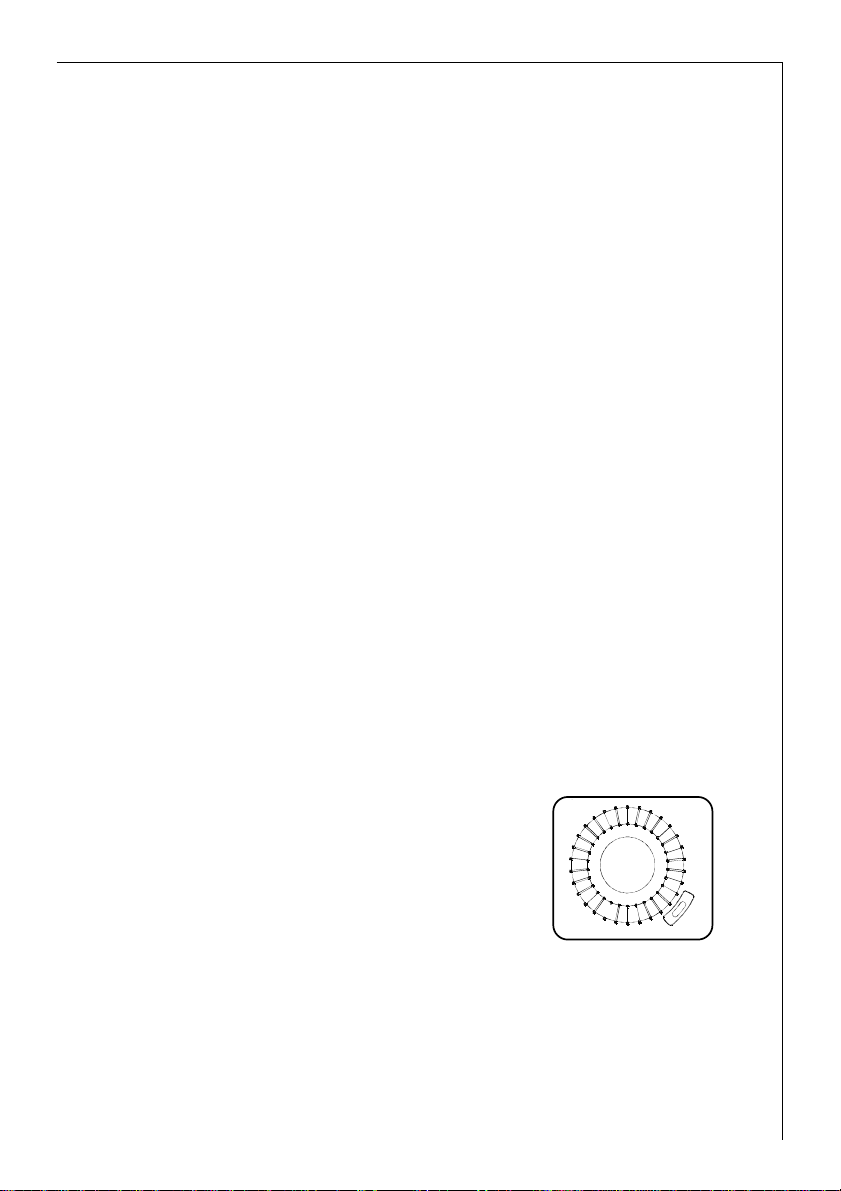
QUICK CHILL
The quick chill function can be used for the fast cooling of drinks in cans or
bottles in the fast cool storage tray or of larger amounts of room-tempera
ture food. The built-in charcoal filter reduces the development of any smell.
Chilling of cans or bottles
Place cans or bottles in the holder
on the fast cool storage tray in front
of the fan grille. Turn the fan
regulator to maximum and press the
COOLMATIC button. The yellow
indicator light comes on.
Chilling of food
Place the food in the fridge.
Open the fan regulator to maximum and press the COOLMATIC button.
The yellow indicator light comes on.
When the drinks or the food is sufficiently cooled, press the COOLMATIC
button again. The yellow indicator light goes out. Set the fan regulator to
the minimum position.
MAX
MIN
Page 14

14
"Open Door"- Warning
If the fridge door is left open for longer than 5 minutes the red warning
display will flash and an acoustic warning tone will sound.
If you need more time to load or rearrange refrigerated foods, you can
switch off the warning tone by pressing the ALARM OFF button. The red
warning display will go off when the door is closed.
Holiday Mode
In the holiday mode the temperature for the refrigerator is approximately
+15 °C. In the holiday mode it is therefore possible to leave the door of the
empty refrigerator closed during periods of extended absence. Advantage:
Unintentional, or accidental closing of the door by persons who have access
to your home during your absence, is no longer possible. Without activating
the holiday mode, leaving the door closed would lead to the accumulation
of odours and mould.
After emptying and cleaning the appliance, proceed as follows:
1. To set the holiday mode, press the “ +” (WARMER) or “-“ (COLDER) button. The temperature display will change and indicate in flashing numbers
the DESIRED temperature that is currently set.
2. Hold down the “+“ (WARMER) button until the temperature display
indicates H (for holiday). The temperature shown in the temperatur e display
will change in steps of 1 °C until it reaches +8 °C. After +8 °C the value +15
°C will appear in the display with the letter H. The fridge is now operating
in energy-saving holiday mode.
3 To switch the fridge back to normal operation, press the “-“ (COLDER)
button.
Important! Do not store any goods in the refrigerator when the holiday
mode is in operation. The temperature is regulated at about +15 °C when
the holiday mode is in operation. This is too warm for food products.
Warning: this appliance i s sold in France.
In accordance with regulations
valid in this country it must be
provided with a special device (see
figure) placed in the lower
compartment of the fridge, to
indicate the coldest zone of it.
Page 15
15
Interior Accessories
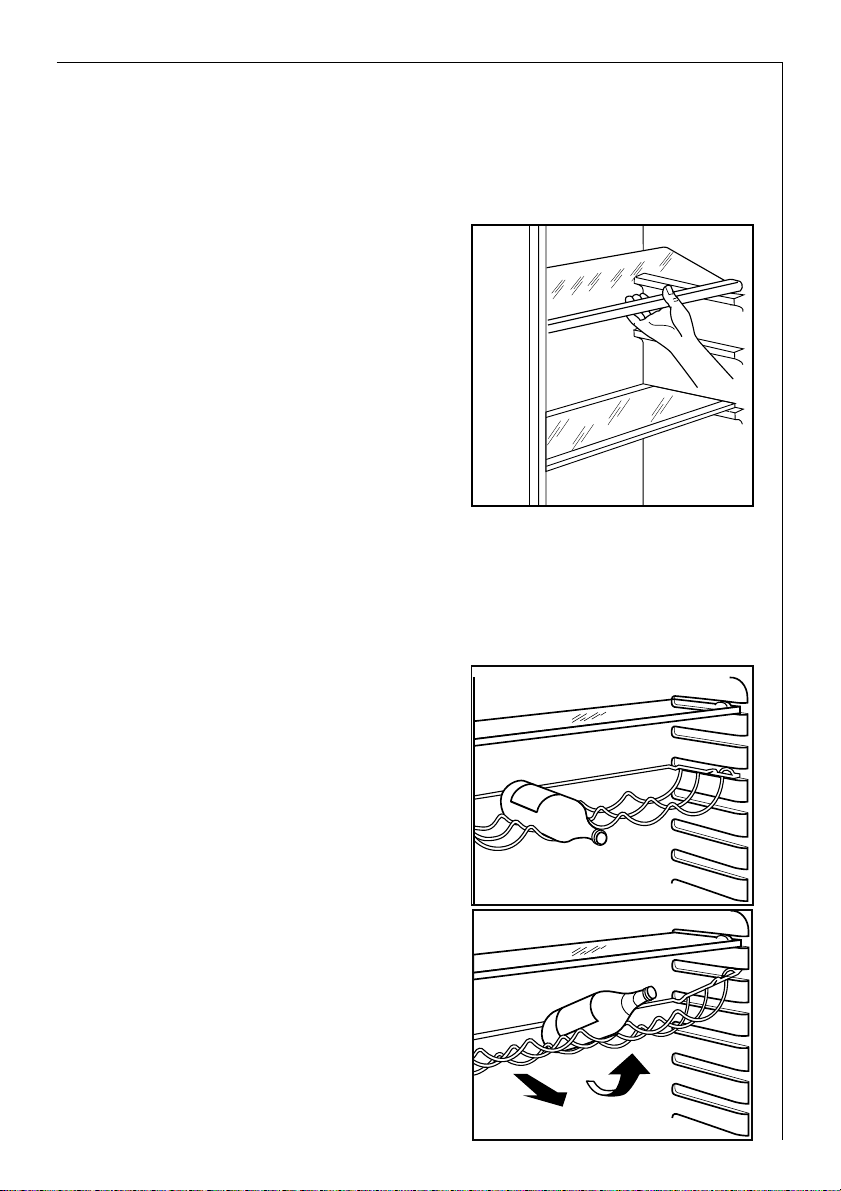
Storage shelves
• You should always slide one of the full size glass storage shelf into the
lowest set of guides, above the fruit and the vegetable containers, and
keep it in this position.
• The height of the storage shelves
can be adjusted:
• To do this pull the storage shelf
forward until it can be swivelled
upwards or downwards and
removed.
• Please do the same in reverse to
insert the shelf at a different
height. Slide the front half of the
shelf in another level to the rear . To
gain space to place tall items on
the storage shelf below.
Adjusting the upper door rack
Depending on the food stored, the upper door racks can be changed to
other holders or removed. Take out the food, press the door racks digonally
upwards at their edges, reposition them, and press them back into place.
Bottle holder
Place the bottles (with the opening
facing front) in the pre- positioned
shelf.
If the shelf is positioned horizontally,
place only closed bottles.
This bottle holder shelf can be tilted
in order to store previously opened
bottles.
To do this, pull the shelf up so it can
rotate upwards and be placed on the
next higher level.
D338
Page 16
16
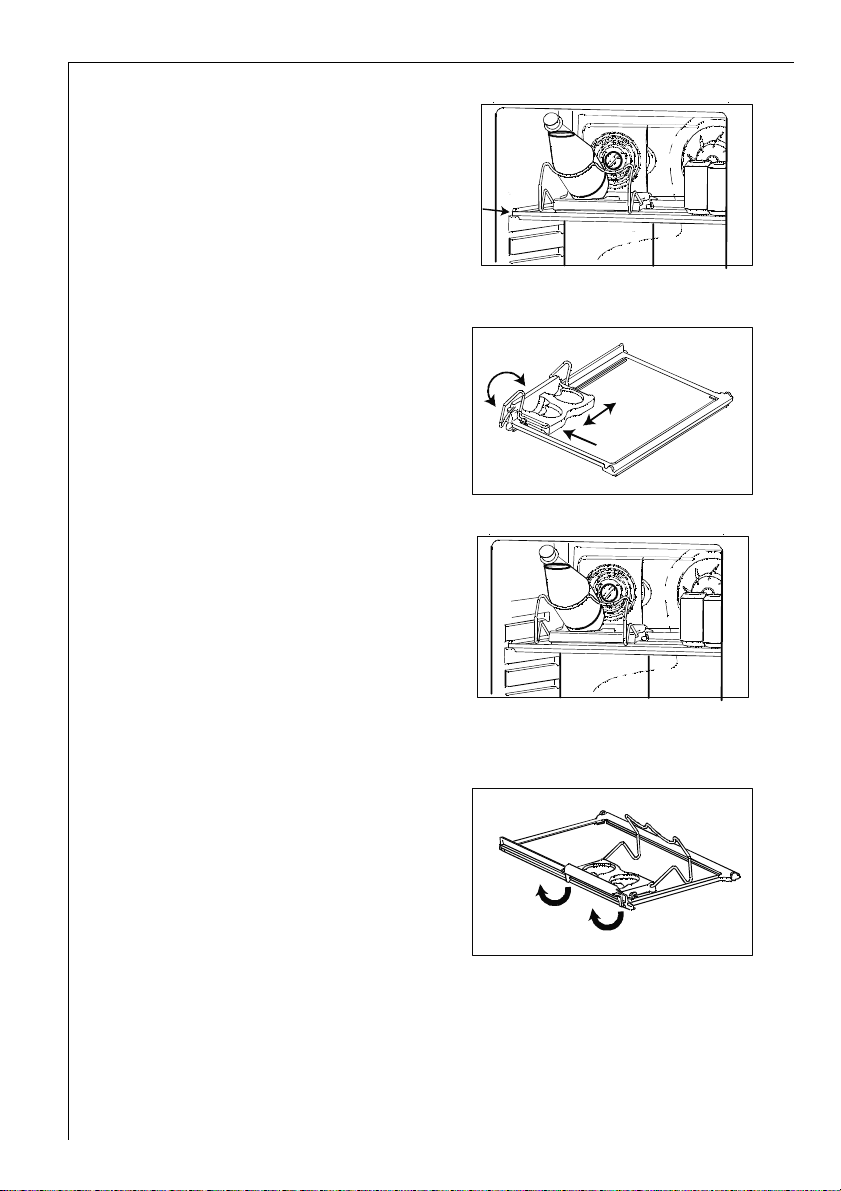
Quick Chill Shelf
The quick chill shelf can be placed
in the upper groove.
Bottle and Can Holder
The side of the bottle and can
holder is moveable to enable a more
flexible placement of cans and
bottles in front of the grid. To allow
the holder to be moved easier when
moving sideways, press the shelf
backwards.
The bottle support can be pulled out
when chilling larger bottles.
Dismantling of the Bottle and Can Holder
Take out the quick chill shelf with
holder from the cabinet.
To loosen the holder from the shelf,
bend the hooks/brackets that
surround the backside of the shelf.
Page 17

17
Changing the carbon filter
To maintain the best performance
the carbon filter should be
changed once a year with normal
usage.
New carbon filters can be
purchased from your local dealer.
The filter is placed behind the grill
and can be
reached by opening the cover . The
cover can be opened by turning
the cover outward. The carbon
filter is pulled out of its slot.
The new carbon filter is placed in
the existing slot
The filter should be handled
carefully so fragments don´t
loosen from the surface.
Installation of the carbon filter
On delivery the carbon filter is
placed in a plastic bag to secure
the length of the carbon filter
life. The filter should be placed
behind the grill before the
cabinet is turned on.
The cover can be opened by
turning the cover outward. The
carbon filter is then mounted in
the slot found in the back, see the
illustration.
The filter should be handled
carefully so fragments don´t
loosen from the surface.
1
1
Page 18

18
Fresh food refrigeration
To obtain the best performance:
• do not store warm food or evaporating liquid in the refrigerator
• do cover or wrap the food, particularly if it has a strong flavour.
• Position food so that air can circulate freely round it.
Useful hints:
Meat (all types): wrap in polythene bags and place on the glass shelf above
the vegetable drawer(s)For safety, store in this way only one or two days
at the most.
Cooked foods, cold dishes , etc: these should be covered and may be placed
on any shelf.
Fruit and vegetables: these should be thoroughly cleaned and placed in the
special drawer(s) provided.
Butter and cheese: these should be placed in special airtight containers or
wapped in aluminium foil or polythene bags to exclude as much air as
possible.
Milk bottles: these should have a cap and should be stored in the bottle
rack in the door.
Bananas, potatoes, onions and garlic, if not packed, must not be kept in
the refrigerator.
Defrosting
Refrigerator
Frost is automatically eliminated from the evaporator of the refrigerator
compartment every time the motor compressor stops, during normal use.
The defrost water drains out through a channel into a special container at
the back of the appliance, over the motor compressor, where it evaporates.
Page 19

19
Switching off the appliance
1. To switch off, press the ON/OFF button. This will result in a countdown
from "3" to "1" taking place in the temperature display. On reaching "1" the
fridge will switch off. The temperature display will go off.
The appliance is only completely disconnected from the electricity supply
when the power plug has been removed from the power outlet.
Note:
The appliance cannot be switched on or off if unplugged, or if there is no
power being supplied to it.
Following connection to the mains power supply, the appliance returns to
the same operating state as before the interruption of main power.
If the appliance is not going to be used for an extended period:
1. Remove all refrigerated and deep-frozen packages as well as ice trays.
2. Switch off the appliance by pressing the ON/OFF button (A).
3. Remove the mains plug or switch off or turn out the circuit breaker or fuse.
4. Leave the door open to avoid the build up of odours.
Cleaning and Care
For hygienic reasons the appliance interior, including interior accessories,
should be cleaned regularly.
Warning!
• The appliance may not be connected to the mains during cleaning. Danger
of electrical shock! Before cleaning switch the appliance off and remove
the plug from the mains, or switch off or turn out the circuit breaker or
fuse.
• Never clean the appliance with a steam cleaner. Moisture could
accumulate in electrical components, danger of electrical shock! Hot
vapours can lead to the damage of plastic parts.
• The appliance must be dry before it is switched back on.
Attention!
• Ethereal oils and organic solvents can attack plastic parts, e.g.
– lemon juice or the juice from orange peals;
– butyric acid;
Page 20

20
– cleansers which contain acetic acid.
Do not allow such substances to come into contact with appliance parts.
• Do not use any abrasive cleansers.
1. Remove the food from the refrigerator.
2. Switch the appliance off and remove the plug from the mains, or switch off
or turn out the circuit breaker or fuse.
3. Clean the appliance and the interior accessories with a cloth and lukewarm
water. Commercially available dish washing detergents may also be used.
4. After cleaning wipe with clean water and rub dry.
Accumulation of dust at the condenser increases energy consumption. For
this reason carefully clean the condenser at the back of the appliance once
a year with a soft brush or a vacuum cleaner.
5. Check the water drain hole on
the rear wall of the fridge. Clear a
blocked drain hole with the aid of
the green peg in the pack of
accessories included with the
appliance.
6. After everything is dry place
appliance back into service.
Energy Saving Tips
• Do not install the appliance near cookers, radiators or other sources of
warmth. High ambient temperatures cause longer, more frequent
operation of the compressor.
• Ensure sufficient air circulation and exhaust at the appliance base
and at the back wall of the appliance. Never cover air vent openings.
• Do not place warm foods into the appliance. Allow warm foods to cool
first.
• Only leave door open as long as necessary.
• Do not set temperature any colder than necessary.
• Put frozen food in the fridge to defrost. The cold in the frozen food will
then be used to cool the fridge.
• Keep the heat emitting condenser and the metal grille on the rear wall of
your appliance clean at all times.
D037
Page 21

21
The food is too warm.
Interior lighting does not
work.
The appliance is near a heat
source.
Temperature is not pr operly
adjusted.
Please look in the "Initial Start
Up" section.
Light bulb is defective.
Please look in the "Changing
the Light Bulb" section.
Turn the temperature
regulator to a colder setting
temporarily .
Door was open for an
extended period.
Please look in the "Installation
location" section.
A large quantity of warm food
was placed in the appliance
within the last 24 hours.
Open the door only as long as
necessary.
Malfunction Possible Cause Remedy
Appliance does not work.
Appliance is not switched on Switch on the appliance.
Mains plug is not plugged in
or is loose.
Insert mains plug.
Fuse has blown or is defective.
Check fuse, replace if
necessary.
Socket is defective.
Mains malfunctions are to be
corrected by an electrician.
Appliance cools too much. Temperature is set too cold.
Turn the temperature
regulator to a warmer setting
temporarily .
What to do if ...
Correcting Malfunctions
A malfunction may be caused by only a minor fault that you can rectify
yourself using the following instructions. Do not perform any other work on
the appliance if the following information does not provide assistance in
your specific case.
Warning! Repairs to refrigerator s/freezers may only be performed by
qualified service engineers. Improper repairs can give rise to significant
hazards for the user. If your appliance needs repairing, please contact your
local Service Force Centre.
Heavy build up of frost,
possibly also on the door seal.
Door seal is not air tight
(possibly after changing over
the hinges).
Carefully warm the leaking
sections of the door seal with
a hair dryer (not hotter than
approx. 50 °C). At the same
time shape the warmed door
seal by hand such that it sits
correctly .
Page 22

22
Unusual noises.
The appliance is touching the
wall or other objects.
Appliance is not level.
A component, e.g. a pipe, on
the rear of the appliance is
touching another part of the
appliance or the wall.
The compressor starts after a
period of time.
See the "Cleaning and Care"
section.
This is normal, no error has
occurred.
The compressor does not start
immediately after changing
the temperature setting.
Water on the floor or on
storage shelves.
Water drain hole is blocked.
If necessary, car efully bend
the component out of the
way.
Move the appliance slightly.
Readjust the feet.
Malfunction Possible Cause Remedy
Changing the light bulb
Warning! There is a risk of electric shocks! Before changing the light bulb,
switch off the appliance and unplug it, or pull the fuse or the circuit breaker .
Light bulb data: 220-240 V
1. To switch off the appliance, push the
button (A).
2. Unplug the mains plug.
3. To change the light bulb press on the
rear hook and at the same time slide
the cover in the direction indicated
by the arrow.
4. Change the defective light bulb with
one of the some power (the
maximum power is shown on the
light diffuser).
5. Refit the light bulb cover.
6. Put the refrigerator back into
operation.
Page 23

23
Regulations, Standards, Guidelines
This appliance was designed for household use and was manufactured in
accordance with the appropriate standards. The necessary measures in
accordance with appliance safety legislation regulations (GSG), accident
prevention regulations for refrigeration appliances (VBG 20) and the
regulations of the German Society of Electrical Engineers (VDE) were
observed in the manufacture of this appliance.
The refrigerant circuit has been checked for leaks.
This appliance is in accordance with the following EU guidelines:
– 73/23/EWG dated 19 February 1973 - low voltage guidelines.
– 89/336/EWG dated 3 May 1989
(including guideline change notice 92/31/EWG) - EMV guideline
Page 24

24
Lors de sa fabrication, cet appareil a été construit selon des normes,
directives et/ou décrets pour une utilisation sur le territoire français.
Pour la sécurité des biens et des personnes ainsi que pour le
respect de l’environnement, vous devez d’abord lire
impérativement les préconisations suivantes avant toute
utilisation de votre appareil.
Pour éviter tout risque de détérioration de l’appareil, transportez-le dans sa
position d’utilisation muni de ses cales de transport (selon modèle).
Au déballage de celui-ci, et pour empêcher des risques d’asphyxie et
corporel, tenez les matériaux d’emballage hors de la portée des enfants.
Pour éviter tout risque (mobilier, immobilier, corporel,…), l’installation, les
raccordements (eau, gaz, électricité, évacuation selon modèle), la mise en
service et la maintenance de votre appareil doivent être effectués par un
professionnel qualifié.
Votre appareil a été conçu pour être utilisé par des adultes. Il est destiné à
un usage domestique normal. Ne l’utilisez pas à des fins commerciales ou
industrielles ou pour d’autres buts que ceux pour lesquels il a été conçu.
Vous éviterez ainsi des risques matériel et corporel.
Débranchez votre appareil avant toute opération de nettoyage manuel.
N’utilisez que des produits du commerce non corrosifs ou non inflammables.
Toute projection d’eau ou de vapeur est proscrite pour écarter le risque
d’électrocution.
Si votre appareil est équipé d’un éclairage, débranchez l’appareil avant de
procéder au changement de l’ampoule (ou du néon, etc.) pour éviter de
s’électrocuter.
Afin d’empêcher des risques d’explosion et d’incendie, ne placez pas de
produits inflammables ou d’éléments imbibés de produits inflammables à
l’intérieur, à proximité ou sur l’appareil.
Lors de la mise au rebut de votre appareil, et pour écarter tout risque
corporel, mettez hors d’usage ce qui pourrait présenter un danger : coupez
le câble d’alimentation au ras de l’appareil. Informez-vous auprès des
services de votre commune des endroits autorisés pour la mise au rebut de
l’appareil.
Respectez la chaîne de froid dès l’acquisition d’un aliment jusqu’à sa
consommation pour exclure le risque d’intoxication alimentaire.
Veuillez maintenant lire attentivement cette notice pour une
utilisation optimale de votre appareil.
Page 25

25
Chère cliente, cher client
Nous vous remercions d'avoir choisi un de nos produits.
Tout au long de son utilisation, vous ferez l'expérience d'une combinaison parfaite
entre design fonctionnel et technologie d'avant-garde.
Sa fabrication est basée sur les standards les plus élevés de l'excellence. Votre
appareil a été ainsi conçu pour vous fournir les meilleures performances tout en
respectant les aspects environnementaux et d'économie d'énergie.
Nous vous conseillons de lire attentivement cette notice d'utilisation et de la
conserver à proximité pour une utilisation optimale.
Pensez également à la transmettre au prochain utilisateur.
Nous vous souhaitons beaucoup de plaisir avec votre appareil A.E.G. Electrolux.
Les symboles suivants sont utilisés dans cette notice d’utilisation
Informations importantes concernant votre sécurité personnelle et
consignes pour éviter tout endommagement de l'appareil
Informations générales et conseils
Information environnementale
Page 26

26
Sommaire
Advertissements importants . . . . . . . . . . . . . . . . . . . . . . . . . . . . . . .27
Elimination . . . . . . . . . . . . . . . . . . . . . . . . . . . . . . . . . . . . . . . . . . . . .32
Information sur l’emballage de l’appareil . . . . . . . . . . . . . . . . . . . . . . . .32
Elimination des vieux appareils . . . . . . . . . . . . . . . . . . . . . . . . . . . . . . . .32
Retrait de la protection pour le transport . . . . . . . . . . . . . . . . . . . .32
Installation . . . . . . . . . . . . . . . . . . . . . . . . . . . . . . . . . . . . . . . . . . . . .33
Lieu d’installation . . . . . . . . . . . . . . . . . . . . . . . . . . . . . . . . . . . . . . . . . . .33
Votre congélateur a besoin d’air . . . . . . . . . . . . . . . . . . . . . . . . . . . . . . .34
Fixation des entretoises arriére . . . . . . . . . . . . . . . . . . . . . . . . . . . . . . . .34
Monter le poignées de porte . . . . . . . . . . . . . . . . . . . . . . . . . . . . . . . . . .34
Réversibilité de la porte . . . . . . . . . . . . . . . . . . . . . . . . . . . . . . . . . . . . . .35
Raccordement électrique . . . . . . . . . . . . . . . . . . . . . . . . . . . . . . . . . .37
Avant la mise en service . . . . . . . . . . . . . . . . . . . . . . . . . . . . . . . . . .37
Bandeau de commande . . . . . . . . . . . . . . . . . . . . . . . . . . . . . . . . . . .37
Utilisation de votre appareil . . . . . . . . . . . . . . . . . . . . . . . . . . . . . . .38
Equipement intérieur . . . . . . . . . . . . . . . . . . . . . . . . . . . . . . . . . . . .43
Les clayette . . . . . . . . . . . . . . . . . . . . . . . . . . . . . . . . . . . . . . . . . . . . . . . .43
Les balconnets . . . . . . . . . . . . . . . . . . . . . . . . . . . . . . . . . . . . . . . . . . . . . .43
Clayette porte bouteille . . . . . . . . . . . . . . . . . . . . . . . . . . . . . . . . . . . . . .43
Installation / Changement du filtre a charbon . . . . . . . . . . . . . . . . . . .45
Réfrigération . . . . . . . . . . . . . . . . . . . . . . . . . . . . . . . . . . . . . . . . . . .46
Dégivrage . . . . . . . . . . . . . . . . . . . . . . . . . . . . . . . . . . . . . . . . . . . . . .46
Mettre l’appareil hors service . . . . . . . . . . . . . . . . . . . . . . . . . . . . . .46
Nettoyage et entretien . . . . . . . . . . . . . . . . . . . . . . . . . . . . . . . . . . .47
Conseils d’économie d’énergie . . . . . . . . . . . . . . . . . . . . . . . . . . . . .48
Que faire si... . . . . . . . . . . . . . . . . . . . . . . . . . . . . . . . . . . . . . . . . . . .48
Remèdes en cas de dérangements . . . . . . . . . . . . . . . . . . . . . . . . . . . . . .48
Remplacement de l’ampoule d’éclairage . . . . . . . . . . . . . . . . . . . . . . . .50
En cas d’absence prolongée ou de non utilisation . . . . . . . . . . . . . . . .50
Règlements, normes, directives . . . . . . . . . . . . . . . . . . . . . . . . . . . . .50
Page 27

27
Avertissements importants
Ces avertissements ont été rédigés pour votre sécurité et celle d’autrui
Utilisation
• Cet appareil a été conçu pour être utilisé par des adultes. Veillez à ce que
les enfants n’y touchent pas et ne l’utilisent pas comme un jouet.
• A la réception de l’appareil, déballez-le ou faites-le déballer
immédiatement. Vérifez son aspect général. Faites les éventuelles réserves
par écrit sur le bon de livraison dont vous garderez un exemplaire.
• Votre appareil est destiné à un usage domestique normal. Ne l’utilisez pas
à des fins commerciales ou industrielles ou pour d’autres buts que celui pour
lequel il a été conçu.
• Ne modifiez pas ou n’essayez pas de modifier les caractéristiques de cet
appareil. Cela représenterait un danger pour vous.
• Ne touchez pas avec les mains humides les surfaces givrées et les produits
congelés et ne consommez pas certains produits tels que les bâtonnets
glacés dès leur sortie de l’appareil ; la température très basse à laquelle ils se
trouvent peut provoquer des brûlures ou un arrachement de la peau.
• Les réfrigérateurs et / ou congélateurs ménager s sont destinés uniquement
à la conservation et/ou congélation des aliments.
• Un produit décongelé ne doit jamais être recongelé.
• Suivez les indications du fabricant pour la conservation et/ou congélation
des aliments.
• Dans tous les appareils de réfrigération et congélation certaines surfaces
peuvent se couvrir de givre. Suivant le modèle, ce givre peut être éliminé
automatiquement (dégivrage automatique) ou bien manuellement.
• N’essayez jamais d’enlever le givre avec un objet métallique, vous
risqueriez d’endommager irrémédiablement l’évaporateur rendant du même
coup l’appareil inutilisable. N’employez pour cela qu’une spatule en
plastique.
• Si la température ambiente est inférieure ou égale à 10°C, les
performances du compartiment congélateur ne seront plus assurées. Ceci
est aussi valable lorsque l’interrupteur de température ambiante est basculé
(si votre appareil en est équipé).
• Ne décollez pas les bacs à glaçons avec un couteau ou tout autre objet
tranchant.
• Ne placez ni bouteilles ni boîtes de boissons gazeuses dans le
congélateur/compartiment basse température, elles pourraient éclater.
Page 28

28
• Débranchez toujours la prise de courant avant de procéder au nettoyage
intérieur et extérieur de l’appareil et au remplacement de la lampe
d’éclairage (pour les modèles qui en sont équipés).
• Ne faites pas fonctionner d’appareils électriques (par exemple : sorbetières
électriques, mélangeurs,...) à l’intérieur de l’appareil.
Stockage des denrées dans les réfrigérateurs et
règles d’hygiène
La consommation croissante de plats préparés et d’autres aliments fragiles,
sensibles en particulier au non-respect de la chaîne de froid (1), rend
nécessaire une meilleure maîtrise de la température de transport et de
stockage de ces produits.
A la maison, le bon usage du réfrigérateur et le respect de règles rigoureuses
contribuent de façon significative et efficace à l’amélioration de la
conservation des aliments.
Conservation des aliments/Maîtri se des tempér atur es
• Stockez les aliments selon leur nature dans la zone appropriée:
Zone tempérée: Boissons œufs, beurre, sauces industrielles et préparées,
fromages à pâtes cuite, fruits et légumes frais.
Zone fraîche: Produits laitiers, desserts lactés, matières grasses, fromages
frais.
Zone la plus froide: Viandes, volailles, poissons, charcuteries, plats préparé,
salades composées, préparations et pâtisseries à base d’œufs ou de crème,
pâtes fraîches, pâte à tarte, pizza/quiches, produits frais et fromages au lait
cru, légumes prêts à l’empli vendus sous sachet plastique et plus
géneéralement,tout produits frais dont la date limite de consommation
(DLC) est associée à une temperature de conservation inférieure ou égale à
+4°C.
L’observation des conseils suivantes est de nature à éviter la contamination
croisée et à pévenir une mauvaise conservation des aliments.
• Emaller systématiquement les produits pour éviter que les denrées ne se
contaminent mutuellement.
• Se laver les mains avant de toucher les aliments et plusieurs fois pendant
la préparation du repas si celle-ci implique des maniplations successives
de produits différents, et après, bien sûr, au moment de passer à table
comme les règles d’hygiène l’imposent.
• Ne pas réutiliser des utensiles ayant déjà servi (cuillère en bois, planche à
dècouper sans les avoir bien nettoyés au préalable).
• Attendre le refroidissement complet des prépar ations avant de les stocker
(ex : soupe).
Page 29

29
• Limiter le nombre d’ouvertures de la porte et, en tout état de cause, ne
pas laisser ouverte trop longtemps pour éviter une remontée en
température du réfrigérateur.
• Disposer les aliments de telle sorte que l’air puisse circuler librement tout
autour.
Il convient de vérifier régulièrement que la température, notamment celle
de la zone la plus froide, est correcte et le cas chéant, d’ajuster le thermostat
en conséquence comme indiqué (page “UTILISATION”).
La mesure de la tempérautre dans un zone (sur une clayette, par exemple)
peut se faire au moyen d’un thermomètre placé, dès le départ, dans un
récipient rempli d’eau (verre). Pour avoir une représentation fidèle de la
réalité, lisez la température sans manipulation des commandes ni ouvertre de
porte.
Respect des règles d’hygiène
• Nettoyez fréquemment l’intérieur du réfrigérateur en utilisant un produit
d’entretien doux sans effet oxydant sur les parties métalliques, puis rincer
avec de l’eau additionnèe de jus de citron, de vinaigre blanc ou avec tout
produit désinfectant adapté au réfrigérateur.
• Retirez les suremballages du commerce avant de placer les aliments dans
le réfrigérateur (par exemple suremballages des packs de yaourts).
• Couvrez les aliments.
• Consultez la notice d’utilisation de l’appareil en toutes circonstances et en
particulier pour les conseils d’entretien.
(1) Chaîne de froid: maintien sans rupture de la température requise d’un
produit, depuis sa préparation et son conditionnement jusqu’à son
utulisation par le consommateur.
Installation
• Assurez-vous, après avoir installé l’appareil, que celui-ci ne repose pas sur
le câble d’alimentation.
Important: en cas de dommage du câble d’alimentation, il ne doit être
renplacé que par un professionnel qualifié.
• L’appareil se réchauffe sensiblement au niveau du condenseur et du
compresseur. Veillez à ce que l’air circule librement tout autour de
l’appareil. Une ventilation insuffisante entraînerait un mauvais
fonctionnement et des dommages sur l’appareil.
• Suivez les instructions données pour l’installation.
• Après la livraison, attendez 2 heures avant de brancher l’appar eil pour que
le circuit frigorifique soit stabilisé.
• Cet appareil est lourd. Faites attention lors de son déplacement.
Page 30

30
Veuillez lire attentivement ces remarques avant d’installer et d’utiliser
votre appareil. Nous vous remercions de votre attention.
Protection de l’environnement
Tous les matériaux marqués par le symbole , >PE< (polyéthylène),
>PS< (mousse de polystyrène) sont recyclables. Déposez-les dans une
déchetterie prévue à cet effet (renseignez-vous auprès des services de
votre commune) pour qu’ils puissent être récupérés et recyclés.
• Le système frigorifique et l’isolation de votre appareil ne contiennent
pas de C.F.C. contribuant ainsi à préserver l’environnement.
• Les C.F.C. sont remplacés par des hydrocarbures.
Le circuit réfrigérant de cet appareil contient de l’isobutane (R 600 A):
les interventions doivent être effectuées exclusivement par des
personnes qualifiées ayant reçues une formation spécifique pour le R
600 A.
Ce gaz est néanmoins inflammable:
1.Ne faites pas fonctionner d’appareils électriques (par exemple:
sorbetières électriques, mélangeurs ou de sèche cheveux pour accélér er
le dégivrage,...) à l’intérieur de votre appareil.
2.Pendant le transport et l’installation de votre appareil, assurez-vous
qu’aucune partie du circuit n’est endommagée. Si tel est le cas:
• Evitez les flammes vives (briquet) et tout autre allumage (étincelles).
• Aérez la pièce où se trouve l’appareil.
• Si vous vous débarrassez de votre appareil, veillez à ne pas détériorer
les circuits frigorifiques.
• Cet appareil est muni de fermetures magnétiques. S’il remplace un
appareil équipé d’une fermeture mécanique, nous vous conseillons de
rendre celle-ci inutilisable avant de vous en débarrasser, ceci afin d’éviter
aux enfants de s’enfermer dans l’appareil et de mettre ainsi leur vie en
danger. Veillez également à couper le câble d’alimentation électrique au
ras de l’appareil. Renseignez-vous auprès des services de votre commune
pour la reprise de l’appareil.
• Le symbole sur le produit ou son emballage indique que ce
produit ne peut être traité comme déchet ménager. Il doit être remis
au point de collecte dédié à cet effet (collecte et recyclage du
matériel électrique et électronique). En procédant à la mise au rebut
de l'appareil dans les règles de l'art, nous préservons l'environnement
et notre sécurité, s'assurant ainsi que les déchets seront traités dans
des conditions optimum. Pour obtenir plus de détails sur le recyclage
de ce produit, veuillez prendre contact avec les services de votre
commune ou le magasin où vous avez effectué l'achat.
Page 31

31
En cas d’anomalie de fonctionnement, reportez-vous à la rubrique “EN CAS
D’ANOMALIE DE FONCTIONNEMENT”. Si malgré toutes les vérifications, une
intervention s’avère nécessaire, le vendeur de votre appareil est le premier
habilité à intervenir. A défaut (déménagement, fermeture du magasin où
vous avez effectué l’achat...), consultez le Centre Contact Consommateurs
qui vous communiquera alors l’adresse d’un service après vente.
En cas d’intervention sur votre appareil, exigez du service après vente les
pièces de rechange certifiées Constructeur
Veuillez lire attentivement ces remarques avant d’installer et d’utiliser
votre appareil. Nous vous remercions de votre attention.
Page 32

32
Elimination
Information sur l’emballage de l’appareil
Tous les matériaux utilisés sont non polluants ! Ils peuvent être déposés sans
danger à une décharge ou incinérés !
Matériaux : Les matières plastiques peuvent également être recyclées et sont
repérées de la manière suivante:
>PE< pour le polyéthylène, par ex. pour l’enveloppe extérieure et les sachets
à l’intérieur.
>PS< pour la mousse de polystyrène, par ex. pour les éléments de
rembourrage, toujours sans CFC.
Les éléments en carton sont réalisés à partir de papier recyclé et doivent être
ramenés à la collecte de vieux papiers.
Elimination des vieux appareils
Pour des raisons de pr otection de l’environnement, les appareils frigorifiques
doivent être éliminés dans les règles de l’art. Cette règle s’applique à votre
appareil précédent ainsi qu’à votre nouvel appareil, lorsqu’il ne servira plus.
Attention ! Avant l’élimination, rendre les vieux appareils inutilisables.
Débrancher la fiche secteur, sectionner le câble d’alimentation, retirer ou
détruire les éventuelles fermetures à houssette ou à verrou. Ceci a pour but
d’empêcher des enfants de s’enfermer dans l’appareil par jeu (risque
d’asphyxie !) ou de se mettre dans d’autres situations dangereuses pouvant
être mortelles.
Consignes d’élimination :
• L’appareil ne doit pas être mis avec les ordures ménagères ou les déchets
encombrants.
• Le circuit frigorifique, en particulier l’échangeur thermique au dos de
l’appareil, ne doit pas être endommagé.
Retrait de la protection pour le transport
L’appareil et certaines parties de l’équipement intérieur sont protégés pour
le transport.
Page 33

33
Enlever toutes les bandes autocollantes et rembourrages de l’intérieur de
l’apVotre appareil est équipé d'arrêts pour clayettes qui permettent de les
bloquer pendant le transport.
Pour les enlever , pr océder de la façon
suivante :
déplacez les arrêts dans le sens de la
flèche, soulevez à l'arrière la clayette
et poussez-la vers l'avant jusqu'à elle
se dégage. Retirez les arrêts.
A
C
B
Installation
Lieu d’installation
L’appareil doit être placé dans un local bien ventilé et sec.
La température ambiante agit sur la consommation de courant.
Par conséquent
– ne pas exposer directement l’appareil au soleil;
– ne pas placer l’appareil à côté d’un poêle ou autre source de chaleur;
– ne placer l’appareil qu’à un endroit dont la température ambiante
correspond à la classe climatique pour lequel il est prévu.
La classe climatique est indiquée sur la plaque signalétique qui se trouve à
l’intérieur de l’appareil.
Le tableau ci-après indique quelle température ambiante correspond
àquelle classe climatique:
Classe climatique pour une température ambiante de
SN +10 bis +32 °C
N +16 bis +32 °C
ST +16 bis +38 °C
T +16 bis +43 °C
Si l’installation à côté d’une source de chaleur est inévitable, observer les
distances latérales minimales suivantes:
– avec des cuisinières électriques 3 cm;
– avec des poêles à mazout et à charbon 30 cm.
S’il n’est pas possible d’observer ces distances, une plaque isolante doit être
placée entre la source de chaleur et l’appareil frigorifique.
Si l’appareil est placé à côté d’un autre réfrigérateur ou congélateur, une
distance latérale de 5 cm est nécessaire pour éviter la formation
decondensation sur les côtés des appareils.
Page 34

34
Votre réfrigérateur a besoin d’air
Pour des raisons de sécurité, la
ventilation doit être prévue
comme indiqué dans la Fig.
Attention: veillez à ne pas
obstruer les overtures de
ventilation.
100 mm10 mm
10 mm
NP007
Fixation des entretoises arrière
Vous trouverez deux entretoises
jointes à l'appareil qui doivent être
installées comme indiqué sur la figure
Desserrez les vis et introduisez
l'entretoise sous la tête de vis, puis
resserrez les vis.
Monter les poignées de porte
1. Visser le support de
poignéesupérieur à la
barre de poignée(1).
Monter le support de
poignée inférieur à la
porte (2).
2. Monter le support de
poignée supérieur à la
porte (3) et visser la barre
de poignée au support
depoignée inférieur. (4)
Page 35

35
Réversibilité de la porte
La porte de cet appareil est réversible: son sens d’ouverture peut être
modifié en fonction du souhait de l’utilisateur.
Attention ! Avant de procéder à la réversibilité de la porte, débranchez
l’appareil.
Pour changer le sens d'ouverture de la porte :
Nous vous conseillons de faire appel à une seconde personne lors de la
réversibilité de la porte. Inclinez l'appareil avec précaution vers l'arrière.
1. Retirez la grille de ventilation.
2. Dévissez la charnière inférieure (A).
3. Retirez la porte.
4. Dévissez le pivot inférieur (f) de la
charnière inférieure et montez-le sur
le second trou resté libre de la
charnière.
5. Dévissez le pivot supérieur (d) et
montez-le sur le côté opposé.
6. Remontez la porte dans le pivot
supérieur (d). Replacez et fixez la
charnière (A).
Veillez à ce que le bord de la porte
soit parallèle au bord supérieur de
l'appareil.
7. Dégagez le cache (e) de la grille de
ventilation et replacez-le sur le côté
opposé de la grille.
8. Replacez la grille de ventilation.
Page 36

36
9 Dévisser le support de
poignéesupérieur de la barre de
poignée (1). Dévisser le support
de poignéeinférieur de la porte
(2).
10. Dévisser le support de
poignéesupérieur de la porte
(3) et le vis-ser en bas à droite à
la porte (4).
11. Visser le support de poignée
avec la barre de poignée
tournée de 180° à la porte (5)
et au support de poignée
monté (6).
12. Déplacer le capuchon de droite
à gauche.
Replacez l'appareil dans sa
position initiale et mettez-le de
niveau et d'aplomb. Attendez
au moins 1 heure avant de le
rebrancher.
Si ne voulez pas faire les
operations vous pouvez
contacter le Service AprèsVente en payant..
Attention!
Ne pas serrer les vistrop fortement (max. 2 Nm), les poignées de porte
pourraient être endommagées.
La réversibilité des portes une fois effectuée, contrôlez que les joints
magnétiques adhèrent à la carrosserie. Si la température à l’intérieur de la
pièce est trop basse (en hiver, par exemple), il se peut que les joints
n’adhèrent pas parfaitement. Dans ce cas, si on ne veut pas attendre que les
joints reprennent leurs dimensions naturelles après un certain temps, on
pourra accélérer ce processus en chauffant la partie intéressée à l’aide d’un
sèche-cheveux.
Page 37

37
Bandeau de commande
Avant la mise en service
• Nettoyez l’intérieur de l’appareil et tous les équipements avant la première
mise en service (voir “Nettoyage et entretien”)
B
C
EDF
A
A. Touche MARCHE/ARRET du compartiment réfrigérateur
B. Touche de réglage de la température (moins de froid)
C. Indication de température du réfrigérateur (sur le bandeau de commande)
D. Touche de réglage de la température (plus de froid)
E. Touche COOLMATIC
F. Voyant de la fonction COOLMATIC (jaune)
Raccordement électrique
Une prise de courant avec contact de terre installée réglementaire-ment est
nécessaire pour le raccor-dement électrique. Il devrait être placée de façon
à pouvoir retirer la fiche du câble d’alimentation.
La protection électrique doit admettre un courant d’au moins 10 ampères.
Si la prise de courant n’est plus accessible lorsque l’appareil est mis en place,
un dispositif approprié de l’installation électronique doit garantir que
l’appareil puisse être coupé du réseau (p. ex. fusible, disjoncteur, disjoncteur
différentiel ou équivalent avec ouverture de contact d’au moins 3 mm).
• Avant la mise en service, vérifier sur la plaque signalétique de l’appareil si
la tension d’alimentation et le type de courant correspondent aux valeurs
du réseau électrique du lieu d’installation.
P.ex.: AC 230 ... 240 V 50 Hz ou
230 ... 240 V~ 50 Hz
(c–à–d courant alternatif 230 à 240 volts, 50 Hertz)
La plaque signalétique se trouve à gauche à l’intérieur de l’appareil.
Page 38

38
Touches de réglage de la température
Le réglage de la température se fait à l’aide des touches «B» (PLUS CHAUD)
et «D» (PLUS FROID).
Les touches sont en relation avec l’indicateur de température.
• Lorsqu’on appuie sur une des deux touches «B» (MOINS FROID) ou «D»
(PLUS FROID), l’indicateur de température passe de l’affichage de la
température REELLE (l'indication de température s'allume) à l’affichage de
la température de CONSIGNE (l'indication de température clignote).
• A chaque pression supplémentaire sur une des deux touches, la
température de CONSIGNE est modifiée de 1 °C. La températur e CONSIGNE
doit être atteinte dans les 24 heures.
• Si on actionne aucune touche, l’indicateur de température affiche à
nouveau la température REELLE après un bref délai (env. 5 s).
Température de CONSIGNE signifie:
La température qui doit régner dans le compartiment réfrigérateur. La
température de CONSIGNE est indiquée par des chiffres clignotants.
Température REELLE signifie:
L'affichage de température indique la température qui est
momentanément réellement présente dans le compartiment réfrigérateur.
La température REELLE est indiquée par des chiffres fixes.
ALARM OFF touche
An appuyant sur la touche ALARM OFF, le signal sonore s’eteign, p.c. le
signale sonore s’entend lors de la mise en place de denrées alimentaires a
refraîchir.
Indication de température (sur le bandeau de
commande)
L’indicateur de température peut afficher plusieurs informations.
• En fonctionnement normal, il affiche la température régnant
momentanément dans l’appareil (température REELLE).
• Pendant le réglage de températur e, la températur e momentanément réglée
pour le compartiment réfrigérateurs’affiche en clignotant (température de
CONSIGNE).
Mise en service - Réglage de la températur e
1. Branchez l’appareil.
2. Appuyez sur la touche MARCHE/ARRET.
3. Appuyez sur une des touches «B» (MOINS FROID) ou «D» (PLUS FROID).
Page 39

39
L’indicateur de température change d’affichage et indique par un
clignotement la température de CONSIGNE momentanément réglée.
4. Réglez la température désirée en appuyant sur les touches «B» (MOINS
FROID) et «D» (PLUS FROID) (voir partie "Touches de réglage de la
température"). L'indicateur de température indique immédiatement le
réglage modifié. A chaque action supplémentaire sur l’une des deux
touches, la température est modifiée de 1 °C.
5. Si, après avoir modifié le réglage de la température, les touches ne sont plus
actionnées, l’indicateur de température affiche à nouveau après un bref
délai (env. 5 sec.) la température REELLE régnant momentanément dans le
compartiment réfrigérateur.
Indication: En cas de modification du réglage, le compresseur ne démarre
pas immédiatement si le dégivrage automatique est en cours.
La température de stockage dans le compartiment réfrigérateur est
rapidement atteinte, les aliments peuvent être introduits immédiatement
après la mise en service.
Réglage de la température
La température à l'intérieur du compartiment réfrigérateur peut êtr e réglée
de « 2 » à « 8 », la position « 8 » représentant la température la plus chaude.
Ne modifiez la position du dispositif de réglage de température que
progressivement.
Les positions « 2 » et « 8 » étant des positions extrêmes, nous vous conseillons
lors de la mise en service d'effectuer un premier réglage sur la position 4 qui
correspond à la température conseillée pour la conservation des denrées
hautement périssables, en tenant compte des remarques ci-dessous ;
ensuite, seule votre expérience vous permettra de déterminer la position
convenant le mieux.
Après le chargement de l'appareil et à chaque modification du dispositif de
réglage de température, attendez la stabilisation de la température à
l'intérieur de l'appareil avant de procéder si nécessaire, à un nouveau
réglage.
Remarque :
La température à l'intérieur du compartiment est fonction de plusieurs
facteurs, tels que la température ambiante, la quantité de denrées stockées,
la fréquence d'ouverture de la porte, etc.
Prenez ces facteurs en considération lor s du réglage du dispositif de réglage
de température.
Page 40

40
Indicateur de température :Pour vous aider au bon réglage de votre appareil nous
avons équipé votre réfrigérateur d'un indicateur de température, celui-ci étant
placé dans la zone la plus froide.
Pour la bonne conservation des
denrées dans votre réfrigérateur et
notamment dans la zone la plus
froide, veillez à ce que dans
l’indicateur de température “OK”
apparaisse.
Si “OK” n’apparaît pas, la
température moyenne de la zone est
trop élevée. Réglez le thermostat sur
une position supérieure.
L’indicateur “OK” apparaissant en
noir, celui-ci est difficilement visible
si l’indicateur de température est mal
éclairé. La bonne lecture de celui-ci
est facilité s’il est correctement
éclairé.
A chaque modification du touche de réglage de la température , attendez
la stabilisation de la température à l’intérieur de l’appareil avant de pr océder
si nécessaire, à un nouveau réglage. Ne modifiez la position du touche de
réglage de la température que progressivement et attendez au moins 12
heures avant de procéder à une nouvelle vérification et à une éventuelle
modification.
NOTA: Après chargement de l’appareil de denrées fraîches ou après
ouvertures répétées (ou ouverture prolongée) de la porte il est normal que
l’inscription “OK” n’apparaisse pas dans l’indicateur de température;
attendez au moins 12h avant de réajuster le thermostat.
Si l’évaporateur du compartiment réfrigérateur (paroi du fond de l’appar eil)
se couvre anormalement de givre (appareil trop chargé, température
ambiante élevée, touche de réglage de la température sur une position
élevée, ouvertures fréquentes de la porte), ramenez progressivement la
manette du thermostat sur une position inférieure, jusqu’à obtenir de
nouveau des périodes d’arrêt du compresseur. En effet, le dégivrage
automatique de compartiment réfrigérateur ne s’effectue que si le
compresseur s’arrête par intermittence.
OK
Page 41

41
Coolmatic
La fonction COOLMATIC permet un refroidissement rapide de quantités
importantes dans le réfrigérateur.
1. En appuyant sur la touche COOLMATIC, on enclenche la fonction
COOLMATIC. Le voyant jaune s’allume. La fonction COOLMATIC assure
maintenant un refroidissement intensif, une température de +2 °C étant
spécifiée automatiquement. pendant 6 heures.
A la fin de ce laps de temps. la fonction COOLMATIC s’arrête d’elle même et
l’appareil revient automatiquement à la température sélectionnée
initialement.
2. En appuyant à nouveau sur la touche COOLMATIC, on peut à tout moment
mettre manuellement fin à la fonction COOLMATIC.
Emplacement des denrées
Zone la plus froide
Vous obtiendrez une meilleure conservation de vos aliments si vous les
placez dans la zone de froid convenant le mieux à leur nature. La zone la
plus froide se situe au niveau de la clayette inférieure en verre.
Le symbole ci-contre indique l’emplacement de la zone la plus froide de
votre régrigérateur .
L’espace situé directement au dessus de la clayette en verre du bac à
légumes est la zone la plus froide du compartiment réfrigérateur Dans un
réfrigérateur la température n’est pas uniforme (à l’exception des appareils
à froid ventilé ou brassé).
Chaque type d’aliment a une température de conservation idéale et donc un
emplacement précis à respecter.
En réglant correctement votre réfrigérateur, vous obtiendrez des zones
correspondant à chaque type d’aliment (voir chapitre “AVERTISSEMENTS
IMPORTANTS”).
Bien que votre appareil soit équipé du dispositif de brassage d’air, nous vous
conseillons de disposer les aliments comme indiqué dans le tableau cidessous. Veillez à ne pas placer d’aliments devant le dispositif ce qui aurait
pour effet de diminuer le brassage de l’air.
Remarques : Les bananes, les pommes de terre, l’ail et les oignons ne se
conservent pas au réfrigérateur. Les fromages fermentés ne seront mis au
réfrigérateur que si l’on désire arrêter leur maturation. Ils devr ont alors être
soigneusement enveloppés.
Page 42

42
Fonction vacances
La fonction “Vacances” permet de régler la température du réfrigérateur à
+15°C. Ainsi, lorsque vous vous absentez pendant une longue période
(vacances per exemple), cette fonction vous permettra de garder votre
réfrigérateur vide avec la porte fermée sans qu’il ne se forme de mauvaises
odeurs ou de moisissures.
1. Pour activer la fonction vacances, appuyer sur la touche (B).
2. Gardez la pression sur la touche de réglage de la témperature “+” jusqu'à ce
que vous voyiez s’afficher sur l’indicateur de témperature la lettre “H”
(Holiday). L’indicateur de témperature modifie la température affichée
jusqu’à +8°C, par étape de 1°C. Aprés +8°C, s’affiche la lettre “H”.
Maintenant, le réfrigérateur se trouve en mode économie d’énergie avec la
fonction “Vacances”.
Avec la fonction “Vacances” le compartiment réfrigérateur doit rester vide.
Vous ne devez pas conserver de mar chandises dans l’appareil.
Fonction Refroidissement Rapide
Cette fonction permet le refroidissement rapide de canettes et de bouteilles
grâce à une circulation dynamique de l’air pulsé.
Placez les rafraîchissements sur la clayette Refroidissement Rapide et ouvr ez
la manette du diffuseur d’air au maximum.
Pour activer la fonction Refroidissement Rapide, pressez la touche
COOLMATIC jusqu’à ce que le voyant jaune s’allume.
Quand les rafrâichissements sont froid appyez sur la touche Coolmatic, le
voyant jaune s’eteign. Tournez la manette du diffuseur d’air au minimum.
"Porte Ouverte"- Alarme
Si la porte refrigerateur reste ouverte plus de 5 minute, le voyant rouge
s’allume et clignote et le signal sonore se fait entendre. An appuyant sur le
touche ALARM OFF le signal sonore s’eteign et le voyant rouge continue a
clignoter.
MAX
MIN
Page 43

43
Equipement intérieur
Les clayettes
Les glissières se trouvant sur les
parois de la cuve permettent de
positionner les clayettes à différentes
hauteurs selon vos besoins. Seule la
clayette située sur le(s) bac(s) à
légumes doit rester à cet
emplacement.
Pour retir er les clayettes, tirez-les vers
vous et soulevez-les.
Si votre appareil est équipé de demi-clayettes, vous pouvez retirer la demi
clayette avant afin de placer des aliments de grande hauteur sur la clayette
situeé en dessous.
Les balconnets
Il est possible de modifier la position en hauteur des balconnets sur la contre
porte selon vos besoins. Pour les retirer, soulevez-les vers le haut.
Clayette porte bouteille
Placez les bouteilles (ouverture
vers l’avant) dans les
emplacements prévus de la
clayette.
Si la clayette est placée à
l’horizontal, ne placez que des
bouteilles non entamées.
Cette clayette porte bouteilles a la
possibilité de s’incliner afin de
favoriser le rangement de
bouteilles déjà entamées.
Pour cela, tirez la clayette vers
l’avant jusqu’à ce qu’elle puisse
pivoter vers le haut afin de glisser
D338
Page 44

44
Clayette de Refroidissement Rapide
La clayette de Refroidissement Rapide
peut être placée sur l’un des niveaux
supérieurs. Afin d’obtenir un résultat
optimal il est recommandé de placer
la clayette sur le deuxième niveau
depuis le haut.
Support porte-bouteilles
Il se place sul la clayette supérieure
de l’appareil.
Pour faciliter son déplacement
veuillez presser le rayon vers l’arrière.
Lorsque vous placez une bouteille sur
le support, positionnez le rayon vers
l'avant.
Lors de la réfrigération rapide de
bouteille ou canette, positionnez le
support devant le diffuseur d'air.
Démontage du support porte-bouteilles
Sortez la clayette de Refroidissement
Rapide ainsi que le support portebouteilles.
Afin de libérer le support portebouteilles de la clayette, veuillez
presser les crochets qui soutiennent
l’arrière de celui-ci.
Page 45

45
Installation du filtre à charbon
Le filtre est livré dans un emballage en
plastique afin d’en garantir la longé vité.
Le filtre doit être placé derrière la grille
avant la mise en fonction de l’appareil.
1. Pour ouvrir la grille, pressez sur le
levier placé à la droite de la grille (1) et
tirez en même temps le panneau vers
l’extérieur (2).
2. Placez en suite le nouveau filtre
dans le compartiment situé sur l’arrière
du panneau (3).
Manipulez le filtre avec précaution afin
d’éviter que des résidus en sortent.
Changement du filtre à charbon
Lors d’un usage normal et afin de
permettre un bon fonctionnement,
il est recommandé de changer le filtre à
charbon une fois par année.
Vous pourrez vous procurer ce filtre
auprès de votre magasin vendeur.
Le filtre se place derrière la grille et il
est accessible par l’ouverture du
panneau. Pour ouvrir la grille, pressez
sur le levier placé à la droite de la grille
(1) et tirez en même temps le panneau
vers l’extérieur (2).
Sortez ensuite le filtre du compartiment dans lequel il est engagé (3).
Insérez le nouveau filtre dans la
compartiment.
Manipulez le filtre avec précaution afin
d’éviter que des résidus en sortent.
1
1
Page 46

46
Dégivrage
Réfrigérateur
Le dégivrage du compartiment réfrigérateur s’effectue
automatiquement, à chaque arrêt du compresseur.
L’eau de dégivrage est évacuée dans un bac situé dans la partie
postérieure de l’appareil où elle s’évapore sans intervention.
Nettoyez régulièrement l’orifice d’écoulement de l’eau de dégivrage du
réfrigérateur à l’aide du bâtonnet prévu à cet effet.
Mettre l’appareil hors service
Si l’appareil doit rester longtemps hors service :
1. Enlever les produits à réfrigérer ainsi que les bacs à glaçons.
2. Mettre l’appareil hors service, Mettre l’appareil hors service, appuyez la
touche MARCHE/ARRET.
3. Débrancher la fiche secteur ou déconnecter ou dévisser le fusible.
4. Dégivrer le congélateur et le nettoyer soigneusement (voir “Nettoyage et
entretien”).
5. Laisser ensuite les portes ouvertes afin d’éviter la formation d’odeurs.
Réfrigération
Pour obtenir le meilleur rendement du compartiment réfrigérateur:
• n’introduisez pas d’aliments encore chauds ou de li-quides en
évaporation dans la cuve;
• couvrez les aliments, surtout s’ils sont aromatiques;
• placez les denrées de façon à ce que l'air puisse cir-culer tout autour.
Où placer les denrées?
Viandes (de toutes sortes): enveloppez-la dans des sachets en plastique
et placez-la sur la tablette en verre au-dessus du(des) bac(s) à légumes.
La période de conservation est de 1 à 2 jours au maximum.
Aliments cuits, plats froids, etc.: placez-les, bien couverts, sur une
clayette.
Fruits et légumes: bac(s) à légumes (une fois nettoyés).
Beurre et fromage: enveloppez-les soigneusement dans des feuilles
d’aluminium ou de polyéthylène et mettez-les dans les casiers appropriés.
Lait en bouteille: à placer dans l’un des balconnets de la contreporte.
Bananes, pommes de terre, oignon et ail ne doi-vent pas être placés
dans le réfrigérateur, s’ils ne sont pas conditionnés.
Page 47

47
Nettoyage et entretien
Pour des raisons d’hygiène, il est nécessaire de nettoyer régulière ment
l’intérieur de l’appareil, y compris les équipements intérieurs.
Avertissement !
• Pendant le nettoyage, l’appareil ne peut pas être raccordé au secteur.
Danger d’électrocution ! Avant tous travaux de nettoyage, mettre
l’appareil hors service et tirer la fiche de la prise ou couper le fusible ou le
tirer .
• Ne jamais nettoyer l’appareil à l’aide d’appareils de nettoyage à l’aide de
vapeur sous pression. L’humidité pourrait pénétrer dans des élé-ments
électriques. Danger d’électrocution ! La vapeur chaude peut endommager
les parties en matière plastique.
• L’appareil doit être sec avant la remise en marche.
Attention !
• Les huiles essentielles et les solvants organiques peuvent agresser les pièces
en plastique, par ex.
– le jus de citron ou les pelures d’orange ;
– l’acide butyrique ;
– les agents de nettoyage contenant de l’acide acétique.
Ne pas amener de telles substances en contact avec les partiess de l’appareil.
• Ne pas utiliser de produits de nettoyage abrasifs.
1. Enlever les aliments refroidis et surgelés. Envelopper les aliments surge-lés
dans plusieurs couches de papier journal. Entreposer le tout couvert dans un
endroit frais.
2. Mettre l’appareil hors service et tirer le cordon d’alimentation de laprise ou
débrancher/dévisser le fusible.
3. Nettoyer l’appareil ainsi que les parties intérieures à l’aide d’un chiffon et
d’eau tiède. Ajouter éventuellement quelques gouttes d’un produit de
nettoyage de la vaisselle du commerce.
4. Essuyer ensuite avec de l’eau pure et sécher.
Les dépôts de poussière sur le condenseur augmentent la consommation
d’énergie. Par conséquent, nettoyer prudemment le condenseur à l’arrière
de l’appareil avec une brosse souple ou un aspirateur une fois par an.
Page 48

48
5. Contrôler le trou d’écoulement de
l’eau de dégivrage dans la paroi
arrière du compartiment frigo. S’il
est bouché, vous pouvez
déboucher le trou d’écoulement de
l’eau de dégivrage à l’aide de
bouchon vert se trouvant dans le
sachet qui fait partie de la livraison.
6. Lorsque tout est sec, replacer les
aliments et remettre l’appareil en
service.
Conseils d’économie d’énergie
• Ne pas installer l’appareil à proximité de cuisinières, radiateurs ou autres
sources de chaleur. En cas de température ambiante élevée, le
compresseur tourne plus souvent et plus longtemps.
• Veiller à une ventilation suffisante du socle de l’appareil. Ne jamais
recouvrir les ouvertures de ventilation.
• Ne pas placer d’aliments chauds dans l’appareil. Laisser d’abord refr oidir les
aliments chauds.
• Ne pas ouvrir la porte plus longtemps que nécessaire.
• Ne pas régler la température plus bas que nécessaire.
• Placer les aliments surgelés dans le compartiment frigo pour les dégeler.
Le froid des aliments surgelés est ainsi utilisé pour le refroi-dissement du
compartiment frigo.
• Tenez bien prope le condenseur dégageant de la chaleur, la grille
métallique sur la paroi arrière de votre appareil.
Que faire si ...
Remèdes en cas de dérangements
Le dérangement n’est peut-être qu’un petit défaut auquel vous pouvez
remédier vous-même à l’aide des indications suivantes. N’effectuez pas de
travaux vous-même si les informations suivantes ne vous aident pas de
manière concrète.
Avertissement! Les réparations à l’appareil de congélation peuvent
uniquement être effectuées par des spécialistes. Des réparations incor-rectes
peuvent être source de dangers graves pour l’utilisateur. En cas de
réparation, adressez-vous à votre distributeur ou à notre service aprèsvente.
D037
Page 49

49
L’appareil vibr e
Vérifiez que:
• l’appareil est correctement calé (voir chapitre
“ Installation ”),.
• l’appareil n’est pas installé contre une cloison
résonnante,
• l’appareil n’est pas situé trop près des meubles.
Il y a des traces d’eau au fond du
compartiment réfrigérateur
Vérifiez que:
• l’orifice d’écoulement de l’eau de dégivrage
n’est pas obstrué.
ll y a du givre sur l’évaporateur
Vérifiez que:
• le thermostat n’est pas sur une position trop
élevée,.
• les aliments ne sont pas en contact avec
l’évaporateur afin que l’air circule
correctement,
L’éclairage intérieur ne fonctionne pas
Vérifiez que:
• l’ampoule n’est pas défectueuse.
La température à l’intérieur de l’appareil est
trop chaude
Vérifiez que:
• le thermostat n’est pas sur une position trop
basse,
• les denrées sont correctement placées (voir
paragraphe “ Emplacement des denrées ”),
• les aliments ne sont pas en contact avec
l’évaporateur afin que l’air circule librement,
• la porte est correctement fermée,
• le joint de porte est en bon état et propre,
• trop d’aliments n’ont pas été introduits en
même temps,
• l’appareil est dans une pièce où la circulation
d’air est normale,
• l’appareil n’est pas situé à proximité d’une
source de chaleur .
Symptômes Solutions
L’appareil ne fonctionne pas
Vérifiez que:
• la prise est effectivement branchée,
• les fusibles sont en bon état et n’ont pas
disjoncté,
• le thermostat n’est pas sur la position “•” .
La température à l’intérieur de l’appareil est
trop froide
Vérifiez que:
• le thermostat n’est pas sur une position trop
élevée
Page 50

50
Remplacement de l’ampoule d’éclairage
L’ampoule est accessible à travers l’ouverture prévue à cet effet dans le
diffuseur.
Pour remplacer l’ampoule
• Débranchez l’appareil.
• Appuyez sur l’enclichetage arrière
et en même temps retirez le
couvercle dans le sens de la flèche.
• Remplacez l’ampoule par un
modèle semblable (
(La puissance
maximale est indiquée sur le
diffuseur).
• Replacez le cache.
• Rebranchez l’appareil.
En cas d’absence prolongée ou de non-utilisation
Débranchez, videz, dégivrez et nettoyez l’appareil.
Maintenez la porte entrouverte pendant toute la durée de non-utilisation.
Si toutefois, vous n’avez pas la possibilité de débrancher et vider l’appareil,
faites vérifier régulièrement le bon fonctionnement de celui-ci.
Règlements, normes, directives
L’appareil frigorifique est destiné à un usage domestique et a été fabriqué
en respect des normes s’appliquant à ce type d’appareils. La fabrication tient
en particulier compte des mesures prévues par la loi allemande sur la
sécurité des appareils (GSG), le règlement préventif contre les accidents pour
les installations frigorifiques (VBG 20) et les dispositions de l’union des
électrotechniciens allemands (VDE). L’étanchéité du cir cuit frigorifique a été
contrôlée.
Cet appareil est conforme aux directives européennes suivantes :
– Directive de CEM
Page 51

Page 52

2223 482-03-00-31082009 Subject to change without notice
Sous réserve de modifications
www.electrolux.com
www.aeg-electrolux.de
 Loading...