

Page 1

GB
IMPORTANT INFORMATION
Read before use and retain for future reference
DE
WICHTIGE INFORMATION
Bitte vor dem Benutzen des Gerätes
durchlesen und gut aufbewahren
FR
RENSEIGNEMENTS IMPORTANTS
A lire avant usage et à conserver pour
référence ultérieure
NL
BELANGRIJKE INFORMATIE
Leest u deze informatie voor het gebruik en
bewaar ze voor toekomstige raadpleging
NO
VIKTIG INFORMASJON
Les bruksanvisningen nøye før bruk og
oppbevar den for senere bruk
SE
VIKTIG INFORMATION
Läs anvisningarna före användningen och
spara dem för framtida behov
DK
VIGTIGE OPLYSNINGER
Du bør læse brugsanvisningen før brug og
gemme til senere henvisning
ES
INFORMACIÓN IMPORTANTE
Léase antes de utilizar y consérvela como
referencia en el futuro
PT
INFORMAÇÕES IMPORTANTES
Leia antes de utilizar e guarde para consulta
futura
IT
INFORMAZIONI IMPORTANTI
Leggere prima dell’uso e conservare per
ulteriore consultazione
FI
TÄRKEÄÄ TIETOA
Lue tämä ennen käyttöä ja säilytä myöhempää
tarvetta varten
HU
Jótállást vállalni csak rendeltetésszerűen
használatba vett gépekre tudunk. Kérjük,
hogy a gép használatba vétele elött
gondosan olvassa el a kezelési utasításokat.
SK
Záruka na tento produkt nebude uznaná v
prípade porúch spôsobených nesprávnou
obsluhou alebo používaním výrobku na iný
účel alebo iným spôsobom, ako je uvedené.
Pred začatím práce si prosím dôkladne
prečítajte návod na obsluhu a tento si aj pre
prípad potreby uschovajte
SI
Garancija ne velja ob nepravilni uporabi
proizvoda in/ali ob uporabi za drugi namen
kot je izdelan. Prosimo, da pred uporabo,
preverite pazljivo navodila za obratovanje in
jih shranite za kasnejšo rabo.
PL
Gwarancja traci ważność w przypadku używania
urządzenia do celów innych niż wymienione w
instrukcji obsługi. Prosimy o uważne
przeczytanie instrukcji oraz o stosowanie się do
zaleceń i wskazówek w niej zawartych
CZ
Záruka se nebude vztahovat na závady
způsobené nesprávným používáním, nebo
jestliže bude výrobek použit pro jiné účely
než pro jaké byl vyroben, nebo také jinak
než je uvedeno v návodu k obsluze. Tento
návod si přečtěte, prosím, velmi pozorně a
uchovejte jej pro možné budoucí odkazy
ET500/ET700
GR
ΣΣΗΗΜΜΑΑΝΝΤΤΙΙΚΚΕΕΣΣ ΠΠΛΛΗΗΡΡΟΟΦΦΟΟΡΡΙΙΕΕΣΣ
∆ιαβάστε αυτό το φυλλάδιο πριν από τη χρήση της
συσκευής και φυλάξτε το για µελλοντική αναφορά
TR
ÖNEMLİ BİLGİLER
Kullanmadan önce okuyunuz ve ileride
başvurmak üzere saklayınız.
RU
ВАЖНАЯ ИНФОРМАЦИЯ
Прочитайте перед тем, как включить триммер,
и сохраните для дальнейшего использования.
EE
OLULINE TEAVE
Enne seadme kasutuselevõtmist lugege
kasutusjuhend läbi ning säilitage see tuleviku tarbeks.
LV
SVARŒGA INFORM÷CIJA
Pirms lieto|anas izlasiet un saglab◊jiet
turpm◊k◊m uzziª◊m
Page 2

The symbol on the product or on its packaging indicates that this product may not be treated as household waste.
Instead it shall be handed over to the applicable collection point for the recycling of electrical and electronic equipment.
By ensuring this product is disposed of correctly, you will help prevent potential negative consequences for the
environment and human health, which could otherwise be caused by inappropriate waste handling of this product.
For more detailed information about recycling of this product, please contact your local council office, your
household waste disposal service or the shop where you purchased the product.
Environmental Information
Das Symbol auf dem Produkt bzw. auf der Produktverpackung gibt an, dass dieses Produkt nicht als Hausmüll
behandelt werden darf. Zur Entsorgung ist es an einen entsprechenden Recycling-Punkt für elektrische und
elektronische Geräte zu bringen.
Durch die umweltgerechte Entsorgung dieses Produkts tragen Sie dazu bei, potentielle Folgeschäden an der
Umwelt und Gesundheitsschäden zu verhindern.
Ausführlichere Informationen über das Recycling dieses Produkts erhalten Sie auf Wunsch von Ihrem Stadt- oder
Gemeinderat, den für die Hausmüllentsorgung zuständigen Behörden oder dem Geschäft, in dem Sie dieses
Produkt gekauft haben.
Le symbole sur le produit ou sur son emballage indique que ce produit ne doit pas être traité comme déchet
ménager. Il doit obligatoirement être déposé au point de collecte prévu pour le recyclage du matériel électrique et
électronique.
En vous conformant à une procédure d'enlèvement correcte du produit devenu obsolète, vous aiderez à prévenir
tout effet nuisible à l'environnement et à la santé, qu'une manipulation inappropriée de celui-ci pourrait autrement
provoquer.
Pour de plus amples informations sur le recyclage de ce produit, veuillez contacter votre mairie ou collectivité
locale, la déchetterie de votre localité ou le magasin où vous avez acheté le produit.
Het symbool . op het product of de verpakking betekent dat dit product niet mag worden behandeld als gewoon
huishoudelijk afval, maar in plaats daarvan moet worden ingeleverd bij het punt voor recycling van elektrische en
elektronische apparatuur.
Door dit product correct te verwijderen helpt u om de negatieve gevolgen die een verkeerde verwerking van dit
product kan hebben voor het milieu en de gezondheid te voorkomen.
Voor verdere informatie over recycling van dit product kunt u contact opnemen met uw gemeente, de relevante
dienst voor de verwerking van huishoudelijk afval of de winkel waar u het product hebt gekocht.
GB
Umweltinformation
DE
Informations Concernant L’environnement
FR
Informatie met betrekking tot het milieu
NL
Symbolet på produktet eller på produktets innpakning angir at dette produktet bør muligens ikke bli behandlet
som husholdningsavfall. Det skal i stedet bli levert inn på et egnet samlepunkt for gjenvinning av elektrisk og
elektronisk utstyr.
Ved å forsikre deg om at dette produktet er deponert korrekt, hjelper du med å forebygge negative virkninger på
miljøet og menneskelig helse,som ellers kan bli forårsaket av uhensiktsmessig avfallshåndtering av dette produktet.
For mer detaljert informasjon om gjenvinning av dette produktet, vennligst ta kontakt med kommunekontoret på
stedet, renovasjonstjenesten for husholdningsavfall, eller butikken hvor du kjøpte produktet.
Miljøinformasjon
NO
Tuotteessa tai pakkauksessa oleva -merkki tarkoittaa, että tätä tuotetta ei voi hävittää talousjätteiden tavoin.
Sen sijaan se täytyy viedä käsiteltäväksi asianmukaiseen sähkö- ja elektronisten laitteiden kierrätyspisteeseen.
Kun hävität tämän tuotteen asianmukaisesti, autat estämään ympäristölle ja ihmisille
mahdollisesti aiheutuvia haitallisia jälkiseurauksia, joita saattaa syntyä, jos tämä tuote hävitetään väärällä tavalla.
Tarkempia tietoja tämän tuotteen kierrätyksestä saat ottamalla yhteyttä paikalliseen kunnanvirastoon, kotitalouksien
jätepalveluun tai liikkeeseen, josta ostit tuotteen.
Ympäristöietoa
FI
Page 3
F
1
H
K
G
J
2
1
L
A1
A2
B1
B2
1
C
D
E1
E2
1
3
2
Page 4

1
1
2
3
4
5
M N
P Q
1
S
R
VT
P1
Page 5

GB - CONTENTS
1. Switch Handle
2. Steady Handle
3. Tube
4. Trimmer Head
5. Instruction Manual
6. Safety Guard
7. Warning Label
8. Product Rating Label
9. Electric Cable with Moulded on Plug
DE - INHALT
1. Schalter-Griff
2. Haltegriff
3. Rohr
4. Trimmerkopf
5. Bedienungsanweisung
6. Schutzvorrichtung
7. Warnetikett
8. Produkttypenschild
9. Gerätekabel mit anvulkanisiertem
Gerätestecker
FR - TABLE DES MATIÈRES
1. Manette de contact
2. Poignée auxiliaire
3. Tube
4. Tête de la désherbeuse
5. Manuel d’Instructions
6. Carter
7. Etiquette d’avertissement
8. Plaquette des Caractéristiques du
Produit
9. Câble électrique avec fiche moulée
NL - INHOUD
1. Schakelhendel
2. Tweede handvat
3. Buis
4. Trimmerkop
5. Handleiding
6. Beschermplaat
7. Waarschuwingsetiket
8. Product-informatielabel
9. Snoer met aangespoten stekker
NO - INNHOLD
1. Bryterhåndtak
2. Håndtaksbøyle
3. Rør
4. Trimmerhode
5. Bruksanvisning
6. Trimmerskjerm
7. Advarselsetikett
8. Produktmerking
9. Elektrisk ledning med integrert
støpsel
FI - SISÄLTÖ
1. Käynnistyskahva
2. Vakain
3. Varsi
4. Siistijän pää
5. Käyttöopas
6. Teränsuojus
7. Takuukortti
8. Ruohonleikkurin arvokilpi
9. Verkkojohto ja umpipistoke
SE - INNEHÅLL
1. Brytarhandtag
2. Stödhandtag
3. Skaft
4. Trimmerhuvud
5. Bruksanvisning
6. Trimmersköld
7. Varningsetikett
8. Produktmärkning
9. Elektrisk sladd med formad påplugg
DK - INDHOLD
1. Omskifterhåndtag
2. Støttehåndtag
3. Rør
4. Trimmerhoved
5. Brugsvejledning
6. Beskyttelsesskærm
7. Advarselsmœrkat
8. Produktets mærkeskilt
9.Elledning med sammenstøbt stik
ES - CONTENIDO
1. Mango del interruptor
2. Manilla del asa
3. Tubo
4. Cabeza de recortadora
5. Manual de instrucciones
6. Cubierta protectora
7. Etiqueta de Advertencia
8. Placa de Características del
Producto
9. Cable eléctrico con enchufe
moldeado en él
PT - LEGENDA
1. Pega do interruptor
2. Pega fixa
3. Tubo
4. Cabeça de corte
5. Manual de Instrucções
6. Protecção de segurança
7. Etiqueta de Aviso
8. Rótulo de Avaliação do Produto
9. Cabo eléctrico com ficha moldada
IT - INDICE CONTENUTI
1. Maniglia d’interruzione
2. Impugnatura
3. Tubo
4. Testa tagliabordi
5. Manuale di istruzioni
6. Protezione testa di taglio
7. Etichetta di pericolo
8. Etichetta dati del prodotto
9. Cavo elettrico con spina stampata
HU - TARTALOMJEGYZÉK
1. Kézikapcsoló
2. Alsó fogantyú
3. Cső
4. Trimmelő fej
5. Kezelési útmutató
6. Biztonsági perem
7. Figyelmeztető címke
8. Termékminősítő címke
9. Elektromos kábel öntött dugóval
PL - ZAWARTOSC KARTONU
1. Rączka przełącznika
2. Uchwyt
3. Ramie
4. Głowica tnąca
5. Instrukcja Obsługi
6. Osłona bezpieczeństwa
7. Znaki bezpieczeństwa
8. Tabliczka znamionowa
9.Przewód z wtyczką
CZ - POPIS STROJE
1. Spínací rukoje
2. Pevná rukoje
3. Trubice
4. Hlava vyžínače
5. Návod k obsluze
6. Ochranný kryt
7. Výstražný štĺtek
8. Typový štĺtek výrobku
9. Elektrický kabel s nalisovanou
zástrčkou
SK - OBSAH
1. Spínacia rúčka
2. Oporná rukovä
3. Trubica
4. Hlava kosačky
5. Príručka
6. ochranny kryt
7. Varovný štítok
8. Prístrojový štítok
9. Elektrický kábel s odlievanou
zástrčkou
SI - VSEBINA
1. Ročaj s stikalom
2. Ravnotežno držalo
3. Cev
4. Glava trimerja
5. Priročnik
6. Varnostno vodilo
7. Opozorilna oznaka
8. Tipna tablica
9. Električni kabel z vtikačem
GR -
ΠΠΕΕΡΡΙΙΕΕΧΧΟΟΜΜΕΕΝΝΑΑ
1. Λαβή ∆ιακόπτη
2. Σταθερή Λαβή
3. Σωλήνας
4. Κεφάλι Κλαδευτηριού
5. Εγχειρίδιο Οδηγίας
6. Προστατευτική Ασφάλεια
7. Ετικέτα Προειδοποίησης
8. Ετικέτα Κατάταξης Προϊόντος
9. Ηλεκτρικό Καλώδιο Φορµαρισµένο
στην Πρίζα
TR - İÇİNDEKİLER
1. Anahtarlı Kulp
2. Denge Kulpu
3. Boru
4. Kesme Kafası
5. Talimat Elkitabı
6. Emniyet Siperi
7. Uyarı Etiketi
8. Ürün Sınıflandırma Etiketi
9. Yekpare Fişli Elektrik Kablosu
RU - СОДЕРЖИМОЕ
1. Рукоятка с переключателем
2. Стабилизирующая рукоятка
3. Трубка
4. Головка триммера
5. Руководство по использованию
6.
Предохранитель
7. Предупреждающая этикетка
8. Этикетка с характеристиками
изделия
9. Электрический кабель с литым
штепселем
EE - SISU
1. Lülituskäepide
2. Juhtkäepide
3. Toru
4. Lõikepea
5. Kasutusjuhend
6. Kaitsekate
7. Hoiatusmärgis
8. Toote nimiandmesilt
9. Pistikuga toitejuhe (valuvormliidetud)
LV - SATURS
1. Rokturis ar sl]dzi
2. Stabiliz]t◊jrokturis
3. Caurule
4. Trimera griez]jda±a
5. Instrukciju rokasgr◊mata
6. Dro|œbas p◊rsegs
7. Eti∑ete ar brœdin◊jumu
8. Produkta kategorijas eti∑ete
9. Elektrœbas kabelis ar kontaktdak|u
Page 6

(GB) CARTON CONTENTS
(DE) KARTONINHALT
(FR) CONTENU DU
CARTON
(NL) INHOUD
(NO) KARTONGEN
INNEHOLDER
(FI) PAKETIN SISÄLTÖ
(SE) FÖRPACKNINGENS
INNEHÅLL
(DK) KARTONINDHOLD
(ES) CONTENIDO DEL
CARTON
(PT) LEGENDAS DOS
DESENHOS
(IT) CONTENUTO
(HU) A DOBOZ TARTALMA
(PL) ZAWARTOŚĆ
KARTONU
(CZ) OBSAH KRABICE
(SK) OBSAH BALENIA
(SI) VSEBINA ŠKATLE
(GR) ΠΕΡΙΕΧΟΜΕΝΟ
ΧΑΡΤΟΚΙΒΩΤΙΩΝ
(TR) KUTUNUN İÇERİĞİ
(RU) СОДЕРЖИМОЕ
КАРТОННОЙ УПАКОВКИ
(EE) PAKENDI SISU
(LV) IEPAKOJUMA SATURS
1
2
3
5
8
4
6
7
9
Page 7

Explanation of Symbols on the Power Trim/ET500/ET700
Warning
Read the user instructions carefully to
make sure you understand all the
controls and what they do.
Keep others, including children, pets
and bystanders outside the 10 metre
hazard zone. Stop the trimmer
immediately if you are approached.
The use of eye protection is
recommended to protect against
objects thrown by the cutting line.
To avoid the possibility of electric
shock, do not use in damp or wet
conditions.
Switch off! Remove plug from mains
before adjusting, cleaning or if cable is
entangled or damaged.
Warning: The cutting line continues to rotate after the
machine has been switched off.
General
1. Never allow children or people unfamiliar with these
instructions to use the trimmer. Local regulations
may restrict the age of the operator.
2. Only use the trimmer in the manner and for the
functions described in these instructions.
3. Never operate the trimmer when you are tired, ill or
under the influence of alcohol, drugs or medicine.
4. The operator or user is responsible for accidents or
hazards occurring to other people or their property.
Electrical
1. The use of a Residual Current Device (R.C.D.) with
a tripping current of not more than 30mA is
recommended. Even with a R.C.D. installed 100%
safety cannot be guaranteed and safe working
practice must be followed at all times. Check your
R.C.D. every time you use it.
2. Before use, examine cable for damage. If there are
signs of damage or ageing, it must be replaced by
the manufacturers service agent or a similar
qualified person to avoid hazard.
3. Do not use the trimmer if the electric cables are
damaged or worn.
4. Immediately disconnect from the mains electricity supply
if the cable is cut, or the insulation is damaged. Do not
touch the electric cable until the electrical supply has
been disconnected. Do not repair a cut or damaged
cable. Replace it with a new one.
5. Your extension cable must be uncoiled, coiled cables
can overheat and reduce the efficiency of your trimmer.
6. Keep the cable clear of the cutting area and
obstacles at all times.
7. Do not pull cable around sharp objects.
8. Always switch off at the mains before disconnecting
any plug, cable connector or extension cable.
9. Never pull on the cable to disconnect any of the
plugs.
10. Switch off, remove plug from mains and examine
electric supply cable for damage or ageing befor
e
winding cable for storage. Do not repair a damaged
cable, replace it with a new one. Use only
Electrolux Outdoor Products replacement cable.
11. Always wind cable carefully, avoiding kinking.
12. Use only on AC mains supply voltage shown on the
product rating label.
13. Electrolux Outdoor Products trimmers are double
insulated to EN60335. Under no circumstance should
an earth be connected to any part of the trimmer.
Cables
Use only 1.00mm
2
size cable up to 40 metres length
maximum.
Maximum rating:
1.00mm2size cable 10 amps 250 volts AC
1. Mains cables and extensions are available from your
local Electrolux Outdoor Products Approved Service
Centre.
2. Only use extension cables specifically designed for
outdoor use.
Preparation
1. While using your product always wear substantial
footwear and long trousers.
2. Before using the machine and after any impact,
check for signs of wear or damage and repair as
necessary.
3. Inspect the area to be cut before each use. Remove
all objects such as stones, broken glass, nails, wire,
string etc, which can be thrown or become
entangled in the trimmer head.
4. Check that the cutting head is fitted correctly.
Use
AVOID ACCIDENTAL STARTING. REMOVE PLUG
FROM MAINS AND KEEP FEET AWAY FROM THE
SWITCH LEVER WHEN:- CLEANING AROUND THE
INSIDE OF THE SAFETY GUARD, REMOVING OR
REFITTING SPOOL CAP, MANUALLY FEEDING OR
REPLACING NYLON LINE.
1. Use the trimmer only in daylight or good artificial
light.
2. Avoid operating your trimmer in wet grass, where
feasible.
3. Take care in wet grass, you may lose your footing.
4. On slopes, be extra careful of your footing and wear
non-slip footwear.
5. Do not walk backwards when trimming, you could
trip. Walk never run.
6. Keep cutting head below waist level.
7. Switch off before pushing the trimmer over surfaces
other than grass.
8. Never operate the trimmer with damaged guards or
without guards in place.
9. Never fit metal cutting elements.
10. Keep hands and feet away from the cutting means at
all times and especially when switching on the motor.
11. Never pick up or carry a trimmer by the cable.
12. Do not lean over the trimmer guard - objects may be
thrown by the cutting line.
Safety Precautions
If not used properly this trimmer can be dangerous! This trimmer can cause serious injury to
the operator and others, the warnings and safety instructions must be followed to ensure
reasonable safety and efficiency in using this trimmer. The operator is responsible for following
the warning and safety instructions in this manual and on the trimmer.
ENGLISH - 1
10m
360º
Page 8

Safety Precautions
13. Remove the plug from the mains :
- before leaving the trimmer unattended for any
period;
- before clearing a blockage;
- before checking, cleaning or working on the
appliance;
- if you hit an object. Do not use your trimmer until
you are sure that the entire trimmer is in a safe
operating condition;
- if the trimmer starts to vibrate abnormally. Check
immediately. Excessive vibration can cause injury.
Maintenance and storage
1. Keep all nuts, bolts and screws tight to be sure the
trimmer is in safe working condition.
2. Replace worn or damaged parts for safety.
3. Only use the replacement cutting line specified for
this product.
4. Only use replacement parts and accessories
recommended by Electrolux Outdoor Products.
5. To avoid the risk of injury keep fingers and hands clear of
the line cutter on the leading edge of the guard.
6. Inspect and maintain the trimmer regularly. Any repairs
must be carried out by an authorised repairer.
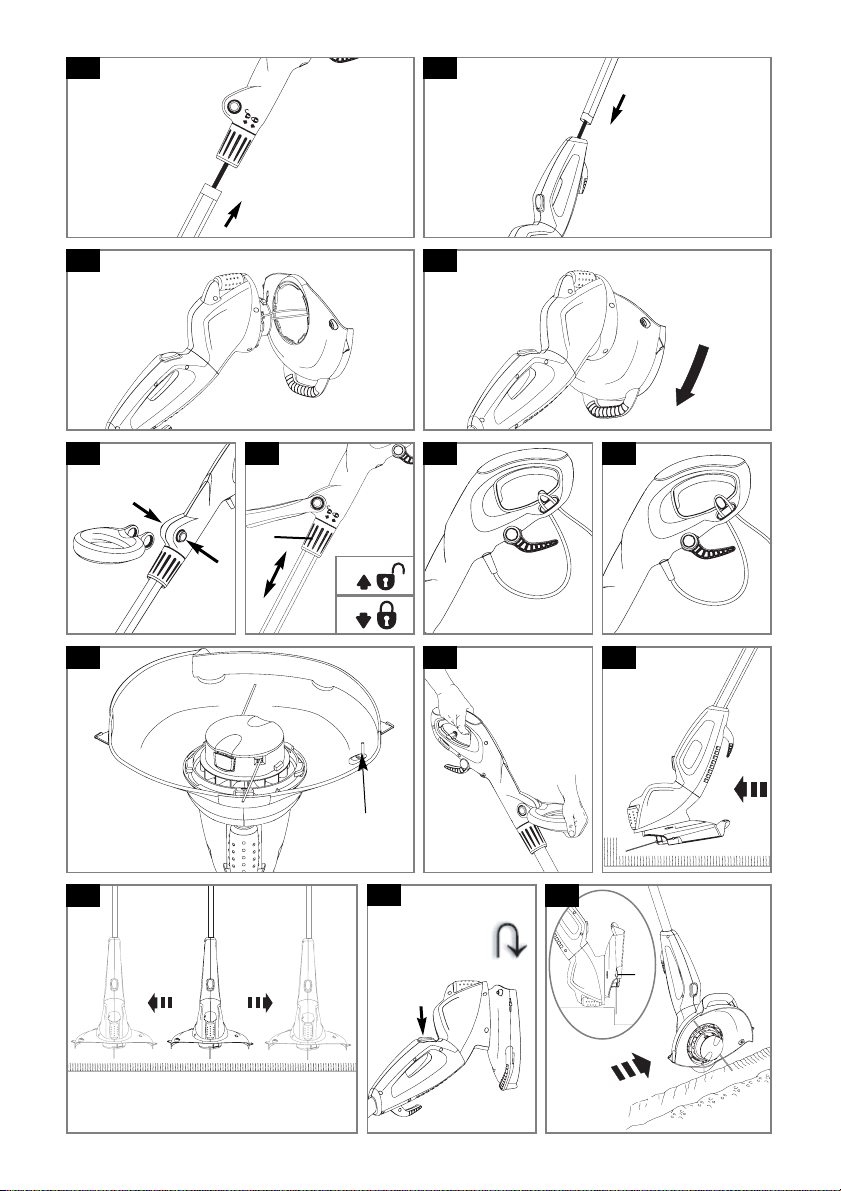
Assembly Instructions
Assembly of Switch Handle to Tube (A1)
• Ensure that the internal cable is not twisted.
1. Insert the tube into the switch handle.
2. Push until it clicks into position.
• ENSURE THAT THE TUBE IS FULLY LOCATED
BY ATTEMPTING TO REMOVE IT.
Assembly of T
rimmer Head to Tube (A2)
• Ensure that the internal cable is not twisted.
1. Insert the tube into the trimmer head.
2. Push until it clicks into position.
• ENSURE THAT THE TUBE IS FULLY LOCATED
BY ATTEMPTING TO REMOVE IT.
Safety Guar
d Assembly (B1) & (B2)
1. Locate the safety guard over the cutting head.
Ensure the nylon line is fed through the hole in the
safety guard as illustrated in fig B1.
2. Push into location and turn safety guard in the
direction illustrated in Fig B2, until a click is heard
and the safety guard is securely locked in position.
• ENSURE THE SAFETY GUARD IS SECURELY IN
PLACE BY ATTEMPTING TO TWIST GUARD.
Steady Handle Assembly (C)
1. Depress the two buttons on the sides of the switch
handle.
2. Locate the steady handle over the buttons and
release the buttons.
3. Adjust the steady handle to the most comfortable
operating position by depressing the buttons and
moving the handle.
Height Adjustment (D)
1. Turn height adjuster (D1) in the direction indicated to
un-lock (D2).
2. Adjust the length of the tube to the most comfortable
operating position.
3. Turn height adjuster in the opposite direction to lock
(D3).
• ENSURE THAT THE TUBE IS FULLY SECURED.
Cable Restraint (E1) & (E2)
1. Form loop in mains cable and push the loop through
the slot as illustrated in picture (E1).
2. To secure, position loop over the hook and pull the
cable back through the slot as illustrated in picture (E2).
Double Auto Feed System
F1 - Line cutter
How the automatic line feed works (F)
1. When initially switching on the trimmer, a small
length of line is fed out.
2. A ‘clattering’ noise will be heard when the two nylon
lines hit the line cutter. DO NOT BE ALARMED
this is quite normal. After approximately 5 seconds
the line will be cut to the correct length and the
noise will reduce as the motor reaches full speed.
• Make sure the motor is up to full speed before
trimming or edging.
3. If the noise of the nylon line being cut cannot be
heard, more line will need to be fed out.
4. To feed more line, it is first necessary to to allow the
motor to stop completely, then re-start, allowing the
motor to reach full speed.
5. Repeat step 4. until you hear the lines hitting against
the cutter. (Do not repeat this procedure more than
6 times)
6. If problems are experienced with the automatic line
feed refer to Fault Finding Chart.
How to Trim and Edge
WARNING
The use of eye protection is recommended. Do not
lean over the trimmer whilst trimming or edging,
objects may be thrown by the cutting line. Do not
allow cutting head to rest on the ground. Do not
overload your trimmer. Overloading can be avoided
by making sure the motor speed does not drop
unduly. DISCONNECT FROM THE MAINS
ELECTRICITY SUPPLY BEFORE ATTEMPTING ANY
MAINTENANCE OR ADJUSTMENT.
BEFORE USE:
Make sure that both lines are fed out.
Make sure motor is up to full speed before trimming
or edging.
How to trim
1. Hold as illustrated in Fig G.
2. To start, squeeze the switch lever.
3. Cut with nylon line at an angle using the tip. See Fig
H.
4. Swing trimmer in and out of the cutting area taking
small cuts (J).
5. Line is fed out automatically every time the trimmer
head stops rotating and returns to operating speed.
6. To stop your trimmer release the switch lever.
How to edge
1. To convert to edging mode, depress the locking
button (K1) and twist head anti-clockwise (K2). An
audible "click" will confirm that the head is locked.
Ensure the button has returned to its original
position.
2. Hold as illustrated in Fig G.
3. To start, squeeze the switch lever.
4. Rest the edger on the roller for extra stability and
line up the edge of the lawn with the two indicators
on the guard (L1). Edge in direction indicated in Fig
L.
5. To stop your trimmer release the switch lever.
6. To return to trimming mode, depress the locking
button and twist head clockwise. An audible "click"
will confirm that the head is locked. Ensure the
button has returned to its original position.
ENGLISH - 2
Page 9

Manual line feed
M1 - Manual line feed button
To manually feed the nylon line (M)
1. If required line can be fed out manually.
2. To operate, press and release manual line feed
button, whilst gently pulling on one of the lines
until the line reaches the line cutter.
3. When the required amount of line is fed out, gently
pull on the second line (there is no need to press
the manual line feed button again).
4. If the line extends past the line cutter, too much
line has been fed out.
5. If too much line is fed out, remove the spool cap
and click spool anti-clockwise until the line is at the
desired length.
Cutting Head
N1 - Cap
N2 - Cap release latch
N3 - Spool
N4 - Spoolholder
N5 - Slot
Q1 - Cleat
T
o remove spool cap
1. Press and hold in the two cap release latches. (N).
2. Pull
cap away from the spoolholder. (N).
When r
efitting the spool cap
1. Keep all areas of the cap and spoolholder clean.
Failure to do so may prevent the cap being
securely located in the spoolholder.
2. Replace the cap, pr
essing firmly DOWN towards
the spoolholder to ensure cap is fully located.
3. Check that the cap is correctly fitted by trying to
remove it without depressing the two latches.
T
o replace nylon line
For your convenience it is recommended you buy
spool and line complete. Nylon line only is also
available. Both are available from Electrolux Outdoor
Products stockists.
T
o fit spool and line complete:
1. Remove the cap.
2. Remove old spool.
3. Place spool into spoolholder.
4. Release one line from cleat (Q1).
5. Secure line into slot (P1).
6. Repeat for second line.
• Ensure spool is fully located by gently rotating
it during fitment, whilst keeping the
spoolholder steady.
7. Refit the cap.
T
o fit nylon line only:
• Remember! Your Electrolux Outdoor Products
Trimmer is designed to use only nylon line with a
maximum diameter of 1.5mm
. Use only genuine
Electrolux Outdoor Products nylon line.
1. IMPORTANT - Always wind the line onto the
upper section of the spool first.
Take approximately 5 metres of line. Insert 15mm
of line into one of the holes in the upper section of
the spool (Q) and wind line in the direction of the
arrows on the top of the spool. Leave
approximately 100mm of line unwound and place
into cleat as illustrated in figure Q1. Repeat on
lower section of spool.
2. Care should be taken to ensure that the line is
neatly coiled on the spool. Failure to do so will
impair the efficiency of the automatic line feed.
3. Then fit spool as described in ‘To fit spool and
line complete’, section above.
Maintenance
• WARNING
Disconnect from the mains electricity supply,
before attempting any maintenance or
adjustment. Cutting head continues to rotate
after the trimmer has been switched off. Keep
fingers and hands clear of the line cutter on
leading edge of guard.
Caring for your Power T
rim/ET500/ET700
After you have finished using your Power
Trim/ET500/ET700 follow the procedure below:
AVOID ACCIDENTAL STARTING. REMOVE PLUG
FROM MAINS AND KEEP FEET AWAY FROM THE
SWITCH LEVER WHEN: CLEANING AROUND THE
INSIDE OF THE SAFETY GUARD, REMOVING OR
REFITTING SPOOL CAP, MANUALLY FEEDING OR
REPLACING NYLON LINE.
1. Disconnect from the mains electricity supply.
2. Never clean your trimmer with water, cleaning
fluids, or solvents, just remove debris with a
suitable tool, a soft brush or dry cloth.
3. Using a soft brush, clean around the inside of the
safety guard, the cutting head (Fig R) and the
motor housing air vents. (Fig S)
4. Inspect the trimmer carefully, especially the parts
of the cutting head.
5. If your trimmer is damaged in any way contact
your local Electrolux Outdoor Products approved
service centre.
• Never use a damaged trimmer.
6. Store in a cool, dry place and out of reach of
children.
Cable Storage
1. Your mains cable can be stored on the product as
illustrated in Fig T.
2. Wind cable carefully to avoid kinking.
3. To release the cable press the button and the hook
will drop down (Fig V).
4. Push cable hook fully back into position.
Service Recommendations
• Your product is uniquely identified by a silver and black product rating label.
• We strongly recommend that your product is serviced at least every twelve months, more often in a
professional application.
ENGLISH - 3
Page 10

Fault Finding Chart
WARNING Disconnect from the mains electricity supply before attempting any maintenance or adjustment.
FAULT CHECK ACTION
Is the automatic line feed
working?
Manually feed out line.
SEE “MANUAL LINE FEED”
Is the line fed out and visible?
Has line been removed from
cleat?
Remove cap and spool, free line
and re-fit spool and cap. SEE
“CUTTING HEAD”
The line may be jammed on the
spool. Rewind line to remove
crossed loops. Check that line is
in correct section of spool.
Is the manual line feed working?
Has too much line been fed out?
SEE “MANUAL LINE FEED”
Contact your local approved
Service Centre or Electrolux
Outdoor Products Customer
Service.
Is the line cutter missing from
the safety guard?
Contact your local approved Electrolux Outdoor Products Service
Centre
No
No
No
Yes
Yes
LINE NOT FEEDING
OR
LINE TOO SHORT
OR
TRIMMER VIBRATES
CONTINUOUS
CLATTERING NOISE
LINE SNAPS
CONTINUOUSLY
IF NONE OF THE ABOVE
OR IF FAULT PERSISTS
Has the motor reached full
speed before use?
No
Allow the motor to reach full speed
before use.
Are you using the trimmer
correctly?
?
Only use tip of nylon line to trim.
SEE “How to trim and edge”
Is the line jamming on the
spool?
Yes
Rewind the line on the spool, if
symptoms still persist, change
spool and line.
Environmental Information
Electrolux Outdoor Products are manufactured
under an Environmental Management System (ISO
14001) using, where practical, components
manufactured in the most environmentally
responsible manner, according to company
procedures, and with the potential for recycling at
the end of the products’ life.
• Packaging is recyclable and plastic components
have been labelled (where practical) for
categorised recycling.
• Awareness of the environment must be
considered when disposing of ‘end-of-life’
product.
• If necessary, contact your local authority for
disposal information.
Guarantee and Guarantee Policy
If any part is found to be defective due to faulty
manufacture within the guarantee period, Electrolux
Outdoor Products, through its Authorised Service
Repairers will effect the repair or replacement to the
customer free of charge providing:
(a) The fault is reported directly to the Authorised
Repairer.
(b) Proof of purchase is provided.
(c) The fault is not caused by misuse, neglect or faulty
adjustment by the user.
(d) The failure has not occurred through fair wear and
tear.
(e) The machine has not been serviced or repaired,
taken apart or tampered with by any person not
authorised by Electrolux Outdoor Products.
(f) The machine has not been used for hire.
(g) The machine is owned by the original purchaser.
(h) The machine has not been used commercially.
* This guarantee is additional to, and in no way
diminishes the customers statutory rights.
Failures due to the following are not covered, therefore
it is important that you read the instructions contained in
this Operator's Manual and understand how to operate
and maintain your machine:
Failures not covered by guarantee
* Replacing Nylon Line.
* Failures as a result of not reporting an initial fault.
* Failures as a result of sudden impact.
* Failures as a result of not using the product in
accordance with the instructions and
recommendations contained in this Operator's
Manual.
* Machines used for hire are not covered by this
guarantee.
* The following items listed are considered as wearing
parts and their life is dependent on regular
maintenance and are, therefore not normally subject
to a valid warranty claim: Nylon Line, Spool and
Line, Electric Mains Cable
* Caution!
Electrolux Outdoor Products does not accept liability
under the warranty for defects caused in whole or
part, directly or indirectly by the fitting of
replacement parts or additional parts that are not
either manufactured or approved by Electrolux
Outdoor Products, or by the machine having been
modified in any way.
ENGLISH - 4
Page 11

I, the undersigned M. Bowden of Electrolux
Outdoor Products, Aycliffe Industrial Park,
NEWTON AYCLIFFE, Co. Durham. DL5
6UP. Certify that the Trimmer:-
Category........ Electric Lawn Trimmer
Make.............. Electrolux Outdoor
Products
Conforms to the specifications of Directive
2000/14/EEC
I, the undersigned M. Bowden of Electrolux
Outdoor Products, Aycliffe Industrial Park,
NEWTON AYCLIFFE, Co. Durham. DL5
6UP Certify that a sample of the above
product has been tested using directive
81/1051/EEC as a guide. The maximum Aweighted sound pressure level recorded at
operator position under free field semi
anechoic chamber conditions was :-
I, the undersigned M. Bowden of
Electrolux Outdoor Products, Aycliffe
Industrial Park, NEWTON AYCLIFFE, Co.
Durham. DL5 6UP Certify that a sample
of the above product has been tested
using ISO 5349 as a guide. The maximum
weighted root mean square value of
vibration recorded at operator’s hand
position was:-
Type of Cutting Device.............Cutting Line
Identification of Series..............See Product Rating Label
Conformity Assesment Procedure....ANNEX VI
Notified Body....................I.T.S., Cleeve Road, Leatherhead,
Surrey. KT22 7SB England
Other Directives:-.............98/37/EEC, 89/336/EEC, 73/23/EEC
& applicable standards:- EN786, IEC60335-1, IEC60335-2-91,
EN61000-3-2, EN61000-3-3, EN55014-1, EN55014-2
Type............................................................................ A
Width of Cut............................................................... B
Speed of Rotation of Cutting Device.......................... C
Guaranteed sound power level................................... D
Measured Sound Power Level.................................... E
Level............................................................................ F
Value........................................................................... G
Weight...........................................................................H
Ich, der Unterzeichner M. Bowden of
Electrolux Outdoor Products, Aycliffe
Industrial Park, NEWTON AYCLIFFE, Co.
Durham. DL5 6UP. bescheinige hiermit,
dass der Trimmer:-
Kategorie.... Elektrorasentrimmer
Fabrikat....... Electrolux Outdoor Products
die Spezifikationen der Direktive
2000/14/EG erfüllt
Ich, der Unterzeichner M. Bowden, Electrolux
Outdoor Products, Aycliffe Industrial Park,
NEWTON AYCLIFFE, Co. Durham, DL5 6UP,
bescheinige hiermit, daß eine Probe des obigen
Produkts getestet wurde und dabei Direktive
81/1051/EWG als Richtschnur verwendet wurde.
Der maximale A-gewichtete Schalldruckpegel,
der an der Bedienerposition unter FreifeldHalbschalltot-Kammerbedingungen gemessen
wurde, betrug:-
Ich, der Unterzeichner M. Bowden, Electrolux
Outdoor Products, Aycliffe Industrial Park,
NEWTON AYCLIFFE, Co. Durham, DL5 6UP,
bescheinige hiermit, daß eine Probe des
obigen Produkts getestet wurde und dabei ISO
5349 als Richtschnur verwendet wurde. Der
maximale gewichtete Vibrationseffektivwert, der
an der Handposition des Bedieners gemessen
wurde, betrug:-
Schneidwerktyp.................................
Schnur
Identifizierung der reihe..................... Siehe Produkttypenschild
Konformitätsbestätigungsverfahren..ANNEX VI
Benachrichtigte Behörde................. I.T.S., Cleeve Road, Leatherhead,
Surrey. KT22 7SB England
Andere Direktiven-................... 98/37/EEC, 89/336/EEC,
73/23/EEC
und Normen:-..................................... EN786, IEC60335-1,
IEC60335-2-91, EN61000-3-2, EN61000-3-3, EN55014-1,
EN55014-2
Typ.............................................................................. A
Schnittbreite................................................................... B
Umdrehungsgeschwindigkeit des Schneidwerks....... C
Garantierter Geräuschpegel...................................... D
Gemessener Geräuschpegel...................................... E
Höhe ............................................................................F
Wert.............................................................................. G
Gewicht........................................................................ H
Je soussigné M. Bowden of Electrolux
Outdoor Products, Aycliffe Industrial Park,
NEWTON AYCLIFFE, Co. Durham. DL5
6UP. certifie que le taille-herbe:-
Catégorie..... Coupe-bordure électrique
Marque........ Electrolux Outdoor Products
est conforme aux spécifications de la
Directive 2000/14/EEC
Je soussigné M. Bowden, Electrolux Outdoor
Products, Aycliffe Industrial Park, NEWTON
AYCLIFFE, Co. Durham, DL5 6UP, GrandeBretagne, certifie qu’un échantillon du produit cidessus a été essayé selon les indications de la
directive 81/1051/EEC. Le niveau maximum
pondéré de pression acoustique enregistré à la
position de l’opérateur en champ libre en
chambre demi-sourde était de:-
Je soussigné M. Bowden, Electrolux Outdoor
Products, Aycliffe Industrial Park, NEWTON
AYCLIFFE, Co. Durham, DL5 6UP, GrandeBretagne, certifie qu’un échantillon du produit
ci-dessus a été essayé selon les indications
de la norme ISO 5349. La moyenne
quadratique pondérée des vibrations
enregistrées à la position de la main de
l’opérateur était de:-
Type d'outil de coupe...............
Fil de coupe
Identification de la serie............Voir la Plaquette D’identification
Procédure d'évaluation de la conformité........ANNEX VI
Organisme notifié......................I.T.S., Cleeve Road, Leatherhead,
Surrey. KT22 7SB England
Autres directives........................98/37/EEC, 89/336/EEC, 73/23/EEC
et aux normes............................ EN786, IEC60335-1, IEC60335-2-
91, EN61000-3-2, EN61000-3-3, EN55014-1, EN55014-2
Type....................................................................... A
Largeur de coupe...................................................... B
Vitesse de rotation de l'outil de coupe.................. C
Niveau garanti de puissance sonore.................... D
Niveau mesuré de puissance sonore.................... E
Niveau................................................................... F
Valeur................................................................... G
Poids...................................................................... H
Ik, ondergetekende M. Bowden of
Electrolux Outdoor Products, Aycliffe
Industrial Park, NEWTON AYCLIFFE, Co.
Durham. DL5 6UP. verklaar dat de
Trimmer:-
Categorie.... Elektrische gazonmaaier
Merk............ Electrolux Outdoor Products
Voldoet aan de specificaties van directief
2000/14/EEC
Ik, ondergetekende M. Bowden, Electrolux
Outdoor Products, Aycliffe Industrial Park,
NEWTON AYCLIFFE, Co. Durham, DL5 6UP,
verklaar hierbij dat een proefexemplaar van het
bovengenoemde product is getest volgens
richtlijn 81/1051/EEC. Het maximale A-belaste
geluidsdrukniveau dat is geregistreerd bij de
positie van de bediener in een semi geluiddichte
ruimte bij vrije veld condities bedraagt:-
Ik, ondergetekende M. Bowden, Electrolux
Outdoor Products, Aycliffe Industrial Park,
NEWTON AYCLIFFE, Co. Durham, DL5 6UP,
verklaar hierbij dat een proefexemplaar van
het bovengenoemde product is getest volgens
ISO 5349 als richtlijn. De maximale belaste
effectieve waarde van trilling, geregistreerd bij
de positie van de hand van de bediener,
bedraagt:-
Type maaier...................................
Snijdraad
Identificatie van serie.................... Zie Productlabel
Procedure voor het beoordelen van conformiteit..........ANNEX VI
Op de hoogte gestelde instantie.I.T.S., Cleeve Road, Leatherhead,
Surrey. KT22 7SB England
Andere directieven.........................98/37/EEC, 89/336/EEC, 73/23/EEC
en aan de volgende normen.......EN786, IEC60335-1, IEC60335-2-
91, EN61000-3-2, EN61000-3-3, EN55014-1, EN55014-2
Type....................................................................... A
Maaibreedte............................................................... B
Toerental maaier.................................................... C
Gegarandeerd geluidsvermogen............................ D
Gemeten geluidsvermogen.................................... E
Niveau.................................................................... F
Waarde................................................................... G
Gewicht................................................................... H
EC DECLARATION OF CONFORMITY
EC KONFORMITÄTSERKLÄRUNG
EC DÉCLARATION DE CONFORMITÉ
EC CONFORMITEITSVERKLARING
Page 12

Es, Electrolux Outdoor Products, Aycliffe
Industrial Park, NEWTON AYCLIFFE, Co.
Durham. DL5 6UP. p◊rst◊vis M. Bowden
apstiprinu, ka produkts
Kategorija........elektriskais mauriªa trimers
Raãot◊js..............Electrolux Outdoor
Products
atbilst direktœv◊ 2000/14/EEC nor◊dœtajiem
tehniskajiem noteikumiem.
Es, Electrolux Outdoor Products, Aycliffe
Industrial Park, NEWTON AYCLIFFE, Co.
Durham. DL5 6UP. p◊rst◊vis M. Bowden
apstiprinu, ka iepriek| min]t◊ produkta
paraugs ir test]ts atbilsto|i direktœvai
81/1051/EEC. Maksim◊lais A-izsvarotais
skaªas spiediena lœmenis, kas tika fiks]ts
operatora pozœcij◊ brœvos lauka da±]jas
atbalss apst◊k±os, bija:
Es, Electrolux Outdoor Products, Aycliffe
Industrial Park, NEWTON AYCLIFFE, Co.
Durham. DL5 6UP. p◊rst◊vis M. Bowden
apstiprinu, ka iepriek| min]t◊ produkta
paraugs ir test]ts atbilsto|i standartam
ISO 5349. Vibr◊cijas maksim◊l◊ izsvarot◊
pa◊trin◊juma vid]j◊ kvadr◊tisk◊ v]rtœba,
kas tika fiks]ta operatora roku atra|an◊s
viet◊, bija:
Grie|anas ierœces tips........ griez]jaukla
S]rijas nor◊de................... sk. produkta kategorijas eti∑eti
Atbilstœbas nov]rt]|anas proced·ra....ANNEX VI
Sertific]|anas instit·cija.... I.T.S., Cleeve Road, Leatherhead,
Surrey. KT22 7SB Anglija
Citas direktœvas:................. 98/37/EEC, 89/336/EEC, 73/23/EEC
un piem]rojamie standarti:- EN786, IEC60335-1, IEC60335-2-
91, EN61000-3-2, EN61000-3-3, EN55014-1, EN55014-2
Tips..............................................................................A
P±◊vuma platums.........................................................B
Griez]jierœces rot◊cijas ◊trums.................................... C
Garant]tais skaªas pak◊pes lœmenis.......................... D
Izm]rœtais skaªas pak◊pes lœmenis..............................E
Lœmenis........................................................................ F
V]rtœba......................................................................... G
Svars........................................................................... H
EK DEKLAR÷CIJA PAR ATBILSTŒBU
A
SET250
B
25 cm
C
10500 RPM
D
93 dB(A)
E
91 dB(A)
F
79.5 dB(A)
G
6.79 m/s
2
H
3.26 kg
A
SET300
B
30 cm
C
10300 RPM
D
96 dB(A)
E
94 dB(A)
F
80.4 dB(A)
G
6.38 m/s
2
H
3.45 kg
Newton Aycliffe, 17/09/2004
M. Bowden,
Research & Development Director
Page 13

BELGIQUE/BELGIË Flymo Belgique/België
Tel: 02 363 0311, Fax: 02 363 0391
ČESKÁ REPUBLIKA Electrolux, spol. s.r.o., oz Electrolux Outdoor Products,
Na Křečku 365, 109 00 Praha 10 - Horní Měcholupy.
Tel: 274008905, Info-linka: 800/110 220
Internet: www.partner-flymo.cz E-mail: info@husqvarna.cz
DANMARK Electrolux Outdoor Products, Flymo/Partner A/S,
Lundtoftegaardsvej 93A, DK 2800 Kgs.Lyngby
Tel: 45 87 75 77, Fax: 45 93 33 08, www.flymo-partner.dk
DEUTSCHLAND Flymo Deutschland
Tel: 097 21 7640, Fax:097 21 764202
ESTONIA Electrolux Estonia Ltd (Electrolux Eesti AS)
Tel: (372) 6650010
FRANCE Flymo France SNC
Tel 01 46 67 8141, Fax 01 43 34 2491
FINLAND SUOMI Electrolux Outdoor Products Finland
Tel: 00 358 9 39611, Fax: 00 358 9 3961 2644
ITALIA McCulloch Italiana s.r.l. - Via Como 72, 23868 Valmadrera
(LECCO) - ITALIA
Tel: 800 017829, Fax: 0341 581671
IRELAND Flymo Ireland
Tel: 01 4565222, Fax: 01 4568551
MAGYARORSZÁG Electrolux Lehel Kft
Tel: 00 36 1 251 41 47
NORGE Flymo/Partner, div. av Electrolux Motor a.s.
Tel: 69 10 47 90
NEDERLAND Flymo Nederland
Tel: 0172-468322, Fax: 0172-468219
ÖSTERREICH Husqvarna-Ges.m.b.H. Nfg. KG, Industriezeile 36, 4010 LINZ,
Tel: 0732 770101-0, Fax: 0732 770101-40,
email: office@husqvarna.co.at Internet: www.husqvarna.at
POLSKA Electrolux Poland Sp. z.o.o. Husqvarna, Wysockiego 15 b
03-371 Warszawa
Tel:- (0-22) 330 96 00, Fax: (0-22) 330 96 35
SLOVENIJA Husqvarna-Ges.m.b.H. Nfg. KG, Industriezeile 36, 4010 LINZ,
Tel: 0732 770101-0, Fax: 0732 770101-40,
email: office@husqvarna.co.at Internet: www.husqvarna.at
SLOVENSKA Electrolux Slovakia s.r.o., Borova Sihot 211, 033 01 Lipt. Hradok
Tel: 044 522 14 19, Fax: 044 522 14 18, www.flymo-partner.sk
SCHWEIZ/SUISSE/SUIZZERA Flymo Schweiz/Suisse/Suizzera
Tel 062 889 93 50 / 889 94 25, Fax 062 889 93 60 / 889 94 35
SVERIGE Electrolux Outdoor Products, Sverige
Tel: 036 – 14 67 00, Fax: 036 – 14 60 70
UNITED KINGDOM Electrolux Outdoor Products United Kingdom
Tel: 01325 300303, Fax: 01325 310339
Page 14

5119676-01
Electrolux Outdoor Products
Aycliffe Industrial Park
NEWTON AYCLIFFE
Co.Durham DL5 6UP
ENGLAND
Telephone - (00) 44 1325 300303 Fax - (00) 44 1325 310339
UK Telephone - 01325 300303 Fax - 01325 310339
www.electrolux.com
Our policy of continuous improvement means that the specification of products may be altered from time to time without prior notice.
Electrolux Outdoor Products manufacture products for a number of well known brands under various registered patents, designs and
trademarks in several countries.
© Electrolux Outdoor Products Ltd. Registered Office, Electrolux Works, Oakley Road, Luton LU4 9QQ
Registered number 974979 England
The Electrolux Group is the world’s largest producer of powered appliances for kitchen, cleaning and outdoor use. More than 55 million
Electrolux Group products (such as refrigerators, cookers, washing machines, vacuum cleaners, chain saws and lawn mowers) are
sold each year to a value of approx. USD 14 billion in more than 150 countries around the world.
The Electrolux Group. The world’s No.1 choice.
 Loading...