

Page 1
LYB1AF8W0
EN Freezer User Manual 2
DE Gefriergerät Benutzerinformation 18
IT Congelatore Istruzioni per l’uso 36
ES Congelador Manual de instrucciones 53
Page 2
www.electrolux.com2
CONTENTS
1. SAFETY INFORMATION....................................................................................2
2. SAFETY INSTRUCTIONS..................................................................................4
3. INSTALLATION.................................................................................................. 6
4. OPERATION.....................................................................................................10
5. DAILY USE....................................................................................................... 10
6. HINTS AND TIPS............................................................................................. 11
7. CARE AND CLEANING....................................................................................12
8. TROUBLESHOOTING......................................................................................14
9. NOISES............................................................................................................ 16
10. TECHNICAL DATA.........................................................................................16
11. INFORMATION FOR TEST INSTITUTES......................................................16
WE’RE THINKING OF YOU
Thank you for purchasing an Electrolux appliance. You’ve chosen a product that
brings with it decades of professional experience and innovation. Ingenious and
stylish, it has been designed with you in mind. So whenever you use it, you can
be safe in the knowledge that you’ll get great results every time.
Welcome to Electrolux.
Visit our website to:
Get usage advice, brochures, trouble shooter, service and repair information:
www.electrolux.com/support
Register your product for better service:
www.registerelectrolux.com
Buy Accessories, Consumables and Original spare parts for your appliance:
www.electrolux.com/shop
CUSTOMER CARE AND SERVICE
Always use original spare parts.
When contacting our Authorised Service Centre, ensure that you have the
following data available: Model, PNC, Serial Number.
The information can be found on the rating plate.
Warning / Caution-Safety information
General information and tips
Environmental information
Subject to change without notice.
1. SAFETY INFORMATION
Before the installation and use of the appliance, carefully
read the supplied instructions. The manufacturer is not
responsible for any injuries or damage that are the result
Page 3

ENGLISH 3
of incorrect installation or usage. Always keep the
instructions in a safe and accessible location for future
reference.
1.1 Children and vulnerable people safety
• This appliance can be used by children aged from 8
years and above and persons with reduced physical,
sensory or mental capabilities or lack of experience
and knowledge if they have been given supervision or
instruction concerning the use of the appliance in a
safe way and understand the hazards involved.
• Children aged from 3 to 8 years are allowed to load
and unload the appliance provided that they have
been properly instructed.
• This appliance may be used by persons with very
extensive and complex disabilities provided that they
have been properly instructed.
• Children of less than 3 years of age should be kept
away from the appliance unless continuously
supervised.
• Do not let children play with the appliance.
• Children shall not carry out cleaning and user
maintenance of the appliance without supervision.
• Keep all packaging away from children and dispose of
it appropriately.
1.2 General Safety
• This appliance is intended to be used in household
and similar applications such as:
– Farm houses; staff kitchen areas in shops, offices
and other working environments;
– By clients in hotels, motels, bed and breakfast and
other residential type environments.
• To avoid contamination of food respect the following
instructions:
– do not open the door for long periods;
– clean regularly surfaces that can come in contact
with food and accessible drainage systems;
Page 4
www.electrolux.com4
• WARNING: Keep ventilation openings, in the
appliance enclosure or in the built-in structure, clear of
obstruction.
• WARNING: Do not use mechanical devices or other
means to accelerate the defrosting process, other than
those recommended by the manufacturer.
• WARNING: Do not damage the refrigerant circuit.
• WARNING: Do not use electrical appliances inside the
food storage compartments of the appliance, unless
they are of the type recommended by the
manufacturer.
• Do not use water spray and steam to clean the
appliance.
• Clean the appliance with a moist soft cloth. Only use
neutral detergents. Do not use abrasive products,
abrasive cleaning pads, solvents or metal objects.
• When the appliance is empty for long period, switch it
off, defrost, clean, dry and leave the door open to
prevent mould from developing within the appliance.
• Do not store explosive substances such as aerosol
cans with a flammable propellant in this appliance.
• If the supply cord is damaged, it must be replaced by
the manufacturer, its Authorised Service Centre or
similarly qualified persons in order to avoid a hazard.
2. SAFETY INSTRUCTIONS
2.1 Installation
WARNING!
Only a qualified person must
install this appliance.
• Remove all the packaging.
• Do not install or use a damaged
appliance.
• Follow the installation instructions
supplied with the appliance.
• Always take care when moving the
appliance as it is heavy. Always use
safety gloves and enclosed footwear.
• Make sure the air can circulate
around the appliance.
• At first installation or after reversing
the door wait at least 4 hours before
connecting the appliance to the power
supply. This is to allow the oil to flow
back in the compressor.
• Before carrying out any operations on
the appliance (e.g. reversing the
door), remove the plug from the
power socket.
• Do not install the appliance close to
radiators or cookers, ovens or hobs.
• Do not expose the appliance to the
rain.
• Do not install the appliance where
there is direct sunlight.
• Do not install this appliance in areas
that are too humid or too cold.
Page 5
ENGLISH 5
• When you move the appliance, lift it
by the front edge to avoid scratching
the floor.
2.2 Electrical connection
WARNING!
Risk of fire and electric
shock.
WARNING!
When positioning the
appliance, ensure the supply
cord is not trapped or
damaged.
WARNING!
Do not use multi-plug
adapters and extension
cables.
• The appliance must be earthed.
• Make sure that the parameters on the
rating plate are compatible with the
electrical ratings of the mains power
supply.
• Always use a correctly installed
shockproof socket.
• Make sure not to cause damage to
the electrical components (e.g. mains
plug, mains cable, compressor).
Contact the Authorised Service
Centre or an electrician to change the
electrical components.
• The mains cable must stay below the
level of the mains plug.
• Connect the mains plug to the mains
socket only at the end of the
installation. Make sure that there is
access to the mains plug after the
installation.
• Do not pull the mains cable to
disconnect the appliance. Always pull
the mains plug.
2.3 Use
WARNING!
Risk of injury, burns, electric
shock or fire.
The appliance contains flammable
gas, isobutane (R600a), a natural gas
with a high level of environmental
compatibility. Be careful not to cause
damage to the refrigerant circuit
containing isobutane.
• Do not change the specification of this
appliance.
• Do not put electrical appliances (e.g.
ice cream makers) in the appliance
unless they are stated applicable by
the manufacturer.
• If damage occurs to the refrigerant
circuit, make sure that there are no
flames and sources of ignition in the
room. Ventilate the room.
• Do not let hot items to touch the
plastic parts of the appliance.
• Do not put soft drinks in the freezer
compartment. This will create
pressure on the drink container.
• Do not store flammable gas and liquid
in the appliance.
• Do not put flammable products or
items that are wet with flammable
products in, near or on the appliance.
• Do not touch the compressor or the
condenser. They are hot.
• Do not remove or touch items from
the freezer compartment if your hands
are wet or damp.
• Do not freeze again food that has
been thawed.
• Follow the storage instructions on the
packaging of frozen food.
• Wrap the food in any food contact
material before putting it in the freezer
compartment.
2.4 Internal lighting
WARNING!
Risk of electric shock.
• Concerning the lamp(s) inside this
product and spare part lamps sold
separately: These lamps are intended
to withstand extreme physical
conditions in household appliances,
such as temperature, vibration,
humidity, or are intended to signal
information about the operational
status of the appliance. They are not
intended to be used in other
applications and are not suitable for
household room illumination.
Page 6
www.electrolux.com6
2.5 Care and cleaning
WARNING!
Risk of injury or damage to
the appliance.
• Before maintenance, deactivate the
appliance and disconnect the mains
plug from the mains socket.
• This appliance contains hydrocarbons
in the cooling unit. Only a qualified
person must do the maintenance and
the recharging of the unit.
• Regularly examine the drain of the
appliance and if necessary, clean it. If
the drain is blocked, defrosted water
collects in the bottom of the
appliance.
2.6 Service
• To repair the appliance contact the
Authorised Service Centre. Use
original spare parts only.
• Please note that self-repair or nonprofessional repair can have safety
consequences and might void the
guarantee.
• The following spare parts will be
available for 7 years after the model
has been discontinued: thermostats,
temperature sensors, printed circuit
boards, light sources, door handles,
door hinges, trays and baskets.
Please note that some of these spare
parts are only available to
professional repairers, and that not all
spare parts are relevant for all
models.
• Door gaskets will be available for 10
years after the model has been
discontinued.
2.7 Disposal
WARNING!
Risk of injury or suffocation.
• Disconnect the appliance from the
mains supply.
• Cut off the mains cable and discard it.
• Remove the door to prevent children
and pets to be closed inside of the
appliance.
• The refrigerant circuit and the
insulation materials of this appliance
are ozone-friendly.
• The insulation foam contains
flammable gas. Contact your
municipal authority for information on
how to discard the appliance
correctly.
• Do not cause damage to the part of
the cooling unit that is near the heat
exchanger.
3. INSTALLATION
WARNING!
Refer to Safety chapters.
Page 7
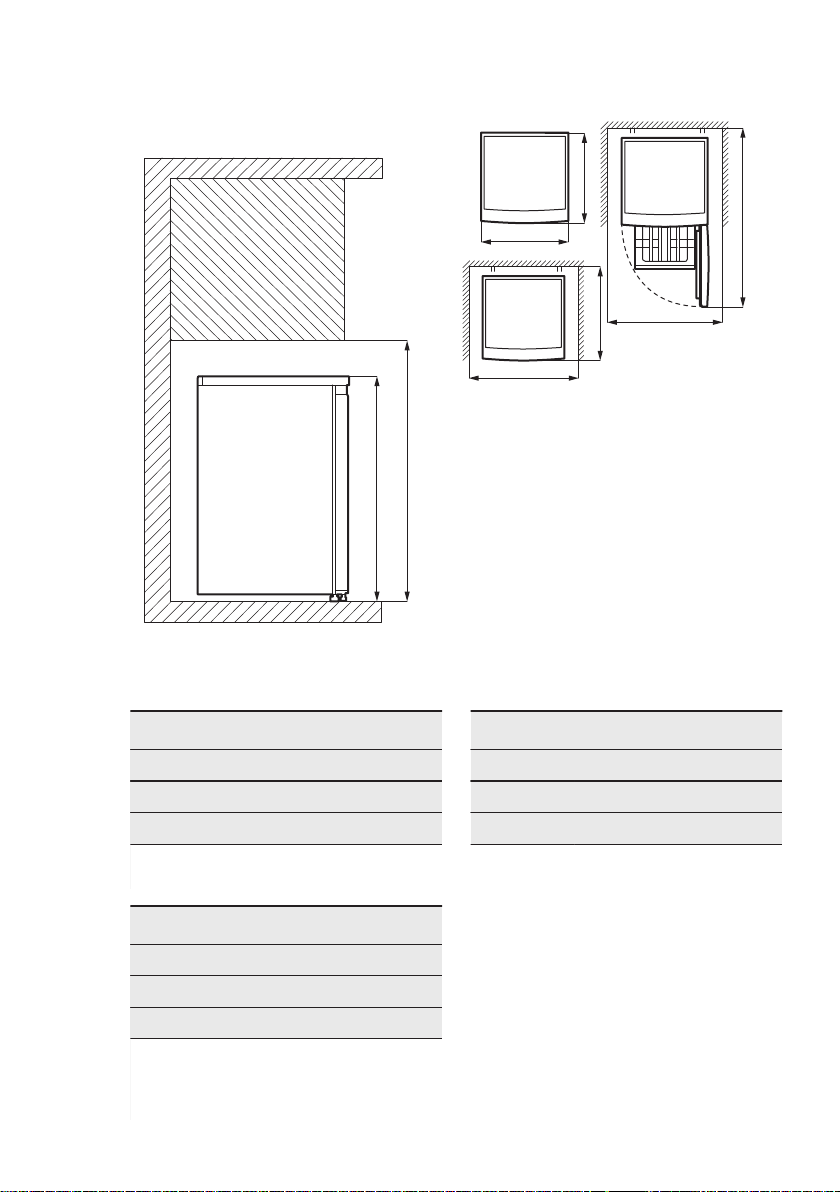
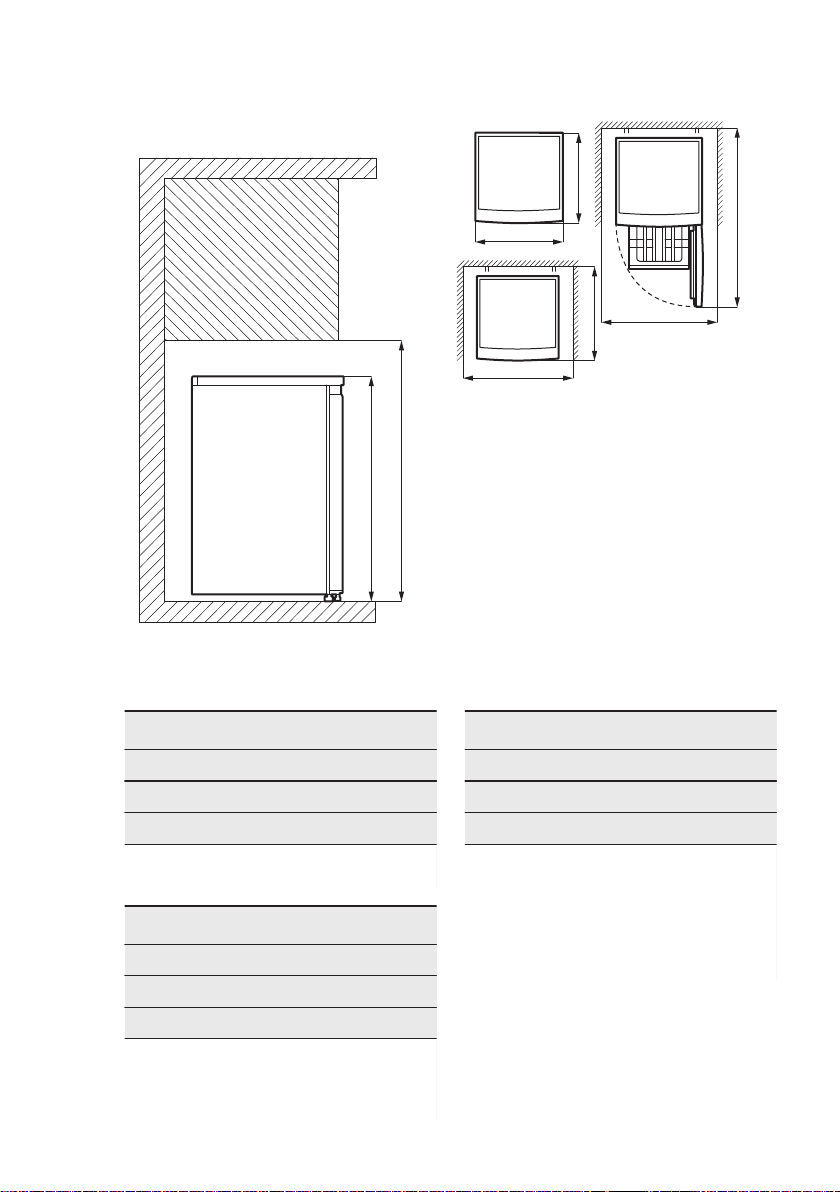
3.1 Dimensions
H1
H2
W1
D1
W2
D2
W3
D3
ENGLISH 7
Overall dimensions
1)
H1 mm 845
W1 mm 560
D1 mm 575
1)
the height, width and depth of the appli‐
ance without the handle and feet
Space required in use
H2 mm 945
1)
W2 mm 760
D2 mm 650
1)
the height, width and depth of the appli‐
ance including the handle, plus the space
necessary for free circulation of the cooling
air
Overall space required in use
1)
H2 mm 945
W3 mm 760
D3 mm 1165
1)
the height, width and depth of the appli‐
ance including the handle, plus the space
necessary for free circulation of the cooling
air, plus the space necessary to allow door
opening to the minimum angle permitting
removal of all internal equipment
3.2 Location
To ensure appliance's best functionality,
you should not install the appliance in the
nearby of the heat source (oven, stoves,
radiators, cookers or hobs) or in a place
with direct sunlight. Make sure that air
Page 8
www.electrolux.com8
can circulate freely around the back of
the cabinet.
To ensure best performance, if the
appliance is positioned below an
overhanging wall unit, the minimum
distance between the top of the cabinet
shall be maintained. Ideally, however,
the appliance should not be positioned
below overhanging wall units. One or
more adjustable feet at the base of the
cabinet ensure that the appliance stands
level.
It must be possible to
disconnect the appliance
from the mains power
supply. The plug must
therefore be easily
accessible after installation.
3.3 Positioning
This appliance is not intended to be used
as a built-in appliance.
This appliance should be installed in a
dry, well ventilated indoor position.
The correct operation of the appliance
can only be guaranteed within the
specified temperature range. This
appliance is intended to be used at
ambient temperature ranging from 10°C
to 43°C.
If, due to different installation, proper
ventilation requirements are not
respected, the appliance will function
correctly but energy consumption might
increase slightly.
If you have any doubts
regarding where to install the
appliance, please turn to the
vendor, to our customer
service or to the nearest
Authorised Service Centre.
If you position the appliance
against the wall, use back
spacers provided or keep
the minimum distance
indicated in the
"Dimensions" section.
CAUTION!
If you install the appliance
next to a wall, refer to the
"Dimensions" section to
understand the minimum
distance between the wall
and the side of the appliance
where door hinges are to
provide enough space to
open the door when the
internal equipment is
removed (e.g. when
cleaning).
3.4 Electrical connection
• Before plugging in, ensure that the
voltage and frequency shown on the
rating plate correspond to your
domestic power supply.
• The appliance must be earthed. The
power supply cable plug is provided
with a contact for this purpose. If the
domestic power supply socket is not
earthed, connect the appliance to a
separate earth in compliance with
current regulations, consulting a
qualified electrician.
• The manufacturer declines all
responsibility if the above safety
precautions are not observed.
• This appliance complies with the
E.E.C. Directives.
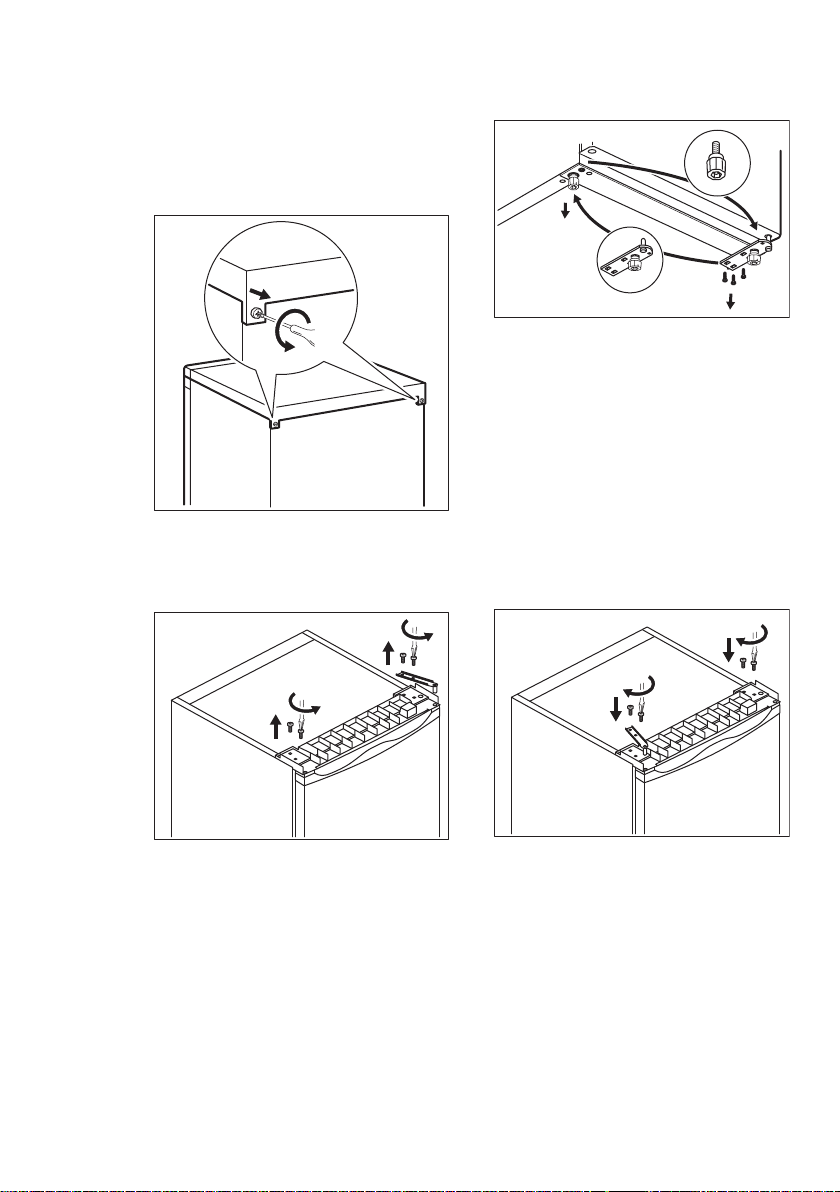
3.5 Door reversibility
WARNING!
Before carrying out any
operations, remove the plug
from the power socket.
1. Make sure the appliance stands
upright.
2. Open the door and remove the door
equipment. Refer to "Daily Use"
chapter. Close the door.
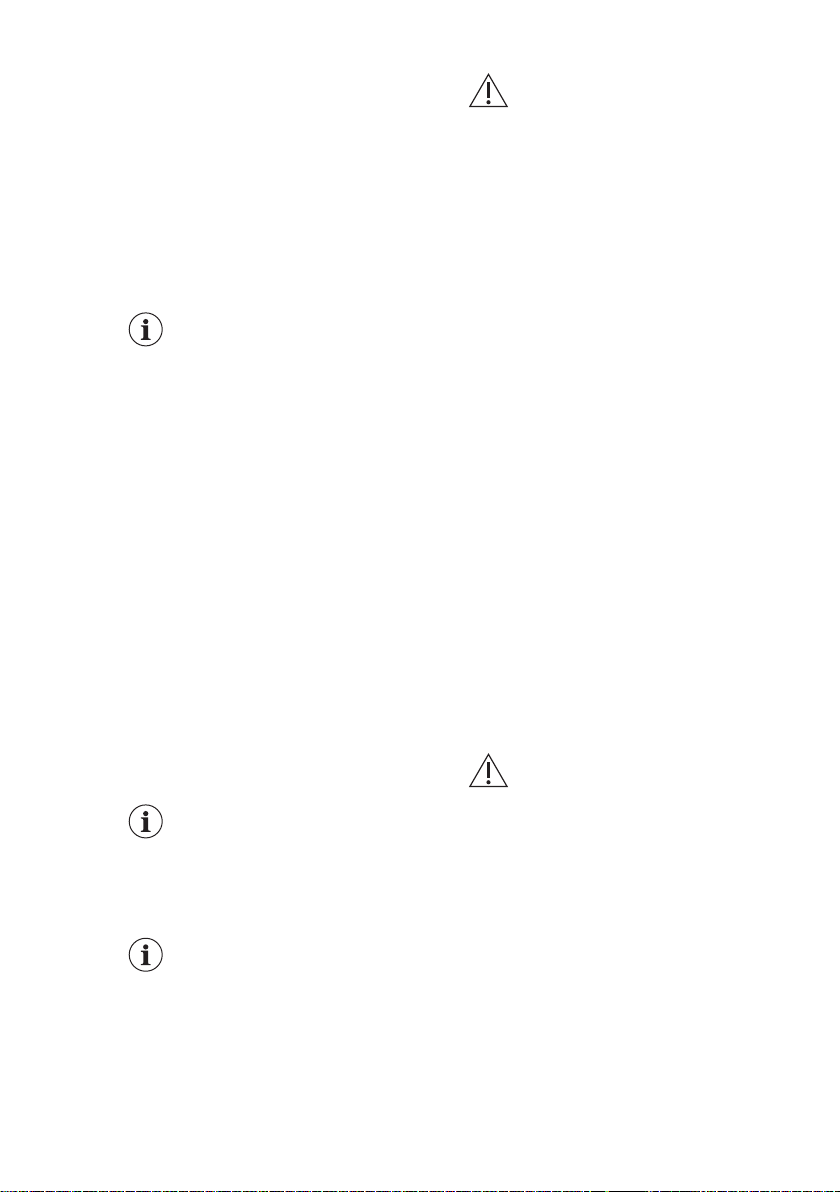
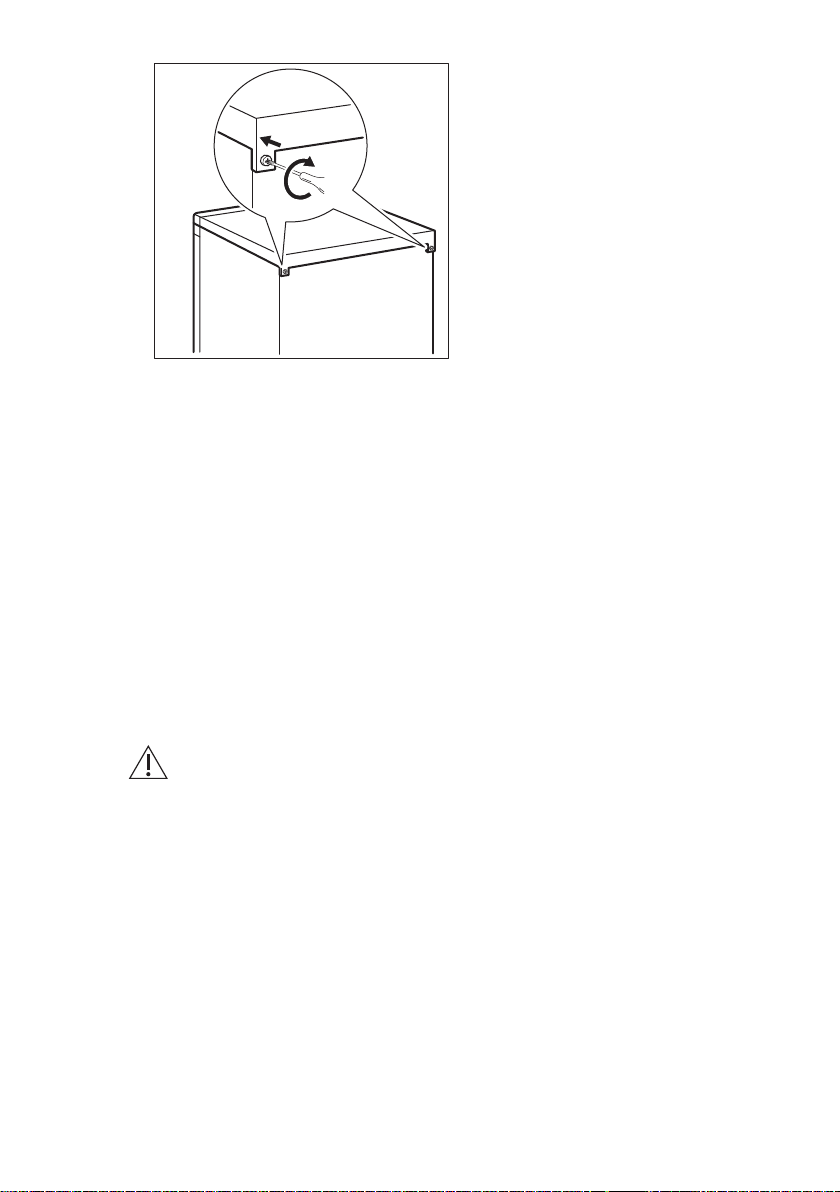
3. Unscrew the screws on the back of
the top cover.
Page 9
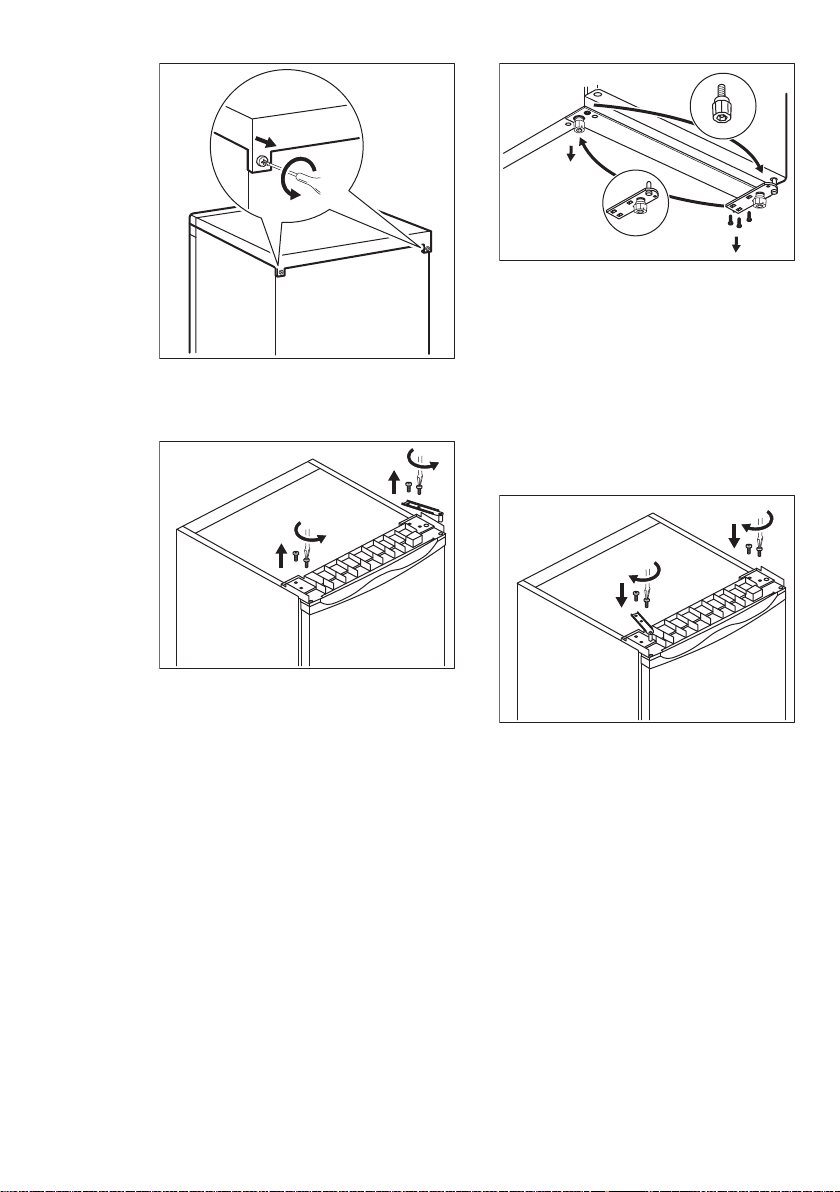
4. Lift the top cover and place it on a
soft surface.
5. Unscrew the 4 screws.
ENGLISH 9
11. Screw the bottom hinge on the other
side of the appliance.
12. Install the rubber support on the side
with no hinge.
13. Fit the door on the lower hinge
making sure the hinge pin enters the
door bottom hole.
14. Install the upper hinge on the
opposite side of the appliance. Fit the
upper hinge pin into the door upper
hole. Tighten the screws.
6. Lift the upper hinge and put it in a
safe place together with the screws.
7. Lift the door and put it on a soft
surface.
8. Tilt the appliance carefully on a soft
foam packaging or similar material to
avoid any damage to the back of the
appliance and the floor.
9. Unscrew the screws of the bottom
hinge and adjustable feet.
10. Install the pin in the opposite hole of
the hinge.
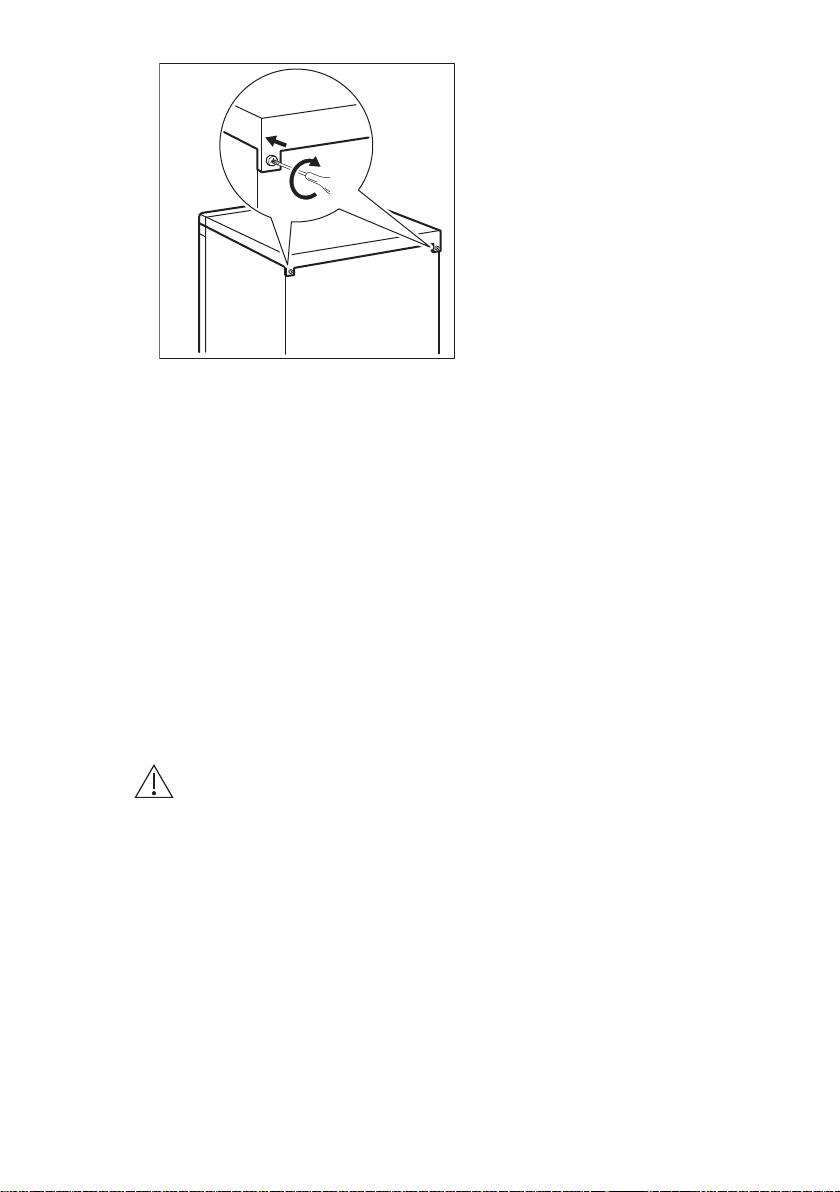
15. Screw the remaining 2 screws on the
top side of the appliance with no
hinge.
16. Place the top cover on the appliance
and tighten the screws on the back.
Page 10
www.electrolux.com10
4. OPERATION
Install the door equipment.
Wait at least 4 hours before connecting
the appliance to the power supply.
4.1 Switching on
Insert the plug into the wall socket.
4.2 Switching off
To turn off the appliance, remove the
plug from the power socket.
4.3 Temperature regulation
The temperature is regulated
automatically. However, you can set a
5. DAILY USE
WARNING!
Refer to Safety chapters.
5.1 Freezing fresh food
The freezer compartment is suitable for
freezing fresh food and storing frozen
and deep-frozen food for a long time.
Store the fresh food evenly distributed in
the first and second compartment or
drawer from the top.
The maximum amount of food that can
be frozen without adding other fresh food
during 24 hours is specified on the rating
plate (a label located inside the
appliance).
temperature inside the appliance
yourself.
Choose the setting keeping in mind that
the temperature inside the appliance
depends on:
• room temperature,
• frequency of opening the door,
• quantity of food stored,
• appliance location.
A medium setting is generally the most
suitable one.
5.2 Storage of frozen food
When activating an appliance for the first
time or after a period out of use, before
putting the products in the compartment
let the appliance run at least 3 hours.
The freezer drawers ensure that it is
quick and easy to find the food package
you want. If large quantities of food are
to be stored, remove all drawers, except
for the bottom drawer which needs to be
in place to provide good air circulation.
Keep the food no closer than 15 mm
from the door.
Page 11
ENGLISH 11
CAUTION!
In the event of accidental
defrosting, for example due
to a power failure, if the
power has been off for
longer than the value shown
on rating plate under "rising
time", the defrosted food
must be consumed quickly
or cooked immediately then
cooled and then re-frozen.
6. HINTS AND TIPS
6.1 Hints for energy saving
• The internal configuration of the
appliance is the one that ensures the
most efficient use of energy.
• Do not open the door frequently or
leave it open longer than necessary.
• The colder the temperature setting,
the higher the energy consumption.
• Ensure a good ventilation. Do not
cover the ventilation grilles or holes.
6.2 Hints for freezing
• Before freezing wrap and seal fresh
food in: aluminium foil, plastic film or
bags, airtight containers with lid.
• For more efficient freezing and
thawing divide food into small
portions.
• It is recommended to put labels and
dates on all your frozen food. This will
help to identify foods and to know
when they should be used before their
deterioration.
• The food should be fresh when being
frozen to preserve good quality.
Especially fruits and vegetables
should be frozen after the harvest to
preserve all of their nutrients.
• Do not freeze bottles or cans with
liquids, in particular drinks containing
carbon dioxide - they may explode
during freezing.
• Do not put hot food in the freezer
compartment. Cool it down at room
temperature before placing it inside
the compartment.
• To avoid increase in temperature of
already frozen food, do not place
fresh unfrozen food directly next to it.
Place food at room temperature in the
5.3 Thawing
Deep-frozen or frozen food, prior to
being used, can be thawed in the
refrigerator or at room temperature,
depending on the time available for this
operation.
Small pieces may even be cooked still
frozen, directly from the freezer: in this
case, cooking will take longer.
part of the freezer compartment
where there is no frozen food.
• Do not eat ice cubes, water ices or ice
lollies immediately after taking them
out of the freezer. Risk of frostbites.
• Do not re-freeze defrosted food. If the
food has defrosted, cook it, cool it
down and then freeze it.
6.3 Hints for storage of frozen
food
• The medium temperature setting
ensures good preservation of frozen
food products.
Higher temperature setting inside the
appliance may lead to shorter shelf
life.
• The whole freezer compartment is
suitable for storage of frozen food
products.
• Leave enough space around the food
to allow air to circulate freely.
• For adequate storage refer to food
packaging label to see the shelf life of
food.
• It is important to wrap the food in such
a way that prevents water, humidity or
condensation from getting inside.
6.4 Shopping tips
After grocery shopping:
• Ensure that the packaging is not
damaged - the food could be
deteriorated. If the package is swollen
or wet, it might have not been stored
in the optimal conditions and
defrosting may have already started.
• To limit the defrosting process buy
frozen goods at the end of your
Page 12
www.electrolux.com12
grocery shopping and transport them
in a thermal and insulated cool bag.
• Place the frozen foods immediately in
the freezer after coming back from the
shop.
• If food has defrosted even partially, do
not re-freeze it. Consume it as soon
as possible.
• Respect the expiry date and the
storage information on the package.
6.5 Shelf life
Type of food Shelf life (months)
Bread 3
Fruits (except citrus) 6 - 12
Vegetables 8 - 10
Leftovers without meat 1 - 2
Dairy food:
Butter
Soft cheese (e.g. mozzarella)
Hard cheese (e.g. parmesan, cheddar)
Seafood:
Fatty fish (e.g. salmon, mackerel)
Lean fish (e.g. cod, flounder)
Shrimps
Shucked clams and mussels
Cooked fish
Meat:
Poultry
Beef
Pork
Lamb
Sausage
Ham
Leftovers with meat
6 - 9
3 - 4
6
2 - 3
4 - 6
12
3 - 4
1 - 2
9 - 12
6 - 12
4 - 6
6 - 9
1 - 2
1 - 2
2 - 3
7. CARE AND CLEANING
WARNING!
Refer to Safety chapters.
7.1 General warnings
CAUTION!
Unplug the appliance before
carrying out any
maintenance operation.
This appliance contains
hydrocarbons in its cooling
unit; maintenance and
recharging must therefore
only be carried out by
authorized technicians.
The accessories and parts of
the appliance are not
suitable for washing in a
dishwasher.
Page 13
ENGLISH 13
7.2 Cleaning the interior
Before using the appliance for the first
time, the interior and all internal
accessories should be washed with
lukewarm water and some neutral soap
to remove the typical smell of a brandnew product, then dried thoroughly.
CAUTION!
Do not use detergents,
abrasive powders, chlorine
or oil-based cleaners as they
will damage the finish.
7.3 Periodic cleaning
The equipment has to be cleaned
regularly:
1. Clean the inside and accessories
with lukewarm water and some
neutral soap.
2. Regularly check the door seals and
wipe them clean to ensure they are
clean and free from debris.
3. Rinse and dry thoroughly.
7.4 Defrosting of the appliance
CAUTION!
Never use sharp metal tools
to scrape off frost from the
evaporator as you could
damage it.
Do not use a mechanical
device or any artificial
means to speed up the
thawing process other than
those recommended by the
manufacturer.
About 12 hours prior to
defrosting set a lower
temperature in order to build
up sufficient chill reserve in
case of any interruption in
operation.
To defrost freezer compartment:
1. Switch off the appliance or pull out
electrical plug from the wall socket.
2. Remove any stored food, wrap it in
several layers of newspaper and put
it in a cool place.
CAUTION!
A temperature rise of the
frozen food packs during
defrosting may shorten
their safe storage life.
Do not touch frozen
goods with wet hands.
Hands can freeze to the
goods.
3. Leave the door open. Protect the
floor from the defrosting water e.g.
with a cloth or a flat vessel.
4. In order to speed up the defrosting
process, place a pot of warm water in
the freezer compartment. In addition,
remove pieces of ice that break away
before defrosting is complete.
5. When defrosting is complete, dry the
interior thoroughly.
6. Switch on the appliance and close
the door.
7. Set the temperature regulator to
obtain the maximum coldness and
run the appliance for three hours
using this setting.
Only after this time put the food back into
the freezer compartment.
7.5 Periods of non-operation
When the appliance is not in use for long
periods, take the following precautions:
1. Disconnect the appliance from
electricity supply.
2. Remove all food.
3. Defrost (if necessary) and clean the
appliance and all accessories.
4. Leave the door/doors open to
prevent unpleasant smells.
Defrost the freezer compartment when
the frost layer reaches a thickness of
about 3-5 mm.
Page 14
www.electrolux.com14
8. TROUBLESHOOTING
WARNING!
Refer to Safety chapters.
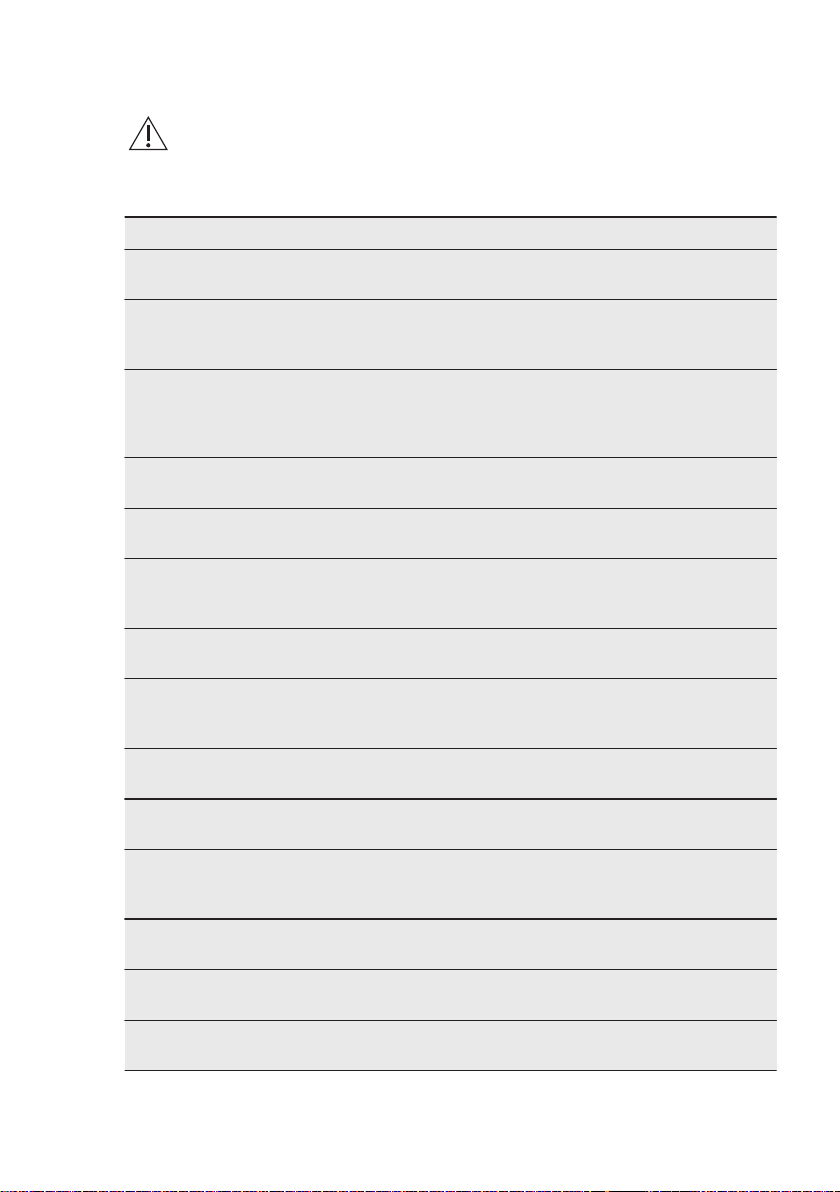
8.1 What to do if...
Problem Possible cause Solution
The appliance does not
operate.
The mains plug is not con‐
There is no voltage in the
The appliance is noisy. The appliance is not sup‐
The compressor operates
continually.
Many food products were
The room temperature is
Food products placed in
The door is not closed cor‐
Door is misaligned or inter‐
feres with ventilation grill.
Door does not open easily. You attempted to re-open
There is too much frost
and ice.
The gasket is deformed or
Food products are not
The appliance is switched
off.
nected to the mains socket
correctly.
mains socket.
ported properly.
Temperature is set incor‐
rectly.
put in at the same time.
too high.
the appliance were too
warm.
rectly.
The appliance is not level‐
led.
the door immediately after
closing.
The door is not closed cor‐
rectly.
dirty.
wrapped properly.
Switch on the appliance.
Connect the mains plug to
the mains socket correctly.
Connect a different electri‐
cal appliance to the mains
socket. Contact a qualified
electrician.
Check if the appliance
stands stable.
Refer to "Operation" chap‐
ter.
Wait a few hours and then
check the temperature
again.
Refer to "Installation" chap‐
ter.
Allow food products to cool
to room temperature be‐
fore storing.
Refer to "Closing the door"
section.
Refer to installation instruc‐
tions.
Wait a few seconds be‐
tween closing and re-open‐
ing of the door.
Refer to "Closing the door"
section.
Refer to "Closing the door"
section.
Wrap the food products
better.
Page 15
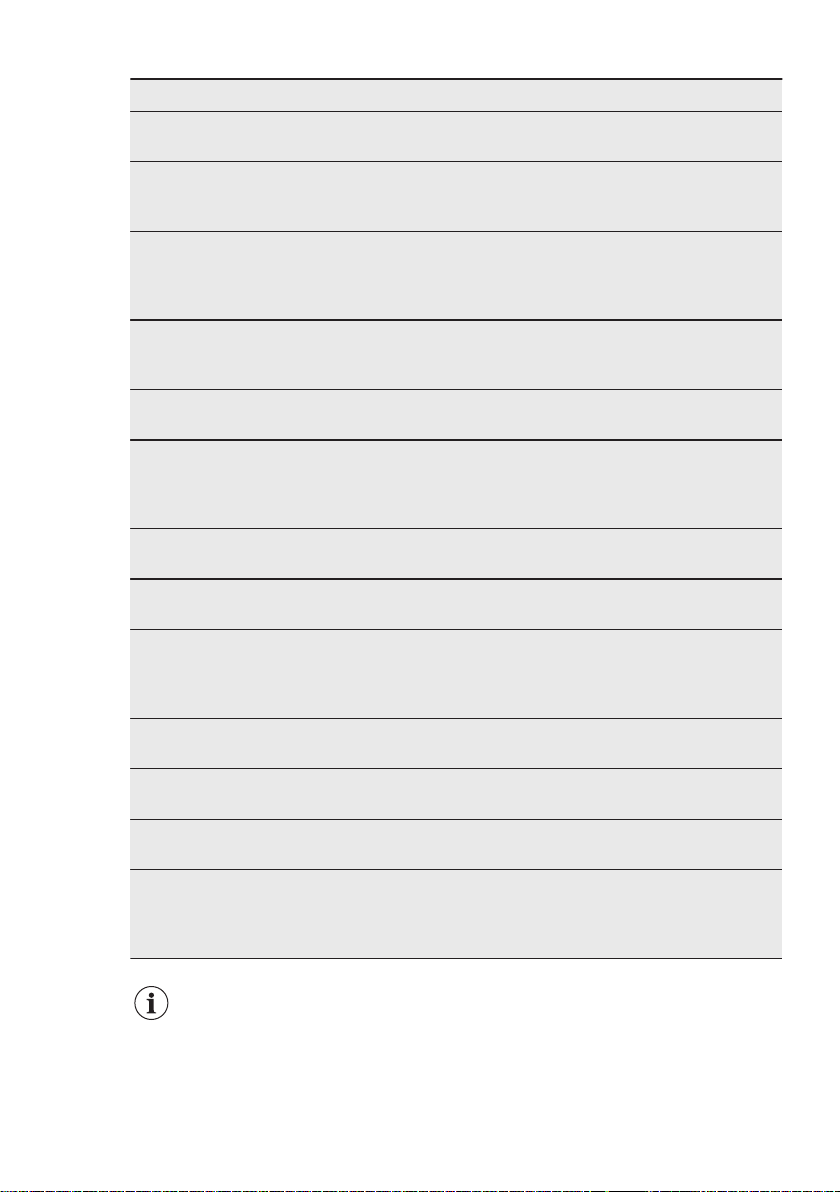
Problem Possible cause Solution
Temperature is set incor‐
Appliance is fully loaded
Temperature set in the ap‐
Water flows inside the re‐
frigerator.
Water flows on the floor. The melting water outlet is
The temperature in the ap‐
pliance is too low/too high.
The door is not closed cor‐
The food products' temper‐
Many food products are
The door has been opened
There is no cold air circula‐
rectly.
and is set to the lowest
temperature.
pliance is too low and the
ambient temperature is too
high.
Food products prevent the
water from flowing into the
water collector.
The water outlet is clog‐
ged.
not connected to the evap‐
orative tray above the com‐
pressor.
The temperature is not set
correctly.
rectly.
ature is too high.
stored at the same time.
The thickness of the frost
is greater than 4-5 mm.
often.
tion in the appliance.
Refer to "Operation" chap‐
ter.
Set a higher temperature.
Refer to "Operation" chap‐
ter.
Set a higher temperature.
Refer to "Operation" chap‐
ter.
Make sure that food prod‐
ucts do not touch the rear
plate.
Clean the water outlet.
Attach the melting water
outlet to the evaporative
tray.
Set a higher/lower temper‐
ature.
Refer to "Closing the door"
section.
Let the food products tem‐
perature decrease to room
temperature before stor‐
age.
Store less food products at
the same time.
Defrost the appliance.
Open the door only if nec‐
essary.
Make sure that there is
cold air circulation in the
appliance. Refer to "Hints
and Tips" chapter.
ENGLISH 15
If the advice does not lead to
the desired result, call the
nearest Authorized Service
Centre.
8.2 Closing the door
1. Clean the door gaskets.
2. If necessary, adjust the door. Refer
to "Installation" chapter.
3. If necessary, replace the defective
door gaskets. Contact the Authorised
Service Centre.
Page 16
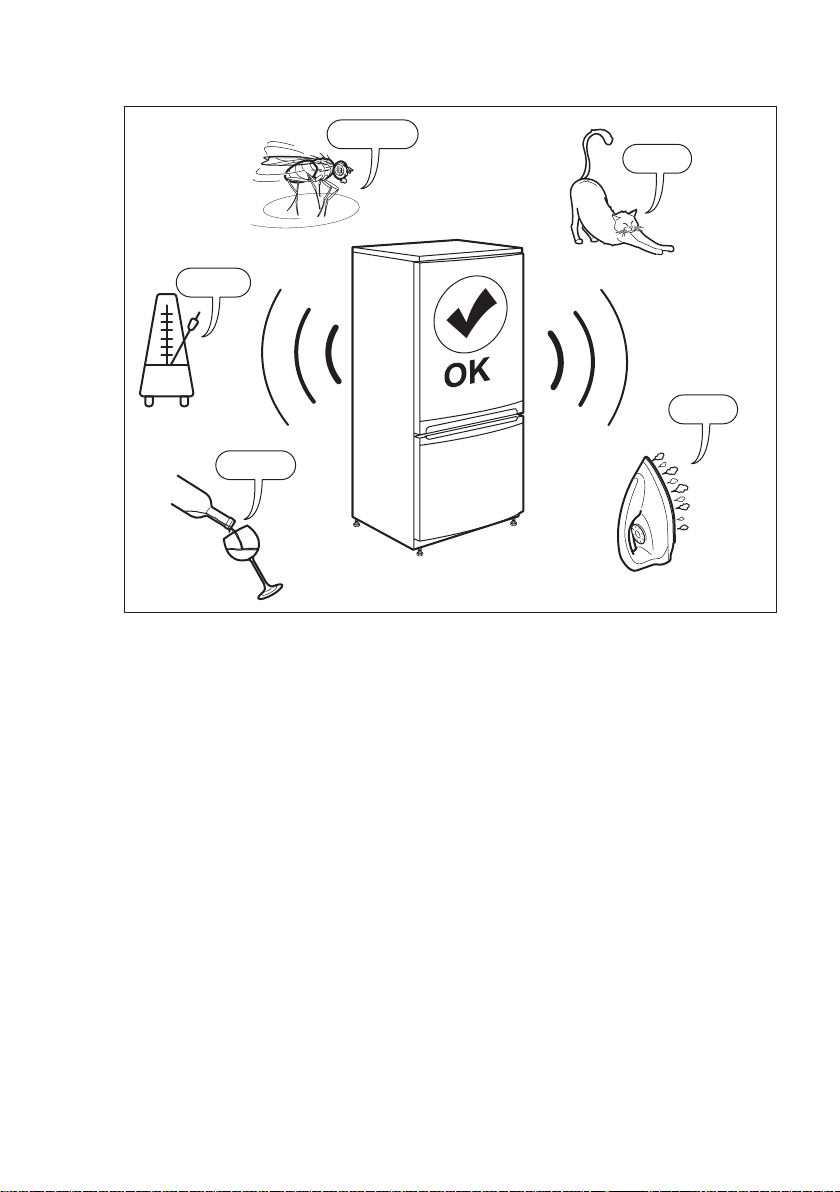
SSSRRR!
CLICK!
HISSS!
BRRR!
BLUBB!
www.electrolux.com16
9. NOISES
10. TECHNICAL DATA
The technical information is situated in
the rating plate on the internal side of the
appliance and on the energy label.
The QR code on the energy label
supplied with the appliance
provides a web link to the information
related to the performance of the
appliance in the EU EPREL database.
Keep the energy label for reference
together with the user manual and all
other documents provided with this
appliance.
It is also possible to find the same
information in EPREL using the link
https://eprel.ec.europa.eu
name and product number that you find
on the rating plate of the appliance.
See the link
detailed information about the energy
label.
www.theenergylabel.eu
11. INFORMATION FOR TEST INSTITUTES
Installation and preparation of the
appliance for any EcoDesign verification
shall be compliant with EN 62552.
Ventilation requirements, recess
dimensions and minimum rear
clearances shall be as stated in this User
Manual at Chapter 3. Please contact the
manufacturer for any other further
information, including loading plans.
and the model
for
Page 17
12. ENVIRONMENTAL CONCERNS
ENGLISH 17
Recycle materials with the symbol .
Put the packaging in relevant containers
to recycle it. Help protect the
environment and human health by
recycling waste of electrical and
electronic appliances. Do not dispose of
appliances marked with the symbol
with the household waste. Return the
product to your local recycling facility or
contact your municipal office.
Page 18
www.electrolux.com18
INHALTSVERZEICHNIS
1. SICHERHEITSHINWEISE................................................................................18
2. SICHERHEITSANWEISUNGEN...................................................................... 21
3. MONTAGE........................................................................................................23
4. BETRIEB.......................................................................................................... 27
5. TÄGLICHER GEBRAUCH................................................................................27
6. TIPPS UND HINWEISE....................................................................................28
7. REINIGUNG UND PFLEGE............................................................................. 30
8. FEHLERSUCHE............................................................................................... 31
9. GERÄUSCHE................................................................................................... 34
10. TECHNISCHE DATEN................................................................................... 34
11. INFORMATIONEN FÜR PRÜFINSTITUTE....................................................34
WIR DENKEN AN SIE
Vielen Dank, dass Sie sich für ein Gerät von Electrolux entschieden haben. Sie
haben ein Produkt gewählt, hinter dem jahrzehntelange professionelle Erfahrung
und Innovation stehen. Bei der Entwicklung dieses großartigen und eleganten
Geräts haben wir an Sie gedacht. So haben Sie bei jedem Gebrauch die
Gewissheit, dass Sie stets großartige Ergebnisse erzielen werden.
Willkommen bei Electrolux.
Besuchen Sie uns auf unserer Website, um:
Anwendungshinweise, Prospekte, Fehlerbehebungs-, Service- und ReparaturInformationen zu erhalten:
www.electrolux.com/support
Ihr erworbenes Produkt zu registrieren, um den besten Service für es zu
gewährleisten:
www.registerelectrolux.com
Zubehör, Verbrauchsmaterial und Original-Ersatzteile für Ihr Gerät zu
erwerben:
www.electrolux.com/shop
REPARATUR- UND KUNDENDIENST
Verwenden Sie ausschließlich Original-Ersatzteile.
Halten Sie folgende Angaben bereit, wenn Sie sich an den Kundendienst
wenden: Modell, Produktnummer (PNC), Seriennummer.
Diese Informationen finden Sie auf dem Typenschild.
Warnungs-/Sicherheitshinweise
Allgemeine Informationen und Empfehlungen
Informationen zum Umweltschutz
Änderungen vorbehalten.
1. SICHERHEITSHINWEISE
Lesen Sie vor der Montage und dem Gebrauch des
Geräts zuerst die Bedienungsanleitung. Bei
Page 19

DEUTSCH 19
Verletzungen oder Schäden infolge nicht
ordnungsgemäßer Montage oder Verwendung
übernimmt der Hersteller keine Haftung. Bewahren Sie
die Anleitung zum Nachschlagen an einem sicheren und
zugänglichen Ort auf.
1.1 Sicherheit von Kindern und schutzbedürftigen Personen
• Das Gerät kann von Kindern ab 8 Jahren und
Personen mit eingeschränkten physischen,
sensorischen oder geistigen Fähigkeiten oder mit
mangelnder Erfahrung und/oder mangelndem Wissen
nur dann verwendet werden, wenn sie durch eine für
ihre Sicherheit zuständige Person beaufsichtigt
werden oder in die sichere Verwendung des Geräts
eingewiesen wurden und die mit dem Gerät
verbundenen Gefahren verstanden haben.
• Kinder zwischen 3 und 8 Jahren dürfen das Gerät be-
und entladen, vorausgesetzt, sie wurden
ordnungsgemäß eingewiesen.
• Dieses Gerät kann von Personen mit schweren und
komplexen Behinderungen benutzt werden,
vorausgesetzt, sie wurden ordnungsgemäß
eingewiesen.
• Halten Sie Kinder unter 3 Jahren vom Gerät fern,
wenn sie nicht ständig beaufsichtigt werden.
• Kinder dürfen nicht mit dem Gerät spielen.
• Kinder dürfen keine Reinigung und Wartung ohne
Beaufsichtigung durchführen.
• Halten Sie sämtliches Verpackungsmaterial von
Kindern fern und entsorgen Sie es ordnungsgemäß.
1.2 Allgemeine Sicherheit
• Dieses Gerät ist für die Verwendung im Haushalt und
ähnliche Zwecke vorgesehen, wie z. B.:
– Bauernhöfe, Personalküchenbereiche in
Geschäften, Büros und anderen Arbeitsumfeldern;
Page 20

www.electrolux.com20
– Für Gäste in Hotels, Motels, Pensionen und
anderen wohnungsähnlichen Räumlichkeiten.
• Um eine Kontaminierung von Lebensmitteln zu
vermeiden, beachten Sie die folgenden Hinweise:
– Öffnen Sie die Tür nicht über längere Zeit hinweg;
– Reinigen Sie regelmäßig Oberflächen, die mit
Lebensmitteln in Kontakt kommen können, und
zugängliche Ablaufsysteme;
• WARNUNG: Achten Sie darauf, dass die
Belüftungsöffnungen im Schrank, um das Gerät und in
der Einbaunische nicht blockiert sind.
• WARNUNG: Versuchen Sie nicht, den Abtauvorgang
durch andere als vom Hersteller empfohlene
mechanische oder sonstige Hilfsmittel zu
beschleunigen.
• WARNUNG: Beschädigen Sie nicht den
Kältekreislauf.
• WARNUNG: Betreiben Sie in den Lebensmittelfächern
des Geräts keine anderen als die vom Hersteller
empfohlenen Elektrogeräte.
• Reinigen Sie das Gerät nicht mit Wasserspray oder
Dampf.
• Reinigen Sie das Geräts mit einem weichen, feuchten
Tuch. Nur neutrale Reinigungsmittel verwenden.
Benutzen Sie keine Scheuermittel, scheuernde
Reinigungsschwämmchen, Lösungsmittel oder
Metallgegenstände.
• Wenn das Gerät längere Zeit leer steht, schalten Sie
es aus, tauen Sie es ab, reinigen und trocknen Sie es
und lassen Sie die Tür offen, um Schimmelbildung im
Gerät zu vermeiden.
• Bewahren Sie in dem Gerät keine explosiven
Substanzen, wie Spraydosen mit entzündlichen
Treibgasen auf.
• Wenn das Netzkabel beschädigt ist, muss es vom
Hersteller, seinem autorisierten Kundenservice oder
einer gleichermaßen qualifizierten Person
Page 21
ausgetauscht werden, um Gefahrenquellen zu
vermeiden.
2. SICHERHEITSANWEISUNGEN
DEUTSCH 21
2.1 Montage
WARNUNG!
Die Montage des Geräts darf
nur von einer qualifizierten
Fachkraft durchgeführt
werden.
• Entfernen Sie das gesamte
Verpackungsmaterial.
• Montieren Sie ein beschädigtes Gerät
nicht und benutzen Sie es nicht.
• Halten Sie sich an die mitgelieferte
Montageanleitung.
• Seien Sie beim Umsetzen des
Gerätes vorsichtig, da es sehr schwer
ist. Tragen Sie stets
Sicherheitshandschuhe und festes
Schuhwerk.
• Stellen Sie sicher, dass die Luft um
das Gerät zirkulieren kann.
• Warten Sie nach der Montage oder
dem Wechsel des Türanschlags
mindestens 4 Stunden, bevor Sie das
Gerät an die Stromversorgung
anschließen. Dies ist erforderlich,
damit das Öl in den Kompressor
zurückfließen kann.
• Ziehen Sie den Stecker aus der
Steckdose, bevor Sie am Gerät
arbeiten (z.B. Wechsel des
Türanschlags).
• Stellen Sie das Gerät nicht in der
Nähe von Heizkörpern, Herden,
Backöfen oder Kochfeldern auf.
• Setzen Sie das Gerät nicht dem
Regen aus.
• Stellen Sie das Gerät nicht dort auf,
wo es direktem Sonnenlicht
ausgesetzt sein könnte.
• Stellen Sie dieses Gerät nicht in
Bereichen auf, die zu feucht oder kalt
sind.
• Wenn Sie das Gerät verschieben
möchten, heben Sie es bitte an der
Vorderkante an, um den Fußboden
nicht zu verkratzen.
2.2 Elektrischer Anschluss
WARNUNG!
Brand- und
Stromschlaggefahr.
WARNUNG!
Achten Sie bei der Montage
des Geräts darauf, dass das
Netzkabel nicht eingeklemmt
oder beschädigt wird.
WARNUNG!
Verwenden Sie keine
Mehrfachsteckdosen oder
Verlängerungskabel.
• Das Gerät muss geerdet sein.
• Stellen Sie sicher, dass die Daten auf
dem Typenschild mit den elektrischen
Nennwerten der Netzspannung
übereinstimmen.
• Schließen Sie das Gerät nur an eine
ordnungsgemäß installierte
Schutzkontaktsteckdose an.
• Achten Sie darauf, elektrische
Bauteile (wie Netzstecker, Netzkabel
und Kompressor) nicht zu
beschädigen. Wenden Sie sich an
den autorisierten Kundendienst oder
einen Elektriker, um die elektrischen
Bauteile auszutauschen.
• Das Netzkabel muss unterhalb des
Netzsteckers verlegt werden.
• Stecken Sie den Netzstecker erst
nach Abschluss der Montage in die
Steckdose. Stellen Sie sicher, dass
der Netzstecker nach der Montage
noch zugänglich ist.
• Ziehen Sie nicht am Netzkabel, wenn
Sie das Gerät von der
Stromversorgung trennen möchten.
Ziehen Sie stets am Netzstecker.
Page 22
www.electrolux.com22
2.3 Gebrauch
WARNUNG!
Es besteht Verletzungs-,
Verbrennungs-,
Stromschlag- oder
Brandgefahr.
Das Gerät enthält Isobutan
(R600a), ein brennbares Erdgas mit
einem hohen Grad an
Umweltverträglichkeit. Achten Sie darauf,
den Kältekreislauf, der Isobutan enthält,
nicht zu beschädigen.
• Nehmen Sie keine technischen
Änderungen am Gerät vor.
• Stellen Sie keine elektrischen Geräte
(z. B. Eisbereiter) in das Gerät, wenn
solche Geräte nicht ausdrücklich vom
Hersteller für diesen Zweck
zugelassen sind.
• Wird der Kältekreislauf beschädigt,
stellen Sie bitte sicher, dass es keine
Flammen und Zündquellen im Raum
gibt. Belüften Sie den Raum.
• Stellen Sie keine heißen
Gegenstände auf die Kunststoffteile
des Geräts.
• Legen Sie Erfrischungsgetränke nicht
in das Gefrierfach. Dadurch entsteht
Druck auf den Getränkebehälter.
• Bewahren Sie keine entzündbaren
Gase und Flüssigkeiten im Gerät auf.
• Laden Sie keine entflammbaren
Produkte oder Gegenstände, die mit
entflammbaren Produkten benetzt
sind, in das Gerät und stellen Sie
solche nicht in die Nähe oder auf das
Gerät.
• Berühren Sie nicht den Kompressor
oder den Kondensator. Sie sind heiß.
• Nehmen Sie keine Gegenstände aus
dem Gefrierfach bzw. berühren Sie
diese nicht, falls Ihre Hände nass
oder feucht sind.
• Frieren Sie aufgetaute Lebensmittel
nicht wieder ein.
• Befolgen Sie die Hinweise auf der
Verpackung zur Aufbewahrung
tiefgekühlter Lebensmittel.
• Wickeln Sie die Lebensmittel in
Lebensmittelkontaktmaterial ein,
bevor Sie sie in das Gefrierfach legen.
2.4 Innenbeleuchtung
WARNUNG!
Stromschlaggefahr.
• Bezüglich der Lampe(n) in diesem
Gerät und separat verkaufter
Ersatzlampen: Diese Lampen müssen
extremen physikalischen
Bedingungen in Haushaltsgeräten
standhalten, wie z.B. Temperatur,
Vibration, Feuchtigkeit, oder sollen
Informationen über den
Betriebszustand des Gerätes
anzeigen. Sie sind nicht für den
Einsatz in anderen Geräten
vorgesehen und nicht für die
Raumbeleuchtung geeignet.
2.5 Reinigung und Pflege
WARNUNG!
Verletzungsgefahr sowie
Risiko von Schäden am
Gerät.
• Schalten Sie das Gerät immer aus
und ziehen Sie den Netzstecker aus
der Steckdose, bevor
Reinigungsarbeiten durchgeführt
werden.
• Der Kältekreis des Gerätes enthält
Kohlenwasserstoffe. Das Gerät muss
von einer qualifizierten Fachkraft
gewartet und nachgefüllt werden.
• Prüfen Sie regelmäßig den
Wasserabfluss des Geräts und
reinigen Sie ihn gegebenenfalls. Bei
verstopftem Wasserabfluss sammelt
sich das Abtauwasser am Boden des
Geräts an.
2.6 Wartung
• Zur Reparatur des Geräts wenden Sie
sich an den autorisierten
Kundendienst. Dabei dürfen
ausschließlich Originalersatzteile
verwendet werden.
• Bitte beachten Sie, dass eigene
Reparaturen oder Reparaturen, die
nicht von Fachkräften durchgeführt
werden, die Sicherheit des Geräts
beeinträchtigen und die Garantie
ungültig machen können.
• Folgende Ersatzteile sind innerhalb
von 7 Jahren nach Produkteinstellung
Page 23
DEUTSCH 23
des Modells erhältlich: Thermostate,
Temperatursensoren, Leiterplatten,
Lichtquellen, Türgriffe, Türscharniere,
Ablagen und Körbe. Bitte beachten
Sie, dass einige dieser Ersatzteile nur
an Reparaturbetriebe geliefert werden
können und nicht alle Ersatzteile für
alle Modelle relevant sind.
• Türdichtungen sind innerhalb von 10
Jahren nach Produkteinstellung des
Modells erhältlich.
2.7 Entsorgung
WARNUNG!
Verletzungs- und
Erstickungsgefahr.
• Trennen Sie das Gerät von der
Stromversorgung.
3. MONTAGE
WARNUNG!
Siehe Kapitel
Sicherheitshinweise.
• Schneiden Sie das Netzkabel ab, und
entsorgen Sie es.
• Entfernen Sie die Tür, um zu
verhindern, dass sich Kinder oder
Haustiere in dem Gerät einschließen.
• Der Kältekreislauf und die
Isolierungsmaterialien dieses Gerätes
sind ozonfreundlich.
• Die Isolierung enthält entzündliches
Gas. Für Informationen zur korrekten
Entsorgung des Gerätes wenden Sie
sich an Ihre kommunale Behörde.
• Achten Sie darauf, dass die
Kühleinheit in der Nähe des
Wärmetauschers nicht beschädigt
wird.
Page 24
H1
H2
W1
D1
W2
D2
W3
D3
www.electrolux.com24
3.1 Abmessungen
Gesamtabmessungen
1)
H1 mm 845
W1 mm 560
D1 mm 575
1)
Höhe, Breite und Tiefe des Geräts ohne
Griff und Füße
Platzbedarf im Betrieb
H2 mm 945
1)
W2 mm 760
D2 mm 650
1)
Höhe, Breite und Tiefe des Geräts ein‐
schließlich Griff und zuzüglich des notwen‐
digen Freiraums für die Zirkulation der
Kühlluft
Platzbedarf insgesamt im Betrieb
1)
H2 mm 945
W3 mm 760
D3 mm 1165
1)
Höhe, Breite und Tiefe des Geräts ein‐
schließlich Griff plus des notwendigen Frei‐
raums für die Zirkulation der Kühlluft, zu‐
züglich des Platzes, der notwendig ist, um
eine Türöffnung bis zu dem minimalen Win‐
kel zu ermöglichen, der die Entfernung der
Innenausstattung erlaubt
3.2 Standort
Um die beste Funktionalität des Gerätes
zu gewährleisten, sollten Sie das Gerät
nicht in der Nähe von Wärmequellen
(Backöfen, Heizöfen, Heizkörpern,
Herden oder Kochfeldern) oder an einem
Page 25
DEUTSCH 25
Ort mit direkter Sonneneinstrahlung
installieren. Stellen Sie sicher, dass die
Luft frei um die Geräterückseite
zirkulieren kann.
Um einen einwandfreien Betrieb
sicherzustellen, muss der
Mindestabstand zur Oberseite des
Gehäuses eingehalten werden, wenn
das Gerät unter einem Hängeschrank
aufgestellt wird. Allerdings sollte die
Aufstellung des Geräts unter einem
Hängeschrank nach Möglichkeit
vermieden werden. Das Gerät muss
mithilfe eines Fußes oder mehrerer
verstellbarer Füße am Sockel des
Gehäuses ausgerichtet werden.
Es muss möglich sein, das
Gerät vom Netz zu trennen.
Daher muss der Stecker
nach der Installation
zugänglich bleiben.
3.3 Aufstellung
Dieses Gerät ist nicht für die
Verwendung als Einbaugerät
vorgesehen.
Dieses Gerät sollte in einem trockenen,
gut belüfteten Innenbereich aufgestellt
werden.
Der ordnungsgemäße Betrieb des
Geräts wird nur innerhalb des
angegebenen Temperaturbereichs
gewährleistet. Dieses Gerät ist für den
Einsatz bei einer Umgebungstemperatur
von 10°C bis 43°C vorgesehen.
Wenn aufgrund einer anderen
Installation die Anforderungen an die
richtige Belüftung nicht eingehalten
werden, funktioniert das Gerät zwar
korrekt, der Energieverbrauch kann sich
jedoch leicht erhöhen.
Bei Fragen zum
Aufstellungsort des Geräts
wenden Sie sich an den
Verkäufer, unseren
Kundendienst oder
nächstgelegenen
autorisierten Kundendienst.
Wenn Sie das Gerät gegen
eine Wand stellen,
verwenden Sie die
mitgelieferten Distanzstücke
für die Rückseite, um den
Mindestabstand, der im
Abschnitt
„Abmessungen“ angegeben
ist, einzuhalten.
VORSICHT!
Wenn Sie das Gerät neben
einer Wand aufstellen, halten
Sie den im Abschnitt
„Abmessungen“ angegebenen
Mindestabstand zwischen der
Wand und Geräteseite mit
den Türscharnieren ein, damit
sich die Tür weit genug öffnen
lässt, um die
Innenausstattung
herauszunehmen (z.B. für die
Reinigung).
3.4 Elektroanschluss
• Kontrollieren Sie vor dem Einschalten
des Geräts, ob die Netzspannung und
-frequenz Ihres Hausanschlusses mit
den auf dem Typenschild
angegebenen Anschlusswerten
übereinstimmen.
• Das Gerät muss geerdet sein. Zu
diesem Zweck ist der Netzstecker mit
einem Schutzkontakt ausgestattet.
Falls die Steckdose Ihres
Hausanschlusses nicht geerdet sein
sollte, lassen Sie das Gerät gemäß
den geltenden Vorschriften von einem
qualifizierten Elektriker erden.
• Der Hersteller übernimmt keinerlei
Haftung bei Missachtung der
vorstehenden Sicherheitshinweise.
• Das Gerät entspricht den ECRichtlinien.
3.5 Wechseln des
Türanschlags
WARNUNG!
Vor der Durchführung von
Arbeiten am Gerät ist stets
der Netzstecker aus der
Steckdose zu ziehen.
Page 26
www.electrolux.com26
1. Vergewissern Sie sich, dass das
Gerät aufrecht steht.
2. Öffnen Sie die Tür und entfernen Sie
die Türausstattung. Siehe Kapitel
„Täglicher Gebrauch“. Schließen Sie
die Tür.
3. Lösen Sie die hinteren Schrauben
der oberen Abdeckung.
4. Heben Sie die obere Abdeckung ab
legen Sie sie auf eine weiche
Oberfläche.
5. Lösen Sie die 4 Schrauben.
10. Setzen Sie den Stift in das
gegenüberliegende Loch des
Scharniers.
11. Schrauben Sie das untere Scharnier
an der anderen Seite des Geräts an.
12. Montieren Sie die Gummiunterlage
an der Seite ohne Scharnier.
13. Setzen Sie die Tür auf das untere
Scharnier und achten Sie darauf,
dass der Scharnierstift in das untere
Loch der Tür ragt.
14. Montieren Sie das obere Scharnier
an der gegenüberliegenden Seite
des Geräts. Setzen Sie den Stift des
oberen Scharniers in das obere Loch
der Tür ein. Ziehen Sie die
Schrauben fest.
6. Heben Sie das obere Scharnier ab
und bewahren Sie es zusammen mit
den Schrauben an einem sicheren
Ort auf.
7. Heben Sie die Tür ab und legen Sie
sie auf eine weiche Oberfläche.
8. Kippen Sie das Gerät vorsichtig auf
ein weiches Schaumstoffteil oder
ähnliches Material, um Schäden an
der Rückseite des Geräts und am
Boden zu vermeiden.
9. Lösen Sie die Schrauben des
unteren Türscharniers und die
Schraubfüße.
15. Schrauben Sie die restlichen 2
Schrauben an der Oberseite des
Gerät auf der Seite ohne Scharniere
fest.
16. Legen Sie die obere Abdeckung auf
das Gerät und ziehen Sie die
hinteren Schrauben fest.
Page 27
4. BETRIEB
DEUTSCH 27
Bringen Sie die Türausstattung an.
Warten Sie mindestens 4 Stunden, bevor
Sie das Gerät an das Stromnetz
anschließen.
4.1 Einschalten des Geräts
Stecken Sie den Stecker in die
Netzsteckdose.
4.2 Ausschalten des Geräts
Schalten Sie das Gerät durch Ziehen des
Netzsteckers aus der Steckdose aus.
4.3 Temperaturregelung
Die Temperatur wird automatisch
geregelt. Sie können jedoch selbst die
5. TÄGLICHER GEBRAUCH
WARNUNG!
Siehe Kapitel
Sicherheitshinweise.
5.1 Einfrieren frischer Lebensmittel
Das Gefrierfach eignet sich zum
Einfrieren von frischen Lebensmitteln
und zum Lagern von gefrorenen und
tiefgefrorenen Lebensmitteln über einen
längeren Zeitraum.
Lagern Sie frische Lebensmittel
gleichmäßig verteilt im ersten und
zweiten Fach oder der ersten und
zweiten Schublade von oben.
Die maximale Menge an Lebensmitteln,
die ohne Hinzufügen von anderen
Temperatur im Inneren des Gerätes
einstellen.
Berücksichtigen Sie für eine exakte
Einstellung, dass die Temperatur im
Inneren des Geräts von folgenden
Faktoren abhängt:
• Raumtemperatur,
• Häufigkeit der Türöffnung,
• Menge der gelagerten Lebensmittel,
• Aufstellungsort des Geräts.
Eine mittlere Einstellung ist im
Allgemeinen am besten geeignet.
frischen Lebensmitteln innerhalb von 24
Stunden eingefroren werden kann, ist auf
dem Typenschild (einem Schild im Gerät)
angegeben.
5.2 Lagern von gefrorenen
Lebensmitteln
Lassen Sie das Gerät vor der ersten
Inbetriebnahme oder nach einer Zeit, in
der das Gerät nicht benutzt wurde,
mindestens 3 Stunden lang laufen, bevor
Sie Lebensmittel in das Fach legen.
Die Gefrierschubladen sorgen dafür,
dass Sie die Lebensmittel schnell und
einfach finden. Wenn große Mengen an
Lebensmitteln gelagert werden sollen,
entfernen Sie die Schubladen,
ausgenommen die untere Schublade, die
Page 28
www.electrolux.com28
an ihrem Platz bleiben muss, um eine
gute Luftzirkulation zu garantieren.
Lagern Sie die Lebensmittel mit einem
Mindestabstand zur Tür von 15 mm.
VORSICHT!
Kam es zum Beispiel durch
einen Stromausfall, der
länger dauerte als der auf
dem Typenschild
angegebene Wert (siehe
„Lagerzeit bei Störung“) zu
einem ungewollten Abtauen,
dann müssen die
aufgetauten Lebensmittel
sehr rasch verbraucht oder
sofort gekocht und nach
dem Abkühlen erneut
eingefroren werden.
6. TIPPS UND HINWEISE
6.1 Tipps zum Energiesparen
• Die Konfiguration des
Geräteinnenraums gewährleistet die
effizienteste Energienutzung.
• Öffnen Sie die Tür nicht zu häufig,
und lassen Sie diese nicht länger
offen als notwendig.
• Je kälter die Temperatureinstellung,
desto höher der Energieverbrauch.
• Sorgen Sie für eine gute Belüftung.
Bedecken Sie die Lüftungsgitter oder
-öffnungen nicht.
6.2 Hinweise zum Einfrieren
• Vor dem Einfrieren verpacken und
verschließen Sie frische Lebensmittel
in: Aluminiumfolie, Kunststofffolie oder
-beutel, luftdichte Behälter mit Deckel.
• Teilen Sie die Lebensmittel in kleine
Portionen, um das Einfrieren und
Auftauen zu erleichtern.
• Es wird empfohlen, Ihre tiefgekühlten
Lebensmittel mit Etiketten und dem
Datum zu versehen. So können Sie
die Lebensmittel identifizieren und
erkennen wann sie verzehrt werden
sollten, bevor sie verderben.
• Die Lebensmittel sollten beim
Einfrieren frisch sein, um eine gute
Qualität zu bewahren. Besonders
Obst und Gemüse sollte nach der
5.3 Auftauen
Tiefgefrorene oder gefrorene
Lebensmittel können vor der
Verwendung je nach der zur Verfügung
stehenden Zeit im Kühlschrank oder bei
Raumtemperatur aufgetaut werden.
Kleinere Gefriergutteile können sogar
direkt aus dem Gefriergerät entnommen
und anschließend sofort gekocht werden.
In diesem Fall dauert der Garvorgang
allerdings etwas länger.
Ernte eingefroren werden, um alle
Nährstoffe zu erhalten.
• Frieren Sie keine Flaschen oder
Dosen mit Flüssigkeiten,
insbesondere kohlensäurehaltige
Getränke, ein - die Gefäße können
beim Einfrieren explodieren.
• Geben Sie keine heißen Lebensmittel
in den Gefrierraum. Vergewissern Sie
sich, dass sie auf Raumtemperatur
abgekühlt sind, bevor Sie sie in das
Fach legen.
• Um eine Erwärmung bereits
eingefrorener Lebensmittel zu
verhindern, legen Sie die frischen,
nicht gefrorenen Lebensmittel nicht
direkt neben sie. Legen Sie die
Lebensmittel mit Raumtemperatur in
die Gefrierfächer, die keine
gefrorenen Lebensmittel enthalten.
• Essen Sie keine Eiswürfel, Wassereis
oder Eis am Stiel, wenn sie direkt aus
dem Gefriergerät genommen wurden.
Gefahr von Erfrierungen.
• Frieren Sie aufgetaute Lebensmittel
nicht wieder ein. Wenn Lebensmittel
aufgetaut wurden, kochen Sie sie,
lassen Sie sie abkühlen und frieren
Sie sie dann ein.
Page 29
DEUTSCH 29
6.3 Hinweise zur Lagerung
gefrorener Lebensmittel
• Eine mittlere Einstellung stellt eine
gute Konservierung von gefrorenen
Lebensmitteln sicher.
Eine höhere Temperatureinstellung im
Gerät kann die Haltbarkeit verkürzen.
• Der gesamte Gefrierraum ist für die
Lagerung von Tiefkühlprodukten
geeignet.
• Lassen Sie ausreichend Platz um die
Lebensmittel herum, damit die Luft
frei zirkulieren kann.
• Die Haltbarkeit von Lebensmitteln ist
auf dem Etikett der
Lebensmittelverpackung angegeben.
• Es ist wichtig, die Lebensmittel so zu
verpacken, dass kein Wasser,
Feuchtigkeit oder Kondenswasser ins
Innere gelangt.
6.4 Einkaufstipps
Nach dem Lebensmitteleinkauf:
• Achten Sie darauf, dass die
Verpackung nicht beschädigt ist - die
Lebensmittel könnten verdorben sein.
Wenn die Verpackung aufgequollen
oder nass ist, wurde das Lebensmittel
möglicherweise nicht unter den
optimalen Bedingungen gelagert und
das Auftauen hat eventuell bereits
begonnen.
• Um den Auftauprozess zu minimieren,
kaufen Sie Tiefkühlware am Ende
Ihres Einkaufs und transportieren Sie
diese in einer Isoliertasche.
• Legen Sie die tiefgefrorenen
Lebensmittel sofort nach der
Rückkehr aus dem Laden in das
Gefriergerät.
• Wenn Lebensmittel auch nur teilweise
aufgetaut sind, dürfen sie nicht wieder
eingefroren werden. Verzehren Sie
sie schnell wie möglich.
• Beachten Sie das Haltbarkeitsdatum
und die Lagerinformationen auf der
Verpackung.
6.5 Lagerdauer
Lebensmittelart Lagerdauer (Mona‐
Brot 3
Obst (außer Zitrusfrüchten) 6 - 12
Gemüse 8 - 10
Speisereste ohne Fleisch 1 - 2
Molkereiprodukte:
Butter
Weichkäse (z.B. Mozzarella)
Hartkäse (z.B. Parmesan, Cheddar)
Meeresfrüchte:
Fette Fische (z.B. Lachs, Makrele)
Magere Fische (z.B. Kabeljau, Flunder)
Shrimps
Muscheln und Miesmuscheln ohne Schale
Gekochter Fisch
Fleisch:
te)
6 - 9
3 - 4
6
2 - 3
4 - 6
12
3 - 4
1 - 2
Page 30
www.electrolux.com30
Lebensmittelart Lagerdauer (Mona‐
Geflügel
Rindfleisch
Schweinefleisch
Lamm
Wurst
Schinken
Speisereste mit Fleisch
7. REINIGUNG UND PFLEGE
WARNUNG!
Siehe Kapitel
Sicherheitshinweise.
7.1 Allgemeine Warnhinweise
VORSICHT!
Ziehen Sie vor jeder
Wartungsmaßnahme immer
den Netzstecker aus der
Steckdose.
Dieses Gerät enthält
Kohlenwasserstoffe in
seinem Kältekreislauf. Aus
diesem Grund dürfen die
Wartung und das Nachfüllen
ausschließlich durch
autorisiertes Fachpersonal
erfolgen.
Das Zubehör des Geräts
und die Innenteile eignen
sich nicht für die Reinigung
im Geschirrspüler.
te)
9 - 12
6 - 12
4 - 6
6 - 9
1 - 2
1 - 2
2 - 3
VORSICHT!
Verwenden Sie keine
chemischen
Reinigungsmittel,
Scheuerpulver, chlor- oder
ölhaltige Reinigungsmittel,
da diese die Oberfläche
beschädigen.
7.3 Regelmäßige Reinigung
Das gesamte Gerät muss regelmäßig
gereinigt werden:
1. Reinigen Sie das Innere und die
Zubehörteile mit lauwarmem Wasser
und etwas Neutralseife.
2. Prüfen und säubern Sie die
Türdichtungen in regelmäßigen
Abständen, um zu gewährleisten,
dass diese sauber und frei von
Fremdkörpern sind.
3. Spülen und trocknen Sie diese
sorgfältig ab.
7.4 Abtauen des Geräts
7.2 Reinigen des Innenraums
Bevor Sie das Gerät in Betrieb nehmen,
beseitigen Sie den typischen Neugeruch
am besten durch Reinigen der Innenteile
mit lauwarmem Wasser und einer
neutralen Seife. Sorgfältig nachtrocknen.
VORSICHT!
Verwenden Sie niemals
scharfe Metallwerkzeuge,
um Reif vom Verdampfer zu
kratzen, weil er dadurch
beschädigt werden könnte.
Versuchen Sie nicht, den
Abtauvorgang durch andere
als vom Hersteller
empfohlene mechanische
oder sonstige Hilfsmittel zu
beschleunigen.
Page 31
DEUTSCH 31
Stellen Sie ungefähr 12
Stunden vor dem Abtauen
eine niedrigere Temperatur
ein, um ausreichend
Kältereserve für die
Betriebsunterbrechung
aufzubauen.
Tauen Sie den Gefrierschrank ab, wenn
die Reifschicht eine Stärke von etwa 3
bis 5 mm erreicht hat
Abtauen des Gefrierraums:
1. Schalten Sie das Gerät aus, oder
ziehen Sie den Netzstecker aus der
Steckdose.
2. Entfernen Sie das gesamte
Gefriergut, packen Sie es in mehrere
Schichten Zeitungspapier und lagern
Sie es an einen kühlen Ort.
VORSICHT!
Ein Temperaturanstieg
der gefrorenen
Lebensmittelpakete
während des Abtauens
kann deren
Haltbarkeitsdauer
verkürzen.
Fassen Sie gefrorene
Lebensmittel nicht mit
nassen Händen an. Ihre
Hände könnten an den
Lebensmitteln
festfrieren.
3. Lassen Sie die Tür offen. Schützen
Sie den Boden vor dem
Abtauwasser, z.B. mit einem Tuch
oder einem flachen Behälter.
4. Zur Beschleunigung des
Abtauprozesses stellen Sie einen
Topf mit warmem Wasser in das
Gefrierfach. Entfernen Sie bereits
während des Abtauprozesses
vorsichtig Eisstücke, die sich lösen
lassen.
5. Wenn der Gefrierraum vollständig
abgetaut ist, wischen Sie das Innere
sorgfältig trocken.
6. Schalten Sie das Gerät ein und
schließen Sie die Tür.
7. Drehen Sie den Temperaturregler auf
eine höhere Einstellung, um die
maximal mögliche Kühlung zu
erreichen, und lassen Sie das Gerät
drei Stunden mit dieser Einstellung
laufen.
Legen Sie das Gefriergut erst nach
dieser Zeit wieder in das Gefrierfach.
7.5 Stillstandszeiten
Bei längerem Stillstand des Geräts
müssen Sie folgende Vorkehrungen
treffen:
1. Trennen Sie das Gerät von der
Spannungsversorgung.
2. Entnehmen Sie alle Lebensmittel.
3. Tauen Sie das Gerät ab (falls
erforderlich). Reinigen Sie das Gerät
und alle Zubehörteile.
4. Lassen Sie die Tür(en) offen, um das
Entstehen unangenehmer Gerüche
zu vermeiden.
8. FEHLERSUCHE
WARNUNG!
Siehe Kapitel
Sicherheitshinweise.
8.1 Was tun, wenn...
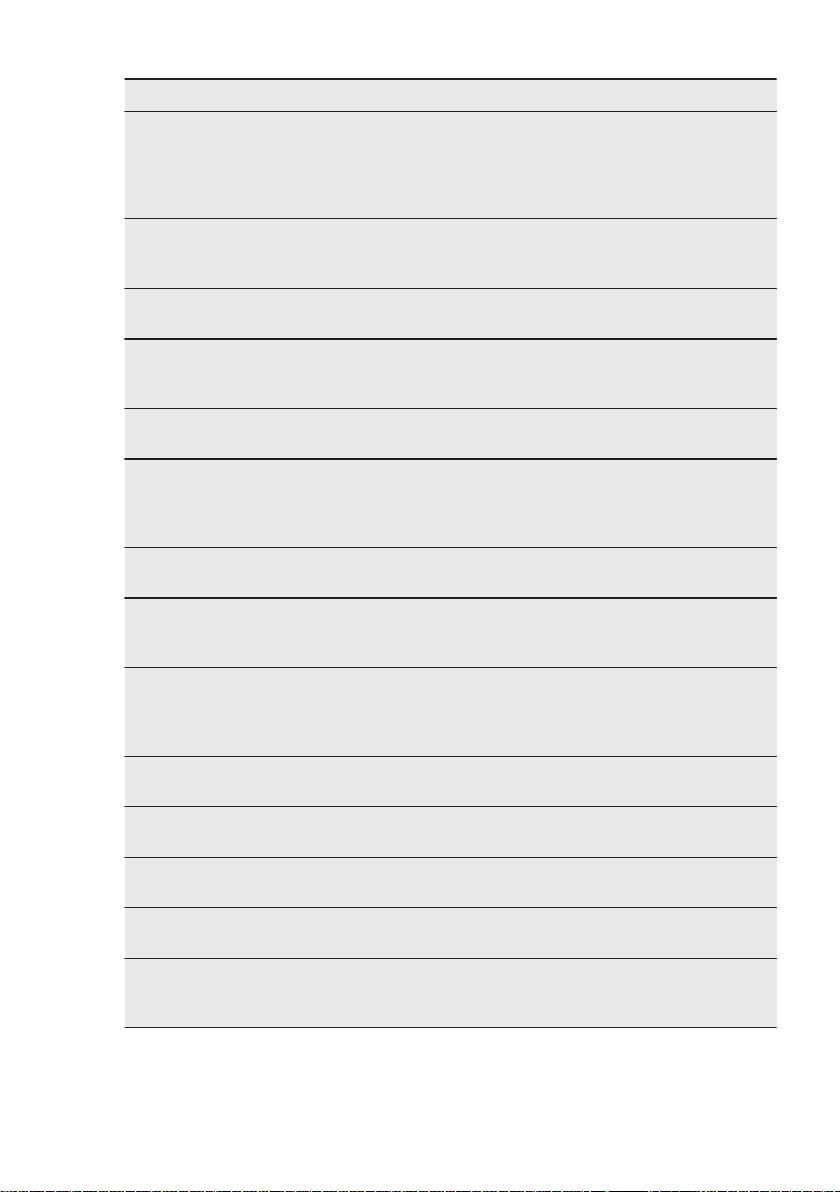
Störung Mögliche Ursache Abhilfe
Das Gerät funktioniert
nicht.
Der Netzstecker wurde
Das Gerät ist ausgeschal‐
tet.
nicht richtig in die Steckdo‐
se gesteckt.
Schalten Sie das Gerät
ein.
Stecken Sie den Netzste‐
cker korrekt in die Steckdo‐
se.
Page 32
www.electrolux.com32
Störung Mögliche Ursache Abhilfe
Es liegt keine Spannung
an der Steckdose an.
Das Gerät erzeugt Geräu‐
sche.
Unebenheiten im Boden
wurden nicht ausgegli‐
chen.
Der Kompressor ist durch‐
gehend in Betrieb.
Die Temperatur wurde
falsch eingestellt.
Es wurden zu viele Le‐
bensmittel gleichzeitig ein‐
gelegt.
Die Raumtemperatur ist zu
hoch.
In das Gerät eingelegte
Lebensmittel waren noch
zu warm.
Die Tür ist nicht richtig ge‐
schlossen.
Die Tür ist nicht richtig aus‐
gerichtet oder berührt das
Das Gerät ist nicht ausge‐
richtet.
Belüftungsgitter.
Die Tür lässt sich nicht
leicht öffnen.
Sie haben versucht, die
Tür unmittelbar nach dem
Schließen wieder zu öff‐
nen.
Zu starke Reif- und Eisbil‐
dung.
Die Tür ist nicht richtig ge‐
schlossen.
Die Dichtung ist verzogen
oder verschmutzt.
Die Lebensmittel sind nicht
richtig verpackt.
Die Temperatur wurde
falsch eingestellt.
Das Gerät ist voll beladen
und auf die niedrigste
Temperatur eingestellt.
Testen Sie, ob ein anderes
Gerät an dieser Steckdose
funktioniert. Wenden Sie
sich an eine Elektrofach‐
kraft.
Prüfen Sie, ob das Gerät
stabil steht.
Siehe Kapitel „Betrieb“.
Warten Sie einige Stunden
und prüfen Sie erneut die
Temperatur.
Siehe Kapitel „Montage“.
Lassen Sie die Lebensmit‐
tel auf Raumtemperatur
abkühlen, bevor Sie sie
einlagern.
Siehe Abschnitt „Schließen
der Tür“.
Siehe Montageanleitung.
Warten Sie einige Sekun‐
den zwischen dem Schlie‐
ßen und erneuten Öffnen
der Tür.
Siehe Abschnitt „Schließen
der Tür“.
Siehe Abschnitt „Schließen
der Tür“.
Verpacken Sie die Lebens‐
mittel richtig.
Siehe Kapitel „Betrieb“.
Stellen Sie eine höhere
Temperatur ein. Siehe Ka‐
pitel „Betrieb“.
Page 33
Störung Mögliche Ursache Abhilfe
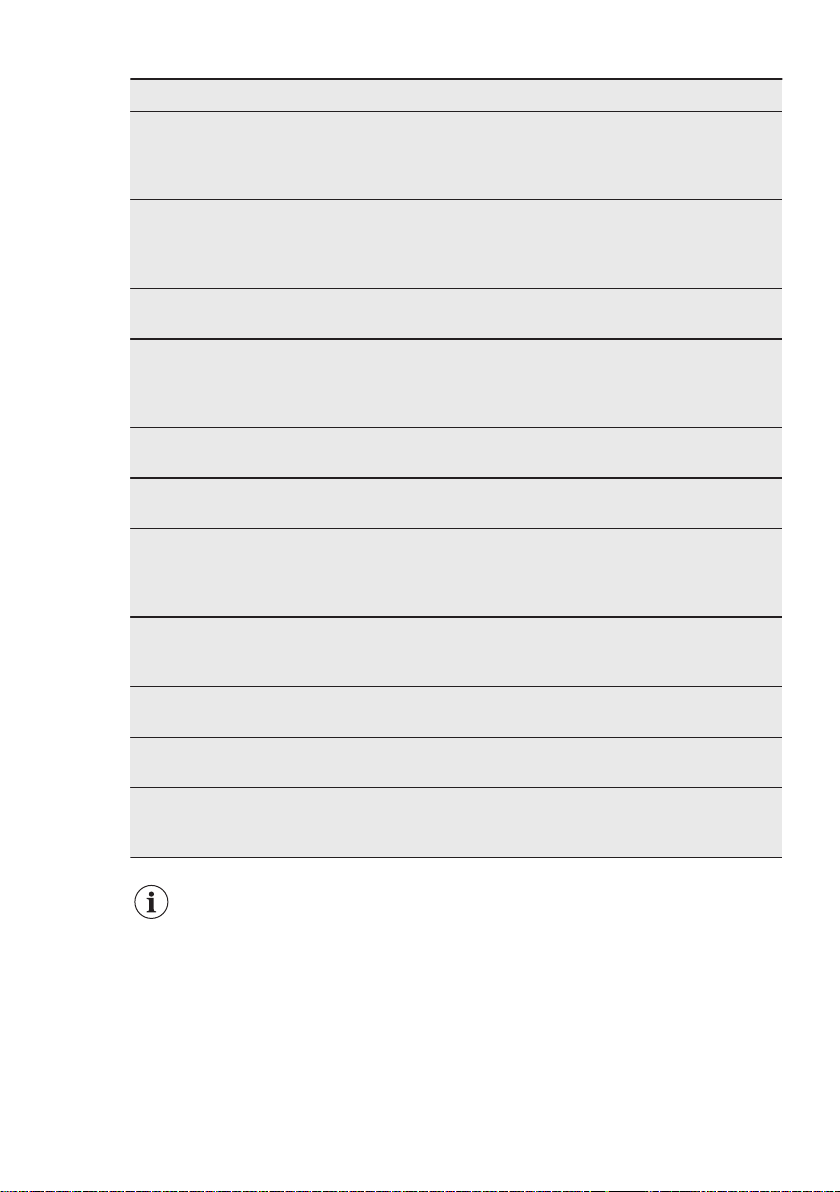
Die Temperatur im Gerät
Wasser fließt in den Kühl‐
schrank.
Wasser läuft auf den Bo‐
den.
Die Temperatur im Gerät
ist zu niedrig/zu hoch.
Die Tür ist nicht richtig ge‐
Die Temperatur der zu
Es wurden zu viele Le‐
Die Tür wurde zu häufig
Die Kaltluft kann im Gerät
ist zu niedrig und die Um‐
gebungstemperatur ist zu
hoch.
Lebensmittel verhindern
das Abfließen des Was‐
sers in den Wassersamm‐
ler.
Der Wasserablauf ist ver‐
stopft.
Der Tauwasserablauf ist
nicht mit der Verdampfer‐
schale über dem Kompres‐
sor verbunden.
Die Temperatur ist nicht
richtig eingestellt.
schlossen.
kühlenden Lebensmittel ist
zu hoch.
bensmittel gleichzeitig ein‐
gelegt.
Die Reifschicht ist dicker
als 4 - 5 mm.
geöffnet.
nicht zirkulieren.
Stellen Sie eine höhere
Temperatur ein. Siehe Ka‐
pitel „Betrieb“.
Stellen Sie sicher, dass die
Lebensmittel nicht die
Rückwand berühren.
Reinigen Sie den Wasser‐
ablauf.
Verbinden Sie den Tau‐
wasserablauf mit der Ver‐
dampferschale.
Stellen sie eine höhere/
niedrigere Temperatur ein.
Siehe Abschnitt „Schließen
der Tür“.
Lassen Sie die Lebensmit‐
tel auf Raumtemperatur
abkühlen, bevor Sie sie in
das Gerät geben.
Lagern Sie weniger Le‐
bensmittel zur selben Zeit
ein.
Tauen Sie das Gerät ab.
Öffnen Sie die Tür nur,
wenn es notwendig ist.
Kaltluftzirkulation im Gerät
sicherstellen. Siehe Kapitel
„Tipps und Hinweise“.
DEUTSCH 33
Bitte wenden Sie sich an
den nächsten autorisierten
Kundendienst, wenn alle
genannten
Abhilfemaßnahmen nicht
zum gewünschten Erfolg
führen.
8.2 Schließen der Tür
1. Reinigen Sie die Türdichtungen.
2. Stellen Sie die Tür nach Bedarf ein.
Siehe Kapitel „Montage“.
3. Ersetzen Sie die defekten
Türdichtungen, falls erforderlich.
Wenden Sie sich an einen
autorisierten Kundendienst.
Page 34
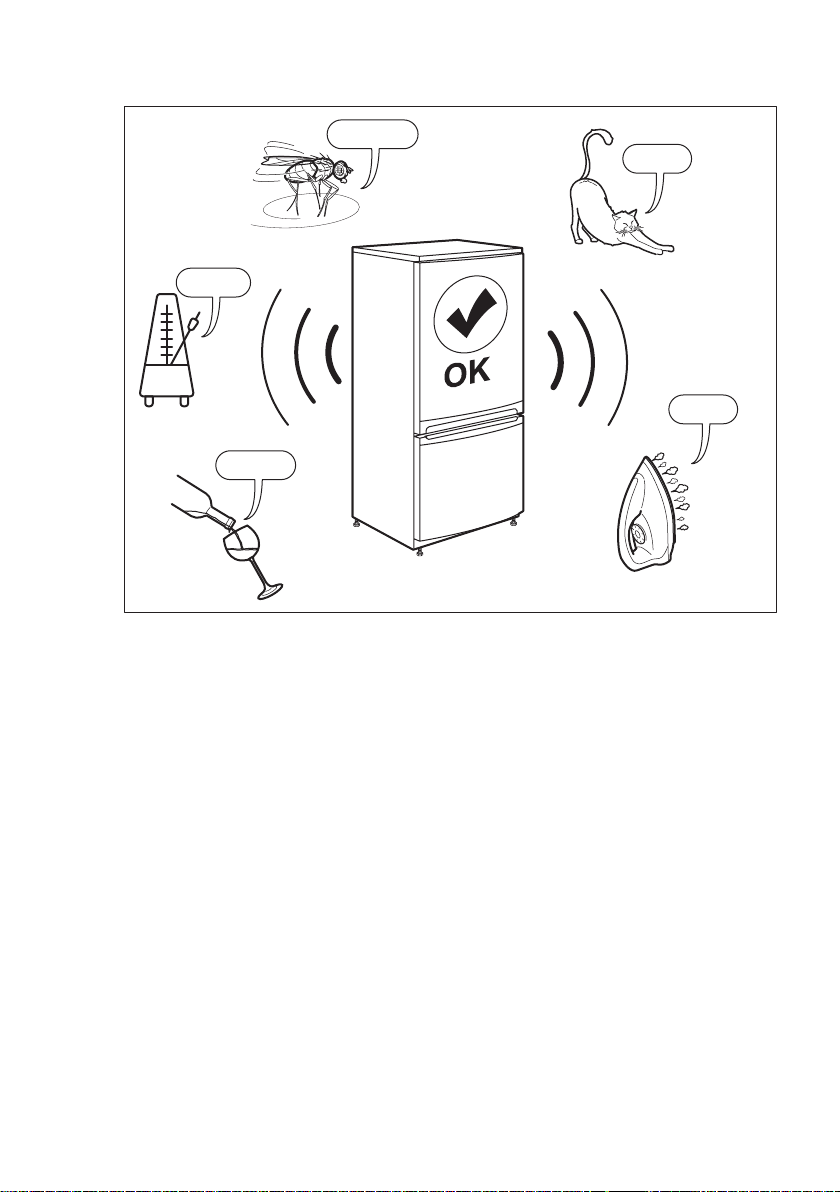
SSSRRR!
CLICK!
HISSS!
BRRR!
BLUBB!
www.electrolux.com34
9. GERÄUSCHE
10. TECHNISCHE DATEN
Die technischen Daten befinden sich auf
dem Typenschild innen im Gerät sowie
auf der Energieplakette.
Der QR-Code auf der Energieplakette
des Geräts bietet einen Web-Link zu
Informationen über die Geräteleistung in
der EU EPREL-Datenbank. Bewahren
Sie daher die Energieplakette als
Referenz zusammen mit dieser
Bedienungsanleitung und allen anderen
Unterlagen, die mit dem Gerät geliefert
wurden, auf.
Es ist auch möglich, die gleichen
Informationen in EPREL zu finden,
indem Sie den Link
eprel.ec.europa.eu
Modellnamen und die Produktnummer,
die Sie auf dem Typenschild des Geräts
finden, verwenden.
Beachten Sie den Link
https://
sowie den
www.theenergylabel.eu
detaillierter Informationen zur
Energieplakette.
11. INFORMATIONEN FÜR PRÜFINSTITUTE
Die Installation und die Vorbereitung des
Geräts für eine eventuelle EcoDesignPrüfung müssen mit EN 62552
übereinstimmen. Die Anforderungen an
die Belüftung, die Abmessungen der
Aussparungen und die Mindestabstände
auf der Rückseite müssen den Angaben
in diesem Benutzerhandbuch in Kapitel 3
entsprechen. Für weitere Informationen,
einschließlich der Beladungspläne,
wenden Sie sich bitte an den Hersteller.
bezüglich
Page 35
12. UMWELTTIPPS
DEUTSCH 35
Recyceln Sie Materialien mit dem
Symbol . Entsorgen Sie die
Verpackung in den entsprechenden
Recyclingbehältern. Recyceln Sie zum
Umwelt- und Gesundheitsschutz
elektrische und elektronische Geräte.
Entsorgen Sie Geräte mit diesem Symbol
nicht mit dem Hausmüll. Bringen Sie
das Gerät zu Ihrer örtlichen
Sammelstelle oder wenden Sie sich an
Ihr Gemeindeamt.
Page 36
www.electrolux.com36
INDICE
1. INFORMAZIONI DI SICUREZZA......................................................................36
2. ISTRUZIONI DI SICUREZZA........................................................................... 39
3. INSTALLAZIONE..............................................................................................41
4. FUNZIONAMENTO.......................................................................................... 44
5. UTILIZZO QUOTIDIANO.................................................................................. 45
6. CONSIGLI E SUGGERIMENTI UTILI...............................................................45
7. PULIZIA E CURA..............................................................................................47
8. RISOLUZIONE DEI PROBLEMI.......................................................................48
9. RUMORI........................................................................................................... 51
10. DATI TECNICI................................................................................................ 51
11. INFORMAZIONI PER GLI ISTITUTI DI PROVA.............................................51
PENSATI PER VOI
Grazie per aver acquistato un'apparecchiatura Electrolux. Avete scelto un
prodotto che ha alle spalle decenni di esperienza professionale e innovazione.
Ingegnoso ed elegante, è stato progettato pensando a voi. Quindi, in qualsiasi
momento desiderate utilizzarlo, potete esser certi di ottenere sempre i migliori
risultati.
Benvenuti in Electrolux.
Visitate il nostro sito web per:
Ricevere consigli, scaricare i nostri opuscoli, eliminare eventuali anomalie,
ottenere informazioni sull'assistenza e la riparazione:
www.electrolux.com/support
Per registrare il vostro prodotto e ricevere un servizio migliore:
www.registerelectrolux.com
Acquistare accessori, materiali di consumo e ricambi originali per la vostra
apparecchiatura:
www.electrolux.com/shop
SERVIZIO CLIENTI E MANUTENZIONE
Consigliamo sempre l’impiego di ricambi originali.
Quando si contatta l'Assistenza, accertarsi di disporre dei seguenti dati: Modello,
PNC, numero di serie.
Le informazioni si trovano sulla targhetta dei dati.
Avvertenza / Attenzione - Importanti Informazioni di Sicurezza.
Informazioni e consigli generali
Informazioni ambientali
Con riserva di modifiche.
1. INFORMAZIONI DI SICUREZZA
Leggere attentamente le istruzioni fornite prima di
installare e utilizzare l'apparecchiatura. I produttori non
Page 37

ITALIANO 37
sono responsabili di eventuali lesioni o danni derivanti
da un'installazione o un uso scorretti. Conservare
sempre le istruzioni in un luogo sicuro e accessibile per
poterle consultare in futuro.
1.1 Sicurezza dei bambini e delle persone vulnerabili
• Questa apparecchiatura può essere usata da bambini
a partire dagli 8 anni e da adulti con limitate capacità
fisiche, sensoriali o mentali o con scarsa esperienza o
conoscenza sull'uso dell'apparecchiatura, solamente
se sorvegliati o se istruiti relativamente all'uso
dell'apparecchiatura e se hanno compreso i rischi
coinvolti.
• I bambini di età compresa tra i 3 e gli 8 anni possono
caricare e scaricare l'apparecchio a condizione che
siano stati adeguatamente istruiti.
• Questa apparecchiatura può essere usata da persone
con disabilità diffuse e complesse, se debitamente
istruite.
• Tenere lontani dall'apparecchiatura i bambini al di
sotto dei 3 anni se non costantemente supervisionati.
• Non consentire ai bambini di giocare con
l'apparecchiatura.
• I bambini non devono eseguire interventi di pulizia e
manutenzione sull'apparecchiatura senza essere
supervisionati.
• Tenere gli imballaggi lontano dai bambini e smaltirli in
modo adeguato.
1.2 Sicurezza generale
• Questa apparecchiatura è destinata all'uso domestico
e applicazioni simili, tra cui:
– Case di campagna; cucine di negozi, uffici e altri
ambienti di lavoro;
– Clienti di hotel, motel, bed and breakfast e altri
ambienti residenziali.
Page 38

www.electrolux.com38
• Per evitare la contaminazione degli alimenti rispettare
le seguenti istruzioni:
– non aprire la porta per lunghi periodi;
– pulire regolarmente le superfici che possono venire
a contatto con gli alimenti e i sistemi di drenaggio
accessibili;
• AVVERTENZA! Verificare che le aperture di
ventilazione, sia sull'apparecchiatura che nella
struttura da incasso, siano libere da ostruzioni.
• AVVERTENZA! Non usare dispositivi elettrici o altri
mezzi artificiali non raccomandati dal produttore allo
scopo di accelerare il processo di sbrinamento.
• AVVERTENZA! Non danneggiare il circuito
refrigerante.
• AVVERTENZA! Non utilizzare apparecchiature
elettriche all'interno dei comparti di conservazione
degli alimenti, ad eccezione di quelli consigliati dal
costruttore.
• Non nebulizzare acqua né utilizzare vapore per pulire
l'apparecchiatura.
• Pulire l'apparecchiatura con un panno inumidito e
morbido. Utilizzare solo detergenti neutri. Non usare
prodotti abrasivi, spugnette abrasive, solventi od
oggetti metallici.
• Quando l'apparecchiatura resta vuota per un lungo
periodo di tempo, spegnerla, sbrinarla, pulirla,
asciugarla e lasciare la porta aperta per evitare la
formazione di muffa al suo interno.
• Non conservare in questa apparecchiatura sostanze
esplosive come bombolette spray contenenti un
propellente infiammabile.
• Se il cavo di alimentazione è danneggiato, deve
essere sostituito dal produttore, dal Centro di
Assistenza Autorizzato o da una persona qualificata
per evitare situazioni di pericolo.
Page 39
2. ISTRUZIONI DI SICUREZZA
ITALIANO 39
2.1 Installazione
AVVERTENZA!
L’installazione
dell'apparecchiatura deve
essere eseguita da
personale qualificato.
• Rimuovere tutti i materiali di
imballaggio.
• Non installare o utilizzare
l'apparecchiatura se è danneggiata.
• Attenersi alle istruzioni fornite insieme
all'apparecchiatura.
• Prestare sempre attenzione in fase di
spostamento dell'apparecchiatura,
dato che è pesante. Usare sempre i
guanti di sicurezza e le calzature
adeguate.
• Assicurarsi che l'aria possa circolare
liberamente attorno
all'apparecchiatura.
• In fase di prima installazione o dopo
aver girato la porta, attendere almeno
4 ore prima di collegare
l'apparecchiatura alla sorgente di
alimentazione. Questo serve a
consentire all'olio di fluire nuovamente
nel compressore.
• Prima di eseguire eventuali operazioni
sull'apparecchiatura (ad esempio
invertire la porta), togliere la spina
dalla presa di corrente.
• Non installare l'apparecchiatura in
prossimità di radiatori, fornelli, forni o
piani di cottura.
• Non esporre l'apparecchiatura alla
pioggia.
• Non installare l'apparecchiatura dove
sia esposta alla luce solare diretta.
• Non installare questa apparecchiatura
in aree troppo umide o troppo fredde.
• Quando si sposta l'apparecchiatura,
sollevarla dal bordo anteriore, così da
non graffiare il pavimento.
AVVERTENZA!
In fase di posizionamento
dell'apparecchiatura,
verificare che il cavo di
alimentazione non sia
intrappolato o danneggiato.
AVVERTENZA!
Non utilizzare prese multiple
e prolunghe.
• L'apparecchiatura deve disporre di
una messa a terra.
• Verificare che i parametri sulla
targhetta siano compatibili con le
indicazioni elettriche
dell'alimentazione.
• Utilizzare sempre una presa elettrica
con contatto di protezione
correttamente installata.
• Accertarsi di non danneggiare i
componenti elettrici (ad es. la spina di
alimentazione, il cavo di
alimentazione, il compressore).
Contattare il Centro di Assistenza
Autorizzato o un elettricista per
sostituire i componenti elettrici.
• Il cavo di alimentazione deve
rimanere sotto il livello della spina di
alimentazione.
• Inserire la spina di alimentazione nella
presa solo al termine
dell'installazione. Verificare che la
spina di alimentazione rimanga
accessibile dopo l'installazione.
• Non tirare il cavo di alimentazione per
scollegare l’apparecchiatura. Tirare
sempre dalla spina.
2.3 Utilizzare
AVVERTENZA!
Rischio di lesioni, scottature
o scosse elettriche.
2.2 Collegamento elettrico
AVVERTENZA!
Rischio di incendio e scossa
elettrica.
L'apparecchiatura contiene gas
infiammabile, isobutano (R600a), un gas
naturale con un alto livello di
compatibilità ambientale, Fare attenzione
a non danneggiare il circuito refrigerante
che contiene isobutano.
Page 40
www.electrolux.com40
• Non modificare le specifiche tecniche
dell'apparecchiatura.
• Non introdurre apparecchiature
elettriche (ad es. gelatiere)
nell'apparecchiatura se non
specificamente consentito dal
produttore.
• Nel caso di danno al circuito
refrigerante, assicurarsi che non si
sviluppino fiamme libere e scintille nel
locale. Aerare bene l'ambiente.
• Non appoggiare oggetti incandescenti
sulle parti in plastica
dell'apparecchiatura.
• Non introdurre bevande analcoliche
nel vano congelatore. Si verrà a
creare una pressione nel contenitore
della bevanda.
• Non conservare gas e liquidi
infiammabili nell'apparecchiatura.
• Non appoggiare o tenere liquidi o
materiali infiammabili, né oggetti
facilmente incendiabili
sull'apparecchiatura, al suo interno o
nelle immediate vicinanze.
• Non toccare il compressore o il
condensatore. Sono incandescenti.
• Non togliere o toccare gli oggetti nel
vano congelatore con le mani bagnate
o umide.
• Non ricongelare del cibo
precedentemente scongelato.
• Attenersi alle istruzioni per la
conservazione riportate sulla
confezione del cibo surgelato.
• Avvolgere gli alimenti con materiali
per uso alimentare prima di metterli
nello scomparto del congelatore.
2.4 Illuminazione interna
AVVERTENZA!
Pericolo di scosse elettriche.
• Per quanto riguarda la lampada o le
lampade all'interno di questo prodotto
e le lampade di ricambio vendute
separatamente: Queste lampade
sono destinate a resistere a
condizioni fisiche estreme negli
elettrodomestici, come temperatura,
vibrazioni, umidità, o sono destinate a
segnalare informazioni sullo stato
operativo dell'apparecchio. Non sono
destinate ad essere utilizzate in altre
applicazioni e non sono adatte per
l'illuminazione di ambienti domestici.
2.5 Pulizia e cura
AVVERTENZA!
Vi è il rischio di ferirsi o
danneggiare
l'apparecchiatura.
• Prima di eseguire qualunque
intervento di manutenzione, spegnere
l'apparecchiatura ed estrarre la spina
dalla presa.
• L'unità refrigerante di questa
apparecchiatura contiene idrocarburi.
L’unità deve essere ricaricata ed
ispezionata esclusivamente da
personale qualificato.
• Controllare regolarmente lo scarico
dell'apparecchiatura e, se necessario,
pulirlo. L'ostruzione dello scarico può
causare un deposito di acqua di
sbrinamento sul fondo
dell'apparecchiatura.
2.6 Assistenza Tecnica
• Per riparare l'apparecchiatura
contattare un Centro di Assistenza
Autorizzato. Utilizzare esclusivamente
ricambi originali.
• Tenere presente che la riparazione
autonoma o non professionale
possono avere conseguenze sulla
sicurezza e potrebbero invalidare la
garanzia.
• Le guarnizioni per porte saranno
disponibili per 7 anni dopo
l'interruzione del modello. termostati,
sensori di temperatura, circuiti
stampati, sorgenti luminose, maniglie
delle porte, cerniere delle porte,
vassoi e cestelli. Si prega di notare
che alcuni di questi pezzi di ricambio
sono disponibili solo per i riparatori
professionisti e che non tutti i pezzi di
ricambio sono rilevanti per tutti i
modelli.
• Le guarnizioni per porte saranno
disponibili per 10 anni dopo
l'interruzione del modello.
Page 41
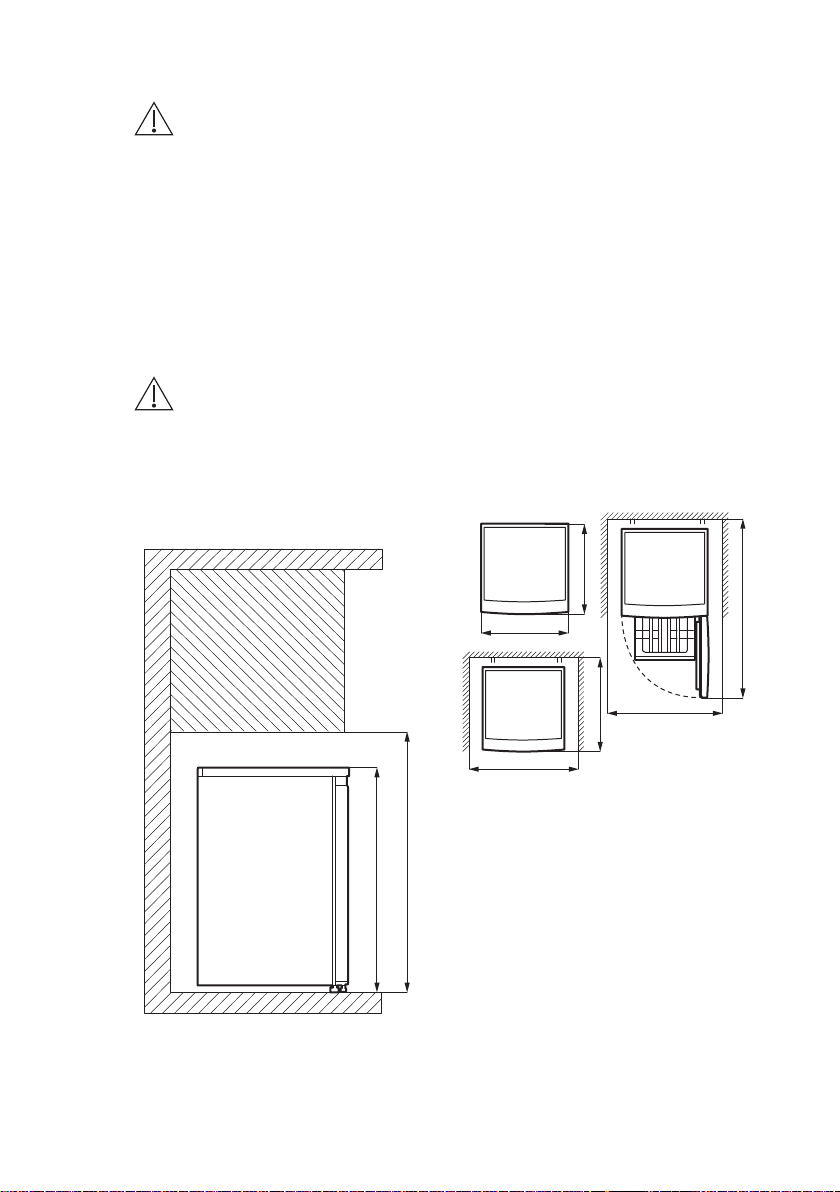
H1
H2
W1
D1
W2
D2
W3
D3
ITALIANO 41
2.7 Smaltimento
AVVERTENZA!
Rischio di lesioni o
soffocamento.
• Staccare la spina dall'alimentazione
elettrica.
• Tagliare il cavo di rete e smaltirlo.
• Rimuovere la porta per evitare che
bambini e animali domestici
rimangano chiusi all’interno
dell’apparecchiatura.
3. INSTALLAZIONE
AVVERTENZA!
Fare riferimento ai capitoli
sulla sicurezza.
3.1 Dimensioni
• Il circuito refrigerante e i materiali di
isolamento di questa apparecchiatura
rispettano l'ozono.
• La schiuma isolante contiene gas
infiammabili. Contattare le autorità
locali per ricevere informazioni su
come smaltire correttamente
l'apparecchiatura.
• Non danneggiare i componenti
dell'unità refrigerante che si trovano
vicino allo scambiatore di calore.
Page 42
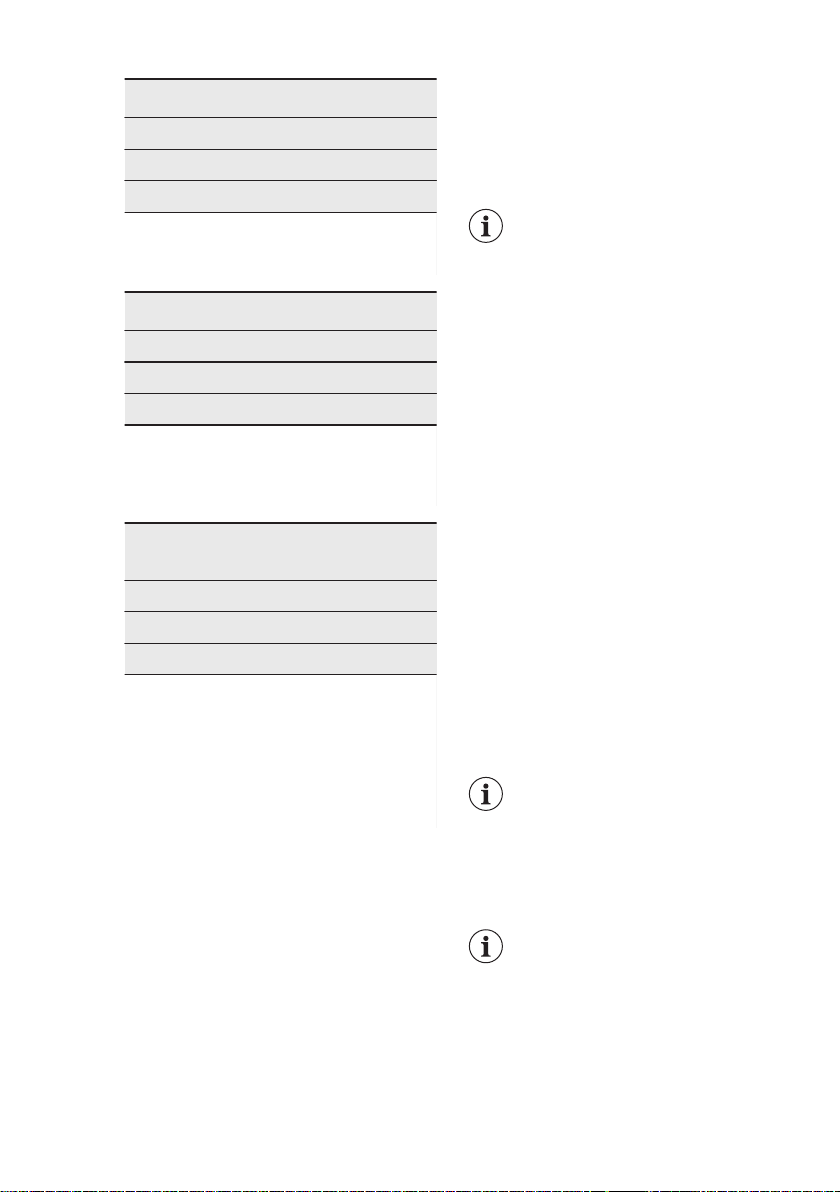
www.electrolux.com42
Dimensioni complessive
1)
H1 mm 845
W1 mm 560
D1 mm 575
1)
l'altezza, la larghezza e la profondità del‐
l'apparecchio senza l'impugnatura e i piedi‐
ni
Spazio necessario durante l’uso
H2 mm 945
W2 mm 760
D2 mm 650
1)
l'altezza, la larghezza e la profondità del‐
l'apparecchio, compresa la maniglia, più lo
spazio necessario per la libera circolazione
dell'aria di raffreddamento
Spazio complessivo necessario du‐
rante l’uso
1)
H2 mm 945
W3 mm 760
D3 mm 1165
1)
l'altezza, la larghezza e la profondità del‐
l'apparecchiatura, compresa la maniglia, più
lo spazio necessario per la libera circolazio‐
ne dell'aria di raffreddamento, più lo spazio
necessario per consentire l'apertura della
porta con l'angolazione minima che permet‐
te la rimozione di tutte le apparecchiature
interne
3.2 Luogo
Per garantire la migliore funzionalità
dell'apparecchiatura, non si dovrebbe
installare l'apparecchio nelle vicinanze
della fonte di calore (forno, stufe,
termosifoni, fornelli o piani di cottura) o in
un luogo con luce solare diretta.
Controllare che sul retro dell’apparecchio
sia garantita un’adeguata circolazione
dell’aria.
Per garantire le migliori prestazioni, se
l'apparecchiatura è posizionata sotto un
pensile a sbalzo, deve essere mantenuta
la distanza minima tra la parte superiore
dell'armadio. Se possibile, tuttavia,
evitare di installare l'apparecchiatura
sotto un pensile. Uno o più piedini
regolabili alla base dell'armadietto
garantiscono che l'apparecchiatura resti
in piano.
Deve essere possibile
scollegare l'apparecchiatura
dalla rete elettrica. Eseguire
perciò l'installazione facendo
1)
sì che la spina rimanga
facilmente accessibile.
3.3 Posizionamento
Questa apparecchiatura non è stata
pensata per essere usata come
apparecchiatura da incasso.
Questa apparecchiatura deve essere
installata in una posizione interna
asciutta e ben ventilata.
Il corretto funzionamento
dell'apparecchiatura può essere garantito
solo nel rispetto delle temperature
indicate. Questa apparecchiatura è
destinata ad essere utilizzata a
temperature ambiente che vanno da
10°C a 43°C.
Se, a causa di una diversa installazione,
non vengono rispettate le corrette
esigenze di ventilazione,
l'apparecchiatura funzionerà
correttamente, ma il consumo energetico
potrebbe aumentare leggermente.
In caso di dubbi sul luogo di
installazione
dell'apparecchiatura,
contattare il venditore, il
nostro Centro di Assistenza
o il rivenditore autorizzato
più vicino.
Se si posiziona
l'apparecchiatura contro la
parete, utilizzare i
distanziatori posteriori in
dotazione o mantenere la
distanza minima indicata
nella sezione "Dimensioni".
Page 43
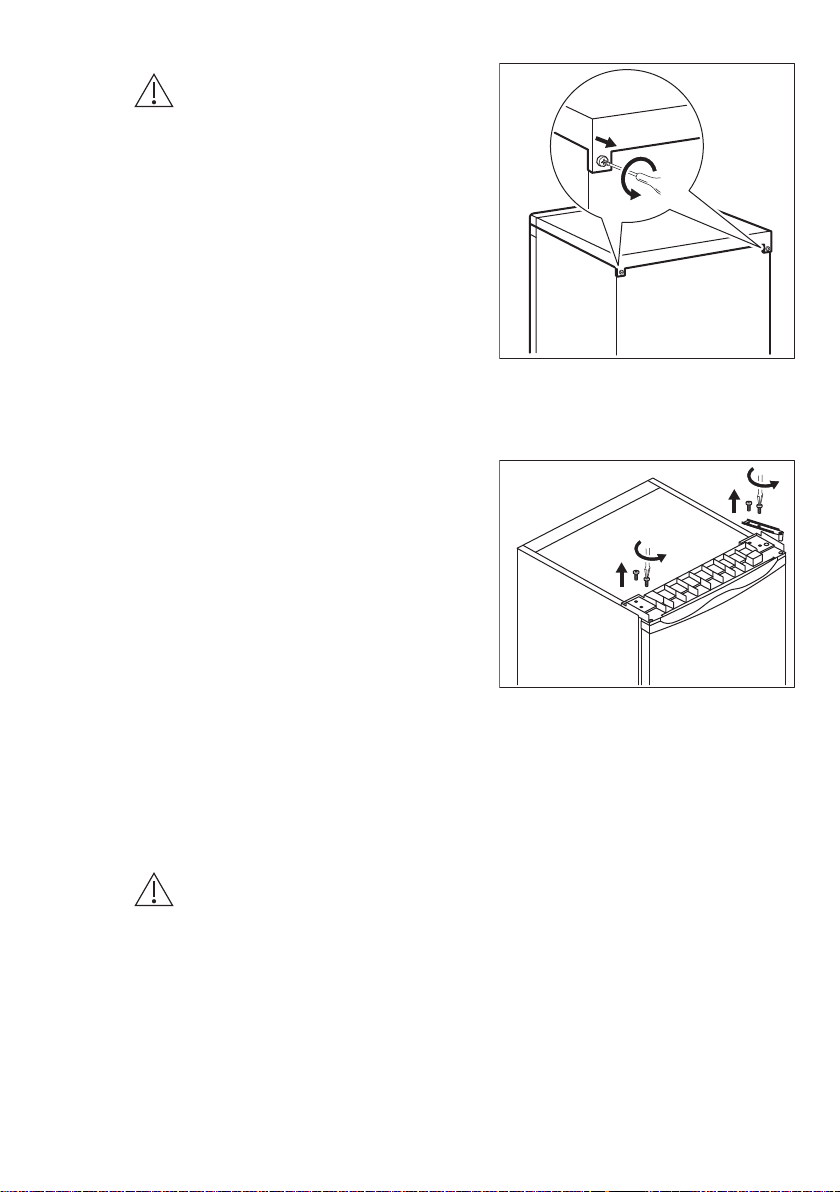
ATTENZIONE!
Se si installa
l'apparecchiatura vicino ad
una parete, fare riferimento
alla sezione "Dimensioni"
per capire la distanza
minima tra la parete e il lato
dell'apparecchio dove le
cerniere della porta devono
fornire spazio sufficiente per
aprire la porta quando
l'apparecchiatura interna
viene rimossa (ad es.
durante la pulizia).
3.4 Collegamento elettrico
• Prima di inserire la spina, verificare
che la tensione e la frequenza
riportate sulla targhetta di
identificazione corrispondano a quelle
dell'impianto domestico.
• L'apparecchiatura deve disporre di
una messa a terra. La spina del cavo
di alimentazione è dotata di un
apposito contatto. Se la presa di
corrente dell'impianto domestico non
è collegata a terra, allacciare
l'apparecchiatura a una presa di terra
separata in conformità alle norme in
vigore, rivolgendosi a un elettricista
qualificato.
• Il produttore declina ogni
responsabilità qualora le suddette
precauzioni di sicurezza non vengano
rispettate.
• Questa apparecchiatura è conforme
alle direttive CEE.
3.5 Possibilità di invertire la
porta
AVVERTENZA!
Prima di eseguire le
operazioni descritte, estrarre
la spina dalla presa di
corrente.
1. Controllare che l'apparecchiatura sia
in posizione eretta.
2. Aprire la porta e rimuovere
l'attrezzatura della porta. Fare
riferimento al capitolo "Utilizzo
quotidiano". Chiudere la porta.
3. Svitare le viti sul retro del coperchio
superiore.
ITALIANO 43
Sollevare il coperchio superiore e
4.
posizionarlo su una superficie
morbida.
5. Rimuovere le 4 viti.
6. Sollevare la cerniera superiore e
metterla in luogo sicuro insieme alle
viti.
7. Sollevare la porta e riporla su una
superficie morbida.
8. Inclinare l'apparecchiatura con
cautela su un imballaggio di schiuma
morbida o materiale simile per
evitare di danneggiare il retro
dell'apparecchiatura e il pavimento.
9. Svitare le viti della cerniera inferiore
e i piedini regolabili.
10. Installare il perno nel foro opposto
della cerniera.
Page 44
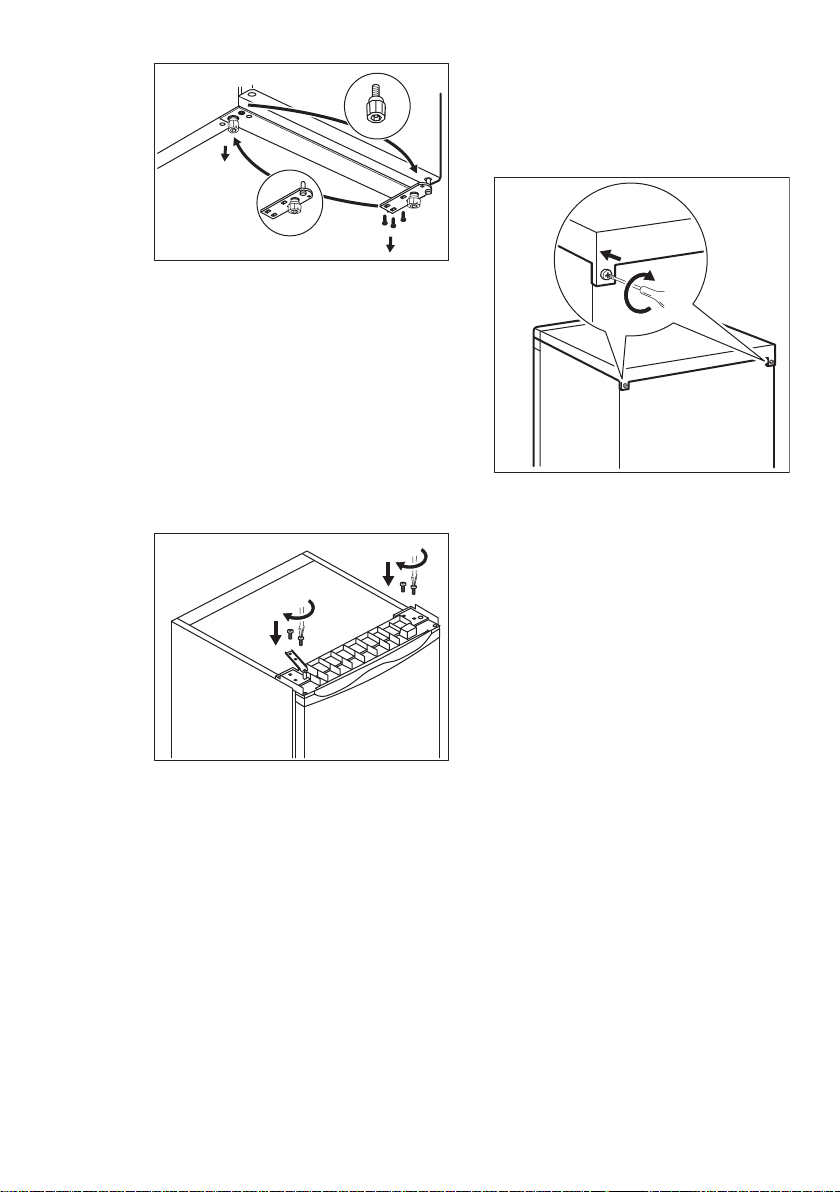
www.electrolux.com44
11. Avvitare la cerniera inferiore sull'altro
lato dell'apparecchio.
12. Installare il supporto in gomma sul
lato senza cerniera.
13. Montare la porta sulla cerniera
inferiore assicurandosi che il perno
della cerniera entri nel foro inferiore
della porta.
14. Montare la cerniera superiore sul lato
opposto dell'apparecchiatura.
Inserire il perno superiore della
cerniera nel foro superiore della
porta. Serrare le viti.
15. Avvitare le 2 viti rimanenti sul lato
superiore dell'apparecchio senza
cerniera.
16. Posizionare il coperchio superiore
sull'apparecchio e stringere le viti sul
retro.
Installare l'apparecchiatura della porta.
Attendere almeno 4 ore prima di
collegare l'apparecchiatura
all'alimentazione.
4. FUNZIONAMENTO
4.1 Accensione
Inserire la spina nella presa a muro.
4.2 Spegnimento
Per spegnere l'apparecchiatura togliere
la spina dalla presa di corrente.
4.3 Regolazione della temperatura
La temperatura viene regolata
automaticamente. Sarà tuttavia possibile
impostare una temperatura all'interno
dell'apparecchiatura.
È importante ricordare che la
temperatura all'interno
dell'apparecchiatura è condizionata dai
seguenti fattori:
• temperatura ambiente,
• frequenza di apertura della porta,
• quantità di alimenti conservati,
• posizione dell'apparecchiatura.
In condizioni normali, si consiglia di
utilizzare una regolazione media.
Page 45
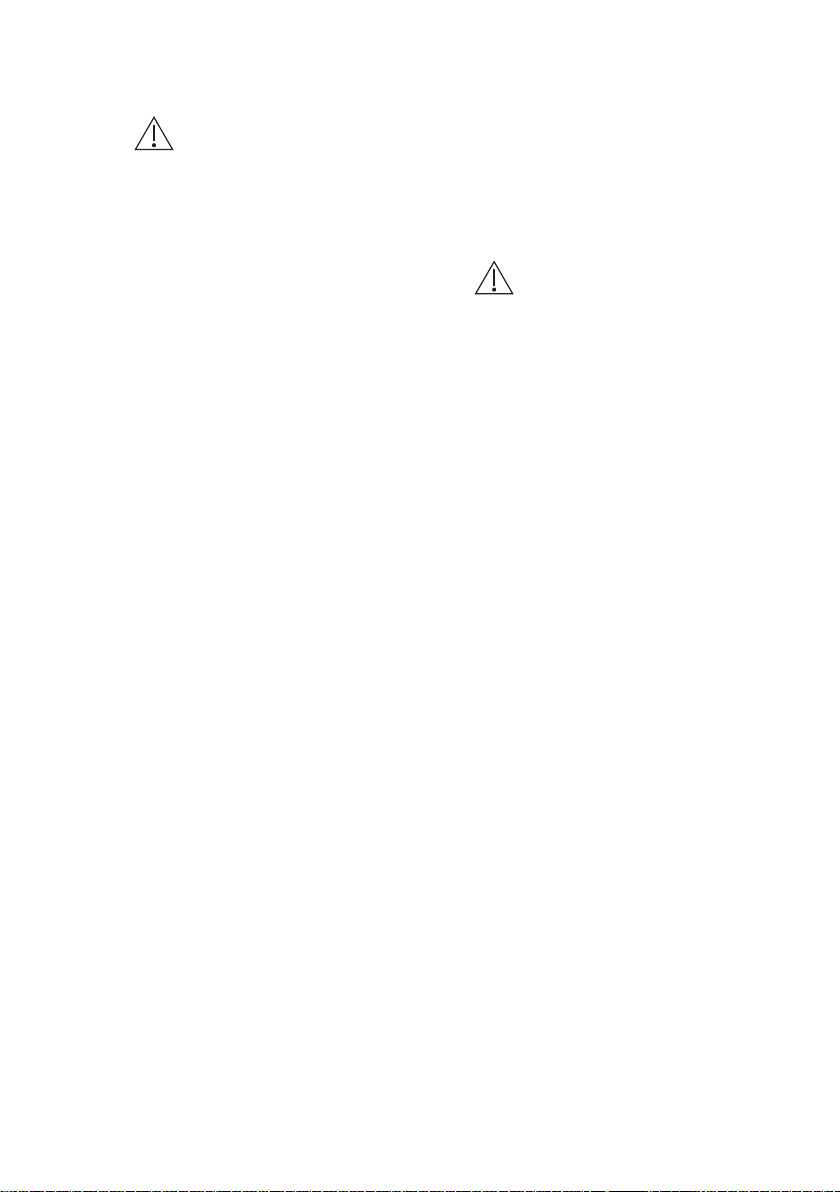
5. UTILIZZO QUOTIDIANO
ITALIANO 45
AVVERTENZA!
Fare riferimento ai capitoli
sulla sicurezza.
5.1 Congelamento dei cibi
freschi
Il vano congelatore è adatto al
congelamento di cibi freschi e alla
conservazione a lungo termine di
alimenti congelati e surgelati.
Conservare gli alimenti freschi distribuiti
uniformemente nel primo e secondo
scomparto o cassetto dall'alto.
La quantità massima di cibo che può
essere congelata, senza l'aggiunta di altri
alimenti freschi per 24 ore, è indicata
sulla targhetta (un'etichetta situata
all'interno dell'apparecchio).
5.2 Conservazione dei surgelati
Al primo avvio o dopo un periodo di
inutilizzo si consiglia di lasciare in
funzione l'apparecchiatura per almeno 3
ore, prima di introdurre gli alimenti nel
vano.
I cassetti del congelatore consentono di
individuare rapidamente e facilmente la
confezione di alimenti desiderata. Se
occorre conservare grandi quantità di
cibo, si consiglia di rimuovere tutti i
cassetti ad eccezione del cassetto
inferiore, la cui presenza è necessaria
per assicurare la buona circolazione
dell'aria.
Il cibo deve trovarsi ad una distanza di
15 mm dalla porta.
ATTENZIONE!
In caso di scongelamento
accidentale, ad esempio a
causa di un'interruzione di
corrente, se la corrente è
rimasta spenta più a lungo
del valore indicato sulla
targhetta sotto "tempo di
risalita", gli alimenti
scongelati devono essere
consumati rapidamente o
cotti immediatamente, poi
raffreddati e poi ricongelati.
5.3 Scongelamento
Prima dell'utilizzo, i cibi surgelati o
congelati possono essere scongelati nel
frigorifero o, per un processo più veloce,
a temperatura ambiente.
Gli alimenti divisi in piccole porzioni
possono essere cucinati direttamente,
senza essere prima scongelati, in questo
caso la cottura durerà più a lungo:
6. CONSIGLI E SUGGERIMENTI UTILI
6.1 Consigli per il risparmio
energetico
• La configurazione interna
dell'apparecchiatura è quella che
garantisce l'uso più efficiente
dell'energia.
• Non aprire frequentemente la porta e
limitare il più possibile i tempi di
apertura.
• Più fredda è l'impostazione della
temperatura, maggiore è il consumo
di energia.
• Garantire una buona ventilazione.
Non coprire le griglie di ventilazione o
i fori.
6.2 Consigli per il congelamento
• Prima di congelare avvolgere e
sigillare gli alimenti freschi in: foglio di
alluminio, pellicola di plastica o
sacchetti, contenitori ermetici con
coperchio.
• Per congelare e scongelare in modo
più efficace, suddividere gli alimenti in
piccole porzioni.
• Si raccomanda di mettere etichette e
date su tutti gli alimenti surgelati.
Questo aiuterà a identificare gli
alimenti e a sapere quando devono
essere utilizzati prima del loro
deterioramento.
Page 46
www.electrolux.com46
• Il cibo deve essere fresco quando
viene congelato per preservarne la
buona qualità. Soprattutto frutta e
verdura dovrebbero essere congelate
dopo il raccolto per preservare tutte le
loro sostanze nutritive.
• Non congelare bottiglie o lattine con
liquidi, in particolare bevande
contenenti anidride carbonica potrebbero esplodere durante il
congelamento.
• Non mettere cibi caldi nel
congelatore. Raffreddarli a
temperatura ambiente prima di
collocarli all'interno dello scomparto.
• Al fine di evitare gli aumenti di
temperatura di alimenti già congelati,
non mettere alimenti freschi
scongelati nelle immediate vicinanze.
Collocare gli alimenti a temperatura
ambiente nella parte dello scomparto
del congelatore dove non ci sono cibi
surgelati.
• Non mangiare i cubetti di ghiaccio, i
ghiaccioli o granite subito dopo averli
tolti dal congelatore. Rischio di
sintomi da congelamento.
• Non congelare nuovamente il cibo
scongelato. Se il cibo si è scongelato,
cuocerlo, raffreddarlo e poi
congelarlo.
6.3 Consigli per la
conservazione dei surgelati
• L'impostazione della temperatura
media garantisce una buona
conservazione degli alimenti
congelati.
L'impostazione di una temperatura più
elevata all'interno dell'apparecchio
può portare a una minore durata di
conservazione.
• L'intero scomparto del congelatore è
adatto alla conservazione di prodotti
alimentari surgelati.
• Lasciare abbastanza spazio intorno al
cibo per permettere all'aria di circolare
liberamente.
• Per una conservazione adeguata, fare
riferimento all'etichetta
dell'imballaggio alimentare per vedere
la durata di conservazione degli
alimenti.
• È importante avvolgere il cibo in modo
tale da evitare che l'acqua, l'umidità o
la condensa penetrino all'interno.
6.4 Consigli per l’acquisto
Dopo aver acquistato alimenti:
• Assicurarsi che l'imballaggio non sia
danneggiato - il cibo potrebbe
deteriorarsi. Se la confezione è gonfia
o bagnata, potrebbe non essere stata
conservata nelle condizioni ottimali e
lo sbrinamento potrebbe essere già
iniziato.
• Per limitare il processo di
scongelamento, acquistare i prodotti
surgelati alla fine della spesa e
trasportarli in un sacchetto termico e
isolato.
• Mettete i surgelati immediatamente
nel congelatore dopo essere tornati
dal negozio.
• Se il cibo si è scongelato anche solo
parzialmente, non congelarlo di
nuovo. Consumarlo il prima possibile.
• Rispettare la data di scadenza e le
informazioni di conservazione sulla
confezione.
6.5 Periodo di conservazione
Tipo di alimento Periodo di conser‐
Pane 3
Frutta (a eccezione degli agrumi) 6 - 12
Verdure 8 - 10
Avanzi senza carne 1 - 2
Latticini:
vazione (mesi)
Page 47
ITALIANO 47
Tipo di alimento Periodo di conser‐
Burro
Formaggio a pasta molle (ad es. mozzarella)
Formaggio a pasta dura (ad esempio parmigiano, cheddar)
Frutti di mare:
Pesci grassi (ad esempio salmone, sgombro)
Pesci magri (ad esempio merluzzo, passera pianuzza)
Gamberetti
Vongole e cozze sgusciate
Pesce cotto
Carne:
Pollame
Manzo
Maiale
Agnello
Salsicce
Prosciutto
Avanzi con carne
7. PULIZIA E CURA
AVVERTENZA!
Fare riferimento ai capitoli
sulla sicurezza.
7.1 Avvertenze generali
ATTENZIONE!
Prima di qualsiasi intervento
di manutenzione, estrarre la
spina dalla presa.
vazione (mesi)
6 - 9
3 - 4
6
2 - 3
4 - 6
12
3 - 4
1 - 2
9 - 12
6 - 12
4 - 6
6 - 9
1 - 2
1 - 2
2 - 3
accessori con acqua tiepida e sapone
neutro per eliminare il tipico odore dei
prodotti nuovi, quindi asciugare
accuratamente.
ATTENZIONE!
Non usare detergenti, polveri
abrasive, detergenti a base
di cloro od olio, dato che
potrebbero danneggiare le
finiture.
Questa apparecchiatura
contiene idrocarburi
nell’unità di raffreddamento,
pertanto le operazioni di
manutenzione e ricarica
devono essere eseguite
esclusivamente da
personale autorizzato.
Gli accessori e i componenti
dell’apparecchiatura non
sono lavabili in lavastoviglie.
7.2 Pulizia dell'interno
Prima di utilizzare l'apparecchiatura per
la prima volta, lavare l'interno e gli
7.3 Pulizia periodica
L'apparecchiatura deve essere pulita
regolarmente:
1. Lavare l'interno e gli accessori con
acqua tiepida e sapone neutro.
2. Ispezionare regolarmente le
guarnizioni della porta ed eliminare
con un panno umido tracce di sporco
e residui.
3. Risciacquare e asciugare
accuratamente.
Page 48
www.electrolux.com48
7.4 Sbrinare l'apparecchiatura
ATTENZIONE!
Per rimuovere la brina
dall'evaporatore, non usare
utensili metallici appuntiti
che possano danneggiarlo.
Non usare dispositivi
meccanici o altri mezzi
artificiali non raccomandati
dal produttore allo scopo di
accelerare il processo di
sbrinamento.
Circa 12 ore prima dello
sbrinamento, impostare una
temperatura più bassa per
accumulare una riserva di
freddo sufficiente in caso di
eventuale interruzione del
funzionamento.
Quando tale strato raggiunge uno
spessore di ca. 3-5 mm, il vano
congelatore deve essere sbrinato.
Per sbrinare il vano congelatore:
1. Spegnere l'apparecchiatura o
estrarre la spina della presa a parete.
2. Rimuovere i surgelati, avvolgerli in
alcuni strati di carta di giornale e
riporli in un luogo fresco.
ATTENZIONE!
Un innalzamento della
temperatura dei surgelati
durante lo sbrinamento
può ridurre la loro durata
di conservazione.
Non toccare il cibo
congelato con le mani
bagnate. Le mani
potrebbero aderire
all'alimento congelato.
3. Lasciare la porta aperta. Proteggere
il pavimento dall'acqua di
sbrinamento, ad esempio con un
panno o un recipiente piatto.
4. Per accelerare il processo di
sbrinamento, collocare un recipiente
di acqua calda nel vano congelatore.
Rimuovere inoltre i pezzi di ghiaccio
che si staccano prima che lo
sbrinamento sia completo.
5. Una volta completato lo sbrinamento,
asciugare accuratamente l'interno.
6. Accendere l'apparecchiatura e
chiudere la porta.
7. Impostare il regolatore di
temperatura al livello massimo di
raffreddamento e lasciare in funzione
l'apparecchiatura per tre ore.
Solo successivamente rimettere gli
alimenti nello scomparto congelatore.
7.5 Periodi di non utilizzo
Se l'apparecchiatura non viene utilizzata
per un lungo periodo, adottare le
seguenti precauzioni:
1. Scollegare l'apparecchiatura dalla
rete elettrica.
2. Estrarre tutti gli alimenti.
3. Sbrinare (se necessario) e pulire
l'apparecchiatura e tutti gli accessori.
4. Lasciare la porta/le porte socchiuso/i
per evitare la formazione di odori
sgradevoli.
8. RISOLUZIONE DEI PROBLEMI
AVVERTENZA!
Fare riferimento ai capitoli
sulla sicurezza.
Page 49
8.1 Cosa fare se...
Problema Causa possibile Soluzione
L'apparecchiatura non fun‐
ziona.
La spina non è inserita cor‐
Assenza di tensione nella
L'apparecchiatura è rumo‐
rosa.
Il compressore rimane
sempre in funzione.
Sono stati introdotti molti
La temperatura ambiente è
Gli alimenti introdotti nel‐
La porta non è chiusa cor‐
La porta non è allineata o
interferisce con la griglia di
ventilazione.
La porta non si apre facil‐
mente.
C'è un'eccessiva presenza
di brina e ghiaccio.
La guarnizione è deforma‐
Gli alimenti non sono av‐
La temperatura impostata
L'apparecchiatura è spen‐
ta.
rettamente nella presa di
alimentazione.
presa di alimentazione.
L'apparecchiatura non è
appoggiata in modo corret‐
to
La temperatura impostata
non è corretta.
alimenti contemporanea‐
mente.
troppo alta.
l'apparecchiatura erano
troppo caldi.
rettamente.
L'apparecchiatura non è
perfettamente in piano.
Hai cercato di ri-aprire la
porta subito dopo averla
chiusa.
La porta non è chiusa cor‐
rettamente.
ta o sporca.
volti correttamente.
non è corretta.
Accendere l’apparecchia‐
tura.
Inserire correttamente la
spina nella presa di ali‐
mentazione.
Collegare alla presa di ali‐
mentazione un altro appa‐
recchio elettrico. Rivolgersi
ad un elettricista qualifica‐
to.
Controllare se l'apparec‐
chiatura è appoggiata in
modo stabile.
Fare riferimento al capitolo
"Funzionamento".
Attendere alcune ore e ri‐
controllare la temperatura.
Fare riferimento al capitolo
“Installazione”.
Lasciar raffreddare gli ali‐
menti a temperatura am‐
biente prima di introdurli.
Vedere la sezione "Chiusu‐
ra della porta".
Fare riferimento alle istru‐
zioni di installazione.
Attendere alcuni secondi
fra la chiusura e la riaper‐
tura della porta.
Vedere la sezione "Chiusu‐
ra della porta".
Vedere la sezione "Chiusu‐
ra della porta".
Avvolgere correttamente
gli alimenti.
Fare riferimento al capitolo
"Funzionamento".
ITALIANO 49
Page 50
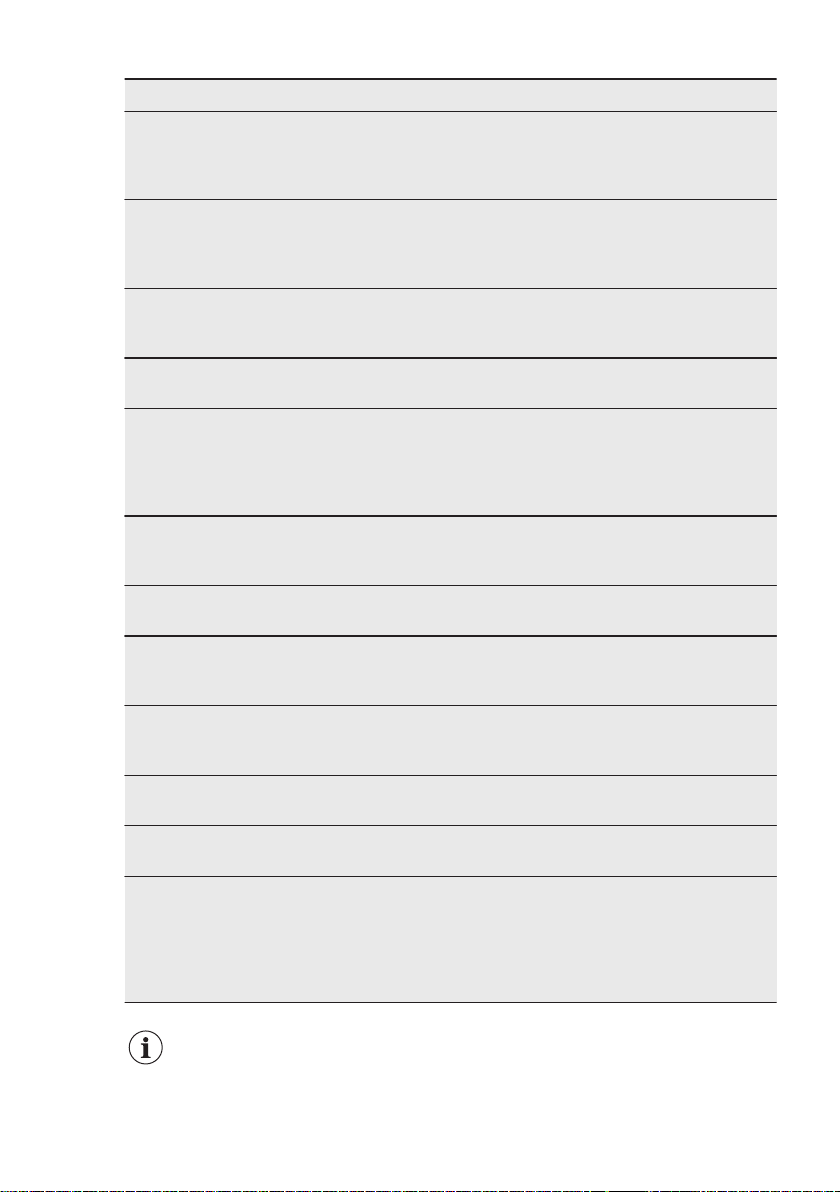
www.electrolux.com50
Problema Causa possibile Soluzione
L'apparecchiatura è com‐
La temperatura impostata
Scorre dell'acqua all'inter‐
no del frigorifero.
Presenza di acqua sul pa‐
vimento.
La temperatura all'interno
dell'apparecchiatura è trop‐
po bassa/troppo alta.
La porta non è chiusa cor‐
La temperatura degli ali‐
Sono stati introdotti molti
Il coperchio viene aperto
L'aria fredda non circola
pletamente carica ed è im‐
postata sulla temperatura
più bassa.
nell'apparecchiatura è trop‐
po bassa e la temperatura
ambiente è troppo alta.
Gli alimenti impediscono
all'acqua di scorrere nel‐
l'apposito collettore.
Lo scarico dell'acqua è
ostruito.
L'acqua di sbrinamento
non viene scaricata nella
bacinella di evaporazione
posta sopra il compresso‐
re.
La temperatura non è im‐
postata correttamente.
rettamente.
menti è troppo alta.
alimenti contemporanea‐
mente.
Lo spessore dello strato di
brina supera i 4 - 5 mm.
frequentemente.
correttamente all'interno
dell'apparecchio.
Impostare una temperatura
superiore. Fare riferimento
al capitolo "Funzionamen‐
to".
Impostare una temperatura
superiore. Fare riferimento
al capitolo "Funzionamen‐
to".
Evitare di disporre gli ali‐
menti direttamente contro
la parete posteriore.
Pulire lo scarico dell'acqua.
Collegare lo scarico del‐
l'acqua di sbrinamento alla
bacinella di evaporazione.
Impostare una temperatura
superiore/inferiore.
Vedere la sezione "Chiusu‐
ra della porta".
Prima di introdurre gli ali‐
menti, lasciarli raffreddare
a temperatura ambiente.
Introdurre gli alimenti un
poco alla volta.
Sbrinare l'apparecchiatura.
Aprire la porta solo se ne‐
cessario.
Adottare le misure neces‐
sarie per garantire una cor‐
retta circolazione dell'aria
fredda. Fare riferimento al
capitolo “Consigli e sugge‐
rimenti utili”.
Se il consiglio non da
risultati, contattare il Centro
di Assistenza Autorizzato più
vicino.
8.2 Chiusura della porta
1. Pulire le guarnizioni della porta.
2. Se necessario, regolare la porta.
Fare riferimento al capitolo
“Installazione”.
Page 51
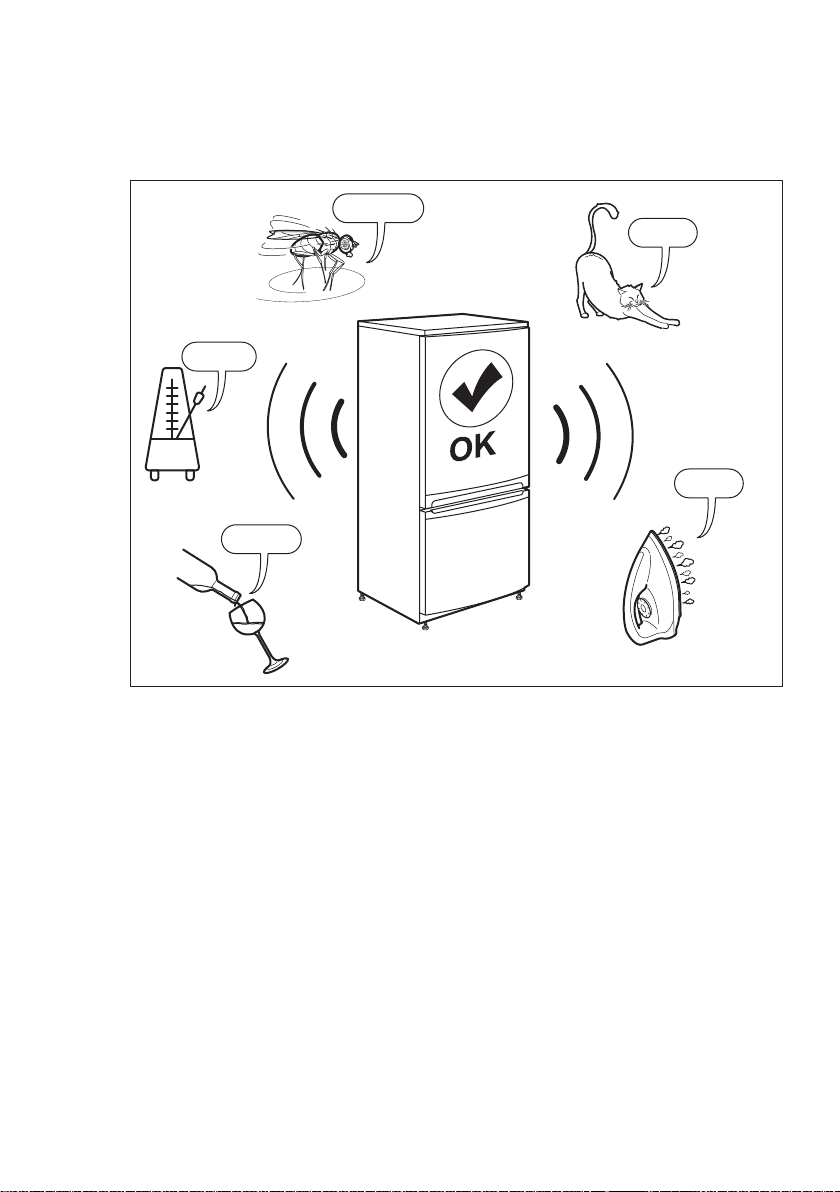
3. Se necessario, sostituire le
SSSRRR!
CLICK!
HISSS!
BRRR!
BLUBB!
guarnizioni difettose. Contattare il
Centro Assistenza Autorizzato.
9. RUMORI
ITALIANO 51
10. DATI TECNICI
I dati tecnici sono riportati sulla targhetta
dei dati applicata sul lato esterno
dell'apparecchiatura e sull'etichetta dei
valori energetici.
Il codice QR sull'etichetta energetica
fornita con l'apparecchio fornisce un link
web alle informazioni correlate al
funzionamento di questa
apparecchiatura nella banca dati EPREL
dell'UE. Conservare l'etichetta energetica
come riferimento insieme al manuale
d'uso e a tutti gli altri documenti forniti
con questo apparecchio.
È possibile trovare le stesse informazioni
anche in EPREL utilizzando il link
eprel.ec.europa.eu
e il numero di prodotto che si trovano
sulla targhetta dell'apparecchio.
Per informazioni dettagliate sull’etichetta
energetica, vedere il sito
www.theenergylabel.eu
e il nome del modello
.
11. INFORMAZIONI PER GLI ISTITUTI DI PROVA
L'installazione e la preparazione
dell'apparecchiatura per qualsiasi verifica
di EcoDesign devono essere conformi a
EN 62552. I requisiti di ventilazione, le
dimensioni dell'incavo e le distanze
minime dalla parte posteriore devono
essere conformi a quanto indicato nel
presente manuale d'uso al capitolo 3. Si
https://
Page 52
www.electrolux.com52
prega di contattare il produttore per
qualsiasi altra informazione, compresi i
piani di carico.
12. CONSIDERAZIONI SULL'AMBIENTE
Riciclare i materiali con il simbolo .
Buttare l'imballaggio negli appositi
contenitori per il riciclaggio. Aiutare a
proteggere l’ambiente e la salute umana
e a riciclare rifiuti derivanti da
apparecchiature elettriche ed
elettroniche. Non smaltire le
apparecchiature che riportano il simbolo
insieme ai normali rifiuti domestici.
Portare il prodotto al punto di riciclaggio
più vicino o contattare il comune di
residenza.
Page 53
ESPAÑOL 53
CONTENIDO
1. INFORMACIÓN SOBRE SEGURIDAD............................................................ 53
2. INSTRUCCIONES DE SEGURIDAD................................................................56
3. INSTALACIÓN..................................................................................................58
4. FUNCIONAMIENTO......................................................................................... 61
5. USO DIARIO.....................................................................................................61
6. CONSEJOS...................................................................................................... 62
7. MANTENIMIENTO Y LIMPIEZA.......................................................................64
8. SOLUCIÓN DE PROBLEMAS..........................................................................65
9. RUIDOS............................................................................................................68
10. DATOS TÉCNICOS........................................................................................68
11. INFORMACIÓN PARA LOS INSTITUTOS DE PRUEBAS.............................69
PENSAMOS EN USTED
Gracias por adquirir un aparato Electrolux. Ha escogido un producto que contiene
décadas de experiencia e innovación profesionales. Ingenioso y elegante, se ha
diseñado pensando en usted. Así pues, siempre que lo utilice, puede tener la
seguridad de que conseguirá excelentes resultados.
Bienvenido a Electrolux.
Visite nuestro sitio web para:
Obtener consejos, folletos, soluciones a problemas e información de servicio y
reparación:
www.electrolux.com/support
Registrar su producto para recibir un mejor servicio:
www.registerelectrolux.com
Adquirir accesorios, artículos de consumo y recambios originales para su
aparato:
www.electrolux.com/shop
ATENCIÓN Y SERVICIO AL CLIENTE
Le recomendamos que utilice recambios originales.
Al contactar con nuestro centro autorizado de servicio técnico, cerciórese de
tener la siguiente información a mano: Modelo, PNC, Número de serie.
La información se puede encontrar en la placa de características.
Advertencia / Precaución-Información sobre seguridad
Información general y consejos
Información sobre el medio ambiente
Salvo modificaciones.
1. INFORMACIÓN SOBRE SEGURIDAD
Antes de instalar y utilizar el aparato, lea atentamente
las instrucciones facilitadas. El fabricante no se hace
responsable de lesiones o daños producidos como
Page 54

www.electrolux.com54
resultado de una instalación o un uso incorrectos.
Conserve siempre estas instrucciones en lugar seguro y
accesible para futuras consultas.
1.1 Seguridad de niños y personas vulnerables
• Este aparato puede ser utilizado por niños de 8 años
en adelante y personas cuyas capacidades físicas,
sensoriales o mentales estén disminuidas o que
carezcan de la experiencia y conocimientos
suficientes para manejarlo, siempre que cuenten con
las instrucciones o la supervisión sobre el uso del
electrodoméstico de forma segura y comprendan los
riesgos.
• Los niños de 3 a 8 años pueden cargar y descargar el
aparato siempre que hayan sido debidamente
instruidos.
• Este aparato puede ser utilizado por personas con
discapacidades muy extensas y complejas, siempre
que hayan sido instruidas adecuadamente.
• Es necesario mantener alejados del aparato a los
niños de menos de 3 años salvo que estén bajo
supervisión continua.
• No deje que los niños jueguen con el aparato.
• La limpieza y mantenimiento de usuario del aparato
no podrán ser realizados por niños sin supervisión.
• Mantenga todo el material de embalaje fuera del
alcance de los niños y deséchelo de forma adecuada.
1.2 Seguridad general
• Este aparato está concebido para utilizarse en
aplicaciones domésticas y similares, tales como:
– Granjas; áreas de cocina para el personal en
tiendas, oficinas y otros entornos de trabajo;
– Por clientes en hoteles, moteles, pensiones y otros
entornos de tipo residencial.
• Para evitar la contaminación alimentaria, respete las
siguientes instrucciones:
Page 55

ESPAÑOL 55
– no abra la puerta durante largos periodos de
tiempo;
– limpie regularmente las superficies que pueden
entrar en contacto con los alimentos y los sistemas
de drenaje accesibles;
• ADVERTENCIA: Mantenga libres de obstrucciones las
aberturas de ventilación del alojamiento del aparato o
de la estructura empotrada.
• ADVERTENCIA: No utilice dispositivos mecánicos ni
medios artificiales para acelerar el proceso de
descongelación, excepto los recomendados por el
fabricante.
• ADVERTENCIA: No dañe el circuito del refrigerante.
• ADVERTENCIA: No utilice dispositivos eléctricos
dentro de los compartimientos para alimentos del
aparato, salvo si son del tipo recomendado por el
fabricante.
• No utilice pulverizadores ni vapor de agua para limpiar
el aparato.
• Limpie el aparato con un paño suave humedecido.
Utilice solo detergentes neutros. No utilice productos
abrasivos, estropajos duros, disolventes ni objetos
metálicos.
• Cuando el aparato esté vacío durante un largo
período, apáguelo, descongélelo, límpielo, séquelo y
deje la puerta abierta para evitar que se desarrolle
moho en el interior del aparato.
• No almacene sustancias explosivas tales como latas
de aerosol con un propulsor inflamable en este
aparato.
• Si el cable eléctrico sufre algún daño, el fabricante, su
servicio técnico autorizado o un profesional cualificado
tendrán que cambiarlo para evitar riesgos.
Page 56
www.electrolux.com56
2. INSTRUCCIONES DE SEGURIDAD
2.1 Instalación
ADVERTENCIA!
Sólo un técnico cualificado
puede instalar el aparato.
• Retire todo el embalaje.
• No instale ni utilice un aparato
dañado.
• Siga las instrucciones de instalación
suministradas con el aparato.
• Tenga cuidado al mover el aparato,
porque es pesado. Utilice siempre
guantes de protección y calzado
cerrado.
• Asegúrese de que el aire pueda
circular alrededor del aparato.
• En la primera instalación otras invertir
el sentido de apertura de la puerta,
espere al menos 4 horas antes de
conectar el aparato a la alimentación
eléctrica. Esto es para permitir que el
aceite regrese al compresor.
• Desenchufe siempre el aparato antes
de llevar a cabo cualquier operación,
por ejemplo cambiar el sentido de
apertura de la puerta.
• No instale el aparato cerca de
radiadores, cocinas, hornos o placas
de cocción.
• No exponga el aparato a la lluvia.
• No instale el aparato donde reciba luz
solar directa.
• No instale este aparato en áreas
excesivamente húmedas o frías.
• Al mover el aparato, levántelo por el
borde frontal para no arañar el suelo.
2.2 Conexión eléctrica
ADVERTENCIA!
Riesgo de incendios y
descargas eléctricas.
ADVERTENCIA!
Al colocar el producto,
asegúrese de que el cable
de alimentación no queda
atrapado o doblado.
ADVERTENCIA!
No utilice adaptadores de
enchufes múltiples ni cables
prolongadores.
• El aparato debe conectarse a tierra.
• Asegúrese de que los parámetros de
la placa de características son
compatibles con los valores eléctricos
del suministro eléctrico.
• Utilice siempre una toma con
aislamiento de conexión a tierra
correctamente instalada.
• Asegúrese de no provocar daños en
los componentes eléctricos (como
enchufe, cable de alimentación,
compresor). Póngase en contacto con
un electricista o con el servicio
técnico autorizado para cambiar los
componentes eléctricos.
• El cable de alimentación debe estar
por debajo del nivel del enchufe de
alimentación.
• Conecte el enchufe a la toma de
corriente únicamente cuando haya
terminado la instalación. Asegúrese
de tener acceso al enchufe del
suministro de red una vez finalizada
la instalación.
• No desconecte el aparato tirando del
cable de conexión a la red. Tire
siempre del enchufe.
2.3 Uso del aparato
ADVERTENCIA!
Existe riesgo de lesiones,
quemaduras, descargas
eléctricas o incendios.
El aparato contiene un gas
inflamable, isobutano (R600a), un gas
natural con alto grado de compatibilidad
medioambiental. Tenga cuidado para no
dañar el circuito de refrigerante que
contiene isobutano.
• No cambie las especificaciones de
este aparato.
• No utilice otros aparatos eléctricos
(como máquinas de hacer helados)
dentro de aparatos de refrigeración,
Page 57
ESPAÑOL 57
salvo que el fabricante haya
autorizado su utilización.
• Si se daña el circuito del refrigerante,
evite las llamas y fuentes de ignición
en la habitación. Ventile la habitación.
• No toque con elementos calientes las
piezas de plástico del aparato.
• No coloque bebidas con gas en el
congelador. Se creará presión en el
contenedor de la bebida.
• No almacene gas ni líquido inflamable
en el aparato.
• No coloque productos inflamables ni
objetos mojados con productos
inflamables dentro, cerca o encima
del aparato.
• No toque el compresor ni el
condensador. Están calientes.
• No retire ni toque elementos del
compartimento congelador con las
manos húmedas o mojadas.
• No vuelva a congelar alimentos que
se hayan descongelado.
• Siga las instrucciones del envase de
los alimentos congelados.
• Envuelva los alimentos en cualquier
material adecuado antes de ponerlos
en el congelador.
2.4 Luces interiores
ADVERTENCIA!
Riesgo de descarga
eléctrica.
• En cuanto a la(s) bombilla(s) de este
producto y las de repuesto vendidas
por separado: Estas bombillas están
destinadas a soportar condiciones
físicas extremas en los aparatos
domésticos, como la temperatura, la
vibración, la humedad, o están
destinadas a señalar información
sobre el estado de funcionamiento del
aparato. No están destinadas a
utilizarse en otras aplicaciones y no
son adecuadas para la iluminación de
estancias domésticas.
2.5 Mantenimiento y limpieza
ADVERTENCIA!
Podría sufrir lesiones o
dañar el aparato.
• Antes de proceder con el
mantenimiento, apague el aparato y
desconecte el enchufe de la red.
• Este equipo contiene hidrocarburos
en la unidad de refrigeración. Solo
una persona cualificada debe realizar
el mantenimiento y la recarga de la
unidad.
• Examine periódicamente el desagüe
del aparato y límpielo si fuera
necesario. Si el desagüe se bloquea,
el agua descongelada se acumulará
en la base del aparato.
2.6 Asistencia
• Para reparar el aparato, póngase en
contacto con el centro de servicio
autorizado. Utilice solamente piezas
de recambio originales.
• Tenga en cuenta que la
autorreparación o la reparación no
profesional puede tener
consecuencias de seguridad y podría
anular la garantía.
• Las siguientes piezas de repuesto
estarán disponibles durante 7 años
después de que el modelo se haya
retirado: termostatos, sensores de
temperatura, placas de circuitos
impresos, fuentes de luz, manijas de
puertas, bisagras de puertas,
bandejas y cestas. Tenga en cuenta
que algunas de estas piezas de
recambio solo están disponibles para
los reparadores profesionales, y que
no todas las piezas de recambio son
relevantes para todos los modelos.
• Las juntas de las puertas estarán
disponibles durante 10 años después
de que el modelo se haya retirado.
2.7 Desecho
ADVERTENCIA!
Existe riesgo de lesiones o
asfixia.
• Desconecte el aparato de la red.
• Corte el cable de conexión a la red y
deséchelo.
• Retire la puerta para evitar que los
niños y las mascotas queden
encerrados en el aparato.
• El circuito del refrigerante y los
materiales aislantes de este aparato
no dañan la capa de ozono.
Page 58
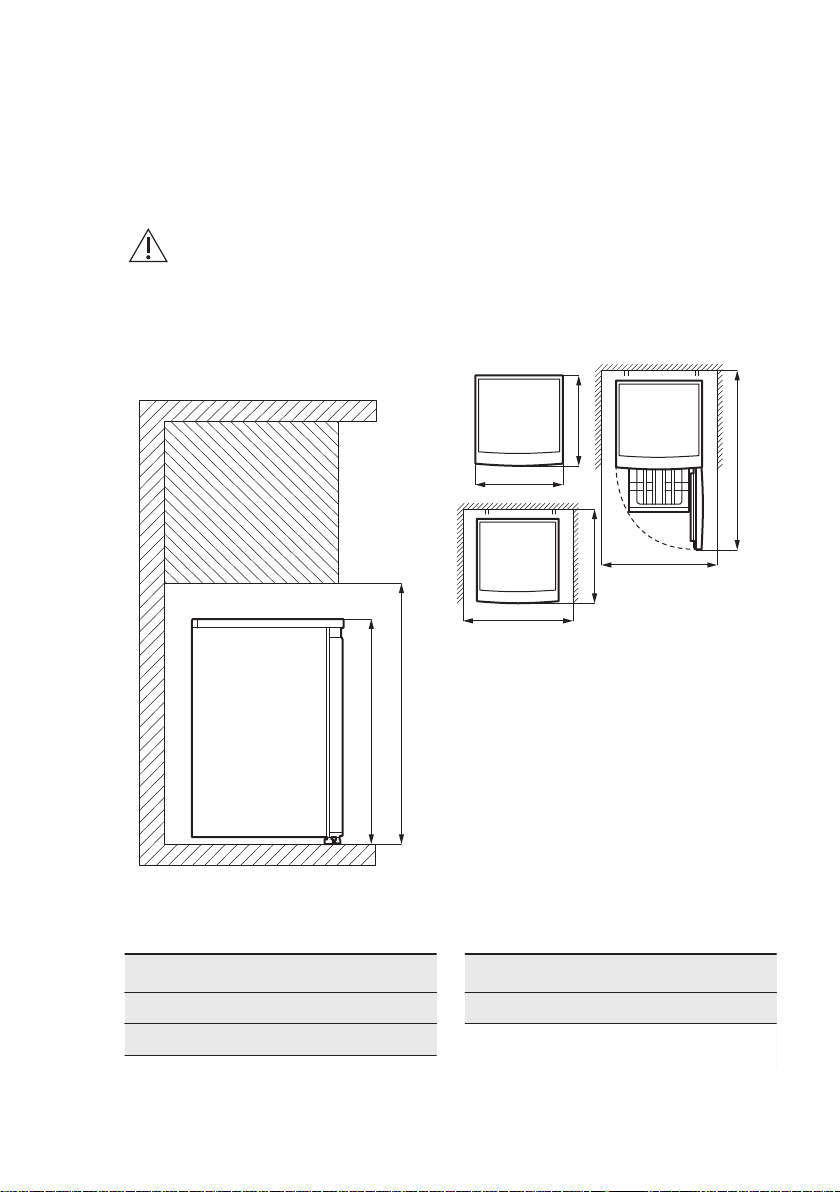
H1
H2
W1
D1
W2
D2
W3
D3
www.electrolux.com58
• La espuma aislante contiene gas
inflamable. Póngase en contacto con
las autoridades locales para saber
cómo desechar correctamente el
aparato.
3. INSTALACIÓN
ADVERTENCIA!
Consulte los capítulos sobre
seguridad.
3.1 Medidas
• No dañe la parte de la unidad de
refrigeración que está cerca del
intercambiador de calor.
Dimensiones generales
H1 mm 845
1)
W1 mm 560
Dimensiones generales
1)
D1 mm 575
1)
la altura, anchura y profundidad del apa‐
rato sin el mango y las patas
Page 59
Espacio necesario en uso
1)
H2 mm 945
W2 mm 760
D2 mm 650
1)
la altura, anchura y profundidad del apa‐
rato, incluyendo la manija, más el espacio
necesario para la libre circulación del aire
de refrigeración
Espacio total necesario en uso
1)
H2 mm 945
W3 mm 760
D3 mm 1165
1)
la altura, anchura y profundidad del apa‐
rato, incluido el mango, más el espacio ne‐
cesario para la libre circulación del aire de
refrigeración, más el espacio necesario pa‐
ra permitir la apertura de la puerta hasta el
ángulo mínimo que permita la extracción de
todo el equipo interno
3.2 Ubicación
Para garantizar el mejor funcionamiento
del aparato, no debe instalarlo en las
proximidades de la fuente de calor
(horno, estufas, radiadores, cocinas o
fogones) ni en un lugar con luz solar
directa. Asegúrese de que el aire pueda
circular libremente alrededor de la parte
posterior del gabinete.
Para garantizar el mejor rendimiento, si
el aparato se coloca debajo de un
mueble de cocina colgado en la pared,
mantenga la distancia mínima entre la
parte superior y el mueble. Sin embargo,
no conviene colocar el aparato debajo de
muebles de pared. Una o más patas
ajustables en la base del armario
garantizan que el aparato se mantiene
nivelado.
Puede que en algún
momento sea necesario
desenchufar el aparato de la
toma de corriente. por lo que
el enchufe debe quedar
accesible tras la instalación
del aparato.
ESPAÑOL 59
3.3 Colocación
Este aparato no está diseñado para
utilizarse empotrado.
Este aparato debe instalarse en una
ubicación interior seca y bien ventilada.
Solo se puede garantizar el correcto
funcionamiento del aparato dentro del
rango de temperatura especificado. Este
aparato está destinado a ser utilizado a
una temperatura ambiente que oscila
entre 10°C y 43°C.
Si, debido a una instalación diferente, no
se respetan los requisitos de ventilación
adecuados, el aparato funcionará
correctamente pero el consumo de
energía podría aumentar ligeramente.
Si tiene cualquier duda
respecto al lugar de
instalación del aparato,
consulte al vendedor, a
nuestro servicio de atención
al cliente o al servicio
técnico autorizado más
cercano.
Se coloca el aparato contra
un muro, utilice los
separadores traseros
suministrados o mantenga la
distancia mínima indicada
en la sección
"Dimensiones".
PRECAUCIÓN!
Se instala el aparato junto
muro, consulte la sección
"Dimensiones" para conocer
la distancia mínima entre el
muro y el lado del aparato
donde se encuentran las
bisagras de la puerta para
dejar espacio suficiente para
abrir la puerta al retirar los
equipos internos (por
ejemplo, limpiar).
3.4 Conexión eléctrica
• Antes de conectar el aparato,
compruebe que el voltaje y la
frecuencia indicados en la placa de
datos técnicos se corresponden con
el suministro de la vivienda.
Page 60
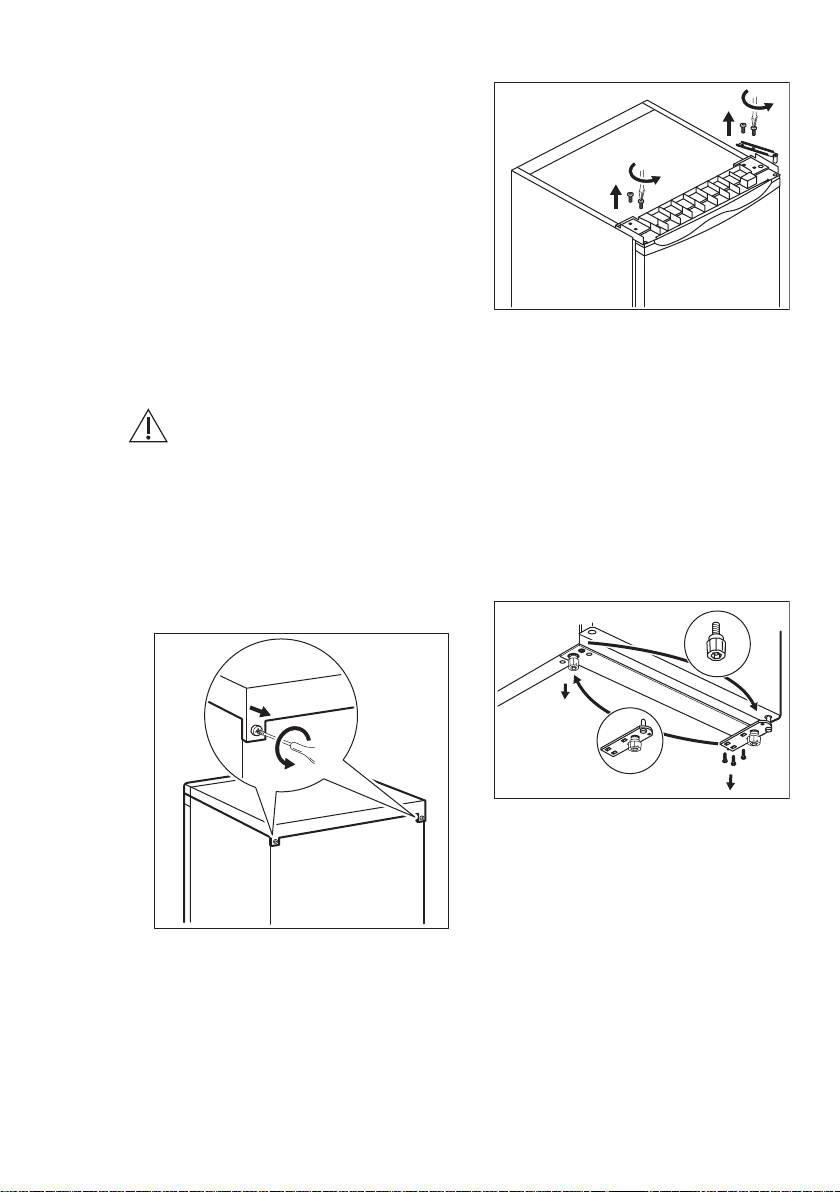
www.electrolux.com60
• El aparato debe conectarse a tierra.
El enchufe del cable de alimentación
se suministra con un contacto para tal
fin. Si la toma de red de la vivienda
carece de conexión a tierra, conecte
el aparato a una toma de tierra
conforme con la normativa, después
de consultar a un electricista
profesional
• El fabricante declina toda
responsabilidad si no se toman las
precauciones antes indicadas.
• Este aparato cumple las directivas
CEE.
3.5 Cambio del sentido de
apertura de la puerta
ADVERTENCIA!
Desenchufe siempre el
aparato antes de llevar a
cabo cualquier operación.
1. Asegúrese de que el aparato se
mantenga en posición vertical.
2. Abra la puerta y saque el equipo de
la puerta. Consulte "Uso diario".
Cierre la puerta.
3. Desatornille los tornillos de la parte
posterior de la cubierta superior.
5. Desatornille los 4 tornillos.
6. Levante la bisagra superior y
póngala en un lugar seguro junto con
los tornillos.
7. Levante la puerta y colóquela sobre
una superficie blanda.
8. Incline el aparato con cuidado sobre
un embalaje de espuma blanda o un
material similar para evitar cualquier
daño a la parte posterior del aparato
y al suelo.
9. Desatornille los tornillos de la bisagra
inferior y las patas ajustables.
10. Coloque el pasador en el orificio
opuesto de la bisagra.
4. Levante la cubierta superior y
colóquela sobre una superficie
blanda.
11. Atornille la bisagra inferior en el otro
lado del aparato.
12. Instale el soporte de goma en el lado
sin bisagra.
13. Encaje la puerta en la bisagra inferior
asegurándose de que el pasador de
la bisagra entra en el agujero inferior
de la puerta.
14. Coloque la bisagra superior en el
lado opuesto del aparato. Monte el
pasador de la bisagra superior en el
agujero superior de la puerta. Apriete
los tornillos.
Page 61
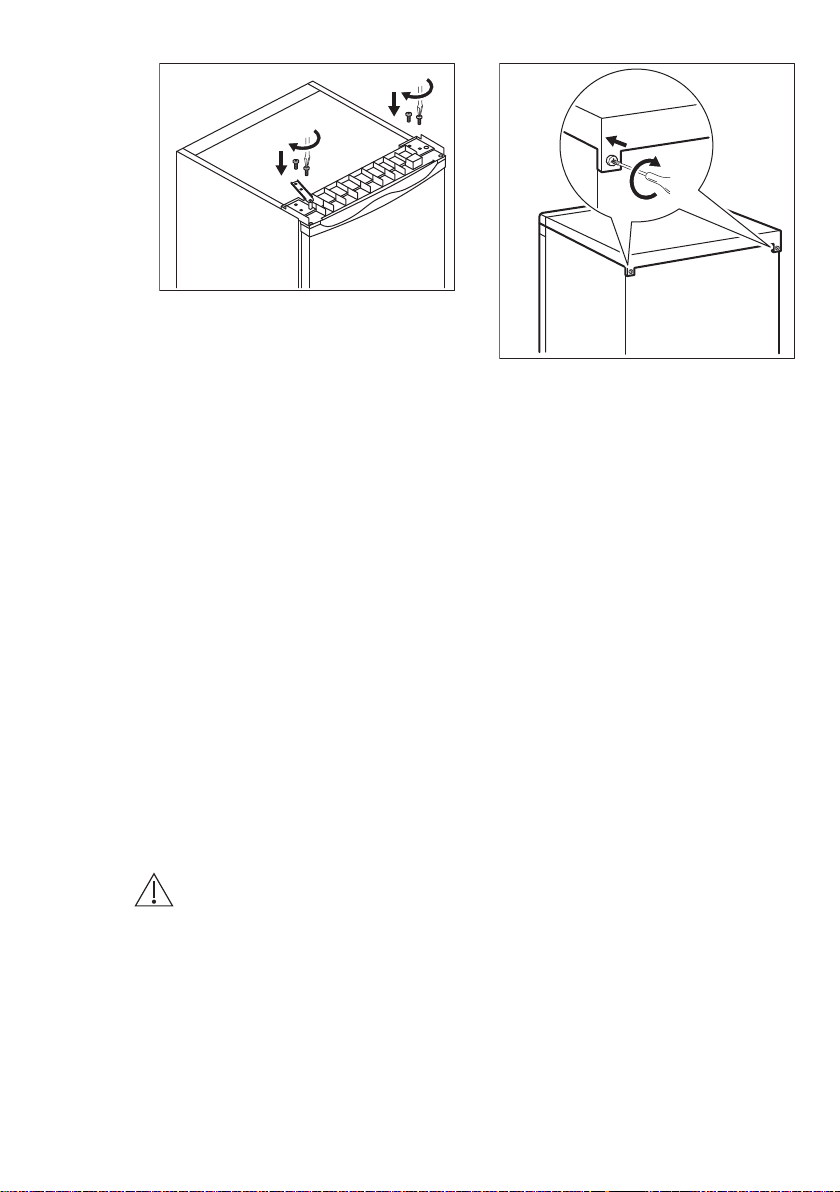
15. Atornille los 2 tornillos restantes en la
parte superior del aparato sin
bisagra.
16. Coloque la cubierta superior del
aparato y apriete los tornillos de la
parte posterior.
4. FUNCIONAMIENTO
ESPAÑOL 61
Instale el equipo de la puerta.
Espere al menos 4 horas antes de
conectar el aparato a la alimentación
eléctrica.
4.1 Encendido
Introduzca el enchufe en la toma de
pared.
4.2 Apagado
Para apagar el aparato, desenchufe el
enchufe de la toma de corriente.
4.3 Regulación de la temperatura
La temperatura se regula
automáticamente. Sin embargo, puede
5. USO DIARIO
ADVERTENCIA!
Consulte los capítulos sobre
seguridad.
5.1 Congelación de alimentos frescos
El compartimento del congelador es
adecuado para congelar alimentos
frescos y conservar a largo plazo los
alimentos congelados y ultracongelados.
configurar la temperatura del aparato
usted mismo.
El ajuste debe elegirse teniendo en
cuenta que la temperatura interior del
aparato depende de:
• temperatura ambiente,
• frecuencia de apertura de la puerta,
• cantidad de alimentos guardados,
• ubicación del aparato.
Lo más conveniente es ajustar la
temperatura en una posición intermedia.
Guarde los alimentos frescos distribuidos
uniformemente en el primero y segundo
compartimiento o cajón desde la parte
superior.
La cantidad máxima de alimentos que
pueden congelarse sin añadir otros
alimentos frescos durante 24 horas, se
indica en la placa de datos técnicos (una
etiqueta situada en el interior del
aparato).
Page 62
www.electrolux.com62
5.2 Conservación de alimentos
congelados
Al activar un aparato por primera vez o
después de un periodo sin uso, déjelo en
marcha al menos durante 3 horas antes
de colocar productos en el
compartimento.
Los cajones de congelados aseguran
una búsqueda fácil y rápida del paquete
de alimentos que se desea encontrar.
Cuando tenga que conservar grandes
cantidades de alimentos, quite todos los
cajones excepto el último, que debe
permanecer en su sitio para la correcta
circulación del aire.
Todos los alimentos deben estar como
mínimo a 15 mm de la puerta.
PRECAUCIÓN!
En caso de producirse una
descongelación accidental,
por ejemplo, por un corte del
suministro eléctrico, y si la
interrupción ha sido más
prolongada que el valor
indicado en el campo
"tiempo de elevación" de la
placa de características
técnicas, será necesario
consumir cuanto antes los
alimentos descongelados o
cocinarlos de inmediato,
enfriarlos y después
congelarlos de nuevo.
5.3 Descongelación
Los alimentos ultracongelados o
congelados, antes de utilizarlos, se
pueden descongelar en el frigorífico o a
temperatura ambiente, dependiendo del
tiempo de que se disponga.
Es posible incluso cocinar piezas
pequeñas congeladas, tomadas
directamente del congelador: en tal caso,
el tiempo de cocción será más
prolongado.
6. CONSEJOS
6.1 Consejos para ahorrar
energía
• La configuración interna del aparato
es la que garantiza el uso más
eficiente de la energía.
• No abra la puerta con frecuencia ni la
deje abierta más tiempo del
necesario.
• Cuanto más frío sea el ajuste de la
temperatura, mayor será el consumo
de energía.
• Asegure una buena ventilación. No
cubra las rejillas de ventilación ni los
agujeros.
6.2 Consejos sobre la congelación
• Antes de congelar, envuelva y selle
los alimentos frescos en: papel de
aluminio, film o bolsas de plástico,
envases herméticos con tapa.
• Para congelar y descongelar con más
eficacia, divida la comida en
porciones pequeñas.
• Se recomienda poner etiquetas y
fechas en todos sus alimentos
congelados. Esto ayudará a identificar
los alimentos y a saber cuándo deben
utilizarse antes de su deterioro.
• Los alimentos deben ser frescos al
congelarlos para preservar la buena
Page 63
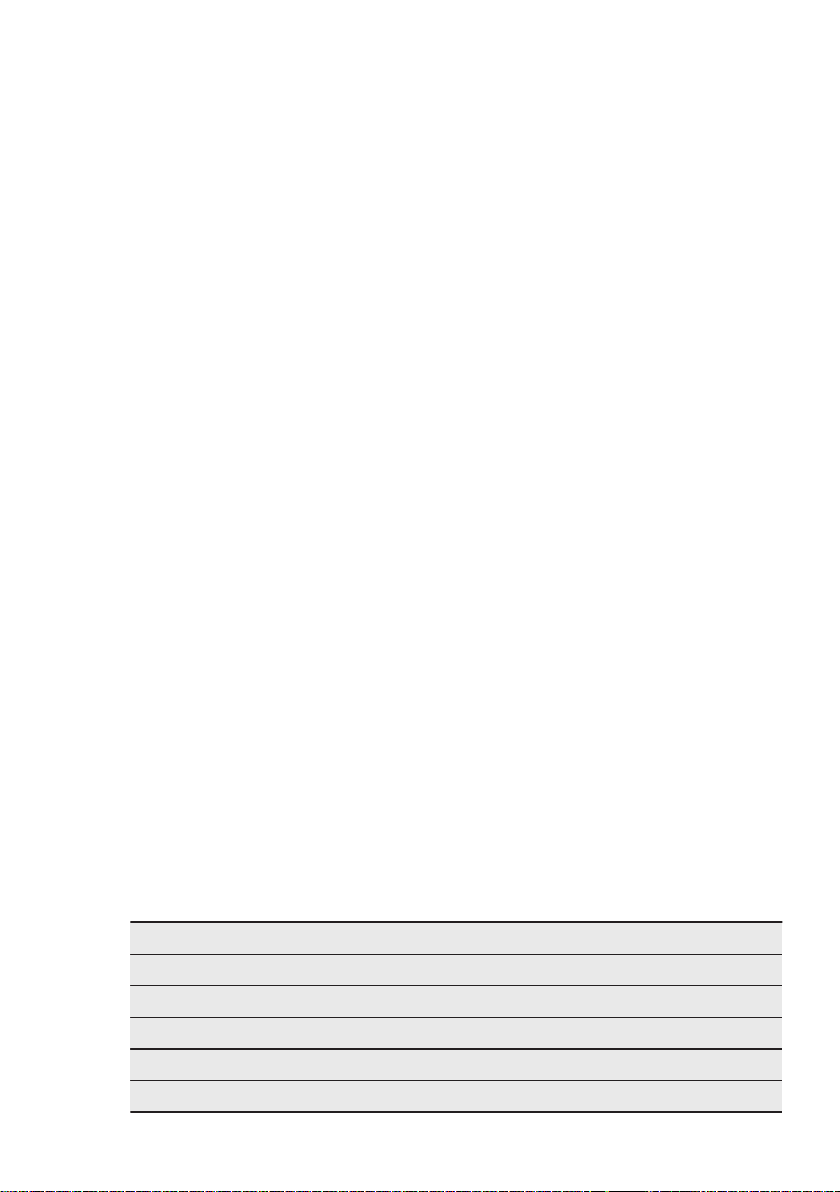
ESPAÑOL 63
calidad. Especialmente las frutas y
verduras deben ser congeladas
después de cosecharlos para
preservar todos sus nutrientes.
• No congele las botellas o latas con
líquidos, en particular las bebidas que
contienen dióxido de carbono, ya que
pueden explotar durante la
congelación.
• No coloque alimentos calientes en el
compartimiento del congelador.
Enfríelos a temperatura ambiente
antes de colocarlos dentro del
compartimento.
• Para evitar aumentos en la
temperatura de comida ya congelada,
no coloque comida no congelada
justo al lado. Coloque los alimentos a
temperatura ambiente en la parte del
compartimento del congelador donde
no hay alimentos congelados.
• No coma cubitos de hielo, sorbetes o
helados inmediatamente después de
sacarlos del congelador. Existe riesgo
de quemaduras.
• No vuelva a congelar los alimentos
descongelados. Si la comida se ha
descongelado, cocínela, enfríela y
luego congélela.
6.3 Consejos para el
almacenamiento de alimentos
congelados
• El ajuste de temperatura medio
asegura una buena conservación de
los alimentos congelados.
Una temperatura más alta en el
interior del aparato puede reducir la
vida útil.
• Todo el compartimento del
congelador es adecuado para el
almacenamiento de comida
congelada.
• Deje suficiente espacio alrededor de
los alimentos para permitir que el aire
circule libremente.
• Para un almacenamiento adecuado,
consulte la etiqueta de los envases de
alimentos para ver la vida útil de los
alimentos.
• Es importante envolver los alimentos
de tal manera que se evite que el
agua, la humedad o la condensación
entren en su interior.
6.4 Consejos de compra
Después de la compra:
• Asegúrese de que el envase no esté
dañado - los alimentos podrían estar
deteriorados. Si el paquete está
hinchado o mojado, es posible que no
se haya almacenado en condiciones
óptimas y que la descongelación ya
haya comenzado.
• Para limitar el proceso de
descongelación, compre los
productos congelados al final de su
compra en el supermercado y
transpórtelos en una bolsa térmica y
aislada.
• Ponga los alimentos congelados
inmediatamente en el congelador
después de volver de la tienda.
• Si la comida se ha descongelado
aunque sea parcialmente, no la
vuelva a congelar. Se debe consumir
lo antes posible.
• Respete la fecha de caducidad y la
información de almacenamiento del
paquete.
6.5 Vida útil
Tipo de alimento Vida útil (meses)
Pan 3
Frutas (excepto cítricos) 6 - 12
Verduras 8 - 10
Sobras sin carne 1 - 2
Lácteos:
Page 64
www.electrolux.com64
Tipo de alimento Vida útil (meses)
Mantequilla
Queso blando (p. ej. mozzarella)
Queso duro (p. ej. parmesano, cheddar)
Marisco:
Pescado graso (p. ej. salmón, caballa)
Pescado magro (p. ej. bacalao, platija)
Camarones
Almejas y mejillones desconchados
Pescado cocinado
Carne:
Aves
Carne de res
Cerdo
Cordero
Salchichas
Jamón
Sobras con carne
7. MANTENIMIENTO Y LIMPIEZA
6 - 9
3 - 4
6
2 - 3
4 - 6
12
3 - 4
1 - 2
9 - 12
6 - 12
4 - 6
6 - 9
1 - 2
1 - 2
2 - 3
ADVERTENCIA!
Consulte los capítulos sobre
seguridad.
7.1 Advertencias generales
PRECAUCIÓN!
Antes de realizar tareas de
mantenimiento, desenchufe
el aparato
Este aparato contiene
hidrocarburos en la unidad
de refrigeración por lo que
cualquier tarea de
mantenimiento o recarga
debe ser realizada por
personal técnico
homologado.
Los accesorios y las piezas
del aparato no deben
lavarse en el lavavajillas.
7.2 Limpieza del interior
Antes de utilizar el aparato por primera
vez, lave su interior y todos los
accesorios internos con agua templada y
jabón neutro para eliminar el típico olor
de los productos nuevos. A continuación,
seque todo bien.
PRECAUCIÓN!
No utilice detergentes,
polvos abrasivos ni
limpiadores a base de cloro
o aceite, ya que podrían
dañar el acabado.
7.3 Limpieza periódica
El equipo debe limpiarse de forma
regular:
1. Limpie el interior y los accesorios con
agua templada y un jabón neutro.
2. Revise y limpie periódicamente las
juntas de la puerta para mantenerlas
limpias y sin restos.
3. Aclare y seque a fondo.
Page 65
ESPAÑOL 65
7.4 Descongelación del aparato
PRECAUCIÓN!
No utilice herramientas
metálicas afiladas para
raspar la escarcha del
evaporador, ya que podría
dañarlo.
No utilice dispositivos
mecánicos ni medios
artificiales para acelerar el
proceso de descongelación,
excepto los recomendados
por el fabricante.
Unas 12 horas antes de
realizar la descongelación,
ajuste una temperatura más
baja con el fin de acumular
frío suficiente en caso de
una interrupción del
funcionamiento.
Descongele el compartimento del
congelador cuando la capa de escarcha
alcance un grosor de unos 3-5 mm.
Para descongelar el compartimento del
congelador:
1. Apague el aparato o desconecte el
enchufe de la toma de corriente.
2. Retire los alimentos congelados,
envuélvalos en varias hojas de papel
de periódico y colóquelos en un sitio
fresco.
PRECAUCIÓN!
El aumento de la
temperatura de los
paquetes de alimentos
congelados durante la
descongelación puede
acortar su tiempo de
almacenamiento.
No toque los alimentos
congelados con las
manos mojadas. Podrían
congelarse al contacto
con los alimentos.
3. Deje la puerta abierta. Proteja el
suelo del agua de la descongelación
p. ej., con un paño o recipiente
plano.
4. Para acelerar el proceso de
descongelación, coloque un
recipiente con agua tibia en el
compartimento congelador. Además,
retire los trozos de hielo que se
desprendan antes de que finalice la
descongelación.
5. Cuando la descongelación haya
terminado, seque a fondo el interior
del aparato.
6. Encienda el aparato y cierre la
puerta.
7. Ajuste el regulador de temperatura
para obtener el máximo frío y haga
funcionar el aparato durante tres
horas con dicho ajuste.
Solo después de este tiempo vuelva a
poner la comida en el congelador.
7.5 Periodos de inactividad
Si el aparato no se utiliza durante un
tiempo prolongado, tome las siguientes
precauciones:
1. Desconecte el aparato de la red
eléctrica.
2. Extraiga todos los alimentos.
3. Descongele (si fuera necesario) y
limpie el aparato y todos los
accesorios.
4. Deje la puerta o puertas abiertas
para que no se produzcan olores
desagradables.
8. SOLUCIÓN DE PROBLEMAS
ADVERTENCIA!
Consulte los capítulos sobre
seguridad.
Page 66
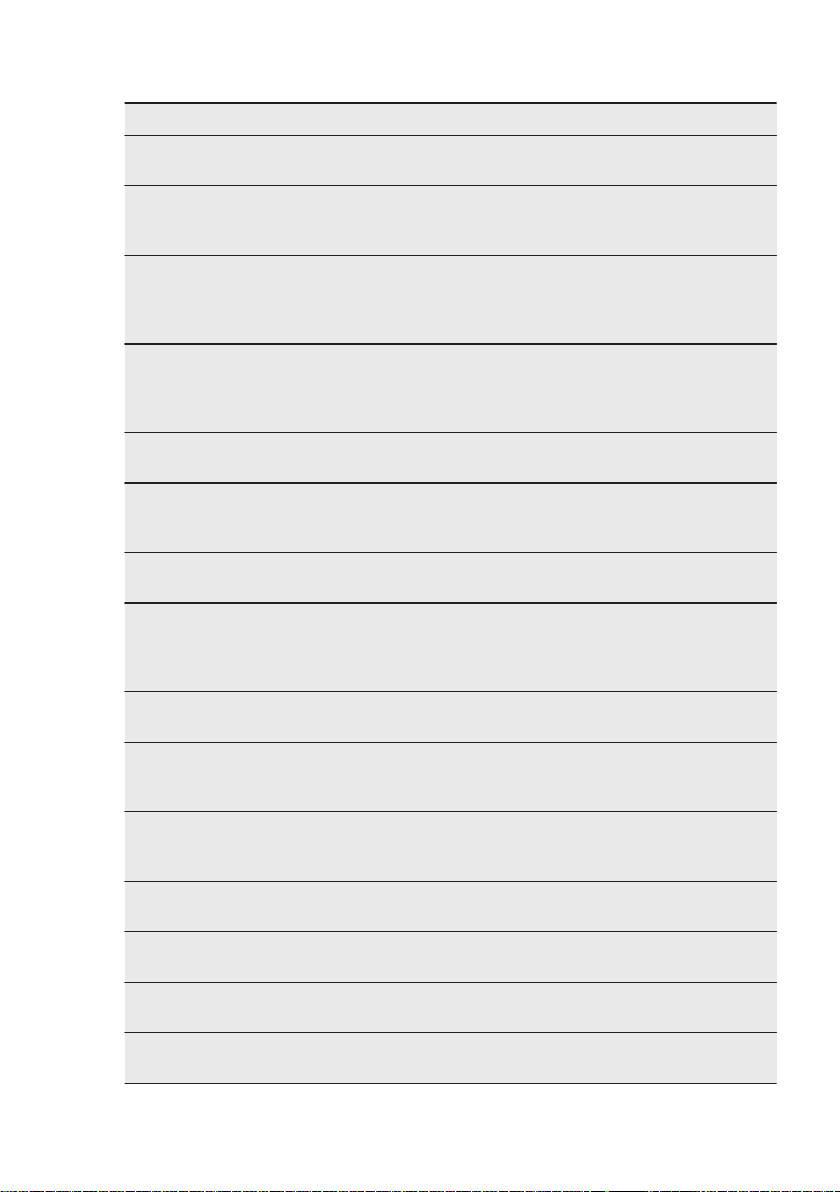
www.electrolux.com66
8.1 Qué hacer si...
Problema Posible causa Solución
El aparato no funciona. El aparato se apaga. Encienda el electrodomés‐
El aparato no está correc‐
No hay tensión en la toma
El aparato hace ruido. El aparato no está bien
El compresor funciona
continuamente.
Se han guardado muchos
La temperatura ambiente
Los alimentos introducidos
La puerta no está bien ce‐
La puerta está mal alinea‐
da o interfiere con la rejilla
de ventilación.
La puerta no se abre fácil‐
mente.
Hay demasiada escarcha
o hielo.
La junta de la puerta está
Los alimentos no están
La temperatura está ajus‐
tamente enchufado a la to‐
ma de corriente.
de corriente.
apoyado en el suelo.
La temperatura está ajus‐
tada incorrectamente.
alimentos al mismo tiempo.
es demasiado alta.
en el aparato estaban de‐
masiado calientes.
rrada.
El aparato no está nivela‐
do.
Ha intentado volver a abrir
la puerta inmediatamente
después de cerrarla.
La puerta no está bien ce‐
rrada.
sucia o deformada.
bien envueltos.
tada incorrectamente.
tico.
Enchufe el aparato correc‐
tamente a la toma de co‐
rriente.
Enchufe un aparato eléctri‐
co diferente a la toma de
corriente. Llame a un elec‐
tricista cualificado.
Compruebe que los sopor‐
tes del aparato descansan
sobre una superficie esta‐
ble.
Consulte el capítulo de
funcionamiento.
Espere unas horas y vuel‐
va a comprobar la tempe‐
ratura.
Consulte el capítulo "Insta‐
lación".
Deje que los alimentos se
enfríen a temperatura am‐
biente antes de almace‐
narlos.
Consulte la sección "Cierre
de la puerta".
Consulte las instrucciones
de instalación.
Espere unos segundos en‐
tre el cierre y la reapertura
de la puerta.
Consulte la sección "Cierre
de la puerta".
Consulte la sección "Cierre
de la puerta".
Envuelva mejor los produc‐
tos.
Consulte el capítulo de
funcionamiento.
Page 67
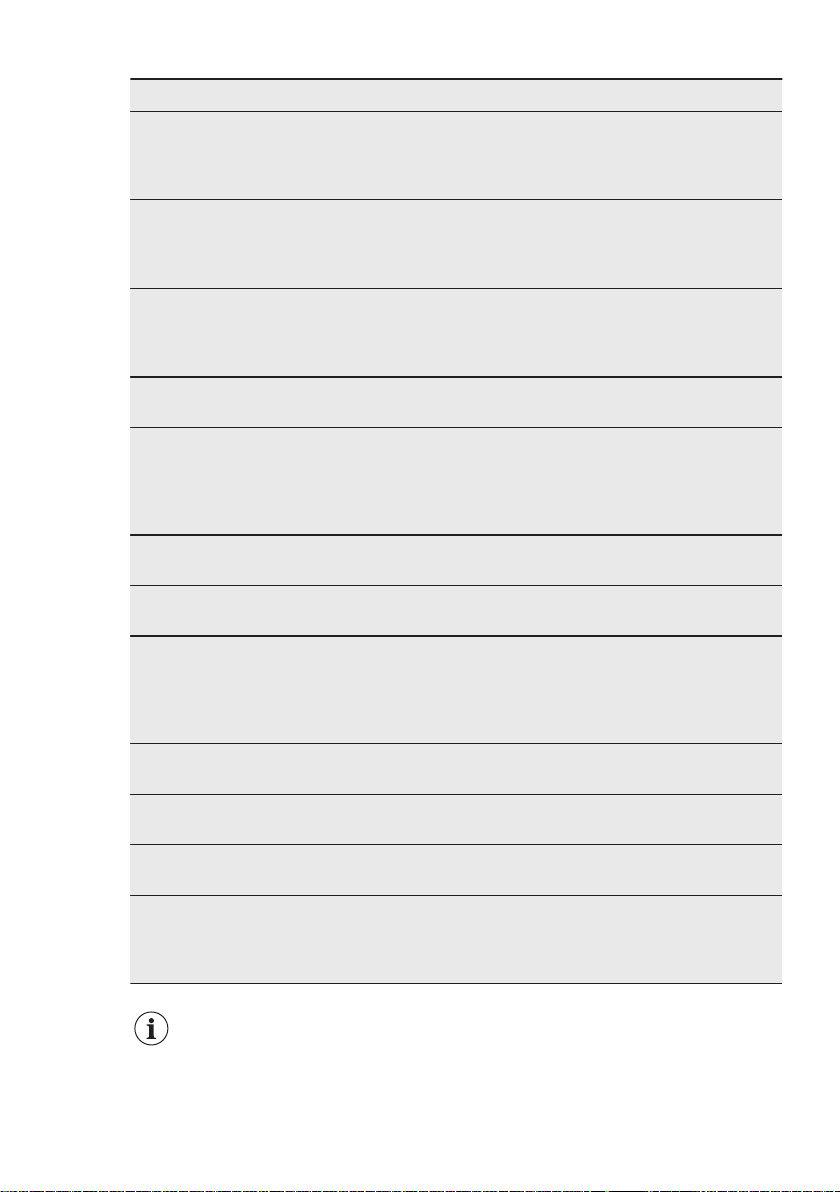
Problema Posible causa Solución
El aparato está completa‐
La temperatura ajustada
El agua fluye por el interior
del frigorífico.
Hay agua en el suelo. La salida de agua de la
La temperatura del aparato
es demasiado baja/alta.
La puerta no está bien ce‐
La temperatura de los pro‐
Se han guardado muchos
La puerta se ha abierto
No hay circulación de aire
mente cargado y ajustado
a la temperatura más baja.
en el aparato es demasia‐
do baja y la temperatura
ambiente demasiado alta.
Los productos impiden que
el agua fluya al colector de
agua.
La salida de agua está
obstruida.
descongelación no está
conectada a la bandeja de
evaporación situada sobre
el compresor.
La temperatura no se ha
ajustado correctamente.
rrada.
ductos es demasiado alta.
alimentos al mismo tiempo.
El grosor de la escarcha
es de más de 4-5 mm.
con frecuencia.
frío en el aparato.
Seleccione una temperatu‐
ra más alta. Consulte el
capítulo de funcionamien‐
to.
Seleccione una temperatu‐
ra más alta. Consulte el
capítulo de funcionamien‐
to.
Asegúrese de que los ali‐
mentos no entran en con‐
tacto con la placa poste‐
rior.
Limpie la salida de agua.
Fije la salida de agua de
descongelación a la ban‐
deja de evaporación.
Seleccione una temperatu‐
ra más alta o baja.
Consulte la sección "Cierre
de la puerta".
Deje que la temperatura
de los productos descien‐
da a la temperatura am‐
biente antes de guardar‐
los.
Guarde menos productos
al mismo tiempo.
Descongele el aparato.
Si es necesario, cierre la
puerta.
Compruebe que el aire frío
circula libremente en el
aparato. Consulte el capí‐
tulo "Consejos".
ESPAÑOL 67
Si el consejo anterior no
ofrece resultados, llame al
servicio técnico autorizado
más cercano.
8.2 Cierre de la puerta
1. Limpie las juntas de la puerta.
2. Si es necesario, ajuste la puerta.
Consulte el capítulo "Instalación".
Page 68
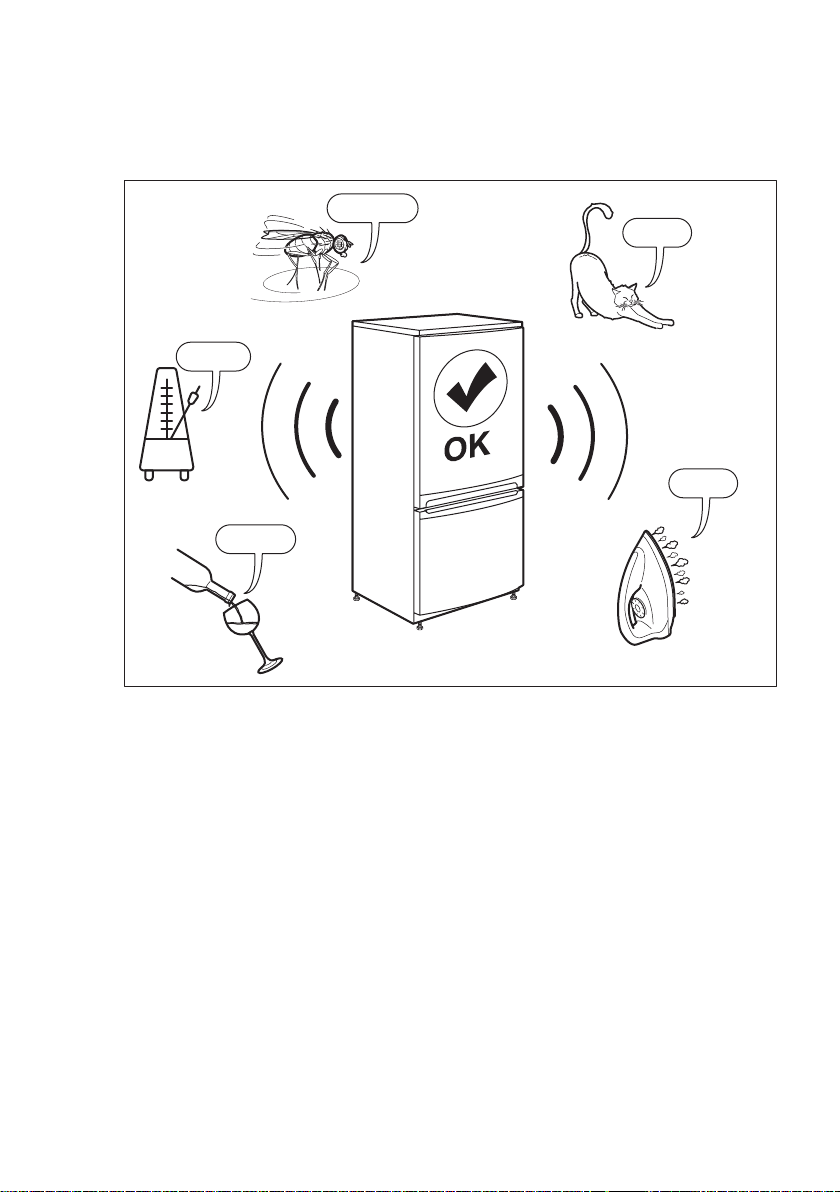
SSSRRR!
CLICK!
HISSS!
BRRR!
BLUBB!
www.electrolux.com68
3. Si es necesario, cambie las juntas
defectuosas. Póngase en contacto
con el servicio técnico autorizado.
9. RUIDOS
10. DATOS TÉCNICOS
La información técnica se encuentra en
la placa de datos técnicos en el lado
interior izquierdo del aparato y en la
etiqueta de energía.
El código QR de la etiqueta energética
suministrada con el aparato proporciona
un enlace web a la información
relacionada con el rendimiento del
aparato en la base de datos de EU
EPREL. Guarde la etiqueta de energía
como referencia junto con el manual de
usuario y todos los demás documentos
que se proporcionan con este aparato.
También puede encontrar la misma
información en EPREL utilizando el
enlace
https://eprel.ec.europa.eu
nombre del modelo y el número de
producto que se encuentra en la placa
de características del aparato.
Consulte el enlace
www.theenergylabel.eu
detallada sobre la etiqueta energética.
para información
y el
Page 69
11. INFORMACIÓN PARA LOS INSTITUTOS DE PRUEBAS
ESPAÑOL 69
La instalación y la preparación del
aparato para cualquier verificación de
EcoDiseño deberá cumplir con EN
62552. Los requisitos de ventilación, las
dimensiones de los huecos y las
distancias mínimas traseras serán los
indicados en el Capítulo 3 de este
Manual de Usuario. Por favor, póngase
en contacto con el fabricante para
cualquier otra información adicional,
incluyendo los planos de carga.
12. ASPECTOS MEDIOAMBIENTALES
Recicle los materiales con el símbolo .
Coloque el material de embalaje en los
contenedores adecuados para su
reciclaje. Ayude a proteger el medio
ambiente y la salud pública, así como a
reciclar residuos de aparatos eléctricos y
electrónicos. No deseche los aparatos
marcados con el símbolo junto con los
residuos domésticos. Lleve el producto a
su centro de reciclaje local o póngase en
contacto con su oficina municipal.
*
Page 70

Page 71

Page 72
www.electrolux.com/shop
804183041-B-372020
 Loading...