

Page 1
LNT3LF34W3
EN Fridge Freezer User Manual
Page 2
www.electrolux.com2
CONTENTS
1. SAFETY INFORMATION....................................................................................2
2. SAFETY INSTRUCTIONS..................................................................................4
3. INSTALLATION.................................................................................................. 6
4. CONTROL PANEL............................................................................................. 9
5. DAILY USE....................................................................................................... 10
6. HINTS AND TIPS............................................................................................. 12
7. CARE AND CLEANING....................................................................................14
8. TROUBLESHOOTING......................................................................................15
9. NOISES............................................................................................................ 19
10. TECHNICAL DATA.........................................................................................20
11. INFORMATION FOR TEST INSTITUTES......................................................20
WE’RE THINKING OF YOU
Thank you for purchasing an Electrolux appliance. You’ve chosen a product that
brings with it decades of professional experience and innovation. Ingenious and
stylish, it has been designed with you in mind. So whenever you use it, you can
be safe in the knowledge that you’ll get great results every time.
Welcome to Electrolux.
Visit our website for:
Get usage advice, brochures, trouble shooter, service and repair information:
www.electrolux.com/support
Register your product for better service:
www.registerelectrolux.com
Buy Accessories, Consumables and Original spare parts for your appliance:
www.electrolux.com/shop
CUSTOMER CARE AND SERVICE
Always use original spare parts.
When contacting our Authorised Service Centre, ensure that you have the
following data available: Model, PNC, Serial Number.
The information can be found on the rating plate.
Warning / Caution-Safety information
General information and tips
Environmental information
Subject to change without notice.
1. SAFETY INFORMATION
Before the installation and use of the appliance, carefully
read the supplied instructions. The manufacturer is not
responsible for any injuries or damage that are the result
Page 3

ENGLISH 3
of incorrect installation or usage. Always keep the
instructions in a safe and accessible location for future
reference.
1.1 Children and vulnerable people safety
• This appliance can be used by children aged from 8
years and above and persons with reduced physical,
sensory or mental capabilities or lack of experience
and knowledge if they have been given supervision or
instruction concerning the use of the appliance in a
safe way and understand the hazards involved.
• Children aged from 3 to 8 years are allowed to load
and unload the appliance provided that they have
been properly instructed.
• This appliance may be used by persons with very
extensive and complex disabilities provided that they
have been properly instructed.
• Children of less than 3 years of age should be kept
away from the appliance unless continuously
supervised.
• Do not let children play with the appliance.
• Children shall not carry out cleaning and user
maintenance of the appliance without supervision.
• Keep all packaging away from children and dispose of
it appropriately.
1.2 General Safety
• This appliance is intended to be used in household
and similar applications such as:
– Farm houses; staff kitchen areas in shops, offices
and other working environments;
– By clients in hotels, motels, bed and breakfast and
other residential type environments.
• To avoid contamination of food respect the following
instructions:
– do not open the door for long periods;
Page 4

www.electrolux.com4
– clean regularly surfaces that can come in contact
with food and accessible drainage systems;
– store raw meat and fish in suitable containers in the
refrigerator, so that it is not in contact with or drip
onto other food.
• WARNING: Keep ventilation openings, in the
appliance enclosure or in the built-in structure, clear of
obstruction.
• WARNING: Do not use mechanical devices or other
means to accelerate the defrosting process, other than
those recommended by the manufacturer.
• WARNING: Do not damage the refrigerant circuit.
• WARNING: Do not use electrical appliances inside the
food storage compartments of the appliance, unless
they are of the type recommended by the
manufacturer.
• Do not use water spray and steam to clean the
appliance.
• Clean the appliance with a moist soft cloth. Only use
neutral detergents. Do not use abrasive products,
abrasive cleaning pads, solvents or metal objects.
• When the appliance is empty for long period, switch it
off, defrost, clean, dry and leave the door open to
prevent mould from developing within the appliance.
• Do not store explosive substances such as aerosol
cans with a flammable propellant in this appliance.
• If the supply cord is damaged, it must be replaced by
the manufacturer, its Authorised Service Centre or
similarly qualified persons in order to avoid a hazard.
2. SAFETY INSTRUCTIONS
2.1 Installation
WARNING!
Only a qualified person must
install this appliance.
• Remove all the packaging.
• Do not install or use a damaged
appliance.
• Follow the installation instructions
supplied with the appliance.
• Always take care when moving the
appliance as it is heavy. Always use
safety gloves and enclosed footwear.
• Make sure the air can circulate
around the appliance.
• At first installation or after reversing
the door wait at least 4 hours before
Page 5
connecting the appliance to the power
supply. This is to allow the oil to flow
back in the compressor.
• Before carrying out any operations on
the appliance (e.g. reversing the
door), remove the plug from the
power socket.
• Do not install the appliance close to
radiators or cookers, ovens or hobs.
• Do not expose the appliance to the
rain.
• Do not install the appliance where
there is direct sunlight.
• Do not install this appliance in areas
that are too humid or too cold.
• When you move the appliance, lift it
by the front edge to avoid scratching
the floor.
2.2 Electrical connection
WARNING!
Risk of fire and electric
shock.
WARNING!
When positioning the
appliance, ensure the supply
cord is not trapped or
damaged.
WARNING!
Do not use multi-plug
adapters and extension
cables.
• The appliance must be earthed.
• Make sure that the parameters on the
rating plate are compatible with the
electrical ratings of the mains power
supply.
• Always use a correctly installed
shockproof socket.
• Make sure not to cause damage to
the electrical components (e.g. mains
plug, mains cable, compressor).
Contact the Authorised Service
Centre or an electrician to change the
electrical components.
• The mains cable must stay below the
level of the mains plug.
• Connect the mains plug to the mains
socket only at the end of the
installation. Make sure that there is
access to the mains plug after the
installation.
ENGLISH 5
• Do not pull the mains cable to
disconnect the appliance. Always pull
the mains plug.
2.3 Use
WARNING!
Risk of injury, burns, electric
shock or fire.
The appliance contains flammable
gas, isobutane (R600a), a natural gas
with a high level of environmental
compatibility. Be careful not to cause
damage to the refrigerant circuit
containing isobutane.
• Do not change the specification of this
appliance.
• Do not put electrical appliances (e.g.
ice cream makers) in the appliance
unless they are stated applicable by
the manufacturer.
• If damage occurs to the refrigerant
circuit, make sure that there are no
flames and sources of ignition in the
room. Ventilate the room.
• Do not let hot items to touch the
plastic parts of the appliance.
• Do not put soft drinks in the freezer
compartment. This will create
pressure on the drink container.
• Do not store flammable gas and liquid
in the appliance.
• Do not put flammable products or
items that are wet with flammable
products in, near or on the appliance.
• Do not touch the compressor or the
condenser. They are hot.
• Do not remove or touch items from
the freezer compartment if your hands
are wet or damp.
• Do not freeze again food that has
been thawed.
• Follow the storage instructions on the
packaging of frozen food.
• Wrap the food in any food contact
material before putting it in the freezer
compartment.
2.4 Internal lighting
WARNING!
Risk of electric shock.
Page 6
www.electrolux.com6
• The type of lamp used for this
appliance is for household appliances
only. Do not use it for house lighting.
2.5 Care and cleaning
WARNING!
Risk of injury or damage to
the appliance.
• Before maintenance, deactivate the
appliance and disconnect the mains
plug from the mains socket.
• This appliance contains hydrocarbons
in the cooling unit. Only a qualified
person must do the maintenance and
the recharging of the unit.
• Regularly examine the drain of the
appliance and if necessary, clean it. If
the drain is blocked, defrosted water
collects in the bottom of the
appliance.
2.6 Service
• To repair the appliance contact the
Authorised Service Centre. Use
original spare parts only.
• Please note that self-repair or nonprofessional repair can have safety
consequences and might void the
guarantee.
• The following spare parts will be
available for 7 years after the model
has been discontinued: thermostats,
temperature sensors, printed circuit
boards, light sources, door handles,
door hinges, trays and baskets.
Please note that some of these spare
parts are only available to
professional repairers, and that not all
spare parts are relevant for all
models.
• Door gaskets will be available for 10
years after the model has been
discontinued.
2.7 Disposal
WARNING!
Risk of injury or suffocation.
• Disconnect the appliance from the
mains supply.
• Cut off the mains cable and discard it.
• Remove the door to prevent children
and pets to be closed inside of the
appliance.
• The refrigerant circuit and the
insulation materials of this appliance
are ozone-friendly.
• The insulation foam contains
flammable gas. Contact your
municipal authority for information on
how to discard the appliance
correctly.
• Do not cause damage to the part of
the cooling unit that is near the heat
exchanger.
3. INSTALLATION
WARNING!
Refer to Safety chapters.
Page 7
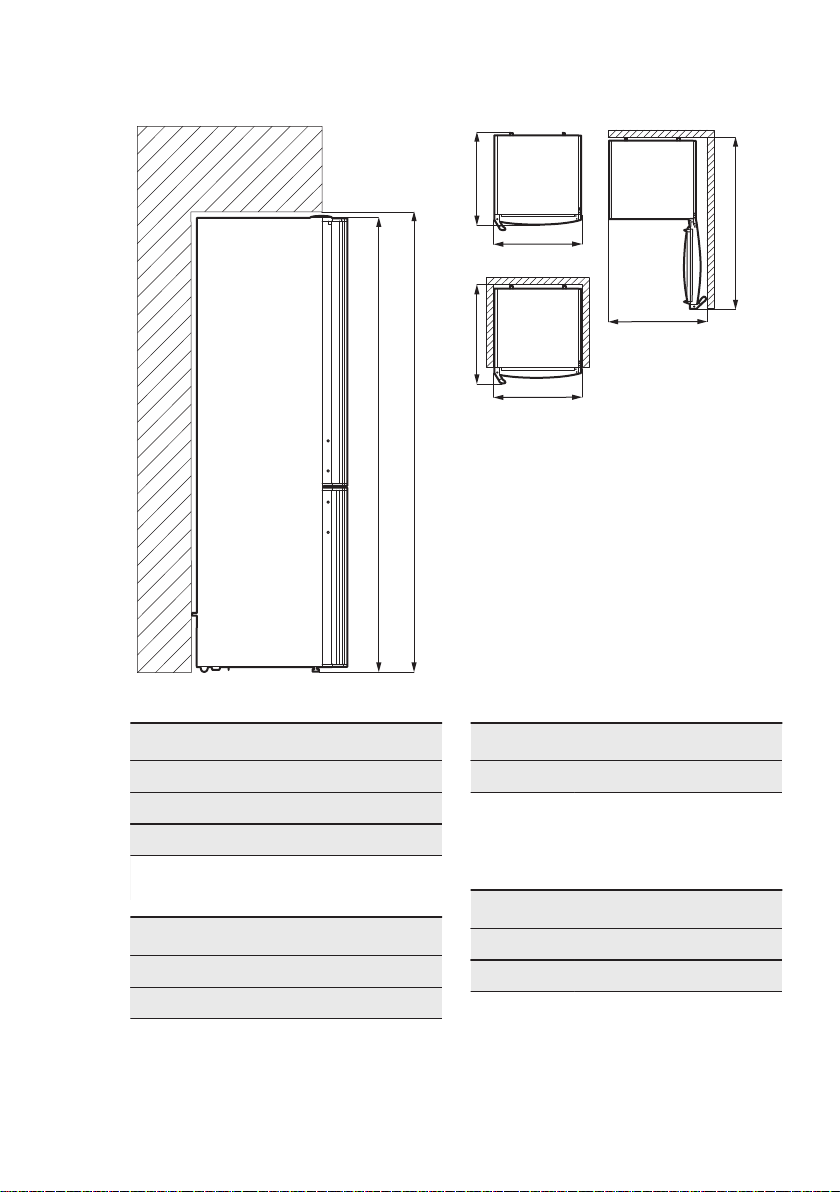
3.1 Dimensions
H1
H2
W1
D1
W2
D2
W3
D3
ENGLISH 7
Overall dimensions
1)
H1 mm 1850
W1 mm 595
D1 mm 647
1)
the height, width and depth of the appli‐
Space required in use
D2 mm 684
1)
the height, width and depth of the appli‐
ance including the handle, plus the space
necessary for free circulation of the cooling
air
1)
ance without the handle and feet
Overall space required in use
Space required in use
H2 mm 1950
W2 mm 660
1)
H2 mm 1950
W3 mm 795
1)
Page 8
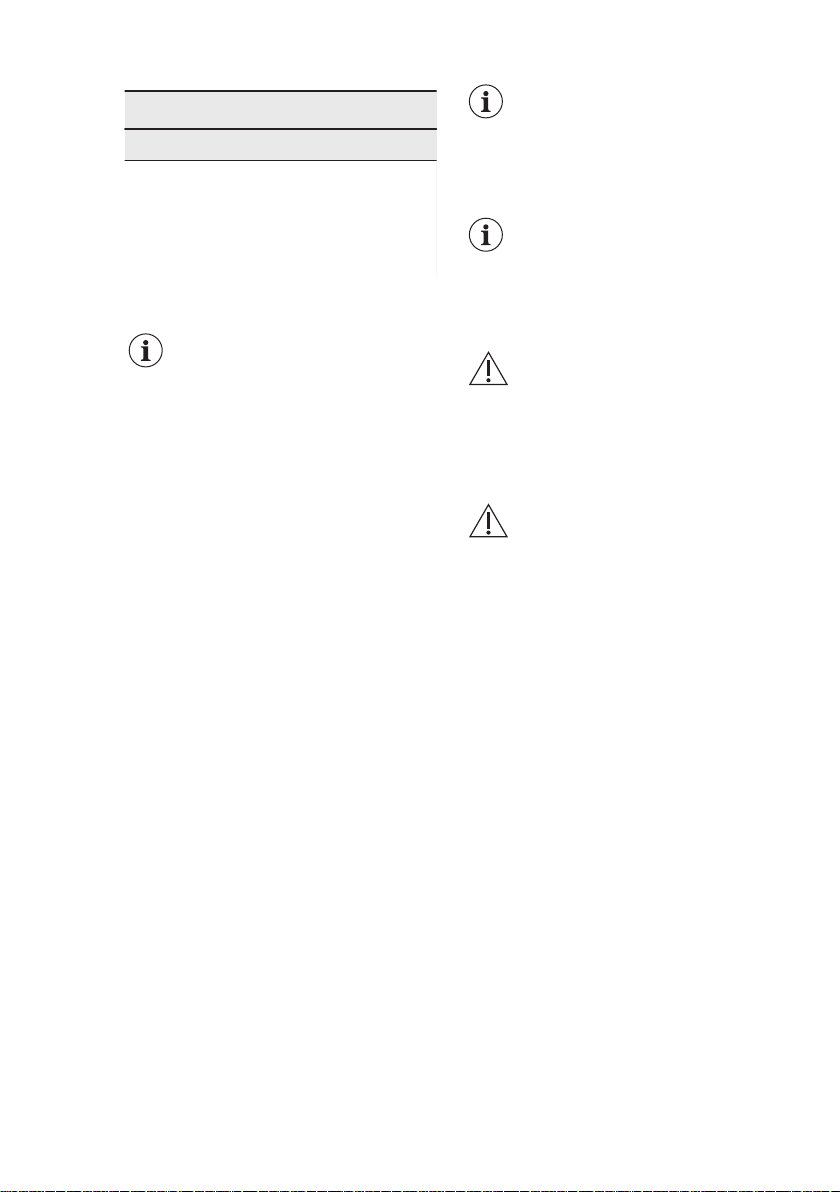
www.electrolux.com8
Overall space required in use
D3 mm 1189
1)
the height, width and depth of the appli‐
ance including the handle, plus the space
necessary for free circulation of the cooling
air, plus the space necessary to allow door
opening to the minimum angle permitting
removal of all internal equipment
1)
3.2 Location
Refer to the installation
instructions for the
installation.
To ensure appliance's best functionality,
you should not install the appliance in the
nearby of the heat source (oven, stoves,
radiators, cookers or hobs) or in a place
with direct sunlight. Make sure that air
can circulate freely around the back of
the cabinet.
To ensure best performance, if the
appliance is positioned below an
overhanging wall unit, the minimum
distance between the top of the cabinet
shall be maintained. Ideally, however,
the appliance should not be positioned
below overhanging wall units. One or
more adjustable feet at the base of the
cabinet ensure that the appliance stands
level.
3.3 Positioning
This appliance is not intended to be used
as a built-in appliance.
This appliance should be installed in a
dry, well ventilated indoor position.
This appliance is intended to be used at
ambient temperature ranging from 10°C
to 43°C.
If, due to different installation, proper
ventilation requirements are not
respected, the appliance will function
correctly but energy consumption might
increase slightly.
If you have any doubts
regarding where to install the
appliance, please turn to the
vendor, to our customer
service or to the nearest
Authorised Service Centre.
It must be possible to
disconnect the appliance
from the mains power
supply. The plug must
therefore be easily
accessible after installation.
CAUTION!
If you position the appliance
against the wall, use back
spacers provided or keep
the minimum distance
indicated in the installation
instructions.
CAUTION!
If you install the appliance
next to a wall, refer to the
installation instructions to
understand the minimum
distance between the wall
and the side of the appliance
where door hinges are to
provide enough space to
open the door when the
internal equipment is
removed (e.g. when
cleaning).
3.4 Electrical connection
• Before plugging in, ensure that the
voltage and frequency shown on the
rating plate correspond to your
domestic power supply.
• The appliance must be earthed. The
power supply cable plug is provided
with a contact for this purpose. If the
domestic power supply socket is not
earthed, connect the appliance to a
separate earth in compliance with
current regulations, consulting a
qualified electrician.
• The manufacturer declines all
responsibility if the above safety
precautions are not observed.
• This appliance complies with the
E.E.C. Directives.
Page 9

1 2 3 4 5 6
ENGLISH 9
3.5 Door reversibility
Please refer to the separate document
with instructions on installation and door
reversal.
4. CONTROL PANEL
Freezer temperature regulator
1
Alarm light
2
Power indicator light
3
FastFreeze indicator
4
4.1 Switching on
1. Insert the plug into the wall socket.
The power indicator light switches on.
2. Switch on the fridge.
Refer to 'Switching on the fridge'.
3. Switch on the freezer.
Refer to 'Switching on the freezer'.
4.2 Switching on the fridge
To switch on the fridge turn the fridge
temperature regulator clockwise to a
medium setting.
4.3 Switching on the freezer
To switch on the freezer turn the freezer
temperature regulator clockwise to a
medium setting.
4.4 Switching off
1. Switch off the fridge.
Refer to 'Switching off the fridge'.
2. Switch off the freezer.
Refer to 'Switching off the freezer'.
3. Disconnect the plug from the wall
socket.
The power indicator light switches off.
CAUTION!
At every stage of reversing
the door protect the floor
from scratching with a
durable material.
FastFreeze / Alarm reset button
5
Fridge temperature regulator
6
4.5 Switching off the fridge
To switch off the fridge turn the fridge
temperature regulator clockwise to the
'O' position.
4.6 Switching off the freezer
To switch off the freezer turn the freezer
temperature regulator clockwise to the
'O' position.
4.7 Temperature regulation
The temperature is regulated
automatically. However, you can set a
temperature inside the appliance
yourself.
Choose the setting keeping in mind that
the temperature inside the appliance
depends on:
• room temperature,
• frequency of opening the door,
• quantity of food stored,
• appliance location.
A medium setting is generally the most
suitable one.
Page 10
1
2
www.electrolux.com10
To operate the appliance:
1. Turn the temperature regulator
clockwise to obtain a lower
temperature inside the appliance.
2. Turn the temperature regulator
counterclockwise to obtain a higher
temperature inside the appliance.
If the ambient temperature is
high or the appliance is fully
loaded, and the appliance is
set to the lowest
temperatures, it may run
continuously causing frost to
form on the rear wall. In this
case the knobs should be
set to a higher temperature
or activate the FastFreeze to
allow automatic defrosting to
reduce energy consumption.
4.8 FastFreeze function
The FastFreeze function is used to
perform pre-freezing and fast freezing in
sequence in the freezer compartment.
This function accelerates the freezing of
fresh food and, at the same time,
protects food products already stored in
the freezer compartment from
undesirable warming.
To freeze fresh food activate
the FastFreeze function at
least 24 hours before placing
the food to complete prefreezing.
1. Activate the FastFreeze function by
pressing the FastFreeze.
The FastFreeze indicator switches on.
This function stops
automatically after 52 hours.
2. It is possible to deactivate the
function at any time by pressing the
FastFreeze.
The FastFreeze indicator switches off.
4.9 High temperature alarm
When there is a temperature increase in
the appliance (for example due to an
earlier power failure or opening of the
door) the alarm light flashes and the
sound is on.
The sound can be switched off by
pressing the alarm reset button.
When normal conditions are restored the
alarm light stops flashing and the sound
turns off automatically.
5. DAILY USE
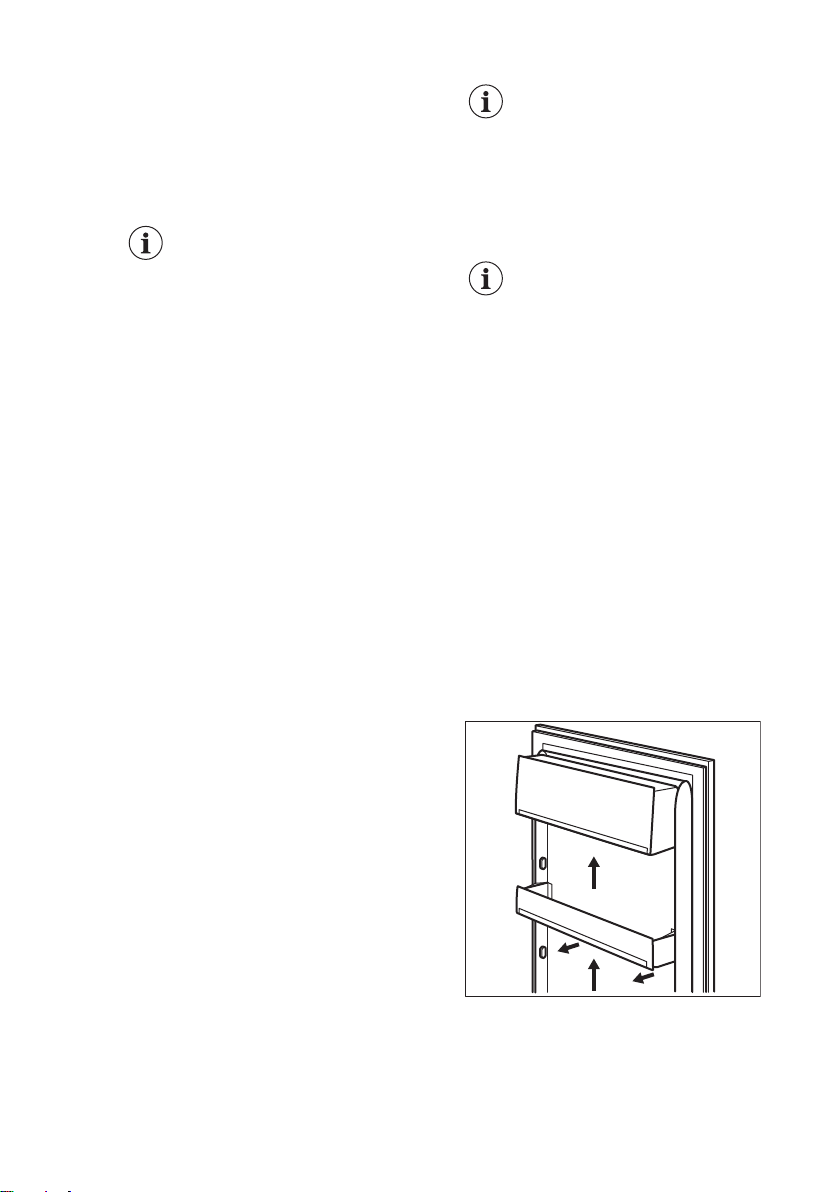
5.1 Positioning the door
shelves
To permit storage of food packages of
various sizes, the door shelves can be
placed at different heights.
1. Gradually pull the shelf up until it
comes free.
2. Reposition as required.
5.2 Movable shelves
The walls of the refrigerator are equipped
with a series of runners so that the
shelves can be positioned as desired.
Page 11
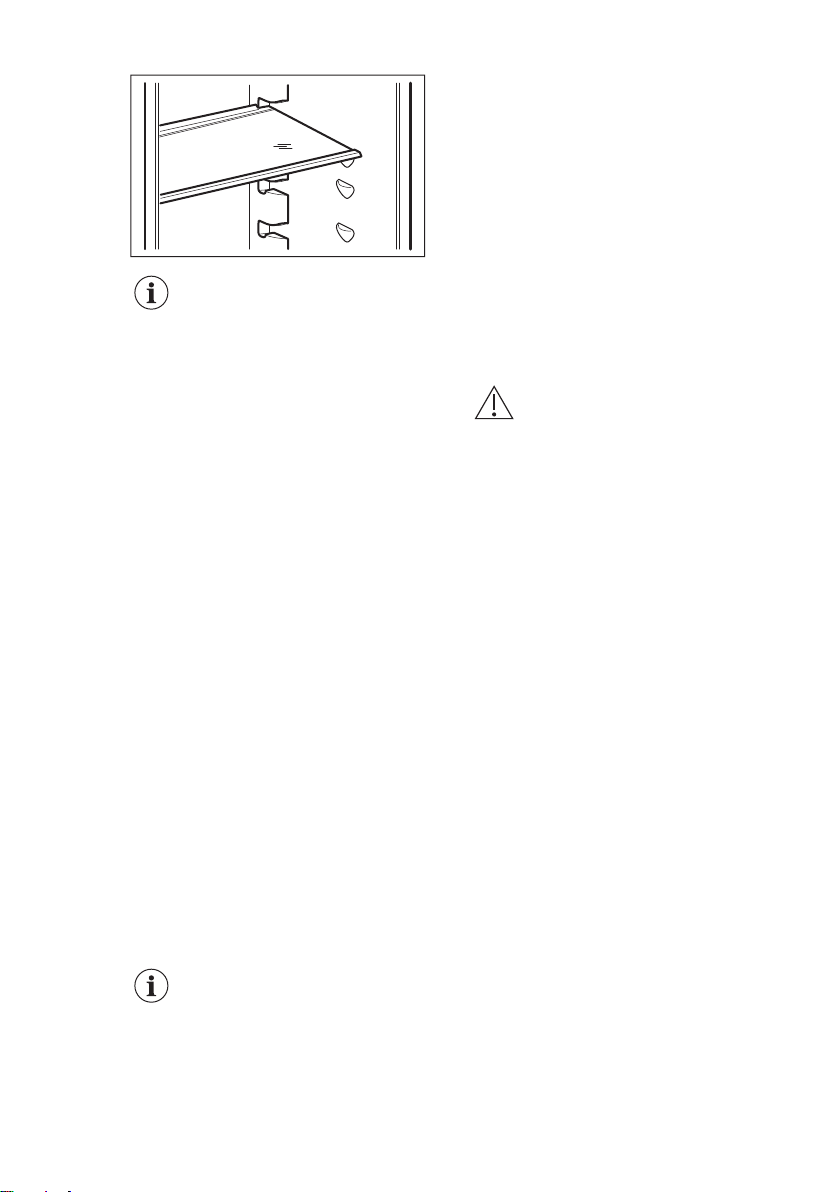
Do not move the glass shelf
above the vegetable drawer
to ensure correct air
circulation.
5.3 Vegetable drawers
There are special drawers in the bottom
part of the appliance suitable for storage
of fruits and vegetables.
5.4 Freezing fresh food
The freezer compartment is suitable for
freezing fresh food and storing frozen
and deep-frozen food for a long time.
To freeze small amount of fresh food it is
not necessary to change the present
setting.
To freeze fresh food activate the
FastFreeze function at least 24 hours
before placing the food to be frozen in
the freezer compartment.
Store the fresh food evenly distributed in
the first compartment or drawer from the
top.
The maximum amount of food that can
be frozen without adding other fresh food
during 24 hours is specified on the rating
plate (a label located inside the
appliance).
When the freezing process is complete,
return to the required temperature (see
"FastFreeze Function").
In this condition, the
refrigerator compartment
temperature might drop
below 0°C. If this occurs
reset the temperature
regulator to a warmer
setting.
ENGLISH 11
5.5 Storage of frozen food
When activating an appliance for the first
time or after a period out of use, before
putting the products in the compartment
let the appliance run at least 3 hours with
the FastFreeze function switched on.
The freezer drawers ensure that it is
quick and easy to find the food package
you want. If large quantities of food are
to be stored, remove all drawers, except
for the bottom drawer which needs to be
in place to provide good air circulation.
Keep the food no closer than 15 mm
from the door.
CAUTION!
In the event of accidental
defrosting, for example due
to a power failure, if the
power has been off for
longer than the value shown
on rating plate under "rising
time", the defrosted food
must be consumed quickly
or cooked immediately then
cooled and then re-frozen.
Refer to "High temperature
alarm".
5.6 Thawing
Deep-frozen or frozen food, prior to
being consumed, can be thawed in the
refrigerator or inside a plastic bag under
cold water.
This operation depends on the time
available and on the type of food. Small
pieces may even be cooked still frozen.
Page 12

www.electrolux.com12
6. HINTS AND TIPS
6.1 Hints for energy saving
• Freezer: The internal configuration of
the appliance is the one that ensures
the most efficient use of energy.
• Fridge: Most efficient use of energy is
ensured in the configuration with the
drawers in the bottom part of the
appliance and shelves evenly
distributed. Position of the door bins
does not affect energy consumption.
• Do not open the door frequently or
leave it open longer than necessary.
• Freezer: The colder the temperature
setting, the higher the energy
consumption.
• Fridge: Do not set too high
temperature to save energy unless it
is required by the characteristics of
the food.
• If the ambient temperature is high and
the temperature control is set to low
temperature and the appliance is fully
loaded, the compressor may run
continuously, causing frost or ice
formation on the evaporator. In this
case, set the temperature control
toward higher temperature to allow
automatic defrosting and to save
energy this way.
• Ensure a good ventilation. Do not
cover the ventilation grilles or holes.
6.2 Hints for freezing
• Activate FastFreeze function at least
24 hours before placing the food
inside the freezer compartment.
• Before freezing wrap and seal fresh
food in: aluminium foil, plastic film or
bags, airtight containers with lid.
• For more efficient freezing and
thawing divide food into small
portions.
• It is recommended to put labels and
dates on all your frozen food. This will
help to identify foods and to know
when they should be used before their
deterioration.
• The food should be fresh when being
frozen to preserve good quality.
Especially fruits and vegetables
should be frozen after the harvest to
preserve all of their nutrients.
• Do not freeze bottles or cans with
liquids, in particular drinks containing
carbon dioxide - they may explode
during freezing.
• Do not put hot food in the freezer
compartment. Cool it down at room
temperature before placing it inside
the compartment.
• To avoid increase in temperature of
already frozen food, do not place
fresh unfrozen food directly next to it.
Place food at room temperature in the
part of the freezer compartment
where there is no frozen food.
• Do not eat ice cubes, water ices or ice
lollies immediately after taking them
out of the freezer. Risk of frostbites.
• Do not re-freeze defrosted food. If the
food has defrosted, cook it, cool it
down and then freeze it.
6.3 Hints for storage of frozen
food
• The medium temperature setting
ensures good preservation of frozen
food products.
Higher temperature setting inside the
appliance may lead to shorter shelf
life.
• The whole freezer compartment is
suitable for storage of frozen food
products.
• Leave enough space around the food
to allow air to circulate freely.
• For adequate storage refer to food
packaging label to see the shelf life of
food.
• It is important to wrap the food in such
a way that prevents water, humidity or
condensation from getting inside.
6.4 Shopping tips
After grocery shopping:
• Ensure that the packaging is not
damaged - the food could be
deteriorated. If the package is swollen
or wet, it might have not been stored
in the optimal conditions and
defrosting may have already started.
• To limit the defrosting process buy
frozen goods at the end of your
Page 13
ENGLISH 13
grocery shopping and transport them
in a thermal and insulated cool bag.
• Place the frozen foods immediately in
the freezer after coming back from the
shop.
• If food has defrosted even partially, do
not re-freeze it. Consume it as soon
as possible.
• Respect the expiry date and the
storage information on the package.
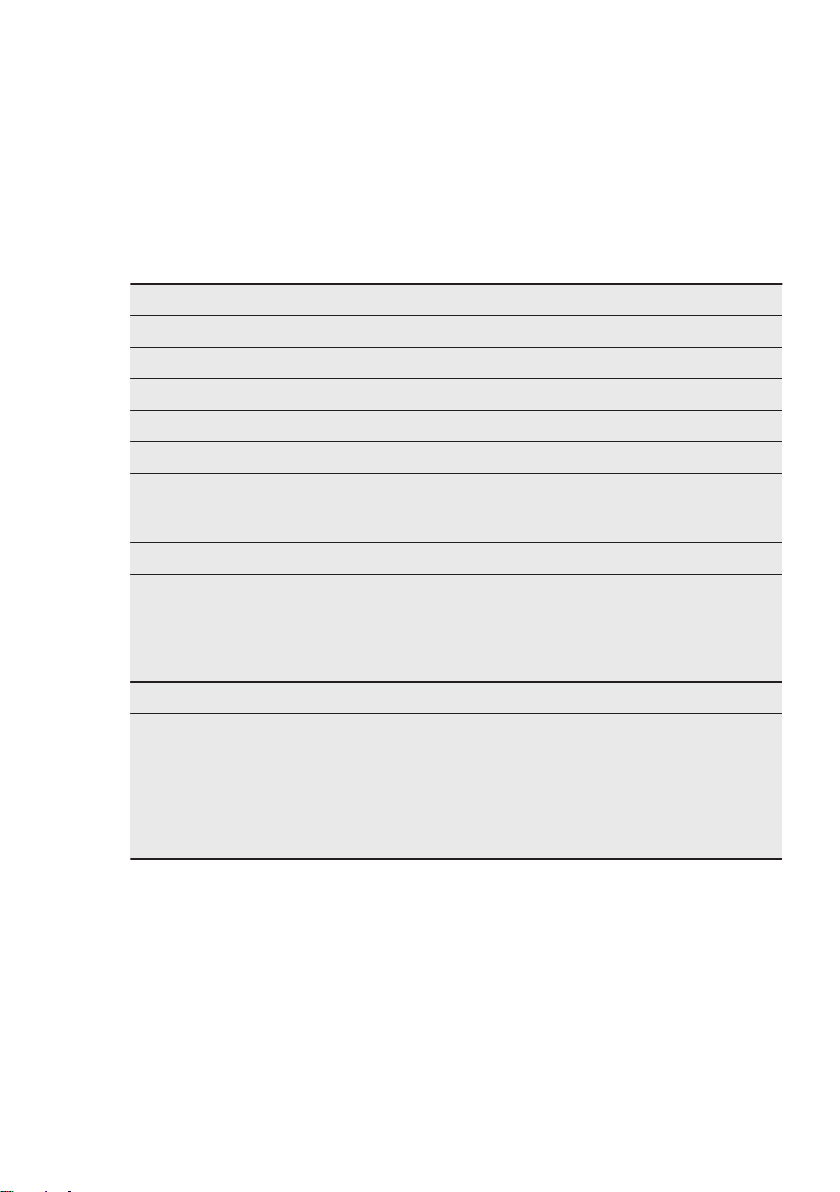
6.5 Shelf life for freezer compartment
Type of food Shelf life (months)
Bread 3
Fruits (except citrus) 6 - 12
Vegetables 8 - 10
Leftovers without meat 1 - 2
Dairy food:
Butter
Soft cheese (e.g. mozzarella)
Hard cheese (e.g. parmesan, cheddar)
Seafood:
Fatty fish (e.g. salmon, mackerel)
Lean fish (e.g. cod, flounder)
Shrimps
Shucked clams and mussels
Cooked fish
Meat:
Poultry
Beef
Pork
Lamb
Sausage
Ham
Leftovers with meat
6 - 9
3 - 4
6
2 - 3
4 - 6
12
3 - 4
1 - 2
9 - 12
6 - 12
4 - 6
6 - 9
1 - 2
1 - 2
2 - 3
6.6 Hints for fresh food refrigeration
• The medium temperature setting
ensures good preservation of fresh
food.
Higher temperature setting inside the
appliance may lead to shorter shelf
life of food.
• Cover the food with packaging to
preserve its freshness and aroma.
• Always use closed containers for
liquids and for food, to avoid flavours
or odours in the compartment.
• To avoid the cross-contamination
between cooked and raw food, cover
the cooked food and separate it from
the raw one.
• It is recommended to defrost the food
inside the fridge.
• Do not insert hot food inside the
appliance. Make sure it has cooled
down at room temperature before
inserting it.
Page 14
www.electrolux.com14
• To prevent food waste the new stock
of food should always be placed
behind the old one.
6.7 Hints for food refrigeration
• Meat (all types): wrap in a suitable
packaging and place it on the glass
shelf above the vegetable drawer.
Store meat for at most 1-2 days.
• Fruit and vegetables: clean thoroughly
(eliminate the soil) and place in a
special drawer (vegetable drawer).
• It is advisable not to keep the exotic
fruits like bananas, mangos, papayas
etc. in the refrigerator.
7. CARE AND CLEANING
• Vegetables like tomatoes, potatoes,
onions, and garlic should not be kept
in the refrigerator.
• Butter and cheese: place in an airtight
container or wrap in an aluminium foil
or a polythene bag to exclude as
much air as possible.
• Bottles: close them with a cap and
place them on the door bottle shelf, or
(if available) on the bottle rack.
• Always refer to the expiry date of the
products to know how long to keep
them.
WARNING!
Refer to Safety chapters.
7.1 Cleaning the interior
Before using the appliance for the first
time, the interior and all internal
accessories should be washed with
lukewarm water and some neutral soap
to remove the typical smell of a brandnew product, then dried thoroughly.
CAUTION!
Do not use detergents,
abrasive powders, chlorine
or oil-based cleaners as they
will damage the finish.
CAUTION!
The accessories and parts of
the appliance are not
suitable for washing in a
dishwasher.
7.2 Periodic cleaning
The equipment has to be cleaned
regularly:
1. Clean the inside and accessories
with lukewarm water and some
neutral soap.
2. Regularly check the door seals and
wipe them clean to ensure they are
clean and free from debris.
3. Rinse and dry thoroughly.
7.3 Defrosting of the
refrigerator
Frost is automatically eliminated from the
evaporator of the refrigerator
compartment during normal use. The
defrost water drains out through a trough
into a special container at the back of the
appliance, over the motor compressor,
where it evaporates.
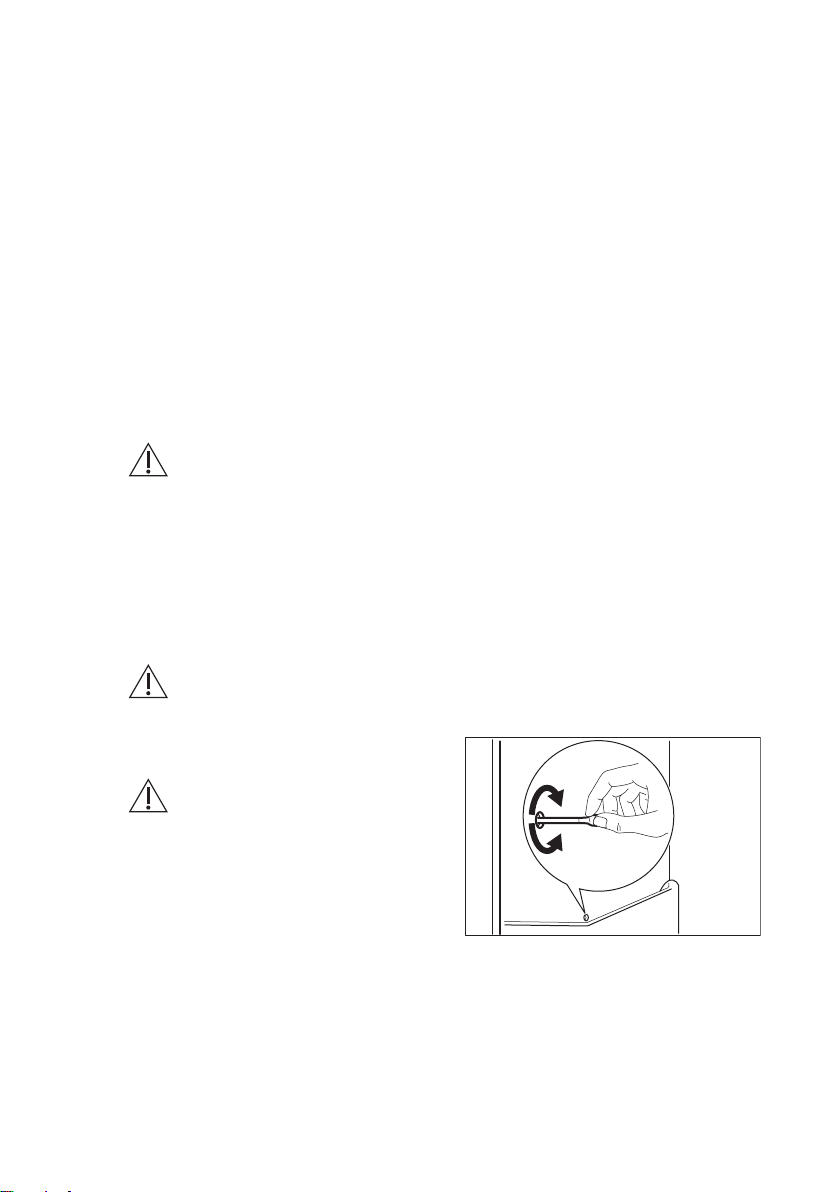
It is important to periodically clean the
defrost water drain hole in the middle of
the refrigerator compartment channel to
prevent the water overflowing and
dripping onto the food inside.
Page 15
7.4 Defrosting of the freezer
CAUTION!
Never use sharp metal tools
to scrape off frost from the
evaporator as you could
damage it.
Do not use a mechanical
device or any artificial
means to speed up the
thawing process other than
those recommended by the
manufacturer.
About 12 hours prior to
defrosting set a lower
temperature in order to build
up sufficient chill reserve in
case of any interruption in
operation.
A certain amount of frost will always form
on the freezer shelves and around the
top compartment.
Defrost the freezer when the frost layer
reaches a thickness of about 3-5 mm.
1. Switch off the appliance or pull out
electrical plug from the wall socket.
2. Remove any stored food and put it in
a cool place.
CAUTION!
A temperature rise of the
frozen food packs during
defrosting may shorten
their safe storage life.
Do not touch frozen
goods with wet hands.
Hands can freeze to the
goods.
ENGLISH 15
3. Leave the door open. Protect the
floor from the defrosting water e.g.
with a cloth or a flat vessel.
4. In order to speed up the defrosting
process, place a pot of warm water in
the freezer compartment. In addition,
remove pieces of ice that break away
before defrosting is complete. Use
the supplied ice scraper for this
purpose.
5. When defrosting is complete, dry the
interior thoroughly. Keep the ice
scraper for the future use.
6. Switch on the appliance and close
the door.
7. Set the temperature regulator to
obtain the maximum coldness and
run the appliance for at least 3 hours
using this setting.
Only after this time put the food back into
the freezer compartment.
7.5 Period of non-operation
When the appliance is not in use for long
period, take the following precautions:
1. Disconnect the appliance from
electricity supply.
2. Remove all food.
3. Defrost the appliance.
4. Clean the appliance and all
accessories.
5. Leave the doors open to prevent
unpleasant smells.
8. TROUBLESHOOTING
WARNING!
Refer to Safety chapters.
8.1 What to do if...
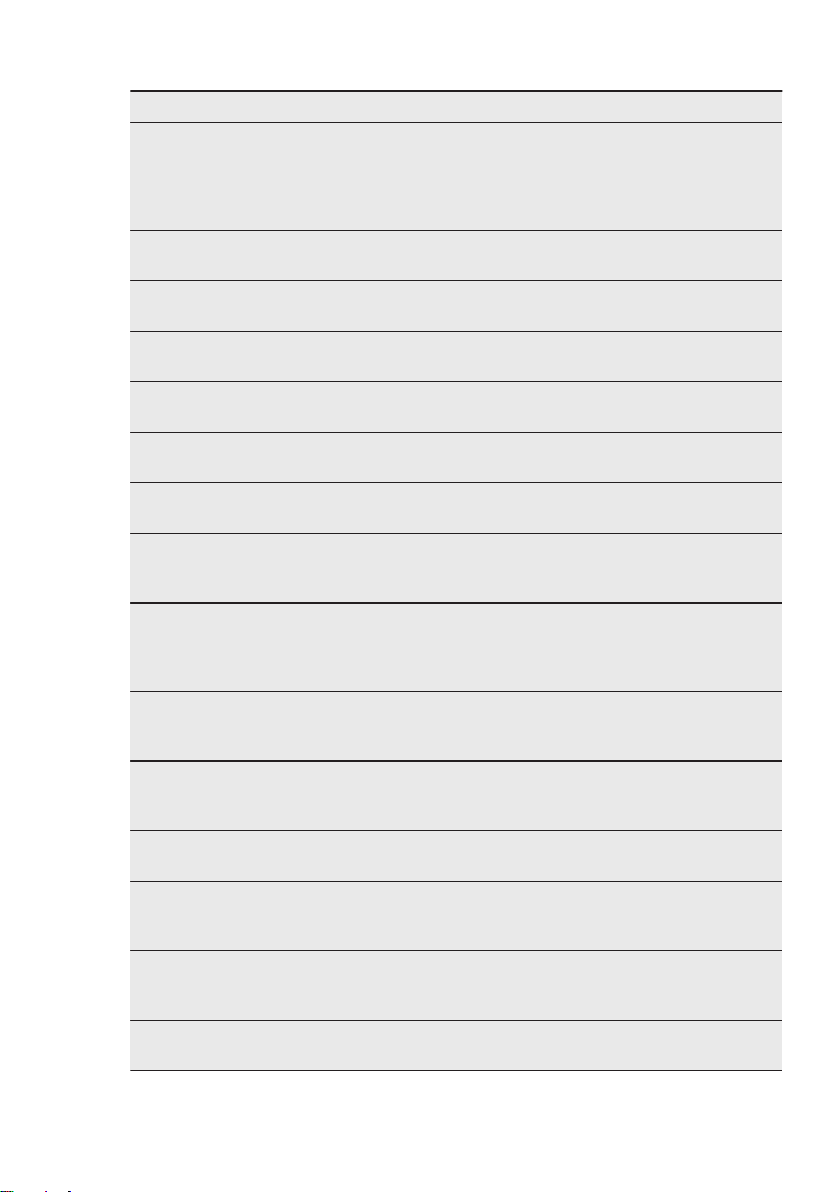
Problem Possible cause Solution
The appliance does not
operate.
The appliance is switched
off.
Switch on the appliance.
Page 16
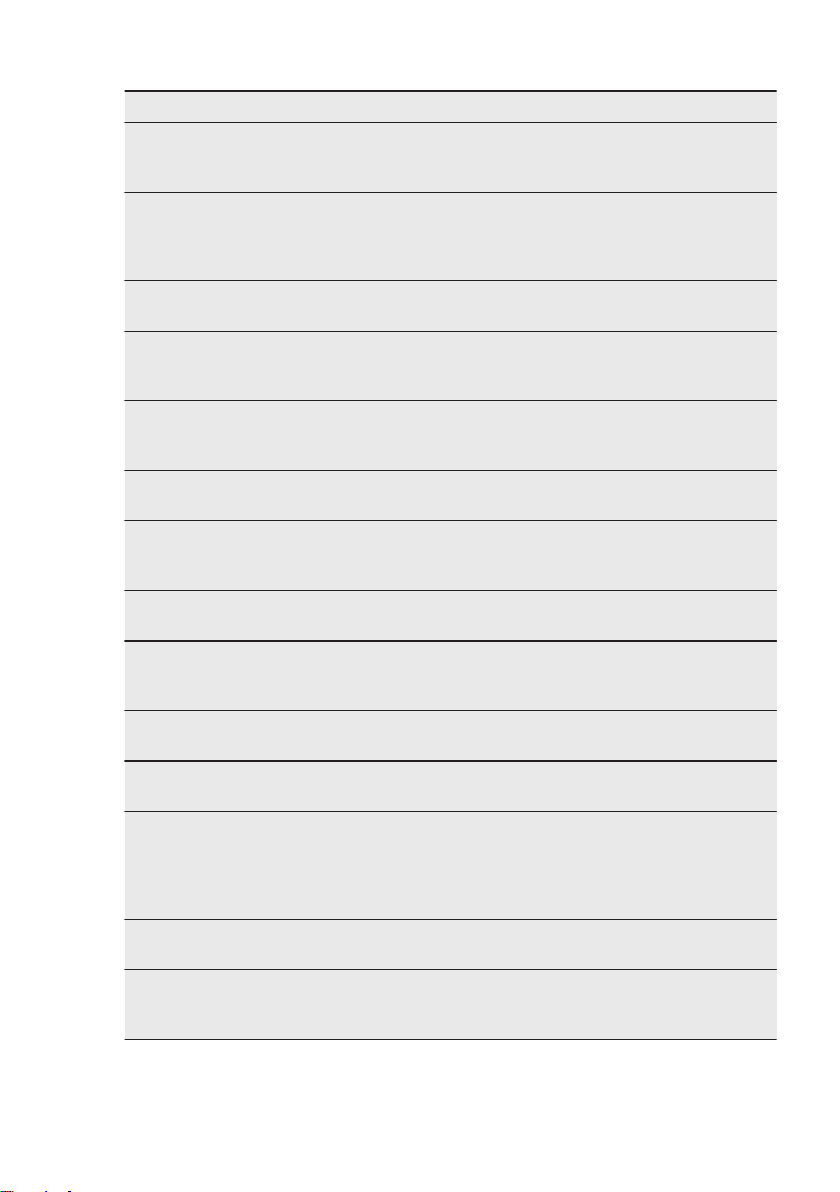
www.electrolux.com16
Problem Possible cause Solution
The mains plug is not con‐
nected to the mains socket
correctly.
There is no voltage in the
mains socket.
The appliance is noisy. The appliance is not sup‐
ported properly.
Acoustic or visual alarm is
on.
The cabinet has been re‐
cently switched on.
The temperature in the ap‐
pliance is too high.
The compressor operates
continually.
Temperature is set incor‐
rectly.
Many food products were
put in at the same time.
The room temperature is
too high.
Food products placed in
the appliance were too
warm.
The door is not closed cor‐
rectly.
The FastFreeze function is
switched on.
The compressor does not
start immediately after
The compressor starts af‐
ter a period of time.
pressing the "FastFreeze",
or after changing the tem‐
perature.
Door is misaligned or inter‐
feres with ventilation grill.
The appliance is not level‐
led.
Door does not open easily. You attempted to re-open
the door immediately after
closing.
Connect the mains plug to
the mains socket correctly.
Connect a different electri‐
cal appliance to the mains
socket. Contact a qualified
electrician.
Check if the appliance
stands stable.
Refer to "Door Open
Alarm" or "High Tempera‐
ture Alarm".
Refer to "Door Open
Alarm" or "High Tempera‐
ture Alarm".
Refer to "Control Panel"
chapter.
Wait a few hours and then
check the temperature
again.
Refer to "Installation" chap‐
ter.
Allow food products to cool
to room temperature be‐
fore storing.
Refer to "Closing the door"
section.
Refer to "FastFreeze func‐
tion" section.
This is normal, no error
has occurred.
Refer to installation instruc‐
tions.
Wait a few seconds be‐
tween closing and re-open‐
ing of the door.
Page 17
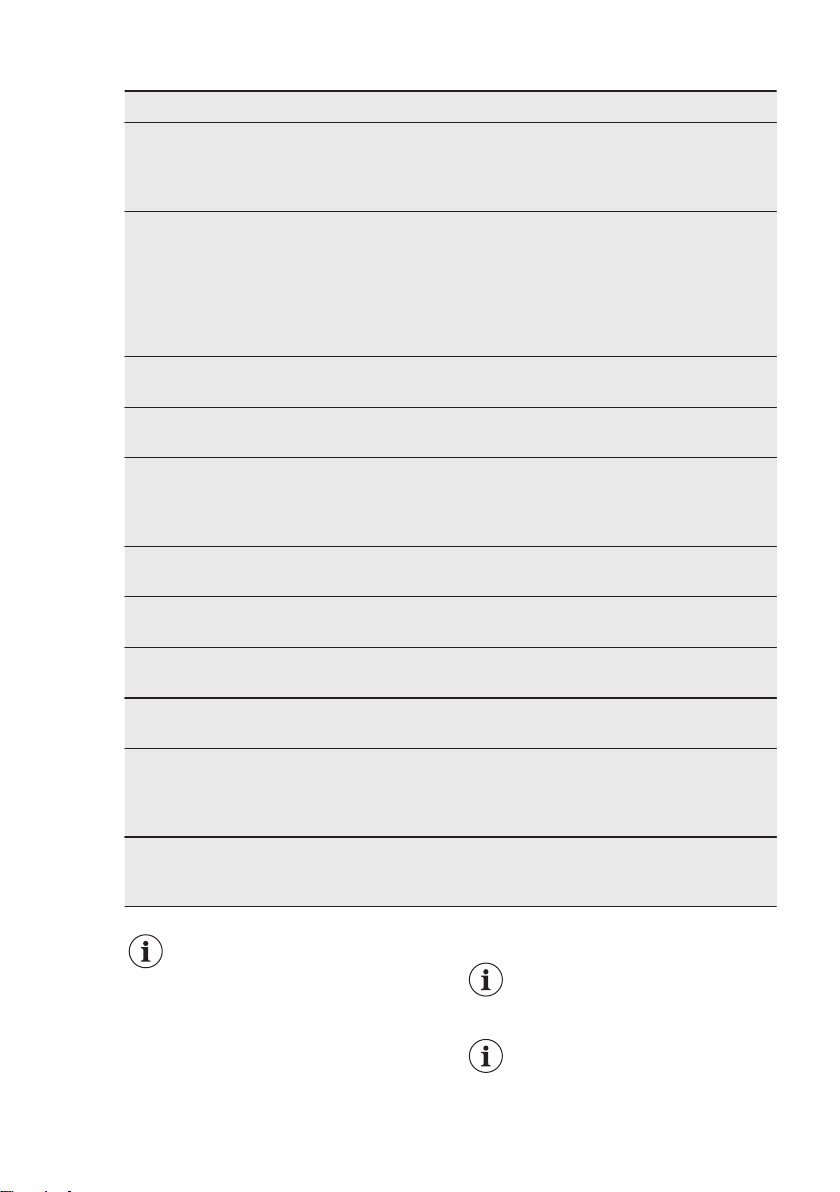
Problem Possible cause Solution
Side panels of the appli‐
ance are warm.
This is a normal state
caused by operation of the
heat exchanger.
Make sure that there is at
least 30 mm of space be‐
tween each side of the ap‐
pliance and the surround‐
ing furniture.
The lamp does not work. The lamp is in stand-by
Close and open the door.
mode.
The lamp is defective. Refer to "Replacing the
lamp" section.
There is too much frost
and ice.
The gasket is deformed or
Food products are not
Temperature is set incor‐
Appliance is fully loaded
Temperature set in the ap‐
The door is not closed cor‐
rectly.
dirty.
wrapped properly.
rectly.
and is set to the lowest
temperature.
pliance is too low and the
ambient temperature is too
Refer to "Closing the door"
section.
Refer to "Closing the door"
section.
Wrap the food products
better.
Refer to "Control Panel"
chapter.
Set a higher temperature.
Refer to "Control Panel"
chapter.
Set a higher temperature.
Refer to "Control Panel"
chapter.
high.
Water flows on the rear
plate of the refrigerator.
During the automatic de‐
frosting process, frost
This is correct.
melts on the rear plate.
There is too much con‐
densed water on the rear
Door was opened too fre‐
quently.
Open the door only when
necessary.
wall of the refrigerator.
Door was not closed com‐
pletely.
Stored food was not wrap‐
ped.
Make sure the door is
closed completely.
Wrap food in suitable
packaging before storing it
in the appliance.
Water flows inside the re‐
frigerator.
The water outlet is clog‐
Food products prevent the
water from flowing into the
water collector.
Make sure that food prod‐
ucts do not touch the rear
plate.
Clean the water outlet.
ged.
ENGLISH 17
Page 18
www.electrolux.com18
Problem Possible cause Solution
Water flows on the floor. The melting water outlet is
Temperature cannot be
set.
The temperature in the ap‐
pliance is too low/too high.
The door is not closed cor‐
The food products' temper‐
Many food products are
The door has been opened
Power indicator light flash‐
es.
not connected to the evap‐
orative tray above the com‐
pressor.
The "FastFreeze function"
is switched on.
The temperature is not set
correctly.
rectly.
ature is too high.
stored at the same time.
The thickness of the frost
is greater than 4-5 mm.
often.
The FastFreeze function is
switched on.
There is no cold air circula‐
tion in the appliance.
An error has occurred in
measuring the tempera‐
ture.
Attach the melting water
outlet to the evaporative
tray.
Switch off "FastFreeze
function" manually, or wait
until the function deacti‐
vates automatically to set
the temperature. Refer to
"FastFreeze function" sec‐
tion.
Set a higher/lower temper‐
ature.
Refer to "Closing the door"
section.
Let the food products tem‐
perature decrease to room
temperature before stor‐
age.
Store less food products at
the same time.
Defrost the appliance.
Open the door only if nec‐
essary.
Refer to "FastFreeze func‐
tion" section.
Make sure that there is
cold air circulation in the
appliance. Refer to "Hints
and Tips" chapter.
Contact a qualified electri‐
cian or the nearest Author‐
ized Service Centre.
If the advice does not lead to
the desired result, call the
nearest Authorized Service
Centre.
8.2 Replacing the lamp
The appliance is equipped
with a long-life LED interior
light.
It is strongly recommended
to use original spare parts
only.
Page 19
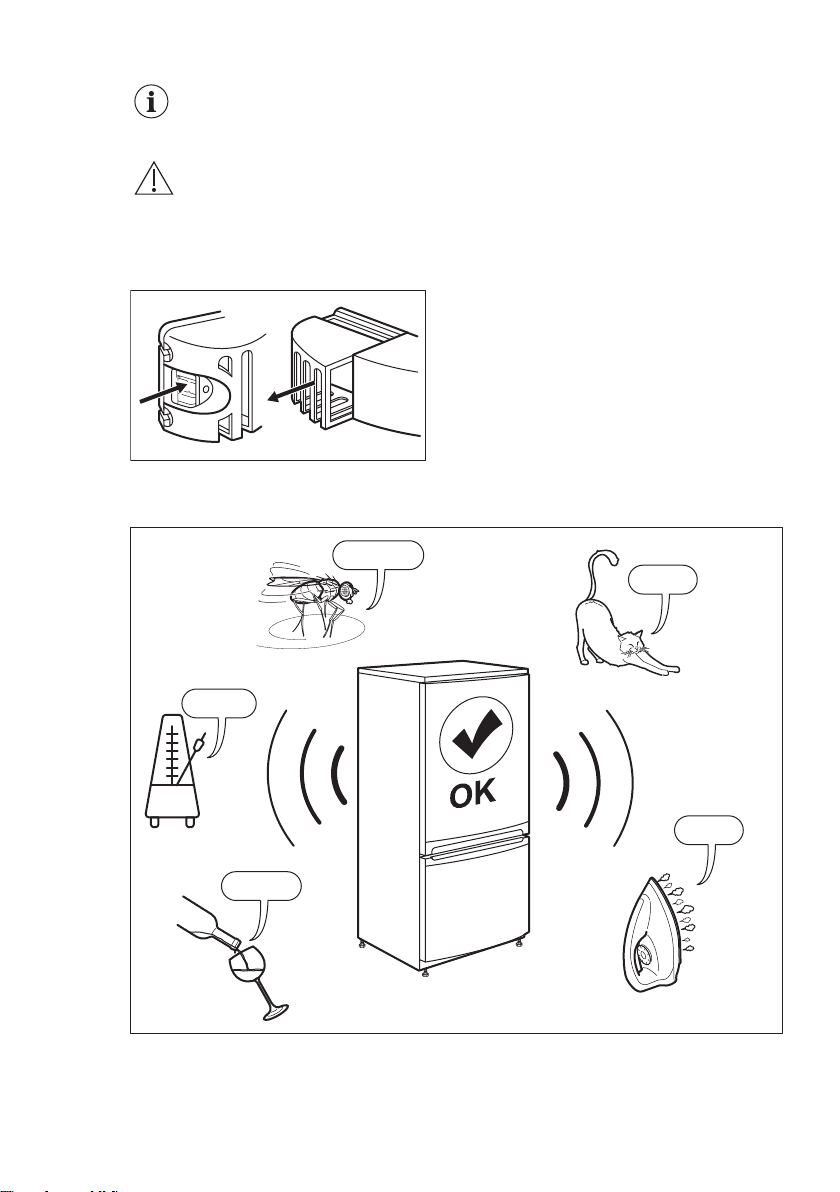
1. Push the movable part of the lamp
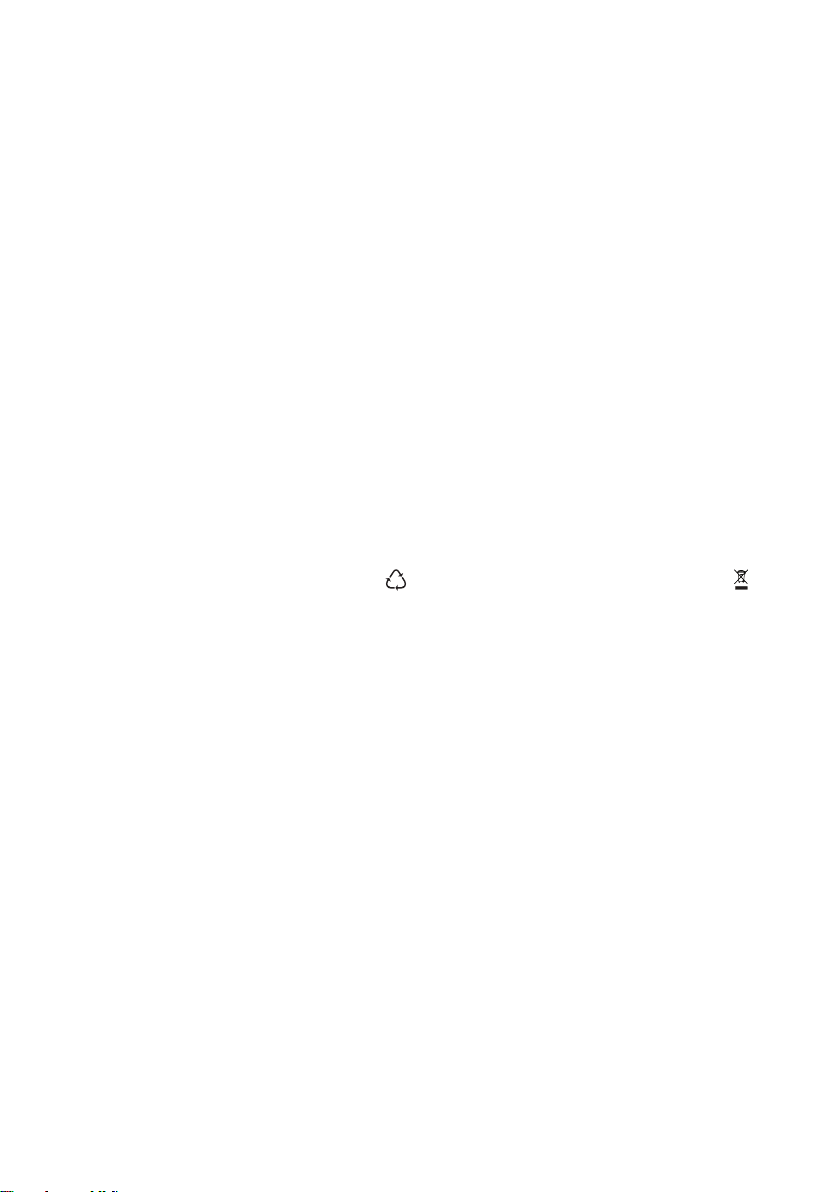
1
2
SSSRRR!
CLICK!
HISSS!
BRRR!
BLUBB!
cover (1) to unhook it.
2. Remove the lamp cover (2).
9. NOISES
Use LED bulbs (E14 base)
only. The maximum power is
shown on the lamp unit.
CAUTION!
Disconnect the plug from the
mains socket.
ENGLISH 19
3. Replace the bulb with one of the
same power and shape, specifically
designed for household appliances.
4. Install the lamp cover.
5. Connect the plug to the mains
socket.
6. Open the door. Make sure that the
light switches on.
8.3 Closing the door
1. Clean the door gaskets.
2. If necessary, adjust the door. Refer
to installation instructions.
3. If necessary, replace the defective
door gaskets. Contact the Authorised
Service Centre.
Page 20
www.electrolux.com20
10. TECHNICAL DATA
The technical information is situated in
the rating plate on the internal side of the
appliance and on the energy label.
The QR code on the energy label
supplied with the appliance
provides a web link to the information
related to the performance of the
appliance in the EU EPREL database.
Keep the energy label for reference
together with the user manual and all
other documents provided with this
appliance.
It is also possible to find the same
information in EPREL using the link
https://eprel.ec.europa.eu
name and product number that you find
on the rating plate of the appliance.
See the link
detailed information about the energy
label.
www.theenergylabel.eu
11. INFORMATION FOR TEST INSTITUTES
Installation and preparation of the
appliance for any EcoDesign verification
shall be compliant with EN 62552.
Ventilation requirements, recess
dimensions and minimum rear
clearances shall be as stated in this User
Manual at Chapter 3. Please contact the
manufacturer for any other further
information, including loading plans.
12. ENVIRONMENTAL CONCERNS
Recycle materials with the symbol .
Put the packaging in relevant containers
to recycle it. Help protect the
environment and human health by
recycling waste of electrical and
electronic appliances. Do not dispose of
appliances marked with the symbol
with the household waste. Return the
product to your local recycling facility or
contact your municipal office.
and the model
for
*
Page 21

ENGLISH 21
Page 22

www.electrolux.com22
Page 23

ENGLISH 23
Page 24
www.electrolux.com/shop
280158499-A-062020
 Loading...