

Page 1
INS T R U C T I O N S F O R U S E ........................... Page 3
MO D E D ' EM P L O I GEBRUIKSAANWIJZING .. Biad 7
Page 2
Page 3
INTRODUCTION
To ensure satisfactory and economical operation, it is essential that
the refrigerator is installed as directed in the Electrolux Installation
Instructions, and is used in accordance with these instructions. The
ventilation openings for air circulation over the cooling unit must
not be reduced in size or obstructed in any way otherwise the perfo rman ce o f the
cooling unit may be impaired and consumption
increased.
When the caravan is on t ow, th e refri gerator shoul d be opera t e d e l e c t rical l y, i .e.
from the 12V battery in the towing vehicle,
and not by means of bottled gas.
WARNING
Because of the hazards associated with the use of continuously
operating bottled-gas appli ances with open-fla me burners in
difficult-to-ventilate confined spaces, and oth er considerations ,
Electrolux do not recommend the installation of their bottled-gas
caravan refrigerators on boats , and refriger ators so inst alled will
not be covered by the Company's guarantee.
If, however, a boat installation is planned for the refrigerator,
reference should be made to British S tandard 5482, P art 3, 197 9
and to the Thames Water Authority "Launch Digest" and "Launch
Specification". Also, current Guide Lines published by local Water
Authorities, or the Ship and Boat Builders' National Federation.
It should be noted that special Marine Refrigerators are available
from Electrolux for use on boats.
LEVEL
When the refrigerator is operating, ref rigerant tri ckles thro ugh the
cooling unit under the influence of gravity. To enable a satisfactory
flow to take place, the unit must be level in both directions, other
wise refrigerant can accumulat e in pocket s and the cool ing proces s
impaired.
A continuous rolling and pitching motion as occurs in a caravan
on tow will not normally affect operation, but when the caravan is
at rest for more than about half an hour it must be levelled, in both
directions, so that the ice-tray shelf inside the frozen food stor age
compartment is level. (This can be checked with a small spirit level
placed on the ice-tray shelf). If it is not convenient to level the
vehicle and it is to stand out of level for more than half an hour, the
refrigerator should be temporarily turned off.
GAS PRESSURE, BURNER, JET, AND GAS
CONTROL VALVE
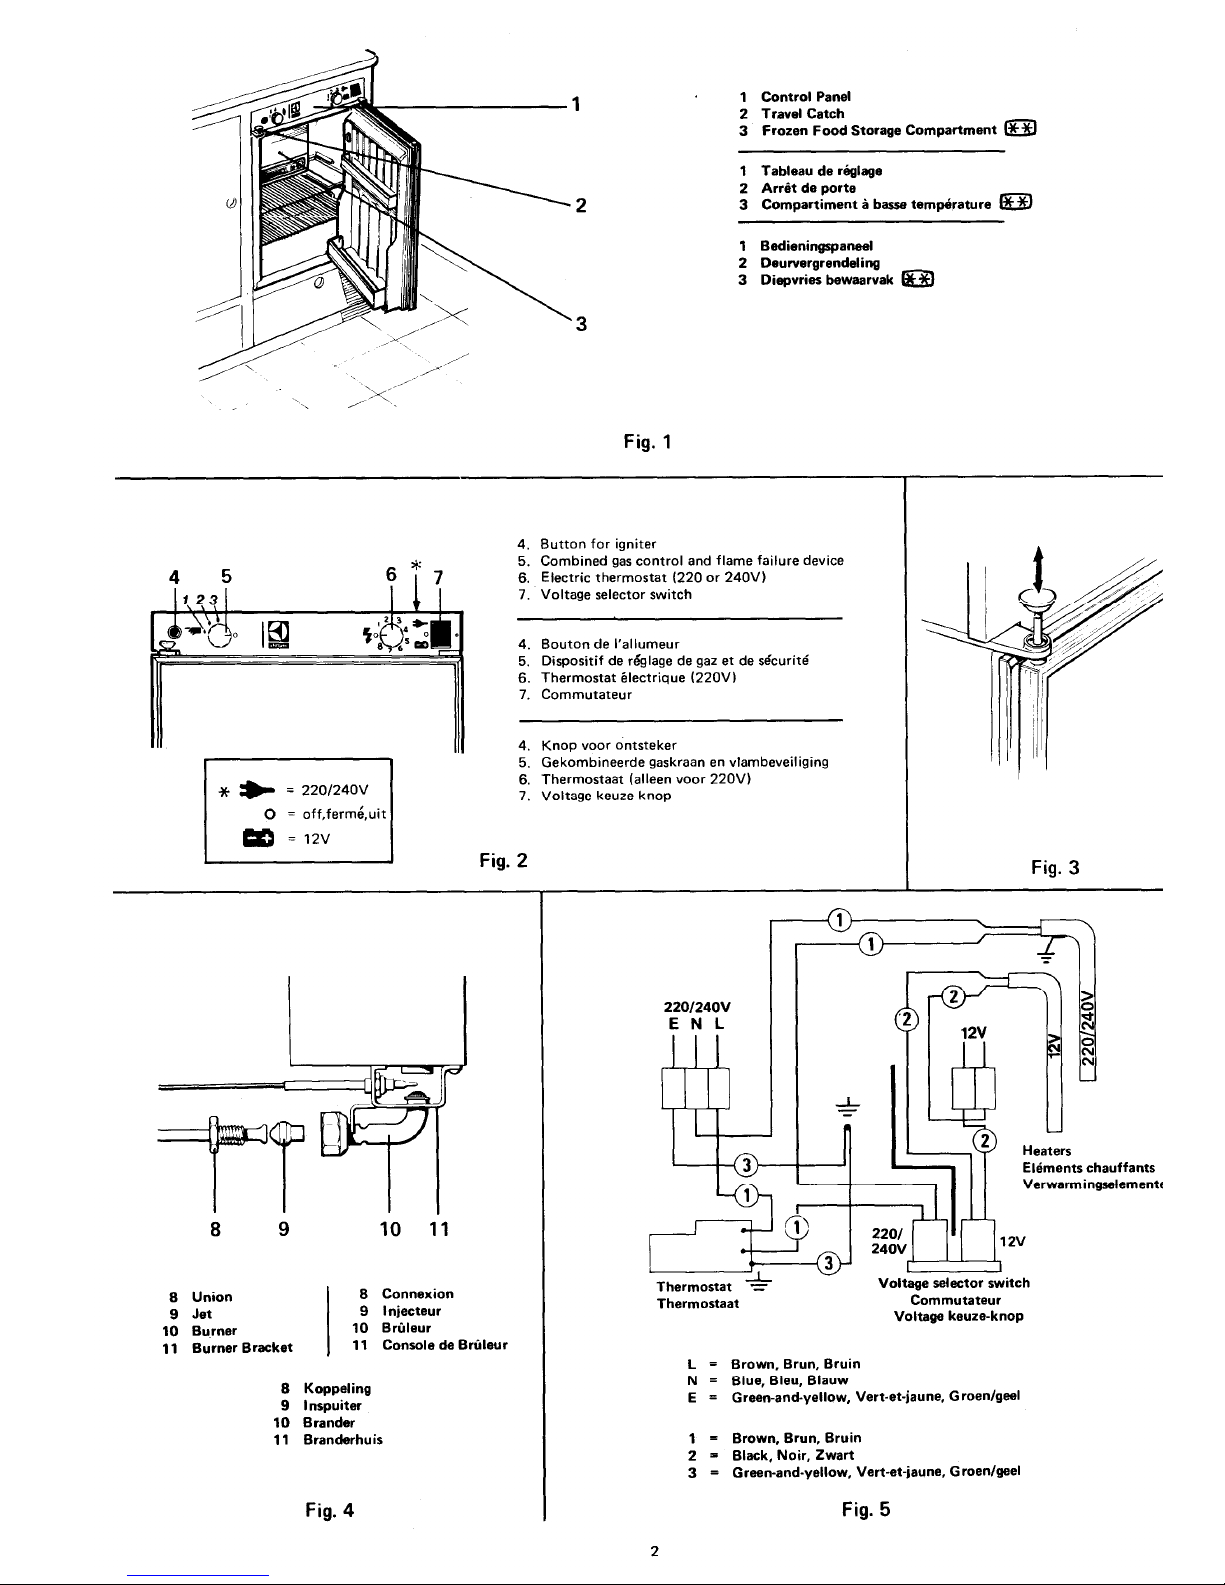
The combined gas control valve and f lame failur e device (5, f ig.2),
and jet and burner (9 & 10, fig. 4), must be of the correct type or
size for the gas and gas pressure which you use. The gas pressure
is determined by the type of regulator fitted to your gas bottle, and
this may vary according to the Standard adopted in the country
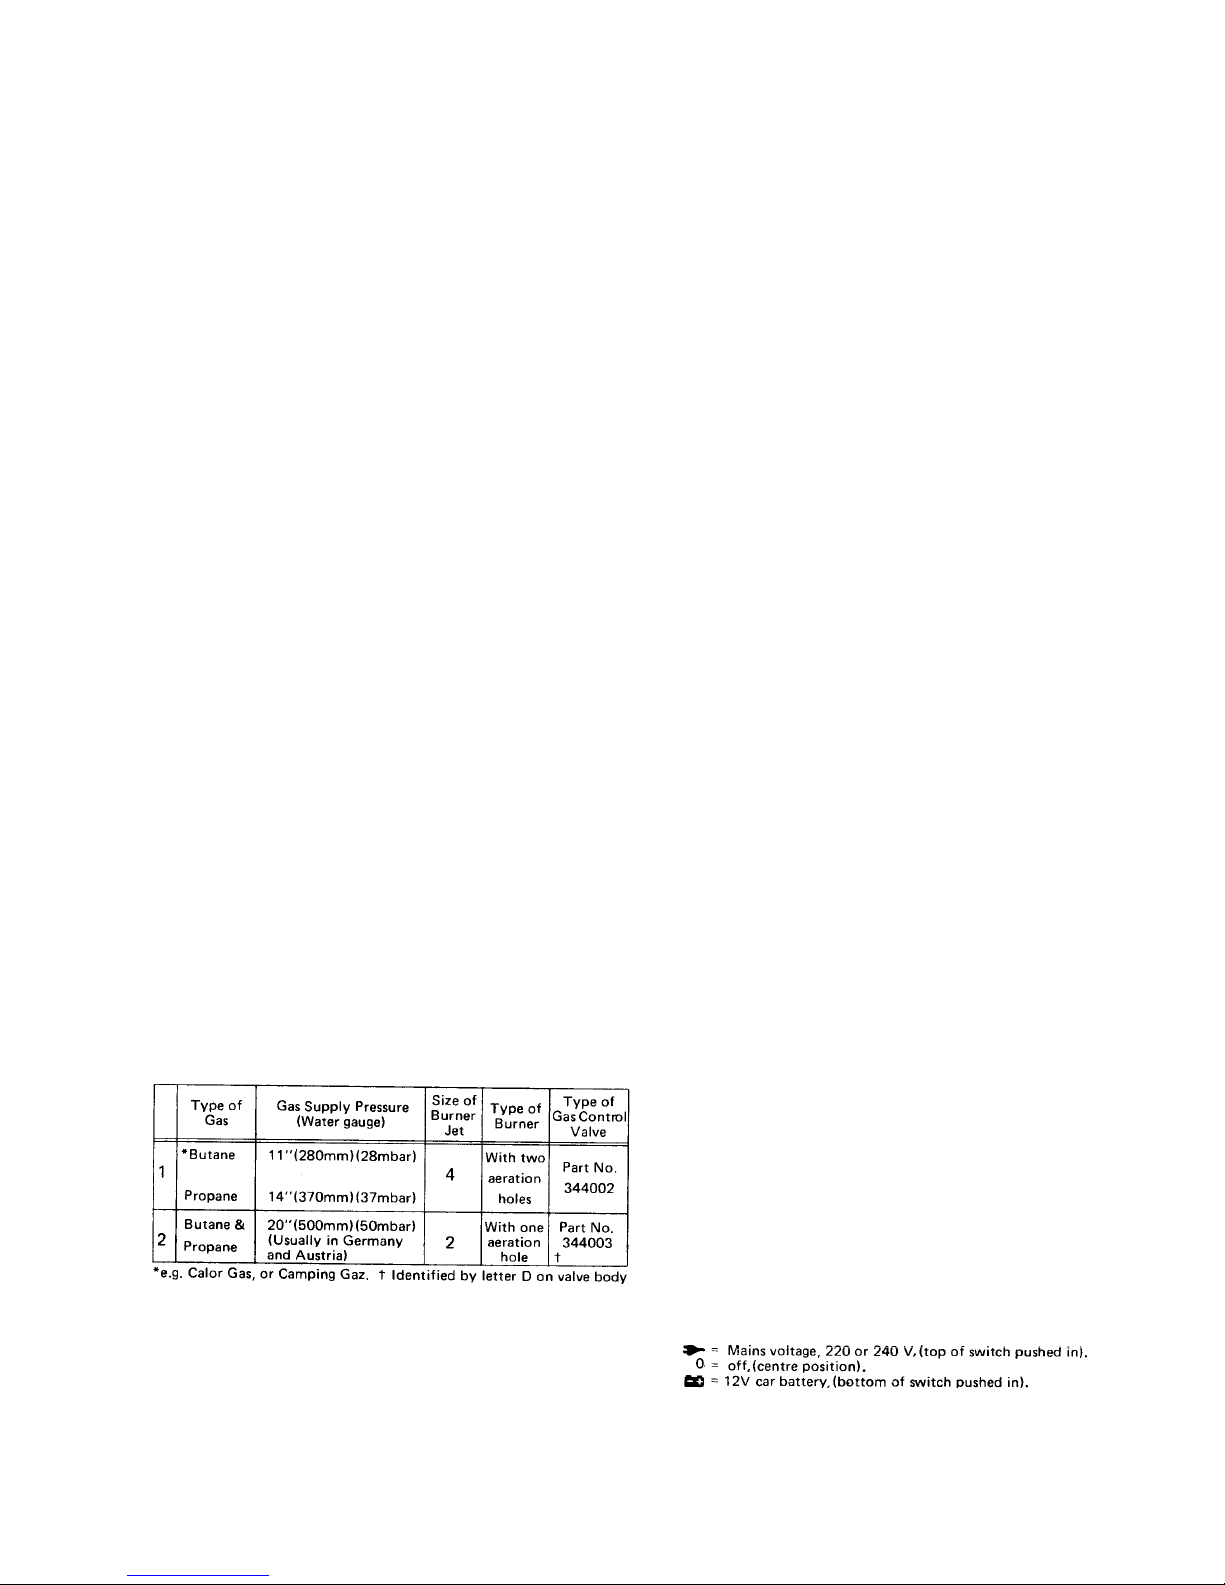
concerned. In the United Kingdom, and most of Europe, the
standard pressures used for butane and propane are as shown in
section 1 of the table below. In Germany and Austria, the higher
pressure shown in section 2 of the table usually applies.
It is essential that a reliable pressure regulator, set to deliver no
more than the appropriate pressure sho wn in the table , is fitted
directly to the gas bottle. Needle val ve operated g as control ta ps
are NOT suitable for use with this refrigerator and must not be
used as a substitute for a pressure regulator.
Before using the refrigerator, check from the label attached to it
that the gas equipment is correct fo r the gas and gas pr essure t o be
used. If it is not, the burner, jet, and combined g as control valve
and flame failure device must be changed for the correct size or type
in accordance with the table below. For future reference, any
chan
g
es made should be recorded on or beside the data label.
STARTING THE REFRIG ERATOR (see fig.2)
Before using your refrigerator for the first time, it is advisable to wash
the interior and its accessories as described later under 'Cleaning'.
which creates a spark over the burner when the button (4) is pushed
in fully. No batteries or flints are required to operate this lighter.
Before starting the refrigerator, always check that the alternative
method of operation is off as the refrigerator should not be operated
by both means at the same time. If th e caravan is to be stati onary
for a period, check that the refrigerator is level.
Bottled Gas Operation - Lighting the burner
1. See that the voltage selector switch (7) is set to '0', i.e. is in its
centre position. Ensure that gas is a vailable fro m the bottl e and
turn on any taps in the supply to the refrigerator.
2. Turn the gas control knob (5) so that '3' is opposite the indicator
mark.
3. Push in fully the gas control knob (5) for about 5 seconds to allow
air to clear from the pipe line. (When starting initially, or after
changing a gas bottle, it may be necessary to push in the knob appre
ciably longer to clear all the air. Do not, however, allow too much gas
to accumulate around the burner as an over-rich ga s/air mixt ure may
be difficult to ignite).
4. Still pressing in the knob (5), push in the b utton (4 ) which operat es
the Piezo igniter, several times in quick succession. (A click should be
heard each time the button is pushed in). Contin ue to press i n the
gas control knob (5) for a further 15 seconds to allow time for the
thermocouple tip (over the burner) to heat up.
5. Release the gas con trol knob then c heck that the bur ner is alight by
looking directly through the flame viewer located inside the cabinet
at the rear left-hand lower corner. If the burner has not lit, repeat
the lighting procedure.
Note:- The refrigerator has a flame failure device which will automati
cally shut off the gas to the burner if the flame is blown out. While
the knob (5) is being pressed in, this device is temporarily inoperative.
Electric operation
The dual voltage electric equipment is for operation from the main
12 volt battery in the car when the caravan is on tow, or from mains
voltage electricity when a 220 to 240V a.c. supply, with satisfactory
earthing, is available on a site. Bef ore using th e refrigera tor on elect ricity
make sure that the electricity supply is suitable for the refrigerator.
It is important to understand that 12 volt operation is only intended
to be used while the car engine is runn ing and is cha rging the ba ttery,
otherwise the battery may be discharged to a point where it will not
restart the engine. (The current drain at 12V is 8 amps minimum). When
at rest for more than a short period, th e caravan sh ould be levell ed and
the refrigerator switched over to mains voltage, if available, or the 12V
supply switched off and the refrigerator started up on bottled gas.
Before connecting to a mains voltage supply, it is important to
make certain that the circuit to, and in, the caravan is properly and
effectively earthed.
When operating on mains voltag e, the t emper ature in th e refr igerat or
is thermostatically controlled and can be adjusted by means of the
knob (6) of the thermostat. The 12V circuit is not thermostatically
controlled and the cooling unit will operate all the time the refrigerator
is connected to 12V and switched on. 12V operation is, therefore,
only intended to be used for relatively short periods, i.e. when the
caravan is on tow. It is not intended for extended periods of use from
a continuous 12V supply, otherwise the fresh food compartment may
become too cold for the satisfactory s torage of f resh food s and drinks.
For connection to the 12V supply, a two-way terminal block is
located behind the right-hand end of the control panel (1, fig 1) at the
top of the refrigerator.
For connection to a 220-240V electricity supply, the refrigerator
is provided with a 3-core mains lead which is intended for connection
to a properly earthed plug and socket outlet. In the United Kingdom,
the following plug connection instructions must be observed.
IMPORTANT: The wires in the mains lead of this appliance are
coloured in accordance with the following code.
GREEN-AND-YELLOW : EART H,
BLUE : NEUTRAL, BROWN : LIVE
As the colours of the wires may not correspond with the coloured
markings identifying the terminals in your plug, proceed as follows :
The wire which is coloured GREEN-AND-YELLOW must be con
nected to the terminal in the plug which is marked with the letter E
or by the earth symbol -=L- or coloured green or green-and-yellow.
The wire which is coloured BLUE must be connected to the terminal
which is marked with the letter N or coloured black.
The wire which is coloured BROWN must be connected to the
terminal which is marked with the letter L or coloured red.
WARNING -THIS APPLIANCE MUST BE EARTHED.
In the United Kingdom, the plug or circuit to the refrigerator must
be fitted with a fuse not greater than 5 amps. If a 13 amp. (B.S.1363)
fused-plug is used, it should be fitt ed with a 3 amp fuse. I n other
countries, the fuse rating will depend on local pr actice.
During installation, a suitable socke t outlet for the mains voltage
supply should have been fitted in the caravan, near the refrigerator,
in a position readily accessible to the user. In the United Kingdom,
all mains voltage wiring in the c arava n must be in stalle d in a ccord
ance with I.E.E. regulations, includ ing the use of an outle t and coupl er
to BS 4343/CE E17.
Voltage Selector Switch
The voltage selector switch (7) can be set to three different positions,
identified by the following symbols :
To start the refrigerator on electricity, see that the gas control knob (5)
is at '0' (off), set the voltage selector switch (7) to the voltage required,
then connect the refrigerator to the appropria te voltage s upply.
If on mains voltage (220-240), turn the thermostat knob (6) to
setting No. 3
or
4.
Page 4
TEMPERATURE REGULATION
After starting up the refrigerator, it will take about an hour before
there are signs of cooling. When ope rating on main s voltage electricit y,
the refrigerator is thermostatically controlled and the thermostat knob
(6) should be set to No. 3 or 4. This will maintain a suitable temperature
in the refrigerator and frozen food storage compa rtment for g eneral use
but, in hot weather, or if more cooling is required, the knob should be
turned to a higher number. If less cooling is required, the knob should
be turned to a lower number. (This does not apply to 12 volt operation
which is not thermostatically controlled).
For operation on gas, the refrigerator should be started off with
the gas control (5) set at 'T. This will provide suitable temperatures
in the refrigerator in warm weather, but if the fresh food compartment
becomes too cold, especially in cooler weather, turn the gas cont rol
knob to '2' or '1'. Remember to return it to a higher setting when
necessary, - if the weather becomes warm again for instance.
FROZEN FOOD STORAGE COMPARTMENT
The frozen food storage compartment has a net volume of 3.7 litres
(0.13 cubic feet) and has a two-sta r classification ® . This means
that, provided the electric thermosta t or gas cont rol is set as described
under "Temperature Regulation", the frozen food storage compart
ment will be maintained at a temperature of -12
°
C (109F), or below.
Under these conditions, most types of frozen food can be stored in
the compartment for up to one month.
When storing frozen food, do not set the gas control at too low a
setting. Reduce it only if foodstuffs in the fresh food compartment
become too cold.
The permissible length of storage time cannot be precisely stated
as this varies very much with the nature of the packaged quick-frozen
food stored - vegetables, fish, meat, fruit and dairy products. It is
therefore important to take note of the food manufacturer's estimate
of the permissible storage times of his products. This estimate , which
should be marked on each frozen foo d package, t akes into acco unt
inevitable variations during every-da y operation wh ich may lead to
changes in taste and colour.
If frozen food is allowed to thaw, i.e. the packs become wet and
limp, no attempt should be made to store or re-freeze - it should be
consumed within 24 hours.
The frozen food storage compartment is for storing quick frozen
foods, ice-cream and making ice. It is not intended for the quick
freezing of foodstuffs.
Care should be taken when handling and consuming water, ices (.e.g.
iced lollies) taken directly from the frozen food storage compartment
because of the possibili ty of cold burn (f rost bite) when such ices are
at very low temperatures .
Never put bottles or cans of carbonated (gassy) drinks in the frozen
food storage compartment as they may bu rst if the ga s is forced out
by freezing.
STORING FOOD IN THE REFRIGERATOR
To prevent drying out and the transfer of flavours from one food to
another, always store foods in co vered cont ainers or pl astic bags , or
wrap them in waxed paper or aluminium foil.
Tall bottles can be placed in the lower door shelf by moving the
upper door shelf to its storage position at the top of the door. The
p
lastic tray can be removed from the upper cabinet shelf to make room
for bottles and other tall items in the cabinet.
Do not leave the refrigerator door open longer than necessary.
NEVER PUT HOT FOOD IN THE REFRIGERATOR.
Whenever possible, it is of ad vantage to pr e-cool your r efrige rator
with its contents by running it on bottled gas or mains electricity for
a few hours, or overnight, before starting out from home.
To prevent undue movement of bottles etc. in
the refrigerator when
"on the move", crumpled pieces of clean paper may be wedged tem
porarily between the various items.
TRAVEL CATCH
The travel catch (fig.3) is to keep the refrigerato r door sec urely closed
when the vehicle is on the move. Remember always to push the catch
down so that its lower end fully engages the plastic bush in the top of
the door, before moving off.
ICE-MAKING
Fill the ice-tray with water to within 5mm from the top, and place
it on the shelf in the top of the frozen food storage compartment.
When ice has formed, the tray can be released from the shelf simply
by lifting one corner.
Ice will be made more quickly if the gas control or electric
thermostat (except on 12V) is turned to its highest setting. Remember
to return the knob to its normal setting when ice has formed, other
wise food in the cabinet may become too cold.
DEFROSTING
Frost will gradually form on and in the frozen food storage compart
ment and on the fins at the side of the compartment. It is a mistake
to assume that an accumulation of frost gives a colder cabinet there
fore the re fri ger ato r sh oul d b e de fro ste d r egul ar ly - about once a
week or ten days, depending on th e condition s of use.
To defrost, turn the gas control knob (5) or the voltage selector
switch (7) to '0' (off), depending on which operation is being used.
Remove the ice-tray, food, etc., wrap frozen foo ds in seve ral layers
of clean newspaper and place the package in a cool place.
To defrost as quickly as possible, a small dish of hot (not boiling)
water may be placed on the ice-tray shelf, and a bowl of hot water
on a cabinet shelf, changing the hot water as necessary until all frost
has melted.
Do not place dishes of hot water on the bottom of the frozen food
stora
g
e compartment, and do not attempt to defrost more quickl
y
with an electric fire or other form of heat as this may damage the
plastic surfaces.
Defrost water will run via a tube at the back into the drip collector
fixed to the rear of the refrigerator, where it will evaporate into the
circulating air.
When all frost has melted, wipe dry th e frozen foo d storage com
partment and cabinet interior, then re-start the refrigerator, setting
the gas control knob or voltage selector switch and thermosta t knob
to their respective positions.
Replace the fresh and frozen food, but wait until the cabinet has
cooled down again before making ice.
Remember that if the temperature of frozen food is allowed to
rise unduly during defrosting, its stor age life ma y be shorten ed.
CLEANING THE REFRIGERATOR
Clean the refrigerator thoroug hly at inter vals as nece ssary. Tur n off
the gas or disconnect from the electricity supply, depending on which
is being used, empty the cabinet and defrost as described earlier.
The refrigerator and its accessories may then be cleaned with a
soft cloth wrung out in a weak solution of bicarbonate of soda.
Finally, wipe over with a cloth wrung out in warm water only and
dry with a clean cloth. Do not wash any plastic parts in water that is
more than hand hot and do not expose them to dry heat.
NEVER USE STRONG CHEMICALS OR ABRASIVE CLEANING
MATERIALS ON ANY PART OF THE REFRIGERATOR.
Replace the accessories and restart the refrigerator.
WHEN NOT IN USE
Whenever your refrigerator is to be out of use for a period, turn off
the gas, or disconnect from the electricity supply, as applicab le. Empty
the cabinet and defrost as describ ed earlier. Clean and th oroughl y dry
the interior and accessories and
leave the door open. If this is not done
the air inside may go stale giving rise to an unpleasant odour which
could be difficult to remove at a later date. Empty and dry the ice-tray.
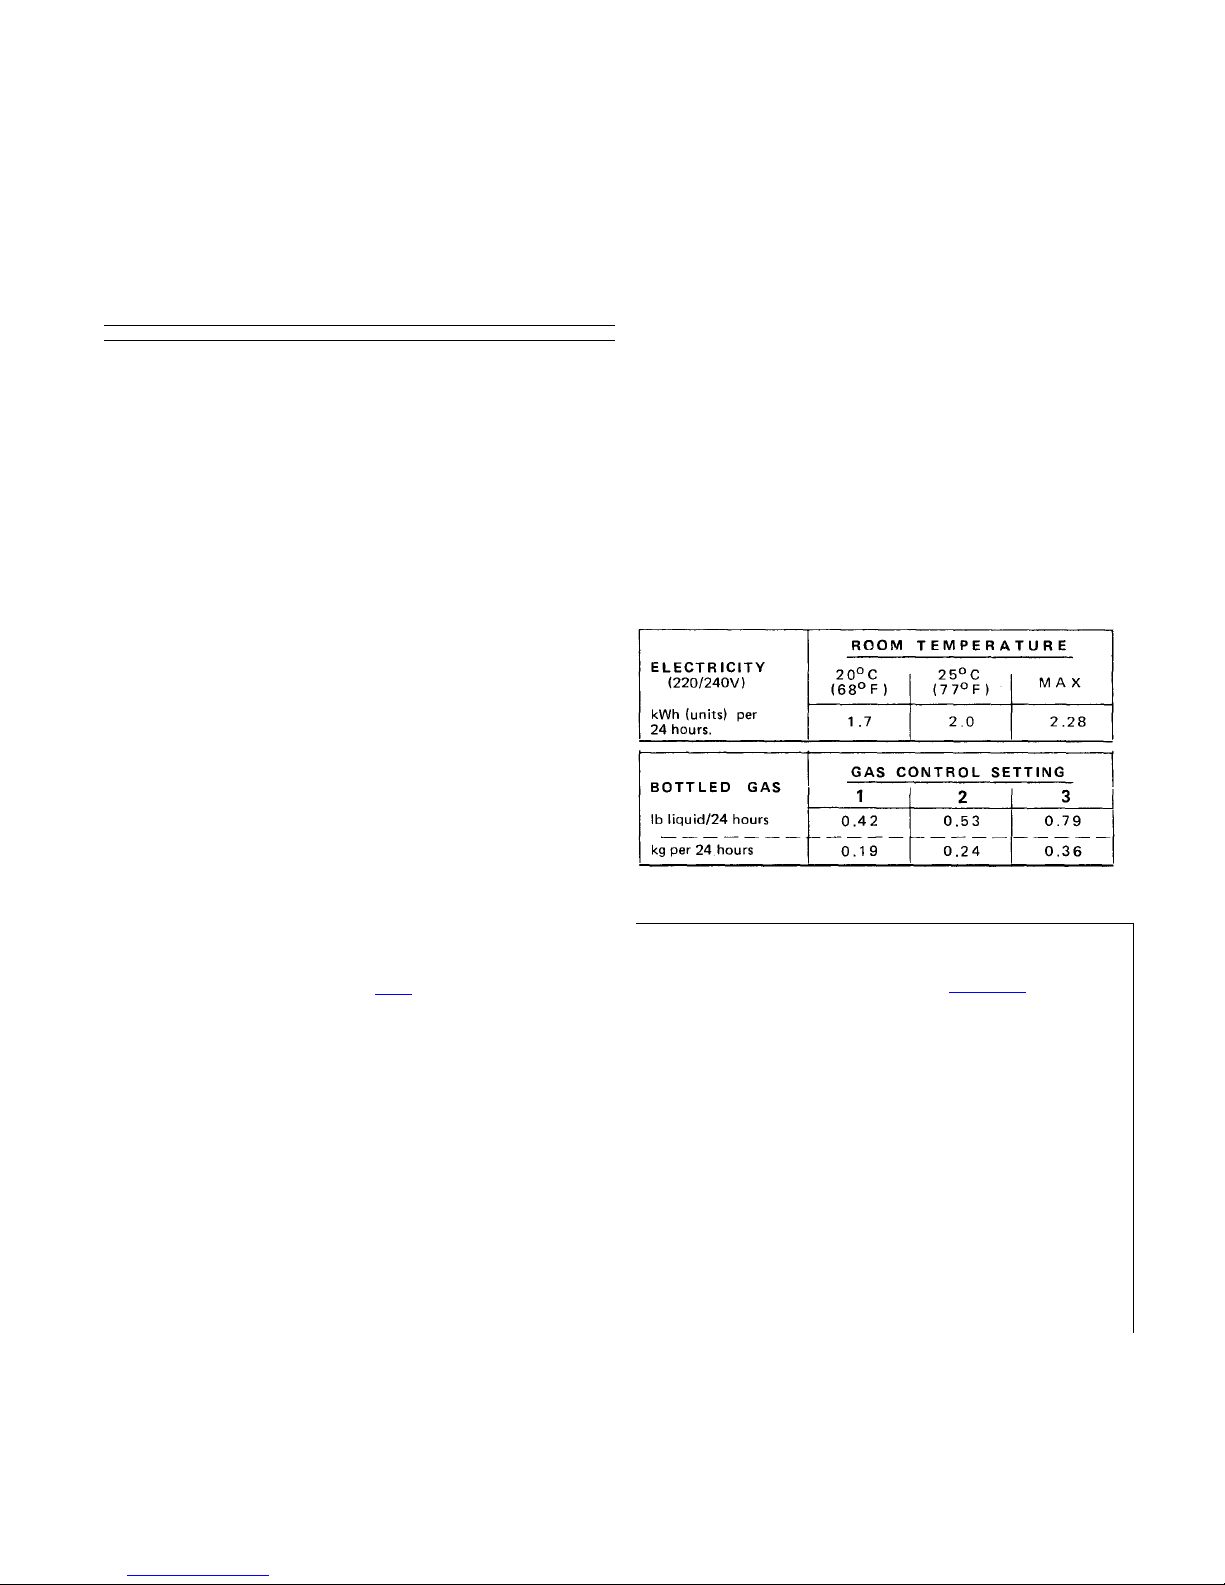
CONSUMPTION
It is not possible to give precise consu mption fig ures for main s voltage
electricity, as these vary depending on individua l conditio ns of use. T he
figures in the following table may, h owever, be t aken as a guide.
MAINTENANCE
CHECKING FOR GAS LEAKS
Periodically, and after service adju stment s to the gas equ ipment, all
connections should be checked for leaks by applying a soap/water
solution (with the burner alight) and watching for bubbles. DO
NOT
USE A FLAME TO CHECK FOR LEAKS. Screw connections should
be tight but not overtight. (To check at the back of the refrigerator
it will be necessary to make a
temporary connection with flexible
tubing).
FLUE BAFFLE
The flue baffle must be in position in the central tube of the boiler,
over the burner, suspended on its support wire so that the lower edge
of the baffle is 75mm (3 inches) above the bottom of the tube. If the
baffle is missing or incorrectly located, the cooling unit will not
operate properly on bottled gas.
CLEANING FLUE, BURNER, AND JET' (see fig.4)
The appearance of the burner flame should be checked at least once
a year. To do this, turn the gas control knob to '3', when the colour
of the flame should be predominantly blue. If this is not the case, the
refrigerator should be emptied, disconnected, and removed from the
recess, and the flue, burner and jet c leaned as described bel ow. (The
outer cover of the flue outlet will have to be removed and the flue
extension tube withdrawn from the outside before the refrigerator
can be moved). When the refrigerator is out of the recess, proceed as
follows.
1. Remove the 'lazy T' flue top, then, from top of central flue tube of
2.
boiler, lift out the flue baffle on its support wire.
With door travel catch engaged, lay cabinet on left-hand side (i.e.
3.
burner near the floor) on sheets of newsp aper.
Disconnect gas pipe from burner by undoing union (8), then pull
out burner jet (9). Clean jet by washing it in White Spirit or alcohol,
then blowing through with air. Do not under any circumstances
prick out the jet. The orifice in the jet has been carefully designed.
It is very delicate and any damage to the orifice could affect safety
and performance.
Page 5

IGNITER SPARK GAP
The distance between the tip of the igniter and the top edge of the
burner head gauze should be a minimum of 3mm.
HEATERS FOR ELECTRIC OPERATION
For electric operation, the boiler of the cooling unit is fitted with
two separate heaters. The one near the back of the refrigerator casing
has black leads and is for use on 12V . The other has brown l eads, and
an earth connection tag, and is for use on 220 to 240V. The 12V
heater is rated at 95 watts, and the mains voltage heater, 100 watts.
SERVICE
Should you require help or service in connection with your refriger
ator, please refer to addresses on back pages.
4. Remove screw holding burner bracket (11) to boiler, release
5.
bracket tongues from slot in boiler, then carefully move burner
bracket assembly to one side, clear o f the flue t ube.
Clean burner and adjacent component s of soot etc. without dis
6.
turbing their relative positions.
Clean flue tube of boiler - a special flue brush (part No. 151404)
7.
is available as an extra for this purpose.
Reassemble equipment, engaging tongues in top of burner bracket
8.
(11) in corresponding slot in bottom of boiler before replacing
fixing screw. Gas unions must be tight but not overtightened.
Operate button (4) of igniter whilst watching to check that spark
9.
jumps from electrode to burner head. (See next section).
Referring to item 'Checking for Gas Leaks', re-install refrigerator,
light burner and leave on test to ensur e that it ope rates proper ly.
 Loading...