

Electrolux EXP26U338CW, EXP34U338CW, EXP26U538CW, EXP26U758CW, EXP26U338HW User Manual
...
EN
Air Conditioner
DA
Klimaanlæg
FI
Ilmastointilaite
NO
Luftkjøler
SV
Luftkonditionering
IT
Condizionatore d’aria
FR
Climatiseur
User Manual
Brugsvejledning
Käyttöohje
Bruksanvisning
Bruksanvisninng
Manuale per l’utente
Manuel D'utilisation
2
23
44
66
86
108
130
EXP26U338CW
EXP26U538CW
EXP34U338CW
EXP35U538CW
EXP26U558CW
EXP26U758CW
EXP26U338HW
EXP26U538HW
EXP34U338HW
EXP35U538HW
EXP26U558HW

2
www.electrolux.com
Subject to change without notice.
Warning / Caution-Safety information.
General information and tips.
Environmental information.
CUSTOMER CARE AND SERVICE
Always use original spare parts.
When contacting our Authorised Service Centre, ensure that you have the following
data available: Model, PNC, Serial Number.
The information can be found on the rating plate.
Register your product for better service:
www.registerelectrolux.com
Buy Accessories, Consumables and Original spare parts for your appliance:
www.electrolux.com/shop
Visit our website to:
Get usage advice, brochures, trouble shooter, service information:
www.electrolux.com/webselfservice
Thank you for purchasing an Electrolux appliance. You’ve chosen a product that brings
with it decades of professional experience and innovation. Ingenious and stylish, it
has been designed with you in mind. So whenever you use it, you can be safe in the
knowledge that you’ll get great results every time. Welcome to Electrolux.
WE’RE THINKING OF YOU
1.
SAFETY INFORMATION .................................................................................. 3
2.
SAFETY INSTRUCTION ................................................................................... 9
3.
UNIT DESCRIPTION ....................................................................................... 12
4.
ACCESSORIES INCLUDED ........................................................................... 12
5.
INSTALLATION INSTRUCTIONS ................................................................... 13
6.
AIR CONDITIONER FEATURES .................................................................... 14
7.
OPERATING INSTRUCTIONS ....................................................................... 14
8.
CARE & CLEANING ........................................................................................ 20
9.
TROUBLE SHOOTING ................................................................................... 21
10.
ENVIRONMENTAL CONCERNS .................................................................... 22
CONTENTS
3
ENGLISH
1.
SAFETY INFORMATION
WARNING!
• This appliance can be used by children aged from
8 years and above and persons with reduced
physical, sensory or mental capabilities or lack
of experience and knowledge if they have been
given supervision or instruction concerning use
of the appliance in a safe way and understand
the hazards involved.
• Children shall not play with the appliance.
• If the supply cord is damaged, it must bereplaced
by the manufacturer, its service agent or similarly
qualied persons in order to avoid a hazard.
This manual explains the proper use of your new air
conditioner. Please read this manual carefully before
using the product. This manual should be kept in a safe
place for handy reference.
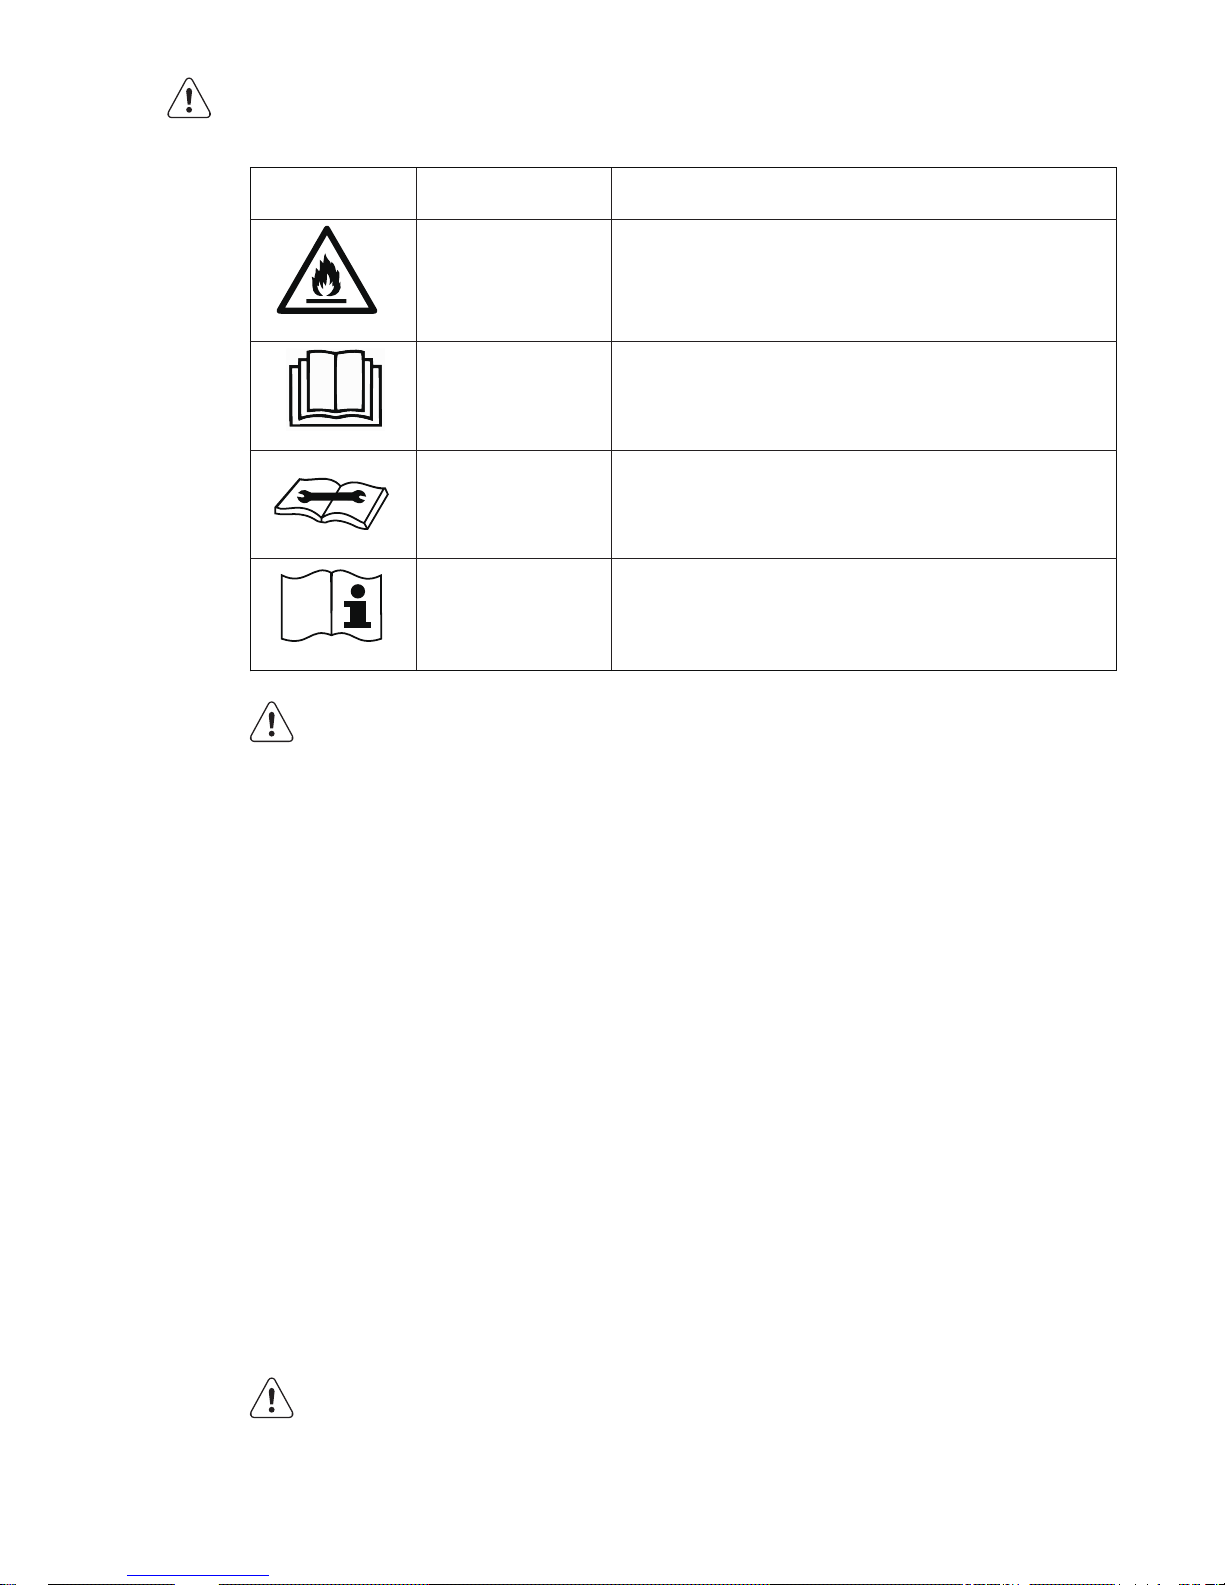
6\PERO 1RWH ([SODQDWLRQ
:$51,1*
&$87,21
&$87,21
&$87,21
7KLVV\PEROVKRZVWKDWWKLVDSSOLDQFHXVHV
DIODPPDEOHUHIULJHUDQW,IWKHUHIULJHUDQWLVOHDNHG
DQGH[SRVHGWRDQH[WHUQDOLJQLWLRQVRXUFHWKHUH
LVDULVNRIILUH
7KLVV\PEROVKRZVWKDWWKHRSHUDWLRQPDQXDO
VKRXOGEHUHDGFDUHIXOO\
7KLVV\PEROVKRZVWKDWDVHUYLFHSHUVRQQHOVKRXOG
EHKDQGOLQJWKLVHTXLSPHQWZLWKUHIHUHQFHWRWKH
LQVWDOODWLRQPDQXDO
7KLVV\PEROVKRZVWKDWLQIRUPDWLRQLVDYDLODEOHVXFK
DVWKHRSHUDWLQJPDQXDORULQVWDOODWLRQPDQXDO
CAUTION!
• Contact authorised service technician for repair
or maintenance of this unit.
• Contact the installer for installation of this unit.
4
www.electrolux.com
1.2
Point to Keep in Mind When Using Your
Air Conditioner
CAUTION!
Warnings for use
• Do not modify any part of this product.
• Do not insert anything into any part of the unit.
• Ensure the power supply used has an appropriate
voltage rating. Only use a 220 - 240V, 50Hz, 10A
mains electricity supply. Use of a power supply
with an improper voltage rating can result in
damage to the unit an possibly re.
1.1
Important notes
1. Do not operate unit without the air lter.
2. Do not operate unit near any heat source or open re.
3. Do not expose the unit outside to direct sunlight and rain.
4. Always store or move the unit in an upright position.
5. Do not cover the appliance when in operation
or immediately after use.
6. Always drain condensation before storing unit.
• The air conditioner is not intended for use by young
children of inrmed persons without supervision.
• Young children should be supervised to ensure
that they do not play with the air conditioner.
• There are local council rules regarding maximum
allowable noise levels emitted by air conditioners.
• If the power cord is to be replaced, replacement work
shall be performed by authorised personnel only.
• Installation work must be performed in accordance
with the national wiring standards by authorised
personnel only (if applicable). Incorrect connection
can cause overheating and re.
• Take care not to catch ngers on fan when adjusting
horizontal louvres.
• The fuse is 250V 3.15A, ceramic type.
• Cleaning and user maintenance shall not be made
by children without supervision. Be aware that
refrigerants may not contain an odour.
5
ENGLISH
• This power plug must only be plugged into an
appropriate wall socket. Do not use in conjunction
with any extension cords.
• Push the power plug securely into the socket and
make sure it is not loose.
• Do not pull, deform. or modify the power supply
cord, or immerse it in water. Pulling or misuse of
the power supply cord can result in damage to the
unit and cause electrical shock.
• If the supply cord is damaged, it must be replaced
by the manufacturer or its service agent or
a similarly qualied person in order to avoid
a hazard. Use only the manufacturer specied
power cord for replacement.
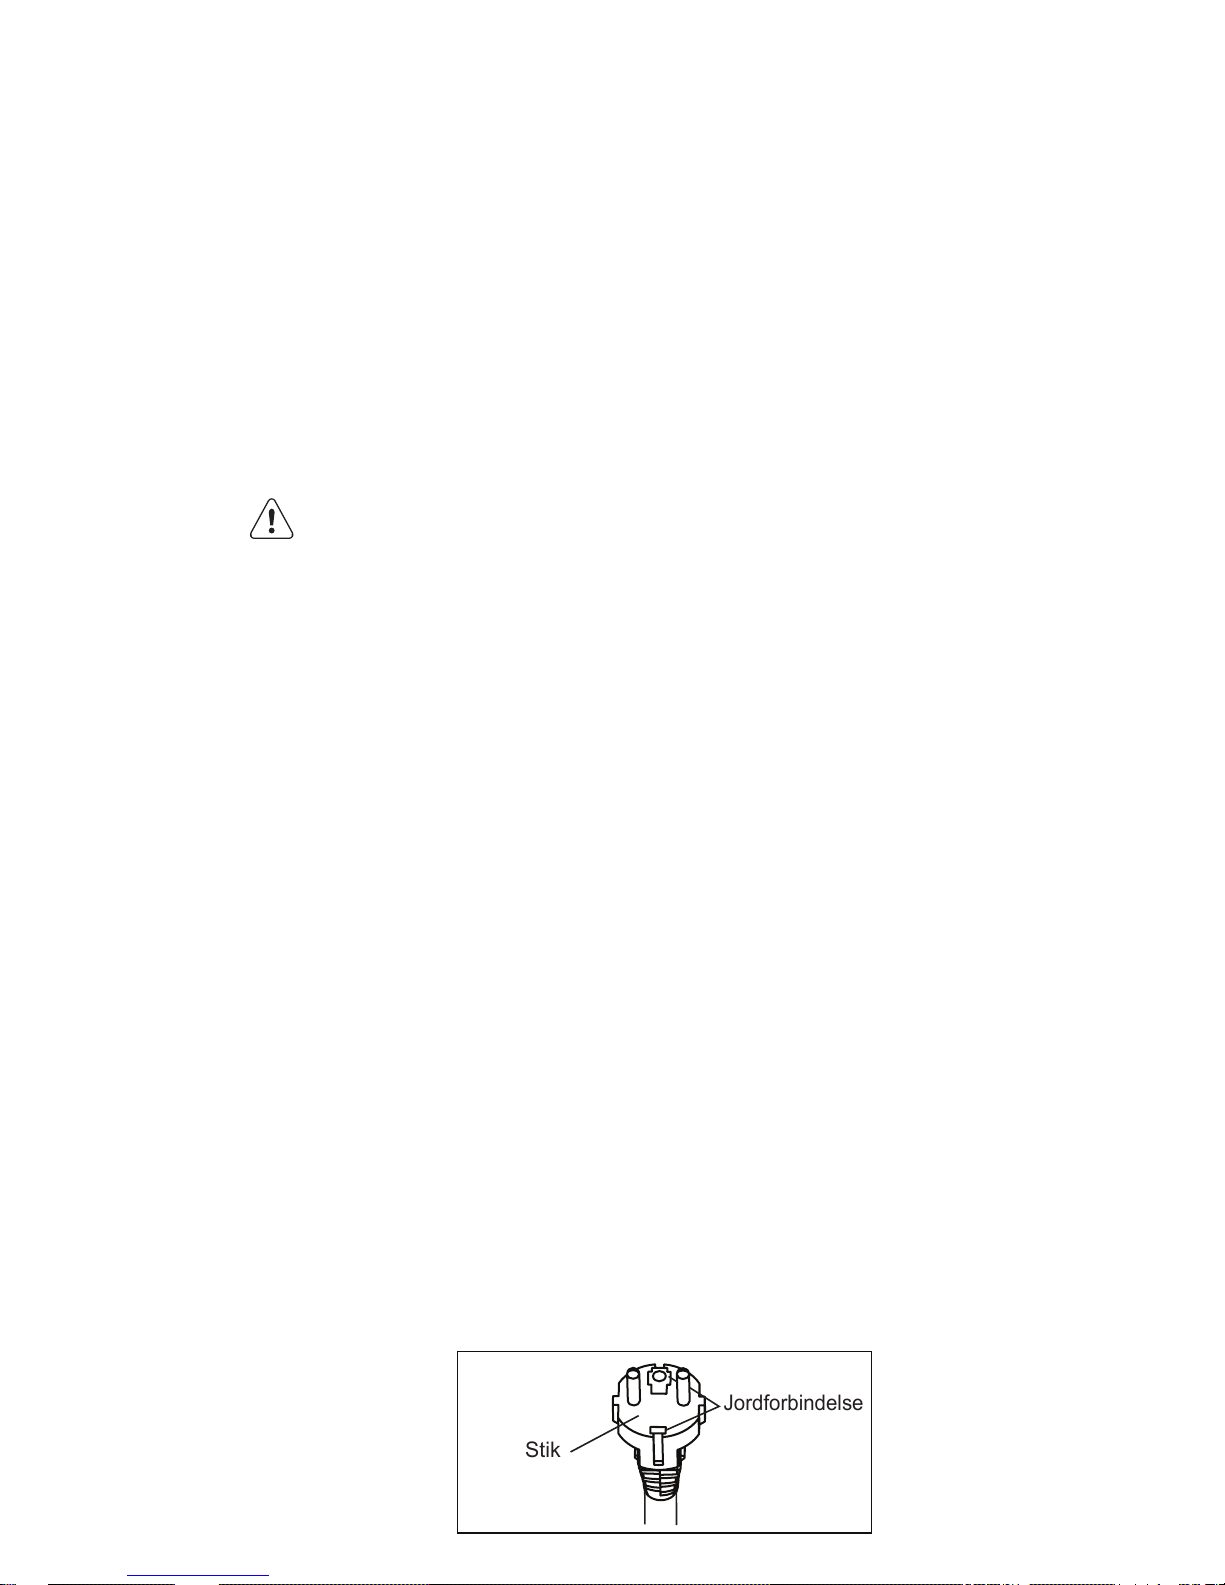
• This appliance must be earthed. This appliance
is equipped with a cord having an earth wire.
The plug must be plugged into an outlet that is
properly installed and earthed. Do not under any
circumstances cut or remove the square earthed
pin (only for UK) from this plug.
CAUTION!
Warning for power supply cord
• Always use a anti-explosive circuit breaker or
fuse with the proper amp rating. Do not, under
any circumstances, use wire, pins or other objects
in place of a proper fuse.
• In the event of any abnormality with the air conditioner
(eg. a burning smell), do not pull out the plug directly,
open the window for ventilation rstly, then turn the
unit o and disconnect the power supply.
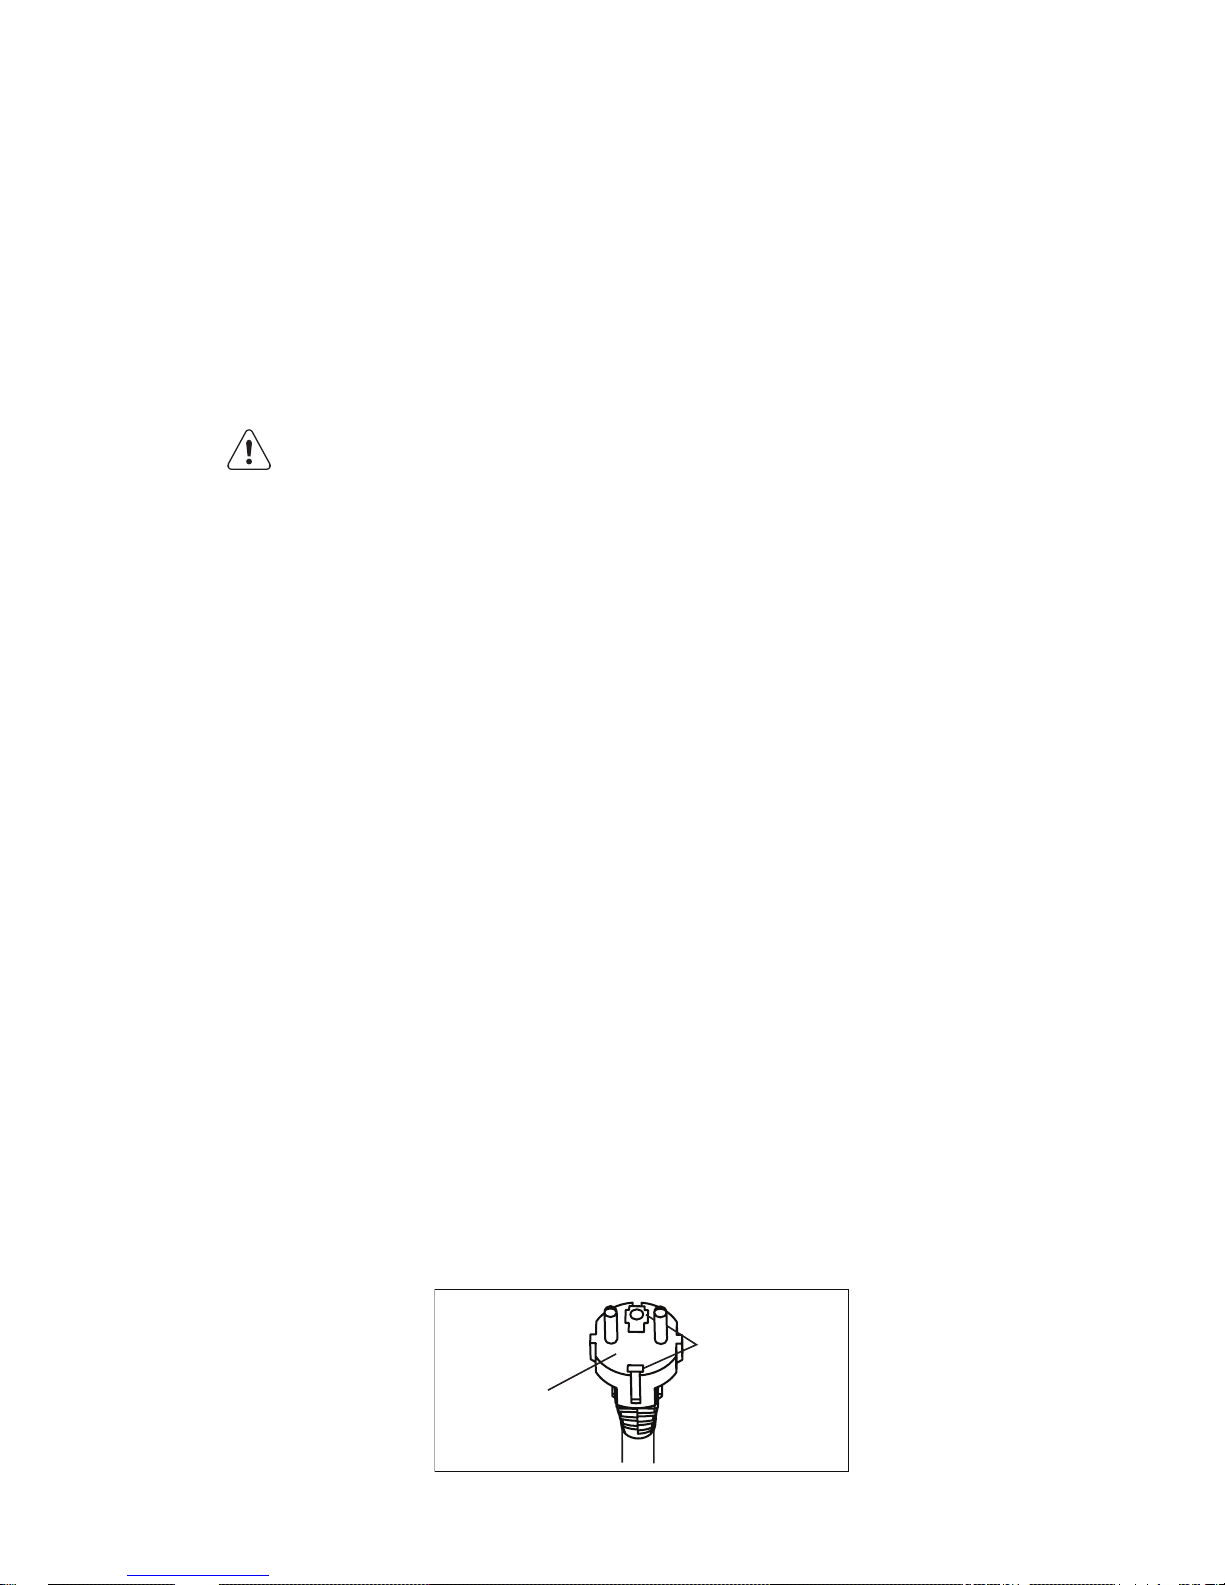
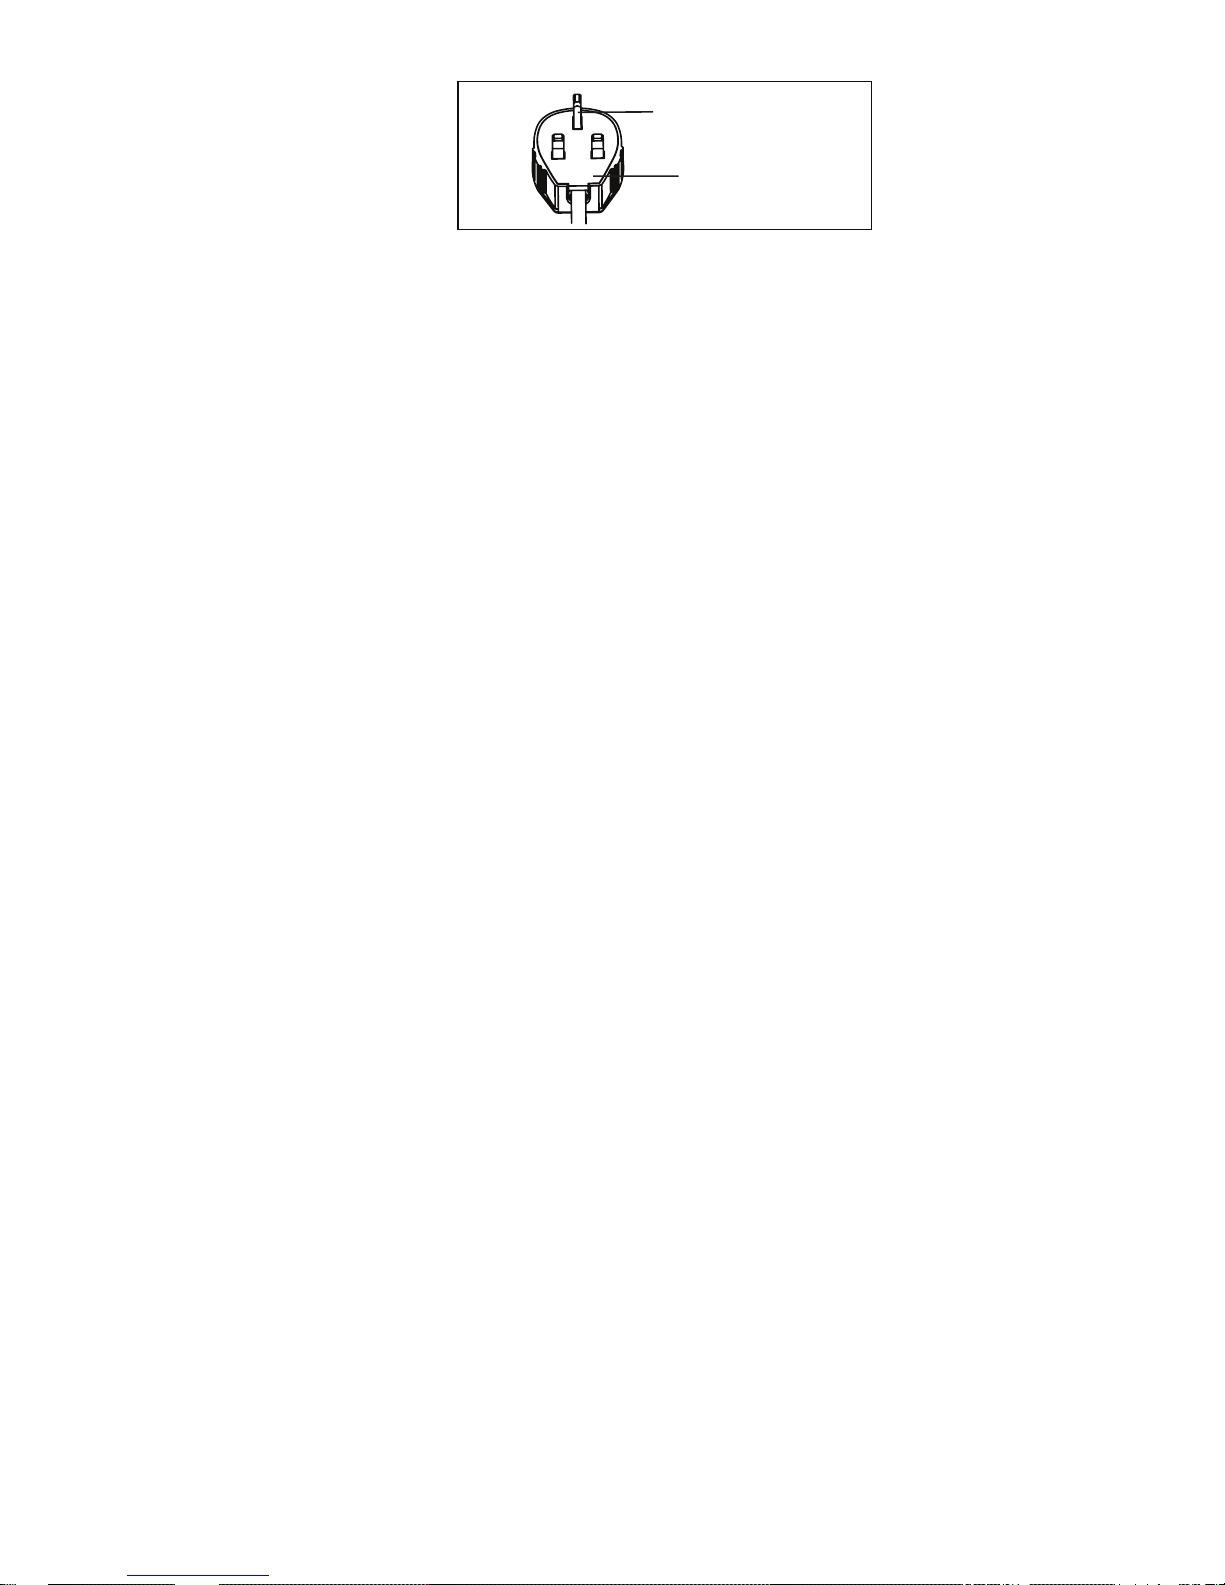
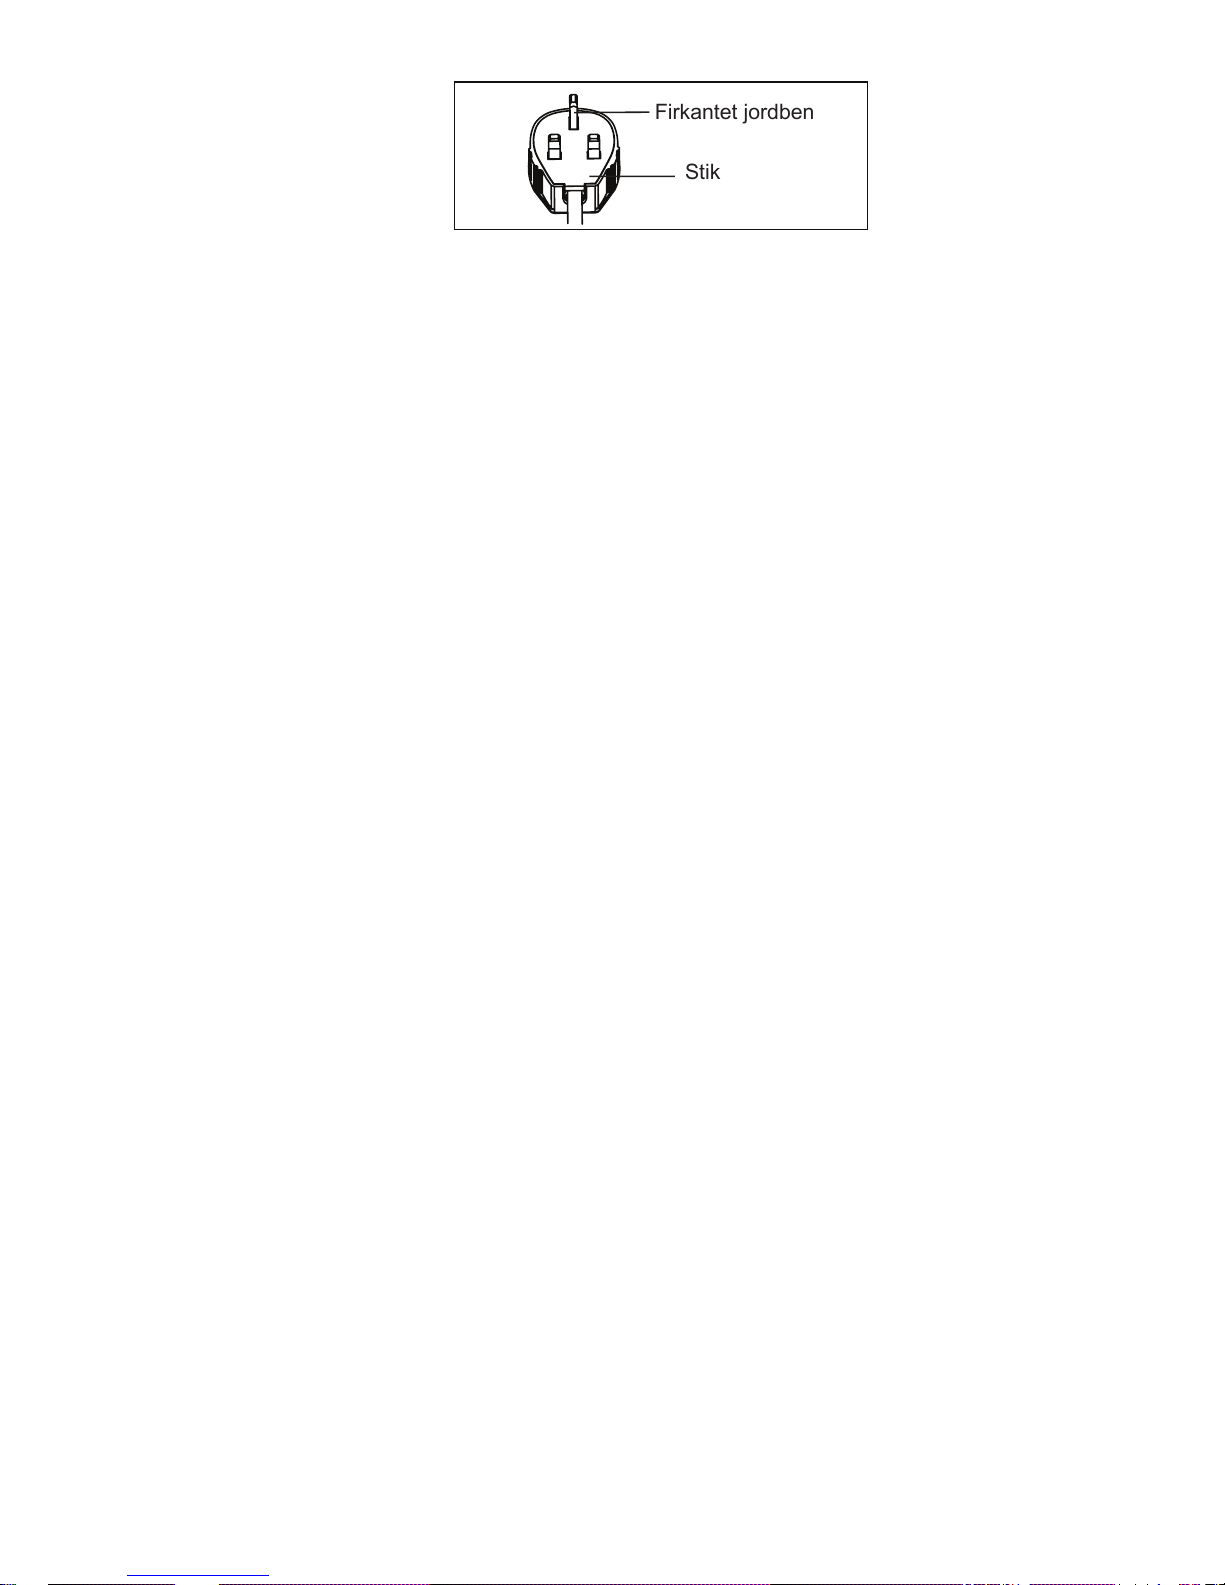
Plug
Grounding tab
6
www.electrolux.com
1.3
Usage cautions
• Be sure to turn the unit o and disconnect the power
supply cord before performing any maintenance or
cleaning.
• Do not put unit near any heat source or open re when
you replacing the lters.
• Do not splash or pour water directly onto the unit. Water
can cause electrical shock or equipment damage.
• Drainage should be performed whenever moving the
air conditioner. If any water remains in the tank, it may
spill out while being moved.
• To ensure proper drainage, the drainage hose must
have no kinks and must not be elevated during
dehumidication mode. If not, the drained water may
spill out into the room.
• The temperature around the drainage hose must not
be below freezing point when used. Drained water may
freeze inside the hose, causing water inside the unit to
overow into the room.
• Do not block the exhaust air outlet with obstacles. Cooling
performance may be reduced or stop completely.
• Provide a anti-explosive residual current device (RCD)
in order to protect against electric shock in accordance
with British Standard and Wiring Rules.
• Exposure to direct airow for an extended period of
time could be hazardous to your health. Do not expose
occupants, pets, or plants to direct airow for extended
periods of time.
• Do not use this air conditioner for non-specied special
purposes (e.g. preserving precision devices, food, pets,
plants, and art objects). Usage in such a manner could
harm such property.
• Do not use means to accelerate the defrosting process
or to clean, other than those recommended by the
manufacturer.
(only for UK)
Plug
Square earthed pin
7
ENGLISH
• The appliance shall be stored in a room without
continuously operating ignition sources (for example:
open ames, an operating gas appliance or an
operating electric heater).
• Do not pierce or burn.
• Compliance with national gas regulations shall
be observed.
• Keep ventilation openings clear of obstruction.
• The appliance shall be stored in a well-ventilated area
where the room size larger than 12 m
2
.
WARNING!
• Thoroughly read all of the warnings.
• When defrosting and cleaning the appliance, do
not use any tools other than those recommended
by the manufacturing company.
• The appliance must be placed in an area without
any continuous sources of ignition (for example:
open ames, gas or electrical appliances in
operation).
• Do not puncture and do not burn.
• Refrigerant gases can be odourless.
• The appliance must be installed, used and stored
in an area that is greater than 12 m
2
.
• This appliance contains a certain number of
grams (see rating label back of unit) of R290
refrigerant gas.
• R290 is a refrigerant gas that complies with the
European directives on the environment. Do not
puncture any part of the refrigerant circuit.
• If the appliance is installed, operated or stored in
a nonventilated area, the room must be designed
to prevent the accumulation of refrigerant leaks
resulting in a risk of re or explosion due to ignition
PLEASE NOTE: CHECK THE PLATE FOR THE TYPE
OF REFRIGERANT GAS USED IN YOUR APPLIANCE.
Specic information regarding appliances with R290
refrigerant gas.

8
www.electrolux.com
of the refrigerant caused by electric heaters,
stoves, or other sources of ignition.
• The appliance must be stored in such a way
as to prevent mechanical failure.
• Individuals who operate or work on the refrigerant
circuit must have the appropriate certication
issued by an accredited organisation that ensures
competence in handling refrigerants according
to a specic evaluation recognized by associations
in the industry.
• Repairs must be performed based on the
recommendations from the manufacturing
company. Maintenance and repairs that require
the assistance of other qualied personnel
must be performed under the supervision of
an individual specied in the use of ammable
refrigerants.
Transport of equipment containing ammable
refrigerants
See transport regulations.
Marking of equipment using signs
See local regulations.
Disposal of equipment using ammable refrigerants
See national regulations.
Storage of equipment/appliances
The storage of equipment should be in accordance with
the manufacturer’s instructions.
Storage of packed (unsold) equipment
Storage package protection should be constructed such
that mechanical damage to the equipment inside the
package will not cause a leak of the refrigerant charge.
The maximum number of pieces of equipment permitted
to be stored together will be determined by local
regulations.
1.4
Additional information
9
ENGLISH
2.2
Warning during usage
To prevent injury to the user or other
people and property damage, the
following instructions must be followed.
Incorrect operation due to ignoring
instructions may cause harm or damage.
The seriousness is classied by the
following indications:
This symbol indicates the possibility
of death or serious injury.
Warning during usage
This symbol indicates the possibility
of injury or damage to property.
WARNING!
WARNING!
CAUTION!
Meanings of symbols used in this manual
are shown below:
This symbol indicates never
to do this.
This symbol indicates always
do this.
2.
SAFETY INSTRUCTION
2.1
Notes on Operation
• Allow 4 minutes for the compressor
to restart cooling. If you turn the air
conditioner o and immediately restart
it, allow 4 minutes for the compressor
to restart cooling. There is an electronic
device in the unit that keeps the
compressor turned o for 4 minutes
for safety.
• In the event of a power failure during
use, allow 4 minutes before restarting
the unit. After power is reinstated, restart
the air conditioner. If the power was o
for less than four minutes, be sure to wait
at least four minutes before restarting
the unit. if you restart the air conditioner
within four minutes, a protective device
in the unit may cause the compressor
to shut o. This protective device will
prevent cooling for about 5 minutes. Any
previous setting will be cancelled and
the unit will return to its initial setting.
• When you turn the unit o in cooling
mode, the compressor will shut o
immediately and the upper/under fan
motor will stop running after 5 seconds;
if operate the unit to fan mode from
cooling mode, the compressor will shut
o immediately and the under fan motor
will stop running after 5 seconds; and if
operate the unit to heating mode from
cooling mode, the compressor will shut
o immediately and the under fan motor
will stop running after 30 seconds.
• Low temperature operation: Is your
unit freezing up? Freezing may occur
when the unit is set close to 18°C in
low ambient temperature conditions,
especially at night. In these conditions,
a further temperature drop may cause the
unit to freeze. Setting the unit to a higher
temperature will prevent it from freezing.
• Dehumidication mode increases room
temperature. The unit generates heat
during dehumidication mode and the
room temperature will rise. Warm air
will be blown out from the exhaust air
outlet, but this is normal and does not
indicate a problem with the unit.
• This air conditioner blows the warm air
generated by the unit outside the room
via the exhaust hose while in cool mode.
In the mean time, the same amount
of air will enter the room from outside
through any openings of the room.
• Any person who is involved with working
on or breaking into a refrigerant circuit
should hold a current valid certicate
from an industry-accredited assessment
authority, which authorises their
competence to handle refrigerants
safely in accordance with an industry
recognised assessment specication.
• Servicing shall only be performed
as recommended by the equipment
manufacturer. Maintenance and repair
requiring the assistance of other skilled
personnel shall be carried out under the
supervision of the person competent in
the use of ammable refrigerants.
• The working temperature range of the
air conditioner is 16-35°C (60-95°F)
under cooling mode; 5-27°C (41-80°F)
under heating mode.
10
www.electrolux.com
Warning Meaning
Plug in power plug properly Otherwise, it may cause electric shock,
re and explosion due to excess heat
generation
Do not operate or stop the unit by
inserting or pulling out Die power plug
It may cause electric shock, re and
explosion due to heat generation
Do not damage or use an unspecied
power cord
It may cause electric shock, re and
explosion. If the power cord is damaged,
it must be replaced by the manufacturer
or an authorised service centre or
a similarly qualied person in order
to avoid a hazard
Do not modify power cord length or
share the outlet with other appliances
It may cause electric shock, re and
explosion due to heat generation
Do not operate with wet hands or in
damp environment
It may cause electric shock
Do not direct airow at room occupants This could harm your health
Always ensure eective earthing Incorrect earthing may cause electric
shock
Do not allow water to run into electric
parts
It may cause failure of unit or electric
shock
Always install circuit breaker and
a dedicated power circuit
Incorrect installation may cause electric
shock, re and explosion
Unplug the unit if strange sounds, smell,
or smoke comes from it
It may cause electric shock, re and
explosion
Do not use the socket if it is loose
or damaged
It may cause electric shock, re and
explosion
Do not open the unit during operation It may cause electric shock, re and
explosion
Keep rearms away It may cause re and explosion
Do not use the power cord close
to heating appliances
It may cause electric shock, re and
explosion
Do not use the power cord near
ammable gas or combustibles, such
as gasoline, benzene, thinner, etc.
It may cause electric shock, re and
explosion
Ventilate room before operating air
conditioner if there is a gas leakage
from another appliance
It may cause explosion, re, explosion
and burns
Do not disassemble or modify unit It may cause failure and electric shock
11
ENGLISH
CAUTION!
Caution Meaning
When the air lter is to be removed,
do not touch the metal parts of the unit
It may cause an injury
Do not clean the air conditioner with
water
Water may enter the unit and degrade the
insulation. It may cause an electric shock
Ventilate the room well when used
together with a stove, etc.
An oxygen shortage may occur
When the unit is to be cleaned, switch
o, and turn o the circuit breaker
Do not clean unit when power is on as
it may cause re, explosion and electric
shock, it may cause an injury
Do not place a pet or house plant where
it will be exposed to direct air ow
This could injure the pet or plant
Do not use for special purposes Do not use this air conditioner to
preserve precision devices, food, pets,
plants, and art objects. It may cause
deterioration of quality, etc.
Stop operation and close the window
in storm or cyclone
Operation with windows opened may
cause wetting of indoor and soaking
of household furniture
Hold the plug by the head of the power
plug when taking it out
It may cause electric shock and damage
Turn o the main power switch when not
using the unit for a long time
It may cause failure of product or re and
explosion
Do not place obstacles around air-inlets
or inside of air-outlet
It may cause failure of appliance
or accident
Always insert the lters securely.
Clean lter once every two weeks
Operation without lters may cause
failure
Do not use strong detergent such
as wax or thinner - use a soft cloth
Appearance may be deteriorated due
to change of product colour or scratching
of its surface
Do not place heavy object on the power
cord and ensure that the cord is not
compressed
There is danger of re, explosion
or electric shock
Do not drink water drained from
air conditioner
It contains contaminants and could make
you sick
Use caution when unpacking and installing Sharp edges could cause injury
If water enters the unit, turn the unit o at
the power outlet and switch o the circuit
breaker. Isolate supply by taking the
power-plug out and contact a qualied
service technician
It could cause electric shock and damage
12
www.electrolux.com
3.
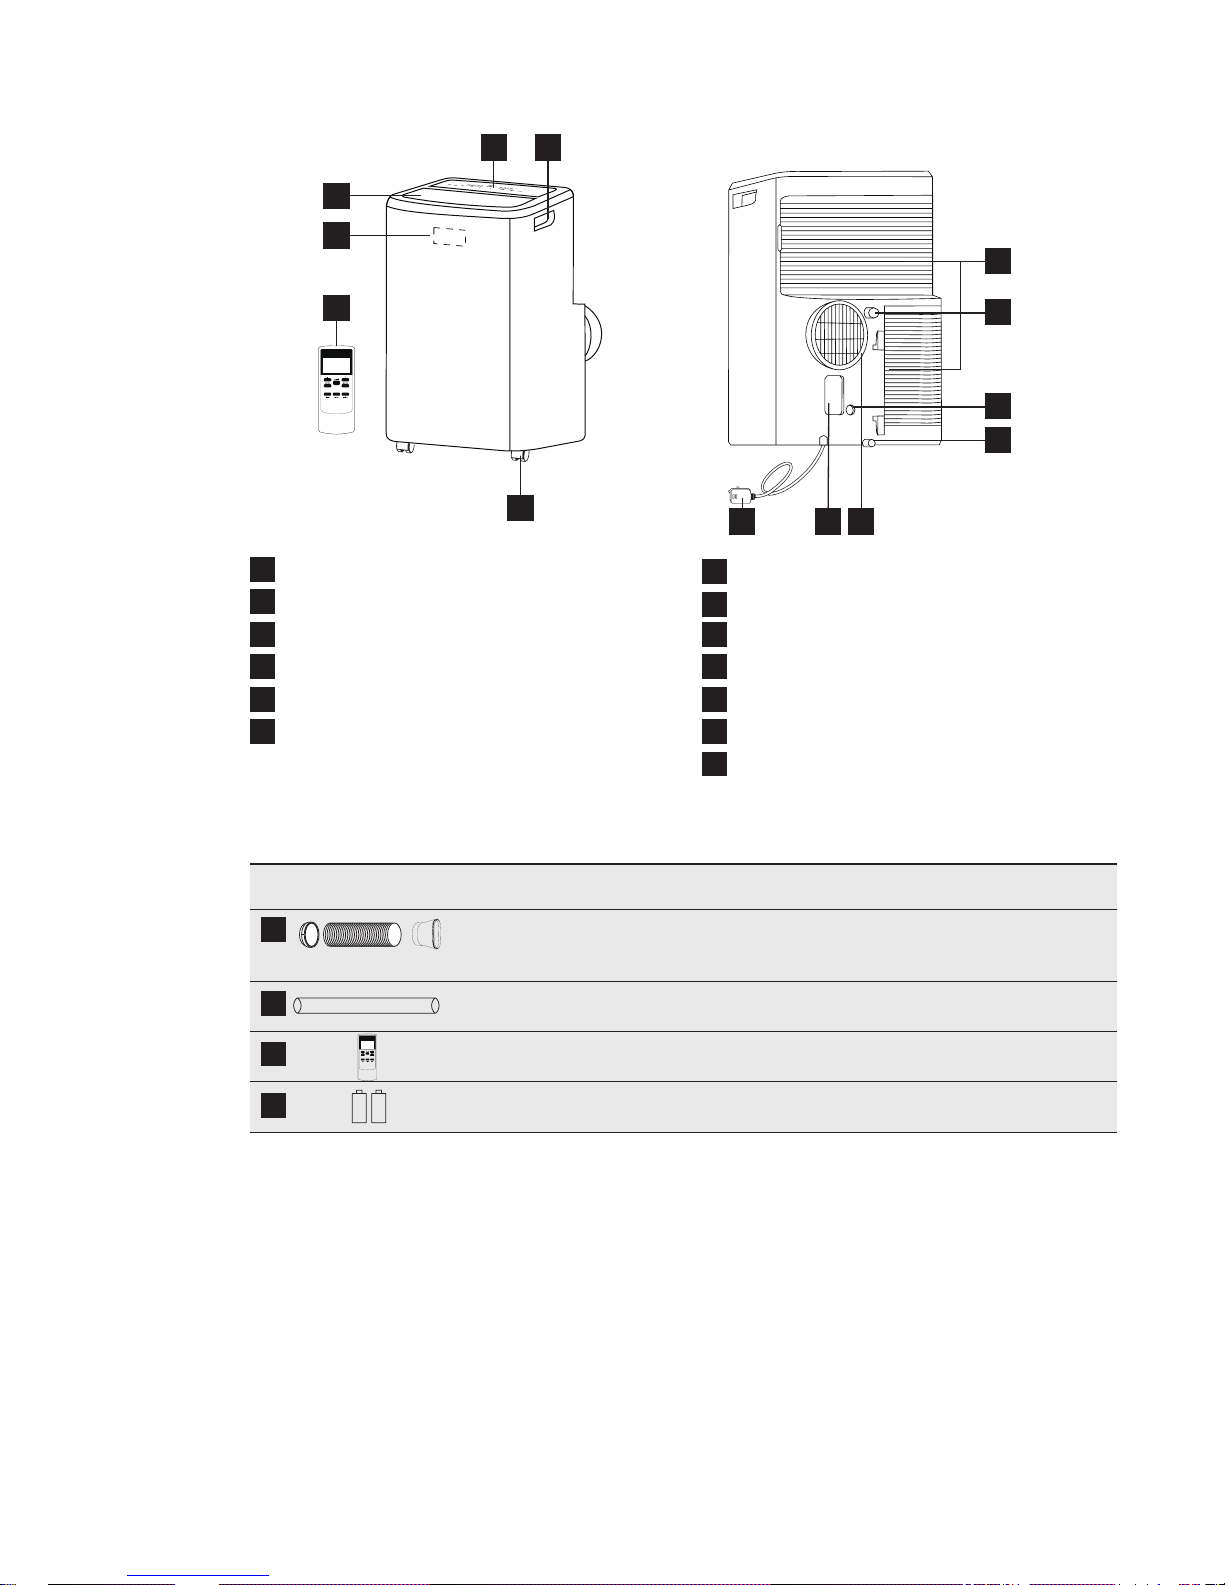
UNIT DESCRIPTION
• Check all the accessories are included in the package and please refer to the installation
instructions for their usage.
1
2
5
6
3
10
11
12
13
9
4
7
8
Remote control
Signal receiver
Carrying handle (both sides)
Air intake
Room air outlet
Air exhaust
Power plug socket
Castor
Control panel
Power cord
Continuous drain outlet
Bottom drain outlet
Pump drain outlet
4.
ACCESSORIES INCLUDED
1
2
3
4
PARTS PARTS NAME: QUANTITY:
Adaptor A, Exhaust duct,
Adaptor B (at mouth),
Drain hose
Remote control
1 set
1 pc
1 set
Battery (R03P “AAA” 1.5V) 2 pcs
13
ENGLISH
5.
INSTALLATION INSTRUCTIONS
5.1
Exhausting hot air
In the Cool Mode the appliance must be
placed close to a window or opening so
that the warm exhaust air can be ducted
outside. First position unit on a at oor
and make sure there’s a minimum of
50cm clearance around the unit, and is
within the vicinity of a single circuit outlet
power source.
1.
Extend either side of the hose (Fig. 1)
and screw the hose to adaptor A (Fig. 2).
3.
Install the adaptor A into the unit (Fig. 4).
Fig. 4
2.
Extend the other side of the hose and
screw it to adaptor B (Fig. 3).
)LJ
)LJ
)LJ
/RFN
6OLGHRQWR
The hose can be extended from
its original length of 38cm up to
150cm, but it is the best to keep
the length to minimum required.
Also make sure that the hose does
not have any sharp bends or sags.
(Fig. 6)
The adaptor A already be screwed
to the hose for this unit.
)LJ
4.
Ax the adaptor B into the window.
(Fig. 5)

14
www.electrolux.com
7.
OPERATING INSTRUCTIONS
Some of the following instructions
can only be used by using the
Control Panel.
It is not necessary to use the
drainage hose in the “cool” mode.
Cooling mode
Heating mode (on some models)
In this mode the exhaust adaptor hose
MUST be used.
In this mode the exhaust adaptor hose
MUST be used.
7.1
Usage of the Control Panel
1.
Press the “mode” button until the Cool
mode indicator is lit.
2.
Press the “fan speed” button to
choose the fan speed according
to the illumination of the fan speed
indicator. You can choose the
fan speed as following sequence:
“auto” → “hi” → “med” → “low” → “auto”.
3.
Press the “
” or “ ” button to choose
the temperature you want.
1.
Press the “mode” button until the “Heat”
indicator is lit.
2.
Press the “fan speed” button to
choose the fan speed according
to the illumination of the fan speed
indicator. You can choose the
fan speed as following sequence:
“auto” → “hi” → “med” → “low” → “auto”.
3.
Press the “
” or “ ” button to choose
the temperature you want.
4.
Connected drain hose. See 7.4
Drainage section.
6.
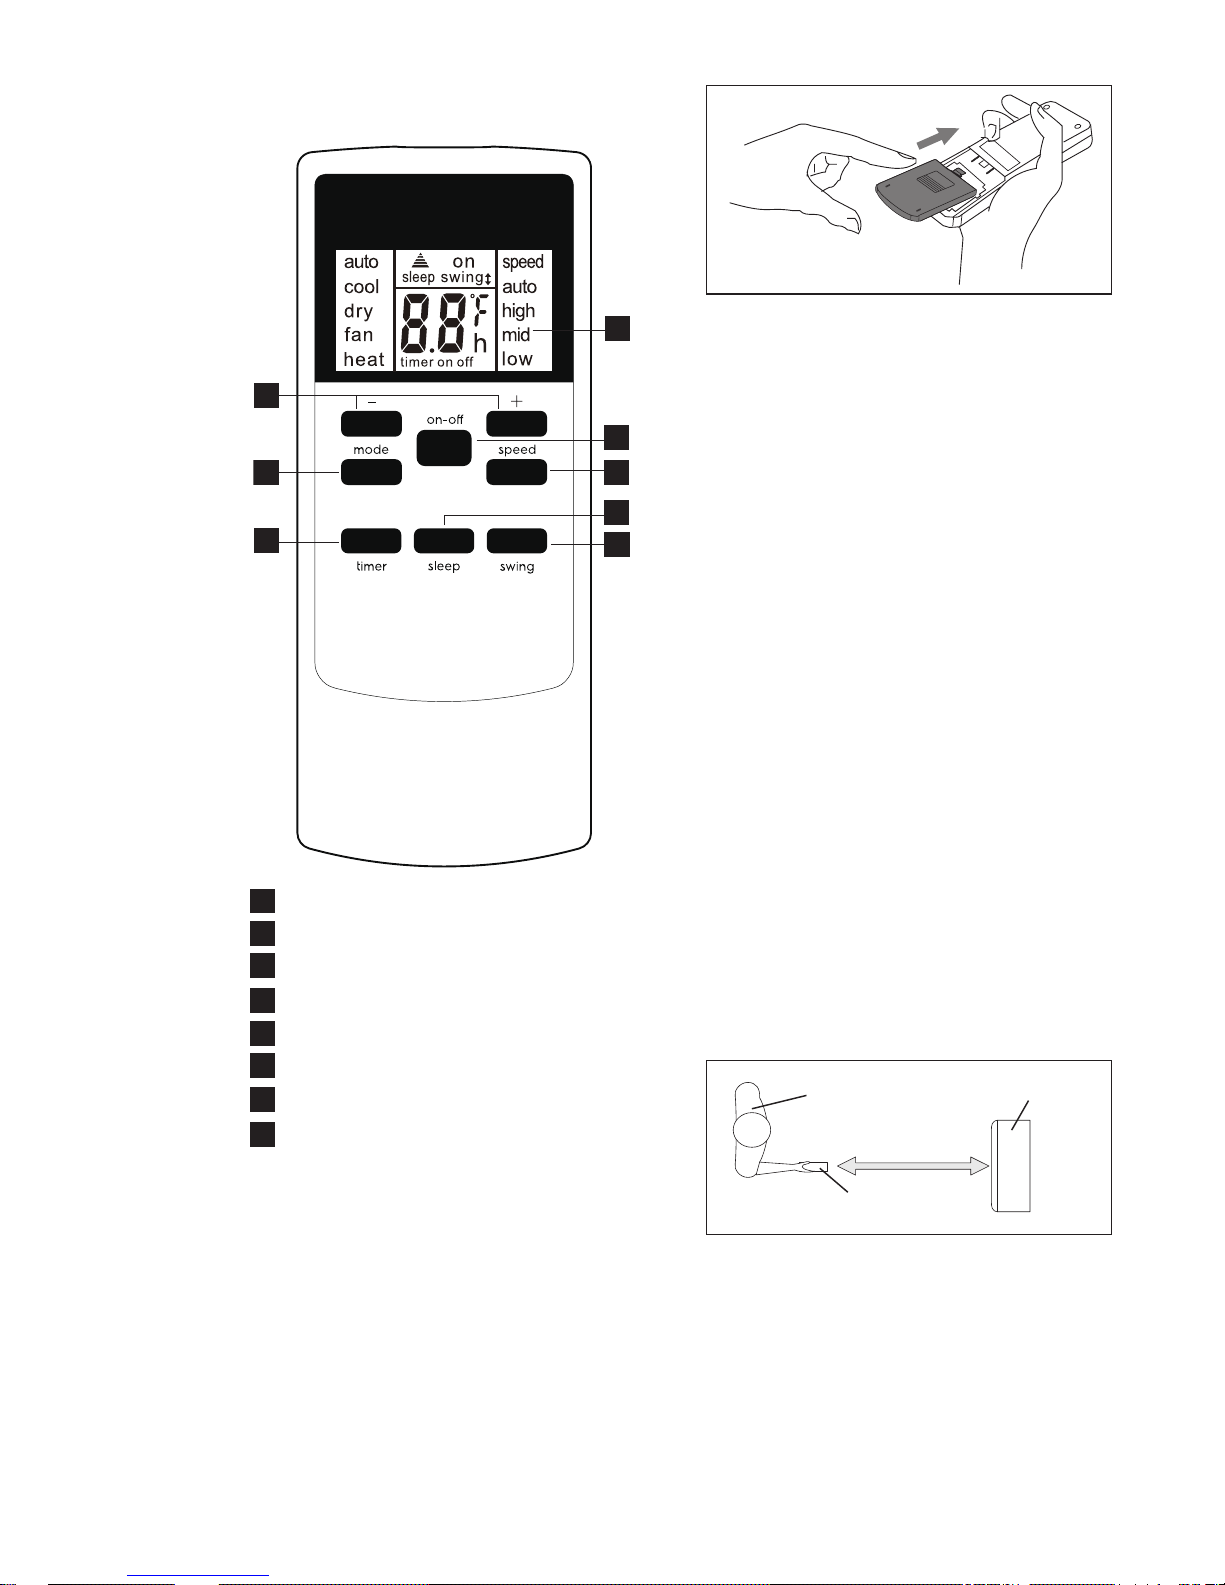
AIR CONDITIONER FEATURES
6.1
CONTROL PANEL
1
2
7
3
4
5
6
8
9
Displays temperature/time
Power ON/OFF
Sleep
Filter Reset
Fan Speed
Adjust Temperature or Timer
Mode Selection
Timer
Swing
Dry mode
Press the “mode” button until the Dry
mode indicator is lit. The screen displays
the room temperature.
At the same time, the “low” fan indicator
lights.
Note:
In this mode, fan speed cannot
be selected.
15
ENGLISH
Fan mode
In this mode, there is no need to use the
exhaust hose or drainage hose.
1.
Press the “mode” button until
the Fan mode indicator is lit.
2.
Press the “Fan speed” button
to choose the desired fan speed.
3.
The fan will run at the selected speed
and the display will show the room
temperature.
Auto mode
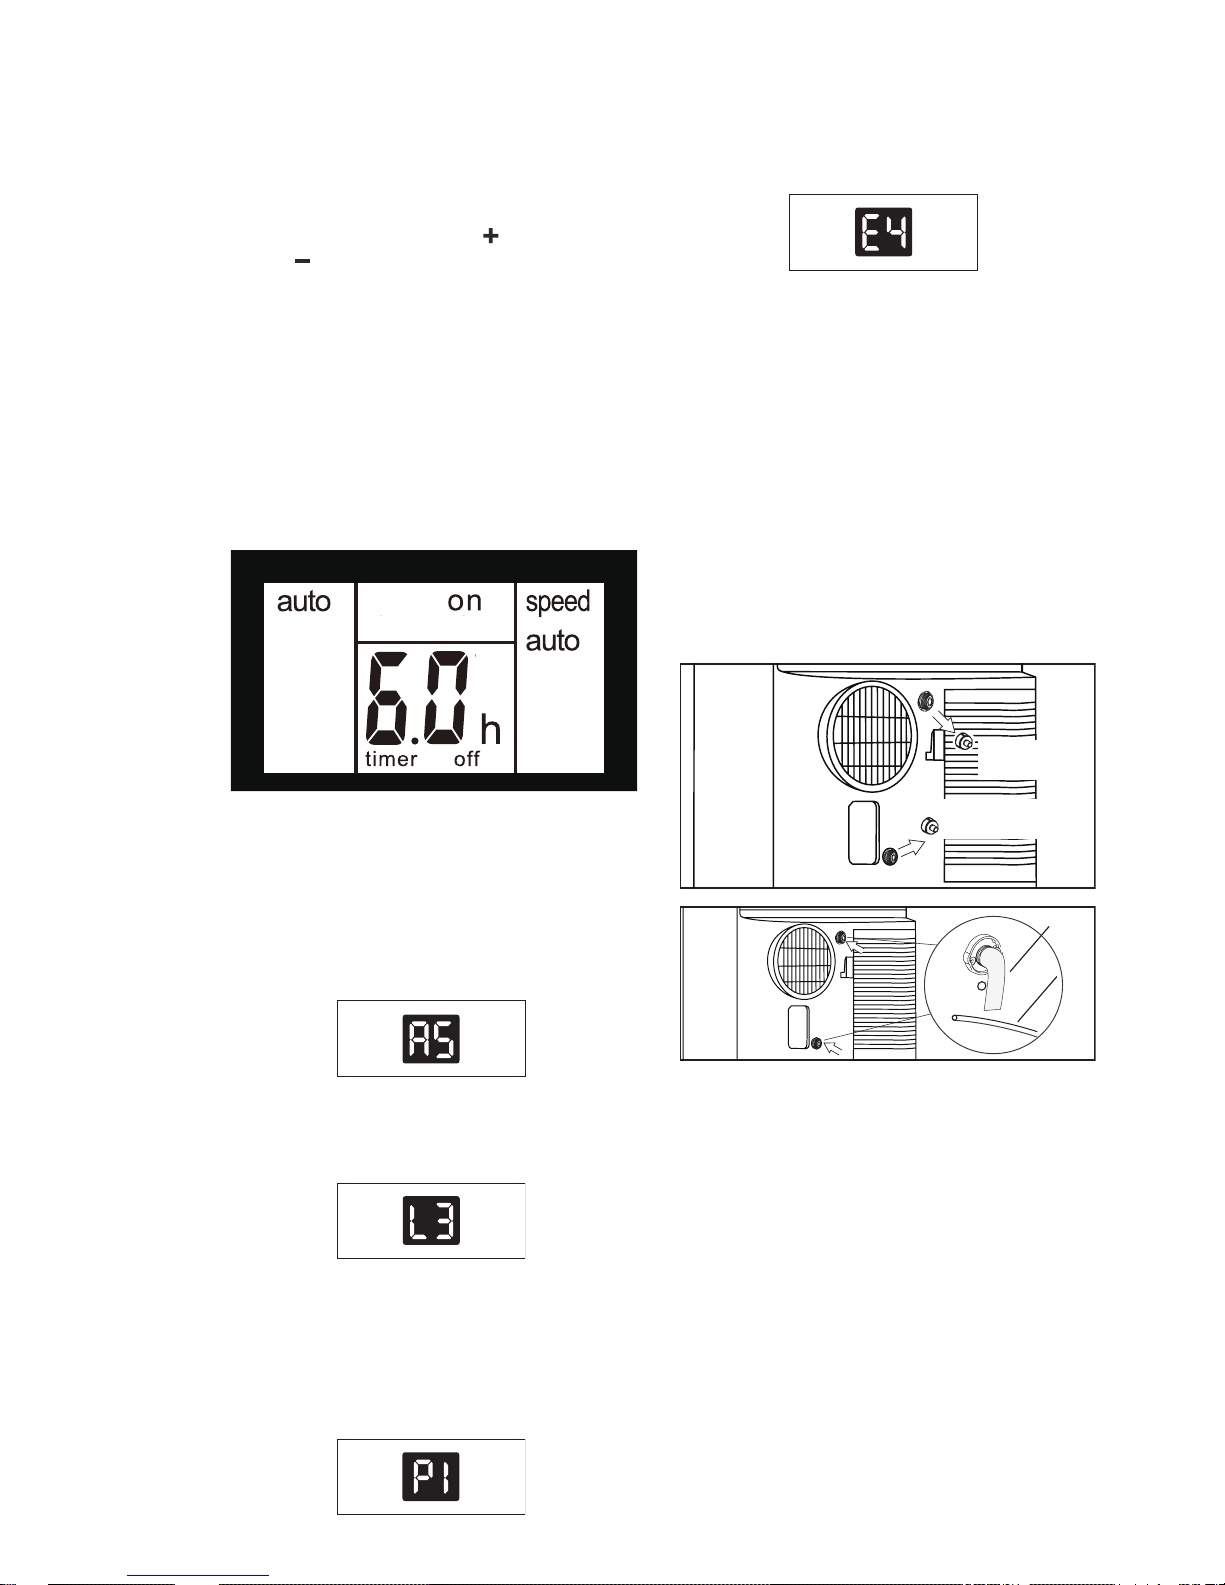
Timer mode
How to delay startup
Always have the exhaust hose attached
in this mode.
When you set the air conditioner in Auto
mode, it will automatically select cooling,
heating (inapplicable for cooling only
models), or fan only operation depending
on what temperature you have selected and
the room temperature. The air conditioner
will control room temperature automatically
round the temperature point set by you.
Under AUTO mode, you can not select
the fan speed.
1. Press the “mode” button until the
“Auto mode” indicator lights.
After the “Auto mode” is selected the unit
will run automatically according to the
actual room air temperature.
The timer facilitates the user to delay the
unit startup or shutdown.
Plug in the unit, so the unit turns to standby.
Press the “timer” button, then the Timer
indicator will switch on and the number
of hours on the screen will show “0.0”.
Tap or hold the UP arrow “
” or the DOWN
arrow “
” to change delay start timer at
0.5 hour increments up to 10 hours, then
at 1 hour increments up to 24 hours. Press
the “timer” button again within 5 seconds,
you will quit the timer setting directly.
After 5 seconds, the timer function
is enabled, the display will show the
temperature back. The control will count
down the time remaining until startup.
The unit will start up in the mode
as previously set.
To cancel the setting, press the “timer”
button again will show the remain time and
press the button again to quit the function.
You can also cancel the setting by pressing
How to delay shutdown
You can delay shutdown when the unit
is on.
Press the “timer” button, then the Timer
indicator will switch on and the number
of hours on the screen will show “0.0”.
Tap or hold the UP arrow “
” or the
DOWN arrow “
” to change delay
stop timer at 0.5 hour increments up
to 10 hours, then at 1 hour increments
up to 24 hours. Press the “timer” button
again within 5 seconds, you will quit
the timer setting directly.
After 5 seconds, the timer function
is enabled, the display will show the
temperature back. The control will count
down the time remaining until shuts down.
To cancel the setting, press the “timer”
button again will show the remaing time and
press the button again to quit the function.
You can also cancel the setting by pressing
the “on/o” button. After cancel the setting,
the timer indicator will switch o.
Filter reset
Sleep mode
Active this feature will give you a
comfortable temperature and help
save energy.
Only when the unit is in Cool, Heat or auto
mode, you can press the “sleep” button to
make the unit run in Sleep mode.
Note: Please refer to page 17 for the
details about “Sleep” mode.
This feature is a reminder to clean the Air
Filter (See Care and Cleaning) for more
ecient operation.
The lter indicator will illuminate after
250 hours of operation. To reset after
cleaning the lter, press the “lter reset”
button, then the “lter” indicator will go o.
°F/°C function
Press the “
” and “ ” button the same
time for more than 3 seconds to switch
between degree Fahrenheit and degrees
Celsius. Under Dry/Fan mode, you can
not select °F/°C.
Press the “swing” button to enable louver
swing function, the louver on the top
panel will swing up and down.
Press this button again to disable the
louver swing function.
Louver Swing Function
Note:
In this mode, auto speed cannot
be selected.
the “on/o” button. After cancel the setting,
the timer indicator will switch o.
16
www.electrolux.com
8VHU
0D[P
5HPRWHFRQWURO
3RUWDEOH$&
TURNING THE UNIT ON
Remove the cover at the back of the
remote control.
Insert the provided batteries correctly
(see the instructions inside the battery
compartment).
Close up the cover.
To replace the old batteries (which have
been used up) with two new R03P “AAA”
1.5V batteries, repeat the steps above.
Battery Installation and Important
Instructions
How to Use the Remote Control
7.2
Remote Control
1
2
5
3
7
4
8
6
Remote Control screen
Temp/Timer setting button
On/O button
Mode button
Sleep button
Timer button
Swing button
Speed button
If the remote control unit is replaced or
discarded, the batteries must be removed
and disposed of in accordance with
local legislation as they do harm to the
environment.
Do not mix old and new batteries.
Do not mix alkaline, standard (carbonzinc) or rechargeable (nickel-cadmium)
batteries.
Do not dispose of batteries in re. Batteries
may explode or leak. If the remote control
is not used for a long time, remove the
batteries from the remote control.
The remote control must be handled with
extreme care. Do not drop it or expose it
to direct sunlight or sources of heat.
This device complies with Part 15 of the
FCC Rules. Operation is subject to the
following two conditions:
(1) This device may not cause harmful
interference, and (2) this device must
accept any interference received,
including interference that may cause
undesired operation.
Point the remote control at the location
of the signal receiver. The remote control
must be no more than 16 ft (5 meters)
away from the unit (without obstacles
between the remote control and the unit).
17
ENGLISH
Plug in the unit, then press the “on/o”
button (when turned on, the unit will operate
as the last setting before shutdown.
To switch the unit o, press “on/o”
button again, then remove the plug.
Always switch the unit o by pressing the
“on/o” button and wait for few minutes
before removing the plug.
Press the “mode” button until the left side
of LCD screen displays “cool”.
Press the “fan speed” button to choose the
fan speed “auto”, “high”, “mid”, and “low”.
Press the “
” and “ ” button to choose
the temperature you want.
Press the “mode” button until the left side
of LCD screen displays “dry”.
At the same time, the “low” fan symbol
appears on the screen.
Note: In this mode, fan speed cannot
be selected.
Press the “mode” button until the left side
of LCD screen displays “heat”.
Press the “fan speed” button to choose the
fan speed “auto”, “high”, “mid”, and “low”.
Press the “
” and “ ” button to choose
the temperature you want.
Press the “mode” button until the upper
side of LCD screen displays “auto”.
Under AUTO mode, you can not select
the fan speed.
Press the “
” and “ ” button to choose
the temperature you want.
When the unit is in Cool, Heat or auto
mode, you can press the “sleep” button
to make the unit run in Sleep mode. In this
mode, the fan speed will be set as “auto”
automatically, which cannot be changed.
In Cool/Heat mode the selected
temperature will increase/decrease
by 1°C 30 minutes after the mode is
selected. The temperature will then
increase/decrease by another 1°C after
an additional 30 minutes. This new
temperature will be maintained for 7 hours
before it returns to the originally selected
temperature. This ends the “Sleep” mode
and the unit will shut down automatically.
Press the “mode” button until the left side
of LCD screen displays “fan”.
In this mode, you can select fan speed
“high”, “mid” or “low” by pressing the Fan
speed button and referring to the diagram.
Note: In this mode, the air exhaust hose
does not need to be connected.
Cool mode
Dry mode
Heat mode (For Heat & Cool models only)
AUTO mode
Sleep mode
Fan mode

18
www.electrolux.com
The “Sleep” mode program can be
cancelled at any time during operation by
pressing the “Sleep”, “mode” or “fan speed”
button.
Note: In Fan or Dry mode, Sleep mode
cannot be set.
Press the “swing” button to enable louver
swing function, and the upper side of
screen will display “
”. The louver
on the top panel will swing up and down.
Press this button again to disable the
louver swing function.
Louver Swing Function
°F/°C function
Timer mode
Press the “
” and “ ” button the same
time for more than 3 seconds to switch
between degree Fahrenheit and degrees
Celsius. Under Dry/Fan mode, you can
not select °F/°C.
How to delay startup
Plug in the unit, so the unit turns to
standby. Press the “timer” button, the
screen will display “timer”and “h”, and
the “on” will ashing.
Tap or hold the UP arrow “
” or the
DOWN arrow “
” to change delay start
timer at 0.5 hour increments up to
10 hours, then at 1 hour increments up to
24 hours. After 3 seconds, the setting will
be memorized. The control will count down
the time remaining until startup. You can
also press the “timer” button again directly
and the “on” will stop ashing immediately,
then the unit will start up in the mode as
previously set.
You can set up the mode and the unit will
start up as you preferred after “on” stop
ashing.
To cancel the setting, press the “timer”
button again.
19
ENGLISH
NOTE:
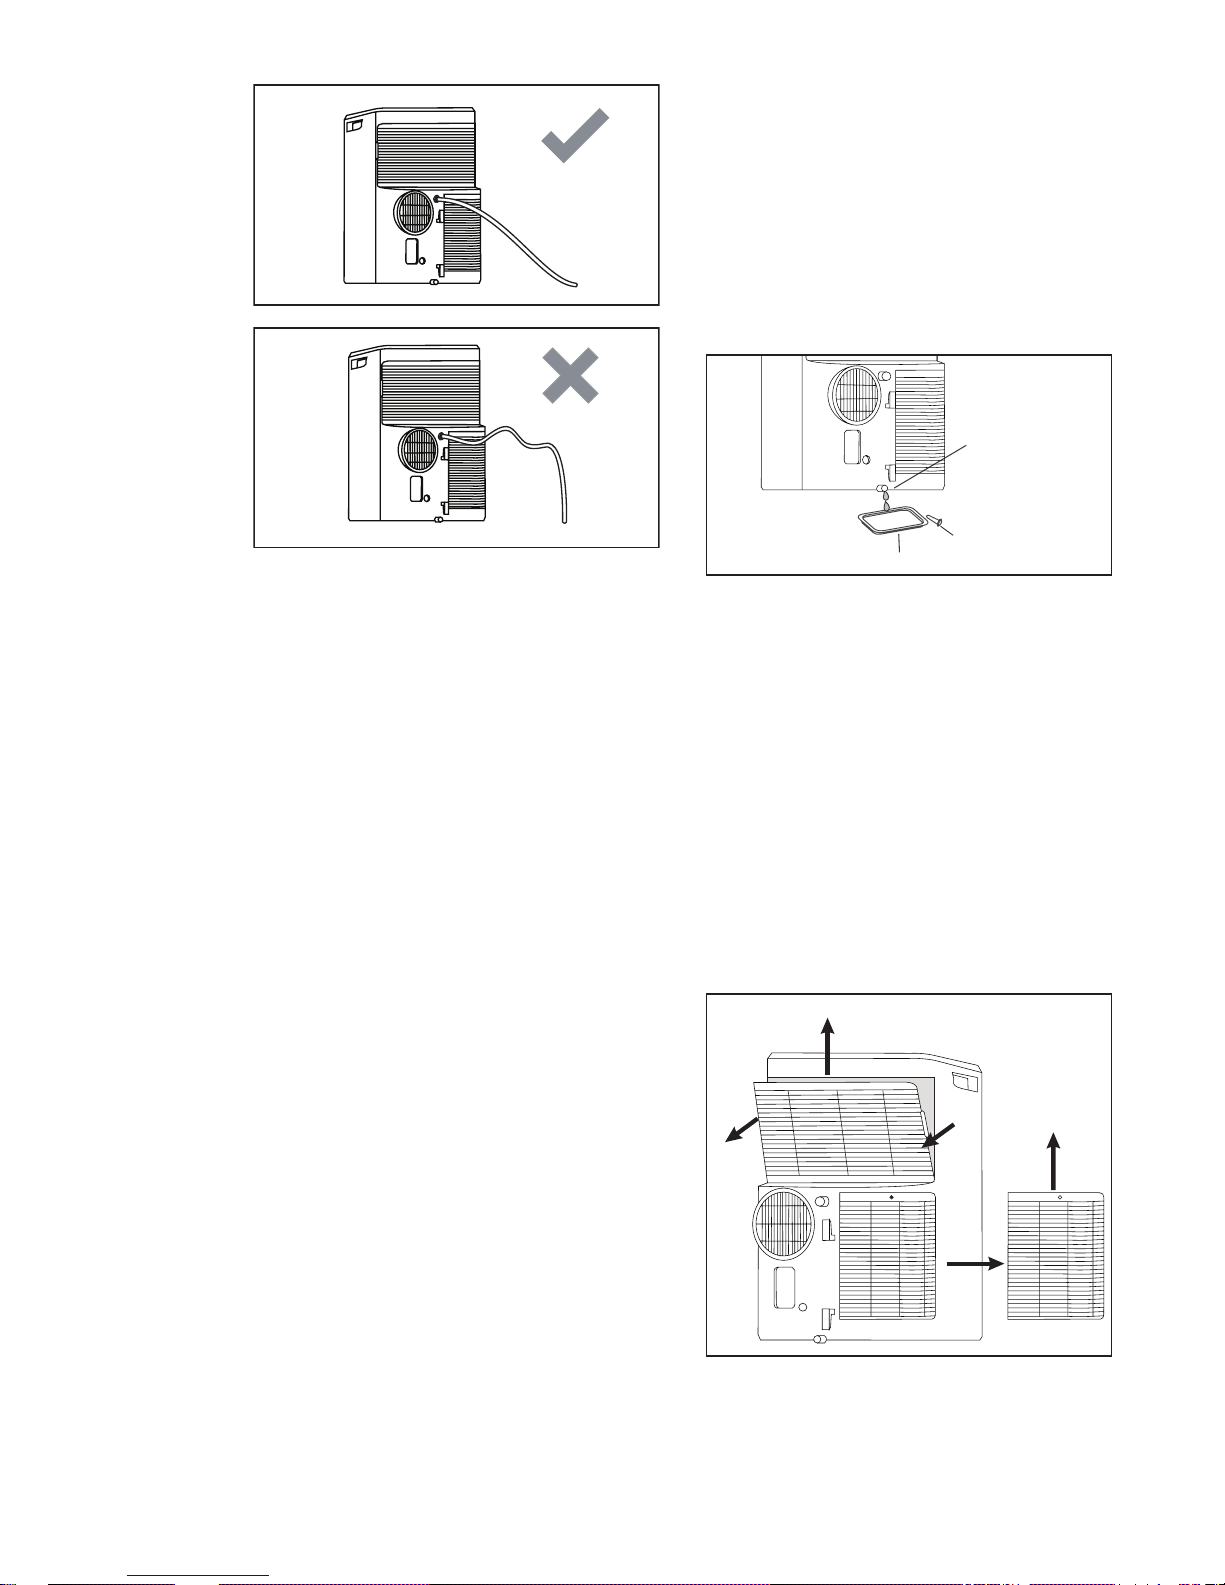
• Unscrew the drain cap of continuous
drain outlet(Fig.20).
• Connect one end of the garden hose
(sold separately) or drain hose to the
drain outlet then lead the other end into
a drain that is lower than the unit(Fig.21).
• Condensate may ow out after removing
the drain cap, if the unit is running in
Cool or Auto mode. When you want
to remove the garden hose, prepare
a drip tray (not supplied) to collect the
condensate from the drain outlet.
• Please be sure that the height of the
drain and section of the drain hose
should not be higher than that of the
drain outlet, or the continous drainage
may not work properly.
• During Cool or Auto mode, it is
recommended to disable continuous
drainage by replacing the drain cap to
the drain outlet, to reach the maximum
performance.
How to delay shutdown
You can delay shutdown when the unit is
on. Press the “timer” button, the screen
will display “timer” and “h”, and the “o”
will ashing.
Tap or hold the UP arrow “
” or the DOWN
arrow “
” to change delay stop timer at
0.5 hour increments up to 10 hours, then
at 1 hour increments up to 24 hours. After
3 seconds, the setting will be memorized,
and the display will show the time
remaining until the unit shuts down. You
can also press the “timer” button again
directly and the “o” will stop ashing
immediately.
To cancel the setting, press the “timer”
button again.
If the display reads “AS”, “CS” and
“ES”, the temperature sensor has failed.
Contact your Authorized Electrolux
Service Center.
If the display reads “L3”, the condenser
DC fan motor has failed. Contact your
Authorized Electrolux Service Center.
If the display reads “E4”, the communication
between display PCB and main control
PCB is faulty. Contact your Authorized
Electrolux Service Center.
If the display reads “P1”, bottom tray is
full. Carefully move the unit to a drain
location, remove the bottom drain plug
and let the water drain away. Restart the
machine until the “P1” symbol disappears.
If error repeats, call for service.
7.3
Fault code
Continuous Drainage
During the DRY mode or heat pump
model, you will need a garden hose
(sold separately) or drain hose to drain
the condensate from the unit.
Follow the steps below:
7.4
Drainage instruction
Fig. 20
Drain cap
for Dry mode
Drain cap
for Heat Pump mode
Garden hose
Drain hose
Fig. 21
20
www.electrolux.com
NOTE: To ensure all condensate residue
has been removed, tilt the unit by lifting
it slightly upwards from the front until no
more condensate comes out from the
drain outlet.
Emptying the condensate residue inside
the unit during winter storage.
Put a drip tray (not supplied) under
bottom drain outlet, then pull out the
drain cap to allow the condensate
to ow into the drip tray.
)LJ
)LJ
Bottom
Drain Outlet
Drip cap
Drip tray
1
2
Replace the drain cap to the continuous
drain outlet when no condensate ows out.
Put the drip tray under the bottom drain
outlet, then remove the rubber stopper from
the drain outlet, to allow the condensate to
ow into the drip tray. If your drip tray can’t
hold all the condensate, a number of lls
will be needed.
Replace the drain cap to the bottom drain
outlet when no condensate ows out.
8.
CARE & CLEANING
Clean your air conditioner occasionally
to keep it looking new. Be sure to unplug
the unit before cleaning to prevent shock
or re hazards.
The cabinet and front may be dusted with
an oil-free cloth or washed with a cloth
dampened in a solution of warm water
and mild liquid dishwashing detergent.
Never use harsh cleaners, wax or polish
on the cabinet front.
Be sure to wring excess water from the
cloth before wiping around the controls.
Excess water in or around the controls
may cause damage to the air conditioner.
8.1
Cleaning the unit
1.
Removed the air lter as shown the
below gure.
To keep your air conditioner working
eciently, you should clean the lters
every two weeks of operation.
Take out the upper air lter and the
lower air lter.
8.2
Cleaning the lters
21
ENGLISH
1.
Drain the water collection tank
completely and leave the bottom
drain cap and rubber plug long time
enough to allow any residual water to
drain out. Once the tank is completely
drained and no more water ows out,
reinstall the rubber plug and cap.
1.
Make sure the lter and drain cap are
in place.
2.
Check the cord to make sure it is in
good condition, without cracks or
damage.
3.
Place new batteries in the remote
control.
4.
Install the air conditioner as described
in the Installation Instructions.
2.
Wash the lter using liquid dishwashing
detergent and warm water under
40°C. Rinse lter thoroughly. Gently
shake excess water from the lter.
Be sure lter is thoroughly dry before
replacing. Or, instead of washing you
may vacuum the lter clean.
3.
Replace the lter after the lter is dry.
Be sure lter is thoroughly dry
before replacing.
If the air conditioner will not be used for
an extended period of time:
Before using the air conditioner again:
8.3
Winter Storage
9.
TROUBLE SHOOTING
Before calling for service, review this list.
It may save you time and expense. This
list includes common occurrences that are
not the result of defective workmanship or
materials in this appliance.
Air conditioner will not operate.
Air from unit does not feel cold
enough.
Air conditioner cooling, but room is
too warm - NO ice forming on cooling
coil behind decorative front.
• Wall plug disconnected. Push plug
rmly into wall outlet.
• House fuse blown or circuit breaker
tripped. Replace fuse with time delay
type or reset circuit breaker.
• Control is OFF. Turn Control ON and
set to desired setting.
• Fault code P1 appears in the display
window. Drain water as described in
7.3 Drainage Section.
• Room Temperature lower than the set
temperature (Cool Mode) or Room
Temperature higher than the set
temperature (Heat Mode). Reset the
temperature.
• Room temperature below 16°C.
Cooling may not occur until room
temperature rises above 16°C.
• Reset to a lower temperature.
• Compressor shut-o by changing
modes. Wait approximately 4 minutes
and listen for compressor to restart
when set in the COOL mode.
• Outdoor temperature below 16°C.
To defrost the coil, set Fan mode.
• Air lter may be dirty. Clean lter.
Refer to 8. Care and Cleaning section.
To defrost, set to Fan mode.
• Temperature is set too low for nighttime
cooling. To defrost the coil, set to
Fan mode. Then, set temperature
to a higher setting.
• Exhaust duct not connected or blocked.
See 5.1 Exhausting hot air Section.
2.
Remove and clean the lter, allow it to
dry completely, then reinstall it.
3.
Remove the batteries from the remote
control.
4.
Store the air conditioner in a cool, dry
location, away from direct sunlight,
extreme temperature, excessive dust,
and well ventilated.

22
www.electrolux.com
• Dirty air lter - air restricted. Clean air
lter.
• Outside temperature extremely hot. Set
FAN speed to a faster setting to bring air
through cooling coils more frequently.
Room too cold.
• Set temperature too low. Increase set
temperature.
Air conditioner cooling, but room is
too warm - ice forming on cooling coil
behind decorative front.
Air conditioner turns on and o
rapidly.
• Dirty air lter - air restricted. Clean air
lter. Refer to 8. Care and Cleaning
section.
• Temperature is set too high. Set
temperature to a lower setting.
• Air directional louvers positioned
improperly. Position louvers for better
air distribution.
• Front of unit is blocked by drapes, blinds,
furniture, etc. - restricts air distribution.
Clear blockage in front of unit.
• Doors, windows, registers, etc. open cool air escapes. Close doors, windows,
registers, etc.
10.
ENVIRONMENTAL CONCERNS
Recycle the materials with the symbol.
Put the packaging in applicable
containers to recycle it. Help protect the
environment and human health and to
recycle waste of electrical and electronic
appliances. Do not dispose appliances
marked with the symbol
with the
household waste. Return the product
to your local recycling facility or contact
your municipal oce.
• Unit recently turned on in hot room.
Allow additional time to remove “stored
heat” from walls, ceiling, oor and
furniture.
23
DANSK
VI TÆNKER PÅ DIG
KUNDEPLEJE OG SERVICE
Tak for dit køb af et Electrolux-apparat. Du har valgt et produkt, som giver dig årtiers
professionel erfaring og innovation på én gang. Genialt og elegant. Det er designet
med dig i tankerne. Så uanset hvornår du bruger det, kan du være sikker på, at du får
fantastiske resultater hver gang. Velkommen til Electrolux.
Brug altid originale reservedele.
Sørg for at have følgende data tilgængelig, når du kontakter vores autoriserede
servicecenter: Model, PNC, serienummer.
Du nder oplysningerne på maskinens typeskilt.
Ret til ændringer uden varsel forbeholdes.
Få rådgivning, brochurer, fejlnding, serviceinformation:
www.electrolux.com/webselfservice
Besøg vores websted for at:
Registrer dit produkt for bedre service:
www.registerelectrolux.com
Købe tilbehør, forbrugsvarer og originale reservedele til dit apparat:
www.electrolux.com/shop
INDHOLD
Advarsel /Forsigtig-Sikkerhedsanvisninger.
Generelle oplysninger og gode råd.
Miljøoplysninger.
1.
OPLYSNINGER OM SIKKERHED ................................................................... 24
2.
ANVISNINGER VEDR. SIKKERHED ............................................................... 29
3.
ENHEDSBESKRIVELSE .................................................................................. 33
4.
TILBEHØR INKLUDERET ................................................................................ 33
5.
INSTALLATIONSINSTRUKTIONER ................................................................ 34
6.
KLIMAANLÆGGETS FUNKTIONER ............................................................... 35
7.
BETJENINGSVEJLEDNING ............................................................................ 35
8.
VEDLIGEHOLDELSE OG RENGØRING ......................................................... 41
9.
FEJLFINDING .................................................................................................. 42
10.
MILJØHENSYN ................................................................................................ 43
24
www.electrolux.com
1.
OPLYSNINGER OM SIKKERHED
ADVARSEL!
• Apparatet kan kun bruges af børn fra 8 år og
opefter samt af personer med nedsat fysisk,
sensorisk eller psykisk funktionsevne, eller som
mangler den nødvendige erfaring eller viden, hvis
de er under opsyn eller er blevet instrueret i at
bruge apparatet på en sikker måde samt forstår
de medfølgende farer.
• Børn må ikke lege med apparatet.
• Hvis netledningen er beskadiget, skal den
af sikkerhedsgrunde udskiftes af producenten,
dennes serviceværksted eller en tekniker med
tilsvarende kvalikationer.
Denne vejledning indeholder oplysninger om korrekt
brug af dit nye klimaanlæg. Læs vejledningen grundigt,
før du bruger produktet. Vejledningen bør opbevares et
sikkert sted til senere reference.
6\PERO %HP¨UN )RUNODULQJ
$'9$56(/
%(05.
%(05.
%(05.
6\PEROHWYLVHUDWXGᚔ\UHWDQYHQGHUHWEUDQGEDUW
NºOHPLGGHO+YLVGHUO¨NNHUNºOHPLGGHORJGHW
HNVSRQHUHVIRUHQHNᚔHUQDQW¨QGHOVHVNLOGH
HUGHUULVLNRIRUEUDQG
6\PEROHWYLVHUDWEHWMHQLQJVYHMOHGQLQJHQ
VNDOO¨VHVQºMH
6\PEROHWYLVHUDWVHUYLFHSHUVRQDOHWVNDO
K§QGWHUHXGᚔ\UHWPHGKHQYLVQLQJWLO
LQᚔDOODWLRQVYHMOHGQLQJHQ
6\PEROHWYLVHUDWLQIRUPDWLRQHQHUWLOJ¨QJHOLJV§VRP
LEHWMHQLQJVYHMOHGQLQJHQHOOHULQᚔDOODWLRQVYHMOHGQLQJHQ
PAS PÅ!
• Kontakt en autoriseret servicetekniker for
reparation eller vedligeholdelse af enheden.
• Kontakt en montør til montering af denne enhed.

25
DANSK
1.2
Ting at huske ved brug af klimaanlægget
PAS PÅ!
Advarsler for brug
1.1
Vigtige bemærkninger
1. Enheden må ikke benyttes uden luftlteret.
2. Enheden må ikke benyttes i nærheden af varmekilder
eller åben ild.
3. Enheden må ikke udsættes for direkte sollyse eller
regn udendørs.
4. Enheden skal altid opbevares eller yttes
i opretstående position.
5. Tildæk ikke apparatet, når det er i brug eller
umiddelbart efter brug.
6. Tøm altid enheden for kondensvand, før den stilles
til opbevaring.
• Klimaanlægget er ikke beregnet til at blive betjent af
mindre børn eller funktionshæmmede uden opsyn.
• Mindre børn skal holdes under opsyn for at sikre,
at de ikke leger med klimaanlægget.
• Der ndes lokale bestemmelser vedrørende
maksimalt tilladte støjniveauer for klimaanlæg.
• Hvis netledningen skal udskiftes, må udskiftningen
kun udføres af autoriserede fagfolk.
• Monteringsarbejdet skal udføres iht.
Stærkstrømsreglementets bestemmelser og må kun
udføres af autoriserede fagfolk (hvis dette er relevant).
Forkert tilslutning kan føre til overophedning og brand.
• Pas på, at ngrene ikke bliver fanget af blæseren,
når de vandrette spjæld justeres.
• Sikringen er 250 V 3,15 A, keramisk type.
• Rengøring og vedligeholdelse må ikke foretages
af børn uden tilsyn. Vær opmærksom på, at
kølemidler måske ikke indeholder lugt.
• Ingen dele af dette produkt må ændres.
• Stik aldrig genstande ind i nogen del af enheden.
• Kontrollér, at den anvendte strømforsyning har
korrekt spænding. Apparatet må kun tilsluttes et
lysnet med 220-240 V, 50 Hz, 10 A. Brug af en
26
www.electrolux.com
PAS PÅ!
Advarsel vedrørende netledningen
• Dette netstik må kun indsættes i en korrekt
stikkontakt. Det må ikke bruges sammen med
forlængerledninger af nogen art.
• Indsæt netstikket korrekt i stikkontakten,
og kontrollér, at det ikke sidder løst.
• Du må ikke trække i eller ændre netledningen eller
nedsænke den i vand. Træk og forkert behandling
af netledningen kan resultere i beskadigelse af
enheden og elektrisk stød.
• Hvis netledningen beskadiges, skal den udskiftes
af producenten, dennes serviceleverandør
eller en montør med tilsvarende kvalikationer
for at forebygge, at nogen udsættes for fare.
Netledningen må kun udskiftes med den ledning,
som producenten har angivet.
• Apparatet skal tilsluttes jord. Apparatet er
udstyret med en netledning med jord. Stikket
skal indsættes i en stikkontakt, der er korrekt
monteret og jordet. Det rkantede ben må under
ingen omstændigheder skæres af eller fjernes fra
stikket (kun for Storbritannien).
Stik
Jordforbindelse
strømforsyning med forkert spænding kan medføre
beskadigelse af enheden og risiko for brand.
• Brug altid et relæ eller en sikring med korrekt
spændingsangivelse. Du må under ingen
omstændigheder bruge, ledninger, stifter eller
andre genstande i stedet for en korrekt sikring.
• I tilfælde af uregelmæssigheder med
klimaanlægget (f.eks. en brændt lugt) må du
ikke trække stikket direkte ud. Åbn vinduet for
ventilation først og sluk derefter for apparatet
og afbryd strømforsyningen.
27
DANSK
1.3
Advarsler om brug
• Sørg for at slukke for enheden og tage stikket ud af
stikkontakten, før der udføres vedligeholdelse eller
rengøring.
• Anbring ikke enheden nær varmekilde eller åben ild,
når du udskifter ltrene.
• Sprøjt eller hæld ikke vand direkte på enheden. Vand
kan give elektrisk stød eller skade udstyret.
• Klimaanlægget skal tømmes for vand, før det yttes.
Hvis der er vand i tanken, kan det løbe ud, når
anlægget yttes.
• For at sikre korrekt tømning må aøbsslangen ikke være
bøjet og må ikke være hævet under augtningstilstand.
Ellers kan der løbe vand ud i rummet.
• Temperaturen rundt om aøbsslangen må ikke være
under frysepunktet under brug. Aøbsvandet kan fryse
i slangen, hvilket medfører, at vandet i enheden løber
ud i rummet.
• Luftudblæsningen må ikke blokeres. Kølefunktionen
kan blive reduceret eller afbrudt helt.
• Installér en fejlstrømsafbryder (RCD) for at beskytte
mod elektrisk stød i overensstemmelse med britisk
standard og regler for ledningsføring.
• Udsættelse for direkte luftstrøm i længere tid kan være
skadeligt for helbredet. Undgå at udsætte beboere, husdyr
eller planter for direkte luftstrøm i længere tid ad gangen.
• Klimaanlægget må ikke bruges til ikke-specicerede
anvendelsesformål (f.eks. til sikring af præcisionsudstyr,
madvarer, husdyr, planter og kunstgenstande). Dette
kan skade disse ting.
• Brug ikke redskaber til at fremskynde optøningen,
medmindre de er anbefalet af producenten.
• Udstyret skal opbevares et sted uden løbende
driftsrelaterede antændelseskilder (eksempelvis:
åben ild, anvendt gasudstyr eller elvarmer).
(kun for
Storbritannien)
Stik
Firkantet jordben
28
www.electrolux.com
• Undgå stansning eller brænding.
• Nationale gasbestemmelser skal overholdes.
• Ventilationsåbningerne må ikke blokeres.
• Apparatet skal opbevares i et godt ventileret område,
hvor rummets størrelse er større end 12 m
2
.
ADVARSEL!
• Læs grundigt alle advarslerne.
• Ved afrimning og rengøring af apparatet må
du ikke bruge andre værktøjer end dem, der
anbefales af fabrikanten.
• Apparatet skal placeres i et område uden
kontinuerlige antændelseskilder (for eksempel:
åben ild, gas eller elektriske apparater i drift).
• Må ikke punkteres og brændes.
• Kølemiddelgasser kan være lugtfrie.
• Apparatet skal installeres, bruges og opbevares
i et område, der er større end 12 m
2
.
• Dette apparat indeholder et vist antal gram
(se mærkaten på bagsiden af enheden) af
R290-kølemiddelgas.
• R290 er en kølemiddelgas, der overholder
de europæiske miljødirektiver. Pas på ikke
at punktere nogen del af kølekredsløbet.
• Hvis apparatet installeres, betjenes eller
opbevares i et uventileret område, skal lokalet
være udformet til at forhindre akkumulering af
kølevæskelækage, der medfører risiko for brand
eller eksplosion på grund af tænding af kølemidlet
forårsaget af elektriske ovne, komfurer eller andre
antændelseskilder.
• Apparatet skal opbevares på en sådan måde,
at mekanisk fejl undgås.
• Personer, som betjener eller arbejder på
kølekredsløbet, skal have den relevante
BEMÆRK: SE TYPESKILTET FOR DEN TYPE
KØLEMIDDELGAS, DER ANVENDES I DIN APPARAT.
Specikke oplysninger om apparater med R290
kølemiddelgas.

29
DANSK
2.
ANVISNINGER VEDR. SIKKERHED
2.1
Bemærkninger om drift
• Lad kompressoren stå i 4 minutter,
før den starter kølingen igen. Hvis
du slukker for klimaanlægget og
tænder for det med det samme igen,
går der 4 minutter, før kompressoren
starter kølingen. En elektronisk enhed
certicering udstedt af en akkrediteret organisation,
der sikrer kompetence til håndtering af kølemidler
i henhold til en specik vurdering, som anerkendes
af foreninger i branchen.
• Reparationer skal udføres på baggrund af
anbefalinger fra fremstillingsvirksomheden.
Vedligeholdelse og reparationer, der kræver hjælp
fra andet kvaliceret personale, skal udføres under
tilsyn af en person, som er en specialist i brugen
af brændbare kølemidler.
Transport af udstyr indeholdende brandfarlige
kølemidler
Se transportregler.
Mærkning af udstyr ved hjælp af tegn
Se lokale regler.
Bortskaelse af udstyr, som bruger brændbare
kølemidler
Se nationale bestemmelser.
Opbevaring af udstyr/apparater
Opbevaring af udstyr skal være i overensstemmelse
med producentens anvisninger.
Lagring af emballeret (usolgt) udstyr.
Emballeringsbeskyttelse skal udføres, så mekanisk
skade på udstyet inden i emballagen ikke fører til lækage
af påfyldt kølemiddel. Det maksimale antal stykker udstyr,
der må opbevares sammen, fremgår af de lokale regler.
1.4
Yderligere oplysninger
i enheden sørger for, at kompressoren
forbliver slukket i 4 minutter
af sikkerhedshensyn.
• Lad der gå 4 minutter, før du genstarter
enheden, i tilfælde af strømsvigt
under brug. Genstart klimaanlægget,
når strømmen vender tilbage. Hvis
strømmen var slukket i mindre end
30
www.electrolux.com
• Augtningstilstanden øger
rumtemperaturen. Enheden genererer
varme i augtningstilstand, og
rumtemperaturen øges. Der blæses
varm luft ud af luftudblæsningen, men
dette er normalt og er ikke tegn på et
problem med enheden.
• Klimaanlægget blæser den varme
luft, der genereres af enheden, ud af
rummet via en udblæsning, når den
er i afkølingstilstand. I mellemtiden
kommer den samme mængde luft
ind i rummet udefra gennem enhver
åbning af rummet.
• Enhver, som arbejder med eller åbner
kølemiddelkredsløbet, skal have gyldigt
certikat fra et branchegodkendt organ,
med autorisation til sikker håndtering af
kølemiddel ifølge specikationer, der er
anerkendte for branchen.
• Service skal kun udføres ifølge
udstyrsproducentens vejledning.
Vedligeholdelse og reparation kræver
assistance fra fagfolk uddannet i
brugen af brandbart kølemiddel.
• Driftstemperaturområdet for
klimaanlægget er 16-35 °C (60-95 °F)
i afkølingstilstand; 5-27 °C (41-80 °F)
i varmetilstand.
2.2
Advarsel under brug
Følgende anvisninger skal følges for at
undgå personskade på brugeren eller
andre personer eller materiel skade.
Forkert betjening som skyldes, at
anvisningerne ikke følges, kan medføre
personskade eller materiel skade.
Alvorligheden er klassiceret af
følgende indikationer:
Dette symbol angiver muligheden
for død eller alvorlig skade.
Advarsel under brug
Dette symbol angiver risiko for
personskade eller materiel skade.
ADVARSEL!
ADVARSEL!
PAS PÅ!
Betydningen af symboler, der anvendes
i denne vejledning, er vist nedenfor:
Dette symbol angiver aldrig at gøre
dette.
Dette symbol angiver, at dette altid
skal gøres.
re minutter, skal du sørge for at
vente mindst re minutter, inden du
genstarter enheden. Hvis du genstarter
klimaanlægget inden for re minutter,
kan en beskyttelsesanordning i
enheden få kompressoren til at slukke.
Beskyttelsesenheden forhindrer, at
klimaanlægget køler i ca. 5 minutter.
Eventuelle tidligere indstillinger
annulleres, og enheden vender tilbage
til de oprindelige indstillinger.
• Når du slukker for apparatet i
afkølingstilstand, slukker kompressoren
straks, og den øverste/nederste
blæsermotor stopper med at køre efter
5 sekunder. Hvis enheden betjenes i
blæsertilstand fra afkølingstilstand, vil
kompressoren slukke øjeblikkeligt, og
nederste blæsermotor vil stoppe med
at køre efter 5 sekunder. Hvis enheden
betjenes til opvarmningstilstand fra
afkølingstilstand, slukker kompressoren
straks, og nederste blæsermotor
stopper med at køre efter 30 sekunder.
• Drift ved lav temperatur: Fryser enheden
til? Der kan opstå frysning, hvis
enheden anvendes tæt på 18 °C under
forhold ved lav omgivelsestemperatur,
især om natten. Under disse forhold kan
et yderligere temperaturfald medføre,
at enheden fryser. Ved at indstille
enheden til en højere temperatur,
undgås det, at den fryser.
 Loading...