

Electrolux EWW1122DW User Manual

EWW1122DW EN WASHER & DRYER USER MANUAL

2
www.electrolux.com
Contents
1. IMPoRtAnt sAFetY InstRUCtIons 4
2. PARts AnD FeAtURes
7
3. InstALLAtIon InstRUCtIons
8
4. InLet Hose ConneCtIon
12
5. tHe FUnCtIon oF ContRoL PAneL
14
6. WAsHInG PRoGRAM
16
7. WAsHInG PRoCeDURe AnD seLeCtIon
17
8. GUIDe FoR otHeR UseFUL PRoGRAMs
28
9. MAIntenAnCe
32
10. HoW to CLeAn tHe FILteR
34
11. ReMoVInG stAIns
36
12. tRoUBLe sHootInG
38
13. sPeCIFICAtIon
39
14. CUstoMeR CARe
40
3
English
tHe FIRst RADICAL teCHnoLoGY AnD
AIR BUBBLe WAsHInG sYsteM In tHe WoRLD
• Your washer is adopted the Radical
Technology that can sterilize your
clothes and deodorize a bad smell
and prevent discoloration.
• Your washer is equipped with the
bubble generator that generates a
great deal of air bubble.
• The air bubbles knock the dirt out
of the clothes during wash and they
push up the heavy dirt to remove it
during rinse.
• Because the double washing
method using both air bubble &
water current is applied to this
washer, wash efciency is excellent
in comparison with the original
washer system.
Economic wash system
With articial intelligence, the washer uses
minimum energy and water by selecting
optimal water level and washing time.
Low noise system
The washer minimizes the washing and
spinning noises by sensing the amount of
laundry.
Child-lock
The Child-Lock system is adopted to
prevent children from pressing any button to
change the program during operation.
4
www.electrolux.com
WARNING!
1.1 The instructions shall include the
substance of the following.
• Do not dry unwashed items in the tumble
dryer.
• Items that have been soiled with
substances such as cooking oil, acetone,
alcohol, petrol, kerosene,spot removers,
turpentine, waxes and wax removers
should be washed in hot water with an
extra amount of detergent before dried in
the tumble dryer.
• Items such as foam rubber (latex foam),
shoer caps, waterproof textiles, rubber
backed articles and clothes or pillows
tted with foam rubber pads should not
be dried in the tumble dryer.
• Fabric softners, or similar products,
should be used as specied by the fabric
softener instructions.
• The nal part of a tumble dryer cycle
occurs without heat (cool down cycle)
to ensure that the items are left at a
temperature that ensures that the items
will not be damaged
• If the supply cord is damaged, it must be
replaced by the manufacturer, its service
agent or similarly qualied persons in
order to avoid a hazard.
• Remove all objects from pockets such as
lighters and matches.
• that the appliance must not be installed
behind a lockable door, a sliding door or
a door with a hinge on the opposite side
to that of the tumble dryer, in such a way
that a full opening of the tumble dryer
door is restricted.
1. IMPoRtAnt sAFetY InstRUCtIons
1.2 The instructions shall include the
substance of the following warning:
IMPORTANT
ReAD ALL InstRUCtIons BeFoRe Use
WARNING!
For your safety, the information in this
manual must be followed to minimize the
risk of re or explosion, electric shock, or to
prevent property damage, personal injury,
or loss of life.
WARNING!
To reduce the risk of re, electric shock, or
injury to persons when using your appliance,
follow basic precautions, including the
following:
• Read all instructions before using the
appliance.
• Do not wash or dry articles that have
been previously cleaned in, washed in,
soaked in, or spotted with gasoline,
dry-cleaning solvents, other ammable
or explosive substances as they give off
vapors that could ignite or explode.
• Do not allow children to play on or in the
appliance. Close supervision of children
is necessary when the appliance is used
near children.
• Before the appliance is removed from
service or discarded, remove the door to
the washing or drying compartment.
• Do not reach into the appliance if the
drum is moving.
• Do not install or store this appliance
where it will be exposed to the weather.
• Do not tamper with controls.
• Do not repair or replace any part of

5
English
the appliance or attempt any servicing
unless specically recommended in
the user maintenance instructions or in
published user-repair instructions that
you understand and have the skills to
carry out.
• Do not add gasoline, dry-cleaning
solvents, or other ammable or explosive
substances to the wash water. These
substances give off vapors that could
ignite or explode.
• Under certain conditions, hydrogen gas
may be produced in a hot water system
that has not been used for 2 weeks or
more. HYDROGEN GAS IS EXPLOSIVE.
If the hot water system has not been
used for such a period, before using
a washing machine or combination
washer-dryer, turn on all hot water
faucets and let the water ow from each
for several minutes.
This will release any accumulated
hydrogen gas. As the gas is ammable,
do not smoke or use an open ame
during this time.
• Keep area around the exhaust opening
and adjacent surrounding areas free
from the accumulation of lint, dust,
and dirt.
• Do not place items exposed to cooking
oils in your dryer. Items contaminated
with cooking oils may contribute to a
chemical reaction that could cause a
load to catch re.
• Do not use heat to dry articles
containing foam rubber or similarly
textured rubber-like materials.
• Do not use fabric softeners or products
to eliminate static unless recommended
by the manufacturer of the fabric
softener or product.
1. IMPoRtAnt sAFetY InstRUCtIons (CONT’D)

6
www.electrolux.com
1.3 Save these instructions
Grounding instructions
This appliance must be grounded. In
the event of malfunction or breakdown,
grounding will reduce the risk of electric
shock by providing a path of least resistance
for electric current. This appliance is
equipped with a cord having an equipmentgrounding conductor and a grounding
plug. The plug must be plugged into an
appropriate outlet that is properly installed
and grounded in accordance with all local
codes and ordinances.
WARNING!
Improper connection of the equipmentgrounding conductor can result in a risk
of electric shock. Check with a qualied
electrician or serviceman if you are in doubt
as to whether the appliance is properly
grounded. Do not modify the plug provided
with the appliance - if it will not t the outlet,
have a proper outlet installed by a qualied
electrician
1. IMPoRtAnt sAFetY InstRUCtIons (CONT’D)
Operation instructions
WARNING!
To reduce the risk of re, electric shock,
or injury to persons, read the IMPORTANT
SAFETY INSTRUCTIONS before operating
this appliance.
This statement is omitted when the
operating instructions are preceded by the
safety instructions and are included in the
same manual.
Understanding your responsibilities when
using the washer.
• Do not use chlorine bleach ancd
ammonida or acid(such as vingar or rust
remover) in the same wash. Hazardous
fumes can form.
• Unplug power supply cord before
attemping to service your washer.
• Do not wash berglass material.
Small particles can stick to fabrics
washed in following loads and cause
skin irritation.
• Do not spray water on the control panel
of the washer. It could cause re or an
electric shock.
• In case of the dual valve model,
If you connect only cold water inlet
valve, while water temperature is
selected as hot or warm, there can be
water leakage form unconnected water
inlet valve.

7
English
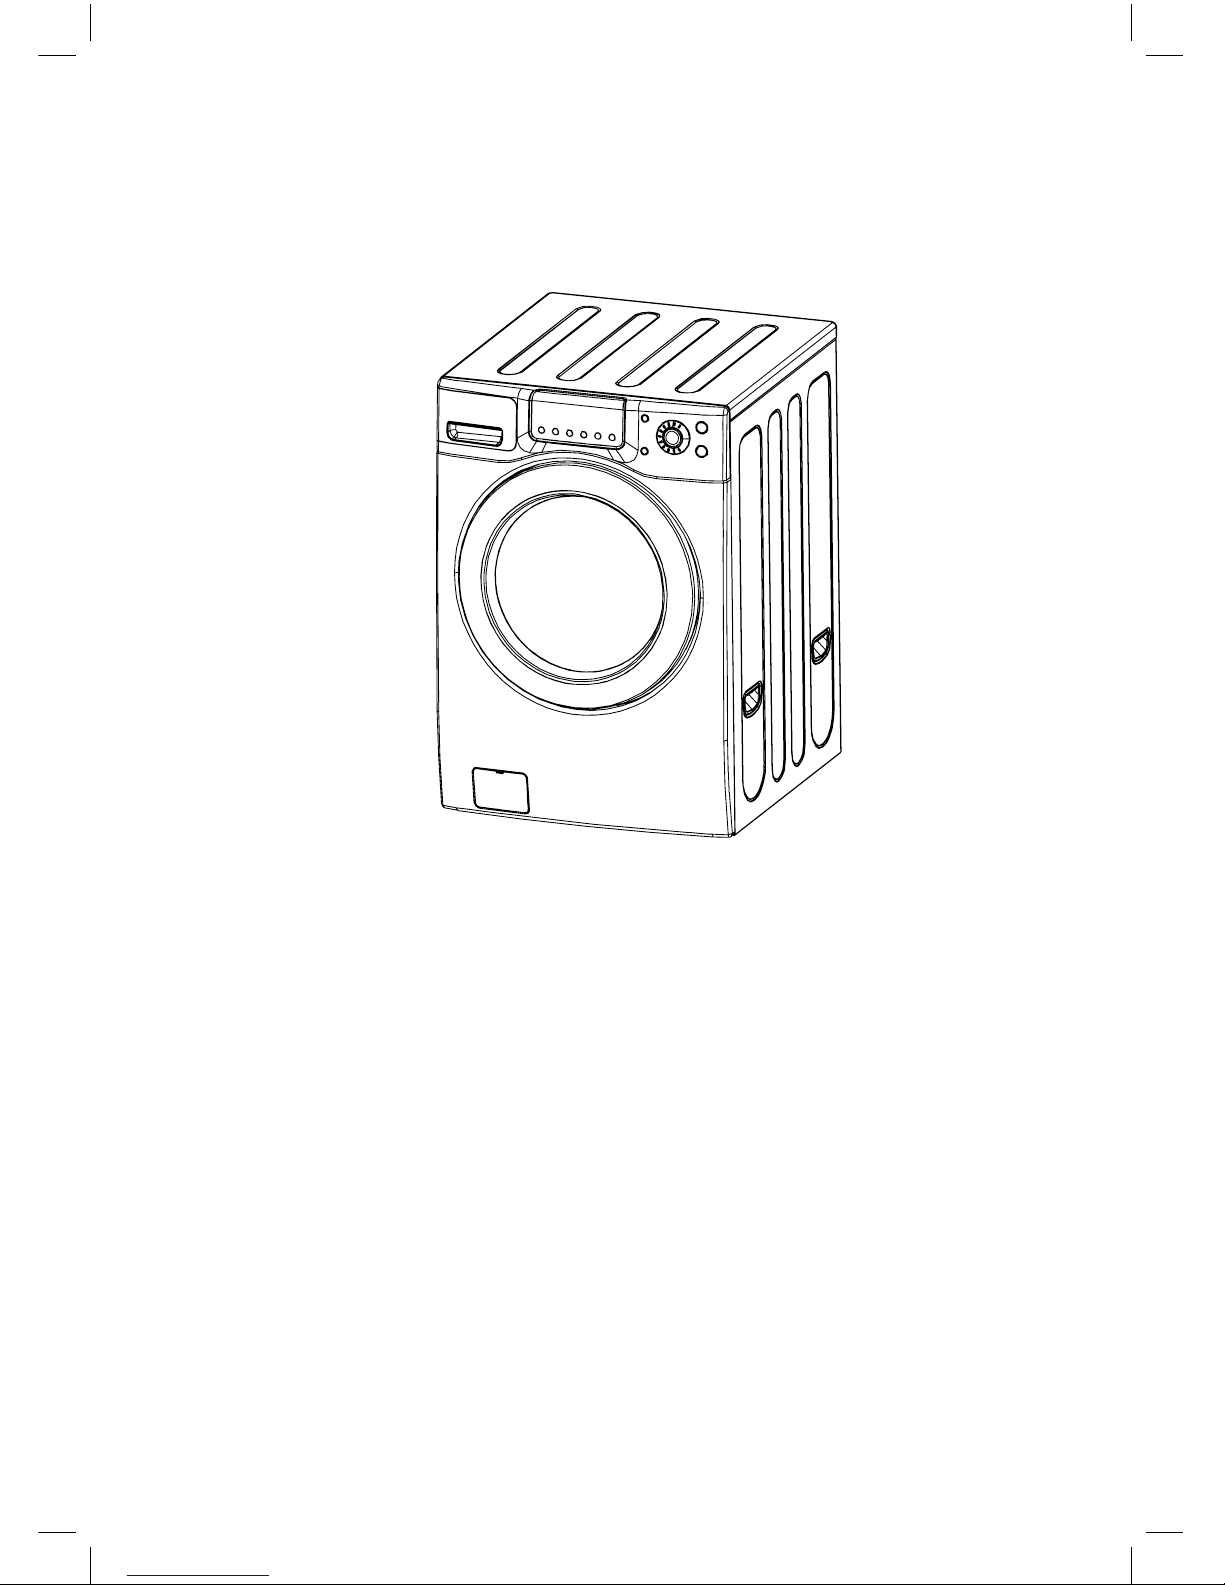
2. PARts AnD FeAtURes
The parts and features of your washer are illustrated on the page. Get familiar with all parts
and features before using your washer.
NOTE
The drawings in the book may vary from your washer model. They are designed to show
the different features of all models coverd by this book, so your model may not include all
the features.
2.1 WAsHInG
MACHIne UnIt
2.2 ACCessoRIes
1.
Detergent Case
2. Door
3.
Pump Cover
4. Inlet Hose (Cold)
5. Power Cord
6. Control Panel
7. Drain Hose
8. Adjustable Leg
9
4
1
3
2
5
6
7
8
9. Drain hose
10.
Inlet hose
11. Spanner
12. Manual
13. Cap holder (4EA)
10 11 12 13

8
www.electrolux.com
3. InstALLAtIon InstRUCtIons
3.1 Removing transit bolts
1. Before operating the washer, remove the
transit bolts (4eA) along with the rubber.
• If the bolts are not removed, it may
cause heavy vibration, noise and
malfunction. (Fig.1)
3.2
Location of your washer
• Check location where the washer will be
installed. Make sure you have everything
necessary for correct installation.
• Do not place or store your washer below
0°C (32°F) to avoid any damage from
freezing.
• Do not place or store laundry products
on top of washer at any times.
• Install the washer on the horizontal
solid oor. If the washer is installed
on an unsuitable oor, it could make
considerable noise, vibrate severely
and cause a malfunction. If the washer
is not level, adjust leg up or down for
horizontal installation.
• Ventilation openings must not be
obstructed by carpeting when the
washer is installed on a carpeted oor.
• Leave some space (right & left : 2.5cm,
rear : 10 cm). (Fig.4)
2. Unscrew the 4 bolts with the spanner
supplied. Keep the 4 bolts and spanner
for future use. (Fig.2)
• Whenever the appliance is
transported, the transit bolts must
be retted.
3. Close holes with supplied cap holders.
(Fig.3)
• In case of built-in installation, the
distance between top of the washer and
bottom of upper plate should be at least
3mm.
1 2 3
Approx.
2.5cm
Laundry
Tub
Washer
Drain Hose
Fig. 1 Fig. 2 Fig. 3
Fig. 4

9
English
3. InstALLAtIon InstRUCtIons (CONT’D)
3.3 Drain system
• Never forget to install drain hose before
operating your washer.
• Open the packing box, and there is a
drain hose inside the drum.
• Connect the drain hose to the drain
outlet at the back side of the washer.
• Top of laundry tub must be at least
61 cm high and no higher than
102 cm from bottom of washer. (Fig.5)
3.4
Level adjustment
1. If the washer is installed on an unsuitable
oor, it could make considerable noise,
vibrate and cause a malfunction.
2. Adjust the level of washer using
adjustable legs.
• Please check if there is any gap
between the four adjustable legs and
the oor.
• Turning adjustable legs by the
enclosed spanner, adjust the level of
washer and make it sure that there is
no swaying of washer.
• After the adjustment is nished, turn
the xing nuts up tightly so that the
washer maintains the adjustment.
3. Make it sure that the washer does not
sway when you press down the four
corners of the washer’s top plate. (Fig.6)
NOTE
There should be no swaying of washer and
all the adjustable legs should stick to the
oor closely.
Laundry
Tub
Max. 102cm
ca. 105 cm
Min. 61cm
Hose
Retailner
Tie
Strap
Max. 102cm
Min. 61cm
Max. 102cm
Min. 61cm
Adjustable
Leg
Fix
Nuts
1
2
3
Fig. 5
Fig. 6
Cold
water
tap
Cold
10
www.electrolux.com
3. InstALLAtIon InstRUCtIons (CONT’D)
3.5 Electrical connection
• Do not use an extension cord or double
adaper.
• If the supply cold is damaged, it must be
replaced by a qualied person in order
to avoid a hazard.
• If the machine will not be used for an
extended time, unplug it and shut off the
water supply.
• Connect the machine to a grounded
outlet in occordance with current wiring
regulations.
• The appliance must be positioned so
that the plug is easily accesible.
3.6
Connecting water supply hose
• Water supply pressure must be between
4.5 and 145 PSI (30~1000 kPa).
• Do not crossthread when connecting
inlet hose to the valve. If the water
supply pressure is more than 145 PSI,
a pressure reducing device should be
installed.
• Two Sealing washers are supplied with
the water inlet hoses to prevent water
leaks.
• Check for leakage of washing machine
connections by turning the tap
completely on.
• Periodically check the condition of the
hose and replace the hose if necessary.
• Make sure that there is no kink in the
hose and that it is not crushed.
• Be sure that the two water input ports
are connected to the correct water
faucets. The connector for ho water is
colored red. (Fig.7)
NOTE
Washing Machine is to be connected to the
water mains using new hoses. Old hoses
should not be used.
Repairs to the washing machine must
only be carried out by qualied personnel.
Repairs carried out by inexperienced
persons may cause injury or serious
malfunctioning. Contact your local service
center.
Do not install your washing machine
in a room where temperatures below
freezing may occur. Frozen hoses may
burst under pressure. The reliability of the
electronic control unit may be impaired at
temperatures below the freezing point
If the appliance is delivered in the winter
months and temperatures are below
freezing, store the washing machine at room
temperature for a few hours before putting it
into operation.
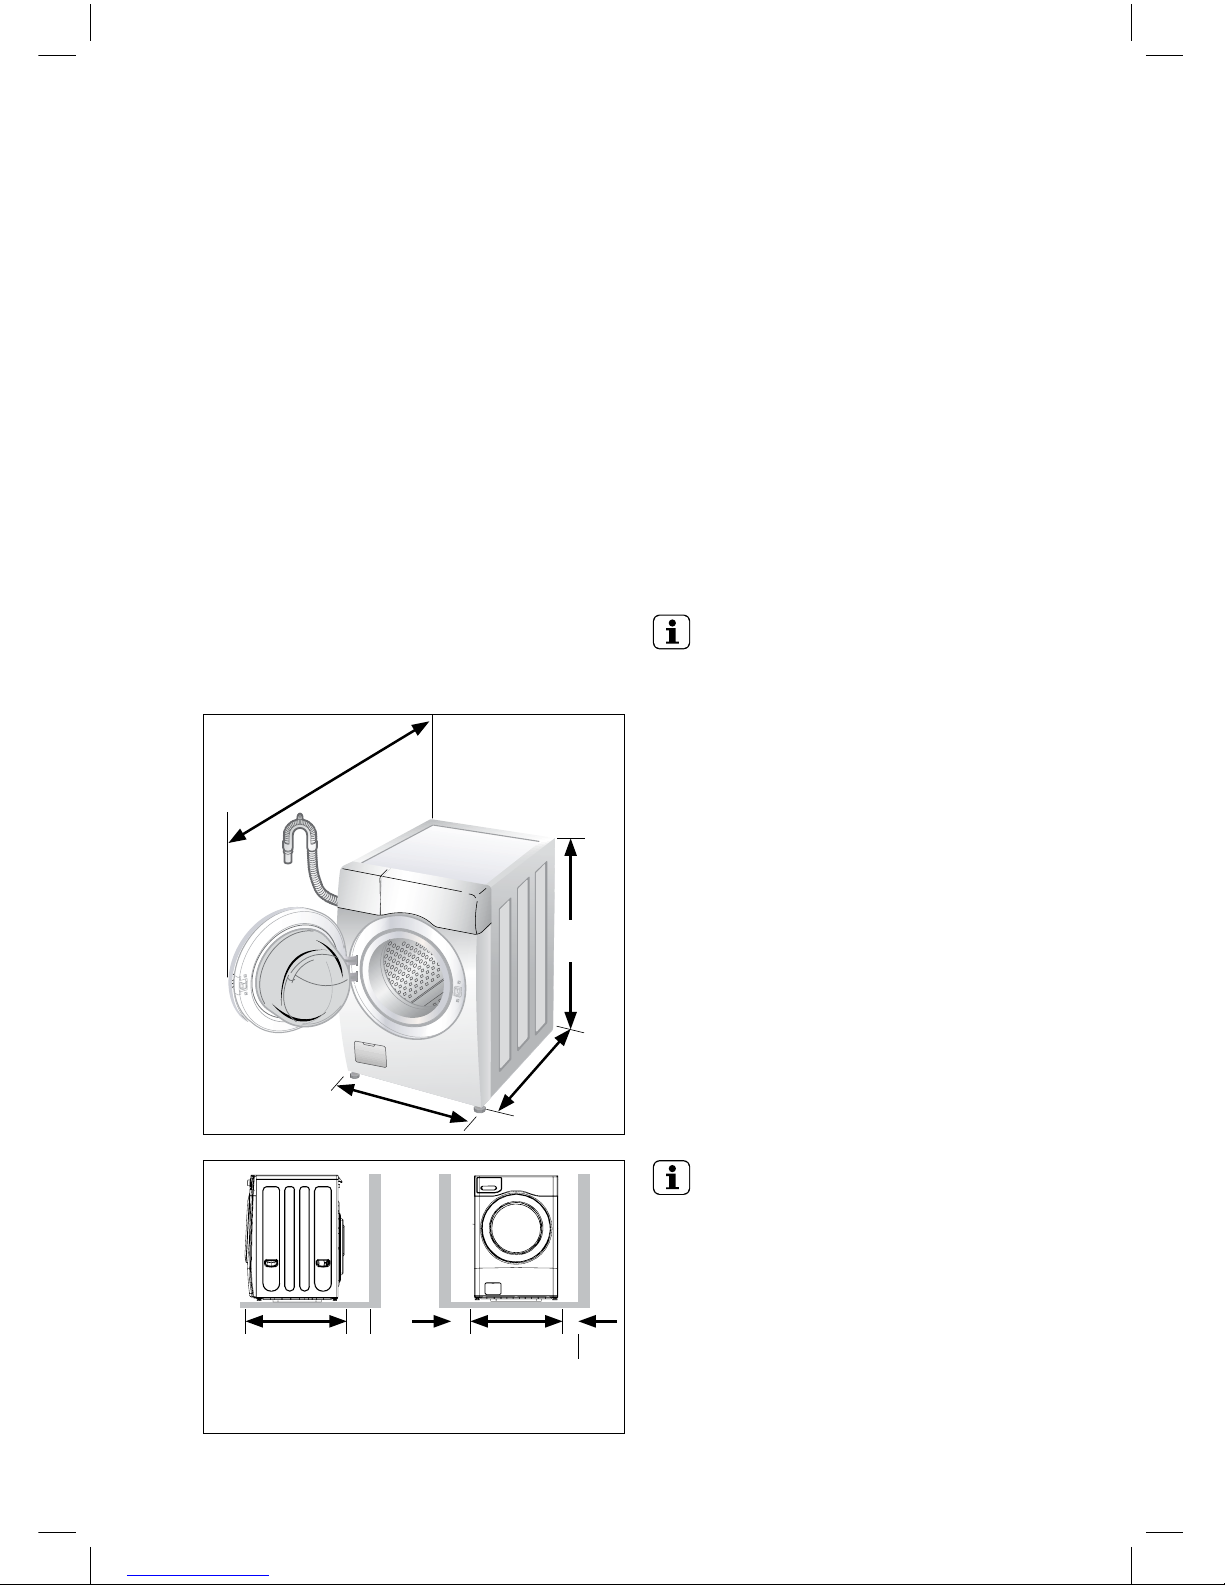
3.7
Positioning the washer
• Installation clearances: The location
must be large enough to fully open the
washer door.
• Washer dimensions: Most installations
require a minimum 4 in. (10 cm)
clearance behind the washer. (Fig.8)
Fig. 7
11
English
68.6cm
3. InstALLAtIon InstRUCtIons (CONT’D)
Level floor
• Allowable slope under entire washer
is 1°.
• To minimize noise and vibration, the
washer MUST be installed on a solidly
constructed oor.
• Carpeting and soft tile surfaces are not
recommended.
• Never install the washer on a platform or
weakly supported structure
NOTE
A rm, solid oor is even more critical
to a front-loading washer than to a toploader. If your oor is wood and/or frame
construction, you may need to reinforce it.
Front-loaders use substantially faster spin
speeds than top-loaders, causing greater
vibration. If the oor is not solid, your washe
will vibrate. You will hear and feel the
vibration throughout your house.
Power outlet
• Must be within 60 in. (1.5 m) of either
side of the washer. Do not overload the
outlet with more than one appliance.
• Time-delay fuse or circuit breaker is
recommended.
NOTE
It is the personal responsibility and
obligation of the customer to have a proper
outlet installed by a qualied electrician.
Minimum installation spacing for
recessed area installation.
The following dimensions shown are for the
minimum spacing allowed.
Additional spacing should be considered for
installation and servicing.
• Additional clearances might be required
for wall, door and oor moldings.
• Additional spacing of 1 in. (2.5 cm) on all
sides of the washer is recommended to
reduce noise transfer. (Fig.9)
Companion appliance spacing should also
be considered.
Side View Front View
2.5cm2.5cm10cm80.9cm
104cm
102cm
68.8cm
80.9cm
Fig. 8
Fig. 9
12
www.electrolux.com
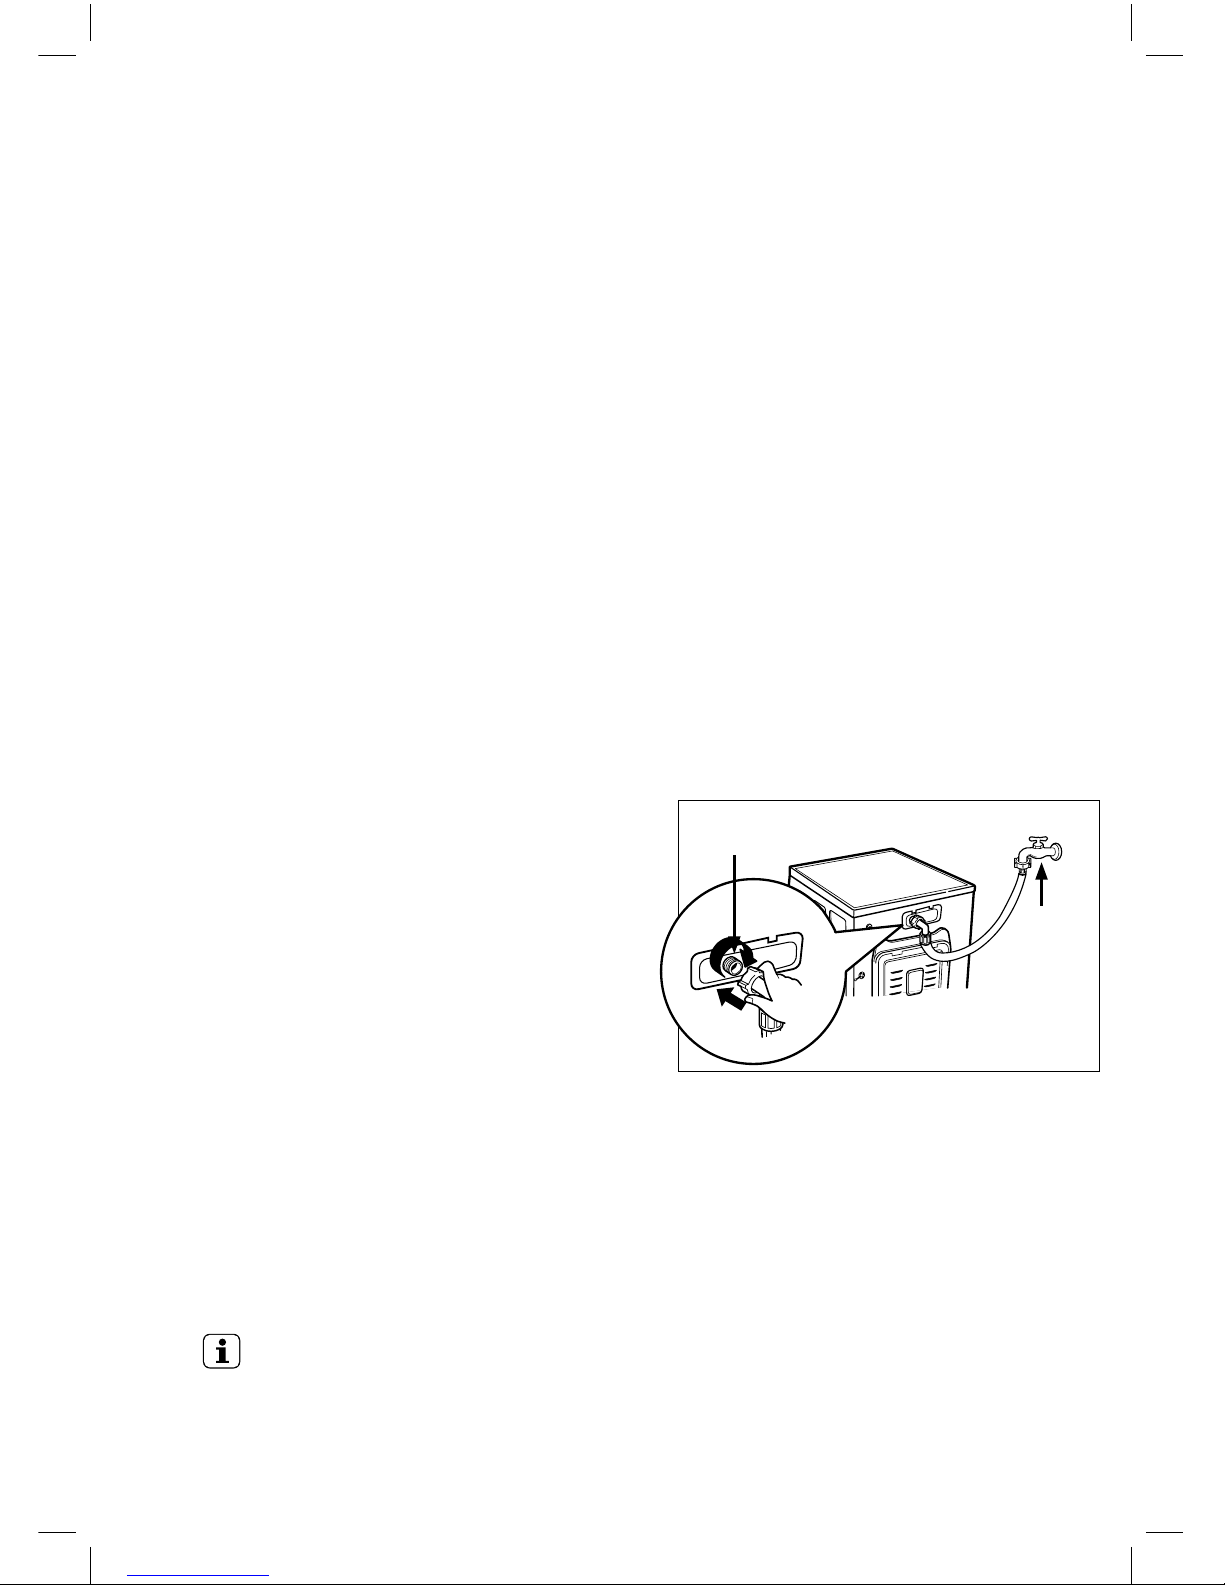
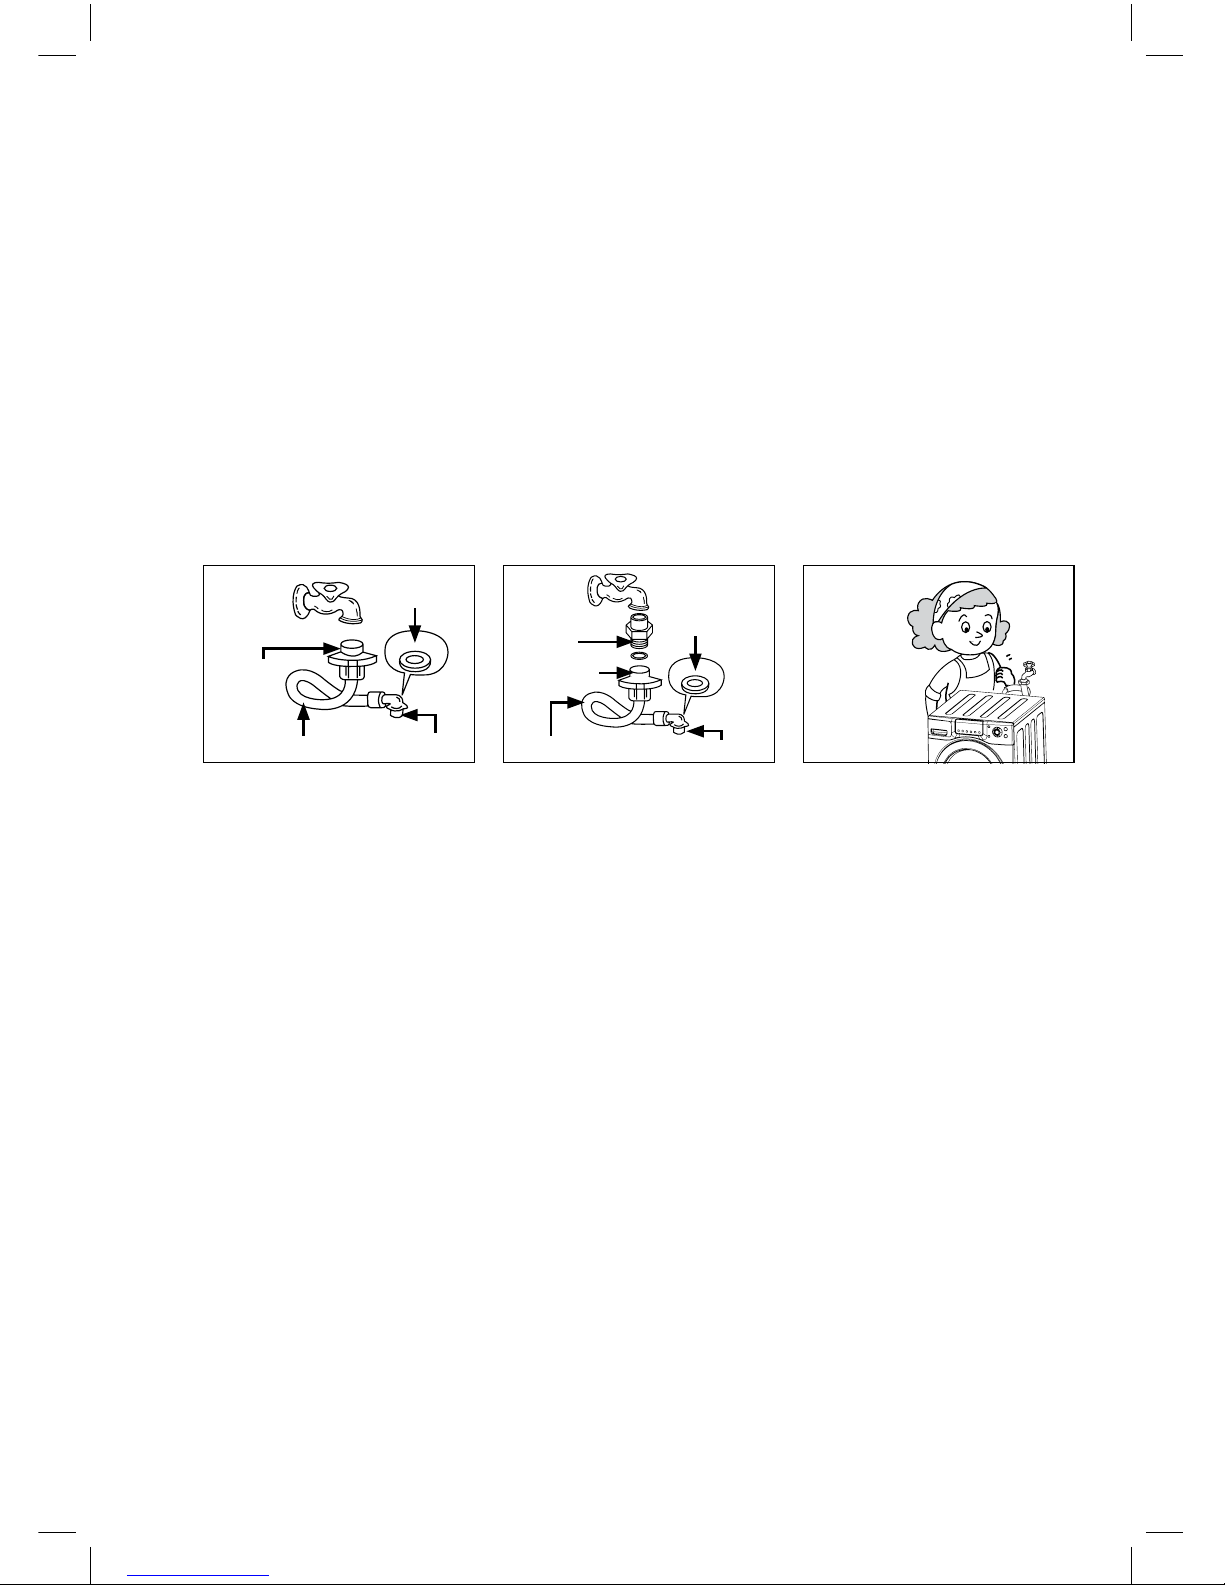
4. InLet Hose ConneCtIon
The washer should be connected to the water mains using new hose sets and old hose
sets should not be reused. In using only one water tap or in case of only one water inlet
valve, connect the inlet hose to the cold water inlet valve.
Option : Be careful not to confuse hot water inlet and cold water inlet
1. Connect the inlet hose to
the water tap by screwing the
connector tightly.
2. Connect the connectorinlet
supplied if necessary.
3. Connect the inlet hose
adapter to the water inlet of a
washer and turn it to be xed.
4.1 For Screw-Shaped Tap
Hose
Hose
Connector
Connector
Connector
Connector
Connector
Inlet
Rubber
Packing
Rubber
Packing
* Check the
packing
in the inlet.
13
English
4. InLet Hose ConneCtIon (CONT’D)
4.2 Loading
• Drop items into washer loosely. Items
should move easily through wash
water for best cleaning and wrinkle-free
results.
• Load washer properly and select correct
load size setting. Overloading and
selecting a setting too small for the wash
load can :
• Cause poor cleaning
• Increase wrinkling
• Create excessive lint
• Wear out items faster
(because of pilling)
• Mix large and small items in each load.
Load evenly to maintain washer balance.
An unbalanced load can make the
washer vibrate during spin.
• Reduce wash time when using a small
load size setting. Load with only a few
small items needs less wash time.
• Use a large load size setting to reduce
wrinkling with permanent press clothes
and some synthetic knits.
These items should have more room
to move in the water than heavy items.
(towels, jeans)
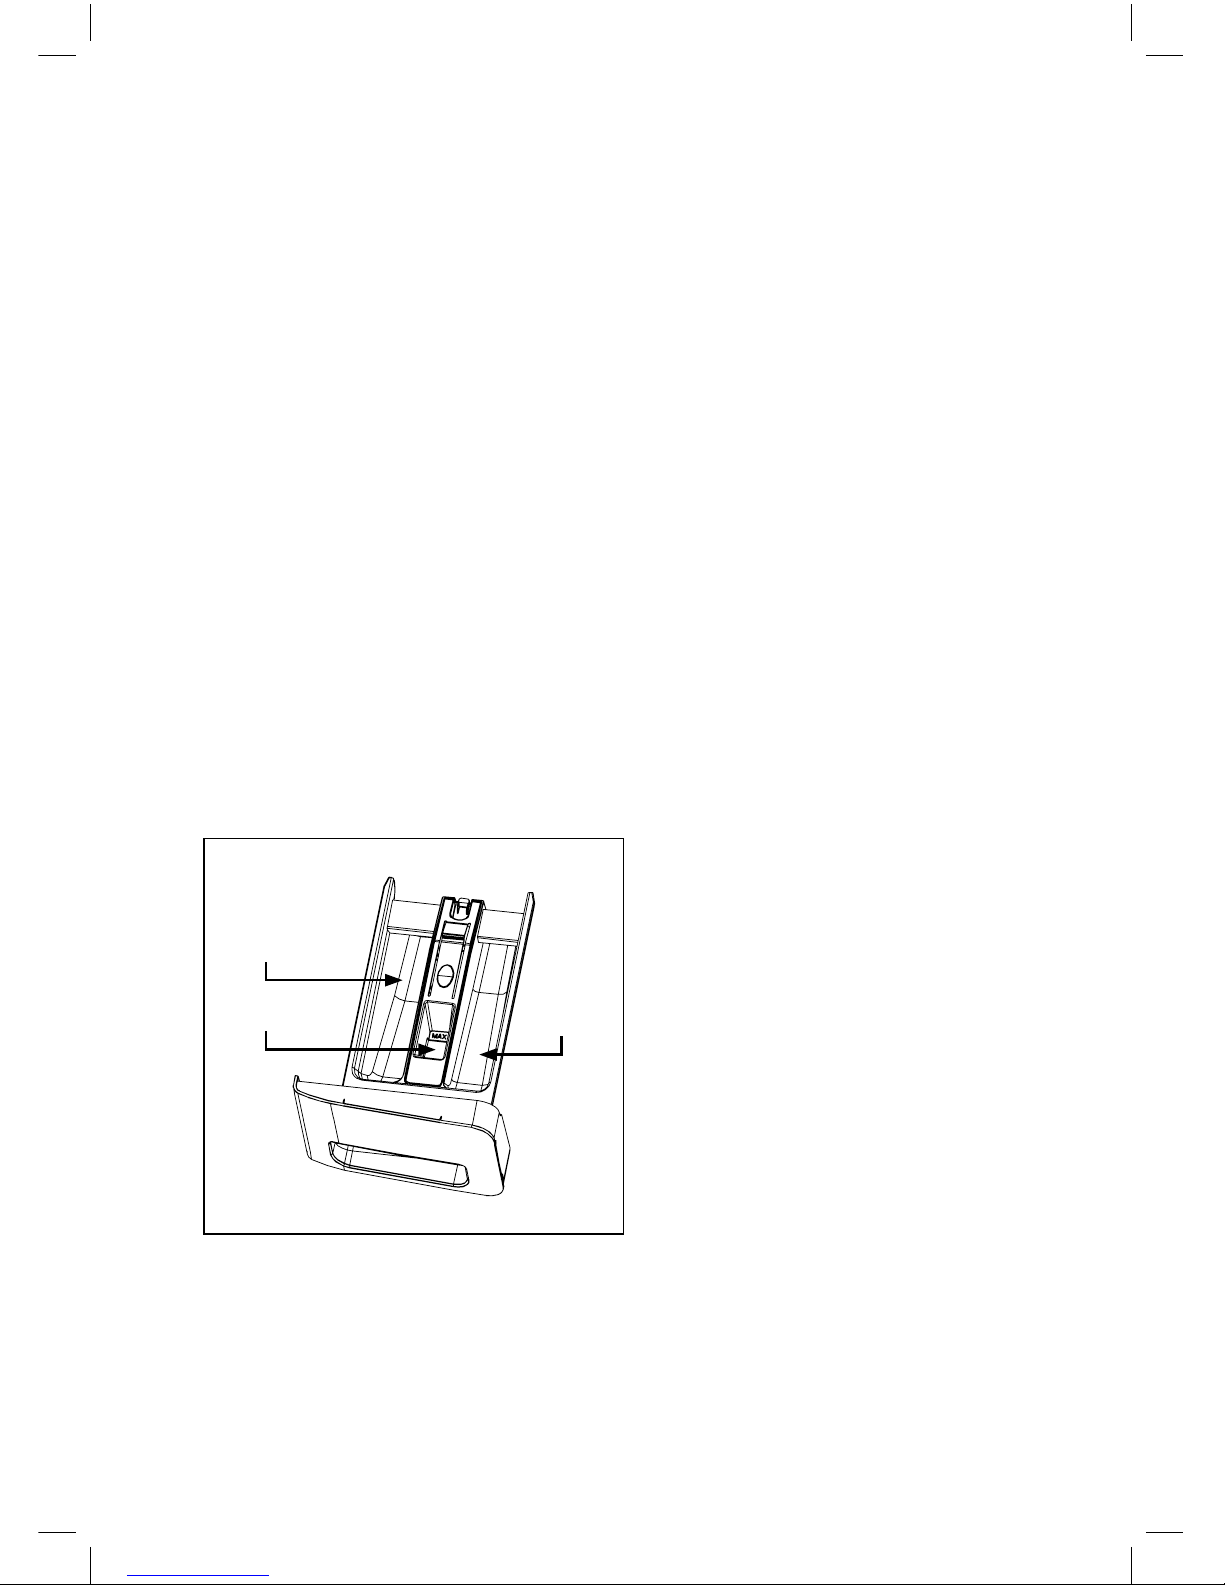
4.3 Adding detergent
1. Detergent case (Fig.10) 2. Adding fabric softener
• If desired, add measured liquid fabric
softener to the softener inlet.
• Pour liquid fabric softener into
the dispenser using the amount
recommended on the package.
• Do not exceed the maximum ll line.
Overlling can cause early dispensing
of the fabric softener which could stain
clothes.
• Do not open the detergent case when
water is supplied.
• Avoid pouring fabric softener directly on
the clothes.
Main wash
Fabric
softener
Pre wash
Fig. 10
Power Start/
Pause
Temp. Dirt
level
Wash Rinse
Delicates
Wash
Wash & Dry
Cottons
Regular
Favourites
Clean Me
Whites
Eco-Whites
Woollens
Heavy Duty
Unlock/
Add Clothes
Start/
Pause
Power
14
www.electrolux.com
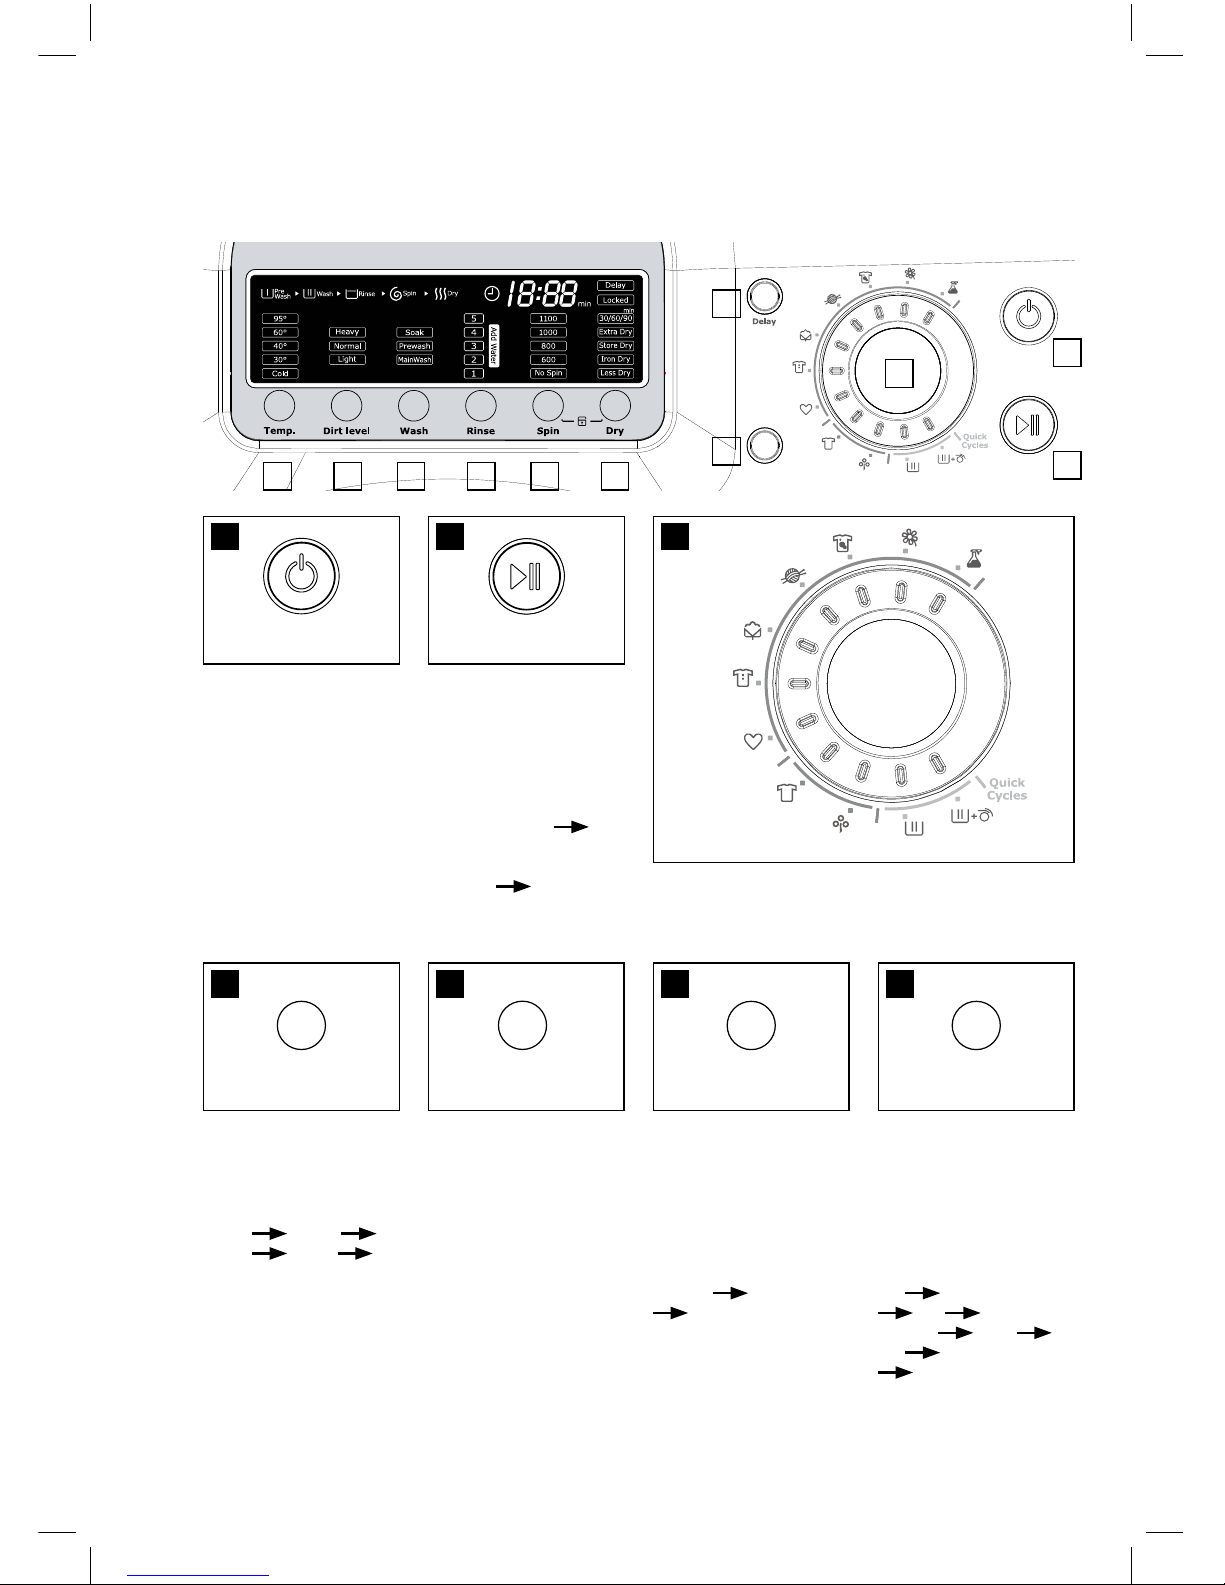
5. tHe FUnCtIon oF ContRoL PAneL
1. Press this switch
to turn the power “ON”
or “OFF”.
2. Operation and
temporary stop is
repeated as it is
pressed. When you
want to change
program in operating;
Press the “Start /
Pause” button
Select the program
that you want to
change Press the
“Start / Pause” button
again.
4. It can be used
to adjust water
temperature according
to types of the load to
be washed.
40°C 60°C
95°C Cold
30°C
5. You can select the
soil level you want and
each lamp is turned
on when that course is
selected.
3. You can select the course you want and each
lamp is turned on when that course is selected.
6. You can select
the wash course you
want and each lamp
is turned on when that
course is selected. As
this button is pressed,
the wash course is
selected by “Main
Wash” “Pre Wash”
“Soak”.
7. You can select the
rinse time(s) you want
and each lamp is
turned on when that
course is selected.
As this button is
pressed, the rinse
time(s) is selected by
‘1’ ‘Add Water’
‘2’ ‘Add
Water’ ... ...
‘5’ ‘Add Water’
‘0’.
4 5 6
1 2 3
7
Delicates
Wash
Wash & Dry
Cottons
Regular
Favourites
Clean Me
Whites
Eco-Whites
Woollens
Heavy Duty
1
2
4 5 6 7 8
3
9
11
12
 Loading...