

Page 1

EWG 147540 W
................................................ .............................................
EN WASHING MACHINE USER MANUAL 2
ES LAVADORA MANUAL DE
TR ÇAMAŞIR MAKİNESİ KULLANMA KILAVUZU 57
INSTRUCCIONES
29
Page 2

2 electrolux
Electrolux. Thinking of you.
Share more of our thinking at www.electrolux.com
CONTENTS
Safety information 2
Safety instructions 3
Product description 4
Control panel 5
First use 8
Personalisation 8
Daily use 8
Helpful hints and tips 12
Washing programmes 14
Consumption values 17
Care and cleaning 17
What to do if… 20
Technical data 23
Installation 23
Building in 26
Environment concerns 27
Subject to change without notice.
SAFETY INFORMATION
Before the installation and use of the appliance, carefully read
the supplied instructions. The manufacturer is not responsible
if an incorrect installation and use causes injuries and damages. Always keep the instructions with the appliance for future reference.
CHILDREN AND VULNERABLE PEOPLE SAFETY
Warning! Risk of suffocation, injury or permanent disability.
• Do not let persons, children included, with reduced physical
sensory, reduced mental functions or lack of experience and
knowledge use the appliance. They must have supervision
or instruction for the operation of the appliance by a person
who is responsible for their safety.
• Do not let children play with the appliance.
• Keep all packaging away from children.
• Keep all detergents away from children.
• Keep children and pets away from the appliance door when
it is open.
• If the appliance has a child safety device, we recommend
you activate it.
GENERAL SAFETY
• Before maintenance, deactivate the appliance and disconnect the mains plug from the mains socket.
• Do not change the specification of this appliance.
Page 3
electrolux 3
• Obey the maximum load volume of 7 kg (refer to the “Programme chart” chapter).
• If the supply cord is damaged, it must be replaced by the
manufacturer, its service agent or similarly qualified persons
in order to avoid a hazard.
• The operating water pressure (minimum and maximum)
must be between 0,5 bar (0,05 MPa) and 8 bar (0,8 MPa)
• The ventilation openings in the base (if applicable) must not
be obstructed by a carpet.
• The appliance is to be connected to the water mains using
the new supplied hose-sets. Old hose sets must not be
reused.
SAFETY INSTRUCTIONS
INSTALLATION
• Remove all the packaging and the transit
bolts.
• Keep the transit bolts. When you move
the appliance again you must block the
drum.
• Do not install or use a damaged appli-
ance.
•Do not install or use the appliance where
the temperature is less than 0 °C or
where it is exposed to the weather.
• Obey the installation instruction supplied
with the appliance.
• Make sure that the floor where you install
the appliance is flat, stable, heat resistant
and clean.
• Do not install the appliance where the ap-
pliance door can not be fully opened.
• Always be careful when you move the
appliance because it is heavy. Always
wear safety gloves.
• Make sure that there is air circulation be-
tween the appliance and the floor.
• Adjust the feet to have the necessary
space between the appliance and the
carpet.
Electrical connection
Warning! Risk of fire and electrical
shock.
• The appliance must be earthed.
• Make sure that the electrical information
on the rating plate agrees with the power
supply. If not, contact an electrician.
• Always use a correctly installed shockproof socket.
• Do not use multi-plug adapters and extension cables.
• Make sure not to cause damage to the
mains plug and to the mains cable. Contact the Service or an electrician to
change a damaged mains cable.
• Connect the mains plug to the mains
socket only at the end of the installation.
Make sure that there is access to the
mains plug after the installation.
• Do not pull the mains cable to disconnect
the appliance. Always pull the mains
plug.
• Do not touch the mains cable or the
mains plug with wet hands.
• This appliance complies with the E.E.C.
Directives.
Water connection
• Make sure not to cause damage to the
water hoses.
• The appliance is to be connected to the
water mains using the new supplied
hose-sets. Old hose sets must not be
reused.
Page 4

4 electrolux
• Before you connect the appliance to new
pipes or pipes not used for a long time,
let the water flow until it is clean.
• The first time you use the appliance,
make sure that there is no leakage.
USE
Warning! Risk of injury, electrical
shock, fire, burns or damage to the
appliance.
• Use this appliance in a household environment.
• Obey the safety instructions on the detergent packaging.
• Do not put flammable products or items
that are wet with flammable products in,
near or on the appliance.
• Do not touch the glass of the door while
a programme operates. The glass can be
hot.
• Make sure that you remove all metal objects from the laundry.
• Do not put a container to collect possible
water leakage under the appliance. Contact the Service to ensure which accessories can be used.
PRODUCT DESCRIPTION
CARE AND CLEANING
Warning! Risk of injury or damage to
the appliance.
• Do not use water spray and steam to
clean the appliance.
• Clean the appliance with a moist soft
cloth. Only use neutral detergents. Do
not use abrasive products, abrasive
cleaning pads, solvents or metal objects.
DISPOSAL
Warning! Risk of injury or suffocation.
• Disconnect the appliance from the mains
supply.
• Cut off the mains cable and discard it.
• Remove the door catch to prevent children and pets to get closed in the appliance.
SERVICE
• Contact the Service to repair the appliance. We recommend only the use of
original spare parts.
Your new appliance meets all modern requirements for effective treatment of laundry
with low water, energy and detergent consumption. Its new washing system allows
total use of detergent and reduces water consumption so saving energy.
1 2 7 8 9
3
4
5
6
Detergent dispenser drawer
1
Control panel
2
Door opening handle
3
Rating plate
4
Drain pump
5
Front adjustable feet
6
10
Page 5
electrolux 5
Water drain hose
7
Mains cable
8
DETERGENT DISPENSER DRAWER
Compartment for detergent used for
prewash and soak phase or for stain remover used during the stain action phase (if
available). The prewash and soak detergent
is added at the beginning of the wash programme. The stain remover is added during the stain action phase.
Compartment for powder or liquid detergent used for main wash. If using liquid
detergent pour it just before starting the
programme.
Compartment for liquid additives (fabric
softener, starch).
Follow the product manufacturer’s recommendations on quantities to use and do not
exceed the «MAX» mark in the detergent
dispenser drawer. Any fabric softener or
starching additives must be poured into the
compartment before starting the wash programme.
CHILD SAFETY DEVICE
Make sure that children or pets do not
climb into the drum. To prevent children
and pets becoming trapped inside the
drum the machine incorporates a special
feature. To activate this device, rotate the
button (without pressing it) inside the door
clockwise until the groove is horizontal. If
necessary use a coin.
Water inlet valve
9
Back adjustable feet
10
To disable this device and restore the possibility of closing the door, rotate the button
counterclockwise until the groove is vertical.
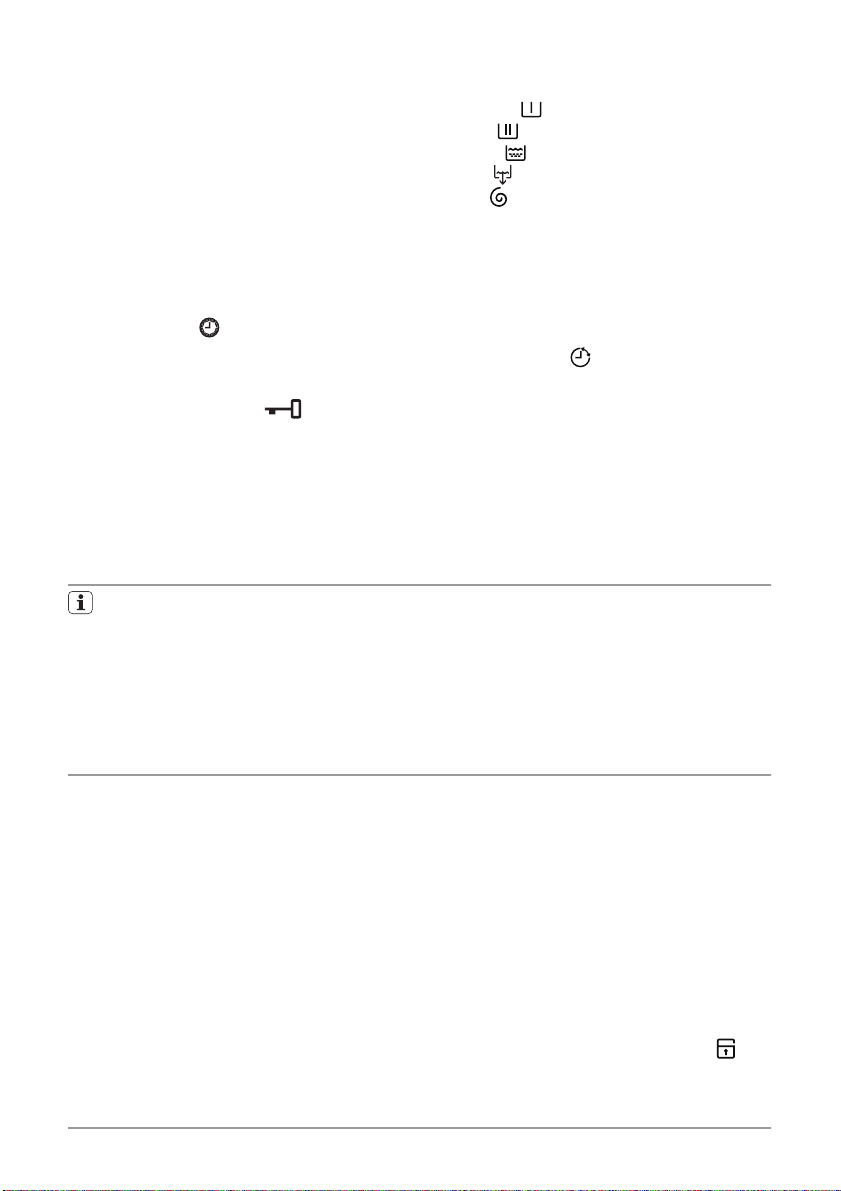
CONTROL PANEL
Below is a picture of the control panel. It shows the programme selector dial as well as
the buttons, pilot lights and the display. These are presented by relevant numbers on
the following pages.
Page 6
6 electrolux
1 2 3 4 5 6 7 8 9
Programme selector dial
1
TEMPERATURE button
2
SPIN button
3
EASY IRON button
4
EXTRA RINSE button
5
DELAY START button
6
Display
7
START/PAUSE button
8
TIME MANAGER buttons
9
PROGRAMME SELECTOR DIAL
It allows you to switch the appliance on/off
and/or to select a programme.
TEMPERATURE
This button allows you to increase or decrease the washing temperature.
SPIN REDUCTION
By pressing this button you can change the
spin speed of the selected programme.
EASY IRON
By selecting this option the laundry is gently
washed and spun to avoid any creasing. In
this way ironing is easier. Furthermore the
machine will perform some additional rinses
in some programmes. On cotton programmes the maximum spin speed is reduced automatically.
EXTRA RINSE
This appliance is designed to save energy.
If it necessary to rinse the laundry using an
extra quantity of water (extra rinse), select
this option. Some additional rinses will be
performed. This option is recommended for
people who are allergic to detergents, and
in areas where the water is very soft.
DELAY START
The programme can be delayed from 30
min - 60 min - 90 min, 2 hours and then by
1 hour up to a maximum of 20 hours by
means of this button.
START PAUSE
This button allows you to start or to interrupt the selected programme.
TIME MANAGER
These buttons allows you to modify the
programme duration automatically proposed by the appliance.
Page 7
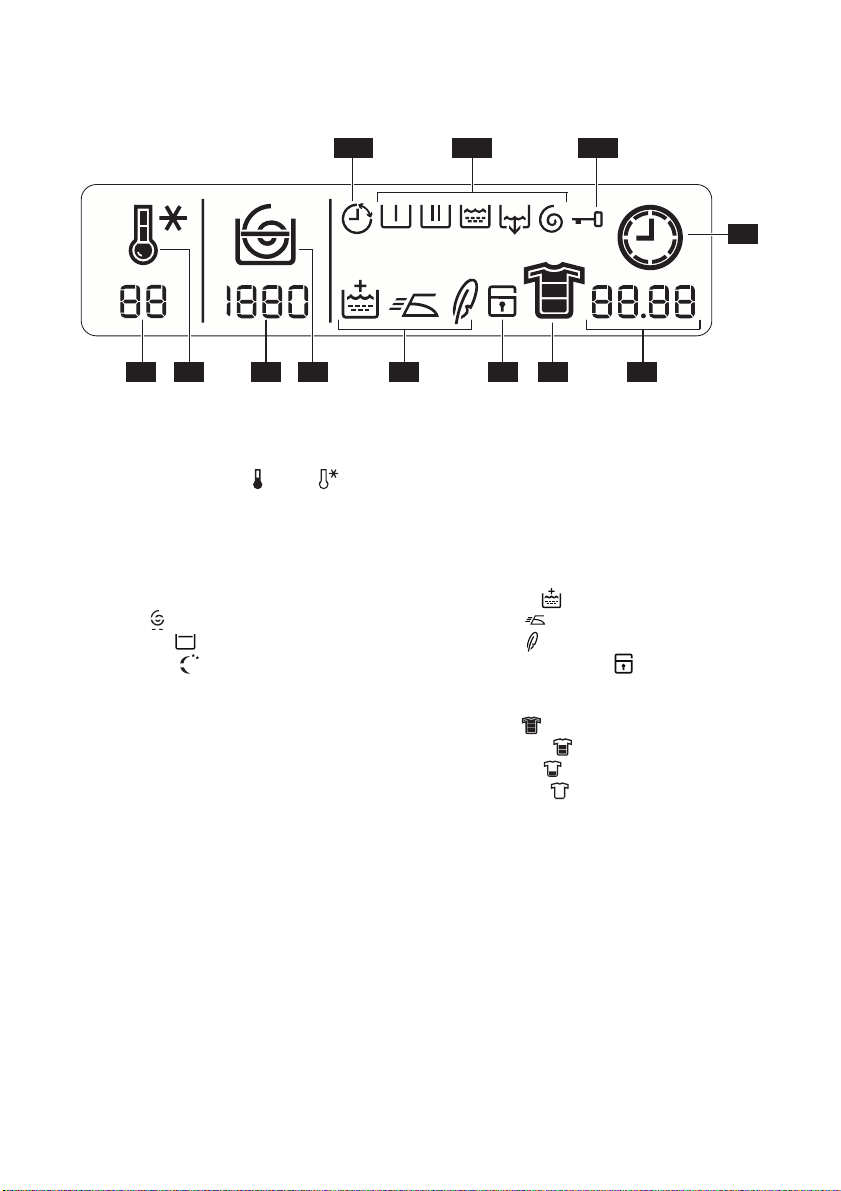
DISPLAY
7.1 7.3 7.5 7.6 7.7 7.8
electrolux 7
7.107.117.12
7.9
7.2 7.4
The display shows the following information:
7.1: Temperature value
7.2: Temperature icons
, Cold .
During the washing cycle the display shows
the temperature icon animated to indicate
that the appliance has started the heating
phase of the water in the tub.
7.3: Spin value
7.4: Spin speed icons.
•
No spin
•
Rinse Hold
•
Night Cycle
During the spinning phase the spiral is animated.
No spin option eliminates all the spin phases and increases the number of rinses for
some programmes.
Rinse Hold: by selecting this option the
water of the last rinse is not emptied out to
prevent the fabrics from creasing. When the
programme has finished the display shows
three blinking 0.00, the icon 7.10 is still visualized, the light of button 8 is off and the
door is locked to indicate that the water
must be emptied out. To empty out the water, please read the paragraph «At the end
of the programme».
Night Cycle: by selecting this option, the
machine will not drain the water of the last
rinse, so as not to wrinkle the laundry. As all
spinning phases are suppressed, this
washing cycle is very noiseless and it can
be selectionned at night or in times with a
more economical power rate. On some
programmes the rinses will be performed
with more water. When the programme has
finished, the display shows three blinking
0.00, the icon 7.10 is still visualized, the
light of button 8 is off and the door is
locked to indicate that the water must be
emptied out. To empty out the water,
please read the paragraph «At the end of
the programme».
7.5: Option icons.
•
Extra Rinse
•
Easy Iron
•
Sensitive
7.6: Child safety lock
,
,
(if available).
(see «Personali-
sation» paragraph).
7.7: Soil degree icons
•
Intensive
•
Normal/Daily
•
Light/Quick
•
Super Quick
7.8:
Duration of the selected programme
•
After selecting a programme, the duration
is displayed in hours and minutes (for example 2.05). The duration is calculated
automatically on the basis of the maximum recommended load for each type of
fabric. After the programme has started,
the time remaining is updated every minute.
End of programme
•
When the programme has finished three
flashing zeros is displayed, the icon 7.10
disappears and the door can be opened.
• Incorrect option selection
Page 8
8 electrolux
If an option which is not compatible with
the set wash programme is selected, the
message Err is displayed at the bottom
of the display for a few seconds and the
integrated red light of button 8 start flashing.
Alarm codes
•
In the event of operating problems, some
alarm codes can be displayed, for example E20 (see paragraph «What to do
if...»).
• Delay Time value
7.9: Clock icon
After the programme has started, the duration is displayed and the clock icon is animated.
7.10: Door locked icon
After you have pressed button 8 and the
machine has started, this icon is lighted on
and only the phase running icon stays on.
When the programme has finished, three
flashing zero (0.00) are displayed and this
icon disappears.
FIRST USE
• Ensure that the electrical and water
connections comply with the installation instructions.
• Remove the polystyrene block and
any material from the drum.
• Before the first wash, run a cotton
cycle at the highest temperature
7.11: Washing programme phase icons
•
Prewash
•
Wash
•
Rinses
•
Drain
•
Spin
By selecting the wash programme, the
washing programme phase icons corresponding to the various phases making up
the programme are shown in the upper part
of the display. After having pressed button
8 only the icon of the running phase stays
on.
7.12: Delay icon
The selected delay set by pressing the relevant button appears on the display for a
few seconds, then the duration of the previously selected programme is displayed. The
relevant icon is lighted on. The delay time
value decreases by one unit every hour and
then, when 1 hour remains, the time decreases every minute.
without any laundry in the machine,
to remove any manufacturing residue
from the drum and tub. Pour 1/2 a
measure of detergent into the main
wash compartment and start the
machine.
PERSONALISATION
ACOUSTIC SIGNALS
The machine is provided with an acoustic
device, which sounds in the following cases:
• at the end of the cycle
• if there is a fault.
By pressing the 4 and 5 buttons simultaneously for about 6 seconds, the acoustic
signal is deactivated (except if there is a
fault). By pressing these 2 buttons again,
the acoustic signal is reactivated.
CHILD SAFETY LOCK
This device permits you to leave the appliance unattended and not to worry that chil-
DAILY USE
Load the laundry
dren might be injured by or cause damage
to the appliance. This function remains enabled also when the washing machine is not
working.
There are two different ways to set this option:
1. Before pressing button 8: it will be im-
possible to start the machine.
2. After pressing button 8: it will be im-
possible to change any other pro-
gramme or option.
To enable or disable this option press simultaneously for about 6 seconds buttons
5 and 6 until on the display, the icon
pears or disappears.
ap-
Page 9

Open the door by carefully pulling the door
handle outwards. Place the laundry in the
drum, one item at a time, shaking them out
as much as possible. Close the door.
Make sure that no laundry stays between
the seal and the door. There is a risk of water leakage or damage to the laundry.
Measure out the detergent and the fabric softener
Pull out the dispenser drawer until it stops.
Measure out the amount of detergent required, pour it into the main wash compart-
ment
or in the appropriate compartment
if the selected programme/option it requires
(see more details in «Detergent dispenser
drawer»).
If required, pour fabric softener into the
compartment marked
(the amount used
must not exceed the «MAX» mark in the
drawer). Close the drawer gently.
electrolux 9
SELECT THE REQUIRED PROGRAMME
BY TURNING THE PROGRAMME
SELECTOR DIAL (1)
Turn the programme selector dial to the required programme. The washing machine
will propose a temperature and automatically select the maximum spin value provided for the programme you have chosen.
You can change these values by operating
the corresponding buttons. The green pilot
light of the button 8 starts to flash.
The selector dial can be turned either clockwise or counterclockwise. Turn to position
to reset programme/Switching the ma-
chine off.
At the end of the programme the selector dial must be turned to position
,
to switch the machine off.
Caution! If you turn the programme
selector dial to another programme
when the machine is working, the red
pilot light of button 8 will blink 3 times
and the message Err is displayed to
indicate a wrong selection. The
machine will not perform the new
selected programme.
SELECT THE TEMPERATURE BY
PRESSING BUTTON 2
By selecting a programme, the appliance
proposes automatically a default temperature.
Press this button repeatedly to increase or
decrease the temperature, if you want your
laundry to be washed at a different temperature.
Page 10
10 electrolux
REDUCE THE SPIN SPEED BY
PRESSING BUTTON 3
By selecting a programme, the appliance
proposes automatically the maximum spin
speed provided for that programme.
Press button 3 repeatedly to change the
spin speed, if you want your laundry to be
spun at a different speed.
SELECT THE AVAILABLE OPTIONS BY
PRESSING BUTTONS 3, 4 AND 5
Depending on the programme, different
functions can be combined. These must be
selected after choosing the desired programme and before pressing button 8.
When these buttons are pressed, the corresponding icons appear on the display.
When they are pressed again, the icons
disappear. If an incorrect option is selected,
the integrated red pilot light of the button 8
flashes for 3 times and the Err message
appears on the display for a few seconds.
For the compatibility among the washing programmes and the options see
chapter «Washing Programmes».
SELECT THE DELAY START BY
PRESSING BUTTON 6
Before you start the programme, if you wish
to delay the start, press the button 6 repeatedly, to select the desired delay. The
corresponding icon 7.12 will appear on the
display in the upper part of the display.
The selected delay time value (up to 20
hours) will appear on the display a few seconds, then the duration of the programme
will appear again.
You must select this option after you have
set the programme and before you press
button 8.
You can cancel or modify the delay time at
any moment, before you press button 8.
Selecting the delayed start:
1. Select the programme and the required
options.
2. Select the delay start by pressing the
button 6.
3. Press button 8:
– the machine starts its hourly count-
down.
– The programme will start after the
selected delay has expired.
Cancelling the delayed start after having
pressed button 8:
1. Set the washing machine to PAUSE by
pressing button 8.
2.
Press button 6 once until the symbol
’ is displayed
3. Press button 8 again to start the programme.
Important! The selected delay can be
changed only after selecting the washing
programme again.
The Delay Start can not be selected with
DRAIN programme.
START THE PROGRAMME BY
PRESSING BUTTON 8
To start the selected programme, press the
button 8, the green pilot light of the button
8 stops blinking. The icon 7.10 appears on
the display to indicate that the appliance
starts operating and the door is locked.
To interrupt a programme which is running,
press the button 8: the green pilot light
starts to blink.
To restart the programme from the point at
which it was interrupted, press the button 8
again. If you have chosen a delayed start,
the machine will begin the countdown.
If an incorrect option is selected, the red pilot light of the button 8 blinks for 3 times
the message Err is displayed for few seconds.
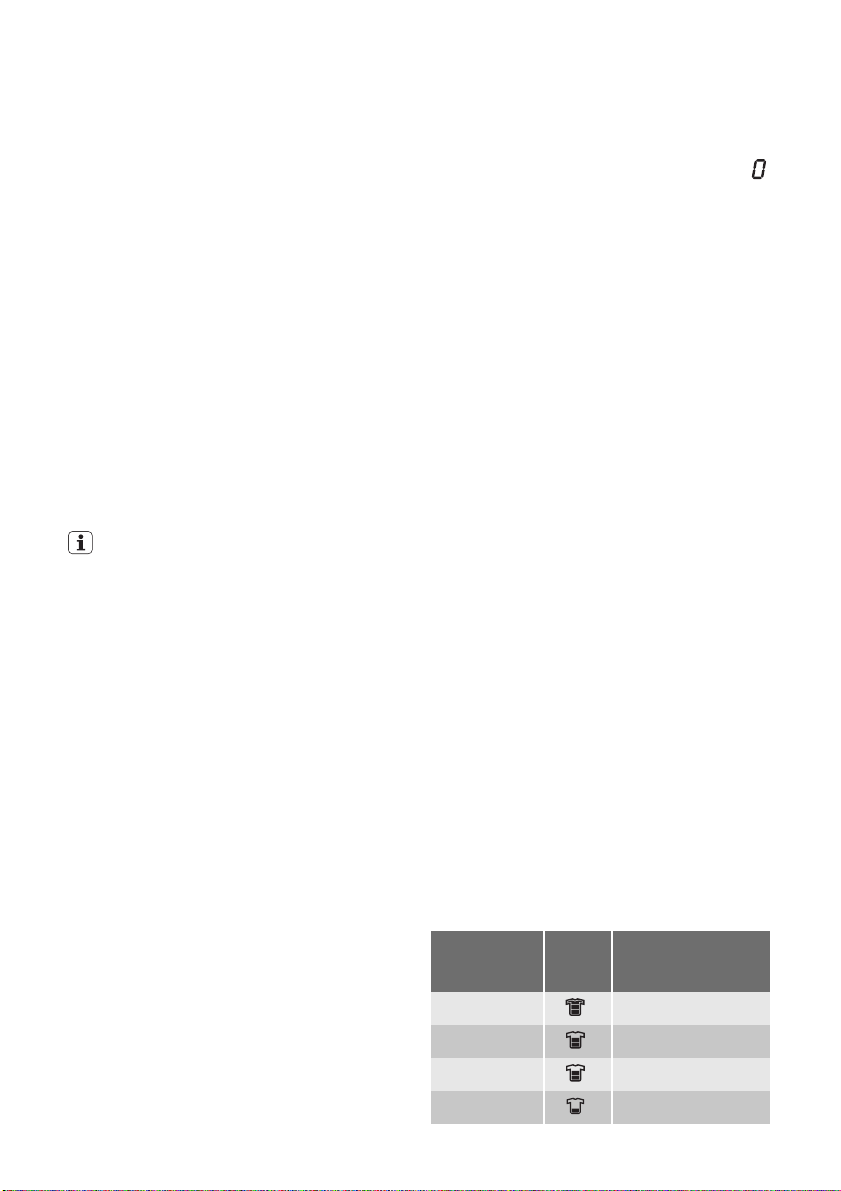
SELECT THE TIME MANAGER OPTION
BY PRESSING BUTTONS 9
By pressing these buttons repeatedly, the
duration of the washing cycle can be increased or decreased. The icon 7.7 will appear on the display to indicate the chosen
degree of soil. This option is available only
with Cotton, Synthetic and Delicate programmes.
Washing cy-
cle
Intensive Heavy soiled items
Normal Normal soiled items
Daily Daily soiled items
Light Slightly soiled items
Soil
Level
icon
Type of fabric
Page 11
electrolux 11
Washing cy-
cle
Quick Very slightly soiled
Super Quick
1)
1) We recommend you to reduce the load sizes (see
Washing programmes table).
Soil
Level
icon
Type of fabric
items
Items used or worn
for a short time
Important! The Time Manager cannot be
selected with the programmes
.
The availability of these soil level icons
change according to the type of fabric as
shown in the following chart.
Fabric Soil Level
Cottons
95°/90°C X X X X X X
60°C/50°C X X X X X X
40°C X X X X X X
30°C X X X X X X
Cold X X X X X X
Synthetics
60°C/50°C X X X X
40°C X X X X
30°C X X X X
Cold X X X X
Delicates
40°C X X X X
30°C X X X X
Cold X X X X
ALTERING AN OPTION OR A RUNNING
PROGRAMME
It is possible to change some options before the programme carries them out .
Before you make any change, you must
PAUSE the appliance by pressing the button 8 (if you wish to change the Time Manager option, you must cancel the running
programme and make your selection
again).
Changing a running programme is possible
only by resetting it. Turn the programme se-
lector dial to
and then to the new pro-
gramme position. Start the new programme
by pressing the button 8 again. The washing water in the tub will be not emptied out.
INTERRUPTING A PROGRAMME
Press the button 8 to interrupt a pro-
gramme which is running, the corresponding green pilot light starts blinking.
Press the button again to restart the programme.
CANCELLING A PROGRAMME
Turn the selector dial to
to cancel a programme which is running.
You can select now a new programme.
OPENING THE DOOR
After the programme has started (or during
the delay time) the door is locked, if you
need to open it, set first the machine to
PAUSE by pressing the button 8.
If the icon 7.10 after a few minutes disappears from the display, the door can be
opened.
If the icon 7.10 does not go off, this means
that the machine is already heating or that
the water level is too high. Do not try to
force the door!
If you cannot open the door but you need
to open it you have to switch the machine
off by turning the selector dial to
. After a
few minutes the door can be opened (pay
attention to the water level and temperature!).
After closing the door, it is necessary to select the programme and options again and
to press button 8.
AT THE END OF THE PROGRAMME
The machine stops automatically. Three
blinking zeros (
) appear on the display. The pilot light of button 8 goes off.
Some acoustic signals sound for a few minutes.
If you set a programme or an option that
ends with water left in the tub, the icon 7.10
remains displayed. The door is still locked.
The water must be emptied out before
opening the door. During this time the drum
continues to turn at regular intervals until
water drain.
Follow the below instructions to empty out
the water:
Page 12

12 electrolux
1.
Turn the programme selector dial to
.
2. Select the draining or spinning programme.
3. Reduce the spin speed if needed, by
pressing the relevant button.
4. Press button 8.
At the end of the programme, after a few
minutes, the icon 7.10 disappears. The
Stand by : once the programme has finished after a few minutes the energy saving
system will be enabled. The brightness of
HELPFUL HINTS AND TIPS
SORTING OUT THE LAUNDRY
Follow the wash code symbols on each
garment label and the manufacturer’s
washing instructions. Sort the laundry as
follows: whites, coloureds, synthetics, delicates, woollens.
TEMPERATURES
95° or 90°
60°/50°
40°-30°Cold
BEFORE LOADING THE LAUNDRY
Never wash whites and coloureds together.
Whites may lose their «whiteness» in the
wash.
New coloured items may run in the first
wash; they should therefore be washed
separately the first time.
Make sure that no metal objects are
left in the laundry (e.g. hair clips, safety
pins, pins).
Button up pillowcases, close zip fasteners,
hooks and poppers. Tie any belts or long
tapes.
Remove persistent stains before washing.
for normally soiled white cottons and linen (e.g. tea cloths,
towels, tablecloths, sheets...)
for normally soiled, colour fast
garments (e.g. shirts, night
dresses, pyjamas....) in linen,
cotton or synthetic fibres and
for lightly soiled white cotton
(e.g. underwear)
for delicate items (e.g. net curtains), mixed laundry including
synthetic fibres and woollens
bearing the label «pure new
wool, machine washable, nonshrink»
door can be opened. Turn the programme
selector dial to
to switch the machine
off.
Remove the laundry from the drum and
carefully check that the drum is empty. If
you do not intend to carry out another
wash, close the water tap. Leave the door
open to prevent the formation of mildew
and unpleasant smells.
the display is reduced. By pressing any button the appliance will come out of the energy saving status.
Rub particularly soiled areas with a special
detergent or detergent paste.
Treat curtains with special care. Remove
hooks or tie them up in a bag or net.
MAXIMUM LOADS
Recommended loads are indicated in the
washing programme charts.
General rules:
• Cotton, linen: drum full but not too
tightly packed;
• Synthetics: drum no more than half full;
• Delicate fabrics and woollens: drum
no more than one third full.
Washing a maximum load makes the most
efficient use of water and energy.
For heavily soiled laundry, reduce the load
size.
LAUNDRY WEIGHTS
The following weights are indicative:
The following weights are indicative:
bathrobe 1200 g
quilt cover 700 g
man’s work shirt 600 g
sheet, man’s pyjamas 500 g
tablecloth 250 g
pillow case, towelling towel,
night dress, man’s shirt
tea cloth, ladies’ briefs, nap-
kin, blouse, men’s underpants
200 g
100 g
Page 13
electrolux 13
REMOVING STAINS
Stubborn stains may not be removed by
just water and detergent. It is therefore advisable to treat them prior to washing.
Blood: treat fresh stains with cold water.
For dried stains, soak overnight in water
with a special detergent then rub in the
soap and water.
Oil based paint: moisten with benzine
stain remover, lay the garment on a soft
cloth and dab the stain; treat several times.
Dried grease stains: moisten with turpentine, lay the garment on a soft surface and
dab the stain with the fingertips and a cotton cloth.
Rust: oxalic acid dissolved in hot water or a
rust removing product used cold. Be careful
with rust stains which are not recent since
the cellulose structure will already have
been damaged and the fabric tends to hole.
Mould stains: treat with bleach, rinse well
(whites and fast coloureds only).
Grass: soap lightly and treat with bleach
(whites and fast coloureds only).
Ball point pen and glue: moisten with
1)
acetone
, lay the garment on a soft cloth
and dab the stain.
Lipstick: moisten with acetone as above,
then treat stains with methylated spirits.
Treat any residual marks with bleach.
Red wine: soak in water and detergent,
rinse and treat with acetic or citric acid,
then rinse. Treat any residual marks with
bleach.
Ink: depending on the type of ink, moisten
1)
the fabric first with acetone
, then with
acetic acid; treat any residual marks on
white fabrics with bleach and then rinse
thoroughly.
Tar stains: first treat with stain remover,
methylated spirits or benzine, then rub with
detergent paste.
DETERGENTS AND ADDITIVES
Good washing results also depend on the
choice of detergent and use of the correct
quantities to avoid waste and protect the
environment.
Although biodegradable, detergents contain
substances which, in large quantities, can
upset the delicate balance of nature.
The choice of detergent will depend on the
type of fabric (delicates, woollens, cottons,
etc.), the colour, washing temperature and
degree of soiling.
All commonly available washing machine
detergents may be used in this appliance:
• powder detergents for all types of fabric
• powder detergents for delicate fabrics
(60°C max) and woollens
• liquid detergents, preferably for low temperature wash programmes (60°C max)
for all types of fabric, or special for woollens only.
The detergent and any additives must be
placed in the appropriate compartments of
the dispenser drawer before starting the
wash programme.
If using liquid detergents, a programme
without prewash must be selected.
Your appliance incorporates a recirculation
system which allows an optimal use of the
concentrated detergent.
Follow the product manufacturer’s recommendations on quantities to use and do
not exceed the «MAX» mark in the detergent dispenser drawer.
DEGREES OF WATER HARDNESS
Water hardness is classified in so-called
“degrees” of hardness. Information on hardness of the water in your area can be obtained from the relevant water supply company, or from your local authority.
A water softener must be added when
water has a medium-high degree of
hardness (from degree of hardness II).
Follow the manufacturer’s instructions.
The quantity of detergent can then always be adjusted to degree of hardness I (= soft).
Degrees of water
Level
Charac-
teristic
1 soft 0-7 0-15
2 medium 8-14 16-25
3 hard 15-21 26-37
4 very hard > 21 > 37
hardness
German
°dH
French
°T.H.
1) do not use acetone on artificial silk
Page 14
14 electrolux
WASHING PROGRAMMES
Programme
Maximum and Minimum Temperature
Cycle Description
Maximum Spin Speed
Maximum Fabrics Load
Type of Laundry
Cottons
90° - Cold
Main wash - Rinses
Maximum spin speed 1400 rpm
Max. load 7 kg - Reduced load 3 kg
White and coloured cotton (normally soiled items).
+ Cottons + Prewash
90° - Cold
Prewash - Main wash - Rinses
Maximum spin speed 1400 rpm
Max. load 7 kg - Reduced load 3 kg
White or coloured cottons with prewash phase
(heavily soiled items).
Synthetics
60° - Cold
Main wash - Rinses
Maximum spin speed 900 rpm
Max. load 3 kg - Reduced load 1.5 kg
Synthetic or mixed fabrics normally soiled items.
+
Synthetics + Prewash
60° - Cold
Prewash - Main wash - Rinses
Maximum spin speed 900 rpm
Max. load 3 kg - Reduced load 1.5 kg
Synthetic or mixed fabrics with prewash phase
(heavily soiled items).
Delicates
40° - Cold
Main wash - Rinses
Maximum spin speed 700 rpm
Max. load kg 3 - Reduced load kg 1.5
Delicate fabrics normally soiled delicate items.
Spin
Drain and long spin
Maximum spin speed 1400 rpm
Max. load 7 kg
Separate spin for hand washed garments and after
programmes with the Rinse Hold or Night Cycle option selected. You can choose the spin speed by
pressing the relevant button to adapt it to the fabrics
to be spun.
1)
1)
1)
1)
1)
Options
Detergent Com-
partment
SPIN REDUCTION
RINSE HOLD
NO SPIN
NIGHT CYCLE
EASY IRON
EXTRA RINSE
TIME MANAGER
SPIN REDUCTION
RINSE HOLD
NO SPIN
NIGHT CYCLE
EASY IRON
EXTRA RINSE
TIME MANAGER
SPIN REDUCTION
RINSE HOLD
NO SPIN
NIGHT CYCLE
EASY IRON
EXTRA RINSE
TIME MANAGER
SPIN REDUCTION
RINSE HOLD
NO SPIN
NIGHT CYCLE
EASY IRON
EXTRA RINSE
TIME MANAGER
SPIN REDUCTION
RINSE HOLD
NO SPIN
NIGHT CYCLE
EXTRA RINSE
TIME MANAGER
SPIN REDUCTION
2)
2)
Page 15
Programme
Maximum and Minimum Temperature
Cycle Description
Maximum Spin Speed
Maximum Fabrics Load
Type of Laundry
Drain
Draining of water
Max. load 7 kg
For emptying out the water of the last rinse in programmes with the Rinse Hold or Night Cycle option
selected.
Rinses
Rinses
Maximum spin speed 1400 rpm
Max. load 7 kg
With this programme it is possible to rinse and spin
cotton garments which have been washed by hand.
The machine performs 3 rinses, followed by a final
long spin. The spin speed can be reduced.
Mix 20°
3)
20°
Main wash - Rinses - Spin
Maximum spin speed 900 rpm
Max. load 3 kg
Special programme for cotton, synthetic and mixed
fabrics with light soil.
Set this programme to decrease the energy consumption.
Make sure that the detergent is for low temperature in
order to have good washing results.
Silk
30° - Cold
Main wash - Rinses
Maximum spin speed 700 rpm
Max. load 1 kg
Delicate washing programme suitable for silk and
mixed synthetic items.
Handwash
40° - Cold
Main wash - Rinses
Maximum spin speed 1000 rpm
Max. load 2 kg
Special programme for delicate fabrics with «hand
washing» care symbol.
Options
SPIN REDUCTION
RINSE HOLD
NO SPIN
NIGHT CYCLE
EXTRA RINSE
EASY IRON
SPIN REDUCTION
RINSE HOLD
EXTRA RINSE
SPIN REDUCTION
RINSE HOLD
NO SPIN
NIGHT CYCLE
SPIN REDUCTION
RINSE HOLD
NO SPIN
NIGHT CYCLE
electrolux 15
Detergent Com-
partment
Page 16
16 electrolux
Programme
Maximum and Minimum Temperature
Cycle Description
Maximum Spin Speed
Options
Detergent Com-
partment
Maximum Fabrics Load
Type of Laundry
Wool
40° - Cold
Main wash - Rinses
Maximum spin speed 1000 rpm
SPIN REDUCTION
RINSE HOLD
NO SPIN
NIGHT CYCLE
Max. load 2 kg
Washing programme for machine washable wool as
well as for hand washable woollens and delicate fabrics. Note: A single or bulky item may cause imbalance. If the appliance doesn’t perform the final spin
phase, add more items, redistribute the load manually
and then select the spinning programme.
ECO +
Cottons Eco + Prewash
90 °- 40°
Prewash - Main wash - Rinses
Maximum spin speed 1400 rpm
Max. load 7 kg
SPIN REDUCTION
RINSE HOLD
NO SPIN
NIGHT CYCLE
EASY IRON
EXTRA RINSE
2)
White or coloured cottons with prewash phase.
This programme can be selected for normally soiled
cotton items with stains. The temperature will decrease and the washing time will be extended.
ECO
4)
Cottons Eco
90° - 40°
Main wash - Rinses
Maximum spin speed 1400 rpm
Max. load 7 kg
SPIN REDUCTION
RINSE HOLD
NO SPIN
NIGHT CYCLE
EASY IRON
EXTRA RINSE
White and fast coloured cotton.
This programme can be selected for slightly or normally soiled cotton items. The temperature will decrease and the washing time will be extended. This allows to obtain a good washing efficiency so saving
energy.
O = OFF
For cancelling the programme which is running or to
switch the machine off .
1) If you select the Super Quick option by pressing button 9, we recommend that you reduce the maximum load as
indicated. Full loading is possible however with somewhat reduced cleaning results.
2) If using liquid detergents, a programme without PREWASH must be selected.
3) The appliance performs the short heating phase if the water temperature is below 20°C. The appliance can show
the temperature setting as “cold”.
4) Not for Russia.
STANDARD PROGRAMMES for the Energy Label consumption values. According to regulation 1061/2010,
these programmes are respectively the «standard 60° C cotton programme» and the «standard 40° C cotton
programme». They are the most efficient programmes in terms of combined energy and water consumption for
washing normally soiled cotton laundry.
Set this programme to have a good washing results and decrease the energy consumption. The time of the
washing programme is extended.
The washing temperature of the washing phase may differ from the temperature declared for the set programme.
Page 17
electrolux 17
CONSUMPTION VALUES
The data of this table are approximate. Different causes can change the data: the
quantity and type of laundry, the water and ambient temperature.
Programmes Load
Cottons 60 °C 7 1.2 53 140 52
Cottons 40 °C 7 0.7 53 130 52
Synthetics 40 °C 3 0.5 40 80 35
Delicates 40 °C 3 0.55 55 65 35
Wool/Hand wash
30 °C
Standard cotton programmes
Standard 60 °C
cotton
Standard 60 °C
cotton
Standard 40 °C
cotton
1) At the end of spin phase.
The information given in the charts above are in compliance with the EU Commission regulation
1015/2010 implementing directive 2009/125/EC.
(kg)
3.5 0.77 36 177 52
3.5 0.51 38 160 52
Off Mode (W) Left On Mode (W)
0.10 0.98
Energy con-
sumption
(kWh)
2 0.25 58 50 30
7 0.86 46 189 52
Water con-
sumption (li-
tre)
Approximate
programme
duration (mi-
nutes)
Remaining
moisture
(%)
1)
CARE AND CLEANING
Warning! You must disconnect the
appliance from the electricity supply,
before you can carry out any cleaning
or maintenance work.
DESCALING
The water we use normally contains lime. It
is a good idea to periodically use a water
softening powder in the machine. Do this
separately from any laundry washing, and
according to the softening powder manufacturer's instructions. This will help to prevent the formation of lime deposits.
AFTER EACH WASH
Leave the door open for a while. This helps
to prevent mould and stagnant smells forming inside the appliance. Keeping the door
open after a wash will also help to preserve
the door seal.
MAINTENANCE WASH
With the use of low temperature washes it
is possible to get a build up of residues inside the drum.
We recommend that a maintenance wash
be performed on a regular basis.
To run a maintenance wash:
• The drum should be empty of laundry.
• Select the hottest cotton wash programme.
• Use a normal measure of detergent,
must be a powder with biological properties.
EXTERNAL CLEANING
Clean the exterior cabinet of the appliance
with soap and water only, and then dry
thoroughly.
Page 18
18 electrolux
Important! Do not use methylated spirits,
solvents or similar products to clean the
cabinet.
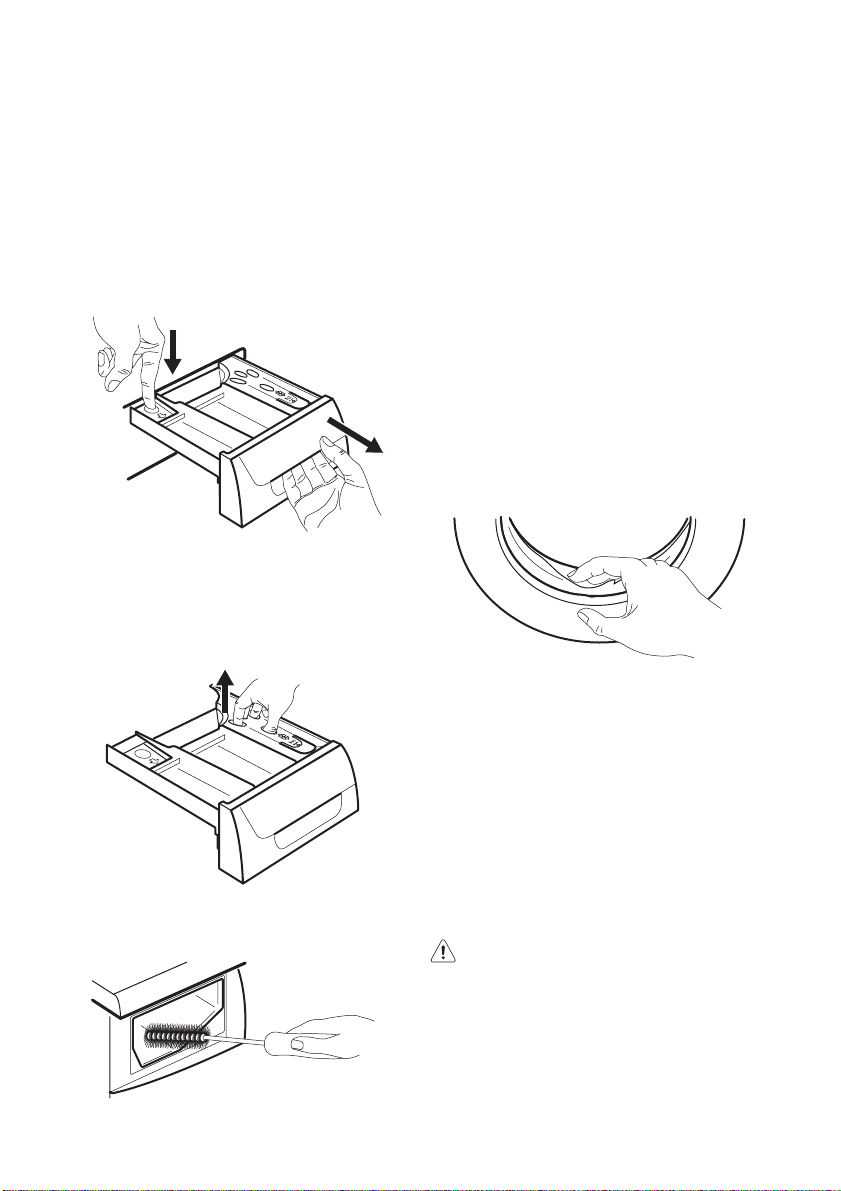
CLEANING THE DISPENSER DRAWER
The detergent dispenser drawer should be
cleaned regularly.
The washing powder and additive dispenser drawer should be cleaned regularly.
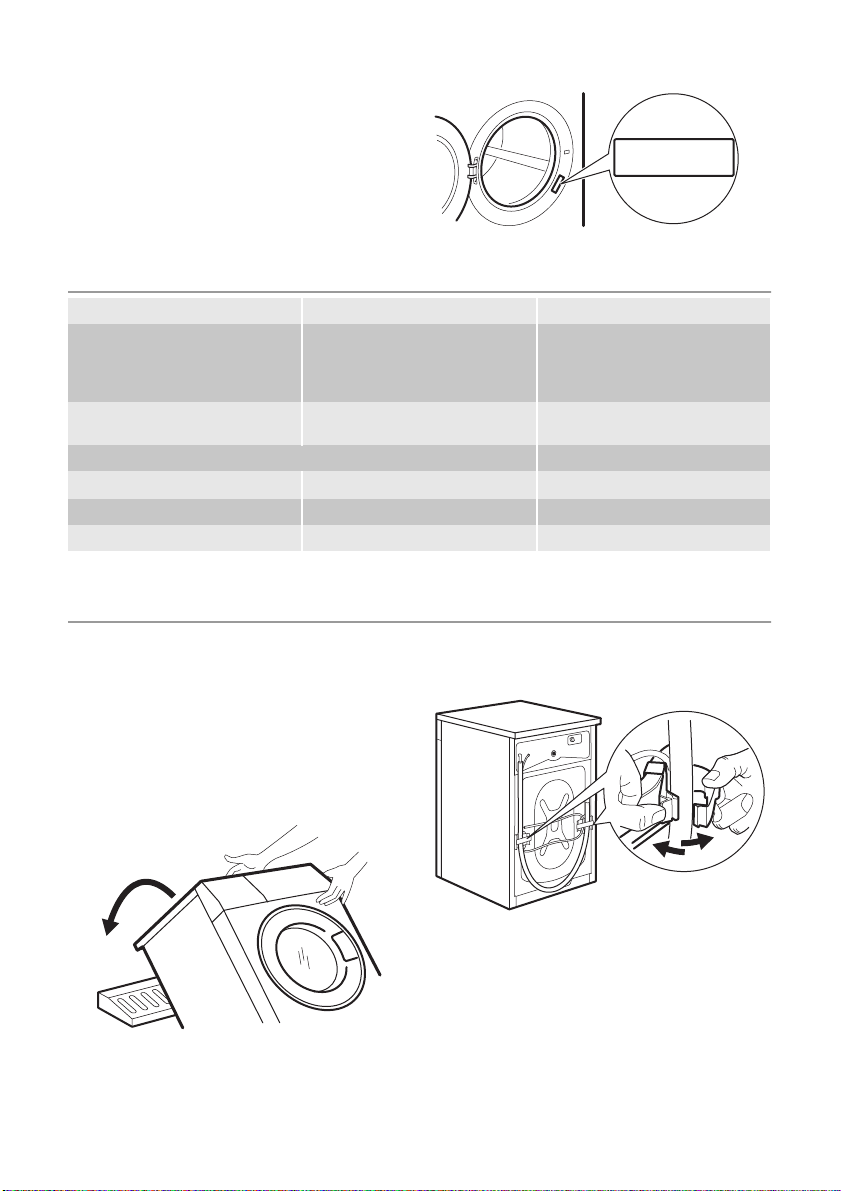
Remove the drawer by pressing the catch
downwards and by pulling it out.
1
2
Flush it out under a tap, to remove any
traces of accumulated powder.
To aid cleaning, the top part of the additive
compartment should be removed. Clean all
parts with water.
WASHING DRUM
Rust deposits in the drum may occur due
to rusting foreign bodies in the washing or
tap water containing iron.
Important! Do not clean the drum with
acidic descaling agents, scouring agents
containing chlorine or iron or steel wool.
1. Remove any rust deposits on the drum
with a cleaning agent for stainless steel.
2. Run a washing cycle without any wash-
ing to clean off any cleaning agent residues.
Programme: Short Cotton Programme
at maximum temperature and add approx. 1/4 measuring cup of detergent.
DOOR SEAL
Check from time to time the door seal and
eliminate eventual possible objects that
could be trapped in the fold.
Clean the chamber of dispenser drawer
with a brush.
DRAIN PUMP
The pump should be inspected regularly
and particularly if:
• the appliance does not empty and/or
spin;
• the appliance makes an unusual noise
during draining due to objects such as
safety pins, coins etc. blocking the
pump;
• a problem with water draining is detected
(see chapter “What to do if...” for more
details).
Warning! Before unscrewing the pump
cover, switch the appliance off and
remove the mains plug from the
socket.
Proceed as follows:
1. Unplug the appliance.
Page 19
electrolux 19
2. If it is necessary, wait until the water
has cooled down.
A
B
3. Place a container close to the pump to
collect any spillage.
4. Release the emergency emptying hose
(B), place it in the container and remove its cap cover
5. When no more water comes out, unscrew the pump cover (A) by turning it
anti-clockwise and remove the filter.
Use pliers, if necessary. Always keep a
rag nearby to dry up any water spillages when removing the cover.
Clean the filter under a tap, to remove
any traces of fluff.
1
6. Remove foreign bodies and fluff from
the filter seat and from the pump impeller.
Check carefully whether the pump impeller rotates (it rotates jerkily). If it
doesn’t rotate, please contact your
Service Centre.
7. Put the cap back on the emergency
emptying hose and place the latter
back in its seat.
8. Replace the filter into the pump by inserting it correctly into the special
guides. Screw the pump cover firmly by
turning it clockwise.
2
2
1
Warning!
When the appliance is in use and depending on the programme selected there can
be hot water in the pump.
Page 20
20 electrolux
Never remove the pump cover during a
wash cycle, always wait until the appliance
has finished the cycle, and is empty. When
refitting the pump cover, ensure it is securely retightened so as to stop leaks and
young children being able to remove it.
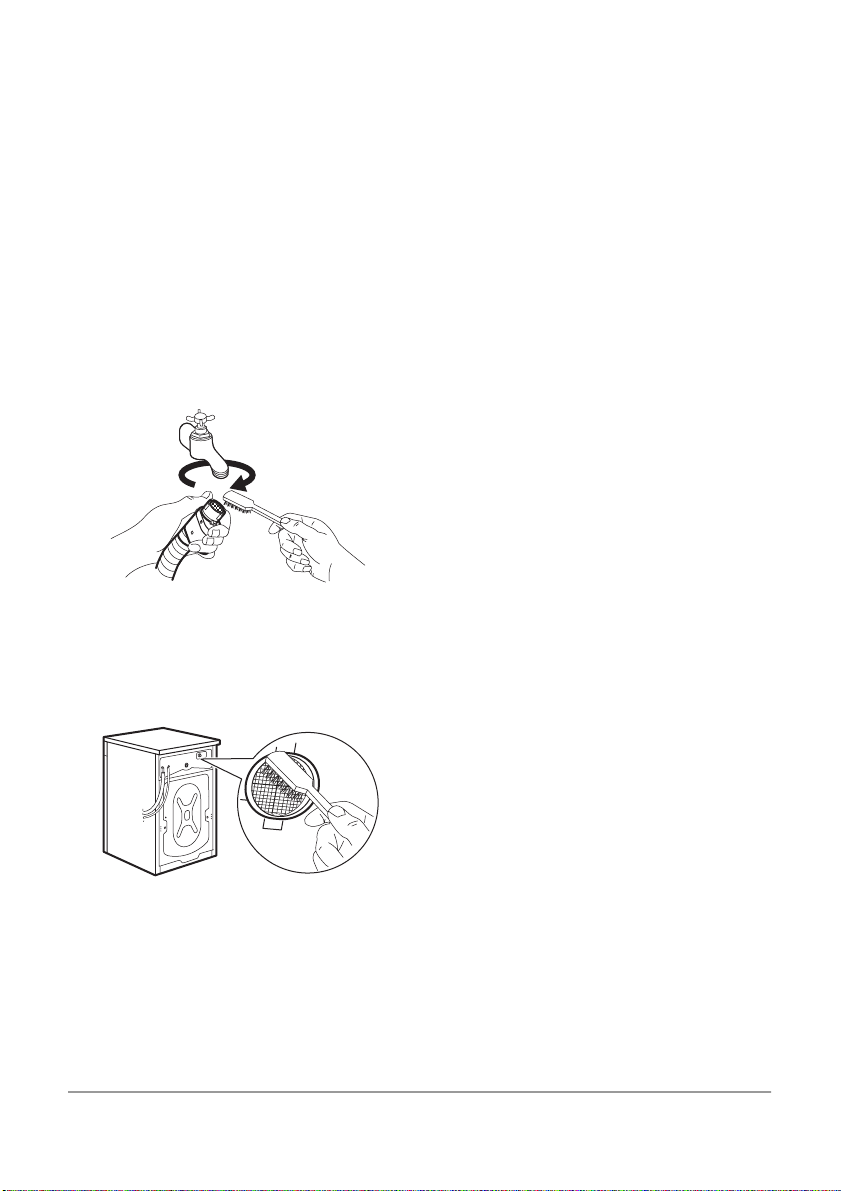
CLEANING THE WATER INLET
FILTERS
If you notice that the machine is taking longer to fill, check that the filter in the water
inlet hose is not blocked.
1. Turn off the water tap.
2. Unscrew the water inlet hose.
3. Clean the filter in the hose using a hard
bristle brush.
4. Screw the hose back onto the tap.
5. Unscrew the hose from the machine.
Keep a rug nearby because some water may flow.
6. Clean the filter in the valve with a stiff
brush or with the piece of cloth.
7. Screw the hose back to the machine
and make sure the connection is tight.
8. Turn on the water tap.
1. Turn off the water tap.
2. Unscrew the inlet hose.
3. Place the end of the emergency emptying hose and that of the inlet hose in a
bowl placed on the floor and let water
drain out.
4. Screw the water inlet hose back on and
reposition the emergency emptying
hose after having put the cap on again.
5. When you intend to start the machine
up again, make sure that the room
temperature is above 0°C.
EMERGENCY EMPTYING OUT
If the water is not discharged, proceed as
follows to empty out the machine:
1. pull out the plug from the power socket;
2. close the water tap;
3. if necessary, wait until the water has
cooled down;
4. place a bowl on the floor and place the
end of the emergency emptying hose
into the bowl. Remove its cap. The water should drain by gravity into the
bowl. When the bowl is full, put the cap
back on the hose. Empty the bowl. Repeat the procedure until water stops
flowing out;
5. clean the pump if necessary as previously described;
6. replace the emergency emptying hose
in its seat after having plugged it;
7. screw the pump again.
Important! Every time you drain the water
through the emergency emptying hose you
must pour 2 litres of water into the main
wash compartment of the detergent drawer
and then run the drain programme. This will
activate the ECO Valve device avoiding
that part of the detergent remains unused
at next washing.
FROST PRECAUTIONS
If the machine is installed in a place where
the temperature could drop below 0°C,
proceed as follows:
WHAT TO DO IF…
Certain problems are due to lack of simple
maintenance or oversights, which can be
solved easily without calling out an engineer. Before contacting your local Service
Page 21
electrolux 21
Centre, please carry out the checks listed
below.
During machine operation it is possible that
the red pilot light of button 8 blinks, one of
the following alarm codes appears on the
display and some acoustic signals sound
every 20 seconds to indicate that the machine is not working:
Problem Possible cause/Solution
The door has not been closed.
• Close the door firmly.
The plug is not properly inserted in the power socket.
• Insert the plug into the power socket.
There is no power at the socket.
• Please check your domestic electrical installation.
The washing machine does
not start:
The machine does not fill:
The machine fills then empties immediately:
The machine does not
empty and/or does not
spin:
The main fuse has blown.
• Replace the fuse.
The selector dial is not correctly positioned and the button 8 has
not been pressed.
• Please turn the selector dial and press the button 8 again.
The delay start has been selected.
• If the laundry are to be washed immediately, cancel the delay
start.
The Child Safety Lock has been activated.
• Deactivate the Child Safety Lock.
The water tap is closed.
• Open the water tap.
The inlet hose is squashed or kinked.
• Check the inlet hose connection.
The filter in the inlet hose or the inlet valve filter are blocked.
• Clean the water inlet filters (See "Cleaning the water inlet filters"
for more details).
The door is not properly closed.
• Close the door firmly.
The end of the drain hose is too low.
• Refer to relevant paragraph in «water drainage» section.
The drain hose is squashed or kinked.
• Check the drain hose connection.
The drain filter is clogged.
• Clean the drain filter.
An option or a programme that ends with the water still in the tub
or a that eliminates all the spinning phases has been selected.
• Select the draining or spinning programme.
The laundry is not evenly distributed in the drum.
• Redistribute the laundry.
•
: problem with the water supply.
•
: problem with the water draining.
•
: door open.
Once the problem has been eliminated,
press the button 8 to restart the programme. If after all checks, the problem
persists, contact your local Service Centre.
Page 22
22 electrolux
Problem Possible cause/Solution
There is water on the floor:
Unsatisfactory washing results:
The door will not open:
The machine vibrates is
noisy:
Spinning starts late or the
machine does not spin:
The machine makes an unusual noise:
No water is visible in the
drum:
Too much detergent or unsuitable detergent (creates too much
foam) has been used.
• Reduce the detergent quantity or use another one.
Check whether there are any leaks from one of the inlet hose fittings. It is not always easy to see this as the water runs down the
hose; check to see if it is damp.
• Check the water inlet hose connection.
The drain or inlet hose is damaged.
• Replace it with a new one.
The cap on the emergency emptying hose has not been replaced
or the filter has not been properly screwed in after cleaning action.
• Refit the cap on the emergency emptying hose or screw the filter fully in.
Too little detergent or unsuitable detergent has been used.
• Increase the detergent quantity or use another one.
Stubborn stains have not been treated prior to washing.
• Use commercial products to treat the stubborn stains.
The correct temperature was not selected.
• Check if you have selected the correct temperature.
Excessive laundry load.
• Reduce the laundry load.
The programme is still running.
• Wait the end of washing cycle.
The door lock has not been released.
•
Wait until the symbol
has gone out.
There is water in the drum.
• Select drain or spin programme to empty out the water.
The transit bolts and packing have not been removed.
• Check the correct installation of the appliance.
The support feet have not been adjusted
• Check the correct levelling of the appliance.
The laundry is not evenly distributed in the drum.
• Redistribute the laundry.
Maybe there is very little laundry in the drum.
• Load more laundry.
The electronic unbalance detection device has cut in because the
laundry is not evenly distributed in the drum. The laundry is redistributed by reverse rotation of the drum. This may happen several
times before the unbalance disappears and normal spinning can
resume. If, after 10 minutes, the laundry is still not evenly distributed in the drum, the machine will not spin. In this case, redistribute the load manually and select the spin programme.
• Redistribute the laundry.
The load is too small.
• Add more items, redistribute the load manually and then select
the spinning programme.
The machine is fitted with a type of motor which makes an unusual
noise compared with other traditional motors. This new motor ensures a softer start and more even distribution of the laundry in the
drum when spinning, as well as increased stability of the machine.
Machines based on modern technology operate very economically
using very little water without affecting performance.
Page 23
If you are unable to identify or solve the
problem, contact our service centre. Before
telephoning, make a note of the model, serial number and purchase date of your machine: the Service Centre will require this
Mod. ... ... ...
Prod. No. ... ... ...
Ser. No. ...
information.
TECHNICAL DATA
Dimensions Width / Height / Depth 596 / 820 / 544 mm
Electrical connection Voltage
Water supply pressure Minimum
Level of protection against ingress of solid particles and moisture IPX4
Water supply
Maximum Load Cotton 7 kg
Spin Speed Maximum 1400 rpm
1) Connect the water inlet hose to a water tap with a 3/4'' thread.
1)
Overall power
Fuse
Frequency
Maximum
Cold water
220-230 V
2000 W
10 A
50 Hz
0,5 bar (0,05 MPa)
8 bar (0,8 MPa)
INSTALLATION
UNPACKING
All transit bolts and packing must be removed before using the appliance.
You are advised to keep all transit devices
so that they can be refitted if the machine
ever has to be transported again.
1. After removing all the packaging, carefully lay machine on it’s back to remove
the polystyrene base from the bottom.
2. Remove the power supply cable and
the draining hose from the hose holders
on the rear of the appliance.
electrolux 23
Page 24
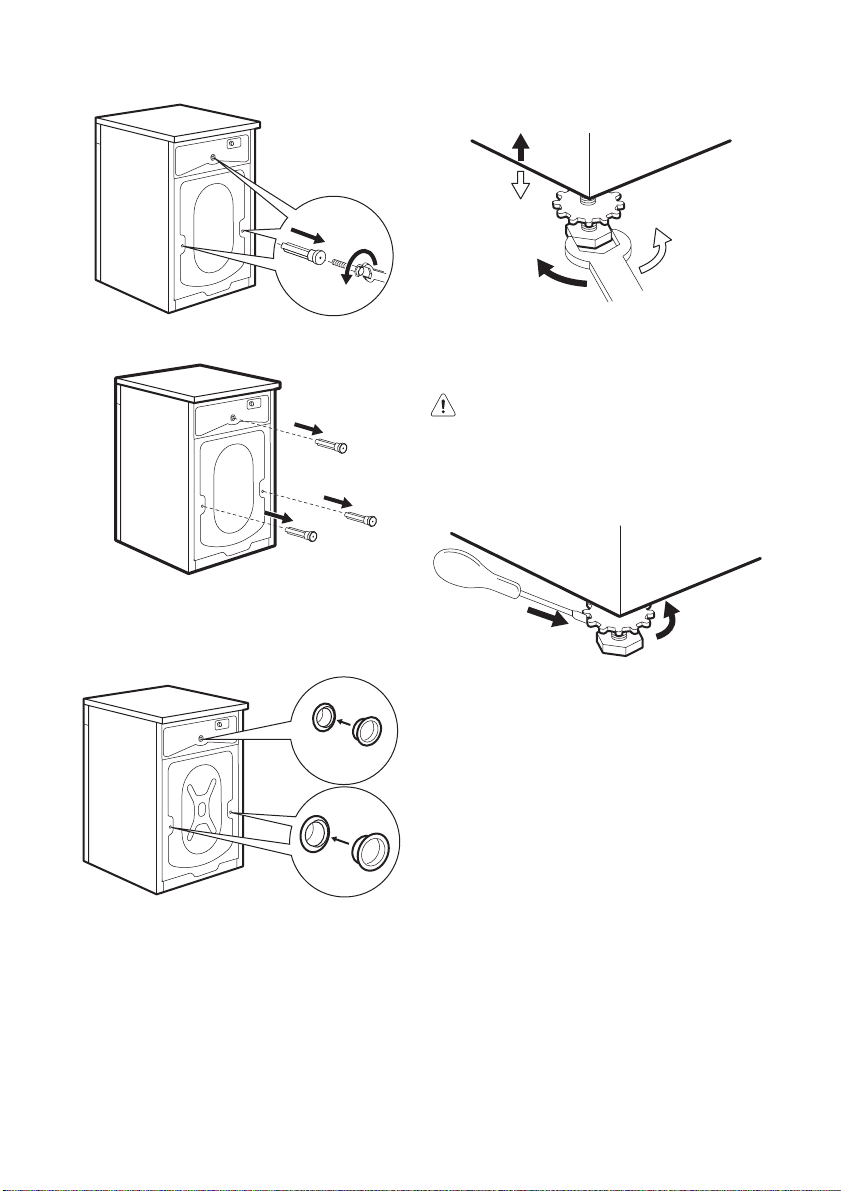
24 electrolux
3. Unscrew the three bolts.
2
1
4. Slide out the relevant plastic spacers.
5. Fill the smaller upper hole and the two
large ones with the corresponding plastic plug caps supplied in the bag containing the instruction booklet.
Any necessary adjustment can be made
with a spanner.
Accurate levelling prevents vibration, noise
and displacement of the machine during
operation.
Caution! Never place cardboard,
wood or similar materials under the
machine to compensate for any
unevenness in the floor. After having
levelled the appliance, tighten the lock
nuts.
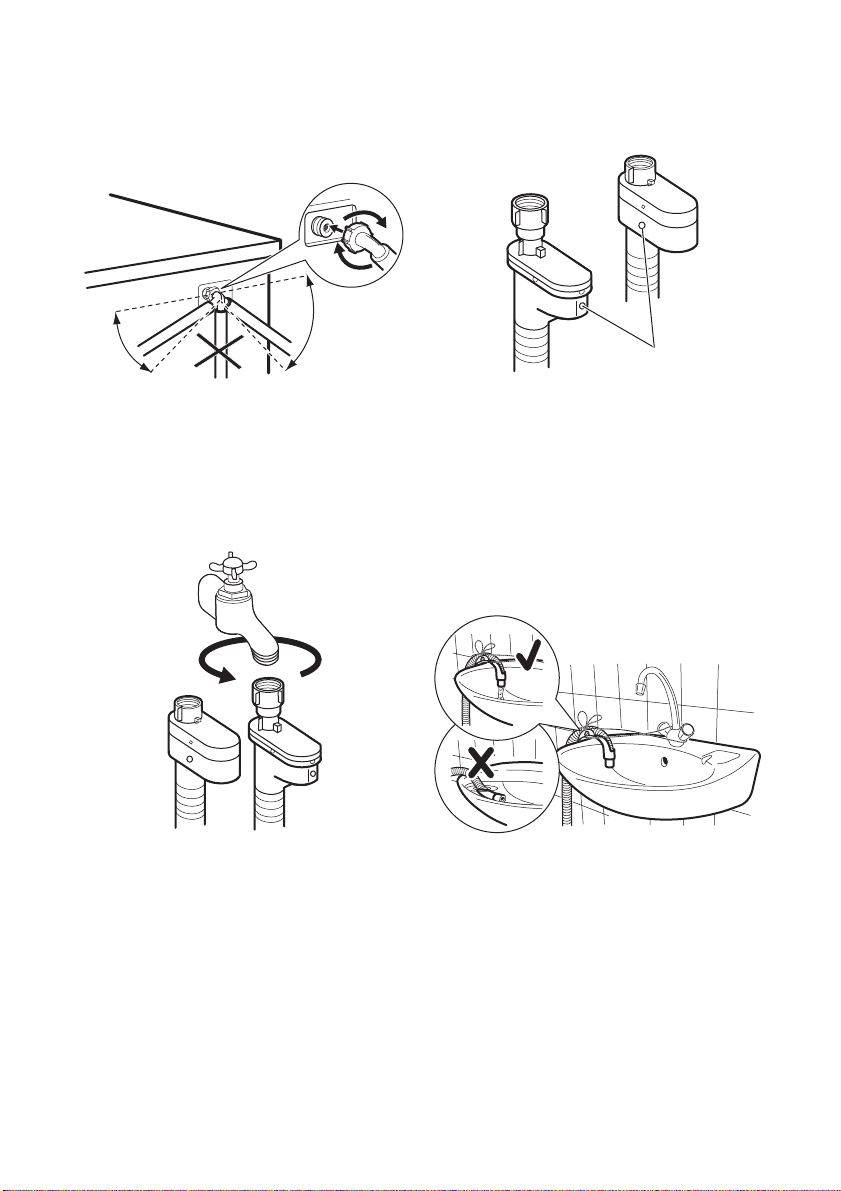
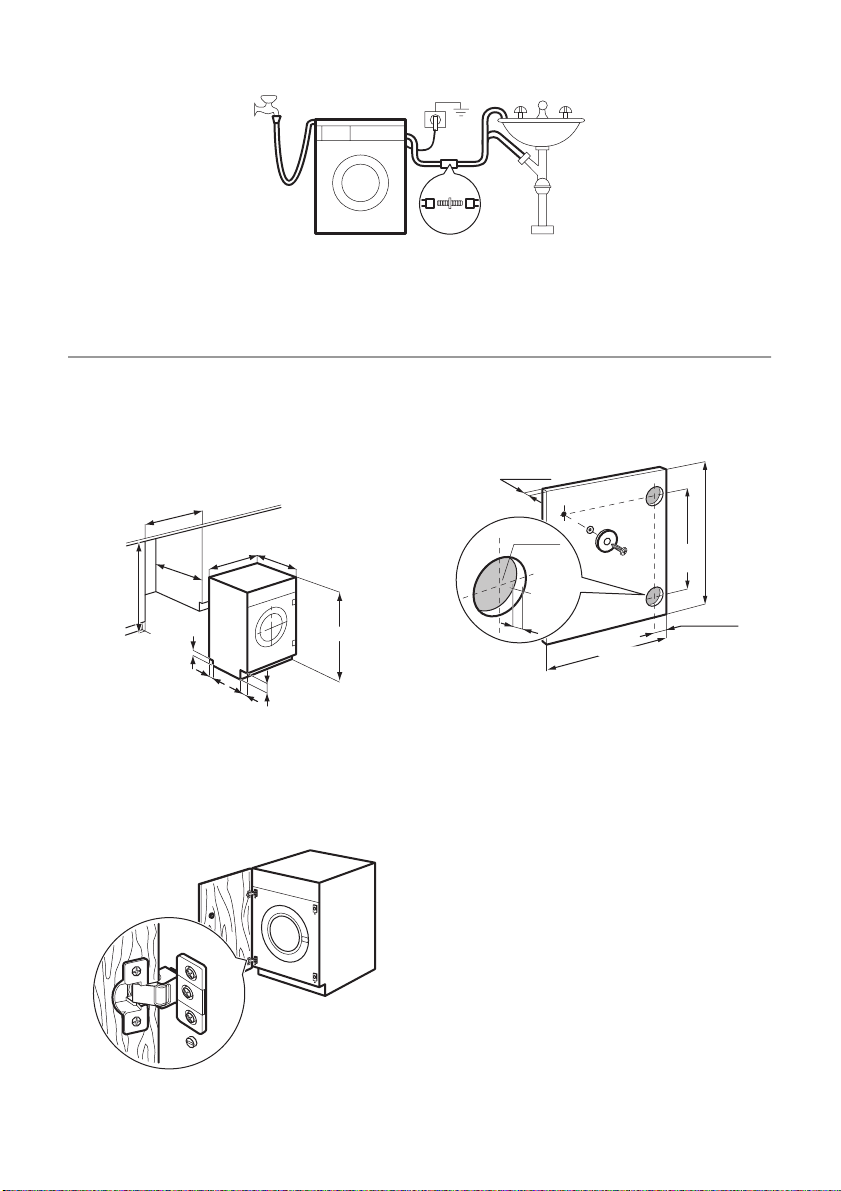
WATER INLET
An inlet hose is supplied and can been
found inside the machine drum. Do not use
the hose from your previous machine to
connect to the water supply.
Important! This appliance must be connected to a cold water supply.
1. Open the porthole and extract the inlet
hose.
POSITIONING
Install the machine on a flat hard floor.
Make sure that air circulation around the
machine is not impeded by carpets, rugs
etc. Check that the machine does not
touch the wall or other kitchen units. Level
the washing machine by raising or lowering
the feet. The feet may be tight to adjust as
they incorporate a self locking nut, but the
machine MUST be level and stable. If necessary, check the setting with a spirit level.
Page 25
electrolux 25
2. Connect the hose with the angled connection to the machine. Do not place
the inlet hose downwards. Angle the
hose to the left or right depending on
the position of your water tap.
45°
35°
3. Set the hose correctly by loosening the
ring nut. After positioning the inlet hose,
be sure to tighten the ring nut again to
prevent leaks.
4. Connect the hose to a tap with a 3/4”
thread. Always use the hose supplied
with the appliance.
the window «A». Should this occur, turn the
water tap off and refer to your Service Centre to replace the hose.
A
WATER DRAINAGE
The end of the drain hose can be positioned in three ways.
• Hooked over the edge of a sink using
the plastic hose guide supplied with the
machine. In this case, make sure the end
cannot come unhooked when the machine is emptying. This could be done by
tying it to the tap with a piece of string or
attaching it to the wall.
The inlet hose must not be lengthened. If it
is too short and you do not wish to move
the tap, you will have to purchase a new,
longer hose specially designed for this type
of use.
WATER-STOP DEVICE
The inlet hose is provided with a water stop
device, which protects against damage
caused by water leaks in the hose which
could develop due to natural ageing of the
hose. This fault is shown by a red sector in
• In a sink drain pipe branch. This
branch must be above the trap so that
the bend is at least 60 cm above the
ground.
• Directly into a drain pipe at a height of
not less than 60 cm and not more than
90 cm. The end of the drain hose must
always be ventilated, i.e. the inside diameter of the drain pipe must be larger than
the outside diameter of the drain hose.
The drain hose must not be kinked.
Page 26
26 electrolux
The drain hose may be extended to a maximum of 4 metres. An additional drain hose
and joining piece is available from your local Service Centre.
BUILDING IN
OVERVIEW
This appliance has been designed to be
built into the kitchen furniture. The recess
should have the dimensions shown in Fig.
1.
Fig. 1
600 mm
min.
min.
820 mm
560 mm
75 mm
596 mm
555 mm
818 mm
- thickness 16-22 mm
The height X depends on the height of the
adjacent furniture's base (Fig. 3).
Fig. 3
16-22 mm
Ø 35 mm
14 mm
595-598 mm
416
mm
22±1,5 mm
X
60 mm
100 mm
170 mm
Preparation and assembly of the door
The appliance is originally prearranged for
the assembly of a door opening from right
to left (Fig. 2).
Fig. 2
a) Door
The dimensions of the door should be:
- width 595-598 mm
b) Hinges
To mount the hinges it is necessary to drill
two holes (dia. 35 mm, depth 12.5-14 mm
depending on the depth of door furniture)
on the inner side of the door. The distance
between the holes hobs fixing centres must
be 416 mm.
The distance from upper edge of the door
to the centre of the hole depends on the
adjacent furniture's dimensions.
The hinges will be fixed to the door by
means of screws for wood 1 and 2 (Fig. 4)
supplied with the appliance.
Page 27

electrolux 27
Fig. 4
2
1
c) Mounting the door
Fix the hinges to the appliance by means of
the M5x15 screws. The hinges can be adjusted to compensate for possible uneven
thickness of the door.
To align the door perfectly it is necessary to
loosen the screw, adjust the door and tighten the screw A again (Fig. 5).
Warning! Do not remove the screw B
(Fig. 5).
Fig. 5
A (steel disk + rubber ring) into the inner
side of the door. Its position must correspond to the magnet B on the appliance
(Fig. 6).
Warning! Do not remove the screw C.
Fig. 6
A
B
C
If the door has to be opened from left to
right, invert the position of the plates E, the
magnet D and the plate C. Mount the
counter-magnet D and the hinges A as previously described (Fig. 7).
Warning! Do not remove the screw B.
Fig. 7
D
A
B
d) Counter-magnet
The appliance is prearranged for a magnetic closure of the door.
To enable a correct operation of this device,
it is necessary to screw the counter-magnet
ENVIRONMENT CONCERNS
Recycle the materials with the symbol
Put the packaging in applicable containers
to recycle it.
Help protect the environment and human
health and to recycle waste of electrical and
electronic appliances. Do not dispose
appliances marked with the symbol
the household waste. Return the product to
with
.
A
C
E
B
your local recycling facility or contact your
municipal office.
PACKAGING MATERIALS
The materials marked with the symbol
are recyclable.
>PE<=polyethylene
>PS<=polystyrene
>PP<=polypropylene
Page 28

28 electrolux
This means that they can be recycled by
disposing of them properly in appropriate
collection containers.
ECOLOGICAL HINTS
To save water, energy and to help protect
the environment, we recommend that you
follow these tips:
• Normally soiled laundry may be washed
without prewashing in order to save detergent, water and time (the environment
is protected too!).
• The machine works more economically if
it is fully loaded.
• With adequate pre-treatment, stains and
limited soiling can be removed; the laundry can then be washed at a lower temperature.
• Measure out detergent according to the
water hardness, the degree of soiling and
the quantity of laundry being washed.
Page 29

electrolux 29
Electrolux. Thinking of you.
Conozca mejor nuestros conceptos en www.electrolux.com
ÍNDICE DE MATERIAS
Información sobre seguridad 29
Instrucciones de seguridad 30
Descripción del producto 31
Panel de mandos 33
Primer uso 35
Personalización 35
Uso diario 36
Consejos útiles 39
Programas de lavado 41
Valores de consumo 44
Mantenimiento y limpieza 45
Qué hacer si… 49
Datos técnicos 51
Instalación 52
Empotrado 54
Aspectos medioambientales 56
Salvo modificaciones.
INFORMACIÓN SOBRE SEGURIDAD
Antes de instalar y utilizar el aparato, lea atentamente las instrucciones facilitadas. El fabricante no se hace responsable de
los daños y lesiones causados por una instalación y uso incorrectos. Guarde siempre las instrucciones junto con el aparato
para futuras consultas.
SEGURIDAD DE NIÑOS Y PERSONAS
VULNERABLES
Advertencia Existe riesgo de sufrir asfixia, lesiones o
incapacidad permanente.
• Este aparato no debe ser usado por niños, ni por personas
con capacidades físicas o mentales reducidas, ni por personas sin experiencia en el manejo del aparato, a menos que
lo hagan bajo las instrucciones o la supervisión de la persona responsable de su seguridad.
• No deje que los niños jueguen con el aparato.
• Mantenga los materiales de embalaje fuera del alcance de
los niños.
• Mantenga todos los detergentes fuera del alcance de los niños.
• Mantenga a los niños y mascotas alejados del aparato
cuando la puerta se encuentre abierta.
• Si el aparato dispone de dispositivo de seguridad para niños, se recomienda activarlo.
Page 30

30 electrolux
SEGURIDAD GENERAL
• Antes de proceder con el mantenimiento, apague el aparato
y desconecte el enchufe de la red.
• No cambie las especificaciones de este aparato.
• Respete la carga máxima de 7 kg (consulte el capítulo “Tabla de programas”).
• Si el cable eléctrico sufre algún daño, el fabricante, su servicio técnico o un profesional tendrán que cambiarlo para evitar riesgos.
• La presión de trabajo del agua (mínima y máxima) debe oscilar entre 0,5 bares (0,05 MPa) y 8 bares (0,8 MPa)
• Vigile que ninguna alfombra obstruya las aberturas de ventilación de la base (si existen).
• El aparato debe conectarse a la toma de agua utilizando los
nuevos juegos de tubos suministrados. No se deben reutilizar los juegos de tubos antiguos.
INSTRUCCIONES DE SEGURIDAD
INSTALACIÓN
• Retire todo el embalaje y los pasadores
de transporte.
• Guarde los pasadores de transporte.
Cuando vuelva a mover el aparato debe
bloquear el tambor.
• No instale ni utilice un aparato dañado.
• No instale ni utilice el aparato si la tempe-
ratura es inferior a 0 °C o si está expuesto a la intemperie.
• Siga las instrucciones de instalación su-
ministradas con el aparato.
• Asegúrese de instalar el aparato en un
suelo plano, estable, resistente al calor y
limpio.
• No coloque el aparato donde la puerta
no se pueda abrir completamente.
• El aparato es pesado, tenga cuidado
siempre que lo mueva. Utilice siempre
guantes de protección.
• Compruebe que el aire circula libremente
entre el aparato y el suelo.
• Ajuste las patas para disponer del espa-
cio necesario entre el aparato y la moqueta.
Conexión eléctrica
Advertencia Riesgo de incendios y
descargas eléctricas.
• El aparato debe quedar conectado a tierra.
• Asegúrese de que las especificaciones
eléctricas de la placa coincidan con las
del suministro eléctrico de su hogar. En
caso contrario, póngase en contacto con
un electricista.
• Utilice siempre una toma con aislamiento
de conexión a tierra correctamente instalada.
• No utilice adaptadores de enchufes múltiples ni cables prolongadores.
• Asegúrese de no provocar daños en el
enchufe ni en el cable de red. Póngase
en contacto con un electricista o con el
servicio técnico para cambiar un cable de
red dañado.
• Conecte el enchufe a la toma de corriente únicamente cuando haya terminado la
instalación. Asegúrese de tener acceso al
enchufe del suministro de red una vez finalizada la instalación.
Page 31

electrolux 31
• No desconecte el aparato tirando del cable de conexión a la red. Tire siempre del
enchufe.
• No toque el cable de red ni el enchufe
con las manos mojadas.
• Este aparato cumple las directivas CEE.
Conexión de agua
• Asegúrese de no provocar daños en los
tubos de agua.
• El aparato debe conectarse a la toma de
agua utilizando los nuevos juegos de tubos suministrados. No se deben reutilizar
los juegos de tubos antiguos.
• Antes de conectar el aparato a las nuevas tuberías o a tuberías que no se hayan usado durante mucho tiempo, deje
correr el agua hasta que esté limpia.
• La primera vez que utilice el aparato,
asegúrese de que no haya fugas.
USO
Advertencia Podrían producirse
lesiones, descargas eléctricas,
incendios, quemaduras o daños en el
aparato.
• Utilice este aparato en entornos domésticos.
• Siga las instrucciones de seguridad del
envase de detergente.
• No coloque productos inflamables ni objetos mojados con productos inflamables
dentro, cerca o encima del aparato.
• No toque el cristal de la puerta mientras
esté en marcha un programa. El cristal
puede estar caliente.
• Asegúrese de sacar todos los objetos
metálicos de la colada.
• No coloque ningún recipiente bajo el
aparato para recoger el agua de posibles
fugas. Póngase en contacto con el servicio técnico para asegurarse de los accesorios que puede utilizar.
MANTENIMIENTO Y LIMPIEZA
Advertencia Podría sufrir lesiones o
dañar el aparato.
• No utilice pulverizadores ni vapor de
agua para limpiar el aparato.
• Limpie el aparato con un paño suave humedecido. Utilice solo detergentes neutros. No utilice productos abrasivos, estropajos duros, disolventes ni objetos
metálicos.
DESECHO
Advertencia Existe riesgo de lesiones
o asfixia.
• Desconecte el aparato de la red.
• Corte el cable de conexión a la red y deséchelo.
• Retire el pestillo de la puerta para evitar
que los niños y las mascotas queden encerrados en el aparato.
ASISTENCIA
• Póngase en contacto con el servicio técnico para reparar el aparato. Le recomendamos que utilice solamente recambios originales.
DESCRIPCIÓN DEL PRODUCTO
Este aparato cumple todos los requisitos actuales para garantizar un lavado eficaz
con bajo consumo de agua, energía y detergente. Su nuevo sistema de lavado permite utilizar todo el detergente y reduce el consumo de agua con el fin de ahorrar
energía.
Page 32

32 electrolux
1 2 7 8 9
3
4
5
6
Depósito del dosificador
1
Panel de control
2
Asa de apertura de la puerta
3
Placa de características
4
Bomba de desagüe
5
DEPÓSITO DOSIFICADOR DE DETERGENTE
Compartimento del detergente para la
fase de prelavado y remojo o del quitamanchas utilizado durante la fase antimanchas
(si está disponible). El detergente de prelavado y remojo se deposita al principio del
programa de lavado. El quitamanchas se
deposita durante la fase de acción antimanchas.
Compartimento del detergente líquido o
en polvo para el lavado principal. Si se utiliza detergente líquido, viértalo justo antes
de iniciar el programa.
Compartimento para aditivos líquidos
(suavizante, almidón).
Siga las instrucciones del fabricante del
producto sobre las cantidades y no permita
que el detergente supere la marca "MAX"
del depósito dosificador. Vierta el suavizante o el almidón en el compartimento antes
de iniciar el programa de lavado.
DISPOSITIVO DE SEGURIDAD PARA
NIÑOS
Impida el acceso de los niños y los animales domésticos al interior del tambor. La
máquina incorpora un dispositivo especial
del tambor. Para activar este dispositivo, gire el botón (sin presionarlo) del interior de la
puerta hacia la derecha hasta que la ranura
esté en posición horizontal. Si es necesario,
utilice una moneda.
para evitar que los niños y los animales domésticos queden atrapados en el interior
Patas delanteras ajustables
6
Tubo de desagüe
7
Cable de alimentación
8
Válvula de entrada de agua
9
Patas ajustables traseras
10
10
Page 33

Para desactivar el dispositivo y permitir el
cierre de la puerta, gire el botón hacia la izquierda hasta que la ranura se sitúe en posición vertical.
PANEL DE MANDOS
A continuación se muestra el panel de mandos con el selector de programas, las teclas, los pilotos indicadores y el indicador, que aparecen representados por números
en las páginas siguientes.
electrolux 33
1 2 3 4 5 6 7 8 9
Selector de programas
1
Tecla TEMPERATURA
2
Tecla CENTRIFUGADO
3
Tecla PLANCHADO FÁCIL
4
Tecla ACLARADO EXTRA
5
Tecla INICIO DIFERIDO
6
Pantalla
7
Tecla INICIO/PAUSA
8
TIME MANAGER teclas
9
SELECTOR DE PROGRAMAS
Permite conectar/desconectar el aparato y/
o seleccionar un programa.
TEMPERATURA
Permite aumentar o reducir la temperatura
de lavado.
CENTRIFUGAR
Permite modificar la velocidad de centrifugado del programa seleccionado.
PLANCHADO FÁCIL
Cuando se selecciona esta opción, se aplican ciclos de lavado y centrifugado suaves
para evitar que la ropa se arrugue. Facilita
el planchado. Además, la lavadora realiza
algunos aclarados adicionales en algunos
programas. En los programas de algodón,
la velocidad máxima de centrifugado se reduce automáticamente.
AQUACARE
Esta lavadora se ha diseñado para funcionar con poco consumo de energía. Seleccione esta opción si es necesario aclarar la
ropa utilizando una cantidad adicional de
agua (aclarado adicional). Se realizarán algunos aclarados adicionales. Se recomien-
Page 34

34 electrolux
da esta opción para personas alérgicas al
detergente y en zonas en las que el agua
es muy blanda.
INICIO DIFERIDO
Permite retrasar el inicio del lavado en 30,
60, 90 minutos o 2 horas y, luego, de 1 hora a un máximo de 20.
INICIO/PAUSA
Este botón permite iniciar o interrumpir el
programa seleccionado.
PANTALLA
7.1 7.3 7.5 7.6 7.7 7.8
7.2 7.4
En el indicador se muestra la siguiente información
7.1: Valor de temperatura
7.2: Iconos de temperatura
, Frío .
Durante el ciclo de lavado, en la pantalla se
muestra el icono de temperatura activo para indicar que el aparato ha iniciado la fase
de calentamiento del agua de la cuba.
7.3: Valor de centrifugado
7.4: Iconos de velocidad del centrifugado.
•
Sin centrifugado
•
Agua en la cuba
•
Ciclo nocturno
Durante la fase de centrifugado se activa y
anima el icono de la hélice.
Sin centrifugado elimina todas las fases
de centrifugado y aumenta el número de
aclarados de algunos programas.
Agua en la cuba: al seleccionar esta opción, el agua del último aclarado no se descarga con el fin de impedir que los tejidos
se arruguen. Una vez finalizado el programa, en la pantalla se muestra 0.00 parpadeando, el icono 7.10 se sigue visualizando, la luz de la tecla 8 se apaga y la puerta
TIME MANAGER
Las teclas permiten modificar la duración
del programa propuesto automáticamente
por la máquina.
7.107.117.12
7.9
se bloquea para indicar que el agua debe
descargarse. Para descargar el agua, consulte el apartado «Al final del programa».
Ciclo nocturno: al seleccionar esta opción, la máquina no descargará el agua del
último aclarado para que las prendas no se
arruguen. Al suprimirse todas las fases de
centrifugado, la lavadora no hace ruido, de
modo que se puede programar para que el
lavado se haga por la noche o durante las
horas en las que la tarifa eléctrica es más
económica. En algunos programas se utiliza más agua para los aclarados. Una vez finalizado el programa, en la pantalla se
muestra 0.00 parpadeando, el icono 7.10
se sigue visualizando, la luz de la tecla 8 se
apaga y la puerta se bloquea para indicar
que el agua debe descargarse. Para descargar el agua, consulte el apartado «Al final del programa».
7.5: Iconos de opción.
•
Aclarado extra
•
Planchado fácil
•
Delicados
,
,
(si está disponible).
Page 35

electrolux 35
7.6: Bloqueo de seguridad para niños
(consulte «Personalización»).
7.7: Iconos del grado de suciedad
•
Muy sucio
•
Normal/Diario
•
Ligero/Rápido
•
Super rápido
7.8:
• Duración del programa seleccionado
Después de seleccionar un programa, la
duración se muestra en horas y minutos
(por ejemplo, 2.05). La duración se cal-
cula automáticamente sobre la base de
una carga máxima recomendada para
cada tipo de tejido. Una vez que se ha
iniciado el programa, el tiempo restante
se actualiza cada minuto.
Fin del programa
•
Una vez finalizado el programa, se mues-
tran tres ceros intermitentes, desaparece
el icono 7.10 y es posible abrir la puerta.
• Selección de opción incorrecta
Cuando se elige una opción incompatible
con el programa de lavado seleccionado,
la parte inferior de la pantalla muestra el
mensaje Err durante unos segundos y el
piloto de la tecla 8 empieza a parpadear.
Códigos de alarma
•
En caso de problemas de funcionamien-
to pueden mostrase algunos códigos de
alarma, por ejemplo E20 (consulte el
apartado «Qué hacer si...»).
• Valor del inicio diferido
7.9: Icono de reloj
Una vez iniciado el programa, aparece la
duración y el icono de reloj aparece como
icono en movimiento.
7.10: Icono de puerta bloqueada
Después de pulsar la tecla 8 y poner en
marcha la máquina, este icono se enciende
y sólo se mantiene encendido el icono de la
fase en marcha. Una vez finalizado el programa, se muestran tres ceros intermitentes (0.00) y el icono desaparece.
7.11: Iconos de las fases del programa
de lavado
•
Prelavado
•
Lavado
•
Aclarados
•
Descarga
•
Centrifugado
Al seleccionar el programa de lavado, en la
parte superior del indicador se muestran todos los iconos de las fases del programa
de lavado correspondientes a los distintos
ciclos del programa. Cuando se pulsa la
tecla 8 sólo se enciende el piloto indicador
de la fase en curso.
7.12: Icono de inicio diferido
El retardo seleccionado mediante la tecla
correspondiente aparece en la pantalla durante unos segundos; a continuación, se
muestra la duración del programa seleccionado previamente. El icono correspondiente se enciende. El valor del inicio diferido se
reduce una unidad cada hora y, a continuación, cuando sólo queda una hora, disminuye cada minuto.
PRIMER USO
• Compruebe que las conexiones
eléctricas e hidráulicas cumplen las
instrucciones de instalación.
• Retire el bloque de poliestireno y
cualquier otro material del tambor.
• Antes del primer lavado, ponga en
marcha un programa de algodón a
PERSONALIZACIÓN
SEÑALES ACÚSTICAS
La máquina incorpora un dispositivo acústico que suena en los siguientes casos:
• al final del programa
• en caso de fallo.
temperatura máxima y sin ropa para
eliminar cualquier residuo de fabricación que pueda haber en la cuba y
en el tambor. Vierta la mitad de una
dosis de detergente en el depósito
dosificador y ponga en marcha la
máquina.
Pulse las teclas 4 y 5 al mismo tiempo durante unos 6 segundos para desactivar la
señal acústica (excepto en caso de fallo).
La señal acústica se reactiva si se vuelven a
pulsar las dos teclas.
Page 36

36 electrolux
SEGURO PARA NIÑOS
El aparato dispone de un seguro contra la
manipulación por niños que permite dejarlo
en funcionamiento sin preocuparse de que
los niños se lesionen o lo dañen. La función
también permanece activada cuando la
máquina no está en funcionamiento.
Se puede ajustar de dos maneras:
1. Antes de pulsar la tecla 8: es imposible
poner la máquina en marcha.
USO DIARIO
Cargue la colada
Abra la puerta tirando cuidadosamente de
la palanca de la puerta hacia fuera. Sacuda
la ropa cuanto pueda e introdúzcala en el
tambor prenda por prenda. Cierre la puerta.
Asegúrese de que no quedan prendas enganchadas entre la puerta y el cierre. Podría provocar fugas de agua y dañar la colada.
2. Después de pulsar la tecla 8: es imposible cambiar cualquier otro programa
u opción.
Para activar o desactivar la opción, pulse a
la vez las teclas 5 y 6 durante 6 segundos
hasta que el icono
rezca del visor digital.
Si es necesario, vierta suavizante en el
compartimento con la marca
dad utilizada no debe superar la marca
"MAX" del depósito). Cierre el depósito suavemente.
aparezca o desapa-
(la canti-
Mida la dosis de detergente y suavizante
Tire del depósito dosificador hasta el tope.
Mida la cantidad de detergente necesaria y
viértala en el compartimento de lavado prin-
cipal
la opción o el programa que ha seleccionado lo requieren (consulte más detalles en
"Depósito dosificador de detergente").
o en el compartimento adecuado si
SELECCIONE EL PROGRAMA CON EL
SELECTOR DE PROGRAMAS (1)
Gire el selector hasta el programa elegido.
La lavadora establecerá una temperatura y
seleccionará automáticamente el valor máximo de centrifugado del programa elegido.
Es posible cambiar estos valores con las
teclas correspondientes. El piloto verde de
la tecla 8 empieza a parpadear.
El selector de programas puede girarse hacia la derecha y hacia la izquierda. Gírelo
hasta la posición
ma o apagar la máquina.
Al final del programa, el selector debe
situarse en la posición
la lavadora.
para reiniciar el progra-
para apagar
Page 37

electrolux 37
Precaución Si gira el selector hasta
otro programa mientras la lavadora
está funcionando, el piloto rojo de la
tecla 8 parpadeará 3 veces y
aparecerá el mensaje Err para indicar
que la selección es incorrecta. El nuevo
programa seleccionado no se pondrá
en marcha.
SELECCIONE LA TEMPERATURA
PULSANDO LA TECLA 2
Seleccione un programa; el aparato propondrá automáticamente una temperatura
predeterminada.
Pulse la tecla varias veces para aumentar o
reducir la temperatura si desea lavar la ropa
a una temperatura diferente a la propuesta.
REDUZCA LA VELOCIDAD DE
CENTRIFUGADO CON LA TECLA 3
Una vez que selecciona el programa deseado, su aparato propone de forma automática la velocidad de centrifugado máxima
que puede alcanzar dicho programa.
Presione la tecla 3 varias veces si desea
centrifugar la colada a una velocidad diferente.
SELECCIONE LAS OPCIONES
DISPONIBLES CON LAS TECLAS 3, 4 Y
5.
Existe la posibilidad de combinar distintas
funciones según el programa. Debe seleccionarlas después de elegir el programa deseado y antes de pulsar la tecla 8.
Al pulsar estas teclas, los iconos correspondientes aparecen en la pantalla, y desaparecen cuando se vuelven a pulsar. Si se
selecciona una opción incorrecta, el piloto
rojo integrado en la tecla 8 parpadea 3 veces y el mensaje Err aparece en la pantalla
durante unos segundos.
Consulte la compatibilidad de los programas de lavado con las opciones en
el capítulo «Programas de lavado».
SELECCIÓN DEL INICIO DIFERIDO
CON LA TECLA 6
Si desea retrasar el inicio de un programa
antes de ponerlo en marcha, pulse la tecla
6 varias veces para seleccionar el intervalo
de retardo apropiado. El icono correspon-
diente 7.12 aparecerá en la parte superior
del indicador.
El valor del tiempo de retraso seleccionado
(hasta 20 horas) se muestra en el indicador
durante unos segundos; a continuación, se
visualiza de nuevo la duración del programa.
Esta opción debe seleccionarse después
de elegir el programa y antes de pulsar la
tecla 8.
Es posible cancelar o modificar el tiempo
de retraso en cualquier momento antes de
pulsar la tecla 8.
Selección del inicio diferido:
1. Seleccione el programa y las opciones
necesarias.
2. Selección del inicio diferido con la tecla
6.
3. Presione la tecla 8:
– La máquina inicia la cuenta atrás ho-
raria.
– El programa se inicia una vez finaliza-
do el intervalo de retraso selecciona-
do.
Cancelación del inicio diferido después de
haber presionado la tecla 8:
1. Ajuste la lavadora en PAUSA pulsando
la tecla 8.
2. Presione la tecla 6 una vez hasta que
aparezca el símbolo
'
3. Vuelva a pulsar la tecla 8 para iniciar el
programa.
Importante El intervalo de retraso
seleccionado sólo se podrá modificar una
vez se haya vuelto a seleccionar el
programa de lavado.
El inicio diferido no puede seleccionarse
con el programa DESCARGA.
INICIE EL PROGRAMA PULSANDO LA
TECLA 8.
Para iniciar el programa seleccionado, pulse la tecla 8, el piloto verde integrado en la
tecla 8 dejará de parpadear. El icono 7.10
aparece en la pantalla para indicar que el
aparato se está poniendo en marcha y la
puerta está bloqueada.
Pulse la tecla 8 para interrumpir un programa en marcha: el piloto verde comienza a
parpadear.
Pulse la tecla 8 otra vez para reiniciar el
programa a partir del punto en que se inte-
Page 38

38 electrolux
rrumpió. Si ha seleccionado un inicio diferido, la máquina comenzará ahora la cuenta
atrás.
Si se selecciona una opción incorrecta, el
piloto rojo de la tecla 8 parpadea 3 veces y
el mensaje Err aparece durante unos segundos.
SELECCIÓN DE LA OPCIÓN DE
ADMINISTRADOR DE TIEMPO CON LA
TECLA 9.
Si pulsa estas teclas varias veces puede
aumentar o reducir la duración del ciclo de
lavado. El icono 7.7 aparece en la pantalla
para mostrar el grado de suciedad elegido.
Esta opción sólo está disponible con los
programas Algodón, Sintéticos y Delica-
dos.
Ciclo de la-
vado
Intenso Prendas muy sucias
Normal Prendas de sucie-
Diario Prendas diarias su-
Ligero Prendas poco su-
Rápido Prendas ligeramente
Super rápido
1)
1) Le recomendamos que reduzca los tamaños de la
carga (consulte la tabla de programas de lavado).
Icono
de nivel de
sucie-
dad
Tipo de tejido
dad normal
cias
cias
sucias
Prendas usadas po-
co tiempo.
Importante La opción Administrador de
tiempo no se puede seleccionar con los
programas
.
La disponibilidad de los iconos de nivel de
suciedad cambia según el tipo de tejido,
como se muestra en el siguiente gráfico.
Tejido Grado de suciedad
Algodón
95°/90°C X X X X X X
60°C/50°C X X X X X X
40°C X X X X X X
30°C X X X X X X
Frío X X X X X X
Tejido Grado de suciedad
Sintético
60°C/50°C X X X X
40°C X X X X
30°C X X X X
Frío X X X X
Delicados
40°C X X X X
30°C X X X X
Frío X X X X
MODIFICACIÓN DE UNA OPCIÓN O DE
UN PROGRAMA EN MARCHA
Es posible cambiar cualquier opción antes
de que el programa se inicie.
Antes de realizar cambios, active el modo
PAUSA de la lavadora con la tecla 8 (si desea cambiar la opción Time Manager, deberá cancelar el programa en curso y repetir la selección).
El cambio de un programa en marcha sólo
puede realizarse reiniciándolo. Gire el selec-
tor de programas hasta
y, a continuación, hasta la posición del nuevo programa.
Para poner en marcha el nuevo programa,
vuelva a presionar el botón 8. El agua de la
cuba no se vaciará.
INTERRUPCIÓN DE UN PROGRAMA
Pulse la tecla 8 para interrumpir un programa en marcha; el correspondiente piloto
verde comenzará a parpadear.
Vuelva a presionar la tecla para reiniciar el
programa.
CANCELACIÓN DE UN PROGRAMA
Gire el selector de programas hasta
para cancelar un programa una vez que está
en marcha.
Después podrá seleccionar otro programa.
APERTURA DE LA PUERTA
La puerta queda bloqueada en cuanto se
inicia un programa (o durante el tiempo de
retardo); si necesita abrirla, active el modo
PAUSA de la lavadora con la tecla 8.
Si el icono 7.10 desaparece de la pantalla
tras unos minutos, puede abrir la puerta.
Si el icono 7.10 no se apaga, significa que
la máquina ya está calentando o que el ni-
Page 39

electrolux 39
vel del agua es demasiado elevado. ¡No intente forzar la puerta!
Si no puede abrir la puerta pero necesita
hacerlo, apague la máquina girando el selector de programas hasta la posición
.
La puerta podrá abrirse pasados unos minutos (preste atención al nivel del agua
y a la temperatura).
Una vez cerrada la puerta, deberá volver a
seleccionar el programa y las opciones y
pulsar el botón 8.
AL FINALIZAR EL PROGRAMA
La máquina se para automáticamente. En
la pantalla aparecen ceros (
) intermitentes. El piloto de la tecla 8 se apaga. Sonarán algunas señales acústicas durante
unos minutos.
Si se ha seleccionado un programa u opción que finaliza dejando agua en la cuba,
el icono 7.10 permanece encendido. La
puerta sigue bloqueada. Es necesario vaciar el agua antes de abrir la puerta. Duran-
En espera : una vez finalizado el programa, al cabo de unos minutos se activa el
sistema de ahorro de energía. Se reduce el
CONSEJOS ÚTILES
CLASIFICACIÓN DE LA ROPA SUCIA
Consulte los símbolos de lavado que aparecen en la etiqueta de la prenda y siga las
instrucciones de lavado del fabricante. La
ropa se debe clasificar de la siguiente manera: ropa blanca, ropa de color, ropa sintética, prendas delicadas y prendas de lana.
TEMPERATURAS
para prendas de algodón y ropa de cama y mesa de color
95° o 90°
60°/50°
blanco con suciedad normal
(como paños de cocina, toallas, manteles, sábanas, etc.)
para prendas de color sólido
con suciedad normal (como
camisetas, camisones, pijamas, etc.) en lino, algodón o fibra sintética y para prendas de
algodón blanco no muy sucias
(como ropa interior)
te este periodo de tiempo, el tambor sigue
girando a intervalos regulares hasta que se
drena el agua.
Siga las instrucciones que se indican a continuación para vaciar el agua:
1.
Gire el selector de programas hasta
.
2. Seleccione el programa de descarga o
de centrifugado.
3. Reduzca la velocidad de centrifugado,
si es necesario, mediante el botón correspondiente.
4. Pulse la tecla 8.
Al finalizar el programa, después de unos
minutos, desaparece el icono 7.10. Se puede abrir la puerta. Gire el selector de pro-
gramas hasta
para apagar la máquina.
Retire las prendas del tambor y cerciórese
de que el tambor queda vacío. Si no va a
realizar otro lavado, cierre la llave de paso.
Deje la puerta abierta para evitar la aparición de moho y olores desagradables.
brillo de la pantalla. Al pulsar cualquier tecla, el aparato abandona el estado de ahorro
de energía.
para prendas delicadas (como
40° - 30° Frío
cortinas), ropa mixta, incluidas
fibras sintéticas, y prendas de
lana cuya etiqueta indique:
"pura lana, lavado a máquina,
no encoge"
ANTES DE INTRODUCIR LA ROPA
SUCIA
Separe la ropa blanca de la ropa de color y
lávela por separado. Las prendas blancas
pueden perder su "blancura" al lavarlas.
La ropa de color nueva puede desteñir durante el primer lavado; por lo tanto, es preciso lavarla aparte la primera vez.
Asegúrese de quitar todos los objetos
metálicos de la ropa (como pinzas para
el pelo, imperdibles, alfileres, etc.).
Abotone las fundas de almohada y cierre
las cremalleras, ganchos, broches, etc. Ate
las correas o cintas largas.
Quite las manchas difíciles antes de lavar la
ropa.
Page 40

40 electrolux
Frote las zonas particularmente sucias con
un detergente especial o en pasta.
Tenga cuidado con las cortinas. Lávelas sin
los ganchos o dentro de una bolsa o malla.
CARGA MÁXIMA
Las cargas máximas recomendadas se indican en los gráficos de programas de lavado.
Normas generales:
• Algodón, lino: tambor lleno, pero no demasiado;
• Prendas sintéticas: no más de la mitad
del tambor;
• Tejidos delicados y prendas de lana:
no más de un tercio del tambor.
El lavado con carga máxima garantiza la
utilización más eficaz del agua y la energía.
Si la ropa está extremadamente sucia, reduzca la carga.
PESO DE LA ROPA SUCIA
Los pesos siguientes son indicativos:
Los pesos siguientes son indicativos:
albornoz 1200 g
funda de edredón 700 g
camisa de trabajo de hombre 600 g
sábana, pijama de hombre 500 g
mantel 250 g
funda de almohada, toalla de
felpa, vestido de noche, camisa de hombre
paño, bragas, servilleta, blusa, calzoncillos
200 g
100 g
ELIMINACIÓN DE MANCHAS
A veces no basta con agua y detergente
para quitar las manchas difíciles. En esos
casos es aconsejable aplicar un tratamiento
antes de lavar las prendas.
Sangre: aplique agua fría a las manchas de
sangre fresca. Si la sangre está seca, debe
dejar la prenda a remojo en agua con un
detergente especial durante la noche y luego frotar con agua y jabón.
Pintura al aceite: humedezca la mancha
con un quitamanchas a base de disolvente,
extienda la prenda sobre un paño suave y
quite la mancha; repita el procedimiento varias veces.
Grasa seca: humedezca la mancha con
aguarrás, extienda la prenda sobre una superficie suave y quite la mancha con la yema de los dedos y un trapo de algodón.
Óxido: utilice ácido oxálico disuelto en
agua caliente o un quitamanchas para óxido en frío. Tenga cuidado con las manchas
de óxido que no sean recientes, ya que la
estructura de la celulosa se habrá dañado y
el tejido tenderá a perforarse.
Moho: utilice lejía y aclare bien (prendas
blancas y de colores sólidos solamente).
Hierba: utilice un poco de jabón y aplique
lejía (prendas blancas y de colores sólidos
solamente).
Tinta y pegamento: humedezca con ace-
2)
, extienda la prenda sobre un paño
tona
suave y quite la mancha.
Pintalabios: humedezca con acetona, como en el caso anterior, y luego quite la
mancha con alcohol desnaturalizado. Utilice
lejía para eliminar las marcas que puedan
quedar.
Vino tinto: ponga la prenda a remojo en
agua y detergente, aclare, aplique ácido
acético o cítrico y vuelva a aclarar. Utilice
lejía para eliminar las marcas que puedan
quedar.
Tinta: dependiendo del tipo de tinta, hume-
2)
dezca la prenda en acetona
y luego en
ácido acético; utilice lejía en los tejidos de
color blanco para eliminar cualquier resto
que pueda quedar y aclare bien.
Alquitrán: primero aplique un quitamanchas, alcohol desnaturalizado o disolvente y
luego frote la mancha con un detergente en
pasta.
DETERGENTES Y ADITIVOS
El resultado del lavado también depende de
la elección del detergente y de las cantidades adecuadas, que permitan proteger el
entorno y evitar vertidos.
Aunque son biodegradables, los detergentes contienen sustancias que, en grandes
cantidades, pueden alterar el delicado equilibrio de la naturaleza.
La elección del detergente depende del tipo
de tejido (delicado, lana, algodón, etc.), del
color, de la temperatura de lavado y del
grado de suciedad.
2) no utilice acetona en seda artificial
Page 41

electrolux 41
En esta máquina pueden utilizarse todos
los detergentes de lavadora de uso habitual:
• detergente en polvo para todo tipo de
prendas
• detergente en polvo para prendas delicadas (60°C máx.) y lana
• detergente líquido para todo tipo de tejidos o especial para lana, preferiblemente
para programas de lavado a baja temperatura (60°C máx.).
El detergente y los aditivos deben introducirse en los compartimentos correspondientes del depósito dosificador antes de
poner en marcha el programa de lavado.
Si se utiliza detergente líquido, debe seleccionar un programa sin prelavado.
La lavadora incorpora un sistema de recirculación que garantiza un aprovechamiento
óptimo del detergente concentrado.
Siga las instrucciones del fabricante del
producto en cuanto a cantidades y no per-
mita que el detergente supere la marca
"MAX" que hay en el depósito dosificador.
PROGRAMAS DE LAVADO
Programa
Temperaturas máxima y mínima
Descripción del ciclo
Velocidad de centrifugado máxima
Carga máxima
Tipo de prenda
Algodón
90° - Frío
Lavado principal - Aclarados
Velocidad de centrifugado máx. 1400 rpm
Carga máxima 7 kg - Carga reducida 3 kg
Algodón blanco y de color (suciedad normal).
+ Algodón + Prelavado
90° - Frío
Prelavado - Lavado principal - Aclarados
Velocidad de centrifugado máx. 1400 rpm
Carga máxima 7 kg - Carga reducida 3 kg
Prendas de algodón blancas o de color con fase
de prelavado (prendas muy sucias).
1)
1)
GRADOS DE DUREZA DEL AGUA
La dureza del agua se clasifica en "grados".
Para obtener información sobre la dureza
del agua local, puede consultar a la compañía encargada del suministro o a la administración local.
Añada un ablandador de agua si el
grado de dureza de ésta es medio-alto
(del nivel de dureza II). Siga las instrucciones del fabricante. La cantidad de
detergente siempre se puede ajustar al
grado de dureza I (= blanda).
Grados de dureza
Nivel Tipo
1 blanda 0-7 0-15
2 intermedia 8-14 16-25
3 dura 15-21 26-37
4 muy dura > 21 > 37
Opciones
CENTRIFUGADO
AGUA EN CUBA
SIN CENTRIFUGADO
CICLO NOCTURNO
PLANCHADO FÁCIL
SUPER ACLARADO
TIME MANAGER
CENTRIFUGADO
AGUA EN CUBA
SIN CENTRIFUGADO
CICLO NOCTURNO
PLANCHADO FÁCIL
SUPER ACLARADO
TIME MANAGER
del agua
°dH ale-
mán
Compartimento
del detergente
°T.H.
francés
2)
Page 42

42 electrolux
Programa
Temperaturas máxima y mínima
Descripción del ciclo
Velocidad de centrifugado máxima
Carga máxima
Tipo de prenda
Sintéticos
60° - Frío
Lavado principal - Aclarados
Velocidad de centrifugado máx. 900 rpm
Carga máxima 3 kg - Carga reducida 1.5 kg
1)
Tejidos sintéticos o mixtos con suciedad normal.
+
Sintéticos + Prelavado
60° - Frío
Prelavado - Lavado principal - Aclarados
Velocidad de centrifugado máx. 900 rpm
Carga máxima 3 kg - Carga reducida 1.5 kg
1)
Tejidos sintéticos o mixtos con fase de prelavado
(muy sucios).
Delicados
40° - Frío
Lavado principal - Aclarados
Velocidad de centrifugado máx. 700 rpm
Carga máxima 3 kg - Carga reducida 1.5
1)
kg
Tejidos delicados con suciedad normal.
Centrifugado
Descarga y centrifugado largo
Velocidad de centrifugado máx. 1400 rpm
Carga máxima 7 kg
Centrifugado independiente para prendas lavadas a
mano y después de programas con la opción Agua
en la cuba o Ciclo nocturno seleccionada. Puede elegir la velocidad de centrifugado pulsando la tecla correspondiente para adaptarla al tejido que se va a
centrifugar.
Descarga
Descarga del agua de lavado
Carga máxima 7 kg
Para vaciar el agua del último aclarado en programas
con la opción Agua en la cuba o Ciclo nocturno seleccionada.
Aclarados
Aclarados
Velocidad de centrifugado máx. 1400 rpm
Carga máxima 7 kg
Este programa permite aclarar y centrifugar prendas
de algodón lavadas a mano. La máquina realiza tres
aclarados, seguidos de un centrifugado final largo. Se
puede reducir la velocidad de centrifugado.
Opciones
Compartimento
del detergente
CENTRIFUGADO
AGUA EN CUBA
SIN CENTRIFUGADO
CICLO NOCTURNO
PLANCHADO FÁCIL
SUPER ACLARADO
TIME MANAGER
CENTRIFUGADO
AGUA EN CUBA
SIN CENTRIFUGADO
CICLO NOCTURNO
PLANCHADO FÁCIL
SUPER ACLARADO
TIME MANAGER
CENTRIFUGADO
AGUA EN CUBA
SIN CENTRIFUGADO
CICLO NOCTURNO
SUPER ACLARADO
TIME MANAGER
CENTRIFUGADO
CENTRIFUGADO
AGUA EN CUBA
SIN CENTRIFUGADO
CICLO NOCTURNO
SUPER ACLARADO
PLANCHADO FÁCIL
2)
Page 43

Programa
Temperaturas máxima y mínima
Descripción del ciclo
Velocidad de centrifugado máxima
Carga máxima
Tipo de prenda
Mix 20°
3)
Lavado principal - Aclarados - Centrifugado
Velocidad de centrifugado máx. 900 rpm
Carga máxima 3 kg
Programa especial para tejidos de algodón, sintéticos
y mixtos con suciedad ligera.
Ajuste este programa para reducir el consumo de
energía.
Asegúrese de que el detergente es apto para baja
temperatura para obtener un buen resultado de lavado.
Seda
30° - Frío
Lavado principal - Aclarados
Velocidad de centrifugado máx. 700 rpm
Carga máxima 1 kg
Programa de prendas delicadas idóneo para prendas
de seda y sintéticas mixtas.
Lavado a mano
40° - Frío
Lavado principal - Aclarados
Velocidad de centrifugado máx. 1000 rpm
Carga máxima 2 kg
Programa especial para tejidos delicados con el símbolo «lavado a mano».
Lana
40° - Frío
Lavado principal - Aclarados
Velocidad de centrifugado máx. 1000 rpm
Carga máxima 2 kg
Programa de lavado para lana lavable a máquina, así
como para lanas de lavado a mano y tejidos delicados. Nota: Una prenda suelta o muy voluminosa puede causar desequilibrio. Si el aparato no realiza la fase
de centrifugado final, añada más prendas, redistribuya la carga manualmente y, a continuación, seleccione el programa de centrifugado.
ECO +
Algodón ECO + Prelavado
90 °- 40°
Prelavado - Lavado principal - Aclarados
Velocidad de centrifugado máx. 1400 rpm
Carga máxima 7 kg
Prendas de algodón blancas o de color con fase
de prelavado.
Este programa puede seleccionarse para prendas de
algodón con suciedad normal y manchas. La temperatura disminuirá y se ampliará el tiempo de lavado.
Opciones
CENTRIFUGADO
AGUA EN CUBA
SUPER ACLARADO
CENTRIFUGADO
AGUA EN CUBA
SIN CENTRIFUGADO
CICLO NOCTURNO
CENTRIFUGADO
AGUA EN CUBA
SIN CENTRIFUGADO
CICLO NOCTURNO
CENTRIFUGADO
AGUA EN CUBA
SIN CENTRIFUGADO
CICLO NOCTURNO
CENTRIFUGADO
AGUA EN CUBA
SIN CENTRIFUGADO
CICLO NOCTURNO
PLANCHADO FÁCIL
SUPER ACLARADO
electrolux 43
Compartimento
del detergente
2)
Page 44

44 electrolux
Programa
Temperaturas máxima y mínima
Descripción del ciclo
Velocidad de centrifugado máxima
Opciones
Compartimento
del detergente
Carga máxima
Tipo de prenda
ECO
4)
Algodón ECO
90° - 40°
Lavado principal - Aclarados
Velocidad de centrifugado máx. 1400 rpm
Carga máxima 7 kg
CENTRIFUGADO
AGUA EN CUBA
SIN CENTRIFUGADO
CICLO NOCTURNO
PLANCHADO FÁCIL
SUPER ACLARADO
Algodón blanco o de color.
Este programa puede seleccionarse para prendas de
algodón poco sucias o con suciedad normal. La temperatura disminuirá y se ampliará el tiempo de lavado.
Esto permite obtener buenos resultados de lavado
ahorrando energía.
O = APAGADO
Permite cancelar el programa en marcha o apagar la
máquina.
1) Si ha seleccionado la opción Super rápido con la tecla 9, se recomienda reducir la carga máxima como se indica.
Puede utilizarse la carga completa, aunque con resultados de limpieza ligeramente inferiores.
2) Si utiliza detergente líquido, debe seleccionar un programa sin PRELAVADO.
3) El aparato ejecuta la fase de calentamiento rápido si el agua está a menos de 20°C. El aparato muestra el ajuste
de temperatura “Frío”.
4) No para Rusia.
PROGRAMAS ESTÁNDAR para los valores de consumo de etiqueta energética. Según la norma
1061/2010, estos programas son respectivamente el «programa estándar de algodón a 60 °C» y el «programa
estándar de algodón a 40 °C». Son los programas más eficaces en cuanto a consumo de agua y energía para el
lavado de algodón de suciedad normal.
Ajuste este programa para obtener unos buenos resultados de lavado y reducir el consumo de energía. Se amplía
la duración del programa de lavado.
La temperatura de lavado en la fase de lavado puede ser distinta de la introducida para el programa seleccionado.
VALORES DE CONSUMO
Los datos de esta tabla son aproximados. Los datos pueden cambiar por varios motivos: la cantidad y tipo de colada, el agua y la temperatura ambiente.
Programas Carga
(kg)
Algodón 60 °C 7 1.2 53 140 52
Algodón 40 °C 7 0.7 53 130 52
Sintéticos 40 °C 3 0.5 40 80 35
Delicados 40 °C 3 0.55 55 65 35
Lana/Lavado a
mano 30 °C
2 0.25 58 50 30
Programa de algodón estándar
Algodón están-
dar 60 °C
7 0.86 46 189 52
Consumo
energético
(KWh)
Consumo de
agua (litros)
Duración
aproximada
del programa
(minutos)
Humedad
restante
(%)
1)
Page 45

electrolux 45
Programas Carga
Algodón estándar 60 °C
Algodón estándar 40 °C
1) Al finalizar la fase de centrifugado.
Modo apagado (W) Modo encendido (W)
La información indicada en las tablas anteriores se ofrece en cumplimiento de la regulación
1015/2010 de la Comisión de la UE que implementa la directiva 2009/125/EC
(kg)
3.5 0.77 36 177 52
3.5 0.51 38 160 52
0.10 0.98
Consumo
energético
(KWh)
Consumo de
agua (litros)
Duración
aproximada
del programa
(minutos)
MANTENIMIENTO Y LIMPIEZA
Advertencia Antes de efectuar
cualquier tipo limpieza o
mantenimiento, desenchufe el aparato
de corriente eléctrica.
DESINCRUSTACIÓN
El agua corriente que utilizamos suele contener cal. Se recomienda utilizar periódicamente en la lavadora un producto en polvo
descalcificador del agua. Realice esta tarea
con independencia de cualquier ciclo de lavado y de acuerdo con las instrucciones del
fabricante del producto descalcificador. Así
impedirá la formación de depósitos de cal.
DESPUÉS DE CADA LAVADO
Mantenga la puerta abierta durante un rato.
Así impedirá la formación de moho y olor a
humedad en el interior de la máquina. También ayudará a conservar en buen estado la
junta de estanqueidad de la puerta.
LAVADO DE MANTENIMIENTO
La sucesión de lavados a baja temperatura
favorece la acumulación de residuos en el
interior del tambor.
Se recomienda realizar un lavado de mantenimiento con regularidad.
Para poner en marcha un lavado de mantenimiento:
• El tambor no debe contener ropa.
• Seleccione el programa de lavado de al-
godón de más temperatura.
• Utilice una dosis normal de detergente:
puede ser en polvo con propiedades biológicas.
LIMPIEZA DEL EXTERIOR
Limpie la carcasa exterior del electrodoméstico con agua y jabón únicamente y séquela a fondo.
Importante No utilice alcohol
desnaturalizado, disolventes ni otros
productos similares para limpiar la carcasa.
LIMPIEZA DEL DEPÓSITO
DOSIFICADOR DE DETERGENTE
El depósito dosificador de detergente debe
limpiarse con regularidad.
Los depósitos de detergente en polvo y de
los aditivos de lavado deben limpiarse con
regularidad.
Retire la cubeta presionando el tope hacia
abajo y tirando hacia fuera.
1
Humedad
restante
1)
(%)
2
Page 46

46 electrolux
Enjuáguela bajo el grifo para eliminar los
restos de detergente en polvo acumulados.
Para facilitar la limpieza debe extraerse la
parte superior del compartimento de aditivos. Limpie todos los componentes con
agua.
Limpie el interior del depósito con un cepillo.
TAMBOR DE LAVADO
La presencia de cuerpos extraños oxidantes en el lavado y el agua corriente con
contenido en hierro pueden dar lugar a la
formación de depósitos de óxido en el tambor.
Importante No limpie el tambor con
desincrustantes ácidos, desengrasantes
que contengan cloro, ni estropajos de
hierro o acero.
1. Retire los depósitos de óxido del tambor con un agente de limpieza para
acero inoxidable.
2. Ponga en marcha un ciclo de lavado
sin introducir ropa para limpiar los residuos del agente de limpieza.
Programa: programa de algodón corto
a temperatura máxima y añada aproximadamente un cuarto de un vaso de
medida de detergente.
JUNTA DE ESTANQUEIDAD DE LA
PUERTA
Compruebe la junta de vez en cuando y
quite todo objeto que haya quedado atrapado en el pliegue.
BOMBA DE DESAGÜE
La bomba debe inspeccionarse con regularidad, especialmente en caso de que:
• el aparato no desagüe o no centrifugue;
• el aparato presente un ruido extraño durante la descarga porque haya objetos,
como imperdibles, monedas, etc., que
obstruyan la bomba;
• se detecte un problema con el desagüe
del agua (consulte el capítulo “Qué hacer
si...” para obtener más información).
Advertencia Antes de desatornillar la
tapa de la bomba, apague el aparato y
desenchúfelo de la toma de corriente.
Proceda de la siguiente manera:
1. Desenchufe el aparato.
2. Si es necesario, espere hasta que el
agua se enfríe.
A
B
3. Coloque un recipiente cerca de la bom-
ba para recoger el líquido que pueda
derramarse.
Page 47

electrolux 47
4. Saque la manguera de descarga de
emergencia (B), colóquela en el reci-
piente y quite el tapón.
5. Cuando deje de salir agua, desenrosque la tapa de la bomba (A) girándola
hacia la izquierda y retire el filtro. Utilice
alicates si fuera necesario. Tenga siempre a mano un trapo para secar el agua
que se derrame al extraer la tapa.
Limpie el filtro bajo el grifo para eliminar
los restos de pelusas.
1
2
6. Retire los cuerpos extraños y limpie las
pelusas del filtro y del rotor de la bomba.
Asegúrese de que el rotor de la bomba
gira (gira con sacudidas). Si no gira,
póngase en contacto con el servicio
técnico.
7. Tapone de nuevo la manguera de desagüe de emergencia y coloque la
manguera en su sitio.
8. Vuelva a colocar el filtro en la bomba
insertándolo correctamente en las
guías especiales. Enrosque la tapa de
la bomba firmemente girándola hacia la
derecha.
2
1
Advertencia
Cuando el aparato está en marcha, dependiendo del programa seleccionado, puede
haber agua caliente en la bomba.
Page 48

48 electrolux
Nunca extraiga la tapa de la bomba durante un ciclo de lavado; espere siempre a que
el aparato haya terminado el ciclo y esté vacío. Al volver a colocar la tapa de la bomba,
asegúrese de apretarla firmemente para impedir que se produzcan fugas y que los niños puedan sacarla.
LIMPIEZA DE LOS FILTROS DE
ENTRADA DE AGUA
Si nota que la lavadora tarda demasiado en
llenarse, compruebe que el filtro situado en
la manguera de entrada de agua no esté
obstruido.
1. cierre la toma de agua;
2. Desconecte la manguera de entrada de
agua.
3. Limpie el filtro de la manguera con un
cepillo rígido.
4. Vuelva a enroscar la manguera en la toma de agua.
5. Desenrosque la manguera de la máquina. Tenga una bayeta a mano porque
puede salir algo de agua.
6. Limpie el filtro en la válvula con un cepillo rígido o con un trozo de tela.
7. Vuelva a enroscar la manguera en la
máquina y compruebe que la conexión
esté bien ajustada.
8. Abra el grifo.
PRECAUCIONES CONTRA LA
CONGELACIÓN
Si la lavadora se instala en un lugar donde
la temperatura puede descender por deba-
jo de 0 °C, tome las siguientes precauciones:
1. Cierre la toma de agua.
2. Desconecte el tubo de entrada de
agua.
3. Coloque el extremo del tubo de descarga de emergencia y el extremo del
tubo de entrada de agua en un recipiente depositado en el suelo y deje
que salga el agua.
4. Vuelva a acoplar el tubo de entrada de
agua y coloque el tubo de descarga de
emergencia en su lugar después de taparlo.
5. Para volver a poner en marcha la lavadora, asegúrese de que la temperatura
ambiente es superior a 0 °C.
DESCARGA DE EMERGENCIA
Si la lavadora no descarga, proceda de la
siguiente manera para vaciarla:
1. desenchufe el aparato;
2. cierre la toma de agua;
3. si es necesario, espere a que el agua
se enfríe;
4. coloque un recipiente en el suelo e introduzca el extremo del tubo de descarga de emergencia en él. Quite el tapón del tubo. El agua debería dirigirse
al recipiente por acción de la gravedad.
Cuando el recipiente se llene, vuelva a
tapar el tubo. Vacíe el recipiente. Repita
el procedimiento hasta que deje de salir
agua;
5. si es necesario, limpie el filtro como se
ha descrito anteriormente;
6. vuelva a colocar el tubo de descarga
de emergencia en su lugar una vez tapado;
7. vuelva a colocar el filtro.
Importante Cada vez que se vacía el agua
a través de la manguera de descarga de
emergencia, es preciso introducir 2 litros de
agua en el compartimento de lavado
principal de la cubeta de detergente y, a
continuación, poner en marcha el programa
de descarga. De este modo se activará el
dispositivo ECO VALVE y se evitará que no
se utilice parte del detergente en el
siguiente lavado.
Page 49

QUÉ HACER SI…
Algunos problemas, que pueden deberse
sencillamente a falta de mantenimiento o a
descuidos, pueden resolverse sin necesidad de llamar al Centro de servicio técnico.
Antes de ponerse en contacto con el Centro de servicio técnico local, realice las
comprobaciones indicadas en la lista siguiente.
Durante el funcionamiento de la lavadora es
posible que el piloto rojo de la tecla 8 parpadee, que aparezca uno de los códigos
de error siguientes en el visor digital y que
se emitan algunas señales acústicas cada
Problema Causa y soluciones posibles
La puerta no está cerrada.
• Cierre bien la puerta.
El enchufe no está correctamente insertado en la toma de corriente.
• Inserte el enchufe en la toma.
No hay tensión en la toma de corriente.
• Compruebe la instalación eléctrica doméstica.
La lavadora no se pone en
marcha:
La máquina no se llena de
agua:
La lavadora se llena de
agua, pero se vacía de inmediato:
El fusible principal se ha quemado.
• Cambie el fusible.
El selector de programas no está en la posición correcta y no se
ha pulsado la tecla 8 no se ha pulsado.
• Gire el selector de programas y vuelva a presionar la tecla 8 de
nuevo.
Se ha presionado la tecla de inicio diferido.
• Si el lavado se va a realizar de inmediato, cancele el inicio diferido.
Se ha activado el bloqueo para niños.
• Desactive el bloqueo para niños.
La toma de agua está cerrada.
• Abra el grifo.
La manguera de entrada de agua está doblada o retorcida.
• Compruebe la conexión de la manguera de entrada de agua.
El filtro de la toma de entrada o el filtro de la válvula de entrada
están obstruidos.
• Limpie los filtros de entrada de agua (consulte la sección "Limpieza de los filtros de entrada de agua" para obtener más información).
La puerta no está bien cerrada.
• Cierre bien la puerta.
El extremo de la manguera de desagüe está demasiado bajo.
• Consulte el apartado correspondiente de la sección "Desagüe"
electrolux 49
20 segundos para indicar que la lavadora
no está funcionando:
•
: problema con el suministro de
agua
•
: problema con el desagüe
•
: puerta abierta
Cuando se haya solucionado el problema,
pulse la tecla 8 para reiniciar el programa.
Si no consigue resolver el problema después de realizar todas las comprobaciones
pertinentes, póngase en contacto con el
Centro de servicio técnico.
Page 50

50 electrolux
Problema Causa y soluciones posibles
La máquina no vacía y/o no
centrifuga:
Hay agua en el suelo:
Los resultados del lavado
no son satisfactorios:
La puerta no se abre:
El aparato vibra o hace mucho ruido:
La manguera de desagüe está doblada o retorcida.
• Compruebe la conexión de la manguera de desagüe.
El filtro de descarga está obstruido.
• Limpie el filtro de descarga.
Se ha seleccionado una opción o programa que finaliza con agua
dentro de la cuba o que elimina todas las fases de centrifugado.
• Seleccione el programa de descarga o de centrifugado.
Las prendas no están uniformemente distribuidas en el tambor.
• Vuelva a distribuir las prendas.
Se ha utilizado demasiado detergente o un detergente inadecua-
do (que produce demasiada espuma).
• Reduzca la cantidad de detergente o utilice otro.
Compruebe si hay fugas en alguno de los racores de la manguera
de entrada de agua. No siempre resulta fácil detectar las fugas, ya
que el agua desciende por la manguera; compruebe si el racor está mojado.
• Compruebe la conexión de la manguera de entrada de agua.
La manguera de desagüe o de entrada está dañada.
• Sustitúyala por una nueva.
El tapón de la manguera de desagüe de emergencia no se ha
sustituido o el filtro no se ha enroscado adecuadamente después
de la operación de limpieza.
• Vuelva a colocar el tapón en la manguera de desagüe de emergencia o enrosque el filtro hasta el tope.
Se ha utilizado poco detergente o un detergente inadecuado.
• Aumente la cantidad de detergente o utilice otro.
No se han eliminado las manchas difíciles antes de lavar la ropa.
• Emplee productos comerciales para tratar las manchas difíciles.
No se ha seleccionado la temperatura adecuada.
• Compruebe si ha seleccionado la temperatura correcta.
La lavadora se ha cargado demasiado.
• Reduzca la carga.
El programa todavía no ha terminado.
• Espere hasta que finalice el ciclo de lavado.
No se ha desbloqueado el cierre de la puerta.
•
Espere a que el símbolo
se apague.
Hay agua en el tambor.
• Seleccione el programa de descarga o centrifugado para vaciar
el agua.
No se han quitado los pasadores ni el material de embalaje utilizados para transportarla.
• Compruebe la correcta instalación del electrodoméstico.
No se han ajustado las patas.
• Compruebe que el electrodoméstico está correctamente nivelado.
Las prendas no están uniformemente distribuidas en el tambor.
• Cambie la distribución de las prendas.
Es posible que haya muy pocas prendas en el tambor.
• Cargue más prendas.
Page 51

Problema Causa y soluciones posibles
El dispositivo que detecta desequilibrios en la carga lo ha interrumpido debido a que las prendas no están uniformemente distribuidas en el tambor. La ropa se redistribuye mediante la rotación
inversa del tambor. Es posible que el tambor gire varias veces antes de que deje de detectarse el problema y se reanude el ciclo de
El centrifugado se retrasa o
la máquina no centrifuga:
centrifugado normal. Si la carga no se distribuye de manera uniforme transcurridos 10 minutos, la máquina no centrifuga. En este
caso, es necesario redistribuirla de forma manual y seleccionar el
programa de centrifugado.
• Cambie la distribución de las prendas.
La carga es demasiado pequeña.
• Añada más prendas, redistribuya la carga de forma manual y
seleccione el programa de centrifugado.
La máquina incorpora un tipo de motor que emite un ruido extra-
La lavadora emite un ruido
extraño:
ño comparado con el de otros motores tradicionales. Este nuevo
motor garantiza un inicio más suave e incluso una mejor distribución de las prendas en el tambor durante el centrifugado, así como una mayor estabilidad de la máquina.
No se ve agua en la lavadora:
Las lavadoras de tecnología moderna están diseñadas para economizar y emplean muy poca agua sin que ello afecte al rendimiento.
Si no puede identificar o resolver el problema, póngase en contacto con nuestro centro de servicio técnico. Antes de llamar al
centro, anote el modelo, el número de serie
y la fecha en que adquirió el electrodoméstico; el centro de servicio técnico le pedirá
esta información.
electrolux 51
Mod. ... ... ...
Prod. No. ... ... ...
Ser. No. ...
DATOS TÉCNICOS
Medidas Ancho / Altura / Fondo 596 / 820 / 544 mm
Conexión eléctrica Voltaje
Potencia total
Fusible
Frecuencia
Presión del suministro de agua Mínima
Máxima
Nivel de protección contra la entrada de partículas sólidas y humedad
Suministro de agua
1)
Agua fría
Carga máxima Algodón 7 kg
Velocidad de centrifugado Máxima 1400 rpm
1) Conecte la manguera de entrada de agua a un grifo con rosca de 3/4 pulgadas.
220-230 V
2000 W
10 A
50 Hz
0,5 bares (0,05 MPa)
8 bares (0,8 MPa)
IPX4
Page 52

52 electrolux
INSTALACIÓN
DESEMBALAJE
Es preciso retirar todo el material de embalaje y los pasadores antes de utilizar el aparato.
Se aconseja guardar todo este material para usarlo de nuevo en caso de que sea necesario transportar el aparato.
1. Después de retirar todo el material de
embalaje, recueste con cuidado la máquina sobre su parte trasera para extraer la base de poliestireno de la parte
inferior.
2. Retire el cable de alimentación y la
manguera de descarga de los soportes
de manguera situados en la parte trasera del aparato.
4. Deslice los separadores de plástico para quitarlos.
5. Tape el orificio superior más pequeño y
los dos más grandes con los tapones
de plástico incluidos en la bolsa con el
manual de instrucciones.
3. Suelte los tres pernos.
COLOCACIÓN
Instale la máquina en el suelo sobre una superficie plana y rígida. Asegúrese de que el
aire circula correctamente alrededor de la
lavadora aunque haya moqueta, alfombras,
etc. Compruebe que la máquina no toca la
pared ni otros muebles o elementos. Nivele
la lavadora subiendo o bajando las patas.
Puede que resulte difícil ajustar las patas,
ya que incorporan una tuerca de seguridad,
pero DEBEN estar niveladas y estables. Si
es necesario, compruebe el ajuste con un
nivel de burbuja. Los ajustes necesarios
pueden realizarse con una llave.
2
1
Page 53

Un nivelado correcto evita las vibraciones,
el ruido y el desplazamiento de la lavadora
durante el funcionamiento.
Precaución No coloque cartón,
madera ni otros materiales similares
bajo la máquina para compensar los
desniveles del suelo. Después de
haber nivelado la máquina, apriete las
tuercas de seguridad.
electrolux 53
2. Conecte el tubo a la lavadora mediante
la conexión en ángulo. No coloque el
tubo de entrada hacia abajo. Sitúelo a
la izquierda o a la derecha en función
de la posición de la toma de agua.
45°
35°
3. Afloje la tuerca anular para colocar el
tubo correctamente. Después de situar
el tubo, vuelva a apretar la contratuerca
para evitar fugas de agua.
4. Conecte el tubo a una toma de agua
mediante una rosca de 3/4 pulgadas.
Debe utilizar siempre el tubo suministrado con el aparato.
ENTRADA DE AGUA
Se suministran tubos de entrada de agua,
que hallará en el interior del tambor de la
máquina. No utilice los tubos de una máquina anterior para conectar el suministro
de agua.
Importante Este aparato debe conectarse a un suministro de agua fría.
1. Abra la puerta de la lavadora y extraiga
el tubo de entrada de agua.
No utilice prolongaciones para el tubo de
entrada de agua. Si es demasiado corto y
no desea mover la toma de agua, tendrá
que adquirir un tubo más largo diseñado
especialmente para estos casos.
DISPOSITIVO ANTIFUGA
El tubo de entrada de agua se suministra
con un dispositivo antifuga para impedir los
daños causados por las posibles fugas de
agua producidas por el envejecimiento natural del tubo. Este fallo se indica mediante
un sector rojo en la ventana "A". Si esto
Page 54

54 electrolux
ocurre, cierre la toma de agua y pida a su
Centro de servicio técnico local que sustituya el tubo.
A
DESAGÜE
El extremo de la manguera de desagüe se
puede instalar de tres maneras distintas.
• Sujeto por encima del borde de un
fregadero con la guía de plástico suministrada. En este caso, debe asegurarse
de que el extremo de la manguera no se
desengancha cuando la lavadora está
desaguando. Para evitarlo, ate el extremo
de la manguera a la toma de agua con
un trozo de cuerda o fíjelo a la pared.
• En un empalme de derivación para
descarga en el fregadero.Este empalme debe estar encima de la toma para
que el codo quede al menos 60 cm sobre el nivel del suelo.
Directamente en un tubo de desagüe
•
a una altura mínima de 60 cm y máxima
de 90 cm. El extremo de la manguera de
descarga siempre debe estar ventilado;
es decir, el diámetro interno del tubo de
descarga debe ser mayor que el diámetro externo de la manguera. La manguera
de desagüe no debe estar retorcida.
La manguera de descarga debe extenderse hasta un máximo de 4 metros. En el Centro
de servicio técnico local encontrará disponibles una manguera de descarga y una pieza
de unión adicionales.
EMPOTRADO
DESCRIPCIÓN GENERAL
Este aparato está diseñado para integrarse
en los muebles de cocina. El hueco de instalación debe tener las dimensiones que se
indican en la figura 1.
Page 55

electrolux 55
Fig. 1
600 mm
min.
min.
820 mm
560 mm
75 mm
596 mm
60 mm
100 mm
555 mm
818 mm
170 mm
Preparación y montaje de la puerta
El aparato viene preparado para que la
puerta pueda abrirse de derecha a izquierda (fig. 2).
Fig. 2
a) Puerta
La puerta debe tener las siguientes medidas:
- Anchura 595 - 598 mm
- Grosor 16 - 22 mm
La altura X depende de la altura de la base
del mobiliario adyacente (fig. 3).
Fig. 3
16-22 mm
b) Bisagras
Para poner las bisagras es preciso taladrar
dos orificios (diámetro de 35 mm, fondo
12,5 - 14 mm dependiendo del fondo del
mueble) por el lado interno de la puerta. La
distancia entre los centros de ambos orificios debe ser de 416 mm.
La distancia entre el borde superior de la
puerta y el centro del orificio depende de
las medidas del mueble adyacente.
Las bisagras se fijan a la puerta con los tornillos para madera 1 y 2 (fig. 4) que se suministran con el aparato.
Fig. 4
2
1
c) Montaje de la puerta
Fije las bisagras al aparato con los tornillos
M5x15. Las bisagras se pueden ajustar para compensar cualquier posible variación
de grosor de la puerta.
Para alinear bien la puerta es preciso aflojar
el tornillo, ajustar la puerta y apretar de
nuevo el tornillo A (fig. 5).
Advertencia No quite el tornillo B (fig.
5).
Fig. 5
Ø 35 mm
14 mm
595-598 mm
X
416
mm
22±1,5 mm
A
B
d) Contraimán
El aparato está preparado para llevar un
cierre magnético instalado en la puerta.
Para que este dispositivo funcione correctamente hay que atornillar el contraimán A
Page 56

56 electrolux
(disco de acero con anillo de goma) por el
lado interno de la puerta. Su posición debe
coincidir con el imán B del aparato (fig. 6).
Advertencia No quite el tornillo C.
Fig. 6
A
B
C
Si la puerta se va a abrir de izquierda a derecha, invierta la posición de las placas E,
el imán D y la placa C. Monte el contraimán
ASPECTOS MEDIOAMBIENTALES
Recicle los materiales con el símbolo
Coloque el material de embalaje en los
contenedores adecuados para su reciclaje.
Ayude a proteger el medio ambiente y la
salud pública, así como a reciclar residuos
de aparatos eléctricos y electrónicos. No
deseche los aparatos marcados con el
símbolo
junto con los residuos
domésticos. Lleve el producto a su centro
de reciclaje local o póngase en contacto
con su oficina municipal.
SÓLO LAVADO
Los materiales marcados con el símbolo
son reciclables.
>PE<=polietileno
>PS<=poliestireno
>PP<=polipropileno
Esto significa que se pueden reciclar si se
desechan correctamente en los contenedores específicos.
.
D y las bisagras A según se ha descrito
previamente (fig. 7).
Advertencia No quite el tornillo B.
Fig. 7
D
A
C
E
B
CONSEJOS ECOLÓGICOS
A continuación ofrecemos algunos consejos para ahorrar agua y energía y ayudar a
proteger el medio ambiente:
• La ropa que no esté demasiado sucia se
puede lavar con un programa que no incluya prelavado a fin de ahorrar detergente, agua y tiempo (y proteger el medio ambiente).
• El lavado resulta más económico si la lavadora se llena por completo.
• Con un tratamiento previo adecuado es
posible eliminar manchas y suciedad moderada; de manera que la ropa se pueda
lavar a menos temperatura.
• Dosifique el detergente en función de la
dureza del agua, el grado de suciedad y
la cantidad de ropa que se va a lavar.
Page 57

electrolux 57
Electrolux. Thinking of you.
Düşüncelerinizi www.electrolux.com.tr adresinden bizimle
daha fazla paylaşın
İÇİNDEKİLER
Güvenlik bilgileri 57
Güvenlik talimatları 58
Ürün tanımı 59
Kontrol Paneli 61
İlk kullanım 63
Kişiselleştirme 63
Günlük kullanım 64
Yararlı ipuçları ve bilgiler 67
Önceden haber verilmeksizin değişiklik yapma hakkı saklıdır.
Yıkama programları 69
Tüketim değerleri 72
Bakım ve temizlik 72
Servisi aramadan önce 76
Teknik veriler 78
Montaj 78
Ankastre montaj 81
Çevreyle ilgili bilgiler 83
GÜVENLİK BİLGİLERİ
Cihazın montaj ve kullanımından önce, verilen talimatları dikkatlice okuyun. Üretici, yanlış bir montajın ve kullanımın yaralanma
ve hasara neden olması durumunda sorumluluk kabul etmez.
Talimatları daha sonra kullanmak için daima cihazın yakınında
bulundurun.
ÇOCUKLARIN VE TEHLIKEYE AÇIK KIŞILERIN
GÜVENLIĞI
Uyarı Boğulma, yaralanma ya da kalıcı sakatlık riski vardır.
• Çocuklar dahil olmak üzere, fiziksel ve mental kapasiteleri
düşük veya cihazın kullanımına yönelik deneyimi ve bilgisi olmayan kişilerin cihazı kullanmalarına izin vermeyin. Bu kişiler
cihazı, güvenliklerinden sorumlu olan bir kişinin denetimi altında veya cihazın kullanımı hakkında bu kişi tarafından bilgilendirilmek kaydıyla kullanabilir.
•Çocukların cihazla oynamalarına izin vermeyin.
• Tüm ambalaj malzemelerini çocuklardan uzak tutun.
•Tüm deterjanları çocuklardan uzak tutun.
• Kapak açıkken, çocukları ve evcil hayvanları cihazdan uzak
tutun.
• Cihazda çocuk güvenliği aygıtı varsa bu aygıtı etkinleştirme-
nizi tavsiye ederiz.
Page 58

58 electrolux
GENEL GÜVENLIK
•Bakım işleminden önce, cihazı devre dışı bırakın ve elektrik fi-
şini prizden çekin.
• Bu cihazın teknik özelliklerini değiştirmeyin.
• 7 kg maksimum yük hacmine uyun (“Program tablosu” bölümüne bakın).
• Elektrik kablosunun zarar görmesi durumunda, bir kazanın
meydana gelmesine engel olmak için, ilgili değişim üretici,
servis acentesi veya benzer nitelikteki kalifiye bir kişi tarafın-
dan değiştirilmelidir.
•Çalıştırma su basıncı (minimum ve maksimum) 0,5 bar (0,05
MPa) ve 8 bar (0,8 MPa) arasında olmalıdır
• Tabandaki havalandırma menfezleri (varsa) bir halıyla tıkan-
mamalıdır.
•Cihaz su şebekesine yeni tedarik edilen hortum seti ile
bağlanmak durumundadır. Eski hortum setleri tekrar kullanılmamalıdır.
GÜVENLİK TALİMATLARI
MONTAJ
• Ambalajı ve nakliye cıvatalarının tamamını
sökün.
•Nakliye cıvatalarını saklayın. Cihazı tekrar
taşırken tamburu bloke etmeniz gerekir.
•Hasarlı bir cihazı monte etmeyin ya da
kullanmayın.
•Cihazı, sıcaklığın 0°C'den daha az olduğu
ya da hava durumundan etkilenebileceği
yerlere monte etmeyin veya buralarda
kullanmayın.
• Cihazla birlikte verilen montaj talimatlarına
uyun.
•Cihazı kuracağınız zeminin düz, sağlam,
ısıya dayanıklı ve temiz olduğuna emin
olun.
•Cihazı, kapağın tamamen açılmasını en-
gelleyecek bir yere kurmayın.
•Ağır olduğundan, cihazı
dikkat edin. Her zaman güvenlik eldivenleri kullanın.
• Cihaz çevresinde ve zeminde hava sirkü-
lasyonu olduğundan emin olun.
•Cihaz ve halı arasında gerekli boşluk kala-
cak şekilde cihazın ayaklarını ayarlayın.
taşırken daima
Elektrik bağlantısı
Uyarı Yangın ve elektrik çarpması riski
vardır.
• Cihaz topraklanmalıdır.
• Bilgi etiketindeki elektriksel verilerin elektrik beslemesine uygun olduğundan emin
olun. Aksi durumda, bir elektrik teknisyenini arayın.
•Her zaman doğru monte edilmiş, darbele-
re dayanıklı bir priz kullanın.
•Priz çoğaltıcıları ve uzatma kabloları kul-
lanmayın.
• Elektrik fişine ve kablosuna zarar vermemeye özen gösterin. Hasarlı bir kabloyu
değiştirmek için yetkili servise ya da bir
elektrikçiye başvurun.
•Fişi prize sadece montaj tamamlandıktan
sonra takın. Montajdan sonra elektrik fişi-
ne erişilebildiğinden emin olun.
•Cihazın fişini prizden çıkarmak için elektrik
kablosunu çekmeyin. Her zaman fişten
tutarak çekin.
• Islak eller ile elektrik kablosuna ya da fişi-
ne dokunmayın.
Page 59

electrolux 59
• Bu cihaz, E.E.C. yönergeleri ile uyumludur.
Su bağlantısı
• Su hortumlarına zarar vermemeye özen
gösterin.
•Cihaz su şebekesine verilen yeni hortum
seti ile bağlanmak durumundadır. Eski
hortum setleri tekrar kullanılmamalıdır.
•Cihazı yeni borulara veya uzun süre kulla-
nılmamış olan borulara bağlamadan önce, temiz su gelene dek suyu akıtın.
•Cihazı ilk kez kullanırken, kaçak olma-
dığından emin olun.
KULLANIM
Uyarı Yaralanma, elektrik çarpması,
yangın, yanma veya cihazın zarar
görme riski söz konusudur.
• Bu cihazı ev ortamında kullanın.
• Deterjan ambalajının üzerindeki güvenlik
talimatlarına uyun.
•Cihazın içine, üzerine veya yakınına yanıcı
ürünler ya da yanıcı ürünlerle ıslanmış eş-
yalar koymayın.
• Program çalışırken kapak camına dokunmayın. Cam sıcak olabilir.
• Tüm metal nesneleri çamaşırlarınızdan çı-
kardığınızdan emin olun.
•Cihazın altına su kaçağını toplamak için
bir kap koymayın. Hangi aksesuarların
kullanılabileceğini belirlemek için yetkili
servis ile temasa geçin.
BAKIM VE TEMIZLIK
Uyarı Yaralanma veya cihazın zarar
görme riski söz konusudur.
•Cihazı temizlemek için su spreyi ve buhar
kullanmayın.
•Cihazı yumuşak nemli bir bezle temizle-
yin. Sadece nötr deterjanlar kullanın.
Aşındırıcı ürünleri, aşındırıcı temizleme
bezlerini, çözücüleri veya metal cisimleri
kullanmayın.
ELDEN ÇIKARMA
Uyarı Yaralanma ya da boğulma riski.
•Cihazın fişini prizden çekin.
• Elektrik kablosunu kesin ve atın.
•Çocukların ve hayvanların cihazda kapalı
kalmasını önlemek için kapak kilit dilini çı-
karın.
SERVIS
•Cihazı onarmak için yetkili servis ile tema-
sa geçin. Sadece orijinal yedek parça kullanılmasını tavsiye ederiz.
Üretici / İhracatçı :
ELECTROLUX APPLIANCES AB
BUSINESS SECTOR EMA-EMEA (SEE)
ST GÖRANSGATAN 143
SE-105 45 STOCKHOLM
SWEDEN
TEL: +46 (8) 738 60 00
FAX: +46 (8) 738 63 35
www.electrolux.com
Kullanım Ömrü Bilgisi :
Kullanım ömrü küçük ev aletlerinde 7 yıl,
diğer beyaz eşya ürünlerinde ise 10 yıldır.
Kullanım ömrü, üretici ve/veya ithalatçı
firmanın cihazınızla ilgili yedek parça temini
ve bakım süresini ifade eder.
ÜRÜN TANIMI
Yeni cihazınız, az su, enerji ve deterjan tüketimiyle daha etkin bir sonuç için tüm modern gereksinimleri karşılamaktadır. Yeni yıkama sistemi, deterjanın tam olarak kullanılmasını sağlar ve su tüketimini azaltarak enerjiden tasarruf sağlar.
Page 60

60 electrolux
1 2 7 8 9
3
4
5
6
Deterjan çekmecesi
1
Kontrol paneli
2
Kapak açma kolu
3
Bilgi etiketi
4
Tahliye pompası
5
DETERJAN ÇEKMECESI
Ön yıkama veya ıslatma aşamasında
kullanılan deterjan ya da leke çıkarma aşamasında (varsa) kullanılan leke çıkarıcı bölmesi. Ön yıkama ve ıslatma deterjanı, yıka-
ma programı başlamadan önce konulur.
Leke çıkarıcı, leke çıkarma aşamasında konulur.
Ana yıkama için kullanılan toz veya sıvı
deterjan bölmesi. Eğer sıvı deterjan kullanı-
yorsanız, bunu program başlamadan he-
men önce koyun.
Sıvı katkı maddeleri (yumuşatıcı, kola)
bölmesi.
Kullanılacak miktarlarla ilgili üreticinin tavsiyelerine uyun ve deterjan çekmecesindeki
«MAX» işaretini geçmeyin. Herhangi bir ça-
maşır yumuşatıcı veya kola maddesi, yıkama programı başlatılmadan önce bölmeye
konmalıdır.
ÇOCUK GÜVENLIK AYGITI
Çocukların veya evcil hayvanların tamburun
iine girmemesine dikkat edin. ocukların ve
evcil hayvanların tamburun iinde kalmalarını
nlemek iin makinede zel bir fonksiyon / aygıt
bulunmaktadır. Bu aygıtı devreye sokmak
iin, kapağın iindeki dğmeyi yarık kısmı yatay
pozisyona gelinceye kadar saat ynnde
10
Ayarlanabilir ön ayaklar
6
Tahliye hortumu
7
Elektrik kablosu
8
Su giriş valfi
9
Ayarlanabilir arka ayaklar
10
dndrn (basmadan). Gerekirse bir bozuk para kullanın.
Page 61

Bu aygıtı devre dıı bırakmak ve kapağın kapanmasını sağlamak iin, yarık kısım dikey
pozisyona gelinceye kadar dğmeyi saatin
tersi ynde dndrn.
KONTROL PANELİ
Aşağıda kontrol panelinin bir resmi verilmiştir. Resimde, program seçme düğmesinin
yanı sıra tuşlar, pilot ışıklar ve gösterge de gösterilmektedir. Bunlar, müteakip sayfalarda ilgili rakam karşılıkları ile belirtilmektedir.
electrolux 61
1 2 3 4 5 6 7 8 9
Program seçme düğmesi
1
SICAKLIK tuşu
2
SIKMA tuşu
3
KOLAY ÜTÜLEME tuşu
4
EKSTRA DURULAMA tuşu
5
GECİKMELİ BAŞLATMA tuşu
6
Gösterge ekranı
7
BAŞLAT/BEKLET tuşu
8
TIME MANAGER tuşları
9
PROGRAM SEÇME DÜĞMESI
Makineyi açıp/kapatmanızı ve/veya bir program seçmenizi sağlar.
SICAKLIK
Bu tuş, yıkama sıcaklığını artırmanızı veya
azaltmanızı sağlar.
DEVIR DÜŞÜRME
Bu tuşa basarak, seçilen programın sıkma
hızını değiştirebilirsiniz.
KOLAY ÜTÜLEME
Bu seçenek kullanıldığında, çamaşırlar nazikçe yıkanır ve kırışıklık yaratmayacak şekil-
de sıkılır. Böylece ütüleme kolay daha hale
gelir. Ayrıca bazı programlarda, makine bazı
ek durulamalar uygulayacakt
programlarında, maksimum sıkma hızı otomatik olarak düşürülür.
EKSTRA DURULAMA
Bu cihaz, enerji tasarrufu sağlayacak şekilde
tasarlanmıştır. Çamaşırların ekstra su kullanılarak durulanması gerekiyorsa (ekstra durulama), bu seçeneği seçin. Makine bazı ek
durulama işlemleri uygular. Bu seçenek, deterjanlara karşı alerjisi olan kişiler için ve su-
ır. Pamuklu
Page 62

62 electrolux
yun çok yumuşak olduğu bölgeler için önerilir.
GECIKMELI BAŞLATMA
Yıkama programı, 30 dak. - 60 dak. - 90
dak. ve 2 saat ve daha sonra 20 saate kadar 1'er saatlik artışlar halinde bu tuş kullanılarak ertelenebilir.
GÖSTERGE EKRANI
7.1 7.3 7.5 7.6 7.7 7.8
7.2 7.4
Gösterge, aşağıdaki bilgileri görüntüler:
7.1:Sıcaklık değeri
7.2: Sıcaklık simgeleri
, Soğuk .
Yıkama aşaması süresince gösterge ekranında, makinenin kazandaki suyu ısıtma
aşamasına geçtiğini belirten sıcaklık simgesi
hareketli olarak görüntülenir.
7.3: Sıkma hızı değeri
7.4: Sıkma hızı simgeleri.
•
Sıkmasız
•
Suda bekletme
•
Gece programı
Sıkma aşamasında, spiral sembolü görüntülenir.
Sıkmasız seçeneği seçildiğinde, tüm sıkma
aşamaları atlanır ve bazı programlar için durulama sayısı artırılır.
Suda bekletme: Bu seçeneği seçtiğinizde,
çamaşırların kırışmasını önlemek için son
durulama suyu boşaltılmaz. Program tamamlandığı zaman, suyun boşaltılması gerektiğini bildirmek üzere göstergede yanıp
sönen üç sıfır ( 0.00) rakamı, 7.10 simgesi
görüntülenir, 8 tuşunun ışığ
ı söner ve kapak
kilitlenir. Suyu boşaltmak için, lütfen "Programın sonunda" bölümünü okuyunuz.
Gece programı: Bu seçeneği seçtiğinizde,
çamaşırların kırışmaması için makine son
durulama suyunu boşaltmaz. Tüm sıkma
BAŞLAT/BEKLET
Bu tuş, seçilen programı başlatır veya durdurur.
ZAMAN KONTROLÜ
Bu tuşlar, cihazın otomatik olarak önerdiği
program süresini değiştirmenizi sağlar.
7.107.117.12
7.9
aşamaları atlandığından dolayı bu yıkama
devri çok sessizdir ve gece ya da elektriğin
daha ucuz olduğu diğer saatlerde seçilebilir.
Bazı programlarda, durulamalar daha fazla
su ile yapılacaktır. Program tamamlandığı
zaman, suyun boşaltılması gerektiğini bildir-
mek üzere göstergede yanıp sönen üç sıfır (
0.00) rakamı, 7.10 simgesi görüntülenir, 8
tuşunun ışığı söner ve kapak kilitlenir. Suyu
boşaltmak için, lütfen "Program
ın sonunda"
bölümünü okuyunuz.
7.5: Seçenek simgeleri.
•
Ekstra durulama
•
Kolay ütüleme
•
Hassaslar
7.6: Çocuk güvenliği kilidi
,
,
(varsa).
(bkz. «Kişi-
selleştirme» paragrafı).
7.7: Leke derecesi simgeleri
•
Yoğun
•
Normal/Günlük
•
Hafif/Hızlı
•
Süper Hızlı Yıkama
7.8:
Seçilen programın süresi
•
Bir program seçildikten sonra, süresi saat
ve dakika cinsinden gösterilir (örneğin
2.05). Bu süre, her bir çamaşır tipi için
önerilen maksimum yük esasına göre
Page 63

electrolux 63
otomatik olarak hesaplanır. Program baş-
latıldıktan sonra, geriye kalan süre her dakika güncellenir.
Program sonu
•
Program tamamlandığı zaman, yanıp sönen üç sıfır rakamı görüntülenir, 7.10 sim-
gesi kaybolur ve kapak açılabilir.
• Yanlış seçenek seçimi
Eğer ayarlanan yıkama programıyla
uyumlu olmayan bir seçenek seçilirse, Err
mesajı göstergenin alt kısmında yaklaşık 8
saniye görüntülenir ve 8 tuşunun entegre
kırmızı ışığı yanıp sönmeye başlar.
• Alarm kodları
İşletim problemleri olması halinde, bazı
alarm kodları görüntülenebilir, örneğin
E20 ("Servis çağırmadan önce" bölümü-
ne bakınız).
Gecikmeli başlatma süresi
•
7.9: Saat simgesi
Program başlatıldıktan sonra, süre görüntülenir ve saat simgesi animasyonu görüntülenir.
7.10: Kapak kilitli simgesi
8 tuşuna bastıktan ve makine çalışmaya
başladıktan sonra, bu simge yanık kalır ve
İLK KULLANIM
• Elektrik ve su bağlantılarının montaj
talimatlarına uygun yapıldığından
emin olunuz.
• Tamburdaki polistiren bloğu ve diğer
malzemeleri çıkartınız.
• İlk yıkamadan önce, tambur ve kazandaki olası üretim kalıntılarını çıkar-
sadece işlemdeki aşamanın simgesi yanık
halde kalır. Program tamamlandığı zaman,
yanıp sönen üç sıfır rakamı ( 0.00) görüntülenir ve bu simge kaybolur.
7.11: Yıkama programı aşama simgeleri
•
Ön yıkama
•
Yıkama
•
Durulamalar
•
Boşaltma
•
Sıkma
Yıkama programını seçtiğinizde, programı
oluşturan çeşitli aşamalara karşılık gelen yı-
kama programı aşama simgeleri gösterge
ekranının üst kısmında gösterilir. 8 tuşuna
bastıktan sonra, sadece işlemdeki aşamanın simgesi yanık halde kalır.
7.12: Gecikmeli başlatma simgesi
İlgili tuş ile seçilen gecikme ayarı birkaç sa-
niyeliğine göstergede görüntülenir, daha
sonra önceden seçilen programın süresi görüntülenir. Karşılık gelen simge yanar. Gecikme süresi değeri her saat başı bir azalır
ve sonra, 1 saat kaldığı zaman süre dakika
dakika azalmaya başlar.
mak için makineye çamaşır koymadan bir pamuklu yıkama programı
başlatınız. Ana yıkama bölmesine 1/2
ölçek deterjan koyunuz ve makineyi
çalıştırınız.
KİŞİSELLEŞTİRME
SESLI IKAZ SINYALLERI
Makinede, aşağıdaki durumlarda uyarıda
bulunan bir sesli ikaz cihazı bulunmaktadır:
• Programın sonunda.
•Eğer bir arıza varsa.
4 ve 5 tuşlarına aynı anda yaklaşık 6 saniye
basılı tutarsanız, sesli ikaz fonksiyonu (işletim sorunları olması durumları haricinde)
devre dışı kalır. Bu 2 tuşa tekrar basıldığın-
da, sesli ikaz fonksiyonu tekrar aktive edilir.
ÇOCUK GÜVENLIĞI KILIDI
Bu aygıt, çocukların yaralanabileceği veya
cihaza zarar verebileceği endişesi taşıma-
dan cihazınızı gönül rahatlığı ile denetimsiz
bırakabilmenizi sağ
şır makinesi çalışmadığı zaman bile aktif du-
rumda kalır.
Bu seçeneği ayarlamanızın iki yolu vardır:
1. 8 tuşuna basmadan önce: Makinenin
çalıştırılması mümkün olmayacaktır.
2. 8 tuşuna bastıktan sonra: Başka bir
programın veya seçeneğin seçilmesi
mümkün olmayacaktır.
Bu seçeneği aktive etmek veya devre dışı
bırakmak için 5 ve 6 tuşlarına aynı anda 6
saniye kadar basıp,
ye veya kayboluncaya kadar basılı tutunuz.
lar. Bu fonksiyon, çama-
simgesi görününce-
Page 64

64 electrolux
GÜNLÜK KULLANIM
Çamaşırların yerleştirilmesi
Kapağın kolunu dikkatlice dışa doğru çeke-
rek kapağı açınız. Çamaşırları yerleştirme-
den önce, mümkün olduğunca silkeleyiniz
ve tambura teker teker koyunuz. Kapağı kapatınız.
Hiçbir çamaşırın conta ve kapak arasında
kalmadığından emin olun. Su sızıntısı ya da
çamaşıra zarar gelme riski mevcuttur.
Deterjanın ve çamaşır yumuşatıcının ölçülmesi
Deterjan çekmecesini durana kadar dışarı
çekiniz. Gerekli olan deterjan miktarını ölçünüz ve ana yıkama bölmesine
veya seçili programa/seçeneğe uygun bölmeye koyunuz (daha fazla bilgi için "Deterjan çekmecesi" bölümüne bakınız).
Eğer gerekirse, çamaşır yumuşatıcıyı ile
işaretli bölmeye koyunuz (kullanılan miktar
çekmecedeki "MAX" işaretini geçmemelidir).
Çekmeceyi yavaşça kapatınız.
bölmesine
PROGRAM SEÇME DÜĞMESINI (1)
KULLANARAK ISTENILEN
PROGRAMIN SEÇILMESI
Program seçme düğmesini istenilen programa getiriniz. Çamaşır makinesi, seçmiş olduğunuz programa uygun bir sıcaklık değeri
önerir ve buna uygun maksimum sıkma hızı-
nı otomatik olarak seçer. İlgili tuşları kullanarak bu değerleri değiştirebilirsiniz. 8 tuşunun
yeşil pilot ışığı yanıp sönmeye başlar.
Program seçme düğmesi saat yönünde veya saatin tersi yönde döndürülebilir. Programı sıfırlamak veya makineyi kapatmak için
pozisyonuna getiriniz.
Programın sonunda makineyi kapamak
için program seçme düğmesini
numuna getirin.
Dikkat Makine çalışıyor haldeyken
program seçme düğmesini başka bir
programa getirirseniz, yanlış bir seçim
yapıldığını bildirmek üzere 8 tuşunun
kırmızı pilot ışığı 3 kez yanıp söner ve
Err mesajı göstergede görüntülenir.
Makine yeni seçilen programı
uygulamayacaktır.
2 TUŞUNA BASARAK SICAKLIĞIN
SEÇILMESI
Bir program seçildiğinde, cihaz otomatik
olarak bu program için varsayılan sıcaklığı
önerir.
Eğer çamaşırlarınızı farklı bir sıcaklıkta yıkamak istiyorsanız, sıcaklığı artırmak veya
azaltmak için bu tu
şa devamlı basınız.
ko-
Page 65

electrolux 65
3 TUŞUNA BASARAK SIKMA HIZININ
AZALTILMASI
İstediğiniz programı seçtikten sonra, cihazı-
nız bu program için öngörülen maksimum
sıkma hızını otomatik olarak uygulayacaktır.
Eğer çamaşırlarınızı farklı bir hızda sıkmak
istiyorsanız, sıkma hızını değiştirmek için 3
tuşuna devamlı basınız.
KULLANILABILIR SEÇENEKLERIN 3, 4
VE 5 TUŞLARINA BASILARAK
SEÇILMESI
Programa bağlı olarak, farklı fonksiyonlar
kombine edilebilir. Bunlar, istenilen program
seçildikten sonra ve 8 tuşuna basılmadan
önce seçilmelidir.
Bu düğmelere basıldığında, ilgili simgeler
ekranda görüntülenir. Bunlara tekrar basıl-
dığında, simgeler kaybolur. Eğer hatalı bir
seçenek seçilirse, 8 tuşunun entegre kırmı-
zı pilot ışığı 3 defa yanıp söner ve Err mesajı birkaç saniyeliğine göstergede görüntülenir.
Yıkama programları arasındaki uyumluluk ve seçenekler hakkında bilgi için "Yı-
kama Programları" bölümüne bakınız.
6 TUŞUNA BASARAK GECIKMELI
BAŞLATMA FONKSIYONUNUN
SEÇILMESI
Programı başlatmadan önce eğer başlatma
işleminin ertelenmesini isterseniz, istediğiniz
gecikme süresini seçmek için 6 tuşuna devamlı basınız. Karşılık gelen simge 7.12,
gösterge ekranının üst kısmında görüntülenecektir.
Seçilen gecikme süresi değeri (20 saate kadar) gösterge ekranında birkaç saniyeliğine
görüntülenecektir, daha sonra programın
süresi tekrar görüntülenecektir.
Bu seçeneği, programı ayarladıktan sonra
ve 8 tuşuna basmadan önce seçmelisiniz.
Gecikmeli başlatmayı, 8 tuşuna basmadan
önce istedi
ğiniz zaman iptal edebilirsiniz.
Gecikmeli başlatmanın seçilmesi:
1. Programı ve istediğiniz diğer seçenekle-
ri seçiniz.
2. 6 tuşuna basarak gecikmeli başlatma
seçeneğini seçiniz.
3. 8 tuşuna basınız:
– Makine saat bazında geri sayımı baş-
latır.
– Program, seçilen gecikme süresi so-
na erer ermez başlar.
8 tuşuna bastıktan sonra gecikmeli başlat-
manın iptal edilmesi:
1. 8 tuşuna basarak çamaşır makinesini
BEKLEME durumuna ayarlayınız.
2.
' sembolü görüntülene kadar 6 tuşu-
na basınız.
3. Programı başlatmak için 8 tuşuna tekrar
basınız.
Önemli Seçilen gecikme süresi sadece
yıkama programı tekrar seçildikten sonra
değiştirilebilir.
Gecikmeli Başlatma seçeneği, BOŞALTMA
programında seçilemez.
8 TUŞUNA BASARAK PROGRAMIN
BAŞLATILMASI
Seçilen programı başlatmak için 8 tuşuna
basınız, 8 tuşunun yeşil pilot lambasının yanıp sönmesi durur. Cihazın çalışmaya başladığını ve kapağın kilitlendi
ğini belirtmek üzere ekranda 7.10 simgesi görüntülenir.
Çalışan bir programı duraklatmak için 8 tuşuna basınız; yeşil pilot ışık yanıp sönmeye
başlar.
Programı kesintiye uğradığı yerden devam
ettirmek için 8 tuşuna tekrar basınız. Eğer
bir gecikmeli başlatma seçeneğini seçtiyseniz, makine geri sayıma başlayacaktır.
Eğer hatalı bir seçenek seçilirse, 8 tuşunun
kırmızı pilot ışığı 3 kez yanıp söner, Err
mesajı birkaç saniyeliğine görüntülenir.
10 TUŞUNU KULLANARAK ZAMAN
KONTROLÜ SEÇENEĞININ SEÇILMESI
Bu tuşlara devaml
ı basmak suretiyle, yıkama devrinin süresi artırılabilir veya azaltılabi-
lir. 7.7 simgesi, seçilen leke derecesini belirtmek üzere gösterge ekranında görüntülenecektir. Bu seçenek sadece, Pamuklu,
Sentetik ve Hassas programlarında kulla-
nılabilir.
Page 66

66 electrolux
Yıkama işle-miKirlilik
Yoğun Ağır kirli çamaşırlar
Normal Normal kirli çamaşır-
Günlük Günlük kirlenen ça-
Lamba Hafif kirli çamaşırlar
Hızlı Çok hafif kirli çama-
Süper Hızlı yı-
1)
kama
1) Çamaşır ağırlığını azaltmanızı öneririz (bkz. Yıkama
programları tablosu).
Sevi-
yesi
simgesi
Çamaşır tipi
lar
maşırlar
şırlar için
Kısa süreli kullanıl-
mış veya giyilmiş çamaşırlar
Önemli Time Manager (Zaman Kontrolü)
seçeneği,
programlarında kullanılamaz.
Bu leke seviyesi simgelerinin görüntülenebilirliği, çizelgede de gösterildiği gibi çamaşırın
tipine göre değişir.
Çamaşır Leke seviyesi
Pamuklular
95°/90°C X X X X X X
60°C/50°C X X X X X X
40°C X X X X X X
30°C X X X X X X
Soğuk X X X X X X
Sentetikler
60°C/50°C X X X X
40°C X X X X
30°C X X X X
Soğuk X X X X
Hassaslar
40°C X X X X
30°C X X X X
Soğuk X X X X
BIR SEÇENEĞIN VEYA ÇALIŞAN BIR
PROGRAMIN DEĞIŞTIRILMESI
Program başlamadan önce herhangi bir seçeneğin değiştirilmesi mümkündür.
Herhangi bir değişiklik yapmadan önce, 8
tuşuna basarak makineyi duraklatmanız GE-
REKLİDİR (eğer Zaman Kontrolü seçeneğini
değiştirmek isterseniz, çalışmakta olan
programı iptal etmeli ve yeniden seçim yapmalısınız).
Çalışan bir programın değiştirilmesi sadece
sıfırlamak (resetlemek) suretiyle mümkün-
dür. Program seçme düğmesini önce
pozisyonuna, ardından seçmek istediğiniz
yeni program pozisyonuna getiriniz. 8 tuşu-
na tekrar basarak yeni programı başlatınız.
Tamburdaki yıkama suyu boşaltılmayacak-
tır.
BIR PROGRAMIN DURAKLATILMASI
Çalışan bir programı duraklatmak için 8 tu-
şuna basınız, karşılık gelen yeşil pilot ışık ya-
nıp sönmeye başlar.
Programı yeniden başlatmak için aynı tuşa tekrar basınız.
BIR PROGRAMIN IPTAL EDILMESI
Çalışmakta olan bir programı iptal etmek
için, program seçme düğmesini
pozisyonuna getiriniz.
Böylece yeni bir program seçebilirsiniz.
KAPAĞIN AÇILMASI
Program başladıktan sonra (veya erteleme
süresi boyunca) kapak kilitli kalır, kapağı açmak isterseniz, öncelikle 8 tuşuna basarak
makineyi BEKLEME durumuna alın.
Eğer 7.10 simgesi birkaç dakika sonra ekrandan kaybolursa, kapak açılabilir.
Eğer 7.10 simgesi sönmezse, bu durum
makinenin halen ısıtma uyguladığı veya su
seviyesinin çok yüksek olduğu anlamına gelir. Kapağı zorlamayın!
Eğer kapağı açamıyorsanız ancak açmanız
gerekiyorsa, program seçme düğmesini
pozisyonuna getirerek makineyi kapamanız
gerekmektedir. Birkaç dakika sonra kapak
açılabilir (su seviyesine ve sıcaklığına
dikkat edin!).
Kapağı kapattıktan sonra, program ve seçenekleri tekrar seçmek ve 8 tuşuna basmak
gerekir.
PROGRAMIN SONUNDA
Makine otomatik olarak durur. Gösterge ekranında yanıp sönen üç adet sıfır (
)
görünür. 8 numaralı tuşun pilot ışığı söner.
Birkaç dakika boyunca bazı sesli sinyaller
verilir.
Page 67

electrolux 67
Eğer tamburda su bırakarak sona eren bir
program veya seçenek seçtiyseniz, pilot
ışığı 7.10 yanmaya devam eder. Kapak ha-
len kilitli durumdadır. Kapak açılmadan önce
su boşaltılmalıdır. Bu süre içerisinde, su boşaltılıncaya kadar tambur düzenli aralıklarla
dönmeye devam eder.
Suyu boşaltmak için aşağıdaki talimatları takip edin:
1.
Program seçme düğmesini
konumu-
na getirin.
2. Boşaltma veya sıkma programını seçin.
3. Gerekirse ilgili tuşa basarak sıkma hızını
azaltın.
Bekletme modu: Program sona erdikten
birkaç dakika sonra enerji tasarrufu sistemi
etkin hale getirilir. Gösterge parlaklığı azaltı-
YARARLI İPUÇLARI VE BİLGİLER
ÇAMAŞIRLARIN SINIFLANDIRILMASI
Her bir giysinin üzerindeki yıkama kodu
sembolüne ve üreticinin yıkama talimatlarına
uyun. Çamaşırları şu şekilde sınıflandırın:
beyazlar, renkliler, sentetikler, hassaslar,
yünlüler.
SICAKLIKLAR
Normal derecede kirli beyaz
95° veya 90°
60°/50°
40°-30°Soğuk
ÇAMAŞIRLARI MAKINEYE KOYMADAN
ÖNCE
Beyazlarla renklileri asla bir arada yıkamayın.
Yıkamada, beyazlar "beyazlığını" yitirebilir.
Yeni alınmış renkli giysiler ilk yıkamada renk
verebilir; dolayısıyla bunlar ilk yıkamada ayrı
yıkanmalıdır.
pamuklular ve ketenler için (örneğin çay örtüleri, havlular,
masa örtüleri, çarşaflar)
Normal kirli, solmaz renkli keten, pamuklu veya sentetik iplikli giysiler (örneğin; gömlekler,
gece elbiseleri, pijamalar) ve
hafif kirli beyaz pamuklular için
(örneğin; iç çamaşırları)
Sentetik iplikli ve yünlüler de
dahil "saf yün, makinede yıka-
nabilir, çekmez" etiketi taşıyan
hassas çamaşırlar (örneğin
perde kumaşları), karışık iplikli
çamaşırlar için
4. 8 tuşuna basın.
Programın sonunda; bir kaç dakika sonra
7.10 simgesi sönecektir. Kapak açılabilir.
Makineyi kapamak için program seçme
düğmesini
pozisyonuna getirin.
Çamaşırları tamburdan çıkarın ve tamburun
boş olduğundan emin olmak için dikkatlice
kontrol edin. Başka bir yıkama daha yapmayacaksanız, su musluğunu kapatın. Küf
ve hoş olmayan kokuların oluşmasını önlemek amacıyla kapağı açık bırakın.
lır. Herhangi bir tuşa basıldığında cihaz enerji tasarrufu modundan çıkar.
Çamaşırların içinde hiçbir metal nesne
bırakmadığınızdan emin olun (saç tokaları, çengelli iğne, toplu iğne gibi).
Yastık kılıflarının düğmelerini kapatın, fermuarları çekin ve kanca ve çıtçıtları kapatın.
Kemer veya uzun bantları bağlayın.
İnatçı lekeleri yı
kamadan önce çıkartın.
Çok kirli bölgeleri özel bir deterjan veya leke
çıkarıcı kremle ovun.
Perdelere ayrı bir özen gösterin. Kancaları
çıkartın veya hepsini bir torbaya veya fileye
geçirin.
AZAMI ÇAMAŞIR MIKTARLARI
Önerilen çamaşır miktarları, yıkama programı çizelgesinde belirtilmektedir.
Genel kurallar:
• Pamuklu, keten: tambur dolu ancak çok
aşırı sıkıştırılmamalıdır;
• Sentetikler: tambur yarıdan fazla dolu
olmamalıdır;
• Hassas çamaşırlar ve yünlüler: tambu-
run üçte birinden fazla doldurulmamalıdır.
Azami yük ağırlığında yıkamak, su ve enerjinin en etkin kullanımını sağlar.
Çok kirli çama
şırlarda, çamaşır miktarını
azaltın.
ÇAMAŞIR AĞIRLIKLARI
Aşağıdaki ağırlık değerleri örnek amaçlıdır:
Page 68

68 electrolux
Aşağıdaki ağırlık değerleri örnek amaçlıdır:
Bornoz 1200 gr
Yorgan kılıfı 700 gr
Erkek iş gömleği 600 gr
Çarşaf, erkek pijaması 500 gr
Masa örtüsü 250 gr
Yastık kılıfı, banyo havlusu,
gecelik, erkek gömleği
Mutfak bezleri, bayan külotla-
rı, bebek bezleri, bluz, erkek
külotları
200 gr
100 gr
LEKELERIN ÇIKARTILMASI
İnatçı lekeler sadece su ve deterjanla çık-
mayabilir. Dolayısıyla, bunların yıkanmadan
önce ön işlemden geçirilmesi önerilir.
Kan: Taze lekelere soğuk su uygulayınız.
Kurumuş lekelerde, özel bir deterjanla geceden suya bastırınız ve sonra sabunlu suyla
ovalayınız.
Yağlı boyalar: Leke çıkarıcı benzinle ıslatı-
nız, çamaşırı yumuşak bir bez üzerine seriniz ve lekeyi çitileyiniz; birkaç kere tekrarlayı-
nız.
Kurumuş gres lekeleri: Neftyağı ile ıslatı-
nız, çamaşırı yumuşak bir zemin üzerine seriniz ve lekeyi parmaklarınızla ve pamuklu bir
bezle ovunuz.
Pas: Sıcak suda çözülmüş oksalik asit veya
bir pas giderici ürün soğuk halde uygulanır.
Yakın tarihte meydana gelmemiş eski pas
lekelerine dikkat edin, çünkü kumaşın selüloz yapısı delik oluşumuna neden olacak şe-
kilde daha önceden zarar görmüş olabilir.
Küf lekeleri: Ağartıcı uygulayın, iyice duru-
layın (sadece beyazlar ve solmaz renkliler).
Çimen: Hafifçe sabunlayın ve ağartıcı uygu-
layın (sadece beyazlar ve solmaz renkliler).
Tükenmez kalem ve tutkal: Asetonla ısla-
3)
, giysiyi yumuşak bir bez üzerine serin
tın
ve lekeyi ovalayın.
Ruj: Yukarıda anlatıldığı gibi asetonla ıslatın,
sonra metil alkol uygulayın. Kalmış olabilecek izleri ağartıcı ile çıkartın.
Kırmızı şarap: Su ve deterjana bastırın,
durulayıp asetik veya sitrik asit uygulayın,
daha sonra tekrar durulayın. Kalmış olabilecek izleri ağartıcı ile çıkartın.
Mürekkep: Mürekkebin tipine göre, kumaşı
3)
önce asetonla
3) Suni ipekler üzerinde aseton uygulamayın
, sonra asetik asitle ıslatın;
beyaz kumaş üzerinde kalan izleri ağartıcı ile
çıkartın ve sonra iyice durulayın.
Zift lekeleri: Önce leke çıkarıcı, metil alkol
(mavi ispirto) veya benzinle ön işlemden geçirin, sonra macun deterjanla ovalayın.
DETERJANLAR VE KATKI MADDELERI
İyi yıkama sonuçlarının elde edilmesi ayrıca
deterjan seçimine ve israfı önleme ve çevreyi koruma için doğru miktarda deterjan kullanımına bağlıdır.
Ekolojik tipte olsa bile deterjanlar, fazla miktarda kullanıldıklarında doğanın hassas dengesini bozabilen maddeler içerir.
Deterjan seçimi kumaşın tipine (hassas,
yünlü, pamuklu, vs.), rengine, yıkama sıcak-
lığına ve kir derecesine göre yapılır.
Genelde kullanılan tüm çamaşır makinesi
deterjanları
bu makinede de kullanılabilir:
•Her türlü kumaş için toz deterjanlar
• Hassas çamaşırlar (maks. 60°C) ve yünlü-
ler için toz deterjanlar
• Tüm çamaşır tiplerinde tercihen düşük sı-
caklıkta yıkama programları için (maks.
60°C) veya sadece yünlüler için özel sıvı
deterjanlar.
Deterjan ve kullanılacak katkı maddeleri, yı-
kama programı başlatılmadan önce deterjan
çekmecesinin uygun bölmelerine konmalı-
dır.
Eğer sıvı deterjanlar kullanılıyorsa, ön yıka-
masız bir program seçilmelidir.
Çamaşır makinesi, konsantre deterjanın en
uygun şekilde kullanımı için bir devridaim
sistemine sahiptir.
Kullanılacak miktarlarla ilgili üretici önerilerine riayet ediniz ve deterjan çekmecesin-
deki "MAX" işaretini geçmeyiniz.
SU SERTLIĞI DERECELERI
Su sertliği, sertlik "derecesi" cinsinden belirtilir. Bölgenizdeki suyun sertliği hakkı
nda bilgiyi ilgili su işleri idaresinden veya yerel yetkilinizden elde edebilirsiniz.
Su sertlik derecesinin orta-yüksek (sertlik derecesinden II) olması halinde bir su
yumuşatıcısı ilave edilmelidir. Üreticinin
talimatlarına uyun. Kullanılacak deterjan
miktarı sertlik derecesine I (= yumuşak)
göre ayarlanabilir.
Page 69

electrolux 69
Su sertliği dereceleri
Seviye Özellik
Alman
°dH
Fransız
°T.H.
1 yumuşak 0-7 0-15
2 orta 8-14 16-25
YIKAMA PROGRAMLARI
Program
Maksimum ve Minimum Sıcaklık
Program Açıklaması
Maksimum Sıkma Hızı
Maksimum Çamaşır Miktarı
Çamaşır Tipi
Pamuklular
90° - Soğuk
Ana yıkama - Durulamalar
Maksimum sıkma hızı 1400 dev./dk.
Maks. çamaşır miktarı 7 kg - Azaltılmış miktar 3 kg
Beyaz ve renkli pamuklular (normal kirli çamaşırlar).
+ Pamuklular + Ön yıkama
90° - Soğuk
Ön yıkama - Ana yıkama - Durulamalar
Maksimum sıkma hızı 1400 dev./dk.
Maks. çamaşır miktarı 7 kg - Azaltılmış miktar 3 kg
Ön yıkama aşamalı beyaz veya renkli pamuklular
(ağır kirli çamaşırlar).
Sentetikler
60° - Soğuk
Ana yıkama - Durulamalar
Maksimum sıkma hızı 900 dev./dk.
Maks. çamaşır miktarı 3 kg - Azaltılmış miktar 1.5 kg
Normal derecede kirli sentetik veya karışık kumaş-
lar.
+
Sentetikler + Ön yıkama
60° - Soğuk
Ön yıkama - Ana yıkama - Durulamalar
Maksimum sıkma hızı 900 dev./dk.
Maks. çamaşır miktarı 3 kg - Azaltılmış miktar 1.5 kg
Ön yıkama aşamalı sentetik veya karışık kumaşlar
(ağır kirli çamaşırlar).
1)
1)
Su sertliği dereceleri
Seviye Özellik
Alman
°dH
3 sert 15-21 26-37
4 çok sert > 21 > 37
Seçenekler Deterjan Bölmesi
DEVİR DÜŞÜRME
SUDA BEKLETME
SIKMASIZ
GECE PROGRAMI
KOLAY ÜTÜ
EKSTRA DURULAMA
TIME MANAGER
DEVİR DÜŞÜRME
SUDA BEKLETME
SIKMASIZ
GECE PROGRAMI
KOLAY ÜTÜ
EKSTRA DURULAMA
TIME MANAGER
DEVİR DÜŞÜRME
SUDA BEKLETME
SIKMASIZ
GECE PROGRAMI
1)
KOLAY ÜTÜ
EKSTRA DURULAMA
TIME MANAGER
DEVİR DÜŞÜRME
SUDA BEKLETME
SIKMASIZ
GECE PROGRAMI
1)
KOLAY ÜTÜ
EKSTRA DURULAMA
TIME MANAGER
Fransız
°T.H.
2)
2)
Page 70

70 electrolux
Program
Maksimum ve Minimum Sıcaklık
Program Açıklaması
Maksimum Sıkma Hızı
Maksimum Çamaşır Miktarı
Çamaşır Tipi
Hassas Çamaşırlar
40° - Soğuk
Ana yıkama - Durulamalar
Maksimum sıkma hızı 700 dev./dk.
Maks. çamaşır miktarı 3 kg - Azaltılmış çamaşır miktarı
1)
kg
1.5
Hassas kumaşlar normal kirli hassas çamaşırlar.
Sıkma
Boşaltma ve uzun süreli sıkma
Maksimum sıkma hızı 1400 dev./dk.
Maks. yük 7 kg
Elde yıkanabilir giysiler için ve Suda Bekletme ile Gece
Programı seçeneği olan programlardan sonra uygulanabilir ayrı sıkma işlemi. Sıkılacak olan çamaşırlara uygun hale getirmek üzere ilgili tuşa basarak sıkma hızını
seçebilirsiniz.
Boşaltma
Su boşaltma
Maks. yük 7 kg
Suda Bekletme veya Gece Programı seçenekli programlarda, son durulama suyunu boşaltmak içindir.
Durulama
Durulama
Maksimum sıkma hızı 1400 dev./dk.
Maks. çamaşır yükü 7 kg
Bu program ile elde yıkanmış olan pamuklu giysilerin
durulanması ve sıkılması mümkündür. Makine 3 durulama işlemi uygular ve ardından uzun süreli son sıkma
işlemi uygulanır. Sıkma hızı azaltılabilir.
Karışık 20°
3)
20°
Ana yıkama - Durulamalar - Sıkma
Maksimum sıkma hızı 900 dev./dk.
Maks. çamaşır yükü 3 kg
Hafif kirli pamuklu, sentetik ve karışık kumaşlar için
özel program.
Enerji tüketimini azaltmak için bu programı ayarlayın.
İyi yıkama sonuçları alabilmek için düşük sıcaklığa uygun deterjan kullandığınızdan emin olun.
İpekliler
30° - Soğuk
Ana yıkama - Durulamalar
Maksimum sıkma hızı 700 dev./dk.
Maks. çamaşır yükü 1 kg
İpek ve karışık sentetik çamaşırlar için uygun hassas
yıkama programı.
Seçenekler Deterjan Bölmesi
DEVİR DÜŞÜRME
SUDA BEKLETME
SIKMASIZ
GECE PROGRAMI
EKSTRA DURULAMA
TIME MANAGER
DEVİR DÜŞÜRME
DEVİR DÜŞÜRME
SUDA BEKLETME
SIKMASIZ
GECE PROGRAMI
EKSTRA DURULAMA
KOLAY ÜTÜ
DEVİR DÜŞÜRME
SUDA BEKLETME
EKSTRA DURULAMA
DEVİR DÜŞÜRME
SUDA BEKLETME
SIKMASIZ
GECE PROGRAMI
Page 71

electrolux 71
Program
Maksimum ve Minimum Sıcaklık
Program Açıklaması
Maksimum Sıkma Hızı
Seçenekler Deterjan Bölmesi
Maksimum Çamaşır Miktarı
Çamaşır Tipi
Elde yıkama
40° - Soğuk
Ana yıkama - Durulamalar
Maksimum sıkma hızı 1000 dev./dk.
DEVİR DÜŞÜRME
SUDA BEKLETME
SIKMASIZ
GECE PROGRAMI
Maks. çamaşır yükü 2 kg
«Elde yıkanabilir» bakım sembolünü taşıyan hassas
kumaşlar için özel program.
Yünlü
40° - Soğuk
Ana yıkama - Durulamalar
Maksimum sıkma hızı 1000 dev./dk.
DEVİR DÜŞÜRME
SUDA BEKLETME
SIKMASIZ
GECE PROGRAMI
Maks. çamaşır yükü 2 kg
Makinede yıkanabilir yünlülerin yanı sıra elde yıkanabilir
yünlüler ve hassas kumaşlar için yıkama programı.
Not: Tek bir çamaşır veya çok miktarda çamaşır den-
gesizliğe neden olabilir. Cihaz son sıkma aşamasını
gerçekleştirmezse, daha fazla çamaşır koyun, çamaşırları elinizle tamburun içinde dağıtın ve sonra sıkma
programını seçin.
ECO +
Pamuklular Eko + Ön yıkama
90 °- 40°
Ön yıkama - Ana yıkama - Durulamalar
Maksimum sıkma hızı 1400 dev./dk.
Maks. çamaşır yükü 7 kg
DEVİR DÜŞÜRME
SUDA BEKLETME
SIKMASIZ
GECE PROGRAMI
KOLAY ÜTÜ
EKSTRA DURULAMA
2)
Ön yıkama aşamalı beyaz veya renkli pamuklular.
Bu program, normal kirli pamuklu çamaşırlar için seçilebilir. Sıcaklık düşer ve yıkama süresi artar.
ECO
4)
Pamuklular Eko
90° - 40°
Ana yıkama - Durulamalar
Maksimum sıkma hızı 1400 dev./dk.
Maks. çamaşır yükü 7 kg
DEVİR DÜŞÜRME
SUDA BEKLETME
SIKMASIZ
GECE PROGRAMI
KOLAY ÜTÜ
EKSTRA DURULAMA
Beyaz ve solmaz renkli pamuklular.
Hafif veya normal kirli pamuklu çamaşırlar için bu
program seçilebilir. Sıcaklık düşer ve yıkama süresi artar. Böylece, enerjiden tasarruf sağlanırken iyi bir yıka-
ma sonucu alınmış olur.
O = KAPAMA
Çalışmakta olan yıkama programını iptal etmek veya
makineyi kapamak içindir.
1) 9 tuşuna basarak Süper Hızlı Yıkama seçeneğini seçerseniz, maksimum çamaşır miktarını belirtildiği şekilde
azaltmanızı öneririz. Tam yükleme mümkün olmakla birlikte, temizleme sonuçlarında kötüleşme olabilir.
2) Sıvı deterjan kullanılıyorsa, ÖN YIKAMA aşaması bulunmayan bir program seçilmelidir.
3) Su sıcaklığının 20°C'den düşük olması halinde cihaz, kısa ısıtma aşamasını uygular. Cihaz, sıcaklık ayarını "soğuk"
olarak görüntüleyebilir.
4) Rusya için geçerli değil.
Enerji Etiketi tüketim değerleri için STANDART PROGRAMLAR. 1061/2010 sayılı düzenleme uyarınca, bu
programlar "standart 60°C pamuklu programı" ve "standart 40°C pamuklu programı" olarak belirlenmi
ştir. Bu
Page 72

72 electrolux
programlar, normal şekilde kirlenmiş pamuklu çamaşırların temizlenmesi için karma enerji ve su tüketimi yönünden
en verimli olanlarıdır.
İyi yıkama sonuçları almak ve enerji tüketimini azaltmak için bu programı ayarlayın. Yıkama programının süresi
uzatılır.
Yıkama aşamasındaki su sıcaklık seviyesi, seçilen program için belirtilen sıcaklıktan farklı olabilir.
TÜKETİM DEĞERLERİ
Bu tablodaki veriler yaklaşık değerlerdir. Farklı nedenler verileri değiştirebilir: çamaşırın
miktarı ve türü, su ve ortam sıcaklığı.
Programlar Çama-
miktarı
Pamuklular 60°C 7 1.2 53 140 52
Pamuklular 40°C 7 0.7 53 130 52
Sentetikler 40°C 3 0.5 40 80 35
Narin Çamaşırlar
40°C
Yünlü/Elde yıka-
ma 30°C
Standart pamuklu programları
Standart 60°C
pamuklu
Standart 60°C
pamuklu
Standart 40°C
pamuklu
1) Sıkma aşamasının sonunda.
Kapalı Modu (W) Açık Bırakma Modu (W)
0.10 0.98
Yukarıdaki tablolarda yer alan bilgiler AB Düzenlemelerinin 1015/2010 ilgili yönergelerine 2009/125/
EC uygundur.
Enerji tüketimi
şır
(kg)
3 0.55 55 65 35
2 0.25 58 50 30
7 0.86 46 189 52
3.5 0.77 36 177 52
3.5 0.51 38 160 52
(kWs)
Su tüketimi (li-
tre)
Yaklaşık
program süresi (dakika)
Kalan nem
(%)
1)
BAKIM VE TEMİZLİK
Uyarı Herhangi bir temizlik veya bakım
işlemi yapmadan önce cihazın elektrik
beslemesini kesmeniz (fişini çekmeniz)
gerekmektedir.
KIREÇ ÇÖZME
Kullandığımız su normalde kireç içerir. Makinede periyodik olarak bir su yumuşatıcı toz
kullanılması iyi bir fikirdir. Bunu, bir çamaşır
yıkama işleminden ayrı olarak ve yumuşatıcı
üreticisinin talimatlarına göre yapınız. Bu iş-
lem, kireç kalıntılarının oluşumunu önlemeye
yardımcı olacaktır.
HER YIKAMADAN SONRA
Kapağı bir süre açık bırakınız. Bu durum, cihazın içerisinde küf ve artık su kalıntı kokula-
ın önlenmesine yardımcı olacaktır. Bir yı-
rın
kamadan sonra kapağın açık bırakılması ayrıca kapak contasının da korunmasına yardımcı olacaktır.
KORUYUCU YIKAMA
Düşük sıcaklıktaki yıkama işlemlerinin kullanımı, tambur içinde kalıntıların oluşmasına
neden olabilir.
Page 73

Düzenli aralıklarla bir koruyucu yıkama işlemi
uygulanmasını öneririz.
Bir koruyucu yıkama işlemi için:
• Tamburda çamaşır olmamalıdır.
•En sıcak pamuklu yıkama programını se-
çiniz.
• Biyolojik özellikleri olan bir toz deterjan-
dan normal ölçekte kullanınız.
DIŞ TEMIZLIK
Cihazın dış kasasını sadece sabun ve su ile
temizleyiniz ve iyice kurulayınız.
Önemli Cihazın gövdesini temizlemek için
metil alkol, çözücüler veya benzeri ürünler
kullanmayınız.
DETERJAN ÇEKMECESININ
TEMIZLENMESI
Deterjan çekmecesi düzenli olarak temizlenmelidir.
Yıkama toz deterjanı ve katkı maddesi çekmecesi düzenli olarak temizlenmelidir.
Çekmeceyi, dili aşağı doğru bastırarak ve
dışarı doğru çekerek çıkartın
ız.
1
2
Birikmiş toz kalıntılarını çıkartmak için akan
bir musluk altında yıkayınız.
Temizliği daha rahat yapmak için, katkı
maddesi bölmesinin üst kısmı çıkartılmalıdır.
Tüm kısımları su ile temizleyiniz.
electrolux 73
Dağıtıcı çekmecesini bir fırça ile temizleyiniz.
YIKAMA TAMBURU
Yıkama veya musluk suyu içerisindeki demir
içeren yabancı maddelerin paslanmasından
dolayı tambur içerisinde pas birikintileri oluşabilir.
Önemli Tamburu asitli kireç çözücü
maddeler, klor içeren aşındırıcı maddeler
veya demir ya da çelik yünü ile
temizlemeyiniz.
1. Tamburda bulunan pas birikintilerini
paslanmaz çelikler için özel temizleme
maddeleri ile temizleyiniz.
2. Olası temizleme maddesi artıklarını temizlemek için, makineye çamaşır koymadan bir yıkama devri başlatınız.
Program: Maksimum sıcaklıkta Kısa Süreli Pamuklu Programı çalıştırınız ve yak.
1/4 ölçek deterjan ekleyiniz.
KAPAK CONTASI
Kapak contasını ara sıra kontrol ediniz ve
lastik körükler arasına sıkışmış nesneler var-
sa çıkartınız.
Page 74

74 electrolux
5. Suyun boşalması bittiğinde, pompa kapağını (A) saat yönünün tersine çevirerek sökün ve filtreyi çıkarın. Gerekirse
pense kullanın. Kapağı çıkarırken dökülen suyu silmek için mutlaka yakınınızda
bir bez bulundurun.
Kalan tüyleri temizlemek için filtreyi
musluk altında yıkayın.
TAHLIYE POMPASI
Pompa, özellikle aşağıda açıklanan durumlarda, düzenli olarak kontrol edilmelidir:
•Cihaz boşaltma ve/veya sıkma yapmıyor-
sa.
• İğne, bozuk para gibi pompayı tıkayan
nesnelerden ötürü cihaz tahliye anında
olağan dışı bir ses çıkarıyorsa.
• Su tahliyesiyle ilgili bir sorun tespit edilmişse (daha fazla bilgi için bkz. "Servisi
aramadan önce" bölümü).
Uyarı Pompa kapağını açmadan önce
cihazı kapayın ve elektrik fişini prizden
çıkarın.
Aşağıdaki işlemleri yapın:
1. Cihazın fişini prizden çekin.
2. Gerekirse, su soğuyana kadar bekleyin.
A
B
3. Dökülen sıvıları toplamak için pompanın
yakınına bir kap koyun.
4. Acil durum tahliye hortumunu (B) çıka-
rın, kabın içine koyun ve kapağını çıkarın.
1
2
6. Yabancı maddeleri ve tüyleri pompa yuvasından ve pompa pervanesinden temizleyin.
Pompa pervanesinin dönüp dönmediğini dikkatlice kontrol edin (tutukluk
yaparak döner). Dönmüyorsa lütfen yetkili servisi arayın.
7. Acil durum tahliye hortumunun kapağını
geri takın ve arka kısmını yuvasına yerleştirin.
Page 75

electrolux 75
8. Filtreyi özel yuvalara doğru şekilde bastırarak tekrar pompaya takın. Pompa
kapağını saat yönünde çevirerek sıkıca
takın.
2
1
Uyarı
Cihaz kullanım halindeyken ve seçilen programa bağlı olarak, pompada sıcak su olabi-
lir.
Bir yıkama programı sırasında pompa kapağını asla çıkarmayın, cihaz yıkama programını tamamlayana ve boşaltma yapana
kadar bekleyin. Kapağı yerine takarken, kaçak yapmayacak ve çocukların çıkarması
mümkün olmayacak şekilde sıkılandığından
emin olun.
SU GIRIŞ FILTRELERININ
TEMIZLENMESI
Makinenin su alması gerekenden daha uzun
zaman alıyorsa, su giriş hortumundaki filtrenin tıkalı olup olmadığını kontrol ediniz
1. Su musluğunu kapatınız.
2. Su giriş hortumunu çıkartınız
3. Hortumun içerisindeki filtreyi sert bir fır-
ça ile temizleyiniz.
4. Hortumu tekrar musluğa takınız.
5. Hortumu makineden gevşeterek çıkartı-
nız. Su dökülebileceğinden, yakınınızda
bir silme bezi bulundurunuz.
6. Valfın içindeki filtreyi, sert bir fırçayla veya bir bez parçasıyla temizleyiniz.
7. Hortumu makineye geri takınız ve
bağlantının sızdırmazlığını kontrol ediniz.
8. Su musluğunu açınız.
DONMAYA KARŞI ÖNLEMLER
Eğer makine sıcaklığın 0°C'nin altına düştüğü bir yere monte edilmişse, aşağıdaki iş-
lemleri yapınız:
1. Su musluğunu kapatınız.
2. Giriş hortumunu çıkartınız.
3. Acil durum tahliye hortumunun ve giriş
hortumunun ucunu yere koyduğunuz
bir kabın içine yerleştiriniz ve suyun boşalmasını sağlayınız.
4. Su giri
ş hortumunu geri takınız ve acil
durum tahliye hortumunu kapağını geri
takıp yuvasına yerleştiriniz.
5. Makineyi tekrar çalıştırmak istediğiniz-
de, ortam sıcaklığının 0°C'nin üzerinde
olduğundan emin olunuz.
ACIL DURUM BOŞALTMASI
Eğer su tahliye olmuyorsa, makineyi boşaltmak için aşağıdaki prosedürü uygulayınız:
1. Cihazın fişini prizden çekiniz;
2. Su musluğunu kapatınız;
3. Gerekirse, su soğuyana kadar bekleyiniz;
4. Yere bir kap koyunuz ve acil durum tahliye hortumunun ucunu kabın içine yerleştiriniz. Kapağını çıkartınız. Su, yer çe-
kimi gücüyle kaba boşalmalıdır. Kap
dolduğu zaman, hortumun kapa
ğını geri
takınız. Kabı boşaltınız. Suyun akması
durana kadar prosedürü tekrarlayınız;
5. Gerekirse pompayı yukarıda anlatıldığı
gibi temizleyiniz;
6. Acil durum tahliye hortumunu kapağını
taktıktan sonra yuvasına yerleştiriniz;
7. Pompayı geri takınız.
Page 76

76 electrolux
Önemli Acil durum boşaltma hortumunu
kullanarak suyu her boşalttığınızda, deterjan
çekmecesinin ana yıkama bölmesine 2 litre
su koymanız ve sonra boşaltma programını
SERVİSİ ARAMADAN ÖNCE
Belirli problemler bazı basit kontrol ve bakımların yapılmamasından kaynaklanır ve bir
mühendisi aramaya gerek kalmadan basit
bir şekilde çözülebilir. Yetkili servisinizi aramadan önce lütfen aşağıdaki kontrol listesini
uygulayınız.
Makine açık haldeyken, makinenin çalışma-
dığını belirtmek üzere 8 tuşunun kırmızı pilot ışının yanıp sönmesi, aşağıdaki alarm
kodlarından birisinin gösterge ekranında görünmesi ve aynı zamanda her 20 saniyede
Sorun Olası neden / Çözüm
Kapak kapanmamıştır.
•Kapağı sıkıca kapatın.
Cihazın fişi prize tam olarak takılmamıştır.
•Fişi prize takın.
Prizde güç yoktur.
• Lütfen evinizin elektrik tesisatını kontrol edin.
Çamaşır makinesi çalışmaya başlamıyor:
Makine su almıyor:
Makine su alıyor sonra hemen boşaltıyor:
Ana sigorta atmıştır.
•Sigortayı değiştirin.
Program seçme düğmesi doğru konumlandırılmamıştır ve 8 tuşuna
basılmamıştır.
• Lütfen program seçme düğmesini çevirin ve 8 tuşuna tekrar basın.
Gecikmeli başlatma fonksiyonu seçilmiştir.
•Çamaşırlar hemen yıkanacaksa, gecikmeli başlatmayı iptal edin.
Çocuk Güvenliği Kilidi etkinleş
•Çocuk Güvenliği Kilidini devre dışı bırakın.
Su musluğu kapalıdır.
•Su musluğunu açın.
Giriş hortumu ezilmiş veya bükülmüştür.
•Giriş hortumunun bağlantısını kontrol edin.
Su giriş hortumundaki filtre veya giriş valfi filtresi tıkanmıştır.
•Su giriş filtrelerini temizleyin (Daha fazla ayrıntı için "Su giriş filtre-
lerinin temizlenmesi" bölümüne bakın).
Kapak tam olarak kapatılmamıştır.
•Kapağı sıkıca kapatın.
Tahliye hortumunun ucu çok alçaktadır.
•«Su boşaltması» bölümündeki ilgili paragrafa bakın.
başlatmanız gereklidir. Bu durum, deterjanın
bir kısmının bir sonraki yıkamada
kullanılmadan kalmasını önleyen EKO Valf
cihazını etkinleştirecektir.
bir bazı sesli ikaz sinyallerinin verilmesi
mümkündür:
•
: Su beslemesiyle ilgili problem.
•
: Su tahliyesiyle ilgili problem.
•
: Kapak açık.
Problem giderildikten sonra, programı yeniden başlatmak için 8 tuşuna basın. Tüm
kontrollerden sonra problem hala giderilmediyse, yetkili servis ile temasa geçin.
tirilmiştir.
Page 77

Sorun Olası neden / Çözüm
Makine boşaltma yapmıyor
ve/veya sıkmıyor:
Zeminde su var:
Yetersiz yıkama sonuçları:
Kapak açılmıyor:
Makine titriyor veya gürültülü çalışıyor:
electrolux 77
Tahliye hortumu ezilmiş veya bükülmüştür.
• Tahliye hortumunun bağlantısını kontrol edin.
Tahliye filtresi tıkanmıştır.
• Tahliye filtresini temizleyin.
Tamburda su bırakarak sona eren ya da tüm sıkma aşamalarını atlayan bir program veya seçenek seçilmiştir.
•Boşaltma veya sıkma programını seçin.
Çamaşırlar tamburun içinde eşit olarak dağıtılmamıştır.
•Çamaşırları tambur içinde yeniden dağıtın.
Çok fazla deterjan veya uygun olmayan (çok fazla köpük oluşumu-
na neden olan) deterjan kullanılmıştır.
• Deterjan miktarını azaltın veya başka bir deterjan kullanın.
Giriş hortumu bağlantılarından birinde kaçak olup olmadığını kontrol edin. Hortumun içinden su geçtiği için bunu anlamak her zaman kolay değildir; nemli olup olmadığına bakın.
•Su giriş hortumunun bağlantısını kontrol edin.
Tahliye ya da giriş hortumu hasar görmüştür.
• Yenisiyle değiştirin.
Temizlik işlemlerinden sonra, acil durum boşaltma hortumu üzerindeki kapak yerleştirilmemiştir veya filtre uygun şekilde sıkılmamıştır.
•Kapağı acil durum boşaltma hortumuna tekrar takın veya filtreyi
tam olarak yerine oturtun.
Çok az veya uygun olmayan deterjan kullanılmıştır.
• Deterjan miktarını artırın veya başka bir deterjan kullanın.
İnatçı lekeler, yıkamadan önce işlemden geçirilmemiştir.
• İnatçı lekeleri çıkarmak için ticari temizlik ürünlerini kullanın.
Doğru sıcaklık değeri seçilmemiştir.
•Doğru sıcaklığı seçip seçmediğinizi kontrol edin.
Cihaza aşırı miktarda çamaşır konulmuştur.
•Çamaşır miktarını azaltın.
Program hala çalışmaktadır.
•Yıkama programının sona ermesini bekleyin.
Elektronik kapak kilidi henüz açılmamıştır.
•
sembolü sönene kadar bekleyin.
Tamburda su vardır.
•Suyu boşaltmak için boşaltma veya sıkma programını seçin.
Nakliye cıvataları ve ambalaj malzemeleri çıkarılmamıştır.
•Cihazın montajının doğru bir şekilde yapıldığından emin olun.
Destek ayakları ayarlanmamıştır.
•Cihazın düzlemselliğini kontrol edin.
Çamaşırlar tamburun içinde eşit olarak dağıtılmamıştır.
•Çamaşırları tambur içinde yeniden dağıtın.
Tamburda çok az çamaşır olabilir.
• Daha fazla çamaşır koyun.
Page 78

78 electrolux
Sorun Olası neden / Çözüm
Çamaşırlar tambur içinde eşit oranda dağılmadığından, elektronik
dengesizlik tespit aygıtı devreye girmiştir. Tamburun ters yönde
dönme hareketiyle çamaşırlar yeniden dağıtılır. Bu durum, dengesizlik ortadan kalkıncaya kadar birkaç defa daha meydana gelebilir
Sıkma işlemi geç başlıyor
veya makine sıkma yapmı-
yor:
Makine sıra dışı sesler çıka-
rıyor:
Tambur içinde su görünmüyor:
ve normal sıkma işlemi devam eder. Eğer 10 dakika sonra, çama-
şırlar tamburda hala eşit oranda dağılmamışsa, makine sıkma işle-
mi yapmayacaktır. Bu durumda, çamaşırları elinizle dağıtın ve sık-
ma programını seçin.
•Çamaşırları tambur içinde yeniden dağıtın.
Çamaşır miktarı çok azdır.
• Daha fazla çamaşır koyun, çamaşı
dağıtın ve sonra sıkma programını seçin.
Makine, diğer klasik motorlara göre daha farklı ses çıkaran tipte bir
motorla donatılmıştır. Bu yeni motor, sıkma işlemi yaparken daha
yumuşak bir başlatmayı, çamaşırların tamburda daha homojen
dağılımını ve ayrıca makinenin daha dengeli olmasını sağlar.
Modern teknolojiyle üretilmiş makineler, performansı etkilemeksizin
daha az su kullanarak çok ekonomik çalışırlar.
Eğer problemi tanımlayamıyor veya çözemiyorsanız, servis merkezimizle temasa geçin.
Telefon açmadan önce, makinenin modelini, seri numarasını ve satın alma tarihinizi
not edin: servis merkezi bu bilgileri isteyecektir.
rları elinizle tamburun içinde
Mod. ... ... ...
Prod. No. ... ... ...
Ser. No. ...
TEKNİK VERİLER
Boyutlar Genişlik / Yükseklik / Derinlik 596 / 820 / 544 mm
Elektrik bağlantısı Gerilim
Su besleme basıncı Minimum
Nem ve katı parçacıkların girmesine karşı koruma seviyesi IPX4
Su beslemesi
Maksimum Çamaşır Miktarı Pamuklu 7 kg
Sıkma Hızı Maksimum 1400 dev./dk.
1) Su giriş hortumunu 3/4" vida dişli bir su musluğuna bağlayın.
1)
Toplam güç
Sigorta
Frekans
Maksimum
Soğuk su
220-230 V
2000 W
10 A
50 Hz
0,5 bar (0,05 MPa)
8 bar (0,8 MPa)
MONTAJ
AMBALAJDAN ÇIKARMA
Cihazı kullanmadan önce tüm nakliye cıvataları ve ambalaj malzemeleri çıkarılmalıdır.
Nakliye amaçlı kullanılan tüm malzemeleri
muhafaza etmeniz önerilir, böylece makinenin ileride tekrar taşınması gerektiğinde yeniden kullanabilirsiniz.
1. Tüm ambalaj malzemeleri çıkarıldıktan
sonra, alt kısmındaki polistiren tabanı
çıkarmak için makineyi arka tarafının
üzerine dikkatlice yatırın.
Page 79

2. Cihazın arka tarafındaki elektrik kablosunu ve boşaltma hortumunu hortum
tutuculardan çıkarın.
3. Üç cıvatayı sökün.
2
1
electrolux 79
5. Küçük üst deliğe ve iki büyük deliğe
kullanma kılavuzunun içinde bulunduğu
torbadaki ilgili plastik tıkaç kapaklarını
takın.
KONUMLANDIRMA
Makineyi düz ve sert bir zemin üzerine monte ediniz. Makine etrafındaki hava dolaşımı-
nın halı, kilim, vs. gibi eşyalarla engellenmediğinden emin olunuz. Makinenin duvara veya diğer mutfak ünitelerine temas etmediğinden emin olunuz. Ayaklarını yükseltip
alçaltmak suretiyle çamaşır makinesinin seviyesini ayarlayınız. Ayaklar, kendinden kilitlemeli bir kilit somunu içerdiğinden ayarlanması zor olabilir, ancak makine düz ve dengeli OLMALIDIR. Gerekirse bir su terazisi
ile düzlemsellik ayarını kontrol ediniz. Herhangi gerekli bir ayarlama bir somun anahtarıyla yapılabilir.
4. İlgili plastik pulları kaydırarak çıkarın.
Doğru seviye ayarı, makine çalışırken titreşimi, gürültüyü ve makinenin kaymasını önler.
Dikkat Zemindeki herhangi bir
engebeyi dengelemek için makinenin
altına asla dolap, tahta veya benzeri bir
nesne koymayınız. Makinenin
düzlemselliğini ayarladıktan sonra, kilit
somunlarını sıkınız.
Page 80

80 electrolux
SU GIRIŞI
Bir su giriş hortumu ürünle birlikte verilmiştir
ve makine tamburunun içindedir. Makineyi
su musluğuna bağlamak için eski makinenizin hortumunu kullanmayınız.
Önemli Bu cihaz soğuk su musluğuna
bağlanmalıdır.
1. Kapağı açınız ve giriş hortumunu çıkartı-
nız.
2. Hortumu, köşeli bir bağlantı parçasıyla
makineye takınız. Giriş hortumunu aşağı
doğru yönlendirmeyiniz. Hortum açısını,
su musluğunuzun yerine göre sağa veya sola doğru ayarlayınız.
45°
35°
4. Hortumu 3/4" dişli ile bir musluğa
bağlayınız. Daima cihazla birlikte verilen
hortumu kullanınız.
Giriş hortumu uzatılmamalıdır. Eğer çok kı-
saysa ve musluğun yerini değiştirmek istemiyorsanız, daha uzun ve özellikle bu tip bir
cihaz için tasarlanmış yeni bir hortum alınız.
SU KESME AYGITI
Giriş hortumunda bir su kesme mekanizması bulunmaktadır ve bu mekanizma, hortumun eskimesinden kaynaklanabilecek olası
su kaçaklarına karşı koruma sağlar. Bu arıza
durumu "A" penceresinde kırmızı bir daireyle belirtilir. Eğer böyle bir durumla karşılaşır-
sanız, su musluğunu kapatınız ve hortumu
değiştirmesi için yetkili servisinizi arayınız.
3. Halka somunu gevşeterek hortumu
doğru şekilde ayarlayını
z. Giriş hortumunun pozisyonunu ayarladıktan sonra,
kaçak olmasını önlemek için halka somunu tekrar sıkınız.
A
SU TAHLIYESI
Tahliye hortumunun ucu üç şekilde konumlandırılabilir.
• Makine ile birlikte verilen plastik hortum
kılavuzu kullanılarak bir lavabonun ke-
narına takma. Böyle bir durumda, makine su boşaltması yaparken kancanın yerinden çıkmış olmadığından emin olunuz.
Page 81

electrolux 81
Bunu, kancayı bir tel ile musluğa takarak
veya duvara sabitleyerek yapabilirsiniz.
• Bir lavabo ek tahliye borusu kullana-
rak. Bu ek boru, dirsek kısmı yerden 60
cm. yukarıda olacak şekilde ağız kısmın-
dan yukarıda olmalıdır.
• Direk olarak bir tahliye borusuna,
yüksekliği 60 cm.'den az ve 90 cm.'den
fazla olmayacak şekilde. Tahliye hortumunun ucu daima hava girişine açık olmalı,
yani tahliye borusunun iç çapı tahliye hortumunun dış çapından geniş olmalıdır.
Tahliye hortumu bükülmemelidir.
Tahliye hortumu maksimum 4 metre uzatılabilir. Ek tahliye hortumu ve eklem parçasını yerel servis merkezinizden elde edebilirsiniz.
ANKASTRE MONTAJ
GENEL BAKIŞ
Bu cihaz, mutfak mobilyasına ankastre
monte edilebilecek şekilde tasarlanmıştır.
Ankastre montaj yeri Şek. 1'de gösterilen
boyutlarda olmalıdır.
Şek. 1
600 mm
Şek. 2
min.
min.
820 mm
560 mm
75 mm
596 mm
60 mm
100 mm
555 mm
818 mm
170 mm
Hazırlık ve kapağın takılması
Kapağın sağdan sola açılabilmesi için cihazın gerekli ayarları orijinalinde önceden yapılmıştır (Şek. 2).
a) Kapak
Kapağın boyutları aşağıda belirtildiği gibi olmalıdır:
- Genişlik 595-598 mm
- Kalınlık 16-22 mm
X yüksekliği, cihazın bitişiğindeki mobilyanın
tabanına göre değişir (Şek. 3).
Page 82

82 electrolux
Şek. 3
16-22 mm
Ø 35 mm
14 mm
595-598 mm
X
416
mm
22±1,5 mm
b) Menteşeler
Menteşeleri takmak için, kapağın iç kısmında iki delik (çapı 35 mm, derinliği 12,5-14
mm - kapak mobilyasının derinliğine bağlı
olarak) açmak gereklidir. Orta noktaları birleştiren delikler arasındaki mesafenin 416
mm olması gerekir.
Kapağın üst kenarından deliğin orta noktası-
na kadar olan mesafe, cihazın bitişiğindeki
mobilyanın boyutuna bağlıdır.
Menteşeler, cihazla birlikte verilen 1 ve 2 ahşap vidaları (Şek. 4) ile kapağa takılır.
Şek. 4
Şek. 5
A
B
d) Mıknatıs karşılığı
Cihaz, manyetik kapanmalı bir kapak mekanizmasıyla önceden donatılmıştır.
Bu cihazın doğru şekilde çalışması için, A
mıknatıs karşılığının (çelik disk + kauçuk halka) kapağın iç kısmına vidalanması gerek-
mektedir. Pozisyonu, cihazdaki B mıknatısı-
na karşılık gelmelidir (Şek. 6).
Uyarı C vidasını çıkarmayın.
Şek. 6
A
B
2
1
c) Kapağın takılması
M5x15 vidalarını kullanarak menteşeleri cihaza takın. Menteşeler, kapağın kalınlığında-
ki olası eşitsizlikleri telafi edecek şekilde
ayarlanabilir.
Kapağı mükemmel şekilde hizalamak için, A
vidasını gevşetmek (Şek. 5), kapağı ayarlamak ve vidayı tekrar sıkmak gereklidir.
Uyarı B vidasını sökmeyin (Şek. 5).
C
Eğer kapağın soldan sağa doğru açılması
gerekiyorsa, E plakalarının, D mıknatısının
ve C plakasının pozisyonlarını ters çevirin. D
mıknatıs karşılığını ve A menteşelerini daha
önceden açıklandığı gibi takın (Şek. 7).
Uyarı B vidasını çıkarmayın.
Page 83

Şek. 7
D
A
C
E
B
ÇEVREYLE İLGİLİ BİLGİLER
Şu sembole sahip malzemeler geri
dönüştürülebilir
için uygun konteynerlere koyun.
Elektrikli ve elektronik cihaz atıklarının geri
dönüşümüne ve çevre ve insan sağlığının
korunmasına yardımcı olun. Ev atığı
sembolü
Ürünü yerel geri dönüşüm tesislerinize
gönderin ya da belediye ile irtibata geçin.
AEEE Yönetmeliğine Uygundur.
AMBALAJ MALZEMELERI
simgesi ile işaretli ambalaj malzemeleri
geri dönüşümlüdür.
>PE<=polietilen
>PS<=polistiren
>PP<=polipropilen
Bu, toplama kutularına uygun şekilde atmak
suretiyle geri dönüştürülebilecekleri anlamı-
na gelmektedir.
. Ambalajı geri dönüşüm
bulunan cihazları atmayın.
electrolux 83
EKOLOJIK TAVSIYELER
Su ve enerjiden tasarruf sağlamak ve çevrenin korunmasına yardımcı olmak için,
aşağıdaki faydalı bilgileri dikkate almanızı
öneririz:
• Normal kirli çamaşırlar, deterjandan, sudan ve zamandan tasarruf için ön yıkama
yapmadan yıkanabilirler (böylece çevre de
korunmuş olur!).
• Makine tam dolu iken daha ekonomik çalışır.
• Lekeler ile kirlerin bir kısmını, çamaşırları
makineye atmadan önce çıkartabilirsiniz;
çamaşırlar böylece daha düşük bir sıcaklıkta yıkanabilir.
• Deterjan miktarını, suyun sertliğine, kirin
derecesine ve yıkanan çamaşır miktarına
göre ayarlay
ın.
Page 84

www.electrolux.com/shop 132917411-A-282013
 Loading...