

Electrolux EWFLW65HSS0, EWFLW65IMB0, EWFLW65IRR0, EWFLW65HTS0, EWFLW65HIW0 Owner’s Manual

Use _ Care Guide
Wave-Touc}f MFront-Load Washer
Guia de uso y cuidado
Lavadora de carga frontal Wave-Touch Ms
Guide d'utilisation et d'entretien
L
aveuse _ chargement frontal Wave-Touch _<
Finding Information
Please read and save this guide
Thank you for choosing Electrolux, the new premium brand in home appliances. This Use & Care Guide
is part of our commitment to customer satisfaction and product quality throughout the life of your new
appliance.
We view your purchase as the beginning of a relationship. To ensure our ability to continue serving you,
please use this page to record important product information.
Keep a record for quick reference
Purchase date
Electrolux model number
Electrolux serial number
For toll-free telephone support in the U.S. and Canada: 1-877-4ELECTROLUX {1-877-435-3287)
For online support and product information visit http://www.electroluxappliances.com
Table of contents
Finding information ......................................................... 2
SAFETY ..................................................................... 3-5
Features .......................................................................... 6
Operating instructions ............................................... 7-24
• Getting Started ........................................................... 7
Normal Operating Sounds .......................................... 7
Operating Your Washer .......................................... 8-13
Cycle Selection .................................................... 14-18
Washing/Rinsing Temperature ............................. 19-20
Spin Speed ............................................................... 21
Soil Level .................................................................. 21
Options ................................................................ 22-24
Operating User interface Features .......................... 25-32
Saving Favorites .................................................. 26-27
Setting Preferences ............................................. 28-31
Other Features .......................................................... 32
Cycle Chart ................................................................... 33
Stain Removal Guide ............................................... 34-35
Stain Removal Procedures ....................................... 34
Stain Removal Suggestions ...................................... 35
Care & Cleaning ....................................................... 36-38
Solutions to Common Problems ............................. 39-42
Common Washing Problems ............................... 39-40
Service Prevention Checklist ............................... 41-42
Warranty information .................................................... 43
Notes ............................................................................ 44
©2008 Electrolux Major Appliances All rights reserved.
[mpoAant Safety Instructions
Recognize safety symbols, words and
labels
Your safety and the safety of others is very
important.
We have provided many important safety
messages in the Use and Care Guide, Installation
Instructions and on your appliance. Always read
and obey all safety messages.
Safety items throughout this manual are labeled
with a WARNING or OAUT[ON based on the risk
type as described below:
Safety
Do not store or use gasoline or other
flammable vapors and liquids in the
vicinity of this or any other appliance.
WHAT TO DO IF YOU SMELL GAS:
/_ WARNING This symbol alerts you to situa-
/_ CAUTION This symbol alerts you to situa-
tions that may cause serious body
harm, death or property damage.
tions that may cause bodily injury
or property damage.
Save these instructions for future reference.
,, Do not try to light any appliance.
,, Do not touch any electrical switch; do
not use any phone in your building.
,, Clear the room, building or area of all
occupants.
,, Immediately call your gas supplier from
a neighbor's phone. Follow the gas
supplier's instructions.
,, If you cannot reach your gas supplier,
call the fire department.
Installation and service must be
performed by a qualified installer,
service agency or the gas supplier.
Safety
PREVENT FiRE
• Do not wash items that have been previously
cleaned in, soaked in, or spotted with gaso-
line, cleaning solvents, kerosene, cooking oils,
waxes, etc. Do not store these items on or near
the washer. These substances give off vapors or
chemical reactions that could ignite or explode.
Do not put oily or greasy rags or clothing on top
of the washer. These substances give off vapors
that could ignite the materials.
Do not add gasoline, cleaning solvents, or other
flammable or explosive substances to the wash
water. These substances give off vapors that
could ignite or explode.
Under certain conditions, hydrogen gas may
be produced in a hot water system that has not
been used for 2 weeks or more. HYDROGEN
GAS IS EXPLOSIVE. If the hot water system has
not been used for such a period, before using
the washer, turn on all hot water faucets and let
the water flow from each for several minutes.
This will release any accumulated hydrogen gas.
Hydrogen gas is flammable; do not smoke or
use an open flame during this time.
Do not store or use gasoline or other flammable
vapors or liquids in the vicinity of this or any
other appliance.
Failure to comply with these warnings could
result in fire, explosion, serious bodily injury and/
or damage to the rubber or plastic parts of the
washer.
PROTECT CHILDREN
Do not allow children to play on or in the washer.
Close supervision of children is necessary when
the washer is used near children. As children
grow, teach them the proper, safe use of all ap-
pliances.
Destroy the carton, plastic bag and other pack-
ing materials after the washer is unpacked. Chil-
dren might use them for play. Cartons covered
with rugs, bedspreads or plastic sheets can
become airtight chambers.
Keep laundry products out of children's reach.
To prevent personal injury, observe all warnings
on product labels.
Before the washer is removed from service or
discarded, remove the washer door to prevent
accidental entrapment.
Failure to comply with these warnings could
result in serious personal injuries.
important Safety instructions, con't
PREVENT INJURY
• To prevent shock hazard and assure stability
during operation, the washer must be installed
and electrically grounded by a qualified service
person in accordance with local codes. Instal-
lation instructions are packed in the washer for
installer's reference. Refer to INSTALLATION
INSTRUCTIONS for detailed grounding proce-
dures. If the washer is moved to a new location,
have it checked and reinstalled by a qualified
service person.
• To prevent personal injury or damage to the
washer, the electrical power cord of the washer
must be plugged into a properly grounded and
polarized 3-prong outlet. The third grounding
prong must never be removed. Never ground the
washer to a gas pipe. Do not use an extension
cord or an adaptor plug.
• Follow package directions when using laundry
products. Incorrect usage can produce poison-
ous gas - resulting in serious injury or death.
• Do not combine laundry products for use in 1
load unless specified on the label.
• Do not mix chlorine bleach with ammonia or
acids such as vinegar.
Safety
PREVENT INJURY AND DAMAGE TO THE
WASHER
• To prevent serious personal injury and damage
to the washer:
• All repairs and servicing must be performed by
an authorized servicer unless specifically rec-
ommended in this Use & Care Guide. Use only
authorized factory parts.
• Do not tamper with controls.
• Do not install or store the washer where it will be
exposed to the weather.
• Do not install on carpet. Install washer on a solid
floor. It may be necessary to reinforce the floor to
prevent vibration or movement.
• To reduce the risk of electric shock, disconnect
this appliance from the power supply before
attempting any user maintenance. Turning the
controls to the OFF position does not disconnect
this appliance from the power supply.
• To prevent injury, do not reach into the washer
while parts are moving. Before loading, unload-
ing or adding items, push inthe cycle selector
knob and allow the drum to coast to a complete
stop before reaching inside.
• This washer is equipped with an electrical over-
load protector. The motor will stop if it becomes
overheated. The washer will automatically restart
after a cool down period of up to 30 minutes,
if the washer has not been manually turned off
during this time.
• Failure to comply with these warnings could
result in serious personal injuries.
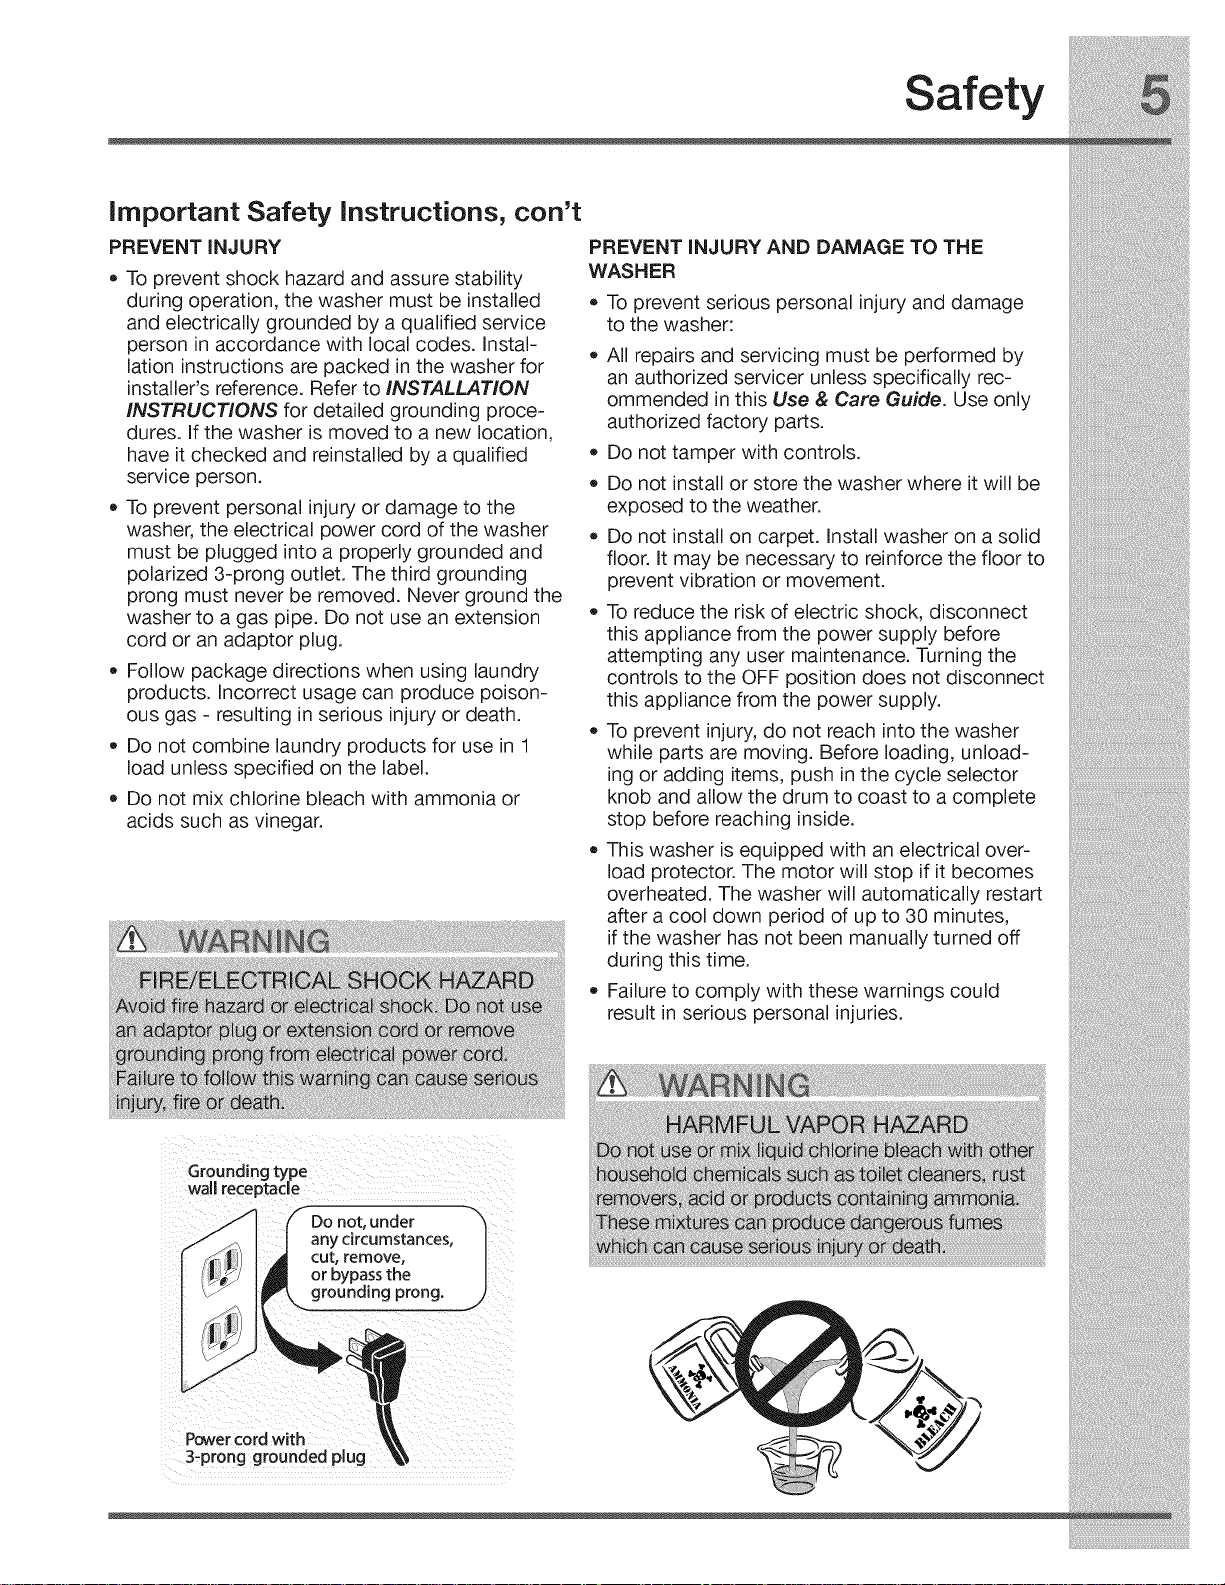
Grounding type
wall receptacle
/
Do not, under
any circumstances,
cut, remove,
Powercordw_th
3-pr;ng gr;_nded plug
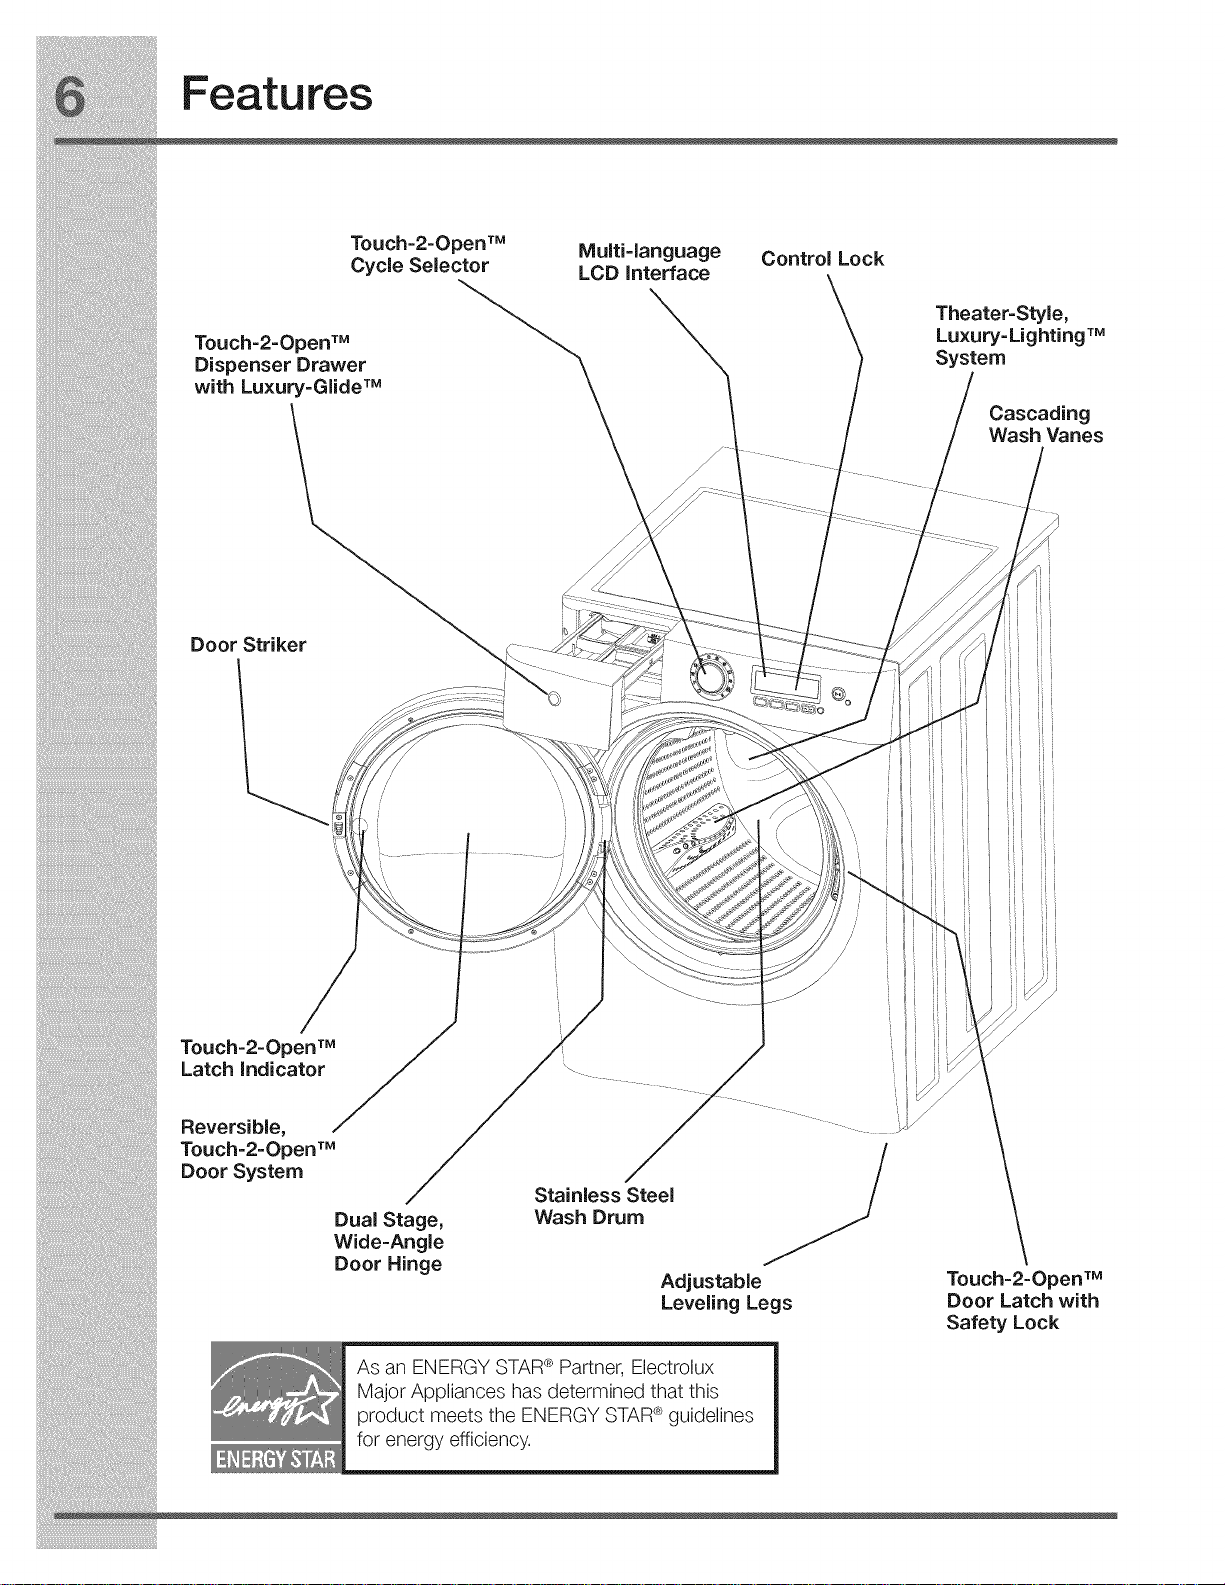
Features
Touch=2=Open_M
Cycle Selector
Multi-language
LCD interface
Control Lock
TOsUCh-2-OpenTM
penser Drawer
with Luxury=GlideTM
Door Strike
Theater=Style,
Luxury-Lighting TM
System
Cascading
Wash Vanes
/
Touch=2=OpenT_
Latch indicator
Reversible,
Touch-2-OpenT_
Door System q\..
Stainless Steel
Dual Stage, Wash Drum
Wide-Angle
Door Hinge
Adjustable
Leveling Legs
Touch-2-OpenTM
Door Latch with
Safety Lock
Getting Started
cobFs
Operating Instructions
normal casual
active
whites fast
heavy J delicate
duty
deep clean hand
sanitize _,ash
my spin
favorites only
wash
To run your washer, follow these basic steps:
1. Sort laundry into loads that can be washed
together. (See page 8.)
2. Prepare items for washing. (See page 8.)
3. Pretreat stains and heavy soil. (See page 9.)
4. Add laundry load to the washer. (See page 9.)
5. Add laundry products to the dispenser. (See
6. Select the appropriate cycle and settings for the
7. Start the washer. (See pages 12-13.)
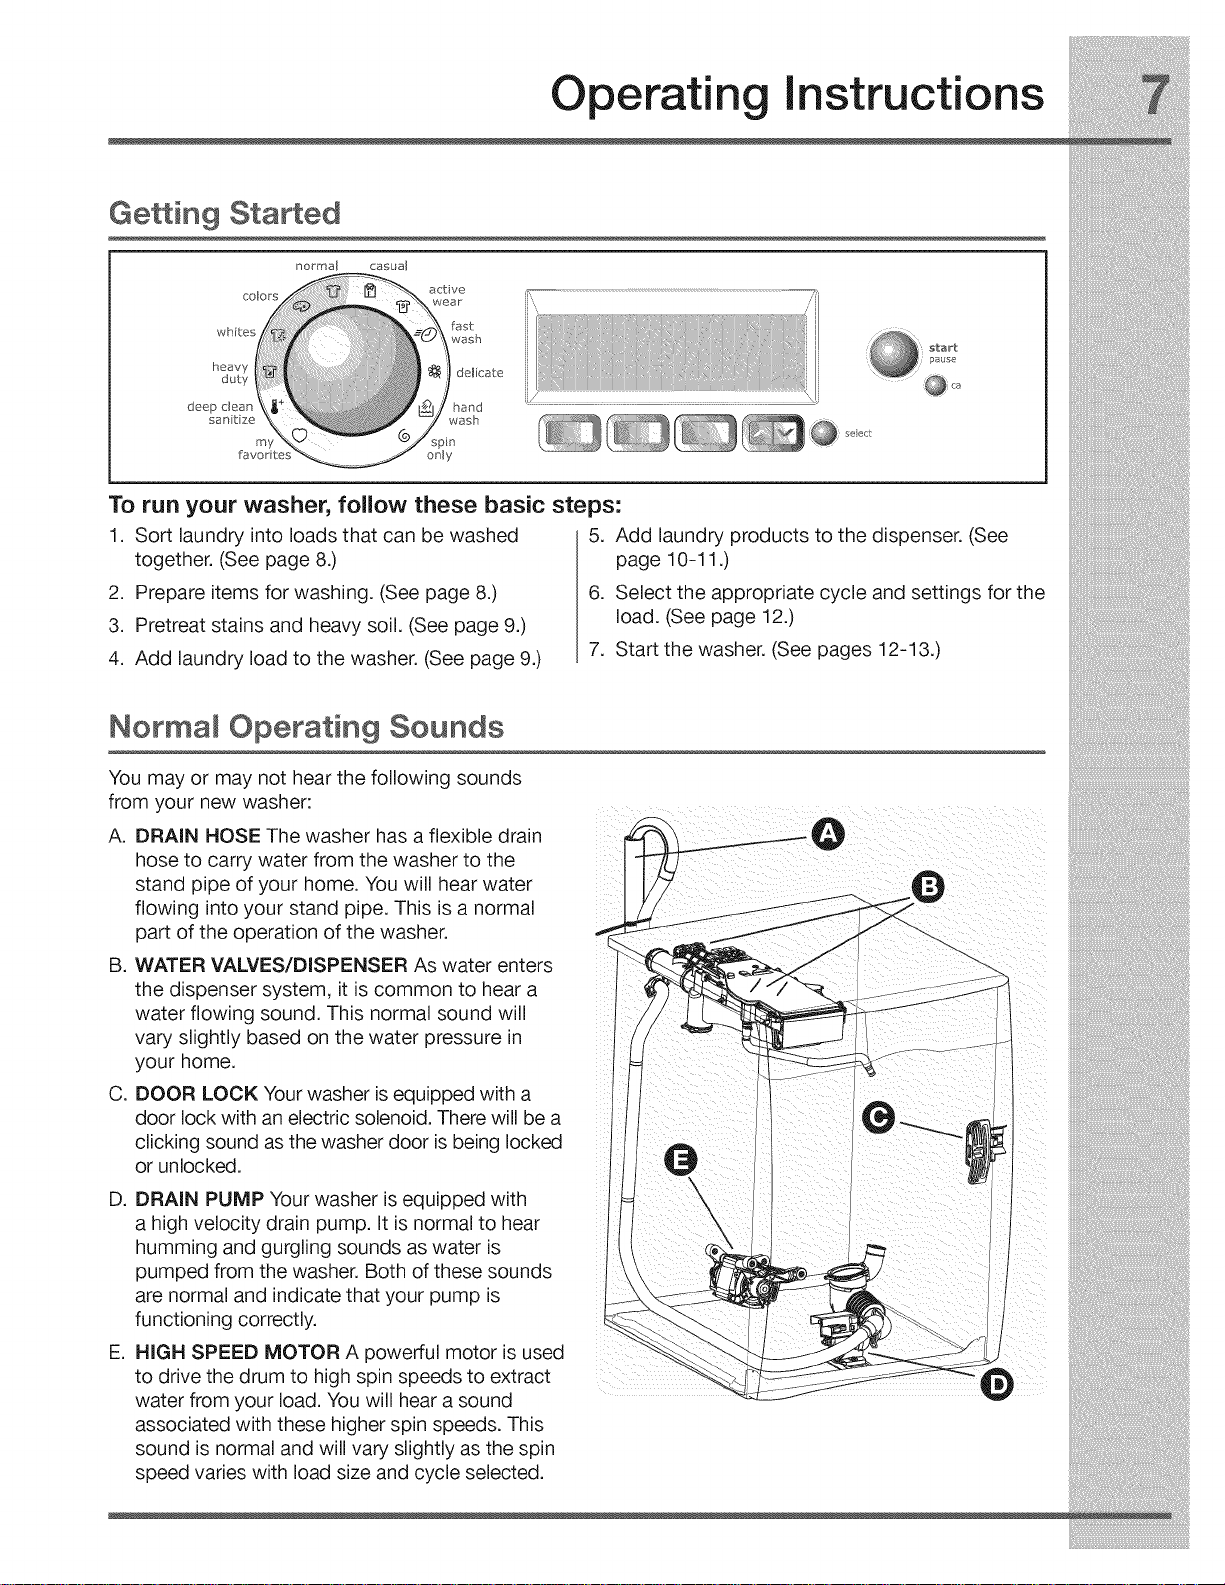
Normal Operating Sounds
You may or may not hear the following sounds
from your new washer:
A. DRAIN HOSE The washer has a flexible drain
hose to carry water from the washer to the
stand pipe of your home. You will hear water
flowing into your stand pipe. This is a normal
part of the operation of the washer.
B. WATER VALVES/DISPENSER As water enters
the dispenser system, it is common to hear a
water flowing sound. This normal sound will
vary slightly based on the water pressure in
your home.
C. DOOR LOCK Your washer is equipped with a
door lock with an electric solenoid. There will be a
clicking sound as the washer door is being locked
or unlocked.
page 10-11 .)
load. (See page 12.)
D. DRAIN PUMP Your washer is equipped with
a high velocity drain pump. It is normal to hear
humming and gurgling sounds as water is
pumped from the washer. Both of these sounds
are normal and indicate that your pump is
functioning correctly.
E. HIGH SPEED MOTOR A powerful motor is used
to drive the drum to high spin speeds to extract
water from your load. You will hear a sound
associated with these higher spin speeds. This
sound is normal and will vary slightly as the spin
speed varies with load size and cycle selected.

Operatin
Instructions
Operating Your Washer
BEFORE USING YOUR WASHER
Read the important instructions in this section of
the Use and Care Guide before operating your
washer.
OPERATING YOUR WASHER
1. Sort laundry into loads that can be
washed together.
Sort items by recommended cycle and water
temperature.
Separate white, light and colorfast items from
dark and non-colorfast items.
Separate items that shed lint from items that
attract lint. Casual, synthetic, knit, and cordu-
roy items will pick up lint from towels, rugs,
and chenille bedspreads.
Separate heavily soiled items from lightly
soiled items.
Separate lacy, sheer, loosely knit, or delicate
items from durable items.
Do not machine wash items containing fiber-
glass. Small particles of fiberglass left in the
drum may transfer to fabrics in other loads and
cause skin irritation.
2_
Prepare items for washing.
Empty pockets.
Brush off lint and dirt. Shake out rugs and
beach towels.
Close zippers, fasten hooks, tie strings and
sashes, and remove non-washable trims and
ornaments.
Mend rips and tears to prevent further damage
during washing.
Turn knit items inside out to prevent pilling.
Place delicate and small items such as bras,
hosiery and baby socks in a mesh bag.
(Mesh bag not included.)
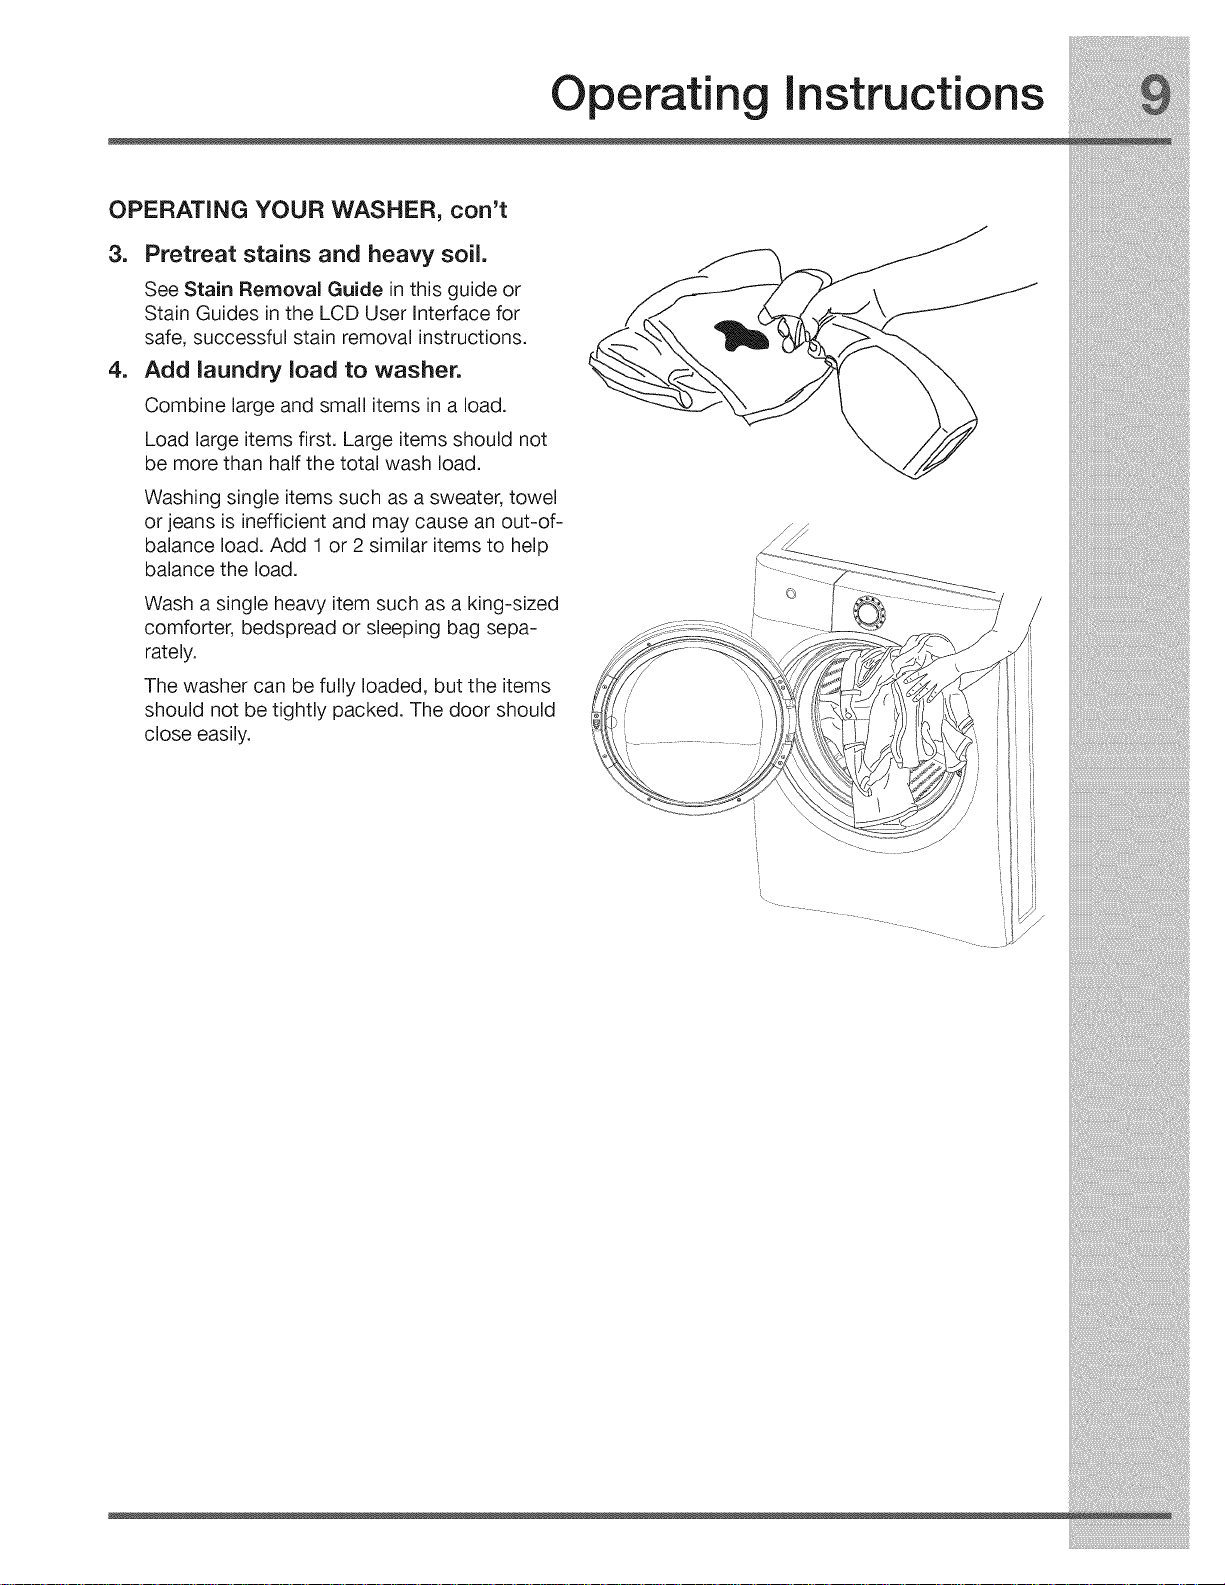
OPERATING YOUR WASHER, con't
3. Pretreat stains and heavy soil.
See Stain Removal Guide inthis guide or
Stain Guides in the LCD User Interface for
safe, successful stain removal instructions.
4. Add laundry load to washer.
Combine large and small items in a load.
Load large items first. Large items should not
be more than half the total wash load.
Washing single items such as a sweater, towel
or jeans is inefficient and may cause an out-of-
balance load. Add 1 or 2 similar items to help
balance the load.
Wash a single heavy item such as a king-sized
comforter, bedspread or sleeping bag sepa-
rately.
The washer can be fully loaded, but the items
should not be tightly packed. The door should
close easily.
Operating Instructions
Operatin
instructions
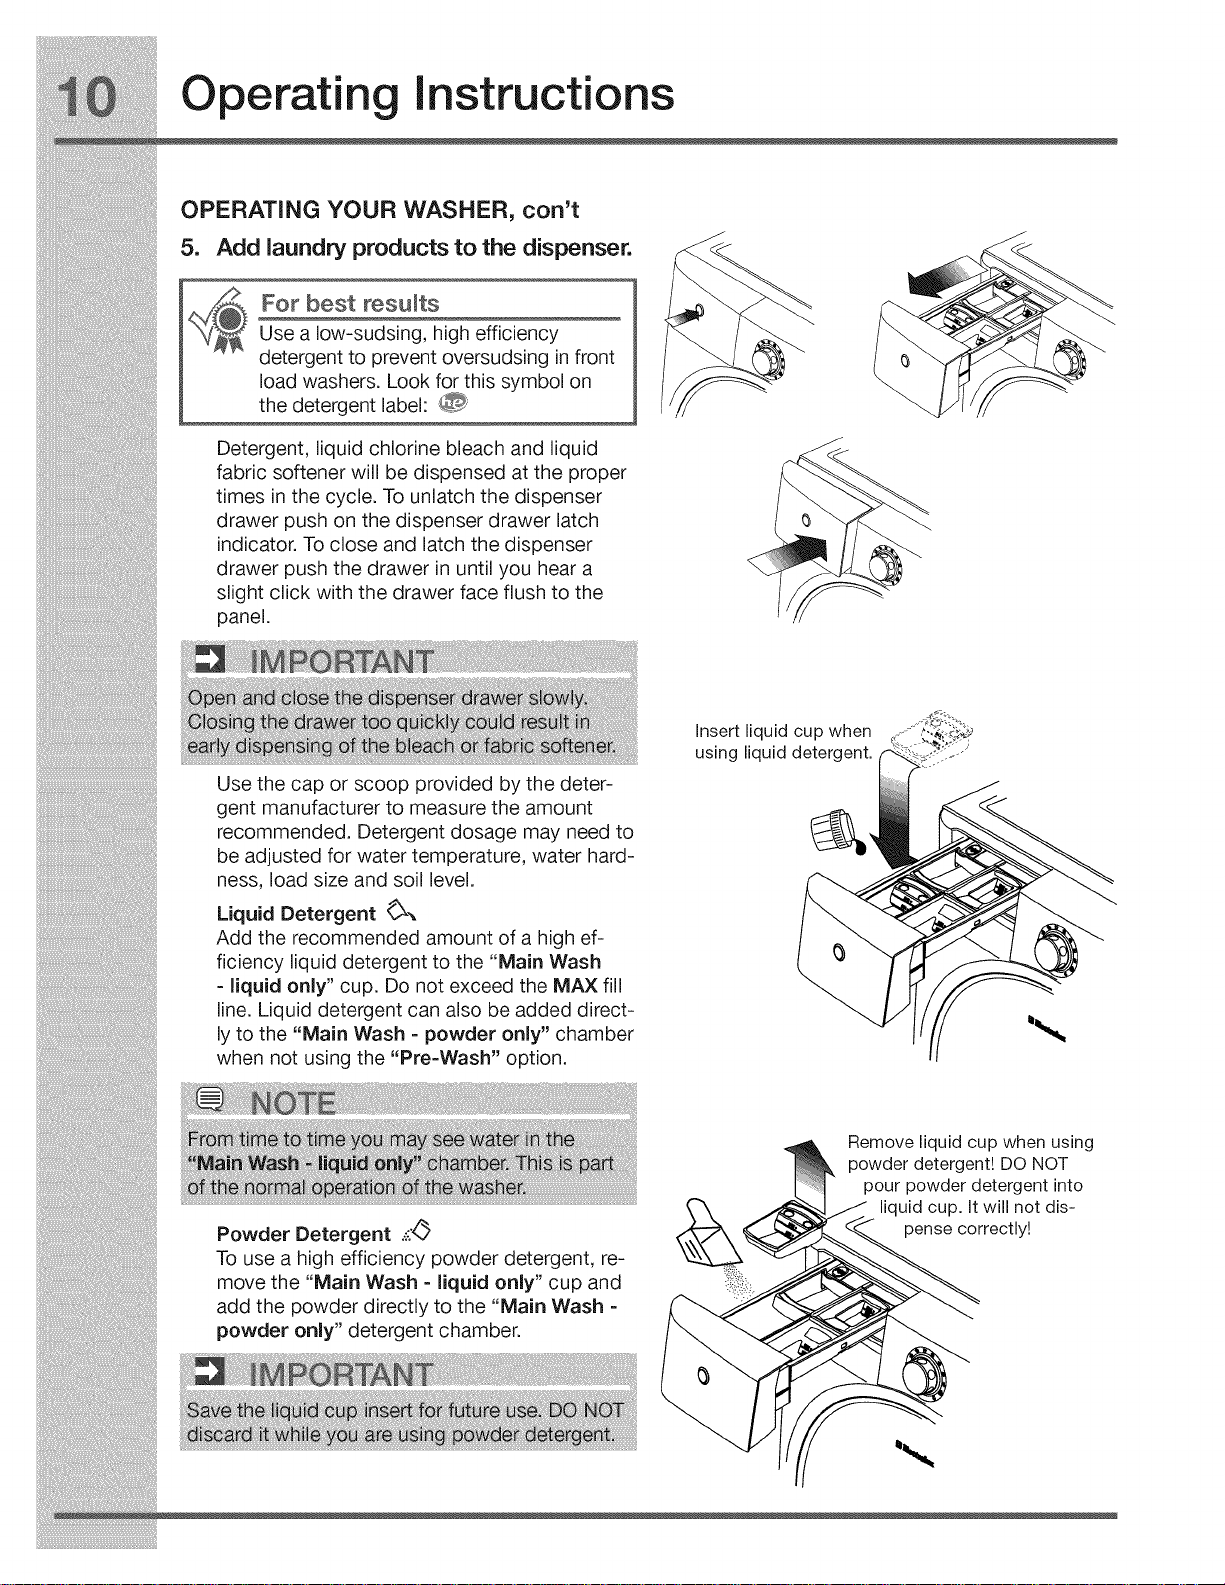
OPERATING YOUR WASHER, con't
5. Add laundry products to the dispenser.
For best results
Use a low-sudsing, high efficiency
detergent to prevent oversudsing in front
load washers. Look for this symbol on
the detergent label: 0
Detergent, liquid chlorine bleach and liquid
fabric softener will be dispensed at the proper
times in the cycle. To unlatch the dispenser
drawer push on the dispenser drawer latch
indicator. To close and latch the dispenser
drawer push the drawer in until you hear a
slight click with the drawer face flush to the
panel.
Use the cap or scoop provided by the deter-
gent manufacturer to measure the amount
recommended. Detergent dosage may need to
be adjusted for water temperature, water hard-
ness, load size and soil level.
Liquid Detergent _,,
Add the recommended amount of a high ef-
ficiency liquid detergent to the "Main Wash
=liquid only" cup. Do not exceed the MAX fill
line. Liquid detergent can also be added direct-
ly to the "Main Wash = powder only" chamber
when not using the "Pre-Wash" option.
Powder Detergent -::_
To use a high efficiency powder detergent, re-
move the "Main Wash =liquid only" cup and
add the powder directly to the "Main Wash =
powder only" detergent chamber.
insert liquid cup when
using liquid detergent.
Remove liquid cup when using
powder detergent! DO NOT
pour powder detergent into
liquid cup. It will not dis-
pense correctly!
Operating instructions
OPERATING YOUR WASHER, con't
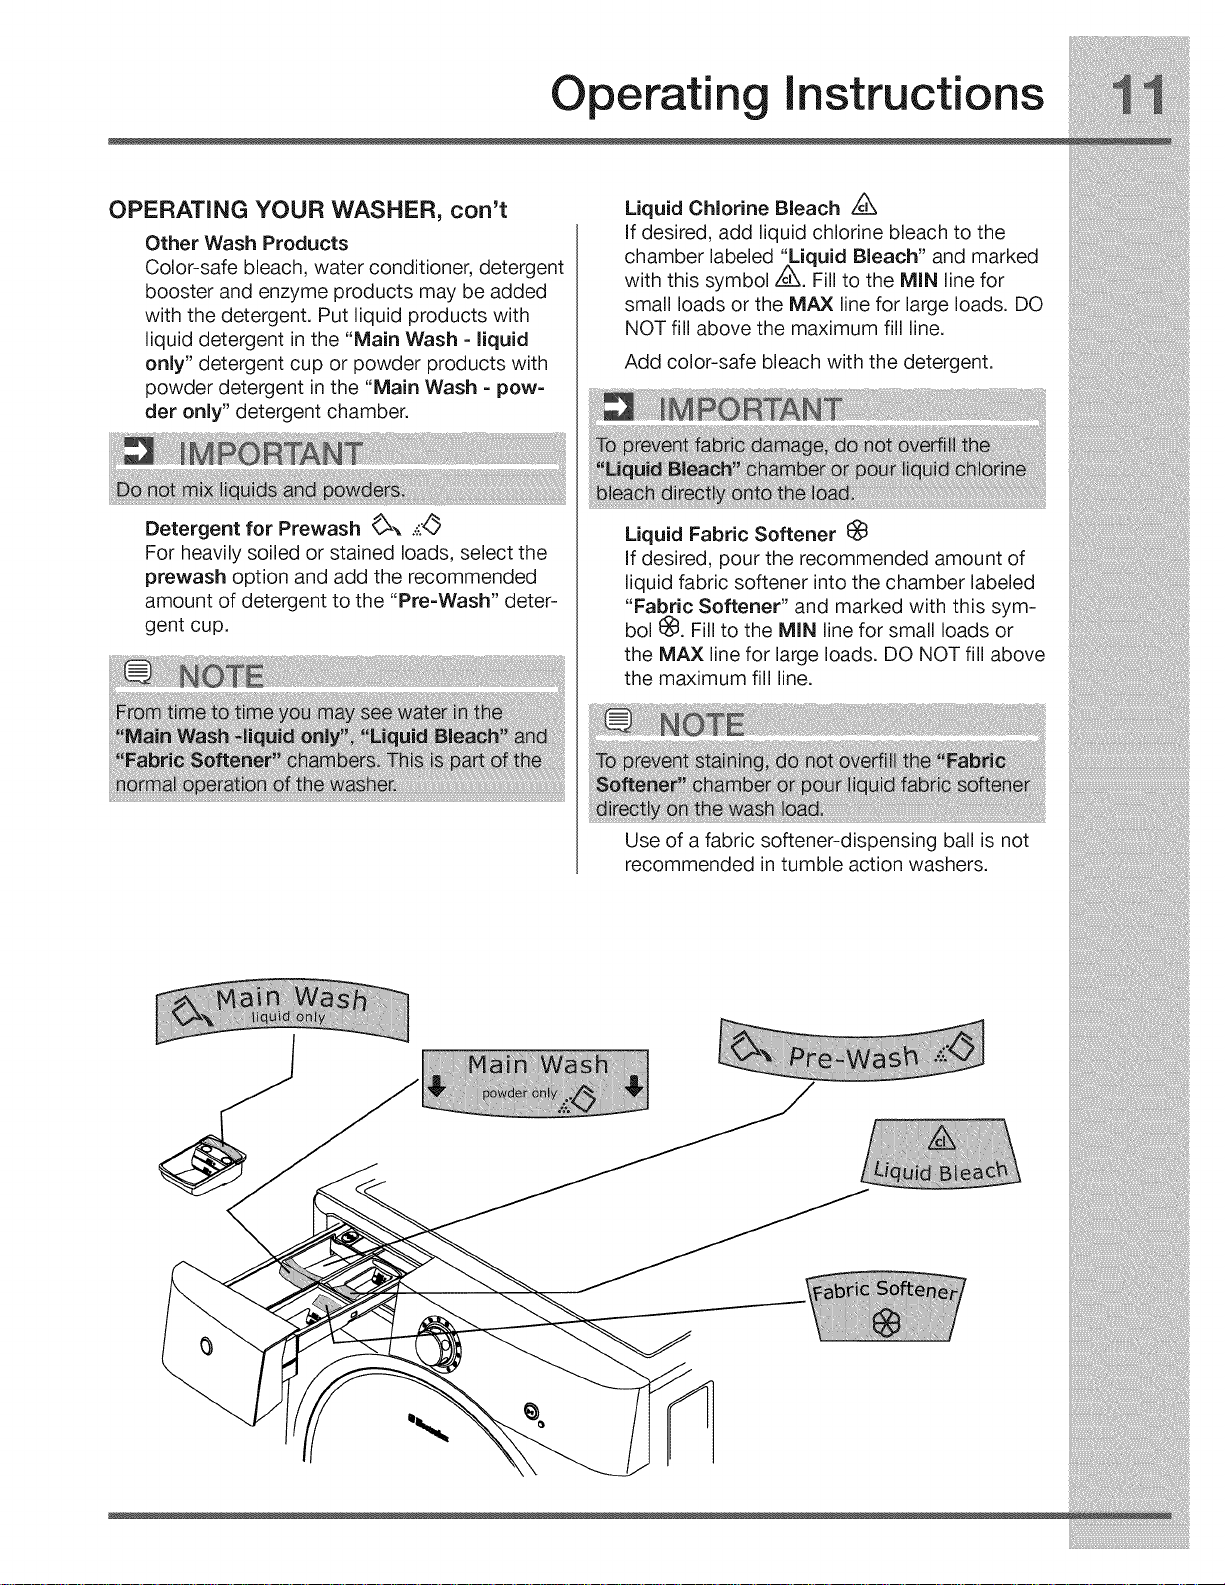
Other Wash Products
Color-safe bleach, water conditioner, detergent
booster and enzyme products may be added
with the detergent. Put liquid products with
liquid detergent in the "Main Wash - liquid
only" detergent cup or powder products with
powder detergent in the "Main Wash - pow-
der only" detergent chamber.
Detergent for Prewash _-, :::_
For heavily soiled or stained loads, select the
prewash option and add the recommended
amount of detergent to the "Pre-Wash" deter-
gent cup.
Liquid Chlorine Bleach Z_
if desired, add liquid chlorine bleach to the
chamber labeled "Liquid Bleach" and marked
with this symbol A_L_.Fill to the MIN line for
small loads or the MAX line for large loads. DO
NOT fill above the maximum fill line.
Add color-safe bleach with the detergent.
Liquid Fabric Softener
If desired, pour the recommended amount of
liquid fabric softener into the chamber labeled
"Fabric Softener" and marked with this sym-
bol I_. Fill to the MIN line for small loads or
the MAX line for large loads. DO NOT fill above
the maximum fill line.
Use of a fabric softener-dispensing ball is not
recommended in tumble action washers.
Operatin
Instructions
OPERATING YOUR WASHER, con't
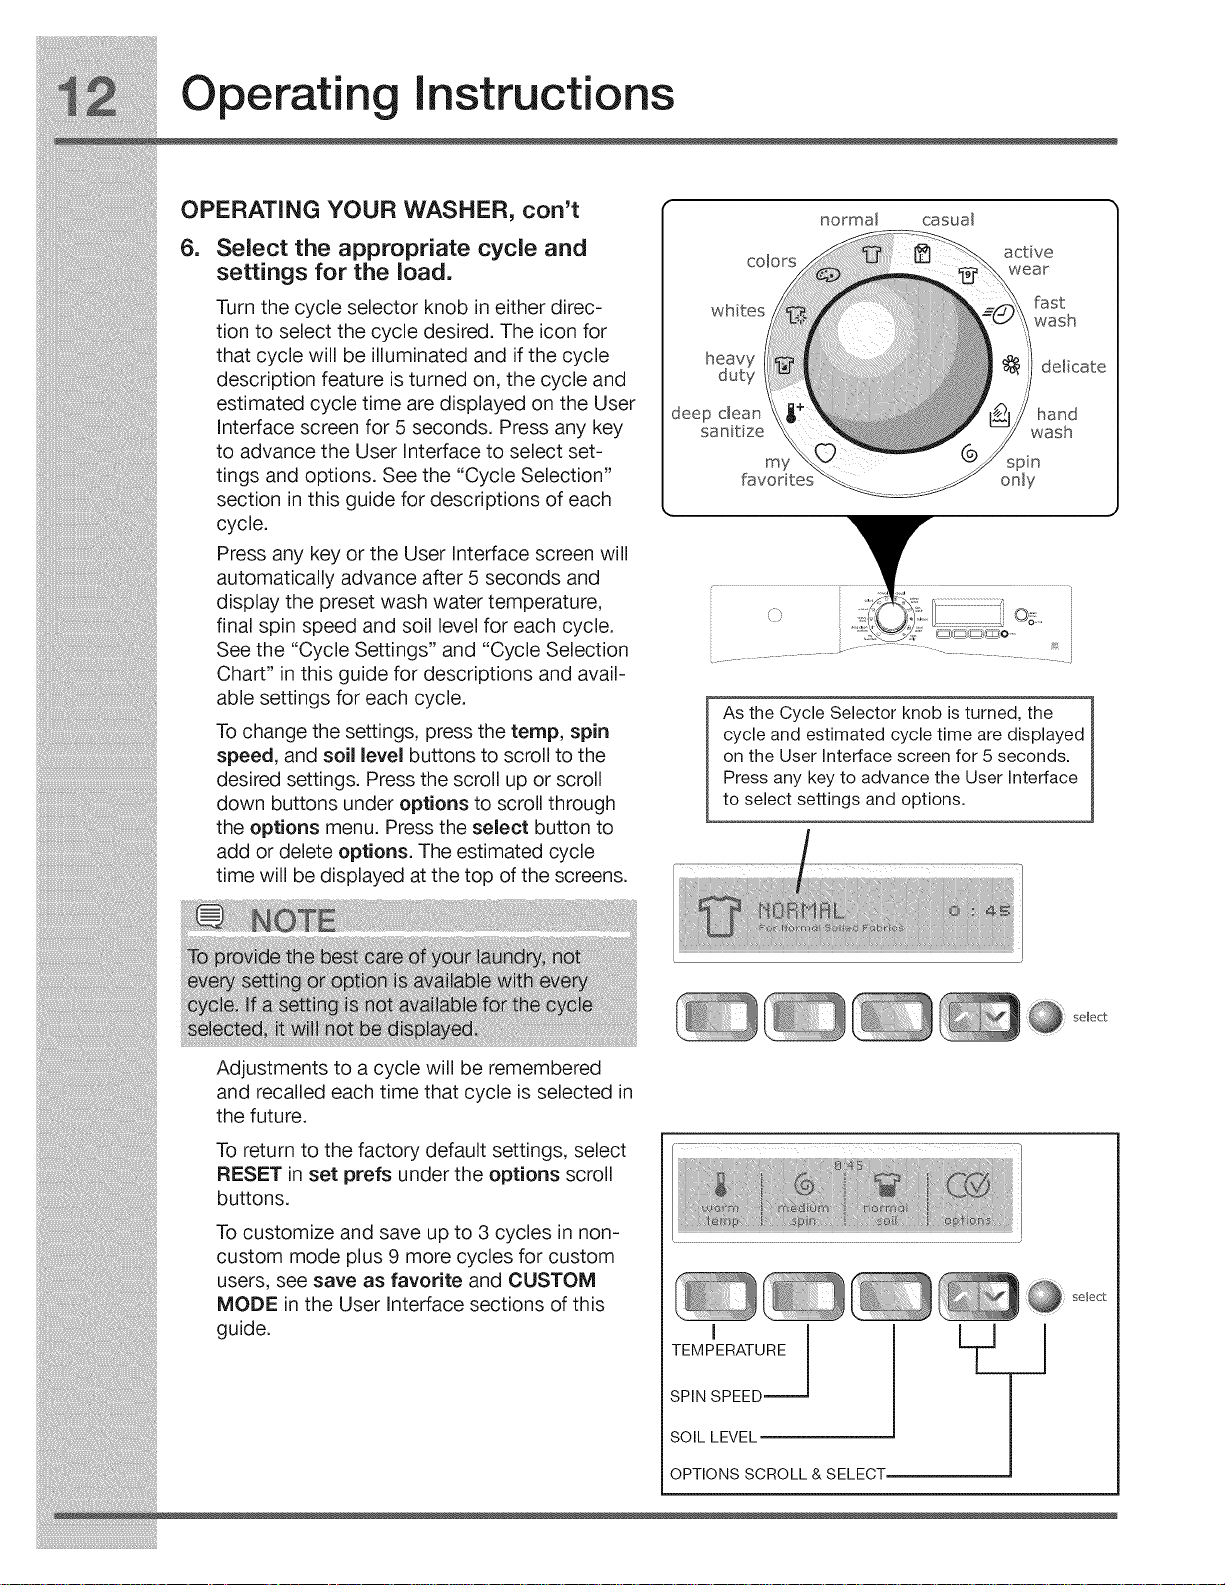
6_
Select the appropriate cycle and
settings for the load.
Turn the cycle selector knob in either direc-
tion to select the cycle desired. The icon for
that cycle will be illuminated and if the cycle
description feature is turned on, the cycle and
estimated cycle time are displayed on the User
Interface screen for 5 seconds. Press any key
to advance the User Interface to select set-
tings and options. See the "Cycle Selection"
section in this guide for descriptions of each
cycle.
Press any key or the User Interface screen will
automatically advance after 5 seconds and
display the preset wash water temperature,
final spin speed and soil level for each cycle.
See the "Cycle Settings" and "Cycle Selection
Chart" in this guide for descriptions and avail-
able settings for each cycle.
To change the settings, press the temp, spin
speed, and soil level buttons to scroll to the
desired settings. Press the scroll up or scroll
down buttons under options to scroll through
the options menu. Press the select button to
add or delete options. The estimated cycle
time will be displayed at the top of the screens.
normal casual
colors
whites
heavy
duty
deep dean
sanitize
my spin
favorites only
............................-.............. _.................. _J_:j
As the Cycle Selector knob is turned, the
cycle and estimated cycle time are displayed
on the User Interface screen for 5 seconds.
Press any key to advance the User Interface
to select settings and options.
active
wear
fast
wash
de[ cate
hand
wash
Adjustments to a cycle will be remembered
and recalled each time that cycle is selected in
the future.
To return to the factory default settings, select
RESET in set prefs under the options scroll
buttons.
To customize and save up to 3 cycles in non-
custom mode plus 9 more cycles for custom
users, see save as favorite and CUSTOM
MODE in the User Interface sections of this
guide.
select
TEMP_ERATURE [ L_
SPIN SPEED ----_
SOIL LEVEL
OPTIONS SCROLL & SELECT--
Operating Instructions
OPERATING YOUR WASHER, con't
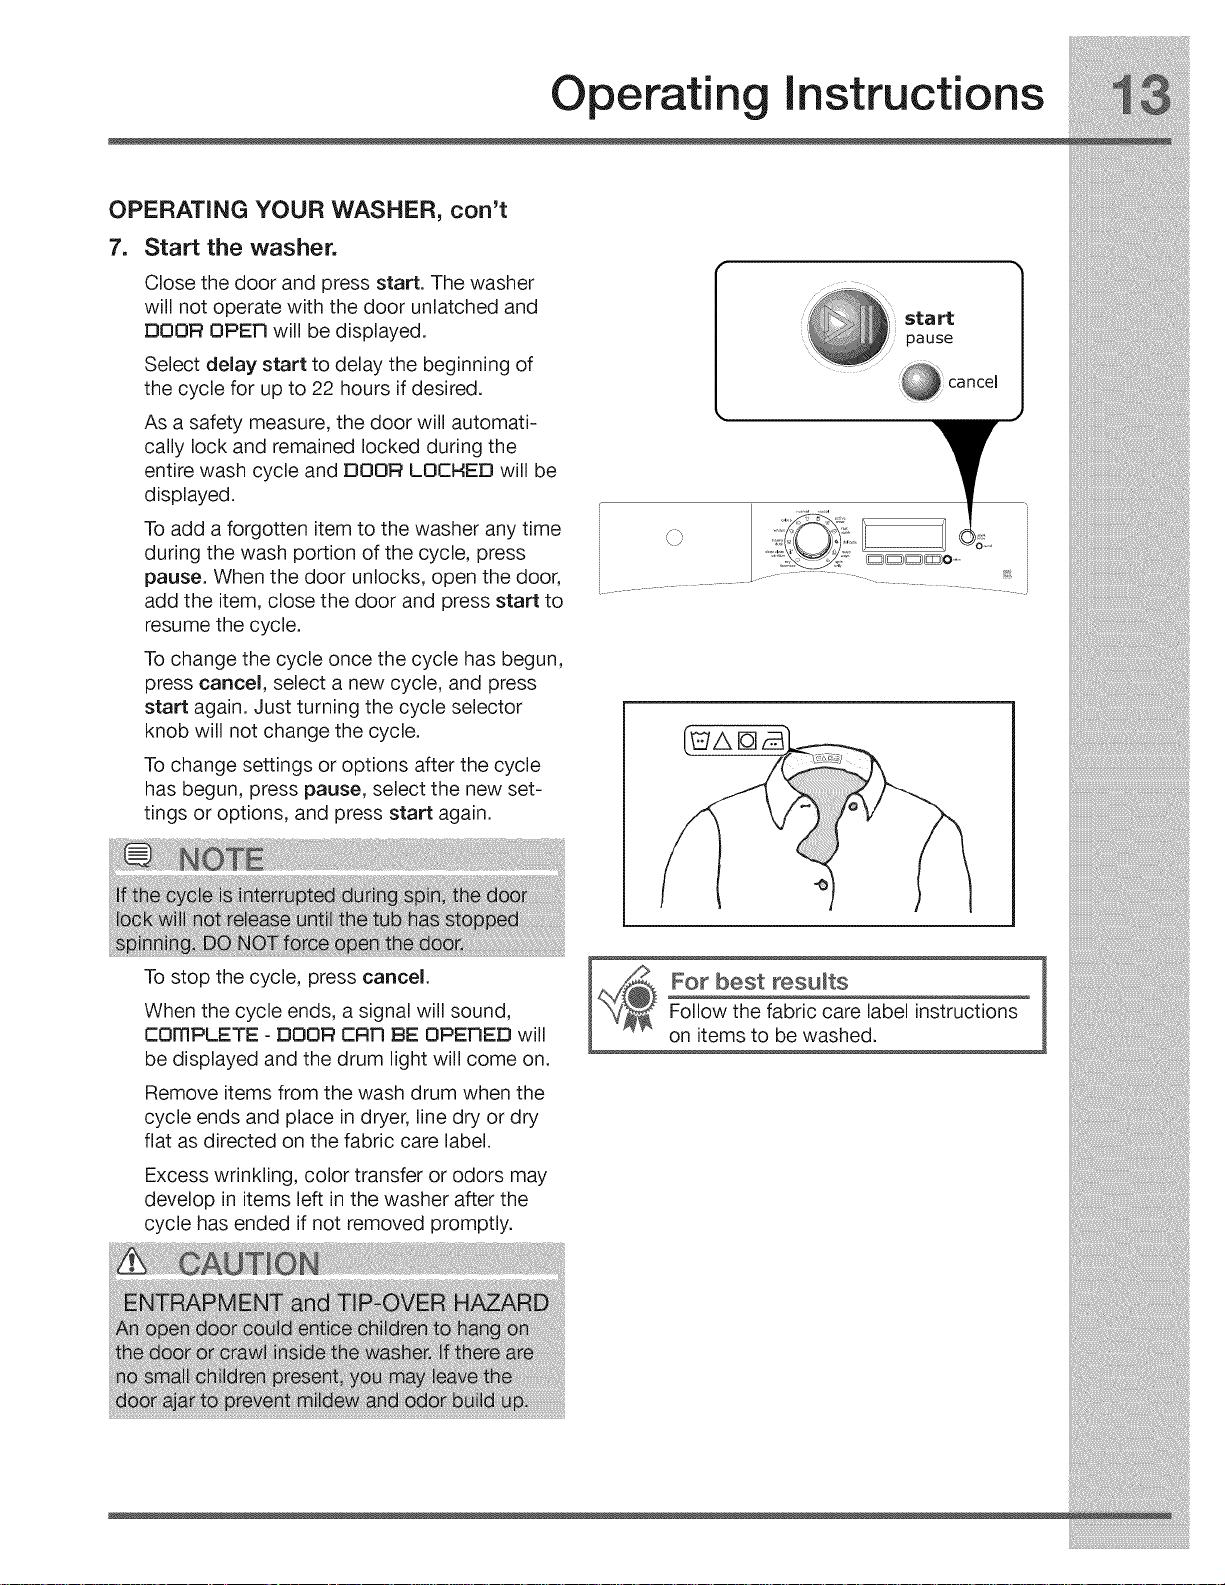
7. Start the washer.
Close the door and press start. The washer
will not operate with the door unlatched and
DOOR OPEn will be displayed.
Select delay start to delay the beginning of
the cycle for up to 22 hours if desired.
As a safety measure, the door will automati-
cally lock and remained locked during the
entire wash cycle and DOOR LOCI-IED will be
displayed.
To add a forgotten item to the washer any time i __ J
during the wash portion of the cycle, press _
When the door unlocks, open the door,pause.
add the item, close the door and press start to
resume the cycle.
To change the cycle once the cycle has begun,
press cancel, select a new cycle, and press
start again. Just turning the cycle selector
knob will not change the cycle.
To change settings or options after the cycle
has begun, press pause, select the new set-
tings or options, and press start again.
L
start 1
pause /
/
[]
To stop the cycle, press cancel.
When the cycle ends, a signal will sound,
cOmPLETE -DOOR CR1q BE OPENED will
be displayed and the drum light will come on.
Remove items from the wash drum when the
cycle ends and place in dryer, line dry or dry
flat as directed on the fabric care label.
Excess wrinkling, color transfer or odors may
develop in items left in the washer after the
cycle has ended if not removed promptly.
For best results
Follow the fabric care label instructions
on items to be washed.
Operatin
Instructions
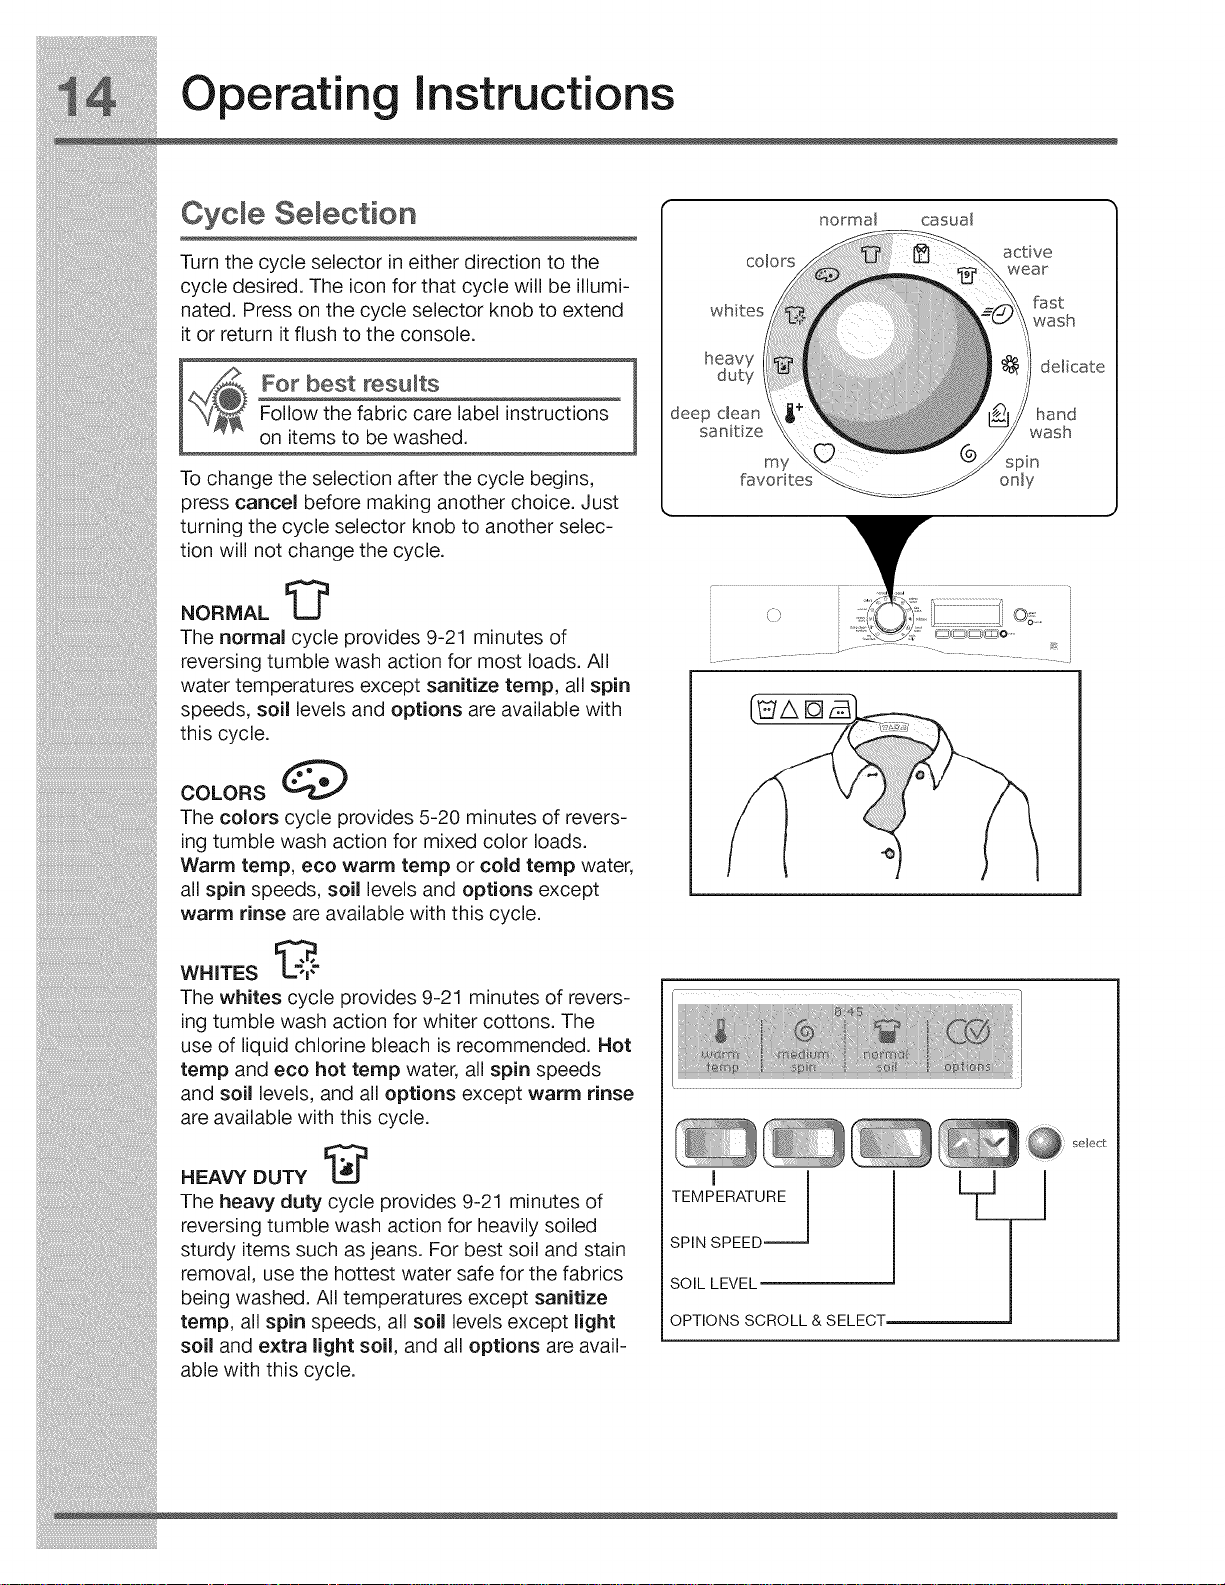
Cycle Selection
Turn the cycle selector in either direction to the
cycle desired. The icon for that cycle will be illumi-
nated. Press on the cycle selector knob to extend
it or return it flush to the console.
For best results
Follow the fabric care label instructions
on items to be washed.
To change the selection after the cycle begins,
press cancel before making another choice. Just
turning the cycle selector knob to another selec-
tion will not change the cycle.
NORMAL I:_
The normal cycle provides 9-21 minutes of
reversing tumble wash action for most loads. All
water temperatures except sanitize temp, all spin
speeds, soil levels and options are available with
this cycle.
COLORS @
The colors cycle provides 5-20 minutes of revers-
ing tumble wash action for mixed color loads.
Warm temp, eco warm temp or cold temp water,
all spin speeds, soil levels and options except
warm rinse are available with this cycle.
normal casual
colors
whites
heavy
duty
Jeep clean
sanit ze
my
.........................................._......... <,_j
active
wear
fast
wash
del cate
hand
wash
spn
only
WHITES _ _"_
The whites cycle provides 9-21 minutes of revers-
ing tumble wash action for whiter cottons. The
use of liquid chlorine bleach is recommended. Hot
temp and eco hot temp water, all spin speeds
and soil levels, and all options except warm rinse
are available with this cycle.
HEAVY DUTY I:_
The heavy duty cycle provides 9-21 minutes of
reversing tumble wash action for heavily soiled
sturdy items such as jeans. For best soil and stain
removal, use the hottest water safe for the fabrics
being washed. All temperatures except sanitize
temp, all spin speeds, all soil levels except light
soil and extra light soil, and all options are avail-
able with this cycle.
TEMPIERATURE I L_
SPIN SPEED -----_
SOIL LEVEL
OPTIONS SCROLL & SELECT--
 Loading...