

Page 1
EWF 1497 HDW2
EN Washing Machine User Manual
Page 2

www.electrolux.com2
CONTENTS
1. SAFETY INFORMATION....................................................................................3
2. SAFETY INSTRUCTIONS..................................................................................4
3. PRODUCT DESCRIPTION................................................................................ 5
4. CONTROL PANEL............................................................................................. 6
5. PROGRAMMES ................................................................................................ 8
6. CONSUMPTION VALUES................................................................................10
7. OPTIONS..........................................................................................................11
8. SETTINGS........................................................................................................13
9. BEFORE FIRST USE....................................................................................... 14
10. DAILY USE..................................................................................................... 14
11. HINTS AND TIPS........................................................................................... 18
12. CARE AND CLEANING..................................................................................19
13. TROUBLESHOOTING....................................................................................23
14. EMERGENCY DOOR OPENING................................................................... 26
15. TECHNICAL DATA.........................................................................................26
WE’RE THINKING OF YOU
Thank you for purchasing an Electrolux appliance. You’ve chosen a product that
brings with it decades of professional experience and innovation. Ingenious and
stylish, it has been designed with you in mind. So whenever you use it, you can
be safe in the knowledge that you’ll get great results every time.
Welcome to Electrolux.
Visit our website for:
Get usage advice, brochures, trouble shooter, service information:
www.electrolux.com
Register your product for better service:
www.registerelectrolux.com
Buy Accessories, Consumables and Original spare parts for your appliance:
www.electrolux.com/shop
CUSTOMER CARE AND SERVICE
Always use original spare parts.
When contacting our Authorised Service Centre, ensure that you have the
following data available: Model, PNC, Serial Number.
The information can be found on the rating plate.
Warning / Caution-Safety information
General information and tips
Environmental information
Subject to change without notice.
Page 3

1. SAFETY INFORMATION
Before the installation and use of the appliance, carefully
read the supplied instructions. The manufacturer is not
responsible if an incorrect installation and use causes
injuries and damages. Always keep the instructions with
the appliance for future reference.
1.1 Children and vulnerable people safety
• This appliance can be used by children aged from 8
years and above and persons with reduced physical,
sensory or mental capabilities or lack of experience
and knowledge if they have been given supervision or
instruction concerning use of the appliance in a safe
way and understand the hazards involved.
• Do not let children play with the appliance.
• Children of less than 3 years should be kept away
unless continuously supervised.
• Keep all packaging away from children.
• Keep all detergents away from children.
• Keep children and pets away from the appliance door
when it is open.
• Cleaning and user maintenance shall not be made by
children without supervision.
ENGLISH 3
1.2 General Safety
• Do not change the specification of this appliance.
• Obey the maximum load volume of 9 kg (refer to the
“Programme chart” chapter).
• The operating water pressure (minimum and
maximum) must be between 0,5 bar (0,05 MPa) and 8
bar (0,8 MPa).
• The ventilation openings in the base (if applicable)
must not be obstructed by a carpet.
• The appliance is to be connected to the water mains
using the new supplied hose-sets. Old hose sets must
not be reused.
Page 4

www.electrolux.com4
• If the supply cord is damaged, it must be replaced by
the manufacturer, its Authorised Service Centre or
similarly qualified persons in order to avoid a hazard.
• Before maintenance, deactivate the appliance and
disconnect the mains plug from the mains socket.
• Do not use water spray and steam to clean the
appliance.
• Clean the appliance with a moist soft cloth. Only use
neutral detergents. Do not use abrasive products,
abrasive cleaning pads, solvents or metal objects.
2. SAFETY INSTRUCTIONS
2.1 Installation
• Remove all the packaging and the
transit bolts.
• Keep the transit bolts. When you
move the appliance again you must
block the drum.
• Always be careful when you move the
appliance because it is heavy. Always
wear safety gloves.
• Do not install or use a damaged
appliance.
• Obey the installation instruction
supplied with the appliance.
• Do not install or use the appliance
where the temperature is less than 0
°C or where it is exposed to the
weather.
• Make sure that the floor where you
install the appliance is flat, stable,
heat resistant and clean.
• Make sure that there is air circulation
between the appliance and the floor.
• Adjust the feet to have the necessary
space between the appliance and the
carpet.
• Do not install the appliance where the
appliance door can not be fully
opened.
2.2 Electrical connection
• The appliance must be earthed.
• Always use a correctly installed
shockproof socket.
• Make sure that the electrical
information on the rating plate agrees
with the power supply. If not, contact
an electrician.
• Do not use multi-plug adapters and
extension cables.
• Make sure not to cause damage to
the mains plug and to the mains
cable. Should the mains cable need to
be replaced, this must be carried out
by our Authorised Service Centre.
• Connect the mains plug to the mains
socket only at the end of the
installation. Make sure that there is
access to the mains plug after the
installation.
• Do not touch the mains cable or the
mains plug with wet hands.
• Do not pull the mains cable to
disconnect the appliance. Always pull
the mains plug.
• Only for UK and Ireland: The
appliance has a 13 amp mains plug. If
it is necessary to change the fuse in
the mains plug, use a 13 amp ASTA
(BS 1362) fuse.
• This appliance complies with the
E.E.C. Directives.
2.3 Water connection
• Make sure not to cause damage to
the water hoses.
• Before you connect the appliance to
new pipes or pipes not used for a long
time, let the water flow until it is clean.
• The first time you use the appliance,
make sure that there is no leakage.
Page 5
2.4 Use
1
2
3
5
6
7
4
WARNING!
Risk of injury, electrical
shock, fire, burns or damage
to the appliance.
• Use this appliance in a household
only.
• Obey the safety instructions on the
detergent packaging.
• Do not put flammable products or
items that are wet with flammable
products in, near or on the appliance.
• Make sure that you remove all metal
objects from the laundry.
• Do not put a container to collect
possible water leakage under the
appliance. Contact the Authorised
Service Centre to ensure which
accessories can be used.
3. PRODUCT DESCRIPTION
3.1 Appliance overview
ENGLISH 5
• Do not touch the glass of the door
while a programme operates. The
glass can be hot.
2.5 Service
• To repair the appliance contact an
Authorised Service Centre.
• Use original spare parts only.
2.6 Disposal
WARNING!
Risk of injury or suffocation.
• Disconnect the appliance from the
mains supply.
• Cut off the mains cable and discard it.
• Remove the door catch to prevent
children and pets to get closed in the
appliance.
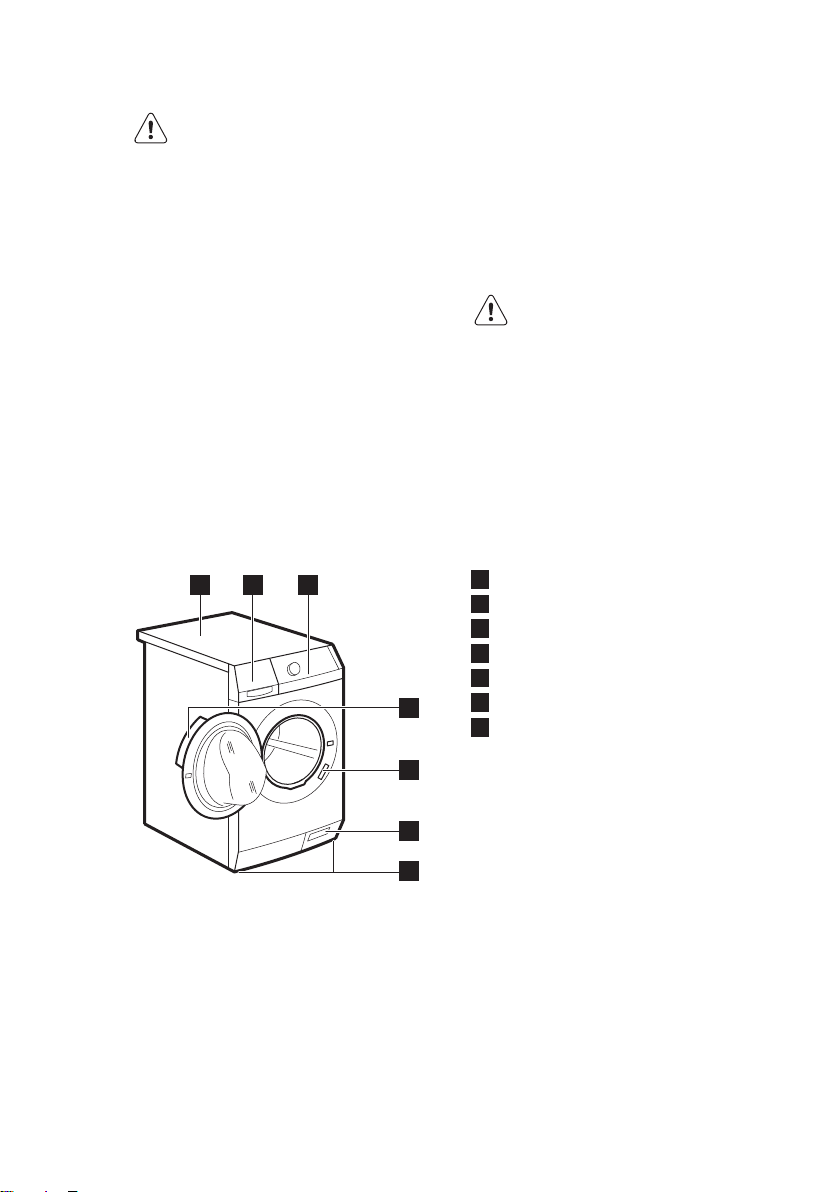
Worktop
1
Detergent dispenser
2
Control panel
3
Door handle
4
Rating plate
5
Drain pump filter
6
Feet for the appliance level
7
3.2 Fixing plate kit (4055171146)
Available from your authorized dealer.
If you install the appliance on a plinth,
secure the appliance in the fixing plates.
Read carefully the instructions supplied
with the accessory.
3.3 Installation on suspended
flooring
Suspended wooden floors are
particularly susceptible to vibration.
To help prevent vibration we recommend
you place a waterproof wood panel, at
least 15 mm thick under the appliance,
secured to at least 2 floor beams with
Page 6
Jeans
Delicates
Synthetics
Cottons
Rinse
Duvet
Spin/Drain
Sports
14 Min.
AutoOff
Refresh
Synthetics
Cottons
Wool/Handwash
TimeManager
MyFavourite
Start/Pause
Extra Rinse
Delay Start
Easy Iron
Prewash
Temperature
Spin
Cottons Eco
53 4
1012 11
8
7
9
6
1 2
www.electrolux.com6
screws, the wood panel must extend
beyond the front feet.
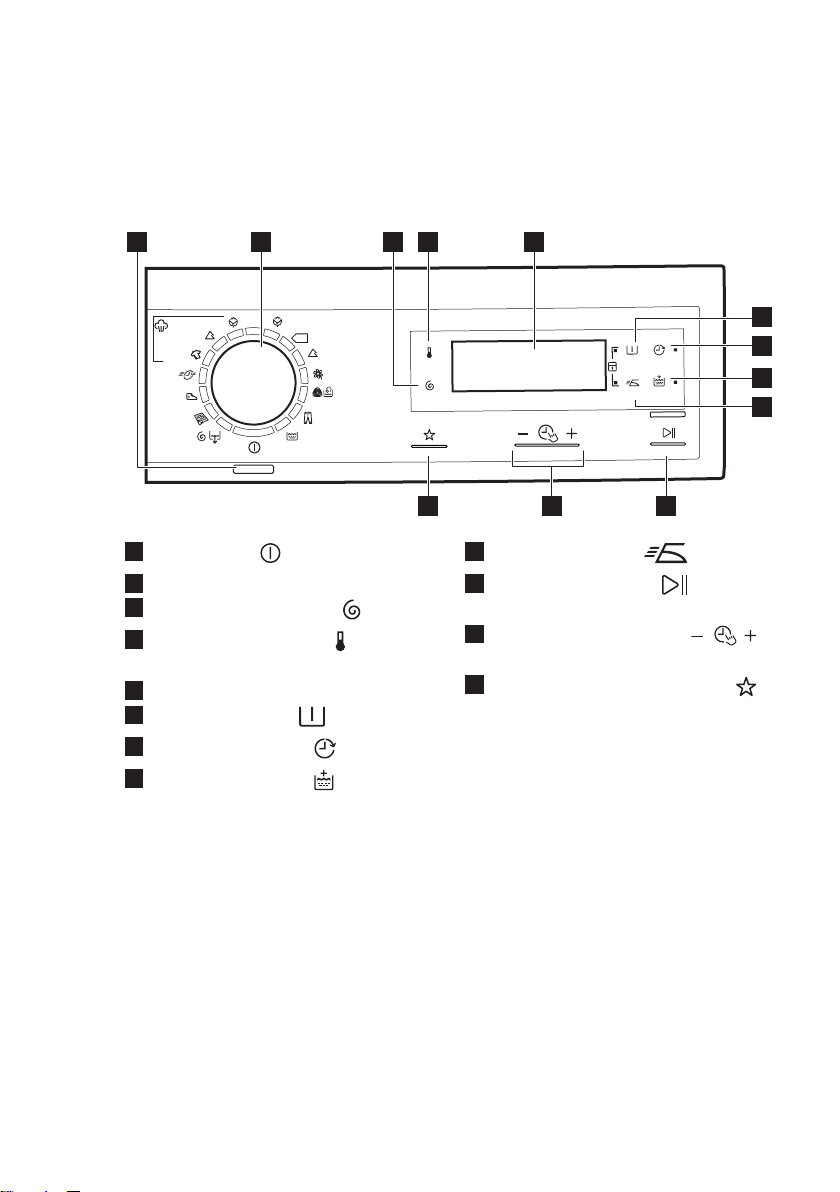
4. CONTROL PANEL
4.1 Control panel description
If possible install the appliance in one of
the corners of the room, where the floor
is more stable.
1
On Off button (AutoOff)
Programme knob
2
3
Spin reduction touchpad (Spin)
4
Temperature touchpad
(Temperature)
Display
5
6
Prewash touchpad (Prewash)
7
Delay start touchpad (Delay Start)
8
Extra rinse touchpad (Extra
Rinse)
9
Easy iron touchpad (Easy Iron)
10
Start/Pause touchpad (Start/
Pause)
11
Time Manager touchpads
(Time Manager)
12
Favourite programme touchpad
(My favourites)
Page 7
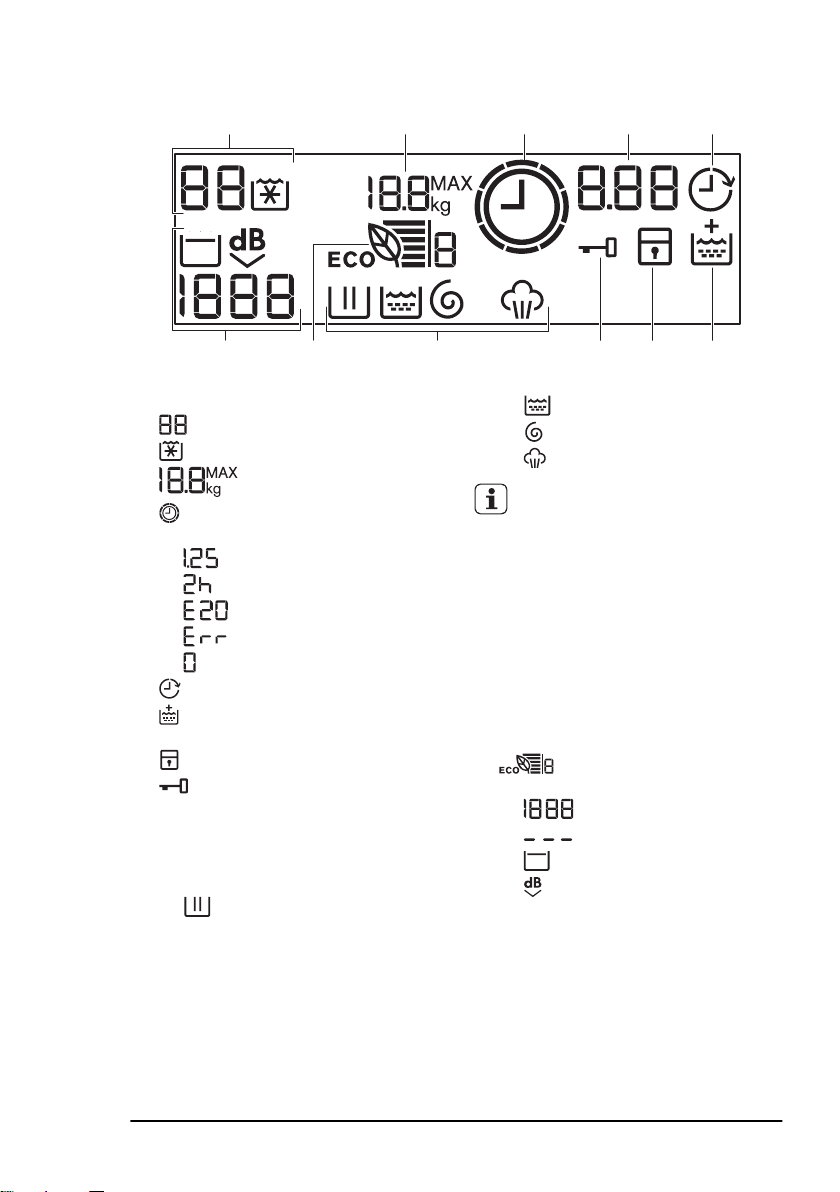
4.2 Display
A B C D E
FGHJ IK
ENGLISH 7
A) The Temperature area:
: Temperature indicator
: Cold water indicator
B) : Maximum laundry load
: Time Manager indicator
C)
D) The time area:
• : The programme duration
• : The delay start
• : The alarm codes
•
• : Programme is completed.
E) : The delay start indicator
F) : The permanent extra rinse
indicator
G) : The indicator of the child lock
H)
• You cannot open the appliance
• You can open the door only when
I) Washing indicators:
• : The washing phase
: The message of error
: The door locked indicator
door when the symbol is on.
the symbol goes off.
1)
• : The rinses phase
• : The spin phase
• : The steam phase
When a programme is
set, all the indicators of
the phases related to the
programme come on.
When the programme
starts, only the indicator
of the phase in operation
flashes.
When a phase is
complete the indicator of
the phase remains on.
When the programme is
completed, the symbol of
the last phase is on.
J) : The Eco Info indicator
K) The spin area:
• : The spin speed indicator
• : The no spin indicator
• : The Rinse Hold indicator
: The Extra Silent indicator
•
1)
Visible only when the door is open.
Page 8
www.electrolux.com8
5. PROGRAMMES
5.1 Programme Chart
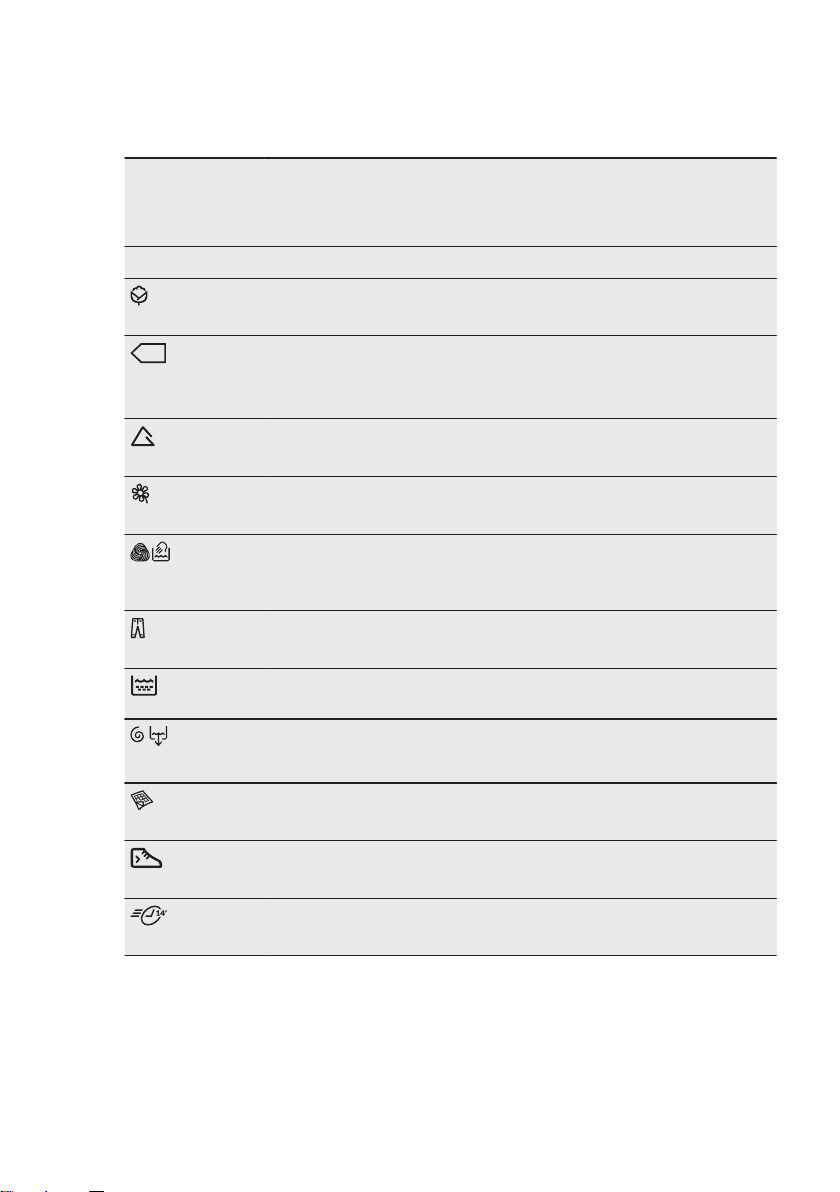
Programme
Temperature
range
Washing programmes
Cottons
90°C - Cold
Cottons
1)
Eco
60°C - 40°C
Synthetics
60°C - Cold
Delicates
40°C - Cold
Wool/
Handwash
40°C - Cold
Jeans
60°C - Cold
Rinse
Spin/
3)
Drain
Duvet
60°C - 30°C
Sports
30°C
14 Min.
30°C
Maximum
load
Maximum
spin speed
9 kg
1400 rpm
9 kg
1400 rpm
4 kg
1200 rpm
4 kg
1200 rpm
1.5 kg
1200 rpm
9 kg
1200 rpm
9 kg
1400 rpm
9 kg
1400 rpm
3 kg
800 rpm
2.5 kg
800 rpm
1.5 kg
800 rpm
Programme description
(Type of load and soil level)
White cotton and coloured cotton. Normal soil
and light soil.
White cotton and colour-fast cotton. Normal
soil. The energy consumption decreases and the
time of the washing programme is extended.
Synthetic items or mixed fabric items. Normal
soil.
Delicate fabrics as acrylics, viscose, polyest‐
er items. Normal soil.
Machine washable wool, hand washable wool
and delicate fabrics with «hand washing» care
2)
symbol.
Items in denim and jersey. Also for dark col‐
oured items.
To rinse and spin the laundry. All fabrics.
To spin the laundry and to drain the water in the
drum. All fabrics.
Special programme for one synthetic blanket,
duvet, bedspread and so on.
Synthetic and delicate items. Light soil items or
items to refresh.
Synthetic and mixed fabric items. Light soil and
items to freshen up.
Page 9
ENGLISH 9
Programme
Temperature
range
Maximum
load
Maximum
Programme description
(Type of load and soil level)
spin speed
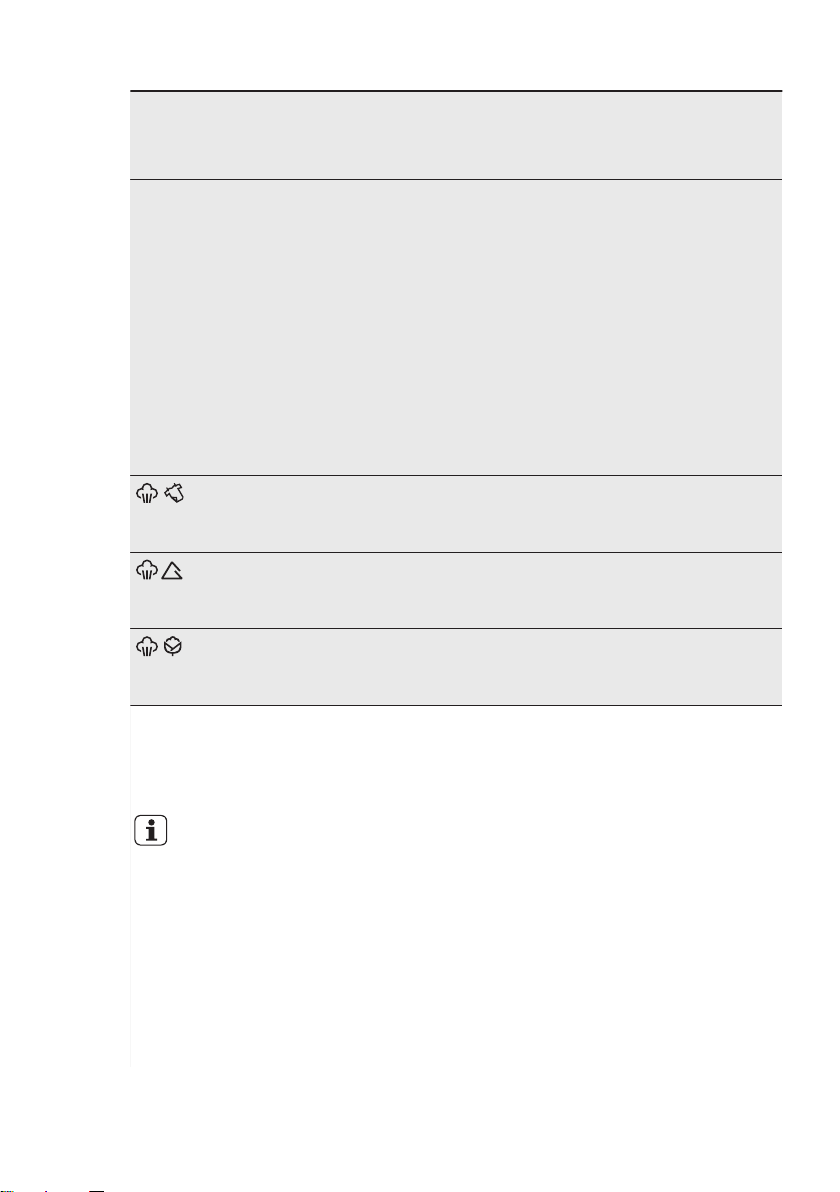
Steam programmes
4)
Steam can be used for dried, washed or worn once laundry. These programmes can
reduce creases and odours and make your laundry more soft.
Do not use any detergent. If necessary, remove stains by washing or using localized
stain removal.
Steam programmes do not perform any hygienic cycle.
Do not set a Steam programme with these types of items:
• items where it is not specified on the care label as being suitable for tumble dry‐
ing.
• all items with plastic, metal, wooden parts or alike.
Steam
Refresh
40°C
Steam
Synthetics
1.5 kg Steam programme for cotton and synthetic
items. This cycle removes odours from the laun‐
5)
dry.
1.5 kg Steam programme for synthetic items. This cy‐
cle helps to dewrinkle the laundry.
40°C
Steam
Cottons
1.5 kg Steam programme for cottons. This cycle helps
to dewrinkle the laundry.
40°C
1)
Standard programmes for the Energy Label consumption values. According to regu‐
lation 1061/2010, these programmes are respectively the «Standard 60°C cotton pro‐
gramme» and the «Standard 40°C cotton programme». They are the most efficient pro‐
grammes in terms of combined energy and water consumption for washing normally soiled
cotton laundry.
The water temperature of the washing phase may differ from the temperature
declared for the selected programme.
2)
During this cycle the drum rotates slowly to ensure a gentle washing. It can seem that the
drum doesn't rotate or doesn't rotate properly. Consider this as a normal functioning of the
appliance.
3)
Set the spin speed. Make sure it agrees with the laundry. If you set No Spin option the
only drain phase is available.
4)
If you set a Steam programme with dried laundry, at the end of the cycle the laundry
could be humid. It is better to expose the items to the fresh air for about 10 minutes to let
the humidity dry. When the programme is completed, quickly remove the laundry from the
drum. After a steam cycle, items may to be ironed anyway, but with less effort!
5)
Steam does not remove animal odours.
Page 10
www.electrolux.com10
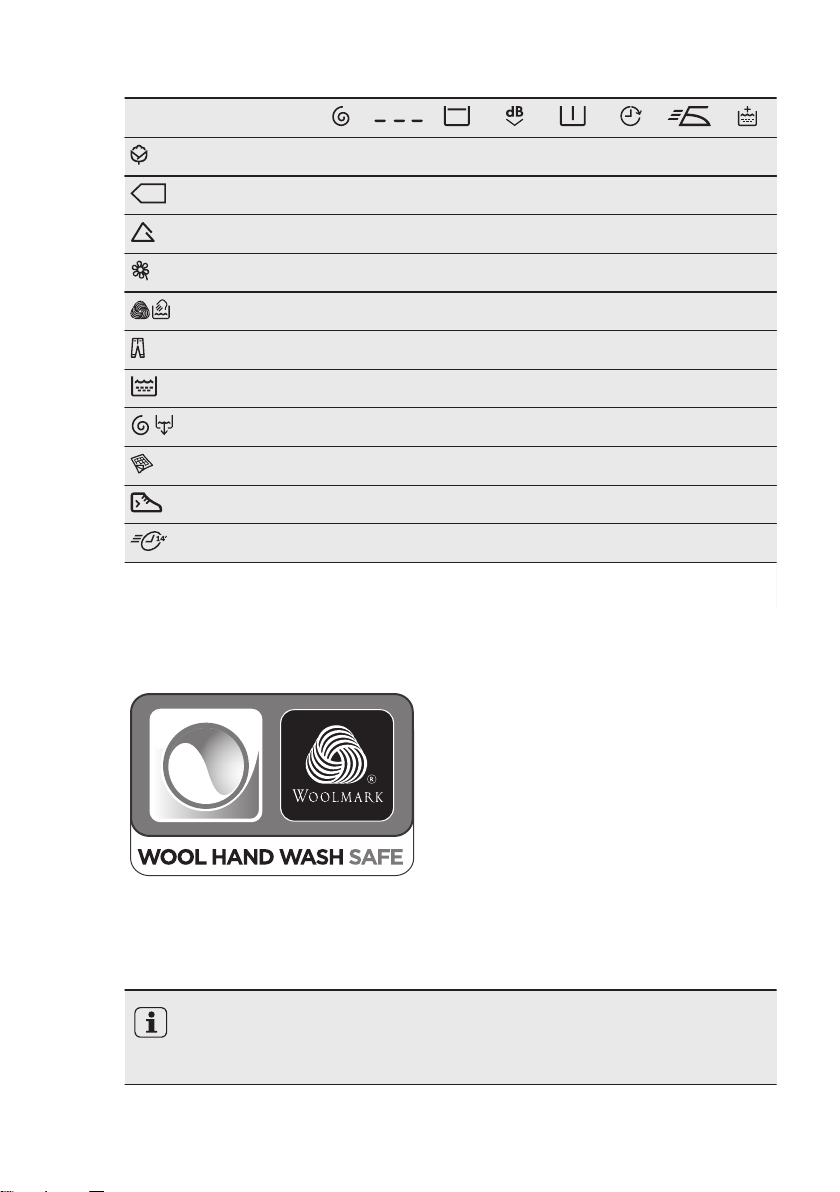
Programme options compatibility
Programme
■ ■ ■ ■ ■ ■ ■ ■
■ ■ ■ ■ ■ ■
■ ■ ■ ■ ■ ■ ■ ■
■ ■ ■ ■ ■ ■ ■
■ ■ ■ ■ ■
■ ■ ■ ■ ■ ■
■ ■ ■ ■ ■
1)
1)
Set the spin speed. Make sure it agrees with the laundry. If you set No Spin option the
only drain phase is available.
■ ■ ■
■ ■
■ ■ ■
■ ■ ■ ■
5.2 Woolmark Apparel Care Blue
The wool wash cycle of this machine has
been approved by The Woolmark
6. CONSUMPTION VALUES
Company for the washing of wool
garments labelled as «hand wash»
provided that the garments are washed
according to the instructions issued by
the manufacturer of this washing
machine. Follow the garment care label
for drying and other laundry instructions.
M1230
In UK, Eire, Hong Kong and India the
Woolmark symbol is a certification
trademark.
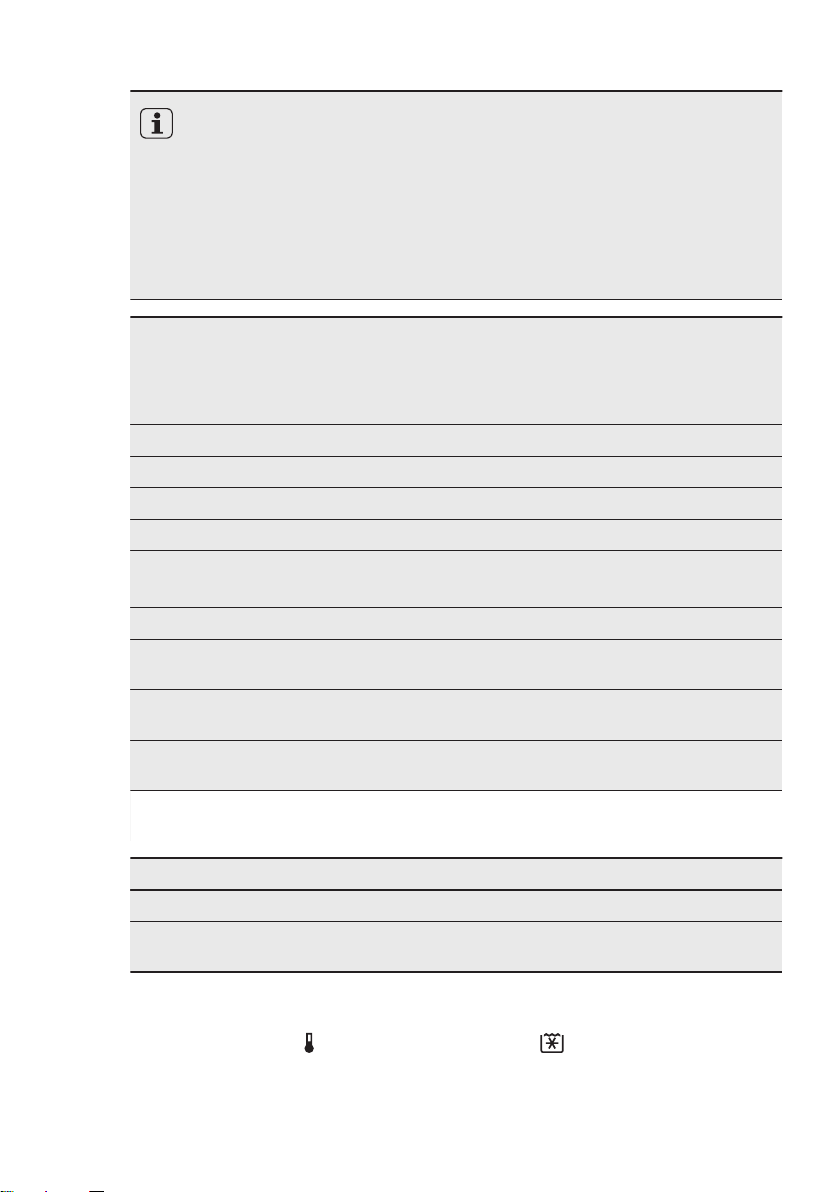
The data of this table are approximate. Different causes can change the
data: the quantity and type of laundry, the water and ambient tempera‐
ture.
Page 11
ENGLISH 11
At programme start the display shows the duration programme for the
maximum load capacity.
During the washing phase the programme duration is automatically cal‐
culated and can be greatly reduced if the laundry load is lower than the
maximum load capacity (e.g. Cotton 60°C, maximum load capacity 9 kg,
the programme duration exceeds 2 hours; real load 1 kg, the programme
duration don’t reach 1 hour).
When the appliance is calculating the real programme duration a dot
blinks in the display.
Programmes Load
Cottons 60 °C 9 1.68 71 180 52
Cottons 40 °C 9 1.05 71 175 52
Synthetics 40 °C 4 0.65 52 110 35
Delicates 40 °C 4 0.70 63 91 35
Wool/Handwash
2)
30 °C
Standard cotton programmes
Standard 60 °C
cotton
Standard 60 °C
cotton
Standard 40 °C
cotton
1)
At the end of spin phase.
2)
Not available for some models.
The information given in the chart above are in compliance with the EU Commission
regulation 1015/2010 implementing directive 2009/125/EC.
(kg)
Off Mode (W) Left On Mode (W)
0,05 0,05
Energy
consump‐
tion (kWh)
1.5 0.35 57 58 30
9 1.05 57 229 52
4.5 0.75 51 173 52
4.5 0.66 51 171 52
Water con‐
sumption
(litre)
Approxi‐
mate pro‐
gramme
duration
(minutes)
Remaining
moisture
1)
(%)
7. OPTIONS
7.1 Temperature
Set this option to change the default
temperature.
Indicator = cold water.
The display shows the set temperature.
Page 12
www.electrolux.com12
7.2 Spin
With this option you can decrease the
default spin speed.
The display shows the indicator of the
set speed.
Additional spin options:
No Spin
• Set this option to remove all spin
phases.
• Set it for very delicate fabrics.
• The rinse phase uses more water for
some washing programmes.
• The display shows the indicator
.
Rinse Hold
• Set this option to prevent the laundry
creases.
• The washing programme stops with
the water in the drum. The drum turns
regularly to prevent the laundry
creases.
• The door stays locked. You must
drain the water to unlock the door.
• The display shows the indicator .
To drain the water refer to
‘At the end of the
programme’.
Extra Silent
• Set this option to remove all spin
phases and to perform a silent
washing.
• The rinse phase uses more water for
some washing programmes.
• The washing programme stops with
the water in the drum. The drum turns
regularly to prevent the laundry
creases.
• The door stays locked. You must
drain the water to unlock the door.
• The display shows the indicator .
To drain the water refer to
‘At the end of the
programme’.
7.3 Prewash
With this option you can add a prewash
phase to a washing programme.
Use this option for heavy soil.
When you set this option the programme
duration increases.
The related indicator comes on.
7.4 Easy Iron
The appliance carefully washes and
spins the laundry to prevent the creases.
The appliance decreases the spin speed,
uses more water and adapts the
programme duration to the type of
laundry.
The related indicator comes on.
7.5 Delay Start
With this option you can delay the start of
a programme from 30 minutes to 20
hours.
The display shows the related indicator.
7.6 Extra Rinse
With this option you can add some rinses
to a washing programme.
Use this option for persons allergic to
detergents and in areas where the water
is soft.
The related indicator comes on.
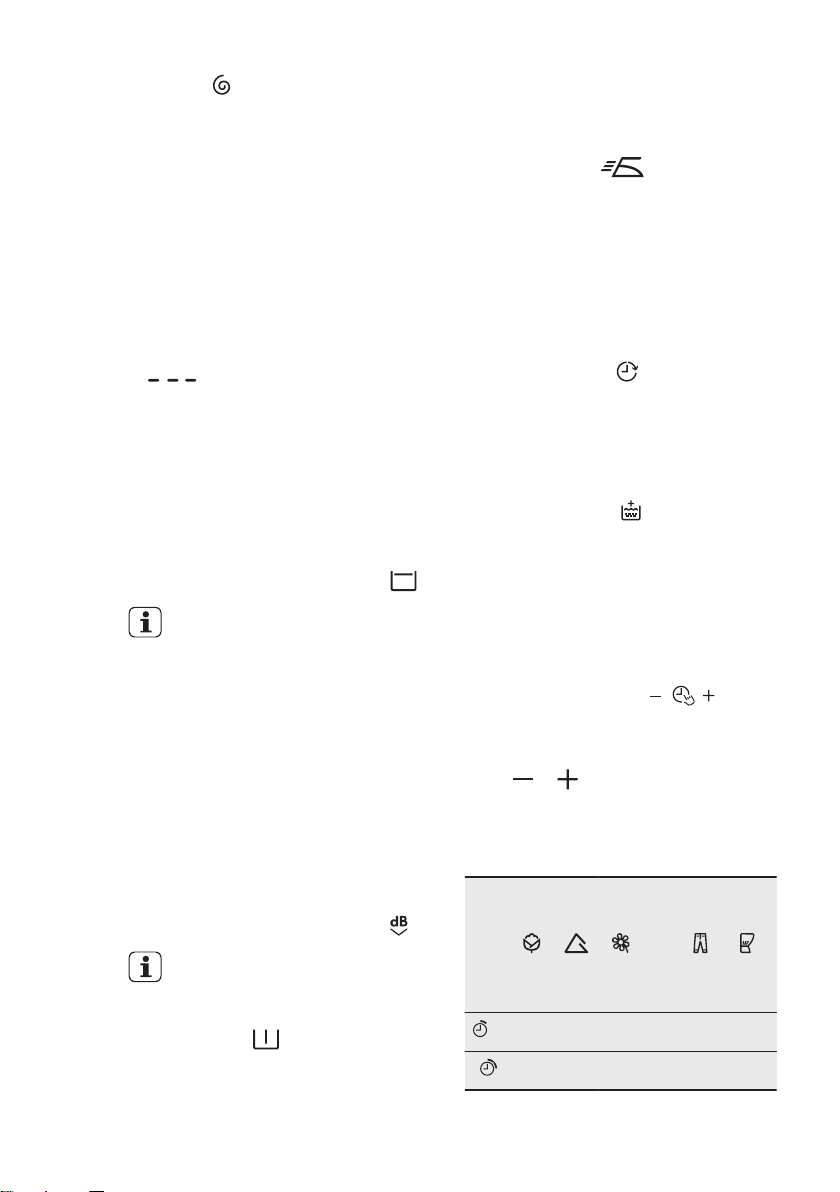
Time Manager
7.7
When you set a washing programme, the
display shows the default duration.
Press or to decrease or increase
the programme duration.
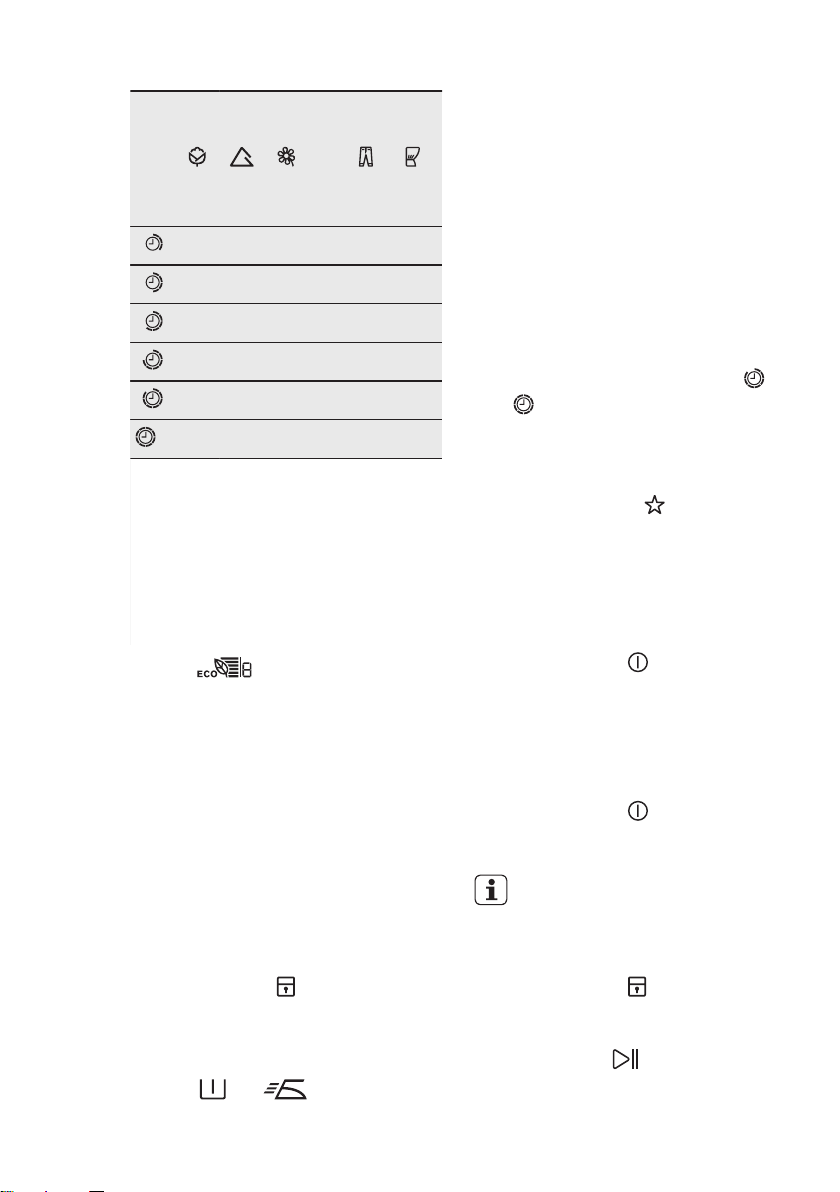
The Time Manager is available only with
the programmes in the table.
1) 1)
Indicator
2)
■ ■
■ ■ ■
Cottons Eco
■
■ ■
Page 13
1) 1)
Indicator
■ ■
Cottons Eco
■
■ ■ ■ ■ ■ ■
3)
■
■3)■
3)
■ ■
■3)■
■ ■
4)
■ ■
1)
If available.
2)
Shortest: to fresh the laundry.
3)
Programme default duration.
4)
Longest: Increasing the programme du‐
ration gradually decreases the energy con‐
sumption. The optimized heating phase
saves energy and the longer duration main‐
tains the same washing results (specially
for normal soil).
■
3)
■
■
■
3)
■
■
Eco Info
The Eco Info stripes (available only in
cotton and synthetics programmes) show
the efficiency of the washing programme
in terms of energy saving:
• 6 stripes: the most efficient setting to
optimize the washing programme
performance.
• 1 stripe: the less efficient setting.
The number of Eco Info stripes changes
if you modify the duration of the washing
programme (refer to Time Manager), the
ENGLISH 13
washing temperature and the laundry
weight. To optimize the washing
programme performance, the stripe
number must increase:
• If you increase the programme
duration, the Eco Info stripes
increases. The increasing the
washing programme duration allows a
constant performance that reduces
the energy consumption.
• If you decrease the washing
temperature, the Eco Info stripes
increases.
Some advices to have the most
efficient setting:
• Set the Time Manager indicators
or .
• Set the possible lower washing
temperature.
• Do not set the Prewash option.
7.8 My favourites
With this option you can memorise your
favourite programme and options.
It is not possible to memorise the delay
start option with MyFavourite.
How to memorise a programme
1. Press the button to activate the
appliance.
2. Set the programme and the options
that you want to memorise.
3. Press MyFavourite until the display
shows the text “MEM”.
How to set the memorised programme
1. Press the button to activate the
appliance.
2. Press shortly MyFavourite.
The delay start is not
memorised.
8. SETTINGS
8.1 Child Lock
With this option you can prevent that the
children play with the control panel.
• To activate/deactivate this option,
press
and at the same time
until the indicator comes on/goes
off.
You can activate this option:
• After you press : the options and
the programme knob are locked.
Page 14
www.electrolux.com14
• Before you press : the appliance
cannot start.
8.2 Permanent Extra Rinse
With this option you can permanently
have an extra rinse when you set a new
programme.
• To activate/deactivate this option
press
until the indicator comes on/goes
off.
and at the same time
8.3 Acoustic signals
The acoustic signals operate when:
9. BEFORE FIRST USE
• The programme is completed.
• The appliance has a malfunction.
To deactivate/activate the acoustic
signals, press and at the same
time for 6 seconds.
If you deactivate the
acoustic signals, they
continue operate when the
appliance has a malfunction.
1. Put 2 litre of water in the detergent
compartment for washing phase.
This activates the drain system.
2. Put a small quantity of detergent in
the compartment for washing phase.
3. Set and start a programme for cotton
at the highest temperature without
laundry.
10. DAILY USE
WARNING!
Refer to Safety chapters.
10.1 Loading the laundry
1. Open the appliance door
2. Put the laundry in the drum, one item
at a time.
3. Shake the items before you put them
in the appliance.
Make sure not to put too much laundry in
the drum.
4. Close the door firmly.
This removes all possible dirt from the
drum and the tub.
CAUTION!
Make sure that no laundry
stays between the seal and
the door. There is a risk of
water leakage or damage to
the laundry.
Page 15
10.2 Using detergent and
A
additives
1. Measure out the detergent and the
fabric conditioner.
2. Carefully close the detergent drawer
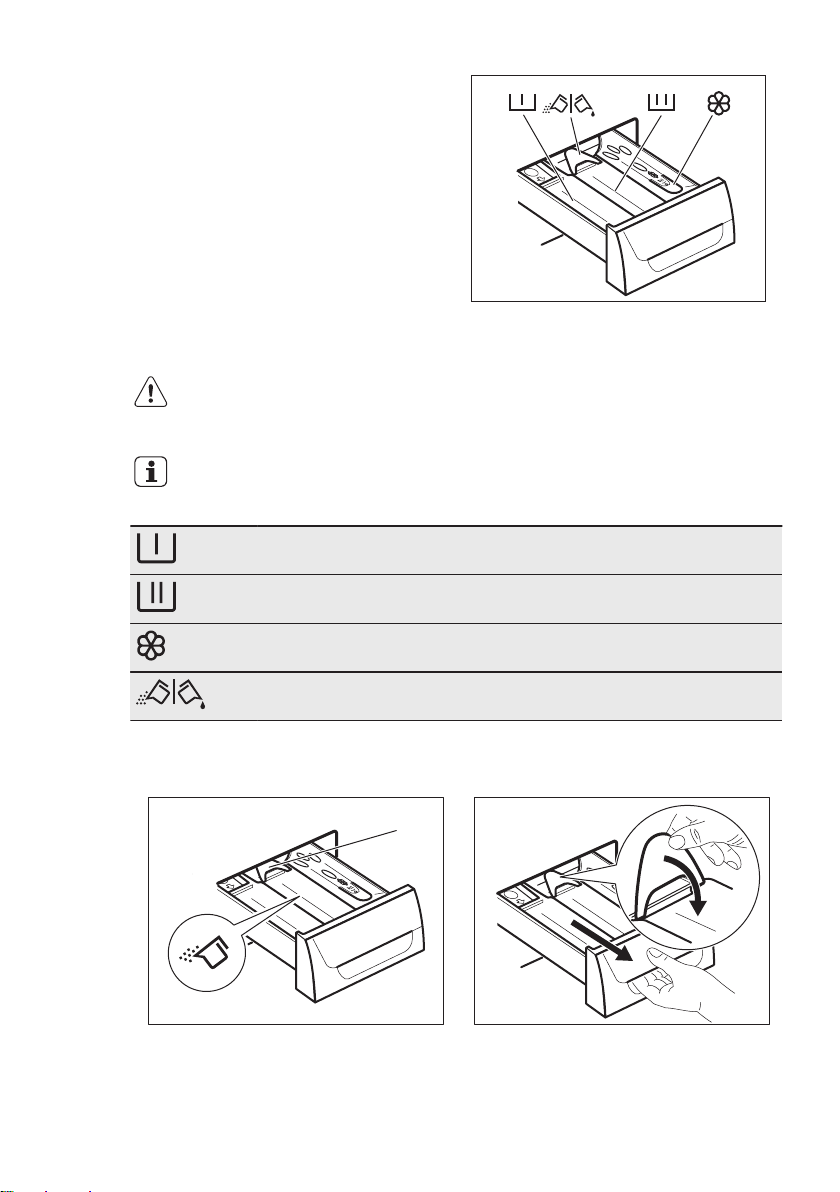
10.3 Detergent compartments
CAUTION!
Use only specified detergents for washing machine.
Always obey the instructions that you find on the packaging of the
detergent products.
Detergent compartment for prewash phase.
Detergent compartment for washing phase.
ENGLISH 15
Compartment for liquid additives (fabric conditioner, starch).
Flap for powder or liquid detergent.
10.4 Liquid or powder detergent
1.
2.
Page 16
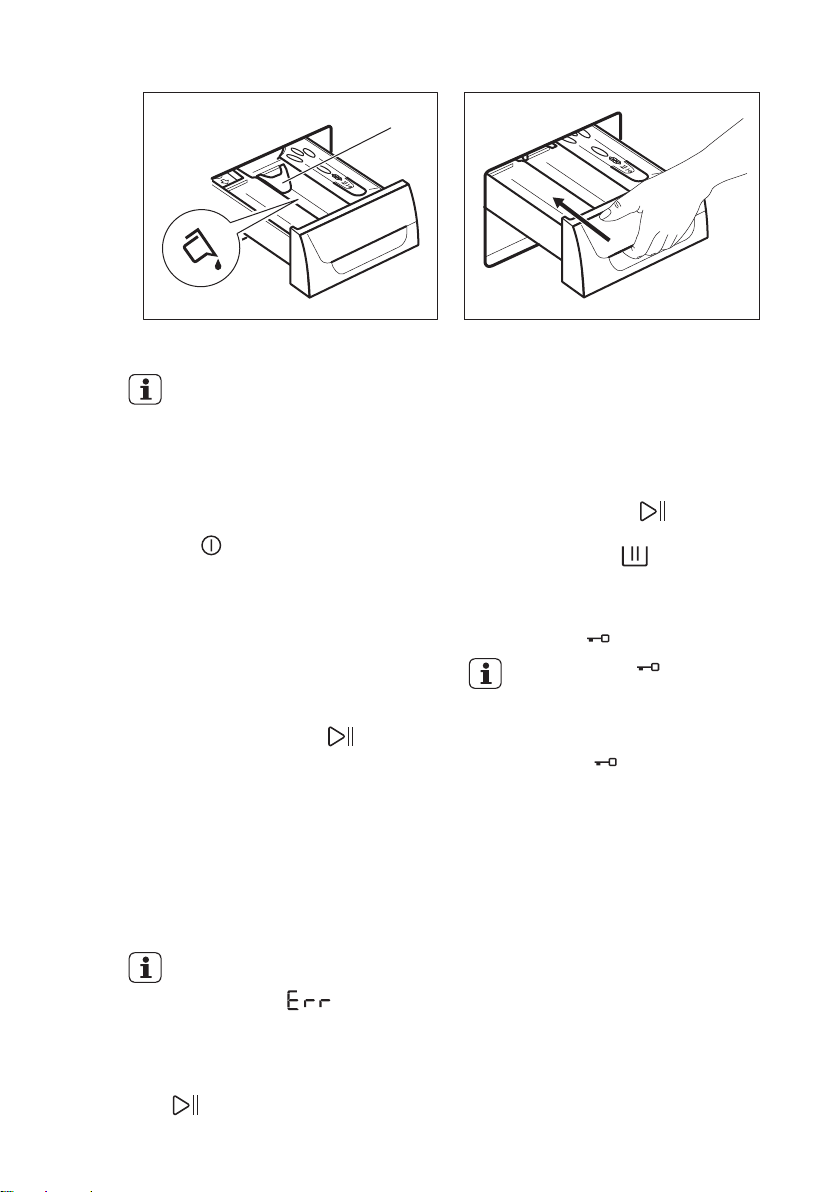
B
www.electrolux.com16
3.
• Position A for powder detergent (factory setting).
• Position B for liquid detergent.
When you use the liquid detergent:
• Do not use gelatinous or thick liquid detergents.
• Do not put more liquid then the maximum level.
• Do not set the prewash phase.
• Do not set the delay start.
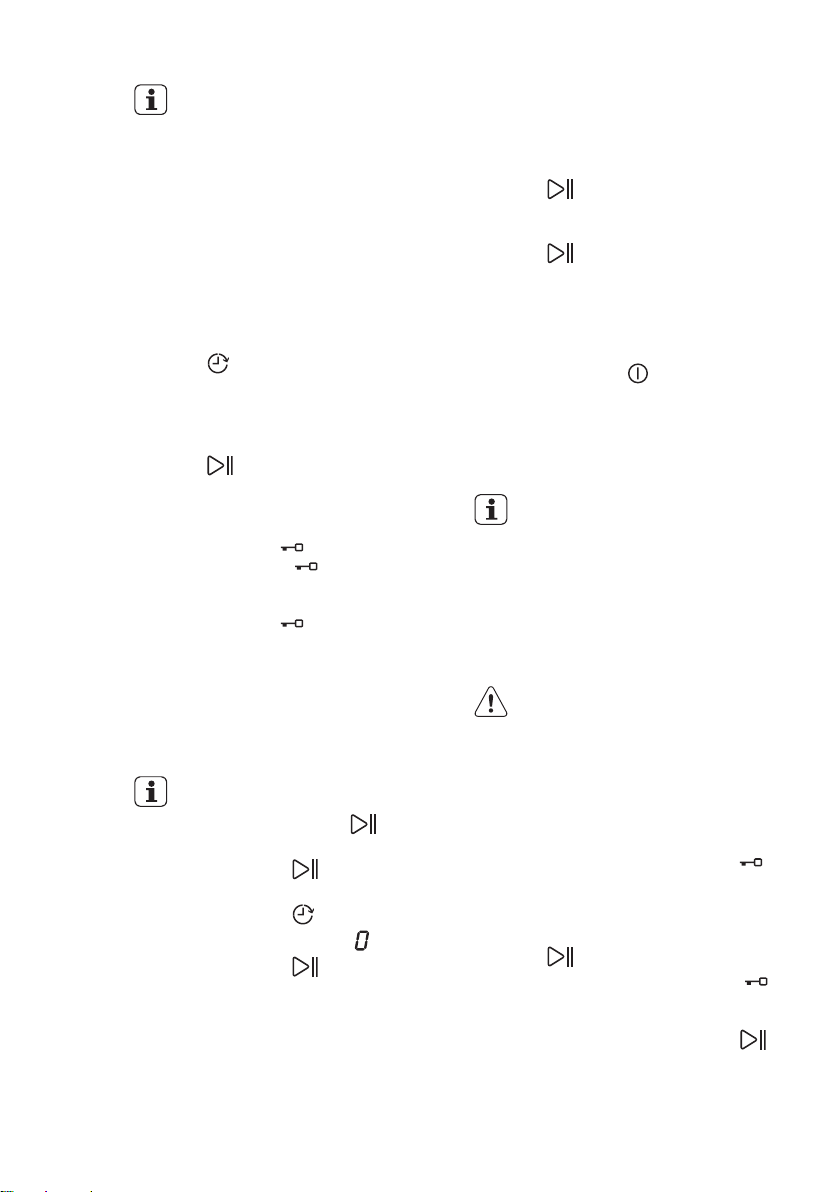
4.
10.5 Activating the appliance
Press the button to activate or
deactivate the appliance. A tune sounds
when the appliance is activated.
10.6 Setting a programme
1. Turn the programme knob and set
the programme:
• The related programme indicator
comes on.
• The indicator of the
• The display shows the level of the
Time Manager, the programme
duration and the indicators of the
programme phases.
2. If necessary, change the
temperature, the spin speed, the
cycle duration or add available
options. When you activate an
option, the indicator of the set option
comes on.
If you set something
incorrect, the display shows
the message .
flashes.
• The indicator of stops to flash
and stays on.
• The indicator starts to flash
on the display.
• The programme starts, the door
locks, the display shows the
indicator .
If the indicator
flashes, the door is
locking. If the display
shows an alarm
message after the
indicator has
flashed for a few
seconds, it indicates
that the door is not
properly locked (for
more details see
Troubleshooting
chapter).
• The drain pump can operate for a
short time when the appliance fills
water.
10.7 Starting a programme without the delay start
Press .
Page 17
ENGLISH 17
After approximately 15
minutes from the start of the
programme:
• The appliance adjusts
automatically the
programme duration
agree with the laundry
load.
• The display shows the
new value.
10.8 Starting a programme with the delay start
1. Press again and again until the
display shows the delay you want to
set.
The related indicator comes on the
display.
2. Press :
• The appliance starts the
countdown.
• The door locks, the display shows
the indicator .
If the indicator flashes, the
door is locking. If the display
shows an alarm message after
the indicator has flashed for a
few seconds, it indicates that the
door is not properly locked (for
more details see Troubleshooting
chapter).
• When the countdown is
completed, the programme starts
automatically.
You can cancel or change
the set of the delay start
before you press the . To
cancel the delay start:
• Press to set the
appliance to pause.
• Press until the
display shows
• Press again to
start the programme
immediately.
'.
10.9 Interrupting a programme
and changing the options
You can change only some options
before they operate.
1. Press
The indicator flashes.
2. Change the options.
3. Press again.
The programme continues.
.
10.10 Cancelling a running programme
1. Press the button for some
seconds to cancel the programme
and to deactivate the appliance.
2. Press the same button again to
activate the appliance. Now, you can
set a new washing programme.
Before starting the new
programme the appliance
could drain the water. In this
case, make sure that the
detergent is still in the
detergent compartment, if
not fill the detergent again.
10.11 Opening the door
CAUTION!
If the temperature and level
of the water in the drum are
too high and the drum still
rotates, you cannot open the
door.
While a programme or the delay start
operates, the appliance door is locked
and the display shows the indicator .
Open the appliance door when the
programme or the delay start
operates:
1. Press to pause the appliance.
2. Wait until the door lock indicator
goes off.
3. Open the door.
4. Close the door and press again .
The programme or delay start continues
to operate.
Page 18
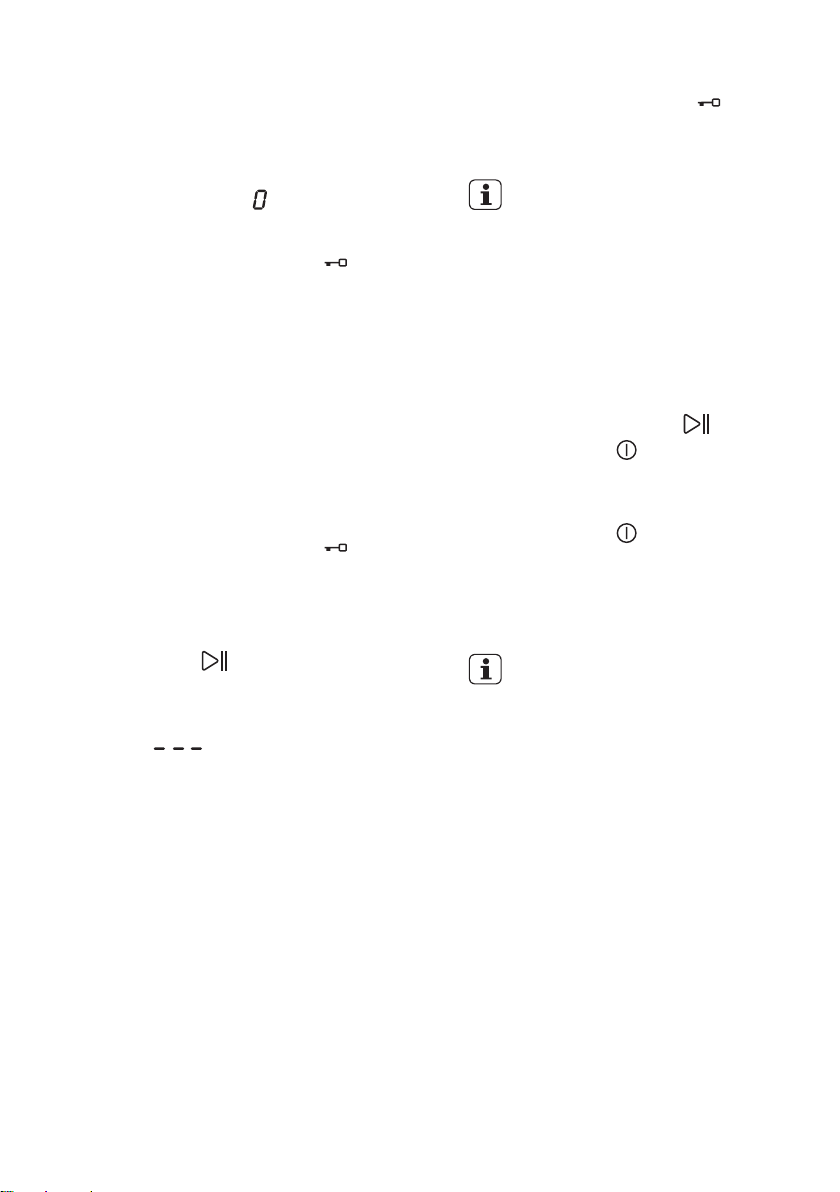
www.electrolux.com18
10.12 At the end of the
programme
• The appliance stops automatically.
• The acoustic signal operates (if it is
activated).
• In the display
• The indicator of theStart/Pause goes
off.
• The door lock indicator goes off.
• You can open the door.
• Remove the laundry from the
appliance. Make sure that the drum is
empty.
• Close the water tap.
• Press the button AutoOff for some
seconds to deactivate the appliance.
• Keep the door ajar, to prevent the
mildew and odours.
The washing programme is
completed, but there is water in the
drum:
• The drum turns regularly to prevent
the creases in the laundry.
• The door lock indicator is on. The
door stays locked.
• You must drain the water to open the
door.
To drain the water:
1. Press .
The appliance drains the water and
spins.
2. To make the appliance drain only, set
. If necessary, decrease the
spin speed.
comes on.
3. When the programme is completed
and the door lock indicator goes
off, you can open the door.
4. Press the button AutoOff for some
seconds to deactivate the appliance.
The appliance drains and
spins automatically after
approximately 18 hours
(except for Wool
programme).
10.13 AUTO OFF option
The AUTO OFF function automatically
deactivates the appliance to decrease
the energy consumption when:
• You do not use the appliance for 5
minutes before you press .
Press the button
appliance again.
• After 5 minutes from the end of the
washing programme
Press the button to activate the
appliance again.
The display shows the end of the last
set programme.
Turn the programme knob to set a
new cycle.
If you set a programme or an
option that ends with water
in the drum, the AUTO OFF
function doesn't deactivate
the appliance to remind you
to drain the water.
to activate the
11. HINTS AND TIPS
11.1 The laundry load
• Divide the laundry in: white, coloured,
synthetics, delicates and wool.
• Obey the washing instructions that
are on the laundry care labels.
• Do not wash together white and
coloured items.
• Some coloured items can discolour
with the first wash. We recommend
that you wash them separately for the
first times.
• Button up pillowcases, close zippers,
hooks and poppers. Tie up belts.
• Empty the pockets and unfold the
items.
• Turn inside out multilayered fabrics,
wool and items with painted
illustrations.
• Remove hard stains.
• Wash with a special detergent heavy
soil stains.
• Be careful with the curtains. Remove
the hooks or put the curtains in a
washing bag or pillowcase.
• Do not wash in the appliance laundry
without hems or with cuts. Use a
washing bag to wash small and/or
Page 19

delicate items (e.g. underwired bras,
belts, tights, etc. ).
• A very small load can cause balance
problems with the spin phase. If this
occurs, adjust manually the items in
the tub and start the spin phase
again.
11.2 Stubborn stains
For some stains, water and detergent is
not sufficient.
We recommend that you remove these
stains before you put the items in the
appliance.
Special stain removers are available.
Use the special stain remover that is
applicable to the type of stain and fabric.
11.3 Detergents and additives
• Only use detergents and additives
specially made for washing machines:
– powder detergents for all types of
fabric,
– powder detergents for delicate
fabrics (40 °C max) and woollens,
– liquid detergents, preferably for
low temperature wash
programmes (60 °C max) for all
types of fabric, or special for
woollens only.
• Do not mix different types of
detergents.
• To help the environment, do not use
more than the correct quantity of
detergent.
• Obey the instructions that you find on
the on packaging of these products.
ENGLISH 19
• Use the correct products for the type
and colour of the fabric, the
programme temperature and the level
of soil.
• If your appliance has not the
detergent dispenser with the flap
device, add the liquid detergents with
a dosing ball (supplied by the
detergent's manufacturer).
11.4 Ecological hints
• Set a programme without the prewash
phase to wash laundry with normal
soil.
• Always start a washing programme
with the maximum load of laundry.
• If necessary, use a stain remover
when you set a programme with a low
temperature.
• To use the correct quantity of the
detergent, check the water hardness
of your domestic system
11.5 Water hardness
If the water hardness in your area is high
or moderate, we recommend that you
use a water softener for washing
machines. In areas where the water
hardness is soft it is not necessary to use
a water softener.
To know the water hardness in your
area, contact your local water authority.
Use the correct quantity of the water
softener. Obey the instructions that you
find on the packaging of the product.
12. CARE AND CLEANING
WARNING!
Refer to Safety chapters.
12.1 External cleaning
Clean the appliance only with soap and
warm water. Fully dry all the surfaces.
CAUTION!
Do not use alcohol, solvents
or chemical products.
12.2 Descaling
If the water hardness in your area is high
or moderate, we recommend that you
use a water descaling product for
washing machines.
Regularly examine the drum to prevent
limescale and rust particles.
To remove rust particles use only special
products for washing machine. Do this
separately from the laundry wash.
Page 20
1
2
www.electrolux.com20
Always obey the instructions
that you find on the
packaging of the product.
12.4 Door seal
12.3 Maintenance wash
With the low temperature programmes it
is possible that some detergent stays in
the drum. Make regularly a maintenance
wash. To do this:
• Remove the laundry from the drum.
• Set the cotton programme with the
highest temperature with a small
quantity of detergent.
Regularly examine the seal and remove
all objects from the inner part.
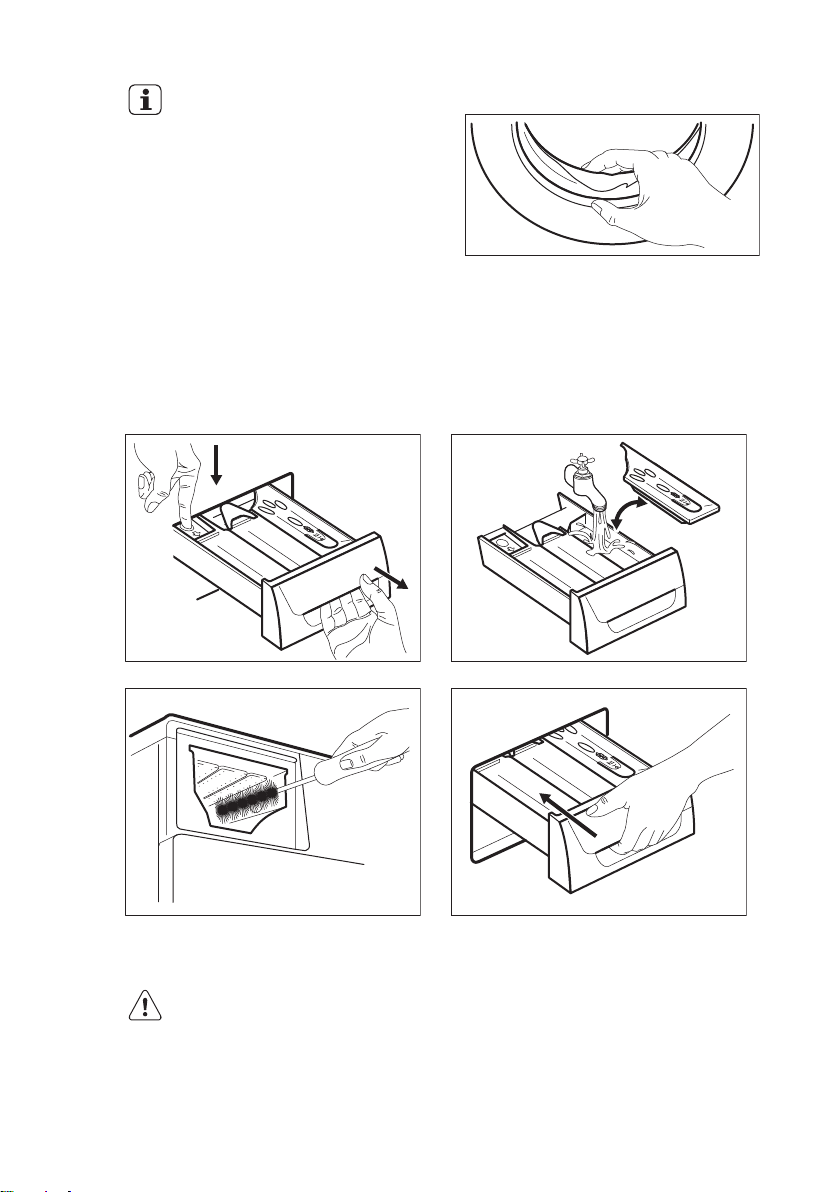
12.5 Cleaning the detergent dispenser
1.
2.
3. 4.
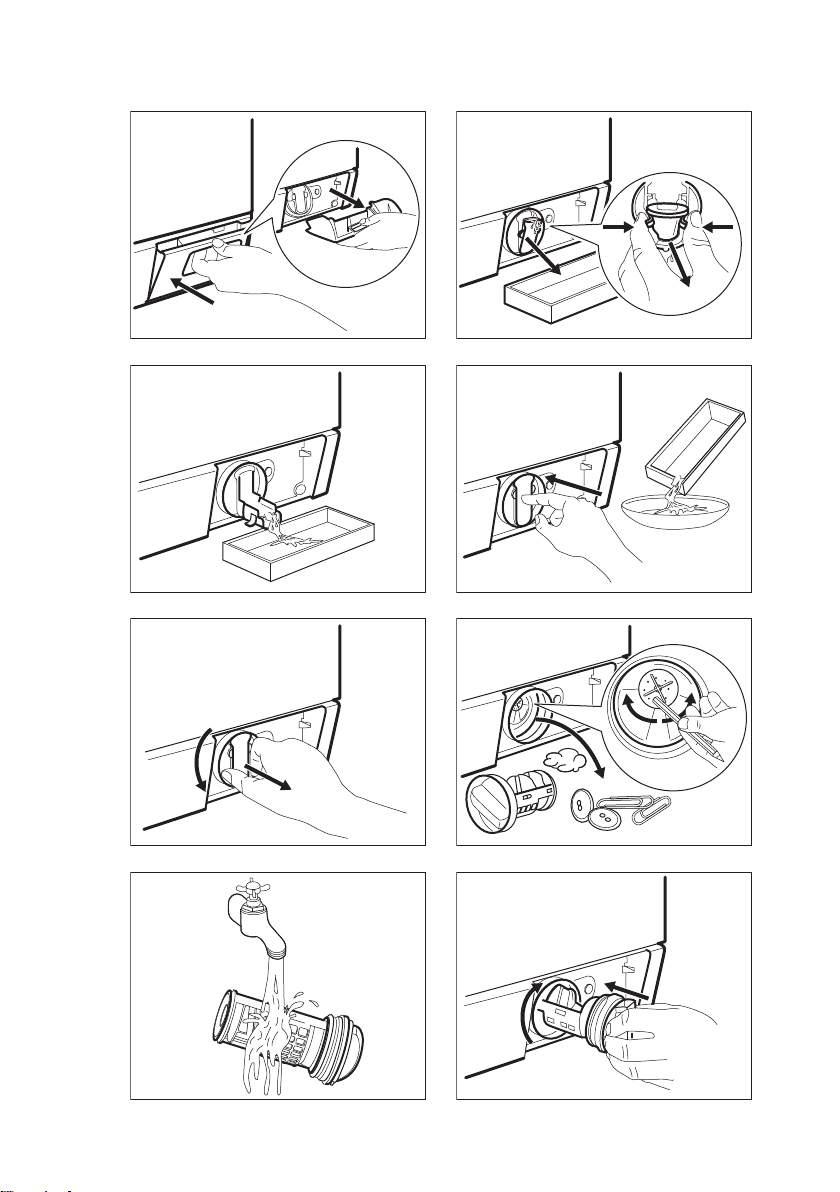
12.6 Cleaning the drain filter
WARNING!
Do not clean the drain filter if
the water in the appliance is
hot.
Page 21
1
2
2
11
1
2
1
2
1
2
ENGLISH 21
1.
3. 4.
5.
2.
6.
7. 8.
Page 22
1
2
1
2
3
45°
20°
www.electrolux.com22
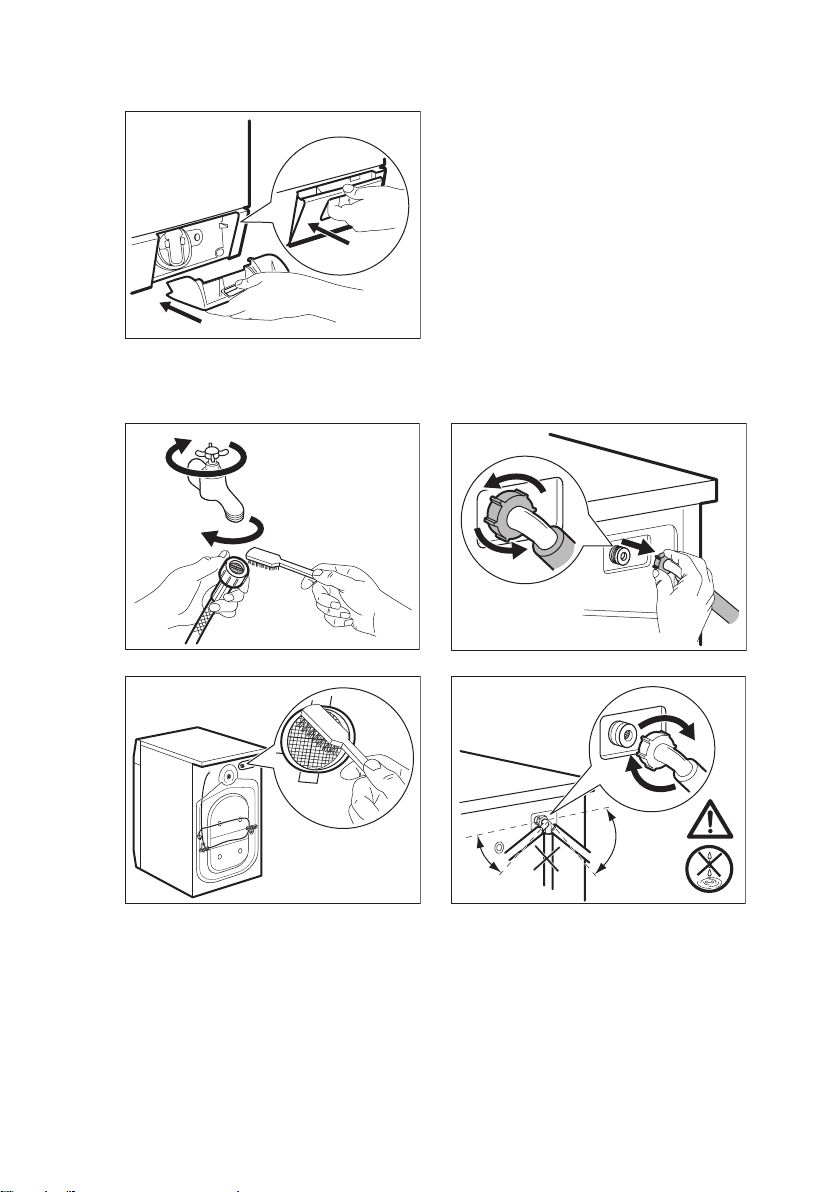
9.
12.7 Cleaning the inlet hose and the valve filter
1.
3. 4.
2.
12.8 Emergency drain
Because of a malfunction, the appliance
cannot drain the water.
If this occurs, do steps (1) through (9) of
'Cleaning the drain filter'. If necessary,
clean the pump.
When you drain the water with the
emergency drain procedure, you must
activate again the drain system:
1. When you drain the water with the
emergency drain procedure, you
must activate again the drain system:
Put 2 litres of water in the main wash
Page 23
compartment of the detergent
dispenser.
2. Start the programme to drain the
water
12.9 Frost precautions
If the appliance is installed in an area
where the temperature can be less than
0° C, remove the remaining water from
the inlet hose and the drain pump.
1. Disconnect the mains plug from the
mains socket.
2. Close the water tap.
3. Put the two ends of the inlet hose in
a container and let the water flow out
of the hose.
13. TROUBLESHOOTING
WARNING!
Refer to Safety chapters.
13.1 Introduction
The start of the appliance does not occur
or it stops during operation.
First try to find a solution to the problem
(refer to the table). If not, contact the
Authorised Service Centre.
With some problems, the acoustic
signals operate and the display shows
an alarm code:
- The appliance does not fill with
•
water properly.
• - The appliance does not drain
the water.
•
- The appliance door is open or
not closed correctly. Please check the
door!
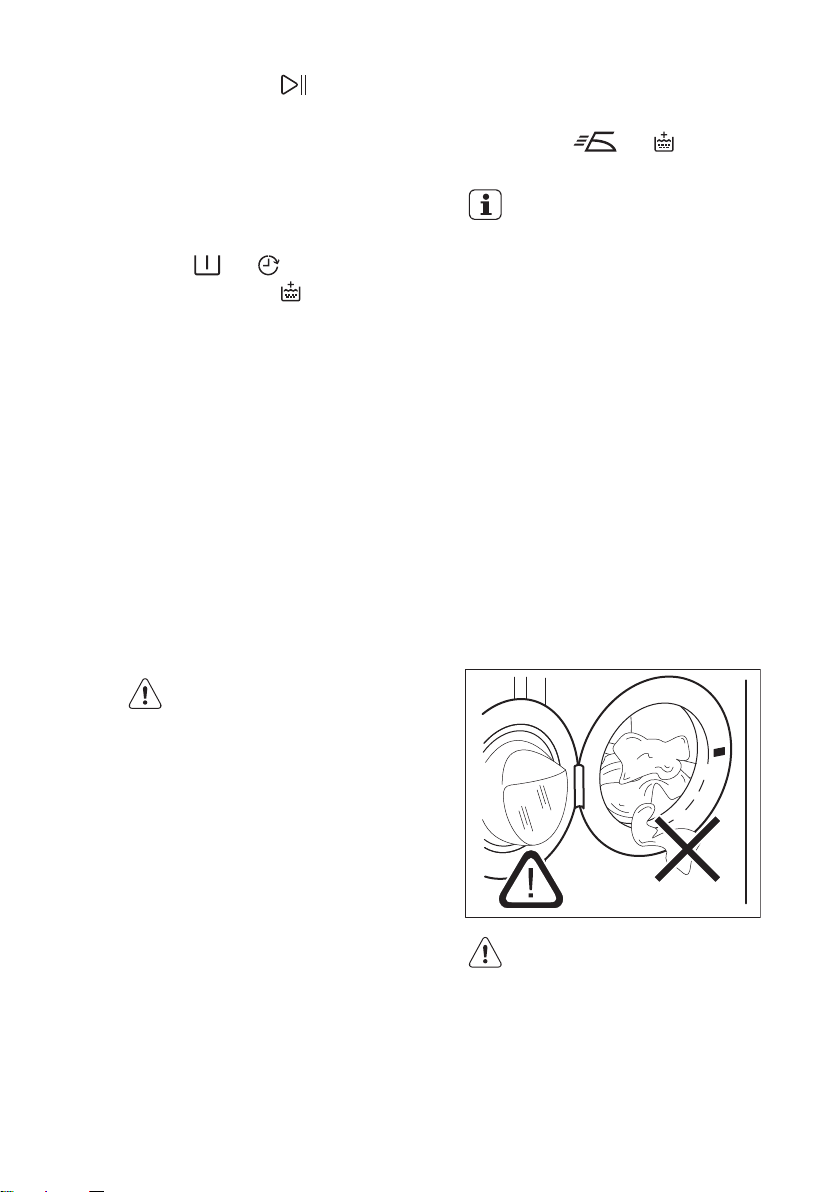
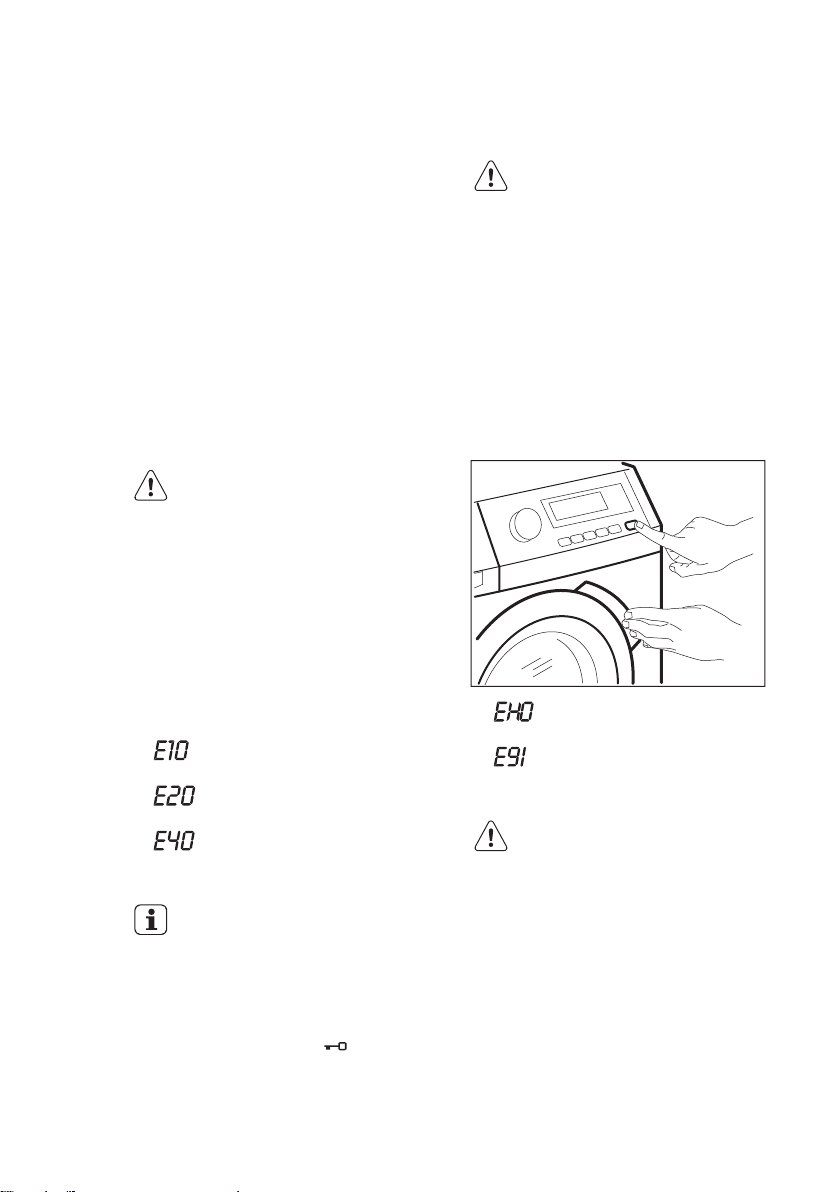
If the appliance is
overloaded, remove
some items from the
drum and/or keep
pressed the door and
push the Start/Pause
button at the same time
until the indicator
stops flashing (see the
picture below).
ENGLISH 23
4. Empty the drain pump. Refer to the
emergency drain procedure.
5. When the drain pump is empty,
install the inlet hose again.
WARNING!
Make sure that the
temperature is more than 0
°C before you use the
appliance again.
The manufacturer is not
responsible for damages
caused by low temperatures.
• - The mains supply is unstable.
Wait until the mains supply is stable.
• - No communication between
electronic elements of the appliance.
Switch off and switch on again.
WARNING!
Deactivate the appliance
before you do the checks.
Page 24

www.electrolux.com24
13.2 Possible failures
Problem Possible solution
The programme does
not start.
Make sure that the appliance door is closed.
Make sure that there is not a damaged fuse in the fuse
Make sure that the Start/Pause has been pressed.
If the delay start is set, cancel the setting or wait for the
Deactivate the Child Lock function if it is on.
The appliance does not
fill with water properly.
Make sure that the pressure of the water supply is not too
Make sure that the water tap is not clogged.
The appliance does not
fill with water and drain
immediately.
The appliance does not
drain the water.
Make sure that the drain hose has no kinks or bends.
Make sure that the drain filter is not clogged. Clean the fil‐
Make sure that the connection of the drain hose is correct.
Set the drain programme if you set a programme without
Set the drain programme if you set an option which ends
The spin phase does
not operate or the
washing cycle lasts lon‐
ger than usually.
Make sure that the mains plug is connected to the mains
socket.
box.
end of countdown.
Make sure that the water tap is open.
low. For this information, contact your local water authority.
Make sure that the filter of the inlet hose and the filter of
the valve are not clogged. Refer to “Care and cleaning”.
Make sure that the inlet hose has no kinks or bends.
Make sure that the connection of the water inlet hose is
correct.
Make sure that the drain hose is in the correct position. The
hose may be too low.
Make sure that the sink spigot is not clogged.
ter, if necessary. Refer to 'Care and cleaning'.
drain phase.
with water in the tub.
Set the spin programme.
Page 25

ENGLISH 25
Problem Possible solution
Make sure that the drain filter is not clogged. Clean the fil‐
ter, if necessary. Refer to 'Care and cleaning'.
Adjust manually the items in the tub and start the spin
phase again. This problem may be caused by balance
problems.
There is water on the
floor.
Make sure that the couplings of the water hoses are tight
and there is not water leakages.
Make sure that the drain hose have no damages.
Make sure you use the correct detergent and the correct
quantity of it.
You cannot open the
Make sure that the washing programme is finished.
appliance door.
Set the drain or the spin programme if there is water in the
drum.
Make sure that the appliance receives electrical power.
This problem may be caused by a failure of the appliance.
Contact the Authorised Service Centre. If you need to open
the door, please read carefully «Emergency door opening».
The appliance makes
an unusual noise.
Make sure the levelling of the appliance is correct. Refer to
'Installation'.
Make sure that the packaging and/or the transit bolts are
removed. Refer to 'Installation'.
Add more laundry in the drum. The load may be too small.
The cycle is shorter
than the time displayed.
The cycle is longer than
the time displayed.
The washing results are
not satisfactory.
The appliance calculates a new time according to the laun‐
dry load. See the ‘Consumption Values’ chapter.
An unbalanced laundry load increases the duration time.
This is a normal behaviour of the appliance.
Increase the detergent quantity or use a different deter‐
gent.
Use special products to remove the stubborn stains before
you wash the laundry.
Make sure that you set the correct temperature.
Decrease the laundry load.
You cannot set an op‐
Make sure that you press only the wanted button(s).
tion.
Page 26
www.electrolux.com26
After the check, activate the appliance. The programme continues from the point of
interruption.
If the problem occurs again, contact the Authorised Service Centre.
If the display shows other alarm codes. Deactivate and activate the appliance. If the
problem continues, contact the Authorised Service Centre.
14. EMERGENCY DOOR OPENING
In case of power failure or appliance
failure the appliance door remains
locked. The washing programme
continues, when the power is restored. If
the door remains locked in case of
failure, it is possible to open it using the
emergency unlock feature.
Before opening the door:
CAUTION!
Make sure that the water
temperature and the
laundry are not hot. Wait
till they cool down, if
necessary.
CAUTION!
Make sure that the drum is
not rotating. Wait till the
drum stops rotating, if
necessary.
Make sure that the water
level inside the drum is
not too high. Proceed with
an emergency drain, if
necessary (refer to
«Emergency drain» in
«Care and cleaning»
chapter).
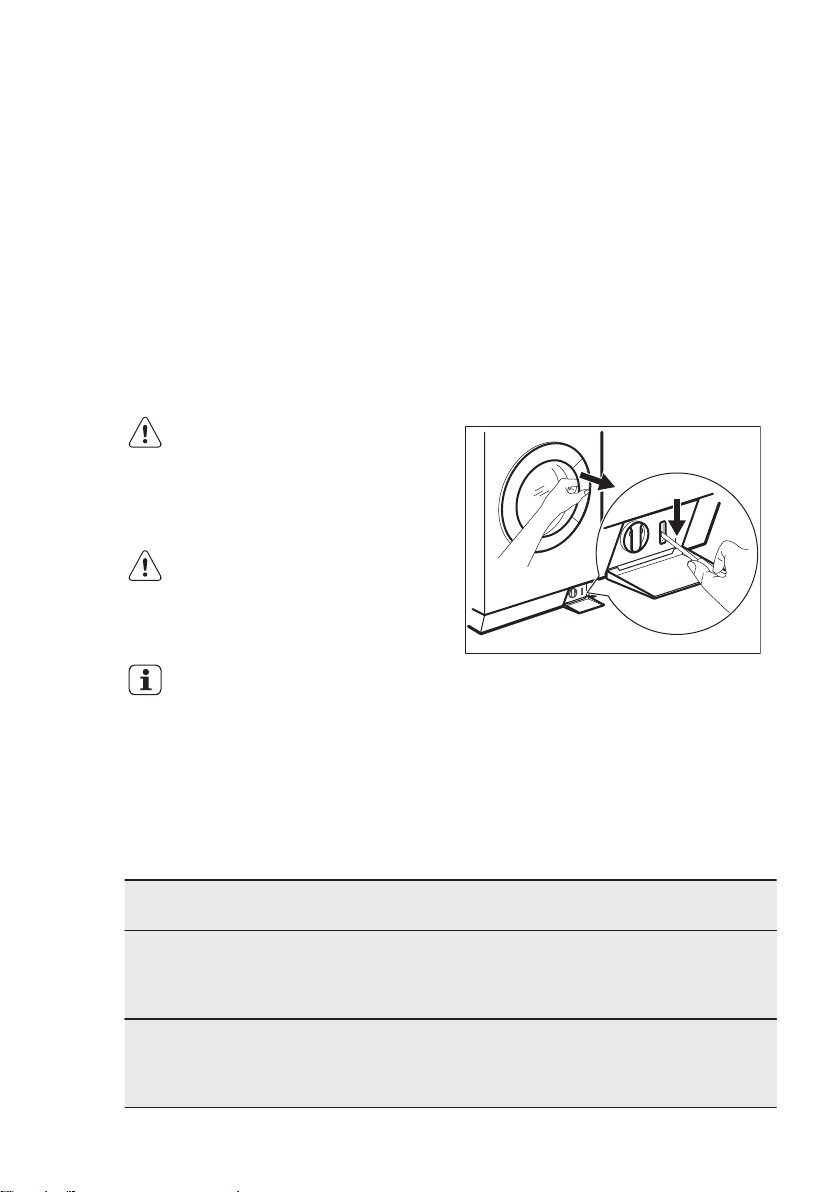
To open the door, proceed as follows:
1. Press the button AutoOff to switch
the appliance off.
2. Disconnect the mains plug from the
mains socket.
3. Open the filter flap.
4. Keep the emergency unlock trigger
pulled downward and, at the same
time, open the appliance door.
5. Take out the laundry and then close
the appliance door.
6. Close the filter flap.
15. TECHNICAL DATA
Dimension Width/ Height/ Depth/
Total depth
Electrical connection Voltage
Overall power
Fuse
Frequency
Level of protection against ingress of solid parti‐
cles and moisture ensured by the protective cov‐
er, except where the low voltage equipment has
no protection against moisture
600 mm/ 850 mm/ 605 mm/ 639
mm
230-240 V
2200 W
13 A
50 Hz
IPX4
Page 27

ENGLISH 27
Water supply pressure1)Minimum
Maximum
Water supply
2)
Maximum Load Cotton 9 kg
Energy Efficiency Class A+++
Spin Speed Maximum 1400 rpm
1)
The appliance works correctly if the water pressure is not less than 0.05 MPa (0.5 bar). If
you can not connect the water inlet hose to the cold water tap of the primary hydraulic sys‐
tem, connect it to your domestic cold water storage system. Make sure not to have more
than a distance of 5.02 m (16.5 ft) between the appliance inlet hose and the bottom of the
water storage tank.
2)
Connect the water inlet hose to a water tap with a 3/4'' thread.
16. ENVIRONMENT CONCERNS
Recycle the materials with the symbol
. Put the packaging in applicable
containers to recycle it. Help protect the
environment and human health and to
recycle waste of electrical and electronic
appliances. Do not dispose appliances
0,5 bar (0,05 MPa)
8 bar (0,8 MPa)
Cold water
marked with the symbol with the
household waste. Return the product to
your local recycling facility or contact
your municipal office.
*
Page 28
www.electrolux.com/shop
132902360-B-092015
 Loading...