

Electrolux EWF14742 User Manual

................................................... ........................................................
EWF14742 WASHING MACHINE USER MANUAL

2 www.electrolux.com
CONTENTS
CONTENTS
SAFETY INFORMATION
1
PRODUCT DESCRIPTION
2
CONTROL PANEL
3
BEFORE FIRST USE
4
DAILY USE
5
WASHING HINTS
6
INTERNATIONAL WASH CODE SYMBOLS
7
CARE AND CLEANING
8
TROUBLESHOOTING
9
TECHNICAL DATA .................................................................................................... 2810
INSTALLATION.......................................................................................................... 2911
ENVIRONMENT CONCERNS .................................................................................... 3112
WARRANTY............................................................................................................... 3213
................................................................................................................ 11
.............................................................................................. 3
........................................................................................... 5
...................................................................................................... 6
................................................................................................. 11
...................................................................................................... 17
............................................................... 19
............................................................................................. 20
............................................................................................... 25
WE’RE THINKING OF YOU
Thank you for purchasing an Electrolux appliance. You’ve chosen a product that brings with
it decades of professional experience and innovation. Ingenious and stylish, it has been
designed with you in mind. So whenever you use it, you can be safe in the knowledge that
you’ll get great results every time. Welcome to Electrolux.
Visit our website to:
Get usage advice, brochures, trouble shooter, service information:
www.electrolux.com
Register your product for better service:
www.electrolux.com/productregistration
Buy Accessories, Consumables and Original spare parts for your appliance:
www.electrolux.com/shop
CUSTOMER CARE AND SERVICE
We recommend the use of original spare parts.
When contacting Service, ensure that you have the following data available.
The information can be found on the rating plate. Model, PNC, Serial Number.
Warning / Caution-Safety information.
General information and tips.
Environmental information.
Subject to change without notice.

ENGLISH 3
1.
SAFETY INFORMATION
Conditions of use
This appliance is intended to be used in
household and similar applications
such as:
-
Farm houses
-
By clients in serviced apartments,
holiday apartments and residential
type environments.
In the interest of your safety and to
ensure the correct use, before installing
and first using the appliance, read this
user manual carefully, including its hints
and warnings.
To avoid unnecessary mistakes and
accidents, it is important to ensure that
all people using the appliance are
thoroughly familiar with its operation and
safety features.
Save these instructions and make sure
that they remain with the appliance if it
is moved or sold, so that everyone
using it through its life will be properly
informed on appliance use and safety.
1.1 GENERAL SAFETY
It is dangerous to alter the
specifications or attempt to modify this
product in anyway.
During high temperature wash
program the door glass may get hot.
Do not touch it!
Make sure that small pets do not
climb into the drum. To avoid this,
please check into the drum before
using the appliance.
Any objects such as coins, safety
pins, nails, screws, stones or any
other hard, sharp material can cause
extensive damage and must not be
placed into the machine.
Wash small items such as socks,
laces, washable belts etc in a washing
bag or pillow case as it is possible for
such items to slip down between the
tub and the inner drum.
Only use the advised quantities of
fabric softener and detergent. Damage
to the fabric or appliance can occur if
you overfill. Refer to the manufacturer’s
recommendations of quantities.
This appliance is not intended for use
by persons (including children) with
reduced physical, sensory or mental
capabilities, or lack of experience and
knowledge, unless they have been
given supervision or instruction
concerning use of the appliance by a
person responsible for their safety.
Do not use your washing machine to
wash articles with whalebones,
material without hems or torn material.
Always unplug the appliance and turn
off the water supply after use, clean
and maintenance.
Under no circumstances should you
attempt to repair the machine yourself.
Repairs carried out by inexperienced
persons may cause injury or serious
malfunctioning. Contact your local
Service Centre. Always insist on
genuine spare parts.
1.2 INSTALLATION
This appliance is heavy. Care should
be taken when moving it.
When unpacking the appliance, check
that it is not damaged. If in doubt, do
not use it and contact the Service
Centre.
All packing and transit bolts must be
removed before use. Serious damage
can occur to the product and to
property if this is not adhered to. See
relevant section in the user manual.
4
www.electrolux.com
After having installed the appliance,
check that it is not standing on the
inlet and drain hose and the worktop
is not pressing the electrical supply
cable.
If the machine is situated on a
carpeted floor, please adjust the feet
in order to allow air to circulate freely.
Always be sure, that there is no water
leakage from hoses and their
connections after the installation.
Any plumbing work required to install
this appliance should be carried out by
a qualified plumber.
Any electrical work required to install
this appliance should be carried out by
a qualified electrician.
1.3 USE
This appliance is designed for
domestic use. It must not be used for
purposes other than those for which it
was designed.
Only wash fabrics which are designed
to be machine washed. Follow the
instructions on each garment label.
Do not overload the appliance. See
the relevant section in the user
manual.
Before washing, ensure that all
pockets are empty and buttons and
zips are fastened. Avoid washing
frayed or torn articles and treat stains
such as paint, ink, rust, and grass
before washing. Underwired bras
must NOT be machine washed.
Garments which have been in contact
with volatile petroleum products
should not be machine washed. If
volatile cleaning fluids are used, care
should be taken to ensure that the
fluid is removed from the garment
before placing in the machine.
Never pull the power supply cable to
remove the plug from the socket;
always take hold of the plug itself.
Never use the washing machine if the
power supply cable, the control panel,
the working surface or the base are
damaged so that the inside of the
washing machine is accessible.
1.4 CHILD SAFETY
This washing machine is not intended
for use by young children or infirm
persons without supervision.
Young children should be supervised
to ensure that they do not play with
the appliance.
The packaging components (e.g.
plastic film, polystyrene) can be
dangerous to children - danger of
suffocation! Keep them out of
children’s reach.
Keep all detergents in a safe place out
of children’s reach.
Make sure that children or pets do not
climb into the drum.
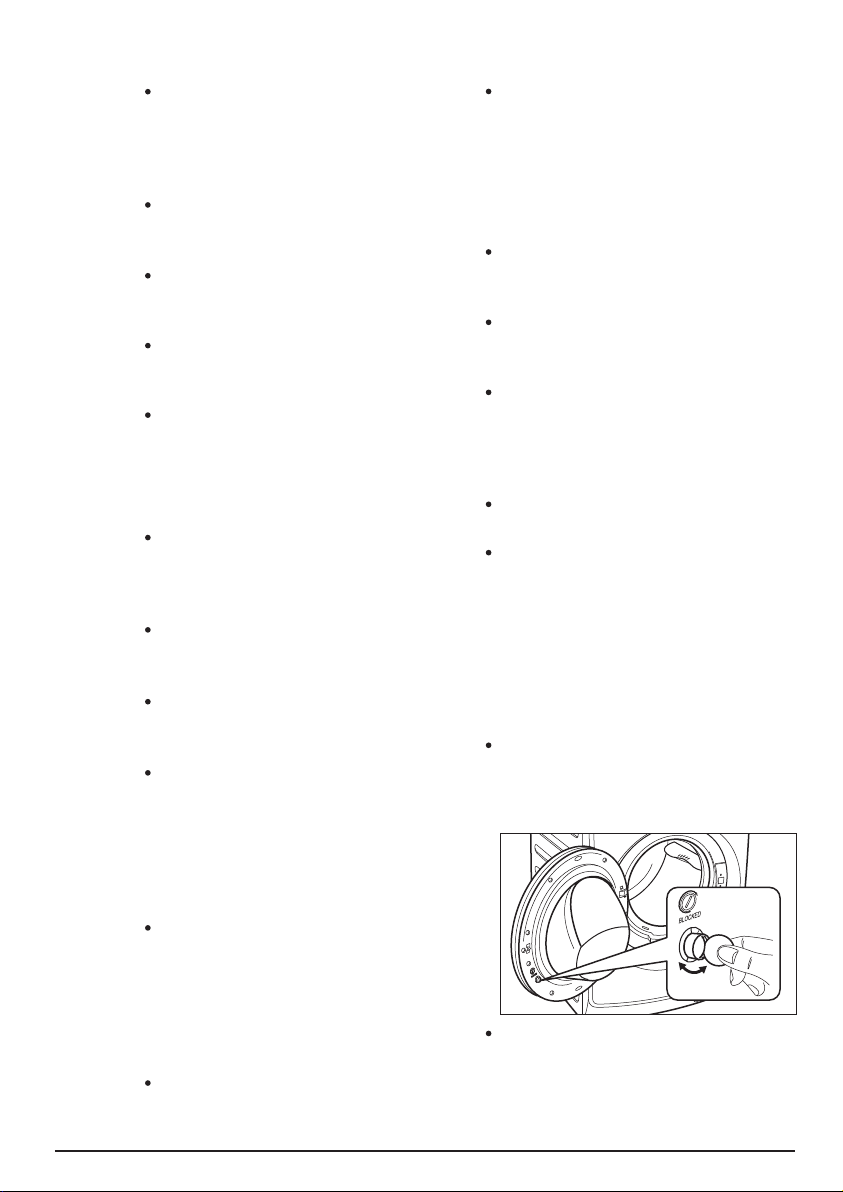
1.5 CHILD SAFETY DEVICE
When you activate this device, you
cannot close the door. This prevents
children or pets to be locked in the
drum.
To activate this device, rotate the
button (WITHOUT pressing it) inside
the door clockwise until the groove is
horizontal. If necessary use a coin.
To disable this device and restore the
possibility of closing the door, rotate
the button anti-clockwise until the
groove is vertical.
ENGLISH 5
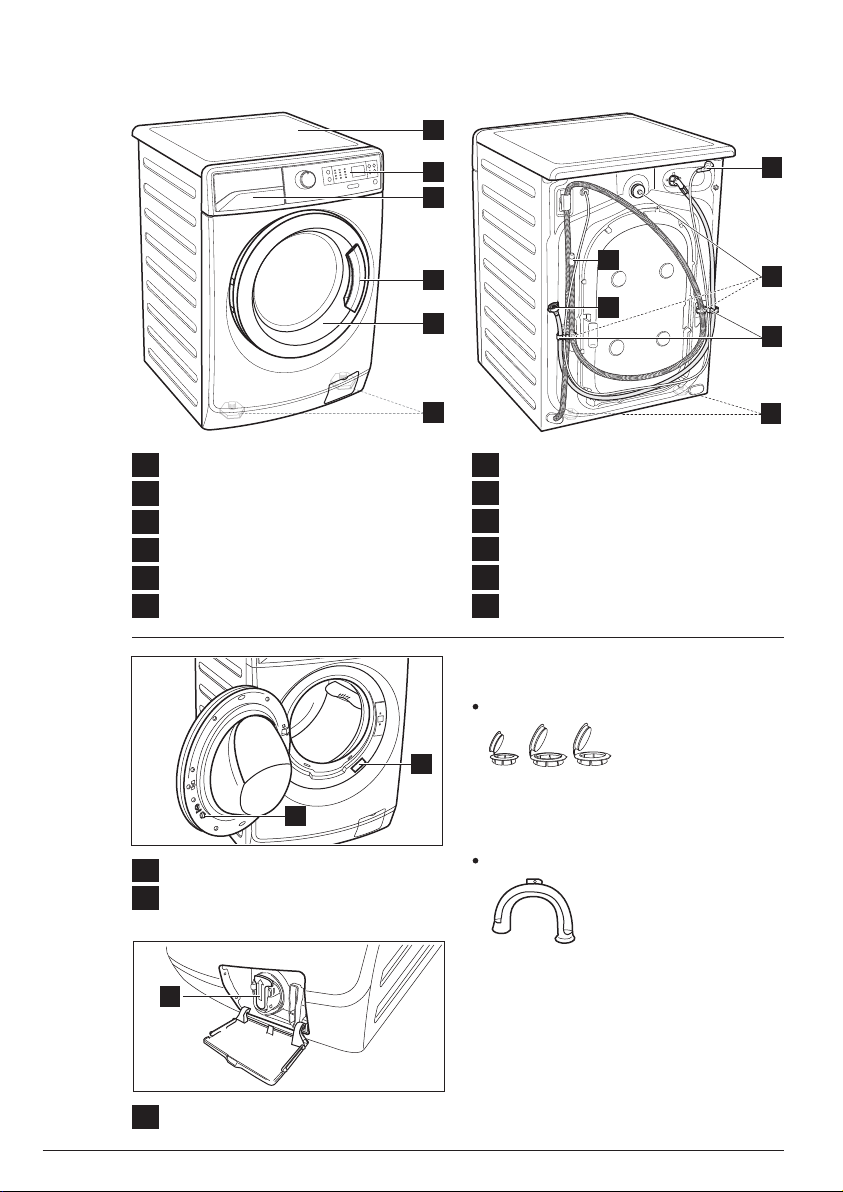
PRODUCT DESCRIPTION2.
1
Worktop
1
Detergent/Softener Dispenser
2
Control Panel
3
Door Handle
4
5
Door
Level Adjustment Feet (Front)
6
3
2
4
5
6
7
8
9
10
11
12
ACCESSORIES
7
9
11
8
10
12
Mains Cable
Water Inlet Hose
Water Drain Hose
Hose Support
Transit Bolts
Back Feet
Plastic caps
Child Safety Device
13
Rating Plate
14
15
Drain Pump Filter
15
13
14
To close the holes on the rear side of
the cabinet after the removal of the
transit bolts.
Plastic hose guide
To connect the drain hose on the edge
of a sink.
6
www.electrolux.com
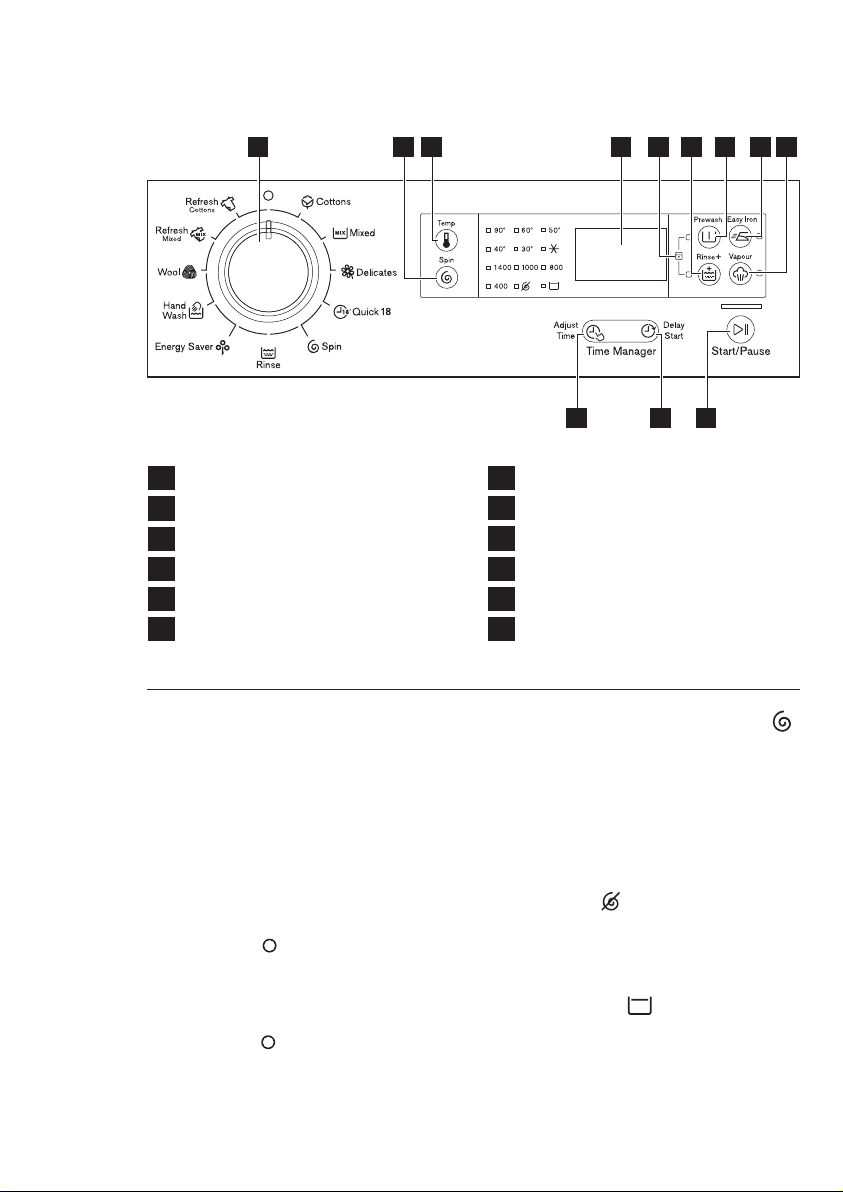
CONTROL PANEL3.
1 2 86 712 9 103
1
Program Selector Knob
2
Spin Selection Touchpad
3
Temperature Touchpad
4
Adjust Time Touchpad
5
Delay Start Touchpad
6
Display
3.1 Program Selector Knob
Turn this knob to select a program.
The washing machine will propose
a temperature and automatically
select the spin value provided for
the program you have chosen.
(See page 9)
The selector knob can be turned
either clockwise or anticlockwise.
Position “ ” to reset program/
switching OFF the machine.
At the end of the program the
selector dial must be turned to
position “ ”, to switch the
machine off.
4 5
7
Rinse Plus Touchpad
8
Prewash Touchpad
9
Easy Iron Touchpad
10
Vapour Touchpad
11
Start/Pause Touchpad
12
Child Lock Option (See page 16)
11
3.2 Spin Selection Touchpad
Press this touchpad repeatedly to
increase or decrease the spin
speed, if you want your laundry to
be spun at a speed different from
the one proposed by the washing
machine.
No Spin
No spin option eliminates all the
spin phases and increases the
number of rinses.
Rinse Hold
By selecting this option the water of
the last rinse is not emptied out and
the drum turns regularly to prevent
the laundry creasing.
ENGLISH 7
The door is still locked to indicate that the
water must be emptied out.
The door stays locked with the water
in the drum. To continue the cycle you
must press (Start/Pause).
3.3 Temperature Touchpad
Press this touchpad repeatedly to
increase or decrease the wash
temperature if you want your laundry to
be washed at a temperature different
from the one proposed by the washing
machine (symbol “ ” corresponds to
cold wash).
3.4 Adjust Time Touchpad
This option allows you to adjust
washing time.
Press this touchpad repeatedly to
decrease or return to default washing
time.
This option will adjust the number of
rinse according to selected washing
time.
3.5 Delay Start Touchpad
This option makes it possible to delay
the start of the program by 30 min, 60
min or 90 min and then by every hour
from 2 to 20 hours.
The delay you have selected is
indicated on the display. The end time
will increase in order to show you the
selected delay.
You must select this option after you
have set the program and before you
press the Start/Pause touchpad.
If you wish to add laundry in the
machine during the delay time press
Start/Pause touchpad to put the
machine in pause mode. Add laundry,
close the door and press Start/Pause
touchpad again.
You can cancel the delay time at
any moment, by pressing ‘Delay
Start’ touchpad repeatedly till the
display shows delay time ‘ ’, then
press the Start/Pause touchpad.
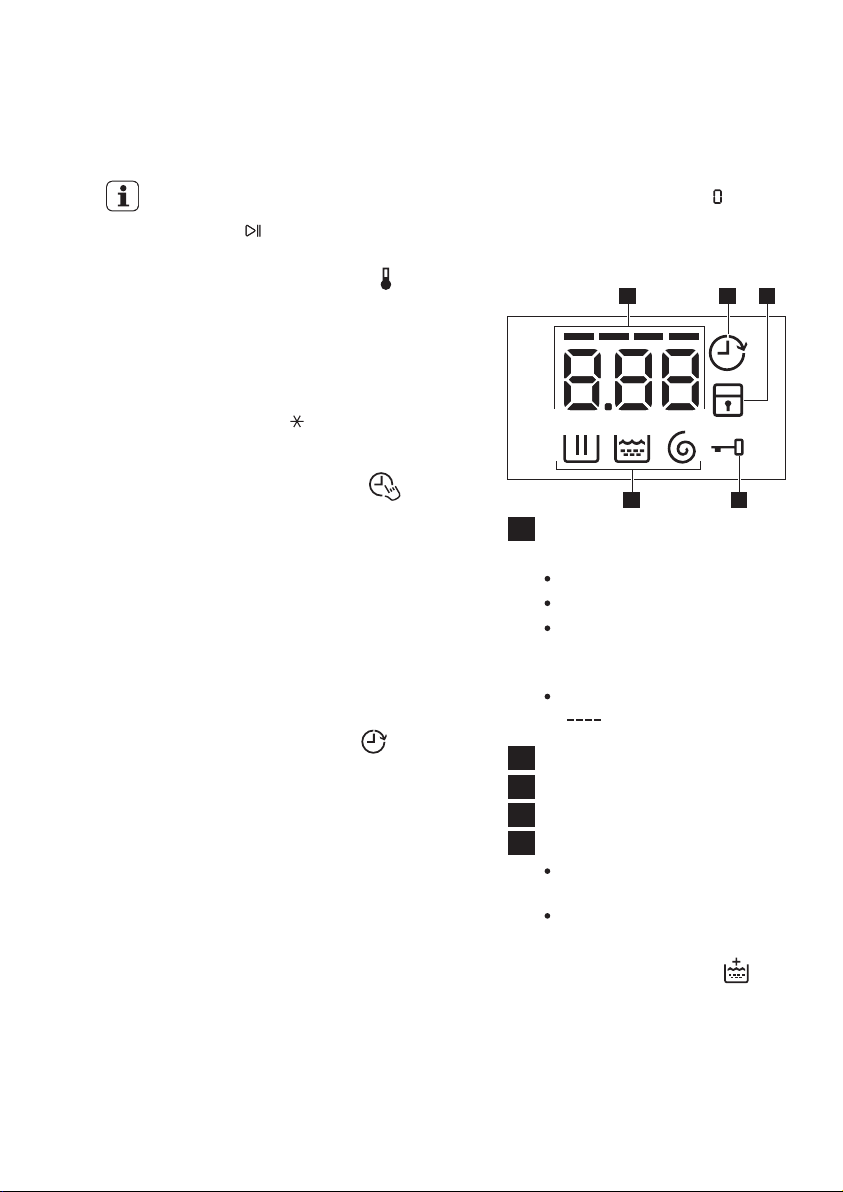
3.6 Display
B E
A
Digital Number;
will show:
Washing cycle time.
Delay start time.
The alarm codes. Refer to the
chapter “Troubleshooting” for
their description.
The level of the Time Manager
( ).
Washing Phase icon
B
C
Delay Start icon
D
Child Lock icon
Door Lock icon
E
It is on, you cannot open the
door.
It is off, you can open the door.
3.7 Rinse Plus Touchpad
This option is recommended for
people who are allergic to detergents,
and in areas where the water is very
soft.
Press it to add rinsing phases to a
program. The indicator of this option
comes on.
C DA

8
www.electrolux.com
3.8 Prewash Touchpad
Select this option if you wish your
laundry to be pre-washed before
the main wash. Use this option for
heavy soil.
The indicator of this option comes
on.
When you set this function, put
the detergent into the “ ”
compartment. (Refer page 13-14)
This function increases the
program duration.
3.9 Easy Iron Touchpad
When selecting this option the
laundry is gently washed and spun
to avoid creasing. In this way
ironing is easier.
The indicator of this option comes
on.
3.10 Vapour Touchpad
Select this option to add
approximately 15-40 minutes of
tumbling in vapour during the wash
cycle. Vapour helps open fabric
fibers up to allow laundry additives
to release tough stains.
The indicator of this option comes
on.
NOTE:
Vapour may not necessarily be
visible inside the drum during a
vapour wash cycle. Vapour is
created below the drum and
allowed to naturally rise into the
clothes.
Vapour may not be present
during the entire vapour wash
cycle.
Vapour function is more effective
with half load.
At the end of the Vapour cycle
the clothes will be warmer,
softer and detached from the
drum.
If Vapour option is selected,
rinse temperatures will be
elevated.
During a vapour cycle you
may notice vapour exiting
from the drain hose of the
washing machine, this is
normal and there is no
cause for alarm.
3.11 Start/Pause Touchpad
To start the selected program,
press the ‘Start/Pause’.
To interrupt a program which is
running, press the ‘Start/Pause’
to pause the machine.
To restart the program from the
point at which it was interrupted,
press the ‘Start/Pause’ again.
If you have chosen a delayed
start, after pressing ‘Start/Pause’
the machine will begin the
countdown.
3.12
Buzzer Sounds
The buzzer sounds operate when:
The program is completed.
The appliance has a malfunction.
If you want to disable the buzzer
sound (except for event of
appliance malfunction),
“Rinse +” and “Vapour” touchpads
at the same time for 3 seconds,
and listen for ‘BEEP, BEEP’.
To return to default configuration
press these 2 touchpads at the
same time for 3 seconds, and
listen for ‘BEEP’.
press
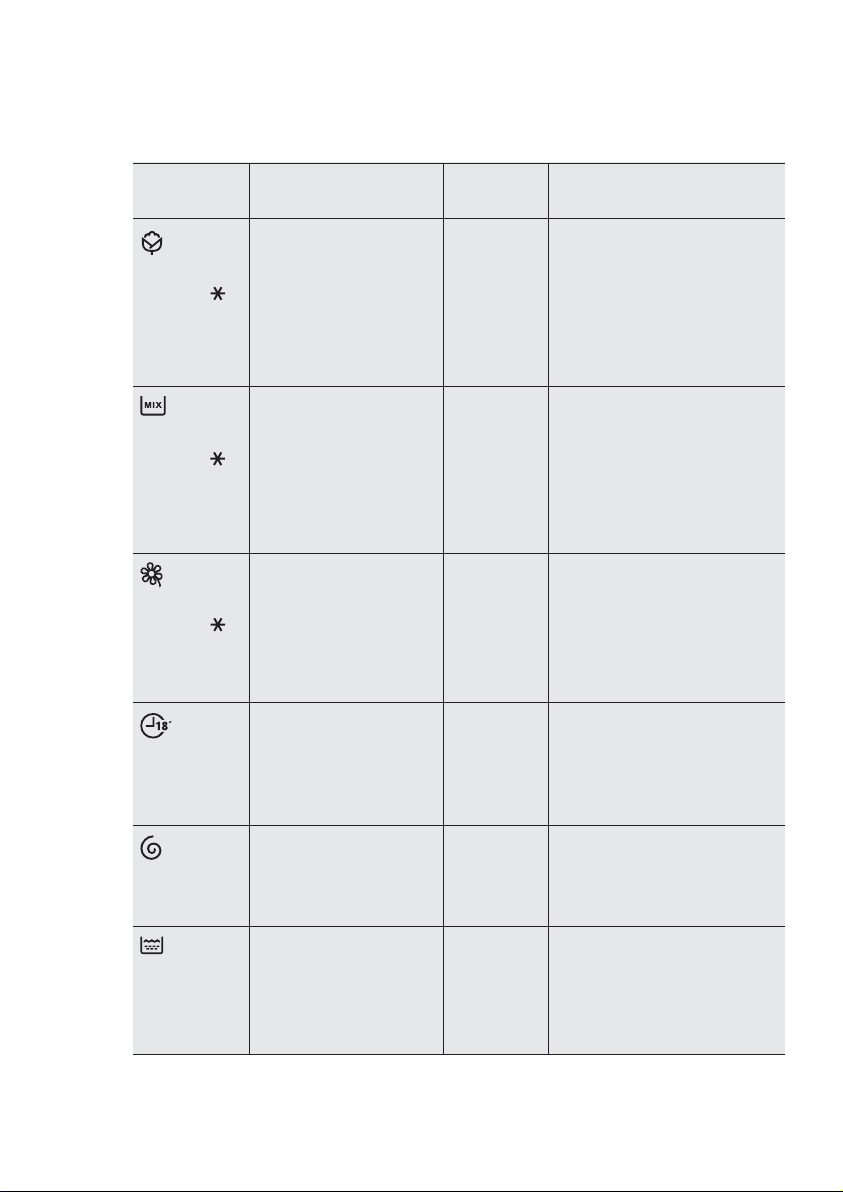
3.13 Programs + Options
ENGLISH 9
Program;
Temperature
Cottons;
90 °C to
Mixed;
60 °C to
Delicates;
40 °C to
Quick 18;
30 °C
Spin
Type of load;
Max. weight of load
White and coloured
cotton with heavy level
of soil;
max. load 7 kg.
Synthetic or mixed
fabric items with
normal level of soil;
max. load 3.5 kg.
Delicate fabrics as
acrylics, viscose,
polyester items with
normal soil;
max. load 3.5 kg
Synthetic and mixed
fabric items. Light soil
and items to freshen
up;
max. load 1.5 kg
To spin the laundry
and to drain the water
in the drum;
max. load 7 kg.
Cycle
description
- Wash
- Rinses
- Long spin
- Wash
- Rinses
- Short spin
- Wash
- Rinses
- Short spin
- Wash
- Rinses
- Short spin
-
Drain
-
Spin phase
Options can be
combined
Spin Reduction
- 1400 to 400 rpm
- No Spin
- Rinse Hold
Prewash, Easy Iron, Rinse +,
Vapour
1)
, Adjust Time,
Delay Start
Spin Reduction
- 1000 to 400 rpm
- No Spin
- Rinse Hold
Prewash, Easy Iron, Rinse +,
Vapour
1)
, Adjust Time,
Delay Start
Spin Reduction
- 1000 to 400 rpm
- No Spin
- Rinse Hold
Prewash, Rinse +, Vapour
1)
Adjust Time, Delay Start
Spin Reduction
- 800 to 400 rpm
- No Spin
- Rinse Hold
Delay Start
Spin Reduction
- 1400 to 400 rpm
- No Spin
Delay Start
,
Rinse
To rinse and spin the
laundry;
max. load 7 kg.
Three
rinses with
softener
Spin phase
-
Spin Reduction
- 1400 to 400 rpm
- No Spin
- Rinse Hold
Delay Start
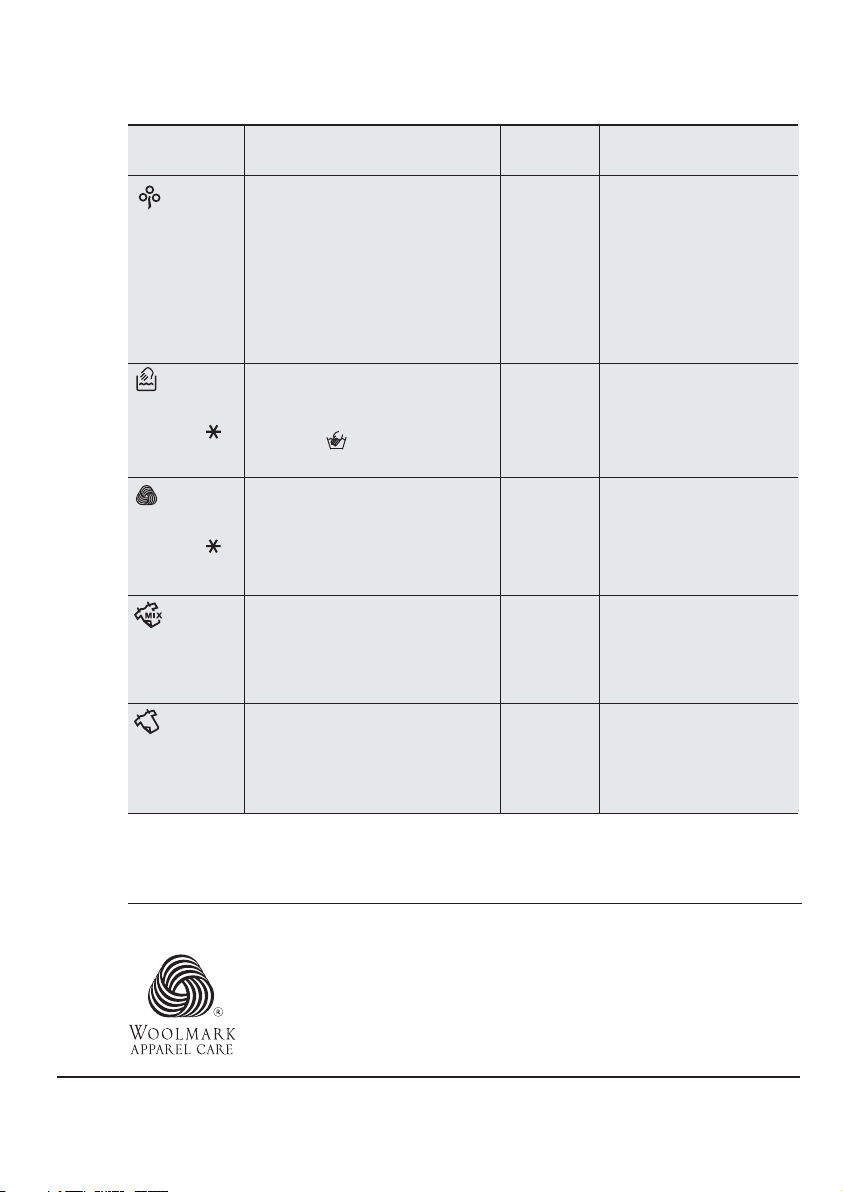
10
www.electrolux.com
Program;
Temperature
Energy
Saver
2)
60 °C
,
40 °C
Hand Wash;
40 °C to
Wool;
40 °C to
Refresh
Mixed
Refresh
Cottons
Type of load;
Max. weight of load
White and colourfast, cotton
with normal soil. Set this
program to have a good
washing results and decrease
the energy consumption. The
time of the washing program is
extended;
max. load 7 kg.
Machine washable woollen,
hand washable woollen and
delicate fabrics with hand
washing ‘ ’ care symbol;
max. load 2 kg.
Specially tested program for
woollen garments bearing the
‘Pure new woollen, non-shrink,
machine washable’ label;
max. load 2 kg.
Vapour program for synthetic or
mixed fabric items. This cycle
removes odours and helps to
dewrinkle the laundry;
max. load 1.5 kg.
Vapour program for White and
coloured cotton. This cycle
removes odours and helps to
dewrinkle the laundry; max. load
1.5 kg.
Cycle
description
- Wash
- Rinses
- Long spin
- Wash
- Rinses
- Short spin
- Wash
- Rinses
- Short spin
-
Clothes
tumble in
vapour
-
Clothes
tumble in
vapour
Options can be
combined
Spin Reduction
- 1400 to 400 rpm
- No Spin
- Rinse Hold
Prewash, Rinse +,
Vapour
1)
, Adjust Time,
Delay Start
Spin Reduction
- 1000 to 400 rpm
- No Spin
- Rinse Hold
Delay Start
Spin Reduction
- 1000 to 400 rpm
- No Spin
- Rinse Hold
Delay Start
Delay Start
Delay Start
1) Vapour option can be combined with temperature 40 to 90 °C only.
2) Energy Saver program with 60 °C option selected is recommended for a full load
of normally soiled cottons, and is the water and energy rating label program.
WOOLMARK CERTIFICATE
The wool wash cycle of this machine has been approved by The
Woolmark Company for the washing of machine washable wool
products provided that the products are washed according to the
instructions on the garment label and those issued by the
manufacturer of this washing machine. M30000111
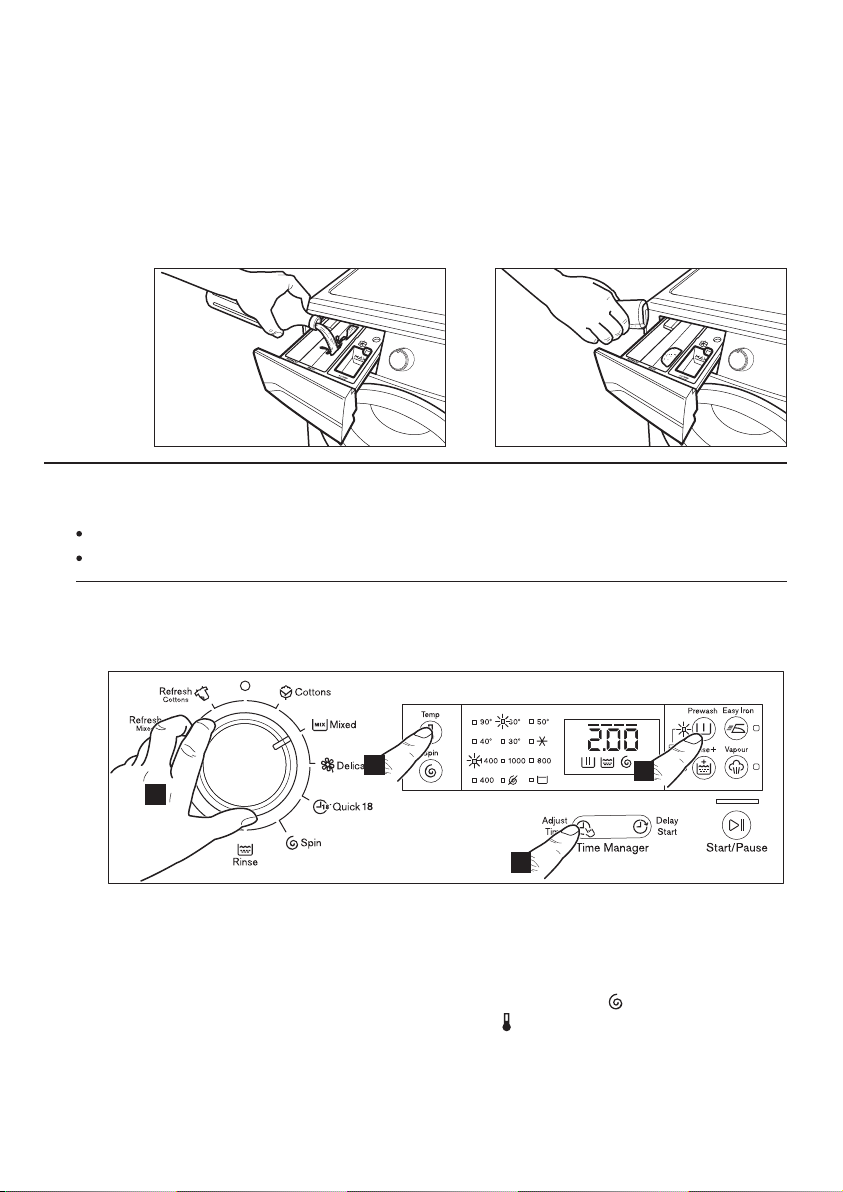
BEFORE FIRST USE4.
1.
Ensure that the electrical and water
connections comply with the
installation instructions.
2.
Put 2 litres of water in the detergent
compartment for washing phase.
This activates the drain system.
DAILY USE5.
Connect the mains plug to the mains socket.
Turn the water tap on.
5.1 Four Steps Start Up Guide
ENGLISH 11
Select a Cottons cycle at 90 °C,
3.
without any laundry in the machine, to
remove any manufacturing residue from
the drum and tub. Pour 1/2 a measure
of detergent into the dispenser drawer
and start the machine.
Step 1 - Setting A Program For Washing
2
1
Turn the program selector dial to the
1.
required program.
-
The selector dial can be turned either
clockwise or anticlockwise.
-
Once you selected a wash program,
the program selected will stay at that
position for the whole of the wash.
-
The display shows the level of the
Time Manager, the program duration
and the indicators of the phases of
the program.
3
4
2.
If you want your laundry to be spun
or use temperature different from
the one proposed by the washing
machine,
pess the Spin ‘ ’ and the temperature
‘ ’ touchpads repeatedly to change
the spin speed and temperature.
 Loading...