

Page 1

user manual
manual de instrucciones
Washing Machine
Lavadora
EWF 127410 X
Page 2

2 electrolux
Electrolux. Thinking of you.
Share more of our thinking at www.electrolux.com
CONTENTS
Safety information 2
Product description 4
Control panel 5
Personalisation 8
Daily use 8
Helpful hints and tips 11
Washing programmes 13
SAFETY INFORMATION
Important! Read carefully & keep for future
reference.
• The safety of Your appliance complies with
the industry standards and with legal requirements on the safety of appliances.
However, as manufacturers, we feel it is
our duty to provide the following safety
notes.
• It is most important that this instruction
book should be retained with the appliance for future reference. Should the appliance be sold or transferred to another
owner, or should you move house and
leave the appliance, always ensure that the
book is supplied with the appliance in order that the new owner can get to know
the functioning of the appliance and the
relevant warnings.
• You MUST read them carefully before installing or using the appliance.
• Before first starting up, check the appliance for any damage incurred during
transport. Never connect up a damaged
appliance . If parts are damaged, contact
your supplier.
• If the appliance is delivered in the winter
months when there are minus temperatures. Store it at room temperature for 24
hours before using for the first time.
General safety
• It is dangerous to alter the specifications or
attempt to modify this product in any way.
• During high temperature wash programmes the door glass may get hot. Do
not touch it!
Care and cleaning 16
What to do if… 20
Technical data 22
Consumption values 23
Installation 23
Electrical connection 26
Environment concerns 26
Subject to change without notice
• Make sure that small pets and children do
not climb into the drum. To avoid this,
please check into the drum before using.
• Any objects such as coins, safety pins,
nails, screws, stones or any other hard,
sharp material can cause extensive damage and must not be placed into the machine.
• Only use the advised quantities of fabric
softener and detergent. Damage to the
fabric can ensue if you over-fill. Refer to the
manufacturer’s recommendations of
quantities.
• Wash small items such as socks, laces,
washable belts etc in a washing bag or pillow case as it is possible for such items to
slip down between the tub and the inner
drum.
• Do not use your washing machine to wash
articles with whalebones, material without
hems or torn material.
• Always unplug the appliance and turn off
the water supply after use, cleaning and
maintenance.
• Under no circumstances should you attempt to repair the machine yourself. Repairs carried out by inexperienced people
may cause injury or serious malfunctioning. Contact your local Service Centre. Always insist on genuine spare parts.
Installation
• This appliance is heavy. Care should be
taken when moving it.
• When unpacking the appliance, check that
it is not damaged. If in doubt, do not use it
and contact the Service Centre.
Page 3
electrolux 3
• All packing and transit bolts must be removed before use. Serious damage can
occur to the product and to property if this
is not adhered to. See relevant section in
the user manual.
• After having installed the appliance, check
that it is not standing on the inlet and drain
hose and the worktop is not pressing the
electrical supply cable against the wall.
• If the machine is situated on a carpeted
floor, please adjust the feet in order to allow air to circulate freely under the appliance.
• Always be sure, that there is no water leakage from hoses and their connections after
the installation.
• If the appliance is installed in a location
subject to frost, please read the “dangers
of freezing” chapter.
• Any plumbing work required to install this
appliance should be carried out by a qualified plumber or competent person.
• Any electrical work required to install this
appliance should be carried out by a qualified electrician or competent person.
Use
• This appliance is designed for domestic
use. It must not be used for purposes other
than those for which it was designed.
• Only wash fabrics which are designed to
be machine washed. Follow the instructions on each garment label.
• Do not overload the appliance. See the
Washing Programme Table.
• Before washing, ensure that all pockets
are empty and buttons and zips are fastened. Avoid washing frayed or torn articles and treat stains such as paint, ink,
rust, and grass before washing. Underwired bras must NOT be machine washed.
• Garments which have been in contact with
volatile petroleum products should not be
machine washed. If volatile cleaning fluids
are used, care should be taken to ensure
that the fluid is removed from the garment
before placing in the machine.
• Never pull the power supply cable to remove the plug from the socket; always
take hold of the plug itself.
• Never use the appliance if the power supply cable, the control panel, the working
surface or the base are damaged so that
the inside of the washing machine is accessible.
Child safety
• This appliance is not intended for use by
person (including children) with reduced
physical sensory or mental capabilities or
lack of experience and knowledge unless
they have been given supervision or instruction concerning use of the appliance
by a person responsible for their safety.
• Children should be supervised to ensure
that they do not play with the appliance.
• The packaging components (e.g. plastic
film, polystyrene) can be dangerous to children - danger of suffocation! Keep them
out of children’s reach.
• Keep all detergents in a safe place out of
children’s reach.
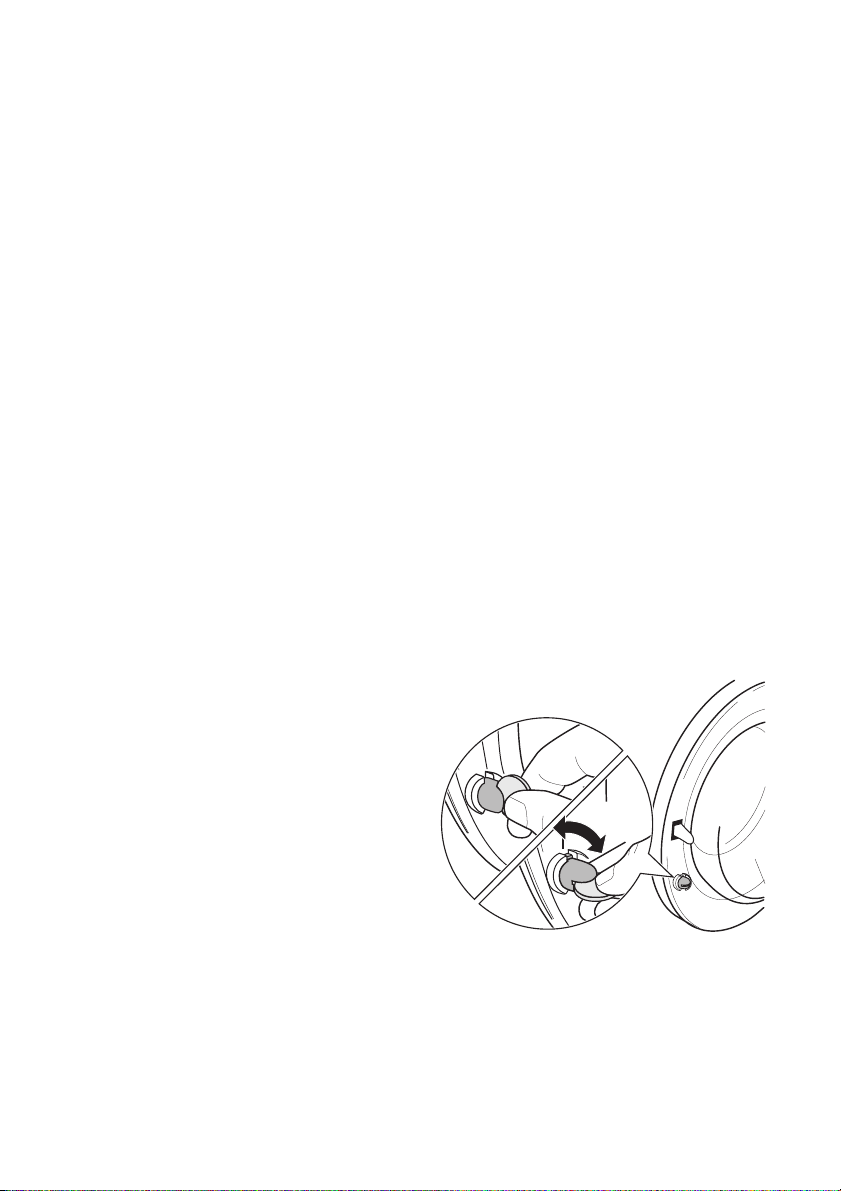
• Make sure that children or pets do not
climb into the drum. To prevent children
and pets becoming trapped inside the
drum the machine incorporates a special
feature. To activate this device, rotate the
button (without pressing it) inside the door
clockwise until the groove is horizontal. If
necessary use a coin.
To disable this device and restore the possibility of closing the door, rotate the button counterclockwise until the groove is
vertical.
Page 4

4 electrolux
PRODUCT DESCRIPTION
Your new appliance meets all modern requirements for effective treatment of laundry
with low water, energy and detergent consumption. Its new washing system allows total
use of detergent and reduces water consumption so saving energy.
1 2
3
4
5
6
1 Detergent dispenser drawer
2 Control panel
3 Door opening handle
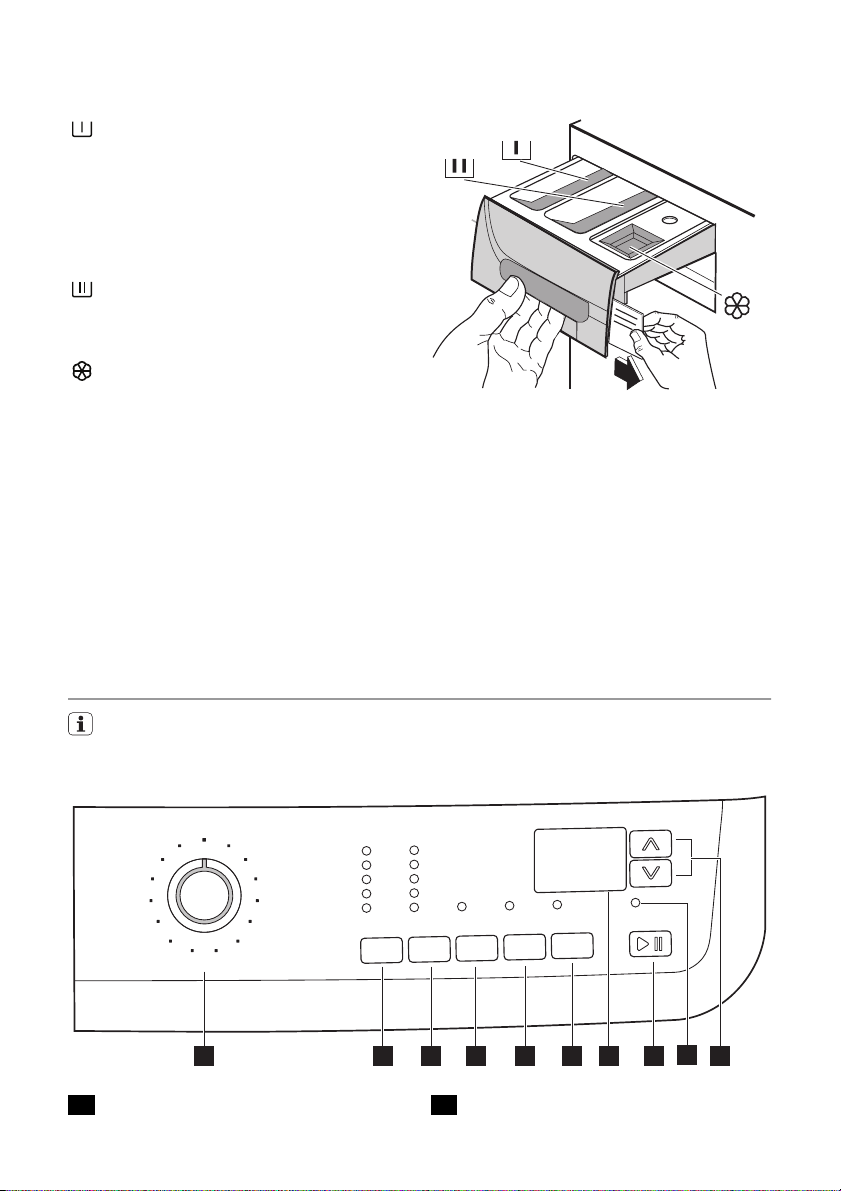
Detergent dispenser drawer
Compartment for detergent used for prewash and soak phase or for stain remover
used during the stain action phase (if available). The prewash and soak detergent is
added at the beginning of the wash programme. The stain remover is added during
the stain action phase.
Compartment for powder or liquid detergent used for main wash. If using liquid detergent pour it just before starting the programme.
Compartment for liquid additives (fabric
softener, starch).
Follow the product manufacturer’s recommendations on quantities to use and do not
exceed the «MAX» mark in the detergent
dispenser drawer. Any fabric softener or
starching additives must be poured into the
compartment before starting the wash programme.
4 Rating Plate
5 Drain pump
6 Adjustable feet
Page 5

electrolux 5
Programme guide
The programme guide is on the front side of
the detergent dispenser drawer.
Other programme guides in different lan-
To replace the programme guide:
1. Pull it out from the right side and remove
it.
2. Put in the new programme guide.
guages are in the user manual bag. (Not all
appliances have more than one programme
guide).
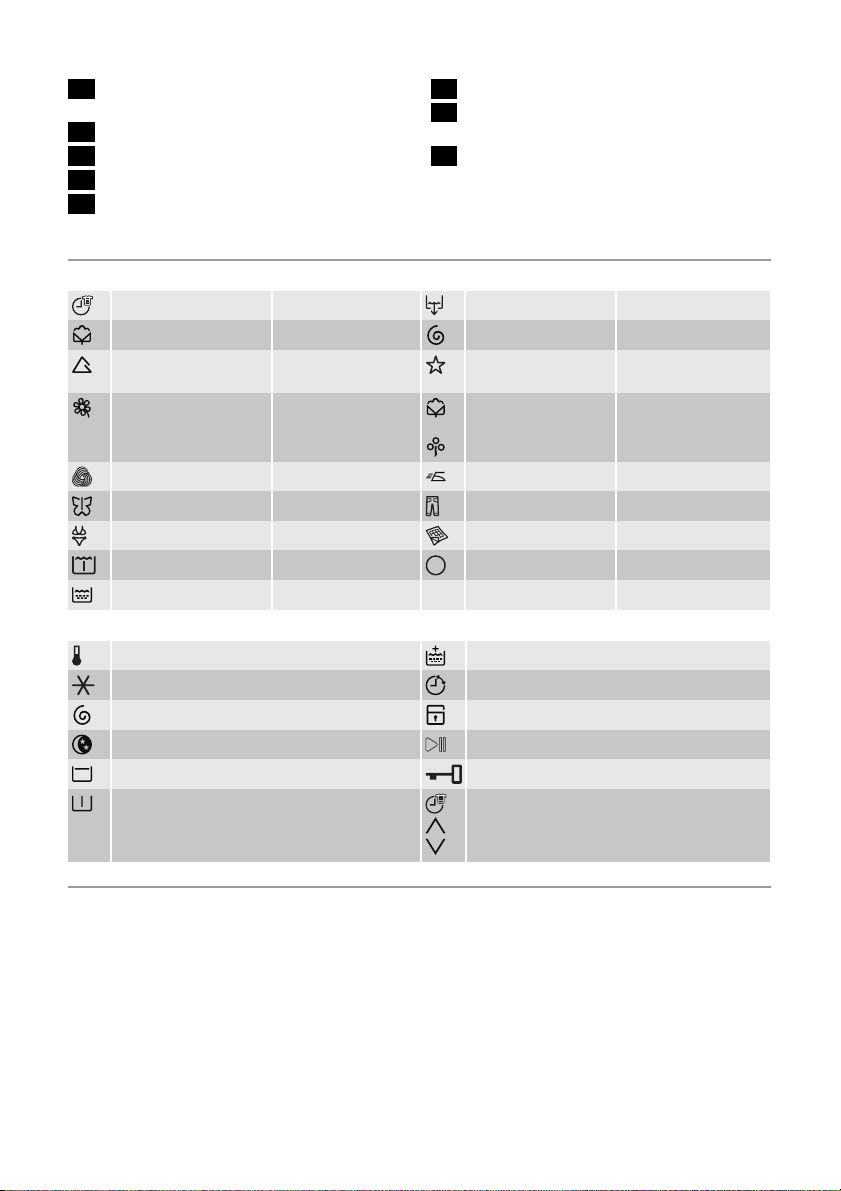
CONTROL PANEL
Below is a picture of the control panel. It shows the programme selector dial as well as
the buttons, pilot light and the display. These are presented by relevant numbers on the
following pages.
1 2 4 6 7
3 5
9
8
10
1 Programme selector dial
2
TEMPERATURE button
3 SPIN reduction button
4 PREWASH button
5 EXTRA RINSE button
6 DELAY START button
7
Display
8 START/PAUSE button
9 DOOR LOCKED pilot light
10 TIME MANAGER buttons
TABLE OF SYMBOLS
Selector dial symbols
= Time Manager Time Manager = Drain Descarga
= Cottons Algódon = Spin Centrifugado
= Synthetics Sintéticos = Special pro-
= Delicates Delicados
= Wool Lana = Easy Iron Plancha facil
= Silk Seda = Jeans Vaqueros
= Lingerie Lencería = Blanket Mantas
grammes
= Cotton economy Algódon económico
+
Programas especiales
Page 6

6 electrolux
= Soak Remojo 30° = Off Apagado
= Rinse Aclarado
Push buttons and pilot lights:
= Temperature = Extra Rinse
= Cold wash = Delay Start
= Spin reduction = Child Safety Lock
= Night Cycle = Start/ Pause
= Rinse Hold = Door Lock
= Prewash = Time Manager buttons (Time Manager)
Programme Selector Dial
It allows you to switch the appliance on/off
and/or to select a programme.
Temperature
This button allows you to increase or decrease the washing temperature.
Spin speed Reduction
By pressing this button you can reduce the
maximum spin speed allowed for the selected programme or to select the available option(s).
Rinse hold
By selecting this function the water of the last
rinse is not emptied out to prevent the fabrics
from creasing. Before opening the door it will
be necessary to empty out the water. To
empty out the water, please read the paragraph «At the end of the programme».
Night Cycle
By selecting this function the machine will not
drain the water of the last rinse and all spinning phases will be suppressed, so as not to
wrinkle the laundry. This washing cycle is
very quiet and it can be selected at night or
in times with a more economical power rate.
On some programmes the rinses will be performed with more water. Before opening the
door it will be necessary to empty out the
water. To empty out the water, please read
the paragraph «At the end of the programme».
Prewash
By selecting this option the machine performs a prewash cycle before the main wash
phase. The washing time will be prolonged.
This option is recommended for heavily
soiled laundry.
Extra Rinse
This appliance is designed to save energy. If
it necessary to rinse the laundry using an extra quantity of water (extra rinse), select this
option. Some additional rinses will be performed. This option is recommended for
people who are allergic to detergents, and in
areas where the water is very soft.
Delay Start
The programme can be delayed from 30 min
- 60 min - 90 min, 2 hours and then by 1 hour
up to a maximum of 20 hours by means of
this button.
Start Pause
This button allows you to start or to interrupt
the selected programme.
Time Manager (Time Manager)
These buttons let you to change the programme duration automatically proposed by
the appliance.
Door locked pilot light
The pilot light 9 illuminates when the programme starts and indicates if the door can
be opened:
• light on: the door cannot be opened. The
machine in working or has stopped with
water left in the tub.
Page 7
electrolux 7
• light off: the door can be opened. The programme is finished or the water has been
emptied out.
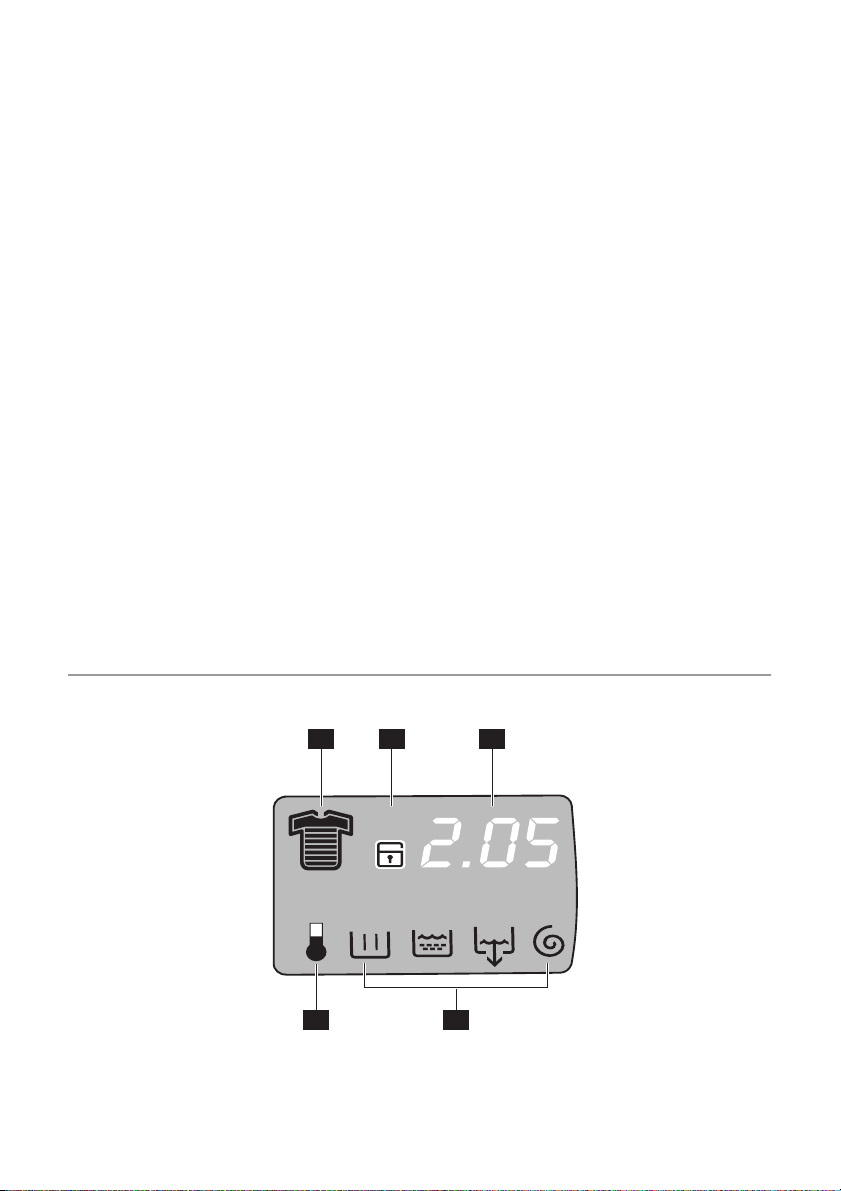
Display
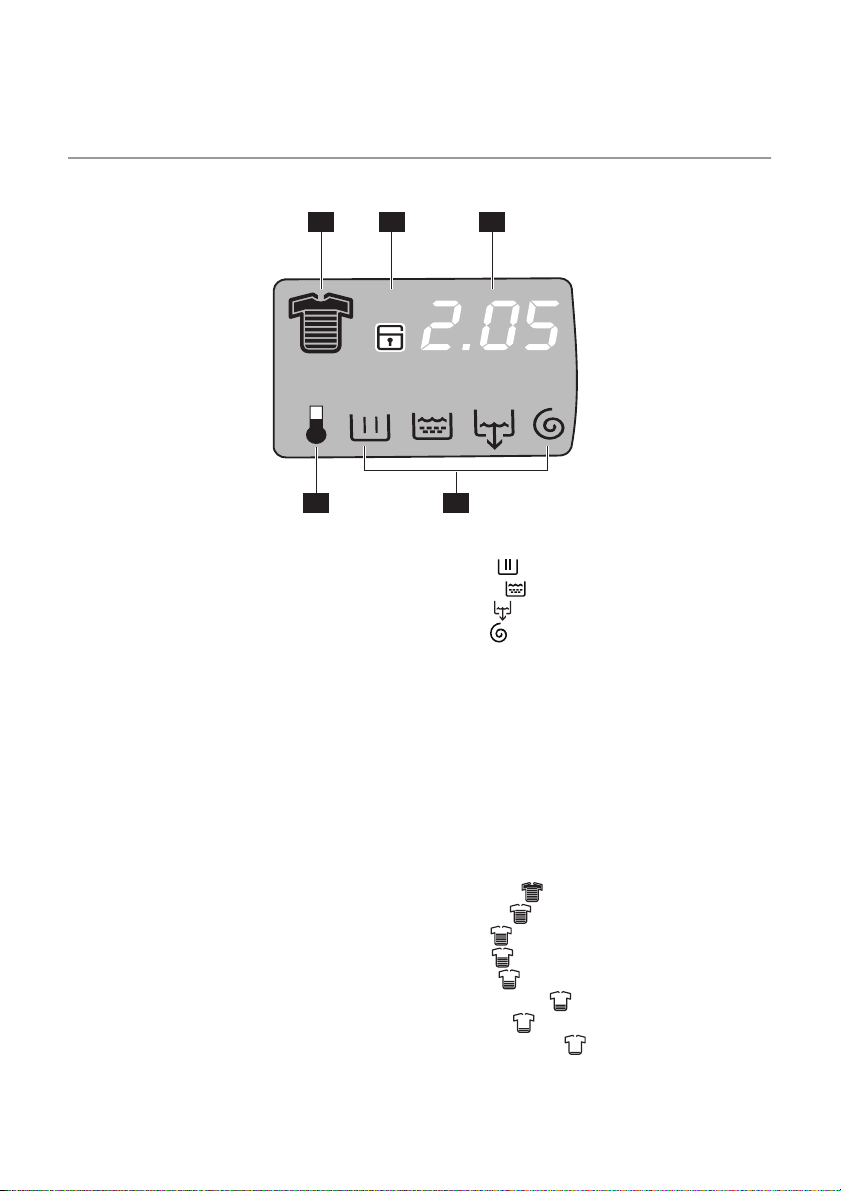
7.4 7.5 7.1
The display shows the following information:
7.1:
• Duration of the selected programme
After selecting a programme, the duration
is displayed in hours and minutes (for example 2.05 ). The duration is calculated
automatically on the basis of the maximum
recommended load for each type of fabric.
After the programme has started, the time
remaining is updated every minute.
• Delayed start
The Selected delay set by pressing the relevant button appears on the display for
few seconds, then the duration of the selected programme is displayed again.
• Alarm codes
In the event of operating problems, some
alarm codes can be displayed, for example
E20 (see paragraph «What to do if...»).
•
Incorrect option selection
If an option which is not compatible with
the set wash programme is selected, the
message Err is displayed at the bottom of
the display for a few seconds and the integrated red light of button 8 start flashing.
• End of programme
When the programme has finished three
flashing zeros are displayed, the pilot light
9 and the pilot light of button 8 go out and
the door can be opened.
• light flashing: the door is opening
7.27.3
7.2: Washing programme phase icons
•
Wash
•
Rinses
•
Drain
•
Spin
By selecting the wash programme, the
washing programme phase icons corresponding to the various phases making up
the programme are shown in the bottom part
of the display. After having pressed button
8 only the icon of the running phase stays on.
7.3: Heating phase
During the washing cycle the display shows
a temperature icon indicating that the appliance has started the heating phase of the
water in the tub.
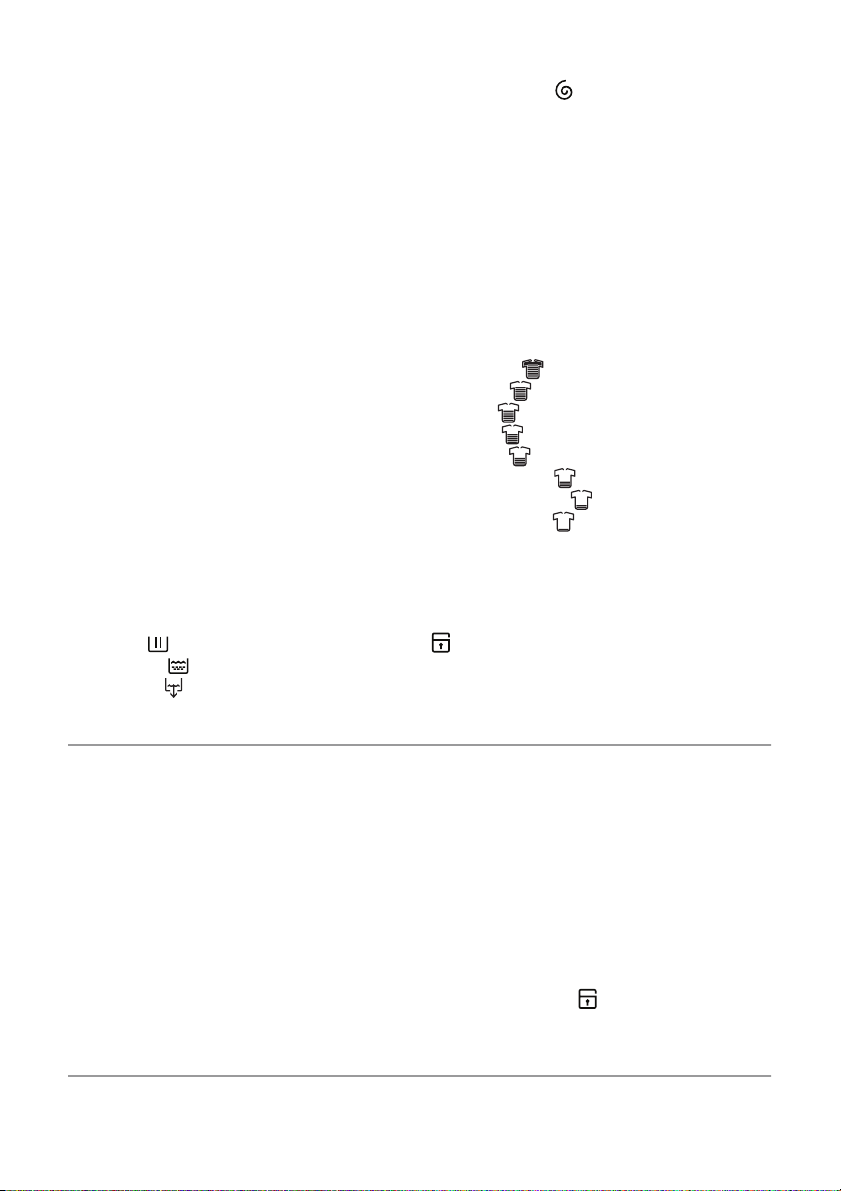
7.4: Soil degree icons
•
Intensive
•
Normal
•
Daily
•
Light
•
Quick
•
Super Quick
•
Refresh
•
Super Refresh
When selecting a programme on the display
appears an icon indicating the degree of soiling automatically proposed by the machine.
Page 8

8 electrolux
7.5: Child safety lock (see «Child Safety
Lock» paragraph).
PERSONALISATION
Acoustic signals
The machine is provided with an acoustic
device, which sounds in the following cases:
• at the end of the cycle
• if there is a fault.
By pressing the 4 and 5 buttons simultaneously for about 6 seconds , the acoustic
signal is deactivated (except if there is a fault).
By pressing these 2 buttons again, the
acoustic signal is reactivated.
Child safety lock
This device permits you to leave the appliance unattended and not to worry that children might be injured by or cause damage to
DAILY USE
Load the laundry
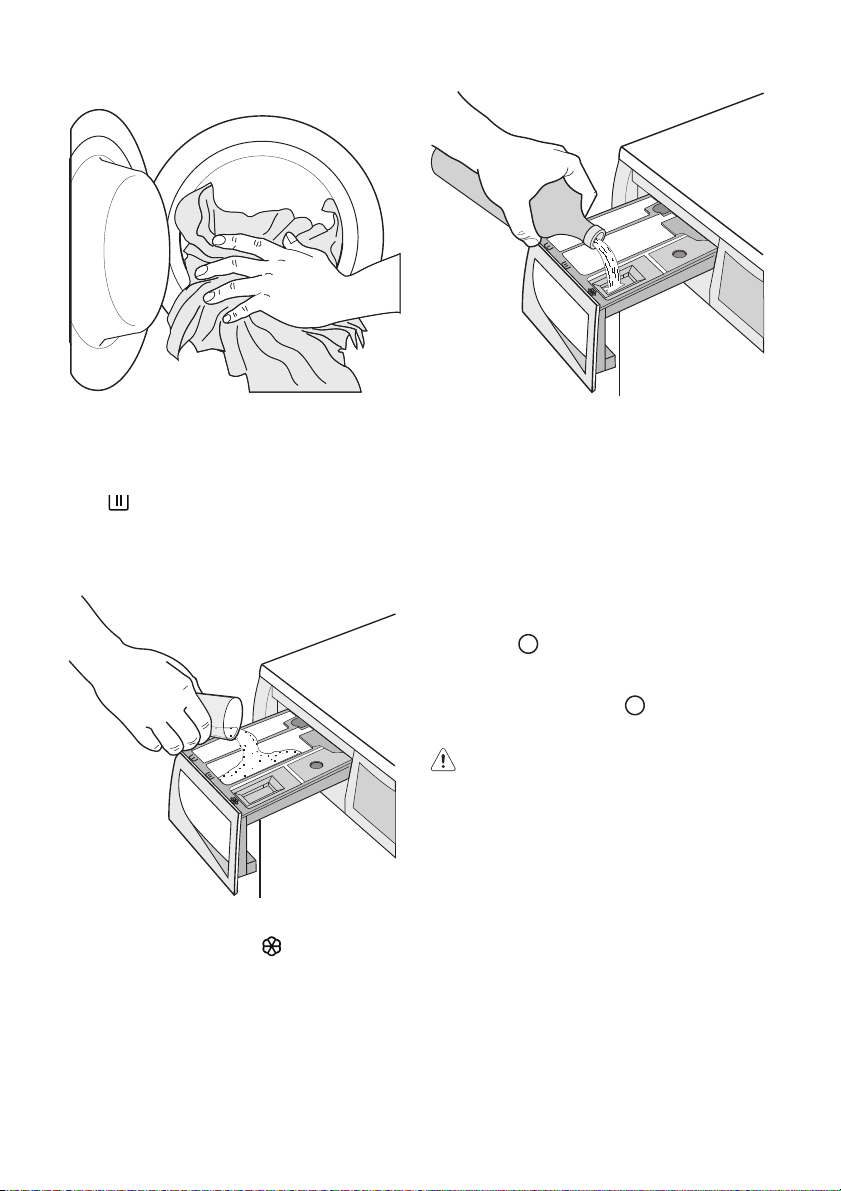
Open the door by carefully pulling the door
handle outwards. Place the laundry in the
drum, one item at a time, shaking them out
as much as possible. Close the door.
the appliance. This function remains enabled
also when the washing machine is not working.
There are two different ways to set this option:
1. Before pressing button 8 : it will be im-
possible to start the machine.
2. After pressing button 8 : it will be impos-
sible to change any other programme or
option.
To enable or disable this option press simultaneously for about 6 seconds buttons 5 and
6 until on the display, the icon
disappears.
appears or
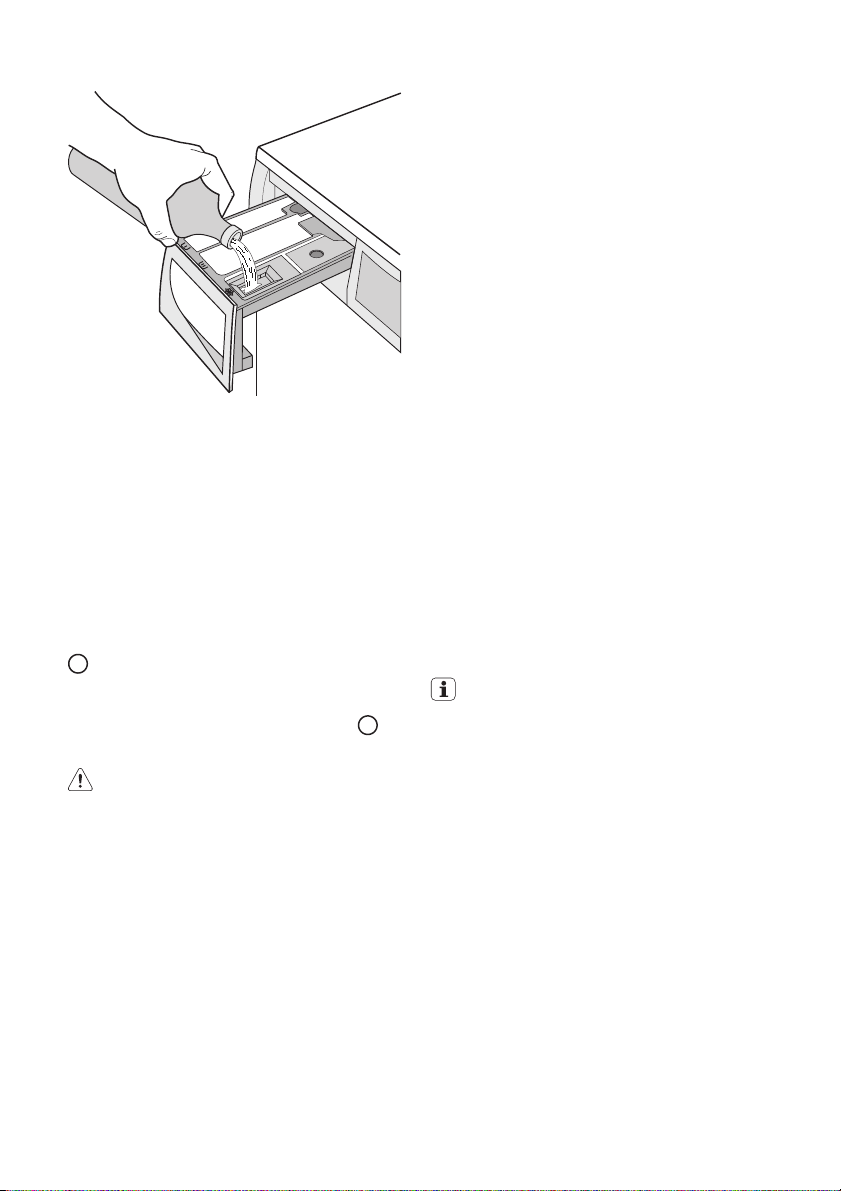
Measure out the detergent and the fabric softener
Pull out the dispenser drawer until it stops.
Measure out the amount of detergent required, pour it into the main wash compart-
ment
if the selected programme/option it requires
(see more details in «Detergent dispenser
drawer»).
or in the appropriate compartment
If required, pour fabric softener into the compartment marked
not exceed the «MAX» mark in the drawer).
Close the drawer gently.
(the amount used must
Page 9
Select the required programme by
turning the programme selector dial (1)
Turn the programme selector dial to the required programme. The washing machine
will propose a temperature and automatically
select the maximum spin value provided for
the programme you have chosen. You can
change these values by operating the corresponding buttons. The green pilot light of the
button 8 starts to flash.
The selector dial can be turned either clockwise or counterclockwise. Turn to position
to reset programme/Switching the ma-
chine off.
At the end of the programme the selector dial must be turned to position
, to
switch the machine off.
Caution! If you turn the programme
selector dial to another programme
when the machine is working, the red
pilot light of button 8 will blink 3 times
and the message Err is displayed to
indicate a wrong selection. The machine
will not perform the new selected
programme.
Programme Option buttons
Depending on the programme, different
functions can be combined. These must be
selected after choosing the desired programme and before pressing the button 8 .
electrolux 9
Select the temperature by pressing
button 2
By selecting a programme, the appliance
proposes automatically a default temperature.
Press this button repeatedly to increase or
decrease the temperature, if you want your
laundry to be washed at a different temperature.
Reduce the spin speed by pressing
button 3
By selecting a programme, the appliance
proposes automatically the maximum spin
speed provided for that programme.
Press button 3 repeatedly to change the spin
speed, if you want your laundry to be spun at
a different speed. The relevant light illuminates.
Select the available option by pressing
buttons 3, 4 and 5
Depending on the selected programme, different functions can be combined before
pressing the button 8 . By selecting an option
the relevant pilot light illuminates.
If an incorrect option is selected, the integrated red pilot light of the button 8 flashes 3
times and the Err message appears on the
display for few seconds.
For compatibility among the washing
programmes and the options see chapter «Washing Programmes».
Select the Delay Start by pressing
button 6
Before you start the programme, if you wish
to delay the start, press the button 6 repeatedly, to select the desired delay. The relevant
pilot light goes on.
The selected delay time value (up to 20
hours) will appear on the display a few seconds, then the duration of the programme
will appear again.
You must select this option after you have set
the programme and before you press button
8 .
You can cancel or modify the delay time at
any moment, before you press button 8 .
Selecting the delayed start:
1. Select the programme and the required
options.
Page 10
10 electrolux
2. Select the delay start by pressing the button 6 .
3. Press button 8 :
– the machine starts its hourly count-
down.
– The programme will start after the se-
lected delay has expired.
Cancelling the delayed start after having
pressed button 8 :
1. Set the washing machine to PAUSE by
pressing button 8 .
2.
Press button 6 once until the symbol 0’ is
displayed
3. Press button 8 again to start the pro-
gramme.
Important! The selected delay can be
changed only after selecting the washing
programme again.
The Delay Start can not be selected with
DRAIN programme.
Start the programme by pressing button
8
To start the selected programme, press the
button 8 , the green pilot light of the button
8 stops blinking.
To interrupt a programme which is running,
press the button 8 : the green pilot light starts
blinking.
To restart the programme from the point at
which it was interrupted, press the button 8
again . If you have chosen a delayed start,
the machine will begin the countdown. If an
incorrect option is selected, the red pilot light
of the button 8 blinks for 3 times the message
Err is displayed for a few seconds.
Select the Time Manager option by
pressing buttons 10
By pressing these buttons repeatedly, the
duration of the washing cycle can be increased or decreased. The soil level icon will
appear on the display to indicate the chosen
degree of soil. This option is available only
with Cotton , Synthetic and Delicate programmes.
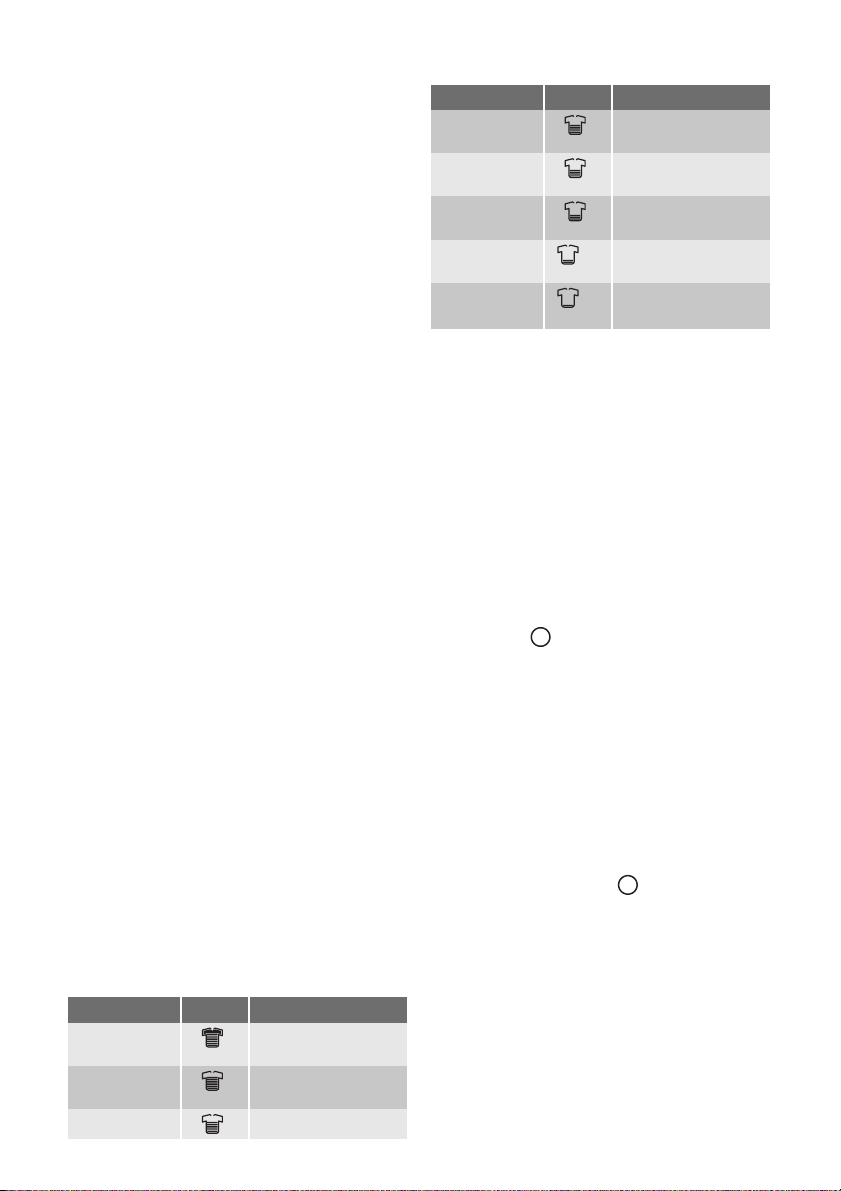
Soil Level Icon Type of fabric
Intensive For heavy soiled
Normal For normal soiled
Daily For daily soiled items
items
items
Soil Level Icon Type of fabric
Light For slightly soiled
Quick For very slightly
Super Quick
Refresh
Super Refresh
1) We recommend you to reduce the load sizes (see
Washing programmes table).
2) When you select this option the relevant icon appears
just for a while and then it disappears immediately.
1)
1)
1)
items
soiled items
For items used or
worn for a short time
2)
For refreshing items
only
2)
For refreshing a very
few items only
Altering an option or a running
programme
It is possible to change some options before
the programme carries them out .
Before you make any change, you must
PAUSE the appliance by pressing the button
8 (if you wish to change the Time Manager
option, you must cancel the running programme and make your selection again).
Changing a running programme is possible
only by resetting it. Turn the programme se-
lector dial to
and then to the new programme position. Start the new programme
by pressing the button 8 again. The washing
water in the tub will be not emptied out.
Interrupting a programme
Press the button 8 to interrupt a programme
which is running, the corresponding green
pilot light starts blinking.
Press the button again to restart the programme.
Cancelling a programme
Turn the selector dial to
to cancel a programme which is running.
You can select now a new programme.
Opening the door
After the programme has started (or during
the delay time) the door is locked, if you need
to open it, set first the machine to PAUSE by
pressing the button 8 .
After a few minutes the pilot light 9 goes out
and it is possible to open the door.
If this pilot light remains lit, this means that
the machine is already heating or that the
Page 11

electrolux 11
water level is too high. In any case, do not try
to force the door!
If you cannot open the door but you need to
open it you have to switch the machine off by
turning the selector dial to O . After a few minutes the door can be opened (pay atten-
tion to the water level and temperature!) .
After closing the door, it is necessary to select the programme and options again and to
press button 8 .
At the end of the programme
The machine stops automatically. Three
blinking 0.00 appear on the display and the
pilot light of button 8 goes off. Some acoustic
signals sound.
If a programme or an option that ends with
water left in the tub has been selected, the
door remains locked to indicate that the water must be emptied out before opening the
door.
Stand by : once the programme has finished
after a few minutes the energy saving system
will be enabled. The brightness of the display
HELPFUL HINTS AND TIPS
Sorting out the laundry
Follow the wash code symbols on each garment label and the manufacturer’s washing
instructions. Sort the laundry as follows:
whites, coloureds, synthetics, delicates,
woollens.
Before loading the laundry
Never wash whites and coloureds together.
Whites may lose their «whiteness» in the
wash.
New coloured items may run in the first wash;
they should therefore be washed separately
the first time.
Button up pillowcases, close zip fasteners,
hooks and poppers. Tie any belts or long
tapes.
Remove persistent stains before washing.
Rub particularly soiled areas with a special
detergent or detergent paste.
Treat curtains with special care. Remove
hooks or tie them up in a bag or net.
Follow the below instructions to empty out
the water:
1. Turn the programme selector dial to O .
2. Select the draining or spinning pro-
gramme.
3. Reduce the spin speed if needed, by
pressing the relevant button.
4. Press button 8 .
At the end of the programme, the door is released and can be opened. Turn the programme selector dial to O to switch the machine off.
Remove the laundry from the drum and carefully check that the drum is empty. If you do
not intend to carry out another wash, close
the water tap. Leave the door open to prevent the formation of mildew and unpleasant
smells.
is reduced. By pressing any button the appliance will come out of the energy saving
status.
Removing stains
Stubborn stains may not be removed by just
water and detergent. It is therefore advisable
to treat them prior to washing.
Blood: treat fresh stains with cold water. For
dried stains, soak overnight in water with a
special detergent then rub in the soap and
water.
Oil based paint: moisten with benzine stain
remover, lay the garment on a soft cloth and
dab the stain; treat several times.
Dried grease stains: moisten with turpentine, lay the garment on a soft surface and
dab the stain with the fingertips and a cotton
cloth.
Rust: oxalic acid dissolved in hot water or a
rust removing product used cold. Be careful
with rust stains which are not recent since the
cellulose structure will already have been
damaged and the fabric tends to hole.
Mould stains: treat with bleach, rinse well
(whites and fast coloureds only).
Grass: soap lightly and treat with bleach
(whites and fast coloureds only).
Page 12

12 electrolux
Ball point pen and glue: moisten with ace-
1)
, lay the garment on a soft cloth and
tone
dab the stain.
Lipstick: moisten with acetone as above,
then treat stains with methylated spirits.
Treat any residual marks with bleach.
Red wine: soak in water and detergent,
rinse and treat with acetic or citric acid, then
rinse. Treat any residual marks with bleach.
Ink: depending on the type of ink, moisten
the fabric first with acetone
1)
, then with acetic acid; treat any residual marks on white
fabrics with bleach and then rinse thoroughly.
Tar stains: first treat with stain remover, methylated spirits or benzine, then rub with detergent paste.
Detergents and additives
Good washing results also depend on the
choice of detergent and use of the correct
quantities to avoid waste and protect the environment.
Although biodegradable, detergents contain
substances which, in large quantities, can
upset the delicate balance of nature.
The choice of detergent will depend on the
type of fabric (delicates, woollens, cottons,
etc.), the colour, washing temperature and
degree of soiling.
All commonly available washing machine detergents may be used in this appliance:
• powder detergents for all types of fabric
• powder detergents for delicate fabrics
(60°C max) and woollens
• liquid detergents, preferably for low tem-
perature wash programmes (60°C max)
for all types of fabric, or special for woollens only.
The detergent and any additives must be
placed in the appropriate compartments of
the dispenser drawer before starting the
wash programme.
If using liquid detergents, a programme
without prewash must be selected.
Your appliance incorporates a recirculation
system which allows an optimal use of the
concentrated detergent.
Follow the product manufacturer’s recommendations on quantities to use and do not
exceed the «MAX» mark in the detergent
dispenser drawer .
Quantity of detergent to be used
The type and quantity of detergent will depend on the type of fabric, load size, degree
of soiling and hardness of the water used.
Follow the product manufacturers’ instructions on quantities to use.
Use less detergent if:
• you are washing a small load
• the laundry is lightly soiled
• large amounts of foam form during washing.
Degrees of water hardness
Water hardness is classified in so-called “degrees” of hardness. Information on hardness
of the water in your area can be obtained
from the relevant water supply company, or
from your local authority. If the water hardness degree is medium or high we suggest
you to add a water softener following always
the manufacturer’s instructions. When the
degree of hardness is soft, readjust the quantity of the detergent.
1) do not use acetone on artificial silk
Page 13

WASHING PROGRAMMES
Programme
Maximum and Minimum Temperature
Cycle Description
Maximum Spin Speed
Maximum Fabrics Load
Type of Laundry
COTTONS - ALGODÓN
90° - Cold
Main wash - Rinses
Maximum spin speed: 1200 rpm
Max. load 7 kg - Reduced load 3,5 kg
White and coloured cotton (normally soiled items).
SYNTHETICS - SINTÉTICOS
60° - Cold
Main wash - Rinses
Maximum spin speed: 900 rpm
Max. load 3,5 kg - Reduced load 2 kg
Synthetic or mixed fabrics: underwear, coloured garments, non-shrink shirts, blouses.
DELICATES - DELICADOS
40° - Cold
Main wash - Rinses
Maximum spin speed: 700 rpm
Max. load 3,5 kg - Reduced load 2 kg
Delicate fabrics: acrylics, viscose, polyester.
WOOL - LANA
40° - Cold
Main wash - Rinses
Maximum spin speed: 900 rpm
Max. load 2 kg
Washing programme for machine washable wool as
well as for hand washable woollens and delicate fabrics
with «hand washing» care symbol.
A single or bulky item may cause imbalance. If the
appliance doesn’t perform the final spin phase,
add more items, redistribute the load manually and
then select the spinning programme.
SILK - SEDA
30° - Cold
Main wash - Rinses
Maximum spin speed: 700 rpm
Max. load 1 kg
Delicate washing programme suitable for silk and mixed
synthetic items.
Options
SPIN REDUCTION
RINSE HOLD
NIGHT CYCLE
PREWASH
EXTRA RINSE
TIME MANAGER
SPIN REDUCTION
RINSE HOLD
NIGHT CYCLE
PREWASH
EXTRA RINSE
TIME MANAGER
RINSE HOLD
NIGHT CYCLE
PREWASH
EXTRA RINSE
TIME MANAGER
SPIN REDUCTION
RINSE HOLD
NIGHT CYCLE
RINSE HOLD
NIGHT CYCLE
1)
1)
1)
electrolux 13
Detergent
Compartment
2)
2)
2)
Page 14
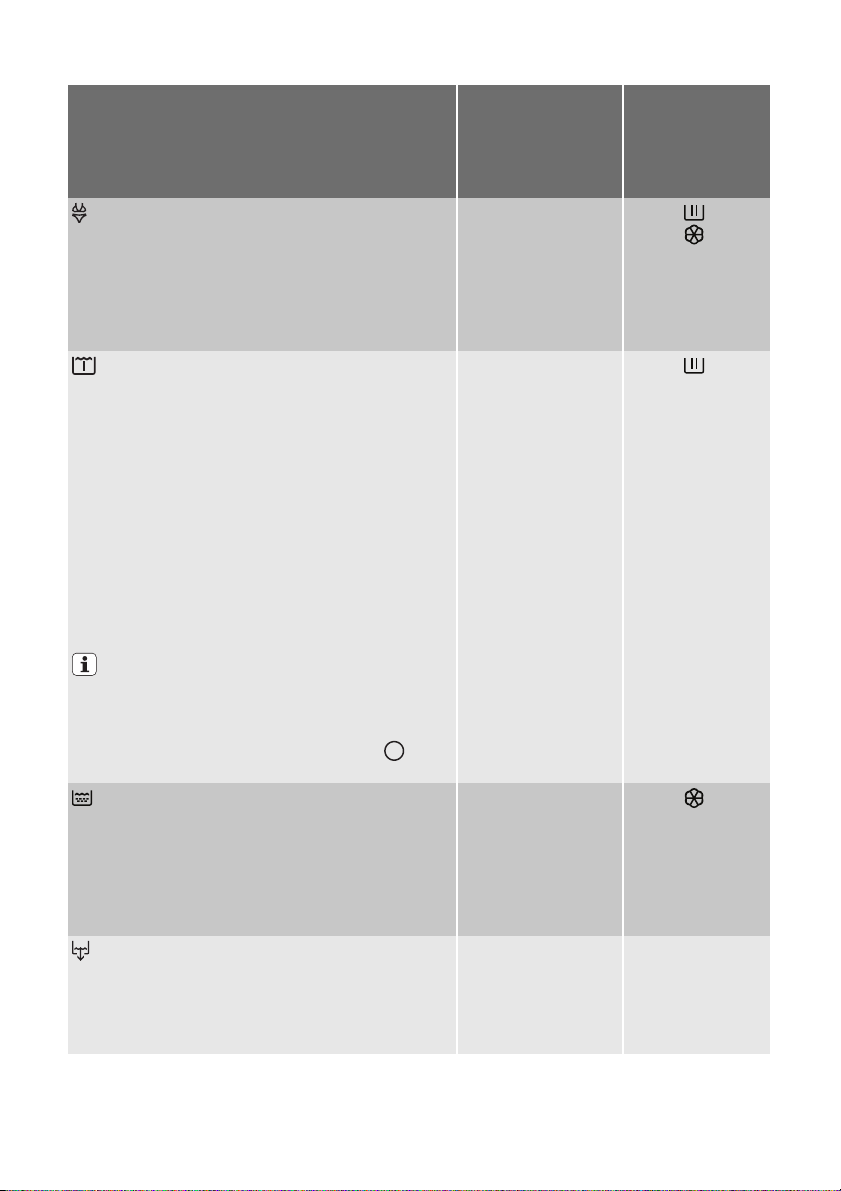
14 electrolux
Programme
Maximum and Minimum Temperature
Cycle Description
Maximum Spin Speed
Maximum Fabrics Load
Type of Laundry
LINGERIE - LENCERÍA
40° - Cold
Main wash - Rinses
Maximum spin speed: 900 rpm
Max. load 2 kg
This programme is suitable for very delicate items such
a lingerie, bras and underwear. The maximum spin
speed is automatically reduced.
SOAK - REMOJO
30°
Prewash - Soak for about 40 minutes - Stop with water
in the tub
Max. load 7 kg
Special programme for heavily soiled laundry. The machine performs a soak at 30°C. At the end of this time
the machine will stop automatically with water left in the
tub.
Before starting a new washing phase, it is necessary to
empty out the water by:
• Draining only : turn the programme selector dial to
Drain programme. (Press the button 8 ).
•
Draining and spinning : turn the programme selector dial to programme Spin, reduce the spin speed by
means of button 3 , and then press button 8 .
This programme cannot be used for very delicate
fabrics as silk or wool. Pour the detergent for the
soak programme into the compartment marked .
At the end of the soak (after having emptied out
the water) you can select the washing programme.
(First turn the programme selector dial to
, then
to the programme and press the button 8 ).
RINSE - ACLARADO
Rinse - Long spin
Maximum spin speed: 1200 rpm
Max. load 7 kg
With this programme it is possible to rinse and spin cotton garments which have been washed by hand. To intensify the rinsing action, select the option EXTRA
RINSE. The appliance will add some additional rinses.
DRAIN - DESCARGA
Draining of water
Max. load 7 kg
For emptying out the water of the last rinse in programmes with the option selected, which ends with
water left in the tub.
Options
SPIN REDUCTION
RINSE HOLD
NIGHT CYCLE
SPIN REDUCTION
RINSE HOLD
NIGHT CYCLE
EXTRA RINSE
Detergent
Compartment
Page 15

Programme
Maximum and Minimum Temperature
Cycle Description
Maximum Spin Speed
Maximum Fabrics Load
Type of Laundry
SPIN - CENTRIFUGADO
Drain and long spin
Maximum spin speed: 1200 rpm
Max. load 7 kg
Separate spin for hand washed garments and after programmes with the Rinse Hold option selected. You can
choose the spin speed by pressing the relevant button
to adapt it to the fabrics to be spun.
+ COTTON ECONOMY - ALGODÓN ECO-
NÓMICO
90° - 40°
Main wash - Rinses
Maximum spin speed: 1200 rpm
Max. load 7 kg
White and fast coloured cotton
This programme can be selected for slightly or normally
soiled cotton items. The temperature will decrease and
the washing time will be extended. This allows to obtain
a good washing efficiency so saving energy.
EASY IRON - PLANCHA FACIL
60° - Cold
Main wash - Rinses
Maximum spin speed: 900 rpm
Max. load 1 kg
This programme can be selected for synthetic items
and mixed fabrics to be ironed. The laundry can be
gently washed and spun to avoid any creasing. In this
way ironing is easier. Furthermore the machine will perform additional rinses.
JEANS - VAQUEROS
60° - Cold
Main wash - Rinses
Maximum spin speed: 1200 rpm
Max. load 3,5 kg
With this programme it is possible to wash items like
pants, shirts or jackets in Jeans and also jersey realized
with hi-tech materials. (The EXTRA RINSE option will be
activated automatically).
BLANKET - MANTAS
40° - 30°
Main wash - Rinses
Maximum spin speed: 700 rpm
Max. load 2 kg
Special programme for a single washable synthetic
blanket or duvet.
electrolux 15
Options
Detergent
Compartment
SPIN REDUCTION
SPIN REDUCTION
RINSE HOLD
NIGHT CYCLE
PREWASH
EXTRA RINSE
SPIN REDUCTION
RINSE HOLD
PREWASH
EXTRA RINSE
SPIN REDUCTION
RINSE HOLD
NIGHT CYCLE
PREWASH
2)
2)
2)
Page 16

16 electrolux
Programme
Maximum and Minimum Temperature
Cycle Description
Maximum Spin Speed
Maximum Fabrics Load
Type of Laundry
/ OFF
For cancelling the programme which is running or to
switch the machine off .
1) If you select the Quick or Super Quick option by pressing button 10 , we recommend that you reduce the maximum
load as indicated. Full loading is possible however with somewhat reduced cleaning results. If you select the Refresh
or Super Refresh option, we recommend that you reduce the load even more.
2) If using liquid detergents, a programme without PREWASH must be selected.
Options
Detergent
Compartment
CARE AND CLEANING
Warning! You must disconnect the
appliance from the electricity supply,
before you can carry out any cleaning or
maintenance work.
Descaling
The water we use normally contains lime. It
is a good idea to periodically use a water
softening powder in the machine. Do this
separately from any laundry washing, and
according to the softening powder manufacturer's instructions. This will help to prevent
the formation of lime deposits.
After each wash
Leave the door open for a while. This helps
to prevent mould and stagnant smells forming inside the appliance. Keeping the door
open after a wash will also help to preserve
the door seal.
Maintenance wash
With the use of low temperature washes it is
possible to get a build up of residues inside
the drum.
We recommend that a maintenance wash be
performed on a regular basis.
To run a maintenance wash:
• The drum should be empty of laundry.
• Select the hottest cotton wash pro-
gramme.
• Use a normal measure of detergent, must
be a powder with biological properties.
External cleaning
Clean the exterior cabinet of the appliance
with soap and water only, and then dry thoroughly.
Important! Do not use methylated spirits,
solvents or similar products to clean the
cabinet.
Cleaning the dispenser drawer
The detergent dispenser drawer should be
cleaned regularly.
The washing powder and additive dispenser
drawer should be cleaned regularly.
Remove the drawer by pressing the catch
downwards and by pulling it out.
Flush it out under a tap, to remove any traces
of accumulated powder.
To aid cleaning, the top part of the additive
compartment should be removed. Clean all
parts with water.
Page 17
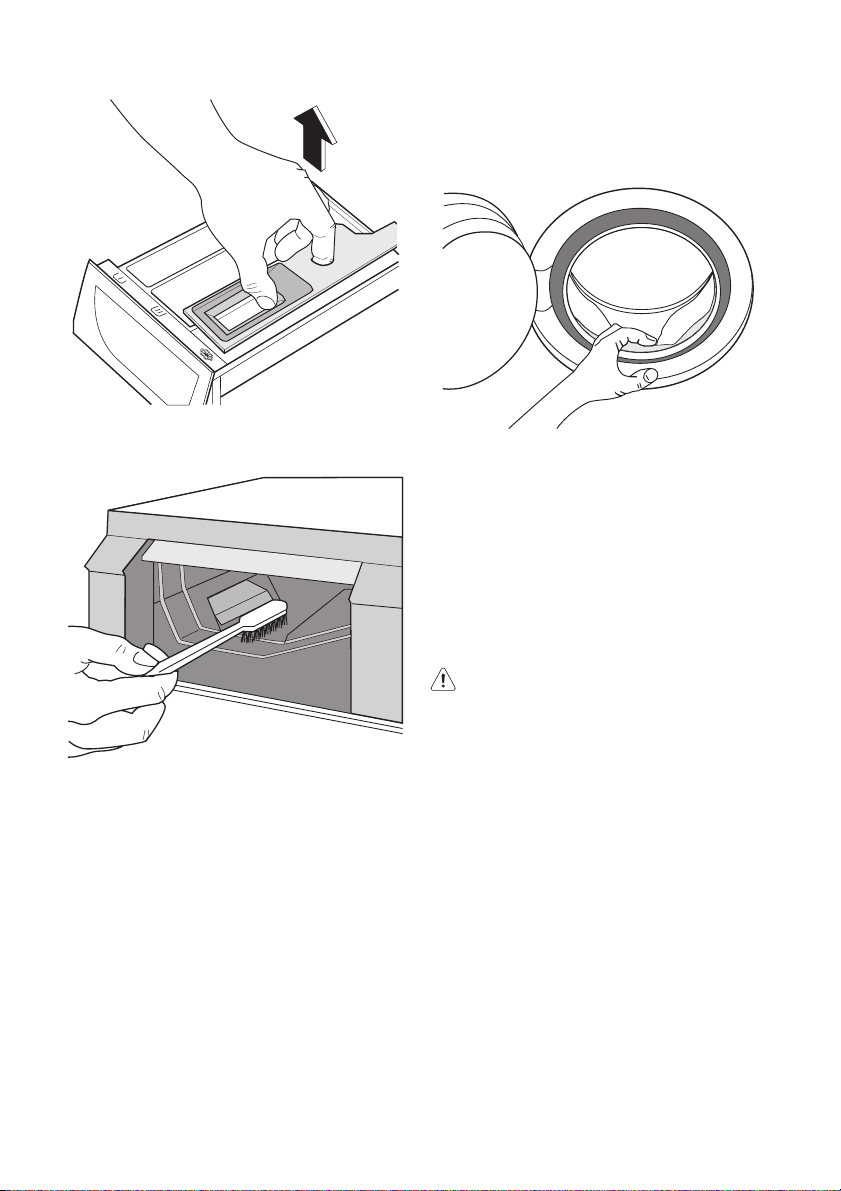
Clean the chamber of dispenser drawer with
a brush.
Washing drum
Rust deposits in the drum may occur due to
rusting foreign bodies in the washing or tap
water containing iron.
Important! Do not clean the drum with
acidic descaling agents, scouring agents
containing chlorine or iron or steel wool.
1. Remove any rust deposits on the drum
with a cleaning agent for stainless steel.
2. Run a washing cycle without any washing
to clean off any cleaning agent residues.
Programme: Short Cotton Programme at
maximum temperature and add approx.
1/4 measuring cup of detergent.
electrolux 17
Door seal
Check from time to time the door seal and
eliminate eventual possible objects that
could be trapped in the fold.
Drain pump
The pump should be inspected regularly and
particularly if:
• the appliance does not empty and/or spin;
• the appliance makes an unusual noise during draining due to objects such as safety
pins, coins etc. blocking the pump.
• a problem with water draining is detected
(see chapter “What to do if...” for more details).
Warning! Before opening the pump
door, switch the appliance off and
remove the mains plug from the socket.
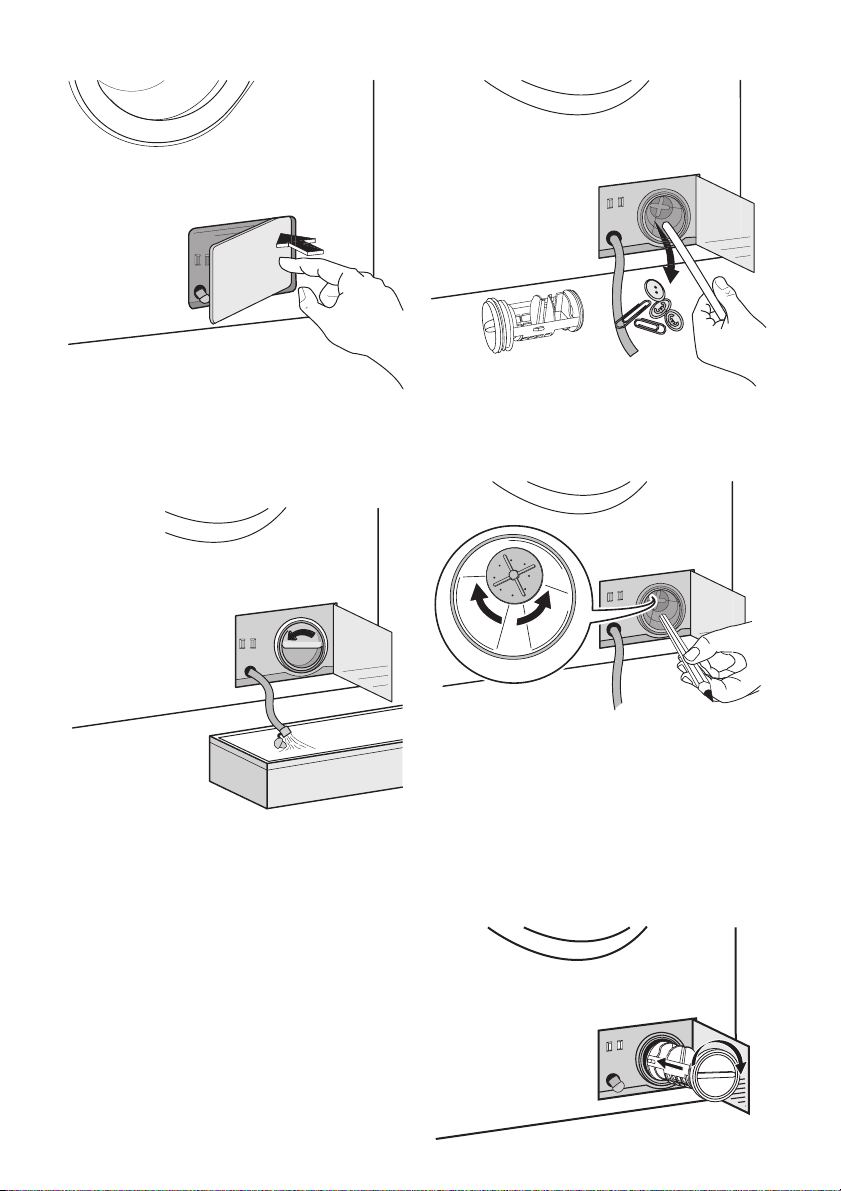
Proceed as follows:
1. Unplug the appliance.
2. If it is necessary, wait until the water has
cooled down.
3. Open the pump door.
Page 18
18 electrolux
4. Place a container close to the pump to
collect any spillage.
5. Pull out the emergency emptying hose,
place it in the container and remove its
cap.
6. When no more water comes out, unscrew the pump cover by turning it anticlockwise and remove the filter. Use pliers, if necessary. Always keep a rag
nearby to dry up any water spillages
when removing the cover.
Clean the filter under a tap, to remove
any traces of fluff.
7. Remove foreign bodies and fluff from the
filter seat and from the pump impeller.
8. Check carefully whether the pump impeller rotates (it rotates jerkily). If it
doesn’t rotate, please contact your
Service Centre.
9. Put the cap back on the emergency
emptying hose and place the latter back
in its seat.
10. Replace the filter into the pump by inserting it correctly into the special
guides. Screw the pump cover firmly by
turning it clockwise.
Page 19
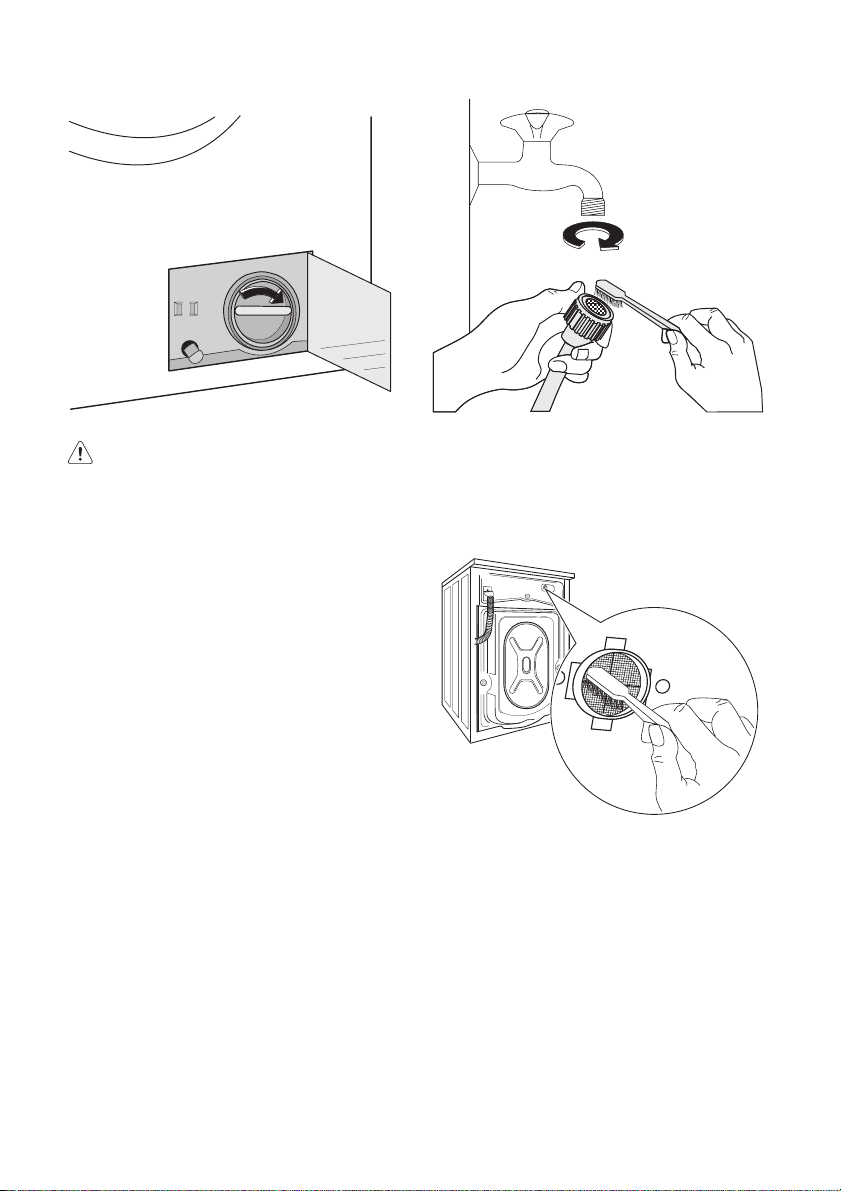
11. Close the pump door.
Warning!
When the appliance is in use and depending
on the programme selected there can be hot
water in the pump.
Never remove the pump cover during a wash
cycle, always wait until the appliance has finished the cycle, and is empty. When refitting
the pump cover, ensure it is securely re-tightened so as to stop leaks and young children
being able to remove it.
Cleaning the water inlet filters
If you notice that the machine is taking longer
to fill, check that the filter in the water inlet
hose is not blocked.
1. Turn off the water tap.
2. Unscrew the water inlet hose.
3. Clean the filter in the hose using a hard
bristle brush.
electrolux 19
4. Screw the hose back onto the tap.
5. Unscrew the hose from the machine.
Keep a rug nearby because some water
may flow.
6. Clean the filter in the valve with a stiff
brush or with the piece of cloth.
7. Screw the hose back to the machine and
make sure the connection is tight.
8. Turn on the water tap.
Emergency emptying out
If the water is not discharged, proceed as
follows to empty out the machine:
1. pull out the plug from the power socket;
2. close the water tap;
3. if necessary, wait until the water has
cooled down;
4. open the pump door;
5. place a bowl on the floor and place the
end of the emergency emptying hose into
the bowl. Remove its cap. The water
Page 20
20 electrolux
should drain by gravity into the bowl.
When the bowl is full, put the cap back
on the hose. Empty the bowl. Repeat the
procedure until water stops flowing out;
6. clean the pump if necessary as previously
described;
7. replace the emergency emptying hose in
its seat after having plugged it;
8. screw the pump again and close the
door.
Frost precautions
If the machine is installed in a place where the
temperature could drop below 0°C, proceed
as follows:
1. close the water tap and unscrew the water inlet hose from the tap;
2. place the end of the emergency emptying
hose and that of the inlet hose in a bowl
WHAT TO DO IF…
Certain problems are due to lack of simple
maintenance or oversights, which can be
solved easily without calling out an engineer.
Before contacting your local Service Centre,
please carry out the checks listed below.
During machine operation it is possible that
the red pilot light of button 8 blinks, one of
the following alarm codes appears on the
display and some acoustic signals sound every 20 seconds to indicate that the machine
is not working:
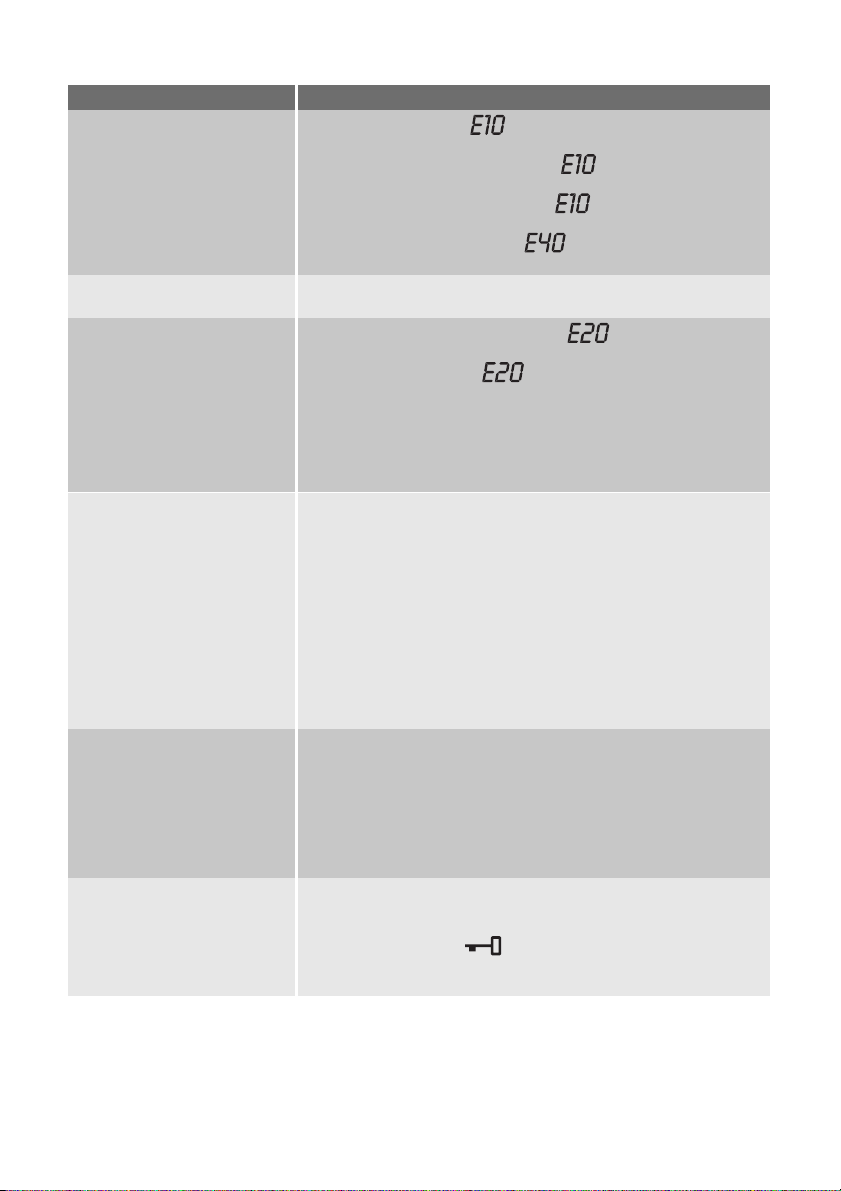
Problem Possible cause/Solution
The door has not been closed.
•Close the door firmly.
The plug is not properly inserted in the power socket.
• Insert the plug into the power socket.
There is no power at the socket.
• Please check your domestic electrical installation.
The washing machine does
not start:
The main fuse has blown.
• Replace the fuse.
The selector dial is not correctly positioned and the button 8 has not
been pressed.
•
Please turn the selector dial and press the button 8 again.
The delay start has been selected.
• If the laundry are to be washed immediately, cancel the delay start.
The Child Safety Lock has been activated.
• Deactivate the Child Safety Lock.
placed on the floor and let water drain
out;
3. screw the water inlet hose back on and
reposition the emergency emptying hose
after having put the cap on again.
By doing this, any water remaining in the machine is removed, avoiding ice forming and
consequently damage to the appliance.
When you use the machine again, make sure
that the ambient temperature is above 0°C.
Important! Every time you drain the water
through the emergency emptying hose you
must pour 2 litres of water into the main wash
compartment of the detergent drawer and
then run the drain programme. This will
activate the ECO Valve device avoiding that
part of the detergent remains unused at next
washing.
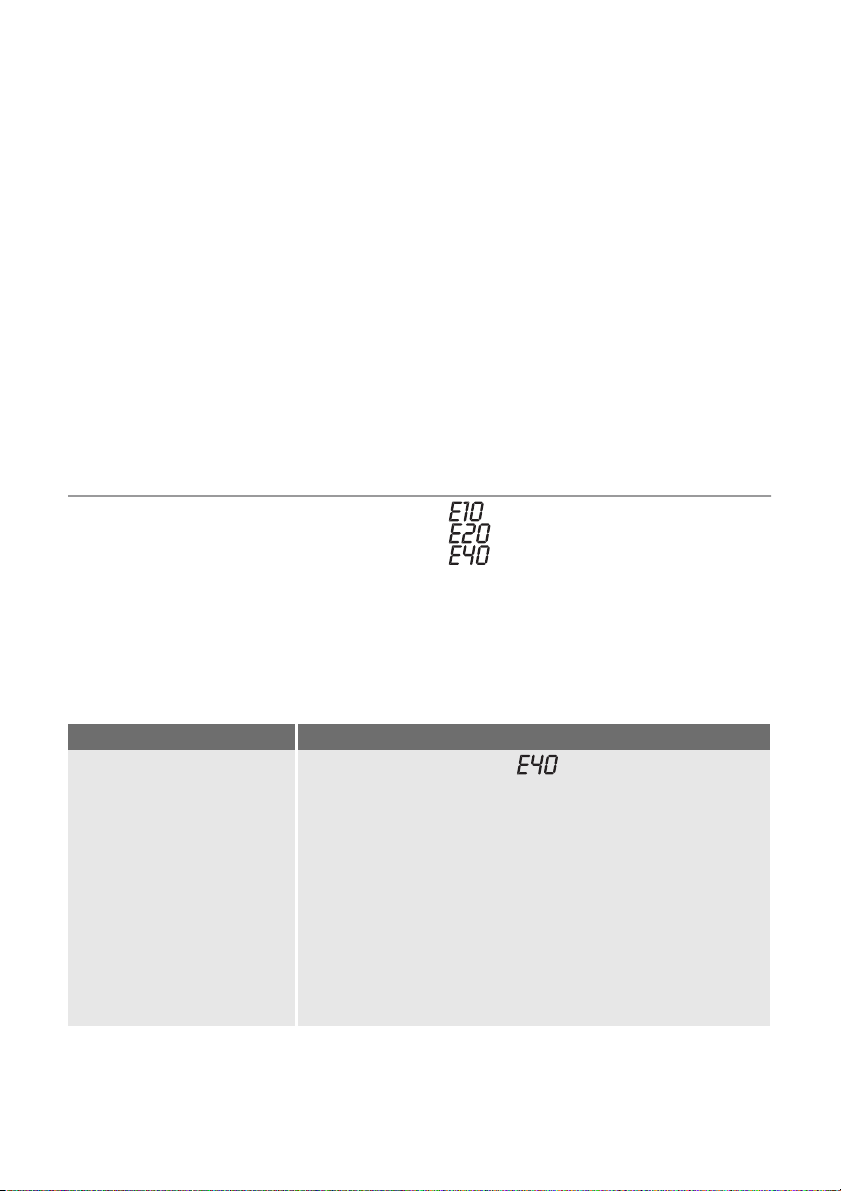
•
: problem with the water supply.
•
: problem with the water draining.
•
: door open.
Once the problem has been eliminated,
press the button 8 to restart the programme.
If after all checks, the problem persists, contact your local Service Centre.
Page 21
Problem Possible cause/Solution
The machine does not fill:
The machine fills then empties immediately:
The machine does not empty and/or does not spin:
There is water on the floor:
Unsatisfactory washing results:
The door will not open:
electrolux 21
The water tap is closed.
•Open the water tap.
The inlet hose is squashed or kinked.
• Check the inlet hose connection.
The filter in the inlet hose is blocked.
• Clean the water inlet hose filter.
The door is not properly closed.
•Close the door firmly.
The end of the drain hose is too low.
• Refer to relevant paragraph in «water drainage» section.
The drain hose is squashed or kinked.
• Check the drain hose connection.
The drain filter is clogged.
• Clean the drain filter.
An option or a programme that ends with the water still in the tub or
a that eliminates all the spinning phases has been selected.
• Select the draining or spinning programme.
The laundry is not evenly distributed in the drum.
• Redistribute the laundry.
Too much detergent or unsuitable detergent (creates too much
foam) has been used.
• Reduce the detergent quantity or use another one.
Check whether there are any leaks from one of the inlet hose fittings.
It is not always easy to see this as the water runs down the hose;
check to see if it is damp.
• Check the water inlet hose connection.
The drain or inlet hose is damaged.
• Replace it with a new one.
The cap on the emergency emptying hose has not been replaced
or the filter has not been properly screwed in after cleaning action.
• Refit the cap on the emergency emptying hose or screw the filter
fully in.
Too little detergent or unsuitable detergent has been used.
• Increase the detergent quantity or use another one.
Stubborn stains have not been treated prior to washing.
• Use commercial products to treat the stubborn stains.
The correct temperature was not selected.
• Check if you have selected the correct temperature.
Excessive laundry load.
• Reduce the laundry load.
The programme is still running.
• Wait the end of washing cycle.
The door lock has not been released.
•
Wait until the symbol
has gone out.
There is water in the drum.
• Select drain or spin programme to empty out the water.
Page 22
22 electrolux
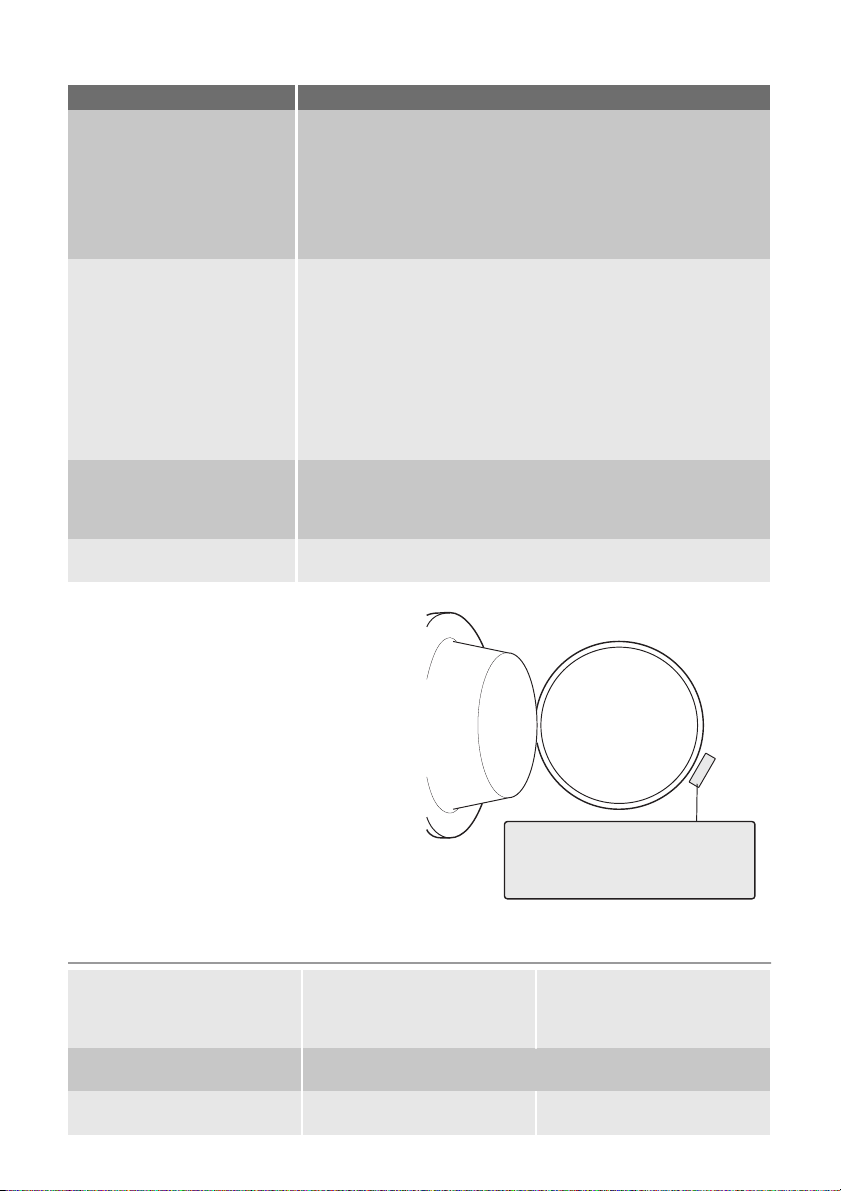
Problem Possible cause/Solution
The transit bolts and packing have not been removed.
• Check the correct installation of the appliance.
The support feet have not been adjusted
The machine vibrates is
noisy:
• Check the correct levelling of the appliance.
The laundry is not evenly distributed in the drum.
• Redistribute the laundry.
Maybe there is very little laundry in the drum.
• Load more laundry.
The electronic unbalance detection device has cut in because the
laundry is not evenly distributed in the drum. The laundry is redistributed by reverse rotation of the drum. This may happen several
times before the unbalance disappears and normal spinning can re-
Spinning starts late or the
machine does not spin:
sume. If, after 10 minutes, the laundry is still not evenly distributed
in the drum, the machine will not spin. In this case, redistribute the
load manually and select the spin programme.
• Redistribute the laundry.
The load is too small.
• Add more items, redistribute the load manually and then select
the spinning programme.
The machine is fitted with a type of motor which makes an unusual
The machine makes an unusual noise:
noise compared with other traditional motors. This new motor ensures a softer start and more even distribution of the laundry in the
drum when spinning, as well as increased stability of the machine.
No water is visible in the
drum:
Machines based on modern technology operate very economically
using very little water without affecting performance.
If you are unable to identify or solve the problem, contact our service centre. Before telephoning, make a note of the model, serial
number and purchase date of your machine:
the Service Centre will require this information.
TECHNICAL DATA
Dimensions Width
Electrical connection
Voltage - Overall power - Fuse
Water supply pressure Minimum
Height
Depth
Depth (Overall dimensions)
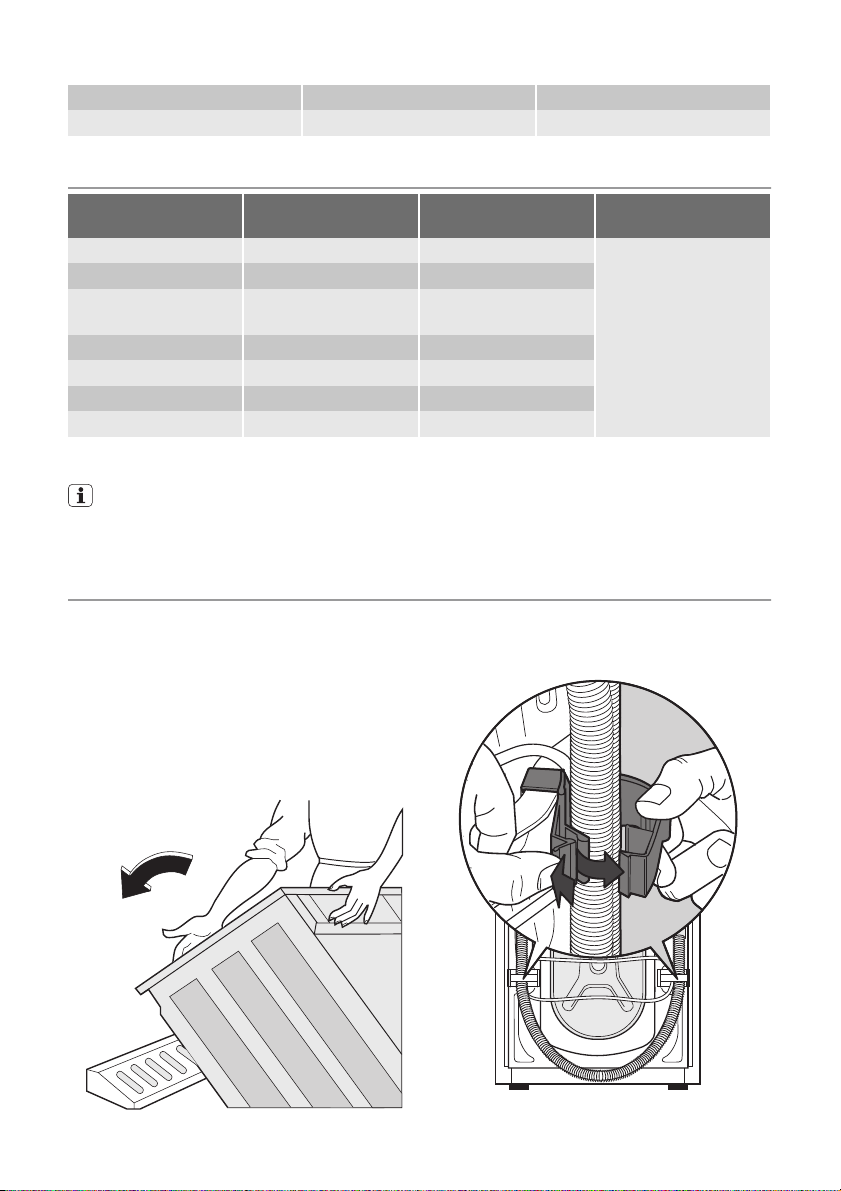
Information on the electrical connection is given on the rating plate,
on the inner edge of the appliance door.
Maximum
..
.
.
..
.
. ..
o
N
r.
.
e
.
S
..
...
.
.
.
.
..
.
.
.
o
..
.
N
d
.
o
d
M
ro
P
Mod. ... ... ...
Prod. No. ... ... ...
Ser. No. ... ... ...
60 cm
85 cm
60 cm
63 cm
0,05 MPa
0,8 MPa
Page 23
electrolux 23
Maximum Load Cotton 7 kg
Spin Speed Maximum 1200 rpm
CONSUMPTION VALUES
Programme Energy consumption
ALGODÓN 90° 2.1 65
ALGODÓN 60° 1.4 60
ALGODÓN ECONÓMI-
1)
CO
ALGODÓN 40° 0.77 60
SINTÉTICOS 40° 0.6 54
DELICADOS 40° 0.6 63
LANA / A MANO 30° 0.25 55
1) This programme at 60°C with a load of 7 kg is the reference programme for the data entered in the energy label, in
compliance with EEC 92/75 standards.
(KWh)
1.05 49
The consumption data shown on this chart is to be considered purely indicative, as it
may vary depending on the quantity and type of laundry, on the inlet water temperature
and on the ambient temperature.
Water consumption
(litres)
Programme duration
(Hours.Minutes)
For the duration of
the programmes,
please refer to the
display on the con-
trol panel.
INSTALLATION
Unpacking
All transit bolts and packing must be removed before using the appliance.
You are advised to keep all transit devices so
that they can be refitted if the machine ever
has to be transported again.
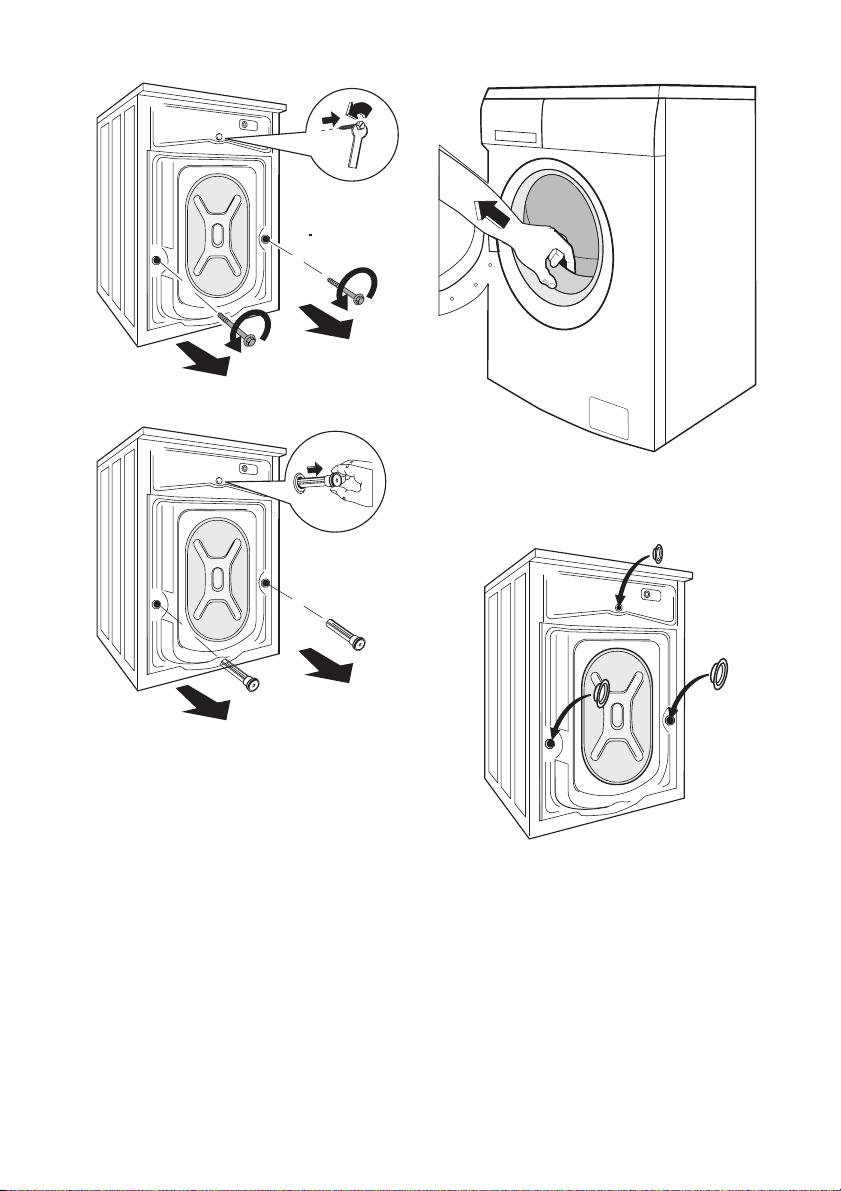
1. After removing all the packaging, carefully
lay machine on it’s back to remove the
polystyrene base from the bottom.
2. Remove the power supply cable and the
draining and inlet hose from the hose
holders on the rear of the appliance.
3. Unscrew the three bolts.
Page 24
24 electrolux
4. Slide out the relevant plastic spacers.
6. Fill the smaller upper hole and the two
large ones with the corresponding plastic
plug caps supplied in the bag containing
the instruction booklet.
5. Open the porthole and remove the polystyrene block fitted on the door seal.
Positioning
Install the machine on a flat hard floor. Make
sure that air circulation around the machine
is not impeded by carpets, rugs etc. Check
that the machine does not touch the wall or
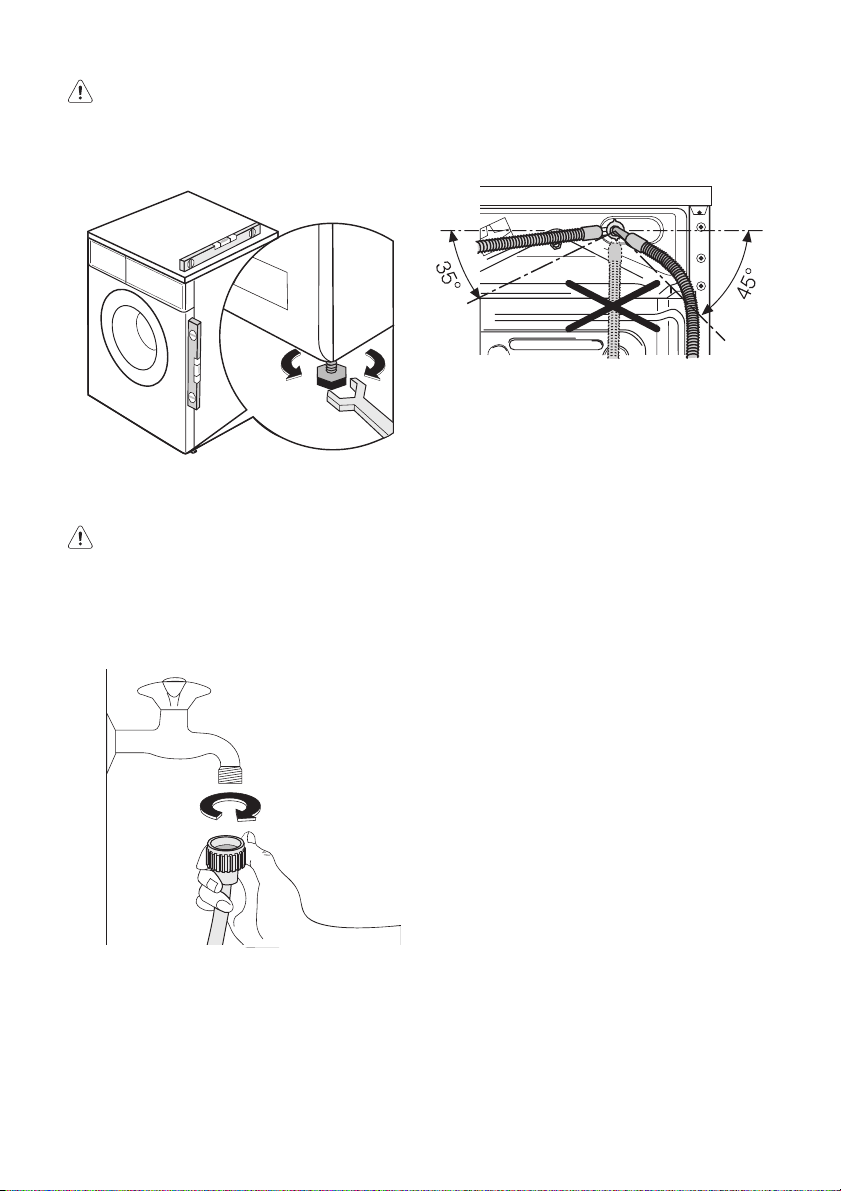
other kitchen units. Level the washing machine by raising or lowering the feet. The feet
may be tight to adjust as they incorporate a
self locking nut, but the machine MUST be
level and stable. If necessary, check the setting with a spirit level. Any necessary adjustment can be made with a spanner. Accurate
levelling prevents vibration, noise and displacement of the machine during operation.
Page 25
electrolux 25
Caution! Never place cardboard, wood
or similar materials under the machine to
compensate for any unevenness in the
floor.
Water inlet
Warning! This appliance must be
connected to a cold water supply.
1. Connect the water inlet hose supplied
with the machine to a tap with a 3/4"
thread. Always use the hose supplied
with the appliance.
Angle the hose to the left or right depending on the position of your water tap.
3. Set the hose correctly by loosening the
ring nut. After positioning the inlet hose,
be sure to tighten the ring nut again to
prevent leaks.
The inlet hose must not be lengthened. If it is
too short and you do not wish to move the
tap, you will have to purchase a new, longer
hose specially designed for this type of use.
Important! Before connecting up the
machine to new pipework or to pipework that
has not been used for some time, run off a
reasonable amount of water to flush out any
debris that may have collected in the pipes.
Water drainage
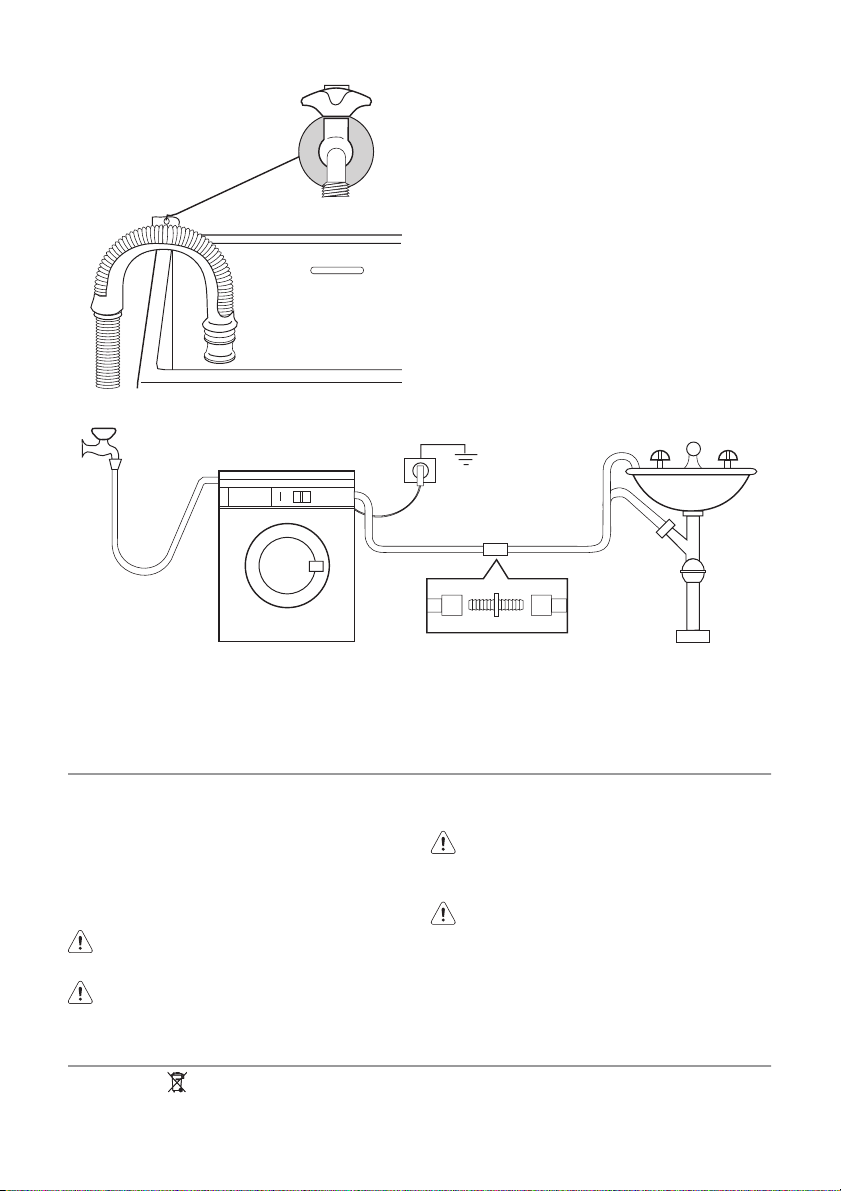
The end of the drain hose can be positioned
in three ways.
• Hooked over the edge of a sink using
the plastic hose guide supplied with the
machine. In this case, make sure the end
cannot come unhooked when the machine is emptying. This could be done by
tying it to the tap with a piece of string or
attaching it to the wall.
Important! Do not use the hose from
your previous machine to connect to the
water supply.
2. The other end of the inlet hose which
connects to the machine can be turned
as showed in the picture.
Do not place the inlet hose downwards.
Page 26
26 electrolux
•
In a sink drain pipe branch. This branch
must be above the trap so that the bend is
at least 60 cm above the ground.
• Directly into a drain pipe at a height of
not less than 60 cm and not more than 90
cm. The end of the drain hose must always
be ventilated, i.e. the inside diameter of the
drain pipe must be larger than the outside
diameter of the drain hose. The drain hose
must not be kinked.
The drain hose may be extended to a maximum of 4 metres. An additional drain hose and
joining piece is available from your local Service Centre.
ELECTRICAL CONNECTION
Information on the electrical connection is
given on the rating plate on the inner edge of
the appliance door.
Check that your domestic electrical installation can take the maximum load required, also taking into account any other appliances
in use.
Connect the machine to an earthed
socket.
The manufacturer does not accept
any responsibility for damage or
injury through failure to comply with
the above safety precaution.
The power supply cable must be
easily accessible after installing the
machine.
Should the appliance power supply
cable need to be replaced, this must
be carried out by a Service Centre.
ENVIRONMENT CONCERNS
The symbol on the product or on its
packaging indicates that this product may
not be treated as household waste. Instead
it should be taken to the appropriate
collection point for the recycling of electrical
and electronic equipment. By ensuring this
Page 27

electrolux 27
product is disposed of correctly, you will help
prevent potential negative consequences for
the environment and human health, which
could otherwise be caused by inappropriate
waste handling of this product. For more
detailed information about recycling of this
product, please contact your local council,
your household waste disposal service or the
shop where you purchased the product.
Packaging materials
The materials marked with the symbol
are
recyclable.
>PE<=polyethylene
>PS<=polystyrene
>PP<=polypropylene
This means that they can be recycled by disposing of them properly in appropriate collection containers.
Ecological hints
To save water, energy and to help protect the
environment, we recommend that you follow
these tips:
• Normally soiled laundry may be washed
without prewashing in order to save detergent, water and time (the environment is
protected too!).
• The machine works more economically if it
is fully loaded.
• With adequate pre-treatment, stains and
limited soiling can be removed; the laundry
can then be washed at a lower temperature.
• Measure out detergent according to the
water hardness, the degree of soiling and
the quantity of laundry being washed.
Page 28

28 electrolux
Electrolux. Thinking of you.
Conozca mejor nuestros conceptos en www.electrolux.com
ÍNDICE DE MATERIAS
Información sobre seguridad 28
Descripción del producto 30
Panel de mandos 31
Personalización 34
Uso diario 34
Consejos útiles 38
Programas de lavado 39
INFORMACIÓN SOBRE SEGURIDAD
Importante Lea las instrucciones
atentamente y téngalas a mano para
consultarlas en caso necesario.
• La seguridad de su aparato cumple las
normas industriales y los requisitos legales
sobre seguridad de los electrodomésticos. No obstante, como fabricantes, nos
sentimos en la obligación de facilitar las siguientes advertencias de seguridad.
• Es muy importante que conserve este manual junto con la lavadora para consultas
futuras. Si vende o transfiere el electrodoméstico a otro propietario, o bien cambia
de domicilio y deja la lavadora en su interior, asegúrese siempre de que el nuevo
propietario recibe el electrodoméstico junto con el manual de instrucciones para que
pueda aprender cómo funciona y conozca
las advertencias pertinentes.
• Es IMPRESCINDIBLE leerlas con atención
antes de instalar o utilizar el electrodoméstico.
• Antes de poner en marcha el aparato por
primera vez, compruebe que no presenta
daños ocasionados durante el transporte.
No conecte nunca un aparato que presente daños. Contacte con su proveedor
si éste tiene componentes dañados.
• Si el electrodoméstico se suministra en invierno, estación en la que se dan temperaturas bajo cero. Almacénelo a temperatura ambiente durante 24 horas antes de
utilizarlo por primera vez.
Mantenimiento y limpieza 42
Qué hacer si… 47
Datos técnicos 49
Valores de consumo 50
Instalación 50
Conexión eléctrica 53
Aspectos medioambientales 54
Salvo modificaciones
Seguridad general
• Resulta peligroso alterar las especificaciones o intentar modificar este producto de
alguna manera.
• El cristal de la puerta se puede calentar
durante el uso de programas de lavado a
alta temperatura. ¡No lo toque!
• Impida el acceso de los niños y animales
domésticos al interior del tambor. Para evitarlo, compruebe el interior del tambor antes de utilizar el aparato.
• Cualquier objeto como, por ejemplo, monedas, imperdibles, clavos, tornillos, piedras o cualquier otro material duro y afilado puede provocar daños considerables y
no se debe introducir en la máquina.
• Utilice sólo las cantidades de detergente y
suavizante recomendadas. Los tejidos
pueden dañarse si se sobrecarga la lavadora. Siga las recomendaciones del fabricante acerca de las cantidades.
• Lave las prendas pequeñas, como calcetines, lazos, cinturones, etc., en una bolsa
de lavado o en una funda de almohada
para evitar que se introduzcan entre la cuba y el tambor interno.
• No utilice la lavadora para lavar prendas
con aros, sin dobladillos o desgarradas.
• Desenchufe siempre el electrodoméstico y
cierre el suministro de agua después del
uso, la limpieza o el mantenimiento del
mismo.
• Bajo ninguna circunstancia debe intentar
reparar la máquina por su cuenta. Si las
reparaciones las llevan a cabo personas
sin experiencia, esto puede causar lesiones o un fallo de funcionamiento grave.
Page 29

electrolux 29
Póngase en contacto con su centro de
servicio técnico local. Insista siempre en
que los repuestos sean originales.
Instalación
• Este aparato es pesado. Por tanto, se debe tener cuidado al transportarlo.
• Al desembalar el aparato, compruebe que
no esté dañado. Si tiene alguna duda, no
lo utilice y póngase en contacto con el
centro de servicio técnico.
• Todos los pasadores del embalaje y transporte se deben retirar antes del uso. De lo
contrario, se pueden producir daños graves en el producto y daños materiales.
Véase el apartado correspondiente en el
manual de usuario.
• Una vez instalada la lavadora, asegúrese
de que ésta no descansa sobre la manguera de entrada ni la de desagüe, así como de que la encimera no está presionando el cable de alimentación eléctrica contra la pared.
• Si la máquina está situada sobre un suelo
enmoquetado, ajuste las patas para que
pueda circular libremente el aire por debajo del aparato.
• Una vez realizada la instalación, asegúrese
de que no existen fugas de agua procedentes de las mangueras y sus conexiones.
• Si el electrodoméstico se instala en un lugar sometido a heladas, consulte el capítulo "Riesgos de helada".
• Los trabajos de fontanería necesarios para
instalar el electrodoméstico deberán correr a cargo de un fontanero o técnico especializado.
• Cualquier trabajo eléctrico que sea necesario para instalar este aparato lo debe llevar a cabo un electricista cualificado o una
persona competente.
Uso
• Este aparato se ha diseñado para uso doméstico. No se debe utilizar para otros
propósitos diferentes a los previstos.
• Lave solamente las prendas que estén diseñadas para lavarse a máquina. Consulte
las instrucciones en la etiqueta de la prenda.
• No sobrecargue el aparato. Consulte la tabla de programas de lavado.
• Antes del lavado, asegúrese de que todos
los bolsillos de las prendas están vacíos y
de que todos los botones y cremalleras
están abrochados. Evite lavar prendas
deshilachadas o desgarradas y trate previamente las manchas de pintura, tinta,
óxido y grasa. Los sujetadores con aros
NO deben lavarse a máquina.
• Las prendas que han estado en contacto
con productos de petróleo volátil no deben lavarse a máquina. Si se utilizan líquidos de limpieza volátiles, se debe prestar
atención a eliminar el líquido de la prenda
antes de introducirla en la máquina.
• No tire del cable de corriente eléctrica para
desenchufar el electrodoméstico; sujete
siempre el cable por el enchufe.
• No utilice nunca la lavadora si el cable de
corriente eléctrica, el panel de mandos, o
la superficie de trabajo o la base están dañados y se puede acceder al interior de la
lavadora.
Seguridad para niños
• Este electrodoméstico no está destinado
a personas (incluidos niños) con funciones
físicas o sensoriales reducidas o con experiencia y conocimiento insuficientes, a
menos que una persona responsable de
su seguridad les supervise o les instruya
en el uso del electrodoméstico.
• Se debe vigilar a los niños para asegurarse
de que no jueguen con el aparato.
• Los componentes del embalaje (por ejemplo, la película de plástico o el poliestireno)
pueden ser peligrosos para los niños - ¡peligro de asfixia! Manténgalos fuera del alcance de los niños.
• Guarde los detergentes en un lugar seguro
al que no puedan acceder los niños.
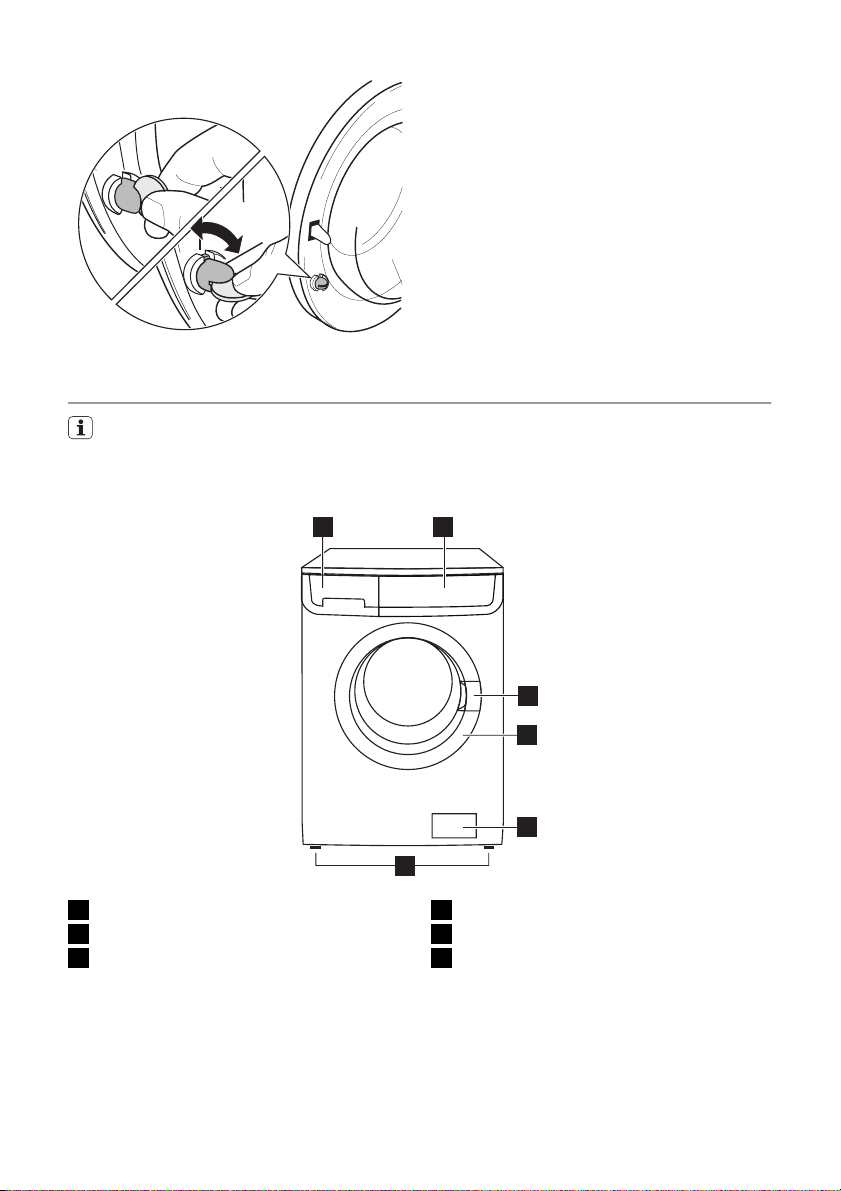
• Impida el acceso de los niños y los animales domésticos al interior del tambor. La
máquina incorpora un dispositivo especial
para evitar que los niños y los animales
domésticos queden atrapados en el interior del tambor. Para activar este dispositivo, gire el botón (sin presionarlo) del interior de la puerta hacia la derecha hasta
que la ranura esté en posición horizontal.
Si es necesario, utilice una moneda.
Page 30
30 electrolux
Para desactivar el dispositivo y permitir el
cierre de la puerta, gire el botón hacia la
izquierda hasta que la ranura se sitúe en
posición vertical.
DESCRIPCIÓN DEL PRODUCTO
Esta moderna lavadora cumple todos los requisitos necesarios para garantizar un lavado
eficaz con bajo consumo de agua, energía y detergente. Su nuevo sistema de lavado
permite utilizar todo el detergente y reduce el consumo de agua con el fin de ahorrar
energía.
1 2
1 Cajetín dosificador de detergente
2 Panel de mandos
3 Palanca de apertura de la puerta
3
4
5
6
4 Placa de datos técnicos
5 Filtro
6 Patas ajustables
Page 31
Depósito dosificador de detergente
Compartimento del detergente para la fase de prelavado y remojo o del quitamanchas utilizado durante la fase antimanchas
(si está disponible). El detergente de prelavado y remojo se deposita al principio del
programa de lavado. El quitamanchas se
deposita durante la fase de acción antimanchas.
Compartimento del detergente líquido o
en polvo para el lavado principal. Si se utiliza
detergente líquido, viértalo justo antes de
iniciar el programa.
Compartimento para aditivos líquidos
(suavizante, almidón).
Siga las instrucciones del fabricante del producto sobre las cantidades y no permita que
el detergente supere la marca "MAX" del
depósito dosificador. Vierta el suavizante o
el almidón en el compartimento antes de iniciar el programa de lavado.
Guía de programas
La guía de programas se encuentra en el lado frontal del depósito dosificador de detergente.
Las guías de programas en otros idiomas se
encuentran en la bolsa del manual de ins-
electrolux 31
trucciones. (No todos los electrodomésticos
tienen más de una guía.)
Para cambiar la guía de programas:
1. Tire del lado derecho y extráigala.
2. Introduzca la nueva guía de programas.
PANEL DE MANDOS
La imagen siguiente corresponde al panel de mandos. Muestra el selector de programas,
los indicadores luminosos y el visor digital, que aparecen representados por números
en las páginas siguientes.
1 2 4 6 7
1
Selector de programas
3 5
2
Tecla TEMPERATURA
9
8
10
Page 32
32 electrolux
3
Tecla de reducción del CENTRIFUGADO
4 Botón PRELAVADO
5
Botón ACLARADO EXTRA
6 Tecla INICIO DIFERIDO
8
Tecla INICIO/PAUSA
9 Piloto indicador PUERTA BLO-
QUEADA
10
Teclas ADMINISTRADOR DE TIEMPO
7 Pantalla
TABLA DE SÍMBOLOS
Símbolos del selector
= Time Manager Time Manager = Drain Descarga
= Cottons Algódon = Spin Centrifugado
= Synthetics Sintéticos = Special program-
= Delicates Delicados
= Wool Lana = Easy Iron Plancha facil
= Silk Seda = Jeans Vaqueros
= Lingerie Lencería = Blanket Mantas
= Soak Remojo 30° = Off Apagado
= Rinse Aclarado
mes
= Cotton economy Algódon económico
+
Pulsadores y pilotos luminosos:
= Temperatura = Aclarado extra
= Lavado en frío = Inicio diferido
= Reducción de centrifugado = Bloqueo de seguridad para niños
= Ciclo nocturno = Inicio/Pausa
= Agua en la cuba = Puerta bloqueada
= Prelavado = Teclas del administrador de tiempo (Time
Manager)
Programas especiales
Selector de programas
Permite conectar/desconectar el aparato y/
o seleccionar un programa.
Temperatura
Permite aumentar o reducir la temperatura
de lavado.
Reducción de centrifugado
Esta tecla permite reducir la velocidad máxima de centrifugado que se puede utilizar con
el programa seleccionado. También permite
seleccionar las opciones que están disponibles.
Agua en cuba
Deja sin descargar el agua del último aclarado para impedir que los tejidos se arruguen.
Es necesario vaciar el agua antes de abrir la
puerta. Para descargar el agua, consulte "Al
final del programa".
Ciclo Noche
Con esta opción, la lavadora no descargará
el agua del último aclarado ni centrifuga para
Page 33
electrolux 33
que las prendas no se arruguen. El ciclo de
lavado es muy silencioso para poder utilizar
la lavadora por la noche con la tarifa nocturna. En algunos programas se utiliza más
agua para los aclarados. Es necesario vaciar
el agua antes de abrir la puerta. Para descargar el agua, consulte "Al final del programa".
Prelavado
Cuando se selecciona esta opción, la máquina realiza un ciclo de prelavado antes de
la fase de lavado principal. El tiempo de lavado se prolongará. Esta opción se recomienda para prendas muy sucias.
AquaCare
Esta lavadora se ha diseñado para funcionar
con poco consumo de energía. Seleccione
esta opción si es necesario aclarar la ropa
utilizando una cantidad adicional de agua
(aclarado adicional). Se realizarán algunos
aclarados adicionales. Se recomienda esta
opción para personas alérgicas al detergente
y en zonas en las que el agua es muy blanda.
Inicio diferido
Permite retrasar el inicio del lavado en 30, 60,
90 minutos o 2 horas y, luego, de 1 hora a
un máximo de 20.
Inicio/Pausa
Este botón permite iniciar o interrumpir el
programa seleccionado.
Administrador de tiempo (Time
Manager)
Las teclas permiten modificar la duración del
programa propuesto automáticamente por
la máquina.
Piloto indicador Puerta cerrada
El piloto 9 se enciende cuando se inicia el
programa e indica cuándo se puede abrir la
puerta:
• luz apagada: no se puede abrir la puerta.
La lavadora está funcionando o se ha parado pero no ha desaguado.
• luz apagada: es posible abrir la puerta. El
programa ha terminado o la lavadora ha
desaguado.
• luz parpadeante: la puerta se está abriendo
Pantalla
7.4 7.5 7.1
En la pantalla se muestra la siguiente información:
7.1:
• Duración del programa seleccionado
7.27.3
Después de seleccionar un programa, la
duración se muestra en horas y minutos
(por ejemplo, 2.05 ). La duración se calcula automáticamente sobre la base de
Page 34
34 electrolux
una carga máxima recomendada para cada tipo de tejido. Una vez que se ha iniciado el programa, el tiempo restante se
actualiza cada minuto.
•
Inicio diferido
El intervalo de retardo aparece en el visor
digital durante unos segundos; a continuación vuelve a aparecer la duración del
programa anterior seleccionado.
•
Códigos de alarma
En caso de fallos de funcionamiento, pueden mostrarse algunos códigos de alarma,
como por ejemplo E20 (consulte la sección "Qué hacer si...").
• Selección de opción incorrecta
Cuando se elige una opción que no es
compatible con el programa de lavado seleccionado, aparece el mensaje Err en la
parte inferior de la pantalla durante unos
segundos y el piloto rojo integrado en la
tecla 8 empieza a parpadear.
•
Fin de programa
Cuando el programa ha terminado, aparecen tres ceros intermitentes, el piloto 9 y
el piloto de la tecla 8 se apagan y se puede
abrir la puerta.
7.2: Iconos de las fases del programa de
lavado
•
Lavado
•
Aclarados
•
Descarga
•
Centrifugado
Al seleccionar el programa de lavado, en la
parte inferior del visor digital aparecen los
símbolos de las fases correspondientes a los
distintos ciclos del programa de lavado.
Cuando se pulsa el botón 8 sólo se mantiene
encendido el piloto correspondiente a la fase
que está en marcha.
7.3: Fase de calentamiento
Durante el ciclo de lavado, en la pantalla se
muestra el símbolo de temperatura para indicar que la lavadora ha iniciado la fase de
calentamiento del agua de la cuba.
7.4: Iconos del grado de suciedad
•
Intensivo
•
Normal
•
Diario
•
Ligero
•
Rápido
•
Súper rápido
•
Siempre fresco
•
Súper fresco
Cuando se selecciona un programa, en la
pantalla aparece un icono que indica el grado
de suciedad propuesto automáticamente
por el aparato.
7.5: Bloqueo de seguridad para niños
(consulte el apartado «Bloqueo de segu-
ridad para niños»).
PERSONALIZACIÓN
Señales acústicas
La máquina incorpora un dispositivo acústico que suena en los siguientes casos:
• al final del programa
•en caso de fallo.
Pulse las teclas 4 y 5 al mismo tiempo durante unos 6 segundos para desactivar la
señal acústica (excepto en caso de fallo). La
señal acústica se reactiva si se vuelven a pulsar las dos teclas.
Seguro para niños
El aparato dispone de un seguro contra la
manipulación por niños que permite dejarlo
USO DIARIO
Cargue la colada
Abra la puerta tirando cuidadosamente de la
palanca de la puerta hacia fuera. Sacuda la
en funcionamiento sin preocuparse de que
los niños se lesionen o lo dañen. La función
también permanece activada cuando la máquina no está en funcionamiento.
Se puede ajustar de dos maneras:
1. Antes de pulsar la tecla 8 : es imposible
poner la máquina en marcha.
2. Después de pulsar la tecla 8 : es imposi-
ble cambiar cualquier otro programa u
opción.
Para activar o desactivar la opción, pulse a
la vez las teclas 5 y 6 durante 6 segundos
hasta que el icono
rezca del visor digital.
ropa cuanto pueda e introdúzcala en el tambor prenda por prenda. Cierre la puerta.
aparezca o desapa-
Page 35
electrolux 35
Mida la dosis de detergente y suavizante
Tire del depósito dosificador hasta el tope.
Mida la cantidad de detergente necesaria y
viértala en el compartimento de lavado prin-
cipal
o en el compartimento adecuado si
la opción o el programa que ha seleccionado
lo requieren (consulte más detalles en "Depósito dosificador de detergente").
Si es necesario, vierta suavizante en el compartimento con la marca
(la cantidad utilizada no debe superar la marca "MAX" del
depósito). Cierre el depósito suavemente.
Seleccione el programa con el selector
de programas (1)
Gire el selector hasta el programa elegido. La
lavadora establecerá una temperatura y seleccionará automáticamente el valor máximo
de centrifugado del programa elegido. Es
posible cambiar estos valores con las teclas
correspondientes. El piloto verde de la tecla
8 empieza a parpadear.
El selector de programas puede girarse hacia
la derecha y hacia la izquierda. Gírelo hasta
la posición
para reiniciar el programa o
apagar la máquina.
Al final del programa, el selector debe
situarse en la posición
para apagar la
lavadora.
Precaución Si gira el selector hasta
otro programa mientras la lavadora está
funcionando, el piloto rojo de la tecla 8
parpadeará 3 veces y aparecerá el
mensaje Err para indicar que la
selección es incorrecta. El nuevo
programa seleccionado no se pondrá en
marcha.
Botones de selección de programas
Existe la posibilidad de combinar distintas
funciones según el programa. Debe seleccionarlas después de elegir el programa y
antes de presionar la tecla 8 .
Seleccione la temperatura pulsando la
tecla 2
Seleccione un programa; el aparato propondrá automáticamente una temperatura predeterminada.
Page 36

36 electrolux
Pulse la tecla varias veces para aumentar o
reducir la temperatura si desea lavar la ropa
a una temperatura diferente a la propuesta.
Reduzca la velocidad de centrifugado
con la tecla 3
Una vez que selecciona el programa deseado, su electrodoméstico propone de forma
automática la velocidad de centrifugado máxima que puede alcanzar dicho programa.
Presione la tecla 3 varias veces si desea centrifugar la colada a una velocidad diferente.
Se enciende el piloto correspondiente.
Seleccione las opciones disponibles
con las teclas 3, 4 y 5
En función del programa seleccionado, es
posible combinar distintas funciones presionando la tecla 8 . El piloto de la opción seleccionada se enciende.
Si se selecciona una opción incorrecta, el piloto rojo integrado de la tecla 8 parpadea 3
veces y el mensaje Err se muestra durante
unos segundos.
Consulte la compatibilidad de los programas de lavado con las opciones en
el capítulo "Programas de lavado".
Seleccione el inicio diferido con la tecla
6
Si desea retrasar el inicio antes de poner en
marcha el programa, presione la tecla 6 varias veces para seleccionar el intervalo de inicio diferido que desee. El piloto correspondiente se enciende.
El tiempo de retraso seleccionado (hasta 20
horas) aparece en el indicador durante unos
segundos y después se vuelve a mostrar la
duración del programa.
Esta opción debe seleccionarse después de
elegir el programa y antes de presionar la
tecla 8 .
Es posible cancelar o modificar el intervalo
de retraso en cualquier momento antes presionar la tecla 8 .
Selección del inicio diferido:
1. Seleccione el programa y las opciones
necesarias.
2. Seleccione el inicio diferido con la tecla
6 .
3.
Presione la tecla 8 ;
– La máquina inicia la cuenta atrás hora-
ria.
– El programa se inicia una vez finalizado
el intervalo de retraso seleccionado.
Cancelación del inicio diferido después de
presionar la tecla 8 :
1. Ponga la máquina en PAUSA con la tecla
8 .
2.
Presione la tecla 6 una vez hasta que
aparezca el símbolo 0' .
3. Vuelva a presionar la tecla 8 para iniciar
el programa.
Importante El intervalo de retraso
seleccionado sólo se podrá modificar una
vez que se haya vuelto a seleccionar el
programa de lavado.
El inicio diferido no puede seleccionarse
con el programa DESCARGA .
Seleccione el programa con la tecla 8
Para iniciar el programa seleccionado, pulse
la tecla 8 , el piloto verde integrado en la tecla
8 dejará de parpadear.
Para interrumpir un programa en marcha,
pulse la tecla 8 : el piloto verde comienza a
parpadear.
Para reiniciar el programa a partir del punto
de interrupción, pulse de nuevo la tecla 8 . Si
ha seleccionado un inicio diferido, la lavadora
comienza la cuenta atrás. Si se selecciona
una opción incorrecta, el piloto rojo de la
tecla 8 parpadea 3 veces y el mensaje Err
aparece durante unos segundos.
Selección de la opción de administrador
de tiempo con la tecla 10
Si pulsa estas teclas varias veces puede aumentar o reducir la duración del ciclo de lavado En la pantalla aparece un icono de nivel
de suciedad para indicar el grado de suciedad elegido. Esta opción está disponible únicamente con los programas Algodón , Sin-
téticos
y Delicados .
Nivel de su-
ciedad
Intensivo Para prendas muy
Normal Para prendas con
Diario Para prendas de uso
Ligero Para prendas ligera-
Icono Tipo de tejido
sucias
suciedad normal
diario
mente sucias
Page 37
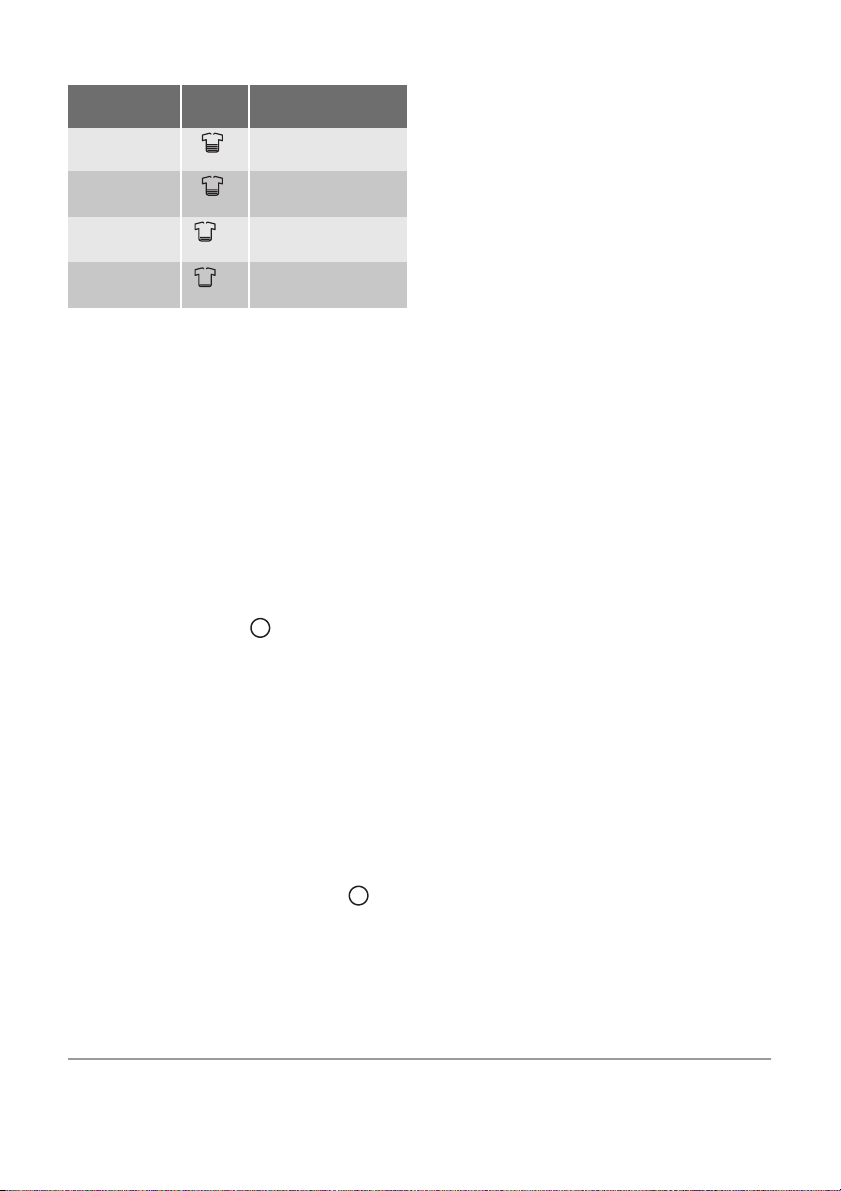
electrolux 37
Nivel de su-
ciedad
Rápido Para prendas poco
Súper rápido
1)
Siempre fres-
1)
co
Súper fresco
1)
1) Le recomendamos que reduzca los tamaños de la
carga (consulte la tabla de programas de lavado)
2) Cuando se selecciona esta opción, el icono
correspondiente aparece solo un momento y a
continuación desaparece inmediatamente.
Icono Tipo de tejido
sucias
Prendas usadas po-
co tiempo
2)
Sólo para refrescar la
ropa
2)
Para refrescar pocas
prendas únicamente
Modificación de una opción o de un
programa en marcha
Es posible cambiar cualquier opción antes
de que el programa se inicie.
Antes de realizar cambios, active el modo
PAUSA de la lavadora con la tecla 8 (si desea
cambiar la opción Time Manager, deberá
cancelar el programa en curso y repetir la
selección).
El cambio de un programa en marcha sólo
puede realizarse reiniciándolo. Gire el selector de programas hasta
y, a continuación,
hasta la posición del nuevo programa. Para
poner en marcha el nuevo programa, vuelva
a presionar el botón 8 . El agua de la cuba no
se vaciará.
Interrupción de un programa
Presione la tecla 8 para interrumpir el programa en marcha; el piloto verde correspondiente empieza a parpadear.
Vuelva a presionar la tecla para reiniciar el
programa.
Cancelación de un programa
Gire el selector de programas hasta
para
cancelar un programa una vez que está en
marcha.
Después podrá seleccionar otro programa.
Apertura de la puerta
La puerta queda bloqueada en cuanto se inicia un programa (o durante el tiempo de re-
tardo); si necesita abrirla, active el modo
PAUSA de la lavadora con la tecla 8 .
Espere unos minutos hasta que el piloto 9 se
apague y se desbloquee la puerta.
Si la luz del piloto siguen encendida, significa
que la lavadora está cargada de agua o calentando el agua. No fuerce nunca la puerta!
Si no puede abrir la puerta pero necesita hacerlo, apague la máquina girando el selector
hasta la posición O . Transcurridos unos minutos podrá abrir la puerta (preste atención
al nivel del agua y a la temperatura) .
Una vez cerrada la puerta, deberá volver a
seleccionar el programa y las opciones, y
pulsar la tecla 8 .
Al finalizar el programa
El aparato se para automáticamente. Aparecen tres 0.00 intermitentes en la pantalla y el
piloto de la tecla 8 se apaga. Se reciben tres
señales acústicas
Si ha seleccionado un programa o una opción que deja el agua en la cuba, la puerta
permanecerá bloqueada para indicar que
debe vaciarse de agua antes de abrirla.
Siga las instrucciones que se indican más
abajo para vaciar el agua:
1. Gire el selector de programas hasta O .
2. Seleccione el programa de descarga o de
centrifugado.
3. Reduzca la velocidad de centrifugado, si
es necesario, pulsando la tecla correspondiente.
4. Pulse la tecla 8 .
Al final del programa, la puerta se desbloquea y es posible abrirla. Gire el selector de
programas hasta O para apagar el aparato.
Retire las prendas del tambor y cerciórese de
que queda vacío. Si no va a realizar otro lavado, cierre la toma del agua. Deje la puerta
abierta para evitar la aparición de moho y
olores desagradables.
En espera : una vez finalizado el programa,
al cabo de unos minutos se activa el sistema
de ahorro de energía. Se reduce el brillo de
la pantalla. Al pulsar cualquier tecla, el aparato abandona el estado de ahorro de energía.
Page 38

38 electrolux
CONSEJOS ÚTILES
Clasificación de la ropa sucia
Consulte los símbolos de lavado que aparecen en la etiqueta de la prenda y siga las instrucciones de lavado del fabricante. La ropa
se debe clasificar de la siguiente manera: ropa blanca, ropa de color, ropa sintética,
prendas delicadas y prendas de lana.
Antes de introducir la ropa sucia
Separe la ropa blanca de la ropa de color y
lávela por separado. Las prendas blancas
pueden perder su "blancura" al lavarlas.
La ropa de color nueva puede desteñir durante el primer lavado; por lo tanto, es preciso lavarla aparte la primera vez.
Abotone las fundas de almohada y cierre las
cremalleras, ganchos, broches, etc. Ate las
correas o cintas largas.
Quite las manchas difíciles antes de lavar la
ropa.
Frote las zonas particularmente sucias con
un detergente especial o en pasta.
Tenga cuidado con las cortinas. Lávelas sin
los ganchos o dentro de una bolsa o malla.
Eliminación de manchas
A veces no basta con agua y detergente para
quitar las manchas difíciles. En esos casos
es aconsejable aplicar un tratamiento antes
de lavar las prendas.
Sangre: aplique agua fría a las manchas de
sangre fresca. Si la sangre está seca, debe
dejar la prenda a remojo en agua con un detergente especial durante la noche y luego
frotar con agua y jabón.
Pintura al aceite: humedezca la mancha
con un quitamanchas a base de disolvente,
extienda la prenda sobre un paño suave y
quite la mancha; repita el procedimiento varias veces.
Grasa seca: humedezca la mancha con
aguarrás, extienda la prenda sobre una superficie suave y quite la mancha con la yema
de los dedos y un trapo de algodón.
Óxido: utilice ácido oxálico disuelto en agua
caliente o un quitamanchas para óxido en
frío. Tenga cuidado con las manchas de óxido que no sean recientes, ya que la estructura de la celulosa se habrá dañado y el tejido
tenderá a perforarse.
Moho: utilice lejía y aclare bien (prendas
blancas y de colores sólidos solamente).
2) no utilice acetona en seda artificial
Hierba: utilice un poco de jabón y aplique
lejía (prendas blancas y de colores sólidos
solamente).
Tinta y pegamento: humedezca con ace-
2)
tona
, extienda la prenda sobre un paño
suave y quite la mancha.
Pintalabios: humedezca con acetona, como en el caso anterior, y luego quite la mancha con alcohol desnaturalizado. Utilice lejía
para eliminar las marcas que puedan quedar.
Vino tinto: ponga la prenda a remojo en
agua y detergente, aclare, aplique ácido acético o cítrico y vuelva a aclarar. Utilice lejía
para eliminar las marcas que puedan quedar.
Tinta: dependiendo del tipo de tinta, hume-
dezca la prenda en acetona
2)
y luego en
ácido acético; utilice lejía en los tejidos de
color blanco para eliminar cualquier resto
que pueda quedar y aclare bien.
Alquitrán: primero aplique un quitamanchas, alcohol desnaturalizado o disolvente y
luego frote la mancha con un detergente en
pasta.
Detergentes y aditivos
El resultado del lavado también depende de
la elección del detergente y de las cantidades
adecuadas, que permitan proteger el entorno y evitar vertidos.
Aunque son biodegradables, los detergentes contienen sustancias que, en grandes
cantidades, pueden alterar el delicado equilibrio de la naturaleza.
La elección del detergente depende del tipo
de tejido (delicado, lana, algodón, etc.), del
color, de la temperatura de lavado y del grado de suciedad.
En esta máquina pueden utilizarse todos los
detergentes de lavadora de uso habitual:
• detergente en polvo para todo tipo de
prendas
• detergente en polvo para prendas delica-
das (60°C máx.) y lana
• detergente líquido para todo tipo de teji-
dos o especial para lana, preferiblemente
para programas de lavado a baja tempe-
ratura (60°C máx.).
El detergente y los aditivos deben introducirse en los compartimentos correspondientes
del depósito dosificador antes de poner en
marcha el programa de lavado.
Page 39

electrolux 39
Si se utiliza detergente líquido, debe seleccionar un programa sin prelavado.
La lavadora incorpora un sistema de recirculación que garantiza un aprovechamiento
óptimo del detergente concentrado.
Siga las instrucciones del fabricante del producto en cuanto a cantidades y no permita
que el detergente supere la marca
"MAX" que hay en el depósito dosificador .
Cantidad de detergente
El tipo y la cantidad de detergente dependen
del tipo de tejido que se va a lavar, así como
de la carga, del grado de suciedad y de la
dureza del agua.
Siga las instrucciones del fabricante del producto en lo referente a la cantidad de detergente que se debe utilizar.
PROGRAMAS DE LAVADO
Programa
Temperaturas máxima y mínima
Descripción del ciclo
Velocidad de centrifugado máxima
Carga máxima
Tipo de prenda
COTTONS - ALGODÓN
90°- Frío
Lavado principal - Aclarados
Velocidad de centrifugado máxima 1200 rpm
Carga máxima 7 kg - Carga reducida 3,5 kg
Algodón blanco y de color (suciedad normal).
SYNTHETICS - SINTÉTICOS
60° - Frío
Lavado principal - Aclarados
Velocidad de centrifugado máxima 900 rpm
Carga máxima 3,5 kg - Carga reducida 2 kg
Tejidos sintéticos o mezclas: ropa interior, prendas
de color, camisas que no encogen, blusas.
DELICATES - DELICADOS
40° - Frío
Lavado principal - Aclarados
Velocidad de centrifugado máxima 700 rpm
Carga máxima 3,5 kg - Carga reducida 2 kg
Tejidos delicados: acrílicos, viscosa, poliéster.
Use menos detergente en los casos siguientes:
• si la lavadora tiene poca carga
• si la ropa no está muy sucia
• si se forma mucha espuma durante el lavado.
Grados de dureza del agua
La dureza del agua se clasifica en "grados".
Para obtener información sobre la dureza del
agua local, puede consultar a la compañía
encargada del suministro o a la administración local. Si el agua tiene un grado de dureza medio o alto, se recomienda añadir un
descalcificante de agua de acuerdo con las
instrucciones del fabricante del mismo.
Cuando el agua sea blanda, bastará con
ajustar la dosis de detergente.
Opciones
REDUCCIÓN DEL
CENTRIFUGADO
AGUA EN LA CUBA
CICLO NOCTURNO
PRELAVADO
ACLARADO EXTRA
ADMINISTRADOR DE
REDUCCIÓN DEL
CENTRIFUGADO
AGUA EN LA CUBA
CICLO NOCTURNO
PRELAVADO
ACLARADO EXTRA
ADMINISTRADOR DE
AGUA EN LA CUBA
CICLO NOCTURNO
PRELAVADO
ACLARADO EXTRA
ADMINISTRADOR DE
TIEMPO
TIEMPO
TIEMPO
1)
1)
1)
Compartimento
de detergente
2)
2)
2)
Page 40
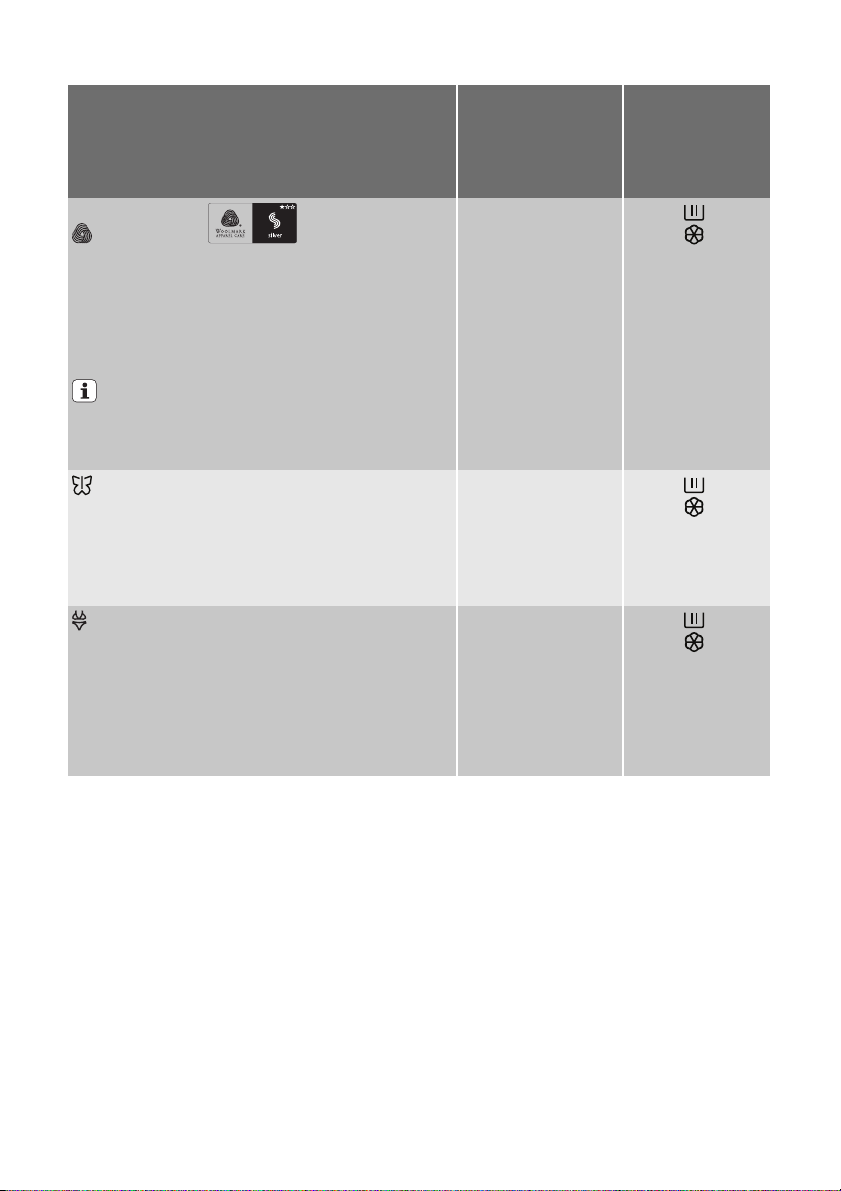
40 electrolux
Programa
Temperaturas máxima y mínima
Descripción del ciclo
Velocidad de centrifugado máxima
Carga máxima
Tipo de prenda
WOOL - LANA
40° - Frío
Lavado principal - Aclarados
Velocidad de centrifugado máxima 900 rpm
Carga máxima 2 kg
Programa de lavado para lana lavable a máquina, así
como lanas de lavado a mano y tejidos delicados con
el símbolo “lavar a mano”.
Una prenda suelta o muy voluminosa puede causar desequilibrio. Si la lavadora no realiza la fase
de centrifugado final, añada más prendas, redistribuya la carga manualmente y, a continuación,
seleccione el programa de centrifugado.
SILK - SEDA
30° - Frío
Lavado principal - Aclarados
Velocidad de centrifugado máxima 700 rpm
Carga máxima 1 kg
Programa de prendas delicadas idóneo para prendas
de seda y sintéticas mixtas.
LINGERIE - LENCERÍA
40° - Frío
Lavado principal - Aclarados
Velocidad de centrifugado máxima 900 rpm
Carga máxima 2 kg
Este programa resulta adecuado para prendas muy
delicadas, como son la lencería, los sujetadores o la
ropa interior. La velocidad de centrifugado máxima se
reduce automáticamente.
Opciones
REDUCCIÓN DEL
CENTRIFUGADO
AGUA EN LA CUBA
CICLO NOCTURNO
AGUA EN LA CUBA
CICLO NOCTURNO
REDUCCIÓN DEL
CENTRIFUGADO
AGUA EN LA CUBA
CICLO NOCTURNO
Compartimento
de detergente
Page 41
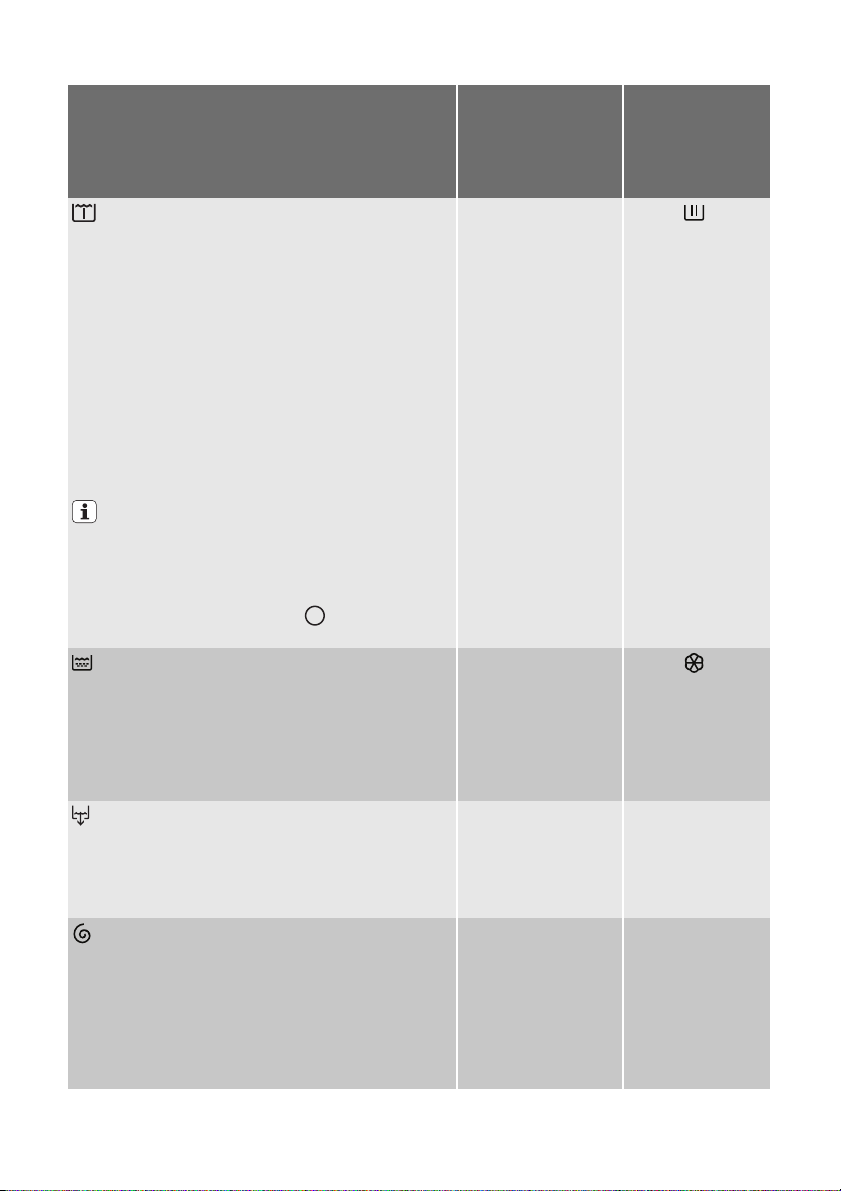
Programa
Temperaturas máxima y mínima
Descripción del ciclo
Velocidad de centrifugado máxima
Carga máxima
Tipo de prenda
SOAK - REMOJO
30°
Prelavado - Remojo durante 40 minutos - Parada con
agua en la cuba
Carga máxima 7 kg
Programa especial para prendas muy sucias. La lavadora realiza una fase de remojo a 30°C. Al finalizar esta
fase, la lavadora se para automáticamente pero no desagua.
Antes de iniciar una nueva fase de lavado debe vaciarse
el agua como se indica a continuación:
•
Sólo descarga : gire el selector hasta el programa
Descarga. (Pulse la tecla 8 ).
•
Descarga y centrifugado : gire el selector hasta el
programa Centrifugado, reduzca la velocidad de centrifugado con la tecla 3 , y pulse la tecla 8 .
Este programa no puede utilizarse para prendas
muy delicadas, como seda o lana. Vierta el detergente para el programa de remojo en el compartimento indicado. Seleccione el programa de lavado al finalizar la fase de remojo (después de haber vaciado el agua). (Primero gire el selector de
programas hasta la posición
, luego hasta el
programa y finalmente pulse el botón 8 .)
RINSE - ACLARADO
Aclarado - Centrifugado largo
Velocidad de centrifugado máxima 1200 rpm
Carga máxima 7 kg
Este programa permite aclarar y centrifugar prendas de
algodón lavadas a mano. Para que la acción de aclarado sea más intensa, seleccione la opción ACLARADO
EXTRA. La máquina realizará aclarados adicionales.
DRAIN - DESCARGA
Descarga del agua de lavado
Carga máxima 7 kg
Para vaciar el agua del último aclarado en programas
que se detienen con la opción seleccionada con agua
en la cuba.
SPIN - CENTRIFUGADO
Descarga y centrifugado largo
Velocidad de centrifugado máxima 1200 rpm
Carga máxima 7 kg
Centrifugado independiente para prendas lavadas a
mano y después de usar programas con la opción Agua
en cuba seleccionada. Puede elegir la velocidad utilizando la tecla correspondiente para adaptarla al tejido
que se va a centrifugar.
Opciones
REDUCCIÓN DEL
CENTRIFUGADO
AGUA EN LA CUBA
CICLO NOCTURNO
ACLARADO EXTRA
REDUCCIÓN DEL
CENTRIFUGADO
electrolux 41
Compartimento
de detergente
Page 42
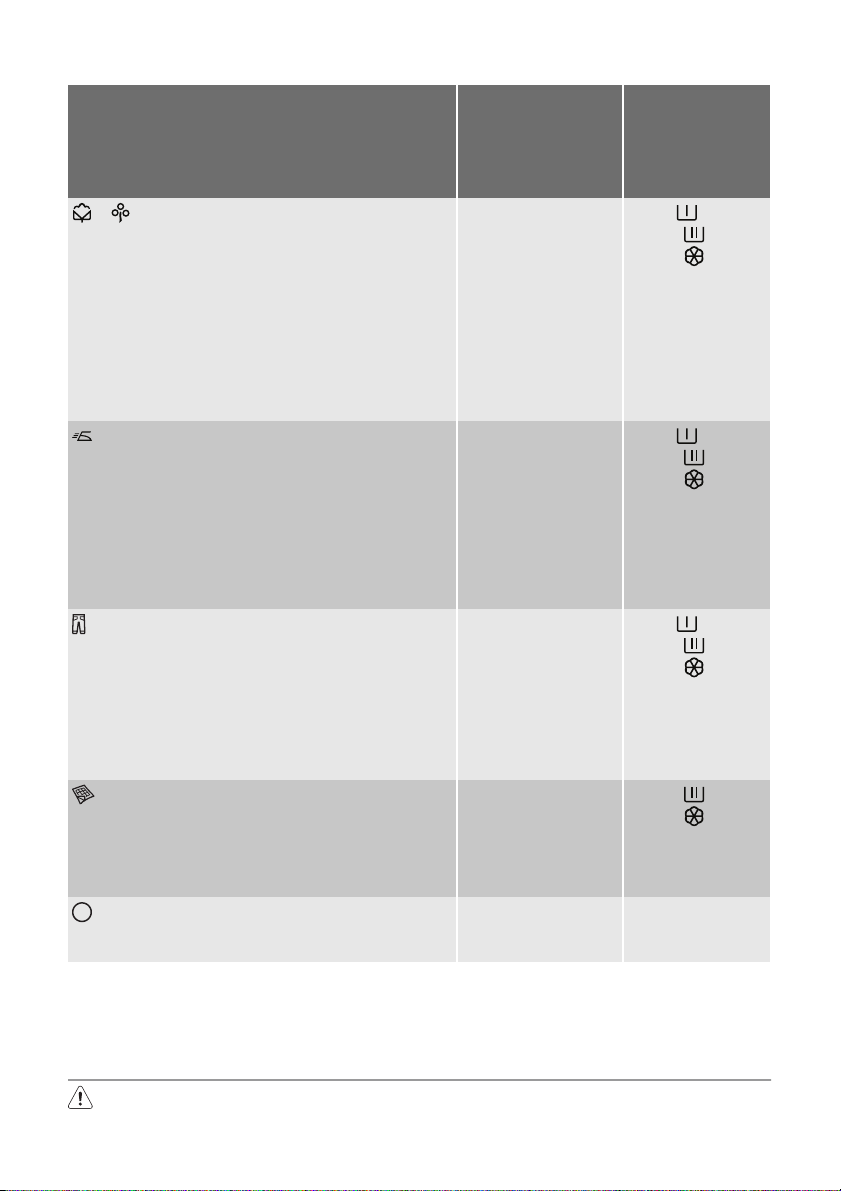
42 electrolux
Programa
Temperaturas máxima y mínima
Descripción del ciclo
Velocidad de centrifugado máxima
Opciones
Compartimento
de detergente
Carga máxima
Tipo de prenda
+ COTTON ECONOMY - ALGODÓN ECO-
NÓMICO
90° - 40°
Lavado principal - Aclarados
Velocidad de centrifugado máxima 1200 rpm
Carga máxima 7 kg
REDUCCIÓN DEL
CENTRIFUGADO
AGUA EN LA CUBA
CICLO NOCTURNO
PRELAVADO
ACLARADO EXTRA
2)
Algodón blanco y de colores resistentes
Este programa puede seleccionarse para prendas de
algodón poco sucias o con suciedad normal. La temperatura disminuirá y se ampliará el tiempo de lavado.
Esto permite obtener buenos resultados de lavado ahorrando energía.
EASY IRON - PLANCHA FACIL
60° - Frío
Lavado principal - Aclarados
Velocidad de centrifugado máxima 900 rpm
Carga máxima 1 kg
REDUCCIÓN DEL
CENTRIFUGADO
AGUA EN LA CUBA
PRELAVADO
ACLARADO EXTRA
2)
Este programa puede seleccionarse para tejidos sintéticos y mixtos que necesitan plancharse. Las prendas
se pueden lavar y centrifugar con suavidad para que no
se arruguen. De este modo, se facilita el planchado.
Además, la máquina realiza aclarados adicionales.
JEANS - VAQUEROS
60° - Frío
Lavado principal - Aclarados
Velocidad de centrifugado máxima 1200 rpm
Carga máxima 3,5 kg
REDUCCIÓN DEL
CENTRIFUGADO
AGUA EN LA CUBA
CICLO NOCTURNO
PRELAVADO
2)
Con este programa es posible lavar prendas como pantalones, camisas o chaquetas vaqueras, así como jerséis de materiales de alta tecnología (la opción ACLARADO EXTRA se activará automáticamente).
BLANKET - MANTAS
40° - 30°
Lavado principal - Aclarados
Velocidad de centrifugado máxima 700 rpm
Carga máxima 2 kg
Programa especial para mantas sintéticas o edredones.
/ APAGADO
Permite cancelar el programa en marcha o apagar la
lavadora.
1) Si ha seleccionado la opción Rápido o Súper rápido con la tecla 10 , se recomienda reducir la carga máxima como
se indica. Puede utilizarse la carga completa, aunque con resultados de limpieza ligeramente inferiores. Si selecciona
las opciones Aireación o Súper Fresco, se recomienda reducir aún más la carga.
2) Si utiliza detergente líquido, debe seleccionar un programa sin PRELAVADO.
MANTENIMIENTO Y LIMPIEZA
Advertencia Antes de efectuar
cualquier tipo limpieza o mantenimiento,
desenchufe el aparato de corriente
eléctrica.
Page 43
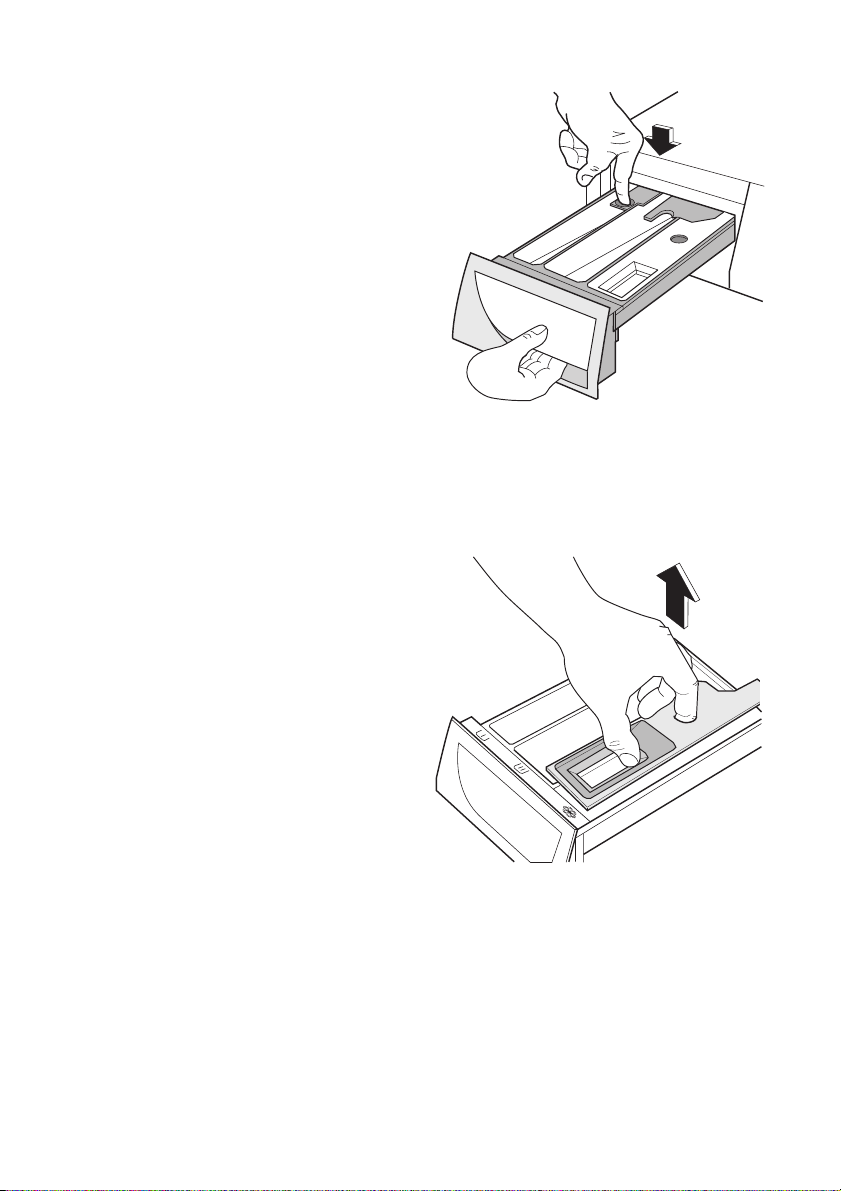
Desincrustación
El agua corriente que utilizamos suele contener cal. Se recomienda utilizar periódicamente en la lavadora un producto en polvo
descalcificador del agua. Realice esta tarea
con independencia de cualquier ciclo de lavado y de acuerdo con las instrucciones del
fabricante del producto descalcificador. Así
impedirá la formación de depósitos de cal.
Después de cada lavado
Mantenga la puerta abierta durante un rato.
Así impedirá la formación de moho y olor a
humedad en el interior de la máquina. También ayudará a conservar en buen estado la
junta de estanqueidad de la puerta.
Lavado de mantenimiento
La sucesión de lavados a baja temperatura
favorece la acumulación de residuos en el
interior del tambor.
Se recomienda realizar un lavado de mantenimiento con regularidad.
Para poner en marcha un lavado de mantenimiento:
• El tambor no debe contener ropa.
• Seleccione el programa de lavado de al-
godón de más temperatura.
• Utilice una dosis normal de detergente:
puede ser en polvo con propiedades biológicas.
Limpieza del exterior
Limpie la carcasa exterior del electrodoméstico con agua y jabón únicamente y séquela
a fondo.
Importante No utilice alcohol
desnaturalizado, disolventes ni otros
productos similares para limpiar la carcasa.
Limpieza del depósito dosificador de
detergente
El depósito dosificador de detergente debe
limpiarse con regularidad.
Los depósitos de detergente en polvo y de
los aditivos de lavado deben limpiarse con
regularidad.
Retire la cubeta presionando el tope hacia
abajo y tirando hacia fuera.
electrolux 43
Enjuáguela bajo el grifo para eliminar los restos de detergente en polvo acumulados.
Para facilitar la limpieza debe extraerse la
parte superior del compartimento de aditivos. Limpie todos los componentes con
agua.
Limpie el interior del depósito con un cepillo.
Page 44
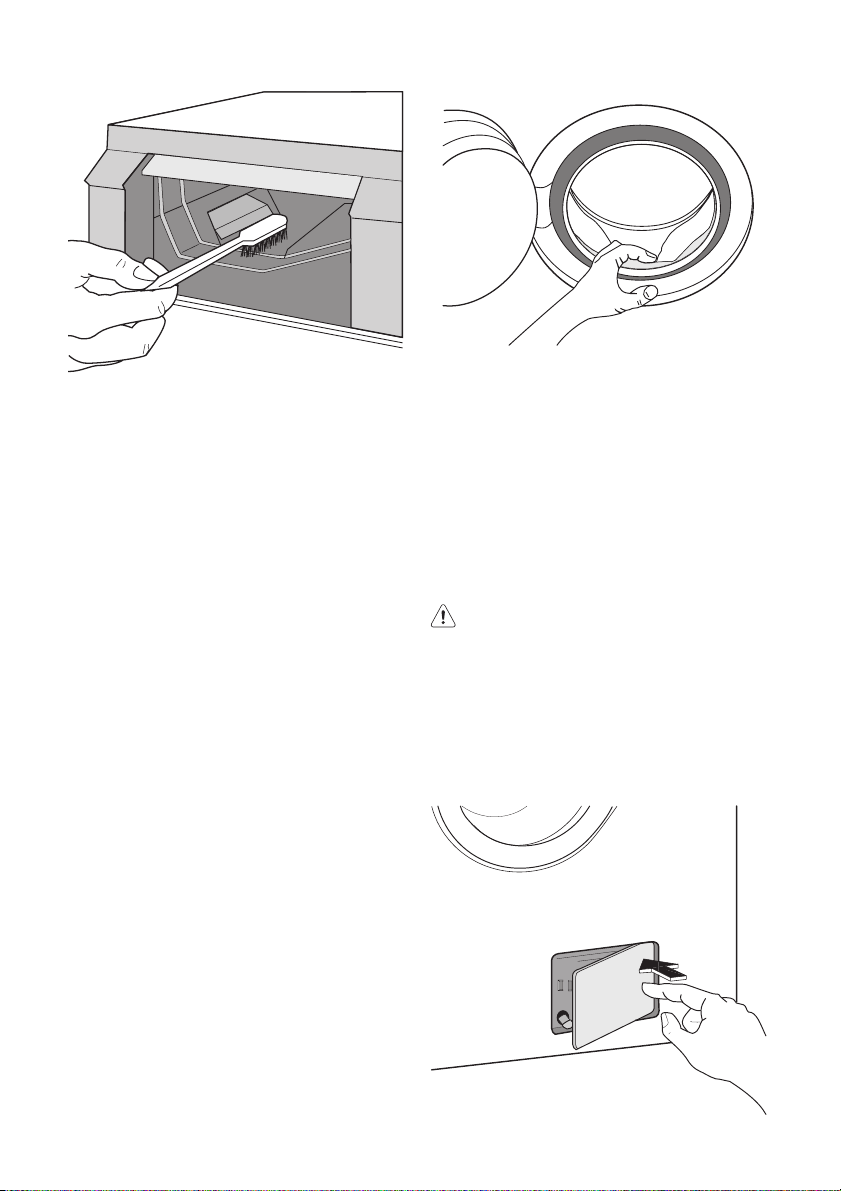
44 electrolux
Tambor de lavado
La presencia de cuerpos extraños oxidantes
en el lavado y el agua corriente con contenido en hierro pueden dar lugar a la formación
de depósitos de óxido en el tambor.
Importante No limpie el tambor con
desincrustantes ácidos, desengrasantes
que contengan cloro, ni estropajos de hierro
o acero.
1. Retire los depósitos de óxido del tambor
con un agente de limpieza para acero
inoxidable.
2. Ponga en marcha un ciclo de lavado sin
introducir ropa para limpiar los residuos
del agente de limpieza.
Programa: programa de algodón corto a
temperatura máxima y añada aproximadamente un cuarto de un vaso de medida
de detergente.
Junta de estanqueidad de la puerta
Compruebe la junta de vez en cuando y quite
todo objeto que haya quedado atrapado en
el pliegue.
Bomba de desagüe
El filtro debe inspeccionarse con regularidad,
especialmente en caso de que
• el aparato no desagüe o no centrifugue;
• la lavadora presente un ruido extraño durante la descarga por la presencia de objetos tales como imperdibles, monedas,
etc., que obstruyen la bomba.
• se detecte un problema con el desagüe
del agua (consulte el capítulo “Qué hacer
si...” para obtener más información).
Advertencia Antes de abrir la puerta del
filtro, apague el aparato y desenchúfelo
de la toma de corriente.
Proceda de la siguiente manera:
1. Desconecte el enchufe de la toma de
corriente.
2. Si es necesario, espere hasta que el
agua se enfríe.
3. Abra la puerta de acceso al filtro.
Page 45
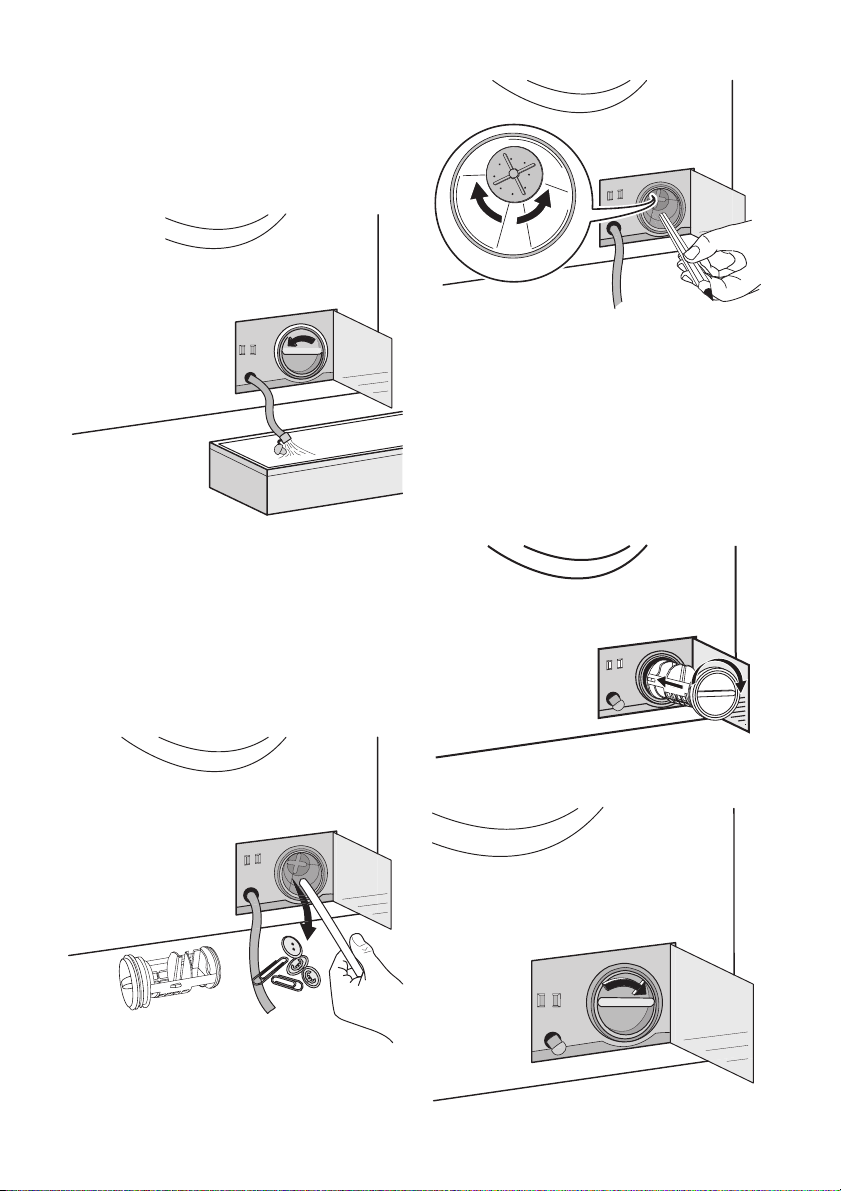
4. Coloque un recipiente cerca de la puerta
del filtro para recoger el líquido que pueda derramarse.
5. Extraiga la manguera de desagüe de
emergencia, colóquela en el contenedor
y retire el tapón.
6. Cuando deje de salir agua, desenrosque
la tapa del filtro girándola hacia la izquierda y retire el filtro. Utilice alicates si
fuera necesario. Tenga siempre a mano
un trapo para secar el agua que se derrame al extraer la tapa.
Limpie el filtro bajo el grifo para eliminar
los restos de pelusas.
7. Retire los cuerpos extraños y limpie las
pelusas del filtro y del rotor.
electrolux 45
9. Tapone de nuevo la manguera de desagüe de emergencia y coloque la manguera en su sitio.
10. Vuelva a colocar el filtro en la bomba insertándolo correctamente en las guías
especiales. Enrosque la tapa de la bomba firmemente girándola hacia la derecha.
8. Asegúrese de que el rotor del filtro gira
(gira con sacudidas). Si no gira, póngase
en contacto con el servicio técnico.
11. Cierre la puerta del filtro.
Page 46
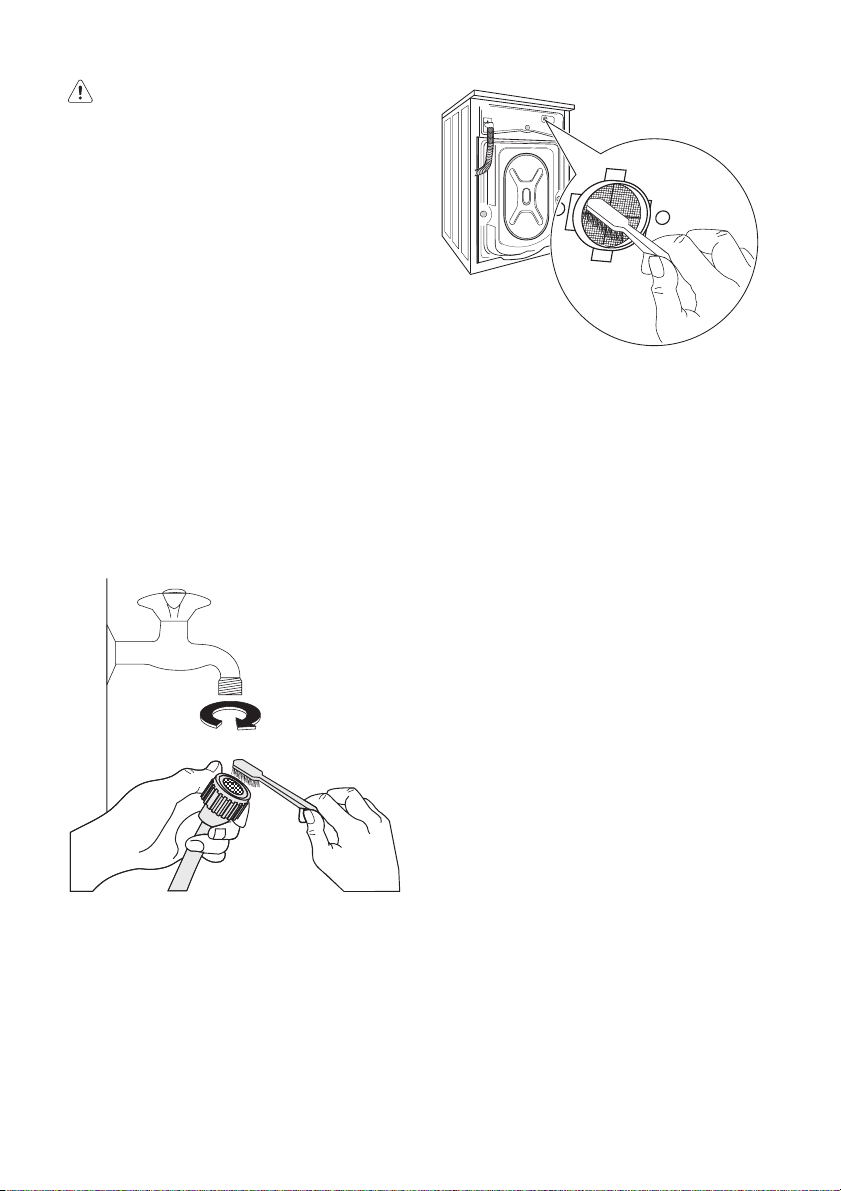
46 electrolux
Advertencia
Cuando la lavadora está en marcha, dependiendo del programa seleccionado, puede
haber agua caliente en el filtro.
Nunca extraiga la tapa del filtro durante un
ciclo de lavado; espere siempre a que la lavadora haya terminado el ciclo y esté vacía.
Al volver a colocar la tapa del filtro, asegúrese
de apretarla firmemente para impedir que se
produzcan fugas y que los niños puedan sacarla.
Limpieza de los filtros de entrada de
agua
Si nota que la lavadora tarda demasiado en
llenarse, compruebe que el filtro situado en
la manguera de entrada de agua no esté
obstruido.
1. cierre la toma de agua;
2. Desconecte la manguera de entrada de
agua.
3. Limpie el filtro de la manguera con un ce-
pillo rígido.
4. Vuelva a enroscar la manguera en la toma
de agua.
5. Desenrosque la manguera de la máqui-
na. Tenga una bayeta a mano porque
puede salir algo de agua.
6. Limpie el filtro en la válvula con un cepillo
rígido o con un trozo de tela.
7. Vuelva a enroscar la manguera en la máquina y compruebe que la conexión esté
bien ajustada.
8. Abra el grifo.
Descarga de emergencia
Si la lavadora no descarga, proceda de la siguiente manera para vaciarla:
1. desenchufe el aparato;
2. cierre la toma de agua;
3. si es necesario, espere a que el agua se
enfríe;
4. abra la puerta del filtro;
5. coloque un recipiente en el suelo e introduzca el extremo del tubo de descarga
de emergencia en él. Quite el tapón del
tubo. El agua debería dirigirse al recipiente por acción de la gravedad. Cuando el
recipiente se llene, vuelva a tapar el tubo.
Vacíe el recipiente. Repita el procedimiento hasta que deje de salir agua;
6. si es necesario, limpie el filtro como se ha
descrito anteriormente;
7. vuelva a colocar el tubo de descarga de
emergencia en su lugar una vez tapado;
8. vuelva a enroscar el filtro y cierre la puerta.
Precauciones contra la congelación
Si la lavadora se instala en un lugar en el que
la temperatura podría descender por debajo
de 0°C, tome las siguientes precauciones:
1. Cierre la toma de agua y desenrosque la
manguera de entrada de agua de la toma.
2. Coloque el extremo de la manguera de
descarga de emergencia y el extremo de
la manguera de entrada de agua en un
recipiente depositado en el suelo y deje
que salga el agua.
Page 47
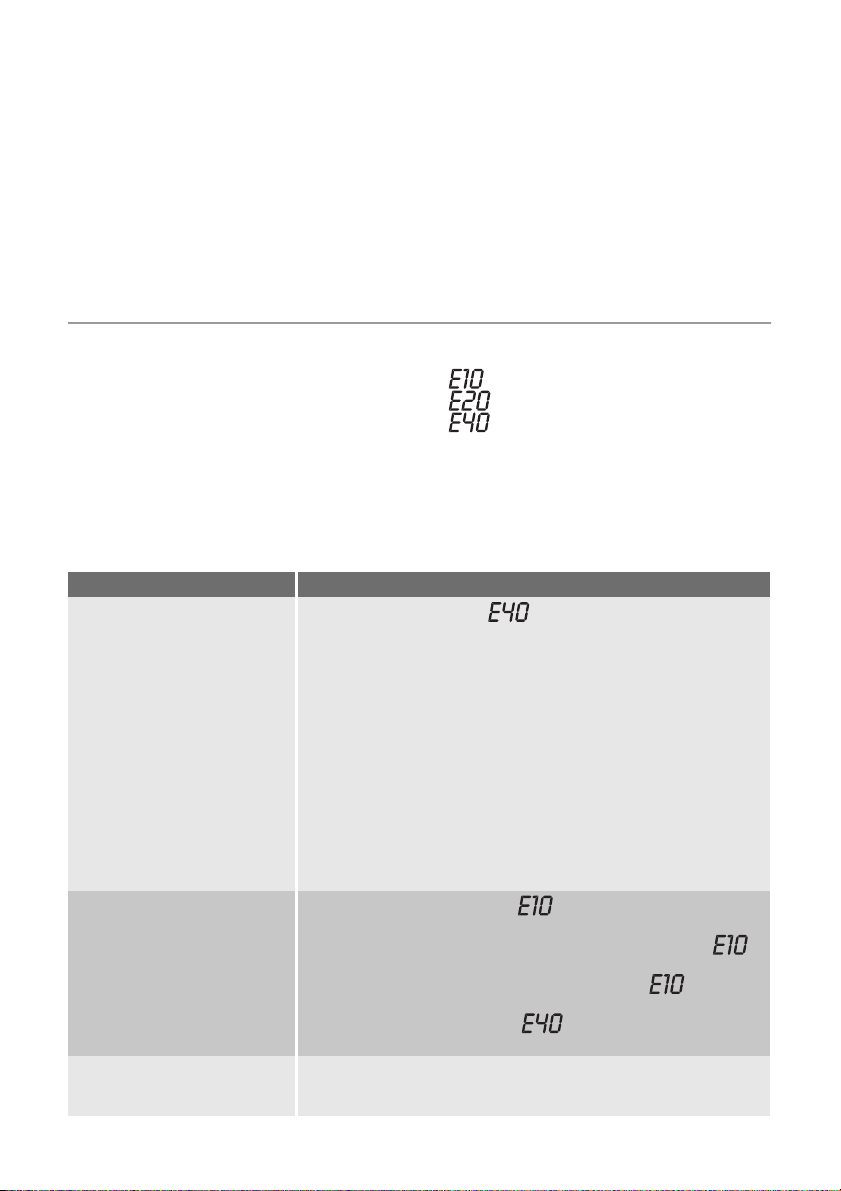
electrolux 47
3. Vuelva a acoplar la manguera de entrada
de agua y coloque la manguera de descarga de emergencia en su lugar después de taponarla.
Si hace esto extraerá el agua que quede en
la máquina y evitará que se forme hielo y el
electrodoméstico sufra desperfectos.
Cuando vuelva a utilizar la máquina, asegúrese de que la temperatura ambiente es superior a 0°C.
QUÉ HACER SI…
Algunos problemas, que pueden deberse
sencillamente a falta de mantenimiento o a
descuidos, pueden resolverse sin necesidad
de llamar al Centro de servicio técnico. Antes
de ponerse en contacto con el Centro de
servicio técnico local, realice las comprobaciones indicadas en la lista siguiente.
Durante el funcionamiento de la lavadora es
posible que el piloto rojo de la tecla 8 parpadee, que aparezca uno de los códigos de
error siguientes en el visor digital y que se
emitan algunas señales acústicas cada 20
Problema Causa y soluciones posibles
La puerta no está cerrada.
• Cierre bien la puerta.
El enchufe no está correctamente insertado en la toma de corriente.
• Inserte el enchufe en la toma.
No hay tensión en la toma de corriente.
• Compruebe la instalación eléctrica doméstica.
La lavadora no se pone en
marcha
La lavadora no se llena de
agua:
La lavadora se llena de
agua, pero se vacía de inmediato:
El fusible principal se ha quemado.
• Cambie el fusible.
El selector de programas no está en la posición correcta y no se ha
pulsado la tecla 8 no se ha pulsado.
• Gire el selector de programas y vuelva a presionar la tecla 8 de
nuevo.
Se ha presionado la tecla de inicio diferido.
• Si el lavado se va a realizar de inmediato, cancele el inicio diferido.
Se ha activado el bloqueo para niños.
• Desactive el bloqueo para niños.
La toma de agua está cerrada.
• Abra el grifo.
La manguera de entrada de agua está doblada o retorcida.
• Compruebe la conexión de la manguera de entrada de agua.
El filtro de la manguera de entrada está obstruido.
• Limpie el filtro de la manguera de entrada de agua.
La puerta no está bien cerrada.
• Cierre bien la puerta.
El extremo de la manguera de desagüe está demasiado bajo.
• Consulte el apartado correspondiente de la sección "Desagüe"
Importante Cada vez que se vacía el agua
a través de la manguera de descarga de
emergencia, es preciso introducir 2 litros de
agua en el compartimento de lavado
principal de la cubeta de detergente y, a
continuación, poner en marcha el programa
de descarga. De este modo se activará el
dispositivo ECO VALVE y se evitará que no
se utilice parte del detergente en el siguiente
lavado.
segundos para indicar que la lavadora no está funcionando:
•
: problema con el suministro de agua
•
: problema con el desagüe
•
: puerta abierta
Cuando se haya solucionado el problema,
pulse la tecla 8 para reiniciar el programa. Si
no consigue resolver el problema después
de realizar todas las comprobaciones pertinentes, póngase en contacto con el Centro
de servicio técnico.
Page 48
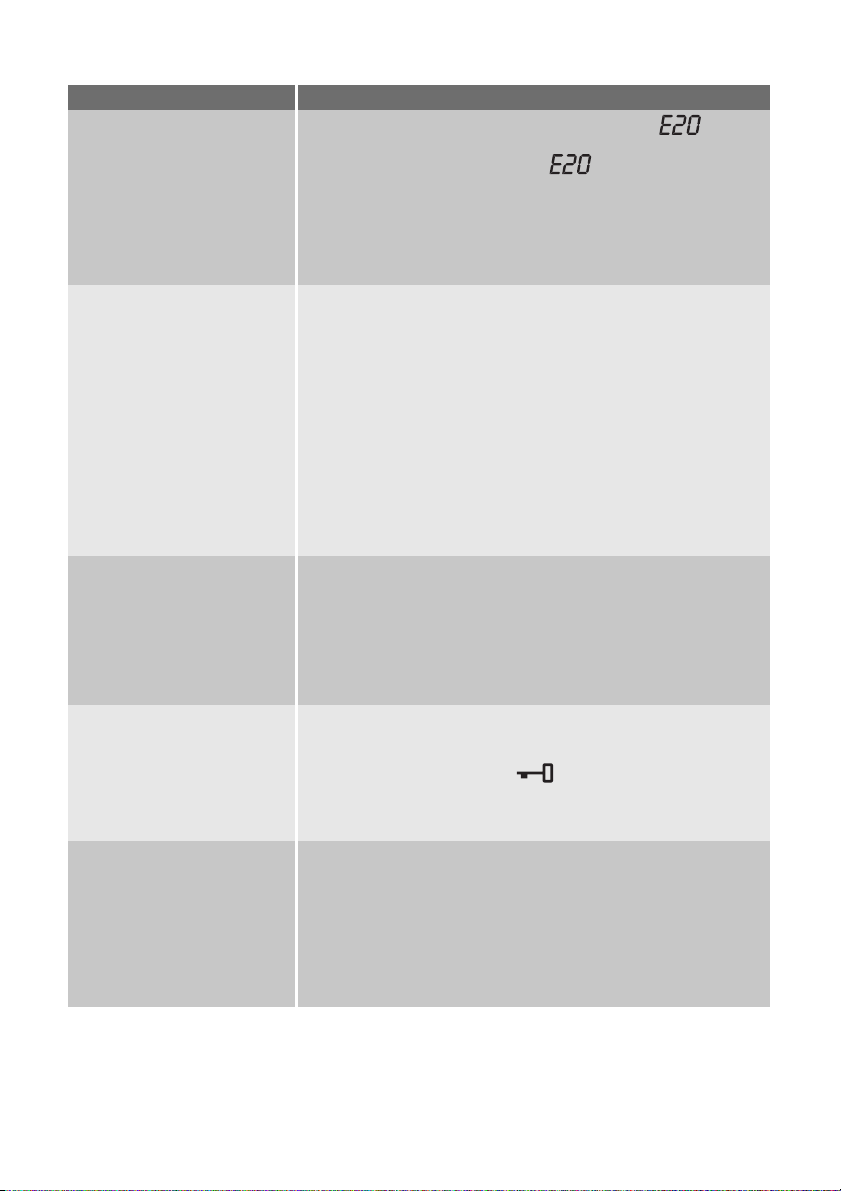
48 electrolux
Problema Causa y soluciones posibles
La máquina no desagua, no
centrifuga o no hace ninguna de las dos cosas:
Hay agua en el suelo:
Los resultados del lavado no
son satisfactorios:
La puerta no se abre:
El aparato vibra o hace mucho ruido:
La manguera de desagüe está doblada o retorcida.
• Compruebe la conexión de la manguera de desagüe.
El filtro de descarga está obstruido.
• Limpie el filtro de descarga.
Se ha seleccionado una opción o programa que finaliza con agua
dentro de la cuba o que elimina todas las fases de centrifugado.
• Seleccione el programa de descarga o de centrifugado.
Las prendas no están uniformemente distribuidas en el tambor.
• Vuelva a distribuir las prendas.
Se ha utilizado demasiado detergente o un detergente inadecuado
(que produce demasiada espuma).
• Reduzca la cantidad de detergente o utilice otro.
Compruebe si hay fugas en alguno de los racores de la manguera
de entrada de agua. No siempre resulta fácil detectar las fugas, ya
que el agua desciende por la manguera; compruebe que el racor no
está mojado.
• Compruebe la conexión de la manguera de entrada de agua.
La manguera de desagüe o de entrada está dañada.
• Sustitúyala por una nueva.
El tapón de la manguera de desagüe de emergencia no se ha vuelto
a colocar o el filtro no se ha enroscado adecuadamente después de
la operación de limpieza.
• Vuelva a colocar el tapón en la manguera de desagüe de emergencia o enrosque el filtro hasta el tope.
Se ha utilizado poco detergente o un detergente inadecuado.
• Aumente la cantidad de detergente o utilice otro.
No se han tratado las manchas difíciles antes de lavar la ropa.
• Emplee productos comerciales para tratar las manchas difíciles.
No se ha seleccionado la temperatura adecuada.
• Compruebe si ha seleccionado la temperatura correcta.
Se han metido demasiadas prendas en la lavadora.
• Reduzca la carga.
El programa todavía no ha terminado.
• Espere hasta que finalice el ciclo de lavado.
No se ha desbloqueado el cierre de la puerta.
•
Espere hasta que el símbolo
haya desaparecido.
Hay agua en el tambor.
• Seleccione el programa de descarga o centrifugado para vaciar
el agua.
No se han quitado los pasadores ni el material de embalaje utilizados
para transportarla.
• Compruebe la correcta instalación del electrodoméstico.
No se han ajustado las patas
• Compruebe que el aparato está correctamente nivelado.
Las prendas no están uniformemente distribuidas en el tambor.
• Vuelva a distribuir las prendas.
Es posible que haya muy pocas prendas en el tambor.
• Introduzca más prendas.
Page 49
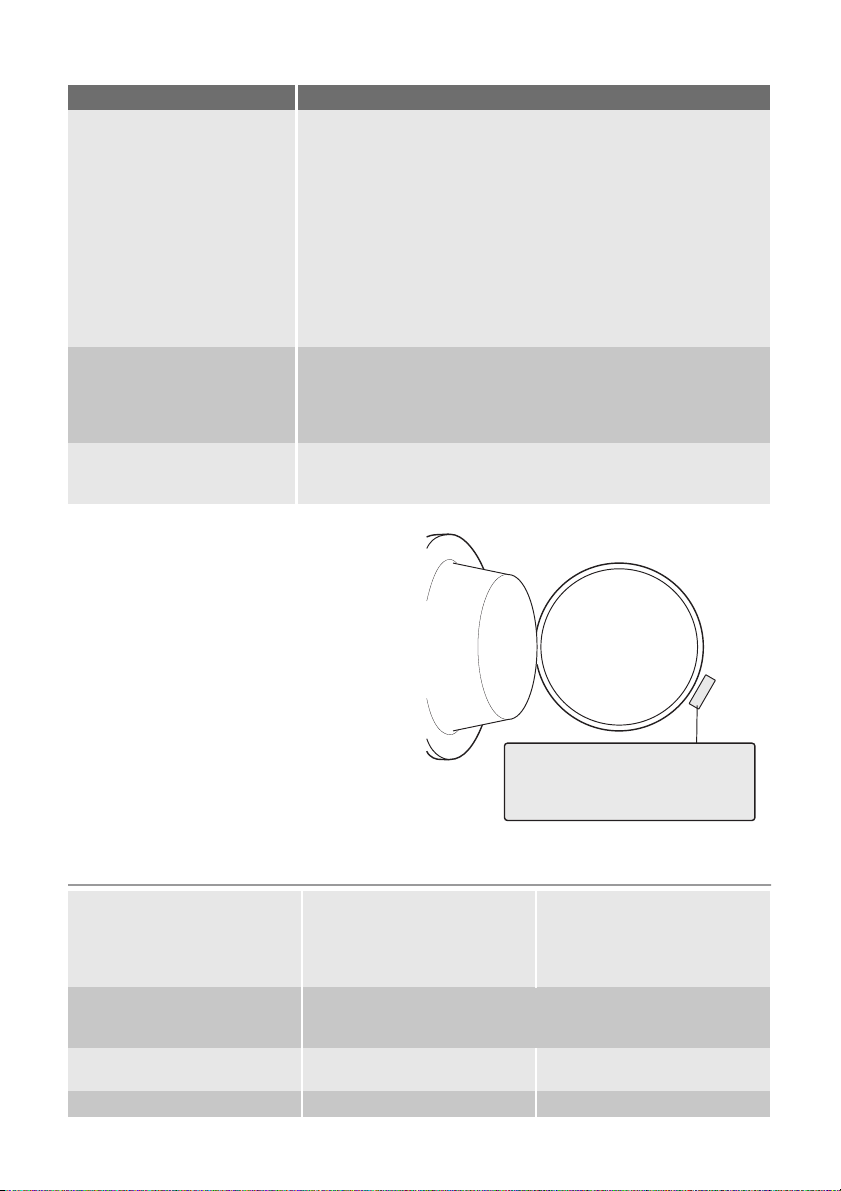
Problema Causa y soluciones posibles
El dispositivo que detecta desequilibrios en la carga ha interrumpido
el proceso debido a que las prendas no están uniformemente distribuidas en el tambor. La ropa se redistribuye mediante la rotación
inversa del tambor. Es posible que el tambor gire varias veces antes
de que deje de detectarse el problema y se reanude el ciclo de cen-
El centrifugado se retrasa o
la máquina no centrifuga:
trifugado normal. Si la carga no se distribuye de manera uniforme
transcurridos 10 minutos, la lavadora no centrifuga. En este caso,
es necesario redistribuirla de forma manual y seleccionar el programa de centrifugado.
• Vuelva a distribuir las prendas.
La carga es insuficiente.
• Añada más prendas, redistribuya la carga de forma manual y seleccione el programa de centrifugado.
La lavadora incorpora un tipo de motor que emite un ruido extraño
La lavadora emite un ruido
extraño:
comparado con el de otros motores tradicionales. Este nuevo motor
garantiza un inicio más suave e incluso una mejor distribución de las
prendas en el tambor durante el centrifugado, así como una mayor
estabilidad de la lavadora.
Las lavadoras de tecnología moderna están diseñadas para eco-
No se ve agua en el tambor:
nomizar y emplean muy poca agua, sin que ello afecte al rendimiento.
Si no puede identificar o resolver el problema, póngase en contacto con nuestro centro de servicio técnico. Antes de llamar al
centro, anote el modelo, el número de serie
y la fecha en que adquirió el electrodoméstico; el centro de servicio técnico le pedirá
esta información.
electrolux 49
..
.
.
..
.
. ..
o
N
r.
.
e
.
.
S
..
..
.
.
..
..
.
.
.
o
..
.
N
d
.
o
d
M
ro
P
Mod. ... ... ...
Prod. No. ... ... ...
Ser. No. ... ... ...
DATOS TÉCNICOS
Medidas Anchura
Altura
Profundidad
Profundidad (dimensiones generales)
Conexión eléctrica
Voltaje - Alimentación general -
Los datos de la conexión eléctrica se indican en la placa de datos
técnicos, en el borde interno de la puerta de la lavadora.
Fusible
Presión del suministro de agua Mínima
Máxima
Carga máxima Algodón 7 kg
60 cm
85 cm
60 cm
63 cm
0,05 MPa
0,8 MPa
Page 50
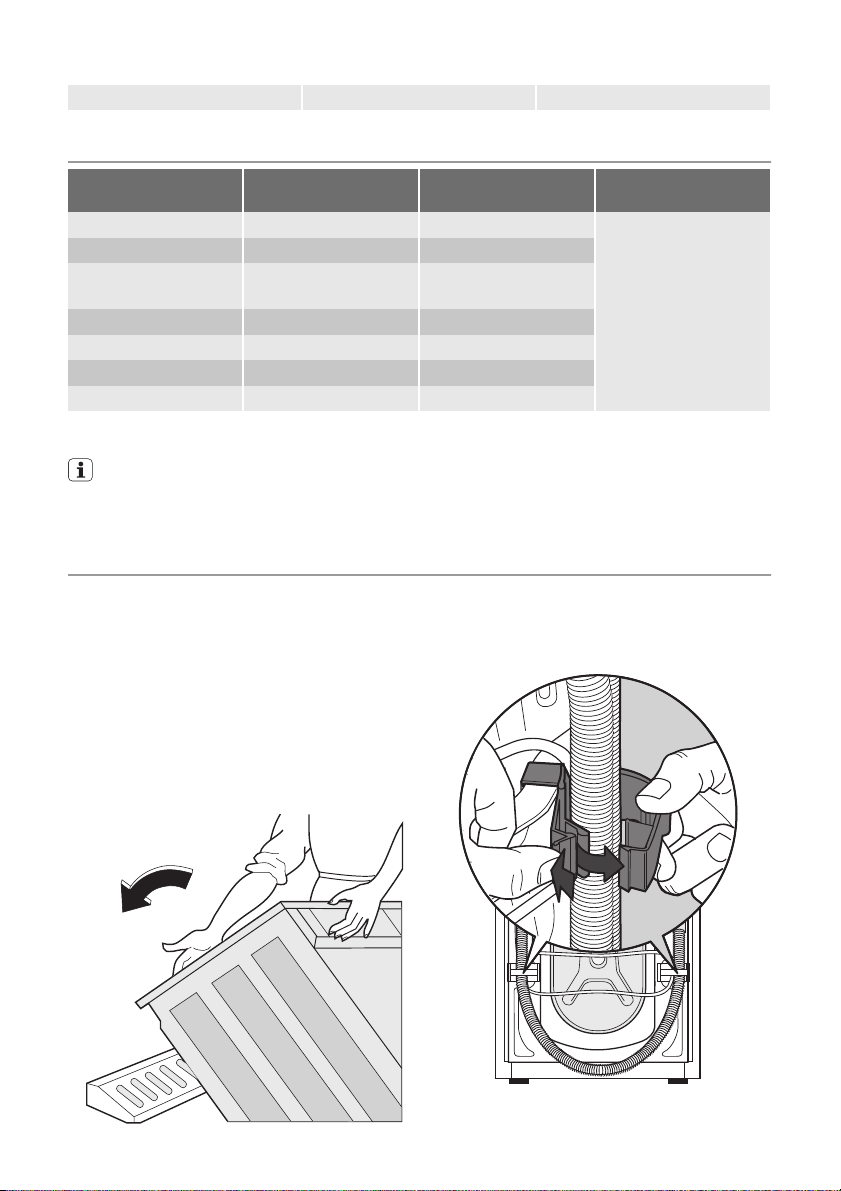
50 electrolux
Velocidad de centrifugado Máxima 1200 rpm
VALORES DE CONSUMO
Programa Consumo energético
ALGODÓN90° 2.1 65
ALGODÓN 60° 1.4 60
ALGODÓN ECONÓMI-
1)
CO
ALGODÓN 40° 0.77 60
SINTÉTICOS 40° 0.6 54
DELICADOS 40° 0.6 63
LANA / A MANO 30° 0.25 55
1) Este programa a una temperatura de 60°C con una carga de 7 kg es el programa de referencia de los datos incluidos
en la etiqueta energética, en conformidad con las normas CEE 92/75.
(KWh)
1.05 49
Los datos de consumo de este gráfico se indican a título orientativo, y pueden variar
dependiendo de la cantidad y tipo de prendas, la temperatura del agua de entrada y la
temperatura ambiente.
Consumo de agua (li-
tros)
Duración del progra-
ma (horas.minutos)
Compruebe la dura-
ción de los progra-
mas en el indicador
del panel de mandos.
INSTALACIÓN
Desembalaje
Es preciso retirar todo el material de embalaje y los pasadores antes de utilizar la máquina.
Se aconseja guardar todo este material para
usarlo de nuevo en caso de que sea necesario transportar el electrodoméstico.
1. Después de retirar todo el material de
embalaje, recueste con cuidado la máquina sobre su parte trasera para extraer
la base de poliestireno de la parte inferior.
2. Retire el cable de alimentación y la manguera de entrada y descarga de los soportes de manguera situados en la parte
trasera de la máquina.
3. Suelte los tres pernos.
Page 51
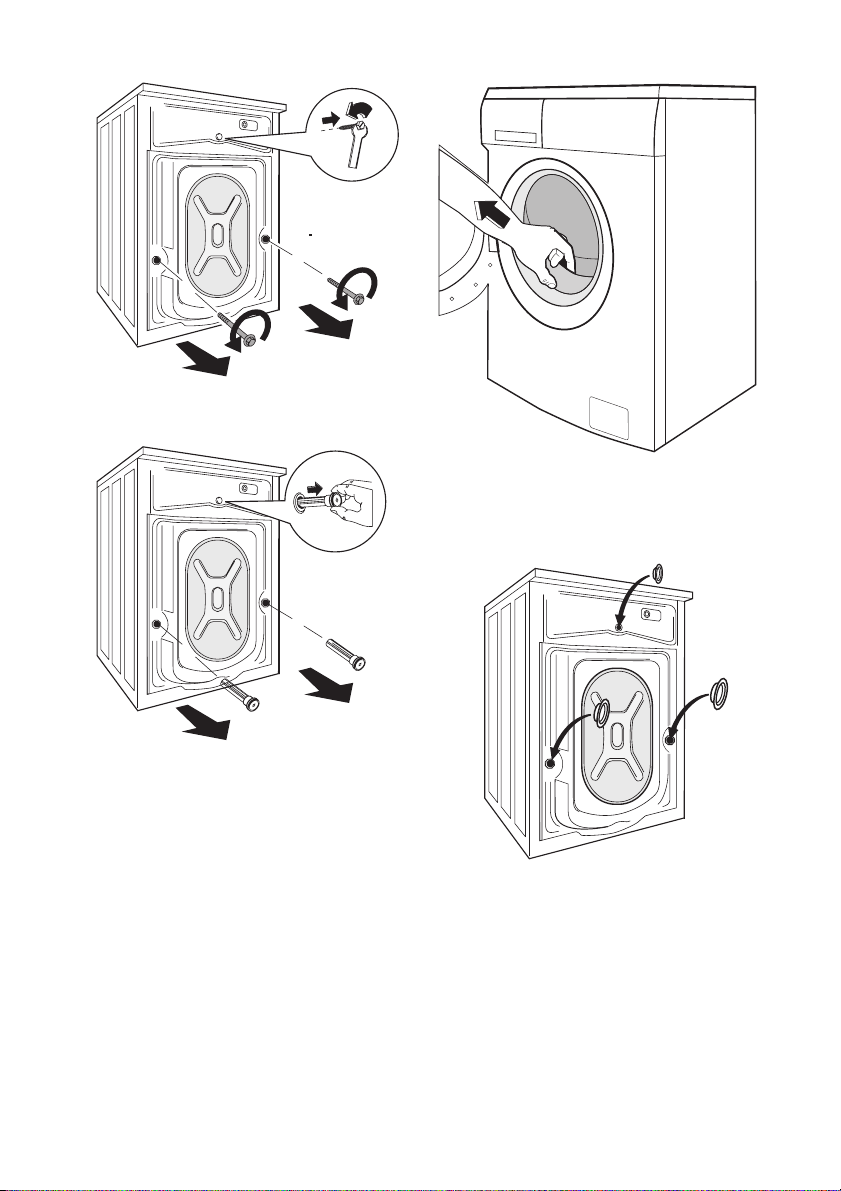
4. Deslice los separadores de plástico para
quitarlos.
electrolux 51
6. Cubra el orificio superior más pequeño y
los dos más grandes con los tapones de
plástico correspondientes incluidos en la
bolsa que contiene el manual de instrucciones.
5. Abra la puerta de la máquina y extraiga el
bloque de poliestireno fijado en la junta
de estanqueidad de la puerta.
Colocación
Instale la máquina en el suelo sobre una superficie plana y rígida. Asegúrese de que el
aire circula correctamente alrededor de la lavadora aunque haya moqueta, alfombras,
etc. Compruebe que la máquina no toca la
pared ni otros muebles o elementos. Nivele
la lavadora subiendo o bajando las patas.
Puede que resulte difícil ajustar las patas, ya
que incorporan una tuerca de seguridad, pero DEBEN estar niveladas y estables. Si es
necesario, compruebe el ajuste con un nivel
Page 52
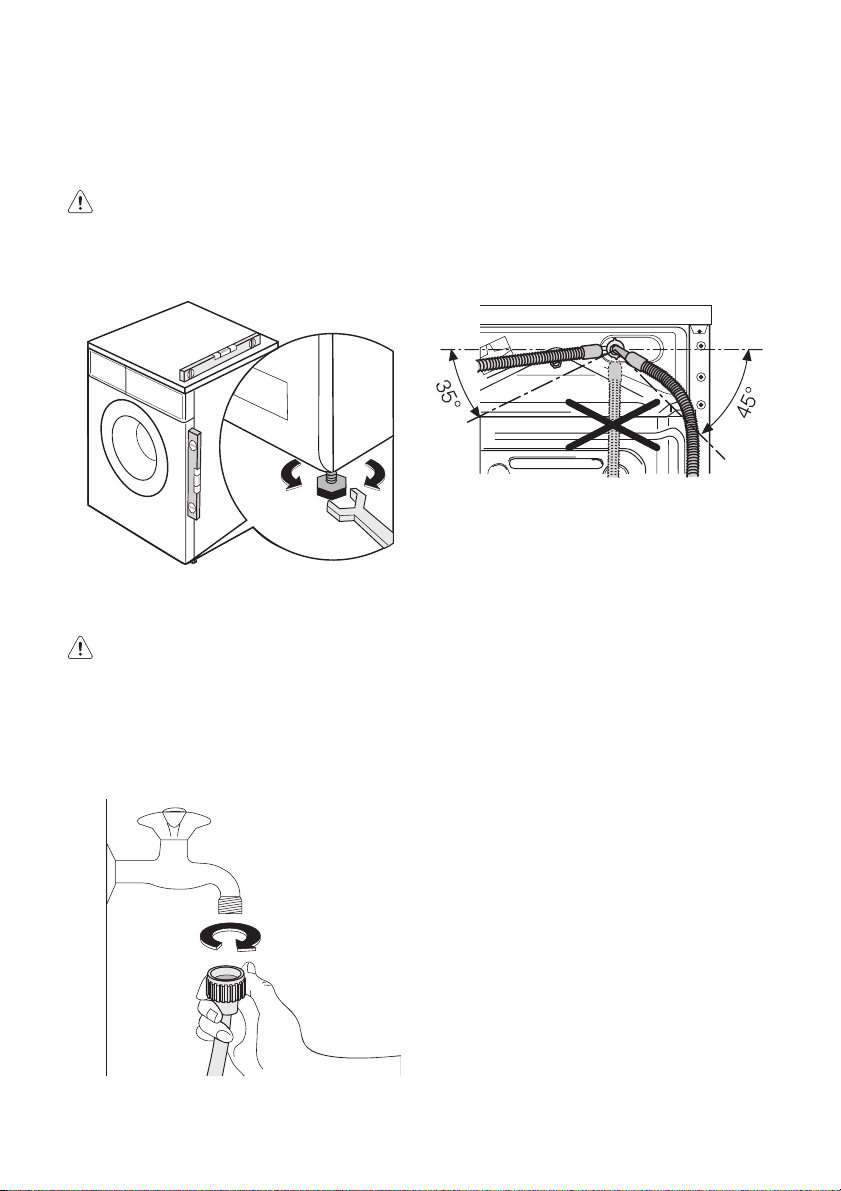
52 electrolux
de burbuja. Los ajustes necesarios pueden
realizarse con una llave. Un nivelado correcto
evita las vibraciones, el ruido y el desplazamiento de la lavadora durante el funcionamiento.
Precaución No coloque cartón,
madera ni otros materiales similares bajo
la máquina para compensar los
desniveles del suelo.
Entrada de agua
Advertencia Este electrodoméstico
debe conectarse a un suministro de
agua fría.
1. Conecte el tubo de entrada de agua suministrado a un grifo con rosca de 3/4
pulgadas. Debe utilizar siempre el tubo
suministrado con la máquina.
2. El otro extremo del tubo, que se conecta
a la lavadora, puede girarse como se indica en la figura.
No coloque el tubo de entrada hacia abajo.
Sitúelo a la izquierda o a la derecha en
función de la posición de la toma de
agua.
3. Afloje la tuerca anular para colocar el tubo
correctamente. Después de situar el tubo, vuelva a apretar la contratuerca para
evitar fugas de agua.
No utilice prolongaciones para el tubo de entrada de agua. Si es demasiado corto y no
desea mover la toma de agua, tendrá que
adquirir un tubo más largo diseñado especialmente para estos casos.
Importante Antes de conectar la lavadora a
tubos nuevos o a tubos que no se hayan
utilizado durante algún tiempo, deje correr
bastante agua para eliminar los restos que
puedan haberse acumulado en los tubos.
Desagüe
El extremo de la manguera de desagüe se
puede instalar de tres maneras distintas.
•
Sujeto por encima del borde de un fregadero con la guía de plástico suministrada. En este caso, debe asegurarse de que
el extremo de la manguera no se desengancha cuando la lavadora está desaguando. Para evitarlo, ate el extremo de la
manguera a la toma de agua con un trozo
de cuerda o fíjelo a la pared.
Importante No utilice los tubos de una
máquina anterior para conectar el
suministro de agua.
Page 53
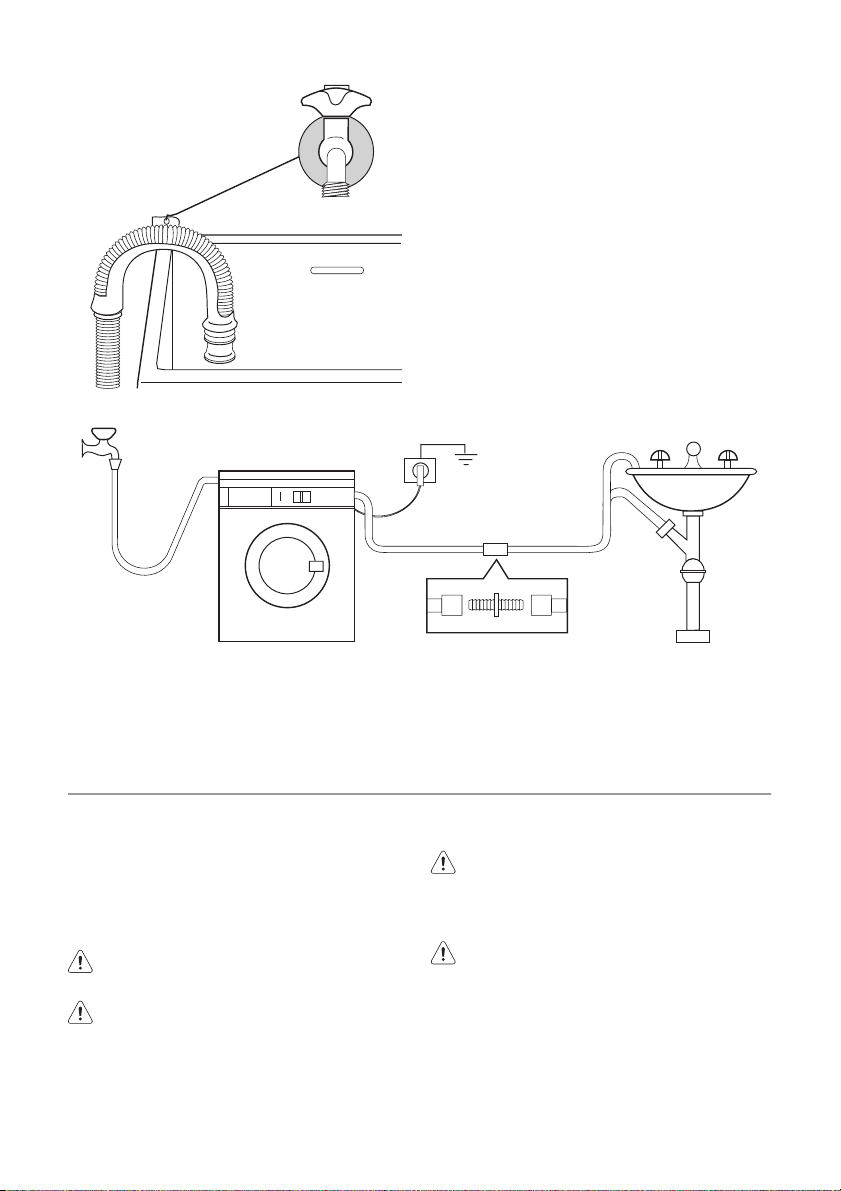
electrolux 53
•
En un empalme de derivación para
descarga en el fregadero. Este empal-
me debe estar encima de la toma para que
el codo quede al menos 60 cm sobre el
nivel del suelo.
• Directamente en un tubo de desagüe
a una altura mínima de 60 cm y máxima
de 90 cm. El extremo de la manguera de
descarga siempre debe estar ventilado; es
decir, el diámetro interno del tubo de descarga debe ser mayor que el diámetro externo de la manguera. La manguera de
desagüe no debe estar retorcida.
La manguera de descarga debe extenderse hasta un máximo de 4 metros. En el Centro
de servicio técnico local encontrará disponibles una manguera de descarga y una pieza de
unión adicionales.
CONEXIÓN ELÉCTRICA
Los datos de la conexión eléctrica se indican
en la placa de datos técnicos, situada en el
borde interno de la puerta de la lavadora.
Compruebe que la instalación eléctrica de su
hogar está preparada para soportar la potencia máxima necesaria y tenga también en
cuenta el resto de electrodomésticos.
Conecte la lavadora a una toma de
corriente con puesta a tierra.
El fabricante declina toda
responsabilidad por los daños o las
lesiones que puedan producirse si
no se respetan las indicaciones de
seguridad anteriores.
El cable de corriente eléctrica debe
quedar en una posición fácilmente
accesible una vez instalada la
máquina.
El centro de servicio técnico es el
único autorizado para cambiar el
cable de corriente eléctrica del
electrodoméstico en caso
necesario.
Page 54

54 electrolux
ASPECTOS MEDIOAMBIENTALES
El símbolo que aparece en el aparato o
en su embalaje, indica que este producto no
se puede tratar como un residuo normal del
hogar. Se deberá entregar, sin coste para el
poseedor, bien al distribuidor, en el acto de
la compra de un nuevo producto similar al
que se deshecha, bien a un punto municipal
de recolección selectiva de equipos
eléctricos y electrónicos para su reciclaje. Al
asegurarse de que este producto se
desecha correctamente, usted ayudará a
evitar posibles consecuencias negativas
para el medio ambiente y la salud pública, lo
cual podría ocurrir si este producto no se
gestionara de forma adecuada. Para obtener
información más detallada sobre el reciclaje
de este producto, póngase en contacto con
el Ayuntamiento de su Municipio, ó con la
tienda donde lo compró.
Materiales de embalaje
Los materiales marcados con el símbolo
son reciclables.
>PE<= polietileno
>PS<= poliestireno
>PP<= polipropileno
Esto significa que se pueden reciclar si se
desechan correctamente en contenedores
específicos.
Consejos ecológicos
A continuación ofrecemos algunos consejos
para ahorrar agua y energía y ayudar a proteger el medio ambiente:
• La ropa que no esté demasiado sucia se
puede lavar con un programa que no incluya prelavado a fin de ahorrar detergente, agua y tiempo (y proteger el medio ambiente).
• El lavado resulta más económico si la la-
vadora se llena por completo.
• Con un tratamiento previo adecuado es
posible eliminar manchas y suciedad moderada; de manera que la ropa se pueda
lavar a menos temperatura.
• Dosifique el detergente en función de la
dureza del agua, el grado de suciedad y la
cantidad de ropa que se va a lavar.
Page 55

electrolux 55
Page 56
www.electrolux.com/shop
132944310-00-182010
 Loading...