

Page 1

EWF12932
EWF12932S
EWF12832
EWF12832S
................................................... ....................................................................
EN
WASHING MACHINE
MESIN CUCI
IN
VI
MÁY GIẶT
USER MANUAL 2
PANDUAN BAGI PENGGUNA
TÀI LIỆU HƯỚNG DẪN SỬ DỤNG3469
Page 2

2 www.electrolux.com
CONTENTS
SAFETY INFORMATION
1
PRODUCT DESCRIPTION
2
CONTROL PANEL
3
BEFORE FIRST USE
4
DAILY USE
5
WASHING HINTS
6
INTERNATIONAL WASH CODE SYMBOLS
7
CARE AND CLEANING
8
TROUBLESHOOTING
9
TECHNICAL DATA ......................................................................................... 3010
INSTALLATION .............................................................................................. 3111
ENVIRONMENT CONCERNS ......................................................................... 3312
.................................................................................................... 12
................................................................................... 3
............................................................................................ 6
...................................................................................... 12
........................................................................................... 19
.................................................................................. 22
.................................................................................... 27
WE’RE THINKING OF YOU
Thank you for purchasing an Electrolux appliance. You’ve chosen a product that
brings with it decades of professional experience and innovation. Ingenious and
stylish, it has been designed with you in mind. So whenever you use it, you can be
safe in the knowledge that you’ll get great results every time.
Welcome to Electrolux.
Visit our website to:
Get usage advice, brochures, trouble shooter, service information:
www.electrolux.com
................................................................................ 5
................................................... 22
CUSTOMER CARE AND SERVICE
We recommend the use of original spare parts.
When contacting Service, ensure that you have the following data available.
The information can be found on the rating plate. Model, PNC, Serial Number.
Warning / Caution-Safety information.
General information and tips.
Environmental information.
Subject to change without notice.
RoHS
Compliant
Being ensured permissible content limitaon of some toxic
chemicals (RoHS compliant)
Page 3
ENGLISH 3
SAFETY INFORMATION1.
Conditions of use
This appliance is intended to be used in
household and similar applications
such as:
-
Farm houses
-
By clients in serviced apartments,
holiday apartments and residential
type environments.
In the interest of your safety and to
ensure the correct use, before installing
and first using the appliance, read this
user manual carefully, including its hints
and warnings.
To avoid unnecessary mistakes and
accidents, it is important to ensure that
all people using the appliance are
thoroughly familiar with its operation and
safety features.
Save these instructions and make sure
that they remain with the appliance if it
is moved or sold, so that everyone
using it through its life will be properly
informed on appliance use and safety.
1.1 GENERAL SAFETY
It is dangerous to alter the
specifications or attempt to modify this
product in anyway.
During high temperature wash
program the door glass may get hot.
Do not touch it!
Make sure that small pets do not
climb into the drum. To avoid this,
please check into the drum before
using the appliance.
Any objects such as coins, safety
pins, nails, screws, stones or any
other hard, sharp material can cause
extensive damage and must not be
placed into the machine.
Wash small items such as socks,
laces, washable belts etc in a washing
bag or pillow case as it is possible for
such items to slip down between the
tub and the inner drum.
Only use the advised quantities of
fabric softener and detergent. Damage
to the fabric or appliance can occur if
you overfill. Refer to the manufacturer’s
recommendations of quantities.
This appliance is not intended for use
by persons (including children) with
reduced physical, sensory or mental
capabilities, or lack of experience and
knowledge, unless they have been
given supervision or instruction
concerning use of the appliance by a
person responsible for their safety.
Do not use your washing machine to
wash articles with whalebones,
material without hems or torn material.
Always unplug the appliance and turn
off the water supply after use, clean
and maintenance.
Under no circumstances should you
attempt to repair the machine yourself.
Repairs carried out by inexperienced
persons may cause injury or serious
malfunctioning. Contact your local
Service Centre. Always insist on
genuine spare parts.
1.2 INSTALLATION
This appliance is heavy. Care should
be taken when moving it.
When unpacking the appliance, check
that it is not damaged. If in doubt, do
not use it and contact the Service
Centre.
All packing and transit bolts must be
removed before use. Serious damage
can occur to the product and to
property if this is not adhered to. See
relevant section in the user manual.
Page 4
4
www.electrolux.com
After having installed the appliance,
check that it is not standing on the
inlet and drain hose and the worktop
is not pressing the electrical supply
cable.
If the machine is situated on a
carpeted floor, please adjust the feet
in order to allow air to circulate freely.
Always be sure, that there is no water
leakage from hoses and their
connections after the installation.
Any plumbing work required to install
this appliance should be carried out by
a qualified plumber.
Any electrical work required to install
this appliance should be carried out by
a qualified electrician.
1.3 USE
This appliance is designed for
domestic use. It must not be used for
purposes other than those for which it
was designed.
Only wash fabrics which are designed
to be machine washed. Follow the
instructions on each garment label.
Do not overload the appliance. See
the relevant section in the user
manual.
Before washing, ensure that all
pockets are empty and buttons and
zips are fastened. Avoid washing
frayed or torn articles and treat stains
such as paint, ink, rust, and grass
before washing. Underwired bras
must NOT be machine washed.
Garments which have been in contact
with volatile petroleum products
should not be machine washed. If
volatile cleaning fluids are used, care
should be taken to ensure that the
fluid is removed from the garment
before placing in the machine.
Never pull the power supply cable to
remove the plug from the socket;
always take hold of the plug itself.
Never use the washing machine if the
power supply cable, the control panel,
the working surface or the base are
damaged so that the inside of the
washing machine is accessible.
1.4 CHILD SAFETY
This washing machine is not intended
for use by young children or infirm
persons without supervision.
Young children should be supervised
to ensure that they do not play with
the appliance.
The packaging components (e.g.
plastic film, polystyrene) can be
dangerous to children - danger of
suffocation! Keep them out of
children’s reach.
Keep all detergents in a safe place out
of children’s reach.
Make sure that children or pets do not
climb into the drum.
1.5 CHILD SAFETY DEVICE
When you activate this device, you
cannot close the door. This prevents
children or pets to be locked in the
drum.
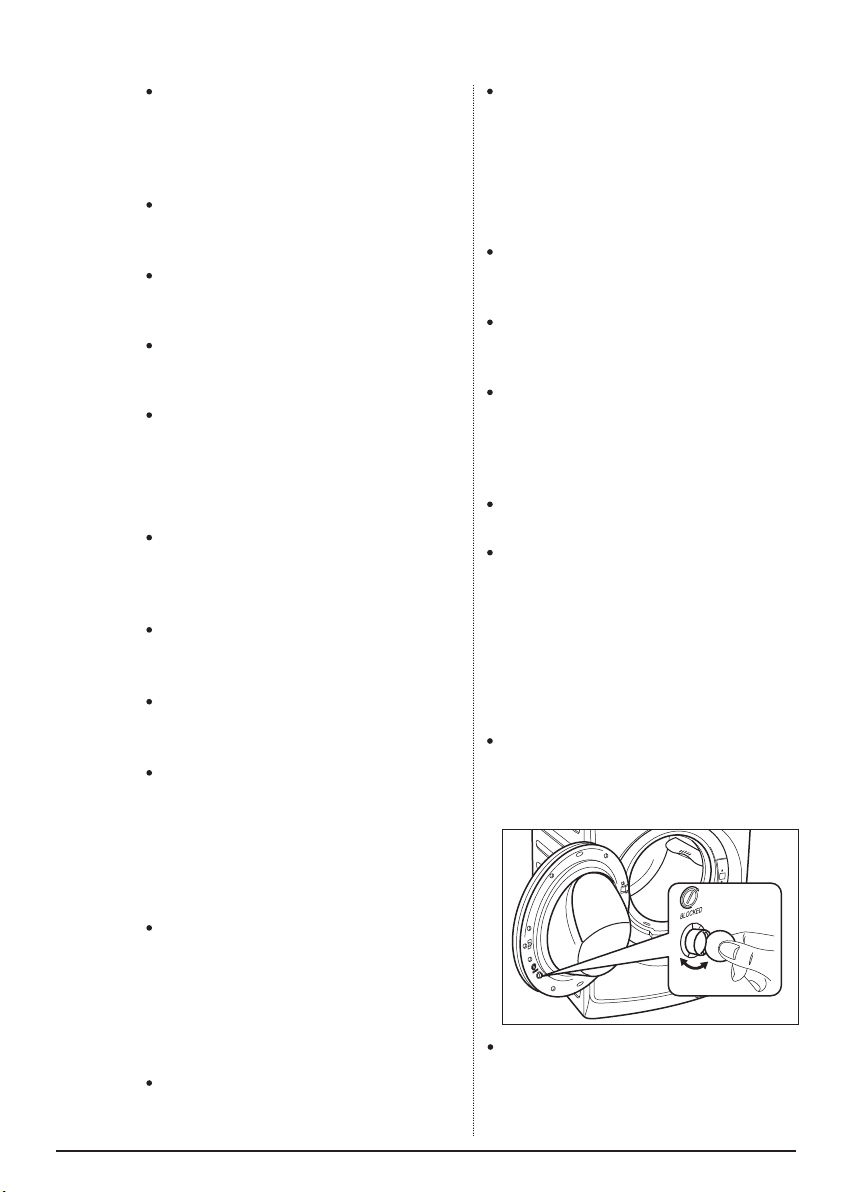
To activate this device, rotate the
button (WITHOUT pressing it) inside
the door clockwise until the groove is
horizontal. If necessary use a coin.
To disable this device and restore the
possibility of closing the door, rotate
the button anti-clockwise until the
groove is vertical.
Page 5
ENGLISH 5
PRODUCT DESCRIPTION2.
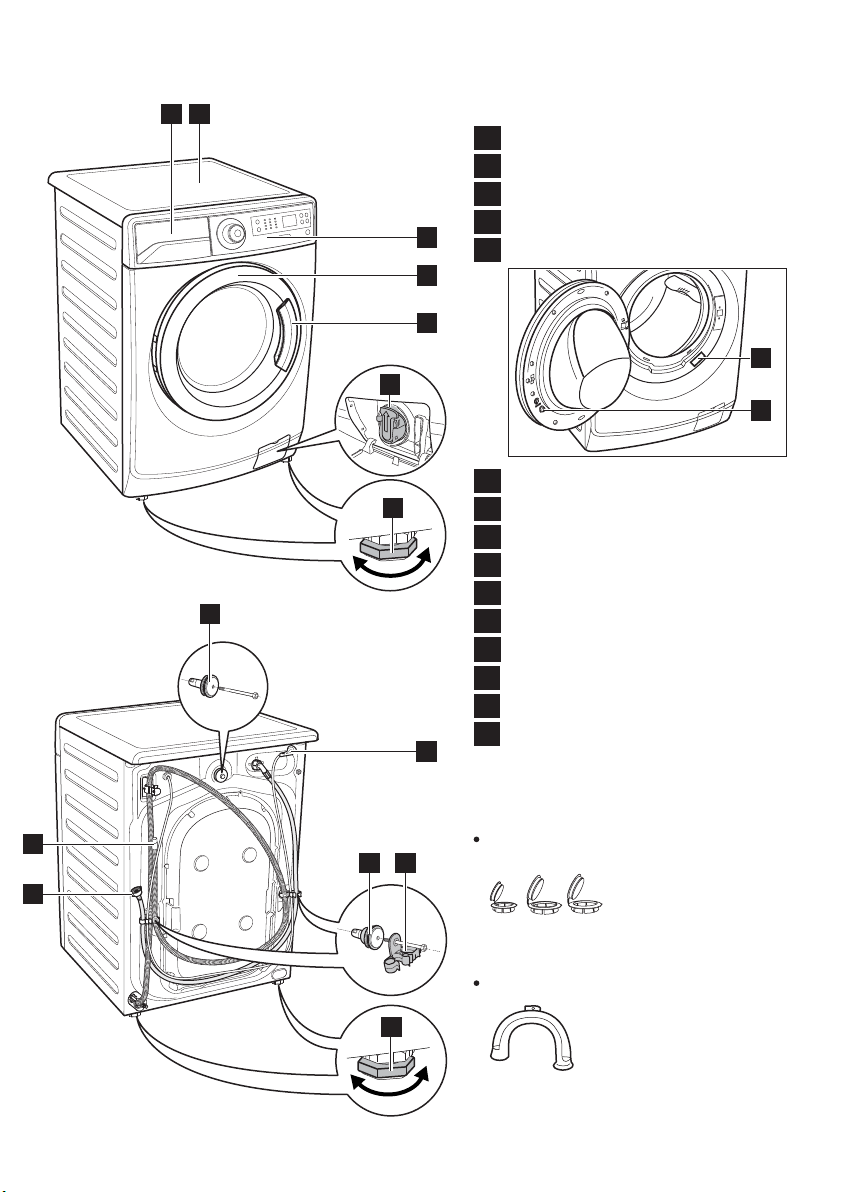
2 1
Worktop
1
Detergent/Softener Dispenser
2
Control Panel
3
Door Handle
4
3
5
Door
5
4
14
15
13
Level Adjustment Feet (Front)
6
6
11
7
Mains Cable
7
Water Inlet Hose
8
Water Drain Hose
9
Hose Support (2pcs)
10
11
Transit Bolts (3pcs)
Level Adjustment Feet (Back)
12
Child Safety Device
13
Rating Label
14
Drain Pump Filter
15
ACCESSORIES
9
1011
8
12
Plastic Caps
To close the holes on
the rear side of the
cabinet after the
removal of the transit
bolts.
Plastic Hose Guide
To connect the drain
hose on the edge of a
sink.
Page 6
6
www.electrolux.com
CONTROL PANEL3.
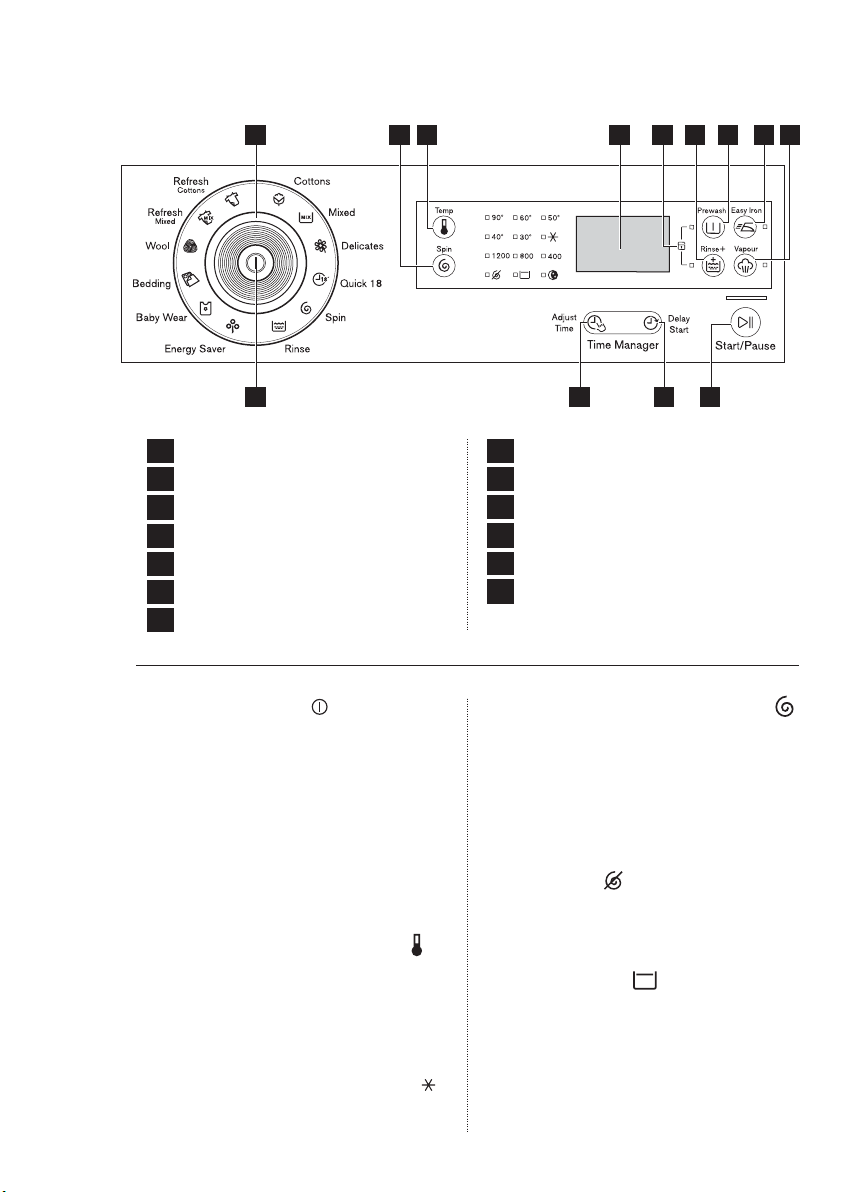
2 4 97 813 10 113
1
1
On/Off Button
2
Program Knob
3
Temperature Touchpad
4
Spin Selection Touchpad
5
Adjust Time Touchpad
6
Delay Start Touchpad
7
Display
3.1 On/Off Button
On/Off button is used to turn On
and turn Off your washing machine.
3.2 Program Knob
Turn this knob to set a program.
The related program indicator
comes on. The buzzer sounds.
(See page 10)
3.3 Temperature Touchpad
Press this touchpad repeatedly to
increase or decrease the wash
temperature if you want your laundry
to be washed at a temperature
different from the one proposed by
the washing machine (symbol “ ”
corresponds to cold wash).
5 6
8
Rinse Plus Touchpad
9
Prewash Touchpad
10
Easy Iron Touchpad
11
Vapour Touchpad
12
Start/Pause Touchpad
13
Child Lock Option (See Page 18)
12
3.4 Spin Selection Touchpad
Press this touchpad repeatedly to
increase or decrease the spin
speed, if you want your laundry to
be spun at a speed different from
the one proposed by the washing
machine.
No Spin
No spin option eliminates all the
spin phases and increase the
number of rinses.
Rinse Hold
By selecting this option the water of
the last rinse is not emptied out and
the drum turns regularly to prevent
the laundry creases.
The door is still locked to indicate
that the water must be emptied out.
Page 7
ENGLISH 7
The door stays locked with
the water in the drum. To
continue the cycle you must
press (Start/Pause).
Night Cycle
By selecting this option, the
machine will not drain the water of
the last rinse to avoid wrinkling the
laundry. All spinning phases are
suppressed.
This washing cycle is very quiet,
and can be selected at night or
other appropriate times.
The door stays locked with
the water in the drum. To
continue the cycle you must
press (Start/Pause).
3.5 Adjust Time Touchpad
This option allows you to reduce
washing time.
Press this touchpad repeatedly to
decrease or return to default
washing time.
This option will adjust the number
of rinse according to selected
washing time.
3.6 Delay Start Touchpad
This option makes it possible to
delay the start of the program by
30 min, 60 min or 90 min and
then by every hour from 2 to 20
hours.
The delay you have selected is
indicated on the display. The end
time will increase in order to show
you the selected delay.
You must select this option after
you have set the program and
before you press the Start/Pause
button.
If you wish to add laundry in the
machine during the delay time
press Start/Pause touchpad to put
the machine in pause mode. Add
laundry, close the door and press
Start/Pause touchpad again.
You can cancel the delay time at
any moment, by pressing ‘Delay
Start’ touchpad repeatedly till the
display shows delay time ‘ ’, then
press the Start/Pause touchpad.
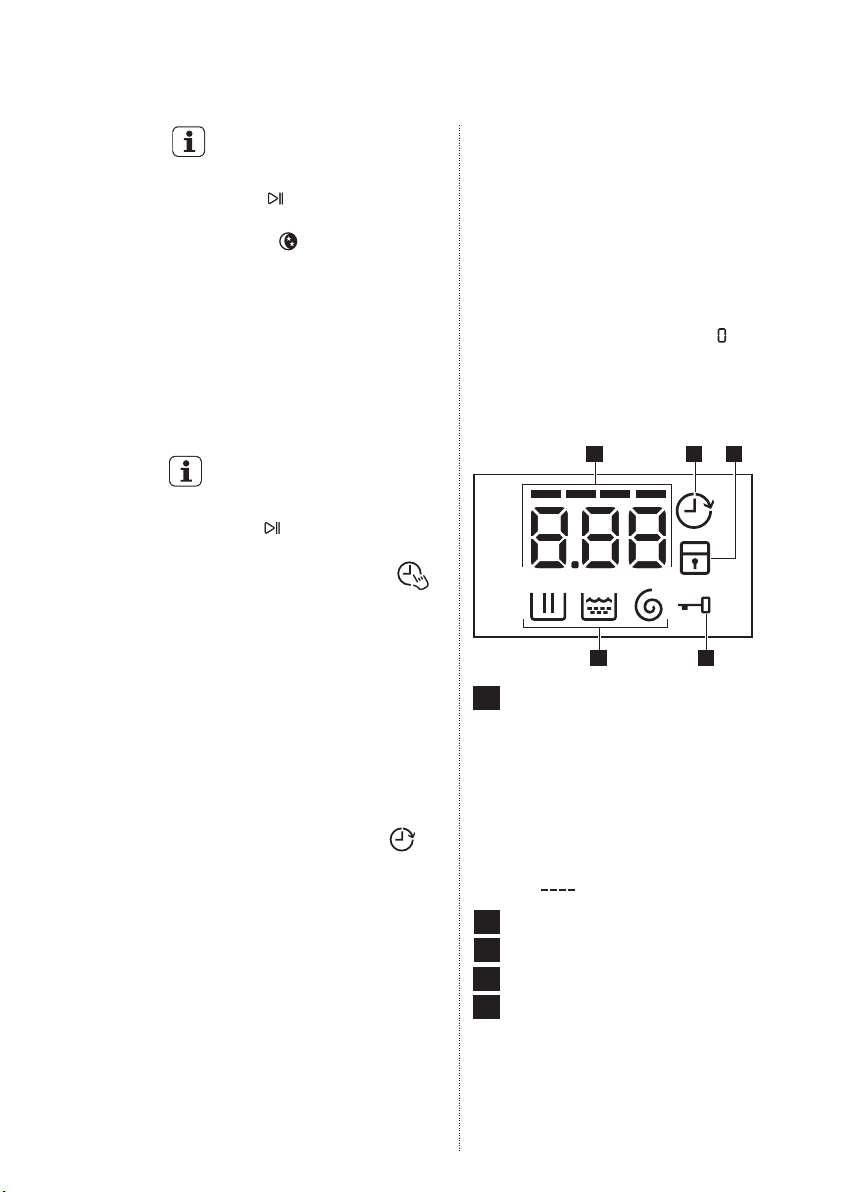
3.7 Display
C DA
B E
A
Digital Number;
will tell you:
-
Washing cycle time.
-
Delay start time.
-
The alarm codes. Refer to the
chapter “Troubleshooting” for
their description.
-
The level of the Time Manager
( ).
Washing Phase icon
B
C
Delay Start icon
D
Child Lock icon
Door Lock icon
E
-
It is on, you cannot open the
door.
-
It is off, you can open the door.
Page 8
8
www.electrolux.com
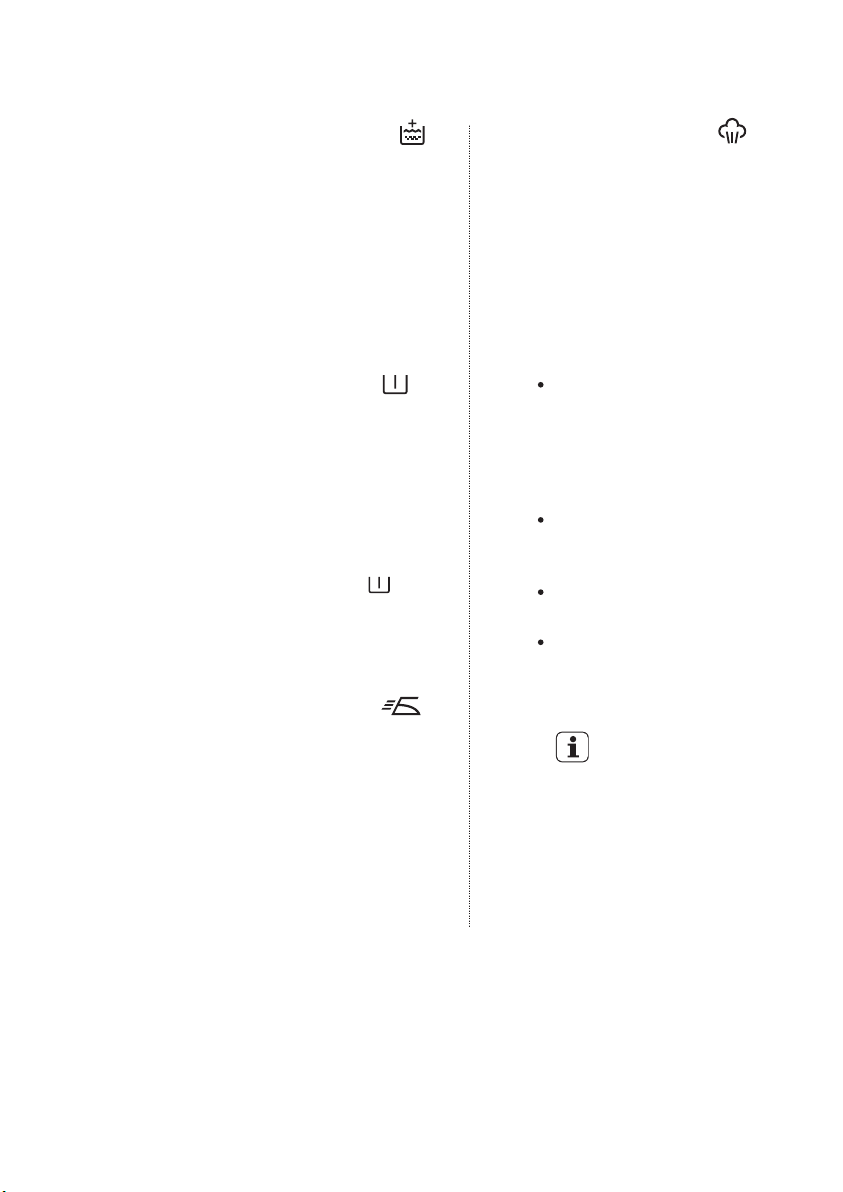
3.8 Rinse Plus Touchpad
This option is recommended for
people who are allergic to
detergents, and in areas where the
water is very soft.
Press it to add rinsing phases to a
program.
The indicator of this option comes
on.
3.9 Prewash Touchpad
Select this option if you wish your
laundry to be pre-washed before
the main wash. Use this option for
heavy soil.
The indicator of this option comes
on.
When you set this function, put
the detergent into the “ ”
compartment. (Refer page 14-15)
This function increases the
program duration.
3.10 Easy Iron Touchpad
When selecting this option the
laundry is gently washed and
spun to avoid creasing. In this
way ironing is easier.
The indicator of this option comes
on.
3.11 Vapour Touchpad
Select this option to add
approximately 45 minutes of
tumbling in vapour during the
wash cycle. Vapour helps open
fabric fibers up to allow laundry
additives to release tough stains.
The indicator of this option comes
on.
NOTE:
Vapour may not necessarily be
visible inside the drum during a
vapour wash cycle. Vapour is
created below the drum and
allowed to naturally rise into the
clothes.
Vapour may not be present
during the entire vapour wash
cycle.
Vapour function is more
effective with half load.
At the end of the Vapour cycle
the clothes will be warmer,
softer and detached from the
drum.
If Vapour option is selected,
rinse temperatures will be
elevated.
During a vapour cycle you
may notice vapour exiting
from the drain hose of the
washing machine, this is
normal and there is no
cause for alarm.
Page 9

3.12 Start/Pause Touchpad
To start the selected program,
press the ‘Start/Pause’.
To interrupt a program which is
running, press the ‘Start/Pause’
to pause the machine.
To restart the program from the
point at which it was interrupted,
press the ‘Start/Pause’ again.
If you have chosen a delayed
start, after pressing ‘Start/Pause’
the machine will begin the
countdown.
ENGLISH 9
3.13
Buzzer Sounds
The buzzer sounds operate when:
The program is completed.
The appliance has a malfunction.
If you want to disable the buzzer
sound (except for event of
appliance malfunction),
“Rinse +” and “Vapour” touchpads
at the same time for 3 seconds,
and listen for ‘BEEP, BEEP’.
To return to default configuration
press these 2 touchpads at the
same time for 3 seconds, and listen
for ‘BEEPS’.
press
Page 10
10
www.electrolux.com
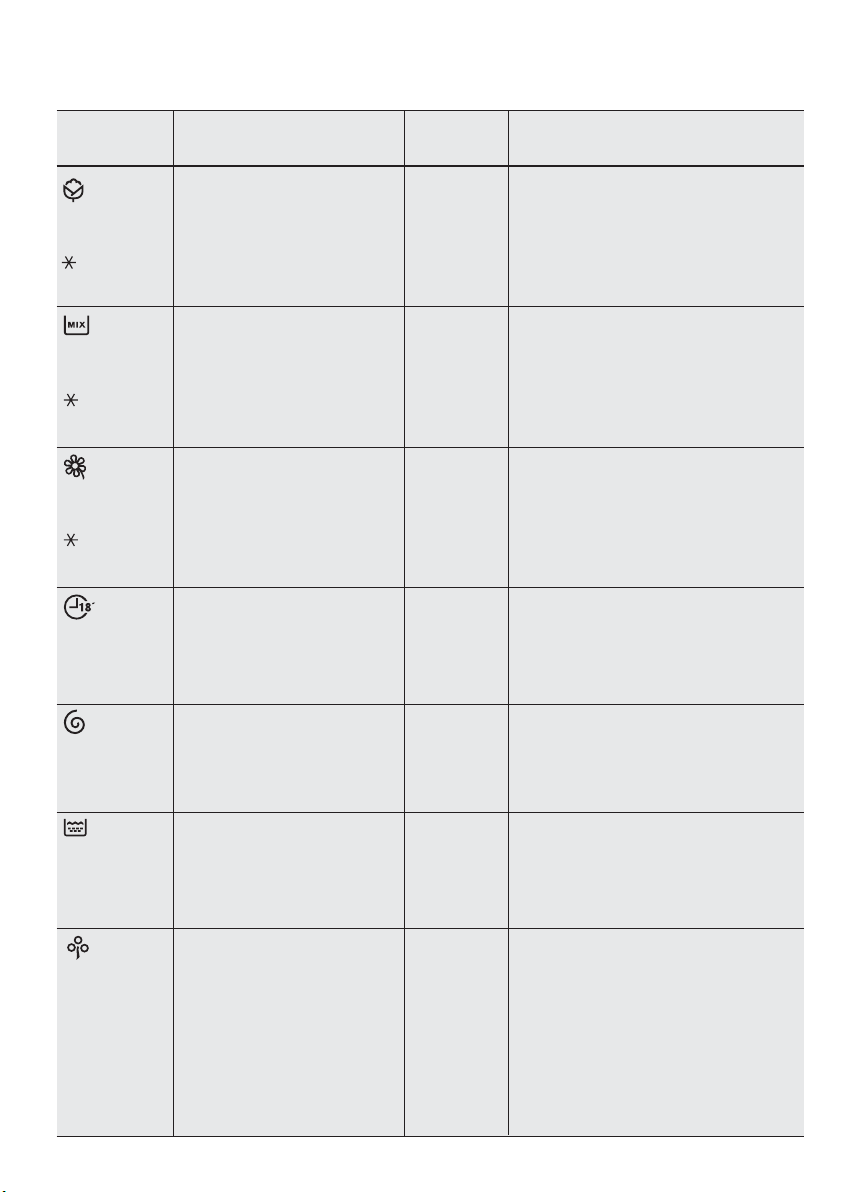
3.14 Programs + Options
Program;
Temperature
(
Cottons
***);
90 °C to
(
cold water)
Mixed;
60 °C to
(
cold water)
Delicates;
40 °C to
cold water)
(
Quick 18;
30 °C
Spin
Rinse
Energy
Saver
2)
,
60 °C
40 °C
Type of load; Max. weight
of load (dry clothes)
White and coloured cotton
with heavy level of soil;
max. load ;
EWF12932, EWF12932S : 9 kg
EWF12832, EWF12832S : 8 kg
Synthetic or mixed
fabric items with
normal level of soil;
max. load 4 kg.
Delicate fabrics as
acrylics, viscose,
polyester items with
normal soil;
max. load 4 kg
Synthetic and mixed
fabric items. Light soil
and items to freshen
up;
max. load 1.5 kg
To spin the laundry and
drain the water in the drum;
max. load ;
EWF12932, EWF12932S : 9 kg
EWF12832, EWF12832S : 8 kg
To rinse and spin the
laundry;
max. load ;
EWF12932, EWF12932S : 9 kg
EWF12832, EWF12832S : 8 kg
White and fast colourfast,
cotton with normal soil. Set
this program to have a good
washing results and decrease
the energy consumption. The
time of the washing program
is extended;
max. load ;
EWF12932, EWF12932S : 9 kg
EWF12832, EWF12832S : 8 kg
Cycle
description
-
Wash
-
Rinses
-
Long spin
-
Wash
-
Rinses
-
Short spin
-
Wash
-
Rinses
-
Short spin
-
Wash
-
Rinses
-
Short spin
-
Drain
Spin phase
-
Three
rinses with
softener
Spin phase
-
- Wash
- Rinses
- Long spin
Options can be
combined
Spin Reduction: 1200 to 400 rpm,
No Spin, Rinse Hold, Night Cycle,
Prewash, Easy Iron, Rinse +, Vapour
Adjust Time, Delay Start
Spin Reduction: 1200 to 400 rpm,
No Spin, Rinse Hold, Night Cycle,
Prewash, Easy Iron, Rinse +, Vapour
Adjust Time, Delay Start
Spin Reduction: 1200 to 400 rpm,
No Spin, Rinse Hold, Night Cycle,
Prewash, Rinse +, Vapour
Adjust Time, Delay Start
Spin Reduction
- 800 to 400 rpm
No Spin, Rinse Hold,
Delay Start
Spin Reduction: 1200 to 400 rpm,
No Spin,
Delay Start
Spin Reduction: 1200 to 400 rpm,
No Spin, Rinse Hold,
Delay Start
Spin Reduction: 1200 to 400 rpm,
No Spin, Rinse Hold,
Prewash, Rinse +, Vapour
Adjust Time, Delay Start
1)
,
1)
,
1)
,
1)
,
Page 11
ENGLISH 11
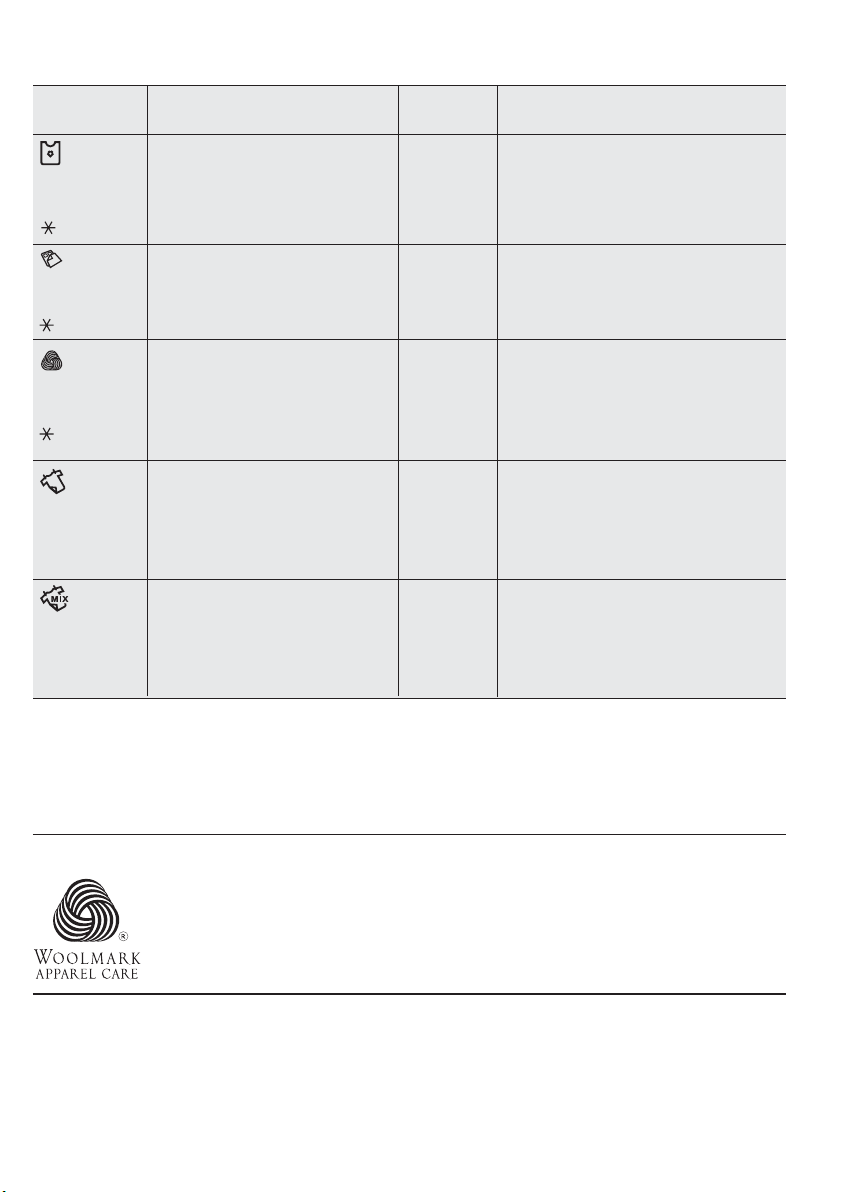
Program;
Temperature
Baby Wear;
40 °C to
(
cold water)
Bedding
60 °C to
cold water)
(
Wool;
40 °C to
(
cold water)
Refresh
Cottons
Refresh
Mixed
Type of load; Max. weight of
load (dry clothes)
Baby cotton clothes and
delicate knitting items
with normal soil;
max. load 4 kg
Special program for one
synthetic blanket, duvet,
bedspread and so on;
max. load 3 kg.
Specially tested program for
woollen garments bearing the
‘Pure new wool, non-shrink,
machine washable’ label;
max. load 2 kg.
Vapour program for White and
coloured cotton. This cycle
removes odours and helps to
dewrinkle the laundry;
max. load 1.5 kg.
Vapour program for synthetic
or mixed fabric items. This
cycle removes odours and
helps to dewrinkle the laundry;
max. load 1.5 kg.
Cycle
description
- Wash
- Rinses
- Short spin
- Wash
- Rinses
- Long spin
- Wash
- Rinses
- Short spin
-
Clothes
tumble in
vapour
-
Clothes
tumble in
vapour
Options can be
combined
Spin Reduction: 1200 to 400 rpm,
No Spin, Rinse Hold, Night Cycle,
Prewash, Rinse +, Vapour
1)
, Delay Start
Spin Reduction
- 800 to 400 rpm
No Spin,
1)
Vapour
Spin Reduction: 1200 to 400 rpm,
No Spin, Rinse Hold, Night Cycle,
, Adjust Time, Delay Start
Delay Start
Delay Start
Delay Start
1) Vapour option can be combined with temperature 40 to 90 °C only.
2)
“Energy Saver” program with 60 °C option selected is recommended for a full load of normally soiled cottons,
and is the water and energy rating label program.
(***) For Vietnam: “Cottons” program with cold water option selected is recommended for a full load of normally
soiled cottons, and is the energy rating label program.
WOOLMARK CERTIFICATE
The wool wash cycle of this machine has been approved by The Woolmark
Company for the washing of machine washable wool products provided
that the products are washed according to the instructions on the garment
label and those issued by the manufacturer of this washing machine.
M1354
Page 12
12
www.electrolux.com
BEFORE FIRST USE4.
DAILY USE5.
Connect the mains plug to the mains socket.
Turn the water tap on.
1.
Ensure that the electrical and water
connections comply with the
installation instructions.
2.
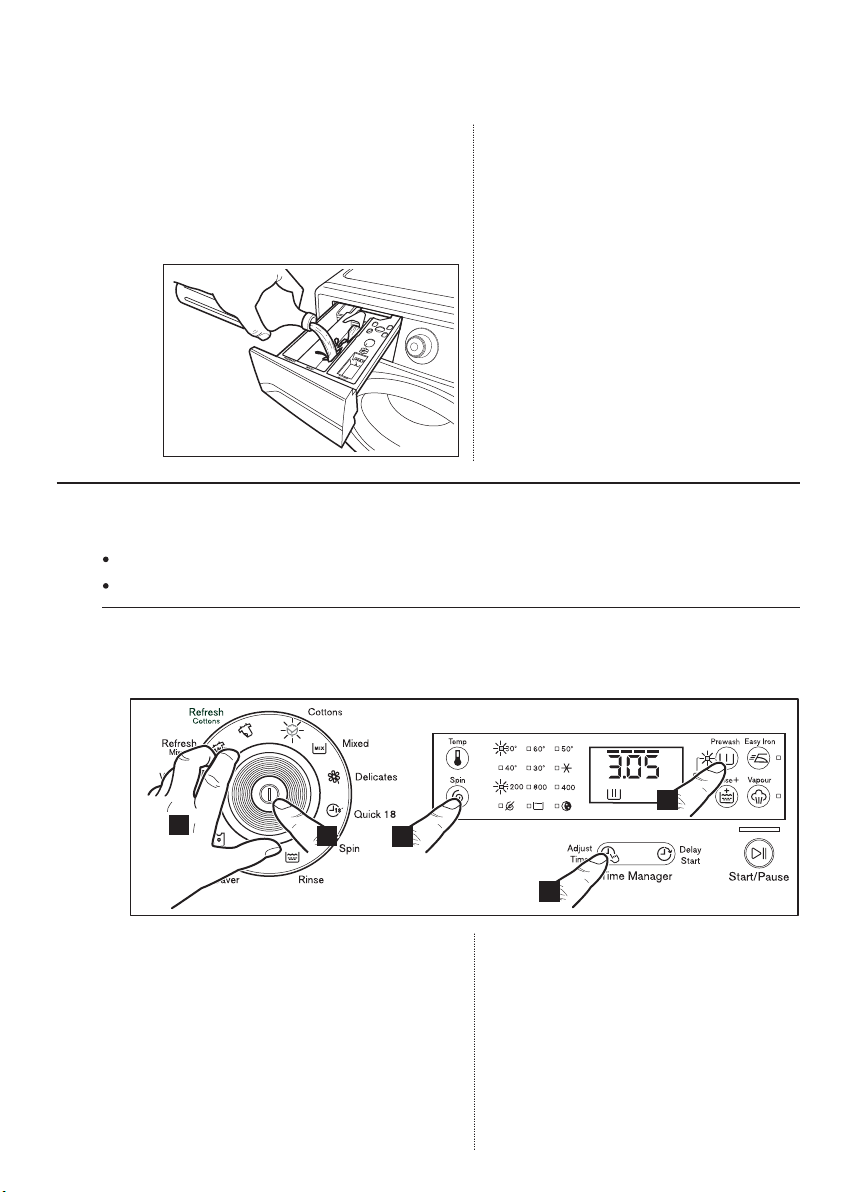
Put 2 litres of water in the detergent
compartment for washing phase.
This activates the drain system.
Select a Cottons cycle at 90 °C,
3.
without any laundry in the machine,
to remove any manufacturing residue
from the drum and tub then start the
machine.
5.1 4 Steps Start Up Guide
Step 1 - Setting A Program For Washing
2
Press the On/Off button to turn on the
1.
washing machine.
Turn the program selector dial
2.
to the required program.
-
The relevant light will light up.
-
The buzzer will sound.
-
The selector dial can be
turned either clockwise or
anticlockwise.
1
3
4
5
-
Once you selected a wash
program, the program selected
will stay at that position for the
whole of the wash.
-
The display shows the level of
the Time Manager, the
program duration and the
indicators of the phases of the
program.
Page 13
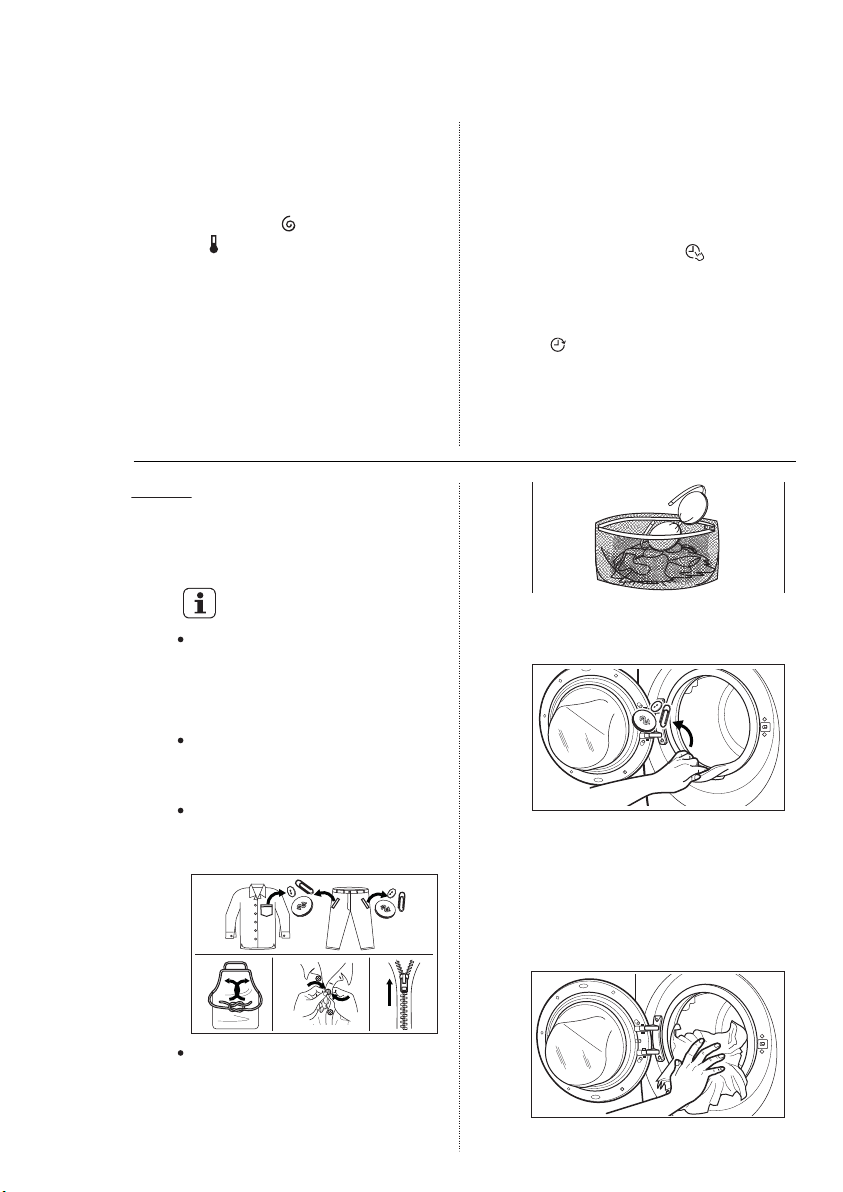
3.
If you want your laundry to be spun
or use temperature different from
the one proposed by the washing
machine,
pess the Spin ‘ ’ and the temperature ‘ ’ touchpads repeatedly to
change the spin speed and
temperature.
Press the option touchpads, if you
4.
want your laundry to be washed
with special functions.
Different functions can be combined
which is dependent on the program
selected.
Step 2 - Loading The Laundry
Before loading the laundry, please
1.
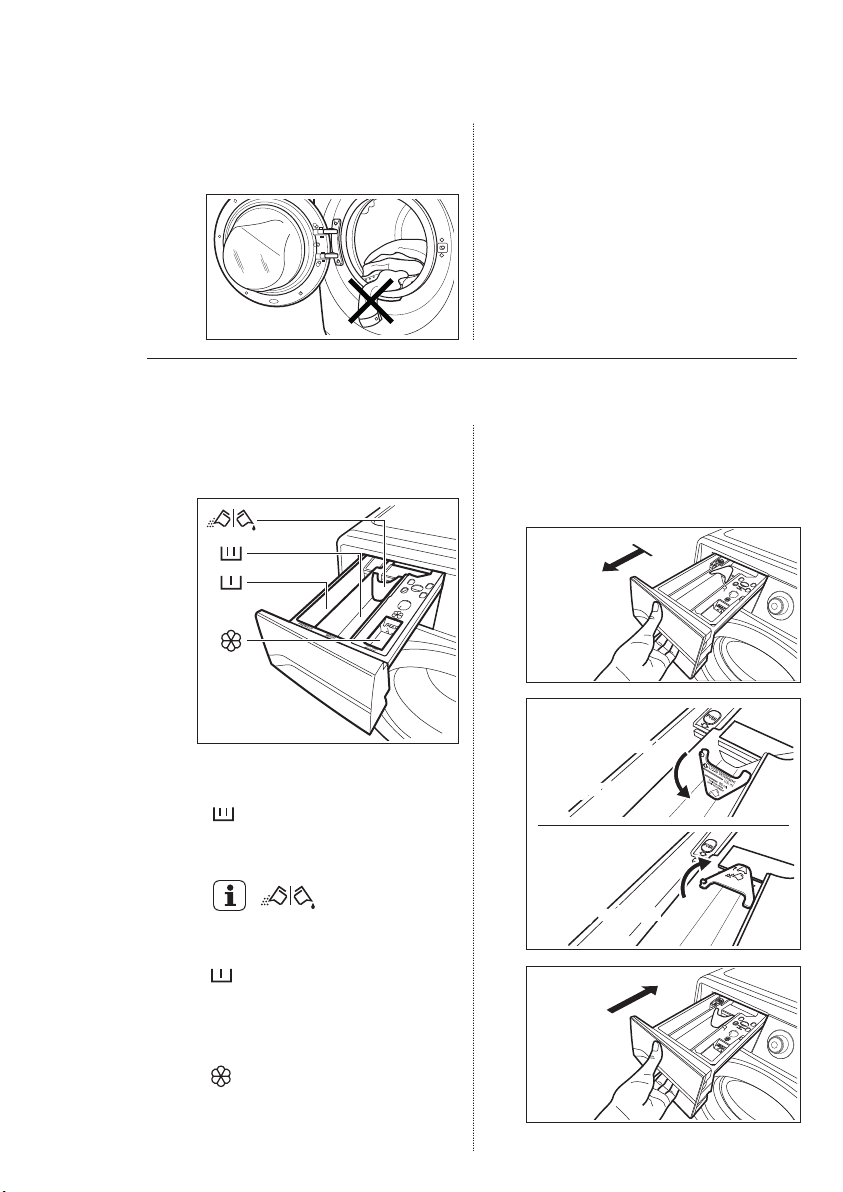
make sure:
IMPORTANT!
Make sure that no metal
objects are left in the laundry
(e.g. hair clips, safety pins,
pins).
Make sure that you wash lint
collectors separately from lint
producers.
Button up pillowcases, close zip
fasteners, hooks and poppers.
Tie any belts or long tapes.
ENGLISH 13
When these touchpads are pressed,
the corresponding pilot lights come
on. When they are pressed again,
the pilot lights go out.
If you want to reduce washing time,
5.
press the ‘Adjust Time ’ touchpad
repeatedly to reduce washing time.
If you want
washing program
Start ’ touchpad repeatedly to
choose your washing machine delay
time.
Open the door by carefully pulling
2.
the door handle outwards.
Check and remove objects (if
there are any) that could be
trapped in the fold.
to delay the start of the
, press the ‘Delay
Wash bras, pantyhose and
other delicates in a mesh
laundry bag, which you can
purchase from your
supermarket.
3.
Place the laundry in the drum,
one item at a time, shaking them
out as much as possible.
Page 14
14
POSITION USING
POWDER DETERGENT
www.electrolux.com
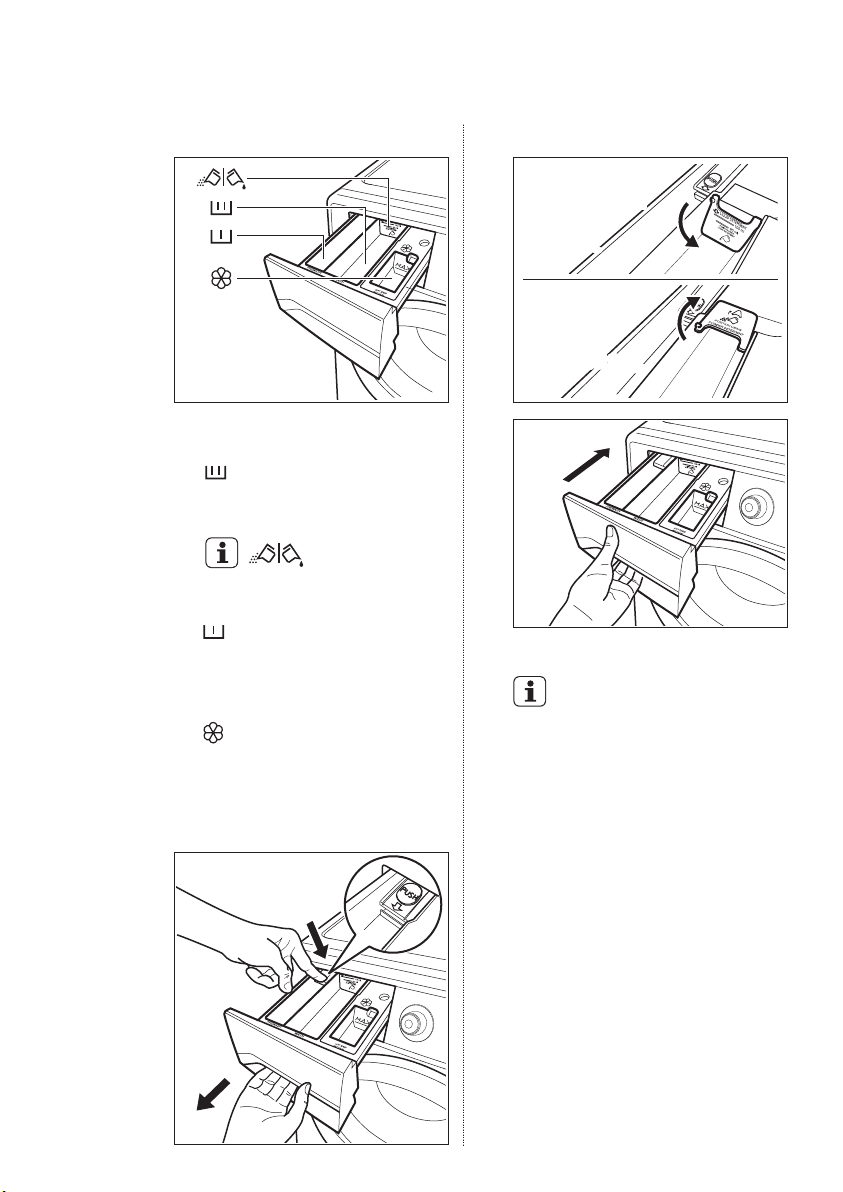
Make sure that no laundry
4.
remains between the seal and
the door.
Step 3 - Using Detergent And Additives
1.
Detergent Dispenser Drawer
Model: EWF12932, EWF12932S
Close the door.
5.
Powder or liquid detergent.
1
The detergent dispenser is divided
into three compartments.
-
Compartment ‘MAIN WASH’
This compartment is used for
detergent on all programs.
Detergeant flap
Flap for powder or liquid
detergent.
-
Compartment ‘PREWASH’
This compartment is only used
for detergent when a Prewash
is selected.
Compartment ‘SOFTENER’
This compartment is used for
fabric conditioner and starching
agent.
2
Position down :
Position down :
for liquid
for liquid
detergent.
detergent.
Position up :
Position up :
for powder
for powder
detergent
detergent
(factory setting).
(factory setting).
3
Page 15
Model: EWF12832, EWF12832S
The detergent dispenser is divided
into three compartments.
-
Compartment ‘MAIN WASH’
This compartment is used for
detergent on all programs.
Detergeant flap
Flap for powder or liquid
detergent.
-
Compartment ‘PREWASH’
This compartment is only used
for detergent when a Prewash
is selected.
Compartment ‘SOFTENER’
This compartment is used for
fabric conditioner and starching
agent.
Powder or liquid detergent.
ENGLISH 15
3
Position down :
Position down :
for liquid
for liquid
detergent.
detergent.
Position up :
Position up :
for powder
for powder
detergent
detergent
(factory setting).
(factory setting).
4
When you use the liquid
detergent:
Do not use gelatinous or thick
liquid detergents.
Do not put more liquid than the
maximum level.
Do not set the PREWASH phase.
Do not set the DELAY START.
-
1
2
Page 16
16
www.electrolux.com
2.
Measure Out The Detergent And The Fabric Softener
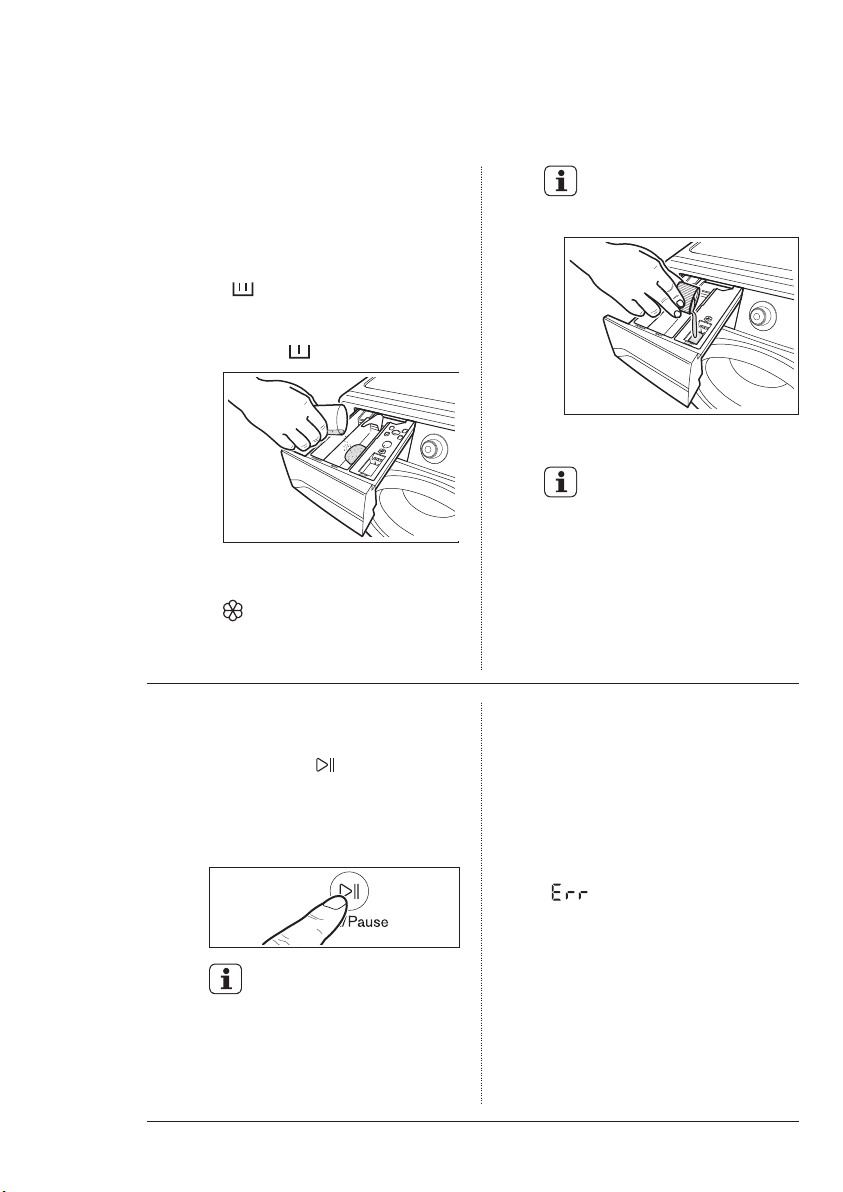
-
Pull out the dispenser drawer
until it stops.
-
Measure out the amount of
detergent required, pour it into
the main wash compartment
( ) and, if you wish to carry
out the “Prewash” phase,
pour it into the compartment
marked .
-
If required, pour fabric softener
into the compartment marked
(the amount used must not
exceed the “MAX” mark in the
drawer).
If you use thick softeners it
is recommended to dilute
with water.
-
Close the drawer gently.
After washing cycle
finish, residues of
detergent, softener and
water may remain in the
dispenser.
It is recommended to
clean the dispenser
regularly to remove any
residue.
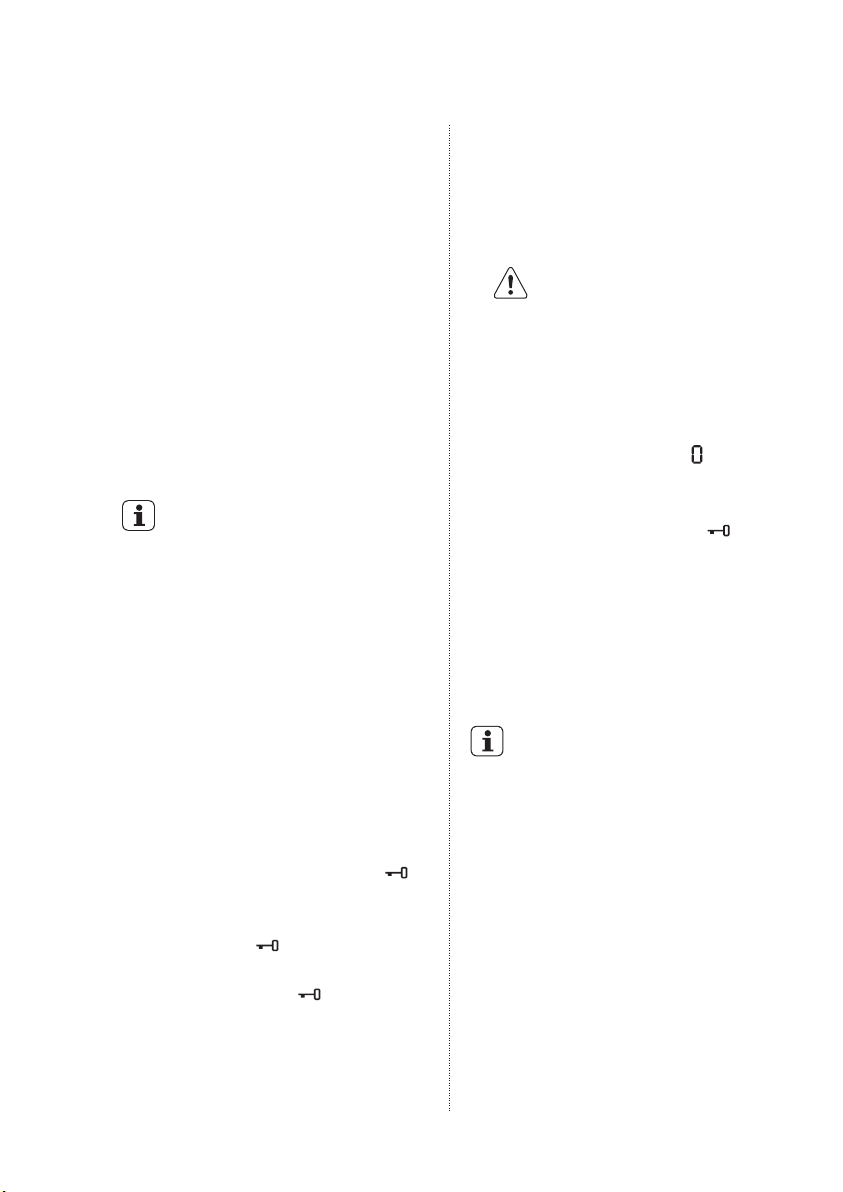
Step 4 - Starting a program
To start a program, press the
Start/Pause ( ) touchpad, the
corresponding pilot light will stop
flashing and a default program
duration will be displayed on the
screen.
After approx. 15 minutes
from the start of a program:
The appliance will automatically
adjust the selected program
duration according to the type
and size of the load.
-
The display will show adjusted
program duration.
ATTENTION !
If you turn the program selector
dial to another program when the
machine is working, the message
“ ” will appear on the
display to indicate a wrong
selection. The machine will not
perform the new selected
program.
Page 17
ENGLISH 17
5.2 Interruption Of A Program
To pause press Start/ Pause.
The indicator will start flashing.
Press the Start/Pause again.
The program will continue.
5.3 Changing A Program
Changing a running program is possible
only by switching off the appliance.
Press the ‘On/Off’ button to cancel
the program and to turn off the
appliance.
Press the ‘On/Off’ button again to start
the appliance. Now, you can set a new
washing program.
The appliance will not drain the
water.
5.4 Changing The Options
It is possible to change only some option
after the program has started.
Press the touchpad Start/Pause. The
1.
indicator will start flashing.
Change the options.2.
Press Start/Pause again. The program
3.
will continue.
5.5 Opening The Door
While a program or the Delay Start is
operating, the appliance door is locked
and the display shows the indicator ‘ ’.
First set the machine to PAUSE by pressing
the “Start/Pause” touchpad. Wait until the
door lock indicator ‘ ’ goes off, then the
door can be opened.
If the door lock indicator ‘ ’ does not
disappear, this means that the machine is
already heating and the water level is above
the bottom edge of the door or the drum is
turning. In this case the door CAN NOT be
opened.
If you can not open the door but you
need to open it you have to switch
the machine off by pressing the
‘On/Off’ button to deactivate the
appliance. After about 5 minutes the
door can be opened.
CAUTION!
Pay attention to the water
level and water temperature.
5.6 At The End Of The Program
-
The appliance stops automatically.
-
The acoustic signal will operate.
-
The display will show ‘ ’.
-
The indicator of the touchpad
Start/Pause goes off.
-
The door lock indicator ‘ ’
goes off.
-
Remove the laundry from the
appliance. Make sure that the
drum is empty.
-
Keep the door ajar, to prevent the
mildew and odours.
-
Turn off the water tap.
At the end of the program the
time remaining can suddenly
decrease from 7 minutes or less
to 0 due to the overestimated
total program time during the
load sensing phase. In some
cases (with perfectly balanced
load) the program time can be
shorter than the time estimated
after the load sensing phase is
completed. This is a normal
behavior of the machine and
not a cause for concern as it
does not compromise its
performance.
Page 18
18
www.electrolux.com
5.7
When The Washing Program
Is Completed, But There Is
Water In The Drum
-
The drum turns regularly to prevent
the creases in the laundry.
-
The door lock indicator ‘ ’ is on.
The door stays locked.
You must drain the water to open the
door.
To drain the water:
1.
Set the “Spin” program.
If necessary, decrease the spin
2.
speed.
3.
Press the touchpad Start/Pause.
The appliance will drain the water
and spin.
4.
When the program is completed
and the door lock indicator ‘ ’
goes off, you can open the door.
5.
Press the ‘On/Off’ button to
deactivate the appliance.
5.8
AUTO Stand-by Option
The AUTO Stand-by option
automatically deactivates the
appliance to decrease the energy
consumption when:
You do not press any buttons
for 5 minutes before you press
“Start/Pause”.
Press the “On/Off” button to
activate the appliance again.
After 5 minutes from the end of
the washing program.
Press the “On/Off” button to
activate the appliance again.
Turn the program knob to set a new
cycle.
5.9 Child Lock Feature
Your appliance is provided with
CHILD SAFETY LOCK which
permits you to leave the appliance
unsupervised with the door closed
without having to worry that children
might be injured by or cause
damage to the appliance.
Set this option before pressing the
Start/Pause and after having
selected the required wash program.
This function remains enabled even
after the appliance is switched off.
Setting Child Lock option:
To activate the function, press
“Prewash” and “Rinse +”
touchpads at the same time until
the display shows the symbol .
To deactivate the function, press
“Prewash” and “Rinse +”
touchpads at the same time until
the symbol goes off.
Page 19
ENGLISH 19
WASHING HINTS6.
6.1 Sorting The Laundry
Follow the wash code symbols on
each garment label and the
manufacturer’s washing instructions.
Sort the laundry as follows: whites,
coloureds, synthetics, delicates,
woollens.
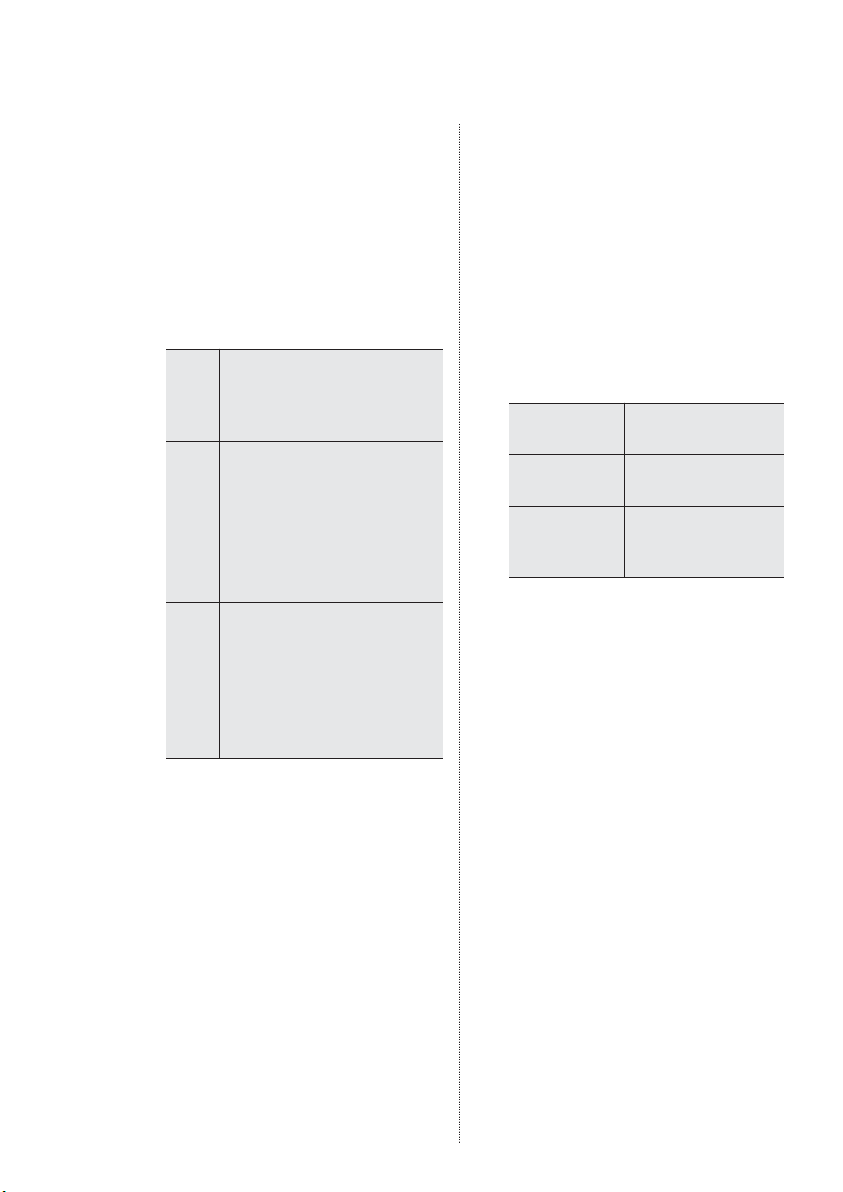
6.2 Temperatures
For normally soiled white
cottons and linen
90°C
(e.g. teacloths, towels,
tablecloths, sheets...).
For normally soiled,
colourfast garments (e.g.
shirts, night dresses,
60°C
pyjamas....) in linen, cotton
50°C
or synthetic fibres and for
40°C
lightly soiled white cotton
(e.g.underwear).
For delicate items (e.g. net
curtains), mixed laundry
including synthetic fibres
30°C
and woollens bearing the
Cold
label pure new wool,
machine washable,
non-shrink.
6.3 Before Loading The
Laundry
Never wash whites and coloureds
together. Whites may lose their
“whiteness” in the wash.
New coloured items may run in the
first wash; they should therefore be
washed separately the first time.
Make sure that no metal objects
are left in the laundry (e.g. hair
clips, safety pins, pins).
Button up pillowcases, close zip
fasteners, hooks and poppers. Tie
any belts or long tapes.
Remove persistent stains before
washing.
Rub particularly soiled areas with a
special detergent or detergent paste.
Treat curtains with special care.
Remove hooks or tie them up in a
bag or a net.
6.4 Maximum Loads
Recommended loads are indicated
in the program charts. General
rules:
Cotton, linen:
Synthetics:
Delicate
fabrics and
woollens:
Washing a maximum load makes
the most efficient use of water and
energy. For heavily soiled laundry,
reduce the load size.
drum full but not
too tightly packed;
drum no more
than half full;
drum no more
than one third full.
6.5 Removing Stains
Stubborn stains may not be
removed by just water and
detergent. It is therefore advisable
to treat them prior to washing.
Blood: treat fresh stains with cold
water. For dried stains, soak
overnight in water with a special
detergent then rub in the soap and
water.
Oil based paint: moisten with
benzine stain remover, lay the
garment on a soft cloth and dab
the stain; treat several times.
Dried grease stains: moisten with
turpentine, lay the garment on a
soft surface and dab the stain with
the fingertips and a cotton cloth.
Page 20
20
www.electrolux.com
Rust: oxalic acid dissolved in hot
water or a rust removing product
used in cold water. Be careful with
rust stains which are not recent
since the cellulose structure will
already have been damaged and
the fabric tends to hole.
Mould stains: treat with bleach,
rinse well (whites and fast
coloureds only).
Grass: soap lightly and treat with
bleach (whites and fast coloureds
only).
Ball point pen and glue: moisten
with acetone (*), lay the garment on
a soft cloth and dab the stain.
Lipstick: moisten with acetone (*)
as above, then treat stains with
methylated spirits. Remove any
residual marks from white fabrics
with bleach.
Red wine: soak in water and
detergent, rinse and treat with
acetic or citric acid, then rinse.
Treat any residual marks with
bleach.
Ink: depending on the type of ink,
moisten the fabric first with
acetone (*), then with acetic acid;
treat any residual marks on white
fabrics with bleach and then rinse
thoroughly.
Tar stains: first treat with stain
remover, methylated spirits or
benzine, then rub with detergent
paste.
(*) do not use acetone on artificial
silk.
6.6 Detergents and Additives
Good washing results also depend
on the choice of detergent and use
of the correct quantities to avoid
waste and protect the
environment.
Although biodegradable, detergents
contain substances which, in large
quantities, can upset the delicate
balance of nature.
The choice of detergent will depend
on the type of fabric (delicates,
woollens, cottons, etc.), the colour,
washing temperature and degree of
soiling.
Only low suds Front load washer
detergents should be used in
this appliance:
powder detergents for all types
of fabric,
powder detergents for delicate
fabrics (60 °C max) and woollens,
liquid detergents, preferably for
low temperature wash program
(60 °C max) for all types of fabric,
or special for woollens only.
The detergent and any additives
must be placed in the appropriate
compartments of the dispenser
drawer before starting the wash
program.
Pour liquid detergent into the
dispenser drawer compartment
marked ‘ ’ just before starting
the program.
If using concentrated powder
or liquid detergents, a program
without PREWASH must be
selected.
Page 21
ENGLISH 21
Any fabric softener or starching
additives must be poured into the
compartment marked ‘ ’ before
starting the wash program.
Follow the product manufacturer’s
recommendations on quantities to
use and do not exceed the MAX
mark in the detergent dispenser
drawer.
Do not spray stain pre-treatment
products (e.g. Preen) on or near
the machine, as it can attack
plastic materials reducing its
life.
6.7 Quantity Of Detergent To Be
Used
The type and quantity of detergent
will depend on the type of fabric,
load size, degree of soiling and
hardness of the water used.
Water hardness is classified in
so-called “degrees” of hardness.
Information on hardness of the
water in your area can be obtained
from the relevant water supply
company, or from your local
authority.
Follow the product manufacturers’
instructions on quantities to use.
Use less detergent if:
you are washing a small load,
the laundry is lightly soiled,
large amounts of foam form
during washing.
Not enough washing powder
causes:
the washload to turn grey,
greasy clothes.
Too much washing powder causes:
sudsing,
reduced washing effect,
inadequate rinsing.
Page 22
22
www.electrolux.com
INTERNATIONAL WASH CODE SYMBOLS7.
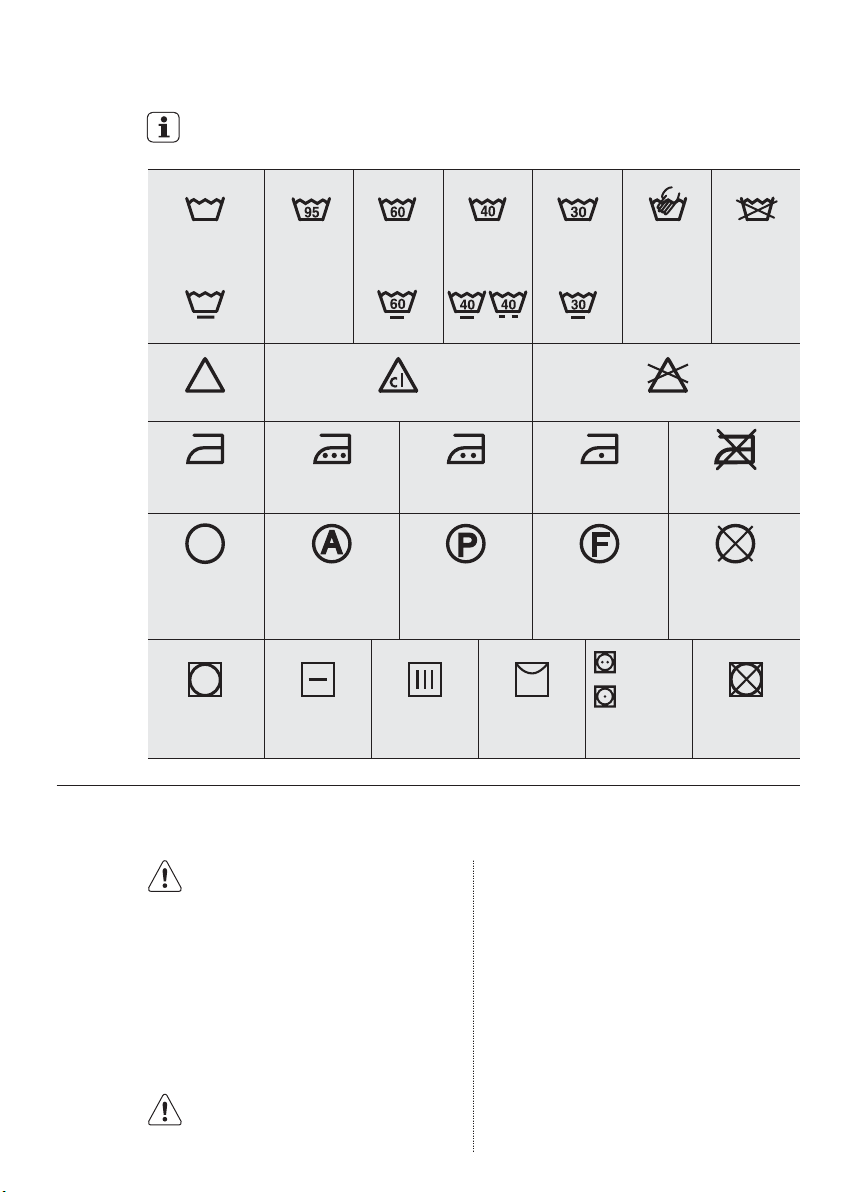
These symbols appear on fabric labels, in order to help you choose the best
way to treat your laundry.
Energetic wash
Max. wash
temperature
95 °C
Delicate wash
Bleaching
Ironing
Dry cleaning
Drying Flat Tumble dry DO NOT
max. 200 °C
Dry cleaning in
all solvents
Max. wash
temperature
60 °C
Bleach in cold water DO NOT bleach
Hot iron
On the line
Max. wash
temperature
40 °C
Warm iron
max. 150 °C
Dry cleaning in
perchlorethylene,
petrol, pure alcohol,
R 111 & R 113
On clothes
hanger
Max. wash
temperature
30 °C
Lukewarm iron
max. 110 °C
Dry cleaning in
petrol, pure alcohol
and R 113
Hand wash
High
temperature
Low
temperature
DO NOT iron
DO NOT
wash at all
DO NOT
dry clean
tumble dry
CARE AND CLEANING8.
WARNING!
You must DISCONNECT the
appliance from the electricity
supply, before you can carry out
any cleaning or maintenance work.
8.1 External Cleaning
Clean the appliance only with soap
and warm water. Fully dry all the
surfaces.
CAUTION!
Do not use alcohol, solvents or
chemical products.
8.2 Descaling
The water we use normally
contains lime. It is a good idea to
periodically use a water softening
powder in the machine.
Do this separately from any laundry
washing, and according to the
softening powder manufacturer's
instructions.
This will help to prevent the
formation of lime deposits.
Page 23

ENGLISH 23
8.3 After Each Wash
Leave the door open for a while.
This helps to prevent mould and
stagnant smells forming inside the
appliance. Keeping the door open
after a wash will also help to
preserve the door seal.
8.4 Maintenance Wash
With the use of low temperature
washes it is possible to get a build
up of residues inside the drum.
We recommend that a
maintenance wash be performed
on a regular basis.
To run a maintenance wash:
The drum should be empty of
laundry.
Select the hottest cotton wash
program.
Use a normal measure of
detergent, must be a powder
with biological properties.
8.5 Cleaning The Dispenser
Drawer
The washing powder and additive
dispenser drawer should be
cleaned regularly.
Remove the drawer by pressing
the catch downwards and by
pulling it out. Flush it out under a
tap, to remove any traces of
accumulated powder.
2
3
To aid cleaning, the top part of the
additive compartment should be
removed.
8.6 Cleaning The Drawer Recess
Having removed the drawer, use a
small brush to clean the recess,
ensuring that all washing powder
residue is removed from the upper
and lower part of the recess.
Replace the drawer and run the
rinse program without any clothes
in the drum.
1
Page 24
24
www.electrolux.com
8.7 Cleaning The Pump
Regularly examine the drain pump
and make sure that it is clean.
Clean the pump if:
The appliance does not drain the
water.
The drum cannot turn.
The appliance makes an unusual
noise because of the blockage of
the drain pump.
The display shows an alarm code
because of the problem with
water drain.
WARNING!
1. Disconnect the mains plug
from the mains socket.
2. Do not remove the filter while
the appliance operates. Do
not clean the drain pump if
the water in the appliance is
hot. The water must be cold
before you clean the drain
pump.
To clean the drain pump:
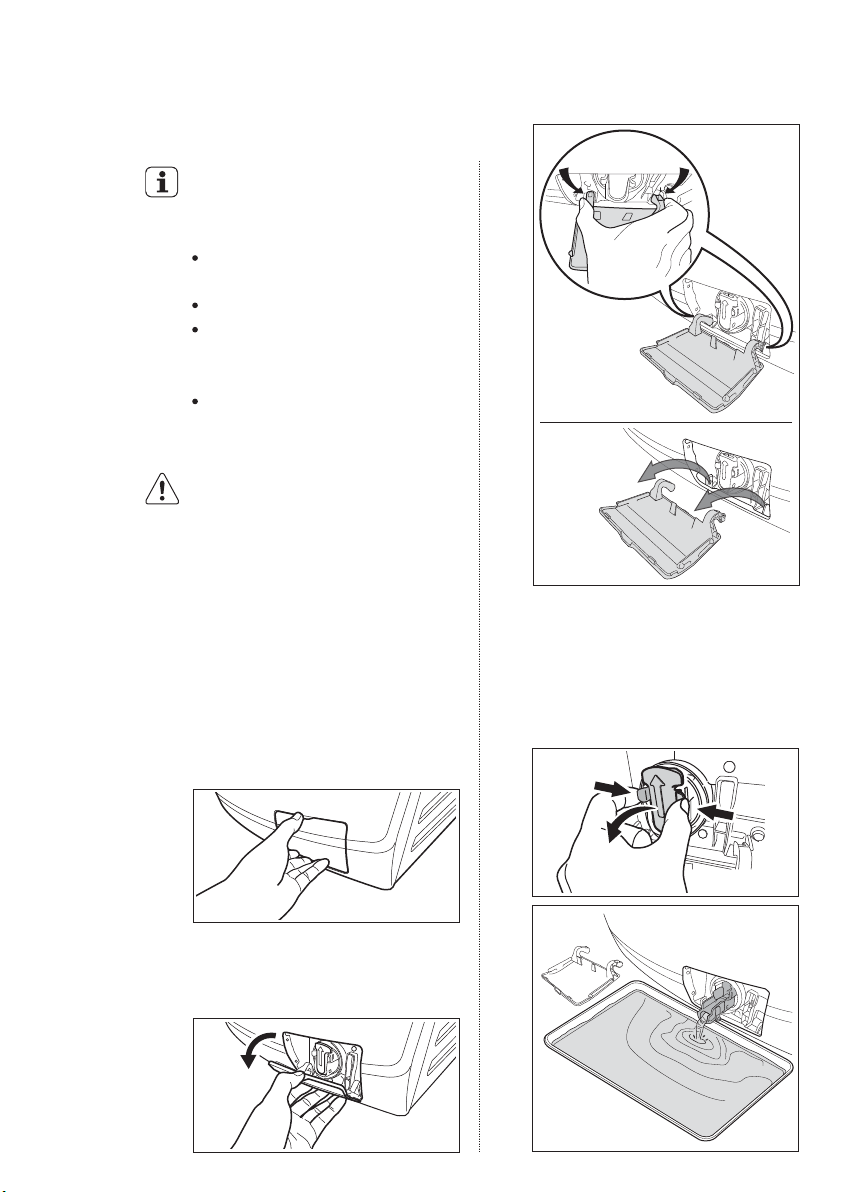
1.
Open the drain pump door.
1
squeeze
the legs
on both
sides
2
pull out
3.
Place a suitable water container
below the recess of the drain pump
to collect the water that flows out.
Press the two levers and pull
forward the drainage duct to let the
water flow out.
2.
Pull the flap down, then squeeze
the legs on both sides of the cover
together and pull out (as picture).
Page 25
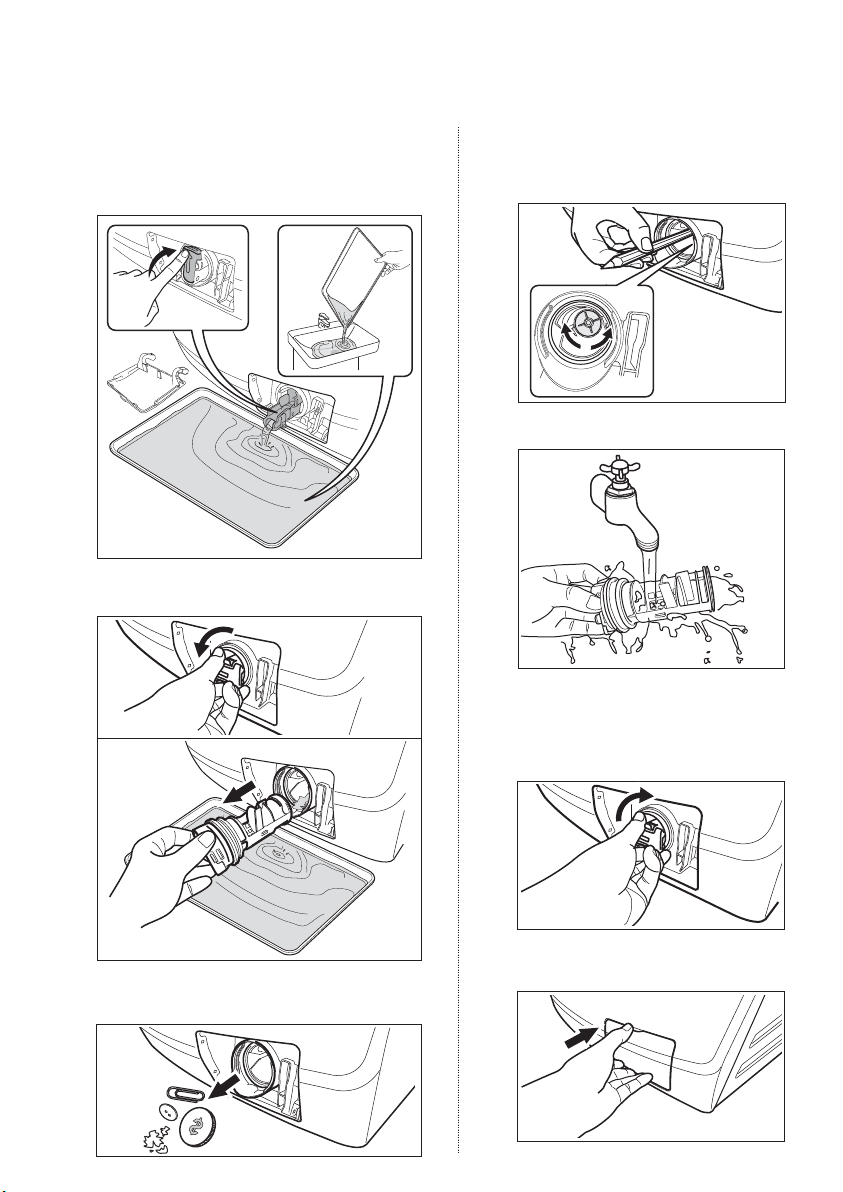
ENGLISH 25
4. When the container is full of water, put the
drainage duct back again and empty the
container. Do step 3 again and again until no
more water flows out from the drain pump.
5. Push back the drainage duct and turn
the filter anti-clockwise to remove it.
1
2
7.
Make sure that the impeller of the
pump can turn. If this does not
occur, contact the service centre.
8.
Clean the filter under the water tap.
9.
Put the filter back in the pump into
the special guides. Make sure that
you tighten correctly the filter to
prevent leakages.
6. Remove fluff and objects from the pump
(if there is any).
10.
Put the flap back and close the
drain pump door.
Page 26
26
www.electrolux.com
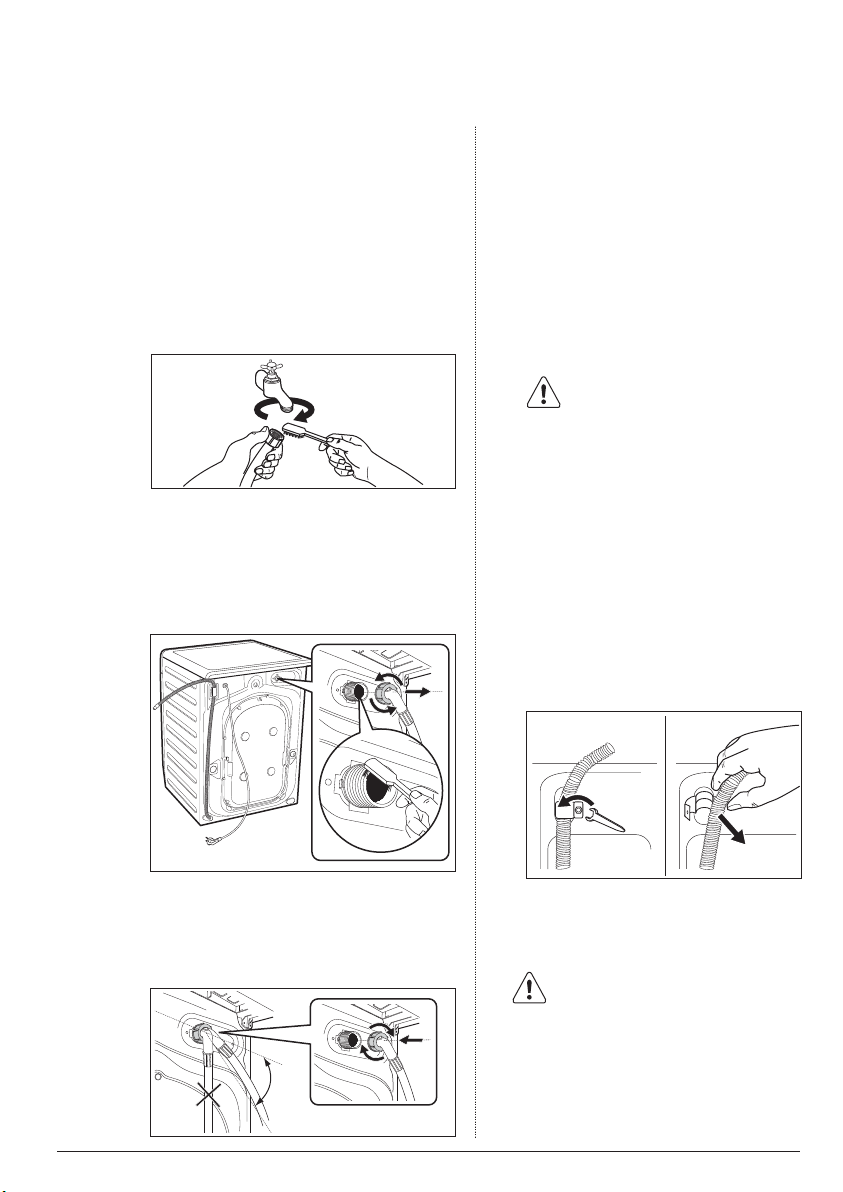
8.8 Cleaning The Water Inlet Filter
If your water is very hard or
contains traces of lime deposit, the
water inlet filter may become
clogged.
It is therefore a good idea to clean
it from time to time.
To clean the water inlet filters:
1.
Close the water tap.
2.
Remove the water inlet hose from
the water tap.
3.
Clean the filter in the inlet hose
with a stiff brush.
Install again the inlet hose.
6.
Make sure that the couplings are
tight to prevent leakages.
7. Open the water tap.
8.9 The Dangers Of Freezing
If the machine is exposed to
temperatures below 0°C, certain
precautions should be taken.
Disconnect the mains plug
from the mains socket.
Turn off the water tap.1.
2. Unscrew the inlet hose.
3. Put a bowl below the recess of
the drain pump to collect the
water that flows out.
Remove the drain hose from the
4.
rear support and unhook it from
sink or spigot.
Put the ends of the drain and
inlet hose in a container. Let the
water flow out of the hoses.
4.
Remove the inlet hose behind
the appliance.
5.
Clean the filter in the valve with
a stiff brush or a towel.
45°
5. When no more water flows,
install the inlet hose and the
drain hose again.
Make sure that the
temperature is more than 0
°C before you use the
appliance again.
Page 27
ENGLISH 27
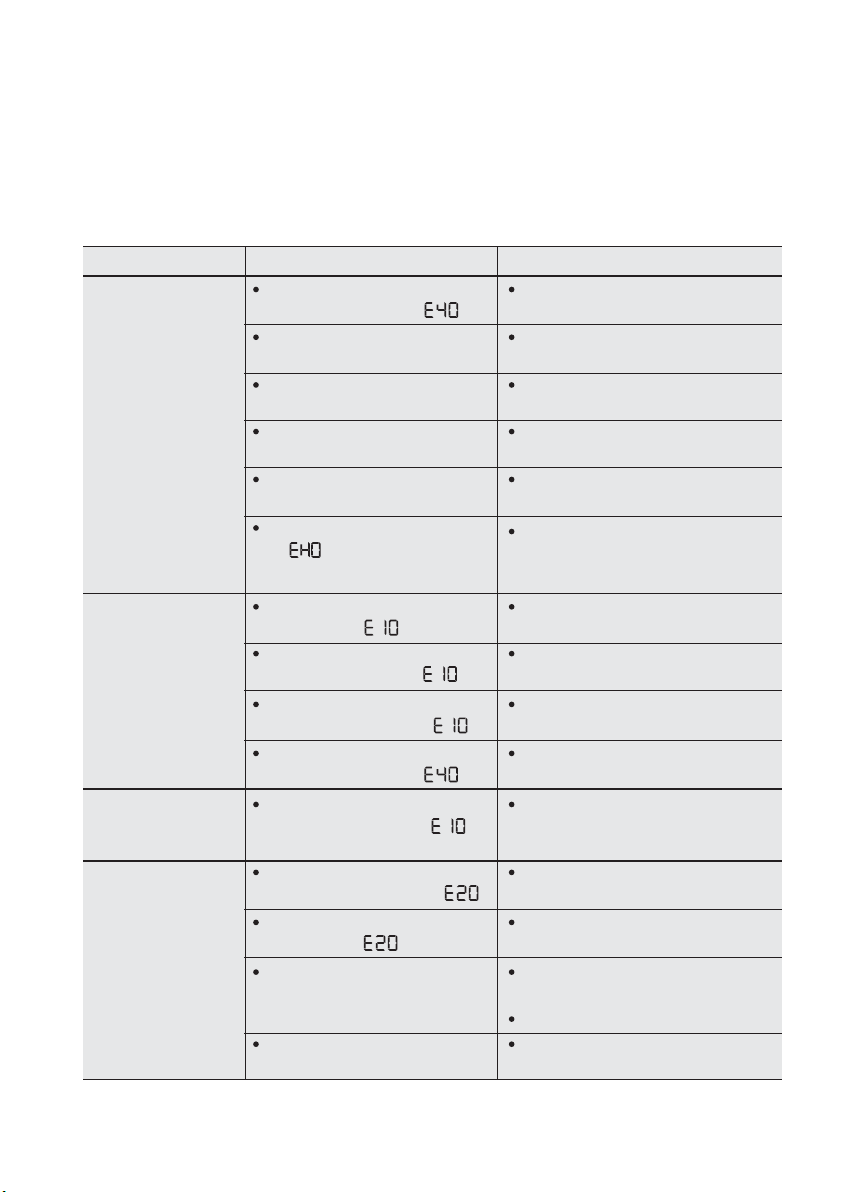
TROUBLESHOOTING9.
Certain problems are due to lack of simple maintenance or oversights, which can be solved
easily without calling out an engineer. Before contacting your local Service Centre, please
carry out the checks listed below. During machine operation it is possible that the red
Start/Pause pilot light flashes to indicate that the machine is not working. Once the
problem has been eliminated, press the Start/Pause button to restart the program. If after
all checks, the problem persists, contact your local Service Centre.
Malfunction Possible cause Solution
The washing
machine does
not start:
The machine
does not fill the
water:
The machine fills
then empties
immediately:
The machine
does not empty
and/or does not
spin:
The door has not been
closed. (Error code: )
The plug is not properly
inserted in the power socket.
There is no power at the
socket.
The Start/Pause button has
not been pressed.
The delay start has been
selected.
The Main supply is unstable.
(If appears in the
display.)
The water tap is closed.
(Error code: )
The inlet hose is squashed or
kinked. (Error code: )
The filter in the inlet hose is
blocked. (Error code: )
The door is not properly
closed. (Error code: )
The end of the drain hose is
too low. (Error code: )
The drain hose is squashed
or kinked. (Error code: )
The drain pump is clogged.
(Error code: )
The option “Rinse Hold” or
“No Spin” has been
selected.
The laundry is not evenly
distributed in the drum.
Close the door firmly.
Insert the plug into the power
socket.
Please check your domestic
electrical installation.
Press the Start/Pause button.
If the laundry are to be washed
immediately, cancel the delay start.
Wait until the main supply is
stable and the appliance
automatically starts operating.
Open the water tap.
Check the inlet hose
connection.
Clean the water inlet hose
filter.
Close the door firmly.
Refer to relevant paragraph in
“water drainage” section.
Check the drain hose
connection.
Clean the drain filter.
Press Start/Pause to drain the
water.
Slelect spin program.
Pause the machine and
redistribute laundry manually.
Page 28
28
www.electrolux.com
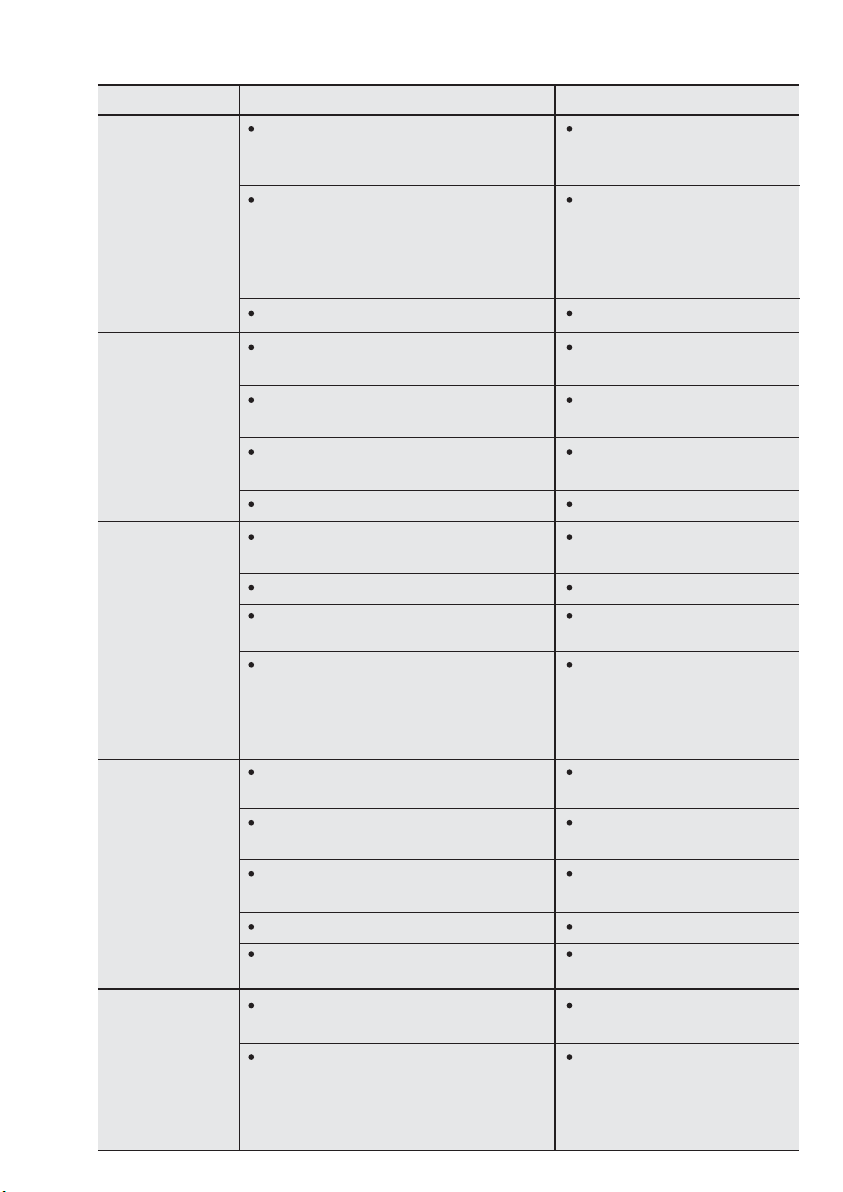
Malfunction Possible cause Solution
Too much detergent or unsuitable
detergent (creates too much foam)
has been used.
There is water
on the floor:
Check whether there are any leaks
from one of the inlet hose fittings. It is
not always easy to see this as the
water runs down the hose; check to
see if it is damp.
The drain hose is damaged. Change it with a new one.
Too little detergent or unsuitable
detergent has been used.
Unsatisfactory
washing
results:
Stubborn stains have not been
treated prior to washing.
The correct temperature was not
selected.
Excessive laundry load. Reduce load.
The program is still running. Wait until the end of
The door lock has not been released.
The door will
not open:
There is water in the drum. Select ‘Spin’ program to
This problem may be caused by a
failure of the appliance.
The transit bolts and packing have
not been removed.
The support feet have not been
The machine
vibrates or is
noisy:
adjusted.
The laundry is not evenly distributed
in the drum.
There is very little laundry in the drum.
Unstable floors eg. wooden floors. Refer to relevant paragraph
Detergent over dose.
Cycle time
longer than
Machine unbalance.
displayed:
Reduce the detergent
quantity or use another one.
Check the water inlet hose
connection.
Increase the detergent
quantity or use another one.
Use commercial products
to treat the stubborn stains.
Check if you have selected
the correct temperature.
washing cycle.
Wait about 5 minutes.
empty out the water.
Contact the Service. If you
need to open the door,
please read carefully
“Emergency door opening”.
on next page.
Check the correct
installation of the appliance.
Check the correct levelling
of the appliance.
Pause the machine and
redistribute laundry manually.
Load more laundry.
in “Positioning” section.
Reduce the detergent
quantity or use another one.
Redistribute laundry manually
in the drum and start the spin
phase again. Refer to relevant
paragraph in “Positioning”
section.
Page 29
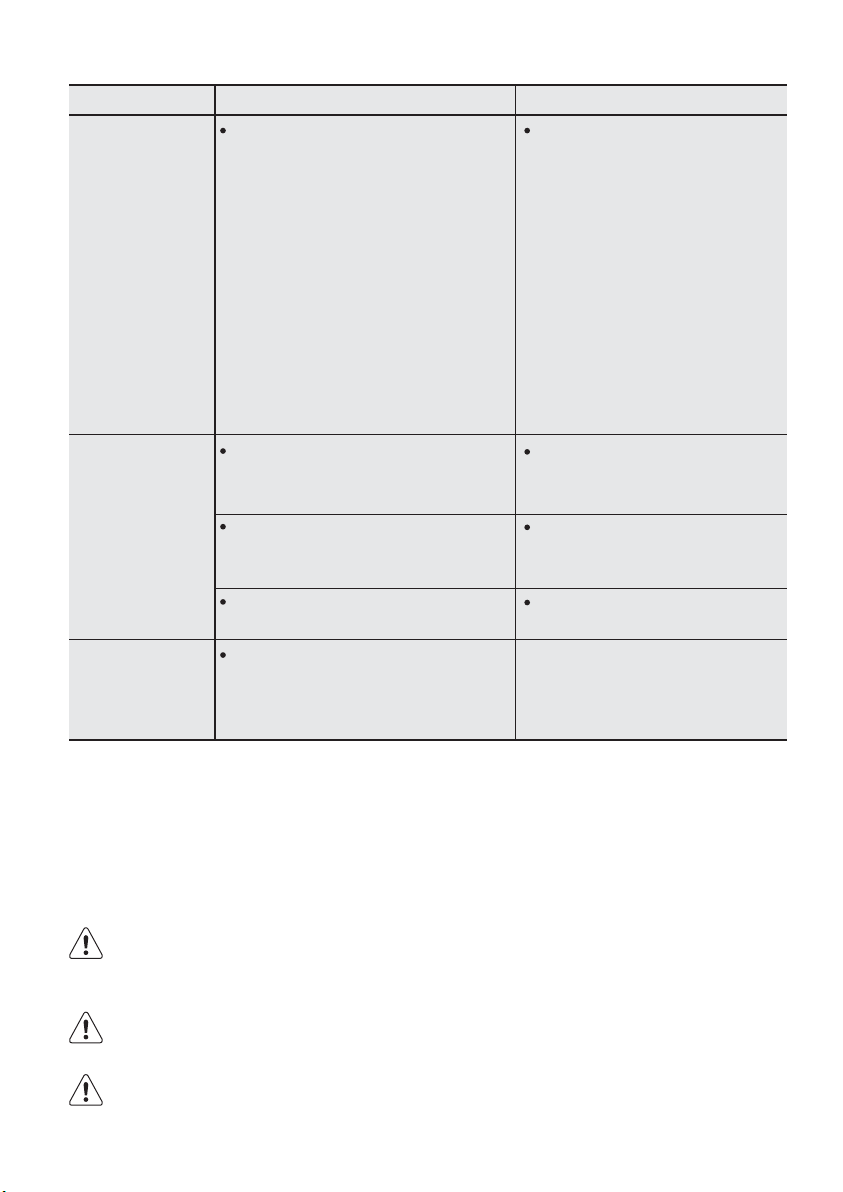
Malfunction Possible cause Solution
The electronic unbalance detection
device has cut in because the
laundry is not evenly distributed in
Pause the machine and
redistribute laundry
manually.
the drum. The laundry is
redistributed by reverse rotation of
Spinning starts
late or the
machine does
not spin:
the drum.
This may happen several times
before the unbalance disappears
and normal spinning can resume. If,
after 10 minutes, the laundry is still
not evenly distributed in the drum,
the machine will not spin. In this
case, redistribute the load manually
and select the spin program.
Machine not installed properly. Make sure the levelling of the
appliance is correct. Refer to
“Installation”.
The machine
makes an
unusual noise:
Transit bolts or packaging
not removed.
The load may be too small.
Make sure that the packaging
and/or the transit bolts are
removed. Refer to “Unpacking”.
Add more laundry in the
drum.
No water is
visible in the
drum:
Machines based on modern
technology operate very
economically using very little water
without affecting performance.
ENGLISH 29
Emergency Door Opening
In case of power failure or appliance failure the appliance door remains locked. The washing
programe continues, when the power is restored. If the door remains locked in case of
failure, it is possible to open it using the emergency unlock feature.
Before opening the door:
WARNING!
Make sure that the water temperature and the laundry are not hot. Wait till they cool
down, if necessary.
WARNING!
Make sure that the drum is not rotating. Wait till the drum stops rotating, if necessary.
WARNING!
Make sure that the water level inside the drum is not too high. Proceed with an
emergency drain, if necessary (refer to “Care and cleaning” chapter).
Page 30
30
www.electrolux.com
TECHNICAL DATA10.
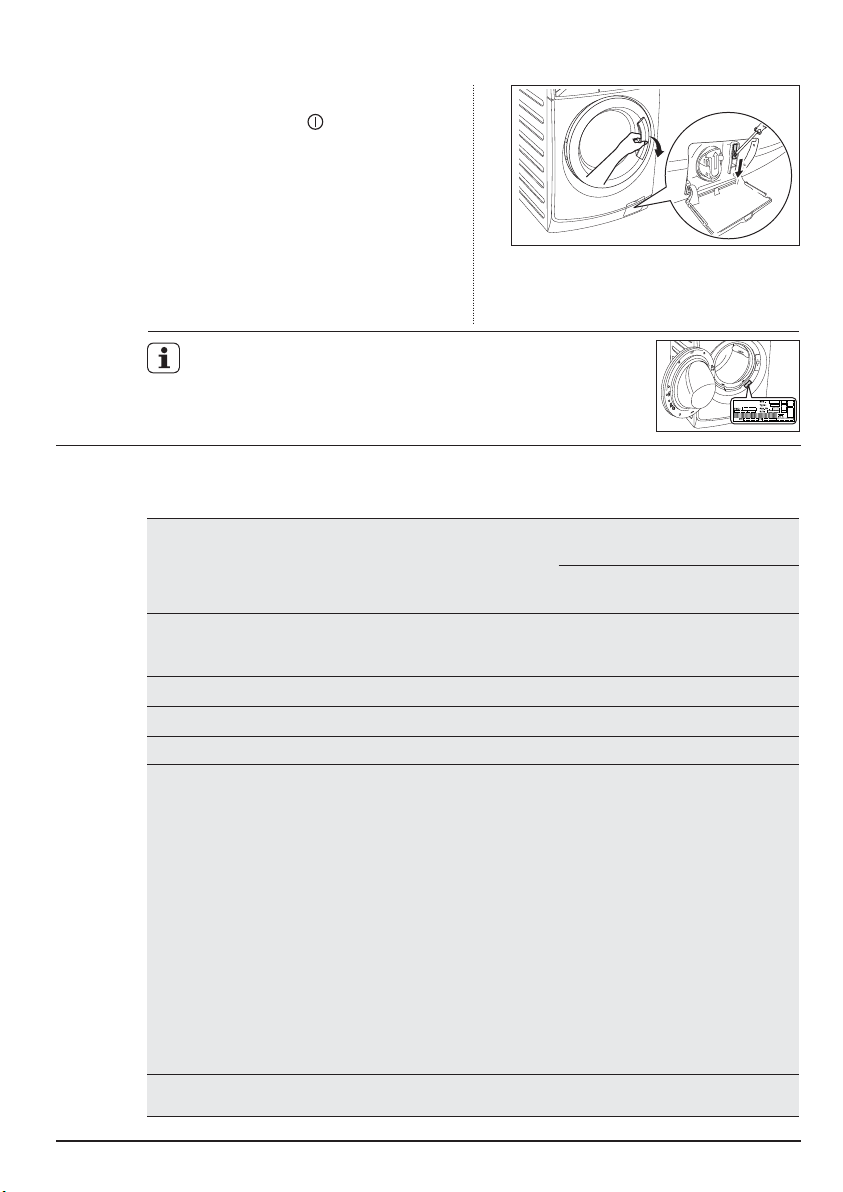
To open the door, proceed as follows:
1. Press the button to switch the
appliance off.
2. Disconnect the mains plug from the
mains socket.
3. Open the filter flap.
4. Keep the emergency unlock trigger
(red object) pulled downward and, at
the same time, open the appliance
5. Take out the laundry.
6. Close the filter flap.
door.
If you are unable to identify or solve the problem, contact
our service centre. Before telephoning, make a note of
the model, serial number and purchase date of your
machine: the Service Centre will require this information.
Model: EWF12932, EWF12932S
Dimensions
(Width / Height / Depth)
59.6 X 84.8 X 66.5 cm
Model: EWF12832, EWF12832S
59.6 X 84.8 X 58.1 cm
220-240 V/50 Hz
Power supply
Total power absorbed
(Voltage / Frequency)
(220 V, 60 Hz for PHILIPPINES)
2200 W (2000 W for PHILIPPINES)
Minimum fuse protection 10 A
Water supply pressure
Maximum dry
clothes capacity
(Maximum / Minimum)
Program
Cottons
Mixed
Delicates
Quick 18
Spin
Rinse
Energy Saver
Baby Wear
Bedding
Wool
Refresh Cottons
Refresh Mixed
0.8 MPa / 0.05 MPa
EWF12932,
EWF12932S
9 Kg
4 Kg
4 Kg
1.5 Kg
9 Kg
9 Kg
9 Kg
4 Kg
3 Kg
2 Kg
1.5 Kg
1.5 Kg
EWF12832,
EWF12832S
1.5 Kg
1.5 Kg
1.5 Kg
8 Kg
4 Kg
4 Kg
8 Kg
8 Kg
8 Kg
4 Kg
3 Kg
2 Kg
Spin speed
(Maximum / Minimum)
1200 rpm / 400 rpm
Page 31
ENGLISH 31
INSTALLATION11.
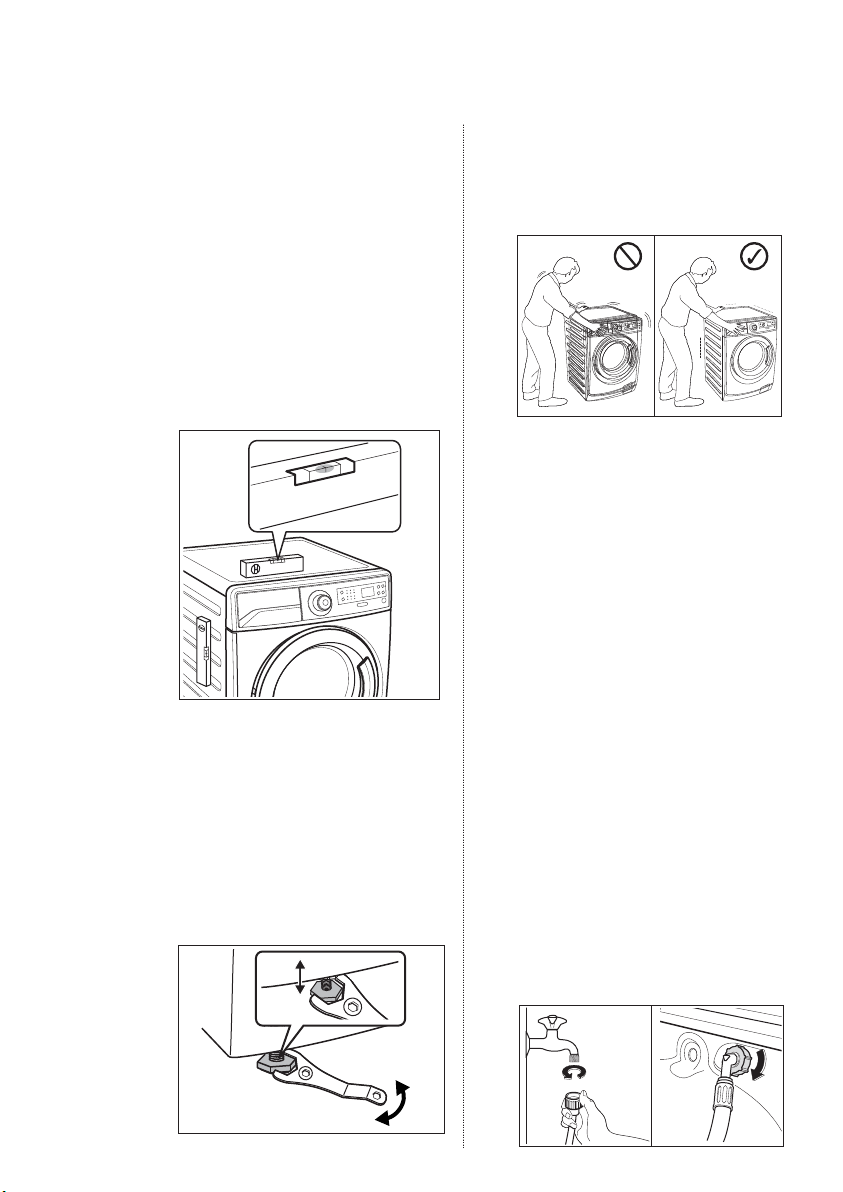
11.1 Positioning
It is important that your washing
machine stands firm and level
on the floor to ensure correct
operation.
That the appliance must not be
installed behind a lockable door, a
sliding door or a door with a hinge
on the opposite side to that of the
washing machine door is restricted.
Use a spirit level on the top and
side of the washing machine to
check the levels.
If you do not have a spirit level, as
a guide use the edge of a door
frame, cupboard or bench to
check that the washing machine
is level. Loosen or tighten the feet
to adjust the level. A correct
adjustment of the appliance level
prevents the vibration, noise and
the movement of the appliance
when in operation.
When the washing machine is
levelled, try to rock it from corner
to corner. If it does rock, adjust the
legs again until it is levelled and
does not rock.
Never place cardboard, wood or
similar materials under the machine
to compensate for any unevenness
in the floor.
Install the machine on a flat hard
floor. Make sure that air circulation
around the machine is not
impeded by carpets, rugs etc.
Check that the machine does not
touch the wall or cupboard units.
11.2 Water Inlet
Connect the water inlet hose to a
tap with 3/4” BSP thread.
Use the hose supplied with the
washing machine. DO NOT USE
OLD HOSES.
The other end of the inlet hose
which connects to the machine
can be turned in any direction.
Simply loosen the fitting, rotate
the hose and retighten the fitting,
making sure there are no water
leaks.
Page 32

32
www.electrolux.com
The inlet hose must not be
lengthened. If it is too short and
you do not wish to move the tap,
you will have to purchase a new,
longer hose specially designed for
this type of use.
90 cm
60 cm
11.3 Water Drainage
The end of the drain hose can be
positioned in three ways:
Hooked over the edge of a sink
using the plastic hose guide
supplied with the machine.
In this case, make sure the end
cannot come unhooked when the
machine is emptying.
This could be done by tying it to
the tap with a piece of string or
attaching it to the wall.
In a sink drain pipe branch. This
branch must be above the trap so
that the bend is at least 60 cm
above the ground.
Directly into a drain pipe at a
height of not less than 60 cm and
not more than 90 cm.
The end of the drain hose must
always be ventilated, i.e. the
inside diameter of the drain pipe
must be larger than the outside
diameter of the drain hose.
The drain hose must not be
kinked. Run it along the floor; only
the part near the drainage point
must be raised.
For the correct functioning of the
machine the drain hose must
remain hooked on the proper
support piece situated on the top
part of back side of the appliance.
11.4 Electrical Connection
This machine is designed to operate
on a 220-240 V, single-phase, 50 Hz
(220 v, 60 Hz for PHILIPPINES)
supply.
IMPORTANT !
Please check rated power
supply condition that is
mentioned on the Rating
Label before you connect to
the power supply.
“An incorrect power supply
may void your warranty.”
Check that your domestic electrical
installation can take the maximum
load required (2.2 kW or 2.0 kW for
PHILIPPINES), also taking into
account any other appliances in use.
CAUTION !
Connect the machine to
an earthed socket outlet.
The manufacturer declines any
responsibility for damage or injury
through failure to comply with the
above safety precaution.
CAUTION !
If the supply cord is
damaged, should the
appliance power supply
cable need to be replaced,
this shall be carried out by
our Service Centre.
Page 33
ENGLISH 33
When the appliance is installed
the power supply cable must be
easily accessible.
ENVIRONMENT CONCERNS12.
12.1 Packaging Materials
The materials marked with
the symbol are
recyclable.
>PE<=polyethylene
>PS<=polystyrene
>PP<=polypropylene
This means that they can be
recycled by disposing of them
properly in appropriate collection
containers.
12.2 Old Machine
Use authorised disposal sites for
your old appliance. Help to keep
your country tidy!
The symbol on the product
or on its packaging indicates that
this product may not be treated
as household waste.
Instead it shall be handed over to
the applicable collection point for
the recycling of electrical and
electronic equipment.
By ensuring this product is
disposed of correctly, you will
help prevent potential negative
consequences for the
environment and human health,
which could otherwise be caused
by inappropriate waste handling
of this product.
If this appliance is supplied from a
cord extension set or electrical
portable outlet device, the cord
extension set or electrical portable
device must be positioned so that
it is not subject to splashing or
ingress of moisture.
For more detailed information
about recycling of this product,
please contact your local city
office, your household waste
disposal service or the shop
where you purchased the
product.
12.3 Ecological Hints
To save water, energy and to
help protect the environment, we
recommend that you follow these
tips:
Normally soiled laundry may be
washed without prewashing in
order to save detergent, water
and time (the environment is
protected too!).
The machine works more
economically if it is fully loaded.
With adequate pre-treatment,
stains and limited soiling can
be removed; the laundry can
then be washed at a lower
temperature.
Measure out detergent
according to the water
hardness, the degree of soiling
and the quantity of laundry
being washed.
Page 34

34 www.electrolux.com
DAFTAR ISI
INFORMASI KESELAMATAN
1
DESKRIPSI PRODUK
2
PANEL KONTROL
3
SEBELUM MENGGUNAKAN PERTAMA KALI
4
PENGGUNAAN SEHARI-HARI
5
PETUNJUK MENCUCI
6
SIMBOL KODE CUCI INTERNASIONAL
7
MERAWAT DAN MEMBERSIHKAN
8
PEMECAHAN MASALAH
9
DATA TEKNIS ........................................................................................................... 6510
PEMASANGAN ......................................................................................................... 6611
KEPEDULIAN LINGKUNGAN .................................................................................... 6812
.................................................................................................... 39
.................................................................................... 35
............................................................................................... 38
........................................................... 45
................................................................................... 46
............................................................................................... 53
.................................................................... 56
........................................................................... 56
.......................................................................................... 61
WE’RE THINKING OF YOU
Terima kasih telah membeli peralatan Electrolux. Anda telah memilih produk yang menghadirkan pengalaman profesional dan inovasi selama beberapa dekade. Cerdas dan bergaya,
didesain dengan memperhatikan Anda. Jadi, kapan pun Anda menggunakannya, Anda
dapat merasa tenang bahwa Anda akan mendapatkan hasil yang hebat setiap saat.
Selamat datang di Electrolux.
Kunjungi situs web kami untuk:
Mendapatkan saran yang bermanfaat, brosur, pemecahan masalah, informasi layanan:
www.electrolux.com
KEPEDULIAN DAN LAYANAN PELANGGAN
Kami menyarankan penggunaan suku cadang asli.Ketika menghubungi Servis, pastikan
Anda telah menyediakan data berikut ini.Informasi ini bisa ditemukan di rating plate. Model,
PNC, Nomor Seri.
Informasi Keselamatan Peringatan / Perhatian.
Informasi Umum dan kiat-kiat.
Informasi lingkungan.
Dapat berubah tanpa pemberitahuan.
Page 35
BAHASA INDONESIA 35
1.
INFORMASI KESELAMATAN
Syarat penggunaan
Peralatan ini dimaksudkan digunakan
untuk rumah tangga dan aplikasi
serupa seperti:
-
Rumah pertanian
-
Oleh klien di apartemen servis,
apartemen liburan, dan lingkungan
jenis hunian.
Demi keselamatan Anda dan untuk
menjamin penggunaan yang benar,
sebelum memasang dan menggunakan
alat untuk pertama kalinya, bacalah buku
petunjuk ini dengan seksama, termasuk
semua petunjuk dan peringatannya.
Untuk menghindari kesalahan dan
kecelakaan yang tidak perlu, sangatlah
penting untuk memastikan bahwa
semua orang yang menggunakan alat ini
betul-betul memahami semua fitur
pengoperasian dan keselamatan.
Simpanlah petunjuk ini dan pastikan
selalu disertakan dengan alat jika alat ini
dipindahkan atau dijual, agar siapa pun
yang menggunakannya akan mengetahui
informasi mengenai cara menggunakan
alat dengan benar dan informasi tentang
keselamatan.
1.1 KEAMANAN UMUM
Mengubah spesifikasi atau berusaha
untuk memodifikasi produk ini dengan
cara apa pun adalah hal yang berbahaya.
Selama program cuci dengan suhu
tinggi dan selama siklus pengeringan,
pintu kaca dapat menjadi panas.
Jangan menyentuh pintu!
Jangan sampai ada binatang
peliharaan kecil masuk ke dalam
tabung. Untuk menghindari hal ini,
periksa tabung sebelum Anda
menggunakan alat.
Jangan memasukkan benda apa pun
seperti koin, peniti, paku, sekrup, batu
atau benda keras dan benda tajam
lainnya ke dalam mesin karena dapat
menyebabkan kerusakan parah.
Cucilah barang-barang kecil, seperti
kaos kaki, renda, sabuk yang bisa
dicuci, dsb. di dalam kantung atau
sarung bantal, karena benda-benda
tersebut kemungkinan bisa menyusup
ke dalam bak dan ke tabung bagian
dalam.
Gunakan pelembut cucian dan deterjen
sebanyak yang disarankan saja. Dapat
terjadi kerusakan pada kain atau alat
apabila Anda menggunakannya secara
berlebihan. Baca rekomendasi jumlah
cucian yang dianjurkan oleh produsen.
Alat ini tidak ditujukan untuk digunakan
oleh orang (termasuk anak-anak) yang
memiliki keterbatasan kemampuan
secara fisik, inderawi atau keterbelakangan mental, atau orang yang kurang
berpengalaman dan kurang berpengetahuan, kecuali mereka telah mendapatkan
pengarahan atau petunjuk mengenai
cara penggunaan oleh orang yang
bertanggung jawab terhadap
keselamatannya.
Jangan menggunakan mesin cuci ini
untuk mencuci benda-benda dengan
kawat, bahan tanpa jahitan atau bahan
yang sobek.
Selalu cabut steker dan tutup keran air
setelah Anda menggunakan, membersihkan dan merawat mesin.
Dalam keadaan apapun, jangan
berusaha memperbaiki mesin sendiri.
Perbaikan yang dilakukan oleh orang
yang tidak berpengalaman dapat
menyebabkan cedera atau kerusakan
parah. Hubungi Pusat Layanan
setempat. Selalu gunakan suku
cadang asli.
Page 36

36
www.electrolux.com
1.2 PEMASANGAN
Mesin ini berat. Berhati-hatilah apabila
memindahkan mesin.
Setelah membuka kemasan,
periksalah apakah mesin tidak rusak.
Jika ragu-ragu, jangan menggunakan
mesin, namun hubungi Pusat Layanan
setempat.
Semua baut kemasan dan baut transit
harus dikeluarkan sebelum mesin ini
digunakan. Jika hal ini tidak dipatuhi,
bisa terjadi kerusakan parah pada
produk dan komponennya. Lihat
bagian terkait di buku petunjuk.
Setelah memasang mesin, periksa
apakah mesin berdiri di atas selang
masukan air dan selang pembuangan
air. Periksa juga apakah bagian tutup
atas tidak menekan kabel listrik.
Jika mesin ditempatkan di lantai
berkarpet, sesuaikan kaki-kaki mesin
agar sirkulasi udara lancar.
Selalu pastikan tidak ada selang air
dan sambungannya yang bocor
setelah mesin dipasang.
Setiap pekerjaan yang berkaitan dengan
pipa air yang diperlukan untuk memasang mesin ini harus dilakukan oleh
tukang ledeng yang berpengalaman.
Setiap pekerjaan yang berkaitan dengan
listrik yang diperlukan untuk memasang
mesin ini harus dilakukan oleh tukang
listrik yang berpengalaman.
1.3 PENGGUNAAN
Mesin ini dirancang hanya untuk
penggunaan rumah tangga. Mesin ini
tidak boleh digunakan untuk tujuan lain.
Cucilah bahan kain yang memang
dirancang untuk dicuci oleh mesin.
Patuhi selalu petunjuk pada label
pakaian.
Jangan membebani mesin secara
berlebihan. Lihat bagian terkait di buku
petunjuk.
Sebelum mencuci, pastikan semua
kantung baju dikosongkan dan kancing
serta ritsleting ditutup. Jangan mencuci
barang-barang dari kain yang sudah
usang atau robek dan bersihkan noda
seperti cat, tinta, karat dan rumput
sebelum mencuci. Baju dalam (BH)
yang berkawat TIDAK BOLEH dicuci
dalam mesin.
Pakaian yang sudah terkena produk
bahan bakar yang mudah menguap
tidak boleh dicuci dalam mesin. Jika
menggunakan cairan pembersih yang
mudah menguap, harap Anda pastikan
bahwa cairan sudah dihilangkan dari
pakaian sebelum dimasukkan ke dalam
mesin.
Jangan sekali-kali menarik kabel listrik
untuk melepaskan steker dari stopkontak; selalu pegang dan cabut stekernya.
Jangan sekali-kali menggunakan mesin
cuci jika kabel listrik, panel kontrol,
permukaan atau alas kerja mesin rusak
sehingga Anda dapat menjangkau
bagian dalam mesin cuci.
1.4 KESELAMATAN ANAK
Mesin cuci ini tidak ditujukan untuk
digunakan oleh anak-anak atau orang
yang memiliki keterbatasan fisik tanpa
pengawasan.
Anak-anak harus diawasi agar mereka
tidak bermain-main dengan alat ini.
Komponen pengemas (misalnya lapisan
plastik, polistiren) dapat berbahaya bagi
anak-anak - bahaya tercekik karena
kurang oksigen! Jauhkan benda-benda
tersebut dari jangkauan anak-anak.
Simpanlah deterjen di tempat yang
aman dan jauh dari jangkauan anakanak.
Page 37
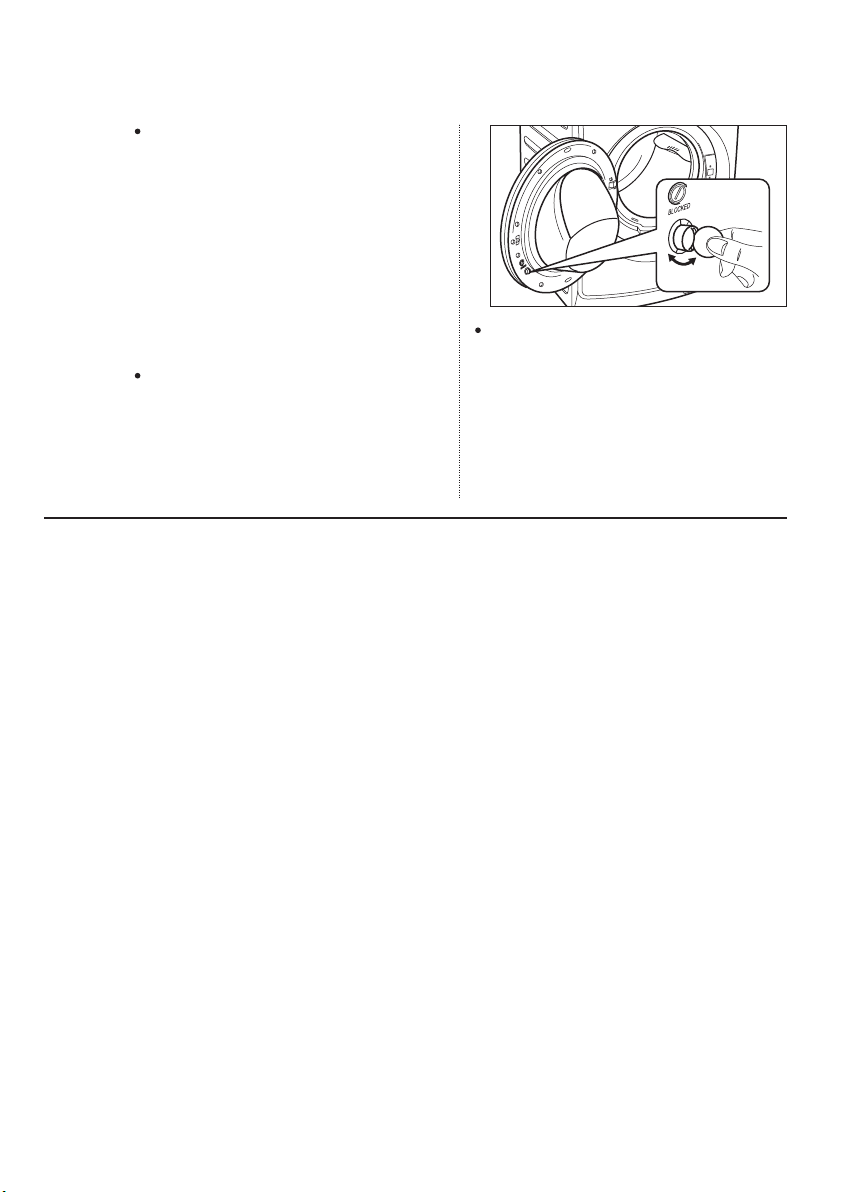
Jangan sampai ada anak kecil atau
binatang peliharaan masuk ke dalam
tabung.
1.5 PERANGKAT KEAMANAN
ANAK
Ketika Anda mengaktifkan perangkat ini,
Anda tidak bisa menutup pintu. Ini
mencegah anak-anak atau piaraan
terkunci di dalam.
Untuk mengaktifkan alat ini, putar
(TANPA ditekan) tombol yang berada
dalam pintu searah dengan jarum jam
sampai alur tombol berada pada
posisi mendatar. Jika perlu, gunakan
koin.
BAHASA INDONESIA 37
Untuk menonaktifan alat ini supaya
pintu bisa ditutup kembali, putar
tombol berlawanan arah dengan jarum
jam sampai alur tombol berada pada
posisi vertikal.
Page 38
38
www.electrolux.com
DESKRIPSI PRODUK2.
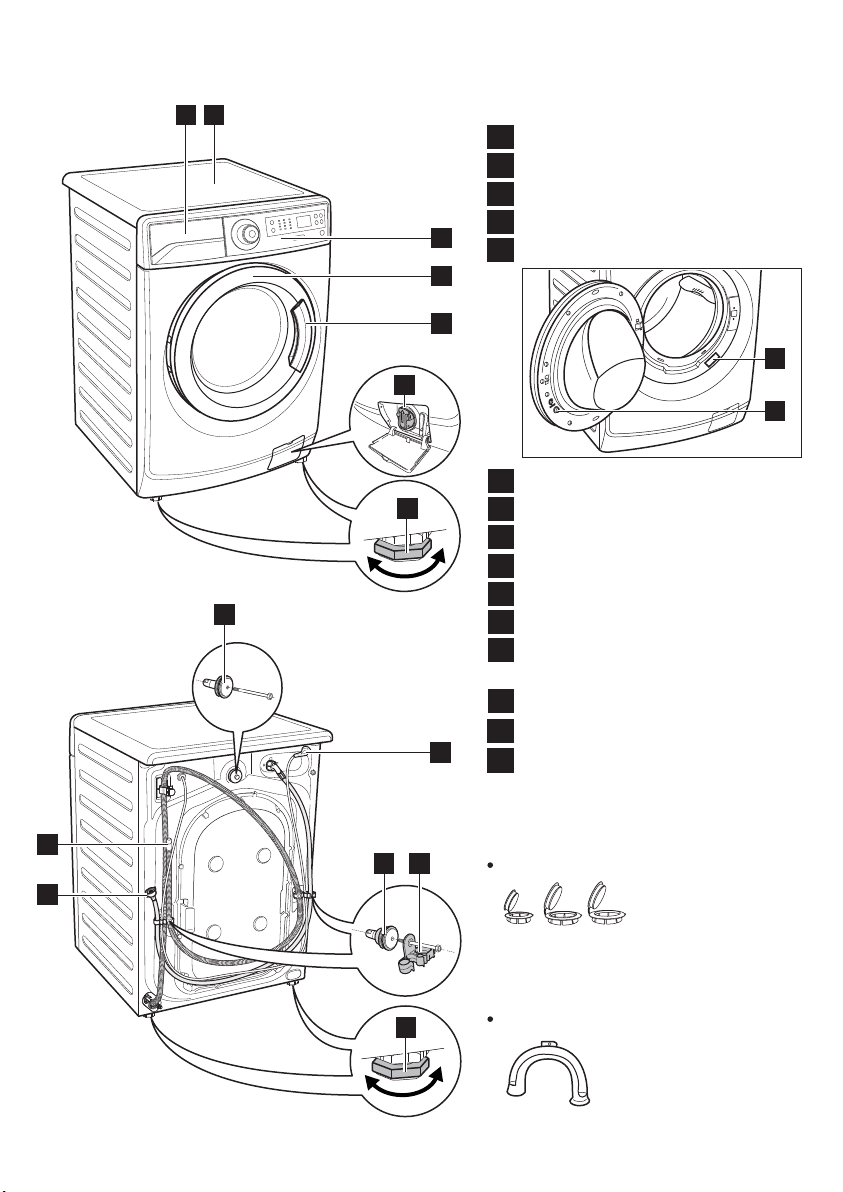
2 1
11
15
Alas Atas
1
Deterjen/Pelembut Dispenser
2
Panel Kontrol
3
Pegangan pintu
4
3
5
Pintu
5
4
14
13
Kaki penyesuaian kedataran (depan)
6
6
Kabel Listrik
7
Selang asupan air
8
Selang pembuangan Air
9
Penyangga Selang
10
11
Baut Transit
Kaki penyesuaian kedataran
12
(Belakang)
Tombol Penahan Pintu
13
Rating Plate
14
7
Filter Pompa pembuangan Air
15
9
1011
8
AKSESORI
Tutup plastik
Untuk menutup lubang sisi belakang
kabinet setelah mencabut baut
sementara.
12
Panduan selang plastik
Untuk menghubungkan
selang pembuangan air
ke pinggir bak cuci.
Page 39
BAHASA INDONESIA 39
PANEL KONTROL3.
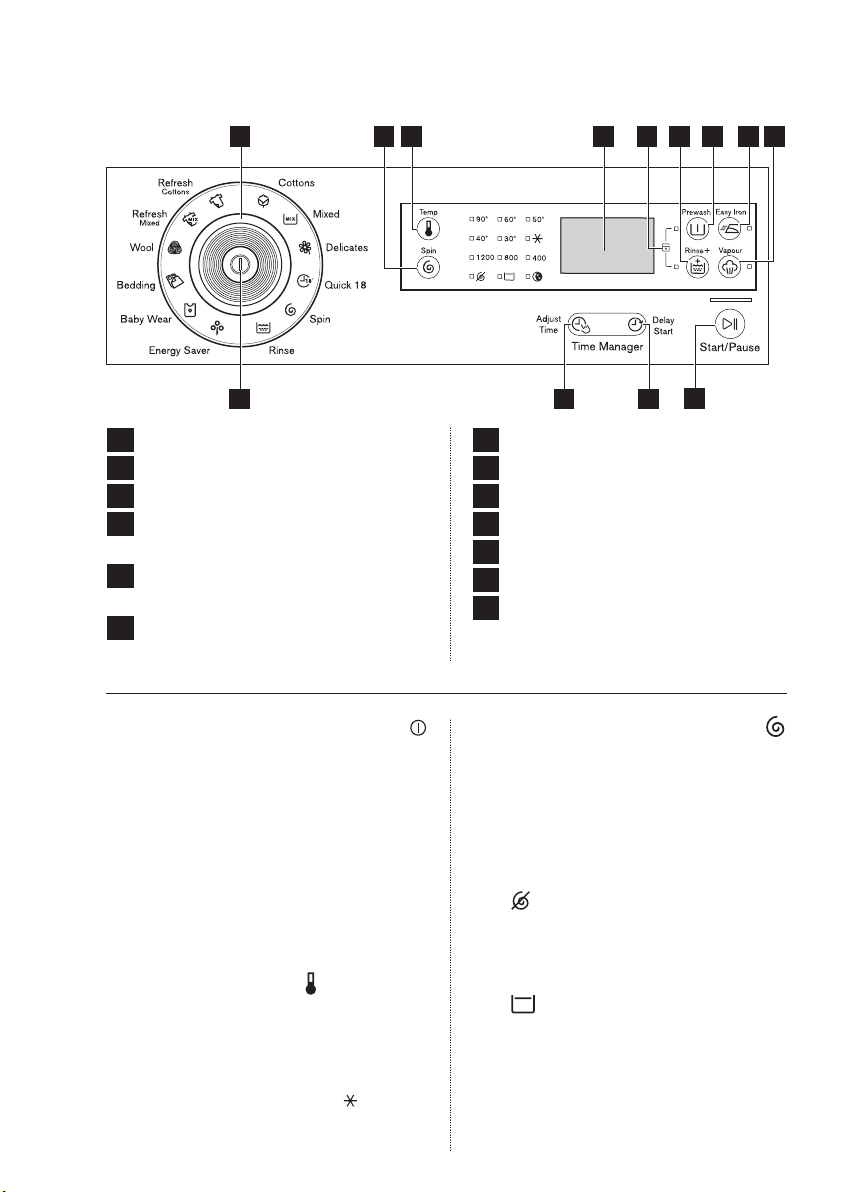
2 4 97 813 10 113
1
1
Tombol On/Off [Hidup/Mati]
2
Knop Program
3
Touchpad Temperature [Suhu]
4
Touchpad Spin Selection
[Pilihan Perasan]
5
Touchpad Adjust Time
[Penyesuaian Waktu]
6
Touchpad Delay Start
[Penundaan Pelaksanaan]
3.1 Tombol On/Off [Hidup/Mati]
Tombol Hidup/Mati digunakan
untuk Menghidupkan dan mematikan mesin cuci.
3.2 Knop Program
Putar Knop ini untuk mengatur
program. Indikator program terkait
muncul. Buzzer berbunyi. (Baca
halaman 43)
3.3 Touchpad Suhu
Tekan Touchpad ini berulang kali
untuk menaikkan atau menurunkan
suhu, jika Anda ingin mencuci pada
suhu yang lain dari yang disarankan
oleh mesin cuci.(simbol “ ”
berhubungan dengan pencucian
dingin).
5 6
7
Layar
8
Touchpad Rinse Plus [Bilas Plus]
9
Touchpad Prewash [Pracuci]
10
Touchpad Easy Iron [Setrika Mudah]
11
Touchpad Vapour [Uap]
12
Touchpad Start/Pause [Mulai/Jeda]
13
Opsi Kunci Pengaman untuk Anak
(Lihat Halaman 52)
12
3.4 Touchpad Pilihan Perasan
Tekan Touchpad ini berulang kali
untuk menaikkan atau menurunkan
kecepatan, jika Anda ingin memeras cucian pada kecepatan yang
lain dari yang diusulkan oleh mesin
cuci.
Tanpa Perasan
Tidak ada opsi perasan menghapus semua fase perasan dan
meningkatkan jumlah bilasna.
Tahan Bilasan
Dengan memilih opsi ini air bilasan
terakhir tidak dikosongkan dan
tabung berputar reguler untuk
mencegah kerutan cucian.
Page 40

40
www.electrolux.com
Pintu masih terkunci untuk menunjukkan bahwa air harus dikosongkan.
Pintu tetap terkunci dengan air
di dalam tabung. Untuk
melanjutkan siklus Anda harus
menekan (Mulai/Jeda).
Posisi Night Cycle [Putaran
Malam]
Dengan memilih opsi ini, mesin tidak
akan menguras air dari bilasan
terakhir untuk menghindari kerutan
cucian. Semua fase perasan ditekan.
Siklus pencucian ini sangat senyap,
dan bisa dipilih di malam hari atau di
waktu lain yang tepat.
Pintu tetap terkunci dengan air
di dalam tabung. Untuk
melanjutkan siklus Anda harus
menekan (Mulai/Jeda).
3.5 Touchpad Penyesuaian
Waktu
Pemilihan pengaturan ini akan
memperbolehkan pengguna mengatur waktu pencucian.
Tekan layar sentuh berulang untuk
mengurangi atau kembali ke waktu
semula.
Fungsi ini akan menyesuaikan jumlah
pembilasan sesuai dengan waktu
pencucian yang di pilih.
3.6 Touchpad “Delay Start”
[Penundaan Pelaksanaan]
Opsi ini memungkinkan penundaan
awal program sebesar 30 menit, 60
menit, atau 90 menit dan kemudian
tiap jam dari 2 hingga 20 jam.
Penundaan yang sudah Anda pilih
ditunjukkan di layar tampilan. Akhir
waktu akan meningkat untuk
menunjukkan penundaan yang
dipilih kepada Anda.
Anda harus memilih dulu opsi ini
setelah Anda menyetel program
dan sebelum menekan tombol
Start/Pause [Mulai/Jeda].
Jika Anda ingin menambahkan
cucian dalam mesin selama
penundaan waktu tekan Touchpad
Start/Pause (Mulai/Jeda) untuk
membuat mesin berada dalam
mode jeda.
Tambahkan cucian, tutup pintu dan
tekan lagi touchpad Start/Pause
(Mulai/Jeda).
Anda bisa membatalkan waktu
penundaan kapan saja, dengan
menekan touchpad "Delay Start
[Tunda Pelaksanaan]" berulangulang hingga layar menampilkan
waktu tunda ‘ ’, lalu tekan Touchpad Start/Pause [Mulai/Jeda].
Page 41
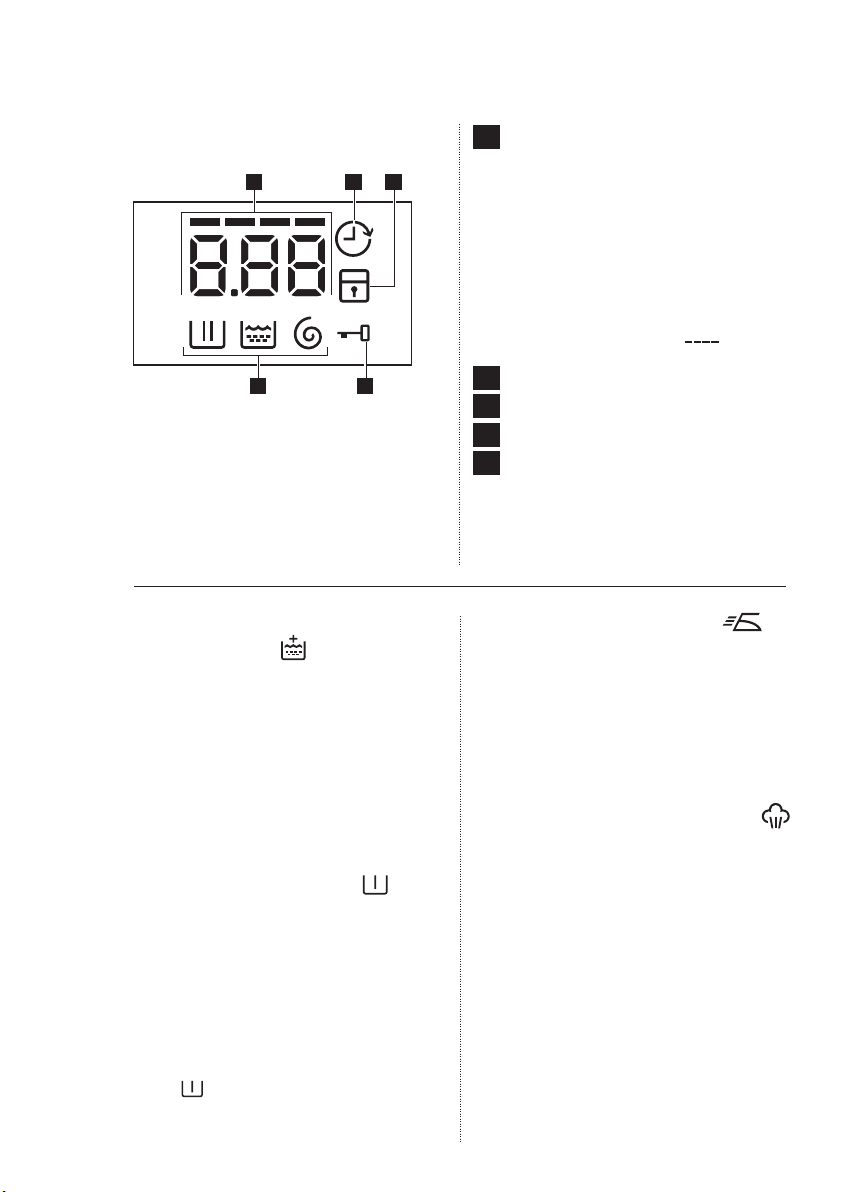
BAHASA INDONESIA 41
3.7 Layar
C DA
B E
3.8 Touchpad Rinse Plus
[Bilas Plus]
Opsi ini disarankan bagi orangorang yang alergi terhadap deterjen
dan untuk daerah-daerah yang
airnya sangat lunak.
Tekan untuk menambahkan fase
pembilasan ke program.
Indikator opsi ini muncul.
3.9 Touchpad Prewash
Pilih opsini jika Anda ingin menggunnakan fitur pra-cuci sebelum
pencucian utama. Gunakan opsi ini
untuk kotoran tanah berat.
Indikator opsi ini muncul.
Ketika Anda mengatur fungsi ini,
letakkan deterjen ke dalam wadah
“ ”. (Baca halaman 48-49)
Fungsi ini meningkatkan durasi
program.
A
Nomor Digital;
akan memberi tahu Anda:
–
Waktu siklus pencucian.
–
Waktu mulai tertunda.
–
Kode alarm. Baca bab
“Pemecahan masalah” untuk
deskripsinya.
–
Tingkat Time Manager
[Pengelola Waktu] ( ).
Ikon Fase Pencucian
B
C
Ikon Tunda Pelaksanaan
D
Ikon Pengaman untuk Anak
Ikon Kunci Pintu
E
–
Sudah hidup, Anda tidak bisa
membuka pintu.
–
Jika mati, Anda bisa membuka pintu.
3.10 Touchpad Easy Iron
Ketika memilih opsi ini, cucian
dicuci dengan lembut dan diperas
untuk menghindari kekusutan.
Dengan cara ini, penyetrikaan
akan lebih mudah.
Indikator opsi ini muncul.
3.11 Touchpad Vapour [Uap]
Pilih opsi ini untuk menambahkan
sekitar 45 menit penggulungan di
dalam uap selama siklus
pencucian. Uap membantu
membuka serat kain agar
memudahkan zat aditif pencucian melepaskan noda-noda
yang sulit.
Indikator opsi ini muncul.
Page 42
42
www.electrolux.com
CATATAN:
Uap mungkin tidak terlihat di dalam
tabung selama siklus pencucian
uap. Uap akan terbentuk di awah
tabung dan dimungkinkan untuk
naik secara alami ke pakaian.
Uap mungkin tidak ada selama
seluruh siklus pencucian uap.
Fungsi uap lebih efektif dengan
separuh beban.
Pada akhir siklus penguapan
pakaian akan menjadi lebih
hangat, lebih lembut dan terlepas
dari tabung.
Jika opsi uap dipilih, suhu
pembilasan akan naik.
Selama siklus penguapan,
Anda mungkin melihat uap
keluar dari mesin cuci - ini
adalah keadaan normal dan
tidak menyebabkan bahaya.
3.12 Touchpad Start/Pause
Untuk menjalankan program yang
dipilih, tekan "Start/Pause
[Mulai/Jeda]".
Untuk menyela program yang
berjalan, tekan "Start/Pause
[Mulai/Jeda]" untuk menjeda mesin.
Untuk menjalankan kembali
program dari tahap ketika program
disela, tekan lagi"Start/Pause
[Mulai/Jeda]".
Jika Anda memilih untuk menunda
pelaksanaan, setelah menekan
"Start/Pause [Mulai/Jeda]"mesin
akan mulai menghitung mundur.
3.13
Suara Buzzer
Suara buzzer beroperasi jika:
Program selesai.
Mesin mengalami malafungsi.
Jika Anda ingin menonaktifkan
suara buzzer (kecuali dalam
kejadian malafungsi peralatan),
tekan “Rinse + [Bilas +]” dan
Touchpad “Vapour [Uap]” secara
bersamaan selama 3 detik, dan
dengarkan ‘BIP, BIP’.
Untuk kembali ke konfigurasi
default tekan 2 Touchpad bersamaan selama 3 detik, dan dengarkan "BIP".
Page 43
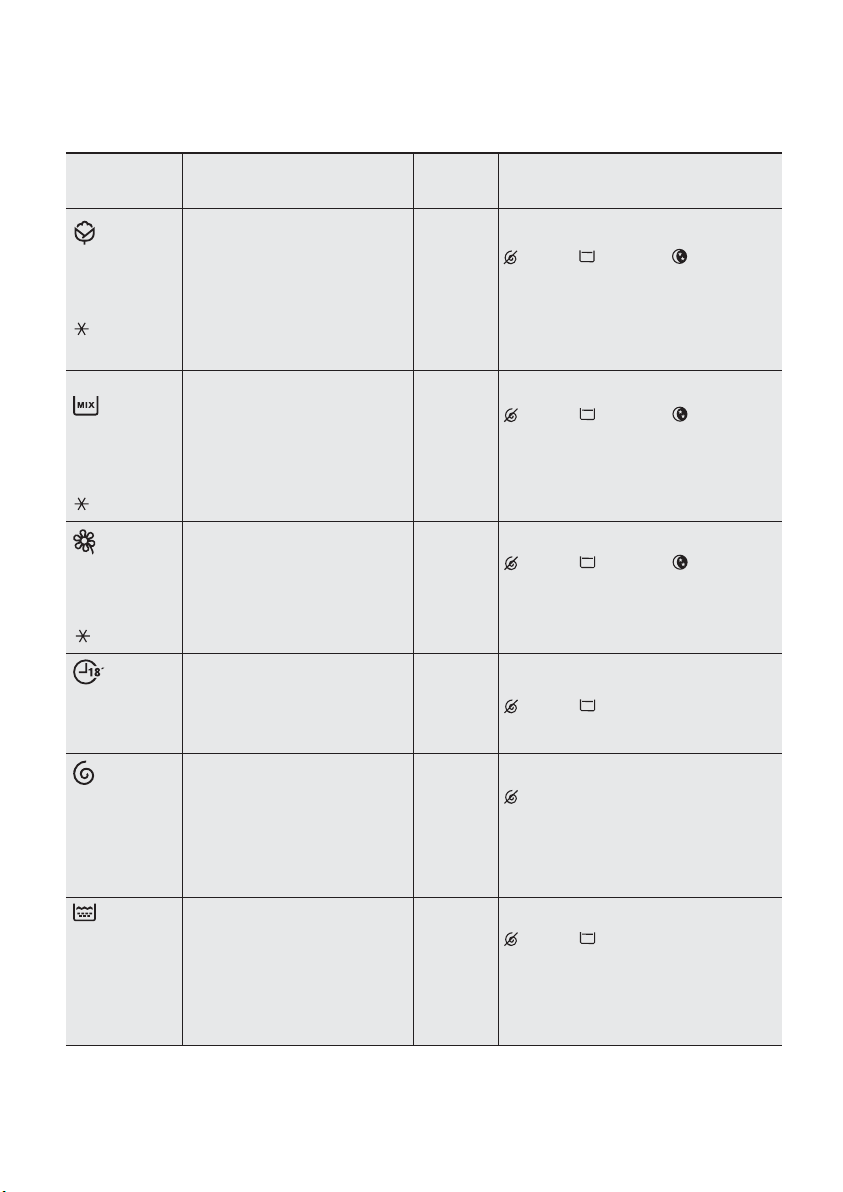
3.14 Program + Opsi
BAHASA INDONESIA 43
Program;
Suhu
Cottons
[Katun] ;
90 °C hingga
Air dingin)
(
Mixed
[Campuran] ;
60 °C hingga
Air dingin)
(
Delicates
[Lembut] ;
40 °C hingga
(
Air dingin)
Quick 18
[Cepat] ;
30 °C
Spin
[Peras]
Jenis beban; Bobot maks.
beban (Pakaian kering)
Katun putih dan berwarna
dengan tingkat kotoran
tanah yang tinggi;
beban maks.:
Model:
EWF12932, EWF12932S : 9 kg
EWF12832, EWF12832S : 8 kg
Item kain sintetis atau
campuran dengan tingkat
kotoran tanah normal;
beban maks.: 4 kg.
Kain lembut seperti akrilik,
viscose, item poliester
dengan kotoran tanah
normal;
beban maks.: 4 kg
Bahan kain sintetis dan
campuran. Sedikit kotor dan
item untuk penyegaran;
beban maks.: 1.5 kg
Untuk memeras cucian dan
mengeringkan air dalam
tabung; beban maks.:
Model:
EWF12932, EWF12932S :
EWF12832, EWF12832S : 8 kg
9 kg
Deskripsi
siklus
-
Cuci
-
Bilas
-
Perasan
lama
-
Cuci
-
Bilas
-
Perasan
singkat
-
Cuci
-
Bilas
-
Perasan
singkat
-
Cuci
-
Bilas
-
Perasan
singkat
-
pembuangan
air
-
Fase
peras
Opsi bisa
dikombinasikan
1200 hingga 400 rpm,
Spin:
No Spin, Rinse Hold, Night Cycle,
Prewash, Easy Iron, Rinse +, Vapour
Adjust Time, Delay Start
Spin:
1200 hingga 400 rpm,
No Spin, Rinse Hold, Night Cycle,
Prewash, Easy Iron, Rinse +, Vapour
Adjust Time, Delay Start
Spin:
1200 hingga 400 rpm,
No Spin, Rinse Hold, Night Cycle,
Prewash, Rinse +, Vapour
Adjust Time, Delay Start
Spin :
- 800 to 400 rpm
No Spin, Rinse Hold,
Delay Start
Spin:
1200 hingga 400 rpm,
No Spin, Delay Start
1)
,
1)
,
1)
,
Rinse
[Bilas]
Untuk membilas dan
memeras cucian;
beban maks.:
Model:
EWF12932, EWF12932S :
EWF12832, EWF12832S : 8 kg
9 kg
-
Tiga
bilasan
dengan
pelembut
-
Fase
Peras
Spin: 1200 hingga 400 rpm,
No Spin, Rinse Hold, Delay Start
Page 44
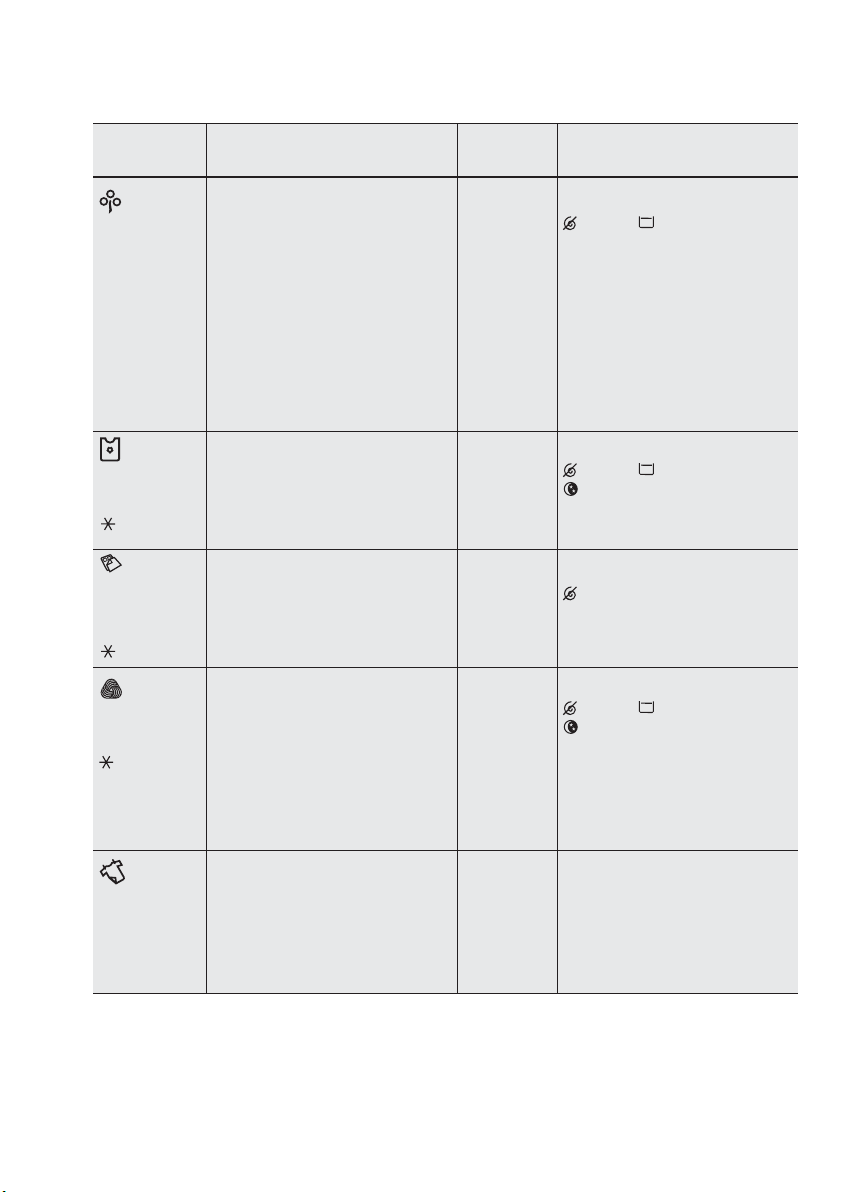
44
www.electrolux.com
Program;
Suhu
Energy Saver
Penghematan
[
]
Energi
2)
,
60 °C
40 °C
Baby [Bayi] ;
40 °C hingga
(
Air dingin)
Bedding
[Seprai] ;
60 °C hingga
Air dingin)
(
Wool [Wol] ;
40 °C hingga
Air dingin)
(
Refresh
Cottons
[Segarkan
Katun]
Jenis beban; Bobot maks.
beban (Pakaian kering)
Putih dan tidak luntur, katun
dengan kotoran tanah normal.
Atur program ini untuk
mendapatkan hasil pencucian
yang baik dan menurunkan
konsumsi energi. Waktu
program pencucian diperpanjang; beban maks.:
Model:
EWF12932, EWF12932S : 9 kg
EWF12832, EWF12832S : 8 kg
Pakaian katu bayi dan item
rajut halus dengan kotoran
normal;
beban maks.: 4 kg
Program khusus untuk selimut
sintetis, selimut, seprai, dan
seterusnya;
beban maks.: 3 kg.
Program yang diuji khusus
untuk garmen wol yang diberi
label ‘Pure new wool,
non-shrink, machine washable’
(Wol baru murni, tidak mengkerut, bisa dicuci dengan
mesin);
beban maks.: 2 kg.
Program Vapour [Uap] untuk
katun Putih dan berwarna.
Siklus ini menghilangkan bau
dan membantu melicinkan
kerutan cucian;
beban maks.: 1.5 kg.
Deskripsi
siklus
-
Cuci
-
Bilas
-
Perasan
lama
-
Cuci
-
Bilas
-
Perasan
singkat
-
Cuci
-
Bilas
-
Perasan
lama
-
Cuci
-
Bilas
-
Perasan
singkat
-
Pakaian
digiling
dalam
uap.
Opsi bisa
dikombinasikan
Spin:
1200 hingga 400 rpm,
No Spin, Rinse Hold,
Prewash, Rinse +, Vapour 1) ,
Adjust Time, Delay Start
Spin:
1200 hingga 400 rpm,
No Spin, Rinse Hold,
Night Cycle,
Prewash, Rinse +, Vapour
Delay Start
Spin:
800 hingga 400 rpm,
No Spin, Vapour
1)
1)
,
Adjust Time, Delay Start
Spin: 1200 hingga 400 rpm,
No Spin, Rinse Hold,
Night Cycle,
Delay Start
Delay Start
,
Page 45
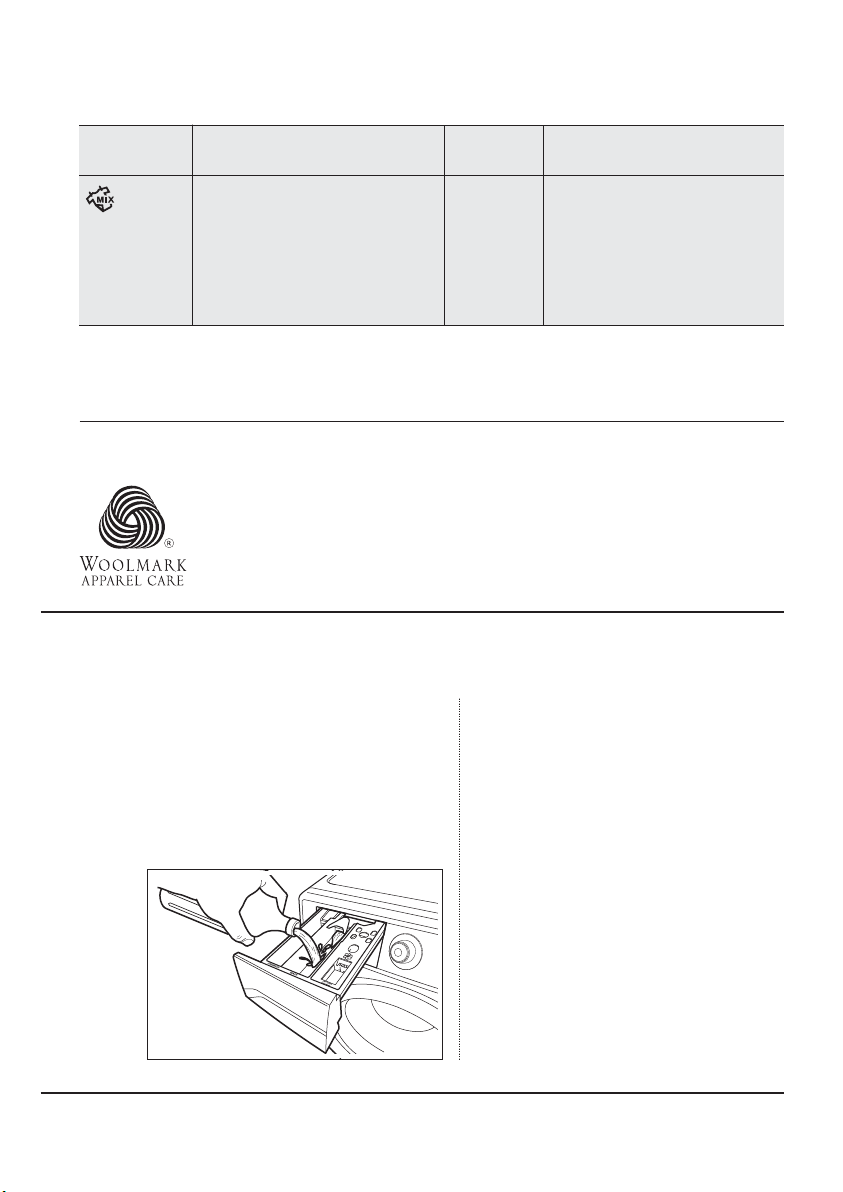
BAHASA INDONESIA 45
Program;
Suhu
Refresh
Mixed
[Segarkan
Campuran]
1) Opsi Vapour [Uap] bisa dikombinasikan dengan suhu 90 hingga 40 °C saja.
2) Program “Energy Saver [Penghemat Energi]” dengan pilihan opsi 60 °C dianjurkan untuk beban
penuh katun dengan kotoran tanah normal, dan merupakan program label rating air dan energi.
Jenis beban; Bobot maks.
beban (Pakaian kering)
Program Vapour [Uap] untuk
item kain sintetis atau
campuran. Siklus ini menghilangkan bau dan membantu
melicinkan kerutan cucian;
beban maks.: 1.5 kg
Deskripsi
siklus
digiling
dalam
uap.
Opsi bisa
dikombinasikan
Delay StartPakaian
SERTIFIKAT WOOLMARK
Siklus pencucian wool pada mesin ini telah disetujui oleh The Woolmark
Company untuk produk wool yang dapat dicuci dengan mesin cuci,
hanya apabila produk tersebut dicuci sesuai dengan instruksi pada
label pakaian serta instruksi dari produsen mesin cuci ini.
M1354
BEFORE FIRST USE4.
1.
Pastikan bahwa sambungan listrik
dan air mematuhi petunjuk
pemasangan.
2.
Masukkan 2 liter air ke wadah
deterjen untuk fase pencucian. Ini
akan mengaktifkan sistem
pembuangan air.
Pilih siklus Cottons [Katun] pada
3.
90 °C, tanpa ada cucian dalam
mesin, untuk menghilangkan residu
produksi apa pun dari tabung dan
bak kemudian aktifkan mesin.
Page 46
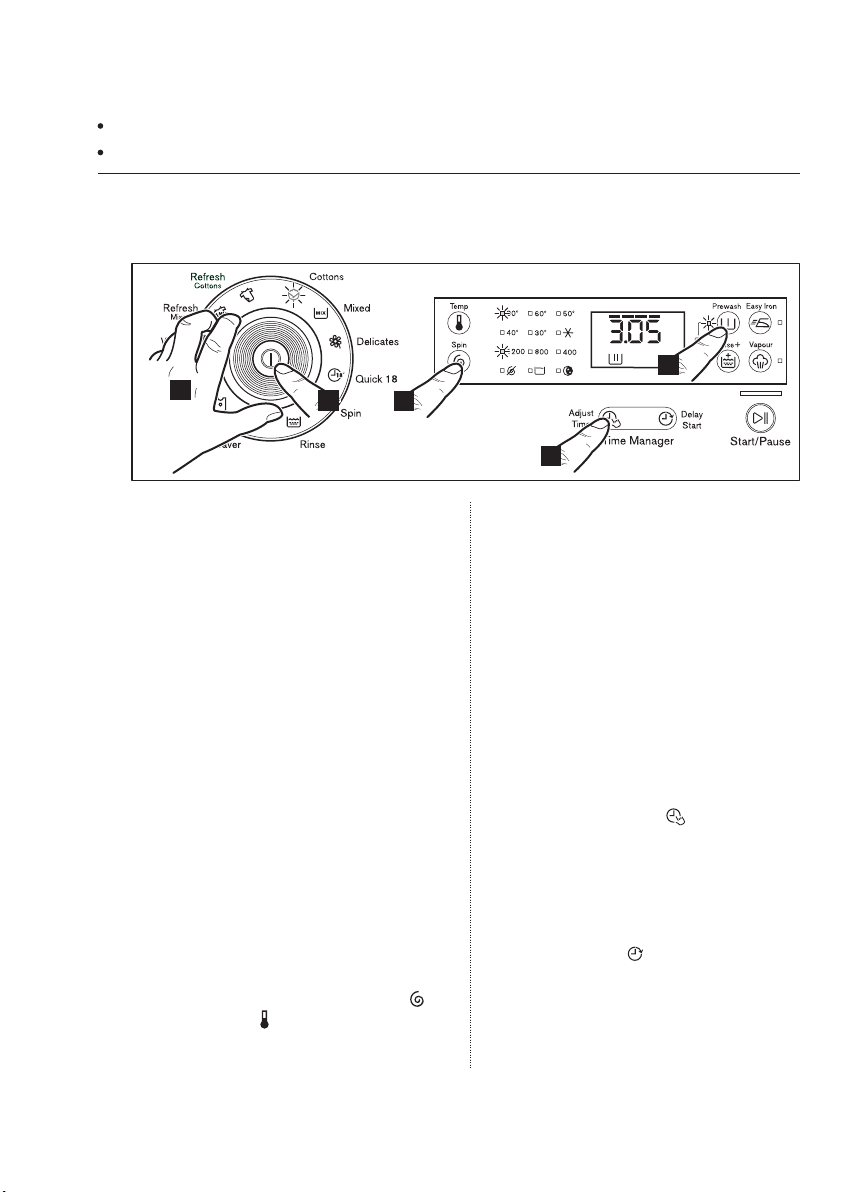
46
www.electrolux.com
PENGGUNAAN SEHARI-HARI
5.
Hubungkan steker listrik ke stop kontak listrik.
Nyalakan keran air.
5.1 Panduan Lima Langkah untuk Memulai
Langkah 1 - Mengatur Program untuk Pencucian
2
1
3
4
5
Tekan tombol On/Off untuk meng-
1.
hidupkan mesin cuci.
Putar tombol pemilih program ke
2.
program yang dikehendaki.
-
Lampu yang terkait akan menyala.
-
Buzzer akan berbunyi.
-
Tombol pemilih dapat diputar
searah atau berlawanan arah
jarum jam.
-
Setelah memilih program mencuci,
program yang dipilih akan tetap
berada di posisi tersebut .selama
siklus pencucian.
-
Layar menunjukkan tingkat Time
Manager, durasi program, dan
indikator fase program.
3.
Jika Anda ingin cucian diperas atau
menggunakan suhu berbeda dari
yang diusulkan oleh mesin cuci,
tekan Touchpad Spin [Peras] ‘ ’
dan suhu ‘ ’ berulang-ulang untuk
mengubah kecepatan perasan dan
suhu.
Tekan Touchpad opsi, jika Anda
4.
ingin cucian dicuci dengan beberapa
fungsi.
Fungsi berbeda dapat dikombinasikan yang tergantung pada program
yang dipilih.
Apabila touchpad ini ditekan, lampu
pilot yang bersangkutan akan
menyala. Apabila ditekan lagi, lampu
pilot yang bersangkutan akan
padam.
Jika Anda ingin mengurangi waktu
5.
pencucian, tekan Touchpad ‘Adjust
Time [Atur Waktu] ’ berulangulang untuk mengurangi waktu
pencucian.
Jika Anda ingin untuk menunda
mulainya program mencuci, tekan
touchpad Delay Start [Tunda
Pelaksanaan] ’ berulang-ulang
untuk memilih penundaan waktu
mesin cuci.
Page 47
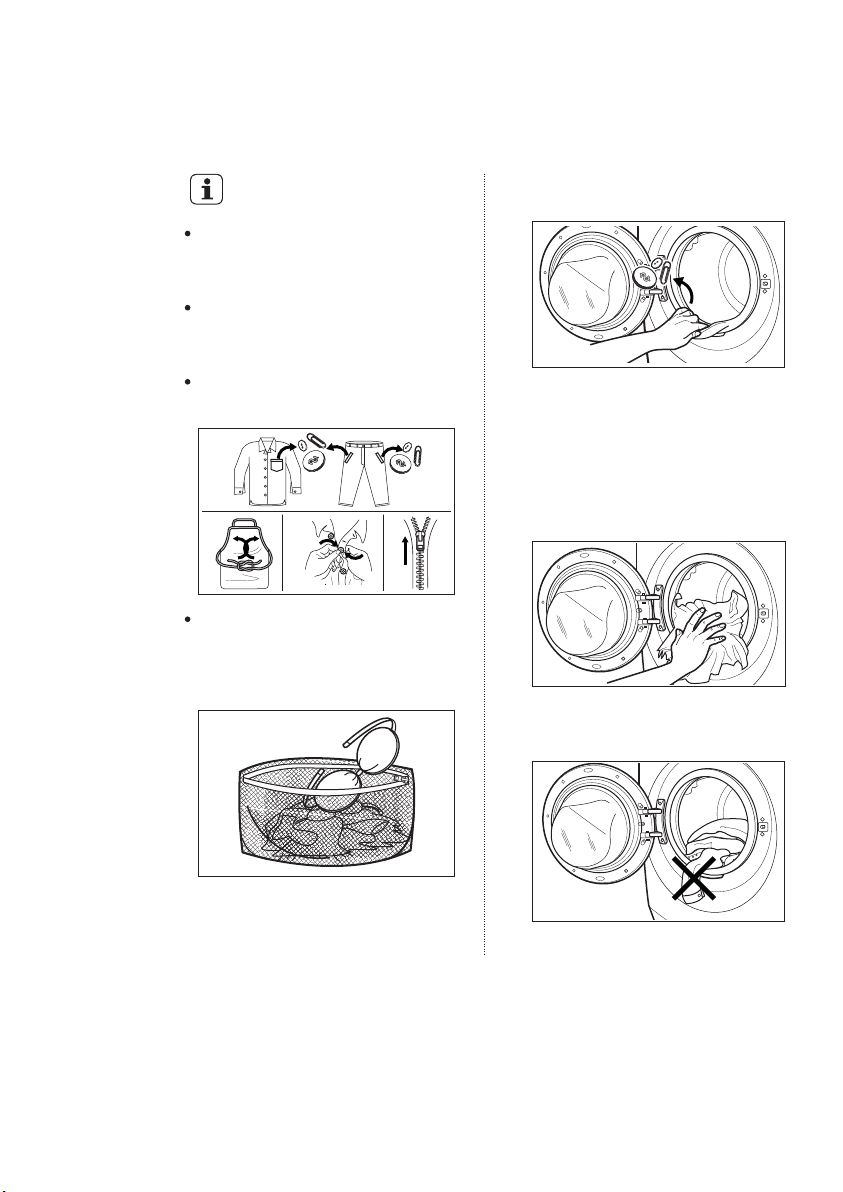
Langkah 2 - Memuat Cucian
1.
PENTING !
Jangan sampai ada benda logam
yang tertinggal di kain (misalnya,
jepit rambut, peniti, pin)
Pastikan Anda mencuci pengumpul tiras secara terpisah dari
penghasil tiras.
Kancingkan sarung bantal, tutup
resleting, kait dan buka kancing.
BAHASA INDONESIA 47
Buka pintu dengan hati-hati, tarik
2.
pegangannya ke arah luar.
Periksa dan bersihkan bendabenda (jika ada) yang bisa
terperangkap di dalam lipatan.
3.
Taruh cucian di dalam tabung,
satu-per-satu, dan pastikan
cucian terpisah satu sama lain.
Cuci bra, celana dalam dan kain
lembut lain di dalam kantung
cucian, yang dapat dibeli di
supermarket.
Pastikan tidak ada cucian tersisa
4.
antara seal dan pintu.
Tutup pintu.
5.
Page 48
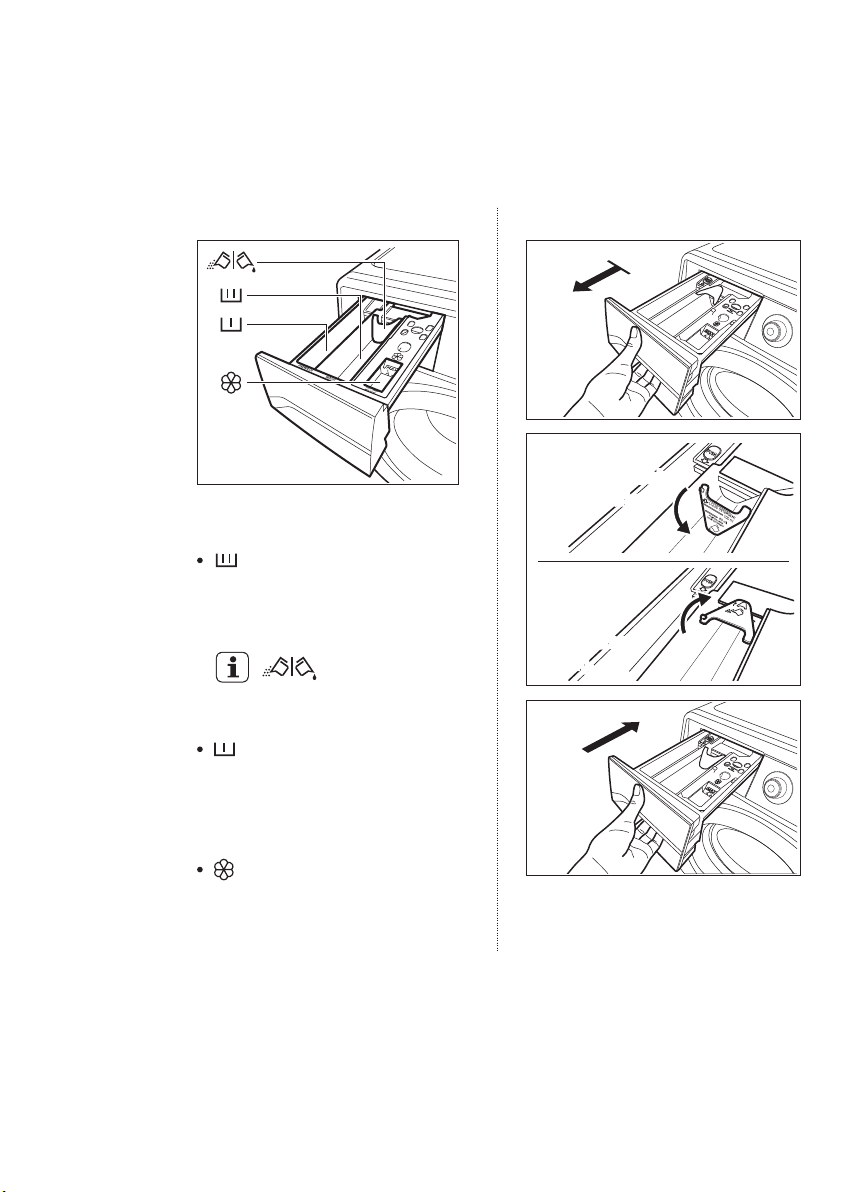
48
POSITION USING
POWDER DETERGENT
www.electrolux.com
Langkah 3 - Menggunakan Deterjen dan Aditif
1.
Laci Dispenser Deterjen
Model: EWF12932, EWF12932S
Dispenser deterjen dibagi ke
dalam tiga wadah.
Wadah ‘MAIN WASH’
(CUCIAN UTAMA)
Wadah ini digunakan untuk
deterjen pada semua program.
Sekat deterjen
Sekat untuk deterjen
bubuk atau cair.
Wadah ‘PREWASH’
(PRACUCI)
Wadah ini hanya digunakan
untuk deterjen jika Anda
memilih Prewash [Pracuci].
Wadah ‘SOFTENER’
(PELEMBUT)
Wadah ini digunakan untuk
kondisioner kain dan agen kanji.
Deterjen bubuk atau cair.
1
2
Posisi ke bawah :
Posisi ke bawah :
untuk deterjen
untuk deterjen
cair.
cair.
Posisi ke atas :
Posisi ke atas :
untuk deterjen
untuk deterjen
bubuk
bubuk
(pengaturan
(pengaturan
pabrik).
pabrik).
3
Page 49
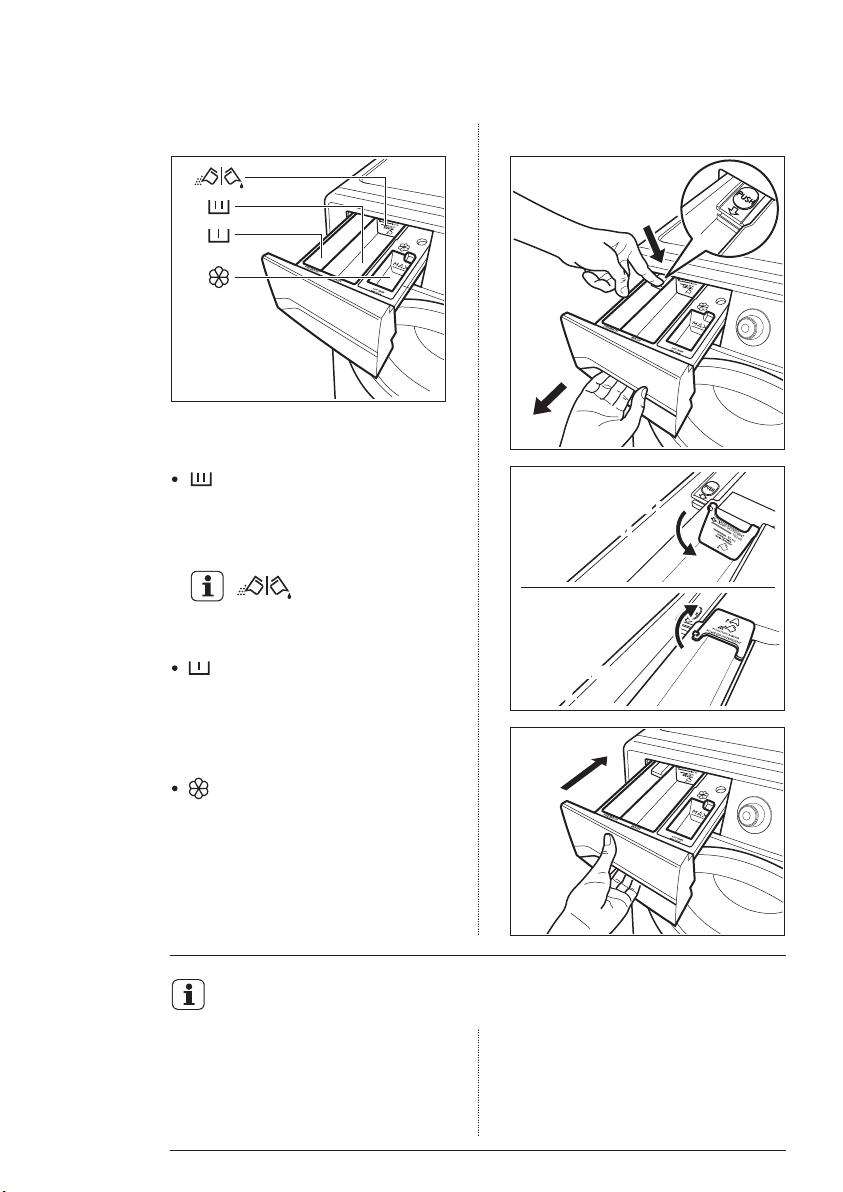
Dispenser deterjen dibagi ke dalam
tiga wadah.
BAHASA INDONESIA 49
Deterjen bubuk atau cair.Model: EWF12832, EWF12832S
1
2
Wadah ‘MAIN WASH’
(CUCIAN UTAMA)
Wadah ini digunakan untuk
deterjen pada semua program.
Sekat deterjen
Sekat untuk deterjen
bubuk atau cair.
Wadah ‘PREWASH’
(PRACUCI)
Wadah ini hanya digunakan
untuk deterjen jika Anda memilih
Prewash [Pracuci].
Wadah ‘SOFTENER’
(PELEMBUT)
Wadah ini digunakan untuk
kondisioner kain dan agen kanji.
Jika Anda menggunakan deterjen cair:
Jangan gunakan deterjen
gelatin atau cairan kental.
Jangan taruh lebih banyak
cairan dibandingkan level
maksimal.
3
Posisi ke bawah :
Posisi ke bawah :
untuk deterjen
untuk deterjen
cair.
cair.
Posisi ke atas :
Posisi ke atas :
untuk deterjen
untuk deterjen
bubuk
bubuk
(pengaturan
(pengaturan
pabrik).
pabrik).
4
Jangan atur fase PREWASH
[PRACUCI].
Jangan atur fase DELAY START
[TUNDA PELAKSANAAN].
Page 50
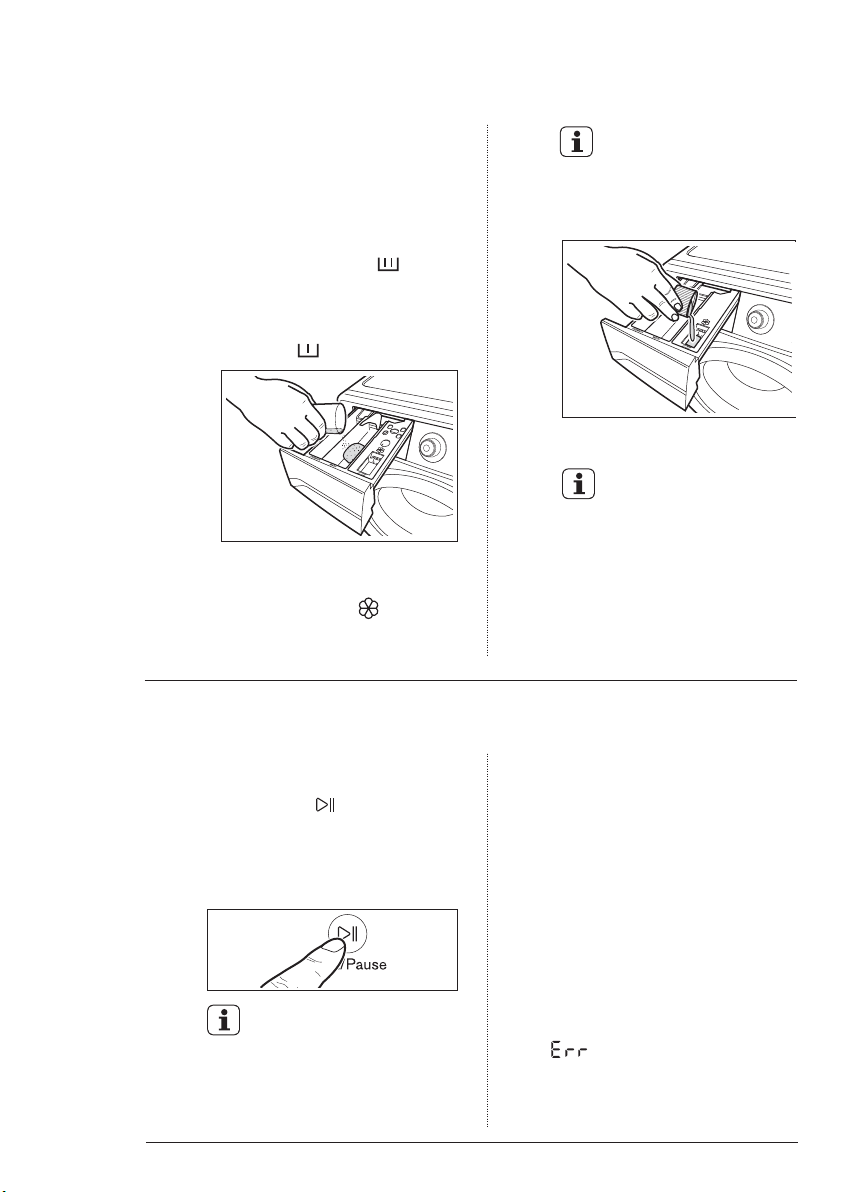
50
www.electrolux.com
2.
Ukur deterjen dan pelembut kain;
-
Tarik keluar laci deterjen
sampai berhenti.
-
Ukur jumlah deterjen yang
diperlukan, tuangkan ke dalam
wadah cuci utama ( ) dan,
jika Anda ingin melaksanakan
fase “Prewash [Pracuci]”,
tuangkan ke dalam wadah
bertanda .
-
Jika diperlukan, tuangkan
pelembut cucian ke dalam
wadah bertanda (takaran
yang digunakan tidak boleh
melebihi tanda “MAX” di laci).
Jika Anda menggunakan
pelembut pakaian yang
kental, disarankan untuk
mengencerkannya dengan
air.
-
Tutup laci dengan hati-hati.
Setelah siklus mencuci
selesai, sisa deterjen,
pelembut dan air dapat
tersisa dalam dispenser.
Disarankan untuk membersihkan dispenser secara
teratur untuk membuang
semua sisa.
Langkah 4 - Memulai program
Untuk memulai program, tekan
Touchpad Start/Pause
[Mulai/Jeda] ( ), lampu pilot
yang terkait akan berhenti
berkedip dan durasi program
default akan ditampilkan di
layar.
Setelah kira-kira 15 menit
dari awal program:
Mesin otomatis akan
menyesuaikan durasi
program yang dipilih
menurut jenis dan ukuran
beban.
-
Layar akan menampilkan
durasi program yang
disesuaikan.
AWAS!
Jika Anda memutar pemilih
program menuju program lainnya
ketika mesin bekerja, pesan
‘ ’ muncul di layar untuk
menunjukkan pilihan yang salah.
Mesin tidak akan melakukan
program baru yang dipilih.
Page 51
BAHASA INDONESIA 51
5.2 Menyela Program
Untuk menjeda, tekan Start/Pause
[Mulai/Jeda]. Indikator akan mulai
berkedip.
Tekan tombol Start/Pause
[Mulai/Jeda] lagi. Program akan
dilanjutkan.
5.3 Mengubah Program
Mengubah program yang berjalan
dimungkinkan hanya dengan
mematikan alat.
Tekan tombol ‘On/Off’ untuk
-
membatalkan program dan
mematikan alat.
Tekan lagi tombol ‘On/Off’ untuk
-
memulai alat.
Sekarang, Anda dapat mengatur
program pencucian baru.
Alat tidak akan menguras air.
5.4 Mengubah Opsi
Dimungkinkan hanya mengubah opsi
tertentu setelah program itu dimulai.
Tekan Touchpad Start/Pause
1.
[Mulai/Jeda]. Indikator akan mulai
berkedip.
Ubah opsi.2.
Tekan lagi Start/Pause [Mulai/
3.
Jeda]. Program akan dilanjutkan.
5.5 Membuka Pintu
Ketika program atau Delay Start
[Tunda Pelaksanaan]beroperasi, pintu
mesin terkunci dan layar menampilkan
indikator ‘ ’.
Mula-mula, setel mesin ke PAUSE
[JEDA] dengan menekan touchpad
"Start/Pause [Mulai/Jeda]". Tunggu
hingga indikator kunci pintu ‘ ’
mati, lalu pintu bisa dibuka.
Jika indikator kunci pintu ‘ ’ tidak
lenyap, artinya mesin sudah panas
dan level air ada di atas sisi bawah
pintu atau tabung berputar. Jika
demikian, pintu TIDAK BISA dibuka.
Jika Anda tidak bisa membuka pintu
tapi Anda harus membukanya Anda
harus mematikan mesin dengan
menekan tombol ‘On/Off’ untuk
menonaktifkan alat. Setelah sekitar 5
menit pintu bisa dibuka.
AWAS!
Perhatikan level air dan
suhu air.
5.6 Di Akhir Program
-
Alat berhenti secara otomatis.
-
Sinyal akustik akan aktif.
-
Layar akan menampilkan ‘ ’.
-
Indikator di Touchpad Start/Pause
[Mulai/Jeda] mati.
-
Indikator kunci pintu ‘ ’ mati.
-
Keluarkan cucian dari alat.
Pastikan tabung kosong.
-
Biarkan pintu terbuka, untuk
mencegah jamur dan bau.
-
Tutup keran air.
Pada akhir program, waktu yang
tersisa dapat secara tiba-tiba
berkurang dari 7 menit atau
kurang menjadi 0 karena adanya
kelebihan perkiraan total waktu
program dalam tahap deteksi
muatan. Dalam beberapa kasus
(dengan muatan yang benar-benar
seimbang) waktu program dapat
lebih singkat daripada waktu yang
diperkirakan setelah tahap deteksi
muatan selesai. Ini adalah perilaku
normal mesin dan tidak perlu
dikhawatirkan karena hal ini tidak
mengurangi kinerjanya.
Page 52
52
www.electrolux.com
5.7
Ketika Program Pencucian
Selesai, Tapi masih tersisa air
di Tabung
-
Tabung berputar secara reguler
untuk untuk mencegah kerutan
cucian.
-
Indikator kunci pintu ‘ ’ menyala.
Pintu tetap terkunci.
Anda harus menguras air untuk
membuka pintu.
Untuk menguras air:
1.
Atur program "Spin [Peras]".
Jika perlu, turunkan kecepatan
2.
perasan.
3.
Tekan Touchpad Start/Pause
[Mulai/Jeda]. Alat akan menguras
air dan memeras.
4.
Setelah program selesai dan
indikator kunci pintu ‘ ’ mati,
Anda bisa membuka pintu.
5.
Tekan tombol ‘On/Off’ untuk
menonaktifkan alat.
5.8
Optional AUTO- Stand by
Pilihan AUTO Stand by akan secara
otomatis mematikan aplikasi yang
berjalan untuk menurunkan tingkat
komsumsi energy ketika :
Bila perangkat tidak digunakan
dalam waktu 5 menit sebelum
tombol “Start/Pause” di tekan.
Tekan tombol “On/Off” untuk
mengaktifkan kembali
perangkat yang di gunakan.
5 Menit setelah proses
pencucian berakhir.
Tekan tombol “ On/Off” untuk
mengaktifkan kembali
perangkat yang di gunakan.
Putar tombol program untuk
mengatur pengaturan yang baru.
5.9 Fitur Pengaman untuk Anak
Alat Anda disertai dengan CHILD
SAFETY LOCK [KUNCI PENGAMAN
UNTUK ANAK] yang memun Anda
meninggalkan alat tanpa pengawasan dengan pintu terbuka tanpa
harus khawatir bahwa anak-anak
akan cedera atau menyebabkan
kerusakan alat.
Atur opsi ini dengan menekan
Start/Pause [Mulai/Jeda] dan setelah
memilih program pencucian yang
diperlukan.
Fungsi ini akan tetap aktif bahkan
setelah alat dimatikan.
Mengatur opsi Pengaman untuk
Anak:
Untuk mengaktifkan fungsi ini,
tekan Touchpad ‘Prewash
[Pracuci]' dan 'Rinse + [Bilas +]'
sekaligus hingga layar
menampilkan simbol ‘ ’.
Untuk menonaktifkan fungsi ini,
tekan Touchpad ‘Prewash
[Pracuci]' dan 'Rinse + [Bilas +]'
sekaligus hingga simbol ‘ ’ mati.
Page 53
BAHASA INDONESIA 53
PETUNJUK MENCUCI6.
6.1 Memilah Cucian
Ikuti simbol kode mencuci pada
setiap label pakaian dan petunjuk
pencucian dari produsen. Pilah
cucian sebagai berikut: putih,
berwarna, sintetis, lembut, wol.
6.2 Suhu
Untuk cucian katun dan linen
putih yang kotor biasa
90°C
(misalnya taplak meja kecil,
handuk, taplak meja, seprai...).
Untuk pakaian berwarna yang
tak luntur dan kotor biasa
(misalnya kemeja, baju tidur
60°C
wanita, piyama....) berbahan
50°C
linen, katun atau serat sintetis
40°C
dan untuk katun putih yang
kotor sedikit (misalnya baju
dalam).
Untuk cucian halus (mis.,
gorden jala-jala), cucian
campuran, termasuk serat
sintetis dan wol yang ada label
30°C
pure new wool, machine
Dingin
washable, non-shrink [murni
wol baru, dapat dicuci mesin,
tidak menyusut].
6.3 Sebelum Memasukkan Cucian
Jangan sekali-kali menyatukan
cucian putih dan berwarna. Cucian
putih dapat menjadi kusam dalam
pencucian.
Pakaian berwarna yang baru
mungkin luntur saat pencucian
pertama; oleh karena itu, harus
dicuci secara terpisah.
Pastikan tidak ada benda logam
yang tertinggal dalam cucian
(misalnya jepit rambut, peniti, bros).
Kancingkan sarung bantal, tutup
risleting, kancing kait dan kancing
tekan. Kaitkan ikat pinggang atau
ikat pita yang panjang.
Hilangkan noda membandel
sebelum dicuci.
Gosok bagian yang sangat kotor
dengan deterjen khusus atau pasta
deterjen. Perlakukan gorden
dengan hati-hati. Lepaskan pengait
atau masukkan ke dalam kantung
atau jaring.
6.4 Beban Maksimal
Beban yang disarankan tercantum
dalam bagan program. Aturan
umum:
Katun, linen:
Sintetis:
Bahan
halus dan
wol:
penuhi tabung tapi
jangan terlalu padat;
jangan penuhi tabung
lebih dari setengahnya;
drum no more
than one third full.
Mencuci dengan beban maksimum
adalah yang paling efisien dalam
penggunaan air dan energi. Untuk
cucian yang sangat kotor, kurangi
jumlah beban.
6.5 Membersihkan Noda
Noda membandel mungkin tidak
dapat dihilangkan hanya dengan air
dan deterjen. Karena itu, disarankan
untuk memberikan perlakuan awal
sebelum mencuci.
Darah: hilangkan noda yang masih
baru dengan air dingin. Untuk noda
yang sudah mengering, rendam
semalam dalam air dengan deterjen
khusus, kemudian gosok dengan air
dan sabun.
Page 54

54
www.electrolux.com
Cat berbasis minyak: lembapkan
dengan penghilang noda bensin,
letakkan pakaian di atas kain yang
lembut, kemudian tekan-tekan
nodanya; lakukan beberapa kali.
Noda gemuk kering: lembapkan
dengan terpentin, letakkan pakaian
pada permukaan yang lembut dan
tekan-tekan noda dengan ujung jari
yang dibungkus lap katun.
Karat: asam oksalat yang
dilarutkan dalam air panas atau
produk penghilang karat digunakan
dalam keadaan dingin.
Berhati-hatilah dengan noda karat
yang sudah lama karena struktur
selulosa bahan sudah rusak dan
bahan cenderung sobek.
Noda jamur: bersihkan dengan
pemutih, bilas dengan baik (hanya
cucian putih dan cucian berwarna
yang tidak luntur).
Rumput: beri sedikit sabun mandi
dan hilangkan dengan pemutih
(hanya cucian putih dan cucian
berwarna yang tidak luntur.).
Bolpoin dan lem: basahi dengan
aseton (*), taruh garmen di atas kain
lunak dan gosok-colek noda itu.
Lipstik: lembapkan dengan aseton
(*) seperti di atas, kemudian
hilangkan noda dengan spiritus
alkohol. Hilangkan sisa noda dari
bahan putih dengan pemutih.
Anggur merah: rendam dalam air
dan deterjen, bilas dan hilangkan
dengan asam asetat atau asam
sitrat, kemudian bilas. Hilangkan
sisa noda dengan pemutih.
Tinta: Tergantung pada jenis
tintanya, lembapkan terlebih dulu
dengan aseton (*), kemudian
gunakan asam asetat; hilangkan
sisa noda pada kain putih dengan
pemutih, kemudian bilas hingga
bersih.
Noda tar: gunakan penghilang
noda terlebih dulu, spiritus alkohol
atau bensin, kemudian gosok
dengan pasta deterjen.
(*) jangan mengunakan aseton
pada sutra sintetis.
6.6 Deterjen dan Aditif
Hasil cuci yang baik juga bergantung
pada pemilihan dan penggunaan
deterjen dalam jumlah yang tepat
agar tidak banyak yang terbuang
percuma dan untuk melindungi
lingkungan.
Meskipun dapat terurai secara alami,
deterjen mengandung zat yang,
dalam jumlah besar, dapat merusak
keseimbangan alam.
Pemilihan deterjen bergantung pada
jenis bahan (halus, wol, katun, dll.),
warna, suhu pencucian dan tingkat
kekotoran.
Hanya deterjen mesin cuci pintu
Depan sedikit busa yang boleh
digunakan dalam alat ini:
deterjen bubuk untuk semua
jenis bahan,
deterjen bubuk untuk bahan
halus (60 °C maks) dan wol,
deterjen cair, lebih baik untuk
program cuci suhu rendah (60 °C
maks) untuk semua jenis bahan,
atau yang khusus untuk wol.
Page 55
BAHASA INDONESIA 55
Deterjen dan bahan aditif harus
ditempatkan di wadah yang sesuai
dalam laci dispenser yang tepat
sebelum program cuci dimulai.
Tuangkan deterjen cair ke dalam
kompartemen laci deterjen bertanda
‘ ’ tepat sebelum memulai
program.
Jika menggunakan bubuk
konsentrat, atau deterjen cair,
harus dipilih program tanpa
PREWASH [PRA-CUCI].
Segala aditif pelembut cucian atau
kanji harus dituangkan ke dalam
wadah bertanda ‘ ’ sebelum
memulai program cuci.
Ikuti saran produsen dalam hal
jumlah yang harus digunakan dan
jangan melampaui tanda MAX pada
laci penyaluran deterjen.
Jangan semprotkan produk
pra-perlakuan noda (seperti
Preen) pada atau di dekat mesin,
karena dapat menyerang bahan
plastik sehingga mengurangi
masa pakainya.
6.7 Jumlah Deterjen yang
Digunakan
Jenis dan jumlah deterjen tergantung pada jenis bahan, jumlah
cucian, tingkat kekotoran dan
kesadahan air yang digunakan.
Kesadahan air digolongkan
berdasarkan ukuran yang disebut
"derajat" kesadahan.
Informasi mengenai kesadahan air
di wilayah Anda dapat diperoleh
dari perusahaan air minum (PAM)
setempat, atau dari pihak yang
berwenang.
Ikuti petunjuk dari produsen mengenai jumlah yang harus digunakan.
Tidak cukup bubuk deterjen
menyebabkan:
cucian memudar,
pakaian berminyak.
Terlalu banyak bubuk deterjen
menyebabkan:
berbuih,
efek pencucian berkurang,
pembilasan yang tidak memadai.
Kurangi jumlah deterjen jika:
beban yang dicuci hanya sedikit,
cucian hanya kotor sedikit,
terbentuk banyak busa ketika
pencucian berlangsung.
Page 56
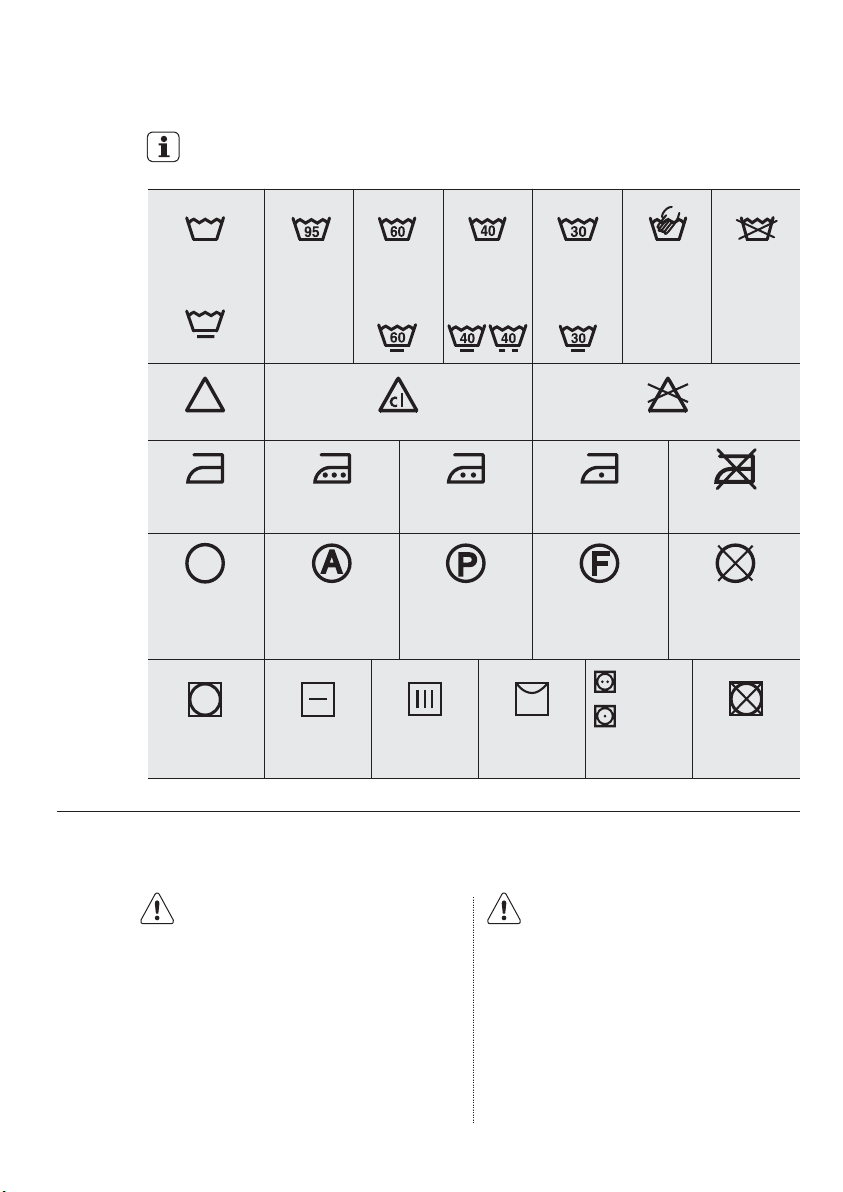
56
www.electrolux.com
SIMBOL KODE CUCI INTERNASIONAL7.
Simbol ini muncul pada label kain, untuk membantu Anda memilih cara
terbaik untuk memperlakukan cucian Anda.
Cuci energik
Suhu
pencucian
maksimal
95 °C
Cuci lembut
Pemutihan
Menyetrika
Pencucian
kering
Mengeringkan Datar
Beri pemutih di dalam air dingin JANGAN beri pemutih
Setrika panas
maks. 200 °C
Pencucian
kering dalam
semua larutan
Suhu
pencucian
maksimal
60 °C
Setrika hangat
maks. 150 °C
Pencucian kering
dalam perkloretilena,
bensin, alkohol murni,
R 111 & R 113
Di jemuran
Suhu
pencucian
maksimal
40 °C
Di hanger
Suhu
pencucian
maksimal
30 °C
Setrika suam kuku
maks. 110 °C
Pencucian kering
dalam bensin,
alkohol murni dan
pakaian
R 113
Cuci tangan
Suhu tinggi
Suhu rendah
Pengering
dengan
pemanas
JANGAN
cuci sama
sekali
JANGAN
setrika
JANGAN
cuci kering
JANGAN
digiling kering
MERAWAT DAN MEMBERSIHKAN8.
PERINGATAN!
Anda harus MENCABUT steker
listrik pada mesin dari stopkontak,
sebelum melakukan pembersihan
atau perawatan.
8.1 Pembersihan Luar
Bersihkan mesin dengan sabun dan
air hangat. Keringkan sepenuhnya
semua permukaan.
AWAS!
Jangan gunakan alkohol,
pelarut, atau produk kimiawi.
8.2 Membersihkan kerak
Air yang kita gunakan, biasanya
mengandung kerak. Sebaiknya,
gunakan serbuk pelunak air di
dalam mesin secara berkala.
Page 57
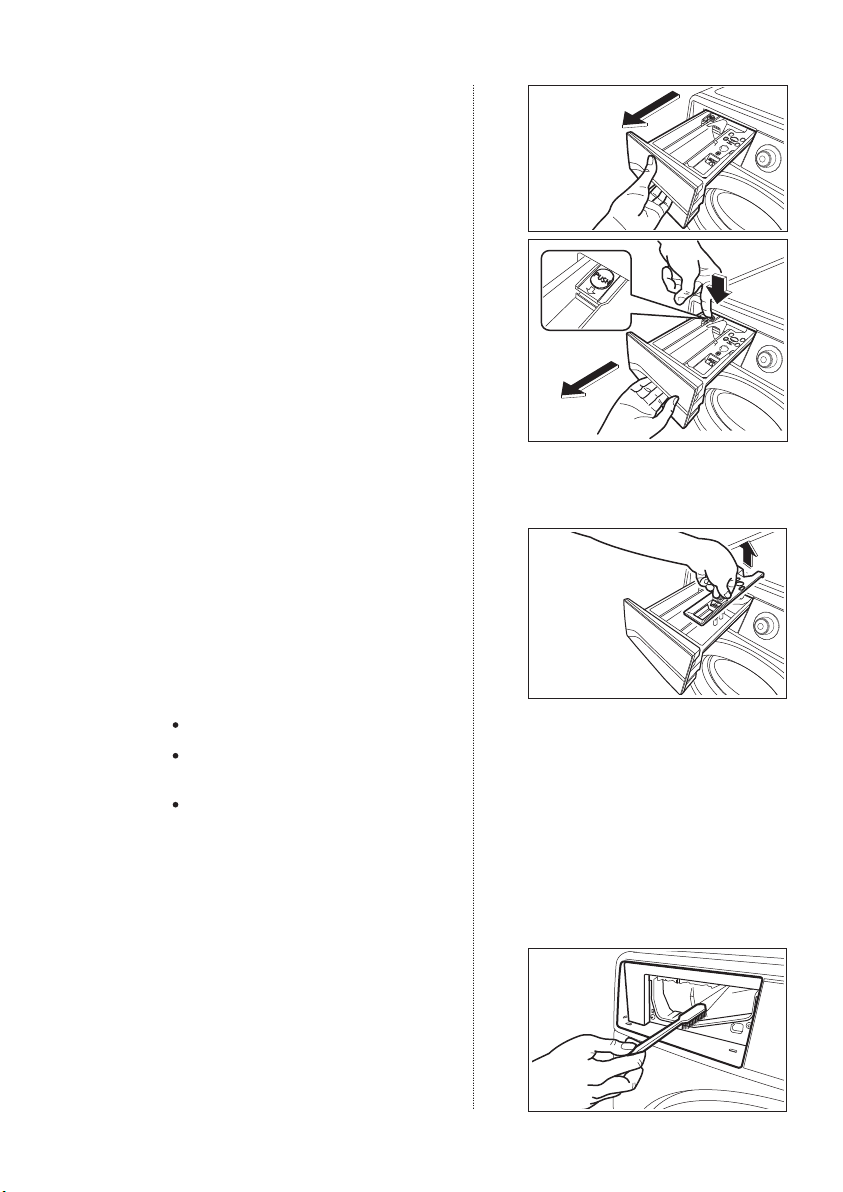
BAHASA INDONESIA 57
Lakukan ini secara terpisah dari
pencucian, dan sesuai dengan
petunjuk pabrik pembuat serbuk
pelunak air tersebut.
Cara ini akan membantu mencegah
terbentuknya endapan kerak.
8.3 Setelah Setiap Kali Mencuci
Biarkan pintu terbuka selama
beberapa saat. Ini membantu
mencegah penggumpalan dan
pembentukan bau stagnan di dalam
mesin. Membuka pintu setelah
selesai mencuci akan membantu
mengawetkan sekat pintu.
8.4 Pencucian Perawatan
Dengan menggunakan pencucian
suhu rendah, hal ini memungkinkan
bertimbunnya residu di dalam
tabung.
Kami anjurkan agar pencucian
pemeliharaan dilakukan secara
rutin.
Untuk menjalankan pencucian
pemeliharaan:
Tabung harus kosong.
Pilih program cuci katun
terpanas.
Gunakan takaran deterjen yang
normal, dan harus berupa
serbuk dengan kandungan
biologis.
8.5 Membersihkan Laci Dispenser
Laci dispenser serbuk cuci dan
aditif harus dibersihkan secara rutin.
Lepaskan laci dengan menekan
kaitannya ke bawah lalu tarik keluar.
Bilas di bawah keran untuk
menghilangkan sisa serbuk yang
menimbun.
1
2
3
Agar lebih mudah dicuci, bagian
atas wadah aditif dapat
dilepaskan.
8.6 Membersihkan Ceruk Laci
Telah melepaskan laci, gunakan
sikat kecil untuk membersihkan
ceruk, dengan memastikan bahwa
semua sisa bubuk deterjendiangkat dari bagian atas dan bawah
celah. Pasang kembali laci dan
jalankan program bilas tanpa ada
pakaian di dalam tabung.
Page 58
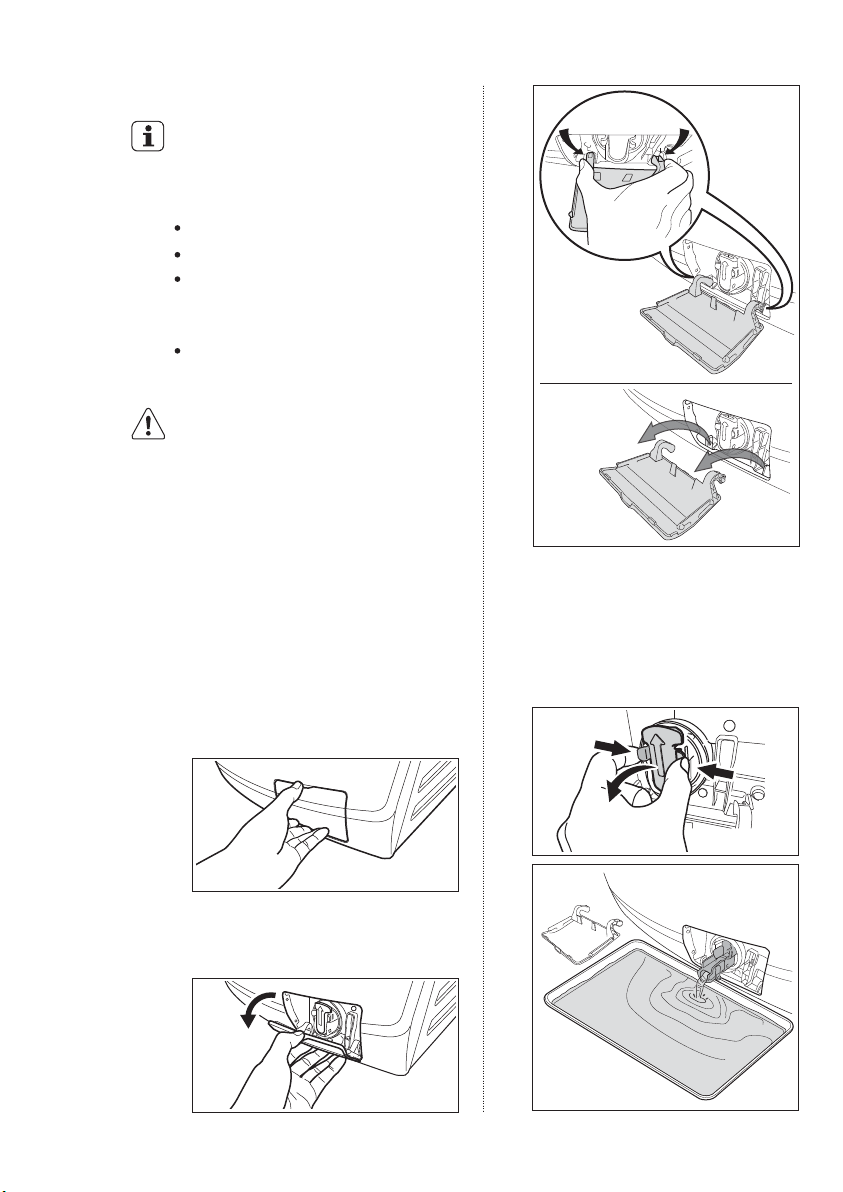
58
www.electrolux.com
8.7 Membersihkan Pompa
Periksa secara teratur pompa
pembuangan air dan pastikan
sudah bersih.
Bersihkan pompa jika:
Mesin tidak menguras air.
Tabung tidak bisa berputar.
Mesin mengeluarkan bunyi yang
tidak biasa karena tersumbatnya
pompa pembuangan air.
Layar menampilkan kode alarm
karena masalah pembuangan air.
PERINGATAN!
1. Lepaskan steker listrik dari stop
kontak.
2. Jangan lepaskan filter selagi
mesin beroperasi. Jangan
bersihkan pompa kruas jika air
dalam mesin panas. Air harus
dingin sebelum Anda
membersihkan pompa
pembuangan air.
Untuk membersihkan pompa
pembuangan air:
1.
Buka pintu pompa pembuangan
air.
1
meremas
kaki di
kedua
sisi
2
tarik
keluar
3.
Letakkan wadah di bawah ceruk
pompa pembuangan air untuk
mengumpulkan air yang mengalir.
Tekan dua tuas dan tarik ke depan
saluran pembuangan agar air
mengalir keluar.
2.
Tarik flap bawah, lalu peras kaki di
kedua sisi penutup bersama-sama
dan mengeluarkan (seperti gambar).
Page 59
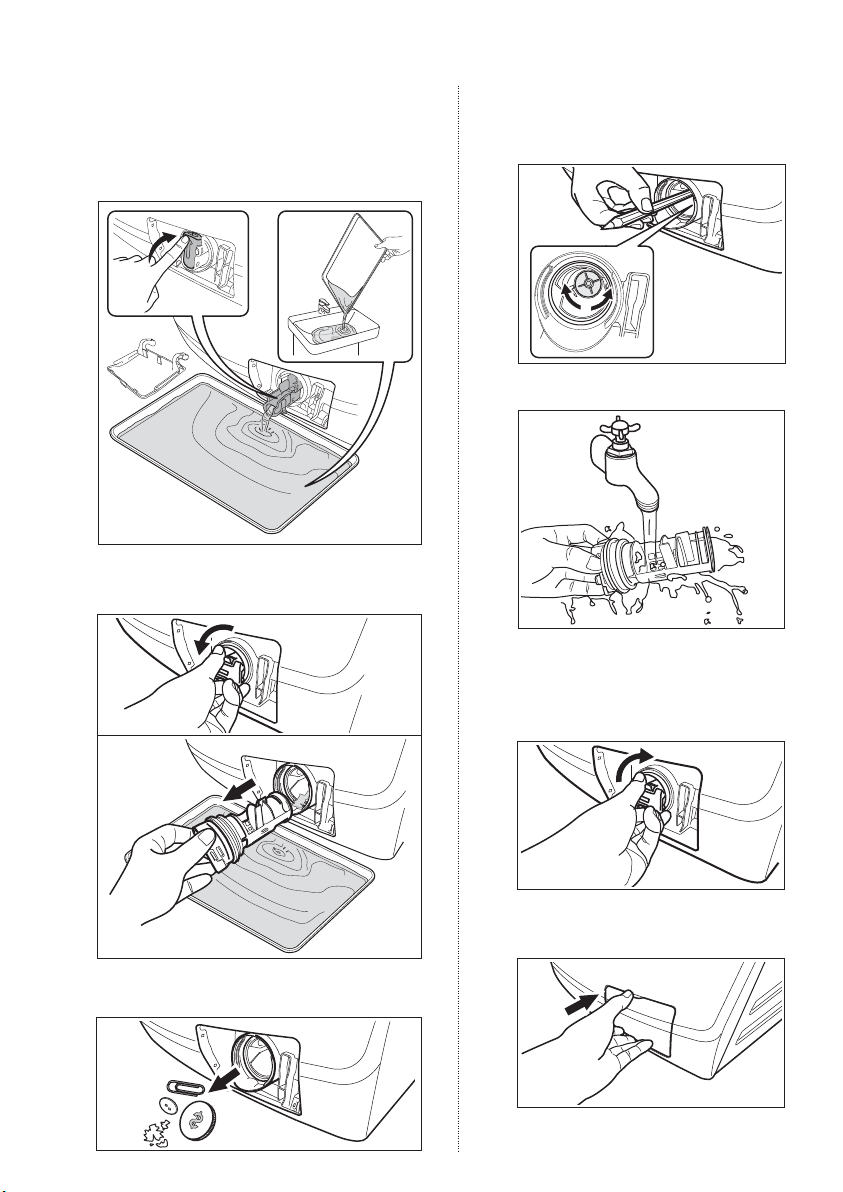
BAHASA INDONESIA 59
4. Ketika wadah sudah penuh air, kembalikan
lagi saluran pembuangan dan kosongkan
wadah. Lakukan langkah 3 kembali dan lagi
hingga tidak ada lagi air mengalir keluar dari
pompa pembuangan air.
5. Tarik kembali saluran pembuangan dan
putar filter untuk melepaskannya.
1
7.
Pastikan impeller bisa berputar.
Jika tidak demikian, hubungi pusat
layanan.
8.
Bersihkan filter di bawah keran air.
9.
Kembalikan lagi filter ke dalam
pemandu khususnya. Pastikan
Anda mengencangkan filter dengan
benar untuk mencegah kebocoran.
2
6. Angkat bulu halus dan benda dari pompa
(jika ada).
10.
Letakkan lagi sekatnya dan tutup
pintu pompa pembuangan air.
Page 60
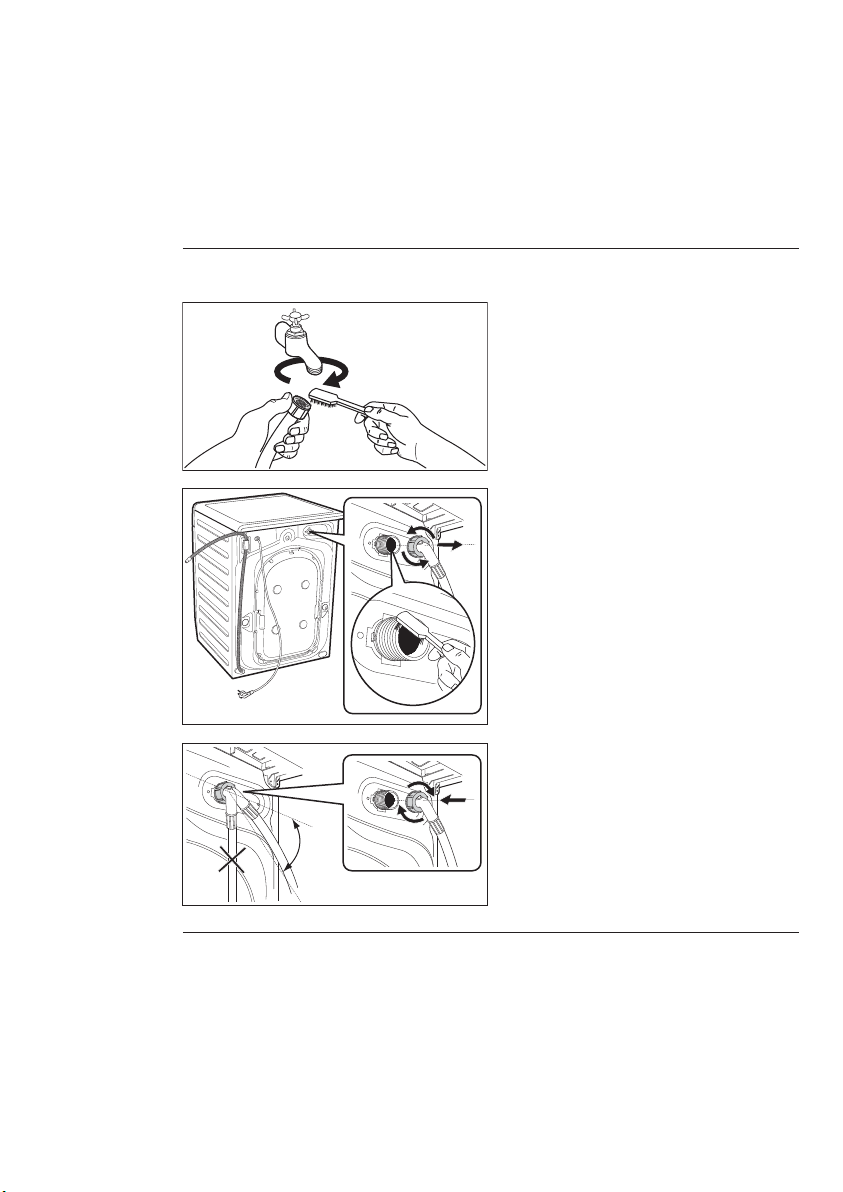
60
www.electrolux.com
8.8 Membersihkan saringan Masukan Air
Jika air sangat sadah atau berisi jejak endapan kapur, filter masukan air
mungkin bisa tersumbat.
Karena itu ada baiknya membersihkannya dari waktu ke waktu.
Untuk membersihkan saringan masukan air:
1.
Tutup keran air.
2.
Lepaskan selang masukan air dari
keran air.
3.
Bersihkan saringan dalam selang
dengan sikat yang kaku.
4.
Lepaskan selang masukan di
belakang mesin.
5.
Bersihkan filter di dalam katup
dengan sikat kaku atau handuk.
45°
6. Pasang lagi selang masukan.
Pastikan pasangannyakuat untuk
mencegah kebocoran.
7. Buka keran air.
Page 61
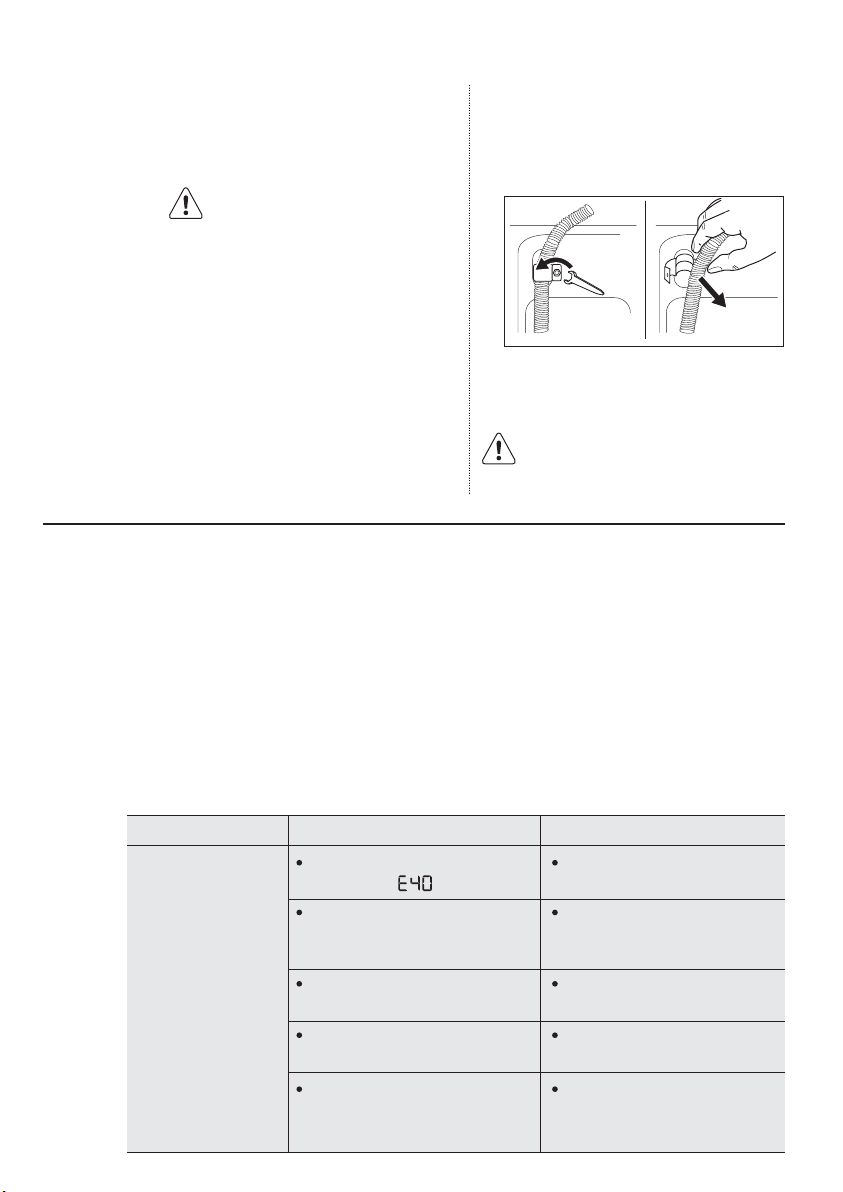
BAHASA INDONESIA 61
8.9 Bahaya Kebekuan
Jika mesin terpaparkan ke suhu di
bawah 0°C, lakukan sejumlah
langkah pencegahan.
Lepaskan steker listrik
dari stop kontak.
Tutup Keran Air.1.
2. Buka sekrup selang air masuk.
3. Letakkan mangkok di bawah
celah pompa pembuangan air
untuk mengumpulkan air yang
mengalir keluar.
Lepaskan selang Pembuangan
4.
Air dari penopang belakang dan
cabut dari bak cuci atau keran.
Tarik ke depan saluran pembuangan dan yang dari selang
masukan dalam mangkok yang
ditempatkan di lantai dan biarkan
air mengalir keluar.
5. Sekrup lagi selang masukan air
dan posisikan lagi saluran
pembuangan.
Apabila Anda bermaksud
menjalankan lagi mesin,
pastikan suhu sekitar mesin di
atas 0°C.
PEMECAHAN MASALAH9.
Sejumlah masalah terjadi akibat kurangnya pemeliharaan yang sederhana, atau tidak
terperhatikan, yang sesungguhnya dapat dengan mudah diselesaikan tanpa
memanggil teknisi. Sebelum menghubungi Service Centre [Pusat Layanan] di tempat
Anda, lakukanlah dulu pengecekan seperti yang tercantum di bawah ini.
Selama pengoperasian mesin, mungkin saja lampu pilot Start/Pause [Mulai/Jeda]
berkedip-kedip untuk menandakan bahwa mesin tidak bekerja.
Jika masalah sudah diatasi, tekan tombol Start/Pause [Mulai/Jeda] untuk kembali
menjalankan program. Jika, setelah pemeriksaan di atas, masih ada masalah, hubungi
Pusat Layanan setempat.
Malafungsi Kemungkinan penyebabnya Solusi
Mesin tidak mau
berfungsi :
Pintu belum ditutup. (Kode
kesalahan: )
Steker belum dimasukkan
dengan benar ke dalam stop
kontak listrik.
Tidak ada arus listrik pada
stop kontak.
Tombol Start/Pause
[Mulai/Jeda] belum ditekan.
Program tunda pelaksanaan
sudah dipilih.
Tutup pintu masuk cucian
sampai rapat.
Pasang steker ke dalam
soket listrik.
Periksa instalasi listrik di
tempat Anda.
Tekan tombol Start/Pause
[Mulai/Jeda].
Jika cucian harus segera
dicuci, batalkan program
tunda pelaksanaan.
Page 62
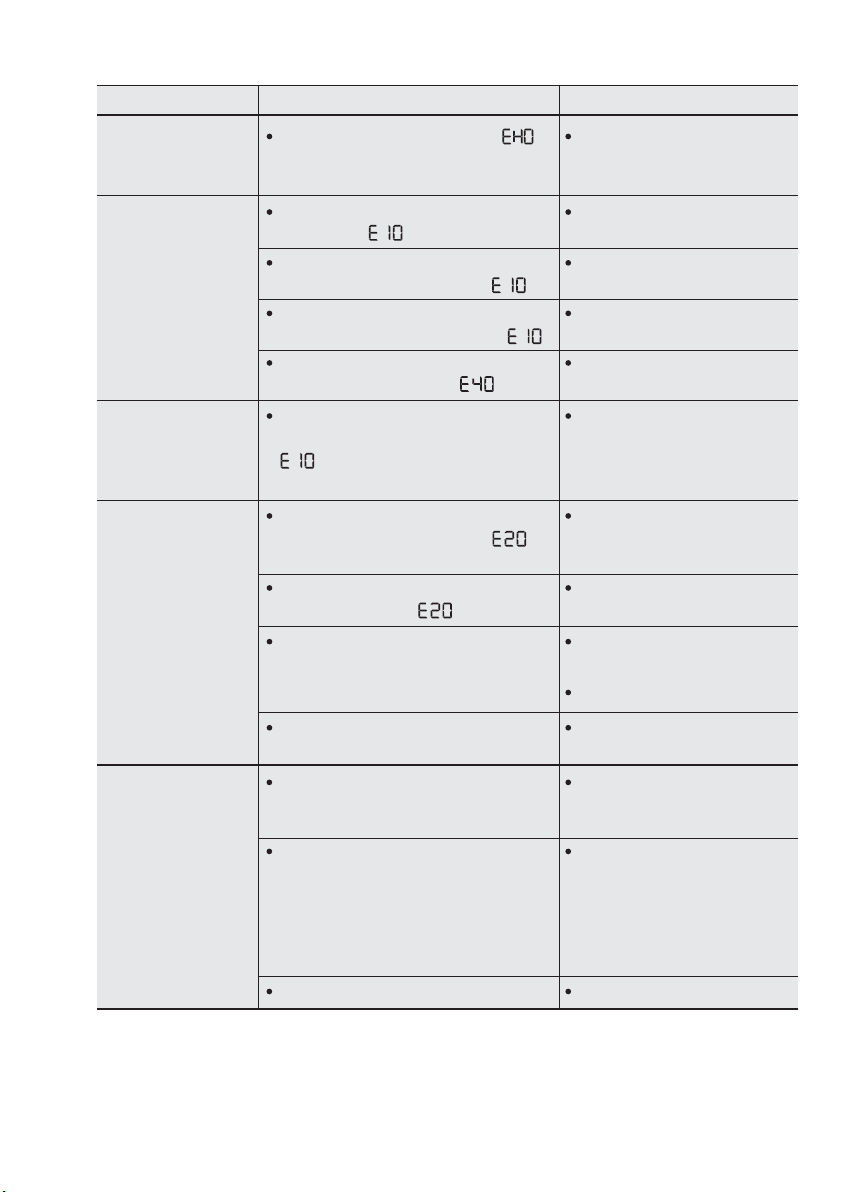
62
www.electrolux.com
Malafungsi Kemungkinan penyebabnya Solusi
Mesin tidak mau
berfungsi :
Listrik tidak stabil (bila kode
tampil di layar) .
Keran air tertutup. (Kode
kesalahan: )
Selang air masuk terjepit atau
Mesin tidak
mengisiair :
tertekuk. (Kode kesalahan: )
Filter dalam selang air masuk
tersumbat. (Kode kesalahan: )
Pintu tidak tertutup dengan
baik. (Kode kesalahan: )
Mesin mengisi
air kemudian
langsung
Ujung selang pembuangan air
terlalu rendah. (Kode kesalahan:
)
membuangnya :
Tunggu hingga listrik stabil
dan mesin akan berjalan
normal secara automatis.
Buka keran air.
Periksa sambungan selang
masukan air.
Bersihkan saringan selang
masukan air.
Tutup pintu masuk cucian
sampai rapat.
Lihat paragraf yang sesuai
di bagian pembuangan air.
Mesin cuci tidak
dapat
dikosongkan
dan/atau tidak
melakukan
perasan :
Ada air di lantai :
Selang air masuk terjepit atau
tertekuk. (Kode kesalahan: )
Pompa pembuangan tersumbat.
(Kode kesalahan: )
Opsi “Rinse Hold [Tahan
Bilasan]” atau “No Spin
[Tanpa Perasan]” telah dipilih.
Cucian tidak terbagi rata dalam
tabung.
Menggunakan deterjen yang terlalu
banyak atau jenisnya tidak tepat
(menimbulkan terlalu banyak busa).
Periksa apakah ada kebocoran
pada sambungan selang air masuk.
Periksa sambungan selang
pembuangan air.
Bersihkan saringan
pembuangan air.
Tekan Mulai/Jeda untuk
mengalirkan air.
Pilih program perasan.
Jeda mesin dan bagi ratakan
cucian secara manual.
Kurangi jumlah deterjen
atau gunakan deterjen
yang lain.
Periksa sambungan selang
masukan air.
Tidak selalu mudah untuk melihat
ini karena air mengalir ke bawah
selang; periksa untuk melihat
apakah lembab.
Selang pembuangan rusak. Ganti dengan yang baru.
Page 63
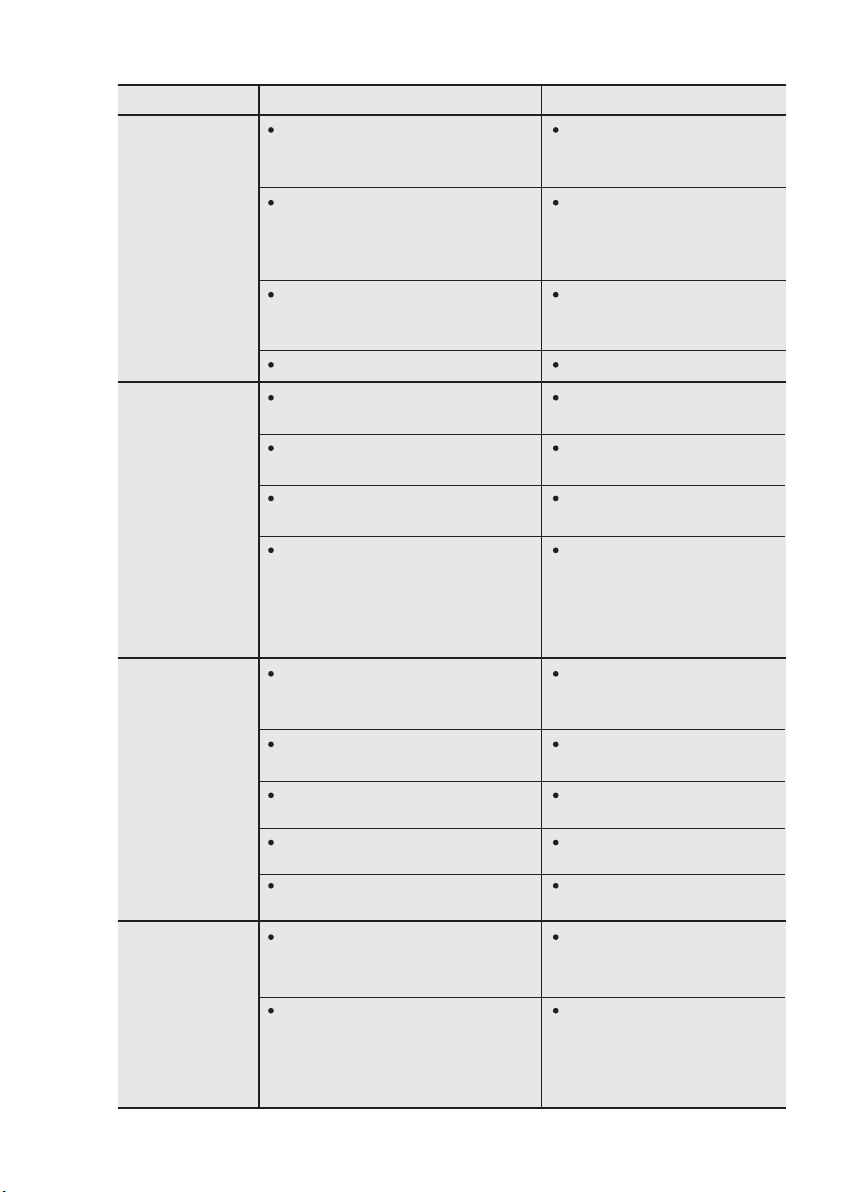
Malafungsi Kemungkinan penyebabnya Solusi
Menggunakan deterjen terlalu
sedikit atau jenisnya tidak sesuai.
Tambah jumlah deterjen
atau gunakan deterjen
yang lain.
Hasil cuci
tidak
memuaskan :
idak dilakukan tindakan apa pun
pada noda membandel sebelum
dicuci.
Suhu yang dipilih tidak tepat.
Gunakan produk yang
dijual di toko untuk
menghilangkan noda yang
membandel.
Periksa apakah Anda
sudah memilih suhu yang
benar.
Beban terlalu berat. Kurangi beban.
Program masih berlangsung. Tunggu sampai siklus
pencucian selesai.
Kunci pintu belum dilepaskan
Tunggu sekitar 5 menit.
released.
Pintu tak
dapat dibuka :
Ada air di dalam tabung. Pilih program "Spin [Peras]"
untuk mengeluarkan air.
Masalah ini akan menyebabkan
gangguan fungsi dari mesin
yang digunakan.
Baut sementara dan kemasan
belum dilepaskan.
Hubungi Customer service. Bila
anda ingin membuka pintu,
mohon baca petunjuk
“Membuka Pintu pada keadaan
darurat” pada halaman berikut
nya.
Periksa apakah
pemasangan mesin sudah
benar.
Mesin
bergetar atau
bising :
Periksa apakah pemasangan
mesin sudah benar.
Cucian tidak terbagi rata dalam
tabung.
Mungkin cucian dalam tabung
Periksa apakah kerataan
mesin sudah benar.
Jeda mesin dan bagi ratakan
cucian secara manual.
Tambah muatan cucian.
terlalu sedikit.
Waktu siklus
lebih lama
dibandingkan
yang
ditampilkan :
Kaki yang tidak stabil seperti
lantai kayu.
Deterjen melebihi dosis.
Mesin tidak seimbang.
Lihat paragraf yang sesuai
di bagian "Pemosisian".
Kurangi jumlah deterjen
atau gunakan deterjen
yang lain.
Bagi ratakan cucian secara
manual di tabung dan mulai
lagi fase perasan. Lihat
paragraf yang sesuai di
bagian "Pemosisian".
BAHASA INDONESIA 63
Page 64
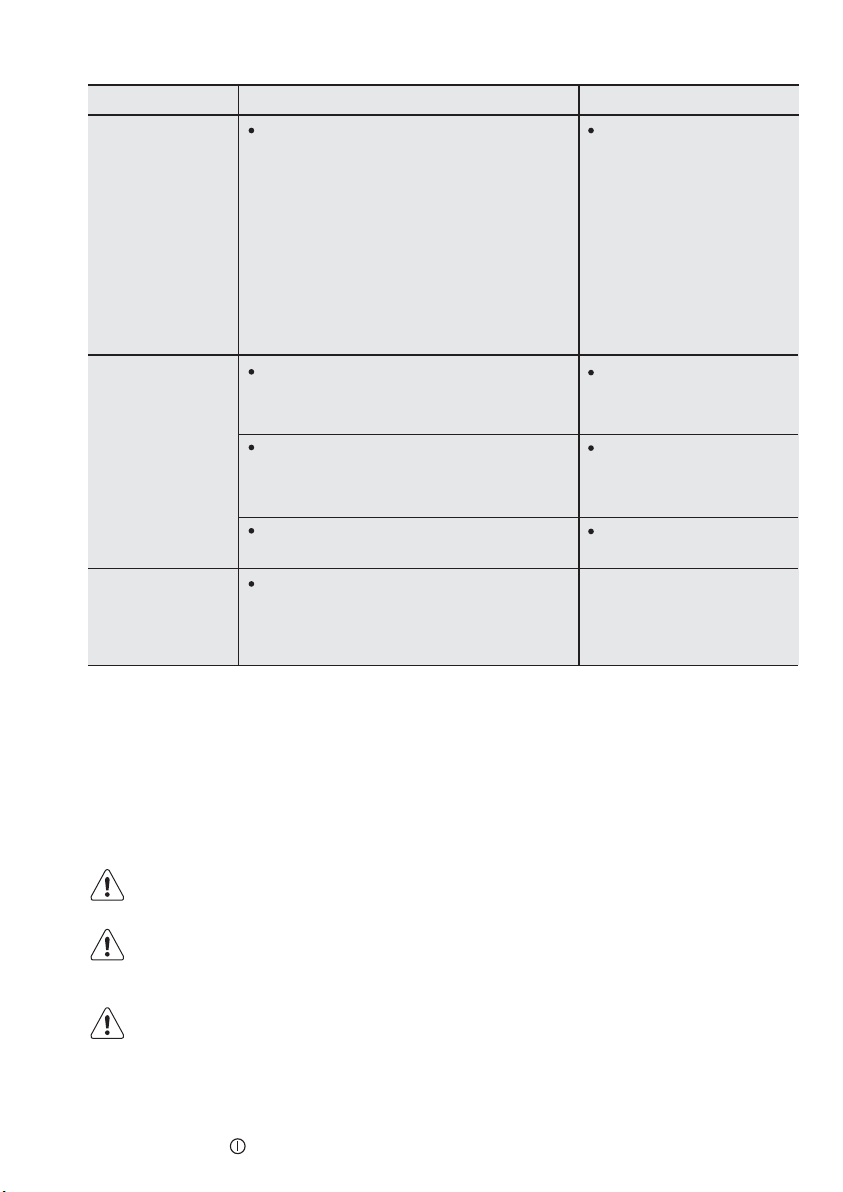
64
www.electrolux.com
Malafungsi Kemungkinan penyebabnya Solusi
Perangkat elektronik pendeteksi ketidakseimbangan diaktifkan karena cucian tidak
terbagi rata dalam tabung. Cucian akan
Pemerasan
lambat
memulai atau
mesin tidak
memeras :
didistribusi-ulang dengan memutar tabung ke
arah berlawanan. Ini dapat terjadi beberapa
kali sebelum ketidak-seimbangan dapat
dihilangkan dan pemerasan normal dapat
dilanjutkan. Jika, setelah 10 menit, cucian
tetap tidak terdistribusi secara rata di dalam
tabung, mesin tidak akan memeras. Jika
begitu, distribusikan ulang beban cucian
secara manual dan pilih program peras.
Mesin tidak dipasang dengan benar. Pastikan kedataran
Bunyi mesin
sangat bising
Baut transit atau kemasan tidak
dilepaskan.
dari biasanya :
Beban cucian mungkin terlalu sedikit.
Air tidak
terlihat di
dalam tabung :
Mesin-mesin yang menggunakan
teknologi modern, bekerja sangat
ekonomis, menggunakan sangat sedikit
air tanpa mempengaruhi hasil cucian.
Jeda mesin dan bagi
ratakan cucian secara
manual.
mesin sudah benar.
Baca "Pemasangan".
Pastikan baut sementara
dan/atau kemasan sudah
dilepaskan. Baca
"Membongkar Kemasan".
Masukkan lagi cucian ke
dalam tabung.
Membuka Pintu pada keadaan darurat
Bila listrik padam atau mesin mengalami gangguan, maka pintu akan terkunci. Mesin akan
melanjutkan proses mencuci bila listrik hidup kembali. Bila mesin mengalami gangguan maka
pintu akan tetap terkunci, dan memungkinkan untuk dibuka dengan menggunakan fungsi
pembuka darurat.
Sebelum membuka pintu :
PERINGATAN!
Pastikan suhu air didalam pencucian sudah tidak panas. Tunggu hingga suhu air dingin.
PERINGATAN!
Pastikan tabung tidak berputar atau tidak melakukan proces pencucian. Tunggu
hingga tabung berhenti berputar.
PERINGATAN!
Pastikan air tidak tampak pada pintu. Lakukan proses pembuangan air (Drain), bila
di butuhkan. (berhubungan dengan bab pemeliharaan dan perawatan (Care and
cleaning)
Untuk membuka pintu, lakukan langkah berikut:
1. Tekan tombol untuk mematikan mesin dari beroperasi.
Page 65
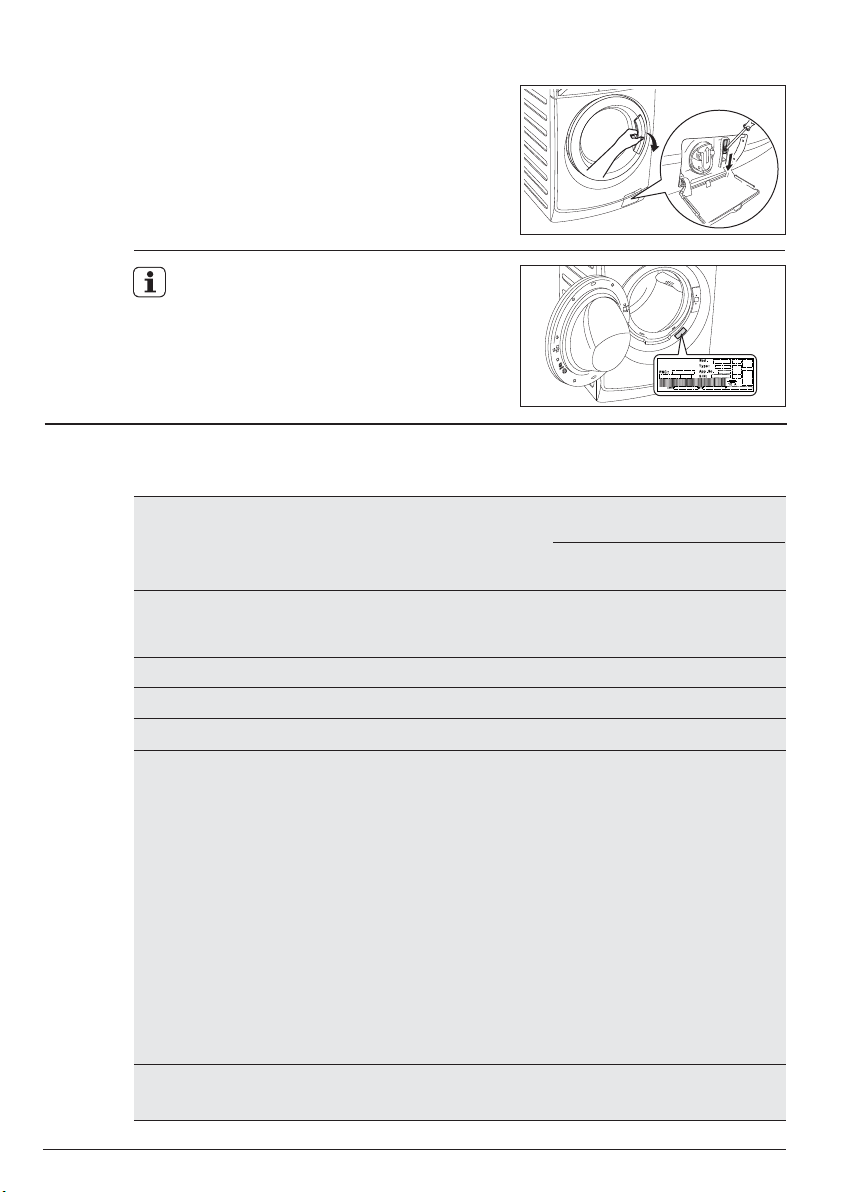
2. Cabut kabel listrik dari tempat listrik.
3. Buka tutup penyaring (filter).
4. Tahan pemicu pembuka darurat ke bawah
dan pada saat yang bersamaan, buka pintu.
5. Ambil cucian keluar.
6. Tutup kembali pintu penyaring ( filter).
Jika Anda tidak dapat menentukan atau
mengatasi masalahnya, hubungi pusat
layanan kami. Sebelum menelepon,
catatlah model, nomor seri dan tanggal
pembelian mesin cuci Anda.
DATA TEKNIS10.
Dimensi (Panjang / Tinggi / Lebar)
Catu daya (Tegangan / Frekuensi)
BAHASA INDONESIA 65
Model: EWF12932, EWF12932S
59.6 X 84.8 X 66.5 cm
Model: EWF12832, EWF12832S
59.6 X 84.8 X 58.1 cm
220-240 V / 50 Hz
(220 V, 60 Hz untuk FILIPINA)
Total daya yang diserap
2200 W (2000 W untuk FILIPINA)
Perlindungan sekring minimal 10 A
Tekanan pasokan air (Maksimum / Minimum) 0.8 MPa / 0.05 MPa
Beban maksimum
(Pakaian kering)
Kecepatan Peras
(Maksimum / Minimum)
Program
Cottons
Mixed
Delicates
Quick 18
Spin
Rinse
Energy Saver
Baby Wear
Bedding
Wool
Refresh Cottons
Refresh Mixed
EWF12932,
EWF12932S
9 Kg
4 Kg
4 Kg
1.5 Kg
9 Kg
9 Kg
9 Kg
4 Kg
3 Kg
2 Kg
1.5 Kg
1.5 Kg
1200 rpm / 400 rpm
EWF12832,
EWF12832S
8 Kg
4 Kg
4 Kg
1.5 Kg
8 Kg
8 Kg
8 Kg
4 Kg
3 Kg
2 Kg
1.5 Kg
1.5 Kg
Page 66
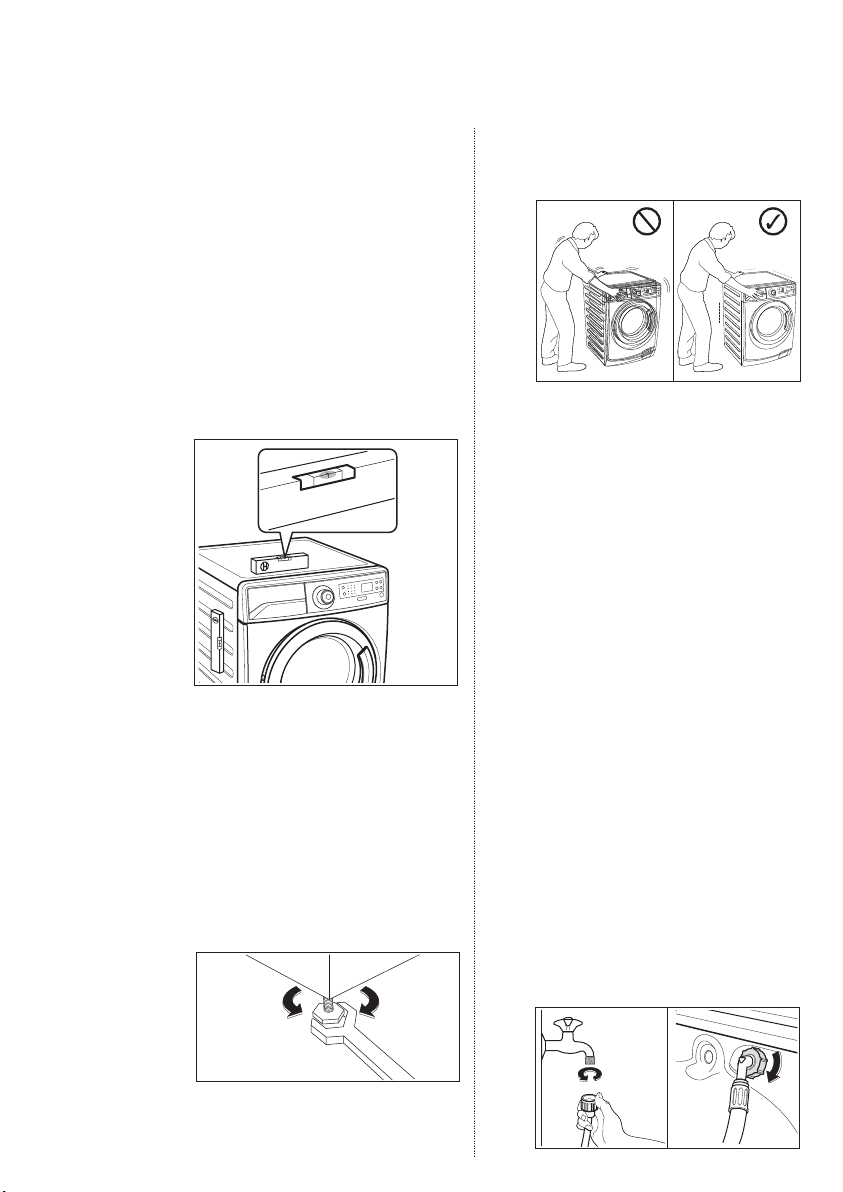
66
www.electrolux.com
PEMASANGAN11.
11.1 Pemosisian
Penting agar mesin cuci Anda
berdiri kokoh dan rata dengan
lantai untuk memastikan
pengoperasian yang benar.
Mesin tidak boleh dipasang di balik
pintu yang dapat dikunci, pintu
geser, atau pintu yang ada
engselnya di sisi yang berlawanan
dari pintu mesin cuci.
Gunakan waterpas di bagian atas
dan samping mesin cuci untuk
memeriksa kerataan.
Jika Anda tidak punya waterpas,
sebagai panduan gunakan tepi
kusen pintu, lemari dapur, atau
meja untuk memeriksa apakah
mesin cuci sudah rata.
Perlonggar atau pererat kaki untuk
disesuaikan dengan kerataan.
Penyesuaian kerataan mesin
dengan tepat mencegah getaran,
kebisingan, dan pergerakan alat
ketika dioperasikan.
Jika guncang, sesuaikan lagi
kaki-kakinya hingga rata dan tidak
lagi berguncang.
Jangan sekali-kali menempatkan
kardus, kayu atau semacamnya di
bawah mesin untuk mengkompensasi ketidakrataan di lantai.
Pasang mesin pada lantai yang datar
dan keras. Pastikan sirkulasi udara di
sekitar mesin tidak terhalang oleh
karpet, permadani, dll.
Periksa dan pastikan mesin tidak
menyentuh dinding atau perangkat
dapur lainnya.
11.2 Masukan Air
Hubungkan selang masukan air ke
keran air dengan ulir BSP
berukuran 3/4".
Gunakan selang yang disertakan
bersama mesin cuci. JANGAN
GUNAKAN SELANG LAMA.
Ujung lain dari selang air masuk
yang terhubung ke mesin dapat
diputar ke segala arah.
Longgarkan sambungannya, putar
selang, kemudian kencangkan
kembali sambungan sambil
memastikan tidak ada kebocoran air.
Ketika mesin cuci sudah rata,
cobalah mengguncangnya dari
sudut ke sudut.
Page 67
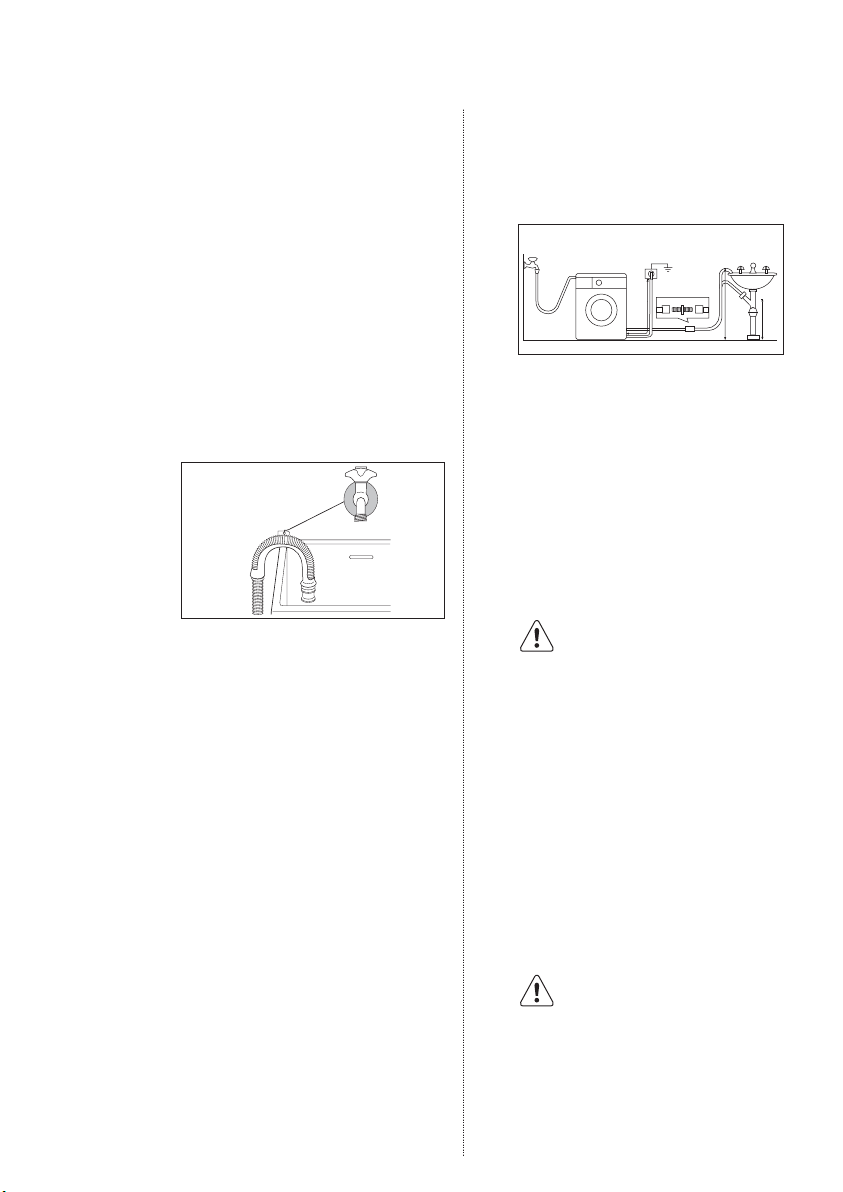
BAHASA INDONESIA 67
Selang air masuk tidak boleh
diperpanjang. Jika selang terlalu
pendek dan Anda tidak ingin
memindahkan keran air, Anda
harus membeli selang baru yang
lebih panjang dan yang khusus
dirancang untuk penggunaan ini.
11.3 Pembuangan Air
Ujung selang pembuangan dapat
diletakkan dengan tiga cara:
Dipasang pada sisi bak cuci
dengan menggunakan pemandu
selang plastik yang disertakan
bersama mesin.
Dalam hal ini, pastikan ujungnya
tidak dapat terlepas ketika mesin
sedang mengeluarkan air.
Ini dapat dilakukan dengan
mengikat selang ke keran air
dengan tali atau menempelkannya
ke dinding.
Pada cabang pipa pembuangan
bak cuci. Cabang ini harus berada
di atas perangkap/saringan kotoran
sedemikian rupa sehingga lekukan
berada sedikitnya 60 cm di atas
lantai.
Langsung pada pipa pembuangan
dengan ketinggian tidak kurang dari
60 cm dan tidak lebih dari 90 cm.
Ujung selang pembuangan harus
selalu berventilasi, yaitu, diameter
dalam pipa pembuangan harus
lebih besar daripada diameter luar
selang pembuangan.
Selang pembuangan tidak boleh
ditekuk. Bentangkan di sepanjang
lantai, hanya bagian yang ada di
dekat titik pembuangan yang harus
ditinggikan.
Untuk fungsi mesin yang benar,
selang pembuangan harus tetap
terkait ke bagian penopang yang
benar yang ada di bagian atas
pada sisi belakang alat.
11.4 Sambungan Listrik
Mesin ini dirancang untuk
digunakan pada daya listrik
220-240 V, fase-tunggal, 50 Hz
(220 V, 60 Hz untuk FILIPINA).
Silakan periksa dinilai
kondisi power supply
yang disebutkan pada
Penilaian Label sebelum
Anda terhubung ke catu
daya.
“Catu daya yang tidak
tepat dapat membatalkan garansi Anda.”
Periksa apakah daya listrik di rumah
Anda cukup untuk menjalankan
mesin dengan beban maksimum
(2.2 kW atau 2.0 kW untuk
FILIPINA), jangan lupa perhitungkan
pula peralatan listrik lain.
AWAS!
Hubungkan mesin ke stop
kontak yang dibumikan.
Produsen mesin ini tidak
bertanggung jawab atas kerusakan
atau cedera yang diakibatkan
kelalaian untuk mematuhi aturan
keselamatan di atas.
90 cm
60 cm
Page 68
68
www.electrolux.com
Kabel listrik harus mudah
dijangkau setelah mesin dipasang.
KEPEDULIAN LINGKUNGAN12.
12.1 Bahan Kemasan
Ini berarti, bahan tersebut dapat
didaur ulang dengan cara dibuang
ke tempat pengumpulan limbah
daur-ulang yang sesuai.
12.2 Mesin Lama
Gunakan lokasi pembuangan yang
diizinkan untuk mesin lama Anda.
Bantulah menjaga kebersihan
negara Anda!
Simbol pada produk ini atau
kemasannya menandakan bahwa
produk ini tidak boleh diperlakukan
sebagai limbah rumah tangga.
Melainkan, produk ini harus
diserahkan ke tempat pengumpulan limbah daur ulang untuk
perangkat listrik dan elektronik.
Dengan memastikan, bahwa
produk ini dibuang dengan cara
yang benar, Anda akan membantu
mencegah timbulnya konsekuensi
negatif terhadap lingkungan dan
kesehatan manusia, yang dapat
terjadi jika limbah produk ini tidak
ditangani secara benar.
Jika kabel listrik mesin
harus diganti, penggantian ini harus dilakukan
oleh Pusat Layanan
kami.
Bahan yang ditandai dengan
simbol dapat didaur
ulang.
>PE<=polyethylene
>PS<=polystyrene
>PP<=polypropylene
Jika daya mesin ini disuplai dari
kabel listrik sambungan atau
perangkat stop kontak portabel,
kabel perpanjangan atau
perangkat portabel listrik itu harus
diposisikan sehingga tidak bisa
terkena cipratan atau masuknya
uap air.
Untuk rincian informasi mengenai
daur ulang produk ini, hubungi
kantor pemda setempat, layanan
pembuangan limbah rumah
tangga atau toko tempat Anda
membeli produk ini.
12.3 Petunjuk Ekologis
Untuk menghemat air, energi dan
untuk melindungi lingkungan,
ikutilah saran-saran berikut ini:
Cucian yang kotornya normal
dapat dicuci tanpa pra-cuci
untuk menghemat deterjen, air
dan waktu (juga untuk
melindungi lingkungan!).
Mesin akan bekerja dengan lebih
ekonomis jika diberi beban
penuh.
Dengan perlakuan sebelum
mencuci yang memadai, noda
dan sebagian kotoran dapat
dihilangkan; baru kemudian
pakaian dapat dicuci pada suhu
yang lebih rendah.
Takar jumlah deterjen sesuai
dengan tingkat kesadahan air,
tingkat kekotoran cucian serta
jumlah cucian.
Page 69
NỘI DUNG
TIẾNG VIỆT 69
THÔNG TIN VỀ AN TOÀN
1
MÔ TẢ SẢN PHẨM
2
BẢNG ĐIỀU KHIỂN
3
TRƯỚC KHI SỬ DỤNG LẦN ĐẦU
4
SỬ DỤNG HÀNG NGÀY
5
GỢI Ý GIẶT
6
CÁC BIỂU TƯỢNG MÃ GIẶT QUỐC TẾ
7
BẢO TRÌ VÀ VỆ SINH
8
KHẮC PHỤC SỰ CỐ
9
........................................................................................................ 86
DỮ LIỆU KỸ THUẬT
LẮP ĐẶT
............................................................................................................ 9811
CÁC VẤN ĐỀ VỀ MÔI TRƯỜNG
................................................................................... 70
............................................................................................ 72
............................................................................................. 73
......................................................................... 79
...................................................................................... 79
............................................................... 89
.......................................................................................... 89
........................................................................................... 94
............................................................................................ 9710
.......................................................................... 10012
CHÚNG TÔI LUÔN NGHĨ VỀ KHÁCH HÀNG
Cảm ơn bạn đã mua thiết bị Electrolux. Bạn đã chọn một sản phẩm trong đó có chứa đựng
cả hàng thập niên kinh nghiệm chuyên gia và sự đổi mới. Tinh tế và sành điệu, thiết bị này
đượcthiết kế dành bạn. Vì vậy bất cứ khi nào bạn sử dụng thiết bị này, bạn có thể yên tâm
rằngbạn sẽ luôn có được kết quả tuyệt vời. Chào mừng bạn đến với Electrolux.
Hãy truy cập trang web của chúng tôi để:
Lấy các lời khuyên về sử dụng, sách giới thiệu, khắc phục sự cố và thông tin dịch vụ:
www.electrolux.com
DỊCH VỤ VÀ CHĂM SÓC KHÁCH HÀNG
Chúng tôi đề nghị sử dụng các linh kiện dự phòng gốc.Khi liên hệ với bộ phận Dịch Vụ,
đảm bảo là bạn có sẵn dữ liệu sau đây. Có thể tìm thấy thông tin trên biển thông số.
Model, PNC, Số Sê-ri.
Cảnh Báo / Thông Tin Quan Trọng Về An Toàn.
Thông tin tổng quan và các lời khuyên.
Thông tin về môi trường.
Có thể thay đổi mà không cần thông báo.
Phù hợp qui định về giới hạn hàm lượng hóa chất độc hại
RoHS
Compliant
(Đáp ứng êu chuẩn RoHS)
(Theo Thông tư số 30/2011/TT-BCT, Việt Nam, ngày 10/08/2011)
Page 70
70 www.electrolux.com
1.
THÔNG TIN VỀ AN TOÀN
Các điều kiện sử dụng
Thiết bị này nhằm sử dụng trong các ứng
dụng gia dụng và tương tự như:
-
Nhà ở xây trong trang trại
-
Cho khách hàng trong căn hộ dịch vụ,
căn hộ cho thuê để nghỉ mát và các
môi trường loại cư trú.
Vì sự an toàn của bạn và để đảm bảo sử
dụng phù hợp, trước khi cài đăt và sử
dụng lần đầu thiết bị này, hãy đọc tài liệu
hướng dẫn sử dụng này, gồm các gợi ý và
cảnh báo.
Để tránh sai sót và tai nạn không cần
thiết, điều quan trọng là cần đảm bảo
rằng tất cả những người sử dụng thiết bị
hoàn toàn quen với với hoạt động và các
tính năng an toàn của thiết bị.
Giữ lại các hướng dẫn này và đảm bảo
rằng các hướng dẫn này vẫn đi kèm thiết
bị nếu thiết bị được di chuyển hoặc bán
để tất cả những ai sử dụng thiết bị đến
hết thời hạn sử dụng sẽ được thông báo
phù hợp về việc sử dụng và an toàn của
thiết bị.
1.1 AN TOÀN CHUNG
Việc thay đổi thông số hay tìm cách
điều chỉnh sản phẩm này dưới bất kỳ
hình thức nào sẽ gây nguy hiểm.
Trong suốt chương trình giặt ở nhiệt độ
cao, tấm kính cửa có thể trở nên nóng.
Đừng chạm vào đó!
Hãy đảm bảo rằng vật nuôi nhỏ
khôngleo vào bên trong trống. Để
tránh tình huống này, hãy kiểm tra
trống trước khi sử dụng thiết bị.
Bất kỳ đồ vật nào chẳng hạn như đồng
xu, ghim an toàn , đinh, ốc vít, đá hay
bất kỳ vật nào cứng, sắc đều có thể gây
ra hư hỏng lớn và không được bỏ vào
máy.
Giặt những đồ vật nhỏ chẳng hạn như
vớ, dây buộc, dây lưng giặt được, v.v.
trong túi giặt hoặc bao gối vì những đồ
vật đó có thể trôi xuống giữa bồn và
trống bên trong.
Chỉ sử dụng lượng chất làm mềm vải và
bột giặt theo khuyến nghị. Nếu bạn cho
quá nhiều các chất này, vải hoặc thiết có
thể bị hỏng. Hãy tham khảo khuyến nghị
số lượng của hãng sản xuất.
Thiết bị này không dành cho sử dụng
bởi những người (kể cả trẻ em) có thể
lực, khả năng giác quan hoặc tâm thần
yếu, hoặc thiếu kinh nghiệm và kiến
thức, trừ khi họ được giám sát hoặc
hướng dẫn về cách sử dụng thiết bị bởi
người chịu trách nhiệm về sự an toàn
của họ.
Không được sử dụng máy giặt để giặt
những thứ có chứa xương cá voi, vải
không có viền hoặc vải bị rách.
Luôn rút phích cắm của thiết bị và tắt
nguồn nước sau khi sử dụng, vệ sinh và
bảo trì.
Bạn không được tìm cách tự sửa máy
trong bất kỳ trường hợp nào. Công việc
sửa chữa do những người thiếu kinh
nghiệm thực hiện có thể gây ra thương
tích hoặc hư hỏng nghiêm trọng. Liên
hệ Trung Tâm Dịch Vụ địa phương của
bạn. Luôn đòi hỏi sử dụng linh kiện dự
phòng chính hãng.
1.2 LẮP ĐẶT
Thiết bị này có trọng lướng lớn. Cần
phải cẩn thận khi di chuyển thiết bị.
Khi mở gói thiết bị, hãy kiểm tra xem nó
có bị hư hỏng không. Nếu có nghi ngờ,
không được sử dụng thiết bị và liện hệ
Trung Tâm Dịch Vụ.
Tất cả bulông đóng gói và vận chuyển
phải được tháo ra trước khi sử dụng. Sản
phẩm và tài sản có thể bị hư hỏng nặng
nếu không tuân theo hướng dẫn này.
Xem mục liên quan trong tài liệu hướng
dẫn sử dụng.
Page 71
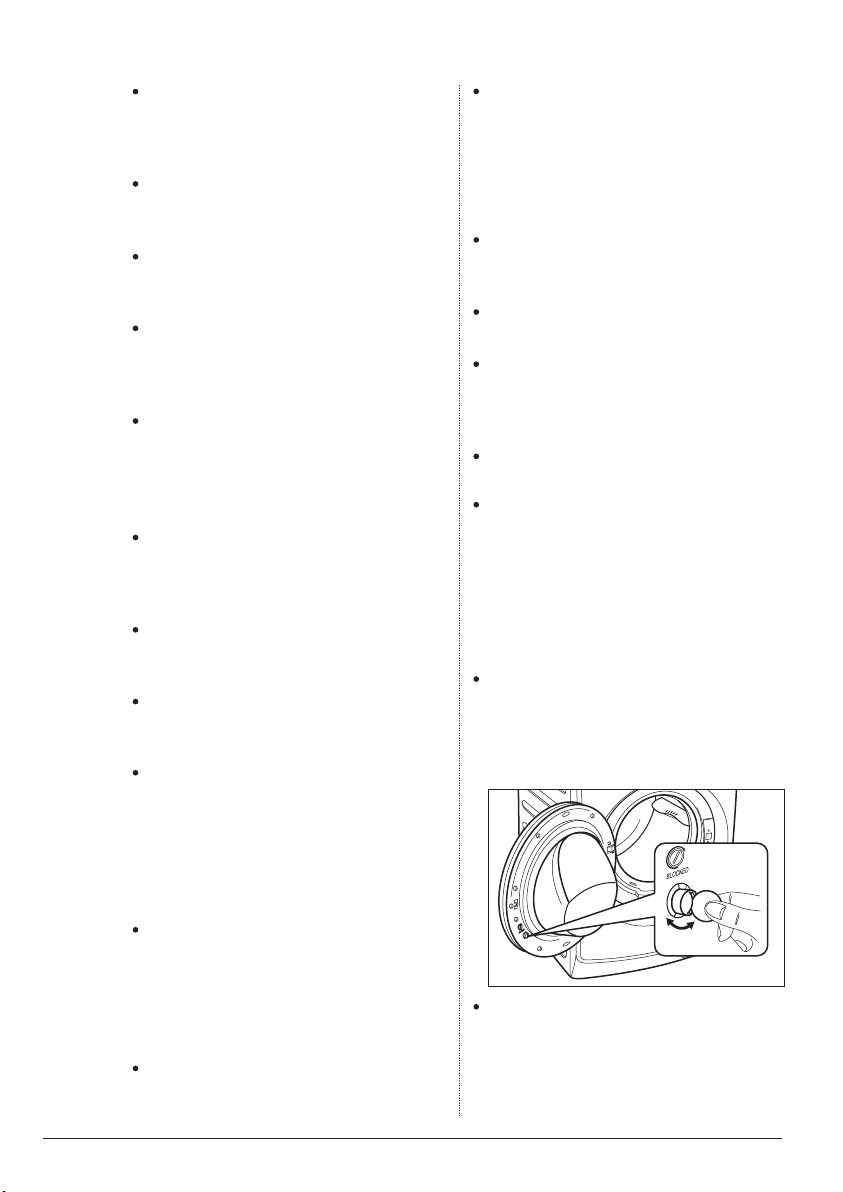
TIẾNG VIỆT 71
Sau khi lắp đặt thiết bị, hãy kiểm tra để
đảm bảo thiết bị không ép lên ống nạp
và ống xả và mặt bàn không đè lên dây
điện.
Nếu máy được đặt trên sàn trải thảm,
hãy điều chỉnh các chân để cho không
khí lưu thông tự do.
Hãy luôn đảm bảo rằng không có nước
rò rỉ từ các ống dây và các đầu nối sau
khi lắp đặt.
Bất kỳ công việc lắp ống nào cần để lắp
đặt thiết bị này cũng phải được tiến
hành bởi một thợ ống nước có năng
lực.
Bất kỳ công việc điện nào cần để lắp đặt
thiết bị này cũng phải được tiến hành
bởi thợ điện có đủ điều kiện.
1.3 SỬ DỤNG
Thiết bị này được thiết kế cho mục đích
gia dụng. Không được sử dụng thiết bị
cho các mục đích khác với mục đích
thiết kế của nó.
Chỉ giặt các loại vải giặt bằng máy giặt.
Tuân thủ các hướng dẫn trên từng nhãn
quần áo.
Không cho quá nhiều đồ vào thiết bị.
Xem mục liên quan trong tài liệu hướng
dẫn sử dụng .
Trước khi giặt, hãy đảm bảo rằng tất cả
các túi quần áo đều rỗng và các nút áo,
khóa kéo đã được kéo. Tránh giặt các
món đồ bị sờn hay rách và xử lý các vết
ố chẳng hạn như sơn, mực, gỉ và cỏ
trước khi giặt. KHÔNG ĐƯỢC giặt áo
ngực bằng máy giặt.
Không được giặt quần áo đã tiếp xúc
với các sản phẩm xăng dầu dễ bay hơi
bằng máy. Nếu dùng nước tẩy dễ bay
hơi, phải cẩn thận để đảm bảo rằng
nước tẩy đã được loại bỏ khỏi quần áo
trước khi bỏ vào máy.
Không được kéo dây điện đểrút phích
cắm ra khỏi ổ cắm; hãy luôn cầm vào
phích cắm.
Không được sử dụng máy giặt nếu dây
nguồn, bảng điều khiển, bề mặt làm
việc hay bệ máy bị hư hỏng để có thể
tiếp cận phía bên trong của máy giặt.
1.4 AN TOÀN CHO TRẺ EM
Máy giặt này được thiết kế không phải
để trẻ em hoặc người có sức khỏe yếu
sử dụng mà không có sự giám sát.
Trẻ nhỏ phải được giám sát để đảm bảo
chúng không nghịch phá thiết bị này.
Các bộ phận đóng gói (ví dụ như các
tấm nhựa, polystyrene) có thể gây nguy
hiểm cho trẻ em –nguy hiểm nghẹt thở!
Để xa tầm với của trẻ em.
Giữ tất cả bột giặt ở nơi an toàn ngoài
tầm tay trẻ.
Hãy đảm bảo rằng trẻ em hoặc vật nuôi
không leo vào bên trong trống.
1.5 THIẾT BỊ AN TOÀN TRẺ EM
Khi bạn kích hoạt thiết bị này, bạnkhông
thể đóng cửa. Điều này ngăn chặn trẻ em
hoặc vật nuôi bị khóa bên trong.
Để kích hoạt thiết bị này, xoay nút (MÀ
KHÔNG nhấn nút) bên trong cửa theo
chiều kim đồng hồ cho đến khi vết
khấc nằm theo chiều ngang. Nếu cần
thiết hãy sử dụng nêm.
Để vô hiệu hóa thiết bị này và khôi
phục khả năng đóng cửa, xoay nút này
ngược chiều kim đồng hồ cho đến khi
vết khấc nằm theo chiều dọc.
Page 72
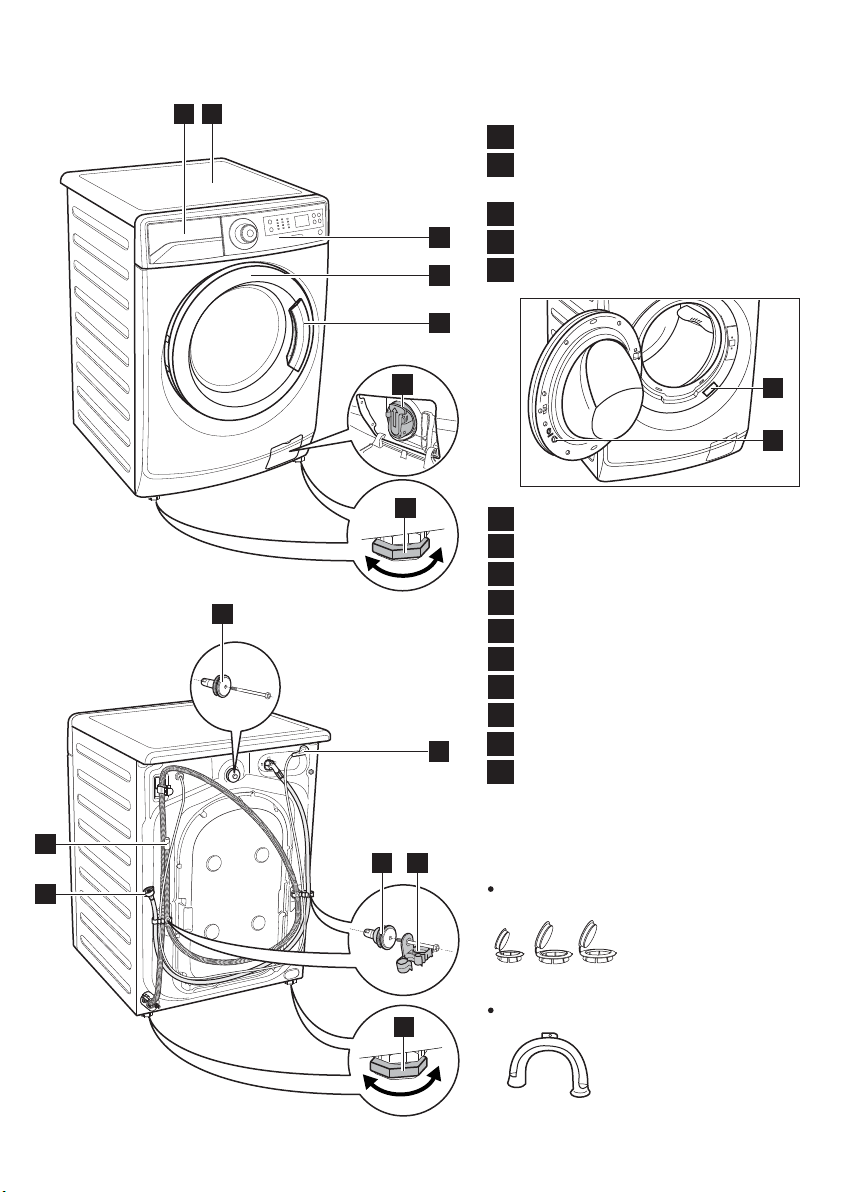
72
www.electrolux.com
MÔ TẢ SẢN PHẨM
2.
2 1
Nắm máy
1
Ngăn Định LượngBột Giặt/
2
Chất Làm Mềm Vải
Bảng Điều Khiển
3
3
5
4
Tay Cầm Cửa
4
5
Cửa
15
6
11
7
9
1011
8
12
Điều Chỉnh Mức Độ Chân Trước
6
Dây Điện
7
Ống Nạp Nước
8
Ống xã
9
Giá Đỡ Ống
10
11
Bulông Vận Chuyển
Điều Chỉnh Mức Độ Chân Sau
12
Nút Khóa Cửa
13
Biển Thông Số
14
Bộ Lọc Bơm Xả
15
PHỤ KIỆN
Nắp nhựa
Để đóng các lỗ trên
mặt sau của tủ sau
khi tháo các bulông
vận chuyển.
Thanh treo ống nhựa
Để treo ống xả trên
mép bồn.
14
13
Page 73
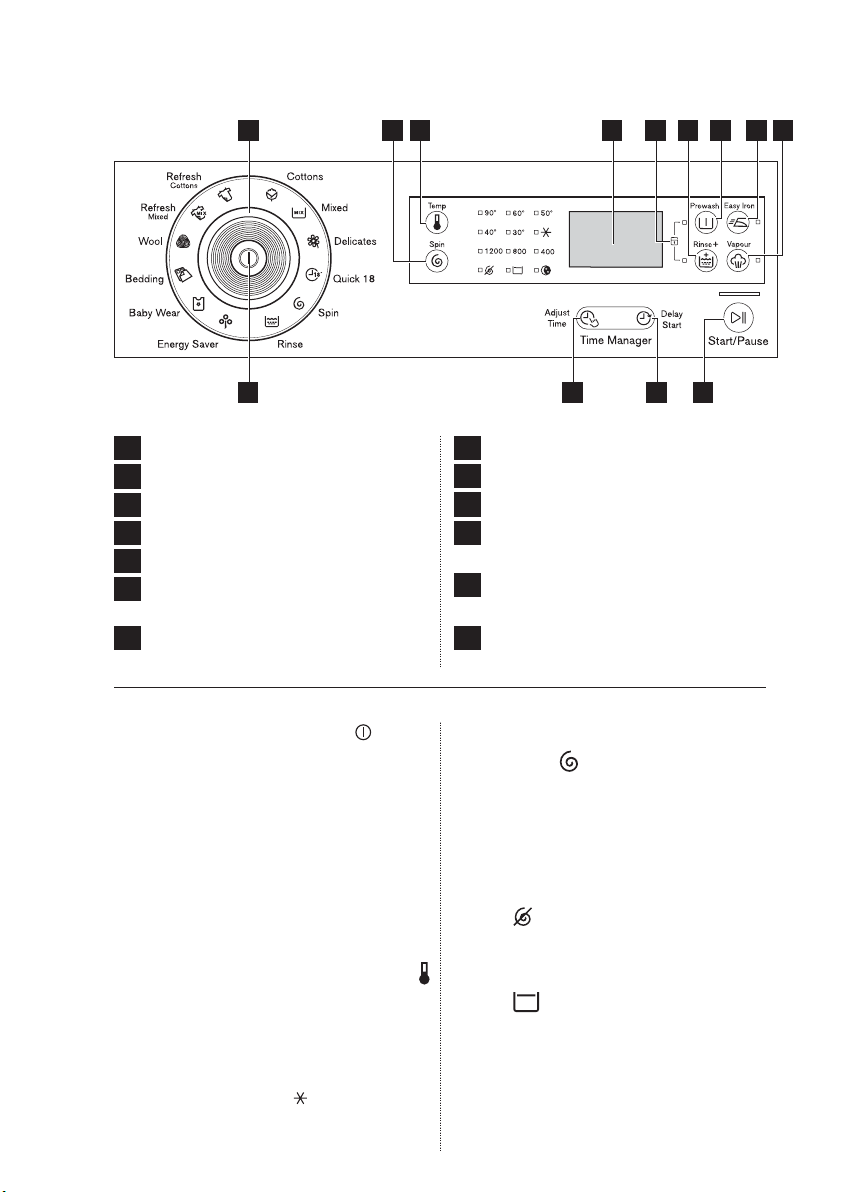
BẢNG ĐIỀU KHIỂN
3.
TIẾNG VIỆT 73
2 4 97 813 10 113
1
1
Nút On/O (Bật/Tắt)
2
Núm Chương Trình
3
Phím Điều Chỉnh Nhiệt Độ
4
Phím Điều Khiển Chọn Vòng Vắt
5
Phím Điều Chỉnh Thời Gian
6
Phím Điều Khiển Delay Start
(Trì Hoãn)
7
Màn Hình Hiển Thị
3.1 Nút On/O (Bật/Tắt)
Nút On/O (Bật/Tắt) được sử dụng
để bật và tắt máy giặt của bạn.
3.2 Núm Chương Trình
Xoay núm này để đặt chương trình.
Đèn chỉ báo của chương trình liên
quan sáng. Chuông kêu. (Xem trang
76)
3.3 Phím Điều Khiển Nhiệt Độ
Nhấn phím điều khiển này lặp đi
lặp lại để tăng hoặc giảm nhiệt độ
giặt nếu bạn muốn giặt đồ giặt tại
nhiệt độ khác với nhiệt độ máy giặt
gợi ý (biểu tượng “ ” tương ứng
với giặt lạnh).
5 6
8
Phím Điều Khiển Rinse Plus (Xả Bổ Sung)
9
Phím Điều Khiển Prewash (Giặt sơ bộ)
10
Phím Điều Khiển Easy Iron (Dễ là/ ủi)
11
Phím Điều Khiển Vapour (chức năng
hơi nước)
12
Phím Điều Khiển Start/Pause
(Bắt Đầu/Tạm Dừng)
13
Tùy Chọn Child Lock (Khóa Trẻ Em)
(Xem Trang 85)
Phím Điều Khiển Chọn Vòng
3.4
12
Vắt
Nhấn phím điều khiển này nhiều lần
để tăng hoặc giảm tốc độ vòng vắt
nếu bạn muốn vắt đồ giặt của mình
ở tốc độ khác tốc độ mà máy giặt đề
xuất.
Không Vắt
Tùy chọn không vắt loại bỏ tất cả
các giai đoạn vắt và tăng số lần xả.
Giữ Xả
Bằng cách chọn tùy chọn này, nước
trong lần xả cuối không bị rút sạch
và lồng giặt xoay liên tục để ngăn
đồ giặt bị nhăn.
Cửa vẫn khóa để cho biết nước phải
được xả hết ra.
Page 74
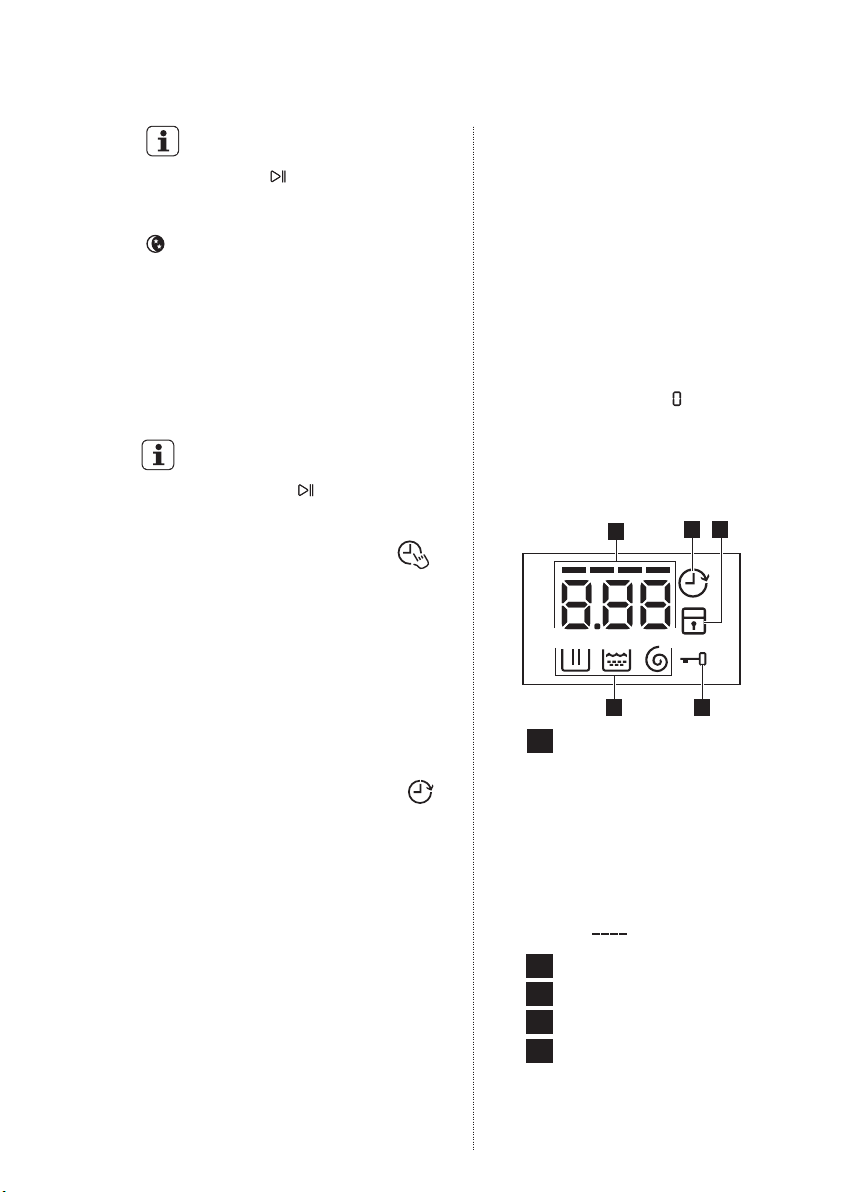
74
www.electrolux.com
Cửa vẫn khóa với nước ở trong
thùng giặt. Để tiếp tục chu kỳ bạn
phải nhấn (Start/Pause [Bắt
Đầu/Tạm Dừng]).
Chu Kỳ Ban Đêm
Bằng cách chọn tùy chọn này, máy sẽ
không xả nước của lần giũ cuối cùng để
tránh làm nhăn quần áo giặt. Mọi giai
đoạn vắt đều bị chặn hoạt động.
Chu kỳ giặt này rất tĩnh, và có thể
được chọn hoạt động vào ban đêm
hoặc các thời gian thích hợp khác.
Cửa vẫn khóa với nước ở trong
thùng giặt. Để tiếp tục chu kỳ
bạn phải nhấn (Start/Pause
[Bắt Đầu/Tạm Dừng]).
3.5
Bảng điều chỉnh thời gian
Chức năng này cho phép bạn điều
chỉnh thời gian. Bấm đi bấm lại nhiều
lần bảng này để tăng thời gian giặt
hoặc trả lại thời gian giặt như mặt
định ban đầu.
Chức năng này sẽ điều chỉnh số lần
xả/giũ theo đúng như thời gian đã
chọn.
Phím Điều Khiển Trì hoãn3.6
Tùy chọn này cho phép trì hoãn
chương trình trong 30 phút, 60
phút hoặc 90 phút và sau đó cứ
hàng giờ từ 2 đến 20 giờ.
Lệnh trì hoãn mà bạn đã chọn được
chỉ ra trên màn hình hiển thị. Thời
gian kết thúc sẽ tăng để cho bạn
thấy lệnh trì hoãn đã chọn.
Bạn phải lựa chọn tùy chọn này sau
khi đã đặt chương trình và trước khi
nhấn nút Start/Pause (Bắt Đầu/Tạm
Dừng) .
Nếu bạn muốn thêm đồ giặt vào
máy trong khoảng thời gian trì
hoãn, hãy nhấn phím điều khiển
Start/Pause (Bắt Đầu/Tạm Dừng) để
đặt máy ở chế độ tạm dừng. Cho đồ
giặt vào, đóng cửa và nhấn lại phím
điều khiển Start/Pause (Bắt
Đầu/Tạm Dừng).
Bạn có thể hủy thời gian hoãn bất kỳ
lúc nào, bằng cách nhấn phím điều
khiển ‘Delay Start’ (Hoãn Bắt Đầu)
nhiều lần cho đến khi màn hình hiển
thị thời gian hoãn ‘ ’, sau đó nhấn
phím điều khiển Start/Pause (Bắt
Đầu/Tạm Dừng).
3.7 Màn hình hiển thị
A
B E
A
Số Kỹ Thuật Số;
sẽ cho bạn biết:
–
Thời gian chu kỳ giặt.
–
Thời gian hoãn bắt đầu.
–
Mã báo động. Tham khảo
chương “Khắc Phục Sự Cố”
để biết phần mô tả.
–
Điều Chỉnh Mức Thời Gian
( ).
Biểu tượng Giai Đoạn Giặt
B
C
Biểu tượng Hoãn Bắt Đầu
D
Biểu tượng Khóa Trẻ Em
Biểu tượng Khóa Cửa
E
–
Nếu chỉ báo phát sáng, bạn
không thể mở cửa.
–
Nếu chỉ báo tắt, bạn có thể
mở cửa.
C D
Page 75
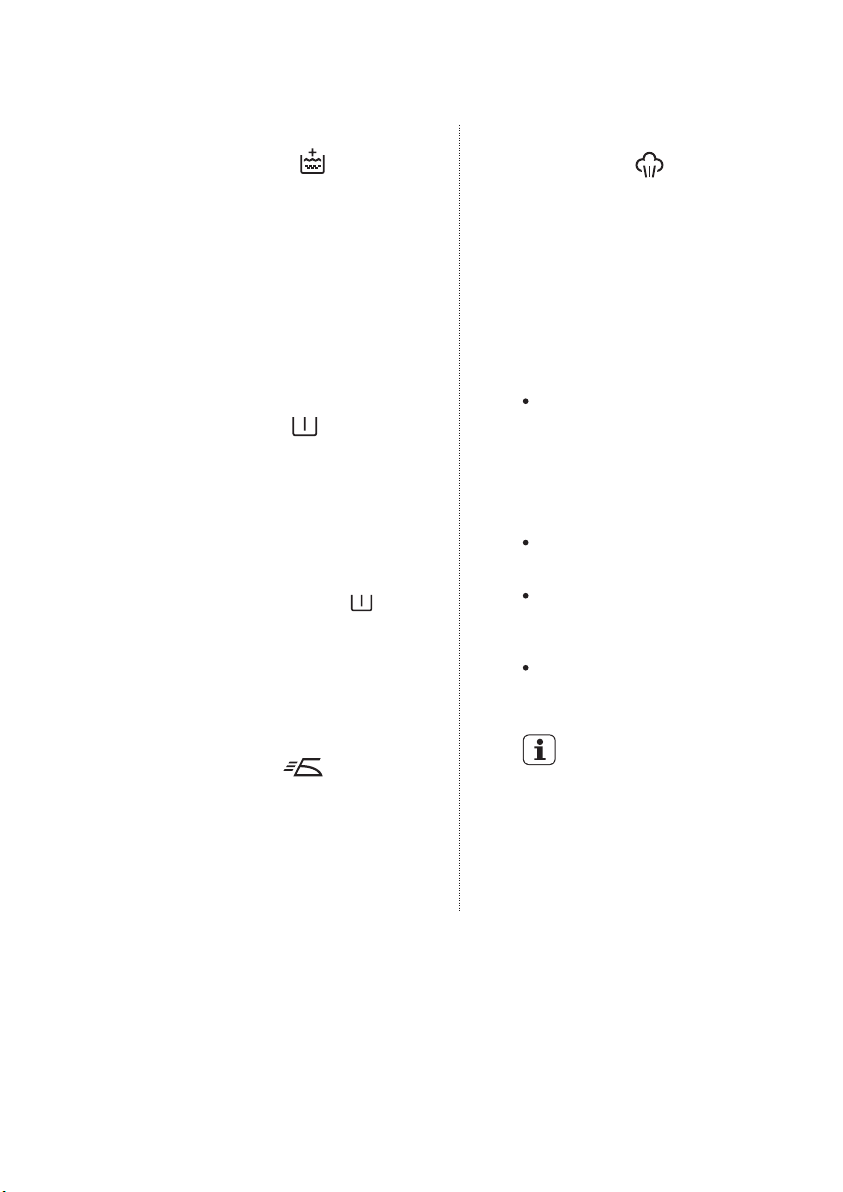
TIẾNG VIỆT 75
3.8 Phím Điều Khiển Rinse Plus
(Xả Bổ Sung)
Tùy chọn này được khuyến nghị
cho những người bị dị ứng với chất
tẩy rửa, và ở những chỗ nước rất
mềm.
Nhấn nút này để thêm giai đoạn xả
vào chương trình.
Chỉ báo tùy chọn này phát sáng.
3.9 Phím Điều Khiển Prewash
(Giặt sơ bộ)
Chọn tùy chọn này nếu bạn muốn
xử lý sơ đồ giặt của mình trước khi
giặt chính. Sử dụng tùy chọn này
đối với đồ rất bẩn.
Chỉ báo của tùy chọn này phát sáng.
Khi bạn đặt chức năng này, hãy cho
chất tẩy rửa vào ngăn “ ” .
(Tham khảo trang 81 - 82)
Chức năng này làm tăng thời gian
của chương trình.
3.10 Phím Điều Khiển Easy Iron
(Dễ Là / ủi )
Khi chọn tùy chọn này đồ giặt được
giặt và vắt nhẹ nhàng để tránh bị
nhăn. Theo cách này việc là ủi sẽ dễ
dàng hơn.
Chỉ báo của tùy chọn này phát sáng.
3.11 Phím Điều Khiển Vapour
(Hơi Nước)
Chọn tùy chọn này sẽ tăng thêm
thời gian khoảng 45 phút xoay đồ
trong hơi nước trong suốt chu kỳ
giặt. Hơi nước giúp sợi vải nở ra để
các chất phụ gia giặt đánh bong
vết bẩn khó giặt.
Chỉ báo của tùy chọn này phát sáng.
LƯU Ý:
Hơi nước không nhất thiết thấy
được bên trong thùng giặt trong
chu kỳ giặt bằng hơi nước. Hơi
nước được tạo ra bên dưới thùng
giặt và được phép bốc hơi tự
nhiên vào trong quần áo.
Hơi nước có thể không xuất hiện
trong toàn chu kỳ giặt hơi nước.
Chức năng Vapour (Hơi Nước)
hiệu quả hơn với quần áo khi
lượng đồ cho vào là một nữa tải .
Cuối chu kỳ Vapour (Hơi Nước)
quần áo sẽ ấm hơn, mềm hơn và
tách ra khỏi thùng giặt.
Nếu tùy chọn Vapour (Hơi
Nước) được chọn, nhiệt độ
xả sẽ tăng lên.
Trong chu kỳ hơi nước bạn có thể
nhận thấy hơi nước thoát ra từ ổng
xả của máy giặt, điều này là bình
thường và không cần quan ngại.
Page 76
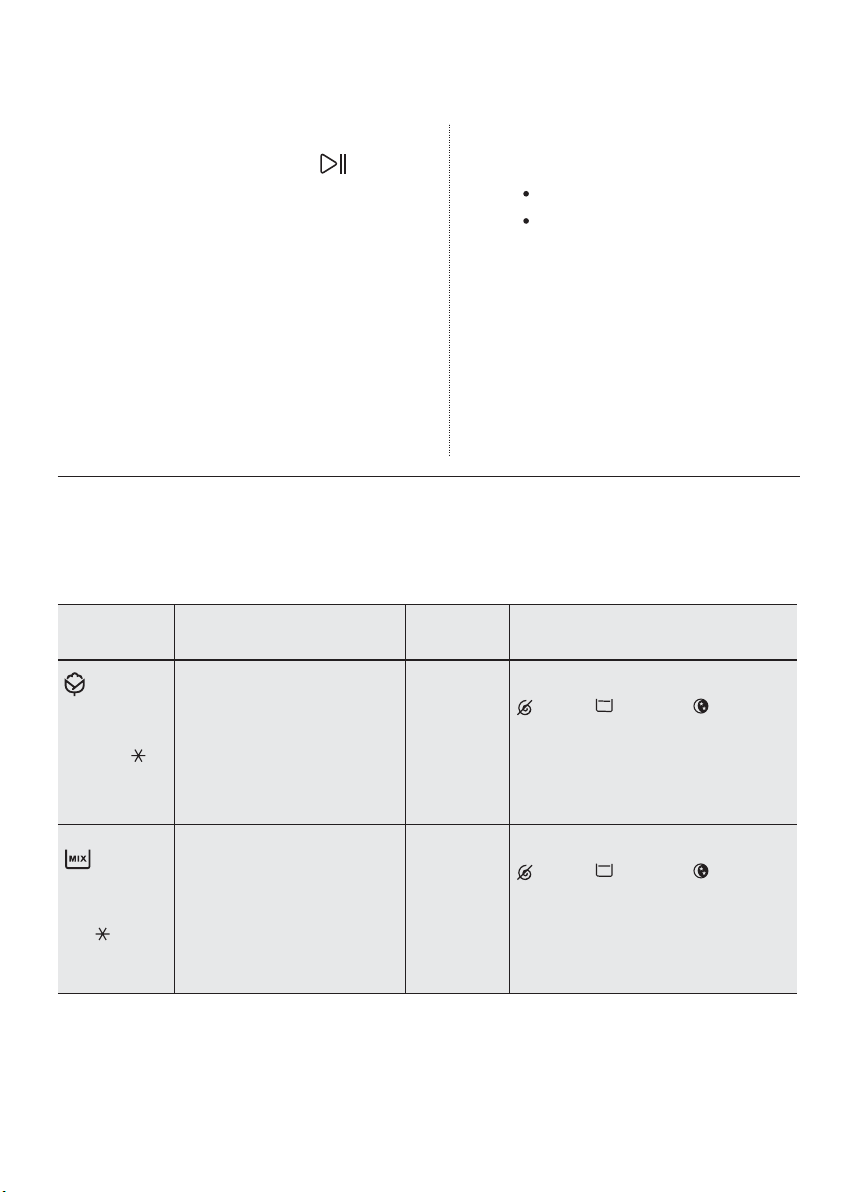
76
www.electrolux.com
3.12
Phím Điều Khiển Start/Pause
(Bắt Đầu/Tạm Dừng)
Để bắt đầu chương trình đã chọn, nhấn
‘Start/Pause’ (Bắt Đầu/Tạm Dừng).
Để ngắt chương trình đang chạy, nhấn
‘Start/Pause’ (Bắt Đầu/Tạm Dừng) để dừng
máy.
Để khởi động chương trình từ điểm mà tại
đó chương trình bị gián đoạn, nhấn lại
‘Start/Pause’ (Bắt Đầu/Tạm Dừng).
Nếu bạn đã chọn trì hoãn , sau khi nhấn
‘Start/Pause’ (Bắt Đầu/Tạm Dừng) máy sẽ
bắt đầu đếm ngược.
3.14 Chương Trình + Tùy Chọn
3.13 Tiếng Buzzer
Tiếng buzzer hoạt động khi:
Chương trình đã hoàn thành.
Thiết bị bị hỏng.
Nếu bạn muốn vô hiệu hóa tiếng
buzzer (ngoại trừ trường hợp Hỏng
hóc thiết bị), nhấn các phím điều
khiển “Rinse +” (Xả +) và “Vapour”
(Hơi Nước) cùng một lúc trong 3
giây và chờ nghe tiếng ‘BÍP, BÍP’.
Để quay lại cấu hình mặc định, nhấn
2 phím điều khiển này cùng lúc
trong 3 giây và đợi nghe tiếng ‘BÍP’.
Chương trình;
Nhiệt độ
Cottons
(
***
(Vải Bông);
90 °C tới
(Nước lạnh)
Mixed (Hỗn
Hợp); 60 °C
tới (Nước
lạnh)
Loại quần áo; Trọng lượng
quần áo tối đa (quần áo khô)
Vải bông trắng và nhuộm
màu rất bẩn ; khối lượng tối
)
đa:
Model:
EWF12932, EWF12932S : 9 kg
EWF12832, EWF12832S : 8 kg
Vải tổng hợp hoặc hỗn hợp
bị bẩn thông thường; khối
lượng tối đa 4 kg.
Mô tả chu kỳCó thể kết hợp các
tùy chọn
Spin:
-
Giặt
-
Xả
-
Vòng Vắt
dài
-
Giặt
-
Xả
-
Vắt mau
1200 xuống 400 rpm,
No Spin, Rinse Hold, Night Cycle,
Prewash, Easy Iron, Rinse +, Vapour
Adjust Time, Delay Start
1200
Spin:
No Spin, Rinse Hold, Night Cycle,
Prewash, Easy Iron, Rinse +, Vapour
Adjust Time, Delay Start
xuống 400 rpm,
1)
,
1)
,
Page 77
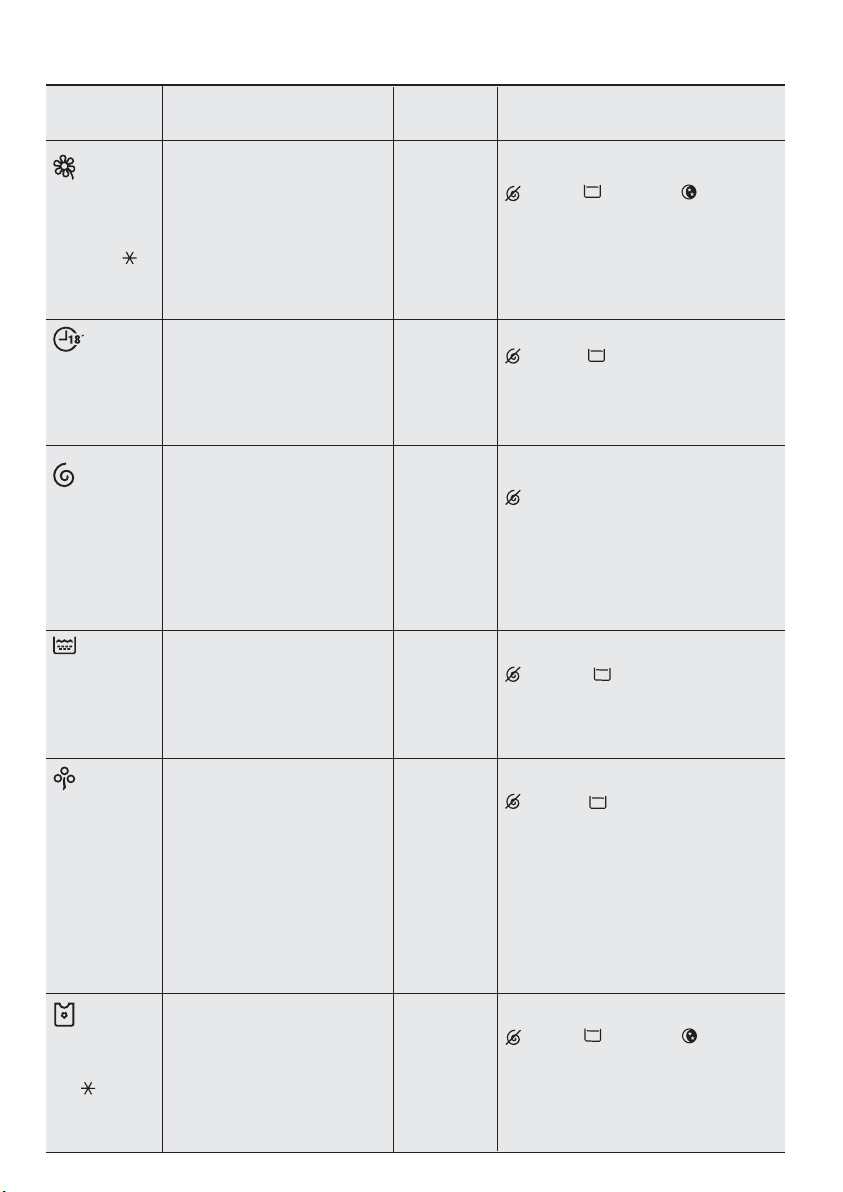
TIẾNG VIỆT 77
Chương trình;
Nhiệt độ
Delicates
(Vải Dễ
Hỏng);
40 °C tới
(Nước lạnh)
Quick
(Nhanh) 18;
30 °C
Spin (Vắt)
Rinse (Xả)
Loại quần áo; Trọng lượng
quần áo tối đa (quần áo khô)
Vải nhạy cảm như hàng dệt
acrylic, sợi vitcô, các mặt
hàng bằng vải poliexte bị
bẩn thông thường;
khối lượng tối đa 4 kg
Vải tổng hợp và hỗn hợp.
Vết bẩn sáng màu và các đồ
cần làm mới ; khối lượng tối
đa 1.5 kg
Để vắt đồ giặt và xả nước
trong thùng giặt; khối lượng
tối đa:
Model:
EWF12932, EWF12932S : 9 kg
EWF12832, EWF12832S : 8 kg
Để xả và vắt đồ giặt; khối
lượng tối đa:
Model:
EWF12932, EWF12932S :
EWF12832, EWF12832S : 8 kg
9 kg
Mô tả chu kỳCó thể kết hợp các
tùy chọn
-
Giặt
-
Xả
-
Vắt mau
-
Giặt
-
Xả
-
Vắt mau
-
Xả Nước
-
Giai đoạn
vắt
Ba lần xả có
-
chất làm
mềm vải
Giai đoạn
-
1200
Spin:
No Spin, Rinse Hold, Night Cycle,
Prewash, Rinse +, Vapour
Adjust Time, Delay Start
Spin : 800 xuống 400 rpm
No Spin, Rinse Hold,
Delay Start
Spin:
No Spin, Delay Start
Spin:
No Spin, Rinse Hold, Delay Start
xuống 400 rpm,
1200
xuống 400 rpm,
1200
xuống 400 rpm,
vắt
1)
,
Energy Saver
(Bộ Tiết Kiệm
Năng Lượng)
2)
,
60 °C
40 °C
Baby (Đồ Trẻ
Em); 40 °C
tới (Nước
lạnh)
Đồ trắng và bền màu, vải
bông bị bẩn thông thường.
Đặt chương trình này để có
kết quả giặt tốt và giảm điện
năng tiêu thụ. Thời gian của
chương trình giặt được lâu
hơn; khối lượng tối đa:
Model:
EWF12932, EWF12932S :
EWF12832, EWF12832S : 8 kg
9 kg
Quần áo vải bông trẻ nhỏ và
hàng dệt mỏng manh bị bẩn
thông thường; khối lượng
tối đa 4 kg
-
Giặt
-
Xả
-
Vòng Vắt
dài
-
Giặt
-
Xả
-
Vắt mau
Spin:
No Spin, Rinse Hold,
Prewash, Rinse +, Vapour 1) ,
Adjust Time, Delay Start
Spin:
No Spin, Rinse Hold, Night Cycle,
Prewash, Rinse +, Vapour
Delay Start
xuống 400 rpm,
1200
xuống 400 rpm,
1200
1)
,
Page 78
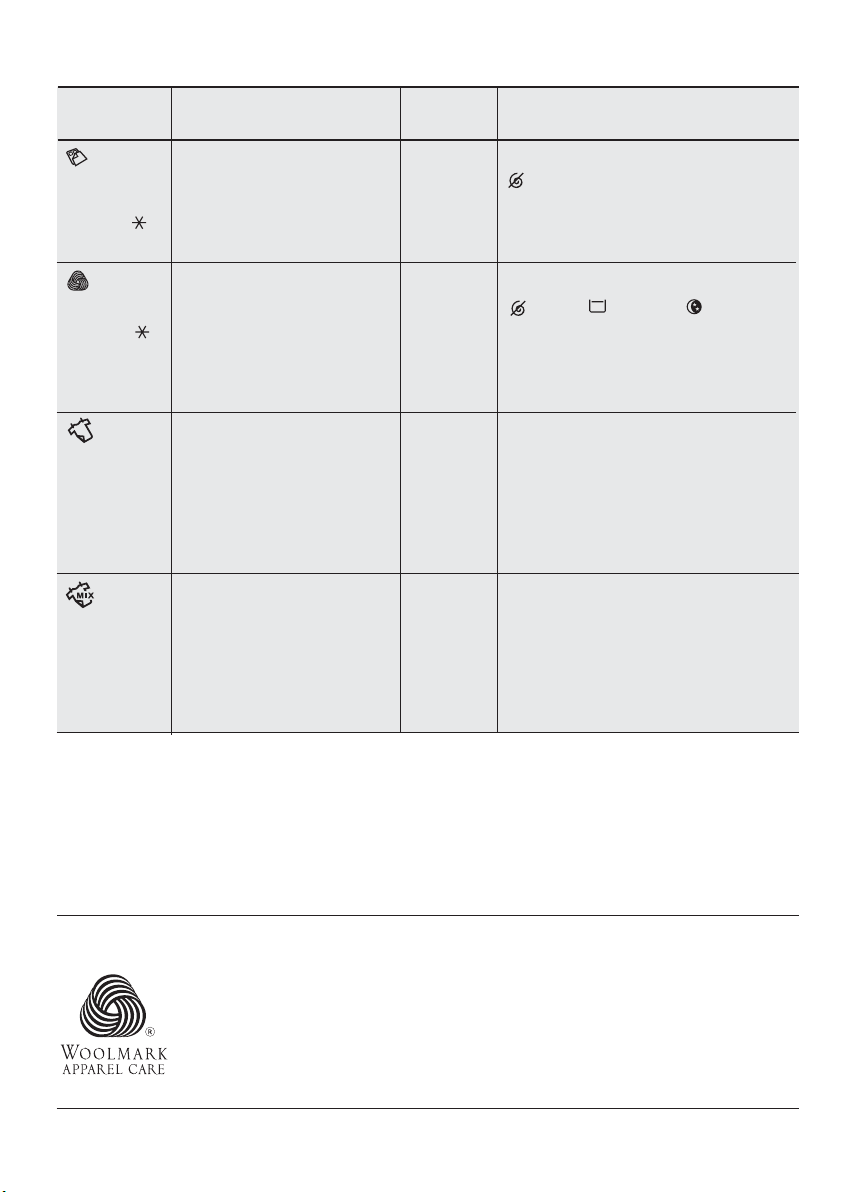
78
www.electrolux.com
Chương trình;
Nhiệt độ
Bedding (Bộ
Đồ Giường);
60 °C tới
(Nước lạnh)
Wool (Len);
40 °C tới
(Nước lạnh)
Refresh
Cottons
(Làm Mới
Vải Bông)
Refresh
Mixed
(Làm Mới
Hỗn Hợp)
Loại quần áo; Trọng lượng
quần áo tối đa (quần áo khô)
Chương trình đặc biệt cho
chăn tổng hợp, chăn lông, ga
phủ giường, v.v…; khối
lượng tối đa 3 kg.
Chương trình đặc biệt cho
quần áo len mang nhãn ‘Len
mới nguyên chất , không co,
giặt máy được’; khối lượng
tối đa 2 kg.
Chương trình Vapour (Hơi
Nước) dành cho vải bông
Trắng và nhuộm màu. Chu
kỳ này loại bỏ mùi hôi và
giúp làm giảm vết nhăn đồ
giặt; khối lượng tối đa 1,5
kg.
Chương trình Vapour (Hơi
Nước) đối với các mặt hàng
sợi tổng hợp hoặc hỗn hợp.
Chu kỳ này loại bỏ mùi hôi
và giúp làm giảm vết nhăn
đồ giặt; khối lượng tối đa
1.5 kg
Mô tả
chu kỳ
-
Giặt
-
Xả
-
Vòng Vắt
dài
-
Giặt
-
Xả
-
Vắt mau
-
Quay trộn
trong hơi
nước.
-
Quay trộn
trong hơi
nước.
Có thể kết hợp
các tùy chọn
800 xuống 400 rpm
Spin:
No Spin,
Vapour
Spin:
1)
, Adjust Time, Delay Start
1200
xuống 400 rpm,
No Spin, Rinse Hold, Night Cycle,
Delay Start
Delay Start
Delay Start
1) Tùy chọn Vapour (Hơi Nước) chỉ có thể được kết hợp với nhiệt độ 90 tới 40 °C.
2) Chương trình Energy Saver (Bộ Tiết Kiệm Năng Lượng) với tùy chọn 60 °C đã chọn được khuyến
nghị cho khối lượng đầy vải bông bẩn thông thường và là chương trình ghi nhãn thông số nước và
năng lượng.
(***) Chương trình “Cottons” với tùy chọn Nước lạnh đã chọn được khuyến nghị cho khối lượng
đầy vải bông bẩn thông thường và là chương trình ghi nhãn thông số năng lượng.
CHỨNG NHẬN CỦA WOOLMARK
Chu kỳ giặt len của máy này đã được Công Ty Woolmark chấp thuận để giặt
các sản phẩm len giặt được bằng máy, với điều kiện là các sản phẩm này phải
được giặt theo các chỉ dẫn trên nhãn quần áo và theo các chỉ dẫn của nhà sản
xuất máy giặt này.
M1354
Page 79
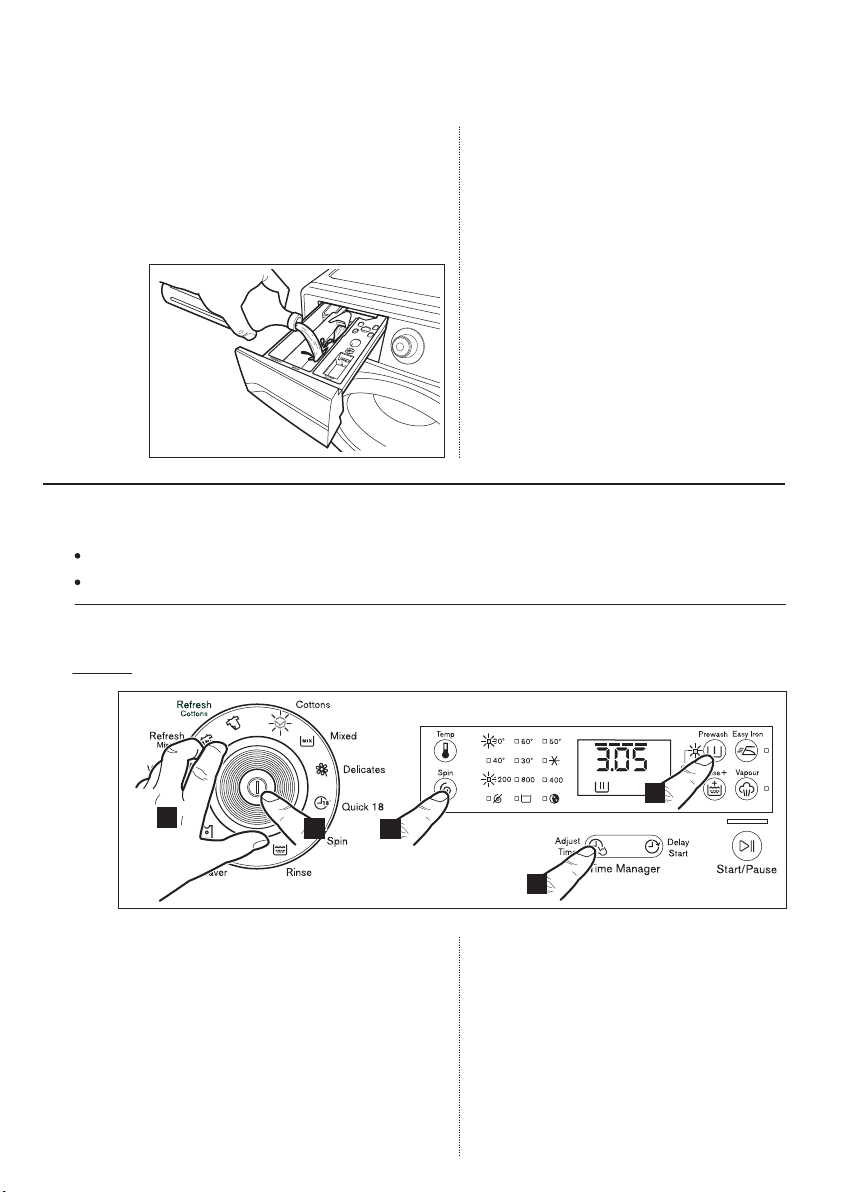
TRƯỚC KHI SỬ DỤNG LẦN ĐẦU
4.
1.
Đảm bảo rằng các kết nối điện và nước
phù hợp với các hướng dẫn lắp đặt.
Cho 2 lít nước vào ngăn bột giặt cho
2.
giai đoạn giặt. Việc này kích hoạt hệ
thống xả.
5.
SỬ DỤNG HÀNG NGÀY
Cắm phích cắm vào ổ cắm điện.
Mở vòi nước.
TIẾNG VIỆT 79
Chọn chu kỳ Cottons (Vải Bông) tại
3.
90 °C, mà không có bất kỳ đồ giặt nào
trong máy để loại bỏ tất cả cặn bẩn
sinh ra từ thùng giặt sau đó bắt đầu
chạy máy.
5.1
Hướng Dẫn Khởi Động Bốn Bước
Bước 1 - Đặt Chương Trình Cho Giai Đoạn Giặt
2
Nhấn nút On/O (Bật/Tắt) để bật máy
1.
giặt.
Vặn núm chọn chương trình đến
2.
chương trình mong muốn.
-
Đèn tương ứng sẽ phát sáng.
-
Chuông sẽ kêu.
-
Núm chọn có thể vặn theo chiều kim
đồng hồ hoặc ngược chiều kim đồng
hồ.
1
3
4
5
-
Sau khi bạn chọn chương trình
giặt, chương trình được chọn sẽ
ở vị trí đó trong toàn bộ quá
trình giặt.
-
Màn hình hiển thị mức của
Chương Trình Quản Lý Thời Gian,
thời lượng của chương trình và
chỉ báo cho các giai đoạn của
chương trình.
Page 80
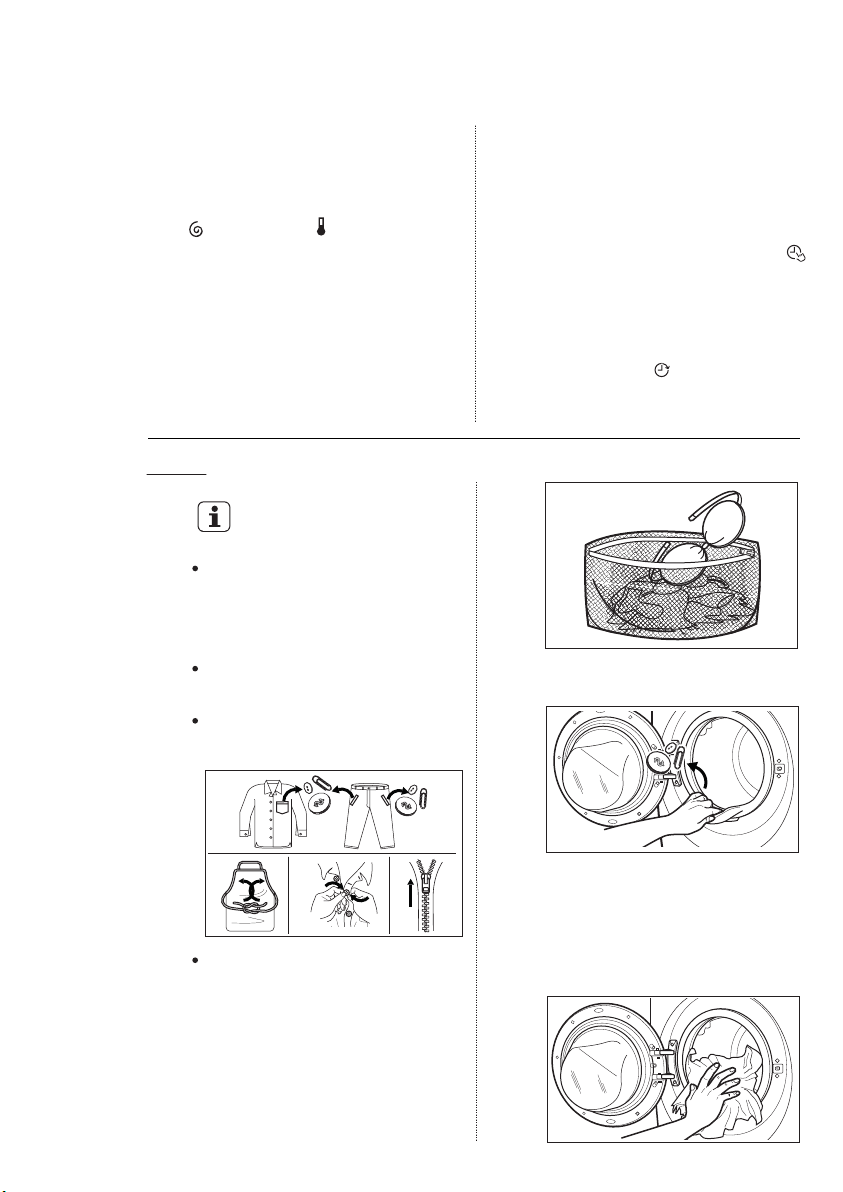
80
www.electrolux.com
Nếu bạn muốn đồ giặt của mình
3.
được vắt hoặc sử dụng nhiệt độ khác
với nhiệt độ mà máy giặt gợi ý,
nhấn các phím điều khiển Spin (vắt)
‘ ’ và nhiệt độ ‘ ’ lặp đi lặp lại để
thay đổi tốc độ vắt và nhiệt độ.
Nhấn các phím điều khiển tùy chọn,
4.
nếu bạn muốn giặt đồ với các chức
năng đặc biệt.
Có thể kết hợp các chức năng khác
nhau tùy thuộc vào chương trình đã
chọn.
Bước 2 - Bỏ Đồ Giặt Vào Máy
Khi nhấn các phím điều khiển này, các
đèn hướng dẫn tương ứng phát sáng.
Khi nhấn lại các phím điều khiển này,
đèn hướng dẫn tương ứng tắt.
Nếu bạn muốn giảm thời gian giặt,
5.
Nhấn phím điều khiển ‘Adjust Time ’
(Điều Chỉnh Thời Gian) lặp đi lặp lại để
giảm thời gian giặt.
Nếu bạn muốn trì hoãn chương trình
giặt, hãy nhấn phím điều khiển tùy
chọn ‘Delay Start ’ (trì hoãn) lặp đi
lặp lại để chọn thời gian trì hoãn máy
giặt.
1.
Trước khi bỏ đồ giặt vào
máy, hãy đảm bảo:
Đảm bảo rằng không có bất cứ
vật kim loại nào còn lại trong
đồ giặt (ví dụ: kẹp tóc, chốt an
toàn, ghim).
Đảm bảo rằng bạn giặt đồ tích
bụi riêng biệt với đồ sinh bụi.
Cài vỏ gối, kéo khóa, móc và
khuy áo.
Giặt áo ngực, ống quần và các
đồ chuyên dụng khác bằng túi
giặt lưới mà bạn có thể mua
trong siêu thị.
Mở cửa bằng cách kéo cẩn thận
2.
tay cầm cửa ra phía ngoài.
Kiểm tra và loại bỏ các vật thể (nếu
có) có thể bị mắc kẹt trong hốc.
Cho đồ giặt vào thùng giặt, từng
3.
chiếc một, rũ chúng ra càng nhiều
càng tốt.
Page 81
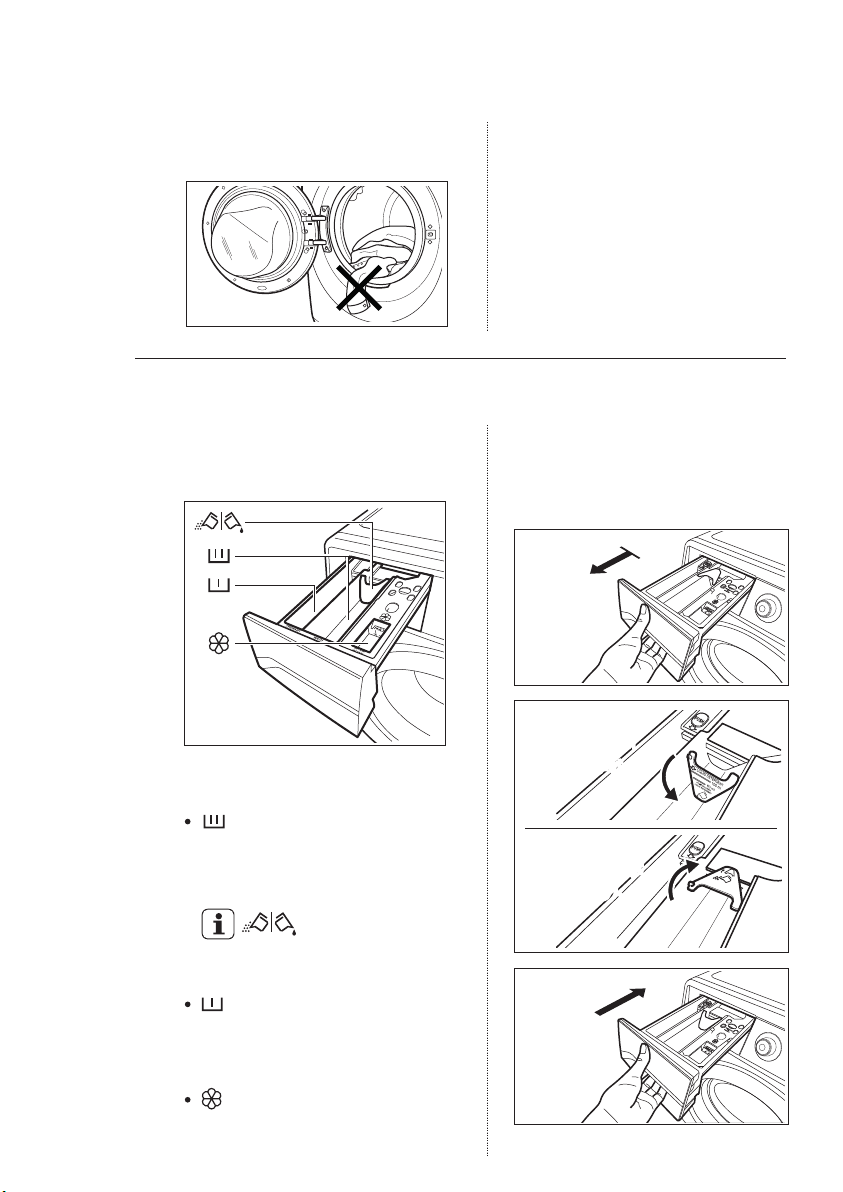
TIẾNG VIỆT 81
POSITION USING
POWDER DETERGENT
Chắc chắn rằng không còn đồ
4.
giặt giữa miếng đệm và cửa.
Bước 3 - Sử Dụng Bột Giặt Và Chất Phụ Gia
1.
Ngăn Định Lượng Bột Giặt
Model: EWF12932, EWF12932S
Đóng cửa lại.
5.
Bột giặt hoặc nước giặt.
1
Ngăn định lượng bột giặt được chia
thành ba ngăn.
Ngăn
‘MAIN WASH’
CHÍNH) Ngăn này được sử dụng
cho bột giặt ở tất cả các chương
trình.
Cửa nạp chất tẩy rửa
Cửa nạp cho bột giặt hoặc
nước giặt.
Ngăn
‘PREWASH’
BỘ) Ngăn này chỉ được sử dụng
cho bột giặt khi chọn
(Giặt Sơ Bộ) .
Ngăn
LÀM MỀM VẢI) Ngăn này được sử
‘SOFTENER’
dụng cho chất làm mềm vải.
(GIẶT
(GIẶT SƠ
Prewash
(CHẤT
2
Đặt xuống: đối
Đặt xuống: đối
với nước giặt
với nước giặt
Đặt lên : đối với
Đặt lên : đối với
bột giặt (cài đặt
bột giặt (cài đặt
tại nhà máy).
tại nhà máy).
3
Page 82
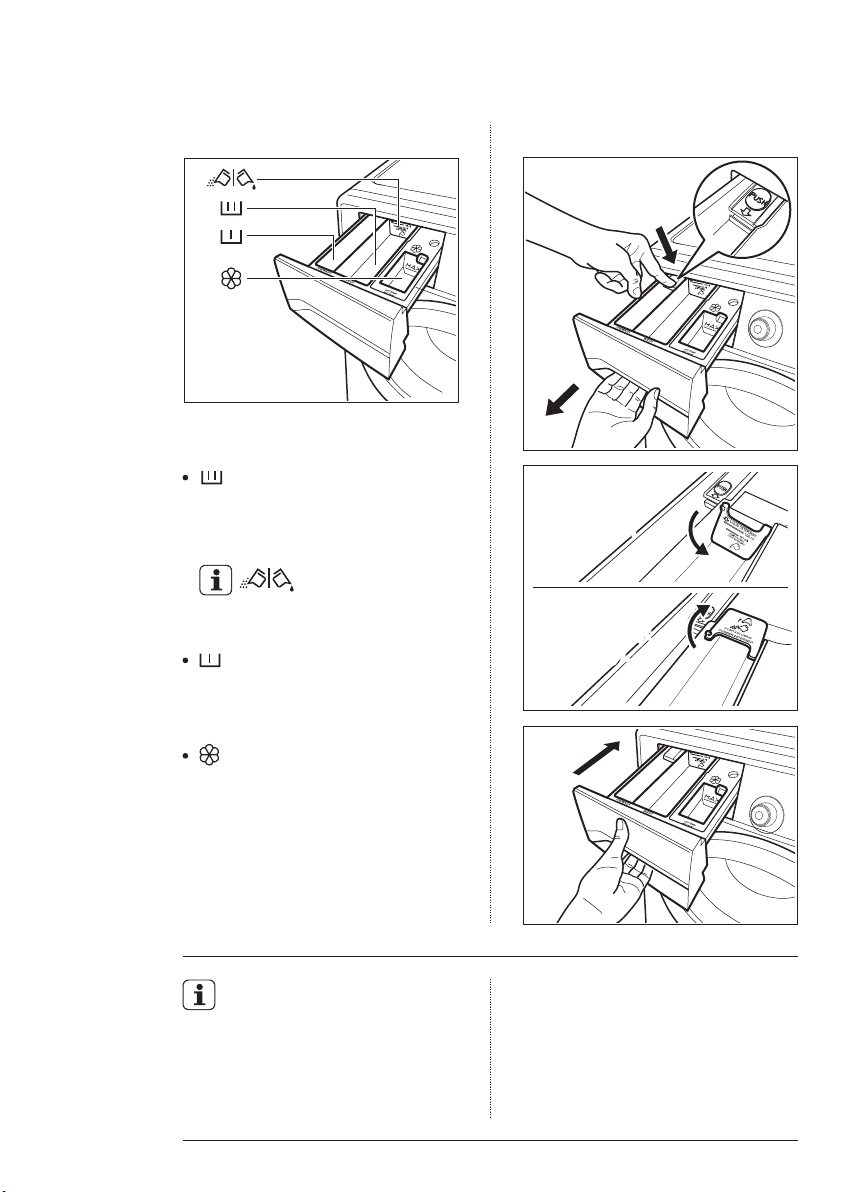
82
4
www.electrolux.com
Model: EWF12832, EWF12832S
Bột giặt hoặc nước giặt.
1
2
Ngăn định lượng bột giặt được chia
thành ba ngăn.
Ngăn
CHÍNH) Ngăn này được sử dụng
cho bột giặt ở tất cả các chương
trình.
‘MAIN WASH’
(GIẶT
3
Đặt xuống : đối
Đặt xuống : đối
với dung dịch
với dung dịch
tẩy rửa.
tẩy rửa.
Cửa nạp chất tẩy rửa
Cửa nạp cho bột giặt hoặc
nước giặt.
Ngăn
BỘ) Ngăn này chỉ được sử dụng
cho bột giặt khi chọn
‘PREWASH’
(GIẶT SƠ
Prewash
Đặt lên : đối với
Đặt lên : đối với
bột giặt (cài đặt
bột giặt (cài đặt
tại nhà máy).
tại nhà máy).
(Giặt Sơ Bộ) .
Ngăn
‘SOFTENER’
(CHẤT
LÀM MỀM VẢI) Ngăn này được sử
dụng cho chất làm mềm vải.
Khi nào thì sữ dụng nước
giặt tẩy:
Không sử dụng bột giặt dạng
-
lỏng gel hoặc đặc.
Không cho dung dịch nước
-
giặt tẩy nhiều hơn mức tối đa.
Không đặt giai đoạn GIẶT SƠ BỘ.
-
Không đặt
-
DELAY START
hoãn).
(Trì
Page 83
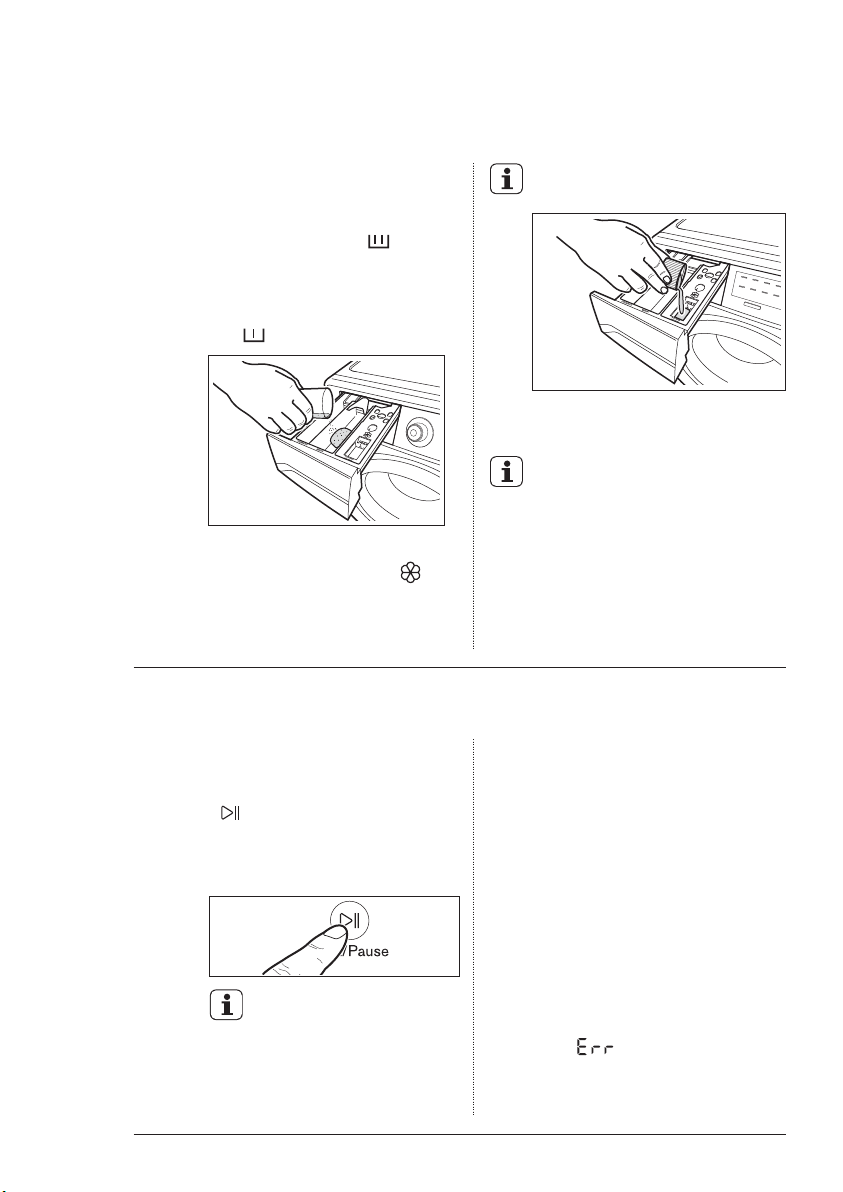
Đo lượng bột giặt và chất làm mềm vải;
2.
-
Kéo ngăn định lượng ra cho
đến khi nó dừng lại.
-
Đo lượng bột giặt cần thiết, đổ
vào ngăn giặt chính ( ).
-
Nếu bạn muốn thực hiện giai
đoạn
“Prewash”
(Giặt Sơ Bộ),
hãy đổ vào ngăn được đánh
dấu .
-
Nếu cần, đổ chất làm mềm vải
vào ngăn được đánh dấu
(lượng được sử dụng không
“MAX”
được vượt dấu
(TỐI ĐA)
trong ngăn).
TIẾNG VIỆT 83
Nếu sử dụng nước xả vải ở dạng
đặc, bạn nên pha loãng với nước.
-
Đóng ngăn lại một cách nhẹ
nhàng.
Sau khi hoàn thành chu trình giặt,
cặn bột giặt, nước xả và nước có
thể vẫn còn trong các ngăn của
máy giặt. Bạn nên vệ sinh các
ngăn của máy giặt thường xuyên
để loại bỏ hết cặn.
Bước 4 - Bắt đầu chương trình
Để bắt đầu một chương trình,
nhấn phím điều khiển Start/
Pause (Bắt Đầu/Tạm Dừng)
( ), đèn dẫn hướng tương
ứng sẽ bật sáng và thời gian
mặc định chương trình sẽ được
hiển thị trên màn hình hiển thị.
Sau xấp xỉ 15 phút kể từ lúc
bắt đầu chương trình:
Thiết bị sẽ tự động điều
-
chỉnh thời gian chạy
chương trình đã chọn
theo loại và kích cỡ khối
lượng.
-
Màn hình hiển thị sẽ hiển
thị thời gian chạy chương
trình đã điều chỉnh.
CHÚ Ý!
Nếu bạn xoay quay số bộ chọn
chương trìnhsang chương trình
khác khi máy đang hoạt động, tin
nhắn ‘ ’ sẽ xuất hiện trên
màn hình hiển thị để chỉ thị chọn
sai. Máy sẽ không thực hiện
chương trình mới đã chọn.
Page 84
84
www.electrolux.com
5.2
Gián Đoạn Chương Trình
Để tạm dừng, hãy nhấn
-
(Bắt Đầu/Tạm Dừng). Chỉ báo sẽ bắt
đầu nhấp nháy.
Nhấn lại
-
Dừng). Chương trình sẽ tiếp tục.
5.3
Thay Đổi Chương Trình
Chỉ có thể thay đổi chương trình đang
chạy bằng cách tắt thiết bị.
Nhấn nút
-
chương trình và tắt thiết bị.
Nhấn lại nút
-
đầu thiết bị.
Bây giờ, bạn có thể đặt một chương
trình giặt mới.
5.4
Thay Đổi Tùy Chọn
Có thể thay đổi chỉ một tùy chọn nào
đó sau khi đã bắt đầu chương trình.
1.
2.
3.
5.5
Mở Cửa
Trong khi chương trình hoặc Trì hoãn
đang hoạt động thì cửa thiết bị đóng và
màn hình hiển thị chỉ báo ‘ ’.
Trước hết đặt máy thành TẠM DỪNG
bằng cách nhấn phím điều khiển
“Start/Pause”
cho đến khi chỉ báo khóa cửa ‘ ’ tắt,
sau đó có thể mở cửa.
Start/Pause
‘On/Off’
‘On/Off’
Thiết bị sẽ không xả hết
nước.
Nhấn phím điều khiển
(Bắt Đầu/Tạm Dừng). Chỉ báo sẽ bắt
đầu nhấp nháy.
Thay đổi tùy chọn.
Nhấn lại
Dừng). Chương trình sẽ tiếp tục.
Start/Pause
(Bắt Đầu/Tạm Dừng). Đợi
Start/Pause
(Bắt Đầu/Tạm
(Bật/Tắt) để huỷ
(Bật/Tắt) để bắt
Start/Pause
(Bắt Đầu/Tạm
Nếu chỉ báo khóa cửa ‘ ’ không
tắt, điều này có nghĩa là máy đang
nóng lên và mức nước ở trên mép
đáy cửa hoặc Lồng giặt đang xoay.
Trong trường hợp này, KHÔNG THỂ
mở cửa.
Nếu bạn không thể mở cửa nhưng
cần mở bạn phải tắt máy bằng cách
nhấn nút
hiệu hóa thiết bị. Sau khoảng 5 phút
cửa có thể được đóng .
5.6
Cuối Chương Trình
-
-
-
-
-
-
-
-
QUAN TRỌNG !
Khi gần kết thúc chương trình,
thời gian còn lại có thể đột nhiên
giảm từ 7 phút xuống đến 0 do
tổng thời gian chương trình vượt
quá dự tính trong giai đoạn cảm
biến tải trọng. Trong một vài
trường hợp (với tải trọng cân
bằng tuyệt đối) thời gian chương
trình có thể ngắn hơn thời gian
dự tính sau khi đã hoàn tất giai
đoạn cảm biến tải trọng.
Đây là một hoạt động bình
thường của máy và không đáng
lo vì nó không ảnh hưởng đến
hoạt động của máy.
‘On/Off’
THẬN TRỌNG!
Chú ý đến mức nước và nhiệt
độ nước.
Thiết bị tự động dừng.
Tín hiệu âm thanh sẽ hoạt động.
Màn hình hiển thị sẽ hiển thị ‘ ’.
Chỉ báo của phím điều khiển
Start/Pause (Bắt Đầu/Tạm Dừng) tắt.
Chỉ báo khóa cửa ‘ ’ tắt.
Lấy đồ giặt ra khỏi thiết bị. Đảm bảo
rằng không còn gì trong Lồng giặt.
Để cửa khép hờ, để ngăn nấm mốc
và mùi hôi.
Tắt vòi nước.
(Bật/Tắt) để vô
Page 85
5.7
Khi Hoàn Thành Chương
Trình Giặt, Nhưng Có Nước
Trong Lồng giặt
-
Lồng giặt xoay thường xuyên để
ngăn đồ bị nhăn.
-
Chỉ báo khóa cửa ‘ ’ phát sáng.
Cửa vẫn khóa.
Bạn phải xả hết nước để mở cửa.
Để xả hết nước :
1.
Chọn chương trình
Nếu cần, giảm tốc độ Vắt.
2.
3.
Nhấn phím điều khiển
Start/Pause
Thiết bị sẽ xả nước và Vắt.
4.
Khi chương trình được hoàn
thành và chỉ báo khóa cửa ‘ ’
tắt, bạn có thể mở cửa.
5.
Nhấn nút
hiệu hóa thiết bị.
Chế Độ Tạm Dừng Hoạt
5.8
‘On/Off’
“Spin”
(Bắt Đầu/Tạm Dừng).
(Bật/Tắt) để vô
Động
Chế độ TẠM DỪNG HOẠT ĐỘNG sẽ
tự động làm cho máy ngừng hoạt
động để giảm năng lượng tiêu thụ
khi:
Khi bạn không vận hành máy
trong vòng 5 phút trước khi nhấn
“Start/Pause”
nút
Tạm dừng.
Nhấn nút
lại máy.
Sau 5 phút kể từ khi máy đã hoàn
tất chương trình giặt.
Nhấn nút
lại máy.
Vặn nút chương trình để chọn
chương trình giặt mới.
“On/ Off”
“On/ Off”
(Khởi động/
để khởi động
để khởi động
(Vắt).
TIẾNG VIỆT 85
5.9
Tính Năng Child Lock (Khóa
Trẻ Em)
Thiết bị của bạn được cung cấp
KHÓA AN TOÀN CHO TRẺ EM cho
phép bạn không giám sát thiết bị
khi đóng cửa mà không phải lo lắng
rằng trẻ có thể bị thương hoặc làm
hỏng thiết bị.
Đặt tùy chọn này trước khi nhấn
Start/Pause
sau khi đã chọn chương trình giặt
được chọn.
Chức năng này vẫn được bật kích
hoạt ngay cả sau khi thiết bị đã tắt.
Đặt tùy chọn Child Lock (Khóa Trẻ
Em):
Để kích hoạt chức năng này, nhấn
các phím điều khiển
(Giặt Sơ Bộ) và
cùng một lúc cho đến khi màn
hình hiển thị hiển thị biểu tượng
‘ ’.
Để vô hiệu hóa chức năng này,
nhấn ‘các phím điều khiển
‘Prewash’
(Xả +) cùng một lúc cho đến khi
biểu tượng ‘ ’ tắt.
(Bắt Đầu/Tạm Dừng) và
‘Prewash’
‘Rinse +'
(Giặt Sơ Bộ) và
(Xả +)
‘Rinse +’
Page 86
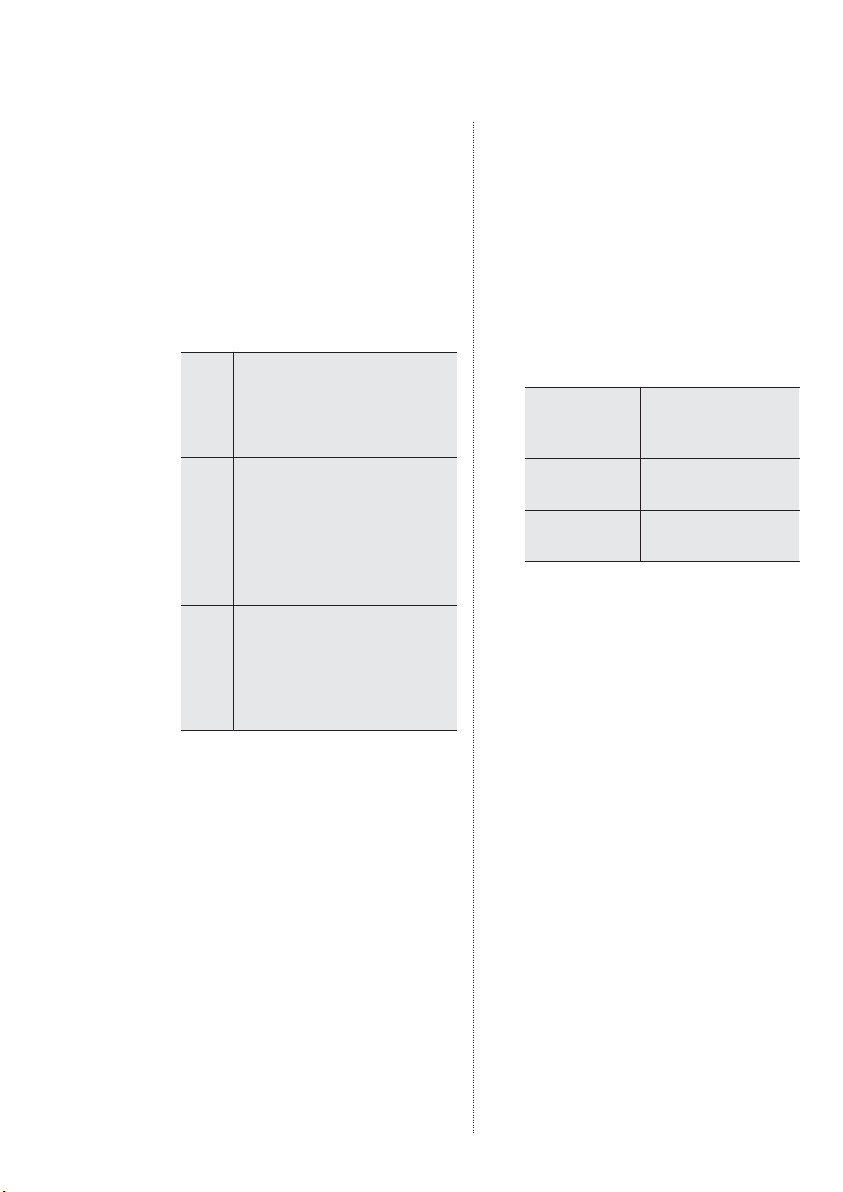
86
www.electrolux.com
GỢI Ý GIẶT
6.
6.1
Phân Loại Đồ Giặt
Tuân theo các biểu tượng mã giặt
trên mỗi nhãn quần áo và hướng
dẫn giặt của nhà sản xuất. Phân loại
đồ giặt như sau: đồ trắng, đồ nhuộm
màu, đồ sợi tổng hợp, đồ dễ hỏng,
đồ len.
6.2
Nhiệt Độ
Đối với vải bông trắng và vải
linen bị bẩn thông thường
90°C
(chẳng hạn như khăn trải bàn
trà, khăn tắm, khăn trải bàn, ga
giường...).
Đối với quần áo bị bẩn bình
thường, bền màu (chẳng hạn
60°C
áo sơ mi, váy ngủ, bộ đồ ngủ....)
50°C
bằng lanh, vải bông hoặc sợi
tổng hợp và đối với vải bông
40°C
trắng bị bẩn nhẹ (chẳng hạn
quần lót).
Đối với đồ dễ hỏng (chẳng hạn
như màn cửa dạng lưới), đồ
30°C
giặt hỗn hợp gồm sợi tổng hợp
Lạnh
và đồ len dán nhãn len mới
nguyên chất, có thể giặt máy,
không co.
6.3
Trước Khi Bỏ Đồ Giặt Vào
Máy
Không bao giờ giặt đồ trắng và đồ
nhuộm màu cùng nhau. Đồ trắng có
thể mất đi “độ trắng” trong quá trình
giặt.
Các đồ màu mới có thể ra màu trong
máy lần đầu tiên; do đó chúng cần
được giặt riêng trong lần đầu tiên.
Đảm bảo không có vật kim loại còn
sót lại trong đồ giặt (ví dụ như kẹp
tóc, ghim an toàn, ghim quần áo).
Đóng nút bao gối, kéo khóa kéo,
móc và khuy bấm. Buộc dây lưng
hay băng dài.
Loại bỏ vết ố khó giặt trước khi giặt.
Chà những chỗ bị bẩn đặc biệt bằng
bột giặt chuyên dụng hoặc bột giặt.
Xử lý cẩn thận với màn cửa. Tháo
móc hoặc buộc chúng chặt lại trong
túi hoặc lưới.
6.4
Khối Lượng Tối Đa
Khối lượng khuyến nghị được nêu
trong bảng chương trình. Các quy
tắc chung:
Vải bông,
lanh:
Vải tổng
hợp:
Vải dễ hỏng
và đồ len:
Việc giặt khối lượng tối đa giúp sử
dụng nước và năng lượng hiệu quả
nhất. Đối với đồ giặt rất bẩn, giảm
bớt kích cỡ khối lượng.
6.5
Loại Bỏ Vết Bẩn
Các vết bẩn cứng đầu không thể loại
bỏ chỉ bằng nước và bột giặt. Do vậy
nên xử lý các vết bẩn trước khi giặt.
Vết máu: xử lý vết máu tươi bằng
nước lạnh. Đối với vết máu khô,
ngâm qua đêm trong nước với bột
giặt chuyên dụng sau đó chà trong
xà phòng và nước.
Sơn dầu: làm ẩm bằng nước tẩy vết
xăng, đặt quần áo trên tấm vải mềm
và thoa lên vết bẩn; làm một vài lần
như thế.
Vết bẩn dầu mỡ khô: làm ẩm bằng
nhựa thông, đặt quần áo trên bề
mặt mềm và thoa lên vết bẩn bằng
đầu ngón tay và tấm vải bông.
đầy lồng giặt
nhưng không nén
quá chặt;
không đầy quá
một nữa lồng giặt ;
không đầy quá một
phần ba lồng giặt.
Page 87
TIẾNG VIỆT 87
Gỉ sắt: axit oxalic hòa tan trong
nước nóng hoặc sản phẩm loại bỏ gỉ
sắt được sử dụng trong nước lạnh.
Chú ý các vết gỉ sắt không phải mới
đây bởi vì cấu trúc xenlulo đã bị phá
hỏng và vải có xu hướng bị thủng lỗ.
Vết mốc: xử lý bằng thuốc tẩy, rồi
xả sạch (chỉ đồ trắng và đồ nhuộm
bền màu).
Nhựa cây: xoa nhẹ xà phòng và xử
lý bằng thuốc tẩy (chỉ đồ trắng và
đồ nhuộm bền màu).
Vết bút bi và keo dán: làm ẩm
bằng axeton (*), đặt quần áo trên
tấm vải mềm và thoa lên vết bẩn.
Vết son: làm ẩm bằng axeton (*) như
trên rồi sau đó xử lý vết bẩn bằng
cồn methylate hóa. Loại bỏ bất kỳ
vết còn lại nào khỏi vải trắng bằng
thuốc tẩy.
Rượu vang đỏ: ngâm trong nước và
bột giặt, xả và xử lý bằng axit axetic
hoặc xitric rồi sau đó xả sạch. Xử lý
bất kỳ vết còn lại nào bằng thuốc
tẩy.
Vết mực: tùy thuộc vào loại mực,
trước tiên làm ướt vải bằng axeton
(*), rồi bằng axit axetic; xử lý bất kỳ
vết còn lại nào trên vải trắng bằng
thuốc tẩy rồi sau đó xả sạch hoàn
toàn.
Vết nhựa đường: trước tiên xử lý
bằng chất tẩy bẩn, cồn methylate
hóa hoặc benzen, sau đó chà với bột
giặt.
(*) không sử dụng axeton trên lụa
nhân tạo.
6.6
Bột Giặt và Chất Phụ Gia
Hiệu quả giặt tốt cũng phụ thuộc
vào việc lựa chọn bột giặt và sử dụng
khối lượng phù hợp để tránh lãng
phí và bảo vệ môi trường.
Mặc dù có thể phân hủy sinh học
nhưng bột giặt gồm phần lớn các
chất có thể phá vỡ sự cân bằng dễ bị
tổn hại của tự nhiên.
Việc lựa chọn bột giặt sẽ phụ thuộc
vào loại vải (vải dễ hỏng, len, vải
bông, v.v…), màu sắc, nhiệt độ giặt
và độ bẩn.
Chỉ sử dụng các bột giặt ít bọt cho
máy giặt cửa trước trong thiết bị
này:
bột giặt cho tất cả các loại vải,
bột giặt cho vải dễ hỏng (tối đa
60 °C) và len,
bột giặt dạng lỏng, ưu tiên cho
chương trình giặt nhiệt độ thấp(tối
đa 60 °C) cho tất cả các loại vải,
hoặc chỉ chuyên dùng cho len.
Bột giặt và bất kỳ chất phụ gia nào
cũng phải được đặt ở ngăn thích
hợp của ngăn định lượng trước khi
bắt đầu chương trình giặt.
Đổ bột giặt dạng lỏng vào trong
ngăn định lượng được đánh dấu ‘ ’
chỉ trước khi bắt đầu chương trình.
Nếu sử dụng bột giặt đậm đặc
hoặc bột giặt dạng lỏng, thì
phải lựa chọn chương trình
không PREWASH (GIẶT SƠ BỘ).
Bất kỳ chất làm mềm vải hay chất phụ
gia dạng bột nào đều phải được đổ
vào ngăn được đánh dấu ‘ ’ trước
khi bắt đầu chương trình giặt.
Page 88

88
www.electrolux.com
Làm theo các khuyến nghị của nhà
sản xuất sản phẩm về khối lượng sử
dụng và không vượt quá dấu MAX
(TỐI ĐA) trong ngăn định lượng bột
giặt.
Không xịt các sản phẩm xử lý sơ bộ
(chẳng hạn Preen) lên trên hoặc gần
máy, bởi vì sản phẩm này có thể dính
vào các vật liệu nhựa, làm giảm tuổi
thọ của máy.
6.7
Lượng Chất Giặt Tẩy Cần
Được Sử Dụng
Loại và khối lượng bột giặt sẽ phụ
thuộc vào loại vải, kích cỡ khối lượng,
độ bẩn và độ cứng của nước được sử
dụng.
Độ cứng của nước được phân loại
theo “độ” cứng.
Thông tin về độ cứng của nước trong
khu vực của bạn có thể có được từ
công ty cấp nước liên quan hoặc từ
chính quyền địa phương của bạn.
Làm theo các hướng dẫn của nhà
sản xuất sản phẩm về khối lượng sử
dụng.
Không đủ bột giặt sẽ gây ra:
khối lượng giặt chuyển sang màu
xám,
quần áo dính dầu mỡ.
Quá nhiều bột giặt sẽ gây ra:
bọt,
hiệu quả giặt giảm,
xả chưa đủ.
Sử dụng ít bột giặt hơn nếu:
bạn đang giặt khối lượng nhỏ,
đồ giặt bị bẩn nhẹ,
lượng lớn bọt hình thành trong
suốt quá trình giặt.
Page 89
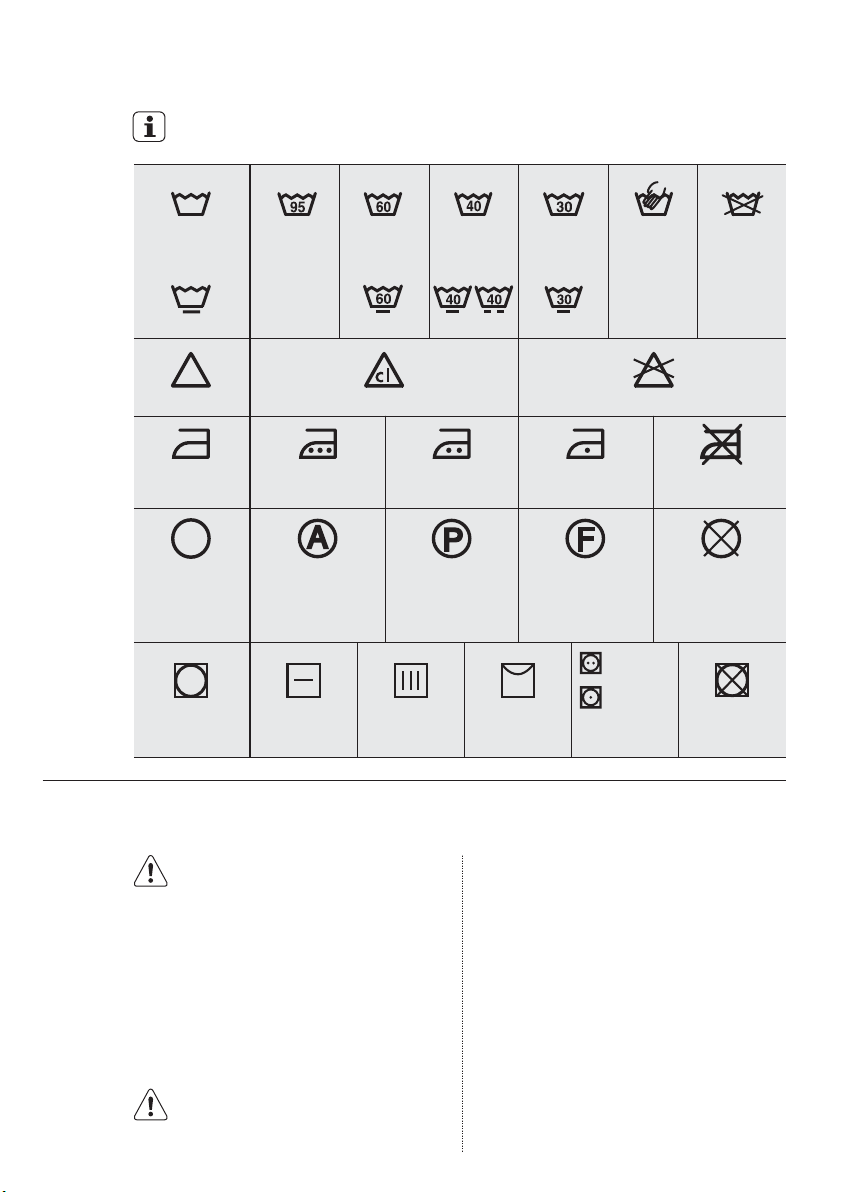
CÁC BIỂU TƯỢNG MÃ GIẶT QUỐC TẾ
7.
Biểu tượng này xuất hiện trên nhãn vải để giúp bạn lựa chọn cách tốt nhất để xử
lý đồ giặt của mình.
Giặt mạnh
TIẾNG VIỆT 89
Nhiệt độ
giặt tối đa
95 °C
Giặt nhẹ
Tẩy trắng
Là
Vệ sinh khô
Sấy Làm Phẳng Sấy Khô KHÔNG sấy
Là nóngnhiệt độ
tối đa
Vệ sinh khô
trong tất cả
dung môi
Nhiệt độ
giặt tối đa
60 °C
Tẩy trắng trong nước lạnh KHÔNG tẩy trắng
200 °C
Trên dây
Nhiệt độ
giặt tối đa
40 °C
Là ấmnhiệt độ
150 °C
tối đa
Vệ sinh khô trong
tetracloetylen, dầu,
cồn nguyên chất,
R 111 & R 113
Trên mắc treo
quần áo
Nhiệt độ
giặt tối đa
30 °C
Là âm ấmnhiệt độ
tối đa
Vệ sinh khô trong
dầu, cồn nguyên
chất và
Giặt tay
KHÔNG là
110 °C
KHÔNG vệ
sinh khô
R 113
Nhiệt độcao
Nhiệt độthấp
KHÔNG
giặt tại tất
cả các
trường hợp
khô
8.
BẢO TRÌ VÀ VỆ SINH
CẢNH BÁO!
Bạn phải NGẮT thiết bị khỏi nguồn
điện, trước khi bạn có thể thực hiện
bất kỳ công việc vệ sinh hoặc bảo trì
nào.
8.1
Vệ Sinh Bên Ngoài
Chỉ vệ sinh thiết bị bằng xà phòng
và nước ấm. Làm khô hoàn toàn tất
cả các bề mặt.
THẬN TRỌNG!
Không sử dụng cồn, dung môi
hoặc sản phẩm hóa chất.
8.2
Khử cặn
Nước chúng ta thường dùng đều
chứa vôi. Nên sử dụng bột làm mềm
nước theo định kỳ trong máy.
Không làm điều này chung với bất
kỳ việc giặt đồ nào và theo các
hướng dẫn của nhà sản xuất bột làm
mềm nước.
Điều này sẽ giúp ngăn việc hình
thành cặn vôi.
Page 90
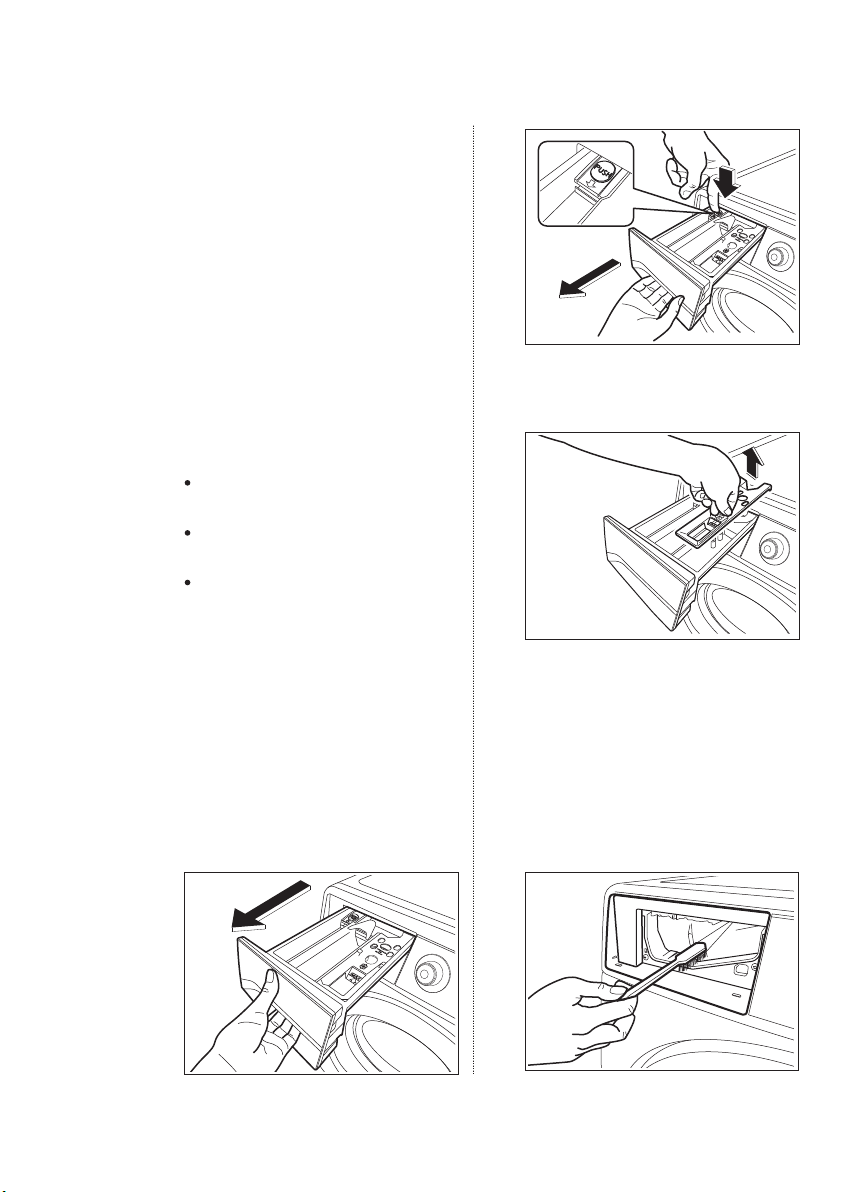
90
www.electrolux.com
8.3
Sau Mỗi Lần Giặt
Để cửa mở trong một lúc. Điều này
giúp ngăn chặn nấm mốc và mùi
đọng lại hình thành bên trong thiết
bị. Để cửa mở sau khi giặt cũng sẽ
giúp bảo quản gioăng cửa.
8.4
Giặt Bảo Trì
Với việc sử dụng nhiệt độ giặt thấp,
có thể hình thành cặn lắng bên
trong lồng giặt.
Chúng tôi khuyến nghị thực hiện
giặt bảo trì thường xuyên.
Để chạy máy giặt bảo trì:
Lồng giặt cần phải không còn đồ
giặt.
Chọn chương trình giặt vải bông
nóng nhất.
Sử dụng tách đo bột giặt thông
thường, phải là bột giặt có các
đặc tính sinh học.
2
3
Để hỗ trợ việc làm sạch, phần trên
cùng của ngăn chất phụ gia cần
được tháo ra.
8.5
Vệ Sinh Ngăn Định Lượng
Ngăn định lượng bột giặt và phụ
gia cần được vệ sinh đều đặn.
Tháo ngăn bằng cách nhấn chốt
xuống phía dưới và bằng cách kéo
ra. Rửa sạch ngăn dưới vòi nước để
loại bỏ bất kỳ vết xà phòng bị đóng
cặn nào.
1
8.6
Vệ Sinh Hốc Ngăn
Sau khi đã tháo ngăn ra, sử dụng
bàn chải nhỏ để vệ sinh hốc, đảm
bảo rằng tất cả cặn lắng bột giặt
được loại bỏ khỏi phần trên và phần
dưới của hốc. Cho ngăn vào lại và
chạy chương trình xả mà không có
quần áo nào ở trong trống.
Page 91
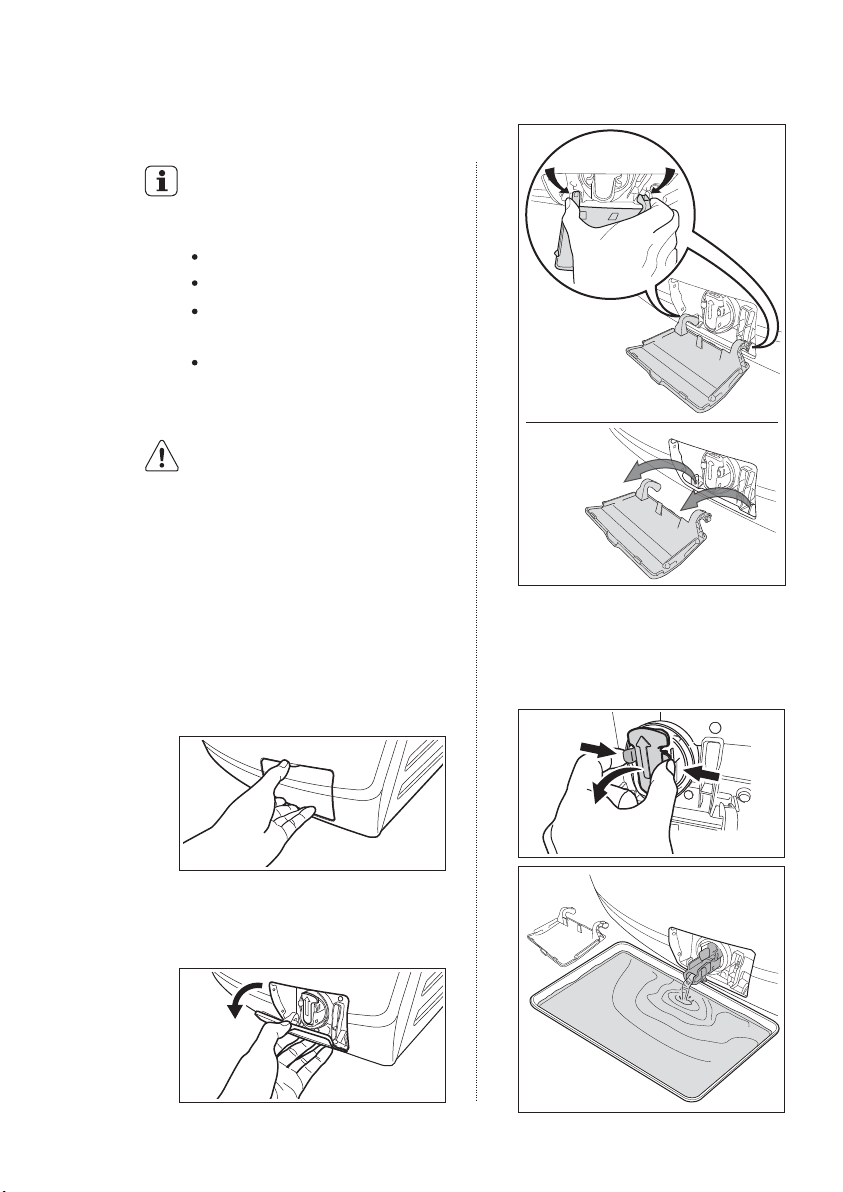
8.7
Vệ sinh Bơm
Thường xuyên kiểm tra bơm xả và
chắc chắn rằng bơm sạch.
Vệ sinh bơm nếu:
Thiết bị không xả nước.
Thùng giặt không thể xoay.
Thiết bị sinh ra tiếng ồn bất
thường do bị tắc nghẽn bơm xả.
Màn hình hiển thị mã báo động
do gặp vấn đề với đường ống xả
nước.
TIẾNG VIỆT 91
1
Ép chân
trên cả
hai bên
CẢNH BÁO!
Tháo phích cắm ra khỏi ổ cắm
1.
điện.
Không tháo bộ lọc ra trong
2.
khi thiết bị hoạt động. Không
vệ sinh bơm xả nếu nước
trong thiết bị còn nóng. Nước
phải lạnh trước khi bạn vệ
sinh bơm xả .
Để vệ sinh bơm xả:
1.
Mở cửa bơm xả.
2.
Kéo cửa nạp xuống, sau đó bóp
chân trên cả hai mặt của trang bìa
với nhau và kéo ra (như hình).
2
kéo ra
3.
Đặt vật đựng dưới hốc bơm xả để
hứng nước chảy ra.
Nhấn hai cần gạt và kéo về phía ống
xả để cho nước chảy ra.
Page 92
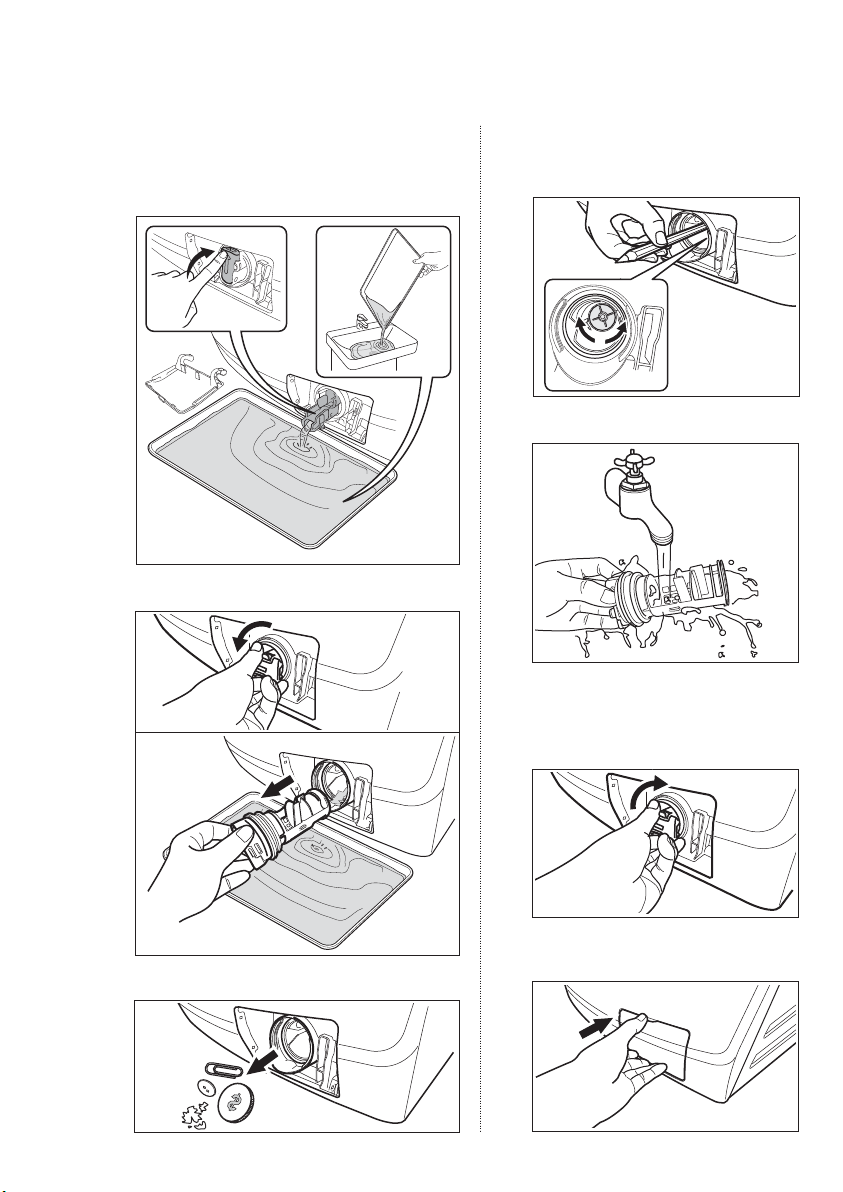
92
www.electrolux.com
Khi đồ chứa đầy nước, đặt lại ống xả và làm
4.
cạn đồ chứa. Thực hiện lại các bước 3 cho
đến khi không còn thêm nước chảy ra từ
bơm xả.
Kéo lại ống xả và xoay bộ lọc để tháo ra.
5.
7.
Đảm bảo rằng cánh quạt bơm có
thể xoay. Nếu điều này không xảy
ra, liên hệ với trung tâm dịch vụ.
8.
Vệ sinh bộ lọc dưới vòi nước.
1
2
6.
Loại bỏ bụi xơ và các vật từ bơm (nếu có).
9.
Đặt lại bộ lọc trong bơm vào trong
các ống dẫn đặc biệt. Chắc chắn
rằng bạn siết chặt bộ lọc một cách
phù hợp để ngăn rò rỉ.
10.
Đặt lại cửa nạp và đóng cửa bơm
xả.
Page 93
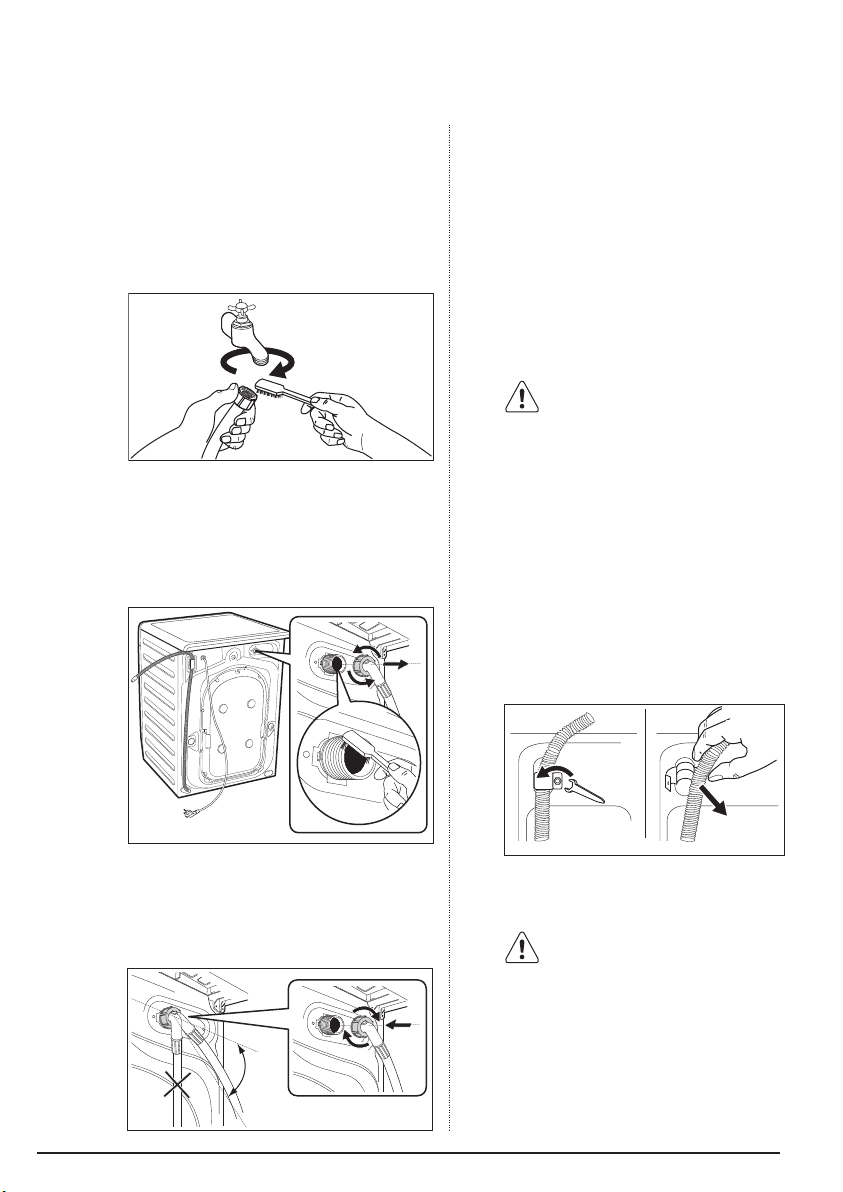
8.8
Vệ Sinh Bộ Lọc Nạp Nước
Nếu nước rất cứng hoặc chứa các vết
cặn vôi thì bộ lọc nạp nước có thể bị
tắc nghẽn. Do đó thỉnh thoảng nên vệ
sinh bộ lọc.
Để vệ sinh bộ lọc nạp nước:
1.
Đóng vòi nước lại.
2.
Tháo ống nạp nước khỏi vòi nước.
Vệ sinh bộ lọc trong ống nạp nước
3.
bằng bàn chải cứng.
TIẾNG VIỆT 93
Lắp lại ống nạp nước.Đảm bảo
6.
rằng các khớp nối đều chặt để
ngăn rò rỉ.
7.
Mở vòi nước.
8.9
Các Nguy Cơ Đóng Băng
Nếu máy tiếp xúc với nhiệt độ thấp
hơn 0°C, cần thực hiện một số biện
pháp phòng ngừa.
Tháo phích cắm ra khỏi ổ cắm
điện.
Tắt vòi nước.
1.
Tháo ống nạp nước ra.
2.
Đặt một cái tô bên hốc bơm xả
3.
để hứng nước chảy ra.
Tháo ống xả khỏi giá đỡ phía sau
4.
và tháo móc ra khỏi bồn hoặc
đầu vòi.
Kéo về phía ống xả và ống xả
của ống nạp nước trong tô đặt
trên sàn nhà và cho phép nước
chảy ra.
4.
Tháo ống nạp nước đằng sau
thiết bị.
Vệ sinh bộ lọc trong van bằng bàn
5.
chải cứng hoặc khăn.
45°
Khi nước không chảy ra nữa, lắp
5.
lại ống nạp và ống xả.
Khi bạn có ý định khởi động lại
máy,chắc chắn rằng nhiệt độ phòng
trên 0°C.
Page 94
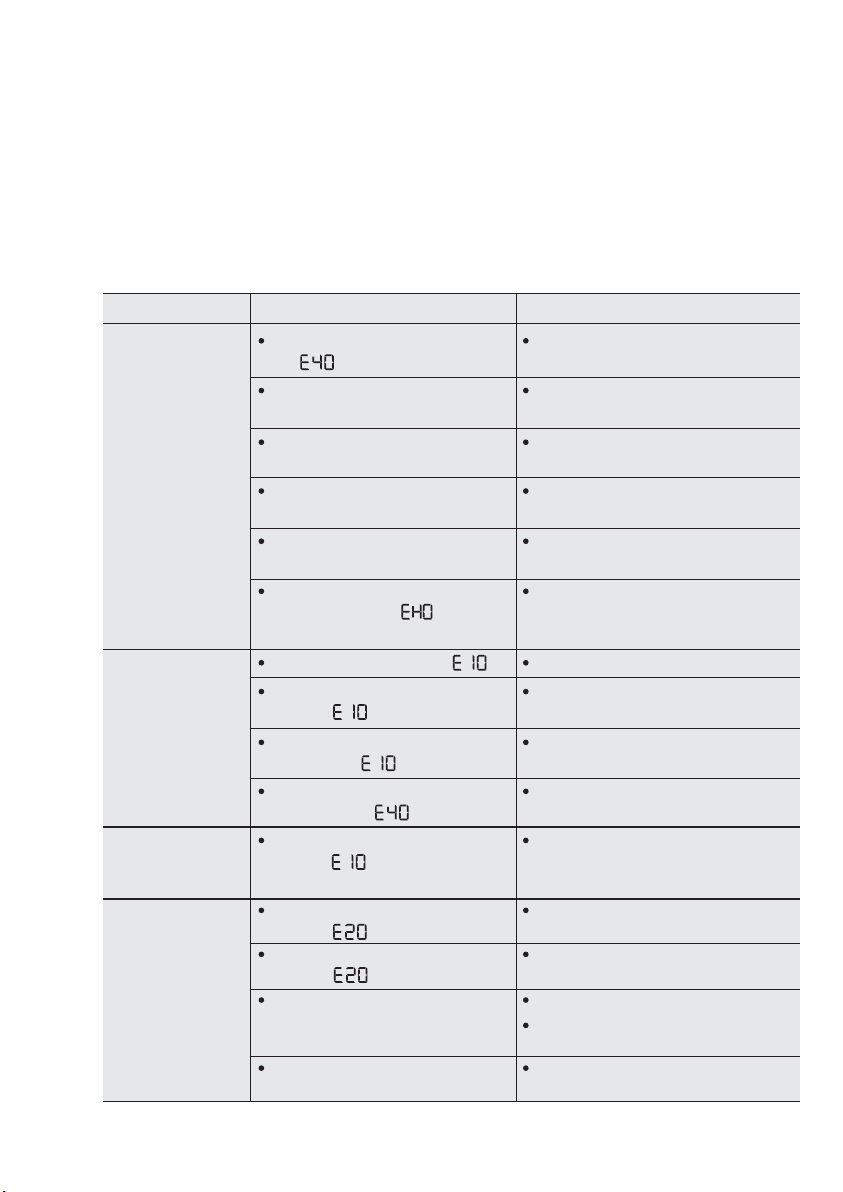
94
www.electrolux.com
KHẮC PHỤC SỰ CỐ
9.
Một số vấn đề là do thiếu bảo trì đơn giản hoặc sơ suất mà có thể được giải quyết dễ dàng mà
không cần gọi kỹ sư. Trước khi liên hệ với Trung Tâm Dịch Vụ địa phương của bạn, vui lòng
thực hiện việc kiểm tra nêu bên dưới. Trong suốt quá trình hoạt động của máy, có thể đèn dẫn
hướng Start/Pause (Bắt Đầu/Tạm Dừng) màu đỏ nhấp nháy để chỉ báo rằng máy đang không
hoạt động. Một khi đã loại bỏ được vấn đề, nhấn nút Start/Pause (Bắt Đầu/Tạm Dừng) để khởi
động lại chương trình. Nếu sau khi thực hiện tất cả các kiểm tra này, vấn đề vẫn còn, hãy liên
hệ với Trung Tâm Dịch Vụ địa phương của bạn.
Hỏng hóc Nguyên nhân có thể có Giải pháp
Máy giặt không
khởi động :
Máy không được
đổ đầy nước :
Máy được đổ đầy
sau đó rút sạch
ngay lập tức :
Máy không
trống và/hoặc
không quay :
Cửa không được đóng. (Mã
lỗi: )
Phích cắm không được cắm
đúng vào ổ cắm điện.
Không có điện tại ổ cắm.
Chưa nhấn nút Start/Pause
(Bắt Đầu/Tạm Dừng).
Đã chọn trì hoãn.
Nguồn điện không ổn định.
(Khi thấy báo lỗi trên
bảng điều khiển).
Vòi nước đóng. (Mã lỗi: ) Mở vòi nước.
Ống nạp bị đè hoặc xoắn lại.
(Mã lỗi: )
Bộ lọc trong ống nạp nước bị
tắc. (Mã lỗi: )
Cửa không được đóng đúng
cách. (Mã lỗi: )
Đầu ống xả quá thấp.
(Mã lỗi: )
Ống xả bị đè hoặc bị xoắn lại.
(Mã lỗi: )
Bơm xả bị tắc nghẽn.
(Mã lỗi: )
Tùy chọn “Rinse Hold” (Giữ Xả)
hoặc “No Spin” (Không Vắt) đã
được chọn.
Đồ giặt không được phân bố
đều trong lồng giặt.
Đóng cửa lại một cách chắc
chắn.
Cắm phích cắm vào ổ cắm điện.
Vui lòng kiểm tra việc lắp đặt ổ
cắm điện trong nhà của bạn.
Nhấn nút Start/Pause (Bắt
Đầu/Tạm Dừng).
Nếu đồ giặt cần được giặt ngay,
hãy hủy lệnh trì hoãn.
Chờ cho tới khi nguồn điện ổn
định thì máy sẽ tự động vận hành
lại.
Kiếm tra đầu nối ống nạp.
Vệ sinh bộ lọc ống nạp nước.
Đóng cửa lại một cách chắc chắn.
Tham khảo đoạn liên quan trong
mục “xả nước”.
Kiểm tra đầu nối ống xả.
Vệ sinh bộ lọc tách nước.
Nhấn Start/Pause để ráo nước.
Chọn chương trình vắt.
Tạm dừng máy và dùng tay phân
bố lại đồ giặt.
Page 95
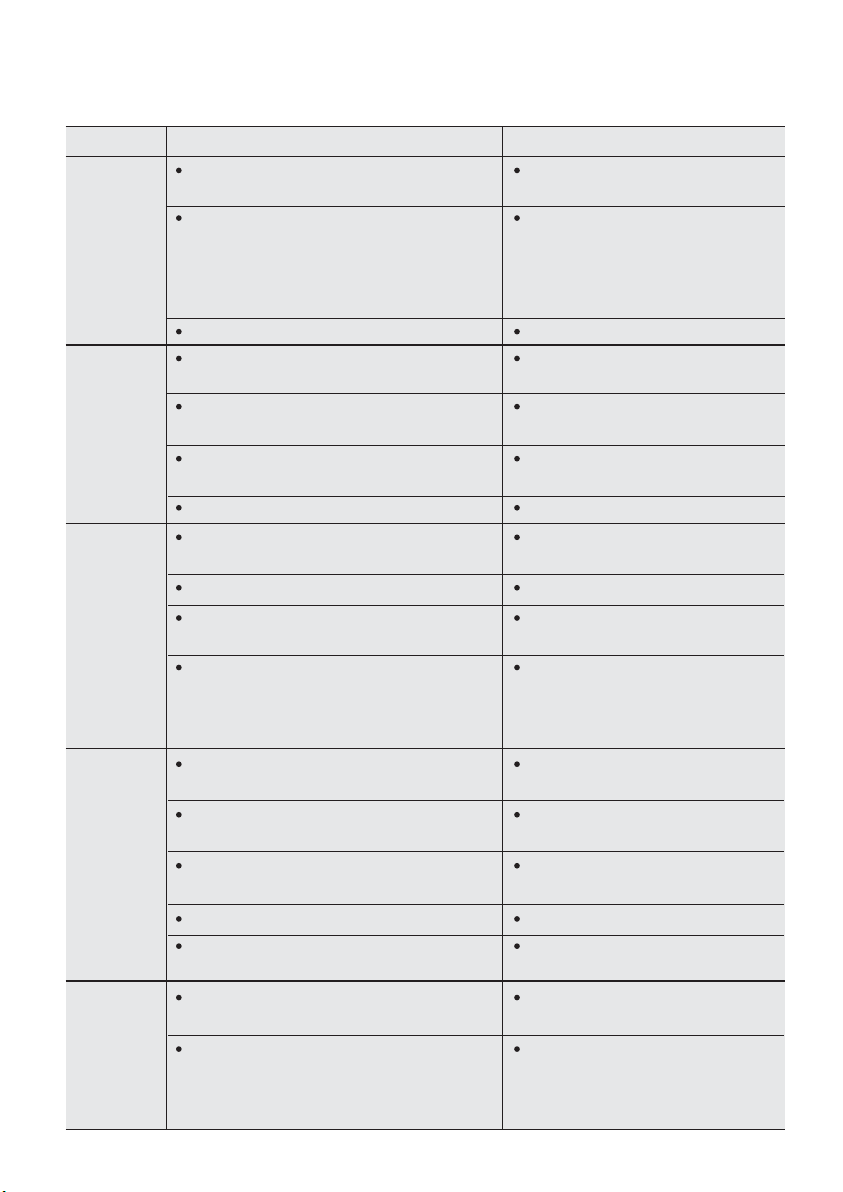
Hỏng hóc Nguyên nhân có thể có Giải pháp
Có nước
trên sàn :
Sử dụng quá nhiều bột giặt hoặc bột giặt
không thích hợp (tạo ra quá nhiều bọt).
Kiểm tra xem có bất kỳ rò rỉ nào từ một
trong số các khớp nối của ống nạp.
Không phải lúc nào cũng dễ biết được
Giảm khối lượng bột giặt hoặc sử
dụng bột giặt khác.
Kiểm tra chỗ nối ống nạp nước.
điều này bởi vì nước chảy xuống ống;
kiểm tra xem nó có bị ướt hay không.
Ống xả bị hỏng. Thay bằng ống mới.
Kết quả
giặt không
thỏa mãn :
Sử dụng quá ít bột giặt hoặc bột giặt
không thích hợp.
Các vết bẩn cứng đầu chưa được xử lý
trước khi giặt.
Đã không chọn nhiệt độ phù hợp.
Tăng khối lượng bột giặt hoặc sử
dụng bột giặt khác.
Sử dụng các sản phẩm thương
mại để xử lý các vết bẩn cứng đầu.
Kiểm tra xem liệu bạn đã chọn
nhiệt độ phù hợp chưa.
Khối lượng đồ giặt quá nhiều. Giảm khối lượng.
Chương trình vẫn đang hoạt động. Đợi cho đến khi kết thúc chu kỳ
giặt.
Cửa sẽ
không mở :
Khóa cửa chưa được nhả ra.
Có nước trong lồng giặt. Chọn chương trình ‘Spin’ (Quay)
vấn đề này có thể gây ra bởi lỗi của thiết
bị.
Đợi khoảng 5 phút.
để làm cạn sạch nước.
Liên hệ với Trung tâm bảo hành.
Nếu bạn cần mở cửa, vui lòng
đọc kỹ điều khoản "Mở cửa khẩn
cấp" ở tran kế tiếp.
Máy rung
hoặc gây
ra tiếng
ồn :
Bulông vận chuyển và vỏ chưa được
tháo ra.
Các chân đỡ chưa được điều chỉnh.
Đồ giặt không được phân bố đều
trong lồng giặt.
Có rất ít đồ giặt trong lồng giặt.
Kiểm tra việc lắp đặt thiết bị phù
hợp.
Kiểm tra mức bằng phù hợp của
thiết bị.
Tạm dừng máy và dùng tay phân
bố lại đồ giặt.
Cho thêm đồ giặt vào máy.
Sàn nhà bấp bênh như sàn gỗ. Tham khảo đoạn liên quan trong
mục “Định Vị”.
Giảm khối lượng bột giặt hoặc sử
dụng bột giặt khác.
Dùng tay phân bố lại đồ giặt
trong lồng giặt và bắt đầu lại giai
đoạn vắt. Tham khảo đoạn liên
Thời gian
chu kỳ lâu
hơn được
hiển thị :
Sử dụng quá nhiều bột giặt.
Mất cân bằng máy.
quan trong mục “Định Vị”.
TIẾNG VIỆT 95
Page 96
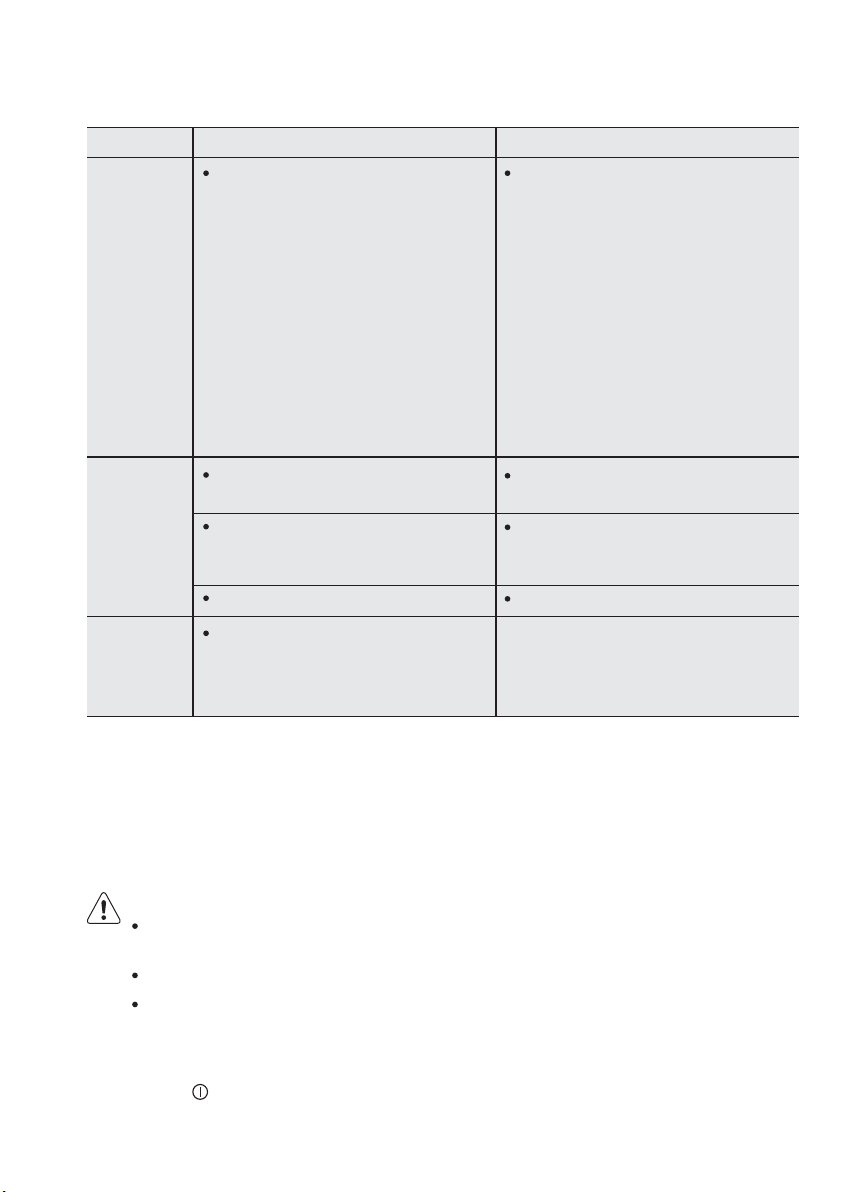
96
www.electrolux.com
Hỏng hóc Nguyên nhân có thể có Giải pháp
Thiết bị điện tử phát hiện sự mất cân
bằng bị phát tín hiệu bởi vì đồ giặt
không được phân bố đều trong lồng
giặt. Đồ giặt được phân bố lại bằng
Bắt đầu
quay muộn
hoặc máy
không
quay :
cách xoay ngược lồng giặt lại.
Điều này có thể xảy ra vài lần trước
khi mất đi sự mất cân bằng và có
thể tiếp tục lại quay thông thường.
Nếu sau 10 phút, đồ giặt vẫn không
được phân bố đều trong lồng giặt,
máy sẽ không quay. Trong trường
hợp này, dùng tay phân bố lại khối
lượng và chọn chương trình quay.
Tạm dừng máy và dùng tay phân bố
lại đồ giặt.
Máy phát
ra tiếng ồn
bất
thường:
Không thấy
nước ở
trong lồng
giặt:
Máy không được lắp đặt phù
hợp.
Bulông vận chuyển hoặc vỏ
không được tháo ra.
Khối lượng có thể quá nhỏ.
Máy dựa trên công nghệ hiện đại
hoạt động rất kinh tế bằng cách sử
dụng rất ít nước mà không tác động
đến hiệu suất.
Đảm bảo rằng mức bằng của thiết bị
đã phù hợp. Tham khảo mục ‘Lắp Đặt’.
Đảm bảo rằng vỏ và/hoặc bu lông
vận chuyển đã được tháo ra. Tham
khảo mục ‘Mở gói thiết bị’.
Thêm đồ giặt vào trong lồng giặt.
Mở cửa khẩn cấp
Trong trường hợp lỗi của nguồn điện hoặc lỗi của thiết bị cửa sẽ bị khoá lại. Chương trình giặt
vẫn tiếp tục hoạt động khi có điện trở lại. Nếu cửa vẫn bị khoá trong trường hợp bị lỗi, chúng ta
vẫn có thể mở cửa bằng cách sử dụng mở khoá khẩn cấp.
Trước khi mở cửa :
CẢNH BÁO!
Bảo đảm rằng nhiệt độ nước và đồ giặt không ở nhiệt độ quá nóng. Hãy chở cho tới khi
nước nguội bớt.
Bả đảm rằng lồng giặt không còn quay. Chờ cho tới khi lồng giặt đứng yên.
Bảo đảm rằng mực nước trong lồng giặt không quá cao. Hãy sử dụng tính năng thoát
nước khẩn cấp (tham khảo thêm chương "Căm sóc và vệ sinh").
Để mở cửa, vui lòng thao tác như sau:
Nhấn nút ( ) để tắt thiết bị.
1.
Rút điện ra khỏi nguồn.
2.
Page 97
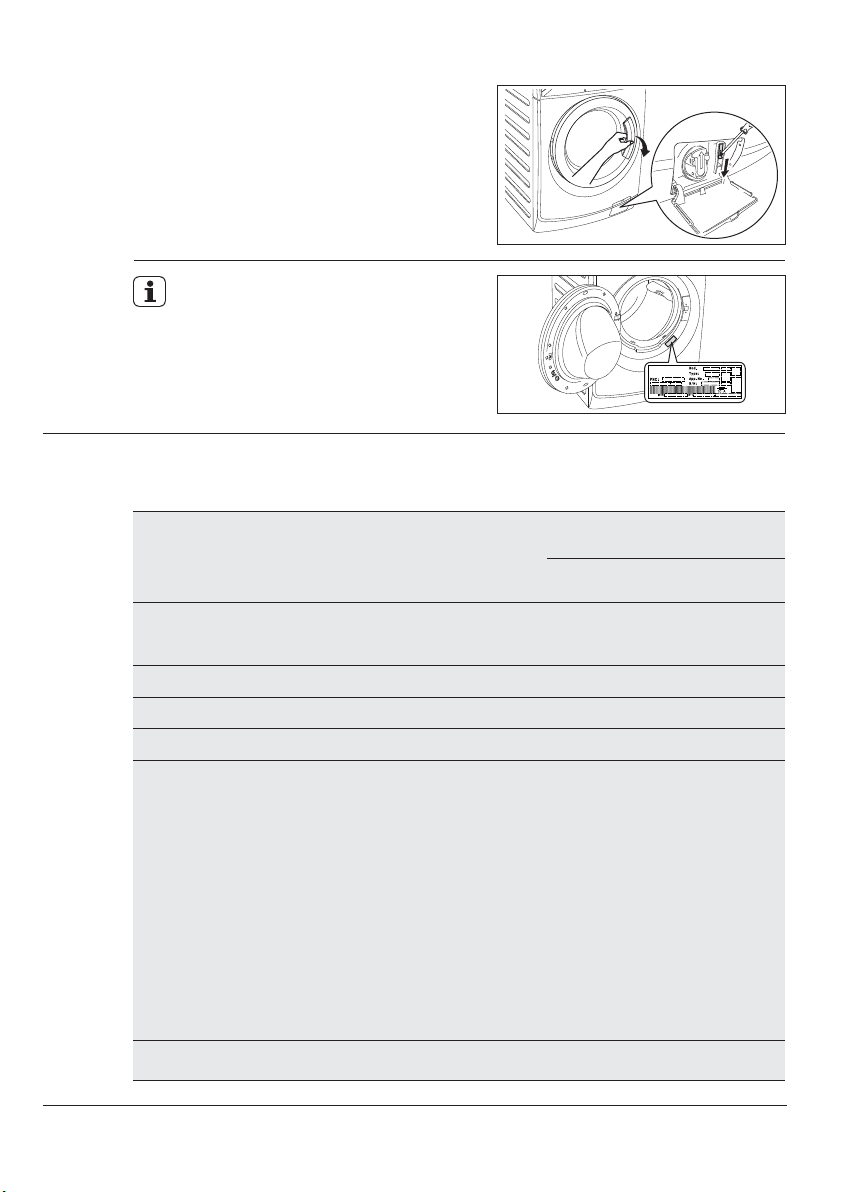
Mở cửa bộ lọc.
3.
Giữ nút mở khoá khẩn cấp (màu đỏ)
4.
đồng thời kéo xuống phía dưới và mở
cửa thiết bị.
Lấy đồ trong lồng giặt ra.
5.
Đóng cửa bộ lọc.
6.
Nếu bạn không thể xác định hoặc giải
quyết được vấn đề, hãy liên hệ với
trung tâm dịch vụ của chúng tôi. Trước
khi gọi điện, hãy ghi lại model, số sê-ri
và ngày mua máy: Trung Tâm Dịch Vụ
sẽ yêu cầu thông tin này.
DỮ LIỆU KỸ THUẬT
10.
TIẾNG VIỆT 97
Các Kích Thước
(Chiều Rộng / Chiều Cao / Chiều Sâu)
Nguồn điện (Điện áp / Tần suất)
Tổng điện hấp thụ
Cầu chì bảo vệ tối thiểu
Áp lực nguồn nước (Tối đa / Tối thiểu)
Khối lượng tối đa
(quần áo khô)
Tốc độ vắt (Tối đa / Tối thiểu)
(220 V, 60 Hz
2200 W (
Program
Cottons
Mixed
Delicates
Quick 18
Spin
Rinse
Energy Saver
Baby Wear
Bedding
Wool
Refresh Cottons
Refresh Mixed
Model: EWF12932, EWF12932S
Model: EWF12832, EWF12832S
59.6 X 84.8 X 66.5 cm
59.6 X 84.8 X 58.1 cm
220-240 V / 50 Hz
đối với PHI-LÍP-PIN
2000 W đối với PHI-LÍP-PIN
10 A
0.8 MPa / 0.05 MPa
EWF12932,
EWF12932S
9 Kg
4 Kg
4 Kg
1.5 Kg
9 Kg
9 Kg
9 Kg
4 Kg
3 Kg
2 Kg
1.5 Kg
1.5 Kg
EWF12832,
EWF12832S
8 Kg
4 Kg
4 Kg
1.5 Kg
8 Kg
8 Kg
8 Kg
4 Kg
3 Kg
2 Kg
1.5 Kg
1.5 Kg
1200 rpm / 400 rpm
)
)
Page 98
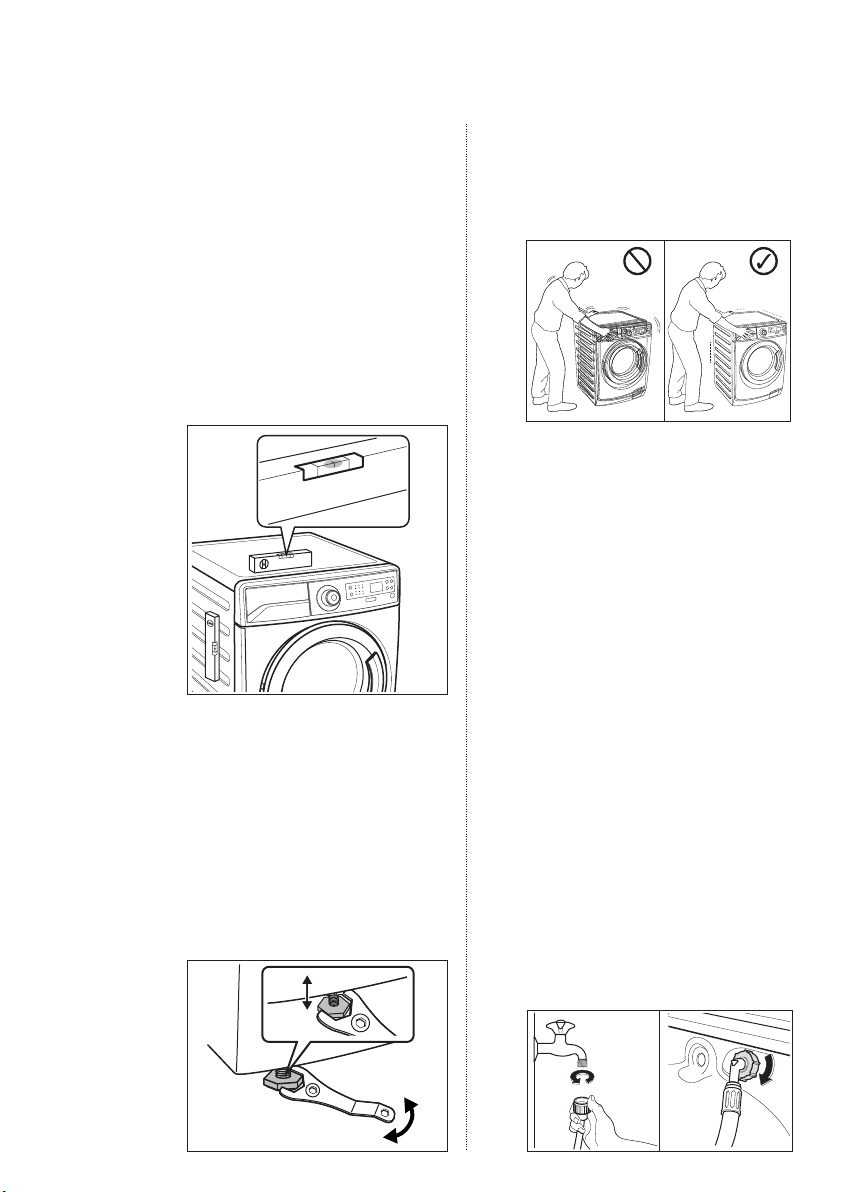
98
www.electrolux.com
LẮP ĐẶT
11.
11.1
Định Vị
Điều quan trọng là máy giặt của
bạn cần đứng vững chắc và nằm
trên sàn nhà để đảm bảo vận hành
đúng cách.
Việc thiết bị không được lắp đặt
sau cửa khóa được, cửa trượt hoặc
cửa có bản lềở bên đối diện với cửa
máy giặt bị hạn chế.
Sử dụng mức bằng lý tưởng ở mặt
trên cùng và mặt bên của máy giặt
để kiểm tra các mức bằng.
Nếu bạn không có mức bằng lý
tưởng làm hướng dẫn, hãy sử dụng
mép khung cửa, tủ hoặc băng ghế
để kiểm tra xem máy giặt có đang
được đặt bằng phẳng không.
Nới lỏng hoặc thắt chặt các chân
để điều chỉnh mức bằng. Việc điều
chỉnh phù hợp mức bằng của thiết
bị ngăn chặn tiếng rung, tiếng ồn
và chuyển động của thiết bị khi
đang vận hành.
Khi máy giặt được đặt bằng phẳng,
hãy cố gắng lắc từ góc này qua góc
kia. Nếu máy lắc, hãy điều chỉnh lại
các chân cho đến khi máy được đặt
bằng phẳng và không lắc.
Không bao giờ đặt bìa các-tông, gỗ
hoặc các vật liệu tương tự dưới máy
để bù cho bất kỳ chỗ không bằng
phẳng nào trên sàn.
Lắp đặt máy trên sàn phẳng, cứng.
Chắc chắn rằng lưu thông khí
quanh máy không bị cản trở bởi
tấm thảm, thảm trải, v.v…
Kiểm tra máy không chạm vào
tường hoặc bộ tủ búp phê.
11.2
Đầu Nạp Nước
Nối ống nạp nước với vòi có ren
BSP 3/4”.
Sử dụng ống được cung cấp kèm
theo máy giặt. KHÔNG SỬ DỤNG
CÁC ỐNG CŨ.
Đầu kia của ống nạp nối với máy
có thể xoay được theo bất kỳ
hướng nào.
Chỉ việc nới lỏng các khớp nối,
xoay ống và siết chặt lại khớp nối,
đảm bảo không có bất kỳ sự rò rỉ
nước nào.
Page 99
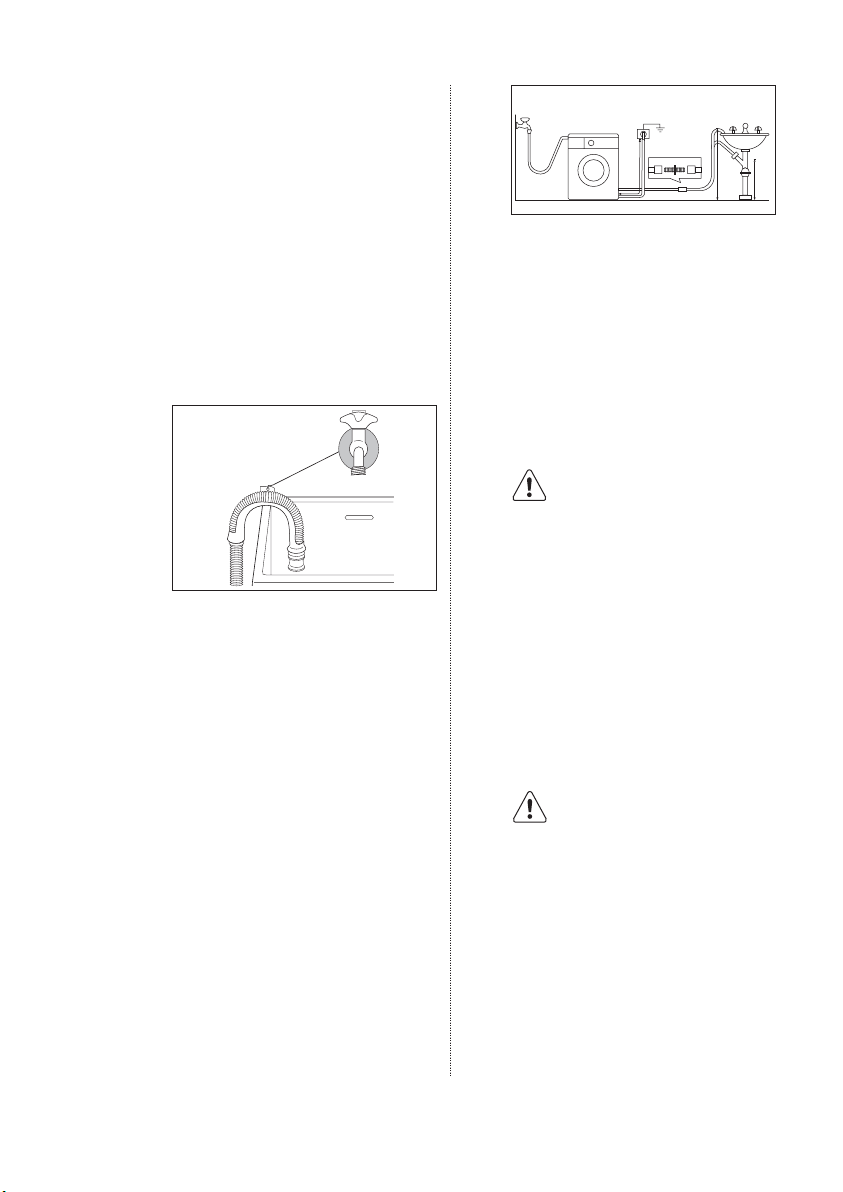
Ống nạp không được kéo dài. Nếu
ống quá ngắn và bạn không muốn
di chuyển vòi nước, bạn sẽ phải
mua ống mới dài hơn, được thiết
kế riêng cho mục đích sử dụng
này.
TIẾNG VIỆT 99
90 cm
60 cm
11.3
Xả Nước
Đầu ống xả có thể được bố trị theo
ba cách:
Móc qua mép chậu nước bằng
cách sử dụng thanh dẫn ống nhựa
được cung cấp kèm theo máy.
Trong trường hợp này, chắc chắn
rằng đầu này không thể bị tuột
móc khi máy đang làm cạn.
Điều này có thể làm được bằng
cách buộc ống với vòi nước bằng
một sợi dây hoặc gắn vào tường.
Trong nhánh ống xả bồn. Nhánh
này phải ở trên khay sao cho phần
uốn cong phải cách ít nhất 60 cm
so với mặt đất.
Trực tiếp vào trong ống xả tại chiều
cao không nhỏ hơn 60 cm và
không lớn hơn 90 cm.
Đầu ống xả phải luôn được thông
hơi tức là đường kính trong của
đường ống xả phải lớn hơn đường
kính ngoài của ống xả.
Ống xả không được bị xoắn. Chạy
ống xả dọc sàn nhà; chỉ phần cạnh
điểm xả cần được nâng cao.
Để có chức năng phù hợp của máy
ống xả vẫn phải được móc trên
tấm giã đỡ phù hợp đặt trên mặt
trên cùng của mặt sau thiết bị.
11.4
Nối Điện
Máy này được thiết kế để hoạt
động trên nguồn một pha
220-240 V, 50 Hz (200 V, 60 Hz
đối với PHI-LÍP-PIN).
Vui lòng kiểm tra đánh
giá tình trạng cung cấp
điện được đề cập trên
nhãn trước khi bạn kết
nối với nguồn điện.
Nối máy với ổ cắm điện
tiếp đất.
Kiểm tra việc lắp đặt điện gia dụng
có thể chịu được khối lượng tối đa
theo yêu cầu (2,2 kW hoặc 2,0 kW
đối với PHI-LÍP-PIN), vì thế nên xem
xét bất kỳ thiết bị nào khác đang
sử dụng.
Nối máy với ổ cắm điện
tiếp đất.
Nhà sản xuất từ chối bất kỳ trách
nhiệm nào đối với hư hại hoặc
chấn thương qua việc không tuân
thủ theo biện pháp phòng ngừa
an toàn nêu trên.
Page 100
100
www.electrolux.com
Nếu dây nguồn điện của
thiết bị cần được thay
thế, điều này cần do
Trung Tâm Dịch Vụ của
chúng tôi thực hiện.
Khi thiết bị được lắp đặt dây
nguồn điện phải tiếp cận được
dễ dàng.
CÁC VẤN ĐỀ VỀ MÔI TRƯỜNG
12.
12.1
Vật Liệu Đóng Gói
Vật liệu có đánh dấu biểu
tượng có thể tái chế
được.
>PE<=polyethylene
>PS<=polystyrene
>PP<=polypropylene
Điều này có nghĩa là chúng có thể
được tái chế bằng cách xử lý
chúng phù hợp trong đồ chứa thu
thập thích hợp.
12.2
Máy Cũ
Sử dụng các địa điểm vứt bỏ được
phép để vứt bỏ thiết bị cũ. Hãy giữ
gìn ngăn nắp cho đất nước của
bạn!
Biểu tượng trên sản phẩm
hoặc trên bao bì cho thấy rằng sản
phẩm có thể không được xử lý làm
chất thải gia đình.
Thay vào đó nó sẽ được chuyển tới
điểm thu gom thiết bị để tái chế
thiết bị điện và điện tử.
Bằng cách chắc chắn sản phẩm
này được thải bỏ đúng cách, bạn
sẽ giúp ngăn các hậu quả tiềm ẩn
đối với môi trường và sức khỏe
con người, mà việc xử lý chất thải
sai quy cách gây ra.
Nếu thiết bị này được cung cấp
từ bộ dây nối dài hoặc thiết bị ổ
cắm di động thì bộ dây nối dài
hay thiết bị ổ cắm di động phải
được bố trí sao cho không bị
dính nước hoặc ngấm ẩm.
Để biết thêm thông tin chi tiếtvề
việc tái chế sản phẩm này, vui lòng
liên hệ văn phòng thành phố địa
phương của bạn , cơ quan phụ
trách vứt bỏ rác thải sinh hoạt
hoặc cửa hàng nơi bạn mua sản
phẩm.
12.3
Gợi Ý về Hệ Sinh Thái
Để tiết kiệm nước, năng lượng và
để giúp bảo vệ môi trường, chúng
tôi khuyến nghị rằng bạn nên làm
theo các lời khuyên sau đây:
Đồ giặt bẩn thông thường có
thể được giặt mà không cần giặt
sơ bộ để tiết kiệm chất tẩy rửa,
nước và thời gian (môi trường
cũng được bảo vệ!).
Máy làm việc tiết kiệm hơn nếu
máy được cho đầy đồ.
Bằng việc xử lý đầy đủ trước khi
giặt, vết bẩn và bẩn giới hạn có
thể bị loại bỏ ; thì đồ giặt có thể
được giặt ở nhiệt độ thấp.
Đong đo chất giặt tẩy theo độ
cứng của nước , độ bẩn và lượng
đồ đang giặt.
 Loading...