

Page 1
WASHING MACHINE
PRALKA AUTOMATYCZNA
AUTOMATICKÁ PRACKA
AUTOMATICKÁ PRÁCKA
AUTOMATA MOSÓGÉP
132 997 210
EW 1220 N
GB
PL
CZ
SK
H
Page 2
Dear customer,
Please read these operating instructions carefully
and pay particular attention to the safety notes
indicated in the first pages. We recommend that you
keep this instruction booklet for future reference and
pass it on to any future owners.
Transport damages
When unpacking the appliance, check that it is not
damaged. If in doubt, do not use it and contact the
Service Centre.
The symbols you will see on some paragraphs of this booklet have the following meaning:
The warning triangle and/or the key words (Warning!, Caution!) emphasize information that is particularly
important for your safety or correct functioning of the appliance.
The information marked with this symbol provides additional instructions and practical tips on the use of
the appliance.
Tips and information about economical and ecological use of the machine are marked with this symbol.
Our contribution to the protection of the
environment: we use environmentally
friendly paper.
2
Page 3

Contents
Warnings 4-5
Disposal 5
Tips for environmental protection 5
Technical specifications 6
Installation 7
Unpacking 7
Positioning 7
Water inlet 7
Water drainage 8
Electrical connection 8
Your new washing machine 9
Description of the appliance 9
Door locked pilot light 9
Detergent dispenser drawer 9
Maintenance 21
Door seal 21
Bodywork 21
Detergent dispenser drawer 21
Drain filter 21
Water inlet filter 21
Emergency emptying out 22
Frost precautions 22
Something not working? 23-24
ENGLISH
Use 10
Control panel 10
Controls 10-13
Washing hints 14
Sorting the laundry 14
Temperatures 14
Before loading the laundry 14
Maximum loads 14
Laundry weights 14
Removing stains 14
Detergents and additives 15
International wash code symbols 16
Operating sequence 17-19
Washing programmes 20
3
Page 4

Warnings
The following warnings are provided in the interests of overall safety. You must read them carefully before
installing or using the appliance.
Installation
• All internal packing must be removed before using
the appliance. Serious damage may be caused to
the machine or adjacent furniture if the protective
transit devices are not removed or are not
completely removed. Refer to the relevant
paragraph in the instruction book.
• Any electrical work required to install this appliance
must be carried out by a qualified electrician.
• Any plumbing work required to install this
appliance must be carried out by a qualified
plumber.
• After having installed the machine, check that it is
not standing on its electrical supply cable.
• If the appliance is placed on a carpeted floor,
ensure that air can circulate freely between the feet
and the floor.
Use
• This appliance is designed for domestic use. It
must not be used for purposes other than those for
which it was designed.
• Only wash fabrics which are designed to be
machine washed. Follow the instructions on each
garment label.
• Do not overload the appliance. Follow the
instructions in the instruction book.
• Make sure that all pockets are empty. Objects such
as coins, safety pins, pins and screws can cause
extensive damage.
• Do not machine wash garments saturated with
petroleum, methylated spirits, trichlorethylene, etc.
If such fluids have been used to remove stains
prior to washing, wait until they have completely
evaporated from the fabric before placing garments
in the appliance.
• Place small items such as socks, belts, etc. in a
cloth bag or pillowcase to prevent them getting
trapped between the drum and the tub.
• Use only the recommended quantities of fabric
softener. An excessive amount could damage the
laundry.
• Leave the porthole door slightly ajar when the
appliance is not in use. This preserves the door
seal and prevents the formation of musty smells.
• Always check that water has emptied out before
opening the door. If not, drain the water following
the instructions in the instruction book.
• Always unplug the appliance and shut the water
tap after use.
General safety
• Repairs to the machine must be carried out only by
qualified personnel. Repairs carried out by
inexperienced persons could cause serious
danger. Contact your local Service Centre.
• Never pull the power supply cable to remove the
plug from the socket; always take hold of the plug
itself.
• During high temperature wash programmes the
door glass may get hot. Do not touch it!
4
Page 5
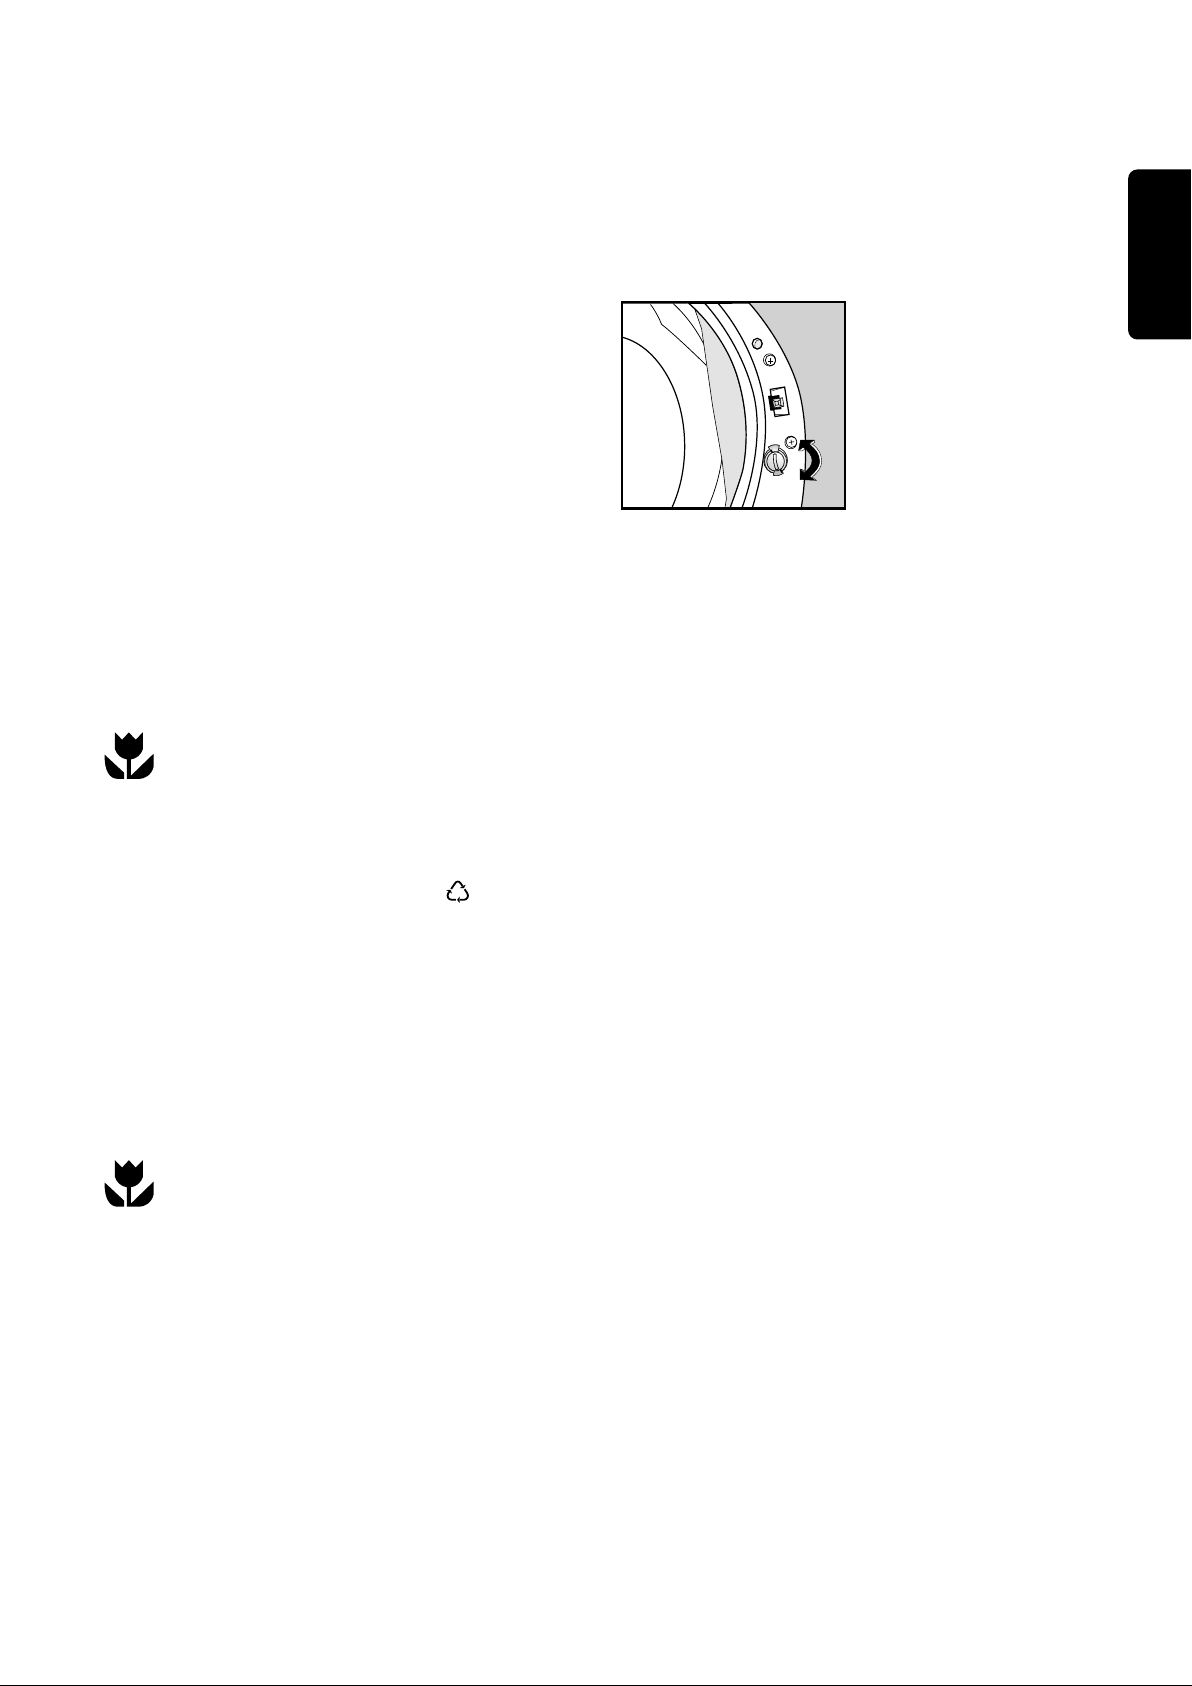
Child safety
P1076
• Children are often not aware of how dangerous
electrical appliances can be. When the machine is
working, children should be carefully supervised
and not be allowed to play with the appliance.
• The packaging components (e.g. plastic film,
polystyrene) can be dangerous to children - danger
of suffocation! Keep them out of children’s reach.
• Keep all detergents in a safe place out of children’s
reach.
• Make sure that children or pets do not climb into
the drum. To avoid this the machine incorporates a
special feature. To activate this device, rotate the
button (without pressing it) inside the door
clockwise until the groove is horizontal. If
necessary use a coin.
Disposal
To disable this device and restore the possibility of
closing the door, rotate the button anti-clockwise until
the groove is vertical.
ENGLISH
• When the appliance is to be scrapped, cut off the
electrical supply cable and destroy the plug with
the remaining cable. Disable the door catch in
order to prevent children from becoming trapped
inside while playing.
Packaging materials
The materials marked with the symbol are
recyclable.
>PE<=polyethylene
>PS<=polystyrene
>PP<=polypropylene
This means that they can be recycled by disposing of
them properly in appropriate collection containers.
Tips for environmental protection
To save water, energy and to help protect the
environment, we recommend that you follow these
tips:
• Normally soiled laundry may be washed without
prewashing in order to save detergent, water and
time (the environment is protected too!).
• The machine works more economically if it is fully
loaded.
Machine
Use authorised disposal sites for your old appliance.
Help to keep your country tidy!
• With adequate pre-treatment, stains and limited
soiling can be removed; the laundry can then be
washed at a lower temperature.
• Measure out detergent according to the water
hardness, the degree of soiling and the quantity of
laundry being washed.
5
Page 6
Technical specifications
DIMENSIONS Height 85 cm
Width 60 cm
Depth 62 cm
MAXIMUM LOAD Cotton 5.5 kg
Synthetics 2.5 kg
Delicates 2.5 kg
Woollens 2 kg
SPIN SPEED 1200 rpm max.
POWER SUPPLY VOLTAGE/FREQUENCY 220-230 V/50 Hz
TOTAL POWER ABSORBED 2200 W
MINIMUM FUSE PROTECTION 10 A
WATER PRESSURE Minimum 500 kPa
Maximum 800 kPa
This appliance complies with the following EEC Directives:
73/23/EEC of 19/02/73 relating to low voltage
89/336/EEC of 03/05/89 relating to electromagnetic compatibility.
6
Page 7

Installation
P0020
P0256
2
1
P1066
P1068
P0255
P0021
P1051
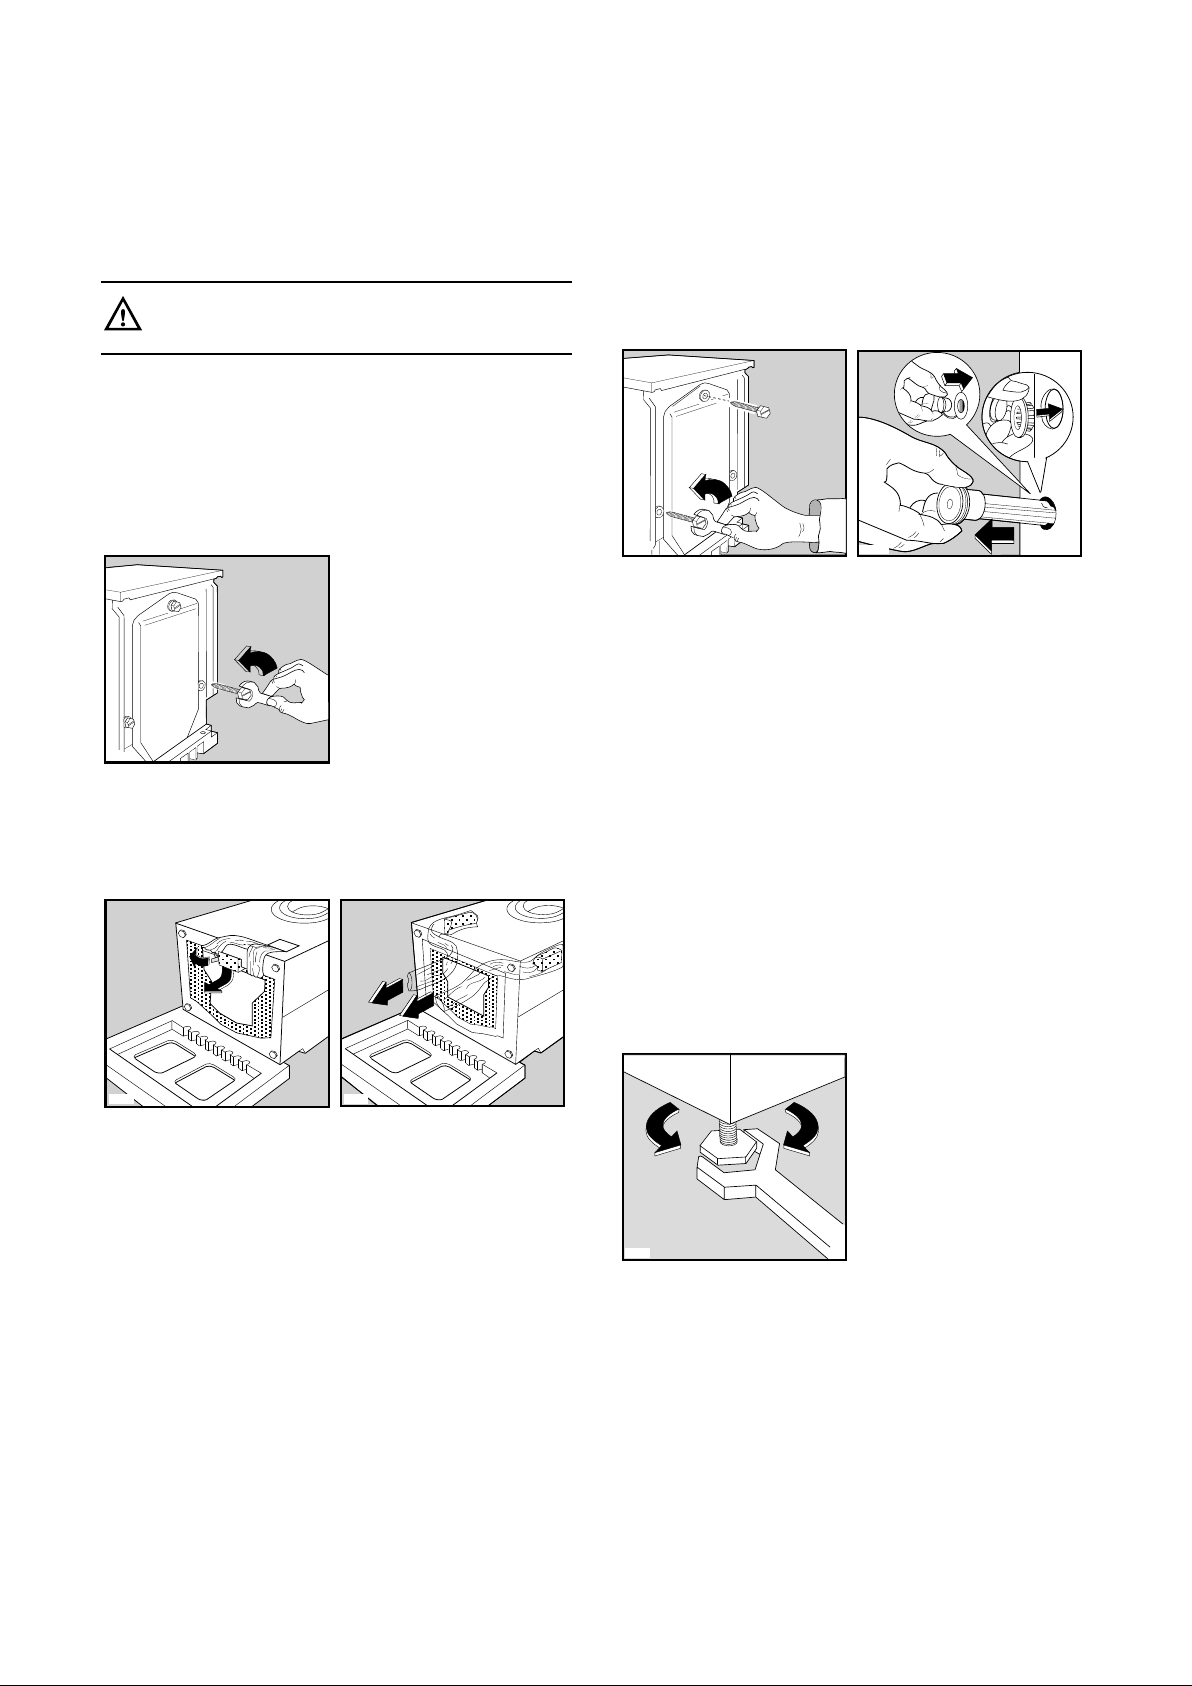
Unpacking
All transit bolts and packing must be removed
before using the appliance.
You are advised to keep all transit devices so that
they can be refitted if the machine ever has to be
transported again.
1. Using a spanner, unscrew and remove the rear
right-hand bolt and lay the machine on its back,
taking care not to squash the hoses. This can be
avoided by placing one of the corner packing
pieces between the machine and the floor.
2. Remove the polystyrene block from the underside
of the machine and release the two plastic bags.
3. Carefully remove the right-hand bag (1) then the
left-hand bag (2) by pulling them towards the
centre of the machine.
Positioning
Install the machine on a flat hard floor.
Make sure that air circulation around the machine is
not impeded by carpets, rugs etc. Check that the
machine does not touch the wall or other kitchen
units.
Carefully level by screwing the adjustable feet in or
out. Never place cardboard, wood or similar
materials under the machine to compensate for any
unevenness in the floor.
Water inlet
Connect the water inlet hose to a tap with a 3/4"
thread.
The other end of the inlet hose which connects to the
machine can be turned in any direction. Simply
loosen the fitting, rotate the hose and retighten the
fitting, making sure there are no water leaks
ENGLISH
4. Set the machine upright and remove the two
remaining bolts from the back.
5. Pull out the three plastic spacers from the holes
into which the bolts were fitted.
6. Plug the open holes with the plugs which you will
find in the envelope containing the instruction
booklet.
P1088
The inlet hose must not be lengthened. If it is too
short and you do not wish to move the tap, you will
have to purchase a new, longer hose specially
designed for this type of use.
7
Page 8
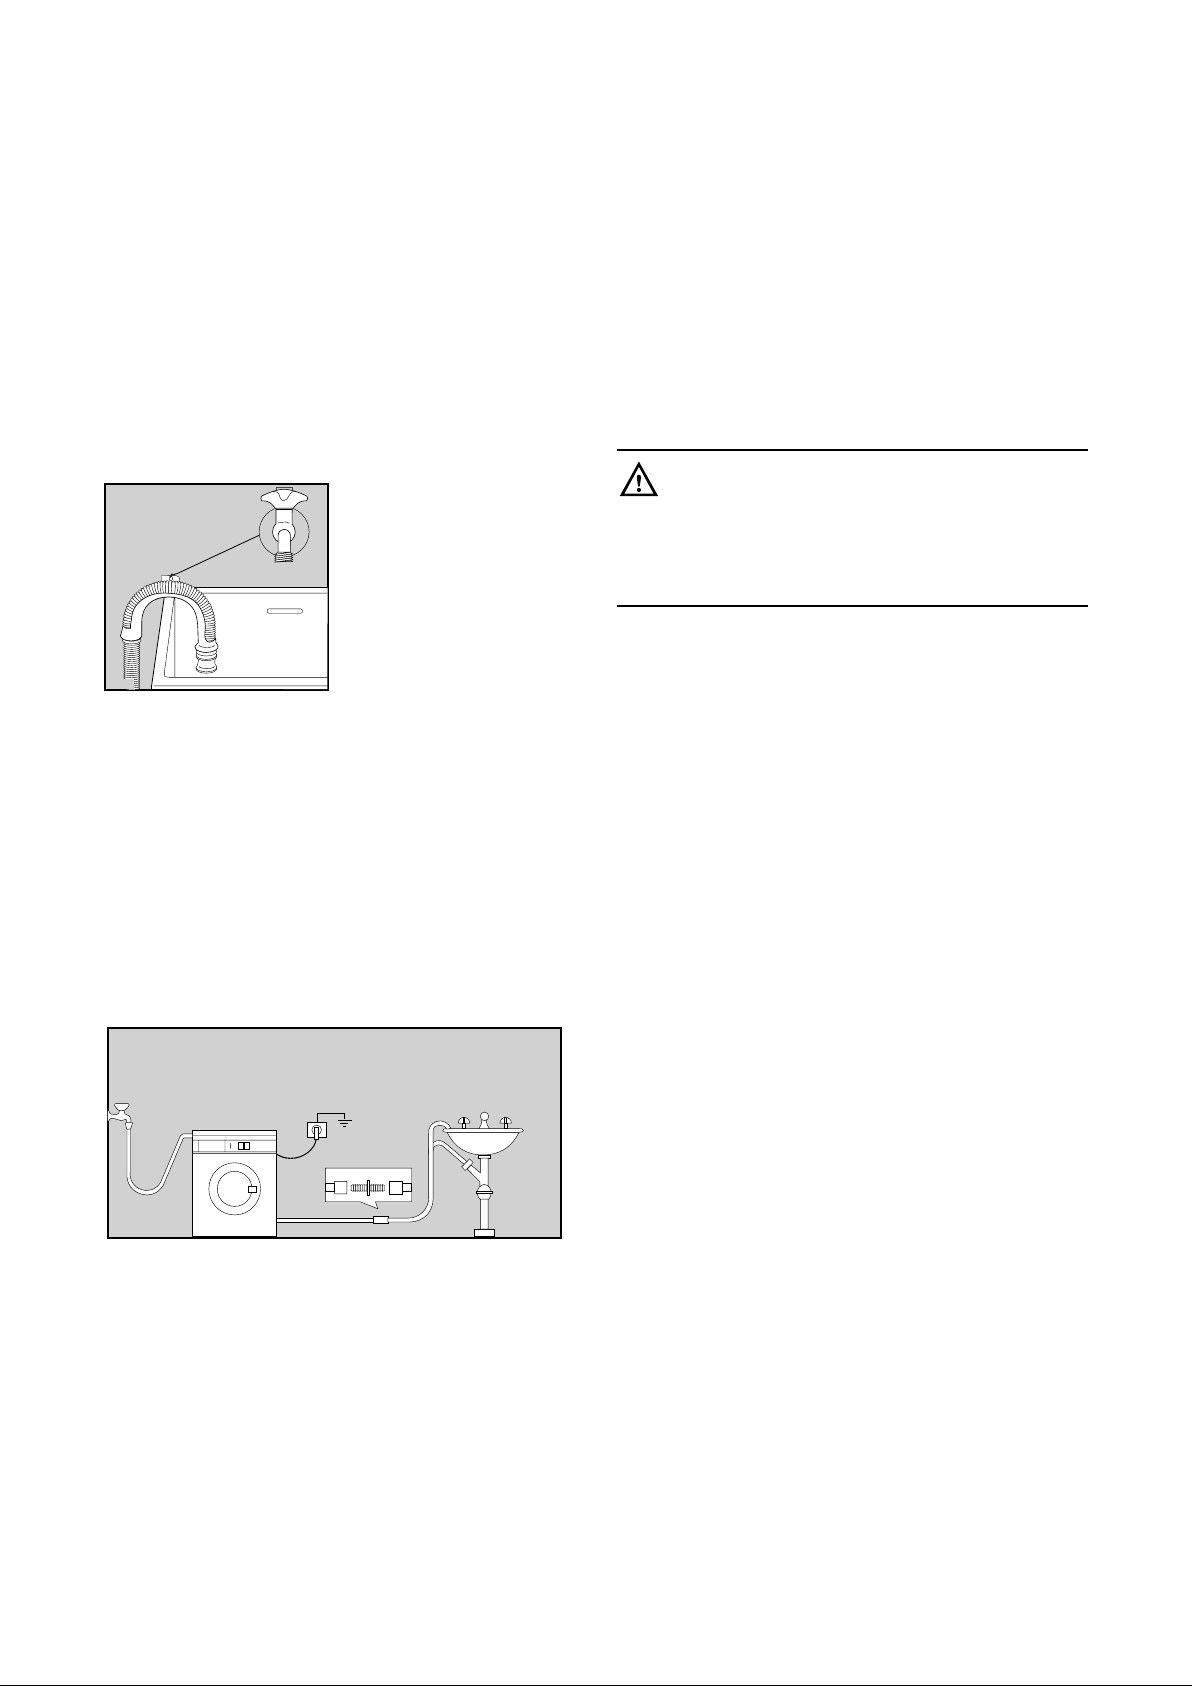
Water drainage
P0023
P0022
Electrical connection
The end of the drain hose can be positioned in three
ways:
Hooked over the edge of a sink using the plastic
hose guide supplied with the machine. In this
case, make sure the end cannot come unhooked
when the machine is emptying.
This could be done by tying it to the tap with a piece
of string or attaching it to the wall.
In a sink drain pipe branch. This branch must be
above the trap so that the bend is at least 60 cm
above the ground.
Directly into a drain pipe at a height of not less
than 60 cm and not more than 90 cm.
The end of the drain hose must always be
ventilated, i.e. the inside diameter of the drain pipe
must be larger than the outside diameter of the drain
hose.
The drain hose must not be kinked. Run it along the
floor; only the part near the drainage point must be
raised.
This machine is designed to operate on a 220-230 V,
single-phase, 50 Hz supply.
Check that your domestic electrical installation can
take the maximum load required (2.2 kW), also
taking into account any other appliances in use.
Connect the machine to an earthed socket.
The manufacturer declines any responsibility
for damage or injury through failure to comply
with the above safety precaution.
Should the appliance power supply cable
need to be replaced, this should be carried
out by our Service Centre.
The power supply cable must be easily
accessible after installing the machine.
8
Page 9
Your new washing machine
This new washing machine, which is fitted with the Jet system, patented Zanussi, meets all modern needs for
effective treatment of laundry with low water, energy and detergent consumption.
Further savings are achieved by washing small loads of laundry, since water and electricity consumption is
proportional to the quantity and type of laundry being washed.
• The possibility of selecting the temperature, spin speed and all the options offered by this washing machine
gives you truly “customised” washing.
• The DELAY START option allows you to delay starting of the wash programme to any time of day, so
allowing you for instance to make use of overnight economy electricity tariffs.
• The programme progress display shows the programme steps selected and the programme phase which
is running.
• The special wool programme with its new delicate wash system treats your woollens with extreme care.
• The balance control device ensures the machine is stable during the spin.
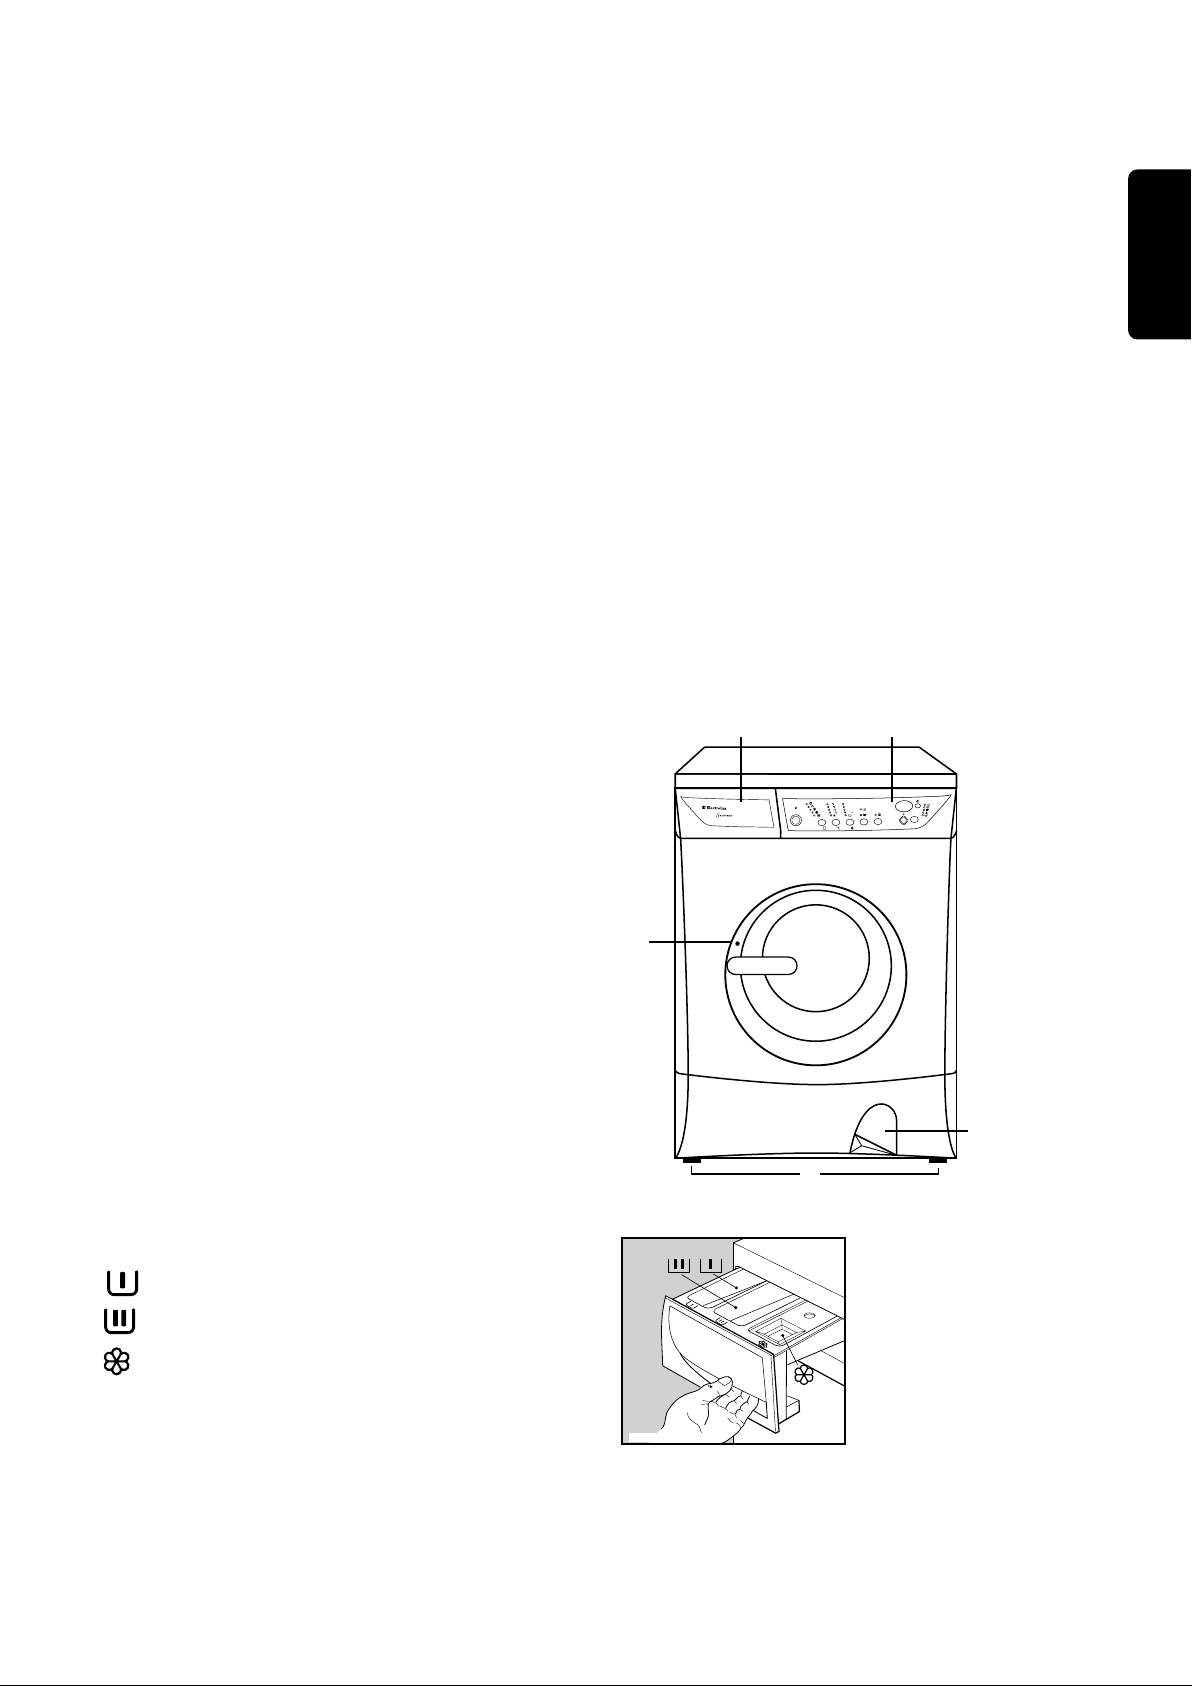
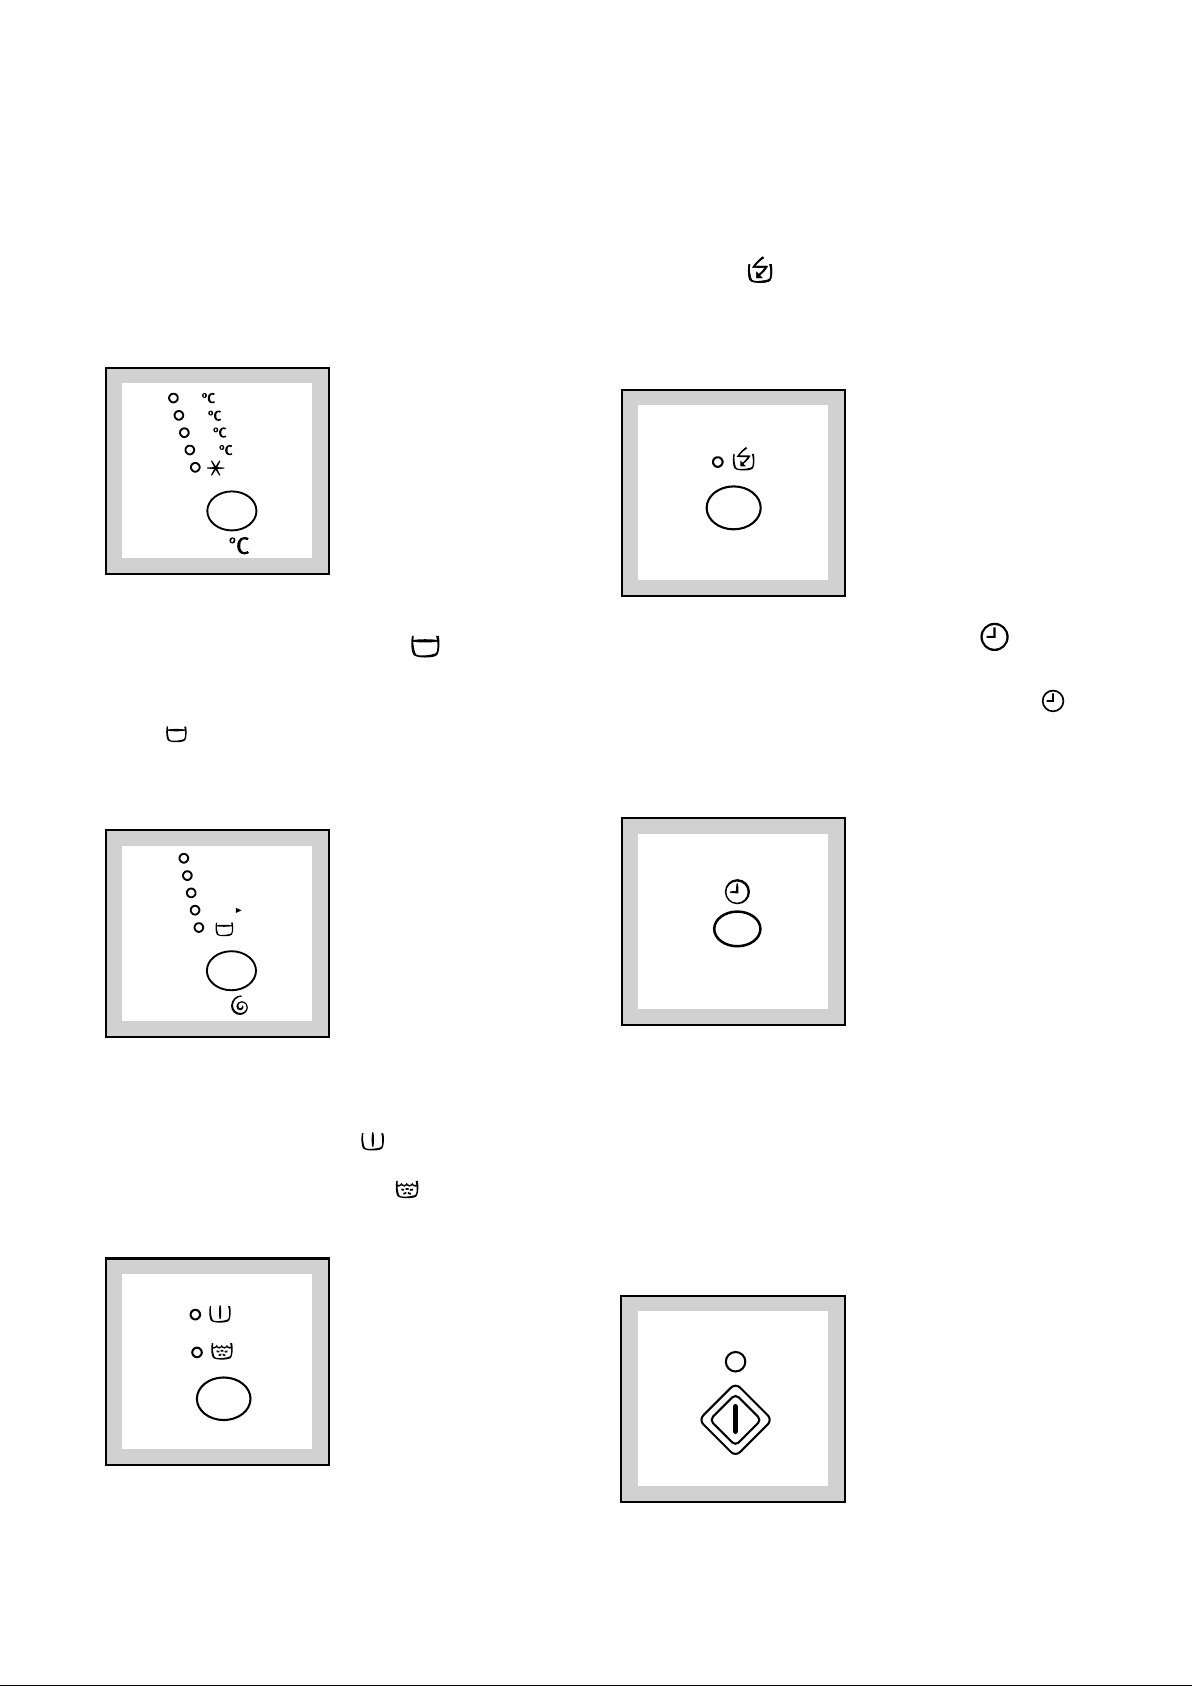
Description of the appliance
ENGLISH
1 Detergent dispenser drawer
2 Control panel
3 Door locked pilot light
4 Drain filter
5 Adjustable feet
Door locked pilot light
It stays on during the whole programme indicating
that the door is locked.
When the light goes out, the door can be opened
(see page 19).
Detergent dispenser drawer
Prewash
12
00
T 12
A
E
1200
90
900
60
700
40
500
30
N
3
4
5
Main wash
Fabric softener, starch
C0063
9
Page 10
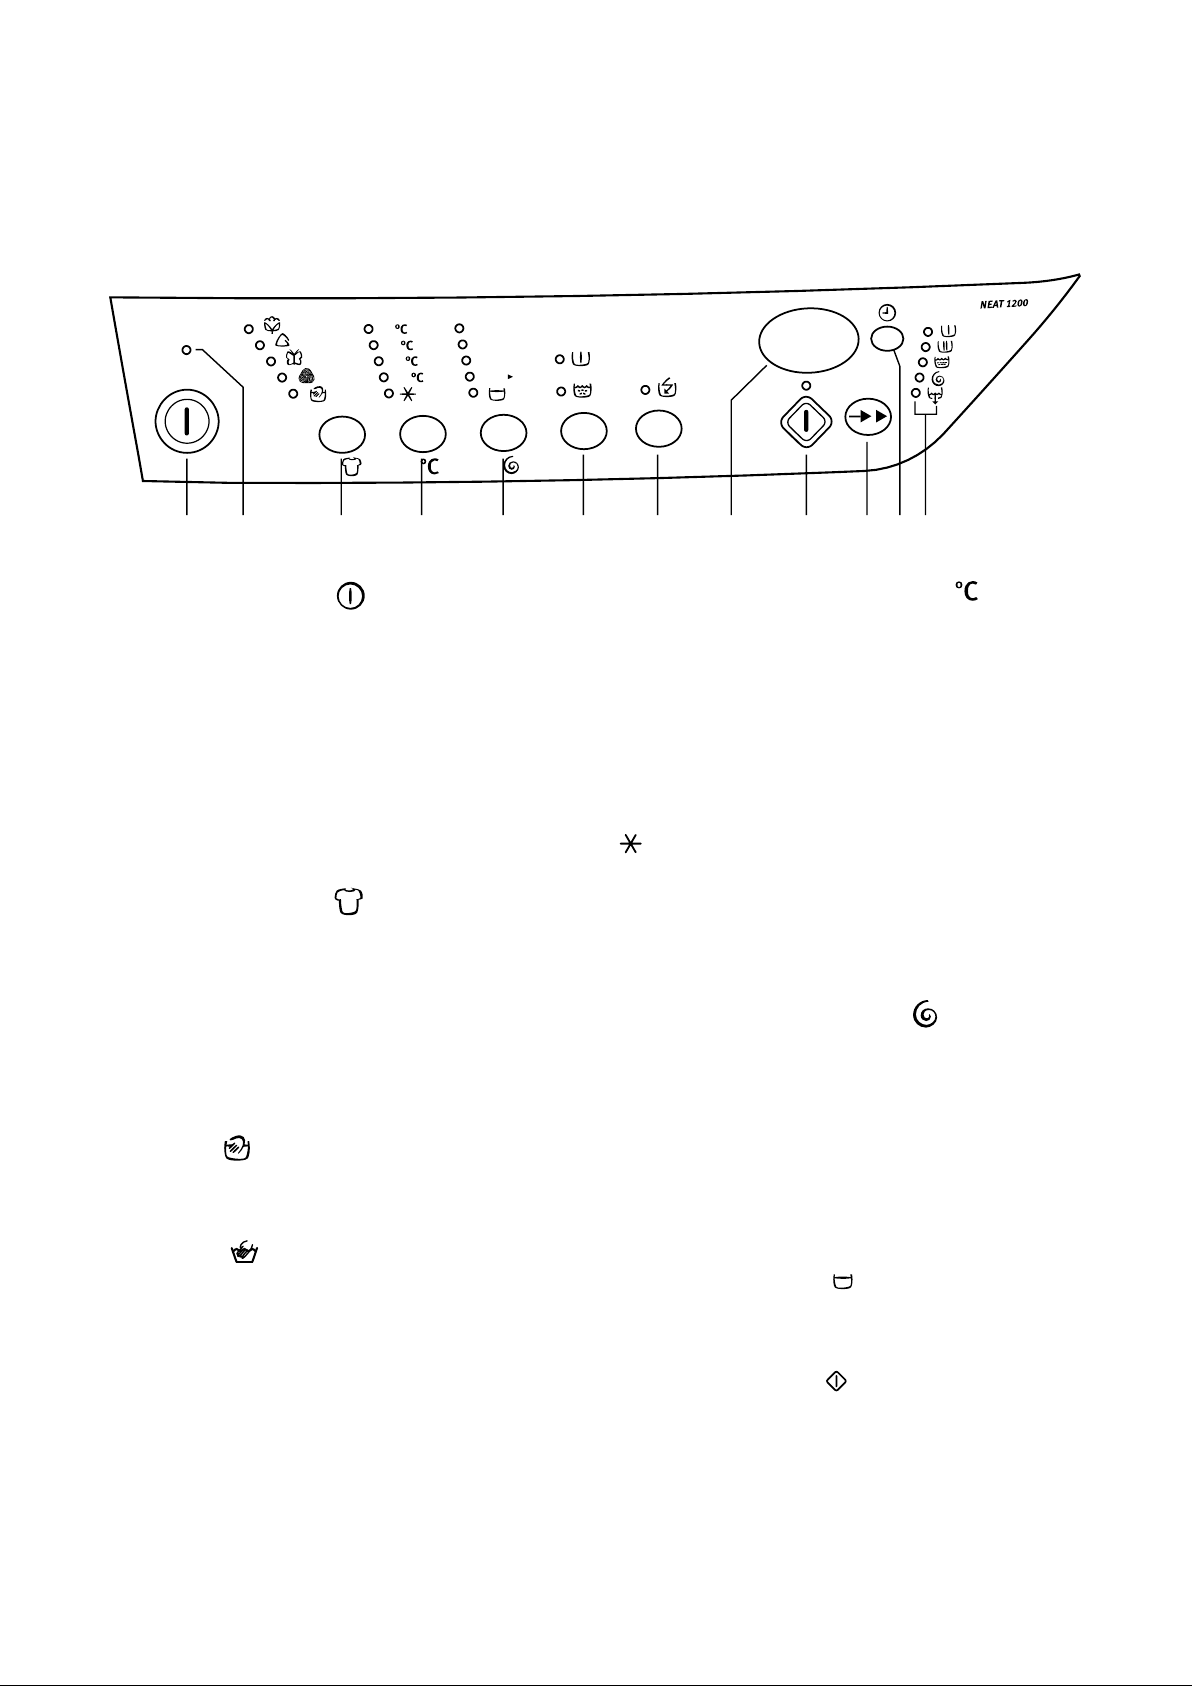
Use
Control panel
90
60
40
30
1200
900
700
500
12 3 4 5 6 7 8 91011
1 ON/OFF button
Press this button to switch the washing machine on.
Press the ON/OFF button again to switch the
machine off.
2 MAINS-ON light
This light is connected to the ON/OFF button. It
lights up when you press the button, and goes out
when you press it again.
3 FABRIC button
Press this button repeatedly to select the
programme on the basis of the type of laundry to be
washed. The light relevant to the selected
programme will light up. The washing machine will
propose a temperature and automatically select the
maximum spin value provided for the programme
you have chosen. You can change these values by
operating buttons 4 and 5.
Hand wash
When you select this programme, you obtain a
particularly delicate washing, suitable for articles of
clothing whose label indicates that they must be
hand-washed .
12
4 TEMPERATURE button
Press this button repeatedly to increase or decrease
the temperature, if you want your laundry to be
washed at a temperature different from the one
proposed by the washing machine. The relevant light
will light up.
Maximum temperatures are 90°C for cotton, 60°C for
synthetic fabrics, 40°C for delicate fabrics, wool and
fabrics to be hand-washed (HAND WASH
programme).
= cold wash
Important!
By depressing TEMPERATURE and SPIN SPEED
buttons simultaneously, the acoustic signal at the
end of the cycle is suppressed.
5 SPIN SPEED button
Press this button repeatedly to change the spin
speed, if you want your laundry to be spun at a
speed different from the one proposed by the
washing machine. The relevant light will light up.
Maximum speeds are:
• for cotton: 1,200 rpm;
• for synthetic fabrics, wool, and fabrics to be handwashed: 900 rpm;
• for delicate fabrics: 700 rpm.
RINSE HOLD position : when you choose this
option, the machine will not drain the water of the
last rinse, so as not to wrinkle the laundry.
At the end of the cycle, the light of the
START/PAUSE button will flash, to indicate that
the water must be drained.
To complete the cycle, choose one of the following
options:
10
Page 11
• Draining and spin:
- Press the START/PAUSE button. The machine
will drain the water, then spin the laundry at the
maximum speed provided for the selected
programme.
- Select spin speed by means of button 5, and
press the START/PAUSE button.
• Drain only
- Press the SKIP/RESET button once, so as to
cause the DRAIN light to light up, then press
the START/PAUSE button.
Important! If you accidentally press the
SKIP/RESET button more than once, the display
will show three blinking dashes. To drain the
water, select any washing programme by means
of the FABRIC button , then press
SKIP/RESET three times in order to select the
DRAIN position (only the DRAIN light will
remain lit).
6 OPTIONS button
Press this button to select the following options:
• PREWASH : select this option if you wish your
laundry to be prewashed before the main wash
(not available for wool and hand-wash cycle).
The prewash ends with a short spin at 650 rpm in
programmes for cotton and synthetic fabrics,
whereas in the programme for delicate fabrics the
water is only drained.
• SUPER RINSE : this option can be selected
with all programmes except the wool programme
and hand wash. The machine performs 4 rinses
instead of 3. This option is recommended for
people who are allergic to detergents, and in areas
where the water is very soft.
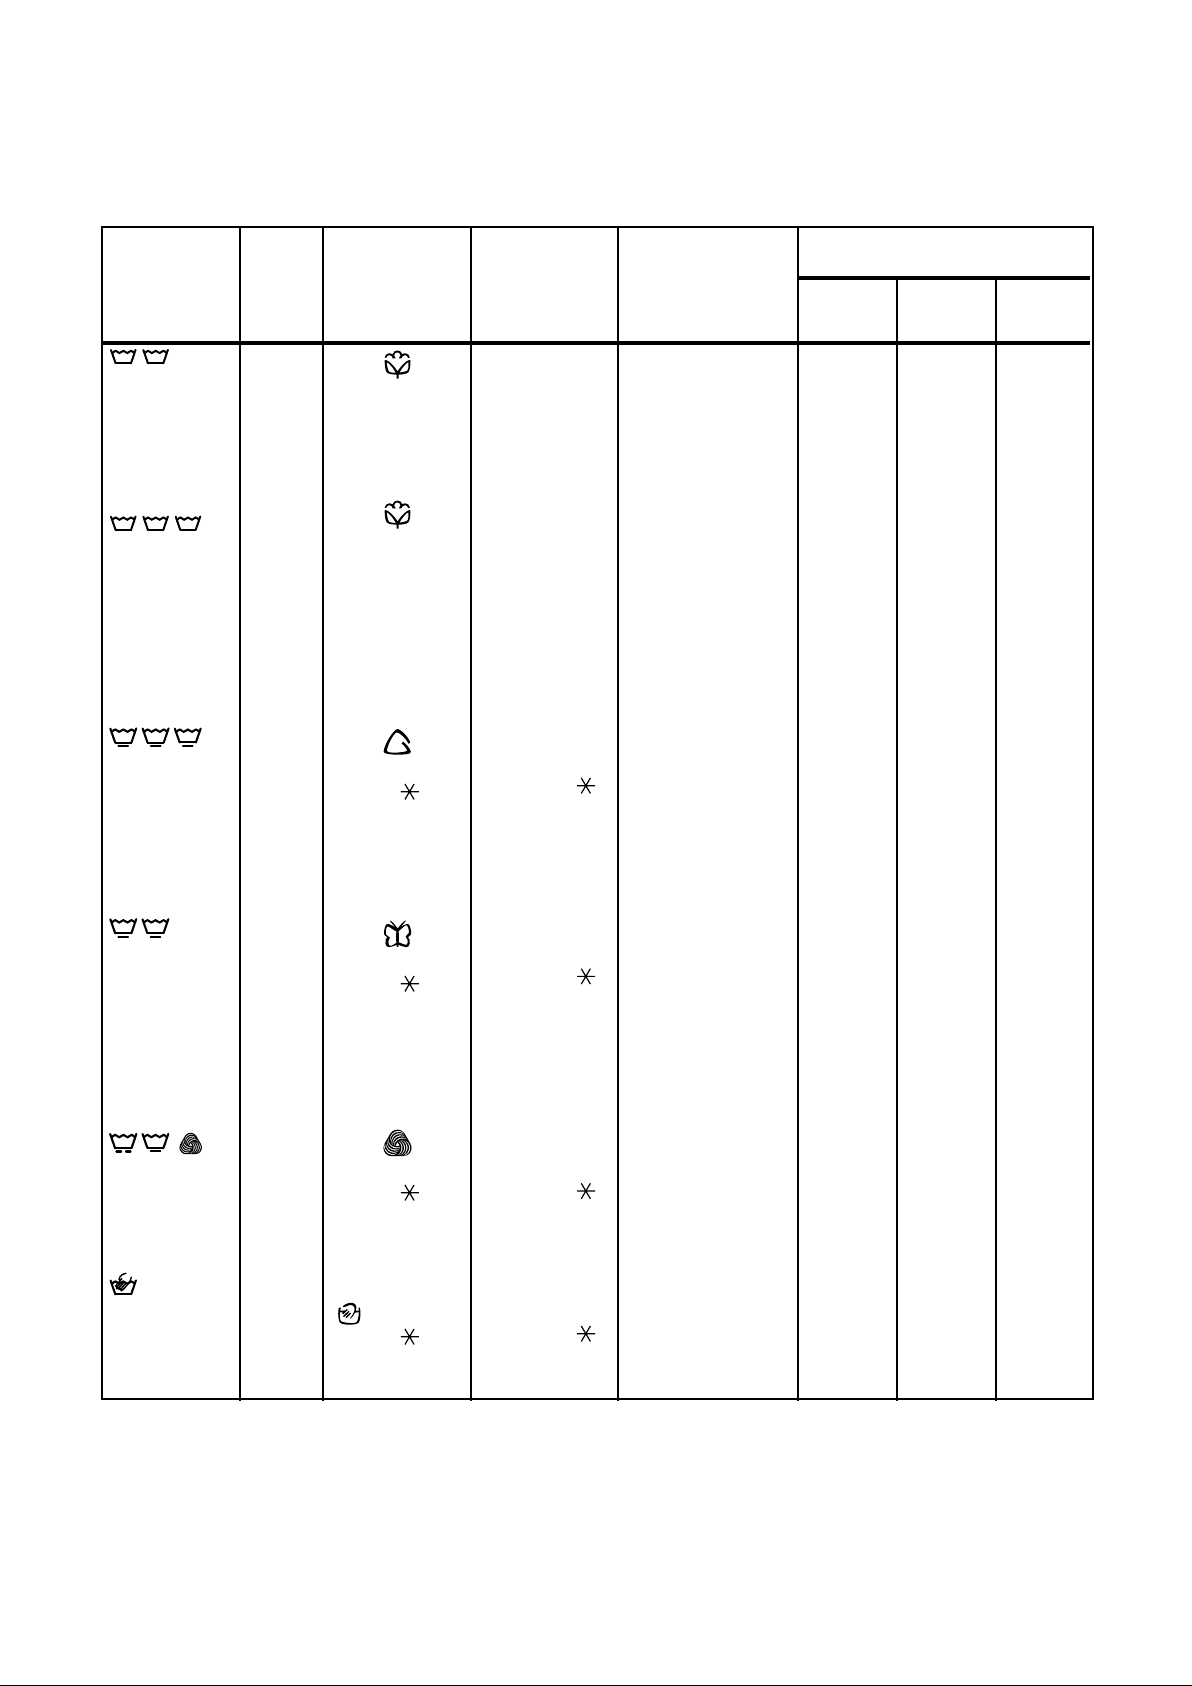
7 QUICK WASH button
This button allows you to select the QUICK WASH
function, for laundry that is only slightly soiled (not
for wool and HAND WASH programme).
The washing time will be reduced according to the
type of fabric and the selected temperature.
8 Display
The following pieces of information are shown on the
display:
• Three blinking dashes, when a programme is
cancelled by means of the SKIP/RESET button.
The three blinking dashes will also appear when you
press the ON/OFF button to switch the machine on,
if the previously selected cycle has been erased.
---
•
Duration of washing programme in hours
and minutes, after you have selected a
programme.
2.05
While the programme is running (after you have
pressed the START/PAUSE button), the displayed
time value decreases by one unit every minute.
• The washing machine has stopped with water in
the tub, at the end of a programme with the
RINSE HOLD option: this is indicated by a static
zero.
• The washing machine has completed the
programme: this is indicated by a blinking zero.
At the same time, the door locked light goes out.
The zero will reappear when you switch the
washing machine on, unless the previous
programme has been erased by means of the
SKIP/RESET button.
ENGLISH
11
Page 12
0
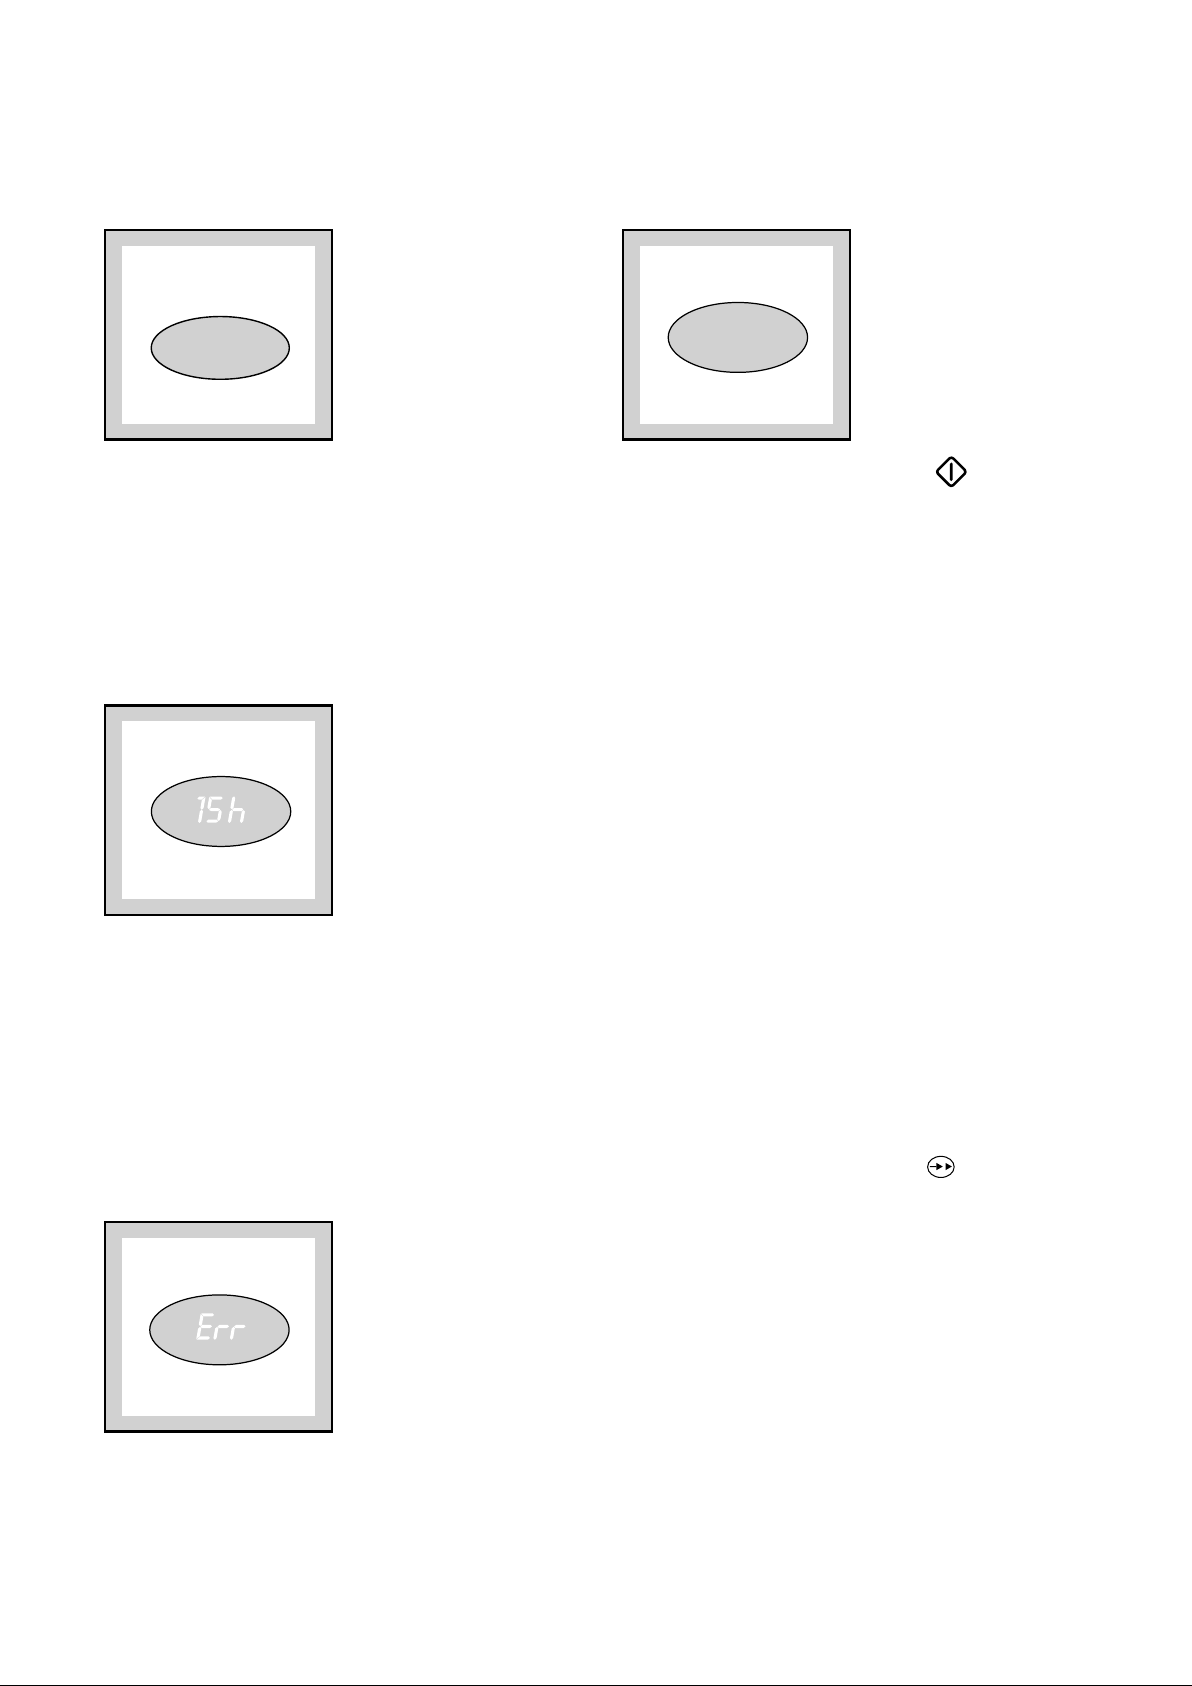
E20
Important!
The first time you use the washing machine,
when you switch it on, it may display a blinking zero and
give an audible warning signal. This is due to the fact
that the washing machine has performed a washing
cycle during the manufacturer’s inspection tests, and
this cycle has not been erased after its completion.
• Delay start, a time value indicated in hours and
selected by means of the relevant button.
The delay time is displayed for 5 seconds, then the
duration of the selected programme reappears.
After you have pressed the START/PAUSE button,
the countdown begins, and the delay time value
decreases by one unit every hour.
You can delay the start of the selected programme
by up to 24 hours in one hour intervals.
• An incorrect option selection has been made:
this is indicated by the message Err when a
function incompatible with the current programme
is selected.
9 START/PAUSE button
This button has three functions:
• Start: after you have selected the desired
programme and options, press this button to start
the washing machine. The light above the button
will stop flashing and remain lit.
If you have selected a delay time by means of
button 11, the countdown will begin and will be
shown on the display.
• Pause: when you press this button again, the
programme in progress is interrupted. The light
above the button will start flashing. To restart the
programme, press the button again.
When you PAUSE the cycle, the DOOR LOCKED
light goes out, and it becomes possible to open the
door, provided
• the washing machine is not in the heating phase;
• the level of the water is not high;
• the drum is not turning.
Important! You must set the washing machine to
PAUSE before you make any change in the
programme in progress.
• Draining of water and spinning after the
execution of programmes with the RINSE HOLD
option.
10 SKIP/RESET button
At the end of a programme, you must press this
button once or repeatedly, in order to clear the
contents of the memory (the display will show three
blinking dashes); otherwise, the next time you switch
the washing machine on, the blinking zero will
reappear and the audible warning signals relevant to
the end of the previous cycle will be given.
You can also press the RESET button to exclude
one or several phases of the programme which is
running, as indicated below.
The incorrect selection is also indicated by an
audible warning signal.
• An alarm code indicates a fault in the machine
operation (see the relevant chapter on page 23).
- set the washing machine to PAUSE by pressing the
START/PAUSE button (the relevant light will flash);
- press the RESET button once or several times, until
the required phase(s) is(are) cancelled (the light next
to the name of the phase(s) will go out).
12
Page 13
Example:
In this case, both the
drain and the spin (at
PREWASH
WASH
RINSES
SPIN
DRAIN
This button allows you also to select special
programmes, such as RINSES, SPIN and DRAIN.
• If the machine is already switched on because it
has just performed a washing programme, proceed
as follows:
- depress RESET once or repeatidly to cancel the
previously performed programme (three blinking
dashes will appear on the display);
- select the type of fabric by means of the relevant
button;
- select the special programme:
• RINSES
Depress RESET once, the pilot light WASH
goes out.
• SPIN
Depress RESET twice, the pilot lights WASH
and RINSES go out.
• DRAIN
Depress RESET three times, the pilot lights
WASH , RINSES and SPIN go out.
the speed provided for
the selected type of
fabric) will be
performed.
11 DELAY button
This button makes it possible to delay the starting of
the programme by up to 24 hours. The delay you
have selected is shown on the display for about 5
seconds; afterwards, the duration of the programme
reappears.
You must select this option after you have set the
programme and before you press the
START/PAUSE button.
The time value shown on the display will decrease
by one unit every hour.
You can change the delay time at any moment,
before you press the START/PAUSE button.
If you have already pressed the START/PAUSE
button, and you wish to change or cancel the delay
time, proceed as follows:
• set the washing machine to PAUSE by pressing the
START/PAUSE button;
• press the DELAY button until the display shows the
desired delay time or
• press the DELAY button once, to erase the delay
time. The display will indicate “0h”.
• press the START/PAUSE button again.
Important!
The door will be locked throughout the delay time
(DOOR LOCKED light lit).
If you need to open the door, you must first set the
washing machine to PAUSE by pressing the
START/PAUSE button. After you have closed the
door, press the START/PAUSE button again.
ENGLISH
Example:
In this case the
machine will perform
the rinses and spin.
• If the machine is switched off:
- depress ON/OFF button to switch it on;
- select the type of fabric by means of button
FABRIC:
- select the special programme as previously
described.
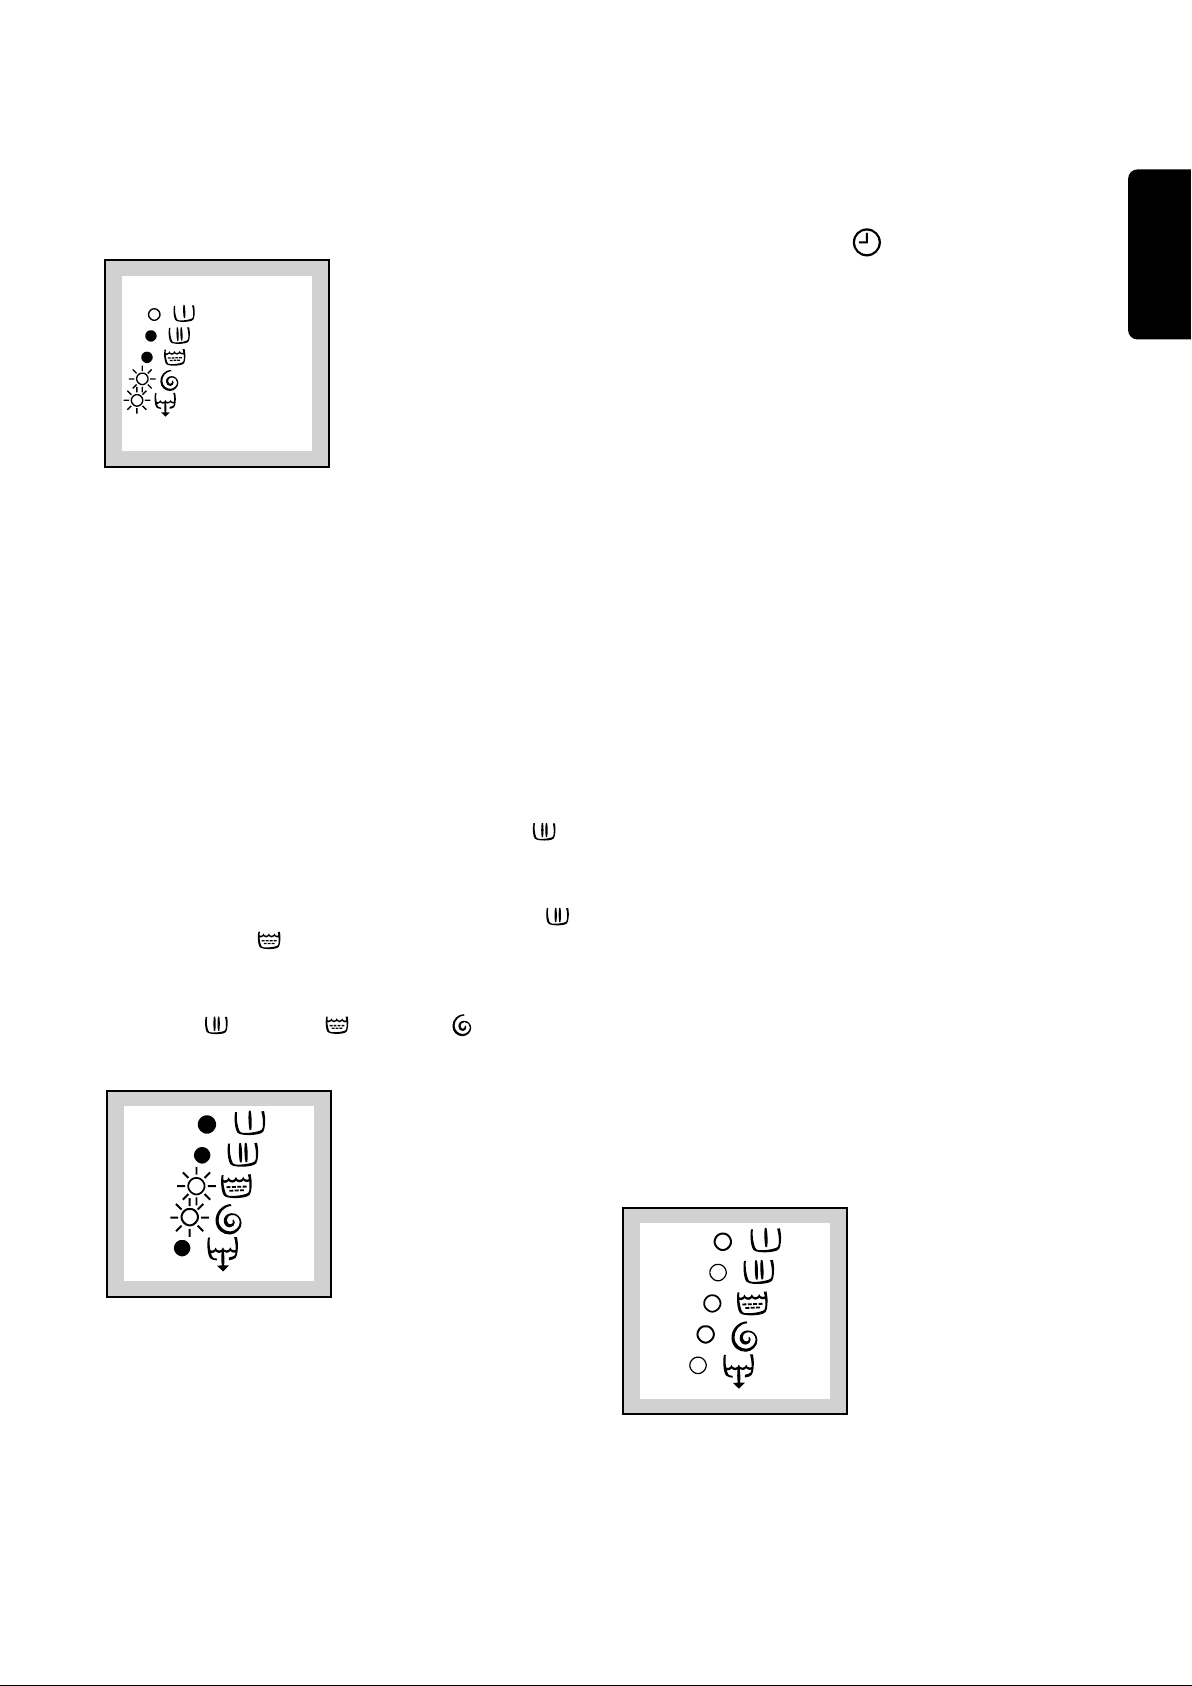
12 Programme phase indicator
lights
When you select a programme, the lights relevant to
the phases that form the programme light up.
After you have started the programme, only the light
relevant to the phase that is currently being carried
out will remain lit.
13
Page 14

Washing hints
Sorting the laundry
Follow the wash code symbols on each garment
label and the manufacturer’s washing instructions.
Sort the laundry as follows:
whites, coloureds, synthetics, delicates, woollens.
Temperatures
90°-95° for normally soiled white cottons and linen
(e.g. tea cloths, towels, tablecloths,
sheets...)
60° for normally soiled, colour fast garments
(e.g. shirts, night dresses, pyjamas....) in
linen, cotton or synthetic fibres and for
lightly soiled white cotton (e.g. underwear).
(cold)for delicate items (e.g. net curtains), mixed
30°-40° laundry including synthetic fibres and
woollens.
Laundry weights
The following weights are indicative:
bathrobe 1200 g
napkin 100 g
quilt cover 700 g
sheet 500 g
pillow case 200 g
tablecloth 250 g
towelling towel 200 g
tea cloth 100 g
night dress 200 g
ladies’ briefs 100 g
man’s work shirt 600 g
man’s shirt 200 g
man’s pyjamas 500 g
blouse 100 g
men’s underpants 100 g
Before loading the laundry
Never wash whites and coloureds together. Whites
may lose their “whiteness” in the wash.
New coloured items may run in the first wash; they
should therefore be washed separately the first time.
Make sure that no metal objects are left in the
laundry (e.g. hair clips, safety pins, pins).
Button up pillowcases, close zip fasteners, hooks
and poppers. Tie any belts or long tapes.
Remove persistent stains before washing. Rub
particularly soiled areas with a special detergent or
detergent paste.
Treat curtains with special care. Remove hooks or tie
them up in a bag or net.
Maximum loads
Recommended loads are indicated in the
programme charts.
General rules:
Cotton, linen: drum full but not too tightly packed;
Synthetics: drum no more than half full;
Delicate fabrics and woollens: drum no more than
one third full.
Washing a maximum load makes the most efficient
use of water and energy.
For heavily soiled laundry, reduce the load size.
Removing stains
Stubborn stains may not be removed by just water
and detergent. It is therefore advisable to treat them
prior to washing.
Blood: treat fresh stains with cold water. For dried
stains, soak overnight in water with a special
detergent then rub in the soap and water.
Oil based paint: moisten with benzine stain
remover, lay the garment on a soft cloth and dab the
stain; treat several times.
Dried grease stains: moisten with turpentine, lay
the garment on a soft surface and dab the stain with
the fingertips and a cotton cloth.
Rust: oxalic acid dissolved in hot water or a rust
removing product used cold. Be careful with rust
stains which are not recent since the cellulose
structure will already have been damaged and the
fabric tends to hole.
Mould stains: treat with bleach, rinse well (whites
and fast coloureds only).
Grass: soap lightly and treat with bleach (whites and
fast coloureds only).
Ball point pen and glue: moisten with acetone (*),
lay the garment on a soft cloth and dab the stain.
Lipstick: moisten with acetone as above, then treat
stains with methylated spirits. Remove any residual
marks from white fabrics with bleach.
Red wine: soak in water and detergent, rinse and
treat with acetic or citric acid, then rinse. Treat any
residual marks with bleach.
14
Page 15
Ink: depending on the type of ink, moisten the fabric
first with acetone (*), then with acetic acid; treat any
residual marks on white fabrics with bleach and then
rinse thoroughly.
Tar stains: first treat with stain remover, methylated
spirits or benzine, then rub with detergent paste.
(*) do not use acetone on artificial silk.
Detergents and additives
Good washing results also depend on the choice of
detergent and use of the correct quantities to avoid
waste and protect the environment. Although
biodegradable, detergents contain substances
which, in large quantities, can upset the delicate
balance of nature.
The choice of detergent will depend on the type of
fabric (delicates, woollens, cottons, etc.), the colour,
washing temperature and degree of soiling.
All commonly available washing machine detergents
may be used in this appliance:
– powder detergents for all types of fabric,
– powder detergents for delicate fabrics (60°C max)
and woollens,
– liquid detergents, preferably for low temperature
wash programmes (60°C max) for all types of
fabric, or special for woollens only.
The detergent and any additives must be placed in
the appropriate compartments of the dispenser
drawer before starting the wash programme.
If using concentrated powder or liquid detergents, a
programme without prewash must be selected.
The washing machine incorporates a recirculation
system which allows an optimal use of the
concentrated detergent.
Pour liquid detergent into the dispenser drawer
compartment marked just before starting the
programme.
Any fabric softener or starching additives must be
poured into the compartment marked before
starting the wash programme.
Follow the product manufacturer’s recommendations
on quantities to use and do not exceed the «MAX»
mark in the detergent dispenser drawer.
Quantity of detergent to be used
The type and quantity of detergent will depend on
the type of fabric, load size, degree of soiling and
hardness of the water used.
Water hardness is classified in so-called “degrees” of
hardness. Information on hardness of the water in
your area can be obtained from the relevant water
supply company, or from your local authority.
Follow the product manufacturers’ instructions on
quantities to use.
Use less detergent if:
– you are washing a small load,
– the laundry is lightly soiled,
– large amounts of foam form during washing.
Degrees of water hardness
Degrees
Level Characteristic
1
2
3
4
soft
medium
hard
very hard
German
°dH
0- 7
8-14
15-21
more than
21
French
°T.H.
0-15
16-25
26-37
more than
37
ENGLISH
15
Page 16
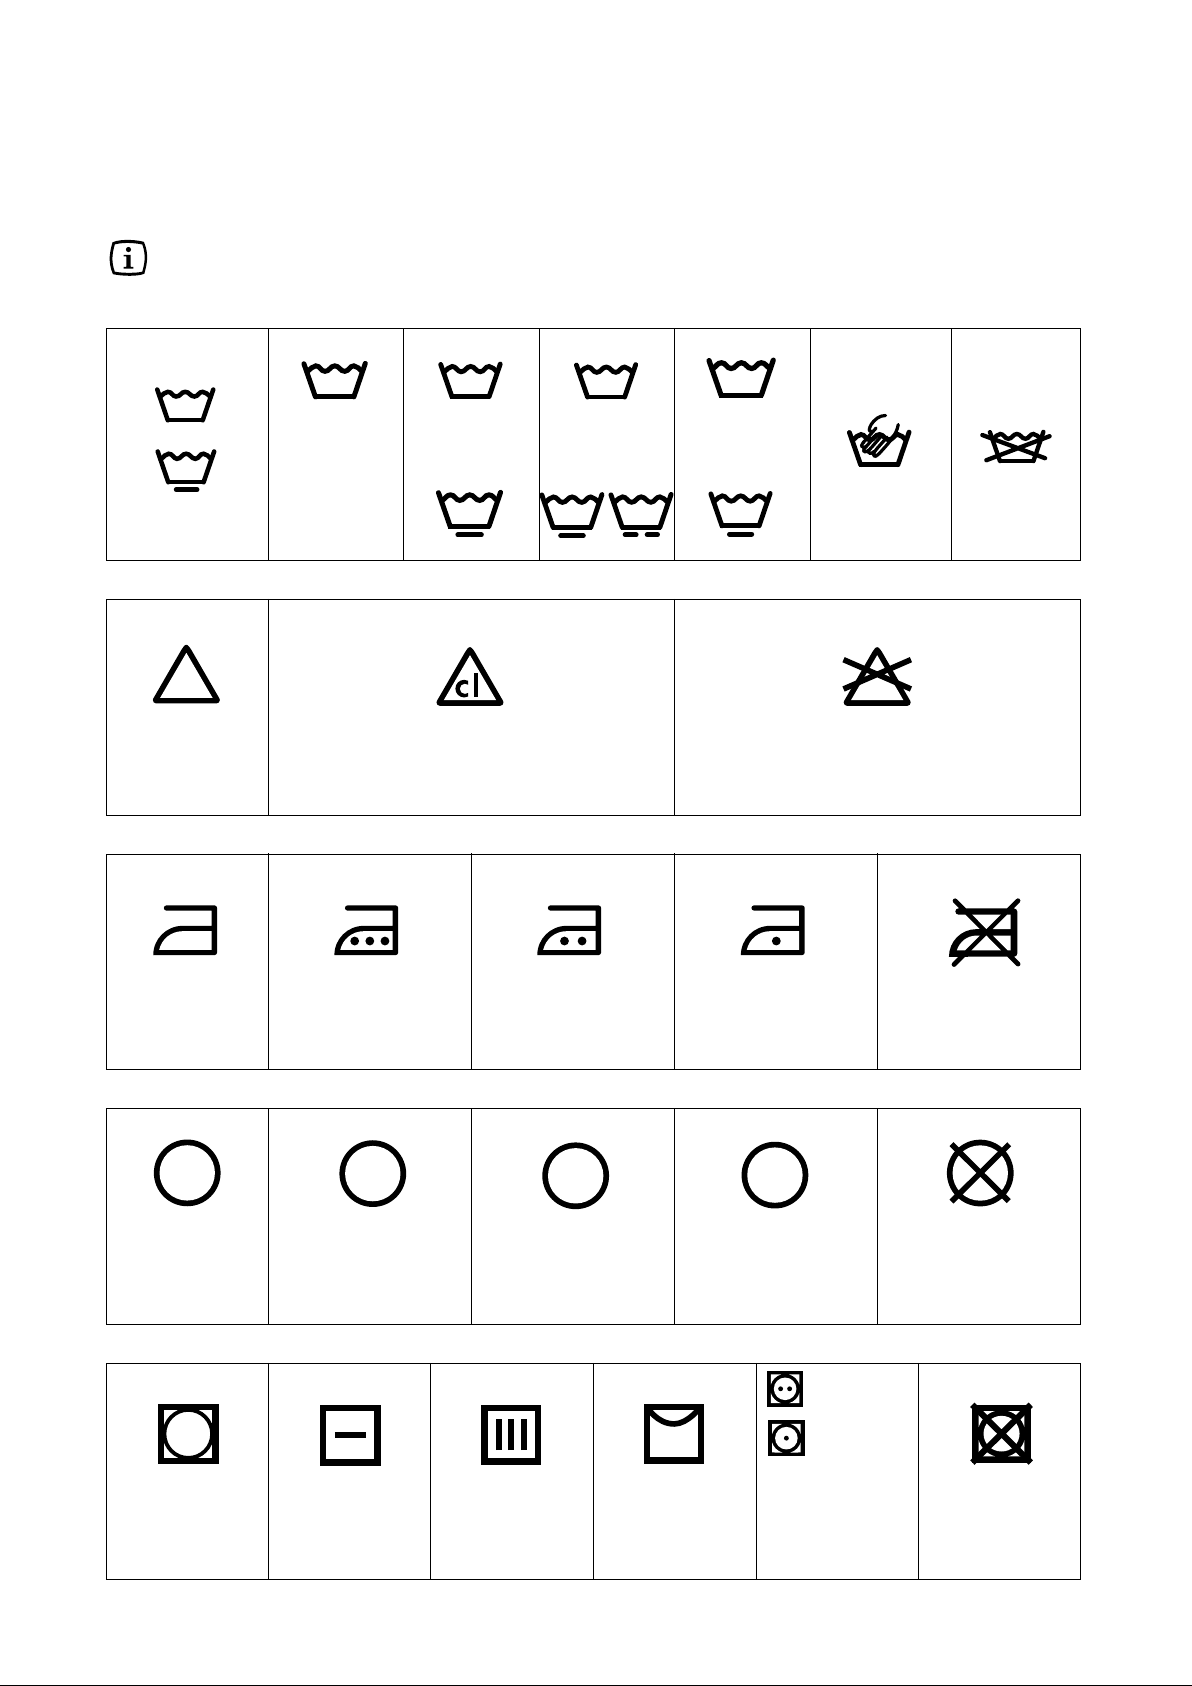
International wash code symbols
These symbols appear on fabric labels, in order to help you choose the best way to treat your laundry.
Energetic wash
95
60
40
30
Max. wash
temperature
95°C
Delicate wash
Bleaching Bleach in cold water Do not bleach
Ironing Hot iron
max 200°C
Max. wash
temperature
60°C
60
Max. wash
temperature
40°C
40
Warm iron
max 150°C
40
Max. wash
temperature
30°C
Hand wash Do not
30
Lukewarm iron
max 110 °C
wash
at all
Do not iron
A
Dry cleaning Dry cleaning
in all solvents
Drying Flat On the line On clothes
perchlorethylene,
petrol, pure alcohol,
P
Dry cleaning in
R 111 & R 113
hanger
16
F
Dry cleaning
in petrol,
pure alcohol
and R 113
Tumble dry
high
temperature
low
temperature
Do not
dry clean
Do not
tumb
le dr
y
Page 17

------
0
Operating sequence
C0065
C0064
P1084
Before washing your first load of laundry, we
recommend that you run a cotton cycle at 60°C, with
the machine empty, in order to remove any
manufacturing residue from the drum and tub.
Pour half a measure of detergent into the main wash
compartment and start up the machine.
1. Place the laundry in the drum
Open the door.
Place the laundry in the drum, one item at a time,
shaking them out as much as possible.
Close the door.
2. Measure out the detergent
Pull out the dispenser drawer until it stops. Measure
out the amount of detergent recommended by the
manufacturer in a graduated cup and pour it into the
main wash compartment .
If you wish to carry out the prewash, pour detergent
into the appropriate compartment marked .
4. Switch the machine on
Press the ON/OFF button to switch the machine on.
The display will show three blinking dashes or a
blinking zero. The light above the button will light up.
5. Select the desired programme/
fabric
Press the FABRIC button repeatedly, in order to
select the desired programme/fabric. The relevant
light will light up.
The lights relevant to the phases that form the
programme will light up.
The display will show the duration of the selected
programme, calculated on the basis of the maximum
load for each type of fabric. The START/PAUSE
button light will start flashing.
If the load of laundry to be washed is small, at the
beginning of the cycle the display will still indicate the
duration relevant to the maximum load. The duration
value will be gradually adjusted during the execution
of the cycle.
ENGLISH
3. Measure out the additive
If required, pour fabric softener into the compartment
marked , without exceeding the «MAX» mark.
17
Page 18
6. Select the temperature
9. Select the QUICK WASH
Press the TEMPERATURE button if you wish to
select a temperature value different from the one
proposed by the washing machine.
The relevant light will light up.
90
60
40
30
7. Select the spin speed or the
RINSE HOLD option
Press the SPIN SPEED button repeatedly, in order
to select the desired spin speed or the RINSE HOLD
option . The relevant light will light up.
If you select the RINSE HOLD option, the machine
will stop at the end of the programme with the water
still in the tub.
option
Depress this button to select the QUICK WASH
option, if your laundry is only slightly soiled. The
relevant light illuminates.
10. Select the DELAY TIME
Before you start the programme, if you wish the
starting to be delayed, press the DELAY button
repeatedly, or keep it pressed, to select the desired
delay. The selected delay time value (up to 24 hours)
will appear on the display for 5 seconds, then the
duration of the programme will appear again.
1200
900
700
500
8. Select the desired options
If your laundry is very dirty, it may be advisable to
select the PREWASH option .
If you wish the laundry to undergo an extra rinse,
select the SUPER RINSE option .
Press the OPTIONS button so as to cause one or
both of the lights to light up.
11. Start the programme
Press the START/PAUSE button. The relevant light
will stop flashing, the DOOR LOCKED light will light
up, and only the light relevant to the phase that is in
progress will remain lit.
If you have chosen a delayed start, the washing
machine will begin the countdown.
The display will show the duration of the programme
or the selected delay.
18
Page 19

12. How to change a programme
during its cycle
Before you make any change, you must pause the
washing machine by pressing the START/PAUSE
button.
It is possible to change any phase before the
programme carries it out.
Changing the type of fabric or temperature is
possible, obviously, only during the washing phase.
When you make a change in these two parameters,
the washing machine will resume the cycle from the
beginning.
If it is necessary to drain the water in order to change
the programme in progress, proceed as follows:
• PAUSE the machine by pressing the
START/PAUSE button;
• press the SKIP/RESET button repeatedly, until
only the DRAIN light remains lit;
• press the START/PAUSE button again.
When the water has been drained, the display shows
a blinking zero. You may now select a new
programme and press the START/PAUSE button to
start it.
13. How to cancel a programme
during its cycle
To cancel a programme that is being carried out, first
pause the washing machine by pressing the
START/PAUSE button, then press the SKIP/RESET
button repeatedly, until the display shows three
blinking dashes.
14. How to open the door during
the cycle of a programme
You can open the door, after having set the washing
machine to PAUSE, provided the following
conditions exist:
• the washing machine is not in the heating phase
beyond 40°C;
• the level of the water is not high;
• the drum is not turning.
If these requirements are met, when you pause the
washing machine, the DOOR LOCKED light goes
out and the door can be opened.
Should it not be possible to open the door, and
should it be absolutely necessary to do so, switch
the machine off by pressing the ON/OFF button.
After approximately 2 minutes, you can open the
door.
Pay attention to the level and temperature of the
water in the washing machine!
When you close the door and press the ON/OFF
button again, the washing machine will resume the
programme from the point where it had been
interrupted.
15. End of programme
At the end of the programme, the washing machine
stops automatically, gives an audible signal, and
displays a blinking zero.
If you had selected the RINSE HOLD option, the
START/PAUSE button light flashes to indicate that
the water must be drained. The display shows a
steadily lit zero.
When the programme has been completed, a
blinking zero appears on the display and the audible
signal is given.
The DOOR LOCKED light goes out at once.
Press the SKIP/RESET button repeatedly to erase
the programme that has just been carried out. If
you omit to do this, the next time you switch the
washing machine on, the blinking zero will
appear on the display and you will hear the
audible signal.
Note: when you switch the machine on, if you must
erase the previously performed programme, it is also
sufficient to press the FABRIC button and select a
new programme.
Press the ON/OFF button to switch the machine off.
The relevant light will go out.
Remove the laundry from the washing machine.
Check whether the drum is completely empty, by
rotating it with your hand. The purpose of this is to
prevent any items of laundry from remaining
accidentally in the drum, where they might get
damaged in a subsequent wash (e.g. by shrinking) or
bleed colour into another load of laundry.
We advise you to close the water supply tap and
disconnect the plug from the socket.
Leave the door ajar in order to air the washing
machine.
ENGLISH
19
Page 20
Washing programmes
304030
30
Type of
laundry and
symbols on
labels
9560
White cotton:
e.g. sheets,
tablecloths,
household
linen
304060
**
Coloured
cotton: e.g.
shirts,
blouses,
underwear,
towels, household linen
4060
Synthetic
fabrics and
blends: e.g.
shirts,
blouses,
underwear
Max
load
5.5 kg
5.5 kg
2.5 kg
Programme/
temperature
60°-90°C
60°-40°-30°C
60°-40°-30°C
or
Description of
programme
Main wash at
60°-90°C
3 rinses
Long spin
Main wash at
60°-40°-30°C
3 rinses
Long spin
Main wash at
60°-40°-30° or
cold wash
3 rinses
Short spin
Available options
SPIN SPEED
RINSE HOLD
PREWASH
SUPER RINSE
QUICK
SPIN SPEED
RINSE HOLD
PREWASH
SUPER RINSE
QUICK
SPIN SPEED
RINSE HOLD
PREWASH
SUPER RINSE
QUICK
Energy
kWh
1.8
0.95
0.9
Consumption*
Water
litres
52
49
56
Time
h/min.
2.29
2.10
1.27
40
Delicate fab-
rics: e.g.
acrylic fabrics,
viscose, poly-
2.5 kg
40°-30°C
or
Main wash at
40°-30°C or
cold wash
3 rinses
Short spin
SPIN SPEED
RINSE HOLD
PREWASH
SUPER RINSE
QUICK
0.7
53
1.04
ester,
synthetic
blends
Wool
2 kg
40°-30°C
or
Main wash at
40°-30°C or
cold wash
SPIN SPEED
RINSE HOLD
0.3
48
57
3 rinses
Short spin
2 kg
Hand wash
40°-30°C
or
Main wash at
40°-30°C or
cold wash
SPIN SPEED
RINSE HOLD
0.25
46
55
3 rinses
Short spin
* The consumption data shown on this chart is to be considered purely indicative, as it may vary depending on
the quantity and type of laundry, on the inlet water temperature and on the ambient temperature. It refers to
the highest temperature for each wash programme. For cotton items it refers to a wash load of 5 kg.
** In compliance with EC directive 92/75 the consumption figures indicated on the Energy label refer to this
programme at 60°C with a load of 5 kg of cotton items.
20
Page 21
Maintenance
P1086
C0068
C0067
C0066
P1050
P0040
P1061
P0038
1. Door seal
Check from time to time the door seal and eliminate
eventual possible objects that could be trapped in
the fold.
2. Bodywork
Clean the outside of the machine with warm water
and a neutral, non-abrasive household detergent.
Rinse with clean water and dry with a soft cloth.
Important: do not use methylated spirits, solvents or
similar products to clean the bodywork.
3. Detergent dispenser drawer
Detergent can also accumulate inside the drawer
recess: clean it with an old toothbrush. Refit the
drawer after cleaning.
ENGLISH
4. Drain filter
The drain filter collects threads and small objects
inadvertently left in the laundry. Check regularly that
the filter is clean.
Open the filter door by pulling it towards the right.
Place a container under the filter to catch any
spillage.
Release the emergency emptying hose, place it in
the container, and remove its cap by unscrewing it.
After a while, detergents and fabric softeners leave
deposits in the drawer.
Clean the drawer from time to time by rinsing it under
a running tap. To remove the drawer from the
machine, press the button in the rear left-hand
corner.
To facilitate cleaning, the top part of the additive
compartment can be removed.
P1062
P1085
When no more water comes out, unscrew the filter
and remove it.
Clean the filter under a running tap, then refit it,
screwing it fully in.
Put the cap back on the emergency emptying hose,
place the latter back in its seat. Close the filter door.
21
Page 22
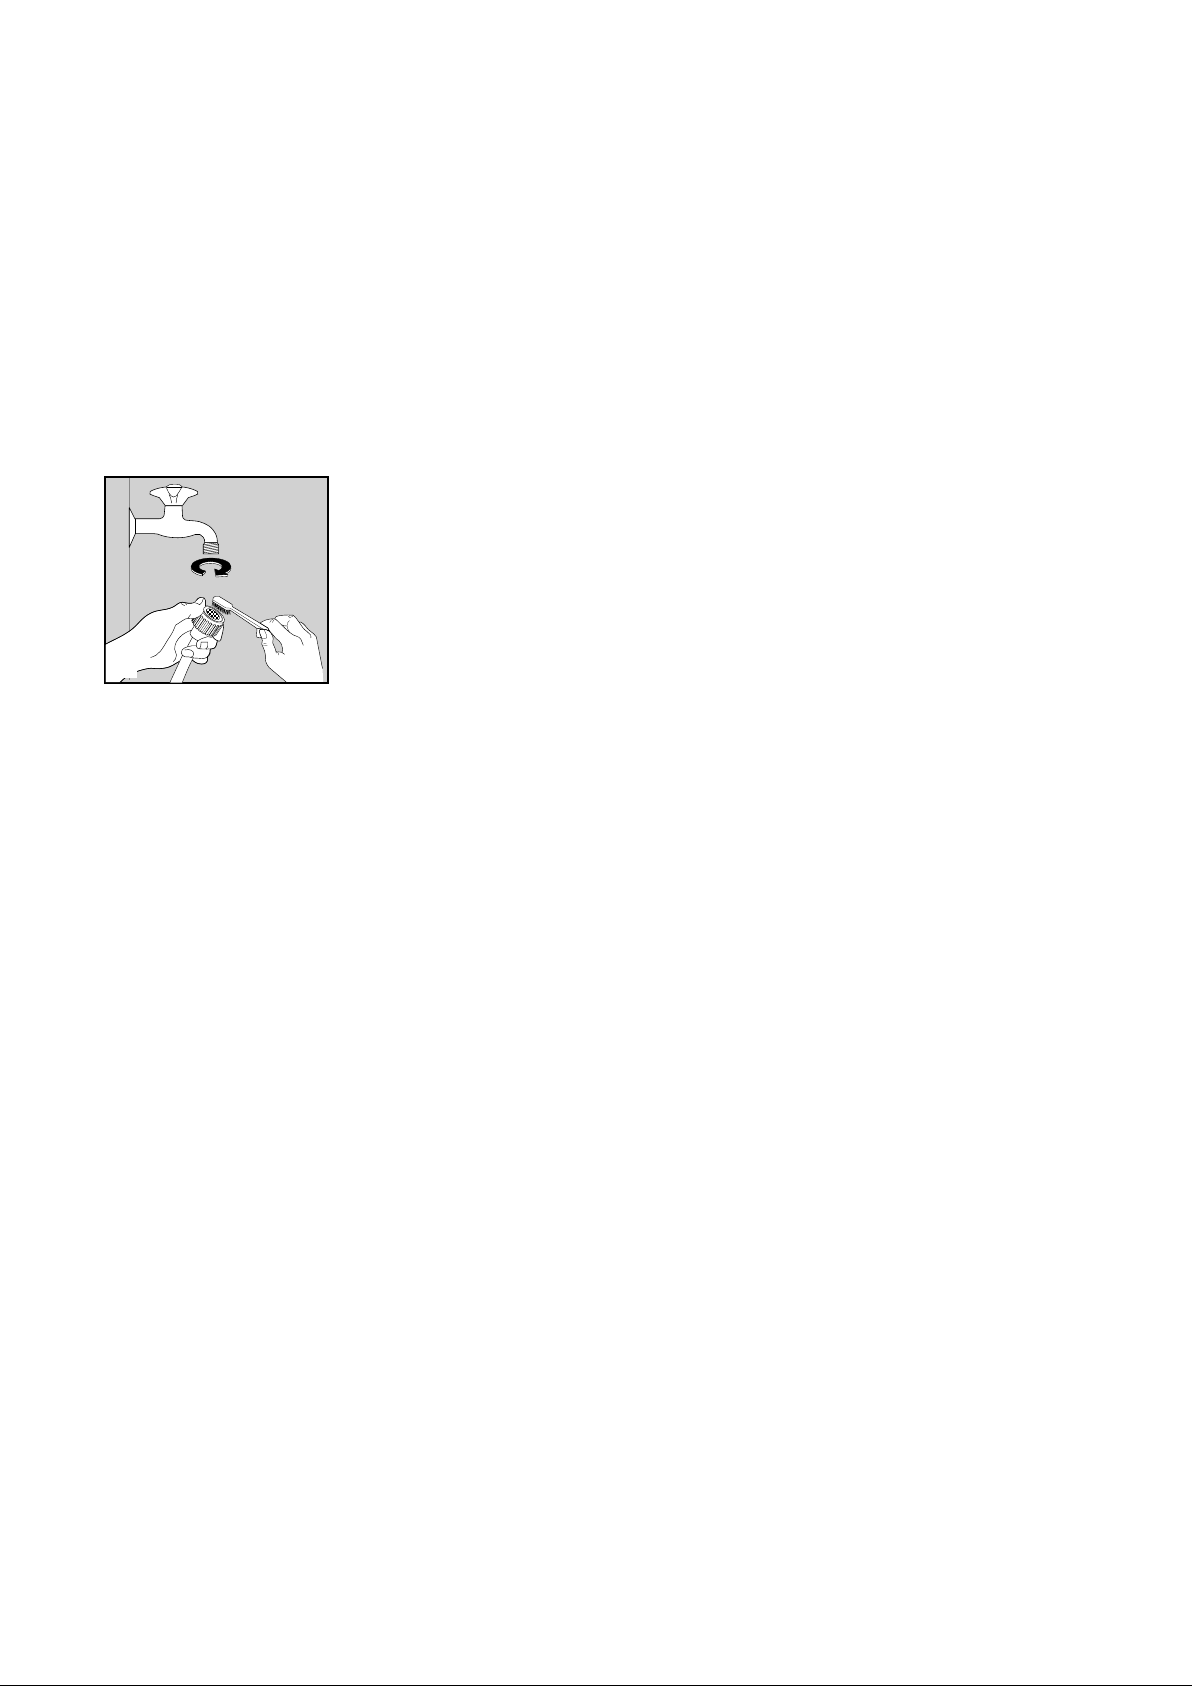
5. Water inlet filter
P1090
7. The dangers of freezing
If you notice that the machine is taking longer to fill,
check that the filter in the water inlet hose is not
blocked.
Turn off the water tap.
Unscrew the hose from the tap.
Clean the filter with a stiff brush.
Screw the hose back onto the tap.
6. Emergency emptying out
If the machine is unable to drain, proceed as follows
to empty out the machine:
• Pull out the plug from the power socket.
• Close the water tap.
• If necessary, wait until the water has cooled
down.
• Place a bowl on the floor under the filter and
place the end of the emergency emptying hose
into the bowl. The water should drain by gravity
into the bowl. When the bowl is full, screw the cap
on again. Empty the bowl. Repeat the procedure
until water stops flowing out.
• Clean the filter if necessary.
• At the end screw the filter again.
If the machine is exposed to temperatures below
0°C, certain precautions should be taken.
• Turn off the water tap.
• Unscrew the inlet hose.
• Place the end of the inlet hose and that of the
emergency emptying hose in a bowl placed on
the floor and let the water drain out.
• Screw the water inlet hose back on and put the
emergency emptying hose back in its place after
having screwed the cap on again.
When you intend to start the machine up again,
make sure that the room temperature is above 0°C.
22
Page 23
Something not working?
Problems which you can resolve yourself.
During machine operation it is possible that one of the following alarm codes appears on the display:
- E10: problem with the water supply
- E20: problem with water draining
- E40: door open
Once the problem has been eliminated, press the START/PAUSE button to restart the programme. If after
all checks, the problem persists, contact your local Service Centre.
Problem Possible cause
ENGLISH
• The machine does not start up:
• The machine does not fill:
• The machine fills then empties
immediately:
• The machine does not empty
and/or does not spin:
• There is water on the floor:
• Unsatisfactory washing results:
• The machine vibrates or is
noisy:
• The door is not firmly closed. (E40)
• The machine is not plugged in or there is no power
at the socket.
• The main fuse has blown.
• The START/PAUSE button has not been
depressed.
• The DELAY START option has been selected.
• The water tap is closed. (E10)
• The inlet hose is squashed or kinked. (E10)
• The filter in the inlet hose is blocked. (E10)
• The door is not properly closed. (E40)
• The end of the drain hose is too low. Refer to
relevant paragraph in “water drainage” section.
• The drain hose is squashed or kinked. (E20)
• The RINSEHOLD optionhas been selected.
• The drain filter is clogged. (E20)
• Too much detergent or unsuitable detergent
(creates too much foam) has been used.
• Check whether there are any leaks from one of the
inlet hose fittings. It is not always easy to see this
as the water runs down the hose; check to see if it
is damp.
• The drain hose is damaged.
• Too little detergent or unsuitable detergent has
been used.
• Stubborn stains have not been treated prior to
washing.
• The correct temperature was not selected.
• Excessive laundry load.
• The transit bolts and packing have not been
removed.
• The support feet have not been adjusted.
• The laundry is not evenly distributed in the drum.
• Maybe there is very little laundry in the drum.
23
Page 24
M
o
d
.
.
.
.
.
.
.
.
.
.
.
P
r
o
d
.
N
o
.
.
.
.
.
.
.
.
.
.
.
.
S
e
r
.
N
o
.
.
.
.
.
.
.
.
.
.
P0042•N
Mod. ..........
Prod. No. ...........
Ser. No. .........
Problem Possible cause
• The door will not open:
• Spinning starts late or the
laundry is not spun enough:
• Water is not visible in the
machine:
• The machine makes an unusual
noise:
• The water level is above the bottom edge of the door.
• The machine is heating the water.
• The drum is turning.
The door can only be opened when the relevant
light has gone out.
• The electronic unbalance detection device has cut
in because the laundry is not evenly distributed in
the drum. The laundry is redistributed by reverse
rotation of the drum. This may happen several
times before the unbalance disappears and normal
spinning can resume. If, after 6 minutes, the
laundry is still not evenly distributed in the drum,
the machine will spin at a lower speed. If at the end
of the programme the laundry is not spun enough,
redistribute the load manually and select the spin
programme.
• The machine, which is the result of modern
technology, runs in a very economical way with low
water consumption. Performance is nevertheless
excellent.
• The machine is fitted with a commutator motor
which improves machine performance.
If you are unable to identify or solve the problem,
contact our service centre. Before telephoning, make
a note of the model, serial number and purchase
date of your machine: the Service Centre will require
this information.
24
Page 25
Szanowni Panstwo,
Prosimy o uwaqne przeczytanie niniejszej instrukcji
obslugi i zwrócenie szczególnej uwagi na podane na
pierwszych stronach zasady bezpieczenstwa.
Radzimy zachowa© instrukcje, aby móc korzysta© z
niej w przyszloßci oraz przekaza© kolejnemu
uqytkownikowi pralki, w razie jej odstapienia.
Bezpieczenstwa
Po rozpakowaniu urządzenia należy sprawdzić, czy
nie jest ono uszkodzone. Jeśli mają Państwo
wątpliwości prosimy o kontakt z autoryzowanym
zakładem serwisowym.
Symbole pojawiające się w niniejszej instrukcji obsługi mają następujące znaczenie:
Trójkat ostrzegawczy i okreßlenia sygnalizacyjne (Uwaga! Ostrzeqenie! Upomnienie!) maja na celu
zwrócenie szczególnej uwagi na wskazówki niezwykle waqne dla zapewnienia Panstwa bezpieczenstwa
i niezawodnej pracy urzadzenia. Prosimy o ich przestrzeganie.
Informacje poprzedzone tym symbolem stanowia uzupelnienie instrukcji funkcjonowania i praktycznego
uqywania urzadzenia.
Ten symbol oznacza zalecenia i wskazówki dotyczace oszczednego korzystania z urzadzenia w sposób
przyjazny dla ßrodowiska.
POLSKI
Oto nasz wkład w ochronę środowiska: używamy
papieru pochodzącego z recyklingu.
25
Page 26

Spis treści
Ważne informacje 27
Utylizacja 28
Zalecenia w zakresie
ochrony środowiska 28
Dane techniczne 29
Instalacja 30
Rozpakowanie 30
Ustawienie i poziomowanie 30
Podłączenie węża dopływowego wody 31
Podłączenie węża odpływowego wody 31
Podłączenie do zasilania elektrycznego 31
Państwa nowa pralka
automatyczna 32
Opis urządzenia 32
Lampka kontrolna blokady drzwi pralki 32
Pojemnik na środki piorące 32
Konserwacja 44
Drzwi 44
Obudowa 44
Pojemnik na środki piorące 44
Filtr spustowy 44
Mały filtr węża dopływowego wody 45
Awaryjne odpompowanie wody 45
Wskazówki dotyczące przechowywania
w niskich temperaturach 45
Co zrobić, jeśli urządzenie nie
pracuje?
46-47
Punkty Serwisowe 48-49
Eksploatacja 33
Panel sterujący 33-36
Wskazówki dotyczące prania 37
Sortowanie odzieży 37
Temperatury 37
Przed włożeniem bielizny 37
Maksymalne ilości bielizny 37
Ciężar bielizny 37
Usuwanie plam 37
Środki piorące i zmiękczające 38
Dozowanie środków piorących 38
Międzynarodowe symbole
konserwacji odzieży 39
Kolejność czynności 40-42
Tabela programów 43
26
Page 27

Ważne informacje
Przed przystąpieniem do podłączenia i eksploatacji pralki powinni Państwo dokładnie zapoznać się z
instrukcją obsługi.
Instalacja
• Przed uruchomieniem urządzenia należy usunąć
wszystkie elementy opakowania. Szczególnie należy
zwrócić uwagę na blokady transportowe. Jeżeli nie
zostaną usunięte może dojść do uszkodzenia pralki
oraz znajdujących się w jej pobliżu przedmiotów i
mebli. Prosimy o dokładne przeczytanie
odpowiedniego rozdziału w niniejszej instrukcji
obsługi.
• Wszelkie przeróbki instalacji elektrycznej /
hydraulicznej muszą być wykonywane przez
uprawnionego montera.
• Pralki nie należy stawiać na przewodzie zasilającym.
• Jeżeli pralka stoi na wykładzinie podłogowej, należy
wyregulować nóżki tak, aby zapewnić swobodną
cyrkulację powietrza.
Eksploatacja
• Urządzenie jest przeznaczone do użytku w warunkach
gospodarstwa domowego. Nie należy go używać
niezgodnie z przeznaczeniem.
• Przed włożeniem bielizny sprawdzić, czy nadaje się
ona do prania w pralce automatycznej. Przestrzegać
zaleceń producenta odzieży, umieszczonych na
metkach.
• Nie przeładowywać pralki. Stosować się do zaleceń
zawartych w niniejszej instrukcji obsługi.
• Przed włożeniem bielizny do pralki sprawdzić, czy w
kieszeniach np. spodni nie zostawiono zapalniczek,
monet, śrubek itp., gdyż mogą one spowodować
zniszczenia.
• W pralce nie należy prać odzieży zabrudzonej olejem,
benzyną, alkoholem lub innymi pochodnymi środkami.
Jeżeli plamy są usuwane specjalnymi środkami
odplamiającymi, należy odczekać z włożeniem bielizny
do pralki do momentu całkowitego ulotnienia się tego
środka.
• Wskazane jest pranie drobnych rzeczy (np. skarpetki,
koronki, paski itp.) w małych woreczkach lub w
poszewce, aby uniknąć przedostania się tych rzeczy
pomiędzy bęben, a zbiornik.
• Używać tylko sprawdzonego środka do zmiękczania
tkanin. Jego nadmierna ilość może uszkodzić tkaninę.
• Po zakończeniu prania drzwiczki należy pozostawić
lekko uchylone, aby uszczelka drzwiczek (fartuch)
dłużej zachowała swoją skuteczność. Zapobiegnie to
również powstawaniu nieprzyjemnego zapachu.
• Po zakończeniu prania należy zawsze sprawdzić przez
drzwiczki, czy została odpompowana woda. Jeśli po
zakończeniu prania w bębnie pozostała woda, należy
ją odpompować przed otwarciem drzwiczek (patrz
odpowiedni rozdział instrukcji).
• Po zakończeniu pracy należy wyjąć przewód
zasilający z gniazdka oraz zakręcić zawór wodny.
Bezpieczeństwo ogólne
• Naprawy urządzenia mogą być wykonywane tylko
przez fachowy personel. Nieprawidłowe naprawy
mogą spowodować poważne zagrożenie. Naprawy
należy zlecać ośrodkom serwisowym
ELECTROLUX.
• Nigdy nie należy wyciągać wtyczki z gniazdka
ciągnąc za przewód, lecz wyjąć wtyczkę.
• Podczas prania w wysokich temperaturach
drzwiczki pralki nagrzewają się. Nie dotykać
drzwiczek podczas pracy urządzenia.
POLSKI
27
Page 28

Bezpieczeństwo dzieci
P1076
• Dzieci czesto nie zdaja sobie sprawy z
niebezpieczenstwa zwiazanego z urzadzeniami
elektrycznymi. Podczas pracy pralki dzieci nie
powinny bawi© sie w pobliqu urzadzenia lub
manipulowa© elementami sterujacymi – istnieje
niebezpieczenstwo zamkniecia sie w nich dzieci.
• Elementy opakowania (np. folia, tworzywo) moga
stanowi© zagroqenie dla dzieci. Niebezpieczenstwo
uduszenia sie! Naleqy trzyma© poza zasiegiem
dzieci.
• Detergenty naleqy trzyma© w miejscu
niedostepnym dla dzieci.
• Naleqy upewni© sie, czy dzieci i zwierzeta domowe
nie weszly do bebna pralki. Aby temu zapobiec,
pralka zostala wyposaqona w specjalne
urzadzenie. W celu jego uruchomienia, naleqy
przekreci© (bez wciskania) guzik znajdujacy sie
wewnatrz zamka drzwi, aq wyqlobienie znajdzie
sie w pozycji poziomej. W razie potrzeby posluqy©
sie moneta.
Aby zabezpieczenie to wylaczy© i przywróci©
moqliwoß©i zamykania drzwi, naleqy obróci© guzik w
kierunku odwrotnym do biegu wskazówek zegara, aq
do ustawienia wyqlobienia w pozycji pionowej.
• W razie zlomowania urzadzenia naleqy wyja©
wtyczke z gniazdka, odcia© przewód i wyrzuci©
wtyczke z pozostalym odcinkiem przewodu.
Naleqy teq unieruchomi© mechanizm blokujacy
drzwi, aby bawiace sie dzieci nie mogly zamkna©
sie w pralce.
Utylizacja
Materialy opakowania
Materialy oznaczone symbolem nadaja sie do
ponownego wykorzystania.
>PE<= polietylen
>PS<= styropian
>PP<= polipropylen
Aby materialy te mogly zosta© ponownie
wykorzystane, musza zosta© umieszczone w
wyznaczonych miejscach (lub pojemnikach).
Zalecenia w zakresie ochrony ßrodowiska
W celu zaoszczedzenia wody i energii elektrycznej
oraz przyczynienia sie do ochrony ßrodowiska,
prosimy o przestrzeganie nastepujacych zalecen:
• Normalnie zabrudzona bielizna moqe by© prana bez
cyklu prania wstepnego. W ten sposób
oszczedzamy detergent, wode i czas (dbajac tym
samym o ochroneßrodowiska!).
•Urzadzenie pracuje w sposób oszczedny, gdy
cieqar zaladowanej bielizny jest zgodny z
podanym maksymalnym cieqarem wsadu. Nie
przeladowywa© pralki.
Pralka
W celu usuniecia Panstwa starego urzadzenia naleqy
korzysta© z wyznaczonych skladowisk odpadów.
Prosimy Panstwa o pomoc w utrzymaniu czystoßci
Waszego miasta!
• Stosujac odpowiednie zabiegi, moqna usuna©
plamy i brud z niewielkich powierzchni, a nastepnie
wykona© cykl prania z zastosowaniem niqszej
temperatury.
• Ilość używanego detergentu powinna zależeć od
poziomu twardości wody, stopnia zabrudzenia
bielizny i jej ilości.
28
Page 29
Dane techniczne
WYMIARY Wysokość 85 cm
Szerokość 60 cm
Głębokość 62 cm
PARAMETRY ELEKTRYCZNE Napięcie 220-230V/50Hz
Maks. pobór mocy 2200 W
Minimalne zabezpieczenie 10 A
CIŚNIENIE WODY Minimalne 50 kPa
Maksymalne 800 kPa
MAKSYMALNA ŁADOWNOŚĆ BEBNA Bawełna i len 5,5 kg
Syntetyki, tkaniny delikatne 2,5 kg
Wełna 2 kg
PREDKOŚĆ WIROWANIA 1200 obrotów/1 minutę
Urządzenie posiada znak CE i spełnia następujące normy EWG
- 73/23/EWG z 19.02.1973 (niskie napięcia) wraz ze zmianami;
- 89/336/EWG z 03.05.1989 wraz ze zmianami.
POLSKI
29
Page 30
Instalacja
2
1
P1066
P1068
P0255
P1051
P0020
P0256
Rozpakowanie
Przed uruchomieniem urzadzenia naleqy
usuna© blokady transportowe.
1. Odkreci© kluczem sworzen znajdujacy sie po
prawej stronie tylnej ßcianki urzadzenia. Oprze©
pralke na tylnej ßciance uwaqajac, aby nie
zgnieß© weqy. Moqna sobie pomóc poprzez
wloqenie miedzy urzadzenie, a posadzke jednego
z katowników opakowania.
2. Wyja© styropian z dna urzadzenia i 2 torebki z
tworzywa, przymocowane pod drzwiczkami filtra.
3. Bardzo delikatnie wyciagna© najpierw torebke
prawa (1), a nastepnie torebke lewa (2).
5. Wyja© trzy kolki z tworzywa z otworów, w których
znajdowaly sie sworznie.
6. Zakry© puste otwory zaßlepkami, które znajduja sie
w torebce zawierajacej instrukcje obslugi.
Zaleca sie zachowa© wszystkie elementy
transportowe, aby móc z nich skorzysta© w razie
przeprowadzki.
Ustawienie i poziomowanie
Urzadzenie musi zosta© zainstalowane na stabilnej i
idealnie poziomej powierzchni.
Upewni© sie, czy cyrkulacja powietrza dookola
urzadzenia nie jest utrudniona przez dywany,
wykladzine dywanowa itp.
Pralka nie moqe dotyka©ßcian, ani mebli
kuchennych.
Wypoziomowa© dokladnie urzadzenie dokrecajac
lub odkrecajac nóqki regulacyjne. Nigdy nie
podklada© pod urzadzenie kartonu, drewna lub
podobnych materialów w celu skasowania
ewentualnych nierównoßci posadzki.
4. Ponownie postawi© urzadzenie i wyja© dwa
pozostale sworznie z tylnej ßcianki.
30
Page 31

Podłączenie węża dopływowego wody
P0022
P0021
P0023
Podlaczy© waq doplywowy do zaworu zimnej wody z
gwintem 3/4”.
Drugi koniec weqa doplywowego (od strony
urzadzenia) moqe zosta© ukierunkowany dowolnie.
Naleqy lekko odkreci© nakretke mocujaca, obróci©
koncówke weqa i ponownie dokreci© nakretke
sprawdzajac, czy nie ma wycieków wody.
P1088
Nie moqna przedluqy© weqa doplywowego. Jeßli jest
on za krótki i nie moqna przenieß© zaworu
doplywowego, naleqy kupi© nowy, dluqszy waq.
Podłączenie węża odpływowego wody
Podlaczy© do wezla sanitarnego na wysokoßci nie
niqszej niq 60 cm i nie wyqszej niq 90 cm.
Koncówka weqa odplywowego zawsze musi mie©
wentylacje, co oznacza, qe ßrednica wewnetrzna
przewodu odplywowego musi by© wieksza niq
ßrednica zewnetrzna weqa odplywowego.
Waq odplywowy nie moqe mie© przeweqen.
Ma on biec po posadzce i by© uniesiony dopiero w
pobliqu odplywu.
Waq odplywowy moqe zosta© przedluqony, ale jego
dlugoß© nie moqe przekracza© 400 cm.
W razie przedluqenia ßrednica wewnetrzna weqa
stanowiacego przedluqenie musi by© równa ßrednicy
wewnetrznej weqa oryginalnego. Do polaczenia obu
weqy naleqy zastosowa© odpowiednia zlaczke.
POLSKI
Waq odplywowy moqna umießci© w trzech róqnych
pozycjach:
Na krawedzi zlewozmywaka przez zastosowanie
kolanka z tworzywa, dostarczonego wraz z
urzadzeniem. Waqne jest, aby predkoß©, która woda
uzyskuje podczas odplywu, nie spowodowala
zeßlizgniecia sie kolanka z krawedzi zlewozmywaka.
Naleqy wiec przymocowa© je sznurkiem do baterii lub
haczyka na ßcianie, zaczepiajac go o specjalny otwór,
biegnacy wzdlluq zagietej czeßci weqa.
Podlaczy© do rozgalezienia syfonu
zlewozmywaka. Rozgalezienia to musi znajdowa© sie
nad syfonem tak, aby zakrzywiona czeß© weqa
znalazla sie na poziomie nie niqszym niq 60 cm od
posadzki.
Podlaczenie do zasilania
elektrycznego
Pralka jest przystosowana do funkcjonowania pod
napieciem 220-230 V pradu jednofazowego i 50 Hz.
Naleqy sprawdzi©, czy instalacja domowa jest w
stanie znieß© maksymalne obciaqenie urzadzen (2,2
kW), biorac pod uwage równieq korzystanie z innych
sprzetów gospodarstwa domowego.
Podlaczy© urzadzenie do gniazdka z
uziemieniem.
Producent nie ponosi qadnej
odpowiedzialnoßci za zniszczenia i uszkodzenia spowodowane nieprzestrzeganiem
przepisów bezpieczenstwa.
Wymiany przewodu zasilajacego moqna
dokona© jedynie w autoryzowanym punkcìe
serwìsowym.
Waqne: po zainstalowaniu urzadzenia przewód
zasilajacy musi by©latwo dostepny.
31
Page 32

Panstwa nowa pralka automatyczna
To nowe urzadzenie, wyposaqone w opatentowany system Jet System czyli tzw. “bezpoßrednie zraszanie”,
spelnia wszystkie nowoczesne wymagania w zakresie efektywnego prania bielizny przy niewielkim zuqyciu
wody, energii i detergentów.
Dodatkowa oszczednoß© uzyskuje sie równieq podczas prania niewielkich wsadów bielizny, do których
dostosowane jest zuqycie wody i energii elektrycznej, proporcjonalne do iloßci i rodzaju pranej bielizny.
• Moqliwoß© wybierania temperatury, predkoßci wirowania i wszystkich opcji, w które pralka jest wyposaqona,
zapewnia pranie rzeczywißcie dostosowane do wymagan.
• Opcja OPÓËNIONY START pozwala na opóΩnienie rozpoczecia programu pioracego, co np. umoqliwia
korzystanie z pralki w porach, gdy koszt zuqycia energii jest niqszy.
• Wyßwietlacz przebiegu programu pokazuje wybrany program i realizowany aktualnie etap programu.
• Specjalny program dla welny z nowym delikatnym systemem prania, który bardzo troskliwie obchodzi sie z
Panstwa welniana odzieqa.
• System kontrolny równowagi: zapewnia stabilnoß© urzadzenia podczas wirowania.
Opis urzadzenia
1 Szufladkowy dozownik detergentu
2 Panel sterujacy
3 Lampka kontrolna blokady drzwi pralki
4 Filtr odplywowy
5Nóqki regulacyjne
Lampka kontrolna blokady
drzwi pralki
Podczas wykonywania programu lampka kontrolna
blokady drzwi pralki wskazuje, qe sa one zamkniete.
Drzwi pralki moqna otworzy© wtedy, gdy lampka
kontrolna zgaßnie.
Pojemnik na środki piorące
Pranie wstepne
12
00
T 12
A
E
1200
90
900
60
700
40
500
30
N
3
4
5
Pranie zasadnicze
Zmiekczacz tkanin, krochmal
C0063
32
Page 33

Eksploatacja
Panel sterujacy
90
60
40
30
1200
900
700
500
12 3 4 5 6 7 8 91011
1 Przycisk WLACZANIE /
WYLACZANIE
Przycisk ten naleqy wcisna©, aby wlaczy© pralke.
Ponowne wcißniecie przycisku powoduje
wylaczenie pralki.
2 GLÓWNA lampka kontrolna
Lampka sygnalizuje wlaczenie przycisku .
Zapala sie ona po uruchamiajacym
wcißnieciu przycisku i gaßnie po jego ponownym
wcißnieciu (wylaczajacym).
3 Przycisk programowania wg.
rodzaju TKANINY
Wciskanie tego przycisku umoqliwia wybieranie
programu dostosowanego do poszczególnych
rodzajów tkanin. Zapala sie lampka oznaczajaca
dany program. Pralka dobiera temperature i
automatycznie wybiera maksymalna predkoß©
wirowania, odpowiadajaca wybranemu programowi.
Do zmiany tych wartoßci sluqa przyciski 4 i 5.
Pranie reczne
Program ten przeznaczony jest dla tkanin bardzo
delikatnych, a wiec dla artykulów posiadajacych
metki wskazujace koniecznoß© prania recznego
4 Przycisk nastawiania
TEMPERATURY
Wciskanie tego przycisku powoduje wzrost lub
obniqenie temperatury qadanej dla pranej bielizny,
jeqeli ma by© ona inna, niq temperatura dobierana
przez pralke. Zapala sie odnoßna lampka.
Maksymalna temperatura wynosi 90°C dla bawelny,
60°C dla tkanin syntetycznych i 40°C dla tkanin
delikatnych, welny i odzieqy przeznaczonej do
prania recznego (program ).
Pozycja oznacza pranie w zimnej wodzie.
12
Waqne!
Jednoczesne wcißniecie przycisków
TEMPERATURA i PREDKOfiCI WIROWANIA
powoduje skasowanie dzialania sygnalu
akustycznego powiadamiajacego o zakonczeniu
cyklu prania.
5 Przycisk zmiany PREDKOfiCI
WIROWANIA
Wciskanie tego przycisku powoduje zmiane
predkoßci wirowania pranej bielizny, jeqeli
wymagana jest predkoß© wirowania inna, niq
przewidywana w wybranym programie. Zapala sie
odnoßna lampka kontrolna.
Maksymalne predkoßci wirowania:
• dla bawelny – 1200 obr./min.
• dla tkanin syntetycznych, welny i tkanin
przeznaczonych do prania recznego – 900
obr./min.
• dla tkanin delikatnych – 700 obr./min.
RINSE HOLD position - Stop z woda w pralce :
wybór tej opcji powoduje, qe pralka nie wylewa wody
z ostatniego plukania, aby zapobiec gnieceniu
bielizny.
Po zakonczeniu cyklu lampka przycisku START /
PRZERWA zapala sie wskazujac, qe woda musi
zosta© wylana.
.
W celu kompletnego zakonczenia cyklu naleqy
wybra© nastepujace opcje:
• Usuwanie wody i wirowanie:
- Wcisna© przycisk START / PRZERWA.
Maszyna usunie wode, nastepnie odwiruje
bielizne z maksymalna predkoßcia przewidywana
przez wybrany program.
- Wybra© predko´s© wirowania przy pomocy
przycisku 5 i wcisna© przycisk START /
PRZERWA.
POLSKI
33
Page 34

• Samo usuwanie wody
- Wcisna© raz przycisk , co spowoduje
zapalenie lampki , po czym wcisna© przycisk
START / PRZERWA.
Waqne! W razie przypadkowego kilkakrotnego
wcißniecia przycisku , na wyßwietlaczu
pojawia sie trzy pulsujace kreski. Aby usuna©
wode, naleqy nastawi© którykolwiek z programów
pioracych poprzez wcißniecie przycisku , po
czym trzy razy wcisna© przycisk w
celu wybrania pozycji USUWANIE wody, czyli
USUWANIE (pozostanie zapalona tylko lampka
dotyczaca USUWANIA wody).
6 Przycisk OPCJI
Przycisk ten sluqy do wybierania nastepujacych
opcji:
• PRANIE WSTEPNE : opcje te naleqy wybra©,
jeqeli przed przystapieniem do prania
zasadniczego qadane jest pranie wstepne (opcja
ta nie jest dostepna w programie dla welny i w
cyklu prania recznego).
Pranie wstepne konczy sie odwirowaniem z
predkoßcia 650 obr./min. w programach dla tkanin
bawelnianych i syntetycznych, natomiast w
programie dla tkanin delikatnych ma nastepuje
tylko usuwanie wody.
• PLUKANIE DODATKOWE : opcja ta moqe
zosta© z wszystkimi programami z wyjatkiem
programu dla welny i prania recznego. Pralka
wykonuje 4 cykle plukania zamiast 3. Opcja ta jest
zalecana w przypadku osób uczulonych na
detergenty oraz w rejonach, w których woda jest
bardzo miekka.
7 Przycisk PRANIA SZYBKIEGO
Trzy migoczace kreski ukazuja sie równieq, gdy
zostanie wcißniety przycisk w przypadku
skasowania poprzednio wybranego cyklu.
---
• Czas trwania programu pioracego w godzinach i
minutach po wybraniu danego programu.
2.05
Podczas funkcjonowania programu pioracego (po
wcißnieciu przycisku START / PRZERWA) na
wyßwietlaczu pojawia sie co minute wstecznie
liczony czas prania.
• Pralka zatrzyma sie z woda w bebnie w
przypadku wybrania opcji : zostanie
wyßwietlone nieruchome zero.
• Kompletne zakonczenie wybranego programu
jest oznaczone migoczacym zerem.
Jednoczeßnie gaßnie lampka kontrolna zamkniecia
drzwiczek. Zero ponownie pojawi sie, gdy pralka
zostanie wlaczona, jeqeli zakonczony program nie
zostal skasowany przyciskiem .
Przycisk ten umoqliwia wybranie funkcji PRANIA
SZYBKIEGO w przypadku prania bielizny lekko
zabrudzonej (z wyjatkiem programu dla welny i
prania recznego).
Czas prania zostanie zredukowany w zaleqnoßci od
rodzaju tkanin i wybranej temperatury.
8 WYfiWIETLACZ
Na wyßwietlaczu pojawiaja sie nastepujace
informacje:
• Trzy migoczace kreski, gdy program zostal
skasowany przy pomocy przycisku .
0
Waqne!
Podczas pierwszego korzystania z pralki po jej
wlaczeniu na wyßwietlaczu moqe pojawi© sie
migoczace zero wraz z akustycznym sygnalem
ostrzegawczym. Oznacza to, qe program wybrany
podczas kontroli technicznej nie zostal skasowany
po jej zakonczeniu.
34
Page 35

• OpóΩniony start: wskazany w godzinach czas
wybrany odnoßnym przyciskiem.
Czas opóΩnionego startu pojawia sie na 5 sekund,
po czym uwidoczniony jest czas trwania
wybranego programu.
Po wcißnieciu przycisku START / PRZERWA
rozpoczyna sie wsteczne liczenie opóΩnionego
startu w godzinach.
OpóΩnienie wybranego programu nie moqe
przekracza© 24 godzin i jest liczone w jednostkach
godzinowych.
• Wybór niewlaßciwej opcji: na wyßwietlaczu
pojawia sie informacja Err w razie wybrania funkcji
niezgodnej z bieqaco nastawionym programem.
9 Przycisk START / PRZERWYA
Przycisk ten posiada trzy funkcje:
• Start: po wybraniu qadanego programu i opcji
naleqy wcisna© ten przycisk, aby uruchomi©
pralke. Lampka kontrolna nad przyciskiem
przestaje migota© i pozostaje zapalona.
W przypadku wybrania opóΩnionego startu
poprzez wcißniecie przycisku 11, na wyßwietlaczu
pojawi sie wsteczne liczenie czasu.
• Przerwa: ponowne wcißniecie tego przycisku
powoduje przerwanie odbywajacego sie programu.
Lampka nad przyciskiem zaczyna pulsowa©.
Ponowne uruchomienie programu wymaga
ponownego wcißniecia przycisku.
Gdy cykl zostaje PRZERWANY, lampka
ZAMKNIECIA DRZWI gaßnie i moga one zosta©
otwarte, pod warunkiem, qe:
• pralka nie znajduje sie w fazie grzania;
• poziom wody nie jest zbyt wysoki;
• beben sie nie obraca.
Waqne! Pralka moqe zosta© ustawiona w pozycji
PRZERWA przed wprowadzeniem jakichkolwiek
zmian w odbywajacym sie programie.
• Usuwanie wody i odwirowanie po wykonaniu
programu z opcja przewidujaca pozostawienie
wody w bebnie.
POLSKI
Wybór niewlaßciwej opcji jest równieq wskazany
sygnalem akustycznym.
• Kod alarmowy wskazuje niewlaßciwe dzialanie
urzadzenia (zob. odpowiedni rozdzial na str. 46)
E20
10 Przycisk PRZESKOKU /
KASOWANIA
Po zakonczeniu programu naleqy wcisna© ten
przycisk raz lub kilkakrotnie w celu skasowania
zawartoßci pamieci (na wyßwietlaczu pojawia sie trzy
pulsujace kreski); w przeciwnym razie, gdy pralka
zostanie wlaczona, pojawi sie pulsujace zero i
ostrzegawczy sygnal akustyczny informujacy o
zakonczeniu poprzedniego programu.
Przyciskiem KASOWANIE moqna równieq skasowa©
jedna lub kilka faz odbywajacego sie programu,
zgodnie z poniqszym:
- ustawi© pralke w pozycji PRZERWA poprzez
wcißniecie przycisku START / PRZERWA (zacznie
migota© odnoßna lampka).
- wcisna© przycisk raz lub kilka razy, aqqadana
faza / qadane fazy cyklu zostanie skasowana /
zostana skasowane (zgasna lampki dotyczace
poszczególnych faz).
35
Page 36

Przyklad:
W tym przypadku
zostanie wykonane tak
PRANIE WSTEPNE
PRANIE ZASADNICZE
PLUKANIE
WIROWANIE
ODPOMPOWANIE
WODY
usuwanie wody, jak i
odwirowanie (z
predkoßcia
przewidziana dla
wybranego rodzaju
tkaniny).
Ten przycisk pozwala równieq wybra© specjalne
programy, jak np. PLUKANIE, WIROWANIE i
ODPOMPOWANIE WODY.
• Jeqeli pralka jest juq wlaczona, poniewaq
wlaßnie wykonala program prania, naleqy postapi©
nastepujaco:
- wcisna© raz lub kilka razy przycisk , aby
skasowa© poprzednio wykonany program (trzy
pulsujace kreski pojawia sie na wyßwietlaczu);
-wlaßciwym przyciskiem wybra© rodzaj tkaniny;
- nastawi© specjalny program.
• PLUKANIE
Wcisna© raz – zgaßnie lampka kontrolna .
• WIROWANIE
Wcisna© dwa razy – zgaßnie lampka
kontrolna i .
• ODPOMPOWANIE WODY
Wcisna© trzy razy – zgaßnie lampka
kontrolna , i .
Przyklad:
W tym przypadku
pralka wykona cykle
plukania i odwirowanie.
11 Przycisk OPOËNIONEGO
STARTU
Przycisk ten umoqliwia opóΩnienie startu o maks. 24
godziny. Wybrany czas opóΩnienia pojawia sie na
wyßwietlaczu przez ok. 5 sekund, po czym ponownie
ukazuje sie czas trwania nastawionego programu.
Opcja ta moqe zosta© wybrana po wybraniu
qadanego programu, ale przed wcißnieciem
przycisku START / PRZERWA.
Czas opóΩnienia ukazywany na wyßwietlaczu jest
odliczany do tylu co godzine.
Czas opóΩnienia moqe zosta© zmieniony w
kaqdej chwili, ale przed wcißnieciem przycisku
START / PRZERWA.
Jeqeli chcemy zmieni© lub skasowa© opóΩnienie juq
po wcißnieciu przycisku START / PRZERWA, naleqy
postapi© w nastepujacy sposób:
• ustawi© pralke w pozycji PRZERWA przez
wcißniecie przycisku START / PRZERWA;
• wciska© przycisk aq do pojawienia sieqadanej
wartoßci czasu, albo
• wcisna© przycisk aq do skasowania czasu
opóΩnienia. Na wyßwietlaczu pojawi sie“0h”;
• ponownie wcisna© przycisk START / PRZERWA.
Waqne!
Drzwiczki pozostana zamkniete przez okres
opóΩnienia (ßwieci sie lampka kontrolna).
W razie potrzeby otworzenia drzwiczek, najpierw
trzeba ustawi© pralke w pozycji PRZERWA przez
wcißniecie przycisku START / PRZERWA. Po
ponownym zamknieciu drzwi naleqy ponownie
wcisna© przycisk START / PRZERWA.
12 Lampki kontrolne bieqacej fazy
programu.
• Jeqeli pralka jest wylaczona:
- naleqy wcisna© przycisk , aby wlaczy© pralke;
- wybra© przyciskiem wlaßciwy rodzaj
tkaniny;
- wybra© specjalny program zgodnie z powyqszymi
zaleceniami.
Podczas wybierania programu zapalaja sie lampki
oznaczajace jego poszczególne fazy.
Po uruchomieniu programu pali sie tylko lampka
kontrolna odbywajacej sie wlaßnie fazy programu.
36
Page 37

Wskazówki dotyczące
prania
Sortowanie odzieży
Należy przestrzegać zaleceń producenta odzieży
umieszczonych na metkach.
Bieliznę posortować w następujący sposób: bielizna
biała, kolorowa, syntetyki, bielizna delikatna, wełna.
Temperatury
90°-95°C
60°C
(pranie na zimno)
30°C-40°C
Przed włożeniem bielizny
Oddzielać ciemne tkaniny od jasnych tkanin
włóknistych oraz ręczników, gdyż resztki włókien mogą
osiąść na ubraniach, a tkaniny białe mogą przybrać
szary kolor.
Nowe, kolorowe ubrania należy przed włożeniem wraz
z innymi do pralki uprać oddzielnie (wcześniej).
Należy opróżnić kieszenie z wszelkich metalowych
przedmiotów (spinki do włosów, pinezki itp.)
Przed włożeniem bielizny do pralki należy pozapinać
guziki, zatrzaski, zamki błyskawiczne i przyszyć “luźne”
guziki.
Wszelkie plamy należy usunąć przed praniem.
Szczególnie zabrudzone tkaniny oczyścić specjalnym
środkiem do usuwania plam.
Z firanek i zasłon zdjąć klamerki i żabki. Prać z
zachowaniem szczególnej ostrożności.
do średnio zabrudzonej białej
bawełny i lnu (np. obrusy, serwety,
prześcieradła, powłoczki, ręczniki,
ścierki lub inne tkaniny).
do średnio zabrudzonych tkanin
kolorowych (koszulki, pidżamy) z
bawełny, lnu lub tkanin
syntetycznych oraz lekko
zabrudzonej białej bawełny (np.
bielizna osobista). do tkanin
delikatnych (np. lekko zabrudzone
firanki).
do tkanin delikatnych,
syntetycznych, jedwabiu, akrylu i
.
wełny
Maksymalne ilości bielizny
Zalecane ilości wsadu bielizny znajdziecie Państwo w
tabeli programów.
Ogólne wskazówki:
bawełna i len: bęben załadować do pełna, ale nie
przeładowywać;
tkaniny syntetyczne: do połowy bębna;
tkaniny delikatne i wyroby wełniane: do 1/3 bębna.
Wykorzystywanie pojemności bębna pozwoli Państwu na
oszczędności wody i energii elektrycznej.
W przypadku tkanin bardzo mocno zabrudzonych
należy zmniejszyć wielkość wsadu.
Ciężar bielizny
Podajemy orientacyjną wagę niektórych sztuk
bielizny :
Szlafrok kąpielowy 1200 g
Poszwa 1000 g
Prześcieradło 700 g
Obrus 500 g
Poszewka 200 g
Serweta 250 g
Ręcznik frotte (mały) 200 g
Serwetka 100 g
Koszula nocna 200 g
Figi damskie 100 g
Koszula męska 600 g
Koszulka męska 200 g
Piżama męska 500 g
Bluzka 100 g
Slipy męskie 100 g
Usuwanie plam
Do usunięcia niektórych plam nie wystarczy tylko
woda i detergent. Dlatego wszystkie plamy należy
usunąć przed przystąpieniem do ich prania.
Plamy z krwi: świeże plamy zaprać zimną wodą i
mydłem, a następnie spłukać. Stare plamy odmoczyć w
zimnej wodzie, a następnie czyścić enzymatycznym
środkiem piorącym lub wodą z solą.
Plamy z wosku: usunąć możliwie jak najwięcej wosku
przy użyciu tępego ostrza. Umieścić tkaninę
pomiędzy dwoma arkuszami bibuły i przeprasować
gorącym żelazkiem.
Plamy z atramentu i długopisu: przyłożyć łatwo
nasączalną szmatkę bawełnianą nawilżoną alkoholem
metylowym (*). Należy przy tym uważać, aby plama
nie powiększyła się. Użyć tylko kilka kropli alkoholu.
Plamy z wilgoci i pleśni: w przypadku tkanin o
trwałych kolorach można zmoczyć je w roztworze
wody z wybielaczem lub zmoczyć w roztworze
zawierającym jedną część wody utlenionej na dziesięć
części wody i pozostawić w roztworze na 10-15
minut.
POLSKI
37
Page 38

Plamy z rdzy: zastosować środek do usuwania rdzy
według zaleceń podanych na opakowaniu tego
środka.
Plamy z farby: nie dopuścić do wyschnięcia !
Natychmiast przetrzeć rozpuszczalnikiem do tej farby,
namydlić, a następnie spłukać.
Plamy ze szminki: przetrzeć tri (trójchloroetylen) w
przypadku tkanin jedwabnych lub eterem w
przypadku tkanin wełnianych.
Plamy z olejów i smoły: położyć na zaplamionym
miejscu kawałeczek masła. Pozostawić na chwilę, a
następnie przetrzeć terpentyną.
Plamy z trawy: starannie namydlić, a następnie
czyścić wodą i wybielaczem (jeśli nie ma
przeciwwskazań). Do wyrobów wełnianych stosuje
się alkohole etylowe.
Plamy z wina: zamoczyć w wodzie z dodatkiem
mydła lub środków piorących. Jeżeli plamy nie
zostały usunięte, można użyć wybielacza dla
danego rodzaju tkaniny.
(*) nie używać acetonu do plam na tkaninach ze
sztucznego jedwabiu.
Środki piorące i zmiękczające
Dobre rezultaty prania zależą również od wybranego
detergentu oraz jego ilości (tak aby unikać jego
marnowania i chronić środowisko naturalne).
Zwłaszcza, że środki ulegające biodegradacji
zawierają w swoim składzie substancje, które w zbyt
dużych ilościach szkodzą środowisku.
Wybór odpowiedniego środka uzależniony jest od
rodzaju tkaniny, koloru i stopnia zabrudzenia bielizny
przeznaczonej do prania.
Do prania w pralce automatycznej można używać
następujących środków:
– proszki do prania wszystkich rodzajów tkanin,
– proszki do prania tkanin delikatnych
(maksymalnie do 60˚C) oraz wełnianych,
- płynne środki do prania, zwłaszcza w niskich
temperaturach (do 60˚C) dla wszystkich rodzajów
tkanin, albo tylko do prania tkanin wełnianych.
Środki piorące i zmiękczające należy umieszczać we
właściwych komorach pojemnika przed
rozpoczęciem prania.
Jeżeli używacie Państwo koncentratów proszków i
płynnych detergentów, należy wybierać programy
bez prania wstępnego.
Płynny środek do prania należy wlać do komory
pojemnika tuż przed rozpoczęciem pracy pralki.
Środki zmiękczające muszą być dodane do komory
tuż przed rozpoczęciem pracy pralki .
Należy przestrzegać zaleceń producenta środka,
dotyczących jego dozowania. Nie należy
przekraczać poziomu „MAX” zaznaczonego w
pojemniku na środki piorące.
Dozowanie środków piorących
Rodzaj i ilość detergentu zależy od rodzaju, ilości, i
stopnia zabrudzenia bielizny oraz twardości wody.
Poziom twardości wody mierzy się w tzw.
“stopniach” twardości. Informacje o stopniu
twardości wody można uzyskać w Miejskich
Zakładach Wodociągowych.
Środki piorące należy dozować według zaleceń
podanych na opakowaniu.
Należy stosować mniejsze ilości detergentów, jeśli:
- pierzecie Państwo mniejszą ilość bielizny,
- bielizna jest lekko zabrudzona,
- podczas prania tworzy się duża ilości piany.
Tabela stopnia twardości wody
Stopien
1
2
3
4
Charakterystyka
wody
miękka
średnia
twarda
bardzo twarda
więcej niż 21
niemiecka
˚dH
00 - 07
08 - 14
15 - 21
Skala
francuska
˚T.H.
00 - 15
16 - 25
26 - 37
więcej niż 37
38
Page 39

A
P
F
30
i
Międzynarodowe symbole konserwacji odzieży
Poniższe symbole pojawiają się na metkach odzieży i pozwolą Państwu wybrać programy
najwłaściwsze dla pranej bielizny.
PRANIE
ZASADNICZE
95 60
Maksymalna
temperatura
prania
95˚C
Maksymalna
temperatura
prania
60˚C
40
Maksymalna
temperatura
prania
40˚C
Maksymalna
temperatura
prania
30˚C
POLSKI
PRANIE
DELIKATNE
CHLOROWANIE
PRASOWAĆ
Wybielanie w zimnej wodzie Nie wybielać
Prasować w
temperaturze
maksymalnej 200˚C
60
Prasować w
temperaturze
maksymalnej 150˚C
40
40
30
Prasować w
temperaturze
maksymalnej 110˚C
Prać ręcznie Nie prać
Nie prasować
CZYŚCIĆ
CHEMICZNIE
SUSZYĆ
Czyścić nadchloranem,
Czyszczenie zwykłe
Suszyć na płasko Suszyć na sznurze
petrolem, czystym
alkoholem
R 111 i R 113
Suszyć przypięte
klipsami
39
Czyścić petrolem,
czystym alkoholem
i R 113
w wysokiej
temperaturze
w niskiej
temperaturze
Suszyć w suszarce
bębnowej
Nie czyścić chemicznie
Nie suszyć w
suszarce bębnowej
Page 40

Kolejnoß© czynnoßci
C0065
C0064
P1084
Przed upraniem pierwszego wsadu bielizny,
zalecamy nastawienie pralki na program dla bawelny
i temperaturze 60 °C, ale bez wkladania do niej
bielizny, aby usuna© ewentualne pozostaloßci
fabryczne z bebna i przewodów.
Wsypa© pól porcji detergentu do komory prania
zasadniczego i uruchomi© urzadzenie.
4. Wlaczanie pralki
Wcißniecie przycisku powoduje wlaczenie pralki.
Na wyßwietlaczu pojawiaja sie trzy pulsujace kreski
lub pulsujace zero i zapala sie odnoßna lampka
kontrolna.
0
1. Wloqy© bielizne do bebna
Otworzy© drzwi.
Naleqy wklada© do bebna jedna sztuke bielizny po
drugiej, nie splatana.
Zamkna© drzwi.
2. Wsypa© detergent
Wysuna© do konca szufladke pojemnika na
detergenty. Wsypa© odpowiednio odmierzona
(dozownikiem) iloß© detergentu zalecanego przez
producenta ßrodka pioracego do przegródki prania
zasadniczego .
Jeßli wybrali Panstwo program z praniem wstepnym,
wtedy detergent naleqy równieq wsypa© do
przegródki prania wstepnego .
------
5. Wybra©qadany program
Naleqy wcisna© przycisk w celu wybrania
qadanego programu / tkaniny. Zapala sie odnoßna
lampka kontrolna.
Zapalaja sie lampki przewidzianych faz programu.
Na wyßwietlaczu pojawia sie czas wybranego
programu wyliczony na podstawie maksymalnego
wsadu przewidzianego dla danego rodzaju tkaniny.
Zaczyna pulsowa© lampka przycisku
START / PRZERWA.
Jeqeli wsad bielizny jest niewielki, na poczatku cyklu
na wyßwietlaczu bedzie widnial czas trwania
programu przewidziany dla wsadu maksymalnego.
Czas ten bedzie stopniowo regulowany w miare
wykonywania cyklu.
3. Doda© plyn zmiekczajacy
W razie potrzeby wsypa©ßrodek zmiekczajacy do
przegródki z symbolem nie przekraczajac
poziomu “MAX”.
40
Page 41

6. Nastawianie temperatury
9. Wybieranie opcji PRANIE
Aby nastawi© temperature inna niq wartoß©
proponowana przez pralke, naleqy wcisna©
przycisk .
Zapali sie odnoßna lampka.
90
60
40
30
7. Wybieranie predkoßci wirowania
lub opcji STOP Z WODA W
PRALCE
Naleqy kilka razy wcisna© ten przycisk, aby wybra©
qadana predkoß© wirowania lub opcje . Zapali sie
odnoßna lampka.
W razie wybrania opcji pralka zatrzyma sie po
zakonczeniu programu pozostawiajac wode w
bebnie.
1200
900
700
500
SZYBKIE
Jeqeli bielizna jest tylko lekko zabrudzona, moqna
wcisna© przycisk w celu wybrania opcji PRANIE
SZYBKIE.
Zapali sie odnoßna lampka.
POLSKI
10. Wybieranie OPÓËNIONEGO
STARTU
Chcac opóΩni© uruchomienie programu, przed
jego startem naleqy kilka razy pulsowa©, lub trzyma©
wcißniety przycisk , aq do wybrania qadanego
czasu opóΩnienia. Wybrana wartoß© czasu
opóΩnienia (do maks. 24 godzin) pojawi sie na
wyßwietlaczu przez 5 sekund, po czym ponownie
pojawi sie czas trwania programu.
8. Wybieranie qadanych opcji
Jeqeli bielizna jest bardzo brudna, zaleca sie
wybranie opcji PRANIE WSTEPNE .
Jeqeli wymagane jest dodatkowe
plukanie bielizny, naleqy wybra© opcje
DODATKOWEGO PLUKANIA.
Wcisna© przycisk OPCJI, w wyniku czego zapali sie
jedna lub obie lampki.
11. Uruchomienie programu
Naleqy wcisna© przycisk START / PRZERWA.
Odnoßna lampka przestanie pulsowa©, zapali sie
lampka zamkniecia drzwi i pozostanie zapalona tylko
lampka oznaczajaca odbywajaca sie faze programu.
Jeqeli zostanie wybrane opóΩnienie startu, pralka
rozpocznie wsteczne odliczanie czasu.
Na wyßwietlaczu pojawi sie wartoß© czasu trwania
programu lub nastawionego opóΩnienia.
41
Page 42

12. Jak zmieni© program w trakcie
jego cyklu
Przed dokonaniem jakichkolwiek zmian naleqy
przerwa© prace pralki wcißnieciem przycisku
START / PRZERWA.
Kaqda z faz moqe by© zmieniona przed wykonaniem
jej przez program.
Oczywißcie zmiana rodzaju tkaniny lub temperatury
jest moqliwa tylko podczas fazy prania. Jeqeli
nastapi zmiana tych dwóch parametrów, pralka
rozpocznie cykl od poczatku.
W razie koniecznoßci usuniecia wody w zwiazku ze
zmiana odbywajacego sie programu, naleqy postapi©
nastepujaco:
• ustawi© pralke w pozycji PRZERWA wcißnieciem
przycisku START / PRZERWA;
• kilka razy wcisna© przycisk PRZESKOK /
KASOWANIE, aq pozostanie zapalona tylko
lampka odpompowanie wody oznaczajaca;
• ponownie wcisna© przycisk START / PRZERWA.
Po usunieciu wody na wyßwietlaczu pojawi sie
pulsujace zero. Teraz naleqy wybra© nowy program i
wcisna© przycisk START / PRZERWA, aby go
uruchomi©.
13. Jak skasowa© program w
trakcie jego cyklu.
Aby skasowa© wykonywany program, najpierw
naleqy przerwa© prace pralki przez wcißniecie
przycisku START / PRZERWA, a nastepnie wcisna©
kilka razy przycisk , aq na wyßwietlaczu ukaqa sie
trzy pulsujace kreski.
14. Jak otworzy© drzwi w trakcie
cyklu programu
Po ok. 2 minutach moqna otworzy© drzwiczki.
Naleqy uwaqa© na poziom i temperature
znajdujacej sie w pralce wody.
Po zamknieciu drzwiczek i wcißnieciu przycisku
pralka rozpocznie program od momentu, w którym
zostal on przerwany.
15. Koniec programu
Po zakonczeniu programu pralka zatrzymuje sie
automatycznie wydajac sygnal akustyczny i
wyßwietlajac pulsujace zero.
Jeqeli zostala wybrana opcja pulsuje lampka
sygnalizujaca koniecznoß© usuniecia wody.
Wyßwietlacz pokazuje stale zero.
Po zakonczeniu programu na wyßwietlaczu pojawia
sie pulsujace zero i zostaje wydany sygnal
akustyczny.
Jednoczeßnie gaßnie lampka zamkniecia drzwi.
Naleqy kilka razy wcisna© przycisk , aby
skasowa© wykonany program. W przeciwnym
razie po nastepnym wlaczeniu pralki na
wyßwietlaczu ukaqe sie pulsujace zero i zostanie
wydany sygnal akustyczny.
Uwaga: jeqeli po wlaczeniu pralki naleqy skasowa©
poprzednio wykonany program, wystarczy równieq
wcisna© przycisk i wybra© nowy program.
Wcisna© przycisk , aby wylaczy© pralke. Zgaßnie
odnoßna lampka.
Wyja© bielizne z pralki.
Sprawdzi©, czy pralka zostala kompletnie
opróqniona poprzez obrócenie bebna. Jest to
konieczne, aby zapobiec przypadkowemu
pozostaniu bielizny w bebnie i tym samym jej
uszkodzeniu podczas nastepnego prania, lub
zafarbowaniu kolejnego wsadu.
Zaleca sie zamkniecie doplywu wody i wyjecie
wtyczki z gniazdka.
Naleqy pozostawi© uchylone drzwiczki pralki, aby
zapewni© dostep powietrza.
Moqna otworzy© drzwiczki po uprzednim ustawieniu
pralki w pozycji PRZERWA i po warunkiem, qe:
• pralka nie znajduje sie w fazie grzania
przekraczajacej 40°C;
• poziom wody nie jest zbyt wysoki;
beben nie jest w trakcie obracania sie.
•
Jeqeli powyqsze warunki sa spelnione, zgaßnie
lampka zamkniecia drzwi i drzwiczki pralki moga
zosta© otwarte.
Jeqeli nie moqna otworzy© drzwiczek, a jest to
absolutnie konieczne, naleqy wylaczy© pralke przez
wcißniecie przycisku .
42
Page 43

Tabela programów
3040304030
Rodzaj
bielizny i
symbole na
metce
9560
Biala bielizna
bawelniana,
np. poßciel,
obrusy,
reczniki
304060
**
Kolorowa
bielizna
bawelniana,
np. koszule,
bluzki, bielizna
osobista,
reczniki, obrusy
4060
Tkaniny
syntetyczne i
mieszane, np.
koszule,
bluzki, bielizna
osobista
Maksy-
malny
wsad
5.5 kg
5.5 kg
2.5 kg
Program /
Temperatura
60°-90°C
60°-40°-30°C
60°-40°-30°C
lub
Opis
programu
Pranie
zasadnicze w
temp. 60°-90°C
3 cykle plukania
Dlugie wirowanie
Pranie
zasadnicze w
temp. 60°-40°30°C
3 cykle plukania
Dlugie wirowanie
Pranie
zasadnicze w
temp. 60°-40°30°C lub w zimnej
wodzie
3 cykle plukania
Krótkie wirowanie
Dostepne opcje
Energia
kWh
1,8
0,95
0,9
Zuqycie*
Woda
litry
52
49
56
Czas
h/min
2,29
POLSKI
2,10
1,27
Tkaniny
delikatne, np.
akryl, wiskoza,
poliester,
mieszane
2.5 kg
40°-30°C
lub
Pranie
zasadnicze w
temp. 40°-30°C
lub w zimnej
wodzie
3 cykle plukania
0,7
53
1,04
Krótkie wirowanie
Welna
2 kg
40°-30°C
lub
Pranie zasadnicze
w temp. 40°-30°C
lub w zimnej
0,3
48
57
wodzie
3 cykle plukania
Krótkie wirowanie
2 kg
40°-30°C
lub
Pranie zasadnicze
w temp. 40°-30°C
lub w zimnej
0,25
46
55
wodzie
3 cykle plukania
Krótkie wirowanie
* Przedstawione w tabeli wartoßci zuqycia naleqy traktowa© jako orientacyjne, gdyq sa one uwarunkowane
iloßcia i rodzajem bielizny, temperatura wlotowa wody i temperatura otoczenia. Odnosza sie one do
najwyqszych temperatur wody przewidzianych dla poszczególnych programów. W przypadku bielizny
bawelnianej dotycza wsadu 5 kg.
** Zgodnie z dyrektywa UE 92/75 podane w tabeli wartoßci zuqycia energii (E) odnosza sie do programu prania
w wodzie o temperaturze 60°C wsadu 5 kg bielizny bawelnianej.
43
Page 44

Konserwacja
P1086
C0068
P0878
P0879
P1050
P0040
P1061
P0038
1. Drzwi
Sprawdza© okresowo, czy nie ma przedmiotów tj.
spinek, guzików czy wykalaczek w fartuchu drzwi.
2. Obudowa
Obudowę można myć ciepłą wodą z dodatkiem
łagodnego środka do mycia. Następnie przetrzeć
suchą szmatką.
Uwaga: Do czyszczenia nie wolno stosować
alkoholu i rozpuszczalników.
3. Pojemnik na środki piorące
We wnęce na pojemnik z czasem może
nagromadzić się proszek do prania, dlatego
konieczne jest czyszczenie wnęki np. szczoteczką
do zębów.
4. Filtr spustowy
Filtr spustowy zatrzymuje nitki i przypadkowo
pozostawione drobne przedmioty. Naleqy regularnie
sprawdza©, czy jest on czysty.
Naleqy otworzy© drzwiczki filtra pociagajac je w
prawa strone.
Pod filtrem naleqy umießci© jakieß naczynie, aby
zapobiec wyciekom na posadzke.
Zwolni© awaryjny przewód wylewowy, wloqy© go do
naczynia i odkreci© zamykajacy go korek.
Środki piorące i zmiękczające z czasem osadzają
się na pojemniku i dlatego należy co jakiś czas
przeczyścić pojemnik pod strumieniem bieżącej
wody.
Pojemnik można całkowicie wyjąć naciskając małą
dźwignię widoczną w tylnej lewej części pojemnika.
Górną część przegródki na płyn zmiękczający
można wyjąć.
P1062
P1085
Gdy woda przestanie wyplywa©, odkreci© filtr i wyja©
go.
Wymy© filtr pod bieqaca woda, po czym wloqy© go
na miejsce i zakreci©.
Ponownie zatka© awaryjny przewód wylewowy i
umießci© go na swoim miejscu. Zamkna© drzwiczki
filtra.
44
Page 45

5. Maly filtr weqa doplywowego
P1090
wody
Gdy zauwaqymy, qe napelnianie pralki woda trwa
dluqej niq zwykle, naleqy sprawdzi©, czy maly filtr
weqa doplywowego wody nie jest zatkany.
Zakreci© zawór doplywowy wody.
Wykreci© waq z zaworu.
Oczyßci© szczoteczka maly filtr.
Przykreci© przewód do kranu.
6. Awaryjne odpompowanie wody
Jeqeli pralka nie wylewa wody, naleqy usuna© z niej
wode w niqej podany sposób.
• Wyja© wtyczke z gniazdka zasilajacego.
• Zamkna© doplyw wody.
• W razie potrzeby poczeka©, aq woda sie ochlodzi.
• Umießci© pod filtrem naczynie i wloqy© do niego
koncówke awaryjnego przewodu wylewowego.
Woda splynie do naczynia na zasadzie sily
grawitacji. Gdy naczynie zostanie napelnione,
naleqy zatka© awaryjny przewód wylewowy,
opróqni© naczynie i powtórzy© powyqsze
czynnoßci aq do zupelnego usuniecia wody z
pralki.
• W razie potrzeby umy© filtr.
• Ponownie go zakreci©.
7. Wskazówki dotyczące
przechowywania w niskich
temperaturach
Jeqeli pralka zostala zainstalowana w
pomieszczeniu, w którym temperatura moglaby
spaß© powyqej 0°C, naleqy postapi© nastepujaco:
• Zakreci© zawór doprowadzajacy wode.
• Odkreci© waq doplywowy.
• Umießci© koncówke weqa doplywowego i
koncówke awaryjnego przewodu wylewowego w
ustawionym na podlodze naczyniu, tak aby woda
splynela calkowicie.
• Ponownie przykreci© waq doplywowy oraz wloqy©
na swoje miejsce awaryjny przewód wylewowy po
uprzednim zatkaniu go.
W razie ponownego uruchomienia pralki naleqy
upewni© sie, czy temperatura w pomieszczeniu jest
powyqej 0°C.
POLSKI
45
Page 46

Co zrobić, jeśli urządzenie nie pracuje ?
Nieprawidlowoßci, które moqna usuna© we wlasnym zakresie.
Moqe sie zdarzy©, qe podczas funkcjonowania pralki, pojawia sie na wyßwietlaczu nastepujace kody alarmowe:
E10: problem z doplywem wody
E20: problem z odplywem wody
E40: otwarte drzwi
Nieprawidlowoßci te moqna usuna© wciskajac przycisk START/PRZERWA , aby ponownie uruchomi©
program. Jeqeli po sprawdzeniu nieprawidlowoßci dalej wystepuja, naleqy zwróci© sie do lokalnego,
autoryzowanego servisu.
Usterka Prawdopodobna przyczyna
• Nie moqna uruchomi© pralki:
• Pralka nie pobiera wody:
• Pralka pobiera wodę, która
samoczynnie się wylewa:
• Pralka nie odpompowuje wody /
nie wiruje:
• Sprawdzić, czy drzwiczki są zamknięte. (E40)
• Sprawdzić, czy w gniazdku jest napięcie.
• Sprawdzić, czy nie przepalił się bezpiecznik.
• Nie zostal wcißniety (zwolniony) przycisk START/
PRZERWA.
• Zostala wybrana opcja START OPÓËNIONY.
• Sprawdzić, czy zawór wodny jest odkręcony. (E10)
• Sprawdzić w innych kranach, czy dopływ wody nie
został przerwany. (E10)
• Sprawdzić, czy wąż dopływowy nie jest zagnieciony.
(E10)
• Sprawdzić, czy filtr siatkowy węża dopływowego nie
jest zatkany. (E10)
• Sprawdzić, czy drzwi są prawidłowo zamknięte.
(E40)
• Sprawdzić, czy wąż odpływowy jest umieszczony
dostatecznie wysoko od poziomu podłogi. Jeśli
nie, należy przeczytać wskazówki zawarte w
instrukcji obsługi.
• Sprawdzić, czy wąż odpływowy nie jest
zagnieciony.
• Zostala wybrana opcja .
• Filtr spustowy jest zatkany. Naleqy go wyczyßci©.
• Woda wylewa się na podłogę:
•
Sprawdzić, czy nie dali Państwo za dużej ilości
proszku; sprawdzić, czy użyli Państwo proszku
przeznaczonego do prania w pralkach
automatycznych. Jeśli proszek za bardzo się pieni,
wtedy woda zacznie wyciekać.
•
Sprawdzić, czy połączenie węża dopływowego z
zaworem czerpalnym jest szczelne i nie przecieka należy to sprawdzić dotykając ręką, gdyż można nie
zauważyć kropel wody.
•
Sprawdzić, czy wąż odpływowy nie został
zniszczony.
46
Page 47

M
o
d
.
.
.
.
.
.
.
.
.
.
.
P
r
o
d
.
N
o
.
.
.
.
.
.
.
.
.
.
.
.
S
e
r
.
N
o
.
.
.
.
.
.
.
.
.
.
P0042•N
Mod. ..........
Prod. No. ...........
Ser. No. .........
Usterka Prawdopodobna przyczyna
•
Efekt prania jest
niezadowalający:
• Pralka dostaje wibracji i pracuje
za głośno:
• Drzwi nie dają się otworzyć:
• Użyto zbyt mało środka do prania, lub dodano
niewłaściwego detergentu.
• Plamy względnie inne mocne zabrudzenia nie
zostały usunięte przed praniem.
• Ustawiono nieodpowiednią temperaturę.
• Za duqy wsad bielizny.
•
Sprawdzić, czy wszystkie zabezpieczenia
transportowe oraz elementy opakowania zostały
usunięte.
•
Sprawdzić, czy pralka nie stoi zbyt blisko ściany lub
innych mebli.
•
Sprawdzić, czy pralka jest dobrze wypoziomowana,
czy stoi prawidłowo na czterech nóżkach.
•
Sprawdzić, czy bielizna w bębnie jest równomiernie
rozłożona.
•
W bębnie znajduje się zbyt mała ilość bielizny.
• Program trwa i beben sie obraca.
• Poziom wody w pralce jest powyqej dolnej
krawedzi drzwi.
• Pralka podgrzewa jeszcze wode.
Drzwi moqna otworzy© dopiero wtedy, gdy
lampka blokady zgaßnie.
POLSKI
• W bębnie pralki nie widać wody:
• Wirowanie uruchamia sie z
opóΩnieniem lub wcale sie nie
odbywa:
Jeśli po wykonaniu opisanych czynności
sprawdzających pralka nadal nie funkcjonuje,
usterkę należy zgłosić w autoryzowanym punkcie
serwisowym. Przy zgłoszeniu usterki należy podać
model, typ i numer seryjny urządzenia. Informacje te
znajdują się na tabliczce znamionowej.
• Pralka jest rezultatem nowoczesnej technologii. Pracuje
w sposób bardzo ekonomiczny zużywając mało wody.
Efekt prania jest doskonały, jak nigdy dotąd.
• Z powodu niewłaßciwego rozmieszczenia bielizny w
bebnie zadziałał elektroniczny system kontroli
równowagi. Zmiana kierunku rotacji bebna spowoduje
równomierne rozmieszczenie w nim bielizny. Moqe to
nastapi© kilka razy przed uzyskaniem równowagi i
wykonaniem normalnego wirowania.
Jeqeli po upływie ok. 6 min. ładunek bielizny w
dalszym ciagu nie ulegnie równomiernemu
rozmieszczeniu, nastapi odwirowanie ze
zredukowana predkoßcia.
Jeqeli po zakonczeniu cyklu bielizna pozostaje
mokra, zaleca sie jej reczne rozloqenie w bebnie i
wybranie programu wirowania.
47
Page 48

Punkty Serwisowe
Miasto Adres Telefon
Bialystok
Bielsko-Biala
Brzeziny
Bydgoszcz
Bytom Kwietniewskiego 5 (0-32) 282-85-22
Chelm
Chojnice
Chrzanów Szpitalna 80c (0-32) 623-48-22
Ciechanów
Czestochowa fiw. Rocha 108
Elblag Lokietka 44
Gdansk
Gdynia Helska 8 (0-58) 663-15-85; 663-15-15
Gdynia J. Unruga 76 (0-58) 625-05-05
Gliwice
Piastowska 11 (0-85) 732-19-55
Reja 18 (0-33) 815-86-13
Pilsudskiego 2/8
Kcynska 6
Wieniawskiego 11a (0-82) 565-70-42
Subislawa 8
Glowackiego 12
Partyzantów 46 (0-58) 520-20-94
J. filiwki 34
(0-46) 874-28-30; 874-37-07
(0-52) 379-31-02
(0-52) 397-25-58
(0-23) 672-48-34
(0-34) 368-16-65; 324-89-60
(0-55) 237-94-05; 232-15-10
(0-32) 279-20-07
Gorzów Wielkopolski
Grudziadz
Kalisz Sukiennicza 4 (0-62) 764-50-60
Katowice 1000-lecia 3 (0-32) 254 11 81; 254-02-78
Kielce
Konin 1 Maja 15 (0-63) 242-17-99
Koszalin Szyprów 4 (0-94) 341-66-68; 341-66-71
Kraków Os. Willowe 30 (0-12) 644-87-64; 644-40-69
Kraków Os. J. Strusia 1a (0-12) 648-22-57; 648-67-60
Kraków
Krosno
Legnica Kasjopei 15 (0-76) 854-48-33
Leszno
Lublin
Lomqa
Moßcickiego 14
Sienkiewicza 17 (0-56) 462-07-41; 462-01-32
Checinska 14a
Koßciuszki 36
Slowackiego 10
Sulkowskiego 46
Leczynska 1
Wiejska 5b (0-86) 216-65-65
(0-95) 729-20-93
(0-41) 361-38-16
(0-12) 421-50-32, 292-75-01/02
(0-13) 432-28-93
(0-65) 520-55-70
(0-81) 745-05-15
LódΩ
LódΩ
Nowy Sacz Batalionów Chlopskich 19a
Pomorska 100 (0-42) 678-92-92
Marynarska 42 (0-42) 657-70-02; 657-99-27
(0-18) 441-11-44
48
Page 49

Miasto Adres Telefon
Olsztyn
Opole Szarych Szeregów 23 (0-77) 455-90-93
Ostroleka Qniwna 9
Ostrowiec fiwietokrzyski
Ostrów Wielkopolski
Pila Przemyslowa 5
Plock
Poznan Czeßnikowska 1a
Przemyßl
Racibórz Opawska 3 (0-32) 415-26-04; 419-09-32
Radom Sobieskiego 1 (0-48) 345-10-10; 345-97-57
Rzeszów
Siedlce Vogla 41 (0-25) 632-72-08
Sieradz Polna 3/5 (0-43) 827-40-92
Slupsk Pilsudskiego 7/b
Blekitna 9
Os. Ogrody 28 ( 0-41) 262-09-38
Wolnoßci 9
Lotników 2c (0-24) 263-38-76; 263-01-04
Mickiewicza 9 (0-16) 678-77-05
Dabrowskiego 44
(0-89) 523-76-26
(0-29) 760-27-87
( 0-62) 736-82-45
(0-67) 212-67-96; 212-35-84
(0-61) 867-41-12
(0-17) 854-16-15
(0-59) 843-54-88
POLSKI
Stalowa Wola K.E.N. 13 (0-15) 842-28-94
Stargard Szczecinski
Suwalki Litynskiego 1a
Szczecin Chmielewskiego 18 (0-91) 485-31-70/71; 0 800 390 960
fiwidnica Slotwina 80
fiwierzawa
Tarnów Graniczna 8a (0-14) 626-00-99
Torun
Warszawa Wawelska 5 (0-22) 825-70-73; 825-36-21 w.60
Warszawa Giewont 21 (0-22) 644-04-32;644-68-48
Wejherowo
Wielun
Wloclawek
Wroclaw Jednosci Narodowej 97
Wroclaw Jagiellonczyka 38a
Woj. Polskiego 114 (0-91) 577-64-11
(0-87) 567-29-58
(0-74) 852-60-71
B. Piasta 14 (0-75) 713-52-86
Wojska Polskiego 43/45 (0-56) 623-15-03
Obronców Helu 3
Baranowskiego 5 (0-43) 843-34-15
Okrzei 46 (0-54) 231-22-75
(0-58) 672-79-97
(0-71) 322-46-66; 322-78-81
(0-71) 321-02-93
Zamoß©
Zielona Góra Okulickiego 35 (0-68) 326-22-37
M. Reja 2 (0-84) 639-71-54
49
Page 50

Vázení zákazníci,
prosíme vás, abyste si pozorn™ precetli tento návod
a zam™rili svou pozornost predevsím na
bezpecnostní predpisy uvedené na prvních
stránkách. Doporucujeme návod uschovat, abyste
do n™ho mohli nahlédnout i kdykoli v budoucnosti, a
eventuáln™ ho predat novému majiteli v prípad™
prodeje tohoto spotrebice.
Skody zp√sobené pri doprav™
Když spotřebič vybalíte, zkontrolujte, zda není
poškozen. Jestliže máte nějaké pochybnosti,
spotřebič nepoužívejte a kontaktujte servisní
středisko.
Symboly, použité u některých odstavců této příručky, mají následující význam:
Trojúhelníkovou znackou anebo upozorñovacími vyrazy (Pozor! nebo Upozorn™ní!) jsou vyznaceny
pokyny zvlást d√lezité pro vasi bezpecnost a pro správné fungování prístroje. Prosíme vás o jejich
dodrzování.
Informace s tímto symbolem slouzí jako dodatek k pokyn√m pro praktické pouzití prístroje.
Tulipán oznacuje rady a doporucení k hospodárnému vyuzívání pracky s ohledem na zivotní prostredí
Náš příspěvek k ochraně životního prostředí:
používáme recyklovaný papír.
50
Page 51

Obsah
Důležité informace 52
Likvidace 53
Rady pro ochranu zivotního
prostredí 53
Technická specifikace 54
Instalace 55
Rozbalení 55
Umístění a vyrovnání 55
Přívod vody 55
Odpad 56
Elektrické zapojení 56
Vase nová pračka 57
Popis spotřebiče 57
Údržba 69
Dvířka 69
Skříň automatické pračky 69
Zásuvka dávkovače 69
Odtokovy filtr 69
Filtr na přívodu vody 70
Nouzové vyprazdňování 70
Nebezpečí zamrznutí 70
Jestliže něco nefunguje správně
71-72
Záruka, servis a náhradní díly 73
ČESKY
Kontrolka uzamčení dvířek 57
Zásuvka na prací prostředky 57
Použití 58
Ovládací panel 58-61
Rady pro praní 62
Třídění prádla 62
Teploty 62
Před vložením prádla do bubnu 62
Maximální náplň prádla 62
Hmotnost prádla 62
Odstraňování skvrn 62
Prací prostředky a přísady 63
Množství použitého pracího prostředku 63
Pracovní postup 64-66
Mezinárodní značení 67
Tabulka programů 68
51
Page 52

Důležité informace
Následující upozornění poskytujeme v zájmu celkové bezpečnosti. Před instalací spotřebiče a jeho používáním si je
musíte pečlivě přečíst.
Instalace
• Všechen vnitřní obalový materiál se před
používáním spotřebiče musí odstranit. Kdybyste
neodstranili všechny ochranné přepravní prvky,
nebo je odstranili jen zčásti, mohlo by dojít k
vážnému poškození spotřebiče i nejbližšího
zařízení. Viz příslušný odstavec této příručky.
• Elektrické připojení spotřebiče a práce související
s jeho instalací musí provádět kvalifikovaný
elektrikář.
• Jakékoli instalatérské práce, které jsou nutné k
instalaci tohoto spotřebiče, musí provádět
kvalifikovaný instalatér.
• Když je instalace spotřebiče ukončena,
překontrolujte, zda spotřebič nestojí na
elektrickém přívodním kabelu.
• Jestliže pračka stojí na podlaze pokryté
kobercem, přesvědčte se, že vzduch může v
prostoru pod pračkou, vymezeném nastavitelnými
nožkami, volně proudit.
Použití
• Mezi praním nechte dveře spotřebiče mírně
pootevřené, aby se šetřilo dveřní těsnění a
nedocházelo ke vzniku nepříjemného zápachu.
• Vždy před otevřením spotřebiče přes průzor ve
dvířkách zkontrolujte, že je voda vypuštěná.
Jestliže tam je voda, vypuste ji podle návodu k
obsluze.
• Po použití spotřebič vždy odpojte ze zásuvky a
uzavřete vodovodní ventil.
Bezpečnost obecně
• Opravy prístroje sm™jí byt vykonány pouze
kvalifikovanym personálem. Nesprávné opravy
mohou zp√sobit znacné nebezpecí. S opravami se
obratte na technicky servis ELECTROLUX.
• Nikdy nevytahujte zástrcku ze zásuvky tahem za
kabel, ale tahem za zástrcku samu.
• V průběhu programů s vysokou teplotou se dvířka
ohřejí na vysokou teplotu. Nedotýkejte se jich.
• Tento spotřebič je určen pro použití v domácnosti.
Nesmí se používat pro jiné účely než pro ty, pro
které byl vyroben.
• Perte jen prádlo, určené pro praní v automatické
pračce. Dodržujte přesně pokyny výrobce prádla
na nášivce.
• Spotřebič nepřetěžujte. Vždy dodržujte pokyny
návodu k obsluze.
• Před praním se přesvědčte, že všechny kapsy jsou
prázdné. Předměty jako jsou mince, zavírací
špendlíky, špendlíky a šrouby mohou způsobit
rozsáhlé škody.
• V automatické pračce neperte oděvy, které jsou
nasyceny ropnými produkty, metylalkoholem,
trichlorem atd. Jestliže se pro čištění skvrn takové
tekutiny před praním použily, před vložením do
pračky počkejte, až se z tkaniny úplně vypaří.
• Malé kusy jako ponožky, pásky atd. vkládejte do
pračky v polštářových povlacích nebo k tomu
určených pracích sáčcích, aby nedocházelo k
zachycení mezi otočným a pevným bubnem.
• Používejte jen doporučená množství přísad na
ošetření tkaniny. Nadměrné dávkování by mohlo
prádlo poškodit.
52
Page 53

P1076
Bezpecnost d™tí
•D™ti neznají nebezpecí spojená s elektrickymi
spotrebici. B™hem fungování prístroje je nutno d™ti
hlídat a nenechat je hrát se spotrebicem - mohlo
by se stát, ze se do pracky zavrou.
• Cásti obalu (fólie, polystyren) mohou byt pro d™ti
nebezpecné. Nebezpecí udusení! Drzte je proto z
dosahu d™tí.
• Prací prostredky uchovávejte na bezpecném míst™
mimo dosah d™tí.
• Zajist™te, aby se d™ti ani malá domácí zvírata
nedostaly do bubnu pracky.Pracka je vybavena
zvlástním ochrannym mechanismem, díky kterému
je mozno zabezpecit její dvírka pred uzavrením.
Pokud budete chtít této moznosti vyuzít, otácejte
pojistkou umíst™nou na vnitrní stranr dvírek (aniz
by jste ji zmáckli) ve sm™ru chodu hodinovych
rucicek tak dlouho, az se její drázka dostane do
vodorovné polohy. Ke snazsímu otácení m√zete
pouzít napríklad minci.
Ke zrusení této funkce, a tedy k obnovení moznosti
zavírání dvírek, je treba otocit pojistkou v opacném
sm™ru. Drázka se bude nalézat v poloze svislé.
•V prípad™ vyrazení prístroje do odpadu vytáhn™te
zástrcku z el. sít™, odrízn™te prívodní kabel a kabel
i se zástrckou vyhodte. Poskodte zavírací
mechanismus dvírek, aby se hrající si d™ti nemohly
v pracce zavrít a z√stat v ní uv™zn™né.
ČESKY
Likvidace
Obalové materiály
Materiály oznacené symbolem jsou
recyklovatelné.
>PE<=polyethylen
>PS<=polystyren
>PP<=polypropylen
K jejich druhotnému vyuzití musí byt tyto materiály
vhozeny do príslusnych kontejner√.
Rady pro ochranu zivotního prostredí
Abyste usetrili vodu i energii a prisp™li k ochran™
zivotního prostredí, doporucujeme dodrzet
následující rady:
•B™zn™ zaspin™né prádlo m√zete prát bez predpírky;
usetríte tak prací prostredek, vodu i cas (a nebudete
zbytecn™ zat™zovat zivotní prostredí!).
•Pracka pracuje hospodárn™, pokud dodrzíte
maximální uvedená mnozství prádla, ale
nepret™zujte buben.
Prístroj
Pri vyrazení vaseho starého prístroje pouzijte jen
autorizované skládky. Pomozte nám udrzet vase
m™sto cisté!
• Vhodnymi cistici m√zete pred praním odstranit
skvrny a zaspin™ná místa. Pak budete moci
vykonat prací cyklus pri nizsí teplot™.
• Prací prostředky dávkujte podle tvrdosti vody,
množství praného prádla a stupně zašpinění.
53
Page 54

Technická specifikace
ROZMĚRY Výška 85 cm
Šířka 60 cm
Hloubka 62 cm
NAPÁJECÍ NAPĚTÍ A FREKVENCE 220-230V/50Hz
MAX. INSTALOVANÝ VÝKON 2200 W
JIŠTĚNÍ 10 A
TLAK VODY Minimální 50 kPa, 0,5 bar
Maximální 800 kPa, 8 bar
MAXIMÁLNÍ DOPORUČENÁ NÁPLŇ Bavlna 5,5 kg
Syntetické tkaniny 2,5 kg
Vlna 2 kg
OTÁČKY PŘI ODSTŘEĎOVÁNÍ 1200 ot./min.
Tento spotřebič odpovídá následujícím předpisům EEC:
73/23/EEC z 19.2.73 - Předpis ohledně nízkého napětí.
89/336/EEC ze 3.5.89 - Předpis o elektromagnetické kompatibilitě.
54
Page 55

Instalace
P0020
P0256
2
1
P1066
P1068
P0255
P0021
P1051
Rozbalení
Pred pouzitím prístroje odstrañte
bezpecnostní ochranné prvky pro prepravu.
1. Klícem vysroubujte matici na pravé zadní stran™
pracky. Polozte pracku na zadní stranu, aniz
byste pritom zmáckli hadice. Pomozte si tak, ze
mezi pracku a podlahu vlozíte rohové kusy obalu.
2. Odstrañte polystyrénovy blok ze dna pracky a
uvoln™te oba nylonové sácky, které jsou
upevn™né pod okénkem filtru.
3. Velmi opatrn™ vytáhn™te napred pravy sácek (1)
a potom levy (2).
Umíst™ní a vyrovnání
Pracka musí byt instalována na tvrdém a presn™
vodorovném povrchu.
Zkontrolujte, zda proud™ní vzduchu kolem pracky
není znemozn™no koberci apod.
Prístroj se nesmí dotykat kuchyňskych st™n nebo
nábytku.
Pecliv™ vyrovnejte pracku do vodorovné polohy
povolením nebo utazením regulovatelnych nozicek.
Pri vyrovnávání prípadnych nerovností podlahy
nepodkládejte nikdy pracku kartónem, drevem nebo
podobnymi materiály.
ČESKY
Prívod vody
Pripojte prívodní hadici na kohoutek studené vody se
závitem 3/4”.
Konec prívodní hadice na stran™ pracky se m√ze
obrátit kterymkoli sm™rem. Lehce povolte
upevñovací objímku, otocte konec hadice, pak
objímku zase utáhn™te a zkontrolujte, zda ze spoje
neuniká voda.
4. Pracku op™t postavte na nozicky a odstrañte
zbyvající dv™ matice na zadní stran™.
5. Ze t rí otvor√, kde byly matice, vyndejte plastikové
cepy.
6. Zakryjte otvory, které z√staly volné, kloboucky, jez
najdete v plastikovém sácku s návodem k pouzití.
Doporucujeme uschovat vsechny prvky pro
prepravu, abyste je mohli znovu pouzít v prípad™
st™hování.
P1088
Prívodní hadici nelze nastavovat. Je-li prílis krátká a
nem√zete-li premístit kohoutek, musíte koupit hadici
delsí, takovou, která je pouzitelná pro tento úcel.
55
Page 56

Odpad
P0023
P0022
Elektrické zapojení
Vypoust™cí hadici m√zete umístit tremi r√znymi
zp√soby:
Zaháknout za okraj umyvadla s pomocí
um™lohmotného kolena dodávaného s prackou.
D√lezité je, aby s rychlostí, jaké vytékající voda
nabyde pri vypoust™ní, se nemohlo koleno se
zahnutou cástí hadice vysmeknout z umyvadla.
Upevn™te ho proto sň√rkou ke kohoutku nebo k
hácku na zdi; sň√rku provlecte okem na ohybu
kolena.
Odbockou v odpadu umyvadla. Tato odbocka se
musí nacházet nad sifonem tak, aby zahnutá cást
hadice byla vzdálená minimáln™ 60 cm od podlahy.
Do odpadního potrubí které se nachází ve vysce
minimáln™ 60 a maximáln™ 90 cm od podlahy.
Konec vypoust™cí hadice musí byt v™trany, tj. vnitrní
pr√m™r odpadního potrubí musí byt sirsí nez vn™jsí
pr√m™r vypoust™cí hadice.
Vypoust™cí hadice nesmí byt nikde preskrcená ani
zalomená.
Hadice musí lezet na zemi a zvedat se teprve v
blízkosti odtoku.
Vypoust™cí hadice se m√ze prodlouzit, ale nesmí byt
delsí nez 400 cm. V prípad™ nastavení musí vnitrní
pr√m™r nastavené hadice byt stejny jako vnitrní
pr√m™r p√vodní hadice. Ke spojení obou kus√
pouzijte vhodnou spojku.
Prístroj m√ze fungovat pri 220-230 V a 50 Hz.
Ov™rte si, ze vás domácí elektricky rozvod unese
maximální zatízení pracky (2,2 kW) plus prípadné
jiné soucasn™ zapnuté domácí elektrospotrebice.
Pracku zapojte na zásuvku s uzemn™ním.
Vyrobce se zríká jakékoli zodpov™dnosti za
skody nebo poran™ní způsobená nedodrzením
vyse uvedeného bezpecnostního predpisu.
Kdybyste potrebovali vym™nit prívodní kabel,
vym™na musí byt provedena nasím
technickym servisem.
D√lezité: Prívodní kabel musí z√stat prístupny i
po instalaci prístroje.
56
Page 57

Vase nová pracka
Tato nová pračka, která je vybavená přímým rozstřikovacím systémem vody (jde o patent firmy Zanussi),
odpovídá všem moderním požadavkům na výkonné praní prádla s nízkou spotřebou vody, energie a pracích
prostředků.
Dalších úspor je dosahováno tak, že v případě praní malého množství prádla je spotřeba vody a energie
přizpůsobená množství a druhu prádla.
• Moznost vyb™ru prací teploty, rychlosti otácek pri odstredování a dalsích funkcí, které vám nabízí tato
pracka, vám umozní priz√sobit prací cyklus vasim potrebám.
• OPO
• Displej postupu program√ zobrazuje jednotlivé kroky nastaveného programu a momentální fázi běžícího
• Speciální program na vlnu s novým systémem jemného praní, který vypere vaše vlněné prádlo velmi
• Kontrola rovnováhy zaručuje, že spotřebič zůstane v průběhu odstřeďování stabilní.
ZDÈNÉ SPOUSTÈNÍ umozñuje zahájit prací cyklus v jakoukoli denní dobu. Díky této moznosti lze pak
vyuzít napr. ekonomicky vyhodn™jsích nocních tarif√ elektriny.
programu.
opatrně.
Popis spotrebice
1 Zásuvka na prací prostředky
2 Ovládací panel
3 Kontrolka uzamčení dvířek
4 Odtokový filtr
5 Regulovatelné nožičky
Kontrolka uzamcení dvírek
Zůstane rozsvícená po celou dobu postupu
programu a označuje, že dveře jsou uzamčeny (viz
str. 66).
Zásuvka na prací prostredky
Předpírka
ČESKY
12
0
T 120
EA
1200
90
900
60
700
40
500
30
3
5
N
4
Hlavní praní
Aviváž, Škrobení
C0063
57
Page 58

Pouzití
Ovládací panel
90
60
40
30
1200
900
700
500
12 3 4 5 6 7 8 91011
1 Hlavní vypínac ON/OFF
Stiskn™te toto tlacítko, kdyz chcete zapnout pracku.
Po skoncení pracího programu je treba pracku
vypnout; k tomu pouzijte op™t tohoto tlacítka.
2 Kontrolka informující o chodu
prístroje
Tato kontrolka doprovází funkci tlacítka ON/OFF.
Rozsvítí se, kdyz zapnete pracku a zhasne, dojde-li
k jejímu vypnutí.
3 Tlacítko TYP TKANINY
K vyb™ru pracího programu vhodného pro urcity
druh materiálu pouzijte opakovan™ tohoto tlacítka.
Rozsvítí se odpovídající kontrolka. Pracka pak dále
sama navrhne teplotu praní a automaticky vybere
maximální rychlost odstredování, která bude
vybranému programu odpovídat. M√zete si vsak i
tyto hodnoty upravit, a to za pouzití tlacítek 4 a 5.
Rucní praní
Pokud se rozhodnete pro tuto variantu, docílíte
skutecn™setrného zp√sobu praní. Program je
vhodny pro choulostivé tkaniny, u kterych je tento
zp√sob praní vyznacen na etiket™
.
4 Tlacítko TEPLOTA
Stiskn™te opakovan™ toto tlacítko, pokud budete chtít
zvysit nebo snízit teplotu praní, která je prackou
automaticky nastavená. Kontrolka odpovídající zvolené
teplot™ se rozsvítí. Maximální teplota pro bavlnu je 90°C,
60°C pro syntetické tkaniny a 40°C pro choulostivé
materiály, vlnu a tkaniny urcené pro rucní praní.
12
= “praní ve studené vod™”
Upozorn™ní!
Pri soucasném stlacení tlacítek pro nastavení teploty
a rychlosti odstredování nedojde po dokoncení
pracího programu ke zvukovému signálu.
5 Tlacítko RYCHLOST
ODSTREDOVÁNÍ
Pouzijte totoho tlacítka v prípad™, ze chcete zvolit
jinou rychlost odstredování, nez jaká je automaticky
nastavena prackou. Odpovídající kontrolka se
rozsvítí.
Maximální rychlost odstredování je:
• pro bavlnu 1 200 otácek/min,
• pro syntetické materiály, vlnu a materiály urcené
pro rucní praní 900 otácek/min,
• pro choulostivé materiály 700 otácek/min,
ZASTAVENÍ S VODOU V BUBNU
Pokud si zvolíte tuto funkci, pak voda z posledního
máchání z√stane v bubnu a na prádle se tak
nevytvorí záhyby. Po skoncení programu se rozsvítí
kontrolka u tlacítka START/PAUZA, jako upozorn™ní,
ze voda z bubnu musí byt vypust™na. K tomu lze
vyuzít tyto moznosti:
• Vypust™ní vody a odstred™ní prádla:
- Stiskn™te tlacítko START/PAUZA - pracka
vypustí vodu a odstredí prádlo nejvyssí rychlostí
moznou pro nastaveny program.
- Pokud si chcete vybrat rychlost odstredování
odlisnou, pouzijte nejdríve tlacítko a teprve
poté stiskn™te tlacítko START/PAUZA.
• Vypust™ní vody:
Stiskn™te jednou tlacítko ; pritom se rozsvítí
kontrolka - vypoust™ní a poté stiskn™te tlacítko
START/PAUZA.
58
Page 59

Upozorn™ní!
Pokud byste omylem stiskli tlacítko více nez
jednou, na displeji se objeví tri blikající pomlcky. K
vypust™ní vody je treba v tomto prípad™ tlacítkem
zvolit jakykoliv program a teprve potom stisknout
trikrát , abyste nastavili fázi vypoust™ní (z√stane
rozsvícena pouze kontrolka vypoust™ní ).
6 Tlacítko FUNKCE
Stisknutím tohoto tlacítka m√zete nastavit:
• PREDPÍRKU PRÁDLA
Pokud si prejete, aby vase prádlo bylo predepráno
pred hlavním praním, vyuzijte této funkce.
Nelze pouzít pro vlnu a tkaniny urcené pro
rucní praní.
Predpírka koncí krátkym odstred™ním (650
otácek/min) u program√ pro bavln™né a syntetické
materiály, zatímco u programu pro choulostivé
tkaniny dojde pouze k vypust™ní vody.
• MÁCHÁNÍ NAVÍC
Touto volbou lze doplnit jakykoliv program s
vyjimkou program√ pro vlnu a rucní praní.
Pracka provede místo 3 máchání 4. Tento program
je vhodny pro ty, kterí trpí alergií na prací
prostredky, anebo jej lze vyuzít v místech s prílis
m™kkou vodou.
8 DISPLEJ
Displej podává následující informace:
• Tri blikající pomlcky se objeví v prípad™, ze je
program zrusen tlacítkem .
Tento symbol se zobrazí i tehdy, pokud zapnete
pracku tlacítkem , a pritom jest™ nebyl zrusen
predcházející program.
---
ČESKY
• Doba trvání pracího programu je zobrazována v
hodinách a minutách.
2.05
7 RYCHLY CYKLUS
Stisknutím tohoto tlacítka dosáhnete zkrácení doby
trvání pracího cyklu. Pouzívejte jen pri málo
spinavém prádle. Nevhodné pro vlnu a materiály
urcené k RUCNÍMU PRANÍ. Trvání pracího cyklu
bude zredukováno podle typu tkaniny a zvolené
teploty praní.
Objeví se automaticky po nastavení programu. V
pr√b™hu programu (tj. po spust™ní programu
tlacítkem START/PAUZA) se cas odecítá po celych
minutách.
• Pracka se na konci programu zastavila s vodou v
bubnu, byla-li nastavena funkce . Tato
informace je zobrazena na displeji rozsvícenou
nulou.
• Prací program skoncil. Tento údaj je zobrazen
blikající nulou na displeji. Soucasn™ zmizí
kontrolka informující o zablokování dvírek. Nula se
také m√ze objevit v prípad™, ze doslo k zapnutí
pracky, aniz by byl predchozí program zrusen
tlacítkem .
0
59
Page 60

Upozorn™ní
Pri prvním pouzití pracky se m√ze po jejím zapnutí
objevit na displeji blikající nula doprovázená hlasitym
zvukovym signálem. To znamená, ze pracka
vykonala zkusební prací cyklus pri vyrobních
prov™rovacích testech a nedoslo po jejich skoncení
ke zrusení programu.
• Opozd™né spoust™ní. casová hodnota je
zobrazena v celych hodinách. K nastavení této
funkce pouzijte tlacítko .
Na displeji se objeví asi na 5 sekund císlice
oznacující pozadované zpozd™ní. Poté se op™t
zobrazí doba trvání nastaveného programu. Po
stisknutí tlacítka START/PAUZA zacíná prístroj
odpocítávat cas (v celych hodinách). Spust™ní
programu m√zete oddálit max. o 24 hodin, v
hodinovych intervalech.
• Chybné nastavení je zobrazeno nápisem Err a
objeví se v prípad™, jestlize jste nastavili funkci,
která je neslucitelná se zvolenym pracím
programem.
9 Tlacítko START/PAUZA
Toto tlacítko zastává tri funkce:
• Start: po nastavení pozadovaného programu a
funkcí stiskn™te toto tlacítko, abyste program
zahájili. Pracka zacne pracovat a kontrolka nad
tímto tlacítkem prestane blikat a z√stane trvale
svítit. Pokud jste si pomocí tlacítka 11
naprogramovali opozd™né spust™ní, zacne se na
displeji odpocítávat cas.
• Pause: pokud stisknete toto tlacítko jest™ jednou,
dojde k prerusení pracího programu. Kontrolka nad
tlacítkem zacne blikat. Op™tovnym stisknutím
tlacítka uvedete prístroj znovu do chodu. Pokud
pracku uvedete do pauzy, zhasne kontrolka
informující o uzamcení dvírek a je mozné je otevrít
za predpokladu, ze:
• pracka se nenachází práv™ ve fázi ohrívání;
• hladina vody v bubnu není prílis vysoká;
• buben se práv™ neotácí.
Upozorn™ní!
Pracku musíte uvést do pauzy vzdy predtím, nez
uskutecníte jakékoliv zm™ny v probíhajícím
programu.
• Vypust™ní vody a odstredování: stiskn™te toto
tlacítko po skoncení programu s nastavením
RINSE HOLD.
10 Tlacítko PRESKOCIT /
• Poplasny kód oznacuje funkcní anomálie (viz
príslusnou kapitolu na str. 71).
E20
ZRUSIT
Po skoncení pracího cyklu musíte stisknout toto
tlacítko jednou nebo n™kolikrát, az se na displeji
ukází tri blikající pomlcky signalizující, ze doslo ke
smazání obsahu pam™ti. V prípad™, ze by k tomuto
úkonu nedoslo, objevila by se pri prístím zapnutí
pracky na displeji blikající nula doprovázená
hlasitym zvukovym signálem, oznamující ukoncení
predchozího pracího cyklu.
Pouzijte tohoto tlacítka i v prípad™, kdyz chcete
preskocit jednu nebo n™kolik fází práv™ probíhajícího
programu, jak je popsáno dále:
- Uvedte prístroj do pauzy, a to stisknutím tlacítka
START/PAUZA (rozsvítí se odpovídající kontrolka).
- Stiskn™te tlacítko , jednou nebo n™kolikrát, az
dojde ke zrusení pozadované fáze programu
(kontrolky príslusné k názv√m zrusenych fází
zhasnou).
60
Page 61

Príklad:
V tomto prípad™ bude
vykonána funkce
(vypust™ní vody)
i (odstredování), a
to rychlostí podle
nastaveného typu
prádla.
Toto tlacítko vám také umozní nastavit samostatn™
programy jako MÁCHÁNÍ, ODSTREDOVÁNÍ nebo
VYPOUSTÈNÍ VODY.
• Pokud je pracka zapnutá, nebot práv™ dokoncila
prací cyklus, je treba:
- stisknout jednou nebo opakovan™ tlacítko , aby
doslo ke smazání predchozího programu (na
displeji se objeví tri blikající pomlcky);
- vybrat TYP TKANINY pomocí odpovídajícího
tlacítka;
- zvolit si speciální program:
• MÁCHÁNÍ
Stiskn™te tlacítko jednou; zhasne kontrolka
u funkce HLAVNÍ PRANÍ .
• ODSTREDOVÁNÍ
Stiskn™te tlacítko dvakrát; zhasnou kontrolky
u funkcí HLAVNÍ PRANÍ a MÁCHÁNÍ .
• VYPOUSTÈNÍ VODY
Stiskn™te tlacítko trikrát. Zhasnou kontrolky
u funkcí HLAVNÍ PRANÍ , MÁCHÁNÍ a
ODSTREDOVÁNÍ .
Príklad:
V tomto prípad™ pracka
vykoná funkci máchání
a odstredování.
11 Tlacítko OPOZDÈNÉ
SPOUSTÈNÍ
Prostrednictvím tohoto tlacítka je mozno oddálit
spust™ní programu az o 24 hodin. Na displeji se asi
na 5 sekund objeví císlice, oznacující pozadované
zpozd™ní; poté se objeví doba trvání programu.
Opozd™né spust™ní musíte nastavit po zvolení
programu a pred zapnutím tlacítka START/PAUZA.
casová hodnota na displeji se bude odpocítávat v
celych hodinách.
Dobu zpozd™ní m√zete zm™nit kdykoliv predtím,
nez stisknete tlacítko START/PAUZA.
Pokud jste jiz zapnuli tlacítko START/PAUZA a
prejete si zm™nit nebo zrusit zpozd™ní, postupujte
následovn™:
• uvedte prístroj do stavu pauzy tlacítkem
START/PAUZA;
• podrzte stisknuté tlacítko do té doby, dokud se
na displeji neukáze nov™ pozadovaná hodnota,
anebo
• pokud chcete zpozd™ní úpln™ zrusit, stiskn™te
tlacítko jednou a na displeji se objeví "0h";
• stiskn™te op™t tlacítko START/PAUZA.
Upozorn™ní!
Dvírka pracky budou uzamcena po celou dobu, kdy
bude prístroj cekat na opozd™né spust™ní (bude
svítit kontrolka zavrení dvírek).
V prípad™, ze byste potrebovali dvírka b™hem této
doby otevrít, musíte nejprve uvést prístroj do pauzy,
a to stisknutím tlacítka START/PAUZA. Po zavrení
dvírek znovu stiskn™te tlacítko START/PAUZA.
12 Kontrolky fází programu
Pri nastavení pracího programu se rozsvítí kontrolky
odpovídající jednotlivym fázím, z nichz se program
skládá.
ČESKY
• Pokud je pracka vypnutá, je zapotrebí:
- zapnout prístroj tlacítkem ;
- nastavit program podle vyse uvedeného postupu.
Po spust™ní programu z√stane rozsvícená jen
kontrolka odpovídající práv™ probíhající fázi.
61
Page 62

Rady pro praní
Praní s maximální náplní prádla v bubnu umožňuje
nejefektivnější využití vody a energie.
Třídění prádla
Sledujte symboly s kódy pro praní na každé visačce
oděvu a dodržujte pokyny výrobce pro praní.
Prádlo třite podle druhu prádla následovně:
bílé, barevné, syntetika, jemné prádlo, vlna.
Teploty
90˚-95˚ pro normálně zašpiněné bílé
bavlněné a lněné prádlo (např.
utěrky, ručníky, ubrusy, prostěradla
atd.).
60˚ pro normálně zašpiněné, barevně
stálé oděvy (např. košile, noční
prádlo, pyžama, atd.) ze lněných,
bavlněných nebo syntetických
tkanin a pro lehce zašpiněné bílé
bavlněné prádlo (např. spodní
prádlo).
(studená lázeň) pro choulostivé kusy (např.
30˚-40˚
síové záclony), smíšené tkaniny
včetně syntetiky a vlny.
Před vložením prádla do bubnu
Nikdy neperte bílé a barevné prádlo společně. Bílé
prádlo by při takovém praní ztratilo svoji bělost.
Nové barevné prádlo by mohlo pustit barvu a proto
by se poprvé mělo prát samostatně.
Ujistěte se, že v prádle nezůstaly žádné kovové
předměty (např. sponky do vlasů, špendlíky
zavírací i obyčejné a pod.)
Zapněte knoflíky polštářů, zatáhněte zipy, zapněte
háčky a patenty. Utáhněte všechny pásky nebo
dlouhé pásy.
Před praním odstraňte silné skvrny. Zejména
obzvláště znečištěná místa vyčistěte speciálním
čistidlem nebo čisticí pastou.
Se záclonami zacházejte se zvláštní péčí. Odstraňte
háčky, nebo je upevněte do nějakého pytlíku nebo
síky.
Maximální náplň prádla
Doporučené náplně jsou vyznačeny na kartách
programů.
Všeobecně platí tyto zásady:
bavlna, len: plný buben, ale prádlo nepěchovat
syntetika: buben plný do poloviny
choulostivé prádlo a vlna: buben plný ne více jak z
jedné třetiny.
U silně zašpiněného prádla náplň snižte.
Hmotnost prádla
Dále uvedené hodnoty jsou jen orientační:
koupací pláš 1200 g
ubrousek 100 g
povlak prošívané přikrývky 700 g
prostěradlo 500 g
povlak polštáře 200 g
ubrus 250 g
vytírací ručník 200 g
utěrka 100 g
noční prádlo 200 g
dámské kalhotky 100 g
pánská pracovní košile 600 g
pánská košile 200 g
pánské pyžamo 500 g
blůza 100 g
pánské spodky 100 g
Odstraňování skvrn
Silně zažrané skvrny se nedají odstranit jen vodou a
pracím prostředkem. Doporučuje se proto
odstraňovat je před praním.
Krev: Čerstvé skvrny odstraňujte studenou vodou.
Zaschlé skvrny nechte přes noc namočené ve vodě
se speciálním pracím přípravkem a pak je
odstraňujte ručně vodou a mýdlem.
Olejové barvy: Navlhčete benzinovým čističem
skvrn, položte kus na měkkou látku a skvrnu
vytřete. Postup několikrát opakujte.
Zaschlé olejové skvrny: Navlhčete terpentýnem a
položte kus na měkkou látku. Skvrnu vytírejte ručně
pomocí klůcku bavlněné látky.
Rez: Použijte kyselinu šavelovou, rozpuštěnou v
horké vodě, nebo studený odstraňovač rzi. U
starých rzivých skvrn si počínejte opatrně, protože
celulózová struktura bude již poškozená a tkanina
má tendenci k děravění.
Plísňové skvrny: Ošetřete je bělicím prostředkem a
řádně vymáchejte (jen bílé a stálobarevné prádlo).
Tráva: Lehce namydlete a ošetřete bělicím
prostředkem (jen bílé a stálobarevné prádlo).
Skvrny od kuličkového pera a lepidel: Navlhčete
acetonem (*), položte kus na měkkou látku a skvrnu
ručně vytřete.
Rtěnka: Navlhčete acetonem jako v předchozím
případě a pak skvrny ošetřete metylalkoholem. Z
62
Page 63

bílého prádla zbytky odstraňte pomocí bělicího
prostředku.
Červené víno: Namočte do vody s pracím
prostředkem, vymáchejte a ošetřete kyselinou
octovou nebo citronovou a vymáchejte. Zbylé stopy
odstraňte pomocí bělicího prostředku.
Inkoust: Podle druhu inkoustu navlhčete tkaninu
nejprve acetonem (*), pak kyselinou octovou; zbylé
stopy na bílém prádle ošetřete bělicím prostředkem a
pak řádně vymáchejte.
Skvrny od dehtu: Nejprve skvrny ošetřete
odstraňovačem skvrn, metylalkoholovým nebo
benzinovým, a pak vytřete pastovým čisticím
prostředkem.
(*) na umělé hedvábí aceton nepoužívejte!
Prací prostředky a přísady
Množství použitého pracího
prostředku
Druh a množství pracího prostředku bude záviset
na druhu tkaniny, velikosti náplně, stupni zašpinění
a tvrdosti použité vody.
Tvrdost vody se označuje tzv. stupni tvrdosti.
Informace o tvrdosti vody ve vaší oblasti vám
poskytne příslušná vodárenská společnost, nebo
úřady místní správy.
Dodržujte pokyny výrobce k množství použitého
prostředku.
Menší množství pracího prostředku používejte
tehdy, když:
- perete malé množství prádla,
- prádlo je lehce zašpiněné,
- při praní se tvoří velké množství pěny
ČESKY
Dobré výsledky praní závisí také na volbě pracího
prostředku a použití správného množství, aby
nedocházelo k plýtvání a poškozování životního
prostředí. Ačkoli jsou biologicky odbouratelné, prací
prostředky obsahují látky, které ve velkých množstvích
mohou změnit jemnou rovnováhu existující v přírodě.
Volba pracího prostředku bude záviset na druhu
tkaniny (choulostivá, vlněná, bavlněná, atd.), barvě, na
prací teplotě a stupni zašpinění.
V tomto spotřebiči se mohou používat všechny běžně
dostupné prací prostředky, určené pro automatické
pračky:
- práškové prostředky pro všechny druhy tkanin,
- práškové prostředky pro choulostivé tkaniny (max.
60˚C) a vlnu,
- tekuté prostředky, přednostně pro prací programy
s nízkou teplotou (max. 60˚C) pro všechny druhy
tkanin nebo speciální prostředky pouze pro vlnu.
Prací prostředek a jakékoli přísady se musí před
spuštěním pracího programu dávkovat do
příslušného oddílu zásuvky dávkovače.
Stupně tvrdosti vody
Úroveň
tvrdosti
1
2
3
4
Charakteristika
vody
měkká
střední
tvrdá
velmi tvrdá
Stupňů
německých
°N
00-07
08-14
15-21
nad 21
francouzských
°N
00-15
16-25
26-37
nad 37
Jestliže použijete koncentrovaný práškový nebo
tekutý prací prostředek, musíte zvolit program bez
předpírky.
Tekutý prací prostředek nadávkujte do zásuvky
dávkovače, označeného , těsně před spuštěním
programu.
Jakékoli avivážní nebo škrobicí přísady se musí
nalít do oddílu označeného před spuštěním
pracího programu.
Dodržujte doporučení výrobce ohledně množství
použitého prostředku.
63
Page 64

Pracovní postup
C0065
C0064
P1084
Před praním první náplně prádla vám doporučujeme
pustit nejprve cyklus pro bavlnu při 60°C naprázdno,
aby se tak odstranily všechny nečistoty, které mohly
v bubnu a hadicích zůstat po ukončení výroby.
Nasypejte poloviční dávku do hlavní prací příhrádky
a zapněte pračku.
4. Zapnutí pracky
K zapnutí prístroje pouzijte tlacítko . Na displeji se
ukází tri blikající pomlcky nebo blikající nula.
Kontrolka nad tlacítkem se rozsvítí.
0
1. Umíst™ní prádla do bubnu
Otevřete dvířka
Umístěte prádlo do bubnu kus po kuse a s každým
kusem co nejsilněji zatřeste.
Zavřete dvířka.
2. Dávkování pracího prostredku
Vytáhněte nadoraz zásuvku na prací prostředky.
Naberte do nádobky s měřítkem množství pracího
prostředku doporučené výrobcem a nalijte do hlavní
přihrádky .
Jestliže chcete provádět předpírku, nalijte prací
prostředek do příslušné přihrádky označené .
------
5. Nastavení pracího programu /
druh materiálu
Stiskn™te opakovan™ tlacítko , abyste nastavili
pozadovany program.
Rozsvítí se kontrolka umíst™ná vedle názvu
materiálu.
Následn™ se rozsvítí vsechny kontrolky odpovídající
fázím, ze kterych se program skládá.
Na displeji se objeví doba trvání vybraného
programu, vypocítaná na základ™ maximálního
mnozství prádla pro kazdy druh materiálu. Zacne
blikat kontrolka vedle tlacítka START/PAUZA.
I v prípad™, kdyz budete prát malé mnozství prádla,
bude na zacátku cyklu displej ukazovat dobu praní
odpovídající maximálnímu mnozství prádla. Doba
trvání se sama postupn™ upraví v pr√b™hu cyklu.
3. Dávkování prísad
V případě potřeby nalijte do přihrádky s označením
avivážní prostředek a neprekracujte znacku
pro maximální hladinu.
64
Page 65

6. Nastavení teploty
9. Nastavení funkce RYCHLÉ
Stiskn™te tlacítko , pokud si prejete nastavit jinou
teplotu, nez jakou navrhuje pracka.
Rozsvítí se príslusná kontrolka.
90
60
40
30
7. Nastavení rychlosti
odstredování nebo ZASTAVENÍ S
VODOU V BUBNU
Stiskn™te opakovan™ tlacítko , abyste nastavili
pozadovanou rychlost odstredování anebo funkci .
Nastavíte-li , pracka se po skoncení programu
zastaví s nevypust™nou vodou v bubnu.
1200
900
700
500
PRANÍ
Jestlize je prádlo jen málo znecist™né, stisknutím
tlacítka zvolíte funkci RYCHLÉ PRANÍ.
Rozsvítí se príslusná kontrolka.
10. Nastavení funkce OPOZDÈNÉ
SPUSTÈNÍ
Pred spust™ním programu, pokud si prejete, aby
pracka zacala prát az po urcité dob™, stiskn™te
n™kolikrát tlacítko anebo ho podrzte stisknuté a
nastavte pozadované zpozd™ní.
Nastavená hodnota zpozd™ní (max. 24 hodin) se
ukáze na displeji asi na 5 sekund a potom se objeví
op™t hodnota oznacující dobu trvání programu.
ČESKY
8. Nastavení pozadovanych funkcí
Je-li prádlo velmi spinavé, doporucujeme nastavit
(PREDPÍRKU PRÁDLA).
Prejete-li si prádlo vymáchat jedenkrát navíc,
nastavte funkci (MÁCHÁNÍ NAVÍC).
Mackejte tlacítko FUNKCE, az se rozsvítí jedna
nebo ob™ príslusné kontrolky.
11. Spust™ní programu
Stiskn™te tlacítko START/PAUZA. Príslusná
kontrolka prestane blikat, rozsvítí se kontrolka
zavrení dverí a dále z√stane rozsvícená jen
kontrolka odpovídající práv™ probíhající fázi
programu.
Jestlize jste nastavili opozd™né spust™ní, pracka
zacne odpocítávat cas.
Na displeji se ukáze bud doba trvání programu nebo
nastavené zpozd™ní.
65
Page 66

12. Jak zm™nit nastavení
programu, ktery uz probíhá
Predtím, nez provedete jakoukoliv zm™nu, musíte
pracku vypnout tlacítkem START/PAUZA.
M√zete zm™nit kteroukoli fázi, kterou jest™ program
nevykonal.
Zm™na nastavení typu tkaniny nebo teploty je
samozrejm™ mozná jedin™ b™hem prací fáze
programu. Zm™níte-li n™ktery z t™chto dvou
parametr√, pracka zacne cyklus od zacátku.
Je-li pri zm™n™ programu nutné vypustit vodu,
postupujte následujícím zp√sobem:
• uvedte pracku do pauzy tlacítkem START/PAUZA;
• opakovan™ stiskn™te tlacítko , dokud nez√stane
svítit jen kontrolka vypoust™ní ;
• zmáckn™te znovu tlacítko START/PAUZA.
Po vypust™ní vody zacne na displeji blikat nula. Nyní
m√zete zvolit novy program a spustit ho stlacením
tlacítka START/PAUZA.
13. Jak zrusit jiz probíhající
program
Chcete-li zrusit program, ktery uz probíhá, napred
uvedte pracku do pauzy stisknutím tlacítka
START/PAUZA a poté opakovan™ stiskávejte
tlacítko , dokud se na displeji neobjeví tri
blikající pomlcky.
14. Jak otevrít dvírka pracky v
pr√b™hu programu
Dvírka pracky je mozné otevrít stisknutím tlacítka
START/PAUZA, ale jen za predpokladu, ze jsou
spln™ny následující podmínky:
Kdyz dvírka znovu uzavrete a stlacíte tlacítko ,
pracka bude pokracovat v programu od místa,
kde byl prerusen.
15. Konec programu
Na konci programu se pracka zastaví automaticky,
vydá zvukové znamení a na displeji bliká nula.
Pokud jste zvolili , rozsvítí se kontrolka u tlacítka
START/PAUZA, která vás upozorñuje, ze musíte
vypustit vodu. Na displeji stabiln™ svítí nula.
Po ukoncení programu zacne na displeji blikat nula a
zazní zvukovy signál.
Kontrolka zavrení dverí zhasne.
Opakovan™ stiskn™te tlacítko , abyste z
pam™ti vymazali program, ktery se práv™
vykonal. Pokud to neud™láte, pri prístím zapnutí
pracky se vám op™t objeví blikající nula na
displeji a uslysíte zvukovy signál.
Poznámka: Potrebujete-li pri zapnutí pracky
vymazat stary program, stací stisknout tlacítko a
nastavit program novy.
Vypn™te pracku tlacítkem . Hlavní kontrolka
zhasne.
Vyndejte prádlo z pracky.
Protocte buben rucn™, abyste zkontrolovali, zda je
úpln™ prázdny. Kdyby v n™m z√stal zapomenuty kus
prádla, mohlo by pri prístím praní dojít k jeho
poskození (napr. srazení), nebo by mohl pustit barvu
na novou várku prádla.
Doporucujeme uzavrít kohoutek na prívodu vody k
pracce a vytáhnout zástrcku ze sít™.
Nechte dvírka pootevrená, aby pracka mohla uvnitr
v™trat.
• pracka se práv™ nenachází ve fázi ohrívání nad
40°C;
• hladina vody v pracce není prílis vysoká;
• buben se práv™ neotácí.
Jsou-li tyto pozadavky spln™ny, po uvedení pracky
do pauzy zhasne kontrolka zavrení dvírek a dvírka
m√zete otevrít.
Pokud by neslo takto dvírka otevrít a pokud by bylo
bezvyhradn™ nutné to ud™lat, vypn™te pracku
tlacítkem .
Cca po 2 minutách bude mozné dvírka otevrít.
Dejte pozor na vysku hladiny a na teplotu vody v
pracce!
66
Page 67

A
P
F
30
i
MEZINÁRODNÍ ZNAČENÍ PRO OŠETŘOVÁNÍ PRÁDLA
Tyto symboly se objevují na visačkách textilu, aby vám pomohly zvolit nejlepší způsob ošetření vašeho prádla.
ÚSPORNÉ
PRANÍ
95 60
40
Max. prací
teplota 95˚C
JEMNÉ PRANÍ
BĚLENÍ
ŽEHLENÍ Horká žehlička
max.200˚C
Max. prací
teplota 60˚C
60
Bělit ve studené vodě Nebělit
Max. prací
teplota 40˚C
40
Teplá žehlička
max.150˚C
40
Max. prací
teplota 30˚C
Ruční praní Vůbec neprat
30
Vlahá žehlička
max.110˚C
ČESKY
Nežehlit
SUCHÉ ČIŠTĚNÍ Čištění za sucha ve
všech prostředcích
SUŠENÍ Rozložené na plocho Na šňůře Na věšáku V bubnové sušičce
Čištění za sucha v
perchloru, benzinu,
čistém alkoholu,
R111 a R113
67
Čištění za sucha v
benzinu, čistém alkoholu
a R113
při vysoké
teplotě
při nízké
teplotě
Nečistit za sucha
Nesušit v bubnové
sušičce
Page 68

Tabulka program√
304030
30
Druh prádla
a symboly
pro praní
9560
Bílé bavln™né
prádlo:
napr. lozní
prádlo, ubrusy,
ln™né prádlo
304060
Barevné
bavln™né
prádlo: **
napr. kosile,
bl√zy, spodní
prádlo, ln™né
prádlo
4060
Syntetické a
sm™sové
tkaniny:
napr. kosile,
bl√zy, spodní
prádlo
Max.
náplñ
5.5 kg
5.5 kg
2.5 kg
Programy
a teploty
60°-90°C
60°-40°-30°C
60°-40°-30°C
nebo
Popis
programu
Hlavní praní pri
60°- 90°C
3 máchání
Dlouhé
odstredování
Hlavní praní pri
60°-40°-30°C
3 máchání
Dlouhé
odstredování
Hlavní praní pri
60°-40°-30°C
nebo ve studené
vod™
3 máchání
Krátké
odstred™ní
Mozná nastavení
Energie
kWh
1,8
0,95
0,9
Spotreba
Vody
litry
52
49
56
Trvání
h/min.
2,29
2,10
1,27
40
Choulostivé
tkaniny: napr.
akrylát,
viskóza,
polyester,
syntetická
2.5 kg
40°-30°C
nebo
Hlavní praní pri
40°-30°C
nebo ve studené
vod™
3 máchání
Krátké
odstred™ní
0,7
53
vlákna
Vlna
2 kg
40°-30°C
nebo
Hlavní praní pri
40°-30°C
nebo ve studené
0,3
48
vod™
3 máchání
Krátké odstred™ní
2 kg
40°-30°C
nebo
Hlavní praní pri
40°-30°C nebo
ve studené vod™
0,25
46
3 máchání
Krátké
odstred™ní
* Údaje o spotřebě uvedené v této tabulce jsou čistě orientační, neboť velmi záleží i na množství a kvalitě
prádla, na teplotě přiváděné vody a na teplotě prostředí. Údaje se vztahují k nejvyšší teplotě každého
pracího programu, v případě bavlny se množství náplně vztahuje na 5 kg.
** V souladu s předpisem EEC 92/75 se údaje o spotřebě uvedené na štítku spotřeby vztahují k tomuto
programu při teplotě 60°C a s náplní 5 kg bavlněného prádla.
1,04
57
55
68
Page 69

Údrzba
P1086
C0064
P0878
P0879
P1050
P0040
P1061
P0038
1. Dvírka
Pravideln™ kontrolujte, zda v t™sn™ní dvírek nejsou
cizí t™lesa jako kancelárské sponky, knoflíky,
párátka.
2. Skříň automatické pračky
Vnější části skříně automatické pračky čistěte teplou
vodou s neutrálním, neabrazivním čisticím prostředkem
pro domácnost. Pak opláchněte čistou vodou a vytřete
jemným hadrem do sucha.
Důležité: K čištění skříně nepoužívejte metylalkohol,
ředidla a podobné výrobky.
3. Zásuvka dávkovače pracích
prostředků
Prací prostředky a aviv
nějaké době vytvoří v zásuvce dávkovače usazeniny.
Čas od času zásuvku dávkovače vyčistěte
opláchnutím pod tekoucí vodou. Když budete
potřebovat zásuvku vyjmout z pračky, stiskněte
tlačítko v zadním levém rohu.
Aby čištění bylo snazší, lze vrchní díl oddílů přísad
vyjmout.
ážn
í prostředky na tkaniny po
Prací prostředky se mohou nakonec usadit také
uvnitř prostoru, kam zasouváte zásuvku. Ten
vyčistěte pomocí starého kartáčku na zuby. Po
vyčištění zásuvku zasuňte na své místo.
4. Odtokovy filtr
Odtokový filtr zadrzuje necistotu a malé predmety,
které omylem z√staly v prádle. Pravideln™
kontrolujte, zda je filtr cistý.
Otevrete dvírka filtru zatáhnutím sm™rem doprava.
Pod filtr postavte nádobu, do které zachytíte
vytékající vodu.
Uvoln™te hadici pro nouzové vypoust™ní pracky,
vlozte její konec do nádoby a vysroubujte zátku.
P1062
Kdyz prestane vytékat voda, vysroubujte filtr a
vyndejte ho.
P1085
ČESKY
Vycist™te filtr pod tekoucí vodou a poté ho vratte na
místo a rádn™ zasroubujte zp™t.
Na hadici pro nouzové vypoust™ní nasroubujte zp™t
zátku a upevn™te ji op™t na místo. Zavrete dvírka
filtru.
69
Page 70

5. Filtr na přívodu vody
P1090
7. Nebezpečí zamrznutí
Jestliže zjistíte, že pračce trvá delší dobu než se
naplní, zkontrolujte filtr na přívodu vody, umístěný ve
šroubení přívodní hadice, zda není zanesený.
Zavřete vodovodní ventil.
Odšroubujte z ventilu přívodní hadici.
Vyčistěte filtr tvrdým kartáčkem. Našroubujte hadici
na ventil.
6. Nouzové vyprazdňování
Jestlize pracka nevypoustí, postupujte pri rucním
vypoust™ní vody následujícím zp√sobem:
• Vytáhn™te zástrcku z el. zásuvky.
• Zavrete kohoutek na prívodu vody.
• Poprípad™ pockejte, az voda v pracce vychladne.
• Na podlahu pod filtr postavte nádobu a do ní vlozte
konec hadice pro nouzové vypoust™ní. Voda by
m™la do nádoby vytéci prepadem. Kdyz se nádoba
naplní, zasroubujte zp™t zátku a vyprázdn™te
nádobu. Postup opakujte, dokud voda neprestane
vytékat.
• Je-li potreba, vycist™te filtr.
• Nakonec zasroubujte filtr zp™t.
Je-li vase pracka instalována v místnosti, kde teplota
m√ze klesnout pod 0°C, postupujte následujícím
zp√sobem:
• Zavrete kohoutek na prívodu vody.
•Odsroubujte prívodní hadici.
• Konec prívodní hadice i konec hadice pro nouzové
vypoust™ní vlozte do nádoby postavené na
podlaze a nechte do ní vytéci vsechnu vodu.
•Prívodní hadici nasroubujte zp™t, na hadici pro
nouzové vypoust™ní nasroubujte zp™t zátku a
upevn™te ji, jako byla predtím.
Az budete chtít pracku znovu zapnout, ujist™te se, ze
je teplota v místnosti vyssí nez 0°C.
70
Page 71

Jestlize n™co nefunguje správn™
Problémy, které můžete vyřešit sami.
Během provozu pračky se mohou na displeji objevit následující poplašné kódy:
- E10: problém s přítokem vody
- E20: problém s odtokem vody
- E40: otevřená dvířka
Po vyřešení problému zatlačte tlačítko START/PAUZA a program se znovu uvede do chodu. Jestliže se
vám po všech kontrolách nepodaří problém odstranit, obraťte se na místní servisní středisko.
Problém
• Pračku nelze spustit:
• Pračka se nenapouští vodou:
• Pračka se při napouštění vodou
vyprazdňuje:
• Pračka se nevypouští a/nebo
neodstřeXuje:
Mozná příčina
• Zkontrolujte, zda jsou dvířka správně zavřena. (E40)
• Zkontrolujte, jestli je zástrčka dobře zapojena do
zásuvky a v zásuvce je napětí.
• Zkontrolujte, jestli nejsou přepálené pojistky nebo
není vypadlý jistič.
• Nebylo vypnuto tlačítko START/PAUZA.
• Je nastavena funkce OPOZDÈNÉ SPUSTENÍ
• Zkontrolujte, zda je vodovodní ventil otevřen. (E10)
• Zkontrolujte, zda z vodovodního ventilu teče
voda. (E10)
• Zkontrolujte, jestli přívodní hadice není ohnutá
nebo překroucená. (E10)
• Zkontrolujte, jestli filtr na přívodu vody není
zanesený. (E10)
• Zkontrolujte, jestli jsou zavřená dvířka. (E40)
• Konec vypouštěcí hadice je příliš nízko nad
podlahou. Viz příslušný odstavec v části
Vypouštění vody.
• Zkontrolujte, jestli vypouštěcí hadice není ohnutá
nebo překroucená.
• Bylo zvolena funkce .
• Odtokovy filtr je zaneseny (E20). Vycist™te ho.
ČESKY
• Na podlaze je voda:
• Pračka nemá uspokojivé
výsledky praní:
• Bylo použito velké množství pracího prostředku
nebo nevhodný prostředek (vytváří se příliš mnoho
pěny).
• Zkontrolujte těsnost přívodní hadice a spojů.
Zkontrolujte rukou, zda hadice není na povrchu
mokrá. Jinak se špatně určuje, jestli voda neteče
podél hadice.
• Zkontrolujte, zda není poškozená vypouštěcí
hadice.
• Bylo použité malé množství pracího prostředku
nebo nevhodný prostředek.
• Před praním jste neodstranili silně zažrané skvrny.
• Nebyla zvolena správná teplota nebo správný
program.
• Dávka prádla je příliš velká.
71
Page 72

M
o
d
.
.
.
.
.
.
.
.
.
.
.
P
r
o
d
.
N
o
.
.
.
.
.
.
.
.
.
.
.
.
S
e
r
.
N
o
.
.
.
.
.
.
.
.
.
.
P0042•N
Mod. ..........
Prod. No. ...........
Ser. No. .........
Problém
Mozná příčina
• Při provozu se projevují
neobvyklé zvuky a vibrace:
• Dvířka se nedají otevřít:
• V pračce není vidět vodu:
• Odstredování zacíná se
zpozd™ním nebo k n™mu v√bec
nedochází:
• Zkontrolujte, jestli byly odstraněny přepravní prvky
a obaly.
• Zkontrolujte, jestli se spotřebič nedotýká stěn
nebo nábytku.
• Zkontrolujte, zda nožky spotřebiče sedí pevně na
zemi.
• Zkontrolujte, zda je prádlo v bubnu rovnoměrně
rozloženo.
• Je možné, že v bubnu je příliš málo prádla.
• Práv™ b™zí program a buben je v pohybu.
• Hladina vody v pracce presahuje dolní cást dvírek.
•Pracka práv™ ohrívá vodu.
• Tento spotřebič, který je výsledkem moderní
technologie, pracuje velice úsporným způsobem, s
nízkou spotřebou energie. Výkon je přesto
vynikající.
•Doslo k zásahu kontrolního elektronického systému
nevyvázení, protoze prádlo není rozmíst™no
rovnom™rn™ uvnitr bubnu. Opacnou rotací bubnu
se prádlo rozmístí rovnom™rn™. M√ze se zopakovat
tato situace vícekrát za sebou nez dojde k
prekonání jevu spatného vyvázení a nez
odstredivka bude pracovat normán™. Jestliže i po 6
minutách pokusů prádlo zůstane rozmístěno se
špatným vyvážením, dojde k odstřeďování při
snížené rychlosti otáček.
Pokud tedy po skoncení cyklu prádlo z√stane
mokré, doporucujeme ho rozlozit v bubnu rucn™ a
nastavit program odstredování.
Jestliže problém nemůžete určit nebo vyřešit,
kontaktujte naše servisní středisko. Dříve než
budete telefonovat do servisu, poznamenejte si
model, číslo výrobku, výrobní číslo a datum
zakoupení: servisní středisko se na tyto údaje bude
dotazovat.
72
Page 73

Záruka, servis a náhradní díly
Prect™te si tento návod k obsluze a dodrzujte v n™m
uvedené rady a pokyny. V mnoha prípadech si budete
moci vyjasnit jakékoli pochybnosti sami a tudíz
vyhnout se zbytecnym voláním do servisu. Predchozí
cásti nazvané "Jestlize n™co nefunguje správn™" a
"Servis" obsahuje doporucení, co by se m™lo
zkontrolovat dríve, nez zavoláte servisního technika.
Jestlize po t™chto kontrolách závada stále
existuje, zavolejte vase nejblizsí autorizované
servisní stredisko ELECTROLUX.
Ujist™te se, ze m√zete sd™lit model a seriové císlo
spotrebice. Tyto informace naleznete na datovém
stítku prístroje.
Originální náhradní díly lze koupit od autorizovanych
stredisek servisu ELECTROLUX.
Model............................................................
Císlo vyrobku (Prod. No.)............................
Seriové císlo (Serial. No.)...........................
eventueln™ KD ... ... ... / ...
Bezpecnost
Prect™te si tento návod a varovná upozorn™ní na
zacátku tohoto návodu. Vyrobce nezodpovídá za
vady zp√sobené nesprávn™ pouzívanym vyrobkem
nebo vyrobkem pouzívanym pro jiné úcely nez jsou
úcely specifikované v tomto návodu.
Technické zm™ny vyrobku vyhrazeny.
ČESKY
Podmínky záruky
My, vyrobce, zarucujeme, ze jestlize b™hem 12
m™síc√ od data zakoupení tohoto spotrebice
ELECTROLUX se tento spotrebic nebo jakákoli jeho
cást ukázou jako vadné pouze z d√vodu vadného
zpracování nebo vadného materiálu, provedeme
podle naseho uvázení bud opravu nebo vym™nu
téhoz bez placení za práci, materiál nebo prepravu za
predpokladu, ze
- spotrebic byl správn™ instalován a pouzíván pouze
na nap™tí uvedené na stítku jmenovitych hodnot
- spotrebic byl pouzíván pouze pro normální domácí
úcely a v souladu s pokyny vyrobce pro provoz a
údrzbu na spotrebici neprovád™la servis, údrzbu ani
opravu jiná nez námi autorizovaná osoba
- vsechny servisní práce podle této záruky musí
provád™t servis ELECTROLUX nebo jím autorizované
stredisko
- kazdy vym™n™ny spotrebic nebo vym™n™ná vadná
soucást se stanou nasím vlastnictvím
- tato záruka platí vedle vasich zákonnych nebo jinak
právn™ podlozenych práv
Vyjimky - tato záruka se nevztahuje na:
- poskození nebo pozadavky vzniklé v d√sledku
prepravy, nesprávného pouzití nebo nedbalosti,
vym™ny zárovek a snímatelnych cástí ze skla
nebo plastickych hmot
- náklady spojené s pozadavky na odstran™ní závad
spotrebice, ktery je nesprávn™ instalován
- spotrebice, které jsou pouzívány v komercním
prostredí vcetn™ pronajímanych
- zem™ Evropského spolecenství. Lze pouzít
standardní záruku, ale zajist™ní, ze spotrebic splñuje
normy platné v príslusné zemi, kam byl spotrebic
dopraven, je na zodpov™dnosti a na náklady vlastníka.
M√ze byt vyzadován doklad o koupi.
V prípad™ problému volejte zdarma
0800/16 00 16.
73
Page 74

Vázeny zákazník,
Prosíme Vás, aby ste si pozorne precítali tento
návod na pouzitie a venovali mimoriadnu pozornost
bezpecnostnym predpisom uvedenym na prvych
stranách. Odporúcame Vám odlozit si tento návod,
aby ste doň mohli v budúcnosti v prípade potreby
nazriet a pri prípadnom predaji Vásho spotrebiča ho
odovzdat novému majite¬ovi.
Skody spôsobené pri doprave
Ked spotrebic vybalíte, skontrolujte, ci nie je
poskodeny. Ak máte pochybnosti, spotrebic
nepouzívajte a kontaktujte servisné stredisko.
Vyznam symbolov pouzitych v niektorych odsekoch tejto prírucky:
Varovnym trojuholníkom a/alebo varovnymi termínmi (Pozor! Upozornenie!) sú oznacené pokyny zvlást
dôlezité pre Vasu bezpecnost a správne fungovanie zariadenia. Prosíme Vás, aby ste sa nimi riadili.
Informácie oznacené tymto symbolom slúzia na doplnenie instrukcií na pouzívanie zariadenia a jeho
praktického vyuzitia.
Rady oznacuje rady a instrukcie na ekonomické, t.j. úsporné pouzívanie zariadenia, v súlade so
zásadami ochrany zivotného prostredia.
Nás príspevok k ochrane zivotného prostredia:
pouzívame recyklovany papier.
74
Page 75

Obsah
Dôlezité upozornenia 76
Likvidácia 77
Ako chránitzivotné prostredie 77
Technická specifikácia 78
Údrzba 93
Dvierka 93
Skriña automatickej prácky 93
Zásuvka dávkovaca93
Odtokovy filter 93
Filter prívodu vody 94
Núdzové vypúsranie 94
Nebezpecenstvo zamrznutia 94
Instalácia 79
Rozbalenie 79
Umiestnenie a nivelácia 79
Prívod vody 80
Vypústanie vody 80
Elektrické zapojenie 80
Ak nieco nefunguje správne 95-96
Vasa nová prácka 81
Popis spotrebica81
Kontrolka uzatvárania dvierok 81
Zásuvka pre pracie prostriedky 81
SLOVENSKY
Pouzitie 82
Ovládací panel 82-85
Rady pre pranie 86
Triedenie bielizne 86
Teploty 86
Pred vlozením bielizne do pracky 86
Maximálna dávka bielizne 86
Hmotnost bielizne 86
Odstrañovanie skvŕn86
Pracie prostriedky a prísady 86
Mnozstvo pouzitého
pracieho prostriedku 87
Medzinárodné znacenie 88
Ako postupovat 89-91
Tabu¬ka programov 92
75
Page 76

Dôležité upozornenia
Nasledujúce upozornenia poskytujeme v záujme celkovej bezpecnosti. Pred instaláciou spotrebica a jeho
pouzívaním si ich ve¬mi pozorne precítajte.
Instalácia
•Vsetok vnútorny obalovy materiál treba pred
pouzitím spotrebica odstránit. Ak by ste
neodstránili vsetky ochranné prepravné prvky
alebo ich odstránili iba ciastocne, mohlo by dôjst k
váznemu poskodeniu spotrebica aj najblizsieho
okolného zariadenia. Pozrite príslusny odsek tejto
prírucky.
• Elektrické zapojenie spotrebica a práce súvisiace s
jeho instaláciou musí vykonávat kvalifikovany
elektrikár.
• Akéko¬vek instalatérske práce nutné k instalácii
tohto spotrebica musí vykonat kvalifikovany
instalatér.
• Po ukoncení instalácie spotrebica skontrolujte, ci
spotrebic nestojí na elektrickom prívodnom kábli.
• Ak pracka stojí na podlahe s kobercom,
presvedcte sa, ci v priestore pod prackou
vymedzenom pre nastavite¬né nôzky môze vo¬ne
prúdit vzduch.
Pouzitie
• Tento spotrebic je urceny k pouzitiu v domácnosti.
Nesmie sa pouzívat pre iné úcely ako pre tie, pre
ktoré bol vyrobeny.
• Perte iba bielizeñ urcenú pre pranie v
automatickych prackach. Dodrzujte presne pokyny
vyrobcu bielizne na etikete .
• Nepretazujte spotrebic. Vzdy dodrzujte pokyny
návodu k obsluhe.
• Pred praním sa ubezpecte, ze sú vsetky vrecká
prázdne. Predmety ako sú mince, zavieracie
spendlíky, spendlíky a skrutky môzu spôsobit
rozsiahle skody.
• V automatickej pracke neperte odevy, ktoré sú
nasytené ropnymi produktami, metylalkoholom,
trichlórom atd. Ak ste tieto kvapaliny pouzili pred
praním na vycistenie skvŕn, pockajte pred
vlozením do pracky, kym sa z tkaniny dokonale
vyparia.
• Malé kusy, ako ponozky, opasky atd. vkladajte do
pracky vo vankúsovych oblieckach alebo k tomu
urcenych vreckách, aby sa nezachytili medzi
otocnym a pevnym bubnom.
• Pouzívajte iba doporucené mnozstvo prísad na
osetrovanie tkanín. Nadmerné dávkovanie by
mohlo bielizeñ poskodit.
• Medzi praním nechajte dvere spotrebica mierne
pootvorené, aby sa setrilo tesnenie dvierok, a aby
sa zabránilo vzniku nepríjemného zápachu.
•Vzdy pred otvorením spotrebica cez okienko vo
dverách skontrolujte, ci je voda vypustená. Ak v
ñom zostala voda, vypustite ju pod¬a návodu k
obsluhe.
• Po pouzití spotrebic vzdy odpojte zo zásuvky a
zatvorte vodovodny ventil.
Vseobecné pravidlá
• Opravy na zariadení smú vykonávat len osoby,
vyskolené na túto prácu. Nevhodné opravy môzu
zaprícinit vázne poskodenie zariadenia. Kvôli
opravnym prácam sa obrátte na násho najblizsieho
zmluvného servisného partnera.
• Nikdy nevytahovat zástrcku zo zásuvky tahaním
za kábel, zásadne tahat samotnú zástrcku.
• V priebehu programov s vysokou teplotou sa dvere
ohrievajú na vysokú teplotu. Nedotykajte sa ich.
76
Page 77

Bezpecnost detí
P1076
• Deti si casto neuvedomujú nebezpecenstvo
súvisiace s elektrickymi zariadeniami. Pocas práce
stroja je nevyhnutné dávat na deti pozor a
nedovolit im hrat sa so zariadením – hrozí
nebezpecenstvo, ze sa deti zamknú vo vnútri.
• Casti obalu (napríklad fólie, polystyrén) môzu byt
pre deti nebezpecné. Nebezpecenstvo zadusenia!
Odstránit tieto predmety z dosahu detí.
• Uschovávat pracie prásky na bezpecnom mieste
mimo dosahu detí.
• Ubezpecit sa, ze deti alebo domáce zvieratá
nemôzu vojst do bubna prácky. Práãka je za t˘mto
úãelom vybavená ‰peciálnym zariadením. Ak
chcete toto zariadenie zapnúÈ, otáãajte gombíkom
vo vnútri dvier v smere otáãania hodinov˘ch
ruãiãiek (netlaãte na gombík), k˘m sa zárez
nedostane do vodorovnej pozície. V prípade
potreby pouÏite na otáãanie gombíka mincu.
Likvidácia
Ak chcete toto zariadenie vypnúÈ, otáãajte gombíkom
proti smeru otáãania hodinov˘ch ruãiãiek, k˘m sa
zárez nedostane do vertikálnej polohy.
• V prípade likvidácie zariadenia vytiahnite zástrcku
zo zásuvky, odstrihnite kábel pre prívod
elektrického prúdu a zástrcku so zbytkom kábla
odstráňte. Znemoznite zatváranie dvierok; tymto
spôsobom zabezpecíte, aby sa deti pri hraní
nemohli zavriet vo vnútri zariadenia.
SLOVENSKY
Obalovy materiál
materiál oznaceny symbolom je recyklovate¬ny.
>PE<= polyetylén
>PS<= polystyrén
>PP<= polypropylén
Aby sa tieto materiály mohli recyklovat, musia sa
ulozit na urcené miesto (alebo do urcenych
kontajnerov).
Ako chránitzivotné prostredie
V záujme úspory vody a energie ako aj v záujme
ochrany zivotného prostredia odporúcame
postupovat pod¬a nasledujúcich rád:
•bezne spinavé prádlo sa môze prat bez predpierky;
tymto spôsobom sa usetrí prací prások, voda a cas
(a chráni sa zivotné prostredie).
• ak je to mozné, perte s maximálnou dávkou
bielizne pre dany program, ale nepretazujte
bubon.
Spotrebic
Správne zlikvidovat vás stary spotrebič znamená
odviezt ho na autorizovanú skládku. Pomôzte
udrzat vase mesto cisté.
• Vhodnym osetrením pred praním mozno odstránit
skvrny a iné ohranicené uspinené plochy; pre
samotné pranie potom postací nizsia teplota.
• Pracie prostriedky dávkujte pod¬a tvrdosti vody,
mnozstva pranej bielizne a stupña znecistenia.
77
Page 78

Technická specifikácia
ROZMERY Vyska 85 cm
Sírka 60 cm
Hĺbka 62 cm
NAPÄTIE A FREKVENCIA NAPÁJANIA 220-230 V/50 Hz
MAX. INSTALOVANY VYKON (PRÍKON) 2200 W
ISTENIE 10 A
TLAK VODY Minimálny 5 N/cm2(50 kPa, 0,5 bar)
Maximálny 80 N/cm2(800 kPa, 8 bar)
MAXIMÁLNA DOPORUCENÁ Bavlna 5,5 kg
NÁPLÑ Syntetické tkaniny 2,5 kg
Vlna 2 kg
OTÁCKY PRI ODSTREĎOVANÍ 1200 ot./min
Tento spotrebic zodpovedá nasledujúcim predpisom EEC:
73/23/EEC z 19.2.73 - Predpis o nízkom napätí,
89/336/EEC z 3.5.89 - Predpis o elektromagnetickej kompatibilite.
78
Page 79

Instalácia
2
1
P1066
P1068
P0255
P1051
P0020
P0256
Rozbalenie
Pred uvedením stroja do prevádzky odstráňte
ochranné zariadenia pre prepravu.
1. Pomocou k¬úca odmontovat skrutku, ktorá sa
nachádza na zadnej strane stroja vpravo.
Prevrátit stroj na zadnú stranu tak, aby sa pritom
nestlacili hadice. Pri prevracaní pouzit ako
pomôcku jeden z “rohov“ obalu a vlozit ho medzi
stroj a dlázku.
2. Odstránit polystyrénovy blok zo spodnej casti
stroja a uvo¬nit 2 nylonové vrecúska, ktoré sú
umiestnené pod okienkom filtra.
3. Ve¬mi opatrne zvesit najprv pravé (1) a potom aj
¬avé (2) vrecúsko.
5. Odstránit tri plastové capíky z otvorov, v ktorych boli
namontované skrutky.
6. Uzavriet otvory, ktoré zostali otvorené, zátkami,
ktoré sa nachádzajú v plastovom vrecúsku s
návodom na pouzitie.
Odporúcame odlozit vsetky pomôcky pouzité pri
preprave, aby sa mohli pouzit pri prípadnom
stahovaní.
Umiestnenie a nivelácia
Zariadenie musí byt umiestnené na pevnom a
dokonale vodorovnom podklade.
Ubezpecte sa, ze cirkulácii vzduchu okolo stroja
nebránia koberce, podlahové krytiny a podobne.
Spotrebič sa nesmie dotýkať steny alebo nábytku
kuchyne.
Zariadenie dôkladne nivelujte odkrútením alebo
zakrútením nastavite¬nych noziciek. Nikdy pod stroj
nevkladajte kartón, drevo alebo podobné materiály
na vykompenzovanie prípadnych nerovností dlázky.
SLOVENSKY
4. Prevrátit stroj spät na nozicky a odmontovat dve
zvysné skrutky na zadnej strane.
79
Page 80

Prívod vody
P0022
P0021
P0023
Pripojit hadicu na prívod vody k vodovodnému
potrubiu s kohútikom so závitom ¬.
Horny koniec prívodnej hadice, na strane stroja,
môze byt orientovany akymko¬vek smerom. Najprv
¬ahko odkrútit poistny krúzok, otocit koniec hadice a
opät namontovat krúzok. Skontrolovat, ci
nedochádza k úniku vody.
P1088
Prívodnú hadicu nemozno predlzovat. Ak je hadica
prílis krátka a kohútik nemozno premiestnit, musí sa
vymenit celá hadica za dlhsiu, vhodnú na tento úcel.
Vypústanie vody
V odtokovom potrubí, umiestnenom vo vyske
najmenej 60 cm a najviac 90 cm. Koniec odtokovej
hadice musí byt vzdy ventilovany, t.j. vnútorny
priemer odtokového potrubia musí byt vzdy väcsí
nez vonkajsí priemer hadice.
Odtoková hadica nesmie byt priskrtená ci stlacená.
Nechajte hadicu lezat na dlázke, vydvihnite ju len v
blízkosti napojenia na odtok.
Odtokovú hadicu mozno predlzovat, ale jej dÍzka
nesmie prekrocit 400 cm. V prípade predÍzenia musí
byt vnútorny priemer predlzovacej hadice zhodny s
vnútornym priemerom pôvodnej hadice. Na spojenie
oboch hadíc pouzite vhodny spoj.
Hadicu na vypústanie vody mozno umiestnit tromi
rôznymi spôsobmi:
Na okraj umyvadla pouzitím plastového kolena
dodaného spolu so zariadením. Je dôlezité, aby pri
rychlosti, ktorú voda dosiahne vo fáze vypústania,
ohnutá cast hadice nevykÍzla z okraja umyvadla.
Pripevnite ju preto ku kohútiku snúrkou alebo hákom
umiestnenym na stene tak, ze sa ohnutá cast hadice
prevlecie cez príslusny otvor.
Elektrické zapojenie
Zariadenie pracuje pri jednofázovom napätí 220-230
V, 50 Hz.
Overte, ci elektrická instalácia v domácnosti je
schopná zniest najvyssiu pozadovanú zátaz (2,25
kW). Vezmite pritom do úvahy aj ostatné
elektrospotrebice, pouzívané v domácnosti.
Pripojte zariadenie na zásuvku elektrického
prúdu s uzemnením.
Vyrobca nepreberá nijakú zodpovednost za
skody alebo úrazy vzniknuté
nerespektovaním horeuvedenych
bezpecnostnych pokynov.
V prípade nutnosti vymeny elektrickej snúry
musí byt táto operácia zverená násmu
zmluvnému servisnému partnerovi.
Dôlezité: Akonáhle je stroj uvedeny do
prevádzky, elektrická snúra musí byt vzdy
prístupná.
80
Page 81

Vasa nová prácka
Tento nový spotrebič, ktorý je vybavený systémom priameho rozstrekovania, ktor˘ je patentovan˘ firmou
Zanussi a zodpovedá v‰etk˘m modern˘m požiadavkám na pranie pri nízkej spotrebe vody, energie a pracieho
prostriedku.
Ďalších úspor je dosahované tak, že v prípade prania malých množstiev bielizne je spotreba vody a energie
zodpovedajúca množstvu a druhu pranej bielizne.
• MoÏnosÈ voºby teploty, r˘chlosti odstreìovania a v‰etky ostatné doplÀujúce prvky Vám v prípade tejto práãky
ponúkajú skutoãné pranie podºa individuálnej potreby.
FFuunnkkcciiaa OONNEESSKKOORREENN
•
YS
TTAARRTT
vám umoÏÀuje nastavit ‰tart programu na akúkoºvek dennú hodinu. Vìaka
tejto funkcii je moÏné napr. vyuÏiÈ ekonomicky v˘hodného noãného tarifu elektrickej energie.
• Displej postupu programov vyobrazuje jednotlivé nastavené kroky postupu a fázy programu, ktorý je v
prevádzke.
• Speciálny program pre vlnu ide o nový systém jemného prania vlnenej bielizne s veľkou opatrnosťou.
• Kontrola rovnováhy zabezpečuje, aby spotrebič ostával stabilný v priebehu otáčania bubna.
Popis spotrebica
1 Zásuvka na pracie prostriedky
2 Ovládací panel
3 Kontrolka uzatvárania dvierok
4 Odtokový filter
5 Nastaviteľné nožičky
Kontrolka uzatvárania dvierok
Ostane rozsvietená počas celej prevádzky programu
a označuje, že dvierka sú zamknuté.
Po zhasnutí kontrolky je možné dvierka otvoriť.
(viď str. 91)
Zásuvka pre pracie prostriedky
Predpierka
12
0
120
AT
E
1200
90
900
60
700
40
500
30
N
SLOVENSKY
3
4
5
Hlavné pranie
Aviváž, škrobenie
C0063
81
Page 82

Pouzitie
Ovládací panel
90
60
40
30
1200
900
700
500
12 3 4 5 6 7 8 91011
11 TTllaaããiiddlloo ZZAAPPNNUUTTÉÉ//VVYYPPNNUUTTÉÉ
Zatlaãte tlaãidlo, ak chcete zapnúÈ spotrebiã. Zatlaãte
znovu toto tlaãidlo, ak chcete spotrebiã vypnúÈ.
22 KKoonnttrroollkkaa ZZAAPPNNUUTTÉÉHHOO SSTTAAVVUU
Táto kontrolka je spojená s tlaãidlom ON/OFF. Po
zatlaãení tlaãidla sa rozsvieti a po jeho opätovnom
zatlaãení zhasne.
33 TTllaaããiiddlloo BBIIEELLIIZZEE≈≈ -- VVOOªªBBAA
PPRROOGGRRAAMMUU
Zatláãajte opakovane toto tlaãidlo pre voºbu
programu na základe druhu bielizne, ktorú chcete
vypraÈ. Po zatlaãení sa rozsvieti kontrolka
príslu‰ného programu. Práãka ponúkne nastavenie
teploty a automaticky nastaví maximálnu r˘chlosÈ
odstreìovania pre zvolen˘ program. Tieto hodnoty je
moÏné zmeniÈ prostredníctvom tlaãidiel 4 a 5.
RRuuããnnéé pprraanniiee
Pri voºbe tohto programu nastavíte mimoriadne
jemné pranie, vhodné pre bielizeÀ, ktorá je na ‰títku
oznaãená znaãkou pre pranie v ruke .
12
44 TTllaaããiiddlloo pprree NNAASSTTAAVVEENNIIEE
TTEEPPLLOOTTYY
Zatláãajte opakovane tlaãidlo pre zv˘‰enie alebo
sníÏenie teploty, ak si Ïeláte praÈ bielizeÀ pri
rozdielnej teplote, neÏ aká bola nastavená
spotrebiãom. Rozsvieti sa zodpovedajúca kontrolka.
Maximálna teplota pre bavlnu je 90°C, pre syntetické
materiály 60°C a 40°C pre delikátnu bielizeÀ, vlnu a
bielizeÀ urãenú na pranie v ruke (Program ).
= praniu v “studenej vode”.
DDôôlleeÏÏiittéé
Po súãasnom zatlaãení tlaãidiel
RR¯¯CCHHLLOOSSËË OODDSSTTRREEëëOOVVAANNIIAA
signál na konci cyklu.
TTEEPPLLOOTTAA
sa vypne zvukov˘
a
55 TTllaaããiiddlloo RR¯¯CCHHLLOOSSËË
OODDSSTTRREEëëOOVVAANNIIAA
Zatláãajte opakovane tlaãidlo pre zmenu r˘chlosti
odstreìovania, ak si Ïeláte, aby va‰a bielizeÀ bola
odstredená pri rozdielnej r˘chlosti, neÏ aká bola
nastavená spotrebiãom. Rozsvieti sa zodpovedajúca
kontrolka.
Maximálna r˘chlosÈ:
• pre bavlnu: 1.200 ot./min.
• pre syntetické materiály, vlnu a bielizeÀ urãenú na
pranie v ruke: 900 ot./min.
• pre jemnú bielizeÀ: 700 ot./min.
Pozícia zastavenia s
tejto funkcie sa práãka po poslednom plákaní zastaví
a nezaãne vypú‰ÈaÈ vodu, ãím sa zabráni krãeniu
bielizne.
VVOODDOOUU VV BBUUBBNNEE
: po voºbe
82
Page 83

Po ukonãení pracieho cyklu zaãne kontrolka tlaãidla
·TART/PAUZA blikaÈ a signalizuje t˘m, Ïe treba
vypustiÈ vodu. Pre dokonãenie cyklu zvoºte jednu z
nasledujúcich funkcií:
•• VVyyppúú‰‰ÈÈaanniiee vvooddyy aa ooddssttrreeììoovvaanniiee
ZZaattllaaããttee ttllaaããiiddlloo ··TTAARRTT//PPAAUUZZAA..
vypú‰ÈaÈ vodu a odstreìovaÈ bielizeÀ pri
maximálnej r˘chlosti otáãok, zodpovedajúcej
zvolenému programu.
- Navoºte r˘chlosÈ odstreìovania prostredníctvom
tlaãidla 5 a zatlaãte tlaãidlo ·TART/PAUZA.
•• IIbbaa pprree vvyyppúú‰‰ÈÈaanniiee vvooddyy
- Zatlaãte tlaãidlo iba
rozsvietila kontrolka a napokon zatlaãte
tlaãidlo ·TART/PAUZA.
DDôôlleeÏÏiittéé
bblliikkaajjúúccee ppoommllããkkyy..
ak˘koºvek program prania prostredníctvom tlaãidla
nastavili (kontrolka ostane rozsvietená).
: Ak by pri‰lo na náhodné zatlaãenie tlaãidla
viac ako jeden raz, na displeji sa objavia
K vypusteniu vody zvoºte
a ìalej zatlaãte
ttrriikkrráátt
jjeeddeenn rraazz
tlaãidlo , aby ste t˘m
Spotrebiã zaãne
, aby sa
ttrrii
66 TTllaaããiiddlloo PPRRÍÍDDAAVVNNÉÉ FFUUNNKKCCIIEE
88
DISPLEJ
Na displeji sa objavujú nasledujúce informaãné
signály:
TTrrii bblliikkaajjúúccee ppoommllããkkyy
•
zru‰en˘ prostredníctvom tlaãidla .
Tri blikajúce pomlãky sa objavia rovnako aj v
prípade, keì stlaãíte tlaãidlo za úãelom zapnutia
spotrebiãa, keì predchádzajúci cyklus bol zru‰en˘.
sa objaví, keì je program
---
TTrrvvaanniiee pprraacciieehhoo pprrooggrraammuu
•
sa objaví po nastavení programu.
v hodinách a minutách
Zatlaãte tlaãidlo, ak chcete zvoliÈ nasledujúce
funkcie:
PPRREEDDPPIIEERRKKAA
•
bielizeÀ bola predpraná pred hlavn˘m cyklom
prania (
pprrooggrraammoocchh pprree vvllnnuu aa rruuããnnéé pprraanniiee
Predpierka sa konãí krátkym odstreìovaním pri
650 ot./min. pri programoch pre bavlnu a syntetiku,
zatiaº ão pri programu jemného prania bude iba
vypustená voda.
SSUUPPEERR PPLLÁÁKKAANNIIEE
•
pri v‰etk˘ch programoch s v˘jimkou
vvllnnuu aa rruuããnnéé pprraanniiee..
plákania namiesto 3 cyklov. Doporuãujeme túto
funkciu pre ºudí postihnut˘ch alergiou na pracie
prostriedky a rovnako v oblastiach s veºmi mäkkou
vodou.
ttááttoo ffuunnkkcciiaa nniiee jjee nnaavvoolliitteeººnnáá pprrii
: zvolte, ak si Ïeláte, aby va‰a
).
: táto funkcia je navoliteºná
pprrooggrraammuu pprree
Práãka vykoná 4 cykly
77 TTllaaããiiddlloo RR¯¯CCHHLLEEHHOO PPRRAANNIIAA
Toto tlaãidlo umoÏÀuje voºbu funkcie
PPRRAANNIIAA
nniiee jjee mmooÏÏnnéé zzvvoolliiÈÈ pprree pprrooggrraammyy pprree vvllnnuu aa RRUUââNNEE
(
PPRRAANNIIEE
âas prania sa zníÏi v závislosti od druhu bielizne a
nastavenej teploty.
pre bielizeÀ, ktorá je iba málo u‰pinená
).
RR¯¯CCHHLLEEHHOO
2.05
Zatiaº ão je program v prevádzke (po zatlaãení
tlaãidla ·TART/PAUZA) sa hodnota ãasu na
displeji po kaÏdej minúte zniÏuje.
PPrrááããkkaa ssaa zzaassttaavviillaa ss vvooddoouu vv bbuubbnnee
•
programu a bola zvolená funkcia : tát situácia je
oznaãená
PPrrááããkkaa uukkoonnããiillaa pprrooggrraamm
•
nnuulloouu
uzamknut˘ch dvier. Nula se objaví znovu, ak
uvediete práãku znovu do prevádzky bez toho, Ïe
by ste najprv zru‰ili predchádzajúci program
prostredníctvom tlaãidla .
nneebblliikkaajjúúccoouu nnuulloouu..
: signalizované
. V tom samom ãase zhasne kontrolka
na konci
bblliikkaajjúúccoouu
0
SLOVENSKY
83
Page 84

DDôôlleeÏÏiittéé::
PPrrii pprrvvoomm ppoouuÏÏiittíí pprrááããkkyy
môÏe objaviÈ blikajúca nula a ozvaÈ sa varujúci
signál. To je spôsobené t˘m, Ïe práãka vykonala vo
fabrike v priebehu v˘stupn˘ch skú‰ok prací program
a tento program nebol po svojom skonãení zru‰en˘.
OOnneesskkoorreenniiee zzaaããiiaattkkuu pprraanniiaa,,
•
v ãase a nastavená prostredníctvom príslu‰ného
tlaãidla.
âas oneskoreného zaãiatku prania sa objaví na 5
sekúnd a pak sa znovu objaví ãas trvania
zvoleného programu.
Po zatlaãení tlaãidla ·TART/PAUZA sa zaãne
spätn˘ odpoãet ãasu, ktorého hodnota sa zniÏuje
kaÏdú hodinu.
Oneskorenie ‰tartu zvoleného programu je moÏné
nastaviÈ do hodnoty 24 hodín po hodinov˘ch
intervaloch.
BBoollaa nnaassttaavveennáá nneesspprráávvnnaa ffuunnkkcciiaa::
•
zvolenú funkciu nie je moÏné nastaviÈ so zvolen˘m
programom, objaví sa nápis
Nesprávna voºba je rovnako signalizovaná
zvukov˘m signálom.
AAllaarrmmoovv˘˘ kkóódd
•
spotrebiãa (pozrite príslu‰né kódy na str. 95).
signalizuje preru‰enie prevádzky
, po jej zapnutí sa na displeji
hodnota je vyjadrená
v prípade, Ïe
EErrrr
.
99 TTllaaããiiddlloo ··TTAARRTT//PPAAUUZZAA
Toto tlaãidlo má nasledujúce funkcie:
··ttaarrtt
•
: Zatlaãte toto tlaãidlo potom, ão ste zvolili
poÏadovan˘ program a doplÀujúce funkcie a
spotrebiã sa uvedie do prevádzky. Kontrolka nad
tlaãidlom prestane blikaÈ a ostane rozsvietená.
V prípade, Ïe ste zvolili oneskorenie ‰tartu
prostredníctvom tlaãidla 11, zaãne sa spätn˘
odpoãet a jeho hodnoty sa objaví na displaji.
PPaauuzzaa
•
• práãka nie je vo fáze zohrievania vody
• hladina vody nie je vysoká
• bubon nie je v pohybe
DDôôlleeÏÏiittéé!!
prevádzkovanéhho pracieho programu, musíte na
spotrebiãi navoliÈ PAUZA.
•
: po opätovnom zatlaãení tohto tlaãidla sa
preru‰í prevádzkovan˘ program. Kontrolka nad
tlaãidlom zaãne blikaÈ. Ak chcete program znovu
spustiÈ o prevádzky, zatlaãte znovu tlaãidlo.
Po zatlaãení funkcie PAUZA cyklu zhasne
kontrolka uzamknut˘ch dvier a je moÏné otvoriÈ
dvierka za predpokladu, Ïe:
Pred t˘m, neÏ vykonáte akúkoºvek zmenu
VVyyppúú‰‰ÈÈaanniiee vvooddyy aa ooddssttrreeììoovvaanniiee
programov s voºbou funkcie .
po vykonaní
1100 TTllaaããiiddlloo ZZRRUU··EENNIIEE//
RREESSEETTOOVVAANNIIEE
Po ukonãení programu musíte zatlaãiÈ toto tlaãidlo
raz alebo opakovane, za úãelom vymazania
programu z pamäti (na displaji sa objaví tri blikajúce
pomlãky); v opaãnom prípade sa pri budúcom
zapnutí spotrebiãa na displaji objaví blikajúca nula a
ozve sa jasn˘ zvukov˘ signál, ktor˘ oznaãuje potrebu
ukonãenia predchádzajúceho pracieho cyklu.
Tlaãidlo moÏete takisto zatlaãiÈ, keì si Ïeláte
vypnúÈ niektoré ãasti prevádzkovaného programu,
ako je to popísané ìalej.
- nastavte spotrebiã na PAUZA zatlaãením tlaãidla
·TART/PAUZA (príslu‰ná kontrolka zaãne blikaÈ).
- zatlaãte raz alebo viac krát tlaãidlo , k˘m sa
nezru‰í poÏadovaná ãasÈ programu (kontrolka u
mena fáze zhasne).
E20
84
Page 85

PPrrííkkllaadd::
V tomto prípade bude
uvedené do prevádzky
PREDPIERKA
HLAVNÉ PRANIE
PLÁKANIE
ODSTREëOVANIE
VYPUSTENIE VODY
vypú‰Èanie vody a
odstreìovanie (pri
r˘chlosti, ktorá je
urãená pre zvolen˘ typ
bielizne).
Toto taãidlo vám taisto umoÏÀuje zvoliÈ ‰peciálne
programy, ako
VVYYPPUUSSTTEENNIIEE VVOODDYY
AAkk jjee ssppoottrreebbiiãã ssttáállee zzaappnnuutt˘˘
•
PPLLÁÁKKAANNIIEE,OODDSSTTRREEëëOOVVAANNIIEE
.
alebo ak práve
a
dokonãil program prania, postupujte takto:
- zatlaãte raz alebo opakovane tlaãidlo za
úãelom vymazania predo‰lého programu (na
displaji sa objaví tri blikajúce pomlãky);
- navoºte druh bielizne prostredníctvom
zopovídajúceho tlaãidla;
- zvoºte ‰peciálny program:
•• PPLLÁÁKKAANNIIEE
Uvolnite tlaãidlo jeden raz, kontrolka zhasne.
•• OODDSSTTRREEëëOOVVAANNIIEE
Uvolnite tlaãidlo dva razy, kontrolky a
zhasnú.
•• VVYYPPUUSSTTEENNIIEE VVOODDYY
Uvolnite tlaãidlo tri razy, kontrolky , a
zhasnú.
PPrrííkkllaadd::
1111 TTllaaããiiddlloo OONNEESSKKOORREENN¯¯
··TTAARRTT
Prostredníctvom tohto tlaãidla je moÏné oneskoriÈ
‰tart programu maximálne o 24 hodín. Zvolené
oneskorenie sa objaví na displeji na 5 sekúnd a
potom sa opäÈ objaví dæÏka zvoleného programu.
Túto funkciu je treba zvoliÈ po nastavení programu a
pred zapnutím tlaãidla ·TART/PAUZA.
âasová hodnota uvedená na displeji sa bude kaÏdou
hodinu zniÏovaÈ.
OOnneesskkoorreenniiee ‰‰ttaarrttuu mmôôÏÏeettee zzvvoolliiÈÈ vv aakkeejjkkooººvveekk cchhvvííllii
pred t˘m, neÏ zatlaãíte tlaãidlo ·TART/PAUZA.
V prípade Ïe ste zatlaãili tlaãidlo ·TART/PAUZA a
Ïeláte si
zzmmeenniiÈÈ
postupujte podle nasledujúceho návodu:
• nastavte spotrebiã do stavu PAUSE zatlaãením
tlaãidla ·TART/PAUZA;
• stláãajte tlaãidlo , dokiaº sa na displeji neobjaví
poÏadovan˘ ãas oneskorenia, alebo
• zatlaãte tlaãidlo jeden raz, aby ste tak zru‰ili
nastavené oneskorenie a na displeji sa objaví „0h”.
• zatlaãte znovu tlaãidlo ·TART/PAUZA.
DDôôlleeÏÏiittéé!!
V priebehu oneskorenia ‰tartu budú dvierka
uzamknuté (kontrolka uzamãen˘ch dvier svieti).
V prípade potreby otvoriÈ dvierka treba najprv
nastaviÈ spotrebiã na PAUZA zatlaãením tlaãidla
·TART/PAUZA. Po zatvorení dvier ztlaãte znovu
tlaãidlo ·TART/PAUZA.
alebo
zzrruu‰‰iiÈÈ
oneskorenie ‰tartu,
SLOVENSKY
V tomto prípade bude
spotrebiã prevádzkovaÈ
plákanie a
odstreìovanie.
VV pprrííppaaddee,, ÏÏee jjee ssppoottrreebbiiãã vvyyppnnuutt˘˘::
•
- zatlaãte tlaãidlo a zapnite tak spotrebiã;
- zvoºte druh bielizne prostredníctvom tlaãidla ;
- zvoºte ‰peciálny program podºa predchádzajúceho
návodu.
1122 KKoonnttrroollkkyy pprrooggrraammoovvééhhoo ppoossttuuppuu
Po voºbe programu sa rozsvieti kontrolky príslu‰n˘ch
programov˘ch fáz.
Po od‰tartování programu ostane rozsvietená iba
kontrolka oznaãujúci fázu programu, ktorá je práve v
prevádzke.
85
Page 86

Rady pre pranie
Triedenie bielizne
Pranie s maximálnou dávkou bielizne umozñuje
najefektívnejsie vyuzitie vody a energie.
Pri silne znecistenej bielizni znízte dávku.
Sledujte symboly pre pranie na kazdej etikete odevu
a dodrziavajte pokyny vyrobcu pre pranie.
Bielizeñ triedte pod¬a druhu nasledujúcim
spôsobom: biele, farebné, synteticky materiál,
jemné, vlna.
Teploty
90°-95°
pre normálne znecistenú bielu bavlnenú
a ¬anovú bielizeñ (napr. uteráky, obrusy,
prestieradlá atd.).
60° pre normálne znecistenú farebne stálu
bielizeñ (kosele, nocná bielizeñ, pyzamy
atd.) z ¬anovych, bavlnenych a
syntetickych tkanín a pre ¬ahko
znecistenú bielu bavlnenú bielizeñ
(spodnú).
(cold)
30°-40°
pre chúlostivé kusy (záclony), zmiesané
tkaniny vrátane syntetiky a vlny.
Pred vlozením bielizne do pracky
Nikdy neperte biele a farebné spolu. Biele by stratilo
svoju belost.
Nová farebná bielizeñ by mohla pustit farbu, preto
prvy raz by sa mala prat samostatne.
Ubezpecte sa, ze na bielizni nezostali ziadne
kovové predmety (napr. vlasové sponky,
spendlíky a pod.).
Zapnite vsetky gombíky, zipsy, hácky a patenty.
Utiahnite vsetky pásky.
Pred praním odstráñte vsetky silné skvrny. Ve¬mi
spinavé miesta vycistite speciálnym prostriedkom
alebo pastou.
So záclonami zaobchádzajte so zvlástnou
starostlivostou. Odstráñte vsetky hácky alebo ich
upevnite do vrecka ci sietky.
Maximálna dávka bielizne
Doporucené dávky sú vyznacené na kartách
programov.
Obecne platia tieto zásady:
Bavlna, ¬an: plny bubon, ale nenapchávat.
Synteticky materiál: bubon plny do polovicky.
Chúlostivá bielizeñ a vlna: bubon plny nie viac ako
do 1/3.
Hmotnost bielizne
Uvedené hodnoty sú iba orientacné:
kúpací plást 1200 g
obrúsok 100 g
obliecka na perinu 700 g
prestieradlo 500 g
obliecka na vankús 200 g
obrus 250 g
uterák 200 g
utierka 100 g
nocná bielizeñ 200 g
dámske nohavicky 100 g
pánska pracovná kose¬a 600 g
pánska kose¬a 200 g
pánske pyzamo 500 g
blúzka 100 g
pánske spodky 100 g
Odstrañovanie skvŕn
Silne zapité skvrny nestací cistit iba vodou a pracím
prostriedkom. Doporucuje sa preto odstránit ich pred
praním.
Krv: Cerstvé skvrny od krvi odstránit chladnou
vodou. Zaschnuté skvrny nechat cez noc namocené
vo vode so speciálnym pracím prípravkom a potom
ich odstránit rucne vodou a mydlom.
Olejové farby: Navlhcit benzínovym cisticom skvŕn,
polozit na mäkkú tkaninu a skvrnu vytriet. Postup
opakovat nieko¬ko ráz.
Zaschnuté olejové skvrny: Navlhcit terpentynom a
polozit kus na mäkkú tkaninu. Vytieratskvrnu rucne
s pomocou kúska bavlnenej látky.
Hrdza: Pouzit odstráñovac hrdze. So starymi
hrdzavymi skvrnami zaobchádzajte opatrne, lebo
celulózová struktúra bude uz poskodená a tkanina
má tendenciu k deraveniu.
Plesñové skvrny: Osetrit bielidlom a dobre
vyplákat (iba biela a farebne stála bielizeñ).
Tráva: Z¬ahka namydlit a osetrit bielidlom (iba biela
a farebne stála bielizeñ).
Skvrny od pera a lepidiel: Navlhcit acetónom (*),
polozit kus na mäkkú látku a skvrnu ¬ahko vytriet.
Rúz: Navlhcit acetónom ako v predchádzajúcom
prípade a osetritskvrny metylalkoholom. Z bielych
kusov odstránit pomocou bielidla.
86
Page 87

Cervené víno: Namocit do vody s pracím
prostriedkom, vyplákat a osetrit kyselinou octovou
alebo citrónovou a vyplákat. Zvysné stopy odstránit
bielidlom.
Atrament: Pod¬a druhu atramentu navlhcit tkaninu
najprv acetónom (*) a potom kyselinou octovou.
Zvysné stopy na bielej bielizni osetrit bielidlom a
dobre vyplákat.
Skvrny od dechtu: Najprv skvrny osetrit
metylalkoholovym alebo benzinovym odstrañovacom
skvŕn a potom vytrietcistiacim prostriedkom.
(*) Nepouzívajte acetón na umely hodváb!
Pracie prostriedky a prísady
Dobré vysledky prania závisia tiez na vo¬be pracieho
prostriedku a na pouzití správneho mnozstva, aby
nedochádzalo k plytvaniu a poskodzovaniu
zivotného prostredia. Napriek tomu, ze sú biologicky
odbúrate¬né, pracie prostriedky obsahujú látky, ktoré
vo ve¬kom mnozstve môzu zmenit jemnú rovnováhu
existujúcu v prírode.
Vo¬ba pracieho prostriedku bude závisiet na druhu
tkaniny (chúlostivá, vlnená, bavlnená atd.), na farbe,
na teplote prania a od stupña znecistenia.
V tomto spotrebici mozno pouzívat vsetky bezne
dostupné pracie prostriedky urcené pre automatické
prácky:
– práskové prostriedky na vsetky druhy tkanín,
– práskové prostriedky na chúlostivé tkaniny,
– kvapalné prostriedky hlavne pre pracie programy s
nízkou teplotou (max. 60°C) na vsetky druhy tkanín a
speciálne prostriedky na vlnu.
Prací prostriedok aj akéko¬vek prísady sa musia pred
spustením pracieho programu dávkovat do
príslusného oddielu zásuvky dávkovaca.
Ak pouzijete koncentrovany práskovy alebo tekuty
prostriedok, musíte zvolit program bez predpierania.
Tekuty prací prostriedok dávkujte do zásuvky
dávkovaca oznaceného tesne pred spustením
programu.
Akéko¬vek avivázne alebo skrobiace prísady sa
musia naliat do oddielu oznaceného pred
spustením pracieho programu.
Dodrzujte doporucenia vyrobcu, pokia¬ ide o
mnozstvo pouzitého prostriedku.
Mnozstvo pouzitého pracieho
prostriedku
Druh a mnozstvo pracieho prostriedku bude závisiet
od druhu tkaniny, ve¬kosti náplne, stupña znecistenia
a tvrdosti pouzitej vody.
Tvrdost vody sa oznacuje tzv. stupñami tvrdosti.
Informácie o tvrdosti vody vo vasej oblasti vám
poskytne príslusná vodárenská spolocnost alebo
miestny úrad.
Dodrziavajte pokyny vyrobcu k mnozstvu pouzitého
prostriedku.
Pouzite mensie mnozstvo pracieho prostriedku, ked:
– periete malé mnozstvo bielizne
– je bielizeñ¬ahko znecistená
– sa pri praní tvorí ve¬ké mnozstvo peny.
Stupne tvrdosti vody
°dH
00-07
08-14
15-21
Stupňov
francúzskych
°T.H.
00-15
16-25
26-37
viac ako 37
Úroveñ
tvrdosti
1
2
3
4
Charakteristika
vody
mäkká
stredná
tvrdá
vemi tvrdá
nemeckych
viac ako 21
SLOVENSKY
87
Page 88

A
P
F
30
i
Medzinárodné symboly osetrovania textílií
Tieto symboly nájdete na štítkoch odevov. Slúžia na ahkú identifikáciu použitých materiálov a spôsobov
ošetrovania.
INTENZĺVNE
PRANIE
95 60
40
Pranie max.
pri 95˚C
JEMNÉ
PRANIE
BIELENIE
ŽEHLENIE Intenzívne
žehlenie max. 200˚C
Bieli& v studenej vode Nebieli&!
Pranie max.
pri 60˚C
60
žehlenie max. 150˚C
Pranie max.
pri 40˚C
40
Stredné
40
Pranie max.
pri 30˚C
Ručné pranie Nepra&!
30
Mierne
žehlenie max. 110˚C
Nežehli&!
CHEMICKÉ
ČISTENIE
SUŠENIE
Chemické
čistenie
všetkými
rozpúš&adlami
Lezato
Chemické čistenie
v perchlóretyléne,
benzíne, čistom
alkohole, R111 a R 113
Na šnúre
Na vesiaku
88
Chemické čistenie
v benzíne, čistom
alkohole a R113
pri vyokej
teplote
pri nízkej
teplote
Sušička
Nečisti& chemicky!
Nesuši& v sušičke
Page 89

Ako postupovat
C0065
C0064
P0004
Pred praním prvej dávky bielizne doporucujeme
nechat prebehnút jeden prací cyklus pre bavlnu
pri 60°C s prázdnou prackou, aby sa z
vnútornych castí pracky odstránili posledné
zvysky pachov a mastnoty z vyroby. Do oddelenia
dávkovaca pre hlavné pranie dajte polovicné
mnozstvo pracieho prostriedku a spustte program.
44.. ZZaappíínnaanniiee ssppoottrreebbiiããaa
Ak chcete zapnúÈ spotrebiã, zatlaãte tlaãidlo . Na
displeji sa objaví tre blikajúce pomlãky alebo
blikajúca nula. Kontrolka nad tlaãidlom sa rozsvieti.
0
1. Do bubna vlozte náplñ bielizne
Otvorte dvierka.
Do bubna vlozte bielizeñ, jeden kus za druhym a
vzdy bielizeñco najviac rozlozte.
Zatvorte dvierka.
2. Odmerajte prací prostriedok
Vytiahnite zásuvku dávkovaca az nadoraz.
Odmerkou odmerajte mnozstvo pracieho prostriedku
pod¬a doporucenia vyrobcu a nasypte ho do
oddelenia pre hlavné pranie .
Ak chcete pouzit predpierku, dávkujte prostriedok do
príslusného oddelenia oznaceného .
------
55.. VVooººbbaa ppooÏÏaaddoovvaannééhhoo
pprrooggrraammuu//ddrruuhhuu bbiieelliizznnee
Pri voºbe poÏadovaného programu/druhu bielizne
zatlaãte tlaãidlo . Rozsvieti sa zodpovedajúca
kontrolka.
Rozsvieti sa kontrolky oznaãujúce jednotlivé fázy
programu.
Na displeji sa objaví dæÏka zvoleného programu
vyrátaná na základe maximálnej náplne pre kaÏd˘
typ bielizne. Kontrolka na tlaãidle ·TART/PAUZA
zaãne blikaÈ.
Ak je v bubne iba malé mnoÏstvo bielizne, objaví sa
na zaãiatku na displeji dæÏka programu vzÈahujúca sa
k maximálnej náplni. Trvanie cyklu bude postupne
upravené v priebehu prevádzky prania.
SLOVENSKY
3. Odmerajte prísady
Ak je treba, nalejte avivázny prostriedok do
oddelenia oznaceného , ale neprekrocte znacku
“MAX” na zásuvke.
89
Page 90

66.. VVooººbbaa tteepplloottyy
Ak chcete zvoliÈ rozdielnu teplotu prania od tej, ktorá
bola nastavená spotrebiãom, zatlaãte tlaãidlo .
Rozsvieti sa prísli‰ná kontrolka.
90
60
40
30
99.. VVooººbbaa ffuunnkkcciiee RR¯¯CCHHLLEEHHOO
PPRRAANNIIAA
Uvoºnite zatlaãené tlaãidlo , ak chcete nastaviÈ
funkciu v prípade, Ïe va‰a bielizeÀ je iba málo
u‰pinená. Rozsvieti sa zodpovedajúca kontrolka.
77.. VVooººbbaa rr˘˘cchhlloossttii ooddssttrreeììoovvaanniiaa
aalleebboo ffuunnkkcciiaa -- ZZAASSTTAAVVEENNIIEE SS
VVOODDOOUU VV BBUUBBNNEE
Zatlaãte opakovane tlaãidlo tak, aby ste nastavili
poÏadovanú r˘chlosÈ, alebo funkciu .
V prípade voºby funkcie sa spotrebiã na konci
programu zastaví a voda ostane v bubne.
1200
900
700
500
88.. VVooººbbaa ddooppllÀÀuujjúúcciicchh ffuunnkkcciiíí..
V prípade, Ïe je va‰a bielizeÀ velmi u‰pinená,
doporuãujeme voºbu funkcie (PREDPIERKA).
Ak si Ïeláte va‰u bielizeÀ vyplákaÈ silnej‰ie, zvolte
funkciu (SUPER PLÁKANIE).
Zatlaãte tlaãidlo PRÍDAVNÉ FUNKCIE tak, aby sa
rozsvietila jedna alebo obidve kontrolky.
1100.. OONNEESSKKOORREENN¯¯ ··TTAARRTT
PPrreedd oodd‰‰ttaarrttoovvaanníímm pprrooggrraammuu
oneskoriÈ, zatlaãte opakovane tlaãidlo alebo ho
podrÏte zatlaãené, pre nastavenie ãasu oneskorenia.
Hodota ãasu oneskorenia (do 24 hodín) sa objaví na
5 sekúnd na displeji a pak sa znovu objaví dæÏka
trvania programu.
, ktorého ‰tart si Ïeláte
1111.. OOdd‰‰ttaarrttoovvaanniiee pprrooggrraammuu
Zatlaãte tlaãidlo ·TART/PAUZA. Zodpovedajúca
kontrolka zaãne blikaÈ, rozsvieti sa kontrolka
uzamãen˘ch dvier a ostane rozsvietená iba kontrolka
zodpovedajúcej fázy programu.
Ak ste zvolili oneskorenie ‰tartu, spotrebiã zaãne
spätn˘ odpoãet.
Na displeji sa objaví dæÏka programu alebo
nastavené oneskorenie.
90
Page 91

1122.. ZZmmeennaa pprrooggrraammuu pprraanniiaa vv
pprriieebbeehhuu pprreevvááddzzkkyy
Pred t˘m, neÏ zaãnete ãokoºvek meniÈ, treba nastaviÈ
spotrebiã na pauzu prostredníctvom tlaãidla
·TART/PAUZA.
Je moÏné zmeniÈ akúkoºvek ãasÈ programu pred t˘m,
neÏ ju spotrebiã uskutoãní.
Zmena druhu bielizne alebo teploty je moÏná iba v
priebehu fáze prania. V prípade, Ïe zmeníte tieto
dva parametre, práãka zaãne prevádzaÈ program
zzaaããiiaattkkuu..
V prípade potreby vypustenia vody z dôvodov zmeny
programu v prevádzke, postupujte podºa
nasledujúceho návodu:
• zastavte spotrebiã zatlaãením tlaãidla
·TART/PAUZA;
• zatlaãte opakovane tlaãidlo , dokiaº sa
nerozsvieti kontrolka ;
• zatlaãte znovu tlaãidlo ·TART/PAUZA;
Po vypustení vody sa na displeji objaví blikajúca
nula. Teraz môÏte zvoliÈ nov˘ program a zatlaãiÈ
tlaãidlo ·TART/PAUZA pre jeho od‰tartovanie.
oodd
1133.. ZZrruu‰‰eenniiee pprrooggrraammuu ppooããaass jjeehhoo
pprreevvááddzzkkoovvaanniiaa
Ak chcete zru‰iÈ program, ktor˘ je práve v
prevádzke, treba najprv nastaviÈ spotrebiã na pauzu
prostredníctvom tlaãidla ·TART/PAUZA a potom
stláãaÈ opakovane tlaãidlo , dokiaº sa na displeji
neobjaví
ttrree bblliikkaajjúúccee ppoommllããkkyy..
1144.. OOttvvoorreenniiee ddvviieerr vv pprriieebbeehhuu
pprreevvááddzzkkoovvaanniiaa pprrooggrraammuu
Po zatvoreni dvierok a zatlaãení tlaãidla bude
práãka pokraãovat v prevádzkovaní programu tam,
kde prestala.
1155.. KKoonneecc pprrooggrraammuu
Na konci programu sa práãka automaticky zastaví,
ozve sa zvukov˘ signál a na displeji zaãne blikaÈ
nula.
V prípade, Ïe ste zvolili funkciu , kontrolka na
tlaãidle ·TART/PAUZA zaãne blikaÈ a signalizuje, Ïe
treba vypustiÈ vodu. Na displeji je trvale vyobrazená
nula.
Po ukonãení programu zaãne nula na displeji blikaÈ a
ozve sa zvukov˘ signál.
Kontrolka uzamknut˘ch dvier zhasne.
ZZaattllaaããttee ooppaakkoovvaannee ttllaaããiiddlloo pprree vvyymmaazzaanniiee
uukkoonnããeennééhhoo pprrooggrraammuu zz ppaammäättii.. AAkk ttoo zzaabbuuddnneettee
vvyykkoonnaaÈÈ,, nnaa ddiisspplleejjii ssaa nnaabbuuddúúccee oobbjjaavvíí oobbjjaavvíí
bblliikkaajjúúccaa nnuullaa aa oozzvvee ssaa zzvvuukkoovv˘˘ ssiiggnnááll..
PPoozznnáámmkkaa
predchádzajúci program, je takisto dostatoãné, keì
zatlaãíte tlaãidlo a nastavíte nov˘ program.
Zatlaãte tlaãidlo ak chcete vypnúÈ spotrebiã.
Zodpovedajúce kontrolky zhasnú.
Vyberte bielizeÀ z práãky.
Skontrolujte, ãi je bubon celkom prázdny tak, Ïe ho
rukou otoãíte. Zabráníte tak, aby v bubne náhodne
ostali kusy bielizne, ktoré by sa v priebehu
nasledujúceho prania mohli po‰kodiÈ (napr. zraziÈ sa)
alebo by mohli zafarbiÈ inú bielizeÀ.
Doporuãujeme vám, aby ste zatvorili uzáver prívodu
vody a odpojili spotrebiã zo siete elektrickej energie.
Nechajte dvierka otvorené, aby do práãky prichádzal
vzduch.
: ak po zapnutí spotrebiãa treba vymazaÈ
SLOVENSKY
Dvierka je moÏné otvoriÈ po nastavení spotrebiãa na
PAUZA, ak sú splnené nasledujúce podmienky:
• práãka nie je vo fázi zohrievania vody nad hodnotu
40°C;
• hladina vody nie je vysoká;
• bubon nie je v pohybe.
V prípade, Ïe tieto podmienky budú dodrÏané, po
uvedení spotrebiãa do pauzy zhasne kontrolka
uzamknut˘ch dvier a je moÏné otvoriÈ dvierka.
V prípade, Ïe nie je moÏné dvierka otvoriÈ a ich
otvorenie je naliehavo potrebné, vypnite spotrebiã
prostredníctvom tlaãidla .
Po uplynutí probliÏne 2 minút bude moÏné otvoriÈ
dvierka.
DDaajjttee ppoozzoorr nnaa hhllaaddiinnuu aa tteepplloottuu vvooddyy vv pprrááããkkee!!
91
Page 92

Tabu¬ka programov
304030
30
TTyypp bbiieelliizznnee aa
ssyymmbboollyy nnaa
eettiikkeettáácchh
9560
BBiiaallaa bbaavvllnnaa::
plachty,
obrusy,
domáca
bielizeÀ
304060
FFaarreebbnnáá
bbaavvllnnaa:: ****
triãká, ko‰ele,
spodné prádlo,
obrusy,
domáca
bielizeÀ
4060
SSyynntteettiicckkéé
a
mie‰ané
materiály:
triãka, ko‰ele,
spodné prádlo
40
JJeemmnnáá
bbiieelliizzeeÀÀ::
bielizeÀ z
akrylu, viskózy,
polyesteru a
mie‰ané
syntetické látky
MMaaxxiimm..
nnááppllÀÀ
5,5 kg
5,5 kg
2,5 kg
2,5 kg
PPrrooggrraammyy//
tteepplloottaa
60°-90°C
60°-40°-30°C
60°-40°-30°C
lub
40°-30°C
lub
OOppiiss
pprrooggrraammuu
Hlavné pranie
pri 60°-90°C
3 plákania
Dlhné
odstreìovanie
Hlavné pranie
pri 60°-40°30°C
3 plákania
Dlhné
odstreìovanie
Hlavné pranie
pri 60°-40°-30°C
alebo studené
vode
3 plákania
Krátke
odstreìovanie
Hlavné pranie
pri 40°-30°C
alebo studené
vode
3 plákania
Krátke
odstreìovanie
MMooÏÏnnéé
ddooppll
ffuunnkkcciiee
ÀÀ
uujjúúccee
EEnneerrggiiee
kkWWhh
1,8
0,95
0,9
0,7
SSppoottrreebbaa
VVooddaa
lliittrree
52
49
56
53
*
ââaass
hh//mmiinn..
2,29
2,10
1,27
1,04
VVllnnaa
2 kg
40°-30°C
lub
Hlavné pranie
pri 40°-30°C
0,3
48
57
alebo studené
vode
3 plákania
2 kg
40°-30°C
lub
Hlavné pranie
pri 40°-30°C
alebo studené
0,25
46
55
vode
3 plákania
Krátke
odstreìovanie
* Údaje o spotrebe uvedené v tejte tabuľke sú iba orientačné, lebo veľa závisí od množstva a druhu bielizne,
teploty prítokovej vody a teploty prostredia. Údaje sa vzľahujú na najvyššie teploty pri každom programe. V
prípade bavlny sa údaj vzťahuje na náplň bielizne o 5 kg.
** V súlade s nariadením EEC 92/75 sú údaje o spotrebe uvedené na štítku s informáciami o spotrebe a
vzťahujú sa na tento program pri 60°C a s náplňou bielizne o 5 kg.
92
Page 93

Údrzba
P1086
C0068
C0067
C0066
P1050
P0040
P1061
P0038
1. Dvierka
Pravidelne kontrolovat, ci sa v tesnení dvierok
neusadili cudzie telesá, napríklad sponky, gombíky,
zubné spáradlá.
2. Skriña automatickej pracky
Vonkajsie casti skrine cistite teplou vodou s
neutrálnym, neabrazívnym cistiacim prostriedkom
pre domácnost. Potom ju umyte cistou vodou a
vytrite jemnou handrou dosucha.
Dôlezité: Na cistenie skrine nepouzívajte
metylalkohol, riedidlá a podobné vyrobky.
3. Zásuvka dávkovaca pracích
prostriedkov
Pracie prostriedky sa môzu usadzovat tiez vo vnútri
priestoru zásuvky.
Tento priestor vycistite starou zubnou kefkou Po
vycistení zasuñte zásuvku na svoje miesto.
4. Odtokovy filter
Odtokovy filter zadrzuje necistotu a malé predmety,
ktoré nedopatrením zostali v bielizni. Pravidelne
kontrolujte, ci je filter cisty.
Otvorte prístupové dvierka k filtru tak, Ïe ich
odsunete napravo.
Pod filter umiestnite nádobu na zachytenie
vytekajúcej vody.
Uvolnite bezpeãnostnú hadicu, umiestnite jej koniec
do nádoby a odskrutkujte uzáver.
SLOVENSKY
Pracie a avivázne prostriedky vytvoria po case v
zásuvke dávkovaca usadeniny.
Cas od casu zásuvku dávkovaca vycistite
opláchnutím pod tecúcou vodou. Ked budete
potrebovat zásuvku vybrat z prácky, stlacte tlacidlo
v zadnom ¬avom rohu.
Aby cistenie bolo ¬ahsie, mozno vybrat vrchny diel
oddielov na prísady.
P1062
P1085
Keì voda prestane vytekaÈ, odskrutkujte filter a
vyberte ho von.
Oãistite filter pod prúdom vody, vráÈte ho na pôvodné
miesto a dobre pritiahnite.
VráÈte uzáver na bezpeãnostnú hadicu, umiestnite ju
späÈ na pôvodné miesto a zatvorte prístupové
dvierka k filtru.
93
Page 94

5. Filter prívodu vody
P1090
Ak zistíte, ze trvá dlhsie, kym sa pracka naplní,
skontrolujte, ci nie je zaneseny filter prívodu vody,
umiestneny v závite prívodnej hadice.
Zatvorte vodovodny ventil.
Odskrutkujte z ventilu prívodnú hadicu.
Filter vycistite tvrdou kefkou.
Hadicu naskrutkujte na ventil.
NNúúddzzoovvéé vvyyppúú‰‰ÈÈaanniiee
6.
Ak práãka nie je schopná vypú‰ÈaÈ vodu, postupujte
podla nasledujúceho návodu:
• Vytiahnite zástrãku zo zásuvky.
• Zatvorte vodovodn˘ ventil.
• Pokiaº je to potrebné, vyãkajte, k˘m neklesne
teplota vody.
• Umiestnite nádobu pod filter koniec bezpeãnostnej
vypú‰Èacej hadice umiestnite do nádoby. Voda
bude samovolne vytekaÈ do nádoby. Keì sa
nádoba naplní, zatvorte uzáver. Vyprázdnite
nádobu a pokraãujte vo vyprazdÀovaní spotrebiãa
dokiaº voda neprestane vytekaÈ.
• V prípade potreby oãistite filter.
• OpäÈ priskrutkujte filter.
7. Nebezpecenstvo zamrznutia
Ak je spotrebic vystaveny teplotám pod bodom
mrazu, sú potrebné niektoré opatrenia.
• Zatvorte vodovodn˘ ventil.
• Odskrutkujte privodovú hadicu
• Umistnite koniec prívodovej hadice a
bezpeãnostnej vypú‰Èacej hadice do nádoby
umiestnené na zemi a nechajte vodu vytiecÈ.
• Priskrutkujte koniec prívodovej hadice späÈ, vráÈte
bezpeãnostnú vypú‰Èaciu hadicu na svoje miesto a
priskrutkujte jej uzáver.
Keì budete spotrebiã znovu pouÏívaÈ presvedãte sa,
ãi je teplota v izbe vy‰‰ia ako 0°C.
94
Page 95

Ak nieco nefunguje správne
Problémy, ktoré môzete odstránit sami:
Počas prevádzky zariadenia sa na displeji môžu objaviť nasledujúce alarmové kódy:
- E10: problém na prívode vody
- E20: problém s odtokom vody
- E40: dvierka ostali otvorené
Po vyriešení problému zatlačte tlačidlo ŠTART/PAUZA a tak uvedete program znovu do prevádzky. Ak po
všetkých kontrolách problém ostáva, obráťte sa na miestne servisné centrum.
Problém
• Prácku nie je mozné spustit:
• Prácka nenapústa vodu:
• Prácka sa pri napústaní vody
vyprázdñuje:
• Prácka sa nevypústa alebo
neodstreduje:
Mozná prícina
• Skontrolujte, ci sú dvierka správne zatvorené. (E40)
• Skontrolujte, ci je zástrcka dobre zapojená do
zásuvky a ci je v zásuvke napätie.
• Skontrolujte, ci nie sú vypálené poistky, a ci je
istic v poriadku.
• Nebolo stlačené tlačidlo ŠTART/PAUZA.
• Bola zvolená funkcia ONESKORENÝ ŠTART
• Skontrolujte, ci je vodovodny ventil otvoreny. (E10)
• Skontrolujte, ci z vodovodného ventilu tecie voda.
(E10)
• Skontrolujte, ci prívodná hadica nie je ohnutá
alebo prekrútená. (E10)
• Skontrolujte, ci filter v prívode vody nie je
zaneseny. (E10)
• Skontrolujte, ci sú zatvorené dvierka. (E40)
• Koniec vypústacej hadice je prive¬mi nízko nad
podlahou. Pozri príslusny odsek v casti
Vypústanie vody.
• Skontrolujte, ci vypústacia hadica nie je ohnutá
alebo prekrútená. (E20)
• Bola zvolená funkcia VODA V BUBNE .
• Odtokovy filter je zaneseny. (E20) Vycistite ho.
SLOVENSKY
• Na podlahe je voda:
• Vysledky prania nie sú
uspokojivé:
• Bolo pouzité ve¬ké mnozstvo pracieho prostriedku
alebo nevhodny prostriedok (vytvára ve¬mi mnoho
peny).
• Skontrolujte tesnost prívodnej hadice a spojov.
Skontrolujte rukou, ci hadica nie je na povrchu
mokrá. Inak sa tazko urcuje, ci voda netecie
pozdĺz hadice.
• Skontrolujte, ci nie je poskodená vypústacia
hadica.
• Bolo pouzité malé mnozstvo pracieho prostriedku
alebo nevhodny prostriedok.
• Pred praním ste neodstranili silne vpité skvrny.
• Nebola zvolená správna teplota alebo správny
program.
95
Page 96

Problém
M
o
d
.
.
.
.
.
.
.
.
.
..
P
r
o
d
.
N
o
.
.
.
.
.
..
.
.
.
.
.
S
e
r
.
N
o
.
.
.
.
.
.
.
.
.
.
P0042•N
Mod. ..........
Prod. No. ...........
Ser. No. .........
Mozná prícina
• Pracka vibruje alebo je hlucná:
• Dvierka sa neotvárajú:
• V pracke nie je vidiet vodu:
• Odstredovanie zacína oneskorene
a vôbec neprebehne:
• Skontrolujte, ci boli odstranené prepravné prvky a
obaly.
• Skontrolujte, ci sa spotrebic nedotyka stien alebo
nábytku.
• Skontrolujte, ci nohy spotrebica stoja pevne na
podlahe.
• Skontrolujte, ci je bielizeñ v bubne rovnomerne
rozlozená.
• Je mozné, ze v bubne je málo bielizne.
• Prebieha niektory program a bubon je v pohybe.
• Hladina vody v prácke presahuje dolnú cast
dvierok.
• Prebieha fáza ohrevu vody
•
Tento spotrebic, ktory je vysledkom modernej
technológie, pracuje ve¬mi úspornym spôsobom s
nízkou spotrebou energie. Vykon je napriek tomu
vynikajúci.
•
Ak bielizeň nie je pred odstredovaním v bubne
rovnomerne rozmiestnená, zariadenie to zistí a
snazí sa ju rovnomerne rozmiestnit pomocou
nieko¬kych otocení bubna. Ked sa bielizen
homogénne rozmiestni, zariadenie prevedie fázu
odstredovania; ak rozdelenie prípadne nie je stále
celkom rovnomerné, odstredovanie prebehne pri
znízenej rychlosti. Ak ani po 6 minútach nie je
rozmiestnenie rovnomerné, odstredovanie
neprebehne. Ak teda zostane bielizeň po
skoncení cyklu mokrá, odporúcame ju rucne
rozmiestnit v bubne a nastavit program
odstredovania.
Ak problém nemôzete urcit alebo vyriesit,
kontaktujte nase servisné stredisko. Skôr, ako
budete telefonovat do servisu, poznacte si model,
císlo vyrobku, vyrobné císlo a dátum kúpy. Servisné
stredisko bude tieto údaje vyzadovat.
Vyrobca si vyhradzuje právo technickych zmien v tomto návode na pouzitie.
96
Page 97

Kedves Ügyfelünk,
kérjük, hogy figyelmesen olvassa el ezt a használati
útmutatót és külön figyeljen az elso oldalakon
feltüntetett biztonsági szabályokra. Lehetséges, hogy
a jövoben is szüksége lesz rá, ezért azt javasoljuk,
hogy gondosan orizze meg a használati útmutatót és
ha eladja a készüléket, akkor adja át ezt is az új
tulajdonosnak.
Szállítási sérülések
Kicsomagoláskor ellenorizze, hogy nem sérült-e meg
a gép. Kétség esetén ne helyezze muködésbe,
hanem forduljon a megfelelo szervízhez.
E használati utasítás néhány fejezetét bizonyos jelekkel láttuk el, melyek jelentése a következo:
Figyelemfelhívó háromszöggel, vagy szavakkal (Figyelem!, Figyelmeztetés!) jeleztük a szövegben az
olyan különleges utasításokat, amelyek az Ön biztonsága, vagy a készülék megfelelo muködése
szempontjából fontosak. Kérjük, hogy tartsa ezeket szem elott.
Ezen jelzést követo információk a készülék használati utasításainak és gyakorlati használatának
kiegészítését szolgálják.
A tulipán a készülék takarékos használatához ad tanácsokat és utasításokat, a környezetvédelem
jegyében.
A környezetvédelemhez mi újrafelhasznált papír
hasznosításával járulunk hozzá.
MAGYAR
97
Page 98

Tartalomjegyzék
Biztonsági szabályok 99
Selejtezés 100
Tanácsok a környezet
védelmére 100
Muszaki jellemzok 101
Üzembe helyezés 102
A szállításhoz használt biztonsági tartozékok 102
Elhelyezés és vízszintbeállítás 102
Vízellátás 103
Vízkivezetés 103
Villamos csatlakoztatás 103
Az Ön új mosógépe 104
Karbantartás 116
Kerek ajtó 116
Külso felület 116
Mosószertartó 116
Vízkivezeto cso szuro 116
Befolyócso szuro 117
A víz kiürítése szükség esetén 117
Fagy elleni óvintézkedések 117
Muködési
rendellenességek 118-119
A készülék leírása 104
Zárt ajtó jelzolámpa 104
Mosószertartó fiók 104
Használat 105
Kezelopanel 105
A kapcsolók leírása 105-108
Mosási tanácsok 109
Szétválogatás 109
Hofok 109
Teendok a ruhanemuk behelyezése elott 109
A ruhanemuk maximális mennyisége 109
A ruhanemuk súlya 109
Foltok eltávolítása 109
Mosószerek és adalékanyagok 110
A felhasznált mosószer mennyisége 110
Az anyagok kezelésére vonatkozó nemzetközi
jelrendszer 111
A muvelet sorrendje 112-114
Program táblázat 115
98
Page 99

Biztonsági szabályok
Ezek a szabályok az önök és mások érdekeit szolgálják. kérjük tehát, hogy mielott a gépet beszerelné és
muködésbe helyezné, figyelmesen olvassa el a biztonsági szabályokat.
Beszerelés
• Használat elott távolítsa el a gép belsejében
található csomagolóanyagot. Ha nem távolítja el a
szállításra használt, a gép védelmére szolgáló
tartozékokat, vagy ha hiányosan távolítja el,
gépében és/vagy a berendezési tárgyakban kár
keletkezhet. Olvassa el a használati utasítás ide
vonatkozó fejezetét.
• Amennyiben a mosógép muködésbe helyezéséhez
szükségessé válna a lakás villamos hálózatának
módosítása, ezt csakis szakember végezheti el.
• Bármilyen, a gép vízhálózatra csatlakoztatásához
szükséges munkát csak szakképzett
vízvezetékszerelo végezhet el.
• A gép üzembe helyezése után ellenorizze, hogy az
ne álljon a tápvezetéken.
• Ha a gépet padlószonyegre helyezi, gyozodjön
meg róla, hogy a lábak és a padló között a levego
szabadon áramlik.
Használat
• Ezt a gépet háztartási célú használatra tervezték.
Ne használja azt más célra, mint amire való.
• Csak gépi mosásra alkalmas termékeket mosson.
Kövesse az egyes ruhanemun feltüntetett mosási
útmutatót.
• Ne töltse túlságosan tele a gépet. Kövesse a
használati utasítás eloírásait.
• A ruhanemukben hagyott pénzérmék, biztosítótuk,
kituzok, csavarok stb. komoly károkat okozhatnak
gépében.
• Ne helyezzen gépébe elozoleg benzint, alkoholt,
trielint tartalmazó szerrel tisztított ruhanemut.
Amennyiben mosás elott ilyen tartalmú tisztítószert
használt, várja meg, míg az teljes mértékben
elpárolog és csak azután helyezze a gépbe
ruháját.
• Kisméreto ruhadarabjait - mint például zokni,
harisnya, öv - tegye be szövetzacskóba vagy
párnahuzatba. Ez azért szükséges, nehogy azok a
dob és az üst közé kerülhessenek.
• Csak a gyártó által javasolt mennyiségu öblítoszert
használja. A szer túlzott használata kárt okozhat
ruhanemujében.
• Használaton kívül a gép kerek ajtaját hagyja félig
nyitva. Ezzel megnöveli az ajtó gumigyurujének
élettartamát és megelozi a dohos szag
keletkezését.
•Mielott kinyitná a kerek ajtót, gyozodjék meg róla,
hogy a víz teljesen kifolyt. Ellenkezo esetben
eressze le a vizet a használati utasításban leírt
módon.
• Használat után mindig húzza ki a dugót a
konnektorból és zárja el a vízcsapot.
Általános tudnivalók
• Meghibásodás esetén ne próbálkozzék a
javítással. A nem szakember által végzett javítások
kárt okozhatnak.
• Amennyiben javítás válna szükségessé, forduljon
szakszervízhez és kérjen eredeti alkatrészeket.
• A dugót sohasem a veztékénél hanem magánál a
dugónál fogva húzza ki az aljzatból.
• A magas homérsékleten történo mosás során az
ajtó üvege felmelegszik. Ne nyúljon hozzá!
MAGYAR
99
Page 100

Biztonság a gyermekek számára
P1076
• A gyermekek gyakran nem ismerik fel a villamos
készülékek által okozható veszélyeket. A gép
muködése alatt a gyermekekre megfeleloen
ügyelni kell és nem szabad nekik megengedni,
hogy a készülékkel játsszanak.
• A csomagolóanyag egyes részei (pl. fólia, polisztirol)
veszélyesek lehetnek gyermekek számára.
Fulladásveszély áll fenn! Tartsa azokat távol
gyermekektol.
• A mosószereket zárja el gyermekek elol és tartsa
biztonságos helyen.
• Ügyeljen arra, hogy a háziállatok vagy a
gyermekek ne kerüljenek a mosógép dobjába.
Ennek elkerüléséhez a gép egy különleges
jellemzovel rendelkezik, melyet úgy hozhat
muködésbe, hogy az ajtóban lévo gombot
(benyomás nélkül) az óra járásának megfelelo
irányba elfordítja egészen addig, amíg a rovátka
vízszintes helyzetbe nem kerül. Ha szükséges, a
muvelethez használjon egy pénzérmét.
Ennek az egységnek muködésen kívül helyezéséhez
és az ajtózárás lehetoségének visszaállításához
elég a gombot az óra járásával ellenkezo irányba
csavarni egészen addig, amíg a rovátka függoleges
helyzetbe nem kerül.
• A készülék selejtezése esetén, húzza ki a dugót az
aljzatból, vágja el a tápvezetéket és semmisítse
meg a dugót a maradék vezetékekkel együtt.
Tegye használhatatlanná a kerek ajtó zárját: ily
módon ha gyerekek játszanak vele nem tudják
magukat a készülékbe zárni.
Selejtezés
Csomagolóanyagok
A jelzéssel ellátott anyagok újrafelhasználhatóak.
>PE<=polietilén
>PS<=polisztirol
>PP<=polipropilén
Annak érdekében, hogy újrafelhasználásra
kerüljenek a megfelelo helyre (vagy tartályokba) kell
oket elhelyezni.
Tanácsok a környezet védelmére
A víz és energiamegtakarítás, valamint a környezet
védelme érdekében kérjük, hogy tartsa be a
következo tanácsokat:
• Az átlagosan szennyezett ruhákat elomosás nélkül
is lehet mosni; ily módon mosószert, vizet és idot
takaríthat meg (nem beszélva arról, hogy ezáltal
védi a környezetet is!).
• A gépet ne kis, hanem maximális mennyiségu ruha
mosására használja. Kerülje a dob túlzott
teletöltését is.
A készülék kiselejtezése
A régi mosógép helyes leselejtezéséhez kérjük, hogy
használja az arra feljogosított begyujto helyeket.
Segítsen városát tisztán tartani!
• Megfelelo elokezeléssel a foltok és a kisebb
szennyezett zónák eltávolíthatóak; ezután a
mosást alacsonyabb homérsékleten is el lehet
végezni.
• A víz keménységi fokának, a ruhanemu
mennyiségének illetve annak szennyezettségi
fokának megfeleloen válassza meg a mosószer
mennyiségét.
100
 Loading...