

Electrolux ETM5200SDRH, ETM4200SDLH User Manual

1
Top mount
Refrigerator User manual
Bottom mount
Single door all refrigerator
Single door all freezer
Built-in refrigerator
Built-in freezer

2
WE’RE THINKING OF YOU
Thank you for purchasing an Electrolux appliance.
You’ve chosen a product that brings with it decades
of professional experience and innovation. Ingenious
and stylish, it has been designed with you in mind. So
whenever you use it, you can be safe in the knowledge
that you’ll get great results every time.
Welcome to Electrolux.
LEGEND
The symbols you will see in this booklet have
these meanings:
WARNING!
This symbol indicates information concerning your
personal safety
CAUTION!
This symbol indicates information on how to avoid
damaging the refrigerator
IMPORTANT!
This symbol indicates tips and information about use
of the refrigerator
ENVIRONMENT!
This symbol indicates tips and information about
economical and ecological use of the refrigerator
CONDITIONS OF USE
This appliance is designed and intended to be used in
normal domestic applications only.
RECORD MODEL AND SERIAL
NUMBER HERE:
Model:
Serial No:
CONTENTS
3 Important safety instructions
4 General warnings
5 Top mount freezer model features
5 Bottom mount freezer model features
6 Single door all refrigerator model features
6 Single door all freezer model features
7 Built-in refrigerator model features
7 Built-in freezer model features
8 Ice & water models
9 Installing your new appliance
10 Initial start up
11 Ice & water installation
15 Electronic display controls – electronic
models only
15 – Controlling the temperature
15 – Freezer temperature alarm
15 – Door alarm
15 – Child lock
16 – Drinks chill timer
16 – Energy efficiency
17 Electronic display controls – ice & water
models only
17 – Controlling the temperature
17 – Freezer temperature alarm
17 – Door alarm
18 – Child lock
18 – Drinks chill timer
18 – Energy efficiency
19 – Fast ice
19 – Filter replacement
19 Manual (rotary) controls – manual models
20 Using your appliance
20 – Crisper bin
21 – Door storage bins
21 – Dairy compartment
21 – Chiller bin
21 – Bottle caddy
21 – Freezer drawers
21 – Freezer baskets
22 – Spillsafe™ glass shelves
22 – Slide away glass shelf
22 – Deodoriser
22 – Bottle twist holder
23 – Twist ice & serve
23 – Ice station
23 Care and maintenance
23 – Changing the lightbulb
24 – Cleaning the appliance
25 Troubleshooting
26 Ice & water troubleshooting
27 Warranty

IMPORTANT SAFETY INSTRUCTIONS
Before you use the refrigerator, we recommend that you
read through the relevant sections of this manual, which
provides the description of your appliance and
its functions.
To avoid the risks that are always present when you use
an appliance, it is important that the appliance is installed
correctly and that you read the safety instructions carefully
to avoid misuse and hazards.
We recommend that you keep this instruction booklet for
future reference and pass it on to any future owners.
IMPORTANT!
Check for any damage or marks
If you find the refrigerator is damaged or marked, you
must report it within 7 days if you wish to claim for
damage/marks under the manufacturer’s warranty.
This does not affect your statutory rights.
3
WARNING!
• This appliance is not intended for use by persons
(including children) with reduced physical, sensory
or mental capabilities, or lack of experience or
knowledge, unless they are being supervised or have
been given instruction concerning use of the appliance
by a person responsible for their safety. Children
should be supervised to ensure that they
do not play with the appliance.
• Don’t use a steam cleaner. If live components come
into contact with condensing steam, they may short
circuit or cause an electric shock.
• Do not use mechanical devices or other means to
accelerate the defrosting process other than those
recommended by the manufacturer.
• This appliance contains insulation formed with
flammable blowing gases. Avoid safety hazards
by carefully disposing of this appliance.
INFORMATION ON DISPOSAL
FOR USERS
ENVIRONMENT!
• Most of the packing materials are recyclable. Please
dispose of those materials marked with the recycle
symbol
placing them in appropriate collection containers.
• If you wish to discard this product, please contact
your local authorities and ask for the correct method
of disposal.
• Local authorities will have the latest information
regarding safe disposal of the product.
• Incorrect disposal may expose the user to injury
from sharp objects, flammable gasses or cause
environmental damage.
• Refrigerant gasses within the unit should only be
discharged by qualified persons. A licence may be
required by your local authorities to discharge or
reclaim the refrigerant gasses. Incorrect discharge of
gasses may expose the user to injury from flammable
gasses or cause environmental damage.
WARNING!
When you dispose of your old refrigerators or freezers
remove any doors. Children can suffocate if they get
trapped inside a discarded unit.
WARNING!
If pressurised aerosol containers bear the
word ‘flammable’ and/or a small flame
symbol, do not store them inside any
refrigerator or freezer. If you do so you
may cause an explosion.
through your local recycling depot or by
R600a refrigerant warning
• This appliance contains flammable R600a refrigerant.
Avoid safety hazards by carefully installing, handling,
servicing and disposing of this appliance.
• Ensure that the tubing of the refrigerant circuit is
not damaged during transportation and installation.
• In the event any damage accidentally occurs, keep the
appliance away from open fires and any devices that
produce sparks or arcs and luminaries during normal
or abnormal operation, and unplug the appliance at
the power point. Call authorised service for necessary
action and advice.
• Leaking refrigerant may ignite vent area if leak occurs.
• The room for installing appliance must be at least
1m3 per 8g of refrigerant. The amount and type of
refrigerant in the appliance can be found on the rating
plate inside the appliance.
• It is hazardous for anyone other than an Authorised
Service Person to service this appliance. In
Queensland Australia - the Authorized Service Person
MUST hold a Gas Work Authorisation for hydrocarbon
refrigerants, to carry out servicing or repairs which
involve the removal of covers.
Switching off your appliance
If the appliance needs to be switched off for an extended
period, the following steps should be taken to reduce the
symptoms of mould:
1. Remove all food.
2. Remove the power plug from the power point.
3. Clean and dry the interior thoroughly.
4. Ensure that all the doors are wedged open slightly
for air circulation.

4
GENERAL WARNINGS
Read the following carefully to avoid damage or injury
This symbol indicates never to do this
This symbol indicates always do this
It is important to use your refrigerator safely.
Check these safety points before using your refrigerator.
The appliance must be plugged into its own dedicated
220-240V, 50Hz AC electrical outlet.
Ensure that the electrical outlet is properly earthed. Consult
a qualified electrician if you are unsure.
If the power cord is damaged, it must be replaced by the
manufacturer, it’s service agent or similarly qualified persons
in order to avoid a hazard.
Check that the power cord can reach the power point.
Don’t plug your refrigerator into an extension cord or double
adaptor.
Unplug the appliance before cleaning or moving.
Choose a location that is not too cold – the ambient
temperature should be above 10°C.
Put the refrigerator in a dry place avoiding areas of high
moisture or humidity.
Keep ventilation openings in the appliance enclosure or in
the built-in structure clear of obstruction.
The plug to the appliance must be accessible when the unit
is in the installed position.
Never unplug the appliance by pulling on the power cord.
Always grip the plug firmly, and pull straight
out of the receptacle to prevent damaging the
power cord.
Don’t plug your refrigerator into a timer fitted to
the power point.
Do not put the refrigerator in frosty or unprotected areas, for
example in a garage or on a veranda.
Do not put the refrigerator in direct sunlight, near stoves,
fires or heaters.
Do not put the refrigerator on an uneven surface.
Do not store explosive substances such as aerosol cans
with a flammable propellant in this appliance.
Do not use electrical appliances inside the food storage
compartments of the appliance, unless they are of the type
recommended by the manufacturer.
Never store fizzy drinks in the freezer compartment.
Never try to repair the refrigerator yourself, only use a
qualified or authorised service person for repairs.
Never use electric heaters or dryers to defrost the freezer
because you can receive an electric shock.
Do not damage the refrigerant circuit.
CAUTION!
Automatic aerosol systems (such as insect control)
should not be located adjacent to the product as the
spray may cause long term damage to the external
plastics of the appliance.
Note: You must read these warnings carefully
before installing or using the refrigerator. If you need
assistance, contact your Customer Care Department.
The manufacturer will not accept liability, should these
instructions or any other safety instructions incorporated
in this book be ignored.
For Ice & Water models only
Check for water leaks at all water connection points in the
first two or three hours after installation. Re-check after 24
hours to ensure connection is watertight. If the connection
is leaking, contact a licensed plumber.
Do not use with water that is microbiologically unsafe
or with water of unknown quality without adequate
disinfection.
Never connect the appliance to a hot water supply.
Never install the water filter in an area of the wall where
there may be electrical wires and/or water supply pipes.
Never install the water filter in an area of direct sunlight.

5
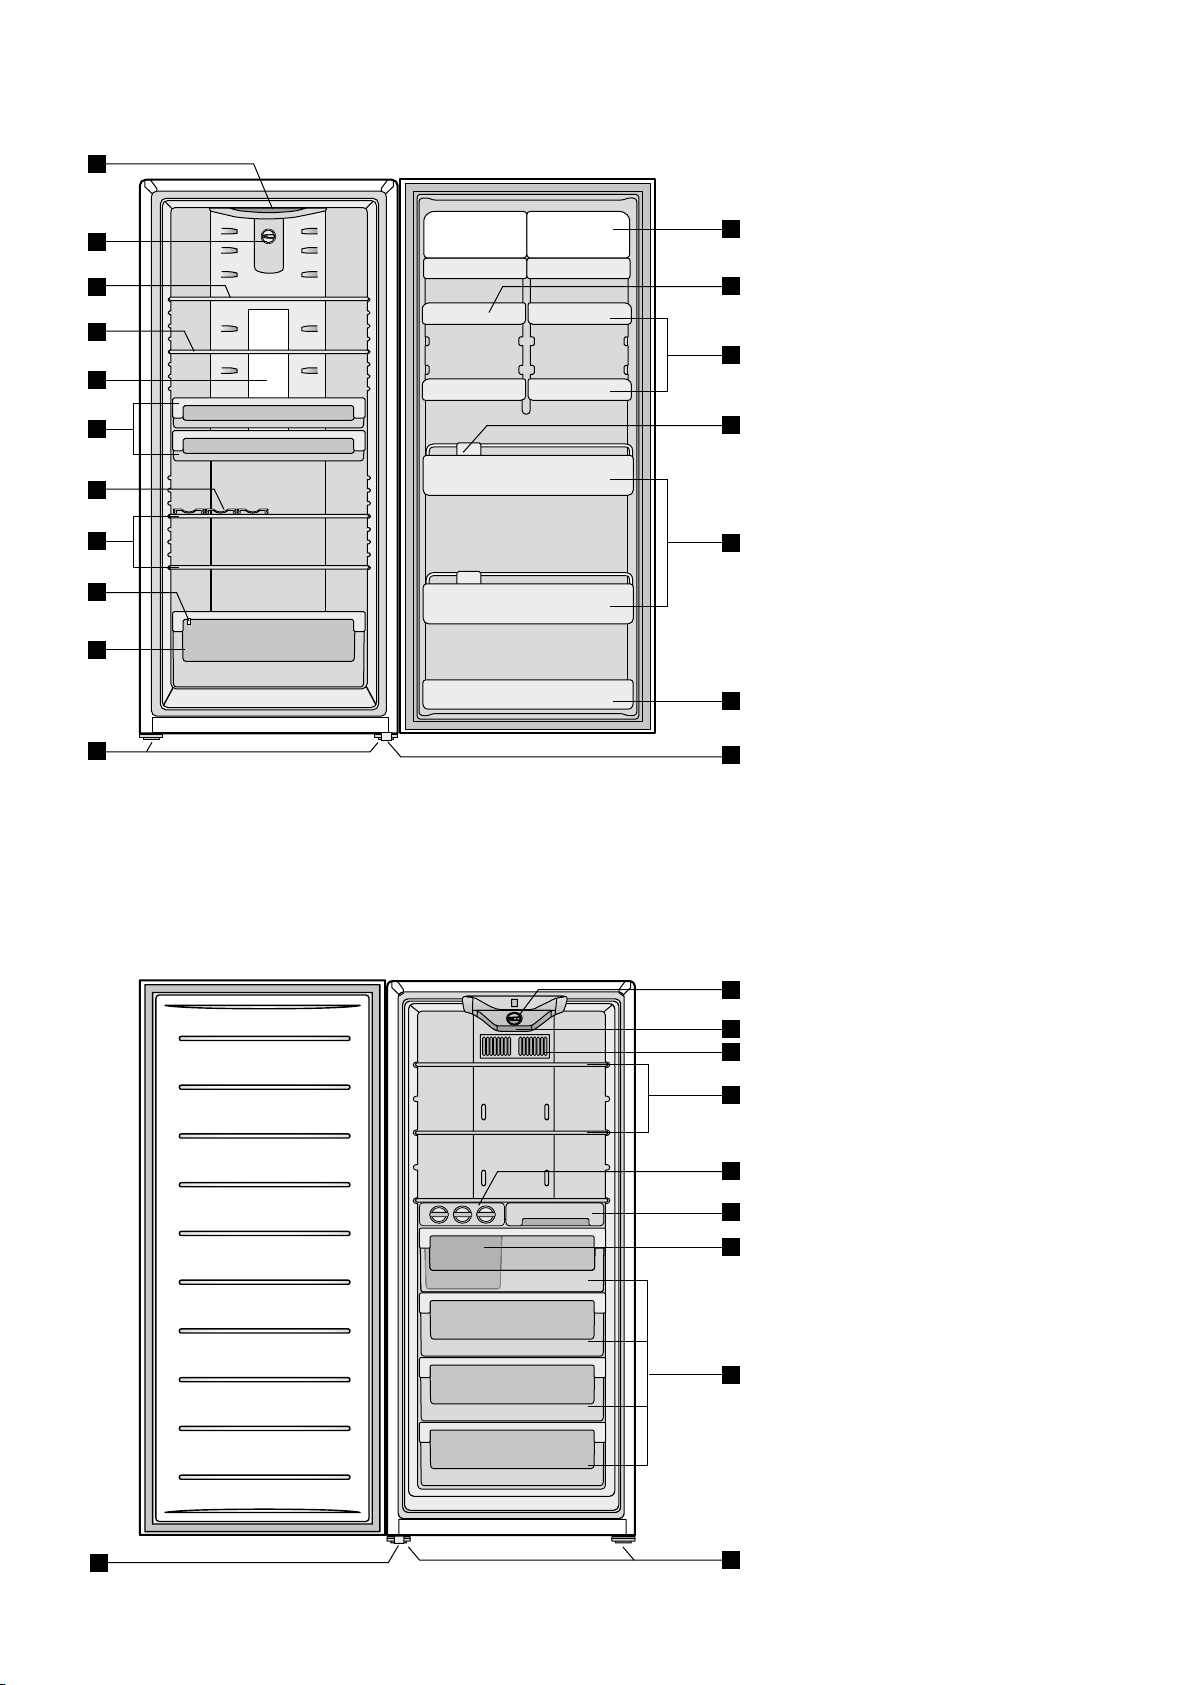
TOP MOUNT FREEZER MODEL (TM)
1
2
3
4
5
6
7
8
9
10
11
12
13
14
15
16
17
Note: Product illustrations demonstrate various features but may not
be completely in line with current products.
1 Sensor (electronic models only)
2 Freezer light (electronic models only)
3 Freezer air delivery vents
4 Adjustable Spillsafe™ glass shelf
5 Twist ice & serve with ice cube trays
6 Freezer air return vents
18
7 Sensor (electronic models only)
8 Deodoriser
9 Fridge and freezer temperature controls
(manual control models)
10 Adjustable Spillsafe™ glass shelves
19
11 Spillsafe™ slide away shelf (where fitted)
12 Fridge light
20
13 Bottle caddy
14 Deli compartments (full width on some models)
21
15 Crisper humidity controls
16 Crisper bins (full width on some models)
17 Adjustable rollers
18 Freezer door bins
19 Dairy compartments
22
20 Egg tray
23
21 Adjustable door bins
22 Full width door bin
24
23 Bottle twist holder (where fitted)
24 Full width door bin (can bin on smaller models)
25
25 Stabilising foot
BOTTOM MOUNT FREEZER MODEL (BM)
1
2
3
4
5
6
7
8
9
10
11
12
13
1 Deodoriser
2 Fridge and freezer temperature controls
(manual control models)
3 Spillsafe™ slide away shelf (where fitted)
15
4 Bottle caddy
5 Adjustable Spillsafe™ glass shelf
6 Fridge light
16
7 Deli compartments (full width on some models)
17
8 Crisper humidity controls
9 Crisper bins (full width on some models)
18
10 Freezer storage tray
19
11 Twist & serve ice
12 Ice bin with scoop (inside freezer drawer)
13 Freezer drawers on telescopic extension slides
20
14 Adjustable rollers
15 Dairy compartments
16 Adjustable door bins
17 Egg tray
18 Bottle twist holder (where fitted)
19 Full width bottle bin
20 Full width bottle bin (can bin on smaller models)
21 Stabilising foot
14
Note: Product illustrations demonstrate various features but may not
be completely in line with current products.
21
6
SINGLE DOOR ALL REFRIGERATOR MODEL (AR)
1
2
3
4
5
6
7
3
8
9
1 Deodoriser
2 Fridge temperature control
11
3 Adjustable Spillsafe™ glass shelves
4 Spillsafe™ slide away shelf (where fitted)
12
5 Fridge light
6 Deli compartments
7 Bottle caddy
13
8 Crisper humidity control
9 Full width crisper bin
14
10 Adjustable rollers
11 Dairy compartments
12 Egg tray
13 Adjustable door bins
15
14 Bottle twist holder
15 Full width bottle bins
16 Can bin
17 Stabilising foot
10
Note: Product illustrations demonstrate various features but may not be
completely in line with current products.
SINGLE DOOR ALL FREEZER MODEL (AF)
16
17
1 Freezer temperature control
1
2 Freezer light
2
3 Air delivery vents
3
4 Adjustable Spillsafe™ glass shelves
5 Twist & serve ice
4
6 Freezer storage tray
7 Ice bin with scoop (inside freezer drawer)
5
8 Freezer drawers on telescopic extension slides
9 Stabilising foot
6
10 Adjustable rollers
7
8
9
10
Note: Product illustrations demonstrate various features but may not be
completely in line with current products.

BU ILT-IN REFRIGERATO R
1
2
3
4
3
5
6
3
7
1 Deodoriser
2 Fridge temperature control
9
3 Adjustable Spillsafe™ glass shelves
4 Slideable deli compartment
10
5 Fridge light
6 Bottle caddy
11
7 Crisper humidity control
8 Full width crisper bin
9 Dairy compartments
12
10 Egg tray
11 Half width door bins
12 Bottle restrainers
13 Full width bottle bins
13
14 Can bin
7
8
Note: Product illustrations demonstrate various features but may not be
completely in line with current products.
BU ILT-IN FREE ZER
14
1 Freezer temperature control
1
2 Freezer light
2
3 Air delivery vents
3
4 Adjustable Spillsafe™ glass shelves
4
5 Twist ice & serve with ice cube trays
6 Freezer baskets with clear fascia
5
4
6
Note: Product illustrations demonstrate various features but may not be completely in
line with current products.

8
BOTTOM MOUNT ICE & WATER MODEL
1
2
3
4
5
6
7
8
9
10
11
12
13
14
Note: EBE5160 shown. Product illustrations demonstrate various
features but may not be completely in line with current products.
1 LED light
2 Electronic controls
15
3 Spillsafe™ slide away shelf (where fitted)
4 Adjustable Spillsafe™ glass shelf
5 LED fridge light
16
6 Deli compartments
17
7 Crisper humidity controls
8 Crisper bins
18
9 Deodoriser
19
10 Freezer storage tray
11 Ice maker assembly
12 Ice bin with scoop (inside freezer drawer)
20
13 Freezer drawers on telescopic extension slides
14 Adjustable rollers
15 Dairy compartments
16 Adjustable door bins
17 Egg tray
18 Bottle twist holder (where fitted)
19 Full width bottle bin
20 Full width bottle bin (can bin on smaller models)
21 Stabilising foot
21
c
Stability foot
wound up
r
Aligned to
cupboa
ie. even ga
550mm for easy glide (telescopic)
10-15mm
Height adjustable
fr
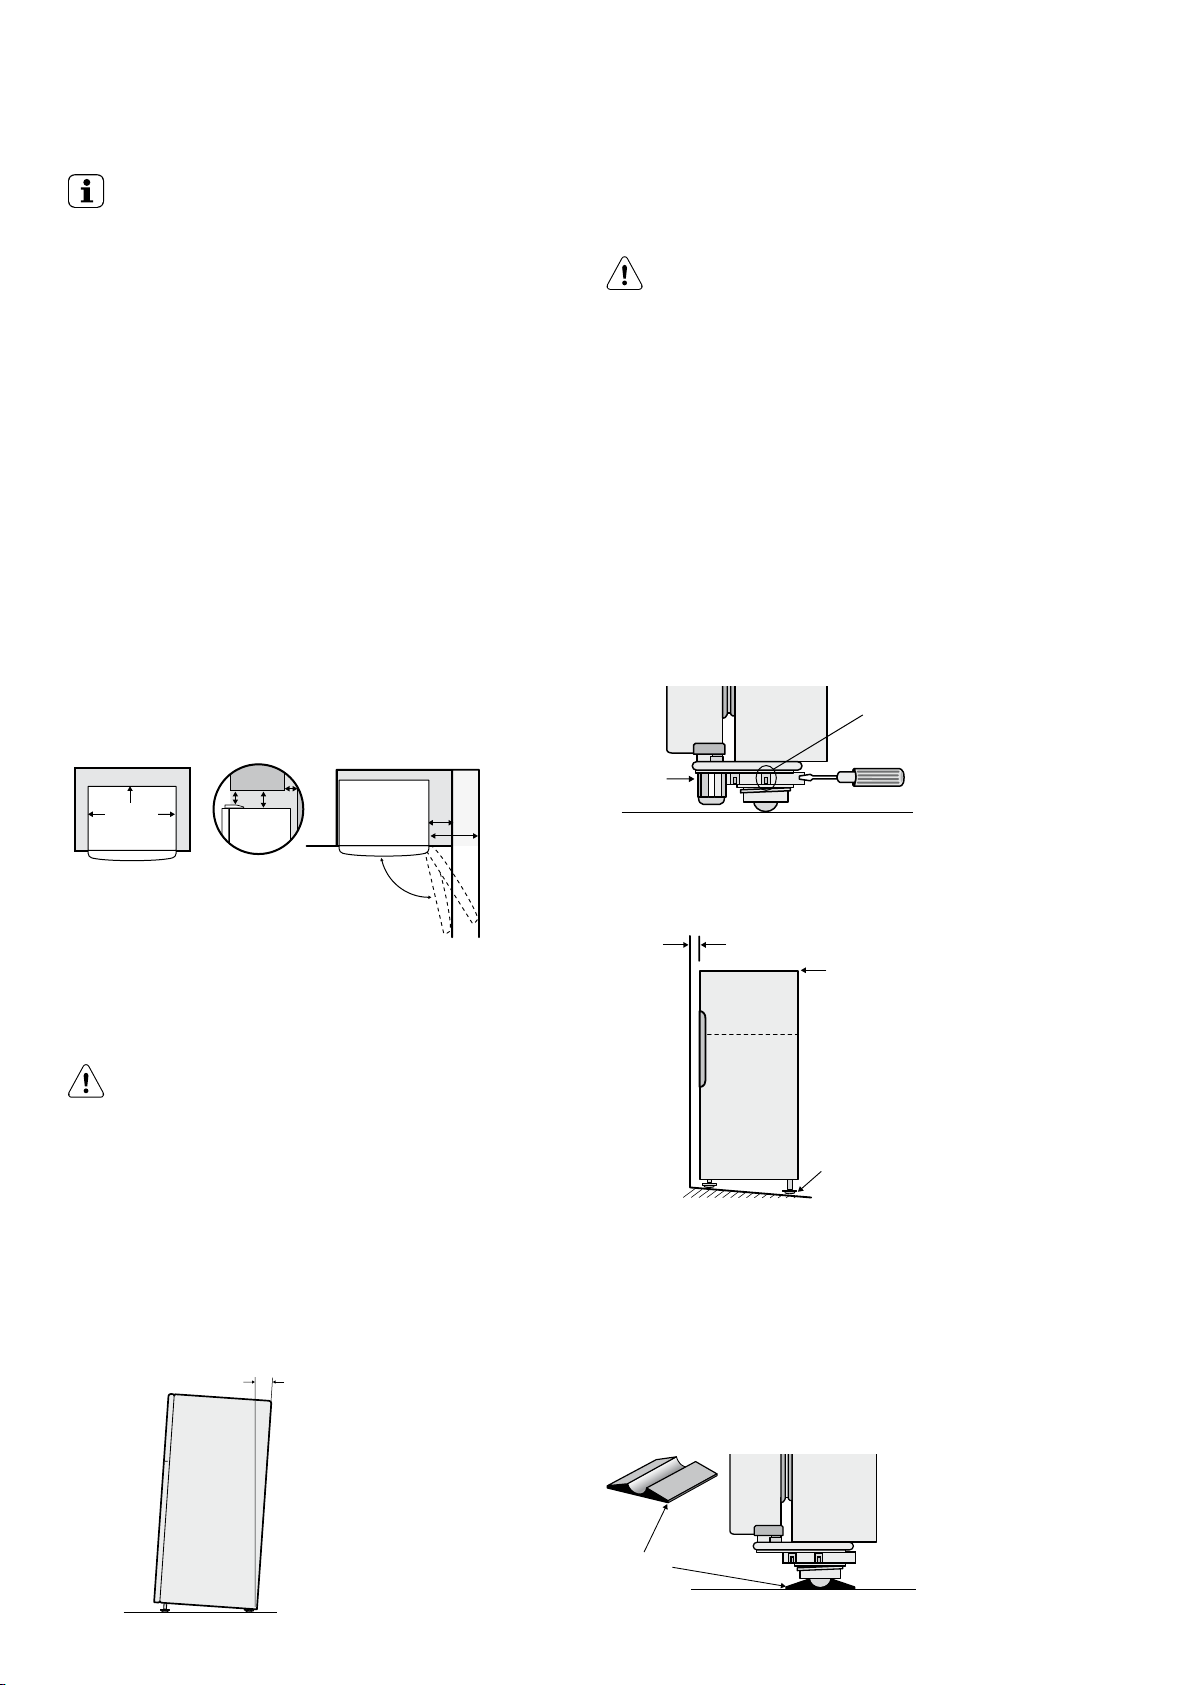
INSTALLING YOUR NEW APPLIANCE
TIPS & INFORMATION!
• For built-in models, refer to the separate booklet.
• To join two E:Line modular fridges together, refer to
the booklet with the connection kit.
Adequate ventilation around your refrigerator.
The diagram below shows the recommended airspace to
allow for ventilation of your refrigerator.
All models except EBE5167SD: If gap (Y) is not
minimum of 100mm, then gap (X) increases from 50 to
90mm.
For EBE5167SD: If gap (Y) is not minimum of 100mm,
then gap (Z) increases from 10 to 45mm. When positioned
in a corner area, spacing of at least 350mm on the hinge
side will allow the doors to open enough to enable the
removal of bins and shelves.
Note: For those models with telescopic extension slideout bins, the clearance required increases from 350mm
to 550mm for top mount and bottom mount models,
and to 450mm for the all refrigerator model to allow full
access to the bins’ contents as well as bin removal.
The stability foot should also be wound fully up so it will
not interfere with the operation of the rollers (see diagram
in Step 3).
CAUTION!
The rollers are designed for forward or backward movement
only. They are not castors. Moving the refrigerator sideways
may damage your floor and the rollers.
1. Roll the refrigerator into place.
2. The top of the refrigerator should be tilted back by
10mm (see diagram on left). This will allow the doors to
self-close providing a consistent door seal.
3. If the refrigerator isn’t tilted back, you can adjust the
two front rollers by turning the large, plastic roller nut.
(see diagram below). One turn of the nut increases the
height of the refrigerator by 10mm. If you have difficulty
turning the roller nut, have someone tilt the refrigerator
back, so you have better access. Alternatively, you
can access the rollers from the side, using a flat
screwdriver. (See diagram below).
Large plasti
roller nut
9
drawer models
50mm
Recommended
airspace
30mm
CABINET
DOOR
30mm
(Rear gap)
(z)
(y)
(x)
350mm
NOTE: Doors are designed to sit proud
of cabinetry (not flush). The clearances shown
above are the recommended minimum clearances.
The clearance at the rear must not exceed 75mm.
WARNING!
Automatic aerosol systems (such as insect control) should not
be located adjacent to the product as the spray may cause
long term damage to the external plastics of the appliance.
Installing your refrigerator
Your new refrigerator should arrive with the front adjustable
rollers wound down, to tilt the top backwards by about
10mm from upright. This will allow your refrigerator door to
self-close, providing a consistent closed seal.
4. Check the alignment of the refrigerator to the
surrounding cupboards to see if it is level. You can
adjust the level with the rollers as detailed in step 3.
rds
p
Top of refrigerator
is level ie. horizontal
Adjust front rollers
for uneveness of floo
eg. wind this roller
down or up
5. If you find your refrigerator rocks from corner to corner,
it means your floor is uneven. Find a piece
of plastic or hardboard etc. and pack it firmly under the
roller.
6. On certain floor surfaces the refrigerator may roll
forward during operation. Where provided a “Roller
Stop” can be placed under the front rollers. If roller
stop is required, please contact Customer Service
(details on back page) and quote part no. 1448845.
ont rollers
Fixed rear
rollers
Roller Stop
 Loading...