

Page 1

user manual
notice d'utilisation
benutzerinformation
Dishwasher
Lave-vaisselle
Geschirrspüler
ESL 66910
Page 2

2 electrolux
Electrolux. Thinking of you.
Share more of our thinking at www.electrolux.com
Contents
Safety information 2
Product description 3
Control panel 4
First use 5
Setting the water softener 6
Use of dishwasher salt 7
Use of rinse aid 7
Daily use 8
Loading cutlery and dishes 9
Use of detergent 11
Multitab function 12
Subject to change without notice
Select and start a washing programme
Unloading the dishwasher 14
Washing programmes 15
Care and cleaning 16
What to do if… 17
Technical data 18
Installation 19
Water connection 19
Electrical connection 21
Environment concerns 21
Safety information
In the interest of your safety and to ensure the correct use, before installing
and first using the appliance, read this
user manual carefully, including its hints
and warnings. To avoid unnecessary
mistakes and accidents, it is important
to ensure that all people using the appliance are thoroughly familiar with its operation and safety features. Save these
instructions and make sure that they remain with the appliance if it is moved or
sold, so that everyone using it through
its life will be properly informed on appliance use and safety.
Correct use
• This dishwasher is only intended for washing household utensils suitable for machine washing.
• Do not put any solvents in the dishwasher.
This could cause an explosion.
• Knives and other items with sharp points
must be loaded in the cutlery basket with
their points down or placed in a horizontal
position in the upper basket.
• Only use products (detergent, salt and
rinse aid) suitable for dishwashers.
• Avoid opening the door whilst the appliance is in operation, hot steam may escape.
• Do not take any dishes out of the dishwasher before the end of the washing cycle.
• After use, isolate the appliance from the
power supply and turn off the water supply.
• This product should be serviced only by an
authorized service engineer, and only genuine spare parts should be used.
• Under no circumstances should you attempt to repair the machine yourself. Repairs carried out by inexperienced persons
could cause injury or serious malfunctioning. Contact your local Service Force Centre. Always insist on genuine spare parts.
General safety
• Persons (including children) with reduced
physical sensory, mental capabilities or
lack of experience and knowledge must
not use the appliance. They must have supervision or instruction for the operation of
the appliance by a person responsible for
their safety.
• Dishwasher detergents can cause chemical burns to eyes, mouth and throat. Could
endanger life! Comply with the safety instructions of the dishwasher detergent
manufacturer.
• Water in the dishwasher is not for drinking
purposes. Detergent residue may still be
present in your machine.
13
Page 3

electrolux 3
• Ensure that the door of the dishwasher is
always closed when it is not being loaded
or unloaded. In this way you will avoid anybody tripping over the open door and hurting themselves.
• Do not sit or stand on the open door.
Child safety
• This appliance is designed to be operated
by adults. Children must be supervised to
ensure that they do not play with the appliance.
• Keep all packaging well away from children. There is a risk of suffocation.
• Keep all detergents in a safe place out of
children’s reach.
• Keep children well away from the dishwasher when the door is open.
Installation
• Check your dishwasher for any transport
damage. Never connect a damaged machine. If your dishwasher is damaged contact your supplier.
Product description
• All packaging must be removed before
use.
• Any electrical and plumbing work required
to install this appliance must be carried out
by a qualified and competent person.
• For safety reasons it is dangerous to alter
the specifications or attempt to modify this
product in any way.
• Never use the dishwasher if the electrical
supply cable and water hoses are damaged; or if the control panel, work top or
plinth area are damaged such that the inside of the appliance is freely accessible.
Contact your local Service Force centre, in
order to avoid hazard.
• All sides of the dishwasher must never be
drilled to prevent damage to hydraulic and
electric components.
Warning! For electrical and water
connection carefully follow the
instructions given in the specific
paragraphs.
1 Upper basket
2 Water hardness dial
3 Salt container
4 Detergent dispenser
5 Rinse aid dispenser
6 Rating plate
Page 4

4 electrolux
7 Filters
8 Lower spray arm
9 Upper spray arm
Optical signal
Once the washing programme starts, a
point-shaped optical signal shows on the
floor beneath the appliance door.
If you install the appliance higher up with a
furniture door mounted flush, the optical signal can no longer be seen.
Control panel
1 On/off button
2 Digital display
3 Delay start button
4 Programme selection buttons
5 Indicator lights
6 Function buttons
Indicator lights
Salt
Rinse aid
Multitab
Delay start button
You can delay the start of the programme for
between 1 and 19 hours.
Refer to 'Select and start a washing programme' chapter for the set of this function.
Programme selection buttons
Press one of these buttons to set a washing
programme. The corresponding indicator
light comes on. Refer to 'Washing programmes' chart for details.
Comes on when the special salt has run out.
Comes on when the rinse aid has run out.
Indicates the activation/deactivation of the multitab function. Refer
to 'Multitab function'.
Optical signal
Red light
fixed
Red light
flashing
Indicates the running of a washing programme. Comes on
when the programme starts.
Goes off once the programme
has ended.
Indicates a malfunction of the
appliance.
The digital display
The digital display indicates:
• the level of hardness to which the water
softener is set,
• the approximate remaining time of the running programme,
• activation/deactivation of the rinse aid dispenser ( ONLY with multitab function active),
• the end of a washing programme (the digital display shows a zero),
• the countdown for the delay start,
Page 5

electrolux 5
• fault codes concerning malfunction of the
dishwasher,
• if the audible signals are activated/deactivated.
Function buttons
The following functions can be set using
these buttons:
• setting the water softener level,
• cancelling a washing programme or a delay start in progress,
• activation/deactivation of the multitab
function,
• activation/deactivation of the rinse aid dispenser when multitab function is active,
• activation/deactivation of the audible signals.
Setting mode
Press the on/off button; if ALL programme
button lights are on the appliance is in setting
mode.
Always remember that when performing
the following operations:
– selecting a washing programme,
– setting the water softener level,
– activating/deactivating the rinse aid,
– activating/deactivating the audible
signals,
the appliance MUST be in setting mode.
Press the on/off button; if a programme button light is on the last performed or selected
programme is still set. In this case, to return
to setting mode, the programme has to be
cancelled.
To cancel a set programme or a
programme in progress
Simultaneously press and hold the two function buttons B and C until all the programme
button lights come on. The programme has
been cancelled and the appliance is now in
setting mode.
Audible signals
Audible signals have been introduced to help
indicate which operations the dishwasher is
performing:
– setting of the water softener,
– end of the washing programme,
– intervention of an alarm due to malfunction
of the machine.
Factory setting: audible signals activated
It is possible to deactivate the audible
signals.
Deactivation/activation of the audible
signals
1. Press the on/off button. The dishwasher
must be in setting mode.
2. Simultaneously press and hold function
buttons B and C until the lights of function
buttons A, B and C start flashing.
3. Press function button C, the lights of
function buttons A and B go off while the
light of function button C continues to
flash. The digital display shows the current level.
Audible signals deactivated
Audible signals activated
4. To change the setting, press function
button C again; the digital display shows
the new setting.
5. To memorize the operation, switch off the
dishwasher.
First use
Before using your dishwasher for the first
time:
• Ensure that the electrical and water connections comply with the installation instructions
• Remove all packaging from inside the appliance
• Set the water softener level
• Pour 1 litre of water into the salt container
and then fill with dishwasher salt
• Fill the rinse aid dispenser
If you want to use combi detergent
tablets such as: '3 in 1', '4 in 1', '5 in
1' etc. set the multitab function. (Refer to 'Multitab function').
Page 6

6 electrolux
Setting the water softener
The dishwasher is equipped with a water
softener designed to remove minerals and
salts from the water supply, which would
have a detrimental or adverse effect on the
operation of the appliance.
The higher the content of these minerals and
salts, the harder your water is. Water hardness is measured in equivalent scales, German degrees (dH°), French degrees (°TH)
and mmol/l (millimol per litre - international
unit for the hardness of water).
Water hardness Adjusting the water hardness setting Use of
°dH °TH mmol/l manually electronically
51 - 70 91 - 125 9,1 - 12,5 2 level 10 yes
43 - 50 76 - 90 7,6 - 9,0 2 level 9 yes
37 - 42 65 - 75 6,5 - 7,5 2 level 8 yes
29 - 36 51 - 64 5,1 - 6,4 2 level 7 yes
23 - 28 40 - 50 4,0 - 5,0 2 level 6 yes
19 - 22 33 - 39 3,3 - 3,9 2 level 5 yes
15 - 18 26 - 32 2,6 - 3,2 1 level 4 yes
11 - 14 19 - 25 1,9 - 2,5 1 level 3 yes
4 - 10 7 - 18 0,7 - 1,8 1 level 2 yes
< 4 < 7 < 0,7 1 level 1 no
Setting manually
The dishwasher is factory set at position
2.
1. Open the dishwasher door.
2. Remove the lower basket from the dishwasher.
3. Turn the water hardness dial to position
1 or 2 (see chart).
4. Replace the lower basket.
Setting electronically
The dishwasher is factory set at level 5.
The softener should be adjusted according
to the hardness of the water in your area.
Your local Water Authority can advise you on
the hardness of the water in your area.
The water softener must be set in two
ways: manually, using the water hardness dial and electronically.
1. Press the on/off button. The dishwasher
must be in setting mode.
2. Simultaneously press and hold function
buttons B and C, until the lights of function buttons A, B and C start flashing.
3. Press function button A, the lights of
function buttons B and C go off while the
light of function button A continues to
flash. The digital display shows the current level and a sequence of intermittent
audible signals are heard.
Examples:
displayed, 5 intermittent audible sig-
nals, pause, etc. = level 5
displayed, 10 intermittent audible
signals, pause, etc. = level 10
4. To change the level, press function button A. Each time the button is pressed the
level changes. (For the selection of the
new level see the chart).
Examples: If the current level is 5, by
pressing function button A once, level 6
is selected.
If the current level is 10, by pressing function button A once, level 1 is selected.
salt
Page 7

5. To memorize the operation, switch off the
dishwasher by pressing the on/off button.
Use of dishwasher salt
Warning!
Only use salt specifically designed for use in
dishwashers. All other types of salt not specifically designed for use in a dishwasher, especially table salt, will damage the water softener. Only fill with salt just before starting one
of the complete washing programmes. This
will prevent any grains of salt or salty water,
which may have been spilt, remaining on the
bottom of the machine for any period of time,
which may cause corrosion.
To fill:
1. Open the door, remove the lower basket
and unscrew the cap of the salt container
by turning it anticlockwise.
2. Pour 1 litre of water into the container
(this is necessary only before filling
with salt for the first time) .
3. Using the funnel provided, pour in the salt
until the container is full.
electrolux 7
4. Replace the cap making sure that there
is no trace of salt on the screw thread or
on the gasket.
5. Replace the cap tightly turning it clockwise until it stops with a click.
Do not worry if water overflows from the
unit when filling with salt, this is quite
normal.
The salt indicator light on the control
panel can remain illuminated for 2-6
hours after the salt has been replenished, assuming the dishwasher remains switched on. If you are using
salt that takes longer to dissolve
then this can take longer. The operation of the machine is not affected.
Use of rinse aid
Warning! Only use branded rinse aid for
dishwashers.
Never fill the rinse aid dispenser with any
other substances (e.g. dishwasher
cleaning agent, liquid detergent). This
would damage the appliance.
Rinse aid ensures thorough rinsing, and
spot and streak free drying.
Rinse aid is automatically added during
the last rinse.
1. Open the container by pressing the release button (A).
Page 8

8 electrolux
2. Add the rinse aid in the container. The
maximum level for filling is indicated by
"max".
40 washing cycles, depending upon the
dosage setting.
3. Ensure that the lid is closed after every
refill.
Clean up any rinse aid spilt during filling
with an absorbent cloth to avoid excess
foaming during the next wash.
According to the finish and drying results obtained, adjust the dose of rinse aid by means
of the 6 position selector (position 1 minimum
dosage, position 6 maximum dosage).
The dose is factory set in position 4.
Increase the dose if there are drops of water
or lime spots on the dishes after washing.
Reduce it if there are sticky whitish streaks
on the dishes or a bluish film on glassware or
knife blades.
The dispenser holds about 110 ml of rinse
aid, which is sufficient for between 16 and
Daily use
• Check if it’s necessary to refill with dishwasher salt or rinse aid.
• Load cutlery and dishes into the dishwasher.
• Fill with dishwasher detergent.
• Select a wash programme suitable for the
cutlery and dishes.
• Start the wash programme.
Helpful hints and tips
Sponges, household cloths and any object
that can absorb water may not be washed in
the dishwasher.
• Before loading the dishes, you should:
– Remove all left over food and debris.
– Soften remnants of burnt food in pans
• When loading the dishes and cutlery,
please note:
– Dishes and cutlery must not impede the
rotation of the spray arms.
– Load hollow items such as cups,
glasses, pans, etc. with the opening
downwards so that water cannot collect
in the container or a deep base.
– Dishes and items of cutlery must not lie
inside one another, or cover each other.
– To avoid damage to glasses, they must
not touch.
– Lay small objects in the cutlery basket.
Page 9

electrolux 9
• Plastic items and pans with non stick coatings have a tendency to retain water
drops; these items will not dry as well as
porcelain and steel items.
For washing in the dishwasher the following cutlery and dishes
are not suitable: are of limited suitability:
• Cutlery with wooden, horn, china or mother-ofpearls handles.
• Plastic items that are not heat resistant.
• Older cutlery with glued parts that are not temperature resistant.
• Bonded cutlery items or dishes.
• Pewter or copper items.
• Lead crystal glass.
• Steel items prone to rusting.
• Wooden platters.
• Items made from synthetics fibres.
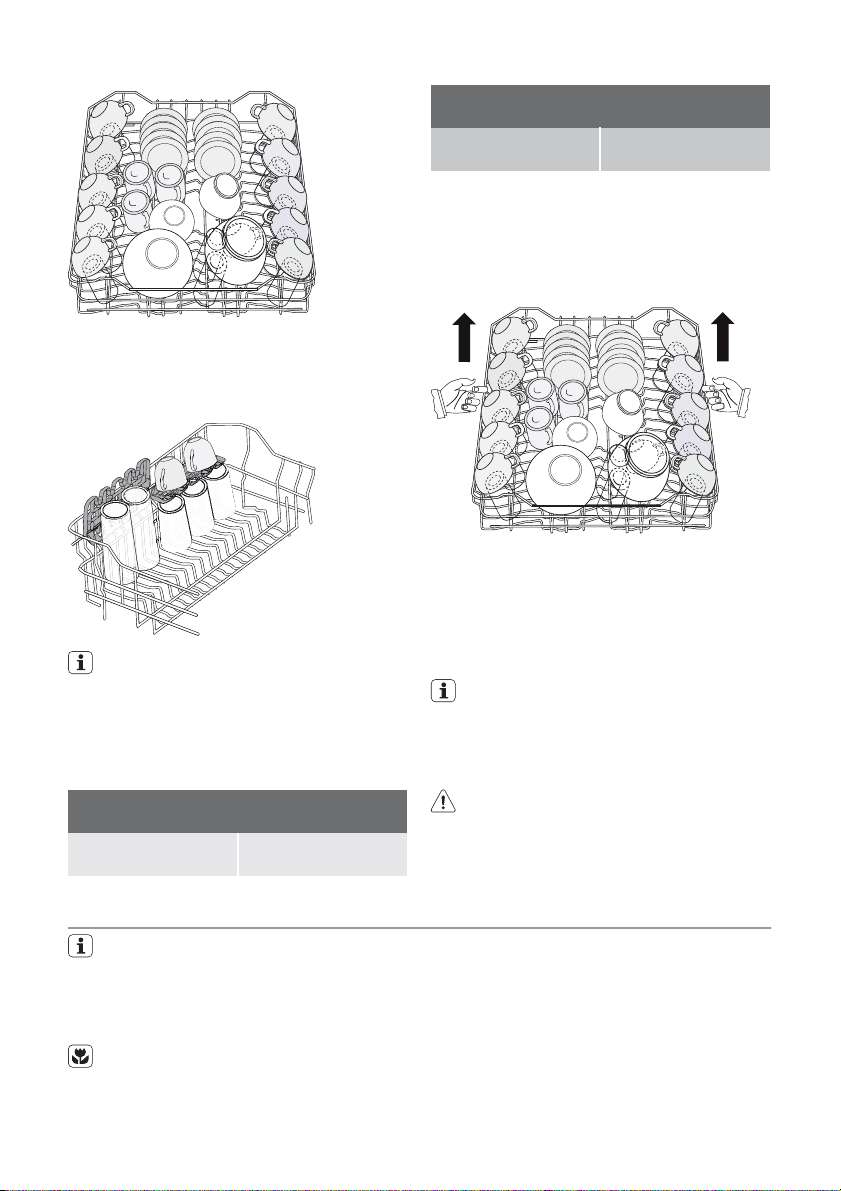
Loading cutlery and dishes
The lower basket
The lower basket is designed to take saucepan, lids, plates, salad bowls, cutlery etc.
Service dishes and large lids should be arranged around the edge of the basket, ensuring that the spray arms can turn freely.
• Light items (plastic bowls etc.) must be
loaded in the upper basket and arranged
so they do not move.
• Only wash stoneware in the dishwasher if it is
specially marked as being dishwasher-safe by
the manufacturer.
• Glazed patterns may fade if machine washed
frequently.
• Silver and aluminium parts have a tendency to
discolour during washing: Residues, e.g. egg
white, egg yolk and mustard often cause discolouring and staining on silver. Therefore always clean left-overs from silver immediately, if
it is not to be washed straight after use.
The rows of prongs in the lower basket can
lie flat to allow you to load pots, pans and
bowls.
The cutlery basket
Long bladed knives stored in an upright
position are a potential hazard. Long
and/or sharp items of cutlery such as
carving knives must be positioned
horizontally in the upper basket. Take
care when loading or unloading sharp
items such as knives.
Forks and spoons should be placed in the
removable cutlery basket with the handles
facing downwards and the knives with their
handles facing upwards.
Page 10

10 electrolux
If the handles protrude from the bottom of the
basket, obstructing the lower spray arm, load
the cutlery with the handles facing upwards.
Mix spoons with other cutlery to prevent
them from sticking together.
To make loading of the cutlery basket easier,
lower the cutlery basket handle.
For best results we recommend that you use
the cutlery grids.
If the size and dimensions of the cutlery do
not allow the use of the grids, they can be
easily hidden.
The cutlery basket is in two parts which can
be separated to give greater loading flexibility. To separate the two parts, slide them horizontally in opposite directions and pull them
apart.
To reassemble, reverse the procedure.
The upper basket
The upper basket is designed for saucers,
salad bowls, cups, glasses, pots and lids.
Arrange items on and underneath the cup
racks so that water can reach all surfaces.
Page 11
electrolux 11
Glasses with long stems can be placed upside down in the cup racks.
For taller items, the cup racks can be folded
upwards.
Before closing the door, ensured that
the spray arms can rotate freely.
Adjusting the height of the upper basket
If washing very large plates you can load
them in the lower basket after moving the
upper basket to the higher position.
Maximum height of the dishes in the lower
With upper basket
raised
basket
33 cm
Maximum height of the dishes in the lower
With upper basket
lowered
basket
29 cm
To move to the higher position proceed
as follows:
1. Pull out the basket until it stops.
2. Carefully lift both sides upwards until the
mechanism is engaged and the basket is
stable.
To lower the basket to the original position proceed as follows:
1. Pull out the basket until it stops.
2. Carefully lift both sides upwards and then
allow the mechanism to drop back down
slowly, keeping hold of it.
Never lift or lower the basket on one side
only
With the upper basket raised we recommend you adjust the cup racks in the
lowest position.
After loading your machine always
close the door, as an open door can
be a hazard.
Use of detergent
Only use detergents specifically designed for use in dishwashers.
Please observe the manufacturer’s dosing and storage recommendations as
stated on the detergent packaging.
Using no more than the correct amount
of detergent contributes to reducing pollution.
Fill with detergent
1. Open the lid.
Page 12

12 electrolux
2. Fill the detergent dispenser (1) with detergent. The marking indicates the dosing
levels:
20 = approximately 20 g of detergent
30 = approximately 30 g of detergent.
3. All programmes with prewash need an
additional detergent dose (5/10 g) that
must be placed in the prewash detergent
chamber (2).
This detergent will be used during the
prewash phase.
When using detergent tablets; place the
tablet in compartment (1)
1
2
Multitab function
This appliance is equipped with the multitab
function, that allows the use of the multitab
combi detergent tablets.
These products are detergents with a combined cleaning, rinsing and salt functions.
They can also contain other different agents
depending on which kind of tablets you
choose ('3 in 1', '4 in 1', '5 in 1' etc.).
Check whether these detergents are suitable
for your water hardness. See the manufacturers instructions.
Once this function is selected it will remain
active for all following wash programmes.
With the selection of this function the inflow
of rinse aid and salt from each respective
supply container is automatically deactivated
4. Close the lid and press until it locks in
place.
Detergent tablets from different manufacturers dissolve at different rates. For
this reason, some detergent tablets do
not attain their full cleaning power during
short washing programmes. Therefore,
please use long washing programmes
when using detergent tablets, to ensure
the complete removal of detergent residuals.
and also the indicator lights for salt and rinse
aid are deactivated.
When using the multitab function, the cycle
duration may change.
Activate/deactivate the multitab function
before the start of a washing programme.
Once the programme is running, the
multitab function can NO longer be
changed. If you want to cancel the multitab function you have to cancel the programme setting and then deactivate the
multitab function. In this case you have
to set a washing programme (and desired options) again.
Page 13

electrolux 13
Activation/deactivation of the multitab
function
Simultaneously press and hold the two multitab buttons (function buttons D and E) until
the multitab indicator light comes on. This
means that the function is active.
To deactivate the function press the same
buttons again until the indicator light corresponding to the multitab function symbol
goes off.
If the drying results are not satisfactory we suggest that you:
1. Fill up the rinse aid dispenser with
rinse aid.
2. Activate the rinse aid dispenser.
3. Set the rinse aid dosage to position
2.
• The activation/deactivation of the
rinse aid is only possible with the multitab function active.
Activation/deactivation of the rinse aid
dispenser
1. Press the on/off button. The appliance
must be in setting mode.
2. Simultaneously press and hold function
buttons B and C, until the lights of function buttons A, B and C start flashing.
3. Press function button B, the lights of
function buttons A and C turn off while the
light of function button B continues to
flash. The digital display indicates the current setting.
Rinse aid dispenser deactivated
Rinse aid dispenser activated
4. To change the setting, press button B
again, the digital display shows the new
setting.
5. To memorize the operation, switch off the
dishwasher by pressing the on/off button.
If you decide to revert back to the
use of individual detergents we advise that you:
1. Deactivate the multitab function.
2. Fill up the salt container and the rinse
aid dispenser again.
3. Adjust the water hardness setting to
the highest setting and perform 1
normal washing programme without
loading any dishes.
4. Adjust the water hardness setting
according to the hardness of the water in your area.
5. Adjust the rinse aid dosage.
Select and start a washing programme
Select the washing programme and
delay start with the door slightly
opened. The start of the programme
or the countdown of the delay start
will occur only after the closure of
the door. Until then it is possible to
modify the settings
1. Check that the baskets have been loaded
correctly and that the spray arms are free
to rotate.
2. Check that the water tap is opened.
3. Press the on/off button. The dishwasher
must be in setting mode.
4. Press the button corresponding to the required programme (refer to 'Washing
programmes' chart).
Close the appliance door, the programme starts automatically.
Setting and starting the programme with
delay start
1. After having selected the washing pro-
2. Close the appliance door, the countdown
3. The countdown will decrease with steps
4. The opening of the door will interrupt the
5. Once the delay start has elapsed the pro-
gramme, press the delay start button until
the flashing number of hours for the delay
start shows in the digital display.
– The delay start indicator light comes
on.
starts automatically.
of 1 hour.
countdown. Close the door, the countdown will continue from the point at
which it was interrupted.
gramme will start automatically.
– The delay start indicator light goes off.
Page 14

14 electrolux
Warning! Interrupt or cancel a
washing programme in progress
ONLY if it's absolutely necessary.
Attention! Hot steam may escape
when the door is opened. Open the
door carefully.
Interrupt a washing programme in
progress
• Open the dishwasher door; the pro-
gramme will stop. Close the door; the programme will start from the point at which
it was interrupted.
Cancel a delay start or a washing
programme in progress
• Simultaneously press and hold the two
function buttons B and C until all the programme lights come on.
• Cancelling a delay start will also cancel the
washing programme. You have to select
the washing programme again.
• If a new washing programme is to be se-
lected, check that there is detergent in the
detergent dispenser.
Unloading the dishwasher
• Hot dishes are sensitive to knocks. The
dishes should therefore be allowed to cool
down before removing from the appliance.
•Empty the lower basket first and then the
upper one; this will avoid water dripping
from the upper basket onto the dishes in
the lower one.
• Water may appear on the sides and the
door of the dishwasher as the stainless
End of the washing programme
• The appliance will automatically stop and
an audible signal informs you of the end of
the washing programme.
1. Open the appliance door. The digital dis-
play shows zero.
2. Switch of the appliance.
3. Leave the appliance door ajar for a few
minutes before removing the dishes. This
way they will be cooler and the drying will
be improved.
Standby mode
If you do not switch off the appliance at the
end of the washing programme, the appliance automatically goes into standby mode.
The standby mode decreases energy consumption.
Three minutes after the end of the programme, all indicator lights go off and the
digital display shows one horizontal bar.
Press one of the buttons (not the on/off button), to go back to end-of-programme mode.
steel will eventually become cooler than
the dishes.
When the washing programme has
finished, it is recommended that the
dishwasher is unplugged and the
water tap turned off.
Page 15

electrolux 15
Washing programmes
Washing programmes
Programme Degree of soil Type of load Programme description
Heavy soil Crockery, cutlery,
1)
2)
3)
1) During the Auto washing programme the level of soiling on the dishes is determined by how cloudy
the water is. The programme duration, water and energy consumption levels can vary; this depends
upon whether the appliance is fully or partially loaded and if the dishes are lightly or heavily soiled. The
temperature of the water is automatically adjusted between 45°C and 70°C.
2) Ideal for washing a partially loaded dishwasher. This is the perfect daily programme, made to meet
the needs of a family of 4 persons who only wish to load breakfast and dinner crockery and cutlery.
3) Test programme for test institutes.
Any Crockery, cutlery,
Normal or light soil Crockery and cutlery Main wash up to 60°C
Normal soil Crockery and cutlery Prewash
Any Partial load (to be
pots and pans
pots and pans
completed later in the
day).
Consumption values
Programme
1) The digital display shows the programme duration.
Duration (in minutes)
- 1,8 - 2,0 23 - 25
- 1,1 - 1,7 12 - 23
- 0,9 9
- 1,0 - 1,1 12 - 13
- 0,1 4
The consumption values are intended as
a guide and depend on the pressure and
1)
Energy (in kWh) Water (in litres)
the variations of the power supply and
the amount of dishes.
the temperature of the water and also by
Prewash
Main wash up to 70°C
2 intermediate rinses
Final rinse
Drying
Prewash
Main wash up to 45°C or
70°C
1 or 2 intermediate rinses
Final rinse
Drying
Final rinse
Main wash up to 50°C
1 intermediate rinse
Final rinse
Drying
1 cold rinse (to avoid food
scraps from sticking).
This programme does not require the use of detergent.
Page 16

16 electrolux
Care and cleaning
Cleaning the filters
The filters must be checked and cleaned
from time to time. Dirty filters will degrade the
washing result.
Warning! Before cleaning the filters
ensure that the machine is switched off.
1. Open the door, remove the lower basket.
2. The dishwasher filter system comprises a
coarse filter ( A ), a microfilter ( B ) and a
flat filter. Unlock the filter system using the
handle on the microfilter.
3. Turn the handle about 1/4 a turn anti-
clockwise and remove the filter system
4. Take hold of the coarse filter ( A ) by the
handle with the hole and remove from the
microfilter ( B ).
5. Clean all filters thoroughly under running
water.
6. Remove the flat filter from the base of the
washing compartment and clean both
faces thoroughly.
7. Put the flat filter back in the base of the
washing compartment and ensure that it
fits perfectly.
8. Place the coarse filter ( A ) in the microfilter ( B ) and press together.
9. Put the filter combination in place and
lock by turning the handle clockwise to
the stop. During this process ensure that
the flat filter does not protrude above the
base of the washing compartment.
NEVER use the dishwasher without
filters. Incorrect repositioning and
fitting of the filters will produce poor
washing results and will result in
damage to the appliance.
NEVER try to remove the spray
arms.
If residues of soil have clogged the holes
in the spray arms, remove the debris
with a cocktail stick.
External cleaning
Clean the external surfaces of the machine
and control panel with a damp soft cloth. If
necessary use only neutral detergents. Never
use abrasive products, scouring pads or solvent (acetone, trichloroethylene etc...).
Internal cleaning
Ensure that the seals around the door, the
detergent and rinse aid dispensers are
cleaned regularly with a damp cloth.
We recommend every 3 months you run the
wash programme for heavy soiled dishes using detergent but without dishes.
Prolonged periods of non-operation
If you are not using the machine for a prolonged period of time you are advised to:
Page 17

electrolux 17
1. Unplug the appliance and then turn off
the water.
2. Leave the door ajar to prevent the formation of any unpleasant smells.
3. Leave the inside of the machine clean.
Frost precautions
Avoid placing the machine in a location
where the temperature is below 0°C. If this is
unavoidable, empty the machine, close the
appliance door, disconnect the water inlet
pipe and empty it.
What to do if…
The dishwasher will not start or stops during
operation.
Certain problems can be due to the lack of
simple maintenance or oversights, which can
be solved with the help of the hints described
in the chart, without calling out an engineer.
Fault codes and malfunction Possible cause and solution
• continuous flashing of the running programme
light
• intermittent audible signal
•
appears in the digital display
The dishwasher does not fill with water
• continuous flashing of the running programme
light
• intermittent audible signal
•
appears in the digital display
The dishwasher will not drain
• continuous flashing of the running programme
light
• intermittent audible signal
•
appears in the digital display
Anti-flood device is activated
Moving the machine
If you have to move the machine (moving
house etc...):
1. Unplug it.
2. Turn the water tap off.
3. Remove the water inlet and discharge
hoses.
4. Pull the machine out together with the
hoses.
Avoid over tilting the machine during transportation.
Open the door and switch off the appliance.
Carry out the following suggested corrective
actions.
• The water tap is blocked or furred with limescale.
Clean the water tap.
• The water tap is turned off.
Turn the water tap on.
• The filter (where present) in the inlet hose fitting
at the water inlet valve is blocked.
Clean the filter.
• The water inlet hose has not been correctly laid
or it is kinked or squashed.
Check the water inlet hose connection.
• The sink spigot is blocked.
Clean out the sink spigot.
• The water drain hose has not been correctly laid
or it is kinked or squashed.
Check the water drain hose connection.
• Close the water tap and contact your local
Service Force Centre.
Page 18

18 electrolux
Malfunction Possible cause and solution
The programme does not start
Once these checks have been carried out
switch on the appliance and close the door.
The programme will continue from the point
at which it was interrupted.
If the malfunction or fault code reappears
contact your local Service Force Centre.
For other fault codes not described in the
above chart, please contact your local Service Force Centre.
Contact your local Service Force Centre,
quoting the model (Mod.), product number
(PNC) and serial number (S.N.).
The wash results are not satisfactory
The dishes are not
clean
The dishes are wet
and dull
There are streaks,
milky spots or a bluish coating on
glasses and dishes
Water drops have
dried onto glasses
and dishes
• The wrong programme has been selected.
• The dishes are arranged in such a way as to stop water reaching all parts
of a surface. The baskets must not be overloaded.
• The spray arms do not rotate freely due to incorrect arrangement of the
load.
• The filters in the base of the washing compartment are dirty or incorrectly
positioned.
• Too little or no detergent has been used.
• Where there are limescales deposits on the dishes; the salt container is
empty or incorrect level of the water softener has been set.
• The drain hose connection is not correct.
• The salt container cap is not properly closed.
• Rinse aid was not used.
• The rinse aid dispenser is empty.
• Decrease rinse aid dosage.
• Increase rinse aid dosage.
• The detergent may be the cause. Contact the detergent manufacturer consumer care line.
If after all these checks, the problem persists,
contact your local Service Force Centre.
• The dishwasher door has not been properly
closed.
Close the door.
• The main plug is not plugged in.
Insert the main plug
• The fuse has blown out in the household fuse
box.
Replace the fuse.
• Delay start has been set.
If dishes are to be washed immediately, cancel
the delay start.
This information can be found on the rating
plate located on the side of the dishwasher
door.
So that you always have these numbers at
hand, we recommend you to make a note of
them here:
Mod. : . . . . . . . . . . . . . . . . . . . . . . . . . . . . . .
PNC : . . . . . . . . . . . . . . . . . . . . . . . . . . . . . .
S.N. : . . . . . . . . . . . . . . . . . . . . . . . . . . . . . .
Technical data
Dimensions Width cm 59,6
Height cm 85,8 - 93,8
Page 19

electrolux 19
Depth cm 55
Electrical connection - Voltage -
Overall power - Fuse
Water supply pressure Minimum 0,05 MPa (0,5 bar)
Maximum 0,8 MPa (8 bar)
Capacity Place settings 12
Information on the electrical connection is given on the rating plate
on the inner edge of the dishwasher door.
Installation
Warning! Any electrical and/or
plumbing work required to install
this appliance should be carried out
by a qualified electrician and/or
plumber or competent person.
Remove all packaging before positioning the
machine.
If possible, position the machine next to a
water tap and a drain.
This dishwasher is designed to be fitted under a kitchen counter or work surface.
Attention! Carefully follow the instructions
on the enclosed template for building in the
dishwasher and fitting the furniture panel.
No further openings for the venting of the
dishwasher are required, but only to let the
water fill and drain hose and power supply
cable pass through.
The dishwasher incorporates adjustable feet
to allow the adjustment of the height.
During all operations that involve accessibility
to internal components the dishwasher has
to be unplugged.
When inserting the machine, ensure that the
water inlet hose, the drain hose and the supply cable are not kinked or squashed.
Fixing to the adjacent units
The dishwasher must be secured against tilting.
Therefore make sure that the counter it is
fixed under, is suitably secured to a fixed
structure (adjacent kitchen unit cabinets,
wall).
Levelling
Good levelling is essential for correct closure
and sealing of the door.
When the appliance is correctly levelled, the
door will not catch on either side of the cabinet .
If the door does not close correctly, loosen
or tighten the adjustable feet until the machine is perfectly level.
Water connection
Water inlet connection
This appliance can be connected to either a
hot (max. 60°) or cold water supply.
With a hot water supply you can have a significant reduction of energy consumption.
This however, depends on how the hot water
is produced. (We suggest alternative sources
of energy that are more environmentally
friendly as e.g. solar or photovoltaic panels
and aeolian).
For making the connection itself, the coupling nut fitted to the appliance water inlet
hose is designed to screw onto a 3/4" thread
spout or to a purpose made quick-coupling
tap such as the Press-block.
The water pressure must be within the limits
given in the 'Technical data'. Your local Water Authority will advise you on the average
mains pressure in your area.
The water inlet hose must not be kinked,
crushed, or entangled when it is being connected.
The locknut must be correctly fitted to avoid
water leaks.
If the appliance is connected to new pipes or
pipes which have not been used for a long
time, you should run the water for a few minutes before connecting the inlet hose.
Page 20

20 electrolux
Do not use connection hoses which
have previously been used on an old appliance.
This appliance has been fitted with safety features which will prevent the water
used in the appliance from returning
back into the drinking water system. This
appliance complies with the applicable
plumbing regulations.
Water inlet hose with safety valve
After connecting the double-walled water inlet hose, the safety valve is next to the tap.
Therefore the water inlet hose is only under
pressure while the water is running. If the water inlet hose starts to leak during this operation, the safety valve cuts off the running
water.
Please take care when installing the water
inlet hose:
• The electrical cable for the safety valve is
in the double-walled water inlet hose. Do
not immerse the water inlet hose or the
safety valve in water.
• If water inlet hose or the safety valve is
damaged, remove the mains plug immediately.
• A water inlet hose with safety valve must
only be replaced by the Service Force
Centre.
Warning! Dangerous voltage
max 85 cm
min 40 cm
max 400 cm
The drain hose can face either to the right or
left of the dishwasher
Ensure the drain hose is not bent or squashed as this could prevent or slow down the
discharge of water.
The sink plug must not be in place when the
machine is draining as this could cause the
water to syphon back into the machine.
If you use a drain hose extension, its internal
diameter must be no smaller than the diameter of the hose provided.
Likewise the internal diameter of the couplings used for connections to the waste outlet must be no smaller than the diameter of
the hose provided.
When connecting the drain hose to an under
sink trap spigot, the entire plastic mem-
brane (A) must be removed. Failure to remove all the membrane will result in food
particles building up over time eventually
blocking the dishwasher drain hose spigot
Water drain connection
The end of the drain hose can be connected
in the following ways:
1. To the sink outlet spigot, securing it to the
underside of the work surface. This will
prevent waste water from the sink running into the machine.
2. To a stand pipe provided with venthole,
minimum internal diameter 4 cm.
Our appliances are supplied with a security device to protect against the return of dirty water back into the machine.
If the spigot of your sink has a "no return
valve" incorporated this can prevent the
correct draining of your dishwasher. We
therefore advise you to remove it.
To avoid water leakage after installation
make sure that the water couplings are
tight.
Page 21

Electrical connection
Warning! Safety standards require
the appliance to be earthed.
Prior to using the appliance for the
first time, ensure that the rated voltage and type of supply on the rating
plate match that of the supply where
the appliance is to be installed. The
fuse rating is also to be found on the
rating plate.
Always plug the mains plug into a
correctly installed shockproof socket.
Multi-way plugs, connectors and extension cables must not be used.
This could constitute a fire hazard
through overheating.
Environment concerns
The symbol on the product or on its
packaging indicates that this product may
not be treated as household waste. Instead
it should be taken to the appropriate
collection point for the recycling of electrical
and electronic equipment. By ensuring this
product is disposed of correctly, you will help
prevent potential negative consequences for
the environment and human health, which
could otherwise be caused by inappropriate
waste handling of this product. For more
detailed information about recycling of this
product, please contact your local council,
your household waste disposal service or the
shop where you purchased the product.
Packaging material
The packaging materials are environmentally
friendly and can be recycled. The plastic
components are identified by markings, e.g.
>PE<, >PS<, etc. Please dispose of the
packaging materials in the appropriate container at the community waste disposal facilities.
Warning! When a unit is no longer being
used:
• Pull the plug out of the socket.
• Cut off the cable and plug and dispose
of them.
• Dispose of the door catch. This prevents children from trapping them-
electrolux 21
If necessary, have the domestic wiring system socket replaced. In case
that the electrical cable has to be
replaced, contact your local Service
Force centre.
The plug must be accessible after
the appliance has been installed.
Never unplug the appliance by pulling on the cable. Always pull the
plug.
The manufacturer accepts no liability for failure to observe the above
safety precautions.
selves inside and endangering their
lives.
Page 22

22 electrolux
Electrolux. Thinking of you.
Partagez notre imagination sur www.electrolux.com
Sommaire
Consignes de sécurité 22
Description de l'appareil 24
Bandeau de commande 25
Première utilisation 26
Réglage de l'adoucisseur d'eau 27
Utilisation du sel régénérant 28
Utilisation du liquide de rinçage 29
Utilisation quotidienne 30
Rangement des couverts et de la vaisselle
Utilisation du produit de lavage 33
Fonction "Tout en 1" 34
Sélection et départ d'un programme de
lavage 35
Sous réserve de modifications
Déchargement du lave-vaisselle 36
Programmes de lavage 37
Entretien et nettoyage 38
En cas d'anomalie de fonctionnement
Caractéristiques techniques 41
Installation 41
Raccordement à l'arrivée d'eau 42
Branchement électrique 43
En matière de protection de
31
l'environnement 43
Consignes de sécurité
Pour votre sécurité et pour garantir une
utilisation correcte de l'appareil, lisez attentivement cette notice d'utilisation,
ainsi que ses conseils et avertissements,
avant d'installer et d'utiliser l'appareil
pour la première fois. Pour éviter toute
erreur ou accident, veillez à ce que toute
personne qui utilise l'appareil connaisse
bien son fonctionnement et ses options
de sécurité. Conservez cette notice avec
l'appareil. Si l'appareil devait être vendu
ou cédé à une autre personne, assurezvous que la notice d'utilisation l'accompagne, afin que le nouvel utilisateur soit
correctement informé du fonctionnement de celui-ci et des avertissements
s'y rapportant.
Utilisation
• Votre appareil est destiné à un usage domestique normal. Ne l'utilisez pas à des
fins commerciales ou industrielles ou pour
d'autres buts que celui pour lequel il a été
conçu. Ce lave-vaisselle est conçu pour
laver la vaisselle et les ustensiles de cuisine
pouvant être lavés en machine.
• N'utilisez pas de solvants dans votre lavevaisselle. Ceux-ci pourraient provoquer
une explosion.
• Les couteaux et autres ustensiles pointus
ou tranchants doivent être placés dans le
panier à couverts avec la pointe vers le
bas, ou placez-les en position horizontale
dans le panier supérieur.
• N'utilisez que des produits (sel, produit de
lavage, liquide de rinçage) spécifiques
pour lave-vaisselle.
• Évitez d'ouvrir la porte pendant que l'appareil fonctionne : une vapeur brûlante
peut s'en échapper.
• Ne sortez pas la vaisselle du lave-vaisselle
avant la fin du cycle de lavage.
• Lorsque le programme est terminé, débranchez l'appareil et fermez le robinet
d'arrivée d'eau.
• Cet appareil ne peut être entretenu et réparé que par un technicien autorisé, exclusivement avec des pièces d'origine.
• N'essayez en aucun cas de réparer le lavevaisselle vous-même. Les réparations effectuées par du personnel non qualifié
peuvent provoquer des blessures ou le
mauvais fonctionnement du lave-vaisselle.
Contactez le Service Après-vente. Exigez
des pièces d'origine.
39
Page 23

electrolux 23
Consignes de sécurité
• Les personnes (y compris les enfants)
souffrant de capacités physiques, sensorielles ou mentales réduites ou qui ne connaissent pas la machine, ne doivent pas
utiliser l'appareil. Elles doivent être supervisées ou guidées par la personne responsable de leur sécurité.
• Les produits de lavage pour lave-vaisselle
peuvent occasionner des brûlures chimiques au niveau des yeux, de la bouche et
de la gorge. Potentiellement dangereux !
Respectez les instructions de sécurité du
fabricant de produit de lavage pour lavevaisselle.
• L'eau de votre lave-vaisselle n'est pas potable. Des résidus de produit de lavage
peuvent subsister dans votre appareil.
• Assurez-vous que la porte du lave-vaisselle est toujours correctement fermée lorsque vous n'êtes pas occupé à le remplir ou
le vider. Vous éviterez ainsi que quelqu'un
ne trébuche sur la porte ouverte et ne se
blesse.
• Ne montez pas et ne vous asseyez pas sur
la porte ouverte de votre appareil.
Sécurité des enfants
• Cet appareil est conçu pour être utilisé par
des adultes. Ne laissez pas les enfants utiliser l'appareil sans surveillance ou jouer
avec celui-ci.
• Ne laissez pas les emballages à portée des
enfants. Ils pourraient s'asphyxier.
• Conservez tous les produits de lavage
dans un endroit sûr, hors de portée des
enfants.
• Éloignez les enfants à bonne distance de
l'appareil lorsque la porte est ouverte.
Installation
• Vérifiez que le lave-vaisselle n'a subi aucun
dommage au cours du transport. Ne branchez jamais un appareil endommagé. Si
votre lave-vaisselle est endommagé,
adressez-vous à votre revendeur.
• Retirez tous les emballages avant utilisation.
• Les branchements électriques et hydrauliques nécessaires à l'installation de l'appareil ne doivent être effectués que par un
électricien et/ou un plombier qualifié.
• Pour des raisons de sécurité, il est interdit
de modifier les spécifications ou de tenter
de modifier l'appareil de quelque façon
que ce soit.
• N'utilisez jamais le lave-vaisselle si le câble
électrique ou les tuyaux d'eau sont endommagés ; ou si le bandeau de commande, le plan de travail de l'appareil ou le
socle sont endommagés au point que l'intérieur de l'appareil en est accessible.
Contactez votre Service Après-vente pour
éviter tout danger.
• Les parois du lave-vaisselle ne doivent jamais être percées, pour éviter d'endommager les composants hydrauliques et
électriques.
Avertissement Avant de procéder
aux branchements électriques et
hydrauliques, respectez
scrupuleusement les instructions
fournies dans les paragraphes
spécifiques de cette notice.
Page 24

24 electrolux
Description de l'appareil
1 Panier supérieur
2 Sélecteur de dureté de l'eau
3 Réservoir à sel
4 Distributeur de produit de lavage
5 Distributeur de liquide de rinçage
6 Plaque signalétique
7 Filtres
8 Bras d'aspersion inférieur
9 Bras d'aspersion supérieur
Signal optique
Dès que le programme de lavage démarre,
un signal optique en forme de point est projeté sur le sol sous la porte de l'appareil.
Si vous installez l'appareil en hauteur dans le
meuble pourvu d'une porte qui jouxte de très
près, ce signal optique ne sera plus visible.
Signal optique
Voyant rouge
fixe
Voyant rouge
clignotant
Indique qu'un programme de
lavage est en cours. Il s'allume
quand le programme démarre.
Il s'éteint quand le programme
de lavage est terminé.
Indique une anomalie de fonctionnement de l'appareil.
Page 25

Bandeau de commande
1 Touche Marche/Arrêt
2 Affichage numérique
3 Touche Départ différé
4 Touches de sélection des programmes
5 Voyants
6 Touches de fonction
Voyants
Sel
Produit rinçage
Tout en 1
Touche Départ différé
Vous pouvez différer de 1 heure à 19 heures,
le départ du programme.
Pour utiliser cette option, reportez-vous au
chapitre "Sélection et départ d'un programme de lavage"
Touches de sélection des programmes
Pour sélectionner un programme de lavage,
appuyez sur l'une de ces touches. Le voyant
correspondant s'allume. Pour plus de détails, reportez-vous au tableau "Programmes
de lavage".
Affichage numérique
L'affichage numérique indique :
• le niveau de dureté sur lequel est réglé
l'adoucisseur d'eau,
• le temps restant (approximatif ) avant la fin
du programme,
• l'activation/la désactivation du distributeur
de liquide de rinçage ( UNIQUEMENT si
la fonction "Tout en 1" est activée),
Il s'allume quand le réservoir à sel est vide.
Il s'allume quand le distributeur de liquide de rinçage est vide.
Indique que la fonction "Tout en 1" est activée/désactivée. Re-
portez-vous à la fonction "Tout en 1".
electrolux 25
• la fin du programme de lavage (affichage
d'un zéro),
• le décompte du départ différé,
• les codes d'anomalie du lave-vaisselle,
• si les signaux sonores sont activés/désactivés.
Touches de fonction
Ces touches servent aussi à régler les fonctions suivantes :
• le réglage du niveau de l'adoucisseur
d'eau,
• l'annulation d'un programme en cours ou
d'un départ différé,
• l'activation/la désactivation de la fonction
"Tout en 1",
• l'activation/la désactivation du distributeur
de liquide de rinçage si la fonction "Tout en
1" est activée,
• l'activation/la désactivation des signaux
sonores.
Page 26

26 electrolux
Mode programmation
Appuyez sur la touche Marche/Arrêt ; si
TOUS les voyants du programme sont allumés, l'appareil est en mode programmation.
Rappelez-vous que pour effectuer une
opération quelconque, comme par
exemple :
– sélectionner un programme de lava-
ge,
– régler le niveau de l'adoucisseur
d'eau,
– activer/désactiver le distributeur de li-
quide de rinçage,
– activer/désactiver les signaux sono-
res,
l'appareil DOIT être en mode programmation.
Appuyez sur la touche Marche/Arrêt ; Si un
voyant de programme est allumé, cela signifie que le dernier programme de lavage exécuté ou sélectionné est encore en mémoire.
Dans un tel cas, pour restaurer le mode programmation, il sera nécessaire d'annuler le
programme.
Pour annuler un programme sélectionné
ou en cours
Appuyez simultanément sur les deux touches de fonction B et C, et maintenez-les
appuyées jusqu'à ce que tous les voyants de
programme s'allument. Le programme est
alors annulé et l'appareil se trouve en mode
programmation.
Signaux sonores
Des signaux sonores ont été programmés
pour indiquer les opérations que le lave-vaisselle est en train d'exécuter :
– le réglage de l'adoucisseur d'eau,
– la fin du programme de lavage,
– le déclenchement d'une alarme en cas
d'anomalie de fonctionnement de l'appareil.
Réglage d'usine : signaux sonores activés
Il vous est possible de désactiver les signaux sonores.
Désactivation/activation des signaux
sonores
1. Appuyez sur la touche Marche/Arrêt. Le
lave-vaisselle doit se trouver en mode
programmation.
2. Appuyez simultanément sur les touches
de fonction B et C, et maintenez-les appuyées jusqu'à ce que les voyants des
touches de fonction A , B et C clignotent.
3. Appuyez sur la touche de fonction C, les
voyants des touches de fonction A et B
s'éteignent, tandis que le voyant de la
touche de fonction C clignote. Le niveau
réglé apparaît sur l'affichage numérique.
Signaux sonores désactivés
Signaux sonores activés
4. Pour modifier le réglage, appuyez de
nouveau sur la touche de fonction C ;
l'affichage numérique indiquera le nouveau réglage.
5. Pour mémoriser cette opération, mettez
à l'arrêt le lave-vaisselle..
Première utilisation
Avant d'utiliser votre lave-vaisselle pour la
première fois :
• Assurez-vous que les raccordements
électriques et hydrauliques sont conformes aux instructions d'installation
• Retirez tous les emballages présents à l'intérieur de l'appareil
• Réglez l'adoucisseur d'eau
• Versez 1 l d'eau dans le réservoir à sel,
puis approvisionnez en sel
• Remplissez le distributeur de liquide de
rinçage
Si vous souhaitez utiliser des pastilles de détergent multifonctions telles que : "3 en 1", "4 en 1", "5 en 1"
etc., programmez la fonction Tout
en 1. (Voir ''Fonction Tout en 1'').
Page 27

Réglage de l'adoucisseur d'eau
Le lave-vaisselle est équipé d'un adoucisseur
d'eau conçu pour éliminer les minéraux et les
sels de l'eau d'alimentation susceptibles de
nuire au bon fonctionnement de l'appareil.
Plus la teneur en minéraux et en sels est élevée, plus l'eau est dure. La dureté de l'eau
est calculée en échelles équivalentes, degrés
allemands (°dH), degrés français (°TH) et
mmol/l (millimol par litre - unité internationale
de dureté de l'eau).
L'adoucisseur doit être réglé en fonction du
degré de dureté de l'eau de votre région.
Dureté de l'eau Réglage de la dureté de l'eau Utili-
°dH °TH mmol/l manuel électronique
51 - 70 91 - 125 9,1 - 12,5 2 niveau 10 oui
43 - 50 76 - 90 7,6 - 9,0 2 niveau 9 oui
37 - 42 65 - 75 6,5 - 7,5 2 niveau 8 oui
29 - 36 51 - 64 5,1 - 6,4 2 niveau 7 oui
23 - 28 40 - 50 4,0 - 5,0 2 niveau 6 oui
19 - 22 33 - 39 3,3 - 3,9 2 niveau 5 oui
15 - 18 26 - 32 2,6 - 3,2 1 niveau 4 oui
11 - 14 19 - 25 1,9 - 2,5 1 niveau 3 oui
4 - 10 7 - 18 0,7 - 1,8 1 niveau 2 oui
< 4 < 7 < 0,7 1 niveau 1 non
Réglage manuel
Le lave-vaisselle est réglé d'usine sur la
position 2.
1. Ouvrez la porte du lave-vaisselle.
2. Sortez le panier inférieur du lave-vaisselle.
3. Tournez le sélecteur de dureté de l'eau
sur la position 1 ou 2 (voir tableau).
4. Replacez le panier inférieur.
Renseignez-vous auprès de la Compagnie
locale de distribution des eaux pour connaître le degré de dureté de l'eau de votre zone
d'habitation.
L'adoucisseur d'eau doit être réglé des
deux façons suivantes : manuellement,
à l'aide du sélecteur de dureté de l'eau
et électroniquement.
Réglage électronique
Le lave-vaisselle est réglé d'usine sur la
position 5.
1. Appuyez sur la touche Marche/Arrêt. Le
lave-vaisselle doit se trouver en mode
programmation.
2. Appuyez simultanément sur les touches
de fonction B et C, et maintenez-les appuyées jusqu'à ce que les voyants des
touches de fonction A, B et C clignotent.
3. Appuyez sur la touche de fonction A, les
voyants des touches de fonction B et C
s'éteignent tandis que le voyant de la touche de fonction A clignote. L'affichage
numérique indique le niveau de réglage et
des signaux sonores retentissent par intermittence.
Exemples :
electrolux 27
sation
du sel
régé-
nérant
Page 28

28 electrolux
affiché, série de 5 signaux sonores,
pause, etc. = niveau 5
affiché, série de 10 signaux sonores,
pause, etc. = niveau 10
4. Pour modifier le niveau, appuyez sur la
touche de fonction A. Le niveau change
à chaque pression de la touche. (Pour
sélectionner un autre niveau, référezvous au tableau).
Utilisation du sel régénérant
Avertissement
Utilisez uniquement du sel spécial pour lavevaisselle. Tout autre type de sel non spécialement étudié pour être utilisé dans un lavevaisselle, en particulier le sel de cuisine, peut
endommager l'adoucisseur d'eau. Approvisionnez en sel avant de démarrer un programme de lavage complet. Vous éviterez
ainsi que des grains de sel ou de l'eau salée
qui a débordé n'entre en contact avec le fond
de la cuve pendant un laps de temps prolongé, engendrant de la corrosion.
Pour réapprovisionner :
1. Ouvrez la porte, sortez le panier inférieur
et dévissez le bouchon du réservoir à sel
en le tournant dans le sens inverse des
aiguilles d'une montre.
2. Versez 1 l d'eau à l'intérieur du réservoir
(cette opération est nécessaire uniquement lorsque vous remplissez le
réservoir pour la première fois) .
3. Versez le sel à l'aide de l'entonnoir, jusqu'à ce que le réservoir soit rempli.
Exemples : Si le niveau est 5, une simple
pression sur la touche A amènera le niveau à 6.
Si le niveau est 10, une simple pression
sur la touche A amènera le niveau à 1.
5. Pour mémoriser cette opération, mettez
à l'arrêt le lave-vaisselle en appuyant sur
la touche Marche/Arrêt.
4. Remettez le bouchon en place en veillant
à ce que le filetage et le joint ne présentent aucune trace de sel.
5. Serrez le bouchon en le tournant dans le
sens des aiguilles d'une montre, jusqu'à
ce que vous entendiez un clic.
Ne vous préoccupez pas si de l'eau déborde du réservoir lorsque vous le remplissez. Cela est parfaitement normal.
Le voyant du réservoir à sel peut
rester allumé pendant 2 à 6 heures
après le remplissage, à condition
que le lave-vaisselle reste sous tension. Si vous utilisez un sel peu soluble, il se peut que cette opération
prenne davantage de temps. Le
fonctionnement de l'appareil n'en
sera pas pour autant entravé.
Page 29

Utilisation du liquide de rinçage
Avertissement Utilisez exclusivement
des liquides de rinçage de marque,
spéciaux pour lave-vaisselle.
Ne remplissez jamais le distributeur de
liquide de rinçage avec d'autres produits
(par ex. un agent de nettoyage pour lave-vaisselle, un produit de lavage liquide). Cela aurait pour effet d'endommager l'appareil.
Le liquide de rinçage assure un rinçage
optimal et un séchage sans taches ni
striures.
Le liquide de rinçage est automatiquement ajouté au cours du dernier rinçage.
1. Ouvrez le distributeur en appuyant sur le
levier de fermeture (A).
2. Versez le liquide de rinçage dans la goulotte de remplissage. Le niveau maximum
de remplissage est signalé par le repère
"max".
electrolux 29
Le distributeur contient environ 110 ml de
liquide de rinçage, quantité suffisante
pour 16 à 40 cycles de lavage, en fonction du réglage de la dose programmée.
3. Vérifiez que le couvercle est fermé après
chaque remplissage.
Essuyez tout débordement de liquide de
rinçage à l'aide de papier absorbant, afin
d'éviter une formation excessive de
mousse lors du lavage suivant.
En fonction des résultats de brillance et de
séchage obtenus, adaptez le dosage du liquide de rinçage à l'aide du sélecteur à 6
positions (position 1 = dosage minimum, position 6 = dosage maximum).
La dose est réglée d'usine sur la position 4.
Augmentez le dosage si vous constatez la
présence de gouttes d'eau ou de taches de
calcaire sur la vaisselle au terme du lavage.
En revanche, si des rayures blanches sont
présentes sur la vaisselle, ou si les verres et
les lames de couteaux sont recouverts d'un
film bleuâtre, il convient de réduire le dosage.
Page 30

30 electrolux
Utilisation quotidienne
• Contrôlez le niveau du réservoir à sel et du
distributeur de liquide de rinçage.
• Rangez les couverts et la vaisselle dans le
lave-vaisselle.
• Versez le produit de lavage dans le compartiment correspondant.
• Sélectionnez un programme adapté au lavage des couverts et de la vaisselle.
• Démarrez le programme.
Conseils
Les éponges, les chiffons de nettoyage et
tout autre objet absorbant l'eau ne doivent
pas être lavés au lave-vaisselle.
• Avant de charger la vaisselle, veillez à :
– Enlever tous les restes d'aliments.
– Laisser tremper les casseroles au fond
desquelles adhèrent des restes d'aliments brûlés ou attachés
• Lorsque vous chargez la vaisselle et les
couverts, veillez à prendre les précautions
suivantes :
– La vaisselle et les couverts ne doivent
pas entraver la rotation des bras d'aspersion.
– Chargez les articles creux, tels que tas-
ses, verres, casseroles, etc. en les retournant, de manière à ce que l'eau ne
s'accumule pas dans le creux ou dans
un fond bombé.
– La vaisselle et les couverts ne doivent
pas être insérés les uns dans les autres,
ou se chevaucher.
– Pour éviter que les verres ne se brisent,
évitez qu'ils ne se touchent.
– Déposez les petits objets dans le panier
à couverts.
• La vaisselle en plastique et les poêles en
matériau antiadhésif tendent à retenir les
gouttes d'eau ; ces articles ne seront pas
séchés aussi bien que les articles en porcelaine et en acier.
• Les articles légers (bols en plastique, etc.)
doivent être rangés dans le panier supérieur et disposés de façon à ce qu'ils ne
puissent se retourner.
Page 31

Pour le lavage au lave-vaisselle, les couverts et plats suivants
ne sont pas adaptés : peuvent convenir dans une mesure limitée :
• Couverts à manche en bois, en corne, en porcelaine ou en nacre.
• Articles en plastique non résistant à la chaleur.
• Couverts anciens dont certains éléments sont
collés et ne résistent pas à la température.
• Couverts ou vaisselle présentant des soudures.
• Articles en étain ou en cuivre.
• Verres en cristal au plomb.
• Articles en acier sujets à la rouille.
• Plateaux en bois.
• Articles en fibres synthétiques.
• Lavez au lave-vaisselle uniquement de la vaisselle en faïence garantie lavable en machine par
le fabricant.
• Les décors vernis peuvent se ternir au fil des
lavages.
• Les pièces en argent et en aluminium ont tendance à se décolorer au cours du lavage : les
résidus de blanc d'œuf, de jaune d'œuf et de
moutarde provoquent souvent une décoloration et la formation de taches sur l'argent. Par
conséquent, veillez à toujours éliminer les restes
d'aliments de la vaisselle en argent si vous ne
la lavez pas immédiatement après utilisation.
Rangement des couverts et de la vaisselle
Panier inférieur
Le panier inférieur est conçu pour y ranger
des casseroles, des couvercles, des assiettes, des saladiers, des couverts, etc.
Les plats et les grands couvercles doivent
être disposés autour du panier, afin de ne
pas gêner la rotation des bras d'aspersion.
mettre de charger des casseroles, des poêles et des saladiers.
electrolux 31
Les rangées d'ergots du panier inférieur peuvent être abaissées aisément pour vous per-
Panier à couverts
Les couteaux à longue lame disposés
avec le manche vers le bas représentent
un danger potentiel. Les couteaux et les
autres ustensiles pointus ou coupants
doivent être placés en position
horizontale dans le panier supérieur.
Soyez prudent lorsque vous chargez ou
déchargez des articles coupants du
lave-vaisselle.
Disposez les fourchettes et les cuillères dans
le panier à couverts extractible, le manche
tourné vers le bas, et les couteaux avec le
manche orienté vers le haut.
Page 32

32 electrolux
Si les manches dépassent du fond du panier
à couverts et entravent la rotation du bras
d'aspersion, disposez les couverts avec le
manche tourné vers le haut.
Intercalez les cuillères aux autres couverts,
afin d'éviter qu'elles ne s'emboîtent.
Pour faciliter le chargement du panier à couverts, nous vous conseillons d'abaisser la
poignée de celui-ci.
Pour un résultat optimal, il est conseillé d'utiliser les séparateurs à couverts.
Si la taille des couverts ne permet pas l'utilisation des séparateurs, il vous sera possible
de les retirer facilement.
Le panier à couverts est constitué de deux
parties amovibles, qu'il vous est possible de
séparer pour obtenir une plus grande surface
de rangement. Pour séparer les deux parties,
faites-les glisser à l'horizontale en direction
opposée et détachez-les.
Pour les assembler à nouveau, procédez
dans le sens inverse.
Panier supérieur
Si vous devez laver des plats de grande dimension, disposez-les dans le panier inférieur après avoir mis le panier supérieur dans
sa position la plus haute.
Les verres à long pied peuvent être suspendus aux porte-tasses en les retournant.
Page 33

electrolux 33
Pour les articles de plus grande dimension, il
vous est possible de rabattre les supports
pour tasses vers le haut.
Disposez les articles en quinconce au-dessus et au-dessous des supports pour tasses,
de façon à ce que l'eau puisse atteindre toutes les surfaces.
Lorsque le panier est en position haute,
il ne vous est plus possible d'utiliser les
supports pour tasses.
Réglage de la hauteur du panier
supérieur
Si vous devez laver des plats de grande dimension, disposez-les dans le panier inférieur après avoir mis le panier supérieur dans
sa position la plus haute.
Hauteur maximale de la vaisselle dans le
Avec le panier supérieur relevé
panier inférieur
33 cm
Hauteur maximale de la vaisselle dans le
Avec le panier supérieur abaissé
panier inférieur
29 cm
Pour régler le panier dans sa position la
plus haute, procédez comme suit :
1. Tirez le panier jusqu'à la butée.
2. Soulevez délicatement les deux côtés
jusqu'à ce que le mécanisme s'encliquette et que le panier soit en position stable.
Pour abaisser le panier dans sa position
d'origine, procédez comme suit :
1. Tirez le panier jusqu'à la butée.
2. Soulevez délicatement les deux côtés,
puis faites en sorte que le mécanisme
s'emboîte vers l'arrière, tout en maintenant le panier.
Ne soulevez ou n'abaissez jamais le panier d'un seul côté uniquement
Lorsque le panier est en position haute,
nous recommandons de régler les supports pour tasses sur la position basse.
Après avoir chargé l'appareil, veillez
à toujours refermer la porte, car une
porte ouverte est source de danger.
Utilisation du produit de lavage
Utilisez exclusivement des produits de
lavage spécialement conçus pour une
utilisation au lave-vaisselle.
Veuillez respecter le dosage et les consignes de stockage du fabricant figurant
sur l'emballage.
Page 34

34 electrolux
En utilisant la quantité de produit de lavage strictement nécessaire, vous contribuerez à la protection de l'environnement.
Versez le produit de lavage dans le
compartiment correspondant
1. Ouvrez le couvercle.
2. Versez le produit de lavage dans le distributeur (1). Le repère indique le niveau
de dosage :
20 = environ 20 g de produit de lavage
30 = environ 30 g de produit de lavage.
1
2
3. Tous les programmes avec prélavage nécessitent une dose supplémentaire de
produit de lavage (5 à 10 g) à placer dans
le compartiment de prélavage (2).
Ce produit de lavage agira au cours de la
phase de prélavage.
Si vous utilisez du produit de lavage en
pastilles ; placez la pastille dans le compartiment (1)
4. Fermez le couvercle et appuyez jusqu'à
ce qu'il soit verrouillé.
Les produits de lavage en pastilles de
différents fabricants présentent un taux
de dissolution variable. C'est pourquoi
certains produits de lavage en pastilles
n'atteignent pas leur pouvoir de nettoyage optimal au cours des programmes
courts. Par conséquent, veuillez sélectionner un programme de lavage long si
vous utilisez des produits de lavage en
pastilles, afin d'éliminer complètement
les résidus de lessive.
Fonction "Tout en 1"
Cet appareil est doté de la "fonction Tout en
1", ce qui vous permet d'utiliser les pastilles
de détergent multifonctions "Tout en 1".
Ces produits combinent les fonctions de produit de lavage, de liquide de rinçage et de sel
régénérant. Ils peuvent également contenir
d'autres substances selon le type de pastille
utilisé ("3 en 1", "4 en 1", "5 en 1", etc.).
Vérifiez que ces produits de lavage sont appropriés au degré de dureté de l'eau d'alimentation. Consultez à cet effet les instructions du fabricant.
Dès que cette fonction est sélectionnée, elle
restera également activée pour les programmes de lavage suivants.
Page 35
electrolux 35
Lorsque cette fonction est sélectionnée, l'alimentation en liquide de rinçage et en sel à
partir des bacs respectifs est automatiquement désactivée, de même que les voyants
correspondant au sel et au liquide de rinçage.
L'utilisation de la fonction "Tout en 1" peut
entraîner une modification de la durée du cycle. Dans ce cas, la durée du programme est
automatiquement réactualisée sur l'affichage
numérique.
Activez/désactivez la fonction ''Tout en
1'' avant de lancer un programme de lavage.
Une fois que le programme a démarré,
la fonction "Tout en 1" NE peut PLUS
être modifiée. Si vous souhaitez annuler
la "fonction Tout en 1", il vous faudra
d'abord annuler la sélection du programme de lavage, puis désactiver la
"fonction Tout en 1". Dans ce cas, vous
devrez régler à nouveau le programme
de lavage (et les options souhaitées).
Activation/désactivation de la fonction
"Tout en 1"
Appuyez simultanément sur les deux touches "Tout en 1" (touches de fonction D et
E), et maintenez-les appuyées jusqu'à ce
que le voyant de la fonction "Tout en 1" s'allume. Cela signifie que la fonction est activée.
Pour désactiver la fonction, appuyez à nouveau sur ces deux touches jusqu'à ce que le
voyant correspondant au symbole de la
fonction "Tout en 1" s'éteigne.
Si le séchage n'est pas satisfaisant,
nous vous suggérons de :
1. Remplir le distributeur de liquide de
rinçage.
2. Activer le distributeur de liquide de
rinçage.
3. Régler le dosage du liquide de rinçage sur la position 2.
• L'activation/la désactivation du distri-
buteur de liquide de rinçage est pos-
sible uniquement si la fonction "Tout
en 1" est activée.
Activation/désactivation du distributeur
de liquide de rinçage
1. Appuyez sur la touche Marche/Arrêt. Le
lave-vaisselle doit se trouver en mode
programmation.
2. Appuyez simultanément sur les touches
de fonction B et C, et maintenez-les appuyées jusqu'à ce que les voyants des
touches de fonction A, B et C clignotent.
3. Appuyez sur la touche de fonction B, les
voyants des touches de fonction A et C
s'éteignent tandis que le voyant de la touche de fonction B clignote. L'affichage
numérique indique le réglage actuel.
Distributeur de liquide de rinçage
désactivé
Distributeur de liquide de rinçage
activé
4. Pour modifier un paramètre, appuyez à
nouveau sur la touche B, le nouveau paramètre apparaît sur l'affichage numérique.
5. Pour mémoriser cette opération, mettez
à l'arrêt le lave-vaisselle en appuyant sur
la touche Marche/Arrêt.
Si vous souhaitez réutiliser des produits de lavage en dose individuelles, nous vous recommandons de :
1. Désactiver la fonction "Tout en 1".
2. Approvisionner à nouveau le réservoir à sel et le distributeur de liquide
de rinçage.
3. Régler la position maximale du degré
de dureté de l'eau et d'effectuer 1
programme normal sans charger
l'appareil.
4. Régler ensuite le degré de dureté de
l'eau en fonction de la dureté de l'eau
de votre région.
5. Régler la dose de liquide de rinçage.
Sélection et départ d'un programme de lavage
Sélectionnez le programme et le départ différé en laissant la porte légèrement ouverte. Le départ du programme ou le décompte du départ
différé démarrera uniquement après
que vous aurez refermé la porte.
Vous pouvez effectuer toutes les
Page 36

36 electrolux
modifications souhaitées jusqu'à ce
moment-là
1. Vérifiez que les paniers ont été chargés
correctement et que les bras d'aspersion
tournent librement.
2. Assurez-vous que le robinet d'eau est
ouvert.
3. Appuyez sur la touche Marche/Arrêt. Le
lave-vaisselle doit se trouver en mode
programmation.
4. Appuyez sur la touche correspondant au
programme souhaité (reportez-vous au
tableau des "Programmes de lavage").
Fermez la porte du lave-vaisselle, le programme démarre automatiquement.
Réglage et départ du programme avec
"départ différé"
1. Après avoir sélectionné le programme de
lavage, appuyez sur la touche de départ
différé jusqu'à ce que le nombre d'heures
clignotant correspondant au départ différé apparaisse sur l'affichage numérique.
– Le voyant Départ différé s'allume.
2. Fermez la porte de l'appareil, le décompte démarre automatiquement.
3. Le décompte s'effectue d'heure en heure.
4. L'ouverture de la porte interrompt le décompte. Fermez la porte du lave-vaisselle
et le décompte reprend là où il a été interrompu.
5. Dès que la durée du départ différé est
écoulée, le programme démarre automatiquement.
– Le voyant Départ différé s'éteint.
Avertissement Interrompez ou
annulez un programme en cours
UNIQUEMENT si cela s'avère
strictement nécessaire.
Attention : Un nuage de vapeur peut
s'échapper par la porte du lave-vaisselle lorsque vous l'ouvrez. Soyez
prudent en effectuant cette opération (risque de brûlure).
Interruption d'un programme en cours
• Ouvrez la porte du lave-vaisselle : le programme s'arrête. Fermez la porte : le programme reprendra là où il a été interrompu.
Annulation d'un départ différé ou d'un
programme en cours
• Appuyez simultanément sur les deux touches de fonction B et C, et maintenez-les
appuyées jusqu'à ce que tous les voyants
de programme s'allument.
• Si le départ différé est annulé, le programme de lavage sélectionné le sera également. Vous devez répéter la sélection du
programme de lavage.
• Si vous voulez sélectionner un nouveau
programme, vérifiez qu'il y a du produit de
lavage dans le distributeur correspondant.
Fin du programme de lavage
• Le lave-vaisselle s'arrête automatiquement et un signal sonore vous informe de
la fin du programme.
1. Ouvrez la porte du lave-vaisselle. Un zéro
apparaît sur l'affichage numérique.
2. Mettez à l'arrêt le lave-vaisselle.
3. Laissez la porte du lave-vaisselle entrou-
verte et attendez quelques minutes avant
de retirer la vaisselle ; cela permet de la
laisser refroidir et améliore le processus
de séchage.
Mode Veille
Si vous ne mettez pas l'appareil à l'arrêt à la
fin du programme de lavage, l'appareil se
met automatiquement en mode Veille. Le
mode Veille fait diminuer la consommation
d'énergie.
Trois minutes après la fin du programme,
tous les voyants s'éteignent et 1 barre horizontale apparaît sur l'affichage numérique.
Appuyez sur une des touches (à l'exception
de la touche Marche/Arrêt), pour revenir au
mode Fin de programme.
Déchargement du lave-vaisselle
• Les plats encore chauds sont sensibles
aux chocs. C'est pourquoi il est préférable
de laisser refroidir la vaisselle avant de la
décharger de l'appareil.
• Videz en premier lieu le panier inférieur,
puis le panier supérieur ; ceci permettra
d'éviter que de l'eau ne s'égoutte du panier supérieur sur la vaisselle du panier inférieur.
Page 37

electrolux 37
• Il se peut que de l'eau soit présente sur les
parois externes et sur la porte du lavevaisselle, car l'acier inoxydable est en dé-
Dès que le programme est terminé,
débranchez le lave-vaisselle et fermez le robinet d'arrivée d'eau.
finitive plus froid que les plats.
Programmes de lavage
Programmes de lavage
Programme Degré de salissure Type de vaisselle Description du program-
Très sale Vaisselle, couverts,
1)
2)
3)
1) Au cours du programme Auto le degré de salissure de la vaisselle est déterminé par le degré de
turbidité de l'eau. La durée du programme, les niveaux de consommation d'eau et d'énergie peuvent
varier ; tout dépend de la charge du lave-vaisselle (pleine ou demi-charge) et du degré de salissure de
la vaisselle. La température de l'eau est automatiquement réglée entre 45°C et 70°C.
2) Idéal pour un lave-vaisselle partiellement chargé. Programme de lavage journalier parfait, adapté aux
besoins d'une famille de 4 personnes qui souhaitent seulement laver la vaisselle et les couverts du
dîner et du petit déjeuner.
3) Programme de test des organismes de contrôle.
Tous Vaisselle, couverts,
Moyennement ou légèrement sale
Moyennement sale Vaisselle et couverts Prélavage
Tous Charge partielle (à
plats et casseroles
plats et casseroles
Vaisselle et couverts Lavage principal à 60°C
compléter dans la
journée).
Prélavage
Lavage principal à 70°C
2 rinçages intermédiaires
Rinçage final
Séchage
Prélavage
Lavage principal à 45°C ou
70°C
1 ou 2 rinçages intermédiaires
Rinçage final
Séchage
Rinçage final
Lavage principal à 50°C
1 rinçage intermédiaire
Rinçage final
Séchage
1 rinçage à froid (pour éviter
que les restes d'aliments ne
collent).
Ce programme n'utilise pas
de produit de lavage.
Valeurs de consommation
Programme
1) La durée du programme de lavage apparaît sur l'affichage numérique.
Durée (en minutes)
- 1,8 - 2,0 23 - 25
- 1,1 - 1,7 12 - 23
- 0,9 9
- 1,0 - 1,1 12 - 13
- 0,1 4
1)
Énergie (en kWh) Eau (en litres)
me
Page 38

38 electrolux
Les valeurs de consommation sont fournies à titre indicatif et varient en fonction
de la pression et de la température de
Entretien et nettoyage
Nettoyage des filtres
Contrôlez et nettoyez les filtres très régulièrement. Des filtres non nettoyés réduisent les
performances de lavage.
Avertissement Avant de nettoyez les
filtres, assurez-vous que l'appareil est
mis à l'arrêt.
1. Ouvrez la porte, sortez le panier inférieur.
2. Le système de filtrage du lave-vaisselle
comporte un filtre grossier ( A ), un microfiltre ( B ) et un filtre plat. Desserrez le
système de filtrage à l'aide de la poignée
du microfiltre.
3. Tournez la poignée dans le sens contraire
des aiguilles d'une montre et effectuez
1/4 de tour pour enlever le système de
filtrage
4.
Saisissez le filtre grossier ( A ) par la poignée annulaire et retirez-le du microfiltre
( B ).
5. Nettoyez minutieusement tous les filtres
à l'eau courante.
l'eau, des variations dans l'alimentation
électrique et de la quantité de vaisselle.
6. Retirez le filtre plat du fond de la cuve et
nettoyez minutieusement les deux faces.
7. Réinstallez le filtre plat dans le fond du
compartiment de lavage en veillant à ce
qu'il soit bien installé.
8. Introduisez le filtre grossier ( A ) dans le
microfiltre ( B ) et appuyez sur les deux
filtres à la fois.
9. Mettez l'ensemble de ces filtres en place
et bloquez-les en tournant la poignée
dans le sens des aiguilles d'une montre
jusqu'à la butée. Au cours de cette opération, contrôlez que le filtre plat ne dépasse pas du fond de la cuve.
N'utilisez jamais le lave-vaisselle
sans les filtres. Si les filtres n'ont pas
été correctement réinstallés, les
performances de lavage pourront
être compromises et l'appareil
pourrait être endommagé.
Ne retirez JAMAIS les bras d'aspersion.
Si des résidus de salissures ont bouché
les orifices des bras d'aspersion, éliminez ceux-ci à l'aide d'un cure-dent.
Nettoyage de la carrosserie
Nettoyez les surfaces externes de l'appareil,
de même que le bandeau de commande, à
l'aide d'un chiffon doux humide, en cas de
besoin humidifié d'un peu d'eau savonneuse. N'utilisez en aucun cas de substances
abrasives, de tampons métalliques ou de
solvants (acétone, trichloréthylène, etc.).
Page 39

electrolux 39
Nettoyage interne
Essuyez régulièrement les joints situés autour de la porte et des distributeurs de produit de lavage et de liquide de rinçage à l'aide
d'un chiffon humide.
Nous vous conseillons d'effectuer tous les 3
mois un lavage pour vaisselle très sale mais
sans vaisselle et avec produit de lavage.
En cas d'absence prolongée
Si vous n'utilisez pas l'appareil pendant un
certain temps, veillez à :
1. Débrancher l'appareil et à fermer le robinet d'arrivée d'eau.
2. Laisser la porte entrouverte pour prévenir
Si cela n'est pas possible, videz l'appareil,
fermez la porte, débranchez le tuyau d'arrivée d'eau et vidangez.
Transport de l'appareil
Si vous devez transporter l'appareil (en cas
de déménagement, etc.) :
1. Retirez la fiche de la prise secteur.
2. Fermez le robinet d'arrivée d'eau.
3. Retirez les tuyaux d'arrivée d'eau et de
4. Tirez l'appareil hors de sa niche ainsi que
Évitez d'incliner l'appareil au cours du transport.
la formation d'odeurs désagréables.
3. Nettoyer soigneusement l'intérieur de
l'appareil.
Précautions contre le gel
Évitez d'installer l'appareil dans un endroit où
la température ambiante est inférieure à 0°C.
En cas d'anomalie de fonctionnement
Le lave-vaisselle ne démarre pas ou s'arrête
en cours de programme.
Certaines anomalies de fonctionnement
peuvent dépendre d'opérations d'entretien
non correctes et peuvent être résolues à l'ai-
Codes d'erreur et anomalie de fonctionne-
• le voyant du programme en cours clignote en
permanence
• un signal sonore intermittent est émis
•
apparaît sur l'affichage numérique
Le lave-vaisselle n'est pas approvisionné en
eau
• le voyant du programme en cours clignote en
permanence
• un signal sonore intermittent est émis
•
apparaît sur l'affichage numérique
Le lave-vaisselle ne vidange pas
ment
de des suggestions fournies dans le tableau,
sans faire appel à un technicien.
Ouvrez la porte, sortez le panier inférieur. Effectuez les contrôles que nous vous suggérons ci-après.
• Le robinet d'arrivée d'eau est obstrué ou incrusté de tartre.
Nettoyez le robinet d'arrivée d'eau.
• Le robinet d'arrivée d'eau est fermé.
Ouvrez le robinet d'arrivée d'eau.
• Le filtre (s'il est présent) situé dans l'embout du
tuyau au niveau de la soupape d'admission est
bouché.
Nettoyez le filtre.
• Le tuyau d'arrivée d'eau n'a pas été installé
correctement, est plié ou écrasé.
Vérifiez le raccordement du tuyau d'arrivée
d'eau.
• Le robinet de l'évier est bouché.
Nettoyez à fond le robinet de l'évier.
• Le tuyau de vidange n'a pas été installé correctement, est plié ou écrasé.
Vérifiez le raccordement du tuyau de vidange.
vidange.
les tuyaux.
Cause possible et solution
Page 40

40 electrolux
Codes d'erreur et anomalie de fonctionne-
• le voyant du programme en cours clignote en
permanence
• un signal sonore intermittent est émis
•
apparaît sur l'affichage numérique
Le système de sécurité anti-débordement
s'est déclenché
Anomalie de fonctionnement Cause possible et solution
Le programme ne démarre pas • La porte du lave-vaisselle n'a pas été fermée
Après avoir effectué ces contrôles, fermez la
porte de l'appareil et mettez l'appareil en
marche.
Le programme reprendra là où il a été interrompu.
Si l'anomalie persiste ou que le code d'erreur
s'affiche à nouveau, contactez le Service
après-vente.
Si des codes d'erreurs non décrits dans le
tableau fourni s'affichent, contactez le Servi-
ment
• Fermez le robinet d'arrivée d'eau et contactez
• La fiche n'est pas branchée.
• Le fusible a grillé dans la boîte à fusibles.
• Le départ différé a été réglé.
Vous trouverez ces informations sur la plaque signalétique située sur le côté du lavevaisselle.
Afin de pouvoir disposer à tout moment de
ces numéros, nous vous recommandons de
les inscrire ici :
Modèle : . . . . . . . . . . . . . . . . . . . . . . . . . . . . . .
N° code pro-
duit : . . . . . . . . . . . . . . . . . . . . . . . . . . . . . .
N° de série : . . . . . . . . . . . . . . . . . . . . . . . . . . . . . .
Cause possible et solution
le Service Après-vente.
correctement.
Fermez la porte.
Insérez la fiche dans la prise secteur
Remplacez le fusible.
Si la vaisselle doit être lavée immédiatement,
annulez le départ différé.
ce après-vente.
Lorsque vous appelez le Service après-vente, communiquez le modèle, le numéro de
code produit et le numéro de série.
Les résultats de lavage sont insatisfaisants
La vaisselle n'est
pas propre
La vaisselle est
mouillée et terne
Les verres et la
vaisselle présentent des rayures,
des taches blanches ou un film
bleuâtre
• Vous n'avez pas sélectionné le programme approprié.
• La vaisselle est disposée de manière telle à empêcher l'eau d'atteindre
toutes les surfaces. Ne surchargez pas les paniers.
• La rotation des bras d'aspersion est entravée par de la vaisselle mal rangée.
• Les filtres situés dans le fond de la cuve sont encrassés ou mal installés.
• Vous avez utilisé trop peu de produit de lavage ou avez oublié d'approvisionner le distributeur de produit de lavage.
• Si des dépôts de tartre sont présents sur la vaisselle ; cela signifie que le
réservoir à sel est vide ou que vous n'avez pas réglé correctement le niveau
de l'adoucisseur d'eau.
• Le raccordement du tuyau de vidange n'a pas été réalisé correctement.
• Le bouchon du réservoir à sel n'a pas été vissé correctement.
• Vous n'avez pas utilisé de liquide de rinçage.
• Le distributeur de liquide de rinçage est vide.
• Réduisez le dosage du liquide de rinçage.
Page 41

electrolux 41
Les résultats de lavage sont insatisfaisants
Des gouttes d'eau
ont séché sur les
verres et la vaisselle
• Augmentez le dosage du liquide de rinçage.
• Il se peut que le produit de lavage soit en cause. Contactez le service clientèle du fabricant du produit de lavage.
Après avoir effectué ces contrôles, fermez la
porte du lave-vaisselle et mettez l'appareil
sous tension.
Caractéristiques techniques
Dimensions Largeur cm 59,6
Hauteur cm 85,8 - 93,8
Profondeur cm 55
Branchement électrique - Ten-
sion - Puissance totale - Fusible
Pression de l'eau d'alimentation Minimum 0,05 MPa (0,5 bar)
Maximum 0,8 MPa (8 bars)
Capacité Couverts 12
Les informations concernant le branchement électrique figurent sur
la plaque signalétique apposée sur le bord intérieur de la porte du
lave-vaisselle.
Installation
Avertissement Les branchements
électriques et les raccordements
hydrauliques nécessaires à
l'installation de l'appareil doivent
être réalisés par un électricien
qualifié et/ou un plombier ou une
autre personne compétente.
Retirez tous les emballages avant d'installer
l'appareil.
Dans la mesure du possible, placez-le à
proximité d'un robinet d'arrivée d'eau et d'un
dispositif d'évacuation.
Ce lave-vaisselle est conçu pour être encastré sous un plan de cuisine ou un plan de
travail.
Attention ! Respectez scrupuleusement les
instructions figurant dans le guide joint pour
encastrer le lave-vaisselle et installer le panneau du meuble.
Outre les ouvertures prévues pour le passage des tuyaux d'alimentation/de vidange et
du cordon d'alimentation, aucune outre ouverture de ventilation du lave-vaisselle n'est
requise.
Le lave-vaisselle incorpore des pieds permettant le réglage en hauteur de l'appareil.
Avant toute intervention sur le lave-vaisselle,
il est nécessaire de débrancher l'appareil.
Au moment d'introduire le lave-vaisselle
dans le meuble d'encastrement, veillez à ce
que le tuyau d'arrivée d'eau, le tuyau de vidange et le cordon d'alimentation ne soient
ni entortillés ni écrasés.
Fixation aux unités adjacentes
Le lave-vaisselle doit être fixé pour éviter qu'il
bascule.
Par conséquent, veillez à ce que l'élément
sous lequel il est installé soit correctement fixé à une structure fixe (éléments de meubles
de cuisine adjacents, mur).
Mise à niveau
Une bonne mise à niveau est indispensable
pour une parfaite fermeture et étanchéité de
la porte.
Assurez-vous que la porte du lave-vaisselle
se ferme correctement sans frottement latéraux.
Si la porte ne ferme pas correctement, dévissez ou vissez les pieds jusqu'à ce que
l'appareil soit parfaitement de niveau et
d'aplomb.
Page 42

42 electrolux
Raccordement à l'arrivée d'eau
Raccordement du tuyau d'arrivée d'eau
Cet appareil peut être alimenté en eau chaude (max. 60°) ou en eau froide
Avec une alimentation en eau chaude, vous
pouvez réduire votre consommation d'énergie électrique de manière spectaculaire. Cela
dépend, toutefois, de la manière dont l'eau
chaude est produite. (Nous suggérons d'autres sources d'énergie plus écologiques telles que, par ex., les panneaux solaires ou
panneaux photovoltaïques, et les éoliennes).
Pour réaliser le raccordement proprement
dit, l'écrou-raccord installé dans le tuyau
d'arrivée d'eau de l'appareil doit être vissé
sur une goulotte avec filetage "Witworth"
pour tuyau 3/4" ou à un robinet à raccord
rapide spécialement conçu à cet effet de type "Press-block".
La pression de l'eau doit se situer dans les
limites indiquées dans les "Caractéristiques
techniques". Pour connaître la pression d'alimentation moyenne de votre région, adressez-vous à votre Compagnie locale de distribution des eaux.
Veillez à ce que le tuyau d'arrivée d'eau ne
soit pas enroulé, écrasé ou enchevêtré lorsque vous effectuez le raccordement.
Le contre-écrou doit impérativement être installé correctement pour éviter toute fuite
d'eau.
Si l'appareil est raccordé au moyen de
tuyaux neufs ou de tuyaux ayant peu servi,
faites s'écouler l'eau pendant quelques minutes avant de brancher le tuyau d'arrivée
d'eau.
N'utilisez PAS des tuyaux provenant
d'un ancien appareil.
Cet appareil est doté de fonctions de
sécurité destinées à empêcher que l'eau
utilisée dans l'appareil ne soit réintroduite dans le système d'eau potable. Cet
appareil est conforme aux règlements
applicables en matière de tuyauterie.
Tuyau d'arrivée d'eau avec soupape de
sécurité
Après avoir raccordé le tuyau d'arrivée d'eau
à double paroi, la soupape de sécurité se situe à proximité du robinet. Par conséquent,
le tuyau d'arrivée d'eau est sous pression
uniquement lorsque l'eau s'écoule. Si le
tuyau d'arrivée d'eau fuit au cours de cette
opération, la soupape de sécurité interrompt
l'écoulement de l'eau.
Faites attention au moment d'installer le
tuyau d'arrivée d'eau :
• Le fil électrique de la soupape de sécurité
est situé à l'intérieur du tuyau d'arrivée
d'eau à double paroi. N'immergez pas le
tuyau d'arrivée d'eau ou la soupape de
sécurité dans l'eau.
• Si le tuyau d'arrivée d'eau ou la soupape
de sécurité est endommagé, remplacez
immédiatement la prise secteur.
• Le remplacement du tuyau d'arrivée d'eau
avec soupape de sécurité relève de la
compétence exclusive du Service Aprèsvente.
Avertissement Tension dangereuse
Raccordement du tuyau de vidange
L'extrémité du tuyau de vidange peut être
raccordée de deux façons :
1. Au robinet de sortie de l'évier, en la fixant
à la partie inférieure de la surface de travail. Cela empêchera que les eaux usées
de l'évier ne pénètrent dans l'appareil.
2. À une conduite fixe dotée d'une évacua-
tion murale dotée d'une ventilation spéciale, diamètre intérieur de 4 cm minimum.
max 85 cm
min 40 cm
max 400 cm
Page 43

Le tuyau de vidange peut être orienté à droite
ou à gauche du lave-vaisselle
Assurez-vous que le tuyau de vidange n'est
pas courbé ou écrasé, sous peine d'empêcher ou de ralentir l'évacuation de l'eau.
Le bouchon d'évier ne doit pas être mis en
place lorsque l'appareil évacue l'eau, sous
peine de provoquer un effet de siphon et un
reflux de l'eau vers l'appareil.
Si vous utilisez une rallonge de tuyau, son
diamètre intérieur ne doit pas être inférieur au
diamètre du tuyau fourni.
De même que le diamètre intérieur des raccords utilisés pour les branchements ne doit
pas être inférieur au diamètre du tuyau d'évacuation fourni.
Lorsque vous raccordez le tuyau de vidange
à un embout du siphon sous l'évier, n'ou-
bliez pas d'enlever toute la membrane
de plastique (A). Si vous oubliez d'enlever
toute la membrane, des particules d'aliments
risquent de s'accumuler avec le temps et de
boucher l'embout du tuyau de vidange du
lave-vaisselle
Branchement électrique
Avertissement L'appareil doit être
relié à la terre conformément aux
normes en vigueur.
Avant d'utiliser l'appareil pour la
première fois, vérifiez que la tension
nominale et le type d'alimentation figurant sur la plaque signalétique
correspondent aux valeurs d'alimentation de la pièce où l'appareil
doit être installé. La puissance nominale du fusible figure également
sur la plaque signalétique
Branchez toujours la fiche principale dans une prise correctement installée, protégée contre les chocs et
comportant une borne de mise à la
terre.
L'appareil ne doit pas être raccordé
à l'aide d'un prolongateur, d'une pri-
electrolux 43
Nos appareils sont équipés d'un dispositif de sécurité empêchant le reflux des
eaux usées vers l'appareil. Si le robinet
de votre évier est doté d'un clapet de
retenue incorporé, cela pourrait entraver
la vidange correcte de votre lave-vaisselle. C'est pourquoi nous vous recommandons de le retirer.
Pour éviter toute fuite d'eau après l'installation, assurez-vous que les raccords
des tuyauteries d'eau sont bien serrés.
se multiple ou d'un raccordement
multiple. Risque d'incendie.
Si nécessaire, remplacez la prise femelle de l'installation électrique de
votre habitation. Si le câble électrique doit être remplacé, contactez le
Service Après-vente.
La prise doit rester accessible une
fois que l'appareil est installé.
Pour débrancher l'appareil, ne tirez
jamais sur le cordon mais tirez toujours la prise.
Le fabricant décline toute responsabilité en cas de non-respect des précautions de sécurité mentionnées
dans ce chapitre.
En matière de protection de l'environnement
Le symbole sur le produit ou son
emballage indique que ce produit ne peut
être traité comme déchet ménager. Il doit
être remis au point de collecte dédié à cet
effet (collecte et recyclage du matériel
électrique et électronique).
En procédant à la mise au rebut de l'appareil
dans les règles de l’art, nous préservons
Page 44

44 electrolux
l'environnement et notre sécurité, s’assurant
ainsi que les déchets seront traités dans des
conditions optimum.
Pour obtenir plus de détails sur le recyclage
de ce produit, veuillez prendre contact avec
les services de votre commune ou le
magasin où vous avez effectué l'achat.
Matériaux d'emballage
Les matériaux d'emballage sont conçus
dans le respect de l'environnement et sont
recyclables. Les composants en plastique
sont identifiables grâce aux sigles >PE <,
>PS <, etc. Veuillez jeter les matériaux d'emballage dans le conteneur approprié du centre de collecte des déchets de votre commune.
Avertissement Si vous n'utilisez plus
votre appareil :
• Retirez la fiche de la prise secteur.
• Coupez le câble et la fiche et jetez-les.
• Éliminez le loquet de la porte, cela évitera aux enfants de s'enfermer dans
l'appareil et de mettre ainsi leur vie en
danger.
Page 45

Electrolux. Thinking of you.
Mehr zu unserem Denken finden Sie unter at
www.electrolux.com
Inhalt
Sicherheitshinweise 45
Gerätebeschreibung 47
Bedienblende 48
Erste Inbetriebnahme 49
Einstellen des Wasserenthärters 49
Gebrauch von Salz für Geschirrspüler 51
Gebrauch von Klarspülmittel 51
Täglicher Gebrauch 52
Laden von Besteck und Geschirr 53
Gebrauch von Spülmittel 56
Funktion "Multitab" 57
Änderungen vorbehalten
Auswählen und Starten eines
Spülprogramms 58
Entladen des Geschirrspülers 59
Spülprogramme 59
Reinigung und Pflege 60
Was tun, wenn … 62
Technische Daten 63
Gerät aufstellen 63
Wasseranschluss 64
Elektrischer Anschluss 65
Umwelttipps 66
Sicherheitshinweise
Lesen Sie zu Ihrer Sicherheit und für die
optimale Geräteanwendung vor der Installation und dem Gebrauch des Gerätes die vorliegende Gebrauchsanweisung aufmerksam durch, einschließlich
der Ratschläge und Warnungen. Es ist
wichtig, dass zur Vermeidung von Fehlern und Unfällen alle Personen, die das
Gerät benutzen, mit der Bedienung und
den Sicherheitsvorschriften vertraut
sind. Heben Sie die Benutzerinformation
gut auf und übergeben Sie sie bei einem
Weiterverkauf des Gerätes dem neuen
Besitzer, so dass jeder während der gesamten Lebensdauer des Gerätes über
Gebrauch und Sicherheit informiert ist.
Bestimmungsgemäßer Gebrauch
• Dieser Geschirrspüler ist nur zum Reinigen
von spülmaschinenfestem Haushaltsgeschirr bestimmt.
• Keine Lösungsmittel in den Geschirrspüler
geben. Es besteht Explosionsgefahr.
• Messer und andere spitze Gegenstände
müssen mit der Spitze nach unten in den
Besteckkorb gestellt oder waagerecht in
den oberen Korb gelegt werden.
• Nur für Geschirrspüler geeignete Produkte
(Klarspüler, Reinigungsmittel und Salz)
verwenden.
• Nicht die Tür während des Gerätebetriebs
öffnen; es kann heißer Dampf austreten.
• Kein Geschirr vor dem Ende des Spülgangs aus dem Geschirrspüler entnehmen.
• Ziehen Sie nach dem Gebrauch den Netzstecker und drehen Sie den Wasserhahn
zu.
• Wenden Sie sich für Reparaturen und
Wartung nur an Fachkräfte der autorisierten Kundendienststellen und verlangen Sie
stets Original-Ersatzteile.
• Versuchen Sie unter keinen Umständen,
das Gerät selbst zu reparieren. Reparaturen durch unerfahrene Personen können
zu schwerwiegenden Fehlfunktionen und
Verletzungen führen. Wenden Sie sich an
Ihren Kundendienst. Bestehen Sie immer
auf Original-Ersatzteilen.
Allgemeine Sicherheitshinweise
• Das Gerät darf von Personen (einschließlich Kindern), deren physische, sensorische Fähigkeiten oder deren Mangel an
Erfahrung und Kenntnissen einen sicheren
Gebrauch des Gerätes ausschließen, nicht
benutzt werden. Sie müssen von einer
Person beaufsichtigt oder bei der Bedienung des Gerätes angeleitet werden, die
für ihre Sicherheit verantwortlich ist.
electrolux 45
Page 46

46 electrolux
• Spülmittel für Geschirrspüler können Verätzungen an Augen, Mund und Kehle verursachen. Lebensgefahr! Halten Sie sich
immer an die Sicherheitsanweisungen der
Spülmittelhersteller.
• Das Wasser in Ihrem Geschirrspüler ist
kein Trinkwasser. Im Geschirrspüler können noch immer Spülmittelrückstände vorhanden sein.
• Sorgen Sie dafür, dass die Tür des Geschirrspülers außer beim Be- und Entladen
immer geschlossen ist. So verhindern Sie,
dass jemand über die offene Tür stolpern
und sich verletzen kann.
• Setzen oder stellen Sie sich nie auf die offene Tür.
Kindersicherung
• Dieses Gerät ist nur für den Gebrauch
durch Erwachsene bestimmt. Der Geschirrspüler darf nicht unbeaufsichtigt von
Kindern benutzt werden.
• Halten Sie das Verpackungsmaterial von
Kindern fern. Erstickungsgefahr.
• Spülmittel außer Reichweite von Kindern
aufbewahren.
• Halten Sie Kinder vom geöffneten Geschirrspüler fern.
Aufstellung
• Kontrollieren Sie das Gerät auf Transportschäden. Nehmen Sie niemals ein schad-
haftes Gerät in Betrieb. Verständigen Sie
Ihren Händler, wenn Ihr Geschirrspüler beschädigt ist.
• Entfernen Sie vor dem Gebrauch das gesamte Verpackungsmaterial.
• Der elektrische Anschluss des Gerätes
und alle sonstigen Installationsarbeiten
dürfen nur von qualifizierten Fachkräften
ausgeführt werden.
• Aus Sicherheitsgründen dürfen keine Änderungen an den technischen Merkmalen
oder dem Produkt selbst vorgenommen
werden.
• Benutzen Sie den Geschirrspüler nie mit
einem beschädigten Netzkabel oder einem defekten Wasserschlauch; oder
wenn die Bedienblende, die Arbeitsfläche
oder der Sockel defekt sind, so dass das
Geräteinnere frei zugänglich ist. Wenden
Sie sich zur Vermeidung von Unfällen an
den lokalen Kundendienst.
• Die Seiten des Geschirrspülers dürfen auf
keinen Fall angebohrt werden, da dadurch
die hydraulischen und elektrischen Bauteile beschädigt werden können.
Warnung! Halten Sie sich für den
elektrischen Anschluss und den
Wasseranschluss strikt an die
Anweisungen der betreffenden
Abschnitte.
Page 47

Gerätebeschreibung
electrolux 47
1 Oberkorb
2 Einstellung der Wasserhärtestufe
3 Salzbehälter
4 Behälter für Reinigungsmittel
5 Dosiergerät für Klarspülmittel
6 Typenschild
7 Filter
8 Unterer Sprüharm
9 Oberer Sprüharm
Optisches Signal
(Programmlaufanzeige)
Nach dem Starten des Spülprogramms
leuchtet am unteren Rand des Geschirrspü-
lers unter der Gerätetür das optische Signal
(Programmlaufanzeige).
Wenn der Geschirrspüler höher mit einer
bündig angebrachten Schranktür installiert
wurde, ist das optische Signal (Programmlaufanzeige) nicht mehr sichtbar.
Optisches Signal (Programmlaufanzeige)
Rote Lampe
leuchtet kontinuierlich
Rote Kontrolllampe blinkt
Zeigt an, dass ein Spülprogramm läuft. Leuchtet nach
dem Start des Spülprogramms
auf. Erlischt nach dem Ende des
Spülprogramms.
Zeigt eine Gerätestörung an.
Page 48

48 electrolux
Bedienblende
1 Ein/Aus-Taste
2 Digital-Display
3 Zeitvorwahl-Taste
4 Programmwahltasten
5 Kontrolllampen
6 Funktionstasten
Kontrolllampen
Salz
Klarspüler
Multitab
Zeitvorwahl-Taste
Der Programmstart kann zwischen 1 und 19
Stunden verzögert werden.
Näheres zur Einstellung dieser Funktion siehe 'Ein Spülprogramm auswählen und starten'.
Programmwahltasten
Drücken Sie eine dieser Tasten, um ein Spülprogramm einzustellen. Die entsprechende
Kontrolllampe beginnt zu leuchten. Näheres
siehe "Spülprogramme".
Digital-Display
Im Digital-Display wird Folgendes angezeigt:
• der Härtegrad, auf den der Wasserenthärter eingestellt ist,
• die ungefähre Restlaufzeit des laufenden
Programms,
• das Ein-/Abschalten des Klarspülmitteldosierers ( NUR bei aktiver 'Funktion Multitab'),
• das Ende eines Spülprogramms (im Digital-Display erscheint eine Null),
Leuchtet auf, sobald Spezialsalz nachgefüllt werden muss.
Leuchtet auf, sobald Klarspülmittel nachgefüllt werden muss.
Zeigt an, ob die Funktion Multitab ein- oder ausgeschaltet ist. Sie-
he die Funktion Multitab.
• der Ablauf der Zeitvorwahl,
• Fehlercodes im Fall von Fehlfunktionen
des Geschirrspülers, und
• das Ein-/Ausschalten der Töne.
Funktionstasten
Mit diesen Tasten können folgende Funktionen eingestellt werden:
• die Einstellung des Wasserenthärters,
• das Abbrechen eines Spülprogramms
oder einer laufenden Zeitvorwahl,
• das Ein-/Abschalten der Funktion Multitab,
• das Ein-/Abschalten des Klarspülmitteldosierers bei aktiver Funktion Multitab, und
das
• Ein-/Abschalten der Töne.
Einstellmodus
Drücken Sie die Ein-/Aus-Taste; wenn AL-
LE Kontrolllampen der Programmwahltasten
leuchten, befindet sich das Gerät im Einstellmodus.
Page 49

electrolux 49
Denken Sie daran, dass sich der Geschirrspüler:
– beim Auswählen eines Spülpro-
gramms,
– bei der Einstellung des Wasserenthär-
ters,
– beim Ein-/Abschalten des Klarspül-
mitteldosierers und
– beim Ein-/Abschalten der Töne
im Einstellmodus befinden MUSS .
Drücken Sie die Ein-/Aus-Taste; Leuchtet die
Kontrolllampe einer Programmwahltaste, ist
das zuletzt ausgeführte oder ausgewählte
Programm noch immer eingestellt. In diesem
Fall muss das Programm gelöscht werden,
um zum Einstellmodus zurückzukehren.
Löschen eines eingestellten oder
laufenden Programms
Drücken Sie gleichzeitig die beiden Funktionstasten B und C so lange, bis alle Kontrolllampen der Programmwahltasten leuchten. Das Programm wurde abgebrochen und
das Gerät befindet sich jetzt wieder im Einstellmodus.
Töne
Damit besser erkennbar ist, welche Operationen der Geschirrspüler ausführt, wurden
Töne eingeführt:
– für die Einstellung des Wasserhärtegrads,
– für das Ende des Spülprogramms,
– und für die Alarmauslösung bei einer Ge-
rätestörung.
Werkseitige Einstellung: Töne eingeschaltet
Es ist möglich, die Töne auszuschalten.
Ein-/Ausschalten der Töne
1. Drücken Sie die Ein-/Aus-Taste. Der Geschirrspüler muss sich im Einstellmodus
befinden.
2. Drücken Sie gleichzeitig die Funktionstasten B und C so lange, bis die Kontrolllampen der Funktionstasten A, B und C
zu blinken beginnen.
3. Drücken Sie Funktionstaste C. Die Kontrolllampen der Funktionstasten A und B
erlöschen, während die Kontrolllampe
der Funktionstaste C weiterhin blinkt. Im
Digital-Display wird die aktuelle Stufe angezeigt.
Akustische Signale ausgeschaltet
Akustische Signale eingeschaltet
4. Drücken Sie zur Änderung der Einstellung
erneut Funktionstaste C. Im Digital-Display wird jetzt die neue Einstellung angezeigt.
5. Zur Speicherung des Vorgangs schalten
Sie den Geschirrspüler bitte aus.
Erste Inbetriebnahme
Vor der ersten Benutzung Ihres Geschirrspülers:
• Vergewissern Sie sich, dass der elektrische und der Wasseranschluss den Installationsanweisungen entsprechen
• Entfernen Sie alles Verpackungsmaterial
aus dem Geräteinneren
• Einstellen des Wasserenthärters
• Gießen Sie 1 Liter Wasser in den Salzbehälter und füllen Sie ihn dann mit Salz für
Geschirrspüler
Einstellen des Wasserenthärters
Der Geschirrspüler ist mit einem Wasserenthärter ausgestattet, der die im Wasser enthaltenen Minerale und Salze zurückhält, die
den Gerätebetrieb negativ und nachhaltig
beeinträchtigen können.
• Füllen Sie das Klarspüldosiergerät mit
Klarspüler
Bei Verwendung von Reinigertabs
wie: "3 in 1", "4 in 1", "5 in 1" usw...
wählen Sie die Funktion "Multitab".
(siehe "Die Funktion Multitab").
Je höher der Mineral- und Salzgehalt ist, um
so härter ist Ihr Wasser. Die Wasserhärte
wird in gleichwertigen Einheiten gemessen,
Deutsche Wasserhärtegrade (°dH), Französische Grade (°TH) und mmol/l (Millimol pro
Page 50

50 electrolux
Liter - internationale Einheit der Wasserhärte).
Der Enthärter muss entsprechend der Was-
Der Wasserenthärter muss sowohl: manuell mit dem Härtebereichsschalter als
auch elektronisch eingestellt werden.
serhärte Ihres Gebietes eingestellt werden.
Ihr lokales Wasserwerk kann Sie über die
Härte Ihres Leitungswassers informieren.
Wasserhärte Einstellung der Wasserhärtestufe Zusatz
°dH °TH mmol/l Manuell Elektronisch
51 - 70 91 - 125 9,1 - 12,5 2 Stufe 10 Ja
43 - 50 76 - 90 7,6 - 9,0 2 Stufe 9 Ja
37 - 42 65 - 75 6,5 - 7,5 2 Stufe 8 Ja
29 - 36 51 - 64 5,1 - 6,4 2 Stufe 7 Ja
23 - 28 40 - 50 4,0 - 5,0 2 Stufe 6 Ja
19 - 22 33 - 39 3,3 - 3,9 2 Stufe 5 Ja
15 - 18 26 - 32 2,6 - 3,2 1 Stufe 4 Ja
11 - 14 19 - 25 1,9 - 2,5 1 Stufe 3 Ja
4 - 10 7 - 18 0,7 - 1,8 1 Stufe 2 Ja
< 4 < 7 < 0,7 1 Stufe 1 Nein
Manuelle Einstellung
Der Wasserenthärter ist werkseitig auf
Härtestufe 2 eingestellt.
1. Öffnen Sie die Tür des Geschirrspülers.
2. Entfernen Sie den Unterkorb aus dem
Geschirrspüler.
3. Stellen Sie den Härtebereichsschalter auf
Härtestufe 1 oder 2 (siehe Tabelle).
4. Setzen Sie den Unterkorb wieder ein.
Kontrolllampen der Funktionstasten A, B
und C zu blinken beginnen.
3. Drücken Sie Funktionstaste A. Die Kontrolllampen der Funktionstasten B und C
erlöschen, während die Kontrolllampe
der Funktionstaste A weiterhin blinkt. Im
Digital-Display wird die aktuelle Stufe angezeigt und eine Reihe aufeinander folgender Signaltöne ertönt.
Beispiele:
Anzeige, 5 aufeinander folgende Tö-
ne, Pause, usw. = Stufe 5
Anzeige, 10 aufeinander folgende
Töne, Pause, usw. = Stufe 10
4. Drücken Sie zur Änderung der Stufe die
Funktionstaste A. Bei jedem Tastendruck
ändert sich die Stufe. (Bitte halten Sie sich
für die Auswahl der neuen Stufe an die
Tabelle).
Beispiele: Ist die aktuelle Stufe 5, wird
Elektronische Einstellung
Der Wasserenthärter ist werkseitig auf
Härtestufe 5 eingestellt.
1. Drücken Sie die Ein/Aus-Taste. Der Geschirrspüler muss sich im Einstellmodus
befinden.
2. Drücken und halten Sie gleichzeitig die
durch einmaliges Drücken von Funktionstaste A Stufe 6 ausgewählt.
Ist die aktuelle Stufe 1, wird durch einmaliges Drücken von Funktionstaste A
Stufe 10 ausgewählt.
5. Schalten Sie mit der Ein-/Aus-Taste den
Geschirrspüler aus, um die ausgewählten
Optionen zu speichern.
Funktionstasten B und C so lange, bis die
von
Salz
Page 51

Gebrauch von Salz für Geschirrspüler
Warnung!
Verwenden Sie ausschließlich Spezialsalz für
Geschirrspüler. Alle anderen Salzarten, die
nicht eigens für Geschirrspüler bestimmt
sind, insbesondere Speisesalz, führen zu
Schäden des Wasserenthärters. Füllen Sie
den Salzbehälter erst kurz vor dem Start eines kompletten Spülprogramms. Das verhindert, dass verschüttetes Salz oder Salzwasser für längere Zeit auf dem Geräteboden
bleibt und Korrosion verursacht.
Einfüllen:
1. Öffnen Sie die Tür, entfernen Sie den Unterkorb und schrauben Sie die Verschlusskappe des Salzbehälters nach
links ab.
2. Gießen Sie 1 Liter Wasser in den Salzbehälter (dies ist nur vor der ersten Be-
nutzung erforderlich) .
3. Füllen Sie den Behälter mithilfe des mitgelieferten Trichters mit Salz.
4. Die Verschlusskappe wieder anbringen
5. Schrauben Sie die Verschlusskappe
electrolux 51
und sicherstellen, dass kein Salz auf dem
Gewinde oder der Dichtung vorhanden
ist.
nach rechts bis zum Anschlag zu. Ein Klicken zeigt an, dass die Kappe fest verschlossen ist.
Seien Sie unbesorgt, wenn beim Einfüllen Wasser aus dem Salzbehälter ausfließt; das ist ganz normal.
Die Salzkontrolllampe kann noch
2-6 Stunden nach dem Nachfüllen
von Salz leuchten, vorausgesetzt,
der Geschirrspüler bleibt eingeschaltet. Bei Verwendung von Salz,
das sich langsamer auflöst, kann
dieser Vorgang länger dauern. Der
Betrieb des Geräts wird dadurch
nicht beeinträchtigt.
Gebrauch von Klarspülmittel
Warnung! Nur Markenklarspülmittel für
Geschirrspülmaschinen verwenden.
Füllen Sie nie andere Produkte (Reinigungsmittel für Geschirrspüler, Flüssigreiniger) in den Behälter für Klarspüler.
Das Gerät kann dadurch beschädigt
werden.
Klarspülmittel sind eine Garantie für ein
perfektes Spülergebnis und fleckenund streifenfreies Trocknen.
Das Klarspülmittel wird automatisch
beim letzten Spülgang zugesetzt.
1. Drücken Sie auf die Entriegelungstaste
(A), um den Behälter zu öffnen.
Page 52

52 electrolux
2. Füllen Sie das Klarspülmittel in den Behälter. Der maximale Füllstand wird durch
die Markierung "max" angezeigt.
Wischen Sie verschüttetes Klarspülmittel sofort mit einem saugfähigen Tuch
auf, um übermäßige Schaumbildung
beim folgenden Spülzyklus zu vermeiden.
Stellen Sie je nach gewünschtem End- und
Trockenergebnis die Klarspülmitteldosierung
mit dem 6-Stufenschalter ein (Stufe 1 geringste Dosierung, Stufe 6 maximale Dosierung).
Die Dosierung ist werkseitig auf Stufe 4 eingestellt.
Erhöhen Sie die Dosierung, wenn auf dem
Geschirr nach dem Spülen Wassertropfen
oder Kalkflecken zurückbleiben.
Verringern Sie die Dosierung, wenn weißliche
Streifen auf dem Geschirr oder ein bläulicher
Überzug auf Gläsern und Messerklingen zu
sehen sind.
Das Dosiergerät fasst ca. 110 ml Klarspülmittel; die Menge reicht je nach der
Dosiereinstellung für 16 bis 40 Spülzyklen.
3. Vergewissern Sie sich nach jedem Füllen,
dass der Deckel geschlossen ist.
Täglicher Gebrauch
• Kontrollieren Sie, ob der Geschirrspüler
mit Salz oder Klarspülmittel aufgefüllt werden muss.
• Laden Sie das Besteck und Geschirr in
den Geschirrspüler.
• Füllen Sie Reinigungsmittel ein.
• Wählen Sie ein für Besteck und Geschirr
geeignetes Spülprogramm.
• Starten Sie das Spülprogramm.
Hilfreiche Hinweise und Tipps
Schwämme, Putzlappen und Gegenstände,
die Wasser aufsaugen, dürfen nicht im Geschirrspüler gereinigt werden.
• Vor dem Laden des Geschirrs:
– Speisereste und Abfall entfernen.
– Töpfe mit angebrannten Speiseresten
einweichen
Page 53

electrolux 53
• Beachten Sie beim Laden des Geschirrs
und Bestecks folgendes:
– Geschirr und Besteck dürfen nicht die
Drehung der Sprüharme behindern.
– Hohlgefäße mit der Öffnung nach unten
einlegen, so dass sich in den Behältern
kein Wasser ansammeln kann.
– Geschirr und Besteckteile dürfen nicht
ineinander liegen oder sich gegenseitig
abdecken.
– Gläser dürfen sich zur Vermeidung von
Bruchschäden nicht berühren.
Folgendes Geschirr und Besteck ist zum Reinigen im Geschirrspüler
ungeeignet: beschränkt geeignet:
• Besteck mit Holz-, Horn-, Porzellan- oder Perlmuttgriffen.
• Nicht hitzebeständige Kunststoffteile.
• Älteres Besteck, dessen Klebeverbindungen
temperaturempfindlich sind.
• Geklebte Geschirr- oder Besteckteile.
• Zinn- bzw. Kupfergegenstände.
• Bleikristallglas.
• Rostempfindliche Stahlteile.
• Frühstücksbrettchen.
• Gegenstände aus Kunstfasern.
Laden von Besteck und Geschirr
Unterkorb
Der Unterkorb ist zur Aufnahme von Kochtöpfen, Deckeln, Tellern, Salatschüsseln, Besteck usw. bestimmt.
Ordnen Sie Servierplatten und große Deckel
um den Korbrand an; achten Sie darauf,
dass die Sprüharme nicht behindert werden.
– Kleine Gegenstände in den Besteck-
korb legen.
• Kunststoffgeschirr und Töpfe mit Antihaftbeschichtung neigen dazu, Wassertropfen
zurückzuhalten; diese Art Geschirr trocknet deshalb schlechter als Porzellan und
Edelstahl.
• Leichte Gegenstände (Kunststoffschüsseln usw.) so im Oberkorb anordnen, dass
sie nicht verrutschen können.
• Reinigen Sie Steingut nur dann im Geschirrspüler, wenn es vom Hersteller als geschirrspülerfest deklariert wird.
• Glasierte Muster können bei häufigem Spülen
ihren Glanz verlieren.
• Silber- und Aluminiumteile neigen zu Verfärbungen: Speisereste wie Eiweiß, Eigelb und Senf
verfärben Silber und hinterlassen darauf oft Flecken. Entfernen Sie daher sofort Speisereste
von Silberbesteck, wenn es nicht sofort nach
dem Gebrauch gespült wird.
Die zwei Stachelreihen des Unterkorbs können zum Laden von Töpfen, Pfannen und
Schüsseln schnell umgeklappt werden.
Page 54

54 electrolux
Besteckkorb
Messer mit langer Klinge in aufrechter
Stellung stellen eine potentielle Gefahr
dar. Langes und/oder scharfes Besteck
wie Tranchiermesser müssen
waagerecht in den Oberkorb gelegt
werden. Seien Sie vorsichtig beim Laden
oder Herausnehmen von scharfen
Gegenständen wie Messern.
Gabeln und Löffel in den herausnehmbaren
Besteckkorb stellen; dabei sollten die Griffe
der Gabeln nach unten und die Griffe der
Messer nach oben gerichtet sein.
Für ein optimales Spülergebnis empfehlen
wir Ihnen die Verwendung des Besteckgitters.
Wenn die Besteckabmessungen die Verwendung der Besteckköcher nicht zulassen,
können diese leicht entfernt werden.
Falls die Griffe auf der Unterseite aus dem
Korb ragen und den unteren Sprüharm behindern, das Besteck mit nach oben gerichtetem Griff laden.
Mischen Sie Löffel mit anderem Besteck, so
können sie nicht zusammenkleben.
Klappen Sie den Korbgriff nach unten, um
das Laden des Bestecks in den Korb zu erleichtern.
Der Besteckkorb besteht aus zwei Teilen, die
bei Bedarf getrennt werden können. Schieben Sie die beiden Hälften zum Trennen in
entgegengesetzte Richtungen und ziehen
Sie sie dann auseinander.
Page 55

Zum Zusammensetzen auf die entgegengesetzte Weise vorgehen.
Oberkorb
Der Oberkorb ist zur Aufnahme von Untertassen, Salatschüsseln, Tassen, Gläsern,
Töpfen und Deckeln bestimmt.
Ordnen Sie das Geschirr auf und unter den
Tassenreihen an, so dass das Wasser die
Oberflächen aller Geschirrteile erreicht.
electrolux 55
Vergewissern Sie sich vor dem Schließen der Tür, dass die Sprüharme beim
Drehen nicht durch Geschirr behindert
werden.
Höhenverstellung des Oberkorbs
Sehr große Platten können zum Spülen in
den Unterkorb geladen werden, nachdem
der Oberkorb auf die obere Position angehoben worden ist.
Maximale Geschirrhöhe im Unterkorb
Bei angehobenem
Oberkorb
Bei abgesenktem
Oberkorb
33 cm
29 cm
So bringen Sie den Korb in die obere Position:
1. Den Korb bis zum Anschlag herausziehen.
2. Den Korb auf beiden Seiten vorsichtig anheben, bis der Mechanismus einrastet
und die Lage des Korbs stabil ist.
Langstielige Gläser können umgedreht in die
Tassenablagen gestellt werden.
Für größere Gegenstände können die Tassenablagen umgeklappt werden.
Gehen Sie wie folgt vor, um den Korb
wieder in die ursprüngliche Position zu
bringen:
1. Den Korb bis zum Anschlag herausziehen.
2. Den Korb auf beiden Seiten vorsichtig anheben und aufsetzen, bis der Mechanismus einrastet.
Verstellen Sie die Korbhöhe nie nur auf
einer Seite
Wenn der Korb in der oberen Position
genutzt wird, empfehlen wir für die Tassenauflagen die unterste Position.
Page 56

56 electrolux
Schließen Sie nach dem Beladen
immer die Tür des Geschirrspülers;
Gebrauch von Spülmittel
Verwenden Sie ausschließlich Reinigungsmittel für Geschirrspülmaschinen.
Befolgen Sie die Herstellerangaben für
Dosierung und Aufbewahrung auf den
Packungen.
Die Verwendung der richtigen Dosierung
der Reinigungsmittel trägt zum Schutz
der Umwelt bei.
Füllen Sie Reiniger ein
1. Öffnen Sie den Deckel.
2. Füllen Sie den Behälter für Reinigungsmittel (1) mit Reiniger. Achten Sie auf die
Dosiermarkierungen:
20 = ca. 20 g Reiniger
30 = ca. 30 g Reiniger.
eine offene Tür stellt stets eine
Unfallgefahr dar.
3. Bei Programmen mit Vorspülen zusätzlichen Reiniger (5/10 g) in die Vorspülkammer (2) füllen.
Dieser Reiniger wird in der Vorspülphase
verwendet.
Verwendung von Reinigertabs; Legen Sie
die Tabletten in das Fach (1)
4. Schließen Sie den Deckel und drücken
Sie ihn an, bis er einrastet.
Reinigertabletten der verschiedenen
Hersteller lösen sich mit unterschiedlicher Schnelligkeit auf. Einige Reinigertabletten erreichen aus diesem Grund
nicht ihre volle Waschkraft bei kurzen
Spülprogrammen. Benutzen Sie daher
bei Verwendung von Reinigungstabletten längere Spülprogramme, um sicher
zu sein, dass alle Reinigungsmittelreste
beseitigt werden.
1
2
Page 57

Funktion "Multitab"
Dieser Geschirrspüler ist mit der Funktion
"Multitab" ausgerüstet, die die Verwendung
von "Multitab" Kombi-Reinigungstabletten
gestattet.
Bei diesen Produkten handelt es sich um
Reiniger mit kombinierten Reinigungs-, Klarspül- und Salzfunktionen. Je nach Art der
verwendeten Tabletten ("3 in 1", "4 in 1", "5
in 1" usw.) können sie auch andere Zusätze
enthalten.
Stellen Sie sicher, dass diese Reinigungstabletten für Ihre Wasserhärte geeignet sind.
Siehe hierzu die Herstellerangaben.
Nach der Auswahl bleibt diese Funktion auch
für die folgenden Spülprogramme eingeschaltet.
Bei der Anwahl dieser Funktion wird der Zufluss von Klarspüler und Salz von den betreffenden Behältern automatisch gesperrt;
die Kontrolllampen für Klarspüler und Salz
sind ebenfalls deaktiviert.
Bei der Funktion "Multitab" kann sich die
Dauer der Spülprogramme ändern. In diesem Fall wird die Dauer des Programms automatisch auf dem Digital-Display aktualisiert.
Ein-/Abschalten der Funktion ''Multitab"
vor dem Beginn eines Spülprogramms.
Nach dem Programmstart kann die
Funktion "Multitab" NICHT mehr geändert werden. Wenn Sie die "Funktion
Multitab" löschen möchten, müssen Sie
zunächst die Programmeinstellung löschen und danach die "Funktion Multitab" abschalten. In diesem Fall müssen
Sie ein Spülprogramm (und die gewünschten Optionen) neu einstellen.
Ein-/Abschalten der Funktion Multitab
Drücken und halten Sie gleichzeitig die beiden Multitab-Tasten (Funktionstasten D und
E) so lange, bis die Multitab-Kontrolllampe
aufleuchtet. Dies zeigt an, dass die Funktion
aktiv ist.
Zum Abschalten der Funktion die gleichen
Tasten nochmals drücken, bis die Kontrolllampe des Symbols der Funktion "Multitab"
erlischt.
electrolux 57
Sollte das Geschirr nicht trocken
genug sein, empfehlen wir Folgendes:
1. Füllen Sie den Klarspüldosierer mit
Klarspüler auf.
2. Schalten Sie den Klarspüldosierer
ein.
3. Bringen Sie den Klarspüldosierer in
Stellung 2.
• Das Ein-/Abschalten des Klarspüldo-
sierers ist nur bei aktiver Funktion Multitab möglich.
Ein-/Abschalten des
Klarspülmitteldosierers
1. Drücken Sie die Ein-/Aus-Taste. Der Geschirrspüler muss sich im Einstellmodus
befinden.
2. Drücken und halten Sie gleichzeitig die
Funktionstasten B und C so lange, bis die
Kontrolllampen der Funktionstasten A, B
und C zu blinken beginnen.
3. Drücken Sie Funktionstaste B. Die Kontrolllampen der Funktionstasten A und C
erlöschen, während die Kontrolllampe
von Funktionstaste B weiterhin blinkt. Im
Digital-Display wird die aktuelle Einstellung angezeigt.
Klarspüldosierer abgeschaltet
Klarspüldosierer eingeschaltet
4. Drücken Sie zum Wechseln der Einstellung erneut die Taste B. Das Digital-Display zeigt die neue Einstellung an.
5. Schalten Sie mit der Ein-/Aus-Taste den
Geschirrspüler aus, um die ausgewählten
Optionen zu speichern.
Page 58

58 electrolux
Wenn Sie sich dafür entscheiden,
wieder normale Reinigungsmitteln
zu verwenden, vergessen Sie bitte
nicht:
1. Die Funktion Multitab auszuschalten.
2. Den Klarspüler- und Salzbehälter
wieder zu füllen.
3. Die Wasserhärte auf die höchste
Härtestufe einzustellen und 1 norma-
len Spülgang ohne Geschirr auszuführen.
4. Die Wasserhärte entsprechend der
Wasserhärte Ihres Gebietes einzustellen.
5. Einstellung der Klarspüldosierung.
Auswählen und Starten eines Spülprogramms
Wählen Sie das Spülprogramm und
die Zeitvorwahl bei etwas geöffneter
Tür. Der Programmstart oder der
Ablauf der Zeitvorwahl setzen erst
nach dem Schließen der Tür ein. Bis
dahin können die Einstellungen
noch geändert werden
1. Kontrollieren Sie, dass die Körbe richtig
beladen sind und die Sprüharme beim
Drehen nicht behindert werden.
2. Vergewissern Sie sich, dass der Wasserhahn geöffnet ist.
3. Drücken Sie die Ein-/Aus-Taste. Der Geschirrspüler muss sich im Einstellmodus
befinden.
4. Drücken Sie die Taste des gewünschten
Programms (siehe die Tabelle "Spülprogramme").
Schließen Sie die Tür des Geschirrspülers; das Programm startet automatisch.
Einstellen und Starten des Programms
mit der Zeitvorwahl
1. Drücken Sie nach Auswahl des Spülprogramms die Zeitvorwahltaste, bis die blinkende Stundenzahl der Zeitvorwahl auf
dem Digital-Display erscheint.
– Die Kontrolllampe der Zeitvorwahl be-
ginnt zu leuchten.
2. Schließen Sie die Tür des Gerätes; das
Programm startet automatisch.
3. Der Ablauf der Zeitvorwahl nimmt in
Schritten von jeweils 1 Stunde ab.
4. Das Öffnen der Tür unterbricht den Ablauf
der Zeitvorwahl. Schließen Sie die Tür
des Geschirrspülers. Das Programm wird
an dem Punkt fortgesetzt, an dem es unterbrochen wurde.
5. Nach Ablauf der Zeitvorwahl beginnt das
Spülprogramm automatisch.
– Die Kontrolllampe der Zeitvorwahl er-
lischt.
Warnung! Unterbrechen oder
löschen Sie ein laufendes
Spülprogramm NUR, wenn es
absolut notwendig ist.
Achtung! Beim Öffnen der Tür kann
heißer Dampf entweichen. Öffnen
Sie die Tür vorsichtig.
Unterbrechen eines laufenden
Spülprogramms
• Öffnen Sie die Tür des Geschirrspülers;
das Programm hält an. Schließen Sie die
Tür des Geschirrspülers; das Programm
wird an dem Punkt fortgesetzt, an dem es
unterbrochen wurde.
Abbrechen eines laufenden
Spülprogramms oder einer laufenden
Zeitvorwahl
• Drücken Sie gleichzeitig die beiden Funktionstasten B und C so lange, bis alle Programmkontrolllampen leuchten.
• Wenn Sie eine Zeitvorwahl ausschalten,
wird damit auch die Auswahl des Spülprogramms aufgehoben. In diesem Fall müssen Sie das Spülprogramm erneut einstellen.
• Soll ein neues Spülprogramm gewählt
werden, kontrollieren Sie, ob der Reinigungsmittelbehälter gefüllt ist.
Ende des Spülprogramms
• Der Geschirrspüler stoppt automatisch,
und ein Signalton zeigt das Ende des Spülprogramms an.
1. Öffnen Sie die Tür des Geschirrspülers.
Das Digital-Display zeigt Null an.
2. Schalten Sie den Geschirrspüler aus.
3. Öffnen Sie die Tür des Geschirrspülers
einen Spaltbreit und warten Sie einige Minuten, bevor Sie das Geschirr entnehmen; auf diese Weise kühlt das Geschirr
Page 59

electrolux 59
rascher ab und die Trockenwirkung wird
verbessert.
Standby-Modus
Wird das Gerät am Ende des Spülprogramms nicht ausgeschaltet, geht es automatisch in den Standby-Modus. Im StandbyModus verbraucht das Gerät weniger Strom.
Entladen des Geschirrspülers
• Heißes Geschirr ist stoßempfindlich. Lassen Sie daher das Geschirr abkühlen, bevor Sie es aus dem Gerät entnehmen.
• Entladen Sie zuerst den Unter- und dann
den Oberkorb; dadurch wird vermieden,
dass Wasser vom Oberkorb auf das Geschirr im Unterkorb tropft.
• Auf den Wänden und der Tür des Geschirrspülers kann sich Kondenswasser
Spülprogramme
Spülprogramme
Programm Grad der Ver-
1)
2)
3)
schmutzung
Stark verschmutzt Geschirr, Besteck,
Beliebig Geschirr, Besteck,
Normal/leicht verschmutzt
Normal verschmutzt Geschirr und Besteck Vorspülgang
Drei Minuten nach dem Ende des Programms erlöschen automatisch alle Kontrolllampen, und im Digital-Display erscheint eine
horizontale Linie.
Drücken Sie eine der Tasten (aber nicht die
Ein-/Aus-Taste), um zurück in den Programmende-Modus zu kehren.
absetzen, da sich Edelstahl schneller als
Geschirr abkühlt.
Nach dem Ende des Spülprogramms sollten Sie den Netzstecker
des Gerätes ziehen und den Wasserhahn schließen.
Spülgut Programmbeschreibung
Töpfe, Pfannen
Töpfe, Pfannen
Geschirr und Besteck Hauptspülgang bis zu 60°C
Vorspülgang
Hauptspülgang bis zu 70 °C
2 Zwischenspülgänge
Klarspülgang
Trockengang
Vorspülgang
Hauptspülgang bis zu 45°C
oder 70°C
1 oder 2 Zwischenklarspülgänge
Klarspülgang
Trockengang
Klarspülgang
Hauptspülgang bis zu 50 °C
1 Zwischenspülgang
Klarspülgang
Trockengang
Page 60

60 electrolux
Programm Grad der Ver-
schmutzung
Beliebig Teilweise beladen
1) Während des Auto Spülprogramms wird der Verschmutzungsgrad des Geschirrs durch den Grad der
Wassertrübung bestimmt. Programmdauer, Wasser- und Stromverbrauch sind unterschiedlich; je
nachdem, ob der Geschirrspüler ganz oder teilweise beladen ist und ob das Geschirr nur leicht oder
stärker verschmutzt ist. Die Wassertemperatur wird automatisch auf 45° C bis 70° C eingestellt.
2) Ideal, wenn der Geschirrspüler nur teilweise beladen ist. Dies ist das perfekte tägliche Spülprogramm
für eine 4-köpfige Familie, die lediglich das Frühstücks- und Abendessensgeschirr samt Besteck
spülen möchte.
3) Testprogramm für Testinstitute.
Spülgut Programmbeschreibung
(weiteres Spülgut soll
im Lauf des Tages
noch hinzukommen).
1 Kaltspülgang (damit die
Speiserückstände nicht verkleben).
Für dieses Programm ist kein
Spülmittel erforderlich.
Verbrauchswerte
Programm Programmdauer (in Minu-
- 1,8 - 2,0 23 - 25
- 1,1 - 1,7 12 - 23
- 0,9 9
- 1,0 - 1,1 12 - 13
- 0,1 4
1) Im Digital-Display wird die Programmdauer angezeigt.
ten)
1)
Die Verbrauchswerte sind als Richtwerte
angegeben, die von dem Druck und der
Energieverbrauch
(in kWh)
Wasser (in Liter)
Schwankungen der Stromversorgung
und der Geschirrmenge abhängen.
Temperatur des Wassers, den
Reinigung und Pflege
Filterreinigung
Die Filter müssen regelmäßig kontrolliert und
gereinigt werden. Schmutzige Filter beeinträchtigen das Spülergebnis.
Warnung! Vergewissern Sie sich vor
dem Reinigen der Filter, dass die
Maschine ausgeschaltet ist.
1. Öffnen Sie die Tür und entfernen Sie den
Unterkorb.
2. Das Filtersystem des Geschirrspülers
umfasst einen Grobfilter ( A ), einen Mikrofilter ( B ) und ein Filtersieb. Entriegeln
Sie das Filtersystem mit dem Griff des
Mikrofilters.
3. Drehen Sie den Griff um 1/4 Umdrehung
nach links und ziehen Sie das Filtersystem heraus
Page 61

4. Fassen Sie den Grobfilter ( A ) am Handgriff und ziehen Sie ihn aus dem Mikrofilter ( B ).
5. Reinigen Sie alle Filter sorgfältig unter
fließendem Wasser.
6. Nehmen Sie das Filtersieb aus dem Spülraumboden und reinigen Sie beide Seiten
sorgfältig.
7. Setzen Sie das Filtersieb wieder in den
Spülraumboden ein und vergewissern
Sie sich, dass es fest sitzt.
8.
Setzen Sie den Grobfilter ( A ) in den Mikrofilter ( B ) ein und drücken Sie die beiden
Filter zusammen.
9. Das Filtersystem einsetzen und durch
Drehen des Griffs nach rechts bis zum
Anschlag verriegeln. Achten Sie darauf,
dass das Filtersieb nicht über den Spülraumboden hervorragt.
Benutzen Sie den Geschirrspüler
NIEMALS ohne die Filter. Falsches
Einsetzen der Filter führt zu
schlechten Spülergebnissen und
kann Schäden am Gerät verursachen.
Versuchen Sie NIE, die Sprüharme
auszubauen.
electrolux 61
Eventuell durch Schmutz verstopfte Löcher der Sprüharme mit einem Partystick reinigen.
Reinigung der Außenseiten
Reinigen Sie die Außenseiten und die Bedienblende des Gerätes mit einem weichen
feuchten Tuch. Benutzen Sie bei Bedarf nur
neutrale Reinigungsmittel. Benutzen Sie keine Scheuermittel, Metallschwämmchen oder
Lösungsmittel (Azeton, Trichloräthylen usw.).
Reinigung des Geräteinneren
Reinigen Sie die Gummidichtungen der Türen und des Reinigungsmittel- und Klarspülerbehälters regelmäßig mit einem feuchten
Tuch.
Alle 3 Monate sollten Sie das Spülprogramm
für stark verschmutztes Geschirr ohne Geschirr, aber mit Verwendung von Spülmitteln
ausführen.
Längerer Gerätestillstand
Vor einem längerem Stillstand des Geschirrspülers sollten Sie folgende Vorsichtsmaßnahmen ergreifen:
1. Ziehen Sie den Netzstecker und schließen Sie den Wasserhahn.
2. Öffnen Sie die Tür einen Spaltbreit, um
dem Entstehen unangenehmer Gerüche
vorzubeugen.
3. Reinigen Sie das Geräteinnere.
Frostschutzmaßnahmen
Stellen Sie den Geschirrspüler nicht in einem
Raum auf, in dem die Temperatur unter 0°C
absinkt. Sollte dies nicht vermeidbar sein, die
Maschine entleeren, die Gerätetür schließen,
den Wasserzulaufschlauch entfernen und
entleeren.
Transport des Gerätes
Halten Sie sich bei einem Transport des Gerätes (Umzug usw.) an folgende Anweisungen:
1. Netzstecker ziehen.
2. Den Wasserhahn schließen.
3. Den Wasserzulauf- und den Ablaufschlauch abnehmen.
4. Ziehen Sie das Gerät zusammen mit den
Schläuchen heraus.
Lassen Sie das Gerät beim Transport nicht
umkippen.
Page 62

62 electrolux
Was tun, wenn …
Der Geschirrspüler startet nicht oder hält
während des Betriebs an.
Einige Störungen können durch nachlässige
Instandhaltung oder Versehen bedingt sein
und mit Hilfe der in der folgenden Tabelle be-
Fehlercodes und Störungsanzeige Mögliche Ursachen und Abhilfe
• Die Kontrolllampe für das laufende Programm
blinkt ständig
• akustische Signalabfolge
•
wird im Digital-Display angezeigt
Der Geschirrspüler füllt kein Wasser ein
• Die Kontrolllampe für das laufende Programm
blinkt ständig
• akustische Signalabfolge
•
wird im Digital-Display angezeigt
Der Geschirrspüler pumpt nicht ab
• Die Kontrolllampe für das laufende Programm
blinkt ständig
• akustische Signalabfolge
•
wird im Digital-Display angezeigt
Die Aquasafe-Einrichtung ist ausgelöst
Störung Mögliche Ursachen und Abhilfe
Das Programm startet nicht
Schließen Sie nach diesen Kontrollen die Tür
des Geschirrspülers und schalten Sie das
Gerät ein.
Das Programm wird an dem Punkt fortgesetzt, an dem es unterbrochen wurde.
Wenden Sie sich an den Kundendienst,
wenn die Störung fortbesteht oder erneut
auftritt.
Sollten Fehler auftreten, die nicht in der o. a.
Tabelle behandelt werden, rufen Sie bitte den
Kundendienst.
schriebenen Hinweise ohne Hilfe des Kundendienstes behoben werden.
Öffnen Sie die Tür und schalten Sie das Gerät
aus. Bitte führen Sie jetzt folgende Abhilfemaßnahmen durch.
• Der Wasserhahn ist blockiert oder durch Kalkablagerungen verstopft.
Den Wasserhahn reinigen.
• Der Wasserhahn ist geschlossen.
Drehen Sie den Wasserhahn auf.
• Der Filter (soweit vorhanden) in der Schlauchverschraubung des Wasserzulaufs am Wassereinlassventil ist zugesetzt.
Reinigen Sie den Filter.
• Der Wasserzulaufschlauch ist nicht richtig verlegt oder gequetscht.
Den Anschluss des Ablaufschlauchs kontrollieren.
• Der Siphon ist verstopft.
Den Siphon reinigen.
• Der Wasserzulaufschlauch ist nicht richtig verlegt oder geknickt oder gequetscht.
Den Anschluss des Ablaufschlauchs kontrollieren.
• Schließen Sie den Wasserhahn und wenden Sie
sich an den lokalen Kundendienst.
• Tür des Geschirrspülers nicht richtig geschlossen.
Schließen Sie die Tür des Geschirrspülers.
• Netzstecker nicht eingesteckt.
Netzstecker einstecken
• Die Sicherung der Hausinstallation ist durchgebrannt.
Sicherung ersetzen.
• Zeitvorwahl eingestellt.
Löschen Sie die Zeitvorwahl, wenn das Geschirr sofort gewaschen werden soll.
Wenden Sie sich bitte an den Kundendienst
und machen Sie folgende Angaben: Modell
(Mod.), Produktnummer (PNC) und Seriennummer (S.N.).
Diese Daten sind aus dem Typenschild auf
der Seite der Geschirrspülertür ersichtlich.
Notieren Sie diese Nummern hier, um sie
stets bei Bedarf zur Hand zu haben:
Modell
(Mod.). : . . . . . . . . . . . . . . . . . . . . . . . . . . . . . .
Page 63
electrolux 63
Produkt-Nummer
(PNC) : . . . . . . . . . . . . . . . . . . . . . . . . . . . . . .
Das Spülergebnis ist nicht zufriedenstellend
Das Geschirr ist
nicht sauber
Das Geschirr ist
nass und glanzlos
Schlieren, Streifen,
milchige Flecken
oder blauschimmernder Belag auf
Gläsern und Geschirr
Eingetrocknete
Wassertropfen auf
Gläsern und Geschirr
• Wahl eines falschen Spülprogramms.
• Das Geschirr ist so eingestellt, dass nicht alle Teile gut von Wasser umspült
werden. Die Körbe dürfen nicht überladen werden.
• Falsche Beladung behindert die Drehung der Sprüharme.
• Die Filter im Spülraumboden sind verstopft oder falsch eingesetzt.
• Zu hohe oder zu geringe Reinigungsmitteldosierung.
• Bei Kalkbelägen auf dem Geschirr; der Salzbehälter ist leer oder falsche
Einstellung des Wasserenthärters.
• Ablaufschlauch falsch verlegt.
• Verschlusskappe des Salzbehälters nicht richtig geschlossen.
• Es wurde kein Klarspüler verwendet.
• Der Behälter für Klarspüler ist leer.
• Klarspülerdosierung reduzieren.
• Klarspülerdosierung erhöhen.
• Die Ursache kann beim Reinigungsmittel liegen. Bitte wenden Sie sich an
den Kundendienst des Reinigungsmittel-Herstellers.
Serien-Nr.
(S.N.). : . . . . . . . . . . . . . . . . . . . . . . . . . . . . . .
Wenn die Störungen nach diesen Kontrollen
fortbestehen, wenden Sie sich an den Kundendienst.
Technische Daten
Abmessungen Breite in cm 59,6
Höhe in cm 85,8 - 93,8
Tiefe in cm 55
Elektrischer Anschluss - An-
schlussspannung - Gesamtleistung - Sicherung
Wasserdruck Mindestdruck 0,05 MPa (0,5 bar)
Höchstdruck 0,8 MPa (8 bar)
Kapazität Gedecke 12
Die Daten der elektrischen Anschlusswerte finden sich auf dem Typenschild am Innenrand der Geschirrspülertür.
Gerät aufstellen
Warnung! Der elektrische Anschluss
des Gerätes und alle sonstigen
Installationsarbeiten dürfen nur von
qualifizierten Elektrikern und
Installateuren ausgeführt werden.
Entfernen Sie vor dem Aufstellen der Maschine das gesamte Verpackungsmaterial.
Das Gerät möglichst in der Nähe eines Wasserhahns und eines Wasserablaufs aufstellen.
Der Geschirrspüler ist zum Einbau unter einer
Küchen-Arbeitsplatte bestimmt.
Achtung! Halten Sie sich für den Einbau des
Geschirrspülers und der Anbauplatte strikt
Page 64

64 electrolux
an die Anweisungen auf der beiliegenden
Schablone.
Es sind keine Lüftungsöffnungen für den Geschirrspüler erforderlich, sondern nur Durchführungen für den Wasserzulauf- und den
Ablaufschlauch und das Netzkabel.
Der Geschirrspüler ist mit höhenverstellbaren
Füßen ausgestattet.
Bei allen Arbeiten, die den Zugang zu den inneren Bauteilen erfordern, muss zuvor der
Netzstecker gezogen werden.
Stellen Sie vor dem Einbau des Geschirrspülers in die Küchenzeile sicher, dass der Wasser-, der Ablaufschlauch und das Netzkabel
weder geknickt noch gequetscht werden.
Fixieren des Geschirrspülers
Der Geschirrspüler muss gegen unbeabsichtigtes Kippen geschützt werden.
Wasseranschluss
Wasserzuleitung
Das Gerät kann mit Warmwasser (max. 60°)
wie auch mit Kaltwasser gespeist werden.
Mit einer Warmwasserversorgung können
Sie unter Umständen deutlich Energie sparen. Allerdings kommt es dabei darauf an,
wie das Warmwasser aufbereitet wird. (Wir
empfehlen alternative Energiequellen, die besonders umweltfreundlich sind wie zum Beispiel Solar- bzw. Photovoltaikanlagen oder
Windenergie).
Wenn Sie den Anschluss selbst durchführen:
die Kopplungsmutter des Wassereinlaufschlauchs des Gerätes ist für ein Rohrgewinde 3/4" ausgelegt oder für spezielle Schnellkupplungen wie zum Beispiel Press-Block.
Der Wasserdruck muss innerhalb des in den
"Technischen Daten" aufgeführten Bereichs
liegen. Ihr Wasserwerk kann Sie über die
durchschnittlichen Druckwerte in Ihrem Gebiet informieren.
Der Wasserzulaufschlauch darf beim Anschluss nicht geknickt, gequetscht oder verdreht werden.
Die Klemmmutter muss zur Vermeidung von
Lecks richtig angebracht werden.
Falls das Gerät mit neuen oder lange Zeit
nicht benutzten Schläuchen angeschlossen
wird, lassen Sie bitte vor dem Anschluss des
Zulaufschlauchs einige Minuten lang Wasser
durch diesen fließen.
Aus diesem Grund ist sicherzustellen, dass
die Arbeitsplatte, unter die der Geschirrspüler eingeschoben wird, ordnungsgemäß und
sicher (an benachbarten Küchenschränken/möbeln usw.) befestigt ist.
Ausrichten
Korrektes Ausrichten ist die Voraussetzung
dafür, dass die Tür wasserdicht schließt.
Bei richtiger Ausrichtung darf die Tür beim
Öffnen auf keiner Seite des Küchenmöbels
anstoßen.
Die Geräteausrichtung ggf. durch Anziehen
oder Lockern der Stellfüße nachstellen.
BENUTZEN Sie KEINE Anschlussschläuche von Altgeräten.
Das Gerät ist mit einer Sicherheitsvorrichtung versehen, die verhindert, dass
das im Geschirrspüler verwendete Wasser in das Trinkwassersystem zurücklaufen kann. Das Gerät entspricht den
gültigen Vorschriften für Installationsarbeiten.
Wasserschlauch mit Sicherheitsventil
Nach dem Anschluss des doppelwandigen
Wasserschlauchs befindet sich das Sicherheitsventil in der Nähe des Wasserhahns. Der
Wasserschlauch steht daher nur während
der Versorgung des Geschirrspülers unter
Druck. Sobald der Wasserschlauch zu lecken beginnt, unterbricht das Sicherheitsventil die Wasserversorgung.
Berücksichtigen Sie bei der Verlegung des
Wasserschlauchs:
• Das Elektrokabel des Sicherheitsventils
befindet sich in dem doppelwandigen
Wasserschlauch. Den Wasserschlauch
oder das Sicherheitsventil nicht in Wasser
tauchen.
• Ziehen Sie sofort den Netzstecker, wenn
der Wasserschlauch oder das Sicherheitsventil beschädigt ist.
• Ein Zulaufschlauch mit Sicherheitsventil
darf nur von einer Fachkraft des Kundendienstes ersetzt werden.
Page 65

electrolux 65
Warnung! Gefährliche Spannung
Anschluss des Ablaufschlauchs
Das Ende des Ablaufschlauchs kann wie
folgt angeschlossen werden:
1. An einen Siphon; dabei den Schlauch an
der Unterseite der Arbeitsplatte befestigen. Dadurch wird verhindert, dass Abwasser aus dem Siphon in das Gerät zurückfließen kann.
2. An ein Standrohr mit Entlüftungsöffnung
und Innendurchmesser von mindestens
4 cm.
max 85 cm
min 40 cm
max 400 cm
Der Ablaufschlauch kann nach rechts oder
links verlegt werden
Stellen Sie sicher, dass der Ablaufschlauch
nicht geknickt oder gequetscht wird, da das
den Wasserablauf behindern oder verlangsamen kann.
Der Spülbeckenstöpsel darf während des
Abpumpens des Gerätes nicht eingesetzt
sein, da dadurch das Wasser wieder in die
Maschine gesaugt werden kann.
Bei Verwendung eines Verlängerungsschlauchs darf der Innendurchmesser nicht
kleiner sein als der des mitgelieferten Ablaufschlauchs.
Ebenso darf der Innendurchmesser der Verbindungen für den Anschluss an den Ablauf
nicht kleiner sein als der Durchmesser des
mitgelieferten Schlauchs.
Wenn der Ablaufschlauch an einen Siphon
unter einem Becken angeschlossen wird,
muss die gesamte Kunststoffmembran
(A) entfernt werden. Wird die Membran
nicht vollständig entfernt, setzt sich der Ablaufschlauch im Laufe der Zeit durch Ablagerungen von Speiseresten im Siphon zu
Unsere Geräte verfügen über eine Sicherheitseinrichtung, die den Rückfluss
von Schmutzwasser in die Maschine
verhindert. Falls der Siphon Ihrer Spüle
mit einem "Rückschlagventil" ausgestattet ist, kann dadurch der Ablauf Ihres
Geschirrspülers beeinträchtigt werden.
Sie sollten das Ventil daher entfernen.
Zur Vermeidung von Undichtigkeiten
müssen die Wasseranschlüsse vollkommen dicht sein.
Elektrischer Anschluss
Warnung! Die
Sicherheitsbestimmungen
schreiben die Erdung des Gerätes
verbindlich vor.
Stellen Sie vor der ersten Benutzung
des Gerätes sicher, dass die Netzspannung und -frequenz mit den auf
dem Typenschild angegebenen Anschlusswerten übereinstimmen. Die
Nennwerte der Sicherung sind
ebenfalls aus dem Typenschild ersichtlich
Benutzen Sie für den Netzstecker
immer eine berührungssichere
Steckdose.
Vielfachsteckdosen, Steckverbinder und Verlängerungskabel dürfen
Page 66

66 electrolux
nicht verwendet werden. Es besteht
Brandgefahr durch Überhitzung.
Lassen Sie ggf. die Steckdose versetzen. Wenden Sie sich für einen
eventuellen Austausch des Netzkabels an den Kundendienst.
Der Stecker muss auch nach der Installation des Geschirrspülers zugänglich sein.
Umwelttipps
Das Symbol auf dem Produkt oder seiner
Verpackung weist darauf hin, dass dieses
Produkt nicht als normaler Haushaltsabfall zu
behandeln ist, sondern an einem
Sammelpunkt für das Recycling von
elektrischen und elektronischen Geräten
abgegeben werden muss. Durch Ihren
Beitrag zum korrekten Entsorgen dieses
Produkts schützen Sie die Umwelt und die
Gesundheit Ihrer Mitmenschen. Umwelt und
Gesundheit werden durch falsches
Entsorgen gefährdet. Weitere Informationen
über das Recycling dieses Produkts erhalten
Sie von Ihrem Rathaus, Ihrer Müllabfuhr oder
dem Geschäft, in dem Sie das Produkt
gekauft haben.
Verpackungsmaterial
Das Verpackungsmaterial ist umweltfreundlich und recycelbar. Kunststoffteile sind mit
internationalen Abkürzungen wie z. B. >PE<,
> PS< usw. gekennzeichnet. Entsorgen Sie
das Verpackungsmaterial entsprechend ihrer Kennzeichnung bei den kommunalen
Entsorgungsstellen in den dafür vorgesehenen Sammelbehältern.
Warnung! Vor der Entsorgung von
Altgeräten:
• Netzstecker ziehen.
• Das Netzkabel abtrennen und entsorgen.
• Das Türschloss entfernen. Damit verhindern Sie, dass spielende Kinder
sich einschließen und gefährden können.
Um das Netzkabel von der Steckdose zu trennen, ziehen Sie stets am
Netzstecker. Niemals am Netzkabel
ziehen.
Der Hersteller übernimmt keine Haftung für Unfälle, die aus der Missachtung dieser Vorschrift entstehen
sollten.
Page 67

electrolux 67
Page 68

www.electrolux.com
Vous pouvez commander des accessoires, consommables et pièces détachées via notre
magasin online sur:
www.electrolux.be
117954810-00-032009
 Loading...