

Page 1
ESF8725ROX
EN Dishwasher User Manual
Page 2

www.electrolux.com2
CONTENTS
1. SAFETY INFORMATION....................................................................................3
2. SAFETY INSTRUCTIONS..................................................................................4
3. PRODUCT DESCRIPTION................................................................................ 6
4. CONTROL PANEL............................................................................................. 7
5. PROGRAMMES................................................................................................. 8
6. SETTINGS........................................................................................................10
7. OPTIONS..........................................................................................................12
8. BEFORE FIRST USE....................................................................................... 13
9. DAILY USE....................................................................................................... 13
10. HINTS AND TIPS........................................................................................... 15
11. CARE AND CLEANING..................................................................................16
12. TROUBLESHOOTING....................................................................................18
13. TECHNICAL INFORMATION......................................................................... 22
14. INSTALLATION.............................................................................................. 22
15. WARRANTY .................................................................................................. 24
WE’RE THINKING OF YOU
Thank you for purchasing an Electrolux appliance. You’ve chosen a product that
brings with it decades of professional experience and innovation. Ingenious and
stylish, it has been designed with you in mind. So whenever you use it, you can
be safe in the knowledge that you’ll get great results every time.
Welcome to Electrolux.
Visit our website for:
Get usage advice, brochures, trouble shooter, service information:
www.electrolux.com/webselfservice
Register your product for better service:
www.registerelectrolux.com
CUSTOMER CARE AND SERVICE
Always use original spare parts.
When contacting our Authorised Service Centre, ensure that you have the
following data available: Model, PNC, Serial Number.
The information can be found on the rating plate.
Warning / Caution-Safety information
General information and tips
Environmental information
Subject to change without notice.
Page 3

1. SAFETY INFORMATION
Before the installation and use of the appliance, carefully
read the supplied instructions. The manufacturer is not
responsible for any injuries or damages that are the
result of incorrect installation or usage. Always keep the
instructions in a safe and accessible location for future
reference.
1.1 Children and vulnerable people safety
• This appliance can be used by children aged 8 years
and above and by persons with reduced capabilities
provided that they have been given instruction and/or
supervision regarding the safe use of the appliance
and understand the potential hazards involved.
• Do not let children play with the appliance.
• Keep detergents away from children.
• Keep children and pets away from the appliance door
when it is open.
• Children shall not carry out cleaning and user
maintenance of the appliance without supervision.
ENGLISH 3
1.2 General Safety
• This appliance is intended to be used in household
and similar applications such as:
– farm houses; staff kitchen areas in shops, offices
and other working environments;
– by clients in hotels, motels, bed & breakfast and
other residential type environments.
• Do not change the specification of this appliance.
• The operating water pressure (minimum and
maximum) must be between 0.5 (50) / 8 (800) bar
(kPa)
• Obey the maximum number of 14 place settings.
• If the supply cord is damaged, it must be replaced by
the manufacturer, its Authorised Service Centre or a
similarly qualified persons in order to avoid a hazard.
Page 4

www.electrolux.com4
• Put knives and cutlery with sharp points in the cutlery
basket with the points down or in a horizontal position.
• Do not keep the appliance door open without
supervision to prevent to fall on it.
• Before any maintenance operation, deactivate the
appliance and disconnect the mains plug from the
socket.
• Do not use high pressure water sprays and/or steam
to clean the appliance.
• The appliance is to be connected to the water mains
using the new supplied hose-sets. Old hose sets must
not be reused.
• The ventilation openings in the base (if applicable)
must not be obstructed by a carpet.
• Some dishwasher detergents are strongly alkaline.
They can be extremely dangerous if swallowed. Avoid
contact with the skin and eyes and keep children away
from the dishwasher when the door is open.
• Check that the detergent receptacle is empty after
completion of the wash cycle.
2. SAFETY INSTRUCTIONS
2.1 Installation
• Remove all the packaging and the
transit bolts.
• Do not install or use a damaged
appliance.
• Do not install or use the appliance
where the temperature is less than 0
°C.
• Follow the installation instruction
supplied with the appliance.
2.2 Electrical connection
WARNING!
Risk of fire and electrical
shock.
• The appliance must be earthed.
• Make sure that the electrical
information on the rating plate agrees
with the power supply. If not, contact
an electrician.
• Always use a correctly installed
shockproof socket.
• Do not use multi-plug adapters and
extension cables.
• Make sure not to cause damage to
the mains plug and to the mains
cable. Should the mains cable need to
be replaced, this must be carried out
by our Authorised Service Centre.
• Connect the mains plug to the mains
socket only at the end of the
installation. Make sure that there is
access to the mains plug after the
installation.
• Do not pull the mains cable to
disconnect the appliance. Always pull
the mains plug.
2.3 Water connection
• Do not cause damage to the water
hoses.
Page 5
• Before connection to new pipes, pipes
not used for a long time, where repair
work has been carried out or new
devices fitted (water meters, etc.), let
the water flow until it is clean and
clear.
• Ensure that there are no visible water
leaks during and after the first use of
the appliance.
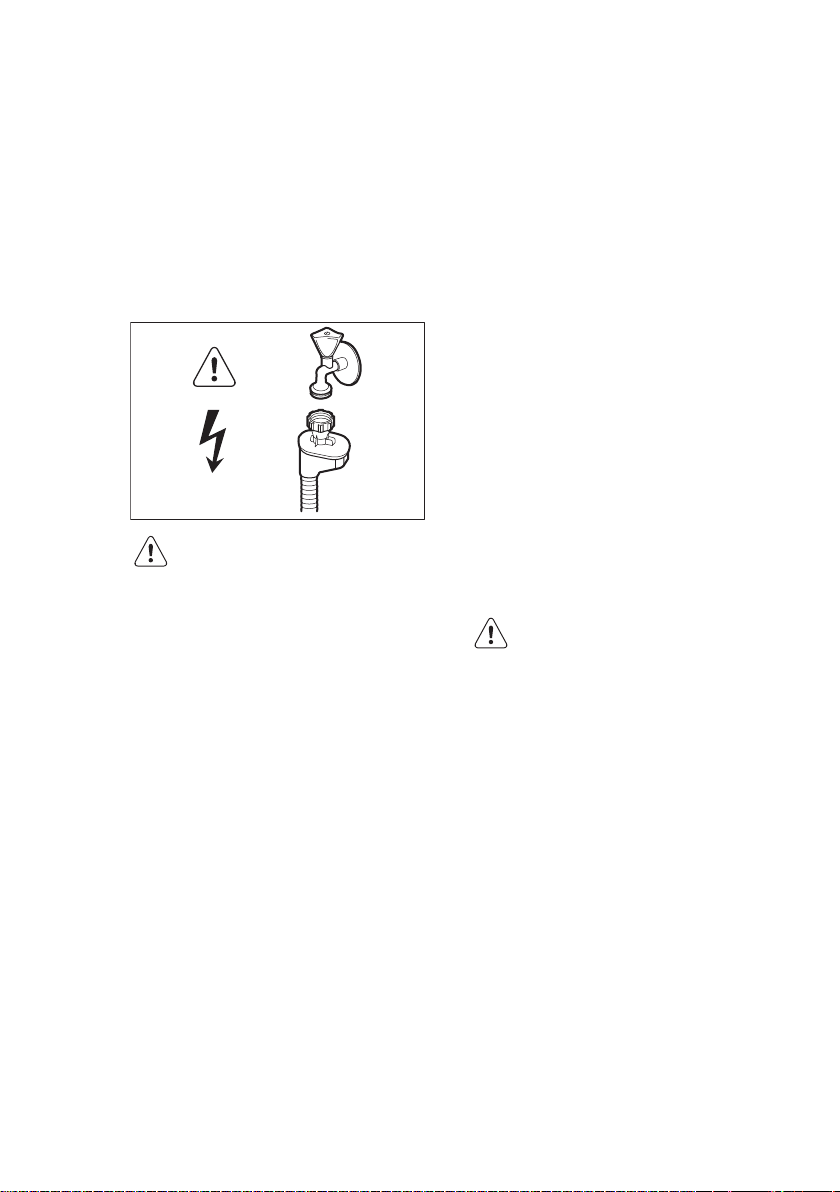
• The water inlet hose has a safety
valve and a sheath with an inner
mains cable.
WARNING!
Dangerous voltage.
• If the water inlet hose is damaged,
immediately disconnect the mains
plug from the mains socket. Contact
the Authorised Service Centre to
replace the water inlet hose.
2.4 Use
• Do not sit or stand on the open door.
• Dishwasher detergents are
dangerous. Obey the safety
instructions on the detergent
packaging.
ENGLISH 5
• Do not drink and play with the water in
the appliance.
• Do not remove the dishes from the
appliance until the programme is
completed. There can be detergent on
the dishes.
• The appliance can release hot steam
if you open the door while a
programme operates.
• Do not put flammable products or
items that are wet with flammable
products in, near or on the appliance.
2.5 Service
• Contact the Authorised Service
Centre to repair the appliance. We
recommend only the use of original
spare parts.
• When you contact the Authorised
Service Centre, ensure that you have
the following information that is
available on the rating plate.
Model :
PNC :
Serial Number :
2.6 Disposal
WARNING!
Risk of injury or suffocation.
• Disconnect the appliance from the
mains supply.
• Cut off the mains cable and discard it.
• Remove the door catch to prevent
children and pets to get closed in the
appliance.
Page 6
12
6
5
8
9
3
4
21
10
711
www.electrolux.com6
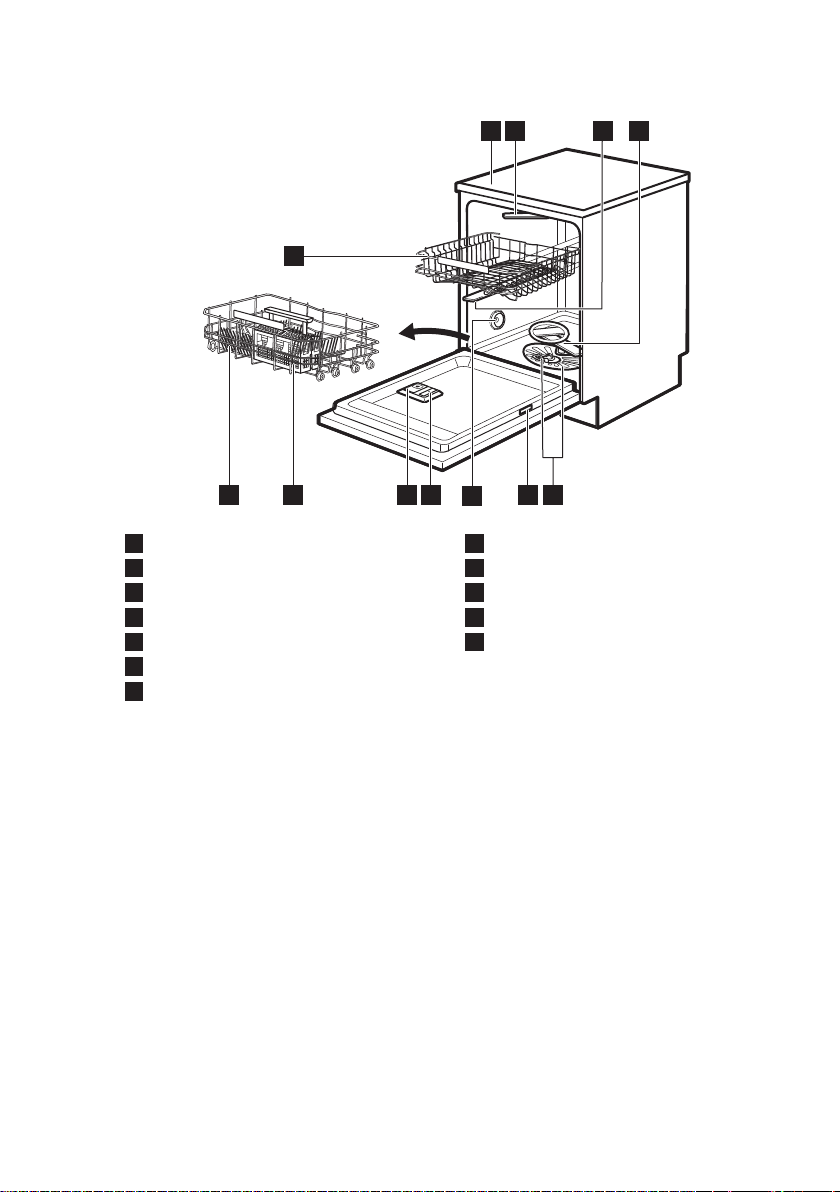
3. PRODUCT DESCRIPTION
Work-top
1
Top spray arm
2
Upper spray arm
3
Lower spray arm
4
Filters
5
Rating plate
6
Air vent
7
Rinse aid dispenser
8
Detergent dispenser
9
Cutlery basket
10
Lower basket
11
Upper basket
12
Page 7
4. CONTROL PANEL
1
2 3 6 7
9
813 1214
4 5
11 10
1
2 3 6 7
9 813 1214
4 5
11 10
ENGLISH 7
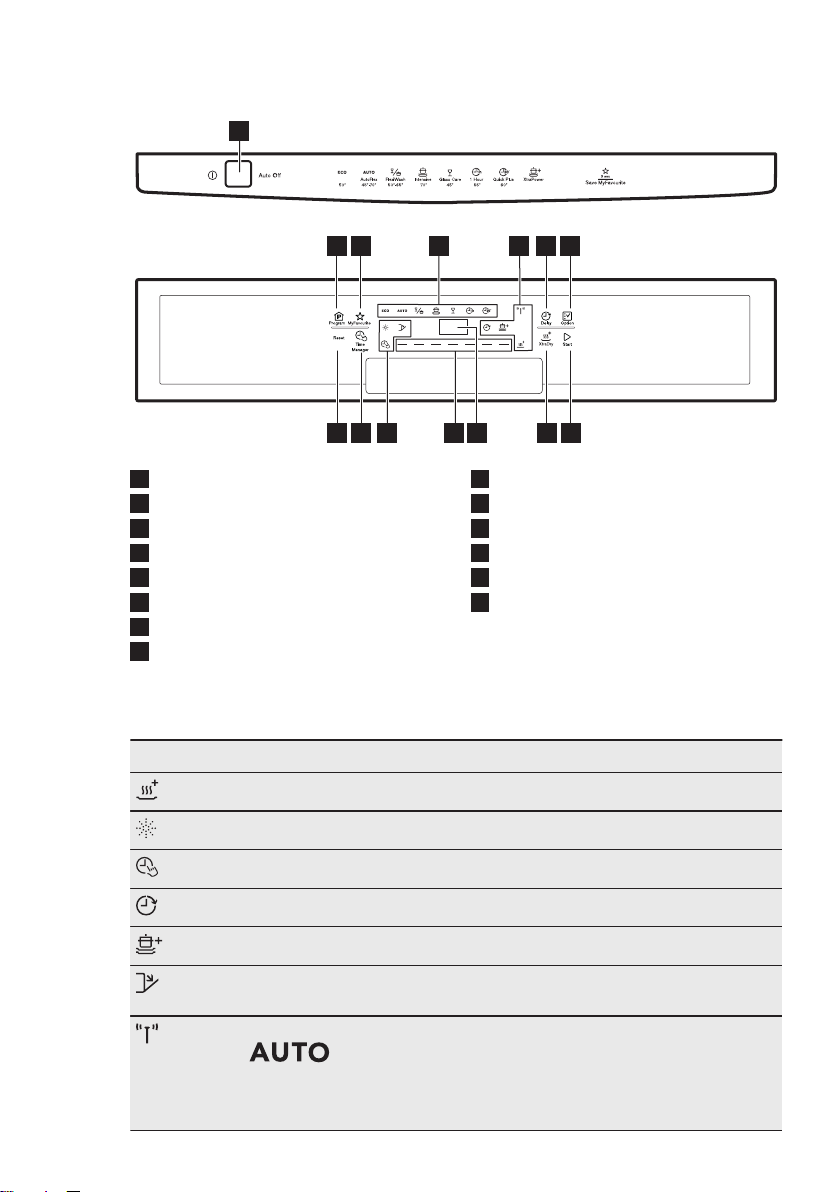
On/off button
1
Program touchpad
2
MyFavourite touchpad
3
Programme indicators
4
Indicators
5
Delay touchpad
6
Option touchpad
7
Start touchpad
8
4.1 Indicators
Indicator Description
XtraDry indicator.
Rinse aid indicator. It is always off while the programme operates.
TimeManager indicator.
Delay indicator.
XtraPower indicator.
Door indicator. It comes on when the appliance door is open or is not
correctly closed.
Turbidity Sensor indicator. It comes on when the sensor for the
indicator is on. All the other indicators, the display and the programme
bar go off. They come on again when the Turbidity Sensor indicator
goes off.
XtraDry touchpad
9
Display
10
Programme bar
11
Indicators
12
TimeManager touchpad
13
Reset touchpad
14
programme operates. When the sensor operates, only this
Page 8
www.electrolux.com8
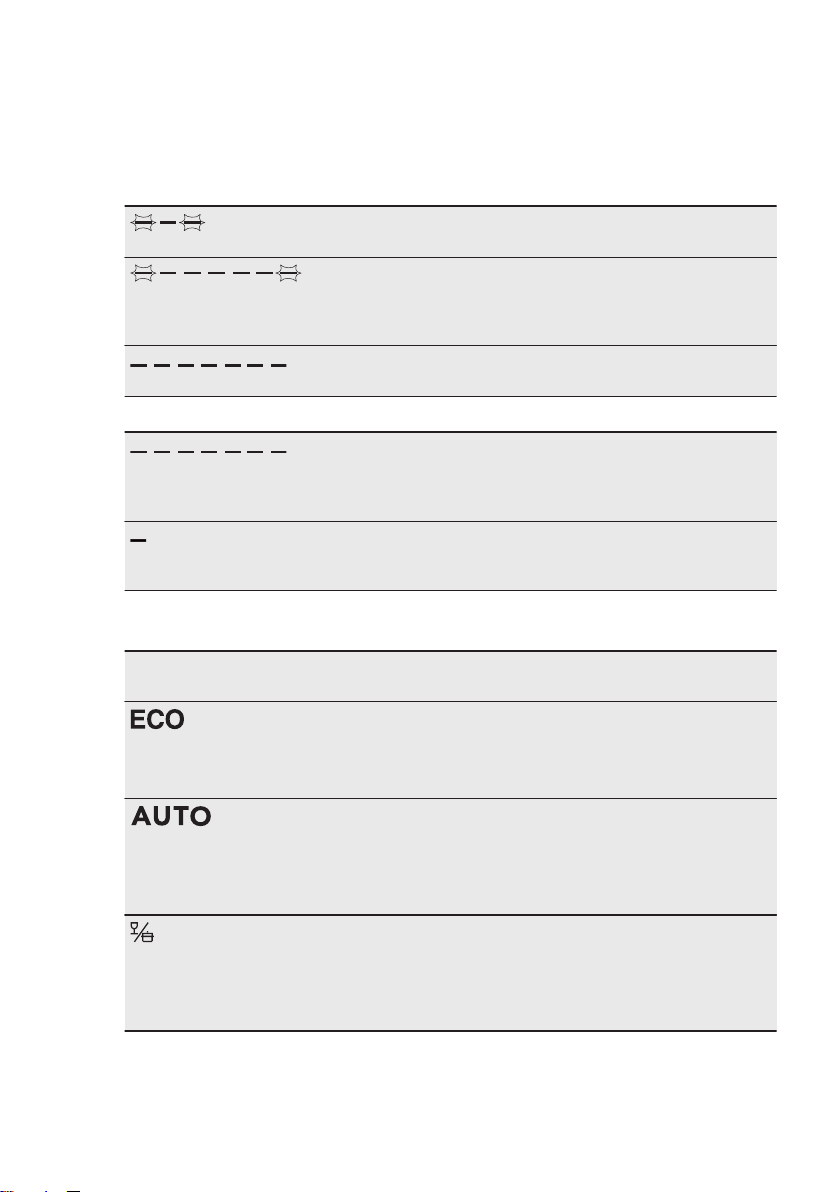
4.2 Programme bar
The programme bar shows information
related to the programme and to the
option TimeManager.
Start and progress of the programme
Programme bar and TimeManager option
5. PROGRAMMES
When the programme starts, the 2 lateral
segments of the programme bar flash.
As the programme is in progress, the
middle segments come on with fixed
light , while the 2 lateral segments contin‐
ue to flash.
When the programme is completed, all
the segments come on with fixed light.
When you set a programme, that is appli‐
cable to the TimeManager option, all the
segments of the programme bar come on
with fixed light.
When you set the TimeManager option,
only the middle segment stays on with
fixed light.
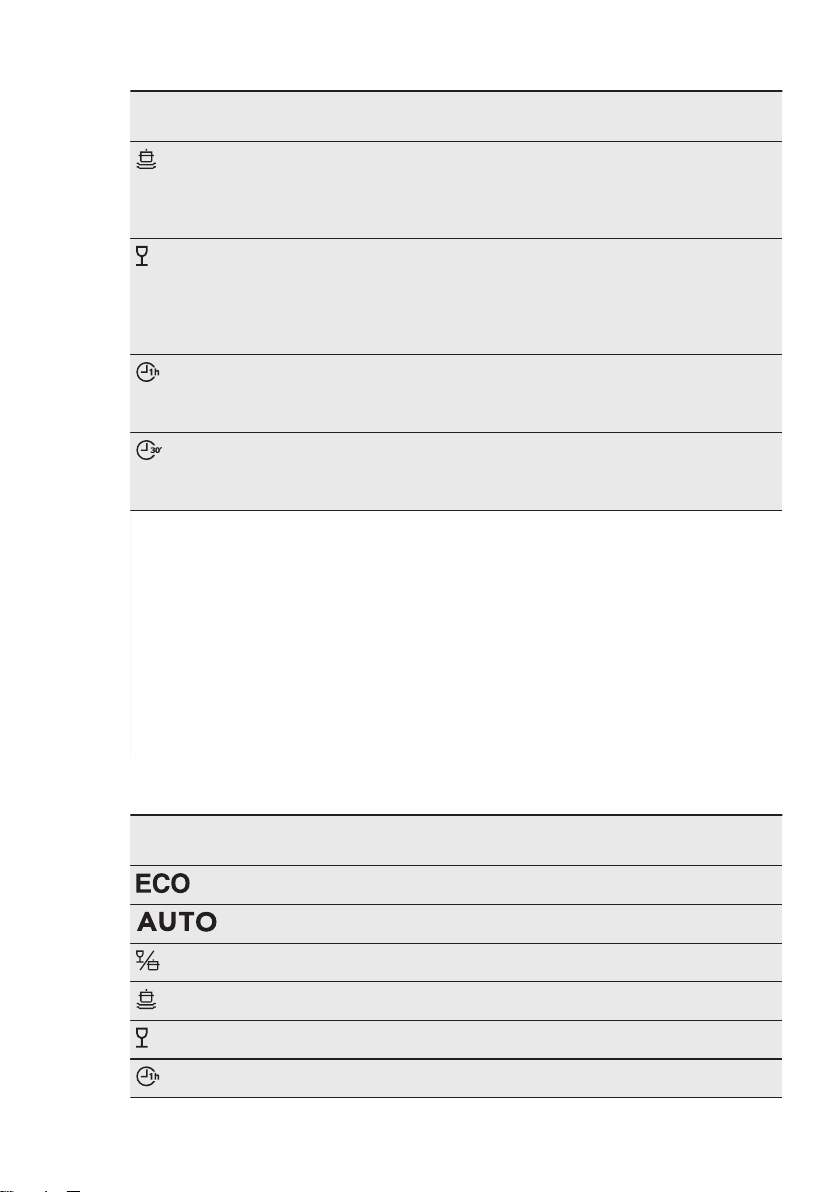
Programme Degree of soil
1)
3)
Type of load
• Normal soil
• Crockery and
• All
2)
• Crockery, cut‐
• Mixed soil
• Crockery, cut‐
cutlery
lery, pots and
pans
lery, pots and
pans
Programme pha‐
ses
• Prewash
• Wash 50 °C
• Rinses
• Dry
• Prewash
• Wash from 45 °C
to 70 °C
• Rinses
• Dry
• Prewash
• Wash 50 °C and
65 °C
• Rinses
• Dry
Options
• TimeManager
• XtraDry
• XtraDry
• TimeManager
• XtraDry
Page 9
ENGLISH 9
Programme Degree of soil
Type of load
4)
• Heavy soil
• Crockery, cut‐
lery, pots and
pans
• Normal or light
soil
• Delicate crock‐
Programme pha‐
ses
• Prewash
• Wash 70 °C
• Rinses
• Dry
• Wash 45 °C
• Rinses
• Dry
Options
• XtraPower
• TimeManager
• XtraDry
• XtraDry
ery and glass‐
ware
• Light soil
• Crockery and
• Wash 55 °C
• Rinses
• XtraDry
cutlery
5)
• Fresh soil
• Crockery and
• Wash 60 °C
• Rinses
• XtraDry
cutlery
1)
With this programme you have the most efficient use of water and energy consumption
for crockery and cutlery with normal soil. (This is the standard programme for test institutes).
2)
The appliance senses the degree of soil and the quantity of items in the baskets . It auto‐
matically adjusts the temperature and the quantity of water, the energy consumption and the
programme duration.
3)
With this programme you can wash a load with mixed soil. Very heavy soil in the lower
basket and normal soil in the upper basket. The pressure and the temperature of the water
in the lower basket are higher than in the upper basket.
4)
This programme has a high temperature rinsing phase for better hygiene results. During
the rinsing phase, the temperature stays at 70 °C for at least 10 minutes.
5)
With this programme you can wash a load with fresh soil. It gives good washing results in
a short time.
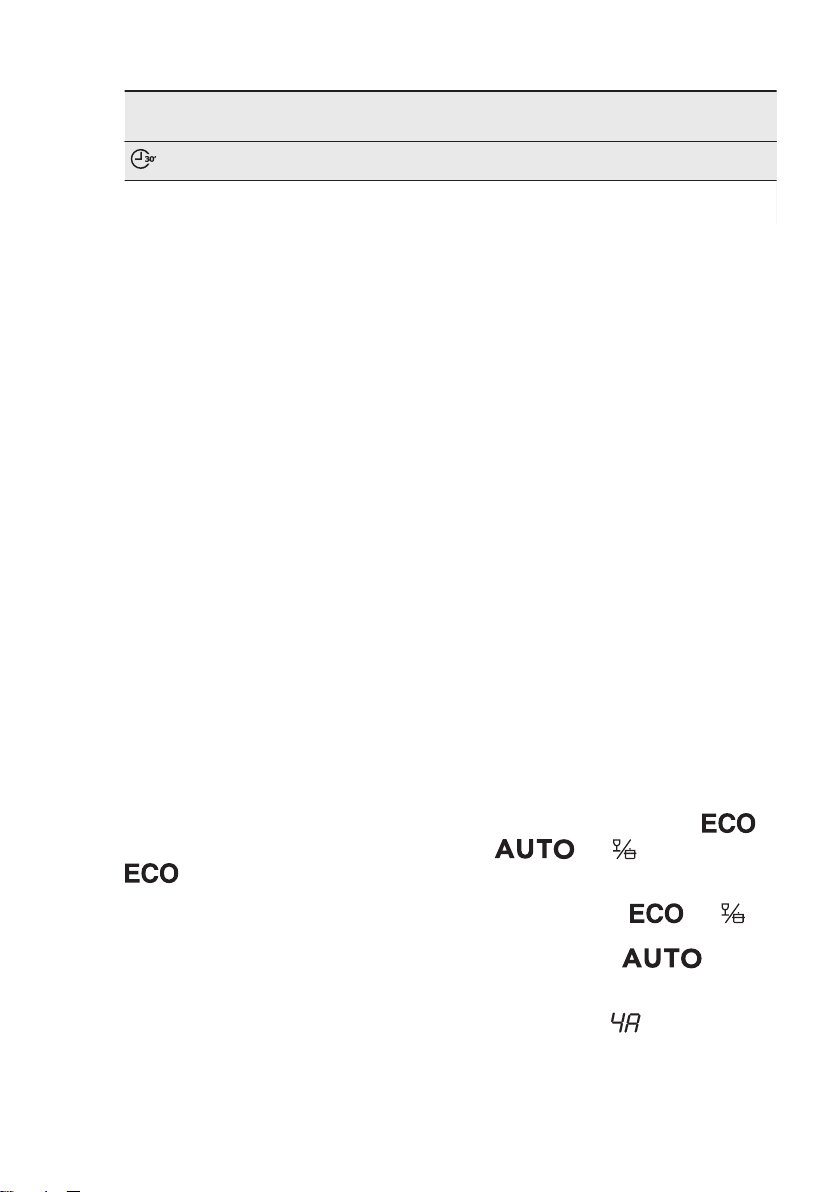
5.1 Consumption values
Programme
1)
7.0 - 14 0.6 - 1.4 40 - 150
13.5 - 15 1.2 - 1.5 139 - 149
13.5 - 14.5 1.4 - 1.6 150 - 164
13 - 13.5 0.7 - 0.9 60 - 70
9.5 - 10 0.9 - 1.0 55 - 65
Water
(l)
Energy
(kWh)
Duration
(min)
11.5 0.86 160
Page 10
www.electrolux.com10
Programme
1)
The pressure and the temperature of the water, the variations of the mains supply, the
options and the quantity of dishes can change the values.
5.2 Information for test institutes
For all the necessary information for test
performance, send an email to:
6. SETTINGS
6.1 Programme selection mode
and user mode
When the appliance is in programme
selection mode it is possible to set a
programme and to enter the user mode.
In user mode, the following settings
can be changed:
• The activation or the deactivation of
the acoustic signal for end of
programme.
• The activation or deactivation of the
rinse aid empty notification.
• The level of rinse aid according to the
required dosage.
These settings will be saved until you
change them again.
How to set the programme selection mode
The appliance is in programme selection
mode when the programme indicator
is on and the display shows the
programme duration.
When you activate the appliance, usually
it is in programme selection mode.
However, if this does not happen, you
can set the programme selection mode
in the following way:
Press and hold Reset until the appliance
is in programme selection mode.
1)
Water
(l)
9 0.8 30
Energy
(kWh)
Write down the product number (PNC)
that is on the rating plate.
Duration
(min)
6.2 The rinse aid dispenser
The rinse aid helps to dry the dishes
without streaks and stains.
The rinse aid is automatically released
during the hot rinse phase.
You can set the released quantity of
rinse aid between level 1 (minimum
quantity) and level 6 (maximum quantity).
Level 0 will deactivate the rinse aid
dispenser and no rinse aid will be
released.
Factory setting: level 4.
How to set the rinse aid level
The appliance must be in programme
selection mode.
1. To enter the user mode, press and
hold simultaneously Delay and
XtraDry until the indicators ,
the display is blank.
2. Press TimeManager.
• The indicators and go
• The indicator
• The display shows the current
and start to flash and
off.
continues to flash.
setting: e.g. = level 4.
– The levels of rinse aid are
from 0A to 6A.
Page 11
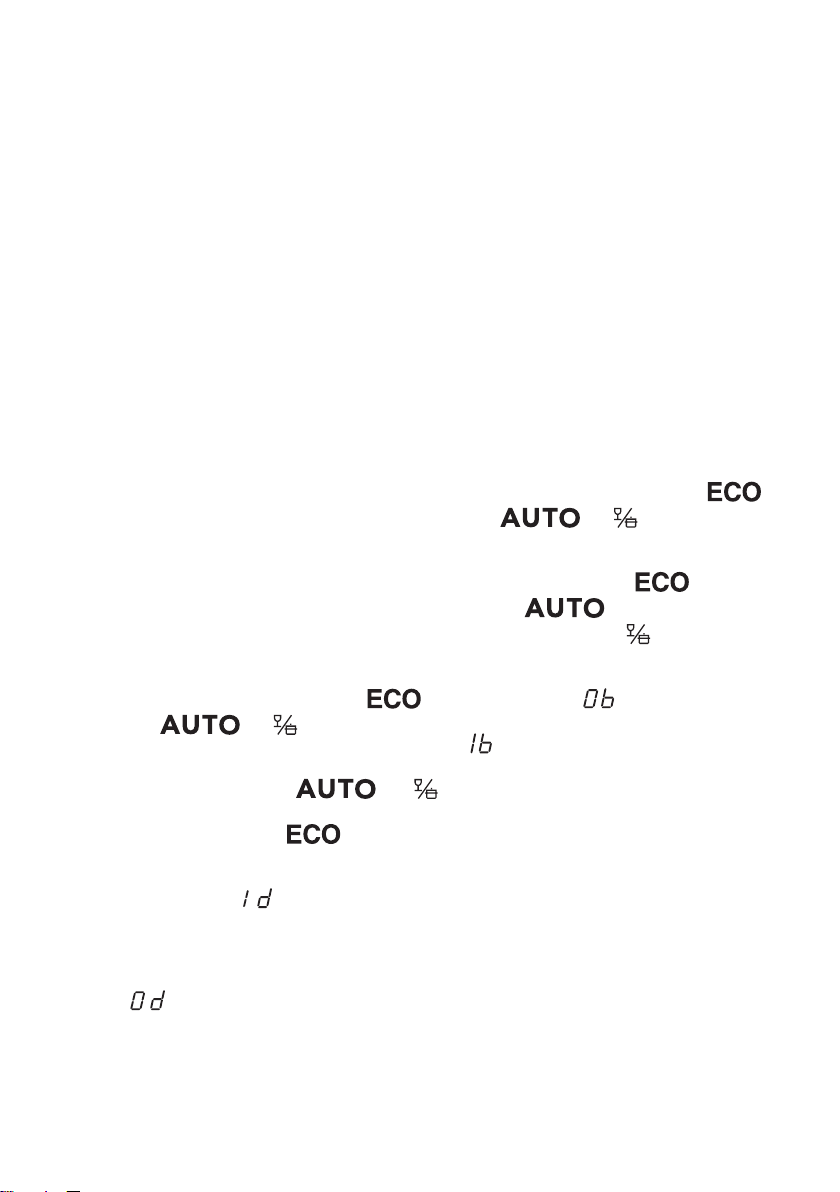
– Level 0 = no rinse aid is
3. Press TimeManager again and
4. Press the on/off button to confirm the
released.
again to change the setting.
setting.
6.3 The rinse aid empty notification
When rinse aid chamber is empty, the
rinse aid indicator is turned on notifying
to refill rinse aid. If you are using multitabs containing rinse aid and you are
satisfied with the drying result, you can
deactivate the notification for refilling
rinse aid. However, we recommend that
you always use rinse aid for best drying
performance.
If you use standard detergent or multitablets without rinse aid, activate the
notification to keep the rinse aid refill
indicator active.
How to deactivate the rinse aid empty notification
The appliance must be in programme
selection mode.
1. To enter the user mode, press and
hold simultaneously Delay and
XtraDry until the indicators ,
the display is blank.
2. Press MyFavourite.
• The indicators and
• The indicator
• The display shows the current
3. Press MyFavourite to change the
setting.
= the rinse aid empty notification is
deactivated.
4. Press the on/off button to confirm the
setting.
and start to flash and
go off.
flash.
setting:
notification is always activated
(factory setting).
= the rinse aid empty
continues to
ENGLISH 11
6.4 Acoustic signals
Acoustic signals sound when a
malfunction of the appliance occurs. It is
not possible to deactivate these acoustic
signals.
There is also an acoustic signal that
sounds when the programme is
completed. By default this acoustic signal
is deactivated but it is possible to
activate it.
How to activate the acoustic signal for the end of programme
The appliance must be in programme
selection mode.
1. To enter the user mode, press and
hold simultaneously Delay and
XtraDry until the indicators
the display is blank.
2. Press Delay
• The indicators and
• The indicator
• The display shows the current
3. Press Delay to change the setting.
= Acoustic signal on.
4. Press the on/off button to confirm the
setting.
and start to flash and
go off.
flash.
setting:
= Acoustic signal off.
continues to
,
6.5 MyFavourite
With this option you can set and save the
programme that you use more
frequently.
You can only save 1 programme. A new
setting cancels the previous one.
How to save the MyFavourite programme
1. Set the programme that you want to
save
You can also set applicable options
together with the programme.
Page 12

www.electrolux.com12
2. Press and hold MyFavourite until the
segments of the programme bar flash
quickly.
How to set the MyFavourite programme
Press MyFavourite.
7. OPTIONS
• The indicators that are related to
the MyFavourite programme and
options come on.
• The display shows the duration of
the programme.
Desired options must be
activated every time before
you start a programme.
It is not possible to activate
or deactivate options while a
programme is running.
Not all options are
compatible with each other.
If you have selected non
compatible options, the
appliance will automatically
deactivate one or more of
them. Only the indicators of
the options still active will
stay on.
7.1 XtraDry
Activate this option when you want to
boost the drying performance. With the
use of this option, the duration of some
programmes, water consumption and the
last rinse temperature can be affected.
The option XtraDry is not a permanent
option and must be selected at every
cycle.
How to activate XtraDry
Press XtraDry.
The related indicator comes on.
7.2 TimeManager
This option increases the pressure and
the temperature of the water. The
washing and the drying phases are
shorter.
The total programme duration decreases
by approximately 50%.
The washing results are the same as
with the normal programme duration. The
drying results can decrease.
How to activate TimeManager
Press TimeManager, the related
indicator comes on.
The display shows the updated
programme duration.
If the option is not applicable to the
programme:
• The programme bar does not come
on.
• The related indicator does not come
on or it flashes quickly for a few
seconds and then goes off.
7.3 XtraPower
This option increases the water pressure
in the prewash and washing phases.
The washing results are very good also
with heavy soiled loads.
How to activate XtraPower
Press Option until the indicator
comes on.
If the option is not applicable to the
programme, the related indicator does
not come on or it flashes quickly for a few
seconds and then goes off.
The display shows the updated
programme duration.
Page 13
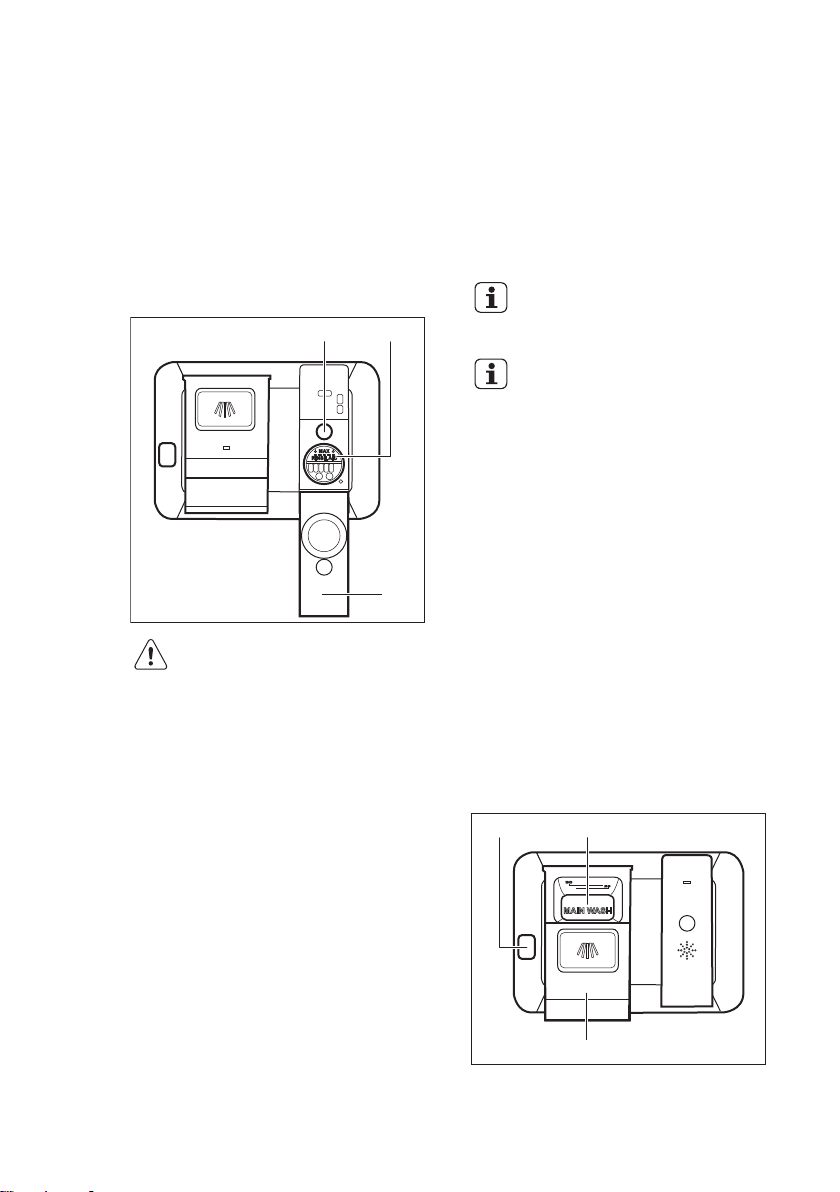
8. BEFORE FIRST USE
A
B
C
A
B
C
ENGLISH 13
1. Fill the rinse aid dispenser.
2. Open the water tap.
3. Start a program to remove any
processing residuals that can still be
inside the appliance. Do not use
detergent and do not load the
baskets.
8.1 How to fill the rinse aid dispenser
CAUTION!
Only use rinse aid
specifically designed for
dishwashers.
1. Open the lid (C).
2. Fill the dispenser (B) until the rinse
aid reaches the marking ''MAX''.
3. Remove the spilled rinse aid with an
absorbent cloth to prevent too much
foam.
4. Close the lid. Make sure that the lid
locks into position.
Fill the rinse aid dispenser
when the indicator (A)
becomes clear.
If you use multi-tablets and
the drying performance is
satisfactory, the rinse aid
refill indication can be
disabled.
We recommend to always
use rinse aid for better
drying performance, also in
combination with multitablets containing rinsing
agent.
9. DAILY USE
1. Open the water tap.
2. Press the on/off button to activate the
Make sure that the appliance is in
programme selection mode.
3. Load the baskets.
4. Add the detergent.
5. Set and start the correct programme
appliance.
• If the rinse aid empty message is
shown fill the rinse aid dispenser.
for the type of load and the degree of
soil.
9.1 Using the detergent
Page 14

www.electrolux.com14
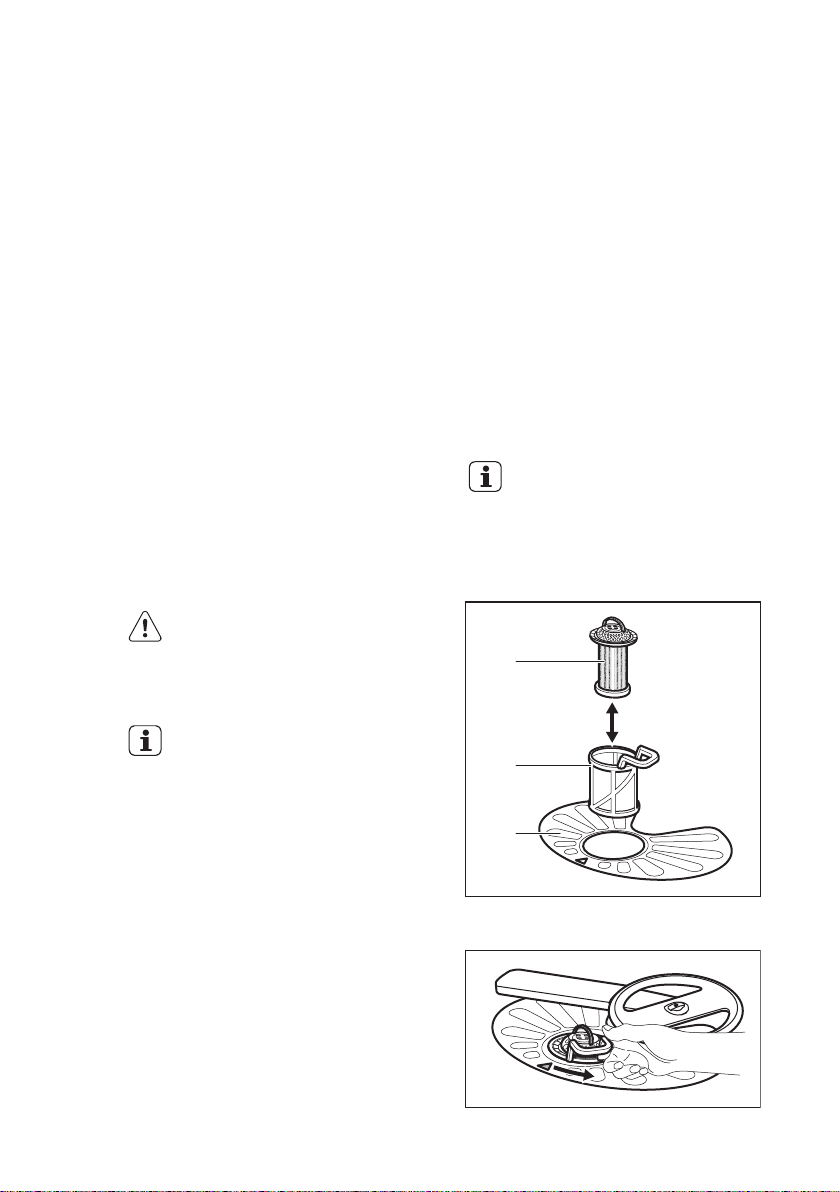
CAUTION!
Only use detergent
specifically designed for
dishwashers.
1. Press the release button (A) to open
the lid (C).
2. Put the detergent, in powder or
tablets, in the compartment (B).
3. If the programme has a prewash
phase, put a small quantity of
detergent on the inner part of the
appliance door.
4. Close the lid. Make sure that the lid
locks into position.
9.2 Setting and starting a
programme
The Auto Off function
This function decreases energy
consumption by deactivating
automatically the appliance when it is not
operating.
The function comes into operation:
• 5 minutes after the completion of the
programme.
• After 5 minutes if the programme has
not started.
Starting a programme
1. Press the on/off button to activate the
appliance. Make sure that the
appliance is in programme selection
mode.
2. Press Program again and again until
the indicator of the programme you
want to select comes on.
• If you want to select the
MyFavourite programme, press
MyFavourite.
• The display shows the
programme duration.
• The door indicator is on.
3. Set the applicable options.
4. Close the appliance door.
5. Press Start to start the programme.
Only the programme bar and the
programme duration are visible in the
display
If you want to see the programme
settings, press any button except for the
on/off button. The indicators of the
running programme and options come on
for a few seconds.
Starting a programme with delay start
1. Set a programme.
2. Press Delay again and again until
the display shows the delay time you
want to set (from 1 to 24 hours).
Only the delay time is visible in the
display.
3. Close the appliance door.
4. Press Start to start the countdown.
• The delay indicator comes on.
• The countdown starts to decrease
with steps of 1 hour. Only the last
hour will decrease with steps of 1
minute.
If you want to see the
programme settings, press
any button except for the
on/off button. The indicators
of the programme and
options come on for a few
seconds.
When the countdown is completed, the
programme starts.
Opening the door while the appliance operates
If you open the door while a programme
is running, the appliance stops. It may
affect the energy consumption and the
programme duration. When you close
the door, the appliance continues from
the point of interruption.
If the door is opened for
more than 30 seconds
during the drying phase, the
running programme will end.
Page 15

ENGLISH 15
Cancelling the delay start while the countdown operates
When you cancel the delay start you
have to set the programme and options
again.
1. Open the appliance door.
2. Press and hold Reset until the
appliance is in programme selection
mode.
Cancelling the programme
1. Open the appliance door.
2. Press and hold Reset until the
appliance is in programme selection
mode.
Make sure that there is detergent in the
detergent dispenser before you start a
new programme.
10. HINTS AND TIPS
10.1 General
The following hints will ensure optimal
cleaning and drying results in daily use
and also help to protect the environment.
• Remove larger residues of food from
the dishes into the waste bin.
• Do not pre-rinse dishes by hand.
When needed, use the prewash
programme (if available) or select a
programme with a prewash phase.
• Always use the whole space of the
baskets.
• When loading the appliance, make
sure that the dishes can be
completely reached and washed by
the water released from the spray arm
nozzles. Make sure that items do not
touch or cover each other.
• You can use dishwasher detergent
and rinse aid separately or you can
use the multi-tablets. Follow the
instructions written on the packaging.
• Select the programme according to
the type of load and degree of soil.
With the ECO programme you have
the most efficient use of water and
energy consumption for crockery and
cutlery with normal soil.
End of the programme
When the programme is completed the
display shows 0:00. All the segments of
the programme bar are on with fixed
light.
All buttons are inactive except for the
on/off button.
1. Press the on/off button or wait for the
Auto Off function to automatically
deactivate the appliance.
If you open the door before the
activation of Auto Off, the appliance
is automatically deactivated.
2. Close the water tap.
10.2 Using rinse aid and
detergent
• Only use rinse aid and detergent for
dishwasher. Other products can
cause damage to the appliance.
• Detergent tablets do not fully dissolve
with short programs. To prevent
detergent residues on the tableware,
we recommend that you use the
tablets with long programs.
• Do not use more than the correct
quantity of detergent. Refer to the
instructions on the detergent
packaging.
10.3 Loading the baskets
• Only use the appliance to wash items
that are dishwasher-safe.
• Do not put in the appliance items
made of wood, horn, aluminium,
pewter and copper.
• Do not put in the appliance items that
can absorb water (sponges,
household cloths).
• Remove remaining food from the
items.
• Make soft the remaining burned food
on the items.
Page 16
C
B
A
www.electrolux.com16
• Put hollow items (cups, glasses and
pans) with the opening down.
• Make sure that cutlery and dishes do
not bond together. Mix spoons with
other cutlery.
• Make sure that glasses do not touch
other glasses.
• Put small items in the cutlery basket.
• Put light items in the upper basket.
Make sure that the items do not
move.
• Make sure that the spray arm can
move freely before you start a
programme.
10.4 Before starting a
programme
Make sure that:
• The filters are clean and correctly
installed.
• The spray arms are not clogged.
• There is dishwasher rinse aid (unless
you use multi- tablets).
11. CARE AND CLEANING
WARNING!
Before maintenance,
deactivate the appliance and
disconnect the mains plug
from the main socket.
• The position of the items in the
baskets is correct.
• The programme is applicable for the
type of load and for the degree of soil.
• The correct quantity of detergent is
used.
10.5 Unloading the baskets
1. For improved drying results with the
most efficient use of energy, open
the door by approximately 10cm at
the end of the program.
2. Allow the tableware to cool for 30 -
40 minutes.
3. Hot items can be easily damaged,
allow them to cool down before
removing from appliance.
4. First remove items from the lower
basket then the upper basket.
At the end of the program
water can still remain on the
sides and on the door of the
appliance.
Dirty filters and clogged
spray arms decrease the
washing results. Make a
check regularly and, if
necessary, clean them.
11.1 Cleaning the filters
The filter system is made of 3 parts.
1. Turn the filter (B) counterclockwise
and remove it.
Page 17
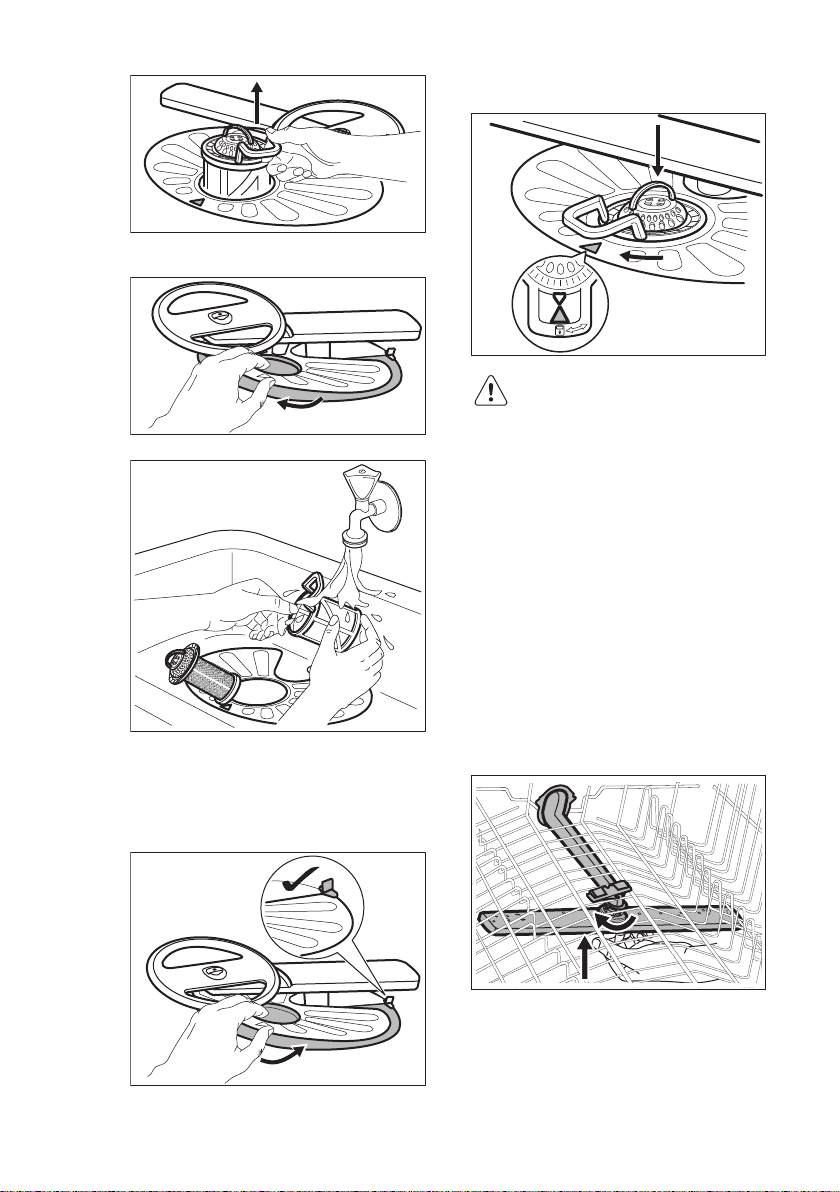
2. Remove the filter (C) out of filter (B).
3. Remove the flat filter (A).
4. Wash the filters.
5. Make sure that there are no residues
of food or soil in or around the edge
of the sump.
6. Put back in place the flat filter (A).
Make sure that it is correctly
positioned under the 2 guides.
ENGLISH 17
8. Put back the filter (B) in the flat filter
(A). Turn it clockwise until it locks.
CAUTION!
An incorrect position of the
filters can cause bad
washing results and damage
to the appliance.
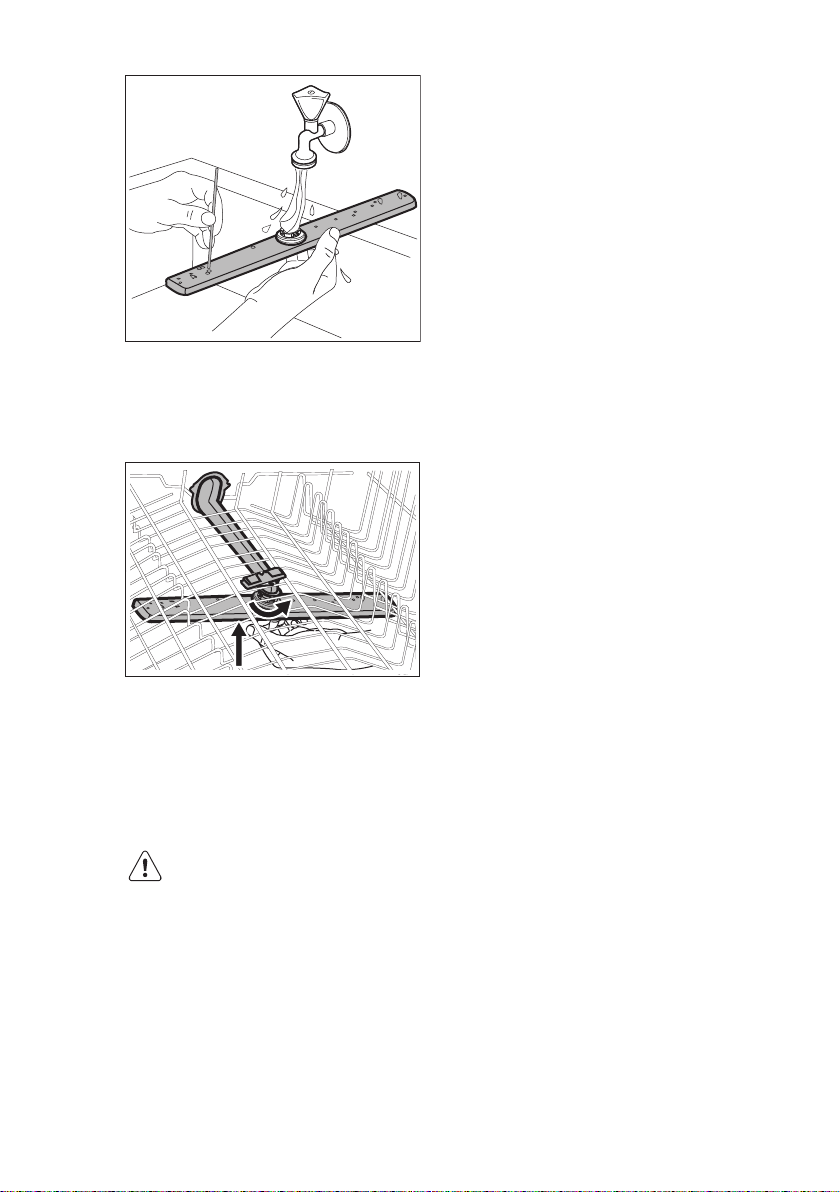
11.2 Cleaning the upper spray
arm
We recommend to clean regularly the
upper spray arm to avoid soil to clog the
holes.
Clogged holes can cause unsatisfactory
washing results.
1. Pull out the upper basket.
2. To disengage the spray arm from the
basket, press the spray arm upwards
in the direction indicated by the lower
arrow and simultaneously turn it
clockwise.
7. Reassemble the filters (B) and (C).
3. Wash the spray arm under running
water. Use a thin pointed tool, e.g.
toothpick, to remove particles of soil
from the holes.
Page 18
www.electrolux.com18
4. To engage again the spray arm to
the basket, press the spray arm
upwards in the direction indicated by
the lower arrow and simultaneously
turn it counterclockwise until it locks
into place.
11.3 External cleaning
• Clean the appliance with a moist soft
cloth.
• Only use neutral detergents.
• Do not use abrasive products,
abrasive cleaning pads or solvents.
11.4 Internal cleaning
• Carefully clean the appliance,
including the rubber gasket of the
door, with a soft damp cloth.
• If you regularly use short duration
programmes, these can leave
deposits of grease and limescale
inside the appliance. To prevent this,
we recommend to run long duration
programmes at least 2 times per
month.
• To maintain the performance of your
appliance at its best, we recommend
to use monthly a specific cleaning
product for dishwashers. Follow
carefully the instructions on the
packaging of the product.
12. TROUBLESHOOTING
If the appliance does not start or it stops
during operation. Before you contact an
Authorised Service Centre, check if you
can solve the problem by yourself with
the help of the information in the table.
WARNING!
Repairs not properly done
may result in serious risk to
the safety of the user. Any
repairs must be performed
by qualified personnel.
With some problems, the display
shows an alarm code.
The majority of problems that can
occur can be solved without the need
to contact an Authorised Service
Centre.
Page 19
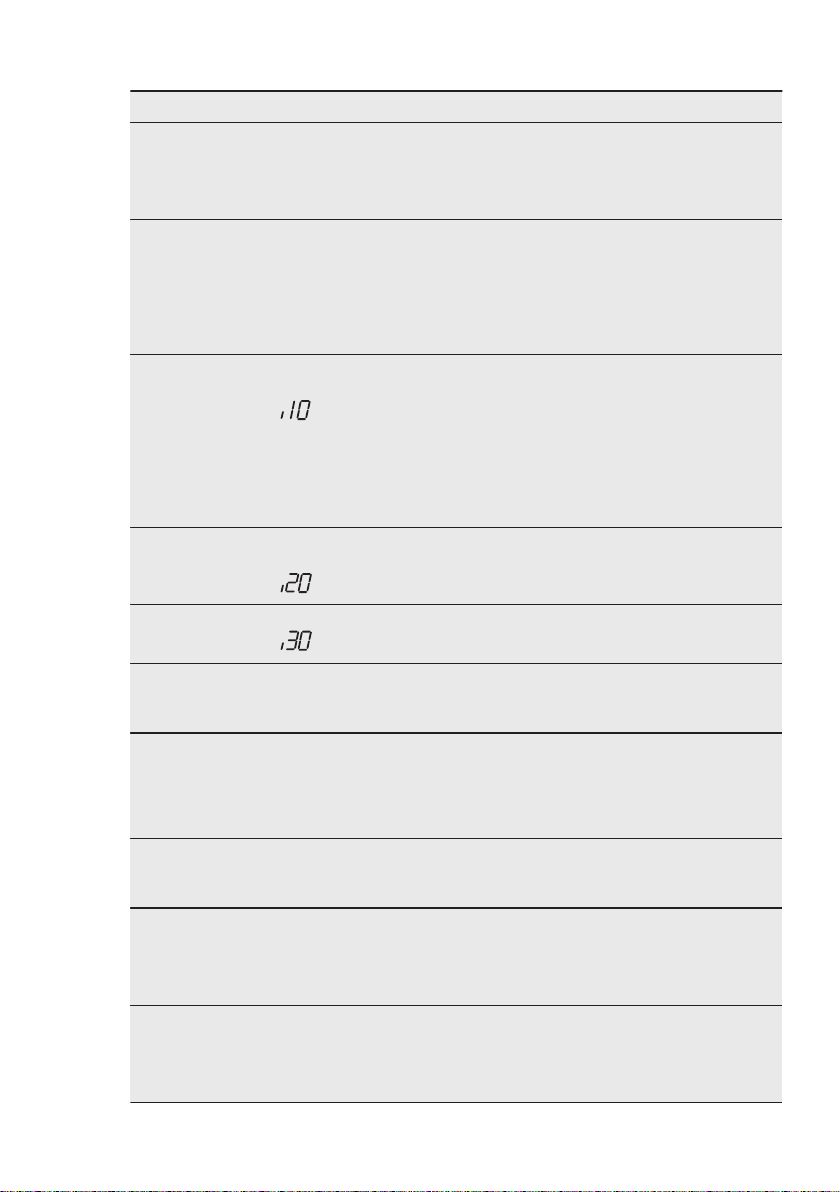
Problem and alarm code Possible solution
You cannot activate the
appliance.
• Make sure that the mains plug is connected to the
mains socket.
• Make sure that there is no damaged fuse in the fuse
box.
ENGLISH 19
The programme does not
start.
The appliance does not fill
with water.
The display shows .
The appliance does not
drain the water.
The display shows .
The anti-flood device is on.
The display shows .
The appliance stops and
starts more times during
operation.
The program lasts too
long.
• Make sure that the appliance door is closed.
• If the delay start is set, cancel the setting or wait for
the end of the countdown.
• The appliance has started the procedure to recharge
the resin inside the water softener. The duration of
the procedure is approximately 5 minutes.
• Make sure that the water tap is open.
• Make sure that the pressure of the water supply is
not too low. For this information, contact your local
water authority.
• Make sure that the water tap is not clogged.
• Make sure that the filter in the inlet hose is not clog‐
ged.
• Make sure that the inlet hose has no kinks or bends.
• Make sure that the sink spigot is not clogged.
• Make sure that the drain hose has no kinks or bends.
• Close the water tap and contact an Authorised Serv‐
ice Centre.
• It is normal. It provides optimal cleaning results and
energy savings.
• Select the TimeManager option to shorten the pro‐
gram time (if applicable).
• If the delayed start option is set, cancel the delay set‐
ting or wait for the end of the countdown.
The options of the program
have to be set again every
time.
Small leak from the appli‐
ance door.
The appliance door is diffi‐
cult to close.
• To save your favourite configuration use option My‐
Favourite.
• The appliance is not levelled. Loosen or tighten the
adjustable feet (if applicable).
• The appliance door is not centred on the tub. Adjust
the rear foot (if applicable).
• The appliance is not levelled. Loosen or tighten the
adjustable feet (if applicable).
• Parts of the tableware are protruding from the bas‐
kets.
Page 20
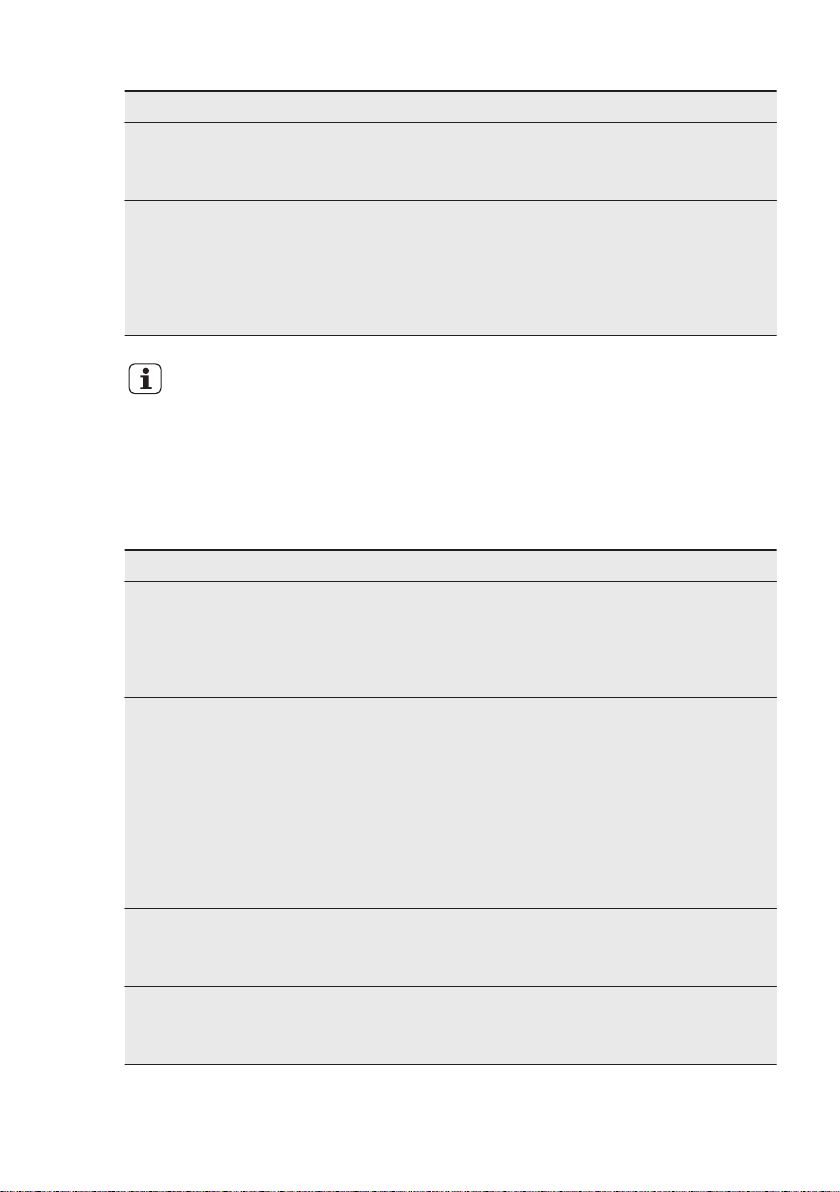
www.electrolux.com20
Problem and alarm code Possible solution
Rattling/knocking sounds
from inside the appliance.
• The tableware is not properly arranged in the bas‐
kets. Refer to basket loading leaflet.
• Make sure that the spray arms can rotate freely.
The appliance trips the cir‐
cuit-beaker.
Refer to "Before first use",
"Daily use", or "Hints and
tips" for other possible
causes.
Once you have checked the appliance,
deactivate and activate the appliance. If
• The amperage is insufficient to supply simultaneous‐
ly all the appliances in use. Check the socket amper‐
age and the capacity of the meter or turn off one of
the appliances in use.
• Internal electrical fault of the appliance. Contact an
Authorised Service Centre.
the problem occurs again, contact an
Authorised Service Centre.
For alarm codes not described in the
table, contact an Authorised Service
Centre.
12.1 The washing and drying results are not satisfactory
Problem Possible cause and solution
Poor washing results. • Refer to "Daily use", "Hints and tips" and basket
Poor drying results. • Tableware has been left for too long inside a
loading leaflet.
• Use more intensive washing programmes.
• Clean spray arm jets and filter. Refer to "Care and
Cleaning".
closed appliance.
• There is no rinse aid or the dosage of rinse aid is
not enough. Set the rinse aid dispenser to a higher
level.
• Plastic items may need to be towel dried.
• For the best drying performance activate the option
XtraDry.
• We recommend to always use rinse aid, even in
combination with multi-tablets.
There are whitish streaks or
bluish layers on glasses and
dishes.
There are stains and dry wa‐
ter drops on glasses and
dishes.
• The release quantity of rinse aid is too much. Ad‐
just the rinse aid level to a lower level.
• The quantity of detergent is too much.
• The released quantity of rinse aid is not sufficient.
Adjust the rinse aid level to a higher level.
• The quality of the rinse aid can be the cause.
Page 21
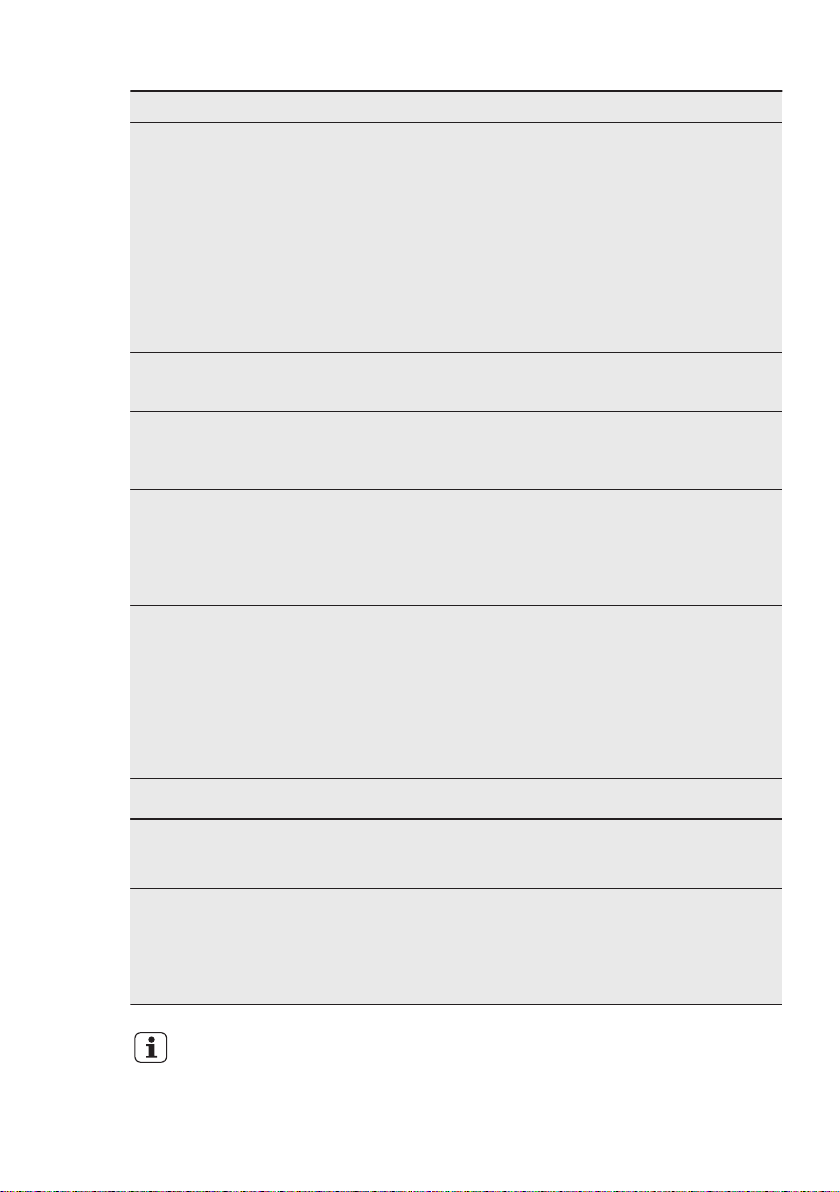
ENGLISH 21
Problem Possible cause and solution
The dishes are wet. • For the best drying performance activate the option
XtraDry.
• The programme does not have a drying phase or
has a drying phase with low temperature.
• The rinse aid dispenser is empty.
• The quality of the rinse aid can be the cause.
• The quality of the multi-tablets can be the cause.
Try a different brand or activate the rinse aid dis‐
penser and use rinse aid and multi-tablets together.
• Keep the dishwasher door ajar for some time be‐
fore removing tableware.
The interior of the appliance
is wet.
Unusual foam during wash‐
ing.
• This is not a defect of the appliance. it is caused by
the humidity in the air that condenses on the walls.
• Use the detergent for dishwashers only.
• There is a leak in the rinse aid dispenser. Contact
an Authorised Service Centre.
Traces of rust on cutlery. • There is too much salt in the water used for wash‐
ing. Refer to "The water softener".
• Silver and stainless steel cutlery were placed to‐
gether. Avoid to put silver and stainless steel items
close together.
There are residues of deter‐
gent in the dispenser at the
end of the programme.
• The detergent tablet got stuck in the dispenser and
therefore was not completely washed away by wa‐
ter.
• Water cannot wash away the detergent from the
dispenser. Make sure that the spray arm is not
blocked or clogged.
• Make sure that items in the baskets do not impede
the lid of the detergent dispenser from opening.
Odours inside the appliance. • Refer to "Internal cleaning".
Limescale deposits on the
• Refer to "The water softener".
tableware, on the tub and on
the inside of the door.
Dull, discoloured or chipped
tableware.
• Make sure that only dishwasher-safe items are
washed in the appliance.
• Load and unload the basket carefully. Refer to bas‐
ket loading leaflet.
• Place delicate items in the upper basket.
Refer to "Before first use",
"Daily use" or "Hints and
tips" for other possible
causes.
Page 22
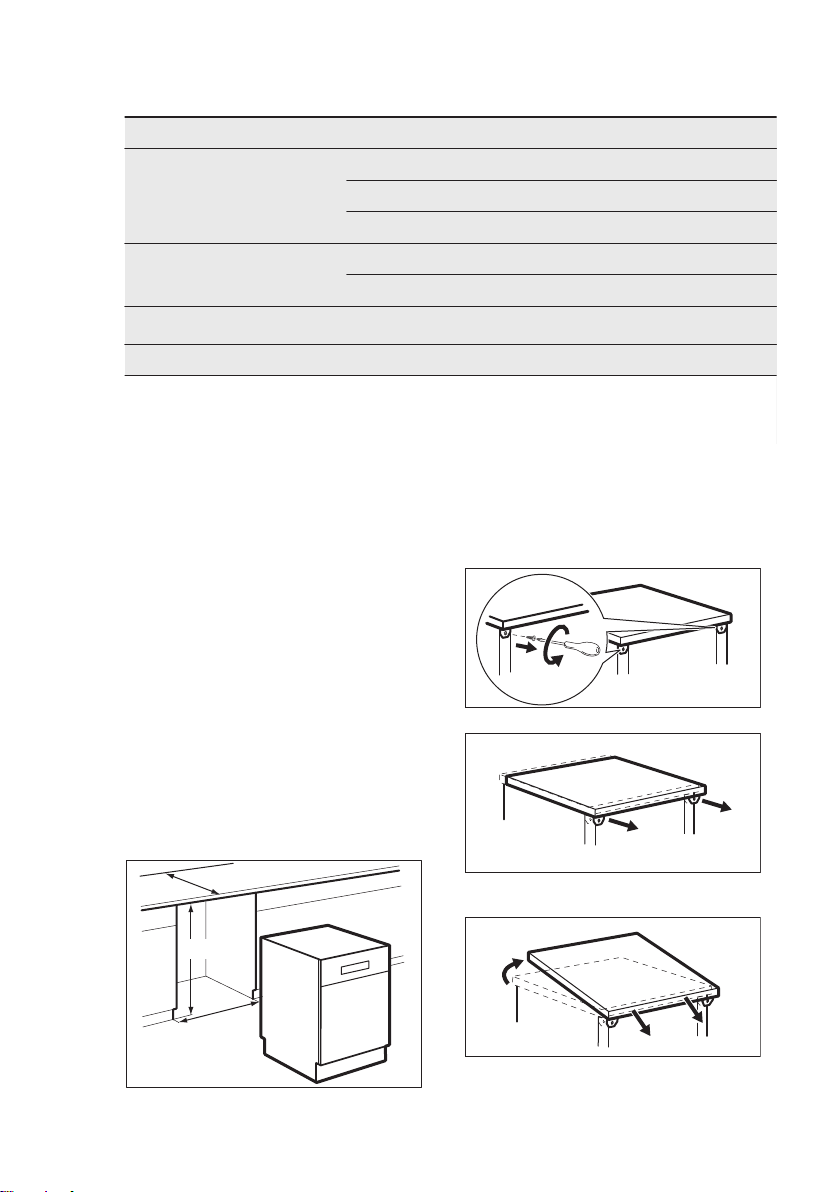
min 570 mm
600 mm
820 mm
1
2
4
3
www.electrolux.com22
13. TECHNICAL INFORMATION
Dimensions Width / height / depth (mm) 596 / 850 / 610
Electrical connection
Water supply pressure bar (minimum and maximum) 0.5 - 8
Water supply
Capacity Place settings 14
1)
Refer to the rating plate for other values.
2)
If the hot water comes from alternative source of energy, (e.g. solar panels, aeolian ener‐
gy), use the hot water supply to decrease energy consumption.
1)
Voltage (V) 200 - 240
Frequency (Hz) 50 / 60
Wattage (W) 1550-2200
kPa (minimum and maximum) 50 - 800
Cold water or hot water
14. INSTALLATION
2)
max 60 °C
14.1 Fitting under a counter
The plinth of a freestanding appliance is
not adjustable. Do not remove the worktop if you want to use the appliance as a
freestanding unit.
It is not necessary to remove the worktop when installing under a standard
kitchen counter. Only remove the worktop when installing the appliance under a
close fitting sink unit or kitchen counter
(820 mm).
Put the appliance adjacent to a water tap
and a water drain.
Make sure that the dimensions of the
recess agree with the dimensions in the
picture.
Removing the work-top
1. Remove the rear screws (1).
2. Pull the work-top from behind (2).
3. Lift the work-top and move it from the
front slots (3/4).
4. Level the appliance using the
adjustable feet.
Page 23
5. Install the appliance under the
Remove
entire
internal
membrane
kitchen counter.
Adjusting the level of the appliance
A correct adjustment of the level of the
appliance allows the door to close and
seal correctly.
If the door does not close correctly,
loosen or tighten the adjustable feet to
level the appliance.
14.2 Water connection
Water inlet hose
Connect the inlet hose to a water tap
with an external BSP thread spout of
3/4''.
For best washing performance it is
recommended to connect the appliance
to a cold water supply.
Energy savings can be made by
connecting the appliance to a Solar
water system and using economy
options, however the water temperature
must not exceed 60° C.
Inlet water supply
• Water pressure: 800 kPa max - 50
kPa min.
• Water flow rate 10 L / minute min.
• If water pressure is in excess of 800
kPa, a pressure reducing valve should
be used. Check for leaks.
• If water temperature is in excess of
60° C, a tempering valve should be
used. Check for leaks.
CAUTION!
Always use new hoses when
you connect the appliance to
the water mains. Old hoses
must not be used. The water
inlet hose must be examined
at an interval of twelve
months for deterioration and
replaced if necessary.
ENGLISH 23
The water pressure must be in the limits
indicated in the chapter ''TECHNICAL
INFORMATION''. Make sure that the
local water authority gives you the
average mains pressure in your area.
Water drain hose
The highest point of the drain hose must
be no more than 600 mm from the floor
and must have a continuous fall to the
plumbing connection.
The drain hose can be lengthened using
additional lengths and connectors. These
must be purchased from Electrolux
Spare Parts. The extension length must
not exceed 2 metres.
The drain hose must be free of
obstructions.
Remove the sink plug when the
appliance drains the water to prevent
that the water goes back into the
appliance.
The appliance has a security feature to
prevent dirty water going back into the
appliance. If the spigot of the sink has a
non-return valve, this valve can cause
the appliance to drain incorrectly. remove
the non-return valve.
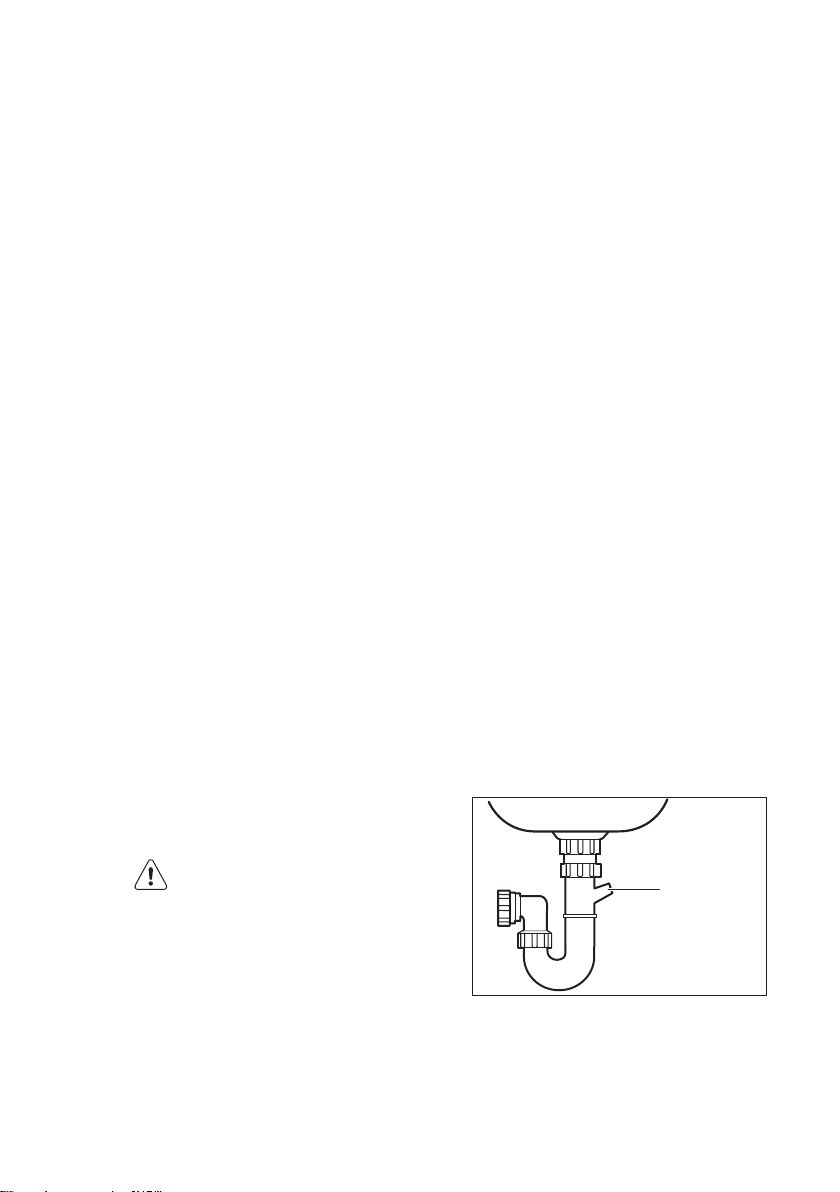
If you connect the water drain hose to a
trap spigot under the sink, remove the
plastic membrane. If you do not remove
the membrane, remaining food can
cause a blockage in the drain hose
spigot.
Page 24

www.electrolux.com24
15. WARRANTY
FOR SALES IN AUSTRALIA AND NEW
ZEALAND
APPLIANCE: DISHWASHER
This document sets out the terms and
conditions of the product warranties
for Electrolux Appliances. It is an
important document. Please keep it
with your proof of purchase
documents in a safe place for future
reference should you require service
for your Appliance.
1. In this warranty:
a) ‘acceptable quality’ as referred to
in clause 10 of this warranty has
the same meaning referred to in
the ACL;
b) ‘ACL’ means Schedule 2 of the
Competition and Consumer Act
2010;
c) ‘Appliance’ means any Electrolux
product purchased by you and
accompanied by this document;
d) ‘ASC’ means Electrolux
authorised service centres;
e) ‘Electrolux’ means Electrolux
Home Products Pty Ltd of 163
O’Riordan Street, Mascot NSW
2020, ABN 51 004 762 341 in
respect of Appliances purchased
in Australia and Electrolux (NZ)
Limited (collectively ‘Electrolux’)
of 3-5 Niall Burgess Road, Mount
Wellington, in respect of
Appliances purchased in New
Zealand;
f) ‘major failure’ as referred to in
clause 10 of this warranty has
the same meaning referred to in
the ACL and includes a situation
when an Appliance cannot be
repaired or it is uneconomic for
Electrolux, at its discretion, to
repair an Appliance during the
Warranty Period;
g) ‘Warranty Period’ means the
Appliance is warranted against
manufacturing defects in
Australia for 24 months and in
New Zealand for 24 months,
following the date of original
purchase of the Appliance;
h) ‘you’ means the purchaser of the
Appliance not having purchased
the Appliance for re-sale, and
‘your’ has a corresponding
meaning.
2. This warranty only applies to
Appliances purchased and used in
Australia or New Zealand and used
in normal domestic applications and
is in addition to (and does not
exclude, restrict, or modify in any
way) any non-excludable statutory
warranties in Australia or New
Zealand.
3. During the Warranty Period
Electrolux or its ASC will, at no extra
charge if your Appliance is readily
accessible for service, without
special equipment and subject to
these terms and conditions, repair or
replace any parts which it considers
to be defective. Electrolux or its ASC
may use remanufactured parts to
repair your Appliance. You agree that
any replaced Appliances or parts
become the property of Electrolux.
This warranty does not apply to light
globes, batteries, filters or similar
perishable parts.
4. Parts and Appliances not supplied by
Electrolux are not covered by this
warranty.
5. To the extent permitted by law, you
will bear the cost of transportation,
travel and delivery of the Appliance
to and from Electrolux or its ASC. If
you reside outside of the service
area, you will bear the cost of:
a) travel of an authorised
representative;
b) transportation and delivery of the
Appliance to and from Electrolux
or its ASC.
In all instances, unless the Appliance
is transported by Electrolux or an
Electrolux authorised representative,
the Appliance is transported at the
owner’s cost and risk while in transit
to and from Electrolux or its ASC.
6. Proof of purchase is required before
you can make a claim under this
warranty.
Page 25

7. You may not make a claim under this
warranty unless the defect claimed is
due to faulty or defective parts or
workmanship. Electrolux is not liable
in the following situations (which are
not exhaustive):
a) the Appliance is damaged by:
– accident
– misuse or abuse, including
failure to properly maintain or
service
– normal wear and tear
– power surges, electrical storm
damage or incorrect power
supply
– incomplete or improper
installation
– incorrect, improper or
inappropriate operation
– insect or vermin infestation
– failure to comply with any
additional instructions
supplied with the Appliance;
b) the Appliance is modified without
authority from Electrolux in
writing;
c) the Appliance’s serial number or
warranty seal has been removed
or defaced;
d) the Appliance was serviced or
repaired by anyone other than
Electrolux, an authorised repairer
or ASC.
8. This warranty, the contract to which it
relates and the relationship between
you and Electrolux are governed by
the law applicable where the
Appliance was purchased. Where the
Appliance was purchased in New
Zealand for commercial purposes the
Consumer Guarantee Act does not
apply.
9. To the extent permitted by law and
subject to your non-excludable
statutory rights and warranties,
Electrolux excludes all warranties
and liabilities (other than as
contained in this document) including
liability for any loss or damage
whether direct or indirect arising from
your purchase, use or non use of the
Appliance.
ENGLISH 25
10. For Appliances and services
provided by Electrolux in Australia,
the Appliances come with a
guarantee by Electrolux that cannot
be excluded under the ACL. You are
entitled to a replacement or refund
for a major failure and for
compensation for any other
reasonably foreseeable loss or
damage. You are also entitled to
have the Appliance repaired or
replaced if the Appliance fails to be of
acceptable quality and the failure
does not amount to a major failure.
The benefits to you given by this
warranty are in addition to your other
rights and remedies under a law in
relation to the Appliances or services
to which the warranty relates.
11. At all times during the Warranty
Period, Electrolux shall, at its
discretion, determine whether repair,
replacement or refund will apply if an
Appliance has a valid warranty claim
applicable to it.
12. For Appliances and services
provided by Electrolux in New
Zealand, the Appliances come with a
guarantee by Electrolux pursuant to
the provisions of the Consumer
Guarantees Act, the Sale of Goods
Act and the Fair Trading Act.
13. To enquire about claiming under this
warranty, please follow these steps:
a) carefully check the operating
instructions, user manual and the
terms of this warranty;
b) have the model and serial
number of the Appliance
available;
c) have the proof of purchase (e.g.
an invoice) available;
d) telephone the numbers shown
below.
14. You accept that if you make a
warranty claim, Electrolux and its
ASC may exchange information in
relation to you to enable Electrolux to
meet its obligations under this
warranty.
Page 26
www.electrolux.com26
Important Notice
Before calling for service, please ensure that the steps listed in clause 13 above
have been followed.
FOR SERVICE
SERVICE AUSTRALIA
or to find the address of
your nearest state service
centre in Australia
Please call 13 13 4 9
For the cost of a local call (Australia
only)
FOR SERVICE
ELECTROLUX HOME
PRODUCTS
www.electrolux.com.au
SERVICE NEW ZEALAND
or to find the address of
your nearest authorised
service centre in New Zea‐
land
Free call 0800 10 66 10
(New Zealand only)
ELECTROLUX (NZ) Limi‐
ted
www.electrolux.co.nz
16. ENVIRONMENTAL CONCERNS
Recycle the materials with the symbol
. Put the packaging in applicable
containers to recycle it. Help protect the
environment and human health and to
recycle waste of electrical and electronic
appliances. Do not dispose appliances
marked with the symbol with the
household waste. Return the product to
your local recycling facility or contact
your municipal office.
FOR SPARE PARTS
or to find the address of
your nearest state spare
parts centre in Australia
Please call 13 13 50
For the cost of a local call (Australia
only)
FOR SPARE PARTS
or to find the address of
your nearest state spare
parts centre in New Zea‐
land
Free call 0800 10 66 20
(New Zealand only)
*
Page 27

ENGLISH 27
Page 28
www.electrolux.com/shop
117891861-A-522015
 Loading...