

Page 1

user manual
Οδηγίες Χρήσης
manual de instruções
Инструкция по
эксплуатации
kullanma kılavuzu
Dishwasher
Πλυντήριο πιάτων
Máquina de lavar loiça
Посудомоечная машина
Bulaşık makinesi
ESF2430
Page 2
2 electrolux
Electrolux. Thinking of you.
Share more of our thinking at www.electrolux.com
Contents
Safety information 2
Product description 3
Control panel 4
Use of the appliance 5
Setting the water softener 5
Use of dishwasher salt 6
Use of rinse aid 6
Loading cutlery and dishes 7
Use of detergent 8
Washing programmes 9
Subject to change without notice
Setting and starting a washing programme
Care and cleaning 11
What to do if… 11
Technical data 13
Installation 13
Water connection 14
Electrical connection 15
Environment concerns 15
Safety information
For your safety and correct operation of
the appliance, read this manual carefully
before installation and use. Always keep
these instructions with the appliance
even if you move or sell it. Users must
fully know the operation and safety features of the appliance.
Correct use
• The appliance is designed exclusively for
domestic use.
• Only use the appliance to clean household
utensils that are applicable for dishwashers.
• Do not put solvents in the appliance. Risk
of explosion.
• Put the knives and all items with sharp
points in the cutlery basket with their
points down. If not, put in a horizontal position in the main basket.
• Use only branded products for dishwashers (detergent, salt, rinse aid).
• If you open the door while the appliance is
in operation, hot steam can escape. Risk
of skin burns.
•Do not remove dishes from the dishwasher
before the end of the washing programme.
• When the washing programme is completed, disconnect the mains plug from the
mains socket and close the water tap.
• Only an authorised service engineer can
repair this appliance. Use only original
spare parts.
• Do not do repairs yourself to prevent injury
and damage to the appliance. Always contact your local Service Force Centre.
General safety
• Persons (including children) with reduced
physical sensory, mental capabilities or
lack of experience and knowledge must
not use the appliance. They must have supervision or instruction for the operation of
the appliance by a person responsible for
their safety.
• Obey the safety instructions from the manufacturer of the dishwasher detergent to
prevent burns to eyes, mouth and throat.
• Do not drink the water from the dishwasher. Detergent residues can stay in your appliance.
• Always close the door when you do not
use the appliance to prevent injury and not
to stumble over the open door.
• Do not sit or stand on the open door.
Child safety
• Only adults can use this appliance. Children must get supervision to make sure
that they do not play with the appliance.
• Keep all the packaging away from children.
There is a risk of suffocation.
• Keep all detergents in a safe area. Do not
let children touch the detergents.
• Keep children away from the appliance
when the door is open.
10
Page 3
electrolux 3
Installation
• Make sure that the appliance is not damaged because of transport. Do not connect a damaged appliance. If necessary,
contact the supplier.
• Remove all packaging before first use.
• A qualified and competent person must do
the electrical installation.
• A qualified and competent person must do
the plumbing installation.
• Do not change the specifications or modify
this product. Risk of injury and damage to
the appliance.
• Do not use the appliance:
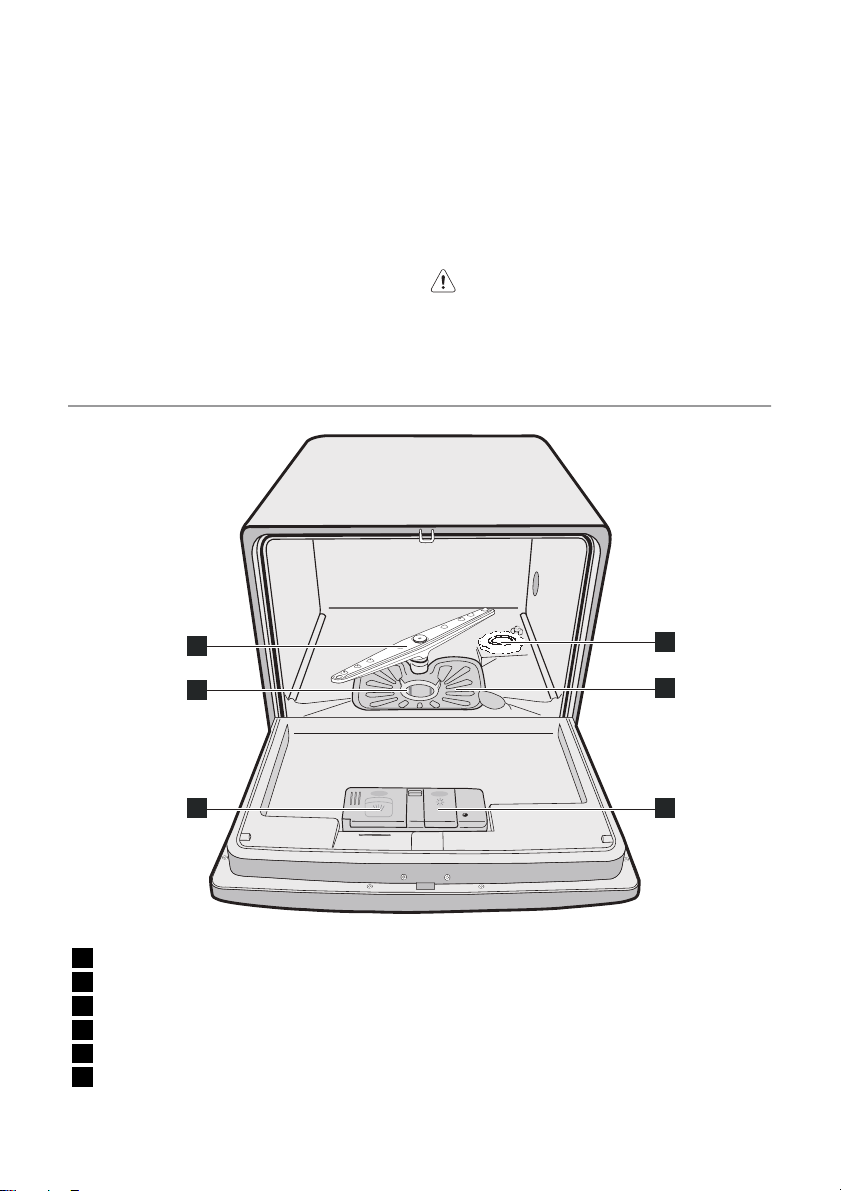
Product description
1
– if the mains cable or water hoses are
damaged,
– if the control panel, worktop or plinth
area are damaged, that you can get access to the inner side of the appliance.
Contact your local Service Force Centre.
• Do not drill into the sides of the appliance
to prevent damage to hydraulic and electrical components.
Warning! Carefully obey the
instructions for electrical and water
connections.
6
2
3
1 Spray arm
2 Microfilter
3 Detergent dispenser
4 Rinse aid dispenser
5 Flat filter
6 Salt container
5
4
Page 4
4 electrolux
The rating label is on the back of appliance.
Control panel
1 Programme knob
2 Start/cancel button
3 Delay start button
4 Indicator lights
5 On/off indicator light
Indicator lights
The indicator light comes on when the washing
phase or the rinsing phase operates.
The indicator light comes on when the drying
phase operates.
The indicator light comes on when the washing
programme is completed. Auxiliary functions:
• Level of the water softener.
• An alarm if the appliance has a malfunction.
The indicator light comes on when it is necessary
1)
1) The indicator light is off while a washing programme operates.
Delay start button
Use the delay start button to delay the start
of the washing programme with an interval of
3 hours. Refer to the chapter 'Setting and
starting a washing programme'.
Programme knob and on/off indicator
light
• To set a washing programme, turn the
programme knob clockwise or anticlockwise. The programme marker on the pro-
to fill the salt container. Refer to the chapter 'Use
of dishwasher salt'.
The salt indicator light can stay on for some hours,
but it does not have an unwanted effect on the
operation of the appliance.
gramme knob must agree with one of the
washing programmes on the control panel.
– The on/off indicator light comes on (po-
sition ON).
• To set the appliance to the off position,
turn the programme knob until the programme marker agrees with the on/off indicator light.
– The on/off indicator light goes off (posi-
tion OFF).
5 4
1 2 3
Page 5
Use of the appliance
Refer to the following instructions for each
step of procedure:
1. Make a check if the water softener level
is correct for the water hardness in your
area. If necessary set the water softener.
2. Fill the salt container with dishwasher salt.
3. Fill the rinse aid dispenser with rinse aid.
4. Load cutlery and dishes into the dishwasher.
5. Set the correct washing programme for
the type of load and soil.
6. Fill the detergent dispenser with the correct quantity of detergent.
7. Start the washing programme.
If you use detergent tablets, refer to the
chapter 'Use of detergent'.
Setting the water softener
The water softener removes minerals and
salts from the water supply. Minerals and
salts can have bad effect on the operation of
the appliance.
Water hardness is measured in equivalent
scales:
• German degrees (dH°).
Water hardness
°dH mmol/l °TH Clarke
>24 >4.2 >40 > 29 10
22- 24 3,9- 4,2 39- 40 27- 29 9
20- 22 3,5- 3,9 35- 39 25- 27 8
18- 20 3,2- 3,5 32- 35 23- 25 7
16- 18 2,8- 3,2 28- 32 20- 23 6
13- 16 2,3- 2,8 23- 28 17-20 5
10- 13 1,8- 2,3 18- 23 13- 17 4
7- 10 1,2- 1,8 12- 18 9- 13 3
4- 7 0.7- 1,2 7- 12 5- 9 2
< 4 < 0.7 < 7 < 5
1) No use of salt required.
Electronic adjustment
The water softener is set at the factory
at level 5.
1. Press and hold the start/cancel button.
Turn the programme knob clockwise until
the programme marker agrees with the
first washing programme on the control
panel.
2. Release the start/cancel button when the
on/off indicator light and the start/cancel
indicator light start to flash.
– At the same time, the end indicator
light flashes to show the level of the
water softener.
• French degrees (°TH).
• mmol/l (millimol per litre - international unit
for the hardness of water).
•Clarke.
Adjust the water softener in to the water
hardness in your area. If necessary, contact
your local water authority.
Example:
5 flashes, pause, 5 flashes, pause,
etc... = level 5
3. Press the start/cancel button one time to
increase the water softener level by one
step.
The end indicator light shows the new
level.
4. Turn the programme knob to the off po-
sition to save the operation.
electrolux 5
Water hardness
setting
1)
1
Page 6
6 electrolux
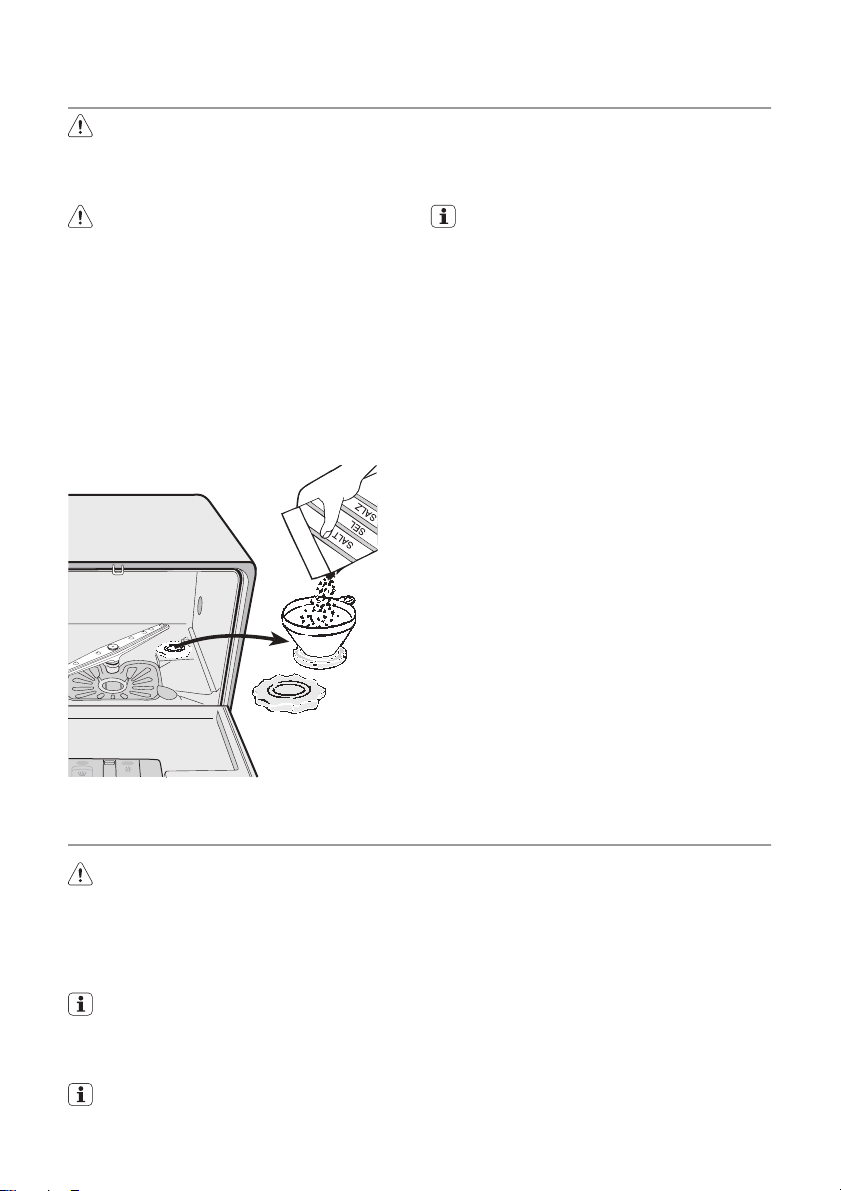
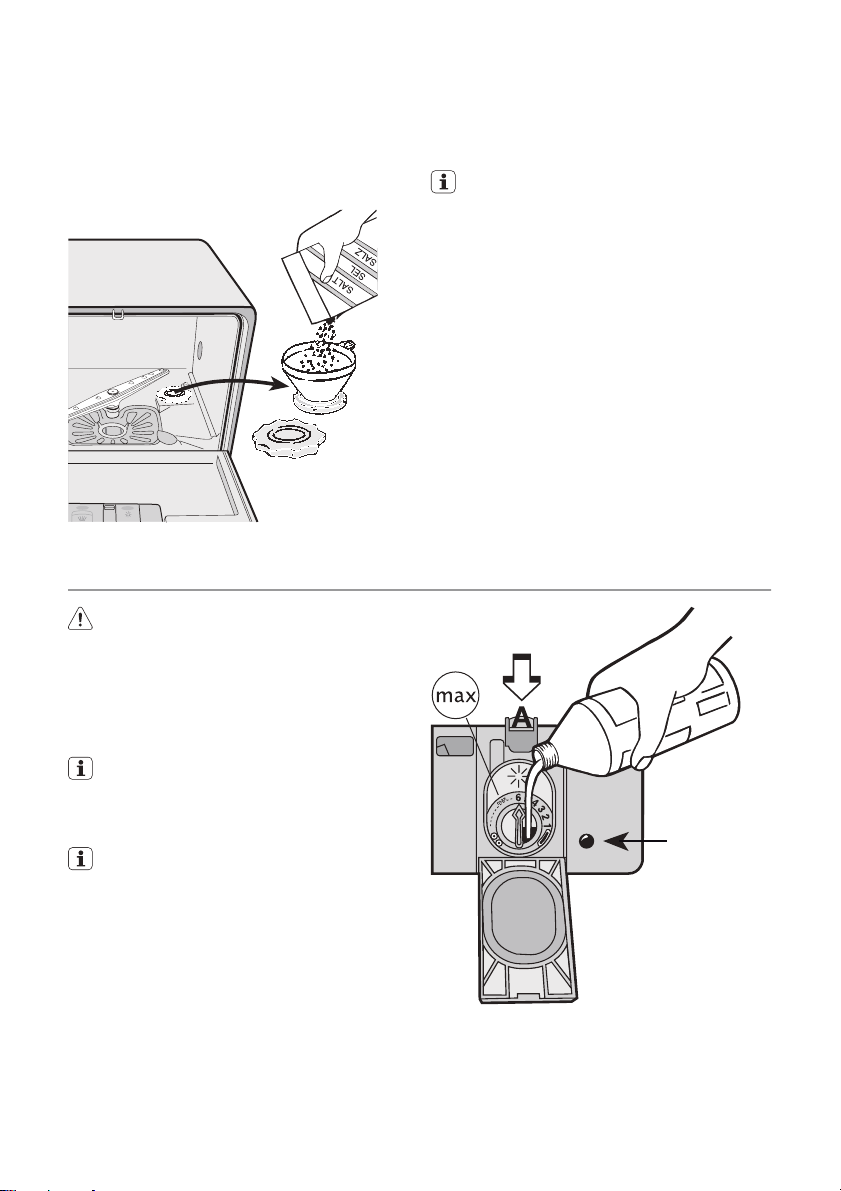
Use of dishwasher salt
Caution! Only use dishwashers salt.
Types of salt that are not applicable for
dishwashers cause damage to the water
softener.
Caution! Grains of salt and salty water
on the bottom of the appliance can
cause corrosion. Fill the appliance with
salt before you start a washing
programme to prevent corrosion.
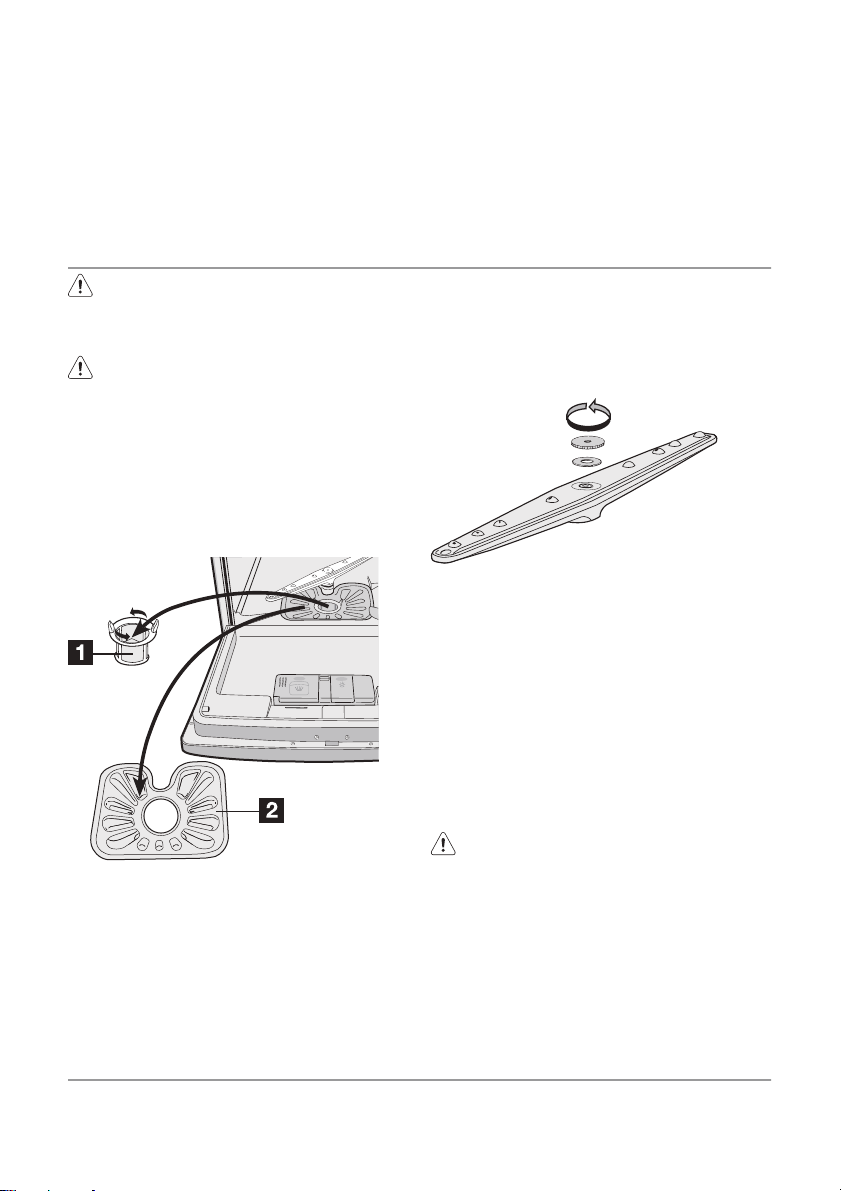
Do these steps to fill the salt container:
1. Turn the cap anticlockwise to open the
salt container.
2. Fill the salt container with 1 litre of water
(only the first operation).
3. Use the funnel to fill the salt container with
salt.
4. Remove the salt around the opening of
the salt container.
5. Turn the cap clockwise to close the salt
container.
It is normal that water overflows from the
salt container when you fill it with salt
When you set the water softener to level 1,
the salt indicator light does not stay on.
Use of rinse aid
Caution! Only use branded rinse aid for
dishwashers.
Do not fill the rinse aid dispenser with
other products (e.g. dishwasher cleaning agent, liquid detergent). There is a
risk of damage to the appliance.
Rinse aid makes it possible to dry the
dishes without streaks and stains.
Rinse aid is automatically added during
the last rinsing phase.
Fill the rinse aid dispenser when the rinse
aid indicator (B) becomes clear.
Do these steps to fill the rinse aid dispenser:
Page 7
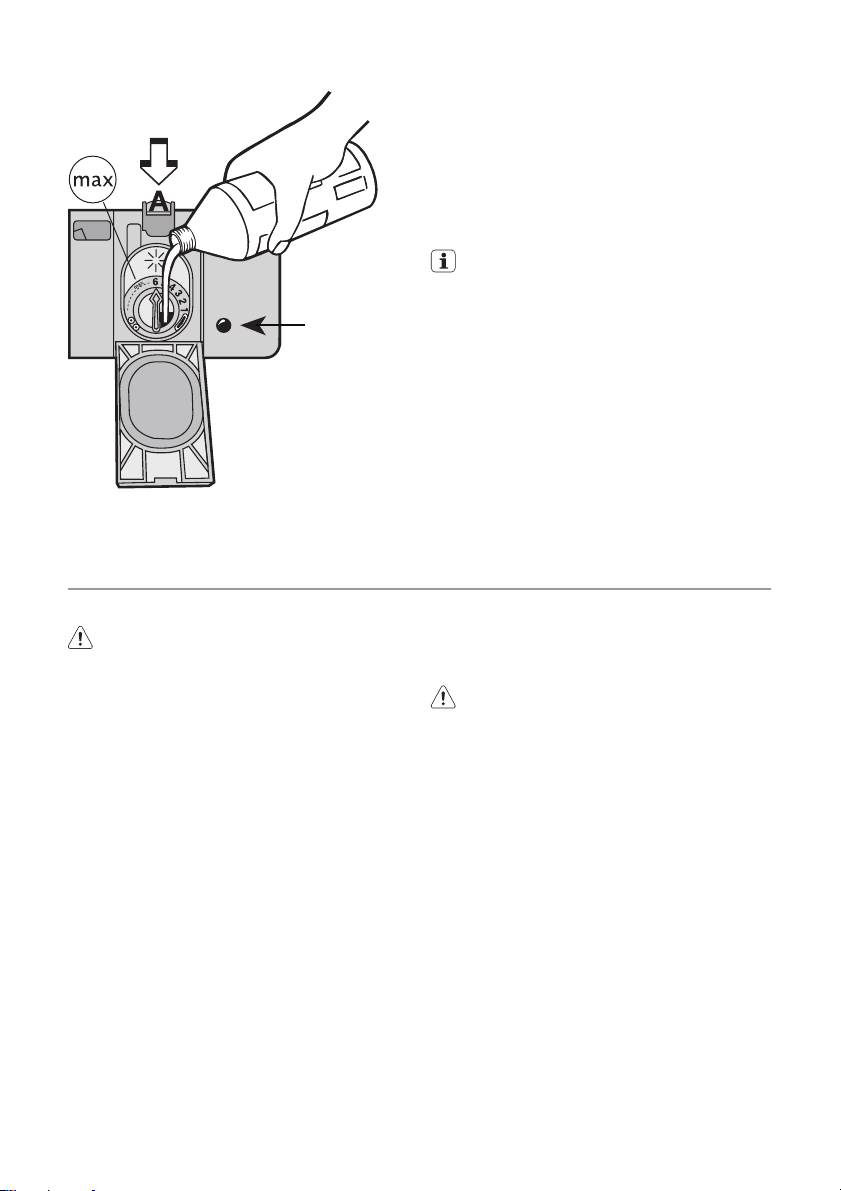
B
1. Press the release button (A) to open the
rinse aid dispenser.
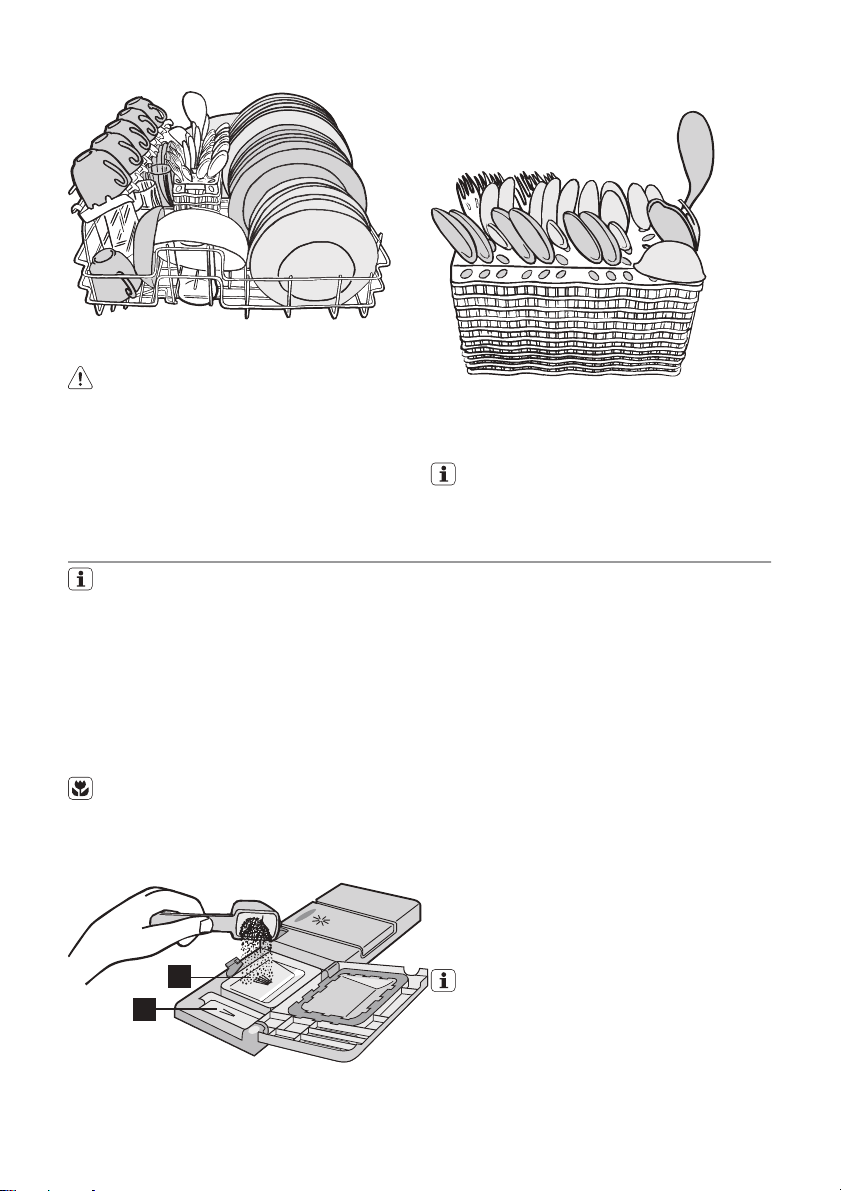
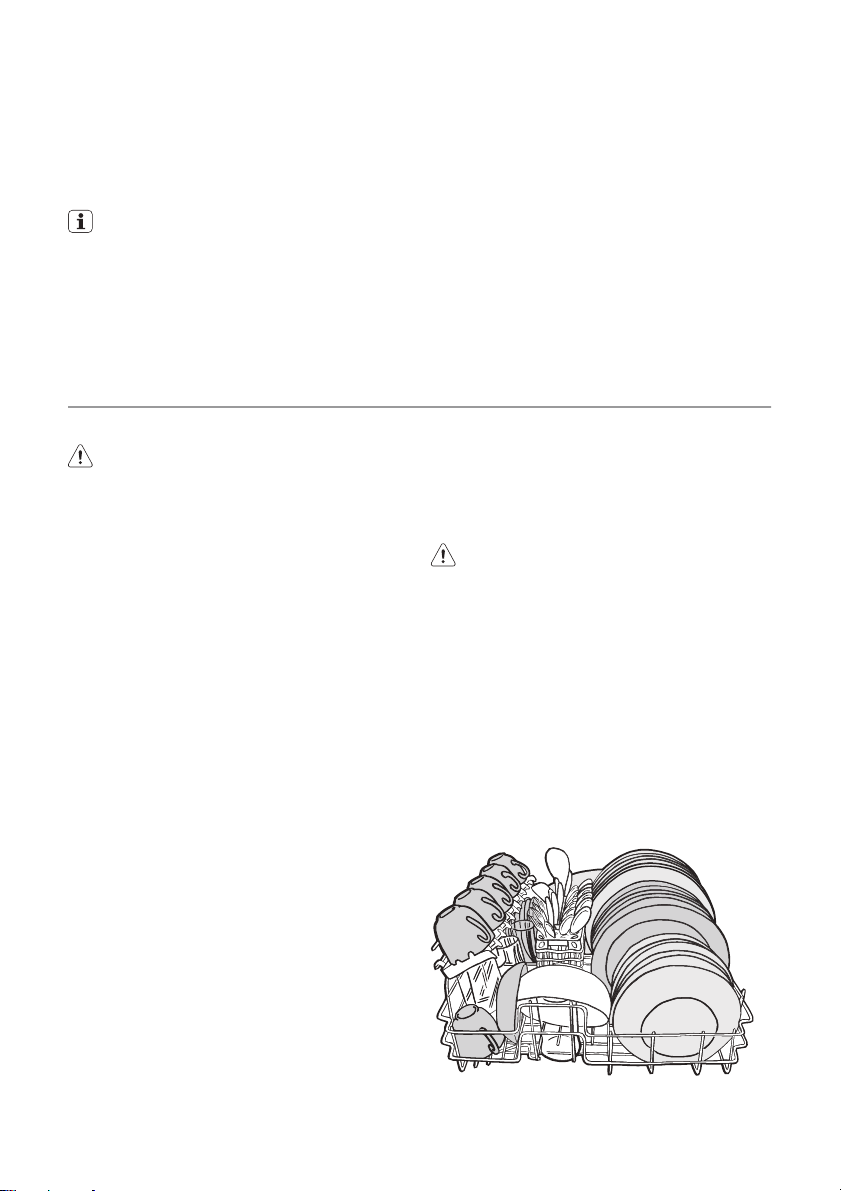
Loading cutlery and dishes
Helpful hints and tips
Caution! Only use the appliance for
household utensils that are applicable
for dishwashers.
Do not use the appliance to clean objects
that can absorb water (sponges, household
cloths, etc.).
• Before you load cutlery and dishes, do
these steps:
– Remove all food remainings and debris.
– Make burnt, remaining food in pans soft.
• While you load cutlery and dishes, do
these steps:
– Load hollow items (e.g. cups, glasses
and pans) with the opening down.
– Make sure that water does not collect in
the container or in a deep base.
– Make sure that cutlery and dishes do not
lie inside one another.
– Make sure that cutlery and dishes do not
cover other cutlery and dishes.
– Make sure that glasses do not touch
other glasses.
– Put small objects in the cutlery basket.
• Plastic items and pans with non-stick
coatings can keep water droplets.
electrolux 7
2. Fill the rinse aid dispenser with rinse aid.
The mark 'max.' shows the maximum
level .
3. Remove the spilled rinse aid with an absorbent cloth to prevent too much foam
during the subsequent washing programme.
4. Close the rinse aid dispenser.
The capacity of the rinse aid dispenser
is approximately 150 ml. The quantity of
rinse aid is sufficient for approximately
60 washing programmes.
Adjust the dosage of rinse aid
The appliance is set at the factory at level 1.
You can set the rinse aid dosage between 1
- 6 (1- 6 ml of the rinse aid).
Refer to the washing results (chapter 'What
to do if...'). Start with the lowest dosage.
1. Turn the arrow clockwise to increase the
dosage.
2. Increase the dosage if there are water
droplets or limescale on the dishes.
• Plastic items do not dry as well as porce-
lain and steel items.
• Put light items in the main basket. Make
sure that the items do not move.
Caution! Make sure that the spray arm
can move freely before you start a
washing programme.
Primary basket
Arrange the deep dishes and large lids
around the edge of the basket. Arrange items
on and below the cup racks. The water must
come to all parts of the dishes.
You can fold the cup racks to clean high
items.
Page 8
8 electrolux
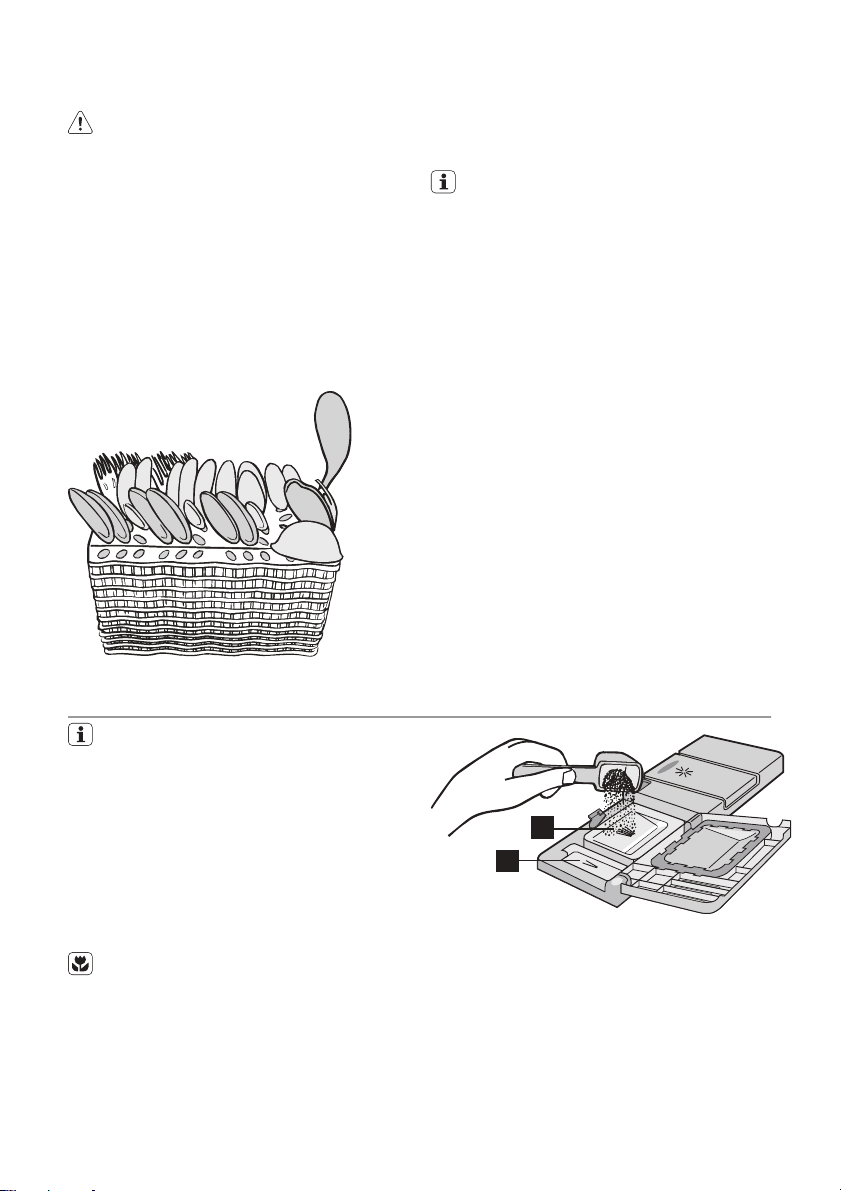
Cutlery basket
Warning! Do not put long-bladed knives
in a vertical position to prevent injury.
Arrange long and/or sharp items of cutlery
horizontally in the primary basket. Be careful
with sharp items such as knives.
Use the cutlery basket for:
• Forks and spoons with the handles down.
Use of detergent
Only use detergents (powder, liquid or
tablet) that are applicable for dishwashers.
Follow the data on the packaging:
• Dosage recommended by the manufacturer.
• Storage recommendations.
The instructions on the packaging usually refer to large dishwashers (12 settings).
Do not use more than the correct quantity of detergent to save an environment.
Fill with detergent
Do these steps to fill the detergent dispenser:
A
B
1. Open the lid of the detergent dispenser.
2. Fill the detergent dispenser (A) with detergent.
• Knives with the handles up.
The cutlery basket has a cutlery grid that you
can remove.
Do not let the cutlery bond together.
Make sure that the spray arm can move
freely before you close the door.
3. If you use a washing programme with
prewash phase, put more detergent in
the prewash detergent compartment (B).
The detergent is removed during the prewash phase.
4. Close the lid of the detergent dispenser.
Use of detergent tablets
Put the detergent tablet in the detergent dispenser (A).
Detergent tablets contain:
• detergent
•rinse aid
• other cleaning agents.
Do these steps to use detergent tablets:
1. Make sure that the detergent tablets are
applicable for your water hardness. Refer
to the instructions from the manufacturer.
2. Set the lowest levels of water hardness
and rinse aid dosage.
It is not necessary to fill the salt container
and the rinse aid dispenser.
Do these steps when the drying results
are not satisfactory:
1. Fill the rinse aid dispenser with rinse aid.
2. Set the rinse aid dosage to position 2.
Page 9
electrolux 9
Do these steps to use the detergent
powder again:
1. Fill the salt container and the rinse aid
dispenser.
2. Set the water softener to the highest level.
3. Do a washing programme without
dishes.
4. Adjust the water softener. Refer to the
chapter 'Setting the water softener'.
Washing programmes
Washing programmes
Programme
A
70°
B
65°
C
1)
55°
D
50°
E
40°
1) Test programme for test institutes
Consumption values
Programme Programme duration
A
70°
B
65°
C
1)
55°
Degree of
soil
Heavy soil
Normal soil
Normal soil
Normal or light
soil
Light soil
(in minutes)
117 1,15 9
94 0,80 7
157 0,63 7
Type of load Programme description
Crockery, cut-
lery, pots and
Crockery and
Crockery and
Crockery and
Delicate crock-
ery and glass-
5. Adjust the rinse aid dosage.
Different brands of detergent dissolve in
different times. Some detergent tablets
do not have the best cleaning results
during short washing programmes. Use
long washing programmes when you
use detergent tablets to fully remove the
detergent.
Prewash
Main wash
pans
cutlery
cutlery
cutlery
ware
Energy consumption
2 intermediate rinses
Final rinse
Drying
Prewash
Main wash
1 intermediate rinse
Final rinse
Drying
Prewash
Main wash
1 intermediate rinse
Final rinse
Drying
Main wash
1 intermediate rinse
Final rinse
Drying
Main wash
1 intermediate rinse
Final rinse
Drying
Water consumption
(in kWh)
(in litres)
Page 10
10 electrolux
Programme Programme duration
(in minutes)
D
36 0,40 6
50°
E
31 0,35 6
40°
1) Test programme for test institutes
The consumption values are intended as
a guide and depends on the pressure
Energy consumption
(in kWh)
so by the variations of the power supply
and the amount of dishes.
and the temperature of the water and al-
Setting and starting a washing programme
Do these steps to set and start a washing
programme:
1. Close the door.
2. Turn the programme knob to set the
washing programme. Refer to the chapter 'Washing programmes'.
– The on/off indicator light comes on.
– The phase indicator light for the wash-
ing programme starts to flash.
3. Press the start/cancel button.
– The washing programme starts auto-
matically.
– The start/cancel indicator light comes
on.
– When the programme starts, only the
phase in progress indicator light stays
on.
When the washing programme operates, you cannot change the programme. Cancel the washing programme.
Warning! Only interrupt or cancel a
washing programme if necessary.
Caution! Open the door carefully. Hot
steam can come free.
Cancelling a washing programme
•Press and hold the start/cancel button for
approximately 5 seconds.
– The start/cancel indicator light goes off.
– The phase indicator lights starts to flash.
The washing programme is cancelled.
At this time you can do these steps:
1. Switch off the appliance.
2. Set a new washing programme.
Fill the detergent dispenser with detergent
before you set a new washing programme.
Interrupting a washing programme
Open the door.
• The programme stops.
Close the door.
• The programme continues from the point
of interruption.
Setting and starting a washing
programme with delay start
1. Set a washing programme.
2. Press the delay start button.
– The delay start indicator light comes
on.
3. Press the start/cancel button.
– The countdown of the delay start
starts.
– The phase indicator lights go off.
When the countdown is completed, the
washing programme automatically starts.
• The delay start indicator light goes off.
• The phase indicator light comes on.
Do not open the door during the countdown to prevent interruption of the
countdown. When you close the door
again, the countdown continues from
the point of interruption.
Cancelling a delay start:
1. Press and hold the start/cancel button for
approximately 5 seconds.
– The start/cancel indicator light and de-
lay start indicator light go off.
– The phase indicator lights start to flash.
2. Press the start/cancel button to start the
washing programme.
Water consumption
(in litres)
Page 11
electrolux 11
End of the washing programme
Switch off the appliance in these conditions:
• The appliance stops automatically.
• The end indicator light comes on.
For better drying results, keep the door ajar
for some minutes before you remove the
dishes.
Care and cleaning
Warning! Switch the appliance off
before you clean the filters.
Cleaning the filters
Caution! Do not use the appliance
without filters. Make sure that the
installation of the filters is correct.
Incorrect installation will cause
unsatisfactory washing results and
damage to the appliance.
The dishwasher has 2 filters:
1. microfilter
2. flat filter
Do these steps to clean the filters:
1. Open the door.
2. Remove the basket.
3. Remove the filters in the bottom of the
appliance.
4. Clean the filters below running water.
5. Put the filters back.
6. Turn the microfilter clockwise to lock it.
Let the dishes cool down before you remove
them from the appliance. Hot dishes are
easily damaged.
7. Close the door.
Cleaning the spray arm
Regularly examine the spray arm. Remove
remaining food from the holes in the spray
arm.
Do these steps to remove the spray arm:
1. Turn the nut anticlockwise.
2. Remove the spray arm.
3. Fully clean the holes.
External cleaning
Clean the external surfaces of the appliance
and control panel with a damp soft cloth.
Only use neutral detergents. Do not use
abrasive products, scouring pads or solvents
(acetone, trichloroethylene etc...).
Frost precautions
Caution! Do not install the appliance
where the temperature is below 0 °C.
The manufacturer is not responsible for
damage because of frost.
If not possible, empty the appliance and
close the door. Disconnect the water inlet
hose and remove water from the water inlet
hose.
What to do if…
The appliance does not start or stops during
operation.
If there is a fault, first try to find a solution to
the problem yourself. If you cannot find a sol-
Page 12

12 electrolux
ution to the problem yourself, contact the
Service Force Centre.
Fault code and malfunction Possible cause and solution
• continuous flash of the start/cancel indicator light
• 1 flash of the end indicator light
The dishwasher does not fill with water
• continuous flash of the start/cancel indicator light
• 2 flashes of the end indicator light
The dishwasher will not drain
• the drain pump operates continuously
• all indicators lights on the control
panel go off
The anti-flood device operates
The programme does not start • The appliance door is not closed.
After the check, switch on the appliance. The
programme continues from the point of interruption. If the malfunction shows again,
contact your Service Force Centre.
These data are necessary to help you quickly
and correctly:
•Model (Mod.)
The cleaning results are not satisfactory
The dishes are not clean • The selected washing programme is not applicable for the type of
Limescales particles on the
dishes
The dishes are wet and dull • No rinse aid has been used.
There are streaks, milky spots
or a bluish coating on glasses
and dishes
• The water tap is blocked or furred with limescale.
Clean the water tap.
• The water tap is closed.
Open the water tap.
• The filter in the water inlet hose is blocked.
Clean the filter.
• The connection of the water inlet hose is not correct. The
hose can be kinked or squashed.
Make sure that the connection is correct.
• There is a blockage in the sink spigot.
Clean the sink spigot.
• The connection of the water drain hose is not correct. The
hose can be kinked or squashed.
Make sure that the connection is correct.
• Close the water tap and contact your local Service Force
Centre.
Close the door.
• Mains plug is not connected in.
Put in the mains.
• The fuse has blown out in the household fuse box.
Replace the fuse.
• Delay start is set.
Cancel the delay start to start the programme immediately.
• Product number (PNC)
• Serial number (S.N.)
For these data, refer to the rating plate.
Write the necessary data here:
Model description : ..........
Product number : ..........
Serial number : ..........
load and soil.
• The basket is loaded incorrectly so that water cannot reach all surfaces.
• Spray arm does not turn freely because of incorrect arrangement of
the load.
• The filters are dirty or not correctly installed.
• The quantity of detergent is too little or missing.
• The salt container is empty.
• The water softener is adjusted on a wrong level.
• The salt container cap is not closed correctly.
• The rinse aid dispenser is empty.
• Decrease the rinse aid dosage.
Page 13

electrolux 13
The cleaning results are not satisfactory
Dry water drop signs on
glasses and dishes
• Increase rinse aid dosage.
• The detergent can be the cause.
Technical data
Dimensions Width
Electrical connection - Voltage Overall power - Fuse
Water supply pressure Minimum
Capacity 6 place settings
Height
Depth
Data on the electrical connection are on the rating plate on the back
of appliance.
0,8 bar (0,08 MPa)
Maximum
54,5 cm
44,7 cm
48,0-49,0 cm
10 bar (1,0 MPa)
Installation
Warning! Make sure that mains plug is
disconnected from the mains socket
during installation.
Fitting the appliance
Put the appliance adjacent to a water tap and
a drain.
When you put the appliance in place, make
sure that the water hoses are not kinked or
squashed.
Install the appliance on a kitchen sink, worktop or built-in..
Positioning
Install the dishwasher into the furniture of the
kitchen.
Make sure that the dimensions of the recess
agree with the given dimensions.
Make sure that there are openings in the furniture for the inlet hose, the water drain hose
and the mains cable.
Adjusting the level of the appliance
Make sure that the appliance is level to close
and seal the door correctly. If the level of the
appliance is correct, the door does not catch
on the sides of the cabinet. If the door does
not close correctly, loosen or tighten the adjustable feet until the appliance is level.
Page 14
14 electrolux
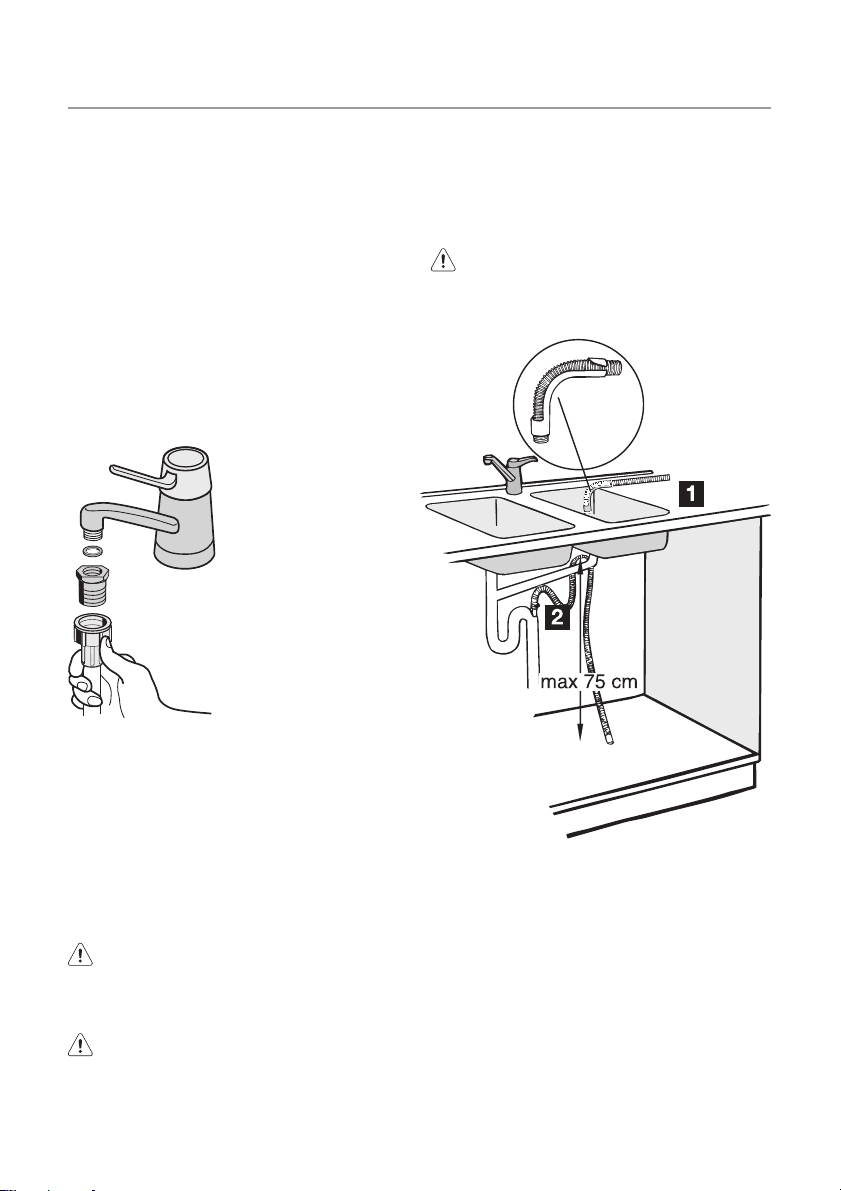
Water connection
Inlet hose
The appliance has safety features to prevent
that the water in the appliance goes back into
the drinking water system.
Connected the appliance to a hot (max. 60°)
or cold water supply.
If the hot water comes from alternative sources of energy that are more environmentally
friendly (e.g. solar or photovoltaic panels and
aeolian), use a hot water supply to decrease
energy consumption.
It is important that a water tap or stopcock is
near the dishwasher with easy access.
Connect the inlet hose to a water tap with an
external thread of 3/4”. If it is necessary, use
the restrictor 1/2".
Drain hose
The appliance has water safety system to
prevent water damage. If there is a malfunction, the drain pump automatically starts to
drain the remaining water out of the dishwasher.
Warning! Only if the dishwasher is
connected to the mains socket, the
water safety system operates when the
dishwasher is off.
If the water inlet hose is too short, replace the
water inlet hose with an applicable, longer
high-pressure hose. Do not connect an extension hose.
To suit the installation, it is possible to turn
the end of the hose that is connected to the
dishwasher. Do these steps :
1. Loosen the retaining nut.
2. Turn the hose.
3. Tighten the retaining nut.
Warning! Make sure that the retaining
nut and all other connections are tight
before you move the dishwasher into
position.
Warning! Always use a new water inlet
hose. Do not use connection hoses from
an old appliance.
2 procedures are possible to install the water
drain hose :
1. Attach the plastic curve supplied at the
end of the hose.
Put the water drain hose in the sink.
2. Connect the water drain hose to the water drain system.
The hose must be less than 75 cm above
the bottom of the dishwasher to prevent
incorrect operation of appliance.
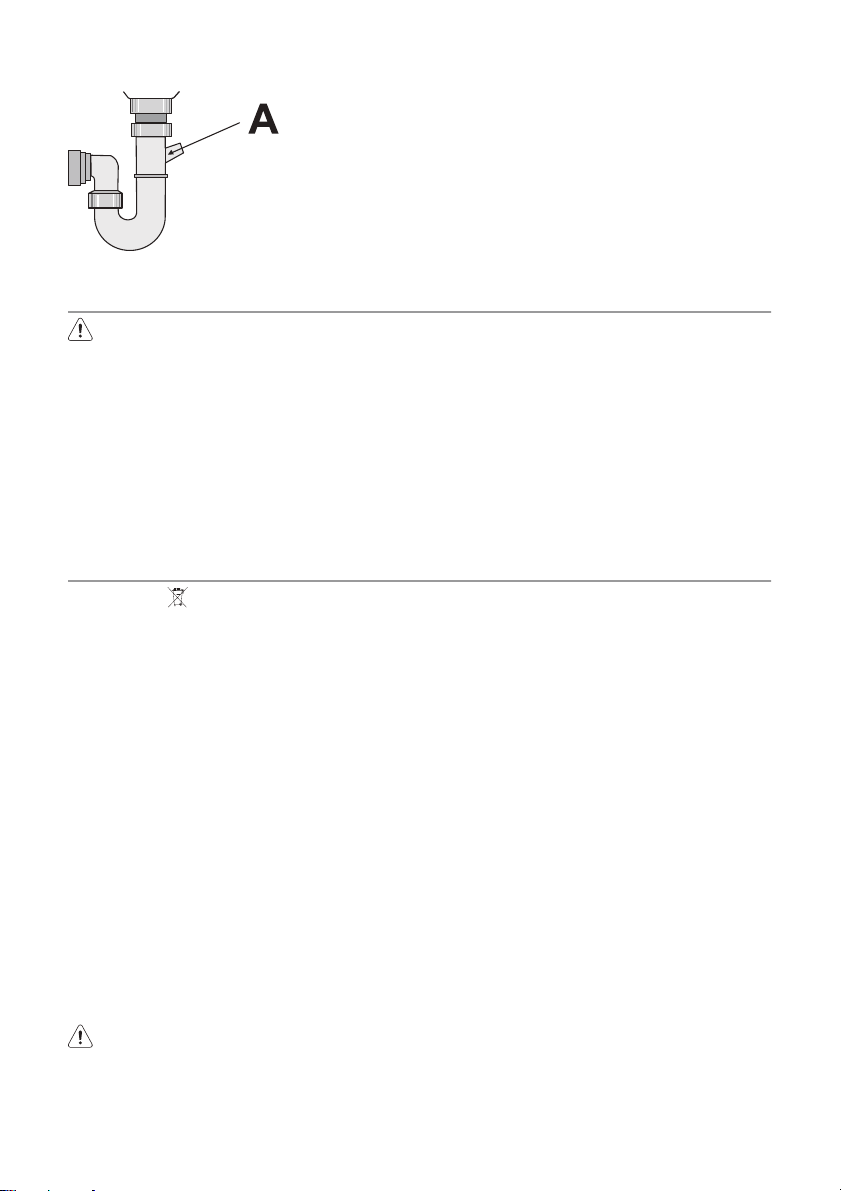
If you connect the water drain hose to a trap
spigot under the sink, remove the plastic
membrane (A). If you do not remove the
membrane, remaining food can cause a
blockage in the drain hose spigot
Page 15
Electrical connection
Warning! The manufacturer is not
responsible if you do not follow these
safety precautions.
Ground the appliance according to safety precautions.
Make sure that the rated voltage and
type of power on the rating plate agree
with the voltage and the power of the local power supply.
Always use a correctly installed shockproof socket.
Environment concerns
The symbol on the product or on its
packaging indicates that this product may
not be treated as household waste. Instead
it should be taken to the appropriate
collection point for the recycling of electrical
and electronic equipment. By ensuring this
product is disposed of correctly, you will help
prevent potential negative consequences for
the environment and human health, which
could otherwise be caused by inappropriate
waste handling of this product. For more
detailed information about recycling of this
product, please contact your local council,
your household waste disposal service or the
shop where you purchased the product.
The packaging materials are environmentally
friendly and can be recycled. The plastic
components are identified by markings, e.g.
>PE<, >PS<, etc. Discard the packaging
materials in the applicable container at the
community waste disposal facilities.
Warning! To discard the appliance,
follow the procedure:
• Pull the mains plug out of the socket.
• Cut off the mains cable and mains
plug and discard them.
electrolux 15
Do not use multi-way plugs, connectors
and extension cables. There is a risk of
fire.
Do not replace the mains cable yourself.
Contact the Service Force Centre.
Make sure that the mains plug is accessible after installation.
Do not pull the mains cable to disconnect the appliance. Always pull the
mains plug.
• Discard the door catch. This prevents
the children to close themselves inside the appliance and endanger their
lives.
Page 16
16 electrolux
Electrolux. Thinking of you.
Μοιραστείτε τη φιλοσοφία μας στο www.electrolux.com
Περιεχόμενα
Πληροφορίες ασφαλείας 16
Περιγραφή προϊόντος 18
Πίνακας χειριστηρίων 18
Χρήση της συσκευής 19
Ρύθμιση του αποσκλυρηντή νερού 20
Χρήση αλατιού για πλυντήριο πιάτων
Χρήση λαμπρυντικού 21
Φόρτωμα των μαχαιροπίρουνων και των
πιάτων 22
Χρήση απορρυπαντικού 23
Υπόκειται αε αλλαγές χωρίς προειδποίηση
Προγράμματα πλύσης 24
Επιλογή και έναρξη ενός προγράμματος
πλύσης 25
Φροντίδα και καθάρισμα 26
Τι να κάνετε αν... 27
Τεχνικά χαρακτηριστικά 29
Εγκατάσταση 29
20
Σύνδεση νερού 30
Ηλεκτρική σύνδεση 31
Περιβαλλοντικά θέματα 31
Πληροφορίες ασφαλείας
Για την προσωπική σας ασφάλεια και
τη σωστή λειτουργία της συσκευής, δια‐
βάστε το παρόν εγχειρίδιο προσεκτικά
πριν από την εγκατάσταση και τη χρή‐
ση . Φυλ άσσετε πάντα τι ς οδη γίες αυτέ ς
μαζί με τη συσκευή, ακόμη και εάν με‐
τακομίσετε ή πουλήσετε τη συσκευή. Οι
χρήστες πρέπει να είναι πλήρως εξοι‐
κειωμένοι με τη λειτουργία και τα χαρα‐
κτηριστικά ασφαλείας της συσκευής.
Σωστή χρήση
• Η συσκευή έχει σχεδιαστεί αποκλειστικά
για οικιακή χρήση.
• Χρησιμοποιείτε τη συσκευή μόνο για τον
καθαρισμό οικιακών σκευών που είναι
κατάλληλα για πλυντήρια πιάτων.
• Μη χρησιμοποιείτε διαλύτες στη συ‐
σκευή. Κίνδυνος έκρηξης.
• Τοποθετείτε τα μαχαίρια και άλλα αντικεί‐
μενα με αιχμηρά άκρα στο καλάθι για τα
μαχαιροπίρουνα με το αιχμηρό άκρο
προς τα κάτω. Σε αντίθετη περίπτωση,
τοποθετείτε τα σε οριζόντια θέση στο κύ‐
ριο καλάθι.
• Χρησιμοποιείτε μόνο προϊόντα για πλυ‐
ντήρια πιάτων (απορρυπαντικό, αλάτι,
λαμπρυντικό).
• Εάν ανοίξετε την πόρτα όταν λειτουργεί η
συσκευή, μπορεί να διαφύγει ζεστός
ατμός. Κίνδυνος δερματικών εγκαυμά‐
των.
• Μην αφαιρείτε τα πιάτα από το πλυντήριο
πιάτων πριν από το τέλος του προγράμ‐
ματος πλύσης.
• Όταν ολοκληρωθεί το πρόγραμμα πλύ‐
σης, αποσυνδέετε το φις τροφοδοσίας
από την πρίζα και κλείνετε τη βρύση νε‐
ρού.
• Η συσκευή αυτή πρέπει να επισκευάζεται
μόνο από εξουσιοδοτημένο τεχνικό σέρ‐
βις. Χρησιμοποιείτε μόνο γνήσια ανταλ‐
λακτικά.
• Για να αποφεύγονται οι τραυματισμοί και
η ζημιά στη συσκευή, μην κάνετε εσείς τις
επισκευές. Επικοινωνείτε πάντα με το
Κέντρο Σέρβις της περιοχής σας.
Γενική ασφάλεια
• Η συσκευή δεν πρέπει να χρησιμοποιεί‐
ται από άτομα (συμπεριλαμβανομένων
παιδιών) με μειωμένες σωματικές, αισθη‐
τη ριακέ ς ή δια νοητι κές ικ ανότη τες ή μ ε έλ‐
λειψη εμπειρίας και γνώσεων. Τα άτομα
αυτά πρέπει να βρίσκονται υπό επιτήρη‐
ση ή να έχουν λάβει οδηγίες σχετικά με τη
χρήση της συσκευής από κάποιο άτομο
που είναι υπεύθυνο για την ασφάλειά
τους.
• Ακολουθείτε πάντα τις οδηγίες ασφαλείας
που παρέχονται από τον κατασκευαστή
του απορρυπαντικού πιάτων, ώστε να
αποφευχθούν εγκαύματα στα μάτια, το
στόμα και το φάρυγγα.
Page 17

electrolux 17
• Μην πίνετε το νερό που υπάρχει στο πλυ‐
ντ ήριο π ιάτω ν. Στη συσκευ ή παρ αμένο υν
υπολείμματα απορρυπαντικού.
• Κλείνετε πάντα την πόρτα όταν δεν χρη‐
σιμοποιείτε τη συσκευή, ώστε να απο‐
φευχθεί ο κίνδυνος τραυματισμού και
ανατροπής λόγω της ανοικτής πόρτας.
• Μην κάθεστε και μη στέκεστε πάνω στην
ανοικτή πόρτα.
Ασφάλεια για τα παιδιά
• Η συσκευή αυτή πρέπει να χρησιμοποιεί‐
ται μόνο από ενήλικες. Τα παιδιά πρέπει
να βρίσκονται υπό επιτήρηση, ώστε δια‐
σφαλιστεί ότι δεν παίζουν με τη συσκευή.
• Φυλάσσετε όλα τα υλικά της συσκευασίας
μακριά από τα παιδιά. Υπάρχει κίνδυνος
ασφυξίας.
• Φυλάσσετε όλα τα απορρυπαντικά σε
ασφαλή περιοχή. Τα παιδιά δεν πρέπει
να έρχονται σε επαφή με απορρυπαντικά.
• Κρατήστε τα παιδιά μακριά από τη συ‐
σκευή όταν η πόρτα είναι ανοικτή.
Εγκατάσταση
• Βεβαιωθείτε ότι η συσκευή δεν έχει υπο‐
στεί ζημιά κατά τη μεταφορά. Μη συνδέε‐
τε τη συσκευή εάν έχει υποστεί ζημιά. Εάν
απαιτείται, επικοινωνήστε με τον προμη‐
θευτή.
• Αφαιρέστε όλα τα υλικά συσκευασίας
πριν από την πρώτη χρήση.
• Η ηλεκτρ ική εγ κατάσταση πρέπει να εκτ ε ‐
λείται από κατάλληλα καταρτισμένο άτο‐
μο.
• Η υδραυλική εγκατάσταση πρέπει να
εκτελείται από κατάλληλα καταρτισμένο
άτομο.
• Μην αλλάζετε τις προδιαγραφές και μην
τροποποιείτε αυτό το προϊόν. Υπάρχει
κίνδυνος τραυματισμού και βλάβης της
συσκευής.
• Μη χρησιμοποιείτε τη συσκευή:
– εάν το καλώδιο τροφοδοσίας ή οι σω‐
λήνες νερού έχουν υποστεί ζημιά,
– εάν ο πίνακας ελέγχου, ο πάγκος ή η
βάση έχουν υποστεί ζημιά, με αποτέ‐
λεσμα να μην είναι δυνατή η πρόσβαση
στο εσωτερικό της συσκευής.
Επικοινωνήστε με το κέντρο σέρβις της
περιοχής σας.
• Μην ανοίγετε οπές στα πλαϊνά τμήματα
της συσκευής, ώστε να αποφευχθεί η
βλάβη των υδραυλικών και ηλεκτρικών
στοιχείων.
ΠΡΟΕΙΔΟΠΟΙΗΣΗ Τηρείτε προσεκτικά
τις οδηγίες για τις ηλεκτρικές συνδέσεις
και τις συνδέσεις νερού.
Page 18
18 electrolux
Περιγραφή προϊόντος
1
2
3
1 Εκτοξευτήρας νερού
2 Μικροφίλτρο
3 Θήκη απορρυπαντικού
4 Θήκη λαμπρυντικού
5 Επίπεδο φίλτρο
6 Θήκη αλατιού
Η πινακίδα τεχνικών στοιχείων βρίσκε‐
ται στην πίσω πλευρά της συσκευής.
Πίνακας χειριστηρίων
6
5
4
5 4
1 2 3
Page 19
1 Διακόπτης προγράμματος
2 Πλήκτρο εκκίνησης/ακύρωσης
3 Πλήκτρο καθυστέρησης εκκίνησης
4 Ενδεικτικές λυχνίες
5 Ενδεικτική λυχνία On/off
Ενδεικτικές λυχνίες
Η ενδεικτική λυχνία ανάβει κατά τη φάση πλύσης
ή ξεβγάλματος.
Η ενδεικτική λυχνία ανάβει κατά τη φάση στε‐
γνώματος.
Η ενδεικτική λυχνία ανάβει όταν ολοκληρωθεί το
πρόγραμμα πλύσης. Βοηθητικές λειτουργίες:
• επίπεδο αποσκληρυντή νερού,
• συναγερμός σε περίπτωση δυσλειτουργίας
της συσκευής.
Η ενδεικτική λυχνία ανάβει όταν πρέπει να γεμί‐
1)
1) Η ενδεικτική λυχνία σβήνει όταν εκτελείται ένα πρόγραμμα πλύσης.
Πλήκτρο καθυστέρησης εκκίνησης
Χρησιμοποιήστε το πλήκτρο καθυστέρησης
εκκίνησης, για να καθυστερήσετε την εκκί‐
νηση του προγράμματος πλύσης για διά‐
στημα 3 ωρών. Ανατρέξτε στην παράγραφο
"Ρύθμιση και εκκίνηση προγράμματος πλύ‐
σης".
Διακόπτης προγράμματος και ενδεικτική
λυχνία on/off
• Για να ρυθμίσετε ένα πρόγραμμα πλύ‐
σης, περιστρέψτε το διακόπτη προγράμ‐
σετε τη θήκη αλατιού. Ανατρέξτε στην ενότητα
"Χρήση αλατιού για πλυντήρια πιάτων".
Η ενδεικτική λυχνία αλατιού μπορεί να παραμεί‐
νει ενεργοποιημένη για μερικές ώρες, ωστόσο
δεν υπάρχουν ανεπιθύμητες επιδράσεις για τη
λειτουργία της συσκευής.
ενδείκτης προγράμματος στο διακόπτη
προγράμματος πρέπει να αντιστοιχεί σε
ένα από τα προγράμματα πλύσης στον
πίνακα ελέγχου.
– Η ενδεικτική λυχνία on/off ανάβει (θέ‐
ση ON).
• Για να απενεργοποιήσετε τη συσκευή,
περιστρέψτε το διακόπτη προγράμματος
μέχρι ο ενδείκτης προγράμματος να αντι‐
στοιχεί στην ενδεικτική λυχνία on/off.
– Η ενδεικτική λυχνία on/off σβήνει (θέ‐
ση OFF).
ματος δεξιόστροφα ή αριστερόστροφα. Ο
electrolux 19
Χρήση της συσκευής
Ανατρέξτε στις συγκεκριμένες οδηγίες που
παρέχονται για κάθε βήμα της διαδικασίας.
1. Ελέγξτε εάν το επίπεδο αποσκληρυντή
νερού είναι σωστό για το βαθμό σκλη‐
ρότητας του νερού στην περιοχή σας.
Εάν απαιτείται, ρυθμίστε τον αποσκλη‐
ρυντή νερού.
2. Γεμίστε τη θήκη αλατιού με αλάτι για
πλυντήρια πιάτων.
3. Γεμίστε τη θήκη λαμπρυντικού με λαμ‐
πρυντικό.
4. Τοποθετήστε τα μαχαιροπίρουνα και τα
πιάτα στο πλυντήριο πιάτων.
5. Ρυθμίστε το σωστό πρόγραμμα πλύσης
αν άλ ογ α με το ν τ ύπο φο ρτ ίο υ κ αι το βα θ‐
μό λερώματος.
6. Γεμίστε τη θήκη απορρυπαντικού με τη
σωστή ποσότητα απορρυπαντικού.
7. Ενεργοποιήστε το πρόγραμμα πλύσης.
Αν χρησιμοποιείτε απορρυπαντικό σε
μορφή ταμπλετών, ανατρέξτε στο κε‐
φάλαιο "Χρήση απορρυπαντικού".
Page 20
20 electrolux
Ρύθμιση του αποσκλυρηντή νερού
Ο αποσκληρυντής νερού απομακρύνει τα
μεταλλικά στοιχεία και τα άλατα από την πα‐
ροχή νερού. Τα μεταλλικά στοιχεία και τα
άλατα επιδρούν αρνητικά στη λειτουργία
της συσκευής.
Η σκληρότητα του νερού μετράται σε ισο‐
δύναμες κλίμακες:
• Γερμανικοί βαθμοί (dH°),
Σκληρότητα νερού
°dH mmol/l °TH Clarke
>24 >4,2 >40 > 29 10
22- 24 3,9- 4,2 39- 40 27- 29 9
20- 22 3,5- 3,9 35- 39 25- 27 8
18- 20 3,2- 3,5 32- 35 23- 25 7
16- 18 2,8- 3,2 28- 32 20- 23 6
13- 16 2,3- 2,8 23- 28 17-20 5
10- 13 1,8- 2,3 18- 23 13- 17 4
7- 10 1,2- 1,8 12- 18 9- 13 3
4- 7 0,7- 1,2 7- 12 5- 9 2
< 4 < 0,7 < 7 < 5
1) Δεν απαιτείται χρήση αλατιού.
Ηλεκτρονικές ρυθμίσεις
Ο αποσκληρυντής νερού ρυθμίζεται από το
εργοστάσιο στο επίπεδο 5.
1. Πατήστε παρατεταμένα το πλήκτρο εκ‐
κίνησης/ακύρωσης. Περιστρέψτε το δια‐
κόπτη προγράμματος δεξιόστροφα μέ‐
χρι ο ενδείκτης προγράμματος να αντι‐
στοιχεί στο πρώτο πρόγραμμα πλύσης
στον πίνακα ελέγχου.
2. Αφήστε το πλήκτρο εκκίνησης/ακύρω‐
σης όταν η ενδεικτική λυχνία on/off και η
ενδεικτική λυχνία εκκίνησης/ακύρωσης
αρχίσουν να αναβοσβήνουν.
– Στο διάστημα αυτό, η ενδεικτική λυ‐
χνία τέλους αναβοσβήνει και υποδει‐
• Γαλλικοί βαθμοί (°TH),
• mmol/l (millimol ανά λίτρο - διεθνής μο‐
νάδα για τη σκληρότητα του νερού),
•Clarke.
Ρυθμίζετε τον αποσκληρυντή νερού ανάλο‐
γα με το βαθ μό σκ λη ρό τη τα ς τ ου ν ερ ού στ ην
περιοχή σας. Εάν απαιτείται, επικοινωνήστε
με τις τοπικές αρχές υδροδότησης.
κνύει το επίπεδο του αποσκληρυντή
νερού.
Παράδειγμα:
5 αναλαμπές, παύση, 5 αναλαμπές,
παύση, κλπ... = επίπεδο 5
3. Πατήστε μία φορά το πλήκτρο εκκίνη‐
σης/ακύρωσης, για να αυξήσετε το επί‐
πεδο του αποσκληρυντή νερού κατά μία
βαθμίδα.
Η ενδεικτική λυχνία τέλους υποδεικνύει
το νέο επίπεδο.
4. Περιστρέψτε το διακόπτη προγράμμα‐
τος στη θέση off για αποθήκευση της
διαδικασίας.
Ρύθμιση σκληρό‐
τητας νερού
1)
1
Χρήση αλατιού για πλυντήριο πιάτων
ΠΡΟΣΟΧΗ Χρησιμοποιείτε μόνο αλάτι
για πλυντήρια πιάτων. Η χρήση τύπων
αλατιού που δεν είναι κατάλληλοι για
πλυντήρια πιάτων μπορεί να οδηγήσει
στην πρόκληση βλάβης στον
αποσκληρυντή νερού.
ΠΡΟΣΟΧΗ Οι κόκκοι αλατιού και το
νερό με αλάτι στο κάτω μέρος της
Ακολουθήστε τα παρακάτω βήματα, για να
γεμίσετε τη θήκη αλατιού:
συσκευής μπορεί να προκαλέσουν
διάβρωση. Γεμίστε τη συσκευή με αλάτι
πριν από την ενεργοποίηση του
προγράμματος πλύσης για την
αποφυγή τυχόν διάβρωσης.
Page 21
electrolux 21
1. Περιστρέψτε αριστερόστροφα το καπά‐
κι, για να ανοίξετε τη θήκη αλατιού.
2. Γεμίστε τη θήκη αλατιού με 1 λίτρο νερού
(μόνο για την πρώτη λειτουργία).
3. Χρησιμοποιήστε το χωνί, για να γεμίσετε
τη θήκη αλατιού με αλάτι.
Χρήση λαμπρυντικού
ΠΡΟΣΟΧΗ Χρησιμοποιείτε μόνο
λαμπρυντικό για πλυντήριο πιάτων.
Μη γεμίζετε ποτέ τη θήκη λαμπρυντικού
με οποιαδήποτε άλλη ουσία (π.χ. κα‐
θαριστικό πλυντηρίου πιάτων, υγρό
απορρυπαντικό). Υπάρχει κίνδυνος
βλάβης της συσκευής.
Με το λαμπρυντικό τα πιάτα στεγνώ‐
νουν χωρίς σημάδια ή κηλίδες.
Το λαμπρυντικό προστίθεται αυτόματα
κατά την τελευταία φάση ξεβγάλματος.
Γεμίστε τη θήκη λαμπρυντικού, όταν η
ένδειξη λαμπρυντικού (B) γίνει διαυγής.
Ακολουθήστε τα παρακάτω βήματα, για να
γεμίσετε τη θήκη λαμπρυντικού:
4. Απομακρύνετε το αλάτι γύρω από το
άνοιγμα της θήκης αλατιού.
5. Περιστρέψτε δεξιόστροφα το καπάκι, για
να κλείσετε τη θήκη αλατιού.
Η υπερχείλιση νερού στη θήκη αλατιού
κατά την πλήρωση είναι φυσιολογική
Όταν ρυθμίσετε τον αποσκληρυντή νερού
στο επίπεδο 1, η ενδεικτική λυχνία αλατιού
δεν παραμένει αναμμένη.
B
1. Πατήστε το κουμπί απασφάλισης (A),
για να ανοίξετε τη θήκη λαμπρυντικού.
2. Γεμίστε τη θήκη λαμπρυντικού με λαμ‐
πρυντικό. Η ένδειξη 'max.' (μέγ.) υπο‐
δεικνύει τη μέγιστη στάθμη.
Page 22
22 electrolux
3. Απομακρύνετε τυχόν λαμπρυντικό που
έχει χυθεί με ένα απορροφητικό πανί,
ώστε να αποφευχθεί ο σχηματισμός
υπερβολικού αφρού κατά τη διάρκεια
του επόμενου προγράμματος πλύσης.
4. Κλείστε τη θήκη λαμπρυντικού.
Η χωρητικότητα της θήκης λαμπρυντι‐
κού είναι περίπου 150 ml. Η ποσότητα
λαμπρυντικού επαρκεί για περίπου 60
προγράμματα πλύσης.
Ρύθμιση της δόσης λαμπρυντικού
Η συσκευή έχει ρυθμιστεί από το εργοστά‐
σιο στο επίπεδο 1.
Μπορείτε να ρυθμίσετε τη δόση λαμπρυντι‐
κού μεταξύ 1 - 6 (1- 6 ml λαμπρυντικού).
Ανατρέξτε στα αποτελέσματα πλύσης ("Τι
να κάνετε εάν..."). Ξεκινήστε με τη μικρότερη
δόση.
1. Περιστρέψτε το βέλος δεξιόστροφα για
αύξηση της δοσολογίας.
2. Αυξήστε τη δόση εάν υπάρχουν σταγό‐
νες νερού ή επικαθίσεις ασβεστίου στα
πιάτα.
Φόρτωμα των μαχαιροπίρουνων και των πιάτων
Συμβουλές
ΠΡΟΣΟΧΗ Χρησιμοπο ιείτε τη συσ κευή
μόνο για οικιακά σκεύη που είναι
κατάλληλα για πλυντήρια πιάτων.
Μη χρησιμοποιείτε τη συσκευή για τον κα‐
θαρισμό αντικειμένων που μπορεί να απορ‐
ροφήσουν νερό (σφουγγάρια, πανιά οικια‐
κής χρήσης, κλπ.).
• Πριν τοποθετήσετε μαχαιροπίρουνα και
πιάτα, ακολουθήστε τα παρακάτω βήμα‐
τα:
– Απομακρύνετε όλα τα υπολείμματα
τροφών.
– Μαλακώνετε τα υπολείμματα καμένων
τροφών στα ταψιά.
• Για να τοποθετήσετε μαχαιροπίρουνα και
πιάτα, ακολουθήστε τα παρακάτω βήμα‐
τα:
– Τοποθετείτε τα κοίλα αντικείμενα (π.χ.
φλιτζάνια, ποτήρια, κατσαρόλες) με το
άνοιγμα προς τα κάτω.
– Βεβαιωθείτε ότι δεν συγκεντρώνεται νε‐
ρό στο δοχείο ή σε μια βαθιά βάση.
– Βεβαιωθείτε ότι τα μαχαιροπίρουνα και
τα πιάτα δεν εισχωρούν το ένα στο άλ‐
λο.
– Βεβαιωθείτε ότι τα μαχαιροπίρουνα και
τα πιάτα δεν καλύπτουν άλλα μαχαιρο‐
πίρουνα και πιάτα.
– Βεβαιωθείτε ότι τα ποτήρια δεν έρχο‐
νται σε επαφή με άλλα ποτήρια.
– Τοποθετείτε μικρά αντικείμενα στο κα‐
λάθι για τα μαχαιροπίρουνα.
• Τα πλαστικά αντικείμενα και οι κατσαρό‐
λες με αντικολλητικές επιστρώσεις συγ‐
κρατούν σταγόνες νερού.
• Τα πλαστικά αντικείμενα δεν στεγνώνουν
τόσο καλά όσο τα αντικείμενα από πορ‐
σελάνη ή χάλυβα.
• Τοποθετείτε τα ελαφριά αντικείμενα στο
κύριο καλάθι. Βεβαιωθείτε ότι τα αντικεί‐
μενα δεν μετακινούνται.
ΠΡΟΣΟΧΗ Βεβαιωθείτε ότι ο
εκτοξευτήρας νερού μπορεί να
μετακινηθεί ελεύθερα πριν από την
εκκίνηση ενός προγράμματος πλύσης.
Κύριο καλάθι
Τακτοποιείτε τα βαθιά πιάτα και τα μεγάλα
καπάκια γύρω από τις πλευρές του καλα‐
θιού. Τακτοποιείτε τα αντικείμενα πάνω και
κάτω από τις σχάρες για τα φλιτζάνια. Το
νερό πρ έπει να εισχ ωρεί σ ε όλα τ α μέρη των
πιάτων.
Μπορείτε να διπλώσετε τα σχάρες για τα
φλιτζάνια για τον καθορισμό αντικειμένων
με μεγάλο ύψος.
Page 23
electrolux 23
Καλάθι για τα μαχαιροπίρουνα
ΠΡΟΕΙΔΟΠΟΙΗΣΗ Μην τοποθετείτε
μαχαίρια με μεγάλου μήκους λεπίδες σε
κατακόρυφη θέση για την αποφυγή
τραυματισμών.
Τακτοποιείτε ψηλά αντικείμενα ή/και αιχμη‐
ρά μαχαιροπίρουνα σε οριζόντια θέση στο
κύριο καλάθι. Απαιτείται ιδιαίτερη προσοχή
με αιχμηρά αντικείμενα όπως μαχαίρια.
Χρησιμοποιείτε το καλάθι για τα μαχαιροπί‐
ρουνα για:
• πιρούνια και κουτάλια με τις λαβές προς
τα κάτω.
• μαχαίρια με τις λαβές προς τα πάνω.
Το καλάθι για τα μαχαιροπίρουνα διαθέτει
σχάρα που μπορείτε να αφαιρέσετε.
Τα μαχαιροπίρουνα δεν πρέπει να είναι
ενωμένα.
Βεβαιωθείτε ότι ο εκτοξευτήρας νερού
μπορεί να μετακινηθεί ελεύθερα πριν
κλείσετε την πόρτα.
Χρήση απορρυπαντικού
Χρησιμοποιείτε μόνο απορρυπαντικά
(σκόνη, υγρό ή ταμπλέτες) ειδικά για
πλυντήρια πιάτων.
Ακολουθήστε τις πληροφορίες στη συ‐
σκευασία:
• Δοσολογία που συνιστά ο κατα‐
σκευαστής.
• Συστάσεις αποθήκευσης.
Οι οδηγίες στη συσκευασία συνήθως
αναφέρονται σε μεγάλα πλυντήρια πά‐
των (12 ρυθμίσεις).
Για λόγους περιβαλλοντικούς, μη χρη‐
σιμοποιείτε περισσότερο από τη σωστή
ποσότητα απορρυπαντικού.
Πλήρωση με απορρυπαντικό
Ακολουθήστε τα παρακάτω βήματα, για να
γεμίσετε τη θήκη απορρυπαντικού:
A
B
1. Ανοίξτε το καπάκι της θήκης απορρυπα‐
ντικού.
2. Γεμίστε τη θήκη απορρυπαντικού (A) με
απορρυπαντικό.
3. Αν χρησιμοποιείτε πρόγραμμα πλύσης
με φάση πρόπλυσης, βάλτε περισσότε‐
ρο απορρυπαντικό στη θήκη απορρυ‐
παντικού πρόπλυσης ( B).
Το απορρυπαντικό απομακρύνεται κατά
τη φάση πρόπλυσης.
Page 24
24 electrolux
4. Κλείστε το καπάκι της θήκης απορρυ‐
παντικού.
Χρήση ταμπλετών απορρυπαντικού
Βάλτε την ταμπλέτα απορρυπαντικού στη
θήκη απορρυπαντικού (A).
Οι ταμπλέτες απορρυπαντικού περιέχουν:
•απορρυπαντικό,
•λαμπρυντικό,
• άλλα καθαριστικά μέσα.
Ακολουθήστε τα παρακάτω βήματα, για να
χρησιμοποιήσετε τις ταμπλέτες απορρυπα‐
ντικού:
1. Βεβαιωθείτε ότι οι ταμπλέτες απορρυ‐
παντικού είναι κατάλληλες για το βαθμός
σκληρότητας του νερού. Ανατρέξτε στις
οδηγίες του κατασκευαστή.
2. Μη γεμίζετε τις θήκες αλατιού και λαμ‐
πρυντικού.
Δεν είναι απαραίτητο να γεμίσετε τη θή‐
κη αλατιού και τη θήκη λαμπρυντικού.
Ακολουθήστε τα παρακάτω βήματα, όταν τα
αποτελέσματα στεγνώματος δεν είναι
ικανοποιητικά:
1. Γεμίστε τη θήκη λαμπρυντικού με λαμ‐
πρυντικό.
Προγράμματα πλύσης
Προγράμματα πλύσης
Πρόγραμμα
A
70°
B
65°
C
1)
55°
D
50°
Βαθμός λε‐
ρώματος
Πολύ λερωμέ‐
να
Κανονικά λε‐
ρωμένα
Κανονικά λε‐
ρωμένα
Κανονικά ή λί‐
γο λερωμένα
Τύπος φορτίου Περιγραφή προγράμματος
Πιάτα, μαχαιρο‐
πίρουνα, κατσα‐
Πιάτα και μαχαι‐
Πιάτα και μαχαι‐
Πιάτα και μαχαι‐
2. Ρυθμίστε τη δόση λαμπρυντικού στη θέ‐
ση 2.
Ακολουθήστε τα παρακάτω βήματα, για να
χρησιμοποιήσετε ξανά σκόνη
απορρυπαντικού:
1. Γεμίστε τις θήκες αλατιού και λαμπρυντι‐
κού.
2. Ρυθμίστε τον αποσκληρυντή νερού στο
υψηλότερο επίπεδο.
3. Εκτελέστε ένα πρόγραμμα πλύσης χω‐
ρίς πιάτα.
4. Ρυθμίστε τον αποσκληρυντή νερού.
Ανατρέξτε στην ενότητα "Ρύθμιση του
αποσκληρυντή νερού".
5. Ρυθμίστε τη δόση λαμπρυντικού.
Όλες οι μάρκες απορρυπαντικών δεν
διαλύονται στον ίδιο χρόνο. Ορισμένες
ταμπλέτες απορρυπαντικού δεν παρέ‐
χουν βέλτιστα αποτελέσματα καθαρι‐
σμού στα σύντομα προγράμματα πλύ‐
σης. Χρησιμοποιείτε μεγάλης διάρκειας
προγράμματα πλύσης, όταν χρησιμο‐
ποιείτε ταμπλέτες απορρυπαντικού, για
πλήρη απομάκρυνση του απορρυπα‐
ντικού.
Πρόπλυση
Κύρια πλύση
ρόλες
ροπίρουνα
ροπίρουνα
ροπίρουνα
2 ενδιάμεσα ξεβγάλματα
Τελικό ξέβγαλμα
Στέγνωμα
Πρόπλυση
Κύρια πλύση
1 ενδιάμεσο ξέβγαλμα
Τελικό ξέβγαλμα
Στέγνωμα
Πρόπλυση
Κύρια πλύση
1 ενδιάμεσο ξέβγαλμα
Τελικό ξέβγαλμα
Στέγνωμα
Κύρια πλύση
1 ενδιάμεσο ξέβγαλμα
Τελικό ξέβγαλμα
Στέγνωμα
Page 25

electrolux 25
Πρόγραμμα
E
40°
1) Δοκιμαστικό πρόγραμμα για ινστιτούτα δοκιμών
Βαθμός λε‐
ρώματος
Λίγο λερωμέ‐ναΕύθραυστα πιά‐
Τύπος φορτίου Περιγραφή προγράμματος
τα και ποτήρια
Στοιχεία κατανάλωσης
Πρόγραμμα Διάρκεια προγράμμα‐
A
70°
B
65°
C
1)
55°
D
50°
E
40°
1) Δοκιμαστικό πρόγραμμα για ινστιτούτα δοκιμών
τος
(σε λεπτά)
117 1,15 9
94 0,80 7
157 0,63 7
36 0,40 6
31 0,35 6
Οι τιμές κατανάλωσης είναι ενδεικτικές
και εξαρτώνται από την πίεση και τη
θερμοκρασία του νερού, καθώς και από
Κύρια πλύση
1 ενδιάμεσο ξέβγαλμα
Τελικό ξέβγαλμα
Στέγνωμα
Κατανάλωση ενέρ‐
γειας
(σε kWh)
Κατανάλωση νερού
(σε λίτρα)
τις μεταβολές της τροφοδοσίας και της
ποσότητας των πιάτων.
Επιλογή και έναρξη ενός προγράμματος πλύσης
Ακλουθήστε τα παρακάτω βήματα για τη
ρύθμιση και την εκκίνηση ενός προγράμμα‐
τος πλύσης:
1. Κλείστε την πόρτα.
2. Περιστρέψτε το διακόπτη προγράμμα‐
τος, για να ρυθμίσετε το πρόγραμμα
πλύσης. Ανατρέξτε στην ενότητα "Προ‐
γράμματα πλύσης".
– Η ενδεικτική λυχνία on/off ανάβει.
– Η ενδεικτική λυχνία φάσης για το πρό‐
γραμμα πλύσης αρχίζει να αναβοσβή‐
νει.
3. Πατήστε το πλήκτρο εκκίνησης/ακύρω‐
σης.
– Το πρόγραμμα πλύσης ξεκινά αυτό‐
ματα.
– Η ενδεικτική λυχνία εκκίνησης/ακύρω‐
σης ανάβει.
– Όταν ξεκινήσει το πρόγραμμα, μόνο η
ενδεικτική λυχνία για τη φάση που βρί‐
σκεται σε εξέλιξη παραμένει αναμμέ‐
νη.
Όταν εκτελείται το πρόγραμμα πλύσης,
δεν μπορείτε να αλλάξετε το πρόγραμ‐
μα. Ακυρώστε το πρόγραμμα πλύσης.
Ανατρέξτε στην ενότητα "Ακύρωση
προγράμματος πλύσης"
ΠΡΟΕΙΔΟΠΟΙΗΣΗ Διακόψτε ή
ακυρώστε το πρόγραμμα πλύσης μόνο
αν είναι απαραίτητο.
Page 26

26 electrolux
ΠΡΟΣΟΧΗ Ανοίξτε την πόρτα
προσεχτικά. Μπορεί να εκλυθεί καυτός
ατμός.
Ακύρωση προγράμματος πλύσης
• Πατήστε παρατεταμένα το πλήκτρο εκκί‐
νησης/ακύρωσης για περίπου 5 δευτερό‐
λεπτα.
– Η ενδεικτική λυχνία εκκίνησης/ακύρω‐
σης σβήνει.
– Η ενδεικτική λυχνία φάσης αρχίζει να
αναβοσβήνει.
Το πρόγραμμα πλύσης ακυρώνεται.
Μπορείτε να ακολουθήσετε τα παρακάτω
βήματα:
1. Απενεργοποιήστε τη συσκευή.
2. Ρυθμίστε ένα νέο πρόγραμμα πλύ‐
σης.
Γεμίστε τη θήκη απορρυπαντικού με
απορρυπαντικό πριν ρυθμίσετε ένα νέο
πρόγραμμα πλύσης.
Διακοπή προγράμματος πλύσης
Ανοίξτε την πόρτα.
• Το πρόγραμμα διακόπτεται.
Κλείστε την πόρτα.
• Το πρόγραμμα συνεχίζει από το σημείο
στο οποίο διακόπηκε.
Ρύθμιση και εκκίνηση προγράμματος
πλύσης με καθυστέρηση εκκίνησης
1. Ρυθμίστε ένα πρόγραμμα πλύσης.
2. Πατήστε το πλήκτρο καθυστέρησης εκ‐
κίνησης.
– Ανάβει η ενδεικτική λυχνία καθυστέ‐
ρησης εκκίνησης.
3. Πατήστε το πλήκτρο εκκίνησης/ακύρω‐
σης.
– Ξεκινά η αντίστροφη μέτρηση της κα‐
θυστέρησης εκκίνησης.
– Η ενδεικτική λυχνία φάσης σβήνει.
Όταν ολοκληρωθεί η αντίστροφη μέτρηση,
το πρόγραμμα πλύσης ξεκινά αυτόματα.
• Η ενδεικτική λυχνία καθυστέρησης εκκί‐
νησης σβήνει.
• Η ενδεικτική λυχνία φάσης ανάβει.
Μην ανοίγετε την πόρτα κατά τη διάρ‐
κεια της αντίστροφης μέτρησης, για να
απ οφ ευ χθ εί η δ ια κο πή τη ς α ντ ίστ ρο φη ς
μέτρησης. Όταν κλείσετε την πόρτα, η
αντίστροφη μέτρηση συνεχίζεται από
το σημείο στο οποίο διακόπηκε.
Ακύρωση καθυστέρησης εκκίνησης:
1. Πατήστε παρατεταμένα το πλήκτρο εκ‐
κίνησης/ακύρωσης για περίπου 5 δευ‐
τερόλεπτα.
– Η ενδεικτική λυχνία εκκίνησης/ακύρω‐
σης και η ενδεικτική λυχνία καθυστέ‐
ρησης εκκίνησης σβήνουν.
– Η ενδεικτική λυχνία φάσης αρχίζει να
αναβοσβήνει.
2. Για εκκίνηση του προγράμματος πλύ‐
σης, πατήστε το πλήκτρο εκκίνησης/
ακύρωσης.
Τέλος του προγράμματος πλύσης
Απενεργοποιείτε τη συσκευή στις παρακά‐
τω περιπτώσεις:
• Η λειτουργία της συσκευής σταματά αυ‐
τόματα.
• Η ενδεικτική λυχνία τέλους ανάβει.
Για καλύτερα αποτελέσματα στεγνώματος,
αφήστε την πόρτα μισάνοιχτη για μερικά λε‐
πτά πριν αφαιρέσετε τα πιάτα.
Περιμένετε μέχρι να κρυώσουν τα πιάτα
πριν τα αφαιρέσετε από τη συσκευή. Τα ζε‐
στά πιάτα μπορεί να υποστούν εύκολα ζη‐
μιά.
Φροντίδα και καθάρισμα
ΠΡΟΕΙΔΟΠΟΙΗΣΗ Απενεργοποιείτε τη
συσκευή πριν την καθαρίσετε.
Καθαρισμός των φίλτρων
ΠΡΟΣΟΧΗ Μη χρησιμοποιείτε τη
συσκευή χωρίς φίλτρα. Βεβαιωθείτε ότι
τα φίλτρα έχουν τοποθετηθεί σωστά. Σε
περίπτωση εσφαλμένης τοποθέτησης,
τα αποτελέσματα της πλύσης μπορεί
μην είναι ικανοποιητικά και να
προκληθεί βλάβη στη συσκευή.
Το πλυντήριο πιάτων διαθέτει 2 φίλτρα:
1. μικροφίλτρο
2. επίπεδο φίλτρο
Page 27

Ακολουθήστε τα παρακάτω βήματα, για να
καθαρίσετε τα φίλτρα:
1. Ανοίξτε την πόρτα.
2. Αφαιρέστε το καλάθι.
3. Αφαιρέστε τα φίλτρα στο κάτω μέρος της
συσκευής.
4. Καθαρίστε τα φίλτρα με τρεχούμενο νε‐
ρό.
5. Τοποθετήστε ξανά τα φίλτρα.
6. Περιστρέψτε το μικροφίλτρο δεξιόστρο‐
φα, για να το ασφαλίσετε.
7. Κλείστε την πόρτα.
Καθαρισμός του εκτοξευτήρα νερού
Ελέγχετε τακτικά τον εκτοξευτήρα νερού.
Απομακρύνετε τα υπολείμματα τροφών από
τις οπές στον εκτοξευτήρα νερού.
electrolux 27
Ακολουθήστε τα παρακάτω βήματα, για να
αφαιρέστε τον εκτοξευτήρα νερού:
1. Περιστρέψτε το παξιμάδι αριστερόστρο‐
φα.
2. Αφαιρέστε τον εκτοξευτήρα νερού.
3. Καθαρίστε πλήρως τις οπές.
Εξωτερικός καθαρισμός
Καθαρίστε τις εξωτερικές επιφάνειες της συ‐
σκευής και τον πίνακα ελέγχου με ένα μα‐
λακό υγρό πανί. Χρησιμοποιείτε μόνο ου‐
δέτερα απορρυπαντικά. Μη χρησιμοποιείτε
αποξεστικά προϊόντα, σύρματα ή διαλύτες
(ασετόν, τριχλωροαιθυλένιο κλπ...).
Προστασία από τον πάγο
ΠΡΟΣΟΧΗ Μην εγκαθιστάτε τη
συσκευή σε χώρο με θερμοκρασία
κάτω των 0°C. Ο κατασκευαστής δεν
είναι υπεύθυνος για βλάβες λόγω
παγετού.
Εάν δεν δυνατόν, αδειάστε τη συσκευή και
κλείστε την πόρτα. Αποσυνδέστε το σωλή‐
να παροχής νερού και αφαιρέστε το νερό
από το σωλήνα παροχής νερού.
Τι να κάνετε αν...
Η συσκευή δεν ξεκινά ή σταματά κατά τη
λειτουργία.
Εάν υπάρχει βλάβη, επιχειρήστε να αποκα‐
ταστήσετε το πρόβλημα μόνοι σας. Ανα‐
τρέξτε στην ενότητα "Τι να κάνετε εάν..." Εάν
δεν μπορείτε να αποκαταστήσετε το πρό‐
βλημα μόνοι σας, επικοινωνήστε με τον
αντιπρόσωπο ή το κέντρο σέρβις.
Page 28

28 electrolux
Κωδικός σφάλματος και δυσλει‐
• η ενδεικτική λυχνία εκκίνησης/
ακύρωσης αναβοσβήνει συνεχώς
• η ενδεικτική λυχνία τέλους αναβο‐
σβήνει 1 φορά
Το πλυντήριο πιάτων δεν γεμίζει με
νερό
• η ενδεικτική λυχνία εκκίνησης/
ακύρωσης αναβοσβήνει συνεχώς
• η ενδεικτική λυχνία τέλους αναβο‐
σβήνει 2 φορές
Το πλυντήριο πιάτων δεν αδειάζει
το νερό
• η αντλία αδειάσματος λειτουργεί
συνεχώς
• όλες οι ενδεικτικές λυχνίες στον
πίνακα ελέγχου σβήνουν
Λειτουργεί η διάταξη προστασίας
από υπερχείλιση
Το πρόγραμμα δεν ξεκινά • Η πόρτα της συσκευής δεν είναι κλειστή.
τουργία
• Έμφραξη της βρύσης νερού από επικαθίσεις ασβεστίου.
Καθαρίστε τη βρύση νερού.
• Η βρύση νερού είναι κλειστή.
Ανοίξτε τη βρύση νερού.
• Έμφραξη του φίλτρου στο σωλήνα παροχής νερού.
Καθαρίστε το φίλτρο.
• Εσφαλμένη σύνδεση του σωλήνα παροχής νερού. Ο σω‐
λήνας έχει συστραφεί ή συνθλιβεί.
Βεβαιωθείτε ότι η σύνδεση είναι σωστή.
• Έμφραξη της στρόφιγγας του νεροχύτη.
Καθαρίστε τη στρόφιγγα του νεροχύτη.
• Εσφαλμένη σύνδεση του σωλήνα αδειάσματος νερού. Ο
σωλήνας έχει συστραφεί ή συνθλιβεί.
Βεβαιωθείτε ότι η σύνδεση είναι σωστή.
• Κλείστε τη βρύση νερού και επικοινωνήστε με το τοπικό
κέντρο σέρβις.
Κλείστε την πόρτα.
• Το φις τροφοδοσίας δεν είναι συνδεδεμένο.
Συνδέστε το φις τροφοδοσίας.
• Έχει καεί μια ασφάλεια στον οικιακό ηλεκτρικό πίνακα.
Αντικαταστήστε την ασφάλεια.
• Έχει ρυθμιστεί η λειτουργία καθυστέρησης εκκίνησης.
Ακυρώστε τη λειτουργία καθυστέρησης εκκίνησης για άμε‐
ση εκκίνηση του προγράμματος.
Μετά τον έλεγχο, ενεργοποιήστε τη συ‐
σκευή. Το πρόγραμμα συνεχίζει από το ση‐
μείο στο οποίο διακόπηκε. Εάν η δυσλει‐
τουργία εμφανιστεί ξανά, επικοινωνήστε με
το κέντρο σέρβις.
Τα παρακάτω στοιχεία είναι απαραίτητα για
την παροχή άμεσης και κατάλληλης βοή‐
θειας από το κέντρο σέρβις:
• Μοντέλο (Mod.)
Τα αποτελέσματα καθαρισμού δεν είναι ικανοποιητικά
Τα πιάτα δεν είναι καθαρά • Το επιλεγμένο πρόγραμμα πλύσης δεν είναι κατάλληλο για τον
Σωματίδια ασβεστίου στα
πιάτα
τύπο φορτίου και το βαθμό λερώματος.
• Το καλάθι δεν έχει τοποθετηθεί σωστά, με αποτέλεσμα το νερό να
μη φτάνει σε όλες τις επιφάνειες.
• Οι εκτοξευτήρες νερού δεν περιστρέφονται ελεύθερα λόγω λαν‐
θασμένης τοποθέτησης του φορτίου.
• Τα φίλτρα έχουν ακαθαρσίες ή δεν έχουν τοποθετηθεί σωστά.
• Υπάρχει πολύ μικρή ποσότητα απορρυπαντικού ή δεν υπάρχει
καθόλου απορρυπαντικό.
• Η θήκη αλατιού είναι κενή.
• Ο αποσκληρυντής νερού έχει ρυθμιστεί σε εσφαλμένο επίπεδο.
• Δεν έχει κλείσει σωστά το καπάκι της θήκης αλατιού.
Πιθανή αιτία και λύση
• Αριθμός προϊόντος (PNC)
• Αριθμός σειράς (S.N.)
Για να εντοπίσετε τα στοιχεία αυτά, ανατρέξ‐
τε στην πινακίδα τεχνικών στοιχείων.
Σημειώστε τα απαιτούμενα στοιχεία στον
παρακάτω χώρο:
Περιγραφή μοντέλου: ..........
Αριθμός προϊόντος: ..........
Αριθμός σειράς: ..........
Page 29

electrolux 29
Τα αποτελέσματα καθαρισμού δεν είναι ικανοποιητικά
Τα πιάτα είναι υγρά και θα‐
μπά
Υπάρχουν σημάδια, γαλα‐
κτώδεις κηλίδες ή μια γαλα‐
ζωπή επικάλυψη στα ποτή‐
ρια και στα πιάτα
Έχουν στεγνώσει οι σταγό‐
νες νερού στα ποτήρια και
στα πιάτα
• Δεν χρησιμοποιήθηκε λαμπρυντικό.
• Η θήκη λαμπρυντικού είναι άδεια.
• Μειώστε τη δόση λαμπρυντικού.
• Αυξήστε τη δοσολογία του λαμπρυντικού.
• Το πρόβλημα μπορεί να οφείλεται στο απορρυπαντικό.
Τεχνικά χαρακτηριστικά
Διαστάσεις Πλάτος
Ηλεκτρική σύνδεση - Τάση Συνολική ισχύς - Ασφάλεια
Πίεση παροχής νερού Ελάχιστη
Χωρητικότητα 6 σερβίτσια
Ύψος
Βάθος
Τα στοιχεία ηλεκτρικής σύνδεσης αναγράφονται στην πινακίδα
τεχνικών στοιχείων στην πίσω πλευρά της συσκευής.
Μέγιστη
0,8 bar (0,08 MPa)
10 bar (1,0 MPa)
54,5 cm
44,7 cm
48,0-49,0 cm
Εγκατάσταση
ΠΡΟΕΙΔΟΠΟΙΗΣΗ Βεβαιωθείτε ότι το
φις τροφοδοσίας δεν είναι συνδεδεμένο
στην πρίζα κατά την εγκατάσταση.
Τοποθέτηση της συσκευής
Τοποθετήστε τη συσκευή κοντά στη βρύση
νερού και στην αποχέτευση.
Όταν τοποθετήσετε τη συσκευή, βεβαιωθεί‐
τε ότι οι σωλήνες παροχής νερού δεν έχουν
συστραφεί ή συνθλιβεί.
Τοποθετήστε τη συσκευή σε νεροχύτη κου‐
ζίνας, πάγκο ή εντοιχισμένο.
Τοποθέτηση
Τοποθετήστε το πλυντήριο πιάτων στο έπι‐
πλο της κουζίνας.
Βεβαιωθείτε ότι οι διαστάσεις της εσοχής
αντιστοιχούν με τις διαστάσεις που καθορί‐
ζονται.
Βεβαιωθείτε ότι υπάρχουν ανοίγματα στο
έπιπλο για το σωλήνα παροχής, το σωλήνα
αδειάσματος νερού και το καλώδιο τροφο‐
δοσίας.
Page 30

30 electrolux
Ρύθμιση οριζόντιας θέσης της συσκευής
Βεβαιωθείτε ότι η συσκευή έχει τοποθετηθεί
σε οριζόντια θέση, ώστε η πόρτα να κλείνει
και να σφραγίζει σωστά. Εάν η οριζόντια
θέση της συσκευής δεν είναι σωστή, η πόρ‐
Σύνδεση νερού
Σωλήνας παροχής
Η συσκευή έχει χαρακτηριστικά ασφαλείας
τα οποία εμποδίζουν το νερό που χρησιμο‐
ποιείται στη συσκευή να επιστρέψει πίσω
στο σύστημα παροχής πόσιμου νερού.
Συνδέστε τη συσκευή σε παροχή ζεστού
(μέγιστο 60°C) ή κρύου νερού.
Αν το ζεστό νερό προέρχεται από εναλλα‐
κτικές πηγές ενέργειας που εί ναι πιο φιλικές
στο περιβάλλον (π.χ. ηλιακούς ή φωτοβολ‐
ταϊκούς συλλέκτες και αιολικά συστήματα),
χρησιμοποιήστε την παροχή ζεστού νερού
για να μειώσετε την κατανάλωση ενέργειας.
Είναι σημαντικό η βρύση του νερού ή η
στρόφιγγα να βρίσκονται κοντά στο πλυ‐
ντήριο πιάτων και να υπάρχει εύκολη πρό‐
σβαση σε αυτήν.
Συνδέστε το σωλήνα παροχής σε βρύση νε‐
ρού με εξωτερικό σπείρωμα 3/4". Αν είναι
απαραίτητο, χρησιμοποιήστε τον μειωτήρα
1/2".
τα δεν ασφαλίζει στα πλαϊνά τμήματα του
θαλάμου. Εάν η πόρτα δεν κλείνει σωστά,
χαλαρώστε ή σφίξτε τα ρυθμιζόμενα πόδια
μέχρι η συσκευή να βρίσκεται σε οριζόντια
θέση.
2. Περιστρέψτε το σωλήνα.
3. Σφίξτε το παξιμάδι συγκράτησης.
ΠΡΟΕΙΔΟΠΟΙΗΣΗ Βεβαιωθείτε ότι το
παξιμάδι συγκράτησης και όλες οι
άλλες συνδέσεις είναι σφιχτές πριν
μετακινήσετε το πλυντήριο πιάτων στη
θέση του.
ΠΡΟΕΙΔΟΠΟΙΗΣΗ Χρησιμοποιείτε
πάντα ένα καινούργιο σωλήνα
παροχής νερού. Μη χρησιμοποιείτε
σωλήνες σύνδεσης από παλιά
συσκευή.
Σωλήνας αδειάσματος
Η συσκευή διαθέτει σύστημα ασφαλείας νε‐
ρού για την αποφυγή πρόκλησης βλάβης
από το νερό. Εάν υπάρχει δυσλειτουργία, η
αντλία αδειάσματος ξεκινά αυτόματα, ώστε
να απομακρυνθεί το νερό από το πλυντήριο
πιάτων.
ΠΡΟΕΙΔΟΠΟΙΗΣΗ Το σύστημα
ασφαλείας νερού λειτουργεί όταν το
πλυντήριο πιάτων είναι
απενεργοποιημένο, μόνο εάν η
συσκευή είναι συνδεδεμένη στην
πρίζα.
Αν ο σωλήνας παροχής νερού είναι πολύ
κοντός, αντικαταστήστε το σωλήνα παρο‐
χής νερού με έναν κατάλληλο, μακρύτερο
σωλήνα για υψηλές πιέσεις. Μη συνδέετε
προέκταση σωλήνα.
Για να ταιριάζει με την εγκατάσταση, είναι
δυνατό να περιστρέψετε το άκρο του σωλή‐
να που είναι συνδεδεμένος στο πλυντήριο
πιάτων. Κάντε αυτά τα βήματα:
1. Χαλαρώστε το παξιμάδι συγκράτησης.
Page 31

Για το άδειασμα του σωλήνα αδειάσματος
νερού μπορούν να χρησιμοποιηθούν 2 δια‐
δικασίες:
electrolux 31
1. Συνδέστε το πλαστικό καμπύλο εξάρτη‐
μα που παρέχεται στο άκρο του σωλή‐
να.
Τοποθετήστε το σωλήνα αδειάσματος
νερού στο νεροχύτη.
2. Συνδέστε το σωλήνα αδειάσματος νερού
στο σύστημα αδειάσματος νερού.
Ο σωλήνας πρέπει να έχει μήκος λιγό‐
τερο από 75 cm πάνω από το κάτω μέ‐
ρος του πλυντηρίου πιάτων, ώστε να
αποφευχθεί η εσφαλμένη λειτουργία της
συσκευής.
Αν συνδέσετε το σωλήνα αποστράγγισης
νερού σε πώμα παγίδας κάτω από το νερο‐
χύτη, απομακρύνετε την πλαστική μεμβρά‐
νη (A). Αν δεν απομακρύνετε τη μεμβράνη,
το υπόλοιπο φαγητό μπορεί να προκαλέσει
φράξιμο στο πώμα του εύκαμπτου σωλήνα
αποστράγγισης.
Ηλεκτρική σύνδεση
ΠΡΟΕΙΔΟΠΟΙΗΣΗ Ο κατασκευαστής
δεν είναι υπεύθυνος για τυχόν βλάβες
σε περίπτωση μη τήρησης αυτών των
προφυλάξεων ασφαλείας.
Γειώστε τη συσκευή σύμφωνα με τις
προφυλάξεις ασφαλείας.
Βεβαιωθείτε ότι η ονομαστική τάση και
ο τύπος ισχύος στην πινακίδα τεχνικών
στοιχείων συμφωνούν με την τάση και
την ισχύ της παροχής ρεύματος στην
περιοχή σας.
Χρησιμοποιείτε πάντα μια σωστά εγκα‐
τεστημένη πρίζα με προστασία από την
ηλεκτροπληξία.
Περιβαλλοντικά θέματα
Το σύµβολο στο προϊόν ή επάνω στη
συσκευασία του υποδεικνύει ότι δεν πρέπει
να µ εταχειρίζεστε το προϊόν αυτό ως
οικιακό απόρριµµα . Αντιθέτως θα πρέπει
Μη χρησι μοποι είτε τ αφ, συνδε τήρες και
προεκτάσεις. Υπάρχει κίνδυνος πυρκα‐
γιάς.
Μην αντικαθιστάτε το καλώδιο τροφο‐
δοσίας μόνοι σας. Επικοινωνήστε με το
κέντρο σέρβις.
Βεβαιωθείτε ότι υπάρχει εύκολη πρό‐
σβαση στο φις τροφοδοσίας μετά την
εγκατάσταση.
Μην τραβάτε το καλώδιο τροφοδοσίας
για αποσύνδεση της συσκευής. Τραβά‐
τε πάντα το φις τροφοδοσίας.
να παραδίδεται στο κατάλληλο σηµείο
συλλογής για την ανακύκλωση ηλεκτρικού
και ηλεκτρονικού εξοπλισµού.
Εξασφαλίζοντας ότι το προϊόν αυτό
Page 32

32 electrolux
διατίθεται σωστά, συµβάλλετε στην
αποτροπή ενδεχόµενων αρνητικών
συνεπειών για το περιβάλλον και την
ανθρώπινη υγεία, οι οποίες θα µπορούσαν
διαφορετικά να προκληθούν από
ακατάλληλο χειρισµό απόρριψης του
προϊόντος αυτού. Για λεπτοµερέστερες
πληροφορίες σχετικά µε την ανακύκλωση
του προϊόντος αυτού, επικοινωνήστε µε το
δηµαρχείο της περιοχής σας, την τοπική
σας υπηρεσία αποκοµιδής οικιακών
απορριµµάτων ή µε το κατάστηµα όπου
αγοράσατε το προϊόν.
Τα υλικά συσκευασίας είναι φιλικά προς το
περιβάλλον και ανακυκλώσιμα. Τα πλαστι‐
κά εξαρτήματα αναγνωρίζονται από την έν‐
δειξη, π.χ.>PE<, >PS<, κλπ. Απορρίψτε τα
υλικά συσκευασίας στο κατάλληλο δοχείο
στην τοπική εγκατάσταση διάθεσης απορ‐
ριμμάτων.
ΠΡΟΕΙΔΟΠΟΙΗΣΗ Για την απόρριψη
της συσκευής, ακολουθήστε την
παρακάτω διαδικασία:
• Τραβήξτε το φις τροφοδοσίας από
την πρίζα.
• Κόψτε το καλώδιο και το φις τροφο‐
δοσίας και απορρίψτε τα.
• Απορρίψτε το μάνδαλο της πόρτας.
Με τον τρόπο αυτό, αποτρέπεται ο
κίνδυνος παγίδευσης των παιδιών
στο εσωτερικό της συσκευής.
Page 33

Electrolux. Thinking of you.
Saiba mais sobre a nossa filosofia em www.electrolux.com
Índice
Informações de segurança 33
Descrição do produto 34
Painel de controlo 35
Utilização da máquina 36
Regular o amaciador da água 36
Utilização do sal para máquinas de lavar
loiça 37
Utilização do abrilhantador 37
Carregar pratos e talheres 38
Utilização do detergente 39
Programas de lavagem 40
Sujeito a alterações sem aviso prévio
Seleccionar e iniciar um programa de
lavagem 41
Manutenção e limpeza 42
O que fazer se… 43
Dados técnicos 44
Instalação 45
Ligação à rede de abastecimento de água
Ligação eléctrica 47
Preocupações ambientais 47
Informações de segurança
Para sua segurança e funcionamento
correcto da máquina, leia este manual
cuidadosamente antes da instalação e
utilização. Guarde sempre estas instruções com a máquina mesmo que seja
transferida ou vendida. Os utilizadores
devem conhecer por completo o funcionamento e as características de segurança da máquina.
Utilização correcta
• Não execute reparações sozinho para evitar ferimentos e danos na máquina. Contacte sempre o centro de assistência.
• Utilize apenas a máquina para limpar utensílios domésticos que são aplicáveis para
máquinas de lavar loiça.
• Não coloque solventes na máquina de lavar loiça. Risco de explosão.
• Coloque as facas e todas as peças com
pontas afiadas no cesto dos talheres com
a ponta virada para baixo. Caso contrário,
coloque numa posição horizontal no cesto
principal.
• Utilize apenas produtos específicos para
máquinas de lavar loiça (detergente, sal,
abrilhantador).
• Se abrir a porta enquanto a máquina está
em funcionamento, o vapor quente pode
escapar. Perigo de queimaduras na pele.
• Não retire a loiça da máquina antes do final
do programa de lavagem.
• Quando o programa de lavagem estiver
concluído, desligue a ficha da tomada e
feche a torneira de água.
• Apenas um técnico de assistência autorizado pode reparar este aparelho. Utilize
apenas peças sobresselentes originais.
• Não execute reparações sozinho para evitar ferimentos e danos na máquina. Contacte sempre o centro de assistência.
Segurança geral
• A máquina não deve ser utilizada por pessoas (incluindo crianças) com capacidades físicas, sensoriais e mentais reduzidas, ou que não possuam o conhecimento e a experiência necessários. Devem ser
vigiadas ou receber formação para a utilização da máquina por parte de uma pessoa responsável pela sua segurança.
• Cumpra as instruções de segurança do
fabricante do detergente da máquina de
lavar a loiça para evitar queimaduras nos
olhos, boca e garganta.
• Não beba água da máquina de lavar loiça.
Os resíduos de detergente podem ficar na
máquina.
• Feche sempre a porta quando não utilizar
a máquina, para evitar ferimentos e para
não tropeçar na porta aberta.
electrolux 33
45
Page 34

34 electrolux
• Não se sente nem se apoie na porta aberta.
Segurança para crianças
• A máquina só pode ser utilizada por adultos. As crianças devem ser vigiadas para
garantir que não brincam com a máquina.
• Mantenha todas as embalagens fora do
alcance das crianças. Existe o risco de asfixia.
• Mantenha todos os detergentes numa
área segura. Não permita que as crianças
toquem nos detergentes.
• Mantenha as crianças afastadas da máquina quando a porta está aberta.
Instalação
• Certifique-se de que a máquina não está
danificada devido ao transporte. Não ligue
uma máquina danificada. Se necessário,
contacte o fornecedor.
• Retire todo o material da embalagem antes da primeira utilização.
Descrição do produto
• Uma pessoa qualificada e competente
tem de fazer a instalação eléctrica.
• Uma pessoa qualificada e competente
tem de fazer a instalação da canalização.
• Não altere as especificações nem modifique este produto. Risco de ferimentos e
danos na máquina.
• Não utilize a máquina:
– Se o cabo de alimentação eléctrica ou
as mangueiras da água estiverem danificados,
– se o painel de controlo, bancada ou zo-
na do rodapé estiverem danificados,
que permitam o acesso ao interior do
aparelho.
Contacte o centro de assistência local.
• Não perfure os lados da máquina para evitar danos nos componentes hidráulicos e
eléctricos.
Advertência Cumpra cuidadosamente
as instruções para as ligações eléctricas
e hídricas.
1
2
3
6
5
4
Page 35

electrolux 35
1 Braço aspersor
2 Micro-filtro
3 Depósito de detergente
4 Depósito de abrilhantador
5 Filtro plano
6 Depósito de sal
A placa de características está na parte
traseira da máquina.
Painel de controlo
5 4
1 2 3
1 Selector de programas
2 Botão Iniciar/Cancelar
3 Tecla de início diferido
4 Indicadores luminosos
5 Indicador luminoso On/Off
Indicadores luminosos
O indicador luminoso acende-se quando a fase
de lavagem ou a fase de enxaguamento estão em
progresso.
O indicador luminoso acende-se quando a fase
de secagem está em curso.
O indicador luminoso acende-se quando o programa de lavagem está concluído. Funções auxiliares:
• nível do descalcificador de água,
• um alarme se a máquina tiver uma avaria.
O indicador luminoso acende-se quando é ne-
1)
1) O indicador luminoso está desligado enquanto um programa de lavagem estiver em curso.
cessário encher o recipiente de sal. Consulte "Utilização de sal para máquinas de lavar loiça".
O indicador luminoso de sal pode ficar aceso durante algumas horas, mas não tem um efeito indesejado no funcionamento da máquina.
Page 36

36 electrolux
Tecla de início diferido
Utilize a tecla de início diferido para atrasar o
início do programa de lavagem com um intervalo de 3 horas. Consulte "Definir e iniciar
um programa de lavagem".
Selector de programas e indicador
luminoso on/off
• Para definir um programa de lavagem, rode o selector de programas para a direita
ou para a esquerda. O marcador de pro-
grama no selector de programas tem de
estar em conformidade com um dos programas de lavagem no painel de controlo.
– O indicador luminoso On/Off acende-se
(posição ON).
• Para regular a máquina para a posição
"off", rode o selector de programas até o
marcador de programa estar em conformidade com o indicador luminoso on/off.
– O indicador luminoso On/Off apaga-se
(posição OFF).
Utilização da máquina
Consulte as instruções especificadas para
cada passo do procedimento.
1. Verifique se o nível do descalcificador de
água está correcto para a dureza de água
da sua área. Se necessário, regule o descalcificador de água.
2. Encha o recipiente de sal com sal para
máquina de lavar loiça.
3. Encha o depósito de abrilhantador.
4. Coloque os talheres e os pratos na máquina de lavar loiça.
5. Defina o programa de lavagem correcto
para o tipo de loiça e sujidade.
6. Encha o distribuidor de detergente com
a quantidade correcta de detergente.
7. Inicie o programa de lavagem.
Se utilizar detergente em pastilhas consulte o capítulo "Utilizar o detergente".
Regular o amaciador da água
O descalcificador de água retira minerais e
sais do fornecimento de água. Os minerais e
os sais podem ter um efeito nocivo no funcionamento da máquina.
A dureza da água é medida em escalas equivalentes:
• Graus alemães (dH°),
• Graus franceses (°TH),
Dureza da água
°dH mmol/l °TH Clarke
>24 >4.2 >40 > 29 10
22- 24 3,9- 4,2 39- 40 27- 29 9
20- 22 3,5- 3,9 35- 39 25- 27 8
18- 20 3,2- 3,5 32- 35 23- 25 7
16- 18 2,8- 3,2 28- 32 20- 23 6
13- 16 2,3- 2,8 23- 28 17-20 5
10- 13 1,8- 2,3 18- 23 13- 17 4
7- 10 1,2- 1,8 12- 18 9- 13 3
4- 7 0.7- 1,2 7- 12 5- 9 2
< 4 < 0,7 < 7 < 5
1) Não é necessário utilizar sal.
• mmol/l (milimol por litro - unidade internacional para a dureza da água),
•Clarke.
Regule o descalcificador de água para a dureza de água da sua área. Se necessário,
contacte os serviços de abastecimento de
água.
Regulação da du-
reza da água
1)
1
Page 37

electrolux 37
Ajuste electrónico
O descalcificador de água é regulado na
fábrica no nível 5.
1. Mantenha premida a tecla iniciar/cancelar. Rode o selector de programas para a
direita até o marcador de programa estar
em conformidade com o primeiro programa de lavagem no painel de controlo.
2. Solte a tecla iniciar/cancelar quando o indicador luminoso on/off e o indicador luminoso iniciar/cancelar começam a piscar.
– Ao mesmo tempo, o indicador lumino-
so Fim pisca para mostrar o nível do
descalcificador de água.
Exemplo:
5 intermitências, pausa, 5 intermitências, pausa, etc... = nível 5
3. Prima a tecla iniciar/cancelar uma vez para aumentar o nível do descalcificador de
água em um passo.
O indicador luminoso Fim mostra o novo
nível.
4. Rode o selector de programas para a posição off para guardar a operação.
Utilização do sal para máquinas de lavar loiça
Cuidado Utilize apenas sal para
máquinas de lavar loiça. Tipos de sal
que não são aplicáveis para máquinas
de lavar loiça causam danos no
descalcificador de água.
Cuidado Grãos de sal e água salgada
no fundo da máquina podem causar
corrosão. Encha a máquina com sal
antes de iniciar um programa de
lavagem, para evitar corrosão.
Execute estes passos para encher o recipiente de sal:
1. Rode a tampa para a esquerda para abrir
o recipiente de sal.
2. Encha o recipiente de sal com 1 litro de
água (apenas a primeira operação).
3. Utilize o funil para encher o recipiente de
sal com sal.
4. Retire o sal em torno da abertura do recipiente do sal.
5. Rode a tampa para a direita para fechar
o recipiente do sal.
É normal que a água transborde do recipiente de sal quando o enche com sal
Quando regula o descalcificador de água para o nível 1, o indicador luminoso de sal não
fica aceso.
Utilização do abrilhantador
Cuidado Utilize apenas abrilhantadores
específicos para máquinas de lavar
loiça.
Nunca encha o depósito de abrilhantador com qualquer outra substância (ex.:
agente de limpeza para máquinas de lavar loiça, detergente líquido). Existe o
risco de danificar a máquina.
Page 38

38 electrolux
O abrilhantador torna possível secar a
loiça sem riscos e manchas.
O abrilhantador é adicionado automaticamente durante a última fase de enxaguamento.
Encha o distribuidor de abrilhantador
quando o indicador de abrilhantador (B)
ficar claro.
Execute estes passos para encher o distribuidor do abrilhantador:
B
1. Prima a tecla de libertação (A) para abrir
o distribuidor de abrilhantador.
2. Encha o depósito de abrilhantador. A
marca máx.mostra o nível máximo.
3. Retire o abrilhantador entornado com um
pano absorvente para evitar demasiada
espuma durante o programa de lavagem
seguinte.
4. Feche o distribuidor de abrilhantador.
A capacidade do distribuidor de abrilhantador é, aproximadamente, de 150
ml. A quantidade de abrilhantador é suficiente para aproximadamente 60 programas de lavagem.
Regule a dosagem de abrilhantador
A máquina é regulada na fábrica para o nível
1.
Pode regular a dosagem de abrilhantador
entre 1 - 6 (1- 6 ml do abrilhantador).
Consulte os resultados de lavagem ("O que
fazer se..."). Inicie com a dosagem mais pequena.
1. Rode a seta para a direita para aumentar
a dosagem.
2. Aumente a dosagem se existirem gotas
de água ou calcário na loiça.
Carregar pratos e talheres
Sugestões e dicas úteis
Cuidado Utilize apenas a máquina para
utensílios domésticos que são
aplicáveis para máquinas de lavar loiça.
Não utilize a máquina para limpar objectos
que podem absorver água (esponjas, panos
domésticos, etc).
• Antes de carregar talheres e pratos, execute estes passos:
– Retire todos os resíduos e restos de ali-
mentos.
– Amoleça os restos de comida queimada
nos tachos.
• Enquanto coloca os talheres e pratos,
execute estes passos:
– Coloque as peças ocas (por exemplo,
chávenas, copos e panelas) com a
abertura para baixo.
– Certifique-se de que a água não acu-
mula no recipiente ou numa base funda.
– Certifique-se de que os talheres e os
pratos não estão dentro uns dos outros.
– Certifique-se de que os talheres e os
pratos não cobrem outros talheres e
pratos.
– Certifique-se de que os copos não to-
cam noutros copos.
– Coloque pequenos objectos no cesto
dos talheres.
• As peças de plástico e os tachos com revestimentos anti-aderentes podem reter
gotas de água.
• As peças de plástico não secam tão bem
como as peças de porcelana e de aço.
• Coloque as peças leves no cesto principal.
Certifique-se de que as peças não se mexem.
Page 39

electrolux 39
Cuidado Certifique-se de que o braço
aspersor pode deslocar-se livremente
antes de iniciar um programa de
lavagem.
Cesto principal
Arrume os pratos fundos e as tampas grandes nas extremidades do cesto. Arrume as
peças por cima e por baixo das prateleiras
para chávenas. A água deve chegar a todas
as partes da loiça.
Pode dobrar as prateleiras de chávenas para
limpar peças altas.
Cesto de talheres
Advertência Não coloque facas
compridas numa posição vertical para
evitar ferimentos.
Coloque os talheres longos e/ou afiados na
horizontal, no cesto principal. Tenha cuidado
com peças afiadas, como as facas.
Utilize o cesto dos talheres para:
• garfos e colheres com as pegas para baixo.
• facas com as pegas para cima.
O cesto dos talheres tem uma grelha de talheres que pode retirar.
Não permita que os talheres se juntem.
Certifique-se de que o braço aspersor
pode deslocar-se livremente antes de
fechar a porta.
Utilização do detergente
Utilize apenas detergentes (pó, líquido
ou pastilha) aplicáveis para máquinas de
lavar loiça.
Siga os dados na embalagem:
• dosagem recomendada pelo fabricante.
• recomendações de armazenamento.
Normalmente, as instruções na embalagem referem-se a máquinas de lavar loiça grandes (12 configurações).
A utilização da dose correcta contribui
para reduzir a poluição.
Adicionar o detergente
Execute estes passos para encher o distribuidor de detergente:
A
B
1. Abra a tampa do distribuidor de detergente.
2. Coloque o detergente no distribuidor (A).
3. Se utilizar um programa de lavagem com
fase pré-lavagem, coloque mais detergente no compartimento de detergente
de pré-lavagem (B).
O detergente é retirado durante a fase de
pré-lavagem.
Page 40

40 electrolux
4. Feche a tampa do distribuidor de detergente.
Utilização de pastilhas de detergente
Coloque a pastilha de detergente no distribuidor do detergente ( A).
As pastilhas de detergente contêm:
• detergente,
• abrilhantador,
• outros agentes de limpeza.
Execute estes passos para utilizar pastilhas
de detergente:
1. Certifique-se de que as pastilhas de detergente são aplicáveis para a dureza da
água. Siga as instruções do fabricante.
2. Não encha o recipiente de sal e o distribuidor de abrilhantador.
Não é necessário encher o compartimento do sal e o distribuidor de abrilhantador.
Execute estes passos quando os
resultados de secagem não forem
satisfatórios.
1. Encha o depósito de abrilhantador.
Programas de lavagem
Programas de lavagem
Programa
A
70°
B
65°
C
1)
55°
D
50°
Grau de suji-
dade
Sujidade in-
tensa
Sujidade nor-
mal
Sujidade nor-
mal
Sujidade normal ou ligeira
Tipo de carga Descrição do programa
Pratos, talheres,
tachos e panelas
Pratos e talheres
Pratos e talheres
Pratos e talheres
2. Regule a dosagem de abrilhantador para
a posição 2.
Execute estes passos para utilizar
novamente o pó detergente:
1. Encha o recipiente de sal e o distribuidor
de abrilhantador.
2. Regule o descalcificador de água para o
nível mais alto.
3. Execute um programa de lavagem sem
loiça.
4. Regule o descalcificador de água. Consulte "Regular o descalcificador de
água".
5. Regule a dosagem de abrilhantador.
As diferentes marcas de detergente dissolvem em tempos diferentes. Algumas
pastilhas de detergente não têm os melhores resultados de limpeza durante
programas de lavagem curtos. Utilize
programas de lavagem longos quando
utilizar pastilhas de detergente, de forma
a retirar por completo o detergente.
Pré-lavagem
Lavagem
2 enxaguamentos intermédios
Enxaguamento final
Secagem
Pré-lavagem
Lavagem
1 enxaguamento intermédio
Enxaguamento final
Secagem
Pré-lavagem
Lavagem
1 enxaguamento intermédio
Enxaguamento final
Secagem
Lavagem
1 enxaguamento intermédio
Enxaguamento final
Secagem
Page 41

electrolux 41
Programa
E
40°
1) Programa de teste para os institutos de teste
Grau de suji-
dade
Sujidade ligei-raLoiça delicada e
Valores de consumo
Programa Duração do progra-
A
70°
B
65°
C
1)
55°
D
50°
E
40°
1) Programa de teste para os institutos de teste
ma
(em minutos)
117 1,15 9
94 0,80 7
157 0,63 7
36 0,40 6
31 0,35 6
Os valores de consumo são meramente
indicativos e dependem da pressão e da
temperatura da água, bem como das
Tipo de carga Descrição do programa
Lavagem
copos
Consumo de energia
1 enxaguamento intermédio
Enxaguamento final
Secagem
(em kWh)
Consumo de água
(em litros)
variações da corrente eléctrica e da
quantidade de loiça.
Seleccionar e iniciar um programa de lavagem
Execute estes passos para definir e iniciar
um programa de lavagem:
1. Feche a porta.
2. Rode o selector de programas para definir o programa de lavagem. Consulte
"Programas de lavagem".
– O indicador luminoso on/off acende-
-se.
– O indicador luminoso de fase para o
programa de lavagem começa a piscar.
3. Prima a tecla iniciar/cancelar.
– O programa de lavagem é automatica-
mente iniciado.
– O indicador luminoso iniciar/cancelar
acende-se.
– Quando o programa inicia, apenas o
indicador luminoso de fase em curso
permanece aceso.
Quando o programa de lavagem estiver
em curso, não pode alterar o programa.
Cancele o programa de lavagem. Consulte "Cancelar um programa de lavagem"
Advertência Interrompa ou cancele um
programa em curso apenas se for
necessário.
Cuidado Abra a porta com cuidado.
Pode ser libertado vapor quente.
Page 42

42 electrolux
Cancelar um programa de lavagem
• Prima e mantenha premida a tecla iniciar/
cancelar durante aproximadamente 5 segundos.
– O indicador luminoso iniciar/cancelar
apaga-se.
– Os indicadores luminosos de fase co-
meçam a piscar.
O programa de lavagem é cancelado.
Neste momento, pode executar estes
passos:
1. Desligue a máquina.
2. Defina um novo programa de lavagem.
Encha o distribuidor de detergente com
detergente antes de definir um novo programa de lavagem.
Interromper um programa de lavagem
Abra a porta.
• O programa pára.
Feche a porta.
• O programa continua a partir do ponto de
interrupção.
Regular e iniciar um programa de
lavagem com início diferido
1. Defina um programa de lavagem.
2. Prima a tecla de início diferido.
– O indicador luminoso do início diferido
acende-se.
3. Prima a tecla iniciar/cancelar.
– Tem início a contagem decrescente do
início diferido.
– Os indicadores luminosos da fase apa-
gam-se.
Quando a contagem decrescente estiver
concluída, o programa de lavagem inicia automaticamente.
• O indicador luminoso de início diferido
apaga-se.
• O indicador luminoso de fase acende-se.
Não abra a porta durante a contagem
decrescente para evitar a interrupção da
mesma. Quando fechar novamente a
porta, a contagem decrescente continuará a partir do ponto de interrupção.
Cancelar um início diferido:
1. Prima e mantenha premida a tecla iniciar/
cancelar durante aproximadamente 5 segundos.
– O indicador luminoso iniciar/cancelar e
o indicador luminoso de início diferido
apagam-se.
– Os indicadores luminosos de fase co-
meçam a piscar.
2. Prima o botão Iniciar/Cancelar para inici-
ar o programa de lavagem.
Fim do programa de lavagem
Desligue a máquina nestas condições:
• A máquina pára automaticamente.
• O indicador luminoso Fim acende-se.
Para obter os melhores resultados de secagem, mantenha a porta entreaberta durante
alguns minutos antes de retirar a loiça.
Deixe a loiça arrefecer antes de a retirar da
máquina. A loiça quente danifica-se facilmente.
Manutenção e limpeza
Advertência Desligue a máquina antes
de a limpar.
Limpar os filtros
Cuidado Não utilize a máquina sem os
filtros. Certifique-se de que a instalação
dos filtros está correcta. Uma instalação
incorrecta irá causar resultados de
lavagem insatisfatórios e danificar a
máquina.
A máquina de lavar loiça tem 2 filtros:
1. micro-filtro
2. filtro plano
Page 43

electrolux 43
Execute estes passos para limpar os filtros:
1. Abra a porta.
2. Retire o cesto.
3. Retire os filtros no fundo da máquina.
4. Limpe os filtros debaixo de água a correr.
5. Torne a colocar os filtros.
6. Rode o micro-filtro para a direita para o
bloquear.
7. Feche a porta.
Limpe o braço aspersor
Examine regularmente o braço aspersor. Retire os restos de comida dos orifícios no braço aspersor.
O que fazer se…
A máquina não arranca ou pára durante o
funcionamento.
Se existir uma falha, tente primeiro encontrar
uma solução para o problema. Consulte "O
Código de avaria e mau funcio-
• intermitência contínua do indicador luminoso iniciar/cancelar
• 1 intermitência do indicador luminoso Fim
A máquina de lavar loiça não se enche de água
• intermitência contínua do indicador luminoso iniciar/cancelar
• 2 intermitências do indicador luminoso Fim
A máquina de lavar loiça não escoa
• a bomba de drenagem funciona
continuamente
• todos os indicadores luminosos
no painel de controlo apagam-se
O dispositivo anti-inundação é accionado
namento
• A torneira da água está obstruída ou com incrustações de
calcário.
Limpe a torneira da água.
• A torneira de água está fechada.
Abra a torneira da água.
• O filtro na mangueira de entrada de água está bloqueado.
Limpe o filtro.
• A ligação da mangueira de entrada de água não está correcta. A mangueira pode estar dobrada ou comprimida.
Certifique-se de que a ligação está correcta.
• O sifão do lava-loiças está bloqueado.
Limpe o sifão do lava-loiças.
• A ligação da mangueira de escoamento de água não está
correcta. A mangueira pode estar dobrada ou comprimida.
Certifique-se de que a ligação está correcta.
• Feche a torneira de água e contacte o serviço de assistência.
Execute estes passos para retirar o braço
aspersor:
1. Rode a porca para a esquerda.
2. Retire o braço aspersor.
3. Limpe por completo os orifícios.
Limpeza externa
Limpe as superfícies externas da máquina e
o painel de controlo com um pano suave humedecido. Utilize apenas detergentes neutros. Não utilize produtos abrasivos, esfregões ou solventes (acetona, tricloroetileno,
etc...).
Precauções contra a formação de gelo
Cuidado Não instale a máquina num
local onde a temperatura seja inferior a
0°C. O fabricante não é responsável por
danos devido a congelamento.
Se não for possível, esvazie a máquina e feche a porta. Desligue a mangueira de entrada de água e retire a água da mangueira de
entrada de água.
que fazer se...". Se não conseguir encontrar
uma solução para o problema, contacte o
seu fornecedor ou o centro de assistência.
Possível causa e solução
Page 44

44 electrolux
Código de avaria e mau funcio-
namento
O programa não arranca • A porta da máquina não está fechada.
Feche a porta.
• A ficha de alimentação eléctrica não está ligada.
Ligue a ficha.
• O fusível do contador está queimado.
Substitua o fusível.
• O início diferido está definido.
Cancele o início diferido para iniciar o programa imediatamente.
Após a verificação, ligue a máquina. O programa continua a partir do ponto de interrupção. Se a avaria persistir, contacte o centro de assistência.
Estes dados são necessários para o ajudar
rápida e correctamente:
• Modelo (Mod.)
Possível causa e solução
• Número de série (S.N.)
Para estes dados, consulte a placa de características.
Escreva os dados necessários aqui:
Designação do modelo: ..........
Número do produto: ..........
Número de série: ..........
• Número do produto (PNC)
Os resultados de limpeza não são satisfatórios
A loiça não está lavada • O programa de lavagem seleccionado não é aplicável para o tipo
Partículas de calcário na loiça • O recipiente de sal está vazio.
A loiça está molhada e baça • Não utilizou abrilhantador.
Há riscos, manchas esbranquiçadas ou uma película
azulada nos copos e na loiça
Sinais de gotas de água secas em copos e pratos.
de loiça e sujidade.
• O cesto é carregado incorrectamente, impedindo a água de atingir
todas as superfícies.
• O braço aspersor não roda livremente devido à disposição incorrecta da loiça.
• Os filtros estão sujos ou não estão instalados correctamente.
• Utilizou pouco ou nenhum detergente.
• O descalcificador de água está regulado para o nível errado.
• A tampa do depósito do sal não está bem fechada.
• O distribuidor de abrilhantador está vazio.
• Diminua a dosagem de abrilhantador.
• Aumente a dose de abrilhantador.
• A causa pode dever-se ao detergente.
Dados técnicos
Dimensões Largura
Ligação eléctrica - Tensão - Potência total - Fusível
Pressão do abastecimento da
água
Capacidade 6 talheres completos
Altura
Profundidade
Os dados na ligação eléctrica estão na placa de características na
parte traseira da máquina.
Mínima
Máxima
0,8 bar (0,08 MPa)
54,5 cm
44,7 cm
48,0-49,0 cm
10 bar (1,0 MPa)
Page 45

Instalação
Advertência Certifique-se de que a
ficha de alimentação eléctrica está
desligada da tomada durante a
instalação.
Instalar a máquina
Coloque a máquina adjacente a uma torneira
de água e uma saída de escoamento.
Quando coloca a máquina no lugar, certifique-se de que as mangueiras de água não
estão dobradas ou comprimidas.
Instale a máquina numa pia, bancada ou...
Posicionamento
Instale a máquina de lavar loiça na mobília da
cozinha.
electrolux 45
Certifique-se de que as dimensões da reentrância estão em conformidade com as dimensões dadas.
Certifique-se de que existem aberturas na
mobília para a mangueira de entrada, mangueira de escoamento de água e cabo de
alimentação eléctrica.
Regular o nível da máquina
Certifique-se de que a máquina está nivelada
para fechar e vedar a porta correctamente.
Se o nível da máquina estiver correcto, a
porta não fica presa nas partes laterais do
armário. Se a porta não fechar correctamente, desaperte ou aperte os pés ajustáveis até
a máquina estar nivelada.
Ligação à rede de abastecimento de água
Mangueira de entrada
A máquina tem funcionalidades de segurança para evitar que a água na máquina regresse ao sistema de água potável.
Ligue a máquina a um fornecimento de água
quente (máx. 60°) ou fria.
Se a água quente for proveniente de fontes
alternativas de energia mais ecológicas (por
exemplo, painéis solares ou fotovoltaicos e
eólicas), utilize um fornecimento de água
quente pata diminuir o consumo de energia.
É importante que uma torneira de água esteja perto da máquina de lavar loiça com
acesso fácil.
Ligue o tubo de entrada a uma torneira com
uma rosca externa de 3/4". Se for necessário, utilize o restritor 1/2".
Page 46

46 electrolux
Se a mangueira de entrada de água for demasiado curta, substitua a mangueira de entrada de água por uma mangueira de alta
pressão maior e aplicável. Não ligue uma
mangueira de extensão.
Conforme o tipo de instalação é possível rodar a extremidade da mangueira que está ligada à máquina de lavar loiça. Efectue estes
passos:
1. Desaperte a porca de retenção.
2. Rode a mangueira.
3. Aperte a porca de retenção
Advertência Certifique-se de que a
porca de retenção e todas as outras
ligações estão apertadas antes de
colocar a máquina de lavar loiça no
lugar.
Advertência Utilize sempre a
mangueira de entrada de água nova.
Não utilize mangueiras de ligação de
máquinas antigas.
Mangueira de escoamento
A máquina tem um sistema de segurança de
água para evitar danos de água. Se existir
uma avaria, a bomba de drenagem começa
automaticamente a drenar a restante água
para fora da máquina de lavar loiça.
Advertência O sistema de segurança
de água funciona quando a máquina de
lavar loiça está desligada, apenas se a
máquina de lavar loiça estiver ligada à
tomada de alimentação eléctrica.
São possíveis 2 procedimentos para drenar
a mangueira de escoamento de água.
1. Instale a curva de plástico fornecida na
extremidade da mangueira.
Coloque a mangueira de escoamento de
água na pia.
2. Ligue a mangueira de escoamento de
água ao sistema de escoamento de
água.
A mangueira tem de ser inferior a 75 cm
acima do fundo da máquina de lavar loiça
para evitar um funcionamento incorrecto
da máquina.
Se ligar a mangueira de escoamento da água
a um sifão por baixo do lava-loiça retire a
membrana de plástico (A). Se não retirar a
membrana, os alimentos podem bloquear o
sifão da mangueira de escoamento
Page 47

Ligação eléctrica
Advertência O fabricante não é
responsável se não seguir estas
precauções de segurança.
Ligue a máquina à terra de acordo com
as precauções de segurança.
Certifique-se de que a tensão nominal e
o tipo de alimentação na placa de características estão em conformidade
com a tensão e a alimentação do fornecimento de energia local.
Utilize sempre uma tomada correctamente instalada e à prova de choques
eléctricos.
Preocupações ambientais
O símbolo no produto ou na embalagem
indica que este produto não pode ser tratado
como lixo doméstico. Em vez disso, deve ser
entregue ao centro de recolha selectiva para
a reciclagem de equipamento eléctrico e
electrónico. Ao garantir uma eliminação
adequada deste produto, irá ajudar a evitar
eventuais consequências negativas para o
meio ambiente e para a saúde pública, que,
de outra forma, poderiam ser provocadas
por um tratamento incorrecto do produto.
Para obter informações mais
pormenorizadas sobre a reciclagem deste
produto, contacte os serviços
municipalizados locais, o centro de recolha
selectiva da sua área de residência ou o
estabelecimento onde adquiriu o produto.
Os materiais da embalagem são ecológicos
e podem ser reciclados. Os componentes de
plástico estão identificados por marcas, por
exemplo, >PE<, >PS<, etc. Elimine os materiais de embalagem no receptáculo adequado nas instalações de eliminação de resíduos da sua zona.
Advertência Para eliminar a máquina,
siga o procedimento:
• Retire a ficha da tomada.
• Corte o cabo de alimentação eléctrica
e a ficha de alimentação eléctrica e
elimine-os.
• Elimine o fecho da porta. Isto evita
que as crianças se fechem dentro da
máquina e coloquem a vida em perigo.
electrolux 47
Não utilize fichas de contactos múltiplos, conectores e cabos de extensão.
Existe um risco de incêndio.
Não substitua o cabo de alimentação
eléctrica sozinho. Contacte o centro de
assistência.
Certifique-se de que a ficha de alimentação eléctrica está acessível após a instalação.
Não puxe o cabo de alimentação eléctrica para desligar a máquina. Puxe
sempre pela ficha.
Page 48

48 electrolux
Electrolux. Thinking of you.
Обменяйтесь с нами своими мыслями на
www.electrolux.com
Содержание
Сведения по технике безопасности
Описание изделия 50
Панель управления 51
Эксплуатация изделия 52
Установка смягчителя воды 52
Использование соли для
посудомоечных машин 53
Использование ополаскивателя 54
Загрузка столовых приборов и посуды
Право на изменения сохраняется
Использование моющих средств 56
Программы мойки 57
48
Выбор и запуск программы мойки 58
Уход и чистка 59
Что делать, если ... 60
Технические данные 61
Установка 61
Подключение к водопроводу 62
Подключение к электросети 63
Охрана окружающей среды 64
54
Сведения по технике безопасности
Для собственной безопасности и
правильной эксплуатации машины
перед ее установкой и использова‐
нием внимательно прочитайте на‐
стоящее руководство. Всегда храни‐
те настоящие инструкции вместе с
машиной, даже если передаете или
продаете ее. Пользователи должны
хорошо знать, как работает машина,
и правила безопасности при ее
эксплуатации.
Правильная эксплуатация
• Данный прибор предназначен только
для бытового применения.
• Используйте машину только для мы‐
тья бытовой посуды, пригодной для
посудомоечных машин.
• Не заправляйте в машину растворите‐
ли. Опасность взрыва.
• Кладите ножи и все предметы с остры‐
ми концами в корзину для столовых
приборов острыми концами вниз. Либо
укладывайте их горизонтально в ос‐
новную корзину.
• Используйте только фирменные про‐
дукты для посудомоечных машин
(моющее средство, соль, ополаскива‐
тель).
• При открывании дверцы посудомоеч‐
ной машины во время ее работы из
нее может вырваться горячий пар.
Опасность ожогов кожи.
• Не извлекайте посуду из посудомоеч‐
ной машины до окончания программы
мойки.
• После завершения программы мойки
отключите сетевой шнур от розетки
электропитания и закройте кран пода‐
чи воды.
• Ремонт машины может выполнять
только квалифицированный специа‐
лист сервисной службы. Используйте
только оригинальные запасные части.
• Не ремонтируйте машину самостоя‐
тельно, чтобы избежать травм и по‐
вреждения прибора. Обращайтесь в
авторизованный сервисный центр.
Общие правила техники безопасности
• Лица (включая детей) с нарушенными
физическими сенсорными или ум‐
ственными способностями и ли с недо ‐
статком опыта или знаний не должны
пользоваться данным прибором. Они
должны находиться под присмотром
или получать инструкции от лица, от‐
ветственного за их безопасность.
• Соблюдайте инструкции по технике
безопасности от производителя мою‐
щего средства для посудомоечных ма‐
шин, чтобы предотвратить ожоги глаз,
рта и горла.
Page 49

electrolux 49
• Не пейте воду из посудомоечной ма‐
шины. В машине могут быть остатки
моющего средства.
• Чтобы предотвратить травмы и не
споткнуться об открытую дверцу, все‐
гда закрывайте ее, если не пользуе‐
тесь машиной.
• Не садитесь и не вставайте на откры‐
тую дверцу.
Безопасность детей
• Этим прибором могут пользоваться
только взрослые. Следите за тем, что‐
бы маленькие дети не играли с прибо‐
ром.
• Храните все упаковочные материалы
в недоступном для детей месте. Су‐
ществует риск смерти от удушения.
• Храните все моющие средства в без‐
опасном месте. Не позволяйте детям
прикасаться к моющим средствам.
• Не подпускайте детей к посудомоеч‐
ной машине, когда ее дверца открыта.
Установка
• Убедитесь, что машина не поврежде‐
на при транспортировке. Не подклю‐
чайте поврежденную машину. При не‐
обходимости свяжитесь с поставщи‐
ком.
• Перед тем, как приступать к
эксплуатации, удалите всю упаковку.
• Подключение к электросети должно
выполняться квалифицированным
компетентным лицом.
• Подключение к сети водоснабжения и
канализации должно в ып олн яться ква‐
лифицированным компетентным ли‐
цом.
• Не меняйте технические характери‐
стики или конструкцию этого изделия.
Риск получения травм или поврежде‐
ния изделия.
•Не включайте машину:
– если повреждены кабель электропи‐
тания или шланги для воды,
– если панель управления, рабочая
поверхность или цоколь поврежде‐
ны настолько, что стала доступной
внутренняя часть машины.
Обращайтесь в местный авторизован‐
ный сервисный центр.
• Не сверлите боковые стенки машины,
чтобы не повредить гидравлические
или электрические компоненты.
ВНИМАНИЕ! Строго
придерживайтесь инструкций по
подключению к сетям электро- и
водоснабжения.
Page 50

50 electrolux
Описание изделия
1
2
3
1 Разбрызгиватель
2 Микрофильтр
3 Дозатор моющего средства
4 Дозатор ополаскивателя
5 Плоский фильтр
6 Емкость для соли
Табличка с техническими данными
находится на тыльной стороне изде‐
лия.
6
5
4
Page 51

Панель управления
1 Селектор программ
2 Кнопка "Пуск/Отмена"
3 Кнопка "Отсрочка пуска"
4 Световые индикаторы
5 Индикатор "Вкл/Выкл"
Световые индикаторы
Индикатор загорается, когда выполняется
фаза мойки или ополаскивания.
Индикатор загорается, когда выполняется
фаза сушки.
Индикатор загорается по завершении про‐
граммы мойки. Дополнительные функции:
• уровень жесткости на устройстве смягче‐
ния воды,
• сигнал тревоги, если в машине возникла
неисправность.
Индикатор загорается, когда необходимо на‐
1)
1) Пока выполняется программа мойки, индикатор не светится.
Кнопка "Отсрочка пуска"
Используйте кнопку отсрочки пуска, что‐
бы отложить запуск программы мойки с
интервалом 3 часа. См. "Настройка и
пуск программы мойки".
Селектор программ и индикатор "Вкл/
Выкл"
• Для выбора программы мойки повора‐
чивайте селектор программ по или
против часовой стрелки. Указатель на
полнить емкость для соли. См. "Применение
посудомоечной соли".
Индикатор наличия соли может оставаться
включенным в течение нескольких часов, но
это не оказывает нежелательного влияния на
работу машины.
селекторе программ должен оказаться
напротив одной из программ мойки на
панели управления.
– При этом загорится индикатор "Вкл/
Выкл" (положение Вкл).
• Чтобы выключить машину, поверните
селектор программ так, чтобы указа‐
тель совместился с индикатором Вкл/
Выкл.
– Индикатор Вкл/Выкл погаснет (поло‐
жение Выкл).
electrolux 51
5 4
1 2 3
Page 52

52 electrolux
Эксплуатация изделия
Следуйте инструкциям, приведенным
для каждого шага процедуры.
1. Проверьте, чтобы на устройстве
смягчения воды был установлен пра‐
вильный для вашей местности уро‐
вень жесткости воды. При необходи‐
мости настройте устройство смягче‐
ния воды.
2. Насыпьте соль для посудомоечных
машин в емкость для соли.
3. Залейте ополаскиватель в дозатор.
4. Загрузите в машину столовые прибо‐
ры и посуду.
5. Выберите правильную программу
мойки в соответствии с типом посуды
и степенью ее загрязнения.
6. Заполните дозатор моющего сред‐
ства надлежащим количеством мою‐
щего средства.
7. Запустите программу мойки.
Если вы используете таблетирован‐
ные моющие средства, см. раздел
"Использование моющих средств".
Установка смягчителя воды
Устройство смягчения воды удаляет ми‐
неральные вещества и соли из водопро‐
водной воды, подаваемой в машину. Ми‐
неральные вещества и соли могут ока‐
зать вредное воздействие на работу ма‐
шины.
Жесткость воды измеряется в соответ‐
ствующих единицах:
• немецких градусах (dH°),
• французских градусах (°TH),
Жесткость воды
°dH ммоль/л °TH шкала Кларка
>24 >4,2 >40 >29 10
22-24 3,9-4,2 39-40 27-29 9
20-22 3,5-3,9 35-39 25-27 8
18-20 3,2-3,5 32-35 23-25 7
16-18 2,8-3,2 28-32 20-23 6
13-16 2,3-2,8 23-28 17-20 5
10-13 1,8-2,3 18-23 13-17 4
7-10 1,2-1,8 12-18 9-13 3
4-7 0,7-1,2 7-12 5-9 2
<4 <0,7 <7 <5
1) Использование соли не требуется
Настройка электронного блока
На заводе устройство для смягчения во‐
ды посудомоечной машины установлено
на уровень 5.
1. Нажмите и удерживайте кнопку "Пуск/
Отмена" Поверните селектор про‐
грамм по часовой стрелке, чтобы его
указатель оказался напротив первой
• ммоль/л (миллимолях на литр - меж‐
дународных единицах жесткости во‐
ды),
• градусах по шкале Кларка.
Установите на устройстве смягчения во‐
ды уровень, соответствующий жесткости
воды в вашей местности. При необходи‐
мости, обратитесь в местную организа‐
цию по водоснабжению.
программы мойки на панели управле‐
ния.
2. Отпустите кнопку "Пуск/Отмена", ко‐
гда загорится индикатор вкл/выкл, а
индикатор пуска/отмены начнет ми‐
гать.
Настройка жест‐
кости воды
1)
1
Page 53

electrolux 53
– В это же время начнет мигать ин‐
дикатор окончания программы, по‐
казывая уровень, установленный
на устройстве для смягчения воды.
Пример:
5 миганий, пауза, 5 миганий, пауза
и т.д. = уровень 5
3. Нажмите кнопку "Старт/Отмена" один
раз, чтобы увеличить уровень на ус‐
тройстве для смягчения вод ы на еди ‐
ницу.
Индикатор "Конец программы" пока‐
зывает новый уровень.
4. Поверните селектор программ в по‐
ложение Выкл, чтобы сохранить опе‐
рацию.
Использование соли для посудомоечных машин
ПРЕДУПРЕЖДЕНИЕ! Используйте
только соль для посудомоечных
машин. Соль, не предназначенная
для посудомоечных машин, может
повредить устройство для
смягчения воды.
ПРЕДУПРЕЖДЕНИЕ! Крупицы соли
или соленая вода на дне машины
могут вызвать коррозию. Чтобы
предотвратить коррозию, насыпайте
соль в машину до начала
выполнения программы мойки.
Чтобы наполнить емкость для соли, вы‐
полните следующие действия:
1. Поверните крышку против часовой
стрелки, чтобы открыть емкость для
соли.
2. Налейте в емкость для соли 1 л воды
(только перед первым использова‐
нием).
3. Чтобы засыпать в емкость соль, вос‐
пользуйтесь воронкой.
4. Уберите соль вокруг отверстия емко‐
сти для соли.
5. Поверните крышку по часовой стрел‐
ке, чтобы закрыть емкость для соли.
То, что вода выливается из емкости
для соли, когда насыпается соль,
нормально.
Когда на устройстве смягчения воды ус‐
тановлен уровень 1, индикатор соли не
светится.
Page 54

54 electrolux
Использование ополаскивателя
ПРЕДУПРЕЖДЕНИЕ! Используйте
только фирменный ополаскиватель
для посудомоечных машин.
Ни в коем случае не заливайте в до‐
затор ополаскивателя другие соста‐
вы (средство для чистки посудо‐
моечных машин, жидкое моющее
средство и т.п.). Существует риск по‐
вреждения машины.
Ополаскиватель позволяет сушить
посуду без образования полос и пя‐
тен.
Машина автоматически добавляет
ополаскиватель во время последне‐
го цикла полоскания.
Залейте в дозатор ополаскиватель,
когда становится виден индикатор
ополаскивателя (B).
Чтобы наполнить дозатор ополаскивате‐
ля, выполните следующие действия:
1. Нажмите кнопку (А), чтобы открыть
дозатор ополаскивателя.
2. Залейте в дозатор ополаскиватель.
Отметка "max." показывает макси‐
мальный уровень.
3. Вытрите пролившийся ополаскива‐
тель салфеткой, хорошо впитываю‐
щей жидкость, во избежание избы‐
точного пенообразования при сле‐
дующей мойке.
4. Закройте дозатор ополаскивателя.
Емкость дозатора ополаскивателя
равна примерно 150 мл. Этого коли‐
чества ополаскивателя достаточно
примерно для 60 программ мойки.
Регулирование дозировки
ополаскивателя.
На заводе устройство для смягчения во‐
ды посудомоечной машины установлено
на уровень 1.
Дозировку ополаскивателя можно уста‐
новить в пределах 1 - 6 (1- 6 мл опола‐
скивателя).
См. результаты мойки ("Если машина не
работает ..."). Начните с самой низкой
дозировки.
1. Чтобы увеличить дозировку, повора‐
чивайте стрелку по ходу часов.
2. Увеличьте дозировку, если на посуде
имеются капельки воды или накипь.
B
Загрузка столовых приборов и посуды
Полезные советы и рекомендации
ПРЕДУПРЕЖДЕНИЕ! Используйте
машину только для мытья бытовой
посуды, пригодной для
посудомоечных машин.
Не используйте машину для мытья пред‐
метов, которые могут поглощать воду
(губки, кухонные салфетки и т.п.).
Page 55

• Перед загрузкой столовых приборов и
тарелок выполните следующие дей‐
ствия:
– Удалите с них все остатки пищи и
отходы.
– Размягчите пригоревшие остатки
пищи на сковородках.
• Во время загрузки столовых приборов
и тарелок выполните следующие дей‐
ствия:
– Загружайте полые предметы (на‐
пример, чашки, стаканы, сковороды)
отверстием вниз.
– Проверьте, чтобы вода не собира‐
лась внутри посуды или машины.
– Проверьте, чтобы посуда и столо‐
вые приборы не находились внутри
друг друга.
– Проверьте, чтобы посуда и столо‐
вые приборы не накрывали друг дру‐
га.
– Проверьте, чтобы стаканы не сопри‐
касались друг с другом.
– Мелкие предметы укладывайте в
корзинку для столовых приборов.
• Пластиковые предметы и сковороды с
антипригарным покрытием способны
удерживать капли воды.
• Пластиковые предметы не высыхают
так же быстро, как фарфоровые и
стальные предметы.
• Легкие предметы укладывайте в ос‐
новную корзину. Проверьте, чтобы по‐
суда не перемещалась.
ПРЕДУПРЕЖДЕНИЕ! Прежде чем
включить программу мойки,
проверьте, чтобы разбрызгиватель
мог свободно перемещаться.
Основная корзина
Разместите глубокие тарелки и большие
крышки вдоль краев корзины. Уложите
предметы на подставках для чашек и под
ними. Вода должна попадать на все их
поверхности.
Если нужно помыть высокие предметы,
подставки для чашек можно сложить.
electrolux 55
Корзина для столовых приборов
ВНИМАНИЕ! Чтобы избежать травм,
не укладывайте вертикально ножи с
длинными лезвиями.
Кладите длинные и/или острые предме‐
ты в основную корзину горизонтально.
Будьте осторожны с острыми предмета‐
ми, такими как ножи.
Укладывайте в корзинку для столовых
приборов:
• вилки и ложки ручками вниз.
• ножи ручками вверх.
В корзинке для столовых приборов
имеется решетка, которую можно вы‐
нуть.
Не кладите столовые приборы друг на
друга.
Прежде чем закрыть дверцу, про‐
верьте, чтобы разбрызгиватель мог
свободно перемещаться.
Page 56

56 electrolux
Использование моющих средств
Используйте только моющие сред‐
ства (порошковые, жидкие или в та‐
блетках), предназначенные для по‐
судомоечных машин.
Следуйте указаниям, приведенным
на упаковке,
• по дозировке моющего средства.
• Рекомендации по хранению.
Инструкции на упаковке обычно от‐
носятся к большим посудомоечным
машинам (на 12 комплектов посуды).
Не превышайте указанную дозиров‐
ку моющего средства, чтобы умень‐
шить загрязнение окружающей сре‐
ды.
Внесение моющего средства
Чтобы наполнить дозатор моющего
средства, выполните следующие дей‐
ствия:
A
B
1. Откройте крышку дозатора моющего
средства.
2. Заполните дозатор моющего сред‐
ства ( A) моющим средством.
3. Если используется программа с фа‐
зой предварительной мойки, напол‐
ните моющим средством отделение
дозатора для предварительной мой‐
ки ( B).
Это моющее средство будет исполь‐
зовано на этапе предварительной
мойки.
4. Закройте крышку дозатора моющего
средства.
Использование моющего средства в
таблетках
Положите таблетку моющего средства в
дозатор моющих средств ( A).
Таблетированные моющие средства со‐
держат:
• моющее средство,
• ополаскиватель,
• другие чистящие вещества.
Чтобы использовать таблетированное
моющее средство, выполните следую‐
щие действия:
1. Проверьте, чтобы таблетированное
моющее средство подходило для во‐
ды с соответствующей жесткостью.
См. инструкции изготовителя.
2. Не наполняйте емкость для соли и
дозатор ополаскивателя.
Заполнять емкость для соли и доза‐
тор ополаскивателя не требуется.
Если результаты сушки
неудовлетворительны, выполните
следующие действия:
1. Залейте в дозатор ополаскиватель.
2. Установите дозировку ополаскивате‐
ля в положение 2.
Чтобы снова использовать порошковое
моющее средство, выполните
следующие действия:
1. Наполните емкость для соли и доза‐
тор ополаскивателя.
2. Установите уровень жесткости воды
на максимальное значение.
3. Выполните программу мойки без по‐
суды.
4. Настройте устройство для смягчения
воды. См. "Настройка смягчителя во‐
ды".
5. Отрегулируйте дозировку ополаски‐
вателя.
Различные моющиеся средства рас‐
творяются за разное время. Поэтому
некоторые таблетированные мою‐
щие средства не успевают полно‐
стью проявить свои чистящие свой‐
ства во время коротких программ
мойки. При использовании таблети‐
рованных моющих средств выбирай‐
те длинные программы мойки, чтобы
моющее средство полностью рас‐
творилось.
Page 57

Программы мойки
Программы мойки
Программа
A
70°
B
65°
C
1)
55°
D
50°
E
40°
1) Проверочная программа для испытательных лабораторий
Данные по потреблению
Программа Продолжительность
A
70°
B
65°
C
1)
55°
D
50°
E
40°
1) Проверочная программа для испытательных лабораторий
Степень за‐
грязненно‐
сти
Сильная за‐
грязнен‐
ность
Обычная за‐
грязнен‐
ность
Обычная за‐
грязнен‐
ность
Обычная или
слабая за‐
грязнен‐
ность
Слабая за‐
грязнен‐
ность
программы
(мин)
117 1,15 9
94 0,80 7
157 0,63 7
36 0,40 6
31 0,35 6
Тип загрузки Описание программы
Фаянс, столо‐
вые приборы,
кастрюли и ско‐
вороды
Фаянс и столо‐
вые приборы
Фаянс и столо‐
вые приборы
Фаянс и столо‐
вые приборы
Тонкий фаянс и
стекло
Электроэнергия
Предварительная мойка
Основная мойка
2 промежуточных полоскания
Заключительное полоскание
Сушка
Предварительная мойка
Основная мойка
1 промежуточное полоскание
Заключительное полоскание
Сушка
Предварительная мойка
Основная мойка
1 промежуточное полоскание
Заключительное полоскание
Сушка
Основная мойка
1 промежуточное полоскание
Заключительное полоскание
Сушка
Основная мойка
1 промежуточное полоскание
Заключительное полоскание
Сушка
(кВтч)
electrolux 57
Вода
(л)
Page 58

58 electrolux
Указанные нормы расхода являются
ориентировочными. Фактическое
потребление зависит от давления и
Выбор и запуск программы мойки
Чтобы выбрать и запустить программу
мойки, выполните следующие шаги:
1. Закройте дверцу.
2. Для выбора программы мойки повер‐
ните селектор программ. См. "Про‐
граммы мойки".
– При этом загорится индикатор
"Вкл/Выкл".
– Индикатор этапа выполнения за‐
данной программы начнет мигать.
3. Нажмите кнопку "Пуск/Отмена".
– Выполнение программы начнется
автоматически.
– При этом загорится индикатор
"Пуск/Отмена".
– Когда выполнение программы на‐
чалось, светится только индикатор
текущего этапа программы.
Во время выполнения программы
мойки программу изменить нельзя.
О тм ен ит е п ро гр ам му мо йк и. См . " От ‐
мена программы мойки".
ВНИМАНИЕ! Не прерывайте и не
отменяйте программу мойку без
необходимости.
ПРЕДУПРЕЖДЕНИЕ! Открывайте
дверцу осторожно. Может выходить
горячий пар.
Отмена программы мойки
• Нажмите кнопку "Пуск/Отмена" и удер‐
живайте ее нажатой приблизительно 5
секунд.
– Индикатор "Пуск/Отмена" погаснет.
– Индикаторы этапов программы на‐
чнут мигать.
Программа мойки отменена.
В этот момент можно выполнить сле‐
дующие действия:
1. Выключите прибор.
2. Выберите новую программу мойки.
Перед выбором новой программы
мойки наполните дозатор моющих
средств.
Прерывание программы мойки
Откройте дверцу.
температуры воды, а также от коле‐
баний напряжения в сети и количе‐
ства посуды.
• Программа остановится.
Закройте дверцу.
• Выполнение программы продолжится
с той точки, в которой она была пре‐
рвана.
Выбор и запуск программы мойки с
отсрочкой пуска
1. Выберите программу мойки.
2. Нажмите кнопку "Отсрочка пуска".
– При этом загорится индикатор "От‐
срочка пуска".
3. Нажмите кнопку "Пуск/Отмена".
– Начнется обратный отсчет време‐
ни отложенного пуска.
– Индикаторы этапов программы по‐
гаснут.
По истечении времени отсрочки пуска
программа мойки запустится автомати‐
чески.
• Индикатор "Отсрочка пуска" погаснет.
• Загорится индикатор соответствую‐
щего этапа.
Не открывайте дверцу во время об‐
ратного отсчета времени, чтобы не
прервать его. После того, как дверца
снова будет закрыта, обратный от‐
счет продолжится с точки, в которой
он был прерван.
Отмена отсрочки пуска:
1. Нажмите кнопку "Пуск/Отмена" и
удерживайте ее нажатой приблизи‐
тельно 5 секунд.
– Индикаторы фазы начинают ми‐
гать.
– Индикаторы "Пуск/Отмена" и "От‐
срочка пуска" погаснут.
2. Для запуска выбранной программы
мойки нажмите кнопку "Старт/Отме‐
на".
Окончание программы мойки
Выключите машину при следующих ус‐
ловиях:
• Машина останавливается автомати‐
чески.
• Загорается индикатор окончания про‐
граммы.
Page 59

electrolux 59
Чтобы улучшить результаты сушки, ос‐
тавьте дверцу приоткрытой и подождите
несколько минут, прежде чем доставать
посуду.
Уход и чистка
ВНИМАНИЕ! Перед чисткой
фильтров отключите
электроприбор.
Очистка фильтров
ПРЕДУПРЕЖДЕНИЕ! Не
пользуйтесь машиной без фильтров.
Убедитесь, что фильтры
установлены правильно. При
неправильно установленных
фильтрах результаты мойки будут
неудовлетворительными, а машина
может повредиться.
В посудомоечной машине имеется 2
фильтра:
1. микрофильтр
2. плоский фильтр
Чтобы почистить фильтры, выполните
следующие действия:
1. Откройте дверцу.
2. Выньте корзину.
3. Выньте фильтры, которые находятся
на дне машины.
4. Промойте фильтры под струей воды.
5. Установите фильтры на место.
6. Поверните микрофильтр по часовой
стрелке, чтобы зафиксировать его.
Прежде чем доставать посуду, дайте ей
остыть. Горячую посуду легко повре‐
дить.
7. Закройте дверцу.
Чистка разбрызгивателя
Внимательно осмотрите разбрызгива‐
тель Удалите остатки пищи из его отвер‐
стий.
Чтобы снять разбрызгиватель, выполни‐
те следующие действия:
1. Поверните гайку против часовой
стрелки.
2. Снимите разбрызгиватель.
3. Тщательно почистите отверстия.
Чистка машины снаружи
Протрите мягкой влажной тряпкой на‐
ружные поверхности и панель управле‐
ния машины. Используйте только не‐
йтральные моющие средства. Не ис‐
пользуйте абразивные материалы, ца‐
рапающие губки и растворители (ацетон,
трихлорэтилен и т.п.).
Меры защиты от замерзания
ПРЕДУПРЕЖДЕНИЕ! Не
устанавливайте машину в местах с
температурой ниже 0°C.
Производитель не несет
ответственность за повреждения,
вызванные воздействием мороза.
Если это невозможно, выньте все из ма‐
шины и закройте дверцу. Отсоедините
шланг для воды и слейте с него воду.
Page 60

60 electrolux
Что делать, если ...
Посудомоечная машина не запускается
или останавливается во время работы.
В случае неисправности сначала попы‐
тайтесь найти способ устранения про‐
Код ошибки и неисправность Возможная причина неисправности и ее устранение
• непрерывно мигает индикатор
пуска/отмены
• 1 мигание индикатора конца
программы
В посудомоечную машину не по‐
ступает вода
• непрерывно мигает индикатор
пуска/отмены
• 2-кратное мигание индикатора
конца программы
Посудомоечная машина не сли‐
вает воду
• сливной насос работает непре‐
рывно
• все индикаторы на панели
управления погасли
Сработала система защиты от
перелива
Программа не запускается • Дверца машины не закрыта.
• Водопроводный кран забит грязью или накипью.
Прочистите водопроводный кран.
• Водопроводный кран закрыт.
Откройте водопроводный кран.
• Засорен фильтр в наливном шланге.
Прочистите фильтр.
• Неправильное подключение наливного шланга. Шланг
может быть изогнут или передавлен.
Убедитесь в правильности подключения шланга.
• Забита сливная труба раковины.
Прочистите сливную трубу раковины.
• Неправильное подключение сливного шланга. Шланг
может быть изогнут или передавлен.
Убедитесь в правильности подключения шланга.
• Закройте кран и обратитесь в местный авторизован‐
ный сервисный центр.
Закройте дверцу.
• Вилка сетевого шнура не вставлена в розетку.
Вставьте вилку в розетку.
• Перегорел предохранитель на домашнем распредели‐
тельном щите.
Замените предохранитель.
• Установлена отсрочка пуска.
Чтобы начать выполнение программы немедленно, от‐
мените отсрочку пуска.
После выполнения проверки включите
машину. Выполнение программы про‐
до лж ит ся с т ой то чк и, в к от ор ой о на бы ла
прервана. Если неисправность появится
снова, обратитесь в местный авторизо‐
ванный сервисный центр.
Чтобы быстро и правильно получить по‐
мощь, необходимы следующие данные:
• Название модели (Mod.):
блемы самостоятельно. Если самостоя‐
тельно найти решение не удалось, обра‐
щайтесь в сервисный центр.
• Номер изделия(PNC)
• Серийный номер (S.N.)
Эта информация приведена на табличке
технических данных.
Запишите необходимые данные здесь:
Название модели: ..........
Номер изделия: ..........
Серийный номер: ..........
Page 61

electrolux 61
Результаты мойки неудовлетворительны
Посуда остается грязной • Выбранная программа мойки не соответствует типу посуды и
На посуде имеется извест‐
ковый налет
Посуда мокрая и тусклая • Не использовался ополаскиватель.
На стеклянной и фаянсо‐
вой посуде видны полосы,
белесые пятна или голубо‐
ватая пленка
После высыхания капель
воды на стекле и посуде
остаются следы
степени ее загрязнения.
• Корзина загружена неправильно, и вода не попадает на все
поверхности.
• Разбрызгиватель не может свободно вращаться из-за непра‐
вильной укладки посуды.
• Фильтры засорены или неправильно установлены.
• Использовано мало моющего средства, или оно не применя‐
лось.
• Емкость для соли пуста.
• Неправильно задана степень жесткости на устройстве для
смягчения воды.
• Неплотно завинчен колпачок емкости для соли.
• Дозатор ополаскивателя пуст.
• Уменьшите дозировку ополаскивателя.
• Увеличьте дозировку ополаскивателя.
• Причиной может быть качество моющего средства.
Технические данные
Габариты Ширина
Электрическое подключение
- Напряжение - Общая мощ‐
ность - Предохранитель
Давление в водопроводной
системе
Вместительность 6 стандартных комплектов
Высота
Глубина
Информация по электрическому подключению указана на та‐
бличке с техническими данными, расположенной на тыльной
стороне машины.
Минимум
Максимум
0,8 бар (0,08 МПа)
10 бар (1,0 МПа)
54,5 см
44,7 см
48,0-49,0 см
посуды
Установка
ВНИМАНИЕ! Проверьте, чтобы во
время установки кабель питания не
был включен в розетку сети
электропитания.
Встраивание машины
Поставьте машину рядом с водопровод‐
ным краном и канализационным сливом.
При установке машины следите за тем,
чтобы шланги для воды не перегибались
и не передавливались.
Установите машину на кухонный слив,
рабочую поверхность или встройте.
Размещение
Установите моечную машину в кухонную
мебель.
Page 62

62 electrolux
Подключение к водопроводу
Наливной шланг
В машине предусмотрены защитные ме‐
ры, предотвращающие попадание воды
обратно в систему водоснабжения.
Подключите прибор к водопроводу с го‐
рячей (макс. 60°) или холодной водой.
Если горячая вода поступает из альтер‐
нативных источников энергии, которые
более безопасны для окружающей сре‐
ды (например, солнечные, фотогальва‐
нические панели, ветровые генерато‐
ры), используйте горячее водоснабже‐
ние из этих источников для снижения по‐
требления энергии.
Важно, чтобы водопроводный кран или
задвижка находились рядом с посудо‐
моечной машиной, и был бы обеспечен
к ним легкий доступ.
Подсоедините наливной шланг к водо‐
проводному крану с наружной резьбой
3/4". При необходимости используйте
переходник на 1/2".
Проверьте, чтобы размеры ниши отве‐
чали указанным размерам.
Проверьте, чтобы в стенках ниши име‐
лись отверстия для наливного шланга,
сливного шланга и кабеля электропита‐
ния.
Горизонтальное выравнивание машины
Проверьте, чтобы машина была хорошо
выровнена по горизонтали и дверца
плотно закрывалась. Если машина вы‐
ровнена надлежащим образом, дверца
не цепляется за стенки корпуса. Если
дверца закрывается неплотно, отвинти‐
те или зав и нтите ре г улиро воч ную но жку ,
чтобы выровнять машину по горизонта‐
ли.
Если наливной шланг слишком короткий,
замените его другим подходящим, более
длинным шлангом высокого давления.
Не используйте удлинитель шланга.
В зависимости от места установки, мож‐
но поворачивать конец шланга, подсое‐
диненный к посудомоечной машине. Вы‐
полните следующие действия:
1. Ослабьте стопорную гайку.
2. Поверните шланг.
3. Затяните стопорную гайку.
ВНИМАНИЕ! Прежде чем
перемещать машину на место,
проверьте, чтобы стопорная гайка и
другие соединения были плотно
затянуты.
Page 63

electrolux 63
ВНИМАНИЕ! Всегда используйте
новый наливной шланг. Не
используйте соединительные
шланги от старого прибора.
Сливной шланг
Машина оснащена предохранительной
системой от протечек воды. Если возни‐
кает неисправность, сливной насос ав‐
томатически начинает откачивать из ма‐
шины оставшуюся воду.
ВНИМАНИЕ! Когда посудомоечная
машина выключена,
предохранительная система
работает только при условии, что
машина подключена к электросети.
Слив воды с помощью сливного шланга
можно выполнить 2 способами:
1. Прикрепите пластмассовый изогну‐
тый наконечник, поставляемый с ма‐
шиной, к концу шланга.
Прикрепите сливной шланг к ракови‐
не.
2. Подсоедините сливной шланг к кана‐
лизационной системе.
Чтобы предотвратить неправильную
работу машины, шланг должен быть
поднят не выше, чем на 75 см от дна
машины.
Если вы подключаете сливной шланг к
раструбу сливной трубы под раковиной,
удалите пластиковую мембрану (А).
Если не удалить мембрану, остатки пи‐
щи мо гу т в ыз ва ть за сор ен ие в м ес те со е‐
динения трубы с наливным шлангом
Подключение к электросети
ВНИМАНИЕ! Производитель не
несет ответственности, если
пользователь не соблюдает эти
меры безопасности.
Заземлите машину в соответствии с
требованиями техники безо‐
пасности.
Проверьте, чтобы напряжение и тип
электропитания, указанные на та‐
бличке с техническими характери‐
стиками, соответствовали напряже‐
нию и типу электропитания в мест‐
ной электросети.
Page 64

64 electrolux
Пользуйтесь только правильно уста‐
новленной электробезопасной ро‐
зеткой.
Не пользуйтесь переходниками, сое‐
динителями и удлинителями. Суще‐
ствует риск возгорания.
Не заменяйте кабель электропита‐
ния самостоятельно. Обращайтесь в
авторизованный сервисный центр.
Охрана окружающей среды
Символ на изделии или на его
упаковке указывает, что оно не подлежит
утилизации в качестве бытовых отходов.
Вместо этого его следует сдать в
соответствующий пункт приемки
электронного и электрооборудования
для последующей утилизации.
Соблюдая правила утилизации изделия,
Вы поможете предотвратить
причинение окружающей среде и
здоровью людей потенциального
ущерба, который возможен в противном
случае, вследствие неподобающего
обращения с подобными отходами. За
более подробной информацией об
утилизации этого изделия просьба
обращаться к местным властям, в
службу по вывозу и утилизации отходов
или в магазин, в котором Вы приобрели
изделие.
Упаковка изготовлена из экологичных
материалов и может быть повторно пе‐
реработана. На пластмассовых деталях
указан материал, из которого они изго‐
товлены, например, >PE<, (полиэтилен)
>PS< (полистирол) и т.д. Упаковочные
материалы следует складывать в соот‐
ветствующие контейнеры местных
служб по утилизации отходов.
ВНИМАНИЕ! Если машина больше
не нужна, выполните следующие
действия:
• Выньте вилку из розетки.
• Отрежьте кабель электропитания
и штепсельную вилку и выкиньте
их.
• Удалите дверной замок. Благода‐
ря этому дети не смогут оказаться
запертыми внутри машины, под‐
вергая свою жизнь опасности.
Проверьте, чтобы после установки
был обеспечен доступ к вилке сете‐
вого шнура.
Для отключения машины от электро‐
сети не тяните за кабель электропи‐
тания. Всегда беритесь за саму вил‐
ку.
Page 65

Electrolux. Thinking of you.
Düşüncelerinizi www.electrolux.com.tr adresinden bizimle
daha fazla paylaşın
İçindekiler
Güvenlik Bilgileri 65
Ürün Tanımı 66
Kontrol Paneli 67
Cihazın kullanımı 68
Su Yumuşatıcının Ayarlanması 68
Bulaşık Makinesi Tuzunun Kullanımı 69
Parlatıcı Bölmenin Doldurulması 69
Çatal-bıçaklar Ve Tabakların Yerleştirilmesi
Deterjan Kullanımı 71
Önceden haber verilmeksizin değişiklik yapma hakkı saklıdır.
Yıkama Programları 72
Bir Yıkama Programının Seçilmesi Ve
Başlatılması 73
Bakım Ve Temizlik 74
Servisi Aramadan Önce 75
Teknik Veriler 76
Montaj 77
Su Bağlantısı 77
Elektrik Ağlantısı 79
70
Çevreyle İlgili Bilgiler 79
Güvenlik Bilgileri
Kendi güvenliğiniz ve cihazın doğru çalışması için cihazı monte etmeden ve kullanmadan önce, bu kılavuzu dikkatle
okuyunuz. Bu kılavuzu saklayınız, cihazı
başka bir yere taşıdığınızda veya sattığınızda dahi beraberinde veriniz. Kullanıcılar, cihazın çalışma ve emniyet özelliklerini tam olarak bilmelidir.
Doğru kullanım
• Cihaz, sadece evde kullanım için tasarlanmıştır.
• Bu cihazı sadece bulaşık makinesi için uygun ev kaplarını temizlemek için kullanınız.
• Cihaza çözücü koymayınız. Patlama riski
•Bıçaklar ve keskin uçlu nesnelerin tümü
sivri uçları aşağı gelecek
çak sepetine konmalıdır. Aksi takdirde, yatay bir şekilde ana sepete konmalıdır.
• Sadece bulaşık makineleri için uygun ürünler (deterjan, tuz ve parlatıcı) kullanınız.
• Cihaz çalışmaktayken kapağını açarsanız
sıcak buhar çıkabilir. Yanma tehlikesi.
•Bulaşık yıkama işlemi bitmeden önce bu-
laşıkları bulaşık makinesinden çıkartmayı-
nız.
•Yıkama programı sona erdiğinde, bulaşık
makinesinin fişini prizden çekiniz ve su
musluğunu kapatınız.
şekilde çatal-bı-
• Bu cihaz, sadece yetkili bir servis mühendisi tarafından tamir edilebilir. Sadece orijinal yedek parçalar kullanınız.
• Yaralanmalardan ve cihazın zarar görmesinden kaçınmak için tamir işlemlerini kendiniz yapmayınız. Daima yerel Yetkili Servisinizle temasa geçiniz.
Genel güvenlik
• Fiziksel, duyusal ve mental kapasiteleri düşük veya cihazın kullanımı hakkında dene-
yimi ve bilgisi olmayan kişiler (çocuklar da
dahil) bu cihazı kullanmamalıdır. Bu kişiler
cihazı, güvenliklerinden sorumlu olan bir kişinin denetimi altında veya cihazın kullanımı
hakkında bu kişi tarafından bilgilendirilmek
kaydıyla kullanabilir.
•Gözde, ağızda ve boğazda yanıkları önle-
mek için bulaşık makinesi deterjanı üreticisinin güvenlik talimatlarına riayet ediniz.
•Bulaşık makinesindeki sudan içmeyiniz.
Cihazınızda deterjan artıkları kalabilir.
• Yaralanmalardan ve açık kapağa takılmak-
tan kaçınmak için kullanmadığ
zın kapağını daima kapatınız.
•Açık kapak üzerine oturmayınız veya bas-
mayınız.
electrolux 65
ınızda ciha-
Page 66

66 electrolux
Çocuk emniyeti
• Bu cihazı sadece yetişkinler kullanabilir.
Çocukların cihazla oynamadıklarından
emin olmak için denetim altında tutulmaları
gerekir.
• Tüm ambalaj malzemelerini çocuklardan
uzak tutunuz. Boğulma riski teşkil eder.
•Tüm deterjanları güvenli bir yere koyunuz.
Çocukların deterjanlara dokunmasına izin
vermeyiniz.
•Kapağı açıkken, çocukları cihazdan uzak
tutunuz.
Montaj
•Cihazın nakliye nedeniyle zarar görme-
diğinden emin olunuz. Hasarlı bir cihazın fişini prize takmayınız. Gerektiği takdirde tedarikçiyi arayınız.
• İlk kez kullanmadan önce tüm ambalaj
malzemelerini çıkartınız.
Ürün Tanımı
• Elektriksel kurulumu kalifiye ve uzman bir
kişi yapmalıdır.
• Su tesisatının kurulumunu kalifiye ve uzman bir kişi yapmalıdır.
• Bu ürünün özelliklerini değiştirmeyiniz veya
ürünü modife etmeyiniz. Yaralanma ve cihazın zarar görme riski.
• Şu durumlarda cihazı kullanmayınız:
– Kablosu veya su hortumları hasarlı ise,
– kontrol paneli, cihazın üst kısmı veya ta-
ban bölgesi cihazın içine direk erişimin
mümkün olabileceği bir şekilde hasar
görmüşse.
Yerel yetkili servis merkezine başvurunuz.
• Hidrolik ve elektrikli bileşenlerine zarar vermemek için, cihazın yanlarında delik açmayınız.
Uyarı Elektrik ve su bağlantısı ile ilgili
talimatlara dikkatlice riayet ediniz.
1
2
3
6
5
4
Page 67

1 Püskürtme kolu
2 Mikro-filtre
3 Deterjan çekmecesi
4 Parlatıcı çekmecesi
5 Yassı filtre
6 Tuz haznesi
Bilgi etiketi cihazın arka kısmındadır.
Kontrol Paneli
1 Program düğmesi
2 Başlatma/İptal tuşu
3 Gecikmeli başlatma tuşu
4 Gösterge ışıkları
5 Açma/Kapama gösterge ışığı
Gösterge ışıkları
Yıkama aşaması veya duralama aşaması gerçekleştirilirken gösterge ışığı yanar.
Kurutma aşaması gerçekleştirilirken gösterge ışığı
yanar.
Yıkama aşaması sona erdiğinde gösterge ışığı yanar. Ek fonksiyonlar;
•su yumuşatıcı seviyesi,
• makinede bir arıza durumunda bir alarm verilmesi.
Tuz haznesinin doldurulması gerektiğinde göster-
1)
1) Bir yıkama programı çalıştırılırken gösterge lambası söner.
Gecikmeli başlatma tuşu
Yıkama programının başlatılmasını 3 saatlik
bir aralıkla geciktirmek için gecikmeli başlat-
ge ışığı yanar. Bkz. "Bulaşık makinesi tuzunun kul-
lanımı"
Tuz gösterge ışığı birkaç saat süresince yanık kalabilir fakat cihazın çalışması üzerinde herhangi bir
istenmeyen etkisi yoktur.
ma tuşunu kullanınız. Bkz. 'Bir yıkama programının ayarlanması ve başlatılması'.
electrolux 67
5 4
1 2 3
Page 68

68 electrolux
Program seçme düğmesi ve Açma/
Kapama gösterge ışığı
•Bir yıkama programını ayarlamak için,
program seçme düğmesini saat yönünde
veya saatin tersi yönde çeviriniz. Program
seçme düğmesinin üzerindeki program
işaretleyici kontrol panelindeki yıkama
programlarından bir tanesine denk gelme-
– Açma/Kapama gösterge ışığı yanar
(AÇIK pozisyonu).
•Cihazı kapalı konumuna getirmek için,
program işaretleyici Açma/Kapama gösterge ışığına denk gelene kadar program
seçme düğmesini döndürünüz.
– Açma/Kapama gösterge ışığı söner (KA-
PALI pozisyonu).
lidir.
Cihazın kullanımı
Prosedürün her adımı için belirtilen talimatlara
bakınız.
1. Su yumuşatıcı seviyesinin bölgenizdeki su
sertliği için uygun olup olmadığını kontrol
ediniz. Gerektiği takdirde su yumuşatıcıyı
ayarlayınız.
2. Tuz haznesini bulaşık makinesi tuzu ile
doldurunuz.
3. Parlatıcı çekmecesine parlatıcı doldurunuz.
4. Çatal-bıçakları ve tabakları bulaşık makinesine koyunuz.
5. Bulaşığın tipine ve kirliliğine göre uygun
yıkama programını ayarlayınız.
6. Deterjan çekmecesine uygun miktarda
deterjan koyunuz.
7. Yıkama programını başlatınız.
Eğer deterjan tabletleri kullanıyorsanız,
'Deterjan kullanımı' bölümüne bakınız.
Su Yumuşatıcının Ayarlanması
Su yumuşatıcı su sistemindeki mineralleri ve
tuzları giderir. Mineraller ve tuzlar cihazın çalışmasını kötü yönde etkileyebilir.
Su sertliği eşdeğer ıskalalarda ölçülür:
• Alman derecesi (dH°),
•Fransız derecesi (°TH),
Su sertliği
°dH mmol / l °TH Clarke
>24 >4.2 >40 > 29 10
22- 24 3,9- 4,2 39- 40 27- 29 9
20- 22 3,5- 3,9 35- 39 25- 27 8
18- 20 3,2- 3,5 32- 35 23- 25 7
16- 18 2,8- 3,2 28- 32 20- 23 6
13- 16 2,3- 2,8 23- 28 17-20 5
10- 13 1,8- 2,3 18- 23 13- 17 4
7- 10 1,2- 1,8 12- 18 9- 13 3
4- 7 0.7- 1,2 7- 12 5- 9 2
< 4 < 0.7 < 7 < 5
1) Tuz kullanımı gerekmez.
Elektronik ayarlama
Su yumuşatıcı fabrikada seviye 5'e ayar-
lanmıştır.
1. Başlatma/İptal düğmesine basınız ve basılı tutunuz. Program işaretleyici kontrol
panelindeki ilk yıkama programını göste-
• mmol/l (litre başına milimol - su sertliğinin
uluslararası birimi),
•Clarke.
Su yumuşatıcıyı bölgenizdeki suyun sertliğine
göre ayarlayınız. Gerektiği takdirde, yerel su
idarenizi arayınız.
rene kadar program düğmesini saat yönünde döndürünüz.
2. Açma/kapama gösterge ışığı ve başlat-
ma/iptal gösterge ışığı yanıp sönmeye
başladığında başlatma/iptal düğmesini
serbest bırakınız.
Su sertliği ayarı
1)
1
Page 69

electrolux 69
–Aynı zamanda, su yumuşatıcının sevi-
yesini göstermek üzere son (end) gösterge ışığı yanıp söner.
Örnek:
5 yanıp sönme, duraklama, 5 yanıp
sönme, duraklama, vs... = seviye 5
3. Su yumuşatıcı seviyesini, bir kademe arttırmak için başlat/iptal tuşuna bir kez basınız.
Bulaşık Makinesi Tuzunun Kullanımı
Dikkat Sadece bulaşık makinesi tuzu
kullanınız. Bulaşık makinelerine uygun
olmayan tuz tipleri su yumuşatıcının
zarar görmesine neden olur.
Dikkat Cihazın tabanındaki tuz
tanecikleri ve tuzlu su korozyona neden
olabilir. Korozyonu önlemek için bir
yıkama programını başlatmadan önce
cihaza tuz koyunuz.
Tuz haznesini doldurmak için şu işlemleri yapınız:
1. Tuz haznesini açmak için kapağını saatin
tersi yönde çeviriniz.
2. Tuz haznesine 1 litre su koyunuz (sadece
ilk kez çalıştırmada).
3. Tuz haznesine tuz koymak için huniyi kullanınız.
Son gösterge ışığı yeni seviyeyi gösterir.
4. İşlemi kaydetmek için, program seçme
düğmesini kapama (off) pozisyonuna getiriniz.
4. Tuz haznesinin deliğinin etrafındaki tuzu
temizleyiniz.
5. Tuz haznesini kapatmak için kapağını saatin yönünde çeviriniz.
Tuz doldururken hazneden su taşması
normaldir
Su yumuşatıcıyı 1 seviyesine ayarladığınızda,
tuz göstergesi ışığı yanık kalmaz.
Parlatıcı Bölmenin Doldurulması
Dikkat Sadece bulaşık makineleri için
üretilmiş özel parlatıcıları kullanınız.
Parlatıcı çekmecesine asla başka maddeler koymayınız (örneğin; bulaşık maki-
Page 70

70 electrolux
nesi temizleme ajanı, sıvı deterjan). Cihaza zarar verme riski söz konusudur.
Parlatıcı, kapları üzerlerinde çizgiler ve
lekeler olmaksızın kurutulabilmesini
sağlar.
Parlatıcı, son durulama aşamasında otomatik olarak eklenir.
Parlatıcı göstergesi (B) net bir şekilde görülene kadar parlatıcı çekmecesini doldurunuz.
Parlatıcı çekmecesini doldurmak için şu iş-
lemleri yapınız:
B
1. Parlatıcı çekmecesini açmak için kilit açma tuşuna (A) basınız.
2. Parlatıcı çekmecesine parlatıcı doldurunuz. 'max.' işaretimaksimum seviyeyi
gösterir.
3. Dökülen parlatıcıyı, bir sonraki yıkamada
aşırı köpük oluşumunu önlemek için emici
bir bezle siliniz.
4. Parlatıcı çekmecesini kapatınız.
Parlatıcı çekmecesinin kapasitesi yakla-
şık 150 ml'dir. Bu parlatıcı miktarı yakla-
şık 60 yıkama programı için yeterlidir.
Parlatıcı dozunu ayarlayınız.
Cihaz, fabrikada seviye 1'e ayarlanmıştır.
Parlatıcı dozunu 1- 6 (1 - 6 mililitre parlatıcı)
arasında ayarlayabilirsiniz.
Yıkama sonuçlarına bakınız ('Servis çağırmadan önce'). En düşük dozda başlayınız.
1. Dozu arttırmak için oku saat yönünde çeviriniz.
2. Tabaklarda su damlaları veya kireç varsa
dozu artırınız.
Çatal-bıçaklar Ve Tabakların Yerleştirilmesi
Faydalı tavsiyeler ve ipuçları
Dikkat Bu cihazı sadece bulaşık
makinesi için uygun ev kaplarını için
kullanınız.
Cihazı, suyu emebilecek eşyaları (süngerler,
ev temizlik bezleri, vs.) temizlemek için kullanmayınız.
•Çatal-bıçakları ve tabakları yerleştirilmeden
önce şu işlemleri yapınız:
– Yemek kalıntılarının ve artıkların tümünü
çıkartınız.
– Tavalardaki yanıkları, yemek kalıntılarını
yumuşatınız.
•Çatal-bıçakları ve tabakları yerleştirirken şu
işlemleri yapı
nız:
– İçi boş eşyaları (örneğin kupalar, bar-
daklar ve tavalar) ağızları aşağı bakacak
şekilde yerleştiriniz.
–Kapların veya derin eşyaların içerisinde
su toplanmadığından emin olunuz.
– Çatal-bıçakların ve tabakların birbirinin
üzerine konmadığından emin olunuz.
– Çatal-bıçakların ve tabakların diğer ça-
tal-bıçakların ve tabakların üzerini kapatmadığından emin olunuz.
– Bardakların diğer bardaklara temas et-
mediğinden emin olunuz.
– Küçük eşyaları çatal-bıçak sepetine ko-
yunuz.
• Plastik eşyalar ve yapışmaz kaplamalı tavalar su damlaların
ı tutabilirler.
Page 71

electrolux 71
• Plastik eşyalar, porselen ve çelik eşyalar
gibi kurumazlar.
•Hafif eşyaları ana sepete koyunuz. Eşyala-
rın hareket etmediğinden emin olunuz.
Dikkat Yıkama programını başlatmadan
önce püskürtme kolunun serbestçe
hareket ettiğinden emin olunuz.
İlk sepet
Derin tabakları ve büyük kapakları sepetin
etrafına yerleştiriniz. Eşyaları bardak rafların
üstüne ve altına yerleştiriniz. Su tabakların her
tarafına erişebilmelidir.
Uzun eşyaları yıkamak için bardak raflarını
katlayabilirsiniz.
Çatal-bıçak sepeti
Uyarı Yaralanmaları önlemek için, uzun
bıçakları dikey konumda
yerleştirmeyiniz.
Uzun ve/veya keskin çatal-bıçakları yatay biçimde ilk sepete yerleştiriniz. Bıçaklar gibi
keskin eşyalara karşı dikkatli olunuz.
Çatal-bıçak sepetini şunlar için kullanınız:
• Çatallar ve kaşıklar, sapları aşağıya gelecek şekilde.
•Bıçaklar, sapları yukarıya gelecek şekilde
Çatal-bıçak sepeti çıkartılabilir bir çatal-bıçak
ızgarasına sahiptir.
Çatal-bıçakların birbirine takılmamasını
sağlayınız.
Kapağı kapatmadan önce püskürtme
kollarının serbestçe dönebildiğinden
emin olunuz.
Deterjan Kullanımı
Sadece bulaşık makinesi için uygun deterjanları (toz, sıvı veya tablet) kullanınız.
Ambalajın üzerindeki bilgilere uyunuz:
• Üretici tarafından önerilen miktar.
• Muhafaza ile ilgili tavsiyeler.
Ambalaj üzerindeki talimatlar, genellikle
büyük bulaşık makineleri içindir (12 kişilik).
Sadece gerektiği kadar deterjan kullanarak, çevre korumasına katkıda bulunmuş
olursunuz.
Deterjan konulması
Deterjan çekmecesini doldurmak için
aşağıdaki işlemleri yapınız:
A
B
1. Deterjan çekmecesinin kapağını açınız.
2. Deterjan çekmecesine (A) deterjanı koyu-
nuz.
3. Eğer ön yıkama aşamalı bir yıkama prog-
ramı kullanıyorsanız, ön yıkama bölmesine de (B) deterjan koyunuz.
Page 72

72 electrolux
Deterjan ön yıkama aşaması esnasında
alınacaktır.
4. Deterjan çekmecesinin kapağını kapatı-
nız.
Deterjan tabletlerinin kullanımı
Deterjan çekmecesine ( A) deterjan tabletini
koyunuz.
Deterjan tabletleri şunları içerir:
• Deterjan,
•Parlatıcı,
•Diğer temizlik maddeleri.
Deterjan tabletlerini kullanmak için şu işlem-
leri yapınız:
1. Deterjan tabletlerinin bölgenizdeki su
sertliği için uygun olduğundan emin olunuz. Üretici talimatlarına bakınız.
2. Tuz haznesini ve parlatıcı çekmecesini
doldurmayınız.
Tuz haznesinin ve parlatıcı çekmecesinin
doldurulması gerekli değildir.
Eğer kurutma sonuçları tatmin edici
değilse, şu işlemleri yapınız:
1. Parlatıcı çekmecesine parlatıcı doldurunuz.
Yıkama Programları
Yıkama programları
Program
A
70°
B
65°
C
1)
55°
D
50°
Kirlilik dere-
cesi
Ağır kirli
Normal kirli
Normal kirli
Normal veya
hafif kirli
Bulaşık türü Program tanımı
Çanak-çömlekler, çatal-bıçak-
lar, tencereler ve
Çanak-çömlek-
ler ve çatal-bı-
Çanak-çömlek-
ler ve çatal-bı-
Çanak-çömlek-
ler ve çatal-bı-
2. Parlatıcı dozunu pozisyon 2'ye ayarlayı-
nız.
Tekrar toz deterjan kullanmak için
aşağıdaki işlemleri yapınız:
1. Tuz haznesini ve parlatıcı çekmecesini
doldurunuz.
2. Su yumuşatıcıyı en yüksek seviyeye ayarlayınız.
3. Makineye bulaşık koymadan bir yıkama
programı çalıştırınız.
4. Su yumuşat
ıcıyı ayarlayınız. Bkz. 'Su yu-
muşatıcının ayarlanması'
5. Parlatıcı dozunu ayarlayınız.
Farklı markalardaki deterjanlar farklı sürelerde çözünürler. Bazı deterjan tabletleri kısa yıkama programlarında iyi temizleme sonuçları vermezler. Deterjan tabletleri kullanırken deterjan kalıntılarının tamamen gidermek için uzun yıkama
programlarını seçiniz.
Ön yıkama
Ana yıkama
2 ara durulama
tavalar
çaklar
çaklar
çaklar
Son durulama
Kurutma
Ön yıkama
Ana yıkama
1 ara durulama
Son durulama
Kurutma
Ön yıkama
Ana yıkama
1 ara durulama
Son durulama
Kurutma
Ana yıkama
1 ara durulama
Son durulama
Kurutma
Page 73

electrolux 73
Program
E
40°
1) Test enstitüleri için test programı
Kirlilik dere-
cesi
Hafif kirli
Tüketim değerleri
Program Program süresi
A
70°
B
65°
C
1)
55°
D
50°
E
40°
1) Test enstitüleri için test programı
(dakika olarak)
117 1,15 9
94 0,80 7
157 0,63 7
36 0,40 6
31 0,35 6
Tüketim değerleri size rehber olması için
verilmiştir ve suyunuzun basıncına ve sı-
caklığına göre ve ayrıca güç besleme-
Bulaşık türü Program tanımı
Hassas çanak-
çömlekler ve
cam eşyalar
Ana yıkama
1 ara durulama
Son durulama
Kurutma
Enerji tüketimi
(kWs olarak)
Su tüketimi
(litre olarak)
sindeki değişimlere ve koyduğunuz tabak miktarına göre de değişiklik gösterebilir.
Bir Yıkama Programının Seçilmesi Ve Başlatılması
Bir yıkama programını ayarlanmak ve başlat-
mak için aşağıdaki işlemleri yapınız:
1. Kapağı kapatınız.
2. Program seçme düğmesini çevirerek yı-
kama programını ayarlayınız. Bkz. 'Yıka-
ma programları'.
– Açma/Kapama gösterge ışığı yanar.
–Yıkama programının gösterge ışığı ya-
nıp sönmeye başlar.
3. Başlatma/iptal tuşuna basınız.
–Yıkama programı otomatik olarak ça-
lışmaya başlar.
–Başlatma/İptal gösterge ışı
ğı yanar.
–Program başladığında, sadece prog-
ram çalışıyor gösterge ışığı yanık kalır.
Yıkama programı i şlemdeyken, programı
değiştirmeniz mümkün değildir. Yıkama
programını iptal ediniz. Bkz. 'Bir yıkama
programının iptal edilmesi'
Uyarı Çalışmakta olan bir yıkama
programını, sadece gerekiyorsa
duraklatınız veya iptal ediniz.
Dikkat Kapağı dikkatlice açınız. Sıcak
buhar çıkabilir.
Page 74

74 electrolux
Bir yıkama programının iptal edilmesi
•Başlatma/iptal tuşuna basınız ve yaklaşık 5
saniye basılı tutunuz.
–Başlatma/İptal gösterge ışığı söner.
–Aşama gösterge lambası yanıp sönme-
ye başlar.
Yıkama programı iptal edilir.
Bu durumda şu işlemleri yapabilirsiniz:
1. Cihazı kapatınız.
2. Yeni bir yıkama programını ayarlayınız.
Yeni bir yıkama programını ayarlamadan
önce deterjan çekmecesine deterjan koyunuz.
Bir yıkama programını duraklatma
Kapağı açınız.
• Program durdurulur.
Kapağı kapat
• Program duraklatıldığı noktadan itibaren
çalışmaya devam eder.
Yıkama programının gecikmeli
başlatmaya ayarlanması ve başlatılması
1. Bir yıkama programı ayarlayınız.
2. Gecikmeli başlatma tuşuna basınız.
– Gecikmeli başlatma gösterge ışığı ya-
3. Başlatma/iptal tuşuna basınız.
– Gecikmeli başlatma için geri sayım
–Aşama gösterge ışıkları söner.
ınız.
nar.
başlar.
Geri sayım işlemi sona erdiğinde, yıkama
programı otomatik olarak çalışmaya ba
• Gecikmeli başlatma gösterge ışığı söner.
•Aşama gösterge ışığı yanar.
Geri sayımın duraklatılmaması için, geri
sayım esnasında kapağı açmayınız. Kapağı tekrar kapattığınızda geri sayım duraklatıldığı noktadan itibaren devam edecektir.
Gecikmeli başlatmanın iptal edilmesi:
1. Başlatma/İptal tuşuna basınız ve yaklaşık
5 saniye basılı tutunuz.
–Başlatma/iptal gösterge ışığı ve gecik-
meli başlatma gösterge ışığı söner.
–Aşama gösterge ışıkları yanıp sönmeye
başlar.
2. Yıkama programı
latma/iptal düğmesine basınız.
Yıkama programının sonu
Şu durumlarda cihazı kapatınız:
• Cihaz otomatik olarak durduğunda.
• Program sonu gösterge ışığı yandığında.
Daha iyi kurutma sonuçları almak için, tabakları çıkartmadan önce kapağı birkaç dakika
aralık bırakınız.
Tabakların cihazdan çıkartmadan önce
soğumalarını bekleyiniz. Sıcak tabaklar kolayca hasar görebilirler.
nı başlatmak için, baş-
şlar.
Bakım Ve Temizlik
Uyarı Temizlemeden önce cihazı
kapatınız.
Filtrelerin temizliği
Dikkat Cihazı filtresiz kullanmayınız.
Filtrelerin düzgün takıldığından emin
olunuz. Filtrelerin yanlış takılması yıkama
performansının düşük olmasına ve
cihazın zarar görmesine neden olur.
Bulaşık makinesinde 2 filtre bulunur:
1. mikro-filtre
2. yassı filtre
Filtreleri temizlemek için aşağıdaki işlemleri
yapınız:
1. Kapağı açınız.
2. Sepeti çıkartınız.
Page 75

electrolux 75
3. Cihazın alt kısmındaki filtreleri çıkartınız.
4. Filtreleri akan suyun altında temizleyiniz.
5. Filtreleri geri takınız.
6. Kilitlenmesi için filtreyi saat yönünde çeviriniz.
7. Kapağı kapatınız.
Püskürtme kolunun temizliği
Püskürtme kolunu düzenli olarak kontrol ediniz. Sprey kolunun deliklerinde kalan yemek
artıklarını temizleyiniz
1. Somunu saatin tersi yönde çeviriniz.
2. Püskürtme kolunu çıkartınız.
3. Delikleri iyice temizleyiniz.
Dış temizlik
Cihazın dış yüzeylerini ve kontrol panelini
nemli yumuşak bir bezle temizleyiniz. Sadece
nötr deterjanlar kullanınız. Aşındırıcı temizlik
ürünleri, ovalama telleri veya çözücüler (aseton, trikloroetilen vs.) kullanmayınız.
Donmaya karşı önlemler
Dikkat Cihazı, sıcaklığın 0°C'nin altına
düştüğü yerlere kurmayınız. Üretici firma
donmadan kaynaklanan zararlardan
sorumlu değildir.
Bunun mümkün olmaması halinde, cihazı boşaltınız ve kapağını kapatınız. Su giriş hortumunun bağlantısını kesiniz ve hortumdaki su-
yu boşaltınız.
Püskürtme kolunu çıkartmak için aşağıdaki
işlemleri yapınız:
Servisi Aramadan Önce
Cihaz çalışmıyor veya çalışırken bir anda duruyor.
Eğer bir arıza varsa önce sorunu kendiniz gidermeye çalışın. Bkz. 'Servis çağırmadan ön-
Hata kodu ve arıza Olası sebep ve çözümü
•Başlat/iptal gösterge ışığı sürekli
yanıp sönüyor.
• Program sonu gösterge ışığı 1 kez
yanıp sönüyor.
Bulaşık makinesi su almıyordur.
•Başlat/iptal gösterge ışığı sürekli
yanıp sönüyor.
• Program sonu gösterge ışığı 2 kez
yanıp sönüyor.
Bulaşık makinesi suyu tahliye etmiyor.
• Tahliye pompası sürekli olarak çalışıyor.
• Kontrol panelindeki tüm gösterge
ışıkları sönük halde.
Taşma tespit aygıtı çalışıyor.
•Su musluğu tıkalıdır veya kireç kaplamıştır.
Su musluğunu temizleyiniz.
•Su musluğu kapalıdır.
Su musluğunu açın.
•Su giriş hortumundaki filtre tıkalıdır.
Filtreyi temizleyiniz.
•Su giriş hortumunun bağlantısı yanlış yapılmıştır. Hortum bü-
külmüş veya ezilmiş olabilir.
Bağlantının düzgün yapıldığından emin olunuz.
• Lavabo borusunun ağzı tıkanmıştır.
Lavabo borusunun ağzını temizleyin.
• Su tahliye hortumunun bağlantısı düzgün yapılmamıştır. Hortum bükülmüş veya ezilmiş olabilir.
Bağlantının düzgün yapıldığından emin olunuz.
•Su musluğunu kapatınız ve yerel yetkili servisinizi arayınız.
ce' Sorunu gideremediğiniz takdirde, satıcı-
nıza veya Yetkili Servise başvurun.
Page 76

76 electrolux
Hata kodu ve arıza Olası sebep ve çözümü
Program çalışmaya başlamıyor. •Cihazın kapağı tam olarak kapatılmamıştır.
Kontrol ettikten sonra cihazı çalıştırınız. Program duraklatıldığı noktadan itibaren çalışma-
ya devam eder. Arıza tekrarlanırsa yetkili servisinizi arayınız.
Bu bilgiler size daha hızlı ve daha doğru destek sağlamak için gereklidir:
•Model (Mod.)
Kurutma sonuçları tatmin edici değil.
Tabaklar temiz değil. • Seçilen yıkama programı bulaşık tipi veya kirlilik derecesi için uygun
• Sepet yanlış şekilde doldurulmuştur, bu yüzden su tüm yüzeylere
•Bulaşıkların yanlış yerleştirilmesinden ötürü püskürtme kolları rahat-
• Filtreler kirlidir veya düzgün takılmamıştır.
• Çok az deterjan kullanılmıştır veya hiç deterjan kullanılmamıştır.
Tabaklar üzerinde kireç kalın-
tıları var.
Tabaklar ıslak ve mat. •Parlatıcı kullanılmamıştır.
Bardakların ve tabakların üzerinde çizgiler, beyazımsı lekeler veya mavimsi bir tabaka
var.
Bardakların ve tabakların üzerinde kurumuş su damlaları
var.
• Tuz haznesi boştur.
•Su yumuşatıcı seviyesi yanlış ayarlanmıştır.
• Tuz haznesinin kapağı doğru bir şekilde kapatılmamıştır.
•Parlatıcı çekmecesi boştur.
•Parlatıcı dozunu azaltınız.
•Parlatıcı dozunu artırınız.
• Sebebi kullandığınız deterjan olabilir.
Kapağı kapatınız.
•Cihazın fişi prize takılı değildir.
Elektrik fişini takınız.
• Evin sigorta kutusundaki sigorta yanmıştır / atmıştır.
Sigortayı değiştiriniz.
• Gecikmeli başlatma ayarlanmıştır.
Programı derhal başlatmak için gecikmeli başlatmayı iptal
ediniz.
• Ürün numarası (PNC)
• Seri No (S.N.)
Bu bilgiler için bilgi etiketine bakınız.
Gerekli bilgileri buraya yazınız:
Model tanımı: ..........
Ürün numarası: ..........
Seri no: ..........
değildir.
ulaşamıyordur.
ça dönemiyordur.
Teknik Veriler
Boyutlar Genişlik
Elektrik bağlantısı - Voltaj - Toplam güç - Sigorta
Su besleme basıncı Minimum
Kapasite 6 kişilik yemek takımı
Yükseklik
Derinlik
Elektrik bağlantısı hakkında bilgiler cihazın arka tarafındaki bilgi etiketinde verilmiştir.
0,8 bar (0,08 MPa)
Maksimum
54,5 cm.
44,7 cm.
48,0-49,0 cm.
10 bar (1,0 MPa)
Page 77

Montaj
Uyarı Kurulum esnasında elektrik fişinin
prizden çekili olduğundan emin olunuz.
Cihazın bağlantısının yapılması
Cihazı bir su musluğunun ve tahliye noktası-
nın yakınına yerleştiriniz.
Cihazı yerine yerleştirdiğinizde, su hortumlarının bükülmediğinden veya ezilmediğinden
emin olunuz.
Cihazı bir mutfak evyesinin, tezgahının üzerine veya ankastre şekilde monte ediniz.
Konumlandırma
Bulaşık makinesini bir mutfak mobilyasının
içerisine yerleştiriniz.
electrolux 77
Yerleştirileceği yerin boyutlarının verilen boyutlara uyduğundan emin olunuz.
Mobilyanın içerisinde giriş hortumu, su tahliye
hortumu ve elektrik kablosu için deliklerin bulunduğundan emin olunuz.
Cihazın düzlemselliğinin ayarlanması
Cihazın, kapağı düzgün şekilde kapatılabilecek ve sızdırmazlığı sağlanabilecek şekilde
düzlemsel olduğundan emin olunuz. Cihazın
düzlemselliği uygun ise, kapak kabinin yan
taraflarına takılmayacaktır. Eğer kapak doğru
kapanmıyorsa, makine tam düz seviyeye gelinceye kadar ayarlanabilir ayakları gevşetiniz
veya sıkınız.
Su Bağlantısı
Giriş hortumu
Cihaz, içerisindeki suyun içme suyuna karış-
maması için emniyet özelliklerine sahiptir.
Bu cihaz bir sıcak (maks. 60°) veya soğuk su
beslemesine bağlanabilir.
Eğer sıcak su çevreyle dost alternatif enerji
kaynaklarından geliyorsa (örn. güneş veya fotovoltaj panelleri ve rüzgar) enerji tüketimini
azaltmak için sıcak su kaynağını kullanınız.
Kolay erişim için su musluğunun veya valfın
cihazın yakınında olması önemlidir.
Su giriş hortumunu, 3/4" harici dişli bir su
musluğuna takınız. Gerektiği takdirde 1/2" kı-
sıtlayıcı kullanınız.
Page 78

78 electrolux
Eğer su giriş hortumu çok kısa ise, su giriş
hortumunu uygun, yüksek basınçlı daha uzun
bir hortumla değiştiriniz. Uzatma hortumu
kullanmayınız.
Tesisata uydurmak için, hortumun bulaşık
makinesine bağlanan ucunu çevirmek mümkündür. Aşağıdaki işlemleri yapınız:
1. Tespit somununu gevşetiniz.
2. Hortumu çeviriniz.
3. Tespit somununu sıkıştırınız.
Uyarı Bulaşık makinesini yerine
yerleştirmeden önce tespit somununun
ve diğer bağlantıların tümünün sağlam
olduğundan emin olunuz.
Uyarı Daima yeni bir su giriş hortumu
kullanınız. Eski bir cihazın bağlantı
hortumlarını kullanmayınız.
Tahliye hortumu
Su zararlarını önlemek için cihaz bir su emniyet sistemine sahiptir. Bir arıza durumunda,
tahliye pompası kalan suyu otomatik olarak
bulaşık makinesinden boşaltmaya başlar.
Uyarı Bulaşık makinesi kapalı
olduğunda, su emniyet sistemi ancak
elektrik fişinin prize takılı olması halinde
çalışır.
Su tahliye hortumunu boşaltmak için 2 prosedür vardır:
1. Hortumun ucunda bulunan plastik dirseği
takınız.
Su tahliye hortumunu evyenin içerisine
yerleştiriniz.
2. Su tahliye hortumunu su tahliye sistemine
bağlayınız.
Cihazın düzgün çalışması için hortum bulaşık makinesinin tabanından 75 cm yukarıda olmalıdır.
Eğer su tahliye hortumunu süzgeçli bir lavabo-altı tahliye borusuna bağlıyorsanız, plastik
membranı (A) çıkartınız. Eğer membranı çı-
kartmazsanız, yiyecek kal
ıntıları tahliye hortu-
munun süzgecini tıkayabilir
Page 79

Elektrik Ağlantısı
Uyarı Bu güvenlik önlemlerine
uyulmamanız halinde üretici firma
sorumluluk kabul etmez.
Cihazı güvenlik önlemlerine uygun şekilde topraklayınız.
Bilgi etiketinde yazılı olan nominal voltaj
ve güç tipinin cihazın monte edildiği yerdeki voltaj ve güç değerlerine uyduğun-
dan emin olunuz.
Daima düzgün takılmış, elektrik çarpmasına karşı korumalı bir priz kullanınız.
Çevreyle İlgili Bilgiler
Ürünün ya da ambalajının üzerindeki
simgesi, bu ürünün normal ev çöpü gibi
atılmayıp, elektrik ve elektronik cihazların geri
dönüşüm için verildiği özel toplama
noktalarından birine verilmesi gerektiğini
belirtir. Bu ürünün doğru şekilde imha
edilmesine katkıda bulunmakla hem çevreyi,
hem de çevrenizdekilerin sağlığını korumuş
olursunuz. Yanlış şekilde imha ise hem
çevreye hem sağlığa zararlıdır. Bu ürünün
geri dönüşümüne ilişkin daha ayrıntılı bilgileri
belediyenizden, çöp dairenizden veya ürünü
satın almış olduğunuz bayiden edinebilirsiniz.
Ambalaj malzemeleri çevreyle dosttur ve geridönüşümlüdür. Plastik bileşenler işaretlerle
tanımlıdır, örn. >PE<, >PS<, vs. Lütfen ambalaj malzemelerini uygun çöp atma noktalarına ve atık imha tesislerine teslim ediniz.
Uyarı Cihazı imha etmek için aşağıdaki
prosedürleri uygulayınız:
•Fişini elektrik prizinden çekiniz.
•Kabloyu ve fişini kesiniz ve atınız.
• Kapak kilit dilini atınız. Bu, çocukların
kendilerini cihazın içerisine kapatmalarını ve hayatlarını tehlikeye atmalarını
önler.
electrolux 79
Priz çoğaltıcılar, konnektörler ve uzatma
kabloları kullanmayınız. Yangın riski söz
konusudur.
Elektrik kablosunu kendiniz değiştirme-
yiniz. Yetkili servis merkezine başvuru-
nuz.
Kurulumdan sonra elektrik prizinin erişi-
lebilir olduğundan emin olunuz.
Cihazın fişini prizden çekmek için kabloyu çekmeyiniz. Daima fişin kendisinden
tutarak çekiniz.
Page 80

www.electrolux.com
www.electrolux.gr
Para comprar acessórios e consumiveis na nossa loja web, por favor, visite:
www.electrolux.pt
www.electrolux.ru
www.electrolux.com.tr
156986410-00-012009
 Loading...