

Page 1
Page 2

- 2 -
Dlq polxzowatelq
Informaciq po bezopanosti 3
Opisanie pribora 4-5
- Dozator opolaskiwatelq
- Raspylitelx
- Setka dlq krupnyh ^astic
- Filxtr tonkoj o^istki
- Dozator mo@]ego sredstwa
- Ustrojstwo dlq smqg^eniq wody
- Zaglu[ka ustrojstwa dlq smqg^eniq wody
Panelx uprawleniq i programm 6
Zagruzka posudy 7
- Kak zagruzitx posudu
- Ukazaniq po prowedeni@ sertifikacionnyh
ispytanij
|kspluataciq pribora 8
- Zapusk programmy
Dejstwiq w slu^ae neisprawnostej 9
Tehni^eskoe obsluviwanie 10
- Tehni^eskoe obsluviwanie i zap^asti
Dlq montavnika
Tehni^eskie dannye 10
Raspakowka 11
- Powrevdeniq
- Ispolxzowanie
- Wstraiwanie posudomoe^noj ma[iny
w kuhonnu@ mebelx
- Za]ita ma[iny ot zamoraviwaniq
ustanowka 12
- Razme]enie
- Poda^a wody
- Organizaciq sliwa
- Podkl@^enie k seti
Instruction book 13
Sodervanie
Uslownye obozna^eniq, ispolxzuemye w rukowodstwe po \kspluatacii
Wy wstretite w tekste sledu@]ie obozna^eniq, kotorye budut westi was po instrukcii:
Informaciq po bezopasnosti
Posledowatelxnostx wypolneniq instrukcij
Poleznye sowety
Informaciq po za]ite okruva@]ej sredy
Page 3

- 3 -
822 90 11-26
Ustanowka i tehni^eskoe obsluviwanie
● Wse raboty po ustanowke i tehni^eskomu obsluviwani@
pribora dolvny osu]estwlqtxsq kwalificirowannym
specialistom. Remont, proizwedennyj licami bez
sootwetstwu@]ej podgotowki, movet serxezno powreditx
pribor i priwesti k trawmam l@dej ili por^e imu]estwa.
Prevde ^em pristupitx k kakim-libo manipulqciqm s
posudomoe^noj ma[inoj, ee obqzatelxno sleduet
otkl@^itx ot seti.
● Sistema wodosnabveniq posudomoe^noj ma[iny dolvna
imetx wentilx w legkodostupnom meste.
● Wilku setewogo [nura nuvno wkl@^atx w zazemlennu@
rozetku \lektroseti, raspolovennu@ w legkodostupnom
meste. Fiksirowannoe podkl@^enie pribora dolvno
osu]estwlqtxsq tolxko upolnomo^ennym na \to \lektrikom.
● Pri podkl@^enii ili o^istke ma[iny ubeditesx w tom,
^to prowod pitaniq ne perevat i ne powrevden kakimlibo obrazom, i ^to [langi ne razorwany ili ne
perekru^eny.
● Esli kabelx pitaniq powrevden, on dolven bytx zamenen
specialxnym kabelem pitaniq, rekomendowannym
proizwoditelem wa[ego pribora. Obra]ajtesx w
awtorizowannye centry.
● Pri wstraiwanii posudomoe^noj ma[iny w kuhonnu@
mebelx neobhodimo ispolxzowatx prednazna^ennyj dlq
\togo komplekt na[ej firmy.
● Tehni^eskoe obsluviwanie i wozmovnyj remont dolvny
osu]estwlqtxsq specialistami awtorizowannogo serwisnogo
centra. Nikogda ne pytajtesx otremontirowatx posudomoe^nu@ ma[inu samostoqtelxno.
Bezopasnostx detej
● Pomnite o tom, ^to plastikowye me[ki, whodq]ie w
upakowku pribora, predstawlq@t soboj smertelxnu@
opasnostx dlq igra@]ih s nimi malenxkih detej.
● Posudomoe^naq ma[ina prednazna^ena dlq ispolxzowaniq
tolxko wzroslymi l@dxmi. Ne razre[ajte detqm igratx
s regulqtorami i drugimi ^astqmi ma[iny.
● Dervite wse mo@]ie sredstwa w meste, nedostupnom
dlq detej.
● Ne pozwolqjte detqm wstawatx, saditxsq i ka^atxsq na
otkrytoj dwerce posudomoe^noj ma[iny.
Wo wremq ispolxzowaniq
● Posudomoe^naq ma[ina prednazna^ena tolxko dlq mojki
doma[nej posudy, prigodnoj dlq ma[innoj mojki.
Ispolxzowanie pribora w kakih-libo drugih celqh movet
priwesti k trawmam l@dej i powrevdeni@ imu]estwa,
a takve k annulirowani@ garantii.
● Ispolxzujte tolxko specialxnye mo@]ie sredstwa dlq
posudomoe^nyh ma[in.
● Ne stawxte ostrye novi w korzinu ostriem wwerh.
Zna^itelxno bezopasnee razmestitx ih w gorizontalxnom
polovenii.
● Starajtesx ne otkrywatx dwercu posudomoe^noj ma[iny
wo wremq ee raboty, tak kak gorq^ij par movet wyrwatxsq
naruvu i obve^x was.
● Pri izwle^enii kakoj-libo posudy iz posudomoe^noj
ma[iny do okon^aniq polnogo cikla mojki, \tu posudu
obqzatelxno sleduet t]atelxno opolosnutx proto^noj
wodoj dlq udaleniq ostatkow mo@]ego sredstwa.
● W slu^ae pereliwa ili ute^ki wody nemedlenno
perekrojte poda^u wody w posudomoe^nu@ ma[inu,
zakryw kran, i otkl@^ite ee ot \lektroseti, wynuw
wilku iz rozetki, ili udalite predohranitelx. Kogda
wy wynimaete wilku iz \lektrorozetki, beritesx za
wilku, a ne za prowod.
● Pri podkl@^enii k wodoprowodu l@bogo bytowogo pribora
su]estwuet opasnostx wozniknoweniq ute^ki, nezawisimo
ot prinqtyh mer predostorovnosti. Po\tomu rekomenduetsq zakrywatx wodoprowodnyj kran kavdyj raz, kogda
posudomoe^naq ma[ina ne ispolxzuetsq.
Utilizaciq
- Upakowka:
Upakowka dannogo pribora sostoit iz \kologi^eski
bezopasnyh materialow. Plastikowye ^asti ime@t
sledu@]ie obozna^eniq i mogut bytx pererabotany
dlq wtori^nogo ispolxzowaniq:
● PE ozna^aet poli\tilen, iz nego izgotowlen me[ok,
nadetyj na pribor, i paket, w kotorom levit instrukciq.
● PS ozna^aet polistirol (pressowannyj), ispolxzuetsq
dlq sekcij upakowki, neobhodimyh dlq amortizacii
pribora pri transportirowke.
Kartonnye ^asti upakowki izgotowleny iz bumagi, prigodnoj dlq pererabotki, i ih sleduet sdatx na specialxnyj
punkt sbora wtorsyrxq. W pribore ime@tsq plastikowye i
rezinowye ^asti. |ti ^asti pome^eny specialxnymi simwolami, ukazywa@]imi, iz ^ego oni sdelany, tak ^to \ti
^asti movno utilizirowatx w sootwetstwii s markirowkoj
po okon^anii sroka \kspluatacii pribora. Materialy
pome^eny w sootwetstwii s mevdunarodnymi standartami.
- Otsluviw[ij swoj srok pribor:
Po okon^anii sroka \kspluatacii pribora otkl@^ite ego
ot seti, zatem obrevxte \lektroprowod w meste ego soedineniq
s priborom. Udostowerxtesx w tom, ^to deti ne smogut
ispolxzowatx pribor w ka^estwe igru[ki.
Informaciq po безопасности
Prevde ^em pristupitx k ustanowke i \kspluatacii posudomoe^noj ma[iny, oznakomxtesx s nastoq]im
rukowodstwom, obra]aq osoboe wnimanie na rekomendacii, sowety i preduprevdeniq.
Wo izbevanie o[ibo^nyh dejstwij i nes^astnyh slu^aew neobhodimo, ^toby wse lica, polxzu@]iesq
posudomoe^noj ma[inoj, polnostx@ oznakomilisx s prawilami \kspluatacii i tehniki bezopasnosti.
Sohranite nastoq]ee rukowodstwo. Posudomoe^naq ma[ina rass^itana na mytxe posudy w te^enie mnogih
let, po\tomu kak wy, tak i budu]ie wladelxcy wsegda smogut najti w \tom rukowodstwe ^to-nibudx
poleznoe.
Page 4
- 4 -
1
2
3
4
5
6
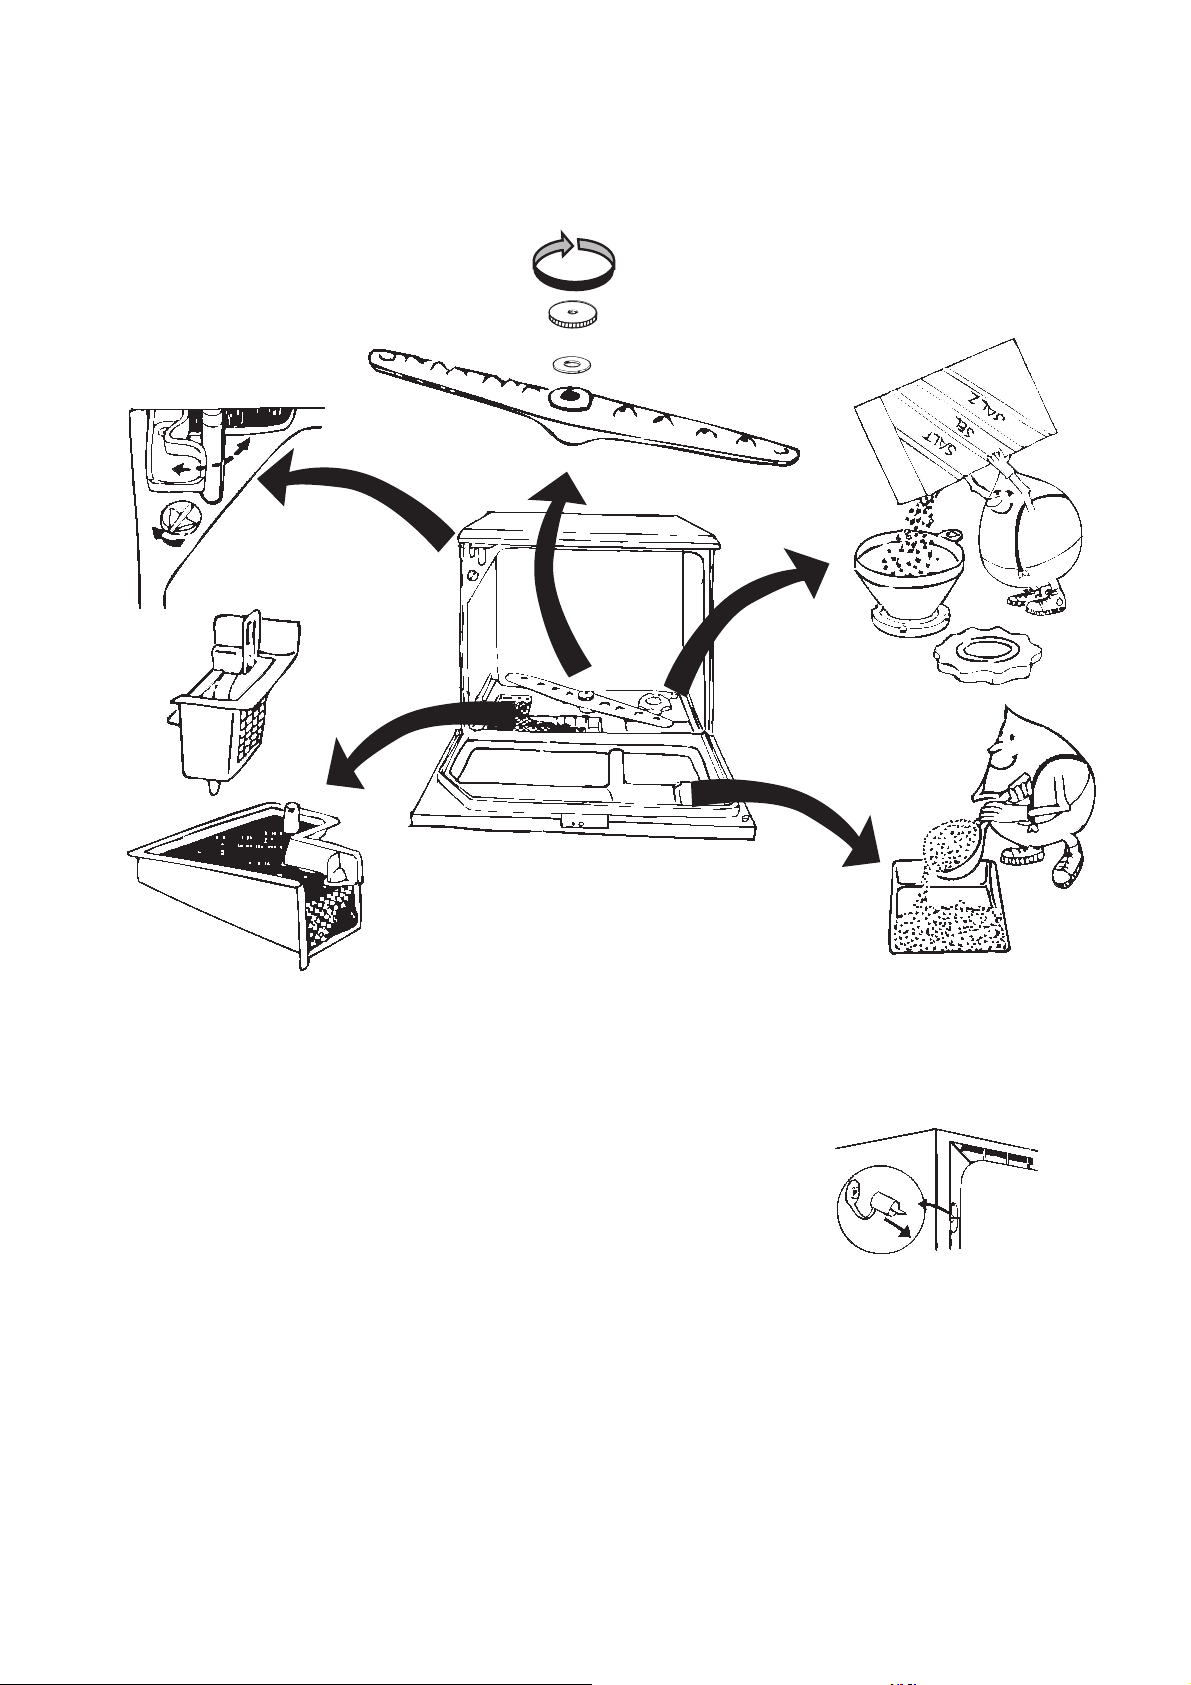
Opisanie pribora
1 Dozator opolaskiwatelq
2 Raspylitelx
3 Setka dlq krupnyh ^astic
4 Filxtr tonkoj o^istki
5 Dozator mo@]ego sredstwa
6 Ustrojstwo dlq smqg^eniq wody
7 Zaglu[ka ustrojstwa dlq smqg^eniq wody
7
Page 5

- 5 -
Dozator opolaskiwatelq 1
Ispolxzowanie opolaskiwatelq pridaet posude blesk i
uskorqet ee wysyhanie, tak kak on sposobstwuet udaleni@
wody i zagrqznenij. Sli[kom bolx[oe koli^estwo
opolaskiwatelq movet priwesti k poqwleni@ razwodow, a
ego nedostatok - k poqwleni@ belyh pqten na posude.
Dozator wme]aet primerno 140 ml opolaskiwatelq. |togo
dostato^no dlq 40-70 ciklow promywki, w zawisimosti ot
ustanowlennoj dozirowki. Dozator neobhodimo napolnqtx
wsqkij raz, kogda urowenx opolaskiwatelq priblivaetsq k
nivnej otmetke [kaly.
Ustanowite dozirowku opolaskiwatelq w sootwetstwii s vestkostx@ wody. Sna^ala ustanowite
minimalxnu@ dozirowku. Zatem uweli^iwajte ee
po mere neobhodimosti, powora^iwaq ukazatelx po
^asowoj strelke.
1. Otkrojte gorlowinu dozatora opolaskiwatelq.
2. Napolnqjte lotok opolaskiwatelem, poka ego
urowenx ne dostignet krasnoj metki na trubke
indikatora urownq; ne pereliwajte za metku.
3. T]atelxno protirajte proliw[u@sq vidkostx
dlq predotwra]eniq izli[nego penoobrazowaniq
wo wremq sledu@]ego cikla mojki.
4. Posle \toj operacii zakrojte lotok dozatora
opolaskiwatelq.
Ne zapolnqjte dozator opolaskiwatelq
vidkim mo@]im sredstwom.
Raspylitelx 2
Neobhodimo, ^toby wse otwerstiq raspylitelq byli ^istymi, w
protiwnom slu^ae \ffektiwnostx mytxq movet su]estwenno
snizitxsq. Esli raspylitelx nuvdaetsq w o^istke, otwernite
gajku po ^asowoj strelke (lewaq rezxba), a zatem snimite
raspylitelx. Pro^istite otwerstiq i udalite wse ostatki
pi]i.
Setka dlq krupnyh ^astic 3
Setka dlq krupnyh ^astic prednazna^ena dlq otfilxtrowywaniq krupnyh predmetow, takih kak zubo^istki i kuso^ki
qi^noj skorlupy. Sledite za tem, ^toby setka ne zasorqlasx.
Pri neobhodimosti wynxte ee i promojte w proto^noj wode.
Filxtr tonkoj o^istki 4
O^enx wavno, ^toby \tot filxtr wsegda byl ^istym.
Zagrqznenie ili zasorenie filxtra obqzatelxno priwedet
k su]estwennomu uhud[eni@ \ffektiwnosti mytxq. Filxtr
tonkoj o^istki movet bytx legko snqt s celx@ promywki
posle togo, kak wy udalite setku dlq krupnyh ^astic.
Dozator mo@]ego sredstwa 5
Izu^ite rekomendacii na pakete s mo@]im sredstwom i
zapolnite dozator mo@]im sredstwom. Pomnite, ^to
instrukcii proizwoditelq mo@]ego sredstwa oby^no
rass^itany na polnorazmernye posudomoe^nye ma[iny,
po\tomu, naprimer, pri ispolxzo-wanii mo@]ego sredstwa w
tabletkah dostato^no ispolxzowatx tolxko polowinu tabletki.
Ispolxzujte tolxko specialxnye mo@]ie
sredstwa dlq posudomoe^nyh ma[in.
Ustrojstwo dlq smqg^eniq wody 6
Dannaq posudomoe^naq ma[ina osna]ena ustrojstwom dlq
smqg^eniq vestkoj wody, po\tomu dozator opolaskiwatelq
sleduet ustanowitx na nizku@ dozirowku. Izwestx w vestkoj
wode wyzywaet poqwlenie belowatyh otlovenij na posude i
wnutrennej powerhnosti posudomoe^noj ma[iny. Wo izbevanie
\togo woda propuskaetsq ^erez specialxnyj kontejner, gde
ee vestkostx umenx[aetsq.
Poskolxku w ustrojstwe dlq smqg^eniq wody ispolxzuetsq
specialxnaq krupnozernistaq solx, to posle opredelennogo
koli^estwa ciklow mojki wam neobhodimo popolnqtx
sodervimoe kontejnera dlq soli.
O^enx wavno, ^toby wo wremq perwogo ispolxzowaniq posudomoe^noj ma[iny kontejner
uve byl zapolnen specialxnoj krupnozernistoj solx@ dlq posudomoe^nyh ma[in.
Kogda na paneli uprawleniq zagoraetsq indikator ,
kontejner neobhodimo zapolnitx krupnozernistoj solx@.
1. Otwintite kry[ku kontejnera, powora^iwaq ee
protiw ^asowoj strelki.
2. Zapolnite kontejner dlq soli wodoj (\to nuvno
sdelatx tolxko w perwyj raz).
3. S pomo]x@ prilagaemoj woronki zapolnite
kontejner krupnozernistoj solx@.
4. Wynxte woronku i wytrite wodu wokrug otwerstiq
dlq zapolneniq.
5. T]atelxno zawintite kry[ku.
Teperx ustrojstwo dlq smqg^eniq wody gotowo k mojke perwoj partii posudy. Wsegda sledite za tem, ^toby w kontejnere byla krupnozernistaq solx. Wmestimostx kontejnera
dlq soli sostawlqet okolo 1 l, ^to dostato^no dlq 20-30
ciklow mytxq.
Ispolxzujte tolxko specialxnu@ solx dlq
posudomoe^nyh ma[in, oby^naq stolowaq
solx movet powreditx ustrojstwo dlq
smqg^eniq wody.
Zaglu[ka ustrojstwa dlq smqg^eniq
wody 7
Na predpriqtii-izgotowitele ustrojstwo dlq smqg^eniq
wody ustanawliwaetsq na vestkostx wody do 20°dH.
Esli woda w wa[em dome imeet bolee wysoku@ vestkostx, wy
movete uweli^itx emkostx smqg^itelq wody, wynuw rezinowu@
zaglu[ku, raspolovennu@ na zadnej ^asti posudomoe^noj
ma[iny s prawoj storony.
Opisanie pribora
Page 6
- 6 -
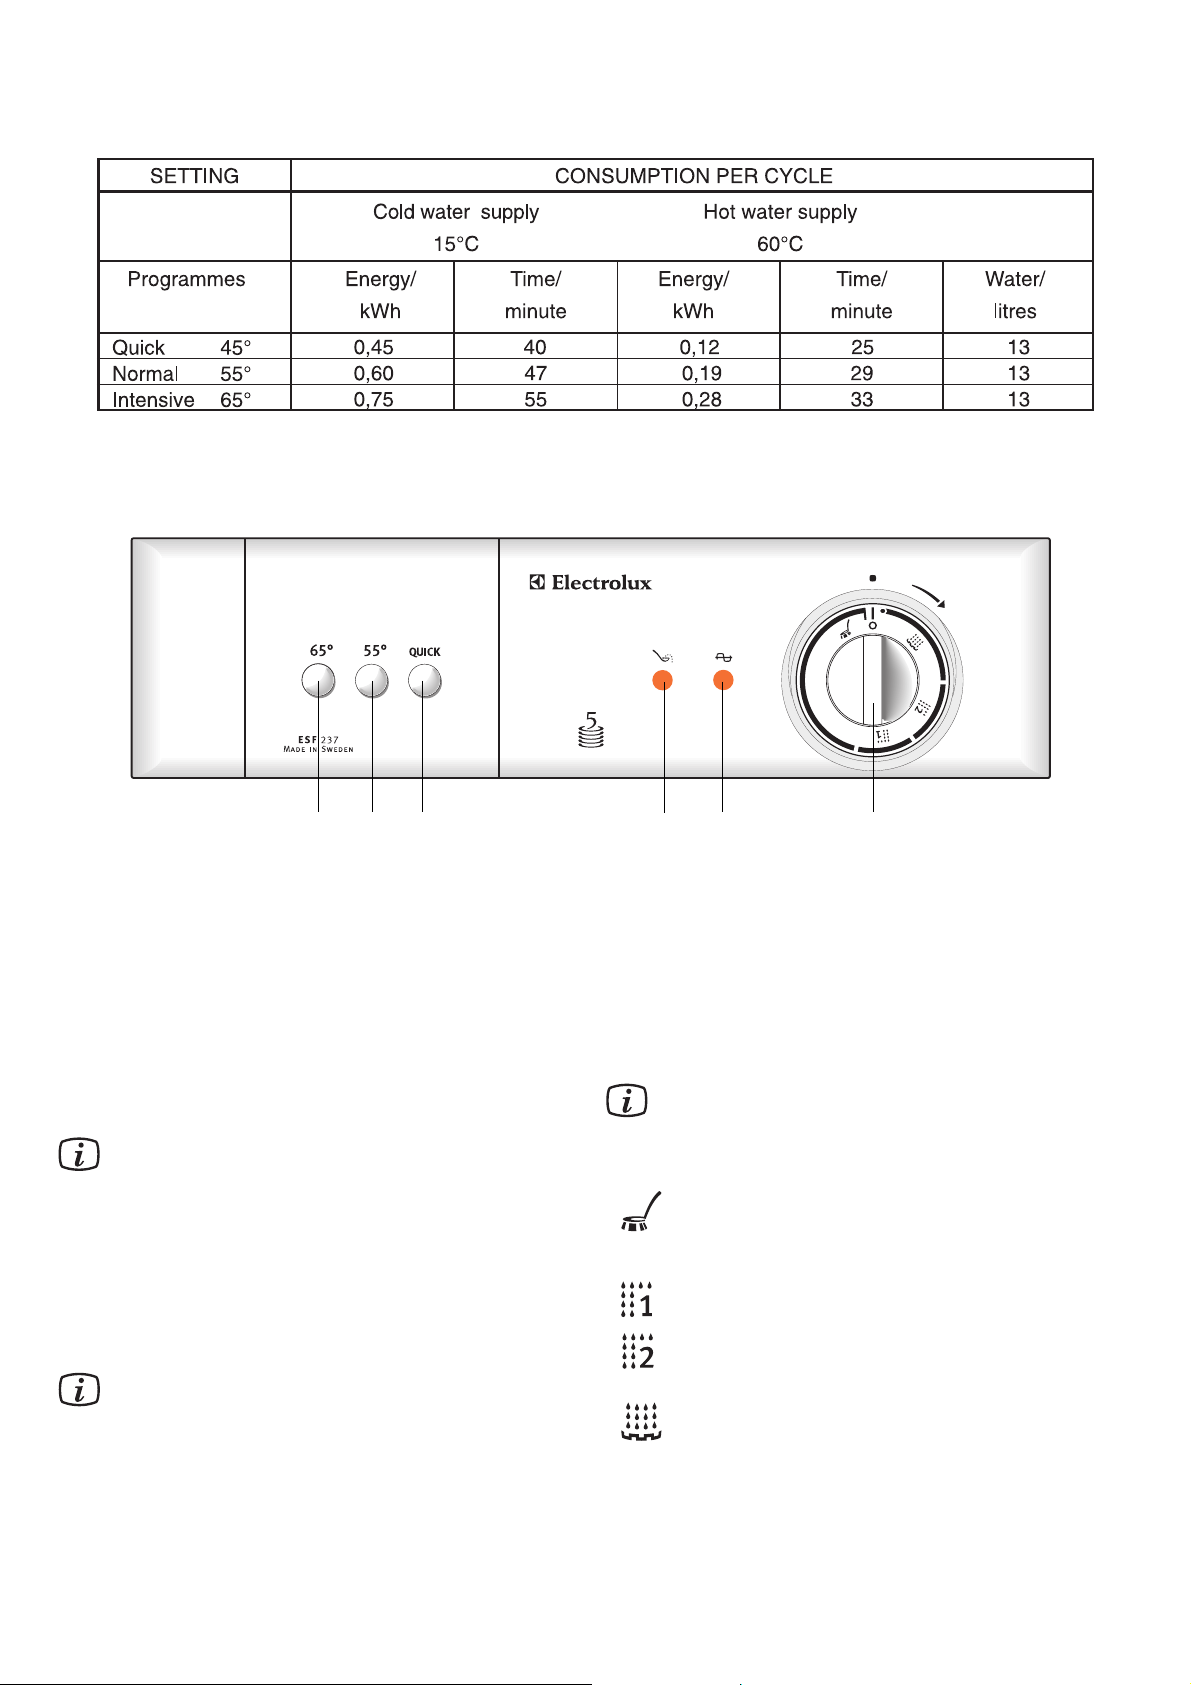
Panelx uprawleniq i programm
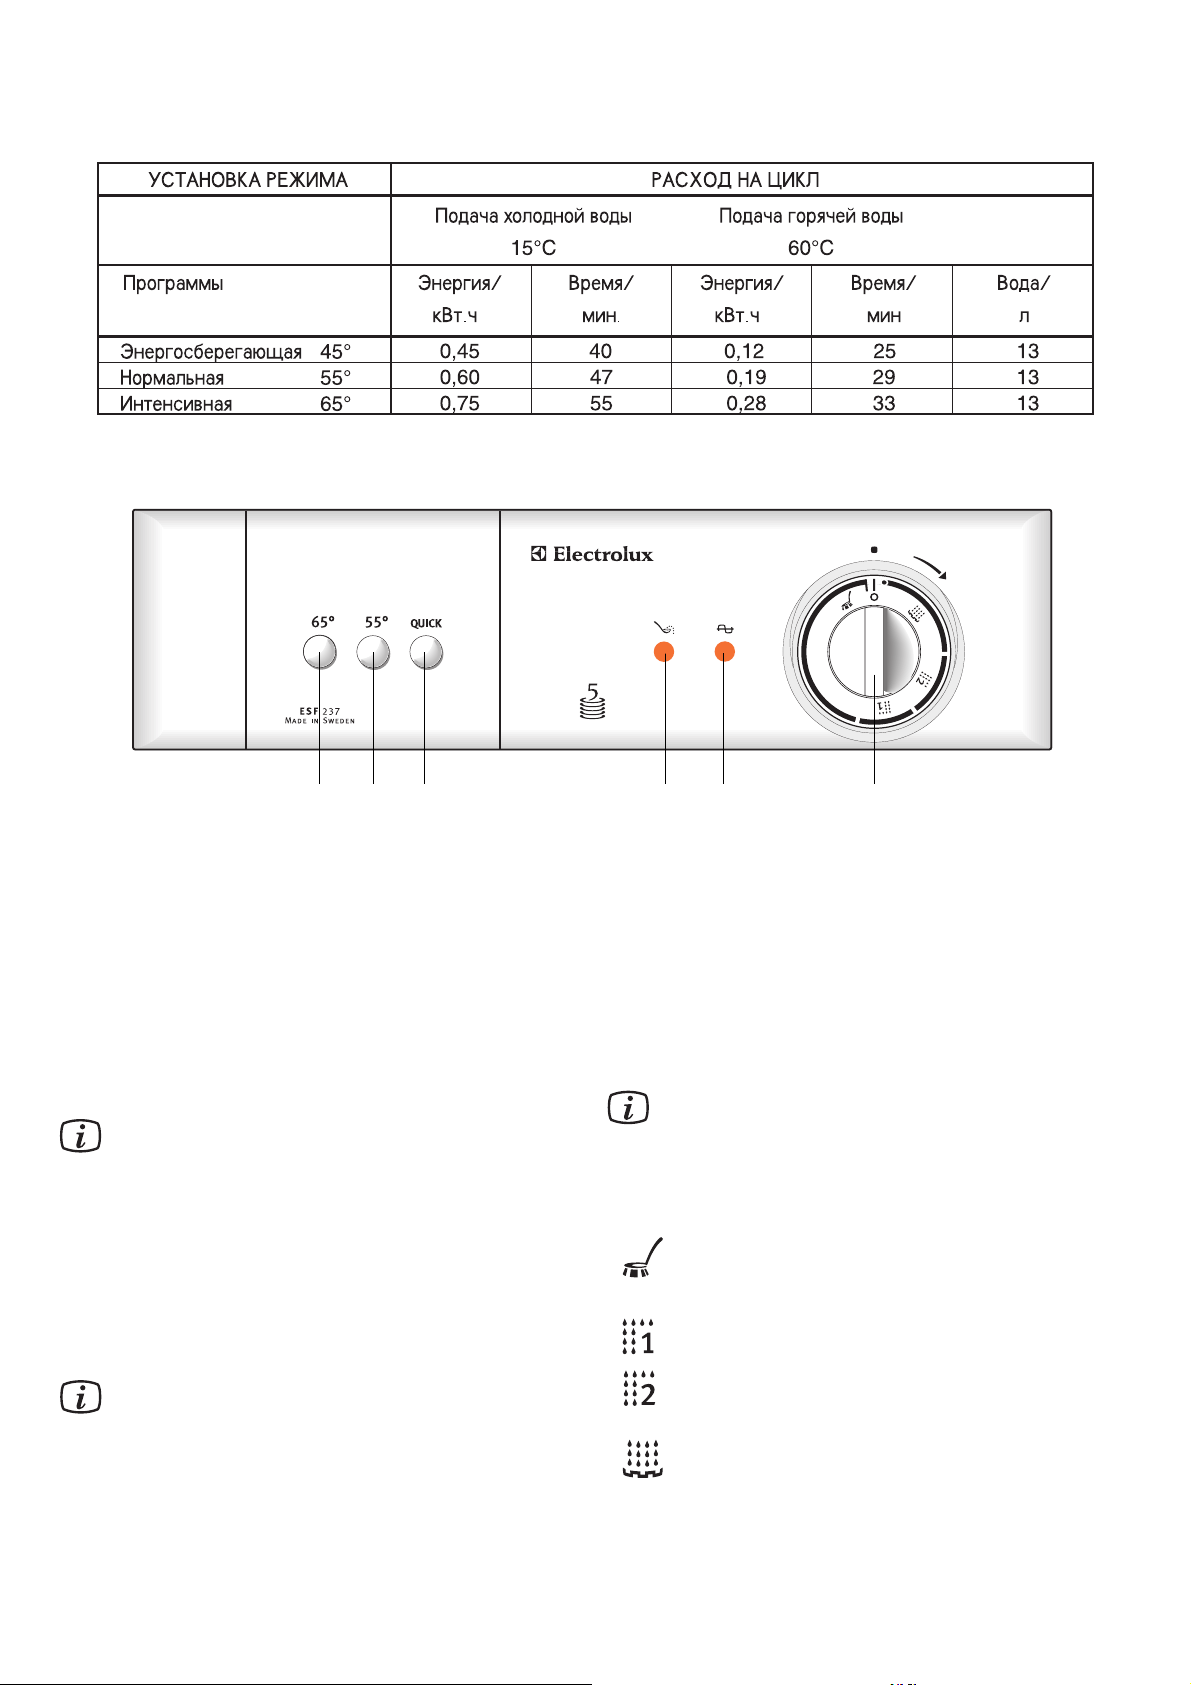
123 5 4
6
1 65° Intensiwnaq
Dlq posudy, na kotoroj ime@tsq pro^no prisoh[ie
ostatki pi]i ili dlq silxno zagrqznennoj posudy.
2 55° Normalxnaq
Dlq umerenno grqznoj posudy.
3 45° Quick/|nergosberega@]aq
Dlq slabo zagrqznennoj posudy, takoj kak ^a[ki,
bl@dca i stakany.
Esli navaty bolee odnoj knopok temperatury mojki,
ma[ina wyberet niz[u@ temperaturu.
4 Selektor wybora programm
~toby wkl@^itx ma[inu:
Powernite selektor wybora programm po ^asowoj
strelke na na^alo programmy. Perekl@^atelx WKL./
WYKL. wstroen w selektor programm.
~toby polnostx@ otkl@^itx ma[inu ot \lektroseti,
wynxte wilku \lektro[nura iz rozetki.
W processe nagrewaniq wody tajmer ne rabotaet.
5 Indikator wypolneniq programmy
|tot indikator ukazywaet na to, ^to w dannyj moment
wypolnqetsq programma mojki.
6 Lampa kontrolq nali^iq soli
|ta indikatornaq lampa pokazywaet, ^to neobhodimo
dobawitx solx do trebuemogo koli^estwa. Dlq odnoj
ili bolx[ego ^isla programm lampa movet prodolvatx
swetitxsq posle dobawleniq soli, ^to wpolne normalxno.
Za]elka dwercy
Navmite wniz ru^ku i otkrojte dwercu. Ne otkrywajte dwercu
pri rabote ma[iny.
Esli dwerca otperta i nahoditsq w otkrytom sostoqnii posle wypolneniq programmy, posuda wysu[itsq
bystree.
Mojka
Poloskaniq
Poloskanie teploj wodoj
- Wremq raboty po programme i potreblenie \nergii zawisqt ot temperatury ispolxzuemoj wody i koli^estwa posudy.
- Dannye nastrojki primenimy dlq mytxq 5 naborow posudy.
Page 7

Kak zagruvatx posudu
Na ill@stracii pokazan primer zagruzki posudy na 5
^elowek. U was movet bytx sower[enno drugaq posuda,
no esli wy budete sobl@datx prawila, to wy obqzatelxno
ostanetesx dowolxny rezulxtatom.
● Wsegda perewora^iwajte ^a[ki, stakany i miski
wwerh dnom.
● Naklonqjte glubokie bl@da (naprimer, supowye
tarelki) tak, ^toby s nih swobodno stekala woda
wo wremq su[ki
● Udostowerxtesx w tom, ^to posuda ne soprikasaetsq
drug s drugom. |to osobenno wavno dlq stolowyh
priborow - slovennye wmeste lovki i podobnye
predmety prosto newozmovno wymytx tak, kak
sleduet. Woda dolvna popadatx na wse zagrqznennye
powerhnosti.
● Sledite za tem, ^toby stolowye pribory s tonkimi
ru^kami i drugie tonkie predmety ne wystupali
skwozx otwerstiq w korzine i ne me[ali raspy
litel@ wra]atxsq.
● Nikogda ne stawxte wmeste serebrqnye izdeliq i
predmety iz nervawe@]ej stali. Kogda \ti metally
wstupa@t w kontakt, proishodit himi^eskaq reakciq,
w rezulxtate ^ego na serebre osta@tsq pqtna.
● Farforowye izdeliq s risunkom na powerhnosti
glazuri mogut okazatxsq neprigodnymi dlq mojki
w posudomoe^noj ma[ine, tak kak cwetnoj risunok
movet poterqtx qrkostx i pobleknutx. |to kasaetsq
takve stolowyh priborow s derewqnnymi i plastikowymi ru^kami.
Pri pokupke posudy ubeditesx w tom, ^to ona
prigodna dlq mojki w posudomoe^noj ma[ine.
● Al@miniewye izdeliq pri mytxe w posudomoe^noj
ma[ine tuskne@t i terq@t blesk. Takie izdeliq
stanowqtsq ^istymi, no ih wne[nij wid uhud[aetsq.
● Pri mytxe hrupkoj posudy ustanawliwajte bolee
nizku@ temperaturu wody.
● Nekotorye izdeliq iz plastmassy ne prigodny
dlq mytxq w posudomoe^noj ma[ine. Esli wy
somnewaetesx, movno li mytx w ma[ine kaku@-libo
plastmassowu@ posudu, rekomenduetsq proweritx
\to, zagruziw w ma[inu tolxko odin plastmassowyj
predmet, ili mytx taku@ posudu wru^nu@.
● We]estwa, soderva]ie stojkie krasiteli
(naprimer, ket^up), mogut wyzwatx obrazowanie
pqten w posudomoe^noj ma[ine, kotorye ^erez
nekotoroe wremq is^eznut.
- 7 -
Ukazaniq po prowedeni@ sertifikacionnyh ispytanij
Standart ispytanij: EN 50242
Ras^etnaq emkostx: 5 stolowyh priborow
Zagruzka moe^noj stojki: Soglasno risunku 1
Programma, ispolxzuemaq pri ispytaniqh: Normalxnyj revim 65°C
Mo@]ee sredstwo (tip W po IEC): 15 grammow w dozator
Dozator opolaskiwatelq (tip III): W srednem polovenii
Dawlenie poda^i wody: Minimum 0,8 bar, maksimum 10 bar
Sliw otrabotannoj wody: Ustanowitx w sootwetstwii s risunkom 2
Kontejner dlq soli i dozator opolaskiwatelq dolvny bytx zapolneny w sootwetstwii s rukowodstwom po \kspluatacii.
Pered prowedeniem zamerow posudomoe^naq ma[ina dolvna otrabotatx dwa polnyh cikla s primeneniem mo@]ego
sredstwa, i odin - bez mo@]ego sredstwa.
1
Zagruzka posudy
2
Page 8

- 8 -
|kspluataciq pribora
Zapusk programmy
1. Udalite s posudy twerdye ostatki pi]i.
2. Zagruzite posudomoe^nu@ ma[inu (sm. nive primery
zagruzki korziny). Wnesite nuvnu@ porci@ mo@]ego
sredstwa w dozator.
3. Zakrojte dwercu.
4. Wyberite neobhodimu@ temperaturu mojki.
5. Wkl@^ite posudomoe^nu@ ma[inu, ustanowiw selektor
wybora programm na na^alo programmy.
6. Po okon^anii mytxq posudy prowerxte, ne trebuetsq li
o^istka filxtrow i setok.
o
1
2
3
5
6
4
Page 9

- 9 -
Dejstwiq w slu^ae neisprawnostej
Ni w koem slu^ae ne pytajtesx sami po^initx
posudomoe^nu@ ma[inu. Prowedenie remonta licom,
ne oblada@]im nadleva]ej kwalifikaciej, movet
priwesti k powrevdeni@ posudomoe^noj ma[iny.
• Esli iz-pod posudomoe^noj ma[iny • Nemedlenno zakrojte wodoprowodnyj kran i
wytekaet woda otkl@^ite posudomoe^nu@ ma[inu ot \lektroseti,
wynuw wilku iz rozetki.
• Prowerxte germeti^nostx wseh uplotnenij, [wow
i soedinenij.
Pri podkl@^enii k wodoprowodu l@bogo bytowogo pribora su]estwuet opasnostx wozniknoweniq ute^ki nezawisimo ot
prinqtyh mer predostorovnosti. Po\tomu rekomenduetsq wsegda zakrywatx wodoprowodnyj kran, poka posudomoe^naq
ma[ina ne ispolxzuetsq.
Prevde ^em wyzwatx mastera po remontu, prowerxte sledu@]ee:
•
Esli posudomoe^naq ma[ina ne wkl@^aetsq • Nadevno li zakryta dwerca ma[iny?
• Prawilxno li ustanowlen selektor programm?
• Otkryty li wodoprowodnyj kran ili wentilx?
• Wkl@^ena li posudomoe^naq ma[ina w \lektrosetx?
• Ne peregorel li predohranitelx?
• Eslipo okon^anii cikla mytxq ne • Otkrywali li wy dwercu posudomoe^noj ma[iny do togo,
sliwaetsqwoda kak pogas indikator i zawer[ilsq cikl mytxq?
• Ne zasorilisx li filxtry?
• Ne zasorilsq li sliwnoj [lang?
• Pri neudowletworitelxnom ka^estwe mytxq • ~to-nibudx me[aet raspylitel@ wra]atxsq?
• Predmety posudy stoqt sli[kom blizko drug k drugu?
• Dostato^no li mo@]ego sredstwa wy ispolxzuete?
• Ne zasorilisx li filxtry?
• Ne opustel li dozator opolaskiwatelq?
• Ne zasorilisx li otwerstiq raspylitelq?
• Prawilxno li ustanowleny filxtry?
• T]atelxno li zakryta kry[ka solewogo kontejnera?
• Posle mytxq posuda ne imeet bleska ili • Wozmovno, wnutri posudomoe^noj ma[iny obrazowalsq
ve na nej widny razwody izwestkowyj osadok iz vestkoj wody, kotoryj takve
osavdaetsq i na posude. Priobretite sredstwo dlq udaleniq
izwestkowogo naleta i sledujte instrukciqm, pome]ennym
na upakowke.
Dannyj pribor sootwetstwuet sledu@]im direktiwam E.E.S.:
– 73/23/EEC ot 19.02.1973 – direktiwa po nizkomu naprqveni@.
– 89/336/EEC ot 03.05.1989 (wkl. poprawku
– 92/31/EEC) – direktiwa po \lektromagnitnoj sowmestimosti.
Page 10

Tehni^eskoe obsluviwanie
Tehni^eskoe obsluviwanie i
zap^asti
Esli, posle wypolneniq opisannyh wy[e dejstwij, wam ne
udalosx ustranitx nepoladki w rabote ma[iny, obratitesx
w remontnoe predpriqtie.
Dlq priobreteniq komplektu@]ih k posudomoe^noj ma[ine
i ee tehni^eskogo obsluviwaniq obratitesx w torgowoe
predpriqtie. Zdesx wam takve posowetu@t, kak samostoqtelxno ustranitx neisprawnostx, esli \to wozmovno.
Prevde ^em obratitxsq w torgowoe predpriqtie ili serwisnyj centr, spi[ite sledu@]ie dannye s zawodskoj
tabli^ki, raspolovennoj na zadnej stenke posudomoe^noj
ma[iny:
TYPE. ............................................................
MOD. ............................................................
PROD.NO. ............................................................
SER.NO. ............................................................
Data pokupki: ............................................................
Tehni^eskie dannye
Razowaq zagruzka: 5 stolowyh priborow
Gabaritnye razmery: {irina 450 mm
Wysota 460 mm
Glubina 480 mm
Wes: 17 kg
Naprqvenie pitaniq: 230 W, odnofaznoe, 50 Gc
Predohranitelx: 10 A
Potreblqemaq
mo]nostx: Nagrewatelxnyj \lement: 1200 Wt
Ob]aq: 1280 Wt
Dawlenie wody: 50-1000 kPa (0,5 - 10 bar)
Temperatura wody: Maksimalxnaq 65°C
- 10 -
Page 11
- 11 -
1
2
3
4
Powrevdeniq
Esli posudomoe^naq ma[ina byla powrevdena wo wremq
transportirowki, wam sleduet nemedlenno izwestitx ob
\tom kompani@, otwetstwennu@ za ee dostawku.
Udostowerxtesx w tom, ^to posudomoe^naq ma[ina ne imeet
powrevdenij. Esli wy obnaruvili kakoe-libo powrevdenie,
neisprawnostx ili otsutstwie komplektu@]ih, wy dolvny
nemedlenno izwestitx postaw]ika.
Nikogda ne ostawlqjte upakowo^nyj material
w mestah, gde deti mogut wospolxzowatxsq
im kak igru[koj.
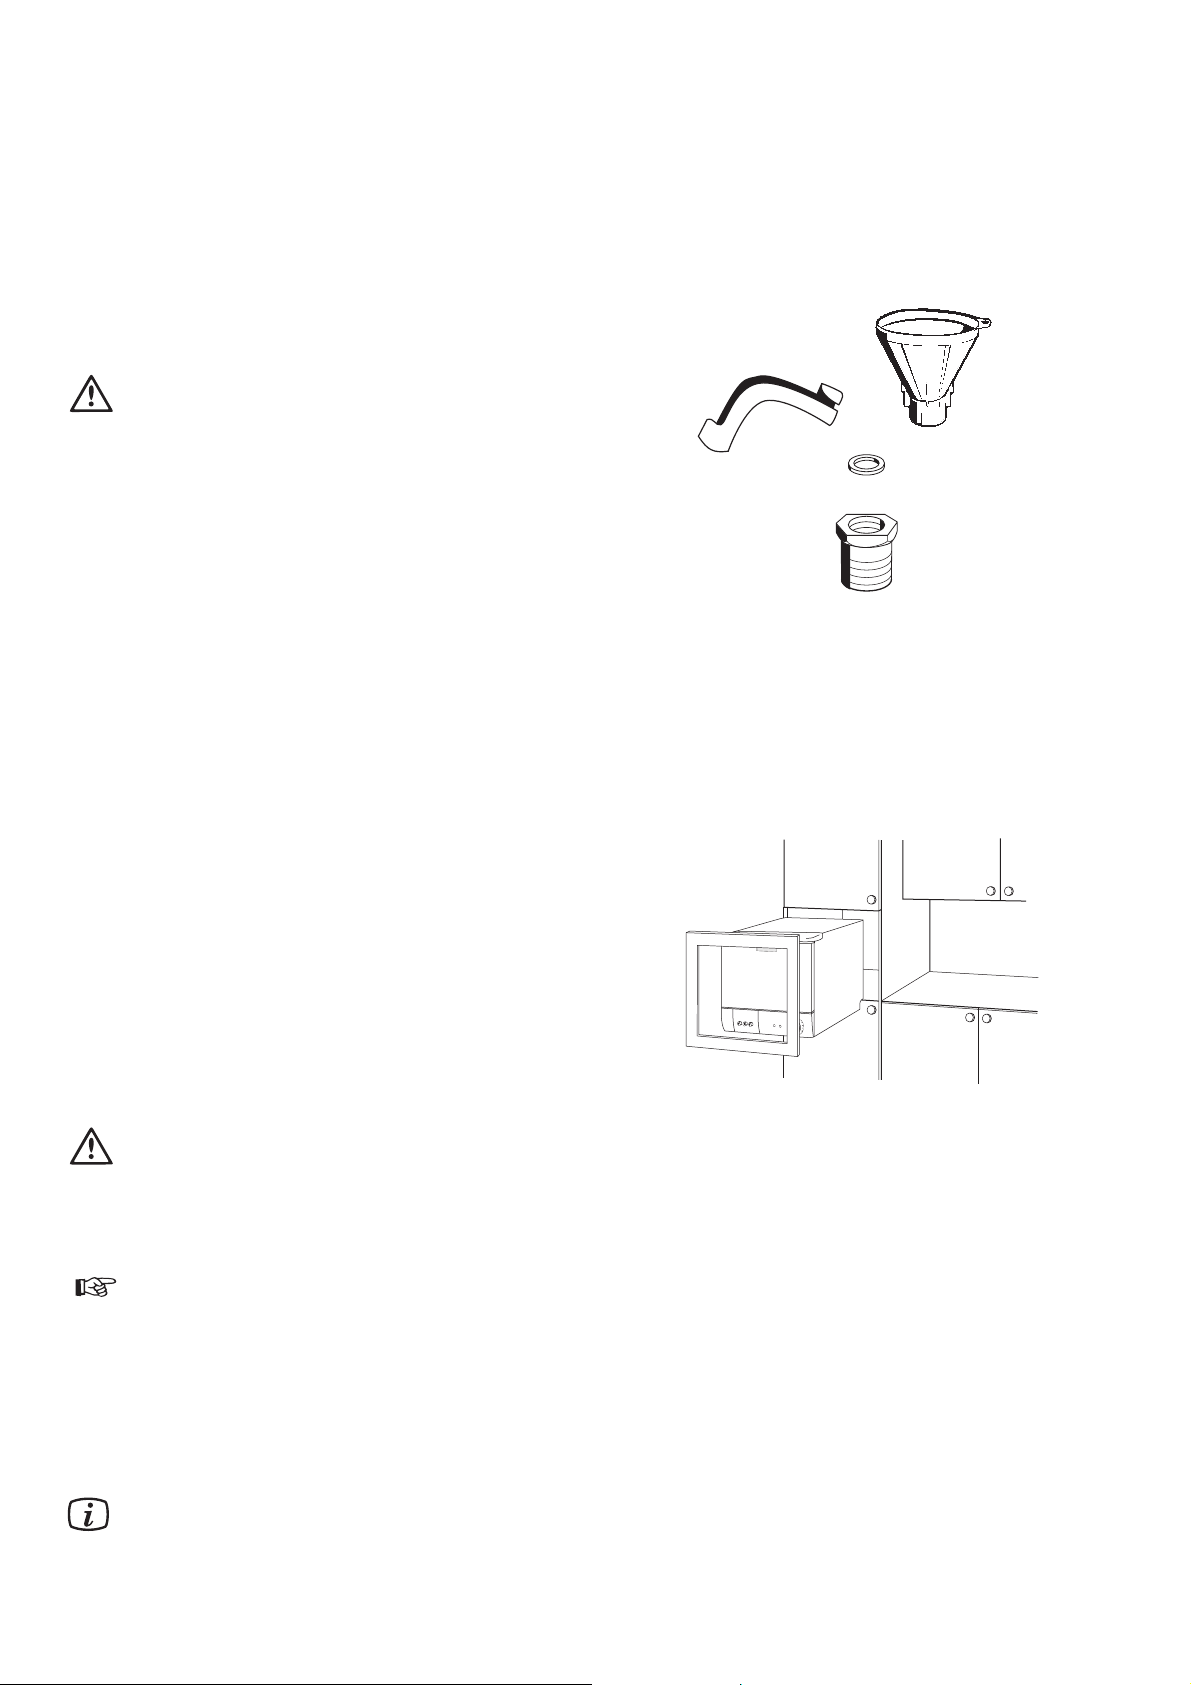
Pri raspakowke udostowerxtesx w tom, ^to w komplekt k
ma[ine whodqt:
● Woronka dlq zapolneniq soli (1)
● Kolen^atyj patrubok dlq sliwnogo [langa (2)
● Rezinowaq prokladka (3)
● Perehodnik 1/2” (4)
Ispolxzowanie
Dannaq posudomoe^naq ma[ina prednazna^ena iskl@^itelxno
dlq mojki bytowoj utwari, prigodnoj dlq mojki w posudomoe^noj ma[ine. Ispolxzowanie w kakih-libo drugih
celqh movet priwesti k powrevdeni@ pribora i potere
garantii na nego.
Wstraiwanie posudomoe^noj
ma[iny w kuhonnu@ mebelx
Esli wy hotite wstroitx posudomoe^nu@ ma[inu w wa[u
kuhonnu@ mebelx, wam neobhodim dlq \togo specialxnyj
nabor, wypuskaemyj na[ej firmoj. K nemu prilagaetsq
dejstwu@]ee rukowodstwo s ukazaniqmi po sobl@deni@
wseh neobhodimyh trebowanij. Dannyj nabor wy movete
priobresti w tom ve torgowom predpriqtii, gde wy pokupali
posudomoe^nu@ ma[inu.
Za]ita ma[iny ot zamoraviwaniq
Esli ma[ina hranitsq w meste, gde temperatura movet inogda opuskatxsq nive 0°C,
su]estwuet risk togo, ^to nebolx[oe koli^estwo wody, kotoroe ostaetsq wnutri ma[iny
posle normalxnogo ispolxzowaniq, zamerznet,
i \to movet priwesti k ee powrevdeni@.
1. Otkl@^ite poda^u wody w posudomoe^nu@ ma[inu.
2. Snimite [langi poda^i i sliwa wody.
3. Wybratx programmu mojki, zapustitx ma[inu i
datx ma[ine porabotatx po programme w te^enie
neprodolvitelxnogo wremeni.
4. Udostowerxtesx, ^to kontejner dlq soli zapolnen
krupnozernistoj solx@ dlq smqg^eniq wody.
Pribor prednazna^en dlq ispolxzowaniq i hraneniq w pome]enii pri normalxnoj komnatnoj
temperature. Izgotowitelx ne neset otwetstwennosti za u]erb, woznik[ij w rezulxtate
zamerzaniq pribora.
Raspakowka
Page 12
- 12 -
Ustanowka
Razme]enie
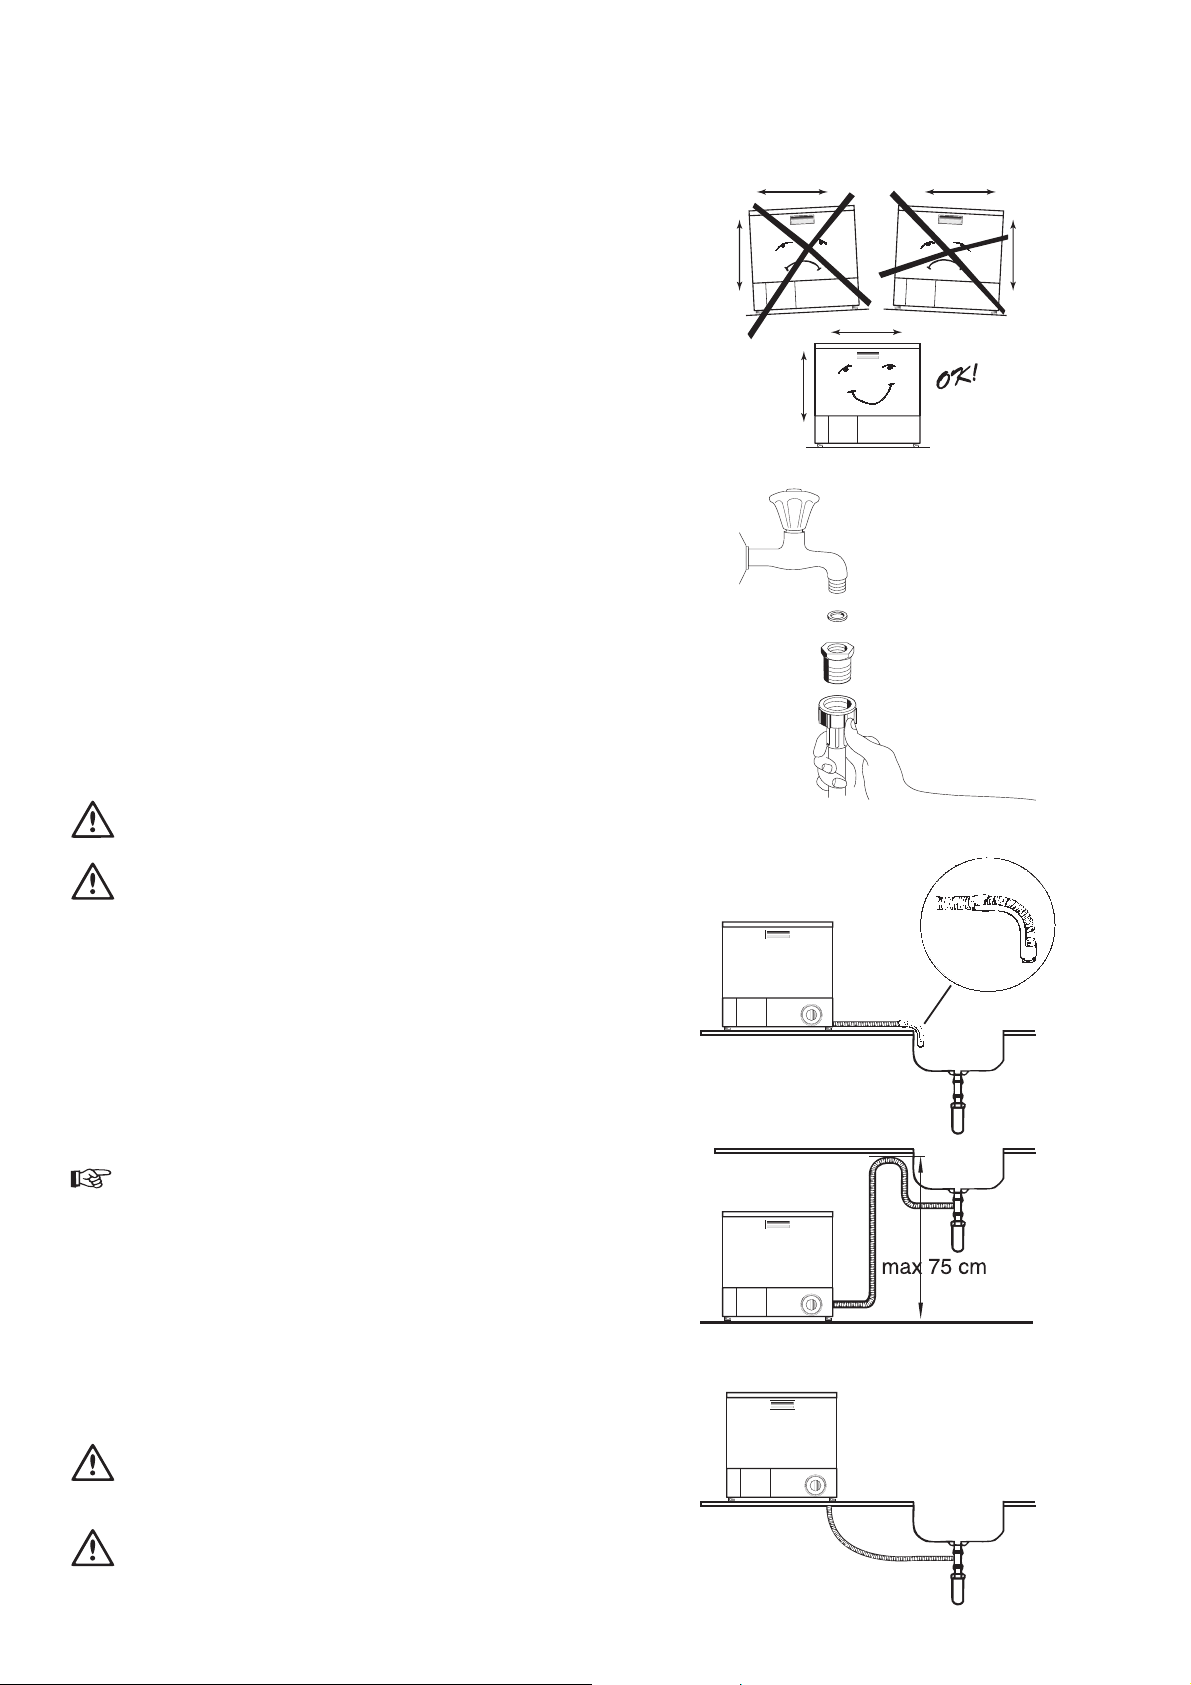
Standartnyj wariant posudomoe^noj ma[iny prednazna^en dlq
razme]eniq na kuhne w rakowine ili na rabo^ej powerhnosti stola.
Dlq prawilxnogo funkcionirowaniq posudomoe^noj ma[iny ona
dolvna bytx raspolovena strogo gorizontalxno. |togo movno
dobitxsq s pomo]x@ reguliruemyh novek (dlinoj 8 mm kavdaq).
Poda^a wody
Temperatura podawaemoj w posudomoe^nu@ ma[inu wody ne dolvna
prewy[atx 65° C, a dawlenie dolvno bytx w diapazone 50-1000 kPa
(0,5-10 bar).
O^enx wavno, ^toby wodoprowodnyj kran ili wentilx raspolagalisx
rqdom s posudomoe^noj ma[inoj w legkodostupnom meste. Wy
movete priobresti kak specialxnye smesiteli, rass^itannye na
podkl@^enie posudomoe^noj ma[iny, tak i adaptery dlq smesitelej
starogo tipa. Podsoedinite zaliwnoj [lang k kranu s rezxboj 3/4”.
Pri neobhodimosti ispolxzujte perehodnik (1/2 d@jma), whodq]ij
w komplekt postawki.
Ni w koem slu^ae ne sleduet kakim-libo obrazom nara]iwatx ili
nadstawlqtx zaliwnoj [lang dlq uweli^eniq ego dliny. Sli[kom
korotkij [lang zamenqetsq polnostx@ na bolee dlinnyj [lang
wysokogo dawleniq i sootwetstwu@]ej konstrukcii. Soedinennyj s
ma[inoj konec [langa movno powernutx w l@bu@ storonu. Dlq \togo
neobhodimo oslabitx kontrgajku, izmenitx polovenie [langa i
wnowx zatqnutx kontrgajku.
Pered tem, kak zadwinutx ma[inu na mesto, udostowerxtesx w tom, ^to gajka nadevno zatqnuta.
Ispolxzujte tolxko tot zaliwnoj [lang, kotoryj
postawlqetsq s wa[ej posudomoe^noj ma[inoj, ne
polxzujtesx starym zaliwnym [langom.
Organizaciq sliwa
Polvite sliwnoj [lang nad rakowinoj, kak pokazano na risunke.
{lang ni w odnoj to^ke ne dolven nahoditxsq wy[e 75 sm nad
powerhnostx@ ustanowki posudomoe^noj ma[iny. Esli [lang budet
proloven wy[e, \to movet naru[itx rabotu posudomoe^noj ma[iny.
Krome togo, wavno proweritx, ^to wnutrennij diametr sliwnogo [langa
po wsej ego dline rawen ne menee 13 mm. Esli sliwnoj [lang okazalsq
sli[kom dlinnym, ego movno legko obrezatx do neobhodimoj dliny.
1. Obrevxte sliwnoj [lang do neobhodimoj dliny ostrym
novom.
2. Nadenxte na konec sliwnogo [langa koleno, whodq]ee w
komplekt postawki.
Podkl@^enie k seti
Posudomoe^naq ma[ina osna]ena kabelem s \lektri^eskoj wilkoj
dlq podkl@^eniq k zazemlennoj rozetke \lektroseti s naprqveniem 220-230 W, raspolovennoj w legkodostupnom meste i
za]i]ennoj predohranitelem s nominalom 10 A.
Prevde ^em pristupitx k kakim-libo manipulqciqm s
posudomoe^noj ma[inoj ee neobhodimo otkl@^itx
ot \lektri^eskoj seti, wynuw wilku iz rozetki.
Fiksirowannoe \lektri^eskoe podkl@^enie dolvno
osu]estwlqtxsq tolxko upolnomo-^ennym na \to
\lektrikom ili kompetentnym licom.
Page 13

- 13 -
Contents
For the User
Safety information 14
Description of the appliance 15-16
- Rinse conditioner dispenser
- Spray arm
- Coarse filter
- Fine filter
- Detergent dispenser
- Water softener
- Water softener plug
The control panel and programme
table 17
Loading 18
- How to load the dishwasher
- Instruction for verification tests
Using the appliance 19
In the event of a fault 20
Service 21
- Service and spare parts
For the Installer
Technical data 21
Unpacking 22
- Damages
- Use
- Building-in
- Protecting the machine against freezing
Installation 23
- Positioning
- Water supply
- Discharge connection
- Electrical connection
Guide to use the instruction book
The following symbols will be found in the text to guide you throughout the instructions:
Safety information
Step by step instructions
Hints and tips
Environmental information
Page 14
Installation and servicing
● All installation and service work done on the product
must be carried out by a qualified technician. Work
performed by persons with inadequate knowledge may
adversely affect the satisfactory functioning of the
product and may cause personal injury or damage.
Before any work is carried out on the dishwasher, it
must be isolated from the electrical supply, by unplugging the power cord or removing the fuse.
● Water connection shall be made via an easily accessible
stopcock.
● The power cord must be plugged into an earthed
socket, which need to be easily accessible. Permanent
installation must only be carried out by an authorized
electrician.
● Make sure that the power cord is not nipped or other-
wise damaged and that the hoses do not get crushed
or kinked when moving the dishwasher in connection
with installation or cleaning etc.
● If the power cord is damaged, it must be replaced
by a special cord or assembly available from the
manufacturer or its service agent.
● Our approved build-in kit must be used if the dishwasher
is to be built into the kitchen furnishings.
● Servicing and possible repairs must be carried out by
a service company authorized by the supplier. Use only
spare parts supplied by these. Never try to repair the
dishwasher yourself.
Child Safety
● Remember that the plastic bags included in the
packaging can be fatal playthings for small children.
● The dishwasher should be used by adults only. Do not
let children play with the controls or other parts of it.
● Keep all detergents in safe place out of children´s reach.
● Prevent children from sitting, swinging or standing
on the open door.
During Use
● This dishwasher is designed solely for washing house-
hold utensils suitable for machine washing. Using it for
other purposes could lead to physical injury or damage
to property and invalidate the guarantee.
● Only use detergent specifically designed for use in
dishwashers.
● Do not place sharp knives with their points upwards.
It is much safer to lay them horizontally in the basket.
● Avoid opening the door while the dishwasher is running,
since hot steam may escape.
● If you take any dishes out of the dishwasher before the
end of the dishwashing cycle, it is extremely important
to rinse them thoroughly under running water to remove
any remaining detergent.
● In the event of flooding or leakage, shut off the water
supply immediately by closing the stopcock and disconnect the power supply by unplugging the power cord
or removing the fuse. When removing the electrical
plug, grip the plug, not the lead.
● There is always a certain risk of leakages in any machine
connected to a water supply, no matter what water
safety features it may have. Therefore it is advisable
always to turn off the water supply tap when the machine
is not in use.
Disposal
- packaging:
All materials used in packaging this appliance are
environmentally-friendly. The various plastics used
are identified and can be recycled:
● PE stands for polyethylene, which is used for the
bag around the appliance and the bag in which these
instructions were supplied.
● PS stands for polystyrene (moulded), which is used
for the sections of packaging needed to cushion the
appliance.
The cardboard components of the packaging are made
from recyclable paper and should be taken to a collection
point for recycling.
The appliance contains plastic and rubber components.
These have identifying marks to show what they are
made from, so they can be recycled or disposed of properly at the end of the appliance's life cycle.
The materials are identified according to international
standards.
- old apparatus:
At the end of the appliance's useful life, disconnect the
electrical plug from the power supply, then cut the electrical
lead at the point where it enters the appliance. Make quite
sure that children will not be able to play with it.
Safety information
Before installing and first using the dishwasher, read this instruction booklet carefully, including its
hints and warnings. To avoid unnecessary mistakes and accidents, it is important to ensure that all
people using the dishwasher are thoroughly familiar with its operation and safety features.
Save these instructions and make sure they remain with the dishwasher if it is moved or sold, so
that everyone using it through its life can be properly informed on appliance use and safety.
- 14 -
Page 15
1
2
3
4
5
6
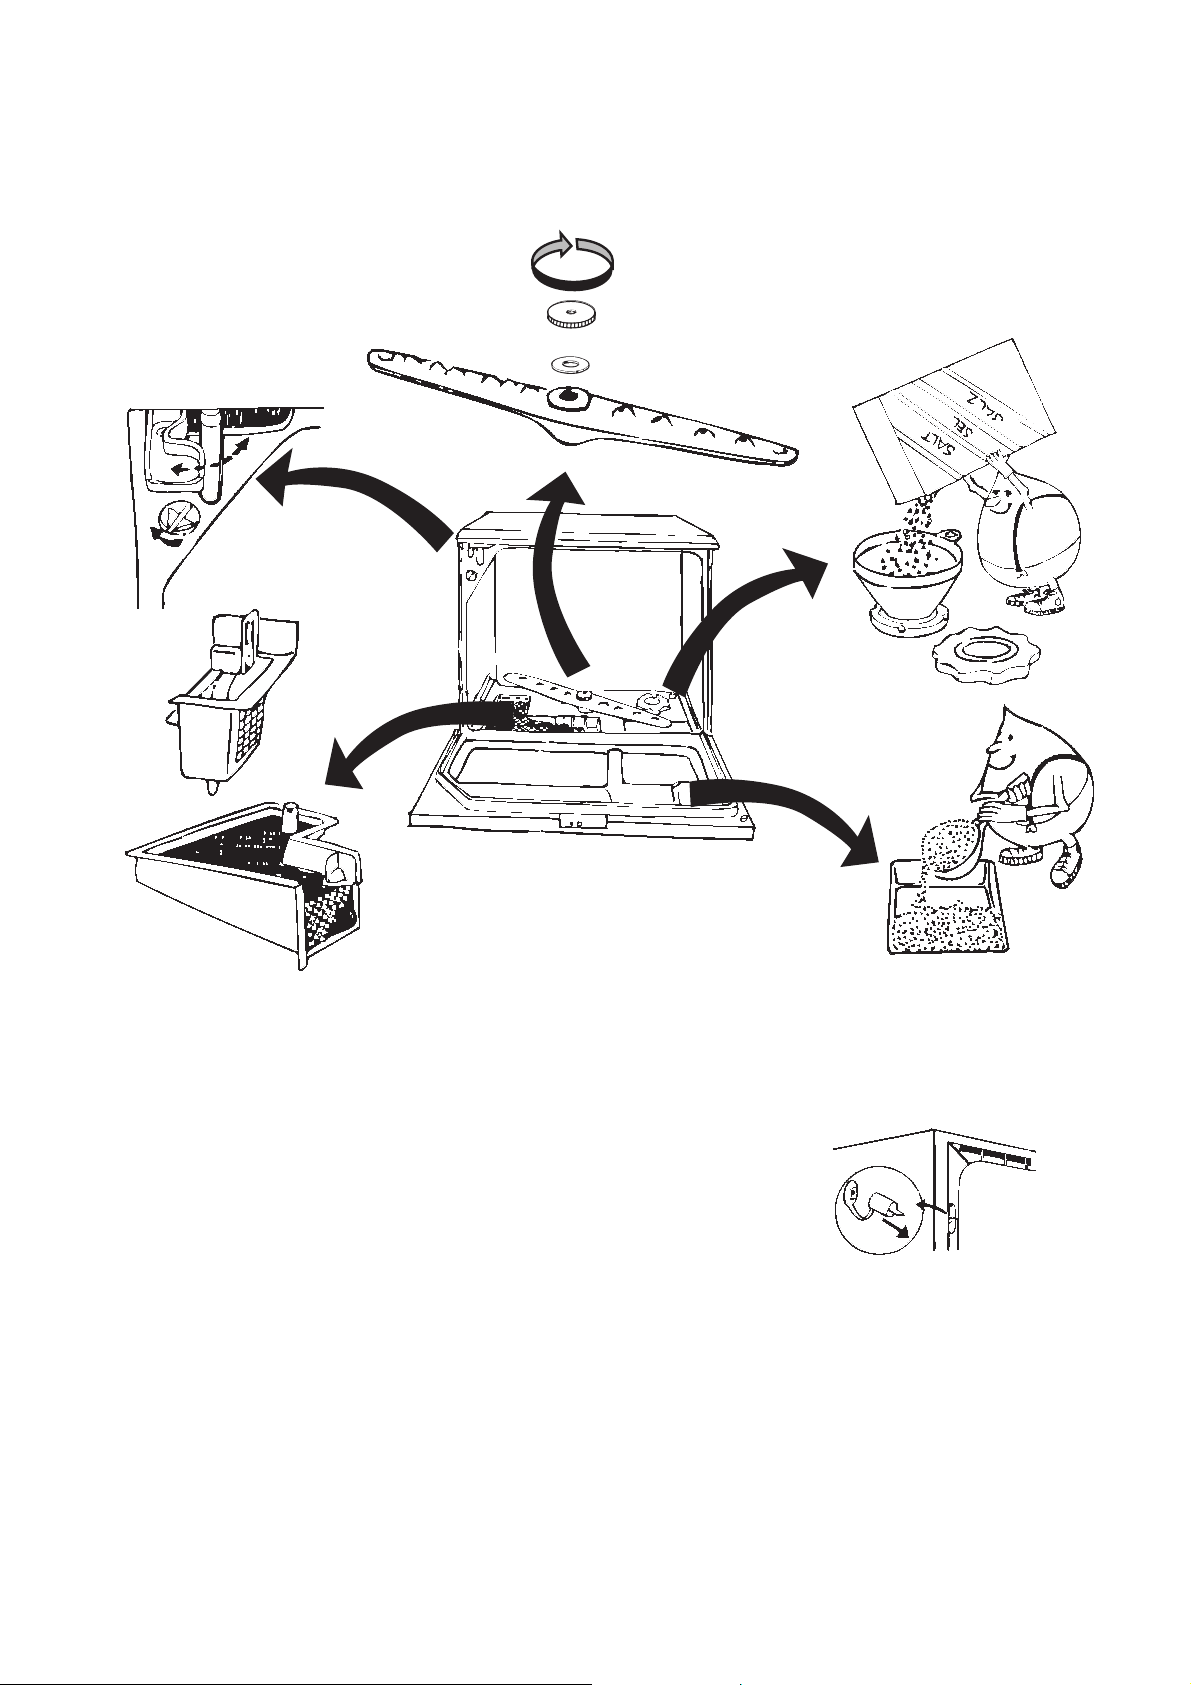
Description of the appliance
1 Rinse conditioner dispenser
2 Spray arm
3 Coarse filter
4 Fine filter
5 Detergent dispenser
6 Water softener
7 Water softener plug
- 15 -
7
Page 16
Rinse conditioner dispenser 1
Use of a rinse conditioner will result in cleaner and faster
drying of the load, since it helps water and soil to run off.
Too much conditioner may result in streakiness, too little
may cause white spots. The dispenser holds about 140 ml.
This is enough for 40-70 wash cycles, depending on the
dosage setting. When the rinse conditioner level is approaching the bottom of the scale it is time to refill the dispenser.
Adjust the dosage setting according to the hardness if the water. Begin with the lowest dosage
setting and increase as necessary by turning the
arrow clockwise.
1. Swivel out the filler trough.
2. Fill up with rinse conditioner until the level reaches
up to the red mark on the level indicator tube; do
not overfill.
3. Wipe off any spillage carefully to prevent excessive
foaming during the next wash programme.
4. Close the filler trough afterwards.
Do not fill the rinse conditioner dispenser
with liquid detergent.
Spray arm 2
It is important to keep all the holes in the spray arm clear.
A clogged hole can seriously affect washing efficiency. If
the spray arm needs cleaning, unscrew the nut clockwise
(left-hand thread) and lift off the spray arm. Clear the holes
and shake out any food remnants.
Coarse filter 3
The purpose of the coarse filter is to catch large objects
such as toothpicks and pieces of eggshell. Make sure that
the filter is always clean. Lift it out and rinse it under running water whenever necessary.
Fine filter 4
It is just as important to keep this filter clean. A dirty or
clogged filter will always impair washing efficiency. The
fine filter can easily be lifted out for cleaning when you
have removed the coarse filter.
Detergent dispenser 5
Consult the instructions on the detergent packet and fill
the compartment with the detergent. Remember that the
instructions usually refer to full-size dishwashers, for example
when using detergent tablets, it is sufficient to use just half
a tablet.
Only use detergents specially designed for
dishwashers.
Water softener 6
This dishwasher is equipped with a water softener for hard
water, therefore shall the rinse aid dispenser be set for a
low dosage. The lime in hard water causes white deposits
to occur on dishes and to the interior of the dishwasher.
To prevent this, the water has to pass through a special
container where the hardness is removed.
Since the water softener uses coarse dishwasher salt,
you will have to refill the salt container after a certain
number of dishwashing cycles.
It is important to fill the compartment with
coarse dishwasher salt before using the
machine for the first time, if you live in an
area where the water is calciferous.
The indicator light on the control panel is lit when the
container requires refilling.
1. Unscrew the filler cap to the salt container anticlockwise.
2. Fill the salt container with water (only the first
time).
3. Fill the container with coarse salt, using the
funnel supplied.
4. Remove the funnel and wipe off any spillage
around the filler opening.
5. Screw the filler cap back properly in place.
The water softener is now ready for the first load of dishes.
Always make sure that there is coarse grained salt in the
container, which holds about 1 litre, which is enough for
about 20 - 30 dishwashing cycles.
Use only special salt for dishwashing machines,
ordinary domestic salt can damage the water
softener.
Water softener plug
As supplied from the factory, the water softener is set for
a water hardness of up to 20°dH. If your water is harder
than this, you can increase the capacity of the water softener by pulling out the ruber plug at the rear of the dishwasher on the right.
Description of the appliance
- 16 -
Page 17
- 17 -
The control panel and programme table
123 5 4
6
1 65° Intensive
For loads which have heavily dried-on food
remnants and for those which are heavily soiled.
2 55° Normal
For normal soiled loads.
3 45° Quick
For lightly soiled loads, such as cups, saucers
and glasses.
If more than one Temperature button is pressed in,
the machine selects the lowest temperature.
4 Selector knob
To start the machine; turn the selector knob clockwise
to the programme start. The ON/OFF switch is built
into the programme selector. To isolate the dishwasher
from the mains completely, unplug it from the wall
socket.
During the water heating process, the timer is
standing still.
5 Cycle sequence lamp
While the programme is in progress, the operating
lamp is lit and it goes out when the programme
is ready.
6 Salt indicator lamp
The operating lamp indicates when the salt needs to be
replenished. The lamp may remain lit for one or more
programmes after replenishment, which is fully normal.
Door lock
Press the handle down and open the door. Avoid opening
the door while the machine is running.
If the door is opened and is put standing ajar after a
completed programme, the dishes will dry faster.
Wash phase
Rinse phases
Rinse with heated water
- All figures are nominal and vary for example due to temperature variations on the inlet water.
- The figures apply to washing up 5 settings.
Page 18
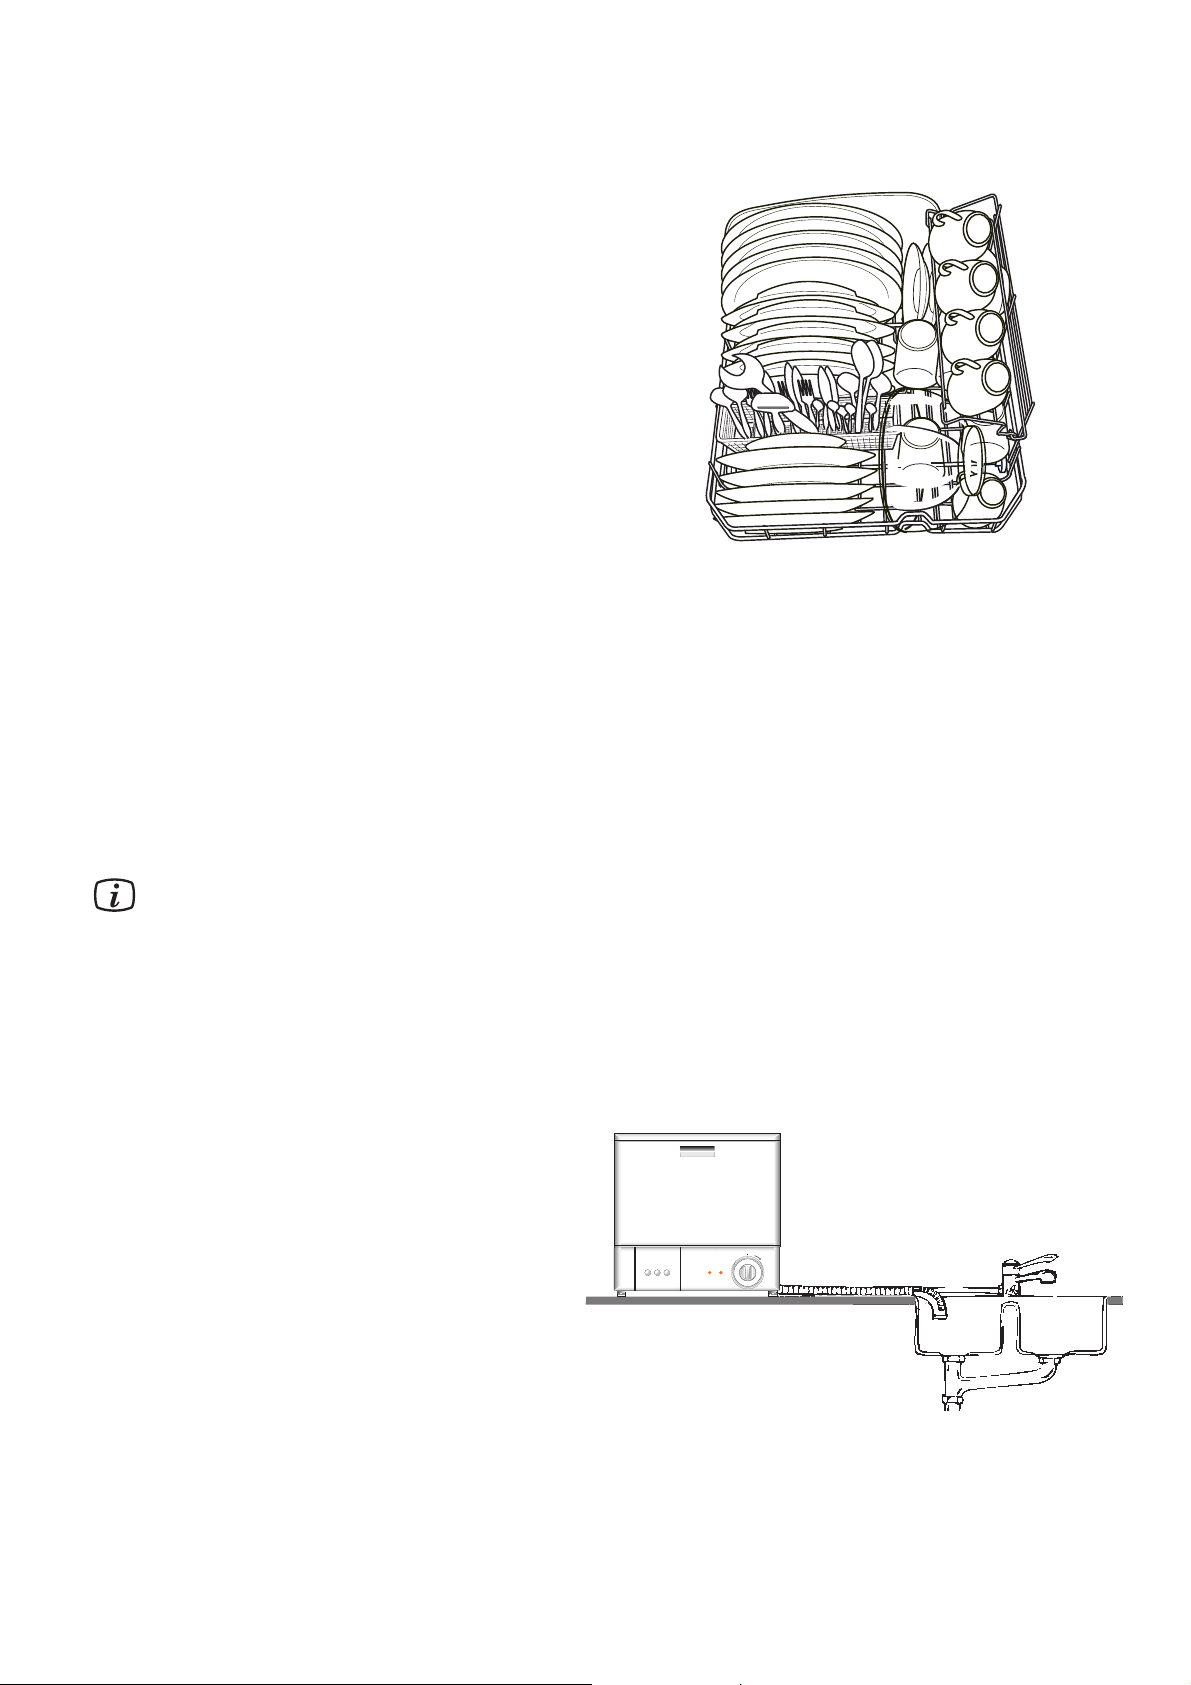
How to load the dishwasher
The illustration shows the machine loaded with five standard place settings. Your own dishes are not likely to be
identical to this load, but if you follow the advice below we
are sure you will be pleased with the results.
● Always place glasses, cups and bowls upside
down.
● Incline deep dishes (soup plates etc.) so that
the water can run off when drying.
● Make sure that the dishes do not rest against
each other. This is particularly important in
regard to the cutlery basket - nested spoons,
etc. simply cannot be properly washed. The
water must get at all the soiled surfaces.
● Make sure that cutlery with slender handles and
other items do not protrude through the openings
in the basket and prevent the spray arm from
rotating.
● Never put silver and stainless steel objects
together. When these metals come into contact
with each other a chemical reaction occurs
which stains the silver.
● China with a pattern applied on top of the glaze
may not be suitable for machine washing as the
colours may fade and lose their lustre. The same
applies to cutlery with wooden or plastic handles.
Make sure you always buy articles that are dishwasher safe.
● Aluminium becomes dull and tarnished when
machine washed. The machine gets it clean, but
at the expense of its appearance.
● When washing delicate items, select the lower
wash temperature.
● Not all plastic articles are machine washable. If
you are in doubt as to whether your plastic-ware
can be washed in the machine, we suggest you
check by washing a single item or else wash
them by hand.
● Substances such as ketchup containing strong
colouring agents can cause temporary discoloration
in the machine.
Instruction for verification tests
Test standard: EN 50242
Rated capacity: 5 place settings
Loading of rack: According to figure 1
Test program: Normal 65° C
Detergent (IEC type B): 15 gram in the dispenser
Rinse aid (typ III): Setting medium
Feed water pressure: Minimum 0,8 bar, maximum 10 bar
Waste water outlet: Install according to figure 2
The salt container and rinse aid dispenser shall be filled in accordance with the instruction manual.
Before conducting the measurements the dishwasher shall be operated for one or two complete cycles using
detergent and a clean load.
1
Loading
2
- 18 -
Page 19
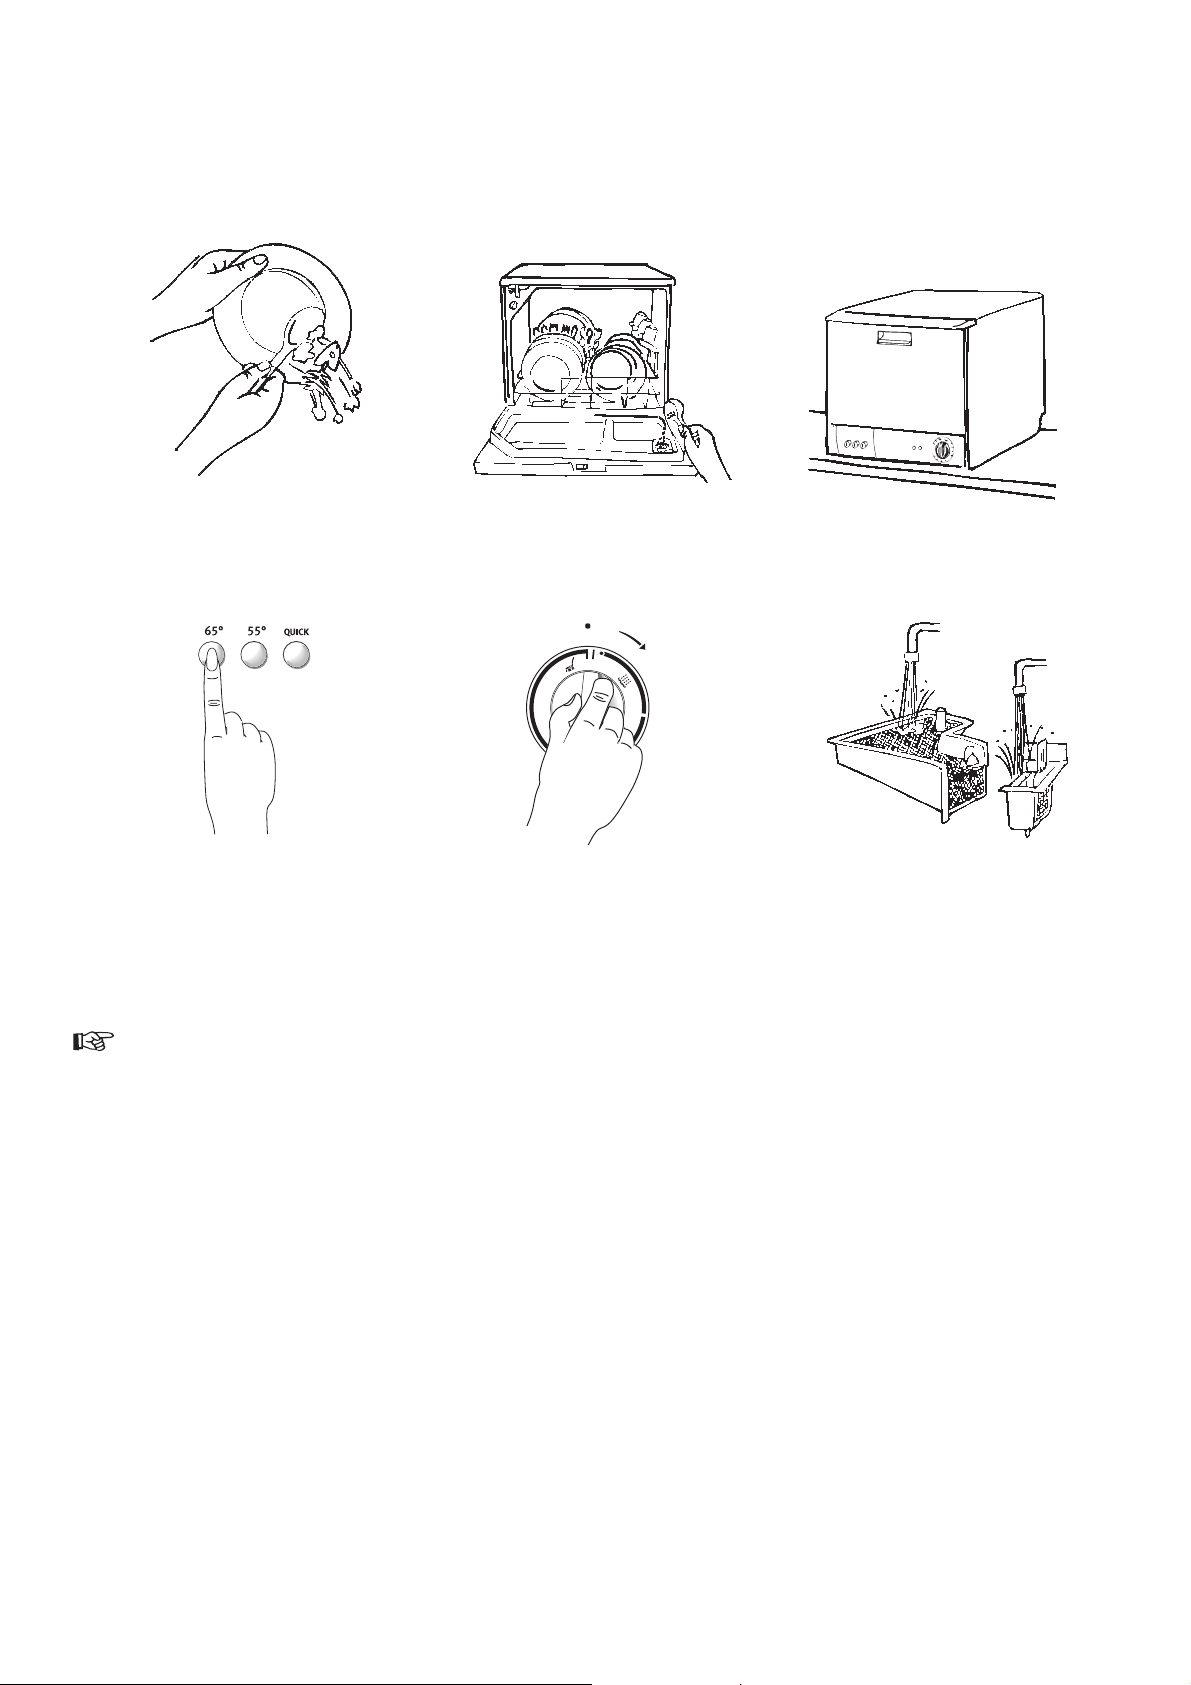
Using the appliance
Starting the programme
1. Scrape or rinse off solid food remnants.
2. Load the dishwasher. (See the basket and loading).
For a normal load pour about 1-2 tablespoons of
detergent into the detergent dispenser.
3. Close the door.
4. Select the required temperature.
5. Start the dishwasher by turning the programme knob to
the start position.
6. Check the filters to see whether they need cleaning
when the dishwasher has finished the wash.
o
1
2
3
5
6
4
- 19 -
Page 20

- 20 -
In the event of a fault
Never attempt to repair the dishwasher yourself.
Repairs carried our by unauthorised or inexperienced
persons can cause injury or other machine faults.
• If water leaks from the machine • Turn off the water supply tap or stopcock immediately
and isolate the machine from the electrical supply by
removing the plug from the wall socket.
• Check that all seals, seams and connections are
watertight.
There is always a certain risk of leakages in any machine connected to a water supply, no matter what water safety
features it may have. Therefore it is advisable always to turn off the water supply tap when the machine is not in use.
Check the following before calling a repairman:
• Dishwasher fails to start
• Is the door properly closed?
• Have you set the programme control knob properly?
• Is the water tap turned on?
• Is the dishwasher plugged in?
• Has the fuse blown?
• Water not discharged at end of cycle • Did you open the door before the light went out and the
cycle ended?
• Are the filters clogged?
• Is the discharge hose blocked?
• Dishes not washed satisfactorily • Has anything prevented the spray arm from rotating?
• Were the dishes packed too close together?
• Did you use enough detergent?
• Are the filters clogged?
• Is the rinse aid dispenser empty?
• Check that the spray arm holes are not clogged.
• Are the filters fitted correctly in place?
• Is the salt container cap properly closed?
• Dishes dull or streaky • Limescale from hard water has probably formed in the
machine and is being deposited on the dishes. Buy a
limescale remover and follow the instructions on the
package to descale the dishwasher.
This appliance complies with the following E.E.C. directives:
– 73/23/EEC, dated 19.02.1973 – low-voltage directive.
– 89/336/EEC, dated 03.05.1989 (incl. amendment
– 92/31/EEC) – directive on electromagnetic compatibility.
Page 21

- 21 -
Technical data
Capacity: 5 place settings
Dimensions: Width 450 mm
Height 460 mm
Depth 480 mm
Weight: 17 kg
Voltage: 230 V, single-phase, 50 Hz
Fuse: 10 A
Rating: Heating element: 1200 W
Total: 1280 W
Water pressure: 50-1000 kPa (0.5-10 kp/cm2)
Temperature: Max. 65°C
Service and spare parts
Servicing and possible repairs must be carried out by a
service company authorized by the supplier. Use only
spare parts supplied by these.
Before calling service, use the trouble shooting table
”In the event of a fault” to try to attend to the fault yourself.
If an engineer is called to resolve a problem listed below
or to repair a fault caused by incorrect installation or misuse a charge will be made, even if the appliance is under
guarantee.
Note that electrical faults shall always be rectified by a
certified electrician.
Give the appliance’s model designation, product- and
serial numbers according to the data plate affixed to the
rear of the dishwasher.
You can record these details here:
TYPE. ............................................................
MOD. ............................................................
PROD.NO. ............................................................
SER.NO. ............................................................
Date of purchase: .........................................................
Service
Page 22
- 22 -
1
2
3
4
Damages
If the dishwasher has been damaged during transport,
you should immediately notify the company responsible
for delivering it.
Check that the dishwasher is undamaged. If you discover
any damage, faults or that anything is missing, you should
notify the dealer immediately.
Never leave packaging material in a place
where children may play with it.
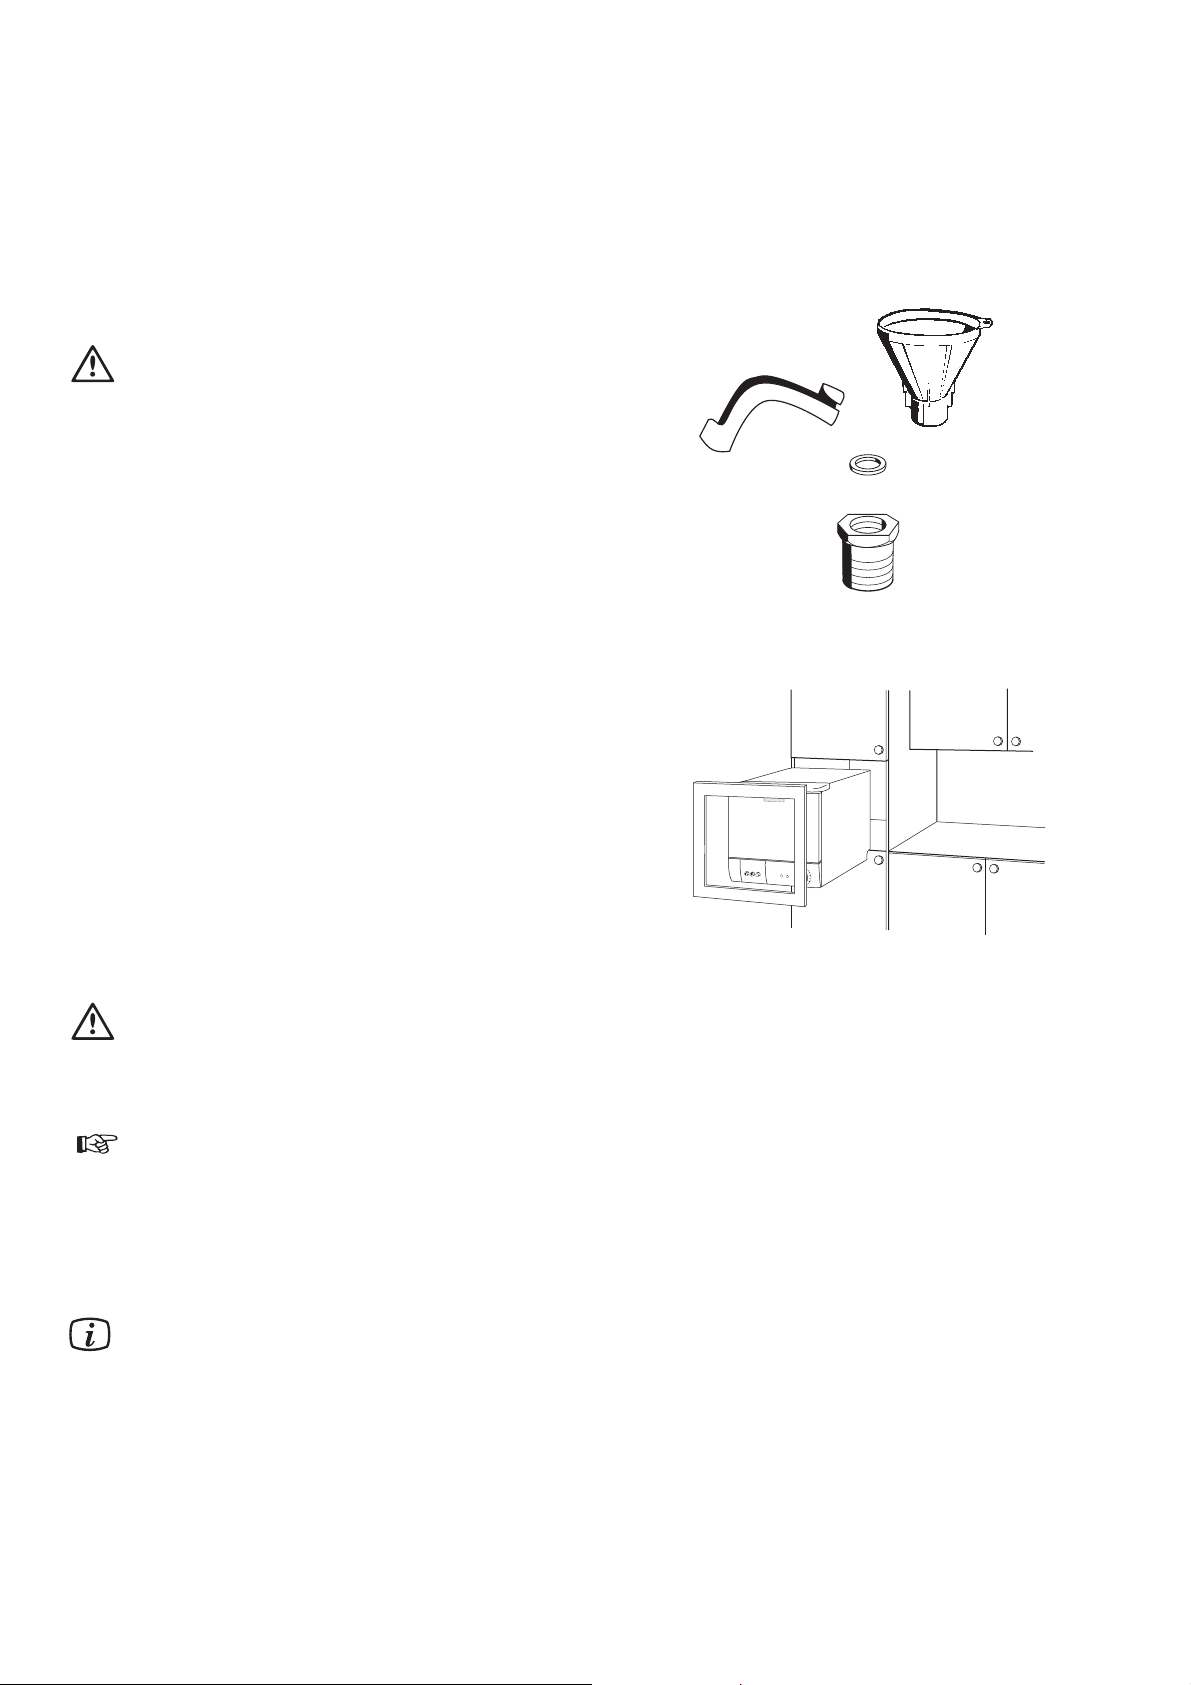
Check that the following accessories are supplied with the
dishwasher when you unpack it:
● A funnel for filling salt (1)
● Elbow for discharge hose (2)
● Rubber seal (3)
● Restrictor 1/2” (4)
Use
This dishwasher is designed solely for washing household
utensils suitable for washing in a dishwasher. Using it for
other purposes may damage it and invalidate the guarantee.
Building-in
If you want to build the dishwasher into your kitchen furniture, it is important to use our approved build-in kit. This
comes with the correct instructions needed to observe all
the relevant regulations. You can obtain the build-in kit
from the same place where you bought the dishwasher.
Protecting the dishwasher against
freezing
If the dishwasher is placed in an environment
where the temperature sometimes falls below
0° C, there is a risk that the small amount of
water which remains inside the parts of the
dishwasher will freeze and damage it.
1. Turn off the water supply to the dishwasher.
2. Remove the water inlet and discharge hoses.
3. Select a wash programme, start the machine
and let the programme run for a short time.
4. Make sure that there is coarse-grained salt in the
salt container for the water softener.
The appliance is only to be used and stored indoors
at normal room temperature. The manufacture is
not responsible for any frost damage.
Unpacking
Page 23
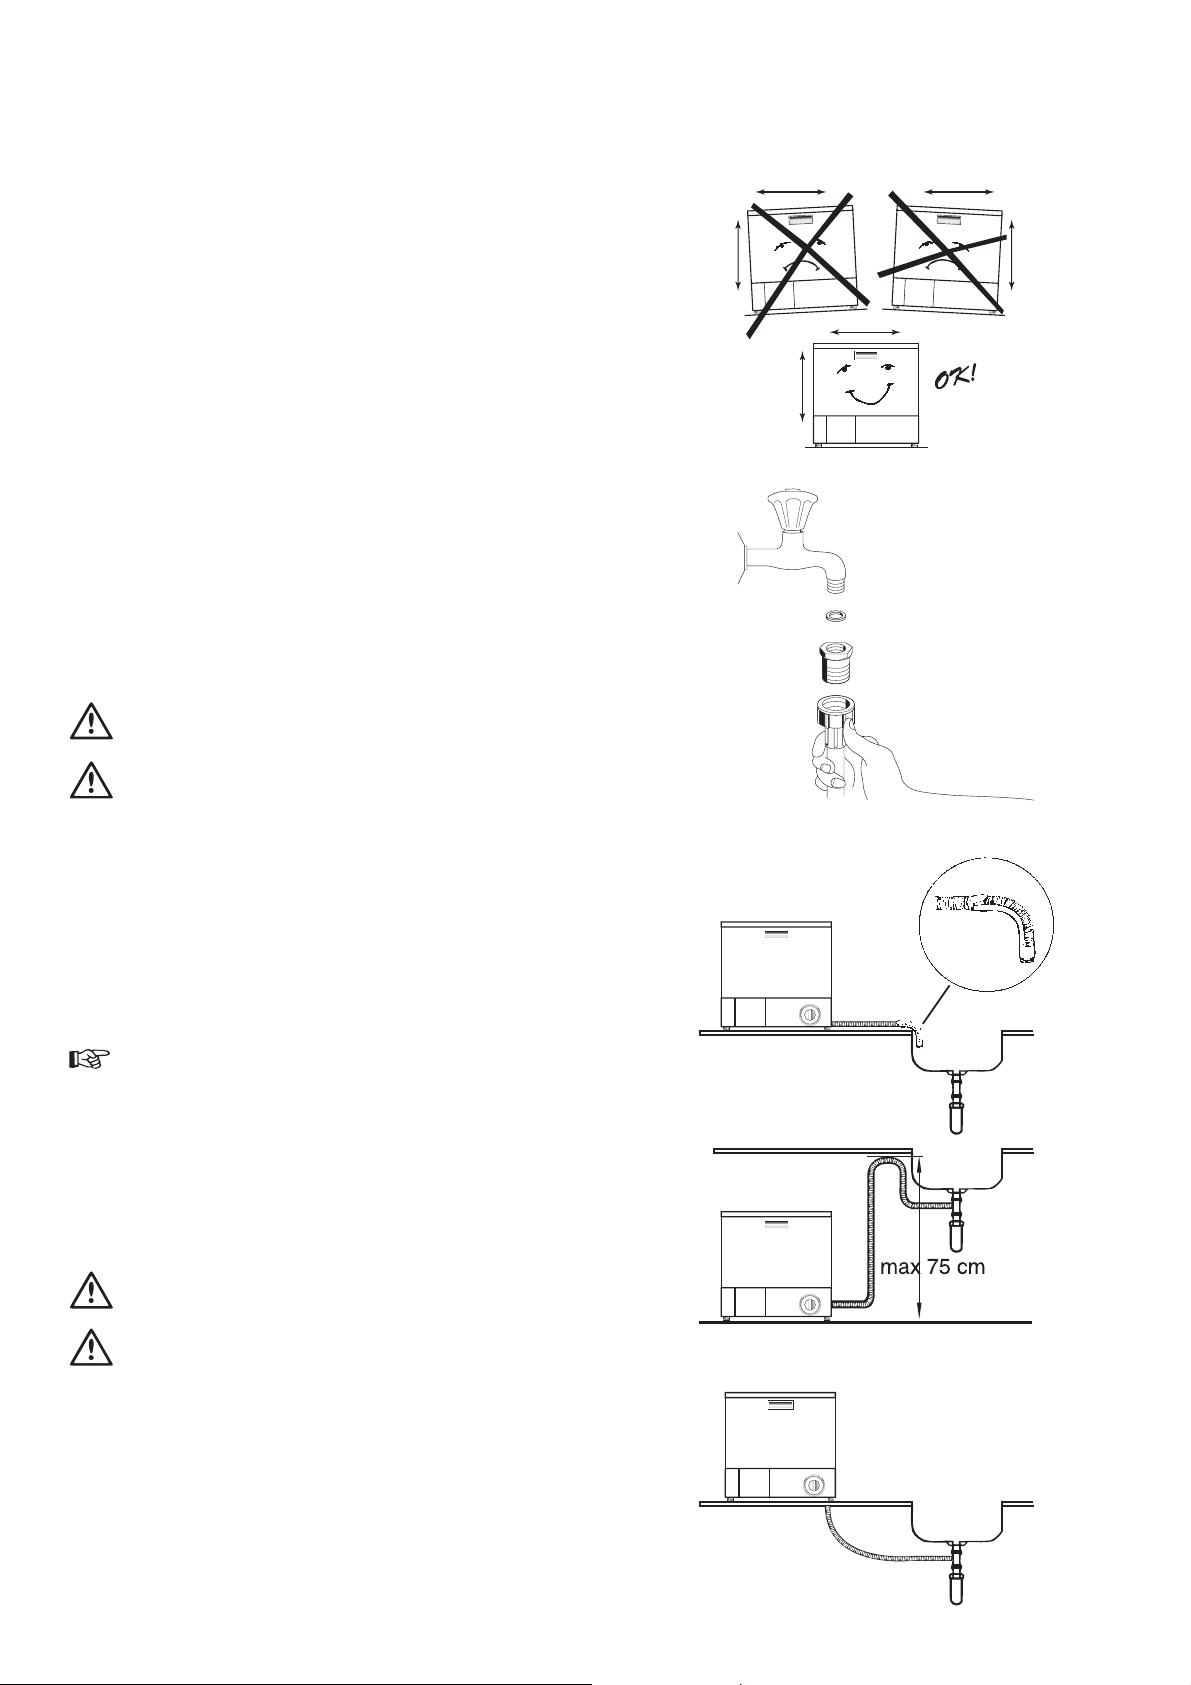
Installation
Positioning
In its standard version the machine is intended for installation on a kitchen sink or worktop. To function properly
the machine must be fully level. Its height can be adjusted
with the adjustable feet (8 mm each).
Water supply
The temperature of the water supply should not exceed
65°C and the pressure should be between 50-1000 kPa
(0.5-10 bar). It is important to have a tap or stopcock,
positioned close to the machine and with easy access.
Special mixer taps with dishwasher connections are
available, as well as adaptors for older mixer taps.
Connect the inlet hose to a tap with a 3/4" pipe thread. If
necessary, use the restrictor (1/2") supplied.
The inlet hose must not be joined onto any form of extension
hose. If it is too short, the entire hose must be replaced
with a longer high-pressure hose, specially designed for
the purpose. The machine end of this hose can be turned
in any direction. Loosen the retaining nut, turn the hose,
then retighten the nut.
Check that the nut is tight before the machine
is moved into position.
Use only the inlet hose supplied to the dishwasher, do not reuse the old inlet hose.
Discharge connection
Place the discharge hose over the sink as illustrated.
It must not at any point be higher up than 75 cm over the
surface which the dishwasher is standing on. If it runs higher,
operation of the dishwasher might be impaired. It is also
important to ensure that the inside diameter of the hose is
not less than 13 mm at any point. If the discharge hose is
too long it can easily be cut to the right length.
1. Cut the hose to a suitable length, using a sharp
knife.
2. Fit the elbow supplied onto the end of the hose.
Electrical connection
The dishwasher must be connected to an earthed wall
socket which must be easily accessible and protected by
a 10 Amp fuse.
Permanent electrical installation must be carried
out by an authorised electrician.
Before any work is carried out on the machine
it must be isolated from the electric mains supply,
for example by removing the plug from the
wall socket.
- 23 -
Page 24

 Loading...