

Page 1
iNStallatioN maNUal
iNStRUCtioNS iNStRUCtioNS
Side by Side RefRigeRatoRS
When correctly installed, your refrigerator should:
• Have adequate clearance to the back, sides and
top for air circulation
• Be aligned to the surrounding cupboards
• Have doors that will self close from a partially
open position
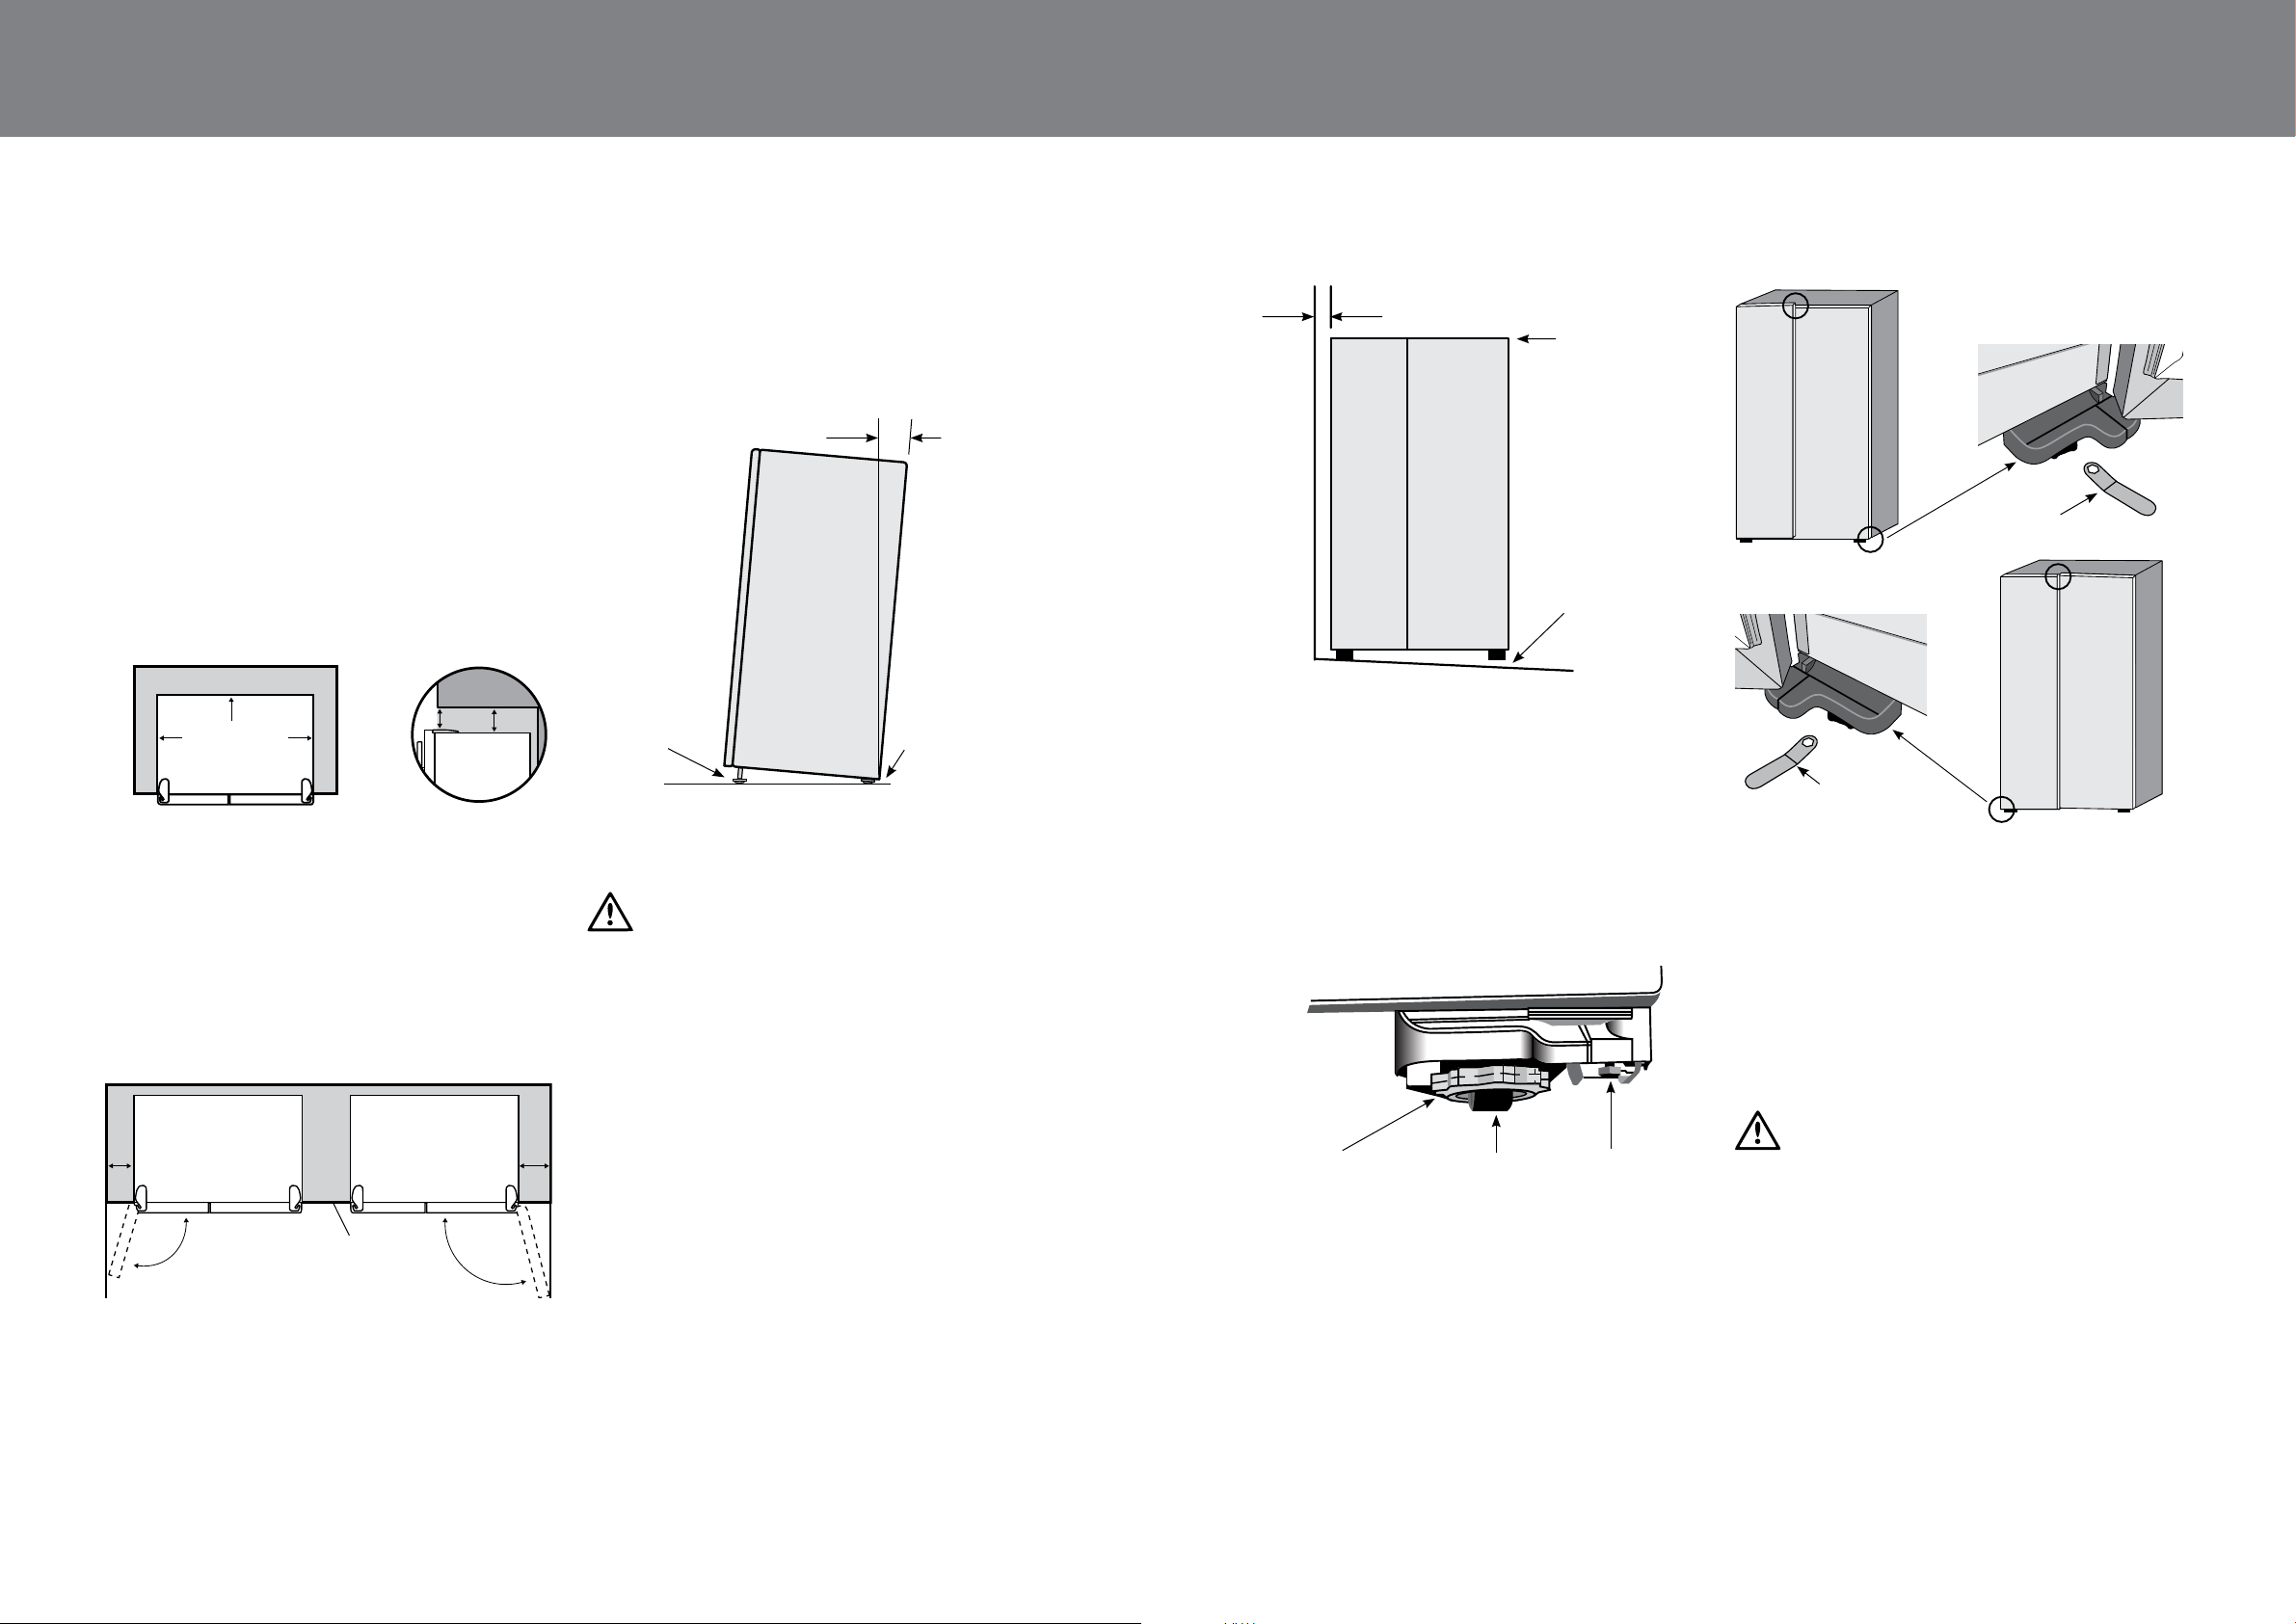
CleaRaNCeS aRoUNd yoUR RefRigeRatoR
Your Side by Side refrigerator can be installed between
cupboards or fixtures but you must allow for the following
spaces around the cabinet.
• Allow a minimum of 5mm clearance on both sides
(see diagram 1)
• Allow a minimum of 10mm clearance above hinge
covers (see diagram 1)
• Allow 10mm clearance at the back of the refrigerator
(see diagram 1)
10mm
Recommended
minimum airspace
5mm
CABINET
5mm
DOORS
Diagram 1
10mm
• If you place the refrigerator next to a wall, allow a
minimum clearance of 250mm for freezer side and
350mm for fridge side of the doors, this will allow
easy removal of shelves and bins for cleaning (refer to
diagram 2).
• The refrigerator is designed to sit proud of cupboards and
other fixtures. To enable doors to open fully, ensure that
other fixtures do not stick out further than the refrigerator
cabinet (see diagram 2).
250mm
maximum
cupboard depth
Diagram 2
350mm
iNStallatioN
The refrigerator should arrive with the front rollers wound
down. We recommend that the appliance be tilted
backwards by about 10mm to 15mm, this will allow the
doors to self close providing a consistent door seal.
To do this follow the instructions below.
10 –15mm
Height adjustable
front rollers
Fixed rear rollers
When you want to install your appliance, take the
following steps.
1. Roll the refrigerator into it’s final position.
WARNING
The rollers are designed for forward or backward
movement only. They are not castors. Moving the
refrigerator sideways may damage your floor and
the rollers.
2. If the refrigerator is not tilted back you can adjust the
two front rollers by adjusting the large plastic roller
nut. You may need two people, one to adjust rollers
and one to tilt the refrigerator slightly back to take the
weight of the appliance off the front rollers. This will
increase or decrease the height of the rollers. One
turn of the nut will change the tilt of the refrigerator by
approximately 5mm.
3. If the cabinet is level, then the side walls should be
plumb or vertical. If the cabinet is built in or partly built
in check the alignment of the cabinet side against
the cupboard.
Aligned to cupboard –
even gap
Top of refrigerator
is level – horizontal
Adjust front rollers for
unevenness of floor. e.g.
adjust this roller down.
Packing may be required
underneath the rear roller
to ensure stability.
4. If the appliance now rocks from one corner to the
opposite rear corner, this means that the floor is
uneven; you will need to put some packing under one
of the rear rollers.
5. You may now need to fine-tune the installation by
adjusting the front rollers once again.
adjUStiNg dooR aligNmeNt
Each door is independently adjustable in the vertical
direction by turning the adjustable bolts under the hinges
using the spanner provided.
Large plastic roller nut
Front roller
Adjusting bolt
The doors can be adjusted up or down. Depending on the
amount of adjustment required it may be sufficient to adjust
only one door (refer to following diagrams).
NOTE: When the height of the rollers and adjusting bolts
are correctly adjusted the refrigerator will stand firmly on
the floor and the doors will be in line with one another.
Spanner
Spanner
iNteRNal paCkagiNg
1. Please remove all internal packaging material before
use. Any glue or tape residue or the like should be
removed with a solution of mild detergent and water.
2. Clean your appliance thoroughly and wipe off any dust
that has accumulated during shipping.
3. It is recommended that the refrigerator is kept upright at
all times. However if for any reason the refrigerator is laid
down, let it stand for a minimum of 1 hour before
turning on.
WARNING
Before cleaning: Remove the power cord from the power
socket. This will make sure there is no chance of getting
an electric shock.
4. Install accessories such as the egg tray. The
accessories are packed together to prevent damage
during delivery.
5. Plug your appliance into the power point.
6. We recommend that you let your refrigerator run for
two to three hours before you put any food in it. This
will allow you to check that it is operating properly
and that enough cool air is circulating.
Page 2
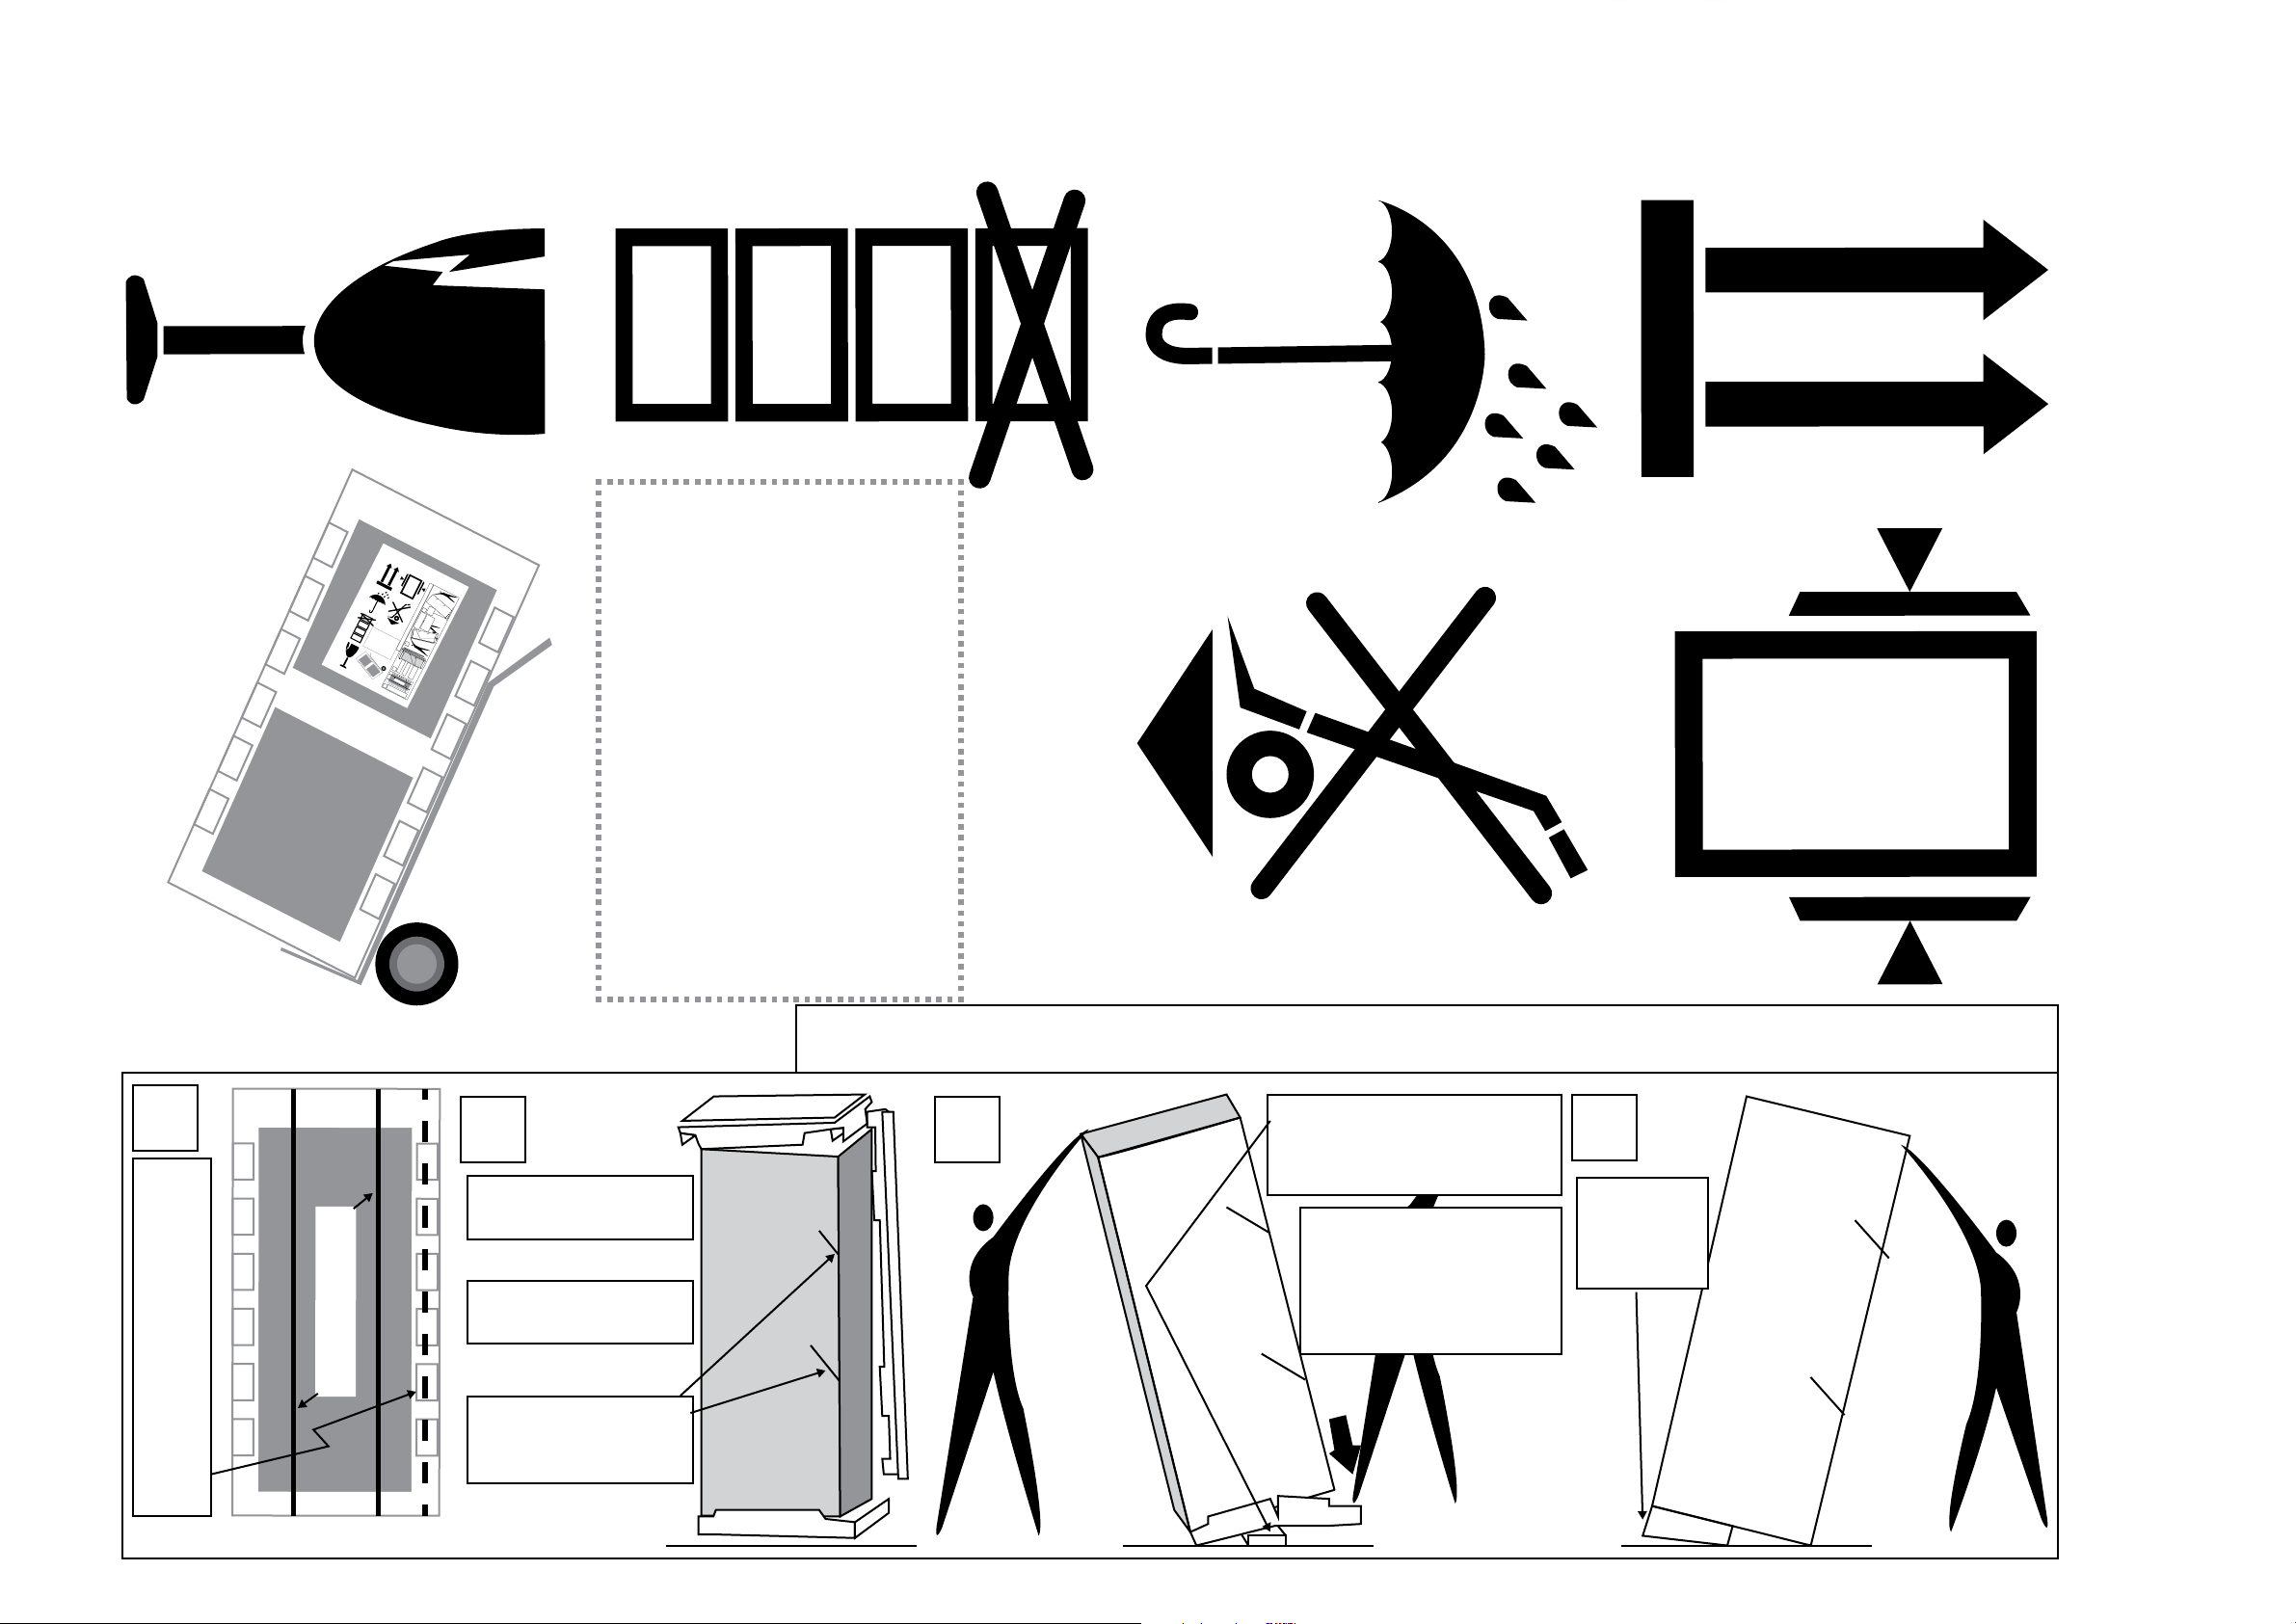
Remove this sticker with care! Installation instructions are printed on the back.
UNPACK IN CUSTOMERS HOUSE
2
1
Remove this sticker with care! Installation instructions are printed on the back.
Front
UNPACK IN CUSTOMERS HOUSE
1
3
UNTIL THE
LEAVE
TO PREVENT DAMAGE,
PACKAGING IN
PLACE
REFRIGERATOR IS IN
Only unpack the refrigerator on a flat, even surface!
ITS FINAL LOCATION.
HEAVY! ITEM! USE A
TROLLEY TO MOVE
TROLLEY.
AGAINST THE
PLACE THE SIDE
THIS REFRIGERATOR.
Front
2
Step
REMOVE PACKAGING
FROM THE TOP AND
UNPACKING INSTRUCTIONS
1
Step
1
2
3
1
TO PREVENT DAMAGE,
CLAMP TOP
FULL BLADE
5
kN
MAX
BE SAFE!
TILT THE REFRIGERATOR!
ASK SOMEONE TO HELP
Side
4
TILT
Step
FORWARD
TO REMOVE
OF BASE
REAR PART
TILT REFRIGERATOR AND
SLIDE THE RECTANGULAR
PACKING BLOCK BEHIND
PACKING BASE AND
STEP DOWN TO BREAK
KICK SIDEWAYS TO
PACK BASE CENTRE LINE.
REMOVE FRONT OF
PACKING BLOCK
PACK BASE. REMOVE
Side
BE SAFE!
ASK SOMEONE TO HELP
TILT THE REFRIGERATOR!
3
Step
SIDES
INSPECT YOUR
OR DAMAGE
PRODUCT FOR DENTS
MOVING THE
LEAVE TAPES ON
WHILE TILTING OR
REFRIGERATOR
CUT STRAP
REMOVE PLASTIC BAG
CUT SIDES & TOP TO
PACKAGING IN
PLACE
REFRIGERATOR IS IN
LEAVE
UNTIL THE
MAX
5
FULL BLADE
CLAMP TOP
ITS FINAL LOCATION.
***
kN
HEAVY! ITEM! USE A
TROLLEY TO MOVE
THIS REFRIGERATOR.
UNPACKING INSTRUCTIONS
Step
1
CUT SIDES & TOP TO
REMOVE PLASTIC BAG
CUT STRAP
Step
2
REMOVE PACKAGING
FROM THE TOP AND
SIDES
INSPECT YOUR
PRODUCT FOR DENTS
OR DAMAGE
LEAVE TAPES ON
WHILE TILTING OR
MOVING THE
REFRIGERATOR
PLACE THE SIDE
AGAINST THE
TROLLEY.
Only unpack the refrigerator on a flat, even surface!
Step
3
TILT THE REFRIGERATOR!
ASK SOMEONE TO HELP
BE SAFE!
Side
TILT REFRIGERATOR AND
SLIDE THE RECTANGULAR
PACKING BLOCK BEHIND
PACK BASE CENTRE LINE.
STEP DOWN TO BREAK
PACKING BASE AND
KICK SIDEWAYS TO
REMOVE FRONT OF
PACK BASE. REMOVE
PACKING BLOCK
Step
4
TILT
FORWARD
TO REMOVE
REAR PART
OF BASE
Side
BE SAFE!
ASK SOMEONE TO HELP
TILT THE REFRIGERATOR!
 Loading...