

Page 1

ERW3313AOX
ERW3313BOX
................................................ .............................................
EN WINE CELLAR USER MANUAL 2
IT CANTINETTA ISTRUZIONI PER L’USO 19
PT GARRAFEIRA MANUAL DE INSTRUÇÕES 36
ES REFRIGERADOR DE VINOS MANUAL DE
INSTRUCCIONES
53
Page 2

www.electrolux.com
2
CONTENTS
1. SAFETY INSTRUCTIONS . . . . . . . . . . . . . . . . . . . . . . . . . . . . . . . . . . . . . . . . . . . . . . . . . . 3
2. CONTROL PANEL . . . . . . . . . . . . . . . . . . . . . . . . . . . . . . . . . . . . . . . . . . . . . . . . . . . . . . . 5
3. DAILY USE . . . . . . . . . . . . . . . . . . . . . . . . . . . . . . . . . . . . . . . . . . . . . . . . . . . . . . . . . . . . . 6
4. CARE AND CLEANING . . . . . . . . . . . . . . . . . . . . . . . . . . . . . . . . . . . . . . . . . . . . . . . . . . . 10
5. WHAT TO DO IF… . . . . . . . . . . . . . . . . . . . . . . . . . . . . . . . . . . . . . . . . . . . . . . . . . . . . . . 11
6. INSTALLATION . . . . . . . . . . . . . . . . . . . . . . . . . . . . . . . . . . . . . . . . . . . . . . . . . . . . . . . . . 13
7. NOISES . . . . . . . . . . . . . . . . . . . . . . . . . . . . . . . . . . . . . . . . . . . . . . . . . . . . . . . . . . . . . . 17
8.
TECHNICAL DATA . . . . . . . . . . . . . . . . . . . . . . . . . . . . . . . . . . . . . . . . . . . . . . . . . . . . . . 18
WE’RE THINKING OF YOU
Thank you for purchasing an Electrolux appliance. You’ve chosen a product that brings with it
decades of professional experience and innovation. Ingenious and stylish, it has been designed
with you in mind. So whenever you use it, you can be safe in the knowledge that you’ll get great
results every time.
Welcome to Electrolux.
Visit our website for:
Get usage advice, brochures, trouble shooter, service information:
www.electrolux.com
Register your product for better service:
www.electrolux.com/productregistration
Buy Accessories, Consumables and Original spare parts for your appliance:
www.electrolux.com/shop
CUSTOMER CARE AND SERVICE
We recommend the use of original spare parts.
When contacting Service, ensure that you have the following data available.
The information can be found on the rating plate. Model, PNC, Serial Number.
Warning / Caution-Safety information
General information and tips
Environmental information
Subject to change without notice.
Page 3
ENGLISH 3
1.
SAFETY INSTRUCTIONS
In the interest of your safety and to ensure
the correct use, before installing and first
using the appliance, read this user manual
carefully, including its hints and warnings.
To avoid unnecessary mistakes and accidents, it is important to ensure that all
people using the appliance are thoroughly
familiar with its operation and safety features. Save these instructions and make
sure that they remain with the appliance if
it is moved or sold, so that everyone using
it through its life will be properly informed
on appliance use and safety.
For the safety of life and property keep
the precautions of these user's instructions as the manufacturer is not responsible for damages caused by omission.
1.1 Children and vulnerable
people safety
• This appliance is not intended for use
by persons (including children) with reduced physical, sensory or mental capabilities, or lack of experience and
knowledge, unless they have been given supervision or instruction concerning
use of the appliance by a person responsible for their safety.
Children should be supervised to ensure that they do not play with the appliance.
• Keep all packaging well away from children. There is risk of suffocation.
• If you are discarding the appliance pull
the plug out of the socket, cut the connection cable (as close to the appliance
as you can) and remove the door to
prevent playing children to suffer electric shock or to close themselves into it.
• If this appliance featuring magnetic
door seals is to replace an older appliance having a spring lock (latch) on the
door or lid, be sure to make that spring
lock unusable before you discard the
old appliance. This will prevent it from
becoming a death trap for a child.
1.2 General safety
WARNING!
Keep ventilation openings, in the appliance enclosure or in the built-in structure,
clear of obstruction.
• This appliance is intended to be used
exclusively for the storage of wine.
• Do not use a mechanical device or any
artificial means to speed up the thawing
process.
• Do not use other electrical appliances
(such as ice cream makers) inside of refrigerating appliances, unless they are
approved for this purpose by the manufacturer.
• Do not damage the refrigerant circuit.
• The refrigerant isobutane (R600a) is
contained within the refrigerant circuit of
the appliance, a natural gas with a high
level of environmental compatibility,
which is nevertheless flammable.
During transportation and installation of
the appliance, be certain that none of
the components of the refrigerant circuit become damaged.
If the refrigerant circuit should become
damaged:
– avoid open flames and sources of ig-
nition
– thoroughly ventilate the room in
which the appliance is situated
• It is dangerous to alter the specifications or modify this product in any way.
Any damage to the cord may cause a
short-circuit, fire and/or electric shock.
WARNING!
Any electrical component (power
cord, plug, compressor) must be
replaced by a certified service
agent or qualified service personnel.
1.
Power cord must not be lengthened.
2.
Make sure that the power plug is
not squashed or damaged by the
back of the appliance. A squashed
or damaged power plug may overheat and cause a fire.
3.
Make sure that you can come to
the mains plug of the appliance.
4.
Do not pull the mains cable.
Page 4
www.electrolux.com
4
• This appliance is heavy. Care should be
• Do not remove nor touch items from
• Avoid prolonged exposure of the appli-
• Bulb lamps (If the lamp is foreseen)
1.3 Daily use
• Do not put hot pot on the plastic parts
• Do not store flammable gas and liquid
• Appliance's manufacturers storage rec-
1.4 Care and cleaning
• Before maintenance, switch off the ap-
• Do not clean the appliance with metal
• Do not use sharp objects to remove
• Regularly examine the drain in the re-
1.5 Installation
5.
If the power plug socket is loose,
do not insert the power plug. There
is a risk of electric shock or fire.
6.
You must not operate the appliance without the lamp cover (If the
lamp cover is foreseen) of interior
lighting.
taken when moving it.
the freezer compartment if your hands
are damp/wet, as this could cause skin
abrasions or frost/freezer burns.
ance to direct sunlight.
used in this appliance are special purpose lamps selected for household appliances use only. They are not suitable
for household room illumination.
in the appliance.
in the appliance, because they may explode.
ommendations should be strictly adhered to. Refer to relevant instructions.
pliance and disconnect the mains plug
from the mains socket.
objects.
frost from the appliance. Use a plastic
scraper.
frigerator for defrosted water. If necessary, clean the drain. If the drain is
blocked, water will collect in the bottom
of the appliance.
For electrical connection carefully
follow the instructions given in
specific paragraphs.
• Unpack the appliance and check if
there are damages on it. Do not connect the appliance if it is damaged. Report possible damages immediately to
the place you bought it. In that case retain packing.
• It is advisable to wait at least four hours
before connecting the appliance to allow the oil to flow back in the compressor.
• Adequate air circulation should be
around the appliance, lacking this leads
to overheating. To achieve sufficient
ventilation follow the instructions relevant to installation.
• Wherever possible the back of the
product should be against a wall to
avoid touching or catching warm parts
(compressor, condenser) to prevent
possible burn.
• The appliance must not be located
close to radiators or cookers.
• Make sure that the mains plug is accessible after the installation of the appliance.
• Connect to potable water supply only (If
a water connection is foreseen).
1.6 Service
• Any electrical work required to do the
servicing of the appliance should be
carried out by a qualified electrician or
competent person.
• This product must be serviced by an
authorized Service Centre, and only
genuine spare parts must be used.
1.7 Environment Protection
This appliance does not contain
gasses which could damage the
ozone layer, in either its refrigerant
circuit or insulation materials. The
appliance shall not be discarded
together with the urban refuse and
rubbish. The insulation foam contains flammable gases: the appliance shall be disposed according
to the applicable regulations to
obtain from your local authorities.
Avoid damaging the cooling unit,
especially at the rear near the heat
exchanger. The materials used on
this appliance marked by the sym-
are recyclable.
bol
Page 5
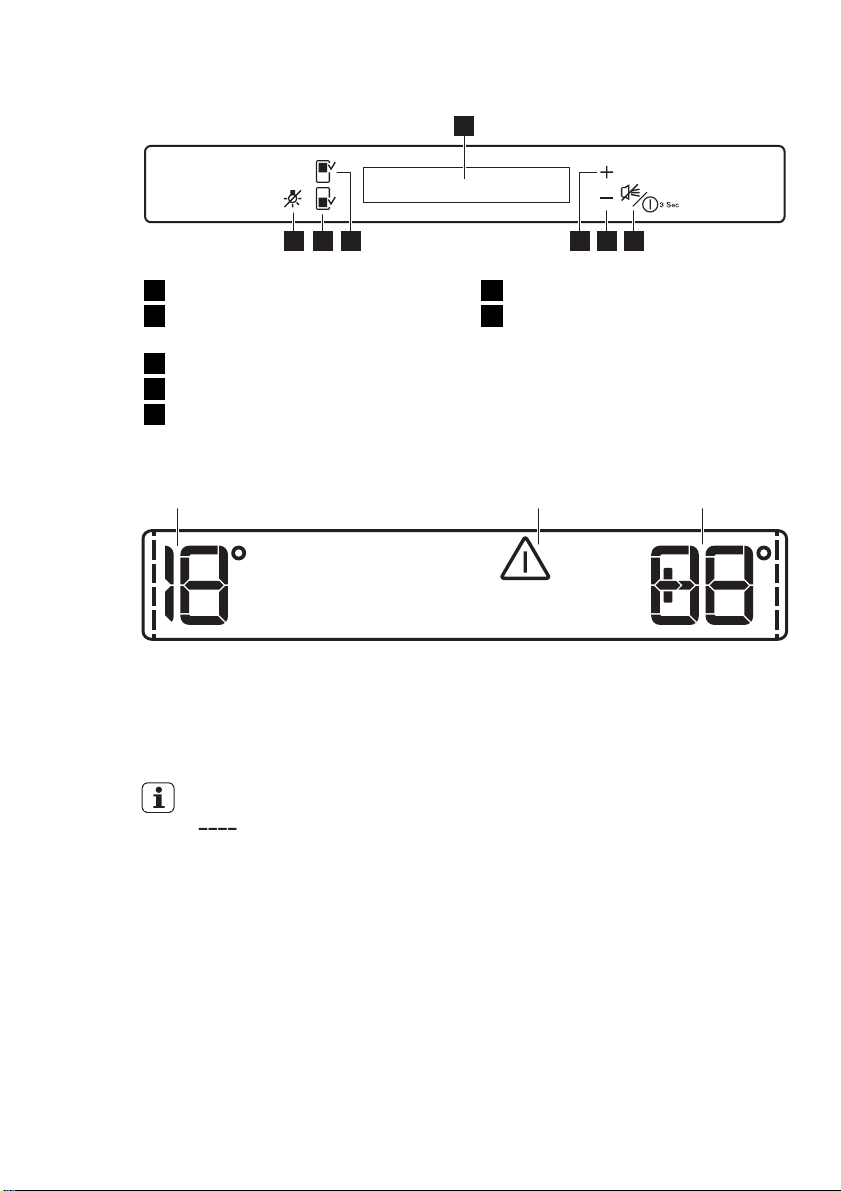
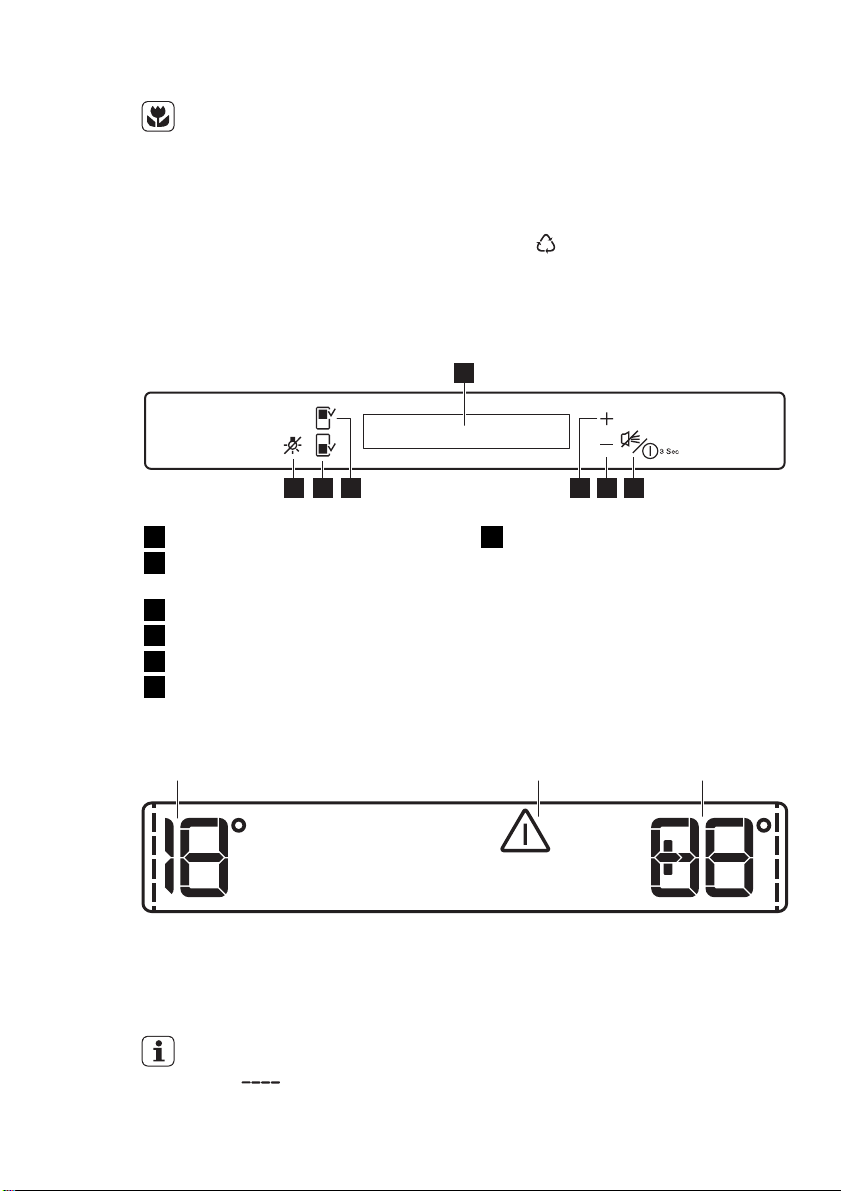
2. CONTROL PANEL
ENGLISH 5
1
234567
Display
1
Appliance ON/OFF button
2
Alarm button
Temperature colder button
3
Temperature warmer button
4
Top Compartment
5
Bottom Compartment
6
Light button
7
It is possible to change predefined sound
of buttons to a loudly one by pressing together Light button and Temperature
colder button for some seconds. Change
is reversible.
2.1 Display
ABC
A)
Bottom Compartment temperature indicator
B)
Alarm indicator
C)
Top Compartment temperature indicator
After selection of the top or bottom compartment the animation
starts.
After selection of the temperature
the animation flashes for a few minutes.
2.2 Switching on
To switch on the appliance do these
steps:
1.
Connect the mains plug to the power
socket.
2.
Press the ON/OFF button if the display is off.
3.
If DEMO appears on the display, the
appliance is in demonstration mode.
Refer to "What to do if...".
4.
The temperature indicators show the
set default temperature.
To select a different set temperature refer
to "Temperature regulation".
2.3 Switching off
To switch off the appliance do these
steps:
1.
Press the ON/OFF button for 3 sec-
onds.
2.
The display switches off.
3.
To disconnect the appliance from the
power disconnect the mains plug
from the power socket.
2.4 Temperature regulation
Select the top or bottom compartment.
Press the temperature button to set the
temperature.
Set default temperature:
• + 8°C for the top compartment
• +14°C for the bottom compartment
Page 6
www.electrolux.com
6
The temperature indicators show the set
temperature.
The set temperature will be reached within 24 hours.
Refer to "Daily use - Wine Arrangement".
After a power failure the set temperature remains stored.
2.5 Light Button
If you want to maintain the light on with
the door closed, it is sufficient to open
and close the door and the light will remain ON automatically for 10 minutes.
If you want to switch off the light before
the automatic turn off time, open the door
and press the light button.
3. DAILY USE
3.1 Cleaning the interior
Before using the appliance for the first
time, wash the interior and all internal accessories with lukewarm water and some
neutral soap so as to remove the typical
smell of a brand-new product, then dry
thoroughly.
Do not use detergents or abrasive
powders, as these will damage
the finish.
The light has no negative effect on the
quality on the wine.
2.6 Door open alarm
An acoustic alarm will sound if the door is
left open for a few minutes. The door
open alarm conditions are indicated by:
• flashing Alarm indicator
• acoustic buzzer
When normal conditions are restored
(door closed), the alarm will stop.
During the alarm, the buzzer can be
switched off by pressing any button.
If DEMO appears on the Display, the appliance is in demonstration mode: refer to
“WHAT TO DO IF...” paragraph.
Page 7
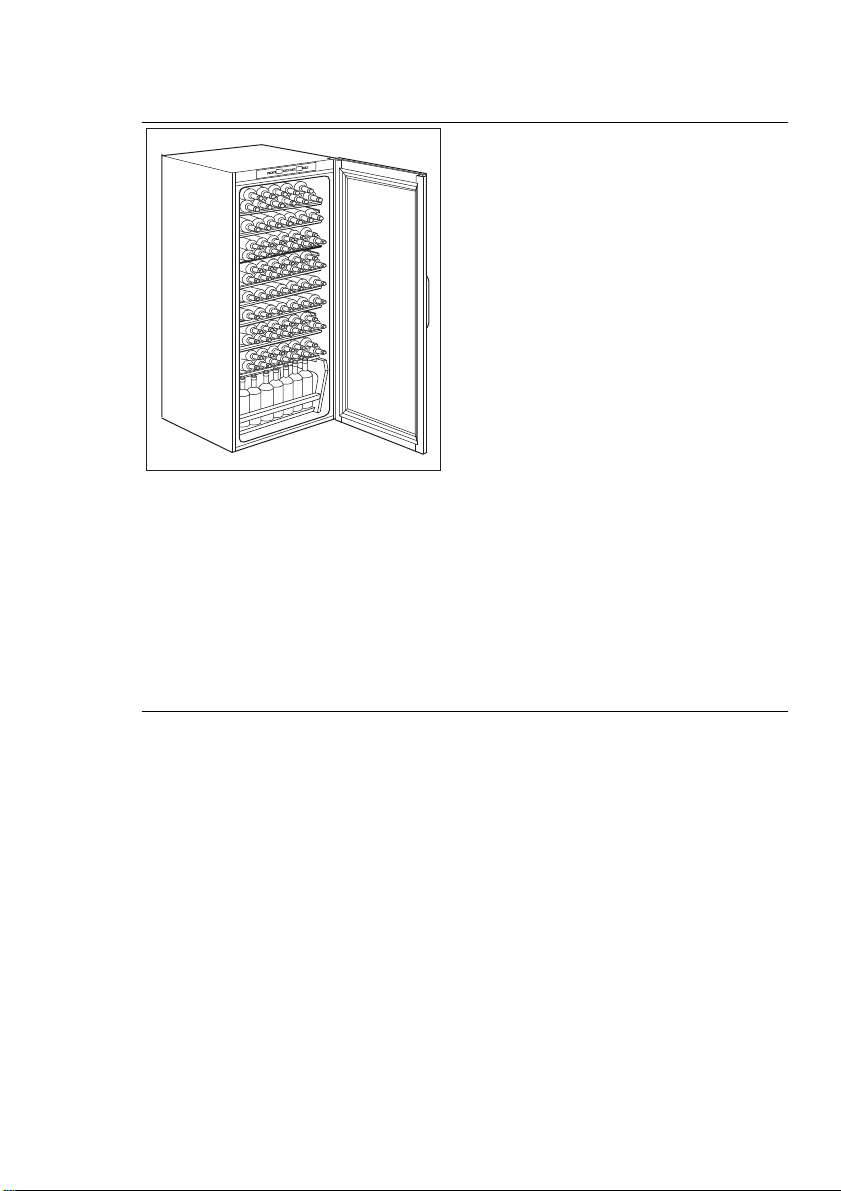
3.2 Wine arrangement
3.3 Storage advice
The storage time for wine depends on
ageing, the type of grapes, alcoholic content and level of fructose and tannin contained in it.At the time of purchase, check
if the wine is already aged or if it will improve over time.
Recommended storage temperatures:
• For champagne and sparkling wines,
between 6 and 8°C
ENGLISH 7
Top Compartment:
The temperature can be adjusted between +6 and + 11°C. This compartment
is ideal for wines, especially new reds and
whites, to be consumed immediately. Operation compartments with differentiated
temperatures.
Bottom Compartment:
The temperature can be adjusted between + 11 and + 18°C. This compartment is ideal for storing and refining red or
white wines for long periods.
The temperatures of this compartment
are suitable for storing aged and full-bodied wines.
Lay the bottles down in such a way that
the corks do not dry.
Keep the wine in the dark. The door is in
anti-UV darkened double glass to protect
the wine from the light in case the refrigerator is located in a well-lit place.
Avoid switching the appliance light on too
often or for too long. Wine keeps better in
the dark.
Handle the bottles with care, to avoid agitating the wine.
Follow the recommendations and advice
received at the time of purchase or given
in the technical documentation regarding
the quality, duration and optimum storage
temperature of the wine.
• For white wines, between 10 and 12°C
• For rose’ and light red wines, between
12 and 16°C
• Aged red wines, 14 -16°C
When placing various bottles on top of
each other, make sure they do not touch
the refrigerator cooling plate.
Page 8
www.electrolux.com
8
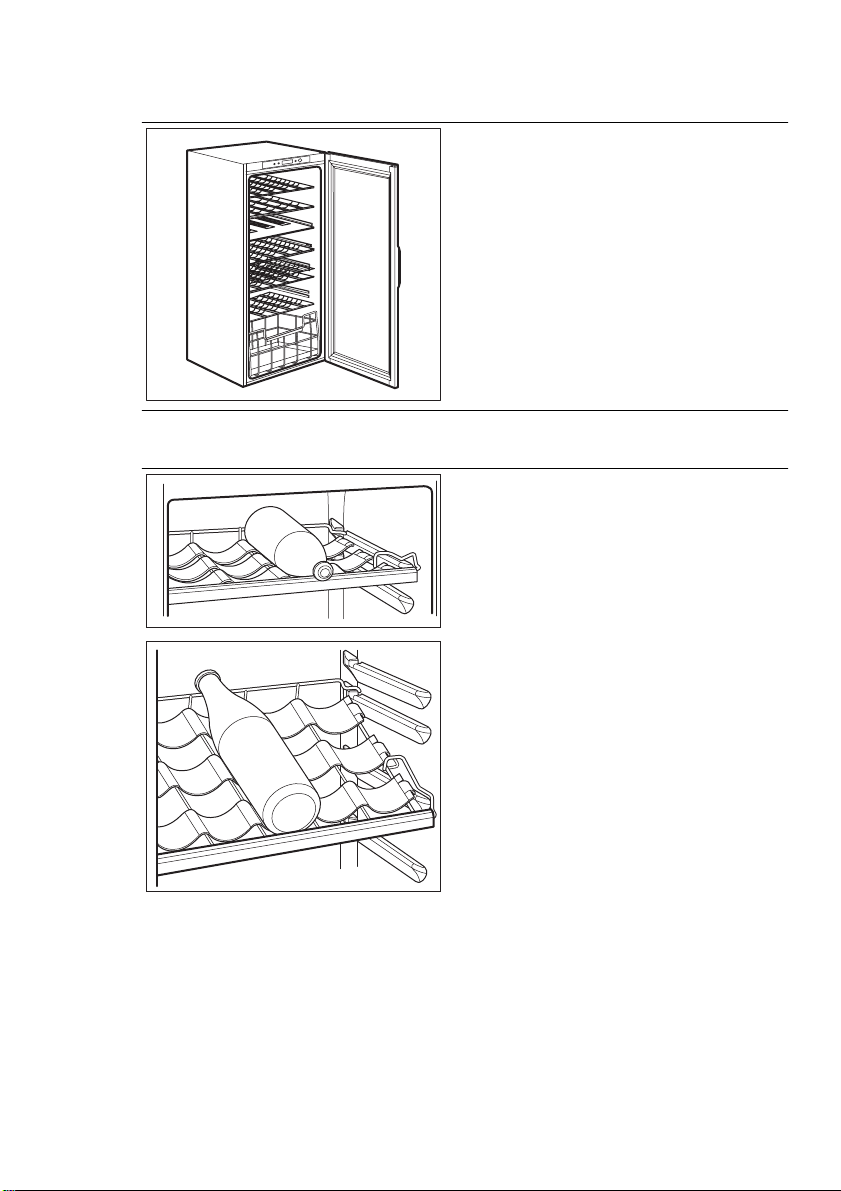
3.4 Wine Cellar shelves
3.5 Wine Cellar Bottle Holder
Remove the shelves for cleaning.
Remove the shelf and insert it between
the two guides.
The maximum possible weight on the bottle shelves is 30 kg.
The shelf can be arranged between
guides 100 mm apart to favour display of
the bottles.
Page 9
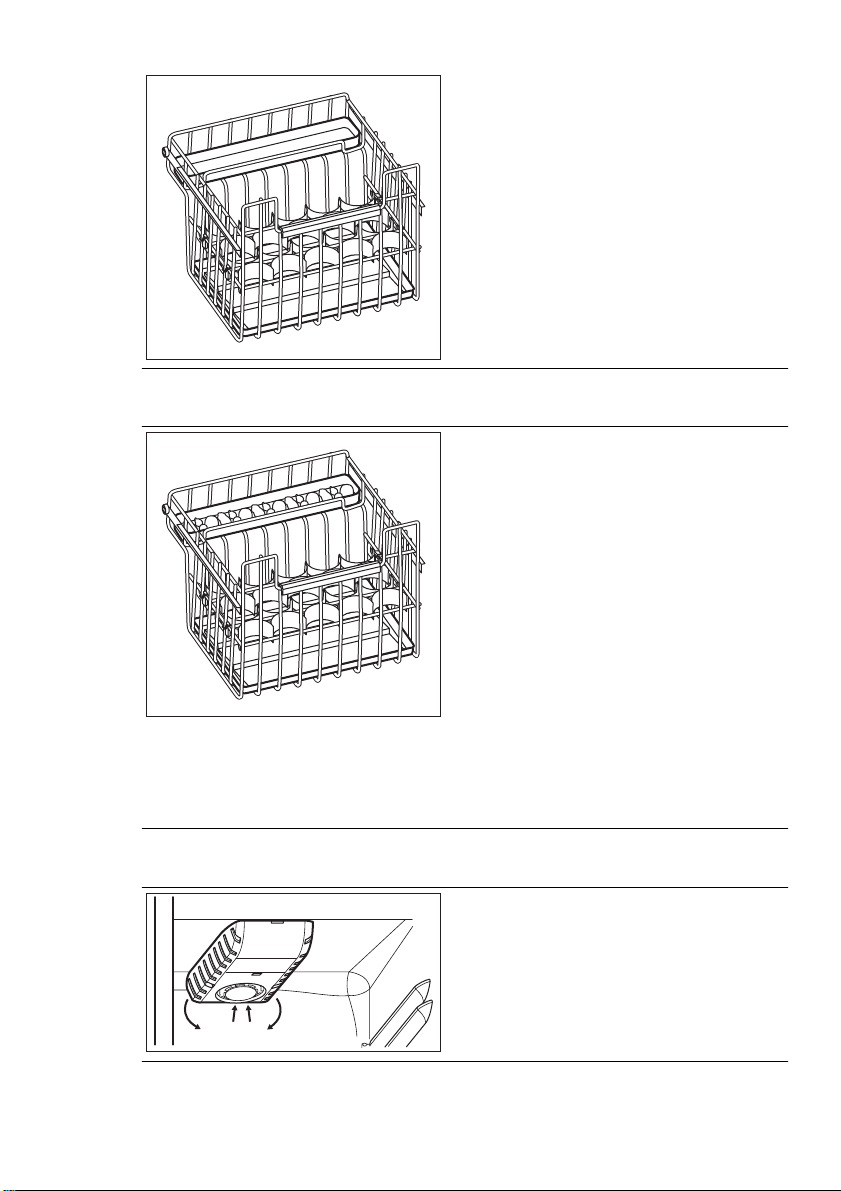
3.6 Humidifier
ENGLISH 9
The bottom compartment is arranged
with a sliding drawer to be used for placing the bottles upright.
The drawer has two dividers that adapt to
bottles of different diameters.
The right humidity is vitally important for
the proper storage of wine.
Your Wine Cellar is fitted with a special
humidifying device that increases the humidity inside the appliance.
Spread out the lava stones provided
along the small tray as show in the picture. Then fill the tray with water up to the
half of its capacity.
In normal operation, the lava stones are
regularly humidified by the water, periodically check at water present inside the
tray and refill it when needed.
Note that if the humidity in the area in
which your appliance is installed is particularly high, the interior of your Wine Cellar
will also be relatively more humid.
This may result in bottles misting up when
the door is opened or labels peeling off. In
this case reduce the quantity of water in
the tray accordingly.
3.7 Air circulation
The refrigerator compartment has a special AIRLIGHT fan which is automatically
activated in function of the appliance thermostat setting and ambient conditions.
Page 10
www.electrolux.com
10
4. CARE AND CLEANING
CAUTION!
Unplug the appliance before carrying out any maintenance operation.
This appliance contains hydrocarbons in its cooling unit; maintenance and recharging must therefore only be carried out by authorized technicians.
4.1 Periodic cleaning
The equipment has to be cleaned regularly:
• clean the inside and accessories with
lukewarm water and some neutral
soap.
• regularly check the door seals and wipe
clean to ensure they are clean and free
from debris.
• rinse and dry thoroughly.
Do not pull, move or damage any
pipes and/or cables inside the
cabinet.
Never use detergents, abrasive
powders, highly perfumed cleaning products or wax polishes to
clean the interior as this will damage the surface and leave a
strong odour.
Clean the condenser (black grill) and the
compressor at the back of the appliance
with a brush. This operation will improve
the performance of the appliance and
save electricity consumption.
Take care of not to damage the
cooling system.
Many proprietary kitchen surface cleaners
contain chemicals that can attack/damage the plastics used in this appliance.
For this reason it is recommended that
the outer casing of this appliance is only
cleaned with warm water with a little
washing-up liquid added.
After cleaning, reconnect the equipment
to the mains supply.
4.2 Defrosting the refrigerator
4.3 Periods of non-operation
When the appliance is not in use for long
periods, take the following precautions:
• disconnect the appliance from elec-
tricity supply
Frost is automatically eliminated from the
evaporator of the refrigerator compartment every time the motor compressor
stops, during normal use. The defrost water drains out through a drain hole into a
special container at the back of the appliance, over the motor compressor, where
it evaporates.
It is important to periodically clean the defrost water drain hole in the middle of the
refrigerator compartment channel to prevent the water overflowing and dripping
onto the food inside.
• defrost (if foreseen) and clean the appliance and all accessories
• leave the door/doors ajar to prevent unpleasant smells.
If the cabinet will be kept on, ask somebody to check it once in a while to pre-
Page 11
vent the food inside from spoiling in case
of a power failure.
5. WHAT TO DO IF…
ENGLISH 11
WARNING!
Before troubleshooting, disconnect the mains plug from the
mains socket.
Only a qualified electrician or competent person must do the troubleshooting that is not in this manual.
There are some sounds during
normal use (compressor, refrigerant circulation).
Problem Possible cause Solution
The appliance is
noisy
The appliance is not supported properly
Check if the appliance
stands stable (all the four
feet should be on the floor)
The buzzer sounds.
The Display is red.
The appliance does
not operate. The
The door is not closed
correctly.
The appliance is switched
off.
Refer to "Door open alarm".
Switch on the appliance.
lamp does not operate.
The mains plug is not con-
nected to the mains sock-
Connect the mains plug to
the mains socket correctly.
et correctly.
The appliance has no
power. There is no voltage
in the mains socket.
Connect a different electrical appliance to the mains
socket.
Contact a qualified electrician.
The lamp does not
The lamp is in stand-by. Close and open the door.
work.
The lamp is defective. Refer to "Replacing the
lamp".
The compressor operates continually.
The door is not closed
The temperature is not set
correctly.
Set a higher temperature.
Refer to "Closing the door".
correctly.
The door has been
opened too frequently.
The room temperature is
too high.
Water flows on the
rear plate of the refrigerator.
During the automatic defrosting process, frost defrosts on the rear plate.
Do not keep the door open
longer than necessary.
Decrease the room temperature.
This is correct.
Page 12
www.electrolux.com
12
Problem Possible cause Solution
Water flows into the
refrigerator.
Products prevent that wa-
The temperature in
the appliance is too
low/high.
The door is not closed
Many products are stored
The temperature in
the appliance is too
high.
Upper or lower
square is shown in
the temperature display.
DEMO appears on
the Display.
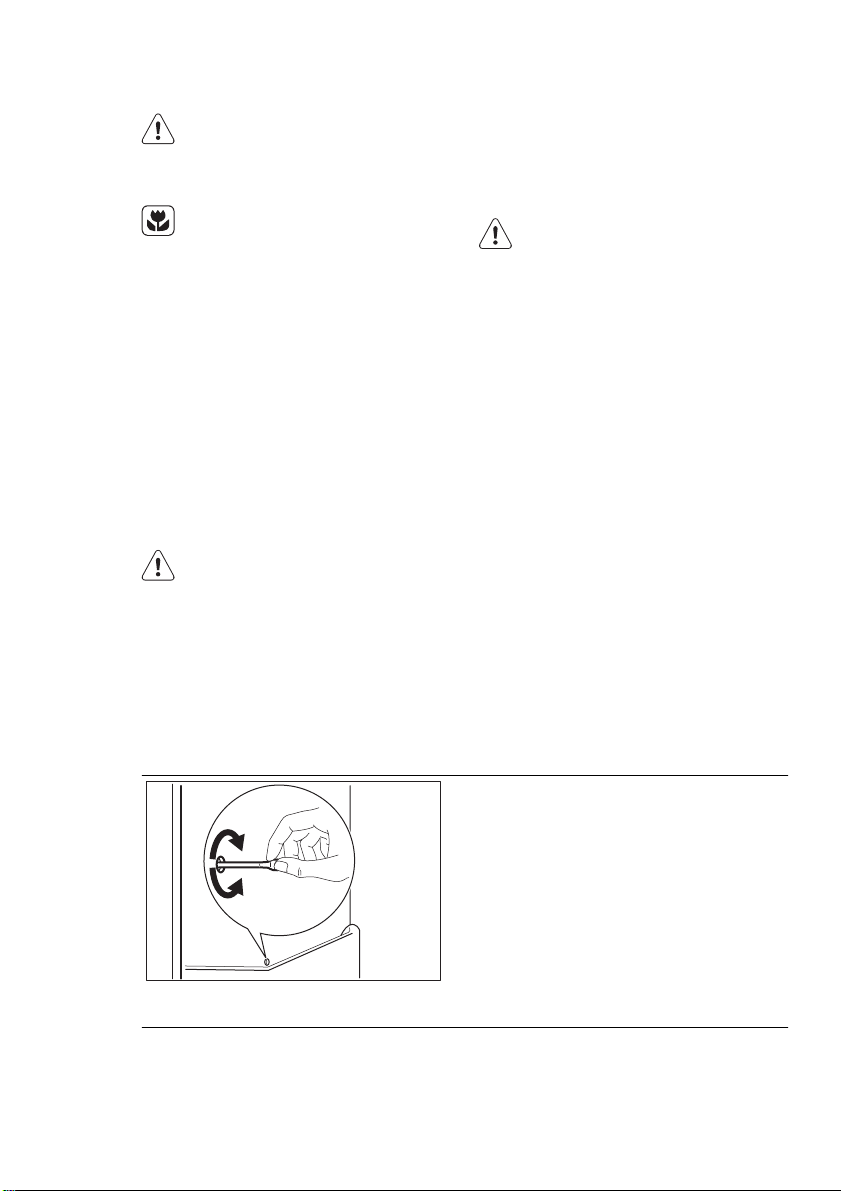
5.1 Replacing the lamp Wine
Cellar
Disconnect the mains plug from the mains
socket.
The water outlet is clogged.
ter flows into the water
collector.
The temperature regulator
is not set correctly.
correctly.
at the same time.
There is no cold air circu-
lation in the appliance.
An error has occurred in
measuring the temperature.
The appliance is in demonstration mode (DEMO).
Clean the water outlet.
Make sure that products do
not touch the rear plate.
Set a higher/lower temperature.
Refer to "Closing the door".
Store less products at the
same time.
Make sure that there is cold
air circulation in the appliance.
Call your service representative (the cooling system
will continue to keep food
products cold, but temperature adjustment will not be
possible).
Keep pressed approximately 10 sec. the Light button
since a long sound of buzzer is heard and the Display
shut off for a short while:
appliance start works regularly.
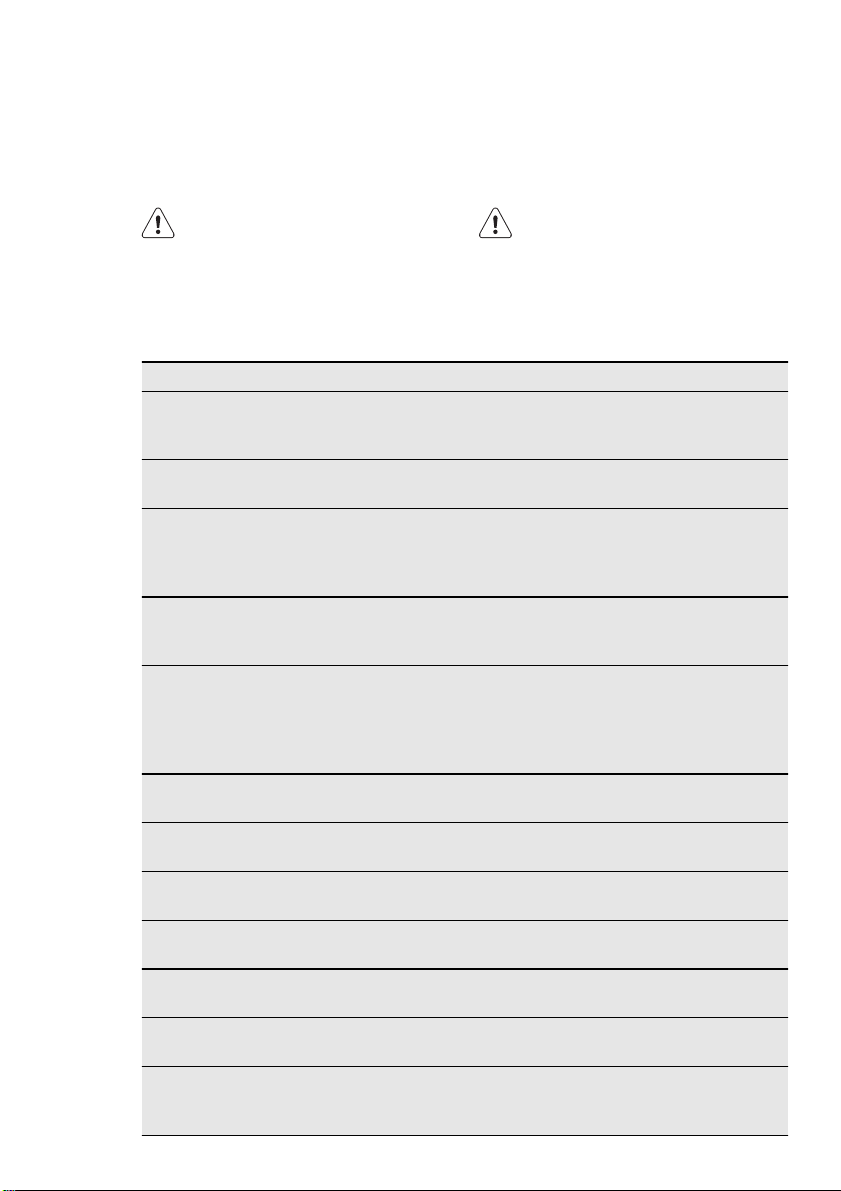
Remove the lamp cover by
pressing it inwards with a
tool (e.g. screwdriver) to free
the rear side hookings.
Page 13
5.2 Closing the door
1.
Clean the door gaskets.
2.
If necessary, adjust the door. Refer to
"Installation".
ENGLISH 13
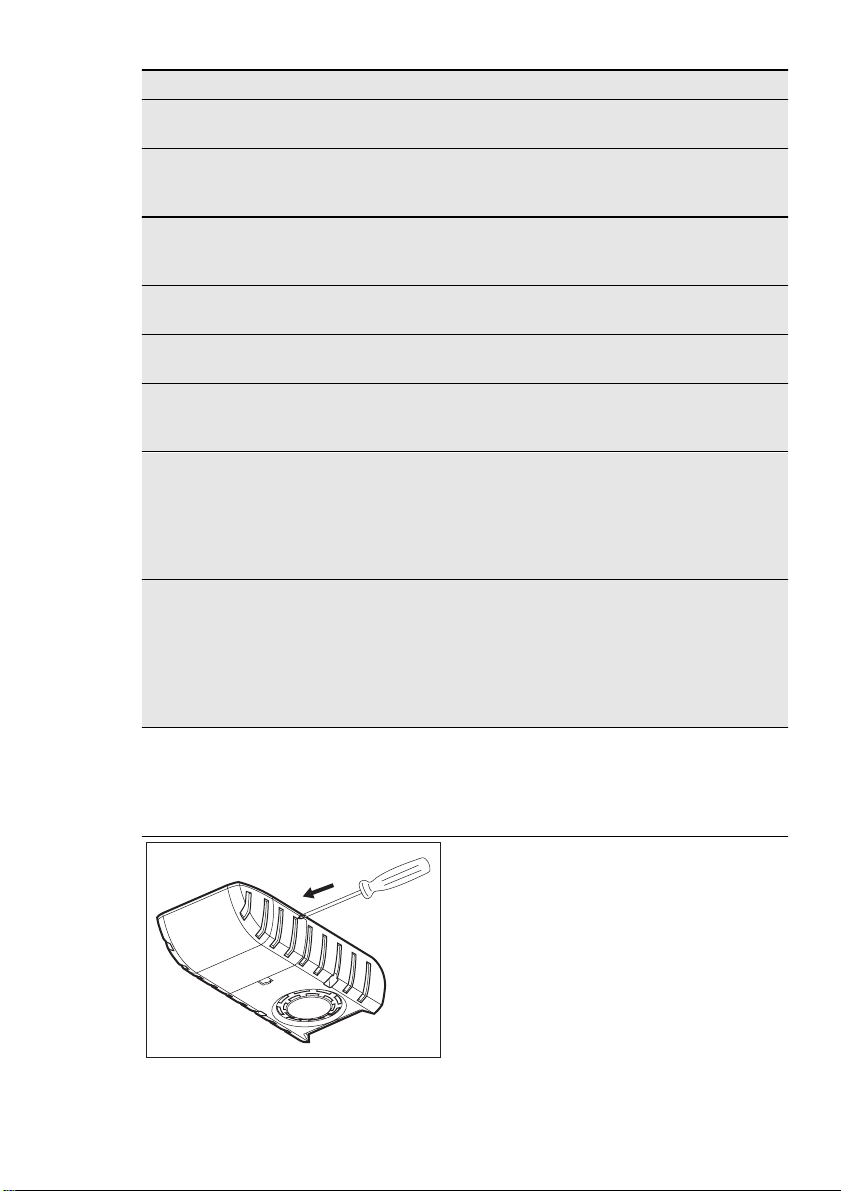
At the same time, free the
middle hook and slide off
the cover in the direction of
the arrows.
Replace the bulb with an
original spare part.
Install the lamp cover.
Connect the mains plug to
the mains socket.
Open the door. Make sure
that the lamp comes on.
3.
If necessary, replace the defective
door gaskets. Contact the Service
Center.
6. INSTALLATION
6.1 Positioning
WARNING!
If you are discarding an old appliance that has a lock or catch on
the door, you must ensure that it
is made unusable to prevent
young children being trapped inside.
The appliance shall have the plug
accessible after installation.
Install this appliance at a location where
the ambient temperature corresponds to
the climate class indicated on the rating
plate of the appliance:
Cli-
Ambient temperature
mate
class
SN +10°C to + 32°C
N +16°C to + 32°C
ST +16°C to + 38°C
T +16°C to + 43°C
6.2 Electrical connection
Before plugging in, ensure that the voltage and frequency shown on the rating
plate correspond to your domestic power
supply.
The appliance must be earthed. The power supply cable plug is provided with a
contact for this purpose. If the domestic
Page 14

www.electrolux.com
14
power supply socket is not earthed, connect the appliance to a separate earth in
compliance with current regulations, consulting a qualified electrician.
6.3 Ventilation requirements
The manufacturer declines all responsibility if the above safety precautions are not
observed.
This appliance complies with the E.E.C.
Directives.
5 cm
min.
200 cm
2
min.
200 cm
6.4 Installing the appliance
CAUTION!
Make sure that the mains cable
can move freely.
The airflow behind the appliance must be
sufficient.
2
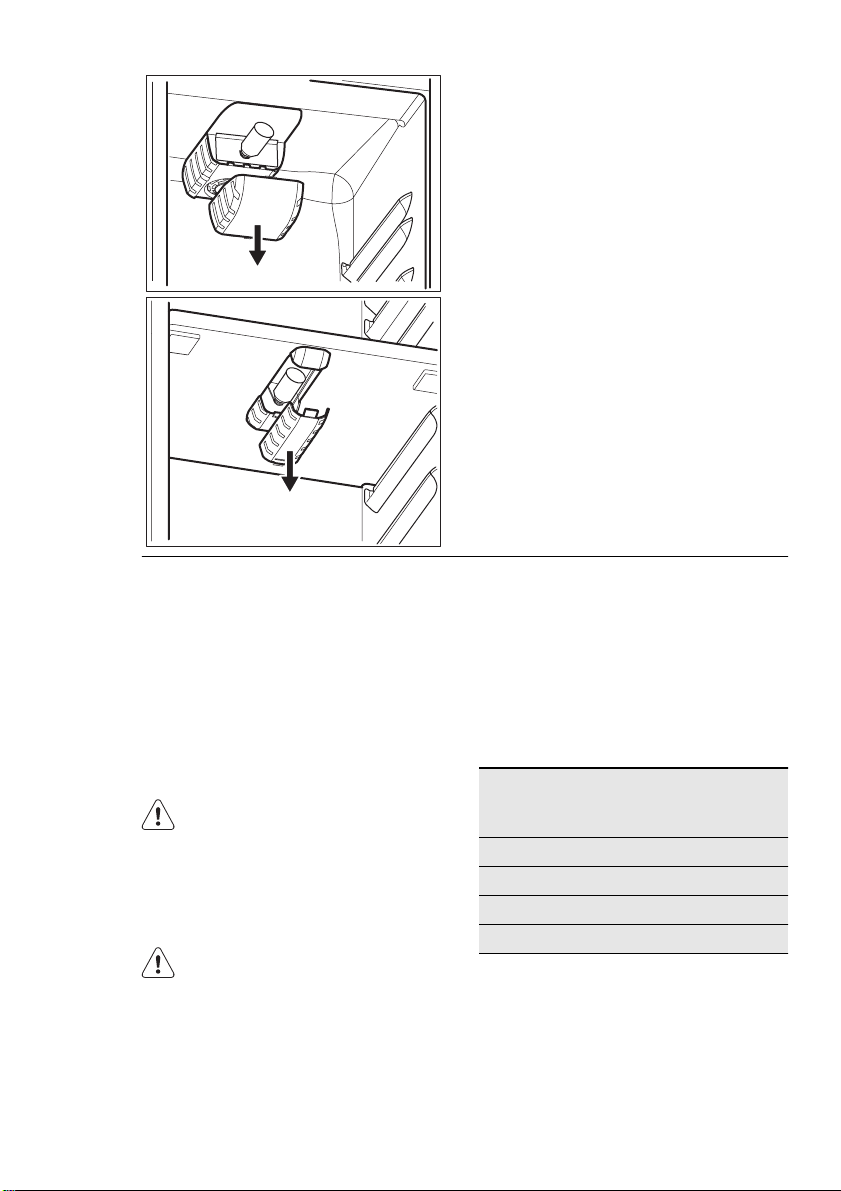
Do the following steps:
Apply the adhesive sealing strip to the appliance as shown in figure.
Page 15
ENGLISH 15
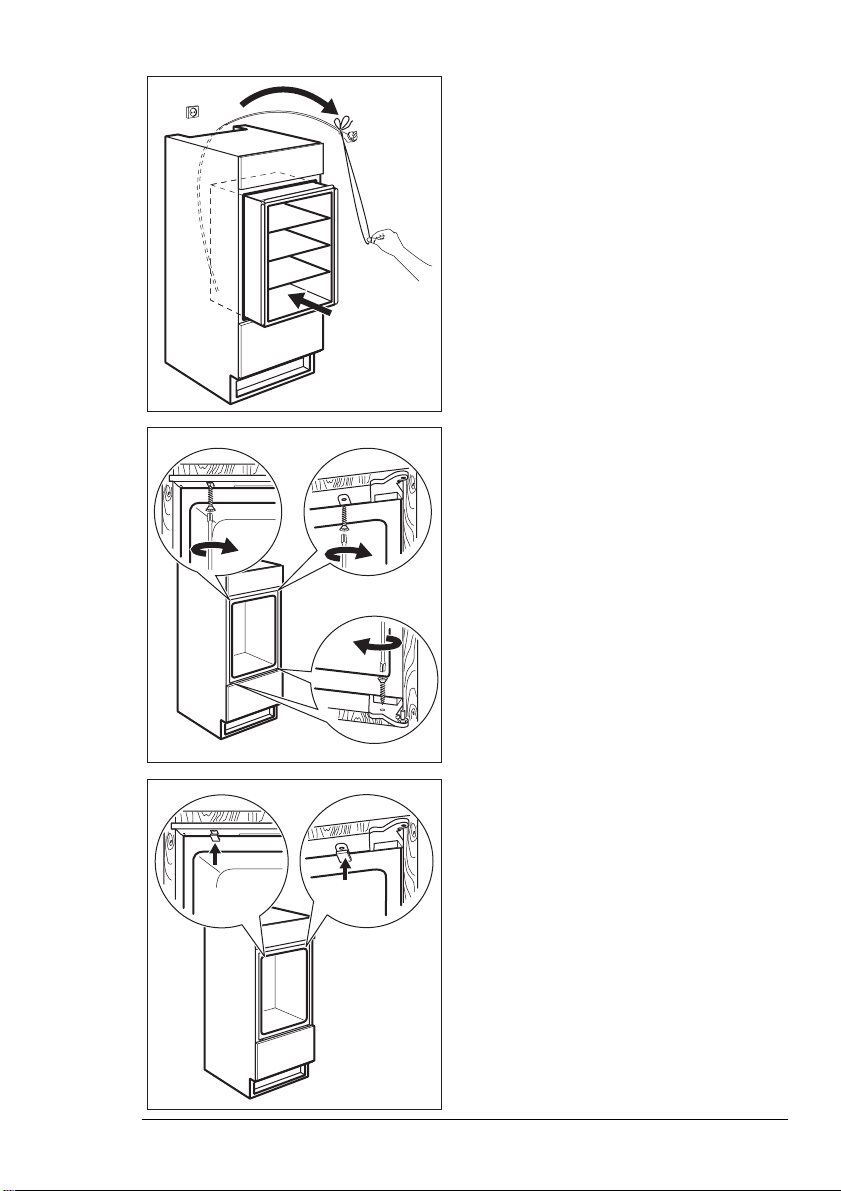
Install the appliance in the niche.
Attach the appliance to the niche with 4
screws.
Fix the covers on the screws.
Do a final check to make sure that: • All screws are tightened.
Page 16

www.electrolux.com
16
• The sealing strip is attached tightly to
6.5 Assembly instructions for the compensator lower part of the
door
the cabinet.
• The door opens and closes correctly.
With the door open, loosen the two
screws situated in the lower part without unscrewing them completely.
Position the steel compensator as indicated in the figure and insert the upper
part under the head of the screws.
Align the compensator with the steel
door panel and tighten the screws.
Insert the steel carter inside the compensator as indicated in the figure.
Page 17
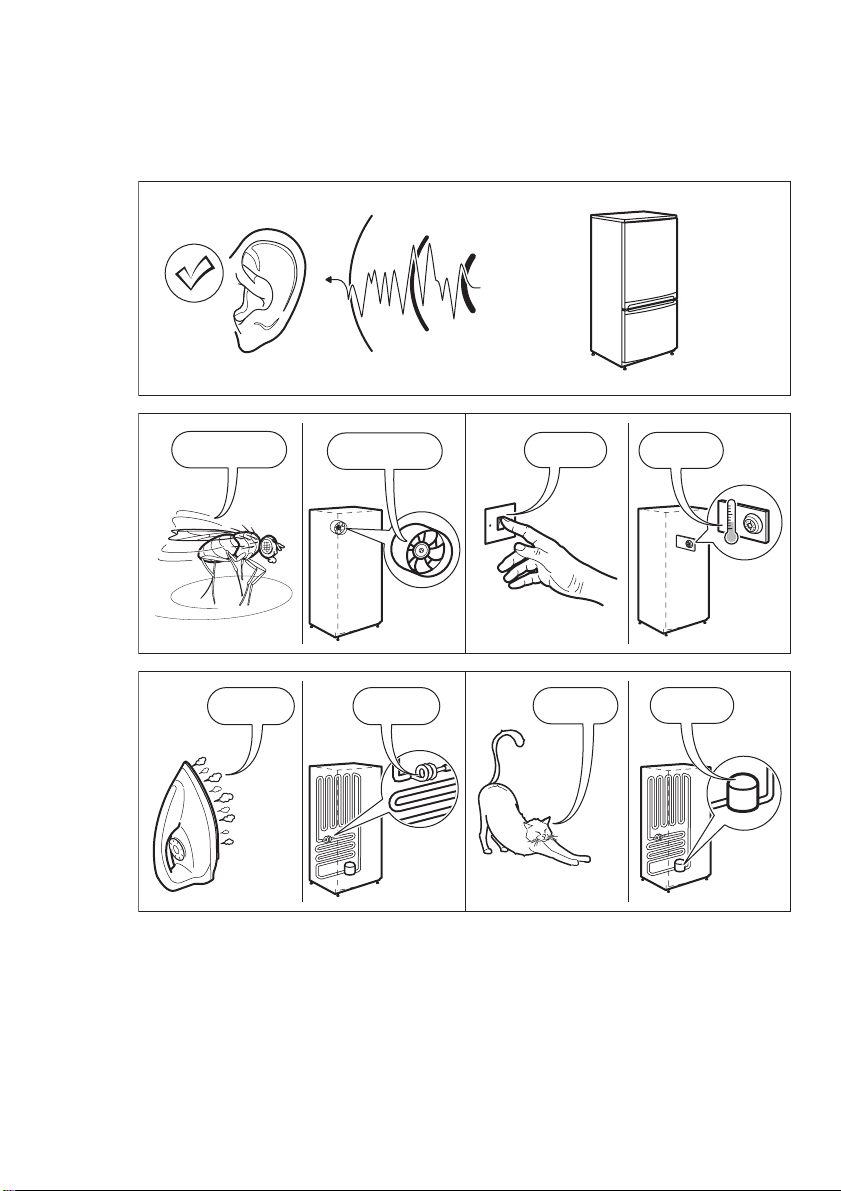
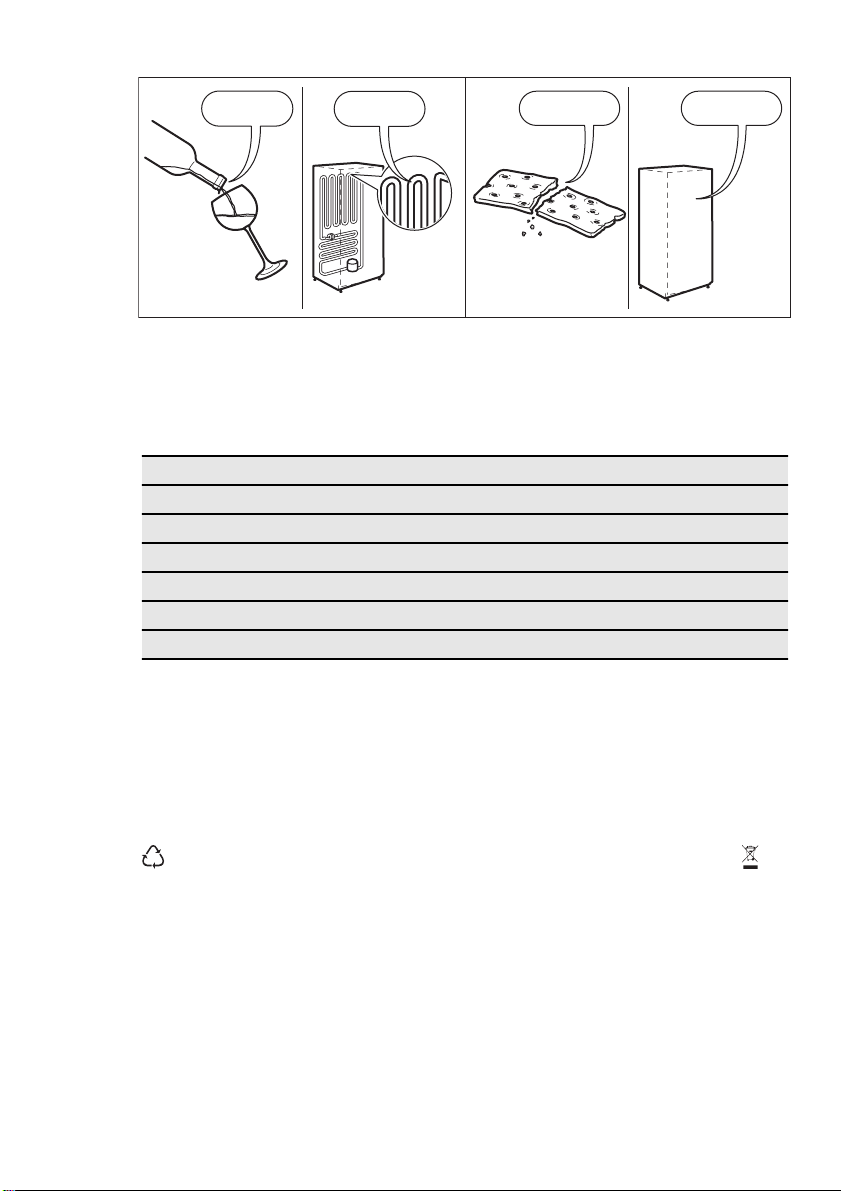
7. NOISES
There are some sounds during normal
running (compressor, refrigerant circulation).
SSSRR
HISSS!
R!
ENGLISH 17
CLICK!
BRRR!
OK
SSSRRR!
HISSS!
SSSRRR!
HISSS!
BLUBB!
CLICK!
BRRR!
CRACK!
CLICK!
BRRR!
Page 18
www.electrolux.com
18
BLUBB!
8. TECHNICAL DATA
Dimension of the recess
Height 1780 mm
Width 560 mm
Depth 550 mm
Voltage 230-240 V
Frequency 50 Hz
The technical information are situated in
the rating plate on the internal left side of
the appliance and in the energy label.
BLUBB!
CRACK!CRACK!
9. ENVIRONMENT CONCERNS
Recycle the materials with the symbol
. Put the packaging in applicable
containers to recycle it.
Help protect the environment and human
health and to recycle waste of electrical
and electronic appliances. Do not dispose
appliances marked with the symbol
with the household waste. Return the
product to your local recycling facility or
contact your municipal office.
Page 19
ITALIANO 19
INDICE
1. ISTRUZIONI DI SICUREZZA . . . . . . . . . . . . . . . . . . . . . . . . . . . . . . . . . . . . . . . . . . . . . . . 20
2. PANNELLO DEI COMANDI . . . . . . . . . . . . . . . . . . . . . . . . . . . . . . . . . . . . . . . . . . . . . . . . 22
3. UTILIZZO QUOTIDIANO . . . . . . . . . . . . . . . . . . . . . . . . . . . . . . . . . . . . . . . . . . . . . . . . . . 23
4. PULIZIA E MANUTENZIONE . . . . . . . . . . . . . . . . . . . . . . . . . . . . . . . . . . . . . . . . . . . . . . . 27
5. COSA FARE SE… . . . . . . . . . . . . . . . . . . . . . . . . . . . . . . . . . . . . . . . . . . . . . . . . . . . . . . . 28
6. INSTALLAZIONE . . . . . . . . . . . . . . . . . . . . . . . . . . . . . . . . . . . . . . . . . . . . . . . . . . . . . . . . 30
7. RUMORI . . . . . . . . . . . . . . . . . . . . . . . . . . . . . . . . . . . . . . . . . . . . . . . . . . . . . . . . . . . . . . 34
8.
DATI TECNICI . . . . . . . . . . . . . . . . . . . . . . . . . . . . . . . . . . . . . . . . . . . . . . . . . . . . . . . . . . 35
PENSATI PER VOI
Grazie per aver acquistato un'apparecchiatura Electrolux. Avete scelto un prodotto che ha alle
spalle decenni di esperienza professionale e innovazione. Ingegnoso ed elegante, è stato
progettato pensando a voi. Quindi, in qualsiasi momento desiderate utilizzarlo, potete esser certi
di ottenere sempre i migliori risultati.
Benvenuti in Electrolux.
Visitate il nostro sito web per:
ricevere consigli, scaricare i nostri opuscoli, eliminare eventuali anomalie, ottenere
informazioni sull'assistenza.
www.electrolux.com
registrare il vostro prodotto e ricevere un servizio migliore:
www.electrolux.com/productregistration
acquistare accessori, materiali di consumo e ricambi originali per la vostra
apparecchiatura:
www.electrolux.com/shop
SERVIZIO CLIENTI E MANUTENZIONE
Consigliamo sempre l’impiego di ricambi originali.
Quando si contatta l'Assistenza, accertarsi di disporre dei seguenti dati.
Le informazioni si trovano sulla targhetta di identificazione. Modello, numero dell'apparecchio
(PNC), numero di serie.
Avvertenza / Attenzione - Importanti Informazioni di Sicurezza
Informazioni e consigli generali
Informazioni in materia di sicurezza ambientale
Con riserva di modifiche.
Page 20
www.electrolux.com
20
1.
ISTRUZIONI DI SICUREZZA
Per garantire un impiego corretto e sicuro
dell'apparecchio, prima dell'installazione e
del primo utilizzo leggere con attenzione il
libretto istruzioni, inclusi i suggerimenti e le
avvertenze. Per evitare errori e incidenti, è
importante garantire che tutte le persone
che utilizzano l'apparecchio ne conoscano il funzionamento e le caratteristiche di
sicurezza. Conservare queste istruzioni e
accertarsi che rimangano unite all'apparecchio in caso di vendita o trasloco, in
modo che chiunque lo utilizzi sia correttamente informato sull'uso e sulle norme di
sicurezza.
Per la sicurezza delle persone e delle cose
osservare le precauzioni indicate nelle
presenti istruzioni per l'utente, il produttore non è responsabile dei danni provocati
da eventuali omissioni.
1.1 Sicurezza dei bambini e
delle persone fragili
• Questo apparecchio non deve essere
usato da persone, bambini inclusi, con
ridotte capacità fisiche, sensoriali o psichiche, oppure prive di conoscenza e
esperienza, a meno che non siano state
istruite all'uso dell'apparecchio da parte
dei responsabili della loro sicurezza, oppure sotto vigilanza di questi.
I bambini devono essere sorvegliati per
assicurarsi che non giochino con l'apparecchio.
• Tenere i materiali di imballaggio al di
fuori della portata dei bambini. Alcuni
materiali possono creare rischi di soffocamento.
• Qualora l'apparecchio venga demolito,
estrarre la spina dalla presa, tagliare il
cavo di collegamento (il più vicino possibile all'apparecchio) e smontare lo
sportello per evitare che i bambini giocando possano subire scosse elettriche
o chiudersi dentro l'apparecchio.
• Se questo nuovo apparecchio, che è
dotato di guarnizioni magnetiche nello
sportello, va a sostituirne uno più vecchio avente sportello o coperchio con
chiusure a molla, si deve rendere inutilizzabili tali chiusure prima di eliminare
l'apparecchio sostituito, per evitare che
diventi una trappola mortale per i bambini.
1.2 Norme di sicurezza generali
AVVERTENZA!
Verificare che le aperture di ventilazione,
sia sull'apparecchiatura che nella struttura
da incasso, siano libere da ostruzioni.
• Questo apparecchiatura è destinato
esclusivamente alla conservazione del
vino.
• Non utilizzare dispositivi meccanici o altri mezzi artificiali per accelerare lo sbrinamento.
• Non utilizzare altri apparecchi elettrici
(per esempio gelatiere) all'interno del frigorifero, salvo quelli approvati per tale
scopo dal produttore.
• Non danneggiare il circuito refrigerante.
• Il circuito refrigerante dell'apparecchiatura contiene isobutano (R600a), un
gas naturale con un elevato livello di
compatibilità ambientale che, tuttavia, è
infiammabile.
Durante il trasporto e l'installazione dell'apparecchiatura, assicurarsi che nessuno dei componenti del circuito refrigerante venga danneggiato.
In caso di danneggiamento del circuito
refrigerante:
– evitare fiamme libere e scintille
– aerare bene il locale in cui si trova
l'apparecchiatura
• È pericoloso cambiare le specifiche o
modificare il prodotto in qualunque modo. Un danneggiamento del cavo potrebbe provocare cortocircuiti, incendi
e/o scosse elettriche.
AVVERTENZA!
Tutti i componenti elettrici (cavo di
alimentazione, spina, compressore) devono essere sostituiti da un
tecnico certificato o da personale
d'assistenza qualificato.
1.
Non collegare prolunghe al cavo di
alimentazione.
Page 21

2.
Evitare che il lato posteriore dell'apparecchiatura possa schiacciare o
danneggiare la spina, causandone
il surriscaldamento con un conseguente rischio di incendio.
3.
La spina dell'apparecchiatura deve
trovarsi in una posizione accessibile.
4.
Non tirare il cavo di alimentazione.
5.
Se la presa elettrica non è perfettamente stabile, non inserire la spina.
Il collegamento potrebbe provocare
scosse elettriche o creare un rischio di incendio.
6.
L'apparecchiatura non deve essere
messa in funzione senza il coprilampada interno (se previsto).
• Quest'apparecchiatura è pesante. Prestare attenzione quando occorre spostarla.
• Evitare di estrarre o di toccare gli alimenti riposti nel vano congelatore con
le mani bagnate o umide; il contatto potrebbe provocare abrasioni o ustioni da
freddo.
• Evitare un'esposizione prolungata dell'apparecchiatura alla luce solare diretta.
• Le lampadine utilizzate in questa apparecchiatura (se previste) sono lampade
speciali selezionate esclusivamente per
elettrodomestici. Non sono adatte per
l'illuminazione degli ambienti.
1.3 Uso normale
• Non appoggiare pentole calde sulle
parti in plastica dell'apparecchiatura.
• Non riporre gas o liquidi infiammabili
nell'apparecchio: i contenitori potrebbero esplodere.
• Osservare rigorosamente le raccomandazioni del produttore riguardo alla conservazione degli alimenti. Leggere attentamente le relative istruzioni.
1.4 Pulizia e cura
• Prima della manutenzione, spegnere
l'apparecchio e staccare la spina dalla
presa.
• Non pulire l'apparecchio con oggetti
metallici.
ITALIANO 21
• Non usare oggetti appuntiti per rimuovere la brina dall'apparecchio. Usare un
raschietto di plastica.
• Esaminare regolarmente il foro di scarico dell'acqua di sbrinamento nel frigorifero. Se necessario, pulirlo. Se il foro è
otturato, l'acqua si raccoglie sul fondo
dell'apparecchio.
1.5 Installazione
Per il collegamento elettrico, seguire attentamente le istruzioni dei
paragrafi corrispondenti.
• Disimballare l'apparecchio e assicurarsi
che non presenti danni. Non collegare
l'apparecchio se è danneggiato. Segnalare immediatamente gli eventuali
danni al negozio in cui è stato acquistato. In questo caso conservare l'imballaggio.
• Si consiglia di attendere almeno due
ore prima di collegare l'apparecchio per
consentire all'olio di arrivare nel compressore.
• Attorno all'apparecchio vi deve essere
un'adeguata circolazione dell'aria, altrimenti si può surriscaldare. Per ottenere
una ventilazione sufficiente seguire le
istruzioni di installazione.
• Se possibile il retro dell'apparecchio
dovrebbe essere posizionato contro
una parete per evitare di toccare le parti
calde o di rimanervi impigliati (compressore, condensatore), evitando così possibili scottature.
• L'apparecchio non deve essere posto
vicino a radiatori o piani di cottura a
gas.
• Installare l'apparecchio in modo che la
presa rimanga accessibile.
• Collegare solo a sorgenti d'acqua potabile (se è previsto un collegamento alla
rete idrica).
1.6 Assistenza tecnica
• Gli interventi elettrici sull'apparecchiatura devono essere eseguiti esclusivamente da elettricisti qualificati o da personale competente.
• Gli interventi di assistenza devono essere eseguiti esclusivamente da tecnici
autorizzati e utilizzando solo ricambi originali.
Page 22
www.electrolux.com
22
1.7 Tutela ambientale
Questo apparecchio non contiene
gas che potrebbero danneggiare
lo strato di ozono nel circuito refrigerante o nei materiali isolanti.
L'apparecchio non deve essere
smaltito assieme ai rifiuti urbani e
alla spazzatura. La schiuma dell'isolamento contiene gas infiamma-
2. PANNELLO DEI COMANDI
bili: lo smaltimento dell'apparecchio va eseguito secondo le prescrizioni vigenti da richiedere alle
autorità locali. Evitare di danneggiare il gruppo refrigerante, specialmente nella parte posteriore vicino allo scambiatore di calore. I
materiali usati su questo apparecchio contrassegnati dal simbolo
sono riciclabili.
1
234567
Display
1
Tasto ON/OFF dell'apparecchiatura
2
Tasto di allarme
Tasto Temperatura più fresca
3
Tasto Temperatura più calda
4
Vano Superiore
5
Vano Inferiore
6
Tasto Luce
7
È possibile modificare le impostazioni audio predefinite dei tasti e impostarle con
un volume più alto, premendo contemporaneamente il tasto Luce ed il tasto Temperatura più fresca per alcuni secondi. La
modifica è reversibile.
2.1 Display
ABC
A)
Indicatore temperatura del vano inferiore
B)
Spia allarme
C)
Indicatore temperatura vano superiore
Dopo aver selezionato il vano superiore o inferiore, si avvia l'anima-
zione
Dopo aver selezionato la temperatura, l'animazione lampeggia per
alcuni minuti.
.
2.2 Accensione
Per accendere l'apparecchiatura procedere come segue:
1.
Inserire la spina nella presa di alimentazione.
2.
Premere il tasto ON/OFF se il display
è spento.
3.
Se DEMO appare sul display, l'apparecchiatura si trova in modalità dimo-
Page 23

strazione. Fare riferimento al capitolo
"Cosa fare se...".
4.
Gli indicatori di temperatura visualizzano la temperatura impostata prede-
finita.
Per selezionare una temperatura diversa,
consultare la sezione "Regolazione della
temperatura".
2.3 Spegnimento
Per spegnere l'apparecchiatura, procedere come segue:
1.
Premere il tasto ON/OFF per 3 secon-
di.
2.
Il display si spegne.
3.
Per scollegare l’apparecchiatura dalla
corrente elettrica, staccare la spina
dalla presa di alimentazione.
2.4 Regolazione della
temperatura
Selezionare il vano superiore o inferiore.
Premere il tasto Temperatura per impostarla.
Impostare la temperatura predefinita:
• + 8°C per il vano superiore
• +14°C per il vano inferiore
Gli indicatori della temperatura visualizzano la temperatura impostata.
La temperatura impostata verrà raggiunta
entro 24 ore.
ITALIANO 23
Consultare la sezione "Utilizzo quotidiano
- Disposizione del vino".
Dopo un'interruzione di corrente la
temperatura impostata rimane in
memoria.
2.5 Tasto spia
Se si desidera che la luce rimanga accesa
con la porta chiusa, è sufficiente aprire e
chiudere quest'ultima: la luce rimane automaticamente accesa per 10 minuti.
Se si desidera spegnere la luce prima dello spegnimento automatico, aprire la porta e premere il tasto Luce.
La luce della spia non ha effetti negativi
sulla qualità del vino.
2.6 Allarme porta aperta
Se la porta è lasciata aperta per alcuni minuti, viene emesso un segnale acustico.
Le condizioni di allarme della porta aperta
sono indicate da:
• indicatore allarme lampeggiante
• segnale acustico
Al ripristino delle condizioni normali (porta
chiusa), l'allarme si interrompe.
Durante l'allarme, il segnale acustico può
essere disattivato premendo qualsiasi tasto.
3. UTILIZZO QUOTIDIANO
3.1 Pulizia dell'interno
Prima di utilizzare l'apparecchiatura per la
prima volta, lavare l'interno e gli accessori
con acqua tiepida e sapone neutro per
eliminare il tipico odore dei prodotti nuovi,
quindi asciugare accuratamente.
Non usare detergenti corrosivi o
polveri abrasive che possano danneggiare la finitura.
Se DEMO appare sul display, l'apparecchiatura si trova in modalità dimostrazione: fare riferimento al paragrafo “COSA
FARE SE…”.
Page 24

www.electrolux.com
24
3.2 Disposizione del vino
3.3 Suggerimenti di
conservazione
Il tempo di conservazione del vino dipende dall'invecchiamento, dal tipo d'uva, dal
contenuto alcolico e dal livello di fruttosio
e tannino in esso contenuti. Al momento
dell'acquisto, controllare se il vino è già invecchiato o se migliorerà col passare del
tempo.
Temperature di conservazione consigliate:
Vano Superiore:
La temperatura è regolabile tra +6 e
+11°C. Questo vano è ideale per i vini da
bere subito, soprattutto bianchi o rossi
giovani. Il vano è diviso in comparti a temperature differenziate.
Vano Inferiore:
La temperatura è regolabile tra 11 e
+18°C. Questo vano è ideale per la conservazione e l'affinamento dei vini rossi o
bianchi per periodi lunghi.
Le temperature di questo comparto sono
idonee per la conservazione di vini invecchiati e corposi.
Coricare le bottiglie in modo che i tappi
non si secchino.
Conservare il vino al buio. La porta è in
doppio vetro offuscato ed anti UV per
proteggere il vino dalla luce, nel caso in
cui il frigorifero si trovi in un luogo molto illuminato.
Evitare di accendere la luce dell'apparecchiatura troppo spesso o troppo a lungo.
Il vino si mantiene meglio al buio.
Maneggiare le bottiglie con cura per evitare di agitare il vino.
Fare attenzione alle raccomandazioni e ai
consigli ricevuti al momento dell'acquisto
o riportati nella documentazione tecnica
relativa alla qualità, alla durata e alla temperatura ottimale di conservazione del vino.
• per champagne e vini frizzanti dai 6 agli
8°C
• per vini bianchi dai 10 ai 12°C
• per vini rosé e rossi leggeri dai 12 ai
16°C
• vini rossi stagionati 14 -16°C
Se si impilano diverse bottiglie una sull'altra, assicurarsi che queste non tocchino la
piastra di raffreddamento del frigorifero.
Page 25

3.4 Ripiani del vano cantina
3.5 Portabottiglie per vano cantina
ITALIANO 25
Rimuovere i ripiani per eseguire la pulizia.
Estrarre il ripiano ed inserirlo tra le due
guide.
Sulle mensole portabottiglie il peso massimo possibile è di 30 Kg.
Ѝ possibile disporre il ripiano tra guide distanti 100 mm per favorire l’esposizione
delle bottiglie.
Page 26

www.electrolux.com
26
3.6 Umidificatore
Il comparto inferiore e’ predisposto con
un cassetto scorrevole da utilizzare per disporre le bottiglie in verticale.
Il cassetto e’ provvisto di due separatori
che si adattano a bottiglie con diametri diversi.
Un'umidità corretta è di vitale importanza
per una corretta conservazione del vino.
Il vostro vano cantina è dotato di uno speciale dispositivo umidificante che aumenta
l'umidità all'interno dell'apparecchiatura.
Spargere le pietre laviche in dotazione sul
piccolo vassoio come illustrato. Quindi,
riempire il piccolo vassoio di acqua fino a
metà della sua capacità.
Durante il normale funzionamento le pietre
laviche vengono regolarmente umidificate
dall'acqua. Si prega di verificare periodicamente il livello dell'acqua e di procedere
al riempimento se necessario.
Si prega di notare che nel caso in cui l'umidità della zona in cui si trova l'apparecchiatura è particolarmente elevata, anche
la parte interna del vano cantina sarà relativamente umida.
Il risultato potrebbe essere un inumidimento delle bottiglie nonché uno scollamento delle etichette all'apertura della
porta. In questo caso, ridurre il quantitativo di acqua all'interno del piccolo vassoio.
3.7 Circolazione dell'aria
Il vano frigorifero è dotato di una speciale
ventola AIRLIGHT che si attiva automaticamente in base alla regolazione del termostato e alle condizioni ambientali.
Page 27

4. PULIZIA E MANUTENZIONE
ITALIANO 27
ATTENZIONE
Staccare la spina dell'apparecchio
prima di eseguire lavori di manutenzione.
Questo apparecchio contiene
idrocarburi nell'unità di raffreddamento; la manutenzione e la ricarica devono pertanto essere effettuate esclusivamente da tecnici
autorizzati.
4.1 Pulizia periodica
L'apparecchio deve essere pulito regolarmente:
• Pulire l'interno e gli accessori con acqua tiepida e un po' di sapone neutro.
• Controllare regolarmente le guarnizioni
della porta e verificare che siano pulite e
prive di residui.
• Risciacquare e asciugare accuratamente.
Non tirare, spostare o danneggiare tubi e/o cavi all'interno dell'apparecchio.
Non usare mai detergenti, polveri
abrasive, prodotti per la pulizia
con una forte profumazione o cere
lucidanti per pulire l'interno, in
quanto danneggiano la superficie
e lasciano un odore forte.
Pulire il condensatore (griglia nera) e il
compressore sul retro dell'apparecchio
con una spazzola. Questa operazione migliorerà le prestazioni dell'apparecchiatura
riducendone i consumi di energia.
Non danneggiare il sistema di raffreddamento.
Molti detergenti per cucine di marca contengono sostanze chimiche in grado di attaccare/danneggiare la plastica impiegata
in questo apparecchio. Per questo motivo
si raccomanda di pulire l'involucro esterno
dell'apparecchio solo con acqua calda
con un po' di liquido detergente.
Dopo la pulizia, ricollegare l'apparecchio
alla rete di alimentazione.
4.2 Sbrinamento del vano frigorifero
4.3 Periodi di inutilizzo
Se l'apparecchiatura non viene utilizzata
per un lungo periodo, adottare le seguenti
precauzioni:
Durante l'uso normale, la brina viene eliminata automaticamente dall'evaporatore
del vano frigorifero ogni volta che il motocompressore si arresta. L'acqua di sbrinamento giunge attraverso un foro di scarico in un apposito recipiente posto sul retro dell'apparecchiatura, sopra il motocompressore, dove evapora
È importante pulire periodicamente il foro
di scarico dell'acqua di sbrinamento, situato al centro del canale sulla parete posteriore, per evitare che l'acqua fuoriesca
sugli alimenti.
scollegare l'apparecchiatura dalla
•
rete elettrica;
• sbrinare (se necessario) e pulire l'apparecchiatura e tutti gli accessori
Page 28

www.electrolux.com
28
• lasciare la porta o le porte socchiuse
per evitare la formazione di odori sgradevoli.
Se l'apparecchiatura rimane accesa, farla
controllare periodicamente per evitare che
5. COSA FARE SE…
gli alimenti si deteriorino in caso di interruzione della corrente elettrica.
AVVERTENZA!
Prima di eseguire la ricerca guasti,
estrarre la spina dalla presa di alimentazione.
Le operazioni di ricerca guasti,
non descritte nel presente manuale, devono essere eseguite esclusivamente da elettricisti qualificati
o da personale competente.
Durante l'uso, alcuni rumori di funzionamento (come quelli del compressore o del circuito refrigerante) sono da considerarsi normali.
Problema Causa possibile Soluzione
L'apparecchiatura è
rumorosa
L'apparecchiatura non è
appoggiata in modo corretto
Controllare che l'apparecchiatura sia appoggiata in
modo stabile (tutti e quattro
i piedini devono essere a
contatto con il pavimento)
Viene emesso un segnale acustico. L'il-
La porta non è chiusa correttamente.
Fare riferimento alla sezione
"Allarme porta aperta".
luminazione del display diventa rossa.
L'apparecchiatura
non funziona. La
L'apparecchiatura è spenta.
Accendere l’apparecchiatura.
lampada non si accende.
La spina non è inserita
correttamente nella presa
di alimentazione.
L'apparecchiatura non ri-
ceve corrente. Assenza di
tensione nella presa di alimentazione.
Inserire correttamente la
spina nella presa di alimentazione.
Collegare alla presa di alimentazione un'altra apparecchiatura elettrica.
Rivolgersi ad un elettricista
qualificato.
La lampada non si
accende.
La lampada è in modalità
stand-by.
Chiudere e riaprire la porta.
La lampada è difettosa. Fare riferimento alla sezione
"Sostituzione della lampada".
Il compressore rimane sempre in fun-
La temperatura non è impostata correttamente.
Impostare una temperatura
superiore.
zione.
Page 29

Problema Causa possibile Soluzione
La porta non è chiusa cor-
La porta viene aperta trop-
La temperatura ambiente
Sul pannello posteriore del frigorifero
scorre acqua.
All'interno del frigorifero scorre acqua.
Gli alimenti impediscono
La temperatura all'interno dell'apparecchiatura è troppo
bassa/alta.
La porta non è chiusa cor-
Sono stati introdotti molti
La temperatura all'interno dell'apparecchiatura è troppo
alta.
Sul display della
temperatura è visualizzato un quadrato
superiore o inferiore.
DEMO appare sul display.
rettamente.
po frequentemente.
è troppo alta.
Durante lo sbrinamento
automatico, la brina che si
forma sul pannello posteriore si scioglie.
Lo scarico dell'acqua è
ostruito.
all'acqua di fluire nell'apposito collettore.
Il regolatore della temperatura non è impostato correttamente.
rettamente.
alimenti insieme.
L'aria fredda non circola
correttamente all'interno
dell'apparecchiatura.
Si è verificato un errore
durante la misurazione
della temperatura.
L'apparecchiatura è in
modalità dimostrazione
(DEMO).
Consultare la sezione
"Chiusura della porta".
Limitare il più possibile il
tempo di apertura della porta.
Abbassare la temperatura
ambiente.
Non si tratta di un'anomalia.
Pulire lo scarico dell'acqua.
Evitare di disporre gli alimenti direttamente contro
la parete posteriore.
Impostare una temperatura
superiore/inferiore.
Consultare la sezione
"Chiusura della porta".
Introdurre gli alimenti poco
alla volta.
Adottare le misure necessarie per garantire una corretta circolazione dell'aria fredda.
Contattare il servizio assistenza (il sistema refrigerante continuerà a tenere gli
alimenti freddi, ma non sarà
possibile regolare la temperatura).
Tenere il tasto Luce premuto per circa 10 sec., finché
non si sente un suono prolungato provenire dal cicalino e il display si spegne per
un tempo brevissimo: l'apparecchiatura inizia a funzionare regolarmente.
5.1 Sostituzione della lampadina
nel vano cantina
Scollegare la spina dalla presa di corrente.
ITALIANO 29
Page 30

www.electrolux.com
30
Togliere il coprilampada premendolo verso l'interno,
servendosi di un utensile (ad
esempio un cacciavite) fino
a liberare gli agganci posteriori.
Contemporaneamente liberare il gancio centrale e sfilare il coperchietto nel senso
delle frecce.
Sostituire la lampadina con
una originale.
Installare il coprilampada.
Inserire la spina nella presa.
Apire la porta. Controllare
che la lampadina si accenda.
5.2 Chiusura della porta
1.
Pulire le guarnizioni della porta.
2.
Se necessario, regolare la porta. Vedere "Installazione".
6. INSTALLAZIONE
6.1 Luogo d'installazione
AVVERTENZA!
Qualora occorra ritirare dall'uso un
apparecchio con serratura, si raccomanda di rendere quest'ultima
inservibile per evitare che i bambini possano chiudersi all'interno.
3.
Se necessario, sostituire le guarnizioni
della porta difettose. Contattare il
Centro di assistenza locale.
La spina dell'apparecchio deve
essere accessibile dopo l'installazione.
Installare l'apparecchio in un luogo la cui
temperatura ambiente corrisponda alla
classe climatica indicata sulla targhetta
del modello:
Page 31

Classe
Temperatura ambiente
climatica
SN da +10°C a +32°C
N da +16°C a +32°C
ST da +16°C a +38°C
T da +16°C a +43°C
6.2 Collegamento elettrico
Prima di inserire la spina, verificare che la
tensione e la frequenza riportate sulla tar-
6.3 Requisiti di ventilazione
ITALIANO 31
ghetta corrispondano ai valori della rete
elettrica domestica.
L'apparecchio deve essere collegato a
massa. La spina del cavo di alimentazione
è dotata di un contatto a tale scopo. Se la
presa della rete elettrica domestica non è
collegata a massa, collegare l'apparecchio ad una massa separata in conformità
alle norme relative alla corrente, consultando un elettricista qualificato.
Il fabbricante declina qualsiasi responsabilità se le precauzioni suddette non sono rispettate.
Il presente apparecchio è conforme alle
direttive CEE.
5 cm
min.
200 cm
2
6.4 Installazione
dell’apparecchiatura
ATTENZIONE
Accertarsi che il cavo di rete sia libero da ostacoli.
min.
200 cm
Il flusso d'aria dietro l'apparecchiatura deve essere sufficiente.
2
Seguire i seguenti passaggi:
Applicare la striscia sigillante adesiva all'apparecchiatura come mostrato in figura.
Page 32

www.electrolux.com
32
Installare l'apparecchiatura nella nicchia.
Fissare l'apparecchiatura nella nicchia con
4 viti.
Fissare i coprivite.
Page 33

ITALIANO 33
Eseguire un controllo finale per accertarsi
che:
• Tutte le viti sono serrate.
• Assicurarsi che la striscia sigillante sia
fissata saldamente all'unità.
• La porta si apra e si chiuda correttamente.
6.5 Istruzioni per l'assemblaggio della parte inferiore della porta del
compensatore
Con la porta aperta, allentare le due viti
situate nella parte inferiore senza svitarle completamente.
Posizionare il compensatore in acciaio
come indicato nella figura e inserire la
parte superiore sotto la testa delle viti.
Allineare il compensatore al pannello in
acciaio della porta e serrare le viti.
Inserire il carter in acciaio all'interno del
compensatore come indicato nella figura.
Page 34

www.electrolux.com
34
7. RUMORI
Durante l'uso, alcuni rumori di funzionamento (come quelli del compressore o del
circuito refrigerante) sono da considerarsi
normali.
SSSRR
HISSS!
R!
CLICK!
BRRR!
OK
SSSRRR!
HISSS!
SSSRRR!
HISSS!
BLUBB!
CLICK!
BRRR!
CRACK!
CLICK!
BRRR!
Page 35

ITALIANO 35
BLUBB!
8. DATI TECNICI
Nicchia di incasso
Altezza 1780 mm
Larghezza 560 mm
Profondità 550 mm
Tensione 230-240 V
Frequenza 50 Hz
Le informazioni tecniche sono riportate
sulla targhetta sul lato sinistro interno del-
BLUBB!
CRACK!CRACK!
l'apparecchio e sull'etichetta dei valori
energetici.
9. CONSIDERAZIONI AMBIENTALI
Riciclare i materiali con il simbolo
Buttare l'imballaggio negli appositi
contenitori per il riciclaggio.
Aiutare a proteggere l’ambiente e la salute
umana e a riciclare rifiuti derivanti da
apparecchiature elettriche ed elettroniche.
.
Non smaltire le apparecchiature che
riportano il simbolo
rifiuti domestici. Portare il prodotto al
punto di riciclaggio più vicino o contattare
il comune di residenza.
insieme ai normali
Page 36

www.electrolux.com
36
ÍNDICE
1. INSTRUÇÕES DE SEGURANÇA . . . . . . . . . . . . . . . . . . . . . . . . . . . . . . . . . . . . . . . . . . . . 37
2. PAINEL DE CONTROLO . . . . . . . . . . . . . . . . . . . . . . . . . . . . . . . . . . . . . . . . . . . . . . . . . . 39
3. UTILIZAÇÃO DIÁRIA . . . . . . . . . . . . . . . . . . . . . . . . . . . . . . . . . . . . . . . . . . . . . . . . . . . . . 40
4. MANUTENÇÃO E LIMPEZA . . . . . . . . . . . . . . . . . . . . . . . . . . . . . . . . . . . . . . . . . . . . . . . 44
5. O QUE FAZER SE… . . . . . . . . . . . . . . . . . . . . . . . . . . . . . . . . . . . . . . . . . . . . . . . . . . . . . 45
6. INSTALAÇÃO . . . . . . . . . . . . . . . . . . . . . . . . . . . . . . . . . . . . . . . . . . . . . . . . . . . . . . . . . . 47
7. RUÍDOS . . . . . . . . . . . . . . . . . . . . . . . . . . . . . . . . . . . . . . . . . . . . . . . . . . . . . . . . . . . . . . 51
8.
DADOS TÉCNICOS . . . . . . . . . . . . . . . . . . . . . . . . . . . . . . . . . . . . . . . . . . . . . . . . . . . . . 52
ESTAMOS A PENSAR EM SI
Obrigado por ter adquirido um aparelho Electrolux. Escolheu um produto que traz consigo
décadas de experiência profissional e inovação. Engenhoso e elegante, foi concebido a pensar
em si. Assim, quando o utilizar, terá a tranquilidade de quem sabe que terá sempre óptimos
resultados.
Bem-vindo(a) à Electrolux.
Visite o nosso website para:
Resolver problemas e obter conselhos de utilização, catálogos e informações sobre
serviços:
www.electrolux.com
Registar o seu produto para beneficiar de um serviço melhor:
www.electrolux.com/productregistration
Adquirir acessórios, consumíveis e peças de substituição originais para o seu aparelho:
www.electrolux.com/shop
APOIO AO CLIENTE E ASSISTÊNCIA
Recomendamos a utilização de peças de substituição originais.
Quando contactar a Assistência, certifique-se de que tem os seguintes dados disponíveis.
A informação encontra-se na placa de características. Modelo, PNC, Número de Série.
Aviso / Cuidado - Informações de segurança.
Informações gerais e conselhos úteis
Informações ambientais
Sujeito a alterações sem aviso prévio.
Page 37

PORTUGUÊS 37
1.
INSTRUÇÕES DE SEGURANÇA
Para a sua própria segurança e para garantir uma utilização correcta, antes de
instalar e usar o aparelho pela primeira
vez, leia atentamente este manual do utilizador, incluindo as suas sugestões e advertências. Para evitar erros e acidentes
desnecessários, é importante que todas
as pessoas que utilizam o aparelho conheçam o seu funcionamento e as características de segurança. Guarde estas instruções e certifique-se de que elas acompanham o aparelho em caso de transferência ou venda, para que todos os que
venham a usá-lo estejam devidamente informados quanto à sua utilização e segurança.
Para sua segurança e da propriedade,
guarde as precauções destas instruções
de utilização, uma vez que o fabricante
não é responsável pelos danos causados
por omissão.
1.1 Segurança para crianças e
pessoas vulneráveis
• Este aparelho não se destina a ser utilizado por pessoas (incluindo crianças)
com capacidades físicas, sensoriais ou
mentais reduzidas ou sem experiência
e conhecimento, excepto se lhes tiver
sido dada supervisão ou instrução relativa à utilização do aparelho por uma
pessoa responsável pela sua segurança.
As crianças devem ser vigiadas para
assegurar que não brincam com o aparelho.
• Mantenha todas as embalagens fora do
alcance das crianças. Existe o risco de
asfixia.
• Se eliminar o aparelho retire a ficha da
tomada, corte o cabo eléctrico (o mais
perto do aparelho possível) e retire a
porta para evitar que crianças a brincar
sofram choques eléctricos ou se fechem dentro do aparelho.
• Se este aparelho, com vedantes de
porta magnéticos for substituir um aparelho mais velho com fecho de mola
(lingueta) na porta ou tampa, certifique-
-se de que o fecho de mola está desactivado antes de eliminar o velho
aparelho. Tal irá evitar que se torne numa armadilha fatal para uma criança.
1.2 Segurança geral
ADVERTÊNCIA
Mantenha as aberturas de ventilação da
caixa do aparelho ou da estrutura de encastre sem obstruções.
• Este aparelho deve ser usado exclusivamente para o armazenamento do vinho.
• Não utilize um dispositivo mecânico ou
qualquer meio artificial para acelerar o
processo de descongelação.
• Não utilize outros aparelhos eléctricos
(como máquinas de fazer gelados) dentro dos aparelhos de refrigeração, a
não ser que sejam aprovados para este
fim pelo fabricante.
• Não danifique o circuito de refrigeração.
• O refrigerante isobutano (R600a) está
contido no circuito de refrigeração do
aparelho, um gás natural com um alto
nível de compatibilidade ambiental que
é, no entanto, inflamável.
Durante o transporte e a instalação do
aparelho, certifique-se de que nenhum
dos componentes do circuito de refrigeração fica danificado.
Se o circuito de refrigeração se danificar:
– evite chamas vivas e fontes de igni-
ção
– ventile totalmente a divisão onde o
aparelho se encontra
• É perigoso alterar as especificações ou
modificar este produto. Quaisquer danos no cabo poderão provocar um curto-circuito, incêndio e/ou choque eléctrico.
ADVERTÊNCIA
Qualquer componente eléctrico
(cabo de alimentação, ficha, compressor) tem de ser substituído
por um agente de assistência certificado ou técnico qualificado.
Page 38

www.electrolux.com
38
• Este aparelho é pesado. Tenha cuidado
• Não retire os itens do compartimento
• Evite a exposição prolongada do apa-
• As lâmpadas (se previstas) utilizadas
1.3 Utilização diária
• Não coloque panelas quentes nas par-
• Não guarde gases ou líquidos inflamá-
• As recomendações de armazenamento
1.4 Limpeza e manutenção
• Antes da manutenção, desligue o apa-
• Não limpe o aparelho com objectos de
• Não utilize objectos afiados para remo-
1.
Não é permitido prolongar o cabo
de alimentação com extensões.
2.
Certifique-se de que a ficha não fica esmagada ou danificada pela
parte de trás do aparelho. Uma ficha esmagada ou danificada pode
sobreaquecer e causar um incêndio.
3.
Certifique-se de que a ficha do
aparelho fica facilmente acessível.
4.
Não puxe o cabo de alimentação.
5.
Se a tomada estiver solta, não introduza a ficha. Existe o risco de
choque eléctrico ou incêndio.
6.
O aparelho não deve funcionar sem
a tampa da lâmpada (se prevista)
de iluminação interior.
quando o deslocar.
do congelador, nem toque neles, se estiver com as mãos húmidas/molhadas,
pois pode sofrer abrasões na pele ou
queimaduras provocadas pelo gelo.
relho à luz solar directa.
neste aparelho são lâmpadas especiais, seleccionadas apenas para electrodomésticos. Não são adequadas para
iluminação doméstica.
tes de plástico do aparelho.
veis no aparelho, porque podem explodir.
dos fabricantes do aparelho devem ser
estritamente cumpridas. Consulte as
respectivas instruções.
relho e retire a ficha da tomada.
metal.
ver o gelo do aparelho. Utilize um raspador de plástico.
• Inspeccione regularmente o orifício de
descarga do frigorífico para presença
de água descongelada. Se necessário,
limpe o orifício de descarga. Se o orifício estiver bloqueado, a água irá acumular na parte inferior do aparelho.
1.5 Instalação
Para efectuar a ligação eléctrica,
siga atentamente as instruções
fornecidas nos parágrafos específicos.
• Desembale o aparelho e verifique se
existem danos. Não ligue o aparelho se
estiver danificado. Em caso de danos,
informe imediatamente o local onde o
adquiriu. Nese caso, guarde a embalagem.
• É recomendável aguardar pelo menos
duas horas antes de ligar o aparelho,
para permitir que o óleo regresse ao
compressor.
• Assegure uma circulação de ar adequada à volta do aparelho, caso contrário pode provocar sobreaquecimento. Para garantir uma ventilação suficiente, siga as instruções relevantes para
a instalação.
• Sempre que possível, a traseira do
aparelho deve ficar virada para uma parede para evitar toques nas partes
quentes (compressor, condensador) e
possíveis queimaduras.
• Não coloque o aparelho perto de radiadores ou fogões.
• Certifique-se de que a ficha de alimentação fica acessível após a instalação
do aparelho.
• Ligue apenas a uma fonte de água potável (se a ligação de água estiver prevista).
1.6 Assistência
• Quaisquer trabalhos eléctricos necessários para a manutenção do aparelho
devem ser efectuados por um electricista qualificado ou pessoa competente.
• A manutenção deste produto deve ser
efectuada por um Centro de Assistência autorizado, o qual deverá utilizar
apenas peças sobressalentes originais.
Page 39

1.7 Protecção ambiental
Este aparelho não contém gases
que possam danificar a camada
de ozono, tanto no circuito refrigerante como nos materiais de
isolamento. O aparelho não deverá ser eliminado juntamente com
o lixo doméstico. A espuma de
isolamento contém gases inflamá-
2. PAINEL DE CONTROLO
PORTUGUÊS 39
veis: o aparelho deverá ser eliminado de acordo com as normas
aplicáveis que pode obter junto
das autoridades locais. Evite danificar a unidade de arrefecimento,
especialmente na parte traseira,
perto do permutador de calor. Os
materiais utilizado neste aparelho
marcados pelo símbolo
recicláveis.
1
234567
são
Display
1
Botão ON/OFF do aparelho
2
Botão do alarme
Botão de diminuição da temperatura
3
Botão de aumento da temperatura
4
Compartimento superior
5
Compartimento inferior
6
Botão da luz
7
É possível alterar o som predefinido dos
botões para outro mais facilmente audível
premindo simultaneamente o botão da luz
e o botão de diminuição da temperatura
durante alguns segundos. A alteração é
reversível.
2.1 Display
ABC
A)
Indicador de temperatura do compartimento inferior
B)
Indicador de alarme
C)
Indicador de temperatura do compartimento superior
Após a selecção do compartimento superior ou inferior, as ani-
mações
Após a selecção da temperatura,
as animações ficam intermitentes
por alguns minutos.
iniciam.
Page 40

www.electrolux.com
40
2.2 Ligar
Para ligar o aparelho, efectue os seguintes passos:
1.
2.
3.
4.
Para seleccionar uma temperatura diferente, consulte "Regulação da temperatura".
2.3 Desligar
Para desligar o aparelho, efectue os passos seguintes:
1.
2.
3.
2.4 Regulação da temperatura
Seleccione o compartimento superior ou
inferior.
Prima o botão da temperatura para definir
a temperatura.
Temperatura predefinida regulada:
• + 8 °C para o compartimento superior
Ligue a ficha do aparelho à tomada.
Prima o botão ON/OFF se o display
estiver desligado.
Se o display indicar DEMO, o apare-
lho está em modo de demonstração.
Consulte "O que fazer se...".
Os indicadores de temperatura apresentam a temperatura pré-definida.
Prima o botão ON/OFF durante 3 segundos.
O display desliga-se.
Para desligar o aparelho da corrente,
desligue a ficha de alimentação eléctrica da tomada.
• +14 °C para o compartimento inferior
Os indicadores de temperatura mostram
a temperatura definida.
A temperatura definida será alcançada
dentro de 24 horas.
Consulte "Utilização diária - Disposição
do vinho".
Após uma falha de energia, a
temperatura definida permanece
memorizada.
2.5 Botão da luz
Se pretender que a luz permaneça acesa
com a porta fechada, basta abrir e fechar
a porta e a luz permanece ACESA automaticamente durante 10 minutos.
Se pretender desligar a luz antes da desactivação automática, abra a porta e prima o botão da luz.
A luz não tem qualquer efeito negativo sobre a qualidade do vinho.
2.6 Alarme de porta aberta
Ouve-se um sinal acústico se a porta permanecer aberta durante alguns minutos.
As condições do alarme de porta aberta
são indicadas por:
• indicador de Alarme intermitente
• alarme sonoro acústico
Quando as condições normais são restabelecidas (porta fechada), o alarme pára.
Durante o alarme, o alarme sonoro pode
ser desligado premindo qualquer botão.
3. UTILIZAÇÃO DIÁRIA
3.1 Limpeza do interior
Antes de utilizar o aparelho pela primeira
vez, limpe o interior e todos os acessórios
com água morna e detergente neutro, para remover o cheiro típico de um produto
novo, e seque minuciosamente.
Não utilize detergentes ou pós
abrasivos, pois estes produtos
danificam o acabamento.
Se o visor indicar DEMO, o aparelho está
em modo de demonstração: consulte o
parágrafo "O QUE FAZER SE...".
Page 41

3.2 Disposição do vinho
3.3 Sugestões de conservação
O tempo de conservação do vinho depende do envelhecimento, do tipo de uva,
do teor alcoólico e do nível de frutose e
tanino nele contidos. No momento da
compra, verifique se o vinho já está envelhecido ou se melhora com o passar do
tempo.
Temperaturas de conservação aconselhadas:
PORTUGUÊS 41
Compartimento superior:
A temperatura pode ser regulada entre +
6 e + 11 °C. Este compartimento é ideal
para vinhos que vão ser consumidos imediatamente, principalmente brancos e tintos jovens. Compartimentos com funcionamento a temperaturas diferenciadas.
Compartimento inferior:
A temperatura pode ser regulada entre +
11 e + 18 °C. Este compartimento é ideal
para a conservação e refinamento de vinhos tintos ou brancos por longos períodos.
As temperaturas deste compartimento
são indicadas para a conservação de vinhos envelhecidos e encorpados.
Coloque as garrafas de forma a que as
rolhas não fiquem secas.
Conserve o vinho no escuro. A porta possui um vidro duplo escurecido e anti-UV
para proteger o vinho da luz se o frigorífico estiver colocado num local bem iluminado.
Evite acender a luz do aparelho muitas
vezes e durante muito tempo. O vinho
conserva-se melhor no escuro.
Manuseie as garrafas com cuidado para
não agitar o vinho.
Tenha em atenção as recomendações e
os conselhos que recebeu no momento
da compra ou os indicados na documentação técnica relativa à qualidade, duração e temperatura óptima de conservação do vinho.
• Para champanhe e vinhos espumantes
entre 6 e 8 °C
• Para vinhos brancos entre 10 e 12 °C
• Para vinhos rosé e tintos leves entre 12
e 16 °C
• Vinhos tintos envelhecidos, 14 -16 °C
Se colocar várias garrafas umas em cima
das outras, certifique-se de que não tocam na placa de refrigeração do frigorífico.
Page 42

www.electrolux.com
42
3.4 Prateleiras da garrafeira
3.5 Porta-garrafas da garrafeira
Retire as calhas quando necessitar de as
limpar.
Retire a prateleira e insira-a entre as duas
calhas.
O peso máximo permitido nas prateleiras
para garrafas é de 30 Kg.
É possível dispor a prateleira entre as calhas a uma distância de 100 mm para
permitir uma melhor exposição das garrafas.
Page 43

3.6 Humidificador
PORTUGUÊS 43
O compartimento inferior está equipado
com uma gaveta deslizante para colocar
as garrafas na vertical.
A gaveta possui dois separadores que se
adaptam a garrafas com diâmetros diferentes.
A quantidade certa de humidade é fundamental para o armazenamento adequado
do vinho.
A garrafeira possui um humidificador especial que aumenta a quantidade de humidade no interior do aparelho.
Distribua as pedras vulcânicas fornecidas
ao longo do tabuleiro pequeno, conforme
ilustrado na imagem. Em seguida, encha
o tabuleiro com água até metade da sua
capacidade.
Para um funcionamento normal, as pedras vulcânicas devem estar sempre húmidas com água. Verifique periodicamente se ainda existe água no tabuleiro e encha quando for necessário.
Se a humidade da área onde o aparelho é
instalado for particularmente elevada, o
interior da garrafeira também terá uma
humidade relativa superior.
Deste modo, as garrafas podem ficar embaciadas quando a porta for aberta e os
respectivos rótulos podem descolar-se.
Neste caso, reduza a quantidade de água
no tabuleiro em conformidade.
3.7 Circulação de ar
O compartimento do frigorífico possui
uma ventoinha AIRLIGHT especial que é
activada automaticamente em função da
regulação do termóstato do aparelho e
das condições do ambiente circundante.
Page 44

www.electrolux.com
44
4. MANUTENÇÃO E LIMPEZA
CUIDADO
Retire a ficha da tomada antes de
efectuar qualquer operação de
manutenção.
Este aparelho contém hidrocarbonetos na sua unidade de arrefecimento; a manutenção e a recarga
devem, por isso, ser efectuadas
exclusivamente por técnicos autorizados.
4.1 Limpeza periódica
O equipamento tem de ser limpo regularmente:
• limpe o interior e os acessórios com
água morna e sabão neutro.
• verifique regularmente os vedantes de
porta e limpe-os para se certificar de
que estão limpos e sem resíduos.
• lave e seque minuciosamente.
Não puxe, desloque nem danifique quaisquer tubos e/ou cabos
dentro do armário.
Nunca utilize detergentes, pós
abrasivos, produtos de limpeza
muito perfumados ou cera de polir
para limpar o interior, pois isto irá
danificar a superfície e deixar um
odor forte.
Limpe o condensador (grelha preta) e o
compressor que está no fundo do aparelho, com uma escova. Esta operação irá
melhorar o desempenho do aparelho e
poupar consumo de electricidade.
Tenha cuidado para não danificar
o sistema de arrefecimento.
Muitos agentes de limpeza de superfícies
de cozinhas contêm químicos que podem
atacar/danificar os plásticos usados neste
aparelho. Por esta razão é aconselhável
que a estrutura exterior deste aparelho
seja limpa apenas com água morna com
um pouco de solução de limpeza adicionada.
Após a limpeza, volte a ligar o equipamento à tomada de alimentação.
4.2 Descongelar o frigorífico
O gelo é automaticamente eliminado do
evaporador do compartimento do frigorífico sempre que o compressor motorizado
pára, durante o funcionamento normal. A
água resultante da descongelação é descarregada por um orifício de descarga para um recipiente especial colocado na
parteposterior do aparelho, sobre o compressor motorizado, onde se evapora.
É importante limpar periodicamente o orifício de descarga da água resultante da
descongelação, no centro do canal do
compartimento do frigorífico, para evitar o
transbordamento de água para os alimentos.
Page 45

4.3 Períodos de inactividade
Quando o aparelho não é utilizado por
longos períodos, observe as seguintes
precauções:
• desligue o aparelho da alimentação
eléctrica
• descongele (se previsto) e limpe o aparelho e todos os acessórios
5. O QUE FAZER SE…
PORTUGUÊS 45
• deixe as portas abertas para evitar
cheiros desagradáveis.
Se o aparelho permanecer ligado, peça a
alguém para o verificar esporadicamente,
para evitar que os alimentos no interior se
estraguem em caso de falha eléctrica.
ADVERTÊNCIA
Antes da resolução de problemas,
retire a ficha da tomada.
A resolução de problemas que
não se encontram neste manual
só deve ser efectuada por um
electricista qualificado ou por uma
pessoa competente.
Existem alguns ruídos durante a
utilização normal (compressor, circulação de refrigerante).
Problema Causa possível Solução
O aparelho faz baru-
lho
O aparelho não está apoiado correctamente
Verifique se o aparelho está
estável (os quatro pés devem estar no chão)
É emitido o alarme
sonoro. O display
A porta não está correctamente fechada.
Consulte “Alarme de porta
aberta”.
está vermelho.
O aparelho não fun-
O aparelho está desligado. Ligue o aparelho.
ciona. A lâmpada
não funciona.
A ficha de alimentação
eléctrica não está correc-
Ligue a ficha correctamente
à tomada.
tamente inserida na tomada.
O aparelho não tem ali-
mentação. Não existe corrente na tomada.
Ligue outro aparelho eléctri-
co à tomada.
Contacte um electricista
qualificado.
A lâmpada não funciona.
A lâmpada está em stand-
-by.
Feche e abra a porta.
A lâmpada está avariada. Consulte "Substituir a lâm-
pada".
O compressor funciona continuamen-
A temperatura não está
definida correctamente.
Defina uma temperatura
mais elevada.
te.
A porta não está correcta-
mente fechada.
Consulte a secção "Fechar
a porta".
Page 46

www.electrolux.com
46
Problema Causa possível Solução
A porta foi aberta dema-
A temperatura ambiente
Há água a escorrer
na placa traseira do
frigorífico.
Há água que escorre para o frigorífico.
Os produtos impedem
A temperatura no
aparelho está demasiado baixa/alta.
A porta não está correcta-
Guardou demasiados pro-
A temperatura no
aparelho está demasiado elevada.
O quadrado superior
ou inferior é apresentado no display
da temperatura.
DEMO aparece no
display.
5.1 Substituir a lâmpada da
garrafeira
Desligue a ficha da tomada eléctrica.
siadas vezes.
está demasiado elevada.
Durante o processo de
descongelação automática, o gelo descongela na
placa posterior.
A saída de água está obstruída.
que a água escorra para o
colector de água.
O regulador de temperatura não está definido correctamente.
mente fechada.
dutos ao mesmo tempo.
Não há circulação de ar
frio no aparelho.
Ocorreu um erro na medição da temperatura.
O aparelho está no modo
de demonstração (DEMO).
Não mantenha a porta
aberta mais tempo do que
o necessário.
Reduza a temperatura am-
biente.
Isto é normal.
Limpe a saída de água.
Certifique-se de que os
produtos não tocam na pla-
ca posterior.
Regule uma temperatura
mais alta/baixa.
Consulte a secção "Fechar
a porta".
Guarde menos produtos ao
mesmo tempo.
Certifique-se de que existe
circulação de ar frio no
aparelho.
Entre em contacto com o
seu representante de assis-
tência (o sistema de refrige-
ração irá continuar a man-
ter os produtos alimentares
frios, mas a regulação da
temperatura não será pos-
sível).
Mantenha o botão da luz
premido durante 10 segun-
dos após ouvir um sinal so-
noro longo e o display se
apagar por um breve mo-
mento: o aparelho começa
a funcionar normalmente.
Page 47

PORTUGUÊS 47
Remova a tampa da lâmpada pressionando-a para
dentro com uma ferramenta
(por ex., uma chave de fendas) para libertar os ganchos traseiros.
Ao mesmo tempo, liberte o
gancho central e retire a
tampa deslizando-a no sentido das setas.
Substitua a lâmpada por
uma lâmpada de substituição original.
Instale a tampa da lâmpada.
Ligue a ficha na tomada
eléctrica.
Abra a porta. Certifique-se
de que a lâmpada acende.
5.2 Fechar a porta
1.
Limpe as juntas da porta.
2.
Se necessário, ajuste a porta. Consulte "Instalação".
6. INSTALAÇÃO
6.1 Posicionamento
ADVERTÊNCIA
Se for eliminar um aparelho velho
que tem um bloqueio ou um fecho na porta, certifique-se de não
funciona para evitar que as crianças fiquem trancadas lá dentro.
3.
Se necessário, substitua as juntas defeituosas da porta. Contacte o Centro
de Assistência Técnica.
O aparelho deverá ter a ficha
acessível após a instalação.
Instale este aparelho num local com uma
temperatura ambiente que corresponde à
classe climática indicada na placa de dados do aparelho:
Page 48

www.electrolux.com
48
Classe
climática
SN +10 °C a + 32 °C
N +16 °C a + 32 °C
ST +16 °C a + 38 °C
T +16 °C a + 43 °C
6.2 Ligação eléctrica
Antes de ligar, certifique-se de que a tensão e a frequência indicadas na placa de
6.3 Requisitos de ventilação
Temperatura ambiente
dados correspondem à fonte de alimentação doméstica.
O aparelho deve ter uma ligação à terra.
A ficha do cabo de alimentação é fornecida com um contacto para este objectivo.
Se a tomada da fonte de alimentação doméstica não estiver ligada à terra, ligue o
aparelho a uma ligação à terra separada,
em conformidade com as normas actuais,
consultando um electricista qualificado.
O fabricante declina toda a responsabilidade caso as precauções de segurança
acima não sejam cumpridas.
Este aparelho cumpre com as directivas.
E.E.C.
5 cm
min.
200 cm
2
6.4 Instalar o aparelho
CUIDADO
Certifique-se de que o cabo de
alimentação não fica preso.
min.
200 cm
A circulação de ar na parte posterior do
aparelho tem de ser suficiente.
2
Execute os seguintes passos:
Aplique a tira adesiva vedante no aparelho, tal como indicado na figura.
Page 49

PORTUGUÊS 49
Instale o aparelho no nicho.
Fixe o aparelho no nicho com 4 parafusos.
Fixe as tampas nos parafusos.
Page 50

www.electrolux.com
50
Faça uma verificação final para garantir
que:
• Todos os parafusos estão apertados.
6.5 Instruções de montagem do compensador na parte inferior da
porta
• A tira vedante está bem fixada no armário.
• A porta abre e fecha correctamente.
Com a porta aberta, desaperte os dois
parafusos localizados na parte inferior
sem os desapertar totalmente.
Posicione o compensador em aço conforme indicado na figura e introduza a
parte superior debaixo da cabeça dos
parafusos.
Alinhe o compensador com o painel da
porta em aço e aperte os parafusos.
Introduza o cárter em aço no compensador, conforme indicado na figura.
Page 51

7. RUÍDOS
Existem alguns ruídos durante o funcionamento normal (compressor, circulação do
refrigerante).
SSSRR
HISSS!
R!
PORTUGUÊS 51
CLICK!
BRRR!
OK
SSSRRR!
HISSS!
SSSRRR!
HISSS!
BLUBB!
CLICK!
BRRR!
CRACK!
CLICK!
BRRR!
Page 52

www.electrolux.com
52
BLUBB!
8. DADOS TÉCNICOS
Dimensão do nicho de
instalação
Altura 1780 mm
Largura 560 mm
Profundidade 550 mm
Tensão 230-240 V
Frequência 50 Hz
As informações técnicas encontram-se na
placa de características no lado esquerdo
BLUBB!
do interior do aparelho e na etiqueta de
energia.
CRACK!CRACK!
9. PREOCUPAÇÕES AMBIENTAIS
Recicle os materiais que apresentem o
símbolo
contentores indicados para reciclagem.
Ajude a proteger o ambiente e a saúde
pública através da reciclagem de
aparelhos eléctricos e electrónicos. Não
. Coloque a embalagem nos
elimine os aparelhos que tenham o
símbolo juntamente com os resíduos
domésticos. Coloque o produto num
ponto de recolha para reciclagem local ou
contacte as suas autoridades municipais.
Page 53

ESPAÑOL 53
ÍNDICE DE MATERIAS
1. INSTRUCCIONES DE SEGURIDAD . . . . . . . . . . . . . . . . . . . . . . . . . . . . . . . . . . . . . . . . . . 54
2. PANEL DE MANDOS . . . . . . . . . . . . . . . . . . . . . . . . . . . . . . . . . . . . . . . . . . . . . . . . . . . . 56
3. USO DIARIO . . . . . . . . . . . . . . . . . . . . . . . . . . . . . . . . . . . . . . . . . . . . . . . . . . . . . . . . . . . 57
4. MANTENIMIENTO Y LIMPIEZA . . . . . . . . . . . . . . . . . . . . . . . . . . . . . . . . . . . . . . . . . . . . . 61
5. QUÉ HACER SI… . . . . . . . . . . . . . . . . . . . . . . . . . . . . . . . . . . . . . . . . . . . . . . . . . . . . . . . 62
6. INSTALACIÓN . . . . . . . . . . . . . . . . . . . . . . . . . . . . . . . . . . . . . . . . . . . . . . . . . . . . . . . . . 65
7. RUIDOS . . . . . . . . . . . . . . . . . . . . . . . . . . . . . . . . . . . . . . . . . . . . . . . . . . . . . . . . . . . . . . 68
8.
DATOS TÉCNICOS . . . . . . . . . . . . . . . . . . . . . . . . . . . . . . . . . . . . . . . . . . . . . . . . . . . . . . 70
PENSAMOS EN USTED
Gracias por adquirir un producto Electrolux. Ha escogido un producto que contiene décadas de
experiencia e innovación profesionales. Ingenioso y elegante, se ha diseñado pensando en usted.
Así que, siempre que lo utilice puede tener la seguridad de que conseguirá excelentes resultados.
Bienvenido a Electrolux.
Visite nuestro sitio web para:
Obtener consejos, folletos, soluciones a problemas e información de servicio:
www.electrolux.com
Registrar su producto para recibir un mejor servicio:
www.electrolux.com/productregistration
Adquirir accesorios, artículos de consumo y recambios originales para su aparato:
www.electrolux.com/shop
ATENCIÓN Y SERVICIO AL CLIENTE
Le recomendamos que utilice recambios originales.
Al contactar con el Servicio, cerciórese de tener la siguiente información a mano.
La información se puede encontrar en la placa de características. Modelo, PNC, Número de
serie.
Advertencia - Precaución-Información sobre seguridad.
Datos y recomendaciones generales
Información medioambiental
Salvo modificaciones.
Page 54

www.electrolux.com
54
1.
INSTRUCCIONES DE SEGURIDAD
Por su seguridad y para garantizar el funcionamiento correcto del aparato, antes
de instalarlo y utilizarlo por primera vez lea
atentamente este manual del usuario, incluidos los consejos y advertencias. Para
evitar errores y accidentes, es importante
que todas las personas que utilicen el
aparato estén perfectamente al tanto de
su funcionamiento y de las características
de seguridad. Conserve estas instrucciones y no olvide mantenerlas junto al aparato en caso de su desplazamiento o venta para que quienes lo utilicen a lo largo
de su vida útil dispongan siempre de la información adecuada sobre el uso y la seguridad.
Por la seguridad de personas y bienes, siga las normas de seguridad indicadas en
estas instrucciones, ya que el fabricante
no se hace responsable de daños provocados por omisiones.
1.1 Seguridad de niños y
personas vulnerables
• Este electrodoméstico no está diseñado para que lo usen personas (incluidos
niños) con discapacidad física, sensorial o mental, o con experiencia y conocimiento insuficientes, a menos que
una persona responsable de su seguridad les supervise o instruya en el uso
del electrodoméstico.
No permita que los niños jueguen con
el electrodoméstico.
• Mantenga los materiales de embalaje
alejados de los niños. Existe riesgo de
asfixia.
• Si va a desechar el aparato, extraiga el
enchufe de la toma, corte el cable de
conexión (tan cerca del aparato como
pueda) y retire la puerta para impedir
que los niños al jugar puedan sufrir
descargas eléctricas o quedar atrapados en su interior.
• Si este aparato, que cuenta con juntas
de puerta magnéticas, sustituirá a un
aparato más antiguo con cierre de
muelle (pestillo) en la puerta, cerciórese
de inutilizar el cierre de muelle antes de
desechar el aparato antiguo. Evitará así
que se convierta en una trampa mortal
para niños.
1.2 Instrucciones generales de
seguridad
Mantenga libres de obstrucciones las
aberturas de ventilación del alojamiento
del aparato o de la estructura empotrada.
• Este aparato se debe utilizar exclusivamente para almacenar vino.
• No utilice dispositivos mecánicos ni
medios artificiales para acelerar el proceso de descongelación.
• No utilice otros aparatos eléctricos (como máquinas para hacer helados) dentro de aparatos de refrigeración, a menos que el fabricante haya autorizado
su utilización para estos fines.
• No dañe el circuito de refrigeración.
• El circuito de refrigeración del aparato
contiene isobutano (R600a). Se trata de
un gas natural con un alto nivel de
compatibilidad medioambiental, aunque
es inflamable.
Durante el transporte y la instalación del
aparato, cerciórese de que ninguno de
los componentes del circuito de refrigeración sufra daños.
Si el circuito de refrigeración resulta dañado:
– mantenga el aparato alejado de las
– ventile bien la habitación en la que se
• Es peligroso alterar las especificaciones
o modificar este producto en modo alguno. Cualquier daño en el cable de alimentación puede provocar un cortocircuito, un incendio o una descarga eléctrica.
1.
ADVERTENCIA
llamas y de cualquier fuente de combustión
encuentra el aparato
ADVERTENCIA
Los componentes eléctricos (cable de alimentación, enchufe,
compresor) debe sustituirlos un
técnico autorizado o un profesional cualificado.
El cable de alimentación no se debe prolongar.
Page 55

2.
Compruebe que la parte posterior
del aparato no aplaste ni dañe el
enchufe.Si el enchufe está aplastado o dañado podría recalentarse y
provocar un incendio.
3.
Cerciórese de que tiene acceso al
enchufe del aparato.
4.
No tire del cable de alimentación.
5.
Si la toma de red está floja, no introduzca el enchufe. Existe riesgo
de descarga eléctrica o incendio.
6.
No utilice el aparato sin la tapa de
la bombilla (si está provisto de ella)
de iluminación interior.
• Este aparato es pesado. Debe tener
precauciones durante su desplazamiento.
• No retire ni toque elementos del compartimento congelador con las manos
húmedas o mojadas, ya que podría sufrir abrasiones en la piel o quemaduras
por congelación.
• Evite la exposición prolongada del aparato a la luz solar directa.
• Las bombillas que se utilizan en este
aparato (si está provisto de ellas) son
especiales, y se han seleccionado exclusivamente para uso en aparatos domésticos. No pueden utilizarse para la
iluminación de la vivienda.
1.3 Uso diario
• No coloque recipientes calientes sobre
las piezas plásticas del aparato.
• No almacene gas ni líquido inflamable
en el aparato, ya que podrían estallar.
• Se deben seguir estrictamente las recomendaciones sobre almacenamiento
del fabricante del aparato. Consulte las
instrucciones correspondientes.
1.4 Cuidado y limpieza
• Antes de realizar tareas de mantenimiento, apague el aparato y desconecte el enchufe de la toma de red.
• No limpie el aparato con objetos metálicos.
• No utilice objetos afilados para eliminar
el hielo del aparato. Utilice un raspador
plástico.
• Inspeccione habitualmente el desagüe
del agua descongelada del frigorífico. Si
ESPAÑOL 55
es necesario, limpie el desagüe. Si el
desagüe se bloquea, el agua se acumulará en la base del aparato.
1.5 Instalación
Para realizar la conexión eléctrica,
siga atentamente las instrucciones
de los párrafos correspondientes.
• Desembale el aparato y compruebe
que no tiene daños. No conecte el aparato si está dañado. Informe de los posibles daños de inmediato a la tienda
donde lo adquirió. En ese caso, conserve el material de embalaje.
• Es recomendable esperar al menos dos
horas antes de conectar el aparato, para permitir que el aceite regrese al compresor.
• El aparato debe contar con circulación
de aire adecuada alrededor, ya que de
lo contrario se produce recalentamiento. Para conseguir una ventilación suficiente, siga las instrucciones correspondientes a la instalación.
• Siempre que sea posible, la parte posterior del producto debe estar contra
una pared, para evitar que se toquen
las partes calientes (compresor, condensador) y se produzcan quemaduras.
• El aparato no debe colocarse cerca de
radiadores ni de hornillas de cocina.
• Asegúrese de que es posible acceder
al enchufe después de instalar el electrodoméstico.
• Realice la conexión sólo a un suministro
de agua potable (si está prevista una
conexión de agua).
1.6 Servicio técnico
• Un electricista homologado deberá realizar las tareas que se requieran para
ejecutar el servicio o mantenimiento de
este electrodoméstico.
• Las reparaciones de este aparato debe
realizarlas un centro de servicio técnico
autorizado y sólo se deben utilizar recambios originales.
Page 56

www.electrolux.com
56
1.7 Protección del medio
ambiente
Este aparato no contiene gases
perjudiciales para la capa de ozono, ni en el circuito de refrigerante
ni en los materiales aislantes. El
aparato no se debe desechar junto con los residuos urbanos. La
espuma aislante contiene gases
2. PANEL DE MANDOS
inflamables: el aparato se debe
desechar de acuerdo con la normativa vigente, que puede solicitar a las autoridades locales. No
dañe la unidad de refrigeración,
en especial la parte trasera, cerca
del intercambiador de calor. Los
materiales de este aparato marca-
dos con el símbolo
clables.
1
234567
son reci-
Pantalla
1
Tecla ON/OFF del aparato
2
Tecla de alarma
Tecla de enfriamiento de temperatura
3
Tecla de calentamiento de tempera-
4
tura
Compartimento superior
5
Compartimento inferior
6
Tecla de luz
7
Se puede cambiar el sonido predefinido
de las teclas a otro más alto manteniendo
pulsadas al mismo tiempo la tecla de la
luz y la de enfriamiento de temperatura
durante unos segundos. El cambio es reversible.
2.1 Pantalla
ABC
A)
Indicador de temperatura del compartimento inferior
B)
Indicador de alarma
C)
Indicador de temperatura del compartimento superior
Tras seleccionar el compartimento
superior o inferior empieza la ani-
mación
Tras seleccionar la temperatura, la
animación parpadea durante unos
minutos.
.
2.2 Encendido
Para encender el aparato siga los siguientes pasos:
Page 57

1.
Conecte el enchufe a la toma de corriente.
2.
Pulse la tecla ON/OFF si la pantalla
está apagada.
3.
Si DEMO aparece en la pantalla, el
aparato está en el modo de demostración. Consulte la sección "Qué hacer si..."
4.
Los indicadores de temperatura
muestran la temperatura predetermi-
nada programada.
Para programar otra temperatura, consulte la sección "Regulación de la temperatura".
2.3 Apagado
Para apagar el aparato:
1.
Pulse la tecla ON/OFF durante 3 se-
gundos.
2.
La pantalla se apaga.
3.
Para desconectar el aparato de la co-
rriente, desconecte el enchufe de la
toma de corriente.
2.4 Regulación de temperatura
Seleccione el compartimento superior o
inferior.
Pulse la tecla de temperatura para ajustar
la temperatura.
Ajuste la temperatura predeterminada:
• + 8°C para el compartimento superior
• +14°C para el compartimento inferior
ESPAÑOL 57
Los indicadores de temperatura muestran
la temperatura programada.
La temperatura programada se alcanza
en un plazo de 24 horas.
Consulte "Uso diario - Disposición del vino".
Después de un corte del suministro eléctrico, la temperatura ajustada se guarda.
2.5 Tecla de luz
Si quiere que la luz siga encendida con la
puerta cerrada, basta con que abra y cierre la puerta. La luz permanece encendida
automáticamente durante 10 minutos.
Para apagar la luz antes de que se apague automáticamente, abra la puerta y
pulse el botón de la luz.
La luz no afecta a la calidad del vino.
2.6 Alarma de puerta abierta
Si la puerta se queda abierta durante
unos minutos, sonará una señal acústica.
Los indicadores de puerta abierta son los
siguientes:
• indicador de alarma intermitente
• señal acústica
Una vez restablecidas las condiciones
normales (puerta cerrada), la alarma acústica se detendrá.
La señal acústica se puede desactivar durante la fase de alarma pulsando para ello
cualquier tecla.
3. USO DIARIO
3.1 Limpieza del interior
Antes de utilizar el aparato por primera
vez, lave el interior y los accesorios internos con agua templada y un jabón neutro
para eliminar el típico olor de los productos nuevos. A continuación seque bien.
No utilice detergentes ni polvos
abrasivos, ya que podrían dañar el
acabado.
Si DEMO aparece en la pantalla, el aparato está en el modo de demostración: consulte el apartado “Qué hacer si….”.
Page 58

www.electrolux.com
58
3.2 Disposición del vino
3.3 Sugerencias para la
conservación
El tiempo de conservación del vino depende del añejamiento, del tipo de uva,
del grado alcohólico y del porcentaje de
fructosa y tanino que contenga. Cuando
compre el vino, averigüe si es añejo o si
mejora con el tiempo.
Temperaturas de almacenamiento recomendadas:
Compartimento superior:
La temperatura se puede regular entre +6
y + 11°C. Este compartimento es ideal
para los vinos que se beben al poco tiempo, especialmente blancos o tintos jóvenes. Las secciones del compartimento
tienen temperaturas diferentes.
Compartimento inferior:
La temperatura se puede regular entre +
11 y + 18°C. Este compartimento es ideal
para conservar y mejorar los vinos tintos o
blancos durante largos periodos.
Las temperaturas de este compartimento
son adecuadas para conservar vinos añejos y con cuerpo.
Coloque las botellas acostadas de modo
que los tapones no se sequen.
Conserve el vino en la oscuridad. La puerta es de doble vidrio oscuro y anti UV para proteger el vino de la luz si el frigorífico
está en un lugar iluminado.
Evite encender la luz del aparato con demasiada frecuencia y no la deje encendida durante demasiado tiempo. El vino se
conserva mejor en la oscuridad.
Manipule las botellas con cuidado para
que el vino no se agite.
Preste atención a las recomendaciones y
los consejos recibidos en el momento de
la compra o incluidos en la documentación técnica con relación a la calidad, la
duración y la temperatura de conservación óptima del vino.
• Para champaña y vinos espumosos, de
6 a 8°C
• Para vinos blancos, de 10 a 12°C
• Para vinos rosados y tintos ligeros, de
12 a 16°C
• Para vinos tintos añejos, de 14 a 16°C
Si apila varias botellas, asegurarse de que
no toquen la placa de enfriamiento del frigorífico.
Page 59

3.4 Estantes de la bodega
3.5 Portabotellas de la bodega
ESPAÑOL 59
Retire los estantes para la limpieza.
Saque el estante y póngalo entre las dos
guías.
Las ménsulas portabotellas admiten un
peso máximo de 30 kg.
Es posible poner el estante entre guías a
100 mm de distancia para favorecer la exposición de las botellas.
Page 60

www.electrolux.com
60
3.6 Humidificador
El compartimento inferior viene con un cajón deslizante que sirve para colocar las
botellas en posición vertical.
El cajón está dotado de dos separadores
que se adaptan a botellas de diámetros
diferentes.
La humedad adecuada es fundamental
para una buena conservación del vino.
Su bodega está equipada con un dispositivo humidificador especial que aumenta
la humedad dentro del aparato.
Esparza por la bandeja las piedras de lava
suministradas tal y como se indica en la
imagen. Después llene de agua la bandeja hasta la mitad de su capacidad.
En el funcionamiento normal, las piedras
de lava se humedecen regularmente con
el agua. Verifique periódicamente que hay
agua en la bandeja y rellénela cuando sea
preciso.
Tenga en cuenta que si la humedad del
área donde se instala el aparato es particularmente elevada, el interior de la bodega también será relativamente más húmedo.
Esto puede hacer que las botellas se empañen al abrir la puerta o se despeguen
las etiquetas. En tal caso, reduzca la cantidad de agua de la bandeja según corresponda.
3.7 Recirculación del aire
El compartimiento frigorífico dispone de
un ventilador AIRLIGHT especial que se
activa automáticamente en función de la
programación del termostato y las condiciones ambientales.
Page 61

4. MANTENIMIENTO Y LIMPIEZA
ESPAÑOL 61
PRECAUCIÓN
Antes de realizar tareas de mantenimiento, desenchufe el aparato.
Este equipo contiene hidrocarburos en la unidad de refrigeración;
por tanto, el mantenimiento y la
recarga deben estar a cargo exclusivamente de técnicos autorizados.
4.1 Limpieza periódica
El equipo debe limpiarse de manera habitual:
• Limpie el interior y los accesorios con
agua templada y un jabón neutro.
• Revise y limpie periódicamente las juntas de la puerta para mantenerlas limpias y sin restos.
• Aclare y seque a fondo.
No mueva, dañe ni tire de los conductos o cables del interior del armario.
No utilice detergentes, polvos
abrasivos, productos de limpieza
perfumados ni cera para limpiar el
interior, ya que dañarán la superficie y dejarán un fuerte olor.
Limpie el condensador (rejilla negra) y el
compresor de la parte posterior del aparato con un cepillo. Esa operación mejorará el rendimiento del aparato y reducirá
el consumo eléctrico.
Tenga cuidado para no dañar el
sistema de refrigeración.
Muchas marcas de limpiadores de superficies de cocina contienen químicos que
pueden atacar o dañar los plásticos del
aparato. Por tal razón, se recomienda que
el exterior del aparato se limpie sólo con
agua templada a la que se añadirá un poco de líquido lavavajillas.
Después de la limpieza, vuelva a conectar
el aparato a la toma de red.
4.2 Descongelación del frigorífico
4.3 Periodos de inactividad
Si el aparato no se utiliza durante un tiempo prolongado, tome las siguientes precauciones:
• desconecte el aparato de la red
eléctrica
La escarcha se elimina automáticamente
del evaporador del frigorífico cada vez
que se detiene el compresor, durante el
funcionamiento normal. El agua de la descongelación se descarga a través de un
orificio hacia un recipiente especial situado en la parte posterior del aparato, sobre
el motor compresor, donde se evapora.
Es importante limpiar periódicamente el
orificio de salida del agua de descongelación situado en la mitad del canal del
compartimento frigorífico para evitar que
el agua se desborde y caiga sobre los alimentos del interior.
• descongele (si así está previsto) y limpie
el aparato y todos sus accesorios
• deje la o las puertas entreabiertas para
evitar olores desagradables.
Si el armario va a mantenerse abierto,
procure que alguien lo vigile de vez en
cuando para que los alimentos de su inte-
Page 62

www.electrolux.com
62
rior no se estropeen si se interrumpe el
suministro eléctrico.
5. QUÉ HACER SI…
ADVERTENCIA
Antes de solucionar problemas,
desenchufe el enchufe de alimentación de red de la toma principal.
Las medidas de solución de problemas que no se indican en este
manual deben dejarse en manos
de un electricista o profesional
cualificado y competente.
Se oyen sonidos durante el funcionamiento normal (compresor,
circulación de refrigerante).
Problema Posible causa Solución
El aparato hace rui-
do
El aparato no está bien
apoyado en el suelo.
Compruebe que los soportes del aparato descansan
sobre una superficie estable
(las cuatro patas deben estar bien apoyadas en el
suelo).
El aparato emite una
señal acústica. La
La puerta no está bien cerrada.
Consulte la sección "Alarma
de puerta abierta".
pantalla está roja.
El aparato no fun-
El aparato está apagado. Encienda el aparato.
ciona. La bombilla
no funciona.
El aparato no está correc-
tamente enchufado a la
toma de corriente.
El aparato no recibe sumi-
nistro eléctrico. No hay
tensión en la toma de corriente.
Enchufe el aparato correctamente a la toma de corriente.
Enchufe un aparato eléctrico diferente a la toma de
corriente.
Llame a un electricista cualificado.
La bombilla no funciona.
La bombilla está en espera.
Cierre y abra la puerta.
La bombilla es defectuosa. Consulte la sección "Cam-
bio de la bombilla".
El compresor funciona continuamen-
La temperatura no se ha
ajustado correctamente.
Seleccione una temperatura más alta.
te.
La puerta no está bien ce-
rrada.
La puerta se ha abierto
con excesiva frecuencia.
Consulte la sección "Cierre
de la puerta".
No mantenga abierta la
puerta más tiempo del necesario.
Page 63

Problema Posible causa Solución
La temperatura ambiente
El agua fluye por la
placa posterior del
frigorífico.
El agua fluye al interior del frigorífico.
Los alimentos impiden que
La temperatura del
aparato es demasiado baja/alta.
La puerta no está bien ce-
Se han guardado muchos
La temperatura del
aparato es demasiado alta.
En la pantalla de
temperatura aparece un cuadrado superior o inferior.
DEMO aparece en la
pantalla.
es demasiado alta.
Durante el proceso de
descongelación automática, el hielo se descongela
en la placa posterior.
La salida de agua está
obstruida.
el agua fluya al colector.
El regulador de temperatura no se ha ajustado correctamente.
rrada.
alimentos al mismo tiempo.
No hay circulación de aire
frío en el aparato.
Se ha producido un error
en la medición de la temperatura.
El aparato está en modo
de demostración (DEMO).
Reduzca la temperatura
ambiente.
Es correcto.
Limpie la salida de agua.
Asegúrese de que los alimentos no entran en contacto con la placa posterior.
Seleccione una temperatura más alta o baja.
Consulte la sección "Cierre
de la puerta".
Guarde menos productos
al mismo tiempo.
Compruebe que el aire frío
circula libremente en el
aparato.
Póngase en contacto con
su servicio técnico (el sistema de refrigeración seguirá
manteniendo fríos los alimentos, pero no podrá
ajustar la temperatura).
Mantenga pulsada aproximadamente 10 s la tecla de
la luz; se escucha un largo
sonido de la señal acústica
y la pantalla se apaga brevemente: el aparato empieza a funcionar con normalidad.
5.1 Cambio de la bombilla de la
bodega
Desenchufe el aparato de la toma de red.
ESPAÑOL 63
Page 64

www.electrolux.com
64
Presione la cubierta de la
bombilla hacia dentro con
una herramienta (como un
destornillador) para soltar el
gancho trasero.
Simultáneamente hay que
soltar el gancho central y
extraer la tapa siguiendo la
dirección de las flechas.
Sustituya la bombilla con un
recambio original.
Instale la tapa de la bombilla.
Conecte el enchufe a la toma de corriente.
Abra la puerta. Compruebe
que la bombilla se ilumina.
5.2 Cierre de la puerta
1.
Limpie las juntas de la puerta.
2.
Si es necesario, ajuste la puerta. Consulte "Instalación".
3.
Si es necesario, cambie las juntas defectuosas. Póngase en contacto con
el servicio técnico.
Page 65

6. INSTALACIÓN
ESPAÑOL 65
6.1 Colocación
ADVERTENCIA
Si va a desechar un aparato antiguo que tiene una cerradura o
cierre en la puerta, deberá asegurarse de su inutilización para impedir que niños pequeños queden
atrapados en su interior.
El enchufe del aparato debe tener
fácil acceso después de la instalación.
Instale el aparato en un punto en el que la
temperatura ambiente se corresponda
con la clase climática indicada en la placa
de datos técnicos del aparato:
Clase
Temperatura ambiente
climática
SN De +10°C a +32°C
N De +16°C a +32°C
ST De +16°C a +38°C
6.3 Requisitos de ventilación
5 cm
min.
200 cm
2
Clase
Temperatura ambiente
climática
T De +16°C a +43°C
6.2 Conexión eléctrica
Antes de conectar el aparato, compruebe
que el voltaje y la frecuencia que aparecen en la placa de datos técnicos se corresponden con el suministro de la vivienda.
El aparato debe tener conexión a tierra. El
enchufe del cable de alimentación se suministra con un contacto para tal fin. Si la
toma de red de la vivienda carece de conexión a tierra, conecte el aparato a una
toma de tierra conforme con la normativa,
después de consultar a un electricista
profesional.
El fabricante rechaza toda responsabilidad si no se toman las precauciones antes indicadas.
Este aparato es conforme con las directivas de la CEE.
El aire debe poder circular libremente por
la parte posterior del aparato.
min.
200 cm
6.4 Instalación del aparato
PRECAUCIÓN
Compruebe que el cable de alimentación de red pueda moverse
con facilidad.
2
Ejecute los pasos siguientes:
Page 66

www.electrolux.com
66
Aplique la cinta selladora adhesiva al aparato como se muestra en la figura.
Instale el aparato en el hueco.
Fije el aparato al hueco con cuatro tornillos.
Page 67

Fije las tapas a los tornillos.
ESPAÑOL 67
Finalmente, compruebe que:
• Todos los tornillos están apretados.
• La cinta selladora se ha fijado con firmeza al armario.
• La puerta abre y cierra correctamente.
6.5 Instrucciones de montaje de la parte inferior del compensador
de la puerta
Con la puerta abierta, afloje los dos tornillos situados en la parte inferior sin
desatornillarlos completamente.
Coloque el compensador de acero como se indica en la figura e introduzca la
parte superior bajo la cabeza de los tornillos.
Page 68

www.electrolux.com
68
7. RUIDOS
Durante el funcionamiento normal del
aparato suelen producirse ciertos ruidos
(compresor, circulación del refrigerante).
Alinee el compensador con el panel de
la puerta de acero y apriete los tornillos.
Inserte el cárter de acero en el interior
del compensador como se indica en la
figura.
OK
SSSRR
HISSS!
BLUBB!
R!
CLICK!
BRRR!
CRACK!
Page 69

ESPAÑOL 69
SSSRRR!
HISSS!
BLUBB!
SSSRRR!
HISSS!
BLUBB!
CLICK!
BRRR!
CLICK!
BRRR!
CRACK!CRACK!
Page 70

www.electrolux.com
70
8. DATOS TÉCNICOS
Medidas de la cavidad
Altura 1780 mm
Anchura 560 mm
Fondo 550 mm
Voltaje 230-240 V
Frecuencia 50 Hz
La información técnica se encuentra en la
placa de datos técnicos en el lado interior
izquierdo del aparato y en la etiqueta de
energía.
9. ASPECTOS MEDIOAMBIENTALES
residuos de aparatos eléctricos y
Recicle los materiales con el símbolo
Coloque el material de embalaje en los
contenedores adecuados para su
reciclaje.
Ayude a proteger el medio ambiente y la
salud pública, así como a reciclar
.
electrónicos. No deseche los aparatos
marcados con el símbolo
residuos domésticos. Lleve el producto a
su centro de reciclaje local o póngase en
contacto con su oficina municipal.
junto con los
Page 71

ESPAÑOL 71
Page 72

www.electrolux.com/shop
222343429-A-172013
 Loading...