

Page 1
User manual
Manual de instrucciones
ERF37800WX
Wine cooler-Freezer
Frigorifico bodeguero-Congelador
Side-by-side
ENC74800
Page 2

We were thinking of you
when we made this product
8183967-00/2
Page 3

Welcome to the world of Electrolux
Thank you for choosing a first class product from Electrolux, which hopefully will
provide you with lots of pleasure in the future. The Electrolux ambition is to offer
a wide variety of quality products that make your life more comfortable. You find
some examples on the cover in this manual. Please take a few minutes to study
this manual so that you can take advantage of the benefits of your new machine.
We promise that it will provide a superior User Experience delivering
Ease-of-Mind. Good luck!
3
Page 4
The following symbols are used in this manual:
Scrapping old appliances
T
Important information concerning your personal safety and
information on how to avoid damaging the appliance
General information and tips
Environmental information
he symbol on the product or on its packaging indicates that this product
may not be treated as household waste. Instead it should be taken to the
appropriate collection point for the recycling of electrical and electronic
equipment. By ensuring this product is disposed of correctly, you will help
prevent potential negative consequences for the environment and human
health, which could otherwise be caused by inappropriate waste handling of
this product. For more detailed information about recycling of this product,
please contact your local council, your household waste disposal service or the
shop where you purchased the product.
4
Page 5
Safety instructions
These warnings are provided in the
interests of your safety.
For the User
Child Safety
WARNING
WARNING
WARNING
WARNING
This appliance is not intended for use by persons (including children) with
reduced physical, sensory or mental capabilities, or lack of experience and
knowledge, unless they have been given supervision or instruction concerning
use of the appliance by a person responsible for their safety.
Your new fridge/freezer may have other
functions compared to your previous
one.
Carefully read these instructions
learn how the appliance works
how to care for it. Keep the
booklet. It will come in handy if
later sell the cabinet or give it
somebody else.
you understand them all before
installing or using the appliance. Your
safety is of paramount importance. If
you are unsure about any of the
meanings or warnings contact the
Customer Care Department.
Ensure that
to
and
instruction
you
to
· The refrigerator is intended for the
storage of foodstuffs and for the
production of ice for normal household
consumption in accordance with these
instructions.
· Do not keep explosive gases or
liquids in the refrigerator or freezer
compartment. They may explode and
cause injury and material damage.
· Do not let sharp objects come into
contact with the refrigerating system
on the back of and inside the cabinet.
If the refrigerating system is punctured,
the cabinet will be damaged and
foodstuff inside may spoil.
· Do not keep carbonised drinks or
bottles in the freezer compartment.
The glass bottles may break.
· The cabinet is heavy. The edges
and projecting parts of the cabinet
may be sharp. Be careful when moving
the cabinet and always use gloves.
· Pay attention so that small children
do not gain access to the operating
controls or the inside of the cabinet.
Keep ventilation openings, in the
appliance enclosure or in the built-in
structure, clear of obstruction.
Do not use mechanical devices or
other means to accelerate the
defrosting process, other than those
recommended by the manufacturer.
Do not damage the refrigerant circuit.
Do not use electrical appliance inside
the food storage compartments of the
appliance, unless they are of the type
recommended by the manufacturer.
5
Page 6

Contents
Safety instructions 5. . . . . . . . . . . . . . .
Contents 6. . . . . . . . . . . . . . . . . . . . . . .
USE 7. . . . . . . . . . . . . . . . . . . . . . . . . . .
HINT and TIPS 14. . . . . . . . . . . . . . . . .
MAINTENANCE and CLEANING 15. .
SOMETHING NOT WORKING
TECHNINICAL SPECIFICATION
INSTALLATION
Guarantee/Customer Service 22. . . . .
European Guarantee 23. . . . . . . . . . . .
www.electrolux.com 24. . . . . . . . . . . .
Scrapping old cabinets 4...........
Control Panel 7...................
Use of the fridge compartment 8.....
Temperature inside the wine cooler 8.
Wine Placement
Storage tip 8..................
Measuring the temperature 8........
Switching off 9....................
Alarms and other features 9.........
Lighting 10.......................
Use of the freezer compartment 10...
To the start the freezer and set the
correct temperature 10.........
Temperature inside the freezer 11....
Switching off 11...................
Freezing 12.......................
Suitable storage periods 12.........
Thawing 13.......................
Cabinet interior 13.................
Saving energy 14..................
Food Storage 14..................
Protect the environment 14.........
Cleaning 15......................
Defrosting the fridge 15.............
Defrosting the freezer 15............
When the appliance is not in use 16..
Mains Cable 19...................
Unpacking 19.....................
Remove the transport supports 19...
Cleaning 20......................
Installing the cabinet 20............
Door Reversal 21..................
Electrical connection 21............
16....
18..
19.................
6
Page 7
USE
This cabinet is a combined freezer/freezer whereby both freezer/freezer
compartments are operated by the same compressor. This means that if the
fridge compartment becomes overloads it will result in even colder temperatures
in the freezer.
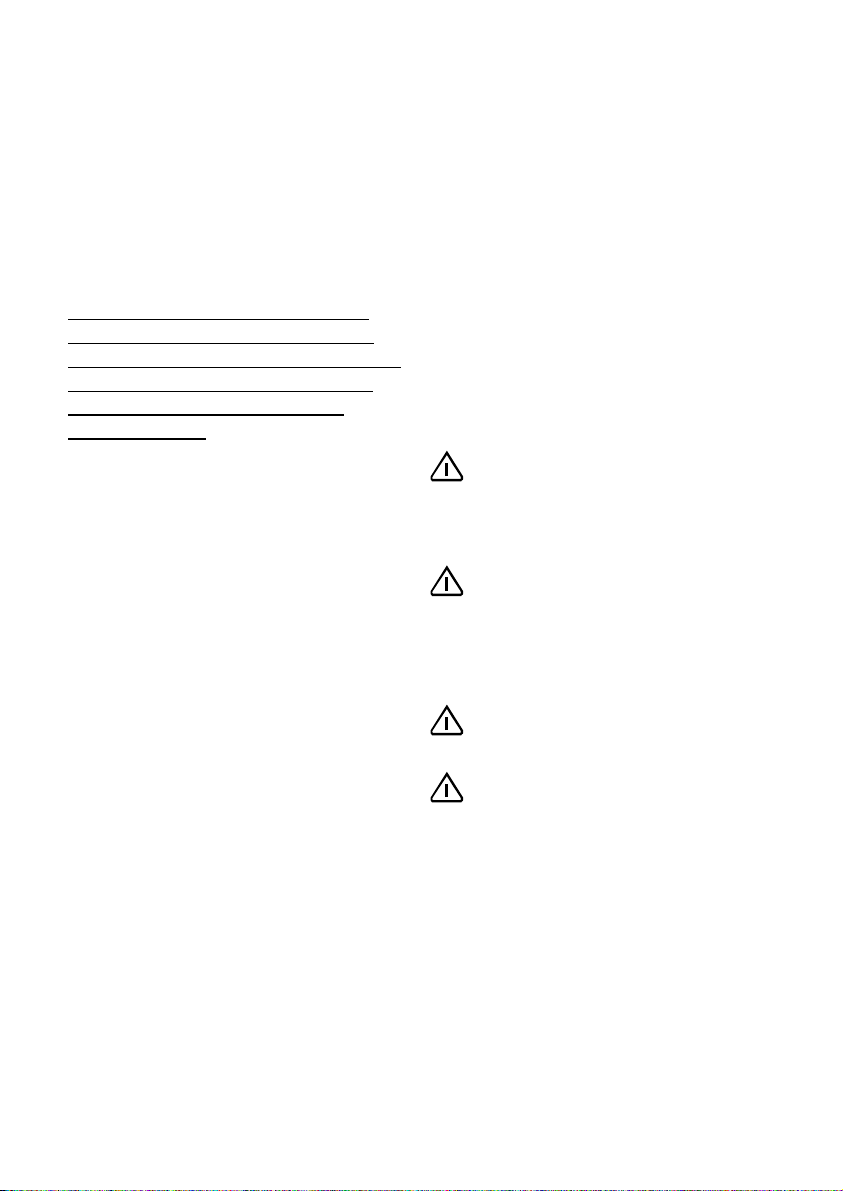
Position and clean the cabinet as explained in the section "Installation".
Check that the drain hose at the rear
of the cabinet discharges in to the drip
tray.
Before inserting the power plug into
the outlet and switching on the cabinet
for the first time, leave it standing
upright for about 2 hours. Otherwise
the compressor may sustain damage.
This time will allow the oil sufficient
time to return to the compressor.
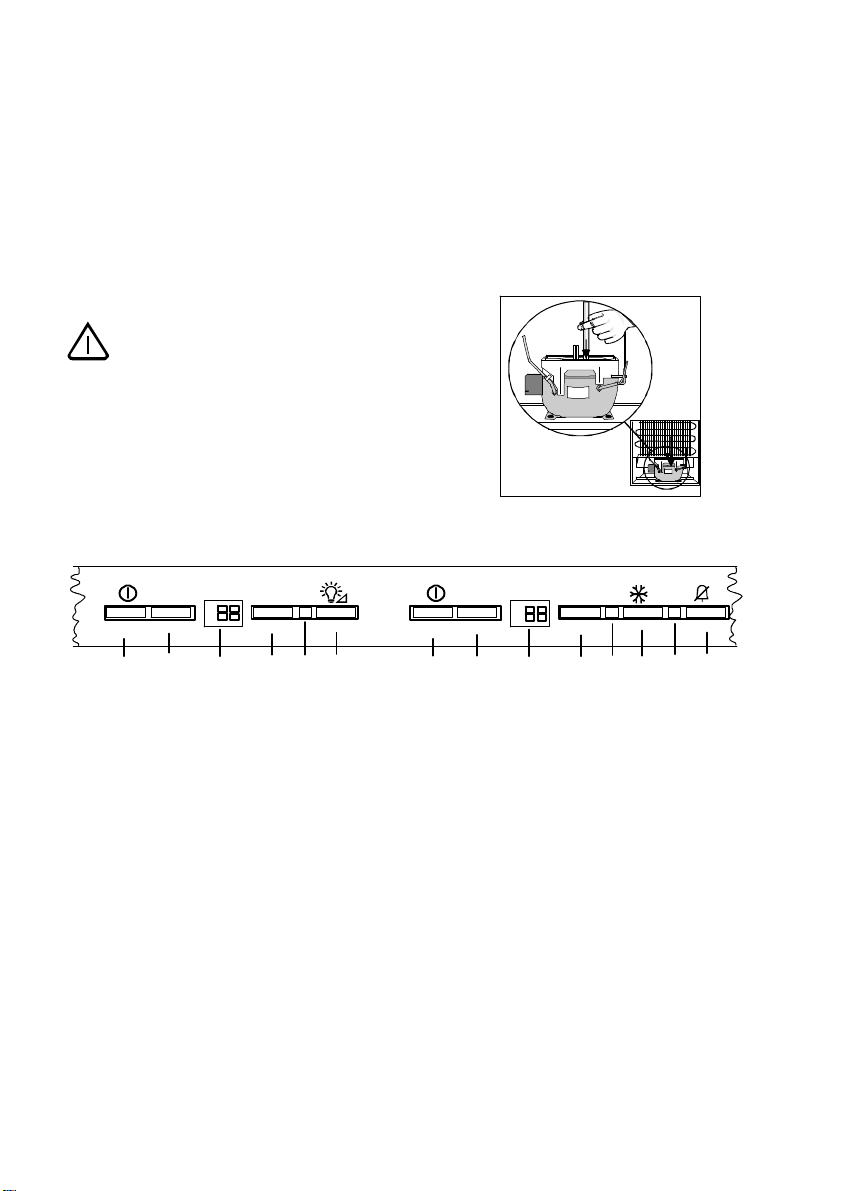
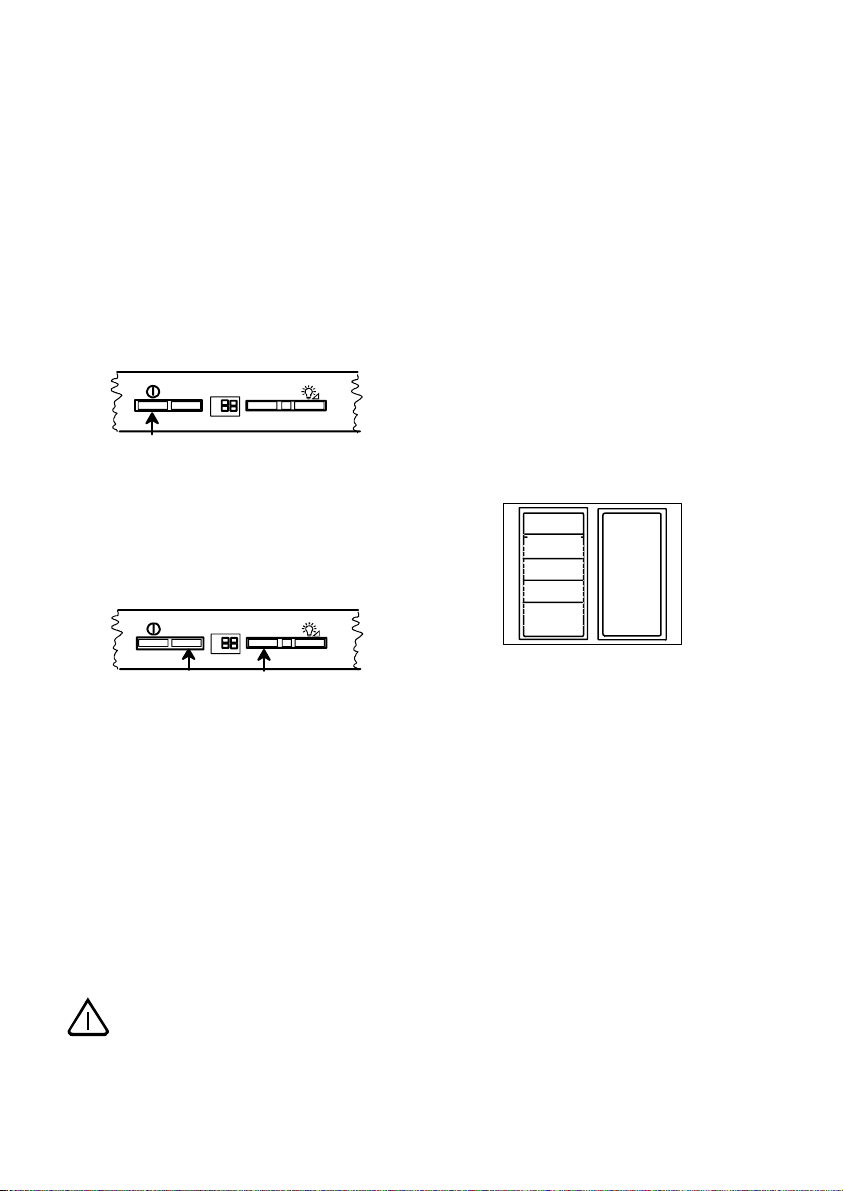
Control Panel
+
B
A
A. Refrigerator power switch Switches the refrigerator on and off.
B. Temperature adjustment buttons/thermostat Used to set the temperature
(warmer).
C. Temperature display Shows the average temperature inside the refrigerator.
D. Temperature adjustment buttons/thermostat Used to set the temperature
(colder).
E. Yellow indicator lamp Lights when lighting is on.
F. Lighting
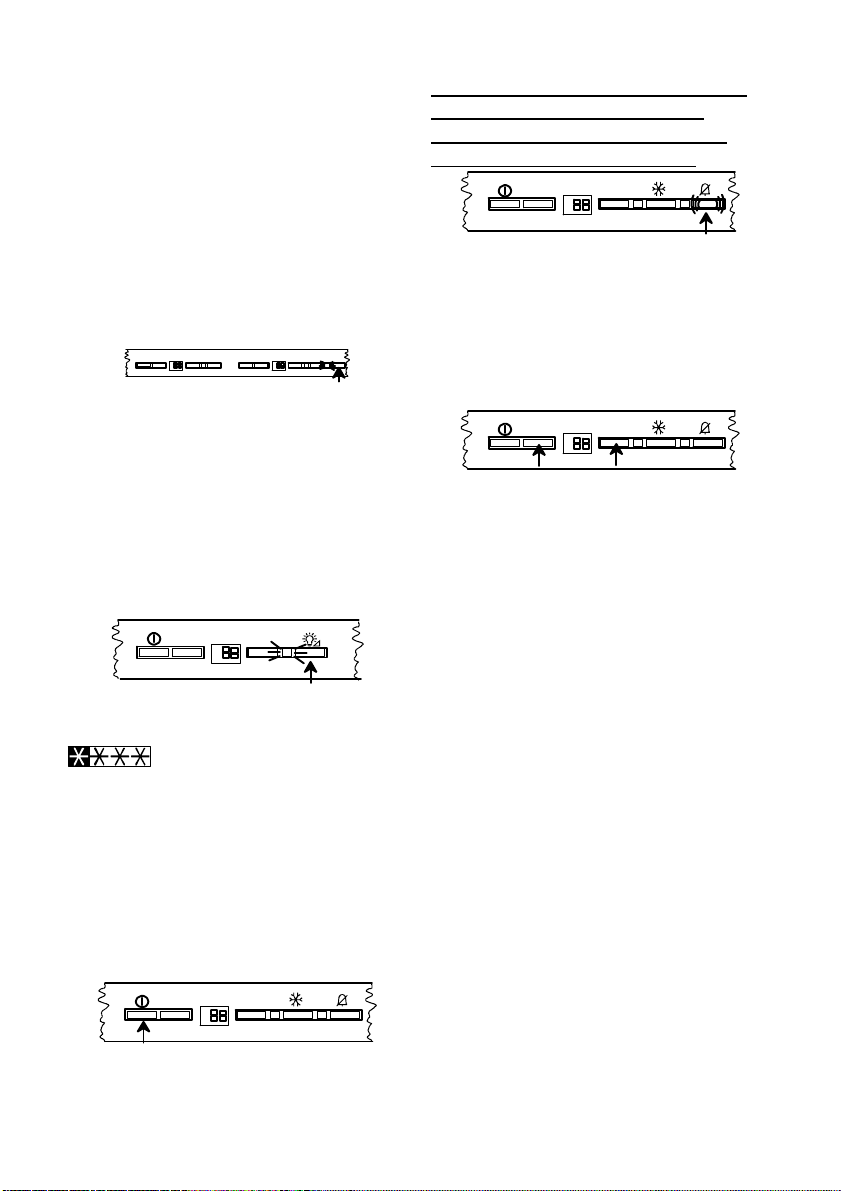
G. Freezer power switch Switches the freezer on and off.
H. Temperature adjustment buttons/thermostat Used to set the temperature
(warmer).
I. Temperature display Shows the highest temperature inside the freezer.
J. Temperature adjustment buttons/thermostat Used to set the temperature
(colder).
7
-
D
C
E
F
+
-
H
G
-
ACTION FREEZE
N
M
L
I
K
J
Page 8
K. Yellow indicator lamp
L. FAST FREEZE button
M. Red warning lamp
N. Alarm shut-off button
Use of the fridge compartment
First switch on
Switching on:
Setting the temperature
Attention
Temperature inside the wine cooler
Wine Placement
Storage tips
triggered.
Lights when Fast Freeze is operating.
Used to switch the Fast Freeze feature on and off.
Lights when one of the alarms in the cabinet has been
Used to turn the audible alarm off.
Switchonthefridgebypressingthe
power switch.
+
Press the buttons until the desired
temperature flashes in the temperature
display (The temperature can be set
between +6°C and +15°C.)
"+" raises the temperature.
"-" lowers the temperature.
-
normal. Especially when:
- a new setting has recently been
selected
- the door has been left open for a
long time
- warm food has been placed in the
compartment.
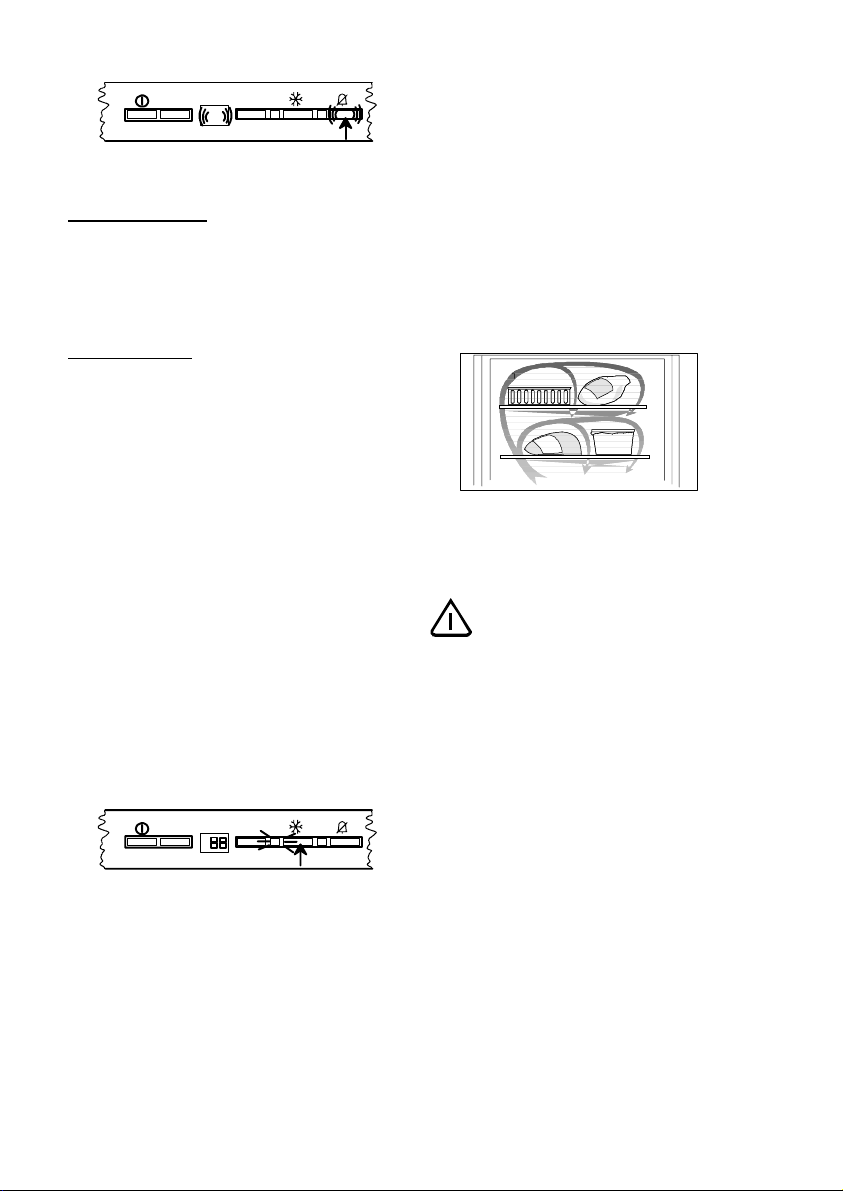
NOTE: The picture shows the coldest
and warmest places inside the fridge.
(+ warm, - cold)
+
+
+
Once set, the temperature display
shows the current temperature inside
the cabinet.
Allow the cabinet to run for a period of
24 hours whenever the temperature
setting is changed. This will allow the
temperature to stabilise inside the
cabinet.
It is not necessary to reset the
temperature when the cabinet is
switched on after it has been out of
use. The thermostat recalls the
previously set temperature.
Difference between the temperature
displayed and temperature setting is
-
!
The amount of time to store wine
depends on its maturity, type of grape,
alcohol content, and dissolved
fructose and tannins.
When purchasing your wine, find out
whether it is mature or if it will improve
over time.
8
Page 9
In the lower part of the cooler.
In the upper part of the cooler.
Store the bottles lying down
Store the wine in the dark.
Avoid turning on the light in the cooler
Handle the bottles with care,
Heed any advice and recommendations
Recommended storage temperatures:
If you stack several bottles on top of
one another,
Measuring the temperature
Switching off
If the freezer is turned off, the
refrigerator will also turn off. E.g. while
defrosting the freezer.
Note:
If the appliance is not going to be used
for an extended period:
Cold air
prolongs the time to maturity. Accordingly, store old and mature wine as well
as wine you would like to store for a
long time in the lower portion of the
cooler. The lower part should also be
usedtostorewinethatistobeserved
cold.
In the
upperpart,storewinethatyouwishto
let further mature, wines that are
served at a warmer temperature, and
those wines you intend to consume
relatively soon.
so that
the corks do not dry out.
The cooler
doors are made with double-paned
glass with a dark coating. This will
protect the wine against light damage
if the cooler is placed in a well-lit area.
too often or for too long. The wine
should be stored in the dark.
so that
the wine is not agitated.
given at the time of purchase or
in the professional literature concerning the wine's quality, durability and
optimal storage temperature.
- for white wines +10 to +12°C
- for rosé wines and light red wines
+12to+16°C
- for champagne and sparkling wines
+6 to +8°C
make sure they do not
touch the cabinet's cooling plate.
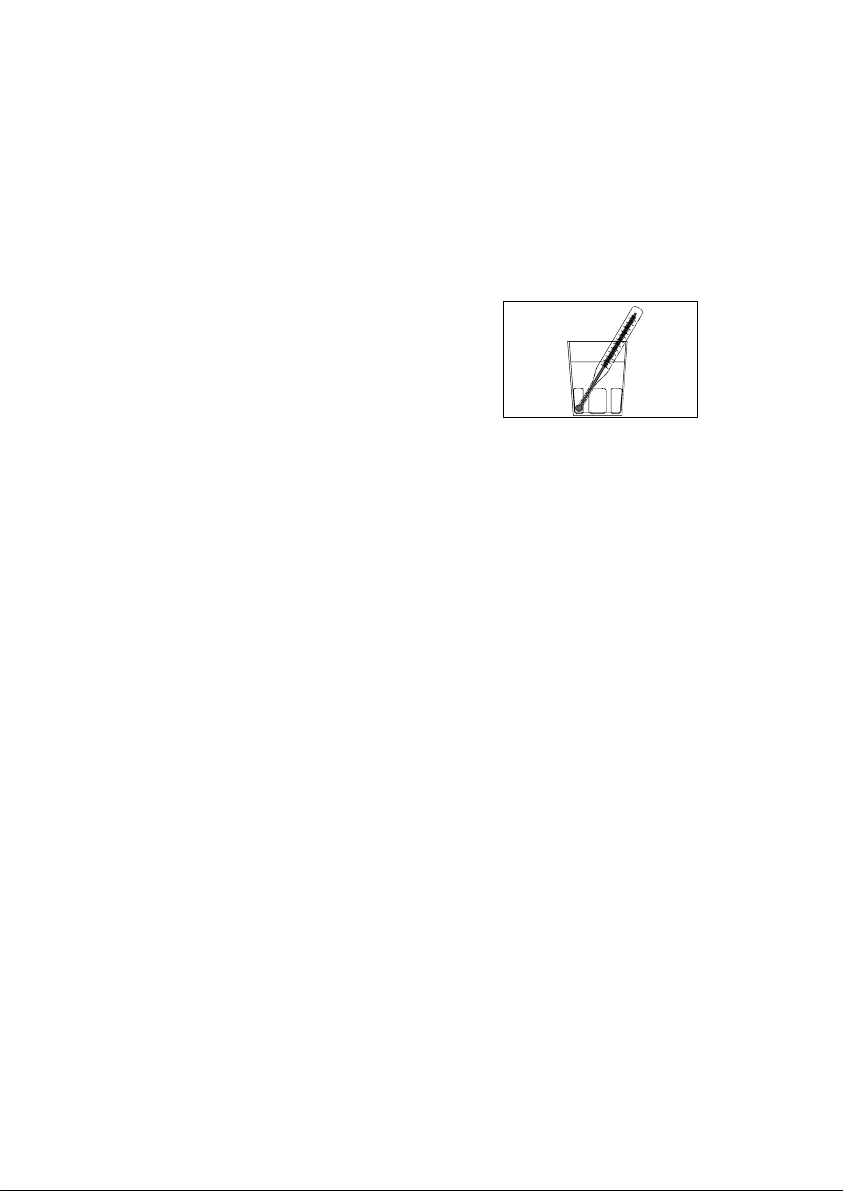
If the temperature is measured using a
standard, single thermometer, this
should be put in a glass of water
centrally placed inside the cabinet.
This will reflect the temperature inside
the food products. Do not place the
thermometer hanging or lying directly
on the shelf.
To switch off, push the ON/OFF
button. This will result in a countdown
from "3" to "1" taking place in the
temperature display. On reaching "1"
the fridge will switch off. The
temperature display will go off.
The appliance cannot be switched on
or off if unplugged, or if there is no
power being supplied to it. Following
connection to the mains power supply,
the appliance returns to the same
operating state as before the
interruption of main power.
1. Switch off the appliance, to do this
press the ON/OFF button.
2. Remove the mains plug.
3. Clean the appliance thoroughly (see
section: "Maintenance and Cleaning").
4. Leave door open to avoid
accumulation of odours.
9
Page 10
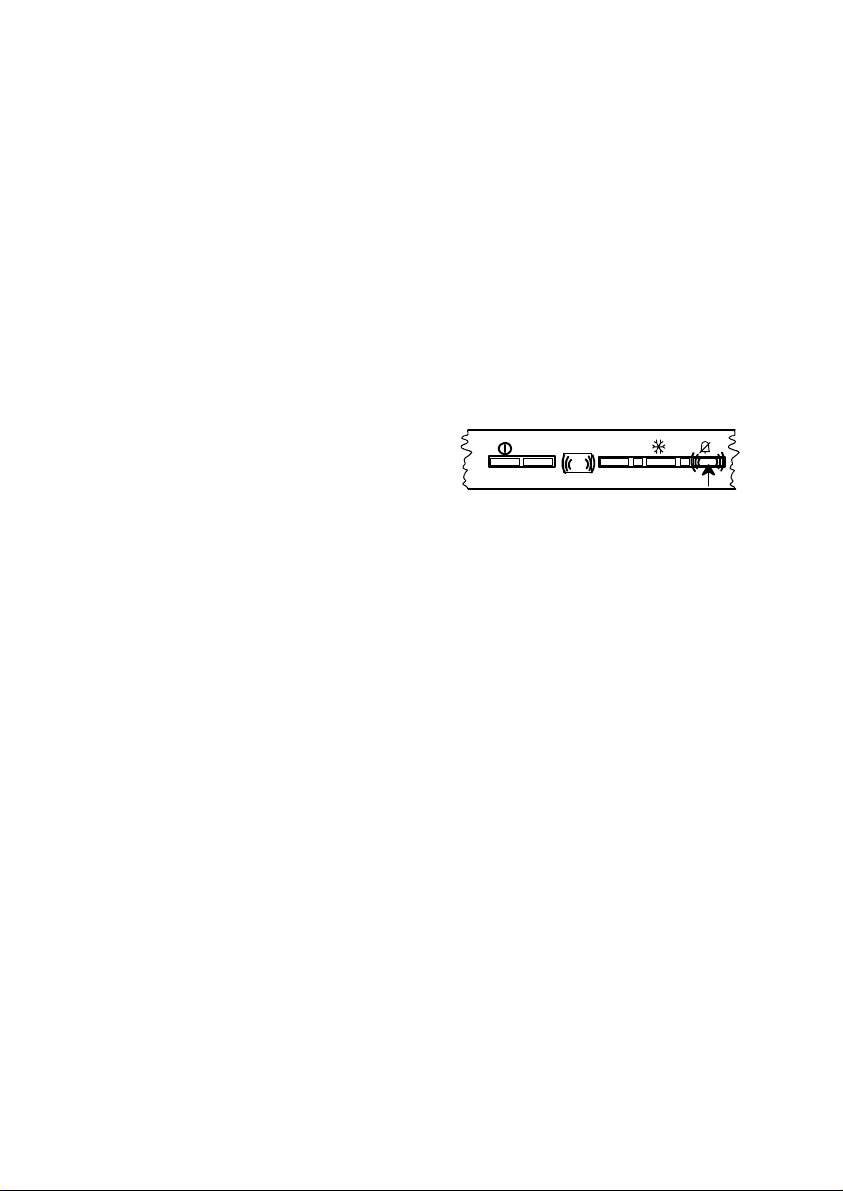
Alarms an d other features
Door open alarm
If the fridge door remains open for
more than 5 minutes, the red warning
lamp starts flashing and an audible
alarm sounds.
To switch off the alarm:
Press the "alarm shut-off button". The
red warning lamp goes out when the
door is closed.
Lighting
The cooler lighting may be turned on
with the door closed. This makes it
easy to survey the contents of the
cooler without opening the door. The
cooler lighting should normally be off,
so that the wine is not unduly exposed
to light. The lighting turns off automatically after about 40 minu tes.
+
-
Use of the freezer compartment
The freezer is provided with the symbol
whichmeansthatitis
suitable for freezing fresh food and for
long term storage of frozen and
deep-frozen food.
To start the freezer and set the correct
temperature
Switching on:
Switch on the freezer by pressing the
power switch.
The alarm sounds if the temperature
inside the freezer reaches r
temperature. Turn off the alarm
pressing the switch-off
+
-
oom
by
button.
-
ACTION FREEZE
Setting the temperature
Press the buttons until the desired
temperature blinks on the temperature
display. (The temperature can be set
between -15°C and -24°C.)
"+" increases the temperature.
"-" decreases the temperature.
+
-
-
ACTION FREEZE
Once set, the temperature display
shows the current temperature in side
the freezer.
Allow the cabinet to run for a period of
24 hours whenever the temperature
setting is changed. This will allow the
temperature to stabilise inside the
cabinet.
It is not necessary to reset the
temperature when the cabinet is
switched on after it has been out of
use. The thermostat recalls the
previously set temperature.
+
-
-
ACTION FREEZE
10
Page 11
Temperature inside the freezer
Switching off
Note:
If the freezer is turned off, the
refrigerator will also turn off. E.g. while
defrosting the freezer.
Temperature alarm
+
11
Temperature memory
To ensure that foodstuff will keep for a
long time, be sure that the temperature
inside the freezer is -18°C or below.
Please note, however, that the energy
consumption increases as the
temperature decreases.
The built-in temperature display shows
the warmest temperature inside the
freezer. If the temperature is measured
using a thermometer, put it between
the products since this will reflect the
real temperature in the frozen
products. It is normal that the built-in
temperature display shows a
temperature slightly above that
measured in other ways.
To switch off, push the ON/OFF
button. This will result in a countdown
from "3" to "1" taking place in the
temperature display. On reaching "1"
the freezer will switch off. The
temperature display will go off.
The appliance cannot be switched on
or off if unplugged, or if there is no
power being supplied to it. Following
connection to the mains power supply,
the appliance returns to the same
operating state as before the
interruption of main power.
If the temperature rises above -12°C
(temperature setting between -15°C
and -24°C) or above than -3°C
(temperature setting between -6°C and
-14°C), the red warning lamp flashes
and an audible alarm sounds. The
temperature display will then start to
flash.
To switch off the alarm:
Press the alarm shut-off button to
switch off the audible alarm. The
temperature display will stop flashing.
The red warning lamp goes out when
the temperature inside the freezer
again falls below -11°C (temperature
setting between -15°C and -24°C) or
colder than -2°C (temperature setting
between -6°C and -14°C).
Find out what caused the alarm. See
the chapter "Something not working".
-
-
ACTION FREEZE
The temperature memory shows when
an alarm has been triggered in the
cabinet.
The temperature memory operates as
follows:
When the temperature inside the
freezer again falls below -11°C
(temperature setting between -15°C
and -24°C) or colder than -2°C
(temperature setting between -6°C and
-14°C) the audible alarm stops. The
temperature display and the red
warning lamp will flash to indicate than
an alarm was triggered. When the
alarm shut-off button is pressed, the
display then displays the warmest
temperature inside the cabinet during
thealarmphaseandthedisplaystops
flashing. By referring to the
temperature display indication, it is
possible to decide whether or not to
discard the products inside the freezer.
11
Page 12
+
18
Temperature setting between -15°C
and -24°C
Freezing
+
Practical advice on freezing
Suitable storage periods
-
-
ACTION FREEZE
At about -12°C:
Most food products can be
immediately re-frozen. Ice cream is
especially sensitive to temperature
changes and should be consumed
as soon as possible.
At -9° - -2°C:
Food products should be prepared
(cooked)
prior to eating or re-freezing them.
However, always check the quality of
the food yourself to determine if it can
be frozen or if it must be discarded.
Press the fast freeze button approx. 24
hours prior to placing the food in the
freezer.
You need not press the fast-freeze
button when freezing smaller quantities
of food during any 24-hour period.
Fast freeze is automatically switched
off apporox 50 hours after the button
has been pressed.
Fast freeze can be discontinued by
pressing the fast freeze button once
again.
-
-
ACTION FREEZE
The yellow fast freeze lamp remains lit
as long as the fast freeze button is
engaged.
· When freezing products, use the
top shelves.
· Do not cover the air hole on the
rear wall.
· Spread out the products as much
as possible to allow air to circulate
between them.
· Do not place food products which
are to be frozen directly against other
frozen food. The heat from the
unfrozen food may cause the frozen
food to thaw on the surface.
· Once frozen, re-arrange the
products and put them as close as
possible to each other. The food will
then stay cold longer in the event of a
power failure.
· Do not freeze too much food at the
same time. The freezing capacity of
the unit is indicated in the
specifications section.
Check that the cabinet is operating
and keeps the set temperature one
day after switching it on for the first
time. Only after then should the freezer
be used to freeze fresh foodstuff.
Food purchased in frozen condition:
Follow the advice on the maximum
storage period indicated on the
packaging.
Fresh food frozen at home:
Fatty and salty food should not be kept
frozen for more than three months.
Cooked food and low-fat food may be
kept up to about six months. Lean
food and berries can be kept for
approximately one year.
12
Page 13
Thawing
Cabinet interior
Freezer drawers
Removable shelves
Freezer tray
Ice cubes
It is best to thaw foods in refrigerator.
Place the foodstuff on a plate with a
raised edge to prevent liquids from
running out. Easily thawed foods can
be placed in room temperature or in
cold water. When using a microwave
oven to thaw foodstuff, follow the
manufacturer's instructions.
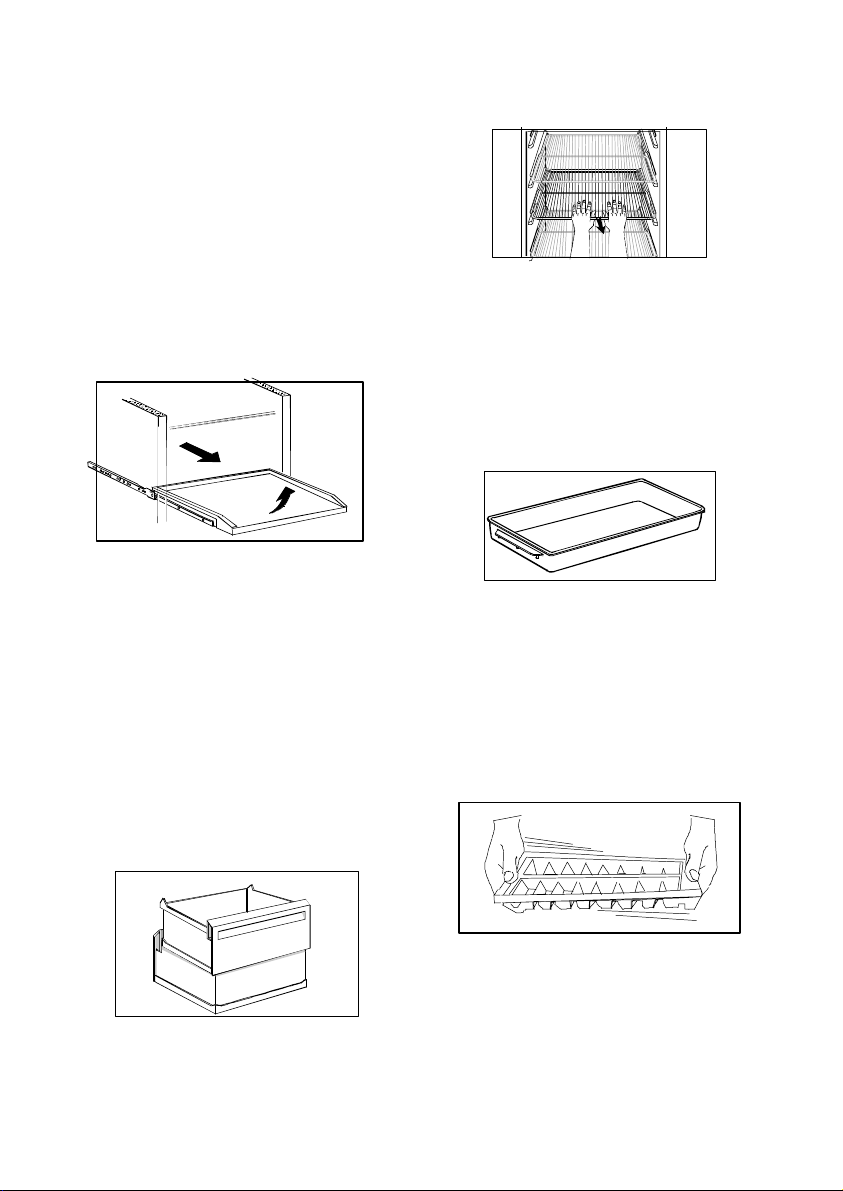
Pull-out tray.
The freezer drawers ensure that it is
quick and easy to find the food
package you want. To gain space, the
drawers can be removed and the
products can be put directly on the
shelves. On all shelves, except the top
shelf, it is possible to place products
that protrude 20 mm from the front
edge. This allows maximum use of the
available space.
Do not remove the bottom drawer. It is
required to assure proper air
circulation.
the freezer. Remove the shelf when
large food products need to be frozen.
Use the freezer tray to freeze berries
and vegetables. After about 4 hours
the food will be thoroughly frozen and
can then be packaged normally. Food
that is frozen in this way will not stick
together, enabling you to use only the
amount required.
Fill the ice tray to max. 3/4 since water
expands as it freezes. Release the ice
cubes by twisting the ice tray.
If ice cubes are kept for a long time,
they will dry out and the taste is
affected. Thus, throw away old ice
cubes and prepare new ones when
needed.
There are the removable shelves inside
13
Page 14

HINT and TIPS
Saving energy
Food Storage
Protect the environment
· Pay careful attention to where the
cabinet is placed. See the section
"Installation". When installed correctly,
the cabinet will consume less energy.
· Try to avoid keeping the door open
for long periods, or opening the door
too frequently as warm air will enter the
cabinet, and cause the compressor to
switch on unnecessarily often.
· Ensure there are no obstructions
preventing the door from closing
properly.
· Thaw frozen food in the fridge. This
will ensure safer defrosting of foods
and reduce the work of the
refrigeration unit
· It is advisable to periodically clean the
refrigeration system at the back of the
appliance with a duster or vacuum
cleaner.
· Always leave warm food to cool
down to room temperature before
placing in the fridge.
· Food which is to be frozen (when
cool) should be placed in the fridge
before being transfered to the freezer.
· Avoid unnecessary frosting in the
cabinet by packing all foodstuffs into
airtight packages before placing them
in the freezer.
· Carefully follow the advice on freezing
products in the section "Using the
freezer". This will prevent wasting
energy.
· Do not set the temperature too low in
the freezer. A suitable temperature is in
the range of -18°C to -20°C .
· Make sure the door gasket is
complete and always clean.
· To obtain the best results from your
appliance, neither hot foods nor liquids
which may evaporate, should be
placed in the larder compartment.
· Avoid buying frozen food if you can
not store it straight away. The use of
an insulated container is advisable.
When you arrive home place the
frozen food in the freezer immediately.
· Ensure that food placed in the freezer
is dated and labelled and used in date
order to ensure that food is consumed
at its best. Remove suspect food from
you refrigerator and clean, refer to
cleaning and maintenance.
· Hand over the cabinet packaging
and discarded fridges and freezers to a
recycling station. Contact your local
council or Environmental Health office
for more information.
· Keep foodstuff in re-usable
containers. Cut down on disposable
material as much as possible.
· When cleaning the cabinet, use a
mild washing-up detergent.
· Follow the advice in the section
"Saving energy"
· The door gasket and coolant used in
this cabinet will not harm the ozone
layer.
· All parts in the packaging can be
recycled.
· The cabinet has been designed for
easy dismantling and subsequent
recycling.
14
Page 15
MAINTENANCE and
Avoid opening the refrigerator door
during defrosting, as the cooling is off.
If the freezer is turned off, the
refriger
ator will also turn off.
Cleaning
Disconnect the appliance from
electricity supply.
Internal Cleaning
External Cleaning
Defrosting the fridge
Defrosting the freezer
CLEANING
Clean the cabinet at regular intervals.
Clean the inside and accessories with
warm water and bicarbonate of soda
(5ml to 0,5 litre water) Rinse and dry
thoroughly.
Regularly check the door seals and
wipe clean to ensure they are clean
and free from debris.
Clean out the drip channel inside the
fridge at regular intervals and ensure
that the drip channel is clear at all
times. If blocked carefully clear using
a piece of flexible curtain wire inserted
into the drain outlet to remove the
blockage.
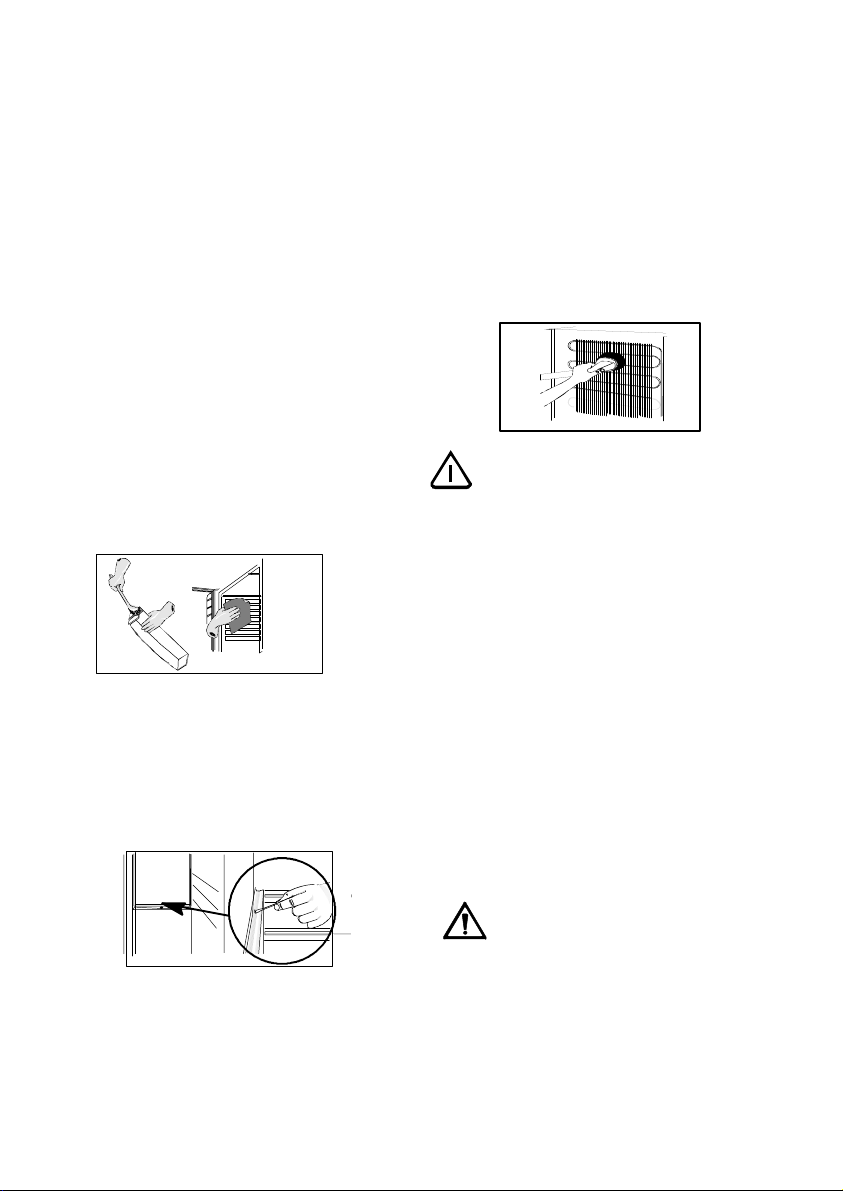
Wash the outer cabinet with warm
soapy water. Vacuum-clean under the
cabinet. Once or twice a year dust the
condenser (black grille) and the
compressor at the back of the
appliance, with a brush or vacuum
cleaner, as an accumulation of dust
will affect the performance of the
appliance and cause excessive
electricity consumption.
When moving the cabinet, lift it by the
front edge to avoid scratching the floor.
The fridge is defrosted automatically
every time the compressor stops. Frost
formation can be prevented by:
· not putting warm foodstuff inside
the cabinet.
· avoiding frequently opening the
door or keeping it open too long.
Defrosting is not necessary.
Every 24 hours, the evaporator is
defrosted automatically.
Use water/neutral soap emulsion for
cleaning the surface of stainless steel,
anti-finger-print coated. Do NOT use
abrasive paste.
15
Never use a hair drier or other heating
appliances to speed up defrosting.
Excessive heat may damage the
plastic interior, and humidity could
enter the electric appliance making it
live.
Page 16
When the appliance is not in use
Disconnect the appliance from
electricity supply.
Before
Problem Possible cause / Remedy
is displayed in the
temperature display.
Audible alarm + flashing red
warning lamp.
It is too warm inside the
refrigerator.
It is too cold inside the
refrigerator.
Empty all foods and clean the
appliance, leaving the doors ajar to
SOMETHING NOT WORKING
prevent unpleasant smells.
If the cabinet is to be kept on, ask
somebody to check it once in a while
to prevent the food inside from spoiling
in case of a power failure.
contacting your local Service Force Centre check the following point:
””
inside the freezer.)
(It is too warm
An error has occurred in measuring the
temperature. Call your service representative.
(The cooling system will continue to keep
food products cold, but temperature
adjustment will not be possible.)
Switch off the audible alarm by pressing the
alarm off button.
The audible alarm could have been triggered
by:
The cabinet having been recently switched
on and the temperature still being too high.
See the chapter "Switching on and setting
the temperature".
The door may have been open for so long
that the `door open' alarm was triggered.
Set a lower temperature.
Put food products in the right place inside the
refrigerator. See the chapter "Temperature
inside the refrigerator".
Distribute the food products to allow cold air
to circulate around them.
Make sure that the door is completely closed
and that the insulating strip is complete and
clean.
Set a warmer temperature.
16
Page 17

It is too warm inside the
freezer.
It is too cold inside the freezer.
Water comes out on the floor.
Too much frost and ice are
produced.
The compressor operates
continuously.
The cabinet does not operate
at all. Cooling or interior light
does not operate. No indicator
lamps light.
Set a lower temperature.
Make sure that the door is completely closed
and that the insulating strip is complete and
clean.
If warm food products have been put inside
the freezer, wait for a couple of hours and
then check the temperature again.
Distribute the food products to allow cold air
to circulate around them.
Set a warmer temperature.
Action Freeze could have been switched on.
The temperature display shows the highest
temperature inside the cabinet. Thus a
difference between the temperature indicated
on the display and the (average) temperature
measured in another way is normal.
Place the drain hose at the back of the
cabinet above the drain bowl. See the
chapter "Before using the cabinet the first
time".
Make sure that the door is completely closed
and that the insulating strip is complete and
clean.
Set a warmer temperature.
Make sure that the door is completely closed
and that the insulating strip is complete and
clean.
The cabinet is not switched on.
Power does not reach the cabinet. (Try
connecting another electrical device to the
power outlet.)
The power plug is not properly connected.
Thefusehasblown.
17
Page 18

Power failure
Sound level in cabinet is too
high.
Model ERF37800WX
Net capacity Refrigerator l 272
Net capacity Freezer l 83
Freezing capacity kg/24 h 10
Rising time h 11
Dimension mm
Width 2000
Height 595
Depth 600
Do not unnecessarily open the cabinet,
except when the power cut seems to be
long, in which case the food products should
be moved to another cabinet that works. If
the frozen products are still hard following the
power cut, they may be immediately refrozen.
If the food products have thawed but are still
fresh, they may be used, however they
should be prepared before re-freezing or
eating them.
The refrigerating system will always produce
some sounds. A pulsing sound is heard when
coolant is pumped inside the cooling pipes.
A ticking sound from the thermostat can be
heard when the compressor switches on and
off. The sound level varies depending on the
operation of the cabinet.
If you feel the sound level is incorrect:
Make sure the pipes at the back of the
cabinet do not touch each other. Carefully
bend them if they do.
If the cushion spacers (between the cabinet
wall and pipes) come loose, put them back in
place again.
Carefully follow the instructions in the chapter
"Installing the cabinet".
TECHNICAL SPECIFICATION
18
Page 19

INSTALLATION
Mains Cable
Do not remove the power cord by
pulling on its lead, particulary when the
product is being pulled out of its niche.
Unpacking
Remove the transport supports
Installation of distance
· Damage to the cord may cause a
short-circuit, fire and/or electric shock.
· In the event of damage to the
appliance's main cable, only an
authorised service company
recommended by the manufacturer or
a similarly qualified person may adjust
it in order to avoid shock hazard for the
user.
Unpack the cabinet and check that it
is in good condition and free of any
transport damage. Notify the dealer
immediately of any damage. Hand the
packaging over for recycling. For more
information, contact your local council
or the dealer.
Do not allow children to play with the
packaging. The plastic film can cause
suffocation.
until the shelf tilts and the transport
support can be removed. Some
models are fitted with a silencing pad
under the cabinet. Do not remove this
pad.
Assemble the attached distance on
the back side of the panel according to
the illustration.
Removethetapeandthetransport
supports from
· the door sides
· inside the door hinges
·theshelves
Remove the transport support on the
glass shelf by pushing the support
forwardalongtheedgeoftheshelf
until it stops. Take hold of the rear
edge of the glass shelf and pull the
shelf and transport support forward
19
Page 20

Cleaning
Installing the cabinet
Make sure that the power plug is not
squashed or damaged by the back of
the product.
Do not place heavy articles or the
product itself on the power cord.
If the power plug socket is loose, do not
insert the power plug.
To obtain the bestperformance from the
cabinet, ensure:
Climate
classification
for an ambient
temperature of
Wash the inside of the cabinet using
lukewarm water, a mild washing-up
detergentandasoftcloth.
· A damaged power plug may
overheat and cause a fire.
· there is a risk of a short circuit and
fire.
· there is a risk of electric shock or fire.
· the cabinet is placed in a dry, cool
place and is not exposed to direct
sunlight.
· the cabinet is not placed close to a
source of heat, e.g. a cooker or
dishwasher.
· the cabinet is level. The cabinet
should not lean against any wall. If
necessary adjust the feet using the
adjustment spanner supplied.
blocked. The ventilation space above
the cabinet must be at least 4 cm.
The ventilation space can either be
a) directly above the cabinet, or
b) behind and above the top cupboard.
In this case, the space behind the
cupboard must be at least 50 mmdeep.
a)
b)
50mm
Cabinet is placed at a location where
the ambient temperature corresponds
to the climate classification*, for which
the appliance is designed.
* See on the rating plate on the inside
of the appliance.
The following table shows which
ambient temperature is correct for
each climate classification.
SN
N
+10°C to +32°C
+16°C to +32°C
· there is good air circulation around
the cabinet and that the air channels
below and behind the cabinet are not
ST
T
+18°C to +38°C
+18°C to +43°C
20
Page 21

If the cabinet is placed in a corner and
Door Reversal
Electrical connection
the side with the hinges facing the
wall, the distance between the wall
and the cabinet must be at least 150
mm to allow the door to open enough
so that the shelves can be removed.
Check that the drain hose at the rear
of the cabinet discharges into the drip
tray.
The power plug must be accessible
after installation of the cabinet.
It is not possible to re-hang the door.
Connect the cabinet to a grounded
electrical outlet.
Voltage: 230 V.
Fuse: 10 A.
Refer to the rating plate on the left
inside the cabinet.
21
Page 22

Guarantee/Customer Service
Standard guarantee conditions
We, Electrolux, undertake that if within
12 months of the date of the purchase
this Electrolux appliance or any part thereof is proved to be defective by reason
only of faulty workmanship or materials,
we will, at our option repair or replace
the same FREE OF CHARGE for labour,
materials or carriage on condition that:
• The appliance has been correctly in-
stalled and used only on the electricity supply stated on the rating plate.
• The appliance has been used for
normal domestic purposes only, and
in accordance with the manufacturer’s instructions.
• The appliance has not been ser-
viced, maintained, repaired, taken
apart or tampered with by any person not authorised by us.
• Electrolux Service Force Centre must
undertake all service work under this
guarantee
• Any appliance or defective part re-
placed shall become the Company’s
property.
• This guarantee is in addition to your
statutory and other legal rights.
Exclusions
• Damage or calls resulting from trans-
portation, improper use or neglect,
the replacement of any light bulbs or
removable parts of glass or plastic.
• Costs incurred for calls to put right
an appliance which is improperly installed or calls to appliances outside
the United Kingdom.
• Appliances found to be in use within
a commercial environment, plus those which are subject to rental agreements.
• Products of Electrolux manufacturer
that are not marketed by Electrolux
Service and Spare Parts
In the event of your appliance requiring
service, or if you wish to purchase spare
parts, please contact your local Service
Force Centre by telephoning
0870 5 929 929
Your telephone call will be automatically
routed to the Service Force Centre covering your postcode area.
For the address of your local Service
Force Centre and further information
about Service Force, please visit the
website at
www.serviceforce.co.uk
Before calling out an engineer, please
ensure you have read the details under
the heading “Something not working”
When you contact the Service Force
Centre you will need to give the following details:
1.Your name, address and postcode.
2.Your telephone number.
3. Clear concise details of the fault.
4. The model and Serial number of the
appliance (found on the rating plate).
5.The purchase date.
Please note a valid purchase receipt or
guarantee documentation is required for
in guarantee service calls.
22
Page 23

Customer Care
For general enquiries concerning your
Electrolux appliance, or for further information on Electrolux products please
contact our Customer Care Department
by letter or telephone at the address below or visit our website at www.electrolux.co.uk
Customer Care Department
Electrolux Major Appliances
Addington Way
Luton
Bedfordshire, LU4 9QQ
Tel: 08705 950 950 (*)
(*) Calls may be recorded for training
purposes
www.electrolux.com
European Guarantee
This appliance is guaranteed by Electrolux in
each of the countries listed at the back of this
user manual, for the period specified in the
appliance guarantee or otherwise by law. If
you move from one of these countries to another of the countries listed below the appliance guarantee will move with you subject to
the following qualifications:-
•
The appliance guarantee starts from the
date you first purchased the appliance
which will be evidenced by production of a
valid purchase document issued by the
seller of the appliance.
•
The appliance guarantee is for the same
period and to the same extent for labour
and parts as exists in your new country of
residence for this particular model or range of appliances.
•
The appliance guarantee is personal to the
original purchaser of the appliance and
cannot be transferred to another user.
•
The appliance is installed and used in accordance with instructions issued by Electrolux and is only used within the home,
i.e. is not used for commercial purposes.
•
The appliance is installed in accordance
with all relevant regulations in force within
your new country of residence.
The provisions of this European Guarantee do
not affect any of the rights granted to you by
law.
p t b
Albania +35 5 4 261 450 Rr. Pjeter Bogdani Nr. 7 Tirane
Belgique/België/
Belgien
Èeská republika +420 2 61 12 61 12 Budìjovická 3, Praha 4, 140 21
Danmark +45 70 11 74 00 Sjællandsgade 2, 7000 Fredericia
Deutschland +49 180 32 26 622 Muggenhofer Str. 135, 90429 Nürnberg
Eesti +37 2 66 50 030 Mustamäe tee 24, 10621 Tallinn
España +34 902 11 63 88
France www.electrolux.fr
+32 2 363 04 44 Bergensesteenweg 719, 1502 Lembeek
Carretera M-300, Km. 29,900
Alcalá de Henares Madrid
23
Page 24

p t b
Great Britain +44 8705 929 929
Hellas +30 23 10 56 19 70 4 Limnou Str., 54627 Thessaloniki
Hrvatska +385 1 63 23 338 Slavonska avenija 3, 10000 Zagreb
Ireland +353 1 40 90 753 Long Mile Road Dublin 12
Italia +39 (0) 434 558500 C.so Lino Zanussi, 26 - 33080 Porcia (PN)
Latvija +37 17 84 59 34 Kr. Barona iela 130/2, LV-1012, Riga
Lietuva +370 5 2780609 Verkių 29, LT09108 Vilnius
Luxembourg +35 2 42 43 13 01 Rue de Bitbourg, 7, L-1273 Hamm
Magyarország +36 1 252 1773
Nederland +31 17 24 68 300
Norge +47 81 5 30 222 Risløkkvn. 2 , 0508 Oslo
Österreich +43 18 66 400 Herziggasse 9, 1230 Wien
Polska +48 22 43 47 300 ul. Kolejowa 5/7, Warsaw
Portugal
Romania +40 21 451 20 30 Str. Garii Progresului 2, S4, 040671 RO
Schweiz/Suisse/
Svizzera
Slovenija +38 61 24 25 731
Slovensko +421 2 43 33 43 22
Suomi +35 8 26 22 33 00 Konepajanranta 4, 28100 Pori
Sverige +46 (0)771 76 76 76
Türkiye +90 21 22 93 10 25
Россия +7 495 9377837
+351 21 440 39 00
+41 62 88 99 111 Industriestrasse 10, CH-5506 Mägenwil
Addington Way, Luton, Bedfordshire
LU4 9QQ
H-1142 Budapest XIV,
Erzsébet királyné útja 87
Vennootsweg 1, 2404 CG Alphen aan den Rijn
Quinta da Fonte - Edificio Gonçalves Zarco Q 35
2774 - 518 Paço de Arcos
Electrolux Ljubljana, d.o.o.
Tržaška 132, 1000 Ljubljana
Electrolux Slovakia s.r.o., Electrolux Domáce
spotrebièe SK, Seberíniho 1, 821 03 Bratislava
Electrolux Service, S:t Göransgatan 143,
S-105 45 Stockholm
Tarlabaþý caddesi no : 35 Taksim
Istanbul
129090 Москва, Олимпийский проспект, 16,
БЦ „Олимпик“
24
Page 25

Bienvenido al mundo Electrolux
Gracias por elegir un producto Electrolux de primera clase, el cual esperamos le
proporcione una gran satisfacción en el futuro. Electrolux ambiciona ofrecerle
una amplia variedad de productos de calidad que haga su vida más cómoda.
Usted encontrará algunos ejemplos en la portada de este manual. Por favor,
tómese unos minutos para estudiar este manual de modo que pueda
aprovecharse de los beneficios de su nueva máquina. Nosotros prometemos
proporcionarle una experiencia superior como usuario y mucha tranquilidad.
¡Buena suerte!
25
Page 26

Algunos párrafos de este libro de instrucciones han sido identificados con
Eliminación de aparato viejos
símbolos que tienen el siguiente significado:
El triángulo de advertencia subraya instrucciones muy importantes
para Su seguridad o para el buen funcionamiento del aparato.
Les informaciones precididas por este símbolo completan las
instrucciones de uso y de utilización práctica del aparato
Este símbolo indica consejos e instrucciones para un empleo
económico del aparatore que respete el ambiente.
El símbolo en el producto o en su embalaje indica que este producto
no se puede tratar como desperdicios normales del hogar. Este
producto se debe entregar al punto de recolección de equipos eléctricos y
electrónicos para reciclaje. Al asegurarse de que este producto se deseche
correctamente, usted ayudará a evitar posibles consecuencias negativas para
el ambiente y la salud pública, lo cual podría ocurrir si este producto no se
manipula de forma adecuada. Para obtener información más detallada sobre
el reciclaje de este producto, póngase en contacto con la administración de
su ciudad, con su servicio de desechos del hogar o con la tienda donde
compró el producto.
26
Page 27

Información sobre la seguridad
Utilización
Niños
ADVERTENCIA!
ADVERTENCIA!
ADVERTENCIA!
ADVERTENCIA!
Este electrodoméstico no está destinado a personas (incluidos niños) con
reducción de las funciones físicas o sensoriales o con experiencia y
conocimiento insuficientes, a menos que una persona responsable de su
seguridad les supervise o les instruya en el uso del electrodoméstico
El nuevo frigorífico/congelador puede que tenga otras funciones en comparación
con el parato que usted haya tenido antes.
Lea atentamente estas instrucciones para conocer el funcionamiento del
aparato y su cuidado. Guarde este manual de instrucciones. Será de utilidad si
con posterioridad es vendido o se deja a otra persona.
· El aparato está diseñado para
guardar los alimentos de un hogar
normal, tal como se explica en este
manual de instrucciones.
· No se deben guardar gases o
líquidos explosivos en el
compartimiento del frigorífico o del
congelador. Podrían explotar y
ocasionar lesiones y daños materiales.
· No se debe permitir que objetos
punzantes entren en contacto con el
sistema de refrigeración de la parte
trasera e interior del aparato. Si se
rompiera el sistema de refrigeración,
resultaría dañado y los alimentos en su
interior podrían echarse a perder.
· No guardar botellas o bebidas
carbonatadas en el compartimiento
congelador. Las botellas de vidrio
podrían romperse.
· El aparato es pesado. Los bordes y
partes salientes del mismo pueden ser
punzantes por lo que hay que tener
cuidado al moverle y utilizar siempre
guantes.
· Prestar atención para que los niños
pequeños no tengan acceso a los
mandos de funcionamiento o al interior
del aparato.
Mantenga libres de obstrucciones las
aberturas de ventilación del
alojamiento del aparato o de la
estructura empotrada.
No utilice dispositivos mecánicos ni
otros medios para acelerar el proceso
de descongelación, excepto los
recomendados por el fabricante.
No dañe el circuito refrigerante.
No utilice dispositivos eléctricos dentro
de los compartimientos para alimentos
del aparato, salvo si son del tipo
recomendado por el fabricante.
27
Page 28

Indice
Eliminación de aparato viejos 26. . . . .
Información sobre la seguridad 27. . .
Cómo usar 29. . . . . . . . . . . . . . . . . . . .
Consejos Útiles 36. . . . . . . . . . . . . . . . .
Cuidados 37. . . . . . . . . . . . . . . . . . . . . .
Si el artículo no funciona
satisfactoriamente 38. . . . . . . . . . .
Caracteristicas técnicas 41. . . . . . . . .
Instalación 42.
. . . . . . . . . . . . . . . . . . . .
Garantía/Servicio postventa 45. . . . . .
Garantía Europea 46. . . . . . . . . . . . . . .
www.electrolux.com 46. . . . . . . . . . . .
Antes de utilizar el aparato por
primera vez 29................
El panel de control 29..............
Uso del frigorífico 30...............
Funcionamiento 30................
Temperatura interior del
frigorífico bodeguero 30.........
Colocación del vino
Consejos de almacenamiento 30.
Ahorro de energía 36...............
El aparato y el medio ambiente 37...
Protección del medio ambiente 37...
Limpieza 37......................
Descongelación del congelador 38...
Descongelación del frigorífico 38.....
Cambio de la bombilla de luz 38.....
Cuando no se vaya a utilizar
el aparato 38..................
Medición de la temperatura 31......
Desconexión 31...................
Alarmas y otras funciones 32........
Uso del compartimento congelador 32
Puesta en marcha del
congelador y ajuste de la
temperatura correcta 32........
Temperatura interior del congelador 33
Desconexión 33...................
Congelación 34...................
Tiempo de conservación apropiado 35
Descongelación 35................
Interior del armario 35..............
Cable 42.........................
Desembalaje 42...................
Extracción de los soportes de
transporte 42..................
Limpieza 43......................
Cambio de sentido de apertura
de la puerta 43................
Instalación del aparato 43...........
Conexión eléctrica 44..............
28
Page 29

Cómo usar el frigorífico
Antes de utilizar el aparato por primera vez
Colocar y limpiar el aparato como se
explica en la sección "Instalación".
Comprobar que la manguera de
drenaje de la parte posterior del
armario descarga en la bandeja de
goteo.
Antes de introducir el enchufe en la
toma de red y poner en marcha el
aparato por primera vez unos 4 horas.
De lo contrario el compresor podría
resultar dañado. Este tiempo de
reposo permitirá que el aceite vuelva
al compresor.
El panel de control
+
B
A
A. Interruptor de encendido del refrigerador Para encender y apagar el
refrigerador.
B.Botonesdeajustedelatemperatura/termostatoSeusaparaajustarla
temperatura ("+" aumenta la temperatura).
C. Indicador de temperatura Indica la temperatura promedio en el interior del
refrigerador.
D.Botonesdeajustedelatemperatura/termostatoSeusaparaajustarla
temperatura("-"disminuyelatemperatura).
E. Lámpara indicadora amarilla Se enciende cuando la función de la luz está
operando.
F. La luz
G. Interruptor de encendido del congelador Para encender y apagar el
congelador.
H.Botonesdeajustedelatemperatura/termostatoSeusaparaajustarla
temperatura ("+" aumenta la temperatura).
I. Indicador de temperatura Indica la temperatura máxima dentro del congelador.
29
-
D
C
E
F
+
-
H
G
-
ACTION FREEZE
N
M
L
I
K
J
Page 30

J. Botones de ajuste de la temperatura/ termostato
K. Lámpara indicadora amarilla
L. Botón de Congelación Rápida
M. Lámpara de aviso roja
N. Botón de desactivación de la alarma
Funcionamiento
Puesta en marcha
Ajuste de la temperatura
¡Atención!
Temperatura interior del
frigorífico bodeguero
Colocación del vino
Consejos de almacenamiento
temperatura("-"disminuyelatemperatura).
Rápida está operando.
desactivar la función de Congelación Rápida.
activa.
Uso del compartimento
Se enciende cuando la función de Congelación
(ACTION FREEZE) Se usa para activar y
Se ilumina cuando una de las alarmas del gabinete se
Para desactivar la alarma acústica.
termostato recuerda la temperatura
previamente ajustada.
frigorífico
Poner en marcha el frigorífico pulsando
el interruptor de encendido.
Pulse los botones hasta que parpadee
la temperatura deseada en la pantalla
de temperatura. (La temperatura
puede ajustarse entre +6°C y +17°C.)
"+" aumenta la temperatura.
"-"disminuyelatemperatura.
Unavezquesehaajustado,la
pantalla de temperatura muestra la
temperatura actual dentro del
fricorifico.
Cada vez que se cambie el ajuste de
la temperatura, dejar el aparato
funcionando un período de 24 horas.
Esto permitirá que la temperatura
dentro del aparato se estabilice.
No es necesario volver a ajustar la
temperatura al encender el gabinete
cuando éste no ha estado en uso. El
:
+
+
-
-
Es normal que exista una diferencia
entre la temperatura mostrada y la
programada. En particular cuando:
- recientemente se ha modificado la
temperatura programada.
-lapuertahaquedadoabiertapor
mucho tiempo.
- se han introducido en el frigorífico
alimentos calientes.
NOTA: La ilustración muestra los
lugaresmásfríosymenosfríosdel
interior del frigorífico.
Elperíododetiempoquesepuede
tener almacenado el vino depende de
su madurez, el tipo de uva, su
graduación, la fructosa disuelta y los
taninos. Cuando compre un vino,
Seusaparaajustarla
+
+
30
Page 31

averigüe si es maduro o si mejorará
Parte inferior del frigorífico bodeguero.
Parte superior del frigorífico
bodeguero.
Coloque las botellas tumbadas
Proteja el vino de la luz.
Evite encender la luz interior
demasiado
Trate las botellas con delicadeza
Tome nota de todos los consejos
Temperaturas de almacenamiento
recomendadas:
Si apila las botellas,
Medición de la temperatura
Desconexión
Si se apaga el congelador (por
ejemplo, para descongelarlo), el
frigorífico también se apagará.
Nota:
con el tiempo.
El aire fresco prolonga el tiempo de
conservación. Por ello, coloque el vino
añejo, el maduro y el que desee
conservar durante un largo período de
tiempo en la parte inferior del frigorífico
bodeguero. Esta parte también es
idónea para almacenar el vino que se
debe servir fío.
coloque el vino que desee añejar, los
vinos que se sirven menos fríos y los
vinos que tiene intención de consumir
relativamente pronto.
quenosesequenloscorchos.
del frigorífico bodeguero tienen doble
cristal tintado para evitar que la luz
dañe el vino si el frigorífico bodeguero
se coloca en un espacio iluminado.
encendida durante demasiado tiempo.
El vino se debe mantener en la
oscuridad.
no agitar el vino.
reciba al comprar el vino o de los
conocimientos que adquiera leyendo
publicaciones especializadas acerca
de la calidad del vino, la conservación
y la temperatura óptima de
almacenamiento.
- para el vino blanco, de +10 a +12°C
- para el vino rosado y tinto ligero, de
+12 a +16°C
- para el champagne y vinos
espumosos, de +6 a +8°C
En la parte superior,
para
Las puertas
a menudo o mantenerla
para
que
no tocan la chapa de enfriamiento.
asegúrese de que
Si usa un termómetro estándar para
medir la temperatura, colóquelo en un
vaso de agua situado centralmente
dentro del gabinete. Esto reflejará la
temperatura de los alimentos. No
cuelgue el termómetro ni lo ponga
directamente sobre la bandeja.
Para desconectar el aparato completo,
mantener pulsada la tecla ON/OFF. En
ambas indicaciones de temperatura se
produce un denominado "Count
down", contando hacia atrás de "3" a
"1". Al denominado "Count down",
contando hacia atrás de "3" a "1". Al
indicadores de temperatura se
apagan.
No es posible ajustar el aparato si está
desenchufado o si está cortada la
corriente. Tras la reconexión a la red
eléctrica, el aparato retorna al estado
en que se hallaba al cortarse la
corriente.
31
Page 32

Si el aparato frigorífico ha de estar
fuera de servicio por mucho tiempo es
preciso:
Alarmas y otras funciones
Alarma de puerta abierta
La luz
El congelador va marcado con el
símbolo
que indica que éste
es adecuado para la congelación de
alimentos frescos y para la conservación, a largo plazo, de alime
ntos
congelados y ultracongelados.
Puesta en marcha del
congelador y ajuste de la
temperatura correcta
Puesta en marcha:
+
+
Ajuste de la temperatura
+
1. Desconectarlo manteniendo
oprimido la tecla ON/OFF.
2. Desenchufarlo o desconectarlo o
bien desenroscar el fusible.
3. Descongelar el compartimento
congelador y limpiar el aparato a fondo
(véase el capítulo "Limpieza y
mantenimiento").
4. Luego ha de dejarse abierta las
puertas para evitar la formación de
olores desagradables.
Si la puerta permanece abierta durante
más de 5 minutos, la lámpara de aviso
roja comenzará a parpadear y una
alarma sonará.
Para desactivar la alarma:
Pulse el botón de desactivación de
alarma. La lámpara de aviso roja se
apagará cuando la puerta sea cerrada.
La luz interior se puede encender
aunque la puerta esté cerrada. De este
modo se puede ver el contenido del
armario bodega sin necesidad de abrir
la puerta. Mantenga apagada la luz
delfrigorífico bodeguero para proteger
el vino de la luz. La luz se apaga
automáticamente a los 40 minutos.
+
-
Uso del compartimento
congelador
Poner en marcha el congelador
pulsando el interruptor de encendido.
Si la temperatura interior del
congelador llega a ser la misma que
temperatura ambiente, suena
alarma.
pulsando el botón de desconexión.
Pulsar los botones hasta que la
temperatura deseada parpadee en la
pantalla de temperatura. (La
temperatura puede ajustarse entre
-15°C y -24°C.)
"+" aumenta la temperatura.
"-"disminuyelatemperatura.
Unavezquesehaajustado,la
pantalla de temperatura muestra la
temperatura actual dentro del
congelador.
Cada vez que se cambie el ajuste de
la temperatura, dejar el aparato
funcionando un período de 24 horas.
Esto permitirá que la temperatura
dentro del aparato se estabilice.
Desconectelaalarma
-
-
-
-
ACTION FREEZE
la
-
ACTION FREEZE
-
ACTION FREEZE
la
32
Page 33

No es necesario volver a ajustar la
Temperatura interior del
congelador
Desconexión
Nota:
Si se apaga el congelador (por
ejemplo, para descongelarlo), el
frigorífico también se apagará.
Alarma de temperatura
+
11
Memoria de temperatura
temperatura al encender el gabinete
cuando éste no ha estado en uso. El
termostato recuerda la temperatura
previamente ajustada.
Para garantizar que los alimentos se
mantendrán durante más tiempo,
asegurarse de que la temperatura
interior del congelador es de -18°C o
inferior. Obsérvese, no obstante, que
el consumo de energía aumenta a
medida que disminuye la temperatura.
La pantalla de temperatura
incorporada muestra la temperatura
menos fría dentro del congelador. Si se
midiera la temperatura con un
termómetro, éste debe ser puesto
entre los productos ya que así
señalará la temperatura real del
producto congelado. Es normal que la
pantalla de termómetro incorporada
muestre una temperatura ligeramente
superior a la que se obtiene con otras
medidas.
Para desconectar el aparato completo,
mantener pulsada la tecla ON/OFF. En
ambas indicaciones de temperatura se
produce un denominado "Count
down", contando hacia atrás de "3" a
"1". Al denominado "Count down",
contando hacia atrás de "3" a "1". Al
indicadores de temperatura se
apagan.
No es posible ajustar el aparato si está
desenchufado o si está cortada la
corriente. Tras la reconexión a la red
eléctrica, el aparato retorna al estado
en que se hallaba al cortarse la
corriente.
Si la temperatura aumenta a más de
-12°C (la temperatura puede ajustarse
entre -15°C y -24°C) o aumenta a
más de -3°C (la temperatura puede
ajustarse entre -6°C y -14°C), la
lámpara de aviso roja comenzará a
parpadear y una alarma sonará.
Luego, la indicación de temperatura
comenzará a parpadear.
Para desactivar la alarma:
Pulse el botón de desactivación de
alarma para desactivar la alarma. La
indicación de temperatura dejará de
parpadear.
La lámpara roja de aviso se apagará
una vez que la temperatura dentro del
congelador descienda a menos de
-11°C (la temperatura puede ajustarse
entre -15°C y -24°C) o descienda a
menos de -2°C (la temperatura puede
ajustarse entre -6°C y -14°C).
Determine la causa de la activación de
la alarma. Consulte el capítulo "Si el
artículo no funciona
satisfactoriamente".
-
-
ACTION FREEZE
La memoria de temperatura indica
cuándo una alarma se ha activado en
el congelador.
La memoria de temperatura funciona
de la siguiente manera:
Cuando la temperatura dentro del
congelador desciende nuevamente a
menos de -11°C (la temperatura
puede ajustarse entre -15°C y -24°C)
o descienda a menos de -2°C (la
33
Page 34

temperatura puede ajustarse entre
+
18
La temperatura puede ajustarse entre
-15°C y -24°C
Congelación
+
Consejos prácticos sobre la
congelación
-6°C y -14°C), la alarma se desactiva.
La indicación de temperatura y la
lámpara de aviso roja parpadearán
para indicar que una alarma se ha
activado. Luego, cuando usted pulse
el botón de desactivación de alarma,
el indicador indicará la temperatura
máxima dentro del congelador durante
la fase de alarma, y la indicación
dejará de parpadear. Basándose en la
indicación del indicador de
temperatura, usted podrá decidir si
debe o no desechar los productos
almacenados en el congelador.
-
-
ACTION FREEZE
A aproximadamente -12°C:
La mayor parte de los alimentos
pueden volver a ser congelados
inmediatamente. Los helados son
especialmente sensibles a los cambios
de temperatura y deben ser
consumidos lo antes posible.
A-9°C:
Los alimentos deben ser preparados
(calentados) antes de consumirlos o
volver a congelarlos.
Compruebe siempre las características
de los alimentos para saber si se
pueden congelar.
Pulsar el botón de congelación rápida
24 horas antes de meter los alimentos
en el congelador.
Cuando se congelen pequeños
volúmenes de alimentos durante
cualquier período de 24 horas, no es
necesario pulsar el botón de
congelación rápida.
La congelación rápida se cancela
automáticamente aproximadamente
50 horas después de que se haya
pulsado el botón de congelación
rápida.
La congelación rápida puede
interrumpirse pulsando de nuevo el
botón de congelación rápida más.
-
-
ACTION FREEZE
La lámpara amarilla de congelación
rápida permanecerá encendida todo el
tiempo que esté activado el botón de
congelación rápida.
· Cuando se congelen productos,
utilizar el estante superior, el estante
quelesiguedespuéshaciaabajo.
· No cubra la rejilla de ventilación
situada en la pared trasera.
· Extender los productos lo más que
se pueda para permitir la circulación
de aire entre ellos.
· No colocar productos alimenticios
que van a ser congelados,
directamente contra otros ya
congelados. El calor de los no
congelados puede producir que los
alimentos congelados se descongelen
en la superficie.
· Una vez que los productos están
congelados, reordenar los productos y
ponerlos lo más cerca posible unos de
otros.Losalimentossemantendrán
fríos más tiempo en el caso de una
interrupción de corriente.
34
Page 35

Tiempo de conservación
apropiado
Descongelación
más rápida, dejarlos a temperatura
Interior del armario
Cajones del congelador
ambiente o en agua fría. Cuando se
utilice un horno microondas que
descongele alimentos, deben seguirse
las instrucciones del fabricante del
mismo.
· No se deben congelar demasiados
alimentos al mismo tiempo. La
capacidad de congelación de la
unidad está indicada en la sección de
especificaciones.
Comprobar que el congelador
continua funcionando y mantiene la
temperatura ajustada un día después
de ponerse en marcha por primera
vez. Sólo después de este tiempo
podrá utilizarse el congelador para
congelar alimentos frescos.
Alimentos comprados en estado
congelado: Seguir el consejo de
tiempo máximo de conservación
indicado en el envase.
Alimentos congelados en casa:
Losalimentosgrasosysaladosno
deben ser conservados congelados
más de tres meses. Los alimentos
cocinados y los bajos en grasas
pueden guardarse unos seis meses.
Los alimentos sin grasas y la fruta se
pueden guardar aproximadamente un
año.
Para descongelar los alimentos lo
mejor es utilizar el propio frigorífico.
Colocar los alimentos en un plato con
bordes levantados para evitar de este
modo el derrame de líquidos. Para
descongelar los alimentos de manera
Extraiga el bandeja
Los cajones del congelador facilitan
una búsqueda rápida y sencilla de los
alimentos que desee utilizar. Para
ganar espacio, los cajones se pueden
quitar y los productos pueden ponerse
directamente encima de los estantes.
En todos los estantes, excepto en el
estante superior, es posible colocar
productos que sobresalgan 20 mm del
borde frontal. Esto permite un mayor
aprovechamiento del espacio
disponible. No se debe quitar el cajón
inferior. Es necesario para garantizar
una circulación adecuada.
35
Page 36

Bandeja de congelación
Cubitos de hielo
Consejos Útiles
Ahorro de energía
Utilice una bandeja de congelación
para congelar, bayas y verduras. Estas
quedan congeladas al cabo de unas 4
horas y pueden ser envasadas de la
forma ordinaria. Los alimentos que se
congelan de esta manera no se pegan
unos con otros, permitiendo utilizar
más sencillamente sólo las partes
necesarias de un paquete congelado.
Llenar la bandeja de cubitos a un
máximo de 3/4 partes de la capacidad
yaqueelaguaseexpandeal
congelarse. Sacar los cubitos
doblando la bandeja.
Si se guardan cubitos de hielo durante
mucho tiempo, se secarán y resultará
afectado su gusto. Por lo tanto, se
deben tirar los cubitos de hielo viejos y
preparar otros nuevos cuando hagan
falta.
· Prestar especial atención al sitio
donde se ha de colocar el aparato.
Véase el apartado "Instalación". Si el
aparato se instala correctamente
consumirá menos energía.
· Evitar abrir el aparato con mucha
frecuencia y por períodos demasiado
prolongados.
· Comprobar de vez en cuando que el
aparato está correctamente cerrado.
· Descongelar los productos
alimenticios dentro del frigorífico; el frío
de los productos congelados serán de
utilidad dentro del frigorífico.
· Limpiar el compresor y el sistema de
refrigeración situados en la parte
posterior del aparato con aspiradora
una vez al año más o menos.
· Dejar que los productos calientes se
enfríen antes de meterlos en el
frigorífico.
· Enfriar los alimentos en el frigorífico
antes de proceder a congelarlos en el
congelador.
· Colocar todos los alimentos en
recipientes herméticos para evitar la
innecesaria formación de escarcha.
· Seguir al detalle los consejos de
congelación de alimentos del apartado
"Uso del Congelador". Esto evitará el
derroche innecesario de energía.
· No ajustar una temperatura
demasiado baja en el congelador. Una
temperatura adecuada es la que se
encuentra en el orden de los -18,5°C a
-20,5°C .
· Descongelar el congelador cuando la
capa de escarcha alcance los 3-5
mm. Asegurarse de que la guarnición
de la puerta esté entera y siempre
limpia.
· Asegurarsedequelamoldurade
juntadelapuertaestéenteray
siempre limpia.
36
Page 37

El aparato y el medio
ambiente
Protección del medio
ambiente
Cuidados
No abra la puerta del frigorífico durante
la descongelación, ya que el sistema
de refrigeración está desactivado.
Si se
apaga el congelador el frigorífico
también se apagará.
Limpieza
Limpieza interior
Limpieza externo
· El matrerial aislante y el liquido
refrigeraante utilizados en este aparati
no dañan la capa de ozono.
· Todas las piezas del embalaje
pueden ser recicladas.
· El aparato ha sido diseñado para un
sencillo desmontaje y consiguiente
reciclado de sus piezas.
· Entregar el embalaje, los frigoríficos y
congeladores desechados a un
establecimiento de reciclaje. Ponerse
en contacto con las autoridades
municipales o con el establecimiento
de venta más próximo para solicitar
información
· Los alimentos deben guardarse en
recipientes re-utilizables. Evitar en lo
posible la utilización de material
desechable de un solo uso.
· Al limpiar el aparato, utilizar un
detergente suave.
· Deben seguirse los consejos
indicados en el apartado "Ahorro de
energía".
Quitar cualquier pieza floja y lavarla a
mano. Limpiar el extrerior, el interior y
la moldura de junta. Utilizar un paño
suave y un detergente también suave
diluído en agua templada. No cerrar la
puerta hasta que el interior del armario
esté totalmente seco.
Limpiar el canal de drenaje dentro del
frigorífico con bastoncillos de algodón
o un limpiador de tubos. Si se hubiera
atascado la manguera de drenaje
puede utilizarse una espiral de cortina
protegida de plástico.
Utilice sólo agua y detergente neutro
para limpiar la superficie de acero
inoxidable de la puerta, que se ha
sometido a un tratamiento especial
antihuellas. No utilice sustancias
abrasivas.
Separar el aparato de la pared y
limpiar con aspiradora la parte
posterior del aparato, el sistema de
refrigeración y el compresor.
Limpiar el aparato a intervalos
regulares.
Desconectar el aparato y desenchufar
de la toma de red o.
37
Page 38

Al cambiar de sitio el aparato, debe
Descongelación del congelador
Descongelación
Descongelación del frigorífico
Cuando no se vaya a utilizar el
aparato
Problema Posible causa / Solución
El indicador de temperatura
indica
levantarse por el borde frontal para
evitar rayar el suelo.
escarcha puede evitarse:
· no poniendo alimentos calientes
dentro del armario.
· evitando aperturas frecuentes de la
puerta o dejándola abierta demasiado
tiempo.
No es necesario descongelar este
aparato.
La sección de alimentos y el
evaporador frontal se descongelan
automáticamente con cierta
periodicidad (normalmente cada 24
horas), que varía en función de la
carga.
El frigorífico se descongela
automáticamente cada vez que se
detiene el compresor. La formación de
Desconectar el aparato y desenchufar
de la toma de red o.
Limpiar el aparato tal como se ha
explicado en la sección "Limpieza".
No cerrar el aparato: esta acción
producirá mal olor en el interior del
mismo.
Si se va a dejar el armario conectado,
pedir a alguien que lo compruebe de
vez en cuando para evitar que los
alimentos guardados en su interior no
se echen a perder en caso de una
interrupción del fluido eléctrico.
SI EL ARTÍCULO NO FUNCIONA SATISF ACTORIAMENTE
Si el aparato no funciona de la forma esperada, a menudo podrá corregir esta
situación usted mismo. Para evitar solicitar servicio innecesariamente, lea y siga
las instrucciones que se dan a continuación.
““.
Ha ocurrido un error durante la medición de
la temperatura. Llame al servicio técnico. (El
sistema de refrigeración seguirá manteniendo
los alimentos fríos, pero el ajuste de
temperatura no funcionará.)
38
Page 39

Alarma acústica + símbolo de
aviso roja parpadeando.
La temperatura es demasiado
alta dentro del congelador.
La temperatura es demasiado
alta dentro del refrigerador.
El agua se escurre al piso.
La temperatura es demasiado
alta dentro del congelador.
temperatura es demasiado alta
dentro del congelador.)
(La
Desactive la alarma pulsando el botón de
desactivación de alarma.
La alarma acústica puede haberse activado
debido a que:
El aparato ha sido recientemente puesto en
marcha y la temperatura aún es demasiado
alta. Consulte el capítulo "Encendido y ajuste
de la temperatura".
Tal vez la puerta haya estado abierta tanto
tiempo que se ha disparado la alarma de
"puerta abierta".
Seleccione una temperatura más baja.
Seleccione una temperatura más baja.
Ponga los alimentos en los lugares
apropiados dentro del refrigerador. Consulte
el capítulo "Temperatura dentro del
refrigerador".
Distribuya los alimentos para permitir que el
aire frío circule alrededor de ellos.
Asegúrese de que la puerta esté
completamente cerrada y que la guarnición
magnéticaestécompletaylimpia.
Coloque la manguera de vaciado, situada en
la parte posterior del frigorifico, encima del
recipiente de vaciado. Consulte el capítulo
"Antes de encender el gabinete por primera
vez".
Seleccione una temperatura más baja.
Asegúrese de que la puerta esté
completamente cerrada y que la guarnición
magnéticaestécompletaylimpia.
Si ha guardado alimentos calientes en el
congelador, espere algunas horas y luego
vuelva a comprobar la temperatura.
Distribuya los alimentos para permitir que el
aire frío circule alrededor de ellos.
39
Page 40

Se ha formado demasiada
escarcha y hielo.
La temperatura es demasiado
baja dentro del congelador.
El compresor funciona
continuamente.
El aparato no funciona en
absoluto. No hay refrigeración
o la luz interior no se enciende.
Ninguna lámpara indicadora se
enciende.
Interrupción del fluido eléctrico
Asegúrese de que la puerta esté
completamente cerrada y que la guarnición
magnéticaestécompletaylimpia.
Seleccione una temperatura más baja.
La función de Congelación Rápida puede
estar activada.
El indicador de temperatura indica la
temperatura máxima dentro del congelador.
Por lo tanto, es normal que haya una
diferencia entre la temperatura indicada en el
indicador y la temperatura (promedio) medida
de otra forma.
Seleccione una temperatura más baja.
Asegúrese de que la puerta esté
completamente cerrada y que la guarnición
magnéticaestécompletaylimpia.
El aparato no está encendido.
El suministro de energía no llega al aparato.
(Pruebe conectar otro aparato eléctrico a la
toma de corriente.)
Elfusiblesehaquemado.
La clavija de alimentación no está
debidamente conectada.
No abra innecesariamente el aparato,
excepto cuando el corte de energía parezca
ser largo, en cuyo caso los alimentos
deberán ser trasladados a un aparato que
funcione. En caso de que los productos
congelados aún estén duros cuando el
suministro de energía sea restablecido, éstos
podrán ser recongelados inmediatamente. Si
los alimentos se han descongelado pero aún
están frescos, usted podrá usarlos; sin
embargo, los alimentos deberán ser
preparados antes de volver a congelarlos o
consumirlos.
40
Page 41

El nivel de ruido del aparato es
demasiado alto.
modelo ERF37800WX
volumen neto frigorifico l 272
volumen neto congelador l 83
capacidad de congelación kg/24 h 10
tiempo deaumento 11
dimension mm
altura 2000
ancho 595
profundidad 600
El sistema de refrigeración siempre produce
algunos ruidos. Un ruido impulsivo se
escucha cuando el gas refrigerante es
bombeado dentro de los tubos de
refrigeración. Asimismo, el termostato
produce un ruido de "tictac" cuando el
compresor se enciende y se apaga. El nivel
de ruido varía dependiendo trabajo del
aparato.
Si le parece el que el nivel de ruido es
excesivo:
Doble cuidadosamente los tubos en la parte
posterior del aparato, asegurándose de que
no se toquen entre sí.
Si las almohadillas espaciadoras (situadas
entre la pared del gabinete y los tubos) se
sueltan, vuelva a colocarlas en posición.
Siga cuidadosamente las instrucciones del
capítulo "Instalación del aparato".
CARACTERISTICAS TÉCNICAS
41
Page 42

INSTALACIÓN
Cable
No cambie o quite el cable de
corriente tirando de él, particularmente
cuando mueva su aparto de su sitio.
Desembalaje
Extracción de los soportes de
transporte
Fijación de separadores
· El cable dañado puede causar un
cortocircuito, fuego y/o un shock
eléctrico.
· Si el cable de alimentación del
producto está dañado, evite riesgos y
deje que sea una empresa de servicio
técnico autorizado recomendada por
el proveedor o una persona cualificada
quien lo cambie.
Desembalar el aparato y comprobar
que esté en perfectas condiciones y
no haya sufrido daños durante el
transporte. Los daños producidos
durante el transporte deberán
comunicarse inmediatamente al
proveedor. Depositar el embalaje en
los contenedores apropiados para que
sea reciclado. Para más información
dirigirse a las autoridades municipales
o al distribuidor.
en el estante de cristal empujando el
mismohaciaadelantealolargodel
borde del estante hasta que se
detenga en el saliente del mismo.
Coger el borde posterior del estante
de cristal y tirar del estante y del
soportedetransportehastaqueel
estanteseinclineysepuedaquitarel
soporte. Algunos modelos están
equipados con una almohadilla
insonorizante situada debajo del
aparato. No se debe quitar esta
almohadilla.
!Nosedebepermitirquelosniños
jueguen con el embalaje. La película
plástica puede provocar asfixia.
Quitar la cinta y los soportes de
transporte de
·losladosdelapuerta
· dentro de las bisagras de la puerta
· los estantes
Quitar el soporte de transporte situado
Monte los separadores acoplados en
la parte posterior del panel tal como
muestra la ilustración.
42
Page 43

Limpieza
Cambio de sentido de apertura
de la puerta
Instalación del aparato
Aseqúrese que el cable y/o toma de
corriente no está atrapado, aplastado
o dañado por la parte trasera del
aparato.
No ponga artículos pesados o el
aparato mismo sobre el cable.
Si el cable de corriente está suelto, no
lo introduzca en el enchufe o toma de
corriente
Para garantizar un funcionamiento
óptimo del armario, asegurarse de
que:
Limpiar el interior del aparato con agua
templada, detergente suave de lavado
a mano y con un paño suave.
Se puede volver a colocar la puerta.
· puede producirse un calentamiento
del cable y/o toma y causar fuego.
· hay un riesgo de cortocircuito y
fuego.
· hay un riesgo de shock eléctrico o
fuego.
· el aparato es colocado en un sitio
seco, fresco y no está expuesto a la
luz directa del sol.
· el apatato no ha sido colocado
cerca de una fuente de calor, v.gr. una
cocina, hornillo o un lavavajillas.
· el aparato debe quedar recto y bien
asentado por sus cuatro esquinas. El
armario no debe ser apoyado contra la
pared. Si fuera necesario, ajustar las
patas con la llave de ajuste.
.
· hay una buena circulación de aire
alrededor del aparato y los canales de
aire situados debajo y detrás del
mismo no están bloqueados. El
espacio de ventilación por encima del
armario y de cualquier compartimiento
o armario de la parte superior debe ser
de al menos 4 cm. El espacio de
ventilación puede estar
a) directamente encima del aparato, o
b) detrás y encima del módulo
superior. En este caso, el espacio libre
detrás del armario debe tener un
mínimo de 50 mm de profundidad.
a)
· el aparato esté colocado solamente
en un lugar cuya temperatura
ambientalcorrespondaalaclase
climática* para el cual fue diseñado.
*La clase climática está indicada en la
placa del lada izquierdo del interior del
aparato.
b)
50mm
43
Page 44

Clase
Conexión eléctrica
climática
SN
N
ST
T
Si se coloca el aparato en un rincón y
el costado que tiene las bisagras da a
la pared, la distancia entre la pared y el
armario debe ser de al menos 150 mm
parapermitirquelapuertaseabralo
suficiente como para que los estantes
puedan quitarse.
Comprobar que la manguera de
drenaje de la parte posterior del
armario descarga en la bandeja de
goteo.
El enchufe debe mantenerse accesible
una vez que el producto haya sido
instalado.
para temperatura
ambiental de
+10°C hasta +32°C
+16°C hasta +32°C
+18°C hasta +38°C
+18°C hasta +43°C
Conecte el armario a una toma de red
eléctrica con toma de tierra.
Tensión: 230 V.
Fusible: 10 A.
Remitirse a la placa de características
situada en la parte interior izquierda
del aparato.
44
Page 45

Garantía/Servicio postventa
Condiciones de Garantía: ELECTROLUX HOME PRODUCTS ESPAÑA, S.A. garantiza al usuario
del aparato cuyos datos de identificación figuran en el presente documento, durante el plazo de
dos (2) años desde la fecha de su entrega, la reparación totalmente gratuita de las averías que experimente el aparato, incluyendo la presente garantía tanto el coste de las piezas de recambio
como el de la mano de obra y, en su caso, el del desplazamiento del personal técnico del Servicio
Oficial de la Marca al domicilio del usuario.
En el supuesto de que el producto, por su tamaño y movilidad, fuera susceptible de ser trasportado
por el usuario al Taller Oficial de la Marca, éste quedará liberado de la obligación de trasladar su
personal técnico al domicilio del usuario.
Para hacer uso del derecho de garantía aquí reconocido, será requisito necesario que el aparato se
destine al uso privado. También será necesario presentar al personal técnico de la marca, antes de
su intervención, la factura o tique de compra del aparato o el albarán de entrega correspondiente
si éste fuera posterior, en unión del presente documento.
Exclusiones: La presente garantía no cubre la instalación, nivelación, instrucciones de uso del aparato ni sustitución de lámparas. No quedan cubiertas por esta garantía y por tanto la misma quedará sin efecto en los casos de averías producidas como consecuencia de:
– Fuerza mayor (fenómenos atmosféricos, geológicos, etc.)
– Uso inadecuado o no acorde con las instrucciones del fabricante.
– Falta de mantenimiento y limpieza: filtros con objetos tales como botones, monedas, etc; con-
densadores con polvo, pelusa u otros elementos que impidan la libre circulación del aire; cubetas de detergente con residuos, etc.
– Uso de productos de limpieza abrasivos que causen daños en chapa, pintura y plásticos.
– La rotura accidental de componentes de plástico y vidrio.
– La instalación y/o conexión incorrectas o no reglamentarias (voltaje, presión de gas o agua, co-
nexión eléctrica o hidráulica no adecuadas).
– Los daños estéticos no denunciados en el momento de la entrega.
La garantía no tendrá efecto en caso de manipulación de la placa de características del aparato o
de los datos que figuren en la factura, tique de compra o albarán de entrega de aquél o de los consignados en este documento. Tampoco producirá efecto si se produjesen intervenciones de personal técnico no autorizado o no perteneciente al Servicio Oficial de la marca.
Se informa al usuario que, además de la garantía reconocida en este documento, tiene la protección que le concede la Ley 23/2003, de 10 de julio, respecto de la exigencia de que el bien adquirido sea conforme con el contrato de compraventa, pudiendo reclamar al vendedor, en caso de
disconformidad, por las faltas que se pongan de manifiesto en el plazo de dos (2) años desde la
entrega. En ese supuesto, tendrá derecho a solicitar la reparación gratuita del bien o a la sustitución de éste, salvo que una de esas opciones resulte imposible o desproporcionada.
ELECTROLUX HOME PRODUCTS ESPAÑA, S.A.-Sociedad Unipersonal
Albacete, n 3C - 28027 MADRID - CIF A08145872
Central Servicio Técnico
Ctra. M-300 km, 29,900
Apdo. 119
28802 Alcalá de Henares (Madrid)
Recepción de Llamadas
Averías 902 116 388
Atención Usuarios:
e-mail: usuarios.postventa@electrolux.es
Para España:
Puede comprar recambios y accesorios on-line entre en
http://www.service.electrolux.com y seleccione Tienda Virtual
45
Page 46

Garantía Europea
Este aparato está garantizado por Electrolux en cada uno de los países indicados en la parte posterior de este manual durante el periodo especificado en la garantía del aparato o el periodo que
prevea la ley. Si usted se traslada de uno de estos países a otro de los países abajo indicados, la
garantía del aparato se desplazará con usted siempre que se cumplan los siguientes requisitos:
•
La garantía entra en vigor el día en que usted compre el aparato, que se demostrará mediante
un justificante de compra válido emitido por el vendedor del aparato.
• La garantía del aparato tendrá el mismo periodo de validez y cubrirá las mismas piezas y mano
de obra que las garantías emitidas en su nuevo país de residencia para ese modelo o gama de
aparatos en concreto.
• La garantía del aparato es personal del comprador original e intransferible.
•
El aparato deberá ser instalado y utilizado según las instrucciones de Electrolux y es únicamente de uso doméstico, lo que significa que no podrá ser utilizado con fines comerciales.
• El aparato deberá ser instalado observando todas las normativas relevantes que estén en vigor
en su nuevo país de residencia.
Las disposiciones de esta Garantía Europea no afectan a los derechos que le correspondan por ley.
www.electrolux.com
p t b
Albania +35 5 4 261 450 Rr. Pjeter Bogdani Nr. 7 Tirane
Belgique/België/
Belgien
Èeská republika +420 2 61 12 61 12 Budìjovická 3, Praha 4, 140 21
Danmark +45 70 11 74 00 Sjællandsgade 2, 7000 Fredericia
Deutschland +49 180 32 26 622 Muggenhofer Str. 135, 90429 Nürnberg
Eesti +37 2 66 50 030 Mustamäe tee 24, 10621 Tallinn
España +34 902 11 63 88
France www.electrolux.fr
Great Britain +44 8705 929 929
Hellas +30 23 10 56 19 70 4 Limnou Str., 54627 Thessaloniki
Hrvatska +385 1 63 23 338 Slavonska avenija 3, 10000 Zagreb
Ireland +353 1 40 90 753 Long Mile Road Dublin 12
Italia +39 (0) 434 558500 C.so Lino Zanussi, 26 - 33080 Porcia (PN)
Latvija +37 17 84 59 34 Kr. Barona iela 130/2, LV-1012, Riga
Lietuva +370 5 2780609 Verkių 29, LT09108 Vilnius
+32 2 363 04 44 Bergensesteenweg 719, 1502 Lembeek
Carretera M-300, Km. 29,900
Alcalá de Henares Madrid
Addington Way, Luton, Bedfordshire
LU4 9QQ
46
Page 47

p t b
Luxembourg +35 2 42 43 13 01 Rue de Bitbourg, 7, L-1273 Hamm
Magyarország +36 1 252 1773
Nederland +31 17 24 68 300
Norge +47 81 5 30 222 Risløkkvn. 2 , 0508 Oslo
Österreich +43 18 66 400 Herziggasse 9, 1230 Wien
Polska +48 22 43 47 300 ul. Kolejowa 5/7, Warsaw
Portugal +351 21 440 39 00
Romania +40 21 451 20 30 Str. Garii Progresului 2, S4, 040671 RO
Schweiz/Suisse/
Svizzera
Slovenija +38 61 24 25 731
Slovensko +421 2 43 33 43 22
Suomi +35 8 26 22 33 00 Konepajanranta 4, 28100 Pori
Sverige +46 (0)771 76 76 76
Türkiye +90 21 22 93 10 25
Россия +7 495 9377837
+41 62 88 99 111 Industriestrasse 10, CH-5506 Mägenwil
H-1142 Budapest XIV,
Erzsébet királyné útja 87
Vennootsweg 1, 2404 CG Alphen aan den Rijn
Quinta da Fonte - Edificio Gonçalves
Zarco - Q 35
2774 - 518 Paço de Arcos
Electrolux Ljubljana, d.o.o.
Tržaška 132, 1000 Ljubljana
Electrolux Slovakia s.r.o., Electrolux
Domáce spotrebièe SK, Seberíniho 1,
821 03 Bratislava
Electrolux Service, S:t Göransgatan 143,
S-105 45 Stockholm
Tarlabaþý caddesi no : 35 Taksim
Istanbul
129090 Москва, Олимпийский
проспект, 16, БЦ „Олимпик“
47
Page 48

484950
Page 49

Page 50

Page 51

51
Page 52

www.electrolux.com
www.electrolux.uk
www.electrolux.es
8183967-00/2 082007
 Loading...