

Electrolux ERES38820W, ERES38820X User Manual [fi]

user manual
käyttöohje
bruksanvisning
bruksanvisning
Refrigerator
Jääkaappi
Kjøleskap
Kylskåp
ERES38820W
ERES38820X

2 electrolux
Electrolux. Thinking of you.
Share more of our thinking at www.electrolux.com
CONTENTS
Safety information 2
Control panel 4
Water dispenser 6
First use 7
Daily use 8
Helpful hints and tips 9
SAFETY INFORMATION
In the interest of your safety and to ensure
the correct use, before installing and first
using the appliance, read this user manual
carefully, including its hints and warnings.
To avoid unnecessary mistakes and accidents, it is important to ensure that all people using the appliance are thoroughly familiar with its operation and safety features.
Save these instructions and make sure that
they remain with the appliance if it is moved
or sold, so that everyone using it through its
life will be properly informed on appliance
use and safety.
For the safety of life and property keep the
precautions of these user's instructions as
the manufacturer is not responsible for
damages caused by omission.
Children and vulnerable people safety
• This appliance is not intended for use by
persons (including children) with reduced
physical, sensory or mental capabilities,
or lack of experience and knowledge, unless they have been given supervision or
instruction concerning use of the appliance by a person responsible for their
safety.
Children should be supervised to ensure
that they do not play with the appliance.
• Keep all packaging well away from children. There is risk of suffocation.
• If you are discarding the appliance pull
the plug out of the socket, cut the connection cable (as close to the appliance
as you can) and remove the door to prevent playing children to suffer electric
shock or to close themselves into it.
• If this appliance featuring magnetic door
seals is to replace an older appliance
Care and cleaning 10
What to do if… 11
Technical data 14
Installation 14
Environmental concerns 18
Subject to change without notice
having a spring lock (latch) on the door or
lid, be sure to make that spring lock unusable before you discard the old appliance. This will prevent it from becoming a
death trap for a child.
General safety
Warning!
Keep ventilation openings, in the appliance
enclosure or in the built-in structure, clear of
obstruction.
• The appliance is intended for keeping
foodstuff, production of cold water, with
or without carbon dioxide and for beverages in a normal household as explained
in this instruction booklet.
• If the gas cylinder is used for other purposes than that intended or if it is filled by
an unauthorised person, all guarantees
automatically become null and void.
• Do not use a mechanical device or any
artificial means to speed up the thawing
process.
• Do not use other electrical appliances
(such as ice cream makers) inside of refrigerating appliances, unless they are approved for this purpose by the manufacturer.
• Do not damage the refrigerant circuit.
• The refrigerant isobutane (R600a) is contained within the refrigerant circuit of the
appliance, a natural gas with a high level
of environmental compatibility, which is
nevertheless flammable.
During transportation and installation of
the appliance, be certain that none of the

electrolux 3
components of the refrigerant circuit become damaged.
If the refrigerant circuit should become
damaged:
– avoid open flames and sources of igni-
tion
– thoroughly ventilate the room in which
the appliance is situated
• It is dangerous to alter the specifications
or modify this product in any way. Any
damage to the cord may cause a shortcircuit, fire and/or electric shock.
Warning! Any electrical component
(power cord, plug, compressor) must
be replaced by a certified service agent
or qualified service personnel to avoid
hazard.
1. Power cord must not be lengthened.
2. Make sure that the power plug is not
squashed or damaged by the back
of the appliance. A squashed or
damaged power plug may overheat
and cause a fire.
3. Make sure that you can come to the
mains plug of the appliance.
4. Do not pull the mains cable.
5. If the power plug socket is loose, do
not insert the power plug. There is a
risk of electric shock or fire.
6. You must not operate the appliance
1)
without the lamp cover
of interior
lighting.
• This appliance is heavy. Care should be
taken when moving it.
• Do not remove nor touch items from the
freezer compartment if your hands are
damp/wet, as this could cause skin abrasions or frost/freezer burns.
• Avoid prolonged exposure of the appliance to direct sunlight.
•
Bulb lamps
2)
used in this appliance are
special purpose lamps selected for
household appliances use only. They are
not suitable for household room illumination.
Daily use
• Do not put hot pot on the plastic parts in
the appliance.
1) If the lamp cover is foreseen
2) If the lamp is foreseen
3) If a water connection is foreseen.
• Do not store flammable gas and liquid in
the appliance, because they may explode.
• Appliance's manufacturers storage recommendations should be strictly adhered
to. Refer to relevant instructions.
Care and cleaning
• Before maintenance, switch off the appliance and disconnect the mains plug from
the mains socket.
• Do not clean the appliance with metal
objects.
• Regularly examine the drain in the refrigerator for defrosted water. If necessary,
clean the drain. If the drain is blocked,
water will collect in the bottom of the appliance.
Installation
Important! For electrical connection
carefully follow the instructions given in
specific paragraphs.
• Unpack the appliance and check if there
are damages on it. Do not connect the
appliance if it is damaged. Report possible damages immediately to the place
you bought it. In that case retain packing.
• It is advisable to wait at least four hours
before connecting the appliance to allow
the oil to flow back in the compressor.
• Adequate air circulation should be
around the appliance, lacking this leads
to overheating. To achieve sufficient ventilation follow the instructions relevant to
installation.
• Wherever possible the back of the product should be against a wall to avoid
touching or catching warm parts (compressor, condenser) to prevent possible
burn.
• The appliance must not be located close
to radiators or cookers.
• Make sure that the mains plug is accessible after the installation of the appliance.
•
Connect to potable water supply only.
3)
Service
• Any electrical work required to do the
servicing of the appliance should be car-

4 electrolux
ried out by a qualified electrician or competent person.
• This product must be serviced by an authorized Service Centre, and only genuine spare parts must be used.
Environment Protection
This appliance does not contain gasses
which could damage the ozone layer,
in either its refrigerant circuit or insula-
be discarded together with the urban
refuse and rubbish. The insulation foam
contains flammable gases: the appliance shall be disposed according to
the applicable regulations to obtain
from your local authorities. Avoid damaging the cooling unit, especially at the
rear near the heat exchanger. The materials used on this appliance marked
by the symbol
tion materials. The appliance shall not
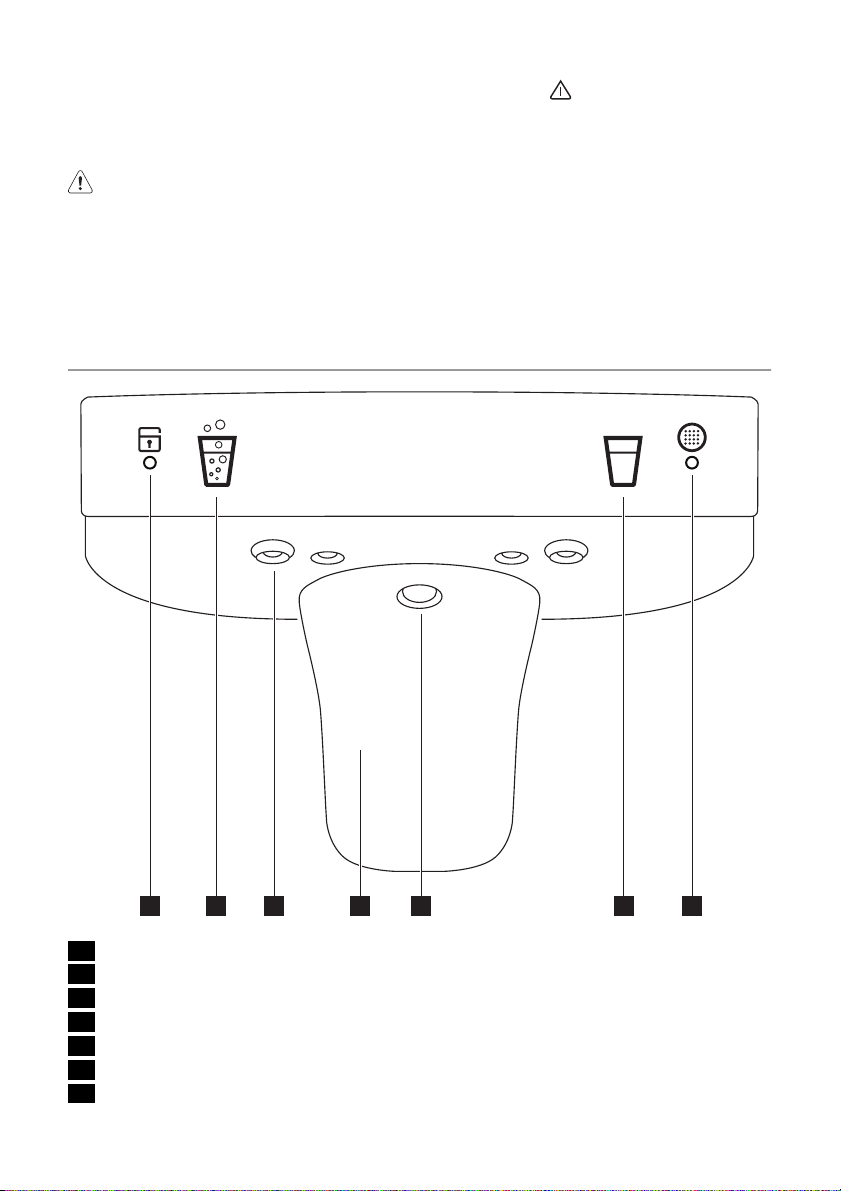
CONTROL PANEL
AC
BDE
A - Appliance button ON/OFF D - Function button
B - Temperature regulation button E - Confirmation button
C - Temperature and function indicator
Display/Indicator
1 2 3
are recyclable.
4567
Temperature indicator.
1
Alarm indicator
2
Shopping function
3
Child Lock function
4
5
6
7
Switching on
Insert the plug into the power outlet. If the
display is not illuminated, press button (A),
to start the appliance.
For optimal food storage select the Eco
Mode and the temperature is set to +5°C in
the fridge.
To select a different temperature refer to
"Temperature regulation".
Extra Humidity function
Positive temperature indicator
Eco mode function
Important! If the door remains open for
some minutes, the light will turn off automatically. The light is reset by closing and
opening the door itself.
Switching off
The appliance is shut off by pressing button
(A) until a countdown from -3 -2 -1 is completed.

electrolux 5
Temperature regulation
The temperature may be changed by
pressing the button (B).
The current temperature setting flashes and
by pressing button (B) again the set temperature is possible to change in steps of
one degree.
The selected-temperature will be reached
within 24 hours.
Functions Menu
By activating the button (D) the functions
menu is operating.
Each function could be confirmed by pressing button (E). If there is no confirmation after some seconds the display will go out
from the menu and return in normal condition.
The following functions are indicated:
Child Lock function
Shopping function
Eco Mode function
Extra Humidity function
Child Lock Function
The Child Lock function is activated by
pressing key (D) (several times if necessary)
until the corresponding icon appears
.
You must confirm the choice by pressing
key (E) within few seconds. You will hear
the buzzer and the icon remains lighted. In
this condition any possible operation
through the keys does not cause any
change as long as this function is activated.
It is possible to de-activate the function at
any time by pressing key (D) until the corresponding icon will flash and then key (E).
Shopping Function
If you need to insert a large amount of
warm food, for example after doing the grocery shopping, we suggest activating the
Shopping function to chill the products
more rapidly and to avoid warming the other food which is already in the refrigerator.
The Shopping function is activated by
pressing key (D) (several times if necessary)
until the corresponding icon appears
.
You must confirm the choise by pressing
key (E) within few seconds. You will hear
the buzzer and the icon remains lighted.
The Shopping function shuts off automatically after approximately 6 hours. It is possible to de-activate the function at any time
by pressing key (D) until the corresponding
icon will flash and then key (E).
Eco Mode Function
The Eco Mode function is activated by
pressing button D (several times if necessa-
ry) until the corresponding icon appears
(or setting the temperature at +5°C).
You must confirm the choice by pressing
button E within few seconds. You will hear
the buzzer and the icon remains lighted.
In this condition the chosen temperatures
are automatically set (+5°C), in the best
conditions for storing food.
It is possible to de-activate the function at
any time by changing the selected temperature in the compartment.
Extra Humidity function
If you need to increase the humidity in the
refrigerator, we suggest activating the Extra
Humidity function.
The Extra Humidity function is activated by
pressing button (D) (several times if necessary) until the corresponding icon appears.
You must confirm the choice by pressing
button (E) within few seconds. You will hear
the buzzer and the icon remains lighted.
It is possible to de-activate the function at
any time by pressing button (D) until the
corresponding icon will flash and then button (E).
Holiday Function H
The Holiday function sets the temperature
at approx +15°C. This function allows you
to keep the refrigerator shut and empty during a long holiday period ( e. g. the summer
holidays) without the formation of a bad
smell.
The Holiday Function H may be regulated
by pressing the button B. By pressing the
button B the current temperature setting
flashes on the indicator. Press the button B
again. When on the display appears the letter H confirm the choice of the temperature
or by pressing the button E, (you will hear
the buzzer) or by waiting for some seconds
(you will not hear the buzzer).
Now the refrigerator is in the Holiday function in the energy- saving mode and the in-
6 electrolux
dicator shows the letter H. It is possible to
de-activate the function at any time by
changing the selected temperature in the
compartment.
Warning! The fridge compartment
must be empty with Holiday function
on.
Door open alarm
An acoustic alarm will sound if the door is
left open for a few minutes. The door open
alarm conditions are indicated by:
WATER DISPENSER
•
flashing icon
• acoustic buzzer
When normal conditions are restored (door
closed), the alarm will stop.
During the alarm phase, the buzzer can be
switched off by pressing button (E).
1 2 7 6 5 3 4
1 Child lock indicator
2 Carbonated water button
3 Plain water button
4 Water filter indicator
5 Water outlet
6 Flap
7 Illumination
Child lock function
The child lock function is activated at delivery.
Temporary unlocking
Press button 2 or 3 for about three seconds
until the child lock indicator light (1) goes
out.
The child lock function is reactivated automatically after about three seconds.
electrolux 7
Permanent unlocking
Press buttons 2 and 3 at the same time for
about three seconds.
The button 2 or 3 lights up to indicate unlocking and the child lock indicator (1) goes
out.
To activate the child lock function
Press buttons 2 and 3 at the same time for
about three seconds.
The child lock indicator is lit when activated.
Selecting and dispensing water
Before dispensing water, select either carbonated water (2) or plain water (3). The actual choice is indicated by the lit button.
Water selection can be changed while the
water is running.
Water is dispensed by pressing a glass or
other container towards the flap (6). Draw
back the glass or container to stop the water flow.
Any water that drips or is spilled is collected
in the drip tray below the water dispenser.
The drip tray can be detached and emptied
when necessary.
Lighting
The water dispenser lighting (7) illuminates
automatically when water is dispensed.
For continuous lighting
1. Make sure that the water dispenser is
unlocked.
2. Press the plain water button (3) until the
lighting goes on (about three seconds).
Brightness is now about 50% until the dispenser is used.
Switch off the lighting
1. Make sure that the water dispenser is
unlocked.
2. Press the plain water button (3) until the
lighting goes out (about three seconds).
Water filter indicator
When the water filter indicator (4) lights up
the water filter has about 20% remaining
lifetime. In this situation, it is recommended
that you buy a replacement filter.
When the water filter indicator starts flashing, the water filter lifetime is consumed .
Replace the water filter without delay, refer
to "Installation of the water filter".
When the water filter is replaced. Press the
plain water button (3) for a few seconds to
reset the water filter indicator.
FIRST USE
Cleaning the interior
Before using the appliance for the first time,
wash the interior and all internal accessories with lukewarm water and some neutral
soap so as to remove the typical smell of a
brand-new product, then dry thoroughly.
Important! Do not use detergents or abrasive powders, as these will damage the finish.
Check that the drain hose at the rear of the
cabinet discharges into the drip tray.

8 electrolux
DAILY USE
Use of the fridge compartment
The temperature of this compartment may
be regulated between +2°C and +8°C.
During normal functioning the indicator
shows the set temperature.
A medium setting is generally the most
suitable.
The exact setting should be chosen keeping in mind that the temperature inside the
appliance depends on:
• room temperature
• how often the door is opened
• the quantity of food stored
• the location of the appliance.
Important! If the ambient temperature is
high or the appliance is fully loaded, and the
appliance is set to the lowest temperatures,
it may run continuously causing frost to
form on the rear wall. In this case the
Temperature regulator must be set to a
higher temperature to allow automatic
defrosting and therefore reduced energy
consumption.
Taste Guard Filter
Your appliance is equipped with a carbon
filter behind the air lever flap.
The filter purifies the air from unwanted
odours in the fridge compartment preserving food quality.
On delivery the filter is in a plastic bag. Refer to "Installation of the Taste Guard filter"
for instructions.
Important! Make sure that the air lever flap
is closed to obtain proper function.
Movable shelves
The walls of the refrigerator are equipped
with a series of runners so that the shelves
can be positioned as desired.
Some shelves must be lifted up by the rear
edge to enable them to be removed.
Important! Do not move the glass shelf
above the vegetable drawer to ensure
correct air circulation.
Vegetable Drawer
The drawer is suitable for storing fruit and
vegetables.
Some models have a separator inside the
drawer that can be placed in different positions to allow for the subdivision best suited
to personal needs.
All parts inside the drawer can be removed
for cleaning purposes.
Bottle rack
Place the bottles (with the opening facing
front) in the pre-positioned shelf.
Important! If the shelf is positioned
horizontally, place only closed bottles.
This bottle holder shelf can be tilted in order
to store previously opened bottles. To obtain this result, pull the shelf up so it can rotate upwards and be placed on the next
higher level.

Positioning the door shelves
To permit storage of food packages of various sizes, the door shelves can be placed
at different heights.
To make these adjustments proceed as follows:
HELPFUL HINTS AND TIPS
Hints for energy saving
• Do not open the door frequently or leave
it open longer than absolutely necessary.
• If the ambient temperature is high and
the Temperature Regulator is set to low
temperature and the appliance is fully
loaded, the compressor may run continuously, causing frost or ice on the evaporator. If this happens, set the Temperature Regulator toward warmer settings to
allow automatic defrosting and so a saving in electricity consumption.
Hints for fresh food refrigeration
To obtain the best performance:
• do not store warm food or evaporating
liquids in the refrigerator
• do cover or wrap the food, particularly if it
has a strong flavour
•position food so that air can circulate
freely around it
Hints for refrigeration
Useful hints:
Meat (all types) : wrap in polythene bags
and place on the glass shelf above the vegetable drawer.
For safety, store in this way only one or two
days at the most.
electrolux 9
gradually pull the shelf in the direction of the
arrows until it comes free, then reposition
as required.
Important! Do not move the lower door
shelf to ensure correct air circulation.
Cooked foods, cold dishes, etc..: these
should be covered and may be placed on
any shelf.
Fruit and vegetables: these should be thoroughly cleaned and placed in the special
drawer(s) provided.
Butter and cheese: these should be placed
in special airtight containers or wrapped in
aluminium foil or polythene bags to exclude
as much air as possible.
Milk bottles: these should have a cap and
should be stored in the bottle rack on the
door.
Bananas, potatoes, onions and garlic, if not
packed, must not be kept in the refrigerator.
Hints for temperature inside the fridge
• A suitable temperature inside the fridge is
approx. +5° C. When the temperature
regulator is set to +5° C this represents
the mean temperature in the fridge. It is
normal with higher temperature in the top
of the fridge. If the temperature regulator
is set to a cold temperature, the ambient
temperature is high or if the fridge is fully
loaded the compressor will run for a longer time. If too cold, change to a higher
temperature setting.
10 electrolux
Important! Do not place food against or
close to the temperature sensor. This can
result in too cold temperatures.
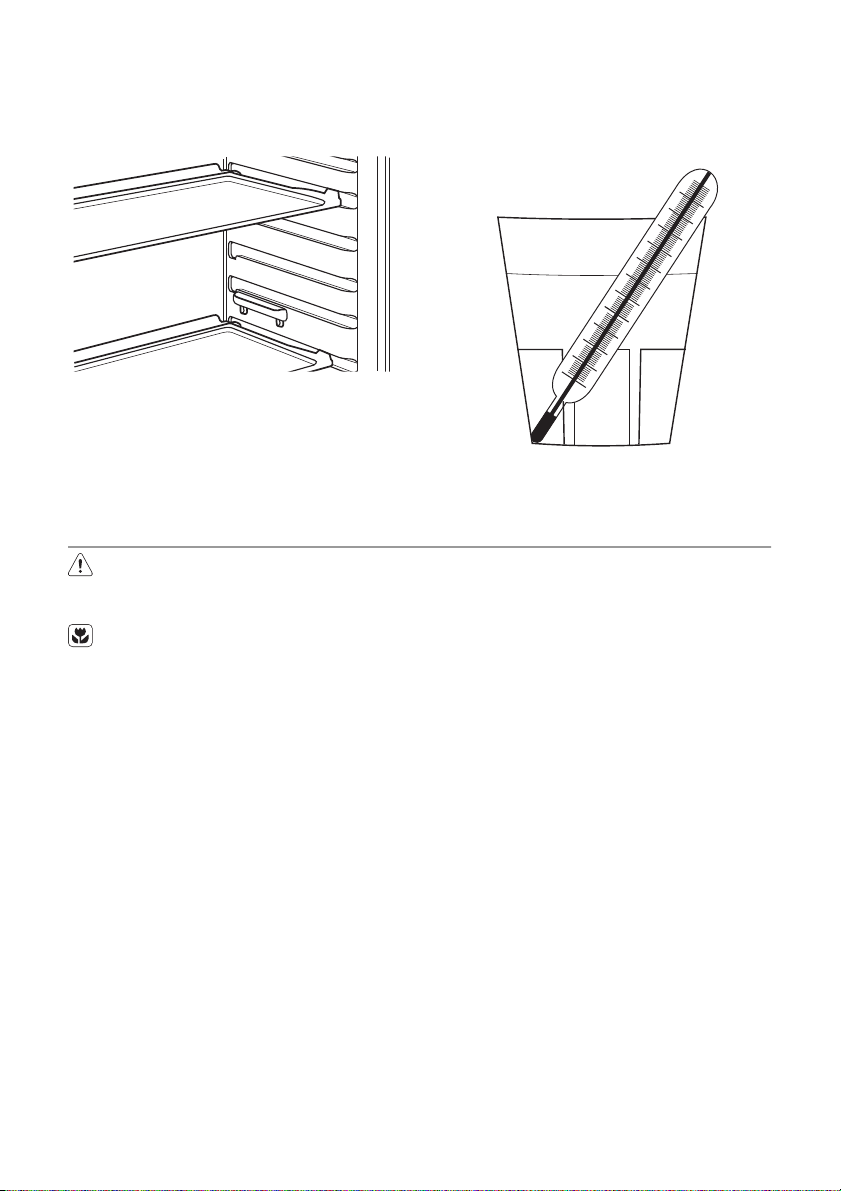
• If you want to check the temperature of
food stored in the refrigerator, place a
glass of water centrally in the cabinet,
and put a proper thermometer with an
accuracy of +/– 1 °C into it. After 6 hours
the temperature can be monitored. The
CARE AND CLEANING
Caution! Unplug the appliance before
carrying out any maintenance
operation.
This appliance contains hydrocarbons
in its cooling unit; maintenance and recharging must therefore only be carried
out by authorized technicians.
Periodic cleaning
The equipment has to be cleaned regularly:
• clean the inside and accessories with
lukewarm water and some neutral soap.
• regularly check the door seals and wipe
clean to ensure they are clean and free
from debris.
• rinse and dry thoroughly.
Important! Do not pull, move or damage
any pipes and/or cables inside the cabinet.
Never use detergents, abrasive powders,
highly perfumed cleaning products or wax
polishes to clean the interior as this will
damage the surface and leave a strong
odour.
Clean the condenser (black grill) and the
compressor at the back of the appliance
with a brush. This operation will improve the
performance of the appliance and save energy consumption.
measuring shall be performed under
steady-stated conditions (without changing the load).
Important! Take care of not to damage the
cooling system.
Important! When moving the cabinet, lift it
by the front edge to avoid scratching the
floor.
Many proprietary kitchen surface cleaners
contain chemicals that can attack/damage
the plastics used in this appliance. For this
reason use a soft cloth rinsed in warm water and neutral soap emulsion for cleaning
external surfaces.
Important! Do not use detergents or
abrasive paste as these will damage the
paint, or stainless steel anti finger print
coating.
After cleaning, reconnect the equipment to
the mains supply.
Replacing the Taste Guard filter
To get the best performance the Taste
Guard filter once every year.
New active filters can be purchased from
your local dealer.
Refer to "Installation of the Taste Guard filter" for instructions.
Replacing the water filter

electrolux 11
Remove the filter. A small amount of water
will run out. Dry off and fit the new filter.
Refer to "Installation of the water filter"
Replacement filters can be ordered from
Electrolux Service Force Centre,
The water connection does not need to
be switched off when changing the filter.
Replacing the gas cylinder
Remove the gas cylinder, refer to "Installation of the gas cylinder"
The replacement gas cylinder is obtained
through your local dealer.
Cleaning the water dispenser
When necessary, clean the surfaces of the
dispenser, using only a soft cloth and warm
water.
The dispenser drip tray can be cleaned with
a lukewarm water and some neutral soap.
Lime deposits on the dispenser surface can
removed using vinegar or diluted acetic
acid as cleaning agent. Wipe clean with a
damp cloth.
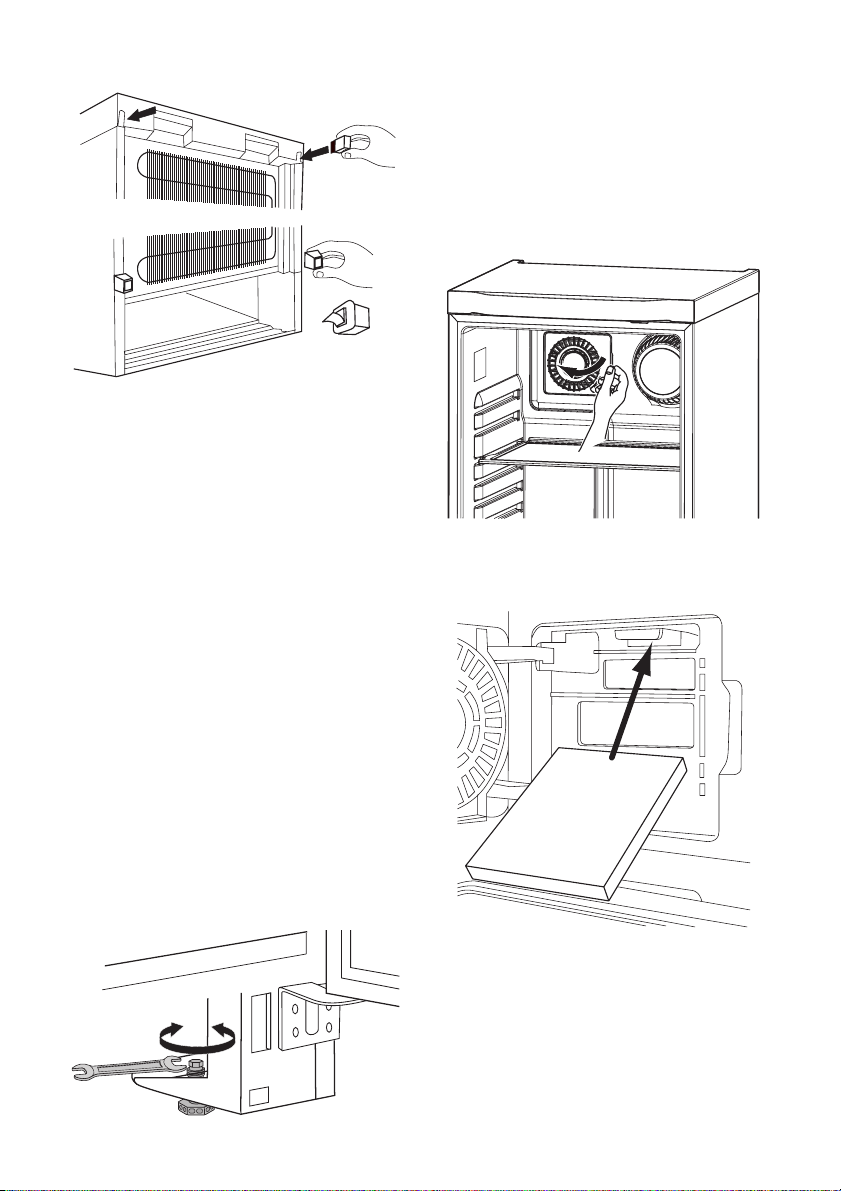
Cleaning the ventilation grille
The ventilation grille can be removed for
washing.
Make sure the door is open and then:
1. Loosen the upper edge of the grille by
pulling outward/downward.
2. Pull the grille straight out to completely
remove it.
3. Vacuum clean under the cabinet.
Defrosting the refrigerator
Frost is automatically eliminated from the
evaporator of the refrigerator compartment
every time the motor compressor stops,
during normal use. The defrost water drains
out through a drain hole into a special container at the back of the appliance, over the
motor compressor, where it evaporates.
Periods of non-operation
When the water system is not use for a long
period, turn off the water connection to the
refrigerator.
• A filter that has been in service shall not
be exposed to temperatures below 0°C
as cracking of the filter body may occur
due to freezing expansion.
• If the filter still is to be preserved for later
reuse, suitable storage temperature will
be +5°C.
When the appliance is not in use for long
periods, take the following precautions:
1. disconnect the appliance from electrici-
ty supply
2. remove all food
3. clean the appliance and all accessories
4. leave the door/doors open to prevent
unpleasant smells.
Before using the appliance again, rinse the
system thoroughly by dispensing at least
three litres (5 pints) of water.
• If necessary, the system can be cleaned
by using a sanitizing kit which can be ordered through Electrolux Service Force
Centre or through our website www.electrolux.com.
Important! If the cabinet will be kept on,
ask somebody to check it once in a while to
prevent the food inside from spoiling in
case of a power failure.
WHAT TO DO IF…
During operation of the appliance some
smaller but annoying trouble can often occur, which does not require calling a technician out. In the following chart information is
given about them to avoid unnecessary
charges on service.
12 electrolux
Important! The operation of the appliance
goes with certain sounds (compressor and
circulating sound). This not means a
trouble, but a normal operation.
compressor does not mean being no
current. That is why you must not touch the
electrical parts of the appliance before
breaking the circuit.
Important! The appliance operates
discontinuously, so the stopping of
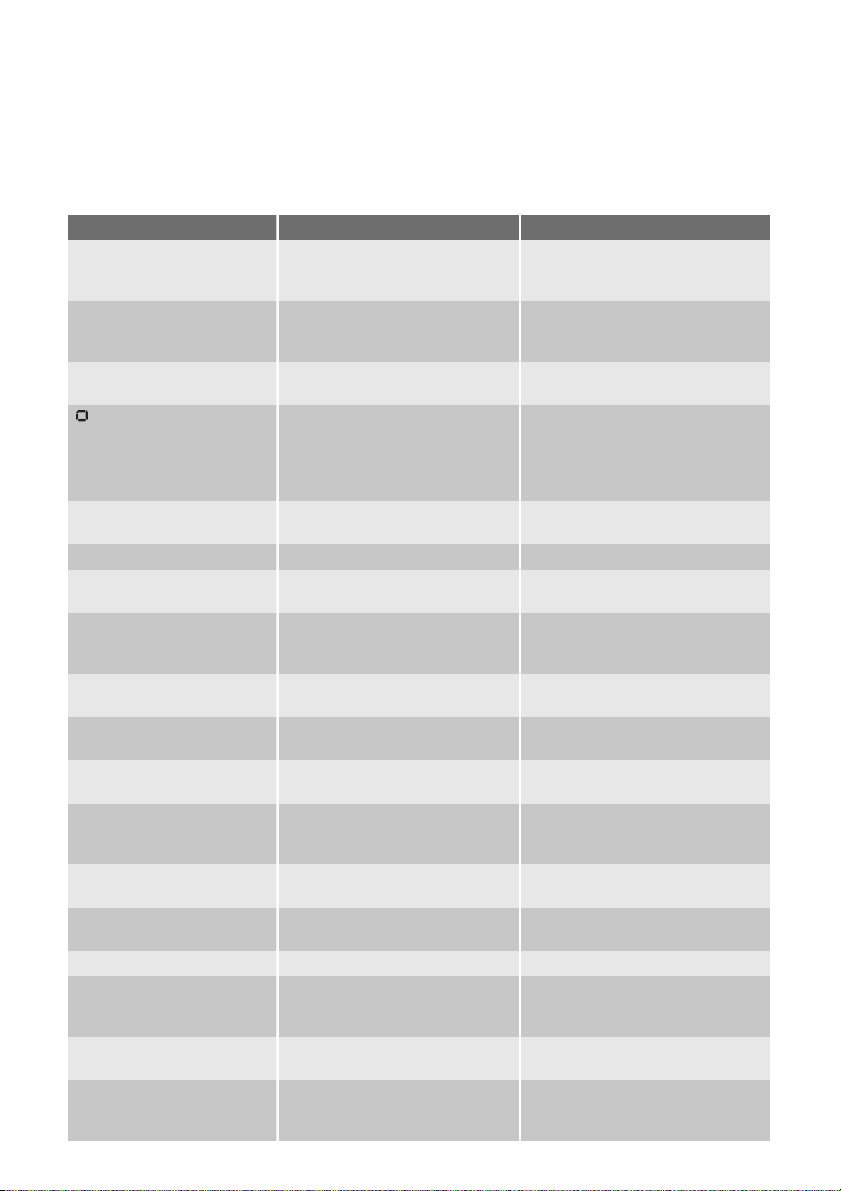
Problem Possible cause Solution
The appliance is noisy.
Sound level is too high
during dispensing of water.
The buzzer sounds. The
Alarm icon flashing.
upper or lower square
is shown in the temperature display.
The compressor runs
continuously.
The door is not closed correctly. Refer to "Closing the door".
The door has been opened too
The food temperature is too
The room temperature is too
Water flows inside the
refrigerator.
Food prevent that water flows
Water flows on the
ground.
The temperature in the
appliance is too cold.
The temperature in the
appliance is too warm.
The door is not closed correctly. Refer to "Closing the door".
The food temperature is too
The temperature in the
refrigeration is too warm.
Large quantities of food to be
The appliance is not supported
properly.
The transport supporting tie of
the water system pressure
pump has not been removed.
The door is not closed correctly. Refer to "Door open alarm".
An error has occurred in measuring the temperature
The Temperature regulator may
be set incorrectly.
frequently.
high.
high.
The water outlet is clogged. Clean the water outlet.
into the water collector.
The melting water outlet does
not flow in the evaporative tray
above the compressor.
The Temperature regulator may
be set incorrectly.
The Temperature regulator may
be set incorrectly.
warm.
There is no cold air circulation in
the appliance.
cooled were put in at the same
time.
Check if the appliance stands stable (all feet and wheels should be
on the floor). Refer to "Levelling".
Remove the tie. Refer to "Removing the transport support".
Call your service representative
(the cooling system will continue
to keep food products cold, but
temperature adjustment will not
be possible)
Set a warmer temperature.
Do not keep the door open longer
than necessary.
Let the food temperature decrease to room temperature before storage.
Decrease the room temperature.
Make sure that food do not touch
the rear plate.
Attach the melting water outlet to
the evaporative tray.
Set a warmer temperature.
Set a colder temperature.
Let the food temperature decrease to room temperature before storage.
Make sure that there is cold air
circulation in the appliance.
Insert smaller quantities of food to
be cooled at the same time.
electrolux 13
Problem Possible cause Solution
The appliance does not
operate.
The mains plug is not connected
The appliance has no power.
Not enough carbon dioxide in the water.
Too much carbon dioxide
in the water.
No carbon dioxide.
No or very low water
flow.
Sediment in the water. Remove and clean the strainer in
Water supply obstructed. Check water supply.
Only gas comes out
when dispensing carbonated water.
Sediment in the water. Remove and clean the strainer in
The water filter indicator
flashes.
The water filter indicator
lights constantly.
The water dispenser
lamp and the child lock
indicator flashes.
Leakage from filter operation. Open water module hatch and
Dispensing is interrupted
after a short time.
The lamp does not work.
The lamp is defective. Refer to "Replacing the lamp".
Door interferes with ventilation grill.
Misaligned door. The appliance is not levelled. Refer to "Levelling".
The appliance is switched off. Switch on the appliance.
to the mains socket correctly.
There is no voltage in the mains
socket.
The carbon dioxide is running
out.
Dilute with ordinary water. Refer to "Selecting and dispens-
The gas cylinder is empty. Refer to "Replacing gas cylinder"
The gas cylinder is empty. Refer to "Replacing gas cylinder".
Water supply obstructed. Check water supply.
The filter has been totally consumed.
20% of filter capacity remains. Buy a new filter.
Internal leakage at the water
connection.
The maximum time of two minutes is exceeded.
The door has been open to long. Close the door.
The appliance is not levelled. Refer to "Levelling".
Connect the mains plug to the
mains socket correctly.
Connect a another electrical appliance to the mains socket.
Check fuse. Contact a qualified
electrician.
Refer to "Installation of the gas
cylinder".
ing water".
the inlet hose connection.
the inlet hose connection.
Refer to "Replacing the water fil-
ter".
Contact your local Electrolux
Service Force Centre.
dry up water from the bottom,
look for leakages.
If filter leaks, refer to "Replacing
the water filter"
Start new dispensing.
As much as the advice does not lead to result, call the nearest brand-mark service.
Replacing the lamp
The appliance is equipped with a longlife
Only service is allowed to replace the lighting device. Contact your Service Center .
LED interior light.
14 electrolux
Closing the door
1. Clean the door gaskets.
3. If necessary, replace the defective door
gaskets. Contact the Service Center.
2. If necessary, adjust the door. Refer to
"Installation".
TECHNICAL DATA
ERES38820W ERES38820X
Dimension
Height 1800 mm 1800 mm
Width 595 mm 595 mm
Depth 650 mm 650 mm
Voltage 230 V 230 V
Frequency 50 Hz 50 Hz
The technical information are situated in the
rating plate on the internal left side of the
appliance and in the energy label.
Water pressure range
The water pressure must be at least 1 bar (100kPa) Consult your installer if water pressure is
Highest allowed water pressure 10 bar (1000kPa) If water pressure exceeds 10 bar a re-
Capacity 50-80 litres of carbonated water
per cylinder.
Important!
• Do not connect the appliance in spaces
where ambient temperature can decrease to below freezing.
less than 1 bar.
duction valve must be fitted (available
from your specialist shop).
• The appliance may only be connected to
drinking water supplies.
• The appliance may only be connected to
cold water supplies.
INSTALLATION
Read the "Safety Information" carefully
for your safety and correct operation of
the appliance before installing the
appliance.
Positioning
Install this appliance at a location where the
ambient temperature corresponds to the
climate class indicated on the rating plate of
the appliance:
Climate
class
SN +10°C to + 32°C
N +16°C to + 32°C
ST +16°C to + 38°C
T +16°C to + 43°C
Ambient temperature
Location
To ensure best performance, if the appliance is positioned below an overhanging
wall unit, the minimum distance between
the top of the cabinet and the wall unit
must be at least 40 mm . Ideally, however,
the appliance should not be positioned below overhanging wall units.
The ventilation space can be:
• directly above the appliance
• behind and above the top cupboard.
In this case, the space behind the top
cupboard must be at least 50 mm deep.

50mm
Electrical connection
Before plugging in, ensure that the voltage
and frequency shown on the rating plate
correspond to your domestic power supply.
The appliance must be earthed. The power
supply cable plug is provided with a contact
for this purpose. If the domestic power supply socket is not earthed, connect the appliance to a separate earth in compliance with
current regulations, consulting a qualified
electrician.
The manufacturer declines all responsibility
if the above safety precautions are not observed.
This appliance complies with the E.E.C. Directives.
Removing the transport support
Your appliance is equipped with transport
support to secure the door and the pump
during transportation.
To remove them do these steps:
1. Open the door.
2. Remove the transport support from the
door sides.
3. Remove the transport support from the
lower hinge (some models).
4. Remove the transport support from underneath the water unit.
5. Cut the pump securing tie and remove
it.
Important! Some models are fitted with a
silencing pad under the cabinet. Do not
remove this pad.
electrolux 15
3
2
5
4
Rear spacers
Install the spacers provided within the accessory bag as shown in the figure.
Install two spacers on the back side of the
panel and two spacers with adhesive on
the lower part.
16 electrolux
Connecting the water hose.
Water supply should be provided with a tap
and 3/4" male connector within 1,5 m from
the appliance.
This work is to be carried out by a skilled
plumber.
There are different type-approved taps and
tap assemblies on the market.
The water hose must not be cracked,
squeezed or put in tight bends.
Before the appliance is placed its final location, ensure that the water connection has
been correctly carried out, that there is no
leakage at the connection to the water tap.
Tighten the screw enough by hand.
Make sure that the gasket is properly positioned in the connector.
We recommend that the appliance is
placed on a "run-off" mat intended for refrigerators and freezers, which makes it
easier to detect possible leakage
Levelling
When placing the appliance ensure that it
stands level. If necessary adjust the feet using the adjustment spanner supplied.
Installation of the Taste Guard filter
The Taste Guard filter is an active carbon filter which absorbs bad odours maintain the
best flavour and aroma for all foodstuffs
without risk of odour cross contamination.
On delivery the carbon filter is in a plastic
bag to preserve performance.
1. Open the air lever flap.
2. Take the filter out of the plastic bag.
3. Insert the filter in the slot found in the
back of the air lever flap.
4. Close the air lever flap.
Important! The filter should be handled
carefully so fragments do not loosen from
the surface.
Make sure that the air lever flap is closed to
obtain proper function.

electrolux 17
Starting the water system for the first
time.
Ensure proper connection to the water supply, refer to "Connecting the water hose".
1. Open the tap on the water connection.
2. Start the refrigerator (switch off and restart if it is already running).
The water system main valve opens and the
pump starts to fill the system.
Installation of the water filter
Unpack the filter.
1. Remove the accessories in front of the
water module and open the service
hatch.
2. Place a cloth or a piece of kitchen towel in the space beneath the water filter.
3. Pull the bypass cartridge outwards,
grasping the lower part, until the water
bypass cartridge is automatically ejected.
5. Push the water filter back to its original
position.
6. Remove cloth or towel and make sure
that spilled water is wiped off.
7. Close the hatch and remount the interior.
8. Keep the bypass cartridge for future
use.
9. Unlock the water dispenser. Refer to
"Child lock functions". Select plain water and dispense about 2 litres of water.
There may be some air to start with.
4. Remove the protective wrapping of the
new water filter and insert the new filter
firmly into the filter connection.
18 electrolux
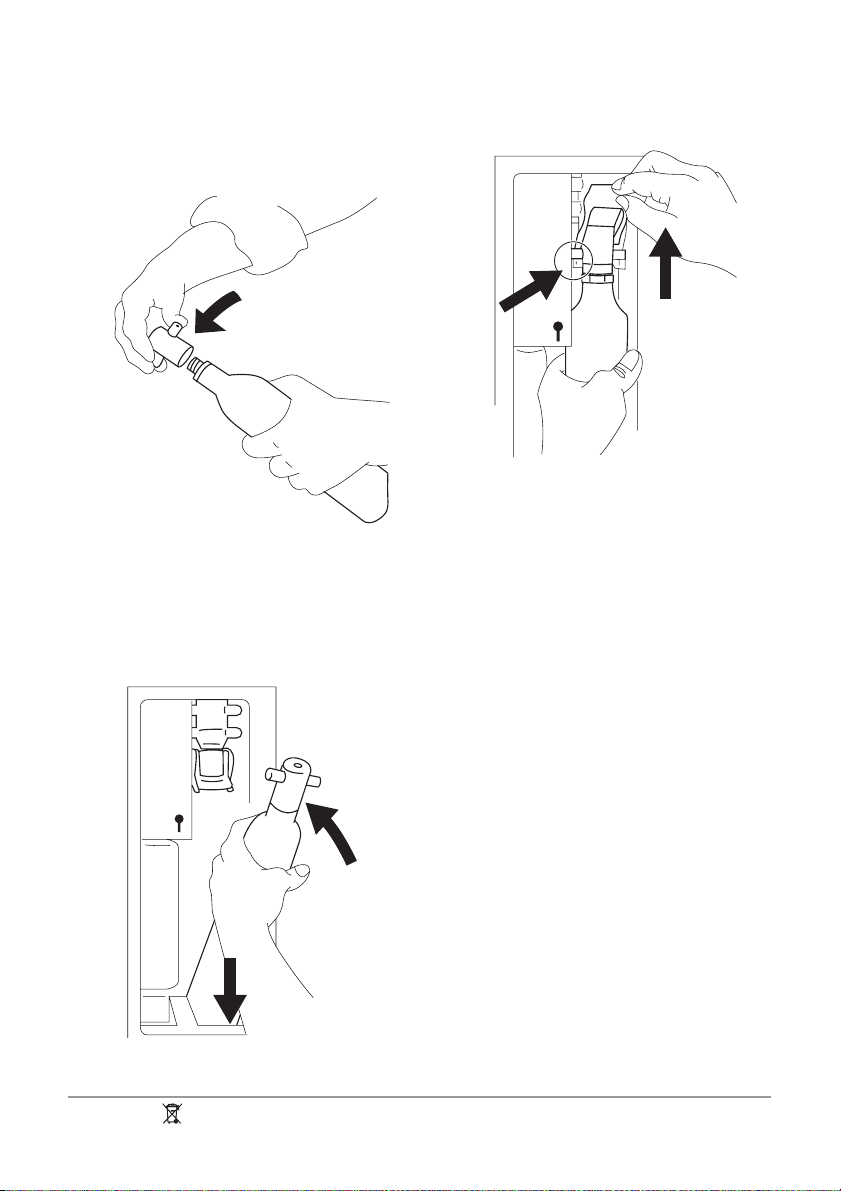
Installation of the gas cylinder
1. Remove the gas cylinder wrapping and
screw on the adapter to the gas cylinder. Tighten by hand only.
2. Position the gas cylinder with the
adapter attached underneath the valve
and ensure that the hooks of the lever
system supports the protruding parts of
the adapter.
3. Then turn the lever upwards in one
continuous movement.
4. Unlock the water dispenser, refer to
"Water dispenser functions". Choose
carbonated water and dispense further
1,5 litres (2,5 pints) of water.
5. The system is now ready for use. In order to obtain the best possible performance from the refrigerator, wait untill the set temperature is reached.
Door reversibility
It is not possible to change the opening direction of the door.
The water supply goes through the hinge to
the water dispenser. Contact your dealer
for more information.
2
1
ENVIRONMENTAL CONCERNS
The symbol on the product or on its
packaging indicates that this product may
not be treated as household waste. Instead
it should be taken to the appropriate

electrolux 19
collection point for the recycling of electrical
and electronic equipment. By ensuring this
product is disposed of correctly, you will
help prevent potential negative
consequences for the environment and
human health, which could otherwise be
caused by inappropriate waste handling of
this product. For more detailed information
about recycling of this product, please
contact your local council, your household
waste disposal service or the shop where
you purchased the product.

20 electrolux
Electrolux. Thinking of you.
Lue lisää osoitteessa www.electrolux.com
SISÄLLYS
Turvallisuusohjeet 20
Käyttöpaneeli 22
Vesiannostelija 24
Ensimmäinen käyttökerta 25
Päivittäinen käyttö 26
Hyödyllisiä neuvoja ja vinkkejä 27
TURVALLISUUSOHJEET
Lue tämä käyttöohje ja sen sisältämät neuvot sekä varoitukset huolellisesti ennen laitteen asentamista ja ensimmäistä käyttöä,
jotta osaisit käyttää laitetta turvallisesti ja oikealla tavalla. Turhien virheiden ja onnettomuuksien välttämiseksi on tärkeää, että
kaikki laitteen käyttäjät perehtyvät huolellisesti sen toimintaan ja turvallisuusominaisuuksiin. Pidä tämä ohje tallessa ja varmista, että se kulkee aina laitteen mukana esimerkiksi asunnon vaihdon yhteydessä tai
luovutetaan mahdolliselle uudelle omistajalle. Näin kaikilla laitteen käyttäjillä on asianmukaiset ohjeet turvallista käyttöä varten.
Huomioi tarkasti käyttöohjeen sisältämät
varoitukset käyttäjien turvallisuuden varmistamiseksi ja omaisuusvahinkojen välttämiseksi. Valmistaja ei vastaa vahingoista, jotka
ovat aiheutuneet varoitusten ja turvallisuusohjeiden vastaisesta toiminnasta.
Lasten ja taitamattomien henkilöiden
turvallisuus
• Tämä laite ei ole tarkoitettu fyysisesti,
motorisesti tai henkisesti rajoitteisten tai
kokemattomien tai taitamattomien henkilöiden (eikä lasten) käyttöön, ellei heidän
turvallisuudestaan vastuussa oleva henkilö valvo ja opasta heitä laitteen käytössä.
Pikkulapsia on valvottava eikä heidän pidä antaa leikkiä laitteella.
• Pidä kaikki pakkausmateriaalit poissa lasten ulottuvilta. Ne voisivat aiheuttaa tukehtumisvaaran.
• Kun poistat laitteen käytöstä lopullisesti,
irrota pistoke pistorasiasta, leikkaa virtajohto irti (mahdollisimman läheltä laitteen
liitäntäkohtaa) ja irrota laitteen ovi. Tällä
tavoin voidaan välttää leikkiville lapsille ai-
Hoito ja puhdistus 28
Käyttöhäiriöt 29
Tekniset tiedot 32
Asennus 32
Ympäristönsuojelu 36
Oikeus muutoksiin pidätetään
heutuva sähköiskun tai loukkuunjäämisen
vaara.
• Tässä laitteessa on magneettiset oven tiivisteet. Jos entisen laitteesi ovessa on
jousilukitus (salpa), riko jousilukitus, ennen kuin poistat vanhan laitteen käytöstä
estääksesi lasten loukkuunjäämisen vaaran.
Yleiset turvallisuusohjeet
Varoitus!
Pidä kalusteen sisään asennetun laitteen
syvennyksen tai kalustekaapin ilmanvaihtoaukot vapaina.
• Laite on tarkoitettu elintarvikkeiden säilytykseen, hiilihapottoman tai hiilihapollisen
veden valmistukseen kotitalouksissa näiden käyttöohjeiden mukaan.
• Takuu mitätöityy automaattisesti, jos hiilihappopatruunaa käytetään muuhun kuin
sen käyttötarkoitukseen tai jos täytön on
tehnyt asiaatuntematon henkilö
• Älä yritä nopeuttaa sulatusta mekaanisten
laitteiden tai muun keinotekoisen sulatusvälineen avulla.
• Älä käytä muita sähkölaitteita (esim. jäätelökonetta) jäähdytyslaitteiden sisällä, ellei valmistaja ole hyväksynyt niitä kyseiseen käyttötarkoitukseen.
• Varo vahingoittamasta jäähdytysputkistoa.
• Laitteen jäähdytysputkisto sisältää isobutaania (R600a), joka on hyvin ympäristöystävällinen maakaasu, mutta kuitenkin
tulenarka.

electrolux 21
Varmista, etteivät jäähdytysputkiston
komponentit pääse vaurioitumaan laitteen
kuljetuksen ja asennuksen aikana.
Jos jäähdytysputkisto vaurioituu:
– Vältä avotulta ja muita syttymislähteitä.
– Tuuleta huolellisesti huone, johon laite
on sijoitettu.
• Laitteen teknisten ominaisuuksien muuttaminen tai muiden muutosten tekeminen
laitteeseen on vaarallista. Vahingoittunut
virtajohto voi aiheuttaa oikosulun, tulipalon ja/tai sähköiskun.
Varoitus! Sähköosien (virtajohto, pistoke, kompressori) vaihdon saa suorittaa
vain valtuutettu huoltoliike vaaratilanteiden välttämiseksi.
1. Virtajohtoa ei saa jatkaa.
2. Varmista, että virtajohto ei joudu pu-
ristuksiin tai pääse vahingoittumaan
laitteen takana. Litistynyt tai vahingoittunut virtajohto voi ylikuumentua
ja aiheuttaa tulipalon.
3. Laitteen verkkovirtakytkennän on ol-
tava hyvin ulottuvilla siten, että pistoke on helppo irrottaa pistorasiasta.
4. Älä vedä virtajohdosta pistoketta ir-
rottaessasi.
5. Jos pistoke on löysästi kiinni virtajoh-
dossa, älä kiinnitä sitä pistorasiaan.
Tämä aiheuttaa sähköiskun tai tulipalon vaaran.
6. Laitetta ei saa käyttää, jos sisävalon
4)
lampun suojus
puuttuu.
• Laite on painava. Sen siirtämisessä on
noudatettava varovaisuutta.
• Älä koske pakastimessa oleviin tuotteisiin
kostein tai märin käsin. Koskettaminen
voi aiheuttaa ihon hankautumista tai kylmävammoja.
• Laite ei saa olla pitkään suorassa auringonvalossa.
•
Tämän laitteen hehkulamput
5)
ovat erityisiä lamppua, joita saa käyttää vain kodinkoneissa. Ne eivät sovi huoneiden valaistukseen.
Päivittäinen käyttö
• Älä laita kuumia kattiloita laitteen muoviosien päälle.
4) Mikäli lampussa on suojus
5) Mikäli laitteessa on lamppu
6) Mikäli laitteessa on vesiliitäntä.
• Älä säilytä tulenarkoja kaasuja tai nesteitä
jääkaapissa, sillä ne voivat räjähtää.
• Noudata tarkasti laitteen valmistajan säilytysohjeita. Lue ohjeet.
Huolto ja puhdistus
• Ennen kuin aloitat huoltoa tai puhdistusta, kytke laite pois toiminnasta ja irrota
pistoke pistorasiasta.
• Älä käytä laitteen puhdistuksessa metalliesineitä.
• Tarkista säännöllisesti jääkaapin sulatusveden poistoaukko. Puhdista poistoaukko tarvittaessa. Jos poistoaukko on tukossa, vesi kerääntyy laitteen pohjalle.
Asennus
Tärkeää Noudata tarkasti sähköliitäntää
käsittelevissä kappaleissa annettuja ohjeita.
• Pura laite pakkauksestaan ja tarkista
mahdolliset kuljetusvauriot. Vaurioitunutta
laitetta ei saa kytkeä verkkovirtaan. Ilmoita mahdollisista vahingoista välittömästi
jälleenmyyjälle. Säilytä tässä tapauksessa
pakkausmateriaalit.
• Odota vähintään kaksi tuntia, ennen kuin
kytket laitteen verkkovirtaan, jotta öljy ehtii virrata kompressoriin.
• Laitteen ympärillä on oltava hyvä ilmankierto, jotta ylikuumenemisen vaaraa ei
ole. Noudata asennusohjeissa esitettyjä
ilmanvaihtomääräyksiä.
• Laite on mahdollisuuksien mukaan sijoitettava selkä seinää vasten, jotta palovammoja aiheuttaviin kuumiin osiin (kompressori, lauhdutin) ei voida koskea.
• Laitetta ei saa sijoittaa lämpöpatterin tai
lieden viereen.
• Varmista, että laitteen verkkovirtakytkentä
on hyvin ulottuvilla laitteen asennuksen
jälkeen.
• Laitteen saa kytkeä ainoastaan puhtaaseen vesijohtoverkkoon.
6)
Huoltopalvelu
• Kaikki laitteen asennukseen liittyvät sähkötyöt on annettava ammattitaitoisen
sähköasentajan tehtäväksi.
22 electrolux
• Laitteen huoltotyöt saa suorittaa vain valtuutettu huoltoliike, ja ainoastaan alkuperäisten varaosien käyttäminen on sallittua.
Ympäristönsuojelu
Tämä laite ei sisällä otsonikerrosta tuhoavia kaasuja jäähdytyspiirissä eikä
eristemateriaaleissa. Käytöstäpoistettua
laitetta ei saa toimittaa tavallisen yhdys-
kuntajätteen keräykseen. Eristevaahto
sisältää tulenarkoja kaasuja: laitteen
käytöstäpoistossa ja hävittämisessä tulee noudattaa paikallisia jätehuoltomääräyksiä. Vältä vahingoittamasta jäähdytysyksikköä, erityisesti lämmönvaihtimen läheltä. Tässä laitteessa käytetyt,
symbolilla
kierrätettäviä.
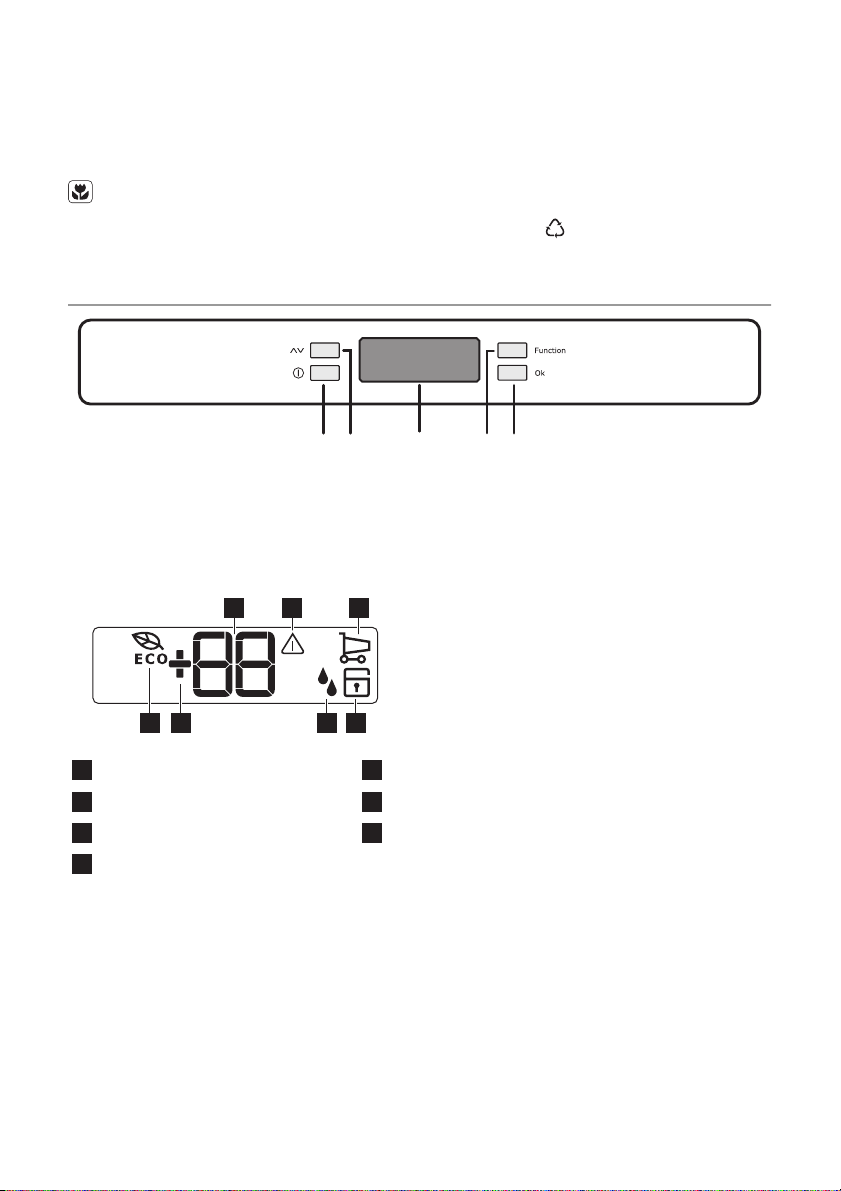
KÄYTTÖPANEELI
AC
BDE
A - Virtapainike D - Toimintopainike
B - Lämpötilan säätöpainike E - Vahvistuspainike
C - Lämpötilan ja toimintojen näyttö
Näyttö/merkkivalot
1 2 3
merkityt materiaalit ovat
4567
Lämpötilanäyttö.
1
Hälytyksen merkkivalo
2
Pikajäähdytystoiminto
3
Lapsilukko
4
5
6
7
Laitteen kytkeminen toimintaan
Kiinnitä pistoke pistorasiaan. Jos näyttöön
ei syty valoa, kytke virta laitteeseen painamalla virtapainiketta (A).
Valitse Eco Mode, jossa jääkaapin lämpötila
säätyy elintarvikkeiden säilytykselle optimaalisen lämpötilaan +5°C.
Jos haluat valita muun lämpötilan, lue ohjeet kohdasta Lämpötilan säätäminen.
Tärkeää Jos ovi on auki muutaman minuutin, sisävalo sammuu automaattisesti. Sisä-
Lisäkosteustoiminto
Positiivisen lämpötilan merkkivalo
Eko-toiminto
valo palautuu automaattisesti toimintaan,
kun ovi suljetaan ja avataan.
Laitteen kytkeminen pois toiminnasta
Virta kytketään pois laitteesta painamalla
painiketta (A), kunnes näytössä näkyy alenevasti -3 -2 -1.
Lämpötilan säätäminen
Lämpötilaa säädetään painikkeella (B).
Nykyinen lämpötilan arvo vilkkuu ja painamalla painiketta (B) uudelleen voidaan asetettua lämpötilaa säätää asteittain.

electrolux 23
Valittu lämpötila saavutetaan 24 tunnin kuluessa.
Toimintovalikko
Toimintovalikko valitaan painikkeella (D).
Kaikki toiminnot vahvistetaan painikkeella
(E). Ellei valintaa vahvisteta muutaman sekunnin kuluessa, valikko katoaa näytöstä ja
näyttö palaa normaalitilaan.
Valikossa näkyvät seuraavat toiminnot:
Lapsilukko
Pikajäähdytystoiminto
Säästötoiminto
Lisäkosteustoiminto
Lapsilukko
Lapsilukko aktivoidaan painamalla painiketta (D) (tarvittaessa useamman kerran), kun-
nes näyttöön tulee kuvake
.
Valinta on vahvistettava painamalla painiketta (E) muutaman sekunnin kuluessa. Kuuluu
äänimerkki ja kuvake jää palamaan. Lapsilukon ollessa toiminnassa, mitään toimintoa ei
voi muuttaa.
Voit kytkeä toiminnon pois käytöstä milloin
tahansa painamalla painiketta (D), kunnes
kuvake alkaa vilkkua, ja sitten painiketta (E).
Pikajäähdytystoiminto
Jos laitat jääkaappiin paljon tuoreita elintarvikkeita, esimerkiksi kaupassakäynnin jälkeen, on suositeltavaa kytkeä pikajäähdytystoiminto, jotta tuotteet jäähtyvät nopeammin. Tällä tavoin voidaan välttää myös
muiden jo jääkaapissa olevien elintarvikkeiden lämpeneminen.
Pikajäähdytystoiminto aktivoidaan painamalla painiketta (D) (tarvittaessa useamman
kerran), kunnes näytössä näkyy symboli
. Valinta on vahvistettava painamalla painiketta (E) muutaman sekunnin kuluessa.
Laitteesta kuuluu äänimerkki ja symboli jää
näkyviin.
Pikajäähdytystoiminto kytkeytyy pois toiminnasta automaattisesti noin kuuden tunnin
kuluttua. Voit kytkeä toiminnon pois käytöstä milloin tahansa painamalla painiketta (D),
kunnes symboli alkaa vilkkua. Paina lopuksi
painiketta (E).
Säästötoiminto
Säästötoiminto kytketään painamalla painiketta D (tarvittaessa useita kertoja), kunnes
näytössä näkyy toimintoa vastaava symboli
(tai säätämällä lämpötila arvoon +5 °C).
Valinta on vahvistettava painamalla painiketta E muutaman sekunnin kuluessa. Laitteesta kuuluu äänimerkki ja kuvake jää palamaan.
Tässä tilassa lämpötila säätyy automaattisesti pakasteille parhaiten sopivaan säilytyslämpötilaan (+5 °C).
Voit poistaa toiminnon käytöstä milloin tahansa muuttamalla osaston valittua lämpötilaa.
Lisäkosteustoiminto
Jääkaapin kosteustasoa voidaan lisätä lisäkosteustoiminnolla.
Lisäkosteustoiminto aktivoidaan painamalla
painiketta D (tarvittaessa useita kertoja),
kunnes näyttöön tulee kuvake.
Valinta on vahvistettava painamalla painiketta (E) muutaman sekunnin kuluessa. Laitteesta kuuluu äänimerkki ja kuvake jää palamaan.
Voit kytkeä toiminnon pois käytöstä milloin
tahansa painamalla painiketta (D), kunnes
symboli alkaa vilkkua. Paina lopuksi painiketta (E).
Lomatoiminto H
Lomatoiminto asettaa lämpötilan noin +15
°C. Tämän toiminnon avulla voit pitää jääkaapin suljettuna ja tyhjänä pitkän loman aikana (esimerkiksi kesäloma) ilman pahan
hajun muodostumista.
Lomatoimintoa H säädetään painikkeella B.
Painiketta B painettaessa näytössä vilkkuu
senhetkinen lämpötilan asetus. Paina uudelleen painiketta B. Kun näytössä näkyy kirjain H, vahvista lämpötilan valinta painikkeella E (kuuluu äänimerkki) tai odottamalla
muutaman sekunnin ajan (äänimerkkiä ei
kuulu).
Jääkaappi on nyt aktivoinut lomatoiminnon
energiansäästötilassa ja näytössä näkyy kirjain H. Toiminto voidaan deaktivoida milloin
tahansa muuttamalla jääkaapin valittua lämpötilaa.
Varoitus! Jääkaappiosasto on tyhjennettävä lomatoiminnon käytön ajaksi.
 Loading...