

Electrolux ETE4607SA-R, ETE4607SA-L, ETE5407SA-R, ETE5407SA-L, EBE4507SA-L Installation Manual
...
Installation manualModular refrigerator
Connection kit
2 electrolux.com.au
CONNECTION KIT
This connection kit is designed for use on the following top mount, bottom mount and single door
refrigerators and freezers whose total body height is 1725 mm.
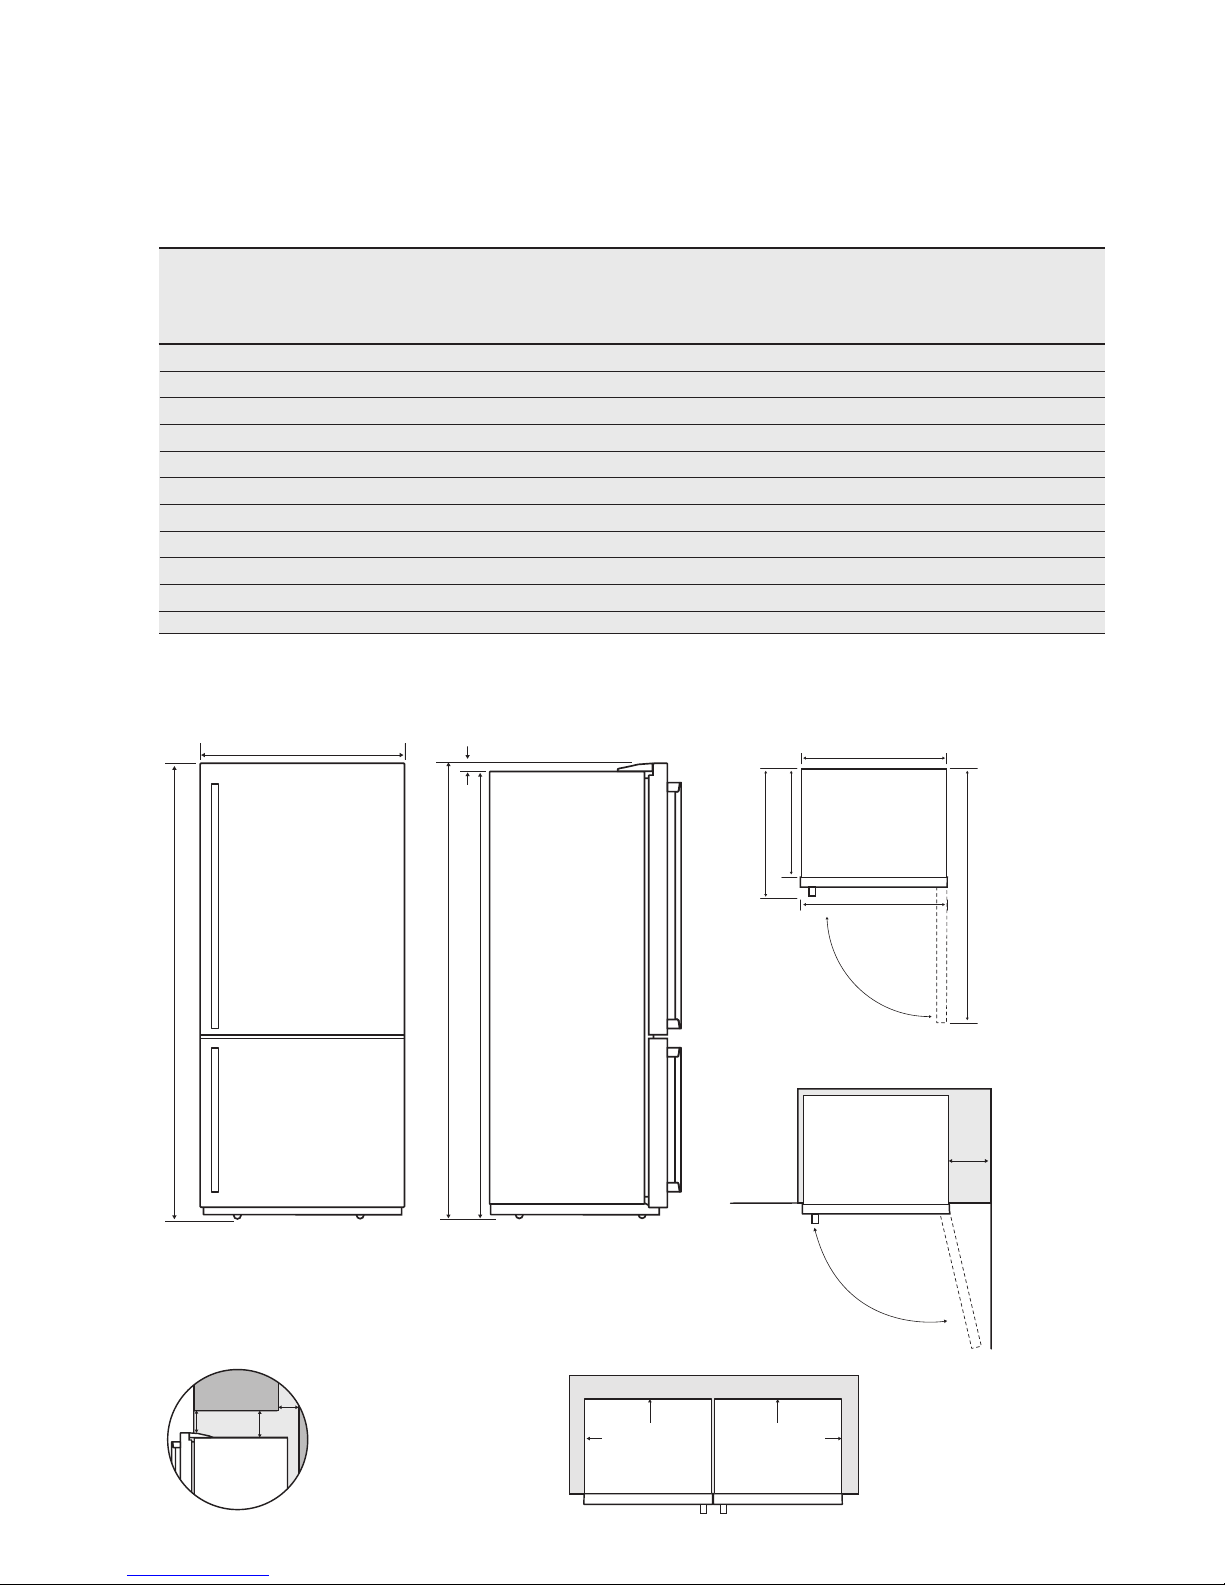
The model numbers and overall dimensions of individual products are:
max
door
height
cabinet
height
total
height
door
width
cabinet
width
total
depth
cabinet
depth
depth
door
open
model description (H) (H1) (H2) (W) (W1) (D) (D1) (D2)
ETE4607SA-R 460 lt Top-Mount, RH Door 1725 1705 1725 699 693 773 6 41 1360
ETE4607SA-L 460 lt Top-Mount, LH Door 1725 1705 1725 699 693 773 6 41 1360
ETE5407SA-R 540 lt Top-Mount, RH Door 1725 1705 1725 796 790 773 641 1457
ETE5407SA-L 540 lt Top-Mount, RH Door 1725 170 5 172 5 796 790 773 6 41 1457
EBE4507SA-R 450 lt Bottom-Mount, RH Door 1725 1705 1725 699 693 773 6 41 1360
EBE4507SA-L 450 lt Bottom-Mount, LH Door 1725 1705 1725 699 693 773 6 41 1360
EBE5307SA-R 530 lt Bottom-Mount, RH Door 17 25 1705 1725 796 790 773 641 1457
EBE5307SA-L 530 lt Bottom-Mount, LH Door 1725 1705 17 25 796 790 773 641 1457
EBE5367SA-R
530 lt Bottom-Mount, RH Door
1725 1705 1725 796 790 773 641 1457
ERE5047SA-R 500 lt Single Door, Refrigerator 1725 1705 1725 699 693 773 6 41 1360
EFE4227SA-L 420 lt Single Door, Freezer LH 1725 1705 1725 699 693 773 6 41 1360
All measurements are in millimetres.
SINGLE CABINET DIMENSIONS
22mm
H2 H1
W
H
Please note:
Doors are designed
to sit proud of
cabinetry (not flush).
50mm
30mm
30mm
CABINET
DOOR
Minimum
recommended
airspace
Minimum Recommended Airspaces
If you do not have a
cupboard with a rear
gap, the recommended
clearance area on top
increases from 50mm to
90mm (x) and from
32mm to 72mm (y).
When positioned
in a corner area,
spacing of at
least 400mm on
the hinge side
will allow the
doors to open
enough to
enable the
removal of bins
and shelves.
Front face
of bench
aligned to
front corner
edge of
cabinet.
400mm
D1
D2
W1
W
D
90°
(x)
(y)
(Rear gap)
When positioned
in a corner area,
spacing of at
least 400mm on
the hinge side
will allow the
doors to open
enough to
enable the
removal of bins
and shelves.
Front face
of bench
aligned to
front corner
edge of
cabinet.
400mm
D1
D2
W1
W
D
90°
When positioned
in a corner area,
spacing of at
least 400mm on
the hinge side
will allow the
doors to open
enough to
enable the
removal of bins
and shelves.
Front face
of bench
aligned to
front corner
edge of
cabinet.
400mm
50mm
30mm
30mm
CABINET
DOOR
Minimum
recommended
airspace
Please note:
Doors are designed
to sit proud of
cabinetry (not flush).
50mm
30mm
CABINET
DOOR
Minimum
recommended
airspace
Wa
63mm
3
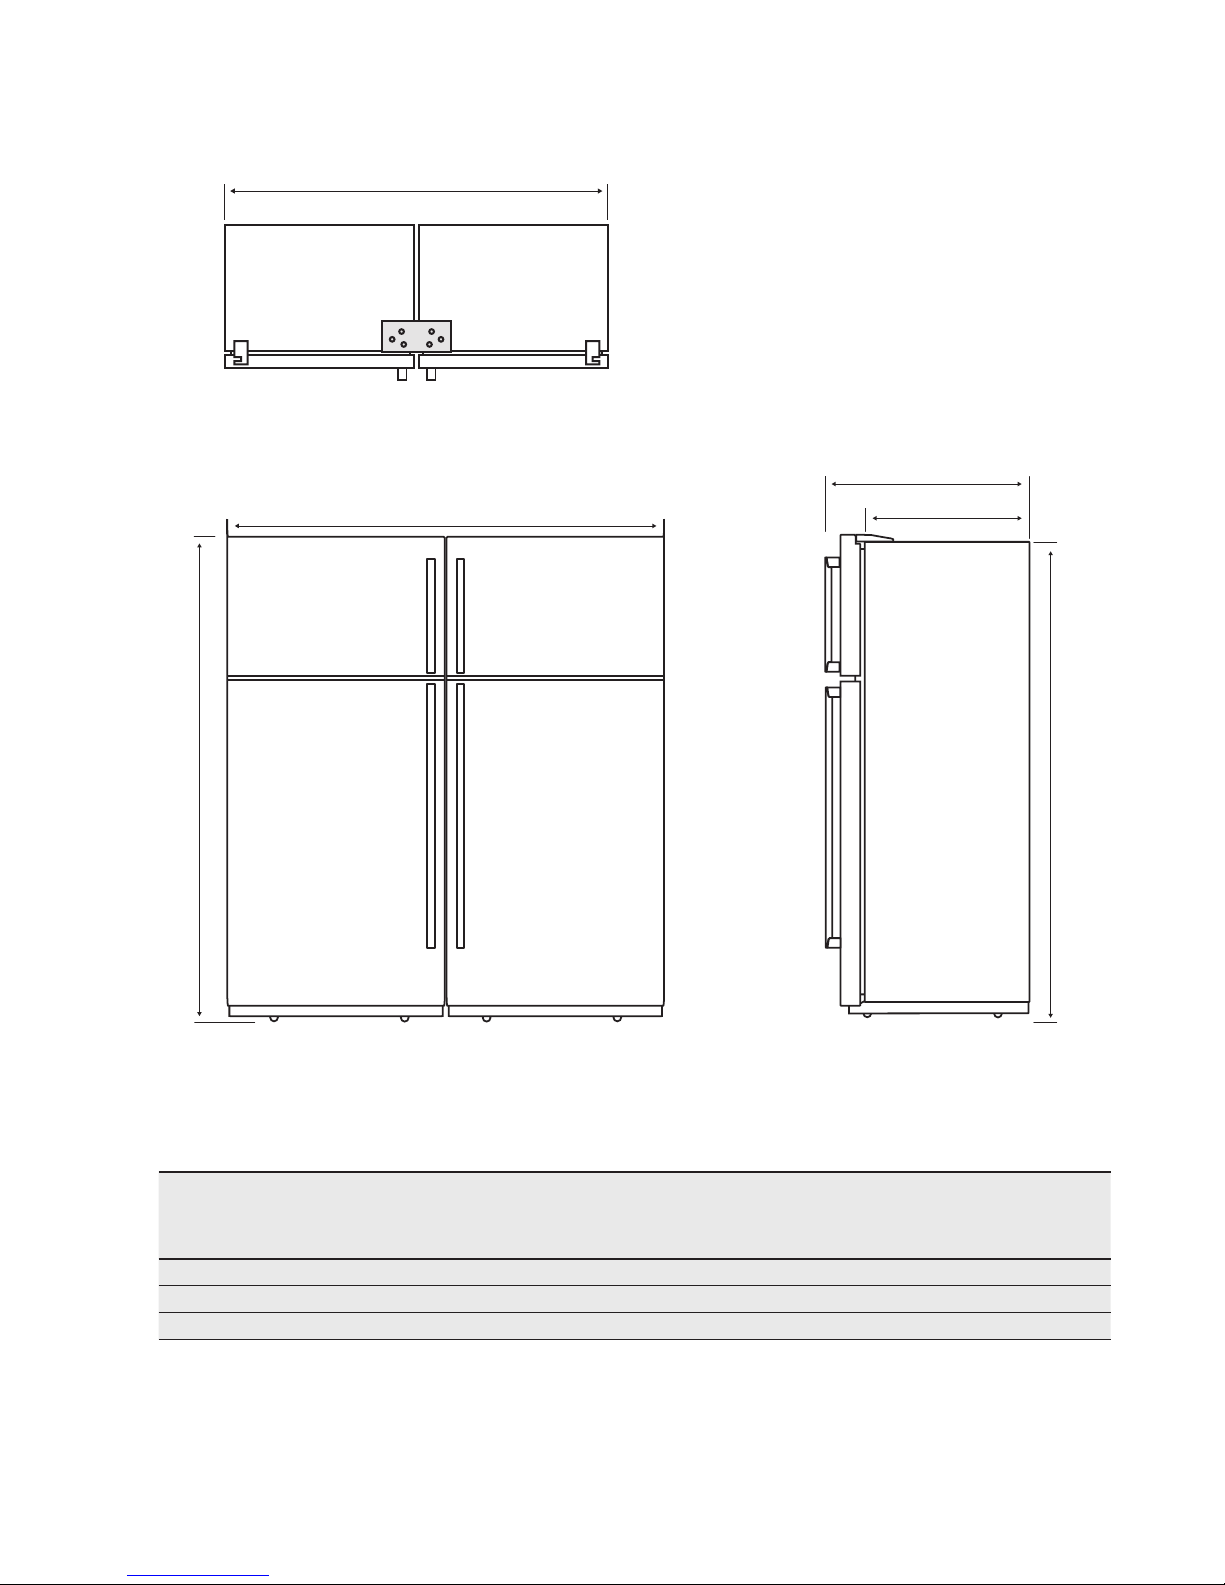
JOINED DIMENSIONS
50mm
30mm
CABINET
DOOR
Minimum
recommended
airspace
Please note:
Doors are designed
to sit proud of
cabinetry (not flush).
50mm
30mm
CABINET
DOOR
Minimum
recommended
airspace
Wa
63mm
Wb
H
H1
D1
D
Wa
63mm
H1
D1
D
individual cabinet widths
(W1)
cabinet
height
max door
height
joined
cabinet
width
joined door
width
max total
depth
max cabinet
depth
model 1 model 2 (H1) (H) (Wa) (Wb) (D) (D1)
693 693 1705 1725 1407 1419 773 641
693 790 1705 1725 1504 1516 773 641
790 790 170 5 1725 1601 1613 773 641
All measurements are in millimetres.
Joined cabinet dimensions:
Wa

4 electrolux.com.au
BEFORE YOU BEGIN
• Thoroughly inspect cabinets for any signs of damage
before commencing installation.
• If any damage is identified please contact Electrolux
Service.
• Check refrigerator recess dimensions and ensure
that they provide at least the minimum clearance at
the back, side and top as recommended on page 2.
• The floor where the refrigerator is to be placed must
be level, otherwise you will not be able to install your
refrigerator properly.
• Ensure that the floor and surrounding cupboards are
adequately protected from damage during unpacking
and throughout the installation process.
• Ensure that two adequate and accessible
powerpoints are installed inside the refrigerator
recess before installing and connecting your
appliances. These powerpoints should also be
readily accessible after fridge installation is
completed.
• Do not use extension leads or power board or
double adapter under any circumstances as it may
lead to electric shock and / or fire. Seek assistance
of a licensed electrician if required.
• Unpack the connection kit and check for
completeness by referring to the “Connection
kit package contents” section.
NOTE:
Due to size and weight of the cabinets as well as
complexity of the task ensure that installation is attempted
with at least two able-bodied persons. You are strongly
urged to consider hiring Electrolux Service to do the
installation.
 Loading...