

Electrolux ER6827D User Manual [fi]
fridge - freezer / kyl - och frysskåp / kjøle - ogfryseskap
køle - fryseskab / Jääkaappipakastin
INSTRUCTION BOOK
BRUKSANVISNING
BRUGSANVISNING
KÄYTTÖOHJE
2223 251-61
ER 6827 D
GB
S
NOR
DK
FI
Electrolux HemProdukter AB
S-105 45 Stockholm
www.electrolux.se
2
WARNINGS
It is most important that this instruction book should be retained with the appliance for future
reference. Should the appliance be sold or transferred to another owner, or should you move house
and leave the appliance, always ensure that the book is supplied with the appliance in order that the
new owner can be acquainted with the functioning of the appliance and the relevant warnings.
If this appliance featuring magnetic door seals is to replace an older appliance having a spring lock
(latch) on the door or lid, be sure to make that spring lock unusable before you discard the old
appliance. This will prevent it from becoming a death-trap for a child.
These warnings are provided in the interest of safety.You must read them carefully before installing or
using the appliance.
General Safety
• This appliance is designed to be operated by
adults. Children should not be allowed to tamper
with the controls or play with the product.
• It is dangerous to alter the specifications or
modify this product in any way.
• Before any cleaning or maintenance work is carried
out, be sure to switch off and unplug the appliance.
• This appliance is heavy. Care should be taken
when moving it
• Ice lollies can cause frost burns if consumed
straight from the appliance.
• Take utmost care when handling your
appliance so as not to cause any damages to
the cooling unit with consequent possible
fluid leakages.
• The appliance must not be located close to
radiators or gas cookers.
• Avoid prolonged exposure of the appliance to
direct sunlight.
• There must be adequate ventilation round the
back of the appliance and any damage to the
refrigerant circuit must be avoided.
• For freezers only (except built-in models): an
ideal location is the cellar or basement.
• Do not use other electrical appliances (such
as ice cream makers) inside of refrigerating
appliances.
Service/Repair
• Any electrical work required to install this
appliance should be carried out by a qualified
electrician or competent person
• This product should be serviced by an authorized
Service Centre, and only genuine spare parts
should be used.
• Under no circumstances should you attempt to
repair the appliance yourself. Repairs carried out
by inexperienced persons may cause injury or
more serious malfunctioning. Refer to your local
Service Centre, and always insist on genuine
spare parts.
• This appliance contains hydrocarbons in its
cooling unit; maintenance and recharging must
therefore only be carried out by authorized
technicians.
Use
• The domestic refrigerators and freezers are
designed to be used specifically for the storage
of edible foodstuffs only.
• Best performance is obtained with ambient
temperature between +18°C and +43°C (class T);
+18°C and +38°C (class ST); +16°C and +32°C
(class N); +10°C and +32°C (class SN).The
class of your appliance is shown on its rating
plate.
Warning: when the ambient temperature is not
included within the range indicated for the class
of this appliance, the following instructions must
be observed: when the ambient temperature
drops below the minimum level, the storage
temperature in the freezer compartment cannot
be guaranteed; therefore it is advisable to use the
food stored as soon as possible.
• Frozen food must not be re-frozen once it has
been thawed out.
• Manufacturers’ storage recommendations should
be strictly adhered to. Refer to relevant
instructions.
• The inner lining of the appliance consists of
channels through which the refrigerant passes. If
these should be punctured this would damage the
appliance beyond repair and cause food loss. DO
NOT USE SHARP INSTRUMENTS to scrape off
frost or ice. Frost may be removed by using a
plastic scraper. Under no circumstances should
solid ice be forced off the liner. Solid ice should be
allowed to thaw when defrosting the appliance.
55
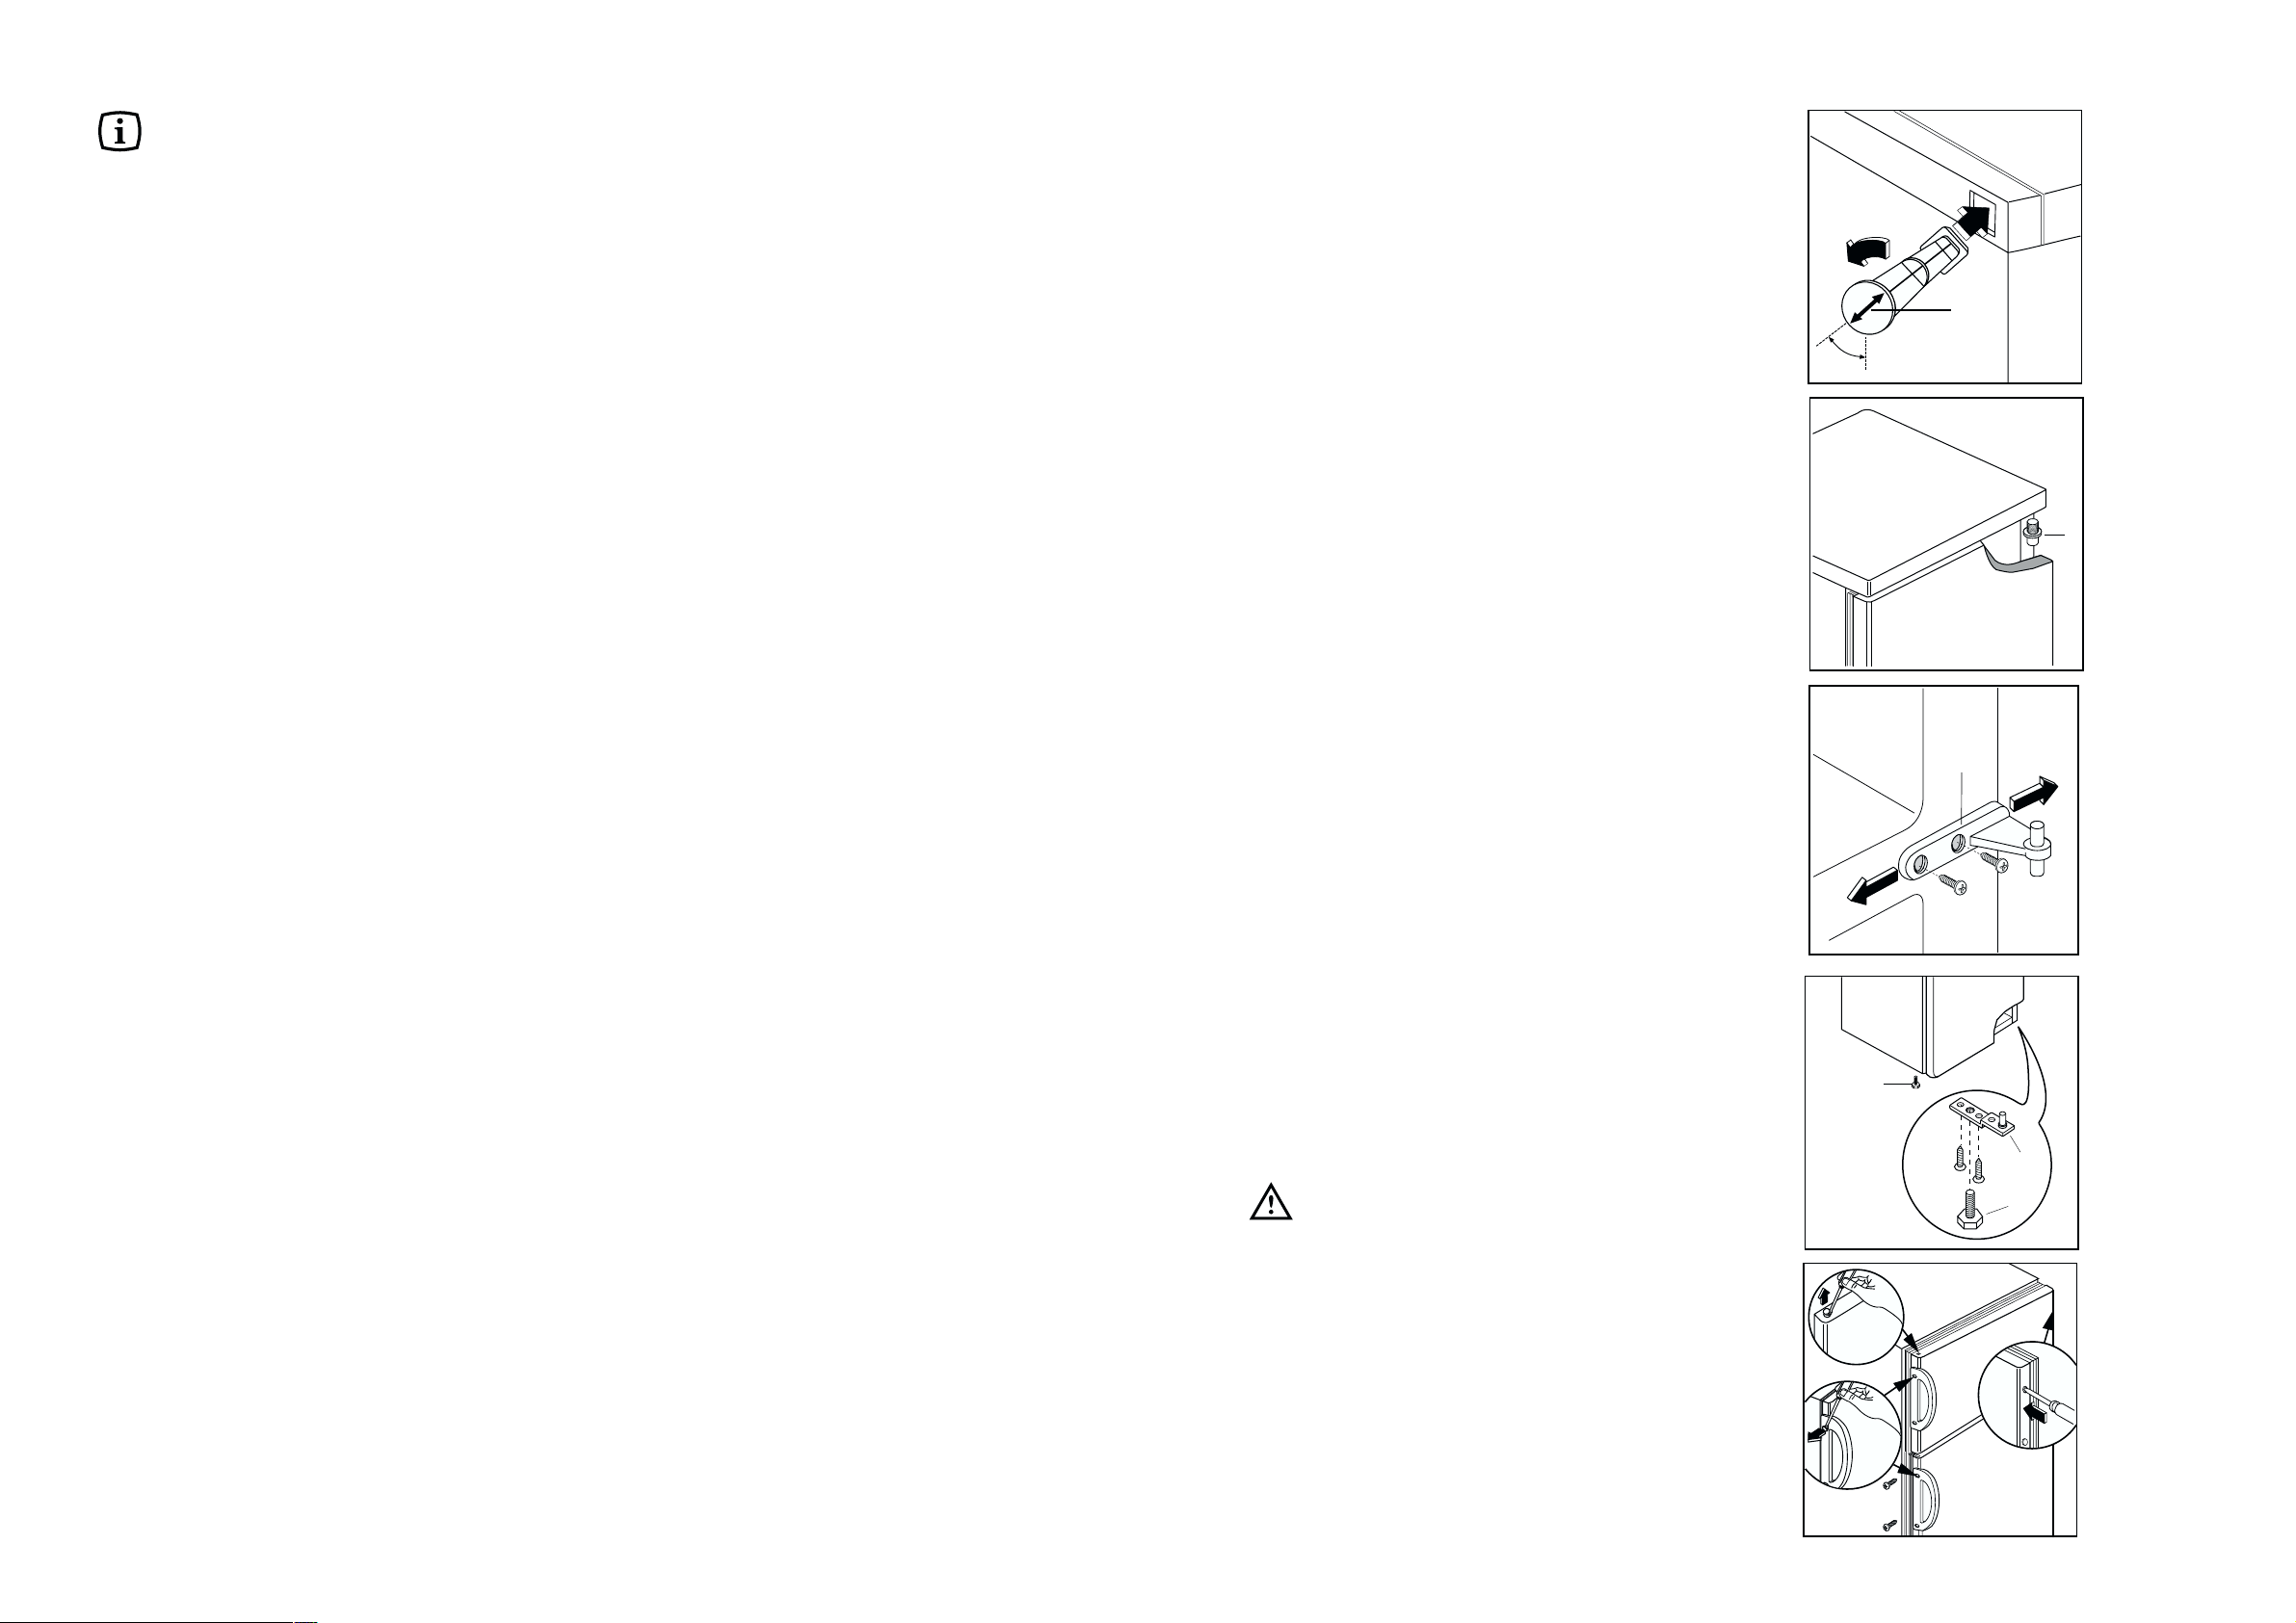
Oven kätisyyden vaihto
Irrota pistotulppa pistorasiasta.
Oven kätisyys vaihdetaan seuraavalla tavalla:
1. Ruuvaa irti jalat (2) ja (3).
2. Irrota alasarana (1).
3. Alaovi irrotetaan irti keskisaranasta (H) ja
irrotetaan keskisarana.
4. Yläovi vedetään irti saranatapista (G), joka
ruuvataan ulos ja siirretään vastakkaiselle
puolella olevaan saranaan.
5. Yläovi kiinnitetään vastakkaiselle puolelle sen
jälkeen, kun sillä puolella olevien
saranatappireikien muoviset suojatulpat on
irrotettu.
6. Muovitulpat siirretään oven vastakkaiselle
puolella oleviin reikiin, minkä jälkeen
keskimmäinen sarana kiinnitetään kaappiin.
7. Asenna alasarana (1) kaapin vastakkaiselle
puolelle.
8. Ruuvaa jalat (2) ja (3) takaisin.
9. Irrota vedin ja siirrä vastakkaiselle puolelle. Ota
vastakkaisen puolen peitetulpat irti naskalilla.
Laita uudet peitetulpat (tuotteen mukana
tulleessa tarvikepussissa) tyhjiksi jääneisiin
vetimen reikiin.
Kun ruuveja on ruuvattu hieman ulos, ovet voidaan
asentaa paikoilleen säätämällä keskimmäistä
saranaa (H) vaakatasossa työkalun avulla.
Huom!
Oven avautumissuunnan vaihtamisen jälkeen
varmistu siitä, että oven tiivistelista on tiiviisti
kaappia vaaten.Ympäröivän lämpötilan ollessa
alhainen (esim. talvella) ovi ei ehkä sulkeudu täysin
tiiviisti.
Jonkin aikaa lämmettyään tiivistelista kuitenkin asettuu automaattisesti paikalleen ja ovi sulkeutuu
tiiviisti.
Jos haluatte nopeuttaa tätä prosessia, voitte lämmittää tiivistelistaa hiustenkuivaajalla.
H
PR228
G
D715 PIED/M
1
2
3
Taakse asennettavat etäisyystuet
Käyttöohjeen sisältävässä muovipussissa on myös
kaksi etäisyystukea, jotka on asennettava niihin
kuuluviin pakastimen takasivulla oleviin aukkoihin.
Etäisyystuet työnnetään aukkoihin ja samalla
varmistetaan, että nuoli A on sijoitettu kuten
kuvassa, jonka jälkeen etäisyystukia kierretään 45°,
kunnes ne kiinnittyvät paikalleen (nuoli on
pystysuorassa asennossa).
PR60
A
45°

3
CONTENTS
Warnings . . . . . . . . . . . . . . . . . . . . . . . . . . . . . . . . . . . . . . . . . . . . . . . . . . . . . . . . . . . . . . . . . . . . . . . .2
Use / Cleaning the interior - Operation - Temperature regulation - Fresh food refrigeration - Freezing . .
fresh food - Storage of frozen food - Thawing - Ice-cube production . . . . . . . . . . . . . . . . . . . . . . . . . . . .4
Use / Movable shelves -Positioning the door shelves - Freezing calendar . . . . . . . . . . . . . . . . . . . . . . . .5
Hints/ Hints for refrigeration- Hints for freezing - Hints for storage of frozen food . . . . . . . . . . . . . . . . . .6
Maintenance - Periodic cleaning - Periods of no operation - Interior light . . . . . . . . . . . . . . . . . . . . . . . .7
Maintenance / Defrosting Customer service and spare parts . . . . . . . . . . . . . . . . . . . . . . . . . . . . . . .8
Technical information / Installation - Location . . . . . . . . . . . . . . . . . . . . . . . . . . . . . . . . . . . . . . . . . . .9
Installation - Electrical connection - Rear spacers . . . . . . . . . . . . . . . . . . . . . . . . . . . . . . . . . . . . . . . . .10
Installation - Door Reversibility . . . . . . . . . . . . . . . . . . . . . . . . . . . . . . . . . . . . . . . . . . . . . . . . . . . . . . . .11
• Do not place carbonated or fizzy drinks in the
freezer as it creates pressure on the container,
which may cause it to explode, resulting in
damage to the appliance. Do not use a
mechanical device or any artificial means to
speed up the thawing process other than those
recommended by the manufacturer. Never use
metal objects for cleaning your appliance as it
may get damaged.
Installation
• During normal operation, the condenser and
compressor at the back of the appliance heat up
considerably. For safety reasons, minimum
ventilation must be as shown in the instructions.
Attention: keep ventilation openings clear of
obstruction.
• Care must be taken to ensure that the appliance
does not stand on the electrical supply cable.
Important: if the supply cord is damaged, it must
be replaced by a special cord or assembly available from the manufacturer or its service agent.
• If the appliance is transported horizontally, it is
possible that the oil contained in the compressor
flows in the refrigerant circuit. It is advisable to
wait at least two hours before connecting the
appliance to allow the oil to flow back in the
compressor.
• There are working parts in this product which
heat up. Always ensure that there is adequate
ventilation as a failure to do this will result in
component failure and possible food loss. See
installation instructions.
• Parts which heat up should not be exposed.
Wherever possible the back of the product should
be against a wall.
Environment Protection
This appliance does not contain gasses which
could damage the ozone layer, in either its
refrigerant circuit or insulation materials.The
appliance shall not be discarded together with
the urban refuse and rubbish. Avoid damaging
the cooling unit, especially at the rear near the
heat exchanger. Information on your local
disposal sites may be obtained from municipal
authorities.The materials used on this appliance
marked by the symbol are recyclable.
54
ASENNUS
Huom
Tämän jääkaappi-pakastimen ovet sulkeutuvat
magneettitiivisteen avulla. Vanhan kaapin
romuttamisen yhteydessä varmista, että kaikki lukot
ja salvat on irrotettu estääksesi pikkulasten
joutumisen kaapin sisälle. Varminta on irrottaa koko
ovi.
Sijoitus
Kaapia ei saa sijoitta lämpölähteiden läheisyyteen
(esim. lämpöpatterit, uunit, suora auringonvalo jne).
Mikäli kyseessä on kalusteisiin asennettava kaappi
ja mahdollinen oven aukeamissuunnan vaihto, lue
asiaa koskeva jakso.
Sähköliitäntä
Kytke kaappi maadoitettuun pistorasiaan.
Jännite: 230 V. Sulake 10 A.
Tämä laite täyttää seuraavien EY- direktlivien
vaatimukset:
- 87/308 EEC/päiväys 2.ó.87 radiohäirintää
koskevan
- 73/23 EEC/päiväys 19.2.73 (pienjännite-direktiivi)
ja seurannaismuutokset;
- 89/336 EEC/päiväys 3.5.89 (direktiivi
sähkömagneettisesta yhteensopivuudesta) ja
seurannaismuutokset.
Puhdistaminen
Puhdista kaapin sisäosat käyttäen haaleaa ÄLÄ
käytä synteettisiä pesuaineita tai hankauspulveria,
joka voi pilata pinnan ja aiheuttaa naarmuja.
Tärkeää
Laite tulee pystyä kytkemään irti sähköverkosta.
Koskettimen tulee olla helposti saavutettavassa
paikassa laitteen asentamisen jälkeen.
A
NP004
100 mm10 mm
B
10 mm
4
Fresh food refrigeration
To obtain the best performance:
• do not store warm food or evaporating liquids in
the refrigerator;
• do cover or wrap the food, particularly if it has a
strong flavour.
• Position food so that air can circulate freely round
it.
Cleaning the interior
Before using the appliance for the first time, wash
the interior and all internal accessories with lukewarm water and some neutral soap so as to remove
the typical smell of a brand-new product, then dry
thoroughly.
Do not use detergents or abrasive
powders, as these will damage the finish.
Temperature regulation
The temperature is automatically regulated and can
be increased to achieve a higher temperature
(warmer) by rotating the thermostat knob toward
lower settings or reduced (colder) rotating the knob
towards higher settings.
However, the exact setting should be chosen
keeping in mind that the temperature inside the
refrigerator depends on:
• room temperature;
• how often the door is opened;
• the quantity of food stored;
• location of appliance.
A medium setting is generally the most suitable.
Important
If the ambient temperature is high or the
appliance is fully loaded, and the appliance is
set to the lowest temperatures, it may run
continuously causing frost to form on the rear
wall. In this case the dial must be set to a higher
temperature to allow automatic defrosting and
therefore reduced energy consumption.
USE
Operation
Insert the plug into the wall socket.
Turn the thermostat knob ,clockwise, beyond the “O”
(STOP) position.
To stop operation, simply turn the thermostat knob to
position “O”.
Freezing fresh food
The freezer compartment is suitable for long term
storage of commercially frozen food, and for freezing
fresh food.
To freeze fresh foods It is not necessary to change
the setting of the thermostat knob. However, for a
quicker freezing operation, turn the thermostat knob
to the coldest setting; but remeber that, in this
condition, the refrigerator compartment temperature
might drop below 0°C. If this occurs reset thermostat
knob to a warmer setting.
Place the food to be frozen on the upper
compartment.
Ice-cube production
This appliance is equipped with one or more trays
for the production of ice-cubes. Fill these trays with
water, then put them in the freezer compartment.
Do not use metallic instruments to remove the
trays from the freezer.
Thawing
Deep-frozen or frozen food, prior to being used, can
be thawed in the refrigerator compartment or at
room temperature, depending on the time available
for this operation.
Small pieces may even be cooked still frozen,
directly from the freezer: in this case, cooking will
take longer.
Storage of frozen food
When first starting-up or after a period out of use,
before putting the products in the compartment let
the appliance run at least two hours on the coldest
setting, then turn the thermostat knob to the normal
operating position.
Important
In the event of accidental defrosting, for example
due to a power failure, if the power has been off
for longer that the value shown in the technical
characteristics chart under “rising time”, the
defrosted food must be consumed quickly or
cooked immediately and then refrozen (after
cooling).
53
TEKNISET TIEDOT
136
42
0,67
245
3
17
1200
550
600
Jääkaapin nettotilavuus litroina
Sähkönkulutus, kWh/24 h
Sähkönkulutus, kWh/vuosi
Pakastusteho, 24 h
Lämpötilan nousuaika -18°C till -9°C: seen (tuntia)
Pakastimen nettotilavuus litroina
Mitat, mm
korkeus
leveys
syvyys
Tekniset tiedot löytyvät arvokilvestä, joka on sijoitettu laitteen sisälle vasemmalle puolelle.
 Loading...