

Page 1
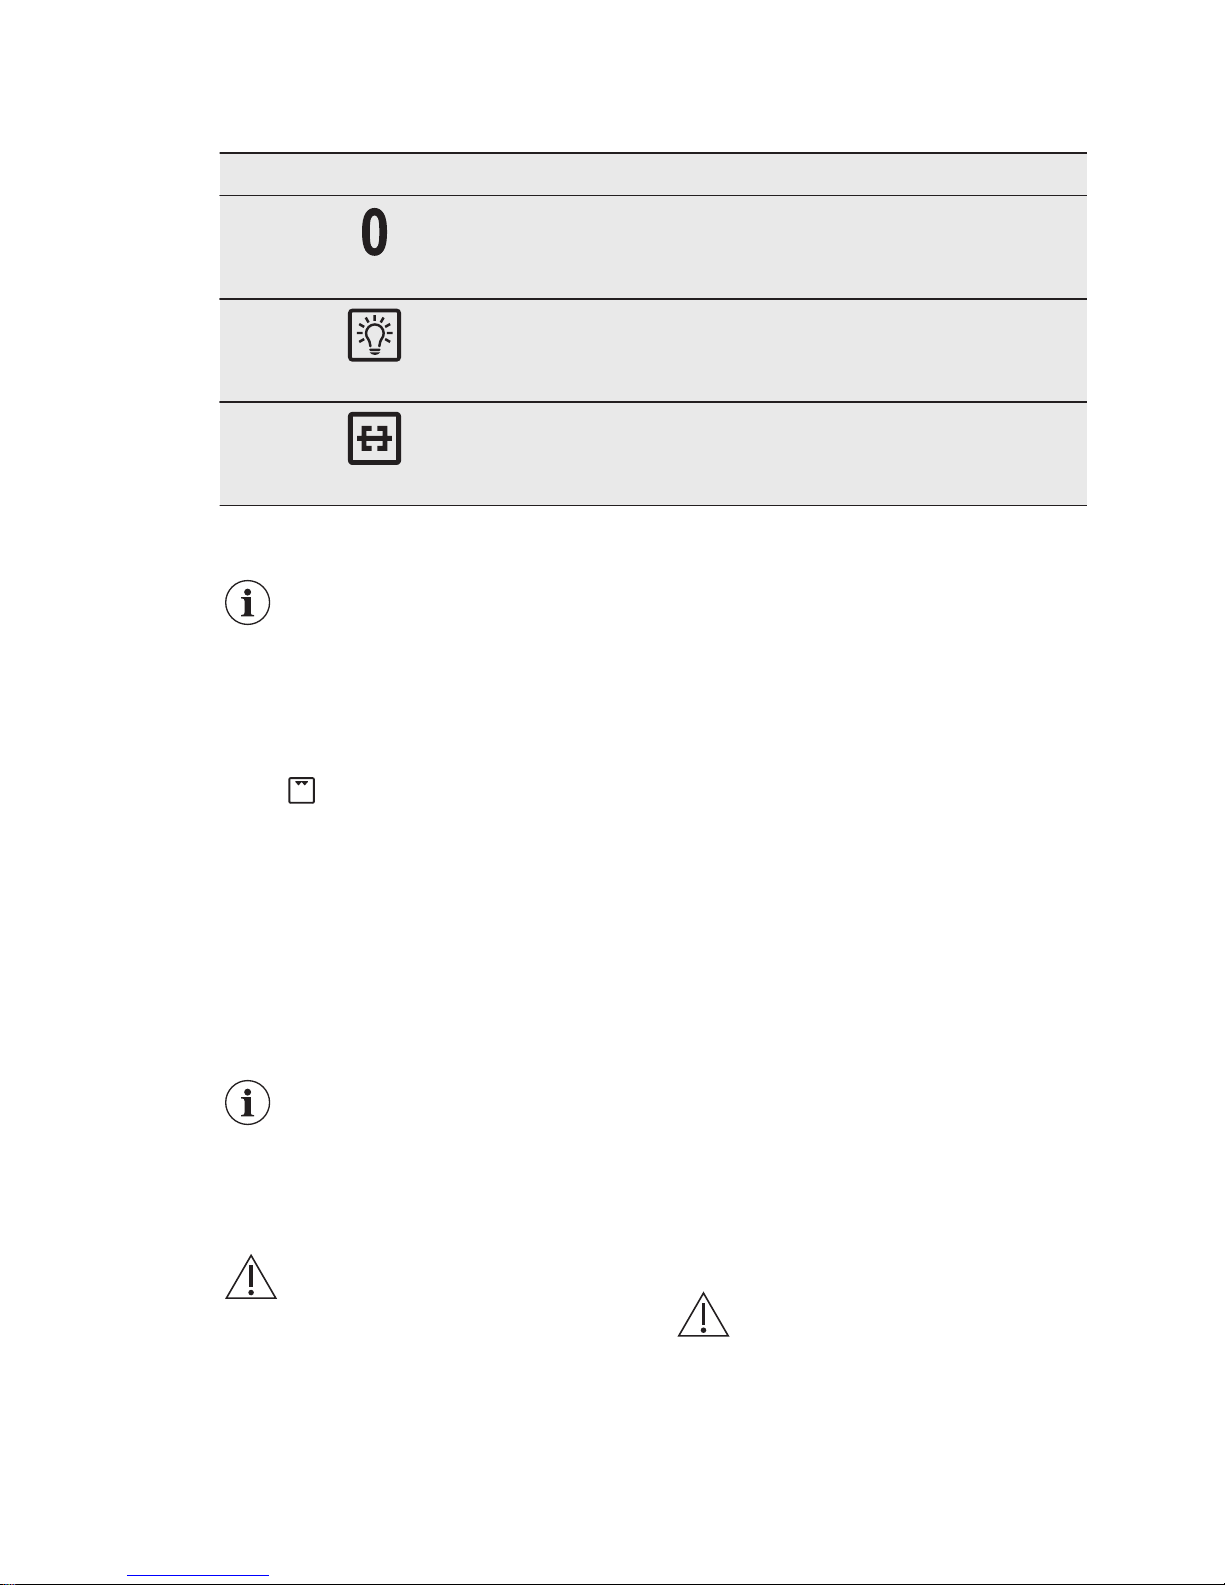
EOG1102COX
EN Oven User Manual 2
ID Oven Buku petunjuk 25
Page 2

CONTENTS
1. SAFETY INFORMATION....................................................................................3
2. SAFETY INSTRUCTIONS..................................................................................4
3. PRODUCT DESCRIPTION................................................................................ 7
4. BEFORE FIRST USE......................................................................................... 7
5. DAILY USE......................................................................................................... 8
6. CLOCK FUNCTIONS......................................................................................... 9
7. USING THE ACCESSORIES............................................................................. 9
8. ADDITIONAL FUNCTIONS.............................................................................. 10
9. HINTS AND TIPS............................................................................................. 11
10. CARE AND CLEANING..................................................................................15
11. TROUBLESHOOTING....................................................................................17
12. INSTALLATION.............................................................................................. 19
13. TECHNICAL DATA.........................................................................................23
WE’RE THINKING OF YOU
Thank you for purchasing an Electrolux appliance. You’ve chosen a product that
brings with it decades of professional experience and innovation. Ingenious and
stylish, it has been designed with you in mind. So whenever you use it, you can
be safe in the knowledge that you’ll get great results every time.
Welcome to Electrolux.
Visit our website for:
Get usage advice, brochures, trouble shooter, service information:
www.electrolux.com/webselfservice
Register your product for better service:
www.registerelectrolux.com
Buy Accessories, Consumables and Original spare parts for your appliance:
www.electrolux.com/shop
CUSTOMER CARE AND SERVICE
Always use original spare parts.
When contacting our Authorised Service Centre, ensure that you have the
following data available: Model, PNC, Serial Number.
The information can be found on the rating plate.
Warning / Caution-Safety information
General information and tips
Environmental information
Subject to change without notice.
www.electrolux.com2
Page 3

1. SAFETY INFORMATION
Before the installation and use of the appliance, carefully
read the supplied instructions. The manufacturer is not
responsible for any injuries or damages that are the
result of incorrect installation or usage. Always keep the
instructions in a safe and accessible location for future
reference.
1.1 Children and vulnerable people safety
• This appliance can be used by children aged from 8
years and above and persons with reduced physical,
sensory or mental capabilities or lack of experience
and knowledge if they have been given supervision or
instruction concerning the use of the appliance in a
safe way and understand the hazards involved.
• Children between 3 and 8 years of age and persons
with very extensive and complex disabilities shall be
kept away unless continuously supervised.
• Children of less than 3 years of age should be kept
away unless continuously supervised.
• Do not let children play with the appliance.
• Keep all packaging away from children and dispose of
it appropriately.
• Keep children and pets away from the appliance when
it operates or when it cools down. Accessible parts are
hot.
• If the appliance has a child safety device, it should be
activated.
• Children shall not carry out cleaning and user
maintenance of the appliance without supervision.
1.2 General Safety
• Only a qualified person must install this appliance and
replace the cable.
• WARNING: The appliance and its accessible parts
become hot during use. Care should be taken to avoid
touching heating elements.
ENGLISH 3
Page 4

• Always use oven gloves to remove or put in
accessories or ovenware.
• Before carrying out any maintenance, disconnect the
appliance from the power supply.
• Ensure that the appliance is switched off before
replacing the lamp to avoid the possibility of electric
shock.
• Do not use a steam cleaner to clean the appliance.
• Do not use harsh abrasive cleaners or sharp metal
scrapers to clean the glass door since they can
scratch the surface, which may result in shattering of
the glass.
• If the mains power supply cable is damaged, it must
be replaced by the manufacturer, its Authorised
Service Centre or similarly qualified persons to avoid
an electrical hazard.
• To remove the shelf supports first pull the front of the
shelf support and then the rear end away from the
side walls. Install the shelf supports in the opposite
sequence.
2. SAFETY INSTRUCTIONS
This appliance is suitable for the
following markets: ID
2.1 Installation
WARNING!
Only a qualified person must
install this appliance.
• Remove all the packaging.
• Do not install or use a damaged
appliance.
• Follow the installation instructions
supplied with the appliance.
• Always take care when moving the
appliance as it is heavy. Always use
safety gloves and enclosed footwear.
• Do not pull the appliance by the
handle.
• Keep the minimum distance from
other appliances and units.
• Install the appliance in a safe and
suitable place that meets installation
requirements.
• Do not operate the appliance without
the cavity bottom cover. It is a
functional safety component.
• The appliance is equipped with an
electric cooling system. It must be
operated with the electric power
supply.
2.2 Electrical connection
WARNING!
Risk of fire and electric
shock.
• All electrical connections should be
made by a qualified electrician.
• The appliance must be earthed.
• Make sure that the parameters on the
rating plate are compatible with the
www.electrolux.com4
Page 5

electrical ratings of the mains power
supply.
• Always use a correctly installed
shockproof socket.
• Do not use multi-plug adapters and
extension cables.
• Make sure not to cause damage to
the mains plug and to the mains
cable. Should the mains cable need to
be replaced, this must be carried out
by our Authorised Service Centre.
• Do not let mains cables touch or
come near the appliance door,
especially when the door is hot.
• The shock protection of live and
insulated parts must be fastened in
such a way that it cannot be removed
without tools.
• Connect the mains plug to the mains
socket only at the end of the
installation. Make sure that there is
access to the mains plug after the
installation.
• If the mains socket is loose, do not
connect the mains plug.
• Do not pull the mains cable to
disconnect the appliance. Always pull
the mains plug.
• Use only correct isolation devices: line
protecting cut-outs, fuses (screw type
fuses removed from the holder), earth
leakage trips and contactors.
• The electrical installation must have
an isolation device which lets you
disconnect the appliance from the
mains at all poles. The isolation
device must have a contact opening
width of minimum 3 mm.
• This appliance complies with the
E.E.C. Directives.
2.3 Gas connection
• All gas connections must be made by
a qualified person.
• Before installation, make sure that the
local distribution conditions (nature of
the gas and gas pressure) and the
adjustment of the appliance are
compatible.
• Make sure that there is air circulation
around the appliance.
• The information about the gas supply
is on the rating plate.
• This appliance is not connected to a
device, which evacuates the products
of combustion. Make sure to connect
the appliance according to current
installation regulations. Pay attention
to requirements regarding adequate
ventilation.
2.4 Use
WARNING!
Risk of injury, burns and
electric shock or explosion.
• Do not change the specification of this
appliance.
• Make sure that the ventilation
openings are not blocked.
• Do not let the appliance stay
unattended during operation.
• Deactivate the appliance after each
use.
• Be careful when you open the
appliance door while the appliance is
in operation. Hot air can release.
• Do not operate the appliance with wet
hands or when it has contact with
water.
• Do not apply pressure on the open
door.
• Do not use the appliance as a work
surface or as a storage surface.
• Open the appliance door carefully.
The use of ingredients with alcohol
can cause a mixture of alcohol and
air.
• Do not let sparks or open flames to
come in contact with the appliance
when you open the door.
• Do not put flammable products or
items that are wet with flammable
products in, near or on the appliance.
WARNING!
Risk of damage to the
appliance.
• To prevent damage or discoloration to
the enamel:
– do not put aluminium foil directly
on the bottom of cavity of the
appliance.
– do not put water directly into the
hot appliance.
– do not keep moist dishes and
food in the appliance after you
finish the cooking.
ENGLISH 5
Page 6

– be careful when you remove or
install the accessories.
• Discoloration of the enamel or
stainless steel has no effect on the
performance of the appliance.
• Use a deep pan for moist cakes. Fruit
juices cause stains that can be
permanent.
• This appliance is for cooking
purposes only. It must not be used for
other purposes, for example room
heating.
• Always cook with the oven door
closed.
• If the appliance is installed behind a
furniture panel (e.g. a door) make
sure the door is never closed when
the appliance is in operation. Heat
and moisture can build up behind a
closed furniture panel and cause
subsequent damage to the appliance,
the housing unit or the floor. Do not
close the furniture panel until the
appliance has cooled down
completely after use.
2.5 Care and cleaning
WARNING!
Risk of injury, fire, or
damage to the appliance.
• Before maintenance, deactivate the
appliance and disconnect the mains
plug from the mains socket.
• Make sure the appliance is cold.
There is the risk that the glass panels
can break.
• Replace immediately the door glass
panels when they are damaged.
Contact the Authorised Service
Centre.
• Be careful when you remove the door
from the appliance. The door is
heavy!
• Clean regularly the appliance to
prevent the deterioration of the
surface material.
• Clean the appliance with a moist soft
cloth. Only use neutral detergents. Do
not use any abrasive products,
abrasive cleaning pads, solvents or
metal objects.
• If you use an oven spray, follow the
safety instruction on it's packaging.
• Do not clean the catalytic enamel (if
applicable) with any kind of detergent.
2.6 Internal lighting
WARNING!
Risk of electric shock.
• The type of light bulb or halogen lamp
used for this appliance is for
household appliances only. Do not
use it for house lighting.
• Before replacing the lamp, disconnect
the appliance from the power supply.
• Only use lamps with the same
specifications.
2.7 Service
• To repair the appliance contact an
Authorised Service Centre.
• Use original spare parts only.
2.8 Disposal
WARNING!
Risk of injury or suffocation.
• Contact your municipal authority for
information on how to discard the
appliance correctly.
• Disconnect the appliance from the
mains supply.
• Cut off the mains electrical cable
close to the appliance and dispose of
it.
• Flat the external gas pipes.
www.electrolux.com6
Page 7
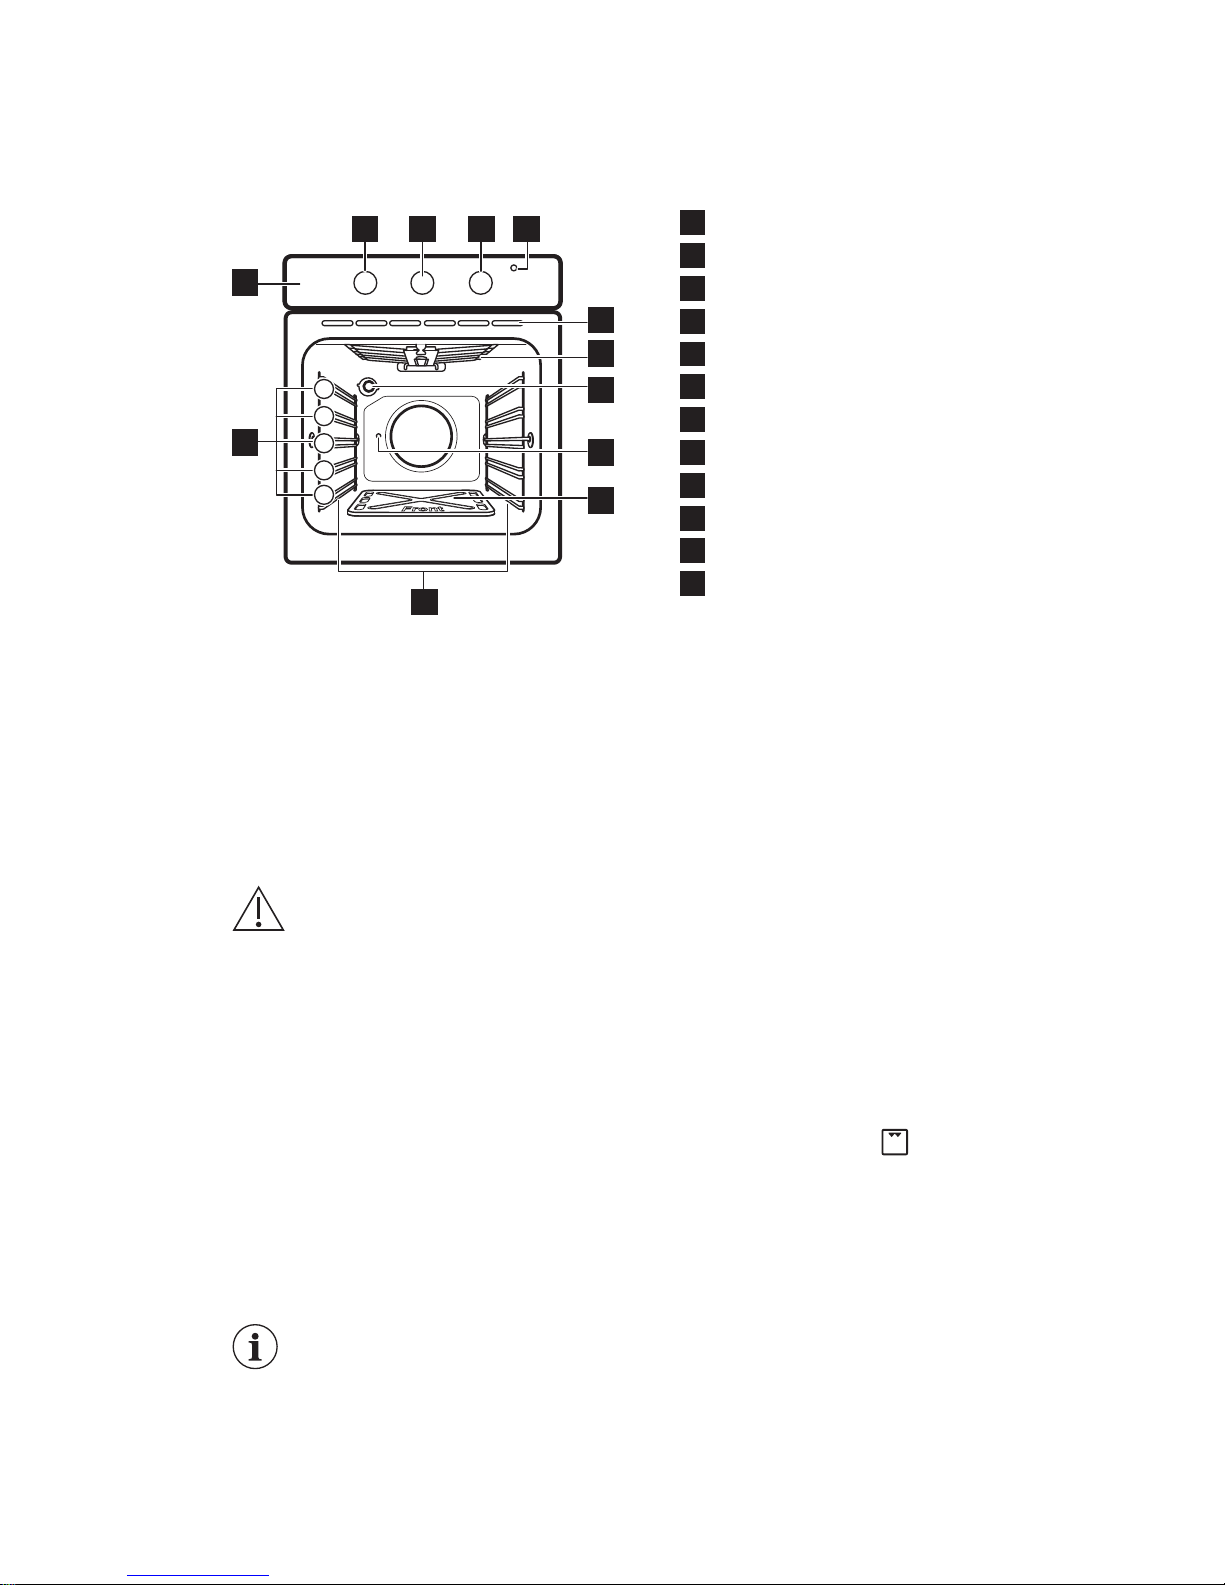
3. PRODUCT DESCRIPTION
3.1 General overview
1
52 3
11
4
1
12
5
4
3
2
1
6
7
8
10
9
1
Control panel
2
Knob for the heating functions
3
Knob for the Minute Minder
4
Knob for the gas control
5
Power indicator
6
Air vents for the cooling fan
7
Heating element
8
Lamp
9
Turnspit hole
10
Oven cavity bottom plate
11
Shelf support, removable
12
Shelf positions
3.2 Accessories
• Wire shelf
For cookware, cake tins, roasts.
• Aluminium baking tray
For cakes and biscuits.
• Turnspit
For roasting larger joints of meat and
poultry.
4. BEFORE FIRST USE
WARNING!
Refer to Safety chapters.
4.1 Oven cavity bottom plate
When you buy the oven, at first the oven
cavity bottom plate is together with the
accessories. Before you use the oven for
the first time, put the bottom plate with
the hole on its front part in the burner
area, as shown in "Product description"
chapter.
4.2 Initial Cleaning
Remove all accessories and removable
shelf supports from the oven.
Refer to "Care and cleaning"
chapter.
Clean the oven and the accessories
before first use.
Put the accessories and the removable
shelf supports back to their initial
position.
4.3 Preheating
Preheat the empty appliance before first
use.
1. Set the maximum temperature.
2. Let the appliance operate for 1 hour.
3. Set the function .
4. Let the appliance operate for 15
minutes.
Accessories can become hotter than
usual. The appliance can emit an odour
and smoke. This is normal. Make sure
that the airflow is sufficient.
Let the oven cool down. Dampen a soft
cloth with warm water and a little mild
washing-up liquid and use this to clean
the oven cavity.
ENGLISH 7
Page 8
5. DAILY USE
WARNING!
Refer to Safety chapters.
5.1 Ignition of oven gas burner
Oven safety device:
The gas oven has a
thermocouple. It stops the
gas flow if the flame goes
out.
1. Press the knob for the gas control
and turn it to .
2. Keep the knob for the gas control
pushed for 15 seconds or less to let
the thermocouple warm up. Do not
release the knob until the flame
ignites, otherwise the gas flow is
interrupted.
Do not keep the knob for the gas control
pushed for more than 15 seconds. If the
oven burner does not ignite after 15
seconds, release the knob for the gas
control, turn it into off position, open the
oven door. Wait minimum 1 minute, close
the oven door and try to ignite the oven
burner again.
5.2 After igniting the oven gas
burner
1. Release the knob for the gas control.
2. Turn the knob for the gas control to
set the temperature.
Control the flame through the holes in
the cavity bottom plate.
5.3 Knob for the gas control
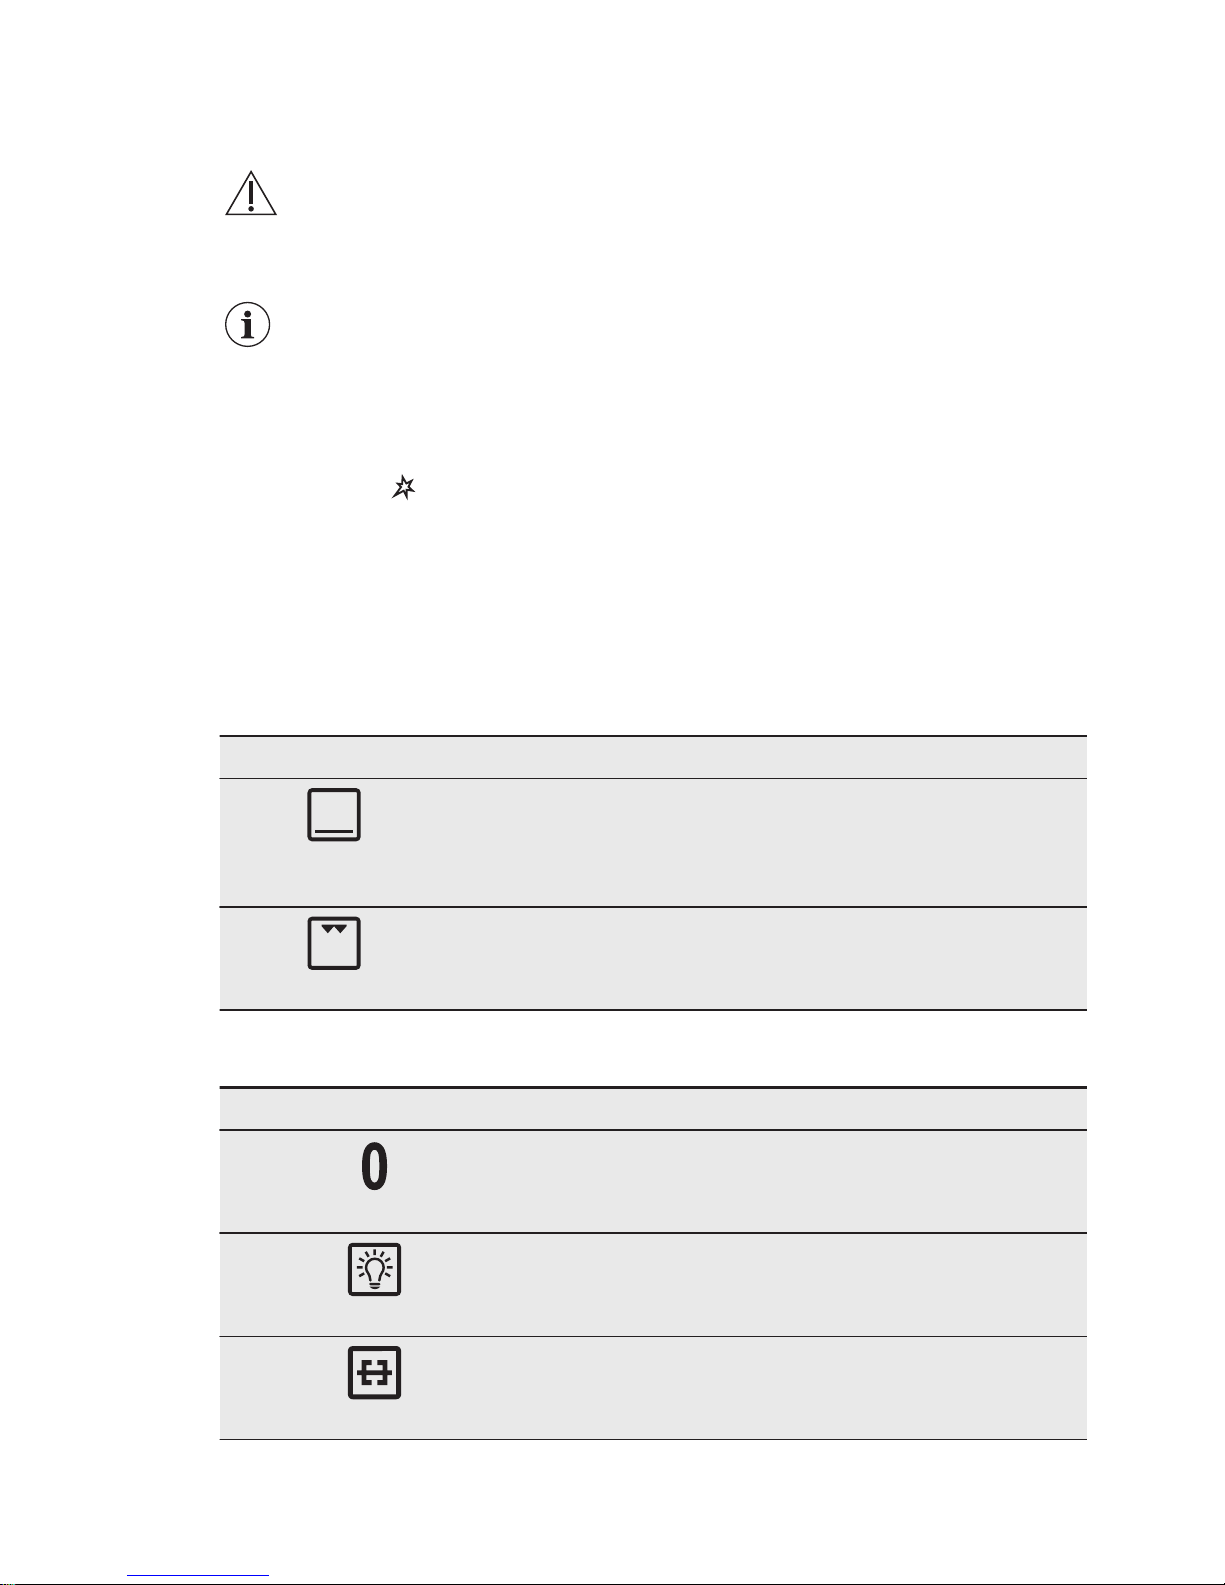
Symbol Function
Conventional Cook‐
ing
Heat from the bottom of the oven. Range of temperature ad‐
justment (150 °C - 250 °C).
Grilling
Heats from the top.
5.4 Oven functions
Oven function Application
Off position
The oven is off.
Light
To turn on the lamp without a cooking function.
Turnspit
To roast larger pieces of meat on the turnspit.
www.electrolux.com8
Page 9
5.5 Using the grill
Oven safety device:
The gas oven has a
thermocouple. It stops the
gas flow if the flame goes
out.
1. Press the knob for the gas control
and turn it to . Keep the knob for
the gas control pushed for 15
seconds or less. Do not release the
knob until the flame ignites.
2. Release the knob for the gas control.
Do not keep the knob for the gas control
pushed for more than 15 seconds. If the
grill burner does not ignite after 15
seconds, release the knob for the gas
control, turn it into off position, open the
oven door. Wait minimum 1 minute, close
the oven door and try to ignite the grill
burner again.
Refer to "Hints and Tips" chapter,
Grilling.
6. CLOCK FUNCTIONS
6.1 Minute Minder
Use it to set a countdown time for an
oven function.
This function has no effect
on the operation of the
appliance.
Turn the knob for the timer as far as it
goes, then turn it to necessary time
period.
After the time period is completed, an
acoustic signal sounds.
7. USING THE ACCESSORIES
WARNING!
Refer to Safety chapters.
7.1 Using the turnspit
WARNING!
Be careful when you use the
turnspit. The forks and the
spit are sharp. There is a
risk of injury.
WARNING!
Use oven gloves when you
remove the turnspit. The
turnspit and the grill are hot.
There is a risk of burns.
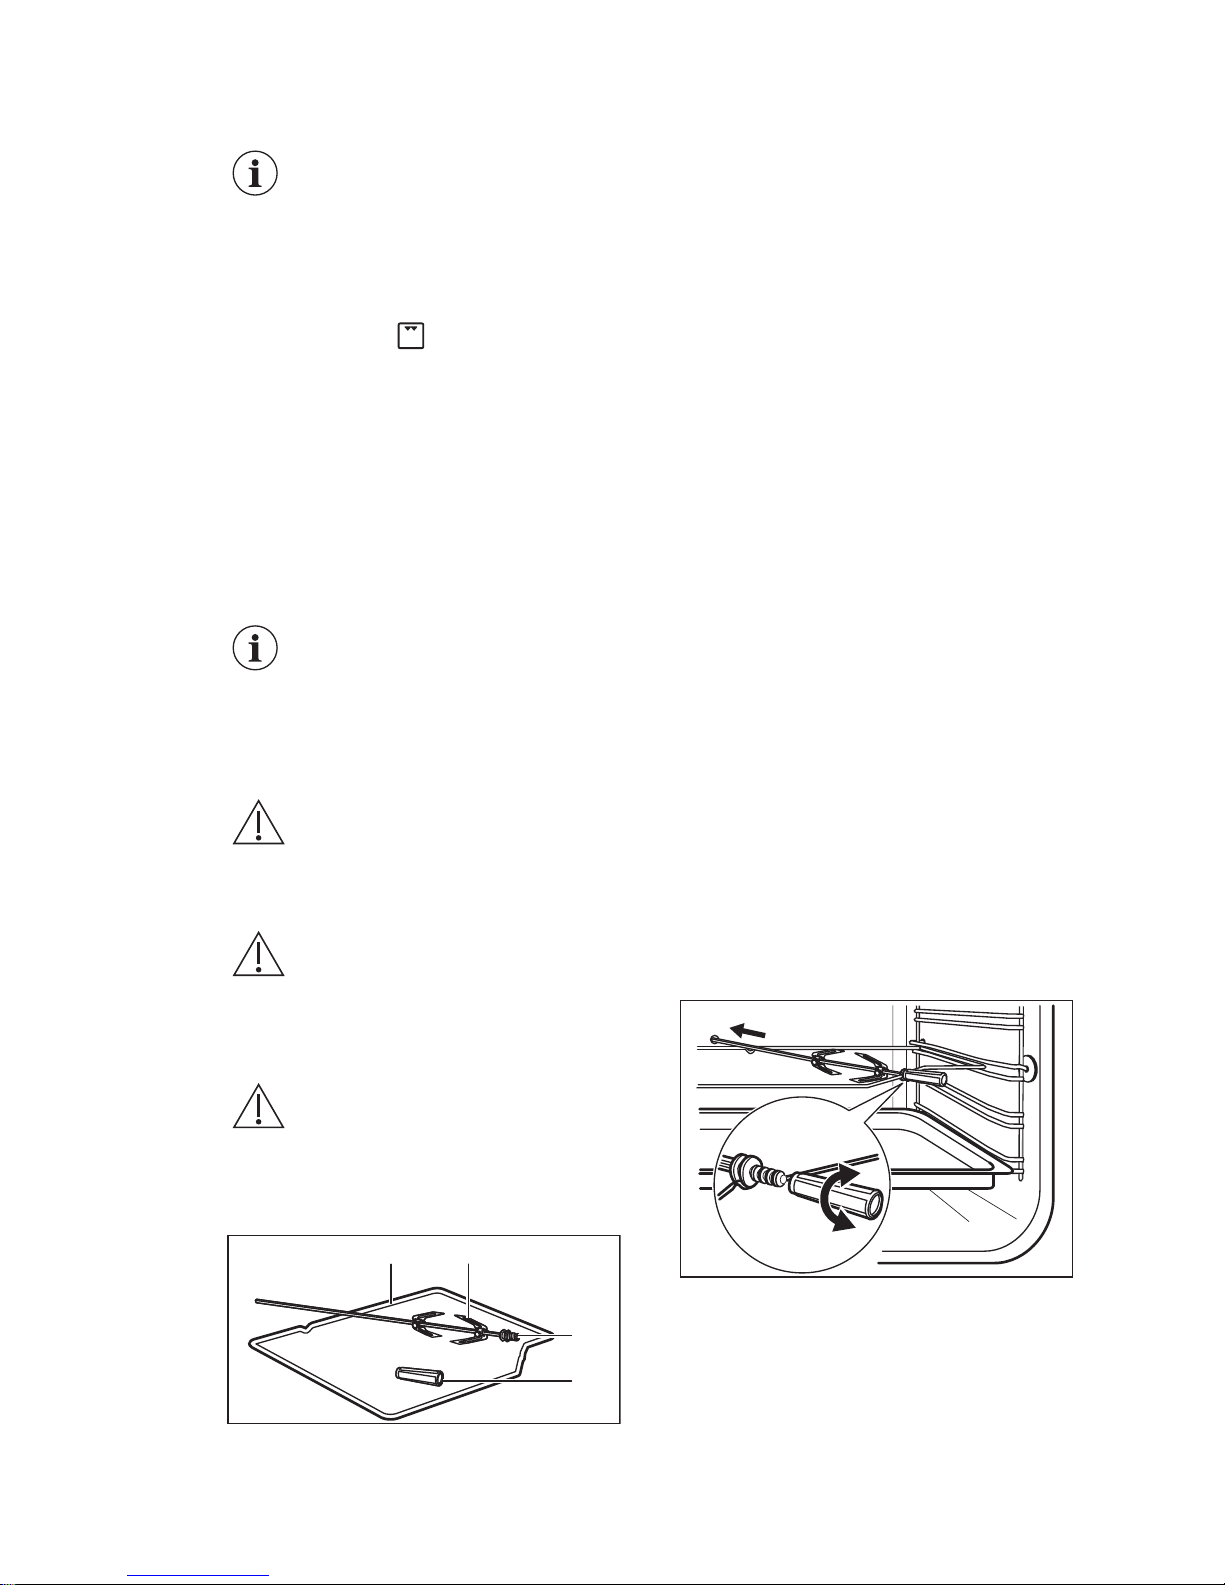
A B
D
C
A. Turnspit frame
B. Forks
C. Spit
D. Handle
1. Put the turnspit handle into the spit.
2. Put the deep pan on the lowest shelf
position.
3. Put the spit frame on the third shelf
position from the bottom.
4. Install the first fork on the spit, then
put the meat on the turnspit and
install the second fork.
ENGLISH 9
Page 10
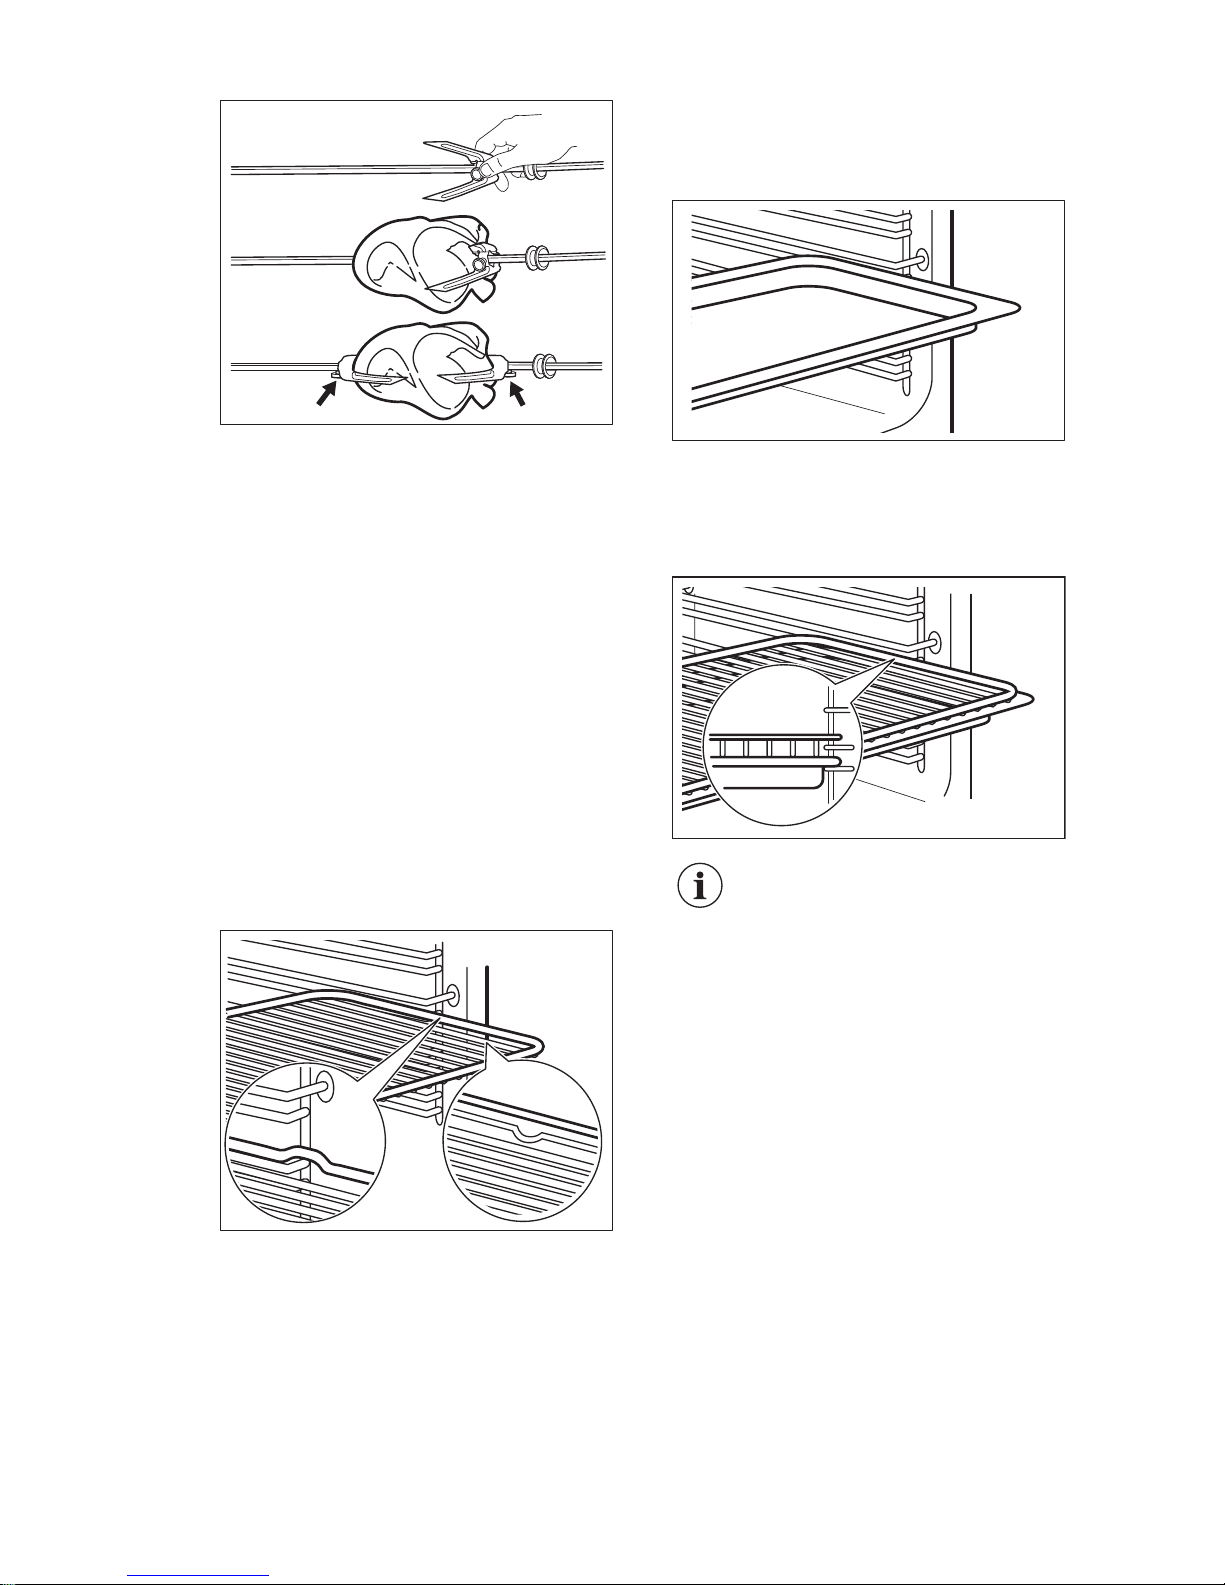
5. Use the screws to tighten the forks.
6. Put the tip of the spit into the turnspit
hole.
7. Lay the back side of the spit on the
turnspit frame.
Refer to "Product description"
chapter.
8. Remove the turnspit handle.
9. Select a function with the turnspit
position. The turnspit rotates.
10. Ignite the grill burner. Refer to the
cooking tables.
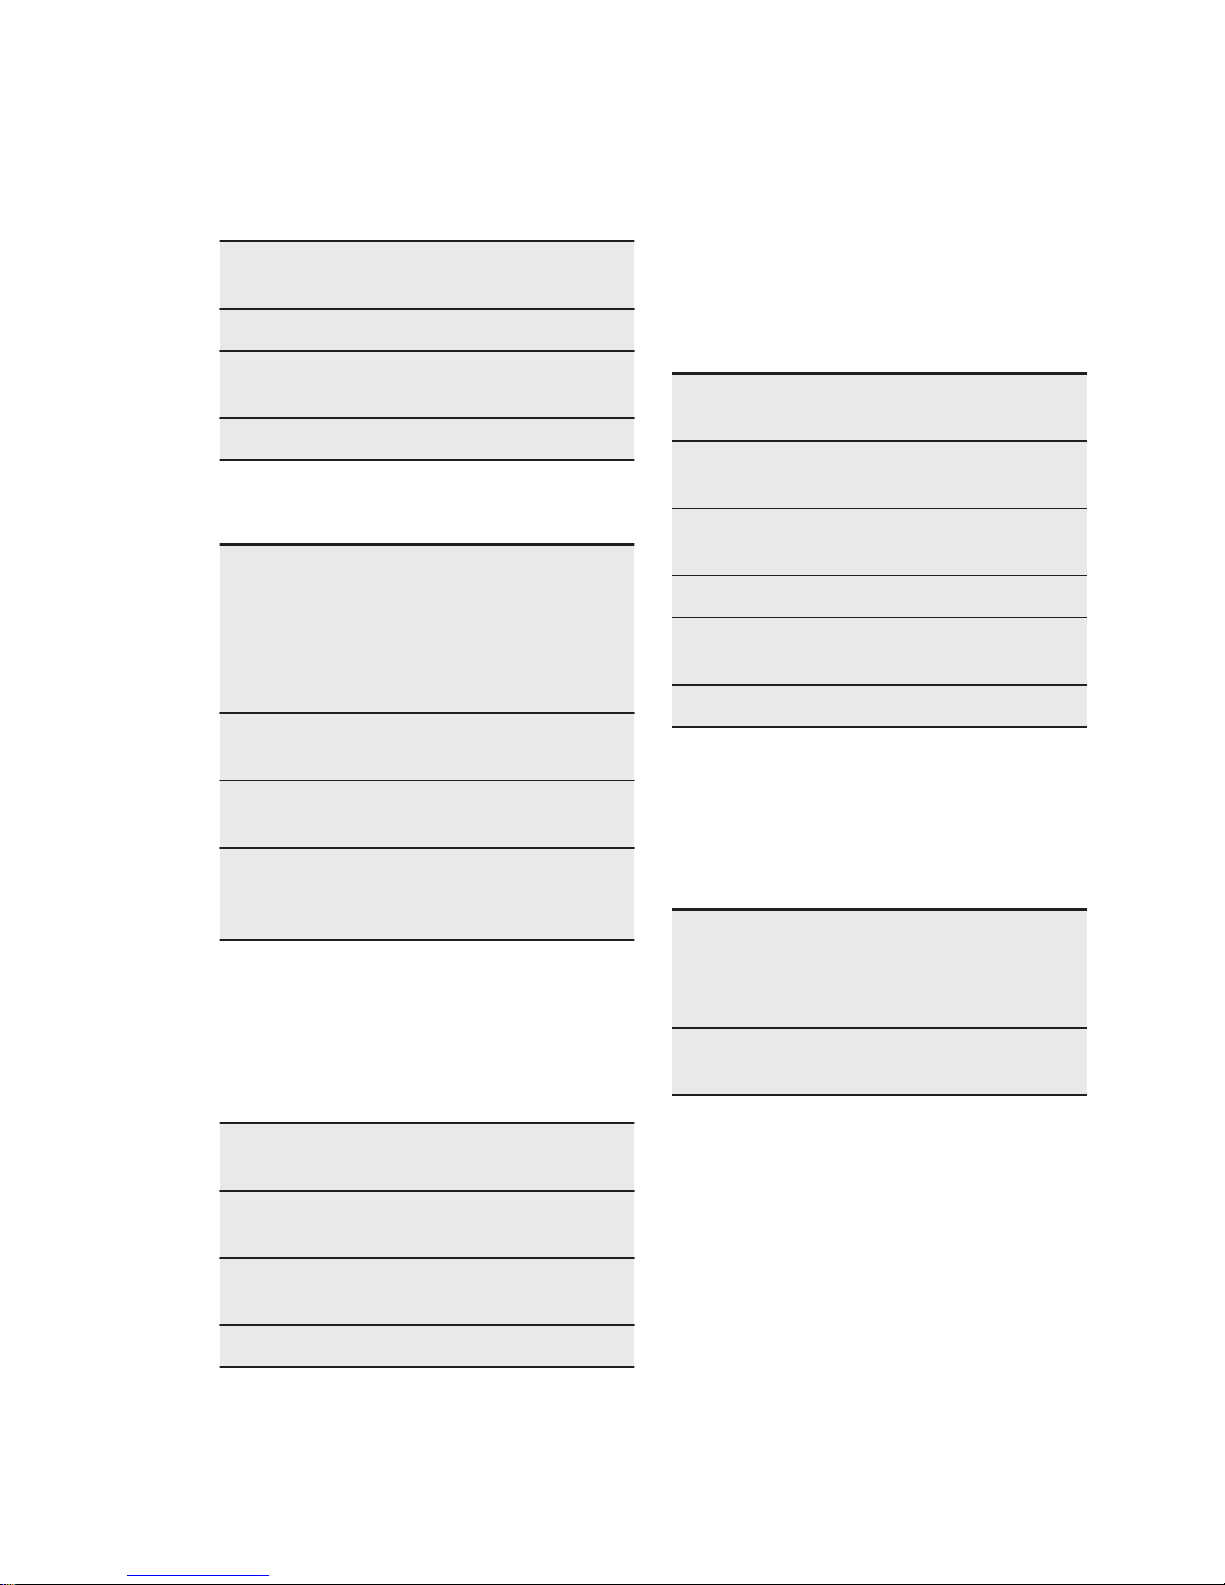
7.2 Inserting the accessories
Wire shelf:
Push the shelf between the guide bars of
the shelf support and make sure that the
feet point down.
Baking tray:
Push the baking tray between the guide
bars of the shelf support.
Wire shelf and baking tray together:
Push the baking tray between the guide
bars of the shelf support and the wire
shelf on the guide bars above.
Small indentation at the top
increase safety. The
indentations are also anti-tip
devices. The high rim
around the shelf prevents
cookware from slipping of
the shelf.
8. ADDITIONAL FUNCTIONS
8.1 Cooling fan
When the oven operates, the cooling fan
turns on automatically to keep the
surfaces of the oven cool. If you turn off
the oven, the cooling fan can continues
to operate until the oven cools down.
www.electrolux.com10
Page 11

9. HINTS AND TIPS
WARNING!
Refer to Safety chapters.
The temperature and baking
times in the tables are
guidelines only. They
depend on the recipes and
the quality and quantity of
the ingredients used.
9.1 Cooking recommendations
The oven has five shelf positions.
Count the shelf positions from the bottom
of the oven floor.
Your oven may bake or roast differently
to the oven you had before. The below
tables provide you with the standard
settings for temperature, cooking time
and shelf position.
If you cannot find the settings for a
special recipe, look for the similar one.
Baking cakes
Do not open the oven door before 3/4 of
the set cooking time is up.
Grilling
Put the food close to the top heating
element for faster cooking and further
away for more gentle cooking.
To minimise splashing, you should dry
food before grilling. Apply a little oil or
melted butter on lean meats and fish to
keep them moist during cooking.
You can place accompaniments such as
tomatoes and mushrooms underneath
the grid when grilling meats.
You should turn over the food during
cooking, as you require.
Cooking meat and fish
Leave the meat for approximately 15
minutes before carving so that the juice
does not seep out.
To prevent too much smoke in the oven
during roasting, add some water into the
deep pan. To prevent the smoke
condensation, add water each time after
it dries up.
Cooking times
Cooking times depend on the type of
food, its consistency, and volume.
Initially, monitor the performance when
you cook. Find the best settings (heat
setting, cooking time, etc.) for your
cookware, recipes and quantities when
you use this appliance.
9.2 Cooking tables
Casserolesl
Preheat the empty oven before cooking.
Prepare 1.5 - 2.5 kg of food.
Use the fourth shelf position.
Food Temperature
(°C)
Time (min)
Lasagne 180 45 - 50
Cannelloni 180 45 - 50
Potato
gratin
180 33 - 40
Baked
macaroni
180 45 - 50
Kebab Ha‐la190 35 - 40
Meat
Preheat the empty oven before cooking.
Use the third shelf position.
Food Tempera‐
ture (°C)
Time
(min)
Mutton, 1.7 kg 180 - 200 80 - 100
Chicken, 1 -
1.8 kg
220 - 230 80 - 90
Duck, 1.8 - 2.5kg220 - 230 100 - 120
Goose, 2.5 -
3.5 kg
220 - 230 160 - 180
Rabbit, 2 kg 180 - 190 60 - 80
Goat meat, 1.8kg170 - 180 60 - 90
ENGLISH 11
Page 12
Pizza
Preheat the empty oven before cooking.
Prepare 1.4 - 1.5 kg of food.
Use the third or fourth shelf position.
Food Temperature
(°C)
Time
(min)
Pizza, thin 200 - 210 20 - 30
Pizza,
thick
200 - 210 25 - 30
Calzone 190 - 200 25 - 30
Cakes
Preheat the empty oven before cooking.
Food Sh
elf
po‐
si‐
tio
n
Temper‐
ature
(°C)
Time
(min)
Flat cake, 0.6
- 1.0 kg
4 170 -
180
20 - 30
Sponge cake,
1.0 - 1.5 kg
4 170 -
180
40 - 50
Feteer me‐
shaltet, 1.2 -
1.5 kg
3 or4190 40 - 45
Grilling
Preheat the empty oven for 3 minutes.
Use the fourth shelf position.
Maximum temperature is the default
value for all types of food.
Food Quantity
(kg)
Time
(min)
Burgers 0.6 (6
pieces)
20 - 30
Toast brown‐
ing
0.5 9 - 12
Toast Hawai 6 pieces 7 - 14
9.3 Gas oven cooking
Meat & Poultry
Preheat the empty oven for 10 minutes
before cooking.
Use the wire shelf.
Put a deep pan on the second shelf
position.
Use the third shelf position.
Food Tempera‐
ture (°C)
Time
(min)
Bone-in beef,
1.0 kg
min. 50 - 65
Boneless beef,
1.0 kg
190 55 - 65
Lamb, 1.0 kg min. 50 - 65
Chicken / Rab‐
bit, 1.2 kg
220 - 230 85 - 95
Duck, 1.0 kg 190 90 - 100
Turkey
Preheat the empty oven for 10 minutes
before cooking.
Use the deep pan.
Use the second shelf position.
Food Tem‐
pera‐
ture
(°C)
Time (min)
Turkey, 4.5 -
5.5 kg
160 220 - 250
Pastry
Preheat the empty oven for 10 minutes
before cooking.
Use the aluminium baking tray if no other
cookware specified below.
Use the fourth shelf position.
www.electrolux.com12
Page 13

Food Temper‐
ature
(°C)
Time
(min)
Fruit tart in a 26 cm
round cake mould
on the wire shelf
165 50 - 60
Fruit pie in a 26 cm
round cake mould
on the wire shelf
min. 50 - 60
Choux pastry 190 35 - 45
Vol au vent 170 25 - 35
Jam tart in a 30 cm
round cake mould
on the wire shelf
165 50 - 60
Pudding
Preheat the empty oven for 10 minutes
before cooking.
Use 9 ceramic ramekins.
Pour 2 cm of water into the deep pan.
Use the third shelf position.
Food Temper‐
ature
(°C)
Time
(min)
Egg Custard in a
bain-marie
min. 70 - 85
Cakes
Preheat the empty oven for 10 minutes
before cooking.
Use the aluminium baking tray if no other
cookware specified below.
Use the fourth shelf position.
Food Temper‐
ature
(°C)
Time
(min)
Rich fruit cake in a
20 cm cake mould
on the wire shelf
min. 160 -
170
Rich fruit cake in a
20 cm cake mould
on the wire shelf
min. 160 -
170
Food Temper‐
ature
(°C)
Time
(min)
Madeira cake in a
20 cm cake mould
on the wire shelf
min. 115 -
130
Small cakes min. -
170
40 - 65
Ginger bread min. 45 - 55
Bread
Preheat the empty oven for 10 minutes
before cooking.
Use the aluminium baking tray.
Use the fourth shelf position.
Food Tempera‐
ture (°C)
Time
(min)
Bread loaves,
0.5 kg
180 - 190 50 - 60
Bread loaves,
1.0 kg
180 - 190 60 - 70
Rolls and buns 180 - 190 25 - 35
9.4 Grilling
Preheat the empty oven for 3 minutes
before cooking.
Use the fourth shelf position.
Maximum temperature is the default
value for all types of food.
Food PiecesTime (min)
1st
side
2nd
side
Fillet
steaks, 0.8
kg
4 13 - 15 13 - 15
Beef
steaks, 0.6
kg
4 12 - 15 12 - 15
Chicken
(cut in 2),
1.0 kg
2 35 - 40 30 - 35
ENGLISH 13
Page 14

Food PiecesTime (min)
1st
side
2nd
side
Kebabs 4 15 - 20 12 - 15
Chicken
breast, 0.4
kg
4 13 - 15 13 - 15
Fish fillet,
0.4 kg
4 13 - 15 12 - 14
Toasted
sandwiches
4 - 6 5 - 7 -
Toast 4 - 6 2 - 4 2 - 3
9.5 Turnspit
Preheat the empty oven for 10 minutes
before cooking.
Use the turnspit with the bottom oven
burner.
Use the third shelf position.
Food Tem‐
pera‐
ture
(°C)
Time
(min)
Poultry, 1.0 - 1.2kg190 -
200
75 - 85
Roasts, 0.8 - 1.0kg190 -
200
75 - 85
9.6 Information for test
institutes
Tests according to IEC 60350-1.
Food Function Acces‐
sories
Shelf
posi‐
tion
Tem‐
pera‐
ture
(°C)
Time (min) Comments
Small
cake
Conventional
Cooking
Alumi‐
nized
baking
tray
4 150 -
170
35 - 55 Put 20 small
cakes per one
baking tray.
Preheat the oven
for 10 minutes.
Apple pie Conventional
Cooking
Wire
shelf
4 170 80 - 90 Use 2 tins (20 cm
diameter), diago‐
nally shifted.
Preheat the oven
for 10 minutes.
Sponge
cake
Conventional
Cooking
Wire
shelf
4 170 50 - 60 Use a cake
mould (26 cm di‐
ameter).
Preheat the oven
for 10 minutes.
Short
bread
Conventional
Cooking
Alumi‐
nized
baking
tray
4 160 -
170
25 - 40 Preheat the oven
for 10 minutes.
www.electrolux.com14
Page 15

Food Function Acces‐
sories
Shelf
posi‐
tion
Tem‐
pera‐
ture
(°C)
Time (min) Comments
Toast
4 - 6
pieces
Grilling Wire
shelf
4 max. 2 - 3 minutes
first side; 2 - 3
minutes sec‐
ond side
Preheat the oven
for 3 minutes.
Beef bur‐
ger
6 pieces,
0.6 kg
Grilling Wire
shelf
and
drip‐
ping
pan
4 max. 20 - 30 Put the wire shelf
on the fourth lev‐
el and the drip‐
ping pan on the
third level of the
oven. Turn the
food halfway
through the cook‐
ing time.
Preheat the oven
for 3 minutes.
10. CARE AND CLEANING
WARNING!
Refer to Safety chapters.
10.1 Notes on cleaning
Clean the front of the oven with a soft
cloth with warm water and a mild
cleaning agent.
To clean metal surfaces, use a dedicated
cleaning agent.
Clean the oven interior after each use.
Fat accumulation or other food remains
may result in a fire.
Clean all accessories after each use and
let them dry. Use a soft cloth with warm
water and a cleaning agent. Do not clean
the accessories in the dishwasher.
Clean stubborn dirt with a special oven
cleaner.
If you have nonstick accessories, do not
clean them using aggressive agents,
sharp-edged objects or a dishwasher. It
can cause damage to the nonstick
coating.
Moisture can condense in the oven or on
the door glass panels. To decrease the
condensation, operate the oven for 10
minutes before cooking. Clean the
moisture from the cavity after each use.
10.2 Stainless steel or
aluminium ovens
Clean the oven door with a damp cloth or
sponge only. Dry it with a soft cloth.
Do not use steel wool, acids or abrasive
materials as they can damage the oven
surface. Clean the oven control panel
with the same precautions.
10.3 Cleaning the door gasket
Regularly do a check of the door gasket.
The door gasket is around the frame of
the oven cavity. Do not use the oven if
the door gasket is damaged. Contact an
Authorised Service Centre.
To clean the door gasket, refer to the
general information about cleaning.
10.4 Removing the shelf
supports
To clean the oven, remove the shelf
supports.
ENGLISH 15
Page 16
CAUTION!
Be careful when you remove
the shelf supports.
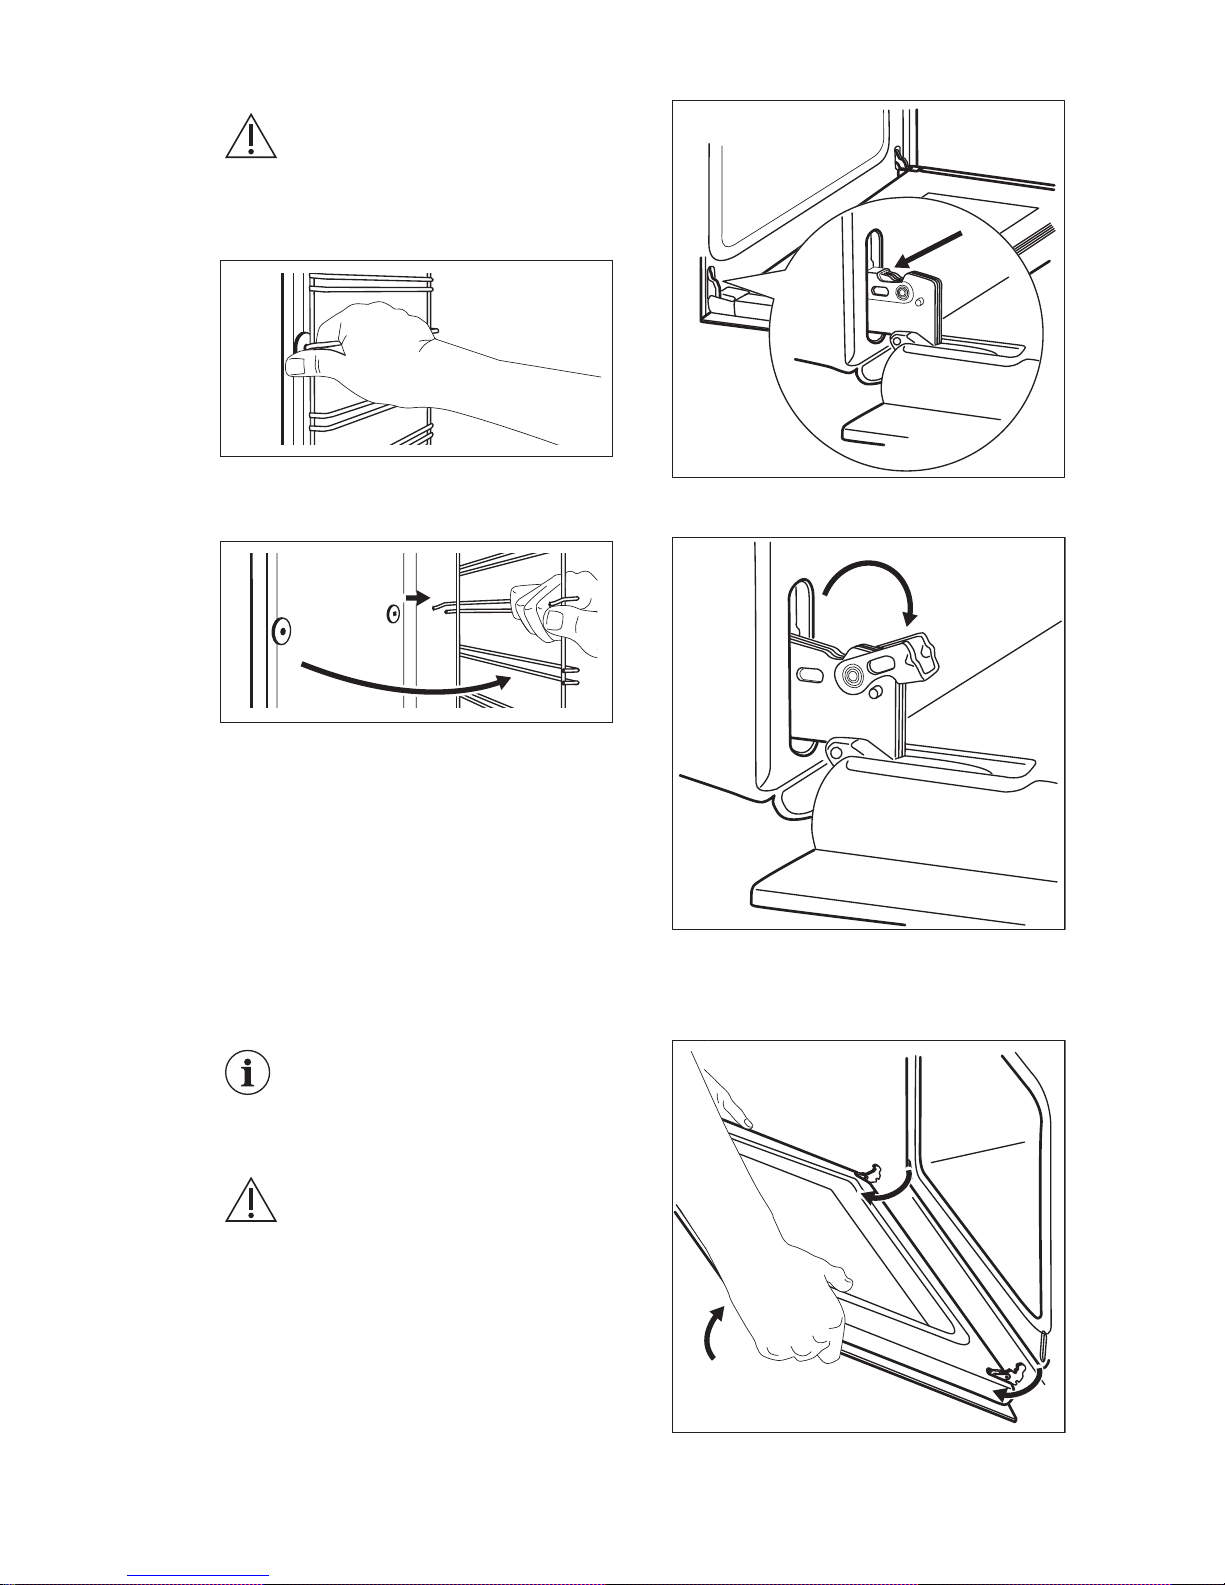
1. Pull the front of the shelf support
away from the side wall.
2. Pull the rear end of the shelf support
away from the side wall and remove
it.
2
1
Install the removed accessories in the
opposite sequence.
10.5 Removing and installing
door
The oven door has two glass panels.
You can remove the oven door and the
internal glass panel to clean it. Read the
whole "Removing and installing door"
instruction before you remove the glass
panels.
The oven door may close if
you try to remove the
internal glass panel before
you remove the oven door.
CAUTION!
Do not use the oven without
the internal glass panel.
1. Open the door fully and hold both
hinges.
2.
Lift and turn the levers fully on both
hinges.
3. Close the oven door halfway to the
first opening position. Then lift and
pull forward and remove the door
from its seat.
4. Put the door on a soft cloth on a
stable surface.
www.electrolux.com16
Page 17
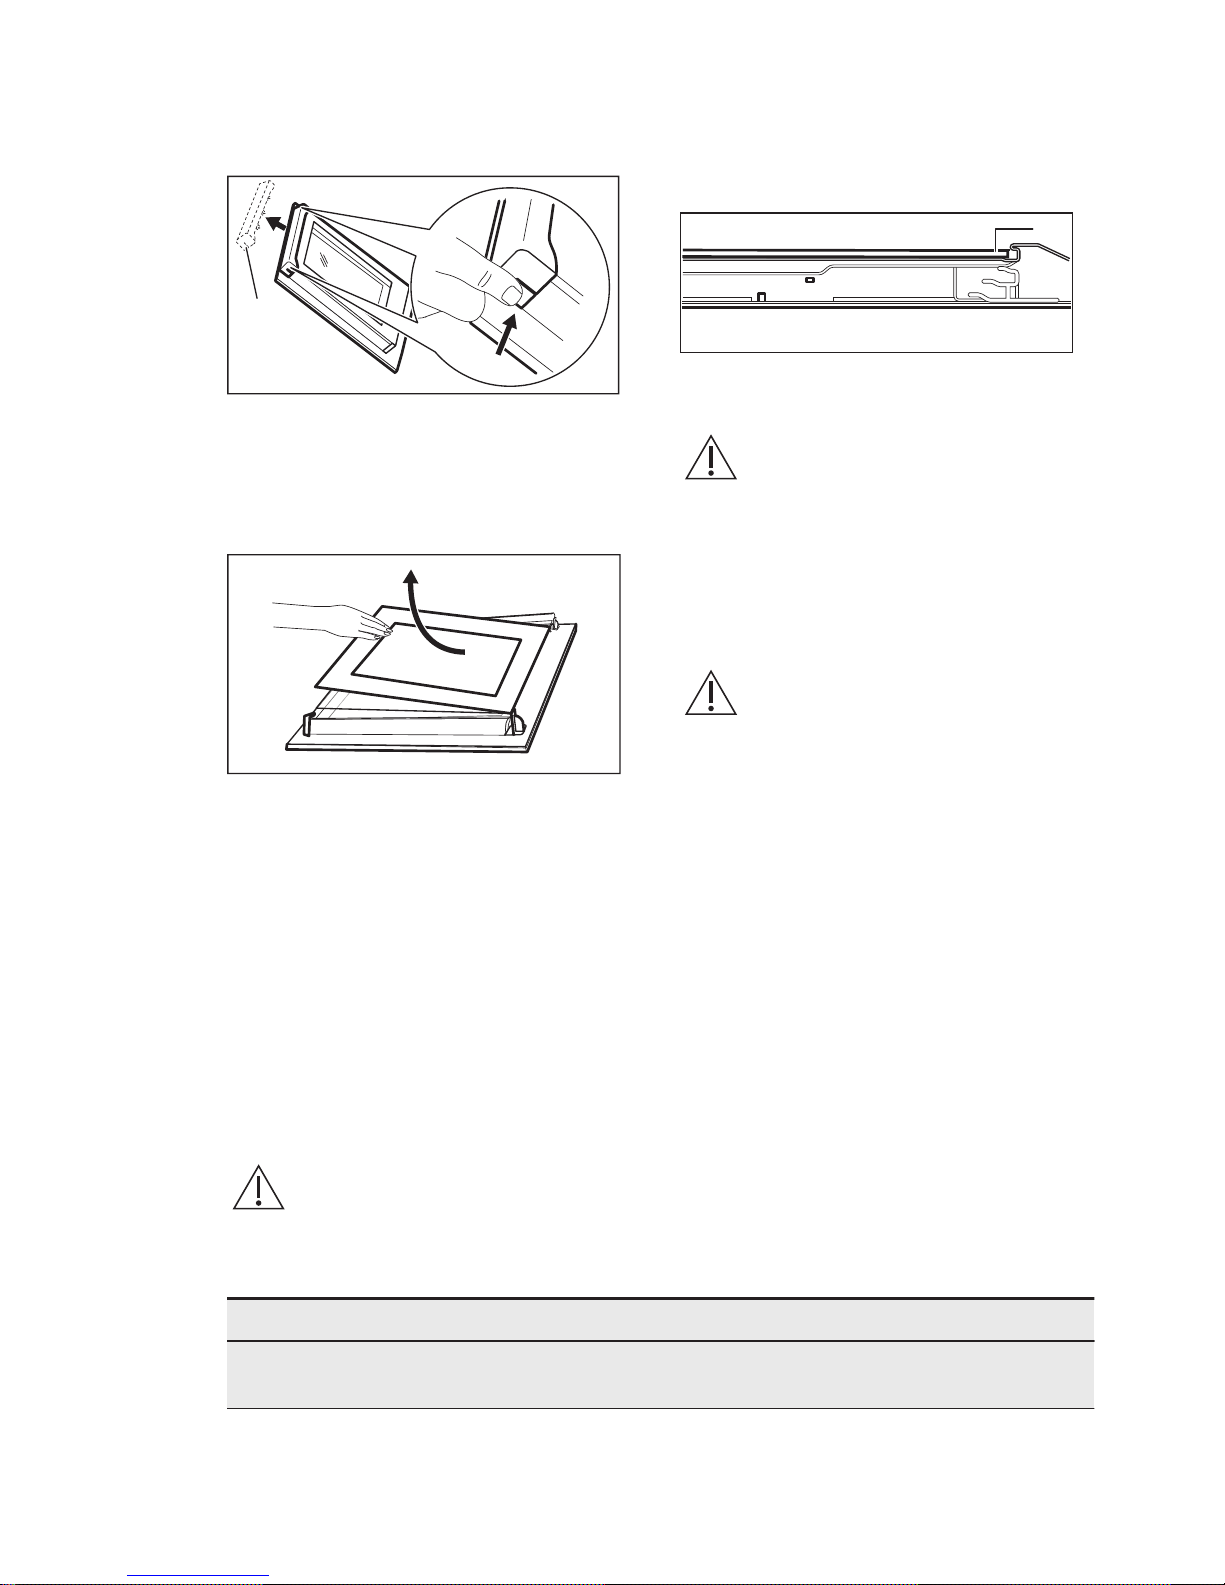
5. Hold the door trim (B) on the top
edge of the door at the two sides and
push inwards to release the clip seal.
1
2
B
6. Pull the door trim to the front to
remove it.
7. Hold the door glass panel by its top
edge and carefully pull it out. Make
sure the glass slides out of the
supports completely.
8. Clean the glass panels with water
and soap. Dry the glass panels
carefully. Do not clean the glass
panels in the dishwasher.
When the cleaning is completed, install
the glass panel and the oven door.
The screen-printing zone must face the
inner side of the door. Make sure that
after the installation the surface of the
glass panel frame on the screen-printing
zones is not rough when you touch it.
When installed correctly the door trim
clicks.
Make sure that you install the internal
glass panel in the seats correctly.
A
10.6 Replacing the lamp
WARNING!
Risk of electric shock.
The lamp can be hot.
1. Turn off the oven.
Wait until the oven is cooled down.
2. Disconnect the oven from the mains.
3. Put a cloth on the bottom of the
cavity.
CAUTION!
Always hold the halogen
lamp with a cloth to prevent
grease residue from burning
on the lamp.
The back lamp
1. Turn the lamp glass cover to remove
it.
2. Clean the glass cover.
3. Replace the lamp with a suitable 300
°C heat-resistant lamp.
4. Install the glass cover.
11. TROUBLESHOOTING
WARNING!
Refer to Safety chapters.
11.1 What to do if...
Problem Possible cause Remedy
The oven does not heat
up.
The oven is off. Turn on the oven.
ENGLISH 17
Page 18

Problem Possible cause Remedy
The oven does not heat
up.
The fuse is blown. Make sure that the fuse is
the cause of the malfunc‐
tion. If the fuse problem re‐
curs, contact a qualified
electrician.
The oven does not work. The automatic ignition
does not work.
Light the burner with a long
match. Hold the flame near
the hole in the bottom of
the oven cavity. At the
same time push the knob
for the gas control and turn
it counterclockwise to the
maximum temperature.
When the flame lights,
keep the knob for the gas
control pushed for 15 sec‐
onds or less to warm up
the thermocouple. Other‐
wise the gas flow is inter‐
rupted.
The lamp does not work. The lamp is broken. Replace the lamp.
Steam and condensation
settle on the food and in
the oven cavity.
A dish was left in the oven
for too long.
Food should not be left in
the oven for longer than
15-20 minutes after cook‐
ing.
The flame extinguishes im‐
mediately after ignition.
The thermocouple is not
heated up.
After the flame lights, keep
the knob for the gas con‐
trol pushed for 15 seconds
or less.
The turnspit does not ro‐
tate.
The turnspit is not correctly
installed into the turnspit
hole.
Refer to "Using the acces‐
sories" chapter, Using the
turnspit.
11.2 Service data
If you cannot find a solution to the
problem yourself, contact your dealer or
an Authorised Service Centre.
The necessary data for the service
centre is on the rating plate. The rating
plate is on the front frame of the oven
cavity. Do not remove the rating plate
from the oven cavity.
We recommend that you write the data here:
Model (MOD.) .........................................
Product number (PNC) .........................................
Serial number (S.N.) .........................................
www.electrolux.com18
Page 19
12. INSTALLATION
WARNING!
Refer to Safety chapters.
12.1 Gas connection
WARNING!
Before the gas connection,
disconnect the mains plug
from the mains socket or
deactivate the fuse in the
fuse box. Close the primary
valve of the gas supply.
The gas supply ramp is on the rear side
of the appliance.
WARNING!
Do not use rubber flexible
pipes!
Do not fully put the oven into the built-in
cabinet (approximately 30 cm).
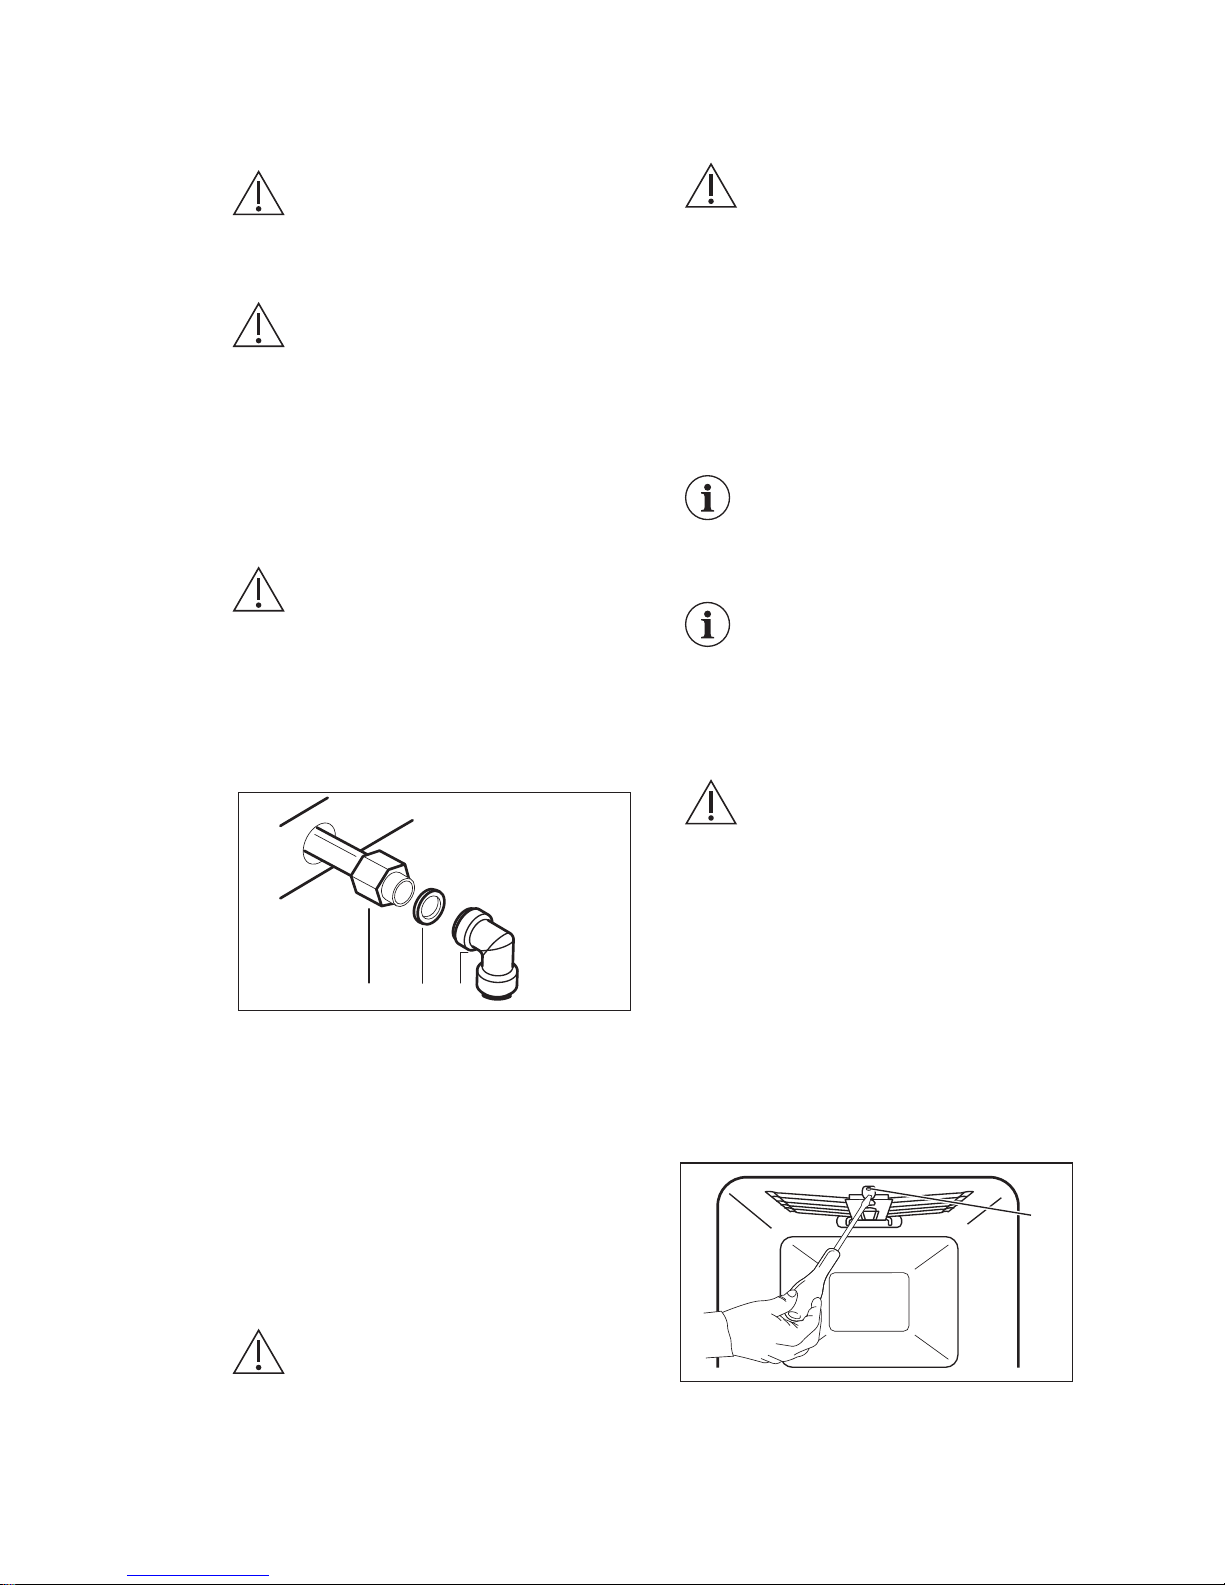
Connection with a flexible metallic
pipe or a rigid metallic pipe:
A B C
A. Gas supply ramp, end of shaft with
ramp
B. Washer
C. Elbow
Put the supplied gasket between the pipe
and the gas supply ramp. Turn the pipe
to the 1/2" gas supply ramp.
1. Use a 22 mm spanner to tighten the
nuts. Keep the gas supply ramp in
the correct position. Do not apply
force to the gas supply circuit.
WARNING!
Do not use a flame to
check for leaks!
2. Fully move the oven into the built-in
cabinet.
WARNING!
Do not squeeze the gas
supply ramp and the
pipe when you move the
oven into the built-in
cabinet.
3. Seal the connection correctly. Use a
leak detection to control it.
12.2 Adjustment to different
types of gas
Only a qualified technician is
authorized to handle
adjustment of different types
of gas.
The oven is set for natural
gas, you can change it to
liquid gas, with the correct
injectors.
The gas rate is adjusted to
suit.
WARNING!
Before you replace the
injectors, make sure that the
gas knobs are in the Off
position. Disconnect the
oven from the electrical
supply. Let the oven cool
down. There is a risk of
injury.
12.3 Gas grill injector
replacement
1. Release the screws which keep the
grill burner in position (A).
A
2. Carefully move forward the burner off
the injector support. Slowly move it
down. Do not apply force to the wire
ENGLISH 19
Page 20
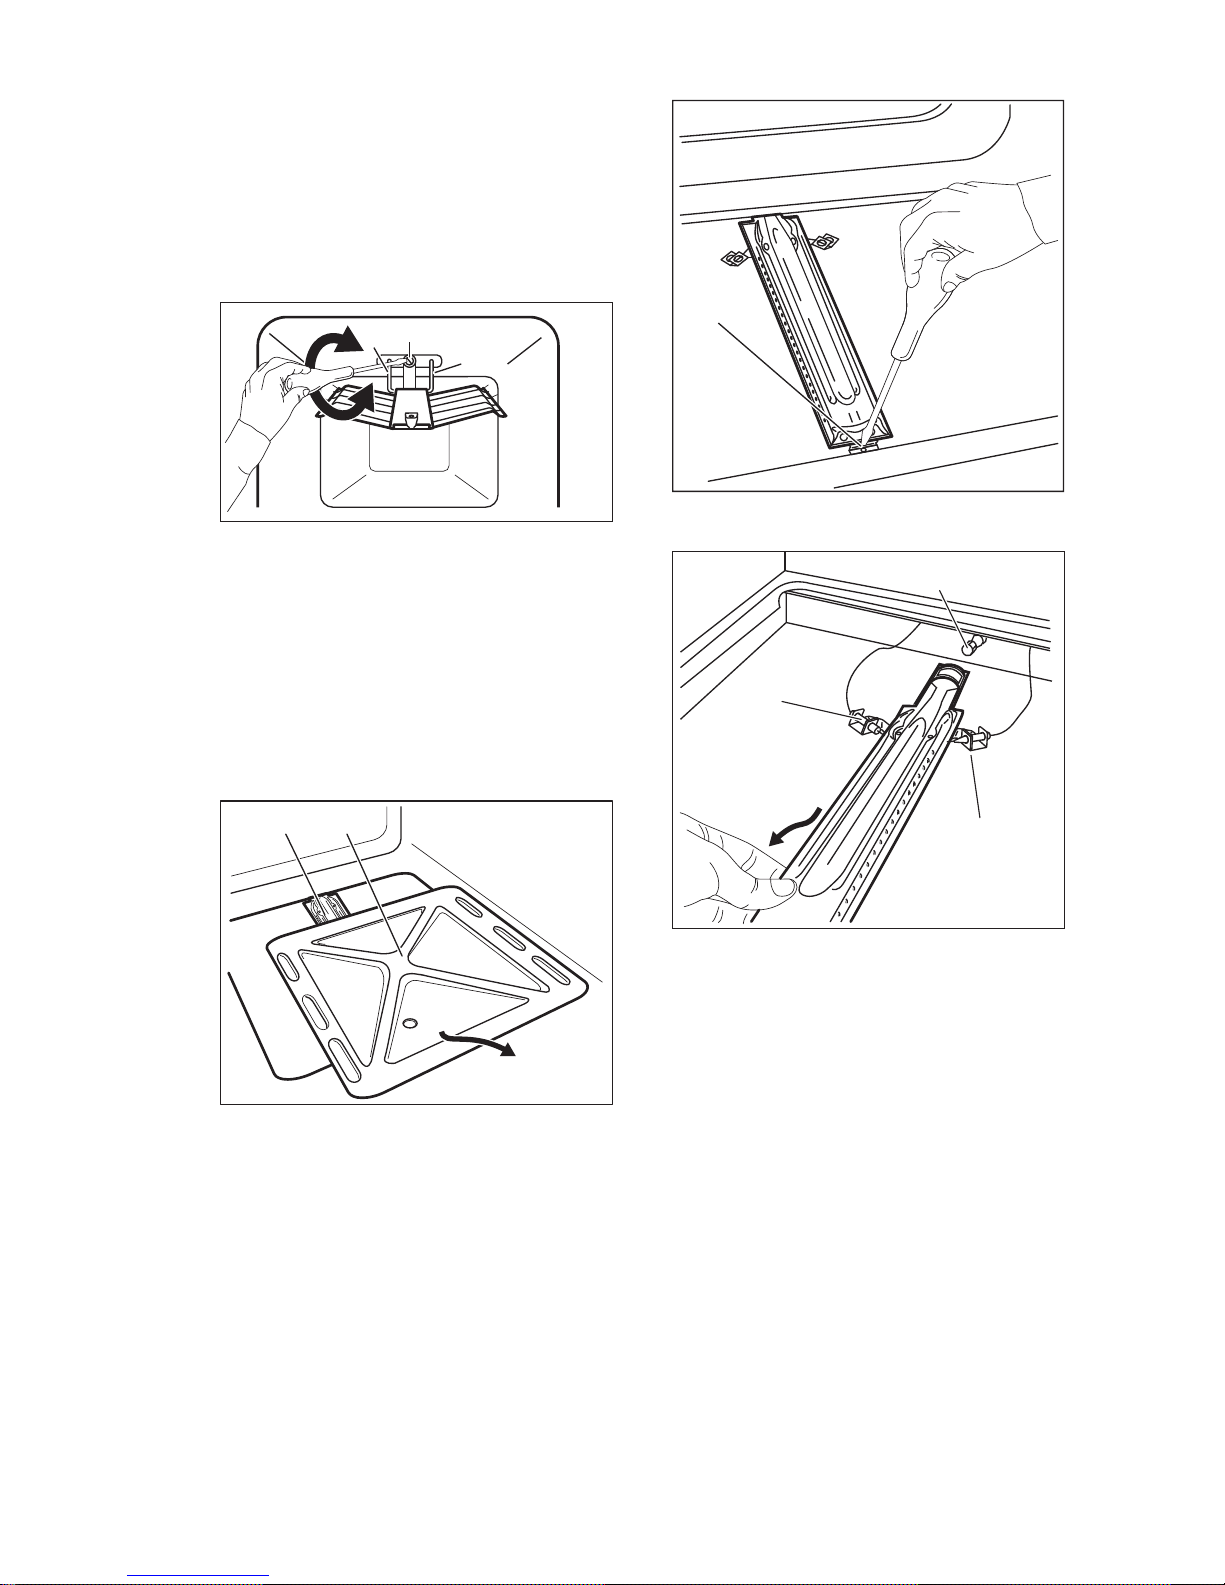
of the spark plug connector (B) and
to the thermocouple conductor (C).
3. Release the burner injector (D) with a
7 mm socket spanner and replace it
with a different one which is
necessary for the type of gas you
use.
Refer to “Technical data” chapter.
D
C
B
4. Assemble the burner in a reverse
sequence. Before you fix the screw,
make sure that the burner is pushed
correctly to the back panel.
Test the grill injectors.
12.4 Oven injector replacement
1. Remove the bottom plate of the oven
cavity (A) to get access to the oven
burner (B).
AB
2. Release the screw (C), which keeps
the burner in position.
C
3. Carefully move the burner off the
injector support (D).
D
E
F
4. Slowly move it to the left side. Do not
apply force to the wire of the spark
plug connector (F) and to the
thermocouple conductor (E).
5. Release the burner injector (D) with a
7 mm socket spanner and replace it
with a different one, which is
necessary for the type of gas you
use.
Refer to “Technical data” chapter.
6. Assemble the burner in a reverse
sequence.
Replace the gas type sticker near the
gas supply ramp with the one related to
the new gas type.
The gas oven burner does not need any
primary gas regulation.
www.electrolux.com20
Page 21
Make sure that the gas
supply pressure of the
appliance is in line with the
recommended values.
If the supply gas pressure is
changeable or different than
the necessary pressure, you
must fit an applicable
pressure adjuster on the gas
supply pipe.
12.5 Minimum level adjustment
of the oven burner
1. Disconnect the appliance from the
electricity.
2. Turn the knob for the gas control to
the minimum position and remove it.
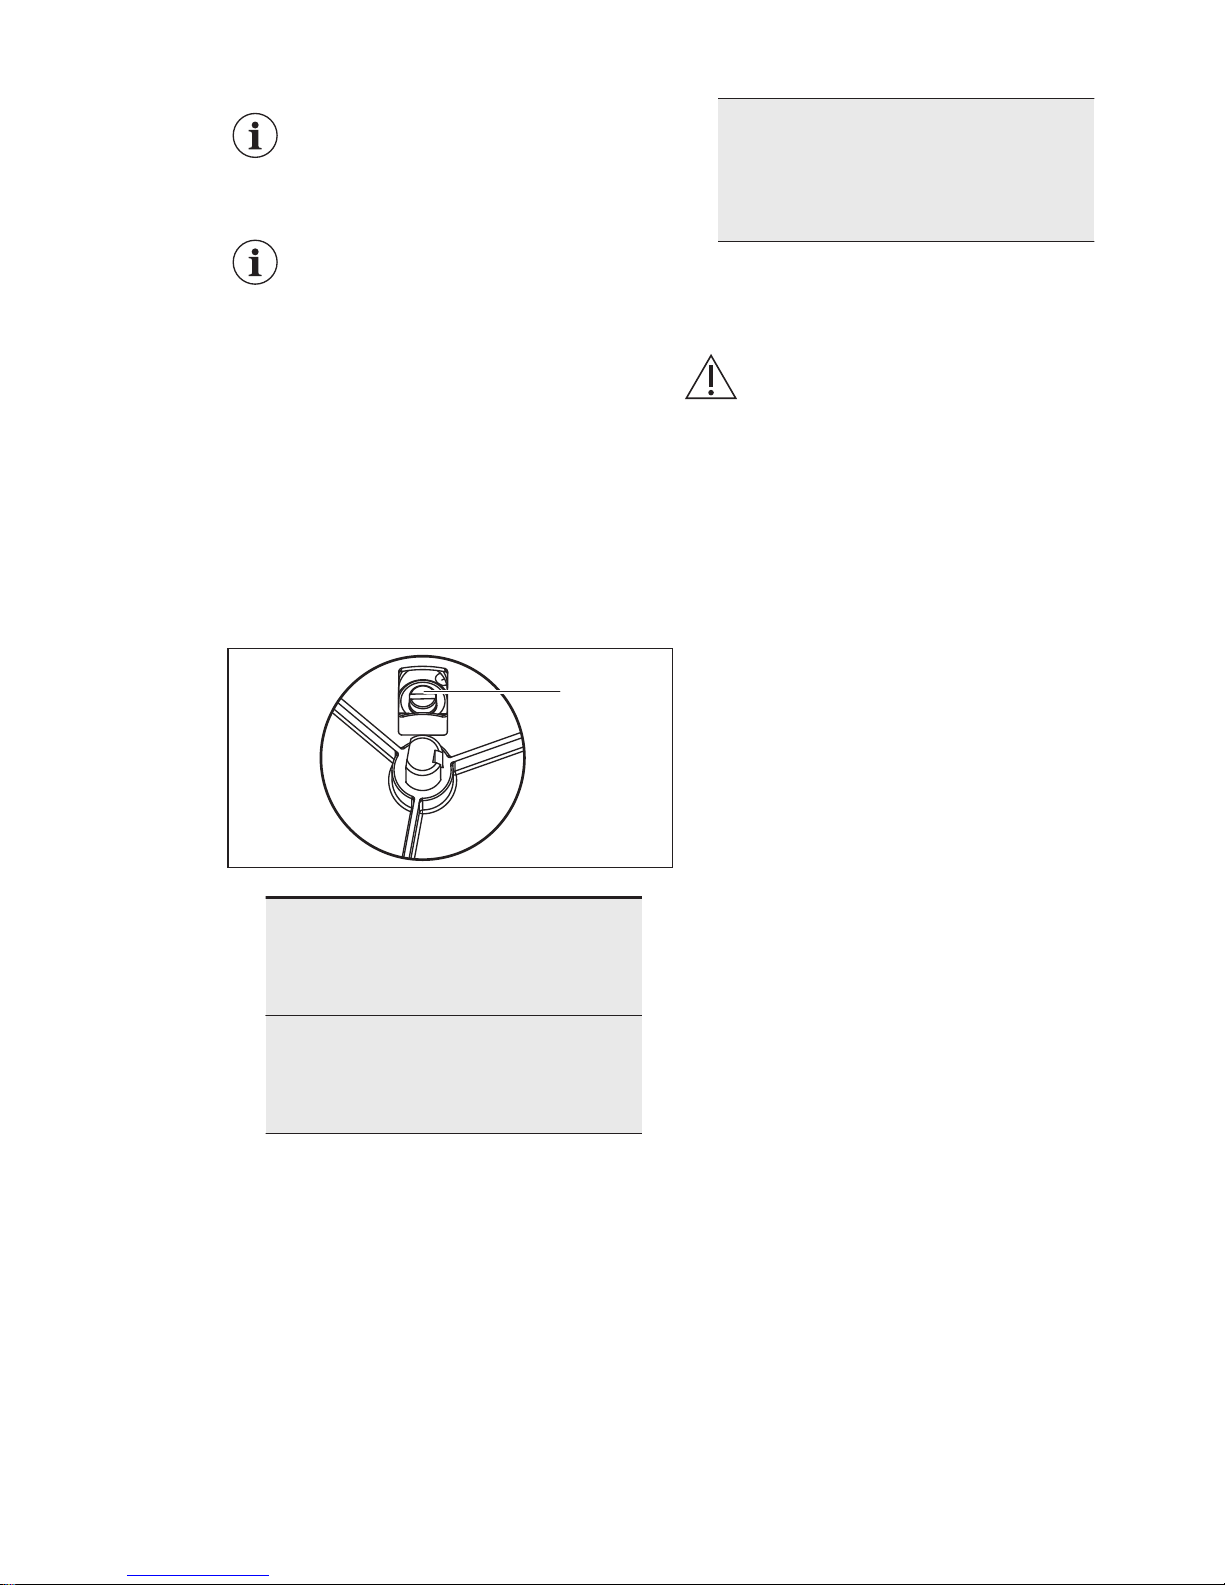
3. Adjust the adjustment screw (A) with
a thin-bladed screwdriver.
A
Change of
the type of
gas
Adjustment
of the ad‐
justment
screw
From natural
gas to liquid
gas
Fully tighten
the adjust‐
ment screw
in.
From liquid
gas to natu‐
ral gas
Release the
adjustment
screw ap‐
proximately
1/3 of a turn.
4. Attach the knob for the gas control.
5. Connect the appliance to the
electricity.
WARNING!
Only put the mains plug into
the mains socket when all
parts are back into their
initial position. There is a risk
of injury.
6. Light the gas oven burner.
Refer to "Daily use" chapter.
7. Set the knob for the gas control to
the maximum position and let the
oven heat for at least 10 minutes.
8. Turn the knob for the gas control
from the maximum to the minimum
position.
Control the flame. If the flame goes out,
do the procedure again. There must be a
small regular flame on the oven burner
crown.
The manufacturer objects liability if
you do not obey to this safety
measures.
12.6 Building In
Only set up the appliance in a kitchen or
in a kitchen-dining room. Do not set up
the appliance in a bathroom or a
bedroom.
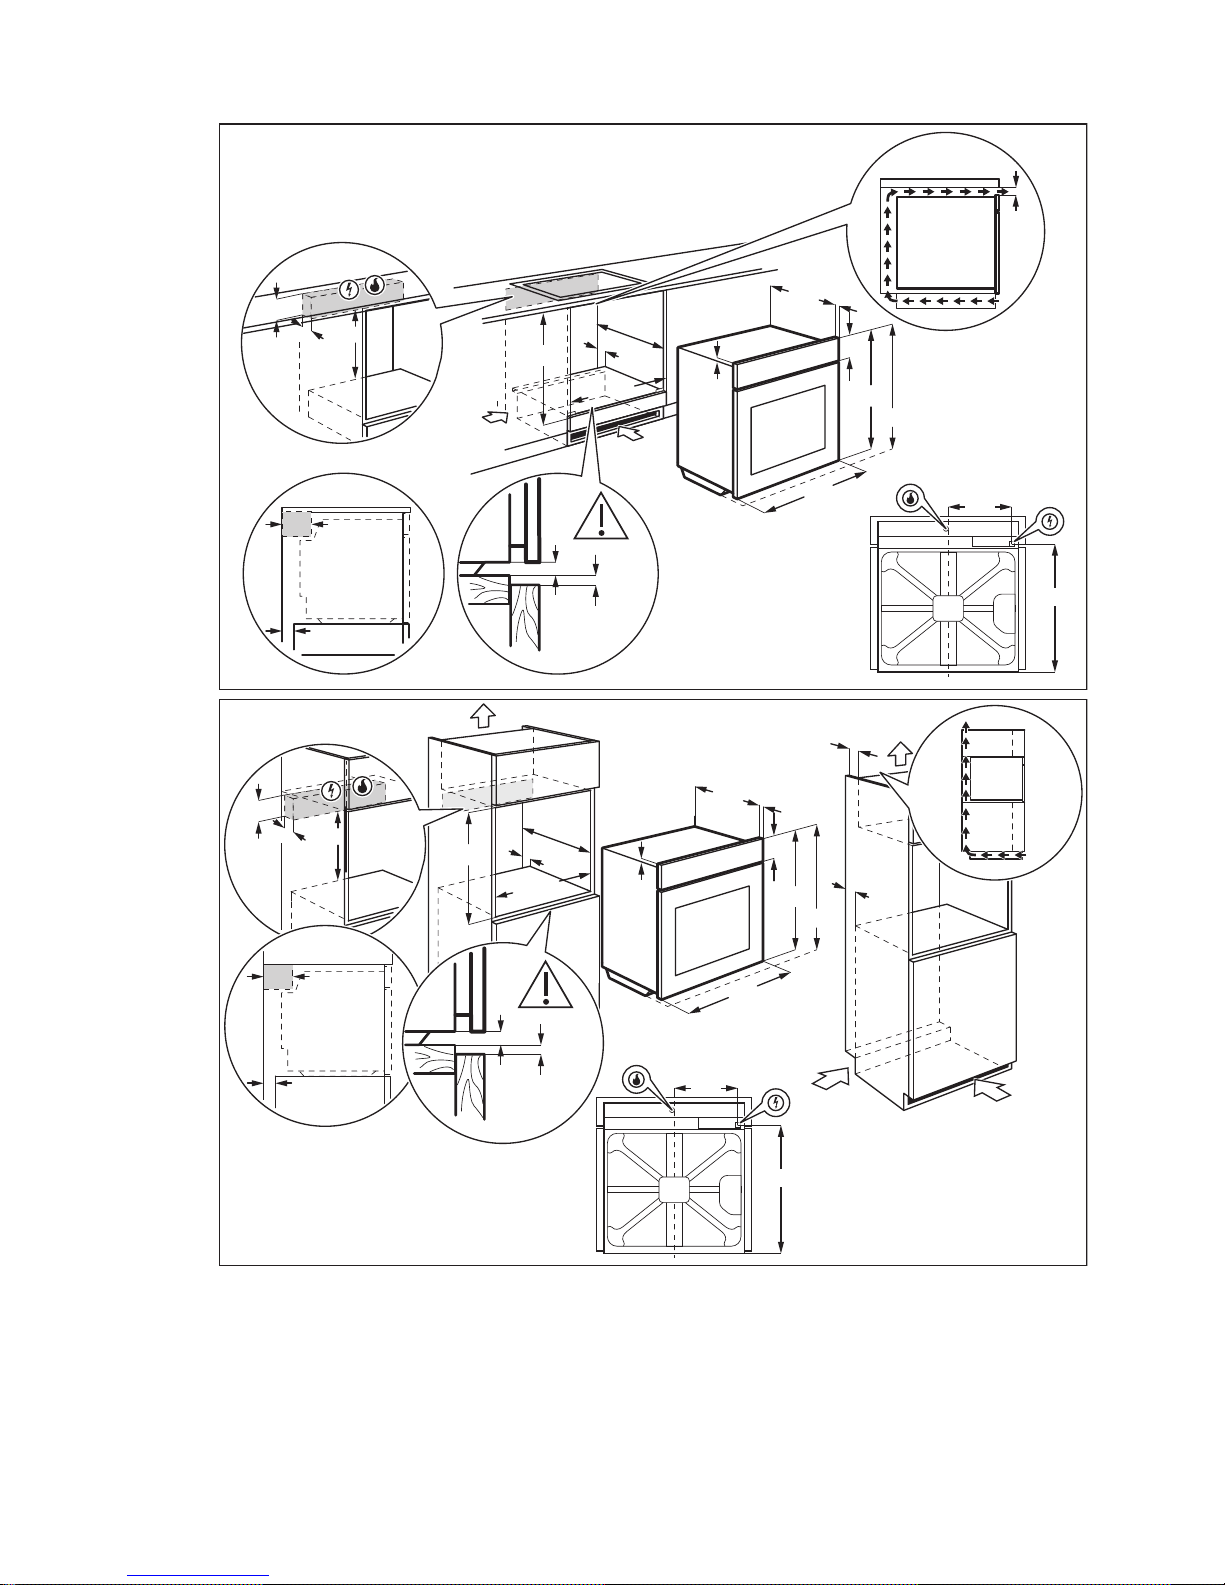
You can install the appliance "built-in" or
"built-under". The dimensions of the builtin cabinet must agree with the related
illustrations.
ENGLISH 21
Page 22
80
520
60
60
20
min. 550
110
600
min. 560
130cm²
min. 4mm
114
18
595
±1
21548
198
523
3
5
589
594
65cm²
130cm²
110
50
min. 550
110
114
18
590
min. 560
595
±1
21548
70
60
520
60
20
198
523
589
594
3
5
65cm²
There must be a clearance of minimum 4
mm between the top surface of the
appliance and the inner top of the
cabinet.
When you install the appliance "builtunder" (below a hob), install the hob
before the oven unit.
The materials must be resistant to a
temperature increase of minimum 60 °C
above the ambient temperature.
There must be a continuous air supply
around the oven in order to not have the
oven become too hot.
www.electrolux.com22
Page 23
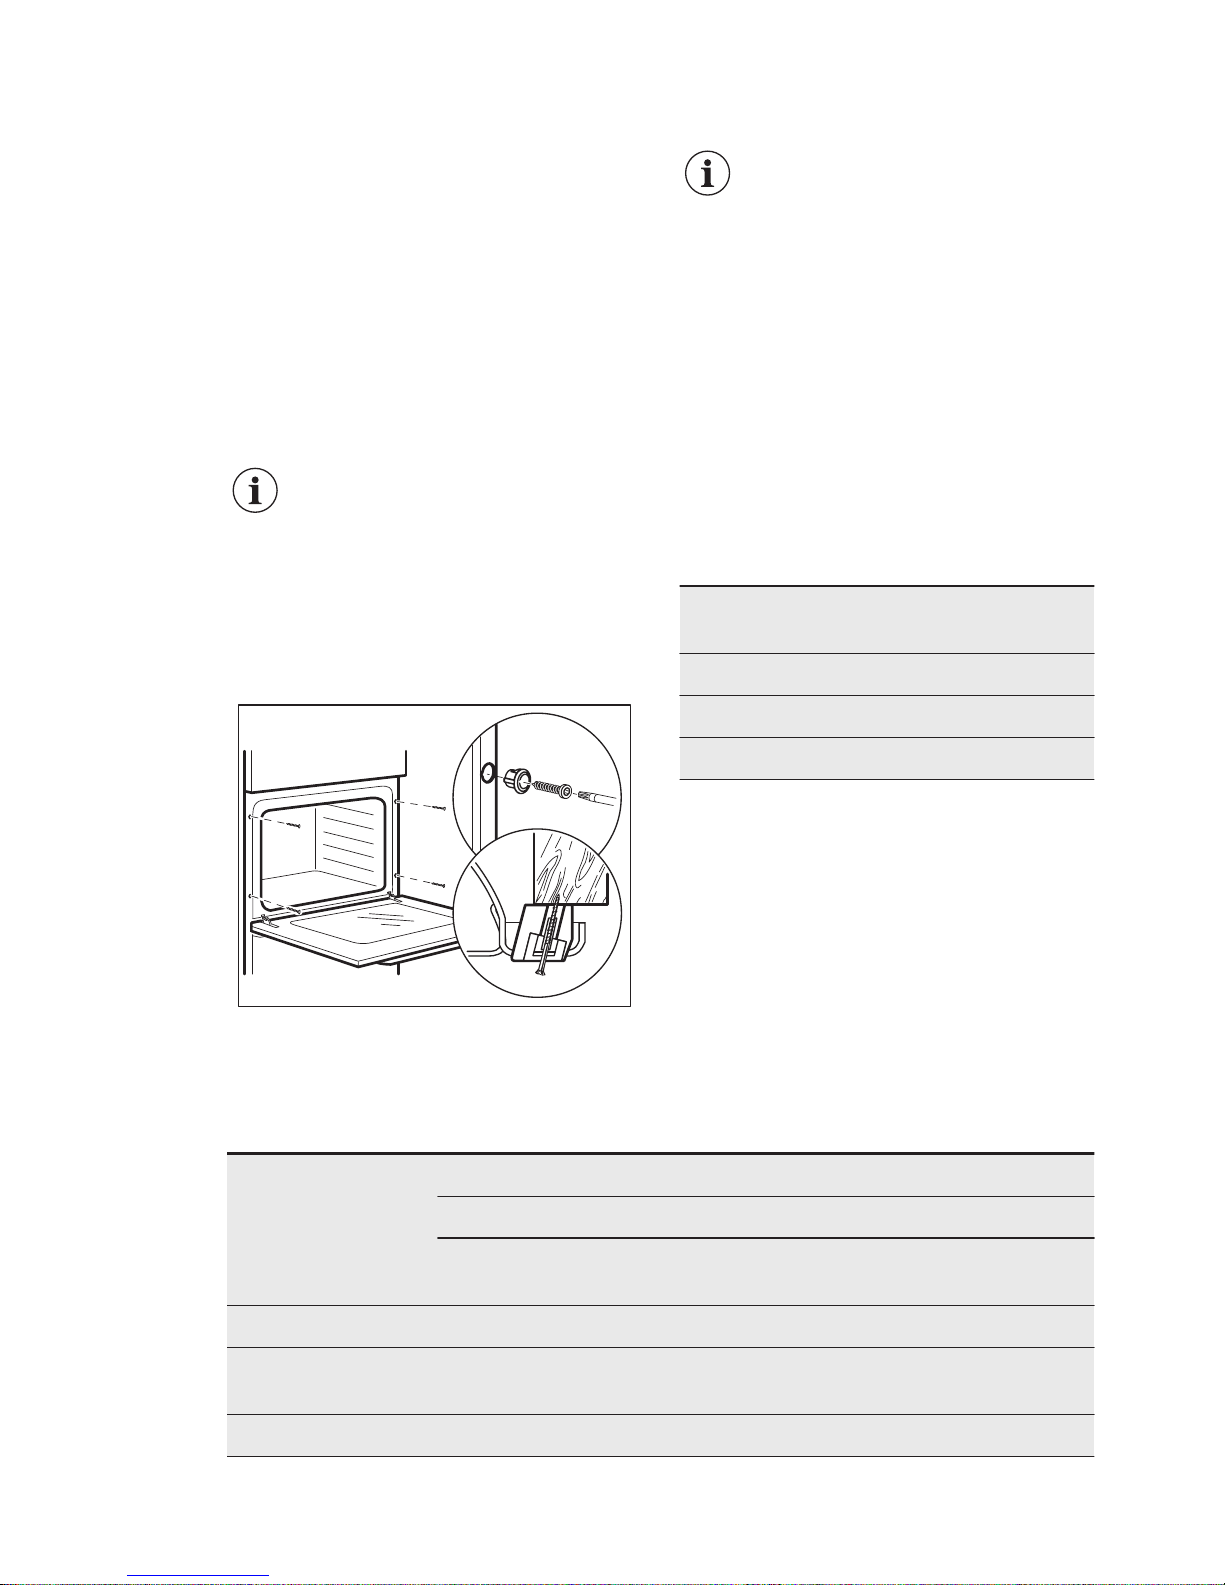
For correct operation, the oven cabinet
must have a minimum opening of 130
cm² in the front or on the sides (a
minimum of 65 cm² for each side). The
manufacturer recommends a 130 cm²
opening in the front for a brick cabinet
and a 65 cm² opening for each side for a
wooden cabinet.
When you install a hob above the oven,
make different electrical connections for
the hob and for the oven.
Only make connections with correct
cables for the power supplied.
Make sure that after the
installation there is easy
access to the appliance if
repairs or maintenance are
necessary.
12.7 Securing the appliance to
the cabinet
A
B
12.8 Electrical installation
The manufacturer is not
responsible if you do not
follow the safety precautions
from the Safety chapters.
This appliance is supplied only with a
main cable.
12.9 Cable
Cable types applicable for installation or
replacement:
H05 V2V2-F (T90), H05 BB-F
For the section of the cable refer to the
total power on the rating plate. You can
also refer to the table:
Total power (W) Section of the ca‐
ble (mm²)
maximum 1380 3 x 0.75
maximum 2300 3 x 1
maximum 3680 3 x 1.5
The earth cord (green / yellow cable)
must be 2 cm longer than phase and
neutral cables (blue and brown cables).
13. TECHNICAL DATA
13.1 Technical data
TOTAL POWER: Electric: 0.07 kW
Gas original: G20 (2H) 20 mbar = 2.6 kW
Gas replacement: G30/G31 30/30 mbar = 196 g/h
G30/G31 30/30 mbar = 2.7 kW
Electric supply: 220 - 240 V ~ 50 / 60 Hz
Appliance catego‐
ry:
II2H3B/P
Gas connection: G 1/2"
ENGLISH 23
Page 24
Appliance class: 3
13.2 Gas oven burner
Gas type NOMINAL
GAS POW‐
ER (kW)
NOMINAL
GAS
FLOW
(g/h)
Reduced
gas power
(kW)
BY-PASS
NEEDLE
(1/100
mm)
INJECTOR
MARK
(1/100
mm)
G20 (2H) 20 mbar 2.6 - 0.7 Reg.
G30/G31 30/30
mbar
2.7 196 0.7 43 80
13.3 Gas grill burner
Gas type NOMINAL
GAS POW‐
ER (kW)
NOMINAL
GAS
FLOW
(g/h)
Reduced
gas power
(kW)
BY-PASS
NEEDLE
(1/100
mm)
INJECTOR
MARK
(1/100
mm)
G20 (2H) 20 mbar 1.85 - - - 92
G30/G31 (3B/P)
30/30 mbar
2.0 145 - - 71
14. ENVIRONMENTAL CONCERNS
Recycle materials with the symbol .
Put the packaging in relevant containers
to recycle it. Help protect the
environment and human health by
recycling waste of electrical and
electronic appliances. Do not dispose of
appliances marked with the symbol
with the household waste. Return the
product to your local recycling facility or
contact your municipal office.
www.electrolux.com24
Page 25

DAFTAR ISI
1. INFORMASI KESELAMATAN.......................................................................... 26
2. PANDUAN KESELAMATAN.............................................................................27
3. DESKRIPSI PRODUK...................................................................................... 30
4. SEBELUM PENGGUNAAN PERTAMA............................................................30
5. PENGGUNAAN SEHARI-HARI........................................................................ 31
6. FUNGSI JAM.................................................................................................... 32
7. MENGGUNAKAN AKSESORIS....................................................................... 32
8. FUNGSI TAMBAHAN....................................................................................... 34
9. PETUNJUK DAN SARAN.................................................................................34
10. MERAWAT DAN MEMBERSIHKAN...............................................................39
11. PENYELESAIAN MASALAH.......................................................................... 41
12. PEMASANGAN.............................................................................................. 43
13. DATA TEKNIS................................................................................................ 47
KAMI MEMIKIRKAN ANDA
Terima kasih telah membeli peralatan Electrolux. Anda telah memilih produk yang
memiliki pengalaman dan inovasi profesional selama puluhan tahun. Canggih
dan bergaya, peralatan ini dirancang supaya khusus untuk Anda. Jadi saat
digunakan, Anda akan merasa yakin untuk mendapatkan hasil terbaik setiap
saat.
Selamat datang di Electrolux.
Kunjungi situs web kami untuk:
Dapatkan saran penggunaan, brosur, pemecahan masalah, informasi layanan:
www.electrolux.com/webselfservice
Mendaftarkan produk untuk layanan yang lebih baik:
www.registerelectrolux.com
Beli Aksesori, Bahan habis-pakai dan Suku cadang asli untuk peralatan Anda:
www.electrolux.com/shop
KEPEDULIAN DAN LAYANAN PELANGGAN
Kami merekomendasikan penggunaan suku cadang asli.
Ketika menghubungi Pusat Layanan Resmi kami, pastikan anda sudah
menyiapkan data-data berikut: Model, PNC, Nomor Seri.
Informasi tersebut dapat ditemukan di pelat rating.
Informasi Peringatan / Hati-hati
Informasi dan tips umum
Informasi lingkungan
Dapat berubah tanpa pemberitahuan.
25
Page 26

1. INFORMASI KESELAMATAN
Sebelum memasang dan menggunakan peralatan,
bacalah dengan saksama petunjuk yang disertakan.
Produsen tidak bertanggung jawab terhadap setiap
cedera dan kerusakan yang diakibatkan pemasangan
atau penggunaan yang tidak benar. Selalu simpan
petunjuk di tempat yang aman dan mudah dijangkau
sebagai rujukan di kemudian hari.
1.1 Keselamatan anak-anak dan orang-orang yang
memiliki kerentanan psikis dan fisik
• Peralatan ini dapat digunakan oleh anak-anak berusia
8 tahun ke atas dan orang-orang dengan
keterbatasan fisik, pengindraan atau mental, atau
kurang pengalaman dan pengetahuan, jika mereka
telah diberikan pengawasan dan instruksi yang
berkaitan dengan penggunaan peralatan tersebut
secara aman dan memahami bahaya yang dapat
ditimbulkan.
• Anak-anak berusia antara 3 dan 8 tahun dan orang
dengan disabilitas yang sangat ekstensif dan
kompleks harus dijauhkan dari peralatan ini kecuali
selalu diawasi.
• Anak-anak di bawah usia 3 tahun harus dijauhkan dari
peralatan ini kecuali jika selalu diawasi.
• Jangan biarkan anak-anak bermain dengan peralatan.
• Jauhkan semua kemasan dari anak-anak dan buang
dengan benar.
• Jauhkan anak-anak dan hewan peliharaan dari
peralatan ini ketika sedang dioperasikan atau
didinginkan. Komponen yang dapat dijangkau dalam
kondisi panas.
• Jika peralatan ini dilengkapi perangkat keselamatan
untuk anak, fungsi tersebut harus diaktifkan.
• Jangan biarkan anak-anak mencuci dan melakukan
perawatan terhadap peralatan tanpa pengawasan.
www.electrolux.com26
Page 27

1.2 Keselamatan Umum
• Hanya orang yang berkompeten yang boleh
memasang peralatan ini dan mengganti kabelnya.
• PERINGATAN: Peralatan dan komponen yang dapat
dijangkau akan menjadi panas selama penggunaan.
Berhati-hatilah untuk tidak menyentuh elemen
pemanas.
• Selalu gunakan sarung tangan oven untuk
mengeluarkan atau memasukkan aksesori atau
peranti oven.
• Sebelum menjalankan pemeliharaan apa pun,
putuskan sambungan listrik peralatan.
• Pastikan peralatan dimatikan sebelum mengganti
lampu untuk mencegah kemungkinan sengatan listrik.
• Jangan gunakan pembersih uap untuk membersihkan
peralatan.
• Jangan gunakan pembersih abrasif yang kasar atau
alat pengikis logam tajam untuk membersihkan pintu
kaca karena akan menimbulkan goresan di kaca dan
mengakibatkan kaca pecah.
• Jika kabel catu daya rusak, penggantian hanya boleh
dilakukan oleh pabrik, Pusat Layanan Resmi, atau
orang yang memiliki kualifikasi serupa untuk
menghindari bahaya tersengat listrik.
• Untuk melepaskan penyangga rak, pertama-tama
tariklah bagian depan penyangga rak lalu tarik ujung
belakang dari sisi samping. Pasang penyangga rak
dalam urutan berlawanan.
2. PANDUAN KESELAMATAN
Mesin ini cocok untuk pasar berikut ini:
ID
2.1 Pemasangan
PERINGATAN!
Hanya orang yang kompeten
yang boleh memasang
peralatan ini.
• Buka seluruh kemasan.
• Jangan memasang atau
menggunakan peralatan yang telah
rusak.
• Ikuti petunjuk pemasangan yang
disertakan bersama peralatan ini.
• Selalu berhati-hati ketika
memindahkan peralatan yang berat
ini. Selalu gunakan sarung tangan
pelindung dan alas kaki tertutup.
27
Page 28

• Jangan menarik peralatan ini pada
pegangannya.
• Pertahankan jarak minimum dari
peralatan dan unit lain.
• Pasang peralatan di tempat yang
aman dan sesuai yang memenuhi
persyaratan pemasangan.
• Jangan operasikan peralatan tanpa
penutup bagian bawah rongga.
Penutup tersebut adalah komponen
keamanan fungsional.
• Peralatan dilengkapi dengan sistem
pendinginan elektrik. Peralatan harus
dioperasikan dengan suplai daya
elektrik.
2.2 Sambungan listrik
PERINGATAN!
Risiko kebakaran dan
sengatan listrik.
• Semua sambungan listrik harus
dilakukan oleh teknisi listrik yang
kompeten.
• Perangkat ini harus dibumikan.
• Pastikan parameter pada rating plate
sesuai dengan nilai kelistrikan suplai
daya utama.
• Selalu gunakan soket tahan kejutan
listrik yang dipasang dengan benar.
• Jangan gunakan adaptor multi-steker
dan kabel ekstensi.
• Pastikan untuk tidak merusak steker
dan kabel jaringan listrik. Jika kabel
jaringan listrik harus diganti,
penggantian ini harus dilakukan oleh
Pusat Servis Resmi.
• Jangan biarkan kabel jaringan listrik
bersentuhan atau mendekati pintu
peralatan, terutama jika pintu
peralatan masih panas.
• Perlindungan kejut pada bagian yang
terisolasi dan aktif harus
dikencangkan agar tidak dapat
dilepas tanpa peralatan.
• Sambungkan steker jaringan listrik
dengan soket jaringan listrik di akhir
pemasangan. Pastikan adanya akses
dengan steker jaringan listrik setelah
pemasangan.
• Jika soket jaringan listrik kendur,
jangan sambungkan steker jaringan
listrik.
• Jangan tarik kabel listrik untuk
memutus sambungan peralatan.
Selalu tarik steker jaringan listrik.
• Hanya gunakan perangkat isolasi
yang sesuai: pengaman jaringan daya
putus, sekering (sekering model
sekrup yang dilepas dari tempat
pemasangannya), pemutus-sambung
kebocoran arus hubungan ke tanah.
• Instalasi listrik harus memiliki
perangkat isolasi yang
memungkinkan pemutusan
sambungan peralatan dari jaringan
listrik pada semua kutub. Lebar
lubang kontak perangkat isolasi ini
sekurang-kurangnya harus sebesar 3
mm.
• Peralatan ini telah sesuai dengan
E.E.C. Pedoman.
2.3 Sambungan gas
• Semua saluran gas harus dipasang
oleh teknisi resmi.
• Sebelum pemasangan, pastikan
bahwa kondisi distribusi setempat
(sifat gas dan tekanan gas) dan
penyesuaian peralatan telah sesuai.
• Pastikan terdapat sirkulasi udara di
sekitar peralatan.
• Informasi mengenai suplai gas
terdapat pada pelat rating.
• Peralatan ini tidak terhubung pada
suatu perangkat yang mengeluarkan
produk pembakaran. Pastikan Anda
menghubungkan peralatan sesuai
dengan aturan pemasangan terkini.
Perhatikan kriteria ventilasi yang
mencukupi.
2.4 Penggunaan
PERINGATAN!
Risiko cedera, terbakar dan
sengatan listrik atau
ledakan.
• Jangan ubah spesifikasi peralatan ini.
• Pastikan lubang ventilasi tidak
terhalang.
• Jangan mengoperasikan peralatan
tanpa pengawasan.
• Matikan peralatan setelah selesai
digunakan.
• Berhati-hatilah ketika membuka pintu
peralatan saat sedang dioperasikan.
www.electrolux.com28
Page 29

Udara panas akan dihembuskan
keluar.
• Jangan mengoperasikan peralatan
dengan tangan yang basah atau saat
peralatan terkena air.
• Jangan menekan pintu yang terbuka.
• Jangan gunakan peralatan sebagai
alas untuk kerja atau sebagai alas
penyimpanan.
• Bukalah pintu peralatan secara hatihati. Penggunaan bahan yang
mengandung alkohol dapat
menyebabkan percampuran alkohol
dan udara.
• Hindarkan peralatan dari percikan api
atau nyala api ketika pintu dibuka.
• Jangan meletakkan produk atau
benda yang basah dan mudah
terbakar di dalam, di dekat, atau di
atas perangkat.
PERINGATAN!
Risiko kerusakan peralatan.
• Untuk mencegah kerusakan atau
perubahan warna pada enamel:
– jangan meletakkan kertas
aluminium secara langsung pada
bagian bawah perangkat.
– jangan memasukkan air secara
langsung ke dalam peralatan
yang panas.
– jangan menyimpan makanan dan
hidangan yang lembap di dalam
peralatan setelah selesai
memasak.
– berhati-hatilah ketika melepas
atau memasang aksesori.
• Pemudaran warna lapisan cat atau
baja tahan karat tidak berpengaruh
pada kinerja perangkat.
• Gunakan loyang tinggi untuk kue
basah. Jus buah akan menimbulkan
noda yang dapat menjadi noda
permanen.
• Peralatan ini hanya digunakan untuk
keperluan memasak. Peralatan ini
tidak boleh digunakan untuk
keperluan lainnya, misalnya untuk
memanaskan ruangan.
• Pastikan pintu oven tertutup saat
memasak.
• Jika alat ini dipasang di belakang
panel furnitur (misalnya pintu)
pastikan pintu tidak tertutup ketika
alat tersebut beroperasi. Panas dan
kelembapan akan meningkat di balik
panel furnitur yang tertutup dan dapat
menyebabkan kerusakan lanjut pada
alat, barang-barang rumah atau pada
lantai. Jangan menutup panel furnitur
sampai alat benar-benar dingin
setelah digunakan.
2.5 Perawatan dan
pembersihan
PERINGATAN!
Risiko cedera, kebakaran
atau kerusakan pada
peralatan.
• Sebelum melakukan perawatan,
matikan perangkat dan cabut steker
listrik dari stopkontak.
• Pastikan peralatan sudah dingin.
Panel kaca memiliki risiko pecah.
• Ganti segera panel kaca pintu jika
mengalami kerusakan. Hubungi Pusat
Layanan Resmi.
• Berhati-hatilah ketika melepas pintu
dari peralatan. Pintunya berat!
• Bersihkan peralatan secara teratur
untuk mencegah penurunan kualitas
material permukaan.
• Bersihkan perangkat dengan kain
lembut yang lembap. Gunakan hanya
detergen netral. Jangan gunakan
produk abrasif, bantalan pembersih
abrasif, bahan pelarut, atau benda
logam apa pun.
• Jika menggunakan semprotan oven,
ikuti petunjuk keselamatan pada
kemasan.
• Jangan bersihkan enamel katalitis
(jika ada) dengan deterjen apa pun.
2.6 Lampu internal
PERINGATAN!
Risiko sengatan listrik.
• Jenis bola lampu atau lampu halogen
yang digunakan pada peralatan ini
hanya diperuntukkan bagi peralatan
rumah tangga. Jangan digunakan
untuk penerangan rumah.
• Sebelum mengganti lampu, putus
sambungan listriknya.
• Gunakan hanya lampu dengan
spesifikasi yang sama.
29
Page 30
2.7 Servis
• Untuk memperbaiki peralatan hubungi
Pusat Servis Resmi.
• Hanya gunakan suku cadang yang
asli.
2.8 Pembuangan
PERINGATAN!
Risiko cedera atau sesak
napas.
• Hubungi pihak yang berwenang di
daerah Anda untuk mendapatkan
informasi tentang cara membuang
peralatan secara tepat.
• Lepaskan sambungan peralatan dari
catu daya.
• Potong kabel listrik yang dekat
dengan peralatan dan buang.
• Ratakan pipa gas eksternal.
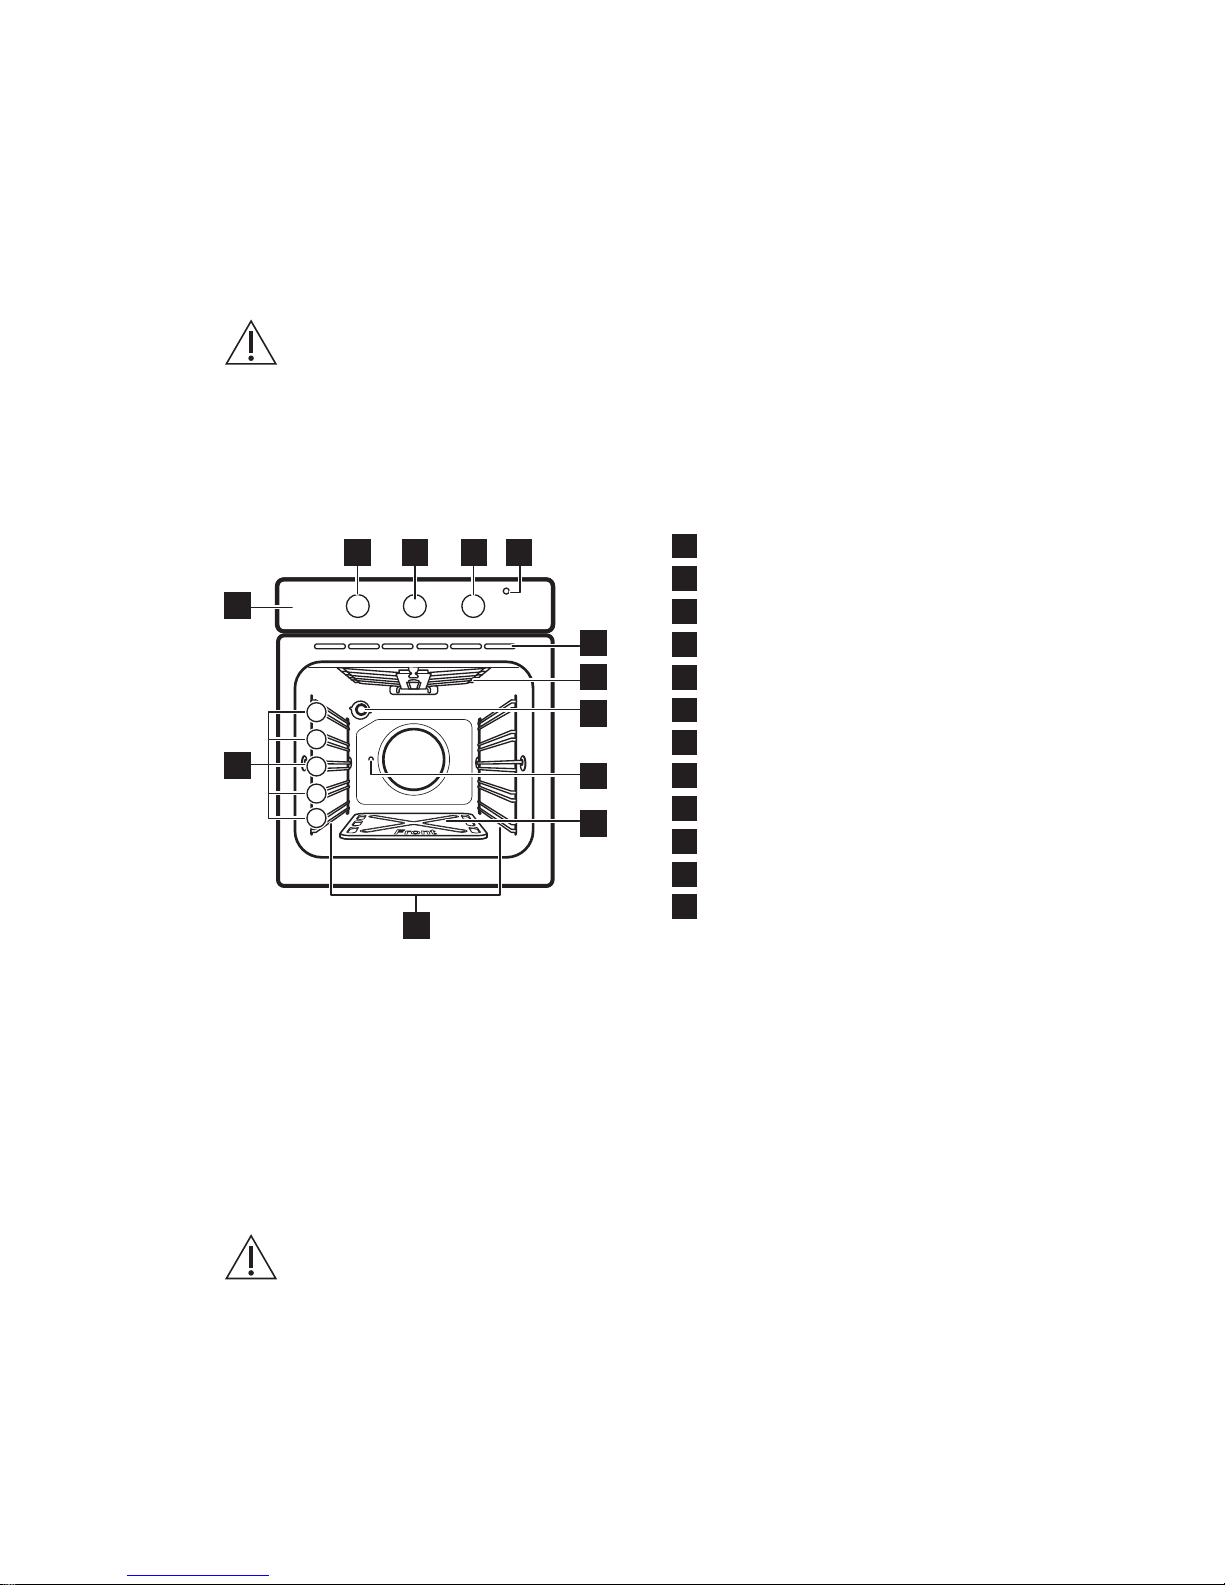
3. DESKRIPSI PRODUK
3.1 Ikhtisar umum
1
52 3
11
4
1
12
5
4
3
2
1
6
7
8
10
9
1
Panel kontrol
2
Kenop fungsi pemanas
3
Kenop untuk Pengingat Menit
4
Kenop kontrol gas
5
Indikator arus listrik
6
Ventilasi udara untuk kipas pendingin
7
Elemen pemanas
8
Lampu
9
Lubang turnspit
10
Pelat dasar rongga oven
11
Penyangga rak, dapat dilepas
12
Posisi rak
3.2 Aksesori
• Rak kawat
Untuk peralatan memasak, loyang
kue, dan pemanggang.
• Loyang panggang aluminium
Untuk kue dan biskuit.
• Turnspit
Untuk memanggang ruas daging
besar atau unggas.
4. SEBELUM PENGGUNAAN PERTAMA
PERINGATAN!
Silakan baca bab
Keselamatan.
4.1 Pelat dasar rongga oven
Saat Anda membeli oven, pada awalnya
pelat dasar rongga oven disertakan
dengan aksesori. Sebelum Anda
menggunakan oven untuk pertama kali,
letakkan pelat dasar dengan lubang di
bagian depannya di area tungku, seperti
yang ditunjukkan dalam bab "Penjelasan
produk".
4.2 Pembersihan Awal
Lepas semua aksesori dan penyangga
rak yang dapat dilepas dari oven.
www.electrolux.com30
Page 31
Lihat bab "Perawatan dan
pembersihan".
Bersihkan oven dan aksesori sebelum
digunakan untuk penggunaan pertama.
Letakkan aksesori dan penyangga rak
yang dapat dilepas kembali ke posisi
awal.
4.3 Pemanasan awal
Panaskan terlebih dahulu peralatan yang
kosong sebelum penggunaan pertama
kali.
1. Atur suhu maksimal.
2. Biarkan peralatan beroperasi selama
1 jam.
3. Atur fungsi .
4. Biarkan peralatan bekerja selama 15
menit.
Aksesori dapat menjadi lebih panas dari
biasanya. Peralatan dapat mengeluarkan
bau dan asap. Ini merupakan hal yang
normal. Pastikan bahwa aliran udara
memadai.
Biarkan oven mendingin. Basahi lap
lembut dengan air hangat dan sedikit
cairan pencuci yang lembut, dan
gunakan untuk membersihkan rongga
oven.
5. PENGGUNAAN SEHARI-HARI
PERINGATAN!
Silakan baca bab
Keselamatan.
5.1 Pengapian tungku oven gas
Perangkat keselamatan
oven:
Oven gas memiliki sebuah
termokopel. Perangkat ini
menghentikan aliran gas jika
api padam.
1. Tekan kenop kontrol gas dan putar
ke
.
2. Tekan terus kenop kontrol gas
selama 15 detik atau kurang agar
termokopel memanas. Jangan
lepaskan kenop sebelum api
menyala, jika tidak, aliran gas akan
terhambat.
Jangan terus tekan kenop kontrol gas
selama lebih dari 15 detik. Jika tungku
oven tidak menyala setelah 15 detik,
lepaskan kenop kontrol gas, putar ke
posisi off, lalu buka pintu oven. Tunggu
minimal 1 menit, tutup pintu oven dan
coba nyalakan lagi tungku oven.
5.2 Setelah menyalakan tungku
gas oven
1. Lepaskan kenop kontrol gas.
2. Putar kenop kontrol gas untuk
mengatur suhu.
Kendalikan api melalui lubang yang ada
di pelat dasar rongga.
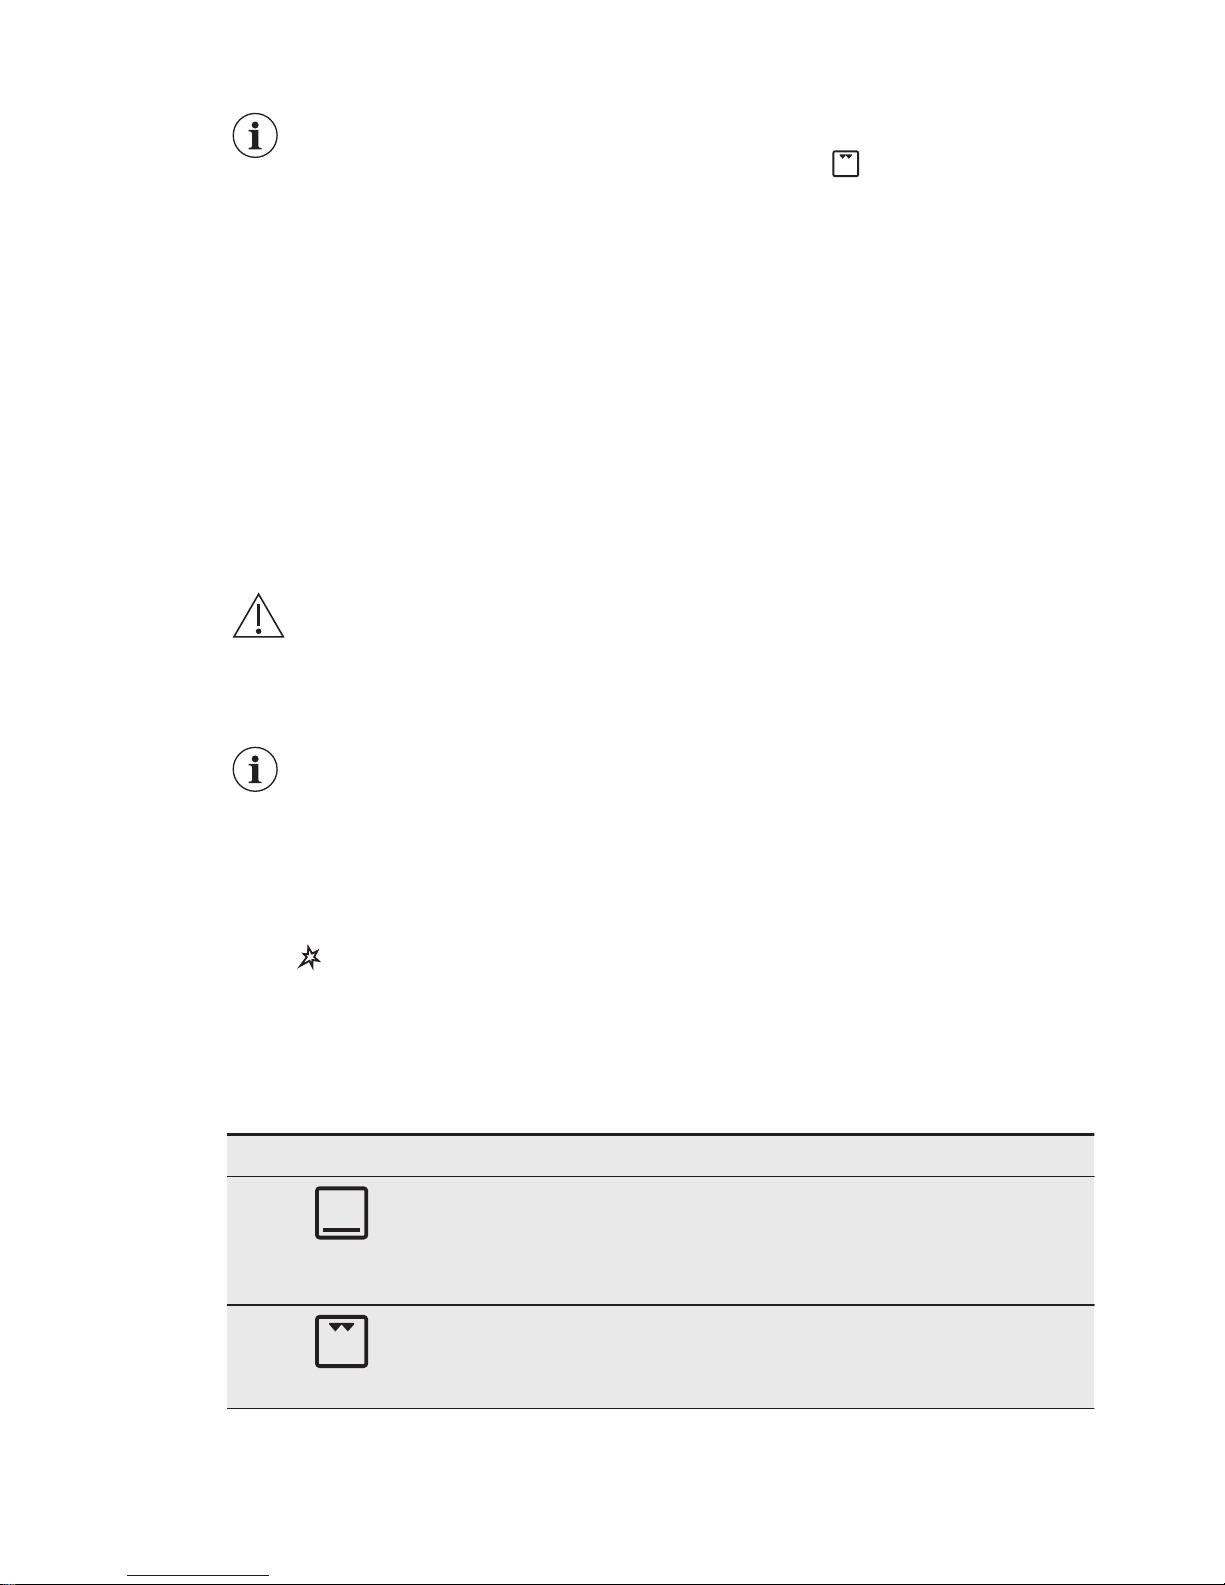
5.3 Kenop kontrol gas
Simbol Fungsi
Pemanggangan Kon‐
vensional
Panaskan dari bagian dasar oven. Rentang penyesuaian su‐
hu (150 °C - 250 °C).
Pemanggangan
Panaskan dari bagian atas.
31
Page 32
5.4 Fungsi oven
Fungsi oven Aplikasi
Posisi off
Oven dimatikan.
Lampu
Untuk menyalakan lampu tanpa fungsi memasak.
Turnspit
Untuk memanggang daging berukuran besar pada
turnspit.
5.5 Menggunakan pemanggang
Perangkat keselamatan
oven:
Oven gas memiliki sebuah
termokopel. Perangkat ini
menghentikan aliran gas jika
api padam.
1. Tekan kenop kontrol gas dan putar
ke . Terus tekan kenop kontrol gas
selama 15 detik atau kurang. Jangan
lepaskan kenop sebelum api
menyala.
2. Lepaskan kenop kontrol gas.
Jangan terus menekan kenop kontrol
gas selama lebih dari 15 detik. Jika
tungku pemanggang tidak menyala
setelah 15 detik, lepaskan kenop kontrol
gas, putar ke posisi off, lalu buka pintu
oven. Tunggu minimal 1 menit, tutup
pintu oven dan coba nyalakan lagi
tungku pemanggang.
Lihat bab "Petunjuk dan Tips",
Pemanggangan.
6. FUNGSI JAM
6.1 Pengingat Menit
Gunakan untuk menyetel waktu hitung
mundur untuk fungsi oven.
Fungsi ini tidak
mempengaruhi
pengoperasian peralatan.
Putar kenop timer sejauh mungkin,
kemudian putar ke periode waktu yang
diinginkan.
Setelah periode waktu terselesaikan,
akan terdengar sinyal suara.
7. MENGGUNAKAN AKSESORIS
PERINGATAN!
Silakan baca bab
Keselamatan.
7.1 Menggunakan turnspit
PERINGATAN!
Hati-hati saat Anda
menggunakan turnspit.
Garpu dan spit sangat tajam.
Terdapat risiko cedera.
www.electrolux.com32
Page 33
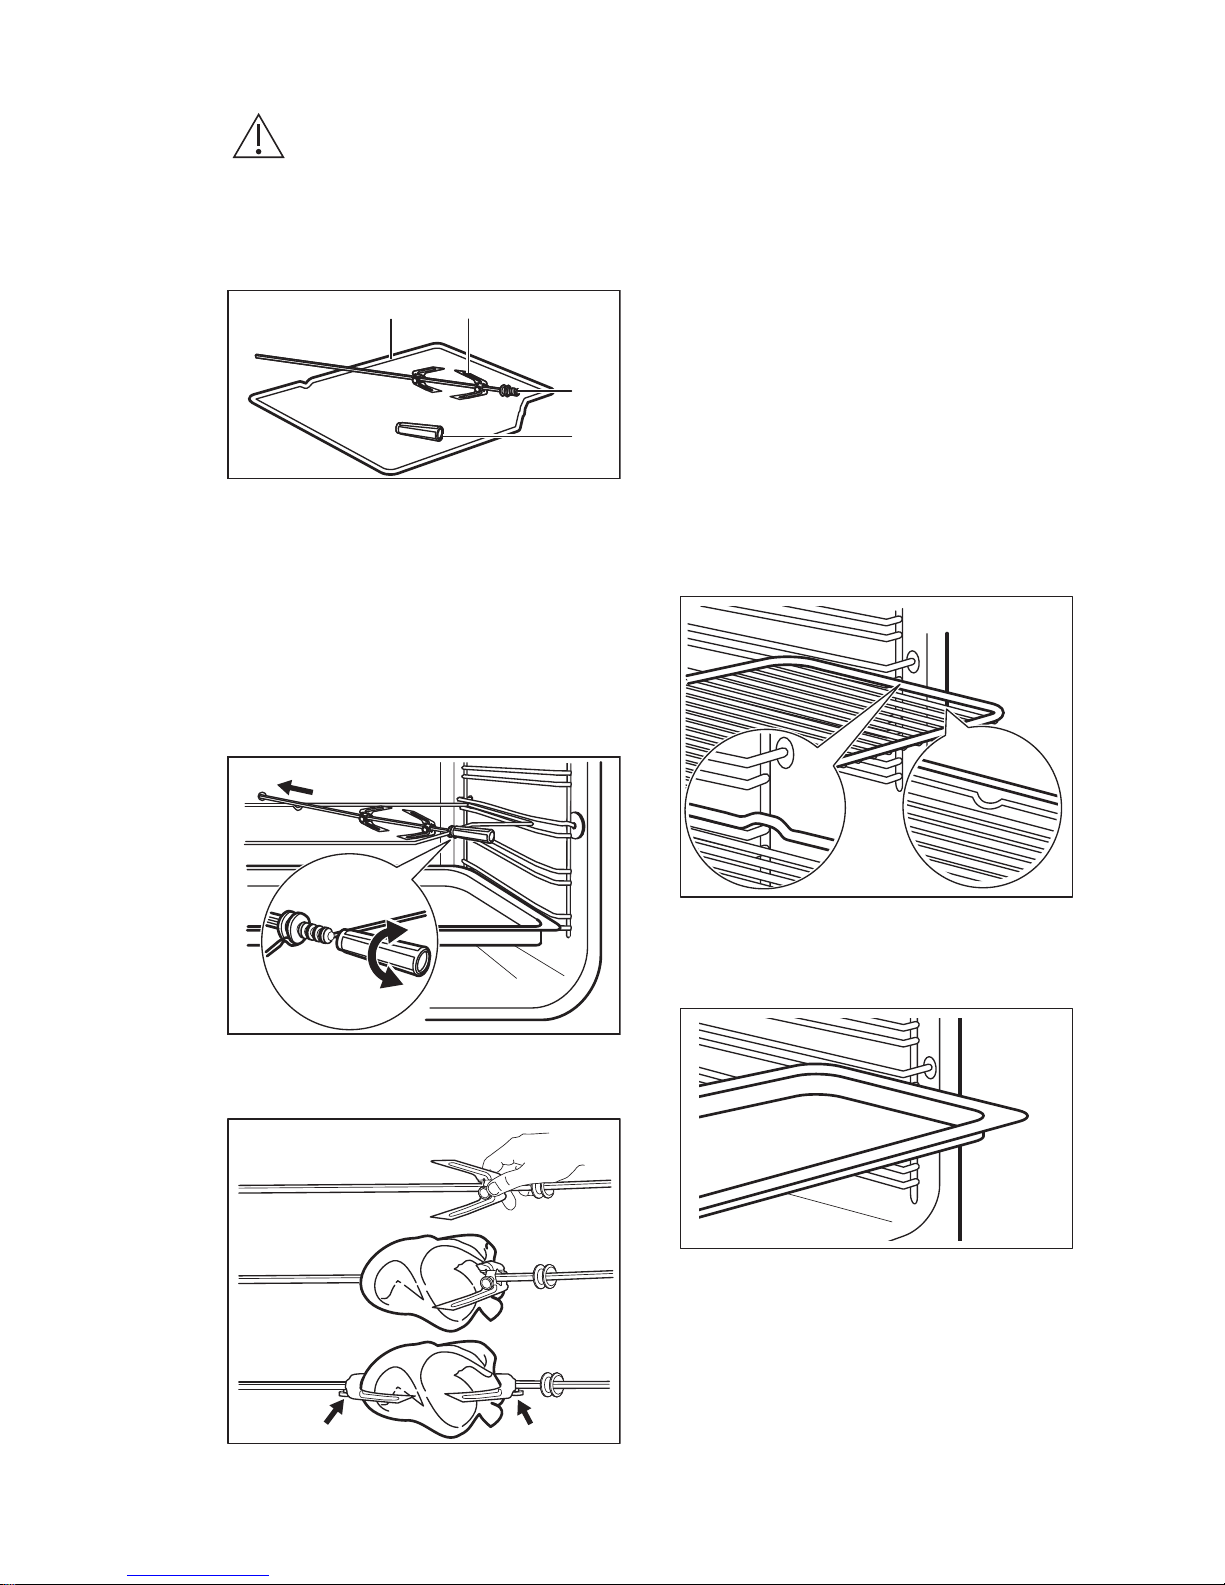
PERINGATAN!
Gunakan sarung tangan
saat Anda melepas turnspit.
Turnspit dan pemanggang
akan panas. Ada risiko
terjadinya kebakaran.
A B
D
C
A. Rangka spit putar
B. Garpu
C. Spit
D. Handel
1. Letakkan gagang turnspit ke dalam
spit.
2. Letakkan nampan tinggi pada posisi
rak terendah.
3. Letakkan rangka spit ke dalam posisi
rak ketiga dari bawah.
4. Pasang garpu pertama pada spit,
kemudian letakkan daging pada
turnspit dan pasang garpu kedua.
5. Gunakan obeng untuk
mengencangkan garpu.
6. Letakkan ujung spit ke dalam celah
turnspit.
7. Baringkan sisi belakang spit pada
rangka spit putar.
Lihat bab "Deskripsi produk".
8. Lepaskan gagang turnspit.
9. Pilih fungsi dengan posisi spit putar.
Spit putar berputar.
10. Nyalakan pembakar panggangan.
Silahkan baca tabel masak.
7.2 Memasukkan aksesori
Rak kawat:
Dorong rak di antara batangan pemandu
pada penyangga rak dan pastikan
ujungnya mengarah ke bawah.
Nampan pemanggang:
Dorong nampan pemanggang di antara
batang pemandu pada penyangga rak.
Rak kawat dan nampan
pemanggangbersama-sama:
Dorong nampan pemanggang di antara
batang pemandu pada penyangga rak
dan rak kawat pada batang pemandu di
atas.
33
Page 34
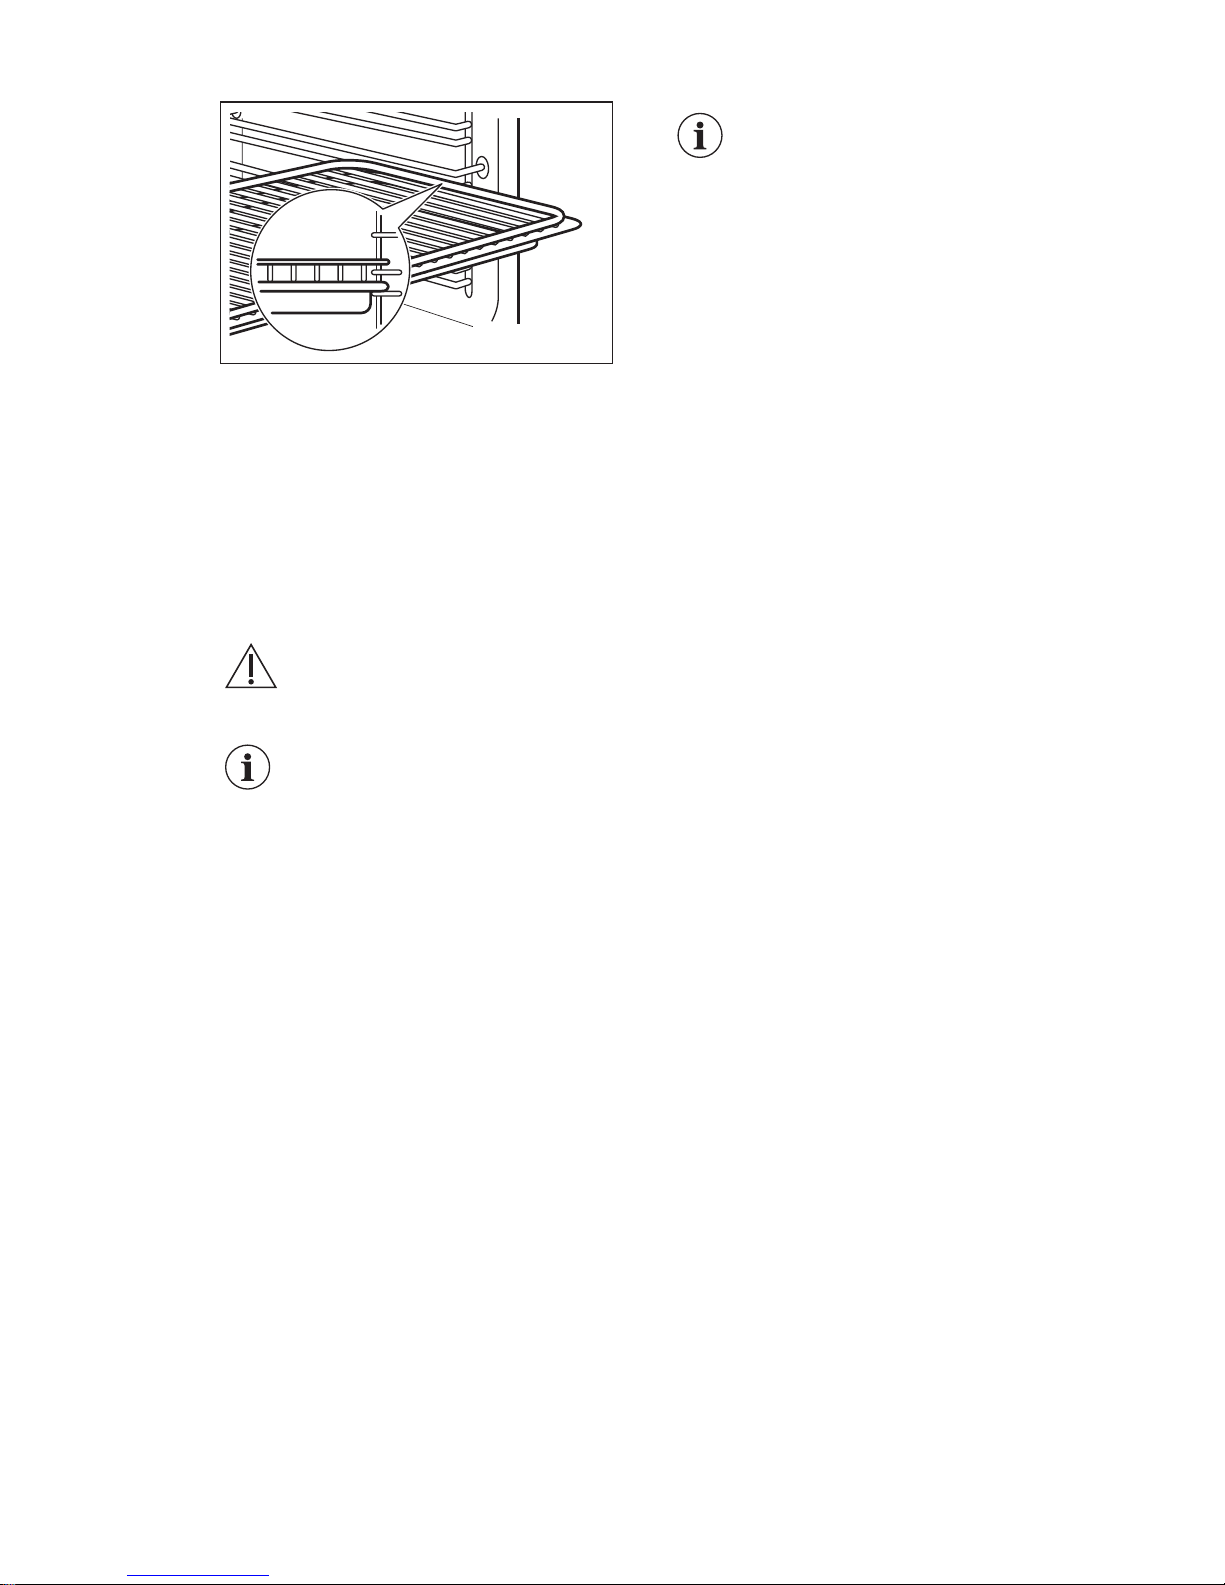
Lekukan kecil di bagian atas
akan meningkatkan
keamanan. Lekukan
tersebut juga membuat
perangkat tidak mudah
tergelincir. Bagian tepi yang
tinggi di sekeliling rak
mencegah peralatan
memasak tergelincir pada
rak.
8. FUNGSI TAMBAHAN
8.1 Kipas pendingin
Ketika oven beroperasi, kipas pendingin
menyala secara otomatis untuk menjaga
permukaan oven tetap dingin. Jika oven
dimatikan, kipas pendingin dapat terus
beroperasi hingga oven menjadi dingin.
9. PETUNJUK DAN SARAN
PERINGATAN!
Silakan baca bab
Keselamatan.
Suhu dan waktu
memanggang di dalam tabel
hanya merupakan panduan.
Suhu dan waktu
memanggang tergantung
pada resep serta kualitas
dan kuantitas bahan yang
digunakan.
9.1 Rekomendasi memasak
Oven ini memiliki lima posisi rak.
Hitunglah posisi rak dari bagian dasar
lantai oven.
Pemanggangan kue atau masakan
dengan oven Anda mungkin berbeda
dari pemanggangan dengan oven Anda
yang terdahulu. Tabel di bawah ini
memberi Anda pengaturan standar untuk
suhu, waktu memasak, dan posisi rak.
Jika Anda tidak dapat menemukan
pengaturan untuk resep khusus, carilah
resep yang mirip.
Memanggang kue
Jangan membuka pintu oven sebelum
melewati 3/4 dari waktu memasak yang
telah ditetapkan.
Pemanggangan
Letakkan makanan dekat dengan
elemen pemanas atas agar dapat
memasak lebih cepat atau jauhkan dari
elemen pemanas atas untuk memasak
dengan waktu yang lebih lama.
Untuk meminimalkan cipratan, Anda
harus mengeringkan makanan sebelum
memanggang. Oleskan sedikit minyak
atau mentega cair pada daging tanpa
lemak dan ikan untuk membuatnya
lembap selama memasak.
Anda dapat meletakkan bahan
pelengkap seperti tomat dan jamur di
bawah kisi panggangan ketika
memanggang daging.
Anda harus membalik makanan selama
memasak, sesuai yang Anda inginkan.
Memasak daging dan ikan
Biarkan daging selama sekitar 15 menit
sebelum mengiris sehingga sari daging
tidak keluar.
Untuk mencegah terlalu banyak asap di
dalam oven selama memanggang,
tambahkan air ke dalam loyang tinggi.
Untuk mencegah mengembunnya asap,
tambahkan air setiap kali mengering.
Waktu memasak
Waktu memasak tergantung pada jenis
makanan, konsistensinya, dan
volumenya.
www.electrolux.com34
Page 35

Pertama-tama, pantau dahulu performa
saat Anda memasak. Temukan
pengaturan terbaik (setelan panas,
waktu memasak, dll.) untuk alat masak,
resep, dan jumlahnya ketika Anda
menggunakan peralatan ini.
9.2 Diagram memasak
Kaseroll
Panaskan oven kosong terlebih dahulu
sebelum memasak.
Siapkan 1,5 - 2,5 kg makanan.
Gunakan posisi rak keempat.
Makanan Suhu (°C) Waktu
(menit)
Lasagna 180 45 - 50
Cannelloni 180 45 - 50
Kentang
gratin
180 33 - 40
Makaroni
panggang
180 45 - 50
Kebab Ha‐la190 35 - 40
Daging
Panaskan oven kosong terlebih dahulu
sebelum memasak.
Gunakan posisi rak ketiga.
Makanan Suhu (°C) Waktu
(menit)
Daging domba,
1,7 kg
180 - 200 80 - 100
Ayam, 1 - 1,8kg220 - 230 80 - 90
Bebek, 1,8 2,5 kg
220 - 230 100 - 120
Angsa, 2,5 3,5 kg
220 - 230 160 - 180
Kelinci, 2 kg 180 - 190 60 - 80
Daging kam‐
bing, 1,8 kg
170 - 180 60 - 90
Pizza
Panaskan oven kosong terlebih dahulu
sebelum memasak.
Siapkan 1,4 - 1,5 kg makanan.
Gunakan posisi rak ketiga atau keempat.
Makanan Suhu (°C) Waktu
(menit)
Pizza, tipis 200 - 210 20 - 30
Pizza, te‐
bal
200 - 210 25 - 30
Calzone 190 - 200 25 - 30
Kue
Panaskan oven kosong terlebih dahulu
sebelum memasak.
Makanan Po‐
sisi
rak
Suhu
(°C)
Waktu
(menit)
Kue datar,
0,6 - 1,0 kg
4 170 -
180
20 - 30
Kue spons,
1,0 - 1,5 kg
4 170 -
180
40 - 50
Pastri lapis
Mesir, 1,2 1,5 kg
3
ata
u 4
190 40 - 45
Pemanggangan
Panaskan oven kosong terlebih dahulu
selama 3 menit.
Gunakan posisi rak keempat.
Suhu maksimum adalah nilai default
untuk semua jenis makanan.
Makanan Kuantitas
(kg)
Waktu
(menit)
Burger 0,6 (6 po‐
tongan)
20 - 30
Roti bakar ke‐
cokelatan
0,5 9 - 12
Roti bakar Ha‐
waii
6 potong 7 - 14
35
Page 36

9.3 Memasak dengan oven gas
Daging Sapi & Unggas
Panaskan terlebih dahulu oven kosong
selama 10 menit sebelum memasak.
Gunakan rak kawat.
Letakkan loyang tinggi pada posisi rak
kedua.
Gunakan posisi rak ketiga.
Makanan Suhu (°C) Waktu
(menit)
Daging sapi de‐
ngan tulang, 1,0
kg
min. 50 - 65
Daging sapi tan‐
pa tulang, 1,0 kg
190 55 - 65
Domba, 1,0 kg min. 50 - 65
Ayam / Kelinci,
1,2 kg
220 - 230 85 - 95
Bebek, 1,0 kg 190 90 - 100
Kalkun
Panaskan terlebih dahulu oven kosong
selama 10 menit sebelum memasak.
Gunakan loyang tinggi.
Gunakan posisi rak kedua.
Makanan Suhu
(°C)
Waktu (me‐
nit)
Kalkun, 4,5 5,5 kg
160 220 - 250
Kue Kering
Panaskan terlebih dahulu oven kosong
selama 10 menit sebelum memasak.
Gunakan nampan pemanggang
aluminium jika tidak ada peralatan
masak lain yang ditentukan di bawah ini.
Gunakan posisi rak keempat.
Makanan Suhu
(°C)
Waktu
(menit)
Tar buah dalam lo‐
yang kue bundar
berukuran 26 cm
pada rak kawat
165 50 - 60
Makanan Suhu
(°C)
Waktu
(menit)
Pai buah dalam lo‐
yang kue bundar
berukuran 26 cm
pada rak kawat
min. 50 - 60
Kue sus 190 35 - 45
Vol au vent 170 25 - 35
Kue tar selai dalam
loyang kue bundar
berukuran 30 cm
pada rak kawat
165 50 - 60
Puding
Panaskan terlebih dahulu oven kosong
selama 10 menit sebelum memasak.
Gunakan 9 ramekin keramik.
Tuangkan 2 cm air ke dalam loyang
tinggi.
Gunakan posisi rak ketiga.
Makanan Suhu
(°C)
Waktu
(menit)
Kue tart telur Da‐
lam teknik bainmarie
min. 70 - 85
Kue
Panaskan terlebih dahulu oven kosong
selama 10 menit sebelum memasak.
Gunakan nampan pemanggang
aluminium jika tidak ada peralatan
masak lain yang ditentukan di bawah ini.
Gunakan posisi rak keempat.
Makanan Suhu
(°C)
Waktu
(menit)
Roti buah dalam
loyang kue beru‐
kuran 20 cm pada
rak kawat
min. 160 -
170
Roti buah dalam
loyang kue beru‐
kuran 20 cm pada
rak kawat
min. 160 -
170
www.electrolux.com36
Page 37

Makanan Suhu
(°C)
Waktu
(menit)
Kue madeira da‐
lam loyang kue
berukuran 20 cm
pada rak kawat
min. 115 -
130
Kue kecil min. -
170
40 - 65
Roti jahe min. 45 - 55
Roti
Panaskan terlebih dahulu oven kosong
selama 10 menit sebelum memasak.
Gunakan nampan pemanggang
aluminium.
Gunakan posisi rak keempat.
Makanan Suhu (°C) Waktu
(menit)
Loyang roti, 0,5kg180 - 190 50 - 60
Loyang roti, 1,0kg180 - 190 60 - 70
Roti rol dan bu‐
lat
180 - 190 25 - 35
9.4 Pemanggangan
Panaskan terlebih dahulu oven kosong
selama 3 menit sebelum memasak.
Gunakan posisi rak keempat.
Suhu maksimum adalah nilai default
untuk semua jenis makanan.
Makanan Po‐
tong
Waktu (menit)
sisi
perta‐
ma
sisi ke‐
dua
Steak fillet,
0,8 kg
4 13 - 15 13 - 15
Makanan Po‐
tong
Waktu (menit)
sisi
perta‐
ma
sisi ke‐
dua
Steak da‐
ging sapi,
0,6 kg
4 12 - 15 12 - 15
Ayam (di‐
potong 2),
1,0 kg
2 35 - 40 30 - 35
Kebab 4 15 - 20 12 - 15
Dada
ayam, 0,4
kg
4 13 - 15 13 - 15
Fillet ikan,
0,4 kg
4 13 - 15 12 - 14
Sandwich
panggang
4 - 6 5 - 7 -
Roti bakar 4 - 6 2 - 4 2 - 3
9.5 Turnspit
Panaskan terlebih dahulu oven kosong
selama 10 menit sebelum memasak.
Gunakan turnspit dengan tungku oven
bagian bawah.
Gunakan posisi rak ketiga.
Makanan Suhu
(°C)
Waktu
(menit)
Ayam, 1,0 - 1,2 kg 190 -
200
75 - 85
Daging panggang,
0,8 - 1,0 kg
190 200
75 - 85
9.6 Informasi untuk lembaga
pengujian
Pengujian berdasarkan IEC 60350-1.
37
Page 38

Makan‐anFungsi Akse‐
sori
Posi‐
si rak
Suhu
(°C)
Waktu (me‐
nit)
Komentar
Kue kecil Pemangga‐
ngan Kon‐
vensional
Nam‐
pan
pe‐
mang‐
gang
alumi‐
nium
4 150 -
170
35 - 55 Letakkan 20 kue
kecil per satu
nampan pang‐
gang.
Panaskan dahulu
oven selama 10
menit.
Pai apel Pemangga‐
ngan Kon‐
vensional
Rak
kawat
4 170 80 - 90 Gunakan 2 lo‐
yang (diameter
20 cm), diletak‐
kan secara diag‐
onal.
Panaskan dahulu
oven selama 10
menit.
Kue
spons
Pemangga‐
ngan Kon‐
vensional
Rak
kawat
4 170 50 - 60 Gunakan cetakan
kue (diameter 26
cm).
Panaskan dahulu
oven selama 10
menit.
Kue bis‐
kuit
Pemangga‐
ngan Kon‐
vensional
Loyang
pang‐
gang
alumu‐
nium
4 160 -
170
25 - 40 Panaskan dahulu
oven selama 10
menit.
Roti
pang‐
gang
4 - 6 po‐
tong
Pemangga‐
ngan
Rak
kawat
4 maks. 2 - 3 menit di
sisi pertama;
2 -3 menit di
sisi kedua
Panaskan dahulu
oven selama 3
menit.
Burger
daging
sapi
6 potong,
0,6 kg
Pemangga‐
ngan
Rak
kawat
dan
pe‐
nam‐
pung
tetesan
4 maks. 20 - 30 Letakkan rak ka‐
wat di tingkat ke‐
empat dan pe‐
nampung tetesan
di tingkat ketiga
oven. Balik ma‐
kanan di tengahtengah waktu
memasak.
Panaskan dahulu
oven selama 3
menit.
www.electrolux.com38
Page 39
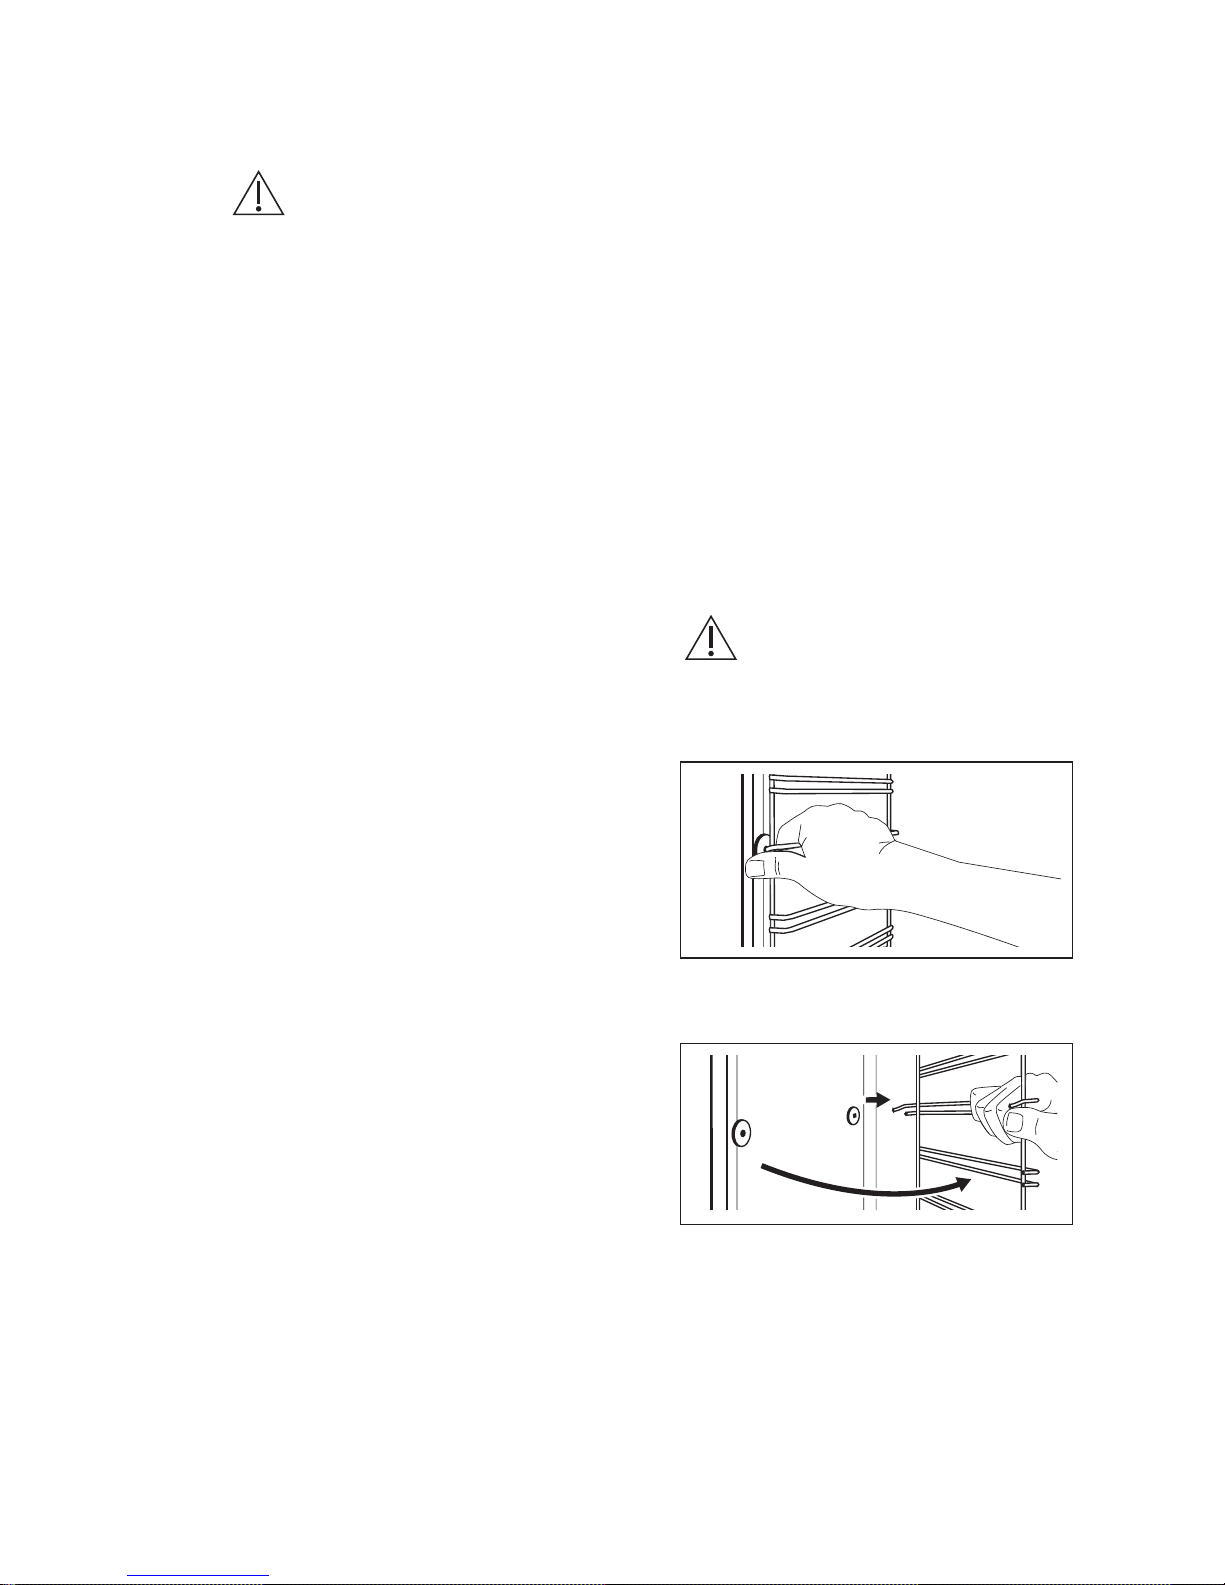
10. MERAWAT DAN MEMBERSIHKAN
PERINGATAN!
Silakan baca bab
Keselamatan.
10.1 Catatan mengenai
pembersihan
Bersihkan bagian depan oven
menggunakan kain lembut dengan air
hangat dan bahan pembersih yang tidak
terlalu keras.
Untuk membersihkan permukaan logam,
gunakan bahan pembersih khusus.
Bersihkan bagian dalam oven setiap kali
setelah pemakaian. Kumpulan lemak
atau sisa makanan lain dapat terbakar.
Bersihkan seluruh aksesori setiap kali
selesai digunakan dan keringkanlah.
Gunakan kain yang lembut dengan air
hangat dan bahan pembersih. Jangan
membersihkan aksesori di mesin pencuci
piring.
Bersihkan noda yang membandel
menggunakan pembersih khusus oven.
Jika Anda memiliki aksesori anti lengket,
jangan membersihkannya menggunakan
bahan pembersih yang keras, benda
tajam, atau mesin pencuci piring. Hal ini
dapat merusak lapisan anti lengket.
Kelembapan dapat mengembun di dalam
oven atau di panel kaca pintu. Untuk
mengurangi embun, operasikan oven
selama 10 sebelum memasak.Bersihkan
kelembapan pada rongga setelah setiap
penggunaan.
10.2 Oven baja antikarat atau
aluminium
Bersihkan pintu oven dengan kain
lembap atau spons saja. Keringkan
dengan kain yang lembut.
Jangan gunakan wol baja, bahan asam
atau abrasif karena cara ini dapat
menimbulkan kerusakan pada
permukaan oven. Bersihkan panel
kontrol oven dengan cara yang sama.
10.3 Membersihkan perapat
pintu
Periksalah perapat pintu secara berkala.
Perapat pintu terletak di sekeliling
bingkai rongga oven. Jangan gunakan
oven jika perapat pintu rusak. Hubungi
Pusat Servis Resmi.
Untuk membersihkan perapat pintu,
bacalah informasi umum tentang
pembersihan.
10.4 Melepaskan penyangga
rak
Untuk membersihkan oven, lepaskan
penyangga rak.
AWAS!
Berhati-hatilah ketika
melepas penyangga rak.
1. Tarik bagian depan penyangga rak
menjauh dari dinding samping.
2. Tarik ujung belakang penyangga rak
menjauh dari dinding samping lalu
lepaskan.
2
1
Pasang aksesori yang dilepaskan dalam
urutan berlawanan.
10.5 Melepas dan memasang
pintu
Pintu oven memiliki dua panel kaca.
Pintu oven dan panel kaca internal dapat
dilepas untuk dibersihkan. Baca seluruh
39
Page 40
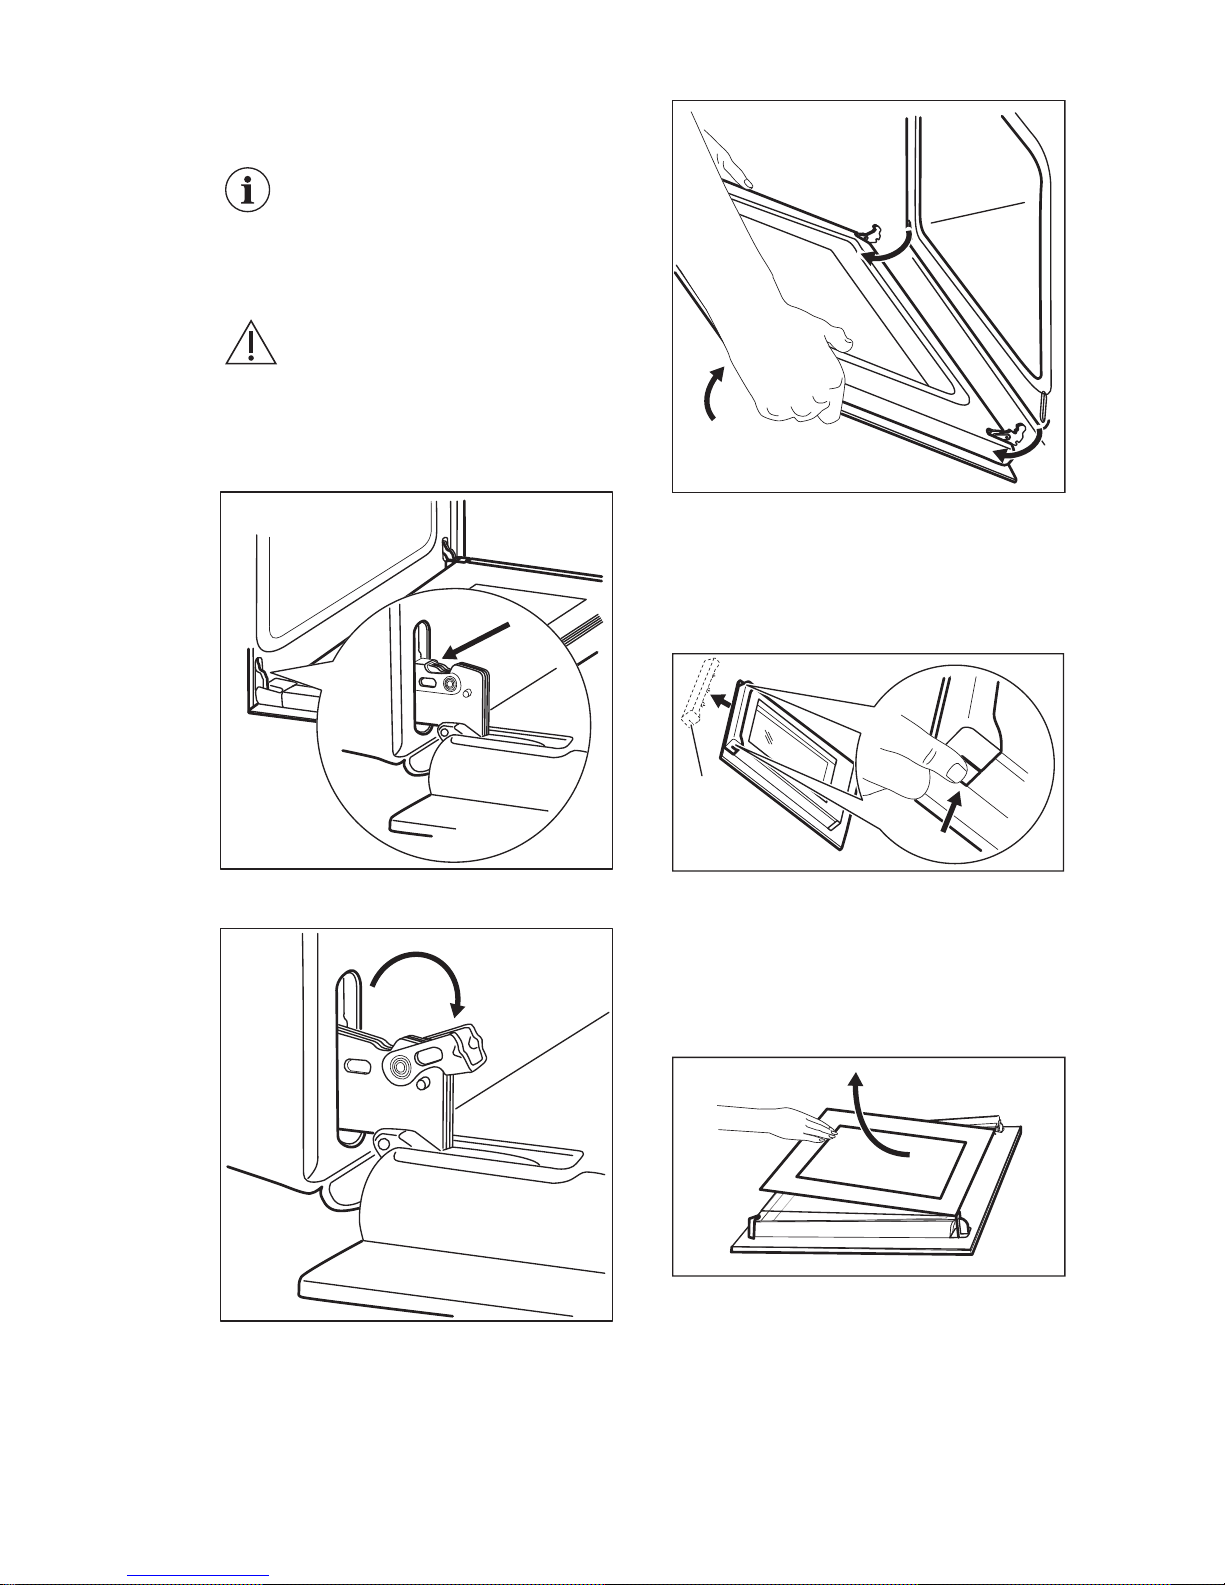
petunjuk “Melepas dan memasang pintu”
sebelum melepas panel kaca.
Pintu oven bisa menutup jika
Anda mencoba melepas
panel kaca bagian dalam
tanpa melepas pintu oven
terlebih dahulu.
AWAS!
Jangan menggunakan oven
tanpa panel kaca bagian
dalam.
1. Buka pintu sepenuhnya dan tahan
kedua engsel.
2. Angkat dan putar tuas di kedua
engsel sepenuhnya.
3. Tutup pintu oven setengah ke posisi
pembukaan pertama. Lalu angkat
dan tarik ke depan dan lepaskan
pintu dari tempatnya.
4.
Letakkan pintu di atas kain lembut
pada permukaan yang stabil.
5. Tahan panel pintu (B) di tepi atas
pintu di kedua belah sisi dan dorong
ke dalam untuk melepaskan segel
klip.
1
2
B
6. Tarik panel pintu ke depan untuk
melepasnya.
7. Pegang panel kaca pintu pada
bagian tepi atas lalu tarik keluar
dengan hati-hati. Pastikan bahwa
kaca keluar dari penyangga secara
utuh.
8. Bersihkan panel kaca dengan air dan
sabun. Keringkan panel kaca dengan
hati-hati. Jangan membersihkan
panel kaca di mesin pencuci piring.
Setelah selesai dibersihkan, pasang
panel kaca dan pintu oven.
www.electrolux.com40
Page 41
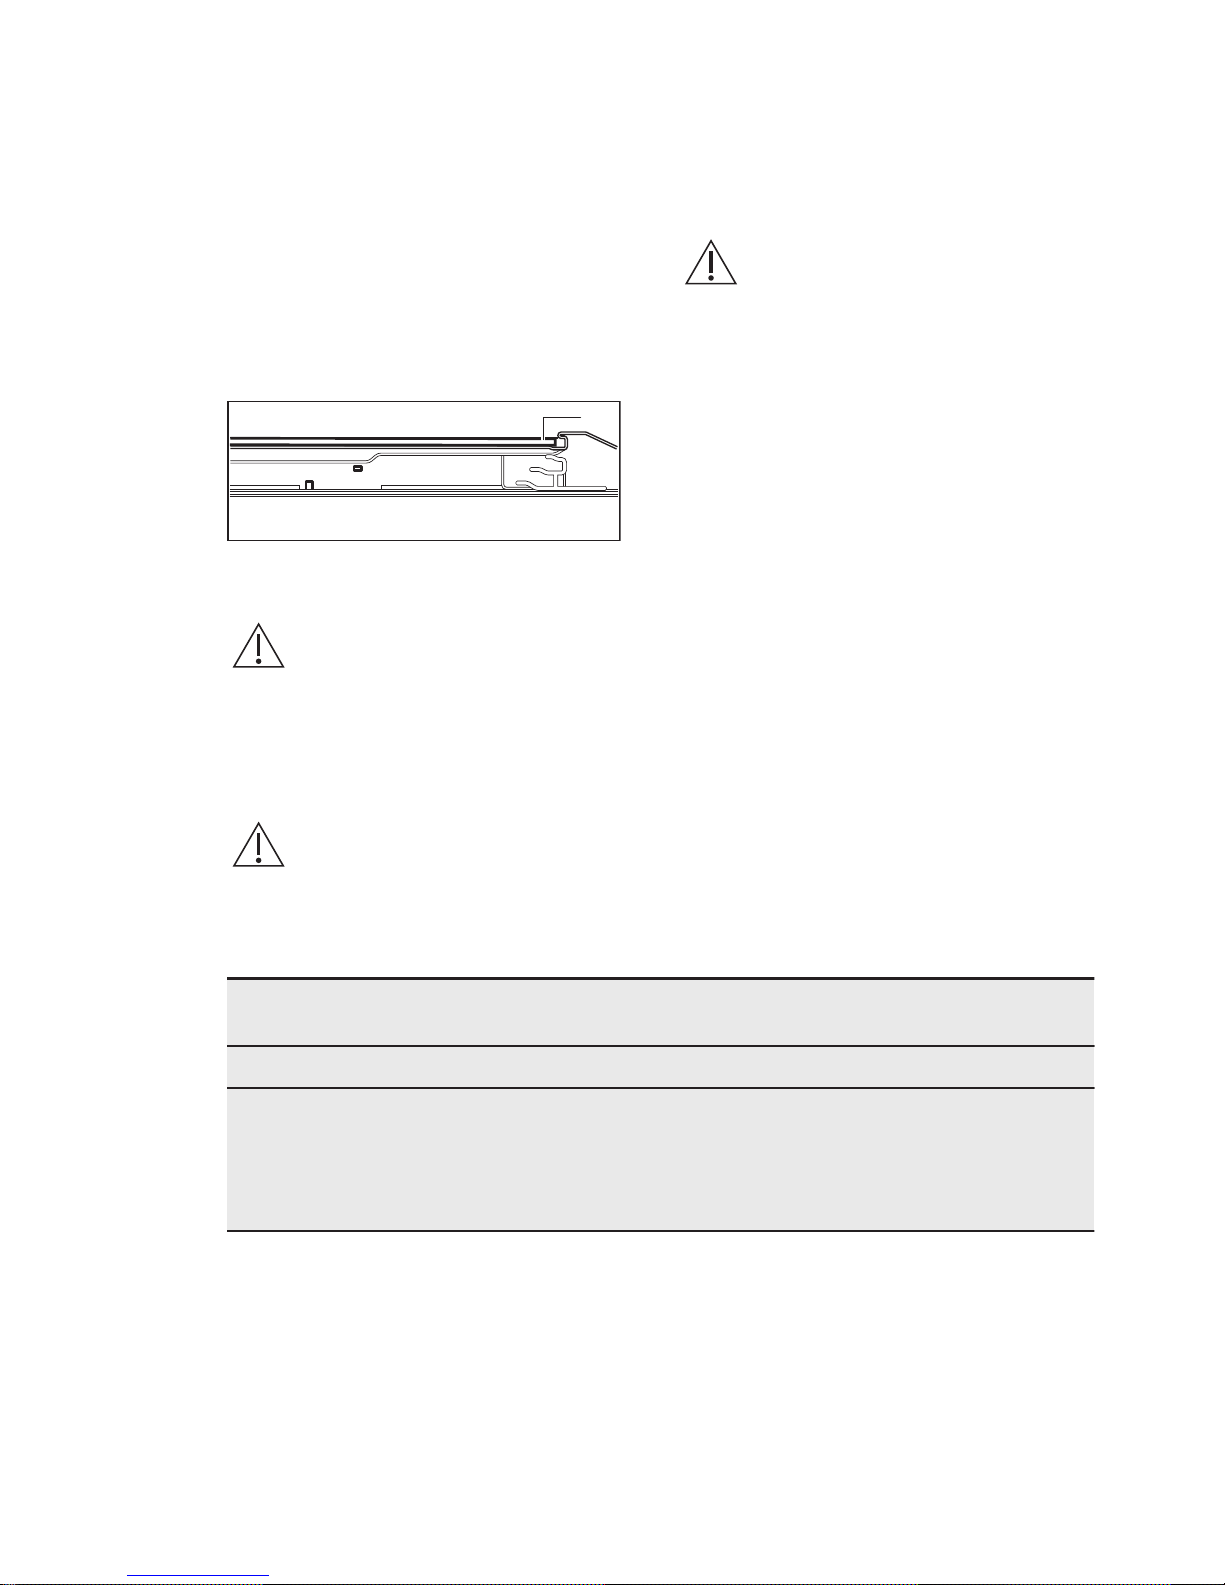
Zona lembar kasa harus menghadap ke
sisi dalam dari pintu. Pastikan bahwa
setelah pemasangan bagian permukaan
dari bingkai panel kaca pada zona
lembar kasa tidak terasa kasar ketika
Anda menyentuhnya.
Jika panel pintu dipasang dengan benar
akan terdengar suara klik.
Pastikan bahwa Anda memasang panel
kaca bagian dalam pada tempatnya
dengan benar.
A
10.6 Mengganti lampu
PERINGATAN!
Risiko sengatan listrik.
Lampu dapat menjadi
panas.
1. Matikan oven.
Tunggu hingga oven mendingin.
2. Putuskan sambungan oven dari
sumber listrik.
3. Letakkan kain di dasar rongga.
AWAS!
Selalu pegang lampu
halogen dengan kain untuk
mencegah terbakarnya
residu gemuk di lampu.
Lampu belakang
1. Putar penutup kaca lampu untuk
melepasnya.
2. Bersihkan penutup kaca.
3. Ganti lampu dengan lampu tahan
panas 300 °C yang cocok.
4. Pasang penutup kaca.
11. PENYELESAIAN MASALAH
PERINGATAN!
Silakan baca bab
Keselamatan.
11.1 Apa yang dilakukan jika...
Masalah Kemungkingan penye‐
bab
Perbaikan
Oven tidak mau panas. Oven dimatikan. Nyalakan oven.
Oven tidak mau panas. Sekring rusak. Pastikan sekring adalah
penyebab gangguan fung‐
si. Jika masalah sekring
terjadi lagi, hubungi teknisi
listrik yang kompeten.
41
Page 42

Masalah Kemungkingan penye‐
bab
Perbaikan
Oven tidak bekerja. Pemantik otomatis tidak
bekerja.
Nyalakan tungku dengan
pemantik gas. Dekatkan
api ke lubang yang terda‐
pat pada bagian dasar
rongga oven. Pada saat
bersamaan, tekan kenop
kontrol gas dan putar me‐
lawan arah jarum jam ke
suhu maksimal. Saat api
menyala, tetap tekan ke‐
nop kontrol gas selama 15
detik atau kurang untuk
memanaskan termokopel.
Jika tidak, aliran gas akan
terhambat.
Lampu tidak beroperasi. Lampu mengalami kerusa‐
kan.
Ganti lampu.
Uap dan embun mengen‐
dap pada makanan dan di
rongga oven.
Masakan ditinggalkan ter‐
lalu lama di dalam oven.
Makanan tidak boleh di‐
tinggalkan di dalam oven
lebih dari 15-20 menit se‐
telah dimasak.
Nyala api segera padam
setelah penyalaan kompor.
Termokopel tidak mema‐
nas.
Setelah api menyala, terus
tekan kenop kontrol gas
selama 15 detik atau ku‐
rang.
Turnspit tidak berputar. Turnspit tidak dipasang de‐
ngan benar di lubang pe‐
manggang.
Lihat bab "Menggunakan
aksesori", Menggunakan
turnspit.
11.2 Data layanan
Jika Anda tidak dapat menyelesaikan
masalahnya sendiri, hubungi penjual
atauPusat Layanan Resmi.
Data yang diperlukan untuk pusat servis
terdapat pada pelat rating. Pelat
spesifikasi oven terdapat pada bingkai
depan rongga oven. Jangan melepas
pelat spesifikasi oven dari rongga oven.
Kami anjurkan Anda menulis data di sini:
Model (MOD.) .........................................
Nomor produk (PNC) .........................................
Nomor seri (S.N.) .........................................
www.electrolux.com42
Page 43
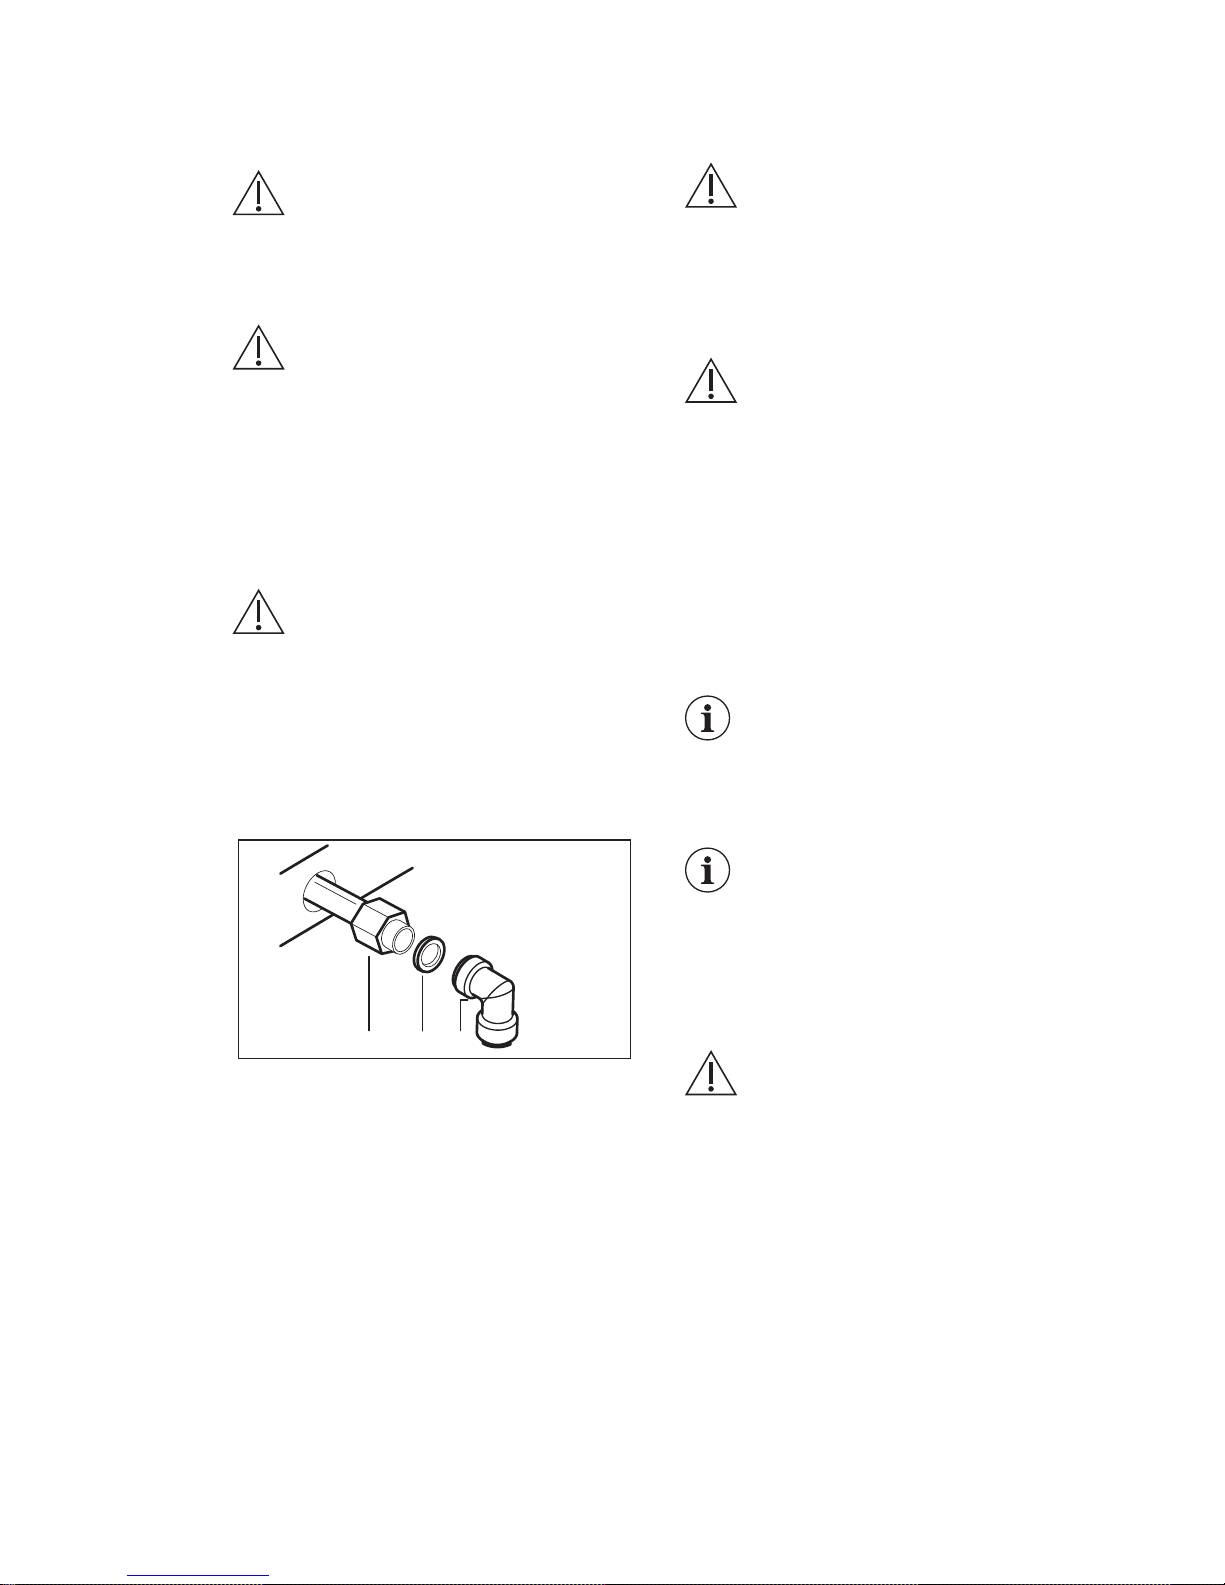
12. PEMASANGAN
PERINGATAN!
Silakan baca bab
Keselamatan.
12.1 Sambungan gas
PERINGATAN!
Sebelum menyambung gas,
lepaskan steker utama dari
soket utama atau matikan
sekering dalam kotak
sekering. Tutuplah katup
utama dari suplai gas.
Saluran suplai gas berada pada bagian
belakang peralatan.
PERINGATAN!
Jangan menggunakan pipa
karet lentur!
Jangan memasukkan oven secara
keseluruhan ke dalam kabinet built-in
(kira-kira 30 cm).
Sambungan dengan pipa metalik yang
fleksibel atau pipa metalik kaku:
A B C
A. Saluran suplai gas, ujung poros
dengan saluran
B. Pembasuh
C. Siku
Letakkan gasket yang disuplai di antara
pipa dan saluran suplai gas. Putar pipa
ke 1/2" saluran suplai gas.
1. Gunakan kunci 22 mm untuk
mengencangkan mur. Pastikan
saluran suplai gas pada posisi yang
tepat. Jangan menangani sirkuit
suplai gas dengan kasar.
PERINGATAN!
Jangan gunakan api
untuk memeriksa
kebocoran!
2. Memindahkan oven secara
keseluruhan ke dalam kabinet builtin.
PERINGATAN!
Jangan menekan
saluran suplai gas dan
pipa ketika Anda
memindahkan oven ke
dalam kabinet built-in.
3. Segel sambungan dengan benar.
Gunakan alat pendeteksi kebocoran
untuk memeriksa kebocoran.
12.2 Penyesuaian dengan
berbagai jenis gas
Hanya teknisi yang
kompeten yang berwenang
untuk menangani
penyesuaian berbagai jenis
gas.
Jika oven diatur untuk gas
alam, Anda dapat
mengubahnya menjadi gas
cair dengan menggunakan
injektor yang tepat.
Aliran gas dapat diatur agar
sesuai.
PERINGATAN!
Sebelum Anda mengganti
injektor, pastikan bahwa
kenop gas berada pada
posisi Off. Cabut oven dari
sumber listrik. Biarkan oven
mendingin. Terdapat risiko
cedera.
12.3 Penggantian injektor
pemanggang gas
1. Lepaskan baut yang menahan
pemanas pemanggang pada
posisinya (A).
43
Page 44
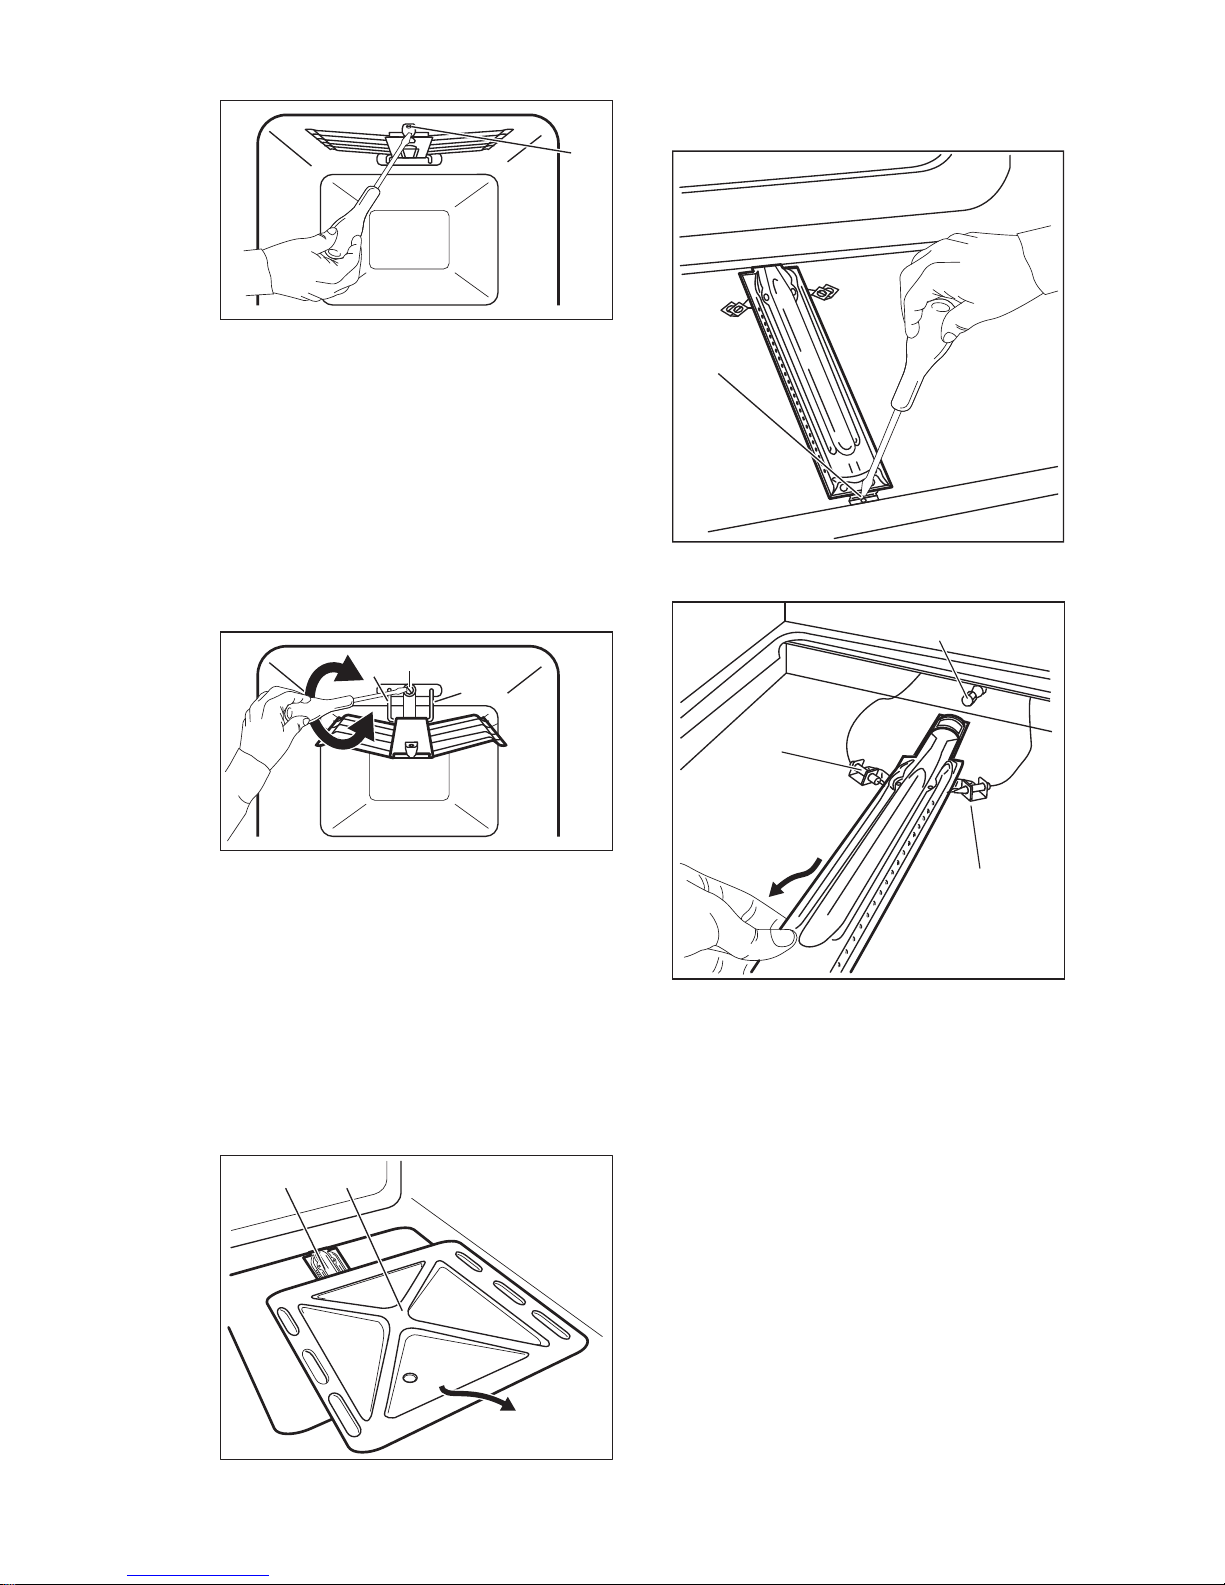
A
2. Pindahkan pemanas dengan hati-hati
dari penyangga injektor. Turunkan
secara perlahan. Jangan menangani
kawat penghubung busi (B) dan
konduktor thermocouple (C) dengan
kasar.
3. Lepaskan injektor pemanas (D)
dengan kunci pas soket 7 mm dan
gantikan dengan yang lain yang
diperlukan untuk jenis gas yang Anda
gunakan.
Lihat bab “Data teknis".
D
C
B
4. Rakit pemanas dengan urutan
terbalik. Sebelum Anda
mengencangkan baut, pastikan
bahwa pemanas ditekan secara
benar ke panel belakang.
Tes injektor pemanggang.
12.4 Penggantian injektor oven
1. Lepaskan pelat dasar dari rongga
oven (A) untuk mendapatkan akses
ke tungku oven (B).
AB
2. Lepaskan baut (C), yang menahan
tungku pada posisinya.
C
3. Pindahkan tungku dengan hati-hati
dari penyangga injektor (D).
D
E
F
4. Perlahan pindahkan ke sisi kiri.
Jangan menekan kabel konektor busi
(F) dan konduktor termokopel (E).
5. Lepaskan injektor tungku (D) dengan
kunci pas soket 7 mm dan ganti
dengan yang lain, yang diperlukan
untuk jenis gas yang Anda gunakan.
Lihat bab “Data teknis".
6. Rakit tungku dengan urutan terbalik.
Gantilah stiker tipe gas di dekat saluran
suplai gas dengan yang berhubungan
dengan tipe gas yang baru.
Tungku oven gas tidak memerlukan
pengaturan gas utama apa pun.
www.electrolux.com44
Page 45
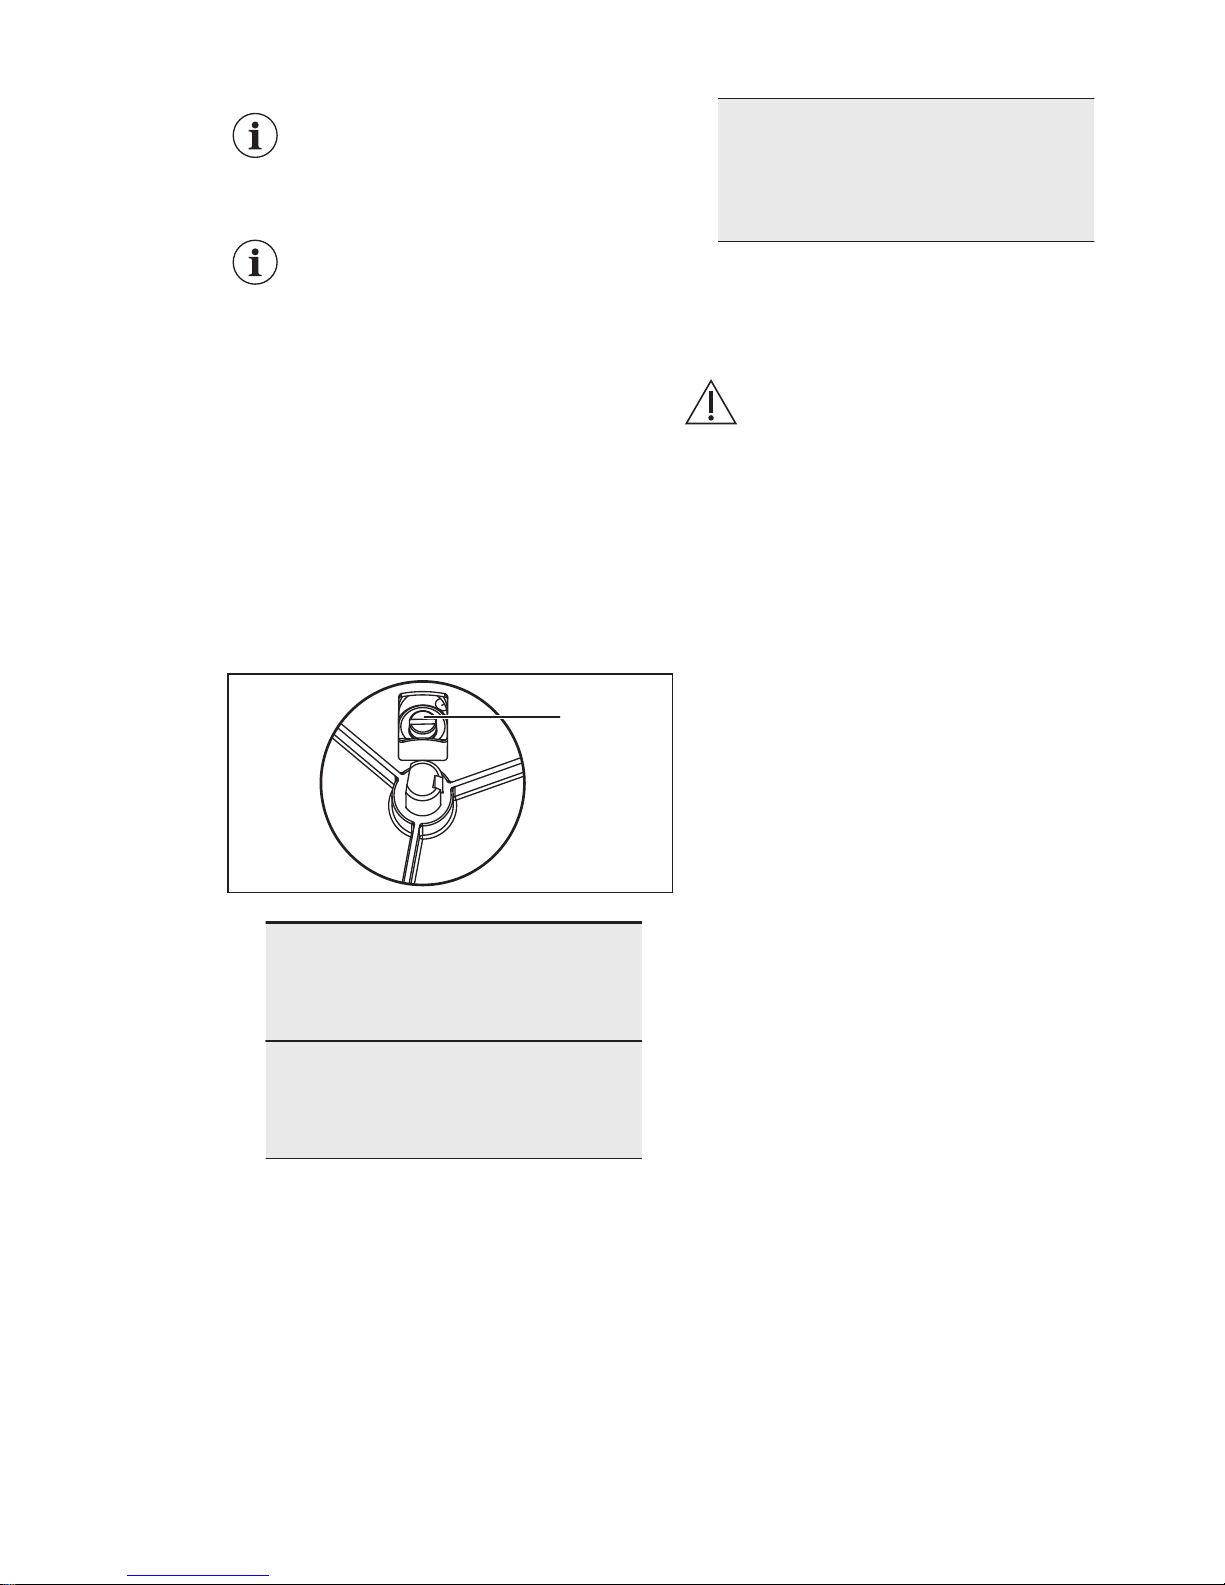
Pastikan bahwa tekanan
pasokan gas peralatan
sesuai dengan nilai yang
disarankan.
Jika tekanan gas suplai
dapat diubah atau berbeda
dengan tekanan yang
diperlukan, Anda harus
menyesuaikan pengatur
tekanan yang berlaku pada
pipa pasokan gas.
12.5 Penyesuaian level
minimum dari pembakar oven
1. Lepaskan peralatan dari sambungan
listrik.
2. Putar tombol putar untuk kontrol gas
ke posisi minimum dan lepaskan.
3. Sesuaikan baut penyesuaian (A)
dengan obeng minus tipis.
A
Perubahan
tipe gas
Penye‐
suaian sekr‐
up penye‐
suaian
Dari gas
alam ke gas
cair
Kencangkan
sepenuhnya
sekrup pe‐
nyesuaian.
Dari gas cair
ke gas alam
Lepaskan
sekrup pe‐
nyesuaian
sekitar 1/3
putaran.
4. Pasang tombol putar untuk kontrol
gas.
5. Hubungkan peralatan ke sambungan
listrik.
PERINGATAN!
Tancapkan steker listrik ke
soket utama hanya setelah
semua bagian kembali ke
posisi semula. Ada risiko
cidera.
6. Nyalakan injektor api oven gas.
Lihat bab “Penggunaan sehari-hari".
7. Atur tombol putar untuk kontrol gas
ke posisi maksimum dan biarkan
oven memanas selama setidaknya
10 menit.
8. Putar tombol putar untuk kontrol gas
dari posisi maksimum ke posisi
minimum.
Kendalikan besaran apinya. Jika api
mati, ulangi prosedurnya. Akan ada api
kecil yang muncul di bagian mahkota
pembakar oven.
Produsen akan menolak kewajibannya
jika Anda tidak mematuhi tindakan
keamanan ini.
12.6 Memasang di Dalam
Tembok
Pasanglah peralatan hanya di dapur atau
ruang makan yang memiliki dapur.
Jangan memasang peralatan di kamar
mandi atau kamar tidur.
Anda dapat memasang peralatan ini
dengan cara "built-in" atau "built-under".
Dimensi dari kabinet built-in harus sesuai
dengan ilustrasi yang berkaitan.
45
Page 46
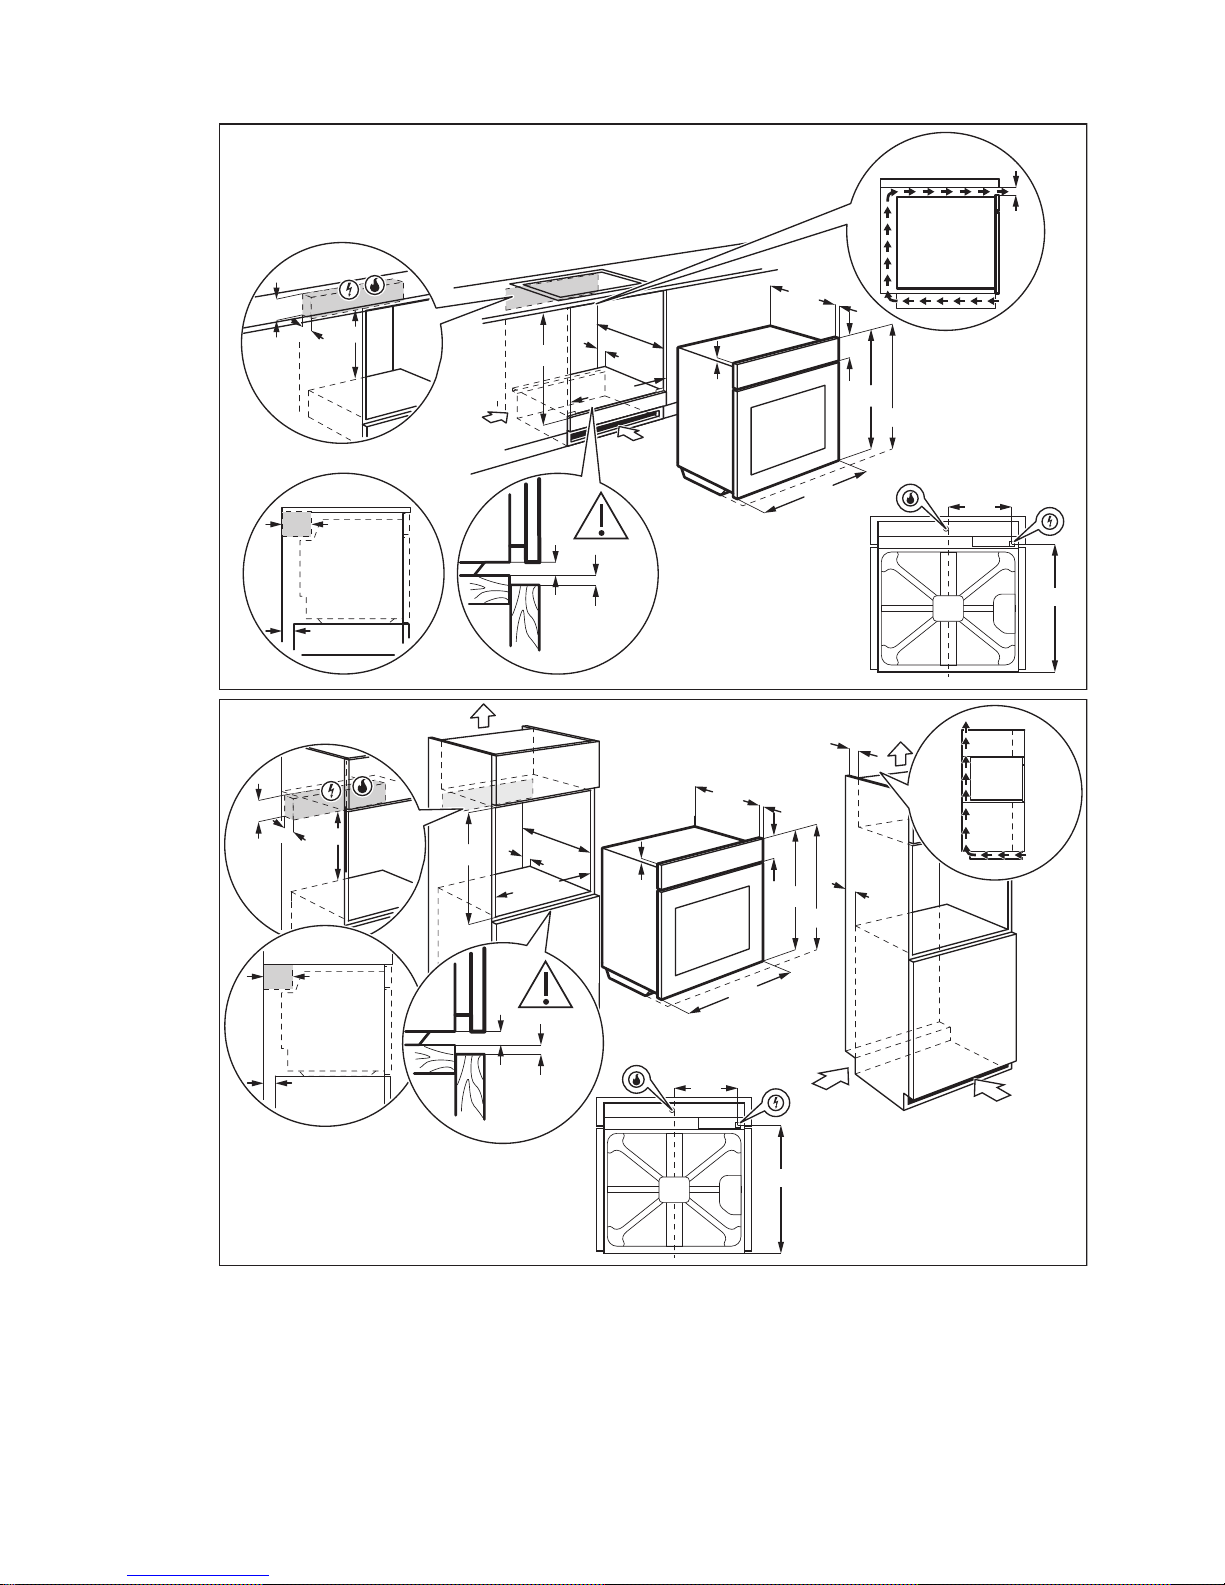
80
520
60
60
20
min. 550
110
600
min. 560
130cm²
min. 4mm
114
18
595
±1
21548
198
523
3
5
589
594
65cm²
130cm²
110
50
min. 550
110
114
18
590
min. 560
595
±1
21548
70
60
520
60
20
198
523
589
594
3
5
65cm²
Harus terdapat jarak sebesar 4 mm
antara permukaan atas dari peralatan
dengan bagian dalam atas dari kabinet.
Ketika Anda memasang peralatan
secara "built-under" (di bawah rak),
pasanglah rak sebelum unit ovennya.
Material yang digunakan harus tahan
terhadap pertambahan suhu sebesar
minimum 60°C di atas temperatur
lingkungan.
Harus terdapat suplai udara terusmenerus di sekitar oven, supaya oven
tidak menjadi terlalu panas.
www.electrolux.com46
Page 47
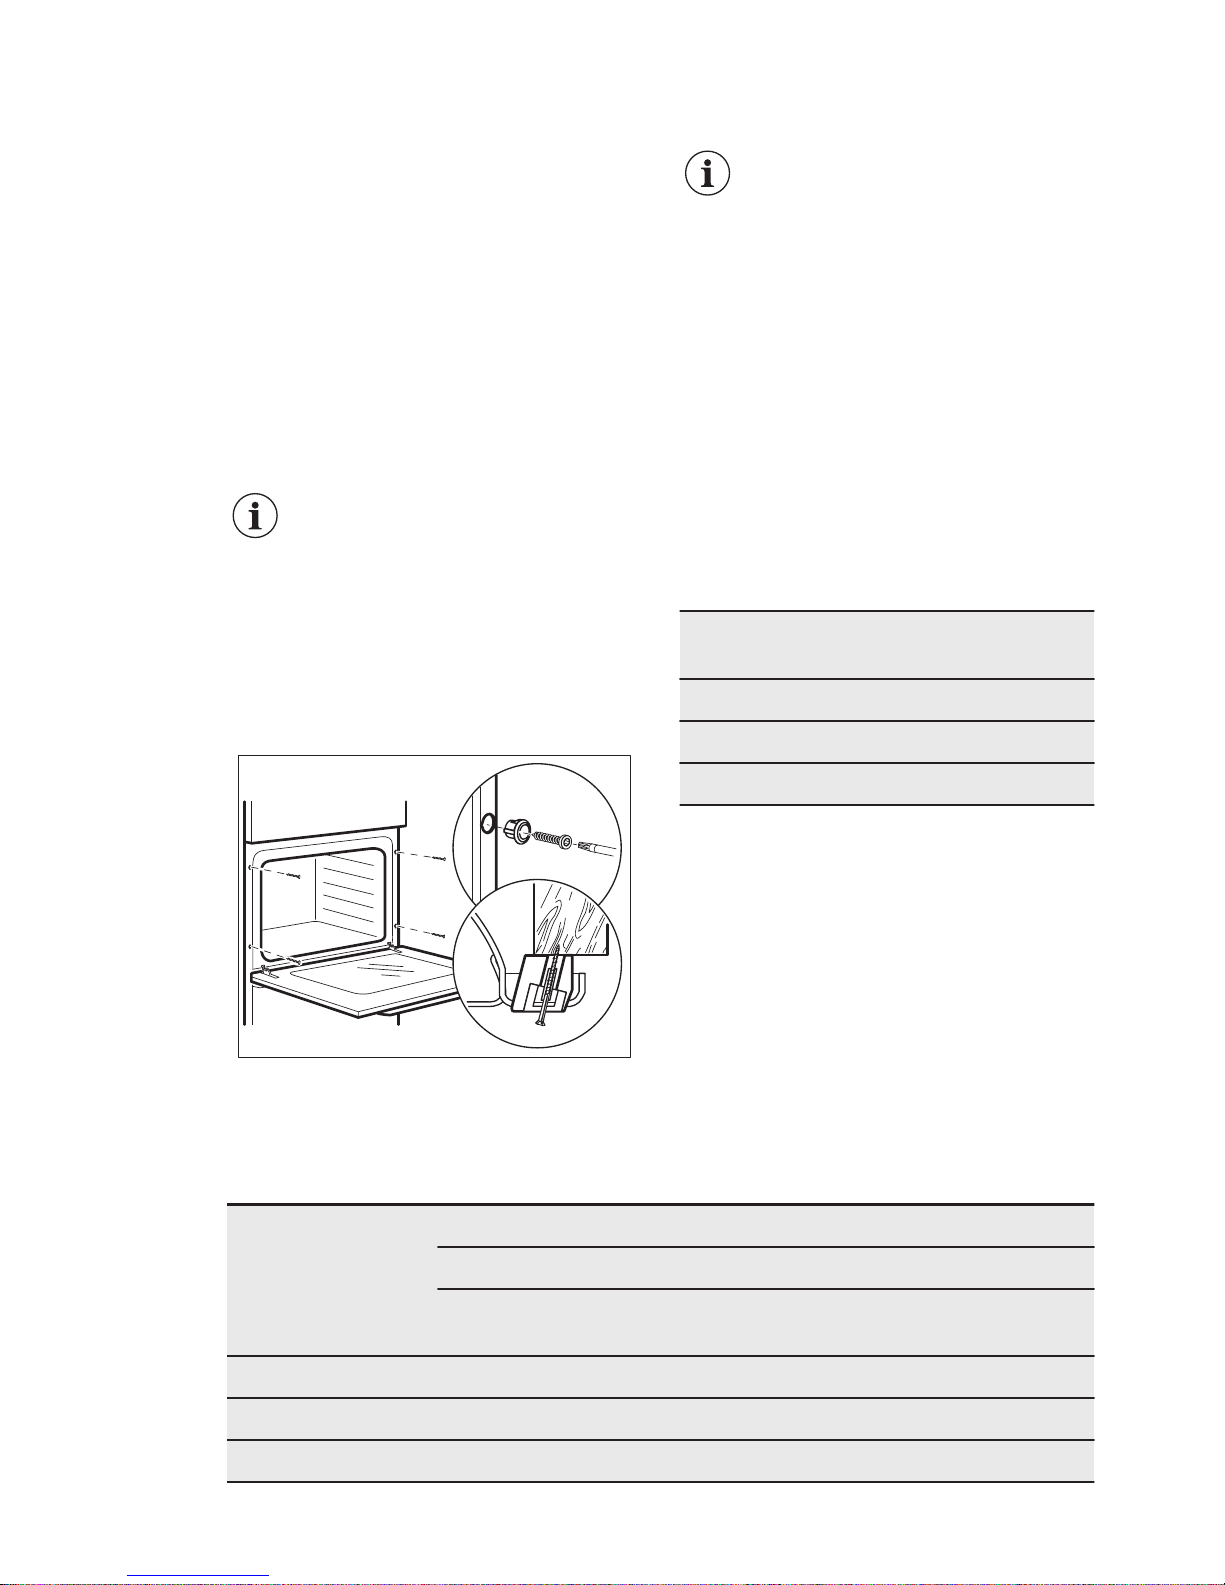
Untuk pengoperasian yang benar,
kabinet oven harus memiliki bukaan
minimum 130 cm² di bagian depan atau
pada bagian samping (minimum 65 cm²
untuk setiap sisi). Produsen
merekomendasikan bukaan 130 cm² di
depan untuk kabinet dari bata dan
bukaan 65 cm² untuk setiap sisi untuk
kabinet dari kayu.
Ketika Anda memasang rak di atas oven,
buatlah sambungan listrik berbeda untuk
rak dan untuk oven.
Buatlah sambungan hanya dengan kabel
yang sesuai dengan arus listrik.
Pastikan bahwa setelah
pemasangan, terdapat
akses yang mudah ke
peralatan jika dibutuhkan
perbaikan atau
pemeliharaan.
12.7 Mengamankan peralatan
pada kabinet
A
B
12.8 Instalasi Listrik
Produsen tidak bertanggung
jawab jika Anda tidak
mengikuti peringatan
keselamatan pada bab
Keselamatan.
Peralatan ini hanya disertai dengan
kabel utama.
12.9 Kabel
Jenis kabel yang dapat digunakan untuk
instalasi listrik atau penggantiannya:
H05 V2V2-F (T90), H05 BB-F
Untuk bagian kabel, silakan membaca
daya total pada pelat rating. Anda juga
dapat melihat pada tabel:
Total daya (W) Bagian kabel
(mm²)
maksimum 1380 3 x 0.75
maksimum 2300 3 x 1
maksimum 3680 3 x 1.5
Kabel arde (kabel hijau/kuning) harus 2
cm lebih panjang daripada kabel fase
dan netral (kabel biru dan coklat).
13. DATA TEKNIS
13.1 Data teknis
DAYA TOTAL: Listrik: 0,07 kW
Gas asli: G20 (2H) 20 mbar = 2,6 kW
Penggantian gas: G30/G31 30/30 mbar = 196 g/h
G30/G31 30/30 mbar = 2,7 kW
Suplai listrik: 220 - 240 V ~ 50 / 60 Hz
Kategori peralatan: II2H3B/P
Sambungan gas: G 1/2"
47
Page 48
Kelas peralatan: 3
13.2 Tungku oven gas
Jenis gas DAYA
GAS NO‐
MINAL
(kW)
ALIRAN
GAS NO‐
MINAL
(g/j)
Daya gas
tereduksi
(kW)
JARUM
BY-PASS
(1/100
mm)
TANDA IN‐
JEKTOR
(1/100
mm)
G20 (2H) 20 mbar 2,6 - 0,7 Reg.
G30/G31 30/30
mbar
2,7 196 0,7 43 80
13.3 Tungku panggangan gas
Jenis gas DAYA
GAS NO‐
MINAL
(kW)
ALIRAN
GAS NO‐
MINAL
(g/j)
Daya gas
tereduksi
(kW)
JARUM
BY-PASS
(1/100
mm)
TANDA IN‐
JEKTOR
(1/100
mm)
G20 (2H) 20 mbar 1,85 - - - 92
G30/G31 (3B/P)
30/30 mbar
2,0 145 - - 71
14. KEPEDULIAN LINGKUNGAN
Daur ulang material yang memiliki simbol
. Taruh kemasan dalam wadah yang
sesuai untuk mendaur-ulang. Bantu
melindungi lingkungan dan kesehatan
manusia dan untuk mendaur-ulang
limbah peralatan listrik dan elektronik.
Jangan membuang peralatan yang
memiliki simbol ini bersama dengan
limbah rumah tangga. Kembalikan
produk lke fasilitas daur ulang di tempat
Anda atau hubungi kantor pemda
setempat.
*
www.electrolux.com48
Page 49

49
Page 50

www.electrolux.com50
Page 51

51
Page 52
www.electrolux.com/shop
867348111-B-362018
 Loading...