


user manual
Built-in Electric Oven
EOB 68713
2 electrolux
Electrolux. Thinking of you.
Share more of our thinking at www.electrolux.com
Contents
Important safety information............................................................................... 3
Description of the oven....................................................................................... 5
The electronic oven controls .............................................................................. 7
Before the first use of the oven........................................................................... 9
Using the oven ................................................................................................ 12
The menu Assisted Cooking............................................................................. 15
The menu My Programmes .............................................................................. 21
The menu Basic Settings ................................................................................. 23
Hints and tips .................................................................................................. 34
Cleaning and maintenance .............................................................................. 35
If something goes wrong .................................................................................. 42
Technical data ................................................................................................. 43
Instructions for the Installer .............................................................................. 44
Building In ....................................................................................................... 45
Guarantee/Customer service ........................................................................... 47
Service and spare parts ................................................................................... 49
European guarantee ........................................................................................ 50
Guide to using the instructions
Safety instructions
Step by step instructions
)
Hints and Tips
This appliance conforms with the following ECC Directives:
- 2006/95 (Low Voltage Directive)
- 2004/108 (EMC Directive)
and subsequent modifications.

electrolux 3
Important safety information
These warnings are provided for the safety of the users and those living
with them. So read them carefully before installing and using the appliance.
This will allow you to obtain best performance, avoid improper actions,
use the appliance in complete safety and also respect the environment.
Installation
• It is mandatory that all operations required for the installation are carried
out by a qualified or competent person, in accordance with existing rules
and regulations.
• This oven is heavy. Take care when
moving it.
• Once you removed all packaging from
the appliance, ensure that it is not
damaged and the electric cable is in
perfect conditions. Otherwise, contact your dealer before proceeding
with the installation.
• It is dangerous to alter the specification in any way.
During use
• This oven is intended for domestic
cooking only. It is not designed for
commercial or industrial purposes.
• Always stand back from the oven
when opening the oven door during cooking or at the end of it to
allow any build up of steam or heat
to release.
• Appliances become very hot with
use, and retain their heat for long
periods after use. Care should be
taken to avoid touching heating elements inside the oven.
• Never line any part of the oven with
aluminium foil.
• Do not allow heatproof cooking ma-
terial, e.g. roasting bags, to come
into contact with oven elements.
• Never place plastic or any other
material which may melt in or on
the oven.
• Do not place sealed cans or aero-
sols inside the oven. They may explode if they are heated.
• Do not hang towels, dishcloths or
clothes from the oven or its handle.
• Do not use this oven if it is in con-
tact with water and never operate
it with wet hands.
• Take great care when heating fats
and oils as they will ignite if they
become too hot.
• Always use oven gloves to remove
and replace food in the oven.
• Before cleaning the oven, either turn
the power off or pull the mains plug
out.
• Ensure that all controls are in the
OFF position when not in use.
• Do not leave cookware containing
foodstuffs, e.g. fat or oil in or on the
oven in case it is inadvertently
switched ON.
• When using other electrical appli-
ances, ensure the cable does not
come into contact with the hot surfaces of the oven.

4 electrolux
• Do not use abrasive cleaners or sharp
metal scrapers. These can scratch the
glass in the oven door, which may result in the shattering of the glass.
People Safety
• This oven is designed to be operated
by adults. Do not allow children to
play near or with the oven.
• The oven gets hot when it is in use.
Children should be kept away until it
has cooled.
• This appliance is not intended for use
by children or other persons whose
physical, sensory or mental capabilities or lack of experience and knowledge prevents them from using the
appliance safely without supervision
or instruction by a responsible person to ensure that they can use the
appliance safely.
Maintenance and Cleaning
• Only clean this oven in accordance
with the instructions.
• The oven should be kept clean at all
times. A build-up of fats or other
foodstuffs could result in a fire,
especially in the grill pan.
• Never use steam or high pressure
steam cleaners to clean the
appliance.
• Always allow the oven to cool down
and switch off the electrical supply
before carrying out any cleaning or
maintenance work.
Service
• This oven should only be repaired or
serviced by an authorised Service
Engineer and only genuine approved
spare parts should be used.
Environmental Information
• After installation, please dispose of
the packaging with due regard to
safety and the environment.
• When disposing of an old appliance,
make it unusable, by cutting off the
cable. Remove any door catches, to
prevent small children being trapped
inside.
The symbol on the product or on its
packaging indicates that this product
may not be treated as household waste.
Instead it shall be handed over to the
applicable collection point for the
recycling of electrical and electronic
equipment. By ensuring this product is
disposed of correctly, you will help prevent
potential negative consequences for the
environment and human health, which
could otherwise be caused by
inappropriate waste handling of this
product.
For more detailed information about
recycling of this product, please contact
your local city office, your household
waste disposal service or the shop where
you purchased the product.
Always keep these user instructions
with the appliance. Should the
appliance be passed on to third
persons or sold, or if you leave this
appliance behind when you move
house, it is very important that the
new user has access to these user
instructions and the accompanying
information.
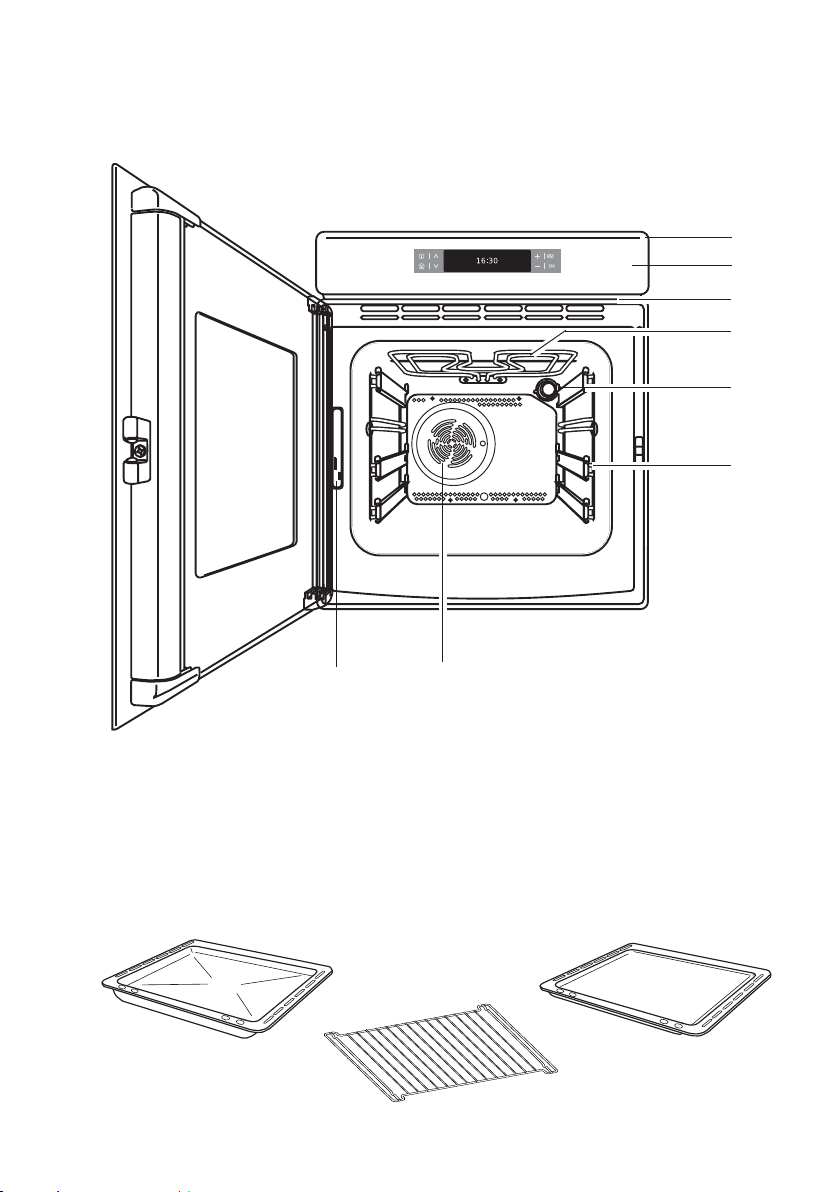
Description of the oven
electrolux 5
1
2
3
4
5
6
1. Light bar
2. Control panel
3. Air vents for cooling fan
4. Grill
Oven accessories
Dripping pan
8
7
5. Oven light
6. Telescopic shelf supports
7. Oven fan
8. Rating plate
Baking tray
Shelf
6 electrolux
How the electronic Touch Controls on the oven work
All the oven functions are controlled
electronically. You can select any combination of cooking function, cooking
temperature and automatic timing using the touch controls.
Make sure you touch just one control
button at a time. If you touch the cooking
function control for a longer time, the next
cooking function will be selected.
The light bar
The light bar is located right above the
display and can be activated/deactivated
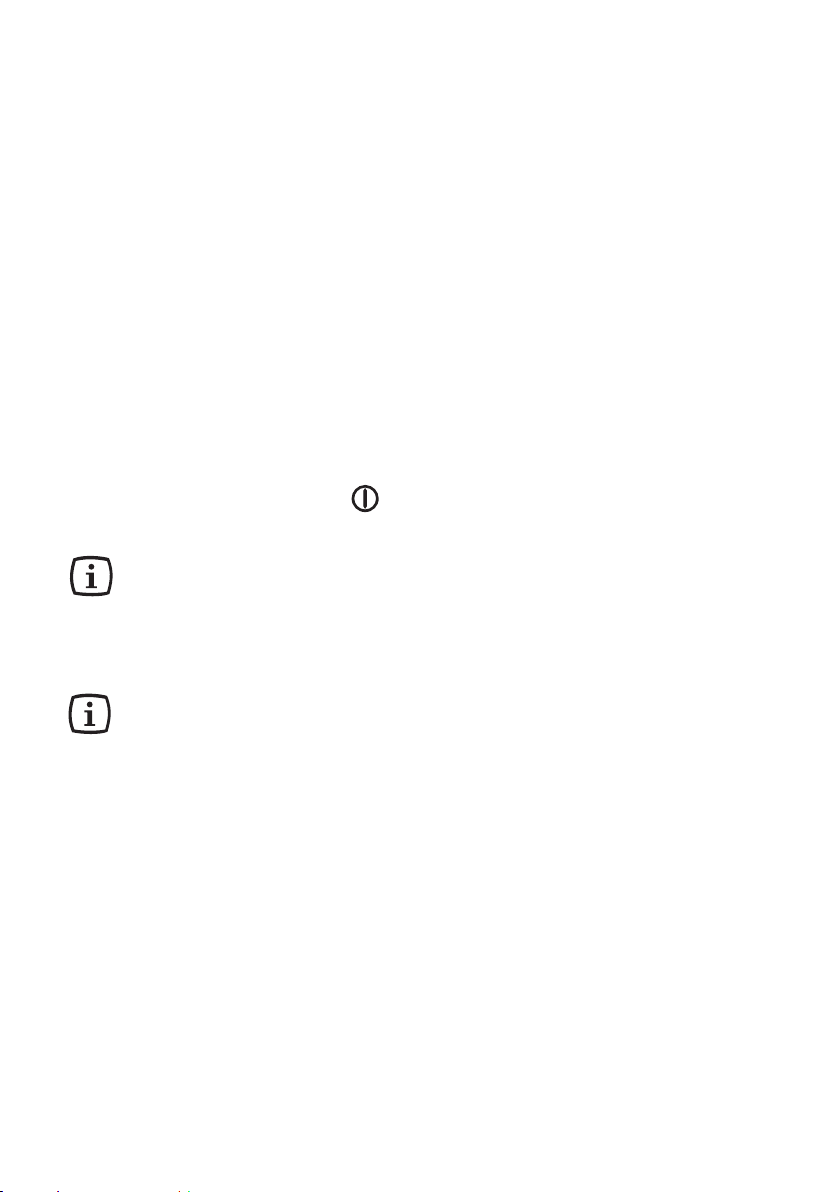
by touching the “On/Off” control .
In the event of a power failure, the
programmer will keep some of the
the settings (e.g. time of day,
language setting, the menu My
Programmes).
The display switches off
automatically after two minutes if
no function is selected and none
of the touch controls are used. The
display shows the time of day, if
set.
Safety Thermostat
To prevent dangerous overheating
(through incorrect use of the appliance
or defective components), the oven is
fitted with a safety thermostat, which
interrupts the power supply. The oven
switches back on again automatically,
when the temperature drops.
Should the safety thermostat trigger due
to incorrect use of the appliance, it is
enough to remedy the error after the oven
has cooled down; if on the other hand,
the thermostat triggers because of a
defective component, please contact
Customer Service.
Cooling fan
This oven is provided with a cooling fan,
meant to keep the front panel and the
oven door handle cool. The fan switches
on automatically after a few minutes of
cooking. Warm air is blown out through
vents between the oven door and the
control panel, as shown in the diagram.
When the oven is switched off, the fan
will remain on in order to to keep the
controls cool, after which it switches off
automatically. This is quite normal.
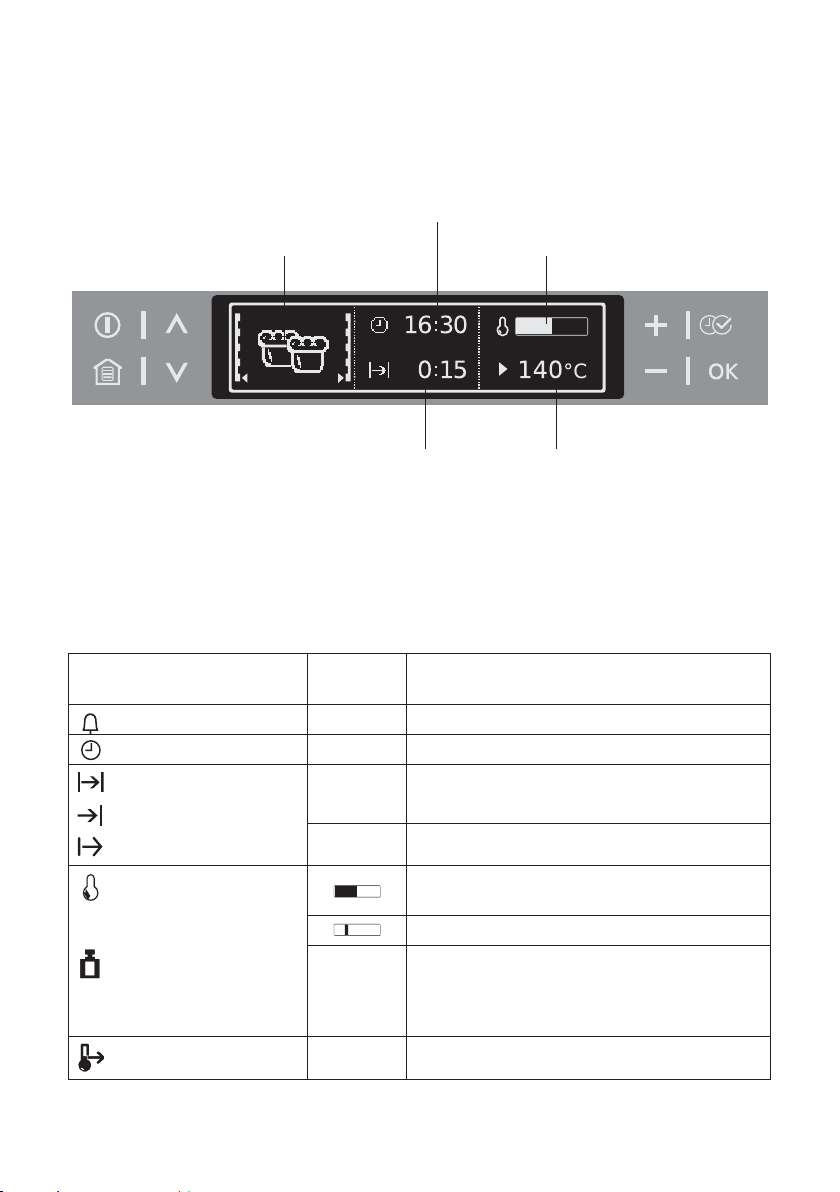
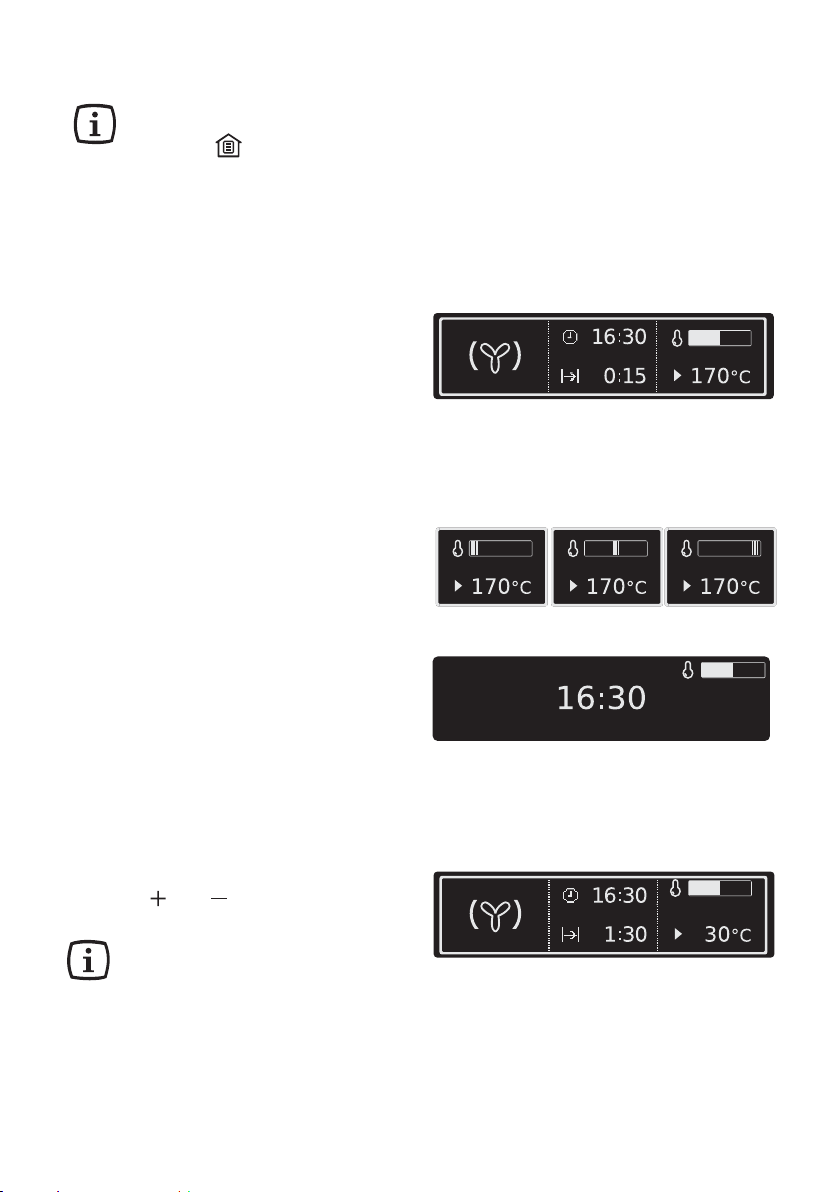
The electronic oven controls
Indicators
electrolux 7
Menu option symbol
(with oven shelf level)
Time functions Temperature
Symbols
Various symbols will now be shown
in the display depending on the selected
function.
Symbol Display Function
(examples)
Minute minder 2:30:00 The minute minder is active.
Time 10:00 Shows the set time.
Duration 1:00 Shows the time required for the cooking cycle.
End Time 14:05 Shows when the cooking cycle will finish.
Start 0:45 Shows when the cooking cycle started.
Clock Heat
indicator
Weight
Temperature Shows the temperature the oven has reached.
Quick heat is active (reduced heating-up time).
Weight 1.5 kg Possibilities:
– Automatic weight system is active.
– Weight can be changed.
Heat+Hold 80°C Heat+Hold is activated.

8 electrolux
Touch Control sensor fields
Set values
On/Off
Scroll
Main menu
Sensor Function Comment
field
, To move down and up in the When a function is active:
menu. • Press once: Change to the higher menu
(function remains active), after 5 seconds
move again into the active menu option.
•Press twice: Up and down in the higher
menu (function switches off).
To display main menu. Functions set switch off
(except for countdown timer).
To confirm.
To switch appliance on or off.
Set
values
Select
options
Confirm
To select time functions,
additional functions.
, To set values (e.g. temperature, • To activate value:
time, weight, degree of cooking).. – Press once: Present symbol flashes.
– Press twice: Value can be set.
• To set values:
– Press once: To set value in single steps.
– Hold down key: To set value in fast steps.
• When setting a cook time or time the
display can be re-set to zero if
are pressed at the same time.
and
Before the first use of the oven
If you would like to change
one of these base settings at
a later date, please refer to the
chapter Basic Settings.
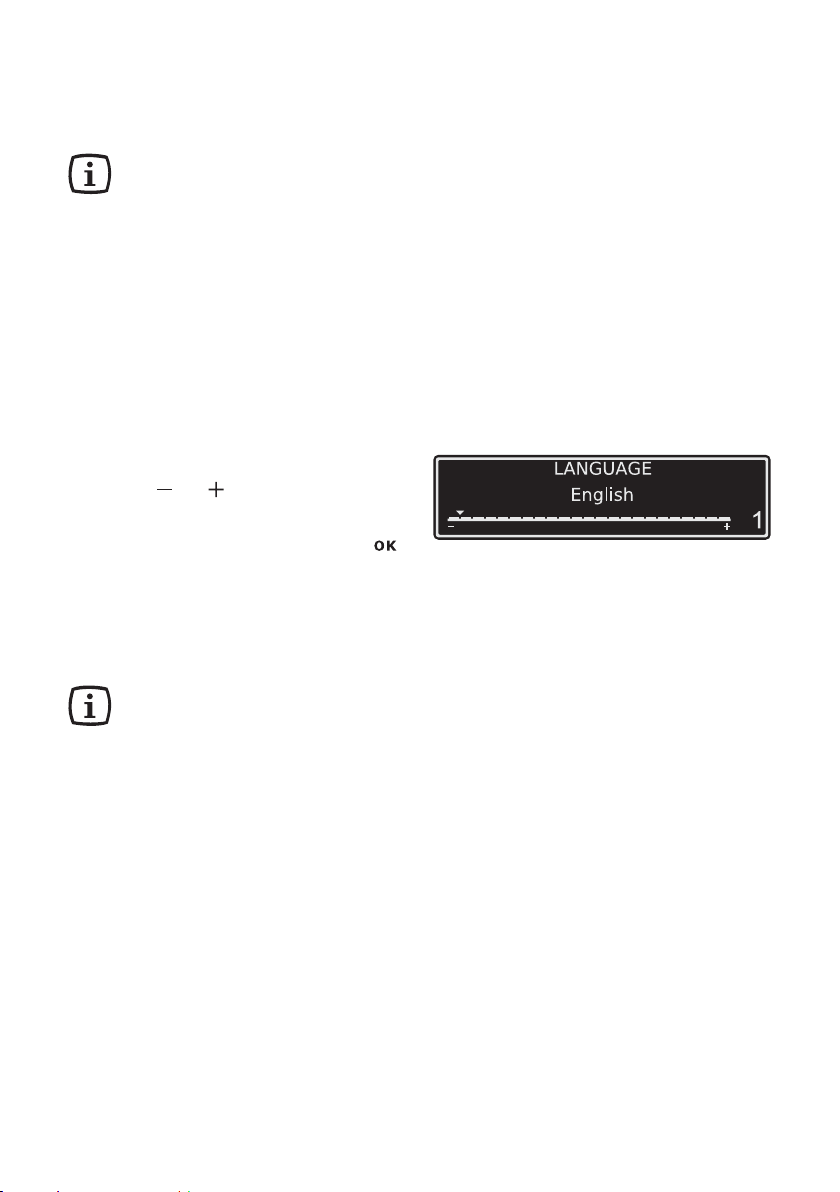
Setting the language
1. When the appliance has been
connected to the electrical supply,
the following is shown in the display.
– the company logo
– the version of the software and the
period of operation
– the message ”Language”
2. Using or , select the desired
language.
3. Confirm selected language with .
From now on the texts in the
display appear in the language set.
electrolux 9
Setting contrast and brightness
After you have set the
language, the messages “Set
contrast” and “Set
brightness” are displayed.
The contrast and the
brightness are set according
to the language set (see
section “Setting language”).
10 electrolux
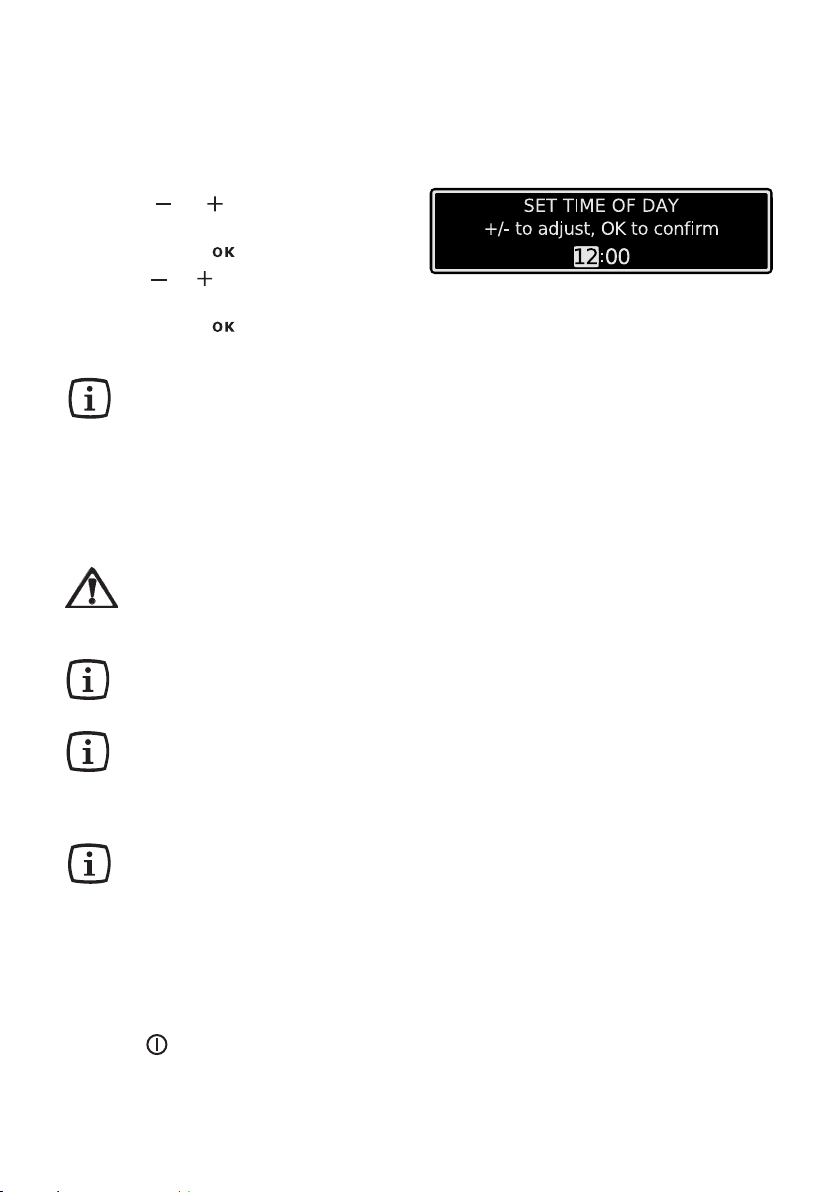
Setting the clock
After you have set the contrast and
the brightness, the message ”Set Time
of Day” is displayed.
4. Using or set the hour of the
current time.
5. Confirm with .
6. Using or set the minutes of the
current time.
7. Confirm with .
The appliance is now ready to use.
The time only has to be set if
the appliance is disconnected
from the power supply for a
long time.
Initial cleaning
Clean the oven before using it for the
first time.
Important: Do not use caustic
or abrasive cleaning agents!
These can damage the oven
surfaces.
For the metal surfaces, use
commercially available
cleaning agents.
Remove all packaging, both
inside and outside the oven,
before using the oven.
The oven will work only if the time
of day has been set.
Before using for the first time, the
oven should be heated up without
food.
During this time, an unpleasant
odour may be emitted. This is
absolutely normal. It is caused by
manufacturing residues.
To do this, proceed as follows:
1. press to switch on the oven.
2
. Select the "Conventional Cooking"
function.
3. Set the temperature to 250°C.
4. Allow the oven to run empty for
approximately 45 minutes.
5. open a window for ventilation.
This procedure should be repeated with the
"Fan Cooking" and "Full Grill" function for
approximately 5-10 minutes.
Once this operation is carried out, let the
oven cool down, then clean the oven cavity
with a soft cloth soaked in warm soapy
water.
Before cooking for the first time, carefully
wash the oven accessories.
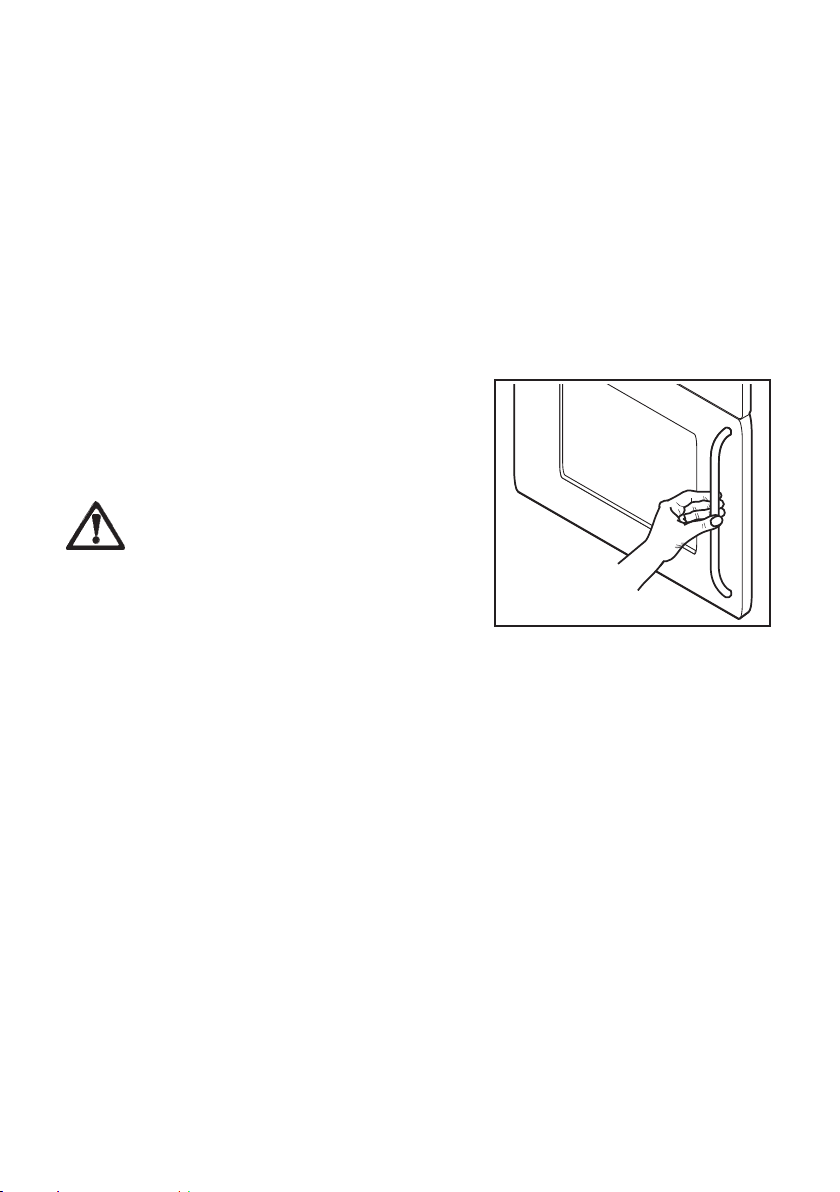
To open the oven door,
always hold the handle in the
centre.
electrolux 11
12 electrolux
Using the oven
The menus in overview
Main menu Sub-menu
Assisted Cooking Pork/Veal
Heating Functions Light
Beef/Game/Lamb
Poultry
Fish
Cake
Pizza/Pie/Bread
Casseroles/Gratins
Convenience
Specials
Fan Cooking
Conventional Cooking
Pizza Setting
Turbo Grill
Economy Grill
Dual Grill
Bottom Heat
Slow Cook
My Programmes 1-My Program
2- My Program
...
Edit Programme Name
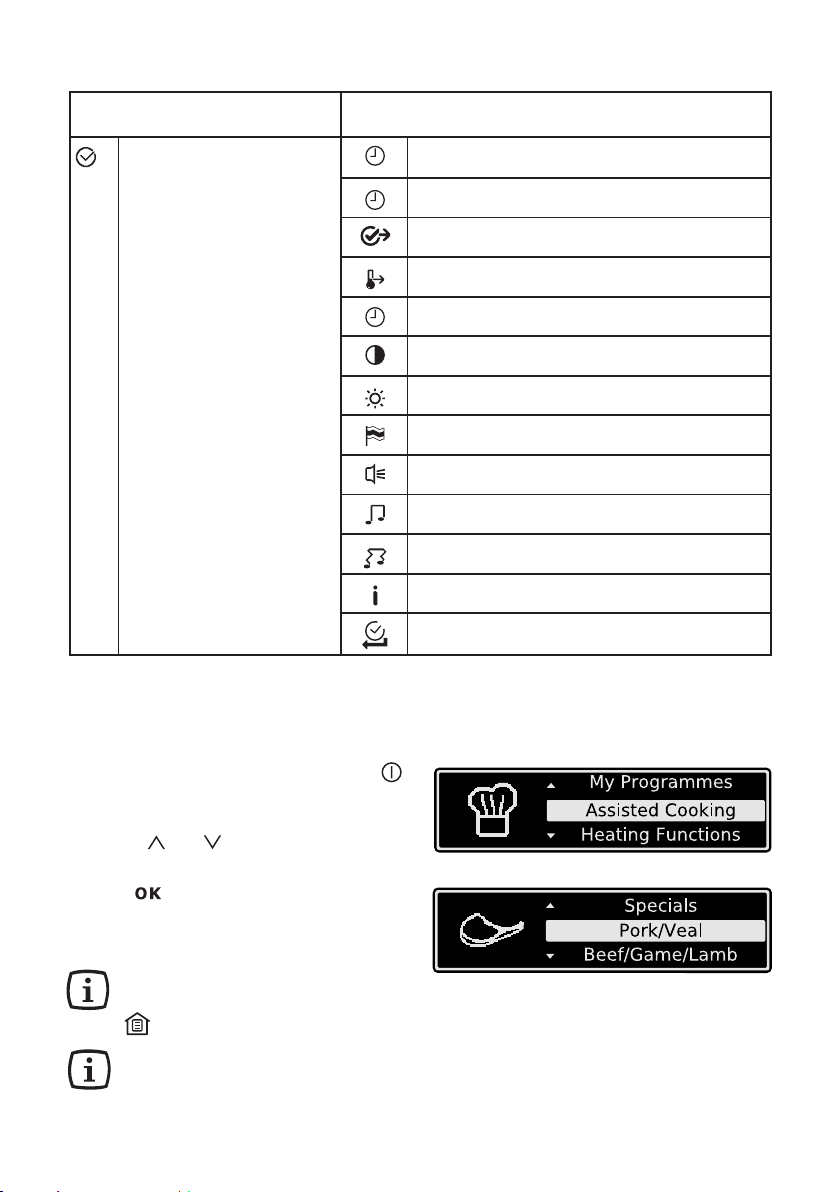
Main menu Sub-menu
Basic Settings Set Time of Day
Time Indication
Set+Go
Heat+Hold
Extra Time Menu
Display Contrast
Display Brightness
Set Language
Buzzer Volume
Key Tones
Alarm/Error Tones
Service
electrolux 13
Operation of the menus
Example
1. Switch the appliance on with .
You will find yourself in the main
menu.
2. With or select the desired
main menu.
3. Use to move to the appropriated
sub-menus.
The sub-menu selected is displayed.
At every point you can get
back to the main menu with
.
At the end of most menus
there is the menu option Back.
You use this to go back to the
higher menu.
Factory Settings
14 electrolux
You can cancel a procedure by
pressing .
Then you will find yourself
back in the main menu.
Heat indicator
Heating up indicator
4. When an oven function has been
switched on the bar that keeps
getting longer indicates how far the
oven has heated up.
Fast heating indicator
With some oven functions the
heating up time is shortened by the
automatic function Fast heating.
5. Until the set temperature is reached,
a stiped bar goes from left to right in
the heat indicator.
Residual heat indicator
6. After switching off the oven, the
residual heat is displayed to the
degree.
Displaying temperature to the degree
The temperature is displayed to the
degree instead of the bar of the heating
up indicator for 5 seconds during the
heating up time.
7. Press and at the same time.
When the temperature set is
reached, an audible signal
sounds.
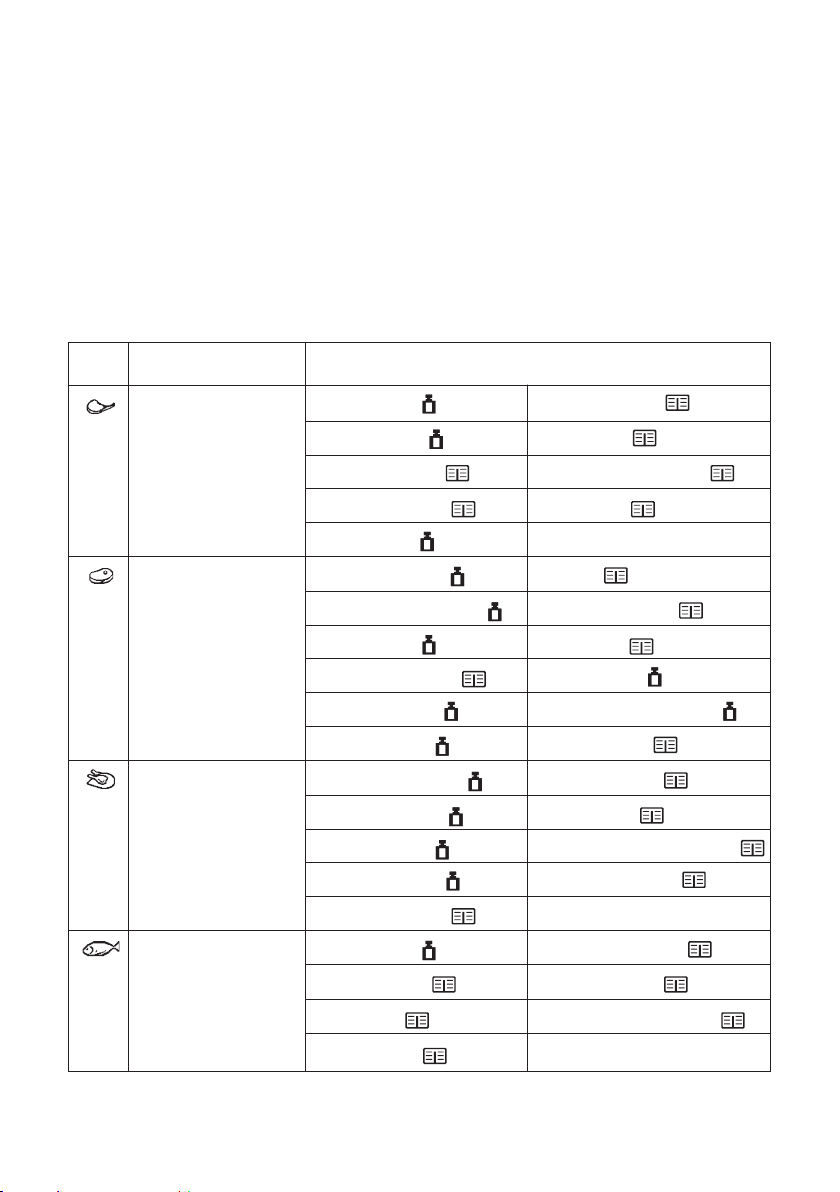
The menu Assisted Cooking
The Assisted Cooking in overview
The dishes in the Kitchen Assistant
(except for Specials) are prepared with
automatic systems.
The automatic systems offer the
optimum settings (oven functions, temperature, cook time) for the respective
dish.
Category Dish
Pork/Veal Roast Pork Veal Knuckle
Loin of Pork Ossobuco
Pork Knuckle Stuffed Veal Breast
Pork Shoulder Meat Loaf
Roast Veal
Beef/Game/Lamb Top Side Beef Rabbit
Scandinavian Beef Mustard Rabbit
electrolux 15
Roast Beef Wild Boar
Marinated Beef Roast Lamb
Loin of Game Lamb Joint, medium
Roast Game Leg of Lamb
Poultry Chicken, whole Chicken Legs
Turkey, whole Coq au Vin
Duck, whole Roast Duck with orange
Goose, whole Stuffed Chicken
Boned Poultry
Fish Whole Fish Stuffed Calamari
Fillet of Fish Steamed Fish
Cod Fish Jansons Temptation
Fish in salt
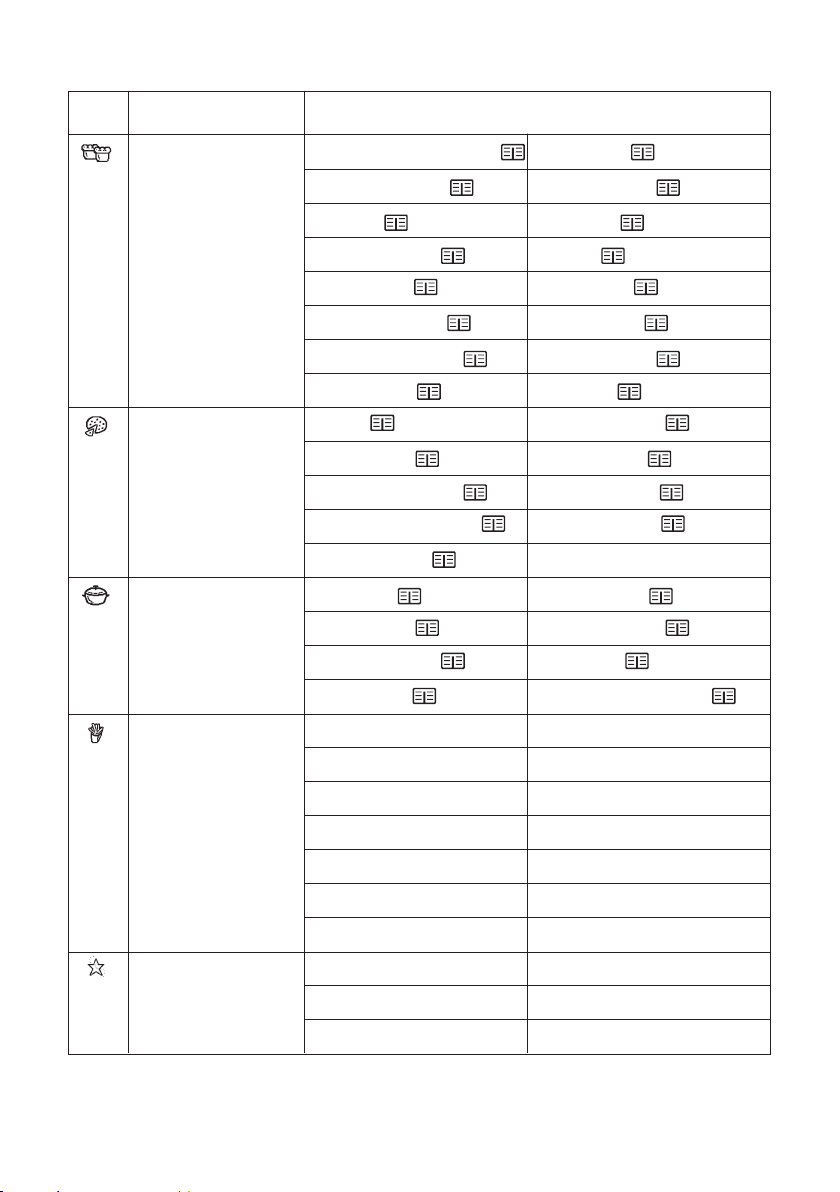
16 electrolux
Cake Lemon Sponge Cake Ring Cake
Pizza/Pie/Bread Pizza Cheese Pastry
Casseroles/Gratins Lasagne Pasta Gratin
Category Dish
Swedish Cake Savarin Cake
Biscuit Brownies
Cheese Cake Muffins
Fruit Cake Sweet Tart
Streusel Cake Carrot Cake
Rich Yeast Plait Almond Cake
Yeast Plait Fruit Tart
Onion Tart White Bread
Quiche Lorraine Farmer Bread
Goatscheese Flan Russian Cake
Cheese Flan
Cannelloni Chicory Gratin
Potato Gratin Casserole
Moussaka Cabbage Casserole
Convenience Pizza, frozen Bread/Rolls
Pizza American, frozen Bread/Rolls, frozen
Pizza, chilled Apple Strudel, frozen
Pizza Snacks, frozen Fillet of Fish, frozen
French Fries Chicken Wings
Wedges/Croquettes Lasagne/Cannelloni, frozen
Hash Browns
Specials Defrost Preserving
Drying Plate Warming
Keep Warm
 Loading...