

Page 1

ENGLISH 1
EMS30400OX MICROWAVE OVEN USER MANUAL 2
EMS30400OX FOUR À MICRO-ONDES MANUEL D'UTILISATION 18
EMS30400OX MIKROBØLGEOVN BRUGSANVISNING 34
Page 2

2 www.electrolux.com
CONTENTS
BEFORE USING YOUR MICROWAVE OVEN ............................................................ 3
SAFETY INFORMATION ........................................................................................... 3
INSTALLATION ......................................................................................................... 7
GUIDANCE CONCERNING OVEN IMPLEMENTS AND ACCESSORIES ................... 8
USE ......................................................................................................................... 9
CARE AND CLEANING .......................................................................................... 16
TECHNICAL INFORMATION ................................................................................... 17
ENVIRONMENTAL CONCERNS ............................................................................. 17
WE’RE THINKING OF YOU
Thank you for purchasing an Electrolux appliance. You’ve chosen a product that brings
with it decades of professional experience and innovation. Ingenious and stylish, it
has been designed with you in mind. So whenever you use it, you can be safe in the
knowledge that you’ll get great results every time. Welcome to Electrolux.
Visit our website for:
Get usage advice, brochures, trouble shooter, service information:
www.electrolux.com
Register your product for better service:
www.electrolux.com/productregistration
Webshop
Accessories and consumables:
www.electrolux.com/shop
CUSTOMER CARE AND SERVICE
We recommend the use of original spare parts.
When contacting Service, ensure that you have the following data available.
The information can be found on the rating plate. Model, PNC, Serial Number.
Warning / Caution-Safety information
General information and tips
Environmental information
Subject to change without notice.
Page 3

ENGLISH 3
BEFORE USING YOUR MICROWAVE OVEN
Read the operating instructions
thoroughly. The following guidance has
been prepared to help you get the best
out of your new Electrolux microwave
oven. Make sure you read it through
thoroughly.
It is important that these operating
instructions are retained for future use
as a source of reference. If the appliance
should change owner or be transferred to
SAFETY INFORMATION
READ THE MANUAL CAREFULLY AND
RETAIN IT FOR FUTURE USE
• The built-in safety switch prevents
the microwave oven from being used
while the door is open.
• Do not tamper with it or attempt to
use the oven while the door is open,
as this could result in you being
exposed to microwave energy.
• Do not allow spilt food or residual
detergent to accumulate on the
door seals. Regarding cleaning: see
the section entitled "Cleaning and
maintenance".
• It is particularly important that the oven
door seals tightly and that there is no
damage to:
(1) door (not straight), (2) hinges and
lock (broken or loose), (3) the door
frame and seals.
WARNING!
If the door, hinges, locking
arm or seals are defective,
the microwave oven must not
be started until it has been
repaired by an authorised service
technician.
WARNING!
It is dangerous for anyone
other than a service technician
trained by the factory to carry
out services or adjust the oven.
Contact your local service agent
for servicing if necessary.
someone else, or if you sell the property
and the appliance remains in situ, the
instructions must always accompany the
appliance, so that the new owner can
familiarise themselves with how it works
and the associated warnings.
Make sure you read the entire
operating instructions before using
the appliance and that you follow the
recommendations given.
• Never remove the external cabinet,
door or control panel. This could result
in you being exposed to an extremely
high voltage.
• The oven must only be installed or set
up as described under "Installation
guidance" in these operating
instructions.
• The oven must only be used for the
intended purpose, as described in
the operating instructions. Do not use
corrosive chemicals in the oven. This
type of oven is intended for heating,
cooking or defrosting food products.
It is not designed for industrial,
laboratory or commercial use, which
will invalidate the guarantee.
• Never start an empty oven. The
magnetron may be damaged if there
is no food or water inside the oven to
absorb the microwave energy.
• The oven must not be kept outdoors.
This product must not be used near
water.
• Do not attempt to dry clothing or
newspapers in the microwave oven.
These types of material can self-ignite.
• Do not use the oven for storage
purposes. Do not leave paper
products, kitchen implements or food
in the oven while the oven is not in
use.
Page 4

4 www.electrolux.com
• The temperature of the exterior surfaces
can be very high when the oven is in
use.
WARNING!
If fumes are visible, switch off the
oven or remove the plug, and keep
the door closed in order to suffocate
any flames. Never use water.
WARNING!
Children and infirm people must
only use the microwave oven
unsupervised if they have already
been given the necessary guidance,
so that they are able to use the
microwave oven safely and are
aware of the risks associated with
incorrect use.
Safe kitchen implements
• Only use kitchen implements which are
suitable for use in a microwave oven.
• Most containers made from glass,
glass ceramics and oven-proof glass
are ideal for use in a microwave oven.
Even though objects made from glass
and ceramics are not normally heated
by microwaves, they can become hot
because the heat is transferred from
the food to the container. Oven gloves
should be used.
Testing the suitability of
cooking implements
• Kitchen implements must be checked
to ensure they are suitable for use in
microwave ovens.
• Place the container in the microwave
oven together with a glass that is halffull of water. Heat at (900W) (100%) for
one minute. If the container feels very
hot, it should not be used. If it is only
slightly hot, it can be used for heating,
but not for cooking. If the container is at
room temperature, it is suitable for use
in microwave ovens.
• Paper serviettes, greaseproof paper,
kitchen roll, plates, cups, cartons,
freezer film and cardboard can be used
without any risk. Always make sure
the container is full of food which can
absorb the energy, so that there is no
risk of overheating or self-ignition.
• Many plastic trays, cups, freezer
boxes and plastic films can be used
in the microwave oven. Follow the
manufacturer's instructions when using
plastic materials in the oven. Avoid
using plastic containers for food with a
high fat or sugar content, as they reach
such high temperatures that they can
cause some types of plastic to melt.
• Never leave the oven unattended
and check it regularly when heating
or cooking food in containers made
from plastic, paper or other flammable
materials.
• Metal containers and containers with
metal edges should not be used in
the microwave oven unless they are
expressly recommended for use in
microwave ovens.
• Containers with narrow openings,
such as bottles, should not be used in
microwave ovens.
• Take care when removing the lid of a
bowl or container. Risk of scalding
Foil trays
It is safe to use flat foil trays for heating in
the microwave oven if the following rules
are followed:
1. Foil trays must be no more than 3cm
(1¼") deep.
2. Foil lids must not be used.
3. The foil trays must be at least two-
thirds full with food. Empty foil trays
must never be placed in the oven.
4. Only one foil tray must be placed in the
microwave oven at a time and it must
not touch the sides of the oven. If the
oven has a metal turntable or rack, the
foil tray must be placed on an upturned
oven-proof plate.
5. Foil containers must never be reused in
the microwave oven.
6. If the microwave oven has been in
use for 15 minutes or more, it must
Page 5
ENGLISH 5
be allowed to cool before being used
again.
7. Containers and the turntable can get
hot during use. Be very careful when
taking them out of the oven. It is
recommended that you use a potholder or oven gloves.
8. Remember that when using an
aluminium tray, the cooking or heating
time can be longer than it would
otherwise be. Always check that the
food is piping hot before serving.
Safe cooking
• Do not heat the food in a tin in the
microwave oven. Always pour the food
into a suitable container.
• The microwave oven must not be used
for deepfrying, because the temperature
of the fat cannot be controlled, causing
dangerous situations to arise.
• Popcorn can be made in the microwave
oven, but only in special packets or
containers which are suitable for the
purpose. Never leave the microwave
oven unattended while making popcorn.
• Prick food products that have an
impermeable skin, peel or membrane
in order to prevent steam from building
up and causing them to burst. Apples,
potatoes, chicken liver and egg yokes
are examples of foods which should be
pricked.
• The contents of feeding bottles and jars
of baby food must be stirred or shaken.
To avoid burning, the temperature
should be checked before the food is
given to the child.
WARNING!
Liquids and other food products
must not be heated in tightly sealed
containers, which can explode.
WARNING!
When drinks are heated in a
microwave oven, strong afterboiling can occur. You should
therefore be very careful when
taking the container out of the
oven.
WARNING!
When liquids such as soups,
sauces and drinks are heated in a
microwave oven, they can reach
boiling point without any bubbles
being visible. This means that the
hot liquid could suddenly boil over.
This can be avoided as follows:
1. Avoid using containers with
straight sides and a narrow
neck.
2. Do not overheat the liquid.
3. Stir the liquid before placing the
container in the oven and again
when half the time has elapsed.
4. Allow the container to stand in
the oven for a while after heating
and stir again before carefully
taking the container out.
WARNING!
Some products, e.g. whole egg
and tightly sealed containers such
as sealed jam jars, can explode and
must not be heated in the oven.
A broken egg can also explode
during cooking. Always prick the
yoke. Place a lid over the egg and
leave it to stand for one minute
before removing the lid.
It is quite normal for steam to seep
out around the door seal, for the
door to mist up and even for water
droplets to form on the underside
of the door while the oven is in
use. This is simply condensed
water from the food being heated
and does not make the oven any
less safe to use. The door is not
designed to seal completely tight
against the oven.
• Do not use rotate the turntable forcefully
by hand. This can cause an operating
fault.
• The occurrence of an electric arc in
the microwave oven is generally due to
metal containers being used. However,
over a long period of time, electric
arcs can damage the oven. Stop the
program and check the container.
Page 6

6 www.electrolux.com
• Make sure there are no obstructions
covering the vents on the top, bottom,
sides and back of the oven.
WARNING!
The oven must not used be
used for commercial purposes.
The oven is intended for
household use only.
Safety instructions
concerning cooking with
the grill, convection and
combination functions.
1. The window in the glass door could
break if water is spilt on it during
cooking with the grill or convection
functions.
2. Use oven gloves when placing
anything in or taking anything out
of the oven. Containers get very
hot, so make sure you do not burn
yourself. The turntable and wire rack
can also get very hot, so use oven
gloves when handling these.
3. Do not touch the internal or external
window in the microwave with metal
components when placing anything
in or taking anything out of the
microwave oven. The internal side of
the door and the microwave oven get
very hot, so take care when cooking
food in the oven.
4. Do not place the turnable or
containers in cold water or cool them
rapidly after use, as this can cause
them to shatter.
5. Do not place objects on top of
the cabinet. The upper part of the
cabinet gets very hot, so anything
placed on this part of the oven could
be damaged by the heat.
6. Only preheat the microwave oven
if you are using the convection
function, never when using the
microwave or combination functions
(microwave and grill or microwave
and convection).
WARNING!
When the combination function
is used, children should
only use the oven under the
supervision of an adult due to
the high temperatures that are
generated.
Keep these instructions in a safe
place!
Page 7

ENGLISH 7
INSTALLATION
1. Remove any labels on the door.
2. The oven must be installed on a flat,
horizontal surface. The surface must
be strong enough to withstand the
weight of the oven (25kg) and its
contents at all times. The oven must
be stable so that it cannot vibrate or
generate noise.
3. The oven must not be placed close
to heat and water. Exposing the
oven to heat sources and water can
reduce its efficiency and result in
functional faults. You should therefore
make sure that the oven is installed
at a good distance from heat sources
and water.
4. Do not block the vents on the top
and sides of the cabinet, and do not
place objects on top of the oven. If
the vents are blocked while the oven
is in use, the oven can overheat,
causing functional faults. A lot of hot
air comes out of the vents, so make
sure you do not block them. You
should for example make sure that
curtains do not hang down between
the back of the oven and the wall.
5. Place the oven as far as possible
away from radios and televisions.
The oven complies with the EU's
requirements for the suppression of
radio noise, but interference can still
occur if it is placed close to a radio or
television. The oven should therefore
be placed at the maximum possible
distance away from such appliances.
6. If the oven is placed in a corner,
it must be at least 10cm from the
walls, and there must be 30cm free
headroom above the oven.
IMPORTANT! The oven can be placed
anywhere in the kitchen. Make sure
you place the oven on a flat, horizontal
surface, and make sure you do not
block the vents and the oven base (to
ensure adequate ventilation).
Connecting to the mains
power supply
The oven is supplied with a mains cable
and a plug for a 230V 50Hz earthed
socket. The earth connection reduces
the risk in the event of a short-circuit.
Check that the specified voltage of the
oven corresponds to the power supply
voltage.
NB: If an extension cable is used when
plugging the oven in, the extension
cable must also be earthed.
The oven must not be used
with an unearthed power
supply. Contact an electrician
if you are unsure about the
electrical connection of the
oven, or whether the wiring
system in your house is
earthed.
The appliance must be
connected to earth. If
the oven has a moulded
plug which is unsuitable
for the socket, for safety
reasons it must be replaced
by the manufacturer, the
manufacturer's service agent
or another suitably qualified
installation technician.
If the mains cable is damaged,
for safety reasons it must be
replaced by the manufacturer,
the manufacturer's service
agent or another suitably
qualified technician.
Page 8
8 www.electrolux.com
GUIDANCE CONCERNING OVEN IMPLEMENTS AND ACCESSORIES
Many implements, containers and
materials can be used for cooking
purposes in a microwave oven. Choose
implements, containers and materials that
are suitable for the method of cooking
you are using, both for safety reasons
and to avoid damaging the implements.
The following list is intended for
guidance only.
Mode of operation
Materials Kitchen implements
Ceramics &
Pyrex Yes Yes Yes Yes
Microwave
oven Grill Convection
Combi-
nation
glass
Oven-proof glass Yes
1)
Ye s Ye s
1)
Glass with metal decoration No No No No
Lead crystal glass No No No No
Porcelain Without metal decoration Yes Yes No No
Stoneware
Plastic Oven-proof in microwave
2)
Ye s Yes Yes Ye s
Ye s No N o N o
oven
Plastic film Yes No No No
Metal Roasting pans No Yes Yes No
Aluminium foil
3)
Ye s Yes Yes Ye s
Paper Cups, plates, kitchen rolls Yes No No No
Ye s
1)
Greaseproof paper Yes No No No
Wood No No No No
Accessories Wire rack No Yes Yes Yes
Turntable Yes Yes Yes Yes
Turntable ring Yes Yes Yes Yes
YES: Kitchen implements and accessories that can be used.
NO: Kitchen implements and accessories that must be avoided.
1)
Only if they do not have metal parts.
2)
Only unglazed or with non-metallic glazing.
3)
NOTE: Only use aluminium foil for covering. If too much foil is used, it can cause electric arcs
inside the oven.
Unpacking
NB: When unpacking the oven, check
that it is free from damage. Notify
the retailer immediately if there is any
damage or parts missing. The oven,
oven components and accessories may
be packed in protective film. If so, this
film must be removed before the oven is
used. Do not leave the packaging lying
around so that young children can play
with it. It can be dangerous.
Page 9
USE
ENGLISH 9
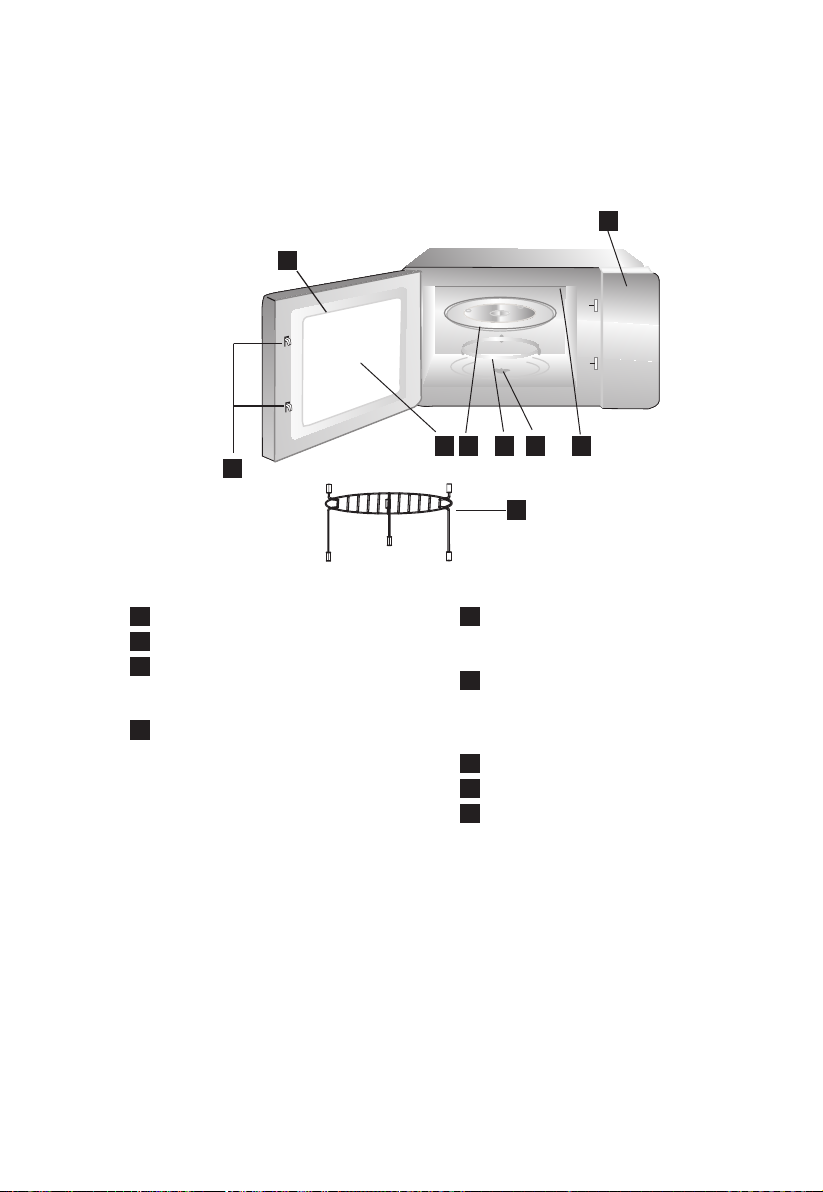
DESCRIPTION OF THE APPLIANCE
Using your microwave oven
6
7
Parts - names and function
1
Control panel
2
Turntable spindle
3
Turntable ring and wheels. Fitted
to the base of the oven in order to
support the turntable
4
Glass turntable. Food products in
suitable containers are placed on this
tray for cooking. Do not use the oven
without the turntable
1
3 4 52
9
5
Window. The food products can be
8
seen through this window during
cooking
6
Oven door and seal. The oven
door must always be closed during
cooking and the sides must be kept
free from dirt and food remains.
7
Locking hook
8
Stand
Grill
9
Fitting the turntable
1. Make sure the turntable spindle is
placed in the hole on the bottom of
the oven and interlocks with the
"D" motor drive shaft.
2. Fit the turntable ring and the wheels,
so that they are concentric with the
drive shaft.
3. Place the glass turntable on the
turntable ring and the wheel, and
rotate carefully until it interlocks with
the drive shaft.
NB:
• Never place the turntable upside
down
.
• The turntable, ring and drive shaft
must
be used during cooking.
• Food and containers containing
food must always
turntable.
• The turntable can rotate both
clockwise
normal.
be placed on the
and anticlockwise. This is
Page 10
10 www.electrolux.com
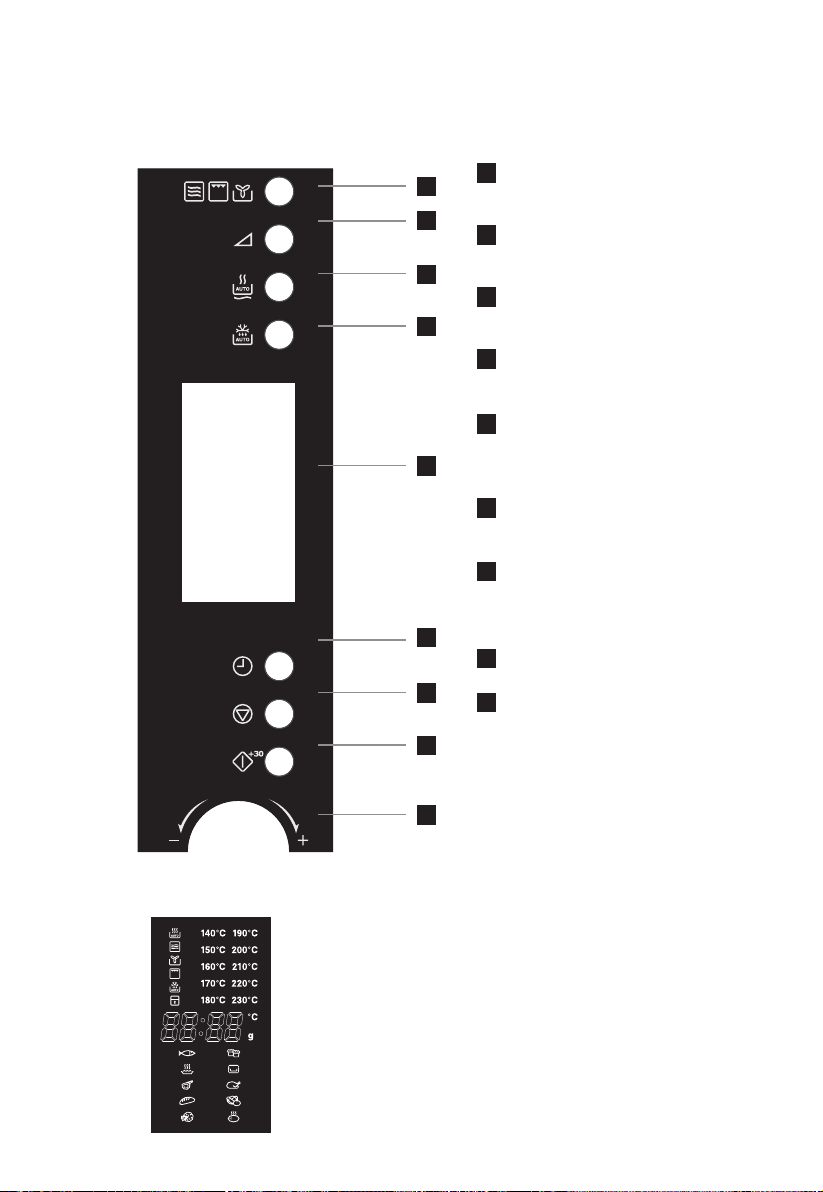
Control panel
EMS30400OX
1
2
1 Cooking function:
select microwave power, grill,
convection or combination cooking.
2 Power level:
select the required microwave
3
power level
3 Auto reheating:
4
select the required reheating
function
4 Defrosting:
select defrosting according to
weight or time
5 Window display:
shows the cooking time, power
5
level, cooking function and the
time of day
6 Clock:
set the time of day and delayed
start
7 Stop/cancel:
Stop or set the microwave
program to pause, or cancel the
6
setting for the cooking program
8 Start/continue:
7
start the microwave oven
9 Function selector:
select the cooking function and time
8
Display views
9
In display views, you can see the
cooking function, convection cooking
and auto cooking.
Setting the clock
When the mains power supply is
connected, the display will show "0.00"
and the beep sound will start. Follow
these steps to set the clock.
1. Press the clock button to select the
12- or 24-hour clock.
Page 11

ENGLISH 11
2. Rotate the function selector to adjust
the hour setting.
3. Press the clock button to confirm the
hour setting. The minute indicator will
flash.
4. Rotate the function selector to adjust
the minute setting.
5. Press the clock button to confirm
the minute setting and complete the
clock setting.
Cooking in the microwave oven
1. Open the door and place the food on
the turntable. Close the door.
2. Press the power level button the
required number of times, as
described in Microwave power.
3. Rotate the function selector to adjust
the cooking time.
4. Press the Start/continue button to
start the oven.
Microwave power
Press the
power level
button
Once 100% 900 Boiling or heating liquids.
Twice 80% 720 Reheating meals in pans, casserole
Three times 50% 450 Faster defrosting of meals in bowls.
Four times 30% 270 Simmering. Heating of cream-cakes
Five times 10% 90 Keeping food hot.
Microwave
oven power
level Watts Recommended use
Cooking vegetables. Preheating
roasting pans.
and precooked dishes.
Roasting of cuts of meat on the bone
and poultry.
Baking of muffins and sponges.
and cheesecakes.
Grilling
1. Open the door and place the wire
rack on the turntable and the food
on the wire rack. Place a nonmetallic plate beneath the wire rack
to catch any spillages or meat juices
in order to minimise cleaning. Close
the door.
2. Press the function selector once.
The display will flash "140".
3. Rotate the function selector in order
to select the grill function "G-1".
4. Press the Start/continue button to
confirm that "G-1" is displayed.
5. Rotate the function selector to
adjust the cooking time.
6. Press the Start/continue button to
start the oven.
Note:
For better results with the grill function,
you can turn the meat half-way through
the grilling time.
The oven will beep twice to indicate it is
half-way through the grilling time. Open
the door and turn the food. Close the
door and press the Start/continue button.
If you do not open the door to turn the
food, the microwave oven will continue to
grill the food.
Convection cooking
The oven has a convection function,
which enables you to cook food in the
same way as in an ordinary oven. No
microwave power is used.
We recommend that you preheat the
oven to the appropriate temperature
Page 12
12 www.electrolux.com
before placing the food in the oven. When
the oven is at the correct temperature,
it will stay at that temperature for five
minutes. If the oven door is not opened
during this time, the microwave oven will
switch itself off.
Preheating the oven for convection
cooking
1. Press the function selector once.
The display will flash "140".
2. Rotate the function selector to select
the convection function.
3. Select the temperature of the
convection oven by continuing to rotate
the function selector. Temperature
range: 140 – 230°C.
4. Press the Start/continue button to
confirm the temperature.
5. Press the Start/continue button to
start preheating. When the appropriate
temperature has been reached, the
beep will sound twice to remind you
that you have placed food in the oven.
The relevant temperature will flash.
6. Place the food in the oven and close
the door.
7. Rotate the function selector to adjust
the cooking time.
8. Press the Start/continue button to start
the oven.
Note:
To use preheating instead of pressing
the Start/continue button, as in point 4 of
Convection cooking, you must rotate the
function selector to adjust the cooking
time.
Note:
The fan will continue to run for a few
minutes after the end of the convection
program in order to cool the oven.
Combination cooking
With this oven, you can combine
microwaving, grilling and convection
cooking. There are four preset
combinations.
Using combination cooking
1. Open the door and place the food on
the turntable. Close the door.
2. Press the function selector once. The
display will flash "140".
3. Rotate the function selector to select
one of the combinations "C-1", "C-2",
"C-3" or "”C-4"; see the table below
4. Press the Start/continue button to
confirm the combination.
5. Rotate the function selector to adjust
the cooking time.
6. Press the Start/continue button to start
the oven.
Combination cooking
Display
C-1
C-2
C-3
C-4
Microwave
oven Grill Convection
165°C
200°C
200°C
Cooking in stages
Up to three phases of cooking can be
set with this oven. If one of the phases is
defrosting, this phase must be set as the
first phase.
The beep will sound after each phase, and
the next phase will then start automatically.
Example:
If you want to cook at 100% microwave
power for 10 minutes and then at 80%
microwave power for 5 minutes, you
should follow these steps.
1. Open the door and place the food on
the turntable. Close the door.
2. Press the microwave power button
once to select 100% power.
3. Rotate the function selector to adjust
the cooking time to 10 minutes.
4. Press the microwave power button
twice to select 80% microwave power.
5. Rotate the function selector to adjust
the cooking time to 5 minutes.
6. Press the Start/continue button to start
the oven.
Page 13

ENGLISH 13
Delayed start
Up to three phases can be programmed
for a delayed start.
Example:
If you wish to cook the food at 80%
microwave power for 15 minutes with a
delayed start, you should follow these
steps.
1. Open the door and place the food on
the turntable. Close the door.
2. Press the microwave power button
twice to select 80% microwave power.
"P80" will be displayed.
3. Rotate the function selector to adjust
the cooking time to 15 minutes.
4. Press the clock button. The hour digits
will flash.
5. Rotate the function selector to adjust
the hour setting.
6. Press the clock button. The minute
digits will flash.
7. Rotate the function selector to adjust
the minute setting.
8. Press the Start/continue button to
end the setting. The display will show
":". When the set time is reached, the
beep will sound twice and the cooking
will start automatically.
Defrosting according to weight
1. Open the door and place the food on
the turntable. Close the door.
2. Press the defrosting button once. "d-1"
will be displayed.
3. Rotate the function selector to adjust
the weight in grams.
4. Press the Start/continue button to start
defrosting.
Defrosting according to time
1. Open the door and place the food on
the turntable. Close the door.
2. Press the defrosting button twice.
"d-2" will be displayed.
3. Rotate the function selector to adjust
the defrosting time.
4. Press the Start/continue button to start
defrosting.
Notes
• If you are unsure, it is better to
underestimate the defrosting time. The
food will continue defrosting during the
standing period.
• Separate the food as soon as possible.
• Turn large portions such as steaks halfway through the defrosting time.
• Open and/or remove the packaging for
defrosting.
• Place the food in a container which is
large enough to enable it to be easily
stirred.
• Start defrosting poultry with the breast
side down, and turn it halfway through
the defrosting time.
Delicate areas such as wingtips can be
covered with small pieces of smooth
foil.
• The standing time is very important,
particularly for large dense foods which
cannot be stirred. This ensures that
the middle of the food is completely
defrosted before cooking.
Auto cooking
The microwave oven has a number of
preset recipes for automatic cooking,
which enable you to cook the food
perfectly every time.
1. Open the door and place the food on
the turntable. Close the door.
2. Rotate the function selector to select
the recipe for auto cooking.
3. Press the Start/continue button to
confirm the recipe for auto cooking.
4. Rotate the function selector to adjust
the weight of the food.
5. Press the Start/continue button to
confirm the weight.
See the table for auto cooking recipes.
Page 14
14 www.electrolux.com
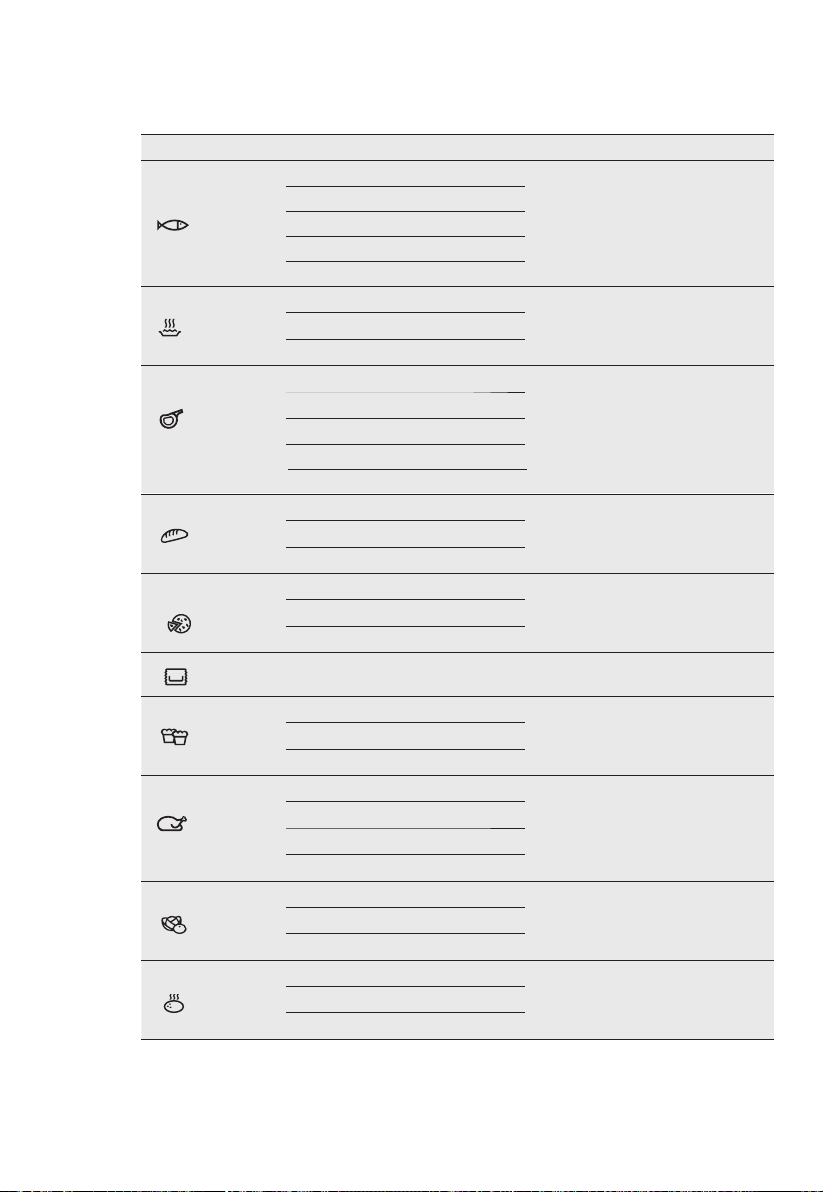
Preset recipes for auto cooking
Menu Weight (g) Display Function and booster
Fish
Soups
Meat
Bread
Pizza
Cakes 475 475
Pasta
Chicken
Vegetables
Potatoes
150 150
250 250
350 350
450 450
650 650
200ml 200
600ml 600
300 300
500 500
700 700
900 900
1100 1100
50 50
150 150
200 200
300 300
400 400
50 with water 450g 50
150 with water 1,200g 150
500 500
750 750
1000 1000
1200 1200
150 150
500 500
230 1
690 3
Microwave oven 80% power
Microwave oven 100% power400ml 400
C-2
G-1 Grill100 100
C-4 30% microwave oven
70% grill and convection 200°C
Convection 180°C
*See note
Microwave oven 80% power100 with water 800g 100
C-4 30% microwave oven
70% grill and convection 200°C
Microwave oven 100% power350 350
Microwave oven 100% power460 2
Note:
The cake recipes which are based on
convection cooking at 180°C require
the oven to be preheated. When the
oven has been preheated and reached
180°C, the beep will sound to remind
you to open the door to place the
cake in the oven. Then press the Start/
continue button to start the baking.
Page 15
ENGLISH 15
Auto reheating
This function enables you to heat food
easily using microwave power. The
time and microwave power are preset.
The table below shows the differences
between the auto reheating functions.
1. Open the door and place the food on
the turntable. Close the door.
2. Press the button for auto reheating to
select "h-1", "h-2", "h-3" or "h-4".
3. Rotate the function selector to select
the weight.
4. Press the Start/continue button to
start the reheating.
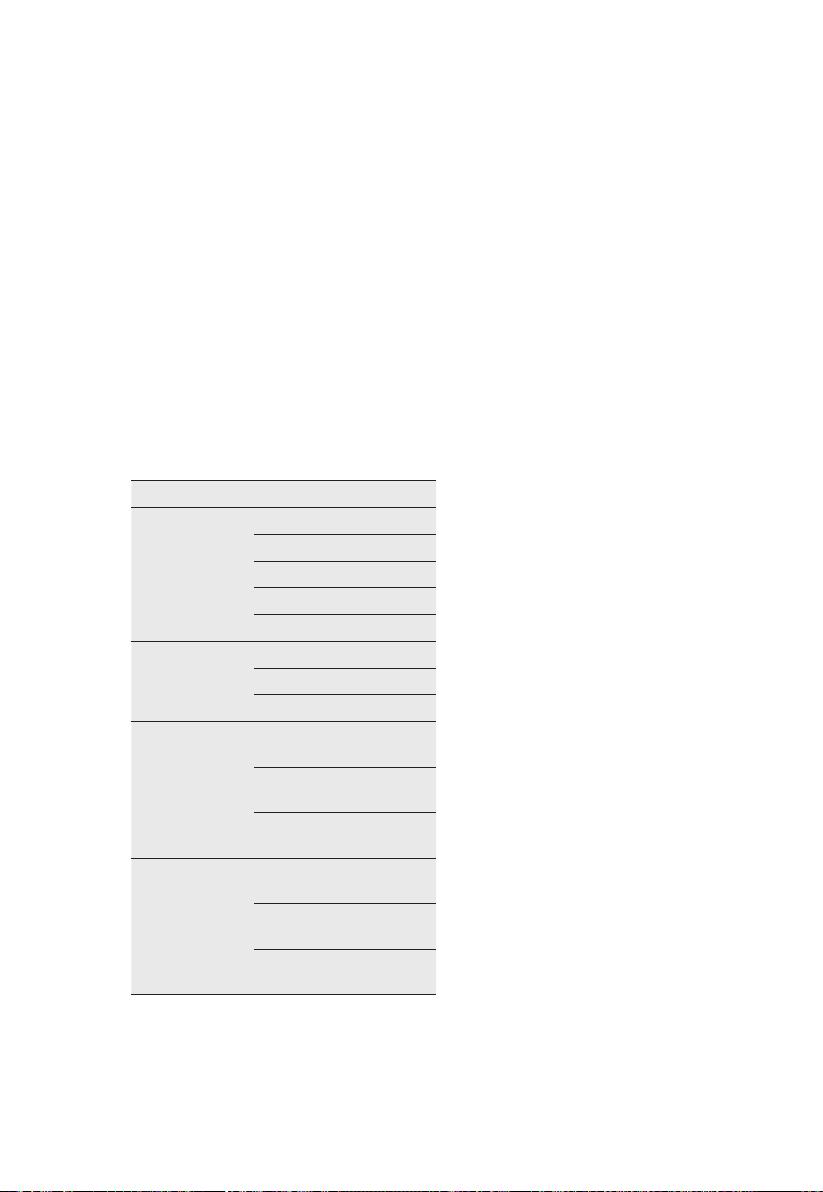
Auto reheating functions
Menu Weight (g) Display
h-1
Auto reheating
h-2
Dinner plate
h-3
Drinks/Coffee1approx. 240g
h-4
Muffins/Rolls1approx. 70g
150 150
250 250
350 350
450 450
600 600
250 250
350 350
450 450
2
approx. 480g
3
approx. 720g
2
approx. 140g
3
approx. 210g
1
2
3
1
2
3
Quick start
Press the Start/continue button to cook
at 100% microwave power for
30 seconds. Every time you press the
Start/continue button, the time will
increase by 30 seconds.
Status function
• During the cooking process, you can
press the microwave power button to
see the current power level.
• When you press the clock button, the
current time will be displayed.
• When delayed start has been set, you
can press the clock button to see the
time at which the oven will start.
Childlock
Press the Stop/clear button for
3 seconds. A long beep will sound, and
the lock indicator will be shown, which
indicates that the microwave oven's
buttons have been locked.
Press the Stop/clear buttons for
3 seconds to unlock the oven. A long
beep will sound and the lock indicator
light will go out, which indicates that the
microwave oven's buttons have been
unlocked.
Stopping the oven
There are two ways of stopping the oven
while it is in use.
1. Press the Stop/clear button.
You can restart the oven by pressing
the Start/continue button.
Pressing the Stop/clear button again
will cancel the current program.
2. Open the door.
You can restart the oven by closing
the door and pressing the Start/
continue button.
Pressing the Stop/clear button again
will cancel the current program.
Page 16

16 www.electrolux.com
CARE AND CLEANING
The oven must always be kept clean.
Waste food from overboiling or splashes
attract microwave energy, causing the
food to burn onto the inside of the oven.
Do not tamper with the oven or adjust or
repair any of the oven's parts yourself.
Repairs must only be carried out by an
authorised service technician.
Always make sure you remove the
plug before cleaning the oven.
WARNING! If you do not keep the
oven clean, it may cause the interior
surface of the oven to deteriorate,
which can reduce the lifetime of
the oven and possibly result in a
dangerous situation.
Cleaning the accessories
(turntable and ring)
Before cleaning, remove the accessories
from the oven and clean them with a
mild detergent. Take care when handling
the turntable ring.
CAUTION!
The internal sides of the
turntable and oven can get
very hot, so do not touch them
immediately after use.
Internal cleaning
Always keep the oven clean internally.
Wipe off spills and splashes immediately.
If waste food is allowed to remain on
the inside walls of the oven, door seal
and door, it can reduce the effectiveness
of the oven and damage the internal
components. Remove deposits with mild
liquid detergent, warm water and a soft,
clean cloth.
NEVER USE ABRASIVE CLEANING
AGENTS, ORDINARY OVEN
CLEANER OR WIRE WOOL
SPONGES ON ANY PART OF THE
MICROWAVE OVEN.
Stubborn food waste can be loosened
by boiling a cup of water in the oven for
2-3 minutes.
NEVER USE A KNIFE OR ANOTHER
IMPLEMENT TO REMOVE WASTE
FOOD FROM THE OVEN SURFACES
Odours inside the oven can be removed
by boiling a cup of water with 2
teaspoons of lemon juice for
5 minutes The turntable motor is
sealed. Nevertheless, you should be
careful to avoid water seeping in below
the turntable spindle when cleaning the
bottom of the oven.
Cleaning the grill
The element may become splattered
with grease or oil while the oven is in
use. Wait until the oven has cooled
down and wipe off the oil before using
the oven again. Spots on the grill can
cause unpleasant odours and fumes.
External cleaning
Open the oven door while cleaning
the control panel. This will ensure that
you cannot start the oven. Clean the
external surfaces of the oven using a
mild liquid detergent and water. Then
remove any surplus soap with a clean
damp cloth.
Then wipe with a soft cloth.
Glass cleaner spray or universal kitchen
spray can also be used. Never use
abrasive cleaning agents, scouring
sponges or strong chemicals on the
external surfaces of the oven. Make
sure water does not seep into the oven
vents, as this can damage the working
components of the oven.
Page 17
ENGLISH 17
TECHNICAL INFORMATION
AC voltage 230 - 50 Hz
Power consumption 1,450W
Microwave power 900W
Grill power (quartz) 1,100W
Convection power 2,300W
Combined maximum power 2,350W
Turntable diameter 315mm
Product dimensions (h x w x d) 335mm x 520mm x 510mm
Oven capacity 30 litres
Weight 19.3kg
ENVIRONMENTAL CONCERNS
The symbol on the product or
packaging indicates that this product
must not be disposed of as household
waste.
It should be taken to a recycling
centre for the processing of electrical
and electronic equipment instead. By
ensuring that this product is disposed of
correctly, you are helping to prevent any
negative impact on the environment or
people's health which could otherwise
be caused by the incorrect disposal
of this product. Contact your local
authority, waste company or the
company you purchased the product
from for more information on recycling
this product.
Page 18

18 www.electrolux.com
TABLE DES MATIÈRES
AVANT D'UTILISER VOTRE FOUR À MICRO-ONDES ............................................ 19
CONSIGNES DE SÉCURITÉ .................................................................................. 19
INSTALLATION ....................................................................................................... 23
GUIDE DES ACCESSOIRES ET OUTILS DU FOUR ................................................ 24
UTILISATION .......................................................................................................... 25
ENTRETIEN ET NETTOYAGE ................................................................................. 32
CARACTÉRISTIQUES TECHNIQUES ..................................................................... 33
EN MATIÈRE DE PROTECTION DE L'ENVIRONNEMENT ...................................... 33
NOUS PENSONS À VOUS
Merci d'avoir choisi ce produit Electrolux. Avec ce produit, vous bénéficiez de dizaines d'années
d'expérience professionnelle et d'innovation. Ingénieux et élégant, il a été conçu sur mesure pour
vous. Grâce à cet appareil, vous savez que chaque utilisation vous apportera satisfaction. Bienvenue
chez Electrolux.
Visitez notre site Internet pour :
Obtenir des conseils d'utilisation, des brochures, de l'aide, des informations :
www.electrolux.com
Enregistrez votre produit pour obtenir un meilleur service :
www.electrolux.com/productregistration
Boutique en ligne
Accessoires et consommables :
www.electrolux.com/shop
SERVICE APRÈS-VENTE
N'utilisez que des pièces de rechange d'origine.
Avant de contacter le service, assurez-vous de disposer des informations suivantes :
Vous trouverez ces informations sur la plaque signalétique. Modèle, PNC, numéro de série.
Avertissement/Consignes de sécurité
Informations générales et conseils
Informations en matière de protection de l'environnement
Sous réserve de modifications.
Page 19

FRANÇAIS 19
AVANT D'UTILISER VOTRE FOUR À MICRO-ONDES
Lisez attentivement la notice d'utilisation.
Les instructions suivantes ont été préparées
pour vous aider à obtenir des performances
optimales de votre four à micro-ondes
Electrolux. Assurez-vous de les lire
attentivement.
Il est important que vous conserviez cette
notice d'utilisation pour pouvoir vous y reporter
ultérieurement. Si vous vendez l'appareil ou
votre propriété et que l'appareil reste sur place,
vous devez fournir cette notice d'utilisation
CONSIGNES DE SÉCURITÉ
LISEZ ATTENTIVEMENT CE MANUEL ET
CONSERVEZ-LE POUR UNE UTILISATION
ULTÉRIEURE
• Les contacts de sécurité intégrés évitent
la mise en marche du four à micro-ondes
lorsque la porte est ouverte.
• N'essayez pas de les modifier ou de faire
fonctionner le four lorsque la porte est
ouverte car vous pourriez être exposé à
l'énergie des micro-ondes.
• Ne laissez pas les résidus alimentaires
ou de produits nettoyants s'accumuler
sur les joints de la porte. Concernant le
nettoyage : reportez-vous au chapitre
« Nettoyage et entretien ».
• Il est particulièrement important que
la porte du four ferme parfaitement et
que les éléments suivants ne soient pas
endommagés :
(1) la porte (déformée), (2) les charnières et
les dispositifs de fermeture (cassés ou mal
fixés), (3) les joints et le cadre la porte.
ATTENTION !
Si la porte, les charnières, le bras
de verrouillage ou les joints sont
défectueux, n'allumez pas le four
à micro-ondes tant qu'il n'a pas
été réparé par un technicien de
maintenance agréé.
ATTENTION !
Il est dangereux pour toute personne
autre qu'un technicien de maintenance
formé par l'usine d'effectuer des
opérations de maintenance ou de régler
le four. Si nécessaire, contactez un
professionnel qualifié pour effectuer des
opérations de maintenance.
avec l'appareil. Ainsi, le nouveau propriétaire
peut la lire et apprendre le fonctionnement et
les consignes de sécurité de l'appareil.
Assurez-vous de lire entièrement la notice
d'utilisation et de suivre les recommandations
indiquées avant de vous servir de l'appareil.
• Ne retirez jamais l'enveloppe extérieure,
la porte, ni le bandeau de commande.
Cela pourrait vous exposer à une tension
extrêmement élevée.
• Le four doit être installé en suivant
à la lettre les consignes du chapitre
« Instructions d'installation » de ce
manuel d'utilisation.
• Le four ne doit pas être utilisé à d'autres
fins que celles décrites dans ce manuel
d'utilisation. N'utilisez aucun produit corrosif
dans ce four. Ce type de four est conçu
pour chauffer, cuisiner ou décongeler
des aliments. Il n'est pas conçu pour une
utilisation industrielle, en laboratoire ou
commerciale, ce qui annulerait la garantie.
• Ne faites jamais fonctionner le four à
vide. En l'absence d'aliments ou d'eau à
l'intérieur du four pour absorber l'énergie
des micro-ondes, le magnétron pourrait
être endommagé.
• Le four ne doit pas être entreposé en plein
air. Ce produit ne doit pas être utilisé à
proximité d'eau.
• N'essayez pas de faire sécher des
vêtements ni des journaux dans le four
à micro-ondes. Ces matières peuvent
s'enflammer.
• N'utilisez pas le four comme un espace
de rangement. Ne laissez pas d'objets en
papier, d'ustensiles de cuisine ni d'aliments
dans le four lorsque vous ne l'utilisez pas.
Page 20

20 www.electrolux.com
• La température des surfaces extérieures
peut être très élevée lorsque le four est en
fonctionnement.
ATTENTION !
En présence de fumée, éteignez le
four ou débranchez la fiche de la
prise électrique et laissez la porte de
l'appareil fermée pour étouffer les
flammes. N'utilisez jamais d'eau.
ATTENTION !
Les enfants et les personnes invalides
ne peuvent utiliser l'appareil sans
surveillance que s'ils ont déjà reçu les
instructions nécessaires leur permettant
d'utiliser le four à micro-ondes en toute
sécurité et s'ils sont conscients des
risques liés à une mauvaise utilisation.
Ustensiles de cuisine adaptés
• N'utilisez que des ustensiles de cuisine
adaptés à une utilisation dans un four à
micro-ondes.
• La plupart des récipients en verre, en
vitrocéramique et en Pyrex sont adaptés à une
utilisation dans un four à micro-ondes. Même
si en général les micro-ondes ne chauffent pas
les objets en verre ou en céramique, ceux-ci
peuvent devenir très chauds car la chaleur est
transmise des aliments au récipient. Utilisez
des gants de cuisine.
Test de compatibilité des
ustensiles de cuisine
• Vous devez vérifier que les ustensiles de
cuisine sont adaptés à une utilisation dans
un four à micro-ondes.
• Placez le récipient dans le four à microondes avec un verre à moitié rempli d'eau.
Faites fonctionner l'appareil à pleine
puissance (900 W) pendant une minute. Si
le récipient est très chaud, ne l'utilisez pas
dans l'appareil. S'il est légèrement chaud,
vous pouvez l'utiliser pour chauffer, mais
pas pour cuisiner. Si le récipient reste à
température ambiante, il est adapté à une
utilisation dans un four à micro-ondes.
• Les serviettes en papier, le papier sulfurisé,
le papier essuie-tout, les assiettes,
les tasses, le carton et le film étirable
peuvent être utilisés sans risque. Assurezvous toujours que le récipient est plein
d'aliments pouvant absorber l'énergie.
Ainsi, ils ne risquent pas de surchauffer ou
de s'enflammer.
• De nombreux ustensiles en plastique
comme des plateaux, tasses, boîtes de
congélation et films peuvent être utilisés
dans le four à micro-ondes. Respectez
les instructions du fabricant lorsque vous
utilisez des ustensiles en plastique dans
le four. Évitez d'utiliser des récipients en
plastique pour cuire des aliments contenant
beaucoup de graisse ou de sucre car ils
atteignent des températures très élevée
pouvant faire fondre le plastique.
• Ne laissez pas l'appareil sans surveillance
et vérifiez-le régulièrement lorsque vous
cuisez ou chauffez des aliments dans des
récipients en plastique, en papier ou dans
toute autre matière inflammable.
• Les récipients en métal ou les récipients
dotés de bords en métal ne doivent pas
être utilisés dans le four à micro-ondes,
sauf s'ils sont spécialement conçus pour
une utilisation dans un four à micro-ondes.
• Les récipients dotés d'une petite ouverture,
comme des bouteilles, ne doivent pas être
utilisés dans un four à micro-ondes.
• Faites attention lorsque vous retirez le
couvercle d'un bol ou d'un récipient.
Risque de brûlure !
Récipients en aluminium
Vous pouvez utiliser des récipients en
aluminium pour chauffer des aliments dans le
four à micro-ondes, à condition de suivre les
instructions suivantes :
1. Le récipient en aluminium ne doit pas
mesurer plus de 3 cm de profondeur.
2. Les couvercles en aluminium ne doivent pas
être utilisés.
3. Le récipient en aluminium doit être rempli au
moins aux deux tiers d'aliments. Ne placez
jamais de récipient en aluminium vide dans
le four.
4. Ne placez jamais plusieurs récipients en
aluminium à la fois dans le four à microondes. Le récipient ne doit pas toucher
les parois du four. Si le four dispose d'un
plateau tournant ou d'une grille en métal, le
récipient en aluminium doit être placé sur
une assiette allant au four retournée.
5. Les récipients en aluminium ne doivent jamais
être réutilisés dans le four à micro-ondes.
6. Si le four à micro-ondes a été utilisé pendant
plus de 15 minutes, laissez-le refroidir avant
de le réutiliser.
Page 21

FRANÇAIS 21
7. Les récipients et le plateau tournant
peuvent chauffer durant l'utilisation. Soyez
très prudent lorsque vous les retirez du
four. Il est recommandé d'utiliser une
manique ou des gants de cuisine.
8. Souvenez-vous que lorsque vous utilisez
un récipient en aluminium, la durée de
cuisson ou de chauffe peut être plus
longue que d'habitude. Vérifiez toujours
que les aliments sont bien chauds avant
de les servir.
Cuisinier en toute sécurité
• N'utilisez pas le four à micro-ondes pour
réchauffer des aliments dans un moule.
Placez toujours les aliments dans un
récipient adapté.
• N'utilisez pas le four à micro-ondes pour
frire car vous ne pouvez pas contrôler la
température de la graisse. Cela pourrait
entraîner des situations dangereuses.
• Vous pouvez cuire du pop-corn au four à
micro-ondes, mais uniquement dans des
sachets ou récipients spécialement prévus
à cet effet. Lorsque vous faites cuire du
pop-corn au four à micro-ondes, ne le
laissez pas sans surveillance.
• Piquez les aliments ayant une peau ou
une membrane imperméable afin d'éviter
que de la vapeur ne se forme à l'intérieur
et ne les fasse exploser. Par exemple, les
pommes, les pommes de terre, le foie
de volaille et les jaunes d'œufs sont des
aliments que vous devez piquer.
• Remuez ou secouez le contenu des
biberons et des petits pots pour bébé.
Pour éviter les brûlures, vérifiez toujours
la température des aliments avant de les
donner à votre enfant.
ATTENTION !
Les liquides et autres aliments ne
doivent pas être chauffés dans des
récipients fermés hermétiquement car
ils pourraient exploser.
ATTENTION !
Après avoir chauffé des boissons au
four à micro-ondes, l'ébullition peut se
poursuivre. Faites très attention lorsque
vous sortez le récipient du four.
ATTENTION !
Lorsque des liquides tels que des
soupes, des sauces et des boissons
sont chauffées au four à micro-ondes,
elles peuvent atteindre un point
d'ébullition sans qu'aucune bulle ne se
forme. Cela signifie que le liquide chaud
peut soudainement déborder. Pour
éviter cela, procédez comme suit :
1. Évitez d'utiliser des récipients
ayant des bords droits et une
ouverture étroite.
2. Ne surchauffez pas le liquide.
3. Remuez le liquide avant de placer
le récipient dans le four, puis une
nouvelle fois à la moitié du temps
de cuisson.
4. Une fois la durée de cuisson
écoulée, laissez reposer le plat
dans le four pendant quelques
minutes, puis remuez de nouveau
le liquide avant de sortir le récipient.
ATTENTION !
Certains aliments, comme les œufs
entiers, ainsi que les récipients
hermétiquement fermés, comme les
pots de confiture, peuvent exploser.
Ils ne doivent en aucun cas être
chauffés au four à micro-ondes.
Un œuf cassé peut également exploser
durant la cuisson. Percez toujours le
jaune. Placez un couvercle sur l'œuf et,
une fois la cuisson terminée, laissez-le
reposer pendant une minute avant de
retirer le couvercle.
Durant le fonctionnement du four, il est
normal que de la vapeur s'échappe
autour du joint de la porte, que de
la buée se forme sur la porte ou
que des gouttes d'eau se déposent
sous la porte. Il ne s'agit que d'eau
condensée provenant des aliments
chauffés. Cette eau ne joue en rien sur
la sécurité d'utilisation de l'appareil. La
porte n'est pas conçue pour se fermer
hermétiquement contre le four.
• Ne forcez pas sur le plateau tournant pour
le faire tourner. Il pourrait ne plus fonctionner
normalement.
• La présence d'un arc électrique dans le
four à micro-ondes est généralement due à
l'utilisation d'un récipient en métal. Au bout
d'un certain temps, les arcs électriques
peuvent endommager le four. Arrêtez le
programme et vérifiez le récipient.
Page 22

22 www.electrolux.com
• Assurez-vous que les fentes d'aération se
trouvant au-dessus, en dessous, sur les
côtés et à l'arrière de l'appareil ne sont
pas bouchées.
ATTENTION !
Le four ne doit pas être utilisé à
des fins commerciales. Le four est
exclusivement destiné à un usage
domestique.
Consignes de sécurité
concernant la cuisson avec les
fonctions gril, convection et
combinées.
1. La fenêtre se trouvant dans la porte
en verre peut se casser si de l'eau se
déverse dessus pendant la cuisson avec
les fonctions gril ou convection.
2. Utilisez des gants de cuisine lorsque
vous placez des récipients dans le
four ou lorsque vous les en sortez. Les
récipients peuvent devenir très chauds.
Faites attention à ne pas vous brûler. Le
plateau tournant et la grille métallique
peuvent également devenir très chauds.
Utilisez des gants de cuisine lorsque
vous les manipulez.
3. Veillez à ne pas toucher la fenêtre
intérieure ou extérieure du four à microondes avec des composants métalliques
lorsque vous placez des récipients dans
le four à micro-ondes ou les en sortez.
Les parois intérieures de la porte et
du four à micro-ondes deviennent très
chaudes. Soyez prudent lorsque vous
cuisinez des aliments dans le four.
4. Ne plongez pas le plateau tournant ni les
récipients dans l'eau froide pour les faire
refroidir rapidement après utilisation car ils
pourraient se briser.
5. Ne posez aucun objet au-dessus de
l'appareil. La partie supérieure de
l'appareil devient très chaude. Tout objet
posé au-dessus de l'appareil pourrait être
endommagé par la chaleur.
6. Préchauffez uniquement l'appareil si vous
utilisez la fonction convection, jamais
lorsque vous utilisez le four à micro-ondes
ou les fonctions combinées (micro-ondes
et gril ou micro-ondes et convection).
ATTENTION !
Lorsque les fonctions combinées
sont activées, les enfants ne
doivent pas utiliser le four sans
la surveillance d'un adulte en
raison des températures élevées
générées.
Conservez ces instructions en lieu sûr !
Page 23

FRANÇAIS 23
INSTALLATION
1. Retirez toutes les étiquettes se trouvant
sur la porte.
2. Le four doit être installé sur une surface
plane et horizontale. La surface doit être
suffisamment solide pour supporter le
poids du four (25 kg) et son contenu, à
tout moment. Le four doit être de niveau
afin d'éviter qu'il n'émette des vibrations
ou du bruit.
3. Le four ne doit pas être placé à proximité
de sources de chaleur ou d'eau. Exposer
le four à des sources de chaleur ou à de
l'eau peut réduire son efficacité et causer
des anomalies de fonctionnement. Veillez
donc à ce que le four soit installé à bonne
distance de toute source de chaleur et
d'eau.
4. Ne bouchez pas les fentes d'aération se
trouvant au-dessus, en dessous et sur
les côtés de l'appareil. Ne posez aucun
objet au-dessus du four. Si les fentes
d'aération sont bouchées lorsque le
four est en fonctionnement, le four peut
surchauffer et provoquer des anomalies
de fonctionnement. Ces fentes d'aération
permettent d'expulser beaucoup d'air
chaud. Veillez donc à ne pas les boucher.
Par exemple, assurez-vous que des
rideaux ne pendent pas entre l'arrière du
four et le mur.
5. Placez le four aussi loin que possible
des radios et des télévisions. Le four
est conforme aux normes de l'Union
Européenne concernant la suppression
des interférences radio. Cependant,
des interférences peuvent apparaître si
l'appareil est placé trop près d'une radio
ou d'une télévision. Le four doit donc
être placé aussi loin que possible de tels
appareils.
6. Si le four est placé en angle, il doit être
situé à 10 cm des murs et à 30 cm de
tout élément se trouvant au-dessus.
IMPORTANT ! Le four peut être installé
n'importe où dans la cuisine. Assurez-vous
que le four est posé sur une surface plane,
horizontale, et que les fentes d'aération à la
base du four ne sont pas bouchées (pour une
bonne aération).
Raccordement de l'appareil à
l'alimentation secteur
Le four dispose d'un câble d'alimentation et
d'une fiche pour une prise murale de 230 V
50 Hz avec mise à la terre. La mise à la terre
augmente la sécurité en cas de court-circuit.
Vérifiez que la tension indiquée pour le four
correspond à la tension de l'alimentation
secteur.
Remarque : Si vous utilisez une rallonge pour
brancher le four, assurez-vous que cette
rallonge est également mise à la terre.
Le four ne doit pas être branché
à une prise secteur non reliée à
la terre. Si vous n'êtes pas sûr
du branchement électrique de
votre four ou si vous ne savez
pas si le système de câblage de
votre domicile est mis à la terre,
contactez un électricien.
L'appareil doit être relié à la terre.
Pour des raisons de sécurité, si le
four dispose d'une fiche moulée
n'étant pas adaptée à la prise
de courant, faites-la remplacer
par le fabricant, un technicien de
maintenance du fabricant ou tout
autre technicien d'installation
qualifié.
Pour des raisons de sécurité,
si le câble d'alimentation est
endommagé, faites-le remplacer
par le fabricant, un technicien de
maintenance du fabricant ou tout
autre technicien qualifié.
Page 24

24 www.electrolux.com
GUIDE DES ACCESSOIRES ET OUTILS DU FOUR
De nombreux ustensiles, récipients et
matériaux peuvent être utilisés pour cuisiner
dans un four à micro-ondes. Choisissez des
ustensiles, des récipients et des matériaux
adaptés à cette méthode de cuisson, tant
pour des raisons de sécurité que pour éviter
tout endommagement des ustensiles.
La liste suivante est fournie à titre indicatif
uniquement.
Mode de fonctionnement
Matériaux Ustensiles de cuisine
Céramique
Pyrex Oui Oui Oui Oui
Four à micro-
ondes Gril Convection
Fonctions
combinées
et verre
Verre allant au four Oui
1)
Oui Oui
1)
Verre avec décoration en métal Non Non Non Non
Verre en cristal au plomb Non Non Non Non
Porcelaine Sans décoration métallique Oui Oui Non Non
2)
Grès
Plastique Résistant au four
Oui Oui Oui Oui
Oui Non Non Non
à micro-ondes
Film plastique Oui Non Non Non
Métal Plats à rôtir Non Oui Oui Non
Feuille d'aluminium
3)
Oui Oui Oui Oui
Papier Tasses, assiettes, essuie-tout Oui Non Non Non
Oui
1)
Papier sulfurisé Oui Non Non Non
Bois Non Non Non Non
Accessoires Grille métallique Non Oui Oui Oui
Plateau tournant Oui Oui Oui Oui
Anneau du plateau tournant Oui Oui Oui Oui
OUI : Ces ustensiles de cuisine et accessoires peuvent être utilisés.
NON : Ces ustensiles de cuisine et accessoires ne peuvent pas être utilisés.
1)
Uniquement s'ils n'ont pas de partie métallique.
2)
Uniquement s'ils ne sont pas émaillés ou si l'émail n'est pas métallique.
3)
REMARQUE: Couvrez uniquement avec des feuilles d'aluminium. Si vous utilisez trop de
feuilles d'aluminium, des arcs électriques peuvent apparaître à l'intérieur du four.
Déballage
Remarque : Lorsque vous déballez l'appareil,
vérifiez qu'il n'est pas endommagé. En cas
d'endommagement ou de pièce manquante,
informez-en immédiatement le détaillant. Il
est possible que le four, ses composants
et les accessoires soient emballés dans un
film protecteur. Si tel est le cas, retirez ce
film avant d'utiliser le four. Ne laissez pas
l'emballage traîner afin d'éviter que les enfants
ne jouent avec. Cela pourrait être dangereux.
Page 25

FRANÇAIS 25
UTILISATION
DESCRIPTION DE L'APPAREIL
Utilisation du four à micro-ondes
6
7
Éléments - noms et fonctions
1
Bandeau de commande
2
Pointe du plateau tournant
3
Anneau et roulettes du plateau
tournant. Installés au fond du
four afin de supporter le plateau
tournant
4
Plateau tournant en verre. Les
récipients contenant les aliments
à cuire doivent être placés sur ce
plateau. N'utilisez pas le four sans
le plateau tournant
Installation du plateau tournant
1. Assurez-vous que la pointe du plateau
tournant est insérée dans le trou situé sur
la paroi inférieure de l'appareil et qu'elle
est enclenchée dans l'axe d'entraînement
du moteur « D ».
2. Installez l'anneau et les roulettes du
plateau tournant afin qu'ils soient
concentriques avec l'axe d'entraînement.
3. Placez le plateau tournant en verre
sur l'anneau et les roulettes du
plateau tournant, puis faites-le tourner
doucement jusqu'à qu'il s'enclenche
dans l'axe d'entraînement.
1
3 4 52
9
5
Fenêtre. Vous pouvez voir les
8
aliments à travers cette fenêtre
durant la cuisson
6
Porte et joint du four. Pendant
la cuisson, la porte du four doit
toujours être fermée. Il ne doit y
avoir aucune salissure ni résidu
alimentaire sur les parois.
7
Crochets de verrouillage
8
Support
9
Gril
Remarque :
• N'installez jamais le plateau tournant à
l'envers.
• Le plateau tournant, l'anneau et l'axe
d'entraînement doivent être utilisés
durant la cuisson.
• Les aliments et les récipients contenant
des aliments doivent toujours
sur le plateau tournant.
• Le plateau tournant peut tourner vers la
et vers la droite. C'est normal.
gauche
être posés
Page 26

26 www.electrolux.com
Bandeau de commande
EMS30400OX
1 Fonction de cuisson :
1
2
pour régler la puissance du four à
micro-ondes, le gril, la convection ou les
fonctions combinées.
2 Niveau de puissance :
3
pour régler le niveau de puissance du
four à micro-ondes selon les besoins
3 Réchauffage automatique :
4
pour sélectionner la fonction de
réchauffage souhaitée
4 Décongélation :
pour régler la décongélation selon le
poids ou la durée
5 Fenêtre d'affichage :
indique le temps de cuisson, le
5
niveau de puissance, la fonction de
cuisson et l'heure
6 Horloge :
pour régler l'heure et le départ
différé
7 Arrêter/Annuler :
Pour arrêter le four, mettre le
programme du four à micro-ondes
6
7
en pause, ou pour annuler le
réglage du programme de cuisson
8 Démarrer/Continuer :
pour mettre le four à micro-ondes en
marche
9 Sélecteur de fonction :
8
pour sélectionner la fonction et la durée
de cuisson
Vues de l'affichage
9
Sur les vues de l'affichage, vous pouvez
voir la fonction de cuisson, la convection
naturelle et la cuisson automatique.
Réglage de l'heure
Lorsque vous branchez l'appareil à
l'alimentation, « 0.00 » s'affiche et un bip
retentit. Pour régler l'heure, procédez
comme suit.
1. Appuyez sur la touche de l'horloge
pour sélectionner le mode 12 heures
ou 24 heures.
Page 27

FRANÇAIS 27
2. Tournez le sélecteur de fonction pour
régler les heures.
3. Appuyez sur la touche de l'horloge pour
confirmer le réglage des heures. Le voyant
des minutes clignote.
4. Tournez le sélecteur de fonction pour
régler les minutes.
5. Appuyez sur la touche de l'horloge pour
confirmer
le réglage des minutes et
terminer le réglage de l'horloge.
Puissance du micro-ondes
Appuyez sur
la touche du
niveau de
puissance
Une fois 100 % 900 Faire bouillir ou chauffer des liquides.
Deux fois 80 % 720 Pour réchauffer un repas dans un plat, une
Trois fois 50 % 450 Pour décongeler rapidement un repas dans
Quatre fois 30 % 270 Pour faire mijoter. Pour cuire des gâteaux à
Cinq fois 10 % 90 Pour maintenir les aliments au chaud.
Niveaux de
puissance
du four à
micro-ondes Watts Utilisation recommandée
Gril
1. Ouvrez la porte, installez la grille
métallique sur le plateau tournant, puis
posez les aliments sur la grille métallique.
Placez une assiette non métallique sous
la grille pour recueillir tout déversement
ou le jus de viande afin de faciliter le
nettoyage. Fermez la porte.
2. Appuyez une fois sur le sélecteur de
fonction. « 140 » clignote sur l'affichage.
3. Tournez le sélecteur de fonction jusqu'à
sélectionner la fonction gril « G-1 ».
4. Appuyez sur la touche Démarrer/
Continuer pour confirmer que « G-1 »
est affiché.
5. Tournez le sélecteur de fonction pour
régler le temps de cuisson.
6. Appuyez sur la touche Démarrer/
Continuer pour mettre le four en marche.
Cuisson dans le four à
micro-ondes
1. Ouvrez la porte et posez les aliments sur
le plateau tournant. Fermez la porte.
2. Appuyez autant de fois que nécessaire
sur la touche du niveau de puissance
(reportez-vous au tableau « Puissance du
micro-ondes ».
3. Tournez le sélecteur de fonction pour
régler le temps de cuisson.
4. Appuyez sur la touche Démarrer/
Continuer pour mettre le four en marche.
Cuire des légumes. Préchauffer des plats
à rôtir.
casserole et des plats précuits.
Pour rôtir des morceaux de viande sur l'os
et de la volaille.
un bol.
Pour cuire des muffins et des génoises.
base de crème ou des gâteaux au fromage.
Remarque :
Pour obtenir de meilleurs résultats avec la
fonction gril, vous pouvez retourner la viande
à la moitié du temps de cuisson.
Deux bips retentiront pour vous indiquer la
moitié du temps de cuisson. Ouvrez la porte
et retournez les aliments. Fermez la porte et
appuyez sur la touche Démarrer/Continuer.
Si vous n'ouvrez pas la porte pour retourner
les aliments, le four à micro-ondes continuera
la cuisson.
Convection naturelle
Le four dispose d'une fonction de cuisson
par convection vous permettant de cuire des
aliments de la même façon que dans un four
ordinaire. Les micro-ondes ne seront pas
utilisées.
Nous vous recommandons de préchauffer
le four à la température souhaitée avant d'y
placer les aliments. Lorsque le four a atteint
Page 28

28 www.electrolux.com
la température souhaitée, il maintiendra cette
température pendant 5 minutes. Si vous
n'ouvrez pas la porte du four durant cette
période, le four à micro-ondes s'éteindra
automatiquement.
Préchauffage du four pour la convection
naturelle
1. Appuyez une fois sur le sélecteur de
fonction.
« 140 » clignote sur l'affichage.
2. Tournez le sélecteur de fonction pour
sélectionner la fonction convection.
3. Réglez la température de la convection en
tournant le sélecteur de fonction. Plage de
températures : de 140 à 230 °C.
4. Appuyez sur la touche Démarrer/
Continuer pour confirmer la température.
5. Appuyez sur la touche Démarrer/
Continuer pour lancer le préchauffage.
Lorsque le four atteint la température
réglée, deux bips retentissent pour vous
rappeler de placer les aliments dans le
four. La température correspondante
clignote.
6. Placez les aliments dans le four et fermez
la porte.
7. Tournez le sélecteur de fonction pour
régler le temps de cuisson.
8. Appuyez sur la touche Démarrer/
Continuer pour mettre le four en marche.
Remarque :
Pour utiliser le préchauffage, au lieu
d'appuyer sur la touche Démarrer/Continuer
comme indiqué au point 4 du paragraphe
Convection naturelle, vous devez tourner le
sélecteur de fonction pour régler la durée de
cuisson.
Remarque :
Le ventilateur continuera de tourner pendant
quelques minutes après la fin du programme
par convection afin de refroidir le four.
Fonctions de cuisson combinées
Ce four vous permet de combiner les
fonctions micro-ondes, gril et convection
naturelle. Il dispose de quatre combinaisons
prédéfinies.
Utilisation des fonctions combinées
1. Ouvrez la porte et posez les aliments sur le
plateau tournant. Fermez la porte.
2. Appuyez une fois sur le sélecteur de
fonction. « 140 » clignote sur l'affichage.
3. Tournez le sélecteur de fonction pour
sélectionner l'une des combinaisons
« C-1 », « C-2 », « C-3 » ou « C-4 »,
comme indiquées dans le tableau
ci-dessous
4. Appuyez sur la touche Démarrer/
Continuer pour confirmer la combinaison.
5. Tournez le sélecteur de fonction pour
régler le temps de cuisson.
6. Appuyez sur la touche Démarrer/
Continuer pour mettre le four en marche.
Fonctions de cuisson combinées
Affichage
C-1
C-2
C-3
C-4
Four à
micro-ondes Gril Convection
165°C
200°C
200°C
Cuisson par étapes
Vous pouvez régler jusqu'à trois phases de
cuisson avec ce four. Si l'une de ces phases est
la décongélation, vous devez la définir en tant
que première phase.
Après chaque phase, un bip retentit et la phase
suivante démarre automatiquement.
Exemple :
Si vous souhaitez cuire les aliments à une
puissance de micro-ondes de 100 % pendant
10 minutes puis à une puissance de 80 %
pendant 5 minutes, suivez les étapes suivantes.
1. Ouvrez la porte et posez les aliments sur le
plateau tournant. Fermez la porte.
2. Appuyez une fois sur la touche de
puissance du micro-ondes pour
sélectionner une puissance de 100 %.
3. Tournez le sélecteur de fonction pour régler
un temps de cuisson de 10 minutes.
4. Appuyez deux fois sur la touche de
puissance du micro-ondes pour
sélectionner une puissance de 80 %.
5. Tournez le sélecteur de fonction pour régler
un temps de cuisson de 5 minutes.
6. Appuyez sur la touche Démarrer/Continuer
pour mettre le four en marche.
Page 29

FRANÇAIS 29
Départ différé
Vous pouvez programmer jusqu'à trois
phases pour régler un départ différé.
Exemple :
Si vous souhaitez cuire des aliments à une
puissance de 80 % pendant 15 minutes avec
un départ différé, suivez les étapes suivantes.
1. Ouvrez la porte et posez les aliments sur
le plateau tournant. Fermez la porte.
2. Appuyez deux fois sur la touche
de puissance du micro-ondes pour
sélectionner une puissance de 80 %.
« P80 » s'affiche.
3. Tournez le sélecteur de fonction
pour régler un temps de cuisson de
15 minutes.
4. Appuyez sur la touche de l'horloge. Les
chiffres des heures clignotent.
5. Tournez le sélecteur de fonction pour
régler les heures.
6. Appuyez sur la touche de l'horloge. Les
chiffres des minutes clignotent.
7. Tournez le sélecteur de fonction pour
régler les minutes.
8. Appuyez sur la touche Démarrer/
Continuer pour terminer le réglage. « : »
s'affiche. Une fois l'heure réglée atteinte,
deux bips retentissent et la cuisson
démarre automatiquement.
Décongélation selon le poids
1. Ouvrez la porte et posez les aliments sur
le plateau tournant. Fermez la porte.
2. Appuyez une fois sur la touche de
décongélation. « d-1 » s'affiche.
3. Tournez le sélecteur de fonction pour
régler le poids en grammes.
4. Appuyez sur la touche Démarrer/
Continuer pour commencer la
décongélation.
Décongélation selon la durée
1. Ouvrez la porte et posez les aliments sur
le plateau tournant. Fermez la porte.
2. Appuyez deux fois sur la touche de
décongélation.
« d-2 » s'affiche.
3. Tournez le sélecteur de fonction pour
régler le temps de décongélation.
4. Appuyez sur la touche Démarrer/
Continuer pour commencer la
décongélation.
Remarques
• Si vous n'êtes pas sûr de la durée, réglez
un temps de décongélation minimal. Les
aliments continueront à décongeler durant
le temps de repos.
• Séparez les aliments dès que possible.
• Retournez les gros aliments comme
les steaks à la moitié du temps de
décongélation.
• Ouvrez et/ou retirez l'emballage pour la
décongélation.
• Placez les aliments dans un récipient
assez grand pour vous permettre de les
remuer facilement.
• Commencez la décongélation de la volaille
poitrail vers le bas, puis retournez-la à la
moitié du temps de décongélation.
Vous pouvez recouvrir les parties
délicates comme les ailes avec une feuille
d'aluminium.
• Le temps de repos est très important,
particulièrement pour les aliments denses
ne pouvant pas être remués. Cela vous
assure que le milieu des aliments est
entièrement décongelé avant de les cuire.
Cuisson automatique
Le four à micro-ondes dispose d'un certain
nombre de recettes prédéfinies pour la
cuisson automatique. Ainsi, vous pouvez cuire
les aliments à la perfection à chaque fois.
1. Ouvrez la porte et posez les aliments sur
le plateau tournant. Fermez la porte.
2. Tournez le sélecteur de fonction pour
sélectionner la recette de cuisson
automatique.
3. Appuyez sur la touche Démarrer/
Continuer pour confirmer la recette de
cuisson automatique.
4. Tournez le sélecteur de fonction pour
régler le poids des aliments.
5. Appuyez sur la touche Démarrer/
Continuer pour confirmer le poids.
Reportez-vous au tableau des recettes
automatiques.
Page 30

30 www.electrolux.com
Recettes prédéfinies pour la cuisson automatique
Menu Poids (g) Affichage Fonction et puissance
Poisson
Soupes
Viande
Pain
Pizza
Gâteaux 475 475
Pâtes
Poulet
Légumes
Pommes de
terre
Remarque :
Le four doit être préchauffé pour les recettes
de gâteaux basées sur la convection
naturelle à 180 °C. Une fois que le four a
préchauffé et qu'il a atteint 180 °C, un bip
retentit pour vous rappeler d'ouvrir la porte
150 150
250 250
350 350
450 450
650 650
200 ml 200
400 ml 400
600 ml 600
300 300
500 500
700 700
900 900
1100 1100
50 50
150 150
200 200
300 300
400 400
50 avec 450 g d'eau 50
100 avec 800 g d'eau 100
150 avec 1 200 g d'eau 150
500 500
750 750
1000 1000
1200 1200
150 150
350 350
500 500
230 1
460 2
690 3
et de placer le gâteau dans le four. Appuyez
ensuite sur la touche Démarrer/Continuer
pour commencer la cuisson.
Puissance du four à micro-ondes
à 80%
Puissance du four à micro-ondes
à 100 %
C-2
G-1 Gril100 100
C-4 Four à micro-ondes à 30 %
Gril à 70 % et convection à
200 °C
Convection à 180 °C
*Voir la remarque
Puissance du four à microondes à 80 %
C-4 Four à micro-ondes à 30 %
Gril à 70 % et convection à
200 °C
Puissance du four à micro-ondes
à 100 %
Puissance du four à micro-ondes
à 100 %
Page 31

FRANÇAIS 31
Réchauffage automatique
Cette fonction vous permet d'utiliser la
puissance du micro-ondes pour réchauffer
facilement des aliments. La durée et la
puissance du micro-ondes sont prédéfinies.
Le tableau ci-dessous vous indique les
différences entre les fonctions de réchauffage
automatique.
1. Ouvrez la porte et posez les aliments sur
le plateau tournant. Fermez la porte.
2. Appuyez sur la touche de réchauffage
automatique pour sélectionner « h-1 »,
« h-2 », « h-3 » ou « h-4 ».
3. Tournez le sélecteur de fonction pour
régler le poids des aliments.
4. Appuyez sur la touche Démarrer/
Continuer pour démarrer le réchauffage.
Fonctions de réchauffage
automatique
Menu Poids (g) Affichage
h-1
Réchauffage
automatique
h-2
Grande assiette
h-3
Boissons/café1environ 240 g
h-4
Muffins/Petits
pains
150 150
250 250
350 350
450 450
600 600
250 250
350 350
450 450
2
environ 480 g
3
environ 720 g
1
environ 70 g
2
environ 140 g
3
environ 210 g
1
2
3
1
2
3
Démarrage rapide
Appuyez sur la touche Démarrer/Continuer
pour cuire à une puissance de micro-ondes
de 100 % pendant 30 secondes. À chaque
pression sur la touche Démarrer/Continuer, la
durée augmente de 30 secondes.
Fonction Statut
• Durant la cuisson, vous pouvez appuyer
sur la touche de puissance du microondes pour vérifier le niveau de puissance
actuel.
• Lorsque vous appuyez sur la touche de
l'horloge, l'heure actuelle s'affiche.
• Si vous avez réglé un départ différé, vous
pouvez appuyer sur la touche de l'horloge
pour voir l'heure à laquelle le four se
mettra en marche.
Sécurité enfants
Appuyez sur la touche Arrêter/Annuler
pendant 3 secondes. Un long bip retentit
et l'indicateur du verrouillage s'allume pour
vous indiquer que les touches du four à
micro-ondes sont verrouillées.
Appuyez sur la touche Arrêter/Annuler
pendant 3 secondes pour déverrouiller le
four. Un long bip retentit et l'indicateur du
verrouillage s'éteint pour vous indiquer que
les touches du four à micro-ondes sont
déverrouillées.
Désactivation du four
Vous pouvez éteindre le four de deux façons
lorsqu'il est en cours de fonctionnement.
1. Appuyez sur la touche Arrêter/Annuler.
Vous pouvez redémarrer le four en appuyant
sur la touche Démarrer/Continuer.
Appuyez de nouveau sur la touche
Arrêter/
Annuler pour annuler le programme
en cours.
2. Ouvrez la porte.
Vous pouvez redémarrer le four en
fermant la porte et en appuyant sur la
touche Démarrer/Continuer.
Appuyez de nouveau sur la touche
Arrêter/Annuler pour annuler le
programme en cours.
Page 32

32 www.electrolux.com
ENTRETIEN ET NETTOYAGE
Le four doit toujours être propre. Les résidus
alimentaires dus à un débordement ou à des
éclaboussures attirent l'énergie des microondes, ce qui brûle les aliments se trouvant à
l'intérieur du four. Ne tentez pas de modifier,
de régler ni de réparer les éléments de
l'appareil par vous-même. Toute réparation
doit uniquement être confiée à un technicien
de maintenance agréé.
Débranchez toujours la fiche de la prise
avant de nettoyer l'appareil.
ATTENTION ! Si le four n'est pas propre,
sa surface intérieure peut se détériorer.
Cela peut réduire la durée de vie du four
et entraîner des situations dangereuses.
Nettoyage des accessoires
(plateau tournant et anneau)
Avant le nettoyage, retirez les accessoires du
four et nettoyez-les en utilisant un détergent
doux. Soyez prudent lorsque vous manipulez
l'anneau du plateau tournant.
ATTENTION !
Les parois intérieures du plateau
tournant et du four peuvent devenir
très chaudes. Ne les touchez pas
immédiatement après utilisation.
Nettoyage intérieur
L'intérieur du four doit toujours être propre.
Essuyez immédiatement les éclaboussures
et débordements d'aliments. Si vous laissez
des résidus alimentaires sur les parois
intérieures du four, sur la porte et le joint de
la porte, vous pourriez réduire l'efficacité
du four et endommager les composants
internes. Retirez les dépôts d'aliments avec
un nettoyant liquide doux, de l'eau chaude et
un chiffon propre et doux.
N'UTILISEZ JAMAIS DE PRODUIT
DE NETTOYAGE ABRASIF,
DE NETTOYANT POUR FOUR
ORDINAIRE NI D'ÉPONGE
MÉTALLIQUE POUR NETTOYER
LE FOUR À MICRO-ONDES.
Pour retirer plus facilement les résidus
alimentaires incrustés, faites bouillir une tasse
d'eau dans le four pendant 2 à 3 minutes.
N'UTILISEZ JAMAIS UN COUTEAU
NI UN AUTRE USTENSILE
POUR RETIRER LES RÉSIDUS
ALIMENTAIRES DES SURFACES
DU FOUR
Vous pouvez supprimer les odeurs à
l'intérieur du four en faisant bouillir une tasse
d'eau contenant 2 cuillères à café de jus
de citron pendant 5 minutes. Le moteur
du plateau tournant est scellé. Néanmoins,
veillez à ne pas renverser d'eau sous la
pointe du plateau tournant lorsque vous
nettoyez le fond du four.
Nettoyage du gril
L'élément chauffant peut être éclaboussé
par de la graisse ou de l'huile lorsque le
four est en fonctionnement. Attendez que le
four refroidisse puis essuyez l'huile avant de
réutiliser le four. Les taches sur le gril peuvent
provoquer des odeurs et des fumées
désagréables.
Nettoyage extérieur
Ouvrez la porte du four lorsque vous nettoyez
le bandeau de commande. Vous éviterez
ainsi d'allumer le four accidentellement.
Nettoyez les surfaces extérieures du four
avec de l'eau et un nettoyant liquide doux.
Retirez ensuite le surplus de savon avec un
chiffon propre humide.
Essuyez l'appareil avec un chiffon doux.
Vous pouvez également utiliser des sprays
de nettoyage pour le verre ou des sprays
universels pour la cuisine. N'utilisez jamais
de produits abrasifs, de tampons à récurer
ou de produits chimiques puissants sur les
surfaces extérieures du four. Veillez à ne pas
renverser d'eau dans les fentes d'aération
du four. Cela pourrait endommager les
composants.
Page 33

FRANÇAIS 33
CARACTÉRISTIQUES TECHNIQUES
TensionCA 230 - 50Hz
Consommation électrique 1450W
Puissance du micro-ondes 900W
Puissance du gril (quartz) 1100W
Puissance de la convection 2300W
Puissance maximale des fonctions
combinées
Diamètre du plateau tournant 315mm
Dimensions du produit (hxlxp) 335mm x 520mm x 510mm
Capacité du four 30 litres
Poids 19,3 kg
2350W
EN MATIÈRE DE PROTECTION DE L'ENVIRONNEMENT
Le symbole qui figure sur le produit ou son
emballage indique que ce produit ne doit pas
être jeté comme un déchet ménager.
Il doit être remis à un point de recyclage
pour le traitement du matériel électrique
et électronique. En procédant à la mise au
rebut de l'appareil dans les règles, vous
aidez à lutter contre l'impact négatif sur
l'environnement ou sur la santé pouvant
être causé par un mauvais recyclage de ce
produit. Contactez les autorités locales, les
services de recyclage ou le magasin où vous
avez acheté ce produit pour obtenir plus
d'informations sur le recyclage de ce produit.
Page 34

34 www.electrolux.com
INDHOLD
FØR DU BRUGER DIN MIKROBØLGEOVN ............................................................ 35
VIGTIGE SIKKERHEDSINSTRUKSER ..................................................................... 35
INSTALLATION ....................................................................................................... 39
VEJLEDNING TIL OVNREDSKABER OG -TILBEHØR ............................................. 40
ANVENDELSE ........................................................................................................ 41
VEDLIGEHOLDELSE OG RENGØRING .................................................................. 48
TEKNISKE DATA .................................................................................................... 49
MILJØHENSYN ...................................................................................................... 49
SERVICEOPLYSNINGER ........................................................................................ 49
VI TÆNKER PÅ DIG
Tak for dit køb af et Electrolux-apparat. Du har valgt et produkt, som giver dig årtiers
professionel erfaring og innovation på én gang. Genialt og elegant. Det er designet
med dig i tankerne. Så uanset hvornår du bruger det, kan du være sikker på, at du får
fantastiske resultater hver gang. Velkommen til Electrolux.
Besøg vores websted for at:
Få rådgivning, brochurer, fejlfinding, serviceinformation:
www.electrolux.com
Registrere dit produkt for bedre service:
www.electrolux.com/productregistration
Købe tilbehør, forbrugsvarer og originale reservedele til dit apparat:
www.electrolux.com/shop
KUNDEPLEJE OG SERVICE
Vi anbefaler brugen af originale reservedele.
Sørg for at have følgende data tilgængelig, når du kontakter service.
Du finder oplysningerne på maskinens typeskilt. Model, PNC, Serienummer.
Advarsel /Forsigtig-Sikkerhedsanvisninger.
Generelle oplysninger og gode råd
Miljøoplysninger.
Ret til ændringer uden varsel forbeholdes.
Page 35

DANSK 35
FØR DU BRUGER DIN MIKROBØLGEOVN
Læs betjeningsvejledningen grundigt
igennem. For at få det bedste ud af din
nye Electrolux mikrobølgeovn er følgende
vejledning udarbejdet. Sørg for at læse
denne grundigt igennem.
Det er vigtigt, at denne brugsanvisning til
apparatet gemmes, så den kan bruges
til at slå op i. Hvis apparatet skifter ejer
eller overdrages til en anden, eller hvis
du sælger ejendommen, og apparatet
bliver stående, skal vejledningen altid
følge med apparatet, så den nye ejer
kan sætte sig ind i, hvordan det virker,
og være bekendt med de tilhørende
advarsler.
Sørg for at læse hele brugsanvisningen,
før du bruger apparatet og at følge de
givne anbefalinger.
VIGTIGE SIKKERHEDSINSTRUKSER
LÆS VEJLEDNINGEN
GRUNDIGT IGENNEM, OG GEM
DEN TIL SENERE BRUG
• De indbyggede sikkerhedsafbrydere
gør, at mikrobølgeovnen ikke kan
betjenes, når døren er åben.
• Pil ikke ved dem, og forsog ikke at
bruge ovnen, når døren er åben,
da det kan medføre udsættelse for
mikrobølgeenergi.
• Lad ikke spildt mad eller rester
af rengøringsmiddel samle sig
på tætningerne i døren. Vedr.
rengøring: Se afsnittet Rengøring og
vedligeholdelse.
• Det er isar vigtigt, at ovndoren slutter
tæt, og at der ikke er skader på:
(1) døren (skæv), (2) hængsler og låse
(i stykker eller løse), (3) dørens ramme
og pakninger.
ADVARSEL!:
Hvis døren, hængsler/låsearme
eller pakninger er defekte, må
mikrobølgeovnen ikke startes, før
den er repareret af en autoriseret
servicetekniker.
ADVARSEL!:
Det er farligt for alle andre end
serviceteknikere uddannet af
fabrikken at udføre service eller
justeringer på ovnen. Kontakt det
lokale serviceværksted ved behov
for service.
• Fjern aldrig det udvendige kabinet,
døren eller kontrolpanelet. Det kan
medføre udsættelse for ekstremt høj
spænding.
• Ovnen ma kun installeres eller
opstilles som beskrevet under
”Installationsvejledning” i denne
brugsvejledning.
• Ovnen ma kun bruges til det tiltænkte
formål, som det er beskrevet i
brugsvejledningen. Brug ikke ætsende
kemikalier i ovnen. Denne type ovn
er specielt beregnet til opvarmning,
tilberedning eller optøning af madvarer.
Den er ikke beregnet til brug i industri
og laboratorier eller erhvervsmæssig
brug, hvilket vil medføre, at garantien
bortfalder.
• Start aldrig en tom ovn. Magnetronen
kan tage skade, hvis der ikke
er mad eller vand til at optage
mikrobølgeenergien.
• Ovnen ma ikke opbevares udendors.
Dette produkt må ikke bruges tæt ved
vand.
• Forsog ikke at torre toj eller aviser
i mikrobølgeovnen. Den slags
materialer kan selvantændes.
• Brug ikke ovnrummet til opbevaring.
Lad ikke produkter af papir,
køkkenredskaber eller mad ligge i
ovnrummet, når ovnen ikke er i brug.
Page 36

36 www.electrolux.com
• Temperaturen pa de udvendige flader
kan være meget høj, når ovnen er i
brug.
ADVARSEL!:
Hvis der er synlig røg, skal ovnen
slukkes eller stikket tages ud, og
døren holdes lukket for at kvæle
eventuelle flammer. Brug aldrig
vand.
ADVARSEL!:
Børn elle svagelige personer må
kun bruge mikrobølgeovnen uden
tilsyn, hvis de i forvejen har fået
den nødvendige vejledning, så de
er i stand til at bruge mikroovnen
på sikker vis og er klar over
risikoen ved forkert brug.
Sikre køkkenredskaber
• Brug kun kokkenredskaber, der er
egnet til brug i en mikrobølgeovn.
• De fleste beholdere af glas,
glaskeramik og ovnfast glas er
særdeles velegnede til brug i
mikrobølgeovn. Selv om ting af glas
og keramik normalt ikke opvarmes
af mikrobølger, kan de blive varme,
fordi varmen overføres fra maden
til beholderen. Det tilrådes at bruge
ovnhandsker.
Afprøvning af kogegrejs
egnethed
• Kokkengrej skal kontrolleres for
at sikre, at det er egnet til brug i
mikrobølgeovne.
• Sat beholderen i mikrobolgeovnen
sammen med et glas, der er halvt fyldt
med vand. Opvarm på (900 W) (100%)
i ét minut. Hvis beholderen føles meget
varm, bør den ikke bruges. Hvis den
kun er lidt varm, kan den bruges til
opvarmning, men ikke til madlavning.
Hvis beholderen har stuetemperatur, er
den egnet til brug i mikrobølgeovn.
• Papirservietter, smorrebrodspapir,
køkkenrulle, tallerkener, kopper,
kartoner, frysefolie og pap kan
udmærket bruges. Sørg altid for,
at beholdere er fyldt med mad, der
kan optage energien, så der ikke
er risiko for overophedning eller
selvantændelse.
• Mange plastbakker, -kopper,
-frysebokse og plastfolier kan
bruges i mikrobølgeovnen. Følg
producentens vejledning, når der
bruges plastmateriale i ovnen Undgå at
bruge plastbeholdere til madvarer med
højt fedt- eller sukkerindhold, da de
kommer op på en høj temperatur, så
de kan smelte nogle typer plastik.
• Lad aldrig ovnen vare uden opsyn, og
kig jævnligt til den, når der opvarmes
eller tilberedes mad i beholdere af
plast, papir eller andet brændbart
materiale.
• Metalbeholdere og beholdere
med metalkanter bør ikke bruges
i mikrobølgeovnen, medmindre de
udtrykkeligt er anbefalet til brug i
mikrobølgeovn.
• Beholdere med snavre abninger,
sasom flasker, bor ikke bruges i
mikrobølgeovn.
• Var forsigtig, nar laget tages af et fad
eller en beholder. Fare for skoldning.
Foliebakker
Det er sikkert at bruge flade foliebakker
til opvarmning i mikrobølgeovnen, hvis
følgende regler overholdes:
1. Foliebakker må højst være 3 cm (1¼")
dybe.
2. Der må ikke bruges folielåg.
3. Foliebakkerne skal mindst være 2/3
fyldt med mad. Der må aldrig sættes
tomme foliebakker i ovnen.
4. Der må kun sættes én foliebakke
i mikrobølgeovnen ad gangen, og
den må ikke røre ovnens sider. Hvis
ovnen har metaldrejeskive eller -rist,
skal foliebakken stilles på en omvendt
ovnfast tallerken.
5. Foliebeholderne må aldrig genbruges i
mikrobølgeovnen.
Page 37

DANSK 37
6. Hvis mikrobølgeovnen har været i
brug i 15 minutter eller mere, skal den
afkøle, før den tages i brug igen.
7. Beholder og drejetallerken kan
blive varme under brug. Vær meget
forsigtig, når de tages ud af ovnen. Det
anbefales at bruge en grydelap eller en
ovnhandske.
8. Husk, at når der bruges en
alubakke, kan tilberednings- eller
opvarmningstiden være længere end
ellers. Kontroller altid, at maden er
rygende varm, inden den serveres.
Sikker madlavning
• Opvarm ikke maden i en dase i
mikrobølgeovnen. Hæld altid maden
over i en passende beholder.
• Mikrobolgeovnen ma ikke bruges
til friturestegning, fordi fedtstoffets
temperatur ikke kan styres, så der kan
opstå farlige situationer.
• Popcorn kan laves i mikrobolgeovnen,
men kun i specialpakninger eller
-beholdere, der er beregnet til formålet.
Forlad aldrig mikrobølgeovnen, mens
der laves popcorn.
• Prik madvarer med tat skind, skral eller
hinder for at undgå, at der opbygges
damp, så de springer. Abler, kartofler,
kyllingelever og æggeblommer er
eksempler på madvarer, der skal
prikkes.
• Indholdet i sutteflasker og glas med
babymad skal omrøres eller rystes,
og for at undgå forbrænding skal
temperaturen kontrolleres inden barnet
får det.
ADVARSEL!:
Væske eller andre madvarer må
ikke opvarmes i tæt lukkede
beholdere, da de så kan
eksplodere.
ADVARSEL!:
Når drikkevarer opvarmes i
mikrobølgeovn, kan der komme
en kraftig efterkogning. Vær derfor
forsigtig, når beholderen tages ud
af ovnen.
ADVARSEL!:
Når væske, f.eks. supper,
saucer og drikke, opvarmes i
mikrobølgeovn, kan de komme
over kogepunktet, uden at der er
synlige bobler. Det kan betyde, at
den varme væske pludselig koger
over. Det undgås på følgende
måde:
1. Undgå at bruge beholdere med
lige sider og snæver hals
2. Lad være med at overophede
væsken.
3. Rør rundt i væsken, inden
beholderen sættes i ovnen, og
endnu en gang, når halvdelen
af tiden er gået.
4. Lad beholderen stå i ovnen,
lidt efter at opvarmningen er
afsluttet, og rør rundt igen,
inden beholderen forsigtigt
tages ud.
ADVARSEL!:
Nogle produkter, f.eks. hele æg
og tæt forseglede beholdere –
såsom lukkede syltetøjsglas –
kan eksplodere og må ikke
opvarmes i ovnen.
Et udslået æg kan også
eksplodere under tilberedningen.
Prik altid blommen, læg låg over
ægget og lad det stå ét minut,
inden låget tages af.
Det er helt normalt, at der siver
damp ud rundt om døren,
at døren dugger eller at der
endda kommer vanddråber på
underkanten af døren, mens
ovnen er i gang. Det er blot
kondensvand fra den mad, der
opvarmes, og det gør ikke ovnen
mindre sikker at bruge. Døren er
ikke beregnet til at slutte helt tæt
til ovnrummet.
• Brug ikke handen til at dreje
drejetallerkenen med magt.
Det kan give funktionsfejl.
• Hvis der opstar en lysbue i
mikrobølgeovnen, skyldes det i reglen,
at der bruges metalbeholdere. Over
Page 38

38 www.electrolux.com
længere tid kan lysbuen imidlertid
skade ovnen. Stands programmet,
og kontroller beholderen.
• Pas pa, at der ikke kommer noget
i vejen for udluftningerne i toppen,
bunden, siderne og bag på ovnen.
ADVARSEL!:
Ovnen må ikke bruges til
erhvervsmæssige formål.
Ovnen er kun beregnet til
husholdningsbrug.
Instruktioner vedrørende
sikkerhed ved tilberedning
med grill-, varmluft- og
kombinationsfunktioner.
1. Ruden i glasdøren kan muligvis blive
knust, hvis der spildes vand på den
under tilberedning med grill eller
varmluft.
2. Brug en ovnhandske, når du sætter
noget ind eller tager noget ud af
ovnen. Beholdere bliver meget
varme i ovnen, så pas på, at du
ikke brænder dig. Drejetallerkenen
og grillristen bliver også meget
varme, så brug en ovnhandske ved
håndtering af disse.
3. Rør ikke ved den indvendige
eller udvendige rude i
mikrobølgeovndøren med
metalkomponenter, når du sætter
noget ind eller tager noget ud af
mikrobølgeovnen. Den indvendige
side af døren og mikrobølgeovnen
bliver meget varme, så pas på, når
du tilbereder mad i mikrobølgeovnen.
4. Læg ikke drejetallerkenen eller
beholdere i koldt vand eller lad dem
afkøle hurtigt efter brug, da de kan
gå i stykker.
5. Anbring ikke genstande ovenpå
kabinettet. Den øverste del af
kabinettet bliver meget varmt, så hvis
noget anbringes der, kan det blive
beskadiget af varmen.
6. Forvarm kun mikrobølgeovnen, hvis
du tilbereder med varmluft, aldrig
når du bruger mikrobølge- eller
kombinationsfunktioner (mikrobølge
og grill eller mikrobølge og varmluft).
ADVARSEL!:
Når apparatet bruges i
kombinationsfunktion, bør børn
kun bruge ovnen under opsyn
af voksne på grund af den
frembragte temperatur.
Opbevar disse anvisninger!
Page 39

DANSK 39
INSTALLATION
1. Fjern eventuelle mærkater på døren.
2. Ovnen skal installeres på en plan,
vandret flade. Den skal vare sa stærk,
at den til enhver tid kan bære vægten
(25 kg) af ovnen og dens indhold.
Ovnen skal stå stabilt, så den ikke
kan give rystelser eller støj.
3. Ovnen må ikke stå tæt på varme og
vand. Hvis den udsættes for varme
og vand, kan det nedsætte dens
effektivitet og give funktionsfejl. Sørg
derfor for at installere ovnen i god
afstand fra varme og vand.
4. Bloker ikke udluftningerne i toppen
og siderne af kabinettet, og stil
ikke ting oven på ovnen. Hvis
udluftningerne blokeres, mens ovnen
er i gang, kan den blive overophedet,
så der opstår fejlfunktioner. Der
kommer meget varm luft ud af
udluftningerne, så pas på ikke at
blokere dem. Lad f.eks. ikke gardiner
hænge ned mellem ovnens bagside
og væggen.
5. Stil ovnen længst muligt fra radioer
og fjernsynsapparater. Ovnen
overholder EU’s krav til dæmpning
af radiostøj, men hvis den står tæt
på en radio eller et fjernsyn, kan der
alligevel forekomme interferens – hold
derfor størst mulig afstand.
6. Hvis ovnen placeres i et hjørne, skal
den stå mindst 10 cm fra væggene,
og der skal være 30 cm fri plads
ovenover.
VIGTIGT! Ovnen kan stå næsten hvor
som helst i køkkenet. Sørg for at stille
ovnen pa en plan, vandret flade, og
pas på ikke at blokere udluftningerne
og ovnens bundplade (af hensyn til
tilstrækkelig ventilation).
Tilslutning til lysnet
Ovnen leveres med netledning og et stik
til en 230 V, 50 Hz stikkontakt med jord.
Jordforbindelsen mindsker risikoen i
tilfælde af kortslutning. Kontroller, at den
opgivne spænding på ovnen svarer til
forsyningsspændingen.
NB: Hvis der bruges forlængerledning,
når ovnen tilsluttes kontakten, skal
forlængerledningen også have jord.
Ovnen må ikke bruges med
et forsyningsnetuden jord.
Kontakt en elektriker, hvis
der er usikkerhed om den
elektriske tilslutning af ovnen,
eller om husinstallationen er
forsynet med jord.
Apparatet skal tilsluttes
jord. Hvis ovnen har et
støbt stik, der ikke passer
til stikkontakten, skal det af
sikkerhedsgrunde udskiftes
af producenten, dennes
serviceværksted eller en
installatør med tilsvarende
kvalifikationer.
Hvis netledningen er
beskadiget, skal den af
sikkerhedsgrunde udskiftes
af producenten, dennes
serviceværksted eller en
tekniker med tilsvarende
kvalifikationer.
Page 40

40 www.electrolux.com
VEJLEDNING TIL OVNREDSKABER OG -TILBEHØR
En række forskellige redskaber,
beholdere og materialer kan bruges
til madlavning i mikrobølgeovn Vælg
redskaber, beholdere og materialer, der
er egnet til tilberedningsmåden, både
af sikkerhedsgrunde og for at undgå,
at redskaberne bliver ødelagt.
Den følgende liste er kun vejledende.
Funktionsmåde
Materiale Køkkengrej
Keramik
Pyrex Ja Ja Ja Ja
Mikro-
bølgeovn Grill Varmluft
Kombi-
nation
& glas
Ovnfast glas Ja
Glas med
Nej Nej Nej Nej
1)
Ja Ja
1)
Ja
1)
metaldekoration
Blykrystalglas Nej Nej Nej Nej
Porcelæn Uden metaldekoration Ja Ja Nej Nej
2)
Stentøj
Plastik Ovnfast i
Ja Ja Ja Ja
Ja Nej Nej Nej
mikrobølgeovn
Plastfolie Ja Nej Nej Nej
Metal Bradepande Nej Ja Ja Nej
Aluminiumsfolie
Papir Bægre, tallerkener,
3)
Ja Ja Ja Ja
Ja Nej Nej Nej
køkkenruller
Smørrebrødspapir Ja Nej Nej Nej
Træ Nej Nej Nej Nej
Tilbehør Grillrist Nej Ja Ja Ja
Drejetallerken Ja Ja Ja Ja
Ring til drejetallerken Ja Ja Ja Ja
JA: Køkkengrej og tilbehør, der kan bruges.
NEJ: Køkkengrej og tilbehør, der skal undgås.
1)
Kun hvis det ikke har metaldele.
2)
Kun uglaseret eller med ikke-metalholdig glasur.
3)
BEMÆRK: Brug kun alufolie til afdækning – hvis der bruges for meget, kan det danne lysbue
i ovnen.
Udpakning
NB: Kontroller ved udpakning, at
ovnen er fri for skader. Underret straks
forhandleren, hvis der er skader eller
mangler dele. Ovn, ovndele eller
tilbehørsdele kan være indpakket i
beskyttelsesfolie. I så fald skal folien
fjernes, inden ovnen tages i brug. Lad
ikke emballage ligge, så små børn kan
lege med den. Det kan være farligt.
Page 41

DANSK 41
ANVENDELSE
BESKRIVELSE AF APPARATET
Sådan betjenes din mikrobølgeovn
6
7
Dele – navn og funktion
1
Betjeningspanel
2
Drejetallerkenens drivaksel
3
Ring til drejetallerken samt hjul.
Anbringes i bunden af ovnen for at
understøtte drejetallerkenen
4
Drejetallerken af glas. Madvarer i
passende beholdere anbringes på
denne bakke for tilberedning. Brug
ikke ovnen uden drejetallerkenen
5
6
7
8
9
1
3 4 52
9
8
Vindue. Madvarerne kan ses
gennem denne rude under
tilberedning
Ovndør og pakning. Ovndøren
skal altid være lukket under
tilberedningen og siderne fri for
snavs og ophobning af mad
Låsekrog
Stativ
Grill
Montering af drejetallerken
1. Sørg for, at drejetallerkenens
drivaksel er placeret i hullet i bunden
af ovnen og i indgreb med ”D”
motordrevakslen
2. Sæt ringen til drejetallerkenen
og hjulene på, så disse sidder
koncentrisk med drivakslen
3. Sæt glasdrejetallerkenen på ringen
til drejetallerkenen og hjulet, og
drej forsigtigt indtil, den placeres i
drivakslen
NB:
• Sat aldrig drejetallerkenen omvendt
på.
• Drejetallerken, ring og drivaksel skal
bruges under tilberedningen.
• Mad og beholdere med mad skal altid
sættes på drejetallerkenen
• Drejetallerkenen kan dreje med uret
og mod uret. Det er normalt.
Page 42

42 www.electrolux.com
Betjeningspanel
EMS30400OX
1 Madlavningsfunktion: vælg
1
mikrobølgeeffekt, grill, varmluft
eller kombinationstilberedning.
2
2 Effektniveau: vælg det
ønskede mikrobølge-
3
effekttrin
3 Automatisk genopvarmning:
vælg den ønskede
4
genopvarmningsfunktion
4 Optøning: vælg optøning efter
vægt eller tid
5 Vinduesvisning: viser
tilberedningstid, effekttrin,
tilberedningsfunktion og tid på
5
dagen
6 Ur:
indstil tidspunktet på dagen og
udskudt start
7 Stop/ryd:
Stop eller sæt mikrobølgeovnprogrammet på pause,
eller afslut indstillingen for
tilberedningsprogrammet
6
8 Start/fortsæt:
start mikrobølgeovnen
9 Funktionsvælger:
7
vælg tilberedningsfunktion og tid
Displayvisninger
8
9
I displayvisninger får du vist
tilberedningsfunktion, tilberedning ved
varmluftstemperatur og automatisk
tilberedning.
Indstilling af uret
Når netledningen er tilsluttet, viser
displayet ”0.00”, og summeren går i
gang. Følg disse trin for at indstille uret.
1. Tryk på urknappen for at vælge
12 eller 24-times tid.
Page 43

DANSK 43
2. Drej funktionsvælgeren for at justere
timerne.
3. Tryk på urknappen for at bekræfte
timerne. Indikatoren for minutter
blinker.
4. Drej funktionsvælgeren for at justere
minutterne.
5. Tryk på urknappen for at bekræfte
minutterne og færdiggøre
urindstillingen.
Tilberedning i mikrobølgeovn
1. Åbn døren, og sæt maden på
drejetallerkenen. Luk døren.
2. Tryk på effekttrin-knappen det
ønskede antal gange, som angivet i
Oversigt over effekttrin.
3. Drej funktionsvælgeren for at justere
tilberedningstiden.
4. Tryk på Start/fortsæt-knappen for at
starte tilberedningen.
Oversigt over effekttrin
Tryk på
effekttrinknappen
1 gang 100% 900 Kogning eller opvarmning af væske.
2 gange 80% 720 Genopvarmning af retter i fade,
3 gange 50% 450 Hurtigere optøning af retter i fad.
4 gange 30% 270 Simre. Opvarmning af creme- og
5 gange 10% 90 Holde mad varm
Mikrobølgeovn-effekt Watt Anbefalet brug
Kogning af grøntsager. Forvarmning af
et stegefad
sammenkogte og forkogte retter.
Stegning af kødstykker med ben samt
fjerkræ
Bagning af muffins og sukkerbrødsdej
ostekager
Tilberedning på grill
1. Åbn døren, sæt grillristen på
drejetallerkenen og maden på
grillristen. Sæt en metalfri plade
under grillristen for at opfange evt.
spild eller kødsaft for at minimere
rengøringen. Luk døren.
2. Tryk på funktionsvælgeren én gang.
Displayet blinker ”140”.
3. Drej funktionsvælgeren for at vælge
grillfunktionen ”G-1”.
4. Tryk på Start/fortsæt-knappen for at
bekræfte, at ”G-1” vises.
5. Drej funktionsvælgeren for at justere
tilberedningstiden.
6. Tryk på Start/fortsæt-knappen for at
starte tilberedningen.
Bemærk
For at få et bedre resultat af
grillfunktionen, kan du vende maden
halvvejs gennem grillstegeperioden.
Ovnen summer to gange for at
angive, at den er halvvejs gennem
grillstegeperioden. Åbn døren, og vend
maden. Luk døren, og tryk på Start/
fortsæt-knappen. Hvis du ikke åbner
døren for at vende maden, fortsætter
mikrobølgeovnen med at grillstege
maden.
Tilberedning med varmluft
Ovnen har en varmluftsovnfunktion,
som giver dig mulighed for at tilberede
maden som i en almindelig ovn.
Mikrobølgeeffekt anvendes ikke.
Page 44

44 www.electrolux.com
Vi anbefaler, at du forvarmer ovnen
til den relevante temperatur, før du
sætter maden i ovnen. Når ovnen når
den relevante temperatur, holder den
temperaturen i 5 minutter. Hvis ovndøren
ikke åbnes inden for denne tid, slukker
mikrobølgeovnen selv.
Sådan forvarmes ovnen for
tilberedning med varmluft
1. Tryk på funktionsvælgeren én gang.
Displayet blinker ”140”.
2. Drej funktionsvælgeren for at vælge
varmluftfunktionen.
3. Vælg varmluftsovnens temperatur
ved at fortsætte med at dreje
funktionsvælgeren. Temperaturinterval
– 140 – 230 °C.
4. Tryk på Start/fortsæt-knappen for at
bekræfte temperaturen.
5. Tryk på Start/fortsæt-knappen igen
for at starte forvarmning. Når den
relevante temperatur er nået, lyder
summeren to gange for at huske dig
på, at du har sat maden i ovnen. Den
relevante temperatur blinker.
6. Sæt maden i ovnen, og luk døren.
7. Drej funktionsvælgeren for at justere
tilberedningstiden.
8. Tryk på Start/fortsæt-knappen for at
starte tilberedningen.
Bemærk
Hvis du vil bruge forvarmning i stedet for
at trykke på Start/fortsæt-knappen, som
i punkt 4 af Tilberedning af varmluft, skal
du dreje funktionsvælgeren for at justere
tilberedningstiden.
Bemærk
Blæseren fortsætter i nogle få minutter i
slutningen af varmluftprogrammet for at
afkøle ovnen.
Kombinationstilberedning
Med denne ovn kan du kombinere
mikrobølgeeffekt, grill og varmluft. Der er
fire forudindstillede kombinationer.
Sådan bruges
kombinationstilberedning
1. Åbn døren, og sæt maden på
drejetallerkenen. Luk døren.
2. Tryk på funktionsvælgeren én gang.
Displayet blinker ”140”.
3. Drej funktionsvælgeren for at vælge
kombinationerne ”C-1”, ”C-2”, ”C-3”,
”C-4”, se tabellen nedenfor
4. Tryk på Start/fortsæt-knappen for at
bekræfte kombinationen.
5. Drej funktionsvælgeren for at justere
tilberedningstiden
6. Tryk på Start/fortsæt-knappen for at
starte tilberedningen.
Kombinationstilberedning
Visning
C-1
C-2
C-3
C-4
Mikro-
bølgeovn Grill Varmluft
165°C
200°C
200°C
Tilberedning i flere trin
Der kan indstilles op til tre faser i
tilberedningen med dette apparat. Hvis
én af faserne er optøning, skal denne
fase indstilles som den første.
Summeren giver et signal efter hver fase,
og den næste fase starter automatisk.
Eksempel:
Hvis du vil tilberede med 100%
mikrobølgeeffekt i 10 minutter, derefter
80% mikrobølgeeffekt i 5 minutter, skal
du følge disse trin.
1. Åbn døren, og sæt maden på
drejetallerkenen. Luk døren.
2. Tryk på effekttrin-knappen én gang
for at vælge 100% effekt.
3. Drej funktionsvælgeren for at justere
tilberedningstiden til 10 minutter.
4. Tryk på effekttrin-knappen to gange
for at vælge 80% mikrobølgeeffekt.
5. Drej funktionsvælgeren for at justere
tilberedningstiden til 5 minutter.
6. Tryk på Start/fortsæt-knappen for at
starte tilberedningen.
Page 45

DANSK 45
Udskudt start
Der kan programmeres op til tre faser
for en udskudt start.
Eksempel:
Hvis du vil tilberede maden med 80%
mikrobølgeeffekt i 15 minutter med
udskudt start, skal du følge disse trin.
1. Åbn døren, og sæt maden på
drejetallerkenen. Luk døren.
2. Tryk på effekttrin-knappen to gange
for at vælge 80% mikrobølgeeffekt.
”P80” vises.
3. Drej funktionsvælgeren for at justere
tilberedningstiden til 15 minutter.
4. Tryk på urknappen. Timetallene
blinker.
5. Drej funktionsvælgeren for at justere
timerne.
6. Tryk på urknappen. Minuttallene
blinker.
7. Drej funktionsvælgeren for at justere
minutterne.
8. Tryk på Start/fortsæt-knappen for
at afslutte indstillingen. Displayet
viser ”:”. Når den indstillede tid
nås, lyder summeren to gange, og
tilberedningen starter automatisk.
Optøning efter vægt
1. Åbn døren, og sæt maden på
drejetallerkenen. Luk døren.
2. Tryk på optøningsknappen én gang.
”d-1” vises.
3. Drej funktionsvælgeren for at justere
vægten i gram.
4. Tryk på Start/fortsæt-knappen for at
starte optøningen.
Optøning efter tid
1. Åbn døren, og sæt maden på
drejetallerkenen. Luk døren.
2. Tryk på optøningsknappen to gange.
”d-2” vises.
3. Drej funktionsvælgeren for at justere
optøningstiden.
4. Tryk på Start/fortsæt-knappen for at
starte optøningen.
Bemærkninger
• Hvis du ikke er sikker, er det bedre
at undervurdere optøningstiden.
Fødevaren fortsætter med at optø
under hviletiden.
• Adskil fodevaren sa hurtigt som
muligt.
• Vend store portioner, f.eks. stege,
halvvejs gennem optøningstiden.
• Abn og/eller fjern emballagen for
optøning.
• Anbring fodevaren i en beholder, der
er stor nok til, at man nemt kan røre
i den.
• Begynd optoning af fjerkra med
brystsiden nedad, og vend den
halvvejs gennem optøningstiden.
Sarte områder, såsom vingespidser,
kan afdækkes med små stykker af
glat folie.
• Hviletiden er meget vigtig, isar
for store tætte madvarer, der
ikke kan omrøres. Dette sikrer, at
midten af maden er helt optøet før
tilberedningen.
Automatisk tilberedning
Mikrobølgeovnen har et antal
forudindstillede opskrifter til automatisk
tilberedning, hvilket giver dig mulighed
for den korrekte tilberedning af
fødevaren.
1. Åbn døren, og sæt maden på
drejetallerkenen. Luk døren.
2. Drej funktionsvælgeren for at
vælge opskriften til den automatisk
tilberedning.
3. Tryk på Start/fortsæt-knappen
for at bekræfte opskriften til den
automatiske tilberedning.
4. Drej funktionsvælgeren for at justere
fødevarens vægt.
5. Tryk på Start/fortsæt-knappen for at
bekræfte vægten.
Se tabel for opskrifter til automatisk
tilberedning
Page 46

46 www.electrolux.com
Forudindstillede opskrifter til automatisk tilberedning
Menu Vægt (g) Visning Funktion og booster
Fisk
Suppe
Kød
Brød
Pizza
Kage 475 475
Pasta
Kylling
Grøntsager
Kartofler
150 150
250 250
350 350
450 450
650 650
200 ml 200
600 ml 600
300 300
500 500
700 700
900 900
1100 1100
50 50
150 150
200 200
300 300
400 400
50 med vand 450 g 50
150 med vand 1.200 g 150
500 500
750 750
1000 1000
1200 1200
150 150
500 500
230 1
690 3
Mikrobølgeovn 80% effekt
Mikrobølgeovn 100% effekt400 ml 400
C-2
G-1 Grill100 100
C-4 30% mikrobølgeovn
70% grill og varmluft 200°C
Varmluft 180°C
*Se bemærkning
Mikrobølgeovn 80% effekt100 med vand 800 g 100
C-4 30% mikrobølgeovn
70% grill og varmluft 200°C
Mikrobølgeovn 100% effekt350 350
Mikrobølgeovn 100% effekt460 2
Bemærk
De kageopskrifter, der er til 180°C
varmluft, skal have forvarmning. Når
ovnen er forvarmet, og har nået 180°C,
lyder summeren for at minde dig om, at
du skal åbne døren for at sætte kagen i
ovnen. Tryk derefter på Start/fortsæt for
at starte bagningen.
Page 47

DANSK 47
Automatisk genopvarmning
Funktionen er med til, at du
nemt kan opvarme mad med
mikrobølgeeffekt. Tiden og effekttrin er
forudindstillede. Nedenstående tabel
viser forskellen mellem automatiske
genopvarmningsfunktioner.
1. Åbn døren, og sæt maden på
drejetallerkenen. Luk døren.
2. Tryk på knappen til automatisk
genopvarmning for at vælge ”h-1”,
”h-2”, ”h-3” eller ”h-4”
3. Drej funktionsvælgeren for at vælge
vægt.
4. Tryk på Start/fortsæt-knappen for at
starte genopvarmningen.
Automatiske
genopvarmningsfunktioner
Menu Vægt (g) Visning
h-1
Automatisk
genopvarmning
h-2
Middagstallerken
h-3
Drikkevarer/Kaffe1ca. 240 g
h-4
Muffins/Boller
150 150
250 250
350 350
450 450
600 600
250 250
350 350
450 450
2
ca. 480 g
3
ca. 720 g
1
ca. 70 g
2
ca. 140 g
3
ca. 210 g
1
2
3
1
2
3
Hurtig start
Tryk på Start/fortsæt-knappen for at
stege med 100% mikrobølgeeffekttrin i
30 sekunder. Hver gang du trykker på
Start/fortsæt-knappen, øges tiden med
30 sekunder.
Statusfunktion
• Under tilberedningen kan du trykke på
effekttrin-knappen for at se det aktuelle
effekttrin.
• Nar du trykker pa urknappen, vises
den aktuelle tid.
• Nar den udskudte start er angivet,
skal du trykke på urknappen for at se
tidspunktet, hvor tilberedningen starter.
Børnelås
Tryk på Stop/ryd-knappen i
3 sekunder. Der lyder et langt bip, og
låseindikatoren lyser, hvilket angiver, at
mikrobølgeovnens knapper er blevet låst.
Tryk på Stop/ryd-knappen i 3 sekunder
for at låse op. Der lyder et langt bip,
og låseindikatorens lys slukker, hvilket
angiver, at mikrobølgeovnens knapper er
blevet låst op.
Stoppe ovnen
Der er to måder at stoppe ovnen, mens
den er i brug.
1. Tryk på Stop/ryd-knappen.
Du kan genstarte ovnen ved at trykke
på Start/fortsæt-knappen.
Ved at trykke på Stop/ryd-knappen
igen annulleres det aktuelle program.
2. Åbn døren.
Du kan genstarte ovnen ved at lukke
døren og trykke på Start/fortsætknappen.
Ved at trykke på Stop/ryd-knappen
igen annulleres det aktuelle program.
Page 48

48 www.electrolux.com
VEDLIGEHOLDELSE OG RENGØRING
Ovnen skal altid holdes ren. Rester
fra overkogning eller sprøjt tiltrækker
mikrobølgeenergi, så resterne brænder
fast Det kan gøre ovnen mindre effektiv
og give dårlig lugt. Pil ikke ved ovnen, og
forsøg ikke selv at justere eller reparere
nogen af ovnens dele. Reparationer
må kun udføres af en autoriseret
servicetekniker.
Sørg altid for at tage stikket ud af
kontakten, inden ovnen rengøres.
ADVARSEL! Hvis du ikke holder
ovnen ren, kan det føre til en
forringelse af overfladen, der
negativt kan påvirke apparatets
levetid og muligvis resultere i en
farlig situation
Rengøring af tilbehøret
(drejetallerken og ring)
Inden rengøring tages tilbehørsdele ud af
ovnrummet, hvorefter de rengøres med
mildt opvaskemiddel Vær forsigtig ved
håndtering af ringen til drejetallerkenen.
BEMÆRK:
Drejetallerkenens og ovnens
indvendige sider bliver meget
varme, så rør dem ikke lige efter
brugen.
Indvendig rengøring
Hold altid ovnen ren indvendig Tør straks
spild og stænk af. Hvis madrester får
lov at blive siddende på ovnrummets
vægge, dørpakningen og døren, kan de
nedsætte ovnens effekt og beskadige
de indvendige dele. Belægninger fjernes
med mildt flydende opvaskemiddel,
varmt vand og en blød, ren klud.
BRUG ALDRIG SLIBENDE
RENGØRINGSMIDLER,
ALMINDELIG OVNRENS ELLER
STÅLULDSSVAMPE PÅ NOGEN
DELE AF MIKROBØLGEOVNEN.
Fastbrændte madrester løsnes ved at
koge en kop vand i ovnen i 2-3 minutter.
BRUG ALDRIG EN KNIV ELLER
ET ANDET REDSKAB TIL AT
FJERNE RESTER PÅ OVNENS
OVERFLADER.
Lugt i ovnrummet fjernes ved at koge
en kop vand tilsat 2 spsk. citronsaft
i 5 minutter. Drejetallerkens motor
er forseglet. Ikke desto mindre
skal du være omhyggelig med at
undgå, at vandet trænger ind under
drejetallerkenens aksel, når bunden af
ovnen rengøres.
Rengøring af grillen
Elementet kan blive plettet med
fedtstænk eller olie, mens ovnen er i
brug. Vent, indtil ovnrummet er afkølet,
og tør oliestænket af, før ovnes bruges
næste gang. Pletter på grillen kan
forårsage ubehagelige lugte og røg.
Udvendig rengøring
Åbn ovndøren, mens betjeningspanelet
rengøres. Det sikrer, at man ikke kan
komme til at starte ovnen. Ovnens
udvendige flader rengores med mildt
flydende opvaskemiddel og vand.
Derefter fjernes overskydende sæbe
med en klud opvredet i rent vand.
Tør efter med en blød klud.
Vinduesspray eller universalkøkkenspray kan også bruges. Brug
aldrig slibende rengøringsmidler,
skuresvampe eller skrappe kemikalier
pa ovnens udvendige flader. Undga, at
der siver vand ind i udluftninger, som
kan skade ovnens arbejdende dele.
Page 49

DANSK 49
TEKNISKE DATA
Vekselspænding 230 - 50 Hz
Strømforbrug 1.450 W
Mikrobølgeeffekt 900 W
Grilleffekt (kvarts) 1.100 W
Varmluftseffekt 2.300 W
Samlet maksimal effekt 2.350 W
Drejetallerkenens diameter 315 mm
Produktmål (h x b x d) 335 mm x 520 mm x 510 mm
Ovnens rumfang 30 liter
Vægt 19,3 kg
MILJØHENSYN
Symbolet på produktet eller på
pakken angiver, at dette produkt ikke må
behandles som husholdningsaffald.
Det skal i stedet overgives til en
affaldsstation for behandling af elektrisk
og elektronisk udstyr. Ved at sørge
for at dette produkt bliver bortskaffet
på den rette måde, hjælper du med
til at forebygge eventuelle negative
SERVICEOPLYSNINGER
Reklamationsret / Fejl og mangler /
Afhjælpningsret
I det i lovgivningen pålagte omfang
udbedres vederlagsfrit fejl og mangler
ved dette produkt iht. reglerne omkring
reklamationsret. Service indenfor
reklamationsperioden udføres af vort
serviceselskab Electrolux Service A/S.
Se telefonnummer i afsnittet ”Service og
reservedele”.
Omfang og bestemmelser
Når produktet er købt som fabriksnyt
i Danmark afhjælpes fabrikations- og
materialefejl, der konstateres ved
påvirkninger af miljøet og af personers
helbred, der ellers kunne forårsages af
forkert bortskaffelse af dette produkt.
Kontakt det lokale kommunekontor,
affaldsselskab eller den forretning,
hvor produktet er købt, for yderligere
oplysninger om genanvendelse af dette
produkt.
apparatets normale brug i privat
husholdning her i landet.
For Grønland og Færøerne gælder
særlige bestemmelser. Såfremt
Electrolux Service A/S skønner det
nødvendigt, at produktet indsendes
til værksted, sker indsendelse og
returnering for vor regning og risiko.
Reklamationsretten omfatter ikke:
Afhjælpning af fejl, mangler eller
skader, der direkte eller indirekte kan
tilskrives uhensigtsmæssig behandling,
misbrug, fejlbetjening, forkert tilslutning
eller opstilling, ændringer i produktets
elektriske/mekaniske
dele, fejl i
Page 50

50 www.electrolux.com
forsyningsnettes elektriske installationer
eller defekte sikringer. Reklamationsretten
dækker ikke uberettiget tilkald af service
eller tilkald, hvor der ikke er fejl eller
mangler ved det leverede produkt.
Hvis et servicebesøg ikke er dækket af
reklamationsretten, vil der blive udstedt
faktura for et servicebesøg – også under
reklamationsperioden – iht. lovgivningen.
Prisen for et servicebesøg kan variere
i produktets levetid. Den aktuelle pris
kan til enhver tid oplyses hos Electrolux
Service A/S. Nærværende bestemmelser
fratager
Dem ikke adgang til at gøre et eventuelt
ansvar efter købeloven gældende overfor
den forhandler, hvor produktet er købt.
Deres reklamation til os virker samtidig
som reklamation overfor den forhandler,
hvor produktet er købt.
Produktansvar
Dette produkt er omfattet af ”Lov om
produktansvar”. Denne lov gælder
for skader på andre ting og for
personskader, som skyldes fejl ved selve
det installerede produkt.
Forbehold
Produktansvaret gælder ikke, hvis den
pagaldende skade skyldes et eller flere
af følgende forhold:
• At produktets installation ikke er
udført i overensstemmelse med vor
installationsanvisning.
• At produktet er anvendt til andet
formål end beskrevet.
• At de i denne brugs- og
installationsanvisning nævnte
sikkerhedsregler ikke er blevet fulgt.
• At en reparation er foretaget
af andre end vor autoriserede
serviceorganisation.
• At der er brugt uoriginale reservedele.
• At skaden er en transportskade, som
måtte være opstået ved en senere
transport f.eks ved flytning eller
videresalg.
• At skaden skyldes en form for
anvendelse, som strider mod
almindelig sund fornuft.
Service
Bestilles hos Electrolux Service A/S
på Telefon 70 11 74 00 eller
Fax 87 40 36 01
Reservedele
Private bestiller hos nærmeste forhandler
eller på telefon 86 25 02 11 og
forhandlere bestiller på telefon
45 88 77 55. Reservedele og tilbehør
kan også bestilles on-line på
http://www.electrolux.dk
Europæisk Garanti
Electrolux yder garanti på dette apparat
i de lande, der står på listen bagest i
denne vejledning, og i den periode, der
er fremgår af apparatets garantibevis
eller ifolge lovens krav. Hvis De flytter fra
et af landene på listen til et andet land
på listen, følger garantien med, dog med
følgende forbehold:-
• Startdatoen for garantien er den dato,
hvor apparatet oprindelig blev købt.
Der skal fremvises gyldig kvittering for
købet, udstedt af den forhandler, som
apparatet er købt hos.
• Mht. arbejdslon og reservedele
dækker garantien på apparatet det
tidsrum og i det omfang, som gælder
for den pågældende model eller
produktgruppe i det nye opholdsland.
• Garantien er personlig og dakker kun
apparatets oprindelige køber. Den kan
ikke overdrages til en anden bruger.
• Apparatet skal installeres og
anvendes i overensstemmelse med
den vejledning, som Electrolux har
udgivet, og det må kun bruges
i husholdningen, dvs. ikke til
erhvervsmæssige formål.
• Ved installationen skal alle galdende
love og bestemmelser i det nye
opholdsland overholdes.
Bestemmelserne i denne Europæiske
Garanti påvirker ikke de rettigheder, De
evt. har ifølge loven.
Page 51

Page 52

17 www.electrolux.com
ﺔﻴﻨﻔﻟﺍ ﺕﺎﻣﻮﻠﻌﻤﻟﺍ
ﺩﺩﺮﺘﻤﻟﺍ ﺭﺎﻴﺘﻟﺍ ﺪﻬﺟﺰﺗﺮﻫ 50 - 230
ﺔﻗﺎﻄﻟﺍ ﻙﻼﻬﺘﺳﺍﺕﺍﻭ 1,450
ﻒﻳﻭﻭﺮﻜﻴﻤﻟﺍ ﺔﻗﺎﻃﺕﺍﻭ 900
(ﻭﺮﻣ) ﺔﻳﺍﻮﺸﻟﺍ ﺔﻗﺎﻃﺕﺍﻭ 1,100
ﻱﺭﺍﺮﺤﻟﺍ ﻞﻤﺤﻟﺍ ﺔﻗﺎﻃﺕﺍﻭ 2,300
ﺔﻄﻠﺘﺨﻤﻟﺍ ﺔﻗﺎﻄﻠﻟ ﻰﺼﻗﻷﺍ ﺪﺤﻟﺍﺕﺍﻭ 2,350
ﺭﺍﻭﺪﻟﺍ ﺹﺮﻘﻟﺍ ﺮﻄﻗﻢﻠﻣ 315
(ﻖﻤﻌﻟﺍ × ﺽﺮﻌﻟﺍ × ﻉﺎﻔﺗﺭﻻﺍ) ﺞﺘﻨﻤﻟﺍ ﺩﺎﻌﺑﺃﻢﻠﻣ 510 × ﻢﻠﻣ 520 × ﻢﻠﻣ 335
ﻥﺮﻔﻟﺍ ﺔﻌﺳﺮﺘﻟ 30
ﻥﺯﻮﻟﺍﻢﺠﻛ 19,3
ﺔﻴﺌﻴﺒﻟﺍ ﺎﻳﺎﻀﻘﻟﺍ
ﻦﻣ ﺪﻳﺰﻣ ﻰﻠﻋ ﻝﻮﺼﺤﻠﻟ ﺞﺘﻨﻤﻟﺍ ﺎﻬﻨﻣ ﺖﻳﺮﺘﺷﺍ ﻲﺘﻟﺍ
.ﺞﺘﻨﻤﻟﺍ ﺍﺬﻫ ﺮﻳﻭﺪﺗ ﺓﺩﺎﻋﺇ ﻝﻮﺣ ﺕﺎﻣﻮﻠﻌﻤﻟﺍ
ﻡﺪﻋ ﻰﻟﺇ ﻪﻓﻼﻏ ﻭﺃ ﺞﺘﻨﻤﻟﺍ ﻰﻠﻋ ﺩﻮﺟﻮﻤﻟﺍ ﺰﻣﺮﻟﺍ ﺮﻴﺸﻳ
.ﺔﻴﻟﺰﻨﻣ ﺔﻳﺎﻔﻨﻛ ﺯﺎﻬﺠﻟﺍ ﻦﻣ ﺺﻠﺨﺘﻟﺍ
ﺔﺠﻟﺎﻌﻤﻟ ﺮﻳﻭﺪﺘﻟﺍ ﺓﺩﺎﻋﺇ ﺰﻛﺮﻣ ﻰﻟﺇ ﻪﺑﺎﺤﻄﺻﺍ ﺐﺠﻳ ﺚﻴﺣ
ﻦﻣ ﺪﻛﺄﺘﻟﺍ ﻝﻼﺧ ﻦﻣﻭ .ﺔﻴﻧﻭﺮﺘﻜﻟﻹﺍﻭ ﺔﻴﺋﺎﺑﺮﻬﻜﻟﺍ ﺕﺍﺪﻌﻤﻟﺍ
ﻰﻠﻋ ﺪﻋﺎﺴﺗ ﺖﻧﺄﻓ ،ﺢﻴﺤﺻ ﻞﻜﺸﺑ ﺞﺘﻨﻤﻟﺍ ﺍﺬﻫ ﻦﻣ ﺺﻠﺨﺘﻟﺍ
ﻱﺬﻟﺍﻭ ﺹﺎﺨﺷﻷﺍ ﺔﺤﺻ ﻭﺃ ﺔﺌﻴﺒﻟﺍ ﻰﻠﻋ ﻲﺒﻠﺳ ﺮﻴﺛﺄﺗ ﻱﺃ ﻊﻨﻣ
.ﺞﺘﻨﻤﻟﺍ ﺍﺬﻫ ﻦﻣ ﺢﻴﺤﺼﻟﺍ ﺮﻴﻏ ﺺﻠﺨﺘﻟﺍ ﺔﺠﻴﺘﻧ ﺞﺘﻨﻳ ﺪﻗ
ﺔﻛﺮﺸﻟﺍ ﻭﺃ ﺕﺎﻳﺎﻔﻨﻟﺍ ﺔﻛﺮﺷ ﻭﺃ ﺔﻴﻠﺤﻤﻟﺍ ﺕﺎﻄﻠﺴﻟﺎﺑ ﻞﺼﺗﺍ
Page 53

ﺔﻴﺑﺮﻌﻟﺍ 16
ﻒﻴﻈﻨﺘﻟﺍﻭ ﺔﻳﺎﻨﻌﻟﺍ
ﺏﻮﻛ ﻥﺎﻴﻠﻏ ﻖﻳﺮﻃ ﻦﻋ ﺔﺒﻌﺼﻟﺍ ﻡﺎﻌﻄﻟﺍ ﺎﻳﺎﻘﺑ ﺖﻴﺘﻔﺗ ﻦﻜﻤﻳ
.ﻖﺋﺎﻗﺩ ﺙﻼﺛ ﻰﻟﺇ ﻦﻴﺘﻘﻴﻗﺩ ﺓﺪﻤﻟ ﻥﺮﻔﻟﺍ ﻲﻓ ءﺎﻤﻟﺍ ﻦﻣ
ﺎﻳﺎﻘﺑ ﺔﻟﺍﺯﻹ ﻯﺮﺧﺃ ﺓﺍﺩﺃ ﺔﻳﺃ ﻭﺃ ﺔﻨﻴﻜﺳ ﻡﺍﺪﺨﺘﺳﺍ ﺮﻈﺤﻳ
ﻥﺮﻔﻠﻟ ﻲﻠﺧﺍﺪﻟﺍ ءﺰﺠﻟﺍ ﻦﻣ ﺔﻬﻳﺮﻜﻟﺍ ﺢﺋﺍﻭﺮﻟﺍ ﺔﻟﺍﺯﺇ ﻦﻜﻤﻳ
ﻦﻴﺘﻘﻌﻠﻣ ﺔﻓﺎﺿﺇ ﻊﻣ ءﺎﻤﻟﺍ ﻦﻣ ﺏﻮﻛ ﻦﻴﺨﺴﺗ ﻖﻳﺮﻃ ﻦﻋ
ﻙﺮﺤﻣ ﻖﻠﻏ ﻢﺘﻳ ،ﻖﺋﺎﻗﺩ ﺲﻤﺧ ﺓﺪﻤﻟ ﻥﻮﻤﻴﻠﻟﺍ ﺮﻴﺼﻋ ﻦﻣ
ﺐﻨﺠﺘﻟ ﺭﺬﺤﻟﺍ ﻲﺧﻮﺗ ﺐﺠﻳ ،ﻚﻟﺫ ﻊﻣﻭ .ﺭﺍﻭﺪﻟﺍ ﺹﺮﻘﻟﺍ
ﻒﻴﻈﻨﺗ ﺪﻨﻋ ﺭﺍﻭﺪﻟﺍ ﺹﺮﻘﻟﺍ ﺩﻮﻤﻋ ﻞﻔﺳﺃ ﻰﻟﺇ ءﺎﻤﻟﺍ ﺏﺮﺴﺗ
ﻥﺮﻔﻟﺍ ﺢﻄﺳﺃ ﻦﻣ
.ﻥﺮﻔﻠﻟ ﻲﻠﻔﺴﻟﺍ ءﺰﺠﻟﺍ
ﻡﺎﻌﻄﻟﺍ
ﺔﻳﺍﻮﺸﻟﺍ ﻒﻴﻈﻨﺗ
ﻡﺍﺪﺨﺘﺳﺍ ءﺎﻨﺛﺍ ﺮﺼﻨﻌﻟﺍ ﻰﻠﻋ ﺖﻳﺰﻟﺍ ﻭﺃ ﻢﺤﺸﻟﺍ ﺮﺛﺎﻨﺘﻳ ﺪﻗ
ﻞﺒﻗ ﺖﻳﺰﻟﺍ ﺢﺴﻣﺍﻭ ﻥﺮﻔﻟﺍ ﺩﺮﺒﻳ ﻰﺘﺣ ﺮﻈﺘﻧﺍ .ﻥﺮﻔﻟﺍ
ﺓﺮﺛﺎﻨﺘﻤﻟﺍ ﺎﻳﺎﻘﺒﻟﺍ ﻱﺩﺆﺗ ﺪﻗ .ﻯﺮﺧﺃ ﺓﺮﻣ ﻥﺮﻔﻟﺍ ﻡﺍﺪﺨﺘﺳﺍ
.ﺓﺭﺎﺳ ﺮﻴﻏ ﺢﺋﺍﻭﺭ ﺙﻭﺪﺣ ﻰﻟﺇ ﺔﻳﺍﻮﺸﻟﺍ ﻰﻠﻋ
ﻲﺟﺭﺎﺨﻟﺍ ﻒﻴﻈﻨﺘﻟﺍ
ﻦﻤﻀﻴﺳ .ﻢﻜﺤﺘﻟﺍ ﺔﺣﻮﻟ ﻒﻴﻈﻨﺗ ﺪﻨﻋ ﻥﺮﻔﻟﺍ ﺏﺎﺑ ﺢﺘﻓﺍ
ﻥﺮﻔﻠﻟ ﺔﻴﺟﺭﺎﺨﻟﺍ ﺢﻄﺳﻷﺍ ﻒﻈﻧ .ﻥﺮﻔﻟﺍ ﻞﻴﻐﺸﺗ ﻡﺪﻋ ﺍﺬﻫ
ﻱﺃ ﺔﻟﺍﺯﺈﺑ ﻢﻗ ﻢﺛ .ءﺎﻤﻟﺍﻭ ﻝﺪﺘﻌﻣ ﻞﺋﺎﺳ ﻒﻈﻨﻣ ﻡﺍﺪﺨﺘﺳﺎﺑ
.ﺔﺒﻃﺭ ﺵﺎﻤﻗ ﺔﻌﻄﻗ ﻡﺍﺪﺨﺘﺳﺎﺑ ﺪﺋﺍﺯ ﻥﻮﺑﺎﺻ
.ﺔﻤﻋﺎﻧ ﺵﺎﻤﻗ ﺔﻌﻄﻗ ﺎًﻣﺪﺨﺘﺴﻣ ﺢﺴﻣﺍ ﻢﺛ
ﺵﺭ ﻭﺃ ﺵﺎﺷﺮﻟﺍ ﺝﺎﺟﺰﻟﺍ ﻒﻈﻨﻣ ﻡﺍﺪﺨﺘﺳﺍ ﺎًﻀﻳﺃ ﻦﻜﻤﻳﻭ
ﻊﻴﻤﻠﺗ ﺞﻨﻔﺳﺇ ﻭﺃ
ﺪﻛﺄﺗ .ﻥﺮﻔﻠﻟ ﺔﻴﺟﺭﺎﺨﻟﺍ ﺢﻄﺳﻷﺍ ﻊﻣ ﺔﻳﻮﻗ ﺔﻴﺋﺎﻴﻤﻴﻛ ﺩﺍﻮﻣ ﻭﺃ
ﻱﺩﺆﻳ ﺪﻗ ﺚﻴﺣ ،ﻥﺮﻔﻟﺍ ﺕﺎﺤﺘﻓ ﻰﻟﺇ ءﺎﻤﻟﺍ ﺏﺮﺴﺗ ﻡﺪﻋ ﻦﻣ
ﺔﻄﺷﺎﻛ ﺕﺎﻔﻈﻨﻣ ﻡﺍﺪﺨﺘﺳﺍ ﺮﻈﺤﻳ .ﺦﺒﻄﻤﻟﺍ
.ﻥﺮﻔﻟﺍ ﻞﻴﻐﺸﺗ ﺕﺎﻧﻮﻜﻣ ﻒﻠﺗ ﻰﻟﺇ ﻚﻟﺫ
ﺎﻳﺎﻘﺑ ﻞﻠﻘﻳ ﻑﻮﺳﻭ .ﺎًﻤﺋﺍﺩ ﺎًﻔﻴﻈﻧ ﻥﺮﻔﻟﺍ ﻰﻠﻋ ﻅﺎﻔﺤﻟﺍ ﺐﺠﻳ
ﺔﻗﺎﻃ ﻦﻣ ﺫﺍﺫﺮﻟﺍ ﻭﺃ ﺪﺋﺍﺰﻟﺍ ﻥﺎﻴﻠﻐﻟﺍ ﻦﻋ ﺞﺗﺎﻨﻟﺍ ﻡﺎﻌﻄﻟﺍ
.ﻥﺮﻔﻟﺍ ﻞﺧﺍﺩ ﻡﺎﻌﻄﻟﺍ ﻕﺍﺮﺘﺣﺍ ﻰﻟﺇ ﻱﺩﺆﻳ ﺎﻤﻣ ،ﻒﻳﻭﻭﺮﻜﻴﻤﻟﺍ
ﻡﻮﻘﺗ ﻭﺃ ﻪﺋﺍﺰﺟﺃ ﻦﻣ ءﺰﺟ ﻱﺃ ﻂﺒﻀﺗ ﻭﺃ ﻥﺮﻔﻟﺎﺑ ﺚﺒﻌﺗ ﻻ
ﻞﺒﻗ ﻦﻣ ﺡﻼﺻﻹﺍ ﺕﺎﻴﻠﻤﻋ ءﺍﺮﺟﺇ ﺐﺠﻳ .ﻚﺴﻔﻨﺑ ﻪﺣﻼﺻﺈﺑ
.ﺪﻤﺘﻌﻣ ﺔﻧﺎﻴﺻ ﺔﻣﺪﺧ
.ﻥﺮﻔﻟﺍ ﻒﻴﻈﻨﺗ ﻞﺒﻗ ﺲﺑﺎﻘﻟﺍ ﺔﻟﺍﺯﺇ ﻦﻣ ﺎًﻤﺋﺍﺩ ﺪﻛﺄﺗ
ﺪﻗ ،ﺎًﻔﻴﻈﻧ ﻥﺮﻔﻟﺍ ﻰﻠﻋ ﻅﺎﻔﺤﻟﺍ ﻡﺪﻋ ﺔﻟﺎﺣ ﻲﻓ !ﺮﻳﺬﺤﺗ
ﻞﻴﻠﻘﺗ ﻰﻟﺇ ﻱﺩﺆﻳ ﺪﻗ ﺎﻤﻣ ،ﻲﻠﺧﺍﺪﻟﺍ ﺢﻄﺴﻟﺍ ﻒﻠﺗ ﻰﻟﺇ ﻱﺩﺆﻳ
.ﺓﺮﻴﻄﺧ ﺔﻟﺎﺤﻟ ﺽﺮﻌﺘﻟﺍ ﺎﻤﺑﺭﻭ ﻥﺮﻔﻠﻟ ﻲﺿﺍﺮﺘﻓﻻﺍ ﺮﻤﻌﻟﺍ
ﻲﻨﻓ
(ﺔﻘﻠﺤﻟﺍﻭ ﺭﺍﻭﺪﻟﺍ ﺹﺮﻘﻟﺍ) ﺕﺎﻘﺤﻠﻤﻟﺍ ﻒﻴﻈﻨﺗ
ﺎﻬﻔﻈﻧﻭ ﻥﺮﻔﻟﺍ ﻦﻣ ﺕﺎﻘﺤﻠﻤﻟﺍ ﺔﻓﺎﻛ ﺔﻟﺍﺯﺈﺑ ﻢﻗ ،ﻒﻴﻈﻨﺘﻟﺍ ﻞﺒﻗ
ﺔﻘﻠﺣ ﻊﻣ ﻞﻣﺎﻌﺘﻟﺍ ﺪﻨﻋ ﺭﺬﺤﻟﺍ ﺥﻮﺗ .ﻝﺪﺘﻌﻣ ﻒﻈﻨﻣ ﻡﺍﺪﺨﺘﺳﺎﺑ
.ﺭﺍﻭﺪﻟﺍ ﺹﺮﻘﻟﺍ
!ﻪﻴﺒﻨﺗ
ﺭﺍﻭﺪﻟﺍ ﺹﺮﻘﻟﺍﻭ ﻥﺮﻔﻠﻟ ﻲﻠﺧﺍﺪﻟﺍ ءﺰﺠﻟﺍ ﻥﻮﻜﻳ
ﺓﺮﺷﺎﺒﻣ ﺎﻤﻬﺴﻤﻟ ﺐﻨﺠﺗ ﻢﺛ ﻦﻣﻭ ،ﺔﻳﺎﻐﻠﻟ ﻦﻴﻨﺧﺎﺳ
.ﻡﺍﺪﺨﺘﺳﻻﺍ ﺭﻮﻓ
ﻲﻠﺧﺍﺪﻟﺍ ﻒﻴﻈﻨﺘﻟﺍ
ﺩﺍﻮﻤﻟﺍ ﺢﺴﻣﺍ .ﻞﺧﺍﺪﻟﺍ ﻦﻣ ﻥﺮﻔﻟﺍ ﺔﻓﺎﻈﻧ ﻰﻠﻋ ﺎًﻤﺋﺍﺩ ﻆﻓﺎﺣ
ﺩﻮﺟﻭ ﺭﺍﺮﻤﺘﺳﺍ ﺔﻟﺎﺣ ﻲﻓ .ﺍًﺭﻮﻓ ﻡﺎﻌﻄﻟﺍ ﺫﺍﺫﺭﻭ ﺔﺑﻮﻜﺴﻤﻟﺍ
ﺏﺮﺴﺘﻟﺍ ﻊﻧﺎﻣﻭ ﻥﺮﻔﻠﻟ ﺔﻴﻠﺧﺍﺪﻟﺍ ﻥﺍﺭﺪﺠﻟﺍ ﻰﻠﻋ ﻡﺎﻌﻄﻟﺍ ﺎﻳﺎﻘﺑ
ﻒﻠﺗﻭ ﻥﺮﻔﻟﺍ ﺓءﺎﻔﻛ ﻦﻣ ﻞﻠﻘﺗ ﻥﺃ ﻦﻜﻤﻤﻟﺍ ﻦﻣ ،ﺏﺎﺒﻟﺍﻭ
ﻒﻈﻨﻣ ﻡﺍﺪﺨﺘﺳﺎﺑ ﻡﺎﻌﻄﻟﺍ ﺎﻳﺎﻘﺑ ﺔﻟﺍﺯﺈﺑ ﻢﻗ .ﺔﻴﻠﺧﺍﺪﻟﺍ ﺕﺎﻧﻮﻜﻤﻟﺍ
.ﺔﻤﻋﺎﻧﻭ ﺔﻔﻴﻈﻧ ﺵﺎﻤﻗ ﺔﻌﻄﻗﻭ ﺊﻓﺍﺩ ءﺎﻣﻭ
ﻥﺮﻔﻟﺍ ﺕﺎﻔﻈﻨﻣ ﻭﺃ ﺔﻄﺷﺎﻜﻟﺍ ﺕﺎﻔﻈﻨﻤﻟﺍ ﻡﺍﺪﺨﺘﺳﺍ ﺐﻨﺠﺗ
ﻦﻣ ءﺰﺟ ﻱﺃ ﻊﻣ ﺔﻴﻜﻠﺴﻟﺍ ﻒﻴﻈﻨﺘﻟﺍ ﺕﺎﺠﻨﻔﺳﺇ ﻭﺃ ﺔﻳﺩﺎﻌﻟﺍ
.ﻒﻳﻭﻭﺮﻜﻴﻤﻟﺍ ﻥﺮﻓ ءﺍﺰﺟﺃ
ﻝﺪﺘﻌﻣ ﻞﺋﺎﺳ
Page 54

15 www.electrolux.com
ﻊﻳﺮﺴﻟﺍ ءﺪﺒﻟﺍ
ﺔﻗﺎﻃ ﻰﻠﻋ ﻲﻬﻄﻠﻟ ﺔﻌﺑﺎﺘﻣ/ءﺪﺑ ﺭﺰﻟﺍ ﻰﻠﻋ ﻂﻐﺿﺍ
ﻡﻮﻘﺗ ﺓﺮﻣ ﻞﻛ .ﺔﻴﻧﺎﺛ 30 ﺓﺪﻤﻟ ٪100 ﺔﺒﺴﻨﺑ ﻒﻳﻭﻭﺮﻜﻴﻤﻟﺍ
ﻝﺪﻌﻤﺑ ﺖﻗﻮﻟﺍ ﺪﻳﺰﻴﺳ ،ﺔﻌﺑﺎﺘﻣ/ءﺪﺑ ﺭﺰﻟﺍ ﻰﻠﻋ ﻂﻐﻀﻟﺎﺑ ﺎﻬﻴﻓ
.ﺔﻴﻧﺎﺛ 30
ﺔﻔﻴﻇﻮﻟﺍ ﺔﻟﺎﺣ
.ﻲﻟﺎﺤﻟﺍ ﺔﻗﺎﻄﻟﺍ ﻯﻮﺘﺴﻣ ﺔﻳﺅﺮﻟ ﻒﻳﻭﻭﺮﻜﻴﻤﻟﺍ
.ﻲﻟﺎﺤﻟﺍ
.ﻥﺮﻔﻟﺍ ﻪﻨﻣ ﺃﺪﺒﻴﺳ ﻱﺬﻟﺍ ﺖﻗﻮﻟﺍ ﺔﻳﺅﺮﻟ ﺔﻋﺎﺴﻟﺍ
ﻝﺎﻔﻃﻷﺍ ﻞﻔﻗ
ﺭﺍﺪﺻﺇ ﻢﺘﻴﺳ .ﻥﺍﻮﺛ 3 ﺓﺪﻤﻟ ﺢﺴﻣ/ﻑﺎﻘﻳﺇ ﺭﺰﻟﺍ ﻰﻠﻋ ﻂﻐﺿﺍ
ﻞﻔﻘﻟﺍ ﺮﺷﺆﻣ ﺽﺮﻋ ﻢﺘﻴﺳﻭ ،ﻞﺻﺍﻮﺘﻣ ﺮﻴﻔﺻ ﺕﻮﺻ
.ﻒﻳﻭﻭﺮﻜﻴﻤﻟﺍ ﻥﺮﻓ ﺭﺍﺭﺯﺃ ﻞﻔﻗ ﻰﻟﺇ ﺮﻴﺸﻳ ﻱﺬﻟﺍﻭ
ﻞﻔﻗ ءﺎﻐﻟﻹ ﻥﺍﻮﺛ 3 ﺓﺪﻤﻟ ﺢﺴﻣ/ﻑﺎﻘﻳﺇ ﺭﺰﻟﺍ ﻰﻠﻋ ﻂﻐﺿﺍ
ﻲﻔﺘﺨﻴﺳﻭ ،ﻞﺻﺍﻮﺘﻣ ﺮﻴﻔﺻ ﺕﻮﺻ ﺭﺍﺪﺻﺇ ﻢﺘﻴﺳ .ﻥﺮﻔﻟﺍ
ﺭﺍﺭﺯﺃ ﻞﻔﻗ ءﺎﻐﻟﺇ ﻰﻟﺇ ﺮﻴﺸﻳ ﻱﺬﻟﺍﻭ ﻞﻔﻘﻟﺍ ﺮﺷﺆﻣ ﺡﺎﺒﺼﻣ
.ﻒﻳﻭﻭﺮﻜﻴﻤﻟﺍ ﻥﺮﻓ
ﻥﺮﻔﻟﺍ ﻑﺎﻘﻳﺇ
.ﻪﻣﺍﺪﺨﺘﺳﺍ ءﺎﻨﺛﺃ ﺯﺎﻬﺠﻟﺍ ﻑﺎﻘﻳﻹ ﻥﺎﺘﻘﻳﺮﻃ ﻙﺎﻨﻫ
.ﺔﻌﺑﺎﺘﻣ/ءﺪﺑ ﺭﺰﻟﺍ ﻰﻠﻋ ﻂﻐﻀﻟﺎﺑ ﻥﺮﻔﻟﺍ ﻞﻴﻐﺸﺗ ﺓﺩﺎﻋﺇ ﻚﻨﻜﻤﻳ
ﻯﺮﺧﺃ ﺓﺮﻣ ﺢﺴﻣ/ﻑﺎﻘﻳﺇ ﺭﺰﻟﺍ ﻰﻠﻋ ﻂﻐﻀﻟﺍ ﻱﺩﺆﻴﺳ
.ﻲﻟﺎﺤﻟﺍ ﺞﻣﺎﻧﺮﺒﻟﺍ ءﺎﻐﻟﺇ ﻰﻟﺇ
ﻂﻐﻀﻟﺍﻭ ﺏﺎﺒﻟﺍ ﻕﻼﻏﺈﺑ ﻥﺮﻔﻟﺍ ﻞﻴﻐﺸﺗ ﺓﺩﺎﻋﺇ ﻚﻨﻜﻤﻳ
.ﺔﻌﺑﺎﺘﻣ/ءﺪﺑ ﺭﺰﻟﺍ ﻰﻠﻋ
ﻯﺮﺧﺃ ﺓﺮﻣ ﺢﺴﻣ/ﻑﺎﻘﻳﺇ ﺭﺰﻟﺍ ﻰﻠﻋ ﻂﻐﻀﻟﺍ ﻱﺩﺆﻴﺳ
.ﻲﻟﺎﺤﻟﺍ ﺞﻣﺎﻧﺮﺒﻟﺍ ءﺎﻐﻟﺇ ﻰﻟﺇ
ﻲﺋﺎﻘﻠﺘﻟﺍ ﻦﻴﺨﺴﺘﻟﺍ ﺓﺩﺎﻋﺇ
ﻡﺍﺪﺨﺘﺳﺎﺑ ﺔﻟﻮﻬﺴﺑ ﻡﺎﻌﻄﻟﺍ ﻦﻴﺨﺴﺗ ﻦﻣ ﺔﻔﻴﻇﻮﻟﺍ ﻩﺬﻫ ﻚﻨﻜﻤﺗ
ﻒﻳﻭﻭﺮﻴﻜﻤﻟﺍ ﺔﻗﺎﻃﻭ ﺖﻗﻮﻟﺍ ﺩﺍﺪﻋﺇ ﻢﺘﻳ .ﻒﻳﻭﻭﺮﻜﻴﻤﻟﺍ ﺔﻗﺎﻃ
ﻒﺋﺎﻇﻭ ﻦﻴﺑ ﺕﺎﻓﻼﺘﺧﻻﺍ ﻩﺎﻧﺩﺃ ﻝﻭﺪﺠﻟﺍ ﺢﺿﻮﻳ .ﺎًﻘﺒﺴﻣ
.ﻲﺋﺎﻘﻠﺘﻟﺍ ﻦﻴﺨﺴﺘﻟﺍ ﺓﺩﺎﻋﺇ
• ﺔﻗﺎﻃ ﺭﺯ ﻰﻠﻋ ﻂﻐﻀﻟﺍ ﻚﻨﻜﻤﻳ ،ﻲﻬﻄﻟﺍ ﺔﻴﻠﻤﻋ ءﺎﻨﺛﺃ
• ﺖﻗﻮﻟﺍ ﺽﺮﻋ ﻢﺘﻴﺳ ،ﺔﻋﺎﺴﻟﺍ ﺭﺯ ﻰﻠﻋ ﻂﻐﻀﻟﺍ ﺪﻨﻋ
• ﺭﺯ ﻰﻠﻋ ﻂﻐﻀﻟﺍ ﻚﻨﻜﻤﻳ ،ﻞﺟﺆﻤﻟﺍ ءﺪﺒﻟﺍ ﻂﺒﺿ ﺪﻨﻋ
."h-4" ﻭﺃ "h-3" ﻭﺃ "h-2" ﻭﺃ "h-1"
ﺪﻳﺪﺤﺘﻟ ﻒﺋﺎﻇﻮﻟﺍ ﺩﺪﺤﻣ ﺮﻳﻭﺪﺘﺑ ﻢﻗ
ﻲﺋﺎﻘﻠﺘﻟﺍ ﻦﻴﺨﺴﺘﻟﺍ ﺓﺩﺎﻋﺇ ﻒﺋﺎﻇﻭ
ﺽﺮﻌﻟﺍ
150150
250250
350350
450450
600600
250250
350350
450450
1 . .ﺢﺴﻣ/ﻑﺎﻘﻳﺇ ﺭﺰﻟﺍ ﻰﻠﻋ ﻂﻐﺿﺍ
2 . .ﺏﺎﺒﻟﺍ ﺢﺘﻔﺑ ﻢﻗ
1
2
3
1
2
3
1
ﺎًﻣﺍﺮﺟ 240 ﻲﻟﺍﻮﺣ
2
ﺎًﻣﺍﺮﺟ 480 ﻲﻟﺍﻮﺣ
3
ﺎًﻣﺍﺮﺟ 720 ﻲﻟﺍﻮﺣ
1
ﺎًﻣﺍﺮﺟ 70 ﻲﻟﺍﻮﺣ
2
ﺎًﻣﺍﺮﺟ 140 ﻲﻟﺍﻮﺣ
3
210 ﻲﻟﺍﻮﺣ
ﺕﺎﻣﺍﺮﺟ
ﺓﻮﻬﻘﻟﺍ/ﺕﺎﺑﻭﺮﺸﻤﻟﺍ
ﻰﻠﺤﻤﻟﺍ ﻚﻌﻜﻟﺍ/ﻚﻌﻜﻟﺍ
1 . ﻖﻠﻏﺃ .ﺭﺍﻭﺪﻟﺍ ﺹﺮﻘﻟﺍ ﻰﻠﻋ ﻡﺎﻌﻄﻟﺍ ﻊﺿﻭ ﺏﺎﺒﻟﺍ ﺢﺘﻓﺍ
.ﺏﺎﺒﻟﺍ
2 . ﺪﻳﺪﺤﺘﻟ ﻲﺋﺎﻘﻠﺘﻟﺍ ﻦﻴﺨﺴﺘﻟﺍ ﺓﺩﺎﻋﻹ ﺭﺰﻟﺍ ﻰﻠﻋ ﻂﻐﺿﺍ
3 . .ﻥﺯﻮﻟﺍ
4 . .ﻦﻴﺨﺴﺘﻟﺍ ﺓﺩﺎﻋﺇ ءﺪﺒﻟ ﺔﻌﺑﺎﺘﻣ/ءﺪﺑ ﺭﺰﻟﺍ ﻰﻠﻋ ﻂﻐﺿﺍ
ﺔﻤﺋﺎﻘﻟﺍ(ﻢﺟ) ﻥﺯﻮﻟﺍ ﺔﺷﺎﺷ
h-1
ﻦﻴﺨﺴﺘﻟﺍ ﺓﺩﺎﻋﺇ
ﻲﺋﺎﻘﻠﺘﻟﺍ
h-2
ءﺎﺸﻌﻟﺍ ﻦﺤﺻ
h-3
h-4
Page 55

ﺔﻴﺑﺮﻌﻟﺍ 14
ﻲﺋﺎﻘﻠﺘﻟﺍ ﻲﻬﻄﻠﻟ ﺎًﻘﺒﺴﻣ ﺔﻃﻮﺒﻀﻤﻟﺍ ﺕﺎﻔﺻﻮﻟﺍ
ﺯﺰﻌﻤﻟﺍﻭ ﺔﻔﻴﻇﻮﻟﺍ
٪80 ﺔﺒﺴﻨﺑ ﻒﻳﻭﻭﺮﻜﻴﻤﻟﺍ ﻥﺮﻓ ﺔﻗﺎﻃ
٪100 ﺔﺒﺴﻨﺑ ﻒﻳﻭﻭﺮﻜﻴﻤﻟﺍ ﻥﺮﻓ ﺔﻗﺎﻃ ﻲﻠﻠﻣ 400400
C-2
G-1 ﺔﻳﺍﻮﺸﻟﺍ 100100
٪30 ﺔﺒﺴﻨﺑ ﻒﻳﻭﻭﺮﻜﻴﻤﻟﺍ ﻥﺮﻓ C-4
ﺔﺟﺭﺩ 200 ﻱﺭﺍﺮﺤﻟﺍ ﻞﻤﺤﻟﺍﻭ ﺔﻳﺍﻮﺸﻠﻟ ٪70
ﺔﻳﻮﺌﻣ
ﺔﻳﻮﺌﻣ ﺔﺟﺭﺩ 180 ﻱﺭﺍﺮﺤﻟﺍ ﻞﻤﺤﻟﺍ
ﺔﻈﺣﻼﻤﻟﺍ ﻊﺟﺍﺭ*
٪80 ﺔﺒﺴﻨﺑ ﻒﻳﻭﻭﺮﻜﻴﻤﻟﺍ ﻥﺮﻓ ﺔﻗﺎﻃ
٪30 ﺔﺒﺴﻨﺑ ﻒﻳﻭﻭﺮﻜﻴﻤﻟﺍ ﻥﺮﻓ C-4
ﺔﺟﺭﺩ 200 ﻱﺭﺍﺮﺤﻟﺍ ﻞﻤﺤﻟﺍﻭ ﺔﻳﺍﻮﺸﻠﻟ ٪70
ﺔﻳﻮﺌﻣ
٪100 ﺔﺒﺴﻨﺑ ﻒﻳﻭﻭﺮﻜﻴﻤﻟﺍ ﻥﺮﻓ ﺔﻗﺎﻃ 350350
٪100 ﺔﺒﺴﻨﺑ ﻒﻳﻭﻭﺮﻜﻴﻤﻟﺍ ﻥﺮﻓ ﺔﻗﺎﻃ 4602
ﺔﺷﺎﺷ
ﺽﺮﻌﻟﺍ
150150
250250
350350
450450
650650
ﻲﻠﻠﻣ 200200
ﻲﻠﻠﻣ 600600
300 300
500500
700 700
900900
1100 1100
150150
200200
300300
400400
ﻢﺟ 450 ﺭﺍﺪﻘﻤﺑ ءﺎﻣ ﻊﻣ 50
50
ﻢﺟ 800 ﺭﺍﺪﻘﻤﺑ ءﺎﻣ ﻊﻣ 100
100
ﻢﺟ 1200 ﺭﺍﺪﻘﻤﺑ ءﺎﻣ ﻊﻣ 150
150
500500
750750
10001000
12001200
150150
500500
2301
6903
ﻙﺎﻤﺳﺃ
ءﺎﺴﺤﻟﺍ
ﻡﻮﺤﻟ
5050
ﺰﺒﺧ ﺔﻔﻏﺭﺃ
ﺍﺰﺘﻴﺑ
ﻚﻌﻛ 475475
ﺔﻧﻭﺮﻜﻣ
ﺝﺎﺟﺪﻟﺍ
ﺕﺍﻭﺍﺮﻀﺨﻟﺍ
ﺲﻃﺎﻄﺒﻟﺍ
ﺔﻤﺋﺎﻘﻟﺍ(ﻢﺟ) ﻥﺯﻮﻟﺍ
ﻙﺮﻴﻛﺬﺘﻟ ﺮﻴﻔﺻ ﺕﻮﺻ ﺭﺍﺪﺻﺇ ﻢﺘﻴﺳ ،ﺔﻳﻮﺌﻣ ﺔﺟﺭﺩ 180
ﺭﺰﻟﺍ ﻰﻠﻋ ﻂﻐﺿﺍ .ﻥﺮﻔﻟﺍ ﻲﻓ ﻚﻌﻜﻟﺍ ﻊﺿﻮﻟ ﺏﺎﺒﻟﺍ ﺢﺘﻔﺑ
.ﺰﺒﺨﻟﺍ ءﺪﺒﻟ ﺔﻌﺑﺎﺘﻣ/ءﺪﺑ
:ﺔﻈﺣﻼﻣ
ﻞﻤﺤﻟﺎﺑ ﻲﻬﻄﻟﺍ ﻰﻠﻋ ﺪﻤﺘﻌﺗ ﻲﺘﻟﺍ ﻚﻌﻜﻟﺍ ﺕﺎﻔﺻﻭ ﺐﻠﻄﺘﺗ
ﻖﺒﺴﻤﻟﺍ ﻦﻴﺨﺴﺘﻟﺍ ﺔﻳﻮﺌﻣ ﺔﺟﺭﺩ 180 ﻰﻠﻋ ﻱﺭﺍﺮﺤﻟﺍ
ﻰﻟﺇ ﻪﻟﻮﺻﻭﻭ ﻥﺮﻔﻠﻟ ﻖﺒﺴﻤﻟﺍ ﻦﻴﺨﺴﺘﻟﺍ ﺪﻨﻋ .ﻥﺮﻔﻠﻟ
Page 56

13 www.electrolux.com
ﺕﺎﻈﺣﻼﻣ
ﻡﺪﻋ ﺓﺮﺘﻓ ءﺎﻨﺛﺃ ﻡﺎﻌﻄﻟﺍ ﺪﻤﺠﺗ ﻚﻓ ﺮﻤﺘﺴﻴﺳ .ﺪﻤﺠﺘﻟﺍ
.ﻡﺍﺪﺨﺘﺳﻻﺍ
.ﺪﻤﺠﺘﻟﺍ ﻚﻓ ﺖﻗﻭ
ﻝﺯﺃ ﻭﺃ/ﻭ ﺢﺘﻓﺍ
.ﺔﻟﻮﻬﺴﺑ ﺎﻬﻜﻳﺮﺤﺗ ﻢﺘﻳ
.ﺪﻤﺠﺘﻟﺍ ﻚﻓ ﺓﺮﺘﻓ ءﺎﻨﺛﺃ ﺐﻴﻠﻘﺘﻟﺎﺑ ﻢﻗ ﻢﺛ ﻞﻔﺳﻷ
ﻊﻄﻘﺑ ﺔﺤﻨﺟﻷﺍ ﻞﺜﻣ ﺔﻘﻴﻗﺮﻟﺍ ﻊﻄﻘﻟﺍ ﺔﻴﻄﻐﺗ ﻦﻜﻤﻳﻭ
.ﺔﻴﻧﺪﻌﻤﻟﺍ ﻖﺋﺎﻗﺮﻟﺍ ﻦﻣ ﺓﺮﻴﻐﺻ
ﻡﺪﻋ ﺖﻗﻭ ﺮﺒﺘﻌﻳ
.ﺎﻬﺟﺰﻣ ﻦﻜﻤﻳ ﻻ ﻲﺘﻟﺍﻭ ﺔﻳﺎﻐﻠﻟ ﺔﻔﻴﺜﻜﻟﺍ ﺔﻤﻌﻃﻸﻟ
ﻞﺒﻗ ﺎًﻣﺎﻤﺗ ﻡﺎﻌﻄﻟﺍ ﻂﺳﻭ ﺪﻤﺠﺗ ﻚﻓ ﺍﺬﻫ ﻦﻤﻀﻳ ﺚﻴﺣ
.ﻲﻬﻄﻟﺍ
ﻲﺋﺎﻘﻠﺘﻟﺍ ﻲﻬﻄﻟﺍ
ﺓﺪﻌﻤﻟﺍ ﺕﺎﻔﺻﻮﻟﺍ ﻦﻣ ﺩﺪﻋ ﻰﻠﻋ ﻒﻳﻭﻭﺮﻜﻴﻤﻟﺍ ﻥﺮﻓ ﻱﻮﺘﺤﻳ
ﻡﺎﻌﻄﻟﺍ ﻲﻬﻃ ﻦﻣ ﻚﻨﻜﻤﺗ ﻲﺘﻟﺍﻭ ،ﻲﺋﺎﻘﻠﺘﻟﺍ ﻲﻬﻄﻠﻟ ﺎًﻘﺒﺴﻣ
.ﺓﺮﻣ ﻞﻛ ﻞﻣﺎﻛ ﻞﻜﺸﺑ
.ﺏﺎﺒﻟﺍ
.ﻲﺋﺎﻘﻠﺘﻟﺍ ﻲﻬﻄﻟﺍ
ﻂﻐﺿﺍ
.ﻲﺋﺎﻘﻠﺘﻟﺍ ﻲﻬﻄﻟﺍ
.ﻲﺋﺎﻘﻠﺘﻟﺍ ﻲﻬﻄﻟﺍ ﺕﺎﻔﺻﻭ ﻰﻠﻋ ﻝﻮﺼﺤﻠﻟ ﻝﻭﺪﺠﻟﺍ ﻊﺟﺍﺭ
4 . .ﺪﻤﺠﺘﻟﺍ ﻚﻓ ءﺪﺒﻟ ﺔﻌﺑﺎﺘﻣ/ءﺪﺑ ﺭﺰﻟﺍ ﻰﻠﻋ ﻂﻐﺿﺍ
• ﻚﻓ ﺖﻗﻭ ﻞﻴﻠﻘﺗ ﻞﻀﻓﻷﺍ ﻦﻤﻓ ،ﺪﻛﺄﺘﻣ ﺮﻴﻏ ﺖﻨﻛ ﺍﺫﺇ
• .ﻦﻜﻤﻣ ﺖﻗﻭ ﻉﺮﺳﺄﺑ ﻡﺎﻌﻄﻟﺍ ﻞﺼﻓﺍ
• ءﺎﻨﺛﺃ ﻢﺤﻠﻟﺍ ﺢﺋﺍﺮﺷ ﻞﺜﻣ ﺓﺮﻴﺒﻜﻟﺍ ءﺍﺰﺟﻷﺍ ﺮﻳﻭﺪﺘﺑ ﻢﻗ
• .ﺪﻤﺠﺘﻟﺍ ﻚﻔﻟ ﻒﻴﻠﻐﺘﻟﺍ
• ﻲﻜﻟ ﺔﻳﺎﻔﻜﻟﺍ ﻪﻴﻓ ﺎﻤﺑ ﺓﺮﻴﺒﻛ ﺔﻳﻭﺎﺣ ﻲﻓ ﻡﺎﻌﻄﻟﺍ ﻊﺿ
• ﺭﺪﺼﻟﺍ ﺐﻧﺎﺟ ﻊﺿﻮﺑ ﻦﺟﺍﻭﺪﻟﺍ ﺪﻤﺠﺗ ﻚﻔﺑ ﺃﺪﺑﺍ
• ﺎًﺻﻮﺼﺧ ،ﺔﻳﺎﻐﻠﻟ ﺎًﻤﻬﻣ ﻡﺍﺪﺨﺘﺳﻻﺍ
.ﻞﺟﺆﻤﻟﺍ ءﺪﺒﻠﻟ ﻞﺣﺍﺮﻣ ﺙﻼﺛ ﻰﻟﺇ ﻞﺼﻳ ﺎﻣ ﻂﺒﺿ ﻦﻜﻤﻳ
ﻒﻳﻭﻭﺮﻜﻴﻤﻟﺍ ﺔﻗﺎﻃ ﻰﻠﻋ ﻡﺎﻌﻄﻟﺍ ﻲﻬﻃ ﻲﻓ ﺐﻏﺮﺗ ﺖﻨﻛ ﺍﺫﺇ
ﻉﺎﺒﺗﺍ ﺐﺠﻴﻓ ،ﻞﺟﺆﻣ ءﺪﺑ ﻊﻣ ﺔﻘﻴﻗﺩ 15 ﺓﺪﻤﻟ ٪80 ﺔﺒﺴﻨﺑ
ﺽﺮﻋ
ﻢﺘﻴﺳ .٪80 ﺔﺒﺴﻨﺑ ﻒﻳﻭﻭﺮﻜﻴﻤﻟﺍ ﺔﻗﺎﻃ
ﺩﺍﺪﻋﻹﺍ ءﺎﻬﻧﻹ ﺔﻌﺑﺎﺘﻣ/ءﺪﺑ ﺭﺰﻟﺍ ﻰﻠﻋ ﻂﻐﺿﺍ
،ﻁﻮﺒﻀﻤﻟﺍ ﺖﻗﻮﻟﺍ ﻰﻟﺇ ﻝﻮﺻﻮﻟﺍ ﺪﻨﻋ .":" ﺽﺮﻋ
ﺔﻴﻠﻤﻋ ﺃﺪﺒﺗ ﻑﻮﺳﻭ ﻦﻴﺗﺮﻣ ﺮﻴﻔﺻ ﺕﻮﺻ ﺭﺍﺪﺻﺇ ﻢﺘﻴﺳ
.ﺎًﻴﺋﺎﻘﻠﺗ ﻲﻬﻄﻟﺍ
ﻥﺯﻮﻟﺍ ﺐﺴﺣ ﺪﻤﺠﺘﻟﺍ ﻚﻓ
1 . ﻖﻠﻏﺃ .ﺭﺍﻭﺪﻟﺍ ﺹﺮﻘﻟﺍ ﻰﻠﻋ ﻡﺎﻌﻄﻟﺍ ﻊﺿﻭ ﺏﺎﺒﻟﺍ ﺢﺘﻓﺍ
2 . ءﺍﺮﺟﻹ ﺔﻔﺻﻮﻟﺍ ﺪﻳﺪﺤﺘﻟ ﻒﺋﺎﻇﻮﻟﺍ ﺩﺪﺤﻣ ﺮﻳﻭﺪﺘﺑ ﻢﻗ
3 . ءﺍﺮﺟﻹ ﺔﻔﺻﻮﻟﺍ ﺪﻴﻛﺄﺘﻟ ﺔﻌﺑﺎﺘﻣ/ءﺪﺑ ﺭﺰﻟﺍ ﻰﻠﻋ
4 . .ﻡﺎﻌﻄﻟﺍ ﻥﺯﻭ ﻂﺒﻀﻟ ﻒﺋﺎﻇﻮﻟﺍ ﺩﺪﺤﻣ ﺮﻳﻭﺪﺘﺑ ﻢﻗ
5 . .ﻥﺯﻮﻟﺍ ﺪﻴﻛﺄﺘﻟ ﺔﻌﺑﺎﺘﻣ/ءﺪﺑ ﺭﺰﻟﺍ ﻰﻠﻋ ﻂﻐﺿﺍ
ﺖﻗﻮﻟﺍ ﺐﺴﺣ ﺪﻤﺠﺘﻟﺍ ﻚﻓ
."d-2" ﺽﺮﻋ ﻢﺘﻴﺳ
ﻞﺟﺆﻣ ءﺪﺑ
:ﻝﺎﺜﻣ
.ﺕﺍﻮﻄﺨﻟﺍ ﻩﺬﻫ
1 . ﻖﻠﻏﺃ .ﺭﺍﻭﺪﻟﺍ ﺹﺮﻘﻟﺍ ﻰﻠﻋ ﻡﺎﻌﻄﻟﺍ ﻊﺿﻭ ﺏﺎﺒﻟﺍ ﺢﺘﻓﺍ
.ﺏﺎﺒﻟﺍ
2 . ﺪﻳﺪﺤﺘﻟ ﻦﻴﺗﺮﻣ ﻒﻳﻭﻭﺮﻜﻴﻤﻟﺍ ﺔﻗﺎﻃ ﺭﺯ ﻰﻠﻋ ﻂﻐﺿﺍ
."P80"
3 . ﻰﻟﺇ ﻲﻬﻄﻟﺍ ﺖﻗﻭ ﻂﺒﻀﻟ ﻒﺋﺎﻇﻮﻟﺍ ﺩﺪﺤﻣ ﺮﻳﻭﺪﺘﺑ ﻢﻗ
.ﻖﺋﺎﻗﺩ 15
4 . .ﺔﻋﺎﺴﻟﺍ ﻡﺎﻗﺭﺃ ﺾﻣﻮﺘﺳ .ﺔﻋﺎﺴﻟﺍ ﺭﺯ ﻰﻠﻋ ﻂﻐﺿﺍ
5 . .ﺔﻋﺎﺴﻟﺍ ﺩﺍﺪﻋﺇ ﻂﺒﻀﻟ ﻒﺋﺎﻇﻮﻟﺍ ﺩﺪﺤﻣ ﺮﻳﻭﺪﺘﺑ ﻢﻗ
6 . .ﻖﺋﺎﻗﺪﻟﺍ ﻡﺎﻗﺭﺃ ﺾﻣﻮﺘﺳ .ﺔﻋﺎﺴﻟﺍ ﺭﺯ ﻰﻠﻋ ﻂﻐﺿﺍ
7 . .ﻖﺋﺎﻗﺪﻟﺍ ﺩﺍﺪﻋﺇ ﻂﺒﻀﻟ ﻒﺋﺎﻇﻮﻟﺍ ﺩﺪﺤﻣ ﺮﻳﻭﺪﺘﺑ ﻢﻗ
8 . ﻢﺘﻴﺳ .
1 . ﻖﻠﻏﺃ .ﺭﺍﻭﺪﻟﺍ ﺹﺮﻘﻟﺍ ﻰﻠﻋ ﻡﺎﻌﻄﻟﺍ ﻊﺿﻭ ﺏﺎﺒﻟﺍ ﺢﺘﻓﺍ
.ﺏﺎﺒﻟﺍ
2 . ﺽﺮﻋ ﻢﺘﻴﺳ .ﺓﺮﻣ ﺪﻤﺠﺘﻟﺍ ﻚﻓ ﺭﺰﻟﺍ ﻰﻠﻋ ﻂﻐﺿﺍ
."d-1"
3 . .ﺕﺎﻣﺍﺮﺠﻟﺎﺑ ﻥﺯﻮﻟﺍ ﻂﺒﻀﻟ ﻒﺋﺎﻇﻮﻟﺍ ﺩﺪﺤﻣ ﺮﻳﻭﺪﺘﺑ ﻢﻗ
4 . .ﺪﻤﺠﺘﻟﺍ ﻚﻓ ءﺪﺒﻟ ﺔﻌﺑﺎﺘﻣ/ءﺪﺑ ﺭﺰﻟﺍ ﻰﻠﻋ ﻂﻐﺿﺍ
1 . ﻖﻠﻏﺃ .ﺭﺍﻭﺪﻟﺍ ﺹﺮﻘﻟﺍ ﻰﻠﻋ ﻡﺎﻌﻄﻟﺍ ﻊﺿﻭ ﺏﺎﺒﻟﺍ ﺢﺘﻓﺍ
.ﺏﺎﺒﻟﺍ
2 . .ﻦﻴﺗﺮﻣ ﺪﻤﺠﺘﻟﺍ ﻚﻓ ﺭﺰﻟﺍ ﻰﻠﻋ ﻂﻐﺿﺍ
3 . .ﺪﻤﺠﺘﻟﺍ ﻚﻓ ﺖﻗﻭ ﻂﺒﻀﻟ ﻒﺋﺎﻇﻮﻟﺍ ﺩﺪﺤﻣ ﺮﻳﻭﺪﺘﺑ ﻢﻗ
Page 57

ﺔﻴﺑﺮﻌﻟﺍ 12
ﻂﻠﺘﺨﻤﻟﺍ ﻲﻬﻄﻟﺍ
ﺔﺷﺎﺷ
ﺽﺮﻌﻟﺍ
C-1
C-2
C-3
C-4
ﺔﻳﻮﺌﻣ
ﺔﻳﻮﺌﻣ
ﺔﺟﺭﺩ 200 ✓
ﺔﻳﻮﺌﻣ
ﻥﺮﻓ
ﻒﻳﻭﻭﺮﻜﻴﻤﻟﺍ ﺔﻳﺍﻮﺸﻟﺍ ﻱﺭﺍﺮﺤﻟﺍ ﻞﻤﺤﻟﺍ
✓ ﺔﺟﺭﺩ 165 ✓
✓✓
✓ ﺔﺟﺭﺩ 200 ✓
✓✓
ﻲﻬﻄﻟﺍ ﻞﺣﺍﺮﻣ
ﻡﺍﺪﺨﺘﺳﺎﺑ ﻲﻬﻃ ﻞﺣﺍﺮﻣ ﺙﻼﺛ ﻰﻟﺇ ﻞﺼﻳ ﺎﻣ ﻂﺒﺿ ﻦﻜﻤﻳ
،ﺪﻤﺠﺘﻟﺍ ﻚﻓ ﻲﻫ ﻞﺣﺍﺮﻤﻟﺍ ﻩﺬﻫ ﺪﺣﺃ ﺖﻧﺎﻛ ﺍﺫﺇ .ﻥﺮﻔﻟﺍ ﺍﺬﻫ
.ﻰﻟﻭﻷﺍ ﺔﻠﺣﺮﻤﻟﺍ ﺎﻬﻧﺃ ﻰﻠﻋ ﺔﻠﺣﺮﻤﻟﺍ ﻩﺬﻫ ﻂﺒﺿ ﺐﺠﻴﻓ
ﺃﺪﺒﺘﺳﻭ ،ﺔﻠﺣﺮﻣ ﻞﻛ ﺪﻌﺑ ﺮﻴﻔﺻ ﺕﻮﺻ ﺭﺍﺪﺻﺇ ﻢﺘﻴﺳ
.ﺎًﻴﺋﺎﻘﻠﺗ ﺔﻴﻟﺎﺘﻟﺍ ﺔﻠﺣﺮﻤﻟﺍ
:ﻝﺎﺜﻣ
ﺔﺒﺴﻨﺑ ﻒﻳﻭﻭﺮﻜﻴﻤﻟﺍ ﺔﻗﺎﻃ ﻰﻠﻋ ﻲﻬﻄﻟﺍ ﻲﻓ ﺐﻏﺮﺗ ﺖﻨﻛ ﺍﺫﺇ
ﺔﺒﺴﻨﺑ
ﻒﻳﻭﻭﺮﻜﻴﻤﻟﺍ ﺔﻗﺎﻃ ﻢﺛ ﻖﺋﺎﻗﺩ 10 ﺓﺪﻤﻟ ٪100
.ﺕﺍﻮﻄﺨﻟﺍ ﻩﺬﻫ ﻉﺎﺒﺗﺍ ﺐﺠﻴﻓ ،ﻖﺋﺎﻗﺩ 5 ﺓﺪﻤﻟ ٪80
.ﺏﺎﺒﻟﺍ
٪100
.ﻖﺋﺎﻗﺩ 10
ﺔﻗﺎﻃ ﺭﺯ ﻰﻠﻋ ﻂﻐﺿﺍ
.٪80 ﺔﺒﺴﻨﺑ ﻒﻳﻭﻭﺮﻜﻴﻤﻟﺍ ﺔﻗﺎﻃ
.ﻖﺋﺎﻗﺩ 5
ﻱﺭﺍﺮﺤﻟﺍ ﻞﻤﺤﻟﺎﺑ ﻲﻬﻄﻠﻟ ﻥﺮﻔﻠﻟ ﻖﺒﺴﻤﻟﺍ ﻦﻴﺨﺴﺘﻟﺍ
."140" ﺔﺷﺎﺸﻟﺍ ﺾﻣﻮﺘﺳ
ﺕﺎﺟﺭﺩ ﻝﺪﻌﻣ .ﻒﺋﺎﻇﻮﻟﺍ ﺩﺪﺤﻣ ﺮﻳﻭﺪﺗ ﺔﻌﺑﺎﺘﻣ ﻖﻳﺮﻃ
ﺔﻳﻮﺌﻣ ﺔﺟﺭﺩ 230 - 140 :ﺓﺭﺍﺮﺤﻟﺍ
ﻢﺘﻴﺳ ،ﺔﺒﺳﺎﻨﻤﻟﺍ ﺓﺭﺍﺮﺤﻟﺍ ﺔﺟﺭﺩ ﻰﻟﺇ ﻝﻮﺻﻮﻟﺍ ﺪﻨﻋ
ﻡﺎﻌﻄﻟﺍ ﻊﺿﻮﺑ ﻙﺮﻴﻛﺬﺘﻟ ﻦﻴﺗﺮﻣ ﺮﻴﻔﺻ ﺕﻮﺻ
.ﺔﻠﺼﻟﺍ ﺕﺍﺫ ﺓﺭﺍﺮﺤﻟﺍ ﺔﺟﺭﺩ ﺾﻣﻮﺘﺳ .ﻥﺮﻔﻟﺍ ﻲﻓ
ﺭﺰﻟﺍ ﻰﻠﻋ ﻂﻐﻀﻟﺍ ﻦﻣ ًﻻﺪﺑ ﻖﺒﺴﻤﻟﺍ ﻦﻴﺨﺴﺘﻟﺍ ﻡﺍﺪﺨﺘﺳﻻ
ﻲﻬﻄﻟﺍ ﻦﻣ ﺔﻌﺑﺍﺮﻟﺍ ﺔﻄﻘﻨﻟﺍ ﻲﻓ ﻝﺎﺤﻟﺍ ﻮﻫ ﺎﻤﻛ ،ﺔﻌﺑﺎﺘﻣ/
ﻂﺒﻀﻟ ﻒﺋﺎﻇﻮﻟﺍ ﺩﺪﺤﻣ ﺮﻳﻭﺪﺗ ﺐﺠﻳ ،ﻱﺭﺍﺮﺤﻟﺍ ﻞﻤﺤﻟﺎﺑ
ءﺎﻬﺘﻧﺍ ﺪﻌﺑ ﺔﻠﻴﻠﻗ ﻖﺋﺎﻗﺪﻟ ﻞﻤﻌﻟﺍ ﻲﻓ ﺔﺣﻭﺮﻤﻟﺍ ﺮﻤﺘﺴﺘﺳ
.ﻥﺮﻔﻟﺍ ﺪﻳﺮﺒﺗ ﻞﺟﺃ ﻦﻣ ﻱﺭﺍﺮﺤﻟﺍ ﻞﻤﺤﻟﺎﺑ ﻲﻬﻄﻟﺍ ﺞﻣﺎﻧﺮﺑ
1 . ﻖﻠﻏﺃ .ﺭﺍﻭﺪﻟﺍ ﺹﺮﻘﻟﺍ ﻰﻠﻋ ﻡﺎﻌﻄﻟﺍ ﻊﺿﻭ ﺏﺎﺒﻟﺍ ﺢﺘﻓﺍ
2 . ﺔﻗﺎﻃ ﺪﻳﺪﺤﺘﻟ ﺓﺮﻣ ﻒﻳﻭﻭﺮﻜﻴﻤﻟﺍ ﺔﻗﺎﻃ ﺭﺯ ﻰﻠﻋ ﻂﻐﺿﺍ
ﻡﺍﺪﺨﺘﺳﺎﺑ ﻲﻬﻄﻟﺍ ﻦﻴﺑ ﻊﻤﺠﻟﺍ ﻚﻨﻜﻤﻳ ،ﻥﺮﻔﻟﺍ ﺍﺬﻫ ﻡﺍﺪﺨﺘﺳﺎﺑ
ﻊﺑﺭﺃ ﺪﺟﻮﺗ .ﻱﺭﺍﺮﺤﻟﺍ ﻞﻤﺤﻟﺍﻭ ﺔﻳﺍﻮﺸﻟﺍﻭ ﻒﻳﻭﻭﺮﻜﻴﻤﻟﺍ
3 . ﻰﻟﺇ ﻲﻬﻄﻟﺍ ﺖﻗﻭ ﻂﺒﻀﻟ ﻒﺋﺎﻇﻮﻟﺍ ﺩﺪﺤﻣ ﺮﻳﻭﺪﺘﺑ ﻢﻗ
4 . ﺪﻳﺪﺤﺘﻟ ﻦﻴﺗﺮﻣ ﻒﻳﻭﻭﺮﻜﻴﻤﻟﺍ
5 .ﻰﻟﺇ ﻲﻬﻄﻟﺍ ﺖﻗﻭ ﻂﺒﻀﻟ ﻒﺋﺎﻇﻮﻟﺍ ﺩﺪﺤﻣ ﺮﻳﻭﺪﺘﺑ ﻢﻗ
6 . .ﻥﺮﻔﻟﺍ ﻞﻴﻐﺸﺗ ءﺪﺒﻟ ﺔﻌﺑﺎﺘﻣ/ءﺪﺑ ﺭﺰﻟﺍ ﻰﻠﻋ ﻂﻐﺿﺍ
؛"C-4" ﻭﺃ "C-3" ﻭﺃ "C-2" ﻭﺃ "C-1" ﺕﺎﻋﻮﻤﺠﻤﻟﺍ
ﻂﻠﺘﺨﻤﻟﺍ ﻲﻬﻄﻟﺍ
.ﺎًﻘﺒﺴﻣ ﺓﺪﻌﻣ ﺕﺎﻋﻮﻤﺠﻣ
ﻂﻠﺘﺨﻤﻟﺍ ﻲﻬﻄﻟﺍ ﻡﺍﺪﺨﺘﺳﺍ
ﻩﺎﻧﺩﺃ ﻝﻭﺪﺠﻟﺍ ﻊﺟﺍﺭ
1 . .ﺓﺮﻣ ﻒﺋﺎﻇﻮﻟﺍ ﺩﺪﺤﻣ ﻰﻠﻋ ﻂﻐﺿﺍ
2 . .ﻱﺭﺍﺮﺤﻟﺍ ﻞﻤﺤﻟﺍ ﺔﻔﻴﻇﻭ ﺪﻳﺪﺤﺘﻟ ﻒﺋﺎﻇﻮﻟﺍ ﺩﺪﺤﻣ ﺮﻳﻭﺪﺘﺑ ﻢﻗ
3 . ﻦﻋ ﻱﺭﺍﺮﺤﻟﺍ ﻞﻤﺤﻟﺍ ﻥﺮﻓ ﺓﺭﺍﺮﺣ ﺔﺟﺭﺩ ﺩﺪﺣ
4 . .ﺓﺭﺍﺮﺤﻟﺍ ﺔﺟﺭﺩ ﺪﻴﻛﺄﺘﻟ ﺔﻌﺑﺎﺘﻣ/ءﺪﺑ ﺭﺰﻟﺍ ﻰﻠﻋ ﻂﻐﺿﺍ
5 . .ﻖﺒﺴﻤﻟﺍ ﻦﻴﺨﺴﺘﻟﺍ ءﺪﺒﻟ ﺔﻌﺑﺎﺘﻣ/ءﺪﺑ ﺭﺰﻟﺍ ﻰﻠﻋ ﻂﻐﺿﺍ
ﺭﺍﺪﺻﺇ
6 . .ﺏﺎﺒﻟﺍ ﻖﻠﻏﺃﻭ ﻥﺮﻔﻟﺍ ﻲﻓ ﻡﺎﻌﻄﻟﺍ ﻊﺿ
7 . .ﻲﻬﻄﻟﺍ ﺖﻗﻭ ﻂﺒﻀﻟ ﻒﺋﺎﻇﻮﻟﺍ ﺩﺪﺤﻣ ﺮﻳﻭﺪﺘﺑ ﻢﻗ
8 . .ﻥﺮﻔﻟﺍ ﻞﻴﻐﺸﺗ ءﺪﺒﻟ ﺔﻌﺑﺎﺘﻣ/ءﺪﺑ ﺭﺰﻟﺍ ﻰﻠﻋ ﻂﻐﺿﺍ
:ﺔﻈﺣﻼﻣ
ءﺪﺑ
.ﻲﻬﻄﻟﺍ ﺖﻗﻭ
:ﺔﻈﺣﻼﻣ
1 . ﻖﻠﻏﺃ .ﺭﺍﻭﺪﻟﺍ ﺹﺮﻘﻟﺍ ﻰﻠﻋ ﻡﺎﻌﻄﻟﺍ ﻊﺿﻭ ﺏﺎﺒﻟﺍ ﺢﺘﻓﺍ
.ﺏﺎﺒﻟﺍ
2 . ﺔﺷﺎﺸﻟﺍ ﺾﻣﻮﺘﺳ .ﺓﺮﻣ ﻒﺋﺎﻇﻮﻟﺍ ﺩﺪﺤﻣ ﻰﻠﻋ ﻂﻐﺿﺍ
."140"
3 . ﻦﻣ ﺔﻋﻮﻤﺠﻣ ﺪﻳﺪﺤﺘﻟ ﻒﺋﺎﻇﻮﻟﺍ ﺩﺪﺤﻣ ﺮﻳﻭﺪﺘﺑ ﻢﻗ
4 . .ﺔﻋﻮﻤﺠﻤﻟﺍ ﺪﻴﻛﺄﺘﻟ ﺔﻌﺑﺎﺘﻣ/ءﺪﺑ ﺭﺰﻟﺍ ﻰﻠﻋ ﻂﻐﺿﺍ
5 . .ﻲﻬﻄﻟﺍ ﺖﻗﻭ ﻂﺒﻀﻟ ﻒﺋﺎﻇﻮﻟﺍ ﺩﺪﺤﻣ ﺮﻳﻭﺪﺘﺑ ﻢﻗ
6 . .ﻥﺮﻔﻟﺍ ﻞﻴﻐﺸﺗ ءﺪﺒﻟ ﺔﻌﺑﺎﺘﻣ/ءﺪﺑ ﺭﺰﻟﺍ ﻰﻠﻋ ﻂﻐﺿﺍ
Page 58

11 www.electrolux.com
ﻒﻳﻭﻭﺮﻜﻴﻤﻟﺍ ﻥﺮﻓ ﻲﻓ ﻲﻬﻄﻟﺍ
.ﻒﻳﻭﻭﺮﻜﻴﻤﻟﺍ ﻥﺮﻓ ﻲﻓ ﺢﺿﻮﻣ ﻮﻫ ﺎﻤﻛ ،ﺔﺑﻮﻠﻄﻤﻟﺍ
.ﺏﺎﺒﻟﺍ
ﻢﻗ
2 . .ﺔﻋﺎﺴﻟﺍ ﺩﺍﺪﻋﺇ ﻂﺒﻀﻟ ﻒﺋﺎﻇﻮﻟﺍ ﺩﺪﺤﻣ ﺮﻳﻭﺪﺘﺑ
1 . ﻖﻠﻏﺃ .ﺭﺍﻭﺪﻟﺍ ﺹﺮﻘﻟﺍ ﻰﻠﻋ ﻡﺎﻌﻄﻟﺍ ﻊﺿﻭ ﺏﺎﺒﻟﺍ ﺢﺘﻓﺍ
2 . ﺕﺍﺮﻤﻟﺍ ﺩﺪﻋ ﺔﻗﺎﻄﻟﺍ ﻯﻮﺘﺴﻣ ﺭﺯ ﻰﻠﻋ ﻂﻐﺿﺍ
3 . .ﻲﻬﻄﻟﺍ ﺖﻗﻭ ﻂﺒﻀﻟ ﻒﺋﺎﻇﻮﻟﺍ ﺩﺪﺤﻣ ﺮﻳﻭﺪﺘﺑ ﻢﻗ
4 . .ﻥﺮﻔﻟﺍ ﻞﻴﻐﺸﺗ ءﺪﺒﻟ ﺔﻌﺑﺎﺘﻣ/ءﺪﺑ ﺭﺰﻟﺍ ﻰﻠﻋ ﻂﻐﺿﺍ
.ﻖﺋﺎﻗﺪﻟﺍ ﺮﺷﺆﻣ ﺾﻣﻮﻴﺳ
.ﺔﻋﺎﺴﻟﺍ ﺩﺍﺪﻋﺇ
ﻒﻳﻭﻭﺮﻜﻴﻤﻟﺍ ﺔﻗﺎﻃ
3 . .ﺔﻋﺎﺴﻟﺍ ﺩﺍﺪﻋﺇ ﺪﻴﻛﺄﺘﻟ ﺔﻋﺎﺴﻟﺍ ﺭﺯ ﻰﻠﻋ ﻂﻐﺿﺍ
4 . .ﻖﺋﺎﻗﺪﻟﺍ ﺩﺍﺪﻋﺇ ﻂﺒﻀﻟ ﻒﺋﺎﻇﻮﻟﺍ ﺩﺪﺤﻣ ﺮﻳﻭﺪﺘﺑ ﻢﻗ
5 . ﻝﺎﻤﻛﺇﻭ ﻖﺋﺎﻗﺪﻟﺍ ﺩﺍﺪﻋﺇ ﺪﻴﻛﺄﺘﻟ ﺔﻋﺎﺴﻟﺍ ﺭﺯ ﻰﻠﻋ ﻂﻐﺿﺍ
.ءﺍﻮﺸﻟﺍ ﺓﻼﻘﻤﻟ ﻖﺒﺴﻤﻟﺍ ﻦﻴﺨﺴﺘﻟﺍ .ﺕﺍﻭﺮﻀﺨﻟﺍ ﻲﻬﻃ
.ﻦﺟﺍﻭﺪﻟﺍﻭ ﻢﻈﻌﻟﺍ ﻰﻠﻋ ﻢﺤﻠﻟﺍ ﻦﻣ ﻊﻄﻗ ءﺍﻮﺷ
.ﺞﻨﻔﺳﻻﺍ ﻚﻌﻛﻭ ﻚﻌﻜﻟﺍ ﺰﺒﺧ
ﺐﻠﻗ ﻚﻨﻜﻤﻳ ،ءﺍﻮﺸﻟﺍ ﺔﻔﻴﻇﻭ ﻊﻣ ﺞﺋﺎﺘﻨﻟﺍ ﻞﻀﻓﺃ ﻰﻠﻋ ﻝﻮﺼﺤﻠﻟ
ءﺎﻨﺛﺃ ﺔﺒﻠﻗ ﻰﻟﺇ ﺓﺭﺎﺷﻺﻟ ﻦﻴﺗﺮﻣ ﺍًﺮﻴﻔﺻ ﻥﺮﻔﻟﺍ ﺭﺪﺼﻳ ﻑﻮﺳ
ﺏﺎﺒﻟﺍ ﻖﻠﻏﺃ .ﻡﺎﻌﻄﻟﺍ ﺮﻳﻭﺪﺘﺑ ﻢﻗﻭ ﺏﺎﺒﻟﺍ ﺢﺘﻓﺍ .ءﺍﻮﺸﻟﺍ ﺖﻗﻭ
ﺮﻳﻭﺪﺘﻟ ﺏﺎﺒﻟﺍ ﺢﺘﻔﺑ ﻢﻘﺗ ﻢﻟ ﺍﺫﺇ .ﺔﻌﺑﺎﺘﻣ/ءﺪﺑ ﺭﺰﻟﺍ ﻰﻠﻋ ﻂﻐﺿﺍﻭ
.ﻡﺎﻌﻄﻟﺍ ءﺍﻮﺷ ﻲﻓ ﻒﻳﻭﻭﺮﻜﻴﻤﻟﺍ ﻥﺮﻓ ﺮﻤﺘﺴﻴﺴﻓ ،ﻡﺎﻌﻄﻟﺍ
.ﺎًﻘﺒﺴﻣ ﺔﻴﻬﻄﻤﻟﺍ
ﺕﺎﺒﺟﻮﻟﺍ ﺪﻤﺠﺗ ﻚﻓ
:ﺔﻈﺣﻼﻣ
.ءﺍﻮﺸﻟﺍ ﺓﺮﺘﻓ ءﺎﻨﺛﺃ ﻢﺤﻠﻟﺍ
ﻱﺭﺍﺮﺤﻟﺍ ﻞﻤﺤﻟﺎﺑ ﻲﻬﻄﻟﺍ
ﻚﻨﻜﻤﺗ ﻲﺘﻟﺍﻭ ،ﻱﺭﺍﺮﺤﻟﺍ ﻞﻤﺤﻟﺍ ﺔﻔﻴﻇﻭ ﻰﻠﻋ ﻥﺮﻔﻟﺍ ﻱﻮﺘﺤﻳ
ﻻﻭ .ﻱﺩﺎﻌﻟﺍ ﻥﺮﻔﻟﺎﺑ ﻲﻬﻄﻟﺍ ﺔﻘﻳﺮﻃ ﺲﻔﻨﺑ ﻡﺎﻌﻄﻟﺍ ﻲﻬﻃ ﻦﻣ
.ﻒﻳﻭﻭﺮﻜﻴﻤﻟﺍ ﺔﻗﺎﻃ ﻡﺍﺪﺨﺘﺳﺍ ﻢﺘﻳ
ﺔﺟﺭﺩ ﻰﻠﻋ ﻝﻮﺼﺤﻠﻟ ﺎًﻘﺒﺴﻣ ﻥﺮﻔﻟﺍ ﻦﻴﺨﺴﺘﺑ ﻚﻴﺻﻮﻧﻭ
ﻞﺼﻳ ﺎﻣﺪﻨﻋ .ﻥﺮﻔﻟﺍ ﻲﻓ ﻡﺎﻌﻄﻟﺍ ﻊﺿﻭ ﻞﺒﻗ ﺔﺒﺳﺎﻨﻤﻟﺍ ﺓﺭﺍﺮﺤﻟﺍ
ﺔﺟﺭﺩ ﻲﻓ ﻞﻈﻴﺳ ،ﺔﺤﻴﺤﺼﻟﺍ ﺓﺭﺍﺮﺤﻟﺍ ﺔﺟﺭﺩ ﻰﻟﺇ ﻥﺮﻔﻟﺍ
ﺏﺎﺒﻟﺍ ﺢﺘﻓ ﻡﺪﻋ ﺔﻟﺎﺣ
.ﻒﻳﻭﻭﺮﻜﻴﻤﻟﺍ ﻥﺮﻓ ﻞﻴﻐﺸﺗ ﻑﺎﻘﻳﺇ ﻢﺘﻴﺴﻓ ،ﺖﻗﻮﻟﺍ ﻚﻟﺫ ءﺎﻨﺛﺃ
ﻲﻓ .ﻖﺋﺎﻗﺩ ﺲﻤﺧ ﺓﺪﻤﻟ ﻩﺬﻫ ﺓﺭﺍﺮﺤﻟﺍ
ﻥﺮﻓ ﺔﻗﺎﻃ ﻯﻮﺘﺴﻣ
ﻒﻳﻭﻭﺮﻜﻴﻤﻟﺍﺕﺍﻭ ﻪﺑ ﻰﺻﻮﻤﻟﺍ ﻡﺍﺪﺨﺘﺳﻻﺍ
ﺭﺰﻟﺍ ﻰﻠﻋ ﻂﻐﺿﺍ
ﺔﻗﺎﻄﻟﺍ ﻯﻮﺘﺴﻣ
ﺓﺪﺣﺍﻭ ﺓﺮﻣ٪100900 .ﻞﺋﺍﻮﺴﻟﺍ ﻦﻴﺨﺴﺗ ﻭﺃ ﻥﺎﻴﻠﻏ
ﻥﺎﺗﺮﻣ٪80720 ﻕﺎﺒﻃﻷﺍﻭ ﻦﺟﺍﻮﻄﻟﺍﻭ ﺓﻼﻘﻤﻟﺍ ﻲﻓ ﺕﺎﺒﺟﻮﻟﺍ ﻦﻴﺨﺴﺗ ﺓﺩﺎﻋﺇ
ﺕﺍﺮﻣ ﺙﻼﺛ٪50450 .ﺕﺎﻴﻧﺎﻄﻠﺴﻟﺍ ﻲﻓ ﻉﺮﺳﺃ ﻞﻜﺸﺑ
ﺕﺍﺮﻣ ﻊﺑﺭﺃ٪30270 .ﻦﺒﺠﻟﺍ ﻚﻌﻛﻭ ﻢﻳﺮﻜﻟﺍ ﻚﻌﻛ ﻦﻴﺨﺴﺗ .ﻥﺎﻴﻠﻐﻟﺍ
ﺕﺍﺮﻣ ﺲﻤﺧ ٪1090 .ﺎًﻨﺧﺎﺳ ﻡﺎﻌﻄﻟﺍ ﻰﻠﻋ ﻅﺎﻔﺤﻟﺍ
ءﺍﻮﺸﻟﺍ
ﺮﻴﻏ ﺎًﻘﺒﻃ ﻊﺿ .ﻲﻜﻠﺴﻟﺍ ﻑﺮﻟﺍ ﻰﻠﻋ ﻡﺎﻌﻄﻟﺍ ﻊﺿﻭ
ﻭﺃ ﺏﺎﻜﺴﻧﺍ ﻱﺃ ﻊﻴﻤﺠﺘﻟ ﻲﻜﻠﺴﻟﺍ ﻑﺮﻟﺍ ﻞﻔﺳﺃ ﻲﻧﺪﻌﻣ
.ﻒﻴﻈﻨﺘﻟﺍ ﺔﻴﻠﻤﻋ ﻞﻴﻠﻘﺗ ﻞﺟﺃ ﻦﻣ ﻢﺤﻠﻟﺍ ﺕﺍﺭﺎﺼﻋ
.ﺏﺎﺒﻟﺍ ﻖﻠﻏﺃ
."140"
ﺮﻳﻭﺪﺘﺑ ﻢﻗ
."G-1"
1 . ﺭﺍﻭﺪﻟﺍ ﺹﺮﻘﻟﺍ ﻰﻠﻋ ﻲﻜﻠﺴﻟﺍ ﻑﺮﻟﺍ ﻊﺿﻭ ﺏﺎﺒﻟﺍ ﺢﺘﻓﺍ
2 . ﺔﺷﺎﺸﻟﺍ ﺾﻣﻮﺘﺳ .ﺓﺮﻣ ﻒﺋﺎﻇﻮﻟﺍ ﺩﺪﺤﻣ ﻰﻠﻋ ﻂﻐﺿﺍ
3 . ءﺍﻮﺸﻟﺍ ﺔﻔﻴﻇﻭ ﺪﻳﺪﺤﺘﻟ ﻒﺋﺎﻇﻮﻟﺍ ﺩﺪﺤﻣ
4 . ."G-1" ﺽﺮﻋ ﺪﻴﻛﺄﺘﻟ ﺔﻌﺑﺎﺘﻣ/ءﺪﺑ ﺭﺰﻟﺍ ﻰﻠﻋ ﻂﻐﺿﺍ
5 . .ﻲﻬﻄﻟﺍ ﺖﻗﻭ ﻂﺒﻀﻟ ﻒﺋﺎﻇﻮﻟﺍ ﺩﺪﺤﻣ ﺮﻳﻭﺪﺘﺑ ﻢﻗ
6 . .ﻥﺮﻔﻟﺍ ﻞﻴﻐﺸﺗ ءﺪﺒﻟ ﺔﻌﺑﺎﺘﻣ/ءﺪﺑ ﺭﺰﻟﺍ ﻰﻠﻋ ﻂﻐﺿﺍ
Page 59

ﺔﻴﺑﺮﻌﻟﺍ 10
ﻢﻜﺤﺘﻟﺍ ﺔﺣﻮﻟ
:ﻲﻬﻄﻟﺍ ﺔﻔﻴﻇﻭ 1
ﻞﻤﺤﻟﺍ ﻭﺃ ﺔﻳﺍﻮﺸﻟﺍ ﻭﺃ ﻒﻳﻭﻭﺮﻜﻴﻤﻟﺍ ﺔﻗﺎﻃ ﺩﺪﺣ
.ﻂﻠﺘﺨﻤﻟﺍ ﻲﻬﻄﻟﺍ ﻭﺃ ﻱﺭﺍﺮﺤﻟﺍ
:ﺔﻗﺎﻄﻟﺍ ﻯﻮﺘﺴﻣ
ﺔﺑﻮﻠﻄﻤﻟﺍ ﻒﻳﻭﻭﺮﻜﻴﻤﻟﺍ ﺔﻗﺎﻃ ﻯﻮﺘﺴﻣ ﺩﺪﺣ
:ﻲﺋﺎﻘﻠﺘﻟﺍ ﻦﻴﺨﺴﺘﻟﺍ ﺓﺩﺎﻋﺇ
ﺔﺑﻮﻠﻄﻤﻟﺍ ﻦﻴﺨﺴﺘﻟﺍ ﺓﺩﺎﻋﺇ ﺔﻔﻴﻇﻭ ﺩﺪﺣ
:ﺪﻤﺠﺘﻟﺍ ﻚﻓ
ﺖﻗﻮﻟﺍ ﻭﺃ ﻥﺯﻮﻠﻟ ﺎًﻘﻓﻭ ﺪﻤﺠﺘﻟﺍ ﻚﻓ ﺩﺪﺣ
:ﺽﺮﻌﻟﺍ ﺓﺬﻓﺎﻧ
ﺔﻗﺎﻄﻟﺍ ﻯﻮﺘﺴﻣﻭ ﻲﻬﻄﻟﺍ ﺖﻗﻭ ﺽﺮﻌﺗ
ﺖﻗﻮﻟﺍﻭ ﻲﻬﻄﻟﺍ ﺔﻔﻴﻇﻭﻭ
:ﺔﻋﺎﺴﻟﺍ 6
ﻞﺟﺆﻤﻟﺍ ءﺪﺒﻟﺍﻭ ﺖﻗﻮﻟﺍ ﻂﺒﺿ
:ءﺎﻐﻟﺇ/ﻑﺎﻘﻳﺇ
ﻒﻳﻭﻭﺮﻜﻴﻤﻟﺍ ﺞﻣﺎﻧﺮﺑ ﻦﻴﻴﻌﺗ ﻭﺃ ﻑﺎﻘﻳﺇ
ﺩﺍﺪﻋﺇ ءﺎﻐﻟﺇ ﻭﺃ ﺖﻗﺆﻤﻟﺍ ﻑﺎﻘﻳﻹﺍ ﻰﻠﻋ
ﻲﻬﻄﻟﺍ ﺞﻣﺎﻧﺮﺑ
:ﺔﻌﺑﺎﺘﻣ/ءﺪﺑ
ﻒﻳﻭﻭﺮﻜﻴﻤﻟﺍ ﻥﺮﻓ ﻞﻴﻐﺸﺗ ءﺪﺑ
:ﻒﺋﺎﻇﻮﻟﺍ ﺩﺪﺤﻣ
ﻲﻬﻄﻟﺍ ﺖﻗﻭﻭ ﺔﻔﻴﻇﻭ ﺪﻳﺪﺤﺗ
2
3
4
5
7
8
9
1
2
3
4
5
EMS30400OX
6
7
ﻲﻬﻄﻟﺍ ﺔﻔﻴﻇﻭ ﺔﻳﺅﺭ ﻚﻨﻜﻤﻳ ،ﺔﺷﺎﺸﻟﺍ ﺽﻭﺮﻋ ﻲﻓ
.ﻲﺋﺎﻘﻠﺘﻟﺍ ﻲﻬﻄﻟﺍﻭ ﻱﺭﺍﺮﺤﻟﺍ ﻞﻤﺤﻟﺎﺑ ﻲﻬﻄﻟﺍﻭ
ﺔﻋﺎﺴﻟﺍ ﺩﺍﺪﻋﺇ
ﺔﺷﺎﺸﻟﺍ ﺽﺮﻌﺘﺳ ،ﻲﺴﻴﺋﺮﻟﺍ ﺔﻗﺎﻄﻟﺍ ﺭﺪﺼﻣ ﻞﻴﺻﻮﺗ ﺪﻨﻋ
ﻩﺬﻫ ﻊﺒﺗﺍ .ﺮﻴﻔﺻ ﺕﻮﺻ ﺭﺍﺪﺻﺇ ﺃﺪﺒﻴﺳﻭ "0.00"
.ﺔﻋﺎﺴﻟﺍ ﻂﺒﻀﻟ ﺕﺍﻮﻄﺨﻟﺍ
8
9
ﺔﺷﺎﺸﻟﺍ ﺽﻭﺮﻋ
1 . .ﺔﻋﺎﺳ 24 ﻭﺃ 12 ﻊﺿﻭ ﺪﻳﺪﺤﺘﻟ ﺔﻋﺎﺴﻟﺍ ﺭﺯ ﻰﻠﻋ ﻂﻐﺿﺍ
Page 60

9 www.electrolux.com
ﻡﺍﺪﺨﺘﺳﻻﺍ
ﺯﺎﻬﺠﻟﺍ ﻒﺻﻭ
ﻒﻳﻭﻭﺮﻜﻴﻤﻟﺍ ﻥﺮﻓ ﻡﺍﺪﺨﺘﺳﺍ
6
7
ﻦﻣ ﻲﻬﻄﻟﺍ ءﺎﻨﺛﺃ ﻡﺎﻌﻄﻟﺍ ﺓﺪﻫﺎﺸﻣ ﻦﻜﻤﻳ .ﺓﺬﻓﺎﻨﻟﺍ
ﺓﺬﻓﺎﻨﻟﺍ ﻩﺬﻫ ﻝﻼﺧ
ﻥﺮﻔﻟﺍ ﺏﺎﺑ ﻖﻠﻏ ﺐﺠﻳ .ﺏﺮﺴﺘﻟﺍ ﻊﻧﺎﻣﻭ ﻥﺮﻔﻟﺍ ﺏﺎﺑ
ﺔﻴﻟﺎﺧ ﺐﻧﺍﻮﺠﻟﺍ ﻰﻠﻋ ﻅﺎﻔﺤﻟﺍ ﺐﺠﻳ ﺎﻤﻛ ﻲﻬﻄﻟﺍ ءﺎﻨﺛﺃ
.ﻡﺎﻌﻄﻟﺍ ﺎﻳﺎﻘﺑﻭ ﺥﺎﺳﻭﻷﺍ ﻦﻣ
ﻞﻔﻘﻟﺍ ﻑﺎﻄﺧ
ﻞﻣﺎﺤﻟﺍ
ﺔﻳﺍﻮﺸﻟﺍ
3 4 52
9
ﺔﻔﻴﻇﻮﻟﺍﻭ ءﺎﻤﺳﻷﺍ - ءﺍﺰﺟﻷﺍ
5
6
ﻲﻓ ﺎﻬﺒﻴﻛﺮﺗ ﻢﺘﻳ .ﺕﺍﺮﻜﺒﻟﺍﻭ ﺭﺍﻭﺪﻟﺍ ﺹﺮﻘﻟﺍ ﺔﻘﻠﺣ
ﺔﻤﻌﻃﻷﺍ ﻊﺿﻭ ﻢﺘﻳ .ﻲﺟﺎﺟﺰﻟﺍ ﺭﺍﻭﺪﻟﺍ ﺹﺮﻘﻟﺍ
ﻻ .ﻲﻬﻄﻠﻟ ﺔﻴﻨﻴﺼﻟﺍ ﻩﺬﻫ ﻰﻠﻋ ﺔﺒﺳﺎﻨﻣ ﺕﺎﻳﻭﺎﺣ ﻲﻓ
7
8
9
ﺭﺍﻭﺪﻟﺍ ﺹﺮﻘﻟﺍ ﻢﻋﺪﻟ ﻥﺮﻔﻟﺍ ﺓﺪﻋﺎﻗ
ﺭﺍﻭﺪﻟﺍ ﺹﺮﻘﻟﺍ ﻥﻭﺪﺑ ﻥﺮﻔﻟﺍ ﻡﺪﺨﺘﺴﺗ
1
8
ﻢﻜﺤﺘﻟﺍ ﺔﺣﻮﻟ
ﺭﺍﻭﺪﻟﺍ ﺹﺮﻘﻟﺍ ﺩﻮﻤﻋ
1
2
3
4
:ﺔﻇﻮﺤﻠﻣ
.ﻲﻬﻄﻟﺍ ءﺎﻨﺛﺃ
.ﺭﺍﻭﺪﻟﺍ ﺹﺮﻘﻟﺍ ﻰﻠﻋ
.ﺎًﻣﺎﻤﺗ ﺎًﻴﻌﻴﺒﻃ ﺮﻣﻷﺍ ﺍﺬﻫ ﺪﻌﻳﻭ .ﺔﻋﺎﺴﻟﺍ ﺏﺭﺎﻘﻋ ﺲﻜﻋﻭ
• .ﺐﻘﻋ ﻰﻠﻋ ﺎًﺳﺃﺭ ﺎًﻘﻠﻄﻣ ﺭﺍﻭﺪﻟﺍ ﺹﺮﻘﻟﺍ ﻊﻀﺗ ﻻ
• ﻞﻴﻐﺸﺘﻟﺍ ﺩﻮﻤﻋﻭ ﺔﻘﻠﺤﻟﺍﻭ ﺭﺍﻭﺪﻟﺍ ﺹﺮﻘﻟﺍ ﻡﺍﺪﺨﺘﺳﺍ ﺐﺠﻳ
• ﻡﺎﻌﻃ ﻰﻠﻋ ﻱﻮﺘﺤﺗ ﻲﺘﻟﺍ ﺕﺎﻳﻭﺎﺤﻟﺍﻭ ﻡﺎﻌﻄﻟﺍ ﻊﺿﻭ ﺐﺠﻳ
• ﺔﻋﺎﺴﻟﺍ ﺏﺭﺎﻘﻋ ﻩﺎﺠﺗﺍ ﻲﻓ ﺭﺍﻭﺪﻟﺍ ﺹﺮﻘﻟﺍ ﺮﻳﻭﺪﺗ ﻦﻜﻤﻳ
ﻞﻔﻘﻟﺎﺑ ﻢﻗﻭ ﻥﺮﻔﻠﻟ ﻲﻠﻔﺴﻟﺍ ءﺰﺠﻟﺍ ﻲﻓ ﺓﺩﻮﺟﻮﻤﻟﺍ
."D" ﻙﺮﺤﻤﻟﺍ ﻞﻴﻐﺸﺗ ﺩﻮﻤﻋ ﻡﺍﺪﺨﺘﺳﺎﺑ
.ﻞﻴﻐﺸﺘﻟﺍ ﺩﻮﻤﻋ ﻊﻣ ﺰﻛﺮﻤﻟﺍ ﺓﺪﺤﺘﻣ ﻥﻮﻜﺗ
ﻞﺧﺍﺪﺘﺗ ﻰﺘﺣ ﺹﺮﺤﺑ ﺮﻳﻭﺪﺘﻟﺎﺑ ﻢﻗﻭ ﺓﺮﻜﺒﻟﺍﻭ ﺭﺍﻭﺪﻟﺍ
ﺭﺍﻭﺪﻟﺍ ﺹﺮﻘﻟﺍ ﺐﻴﻛﺮﺗ
1 . ﺔﺤﺘﻔﻟﺍ ﻲﻓ ﺭﺍﻭﺪﻟﺍ ﺹﺮﻘﻟﺍ ﺩﻮﻤﻋ ﻊﺿﻭ ﻦﻣ ﺪﻛﺄﺗ
2 . ﺚﻴﺤﺑ ،ﺕﺍﺮﻜﺒﻟﺍﻭ ﺭﺍﻭﺪﻟﺍ ﺹﺮﻘﻟﺍ ﺔﻘﻠﺣ ﺐﻴﻛﺮﺘﺑ ﻢﻗ
3 . ﺹﺮﻘﻟﺍ ﺔﻘﻠﺣ ﻰﻠﻋ ﻲﺟﺎﺟﺰﻟﺍ ﺭﺍﻭﺪﻟﺍ ﺹﺮﻘﻟﺍ ﻊﺿ
.ﻞﻴﻐﺸﺘﻟﺍ ﺩﻮﻤﻋ ﻊﻣ
Page 61

ﺔﻴﺑﺮﻌﻟﺍ 8
ﻥﺮﻔﻟﺍ ﺕﺎﻘﺤﻠﻣﻭ ﺕﺍﻭﺩﺄﺑ ﺔﻘﻠﻌﺘﻤﻟﺍ ﺕﺍﺩﺎﺷﺭﻹﺍ
ﻒﻠﺗ ﺐﻨﺠﺘﻟﻭ ﺔﻣﻼﺴﻟﺎﺑ ﺔﺻﺎﺧ ﺏﺎﺒﺳﻷ ،ﺎﻬﻣﺪﺨﺘﺴﺗ
.ﻂﻘﻓ ﺔﻳﺩﺎﺷﺭﺇ ﺔﻤﺋﺎﻗ ﻲﻫ ﺔﻴﻟﺎﺘﻟﺍ ﺔﻤﺋﺎﻘﻟﺍ
ﻞﻴﻐﺸﺘﻟﺍ ﻊﺿﻭ
(1
ﻢﻌﻧ
(1
ﻢﻌﻧ
.ﺕﺍﻭﺩﻷﺍ
ﻥﺮﻓ
ﻒﻳﻭﻭﺮﻜﻴﻤﻟﺍﺔﻳﺍﻮﺸﻟﺍﻱﺭﺍﺮﺤﻟﺍ ﻞﻤﺤﻟﺍﺝﺰﻤﻟﺍ
(1
ﺩﺍﻮﻤﻟﺍﻭ ﺕﺎﻳﻭﺎﺤﻟﺍﻭ ﺕﺍﻭﺩﻷﺍ ﻦﻣ ﺪﻳﺪﻌﻟﺍ ﻡﺍﺪﺨﺘﺳﺍ ﻦﻜﻤﻳ
ﺮﺘﺧﺍ .ﻒﻳﻭﻭﺮﻜﻴﻤﻟﺍ ﻥﺮﻓ ﻲﻓ ﻲﻬﻄﻟﺎﺑ ﺔﺻﺎﺧ ﺽﺍﺮﻏﻷ
ﻲﺘﻟﺍ ﻲﻬﻄﻟﺍ ﺔﻘﻳﺮﻄﻟ ﺔﺒﺳﺎﻨﻤﻟﺍ ﺩﺍﻮﻤﻟﺍﻭ ﺕﺎﻳﻭﺎﺤﻟﺍﻭ ﺕﺍﻭﺩﻷﺍ
ﺩﺍﻮﻤﻟﺍﺦﺒﻄﻤﻟﺍ ﺕﺍﻭﺩﺃ
ﺝﺎﺟﺰﻟﺍﻭ ﻑﺰﺨﻟﺍﺲﻛﺮﻴﺒﻟﺍﻢﻌﻧﻢﻌﻧﻢﻌﻧﻢﻌﻧ
ﻢﻌﻧﻢﻌﻧ
ﻻﻻﻻﻻ
ﻥﺮﻔﻠﻟ ﻡﻭﺎﻘﻤﻟﺍ ﺝﺎﺟﺰﻟﺍ
ﺔﻓﺮﺧﺰﺑ ﺩﻭﺰﻤﻟﺍ ﻲﺟﺎﺟﺰﻟﺍ ءﺎﻧﻹﺍ
ﺔﻴﻧﺪﻌﻣ
ﻲﺻﺎﺻﺭ ﻲﻟﺎﺘﺴﻳﺮﻛ ﺝﺎﺟﺯﻻﻻﻻﻻ
ﻲﻨﻴﺼﻟﺍ ﻑﺰﺨﻟﺍﺔﻴﻧﺪﻌﻣ ﺔﻓﺮﺧﺯ ﻥﻭﺪﺑﻢﻌﻧﻢﻌﻧﻻﻻ
(2
ﺭﺎﺨﻔﻟﺍﻢﻌﻧﻢﻌﻧﻢﻌﻧﻢﻌﻧ
ﺔﻴﻜﻴﺘﺳﻼﺒﻟﺍ ﻲﻧﺍﻭﻷﺍﻒﻳﻭﻭﺮﻜﻴﻤﻟﺍ ﻥﺮﻔﻟ ﺔﻣﻭﺎﻘﻤﻟﺍﻢﻌﻧﻻﻻﻻ
ﺔﻴﻜﻴﺘﺳﻼﺒﻟﺍ ﺔﻔﻠﻏﻷﺍﻢﻌﻧﻻﻻﻻ
ﺔﻴﻧﺪﻌﻤﻟﺍ ﻲﻧﺍﻭﻷﺍءﺍﻮﺸﻟﺍ ﺓﻼﻘﻣﻻﻢﻌﻧﻢﻌﻧﻻ
(3
ﻡﻮﻴﻨﻤﻟﻷﺍ ﻖﺋﺎﻗﺭﻢﻌﻧﻢﻌﻧﻢﻌﻧﻢﻌﻧ
ﻕﺍﺭﻭﻷﺍﺦﺒﻄﻤﻟﺍ ﻒﺋﺎﻔﻟﻭ ﺡﺍﻮﻟﻷﺍﻭ ﺏﺍﻮﻛﻷﺍﻢﻌﻧﻻﻻﻻ
ﻡﻮﺤﺸﻠﻟ ﻡﻭﺎﻘﻤﻟﺍ ﻕﺭﻮﻟﺍﻢﻌﻧﻻﻻﻻ
ﺔﻴﺒﺸﺨﻟﺍ ﻲﻧﺍﻭﻷﺍﻻﻻﻻﻻ
ﺕﺎﻘﺤﻠﻤﻟﺍﻲﻜﻠﺴﻟﺍ ﻑﺮﻟﺍﻻﻢﻌﻧﻢﻌﻧﻢﻌﻧ
ﺭﺍﻭﺪﻟﺍ ﺹﺮﻘﻟﺍﻢﻌﻧﻢﻌﻧﻢﻌﻧﻢﻌﻧ
ﺭﺍﻭﺪﻟﺍ ﺹﺮﻘﻟﺍ ﺔﻘﻠﺣﻢﻌﻧﻢﻌﻧﻢﻌﻧﻢﻌﻧ
.ﺎﻬﻣﺍﺪﺨﺘﺳﺍ ﻦﻜﻤﻳ ﻲﺘﻟﺍ ﺦﺒﻄﻤﻟﺍ ﺕﺎﻘﺤﻠﻣﻭ ﺕﺍﻭﺩﺃ :ﻢﻌﻧ
.ﺎﻬﻣﺍﺪﺨﺘﺳﺍ ﺐﻨﺠﺗ ﺐﺠﻳ ﻲﺘﻟﺍ ﺦﺒﻄﻤﻟﺍ ﺕﺎﻘﺤﻠﻣﻭ ﺕﺍﻭﺩﺃ :ﻻ
.ﺔﻴﻧﺪﻌﻣ ءﺍﺰﺟﺃ ﻰﻠﻋ ﻮﺘﺤﺗ ﻢﻟ ﺍﺫﺇ ﻂﻘﻓ
.ﻥﺩﺎﻌﻣ ﻰﻠﻋ ﻱﻮﺘﺤﻳ ﻻ ﺝﺎﺟﺯ ﺩﻮﺟﻭ ﻭﺃ ﺝﺎﺟﺰﺑ ﺓﺩﻭﺰﻣ ﺮﻴﻏ ﺖﻧﺎﻛ ﺍﺫﺇ ﻂﻘﻓ
ﺔﻴﺋﺎﺑﺮﻬﻛ ﺱﺍﻮﻗﺃ ﺙﻭﺪﺣ ﻰﻟﺇ ﻱﺩﺆﺗ ﺪﻗ ،ﻖﺋﺎﻗﺮﻟﺍ ﻦﻣ ﺓﺮﻴﺒﻛ ﺔﻴﻤﻛ ﻡﺍﺪﺨﺘﺳﺍ ﺔﻟﺎﺣ ﻲﻓ .ﺔﻴﻄﻐﺘﻠﻟ ﻡﻮﻴﻨﻤﻟﻷﺍ ﻖﺋﺎﻗﺭ ﻂﺋﺎﻘﻓ ﻡﺪﺨﺘﺳﺍ :ﺔﻈﺣﻼﻣ
.ﻥﺮﻔﻟﺍ ﻞﺧﺍﺩ
ﻒﻴﻠﻐﺘﻟﺍ ﻚﻓ
ﻒﻴﻠﻐﺘﻟﺍ ﺩﺍﻮﻣ ﻙﺮﺘﺗ ﻻ .ﻥﺮﻔﻟﺍ ﻡﺍﺪﺨﺘﺳﺍ ﻞﺒﻗ ﺔﻔﻠﻏﻷﺍ
ﻥﻮﻜﺗ ﻥﺃ ﻦﻜﻤﻴﻓ .ﺭﺎﻐﺼﻟﺍ ﻝﺎﻔﻃﻷﺍ
ﺎﻬﺑ ﺐﻌﻠﻳ ﺪﻗ ﻢﺛ ﻦﻣﻭ
.ﺓﺮﻄﺧ
ﺩﻮﺟﻭ ﻡﺪﻋ ﻦﻣ ﻖﻘﺤﺗ ،ﻥﺮﻔﻟﺍ ﻒﻴﻠﻐﺗ ﻚﻓ ﺪﻨﻋ :ﺔﻇﻮﺤﻠﻣ
ﻱﺃ ﺩﻮﺟﻭ ﺔﻟﺎﺣ ﻲﻓ ﺍًﺭﻮﻓ ﺔﺋﺰﺠﺘﻟﺍ ﺮﺟﺎﺗ ﻎﻠﺑﺃ .ﻒﻠﺗ ﻱﺃ
ﻪﺗﺎﻧﻮﻜﻣﻭ ﻥﺮﻔﻟﺍ ﻒﻴﻠﻐﺗ ﻦﻜﻤﻳ .ﺓﺩﻮﻘﻔﻣ ءﺍﺰﺟﺃ ﻭﺃ ﻒﻠﺗ
ﻩﺬﻫ ﺔﻟﺍﺯﺇ ﺐﺠﻳ ،ﻚﻟﺬﻛ ﺮﻣﻷﺍ ﻥﺎﻛ ﺍﺫﺇ .ﺔﻴﻗﺍﻭ ﺔﻔﻠﻏﺄﺑ
(1
(2
(3
Page 62

7 www.electrolux.com
ﺐﻴﻛﺮﺘﻟﺍ
ﻲﺴﻴﺋﺮﻟﺍ ﺔﻗﺎﻄﻟﺍ ﺭﺪﺼﻤﺑ ﻥﺮﻔﻟﺍ ﻞﻴﺻﻮﺗ
ﺲﺒﻘﻤﻠﻟ ﺲﺑﺎﻗﻭ ﻲﺋﺎﺑﺮﻬﻛ ﺭﺎﻴﺗ ﻞﺑﺎﻜﺑ ﺩﻭﺰﻣ ﻥﺮﻔﻟﺍ ﺍﺬﻫ
ﻞﻴﺻﻮﺘﻟﺍ ﻞﻠﻘﻳ ﺚﻴﺣ .ﺰﺗﺮﻫ 50 ،ﺖﻟﻮﻓ 230 ﺽﺭﺆﻤﻟﺍ
ﺮﺼﻗ ﺓﺮﺋﺍﺩ ﺙﻭﺪﺣ ﺔﻟﺎﺣ ﻲﻓ ﺮﻃﺎﺨﻤﻟﺍ ﻦﻣ ﻲﺿﺭﻷﺍ
ﺭﺎﻴﺘﻟﺍ ﺪﻬﺟ ﻊﻣ ﺩﺪﺤﻤﻟﺍ ﺪﻬﺠﻟﺍ ﻖﻓﺍﻮﺗ ﻦﻣ ﻖﻘﺤﺗ .ﺔﻴﺋﺎﺑﺮﻬﻛ
.ﻲﺋﺎﺑﺮﻬﻜﻟﺍ
ﻞﻴﺻﻮﺗ ﺪﻨﻋ ﺪﻳﺪﻤﺗ ﻞﺑﺎﻛ ﻡﺍﺪﺨﺘﺳﺍ ﺔﻟﺎﺣ ﻲﻓ :ﺔﻇﻮﺤﻠﻣ
.ﺪﻳﺪﻤﺘﻟﺍ ﻞﺑﺎﻛ ﺾﻳﺭﺄﺗ ﺐﺠﻳ ،ﻥﺮﻔﻟﺍ
ﺭﺎﻴﺗ ﺭﺪﺼﻣ ﻊﻣ ﻥﺮﻔﻟﺍ ﻡﺍﺪﺨﺘﺳﺍ ﻡﺪﻋ ﺐﺠﻳ
ﻲﺋﺎﺑﺮﻬﻛ ﻲﻨﻔﺑ ﻞﺼﺗﺍ
ﻲﺋﺎﺑﺮﻬﻜﻟﺍ ﻞﻴﺻﻮﺘﻟﺍ ﻦﻣ ﺪﻛﺄﺘﻣ ﺮﻴﻏ ﺖﻨﻛ ﺍﺫﺇ
ﻚﻟﺰﻨﻣ ﻲﻓ ﻙﻼﺳﻷﺍ ﻡﺎﻈﻧ ﻥﺎﻛ ﺍﺫﺇ ﺎﻣ ﻭﺃ ،ﻥﺮﻔﻠﻟ
ﻱﻮﺘﺤﻳ ﻥﺮﻔﻟﺍ ﻥﺎﻛ ﺍﺫﺇ .ﺯﺎﻬﺠﻟﺍ ﺾﻳﺭﺄﺗ ﺐﺠﻳ
،ﺲﺒﻘﻤﻠﻟ ﺐﺳﺎﻨﻣ ﺮﻴﻏ ﺐﻟﻮﻘﻣ ﺲﺑﺎﻗ ﻰﻠﻋ
ﻭﺃ ﺔﻌﻨﺼﻤﻟﺍ ﺔﻬﺠﻟﺍ ﻞﺒﻗ ﻦﻣ ﻪﻟﺍﺪﺒﺘﺳﺍ ﺐﺠﻴﻓ
ﻭﺃ ﺔﻌﻨﺼﻤﻟﺍ ﺔﻬﺠﻠﻟ ﻊﺑﺎﺘﻟﺍ ﺔﻧﺎﻴﺼﻟﺍ ﺔﻣﺪﺧ ﻞﻴﻛﻭ
.
ﺔﻣﻼﺴﻟﺎﺑ ﺔﺻﺎﺧ ﺽﺍﺮﻏﻷ ﻞﻫﺆﻣ ﺐﻴﻛﺮﺗ ﻲﻨﻓ
ﺐﺠﻳ ،ﻲﺋﺎﺑﺮﻬﻜﻟﺍ ﺭﺎﻴﺘﻟﺍ ﻞﺑﺎﻛ ﻒﻠﺗ ﺔﻟﺎﺣ ﻲﻓ
ﻞﻴﻛﻭ ﻭﺃ ﺔﻌﻨﺼﻤﻟﺍ ﺔﻬﺠﻟﺍ ﻞﺒﻗ ﻦﻣ ﻪﻟﺍﺪﺒﺘﺳﺍ
ﻲﻨﻓ ﻭﺃ ﺔﻌﻨﺼﻤﻟﺍ ﺔﻬﺠﻠﻟ ﻊﺑﺎﺘﻟﺍ ﺔﻧﺎﻴﺼﻟﺍ ﺔﻣﺪﺧ
.ﺔﻣﻼﺴﻟﺎﺑ ﺔﺻﺎﺧ ﺽﺍﺮﻏﻷ ﻞﻫﺆﻣ ﺐﻴﻛﺮﺗ
.ﺽﺭﺆﻣ ﺮﻴﻏ ﻲﺋﺎﺑﺮﻬﻛ
.ﻻ ﻡﺃ ﺎًﺿﺭﺆﻣ
ﺔﻳﺃ ﺔﻟﺍﺯﺈﺑ ﻢﻗ
ﻥﺯﻭ ﻞﻤﺤﺘﻟ ﺔﻳﺎﻔﻜﻟﺍ ﻪﻴﻓ ﺎﻤﺑ ﺎًﻳﻮﻗ ﺢﻄﺴﻟﺍ ﻥﻮﻜﻳ ﻥﺃ
.ﺕﺎﻗﻭﻷﺍ ﻊﻴﻤﺟ ﻲﻓ ﻪﺗﺎﻳﻮﺘﺤﻣﻭ (ﻢﺠﻛ 25) ﻥﺮﻔﻟﺍ
ﺭﺪﺼﻳ ﻭﺃ ﺰﺘﻬﻳ ﻻ ﺚﻴﺤﺑ ﺎًﺘﺑﺎﺛ ﻥﺮﻔﻟﺍ ﻥﻮﻜﻳ ﻥﺃ ﺐﺠﻳ
.ءﺎﺿﻮﺿ
ﺭﺩﺎﺼﻣ ﻰﻟﺇ ﻥﺮﻔﻟﺍ ﺽﺮﻌﺗ ﻱﺩﺆﻳ ﺪﻘﻓ .ﻩﺎﻴﻤﻟﺍ ﻭﺃ
ﻪﻨﻋ ﺞﺘﻨﻳ ﺎﻤﻣ ﻪﺗءﺎﻔﻛ ﻞﻴﻠﻘﺗ ﻰﻟﺇ ءﺎﻤﻟﺍﻭ ﺓﺭﺍﺮﺤﻟﺍ
ﻰﻠﻋ ﻥﺮﻔﻟﺍ ﻊﺿﻭ ﻦﻣ ﺪﻛﺄﺘﻟﺍ ﺐﺠﻳ .ﺔﻴﻔﻴﻇﻭ ﻝﺎﻄﻋﺃ
.ءﺎﻤﻟﺍﻭ ﺓﺭﺍﺮﺤﻟﺍ ﺭﺩﺎﺼﻣ ﻦﻋ ﺓﺪﻴﺟ ﺔﻓﺎﺴﻣ
ﻰﻠﻋ ءﺎﻴﺷﺃ ﻱﺃ ﻊﻀﺗ ﻻﻭ ﺔﻧﺍﺰﺨﻟﺍ ﻲﺒﻧﺎﺟ ﻭﺃ ﻱﻮﻠﻌﻟﺍ
ﺔﻳﻮﻬﺘﻟﺍ ﺕﺎﺤﺘﻓ
ﺎﻤﻣ ﻥﺮﻔﻟﺍ ﺓﺭﺍﺮﺣ ﺔﺟﺭﺩ ﻊﻔﺗﺮﺘﺳ ،ﻥﺮﻔﻟﺍ ﻞﻴﻐﺸﺗ ءﺎﻨﺛﺃ
ﻦﻣ ﺓﺮﻴﺒﻛ ﺕﺎﻴﻤﻛ ﺝﺮﺨﺗﻭ .ﺔﻴﻔﻴﻇﻭ ﻝﺎﻄﻋﺃ ﻰﻟﺇ ﻱﺩﺆﻳ
ﻦﻣ ﺪﻛﺄﺗ ﻢﺛ ﻦﻣﻭ ،ﺔﻳﻮﻬﺘﻟﺍ ﺕﺎﺤﺘﻓ ﻦﻣ ﻦﺧﺎﺴﻟﺍ ءﺍﻮﻬﻟﺍ
ﺮﺋﺎﺘﺴﻟﺍ ﻖﻴﻠﻌﺗ ﻡﺪﻋ ﻦﻣ ﺪﻛﺄﺘﻟﺍ ﺐﺠﻳﻭ .ﺎﻫﺩﺍﺪﺴﻧﺍ ﻡﺪﻋ
ﺩﺎﺤﺗﻻﺍ ﺕﺎﺒﻠﻄﺘﻣ ﻊﻣ ﻥﺮﻔﻟﺍ ﻖﻓﺍﻮﺘﻳ .ﺯﺎﻔﻠﺘﻟﺍﻭ ﻮﻳﺩﺍﺮﻟﺍ
ﺮﻤﺘﺴﻳ ﺪﻗ ﻦﻜﻟ ،ﺔﻴﻜﻠﺳﻼﻟﺍ ﺕﺎﺟﻮﻤﻟﺍ ﺔﻗﺎﻋﻹ ﻲﺑﻭﺭﻭﻷﺍ
ﻭﺃ ﻮﻳﺩﺍﺮﻟﺍ ﻦﻣ ﺏﺮﻘﻟﺎﺑ ﻪﻌﺿﻭ ﺔﻟﺎﺣ ﻲﻓ ﻞﺧﺍﺪﺘﻟﺍ
ﻥﺎﻜﻣ ﺪﻌﺑﺃ ﻲﻓ ﺯﺎﻬﺠﻟﺍ ﻊﺿﻭ ﺐﺠﻳ ﻢﺛ ﻦﻣﻭ .ﺯﺎﻔﻠﺘﻟﺍ
ﺩﻮﺟﻭ ﺐﺠﻳ ﺎﻤﻛ
ﺪﻛﺄﺗ .ﺦﺒﻄﻤﻟﺍ ﻲﻓ ﻥﺎﻜﻣ ﻱﺃ ﻲﻓ ﻥﺮﻔﻟﺍ ﻊﺿﻭ ﻦﻜﻤﻳ !ﻡﺎﻫ
ﻡﺪﻋ ﻦﻣ ﺪﻛﺄﺗﻭ ﻲﻘﻓﺃﻭ ٍﻮﺘﺴﻣ ﺢﻄﺳ ﻰﻠﻋ ﻥﺮﻔﻟﺍ ﻊﺿﻭ ﻦﻣ
ﻰﻠﻋ ﻝﻮﺼﺤﻟﺍ ﻥﺎﻤﻀﻟ) ﻥﺮﻔﻟﺍ ﺓﺪﻋﺎﻗﻭ ﺕﺎﺤﺘﻔﻟﺍ ﺩﺍﺪﺴﻧﺍ
ﺪﺳ ﺔﻟﺎﺣ ﻲﻓ .ﻥﺮﻔﻠﻟ ﻱﻮﻠﻌﻟﺍ ءﺰﺠﻟﺍ
.ﻂﺋﺎﺤﻟﺍﻭ ﻥﺮﻔﻠﻟ ﻲﻔﻠﺨﻟﺍ ءﺰﺠﻟﺍ ﻦﻴﺑ
ﻥﺮﻔﻟﺍ ﻊﺿ
.ﺓﺰﻬﺟﻷﺍ ﻩﺬﻫ ﻦﻋ ﻦﻜﻤﻣ
،ﻂﺋﺎﺤﻟﺍ ﻦﻣ ﻞﻗﻷﺍ ﻰﻠﻋ ﻢﺳ 10
.ﻥﺮﻔﻟﺍ ﻕﻮﻓ ﻢﺳ 30 ﻲﻟﺍﻮﺣ ﺔﻴﻟﺎﺧ ﺔﺣﺎﺴﻣ
.(ﺔﺒﺳﺎﻨﻣ ﺔﻳﻮﻬﺗ
1 . .ﺏﺎﺒﻟﺍ ﻰﻠﻋ ﻦﻣ ﺕﺎﻘﺼﻠﻣ
2 . ﺐﺠﻳ .ﻲﻘﻓﺃﻭ ٍﻮﺘﺴﻣ ﺢﻄﺳ ﻰﻠﻋ ﻥﺮﻔﻟﺍ ﺐﻴﻛﺮﺗ ﺐﺠﻳ
3 . ﺓﺭﺍﺮﺤﻟﺍ ﺭﺪﺼﻣ ﻦﻣ ﺏﺮﻘﻟﺎﺑ ﻥﺮﻔﻟﺍ ﻊﺿﻭ ﻡﺪﻋ ﺐﺠﻳ
4 . ءﺰﺠﻟﺍ ﻲﻓ ﺓﺩﻮﺟﻮﻤﻟﺍ ﺔﻳﻮﻬﺘﻟﺍ ﺕﺎﺤﺘﻓ ﺪﺴﺑ ﻢﻘﺗ ﻻ
5 . ﺓﺰﻬﺟﺃ ﻦﻋ ﻦﻜﻤﻣ ﻥﺎﻜﻣ ﺪﻌﺑﺃ ﻲﻓ
6 . ﺔﻓﺎﺴﻣ ﻙﺮﺗﺍ ،ﺔﻳﻭﺍﺯ ﻲﻓ ﻥﺮﻔﻟﺍ ﻊﺿﻭ ﺔﻟﺎﺣ ﻲﻓ
Page 63

ﺔﻴﺑﺮﻌﻟﺍ 6
ﻱﺩﺆﻳ ﺪﻗ ﺚﻴﺣ ،ﻡﺍﺪﺨﺘﺳﻻﺍ ﺪﻌﺑ ﺓﺮﺷﺎﺒﻣ ﺎﻫﺪﻳﺮﺒﺘﺑ ﻢﻘﺗ
.ﺎﻬﻤﻄﺤﺗ ﻰﻟﺇ ﻚﻟﺫ
ﻦﻣﻭ
،ﺔﻳﺎﻐﻠﻟ ﺎًﻨﺧﺎﺳ ﺔﻧﺍﺰﺨﻠﻟ ﻱﻮﻠﻌﻟﺍ ءﺰﺠﻟﺍ ﺢﺒﺼﻳ
ﺍﺬﻫ ﻰﻠﻋ ﻪﻌﺿﻭ ﻢﺘﻳ ءﻲﺷ ﻱﺃ ﺔﻧﻮﺨﺴﻟﺍ ﻒﻠﺘﺗ ﺪﻘﻓ ﻢﺛ
.ﻥﺮﻔﻟﺍ ﻦﻣ ءﺰﺠﻟﺍ
ﻡﺍﺪﺨﺘﺳﺍ ﺪﻨﻋ ﺲﻴﻟﻭ ،ﻂﻘﻓ ﻱﺭﺍﺮﺤﻟﺍ ﻞﻤﺤﻟﺍ ﺔﻔﻴﻇﻭ
ﻒﻳﻭﻭﺮﻜﻴﻤﻟﺍ) ﺝﺰﻤﻟﺍ ﻒﺋﺎﻇﻭ ﻭﺃ ﻒﻳﻭﻭﺮﻜﻴﻤﻟﺍ
.(ﻱﺭﺍﺮﺤﻟﺍ ﻞﻤﺤﻟﺍﻭ ﻒﻳﻭﻭﺮﻜﻴﻤﻟﺍ ﻭﺃ ﺔﻳﺍﻮﺸﻟﺍﻭ
!ﺮﻳﺬﺤﺗ
ﻡﺍﺪﺨﺘﺳﺍ ﺐﺠﻳ ،ﺝﺰﻤﻟﺍ ﺔﻔﻴﻇﻭ ﻡﺍﺪﺨﺘﺳﺍ ﺪﻨﻋ
ﻎﻟﺎﺑ ﺺﺨﺷ ﻑﺍﺮﺷﺇ ﺖﺤﺗ ﻥﺮﻔﻠﻟ ﻝﺎﻔﻃﻷﺍ
.ﺓﺭﺍﺮﺤﻟﺍ ﺕﺎﺟﺭﺩ ﻉﺎﻔﺗﺭﻻ ﺍًﺮﻈﻧ
!ﻦﻣﺁ ﻥﺎﻜﻣ ﻲﻓ ﺕﺍﺩﺎﺷﺭﻹﺍ ﻩﺬﻫ ﻆﻔﺣﺍ
4 . ﻭﺃ ﺩﺭﺎﺑ ءﺎﻣ ﻲﻓ ﺕﺎﻳﻭﺎﺤﻟﺍ ﻭﺃ ﺭﺍﻭﺪﻟﺍ ﺹﺮﻘﻟﺍ ﻊﻀﺗ ﻻ
ﺮﻬﻇ ﻭﺃ ﻦﻴﺒﻧﺎﺠﻟﺍ ﻭﺃ ﻞﻔﺳﻷﺍ ﻭﺃ ﻰﻠﻋﻷﺎﺑ ﺓﺩﻮﺟﻮﻤﻟﺍ
5 . ﺚﻴﺣ .ﺔﻧﺍﺰﺨﻠﻟ ﻱﻮﻠﻌﻟﺍ ءﺰﺠﻟﺍ ﻲﻓ ﺕﺎﻳﻭﺎﺤﻟﺍ ﻊﻀﺗ ﻻ
.ﺔﻳﺭﺎﺠﺗ ﺽﺍﺮﻏﻷ ﻥﺮﻔﻟﺍ
.ﻂﻘﻓ ﻲﻟﺰﻨﻤﻟﺍ ﻡﺍﺪﺨﺘﺳﻼﻟ ﻢﻤﺼﻣ ﻥﺮﻔﻟﺍ ﺍﺬﻬﻓ
ﻡﺍﺪﺨﺘﺳﺎﺑ ﻲﻬﻄﻟﺎﺑ ﺔﻘﻠﻌﺘﻤﻟﺍ ﺔﻣﻼﺴﻟﺍ ﺕﺍﺩﺎﺷﺭﺇ
6 . ﻡﺪﺨﺘﺴﺗ ﺖﻨﻛ ﺍﺫﺇ ﻥﺮﻔﻠﻟ ﻖﺒﺴﻤﻟﺍ ﻦﻴﺨﺴﺘﻟﺍ ءﺍﺮﺟﺈﺑ ﻢﻗ
.ﺝﺰﻤﻟﺍﻭ ﻱﺭﺍﺮﺤﻟﺍ ﻞﻤﺤﻟﺍ ﻒﺋﺎﻇﻭﻭ ﺔﻳﺍﻮﺸﻟﺍ
ﻒﺋﺎﻇﻭ ﻭﺃ ﺔﻳﺍﻮﺸﻟﺍ ﻡﺍﺪﺨﺘﺳﺎﺑ ﻲﻬﻄﻟﺍ ءﺎﻨﺛﺃ ﻪﻴﻠﻋ ءﺎﻤﻟﺍ
ﺔﻳﺎﻐﻠﻟ ﺔﻨﺧﺎﺳ ﺕﺎﻳﻭﺎﺤﻟﺍ ﺢﺒﺼﺗ .ﻥﺮﻔﻟﺍ ﻦﻣ ءﻲﺷ
ﺢﺒﺼﻳ ﺪﻗ .ﻚﺴﻔﻧ ﻕﺍﺮﺣﺇ ﻡﺪﻋ ﻦﻣ ﺪﻛﺄﺗ ﻢﺛ ﻦﻣﻭ
ﻦﻣﻭ ،ﺔﻳﺎﻐﻠﻟ ﺎًﻨﺧﺎﺳ
.ﺎﻤﻬﻌﻣ ﻞﻣﺎﻌﺘﻟﺍ ﺪﻨﻋ ﻥﺮﻔﻟﺍ ﺕﺍﺯﺎﻔﻗ ﻡﺪﺨﺘﺳﺍ ﻢﺛ
ﻊﺿﻭ ﺪﻨﻋ ﺔﻴﻧﺪﻌﻣ ﺕﺎﻧﻮﻜﻣ ﻡﺍﺪﺨﺘﺳﺎﺑ ﻒﻳﻭﻭﺮﻜﻴﻤﻟﺍ
ﺪﻗ .ﻒﻳﻭﻭﺮﻜﻴﻤﻟﺍ ﻥﺮﻓ ﻦﻣ ﻪﺟﺍﺮﺧﺇ ﻭﺃ ءﻲﺷ ﻱﺃ
ﻒﻳﻭﻭﺮﻜﻴﻤﻟﺍ ﻥﺮﻓﻭ ﺏﺎﺒﻠﻟ ﻲﻠﺧﺍﺪﻟﺍ ﺐﻧﺎﺠﻟﺍ ﺢﺒﺼﻳ
ﻡﺎﻌﻄﻟﺍ ﻲﻬﻃ ﺪﻨﻋ ﺭﺬﺤﻟﺍ ﺥﻮﺗ ﻢﺛ ﻦﻣﻭ ،ﺔﻳﺎﻐﻠﻟ ﺎ
ﻡﺍﺪﺨﺘﺳﺍ ﻡﺪﻋ ﺐﺠﻳ
.ﻱﺭﺍﺮﺤﻟﺍ ﻞﻤﺤﻟﺍ
ﻲﻜﻠﺴﻟﺍ ﻑﺮﻟﺍ ﻭﺃ ﺭﺍﻭﺪﻟﺍ ﺹﺮﻘﻟﺍ
!ﺮﻳﺬﺤﺗ
.ﻥﺮﻔﻟﺍ ﻲﻓ
.ﻥﺮﻔﻟﺍ
ً
ﻨﺧﺎﺳ
• ﺕﺎﺤﺘﻔﻟﺍ ﻲﻄﻐﺗ ﻖﺋﺍﻮﻋ ﺩﻮﺟﻭ ﻡﺪﻋ ﻦﻣ ﺪﻛﺄﺗ
1 . ﺐﻜﺳ ﺔﻟﺎﺣ ﻲﻓ ﺏﺎﺒﻟﺍ ﻲﻓ ﻲﺟﺎﺟﺰﻟﺍ ﺡﻮﻠﻟﺍ ﺮﺴﻜﻨﻳ ﺪﻗ
2 . ﻱﺃ ﺝﺍﺮﺧﺇ ﻭﺃ ﻊﺿﻭ ﺪﻨﻋ ﻥﺮﻔﻟﺍ ﺕﺍﺯﺎﻔﻗ ﻡﺪﺨﺘﺳ ﺍ
3 . ﻥﺮﻓ ﻲﻓ ﺔﻴﺟﺭﺎﺨﻟﺍ ﻭﺃ ﺔﻴﻠﺧﺍﺪﻟﺍ ﺓﺬﻓﺎﻨﻟﺍ ﺲﻤﻠﺗ ﻻ
Page 64

5 www.electrolux.com
!ﺮﻳﺬﺤﺗ
ﻝﺎﺜﻤﻟﺍ ﻞﻴﺒﺳ ﻰﻠﻋ ،ﻞﺋﺍﻮﺴﻟﺍ ﻦﻴﺨﺴﺗ ﺪﻨﻋ
ﻥﺮﻓ ﻲﻓ ،ﺕﺎﺑﻭﺮﺸﻤﻟﺍﻭ ﺔﺼﻠﺼﻟﺍﻭ ءﺎﺴﺤﻟﺍ
ﻥﺎﻴﻠﻐﻟﺍ ﺔﻄﻘﻧ ﻰﻟﺇ ﻞﺼﺗ ﺪﻗ ،ﻒﻳﻭﻭﺮﻜﻴﻤﻟﺍ
ﺍﺬﻫ ﻥﺃ ﻲﻨﻌﻳ ﺍﺬﻫ .ﺔﻘﺒﻘﺑ ﺕﺎﻣﻼﻋ ﺭﻮﻬﻇ ﻥﻭﺩ
ﺐﻨﺠﺗ ﻦﻜﻤﻳﻭ .ﺓﺄﺠﻓ ﻲﻠﻐﻳ ﺪﻗ ﻦﺧﺎﺴﻟﺍ ﻞﺋﺎﺴﻟﺍ
:ﻉﺎﺒﺗﺎﺑ ﺍﺬﻫ
.ﺔﻘﻴﺿ ﺕﺎﺒﻗﺭ ﺕﺍﺫﻭ
.ﺖﻗﻮﻟﺍ ﻒﺼﻧ ءﺎﻀﻘﻧﺍ ﺪﻨﻋ ﺮﻣﻷﺍ ﺭﺮﻛﻭ
ﺔﻳﻭﺎﺤﻟﺍ ﺝﺍﺮﺧﺇ ﻞﺒﻗ ﻯﺮﺧﺃ ﺓﺮﻣ ﺐﻠﻗﻭ ﻦﻴﺨﺴﺘﻟﺍ
.ﺔﻳﺎﻨﻌﺑ
!ﺮﻳﺬﺤﺗ
ﺾﻴﺒﻟﺍ
ﻝﺎﺜﻣﺃ ﻦﻣ ﺕﺎﺠﺘﻨﻤﻟﺍ ﺾﻌﺑ ﺮﺠﻔﻨﺗ ﺪﻗ
ﻞﻴﺒﺳ ﻰﻠﻋ - ﻖﻠﻐﻟﺍ ﺔﻤﻜﺤﻣ ﺕﺎﻳﻭﺎﺤﻟﺍﻭ ﻪﻠﻤﻛﺄﺑ
ﻢﺛ ﻦﻣﻭ - ﺔﻘﻠﻐﻤﻟﺍ ﻰﺑﺮﻤﻟﺍ ﺕﺎﻧﺎﻤﻃﺮﺑ ،ﻝﺎﺜﻤﻟﺍ
.ﻥﺮﻔﻟﺍ ﻲﻓ ﺎﻬﻨﻴﺨﺴﺗ ﺮﻈﺤﻳ
.ﻲﻬﻄﻟﺍ ءﺎﻨﺛﺃ ﺎًﻀﻳﺃ ﺭﻮﺴﻜﻤﻟﺍ ﺾﻴﺒﻟﺍ ﺮﺠﻔﻨﻳ ﺪﻗﻭ
ﻕﻮﻓ ءﺎﻄﻏ ﻊﺿ .ﺾﻴﺒﻟﺍ ﺭﺎﻔﺻ ﺎًﻤﺋﺍﺩ ﺐﻘﺛﺍ
.ءﺎﻄﻐﻟﺍ ﺔﻟﺍﺯﺇ ﻞﺒﻗ ﺔﻘﻴﻗﺩ ﺓﺪﻤﻟ ﻪﻛﺮﺗﺍﻭ ﺾﻴﺒﻟﺍ
ﻝﻮﺣ ﺭﺎﺨﺒﻟﺍ ﺏﺮﺴﺗ ﺍًﺪﺟ
،ﺏﺎﺒﻟﺍ ﻰﻠﻋ ﺎًﺑﺎﺒﺿ ﻥﻮﻜﻴﻟ ﺏﺎﺒﻟﺍ ﺏﺮﺴﺗ ﻊﻧﺎﻣ
ﻲﻠﻔﺴﻟﺍ ﺐﻧﺎﺠﻟﺍ ﻰﻠﻋ ءﺎﻣ ﺕﺍﺮﻄﻗ ﻦﻳﻮﻜﺗ ﻰﺘﺣﻭ
ﺞﺗﺎﻧ ﺔﻃﺎﺴﺒﺑ ﺍﺬﻫﻭ .ﻥﺮﻔﻟﺍ ﻡﺍﺪﺨﺘﺳﺍ ءﺎﻨﺛﺃ ﺏﺎﺒﻠﻟ
،ﺎﻬﻨﻴﺨﺴﺗ ﻢﺘﻳ ﻲﺘﻟﺍ ﺔﻤﻌﻃﻷﺍ ﻦﻣ ءﺎﻤﻟﺍ ﻒﺜﻜﺗ ﻦﻋ
ﻢﺘﻳ ﻢﻟﻭ .ﻥﺮﻔﻟﺍ ﻡﺍﺪﺨﺘﺳﻻ ﺮﻄﺧ ﺪﺟﻮﻳ ﻻﻭ
.ﺎًﻣﺎﻤﺗ ﻥﺮﻔﻟﺍ ﻕﻼﻏﺇ ﻡﺎﻜﺣﻹ ﺏﺎﺒﻟﺍ ﻢﻴﻤﺼﺗ
،ﻚﻟﺫ ﻊﻣﻭ .ﺔﻴﻧﺪﻌﻤﻟﺍ ﺕﺎﻳﻭﺎﺤﻟﺍ ﻡﺍﺪﺨﺘﺳﺍ ﺔﺠﻴﺘﻧ ﻮﻫ
ﺔﻴﻨﻣﺯ ﺓﺮﺘﻓ ﺮﻣ ﻰﻠﻋ ﺔﻴﺋﺎﺑﺮﻬﻜﻟﺍ ﺱﺍﻮﻗﻷﺍ ﻱﺩﺆﺗ ﺪﻗ
ﻖﻘﺤﺗﻭ ﺞﻣﺎﻧﺮﺒﻟﺍ ﻑﺎﻘﻳﺈﺑ ﻢﻗ .ﻥﺮﻔﻟﺍ ﻒﻠﺗ ﻰﻟﺇ ﺔﻠﻳﻮﻃ
ﻲﻌﻴﺒﻄﻟﺍ ﻦﻣ ﺮﺒﺘﻌﻳﻭ
.ﻞﻴﻐﺸﺘﻟﺍ ﻲﻓ ﻞﻄﻋ ﻰﻟﺇ
.ﺔﻳﻭﺎﺤﻟﺍ ﻦﻣ
7 . ﺎًﻨﺧﺎﺳ ﺭﺍﻭﺪﻟﺍ ﺹﺮﻘﻟﺍﻭ ﺕﺎﻳﻭﺎﺤﻟﺍ ﺢﺒﺼﺗ ﻥﺃ ﻦﻜﻤﻳ
.ﻥﺮﻔﻟﺍ ﻦﻣ ﺎﻬﺟﺍﺮﺧﺇ ﺪﻨﻋ ﺭﺬﺤﻟﺍ ﺥﻮﺗ .ﻡﺍﺪﺨﺘﺳﻻﺍ ءﺎﻨﺛﺃ
.ﻥﺮﻔﻟﺍ ﺕﺍﺯﺎﻔﻗ ﻭﺃ ﺭﺪﻘﻟﺍ ﺕﻼﻣﺎﺣ ﻡﺍﺪﺨﺘﺳﺎﺑ ﻰﺻﻮﻳ
8 . ﺢﺒﺼﻳ ﺪﻗ ،ﻡﻮﻴﻨﻣﻮﻟﺃ ﺔﻴﻨﻴﺻ ﻡﺍﺪﺨﺘﺳﺍ ﺪﻨﻋ ﻪﻧﺃ ﺮﻛﺬﺗ
ءﻲﺷ ﻡﺍﺪﺨﺘﺳﺍ ﻦﻣ ﻝﻮﻃﺃ ﻲﻬﻄﻟﺍ ﻭﺃ ﻦﻴﺨﺴﺘﻟﺍ ﺖﻗﻭ
.ﻪﻤﻳﺪﻘﺗ ﻞﺒﻗ ﻡﺎﻌﻄﻟﺍ ﺔﻧﻮﺨﺳ ﻦﻣ ﺪﻛﺄﺗ .ﺮﺧﺁ
1 . ﻦﻴﺒﻧﺎﺠﻟﺍ ﻦﻣ ﺔﻤﻴﻘﺘﺴﻣ ﺕﺎﻳﻭﺎﺣ ﻡﺍﺪﺨﺘﺳﺍ ﺐﻨﺠﺗ
2 . .ﻞﺋﺎﺴﻠﻟ ﺪﺋﺍﺰﻟﺍ ﻦﻴﺤﺴﺘﻟﺍ ﺐﻨﺠﺗ
3 . ﻥﺮﻔﻟﺍ ﻲﻓ ﺔﻳﻭﺎﺤﻟﺍ ﻊﺿﻭ ﻞﺒﻗ ﻞﺋﺎﺴﻟﺍ ﺐﻠﻗ
4 . ﺪﻌﺑ ﺔﻴﻨﻣﺯ ﺓﺮﺘﻔﻟ ﻥﺮﻔﻟﺍ ﻲﻓ ﺔﻳﻭﺎﺤﻟﺍ ﻙﺮﺗﺍ
• ﻚﻟﺫ ﻱﺩﺆﻳ ﺪﻗﻭ .ﺪﻴﻟﺎﺑ ﺭﺍﻭﺪﻟﺍ ﺹﺮﻘﻟﺍ ﺮﻳﻭﺪﺘﺑ ﻢﻘﺗ ﻻ
• ﻒﻳﻭﻭﺮﻜﻴﻤﻟﺍ ﻥﺮﻓ ﻲﻓ ﻲﺋﺎﺑﺮﻬﻛ ﺱﻮﻗ ﺭﻮﻬﻇ ﺮﺒﺘﻌﻳﻭ
.ﺔﺒﺳﺎﻨﻣ ﺔﻳﻭﺎﺣ ﻲﻓ ﻡﺎﻌﻄﻟﺍ ﺎًﻤﺋﺍﺩ ﻊﺿ .ﻒﻳﻭﻭﺮﻜﻴﻤﻟﺍ
ﻢﻜﺤﺘﻟﺍ ﻦﻜﻤﻳ ﻻ ﻥﻮﻫﺪﻟﺍ ﺓﺭﺍﺮﺣ ﺔﺟﺭﺩ ﻥﻷ ﺍًﺮﻈﻧ
.ﺓﺭﻮﻄﺧ ﻰﻠﻋ ﻚﻟﺫ ﻱﻮﻄﻨﻳ ﺎﻤﻣ ،ﺎﻬﺑ
ﺎ
ﺼﻴﺼﺧ ﺔﻤﻤﺼﻣ ﺔﺻﺎﺧ ٍﻥﺍﻭﺃ ﻭﺃ ﺕﺍﻮﺒﻋ ﻲﻓ ﻂﻘﻓ
ً
ﻞﻤﻋ ءﺎﻨﺛﺃ ﺔﺑﺎﻗﺭ ﻥﻭﺪﺑ ﻥﺮﻔﻟﺍ ﻙﺮﺘﺗ ﻻ .ﺽﺮﻐﻟﺍ ﺍﺬﻬﻟ
ﺙﻭﺪﺣ ﻢﺛ ﻦﻣﻭ ﺭﺎﺨﺒﻟﺍ ﻥﻮﻜﺗ ﻊﻨﻤﻟ ﺬﻓﺎﻧ ﺮﻴﻏ ءﺎﺸﻏ
ﺝﺎﺟﺪﻟﺍ ﺪﺒﻛﻭ ﺲﻃﺎﻄﺒﻟﺍﻭ ﺡﺎﻔﺘﻟﺍ ﺮﺒﺘﻌﻳﻭ .ﺭﺎﺠﻔﻧﺍ
.ﺎﻬﺒﻘﺛ ﺐﺠﻳ ﻲﺘﻟﺍ ﺔﻤﻌﻃﻸﻟ ﺔﻠﺜﻣﺃ ﺾﻴﺒﻟﺍ ﺭﺎﻔﺻﻭ
ﺕﺎﻧﺎﻤﻃﺮﺑﻭ ﻉﺎﺿﺭﻹﺍ ﺕﺎﺟﺎﺟﺯ ﺕﺎﻳﻮﺘﺤﻣ ﺰﻫ ﺐﺠﻳ
ﺕﺎﺟﺭﺩ ﻦﻣ ﻖﻘﺤﺘﻟﺍ ﺐﺠﻳﻭ .ﻝﺎﻔﻃﻷﺍ ﺔﻤﻌﻃﺃ
.ﻕﻭﺮﺤﻟﺍ ﺐﻨﺠﺘﻟ ﻡﺍﺪﺨﺘﺳﻻﺍ ﻞﺒﻗ ﺓﺭﺍﺮﺤﻟﺍ
ﺔﻤﻌﻃﻷﺍ ﺕﺎﺠﺘﻨﻣﻭ ﻞﺋﺍﻮﺴﻟﺍ
ﺪﻗ ﺚﻴﺣ ﻕﻼﻏﻹﺍ ﺔﻤﻜﺤﻣ ﺕﺎﻳﻭﺎﺣ ﻲﻓ ﻯﺮﺧﻷﺍ
،ﻒﻳﻭﻭﺮﻜﻴﻤﻟﺍ ﻥﺮﻓ ﻲﻓ ﺕﺎﺑﻭﺮﺸﻤﻟﺍ ﻦﻴﺨﺴﺗ ﺪﻨﻋ
ﺐﺠﻳ ﻢﺛ ﻦﻣﻭ .ﻥﺎﻴﻠﻐﻟﺍ ﺪﻌﺑ ﺎﻣ ﺔﻄﻘﻧ ﻰﻟﺇ ﻞﺼﺗ ﺪﻗ
.ﻥﺮﻔﻟﺍ ﻦﻣ ﺔﻳﻭﺎﺤﻟﺍ ﺝﺍﺮﺧﺇ ﺪﻨﻋ ﺭﺬﺤﻟﺍ ﻲﺧﻮﺗ
ﻦﻣﻵﺍ ﻲﻬﻄﻟﺍ
• ﻥﺮﻓ ﻲﻓ ﺮﻳﺪﺼﻗ ﺔﺒﻠﻋ ﻲﻓ ﻡﺎﻌﻄﻟﺍ ﻦﻴﺨﺴﺘﺑ ﻢﻘﺗ ﻻ
• ﺝﻮﻠﺜﻟﺍ ﺔﺑﺍﺫﻹ ﻒﻳﻭﻭﺮﻜﻴﻤﻟﺍ ﻥﺮﻓ ﻡﺍﺪﺨﺘﺳﺍ ﻡﺪﻋ ﺐﺠﻳ
• ﻦﻜﻟ ،ﻒﻳﻭﻭﺮﻜﻴﻤﻟﺍ ﻥﺮﻓ ﻲﻓ ﺭﺎﺸﻔﻟﺍ ﺮﻴﻀﺤﺗ ﻦﻜﻤﻳ
.ﺭﺎﺸﻔﻟﺍ
• ﻭﺃ ﺓﺮﺸﻗ ﻭﺃ ﺪﻠﺟ ﻰﻠﻋ ﻱﻮﺘﺤﺗ ﻲﺘﻟﺍ ﺔﻤﻌﻃﻷﺍ ﺐﻘﺛﺍ
•
!ﺮﻳﺬﺤﺗ
ﻦﻴﺨﺴﺗ ﻡﺪﻋ ﺐﺠﻳ
.ﺮﺠﻔﻨﺗ
!ﺮﻳﺬﺤﺗ
Page 65

ﺔﻴﺑﺮﻌﻟﺍ 4
• ﺏﺍﻮﻛﻷﺍﻭ ﻲﻧﺍﻮﺼﻟﺍ ﻦﻣ ﺪﻳﺪﻌﻟﺍ ﻡﺍﺪﺨﺘﺳﺍ ﻦﻜﻤﻳ
ﻚﻴﺘﺳﻼﺒﻟﺍ ﻦﻣ ﺔﻋﻮﻨﺼﻤﻟﺍ ﺪﻤﺠﻤﻟﺍ ﺕﺎﻳﻭﺎﺣﻭ
ﻊﺒﺗﺍ .ﻒﻳﻭﻭﺮﻜﻴﻤﻟﺍ ﻥﺮﻓ ﻲﻓ ﺔﻴﻜﻴﺘﺳﻼﺒﻟﺍ ﺔﻴﻄﻏﻷﺍﻭ
ﻲﻧﺍﻭﻷﺍ ﻡﺪﺨﺘﺳﺍ ﺪﻨﻋ ﺔﻌﻨﺼﻤﻟﺍ ﺔﻬﺠﻟﺍ ﺕﺎﻤﻴﻠﻌﺗ
ﺕﺎﻳﻭﺎﺤﻟﺍ ﻡﺍﺪﺨﺘﺳﺍ ﺐﻨﺠﺗ .ﻥﺮﻔﻟﺍ ﻲﻓ ﺔﻴﻜﻴﺘﺳﻼﺒﻟﺍ
ﺔﻴﻤﻛ ﻰﻠﻋ ﻱﻮﺘﺤﺗ ﻲﺘﻟﺍ ﺔﻤﻌﻃﻷﺍ ﻊﻣ ﺔﻴﻜﻴﺘﺳﻼﺒﻟﺍ
ﻡﺎﻌﻄﻟﺍ ﻞﺼﻳ ﺚﻴﺣ ﺮﻜﺴﻟﺍ ﻭﺃ ﻥﻮﻫﺪﻟﺍ ﻦﻣ ﺓﺮﻴﺒﻛ
ﺔﺑﺍﺫﺇ ﻢﺛ ﻦﻣﻭ ﺓﺭﺍﺮﺤﻟﺍ ﺕﺎﺟﺭﺪﻟ ﻰﺼﻗﻷﺍ ﺪﺤﻟﺍ ﻰﻟﺇ
.ﻚﻴﺘﺳﻼﺒﻟﺍ ﺾﻌﺑ
• ﻞﻜﺸﺑ ﻪﻨﻣ ﻖﻘﺤﺗﻭ ﺔﺑﺎﻗﺭ ﻥﻭﺪﺑ ﻥﺮﻔﻟﺍ ﻙﺮﺘﺗ ﻻ
ﺕﺎﻳﻭﺎﺣ ﻲﻓ ﺎﻬﻴﻬﻃ ﻭﺃ ﺔﻤﻌﻃﻷﺍ ﻦﻴﺨﺴﺗ ﺪﻨﻋ ﻱﺭﻭﺩ
ﺩﺍﻮﻤﻟﺍ ﻭﺃ ﻕﺭﻮﻟﺍ ﻭﺃ ﻚﻴﺘﺳﻼﺒﻟﺍ ﻦﻣ ﺔﻋﻮﻨﺼﻣ
.ﻝﺎﻌﺘﺷﻼﻟ ﺔﻠﺑﺎﻘﻟﺍ ﻯﺮﺧﻷﺍ
• ﺕﺎﻳﻭﺎﺤﻟﺍ ﻭﺃ ﺔﻴﻧﺪﻌﻤﻟﺍ ﺕﺎﻳﻭﺎﺤﻟﺍ ﻡﺍﺪﺨﺘﺳﺍ
ﺮﻈﺤﻳ
ﻢﻟ ﺎﻣ ﻒﻳﻭﻭﺮﻜﻴﻤﻟﺍ ﻥﺮﻓ ﻲﻓ ﺔﻴﻧﺪﻌﻤﻟﺍ ﻑﺍﻮﺤﻟﺍ ﺕﺍﺫ
.ﺔﺣﺍﺮﺻ ﻚﻟﺬﺑ ﺹﻮﻳ
• ﺔﻘﻴﻀﻟﺍ ﺕﺎﺤﺘﻔﻟﺍ ﺕﺍﺫ ﺕﺎﻳﻭﺎﺤﻟﺍ ﻡﺍﺪﺨﺘﺳﺍ ﻡﺪﻋ ﺐﺠﻳ
.ﻒﻳﻭﻭﺮﻜﻴﻤﻟﺍ ﻥﺮﻓ ﻲﻓ ﻲﻬﻄﻠﻟ
• .ﺔﻳﻭﺎﺣ ﻭﺃ ﺔﻴﻧﺎﻄﻠﺳ ءﺎﻄﻏ ﺔﻟﺍﺯﺇ ﺪﻨﻋ ﺭﺬﺤﻟﺍ ﺥﻮﺗ
ﻕﺍﺮﺘﺣﻻﺍ ﺮﻃﺎﺨﻣ
ﺔﻴﻧﺪﻌﻤﻟﺍ ﻖﺋﺎﻗﺮﻟﺍ ﻦﻣ ﺔﻋﻮﻨﺼﻤﻟﺍ ﻲﻧﺍﻮﺼﻟﺍ
ﺔﻋﻮﻨﺼﻤﻟﺍ ﺔﺤﻄﺴﻤﻟﺍ ﻲﻧﺍﻮﺼﻟﺍ ﻡﺍﺪﺨﺘﺳﺍ ﻥﺎﻣﻷﺍ ﻦﻣ ﺮﺒﺘﻌﻳ
ﻲﻓ ﻒﻳﻭﻭﺮﻜﻴﻤﻟﺍ ﻥﺮﻓ ﻲﻓ ﻦﻴﺨﺴﺘﻠﻟ ﺔﻴﻧﺪﻌﻤﻟﺍ ﻖﺋﺎﻗﺮﻟﺍ ﻦﻣ
:ﺔﻴﻟﺎﺘﻟﺍ ﺪﻋﺍﻮﻘﻟﺍ ﻉﺎﺒﺗﺍ ﺔﻟﺎﺣ
.(ﺔﺻﻮﺑ 1¼) ﻢﺳ 3 ﻦﻋ ﺔﻴﻧﺪﻌﻤﻟﺍ
ﻊﺿﻭ
ﻡﺪﻋ ﺐﺠﻳ .ﻞﻗﻷﺍ ﻰﻠﻋ ﺔﻤﻌﻃﻷﺎﺑ ﺔﻴﻧﺪﻌﻤﻟﺍ
ﻲﻫﻭ ﺔﻴﻧﺪﻌﻤﻟﺍ ﻖﺋﺎﻗﺮﻟﺍ ﻦﻣ ﺔﻋﻮﻨﺼﻤﻟﺍ ﻲﻧﺍﻮﺼﻟﺍ
.ﻥﺮﻔﻟﺍ ﻲﻓ ﺔﻏﺭﺎﻓ
ﺐﺠﻳ ﺎﻤﻛ ﺓﺮﻣ ﻞﻛ ﻲﻓ ﻒﻳﻭﻭﺮﻜﻴﻤﻟﺍ ﻥﺮﻓ ﻲﻓ ﺔﻴﻧﺪﻌﻤﻟﺍ
ﻱﻮﺘﺤﻳ ﻥﺮﻔﻟﺍ ﻥﺎﻛ ﺍﺫﺇ .ﻥﺮﻔﻟﺍ ﻲﺒﻧﺎﺟ ﺎﻬﺘﺴﻣﻼﻣ ﻡﺪﻋ
ﻊﺿﻭ ﺐﺠﻴﻓ ،ﻑﺭ ﻭﺃ ﻲﻧﺪﻌﻣ ﺭﺍﻭﺩ ﺹﺮﻗ ﻰﻠﻋ
ﺡﻮﻟ ﻰﻠﻋ
ﺔﻴﻧﺪﻌﻤﻟﺍ ﻖﺋﺎﻗﺮﻟﺍ ﻦﻣ ﺔﻋﻮﻨﺼﻤﻟﺍ ﺔﻴﻨﻴﺼﻟﺍ
.ﻥﺮﻔﻟﺍ ﻦﻣ ٍﻕﺍﻭ ﺏﻮﻠﻘﻣ
.ﻒﻳﻭﻭﺮﻜﻴﻤﻟﺍ ﻥﺮﻓ ﻲﻓ
.ﻯﺮﺧﺃ ﺓﺮﻣ ﻪﻣﺍﺪﺨﺘﺳﺍ ﻞﺒﻗ ﺩﺮﺒﻳ ﻪﻛﺮﺗﺎﻓ ،ﺮﺜﻛﺃ
.ﻥﺮﻔﻟﺍ ﻡﺍﺪﺨﺘﺳﺍ ءﺎﻨﺛﺃ ﺔﻳﺎﻐﻠﻟ ﺔﻌﻔﺗﺮﻣ
ﻥﺮﻔﻟﺍ ﻞﻴﻐﺸﺗ ﻑﺎﻘﻳﺈﺑ ﻢﻘﻓ ،ﺔﻴﺋﺮﻣ ﺓﺮﺨﺑﻷﺍ ﺖﻧﺎﻛ ﺍﺫﺇ
ﻱﺃ ﺩﺎﻤﺧﻹ ﺎًﻘﻠﻐﻣ ﺏﺎﺒﻟﺍ ﻙﺮﺗﺍﻭ ﺲﺑﺎﻘﻟﺍ ﺔﻟﺍﺯﺇ ﻭﺃ
.ءﺎﻤﻟﺍ ﻡﺍﺪﺨﺘﺳﺍ ﺮﻈﺤﻳ .ﺐﻬﻟ ﺔﻨﺴﻟﺃ
ﺏﺎﺤﺻﺃ ﺹﺎﺨﺷﻷﺍ ﻭﺃ ﻝﺎﻔﻃﻷﺍ ﻡﺍﺪﺨﺘﺳﺍ ﺐﺠﻳ
ﻲﻓ ﻑﺍﺮﺷﺇ ﻥﻭﺪﺑ ﻒﻳﻭﻭﺮﻜﻴﻤﻟﺍ ﻥﺮﻓ ﺕﺎﻗﺎﻋﻹﺍ
ﻢﻬﻓ ﻢﺛ ﻦﻣﻭ ،ﺔﻳﺭﻭﺮﻀﻟﺍ ﺕﺍﺩﺎﺷﺭﻹﺍ ﻢﻬﺋﺎﻄﻋﺇ ﺔﻟﺎﺣ
ﻥﺎﻣﺄﺑ ﻒﻳﻭﻭﺮﻜﻴﻤﻟﺍ ﻥﺮﻓ ﻡﺍﺪﺨﺘﺳﺍ ﻰﻠﻋ ﻥﻭﺭﺩﺎﻗ
ﺮﻴﻏ
ﻡﺍﺪﺨﺘﺳﻻﺎﺑ ﺔﻄﺒﺗﺮﻤﻟﺍ ﺮﻃﺎﺨﻤﻠﻟ ﻥﻮﻛﺭﺪﻣﻭ
.ﺢﻴﺤﺼﻟﺍ
ﺔﻨﻣﻵﺍ ﺦﺒﻄﻤﻟﺍ ﺕﺍﻭﺩﺃ
.ﻒﻳﻭﻭﺮﻜﻴﻤﻟﺍ ﻥﺮﻓ
ﻥﺮﻔﻠﻟ ﻡﻭﺎﻘﻤﻟﺍ ﺝﺎﺟﺰﻟﺍﻭ ﻲﺟﺎﺟﺰﻟﺍ ﻚﻴﻣﺍﺮﻴﺴﻟﺍﻭ
ﻰﻠﻋﻭ .ﻒﻳﻭﻭﺮﻜﻴﻤﻟﺍ ﻥﺮﻓ ﻲﻓ ﻡﺍﺪﺨﺘﺳﻼﻟ ﺔﺒﺳﺎﻨﻣ
ﺝﺎﺟﺰﻟﺍ ﻦﻣ ﺔﻋﻮﻨﺼﻤﻟﺍ ﺕﺎﻨﺋﺎﻜﻟﺍ ﻥﺃ ﻦﻣ ﻢﻏﺮﻟﺍ
ﺔﻄﺳﺍﻮﺑ ﻱﺩﺎﻋ ﻞﻜﺸﺑ ﺎﻬﻨﻴﺨﺴﺗ ﻢﺘﻳ ﻚﻴﻣﺍﺮﻴﺴﻟﺍﻭ
ﻝﺎﻘﺘﻧﻻ ﺍًﺮﻈﻧ ﺔﻨﺧﺎﺳ ﺢﺒﺼﺗ ﺪﻗ ،ﻒﻳﻭﻭﺮﻜﻴﻤﻟﺍ ﻥﺮﻓ
ﻡﺍﺪﺨﺘﺳﺍ
ﺐﺠﻳ .ﺔﻳﻭﺎﺤﻟﺍ ﻰﻟﺇ ﻡﺎﻌﻄﻟﺍ ﻦﻣ ﺔﻧﻮﺨﺴﻟﺍ
1 . ﻖﺋﺎﻗﺮﻟﺍ ﻦﻣ ﺔﻋﻮﻨﺼﻤﻟﺍ ﻲﻧﺍﻮﺼﻟﺍ ﻖﻤﻋ ﺪﻳﺰﻳ ﻻﺃ ﺐﺠﻳ
ﻲﻬﻄﻟﺍ ﺕﺍﻭﺩﺃ ﺔﻣءﻼﻣ ﺭﺎﺒﺘﺧﺍ
2 . .ﺔﻴﻧﺪﻌﻤﻟﺍ ﻖﺋﺎﻗﺮﻟﺍ ﺔﻴﻄﻏﺃ ﻡﺍﺪﺨﺘﺳﺍ ﻡﺪﻋ ﺐﺠﻳ
3 . ﻖﺋﺎﻗﺮﻟﺍ ﻦﻣ ﺔﻋﻮﻨﺼﻤﻟﺍ ﻲﻧﺍﻮﺼﻟﺍ ﻲﺜﻠُﺛ ءﻼﺘﻣﺍ ﺐﺠﻳ
4 . ﻖﺋﺎﻗﺮﻟﺍ ﻦﻣ ﺔﻋﻮﻨﺼﻣ ﺓﺪﺣﺍﻭ ﺔﻴﻨﻴﺻ ﻊﺿﻭ ﺐﺠﻳ
5 . ﺔﻴﻧﺪﻌﻤﻟﺍ ﻖﺋﺎﻗﺮﻟﺍ ﺕﺎﻳﻭﺎﺣ ﻡﺍﺪﺨﺘﺳﺍ ﺓﺩﺎﻋﺇ ﻡﺪﻋ ﺐﺠﻳ
6 . ﻭﺃ ﺔﻘﻴﻗﺩ 15 ﺓﺪﻤﻟ ﻒﻳﻭﻭﺮﻜﻴﻤﻟﺍ ﻥﺮﻓ ﻡﺍﺪﺨﺘﺳﺍ ﺔﻟﺎﺣ ﻲﻓ
.ﻒﻳﻭﻭﺮﻜﻴﻤﻟﺍ ﻥﺍﺮﻓﺃ ﻲﻓ ﻡﺍﺪﺨﺘﺳﻼﻟ ﺔﻤﺋﻼﻣ
(ﺕﺍﻭ 900) ﻰﻠﻋ ﻦﻴﺨﺴﺘﻟﺎﺑ ﻢﻗ .ءﺎﻤﻟﺍ ﻦﻣ ﺏﻮﻛ
ﻭﺪﺒﺗ ﺔﻳﻭﺎﺤﻟﺍ ﺖﻧﺎﻛ ﺍﺫﺇ .ﺔﻘﻴﻗﺩ ﺓﺪﻤﻟ (٪100)
ﺖﻧﺎﻛ ﺍﺫﺇ .ﺎﻬﻣﺍﺪﺨﺘﺳﺍ ﻡﺪﻋ ﺐﺠﻴﻓ ،ﺔﻳﺎﻐﻠﻟ ﺔﻨﺧﺎﺳ
ﺲﻴﻟ ﻦﻜﻟ ،ﻦﻴﺨﺴﺘﻠﻟ ﺎﻬﻣﺍﺪﺨﺘﺳﺍ ﻦﻜﻤﻴﻓ ،ًﻼﻴﻠﻗ
،ﺔﻓﺮﻐﻟﺍ ﺓﺭﺍﺮﺣ ﺔﺟﺭﺩ ﻲﻓ ﺔﻳﻭﺎﺤﻟﺍ ﺖﻧﺎﻛ ﺍﺫﺇ .ﻲﻬﻄﻠﻟ
.ﻒﻳﻭﻭﺮﻜﻴﻤﻟﺍ ﻥﺮﻓ ﻲﻓ ﻡﺍﺪﺨﺘﺳﻼﻟ ﺔﻤﺋﻼﻣ ﺎﻬﻧﺈﻓ
ﺏﺍﻮﻛﻷﺍﻭ ﺡﺍﻮﻟﻷﺍﻭ ﺦﺒﻄﻤﻟﺍ ﻒﺋﺎﻔﻟﻭ ﻡﻮﺤﺸﻠﻟ
ﻥﻭﺩ ﻯﻮﻘﻤﻟﺍ ﻕﺭﻮﻟﺍﻭ ﺪﻤﺠﻤﻟﺍ ءﺎﻄﻏﻭ ﻥﻮﺗﺭﺎﻜﻟﺍﻭ
ﻡﺎﻌﻄﻟﺎﺑ ﺔﻳﻭﺎﺤﻟﺍ ءﻼﺘﻣﺍ ﻦﻣ ﺎًﻤﺋﺍﺩ ﺪﻛﺄﺗ .ﺮﻄﺧ ﻱﺃ
ﺪﺟﻮﺗ ﻻ ﻢﺛ ﻦﻣﻭ ،ﺔﻗﺎﻄﻟﺍ ﺹﺎﺼﺘﻣﺍ ﻪﻨﻜﻤﻳ ﻱﺬﻟﺍﻭ
.
ﻲﺗﺍﺬﻟﺍ ﻝﺎﻌﺷﻹﺍ ﻭﺃ ﺪﺋﺍﺰﻟﺍ ﻦﻴﺨﺴﺘﻟﺍ ﺮﻃﺎﺨﻣ
• ﺔﻴﺟﺭﺎﺨﻟﺍ ﺢﻄﺳﻷﺍ ﺓﺭﺍﺮﺣ ﺔﺟﺭﺩ ﻥﻮﻜﺗ ﻥﺃ ﻦﻜﻤﻳ
!ﺮﻳﺬﺤﺗ
!ﺮﻳﺬﺤﺗ
• ﻲﻓ ﻡﺍﺪﺨﺘﺳﻼﻟ ﺔﻤﺋﻼﻤﻟﺍ ﺦﺒﻄﻤﻟﺍ ﺕﺍﻭﺩﺃ ﻂﻘﻓ ﻡﺪﺨﺘﺳﺍ
• ﺝﺎﺟﺰﻟﺍ ﻦﻣ ﺔﻋﻮﻨﺼﻤﻟﺍ ﺕﺎﻳﻭﺎﺤﻟﺍ ﻢﻈﻌﻣ ﺮﺒﺘﻌﺗ
.ﻥﺮﻔﻟﺍ ﺕﺍﺯﺎﻔﻗ
• ﺎﻬﻧﺃ ﻦﻣ ﺪﻛﺄﺘﻠﻟ ﺦﺒﻄﻤﻟﺍ ﺕﺍﻭﺩﺃ ﻦﻣ ﻖﻘﺤﺘﻟﺍ ﺐﺠﻳ
• ﻒﺼﻧ ﺐﻧﺎﺠﺑ ﻒﻳﻭﻭﺮﻜﻴﻤﻟﺍ ﻥﺮﻓ ﻲﻓ ﺔﻳﻭﺎﺤﻟﺍ ﻊﺿ
ﺔﻨﺧﺎﺳ
• ﻡﻭﺎﻘﻤﻟﺍ ﻕﺭﻮﻟﺍﻭ ﺔﻴﻗﺭﻮﻟﺍ ﻞﻳﺩﺎﻨﻤﻟﺍ ﻡﺍﺪﺨﺘﺳﺍ ﻦﻜﻤﻳ
Page 66

3 www.electrolux.com
ﻒﻳﻭﻭﺮﻜﻳﺎﻤﻟﺍ ﻥﺮﻓ ﻡﺍﺪﺨﺘﺳﺍ ﻞﺒﻗ
ﻥﻮﻜﺗ ﻥﺃ ﺐﺠﻳ ،ﻊﻗﻮﻤﻟﺍ ﻲﻓ ﺯﺎﻬﺠﻟﺍ ءﺎﻘﺑ ﻊﻣ ﺕﺎﻜﻠﺘﻤﻤﻟﺍ
ﻚﻟﺎﻤﻟﺍ ﻦﻜﻤﺘﻳ ﺚﻴﺤﺑ ﺯﺎﻬﺠﻟﺍ ﻊﻣ ﺔﻘﻓﺮﻣ ﺕﺍﺩﺎﺷﺭﻹﺍ
ﺕﺍﺮﻳﺬﺤﺘﻟﺍﻭ ﺯﺎﻬﺠﻟﺍ ﻞﻤﻋ ﺔﻴﻔﻴﻛ ﻰﻠﻋ ﻑﺮﻌﺘﻟﺍ ﻦﻣ ﺪﻳﺪﺠﻟﺍ
.ﺔﻘﻠﻌﺘﻤﻟﺍ
ﻡﺍﺪﺨﺘﺳﺍ ﻞﺒﻗ ﺔﻠﻣﺎﻛ ﻞﻴﻐﺸﺘﻟﺍ ﺕﺍﺩﺎﺷﺭﺇ ﺓءﺍﺮﻗ ﻦﻣ ﺪﻛﺄﺗ
.ﺔﻣﺪﻘﻤﻟﺍ ﺕﺎﻴﺻﻮﺘﻟﺍ ﻉﺎﺒﺗﺍﻭ ﺯﺎﻬﺠﻟﺍ
ﻻ
ﺪﻬﺟ ﻰﻟﺇ ﺽﺮﻌﺘﻟﺍ ﻰﻟﺇ ﻚﻟﺫ ﻱﺩﺆﻳ ﺪﻘﻓ .ﻢﻜﺤﺘﻟﺍ
.ﺔﻳﺎﻐﻠﻟ ﻊﻔﺗﺮﻣ
.ﻩﺬﻫ ﻞﻴﻐﺸﺘﻟﺍ ﺕﺍﺩﺎﺷﺭﺇ ﻲﻓ "ﺖﻴﺒﺜﺘﻟﺍ ﺕﺍﺩﺎﺷﺭﺇ"
ﻻ .ﻞﻴﻐﺸﺘﻟﺍ ﺕﺍﺩﺎﺷﺭﺇ ﻲﻓ ﺢﺿﻮﻣ ﻮﻫ ﺎﻤﻛ ،ﻂﻘﻓ
.ﻥﺮﻔﻟﺍ ﻊﻣ ﻞﻛﺂﺘﻠﻟ ﺔﺒﺒﺴﻤﻟﺍ ﺔﻴﺋﺎﻴﻤﻴﻜﻟﺍ ﺩﺍﻮﻤﻟﺍ ﻡﺪﺨﺘﺴﺗ
ﻲﻬﻄﻟﺍ ﻭﺃ ﻦﻴﺨﺴﺘﻠﻟ ﻢﻤﺼﻣ ﻥﺍﺮﻓﻷﺍ ﻦﻣ ﻉﻮﻨﻟﺍ ﺍﺬﻫ
ﻢﻤﺼﻣ ﺮﻴﻏ ﻪﻨﻜﻟ .ﺔﻴﺋﺍﺬﻐﻟﺍ ﺕﺎﺠﺘﻨﻤﻟﺍ ﺝﻮﻠﺛ ﺔﺑﺍﺫﺇ ﻭﺃ
،ﻱﺭﺎﺠﺘﻟﺍ ﻭﺃ ﻲﻠﻤﻌﻤﻟﺍ ﻭﺃ ﻲﻋﺎﻨﺼﻟﺍ ﻡﺍﺪﺨﺘﺳﻼﻟ
.ﻥﺎﻤﻀﻟﺍ ﻝﺎﻄﺑﺇ ﻰﻟﺇ ﻱﺩﺆﻳ ﺪﻗ ﻱﺬﻟﺍﻭ
ﻞﺧﺍﺩ ءﺎﻣ ﻭﺃ ﻡﺎﻌﻃ ﺩﻮﺟﻭ ﻡﺪﻋ ﺔﻟﺎﺣ ﻲﻓ ﻥﻭﺮﺘﻨﺟﺎﻤﻟﺍ
.ﻒﻳﻭﻭﺮﻜﻴﻤﻟﺍ ﺔﻗﺎﻃ ﺹﺎﺼﺘﻣﻻ ﻥﺮﻔﻟﺍ
.ﻖﻠﻄﻟﺍ ءﺍﻮﻬﻟﺍ ﻲﻓ ﻥﺮﻔﻟﺎﺑ ﻅﺎﻔﺘﺣﻻﺍ ﻡﺪﻋ ﺐﺠﻳ
.ءﺎﻤﻟﺍ ﻦﻣ ﺏﺮﻘﻟﺎﺑ ﺞﺘﻨﻤﻟﺍ ﺍﺬﻫ ﻡﺍﺪﺨﺘﺳﺍ ﺮﻈﺤﻳ
ﺔﻠﺑﺎﻗ ﺩﺍﻮﻤﻟﺍ ﻦﻣ ﻉﺍﻮﻧﻷﺍ ﻩﺬﻫ .ﻒﻳﻭﻭﺮﻜﻴﻤﻟﺍ ﻥﺮﻓ
.ﻲﺗﺍﺬﻟﺍ ﻝﺎﻌﺷﻺﻟ
ﻡﺎﻌﻄﻟﺍ ﻭﺃ ﺦﺒﻄﻤﻟﺍ ﺕﺍﻭﺩﺃ ﻭﺃ ﺔﻴﻗﺭﻮﻟﺍ ﺕﺎﺠﺘﻨﻤﻟﺍ
.ﻥﺮﻔﻟﺍ ﻡﺍﺪﺨﺘﺳﺍ ﻡﺪﻋ
ءﺎﻨﺛﺃ ﻥﺮﻔﻟﺍ ﻞﺧﺍﺩ
ﺔﻴﻟﺎﺘﻟﺍ ﺕﺍﺩﺎﺷﺭﻹﺍ ﺩﺍﺪﻋﺇ ﻢﺗ .ﺍًﺪﻴﺟ ﻞﻴﻐﺸﺘﻟﺍ ﺕﺍﺩﺎﺷﺭﺇ ﺃﺮﻗﺍ
ﻦﻣ ﻒﻳﻭﻭﺮﻜﻳﺎﻤﻟﺍ ﻥﺮﻓ ﻦﻣ ﻯﻮﺼﻘﻟﺍ ﺓﺩﺎﻔﺘﺳﻻﺍ ﻲﻓ ﺓﺪﻋﺎﺴﻤﻠﻟ
.ﺍًﺪﻴﺟ ﺎﻬﺗءﺍﺮﻗ ﻦﻣ ﺪﻛﺄﺗ .ﻚﺑ ﺹﺎﺨﻟﺍ Electrolux
ﺎﻬﻴﻟﺇ ﻉﻮﺟﺮﻠﻟ ﻩﺬﻫ ﻞﻴﻐﺸﺘﻟﺍ ﺕﺍﺩﺎﺷﺭﺈﺑ ﻅﺎﻔﺘﺣﻻﺍ ﻢﻬﻤﻟﺍ ﻦﻣ
ﻚﻟﺎﻣ ﺮﻴﻴﻐﺗ ﺔﻟﺎﺣ ﻲﻓ .ﻲﻌﺟﺮﻣ ﺭﺪﺼﻤﻛ ﻞﺒﻘﺘﺴﻤﻟﺍ ﻲﻓ
ﻊﻴﺑ ﺔﻟﺎﺣ ﻲﻓ ﻭﺃ ،ﺮﺧﺁ ﺺﺨﺷ ﻰﻟﺇ ﻪﻠﻘﻧ ﻢﺗ ﻭﺃ
ﻞﺒﻘﺘﺴﻤﻟﺍ ﻲﻓ ﻪﻴﻟﺇ ﻉﻮﺟﺮﻠﻟ ﻪﺑ ﻆﻔﺘﺣﺍﻭ ﺔﻳﺎﻨﻌﺑ ﻞﻴﻟﺪﻟﺍ ﺃﺮﻗﺍ
• ﺔﺣﻮﻟ ﻭﺃ ﺏﺎﺒﻟﺍ ﻭﺃ ﺔﻴﺟﺭﺎﺨﻟﺍ ﺔﻧﺍﺰﺨﻟﺍ ﺔﻟﺍﺯﺈﺑ ﻢﻘﺗ
.ﺏﺎﺒﻟﺍ ﺢﺘﻓ ءﺎﻨﺛﺃ ﻞﻤﻌﻟﺍ
• ﺖﺤﺗ ﺢﺿﻮﻣ ﻮﻫ ﺎﻤﻛ ﻩﺩﺍﺪﻋﺇ ﻭﺃ ﻥﺮﻔﻟﺍ ﺐﻴﻛﺮﺗ ﺐﺠﻳ
ﻥﺮﻓ ﺔﻗﺎﻄﻟ ﻚﺿﺮﻌﺗ ﻰﻟﺇ ﻚﻟﺫ ﻱﺩﺆﻳ ﺚﻴﺣ ،ﺏﺎﺒﻟﺍ
• ﻪﻠﺟﺃ ﻦﻣ ﻢﻤﺼﻤﻟﺍ ﺽﺮﻐﻠﻟ ﻥﺮﻔﻟﺍ ﻡﺍﺪﺨﺘﺳﺍ ﺐﺠﻳ
ﻖﻠﻌﺘﻳ ﺎﻤﻴﻓ .ﺏﺎﺒﻟﺍ
."ﺔﻧﺎﻴﺼﻟﺍﻭ ﻒﻴﻈﻨﺘﻟﺍ" ﻢﺴﻘﻟﺍ ﻊﺟﺍﺭ :ﻒﻴﻈﻨﺘﻟﺎﺑ
:ﻲﻓ ﻒﻠﺗ ﺪﺟﻮﻳ ﻻ ﻢﺛ ﻦﻣﻭ ﺐﺳﺎﻨﻣ ﻞﻜﺸﺑ ﻥﺮﻔﻟﺍ
• ﻒﻠﺘﻳ ﺪﻘﻓ .ﻍﺭﺎﻓ ﻮﻫﻭ ﻥﺮﻔﻟﺍ ﻞﻴﻐﺸﺘﺑ ﻢﻘﺗ ﻻ
•
• ﻲﻓ ﺪﺋﺍﺮﺠﻟﺍ ﻕﺭﻭ ﻭﺃ ﺲﺑﻼﻤﻟﺍ ﻒﻴﻔﺠﺗ ﻝﻭﺎﺤﺗ ﻻ
• ﻙﺮﺘﺗ ﻻ .ﻦﻳﺰﺨﺘﻟﺍ ﺽﺍﺮﻏﻷ ﻥﺮﻔﻟﺍ ﻡﺪﺨﺘﺴﺗ ﻻ
ﻞﻔﻘﻟﺍﻭ ﻞﺻﺎﻔﻤﻟﺍ (2) ،(ﻢﻴﻘﺘﺴﻣ ﺮﻴﻏ) ﺏﺎﺒﻟﺍ (1)
ﻊﻧﺍﻮﻣﻭ ﺏﺎﺒﻟﺍ ﺭﺎﻃﺇ (3) ،(ﺩﻮﻘﻔﻣ ﻭﺃ ﺭﻮﺴﻜﻣ)
ﻉﺍﺭﺫ ﻭﺃ ﻞﺻﺎﻔﻤﻟﺍ ﻭﺃ ﺏﺎﺒﻟﺍ ﻒﻠﺗ ﺔﻟﺎﺣ ﻲﻓ
ﻞﻴﻐﺸﺗ ﻡﺪﻋ ﺐﺠﻴﻓ ،ﺏﺮﺴﺘﻟﺍ ﻊﻧﺍﻮﻣ ﻭﺃ ﻞﻔﻘﻟﺍ
ﻲﻨﻓ ﺪﻳ ﻰﻠﻋ ﻪﺣﻼﺻﺇ ﻢﺘﻳ ﻰﺘﺣ ﻒﻳﻭﻭﺮﻜﻴﻤﻟﺍ
ﻭﺃ ﺔﻧﺎﻴﺼﻟﺍ ﺕﺎﻴﻠﻤﻋ ﺬﻴﻔﻨﺗ ﺮﻄﺨﻟﺍ ﻦﻣ ﺮﺒﺘﻌﻳ
ﻲﻨﻓ ءﺎﺜﻨﺘﺳﺎﺑ ﺺﺨﺷ ﻱﺃ ﻞﺒﻗ ﻦﻣ ﻥﺮﻔﻟﺍ ﻂﺒﺿ
ﻞﻴﻛﻮﺑ ﻞﺼﺗﺍ .ﻊﻨﺼﻤﻟﺍ ﻞﺒﻗ ﻦﻣ ﺏﺭﺪ
ﻡﺰﻟ ﺍﺫﺇ ﺔﻧﺎﻴﺼﻟﺍ ﺐﻠﻄﻟ ﻲﻠﺤﻤﻟﺍ ﺔﻧﺎﻴﺼﻟﺍ ﺔﻣﺪﺧ
ﺏﺮﺴﺗ ﻊﻧﺍﻮﻣ ﻰﻠﻋ ﺕﺎﻔﻈﻨﻤﻟﺍ
.ﻒﻳﻭﻭﺮﻜﻴﻤﻟﺍ
!ﺮﻳﺬﺤﺗ
.ﺪﻤﺘﻌﻣ ﺔﻣﺪﺧ
!ﺮﻳﺬﺤﺗ
ﻣ ﺔﻣﺪﺧ
ُ
.ﺮﻣﻷﺍ
ﺯﺎﻬﺠﻟﺍ
ﻥﺎﻣﻷﺍ ﺕﺎﻣﻮﻠﻌﻣ
• ﻦﻣ ﻒﻳﻭﻭﺮﻜﻴﻤﻟﺍ ﻥﺮﻓ ﻦﻤﻀﻤﻟﺍ ﻥﺎﻣﻷﺍ ﺡﺎﺘﻔﻣ ﻊﻨﻤﻳ
• ﺢﺘﻓ ءﺎﻨﺛﺃ ﻥﺮﻔﻟﺍ ﻡﺍﺪﺨﺘﺳﺍ ﺔﻟﻭﺎﺤﻣ ﻭﺃ ﺚﺒﻌﻟﺍ ﺮﻈﺤﻳ
• ﺎﺑﺎﻘﺑ ﻭﺃ ﺔﺑﻮﻜﺴﻤﻟﺍ ﺔﻤﻌﻃﻷﺍ ﻢﻛﺍﺮﺘﺑ ﺢﻤﺴﺗ ﻻ
• ﺏﺎﺑ ﻖﻠﻏ ﻡﺎﻜﺣﺇ ﺹﻮﺼﺨﻟﺍ ﻪﺟﻭ ﻰﻠﻋ ﻢﻬﻤﻟﺍ ﻦﻣ
.ﺏﺮﺴﺘﻟﺍ
Page 67

ﺔﻴﺑﺮﻌﻟﺍ 2
ﺕﺎﻳﻮﺘﺤﻤﻟﺍ
3 ................................................................................................ ﻒﻳﻭﻭﺮﻜﻳﺎﻤﻟﺍ ﻥﺮﻓ ﻡﺍﺪﺨﺘﺳﺍ ﻞﺒﻗ
3 ................................................................................................................. ﻥﺎﻣﻷﺍ ﺕﺎﻣﻮﻠﻌﻣ
7 .......................................................................................................................... ﺐﻴﻛﺮﺘﻟﺍ
8 ................................................................................... ﻥﺮﻔﻟﺍ ﺕﺎﻘﺤﻠﻣﻭ ﺕﺍﻭﺩﺄﺑ ﺔﻘﻠﻌﺘﻤﻟﺍ ﺕﺍﺩﺎﺷﺭﻹﺍ
9 ........................................................................................................................ ﻡﺍﺪﺨﺘﺳﻻﺍ
16 ................................................................................................................ ﻒﻴﻈﻨﺘﻟﺍﻭ ﺔﻳﺎﻨﻌﻟﺍ
17 ................................................................................................................. ﺔﻴﻨﻔﻟﺍ ﺕﺎﻣﻮﻠﻌﻤﻟﺍ
17 .................................................................................................................... ﺔﻴﺌﻴﺒﻟﺍ ﺎﻳﺎﻀﻘﻟﺍ
ﻚﻴﻓ ﺮﻜﻔﻧ ﻦﺤﻧ
ﺮﻜﺘﺒﻣ ﻮﻬﻓ .ﻲﻓﺍﺮﺘﺣﻻﺍ ﺭﺎﻜﺘﺑﻻﺍﻭ ﺓﺮﺒﺨﻟﺍ ﻦﻣ ﺩﻮﻘﻌﺑ ﺰﻴﻤﺘﻳ ﺎًﺠﺘﻨﻣ ﺕﺮﺘﺧﺍ ﺪﻘﻟ .Electrolux ﺓﺰﻬﺟﺃ ﺪﺣﺃ ءﺍﺮﺷ ﻰﻠﻋ ﻙﺮﻜﺸﻧ
ﻰﻠﻋ ﻞﺼﺤﺘﺳ ﻚﻧﺄﺑ ﻚﺘﻓﺮﻌﻤﻟ ﻥﺎﻣﻷﺎﺑ ﺭﻮﻌﺸﻟﺍ ﻚﻨﻜﻤﻳ ،ﻪﻟ ﻚﻣﺍﺪﺨﺘﺳﺍ ﺪﻨﻋ .ﺔﺻﺎﺨﻟﺍ ﻚﺗﺎﺟﺎﻴﺘﺣﺍ ﺔﻴﺒﻠﺘﻟ ﺎًﺼﻴﺼﺧ ﻢﻤﺼﻣﻭ ﻖﻴﻧﺃﻭ
.Electrolux ﻲﻓ ﻢﻜﺑ ﺎًﺒﺣﺮﻣ .ﺓﺮﻣ ﻞﻛ ﺔﻌﺋﺍﺭ ﺞﺋﺎﺘﻧ
:ﻰﻠﻋ ﻝﻮﺼﺤﻠﻟ ﻲﻧﻭﺮﺘﻜﻟﻹﺍ ﺎﻨﻌﻗﻮﻣ ﺓﺭﺎﻳﺰﺑ ﺍﻮﻠﻀﻔﺗ
:ﺔﻣﺪﺨﻟﺍ ﺕﺎﻣﻮﻠﻌﻣﻭ
.ﻞﺴﻠﺴﻤﻟﺍ ﻢﻗﺮﻟﺍ ،ﺞﺘﻨﻤﻟﺍ ﻢﻗﺭ ،ﺯﺍﺮﻄﻟﺍ .ﺱﺎﻴﻘﻟﺍ ﺔﺣﻮﻟ ﻰﻠﻋ ﺕﺎﻣﻮﻠﻌﻤﻟﺍ ﻩﺬﻫ ﻰﻠﻋ ﺭﻮﺜﻌﻟﺍ ﻦﻜﻤﻳ
ﻞﻛﺎﺸﻤﻟﺍ ﻒﺸﻜﺘﺴﻣﻭ ﺔﻴﺠﻳﻭﺮﺘﻟﺍ ﺕﺎﺒﻴﺘﻜﻟﺍﻭ ﻡﺍﺪﺨﺘﺳﻻﺍ ﺢﺋﺎﺼﻧ ﻰﻠﻋ ﻞﺼﺣﺍ
www.electrolux.com
:ﻞﻀﻓﺃ ﺔﻣﺪﺧ ﻰﻠﻋ ﻝﻮﺼﺤﻠﻟ ﺞﺘﻨﻤﻟﺍ ﻞﺠﺳ
www.electrolux.com/productregistration
:ﻙﻼﻬﺘﺳﻼﻟ ﺔﻠﺑﺎﻘﻟﺍ ﺩﺍﻮﻤﻟﺍﻭ ﺕﺎﻘﺤﻠﻤﻟﺍ ،ﺖﻧﺮﺘﻧﻹﺍ ﻰﻠﻋ ﺽﺮﻌﻤﻟﺍ
www.electrolux.com/shop
ءﻼﻤﻌﻟﺍ ﺔﻣﺪﺧﻭ ﺔﻳﺎﻋﺭ
.ﺔﻴﻠﺻﻷﺍ ﺭﺎﻴﻐﻟﺍ ﻊﻄﻗ ﻡﺍﺪﺨﺘﺳﺎﺑ ﻲﺻﻮﻧ
.ﻚﻳﺪﻟ ﺔﻴﻟﺎﺘﻟﺍ ﺕﺎﻧﺎﻴﺒﻟﺍ ﺮﻓﻮﺗ ﻦﻣ ﺪﻛﺄﺗ ،ﺔﻣﺪﺨﻟﺎﺑ ﻝﺎﺼﺗﻻﺍ ﺪﻨﻋ
ﺔﻣﻼﺴﻟﺎﺑ ﺔﻘﻠﻌﺘﻣ ﺔﻴﻬﻴﺒﻨﺗ / ﺔﻳﺮﻳﺬﺤﺗ ﺕﺎﻣﻮﻠﻌﻣ
ﺕﺎﺤﻴﻤﻠﺗﻭ ﺔﻣﺎﻋ ﺕﺎﻣﻮﻠﻌﻣ
ﺔﻴﺌﻴﺒﻟﺍ ﺕﺎﻤﻴﻠﻌﺘﻟﺍ
.ﺭﺎﻄﺧﺇ ﻥﻭﺩ ﺮﻴﻴﻐﺘﻠﻟ ﺔﺿﺮﻋ
Page 68

ﻡﺪﺨﺘﺴﻤﻟﺍ ﻞﻴﻟﺩ ﻒﻳﻭﻭﺮﻜﻴﻤﻟﺍ ﻥﺮﻓ EMS30400OX
 Loading...