

Electrolux EMM 21150 S Operating Instructions

EMM21150


EMM21150 EN
Before using your microwave oven 4
Technical data 4
Safety instructions 5
– Testing suitability of cookware 5
– Food safety 6
Safety Instructions when cooking by Grill 7
Installation 8
– Connecting to the mains 8
Oven utensils and accessories guide 9
– Unpacking 9
How to operate your microwave oven 10
– Name and function of parts 10
– Turntable Installation 10
– Control panel 11
– Microwave Cooking 12
– Microwave Power Setting Guide 12
– Cooking with Grill 13
– Cooking with Microwave and Grill 13
– Recommendations for Cooking with Grill 14
– Recommendations for Cooking with Microwave and Grill 14
– Microwave and Grill Power Levels 14
– Defrosting instructions using
– Microwave Hints 16
– Care and cleaning 17
– Cleaning the accessories (turntable and support) 17
– Cleaning the interior 17
– Cleaning the exterior 17
– Care and Cleaning (Grill) 17
Guarantee conditions 18
Contents
180W 15
3

EMM21150 EN
Congratulations on the purchase of your new Microwave Oven
Thank you for having chosen a Electrolux product. We are convinced that you will find your new microwave
oven very useful and that it will be of great help to you. As with all new kitchen appliances, it will take some
time to learn all the new functions and features, but with time, this oven will become indispensable to you.
Read through the instruction manual carefully and ensure that you follow the recommendations given, these
instructions have been prepared so that you get the best from your new Electrolux Microwave Oven.
It is important that this instruction book is retained with the appliance for future reference. Should the appliance
be sold or transferred to another owner, or if you move house and leave the appliance, always ensure that the
book is supplied with the appliance so that the new owner can be acquainted with the functioning of the
appliance and the relevant warnings.
Before using your Microwave Oven
Technical data
Overall dimension Weight 13.46 kg
Volume 21 Litre
Width 485 mm Power source 230V, 50 Hz
Depth 422 mm Fuse 10A
Height 287 mm
Power consumption
Cavity dimension Microwave 1250W
Grill 1000W
Width 335.8 mm Power output
Depth 314 mm Microwave 800W
Height 206 mm Grill 1000W
4

EMM21150 EN
• The built-in safety interlock switches prevent the
microwave oven from operating when the door is
open.
• Do not tamper with them, or attempt to operate
the oven with the door open as open door
operation can result in exposure to microwave
energy.
• Do not allow food spills or cleaner residue to
accumulate on door sealing surfaces. See the
Cleaning and Care section for cleaning
instructions.
• It is particularly important that the oven door
closes properly and that there is no damage to
the: (1) door (warped), (2) hinges and latches
(broken or insecure), (3) door seals and sealing
surface.
WARNING : If the door, hinges/latches or
door seals are damaged, the microwave
must not be operated until it has been
repaired by a authorized service person.
WARNING : It is hazardous for anyone
except factory trained service personnel to
service or make adjustments to this oven.
Contact your nearest authorised service
agent if service should be required.
• Do not remove the outer case, door or control
panel at any time. Doing so may cause exposure
to extremely high voltage.
• Install or locate this oven only in accordance with
‘installation instructions’ found in this manual.
• Use the appliance for its intended use as
described in this manual. Do not use corrosive
chemicals in this appliance. This type of oven is
specifically designed to heat, cook, or defrost
food. It is not designed for industrial or laboratory
use neither for commercial use as this will
invalidate the guarantee.
• Do not operate the oven empty. If food or water is
not present to absorb the microwave energy, the
magnetron tube can be damaged.
• Do not store this appliance outdoors. Do not use
this product near water.
Important Safety instructions.
READ CAREFULLY AND KEEP FOR FUTURE REFERENCE
• Do not attempt to dry clothing or newspapers in
the microwave oven. These items can ignite.
• Do not use the cavity for storage purposes. Do
not leave paper products, cooking utensils, or
food in the cavity when not in use.
• The temperature of accessible surfaces may be
high when the appliance is operating.
WARNING : If smoke is observed,
switch off or unplug the appliance and
keep the door closed in order to stifle any
flames. Never use water.
WARNING : Only allow children or
infirm persons to use the microwave,
without supervision, when adequate
instructions have been given so that the
child or infirm person is able to use the
microwave in a safe way and understand
the hazards of improper use.
Utensil safety
• Only use utensils that are suitable for use in a
microwave oven.
• Most glass, glass ceramic and heat-resistant
glass-ware utensils are excellent for use in the
micro-wave oven. Although microwave energy will
not heat most glass and ceramic items, these
utensils can become hot as heat transfers from
the food to the container. The use of oven gloves
to remove dishes is recommended.
Testing suitability of cookware
• Utensils should be checked to ensure they are
suitable for use in Microwave Ovens.
• Place the cookware in the microwave along with a
glass half full of water. Heat on (900W) (100%) for
one minute. If the cookware feels hot, you should
not use it. If it is just slightly warm, you can use it
for reheating but not for cooking. If the dish is
room temperature, it is suitable for microwave
cooking.
• Paper napkins, wax paper, paper towels, plates,
cups, cartons, freezer wrap and cardboard are
great convenience utensils. Always be sure
containers are filled with food to absorb energy
5

EMM21150 EN
and thus avoid the possibility of overheating or
ignition.
• Many plastic dishes, cups, freezer containers and
plastic wraps may be used in the microwave
oven. Follow manufacturer’s instructions when
using plastics in the oven. Avoid using plastic
utensils with foods that have high fat or sugar
content since these foods reach high
temperatures and could melt some plastics.
• Do not leave oven unattended, and look at it from
time to time when heating or cooking food in
plastic, paper or other combustible containers.
• Metal utensils and utensils with metallic trim
should not be used in the microwave oven, unless
specifically recommended for microwave use.
• Containers with restricted openings, such as
bottles, should not be used for microwave
cooking.
• Use caution when removing a lid or cover from a
dish to avoid steam burns.
Foil containers
Shallow foil containers may safely be used to reheat
foods in your microwave oven providing the following
rules are observed:
1. Foil containers should not be more than 3 cms
(1 1/4”) deep.
2. Foil lids must not be used.
3. The foil containers must be at least two-thirds full
of food. Empty containers must never be used.
4. Foil containers should be used singly in the
microwave oven and should not be allowed to
touch the sides. If your oven has a metal turntable
or cooking rack, the foil container should be
placed on an upturned oven-proof plate.
5. Foil containers should never be re-used in the
microwave oven.
6. If the microwave oven has been in use for 15
minutes or more, allow it to cool before using it
again.
7. The container and turntable may become hot
during use, take great care when removing either
from the oven. It is advisable to use an oven cloth
or glove when doing so.
8. Remember when using an aluminium foil
container that the reheating or cooking times may
be longer than you are used to, always ensure
that the food is piping hot before serving.
Food safety
• Do not heat food in a can in the microwave oven.
Always remove the food to a suitable container.
• Deep fat frying should not be done in the
microwave oven, because the fat temperature
cannot be controlled, hazardous situations can
result.
• Popcorn may be prepared in the microwave oven,
but only in special packages or utensils designed
specifically for this purpose. This cooking
operation should never be unattended.
• Pierce foods with non-porous skins or
membranes to prevent steam build-up and
bursting. Apples, potatoes, chicken livers, and
egg yolks are examples of items that should be
pierced.
• The contents of feeding bottles and baby food jars
are to be stirred or shaken and the temperature is
to be checked before consumption, in order to
avoid burns.
WARNING : Liquids or other foods must
not be heated in sealed containers since
they are liable to explode.
WARNING : Microwave heating of
beverages can result in delayed eruptive
boiling, therefore care must be taken when
handling the container.
WARNING : When heating liquids, e.g.
soups, sauces and beverages in your
microwave oven, overheating the liquid
beyond boiling point can occur without
evidence of bubbling. This could result in a
sudden boil over of the hot liquid. To
prevent this possibility the following steps
should be taken:
1. Avoid using straight-sided containers with narrow
necks.
2. Do not overheat.
3. Stir the liquid before placing the container in the
oven and again halfway through the heating time.
6

EMM21150 EN
4. After heating, allow to stand in the oven for a
short time, stirring again before carefully removing
the container.
WARNING : Some products such as whole
eggs and sealed containers – for example,
closed glass jars – may explode and
should not be heated in this oven.
Occasionally, poached eggs may explode
during cooking. Always pierce the yolk,
then cover and allow the standing time of
one minute before removing cover.
It is quite normal for steam to be emitted
around the door, or for misting to occur on the
door, or even for water droplets to appear
below the door during the cooking cycle. This
is merely condensation from the heat of the
food and does not affect the safety of your
oven. The door is not intended to seal
the oven cavity completely.
• Do not force the turntable to rotate by hand. This
may cause malfunctioning.
• Arcing in the oven during microwave operation
usually occurs from use of metallic utensils.
Continuous arcing, however, can damage the
unit. Stop the programme and check the utensil.
• Care should be taken not to obstruct any air vents
located on the top, rear, side and bottom of the
oven.
WARNING : Do not use this oven for
commercial purposes.This oven is made
for domestic use only.
Safety instructions when
cooking with grill, combination modes.
1. The glass viewing window may break if water is
spilled on it during grill cooking.
2. Be sure to use an oven glove when loading and
unloading the oven. Containers get very hot in the
oven, so be careful not to burn yourself. The turntable and metal rack also get very hot so be sure
to use an oven glove when handling them.
3. Do not touch the inner or outer viewing window
with metal components when loading or unloading
the oven. The inside of the door and oven get
very hot so take care when attending food in the
oven.
4. Do not put the turntable or containers in cold
water or try to cool them quickly after use.
5. Do not place items on top of the cabinet. The top
of the cabinet gets very hot, so anything placed
on it may be damaged by the heat.
6. Preheat your oven only when using the Grill,
never when using microwave or combination
modes (Microwave and Grill)
Warning : When the appliance is used in
combination mode, Children should
only use the oven under adult
supervision due to the temperature
generated.
Keep these instructions!
7

EMM21150 EN
1. Remove any promotion label from the door.
2. The oven should be installed on a flat, level
surface. The surface must be strong enough to
safely bear the weight (17 kg) of the oven, and
the contents. To avoid the possibility of causing
vibration or noise the oven must be in a stable
position.
3. Keep the oven away from heat and water.
Exposure to heat and water can lower oven
efficiency and lead to malfunctioning, so be sure to
install the oven away from heat and water sources.
4. Do not block air vents on the top and the sides of
the cabinet and also do not place any articles on
the top of the oven. If air vents are blocked during
operation, the oven may overheat, and this may
lead to malfunctioning. Hot air escapes from the
vents, so be sure not to obstruct it or let curtains
come between the oven and the rear wall.
5. Place the oven as far away from radios and TV’s
as possible. This oven does conform to EEC
requirements of radio interference suppression, but
some interference may occur if it is placed too
close to a radio or TV, so keep them as far apart
as possible.
6. If positioned in a corner, leave a gap of at least
10 cm from the walls and 10 cm above the
microwave.
IMPORTANT! The oven can be placed almost
anywhere in the kitchen. Make sure the oven is
placed on a flat, level surface and that vents as
well as the surface underneath the oven are not
blocked (for sufficient ventilation).
Installation.
Connecting to the mains
The oven is delivered with the power cord and a plug
for 230V, 50Hz, earthed socket outlet.
Earth protection minimises the risks should a short
circuit occur. Check to ensure the voltage of the oven
matches the supply.
N.B. If the oven is connected to the socket via an
extension cord, make sure the cord is earthed.
This appliance must not be used on a nonearth protected power supply. Contact an
electrician if you are uncertain regarding
electrical connection of the oven or
provision of earth protection of the
supply.
This appliance must be earthed. If this
appliance is fitted with a non-rewireable
plug for which your socket is unsuitable, it
must be replaced by the manufacturer, its
service agent or similarly qualified persons
in order to avoid a hazard.
If the supply cord is damaged, it must be
replaced by the manufacturer, its service
agent or similarly qualified persons in
order to avoid a hazard.
8

EMM21150 EN
Oven utensils and accessories guide
A variety of Utensils and Materials may be used for cooking in your microwave oven. For your safety and to
prevent damaging utensils and your oven choose appropriate utensils and materials for each cooking method.
The list below is a general guide.
Material Utensils
Corning ware YES YES YES
Heat resistant glass
Ceramic &
Glass
China
Pottery*2 YES YES YES
Plastic
Metal Baking pan NO YES NO
Aluminium foil*3 YES YES YES
Paper
Wood NO NO NO
Accessories
YES: Utensils and accessories to use NO: Utensils and accessories to avoid
*1 Only if there is no metal trim.
*2 Only if it does not have a glaze containing metal.
*3 NOTE: Use aluminium foil only for shielding purposes, over use may cause arcing.
Glass ware with metal
Lead crystal glass NO NO NO
Cups, plates, towels YES NO NO
ware
decoration
Without metal
decoration
Microwave oven
heat-proof wear
Plastic wrap YES NO NO
Waxed paper YES NO NO
Grill rack NO YES YES
Turntable YES YES YES
Turntable support YES YES YES
Microwave Grill Combination
YES*1 YES YES*1
NO NO NO
YES YES NO
YES NO NO
Mode of operation
Unpacking
N.B. When you unpack the oven, check that the product is free from damage. Damage or any missing parts must be
reported immediately to the retailer. The oven, parts of the oven or the accessories may be wrapped by a protection foil. If
so, you must remove this foil before using the oven. Do not leave packing material so that small children can play with it.
This can be hazardous.
9
EMM21150 EN
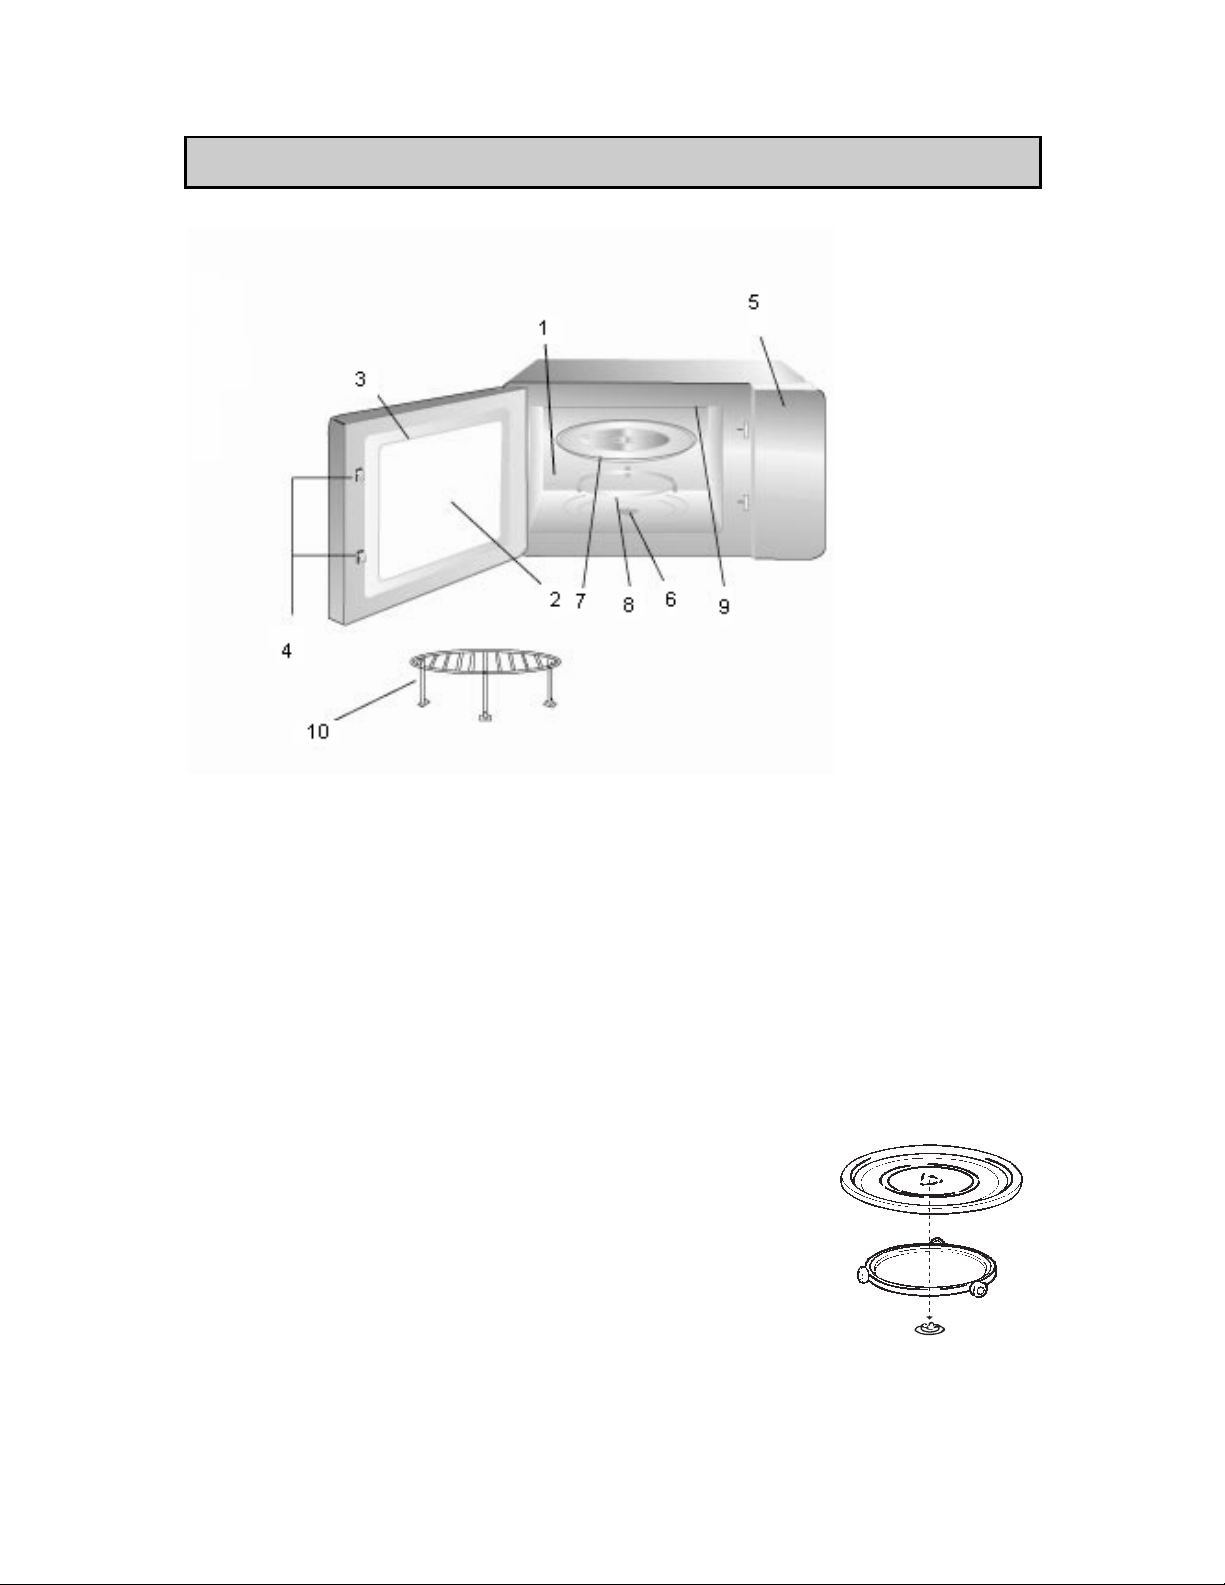
How to operate your microwave oven
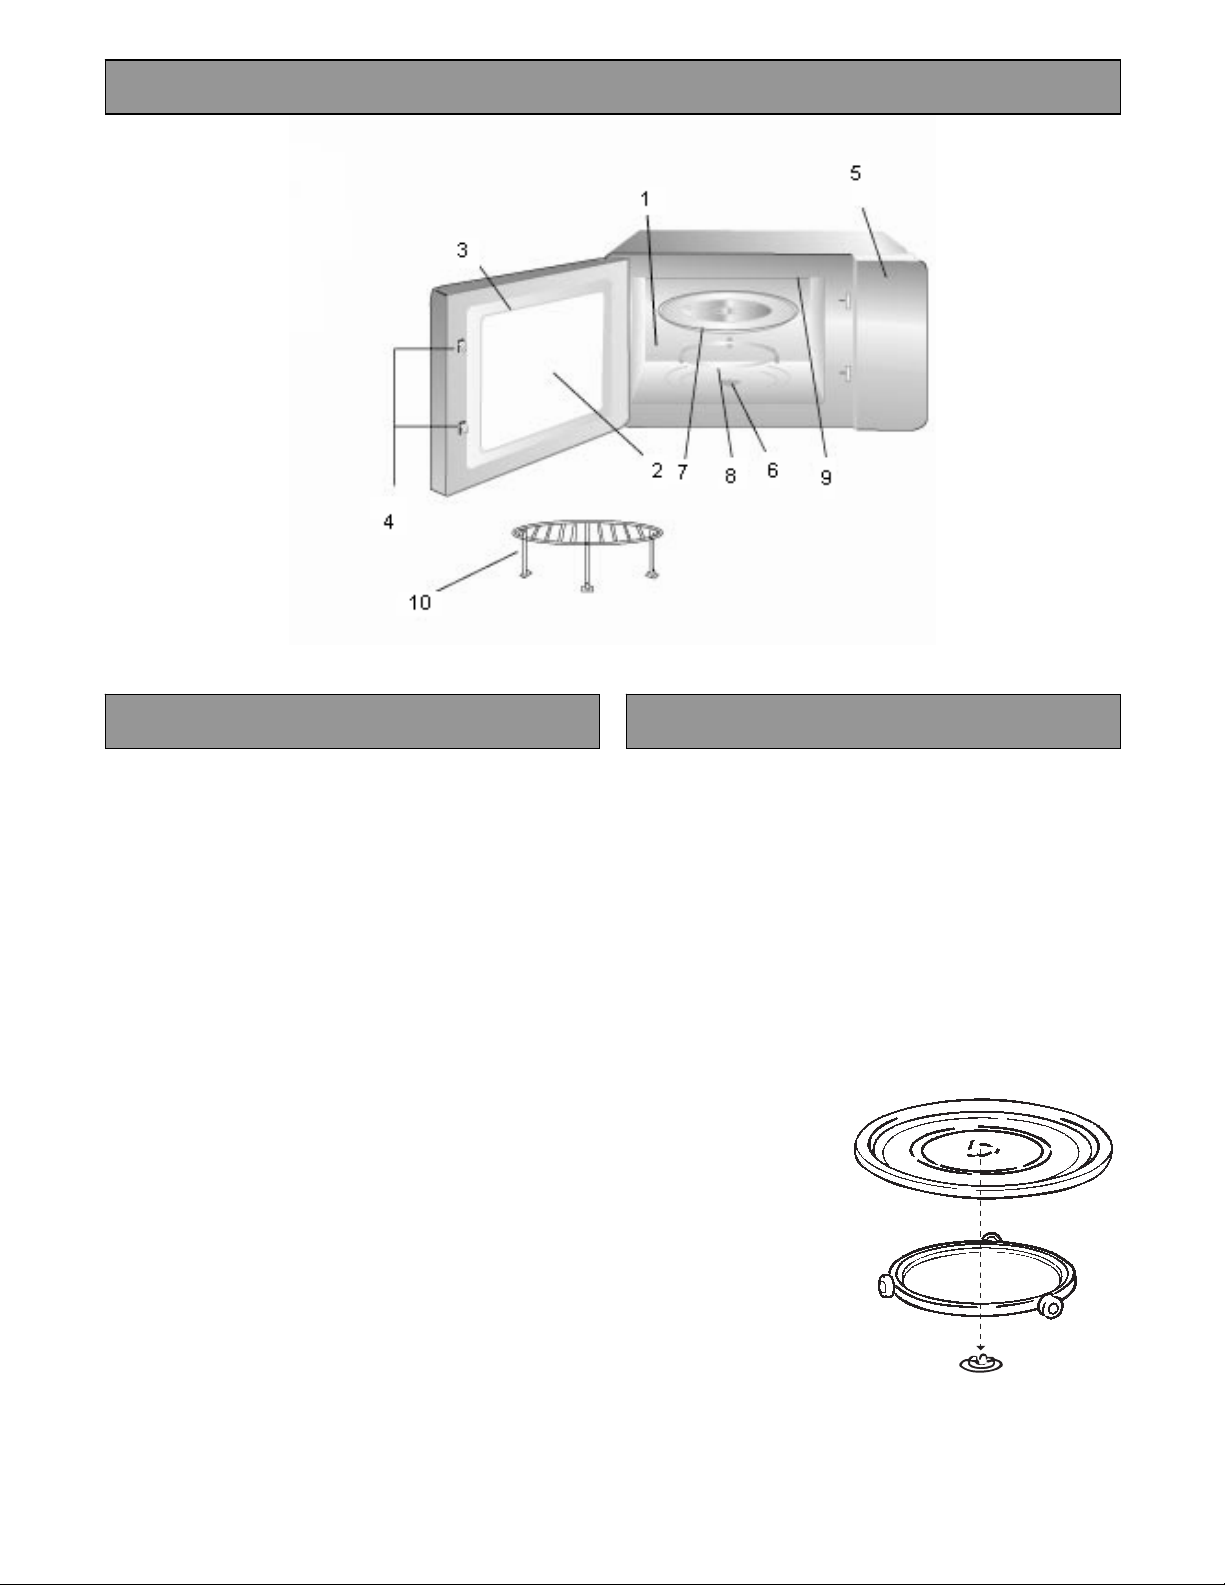
Name and function of parts Turntable Installation
1. Cooking compartment. Wipe the compartment
clean after using the oven.
2. Viewing window. Food can be checked while the
microwave oven is in operation.
3. Oven door. The door must always be firmly
closed while cooking.
4. Latch hook and safety interlock system.
5. Control panel.
6. Drive shaft for turntable
7. Turntable. Made of special heat-resistant glass.
Food in a suitable container is placed on this tray
for cooking. Do not use the oven without the
turntable.
8. Turntable support. Place the support on the floor
of the cooking chamber to support the turntable.
9. Grill.
10. Grill Rack.
1. Place the turntable support on the cavity Bottom.
2. Place the turntable on top of the turntable support
as shown in the diagram. Make sure that turntable
hub is securely locked in the turntable shaft. Never
place the turntable upside down.
• Both turntable and turntable support must always
be used during cooking.
• All food and containers of food are always placed
on this turntable for cooking.
• This turntable rotates clockwise and
anticlockwise; this is normal.
Turntable
Roller rest
Turntable Shaft
10

EMM21150 EN
CONTROL PANEL
1. Power Selector
Adjust this knob to select the correct power
level for your food.
2. Timer
Set for desired cooking time. Cooking
will start. All clockwork timers will operate
more accurately if wound past the desired
time first, and then back.
11
EMM21150 EN
MICROWAVE COOKING
1. Open the door, place the food on the turntable.
Close the door.
2. Set the Power Selector to the desired power
level.(See table below.)
3. Set the Timer to the desired time.
The oven begins cooking.
Example: To cook at 600W for 20 minutes
1. Turn the power selector to 600W.
2. Turn the timer to 20
3. The Oven will automatically start cooking for 20 minutes at 600W
When cooking for less than 2 minutes, turn the timer
for a longer period and than return to the desired
time.
To turn off the oven during cooking, simply turn the
Timer to 0.
Note: After use, be sure to return the Timer to 0,
or the oven will continue to operate.
Re-heating cook-chilled foods
• The food manufacturer’s cooking time should be used as a guide only. If, when stated cooking time has
expired, the food isn’t piping hot, return it to the oven and cook it until it is. In much the same manner as
you would when cooking with a conventional oven.
• Always stir food regularly, particularly sauces and casseroles.
• Standing time is very important, it is part of the cooking process and also allows an even temperature
throughout the food.
Power Setting Suggested use
90W Keeping warm; Keeping foods warm
360W
600W
800W
Microwave Power setting Guide
Defrost; Thawing frozen foods.
Simmer; Completing the cooking cycle of some pot roasts.
Casseroles and stews.
Baked custards or cheesecakes.
Medium; Faster defrosting and reheating for casseroles and
stews.
Baking cakes and sponge puddings
Reheat; Reheating pre-cooked foods.
Roasting joints of meat and poultry
Boiling or reheating liquids.
Cooking vegetables.
Preheating a browning dish.
12
EMM21150 EN
Place the turntable on top of the roller rest on
the base of the cavity and position food on the
metal rack. This method is ideal for grilling
meat such as steak, chops etc. Remember the
oven will be hot.
1. Set the Power Selector to the Grill setting.
2. Set cooking time by turning the Timer to the
desired time. The microwave starts automatically.
Example: To cook using Grill for 40 minutes
1. Turn the power selector to
2. Turn the timer to 40
3. The Oven will automatically start cooking for 40 minutes at
Place the turntable on top of the roller rest on
the base of the cavity and position food on the
metal rack. This method is ideal for grilling
meat such as steak, chops etc. Remember the
oven will be hot.
Example: To cook at 360W and Grill for 30 minutes
1. Turn the power selector to
2. Turn the timer to 30
3. The Oven will automatically start cooking for 30 minutes at
Cooking with Microwave and Grill
(Combi 2).
Cooking with Grill
Note: After use, be sure to return the Timer
to 0, or the oven will continue to operate.
Note: You may detect smoke or a burning smell
when using your grill for the first time, this is
normal and not a sign that the oven is out order.
To avoid this problem, when using your grill for
the first time, heat the oven without any food for
10 minutes on grill.
(Grill).
(Grill).
1. Set the Power Selector to the desired Microwave
Power and Grill level.
2. Set cooking time by turning the Timer to the
desired time. The microwave starts automatically.
Note: After use, be sure to return the Timer
to 0, or the oven will continue to operate.
(Combi 2).
NOTE:
If you open the door during cooking, the oven switches off. To resume cooking, close the door.
At the end of the cooking cycle the grill and microwave switches off and a bell sounds.
In microwave and grill mode, power selection and cooking time can be changed whilst the microwave is
operating.
13

EMM21150 EN
All foods should be placed on the grilling rack with a dish placed underneath to catch any food spillage or
juices to minimise cleaning. Turn all food halfway through the cooking time.
Food QTY. (Weight) Cooking time Special notes
Toast 2 Slices 4 – 5 min
Cheese on Toast 4 Slices 6 – 7 min 4 – 5 min. to toast. 2 min. with topping
Symbol Setting Microwave Power Grill Power
Recommendations for cooking with Grill
Microwave and Grill Power Levels
Grill 0W 1000W
Combi 1 180W 600W
Combi 2 360W 400W
14
EMM21150 EN
Recommendations for Defrosting using 180W
Some foods such as bread and fruit, can successfully be thawed manually by using the power setting.
FOOD PREPARATION
Bread
STANDING
TIME
Small loaf
Sliced large loaf
2 slices Place on kitchen paper. 45–60 sec. 5 min.
1 bread roll Place on kitchen paper. 45–60 sec. 5 min.
2 bread rolls Place on kitchen paper. 1–11/2 min. 5 min.
Cakes and Pastry
Gateau 450g/1 lb Remove from packaging, place on plate. 9–11 min. 15–30 min.
Cheesecake
450g/1 lb
Pie (cooked)
450g/1 lb
Pastry 450g/1 lb Remove from packaging, place on plate. 7– 9 min. 15–30 min.
Butter
250g/8.8 oz
(1 packet)
Fruit
225g/8 oz
Soft berry fruits
450g/1 lb
Soft berry fruits
Plated meal
400g/14 oz
Vegetables
Place on microwave-proof rack or kitchen paper.
Turn over halfway through defrosting time.
Place on microwave-proof rack or kitchen paper.
Turn over halfway through defrosting time.
Remove from packaging, place on plate. 9–11 min. 15–30 min.
Remove from packaging, place on plate. 7– 9 min. 15–30 min.
If foil wrapped, remove from wrapper and place on a
plate
Place in a single layer in a shallow dish. 5– 6 min. 5–10 min.
Place in a single layer in a shallow dish.
Cover with a plate or non P.V.C. cling film.
To reheat, microwave on 100% (800W) for 3–4 minutes.
It is not necessary to defrost vegetables before cooking.
All vegetables can be thawed and cooked on
100% (800W)
8–10 min. 10–15 min.
10–13 min. 10 min
3– 4 min. 5–10 min.
7– 8 min. 5–10 min.
7– 8 min 5–10 min.
15

EMM21150 EN
Microwave Hints Microwave Tips
• Always keep the oven clean – avoid spill-overs
and do not forget to clean under the glass tray
and the inside of the door.
• Preferably use round or oval casseroles with a lid
when cooking in your microwave oven.
• Do not use metal or metal decorated casseroles.
Certain plastic materials can melt and be warped
by hot food.
• Cover the food when cooking. Use a glass lid, a
plate or grease proof paper.
• Pastry, bread and the like can be defrosted
directly in a bread basket or on a paper towel.
• If frozen food is heated in its packaging, the
packaging should be opened. Packaging
containing metal or metal decoration must not be
used unless specifically recommended for use in
the microwave. Remove metal clips and wire ties.
• Smaller pieces of aluminium foil can be used to
cover parts that easily over cook such as chicken
legs.
• Food with peel or skin should be pierced with a
fork – e.g. potatoes and sausages. Do not boil
eggs in the microwave oven as they can explode.
• Put large, thick pieces close to the edge of the
casserole and try to cut the food in to even sized
pieces. Always place the food in the centre of the
oven.
• The food will be evenly cooked if you stir or turn it
a few times.
• Always set a shorter cooking time than indicated
in your recipe to avoid over cooking. The larger
the amount of food the longer it takes.
• Use little or no water for vegetables.
• Use less salt and spices than for ‘normal’ cooking.
• Season afterwards.
• Allow a few minutes ‘standing’ time after the oven
has switched off to ensure complete and even
cooking results.
• Always ensure food is piping hot throughout
before serving.
• Use pot holders or gloves when taking dishes and
food from the oven.
• Softening Honey
If you have a jar of honey which has
crystallised, remove lid and place the jar in the
oven, microwave on medium power for 2
minutes.
• Melting Chocolate
Break 100g of chocolate into squares, place in
a bowl and heat on high power for 1-2
minutes and stir well.
• Softening or Melting Butter
Melting takes a few seconds on high power.
Softening is best done more gently on low
power.
• Freshen or Warm Bread
Use medium power for few seconds.
• Peeling Garlic easily
Heat 3 or 4 cloves of garlic on high power for
15 seconds. Squeeze at one end until the
clove pops out.
• Fruit Juice
Citrus fruits will yield more juice if they are
heated on high power for 15 seconds before
squeezing.
• Cooking Porridge
Porridge is easily cooked in the serving dish
with no sticky pan to wash. Follow food
manufacturers’ recommendations.
16

EMM21150 EN
Care and cleaning
The oven must always be clean. Residue of food from spillovers or spatters will attract microwave energy
causing it to burn on. This could reduce the efficiency of the oven and may cause bad odours. Do not attempt
to tamper with or make any adjustments or repairs to any part of the oven. Repairs should only be done by a
qualified service technician.
Be sure the oven is disconnected from the electricity supply before cleaning.
Clean them with mild detergent after removing them from the cavity. The turntable support should be carefully
handled.
CAUTION: The inside of the oven and turntable get very hot, so do not touch them immediately after use.
Always keep the inside of the oven clean. Wipe up spill-overs and food spatters immediately. Deposits that are
allowed to remain on the oven walls, door seal and door surface will absorb microwave energy, reduce the
efficiency of the oven, and possibly damage the oven interior. Use mild, liquid detergent, warm water and a
soft, clean cloth to remove deposits.
NEVER USE ABRASIVE CLEANERS, COMMERCIAL OVEN CLEANERS OR STEEL WOOL PADS ON
ANY PART OF THE MICROWAVE OVEN.
To loosen difficult deposits, boil a cup of water in the microwave oven for 2 or 3 minutes.
NEVER USE A KNIFE OR ANY UTENSIL TO REMOVE DEPOSITS FROM OVEN SURFACES.
To remove odours from the oven interior, boil a cup of water plus 2 tablespoons of lemon juice for 5 minutes.
Open the oven door when cleaning the control panel. This will prevent the oven from being turned on
accidentally. You should clean outside surfaces of the oven with mild liquid detergent and water followed by a
wiping with clear water to remove any excess detergent. Dry with a soft cloth.
Spray-on window cleaners or all purpose spray-on kitchen cleaners can also be used. Never use abrasive
cleaners, scouring pads or harsh chemicals on outside surfaces of your oven. To prevent damage to the
working parts, do not allow water to seep into ventilation openings.
The element may be stained with spattered fat or oil while the oven is in use. Wait until the cavity cools down
and wipe off the spattered oil before next using of the oven. Stains grill may cause unpleasant odours and
smoke.
Cleaning the accessories (turntable and support)
Cleaning the interior
Cleaning the exterior
Care and cleaning (grill)
17

EMM21150 EN
GUARANTEE CONDITIONS
Electrolux offer the following guarantee to the first purchaser of this appliance:
1. The guarantee is valid for 24 months commencing when the appliance is handed over to the first retail
purchaser, which must be verified by purchase invoice or similar documentation. The guarantee does not
cover commercial use.
2. The guarantee covers all parts or components which fail due to faulty workmanship or faulty material. The
guarantee does not cover appliances where defects or poor performance are due to misuse, accidental
damage, neglect, faulty installation, unauthorised modification or attempted repair, commercial use or
failure to observe requirements and recommendations set out in the instruction book. This guarantee does
not cover such parts as light bulbs, removable glassware, or plastic.
3. Should guarantee repairs be necessary the purchaser must inform the nearest customer service office
(ELECTROLUX's service or authorised agent). ELECTROLUX reserves the right to stipulate the place of
repair (i.e. the customer's home, place of installation or ELECTROLUX workshop).
4. The guarantee or free replacement includes both labour and materials.
5. Repairs carried out under guarantee do not extend the guarantee period for the appliance. Parts removed
during guarantee repairs become the property of ELECTROLUX.
6. The Purchaser's statutory rights are not affected by this guarantee.
European Guarantee
If you should move to another country within Europe then your guarantee moves with you to your new home
subject to the following qualifications:
• The guarantee starts from the date you first purchased your product
• The guarantee is for the same period and to the same extent for labour and parts as exists in the new
country of use for this brand or range of products
• This guarantee relates to you and cannot be transferred to another user
• Your new home is within the European Community (EC) or European Free Trade Area
• The product is installed and used in accordance with our instructions and is only used domestically, i.e. a
normal household
• The product is installed taking into account regulations in your new country
Before you move please contact your nearest Customer Care centre, listed below, to give them details of your
new home. They will then ensure that the local Service Organisation is aware of your move and able to look
after you and your appliances.
France Senlis +33 (0) 3 44 62 20 13
Germany Nürnberg +49 (0) 800 234 7378
Italy Pordenone +39 (0) 800117511
Sweden Stockholm +46 (0) 20 78 77 50
UK Slough +44 (0) 1753 219898
18

EMM21150 HR
Sadržaj
Prije uporabe vaše mikrovalne pećnice ......................................4
Sigurnosne upute...........................................................................4
- Sigurnosne napomene za pripremu hrane pomoću roštilja........... 4
- Provjera prikladnosti posuđa.......................................................... 5
- Sigurnost namirnica .......................................................................5
- Vodič kroz pribor i opremu pećnice ...............................................6
Tehnički podaci ..............................................................................6
Priprema za uključivanje mikrovalne pećnice ............................7
- Skidanje ambalaže.........................................................................7
Postavljanje.....................................................................................7
- Priključak na mrežno napajanje ..................................................... 7
- Električki priključak.........................................................................7
Kako se koristi vaša mikrovalna pećnica ....................................8
- Naziv i funkcija dijelova ..................................................................8
- Postavljanje okretnog tanjura.........................................................8
- Upravljačka ploča...........................................................................9
- Kuhanje s mikrovalovima .............................................................10
- Vodič za podešavanje snage mikrovalova ..................................10
- Kuhanje sa roštiljem..................................................................... 11
- Kuhanje sa mikrovalovima i roštiljem...........................................11
- Preporuke za pripremu hrane pomoću roštilja.............................12
- Preporuke za kuhanje pomoću mikrovalova i roštilja ..................12
- Razine snage mikrovalova i roštilja .............................................12
- Upute za odmrzavanje .................................................................13
- Natuknice o mikrovalnoj pećnici...................................................14
- Održavanje i čišćenje ...................................................................15
- Čišćenje opreme (okretni tanjur i podupirač)...............................15
- Čišćenje unutrašnjosti ..................................................................15
- Čišćenje vanjskog dijela pećnice .................................................15
Servis i nadomjesni dijelovi ........................................................16
3

EMM21150 HR
Čestitamo na kupovini vaše nove mikrovalne pećnice
Hvala vam na odabiru Electrolux proizvoda. Sigurni smo da će vam nova mikrovalna pećnica biti vrlo korisna i od velike
pomoći. Kao što je slučaj i s ostalim novim kuhinjskim uređajima, potrebno je određeno vrijeme da naučite sve nove funkcije i
mogućnosti, ali s vremenom, ova pećnica će vam postati nezamjenjiva.
Prije uporabe vaše mikrovalne pećnice
Pažljivo pročitajte upute za uporabu. Upute koje slijede pripremljene su kako bi vam omogućile optimalno korištenje vaše nove
mikrovalne pećnice.
Molimo vas da ih pročitate pažljivo. Vrlo je važno da ove upute sačuvate uz uređaj za daljnje korištenje. Ako uređaj prodate ili
posudite drugoj osobi, ili ako se preselite i ostavite uređaj, uvijek provjerite da li su upute pohranjene uz uređaj kako bi se novi
vlasnik mogao upoznati s načinom rada i odgovarajućim upozorenjima. Molimo vas da prije korištenja uređaja pročitate ove
upute u potpunosti i potom slijedite dane preporuke.
Sigurnosne upute
• Ugrađeni sigurnosni prekidač za blokadu
onemogućava korištenje mikrovalne pećnice dok
su otvorena vrata.
• Ne “prčkajte” oko vrata i ne pokušavajte uključiti
pećnicu ako su vrata otvorena, jer se na taj način
možete izložiti energiji mikrovalova.
• Ne dopustite prosipanje hrane ili nakupljanje
ostataka sredstva za čišćenje na površini brtve
vrata. Pogledajte poglavlje Čišćenje i održavanje
za upute u vezi čišćenja.
• Ne koristite oštećen uređaj dok ga ne popravi
stručna i ovlaštena servisna osoba.
• Posebno je važno da vrata pećnice budu pravilno
zatvorena i da nema oštećenja na: (1) vratima
(svinuta), (2) šarkama i zasunima (slomljeni ili
nesigurni), (3) brtve na vratima i površini brtve
vrata.
• Nikad ne pokušavajte sami popravljati pećnicu,
nestručni popravci mogu uzrokovati ozljede i
ugroziti funkcioniranje pećnice. Ako trebate
servisnu uslugu potražite je u najbližem
ovlaštenom servisu.
• Nikada ne skidajte vanjsko kućište, vrata ili
upravljačku ploču. Ako to učinite postoji opasnost
od izlaganja iznimno visokom naponu.
• Postavljanje i smještanje ove pećnice izvršite
samo u skladu s poglavljem “UPUTE ZA
POSTAVLJANJE” ovih uputa.
• Ovaj uređaj koristite samo u svrhe za koje je
proizveden, kao što je opisano u ovom uputstvu.
Ne koristite korozivna kemijska sredstva u
uređaju. Ovaj tip pećnice posebno je dizajniran za
zagrijavanje, kuhanje ili odmrzavanje hrane.
Uređaj nije namijenjen za industrijsku,
laboratorijsku ili komercijalnu uporabu i u tom
slučaju gubite pravo na jamstvo.
• Ne koristite pećnicu ako je prazna. Ako nema
hrane ili vode za apsorpciju mikrovalne energije,
može doći do oštećenja cijevi magnetrona.
• Djeca smiju koristiti pećnicu samo uz strogi
nadzor.
• Ne spremajte uređaj izvan kuće. Ne koristite ovaj
proizvod u blizini vode.
• Ne pokušavajte sušiti odjeću ili novine u
mikrovalnoj pećnici. Može doći do požara.
• Ne koristite unutrašnjost pećnice kao spremnik.
Ne ostavljajte papirnate proizvode, pribor za
kuhanje, ili hranu u unutrašnjosti pećnice kada ju
ne koristite.
Sigurnosne napomene za pripremu
hrane pomoću roštilja
1. Staklo prozora može puknuti ako je po njemu
prolivena voda za vrijeme korištenja roštilja.
2. Koristite zaštitne termo-rukavice pri punjenju i
pražnjenju pećnice. Posude u pećnici mogu
postati jako vruće, zato pazite da se ne opečete.
Okretni tanjur i rešetka također postaju jako vrući,
koristite rukavice i kada njima baratate.
3. Prilikom punjenja ili pražnjenja pećnice ne
dodirujte vanjsku ili unutrašnju stranu prozora
metalnim pretmetima. Unutrašnjost vrata i pećnice
postaju jako vrući, pazite prilikom
stavljanja/posluživanja hrane.
4. Ne stavljajte okretni tanjur ili posude u hladnu
vodu, ne pokušavajte ih brzo ohladiti nakon
uporabe.
5. Ne stavljajte predmete na pećnicu. Gornji dio
uređaja postaje jako vruć, sve što stavite na njega
moglo bi se oštetiti. Za vrijeme kuhanja
uobičajeno je da se oko vrata stvara para, ili da se
vrata zamagle, ili čak da se ispod vrata pojave
kapljice vode. To je tek rezultat kondenzacije od
topline hrane i ne utiče na sigurnost pećnice.
Vrata nisu namijenjena potpunom brtvljenju
pećnice.
• Ne okrećite rukom okretni tanjur. To može dovesti
do kvara.
• Iskrenje u pećnici za vrijeme korištenja
mikrovalova najčešće je posljedica korištenja
metalnog pribora. Kontinuirano iskrenje, može
oštetiti uređaj. Zaustavite program i provjerite
pribor.
• Pazite da ne začepite bilo koji od otvora za
provjetravanje smještenih na gornjoj, stražnjoj,
bočnoj i donjoj stranici pećnice.
4

EMM21150 HR
Provjera prikladnosti posuđa
• Postavite posudu u mikrovalnu pećnicu zajedno
sa čašom napunjenom do polovice vodom.
Zagrijavajte je na 800 W (100%) jednu minutu.
Ako je nakon toga posuda vruća, ne bi je trebali
koristiti. Ako je lagano zagrijana, možete je
koristiti za prigrijavanje ali ne i za kuhanje. Ako je
posuda sobne temperature, prikladna je za
mikrovalno kuhanje.
• Papirnati ubrusi, voštani papir, papirnati ručnici,
tanjuri, čaše, omoti za zamrzivač i kartoni su
pribor velike prikladnosti. Uvijek budite sigurni da
je spremnik napunjen hranom koja će apsorbirati
energiju i ukloniti mogućnost pregrijavanja.
• Razno plastično posuđe, čaše, spremnici za
zamrzivač i plastični omoti mogu se koristiti u
mikrovalnoj pećnici. Slijedite upute proizvođača
kada koristite plastiku u pećnici. Izbjegavajte
korištenje plastičnog pribora s hranom koja sadrži
visoki postotak masnoća ili šećera, ta hrana
postiže visoke temperature i može rastopiti neke
plastike.
• Ne ostavljajte pećnicu bez nadzora, pogledajte je
s vremena na vrijeme kada podgrijavate ili kuhate
hranu u plastičnim, papirnatim ili ostalim
zapaljivim spremnicima. Ako ste zapazili dim,
zadržite vrata zatvorenima, isključite pećnicu ili
izvucite mrežni utikač dok dim ne nestane.
• Metalni pribor i pribor s metalnim ukrasima ne bi
trebali koristiti u mikrovalnoj pećnici, osim ako nije
posebno preporučen za uporabu u mikrovalnoj
pećnici.
• Spremnici sa malim otvorima, kao što su boce, ne
bi trebali biti korišteni za mikrovalno kuhanje.
Budite oprezni pri skidanju poklopaca ili pokrova s
posuđa kako bi izbjegli opekline parom.
Sigurnost namirnica
• Ne zagrijavajte hranu u konzervama u mikrovalnoj
pećnici. Uvijek prebacite hranu u prikladan
spremnik.
• Prženje u ulju ("fritiranje") ne možete vršiti u
mikrovalnoj pećnici, jer se temperatura masti ne
može kontrolirati što može dovesti do opasnih
situacija.
• Kokice možete pripremati u mikrovalnoj pećnici,
ali samo u posebnim pakiranjima ili priboru
dizajniranom posebno za ovu namjenu. Ova
operacija kuhanja se nikada ne bi trebala izvoditi
bez nadzora.
• Namirnice s neporoznom kožicom ili ljuskom
probušite kako bi izbjegli stvaranje pare i
rasprskavanje. Jabuke, krumpiri, pileća jetra i
žumanjci su primjer namirnica koje treba probušiti.
UPOZORENJE: Kada zagrijavate tekućine, kao što su
npr. juhe, umaci i napitci u vašoj mikrovalnoj pećnici,
može se dogoditi pregrijavanje tekućine iznad točke
vrenja bez vidljivih mjehurića. To može rezultirati
iznenadnim ključanjem vruće tekućine. Kako bi
spriječili ovu mogućnost učinite sljedeće:
1. Izbjegavajte korištenje spremnika s pravilnim
stranicama i uskim grlima.
2. Ne pregrijavajte tekućinu.
3. Promiješajte tekućinu prije stavljanja spremnika u
pećnicu i ponovite to na pola puta kroz vrijeme
zagrijavanja.
4. Nakon zagrijavanja, ostavite spremnik u pećnici
kratko vrijeme, promiješajte ponovno prije
pažljivog uklanjanja spremnika.
• Neki proizvodi kao što su cijela jaja i zabrtvljeni
spremnici - kao što su npr. zatvorene staklenke mogu eksplodirati i ne smiju se zagrijavati u ovoj
pećnici. Povremeno, jaja mogu eksplodirati i za
vrijeme dok se peku. Zato uvijek probušite
žumanjak, zatim pokrijte i pustite da odstoji jednu
minutu prije skidanja pokrova.
NAPOMENA:
• Ne okrećite rukom okretni tanjur. To može dovesti
do kvara.
• Iskrenje u pećnici za vrijeme korištenja
mikrovalova najčešće je posljedica korištenja
metalnog pribora. Kontinuirano iskrenje, može
oštetiti uređaj. Zaustavite program i provjerite
pribor.
• Pazite da ne začepite bilo koji od otvora za
provjetravanje smještenih na gornjoj, stražnjoj,
bočnoj i donjoj stranici pećnice.
Ne koristite ovu pećnicu u komercijalne svrhe.
Ova pećnica načinjena je samo za korištenje u
domaćinstvima.
Čuvajte ove upute.
5
EMM21150 HR
Vodič kroz pribor i opremu pećnice
Razni pribor i materijali mogu se koristiti za kuhanje u vašoj mikrovalnoj pećnici. Za vašu sigurnost, kako bi
spriječili oštećenja pribora i vaše pećnice, odaberite odgovarajući pribor i materijale za svaku vrstu kuhanja.
Tabela ispod teksta je općeniti vodič.
Način korištenja Materijal Pribor
Mikrovalovi Roštilj Kombinacija
Keramika i staklo
Porculan Bez metalnih ukrasa DA DA NE
Lončarski
proizvodi*2
Drvo NE NE NE
Oprema
DA: Pribor i oprema za uporabu NE: Pribor i oprema koju treba izbjegavati
*1: Samo ako nema metalnih ukrasa.
*2: Samo ako nema glazuru koja sadrži metale.
*3: Aluminijsku foliju koristite samo kao zaštitu, pretjerano korištenje može uzrokovati iskrenje.
Jednostavno posuđe DA DA DA
Vatrostalno stakleno posuđe DA*1 DA DA*1
Stakleno posuđe s metalnim
ukrasima
Olovo-kristal staklo NE NE NE
DA DA DA
Posuđe za mikrovalnu
pećnicu otporno na toplinu
Plastični omot DA
Posude za pečenje NE DA NE Metal
Aluminijska folija*3 DA DA DA
Čaše, tanjuri, ručnici DA NE NE Papir
Voštani papir DA NE NE
Rešetka roštilja NE DA DA
Okretni tanjur DA DA DA
Podupirač okretnog tanjura DA DA DA
NE NE NE
DA NE NE Plastika
Tehnički podaci
Ukupne dimenzije Težina 13.46 kg
Širina 485 mm Volumen 21 litara
Dubina 422 mm
Visina 287 mm Priključak 230V, 50 Hz
Dimenzije unutrašnjosti
Širina 335.8 mm Potrošnja energije 1250W
Dubina 314 mm Roštilj 1000W
Visina 206 mm Snaga
Mikrovalovi 800W
Roštilj 1000 W
6

EMM21150 HR
Priprema za uključivanje mikrovalne pećnice
Uklanjanje ambalaže
Kada otpakirate pećnicu, provjerite da li je proizvod
bez oštećenja. Eventualna oštećenja, ili ako nedostaje
neki dio, odmah morate javiti isporučitelju. Pećnica,
dijelovi pećnice ili oprema mogu biti omotani zaštitnom
folijom. Ako je to tako, morate ukloniti foliju prije
korištenja pećnice. Ne ostavljajte uklonjeni materijal za
pakiranje na dohvatu maloj djeci. To može biti vrlo
opasna igra.
Postavljanje
1. Uklonite sve reklamne naljepnice s vrata.
2. Postavite pećnicu na ravnu, uravnoteženu
podlogu. Površina mora biti dovoljno jaka da izdrži
težinu (13.5 kg) pećnice i sadržaja. Kako bi
izbjegli mogućnost stvaranja vibracija ili buke,
pećnica mora biti u stabilnom položaju.
3. Držite pećnicu podalje od izvora topline i vode.
Izlaganje toplini i vodi može smanjiti efikasnost
pećnice i dovesti do kvarova, tako da obvezno
provjerite da je pećnica postavljena dalje od
izvora topline i vode.
4. Ne pokrivajte otvore za provjetravanje na gornjoj i
bočnim stranicama kućišta, te isto tako ne
stavljajte nikakve predmete na gornju stranicu
pećnice. Ako su otvori za provjetravanje pokriveni
za vrijeme rada, pećnica se može pregrijati što
može dovesti do kvara. Vrući zrak izlazi kroz
otvore, zato budite sigurni da nisu začepljeni ili da
nije pala zavjesa između pećnice i stražnjeg zida.
5. Postavite pećnicu što je dalje moguće od radio i
TV prijemnika. Ova pećnica odgovara EEC
zahtjevima* u vezi potiskivanja radio-smetnji, ali
neke smetnje se ipak mogu pojaviti ako je
smještena preblizu radio ili TV prijemniku, tako da
je držite što je dalje moguće.
6. Ako je smještena u kutu, ostavite razmak od
najmanje 10 cm od zidova, kako bi se osiguralo
pravilno provjetravanje.
Važno! Pećnica može biti smještena gotovo na bilo
kojem mjestu u kuhinji. Provjerite da li je pećnica
smještena na glatku, vodoravnu površinu i da otvori za
provjetravanje kao i površina ispod pećnice nisu
blokirani (za efikasno provjetravanje).
* Ovaj uređaj odgovara zahtjevima danim u EEC
odredbi o radio-smetnjama 87/308/EEC.
Priključak na mrežno napajanje
Pećnica se isporučuje s mrežnim kabelom i utikačem
za 230 V, 50 Hz sa zaštitnim uzemljenjem. Uzemljenje
umanjuje rizik kod pojave kratkog spoja. Provjerite
odgovara li napon pećnice naponu napajanja.
Ako je pećnica priključena na mrežni napon putem
produžnog kabela, on isto tako mora biti uzemljen.
Upozorenje! Ovaj uređaj ne smije biti spojen na izvor
napajanja bez uzemljenja.
Kontaktirajte ovlaštenog električara ako imate
nedoumica, vezano uz električki priključak pećnice ili
osiguranja zaštitnog uzemljenja.
Ovaj uređaj mora biti uzemljen. Ako je ovaj uređaj
opskrbljen mrežnim utikačem koji ne odgovara vašoj
utičnici, utikač treba odrezati i postaviti odgovarajući.
Ako je nužna izmjena osigurača u utikaču, poklopac
osigurača mora se vratiti na mjesto. Ako je poklopac
izgubljen ili oštećen, utikač se ne smije koristiti dok se
ne izvrši zamjena.
Električki priključak
UPOZORENJE! OVAJ UREĐAJ MORA BITI
UZEMLJEN.
Proizvođač odbija svaku odgovornost ako se ne
pridržavate ovih sigurnosnih mjera.
• Ako utikač na vašem uređaju ne odgovara utičnici
treba ga odrezati i zamijeniti odgovarajućim
utikačem.
7
EMM21150 HR
Kako se koristi vaša mikrovalna pećnica
Naziv i funkcija dijelova
1. Odjeljak za kuhanje. Obrišite odjeljak nakon
uporabe.
2. Prozor. Hranu možete kontrolirati za vrijeme
rada mikrovalne pećnice.
3. Vrata pećnice. Za vrijeme pripreme hrane vrata
moraju uvijek biti dobro zatvorena.
4. Kuke zasuna i sigurnosni sistem zabravljivanja.
5. Upravljačka ploča.
6. Pogonska osovina okretnog tanjura.
7. Okretni tanjur. Napravljen je od posebnog
vatrostalnog stakla. Hranu za kuhanje postavite
na njega u prikladnom spremniku. Ne koristite
pećnicu bez okretnog tanjura.
8. Podupirač okretnog tanjura. Postavite
podupirač na dno odjeljka za kuhanje kako bi
poduprli okretni tanjur.
9. Roštilj.
10. Rešetka roštilja.
Postavljanje okretnog tanjura
1. Postavite podupirač okretnog tanjura na dno
unutrašnjosti pećnice.
2. Postavite okretni tanjur na vrh podupirača
okretnog tanjura kao što je prikazano na slici.
Provjerite da li je središte okretnog tanjura sigurno
uglavljeno u pogonsku osovinu okretnog tanjura.
Nikada ne postavljajte okretni tanjur naopako.
• Za vrijeme kuhanja obavezno morate koristiti i
okretni tanjur i podupirač okretnog tanjura.
• Sva hrana i spremnici hrane moraju se uvijek
postaviti na ovaj tanjur za vrijeme kuhanja.
• Ovaj tanjur se vrti u smjeru kazaljki na satu i u
smjeru suprotnom od kazaljki na satu; to je
normalno.
Okretni tanjur
Podupirač s valjčićima
Pogonska osovina
okretnog tanjura
8

EMM21150 HR
Upravljačka ploča
Upravljačka ploča
1. Kontrola za odabir snage
Namjestite kontrolu tako da odredite
ispravnu snagu za vašu hranu.
2. Vremenski sklop
Namjestite željeno vrijeme kuhanja.
Kuhanje će započeti. Svi satni
vremenski sklopovi radit će točnije ako
pri namještanju malo prekoračite
željeno vrijeme i potom ih vratite.
9
EMM21150 HR
Kuhanje s mikrovalovima
1. Otvorite vrata, smjestite hranu na okretni tanjur.
Zatvorite vrata.
2. Namjestite kontrolu za odabir snage do željene
razine snage (vidi tablicu).
3. Namjestite vremenski sklop do željenog vremena.
Pećnica započne s kuhanjem.
Kad kuhate manje od 2 minute, okrenite kontrolu
vremenskog sklopa na dulje trajanje i potom je vratite
na željeno vrijeme.
Ako želite isključiti pećnicu tijekom kuhanja,
jednostavno okrenite kontrolu vremenskog sklopa na
0.
Napomena: Nakon uporabe, provjerite da je
kontrola vremenskog sklopa vraćena na 0, u
suprotnom će pećnica nastaviti s radom.
Primjer: Kuhanje na 600 W u trajanju 20 minuta
1. Okrenite kontrolu za odabir snage na 600 W.
2. Okrenite vremenski sklop na 20.
3. Pećnica će automatski započeti kuhati 20 minuta na 600 W.
• Preporuke proizvođača hrane o vremenu potrebnom za pripremu jela služe samo kao vodič. Ako po isteku
naznačenog vremena hrana nije na dodir vruća, vratite ju u pećnicu i kuhajte sve dok ne bude vruća. To je
gotovo isto kao i pri kuhanju u tradicionalnoj pećnici.
• Uvijek redovito promiješajte hranu, posebno složence i paprikaše.
• Hranu pustite da odstoji, to je dio postupka kuhanja i omogućava jednoliku temperaturu hrane.
Vodič za podešavanje snage mikrovalova
Podešena snaga Preporuka za korištenje
90W Održavanje topline; Održava hranu toplom
360W
600W
800W
Odleđivanje; Otapanje zamrznute hrane.
Ključanje: Dovršenje ciklusa kuhanja nekih pečenki. Složenci i paprikaš.
Zapečena krema od jaja i kolač od sira.
Srednje: Brže odleđivanje i podgrijavanje složenaca i paprikaša.
Srednje; Pečenje kolača
Podgrijavanje: Podgrijavanje već spravljene hrane.
Pečenje većih komada mesa i peradi.
Ključanje ili podgrijavanje tekućina.
Kuhanje povrća.
10
EMM21150 HR
Kuhanje sa roštiljem
Stavite okretni tanjur na valjčiće na dnu u unutrašnjosti
pećnice i postavite hranu na metalnu rešetku. Ova
metoda je idealna za roštiljanje mesa kao što su
odresci i sl. Imajte na umu da će pećnica biti vruća.
Primjer: Kuhanje korištenjem roštilja u trajanju 40 minuta
1. Okrenite kontrolu za odabir snage na roštilj
2. Okrenite vremenski sklop na 40.
3. Pećnica će automatski započeti kuhati 40 minuta na podešenju roštilj .
.
1. Namjestite kontrolu za odabir snage na roštilj.
2. Namjestite vremenski sklop do željenog
vremena. Pećnica automatski započne s
kuhanjem.
Napomena: Nakon uporabe, provjerite da je
kontrola vremenskog sklopa vraćena na 0, u
suprotnom će pećnica nastaviti s radom.
Kuhanje sa mikrovalovima i roštiljem
Stavite okretni tanjur na valjčiće na dnu u unutrašnjosti
pećnice i postavite hranu na metalnu rešetku. Ova
metoda je idealna za roštiljanje mesa kao što su
odresci i sl. Imajte na umu da će pećnica biti vruća.
Primjer: Kuhanje na 360 W i korištenje roštilja u trajanju 15 minuta
1. Okrenite kontrolu za odabir snage na kombinaciju 2
2. Okrenite vremenski sklop na 15.
3. Pećnica će automatski započeti kuhati 15 minuta na podešenju kombinacija 2
NAPOMENA:
Ako za vrijeme kuhanja otvorite vrata, pećnica će se isključiti. Kako bi završili kuhanje, zatvorite vrata.
Na kraju ciklusa kuhanja roštilj i mikrovalovi se isključe i oglasi se zvučni signal.
Na podešenju za kuhanje sa mikrovalovima i roštiljem, razina snage i vrijeme kuhanja mogu se promijeniti
tijekom rada mikrovalne pećnice.
1. Namjestite kontrolu za odabir snage do
željene razine snage i razine roštilja.
2. Namjestite vremenski sklop do željenog
vremena. Pećnica automatski započne s
kuhanjem.
Napomena: Nakon uporabe, provjerite da je
kontrola vremenskog sklopa vraćena na 0, u
suprotnom će pećnica nastaviti s radom.
.
.
11
EMM21150 HR
Preporuke za pripremu hrane pomoću roštilja
Ispod rešetke roštilja na koju ste postavili hranu treba staviti posudu u koju će se skupljati prolivena hrana i
sokovi od pečenja. Time ćete smanjiti čišćenje. Svu hranu okrenite na pola vremena pripreme.
Hrana Količina (težina) Vrijeme pripreme Posebne napomene
Prepečenac 2 kriške 4 – 5 min
Prepečenac sa sirom 4 kriške 6 – 7 min 4 – 5 min za prepečenac. 2
min sa sirom.
Razine snage mikrovalova i roštilja
Simbol Podešenje Snaga
mikrovalova
Roštilj
Kombinacija 1
Kombinacija 2
0 W 1000 W
180 W 600 W
360 W 400 W
Snaga roštilja
12
EMM21150 HR
Upute za odmrzavanje korištenjem snage
Neka hrana kao što su kruh i voće može se uspješno ručno odmrznuti koristeći ovu snagu.
HRANA PRIPREMA
Kruh
VRIJEME
STAJANJA
Mali kruh
Narezan
veliki kruh
2 kriške Postavite na kuhinjski papir. 45–60 sek. 5 min.
1 kruh Postavite na kuhinjski papir. 45–60 sek. 5 min.
2 kruha Postavite na kuhinjski papir.
Keksi i kolači
Gateau 450g Izvadite iz omota, stavite na tanjur. 9–11 min. 15–30 min.
Kolač od sira
450g
Pita
(spravljena)
450g
Kolači 450g Izvadite iz omota, stavite na tanjur. 7– 9 min. 15–30 min.
Maslac
250g
(1 pakiranje)
Voće
225g
Voće s mekim
bobicama
450g
Voće s mekim
bobicama
Obrok
400g
Povrće
Postavite ga na rešetku otpornu na mikrovalove ili na
kuhinjski papir.
Okrenite na polovici vremena odmrzavanja.
Postavite ga na rešetku otpornu na mikrovalove ili na
kuhinjski papir.
Okrenite na polovici vremena odmrzavanja.
Izvadite iz omota, stavite na tanjur. 9–11 min. 15–30 min.
Izvadite iz omota, stavite na tanjur. 7– 9 min. 15–30 min.
Ako je omotan folijom, uklonite ju i postavite ga na
tanjur.
Postaviti u jednom sloju u plitku posudu. 5– 6 min. 5–10 min.
Postaviti u jednom sloju u plitku posudu.
Pokriti tanjurom ili prianjajućom folijom bez PVC-a. Za
podgrijavanje, mikrovalovi na 100% (800 W) u trajanju
3-4 minute.
Odmrzavanje povrća prije kuhanja
nije nužno. Svo povrće može se
odmrzavati i kuhati na 100% (800 W).
8–10 min. 10–15 min.
10–13 min. 10 min
1–11/2
min.
3– 4 min. 5–10 min.
7– 8 min. 5–10 min.
7– 8 min 5–10 min.
5 min.
13

EMM21150 HR
Natuknice o mikrovalnoj pećnici
• Pećnicu uvijek držite čistom – izbjegavajte
proljevanje namirnica i ne zaboravite počistiti
ispod staklene plitice i unutrašnju stranu vrata.
• Po mogućnosti koristite okruglo ili ovalno posuđe
s poklopcem kada kuhate u svojoj mikrovalnoj
pećnici.
• Ne koristite metalno posuđe ili posuđe s metalnim
dekoracijama. Određeni plastični materijali se
mogu rastopiti i iskriviti od vruće hrane.
• Pokrijte hranu kada kuhate. Koristite staklene
poklopce, tanjure ili papir otporan na masoću.
• Kolači, kruh i slično mogu se odmrzavati direktno
u košari za kruh ili na papirnatom ručniku.
• Ako se smrznuta hrana zagrijava u svom omotu,
potrebno ga je otvoriti. Omote koji sadrže metal ili
metalne dekoracije ne smijete koristiti osim ako
nisu preporučeni za uporabu u mikrovalnoj
pećnici. Uklonite metalne kopče i žičane vezice.
• Sitne komadiće aluminijske folije možete koristiti
za pokrivanje dijelova koji se lako prekuhaju kao
što su pileći bataci.
• Hranu sa ljuskama ili kožom trebate probušiti
vilicom - npr. krumpiri i kobasice. Ne kuhajte jaja u
mikrovalnoj pećnici jer mogu eksplodirati.
• Velike, debele komade postavite blizu ruba
posude i pokušajte narezati hranu na nekoliko
jednakih komada. Hranu uvijek postavite u
sredinu pećnice.
• Hrana će biti ujednačeno kuhana ako je
promiješate ili okrenete nekoliko puta.
• Uvijek podesite kraće vrijeme kuhanja nego što je
dano u vašem receptu kako bi izbjegli da se hrana
prekuha. Veća količina hrane zahtijeva duže
vrijeme.
• Koristite malo ili ništa vode za povrće.
• Koristite manje soli i začina nego za "normalno"
kuhanje.
• Začine dodajte na kraju.
• Dopustite nekoliko minuta "stajanja" nakon što se
pećnica isključila, kako bi osigurali potpune i
ujednačene rezultate kuhanja.
• Uvijek servirajte vruću hranu.
• Koristite držače posuda ili rukavice kada vadite
posuđe i hranu iz pećnice.
Savjeti o mikrovalnoj pećnici
• Omekšavanje meda
Ako imate teglu kristaliziranog meda, otklopite ju i
stavite u pećnicu, uključite mikrovalove srednje snage
na 2 minute.
• Otapanje čokolade
Izlomite 100 g čokolade na četvrtaste komade, stavite
ih u posudu i zagrijavajte na velikoj snazi 1-2 minute.
Dobro miješajte.
• Omekšavanje ili otapanje maslaca
Na velikoj snazi za otapanje je potrebno nekoliko
sekundi. Maslac ćete najbolje omekšati nježnije, na
niskoj snazi.
• Osvježavanje ili zagrijavanje kruha
Nekoliko sekundi koristite srednju snagu.
• Lagano guljenje češnjaka
Zagrijte 3 do 4 čena češnjaka na jakoj snazi 15
sekundi. Stisnite s jedne strane, dok čenovi ne
ispadnu.
• Voćni sok
Agrumi će dati više soka ako ih prije cijeđenja 15
sekundi zagrijete na jakoj snazi.
• Kuhanje kaše
Kašu ćete lako skuhati u tanjurima/posuđu za
posluživanje, bez ljepljivih posuda za pranje. Držite se
uputa proizvođača hrane.
14
 Loading...