

Electrolux EMC2895 User Manual
EMC2895
................................................ .............................................
EN MICROWAVE OVEN USER MANUAL 2
LV MIKROVIĻŅU KRĀSNS LIETOŠANAS INSTRUKCIJA 21
LT MIKROBANGŲ KROSNELĖ NAUDOJIMO INSTRUKCIJA 40
PL KUCHENKA MIKROFALOWA INSTRUKCJA OBSŁUGI 59
Downloaded From Microwave-Manual.com Manuals

CONTENTS
1. SAFETY INFORMATION . . . . . . . . . . . . . . . . . . . . . . . . . . . . . . . . . . . . . . . . . . . . . . . . . . . 3
2. SAFETY INSTRUCTIONS . . . . . . . . . . . . . . . . . . . . . . . . . . . . . . . . . . . . . . . . . . . . . . . . . . 5
3. PRODUCT DESCRIPTION . . . . . . . . . . . . . . . . . . . . . . . . . . . . . . . . . . . . . . . . . . . . . . . . . 6
4. BEFORE FIRST USE . . . . . . . . . . . . . . . . . . . . . . . . . . . . . . . . . . . . . . . . . . . . . . . . . . . . . . 7
5. CONTROL PANEL . . . . . . . . . . . . . . . . . . . . . . . . . . . . . . . . . . . . . . . . . . . . . . . . . . . . . . . 8
6. DAILY USE . . . . . . . . . . . . . . . . . . . . . . . . . . . . . . . . . . . . . . . . . . . . . . . . . . . . . . . . . . . . . 9
7. AUTOMATIC PROGRAMMES . . . . . . . . . . . . . . . . . . . . . . . . . . . . . . . . . . . . . . . . . . . . . . 12
8.
USING THE ACCESSORIES . . . . . . . . . . . . . . . . . . . . . . . . . . . . . . . . . . . . . . . . . . . . . . . 14
9. HELPFUL HINTS AND TIPS . . . . . . . . . . . . . . . . . . . . . . . . . . . . . . . . . . . . . . . . . . . . . . . 15
10.
RECIPES . . . . . . . . . . . . . . . . . . . . . . . . . . . . . . . . . . . . . . . . . . . . . . . . . . . . . . . . . . . . . . 16
11. CARE AND CLEANING . . . . . . . . . . . . . . . . . . . . . . . . . . . . . . . . . . . . . . . . . . . . . . . . . . . 19
12.
TROUBLESHOOTING . . . . . . . . . . . . . . . . . . . . . . . . . . . . . . . . . . . . . . . . . . . . . . . . . . . . 19
13. INSTALLATION . . . . . . . . . . . . . . . . . . . . . . . . . . . . . . . . . . . . . . . . . . . . . . . . . . . . . . . . . 20
WE’RE THINKING OF YOU
Thank you for purchasing an Electrolux appliance. You’ve chosen a product that brings with it
decades of professional experience and innovation. Ingenious and stylish, it has been designed
with you in mind. So whenever you use it, you can be safe in the knowledge that you’ll get great
results every time.
Welcome to Electrolux.
Visit our website for:
Get usage advice, brochures, trouble shooter, service information:
www.electrolux.com
Register your product for better service:
www.electrolux.com/productregistration
Buy Accessories, Consumables and Original spare parts for your appliance:
www.electrolux.com/shop
CUSTOMER CARE AND SERVICE
We recommend the use of original spare parts.
When contacting Service, ensure that you have the following data available.
The information can be found on the rating plate. Model, PNC, Serial Number.
Warning / Caution-Safety information
General information and tips
Environmental information
Subject to change without notice.
2
www.electrolux.com
Downloaded From Microwave-Manual.com Manuals

1. SAFETY INFORMATION
Before the installation and use of the appliance, carefully
read the supplied instructions. The manufacturer is not
responsible if an incorrect installation and use causes injuries and damages. Always keep the instructions with
the appliance for future reference.
1.1 Children and vulnerable people safety
WARNING!
Risk of suffocation, injury or permanent disability.
• This appliance can be used by children aged from 8
years and above and persons with reduced physical,
sensory or mental capabilities or lack of experience and
knowledge if they are supervised by an adult or a person who is responsible for their safety.
• Do not let children play with the appliance.
• Keep all packaging away from children.
• Keep children and pets away from the appliance when
it operates or when it cools down. Accessible parts are
hot.
• If the appliance has a child safety device, we recommend that you activate it.
• Cleaning and user maintenance shall not be made by
children without supervision.
• Keep the appliance and its cord out of reach of children less than 8 years.
1.2 General Safety
• This appliance is intended to be used in household and
similar applications such as:
– staff kitchen areas in shops, offices and other work-
ing environments;
– farm houses;
ENGLISH 3
Downloaded From Microwave-Manual.com Manuals

– by clients in hotels, motels and other residential envi-
ronments;
– bed and breakfast type environments.
• Internally the appliance becomes hot when in operation. Do not touch the heating elements that are in the
appliance. Always use oven gloves to remove or put in
accessories or ovenware.
• Do not use a steam cleaner to clean the appliance.
• Before maintenance cut the power supply.
• If the door or door seals are damaged, the appliance
must not be operated until it has been repaired by a
competent person.
• Only a competent person can carry out any service or
repair operation that involves the removal of a cover
which gives protection against exposure to microwave
energy.
• Do not heat liquids and other foods in sealed containers. They are liable to explode.
• Only use utensils that are suitable for use in microwave
ovens.
• When heating food in plastic or paper containers, keep
an eye on the appliance due to the possibility of ignition.
• The appliance is intended for heating food and beverages. Drying of food or clothing and heating of warming pads, slippers, sponges, damp cloth and similar
may lead to risk of injury, ignition or fire.
• If smoke is emitted, switch off or unplug the appliance
and keep the door closed in order to stifle any flames.
• Microwave heating of beverages can result in delayed
eruptive boiling. Care must be taken when handling the
container.
• The contents of feeding bottles and baby food jars shall
be stirred or shaken and the temperature checked before consumption, in order to avoid burns.
4
www.electrolux.com
Downloaded From Microwave-Manual.com Manuals
• Eggs in their shell and whole hard-boiled eggs should
not be heated in the appliance since they may explode,
even after microwave heating has ended.
• The appliance should be cleaned regularly and any
food deposits removed.
• Failure to maintain the appliance in a clean condition
could lead to deterioration of the surface that could adversely affect the life of the appliance and possibly result in a hazardous situation.
• Do not use harsh abrasive cleaners or sharp metal
scrapers to clean the glass door since they can scratch
the surface, which may result in shattering of the glass.
2.
SAFETY INSTRUCTIONS
2.1 Installation
WARNING!
Only a qualified person must install this appliance.
• Remove all the packaging.
• Do not install or use a damaged appli-
ance.
• Obey the installation instruction sup-
plied with the appliance.
• The appliance can be placed almost
anywhere in the kitchen. Make sure the
oven is placed on a flat, level surface
and that vents as well as the surface
underneath the appliance are not
blocked (for sufficient ventilation).
Electrical connection
WARNING!
Risk of fire and electrical shock.
• All electrical connections should be
made by a qualified electrician.
• The appliance must be earthed.
• Make sure that the electrical information
on the rating plate agrees with the power supply. If not, contact an electrician.
• If the appliance is connected to the
socket via an extension cord, make
sure the cord is earthed.
• Make sure not to cause damage to the
mains plug and to the mains cable.
Contact the Service or an electrician to
change a damaged mains cable.
• Do not pull the mains cable to disconnect the appliance. Always pull the
mains plug.
2.2 Use
WARNING!
Risk of injury, burns or electric
shock or explosion.
• Use this appliance in a household environment.
• Do not change the specification of this
appliance.
• Make sure that the ventilation openings
are not blocked.
• Do not let the appliance stay unattended during operation.
• Do not apply pressure on the open
door.
• Do not use the appliance as a work
surface and do not use the cavity for
storage purposes.
ENGLISH 5
Downloaded From Microwave-Manual.com Manuals
2.3 Care and Cleaning
WARNING!
Risk of injury, fire or damage to
the appliance.
• Before maintenance, deactivate the appliance and disconnect the mains plug
from the mains socket.
• Clean regularly the appliance to prevent
the deterioration of the surface material.
• Do not allow food spills or cleaner residue to accumulate on door sealing surfaces.
• Remaining fat or food in the appliance
can cause fire.
• Clean the appliance with a moist soft
cloth. Only use neutral detergents. Do
not use abrasive products, abrasive
cleaning pads, solvents or metal objects.
• If you use an oven spray, obey the safety instructions on the packaging.
2.4 Disposal
WARNING!
Risk of injury or suffocation.
• Disconnect the appliance from the
mains supply.
• Cut off the mains cable and discard it.
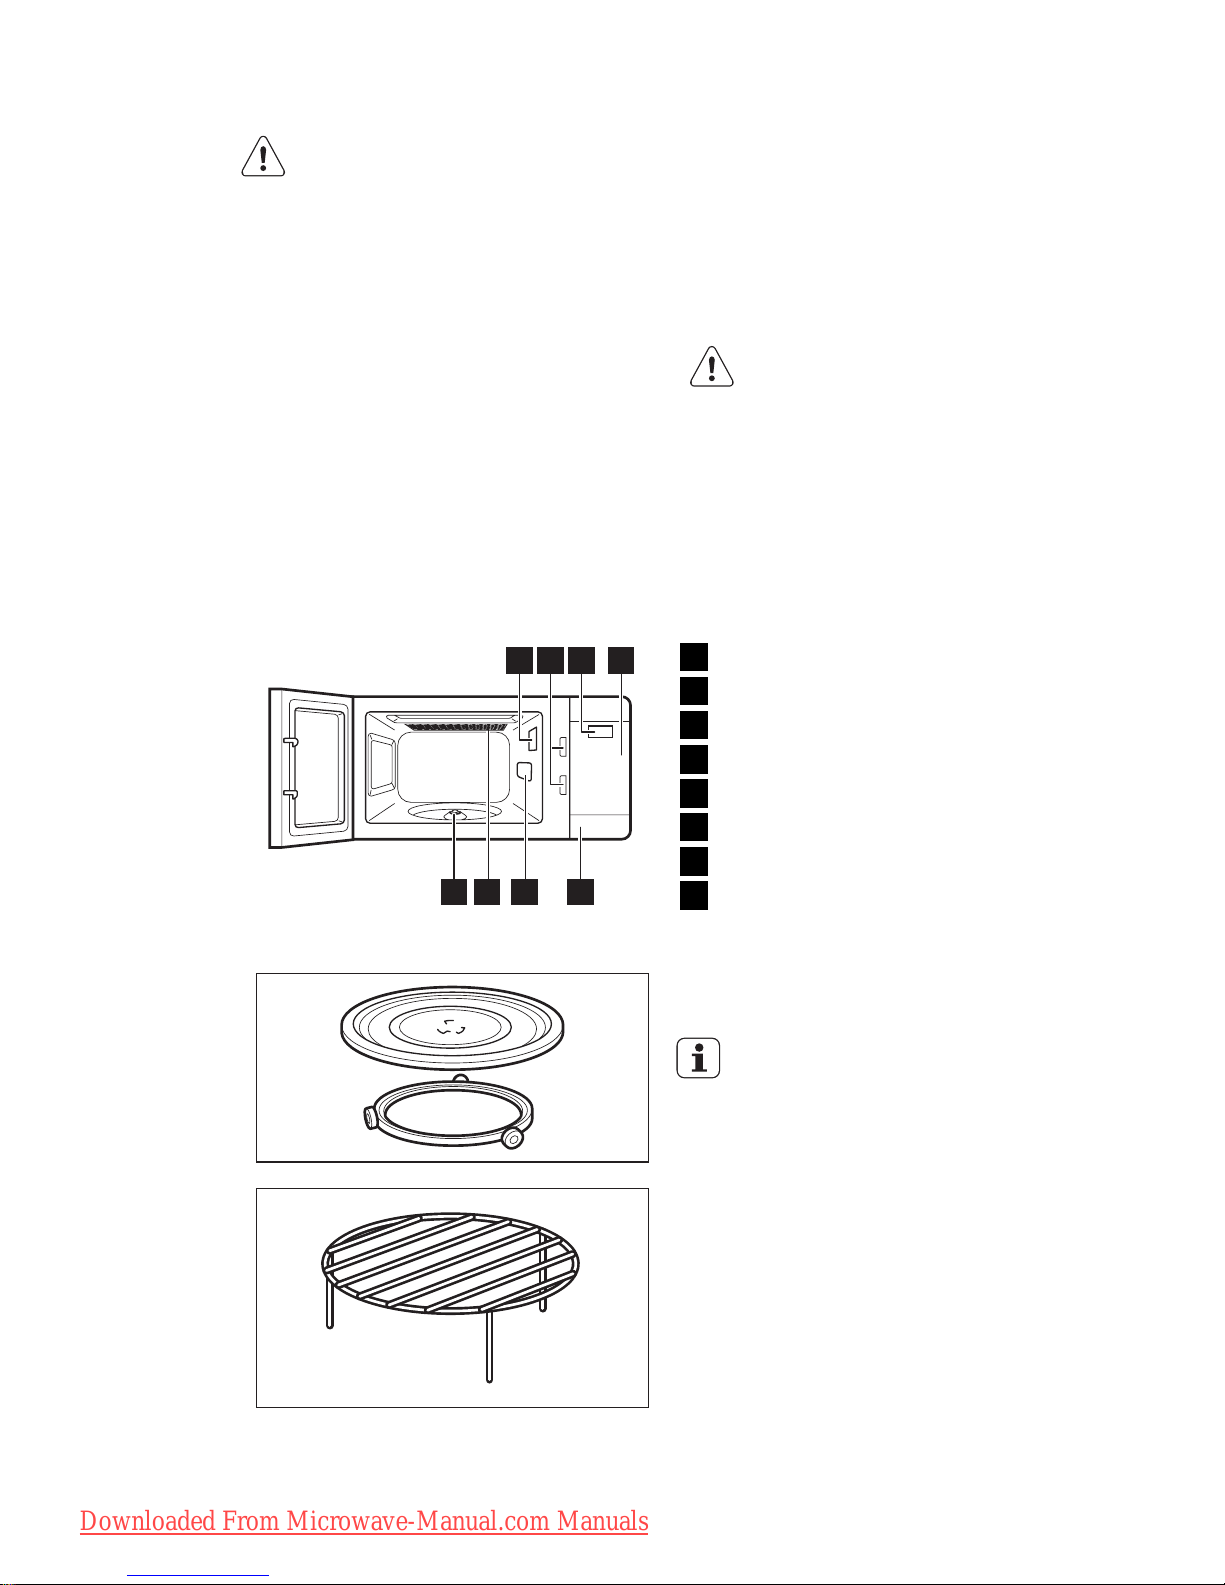
3. PRODUCT DESCRIPTION
8 67 5
1 2 3 4
1
Lamp
2
Safety interlock system
3
Display
4
Control panel
5
Door opener
6
Waveguide cover
7
Grill
8
Turntable shaft
3.1 Accessories
Turntable set
Glass cooking tray and roller guide.
Always use the turntable set to
prepare food in the appliance.
Grill Rack
For grilling food and combi cooking.
6
www.electrolux.com
Downloaded From Microwave-Manual.com Manuals
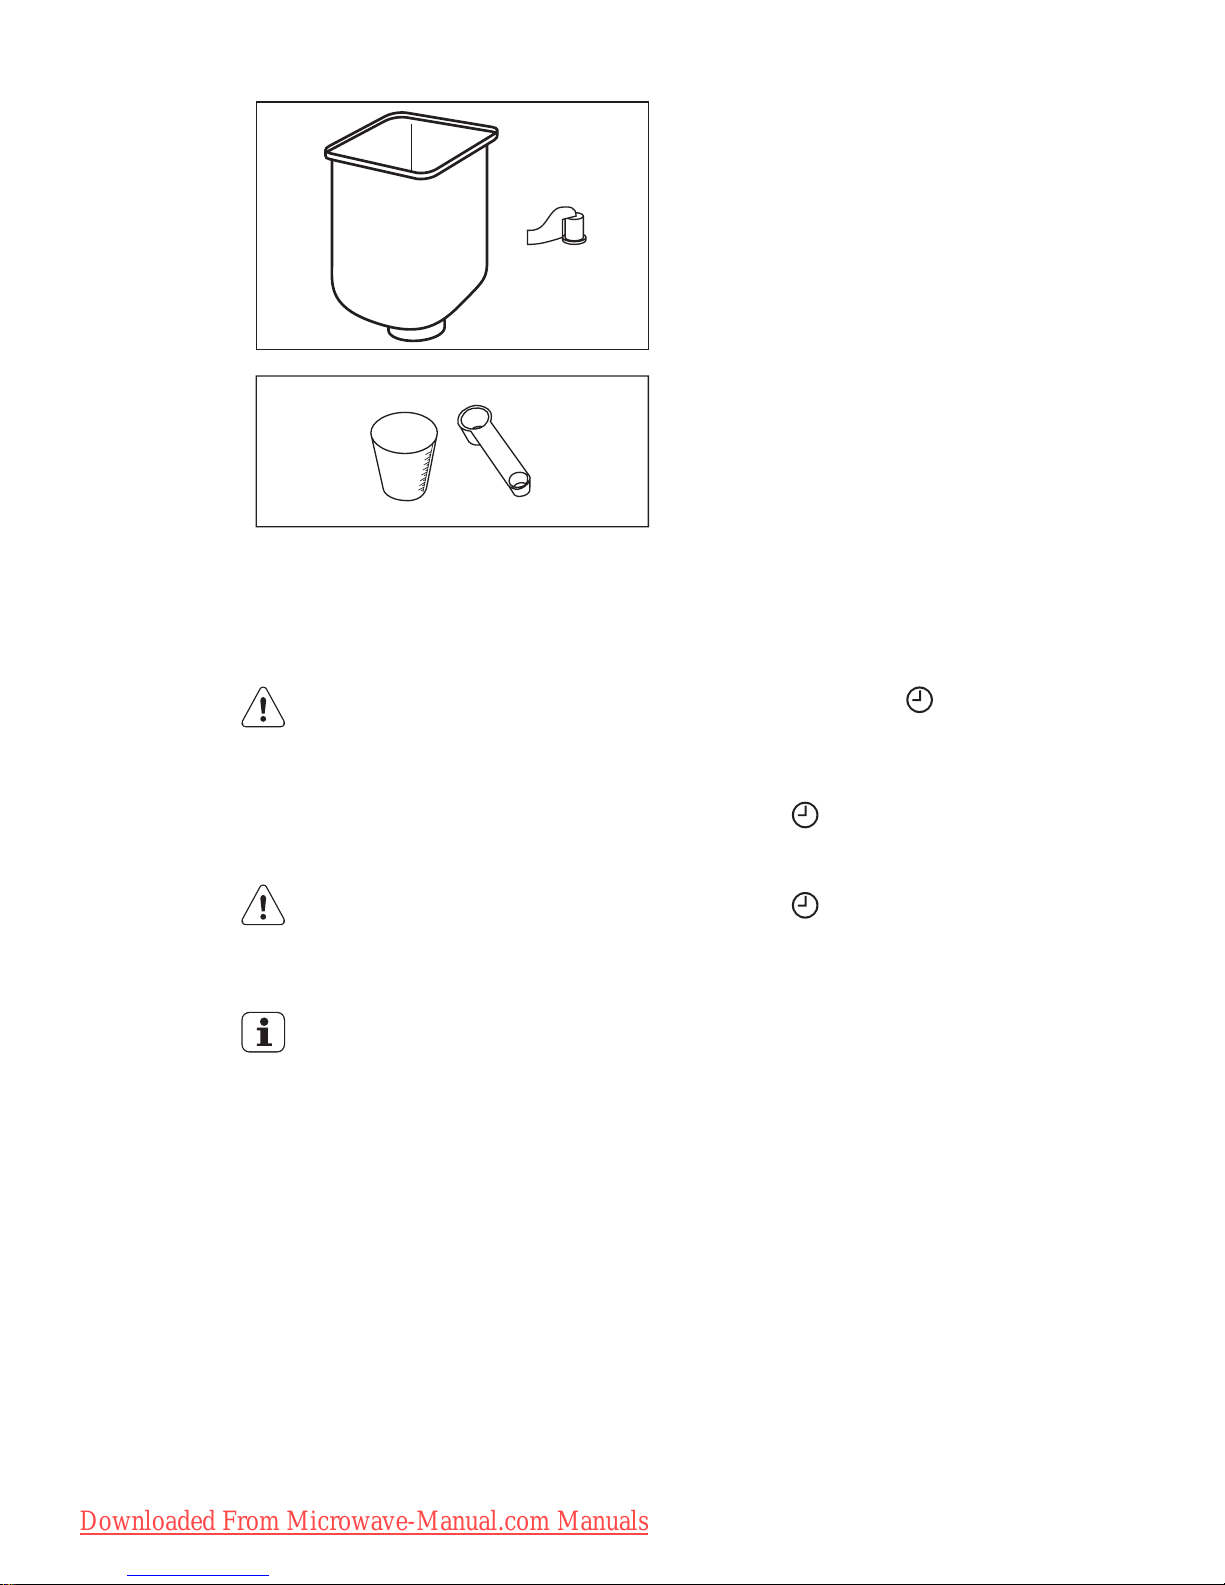
Bakery Set
Non-stick bowl and dough mixer for
bread baking.
Measuring Set
For measuring the proportions.
4. BEFORE FIRST USE
WARNING!
Refer to the Safety chapters.
4.1 Initial Cleaning
• Remove all parts from the appliance.
• Clean the appliance before first use.
Refer to chapter "Care and Cleaning".
4.2 Setting the time
When you connect the appliance
to the electrical supply or after a
power cut, the display shows 0:00
and an acoustic signal sounds.
1.
Repeatedly press to choose 24
hour or 12 hour clock system.
2.
Turn the Setting knob to enter the
amount of hours.
3.
Press to confirm.
4.
Turn the Setting knob to enter the
amount of minutes.
5.
Press to confirm.
ENGLISH 7
Downloaded From Microwave-Manual.com Manuals
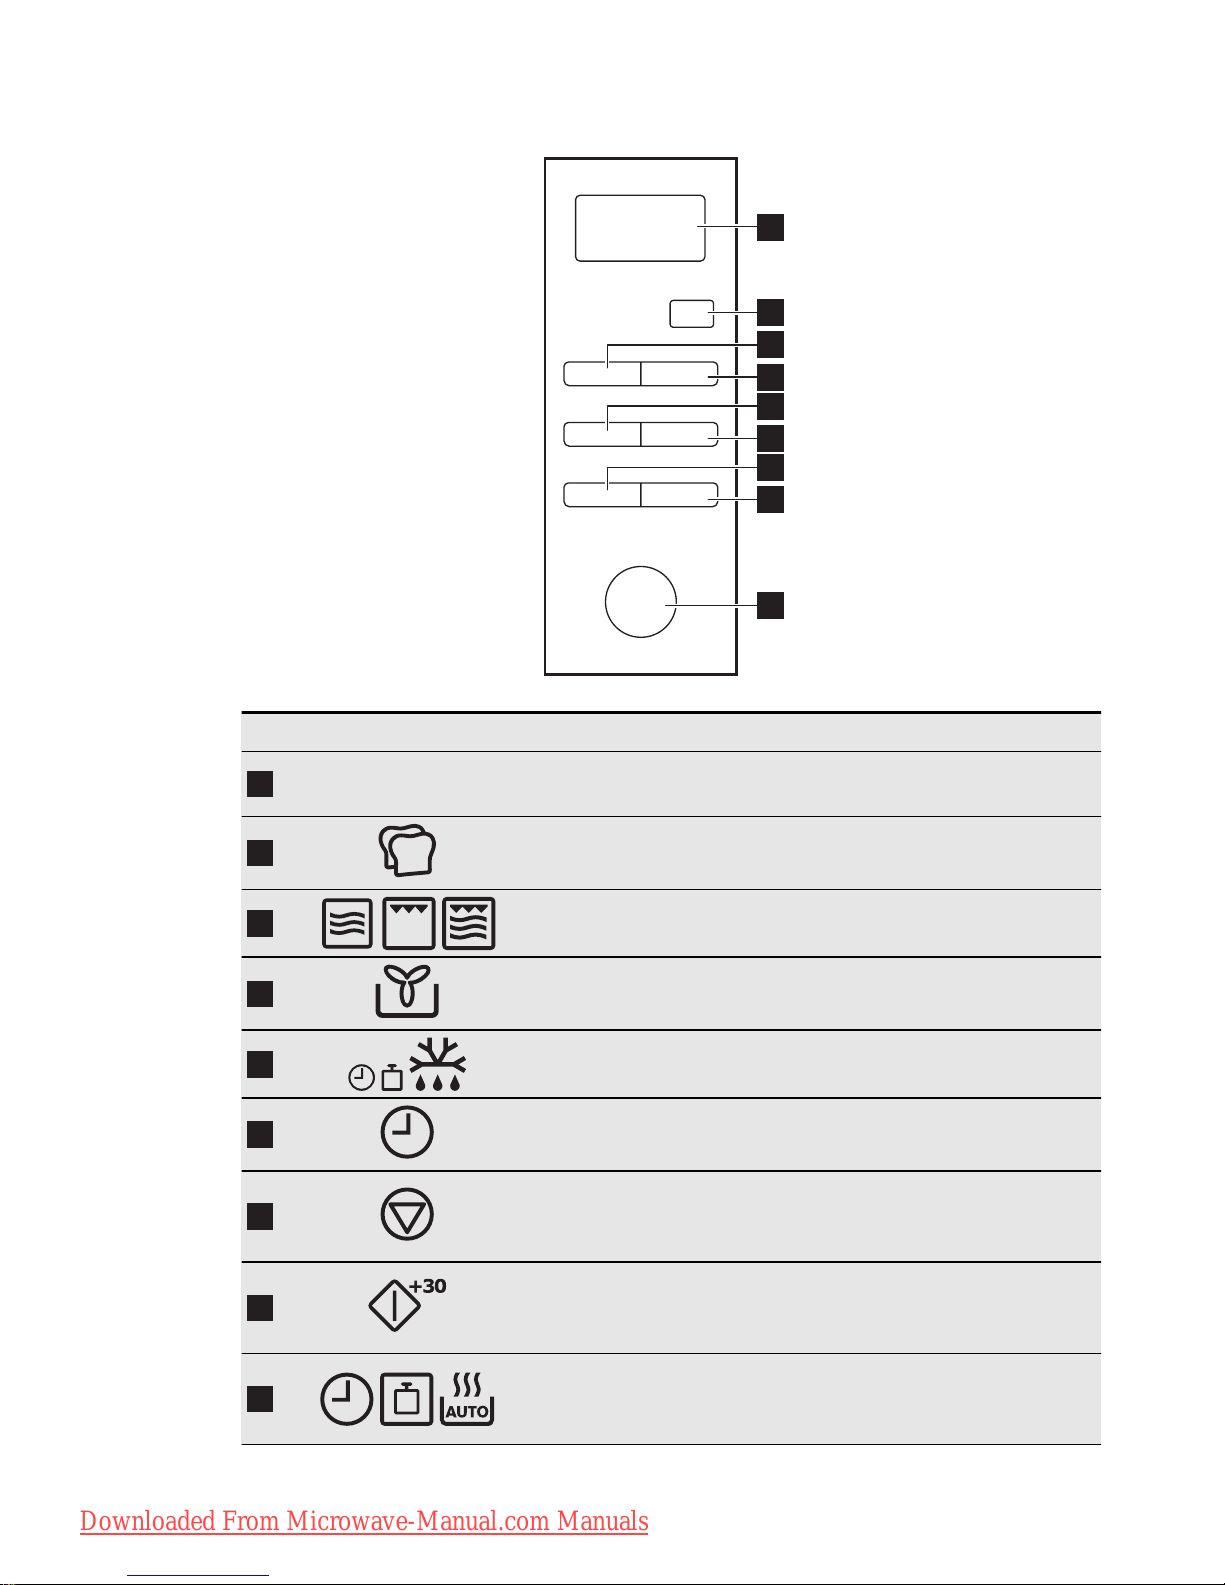
5. CONTROL PANEL
1
2
3
4
5
6
7
8
9
Symbol Function Description
1
— Display
Shows the settings and current time.
2
Bread Baking but-
ton
To start bread baking programmes.
3
Function button
To choose the microwave /
grill / combi cooking mode.
4
Convection Cook-
ing button
To start the convection cooking.
5
Defrosting button
To defrost food by weight or
time.
6
Clock button To set the clock.
7
Stop / Clear button
To deactivate the appliance
or delete the cooking settings.
8
Start / +30 sec but-
ton
To start the appliance or increase the cooking time for
30 seconds at full power.
9
Setting knob
To set the cooking time,
weight or to activate the auto
cooking programmes.
8
www.electrolux.com
Downloaded From Microwave-Manual.com Manuals
6. DAILY USE
WARNING!
Refer to the Safety chapters.
6.1 Activating and deactivating
the appliance
1.
Press the button with the function you
want to activate.
2.
Repeatedly press the button or turn
the Setting knob to set the desired
function.
3.
Press to confirm.
4.
Turn the Setting knob to set the desired time.
5.
Press to confirm and activate the
appliance.
6.
To deactivate the appliance you can:
– wait until the appliance deactivates
automatically when the time comes
to an end.
– open the door. The appliance stops
automatically. Close the door to
continue cooking. Use this option
to inspect the food.
–
press
.
CAUTION!
Do not let the appliance operate
when there is no food in it.
6.2 General information about
using the appliance
General:
• After you deactivate the appliance, let
the food stand for some minutes.
• Remove the aluminium foil packaging,
metal containers, etc. before you prepare the food.
Cooking:
• If possible, cook food covered with material suitable for use in the microwave.
Only cook food without a cover if you
want to keep it crusty
• Do not overcook the dishes by setting
the power and time too high. The food
can dry out, burn or catch fire in some
places.
• Do not use the appliance to cook eggs
or snails in their shells, because they
can explode. With fried eggs, pierce the
yolks first.
• Prick food with "skin" or "peel", such as
potatoes, tomatoes, sausages, with a
fork several times before cooking so
that the food does not explode.
• For chilled or frozen food, set a longer
cooking time.
• Dishes which contain sauce must be
stirred from time to time.
• Vegetables that have a firm structure,
such as carrots, peas or cauliflower,
must be cooked in water.
• Turn larger pieces after half of the cooking time.
• If possible, cut vegetables into similarsized pieces.
• Use flat, wide dishes.
• Do not use cookware made of porcelain, ceramic or earthenware with small
holes, e. g. on handles or unglazed bottoms. Moisture going into the holes can
cause the cookware to crack when it is
heated.
• The glass cooking tray is a work space
for heating food or liquids. It is necessary for the operation of the microwave.
Defrosting meat, poultry, fish:
• Put the frozen, unwrapped food on a
small upturned plate with a container
below it so that the defrosting liquid
collects in the container.
• Turn the food after half of the defrosting
time. If possible, divide and then remove the pieces that started to defrost.
Defrosting butter, portions of gateau,
quark:
• Do not fully defrost the food in the appliance, but let it defrost at room temperature. This gives a more even result.
Fully remove all metal or aluminium
packaging before defrosting.
Defrosting fruit, vegetables:
• Do not fully defrost fruit and vegetables,
which are to be further prepared while
raw, in the appliance. Let them defrost
at room temperature.
• You can use a higher microwave power
to cook fruit and vegetables without defrosting them first.
ENGLISH 9
Downloaded From Microwave-Manual.com Manuals

Ready meals:
• You can prepare ready meals in the appliance only if their packaging is suitable
for microwave use.
• You must follow the manufacturer's instructions printed on the packaging
(e.g. remove the metal cover and pierce
the plastic film).
Suitable cookware and materials
Cookware / Material Microwave Grill-
ing /
Convection
Defrosting
Heating
Cooking
Ovenproof glass and porcelain (with
no metal components, e. g. Pyrex,
heat-proof glass)
X X X X
Non-ovenproof glass and porcelain1)X -- -- --
Glass and glass ceramic made of
ovenproof / frost-proof material (e.
g. Arcoflam), grill shelf
X X X X
Ceramic 2), earthenware
2)
X X X --
Heat-resistant plastic up to 200 °C3)X X X --
Cardboard, paper X -- -- --
Clingfilm X -- -- --
Roasting film with microwave safe
closure
3)
X X X --
Roasting dishes made of metal, e.
g. enamel, cast iron
-- -- -- X
Baking tins, black lacquer or siliconcoated
3)
-- -- -- X
Baking tray -- -- -- X
Browning cookware, e. g. Crisp pan
or Crunch plate
-- X X --
Ready meals in packaging
3)
X X X X
1)
With no silver, gold, platinum or metal plating / decorations
2)
Without quartz or metal components, or glazes which contain metals
3)
You must follow the manufacturer’s instructions about the maximum temperatures.
X suitable -- not suitable
10
www.electrolux.com
Downloaded From Microwave-Manual.com Manuals
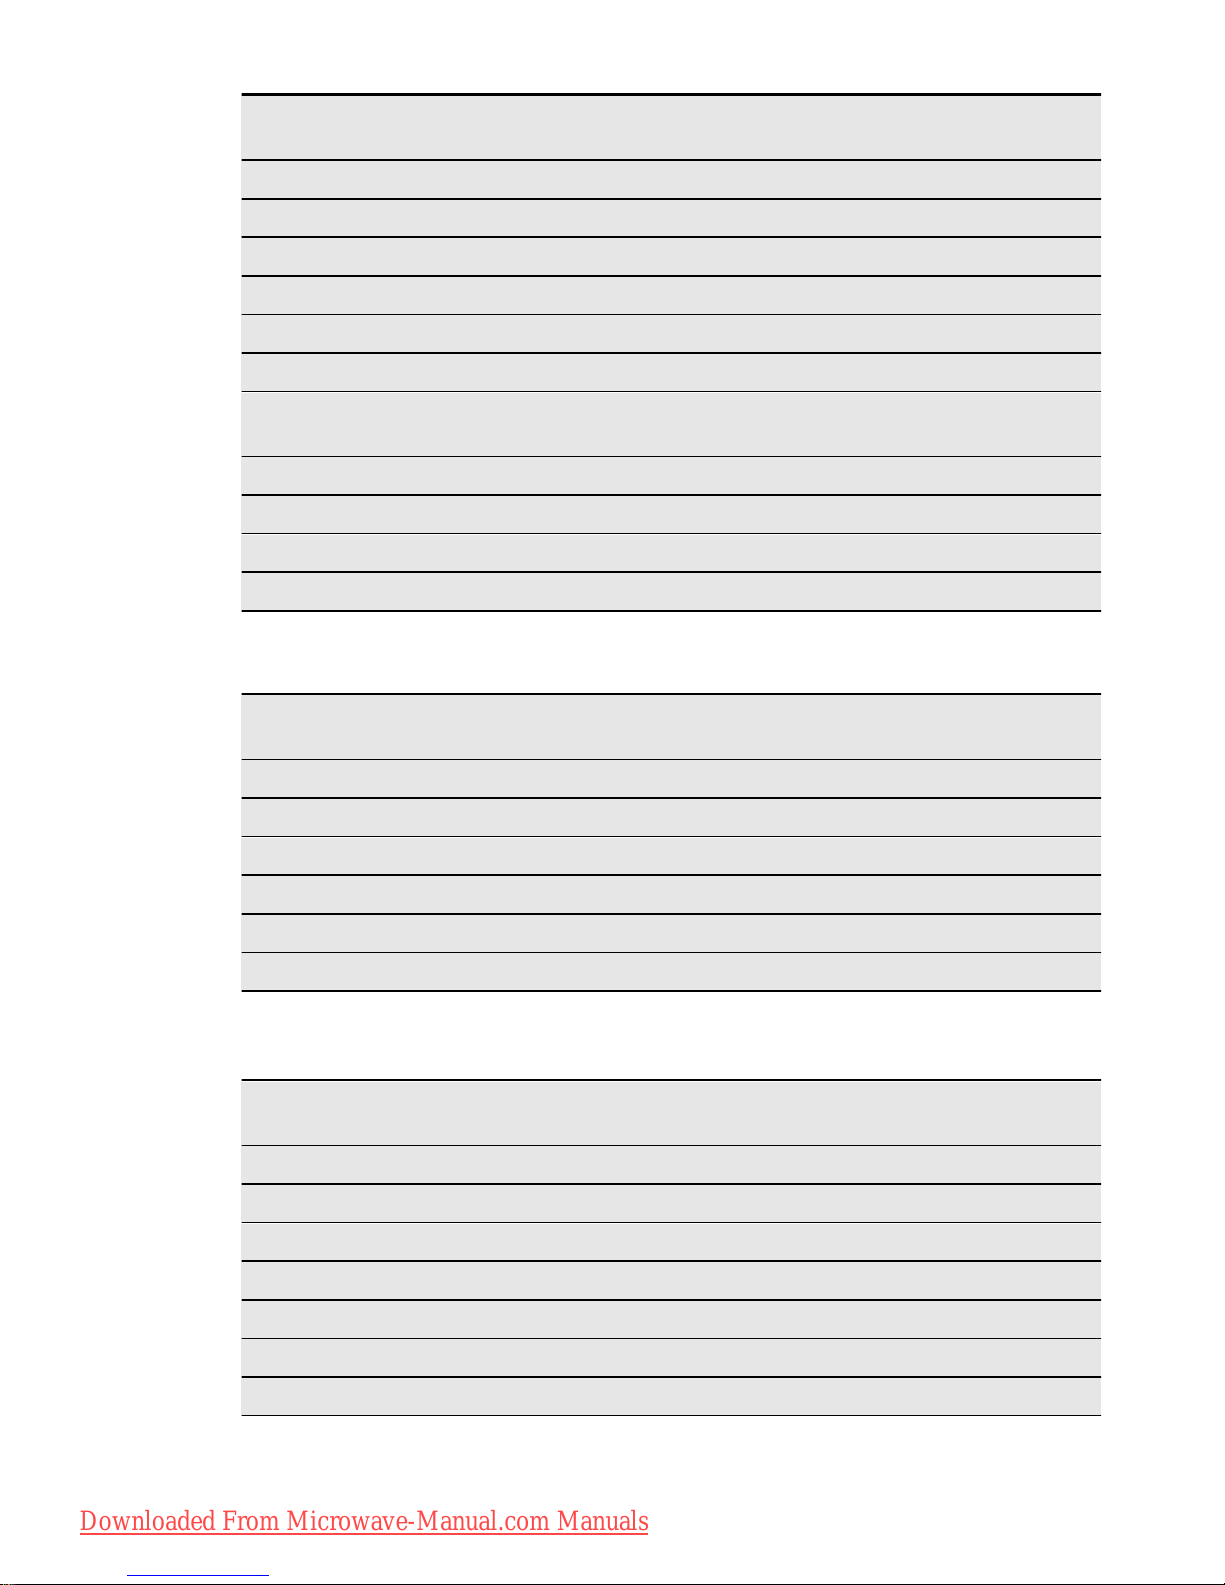
6.3 Power setting table
Press the
Function
button
Power setting Approximate Percentage of Power
1 time P100 100 %
2 times P 80 80 %
3 times P 50 50 %
4 times P 30 30 %
5 times P 10 10 %
Other functions
Press the
Function
button
Power setting Function mode
6 times G – 1 Full Grill
Combi Cooking
7 times C – 1 Microwaves, Convection
8 times C – 2 Microwaves, Grill
9 times C – 3 Grill, Convection
10 times C – 4 Microwaves, Grill, Convection
6.4 Quick Start
•
Press
to activate the appliance for
30 seconds at full function power. The
cooking time increases by 30 seconds
with each additional press of the button. The maximum cooking time is 95
minutes.
• In standby mode, turn the Setting knob
counterclockwise to set the cooking
time, then press
to start the appli-
ance at full microwave power.
6.5 Defrosting
You can choose between 2 defrosting
modes:
•Weight defrosting
•Time defrosting
Weight and time defrosting
1.
Press once to set the weight defrosting or twice for time defrosting.
2.
Turn the Setting knob to input the desired weight or time.
3.
Press to confirm and start the
appliance.
For weight defrosting the time is
set automatically. Weight defrosting should not be used on food
that is left out of the freezer for
more than 20 min, or for frozen
ready-made food.
To activate weight defrosting you
must use more than 100 g of food
and less than 2000 g.
To defrost less than 200 g of food
place it on the edge of the turntable.
6.6 Cooking
You can cook food in maximum 3 stages.
If one stage is defrosting, set it as the first
stage.
Multi-stage cooking:
1.
Press
and set the defrosting mode.
ENGLISH 11
Downloaded From Microwave-Manual.com Manuals
2. Turn the Setting knob to set defrosting
time or food weights.
3. Press the Function button or turn the
Setting knob to select the desired
power level.
4.
Press
to confirm.
5. Turn the Setting knob to input the
time.
6.
Press
to confirm and start the ap-
pliance.
After each stage an acoustic signal
sounds.
6.7 Convection cooking
For better results, preheat the appliance
to the right temperature.
Convection cooking with preheating
function:
1.
Press
.
2.
Repeatedly press
or turn the Set-
ting knob to set the temperature.
3.
Press
to confirm.
4.
Press to start preheating. When
you hear an acoustic signal, the tem-
perature is set and flashes on the dis-
play.
5.
Put in the food.
6. Turn the Setting knob to input the
time.
7.
Press
to confirm and start the ap-
pliance.
You can input the cooking time
only when the appliance is preheated. If you don’t input the
cooking time in 5 minutes, 5
acoustic signals sound and the
appliance turns to standby mode.
Skip step 4 to cook without the preheating function.
6.8 Grilling or Combi Cooking
1. Press the Function button.
2. Turn the Setting knob to set the de-
sired function.
3.
Press
to confirm.
4.
Turn the Setting knob to input the
time.
5.
Press
to confirm and start the ap-
pliance.
6.9 Child Safety Lock
The Child Safety Lock prevents an accidental operation of the appliance.
To activate or deactivate the Child Safety
Lock press and hold
for 3 seconds,
until an acoustic signal sounds.
When the Child Safety Lock is on, display
shows
.
7. AUTOMATIC PROGRAMMES
WARNING!
Refer to the Safety chapters.
7.1 Auto Cooking
You can use Auto Cooking function to
easily cook food.
1.
In standby mode, turn the Setting
knob clockwise to choose the desired
menu.
2.
Press
to confirm.
3.
Turn the Setting knob to set the
weight of the menu.
4.
Press
to confirm and start the ap-
pliance.
12
www.electrolux.com
Downloaded From Microwave-Manual.com Manuals
Menu Weight Approximate percent-
age of power
A1
Reheat
150 g
250 g
350 g
450 g
600 g
100 %
A2
Potato
1 (about 230 g)
2 (about 460 g)
3 (about 690 g)
100 %
A3
Meat
150 g
330 g
450 g
600 g
100 %
A4
Vegetable
150 g
350 g
500 g
100 %
A5
Fish
150 g
250 g
350 g
450 g
650 g
80 %
A6
Pasta
50 g (add 450 ml of water)
100 g (add 800 ml of water)
150 g (add 1200 ml of water)
80 %
A7
Soup
200 g
400 g
600 g
100 %
A8
Cake
475 g Preheat at 160 degrees
A9
Pizza
200 g
300 g
400 g
C - 2
A10
Chicken
500 g
750 g
1000 g
1200 g
C - 4
The Cake menu needs preheating.
7.2 Delayed Start
You can programme the appliance for 3
stages maximum.
1. Press the Function button and set the
power level.
2. Turn the Setting knob to set the cook-
ing time.
3.
Press
to programme the start of
the appliance.
4.
Turn the Setting knob to enter the
amount of hours.
5.
Press
to confirm.
6.
Turn the Setting knob to enter the
amount of minutes.
7.
Press
to end the settings.
The appliance starts automatically
when the set time is reached.
ENGLISH 13
Downloaded From Microwave-Manual.com Manuals
7.3 Bread Baking
Before you use the Bread Baking
function remove the turntable set
and turntable shaft then install the
bakery set.
1.
Press
.
2.
Repeatedly press
or turn the Setting knob to set the desired bread
baking programme.
3.
Press
to confirm.
4.
Repeatedly press
or turn the Setting knob to set the desired bread
weight.
5.
Press
to confirm.
6.
Repeatedly press
or turn the Setting knob to set the desired bread
browning.
7.
Press
to confirm.
8.
Press
to start the appliance.
To cancel the cooking press and
hold
for 3 seconds.
Bread Baking programmes
b - 1
White Bread
b - 2
Turbo Bread
1)
Bread Baking programmes
b - 3
Whole Wheat
Bread
b - 4
Sweet Bread
b - 5 French Bread
b - 6
Dough Bread
2)
1)
No Delayed Start function.
2)
No Delayed Start function. No browning
function.
Bread weight
800 g
1000 g
1200 g
Bread Browning
COL1 Light browning
COL2 Medium browning
COL3 Intensive brown-
ing
8. USING THE ACCESSORIES
WARNING!
Refer to the Safety chapters.
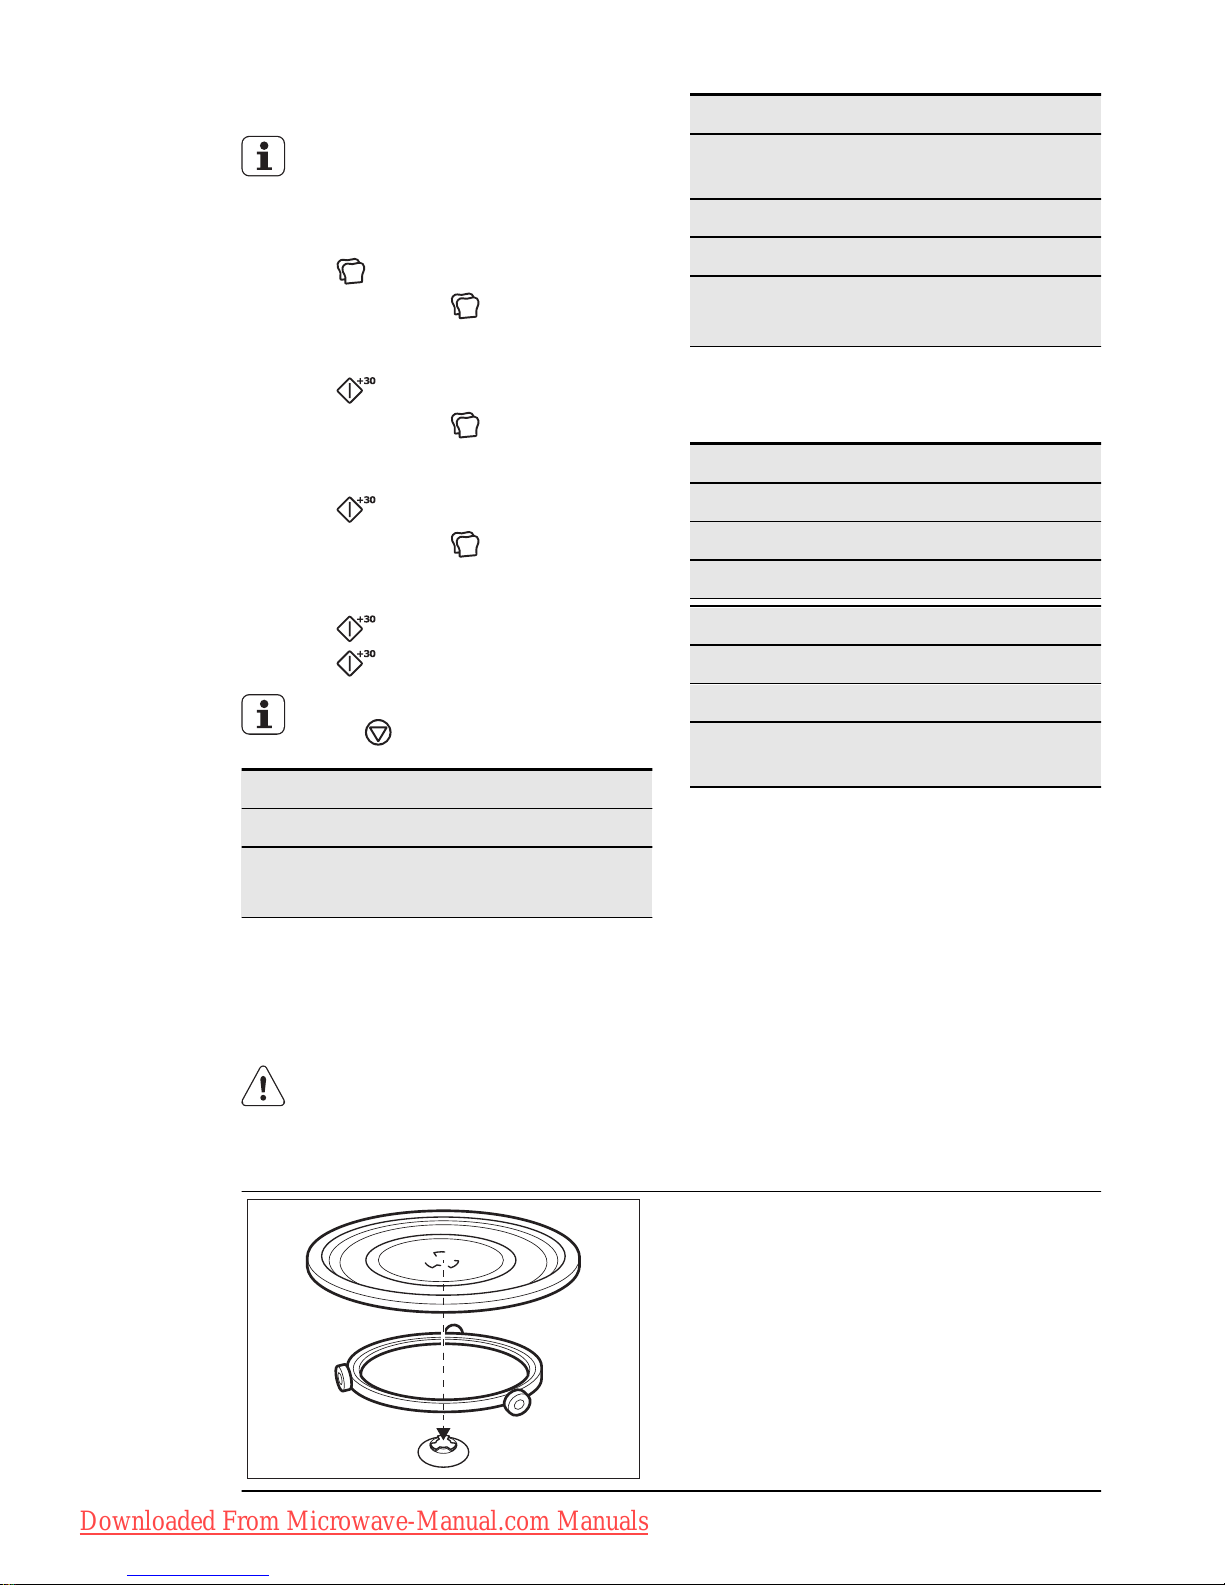
8.1 Inserting the turntable set
1.
Place the roller guide around the turntable shaft.
2.
Place the glass cooking tray on the
roller guide
14
www.electrolux.com
Downloaded From Microwave-Manual.com Manuals
CAUTION!
Do not cook food without the
turntable set. Use only the turntable set provided with the appliance.
Never cook food directly on the
glass cooking tray.
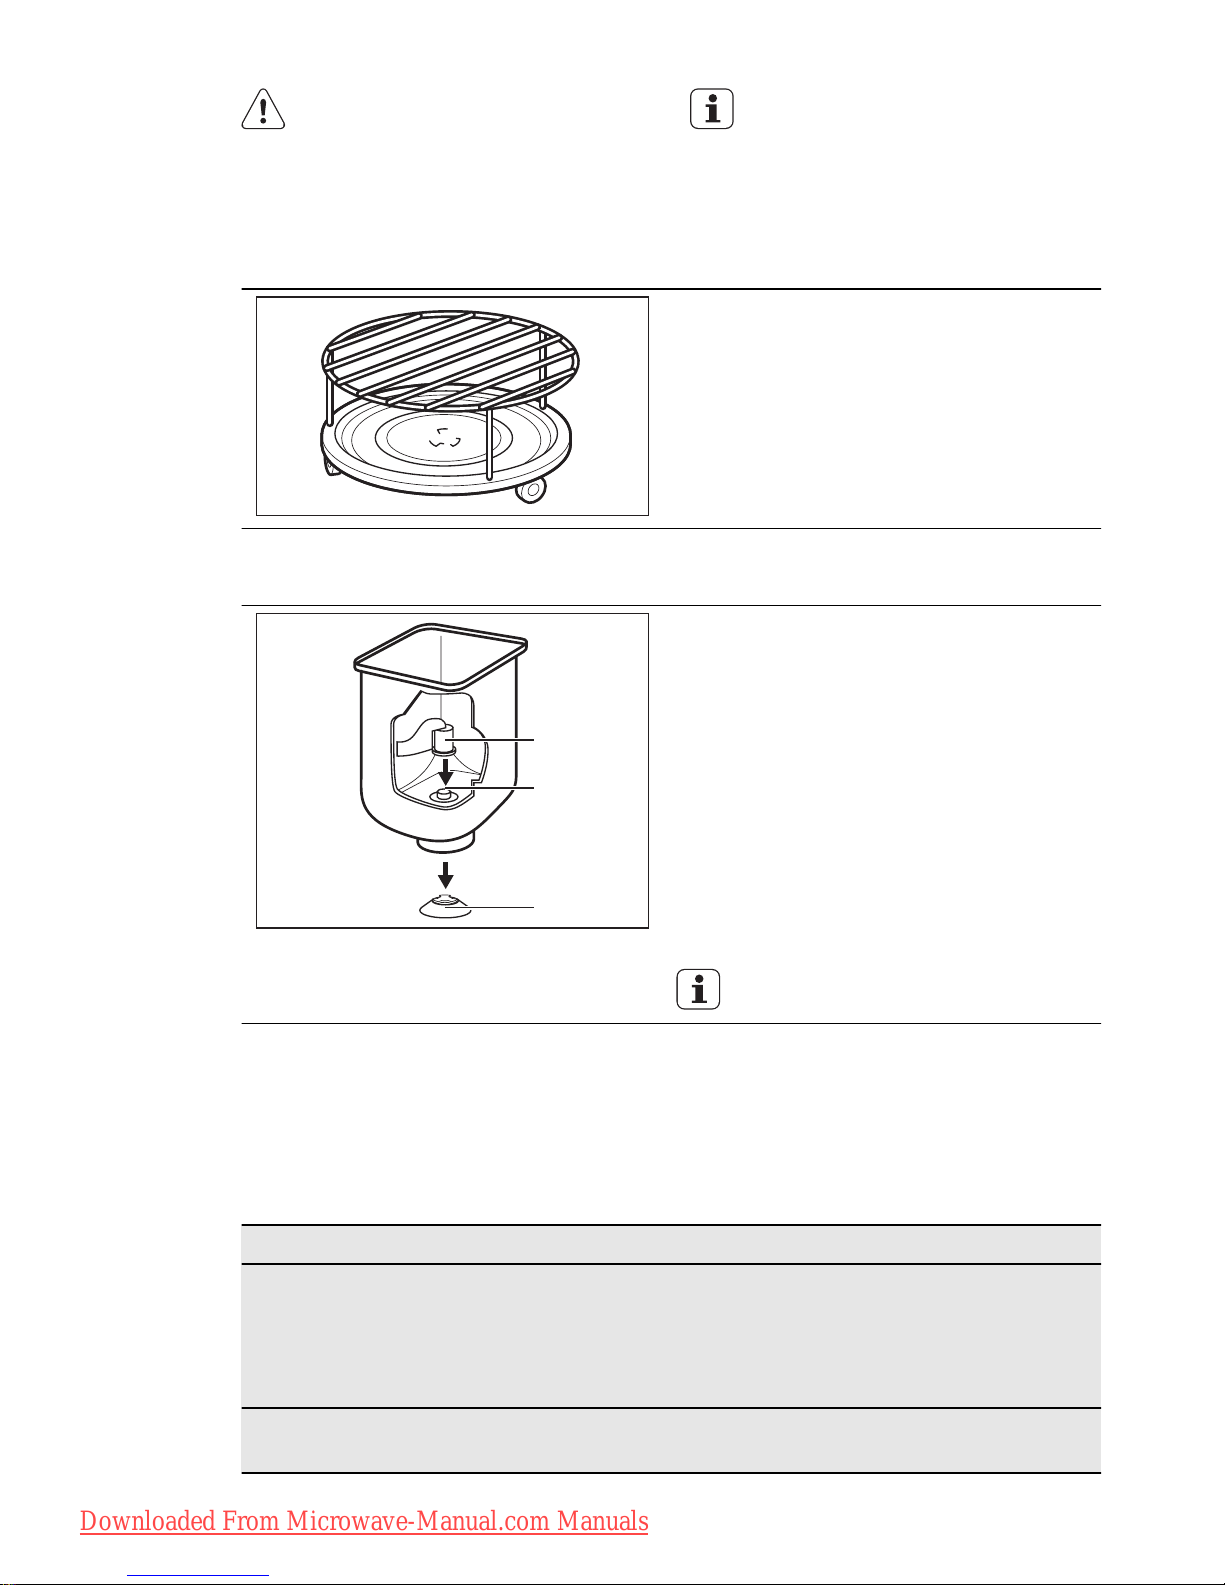
8.2 Inserting the grill rack
Place the grill rack on the turntable set.
8.3 Inserting the bakery set
A
B
C
1.
Attach the dough mixer (A) to the
shaft in the non-stick bowl so that it
matches the edging (B).
2.
Use the measuring set to add all the
ingredients.
3.
Insert the bowl into the slot below the
turntable shaft (C). Make sure the
holes in the bottom of the bowl match
the grips in the appliance.
4.
Turn the bakery set clockwise to lock
it in place. Make sure the arrow mark
on the bowl matches the arrow mark
on the appliance.
Make sure that the Bakery Set is
properly installed before use.
9. HELPFUL HINTS AND TIPS
9.1 Tips for the microwave
Problem Remedy
You cannot find details for the
amount of food prepared.
Look for a similar food. Increase or shorten
the length of the cooking times according to
the following rule: Double the amount = al-
most double the time, Half the amount =
half the time
The food got too dry. Set shorter cooking time or select lower mi-
crowave power.
ENGLISH 15
Downloaded From Microwave-Manual.com Manuals

Problem Remedy
The food is not defrosted, hot or
cooked after the time came to an
end.
Set longer cooking time or set higher power.
Note that large dishes need longer time.
After the cooking time comes to
an end, the food is overheated at
the edge but is still not ready in the
middle.
Next time set a lower power and a longer
time. Stir liquids halfway through, e.g. soup.
To get better results for rice use a flat,
wide dish.
9.2 Defrosting
Always defrost roast with the fat side
down.
Do not defrost covered meat because this
may cause cooking instead of defrosting.
Always defrost whole poultry breast side
down.
9.3 Cooking
Always remove chilled meat and poultry
from the refrigerator at least 30 minutes
before cooking.
Let the meat, poultry, fish and vegetables
stay covered after cooking.
Brush a little oil or melted butter over the
fish.
Add 30 - 45 ml of cold water for every
250 g of vegetables. Cut the fresh vegetables into even size pieces before cooking.
Cook all vegetables with a cover on the
container.
9.4 Reheating
When you reheat packed ready meals always follow the instruction written on the
packaging.
9.5 Grilling
Grill flat food items in the middle of the grill
rack.
Turn the food over halfway through the
set time and continue grilling.
9.6 Convection Cooking
You can cook food as in traditional oven.
No microwaves are used.
9.7 Combi Cooking
Use the Combi Cooking to keep the
crispness of certain foods.
At the half of the cooking time, turn over
the foods then continue.
There are 4 modes for Combi Cooking.
Each mode combines the microwave, grill
and convection functions at different time
periods and power levels.
9.8 Bread Baking
You can only inspect the bread in the first
30 minutes of the baking programme.
Otherwise the dough may not grow properly.
10. RECIPES
Properly measure all the ingredients and
add in the order listed in the tables.
White Bread
16
www.electrolux.com
Downloaded From Microwave-Manual.com Manuals

b - 1
Ingredients Small
800 g
Medium
1000 g
Big
1200 g
Warm water 205 ml 310 ml 360 ml
Sunflower oil 1 tbsp 1.5 tbsp 2 tbsp
Salt 1 tsp 1.5 tsp 2 tsp
Sugar 1.5 tbsp 2 tbsp 3 tbsp
Powder milk 1 tbsp 1.5 tbsp 2 tbsp
Flour 350 g 525 g 675 g
Powder yeast 1.5 tsp 2 tsp 3 tsp
Turbo Bread
b - 2
Ingredients Small
800 g
Medium
1000 g
Big
1200 g
Warm water 240 ml 350 ml 400 ml
Sunflower oil 1.5 tbsp 2 tbsp 2.5 tbsp
Salt 1 tsp 1.5 tsp 2 tsp
Sugar 1.5 tbsp 2 tbsp 3 tbsp
Powder milk 1 tbsp 1.5 tbsp 2 tbsp
Flour 310 g 500 g 650 g
Powder yeast 1.5 tsp 2 tsp 3 tsp
Whole Wheat Bread
b - 3
Ingredients Small
800 g
Medium
1000 g
Big
1200 g
Warm water 250 ml 375 ml 425 ml
Melted butter 20 g 30 g 40 g
Salt 1 tsp 1,5 tsp 2 tsp
Brown sugar 2 tbsp 3 tbsp 4 tbsp
Powder milk 1.5 tbsp 2 tbsp 3 tbsp
Whole wheat flour 300 g 500 g 625 g
Powder yeast 1.5 tsp 2 tsp 3 tsp
Sweet Bread
b - 4
Ingredients Small
800 g
Medium
1000 g
Big
1200 g
Warm water 180 ml 240 ml 300 ml
ENGLISH 17
Downloaded From Microwave-Manual.com Manuals
Ingredients Small
800 g
Medium
1000 g
Big
1200 g
Beaten egg 1 2 3
Powder milk 2 tbsp 2,5 tbsp 3 tbsp
Melted butter 25 g 35 g 45 g
Salt 1 tsp 1.5 tsp 2 tsp
Flour 225 g 300 g 375 g
Powder yeast 1.5 tsp 2 tsp 3 tsp
After 15 minutes of bread making add the ingredients listed below, mix the dough
and close the door to continue.
Almonds 45 g 50 g 55 g
Raisins 35 g 40 g 45 g
Dried fruit mix 35 g 40 g 45 g
Cinnamon 0.5 tbsp 0.75 tbsp 1 tbsp
French Bread
b - 5
Ingredients Small
800 g
Medium
1000 g
Big
1200 g
Warm water 165 ml 250 ml 290 ml
Sunflower oil 1 tbsp 1.5 tbsp 2 tbsp
Salt 1 tsp 1.5 tsp 2 tsp
Sugar 1 tbsp 1.25 tbsp 1.75 tbsp
Flour 350 g 400 g 425 g
Powder yeast 1.5 tsp 2 tsp 2.5 tsp
Dough Bread
1)
b - 6
Ingredients Small
800 g
Medium
1000 g
Big
1200 g
Warm water 165 ml 290 ml 330 ml
Sunflower oil 1 tbsp 1.5 tbsp 2 tbsp
Salt 1 tsp 1.5 tsp 2 tsp
Sugar 1.5 tbsp 2 tbsp 2.5 tbsp
Powder milk 1 tbsp 1.5 tbsp 2 tbsp
Flour 350 g 500 g 650 g
Powder yeast 1.5 tsp 2 tsp 3 tsp
1)
You can use the dough to your favorite recipes.
18
www.electrolux.com
Downloaded From Microwave-Manual.com Manuals
11. CARE AND CLEANING
WARNING!
Refer to the Safety chapters.
Notes on cleaning:
• Clean the front of the appliance with a
soft cloth with warm water and a cleaning agent.
• To clean metal surfaces, use a usual
cleaning agent.
• Clean the appliance interior after each
use. Then you can remove dirt more
easily and it does not burn on.
• Clean stubborn dirt with a special
cleaner.
• Clean all accessories regularly and let
them dry. Use a soft cloth with warm
water and a cleaning agent.
• To soften the hard to remove remains,
boil a glass of water at full microwave
power for 2 to 3 minutes.
• To remove odours, mix a glass of water
with 2 tsp of lemon juice and boil at full
microwave power for 5 minutes.
12. TROUBLESHOOTING
WARNING!
Refer to the Safety chapters.
Problem Possible cause Remedy
The appliance does
not operate.
The appliance is deactivated.
Activate the appliance.
The appliance does
not operate.
The appliance is not plugged in.
Plug in the appliance.
The appliance does
not operate.
The fuse in the fuse box is
blown.
Check the fuse. If the fuse
blows more than one time,
contact a qualified electrician.
The appliance does
not operate.
The door is not closed properly.
Make sure that nothing
blocks the door.
The lamp does not
operate.
The lamp is defective. The lamp has to be replace.
There is sparking in
the cavity.
There are metal dishes or
dishes with metal trim.
Remove the dish from the
appliance.
There is sparking in
the cavity.
There are metal skewers or
aluminium foil that touches
the interior walls.
Make sure that the skewers
and foil does not touch the
interior walls.
The turntable set
makes scratching or
grinding noise.
There is an object or dirt below the glass cooking tray.
Clean the area below the
glass cooking tray.
The appliance stop
to operate without a
clear reason.
There is a malfunction. If this situation repeats call
the customer service center.
If you cannot find a solution to the problem yourself, contact your dealer or the
customer service centre.
The necessary data for the customer
service center is on the rating plate on the
appliance.
ENGLISH 19
Downloaded From Microwave-Manual.com Manuals
We recommend that you write the data here:
Model (MOD.) .........................................
Product number (PNC) .........................................
Serial number (S.N.) .........................................
13. INSTALLATION
CAUTION!
Do not block the air vents. If you
do that, the appliance can overheat.
CAUTION!
Do not connect the appliance to
adapters or extension leads. This
can cause overloading and risk of
fire.
• The appliance is for a kitchen counter
top use only. It must be placed on a
stable and flat surface.
• Put the appliance far away from steam,
hot air and water splashes.
• If you transport the appliance in cold
weather, do not activate it immediately
after the installation. Let is stand in the
room temperature and absorb the heat.
13.1 Electrical installation
WARNING!
Only a qualified person must do
the electrical installation.
The manufacturer is not responsible if you do not follow the safety
precautions from the chapter
"Safety Information".
This appliance is supplied with a main cable and main plug.
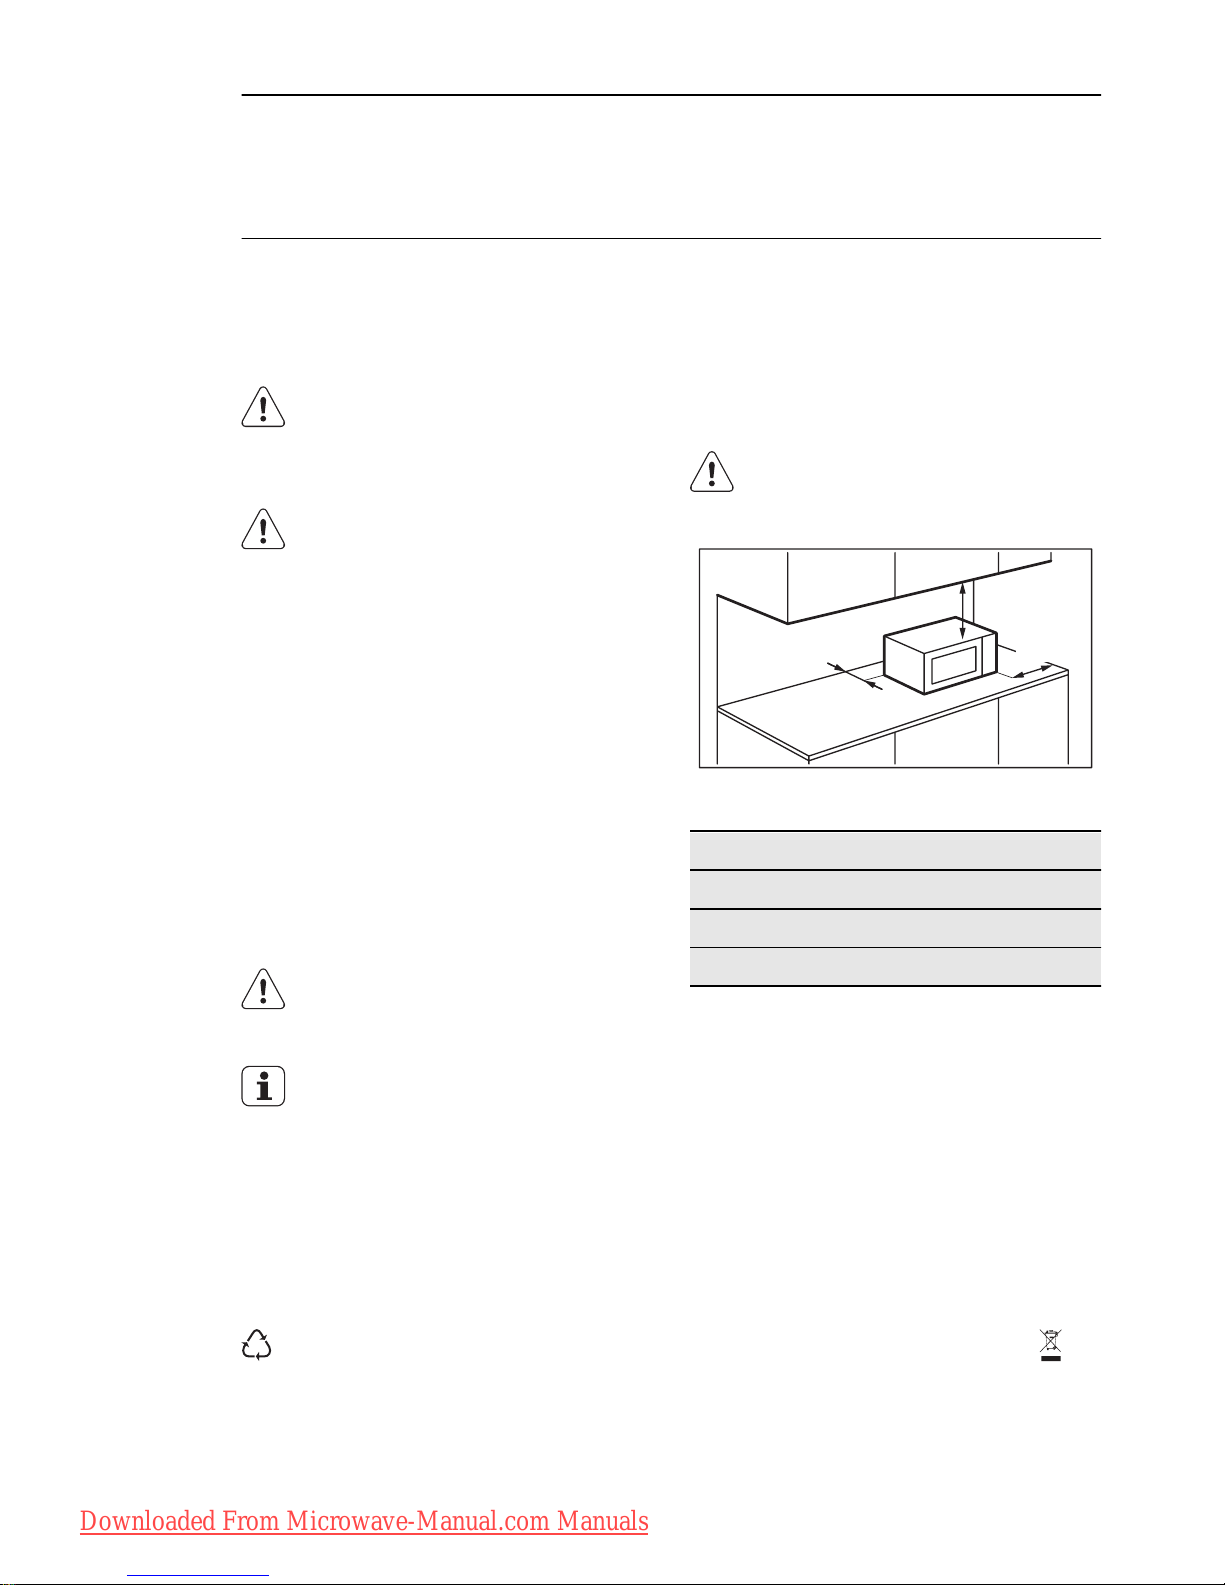
CAUTION!
Minimum installation height is 85
cm.
C
A
B
Minimal distances
Dimension mm
A 300
B 200
C 0
14. ENVIRONMENT CONCERNS
Recycle the materials with the symbol
. Put the packaging in applicable
containers to recycle it.
Help protect the environment and human
health and to recycle waste of electrical
and electronic appliances. Do not dispose
appliances marked with the symbol
with the household waste. Return the
product to your local recycling facility or
contact your municipal office.
20
www.electrolux.com
Downloaded From Microwave-Manual.com Manuals

SATURS
1. DROŠĪBAS INFORMĀCIJA . . . . . . . . . . . . . . . . . . . . . . . . . . . . . . . . . . . . . . . . . . . . . . . . . . . . . . . . . . . . . 22
2. DROŠĪBAS NORĀDĪJUMI . . . . . . . . . . . . . . . . . . . . . . . . . . . . . . . . . . . . . . . . . . . . . . . . . . . . . . . . . . . . . . 24
3. IZSTRĀDĀJUMA APRAKSTS . . . . . . . . . . . . . . . . . . . . . . . . . . . . . . . . . . . . . . . . . . . . . . . . . . . . . . . . . . . 25
4. PIRMS PIRMĀS IESLĒGŠANAS . . . . . . . . . . . . . . . . . . . . . . . . . . . . . . . . . . . . . . . . . . . . . . . . . . . . . . . . . 26
5. VADĪBAS PANELIS . . . . . . . . . . . . . . . . . . . . . . . . . . . . . . . . . . . . . . . . . . . . . . . . . . . . . . . . . . . . . . . . . . . 26
6. IZMANTOŠANA IKDIENĀ . . . . . . . . . . . . . . . . . . . . . . . . . . . . . . . . . . . . . . . . . . . . . . . . . . . . . . . . . . . . . . . 27
7. AUTOMĀTISKĀS PROGRAMMAS . . . . . . . . . . . . . . . . . . . . . . . . . . . . . . . . . . . . . . . . . . . . . . . . . . . . . . . 31
8. PIEDERUMU LIETOŠANA . . . . . . . . . . . . . . . . . . . . . . . . . . . . . . . . . . . . . . . . . . . . . . . . . . . . . . . . . . . . . . 33
9. NODERĪGI IETEIKUMI UN PADOMI . . . . . . . . . . . . . . . . . . . . . . . . . . . . . . . . . . . . . . . . . . . . . . . . . . . . . . 34
10. RECEPTES . . . . . . . . . . . . . . . . . . . . . . . . . . . . . . . . . . . . . . . . . . . . . . . . . . . . . . . . . . . . . . . . . . . . . . . . . . 35
11. KOPŠANA UN TĪRĪŠANA . . . . . . . . . . . . . . . . . . . . . . . . . . . . . . . . . . . . . . . . . . . . . . . . . . . . . . . . . . . . . . . 37
12. PROBLĒMRISINĀŠANA . . . . . . . . . . . . . . . . . . . . . . . . . . . . . . . . . . . . . . . . . . . . . . . . . . . . . . . . . . . . . . . . 37
13. UZSTĀDĪŠANA . . . . . . . . . . . . . . . . . . . . . . . . . . . . . . . . . . . . . . . . . . . . . . . . . . . . . . . . . . . . . . . . . . . . . . . 38
MĒS DOMĀJAM PAR JUMS
Pateicamies, ka iegādājāties šo Electrolux produktu. Jūsu izvēlētais produkts iemieso desmitiem gadu ilgu
profesionālu pieredzi un inovācijas. Tas ir pārdomāts, stilīgs un veidots, domājot par Jums. Tāpēc katru reizi, kad
Jūs to lietojat, varat būt droši, ka tas sniegs lieliskus rezultātus.
Laipni lūdzam Electrolux pasaulē!
Apmeklējiet mūsu mājaslapu:
Atradīsiet lietošanas padomus, brošūras, informāciju par traucējumu novēršanu un apkopi:
www.electrolux.com
Reģistrējiet savu produktu, lai uzlabotu pakalpojumu:
www.electrolux.com/productregistration
Iegādājieties ierīcei oriģinālās rezerves daļas, materiālus un piederumus:
www.electrolux.com/shop
KLIENTU APKALPOŠANA UN PAKALPOJUMI
Iesakām izmantot oriģinālās rezerves daļas.
Sazinoties ar apkalpes dienestu, pārliecinieties, vai jums ir šādi dati.
Šo informāciju var atrast tehnisko datu plāksnītē. Modelis, izstrādājuma Nr., sērijas numurs.
Drošības informācija brīdinājumam un piesardzībai.
Vispārīgā informācija un piemēri
Vides informācija
Izmaiņu tiesības rezervētas.
LATVIEŠU 21
Downloaded From Microwave-Manual.com Manuals

1. DROŠĪBAS INFORMĀCIJA
Pirms ierīces uzstādīšanas un lietošanas rūpīgi izlasiet pievienotos
norādījumus. Ražotājs neatbild par bojājumiem, ko radījusi ierīces
nepareiza uzstādīšana vai lietošana. Saglabājiet šos norādījumus
ierīces tuvumā turpmākām uzziņām.
1.1 Bērnu un nespējīgu cilvēku drošība
BRĪDINĀJUMS
Nosmakšanas, savainošanās vai pastāvīgas invaliditātes
risks.
• Šo ierīci drīkst izmantot bērni no 8 gadu vecuma un cilvēki ar ie‐
robežotām fiziskām, uztveres vai garīgām spējām, vai pieredzes
un zināšanu trūkumu, ja viņus uzrauga pieaugušais vai par viņu
drošību atbildīgā persona.
• Neļaujiet bērniem rotaļāties ar ierīci.
• Glabājiet iesaiņojuma materiālus bērniem nepieejamās vietās.
• Neļaujiet bērniem un dzīvniekiem tuvoties ierīcei tās darbības vai
dzesēšanas laikā. Pieejamās sastāvdaļas ir karstas.
• Ja ierīce aprīkota ar bērnu drošības ierīci, iesakām to aktivizēt.
• Tīrīšanu un lietotāja veikto apkopi nedrīkst veikt bērni bez uzrau‐
dzības.
• Turiet ierīci un tās elektrības vadu bērniem, kas ir jaunāki par 8
gadu vecumu, nepieejamā vietā.
1.2 Vispārīgi drošības norādījumi
• Ierīce paredzēta izmantošanai mājsaimniecībā un līdzīgiem mēr‐
ķiem, piemēram:
– darbinieku virtuves zonās veikalos, birojos un citās darba vie‐
tās;
– lauku saimniecībās;
– klientu vajadzībām viesnīcās, moteļos un citās dzīvojamās tel‐
pās;
– privāto viesnīcu (Bed and Breakfast) apstākļos.
22
www.electrolux.com
Downloaded From Microwave-Manual.com Manuals

• Ierīces iekšpuse darbības laikā sakarst. Nepieskarieties sildele‐
mentiem ierīces iekšpusē. Vienmēr izmantojiet cepeškrāsns cim‐
dus, izņemot vai ievietojot papildpiederumus vai cepeškrāsns
traukus.
• Netīriet ierīci ar tvaika tīrītāju.
• Pirms apkopes veikšanas atvienojiet strāvas padevi.
• Ja durvis vai durvju blīves ir bojāti, ierīci nedrīkst izmantot, līdz
bojājums tiks novērsts autorizētā apkalpošanas centrā.
• Tikai kompetenta persona var veikt apkopes vai remontdarbus,
kas saistīti ar pārsega, kas aizsargā pret pakļaušanu mikroviļņu
enerģijai, noņemšanu.
• Nesildiet šķidrumus un citu pārtiku noslēgtos traukos. Tie var uz‐
sprāgt.
• Izmantojiet tikai tādus piederumus, kas ir piemēroti izmantošanai
mikroviļņu krāsnīs.
• Uzsildot pārtiku plastmasas vai papīra traukos, uzraugiet ierīci
iespējamās aizdegšanās dēļ.
• Ierīce paredzēta pārtikas un dzērienu uzsildīšanai. Pārtiks kaltē‐
šana, drēbju žāvēšana vai sildošo spilventiņu, čību, sūkļu, mitru
drānu un līdzīgu priekšmetu sildīšana var izraisīt traumu, aizdeg‐
šanās vai ugunsgrēka risku.
• Ja ierīce izdala dūmus, izslēdziet to vai atvienojiet no elektrības
padeves un neveriet vaļā durvis, lai apslāpētu liesmas.
• Dzērienu sakarsēšana ar mikroviļņiem var izraisīt pēkšņu vārošā
šķidruma izvirdumu. Izņemot traukus, esiet piesardzīgi.
• Barošanas pudelīšu saturs un mazu bērnu pārtikas burciņas ir
jāapmaisa vai jāsakrata un pirms pasniegšanas jāpārbauda to
temperatūra, lai izvairītos no apdegumiem.
• Olas čaumalās un veselas cieti novārītas olas nedrīkst uzsildīt
ierīcē, jo tās var uzsprāgt pat pēc tam, kad mikroviļņu sildīšana ir
beigusies.
• Ierīce regulāri jātīra un jālikvidē visas pārtikas paliekas.
• Neuzturot ierīci tīru, virsma var bojāties un tas var negatīvi ietek‐
mēt ierīces darbmūžu, kā arī potenciāli izraisīt bīstamu situāciju.
LATVIEŠU 23
Downloaded From Microwave-Manual.com Manuals
• Stikla durvju tīrīšanai neizmantojiet raupjus, abrazīvus tīrīšanas
līdzekļus vai asus metāla skrāpjus, jo tie var saskrāpēt virsmas,
un tādējādi stikls var saplīst.
2.
DROŠĪBAS NORĀDĪJUMI
2.1 Uzstādīšana
BRĪDINĀJUMS
Ierīci drīkst uzstādīt tikai kvalificēta per‐
sona.
• Noņemiet visu iepakojumu.
• Neuzstādiet vai nelietojiet bojātu ierīci.
• Ievērojiet kopā ar ierīci piegādātos uzstādīša‐
nas norādījumus.
• Ierīci var novietot gandrīz jebkurā virtuves vie‐
tā. Pārliecinieties, ka krāsns novietota uz pla‐
kanas, līdzenas virsmas un tās ventilācijas
spraugas un ierīces apakša nav nosegta (lai
nodrošinātu ventilāciju).
Elektriskais savienojums
BRĪDINĀJUMS
Var izraisīt ugunsgrēku un elektrošoku.
• Elektrības padeves pieslēgšana jāveic sertifi‐
cētam elektriķim.
• Ierīcei jābūt iezemētai.
• Pārliecinieties, ka informācija uz tehnisko datu
plāksnītes atbilst jūsu elektrosistēmas para‐
metriem. Ja neatbilst, sazinieties ar elektriķi.
• Ja ierīce elektrotīklam pieslēgta, izmantojot
pagarinātāju, tam jābūt iezemētam.
• Rīkojieties uzmanīgi, lai nesabojātu kontakt‐
spraudni un kabeli. Sazinieties ar servisa daļu
vai elektriķi, lai nomainītu bojātu strāvas kabe‐
li.
• Nekad neatslēdziet ierīci no tīkla, velkot aiz
barošanas kabeļa. Vienmēr velciet aiz kon‐
taktspraudņa.
2.2 Izmantošana
BRĪDINĀJUMS
Pastāv traumu, apdegumu, elektrošoka
vai sprādziena risks.
• Izmantojiet šo ierīci mājsaimniecībā.
• Nemainiet šīs ierīces specifikācijas.
• Pārliecinieties, vai ventilācijas atveres nav blo‐
ķētas.
• Neatstājiet ieslēgtu ierīci bez uzraudzības.
• Neatbalstieties uz atvērtām durvīm.
• Nelietojiet ierīci kā darbvirsmu un neizmanto‐
jiet tilpni priekšmetu uzglabāšanai.
2.3 Apkope un tīrīšana
BRĪDINĀJUMS
Pastāv savainojumu, aizdegšanās vai
ierīces bojājumu risks.
• Pirms apkopes izslēdziet ierīci un atvienojiet
to no elektrotīkla.
• Regulāri tīriet ierīci, lai novērstu virsmas mate‐
riāla nolietošanos.
• Neļaujiet ēdiena vai tīrīšanas līdzekļa atliekām
uzkrāties uz durvju blīvējuma virsmas.
• Cepeškrāsnī atlikušās taukvielas vai pārtikas
atliekas var izraisīt ugunsgrēku.
• Tīriet ierīci ar mitru, mīkstu drānu. Lietojiet tikai
neitrālus tīrīšanas līdzekļus. Neizmantojiet
abrazīvus izstrādājumus, abrazīvus sūkļus,
šķīdinātājus vai metāla priekšmetus.
• Ja lietojat cepeškrāsns tīrīšanai paredzētus
aerosolus, ievērojiet ražotāja drošības norādī‐
jumus, kas atrodami uz iepakojuma.
2.4 Ierīces utilizācija
BRĪDINĀJUMS
Pastāv savainošanās vai nosmakšanas
risks.
• Atvienojiet ierīci no elektropadeves.
• Nogrieziet strāvas kabeli un izmetiet to.
24
www.electrolux.com
Downloaded From Microwave-Manual.com Manuals
 Loading...