

Page 1

Ceramic glass hob
Keramisk koketopp
Installation and Operating
Instructions
Montasje- og brukerveiledning
822 925 394-A-210405-01
EHS 6691
g
n
Page 2

Dear Customer,
Please read these user instructions carefully and
keep them to refer to later.
Please pass the user instructions on to any future
owner of the appliance.
The following symbols are used in the
text:
1 Safety instructions
Warning! Notes that concern your personal
safety.
Important! Notes that show how to avoid
damage to the appliance.
3 Useful tips and hints
2 Environmental information
2
Page 3

Contents
Operating Instructions . . . . . . . . . . . . . . . . . . . . . . . . . . . . . . . . . . . . . . . . . . . . . . . . . . . . . . . . . . . . . 4
Safety instructions . . . . . . . . . . . . . . . . . . . . . . . . . . . . . . . . . . . . . . . . . . . . . . . . . . . . . . . . . . . . . . . . . . . . 4
Description of the Appliance . . . . . . . . . . . . . . . . . . . . . . . . . . . . . . . . . . . . . . . . . . . . . . . . . . . . . . . . . . . . 5
Cooking surface layout . . . . . . . . . . . . . . . . . . . . . . . . . . . . . . . . . . . . . . . . . . . . . . . . . . . . . . . . . . . . . . . . . . 5
Control panel layout . . . . . . . . . . . . . . . . . . . . . . . . . . . . . . . . . . . . . . . . . . . . . . . . . . . . . . . . . . . . . . . . . . . . 5
Touch Control sensor fields . . . . . . . . . . . . . . . . . . . . . . . . . . . . . . . . . . . . . . . . . . . . . . . . . . . . . . . . . . . . 6
Displays . . . . . . . . . . . . . . . . . . . . . . . . . . . . . . . . . . . . . . . . . . . . . . . . . . . . . . . . . . . . . . . . . . . . . . . . . . . 6
Residual heat indicator . . . . . . . . . . . . . . . . . . . . . . . . . . . . . . . . . . . . . . . . . . . . . . . . . . . . . . . . . . . . . . . 6
Operating the appliance . . . . . . . . . . . . . . . . . . . . . . . . . . . . . . . . . . . . . . . . . . . . . . . . . . . . . . . . . . . . . . . . 7
Switching the appliance on and off . . . . . . . . . . . . . . . . . . . . . . . . . . . . . . . . . . . . . . . . . . . . . . . . . . . . . . . . 7
Selecting the heat setting . . . . . . . . . . . . . . . . . . . . . . . . . . . . . . . . . . . . . . . . . . . . . . . . . . . . . . . . . . . . . . . . 7
To switch the outside ring on and off . . . . . . . . . . . . . . . . . . . . . . . . . . . . . . . . . . . . . . . . . . . . . . . . . . . . . . . 7
Locking/unlocking the control panel. . . . . . . . . . . . . . . . . . . . . . . . . . . . . . . . . . . . . . . . . . . . . . . . . . . . . . . . 8
Using the automatic warm-up function . . . . . . . . . . . . . . . . . . . . . . . . . . . . . . . . . . . . . . . . . . . . . . . . . . . . . 8
Using the child safety device . . . . . . . . . . . . . . . . . . . . . . . . . . . . . . . . . . . . . . . . . . . . . . . . . . . . . . . . . . . . . 9
Using the timer . . . . . . . . . . . . . . . . . . . . . . . . . . . . . . . . . . . . . . . . . . . . . . . . . . . . . . . . . . . . . . . . . . . . . . . . 10
Safety cut-out . . . . . . . . . . . . . . . . . . . . . . . . . . . . . . . . . . . . . . . . . . . . . . . . . . . . . . . . . . . . . . . . . . . . . . . . . 12
Tips on cooking and frying. . . . . . . . . . . . . . . . . . . . . . . . . . . . . . . . . . . . . . . . . . . . . . . . . . . . . . . . . . . . . . 13
Cookware . . . . . . . . . . . . . . . . . . . . . . . . . . . . . . . . . . . . . . . . . . . . . . . . . . . . . . . . . . . . . . . . . . . . . . . . . . . . 13
Energy saving . . . . . . . . . . . . . . . . . . . . . . . . . . . . . . . . . . . . . . . . . . . . . . . . . . . . . . . . . . . . . . . . . . . . . . . . . 13
Examples of cooking applications . . . . . . . . . . . . . . . . . . . . . . . . . . . . . . . . . . . . . . . . . . . . . . . . . . . . . . . . . 14
Cleaning and care . . . . . . . . . . . . . . . . . . . . . . . . . . . . . . . . . . . . . . . . . . . . . . . . . . . . . . . . . . . . . . . . . . . . . 15
Metal décor strips . . . . . . . . . . . . . . . . . . . . . . . . . . . . . . . . . . . . . . . . . . . . . . . . . . . . . . . . . . . . . . . . . . . . . . 15
What to do if … . . . . . . . . . . . . . . . . . . . . . . . . . . . . . . . . . . . . . . . . . . . . . . . . . . . . . . . . . . . . . . . . . . . . . . . 16
Disposal . . . . . . . . . . . . . . . . . . . . . . . . . . . . . . . . . . . . . . . . . . . . . . . . . . . . . . . . . . . . . . . . . . . . . . . . . . . . . 17
Installation Instructions . . . . . . . . . . . . . . . . . . . . . . . . . . . . . . . . . . . . . . . . . . . . . . . . . . . . . . . . . . . . 18
Electrical Connection Diagram . . . . . . . . . . . . . . . . . . . . . . . . . . . . . . . . . . . . . . . . . . . . . . . . . . . . . . . . . . . . 19
Warranty conditions. . . . . . . . . . . . . . . . . . . . . . . . . . . . . . . . . . . . . . . . . . . . . . . . . . . . . . . . . . . . . . . . 20
Service and Spare Parts. . . . . . . . . . . . . . . . . . . . . . . . . . . . . . . . . . . . . . . . . . . . . . . . . . . . . . . . . . . . 21
Assembly . . . . . . . . . . . . . . . . . . . . . . . . . . . . . . . . . . . . . . . . . . . . . . . . . . . . . . . . . . . . . . . . . . . . . . . . . . 43
3
Page 4

Operating Instructions
1 Safety instructions
3
Please comply with these instructions. If you
do not, any damage resulting is not covered
by the warranty.
5 This appliance conforms with the following EU
Directives:
– 73/23/EEC dated 19.02.1973 Low Voltage Direc-
tive
– 89/336/EEC dated 03.05.1989 EMC Directive in-
clusive of Amending Directive 92/31/EEC
– 93/68/EEC dated 22.07.1993 CE Marking Directive
Correct use
• This appliance should be used only for normal domestic cooking and frying of food.
• The appliance must not be used as a work surface
or as a storage surface.
• Additions or modifications to the appliance are not
permitted.
• Do not place or store flammable liquids, highly inflammable materials or fusible objects (e.g. plastic
film, plastic, aluminium) on or near the appliance.
Child safety
• Small children must be kept away from the appliance.
• Only let older children work on the appliance under
supervision.
General safety
• The appliance may only be installed and connected by trained, registered service engineers, or
competent persons.
• Built-in appliances may only be used after they
have been built in to suitable built-in units and
work surfaces that meet standards.
• In the event of faults with the appliance or damage
to the glass ceramic (cracks, scratches or splits),
the appliance must be switched off and disconnected from the electrical supply to prevent the
possibility of an electric shock..
• Repairs to the appliance must only be carried out
by trained registered service engineers.
Safety during use
• Remove stickers and film from the glass ceramic.
• There is the risk of burns from the appliance if used
carelessly.
• Cables from electrical appliances must not touch
the hot surface of the appliance or hot cookware.
• Overheated fat and oil can ignite quickly. When
cooking with fat or oil (e.g. frying chips) do not
leave the appliance unattended.
• Switch the cooking zones off after each use.
Safety when cleaning
• For cleaning, the appliance must be switched off
and cooled down.
• For safety reasons, the cleaning of the appliance
with steam jet or high-pressure cleaning equipment is not permitted.
How to avoid damage to the appliance
• The ceramic glass can be damaged by objects falling onto it.
• The edge of the ceramic glass can be damaged by
being knocked by the cookware.
• Cookware made of cast iron, cast aluminium or
with damaged bottoms can scratch the ceramic
glass if pushed across the surface.
• Objects that melt and things that boil over can
burn onto the ceramic glass and should be removed straightaway.
• Do not use the cooking zones with empty cookware or without cookware.
4
Page 5

Description of the Appliance
Cooking surface layout
Single cooking zone
1200W
Triple ring cooking zone
800/1600/2300W
Multi-purpose zone
1500/2400W
Control panel Single cooking zone
1200W
Control panel layout
Lock
with pilot light
Outside/middle ring
On/Off
On/Off
with power indicator
Cooking zone indicators
Timer function
Display
Triple ring pilot light
Timer display
Timer
Heat setting selection
Multi-purpose zone
pilot light
Outside ring
On/Off
5
Page 6
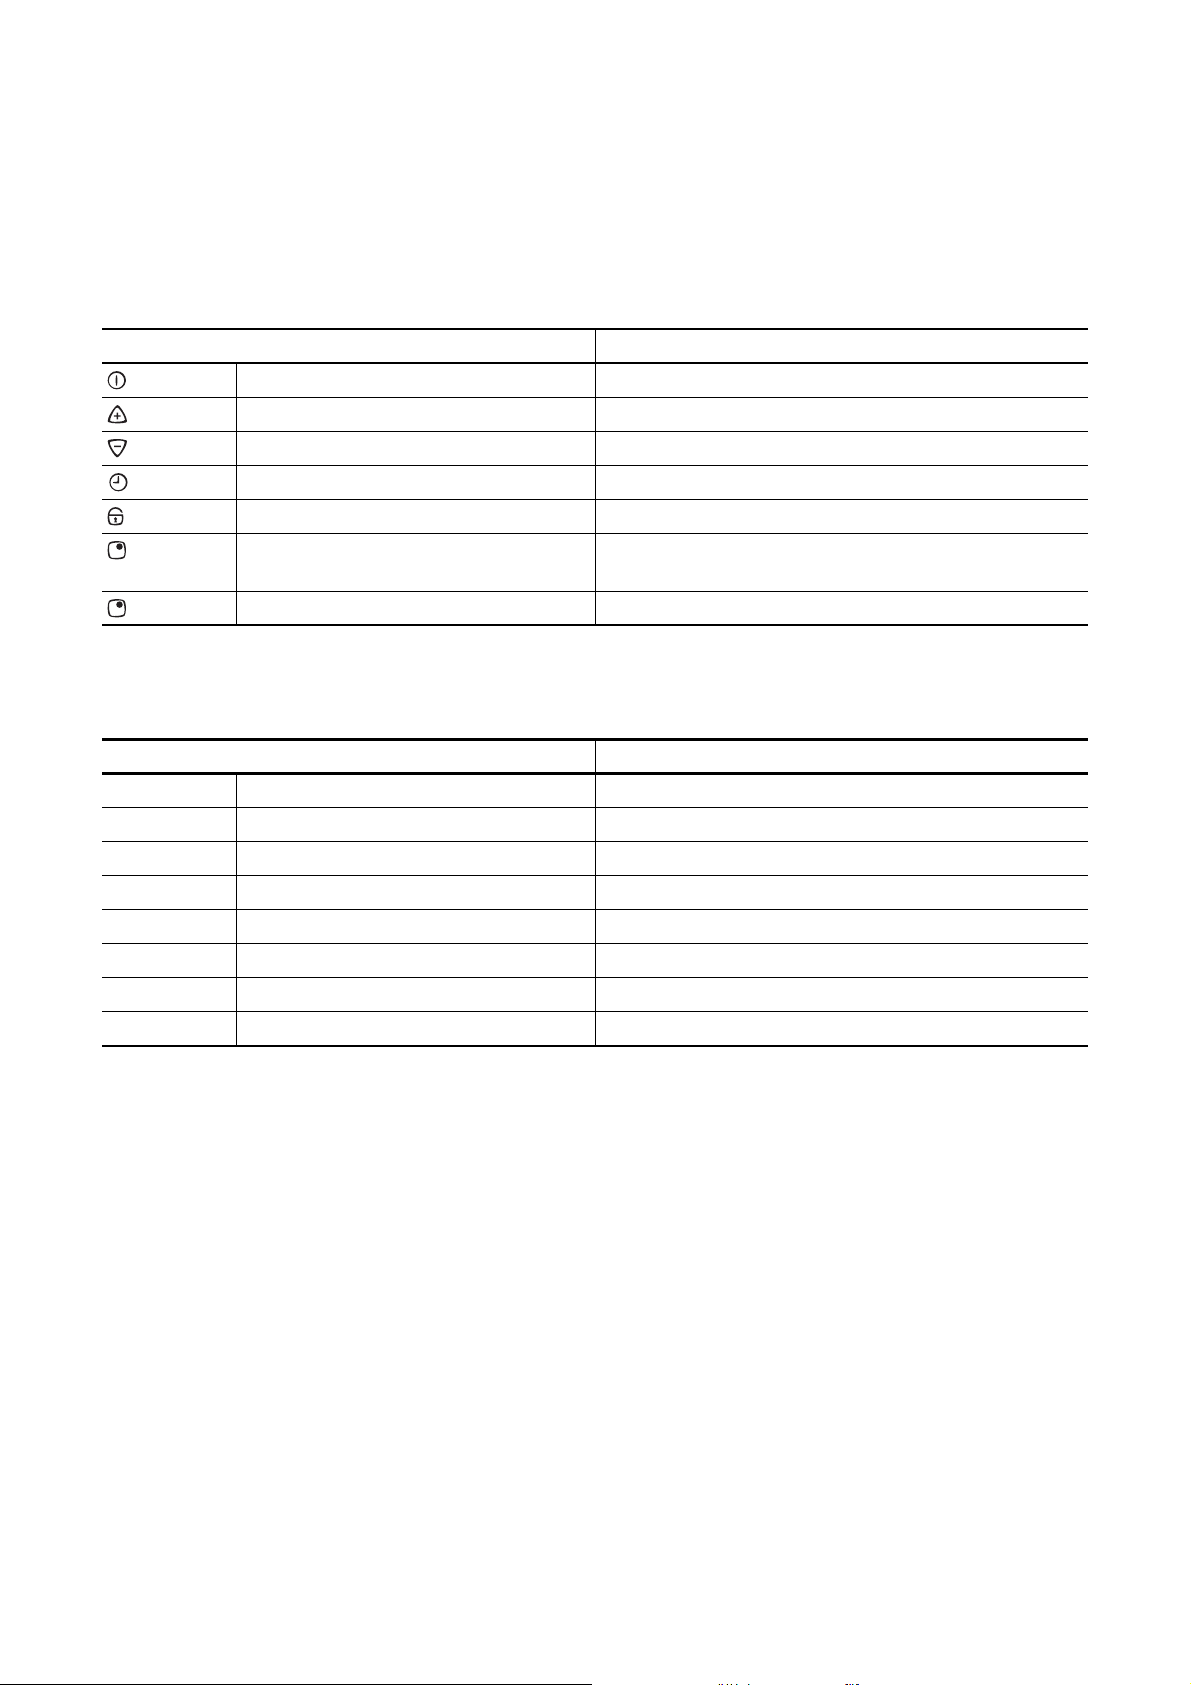
Touch Control sensor fields
The appliance is operated using Touch Control sensor fields. Functions are controlled by touching sensor fields and confirmed by displays and acoustic
signals.
Touch the sensor fields from above, without covering
other sensor fields.
Sensor field Function
On / Off Switches appliance on and off
Increase settings Increasing heat setting/time
Decrease settings Decreasing heat setting/time
Timer Timer selection
Lock Locking/unlocking the control panel
Triple zone touch control Switches outside zones
Multi-purpose zone To switch the outside ring on and off
Displays
on and off
Display Description
¾ Cooking zone is switched off
u Keep warm setting Keep warm setting is set
¿ - Ç Heat settings Heat setting is set
a Automatic warm up function Automatic warm-up function is activated
e Fault Malfunction has occurred
h Residual heat Cooking zone is still hot
l Child safety device Lock/child safety device is set.
_ Safety cut-out Safety cut-out has been activated
Residual heat indicator
1 Warning! Risk of burns from residual heat. Af-
ter being switched off, the cooking zones need
some time to cool down. Look at the residual
heat indicator
h .
3 Residual heat can be used for melting and
keeping food warm.
6
Page 7

Operating the appliance
Switching the appliance on
and off
Control panel Display Pilot light
Switch on Touch for 2 seconds
Switch off Touch for 1 second
¾ / h lights up
h / none goes out
3 After switching on, within approx. 10 seconds
a heat setting or a function must be set, otherwise the appliance automatically switches itself off.
Selecting the heat setting
Control panel Indicator
To increase Touch
To decrease Touch Ç to ¾
To switch off Touch and at the same time ¾
u to Ç
3 The keep warm setting u lies between ¾ and
¿. The keep warm setting can be set using
or . It is used to keep food warm.
To switch the outside ring
on and off
By switching the outside rings on or off, the effective
heating surface can be matched to the size of the
cookware.
3 Before an outside ring can be switched on, the
inside ring must be switched on.
Triple cooking zone Sensor panel Power indicator
To switch on middle ring Touch
To switch on outside ring Touch
To switch off outside ring Touch
To switch off middle ring Touch
Multi-purpose zone Sensor panel Power indicator
To switch on outside ring Touch
To switch off outside ring Touch for 1-2 seconds. goes out
for 1-2 seconds. One power indicator is lit.
for 1-2 seconds. Two power indicators are lit.
for 1-2 seconds. Second power indicator goes out.
for 1-2 seconds. First power indicator goes out.
for 1-2 seconds. is lit
7
Page 8
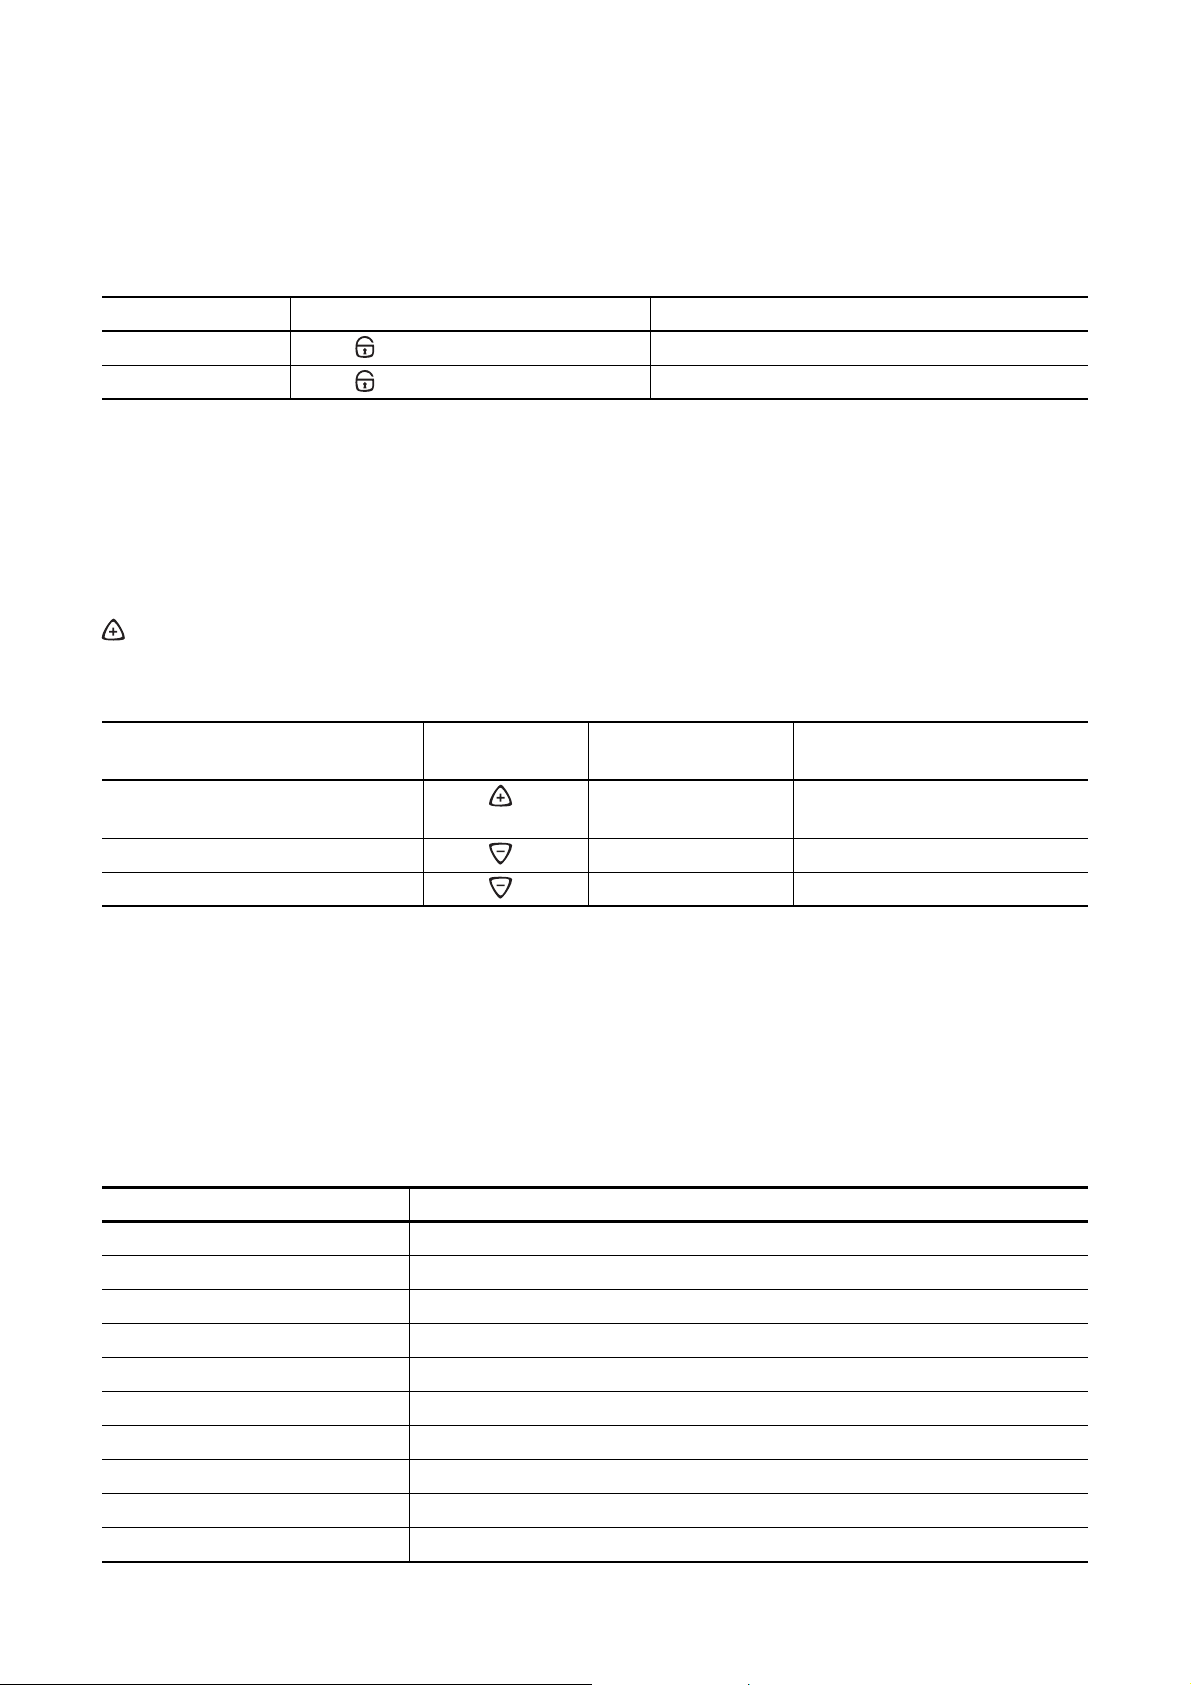
Locking/unlocking the control panel
The control panel, with the exception of the “On/Off”
sensor field, can be locked at any time in order to
prevent the settings being changed e.g. by wiping
over the panel with a cloth.
Control panel Display
Switch on Touch
Switch off Touch previously set heat setting
l (for 5 seconds)
3 When you switch the appliance off, the locking
function is automatically switched off.
Using the automatic warm-up function
All cooking zones are equpped with an automatic
warm up function When setting a heat setting using
, when starting from
es to full power for a certain amount of time and then
automatically switches back to the heat setting set.
Switch on
(only when starting at
Switch off Touch
Not used Touch Ç to uÇ to u
¾, the cooking zone switch-
Control panel possible heat set-
Touch
¾)
Display
tings
¿ to Æa (after 5 seconds)
Æ to ¿ / u Æ to u
3 If during the automatic warm up a a higher
heat setting is selected, e.g. from
automatic warm up is adjusted.
Á to Ã, the
3 If there is still residual heat on the cooking
zone (display
not performed.
The length of time that the automatic warm up function operates depends on the heat setting selected.
Heat setting Length of the automatic warm up [min: sec]
h), the automatic warm up is
v 0:30
1 1:00
2 1:40
3 4:50
4 6:30
5 10:10
6 2:00
7 3:30
8 4:30
9 ---
8
Page 9
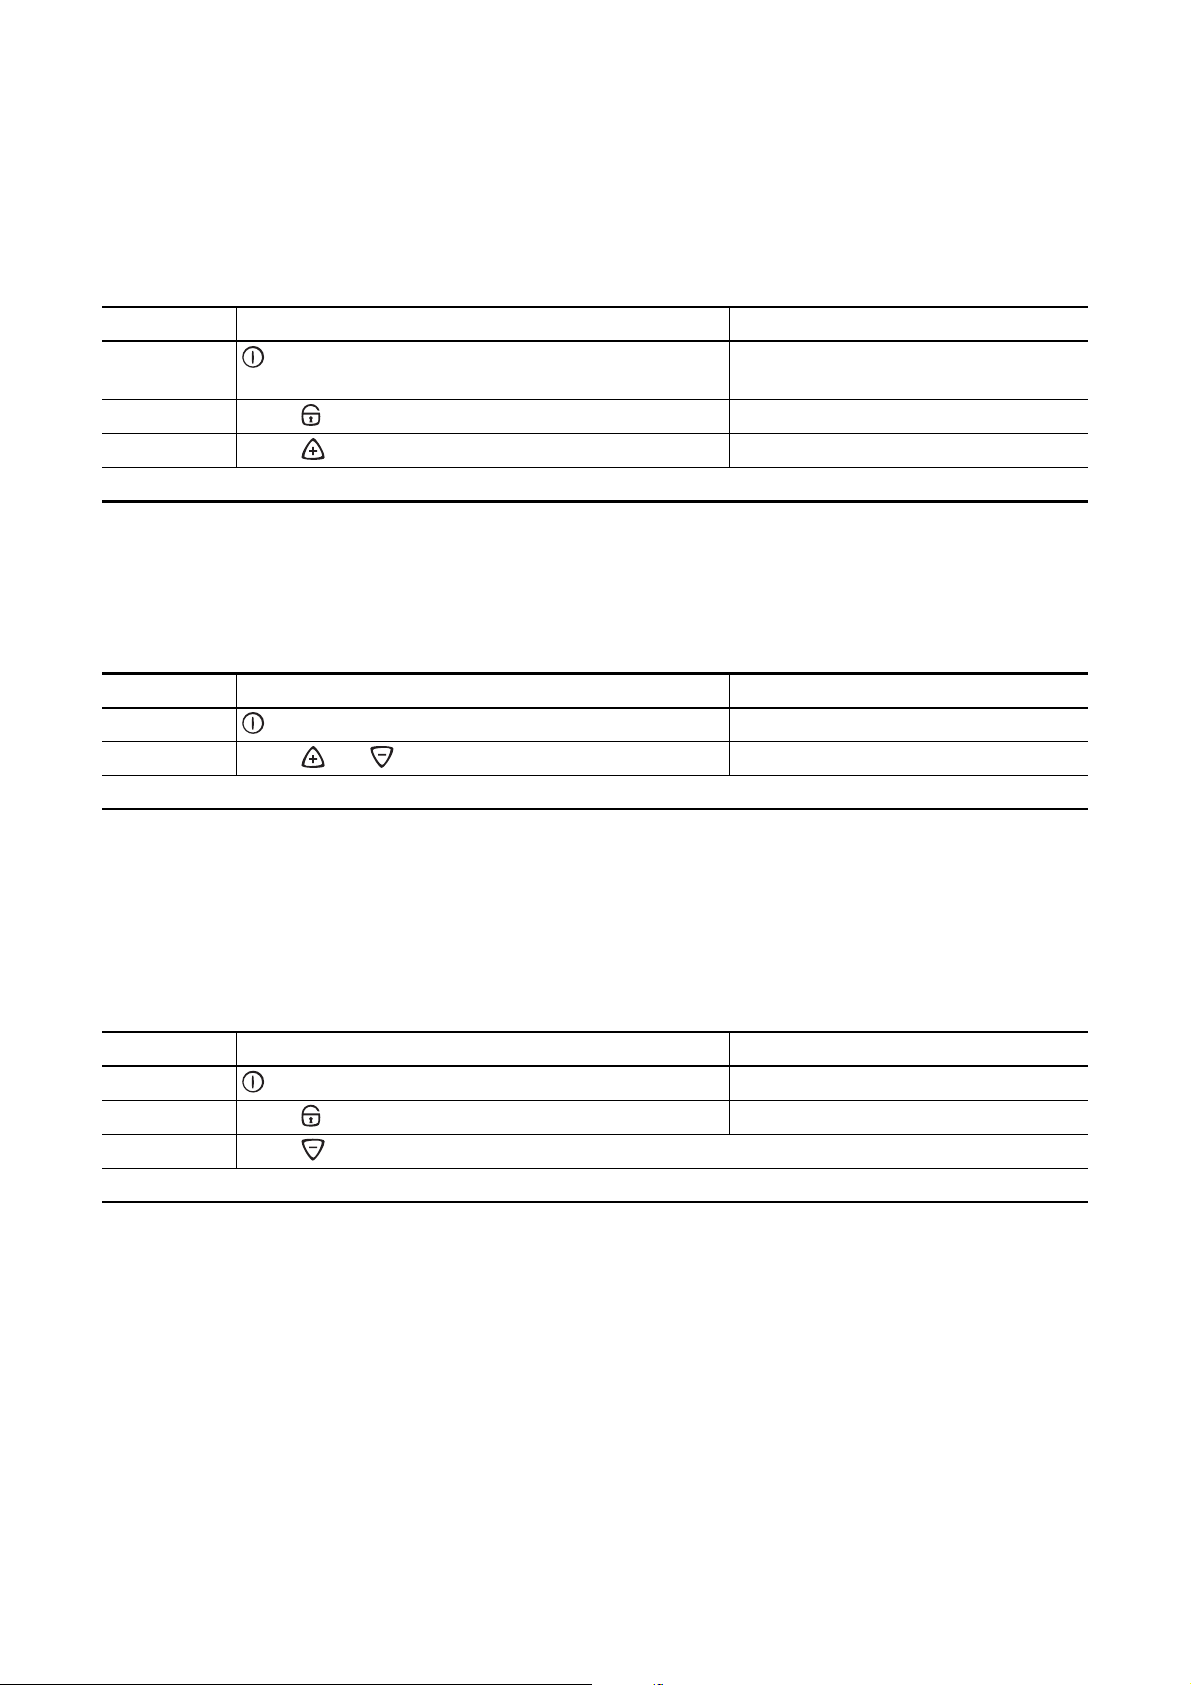
Using the child safety device
The child safety device prevents unintentional use of
the appliance.
Setting the child safety device
Step Control panel Display/Signal
1. Switch on the appliance
(Do not set a heat setting)
2. Touch until the signal sounds Acoustic signal
3. Touch
Appliance switches off. The child safety device is set.
¾
l
Overriding the child safety device
The child safety device can be released in this way
for a single cooking session; it remains activated afterwards.
Step Control panel Display/Signal
1. Switch on the appliance
2. Touch and at the same time
Until the appliance is next switched off, it can used as normal.
l
¾ / acoustic signal
3 After overriding the child safety device, a heat
setting or a function must be set within
approx. 10 seconds, otherwise the appliance
automatically switches itself off.
Releasing the child safety device
Step Control panel Display/Signal
1.
2. Touch until the signal sounds Acoustic signal
3. Touch
Appliance switches off. The child safety device is released.
Switch on the appliance l
9
Page 10
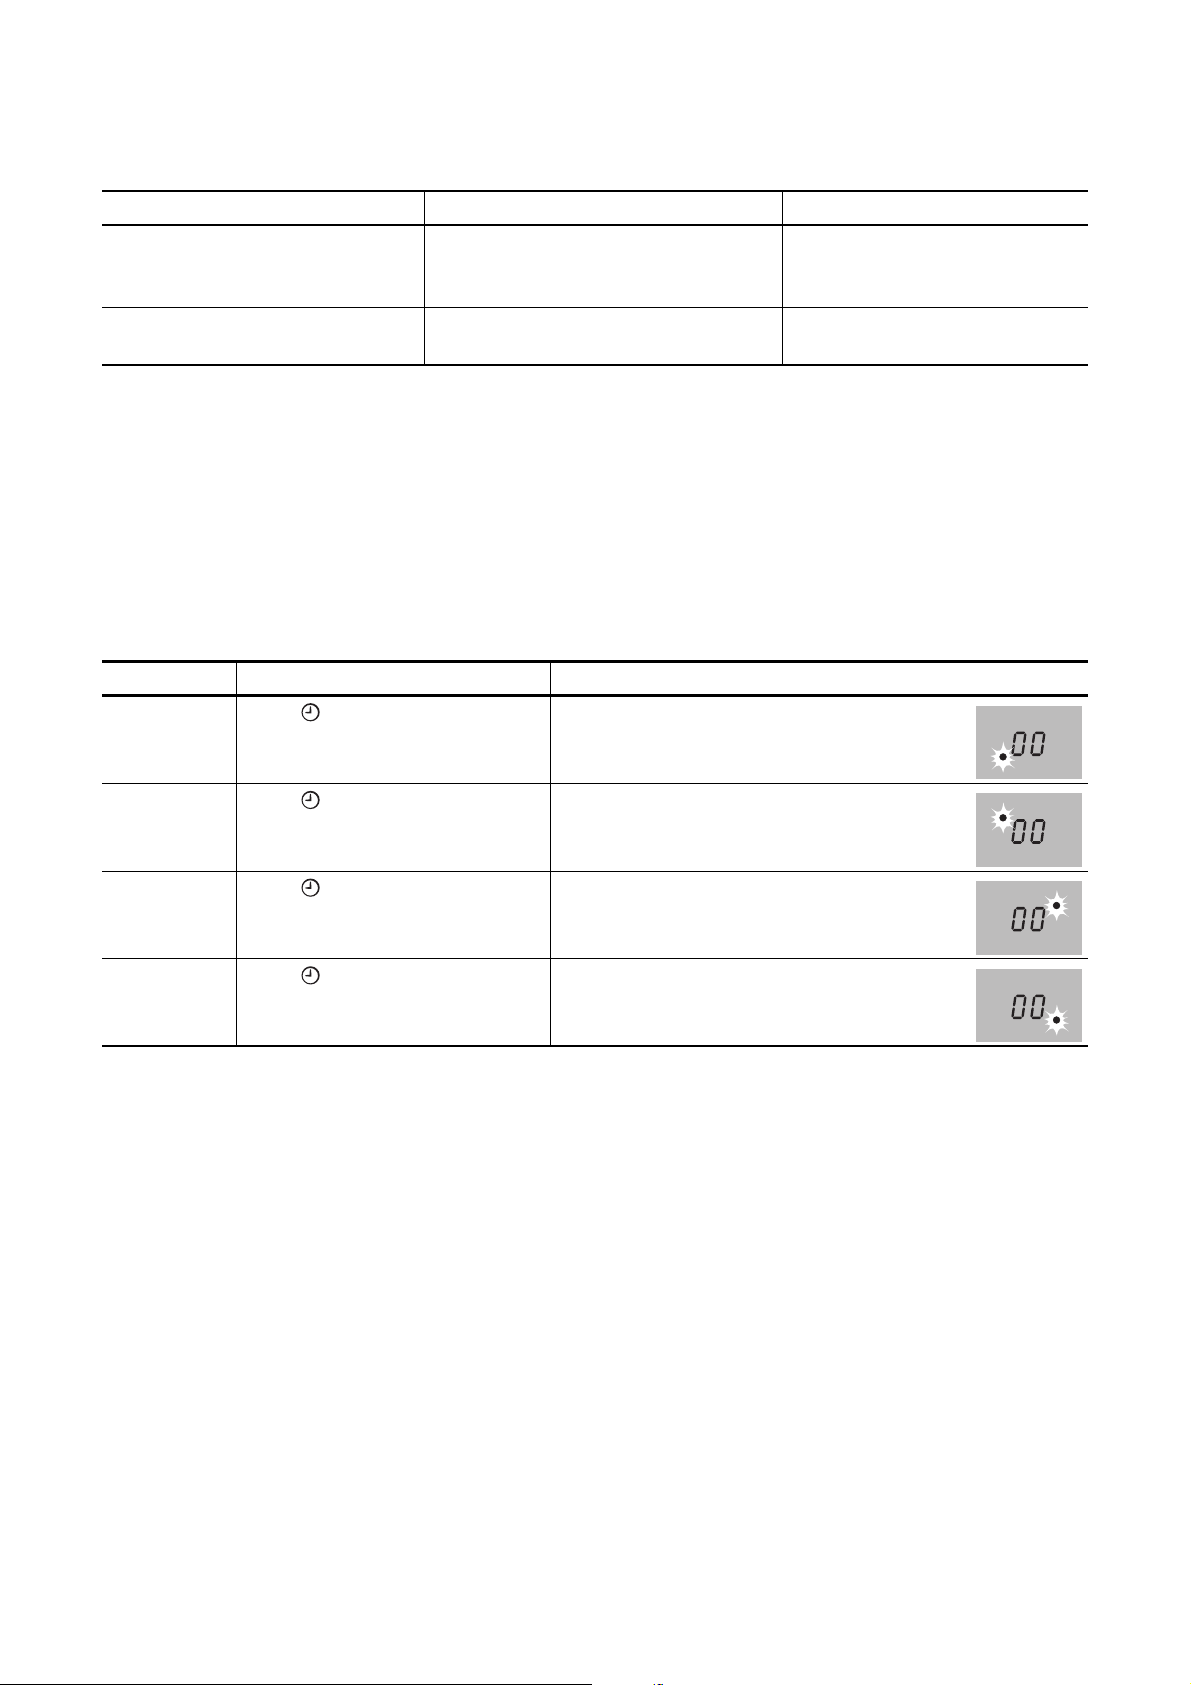
Using the timer
Function Pre-requisite Result after time has elapsed
Automatic cut-out With heat setting set Acoustic signal
Countdown timer Cooking zones are not switched on Acoustic signal
3 While the countdown timer is activated, no
cooking zone can be used.
3 The countdown timer basically cannot be
used if a cooking zone is switched on.
3 If a cooking zone is switched off, the timer
function set is also switched off.
Selecting a cooking zone
Step Control panel Display
00 flashes
Cooking zone switches off
00 flashes
1. Touch once Pilot light of the first cooking zone flashes
2. º Touch once Pilot light of the second cooking zone flashes
3. Touch once Pilot light of the third cooking zone flashes
4. Touch once Pilot light of the fourth cooking zone flashes
3 If the pilot light is flashing more slowly, the
heat setting can be set or modified.
3 If other timer functions are set, after a few sec-
onds the shortest remaining time of all the timer functions is displayed and the
corresponding pilot light flashes.
10
Page 11
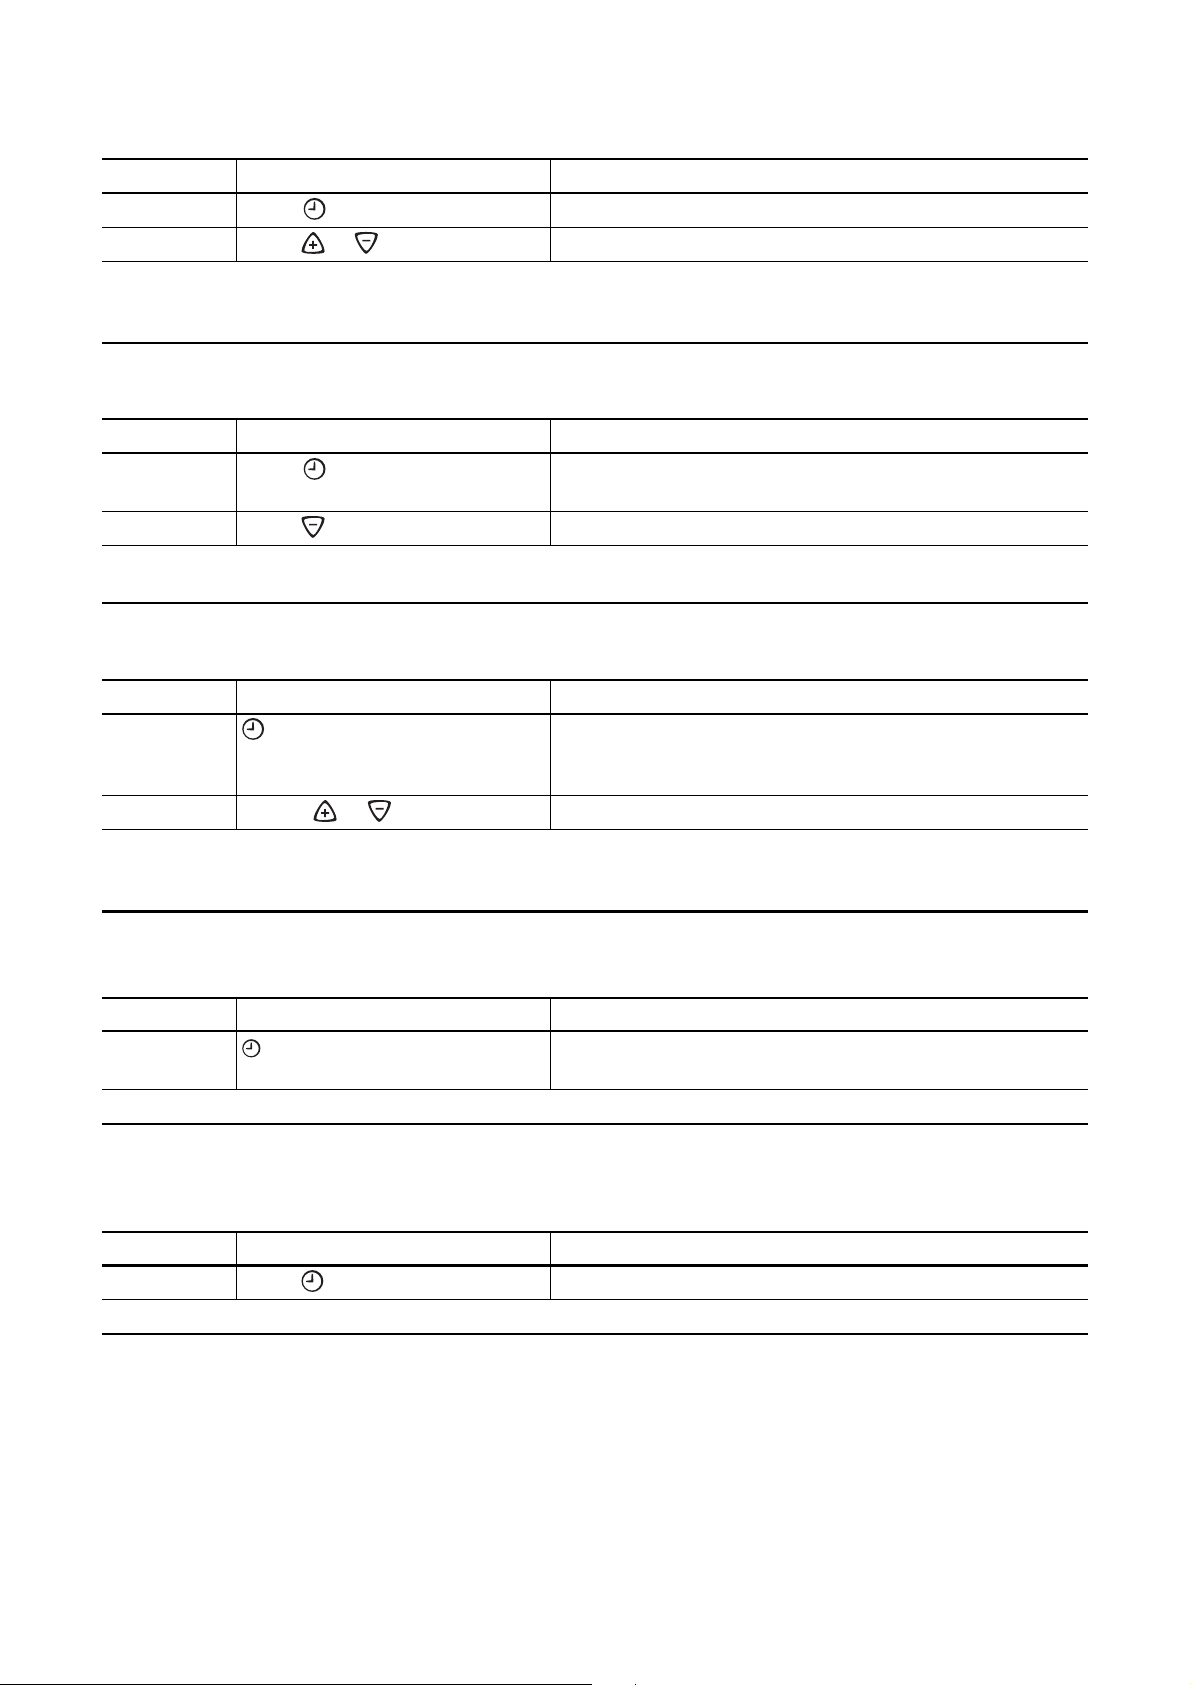
Setting the time
Step Control panel Indicator
1. Select cooking zone Pilot light for the cooking zone selected flashes
2. Touch or
After a few seconds the pilot light flashes more slowly.
The time is set.
The time counts down.
00 to 99 minutes
Switching off the timer function
Step Control panel Indicator
1. Select cooking zone Pilot light of cooking zone selected flashes faster
Time remaining is displayed
2. Touch The time remaining counts backwards to 00.
The pilot light goes out.
The Timer function for the selected cooking zone is switched off.
Changing the time
Step Control panel Indicator
1.
2. Tou ch
Selecting a cooking zone Pilot light of the selected cooking zone flashes more quick-
ly
Remaining time is displayed
or 01 to 99 minutes
After a few seconds the pilot light flashes more slowly.
The time is set.
The time counts down.
Displaying the time remaining for a cooking zone
Step Control panel field Display
1. Select cooking zone Pilot light of the cooking zone selected flashes faster
The time remaining is displayed
After a few seconds the pilot light flashes more slowly.
Switching off the acoustic signal
Step Control panel field Acoustic signal
1. Touch
Acoustic signal stops.
Acoustic signal to acknowledge.
11
Page 12

Safety cut-out
Cooking surface
• If after switching on the cooking surface, a heat
setting is not set for a cooking zone within approx.
10 seconds, the cooking surface automatically
switches itself off.
• If one or more sensor fields are covered for longer
than approx. 10 seconds, e.g. by a pan placed
upon it, a signal sounds and the cooking surface
switches off automatically.
• If all cooking zones are switched off, the cooking
surface automatically switches itself off after approx. 10 seconds.
Control panel
3 Moisture (e.g. a wet cloth) or liquid boiling over
onto the control panel immediately switches
all cooking zones off.
Cooking zones
• If one of the cooking zones is not switched off after
a certain time, or if the heat setting is not modified,
the relevant cooking zone switches off automatically.
Heat setting Switches off after
V, 1 - 2 6 hours
3 - 4 5 hours
5 4 hours
6 - 9 1.5 hours
12
Page 13
Tips on cooking and frying
Information about acrylamides
3
According to the latest scientific research, intensive browning of food, especially in products containing starch, may present a health
risk due to acrylamide. Therefore we recommend cooking at low temperatures and not
browning foods too much.
Cookware
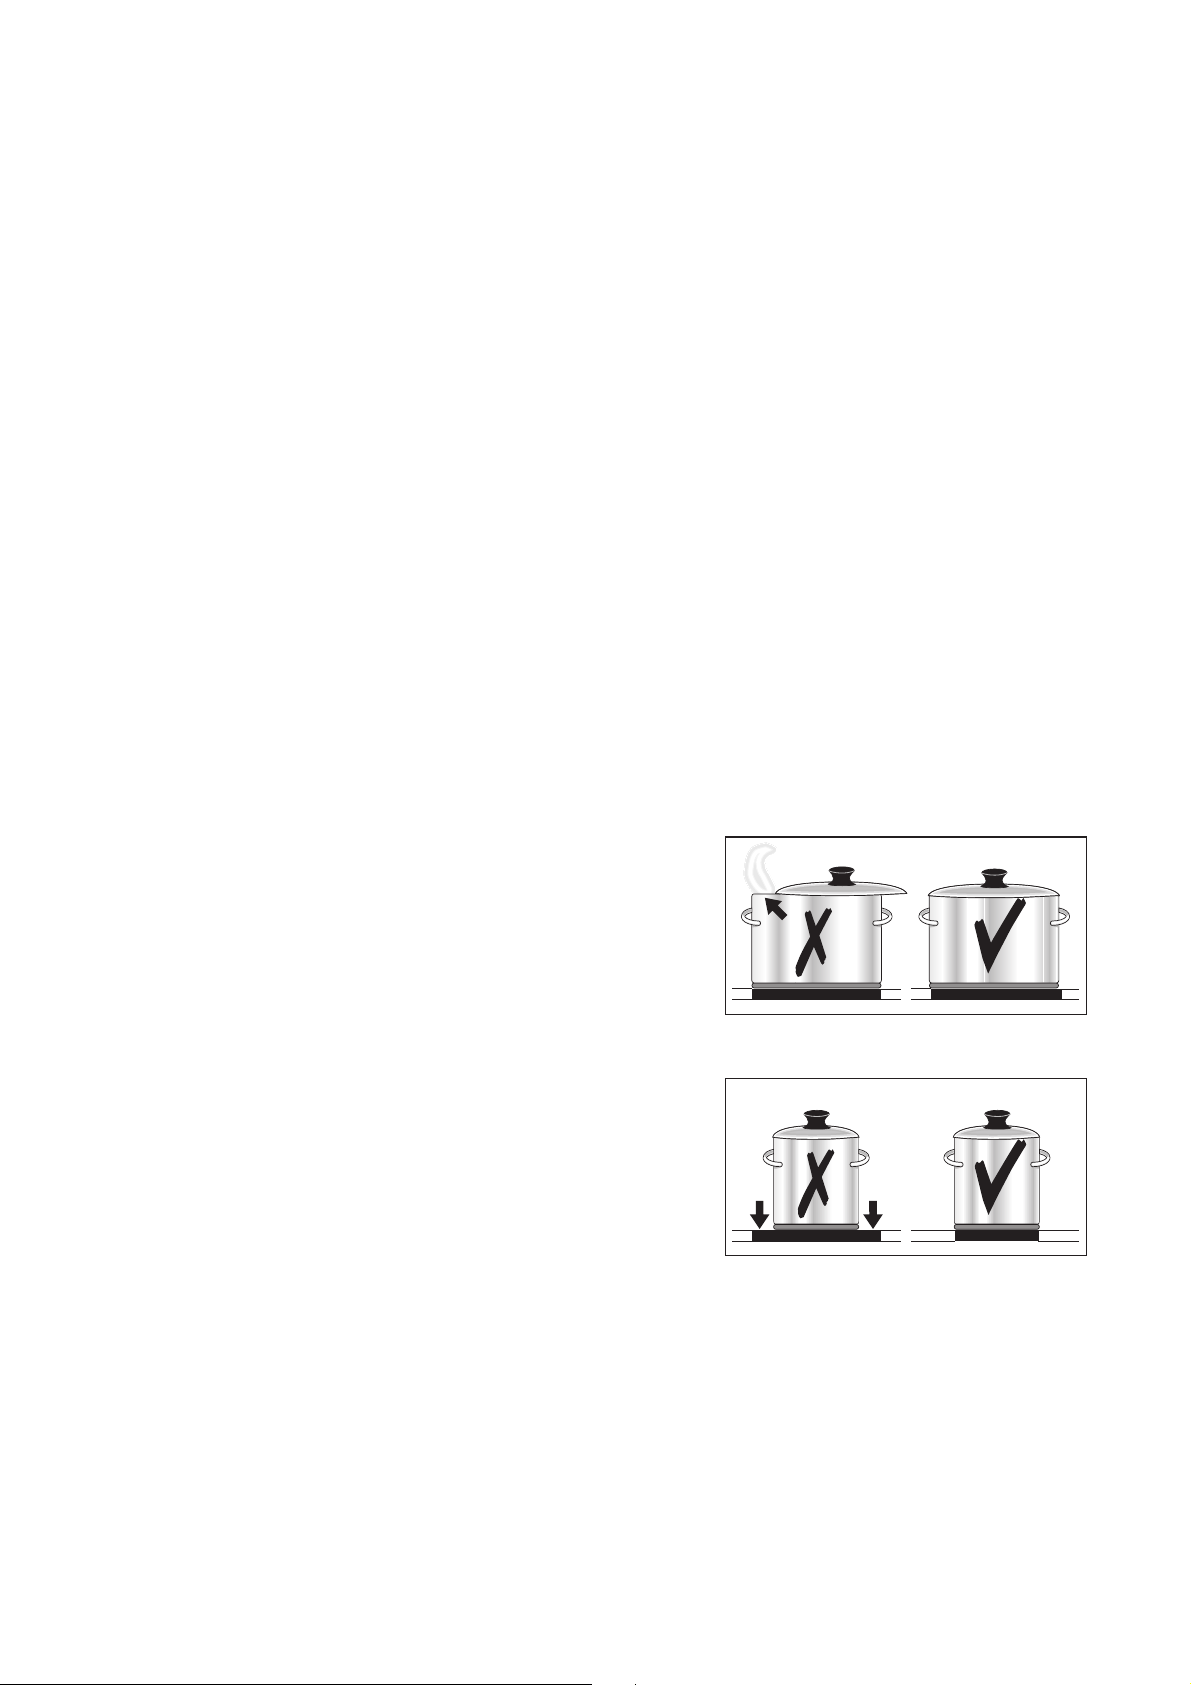
• You can recognise good cookware from the bottoms of the pans. The bottom should be as thick
and flat as possible.
• Cookware made of enamelled steel or with aluminium or copper bottoms can leave discolourations
on the ceramic glass surface which are difficult or
impossible to remove.
Energy saving
2 Always place cookware on the cooking zone
before it is switched on.
2 If possible, always place lids on the pans.
2 Switch cooking zones off before the end of the
cooking time, to take advantage of residual
heat.
2 Bottom of pans and cooking zones should be
the same size.
13
Page 14

Examples of cooking applications
The information given in the following table is for guidance only.
Heat
setting
0 Residual heat, Off position
V
1-2
2-3 Simmering
3-4
4-5 Boiling
6-7
Cooking
process
Keeping
food warm
Melting
Solidifying Fluffy omelettes, baked eggs 10-40 mins. Cook with lid on
Steaming
Braising
Gentle
frying
Keeping cooked foods warm as required Cover
melting butter, chocolate, gelatine
Simmering rice and milk-based
Heating up ready-cooked meals
Steaming vegetables, fish
Cooking larger quantities of food,
Frying escalope, veal cordon
bleu, cutlets, rissoles, sausages,
liver, roux, eggs, pancakes,
suitable for Cook time Tips/Hints
Hollandaise sauce,
dishes
Braising meat
Steaming potatoes 20-60 mins.
stews and soups
doughnuts
5-25 mins. Stir occasionally
Add at least twice as much
25-50 mins.
20-45 mins.
60-150 mins.
as required Turn halfway through cooking
liquid as rice, stir milk dishes
part way through cooking
With vegetables add only a lit-
tle liquid (a few tablespoons)
Use only a little liquid, e. g.:
¼ l water for 750 g of
max.
potatoes
Up to 3 l liquid plus ingredi-
ents
7-8
9
Heavy
frying
Boiling
Searing
Deep frying
Hash browns, loin steaks, steaks,
Flädle (pancakes for garnishing
soup)
Boiling large quantities of water, cooking pasta, searing meat (goulash, pot roast),
5-15 mins.
per pan
deep frying chips
Turn halfway through cooking
14
Page 15
Cleaning and care
1
Take care! Risk of burns from residual heat.
1 Important Sharp objects and abrasive clean-
ing materials will damage the appliance. Clean
with water and washing up liquid.
1 Important Residues from cleaning agents will
damage the appliance. Remove residues with
water and washing up liquid.
Cleaning the appliance after each use
1. Wipe the appliance with a damp cloth and a little
washing up liquid.
2. Rub the appliance dry using a clean cloth.
Removing deposits
1. Place the scraper on the glass ceramic surface at
an angle.
2. Remove residues by sliding the blade over the surface.
3. Wipe the appliance with a damp cloth and a little
washing up liquid.
4. Rub the appliance dry using a clean cloth.
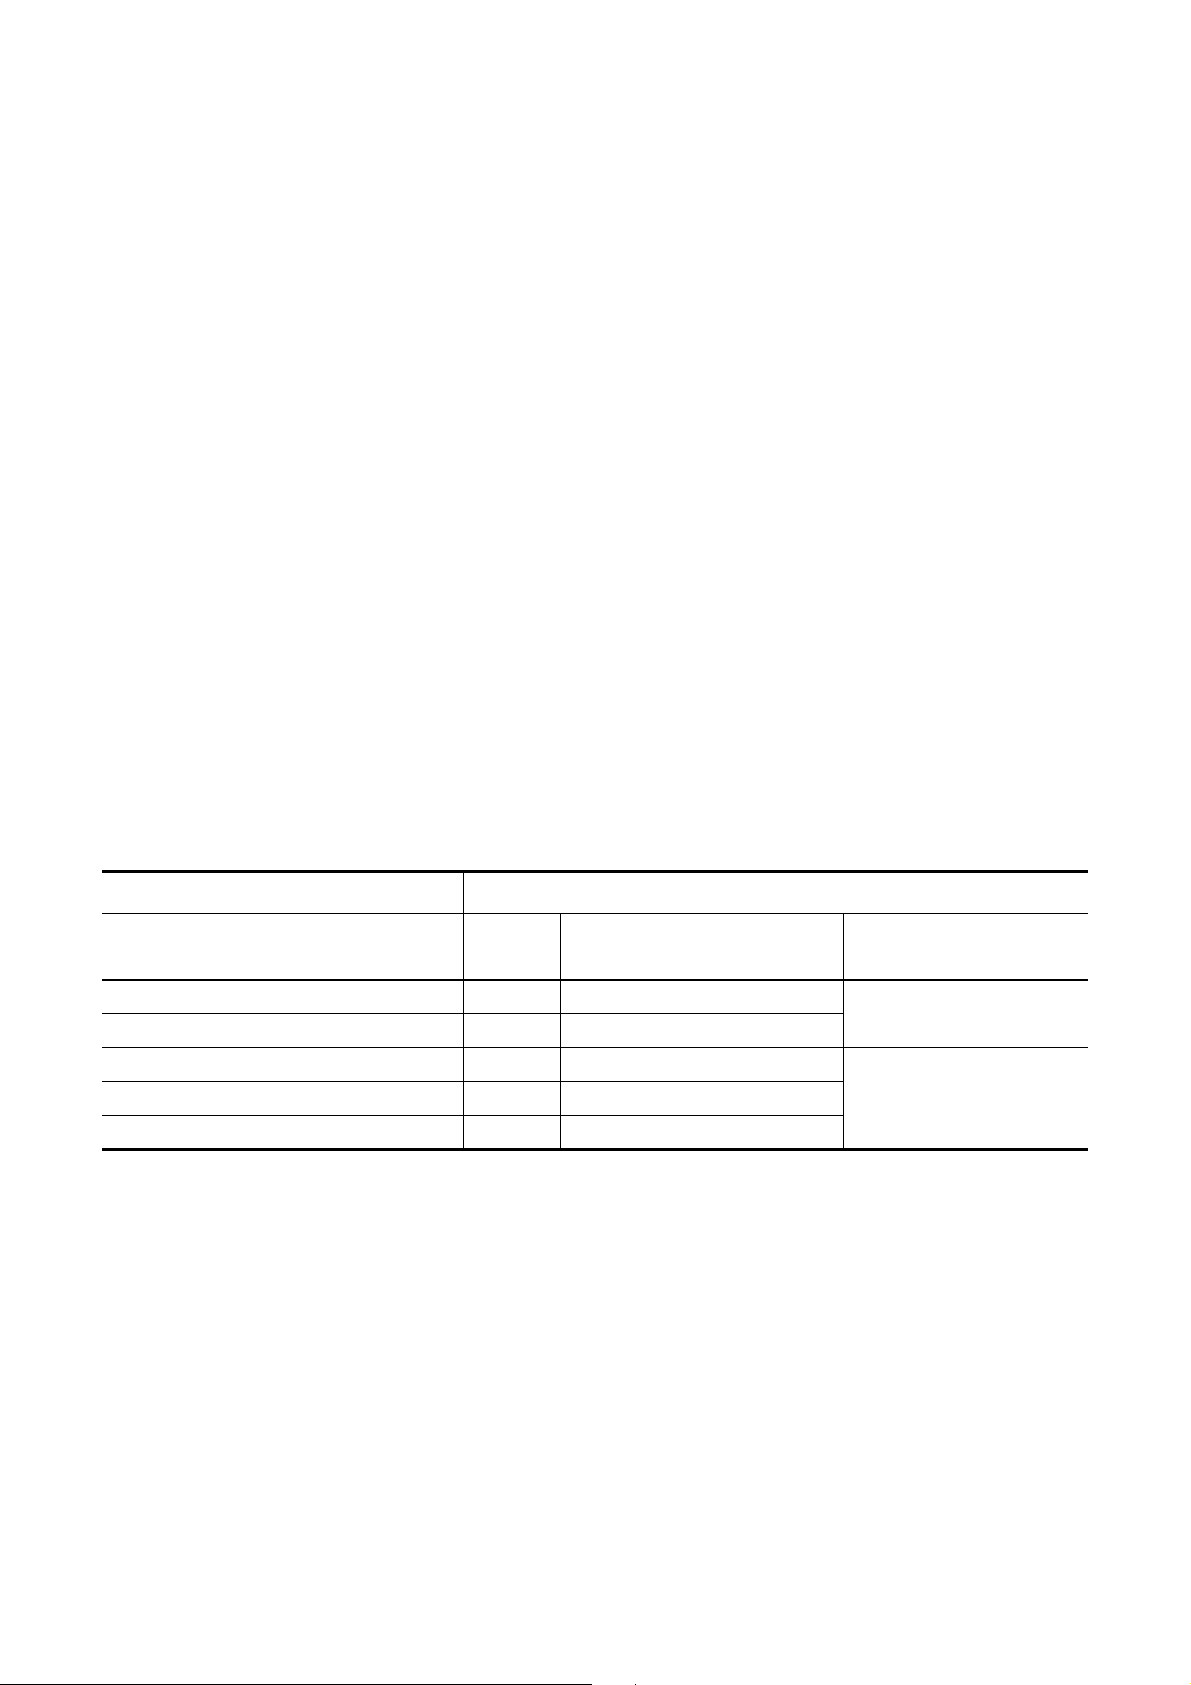
Type of dirt
sugar, food containing sugar yes --plastics, tin foil yes --limescale and water rings --- yes
fat splashes --- yes
shiny metallic discolorations --- yes
*Scrapers and cleaners for glass ceramic and stainless steel
can be purchased in specialist shops, supermarkets, the
parts department of your local Service Force Centre or from
www.shop.electrolux.co.uk
immedi-
ately
3 Remove stubborn residues with a cleaner for
glass ceramic or stainless steel.
3 Scratches or dark stains on the glass ceramic
that cannot be removed do not however affect
the functioning of the appliance.
when the appliance has
cooled down
Metal décor strips
1 Warning! Do not use vinegar, lemon juice or
lime slaking agents on the cooking surface's
décor strips, otherwise dull spots will result.
When cleaning do not introduce flat objects
(e.g. knives) under the décor strips, as otherwise these can possibly become detached.
1.Wipe metal décor strips with a damp cloth and a
little washing up liquid.
2.Soak dried on spillages with a wet cloth. Afterwards wipe off and rub dry.
Remove
using
a scraper*
cleaner for glass ceramic
or stainless steel*
15
Page 16
What to do if …
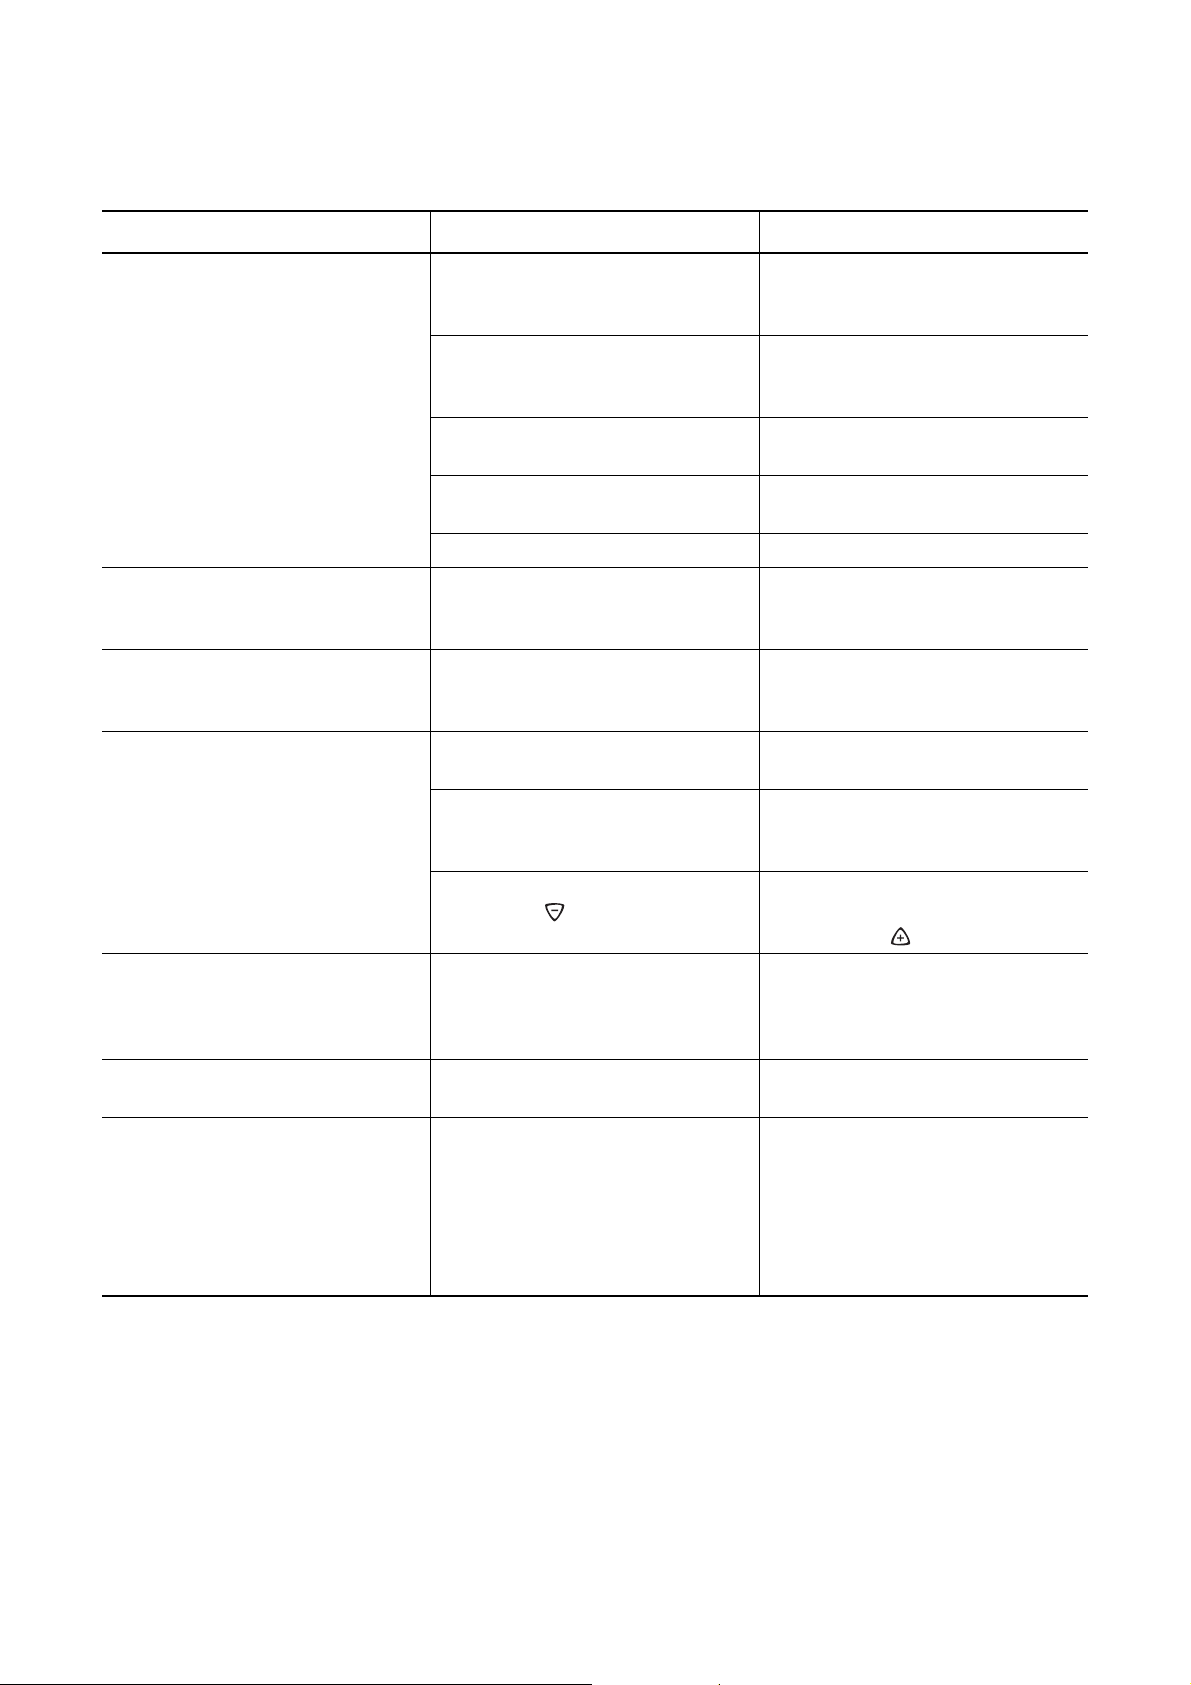
Problem Possible cause Remedy
The cooking zones will not switch
on or are not functioning
The residual heat indicator is not
displaying anything
The automatic warm up function is
not switching itself on
More than 10 seconds have passed
since the appliance was switched
on
The child safety device is switched
l
on
Several sensor fields were touched
at the same time
The sensor fields are partly covered
by a damp cloth or with liquid
Safety cut-out has been triggered Switch the appliance on again
The lock is switched on
The cooking zone was only on for a
short time and is therefore not hot
There is still residual heat on the
cooking zone h
The highest heat setting is set Ç The highest heat setting has the
l Switch off the lock (See the section
Switch the appliance on again.
Deactivate the child safety device
(See the section “Child safety device”)
Only touch one sensor field
Remove the cloth or the liquid.
Switch the appliance on again.
“Locking/unlocking the control
panel”)
If the cooking zone is supposed to
be hot, call your local Service Force
Centre.
Let the cooking zone cool down
same power as the automatic warm
up function
The heat setting was set using the
sensor field
Acoustic signal sounds and appliance switches itself on and then off
again; after 5 seconds another
acoustic signal sounds
The On/Off sensor field has been
covered up, e.g. by a cloth
_ is lit Overheating protection for the
cooking zone has been triggered
1.Switching off the cooking zone
1.Set the cooking zone using the
sensor field
Do not place any objects on the
control panel
Switch off the cooking zone.
Switch the cooking zone on again
e and number are displayed Electronics fault Disconnect the appliance from the
electrical supply for a few minutes
(Take the fuse out of the house’s
wiring system)
If after switching on again,
played again, call the customer
service department
e is dis-
16
Page 17

If you are unable to remedy the problem by following the above suggestions, please contact
your local Service Force Centre.
1 Warning! Repairs to the appliance are only to
be carried out by qualified service engineers.
Considerable danger to the user may result
from improper repairs.
3 If the appliance has been wrongly operated,
the visit from the service technician or dealer
may not take place free of charge, even during
the warranty period.
Disposal
2
Packaging material
The packaging materials are environmentally
friendly and can be recycled. The plastic components are identified by markings, e.g. >PE<,
>PS<, etc. Please dispose of the packaging
materials in the appropriate container at your
local waste disposal facilities.
2 Old appliance
The symbol W on the product or on its pack-
aging indicates that this product may not be
treated as household waste. Instead it shall be
handed over to the applicable collection point
for the recycling of electrical and electronic
equipment. By ensuring this product is disposed of correctly, you will help prevent potential negative consequences for the
environment and human health, which could
otherwise be caused by inappropriate waste
handling of this product. For more detailed information about recycling of this product,
please contact your local city office, your
household waste disposal service or the shop
where you purchased the product.
17
Page 18

Installation Instructions
Safety instructions
The laws, ordinances, directives and standards in
force in the country of use are to be followed (safety
regulations, proper recycling in accordance with the
regulations, etc.)
Installation may only be carried out by a qualified
electrician.
The minimum distances to other appliances and
units are to be observed.
A protective floor must be installed under the appliance.
The cut surfaces of the worktop are to be protected
against moisture using a suitable sealant.
The sealant seals the appliance to the work top with
no gap.
Avoid installing the appliance next to doors and under windows. Otherwise hot cookware may be
knocked off the rings when doors and windows are
opened.
1 WARNING!
Risk of injury from electrical current.
• The electrical mains terminal is live.
• Observe connection schematic.
• Observe electrical safety rules.
• Ensure anti-shock protection through correct in-
stallation by a qualified electrician.
• The appliance must be connected to the electrical
supply by a qualified electrician.
1 IMPORTANT!
Risk of injury from electrical current.
Loose and inappropriate plug and socket connections can make the terminal overheat.
• Have the clamping joints correctedly installed by a
qualified electrician.
• Use strain relief clamp on cable.
• In the event of single-phase or two-phase connec-
tion, the appropriate mains cable of type H05BB-F
Tmax 90° (or higher) must be used.
• If this appliance’s mains cable is damaged, it must
be replaced by a special cable (type H05BB-F
Tmax 90°; or higher). The latter is available from
the Customer Care Department.
A device must be provided in the electrical installation which allows the appliance to be disconnected
from the mains at all poles with a contact opening
width of at least 3 mm
Suitable isolation devices include line protecting cutouts, fuses (screw type fuses are to be removed from
the holder), earth leakage trips and contactors.
18
Page 19
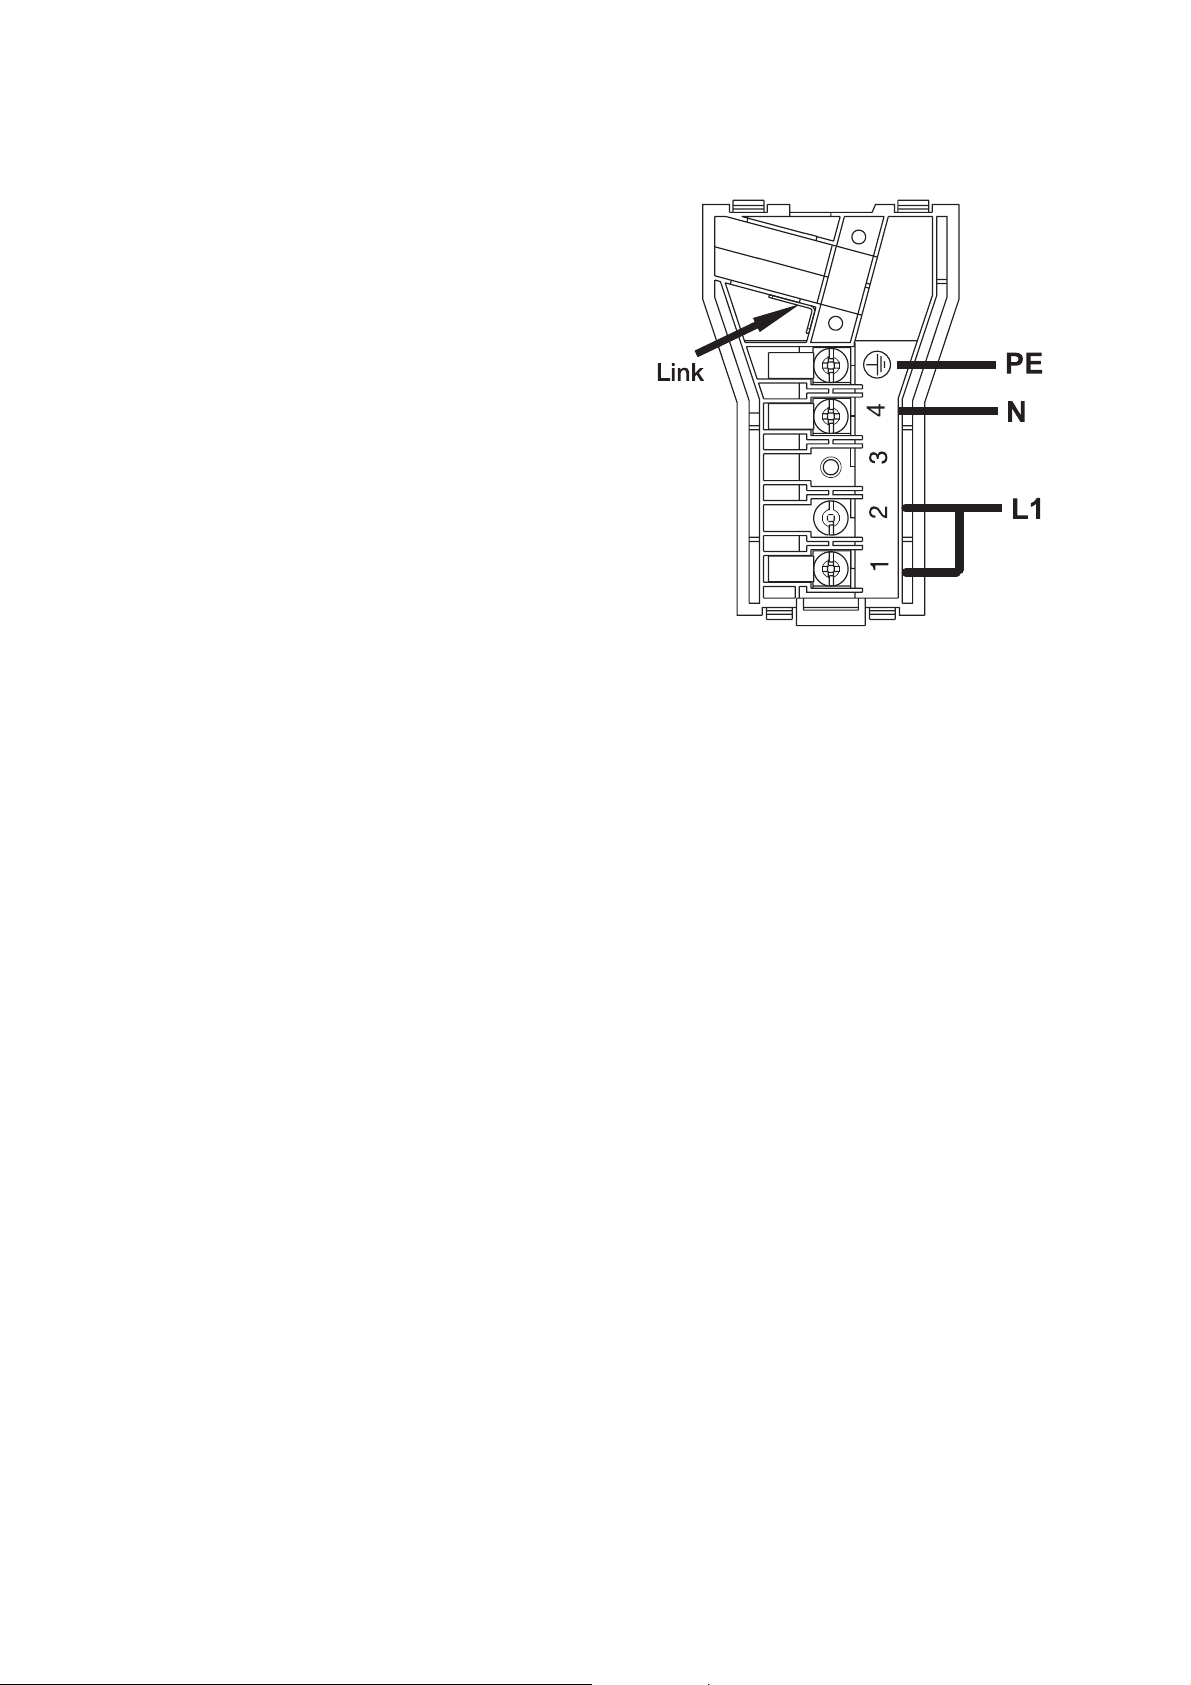
Electrical Connection Diagram
For UK only: 230V...240V~
Sticking on the seal
• Clean the worktop in the area of the cut-out sec-
tion.
• Stick the one-sided self-adhesive sealing tape
supplied all the way round the lower edge of the
cooking surface along the outer edge of the glass
ceramic panel. Do not stretch it. The cut ends
should lie in the middle of one side. When you
have cut it to length (add a few mm), press the two
ends flush up against one another.
19
Page 20

Warranty conditions
Standard guarantee conditions
We, Electrolux, undertake that if within 12 months of
the date of the purchase this Electrolux appliance or
any part thereof is proved to be defective by reason
only of faulty workmanship or materials, we will, at
our option repair or replace the same FREE OF
CHARGE for labour, materials or carriage on condition that:
• The appliance has been correctly installed and
used only on the electricity supply stated on the
rating plate.
• The appliance has been used for normal domestic
purposes only, and in accordance with the manufacturer’s instructions.
• The appliance has not been serviced, maintained,
repaired, taken apart or tampered with by any person not authorised by us.
• All service work under this guarantee must be un-
dertaken by a Service Force Centre.
• Any appliance or defective part replaced shall be-
come the Company’s property.
• This guarantee is in addition to your statutory and
other legal rights.
Home visits are made between 8.30am and 5.30pm
Monday to Friday. Visits may be available outside
these hours in which case a premium will be
charged.
• This guarantee relates to you and cannot be transferred to another user.
• Your new home is within the European Community
(EC) or European Free Trade Area.
• The product is installed and used in accordance
with our instructions and is only used domestically,
i.e. a normal household.
• The product is installed taking into account regulations in your new country.
Before you move please contact your nearest Customer Care centre, listed below, to give them details
of your new home. They will then ensure that the local Service Organisation is aware of your move and
able to look after you and your appliances.
France Senlis +33 (0) 3 44 62 20 13
Germany Nürnberg +49 (0) 800 234 7378
Italy Pordernone +39 (0) 800 11 7511
Sweden Stockholm +46 (0) 20 78 77 50
UK Slough +44 (0) 1753 219898
Exclusions
This guarantee does not cover:
• Damage or calls resulting from transportation, improper use or neglect, the replacement of any light
bulbs or removable parts of glass or plastic.
• Costs incurred for calls to put right an appliance
which is improperly installed or calls to appliances
outside the United Kingdom.
• Appliances found to be in use within a commercial
environment, plus those which are subject to rental
agreements.
• Products of Electrolux manufacture which are not
marketed by Electrolux.
European Guarantee
If you should move to another country within Europe
then your guarantee moves with you to your new
home subject to the following qualifications:
• The guarantee starts from the date you first purchased your product.
• The guarantee is for the same period and to the
same extent for labour and parts as exists in the
new country of use for this brand or range of products.
20
Page 21
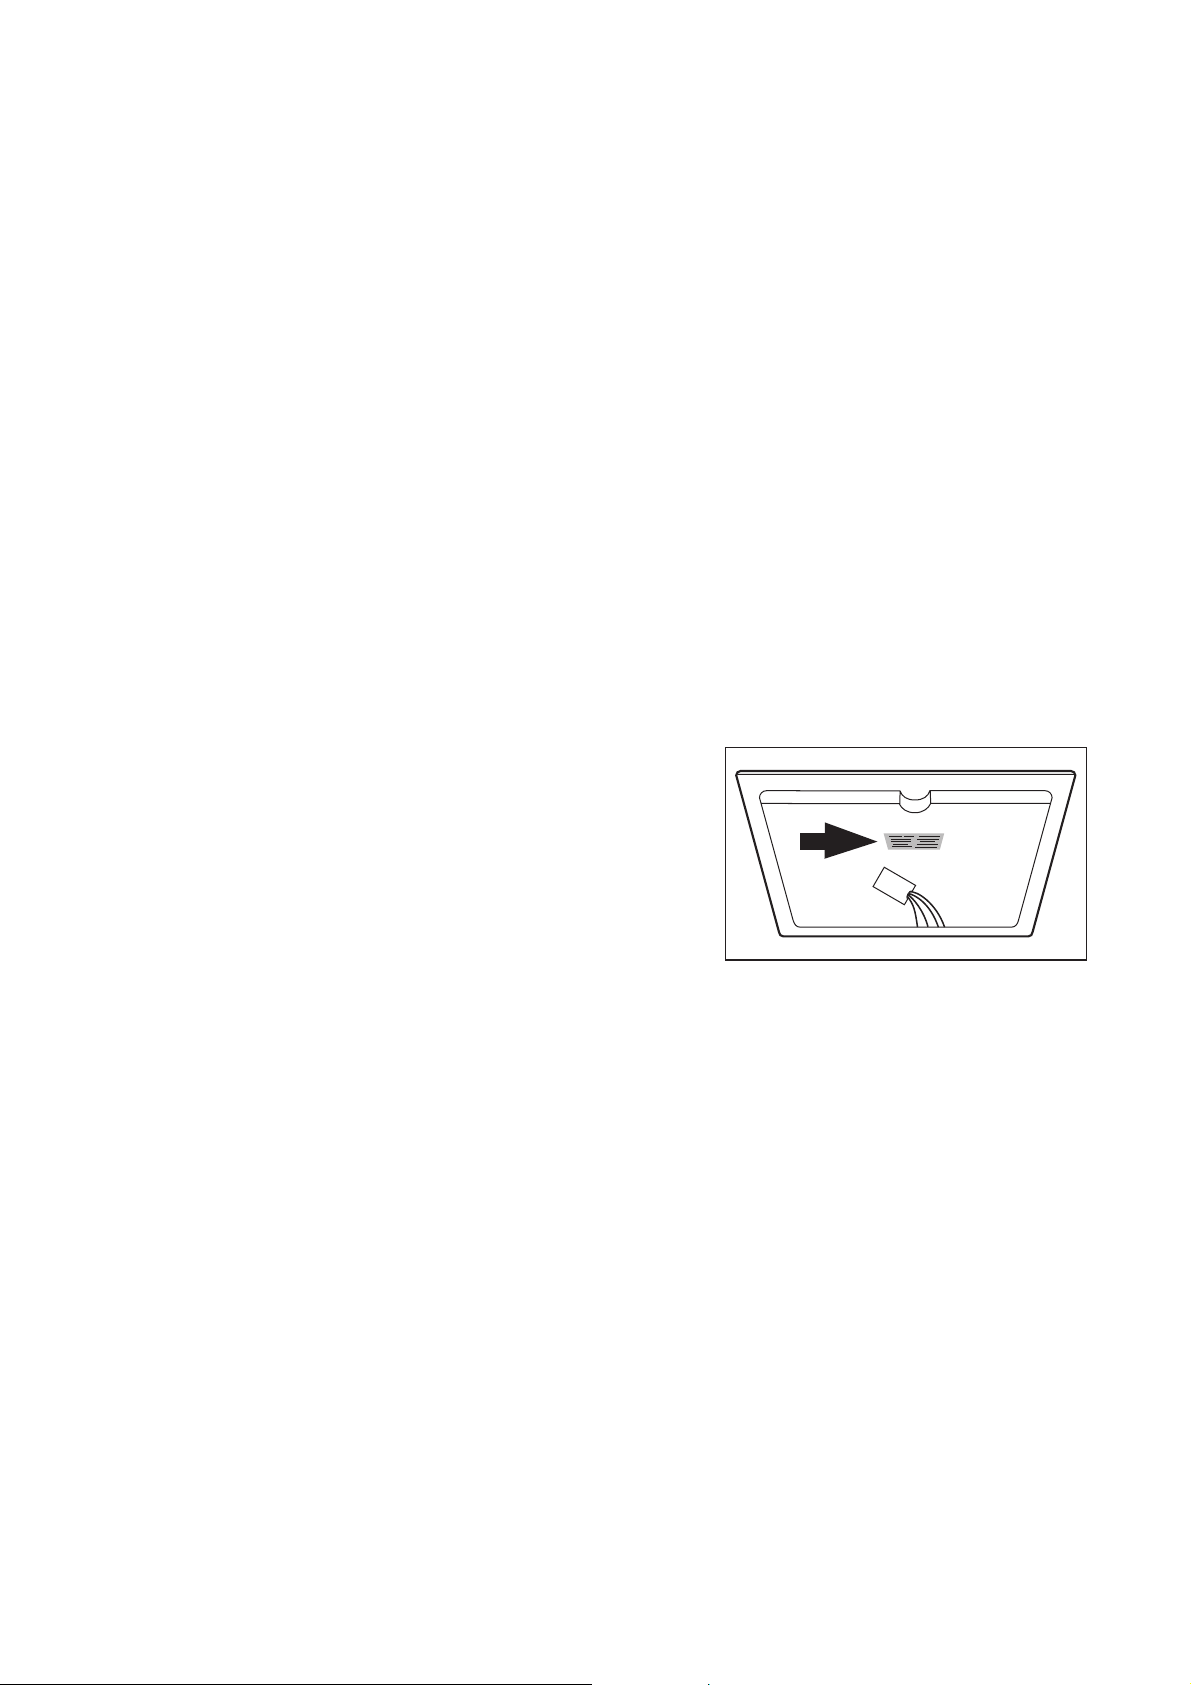
Service and Spare Parts
If the event of your appliance requiring service, or if
you wish to purchase spare parts, please contact
Service Force by telephoning:
0870 5 929 929
Your telephone call will be automatically routed to
the Service Force Centre covering your post code area.
For the address of your local Service Force Centre
and further information about Service Force, please
visit the website at
www. serviceforce.co.uk
Before calling out an engineer, please ensure you
have read the details under the heading „What to do
if...“
When you contact the Service Force Centre you will
need to give the following details:
1. Your name, address and post code.
2. Your telephone number.
3. Clear and concise details of the fault.
4. The model and serial number of the appliance
(found on the rating plate)
5. The purchase date.
Please note that a valid purchase receipt or guarantee documentation is required for in-guarantee service calls.
Customer Care
For general enquiries concerning your AEG appliance, or for further information on AEG products
please contact our Customer Care Department by
letter or telephone at the address below or visit our
website at www.aeg.co.uk.
Customer Care Department
AEG Domestic Appliances
55-77 High Street
Slough
Berkshire, SL1 1DZ
Tel: 08705 350350 (*)
(*) Calls may be recorded for training purposes
For Customer Service in the Republic of Ireland please contact us at the address below:
AEG/ Electrolux Group (Ire) Ltd
Long Mile Road/ Dublin 12
Republic of Ireland
Tel: +353 (0) 1 4090754
Email: [email protected]
21
Page 22

Kjære kunde!
Les nøye gjennom denne bruksanvisningen og oppbevar den for senere referanse.
Gi denne bruksanvisningen videre til eventuelle senere eiere av apparatet.
Følgende symboler brukes i teksten:
1 Sikkerhetsanvisninger
Advarsel! Anvisninger som angår din personlige sikkerhet.
OBS! Anvisninger som skal føre til at du unngår skader på apparatet.
3 Anvisninger og praktiske tips
2 Miljøinformasjoner
22
Page 23

Innhold
Bruksanvisning . . . . . . . . . . . . . . . . . . . . . . . . . . . . . . . . . . . . . . . . . . . . . . . . . . . . . . . . . . . . . . . . . . . . 24
Sikkerhetsanvisninger . . . . . . . . . . . . . . . . . . . . . . . . . . . . . . . . . . . . . . . . . . . . . . . . . . . . . . . . . . . . . . . . . 24
Beskrivelse av apparatet . . . . . . . . . . . . . . . . . . . . . . . . . . . . . . . . . . . . . . . . . . . . . . . . . . . . . . . . . . . . . . . 25
Kokesonens oppbygging . . . . . . . . . . . . . . . . . . . . . . . . . . . . . . . . . . . . . . . . . . . . . . . . . . . . . . . . . . . . . . . . 25
Betjeningspanelets oppbygging . . . . . . . . . . . . . . . . . . . . . . . . . . . . . . . . . . . . . . . . . . . . . . . . . . . . . . . . . . . 25
Sensor-kontrollfelt . . . . . . . . . . . . . . . . . . . . . . . . . . . . . . . . . . . . . . . . . . . . . . . . . . . . . . . . . . . . . . . . . . . 26
Indikatorlamper . . . . . . . . . . . . . . . . . . . . . . . . . . . . . . . . . . . . . . . . . . . . . . . . . . . . . . . . . . . . . . . . . . . . . 26
Restvarmeindikator . . . . . . . . . . . . . . . . . . . . . . . . . . . . . . . . . . . . . . . . . . . . . . . . . . . . . . . . . . . . . . . . . . 26
Betjene apparatet . . . . . . . . . . . . . . . . . . . . . . . . . . . . . . . . . . . . . . . . . . . . . . . . . . . . . . . . . . . . . . . . . . . . . 27
Slå på og av apparatet . . . . . . . . . . . . . . . . . . . . . . . . . . . . . . . . . . . . . . . . . . . . . . . . . . . . . . . . . . . . . . . . . . 27
Stille inn kokenivå . . . . . . . . . . . . . . . . . . . . . . . . . . . . . . . . . . . . . . . . . . . . . . . . . . . . . . . . . . . . . . . . . . . . . . 27
Slå på og av ytre varmekretser . . . . . . . . . . . . . . . . . . . . . . . . . . . . . . . . . . . . . . . . . . . . . . . . . . . . . . . . . . . . 27
Forrigle/frigjøre betjeningsfeltet . . . . . . . . . . . . . . . . . . . . . . . . . . . . . . . . . . . . . . . . . . . . . . . . . . . . . . . . . . . 28
Bruke oppkokingsautomatikken . . . . . . . . . . . . . . . . . . . . . . . . . . . . . . . . . . . . . . . . . . . . . . . . . . . . . . . . . . . 28
Bruke barnesikringen . . . . . . . . . . . . . . . . . . . . . . . . . . . . . . . . . . . . . . . . . . . . . . . . . . . . . . . . . . . . . . . . . . . 29
Bruke timeren . . . . . . . . . . . . . . . . . . . . . . . . . . . . . . . . . . . . . . . . . . . . . . . . . . . . . . . . . . . . . . . . . . . . . . . . . 30
Nødutkopling . . . . . . . . . . . . . . . . . . . . . . . . . . . . . . . . . . . . . . . . . . . . . . . . . . . . . . . . . . . . . . . . . . . . . . . . . 32
Tips til koking og steking . . . . . . . . . . . . . . . . . . . . . . . . . . . . . . . . . . . . . . . . . . . . . . . . . . . . . . . . . . . . . . . 33
Kokekar. . . . . . . . . . . . . . . . . . . . . . . . . . . . . . . . . . . . . . . . . . . . . . . . . . . . . . . . . . . . . . . . . . . . . . . . . . . . . . 33
Energisparing . . . . . . . . . . . . . . . . . . . . . . . . . . . . . . . . . . . . . . . . . . . . . . . . . . . . . . . . . . . . . . . . . . . . . . . . . 33
Eksempler på bruk ved tilberedning . . . . . . . . . . . . . . . . . . . . . . . . . . . . . . . . . . . . . . . . . . . . . . . . . . . . . . . . 34
Rengjøring og pleie. . . . . . . . . . . . . . . . . . . . . . . . . . . . . . . . . . . . . . . . . . . . . . . . . . . . . . . . . . . . . . . . . . . . 35
Metalldekorstriper . . . . . . . . . . . . . . . . . . . . . . . . . . . . . . . . . . . . . . . . . . . . . . . . . . . . . . . . . . . . . . . . . . . . . . 36
Hva må gjøres hvis …. . . . . . . . . . . . . . . . . . . . . . . . . . . . . . . . . . . . . . . . . . . . . . . . . . . . . . . . . . . . . . . . . . 37
Avfallsbehandling . . . . . . . . . . . . . . . . . . . . . . . . . . . . . . . . . . . . . . . . . . . . . . . . . . . . . . . . . . . . . . . . . . . . . 38
Montasjeveiledning . . . . . . . . . . . . . . . . . . . . . . . . . . . . . . . . . . . . . . . . . . . . . . . . . . . . . . . . . . . . . . . .39
Garanti. . . . . . . . . . . . . . . . . . . . . . . . . . . . . . . . . . . . . . . . . . . . . . . . . . . . . . . . . . . . . . . . . . . . . . . . . . . . . 40
Service og reservedeler . . . . . . . . . . . . . . . . . . . . . . . . . . . . . . . . . . . . . . . . . . . . . . . . . . . . . . . . . . . . 41
Service. . . . . . . . . . . . . . . . . . . . . . . . . . . . . . . . . . . . . . . . . . . . . . . . . . . . . . . . . . . . . . . . . . . . . . . . . . . . . 42
Montasje. . . . . . . . . . . . . . . . . . . . . . . . . . . . . . . . . . . . . . . . . . . . . . . . . . . . . . . . . . . . . . . . . . . . . . . . . . . 43
23
Page 24

Bruksanvisning
1 Sikkerhetsanvisninger
3
Ta hensyn til disse anvisningene, ellers faller
reklamasjonsrettighetene bort dersom det
oppstår feil.
5 Dette apparatet er i samsvar med følgende
EU-direktiver:
– 73/23/EEC av 19.02.1973 Lavspenningsdirektiv
– 89/336/EEC av 03.05.1989 EMC-direktiv inklusive
endringsdirektiv 92/31/EEC
– 93/68/EEC av 22.07.93 CE-merkedirektiv
Riktig bruk
• Dette apparatet må kun brukes til tilberedning av
matvarer i vanlig husholdning.
• Apparatet må ikke brukes som arbeids- eller avlastningsplate.
• Det er ikke tillatt å foreta endringer eller ombygginger på apparatet.
• Brennbare væsker, lett antennelige materialer eller
gjenstander som kan smelte (f.eks. folier, kunststoff, aluminium) må ikke legges eller oppbevares
oppå eller i nærheten av apparatet.
Sikkerhet for barn
• Hold alltid små barn borte fra apparatet.
• La større barn arbeide ved apparatet kun under
veiledning og tilsyn.
Generell sikkerhet
• Kabler fra elektriske apparater må ikke komme i
kontakt med apparatets varme overflate eller varme kokekar.
• Overoppvarmede oljer og fett tar lett fyr. Ikke foreta
kokeprosesser med fett eller olje (f.eks. pommes
frites) uten tilsyn.
• Slå av kokesonene etter hver gangs bruk.
Sikkerhet ved rengjøring
• Apparatet må være avslått og avkjølt når du rengjør
det.
• Det er av sikkerhetsgrunner ikke tillatt å rengjøre
apparatet med dampstrålerenser eller høyttrykksspyler.
Hvordan unngå skader på apparatet
• Glasskeramikken kan skades av fallende gjenstander.
• Støt med kokekar kan skade kanten på glasskeramikken.
• Kokekar av støpejern, støpt aluminium eller med
skadd bunn kan stripe opp glasskeramikken når de
trekkes over overflaten.
• Smeltende gjenstander og søl av overkokt mat kan
brenne seg fast i glasskeramikken og bør derfor
fjernes straks.
• Ikke bruk kokesonene med tomme kokekar eller
uten kokekar.
• Montering og tilkopling av apparatet må kun utføres av utdannet og autorisert fagperson.
• Innbyggingsapparater må kun brukes etter innbygging i standardiserte, passende innbyggingsmøbler og benkeplater.
• Ved feil på apparatet eller ved skader i glasskeramikken (sprekker, brudd eller riss) må apparatet
slås av og koples fra strømnettet for å forhindre
fare for elektrisk støt.
• Reparasjoner på apparatet må kun utføres av utdannet og autorisert fagperson.
Sikkerhet under bruk
• Fjern etiketter og folie fra glasskeramikken.
• Det foreligger forbrenningsfare hvis du arbeider
uaktsomt ved apparatet.
24
Page 25
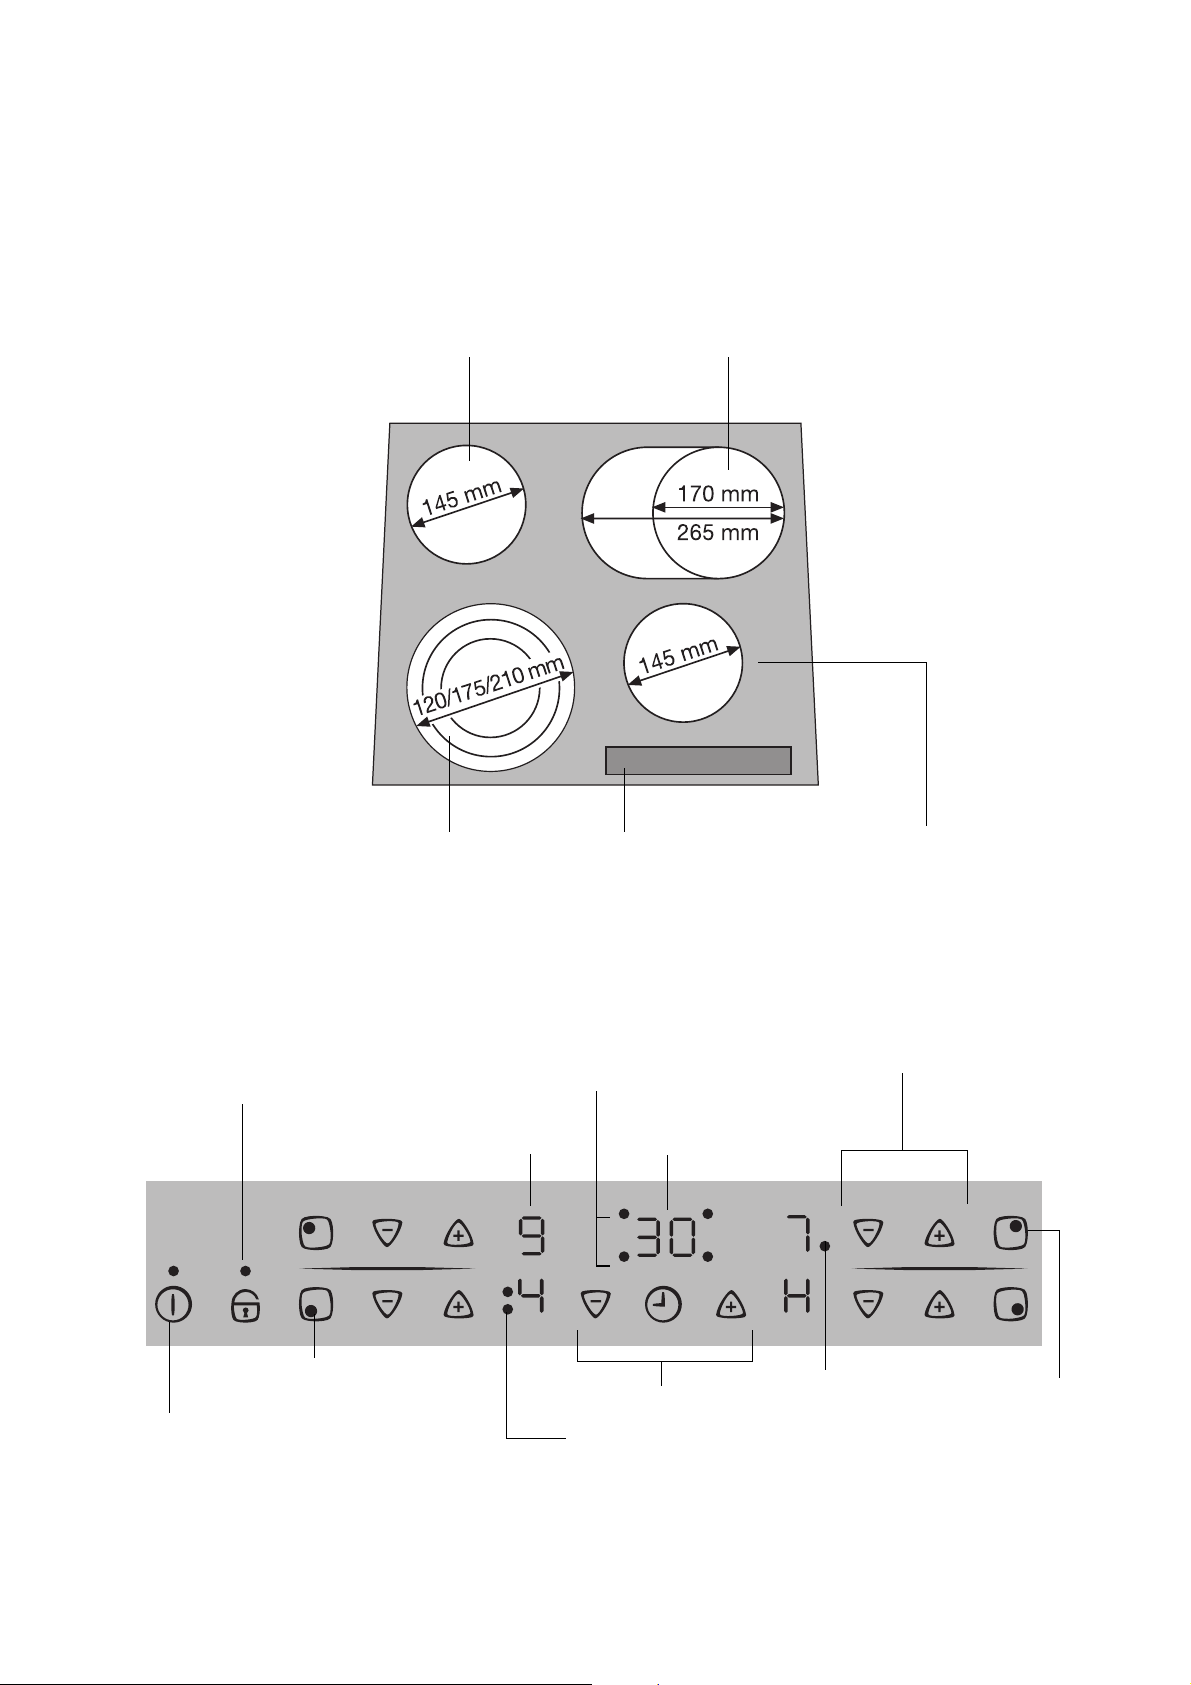
Beskrivelse av apparatet
Kokesonens oppbygging
Enkrets kokesone
1200W
Trekrets varmesone
800/1600/2300W
Betjeningsfelt
Stekesone
1500/2400W
Enkrets kokesone
1200W
Betjeningspanelets oppbygging
Forrigling
med kontrollampe
Indikatorlampe
Ytre/midtre krets
På/Av
På/Av
med kontrollampe
Varmesoneindikatorer
Timer-funksjon
Timer-indikatorlampe
Kontrollamper
Trekr ets
Timer
Kokenivåvalg
Kontrollampe for
dobbeltsone
Ytre krets
På/Av
25
Page 26
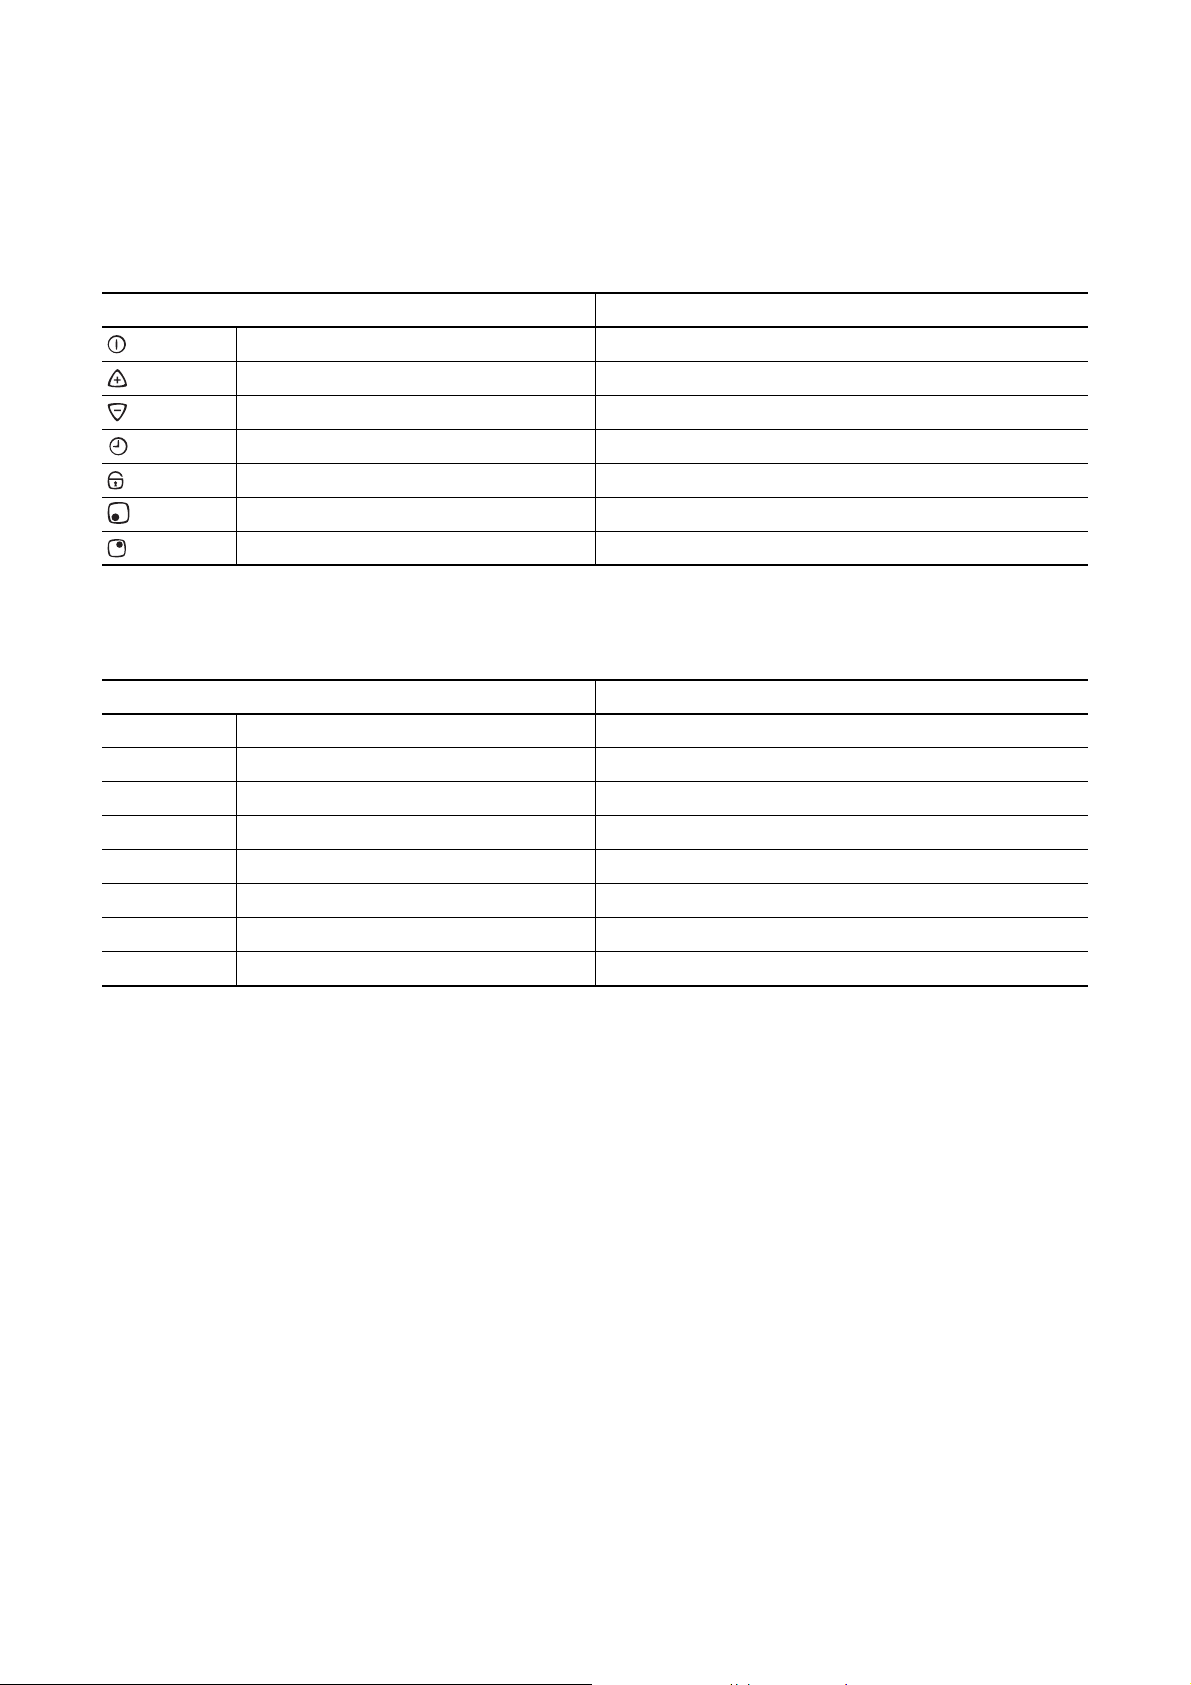
Sensor-kontrollfelt
Apparatet betjenes med sensor-kontrollfeltene.
Funksjonene styres ved å berøre sensorfeltene og
bekreftes med indikatorlamper og pipesignaler.
Berør sensorfeltene ovenfra, uten å komme borti de
øvrige sensorfeltene.
Sensorfelt Funksjon
På / Av Slå på og av apparatet
Øke innstillingene Øke kokenivå/tid
Redusere innstillingene Redusere kokenivå/tid
Timer Timer-valg
Forrigling Forrigle/frigjøre betjeningsfelt
Trekrets tilvalg Slå på og av ytre varmekretser
Stekesone Slå på og av ytre varmekrets
Indikatorlamper
Indikatorlampe Beskrivelse
¾ Varmesonen er deaktivert
u Holde-varm-trinn Holde-varm-trinn er innstilt
¿ - Ç Kokenivåer Kokenivå er innstilt
a Oppkokingsautomatikk Oppkokingsautomatikk er aktivert
e Feil Det er oppstått en feilfunksjon
h Restvarme Varmesonen er varm ennå
l Barnesikring Forrigling/barnesikring er aktivert
_ Nødutkopling Nødutkopling er aktivert
Restvarmeindikator
1 Advarsel! Forbrenningsfare pga. restvarme.
Varmesonene trenger litt tid til å avkjøles etter
at de er slått av. Ta hensyn til restvarmeindikatoren
h.
3 Restvarmen kan brukes til smelting eller til å
holde maten varm.
26
Page 27
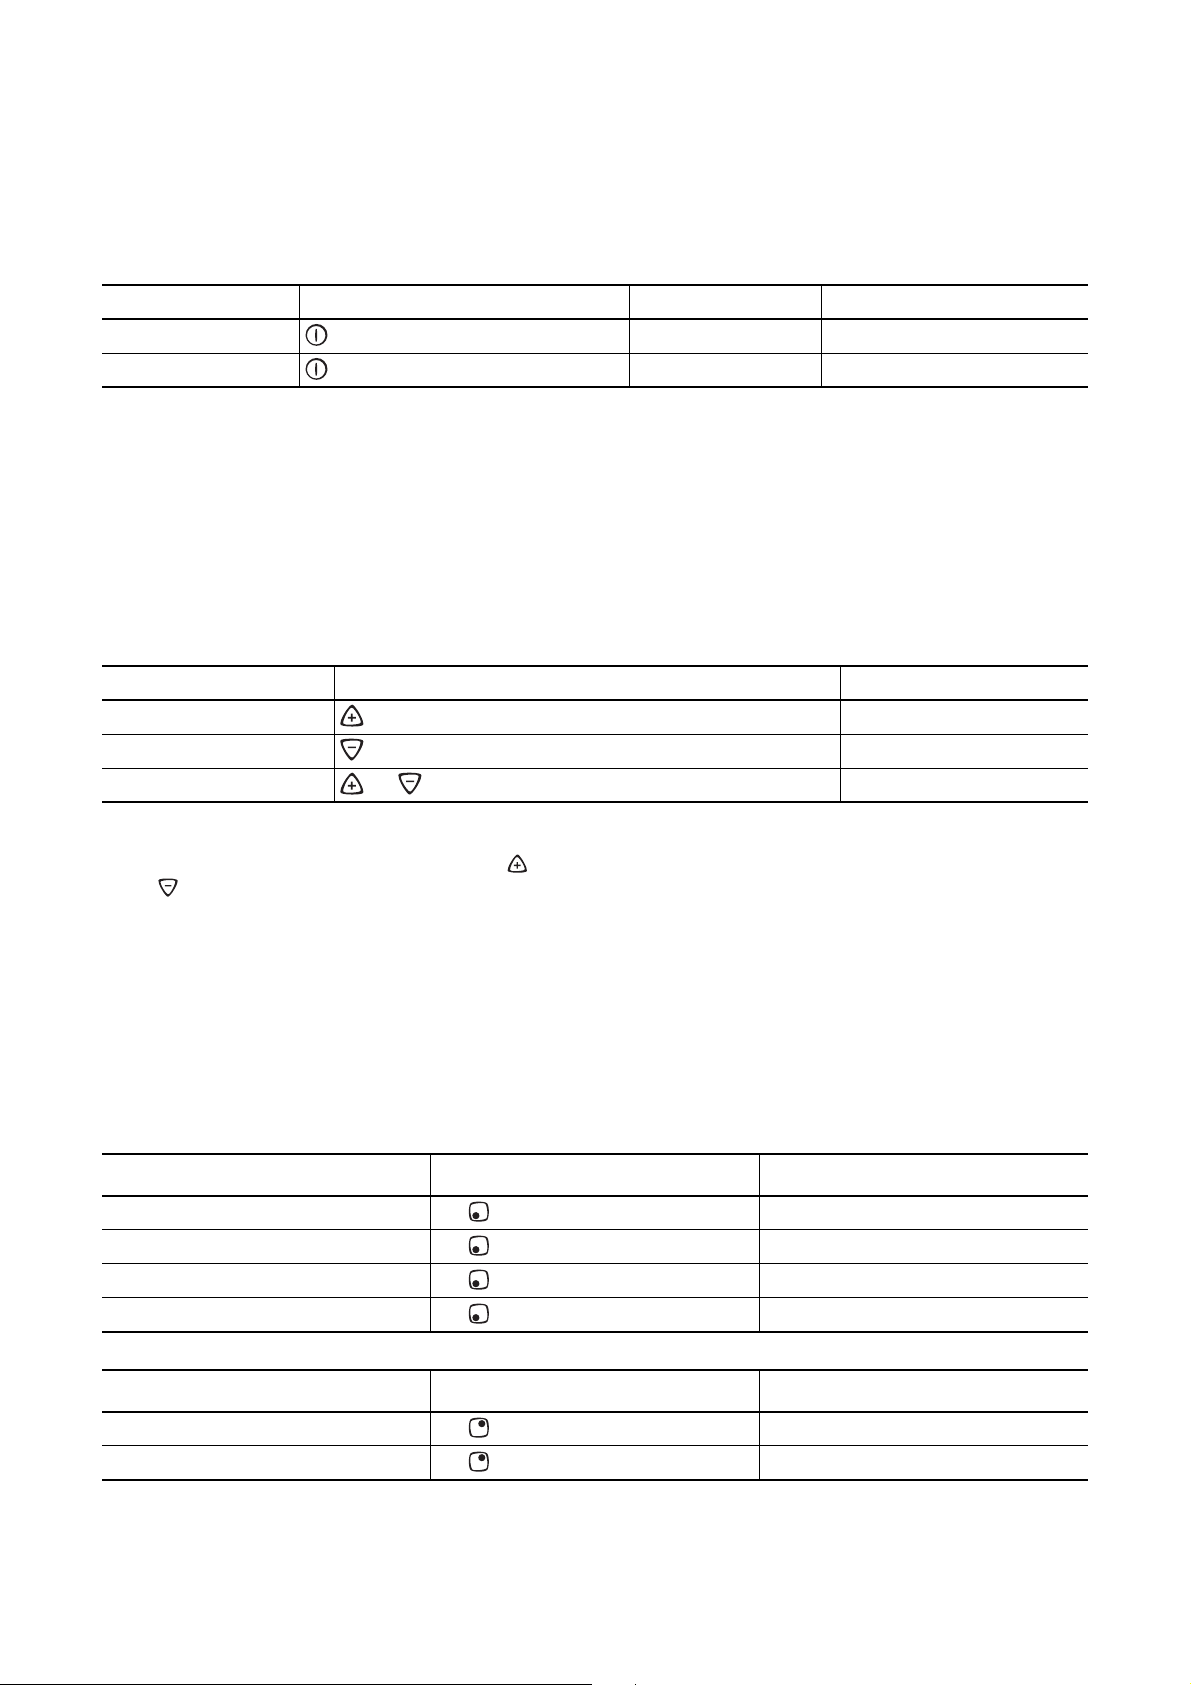
Betjene apparatet
Slå på og av apparatet
Betjeningsfelt Indikatorlampe Kontrollampe
Slå på Berør i to sekunder
Slå av Berør i ett sekund
¾ / h lyser
h / ingen slukker
3 Etter at apparatet er slått på, må det innen ca.
10 sekunder stilles inn et kokenivå eller en
funksjon, ellers slår apparatet seg atomatisk
av.
Stille inn kokenivå
Betjeningsfelt Indikatorlampe
Øke berøres
Redusere berøres Ç til ¾
Slå av og berøres samtidig ¾
u til Ç
3 Holde-varm-trinnet u liger mellom ¾ og ¿.
Holde-varm-trinnet kan innstilles med eller
. Brukes til å holde mat varm.
Slå på og av ytre varmekretser
Du kan tilpasse varmesonen til størrelsen på kokekaret ved å slå på eller av de ytre varmekretsene.
3 Før du kan slå på en ytre varmekrets, må var-
mekretsene innenfor være slått på.
Trekrets kokesone Sensorfelt Kontrollampe
Slå på en midtre varmekrets
Slå på en ytre varmekrets
Slå av en ytre varmekrets
Slå av en midtre varmekrets
Stekesone Sensorfelt Kontrollampe
Slå på en ytre varmekrets
Slå av en ytre varmekrets
Berør i ett til to sekunder En kontrollampe lyser
Berør i ett til to sekunder To kontrollamper lyser
Berør i ett til to sekunder Andre kontrollampe slukker
Berør i ett til to sekunder Første kontrollampe slukker
Berør i ett til to sekunder lyser
Berør i ett til to sekunder slukker
27
Page 28
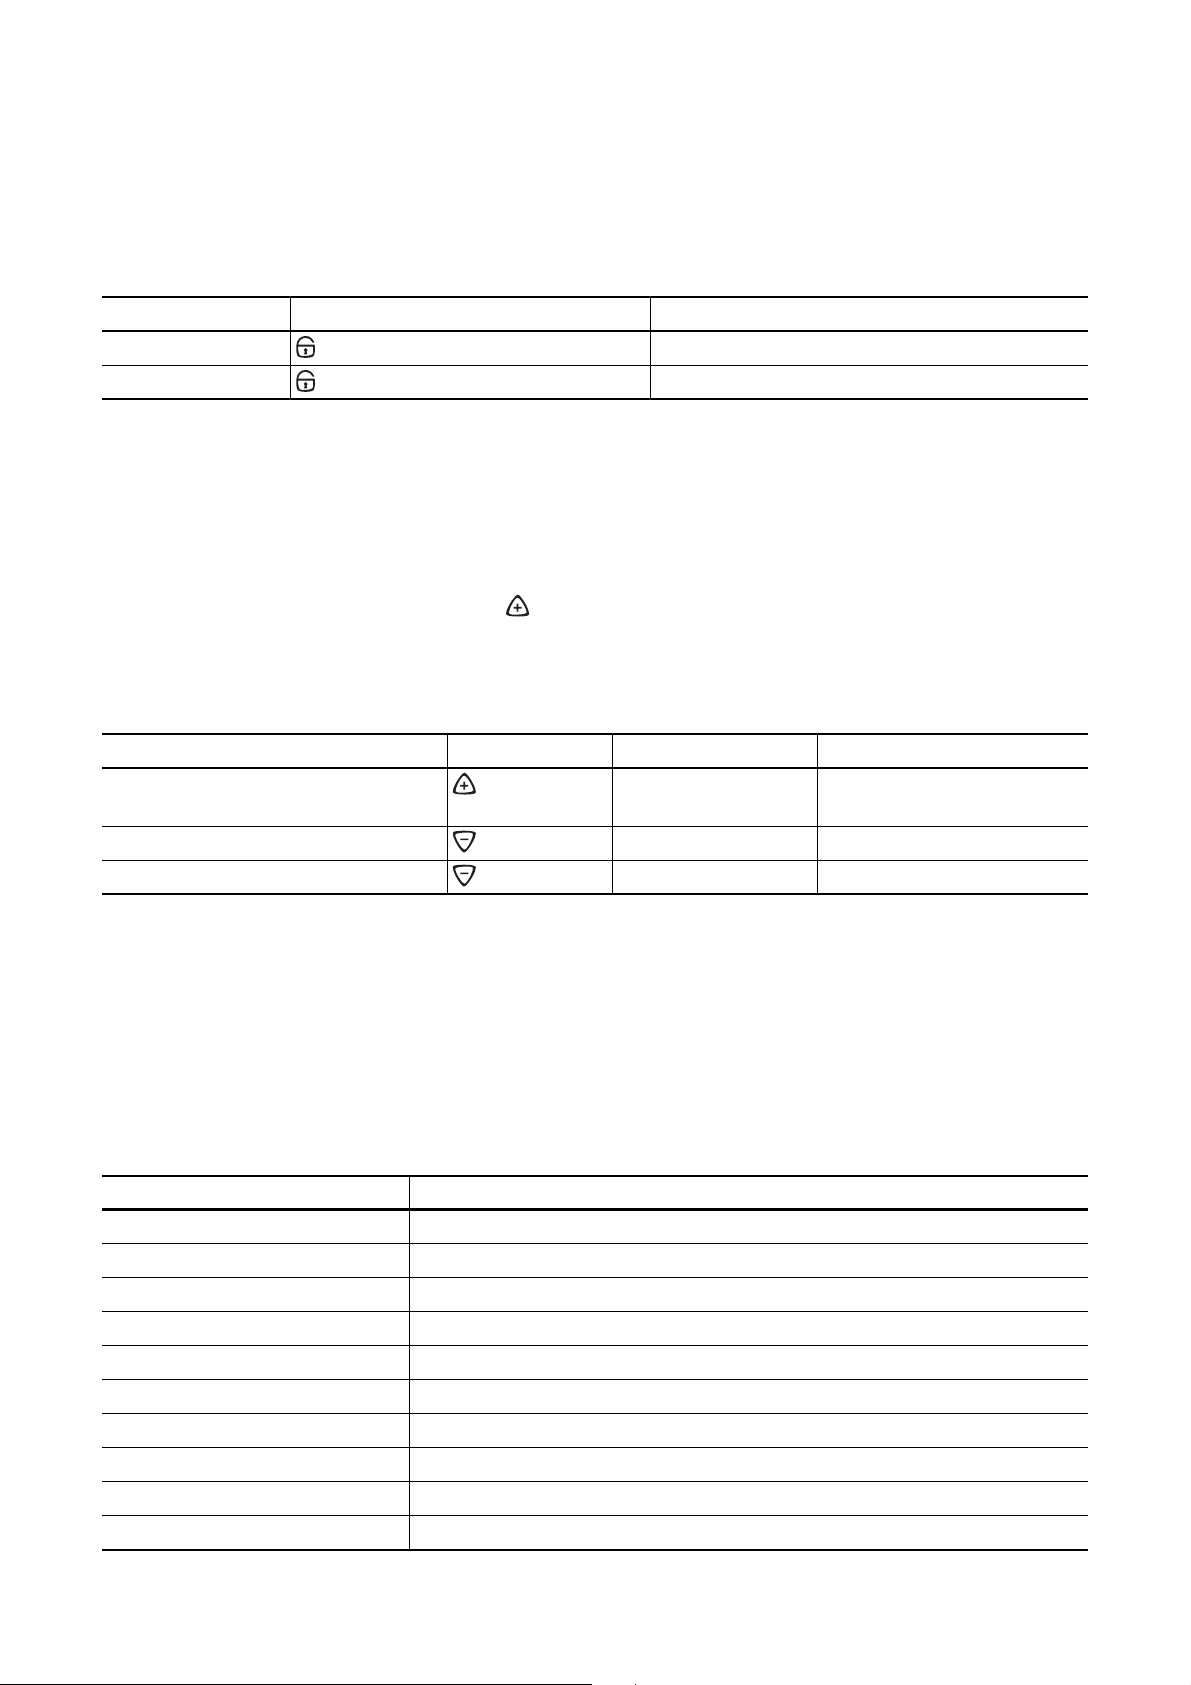
Forrigle/frigjøre betjeningsfeltet
Betjeningsfeltet kan med unntak av sensorfeltet ”På/
Av“ forrigles til enhver tid for å forhindre at innstillingene blir endret utilsiktet, f.eks. når du tørker over
med en klut.
Betjeningsfelt Indikatorlampe
Slå på berøres
Slå av berøres tidligere innstilte kokenivå
l (i fem sekunder)
3 Når du slår av apparatet, deaktiveres forriglin-
gen automatisk.
Bruke oppkokingsautomatikken
Alle varmesonene er utstyrt med en oppkokingsautomatikk. Når du stiller inn en varmesone med , begynnende fra
effekt i en viss tid og slår seg deretter automatisk tilbake til det innstilte kokenivået.
Slå på
(kun fra
Slå av berøres
ikke bruke berøres Ç til uÇ til u
¾, slår varmesonen seg på med full
Betjeningsfelt mulige kokenivå Indikatorlampe
¾ av)
berøres
¿ til Æa (etter 5 sekunder)
Æ til ¿ / u Æ til u
3 Hvis det i løpet av oppkokingsfasen a velges
et høyere kokenivåf.eks. fra
oppkokingstiden.
Á til Ã, tilpasses
3 Hvis det fremdeles foreligger restvarme i var-
mesonen (indikatorlampe
kingsfasen utført.
Den enkelte oppkokingsfasens varighet er avhengig
av innstilt kokenivå.
Kokenivå Oppkokingsfasens varighet [min : sek]
v 0:30
1 1:00
2 1:40
3 4:50
4 6:30
5 10:10
6 2:00
7 3:30
8 4:30
9 ---
h), blir ikke oppko-
28
Page 29
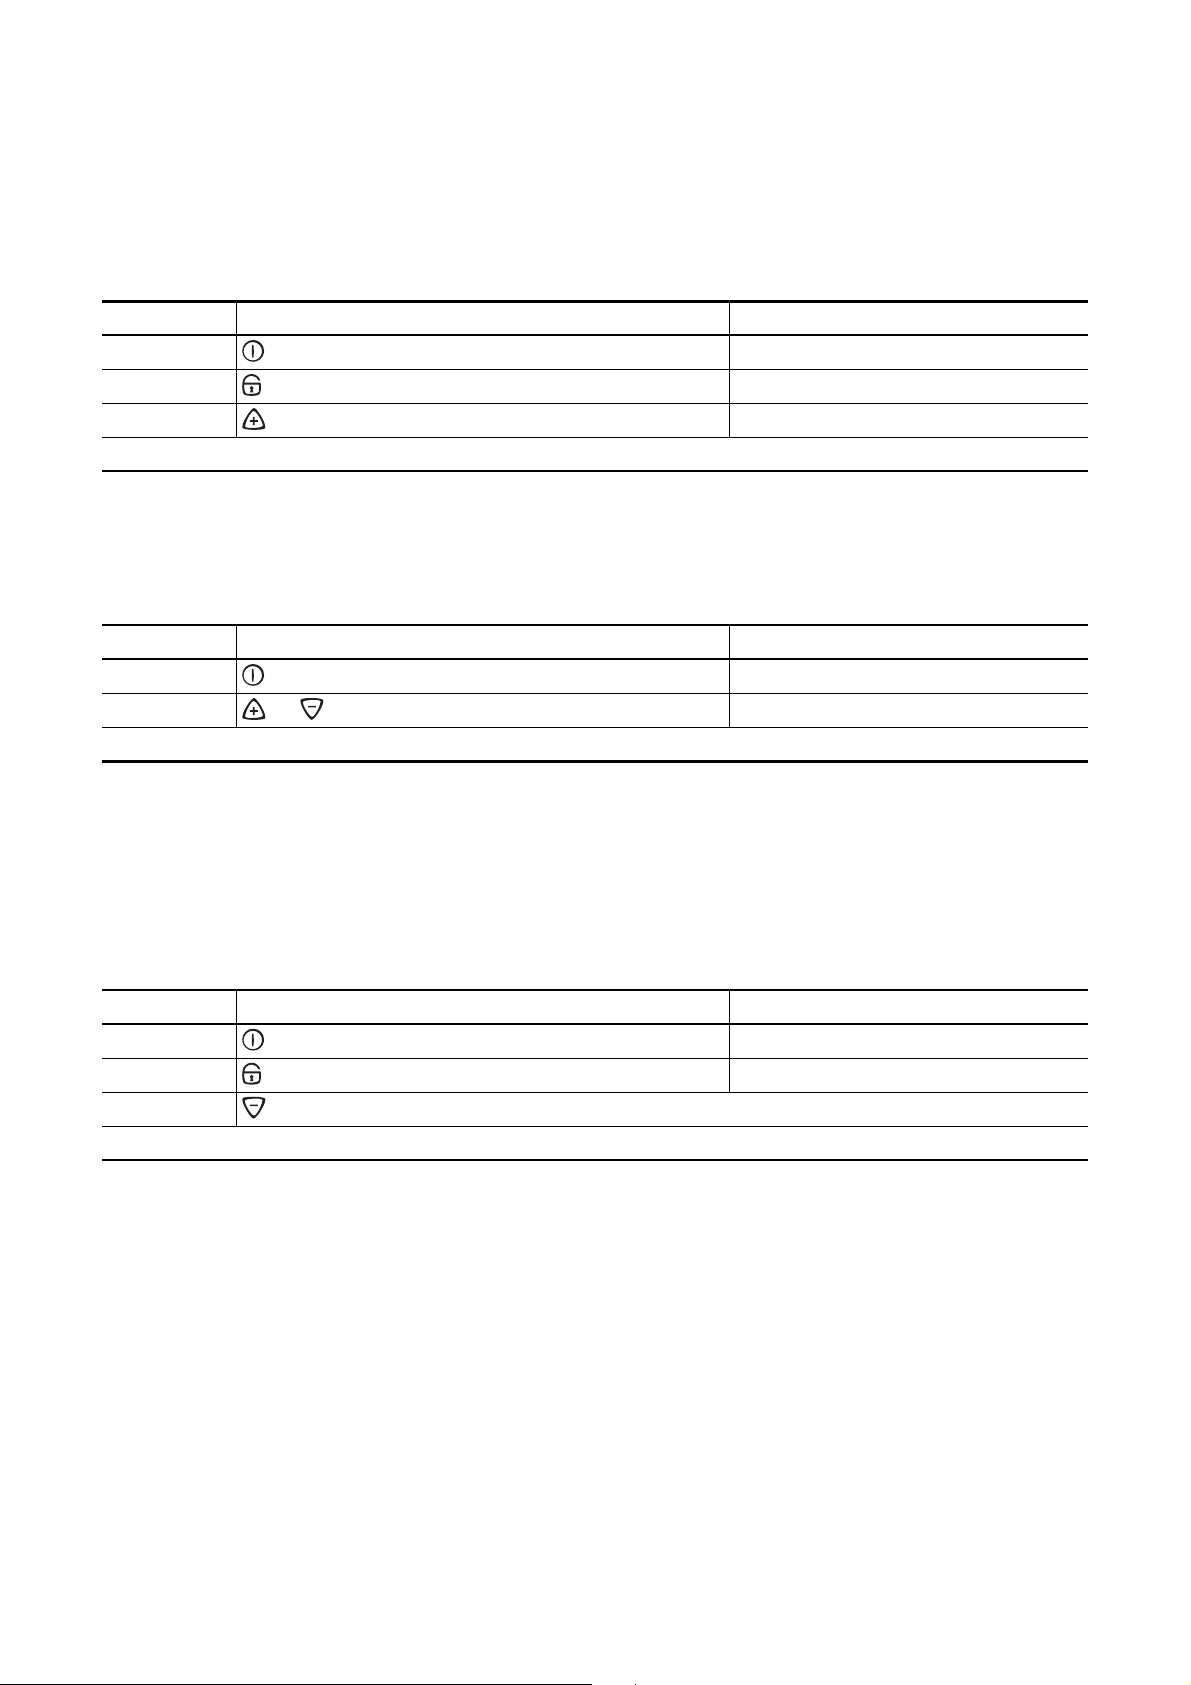
Bruke barnesikringen
Barnesikringen sperrer utilsiktet bruk av apparatet.
Aktivere barnesikringen
Trinn Betjeningsfelt Indikatorlampe/signal
1. Slå på apparatet (ikke still inn kokenivå)
2. berøres til det høres et pipesignal Pipesignal
3. berøres
Apparatet slår seg av. Barnesikring er aktivert.
¾
l
Hoppe over barnesikringen
Slik kan barnesikringen deaktiveres for en enkelt tilberedningsprosess; sikringen forblir aktivert etterpå.
Tri nn Betjeningsfelt Indikatorlampe/signal
1. Slå på apparatet
2. og berøres samtidig
Til neste gang apparatet slås av, kan det brukes som vanlig.
l
¾ / Pipesignal
3 Når du har deaktivert barnesikringen, må du
stille inn et kokenivå eller en funksjon innen
ca. 10 sekunder, ellers slår apparatet seg av
automatisk.
Deaktivere barnesikringen
Tri nn Betjeningsfelt Indikatorlampe/signal
1. Slå på apparatet
2. berøres til det høres et pipesignal Pipesignal
3. berøres
Apparatet slår seg av. Barnesikringen er deaktivert.
l
29
Page 30
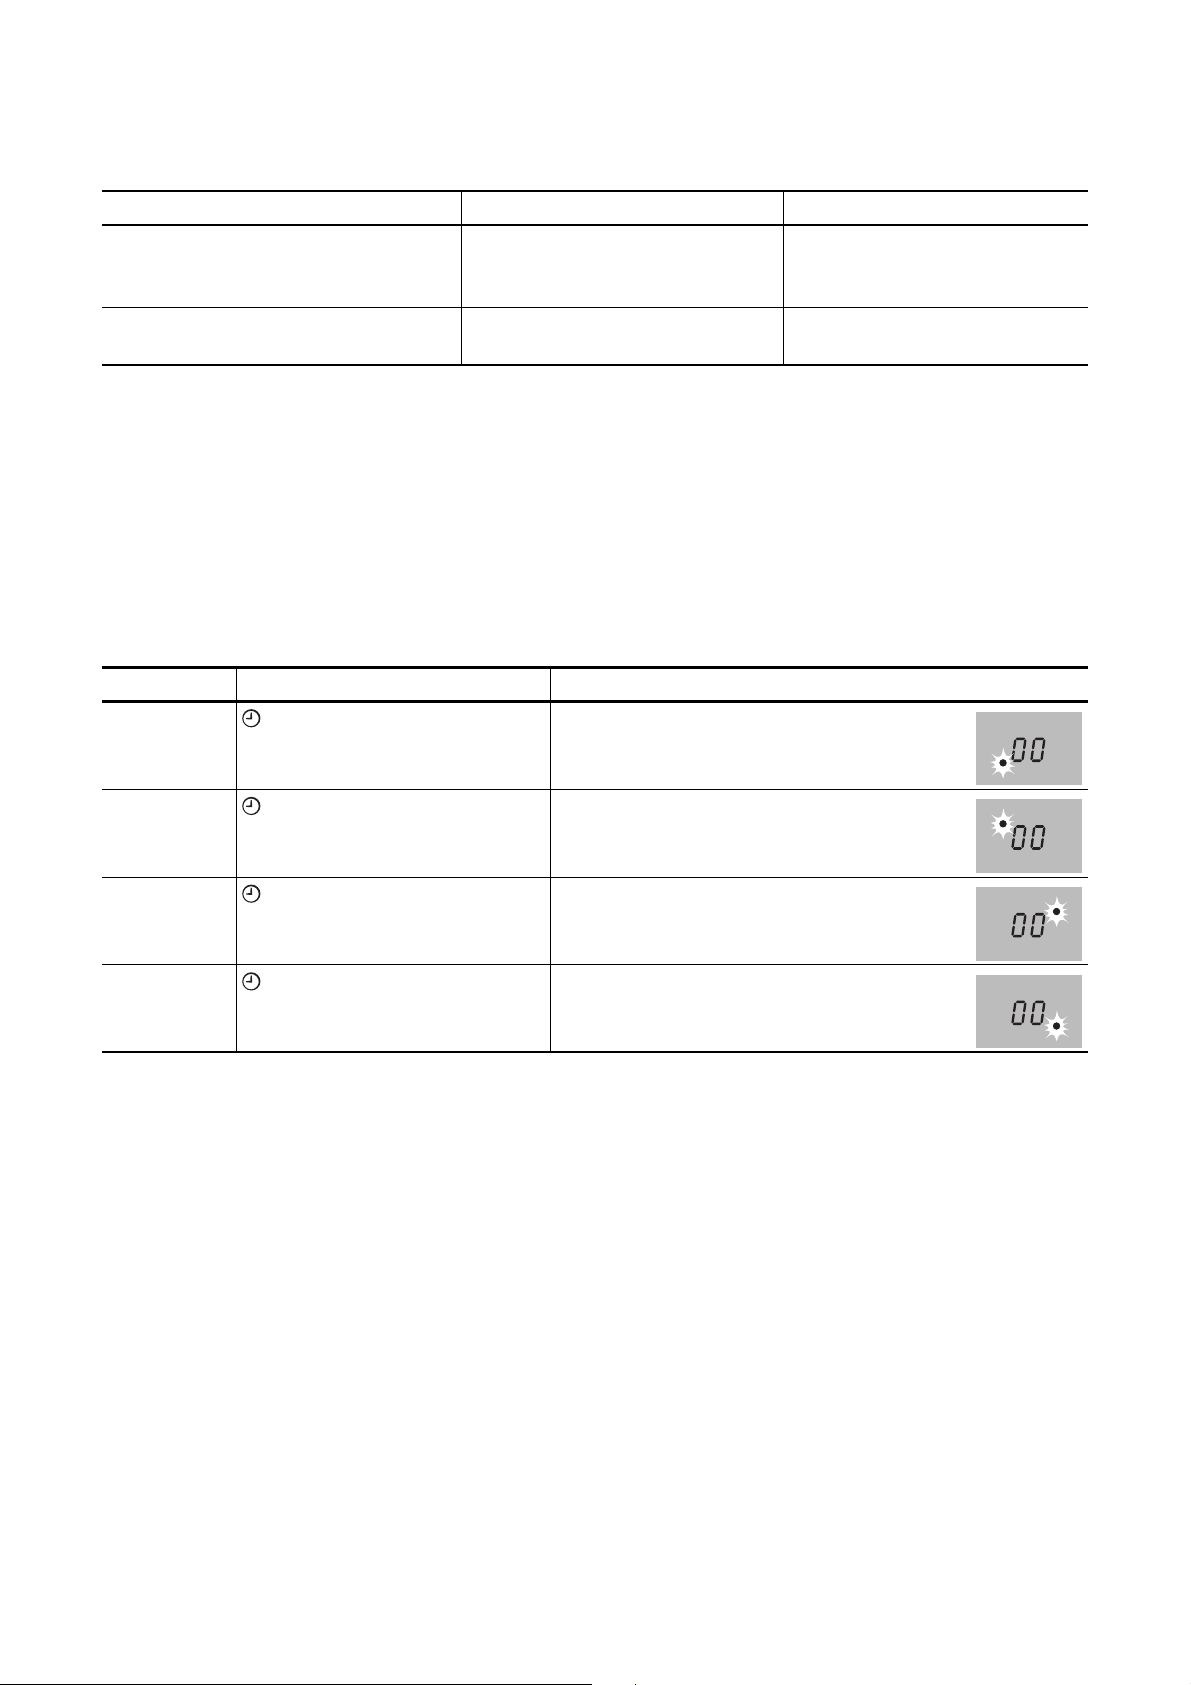
Bruke timeren
Funksjon Forutsetning Resultat når tiden er ute
Utkoplingsautomatikk ved et innstilt kokenivå på en sone pipesignal
00 blinker
varmesonen slår seg av
signalurmåler varmesonene er ikke slått på pipesignal
00 blinker
3 Så lenge varseluret(timer) er aktivert, kan du
ikke bruke noen varmesone.
3 Varseluret(Timer) kan ikke brukes så lenge en
varmesone er aktivert.
3 Hvis en varmesone kopler seg ut, blir den inn-
stilte timer-funksjonen også koplet ut.
Velge varmesone
Trinn Betjeningsfelt Indikatorlampe
1. 1xberøres Kontrollampen for den første varmesonen
blinker
2. 1xberøres Kontrollampen for den andre varmesonen
blinker
3. 1 xberøres Kontrollampen for den tredje varmesonen
blinker
4. 1x berøres Kontrollampen for den fjerde varmesonen blin-
ker
3 Når kontrollampen blinker langsommere, kan
kokenivået stilles inn eller endres.
3 Hvis andre timer-funksjoner er innstilt, vises
den resterende tiden som er kortest av alle timer-funksjonene, og tilhørende kontrollampe
blinker.
30
Page 31
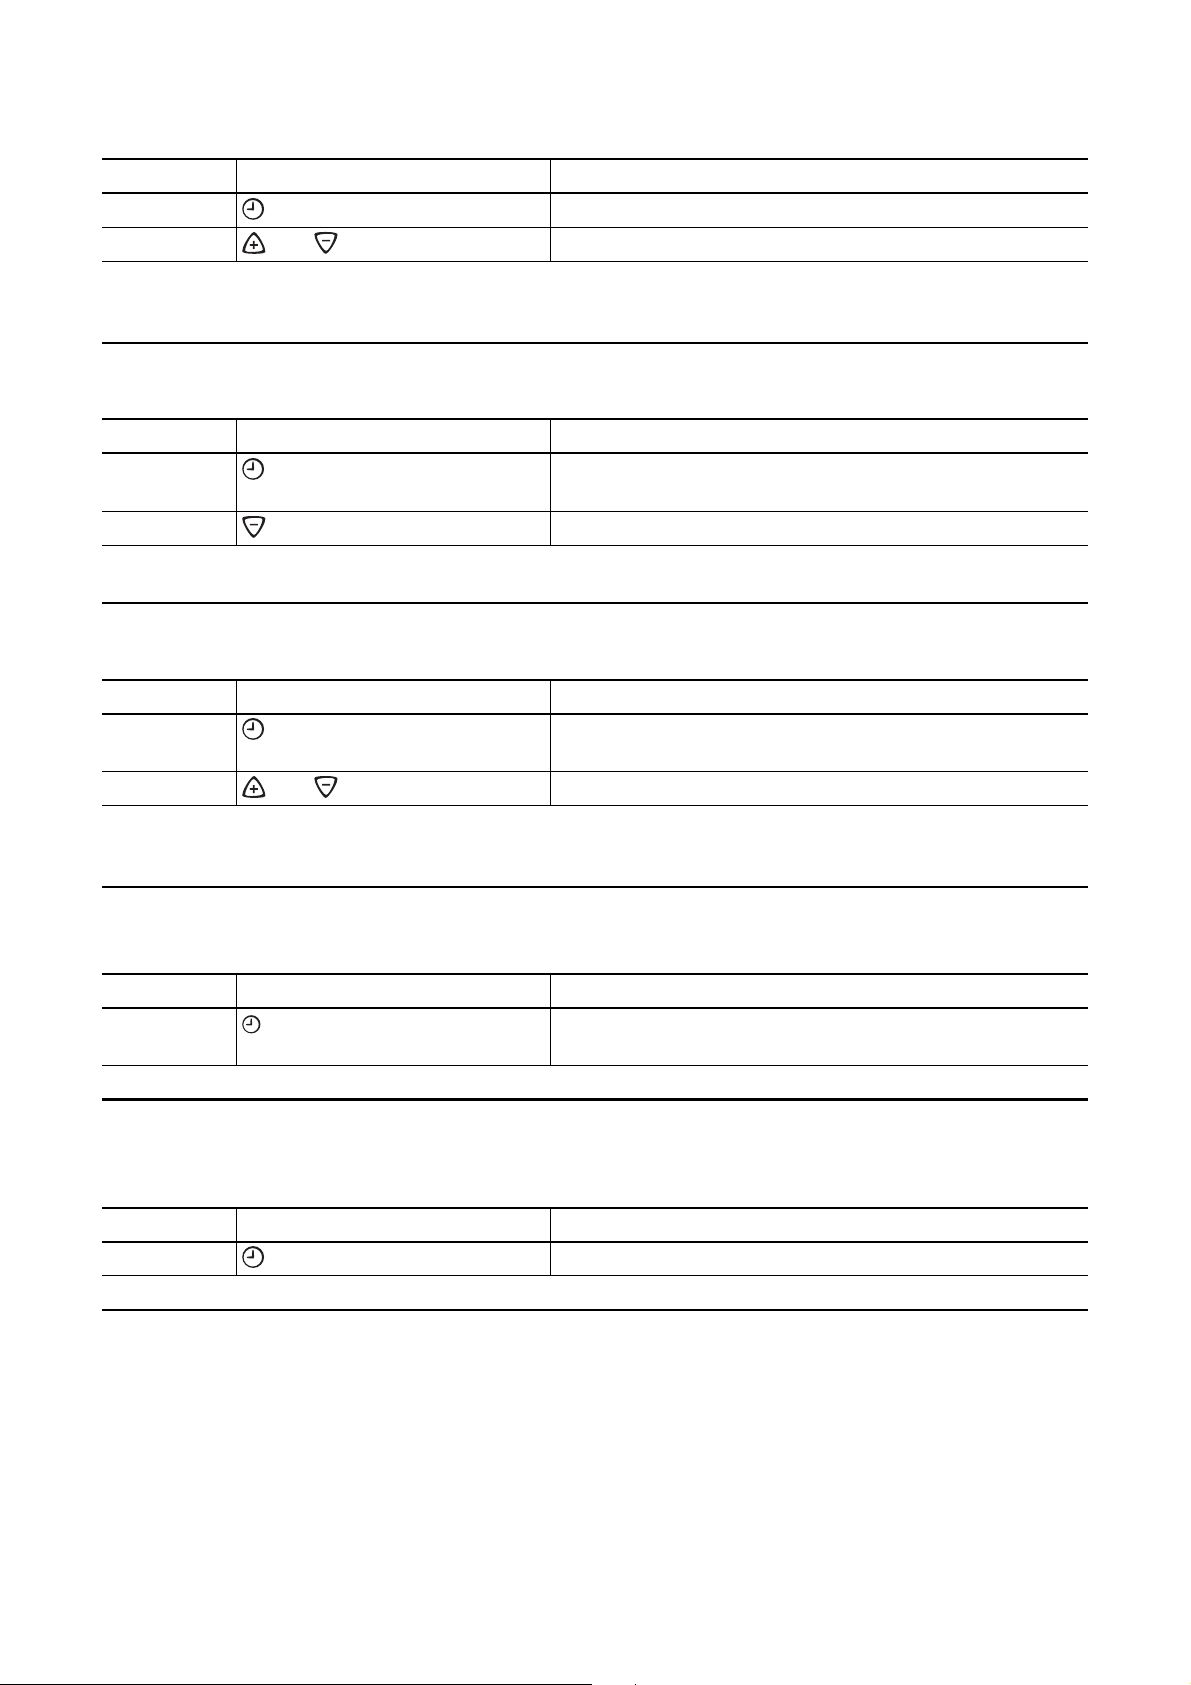
Stille inn tid
Tri nn Betjeningsfelt Indikatorlampe
1.
2. eller berøres
Etter noen sekunder blinker kontrollampen langsommere.
Tiden er innstilt.
Tiden telles ned mot null.
Velge varmesone Kontrollampen for den valgte varmesonen blinker
00 til 99 minutter
Slå av timer-funksjonen
Trinn Betjeningsfelt Indikatorlampe
1.
2. berøres Den resterende tiden telles ned til 00.
Kontrollampen slukker.
Timer-funksjonen for valgte varmesone er avslått.
Velge varmesone Kontrollampen for den valgte varmesonen blinker raskere
Resterende tid meldes
Endre tiden
Trinn Betjeningsfelt Indikatorlampe
1.
2. eller
Velge varmesone Kontrollampen for den valgte varmesonen blinker raskere.
Resterende tid meldes
berøres 01 til 99 minutter
Etter noen sekunder blinker kontrollampen langsommere.
Tiden er innstilt.
Tiden telles ned mot null.
Vise resterende tid for en varmesone
Trinn Betjeningsfelt Indikatorlampe
1. Velge varmesone Kontrollampen for den valgte varmesonen blinker raskere
Resterende tid meldes
Etter noen sekunder blinker kontrollampen langsommere.
Deaktivere pipesignalet
Trinn Betjeningsfelt Pipesignal
1.
Pipesignalet opphører.
berøres Akustisk kvittering.
31
Page 32

Nødutkopling
Kokefelt
• Hvis det ikke velges et kokenivå for varmesonen
innen ca. 10 sekunder etter at kokefeltet er slått
på, slår kokefeltet seg av automatisk.
• Hvis et eller flere sensorfelt er tildekket i lenger enn
ca. 10 sekunder, f.eks. av en kasserolle, høres et
pipesignal, og kokefeltet slår seg automatisk av.
• Hvis alle varmesonene er slått av, slår kokefeltet
seg automatisk av etter ca. 10 sekunder.
Betjeningsfelt
3 Fuktighet (f.eks. en våt klut) eller overkokende
væsker på betjeningsfeltet fører til at alle varmesonene slår seg av øyeblikkelig.
Varmesoner
• Hvis en av varmesonene ikke blir koplet ut etter en
viss tid eller kokenivået ikke blir endret, kopler den
aktuelle varmesonen seg ut automatisk.
Kokenivå Slås av etter
V, 1 -2 6 timer
3 - 4 5 timer
5 4 timer
6 - 9 1,5 timer
32
Page 33
Tips til koking og steking
3
Akrylamidopplysninger
Ifølge de nyeste vitenskapelige resultatene kan
sterk bruning av matvarer, spesielt ved stivelsesholdige produkter, forårsake helsemessige
skader på grunn av akrylamid. Derfor anbefaler vi å tilberede matrettene ved lave temperaturer og ikke brune maten for sterkt.
Kokekar
• Gode kokekar identifiserer du på kokekarets bunn.
Bunnen skal være så tykk og plan som mulig.
• Kokekar av stålemalje eller med aluminiums- eller
kobberbunn kan forårsake misfarging på glasskeramikkens overflate, som vanskelig eller ikke lar
seg fjerne.
Energisparing
2 Sett alltid kokekaret på kokesonen før du slår
kokesonen på.
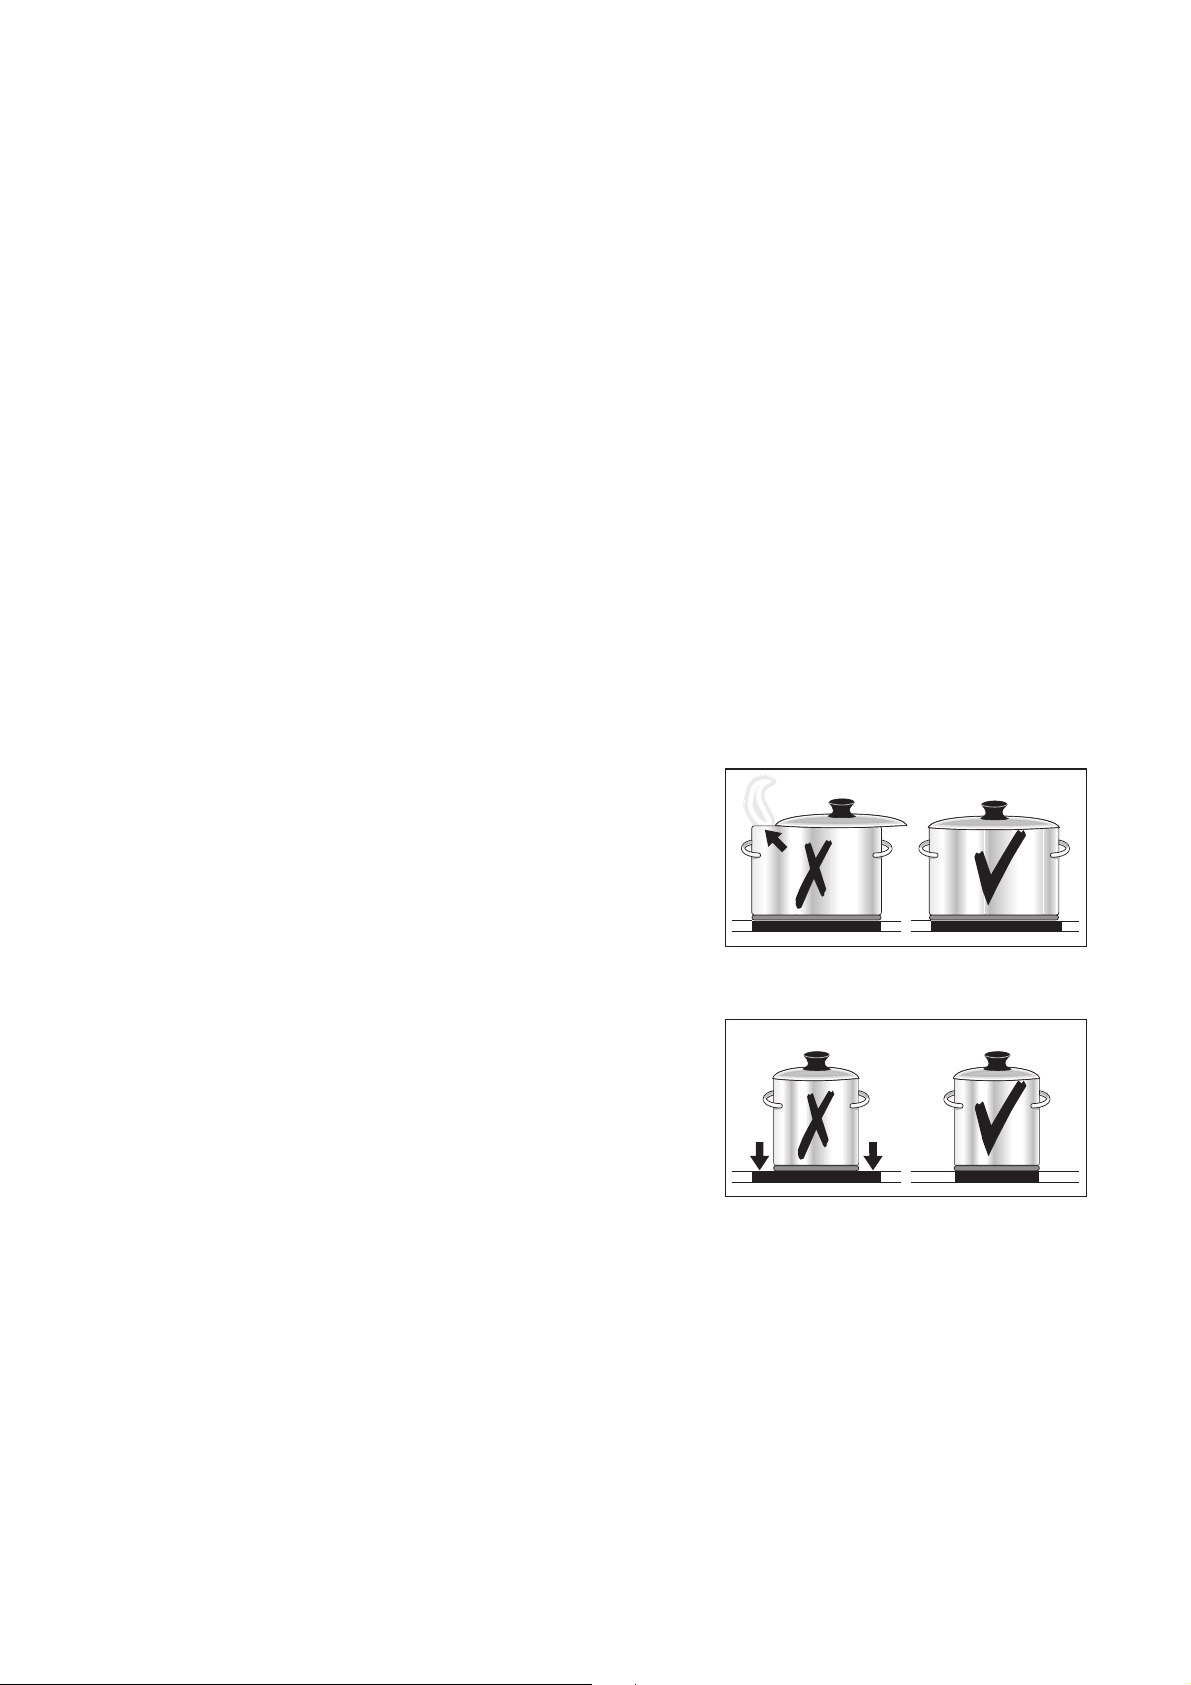
2 Dekk godt til gryter med et lokk, hvis mulig.
2 Slå av kokesonen før tilberedningstiden er ute,
for å utnytte restvarmen.
2 Kokekarets bunn og kokesonen bør være like
store.
33
Page 34

Eksempler på bruk ved tilberedning
Angivelsene i følgende tabell er veiledende.
Kokeni-våTilberednings-
prosess
0 Ettervarme, Av-stilling
V Holde varm
1-2
2-3 Mørkoking
3-4
4-5 Koking
6-7
Smelting
Størkning Eggeomelett, eggestand 10-40 min. Tilberedes med lokk
Dampkoking
Smørdamping
Lett
steking
Holde varm ferdig tilberedte
smelting av smør, sjokolade,
Mørkoke ris og melkeretter
Oppvarming av ferdigretter
Smørdampe grønnsaker, fisk
Koking av større matvare-
mengder, gryteretter og sup-
Snitsler, cordon bleu, kotelet-
ter, frikadeller, stekepølser, le-
ver, sausejevninger, egg,
eggekake, frityrkoke munker
egnet for Varighet Anvisninger/tips
retter
Hollandaisesaus,
gelatin
Brune kjøtt
Dampe poteter 20-60 min.
per
etter behov Tildekkes
5-25 min. Rør om av og til
Tilsett minst dobbelt meng-
25-50 min.
20-45 min.
60-150 min.
stekes
fortløpende
de væske til risen, melke-
retter omrøres av og til
Grønnsaker tilsettes litt væs-
ke (noen spiseskjeer)
Bruk lite væske, f. eks.:
maks.
¼ l vann til
750 g poteter
opptil 3 l væske pluss ingre-
dienser
Snus av og til
7-8
9
Kraftig
steking
Oppkoking
Bruning
Frityrkoking
Potetlapper, hoftestykker, ste-
ker, flatbiff
Oppkoking av større mengder vann, koke nudler, bruning av kjøtt (gulasj, gryte-
stek), frytyrkoking av pommes frites
5-15 min.
per panne
Snus av og til
34
Page 35
Rengjøring og pleie
1
Forsiktig! Forbrenningsfare på grunn av restvarme.
1 OBS! Skarpe og skurende rengjøringsmidler
skader apparatet. Rengjør med vann og oppvaskmiddel.
1 OBS! Rester etter rengjøringsmidler skader
apparatet. Fjern rester med vann og oppvaskmiddel.
Rengjør apparatet etter hver gangs bruk.
1. Tørk av apparatet med en klut fuktet med oppvaskvann.
2. Tørk apparatet tørt med en ren klut.
Fjerne smuss
1. Hold en rengjøringsskrape på skrått mot glasskeramikkens overflate.
2. Fjern smusset ved å la klingen gli over overflaten.
3. Tørk av apparatet med en klut fuktet med opp-
vaskvann.
4. Tørk apparatet tørt med en ren klut.
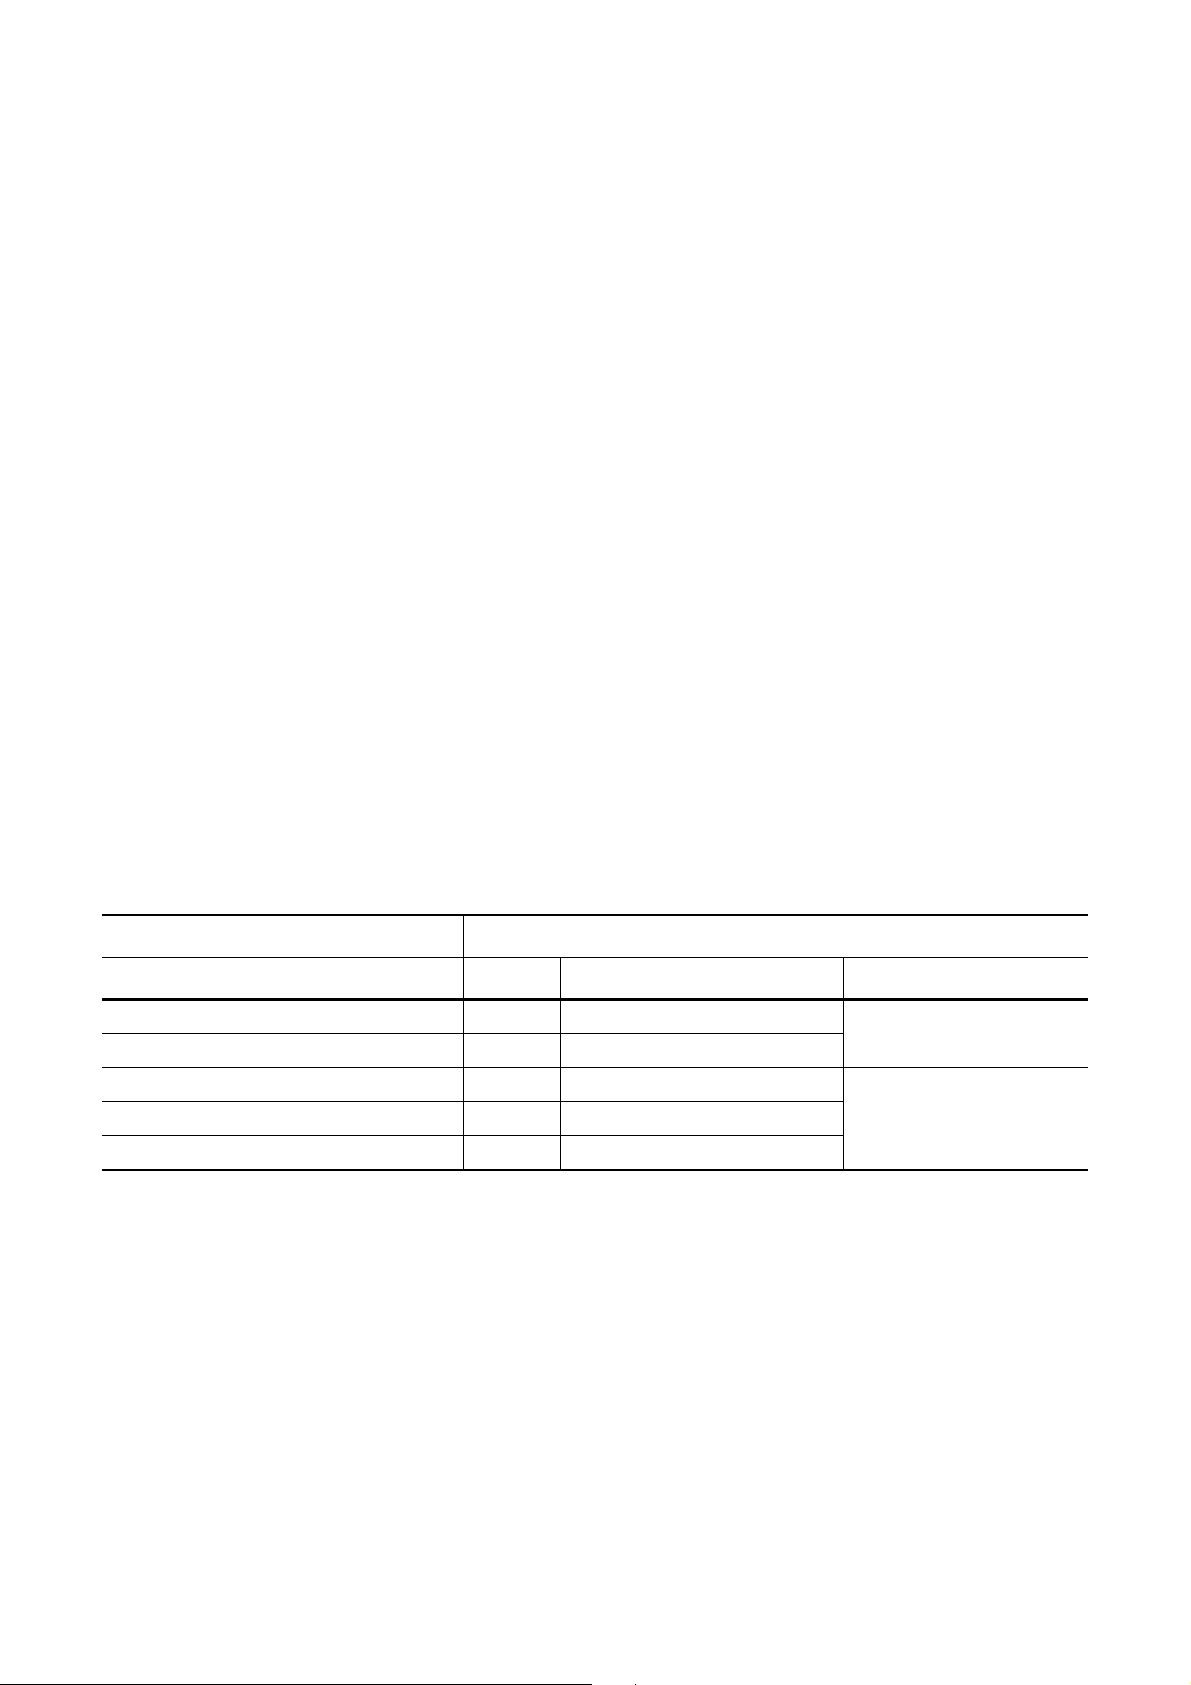
type smuss straks når apparatet er avkjølt med
sukker, sukkerholdige matvarer ja --kunststoff, aluminiumsfolie ja --kalk- og vannstriper --- ja
fettsprut --- ja
metallisk glinsende misfarging --- ja
*rengjøringsskrape og rengjøringsmiddel for glasskeramikk el-
ler rustfritt stål får du kjøpt hos fagforhandler
3 Hardnakkede smussflekker fjernes med et
rengjøringsmiddel for glasskeramikk eller rustfritt stål.
fjern
rengjøringsskrape*
rengjøringsmiddel for
glasskeramikk eller rust-
fritt stål*
3 Striper eller mørke flekker i glasskeramikken
kan ikke fjernes, men dette har ingen innflytelse på apparatets funksjon.
35
Page 36

Metalldekorstriper
1 OBS! Ikke bruk eddik, sitron eller kalkløsende
midler på metalldekorstripene på kokefeltet,
ellers oppstår det matte flekker.
Ikke press flate gjenstander (f.eks. kniver) under dekorstripene ved rengjøring, da kan de
løsne.
1. Tørk av metalldekorstripene med en fuktig klut og
litt oppvaskmiddel.
2. Bløtgjør inntørket smuss med en våt klut. Tørk deretter bort og tørk godt.
36
Page 37
Hva må gjøres hvis …
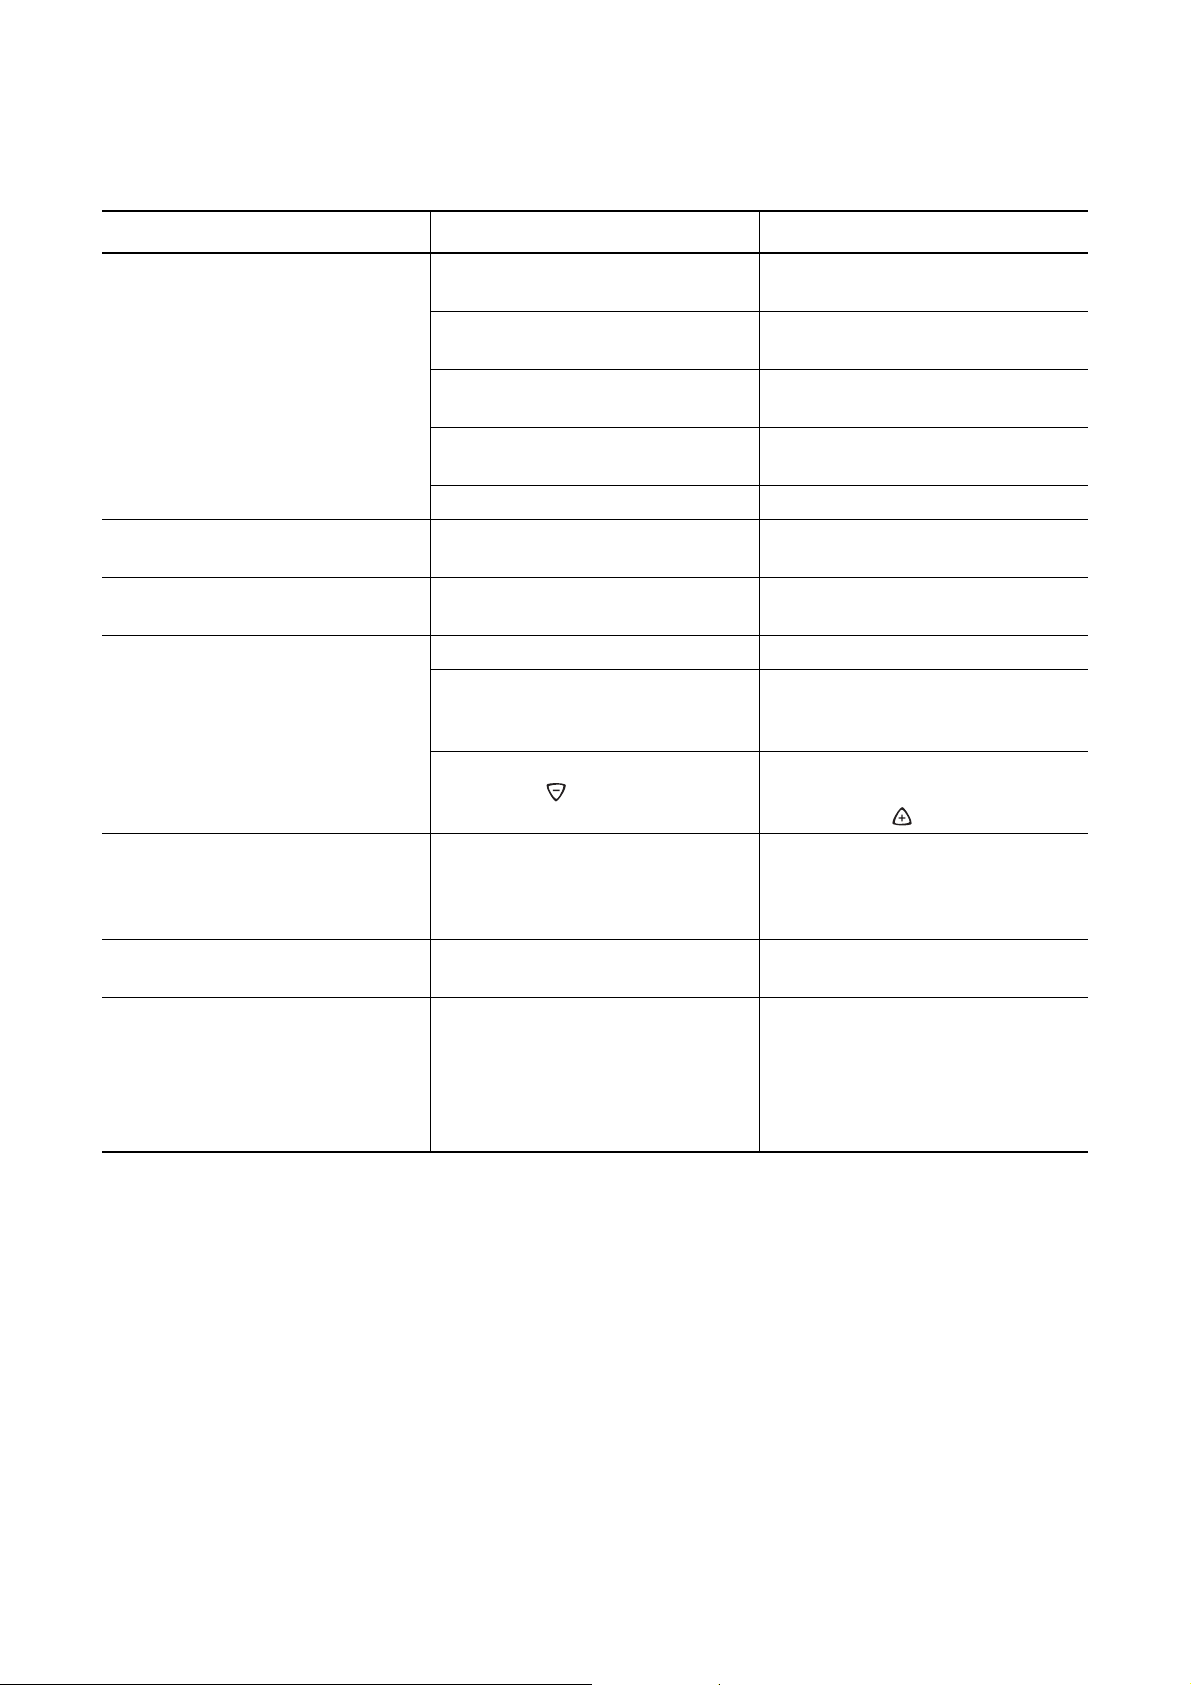
Problem Mulig årsak Løsning
Varmesonene slår seg ikke på eller
fungerer ikke
Restvarmeindikatoren gir ingen
melding
Oppkokingsautomatikken slår seg
ikke på
Det er gått mer enn 10 sekunder siden apparatet ble slått på
Barnesikringen er aktivert
Du har berørt flere sensorfelt samtidig
Sensorfeltene er delvis dekket av
en fuktig klut eller væske
Nødutkopleren har løst seg ut Slå apparatet på igjen
Forriglingen er aktivert
Varmesonen har vært innkoplet i så
kort tid at den ikke er blitt varm nok
Varmesonen har restvarme ennå h
Det høyeste kokenivået er innstilt Ç Det høyeste kokenivået har samme
Kokenivået stilles inn med
sensorfeltet
l Deaktiver barnesikringen (se kapit-
l Deaktiver forriglingen (se kapittelet
Slå apparatet på igjen.
telet ”Barnesikring”)
Berør kun ett sensorfelt
Fjern kluten eller væsken.
Slå apparatet på igjen.
”Forrigle/frigjøre betjeningsfeltet“)
Hvis varmesonen er varm, må du ta
kontakt med kundetjenesten.
La varmesonen avkjøle seg
effekt som oppkokingsautomatikken.
1.Slå av varmesonen
1.Varmefeltet stilles inn over
sensorfeltet
Signaltonen lyder og apparatet kobler seg inn, og så ut igjen etter 5
sek.; etter 5 sek. lyder en ny signaltone
Berøringsfeltet skal dekkes til,
f.eks. med en lapp
_ lyser Overoppvarmingsbeskyttelsen for
varmesonen har løst seg ut
Ikke legg fra deg gjenstander på
betjeningsfeltet
Slå av varmesonen. Slå varmesonen på igjen
e og tall vises. Feil i elektronikken Kople apparatet fra strømnettet
noen minutter (ta ut sikringen i husets installasjon)
Hvis
e vises når du slår apparatet
på igjen, ta kontakt med kundeservice
Hvis du ikke får rettet på problemet med løsningstipsene over, ta kontakt med din forhandler
eller med kundeservice.
1 Advarsel!Reparasjoner på apparatet må kun
utføres av fagpersoner. Ukyndig utførte reparasjoner kan føre til alvorlig fare for den som
bruker apparatet.
3 Feil som er oppstått på grunn av feil bruk av
apparatet kan ikke rettes kostnadsfritt av kundetekniker eller forhandler, selv om dette skjer
innenfor reklamasjonstiden.
37
Page 38

Avfallsbehandling
2
Emballasjemateriale
Emballasjematerialene er miljøvennlige og kan
resirkuleres. Kunststoffene er merket med
f.eks . >PE<, >PS< osv. Sørg for å kaste emballasjematerialene ifølge merkingen i den
kommunale avfallshåndteringens oppsamlingsbeholdere.
2 Kassert apparat
Symbolet W på produktet eller på emballa-
sjen viser at dette produktet ikke må behandles som husholdningsavfall. Det skal derimot
bringes til et mottak for resirkulering av elektrisk og elektronisk utstyr. Ved å sørge for korrekt avhending av apparatet, vil du bidra til å
forebygge de negative konsekvenser for miljø
og helse som gal håndtering kan medføre. For
nærmere informasjon om resirkulering av dette
produktet, vennligst kontakt kommunen, renovasjonsselskapet eller forretningen der du anskaffet det.
38
Page 39

Montasjeveiledning
Sikkerhetsanvisninger
Lover, forordninger, direktiver og standarder som
gjelder i det landet der apparatet skal brukes, må
overholdes (sikkerhetsbestemmelser, saks- og forskriftsmessig avfallsbehandling osv.).
Montering skal kun utføres av fagperson.
Minsteavstandene til andre apparater og møbler skal
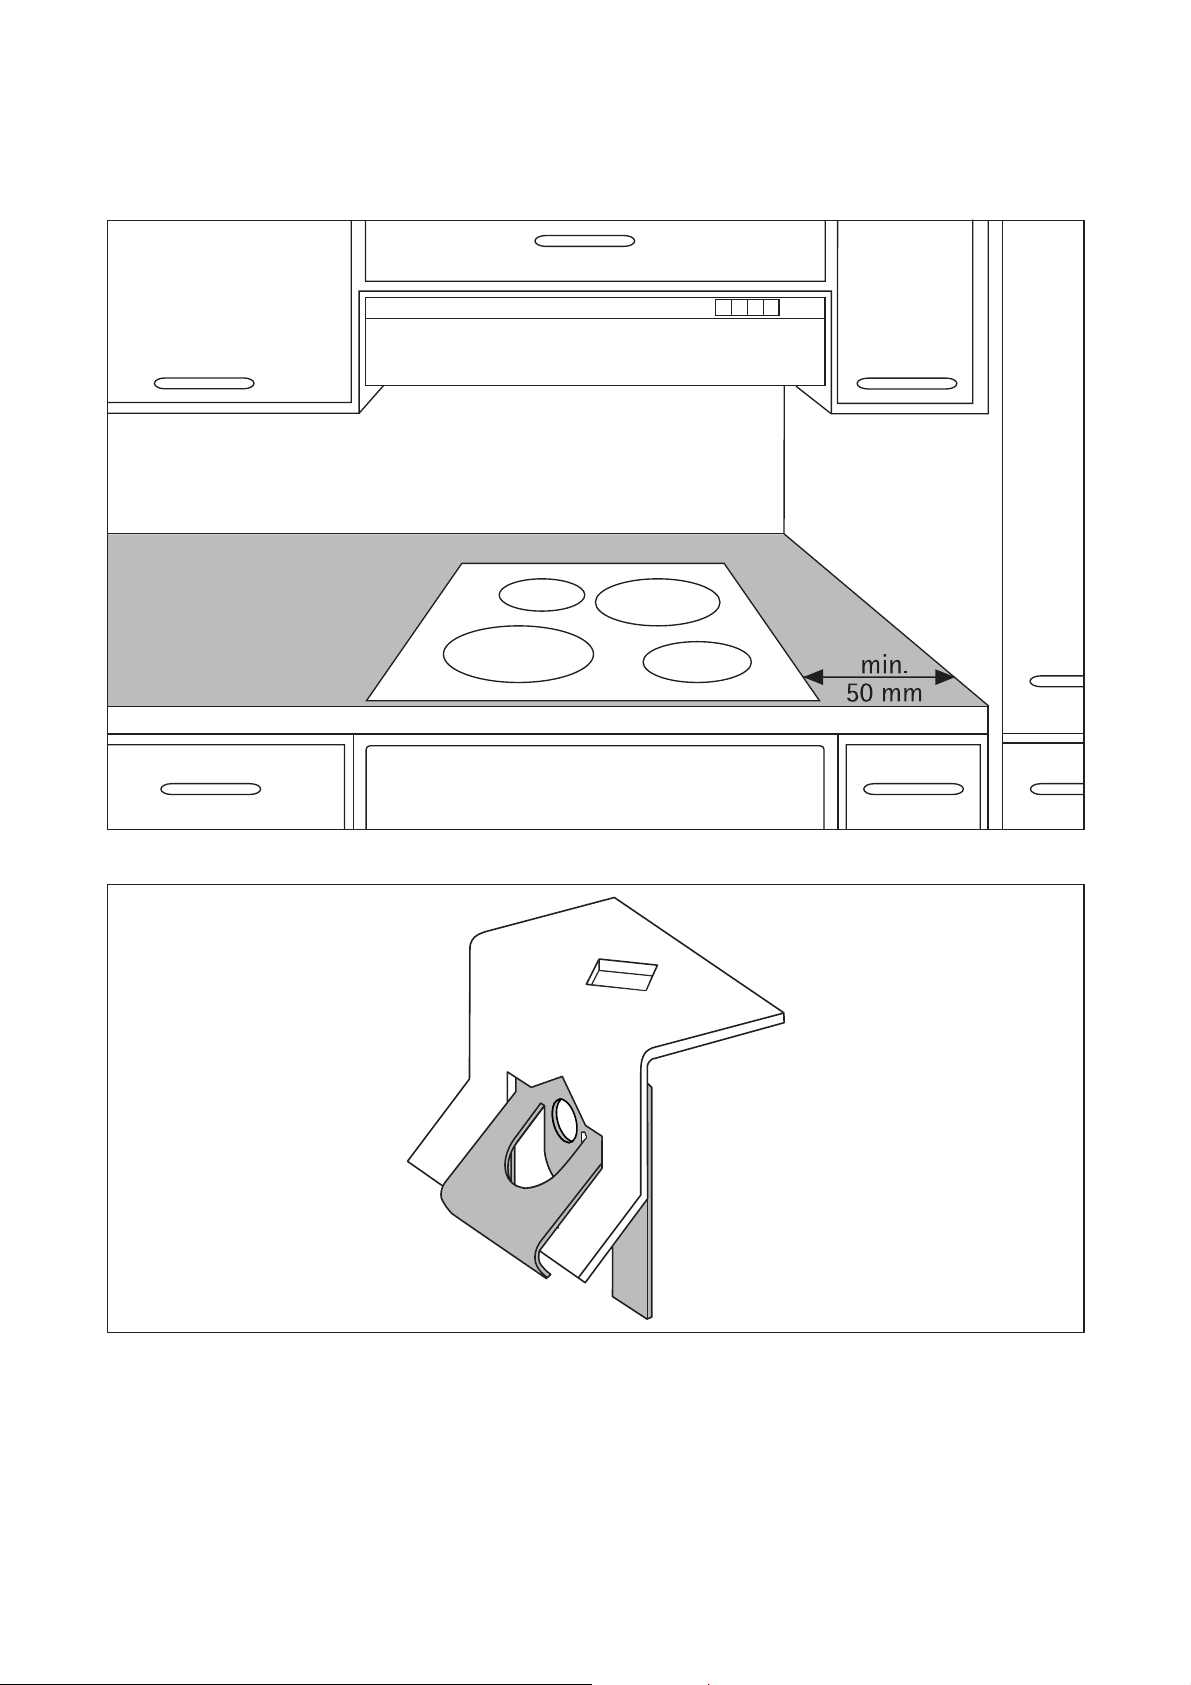
overholdes.
Det skal monteres en beskyttelsesbunn under apparatet.
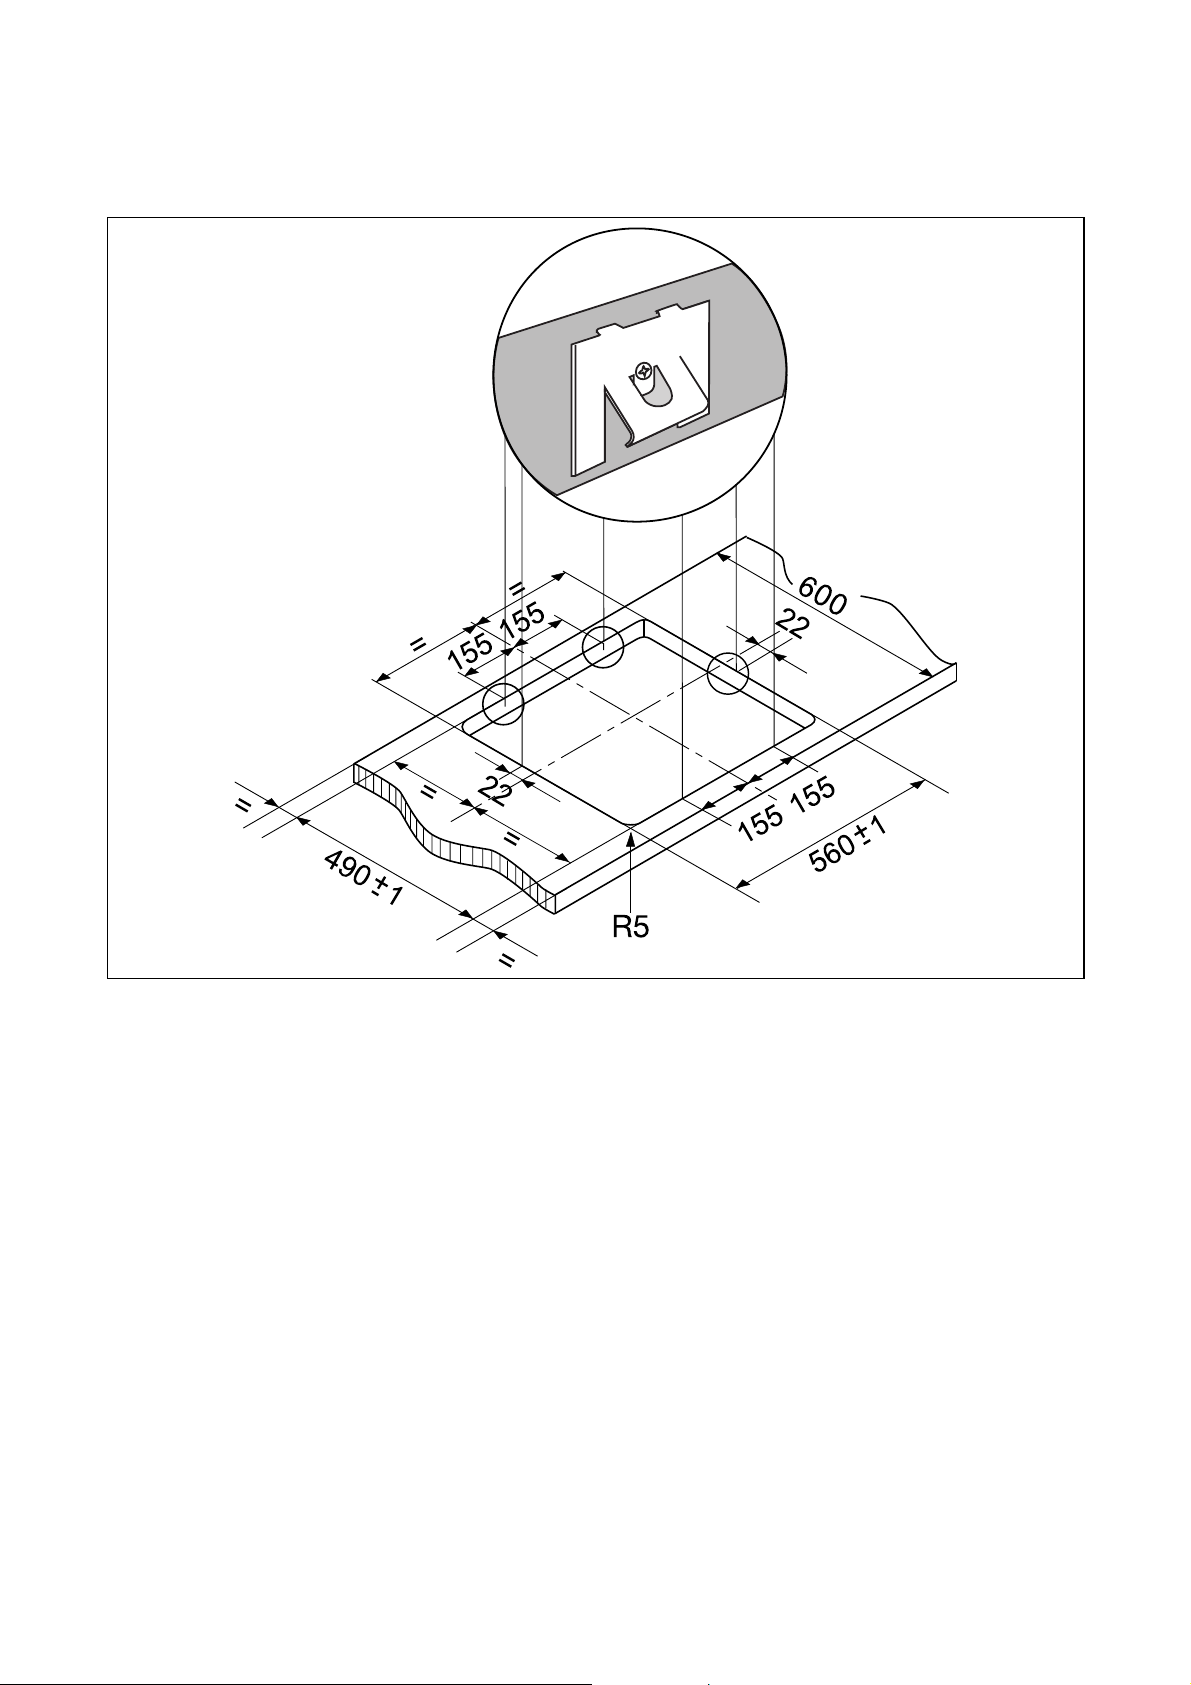
Snittflatene på arbeidsplaten skal beskyttes mot fuktighet med et egnet tetningsmaterial.
Tetningsmaterialet skal slutte tett mellom apparatet
og benkeplaten.
Unngå å montere apparatet rett ved dører og vinduer. Dører og vinduer som slår opp, kan forårsake at
kjeler og lignende faller ned fra kokeplatene.
1 ADVARSEL!
Fare for personskade pga. elektrisk strøm.
• Nettilkoplingsklemmen er strømførende.
• Skill nettilkoplingsklemmen fra strømnettet.
• Ta hensyn til koplingsskjemaet.
• Ta hensyn til sikkerhetsanvisningene for elektrotek-
nikk.
• Sikre berøringsbeskyttelse ved å la apparatet monteres forskriftsmessig.
• La en utdannet elektriker utføre den elektriske tilkoplingen.
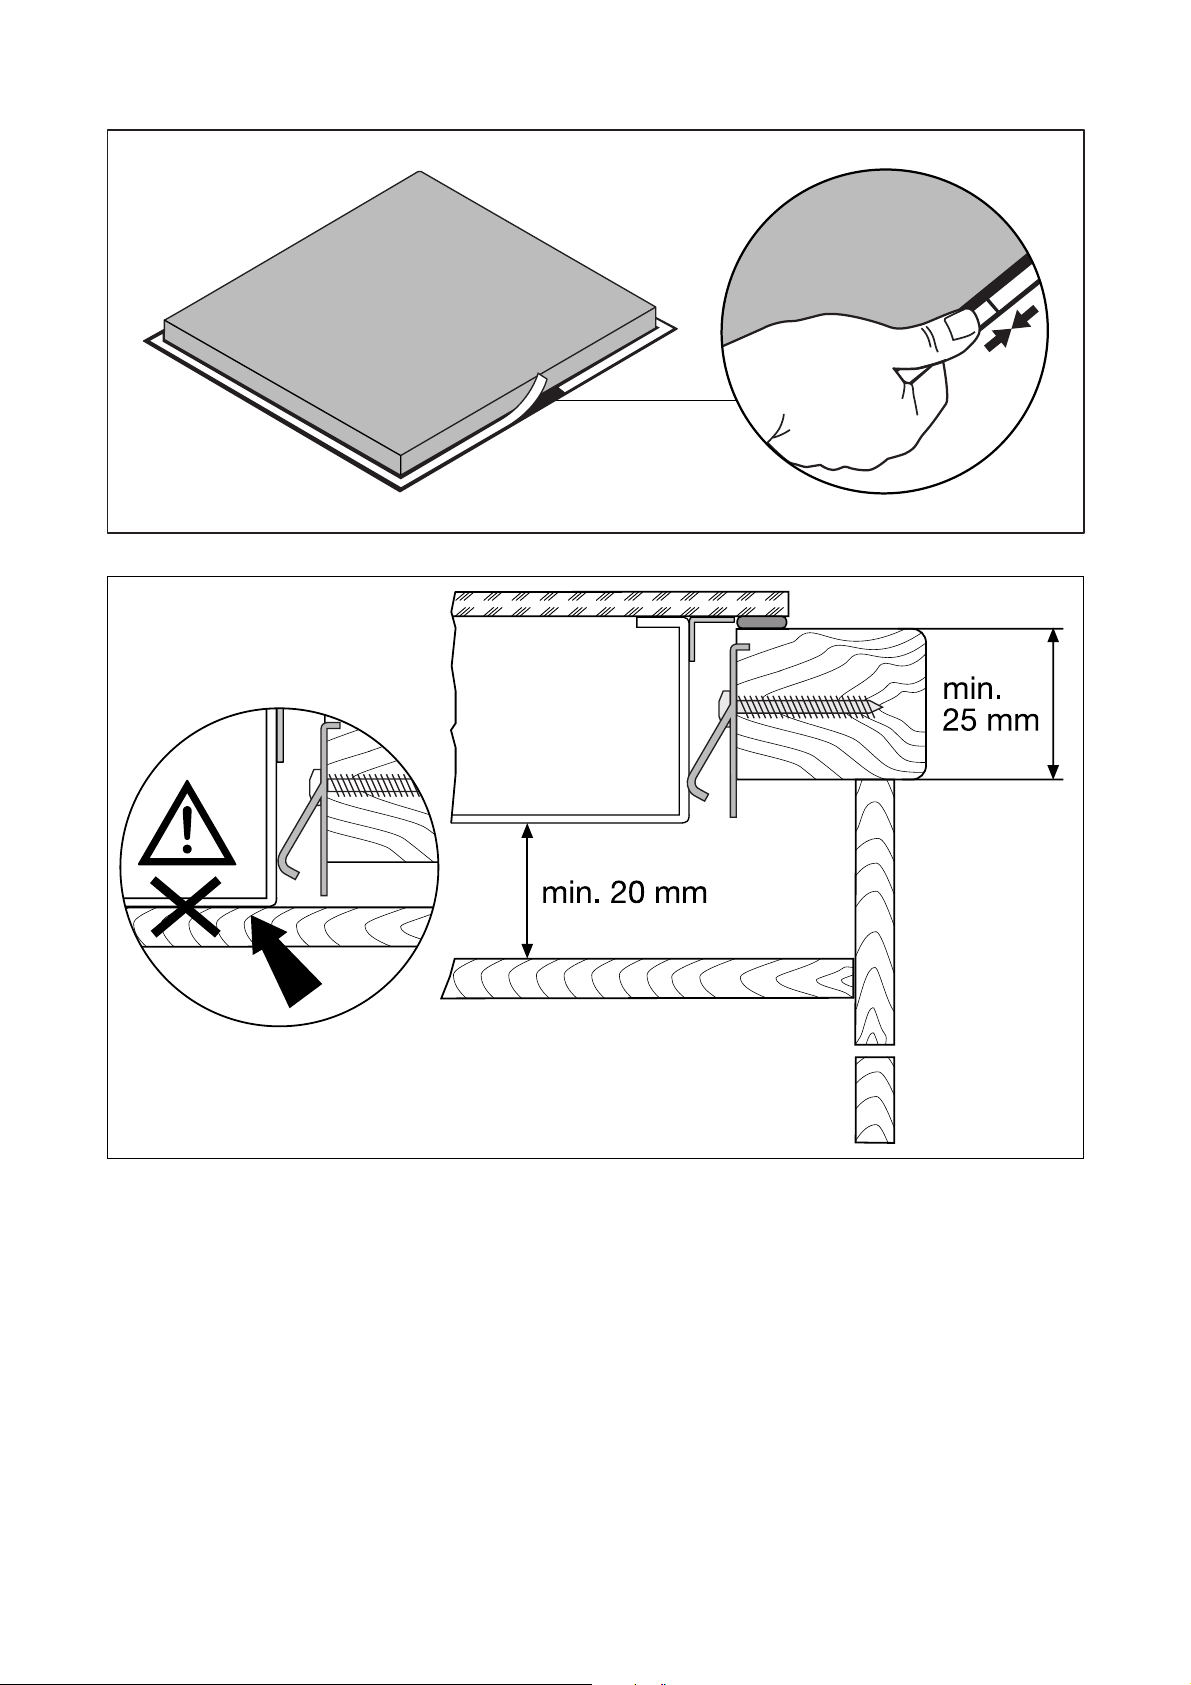
Lim på pakningen
• Rengjør benkeplaten i utskjæringsområdet.
• Lim det selvklebende tetningsbåndet med lim på
én side, rundt hele kanten av undersiden på den
keramiske koketoppen. Ikke strekk tetningsbåndet.
Skjøten skal plasseres midt på en av sidene. Etter
utlegging (la den være et par mm for lang) skal endene legges butt i butt mot hverandre.
1 OBS!
Fare for skade pga. elektrisk strøm.
Løse og uforsvarlige kontaktforbindelser kan overopphete klemmen.
• La klemmeforbindelsene utføres forskriftsmessig.
• Forhindre trekk i kabelen.
• Ved en- eller tofaset tilkopling må det brukes pas-
sende strømtilkoplingskabel av type H05BB-F
Tmaks 90° (eller bedre).
• Hvis strømtilkoplingskabelen til dette apparatet er
skadet, må den skiftes ut med en spesiell tilkoplingskabel (type H05BB-F Tmaks 90°; eller bedre).
Denne kabelen får du kjøpt hos kundetjenesten.
Den elektriske installasjonen må gjøres av autorisert
installatør. Dersom apparatet tilkobles fast (uten kabel og plugg) må det i den elektriske installasjonen
tilkoples en innretning som gjør det mulig å skille apparatet fra strømnettet med en universalpolet kontaktåpningsvidde på minst 3 mm. Egnete
skilleinnretninger er f.eks. LS-bryter, sikringer (skruesikringer må tas ut av holderen), FI-bryter og kontaktorer.
39
Page 40

Garanti
Levering skjer etter kjøpsloven av 1.1.1989, supplert
med "NEL's leveringsbetingelser" (kopi av disse fås
hos din elektroforhandler). Oppstår det problemer
med produktet, bør henvendelse skje til forhandler
hvor produktet er kjøpt.
OBS! Ta vare på kvitteringen. Den gjelder som garantibevis.
40
Page 41

Service og reservedeler
Service
Trenger du service kontakt din lokale serviceforhandler. Forbered deg på samtalen og noter følgende:
Modell: ..................................................
PNCnummer: ..................................................
Serienummer: ..................................................
Kjøpsdato ..................................................
En klar og kortfattet beskrivelse av feilen:
..................................................................................
........
..................................................................................
........
Ta vare på kvitteringen, den gjelder som garantibevis.
Under følger oversikt over våre serviceforbindelser i
de store byene:
Oslo
E-Service Oslo AS
Risløkkveien 2
0508 Oslo
Telefon: 815 30 222
Faks:
Email:
Service: [email protected]
Deler : [email protected]
Verksted: [email protected]
Kristiansand:
Elektroverkstedet A/S
Kirkevn. 4
Postboks 1027 Lund
4631 Kristiansand S
Email: [email protected]
Telefon: 38056440
Faks: 38056441
Faks: 51 91 18 51
email: [email protected]
Tron dh ei m:
Strax Trondheim AS,
Sorgenfriveien 16
7037 Trondheim
Telefon: 73 82 14 80
Faks: 73 82 14 81
Bergen:
E-Service Bergen AS
Øvre Fyllingsvei 81
5162 Laksevåg
Telefon: 55 94 85 50
Faks: 55 94 85 51
Narvik:
Johansens Hvitevareservice
Tore Hundsgt. 48
8514 Narvik
Telefon: 76944480
Mobil: 91849311
Kunder som kontakter service under garantiperioden
bør forsikre seg om at alle nødvendige kontroller er
utført, siden kunden vil bli belastet for arbeid som
ikke skyldes mekaniske eller elektriske produktfeil.
Electrolux hovedkontor:
ELECTROLUX HOME PRODUCTS NORWAY AS
Postboks 77 Økern
0508 Oslo
Telefon: 815 30 222
Faks: 22 63 55 54
Internett: www.electrolux.no
På våre internettsider vil du finne oppdatert produktinformasjon, bruksanvisninger og oversikt over våre
serviceforbindelser og forhandlere og mye mer.
Stavanger:
E-Service Stavanger AS
Overlege Cappelens Gate 3,
4011 Stavanger
Telefon : 51 91 18 50
41
Page 42
Service
Ved tekniske forstyrrelser, kontroller først om du selv
kan løse problemet ved hjelp av bruksanvisningen
(kapittelet „Hva må gjøres, hvis...“)
Hvis du ikke kunne løse problemet, kan du ta kontakt
med kundetjenesten eller en av våre servicepartnere.
For å kunne hjelp deg raskt, trenger vi følgende
opplysninger:
– Modellbetegnelse
– Produktnummer (PNC)
– Serienummer (S-nr.)
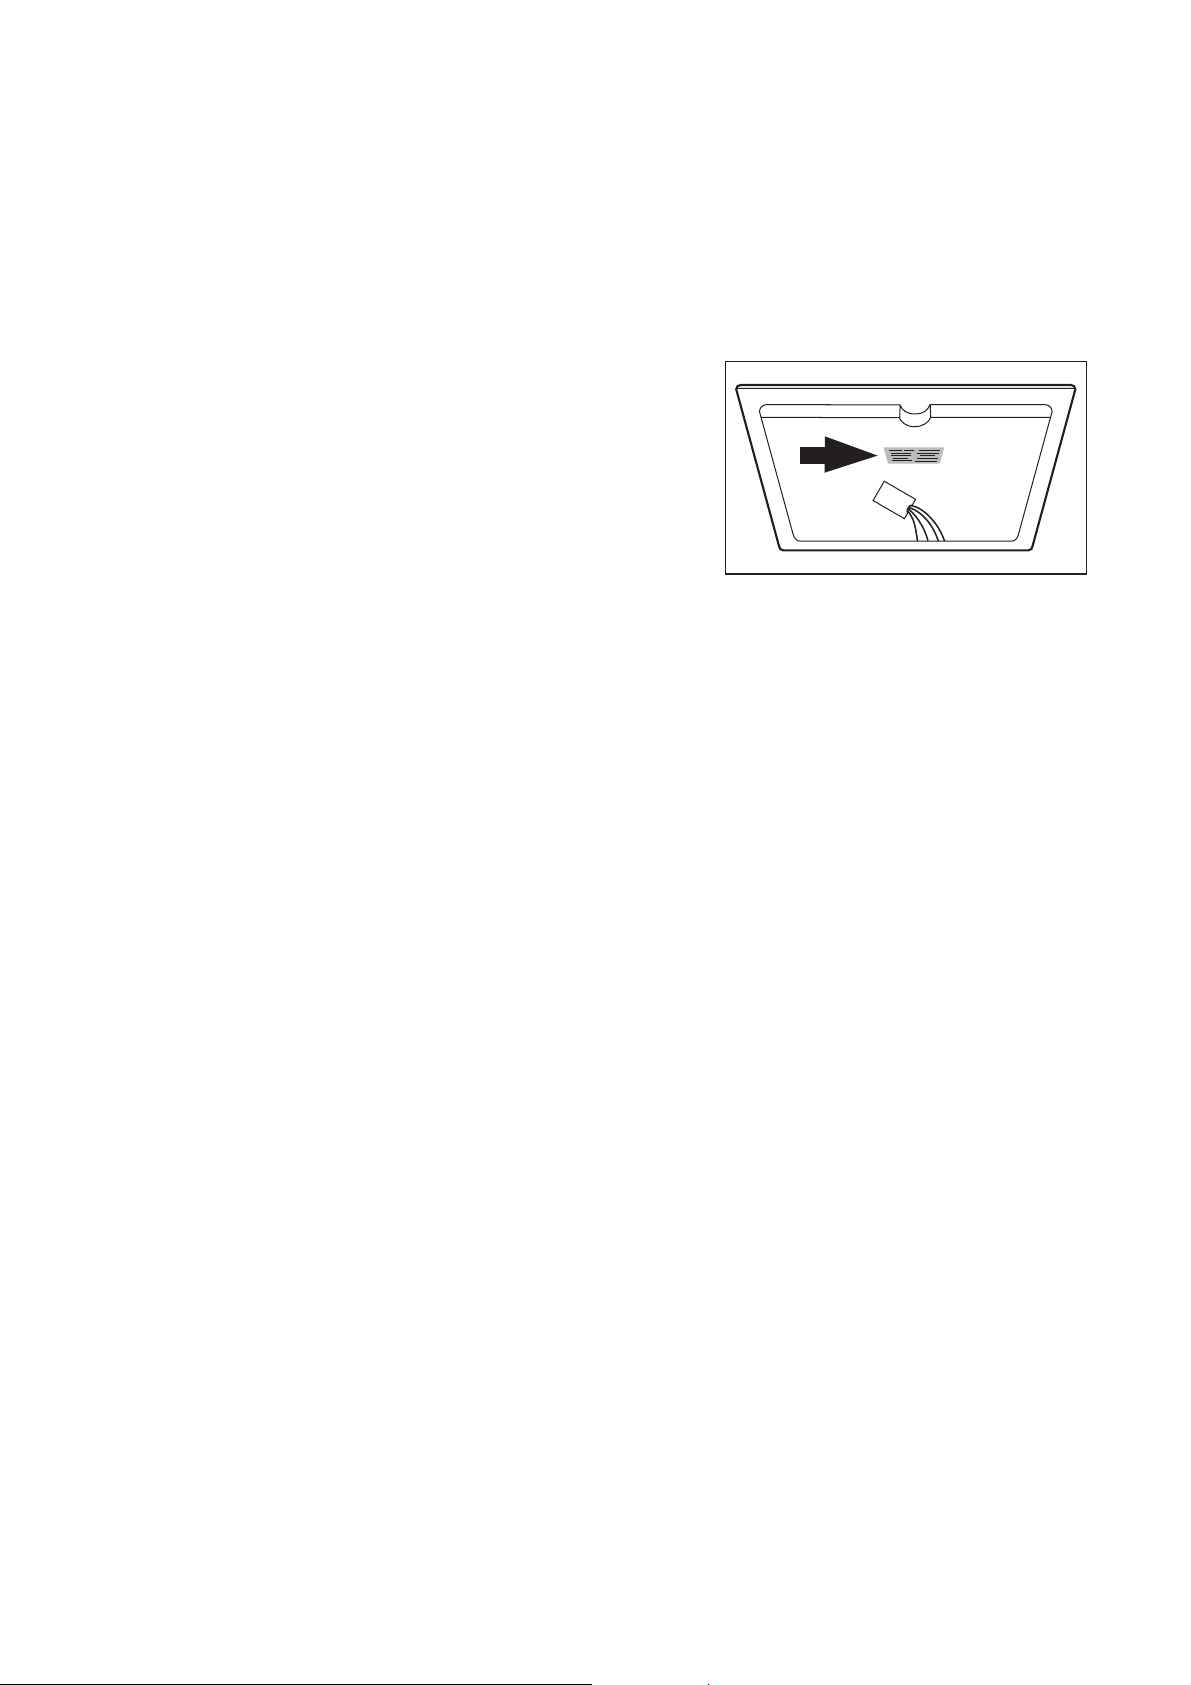
(se typeskiltet for numrene)
– Type forstyrrelse
– Eventuell feilmelding som meldes fra apparatet
– den keramiske platens treplassers bokstav/tall-
kombinasjon
For at du alltid skal ha apparatets identifikasjonstall
for hånden når du trenger dem, anbefaler vi at du
skriver dem opp her:
Modellbetegnelse: .....................................
PNC: .....................................
S-nr. .....................................
42
Page 43
Assembly / Montasje
43
Page 44
44
Page 45
45
Page 46
46
Page 47
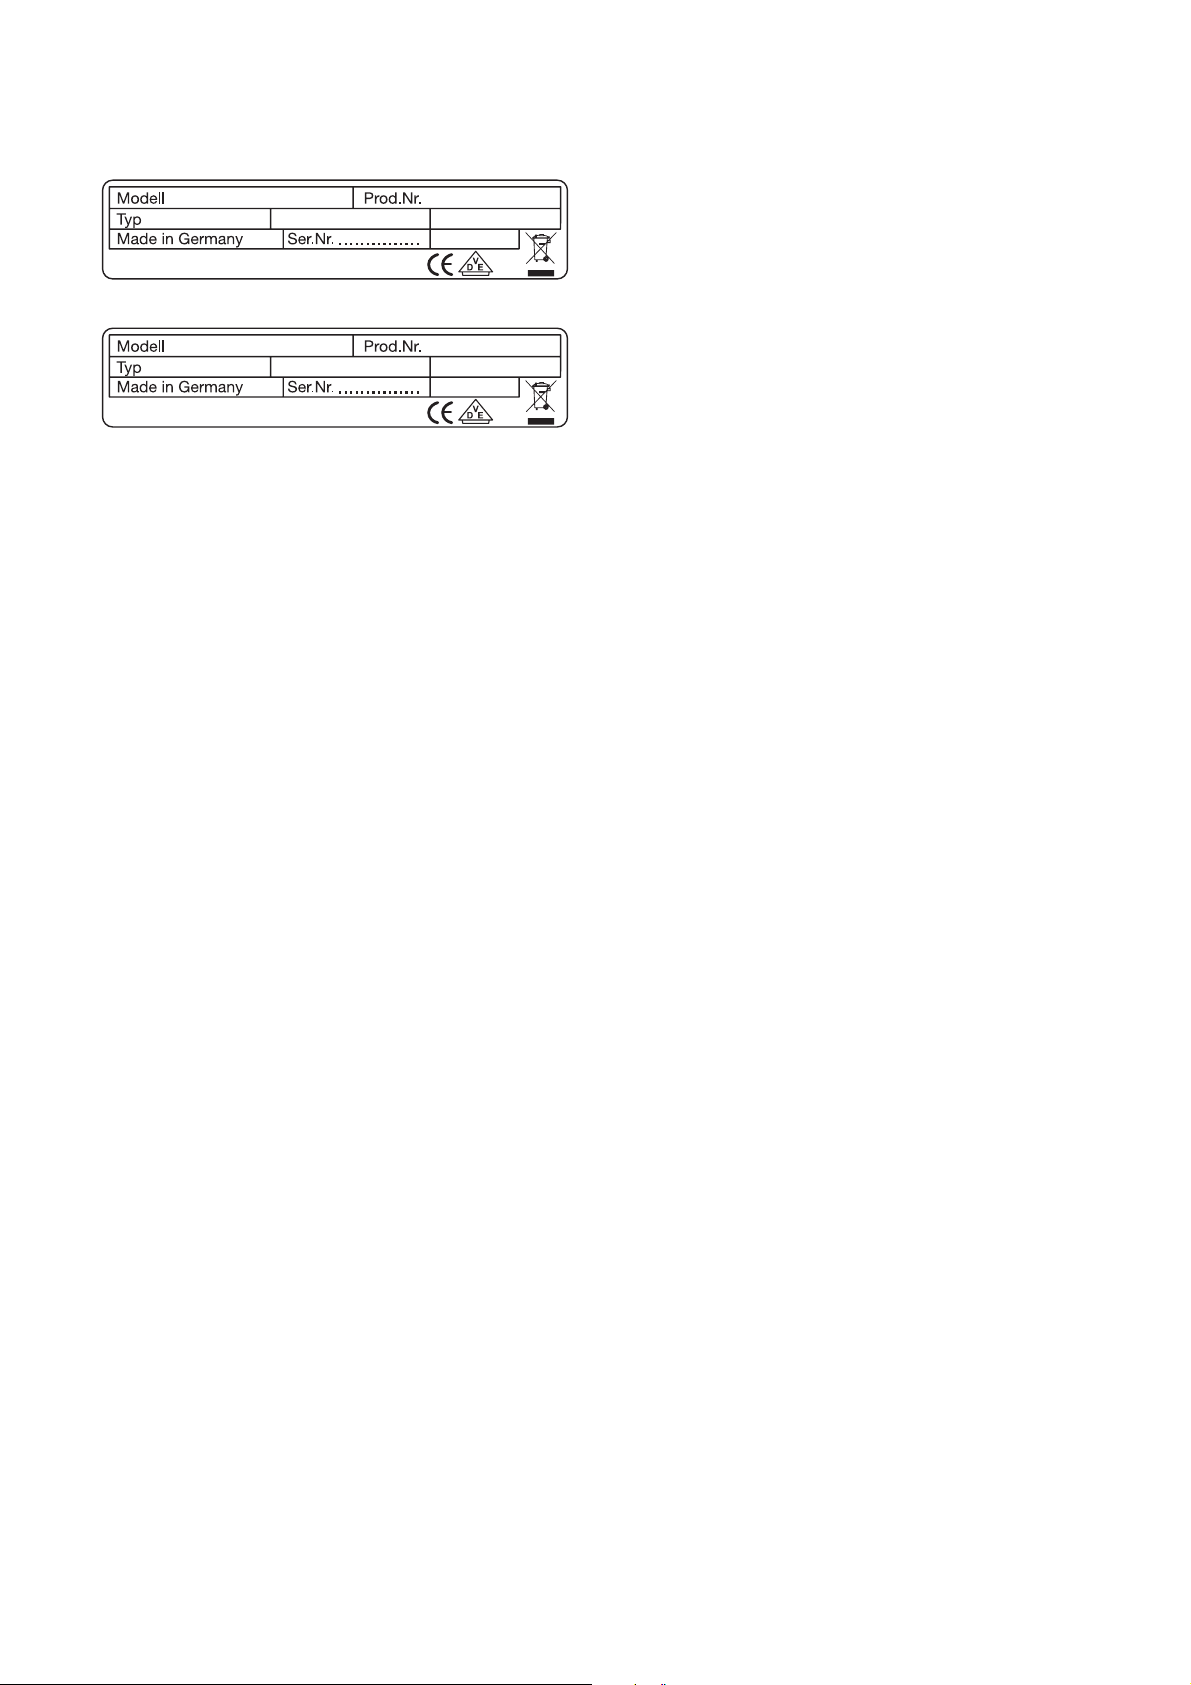
Rating Plates / Typeskilt
EHS 6691 X
55HAD56AO
ELECTROLUX
EHS 6691 U
55HAD56AO
ELECTROLUX
230 V 50 Hz
230 V 50 Hz
949 591 202
7,1 kW
949 591 203
7,1 kW
47
Page 48

Subject to change without notice
822 925 394-A-210405-01 Med forbehold om endringer
The Electrolux Group. The world´s No.1 choice.
The Electrolux Group is the world´s largest producer of powered appliances for kitchen, cleaning and outdoor use. More than 55 million Electrolux Group products
(such as refrigerators, cookers, washing machines, vacuum cleaners, chain saws and lawn mowers) are sold each year to a value of approx. USD 14 billion in more
than 150 countries around the world.
Page 49

documentation manual, user maintenance, brochure, user reference, pdf manual
This file has been downloaded from:
User Manual and User Guide for many equipments like mobile phones, photo cameras, monther board, monitors, software, tv, dvd, and othes..
Manual users, user manuals, user guide manual, owners manual, instruction manual, manual owner, manual owner's, manual guide,
manual operation, operating manual, user's manual, operating instructions, manual operators, manual operator, manual product,
 Loading...