

Page 1

EGW7353
.................................................. ...............................................
EN HOB USER MANUAL 2
FR TABLE DE CUISSON NOTICE D'UTILISATION 18
Page 2
www.electrolux.com
2
CONTENTS
SAFETY INFORMATION . . . . . . . . . . . . . . . . . . . . . . . . . . . . . . . . . . . . . . . . . . . . . . . . . . . . . . . . . 3
PRODUCT DESCRIPTION . . . . . . . . . . . . . . . . . . . . . . . . . . . . . . . . . . . . . . . . . . . . . . . . . . . . . . . 6
DAILY USE . . . . . . . . . . . . . . . . . . . . . . . . . . . . . . . . . . . . . . . . . . . . . . . . . . . . . . . . . . . . . . . . . . . 7
HELPFUL HINTS AND TIPS . . . . . . . . . . . . . . . . . . . . . . . . . . . . . . . . . . . . . . . . . . . . . . . . . . . . . . 9
CARE AND CLEANING . . . . . . . . . . . . . . . . . . . . . . . . . . . . . . . . . . . . . . . . . . . . . . . . . . . . . . . . 10
TROUBLESHOOTING . . . . . . . . . . . . . . . . . . . . . . . . . . . . . . . . . . . . . . . . . . . . . . . . . . . . . . . . . 11
INSTALLATION . . . . . . . . . . . . . . . . . . . . . . . . . . . . . . . . . . . . . . . . . . . . . . . . . . . . . . . . . . . . . . 13
TECHNICAL INFORMATION . . . . . . . . . . . . . . . . . . . . . . . . . . . . . . . . . . . . . . . . . . . . . . . . . . . . 16
ENVIRONMENT CONCERNS . . . . . . . . . . . . . . . . . . . . . . . . . . . . . . . . . . . . . . . . . . . . . . . . . . . . 17
WE’RE THINKING OF YOU
Thank you for purchasing an Electrolux appliance. You’ve chosen a product that brings with it
decades of professional experience and innovation. Ingenious and stylish, it has been designed with
you in mind. So whenever you use it, you can be safe in the knowledge that you’ll get great results
every time.
Welcome to Electrolux.
Visit our website for:
Get usage advice, brochures, trouble shooter, service information:
www.electrolux.com
Register your product for better service:
www.electrolux.com/productregistration
Buy Accessories, Consumables and Original spare parts for your appliance:
www.electrolux.com/shop
CUSTOMER CARE AND SERVICE
We recommend the use of original spare parts.
When contacting Service, ensure that you have the following data available.
The information can be found on the rating plate. Model, PNC, Serial Number.
Warning / Caution-Safety information
General information and tips
Environmental information
Subject to change without notice.
Page 3

SAFETY INFORMATION
ENGLISH 3
This appliance is suitable for the following
markets: FR
Before the installation and use of the appliance, carefully read the supplied instructions. The manufacturer is not responsible
if an incorrect installation and use causes
injuries and damages. Always keep the instructions with the appliance for future reference.
CHILDREN AND VULNERABLE
PEOPLE SAFETY
WARNING!
Risk of suffocation, injury or permanent disability.
• Do not let persons, children included,
with reduced physical sensory, reduced
mental functions or lack of experience
and knowledge use the appliance. They
must have supervision or instruction for
the operation of the appliance by a person who is responsible for their safety.
• Do not let children play with the appliance.
• Keep all packaging away from children.
• Keep children and pets away from the
appliance when it operates or when it
cools down. Accessible parts are hot.
• If the appliance has a child safety device,
we recommend that you activate it.
INSTALLATION
WARNING!
Only a qualified person must install
this appliance.
• Remove all the packaging.
• Do not install or use a damaged appliance.
• Obey the installation instruction supplied
with the appliance.
• Keep the minimum distance from the
other appliances and units.
• Always be careful when you move the
appliance because it is heavy. Always
wear safety gloves.
• Seal the cut surfaces with a sealant to
prevent moisture to cause swelling.
• Protect the bottom of the appliance from
steam and moisture.
• Do not install the appliance adjacent to a
door or under a window. This prevents
hot cookware to fall from the appliance
when the door or the window is opened.
• If the appliance is installed above drawers make sure that the space, between
the bottom of the appliance and the upper drawer, is sufficient for air circulation.
• The bottom of the appliance can get hot.
We recommend to install a non-combustile separation panel under the appliance
to prevent access to the bottom.
Electrical connection
WARNING!
Risk of fire and electrical shock.
• All electrical connections must be made
by a qualified electrician.
• Before every wiring make sure the main
terminal of the appliance is not live.
• Make sure the appliance is installed correctly. Loose and incorrect plug and
socket can make the terminal become
too hot.
• Make sure that a shock protection is installed.
• Do not let the electricity bonds touch the
appliance or hot cookware, when you
connect the appliance to the near sockets.
• Do not let the electricity bonds tangle.
• Use a strain relief clamp on cable.
• Use the correct mains cable.
• Make sure not to cause damage to the
mains plug and to the mains cable. Contact the Service or an electrician to
change a damaged mains cable.
• The electrical installation must have an
isolation device which lets you disconnect the appliance from the mains at all
poles. The isolation device must have a
contact opening width of minimum 3
mm.
• Use only correct isolation devices: line
protecting cut-outs, fuses (screw type
fuses removed from the holder), earth
leakage trips and contractors.
Page 4

www.electrolux.com
4
Gas connection
• All gas connections should be made by
• Make sure that there is air circulation
• The information about the gas supply is
• This appliance is not connected to a de-
USE
• Use this appliance in a household envi-
• Do not change the specification of this
• Do not use an external timer or a sepa-
• Do not let the appliance stay unattended
• Do not operate the appliance with wet
• Do not put cutlery or saucepan lids on
• Set the cooking zone to “off” after use.
• Do not use the appliance as a work sur-
• If the surface of the appliance is cracked,
• Fats and oil when heated can release
• The vapours that very hot oil releases
• Used oil, that can contain food rem-
a qualified person.
around the appliance.
on the rating plate.
vice, which evacuates the products of
combustion. Make sure to connect the
appliance according to current installation regulations. Pay attention to requirements regarding adequate ventilation.
WARNING!
Risk of injury, burns or electric
shock.
ronment.
appliance.
rate remote-control system to operate
the appliance.
during operation.
hands or when it has contact with water.
the cooking zones. They become hot.
face or as a storage surface.
disconnect immediately the appliance
from the power supply. This to prevent
an electrical shock.
WARNING!
Risk of fire or explosion.
flammable vapours. Keep flames or
heated objects away from fats and oils
when you cook with them.
can cause spontaneous combustion.
nants, can cause fire at a lower temperature than oil used for the first time.
• Do not put flammable products or items
that are wet with flammable products in,
near or on the appliance.
• Do not try to extinguish a fire with water.
Disconnect the appliance and cover the
flame with a lid or a fire blanket.
WARNING!
Risk of damage to the appliance.
• Do not keep hot cookware on the control panel.
• Do not let cookware to boil dry.
• Be careful not to let objects or cookware
fall on the appliance. The surface can be
damaged.
• Do not activate the cooking zones with
empty cookware or without cookware.
• Do not put aluminium foil on the appliance.
• Cookware made of cast iron, aluminium
or with a damaged bottom can cause
scratches on the glass ceramic. Always
lift these objects up when you have to
move them on the cooking surface.
• Provide good ventilation in the room
where the appliance is installed.
• Make sure that the ventilation openings
are not blocked.
• Use only stable cookware with the correct shape and diameter larger than the
dimensions of the burners. There is a risk
of overheating and rupture of the glass
plate (if applicable).
• Make sure the flame does not go out
when you quickly turn the knob from the
maximum to the minimum position.
• Make sure pots are centrally positioned
on the rings and do not stick out over
edges of the cooking surface.
• Use only the accessories supplied with
the appliance.
• Do not install a flame diffuser on the
burner.
CARE AND CLEANING
WARNING!
Risk of damage to the appliance.
• Clean regularly the appliance to prevent
the deterioration of the surface material.
• Do not use water spray and steam to
clean the appliance.
Page 5

• Clean the appliance with a moist soft
cloth. Only use neutral detergents. Do
not use abrasive products, abrasive
cleaning pads, solvents or metal objects.
DISPOSAL
WARNING!
Risk of injury or suffocation.
• Contact your municipal authority for information on how to discard the appliance correctly.
• Disconnect the appliance from the mains
supply.
• Cut off the mains cable and discard it.
• Flat the external gas pipes.
ENGLISH 5
Page 6
www.electrolux.com
6
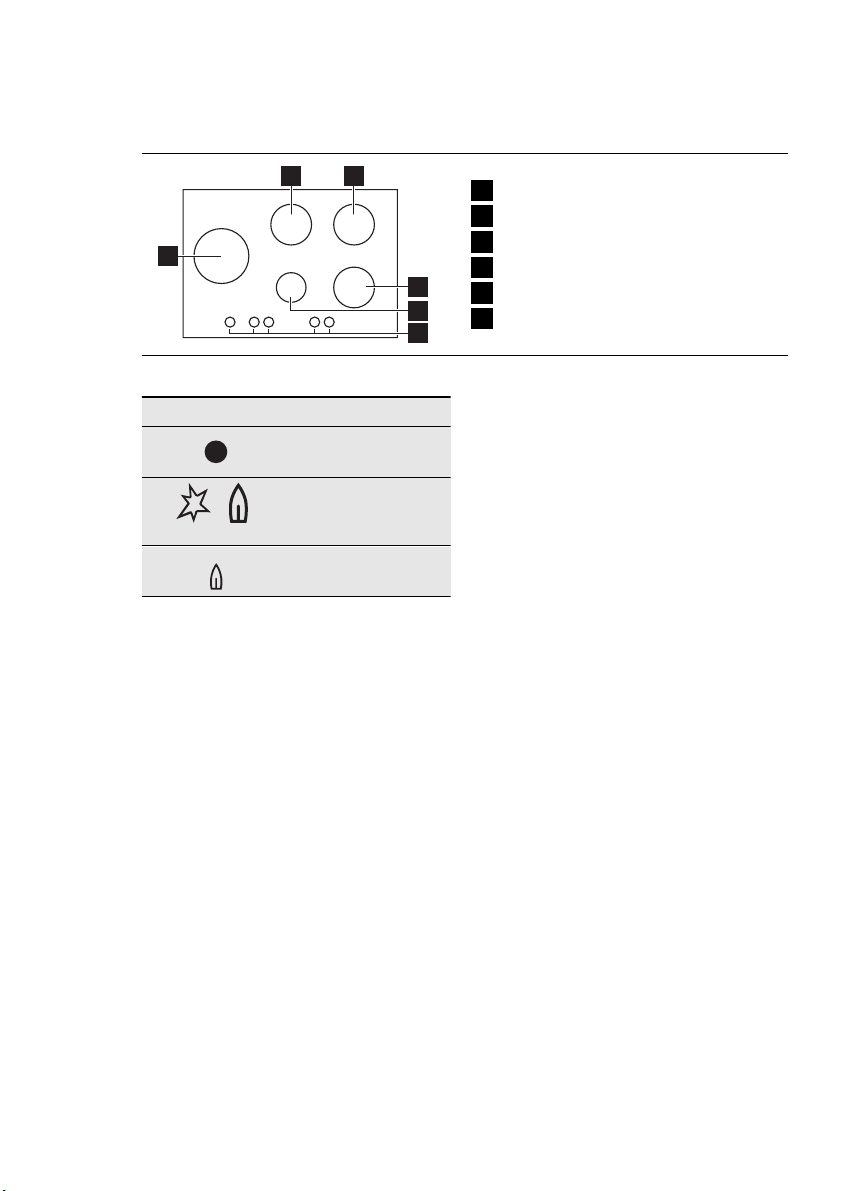
PRODUCT DESCRIPTION
COOKING SURFACE LAYOUT
2 3
1
CONTROL KNOBS
Symbol Description
no gas supply / off
position
ignition position /
maximum gas
supply
minimum gas supply
Triple Crown burner
1
Semi-rapid burner
2
Semi-rapid burner
3
Semi-rapid burner
4
5
6
4
Auxiliary burner
5
Control knobs
6
Page 7
DAILY USE
IGNITION OF THE BURNER
WARNING!
Refer to "Safety information" chapter.
WARNING!
Be very careful when you use open
fire in kitchen environment. Manufacturer decline any responsibility in
case misuse of the flame
ENGLISH 7
A
B
Always light the burner before you
put cookware.
To light the burner:
1.
Turn the control knob counterclockwise to the maximum position (
and push it down.
2.
Keep the control knob pushed for approximately 5 seconds; this will let
thermocouple to warm up. If not, the
gas supply will be interrupted.
3.
Adjust the flame after it is regular.
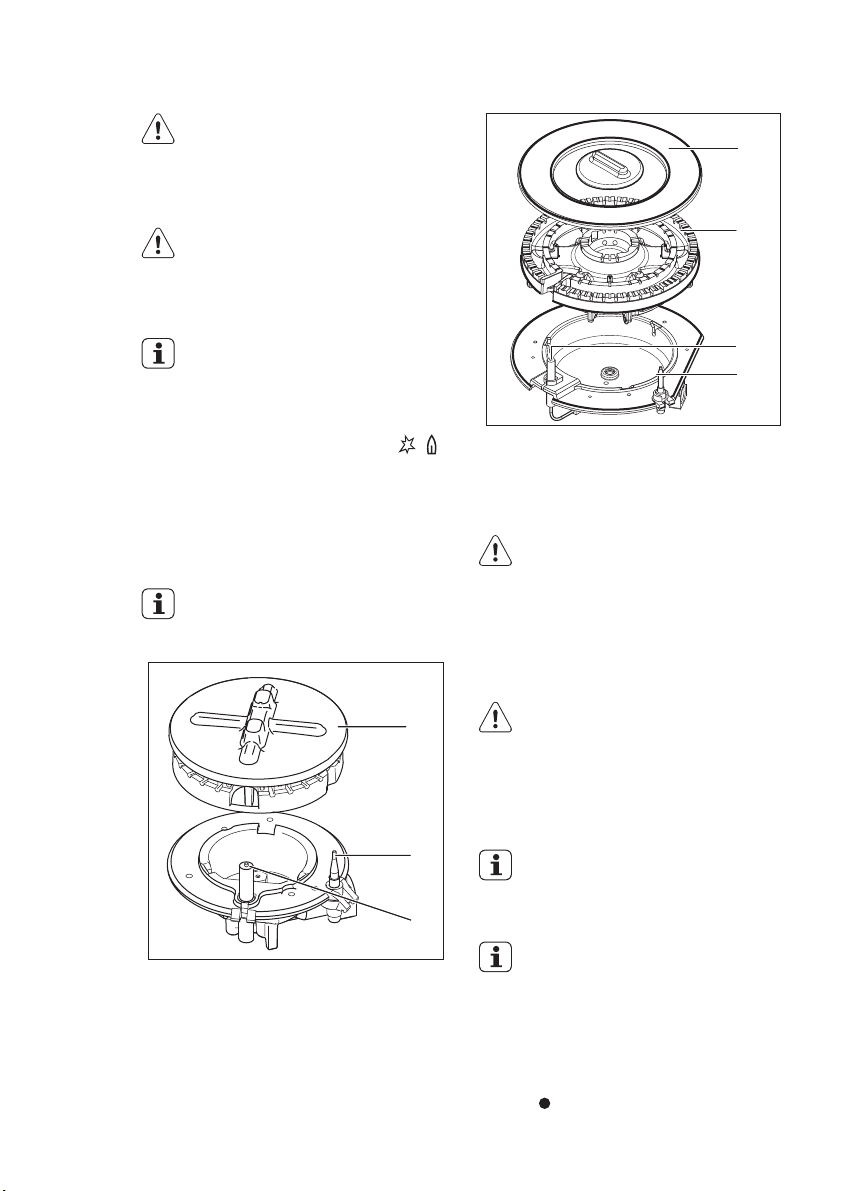
If after some tries the burner does
not light, check if the crown and its
cap are in correct positions.
A)
Burner cap and crown
B)
Thermocouple
C)
Ignition candle
)
A
B
C
C
D
A)
Burner cap
B)
Burner crown
C)
Ignition candle
D)
Thermocouple
WARNING!
Do not keep the control knob
pushed for more than 15 seconds.
If the burner does not light after 15
seconds, release the control knob,
turn it into off position and try to
light the burner again after minimum 1 minute.
In the absence of electricity you
can ignite the burner without electrical device; in this case approach
the burner with a flame, push the
relevant knob down and turn it
counter-clockwise to maximum
gas release position.
If the burner accidentally goes out,
turn the control knob to the off position and try to light the burner
again after minimum 1 minute.
The spark generator can start automatically when you switch on the
mains, after installation or a power
cut. It is normal.
TURNING THE BURNER OFF
To put the flame out, turn the knob to the
symbol
.
Page 8

www.electrolux.com
8
WARNING!
Always turn the flame down or
switch it off before you remove the
pans from the burner.
Page 9

HELPFUL HINTS AND TIPS
ENGLISH 9
WARNING!
Refer to "Safety information" chapter.
ENERGY SAVINGS
• If possible, always put the lids on the
pans.
• When the liquid starts to boil, turn down
the flame to barely simmer the liquid.
Use cookware with diameters applicable to
the size of burners.
Burner Diameters of cook-
Triple
Crown
Semi-rapid
(rear left)
Semi-rapid
(rear right)
Semi-rapid
(front right)
Auxiliary 80 - 180 mm
WARNING!
Do not use cast iron pans, potstones, grill or toaster plates on
gas burners.
ware
180 - 260 mm
120 - 240 mm
120 - 240 mm
120 - 180 mm
WARNING!
Liquids spilt during cooking can
cause the glass to break
WARNING!
Do not put the same pan on two
burners.
WARNING!
Make sure pot handles do not protrude over the front edge of the
cooktop and that pots are centrally
positioned on the rings in order to
achieve maximum stability and to
obtain lower gas consumption.
Do not place unstable or deformed pots on
the rings to prevent from spill and injury.
Page 10
www.electrolux.com
10
CARE AND CLEANING
WARNING!
Refer to "Safety information" chapter.
WARNING!
Deactivate the appliance and let it
cool down before you clean it. Disconnect the appliance from the
electrical supply before you do
cleaning or maintenance work.
Scratches or dark stains on the
surface have no effect on how the
appliance operates.
•You can remove the pan supports to
easily clean the hob.
• To clean the enamelled parts, cap and
crown, wash them with warm soapy water and dry them carefully before you put
them back.
• Wash stainless steel parts with water,
and then dry them with a soft cloth.
• The pan supports are not dishwasher
proof. They must be washed by hand.
• When you wash the pan supports by
hand, take care when you dry them as
the enamelling process occasionally
leaves rough edges. If necessary, remove stubborn stains using a paste
cleaner.
• Make sure you position the pan supports
correctly after cleaning.
• To make the burners work correctly,
make sure that the arms of the pan supports are in the centre of the burner.
2.
Clean the appliance with a damp cloth
and some detergent.
3.
At the end rub the appliance dry
with a clean cloth.
WARNING!
Do not use knives, scrapers or similar instruments to clean the surface
of the glass or between the rims of
the burners and the frame (if applicable).
WARNING!
Do not slide cookware over the
glass because it could scratch the
surface. Also, do not let hard or
sharp objects fall onto the glass or
hit the edge of the hob.
CLEANING OF THE SPARK
PLUG
This feature is obtained through a ceramic
ignition candle with a metal electrode. Keep
these components well clean to prevent
difficult lighting and check that the burner
crown holes are not obstructed.
PERIODIC MAINTENANCE
Periodically speak your local Service Force
Centre to check the conditions of the gas
supply pipe and the pressure adjuster, if fitted.
• Be very careful when you replace the
pan supports to prevent the hob top
from damage.
After cleaning, dry the appliance with a soft
cloth.
Removing the dirt:
1.
– Remove immediately: melting
plastic, plastic foil, and food containing sugar.
Stop the appliance and let it cool
–
down before you clean: limescale
rings, water rings, fat stains, shiny
metallic discolorations. Use a special
cleaner applicable for surface of
hob.
Page 11
TROUBLESHOOTING
Problem Possible cause Remedy
There is no spark when
lighting the gas
• Burner cap and crown
The flame is blow out immediately after ignition
The gas ring burns unevenly
If there is a fault, first try to find a solution to
the problem yourself. If you cannot find a
solution to the problem yourself, speak
your dealer or the local Service Force Centre.
If you operated the appliance incorrectly, or the installation was not
carried out by a registered engineer, the visit from the customer
service technician or dealer may
not take place free of charge, even
during the warranty period.
• There is no electrical
supply
are placed uneven
• Thermocouple is not
heated sufficient
• Burner crown is blocked
with food residues
• Product number (PNC) .................
• Serial Number (S.N.) .................
Use the original spare parts only. They are
available at Service Force Centre and approved spare parts shops.
LABELS SUPPLIED WITH THE
ACCESSORIES BAG
Stick the adhesive labels as indicated below:
ENGLISH 11
• Make sure that the unit
is connected and the
electrical supply is
switched on.
• Control the fuse. If the
fuse is released more
than one time, refer to a
qualified electrician.
• Make sure that the
burner cap and crown
are in correct positions.
• After lightning the flame,
keep the knob pushed
for approximately 5 seconds.
• Make sure that the injector is not blocked
and the burner crown is
clear of food particles.
These data are necessary to help you
quickly and correctly. These data are
available on the supplied rating plate.
• Model description .................
Page 12

www.electrolux.com
12
1 2 3
MOD.
PROD.NO.
SER.NO
DATA
Stick it on Guarantee Card and send
1
this part
Stick it on Guarantee Card and keep
2
this part
Stick it on instruction booklet
3
MOD.
PROD.NO.
SER.NO
DATA
MODELMODEL
0049
03 IT
MADE IN ITALY
MOD.
PROD.NO.
SER.NO.
TYPE
230V-50Hz
IP20
Page 13

INSTALLATION
ENGLISH 13
WARNING!
Refer to "Safety information" chapter.
WARNING!
The following instructions about installation, connection and maintenance must be carried out by qualified personnel in compliance with
standards and local regulations in
force.
GAS CONNECTION
Choose fixed connections or use a flexible
pipe in stainless steel in compliance with
the regulation in force. If you use flexible
metallic pipes, be careful they do not come
in touch with mobile parts or they are not
squeezed. Also be careful when the hob is
put together with an oven.
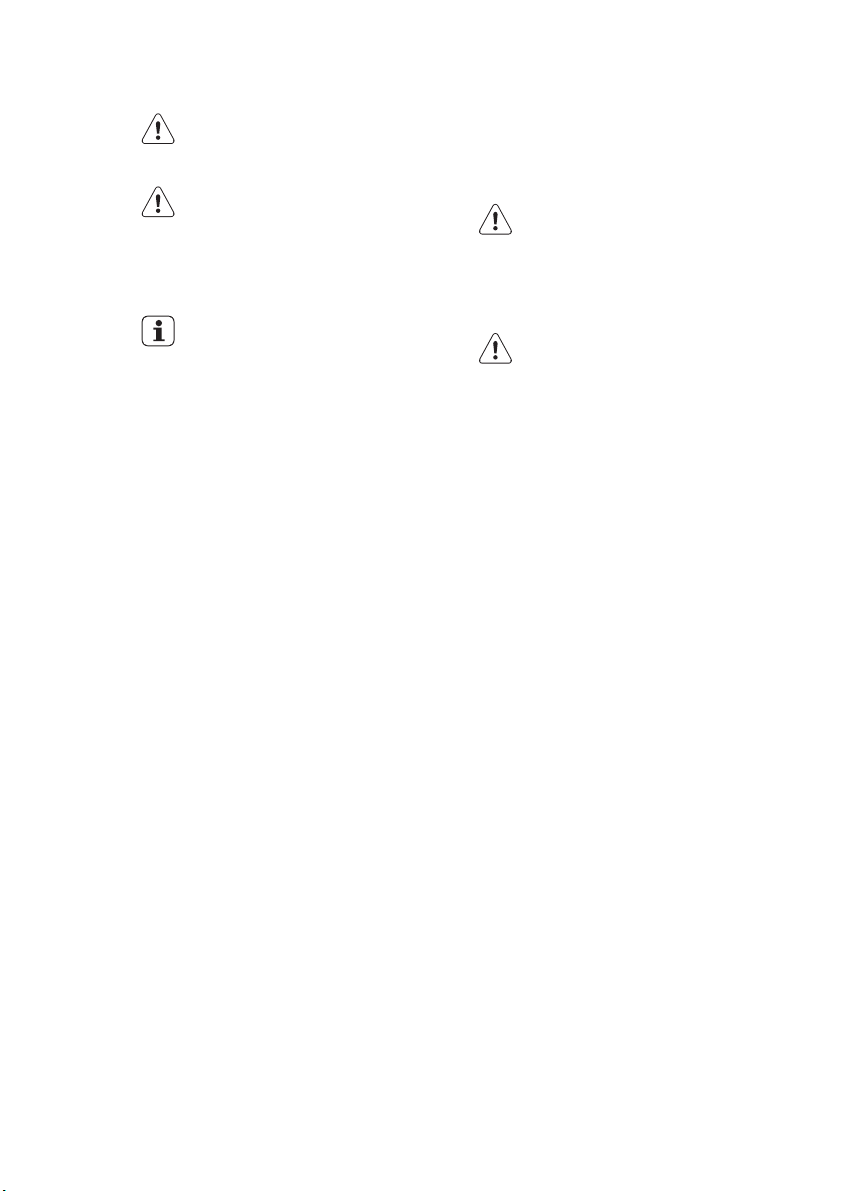
Make sure that the gas supply
pressure of the appliance obeys
the recommended values. The adjustable connection is fixed to the
comprehensive ramp by means of
a threaded nut G 1/2". Screw the
parts without force, adjust the connection in the necessary direction
and tighten everything.
A
B
A)
End of shaft with nut
B)
Washer (additional washer is only for
Slovenia and Turkey)
C)
Elbow
D)
Rubber pipe holder for liquid gas (only
for Slovenia and Turkey)
C
D
Rigid connection:
Carry out connection by using metal rigid
pipes (copper with mechanical end).
"Flexible" connection with
mechanical end:
– Natural gas: connection carry out with
a flexible pipe with mechanical end
which is screwed directly on the elbow
finishing the slope of the appliance.
– Butane / Propane: use a flexible tube,
equipped with it's collars if it is worth visiting over all it's length and if the appliance runs only on butane. If the appliance runs on Propane, use a flexible
pipe with suitable metal end.
Flexible nonmetal pipes
connection:
If it is possible to easily control the connection in its full area, you can use a flexible
pipe. Tightly attach the flexible pipe by
clamps.
Liquid gas: use the rubber pipe holder. Always engage the gasket. Then continue
with the gas connection. The flexible pipe is
prepared for apply when:
– it can not get hot more than room tem-
perature, higher than 30°C;
– it is no longer than 1500 mm;
– it shows no throttles;
– it is not subject to traction or torsion;
– it does not get in touch with cutting
edges or corners;
– it can be easily examined in order to
check its condition.
The control of preservation of the flexible
pipe consists in checking that:
– it does not show cracks, cuts, marks of
burnings on the two ends and on its full
length;
– the material is not hardened, but shows
its correct elasticity;
– the fastening clamps are not rusted;
– expired term is not due.
If one or more defects are visible, do not
repair the pipe, but replace it.
Page 14

www.electrolux.com
14
INJECTORS REPLACEMENT
1.
2.
3.
4.
5.
If the supply gas pressure is changeable or
different from the necessary pressure, you
must fit an applicable pressure adjuster on
the gas supply pipe.
ADJUSTMENT OF MINIMUM
LEVEL
To adjust the minimum level of the burners:
1.
2.
3.
4.
A)
• If you change from natural gas G20/G25
• If you change from liquid gas to natural
When installation is complete,
make sure that the seal of each
pipe fitting is correct. Use a soapy
solution, not a flame!
Remove the pan supports.
Remove the caps and crowns of the
burner.
With a socket spanner 7 remove the
injectors and replace them with the
ones which are necessary for the type
of gas you use (see table in "Technical
Information" chapter).
Assemble the parts, follow the same
procedure backwards.
Replace the rating plate (it is near the
gas supply pipe) with the one for the
new type of gas supply. You can find
this plate in the package supplied with
the appliance.
Light the burner.
Turn the knob on the minimum posi-
tion.
Remove the knob.
With a thin screwdriver, adjust the by-
pass screw position.
A
The by-pass screw
20/25 mbar to liquid gas, fully tighten the
by-pass screw in.
gas G20/G25 20/25 mbar, undo the by-
pass screw approximately 1/4 of a turn
(1/2 of a turn for Triple Crown burner).
WARNING!
Make sure the flame does not go
out when you quickly turn the knob
from the maximum position to the
minimum position.
ELECTRICAL CONNECTION
• Ground the appliance according to safe-
ty precautions.
• Make sure that the rated voltage and
type of power on the rating plate agree
with the voltage and the power of the lo-
cal power supply.
• This appliance is supplied with a mains
cable. It has to be supplied with a cor-
rect plug, able to support the load
marked on the rating plate. The plug has
to be fitted in a correct socket.
• Any electrical component must be instal-
led or replaced by the Service Force
Centre technician or qualified service
personnel.
• Always use a correctly installed shock-
proof socket.
• Make sure that there is an access to the
mains plug after installation.
• Do not pull the mains cable to discon-
nect the appliance. Always pull the
mains plug.
• The appliance must not be connected
with an extension cable, an adapter or a
multiple connection (risk of fire). Check
that the ground connection is in con-
formity with the standard and regulations
force.
• The power cable must be placed in such
a way that it does not touch any hot
part.
• Connect the appliance to the mains with
a device that lets to disconnect the ap-
pliance from the mains at all poles with a
contact opening width of minimum 3
mm, eg. automatic line protecting cut-
out, earth leakage trips or fuse.
• None of a parts of the connection cable
can not get a temperature 90 °C. The
blue neutral cable must be connected to
the terminal block label with "N". The
brown (or black) phase cable (fitted in
the terminal block contact marked with
Page 15

"L") must always be connected to the
live phase.
REPLACEMENT OF THE
CONNECTION CABLE
To replace the connection cable use only
H05V2V2-F T90 or equivalent type. Make
sure that the cable section is applicable to
the voltage and the working temperature.
The yellow/green earth wire must be approximately 2 cm longer than the brown (or
black) phase wire.
BUILDING IN
ENGLISH 15
POSSIBILITIES FOR INSERTION
Kitchen unit with door
The panel installed below the hob must be
easy to remove and let an easy access in
case a technical assistance intervention is
necessary.
30 mm
A
60 mm
B
min 20 mm
(max 150 mm)
min.
55 mm
480 mm
A)
supplied seal
B)
supplied brackets
min.
450 mm
30 mm
min.
650 mm
560 mm
A)
Removable panel
B)
Space for connections
Kitchen unit with oven
The hob recess dimensions must obey the
indication and the kitchen unit must be
equipped with vents to let a continuous
supply of air. The electrical connection of
the hob and the oven must be installed
separately for safety reasons and to let
easy remove oven from the unit.
50 cm2
120 cm2
A
360 cm2
180 cm2
B
Page 16

www.electrolux.com
16
TECHNICAL INFORMATION
Hob dimensions
Width: 740 mm
Length: 510 mm
Hob recess dimensions
Width: 560 mm
Length: 480 mm
Heat input
Triple Crown
burner:
Semi-rapid burner:
Auxiliary burner: 1.0 kW
TOTAL POWER: G20/G25 (2E+)
Gas burners
NOR-
MAL
BURN
Auxiliary
Semirapid
Triple
Crown
POWER
ER
kW kW
1.0 0.33 70 0.095 0.111 50 73 71
1.9 0.45 96 0.181 0.210 71 138 136
3.8 1.4 146 0.362 0.421 98 276 271
3.8 kW
1.9 kW
20/25 mbar =
10.5 kW
G30 (3+) 28-30
mbar = 763 g/h
G31 (3+) 37 mbar
= 750 g/h
REDUCED
POWER
G20/G25 (2E+) 20/25
inj.
1/100
mm
Electric supply: 230 V ~ 50 Hz
Category: II2E+3+
Gas connection: G 1/2"
Gas supply: G20/G25 (2E+)
Appliance class: 3
By-pass diameters
Burner Ø By-pass in
Auxiliary 28
Semi-rapid 32
Triple Crown 56
NORMAL POWER
NATURAL GAS
mbar
G20
20
mbar
m³/h m³/h g/h g/h
G25
mbar
LPG (Butane/Propane)
G30/G31 (3+) 28-30/37
25
inj.
1/100
mm
20/25 mbar
mbar
28-30
mbar
1/100 mm
G30
G31
mbar
37
Page 17

ENVIRONMENT CONCERNS
Recycle the materials with the symbol
Put the packaging in applicable containers
to recycle it.
Help protect the environment and human
health and to recycle waste of electrical
and electronic appliances. Do not dispose
.
appliances marked with the symbol
the household waste. Return the product
to your local recycling facility or contact
your municipal office.
ENGLISH 17
with
Page 18

www.electrolux.com
18
SOMMAIRE
CONSIGNES DE SÉCURITÉ . . . . . . . . . . . . . . . . . . . . . . . . . . . . . . . . . . . . . . . . . . . . . . . . . . . . . 19
DESCRIPTION DE L'APPAREIL . . . . . . . . . . . . . . . . . . . . . . . . . . . . . . . . . . . . . . . . . . . . . . . . . . 22
UTILISATION QUOTIDIENNE . . . . . . . . . . . . . . . . . . . . . . . . . . . . . . . . . . . . . . . . . . . . . . . . . . . . 23
CONSEILS UTILES . . . . . . . . . . . . . . . . . . . . . . . . . . . . . . . . . . . . . . . . . . . . . . . . . . . . . . . . . . . . 25
ENTRETIEN ET NETTOYAGE . . . . . . . . . . . . . . . . . . . . . . . . . . . . . . . . . . . . . . . . . . . . . . . . . . . . 26
EN CAS D'ANOMALIE DE FONCTIONNEMENT . . . . . . . . . . . . . . . . . . . . . . . . . . . . . . . . . . . . . . 27
INSTALLATION . . . . . . . . . . . . . . . . . . . . . . . . . . . . . . . . . . . . . . . . . . . . . . . . . . . . . . . . . . . . . . 29
CARACTERISTIQUES TECHNIQUES . . . . . . . . . . . . . . . . . . . . . . . . . . . . . . . . . . . . . . . . . . . . . . 32
EN MATIÈRE DE PROTECTION DE L'ENVIRONNEMENT . . . . . . . . . . . . . . . . . . . . . . . . . . . . . . 33
NOUS PENSONS À VOUS
Merci d'avoir choisi ce produit Electrolux. Avec ce produit, vous bénéficiez de dizaines d'années
d'expérience professionnelle et d'innovation. Ingénieux et élégant, il a été conçu sur mesure pour
vous. Grâce à cet appareil, vous savez que chaque utilisation vous apportera satisfaction.
Bienvenue chez Electrolux.
Visitez notre site Internet pour :
Obtenir des conseils d'utilisation, des brochures, de l'aide, des informations :
www.electrolux.com
Enregistrer votre produit pour obtenir un meilleur service :
www.electrolux.com/productregistration
Acheter des accessoires, consommables et pièces de rechange d'origine pour votre
appareil :
www.electrolux.com/shop
SERVICE APRÈS-VENTE
N'utilisez que des pièces de rechange d'origine.
Avant de contacter le service, assurez-vous de disposer des informations suivantes :
Vous trouverez ces informations sur la plaque signalétique. Modèle, PNC, numéro de série.
Avertissement/Attention : consignes de sécurité.
Informations générales et conseils
Informations écologiques
Sous réserve de modifications.
Page 19

CONSIGNES DE SÉCURITÉ
FRANÇAIS 19
Cet appareil est adapté aux marchés
suivants : FR
Avant d'installer et d'utiliser cet appareil, lisez soigneusement les instructions fournies. Le fabricant ne peut être tenu pour
responsable des dommages et blessures
liés à une mauvaise installation ou utilisation. Conservez toujours cette notice avec
votre appareil pour vous y référer ultérieurement.
SÉCURITÉ DES ENFANTS ET
DES PERSONNES
VULNÉRABLES
AVERTISSEMENT
Risque d'asphyxie, de blessure ou
d'invalidité permanente.
• Cet appareil n'est pas destiné à être utilisé par des enfants ou des personnes
dont les capacités physiques, sensorielles ou mentales, ou le manque d'expérience et de connaissance les empêchent d'utiliser l'appareil sans risque
lorsqu'ils sont sans surveillance à moins
qu'une personne responsable de leur sécurité ne les supervise ou leur donne des
instructions sur la manière de l'utiliser.
• Ne laissez pas les enfants jouer avec
l'appareil.
• Ne laissez pas les emballages à la portée
des enfants.
• Tenez les enfants et les animaux éloignés de l’appareil lorsqu'il est en cours
de fonctionnement ou lorsqu'il refroidit.
Les parties accessibles sont chaudes.
• Si l'appareil est équipé d'un dispositif de
sécurité enfants, nous vous recommandons de l'activer.
INSTALLATION
AVERTISSEMENT
L'appareil doit être installé uniquement par un professionnel qualifié.
• Retirez l'intégralité de l'emballage.
• N'installez pas et ne branchez pas un
appareil endommagé.
• Suivez scrupuleusement les instructions
d'installation fournies avec l'appareil.
• Respectez l'espacement minimal requis
par rapport aux autres appareils.
• L'appareil est lourd, prenez toujours des
précautions lorsque vous le déplacez.
Portez toujours des gants de sécurité.
• Isolez les surfaces découpées à l'aide
d'un matériau d'étanchéité pour éviter
que la moisissure ne provoque de gonflements.
• Protégez la partie inférieure de l'appareil
de la vapeur et de l'humidité.
• N'installez pas l'appareil près d'une porte ou sous une fenêtre. Les récipients
chauds risqueraient de tomber de l'appareil lors de l'ouverture de celles-ci.
• Si l'appareil est installé au-dessus de tiroirs, assurez-vous qu'il y a suffisamment d'espace entre le fond de l'appareil
et le tiroir supérieur pour que l'air puisse
circuler.
• Le dessous de l'appareil peut devenir
très chaud. Nous vous recommandons
d'installer un panneau de séparation
ignifuge sous l'appareil pour en bloquer
l'accès.
Branchement électrique
AVERTISSEMENT
Risque d'incendie ou d'électrocution.
• L'ensemble des branchements électriques doit être effectué par un technicien
qualifié.
• Avant chaque raccordement, assurezvous que la borne principale de l'appareil
est hors tension.
• Assurez-vous que l'appareil est bien installé. Des connexions desserrées ou incorrectes peuvent être à l'origine d'une
surchauffe des bornes.
• Assurez-vous qu'une protection antichocs est installée.
• Contrôlez que les câbles d'alimentation
n'entrent pas en contact avec les surfaces brûlantes de l'appareil ou les récipients brûlants lorsque vous branchez
l'appareil électrique à des prises électriques situées à proximité.
• Ne laissez pas les connexions s'emmêler.
Page 20

www.electrolux.com
20
• Utilisez une pince pour détendre le câ-
• Utilisez le câble d'alimentation approprié.
• Veillez à ne pas endommager la fiche
• L'installation électrique doit être équipée
• N'utilisez que des systèmes d'isolation
Raccordement au gaz
• Tous les raccordements au gaz doivent
• Assurez-vous que l'air circule autour de
• Les informations concernant l'alimenta-
• Cet appareil n'est pas raccordé à un dis-
UTILISATION
• Utilisez cet appareil dans un environne-
• Ne modifiez pas les caractéristiques de
• Ne faites pas fonctionner l'appareil avec
• Ne laissez jamais l'appareil sans surveil-
• N'utilisez jamais cet appareil avec les
ble.
secteur ni le câble d'alimentation. Contactez le service après-vente ou un électricien pour remplacer le câble d'alimentation s'il est endommagé.
d'un dispositif d'isolement à coupure
omnipolaire. Le dispositif d'isolement
doit présenter une distance d'ouverture
des contacts d'au moins 3 mm.
appropriés : des coupe-circuits, des fusibles (les fusibles à visser doivent être retirés du support), un disjoncteur différentiel et des contacteurs.
être effectués par une personne qualifiée.
l'appareil.
tion en gaz se trouvent sur la plaque signalétique.
positif d'évacuation des produits de
combustion. Assurez-vous de brancher
l'appareil selon les réglementations d'installation en vigueur. Veillez à respecter
les exigences en matière d'aération.
AVERTISSEMENT
Risque de blessures, de brûlures
ou d'électrocution.
ment domestique.
cet appareil.
un minuteur externe ou un système de
commande à distance.
lance pendant son fonctionnement.
mains mouillées ou lorsqu'il est en contact avec de l'eau.
• Ne posez pas de couverts ou de couvercles sur les zones de cuisson. Elles sont
chaudes.
• Éteignez les zones de cuisson après
chaque utilisation.
• N'utilisez jamais l'appareil comme plan
de travail ou comme plan de stockage.
• Si la surface de l'appareil présente des
fêlures, débranchez immédiatement l'appareil pour éviter tout risque d'électrocution.
AVERTISSEMENT
Risque d'explosion ou d'incendie.
• Les graisses et l'huile chaude peuvent
dégager des vapeurs inflammables. Tenez les flammes ou les objets chauds
éloignés des graisses et de l'huile lorsque vous vous en servez pour cuisiner.
• Les vapeurs dégagées par l'huile très
chaude peuvent provoquer une combustion spontanée.
• L'huile qui a servi contient des restes
d'aliments qui peuvent provoquer un incendie à température plus faible que
l'huile n'ayant jamais servi.
• Ne placez pas de produits inflammables
ou d'éléments imbibés de produits inflammables à l'intérieur, à proximité ou
sur l'appareil.
• Ne tentez pas d'éteindre un incendie
avec de l'eau. Débranchez l'appareil et
couvrez les flammes à l'aide d'un couvercle ou d'une couverture à incendie.
AVERTISSEMENT
Risque de dommage de l'appareil.
• Ne laissez pas de récipients chauds sur
le bandeau de commande.
• Ne laissez pas le contenu des récipients
de cuisson s'évaporer.
• Prenez soin de ne pas laisser tomber
d'objets ou de récipients sur l'appareil.
Sa surface risque d'être endommagée.
• Ne faites jamais fonctionner les zones de
cuisson avec des récipients de cuisson
vides ou sans aucun récipient de cuisson.
• Ne placez jamais de papier aluminium
sur l'appareil.
• N'utilisez pas de récipients en fonte ou
en aluminium, ni de récipients dont le
fond est endommagé et rugueux. Ils risqueraient de rayer la surface vitrocérami-
Page 21

que. Soulevez toujours ces objets lorsque vous devez les déplacer sur la surface de cuisson.
• Veillez à ce que la pièce où est installé
l'appareil soit bien aérée.
• Assurez-vous que les orifices de ventilation ne sont pas bouchés.
• Utilisez uniquement des récipients stables avec une forme adaptée et un plus
grand diamètre que les dimensions des
brûleurs. Risque de surchauffe et de rupture de la plaque en verre (si votre appareil en est équipé) !
• Assurez-vous que la flamme ne s'éteint
pas lorsque vous tournez rapidement la
manette de la position maximale à la position minimale.
• Veillez à ce que les récipients se trouvent
bien au centre des cercles et qu'ils ne
dépassent pas des rebords de la table
de cuisson.
• N'utilisez que les accessoires fournis
avec l'appareil.
• N'installez pas de diffuseur de flamme
sur le brûleur.
ENTRETIEN ET NETTOYAGE
AVERTISSEMENT
Risque de dommage de l'appareil.
FRANÇAIS 21
• Nettoyez régulièrement l'appareil afin de
maintenir le revêtement en bon état.
• Ne pulvérisez pas d'eau ni de vapeur
pour nettoyer l'appareil.
• Nettoyez l'appareil avec un chiffon doux
humide. Utilisez uniquement des produits de lavage neutres. N'utilisez pas de
produits abrasifs, de tampons à récurer,
de solvants ou d'objets métalliques.
MISE AU REBUT
AVERTISSEMENT
Risque de blessure ou d'asphyxie.
• Contactez votre service municipal pour
obtenir des informations sur la marche à
suivre pour mettre conformément l'appareil au rebut.
• Débranchez l'appareil de l'alimentation
électrique.
• Coupez le câble d'alimentation au ras de
l'appareil et mettez-le au rebut.
• Aplatissez les tuyaux de gaz externes.
Page 22

www.electrolux.com
22
DESCRIPTION DE L'APPAREIL
DESCRIPTION DE LA TABLE DE CUISSON
2 3
1
MANETTES DE COMMANDE
Symbole Description
pas d'alimentation
en gaz / position
arrêt
position d'allumage / alimentation
en gaz maximum
alimentation en
gaz minimum
Brûleur à triple couronne
1
Brûleur semi-rapide
2
Brûleur semi-rapide
3
Brûleur semi-rapide
4
5
6
4
Brûleur auxiliaire
5
Manettes de commande
6
Page 23

UTILISATION QUOTIDIENNE
AVERTISSEMENT
Reportez-vous au chapitre « Consignes de sécurité ».
ALLUMAGE DU BRÛLEUR
AVERTISSEMENT
Faites très attention lorsque vous
utilisez une flamme nue dans une
cuisine. Le fabricant décline toute
responsabilité en cas de mauvais
usage de la flamme
Allumez toujours le brûleur avant
de poser les plats.
Pour allumer le brûleur :
1.
Tournez le sélecteur dans le sens inverse des aiguilles d'une montre jus-
qu'à sa position maximale (
puis appuyer dessus pour l'enfoncer.
2.
Maintenez la commande appuyée pendant environ 5 secondes, cela permet
au thermocouple de se réchauffer. Sinon, l'alimentation en gaz sera interrompue.
3.
Une fois que la flamme brûle régulièrement, réglez son débit.
Si, après plusieurs tentatives, le
brûleur ne s'allume pas, vérifiez
que la couronne et son chapeau
sont correctement placés.
A)
Chapeau et couronne du brûleur
B)
Thermocouple
C)
Bougie d'allumage
),
FRANÇAIS 23
A
B
C
D
A)
Chapeau du brûleur
B)
Couronne du brûleur
C)
Bougie d'allumage
D)
Thermocouple
AVERTISSEMENT
Ne maintenez pas la manette de
commande appuyée plus de 15
secondes.
Si le brûleur ne s'allume pas au
bout de 15 secondes, relâchez la
manette et positionnez-la sur Arrêt.
Attendez au moins 1 minute avant
d'essayer une nouvelle fois d'allumer le brûleur.
En cas de coupure d'électricité,
vous pouvez utiliser votre table de
cuisson sans avoir recours au sys-
A
B
C
tème automatique. Dans ce cas,
approchez une flamme du brûleur,
enfoncez la manette correspondante et tournez-la dans le sens inverse des aiguilles d'une montre
jusqu'à la position de libération
maximum du gaz.
Si le brûleur s'éteint accidentellement, tournez la manette de commande sur la position Arrêt et attendez au moins 1 minute avant
d'essayer une nouvelle fois d'allumer le brûleur.
Page 24

www.electrolux.com
24
POUR ÉTEINDRE LES
BRÛLEURS
Tournez la manette jusqu'au symbole .
Le générateur d'étincelles se déclenche automatiquement à la mise
sous tension de l'appareil, après
l'installation ou une coupure d'électricité. Ce phénomène est normal.
AVERTISSEMENT
Abaissez ou coupez toujours la
flamme avant de retirer les récipients du brûleur.
Page 25

CONSEILS UTILES
FRANÇAIS 25
AVERTISSEMENT
Reportez-vous au chapitre « Consignes de sécurité ».
ÉCONOMIES D'ÉNERGIE
• Si possible, couvrez les casseroles.
• Lorsque le liquide commence à bouillir,
baissez le feu pour laisser légèrement
frémir le liquide.
Utilisez uniquement des récipients dont le
diamètre correspond aux dimensions des
brûleurs.
Brûleur Diamètres des réci-
Triple cou-
ronne
Semi-rapide
(arrière gau-
che)
Semi-rapide
(arrière
droit)
Semi-rapide
(avant droit)
Auxiliaire 80 - 180 mm
AVERTISSEMENT
N'utilisez pas de plats en fonte, en
stéatite, de grils ou de plats à gratin sur les brûleurs à gaz.
pients
180 - 260 mm
120 - 240 mm
120 - 240 mm
120 - 180 mm
Ne placez pas de récipients instables ou
déformés sur les zones de cuisson afin
d'éviter les débordements et les blessures.
AVERTISSEMENT
Des liquides renversés durant la
cuisson peuvent provoquer le bris
du verre.
AVERTISSEMENT
Ne placez pas le même récipient
sur deux zones de cuisson.
AVERTISSEMENT
Assurez-vous que les casseroles
ne dépassent pas des bords de la
table de cuisson, et qu'elles sont
bien centrées sur les zones de
cuisson, pour une stabilité optimale
et une économie de la consommation de gaz.
Page 26

www.electrolux.com
26
ENTRETIEN ET NETTOYAGE
AVERTISSEMENT
Reportez-vous au chapitre « Consignes de sécurité ».
AVERTISSEMENT
Éteignez l'appareil et laissez-le refroidir avant de le nettoyer. Avant
toute opération de nettoyage ou intervention technique, assurez-vous
que l'appareil est débranché de la
prise électrique.
Les rayures ou les taches sombres
sur la surface n'ont aucune incidence sur le fonctionnement de
l'appareil.
• Vous pouvez retirer les supports de casserole pour nettoyer facilement la table
de cuisson.
• Nettoyez les éléments en émail, le chapeau et la couronne avec de l'eau chaude savonneuse et séchez-les soigneusement avant de les remettre en place.
• Lavez les éléments en acier inoxydable à
l'eau, puis séchez-les à l'aide d'un chiffon doux.
• Les supports de casserole ne doivent
pas être placés dans le lave-vaisselle. Ils
doivent être lavés à la main.
• Lorsque vous lavez les supports à la
main, faites bien attention lorsque vous
les essuyez, car le processus d'émaillage laisse parfois des arêtes risquant de
vous blesser. Si nécessaire, retirez les
taches tenaces à l'aide d'une pâte nettoyante.
• Après avoir lavé les supports de casseroles, veillez à les remettre correctement
en place.
• Pour que les brûleurs fonctionnent correctement, assurez-vous que les bras
des supports de casseroles sont au milieu du brûleur.
Replacez les supports de casserole
•
avec soin afin de ne pas endommager le dessus de la table de cuisson.
Après le nettoyage, séchez l'appareil à l'aide d'un chiffon doux.
Enlevez les salissures :
1.
– Enlevez immédiatement : plasti-
que fondu, feuilles plastique et les
aliments contenant du sucre.
– Mettez l'appareil à l'arrêt et lais-
sez le refroidir avant de procéder
au nettoyage : des cernes de calcaire, traces d'eau, projections de
graisse, décolorations métalliques
luisantes. Utiliser un nettoyant spécial pour la surface de la table de
cuisson.
2.
Nettoyez l'appareil à l'aide d'un chiffon
humide et un peu de détergent.
3.
Pour finir essuyez l'appareil à l'aide
d'un chiffon propre.
AVERTISSEMENT
N'utilisez pas de couteau, de grattoir ou d'instruments similaires pour
nettoyer les surfaces en verre ou
entre les bords des brûleurs et l'encadrement (si présent).
AVERTISSEMENT
Ne faites pas glisser les récipients
sur le verre car ils pourraient en
rayer la surface. De même, ne faites pas tomber d'objets durs ou
pointus sur le verre. Ne cognez pas
non plus contre les rebords de la
table de cuisson.
NETTOYAGE DU GÉNÉRATEUR
D'ÉTINCELLES
Cette fonction emploie une bougie d'allumage en céramique et d'une électrode métallique. Maintenez ces éléments propres
pour prévenir un allumage difficile et vérifier
que les trous de la couronne du brûleur ne
sont pas obstrués.
ENTRETIEN PÉRIODIQUE
Demandez régulièrement à votre service
après-vente local de vérifier l'état du tuyau
d'arrivée de gaz et du régulateur de pression, si l'appareil en est équipé.
Page 27

EN CAS D'ANOMALIE DE FONCTIONNEMENT
Anomalie Cause possible Solution
Aucune étincelle ne se
produit à l'allumage.
• Le couvercle et la cou-
La flamme s'éteint immédiatement après l'allumage.
Les flammes sont irrégulières.
Certaines anomalies de fonctionnement
peuvent dépendre d'opérations d'entretien
non correctes ou d'oubli et peuvent être résolues à l'aide des indications fournies
dans le tableau, sans faire appel à un service après-vente. Si l'anomalie persiste, contactez votre magasin vendeur ou votre service après-vente.
Si un problème résulte d'une mauvaise utilisation ou si l'installation
de l'appareil n'a pas été réalisée
par un professionnel qualifié, le déplacement du technicien du service
après vente ou du revendeur peut
être facturé même en cours de garantie.
• Il n'y a pas d'alimentation électrique.
ronne du brûleur sont
mal positionnés.
• Le thermocouple n'est
pas suffisamment
chauffé.
• La couronne du brûleur
doit être encrassés avec
des restes d'aliments.
de et adaptée. Ces données figurent
sur la plaque signalétique fournie.
• Description du modèle ............
• Référence produit (PNC) ............
• Numéro de série (S.N.) ............
Utilisez exclusivement des pièces d'origine
certifiées constructeur. Elles sont disponibles auprès de votre service après-vente.
ÉTIQUETTES FOURNIES AVEC
LE SAC D'ACCESSOIRES
Collez les étiquettes adhésives comme indiqué ci-dessous :
• Vérifiez si l'appareil est
bien branché et allumé;
• Contrôlez le fusible. Si le
fusible est dégagé plusieurs fois, contactez un
électricien qualifié.
• Assurez-vous que le
couvercle et la couronne du brûleur sont bien
positionnés.
• Après avoir allumé la
flamme, continuez à appuyez sur le bouton
pendant environ 5 secondes.
• vérifiez si l'injecteur
n'est pas bouché et s'il
n'y pas de particules alimentaires dans la couronne.
FRANÇAIS 27
Ces informations sont nécessaires
pour pouvoir vous offrir une aide rapi-
Page 28

www.electrolux.com
28
1 2 3
MOD.
PROD.NO.
SER.NO
DATA
Collez-la sur la carte de garantie et en-
1
voyez cette partie
Collez-la sur la carte de garantie et
2
conservez cette partie
Collez-la sur la notice d'utilisation
3
MOD.
PROD.NO.
SER.NO
DATA
MODELMODEL
0049
03 IT
MADE IN ITALY
MOD.
PROD.NO.
SER.NO.
TYPE
230V-50Hz
IP20
Page 29

INSTALLATION
AVERTISSEMENT
Reportez-vous au chapitre « Consignes de sécurité ».
AVERTISSEMENT
Les instructions suivantes concernant l’installation, le raccordement
et la maintenance de l'appareil doivent être effectuées par un professionnel qualifié selon les normes et
règlements en vigueur.
RACCORDEMENT AU GAZ
Effectuez un raccordement fixe (« rigide »)
ou utilisez un tuyau flexible en acier inoxydable selon les normes en vigueur. Si vous
utilisez des tuyaux flexibles métalliques, ils
ne doivent pas entrer en contact avec des
parties mobiles ni être serrés. Soyez également vigilant lorsque la table est installée
avec un four.
Assurez-vous que la pression d'alimentation en gaz de l'appareil correspond aux valeurs recommandées. Le raccordement réglable est
relié à la rampe complète par un
écrou fileté G 1/2 po. Vissez les
pièces sans forcer, réglez le raccordement dans le sens nécessaire
et serrez le tout.
FRANÇAIS 29
A
C
B
D
A)
Bout du tuyau avec écrou
B)
Rondelle (la rondelle supplémentaire ne
concerne que la Slovénie et la Turquie)
C)
Coude
D)
Porte-tuyau en caoutchouc pour gaz liquide (uniquement pour la Slovénie et la
Turquie)
Raccordement rigide :
Effectuez le raccordement en utilisant des
tuyaux métalliques rigides (en cuivre avec
embout mécanique).
Raccordement « flexible »
avec embout mécanique :
– Gaz naturel : le raccordement s'effec-
tue avec un tuyau flexible à embout mécanique qui se visse directement sur le
coude terminant la rampe de l'appareil.
– Butane / Propane : Un tube souple,
équipé de ses colliers, peut être utilisé
s'il est visitable sur toute sa longueur et
si l'appareil ne fonctionne qu'au butane.
Si l'appareil fonctionne au propane, il
faut utiliser un tuyau flexible à embout
métallique approprié.
Raccordement de tuyaux
flexibles non métalliques :
S'il est visitable sur toute sa longueur, vous
pouvez utiliser un tuyau flexible. Fixez fermement le tuyau flexible à l'aide de colliers.
Gaz liquide : utilisez le détendeur en
caoutchouc. Intercalez toujours le joint.
Page 30

www.electrolux.com
30
Continuez alors le raccordement au gaz. Le
tuyau flexible s'applique lorsque :
– il ne doit pas devenir plus chaud que la
– il n'est pas plus long que 1,50 m ;
– il ne montre aucun étranglement ;
– il n'est soumis à aucune traction et au-
– il n'entre pas en contact avec la décou-
– il est visitable sur toute sa longueur afin
Vérifiez les points suivants pour contrôler le
bon état du tuyau flexible :
– il ne présente aucune fente, coupure,
– le matériau n'est pas durci, mais présen-
– les colliers de serrage ne sont pas rouil-
– la date d'expiration n'est pas passée.
Si vous constatez au moins un de ces défauts, ne réparez pas le tuyau, mais remplacez-le.
REMPLACEMENT DES
INJECTEURS
1.
2.
3.
4.
5.
température ambiante, à savoir plus de
30 °C ;
cune torsion ;
pe ou les coins tranchants ;
de vérifier son état.
marque de brûlure sur les deux extrémités et sur toute sa longueur ;
te une élasticité correcte ;
lés ;
Quand l'installation est terminée,
assurez-vous que chaque raccord
est étanche en utilisant une solution savonneuse, et non une
flamme !
Démontez les supports des casseroles.
Démontez les chapeaux et les couronnes du brûleur.
À l'aide d'une clé de 7, démontez les
injecteurs et remplacez-les par ceux
qui sont nécessaires pour le type de
gaz que vous utilisez (voir le tableau
dans le chapitre « Caractéristiques
techniques »).
Assemblez les pièces et suivez la même procédure dans l'ordre inverse.
Remplacez la plaque signalétique (qui
se trouve près du tuyau d'arrivée de
gaz) par celle correspondant au nouveau type d'alimentation en gaz. Vous
trouverez cette plaque dans le sachet
fourni avec l'appareil.
Si la pression de l'alimentation en gaz peut
être modifiée ou est différente de la pression nécessaire, vous devez monter un
système de réglage de la pression sur le
tuyau d'arrivée de gaz.
RÉGLAGE DU NIVEAU MINIMAL
Pour régler le niveau minimal des brûleurs :
1.
Allumez le brûleur.
2.
Tournez la manette en position minimale.
3.
Retirez la manette.
4.
À l'aide d'un tournevis fin, ajustez la
position de la vis de réglage.
A
A)
Vis de réglage
• Si vous passez du gaz naturel G20/G25
20/25 mbar au gaz liquéfié, serrez au
maximum la vis de réglage.
• Si vous passez du gaz liquéfié au gaz
naturel G20/G25 20/25 mbar, dévissez
la vis de réglage d'environ 1/4 de tour
(1/2 tour pour un brûleur à triple couronne).
AVERTISSEMENT
Assurez-vous que la flamme ne
s'éteint pas lorsque vous tournez
rapidement la manette de la position maximale à la position minimale.
BRANCHEMENT ÉLECTRIQUE
• L'appareil doit être relié à la terre en respectant bien les précautions de sécurité.
• Vérifiez que la tension nominale et le type
d'alimentation figurant sur la plaque signalétique correspondent aux valeurs
d'alimentation locales.
• Cet appareil est alimenté à l'aide d'un
câble principal. Une fiche appropriée doit
être adaptée au cordon d'alimentation
(reportez-vous à la charge électrique
spécifiée sur la plaque signalétique). La
Page 31

fiche doit être insérée dans une prise
murale appropriée.
• Pour toute intervention sur votre appareil, faites appel au service après-vente
de votre magasin vendeur.
• Utilisez toujours une prise antichoc correctement installée.
• Assurez-vous que la prise principale est
accessible après installation.
• Ne tirez jamais sur le câble d'alimentation électrique pour débrancher l'appareil. Tirez toujours sur la prise de courant.
• L'appareil ne doit pas être raccordé à
l'aide d'un prolongateur, d'un raccordement multiple ou d'une prise multiple (risque d'incendie). Vérifiez que la prise de
terre est conforme aux règlements en vigueur.
• Le câble d'alimentation doit être placé
de manière à ce qu'il n'entre pas en contact avec une surface chaude.
• Raccordez l'appareil au secteur à l'aide
d'un système permettant le débranchement de l'appareil à tous les pôles, avec
une largeur d'ouverture de contact d'au
moins 3 mm., par exemple, un disjoncteur automatique de protection, des déclencheurs de perte à la terre ou un fusible.
• Aucune partie du cordon d'alimentation
ne doit afficher une température supérieure à 90 °C. Le câble neutre bleu doit
être raccordé à la borne « N » de la plaque à bornes. Le câble de phase marron
(ou noir) (partant de la borne « L » de la
plaque à bornes doit toujours être relié à
la phase sous tension.
ENCASTREMENT
min.
min.
55 mm
480 mm
A)
joint fourni
B)
équerres fournies
450 mm
30 mm
B
FRANÇAIS 31
min.
650 mm
560 mm
A
REMPLACEMENT DU CÂBLE
D'ALIMENTATION
Ne remplacez le câble de raccordement
qu'avec un câble de type H05V2V2-F T90
ou équivalent. Assurez-vous que la section
du câble convient à la tension et à la température de fonctionnement. Le câble de
terre jaune/vert doit être plus long d'environ
2 cm que le câble de phase marron (ou
noir).
POSSIBILITÉS D'INSERTION
Élément de cuisine avec porte
Le panneau installé sous la table de cuisson doit être facilement amovible et facile
d'accès au cas où une intervention technique serait nécessaire.
Page 32

www.electrolux.com
32
30 mm
A
60 mm
min 20 mm
(max 150 mm)
B
A)
Panneau amovible
B)
Espace pour les branchements
Élément de cuisine avec four
Les dimensions de la niche d'encastrement
doivent être conformes aux indications et
CARACTERISTIQUES TECHNIQUES
l'élément de cuisine doit être équipé d'aérations pour assurer un apport d'air continu. Les branchements électriques de la table de cuisson et du four doivent être installés séparément pour des raisons de sécurité et pour permettre un retrait facile du
four de l'ensemble.
50 cm2
360 cm2
120 cm2
180 cm2
Dimensions de la table de cuisson
Largeur : 740 mm
Longueur : 510 mm
Dimensions de la niche
d'encastrement de la table de
cuisson
Largeur : 560 mm
Longueur : 480 mm
Puissance
Brûleur à triple
3,8 kW
couronne :
Brûleur semi-rapi-
1,9 kW
de :
Brûleur auxiliaire : 1,0 kW
PUISSANCE TO-
TALE :
G20/G25 (2E+)
20/25 mbar =
10,5 kW
G30 (3+) 28-30
mbar = 763 g/h
G31 (3+) 37 mbar
= 750 g/h
Alimentation élec-
230 V ~ 50 Hz
trique :
Catégorie : II2E+3+
Raccordement au
G 1/2"
gaz :
Alimentation en
gaz :
Classe de l'appa-
G20/G25 (2E+)
20/25 mbar
3
reil :
Diamètres de by-pass
Brûleur Ø by-pass en
1/100 mm
Auxiliaire 28
Semi-rapide 32
Triple couronne 56
Page 33

FRANÇAIS 33
Brûleurs à gaz
PUISSANCE NORMALE
LPG (butane/propane)
G30/G31 (3+)
20/25 mbar
G20
20 mb
ar
G25
25 mb
ar
m³/h m³/h g/h g/h
28-30/37 mbar
inj.
1/100
28-30
mm
G30
mbar
BRÛLEUR
Auxi-
PUIS-
SANCE
NOR-
MALE
PUISSANCE
RÉDUI-
TE
GAZ NATUREL
G20/G25 (2E+)
inj.
kW kW
1/100
mm
1.0 0.33 70 0.095 0.111 50 73 71
liaire
Semi-
1.9 0.45 96 0.181 0.210 71 138 136
rapide
Triple
3.8 1.4 146 0.362 0.421 98 276 271
couronne
EN MATIÈRE DE PROTECTION DE L'ENVIRONNEMENT
G31
37 mb
ar
Recyclez les matériaux portant le symbole
. Déposez les emballages dans les
conteneurs prévus à cet effet.
Contribuez à la protection de
l'environnement et à votre sécurité,
recyclez vos produits électriques et
électroniques. Ne jetez pas les appareils
portant le symbole avec les ordures
ménagères. Emmenez un tel produit dans
votre centre local de recyclage ou
contactez vos services municipaux.
Page 34

www.electrolux.com
34
Page 35

FRANÇAIS 35
Page 36

www.electrolux.com/shop 397251301-A-092012
 Loading...